
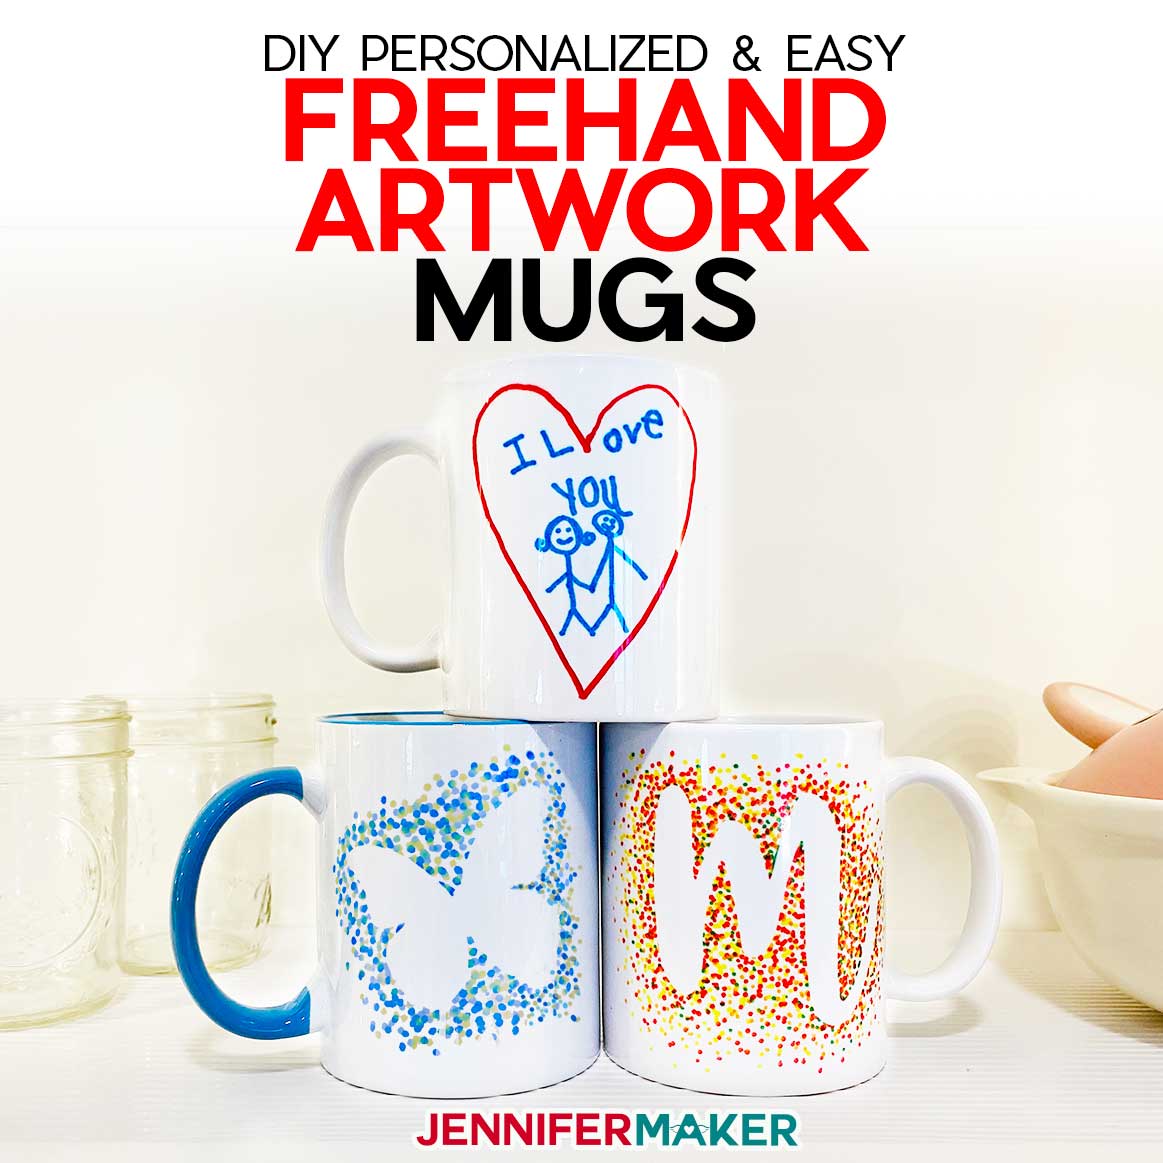
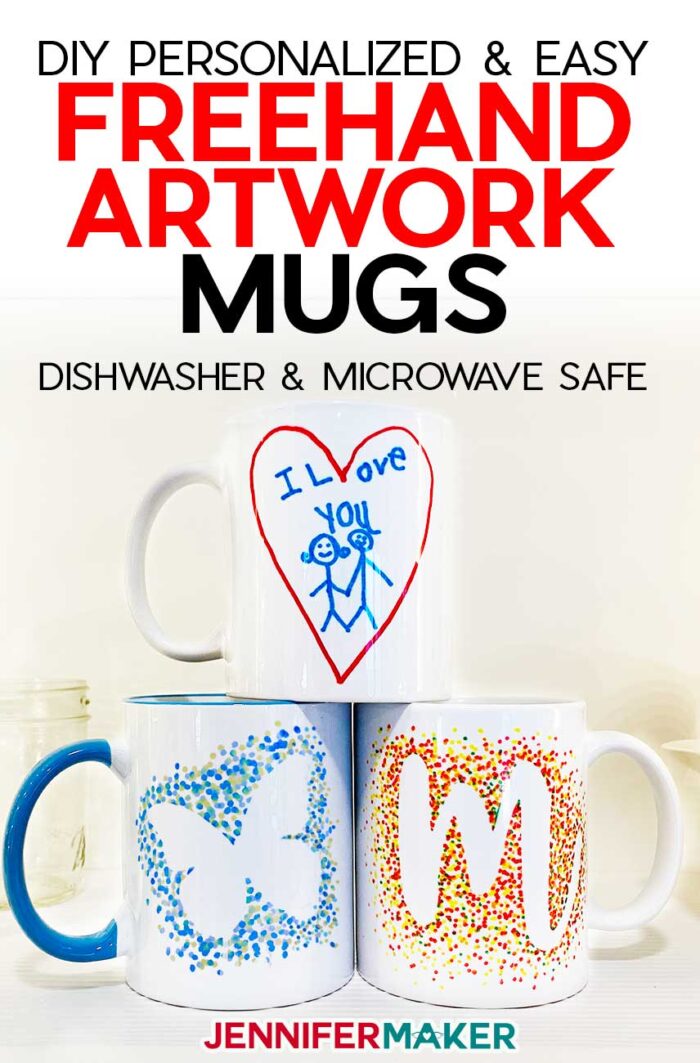
Learn how to use Cricut Infusible Ink markers to create DIY personalized mugs with dotted shapes, unique monograms, kids drawings, and even your own artwork!
So now that I have a Cricut Mug Press in my hands, I’ve been ALL about the mugs. I showed you how to make a full coverage mug with gorgeous color from top to bottom, a hand-lettered decal mug with cute coffee quotes and motivational sayings, a multi-colored mug with animals made by layering infusible ink, and pen and marker mugs drawn with help of a Cricut. I have also made the cutest mug boxes to hold both the 11 oz. and the 15 oz. mug boxes! But I’m not done yet… I’ve saved the best for last. I’m going to show you how to transfer your OWN drawings and artwork to make truly DIY personalized mugs!

See my full step-by-step video to making DIY personalized mugs with the Cricut Mug Press:
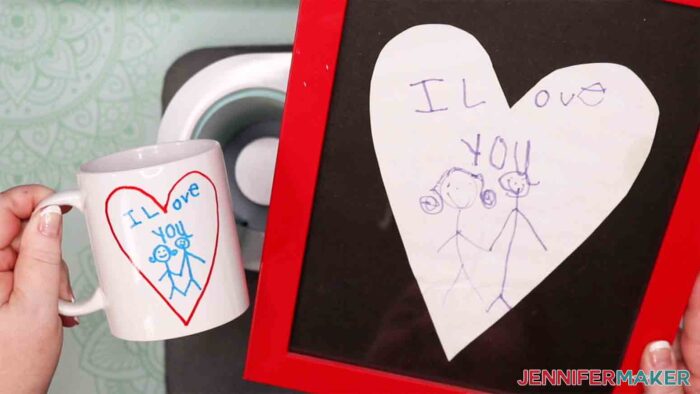
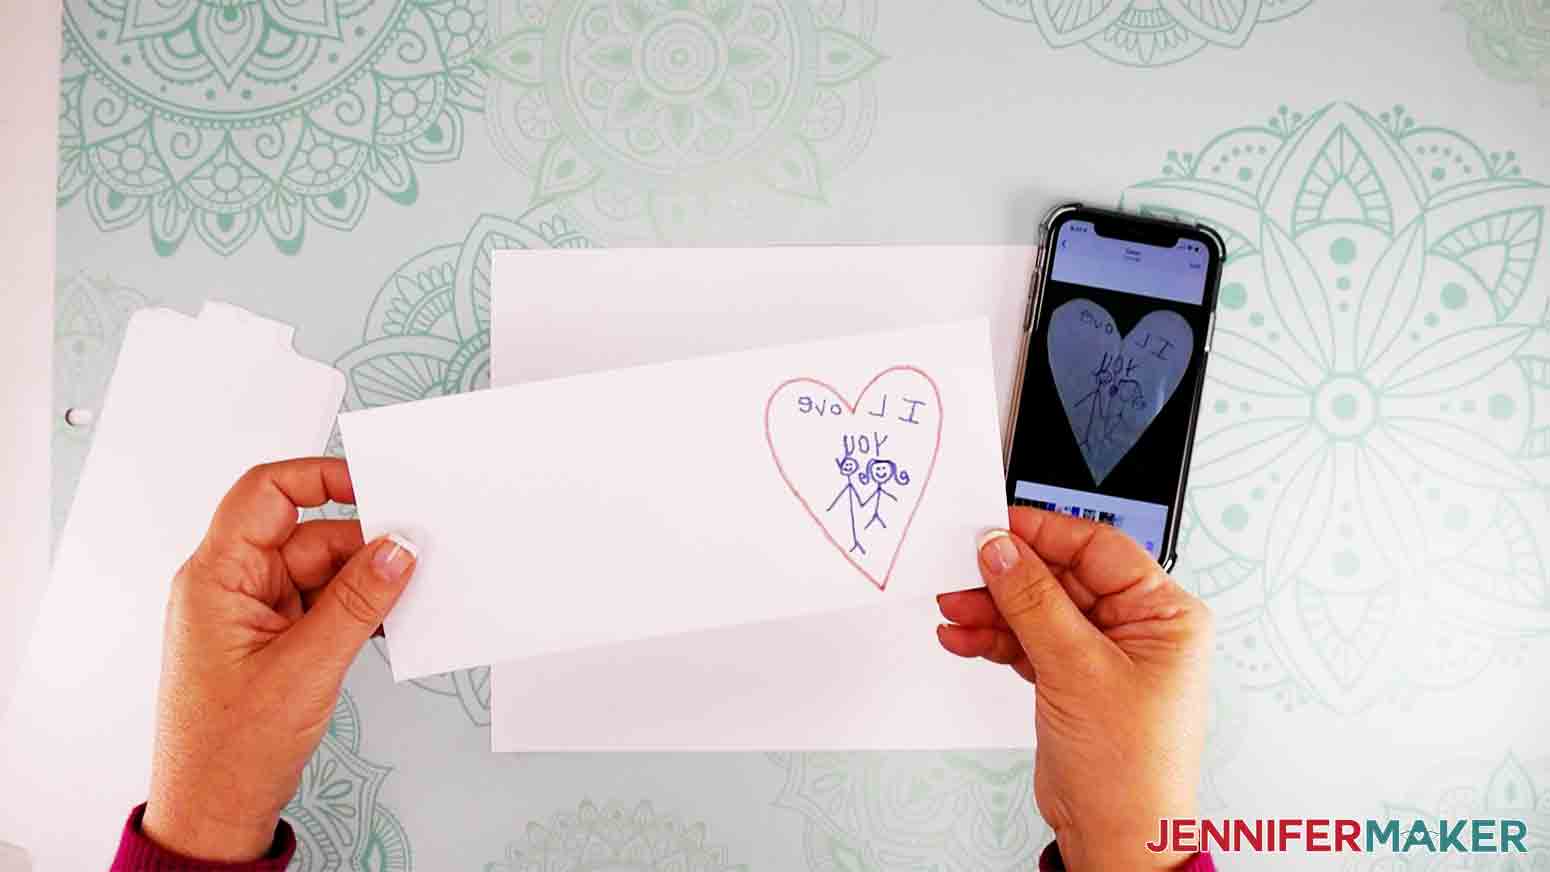
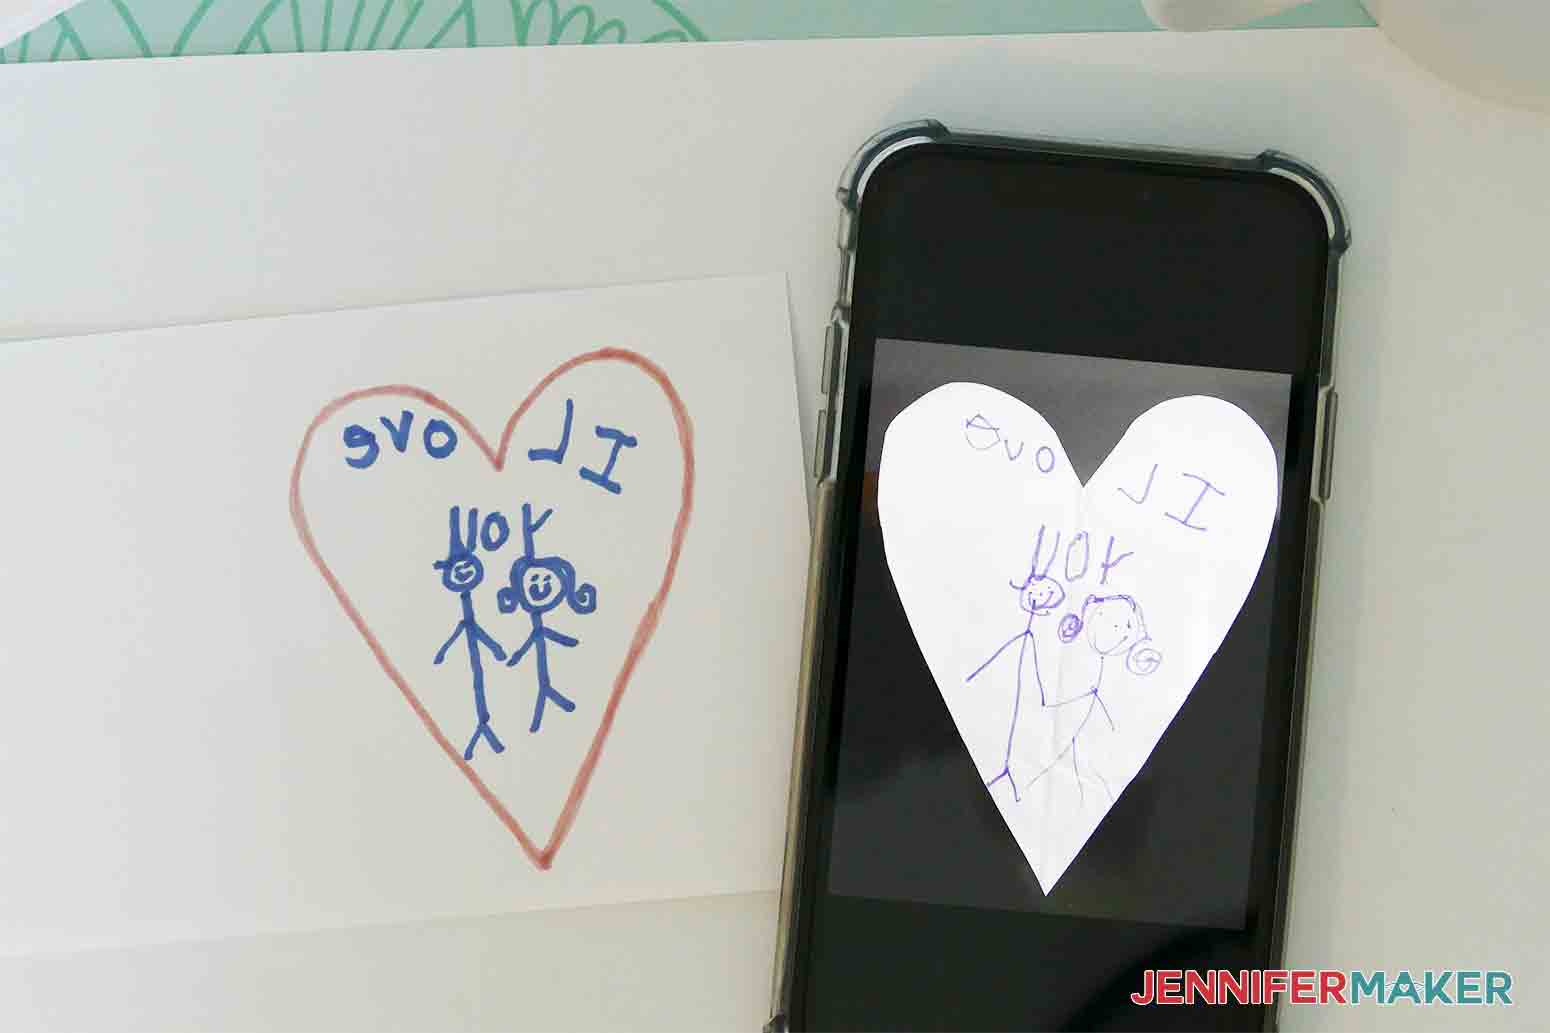
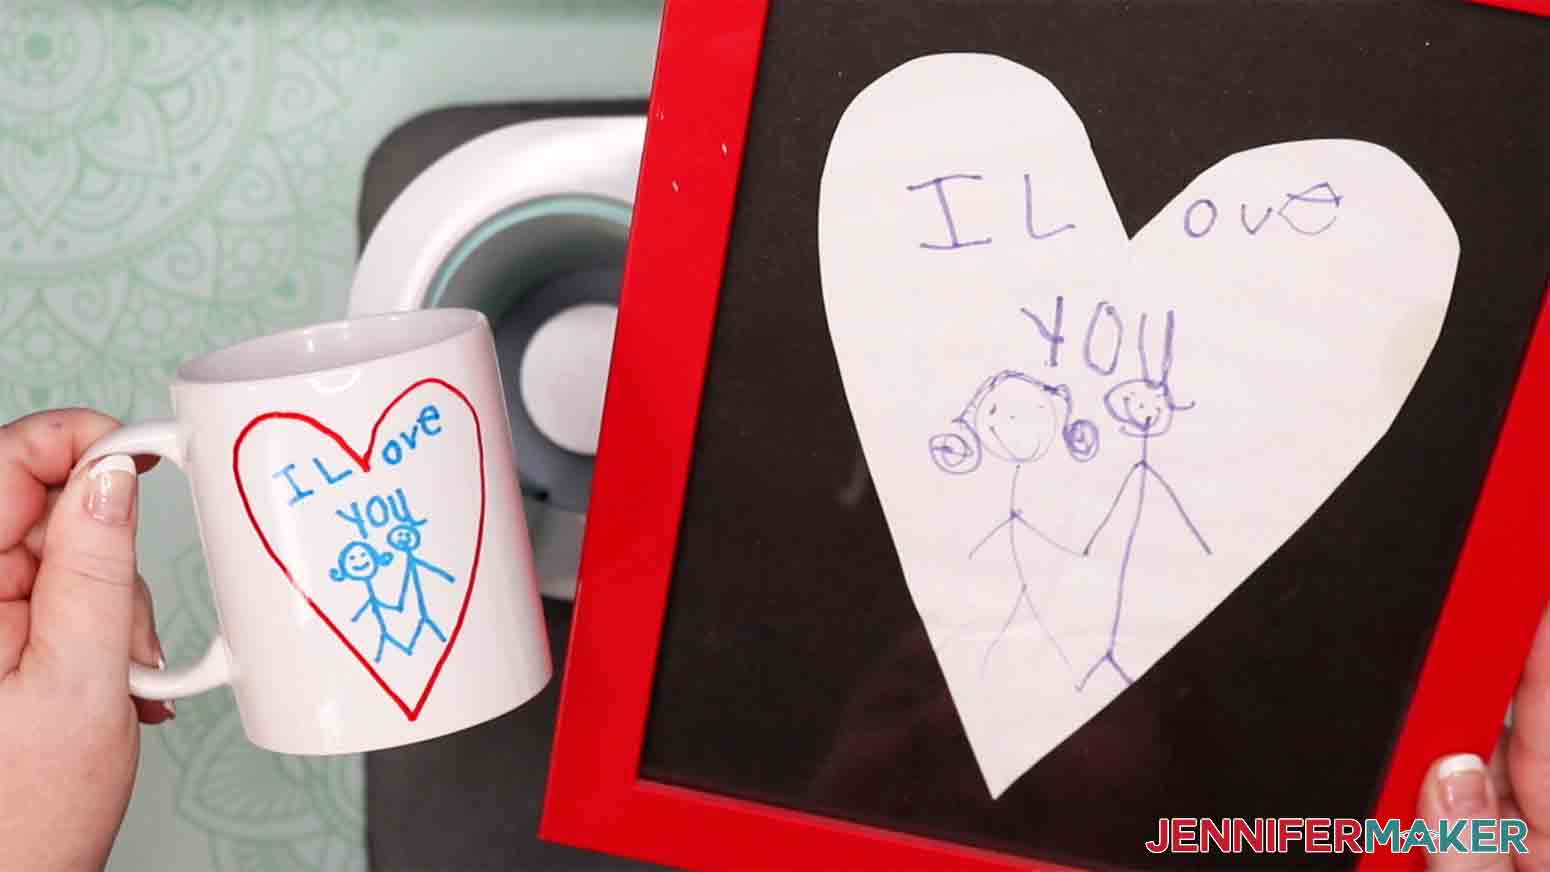
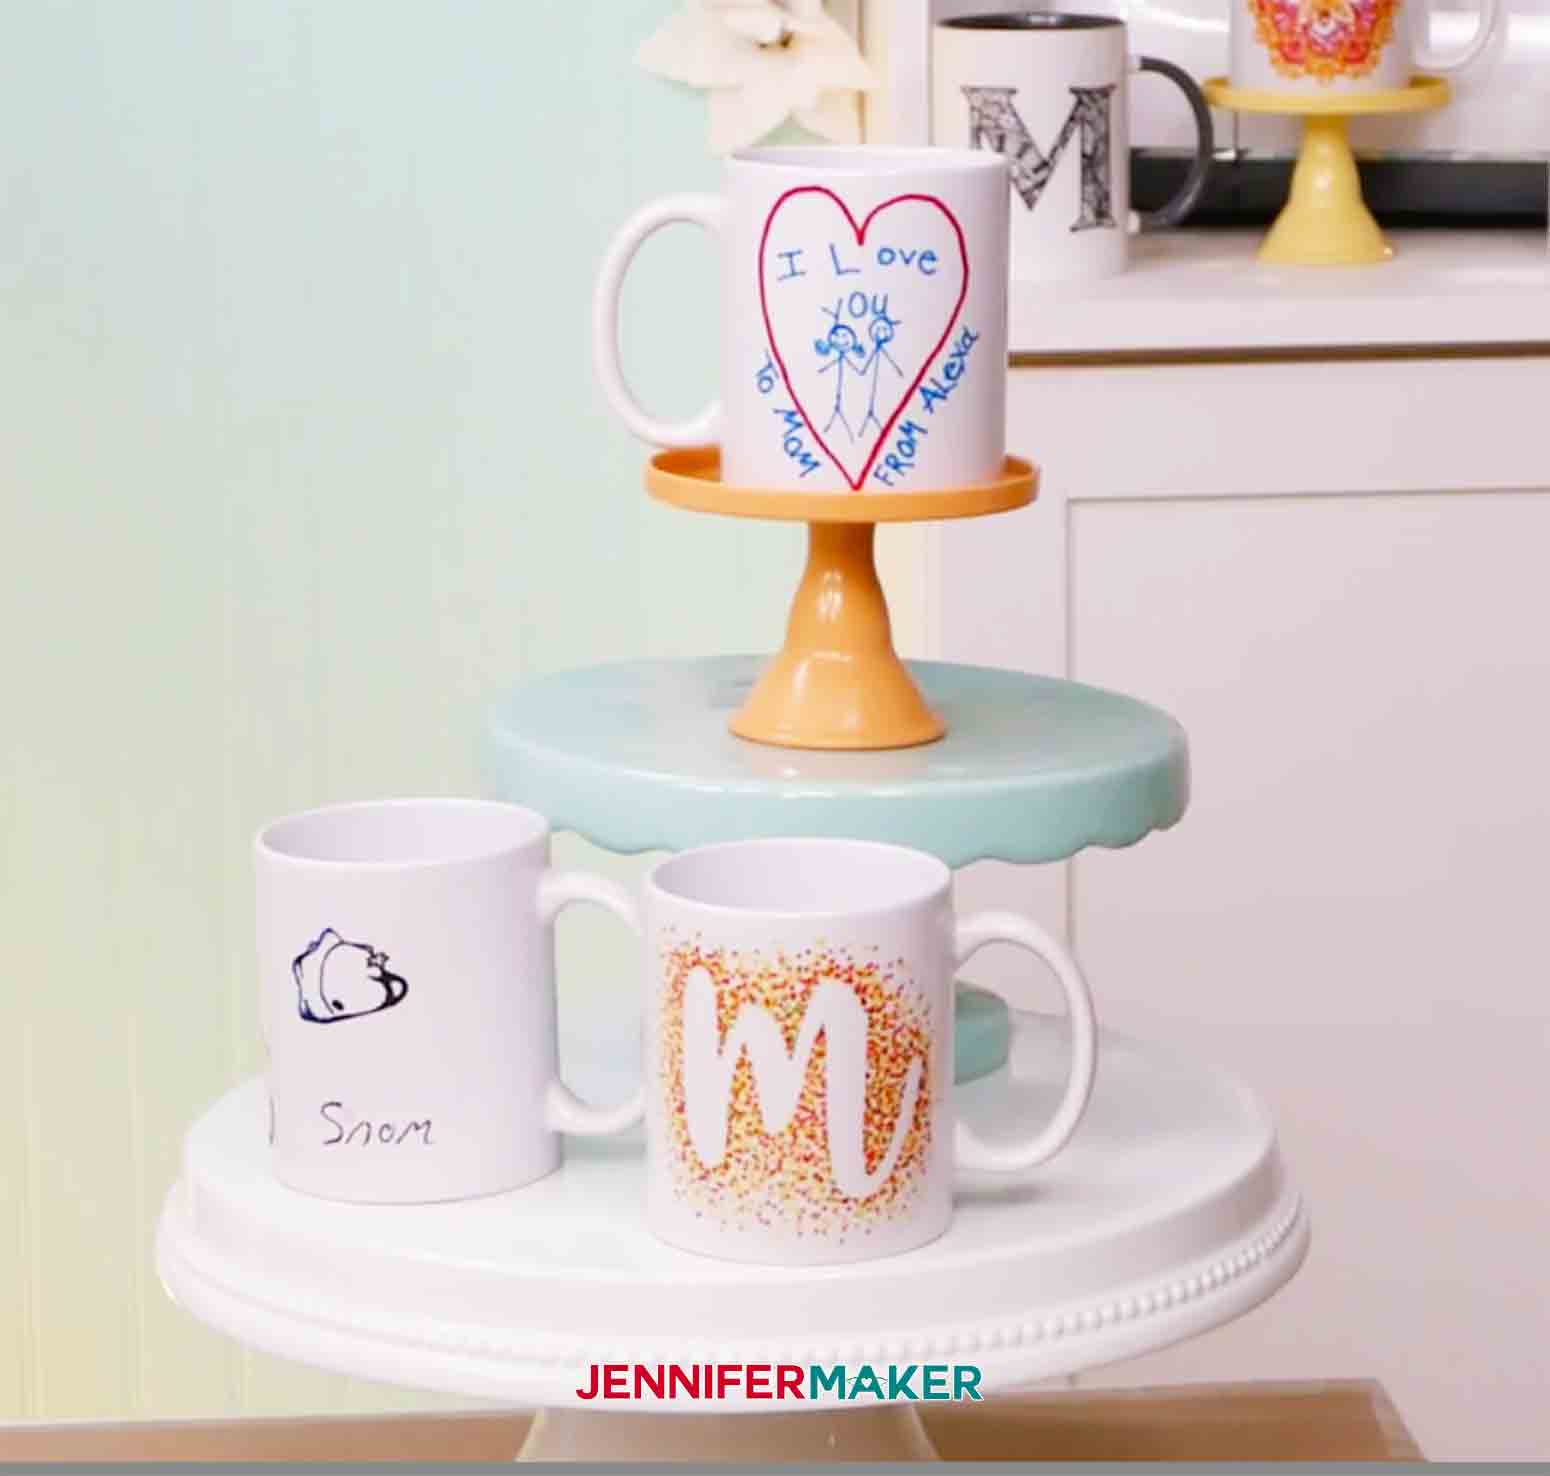
For example, this mug has a picture my daughter Alexa drew for me back in Kindergarten. I keep the picture hanging in my entry way at home. I reproduced the drawing faithfully onto my coffee mug, and I LOVE IT!
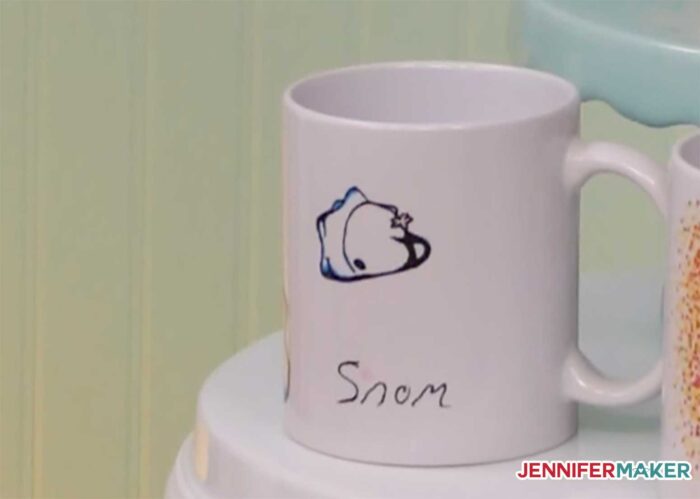
Now this mug here is a drawing my daughter did just the other day — it’s a Pokemon called Snom. She drew right on the paper, and I transferred her actual drawing right to the mug. Isn’t this cool?
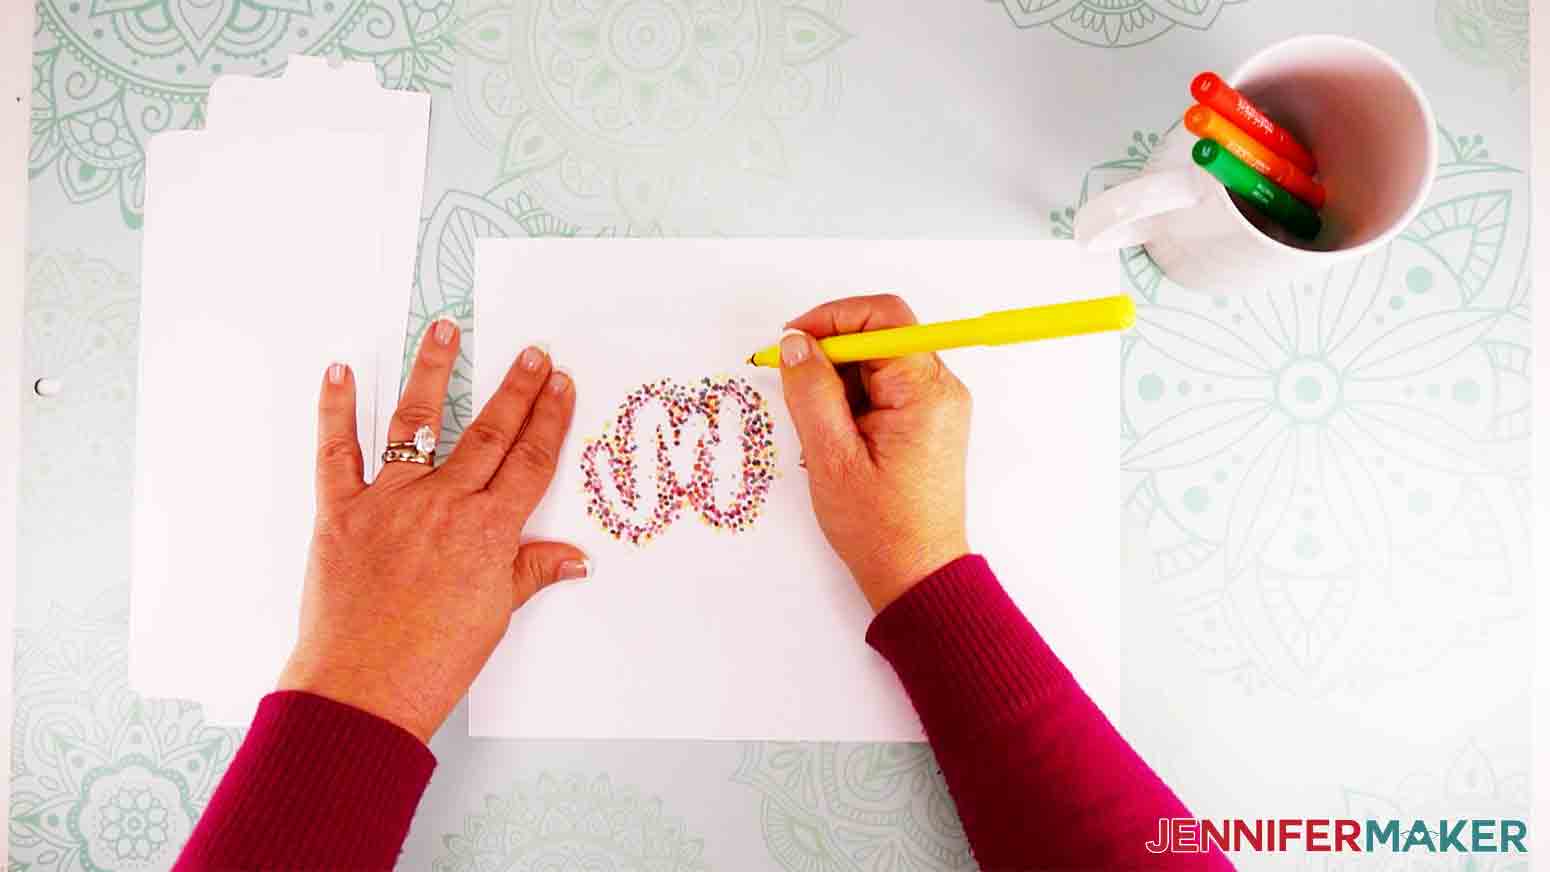
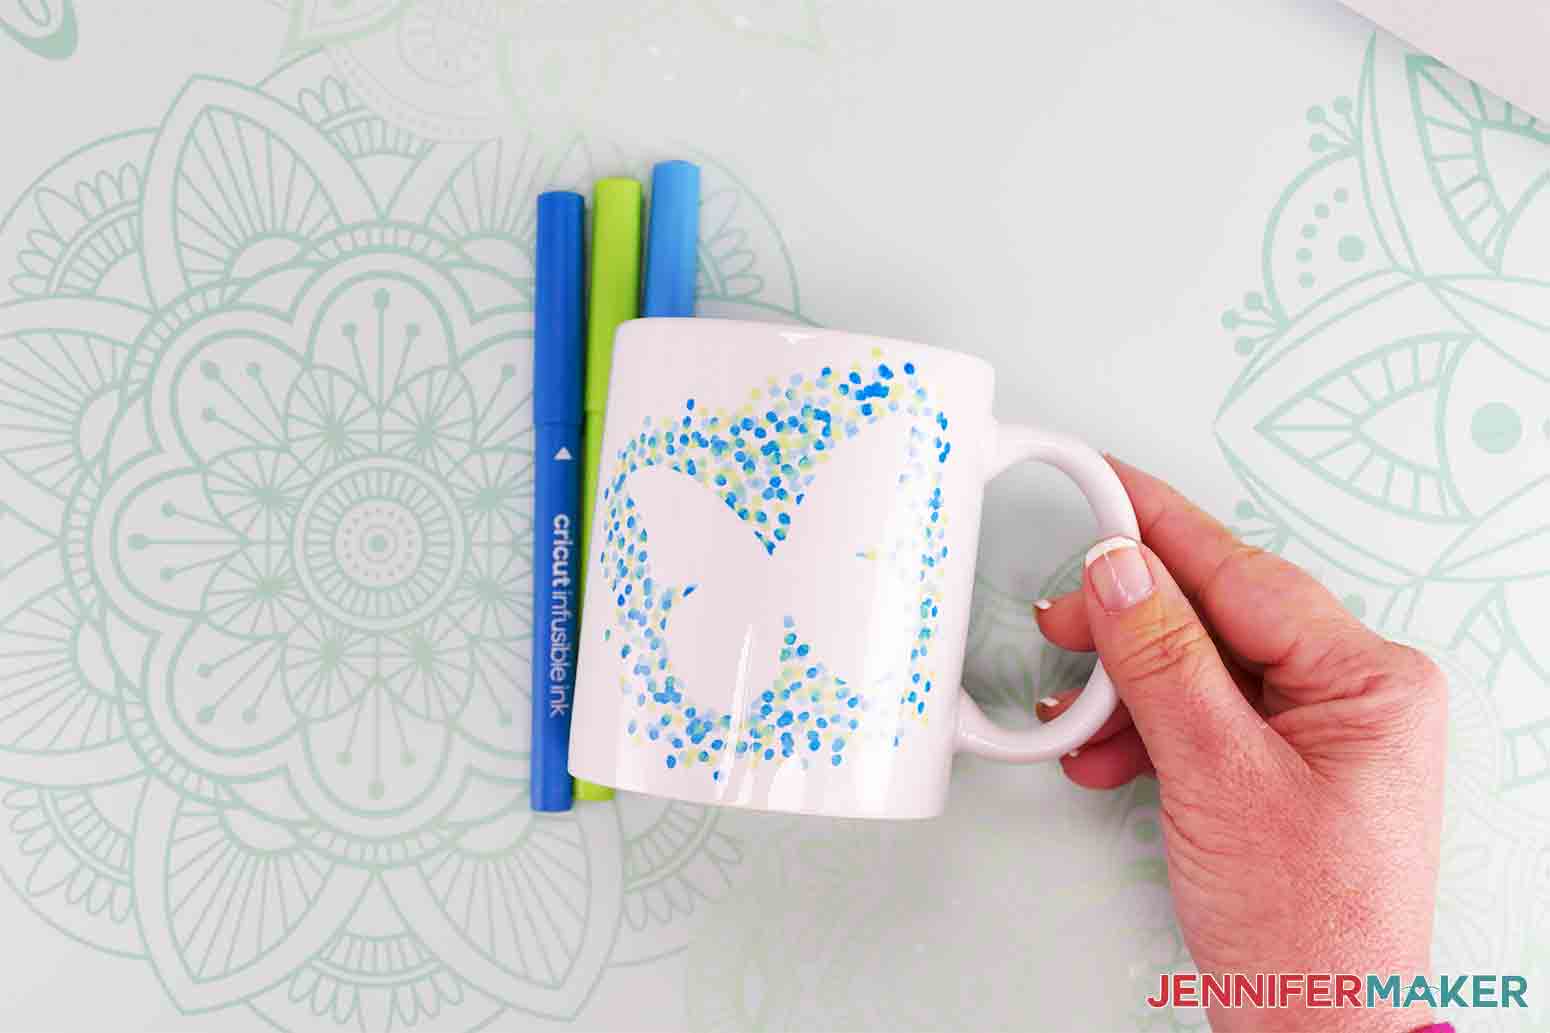
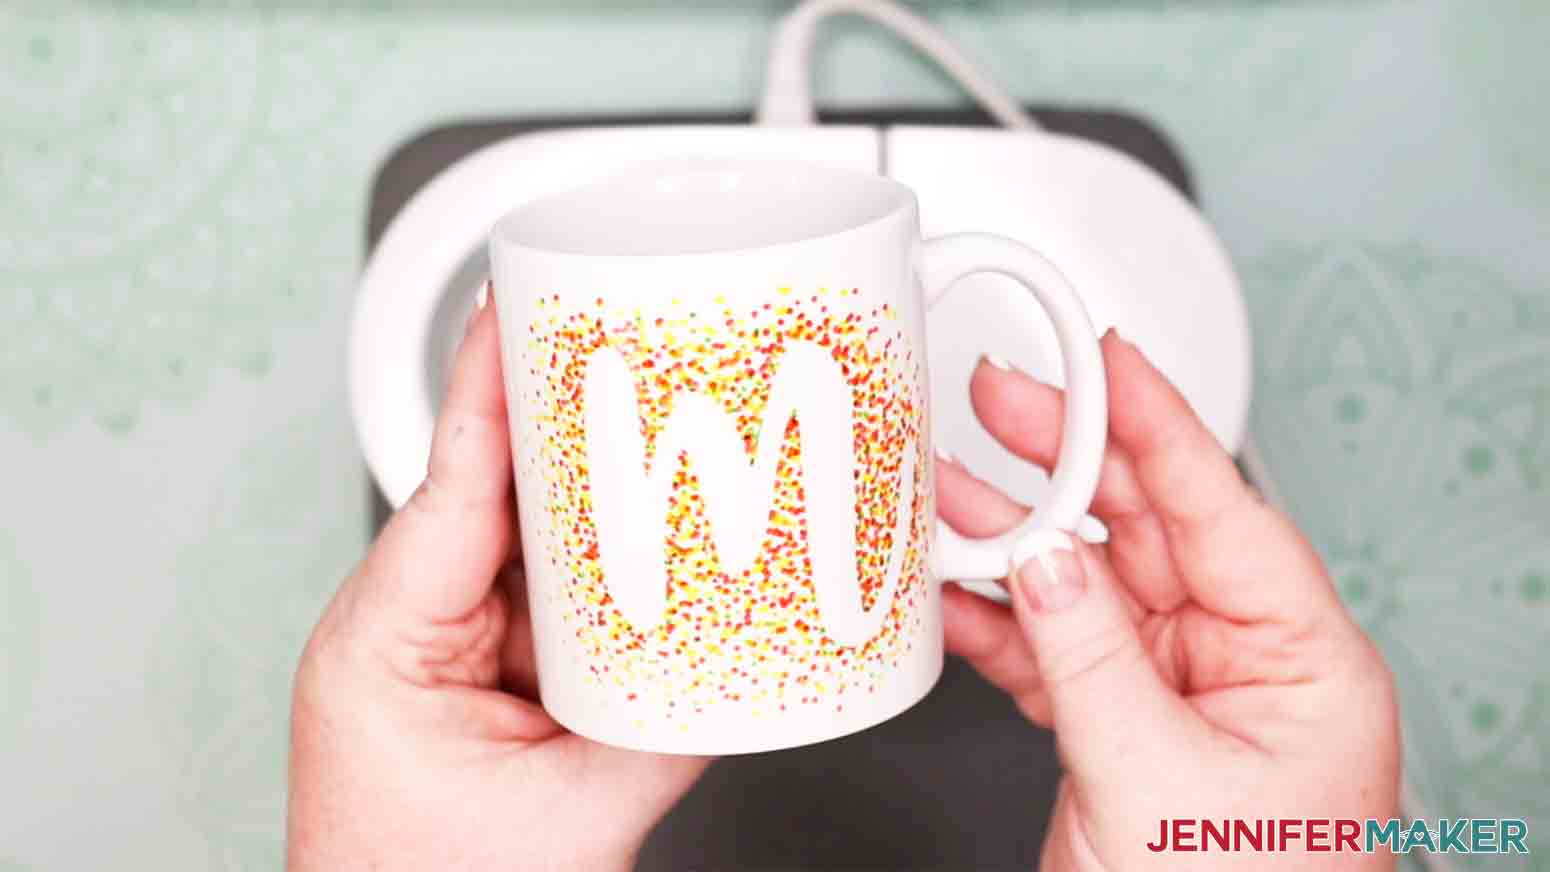
And for us big kids, this is a monogram mug I made with various colors. And all I did was just put dots on paper … I’m amazed at how cool it turned out! This project was inspired by one of my first blog projects — the DIY Sharpie Mug!

I will show you how to do all three styles of mugs in this DIY personalized mug freehand artwork tutorial!
To make these mugs, we’ll use Cricut Infusible Ink markers, which will transfer right into the poly coating of a Cricut mug. You’ll want either Cricut Infusible Ink pens or markers. Or both — feel free to mix and match! The pens are great for drawings with lots of detail, as the pen tip is quite fine. The markers are better for designs that you want to look vibrant and striking. The pen was used for the I Love You mug and Pokemon mugs, whereas markers were used for the monogram mugs!
Remember, you need to use Infusible Ink markers and pens ONLY — Sharpies and other non-sublimation ink pens and markers will not work for this DIY personalized mug tutorial.
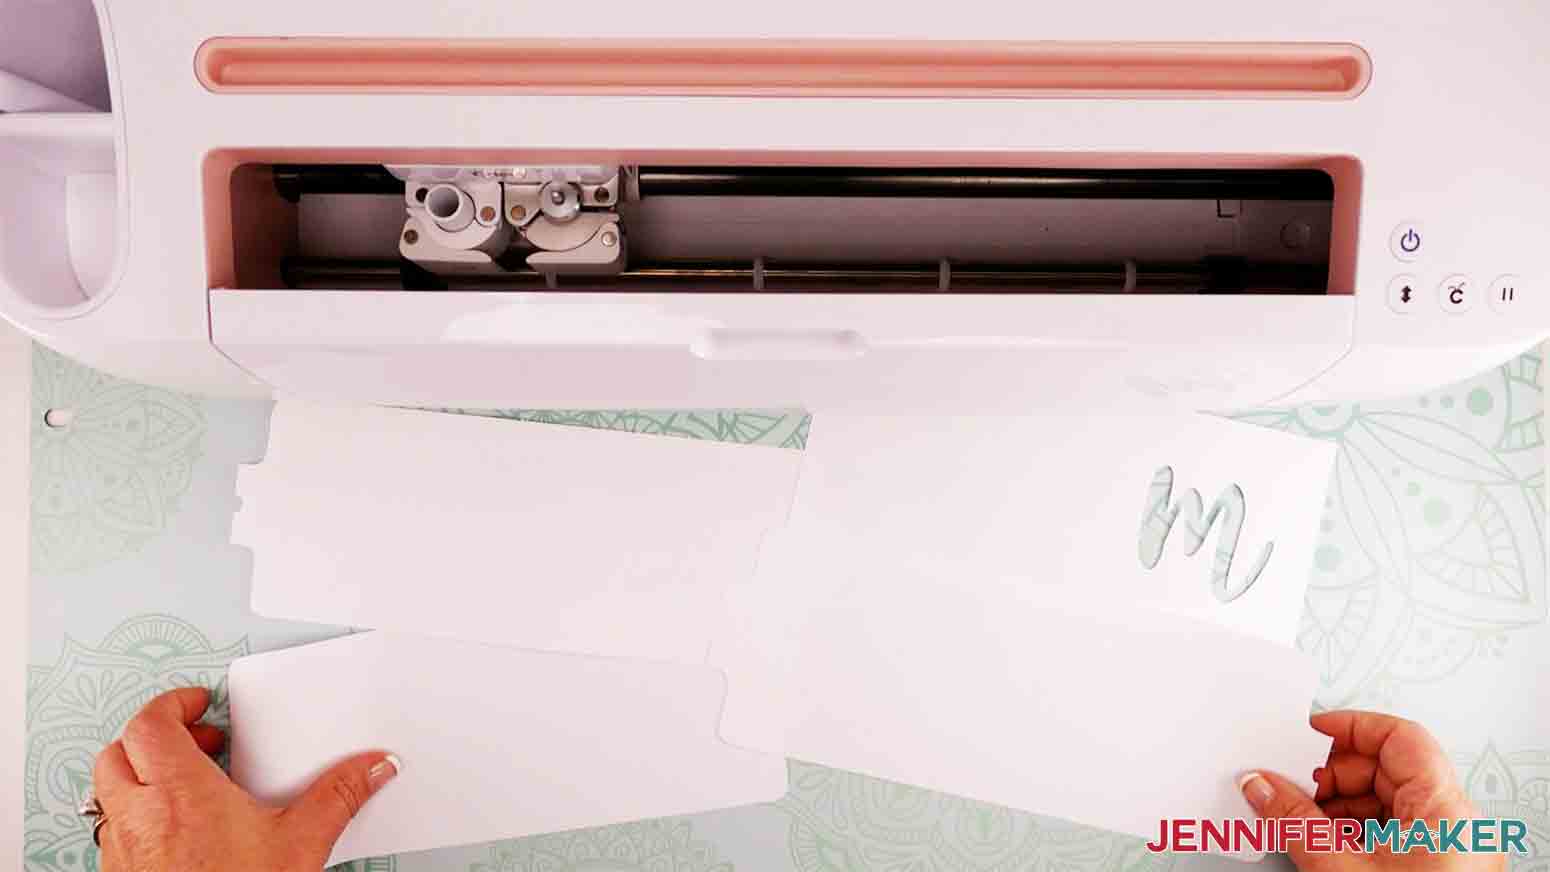
You also need some plain white laser copy paper to draw your design onto. I recommend two sheets of the regular eight and half by eleven inch paper per design for the easiest application, and I’ll show you how to cut these to the right size BEFORE you begin drawing for the best results! I cut these on my Cricut cutting machine, which made it super easy, but you can also cut these with a pair of scissors.
A blue light grip cutting mat, the fine point blade, and a heat resistant tape are also needed for this DIY personalized mug project.
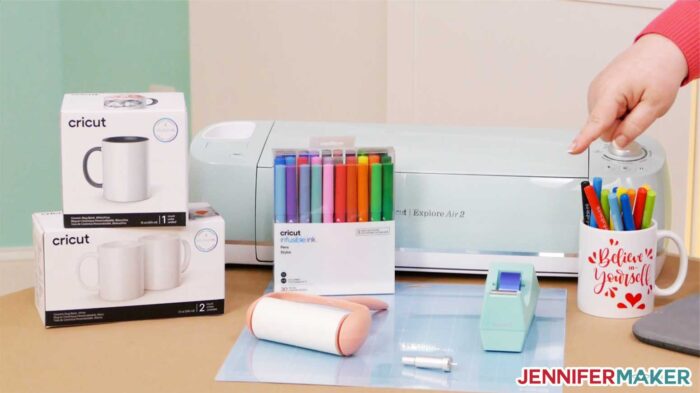
Now let’s talk about the mug itself. You can’t use just any mug — it needs to be a poly-coated sublimation mug so there is something for the ink to sink into. Cricut sells mugs that are optimized to work with Infusible Ink, which is what we’ll use in this tutorial, but if you can’t find those, just look for white sublimation blank mugs with straight walls between eleven and sixteen ounces. Dollar store mugs will NOT work, so don’t waste any ink on those.
To transfer your Infusible Ink drawings onto the mugs, we’ll use the Cricut Mug Press. Yes, this cute little thing right here … it makes the whole transfer process SUPER easy, and I’ll show you exactly how to do that.
Now I can’t help you draw cute pictures, but I can show you my trick for tracing photos of your kids artwork and drawings and provide blank templates for your freehand drawings as well as easy-to-use dot shape and monogram templates!
So let me show you where to find these designs and templates, then together we’ll draw, apply, and press these fun mugs! This post contains some affiliate links for your convenience (which means if you make a purchase after clicking a link I will earn a small commission but it won’t cost you a penny more)! Read my full disclosure policy.
Materials to Make DIY Personalized Mugs with the Cricut Mug Press
View my Amazon shopping list with the exact items we used to make this project!
- Cricut Infusible-Ink compatible mug, 12 oz or 15 oz (you can use non-Cricut sublimation mugs and drinkware)
- Cricut Infusible Ink pens and markers (I mostly used the markers, but you can use both or either)
- Laser copy paper, 8.5″ x 11″, two sheets per mug
- Heat resistant tape
- Cricut Mug Press
- Blue Light Grip Cutting Mat
- Heat resistant pad
- Lint roller
- A way to cut your laser copy paper for the mug (I used the amazing Cricut cutting machine!)
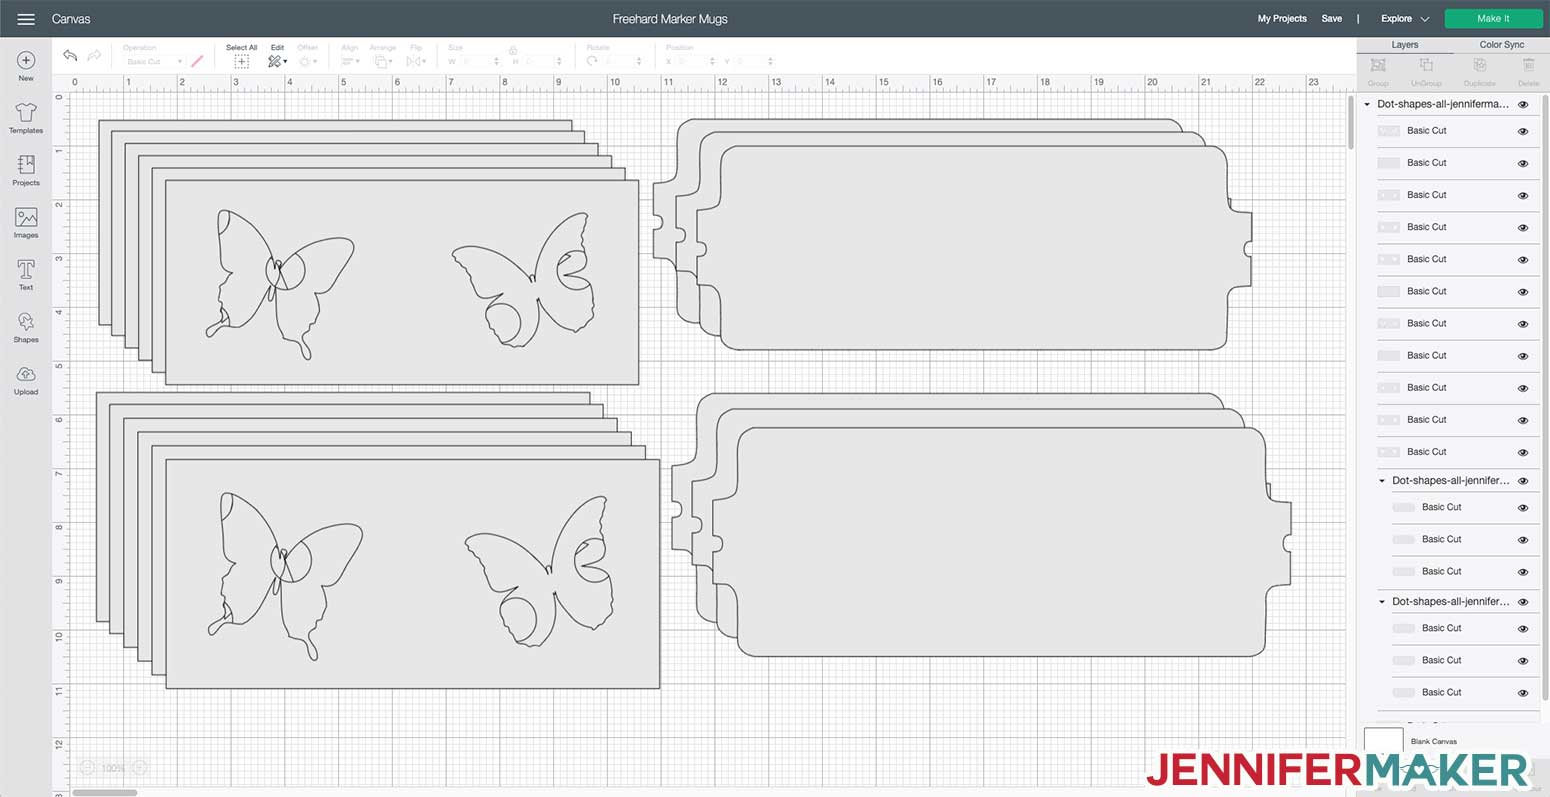
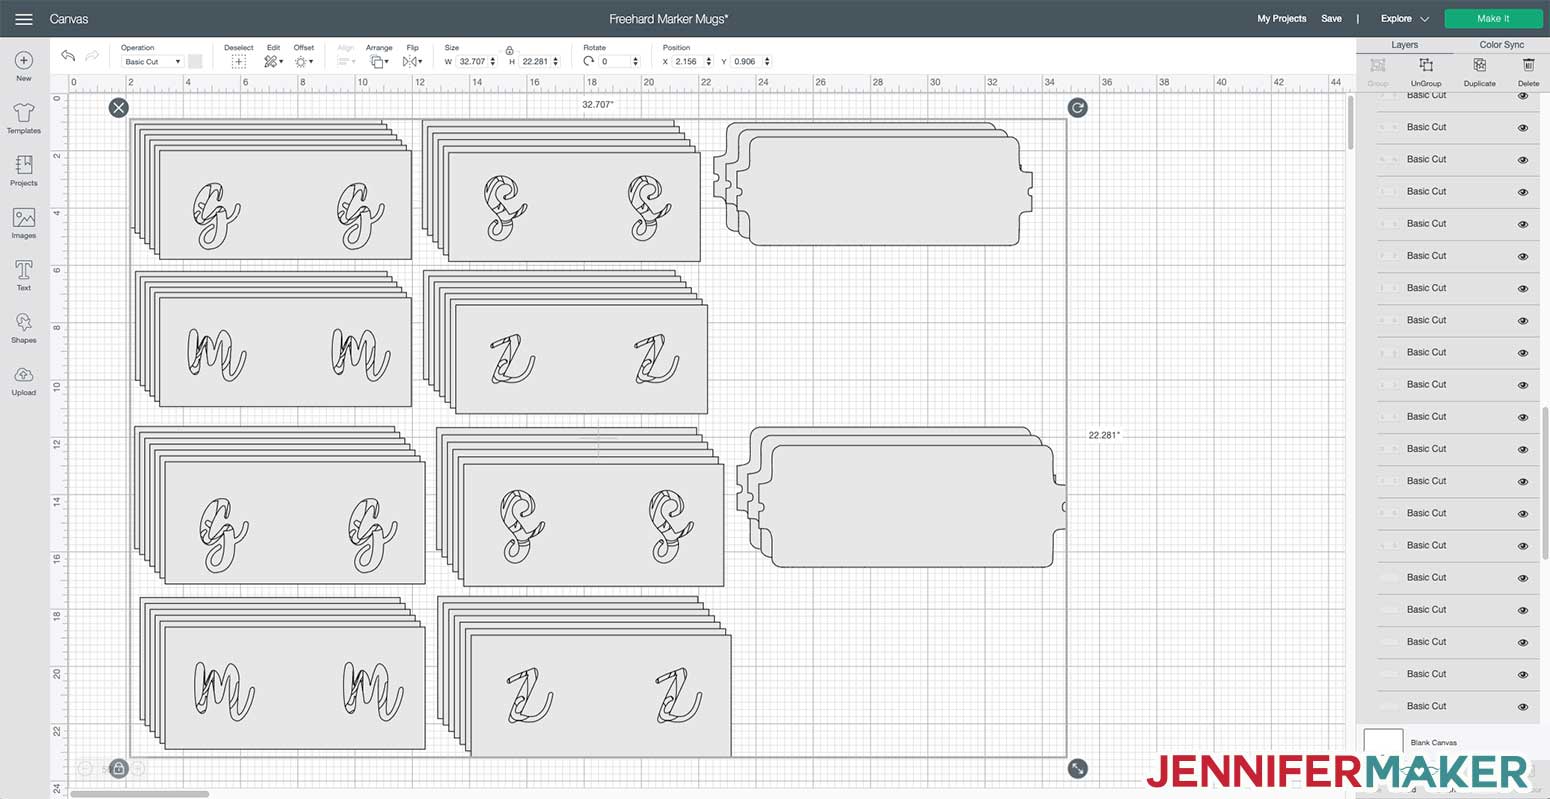
- Design #294 (shape, monogram, and drawing templates), available in my free resource library—get the password at the bottom of this post
How to Create DIY Personalized Mugs with Infusible Ink
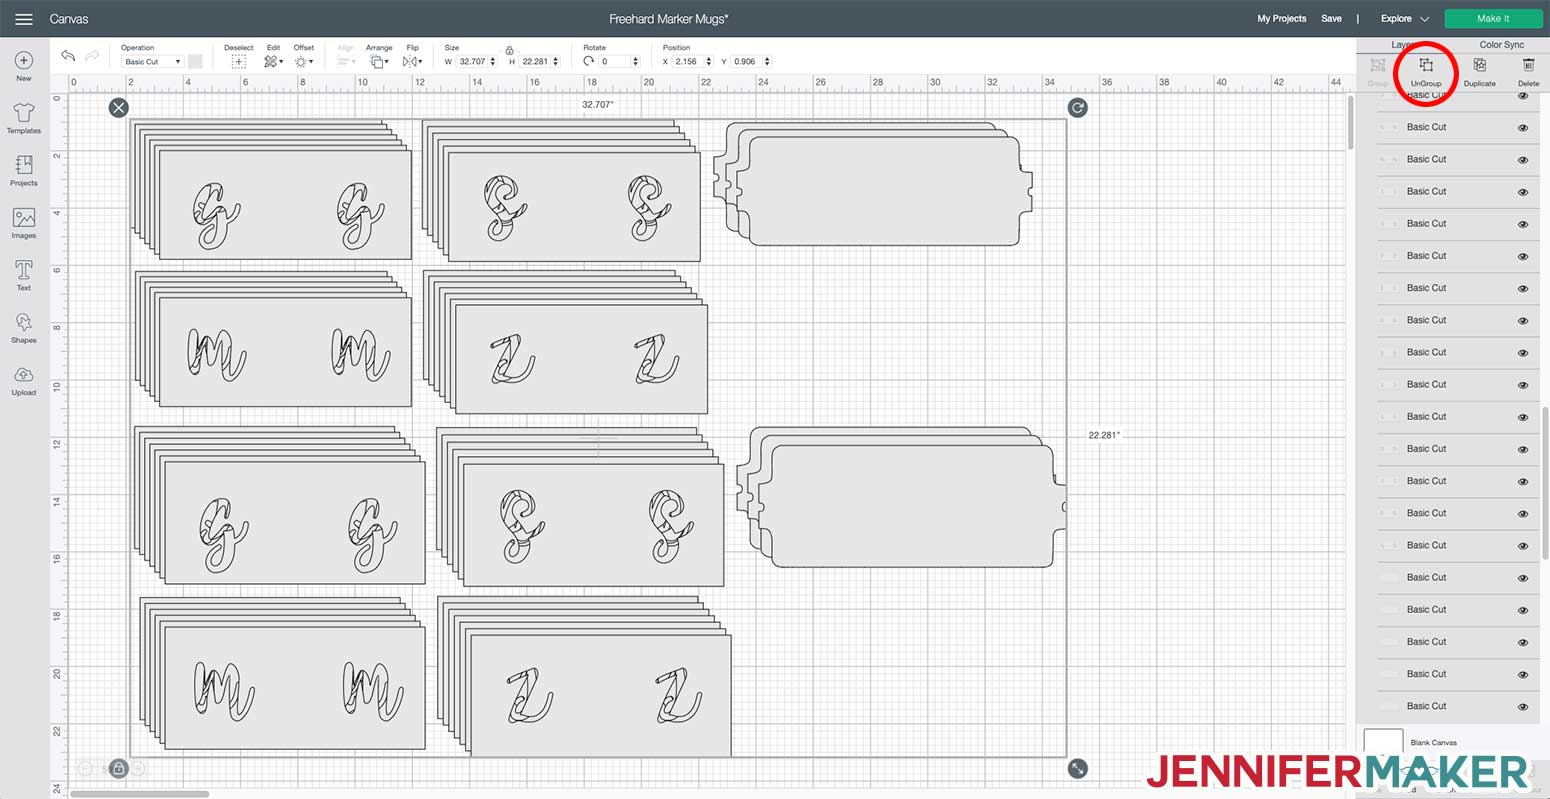
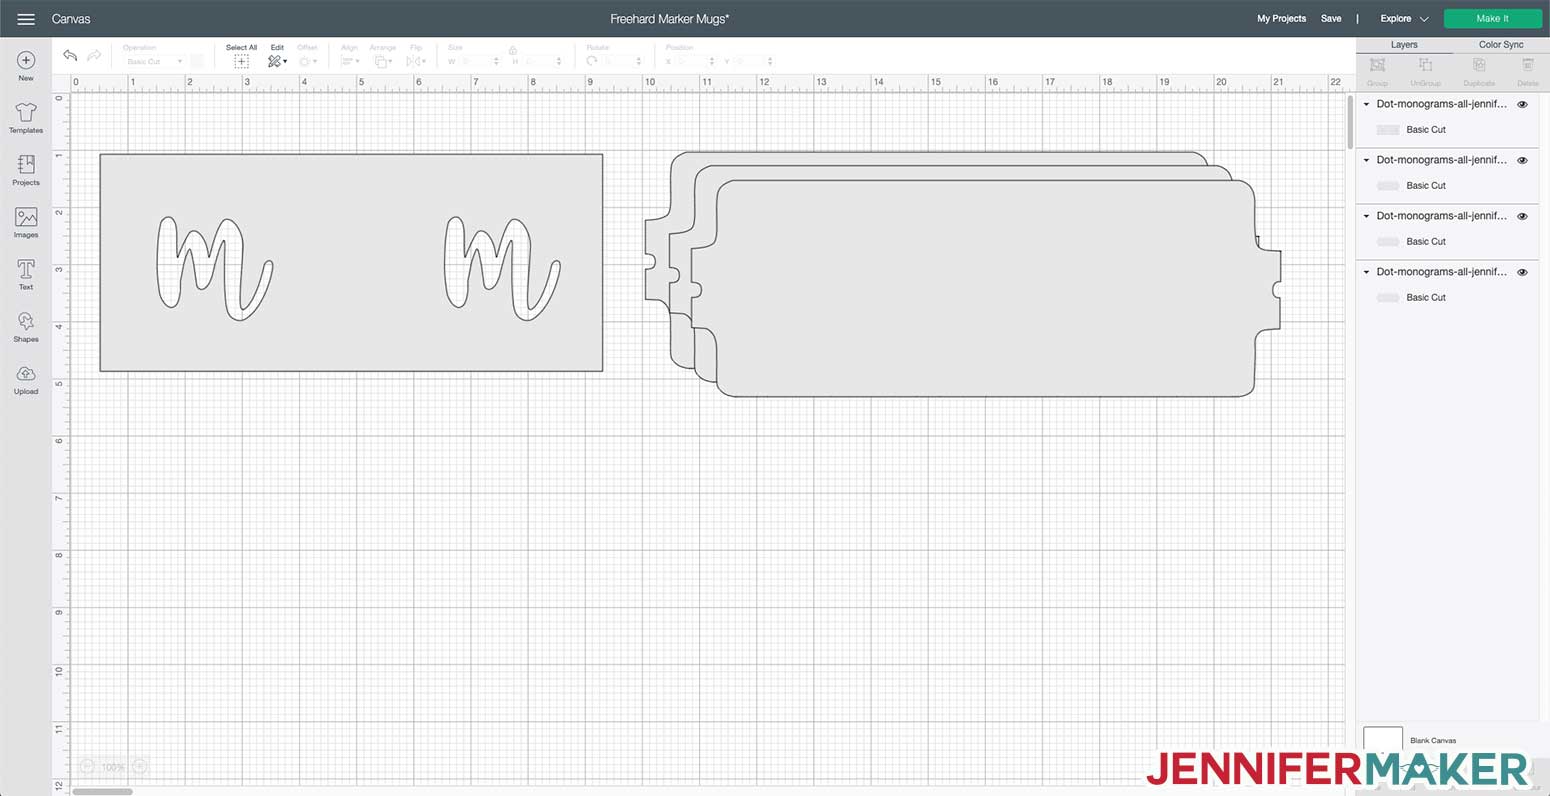
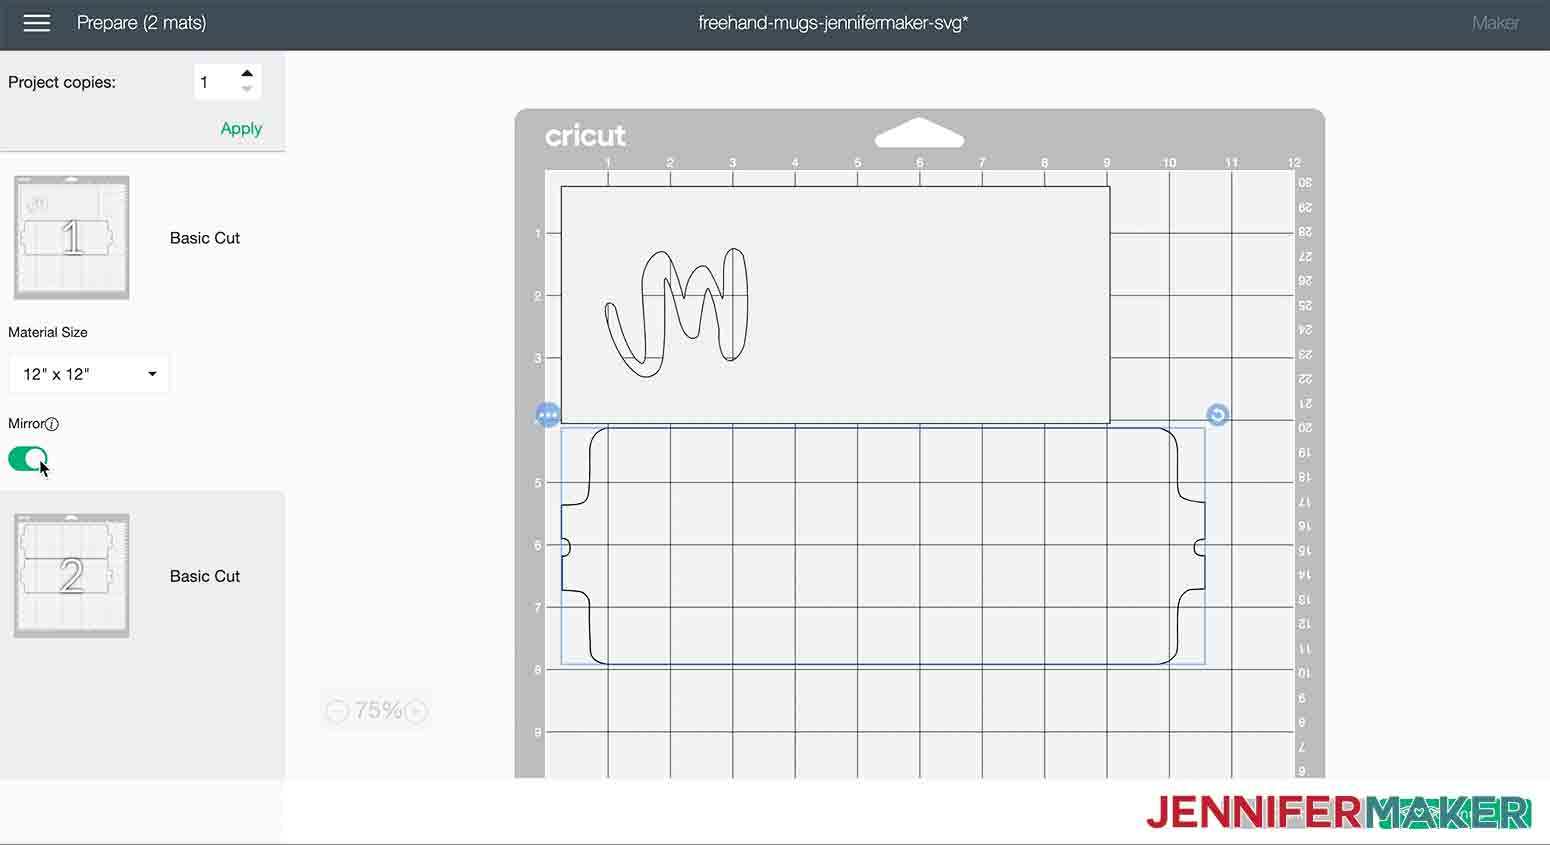
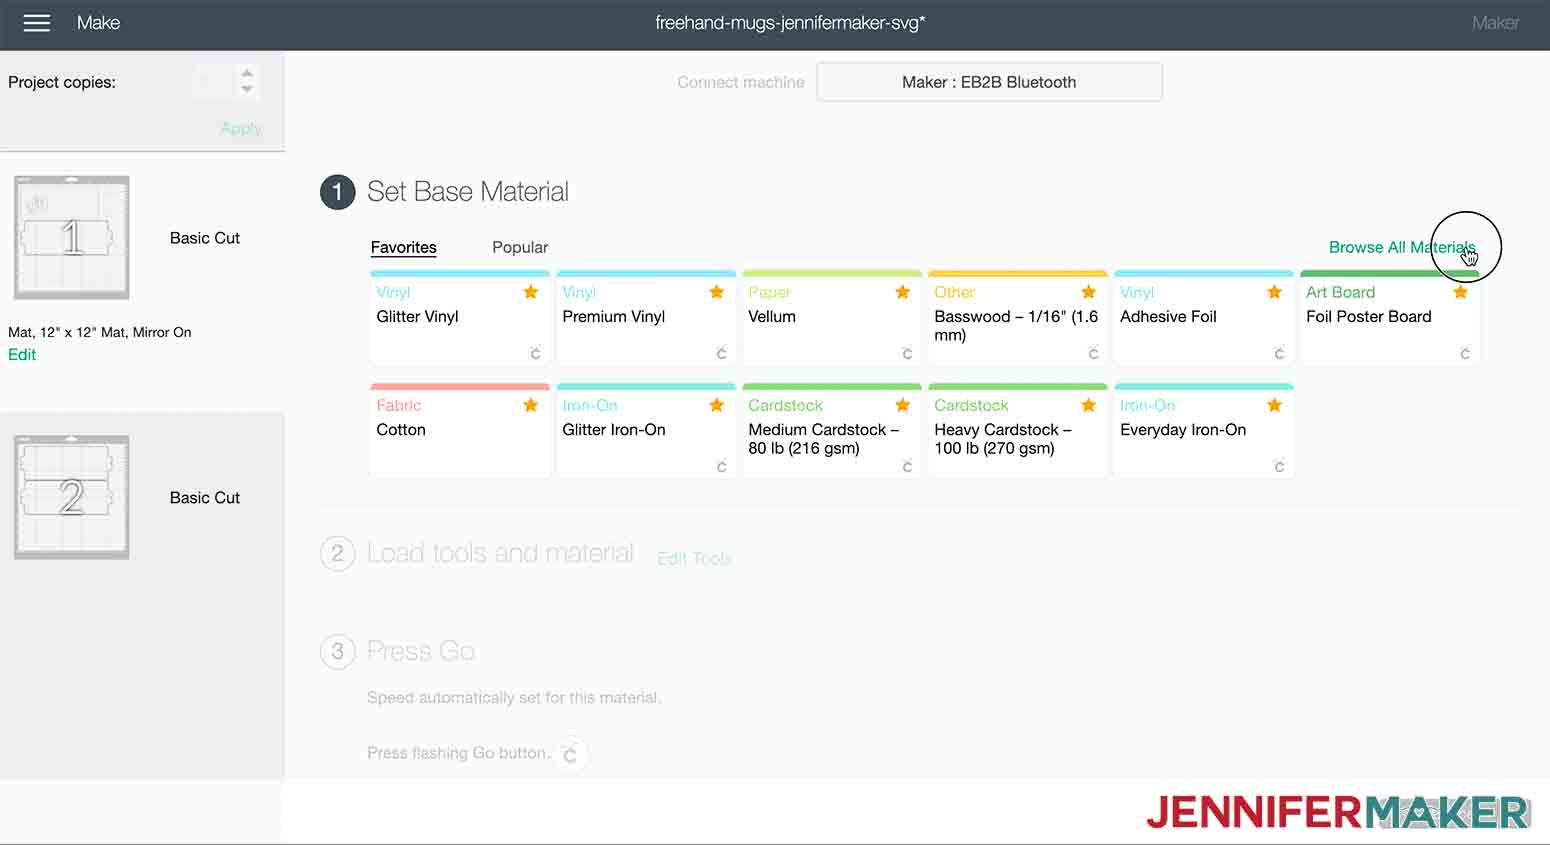
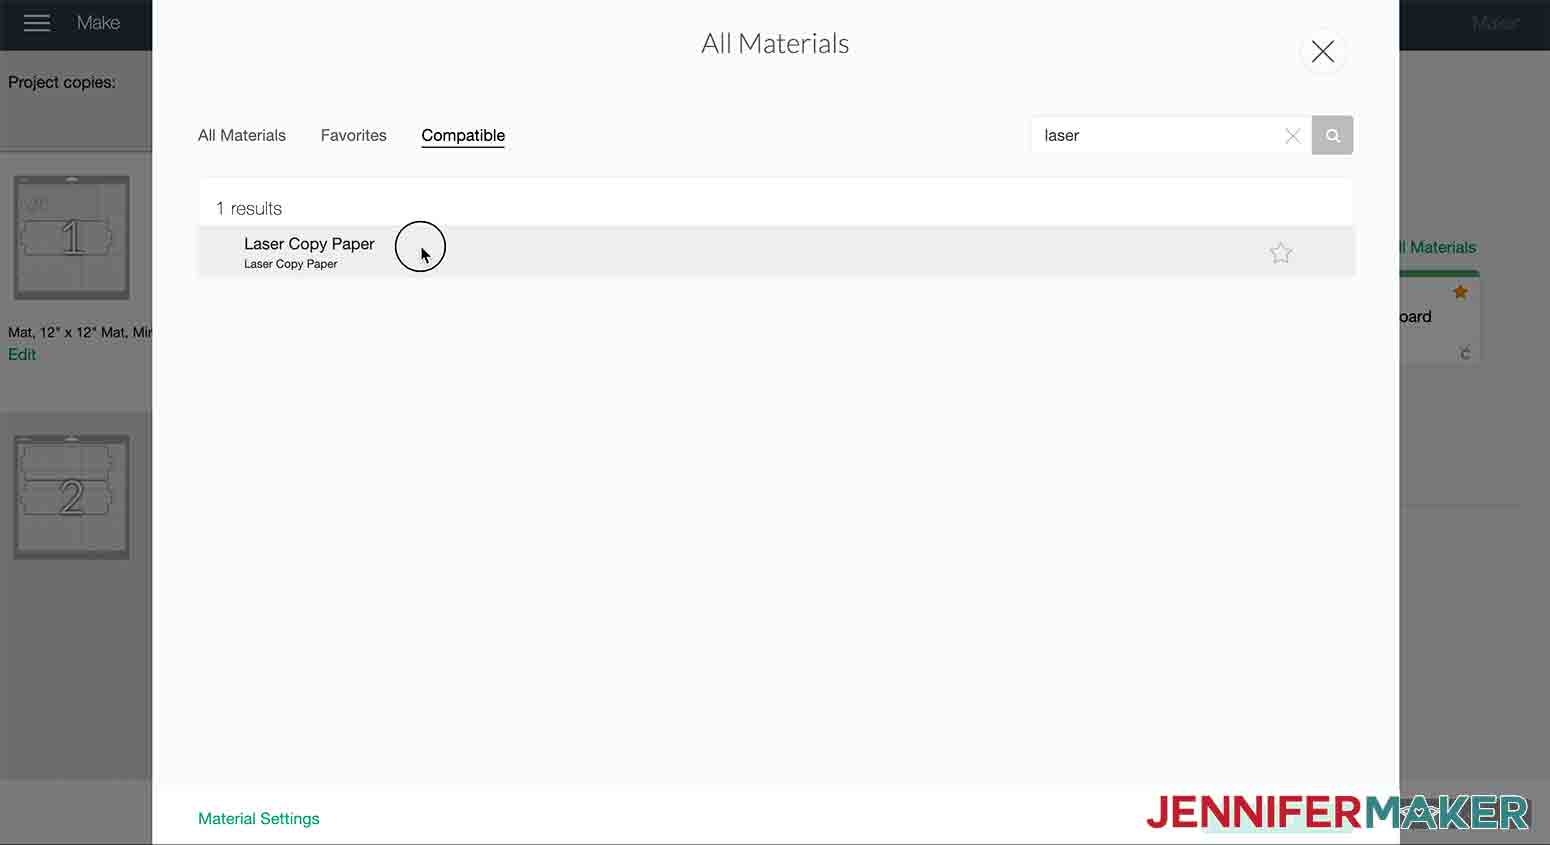
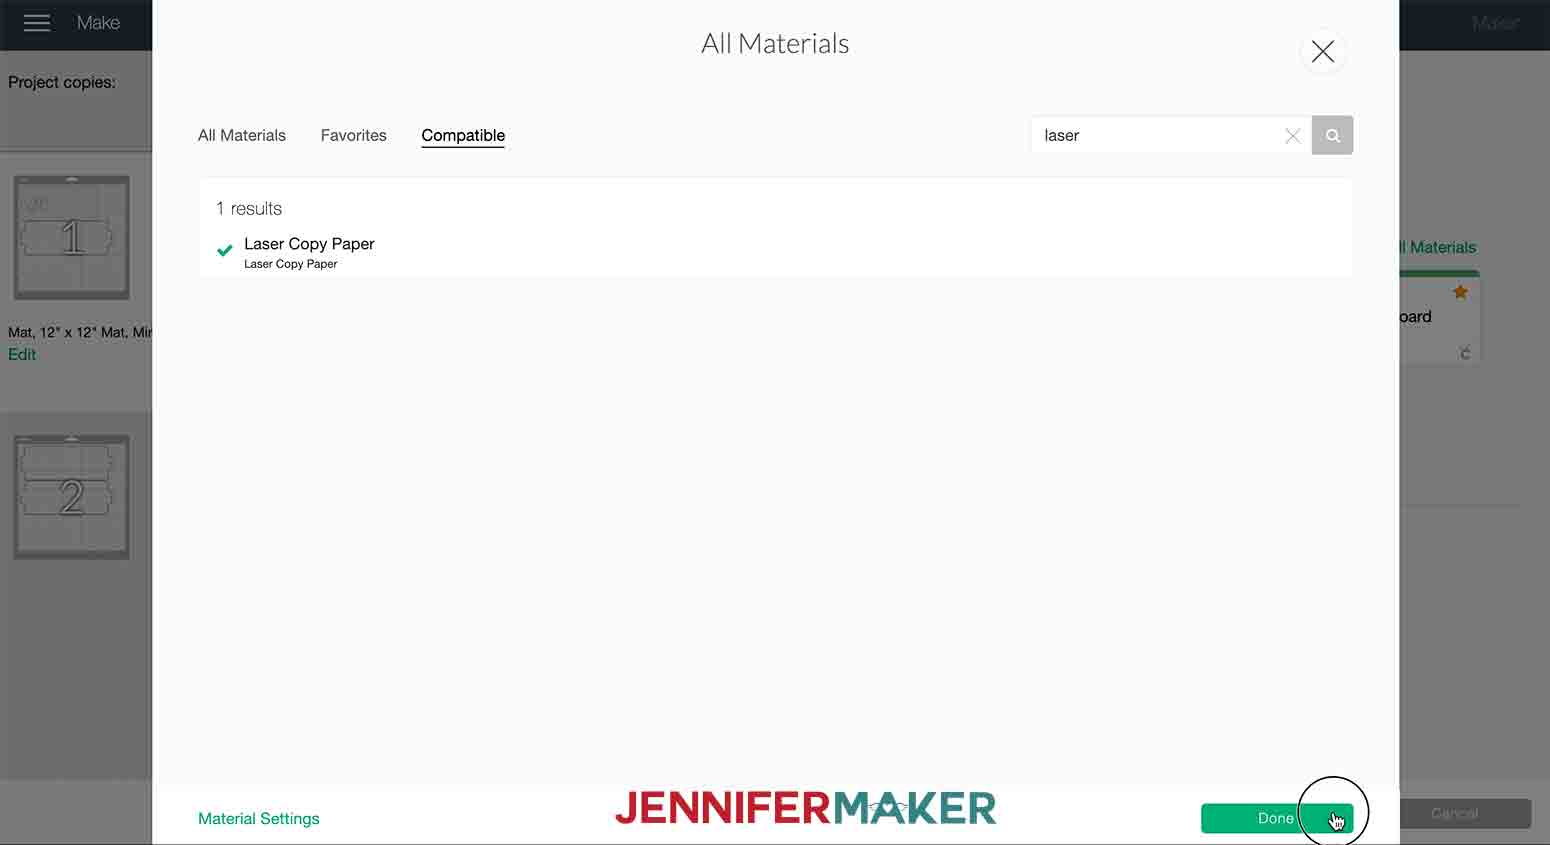
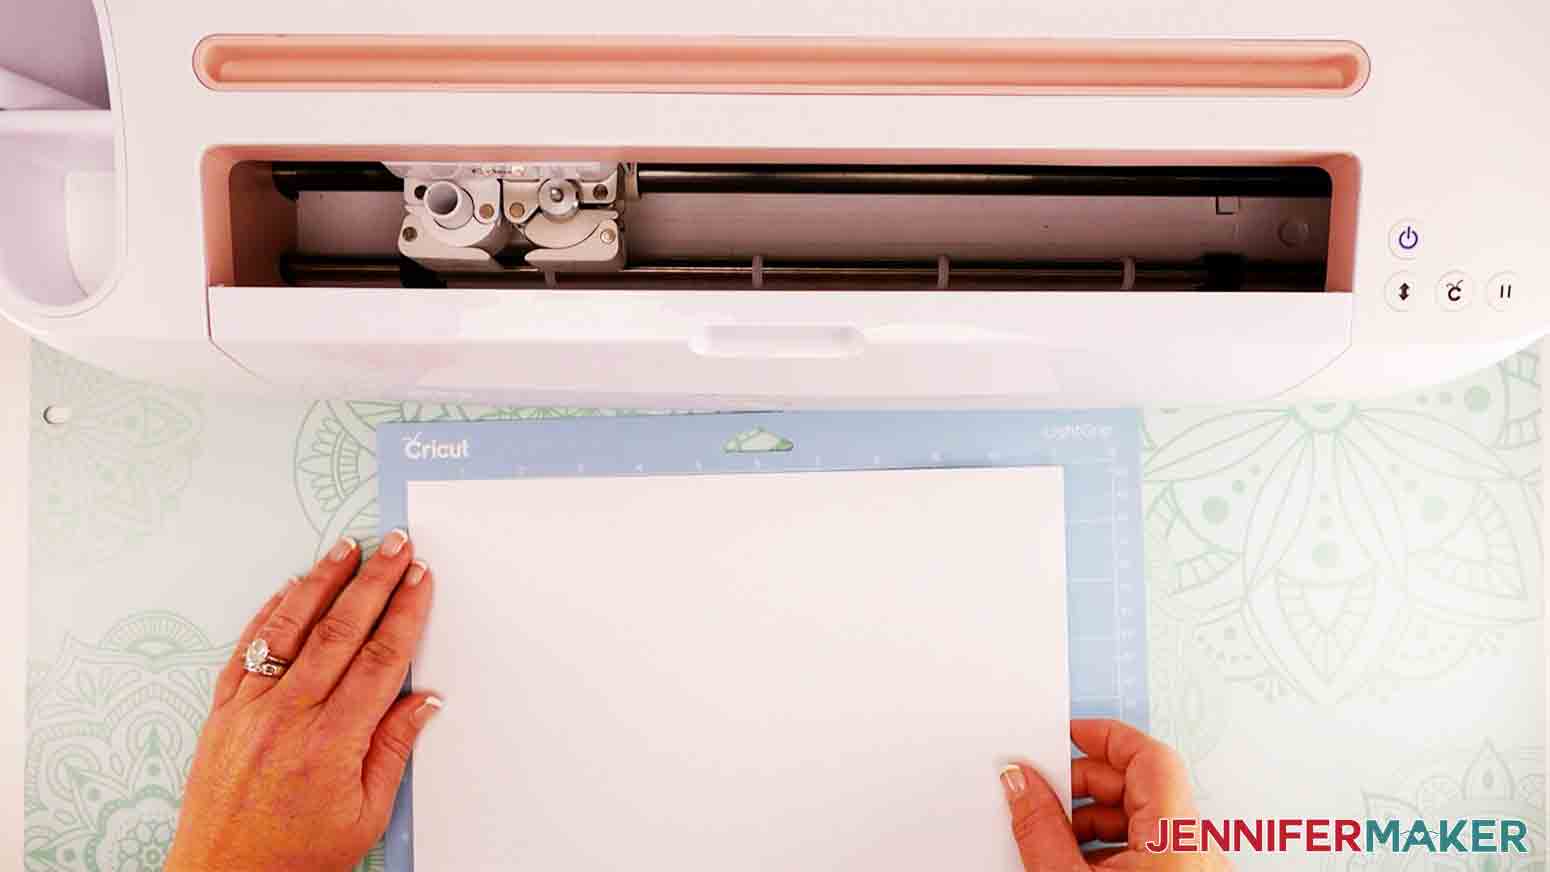
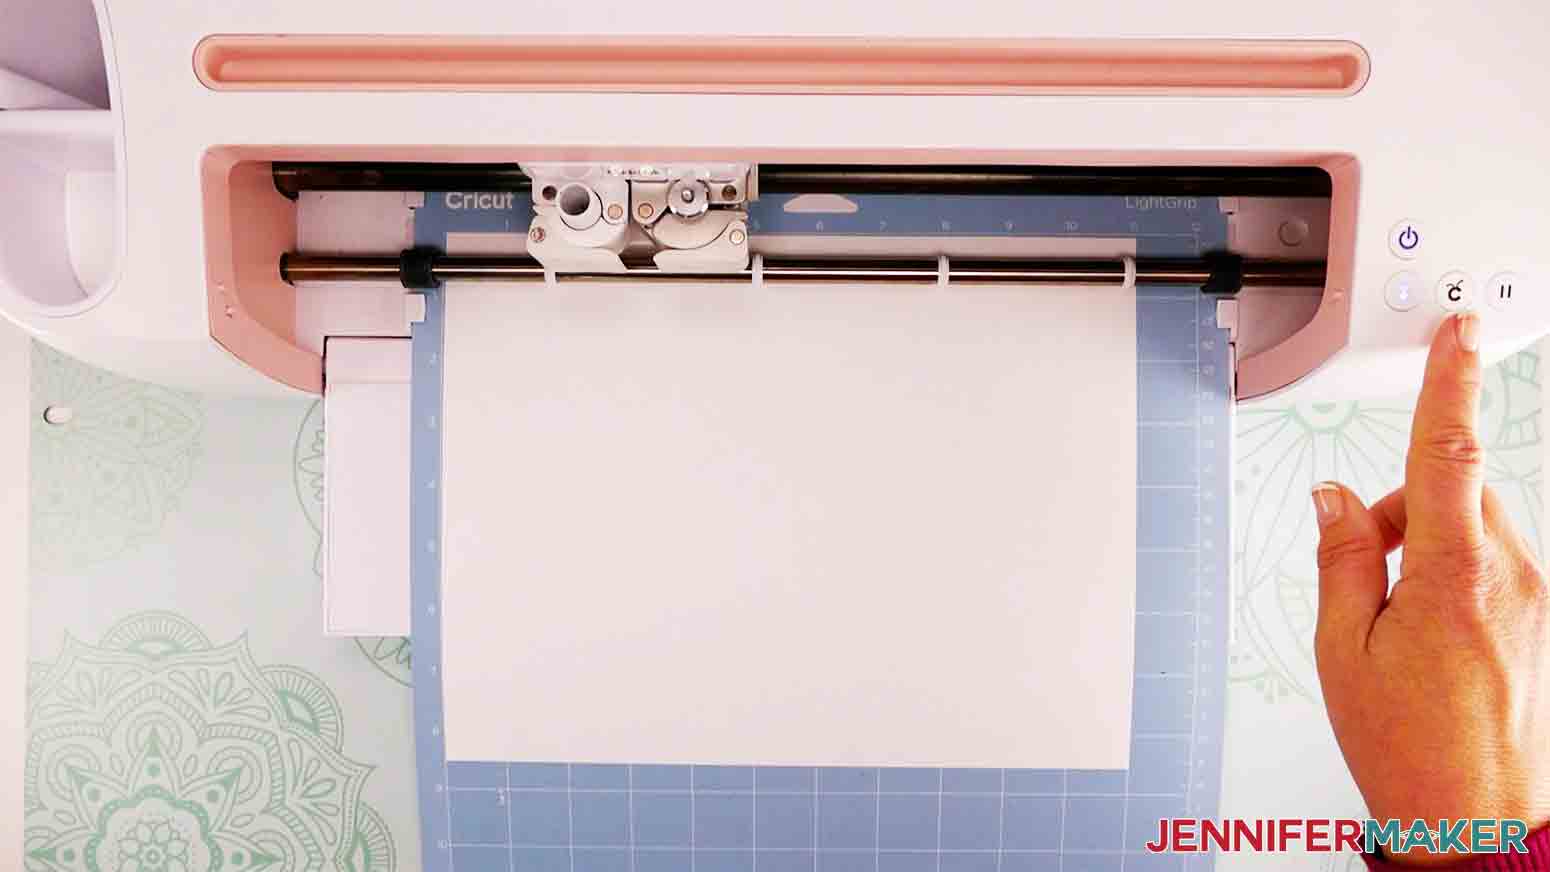
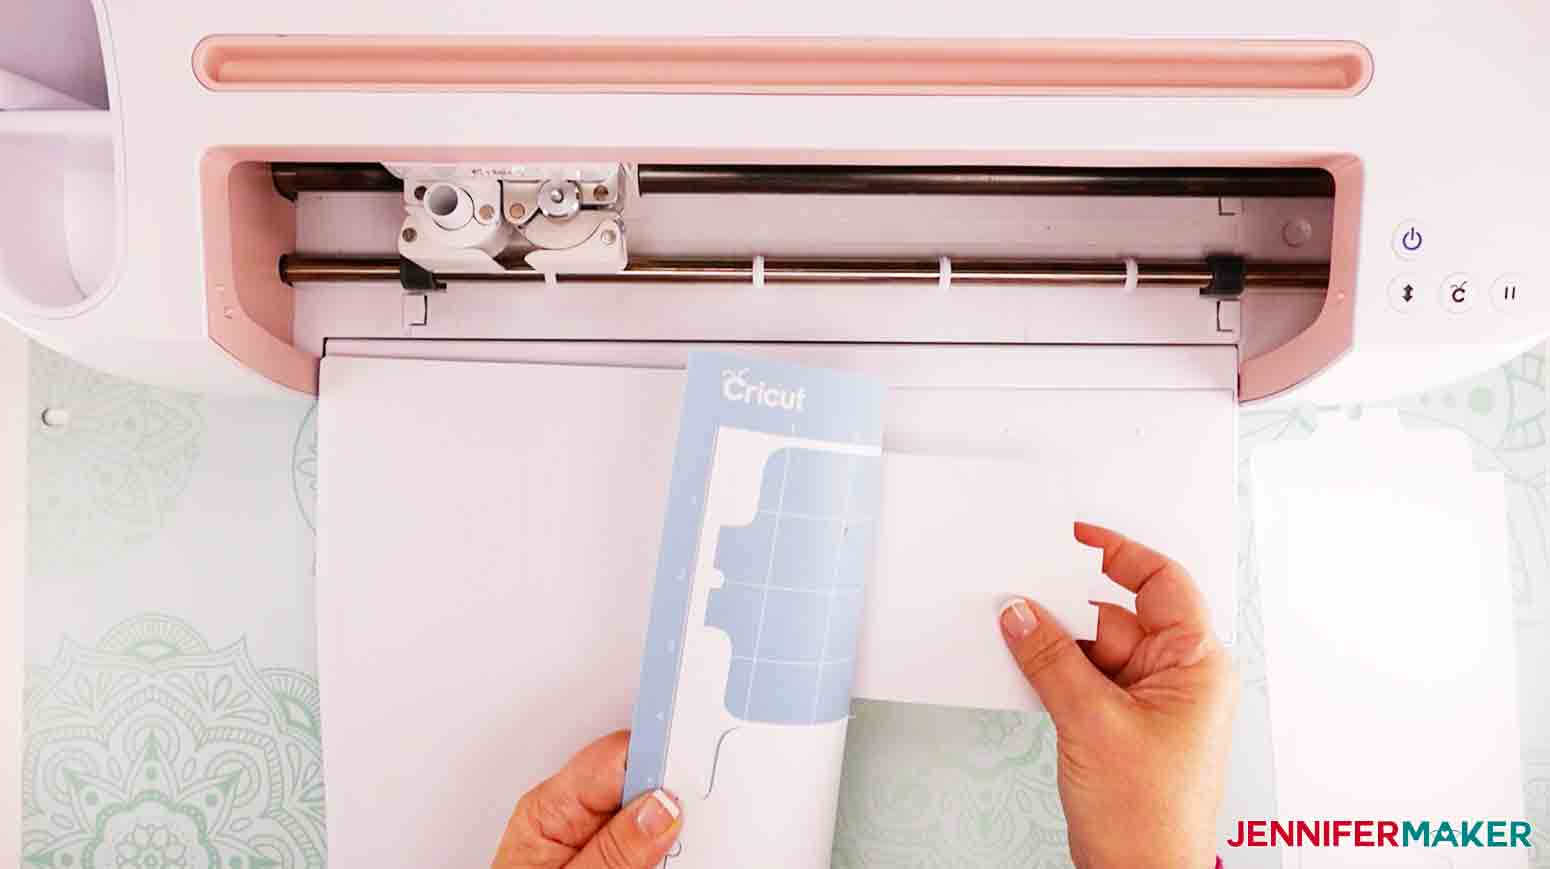
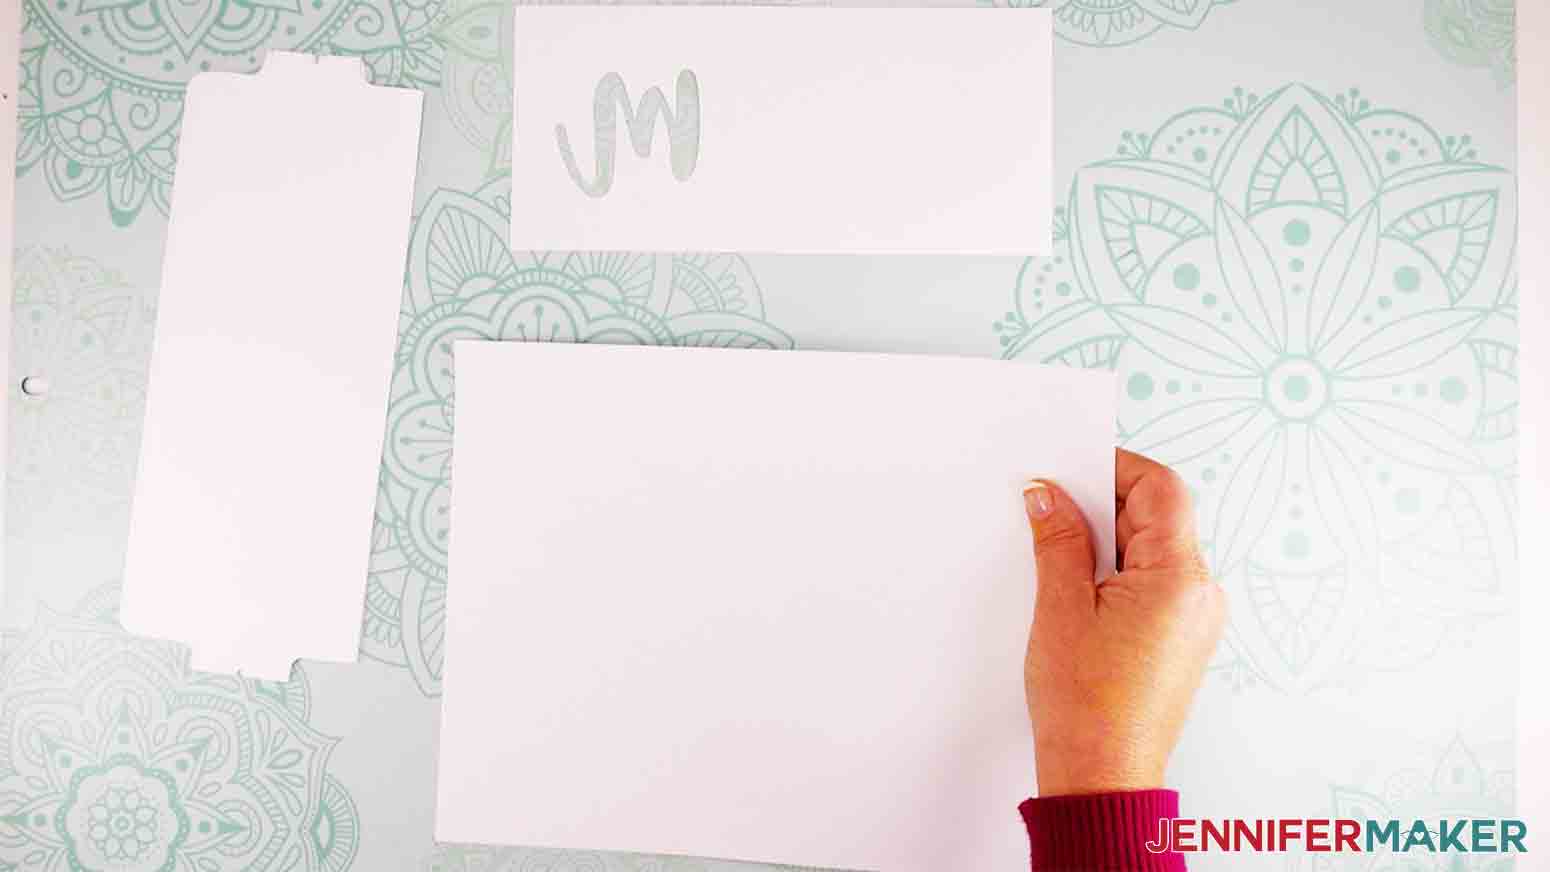
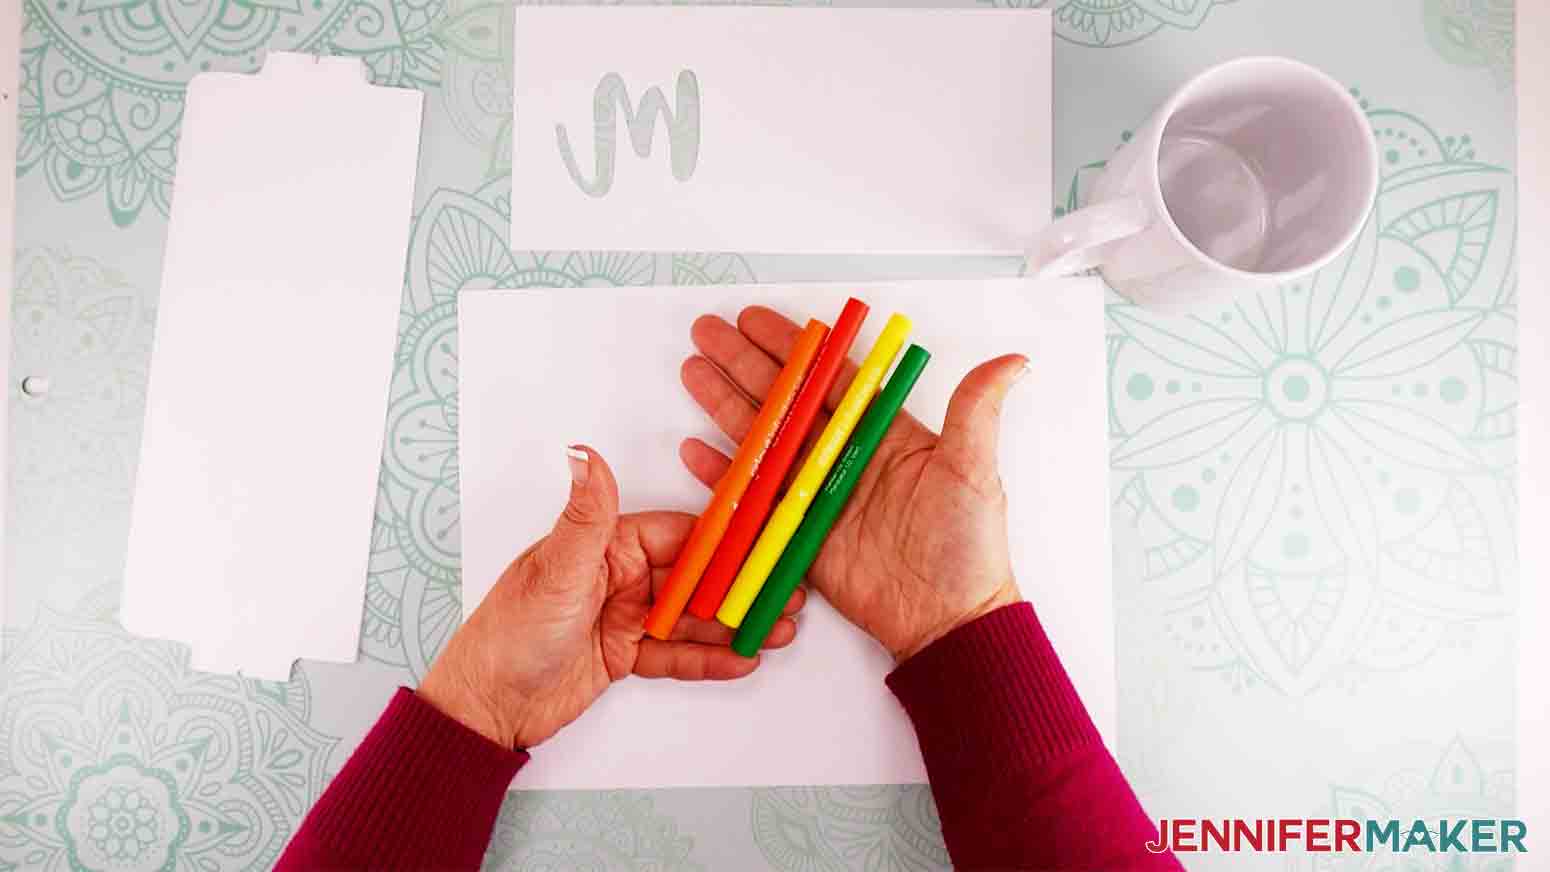
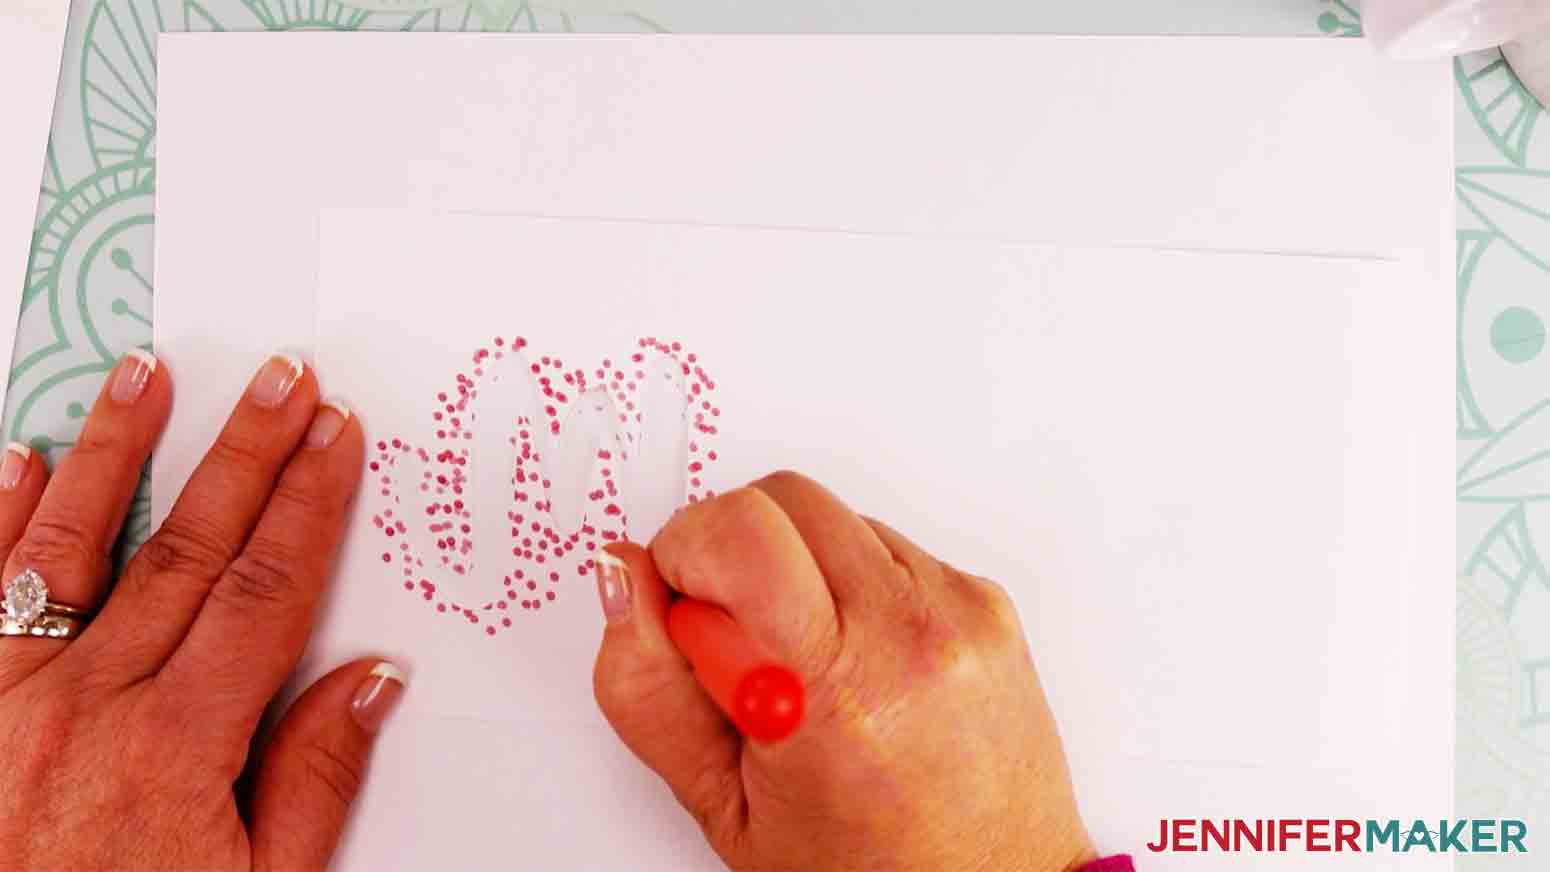
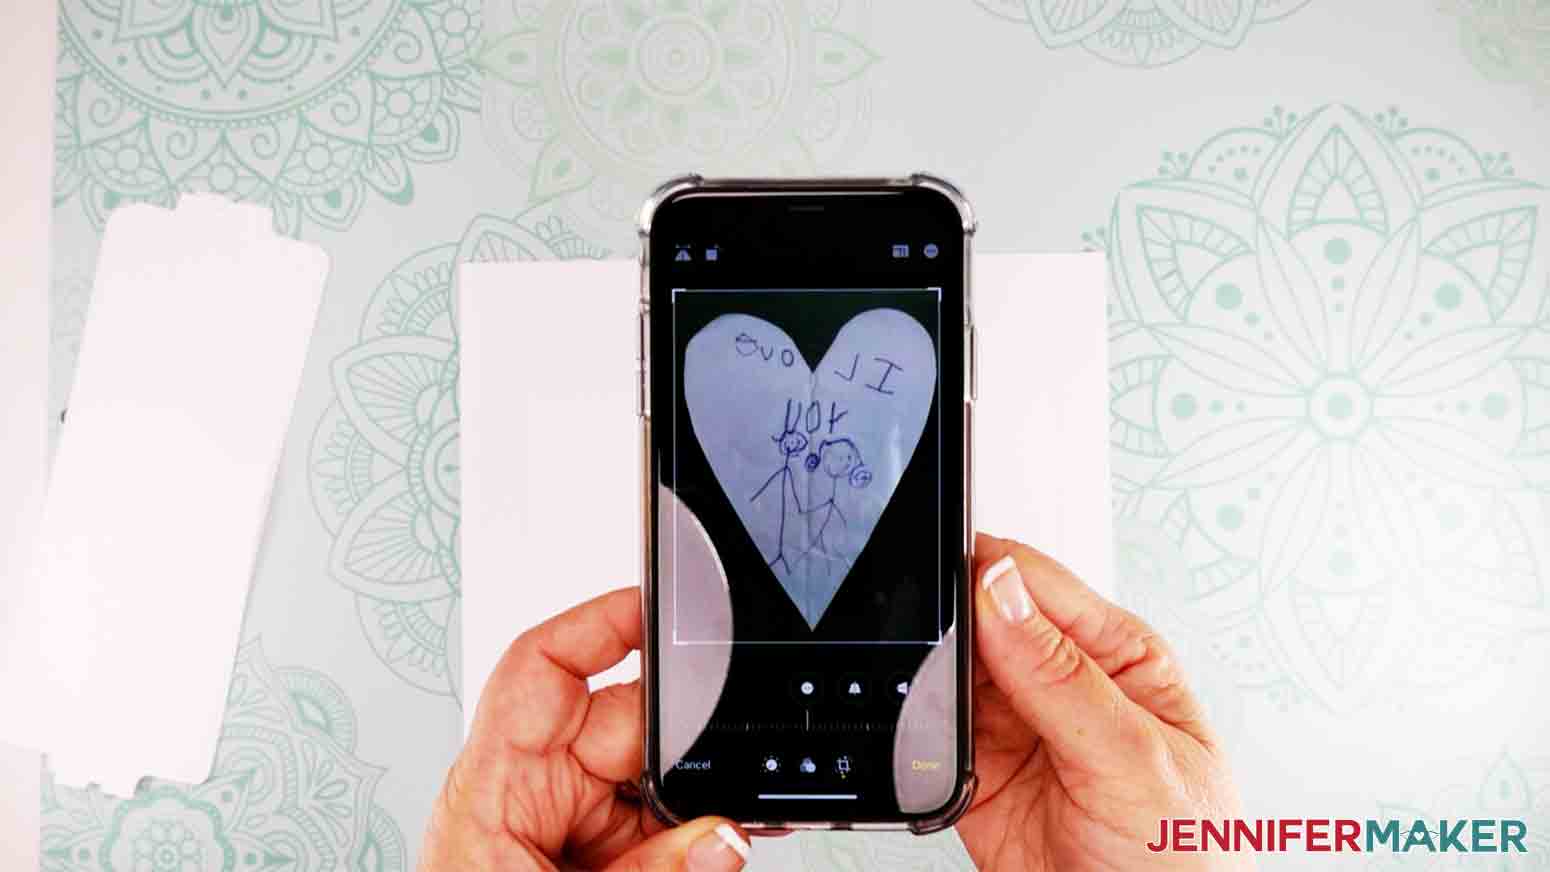
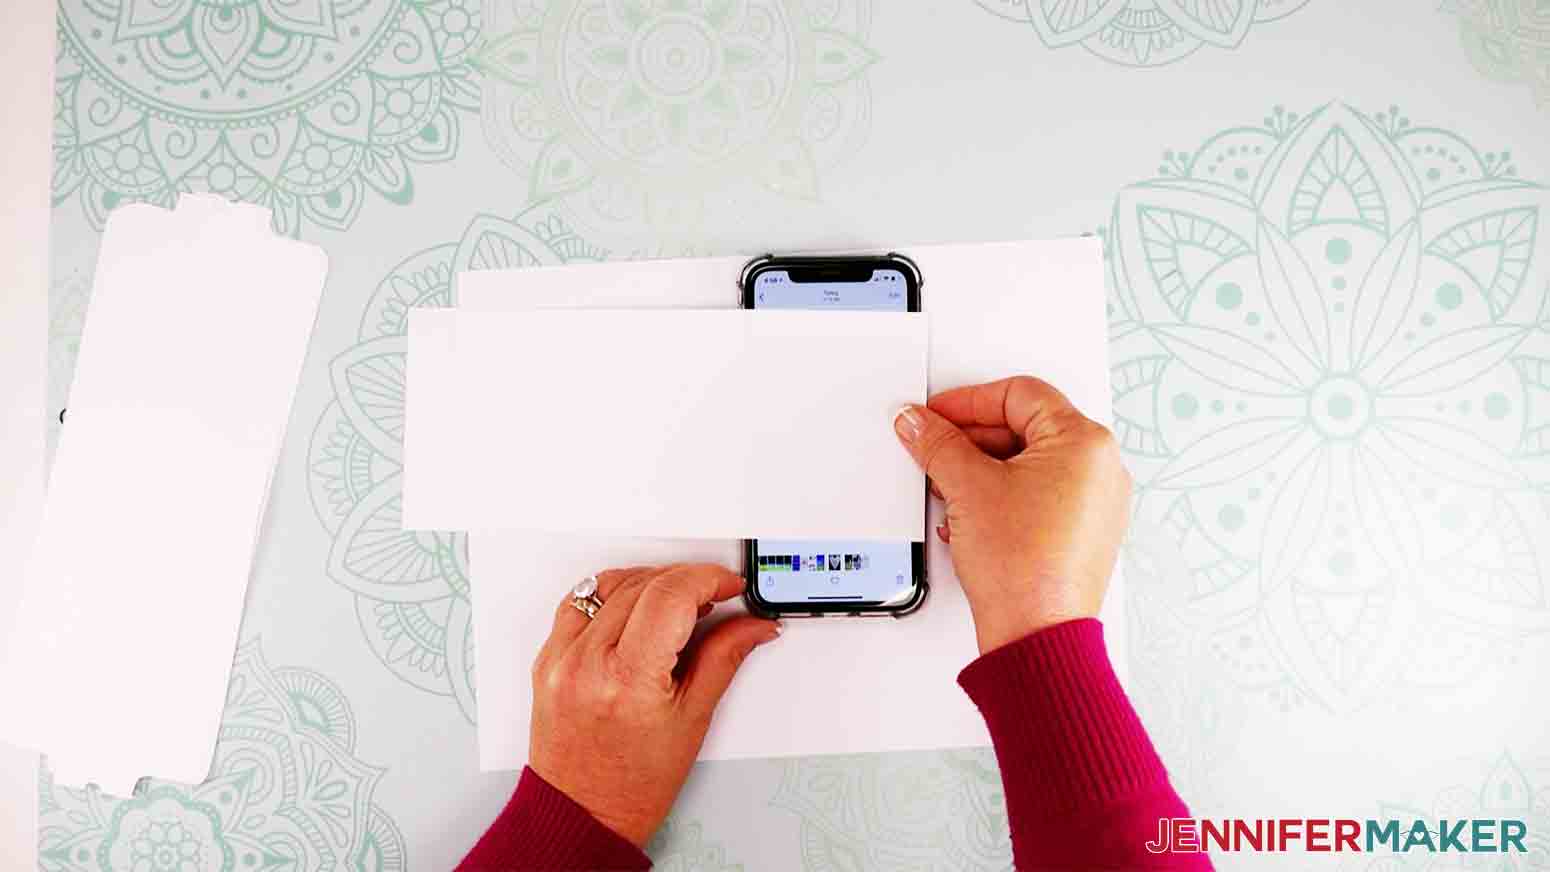
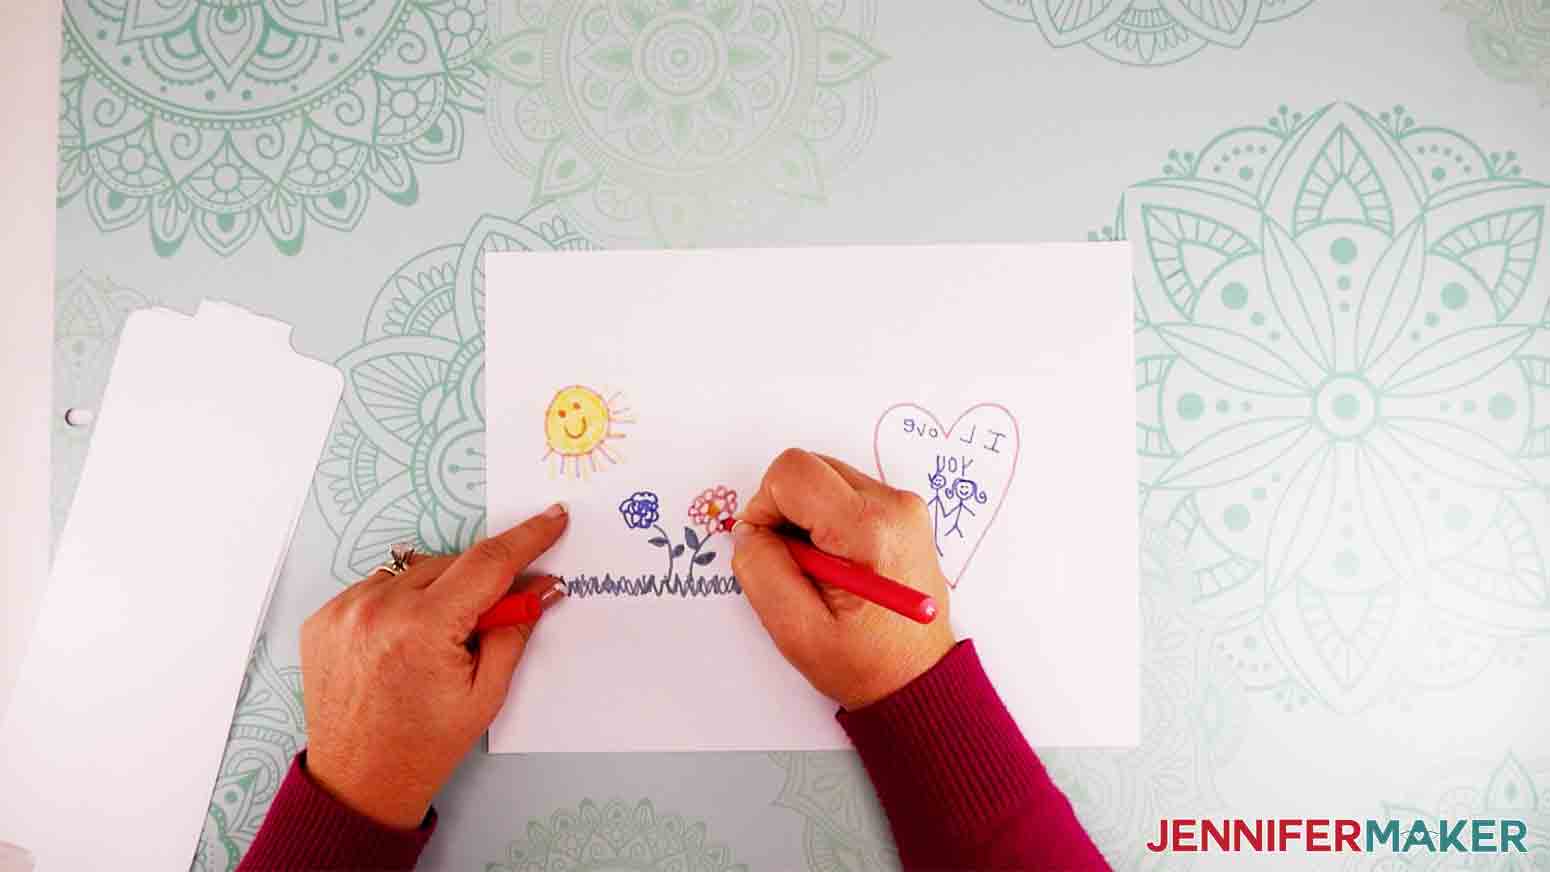
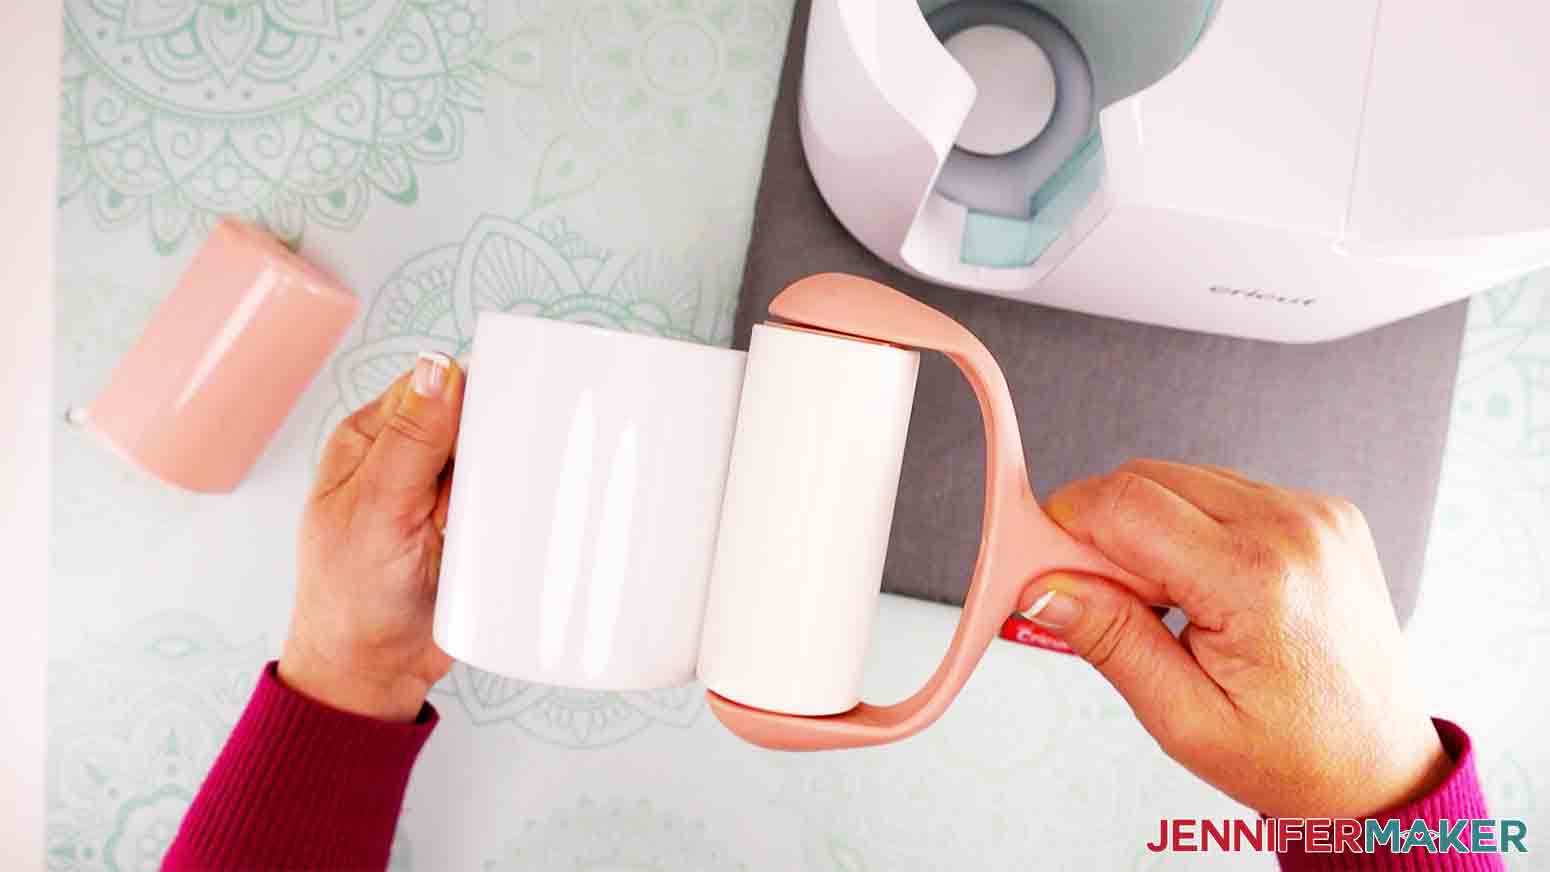
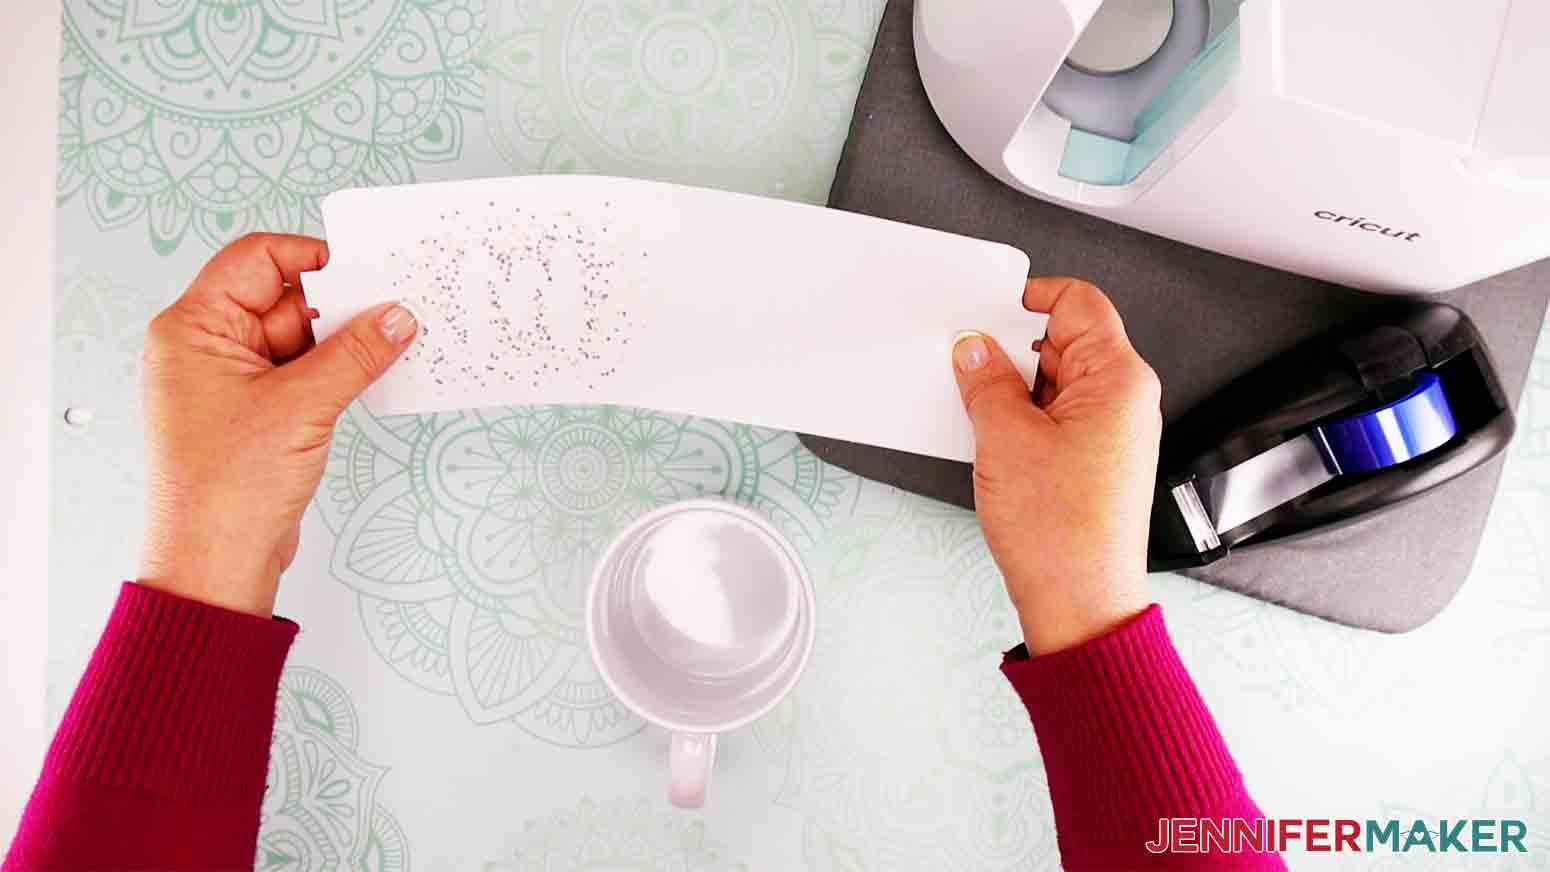
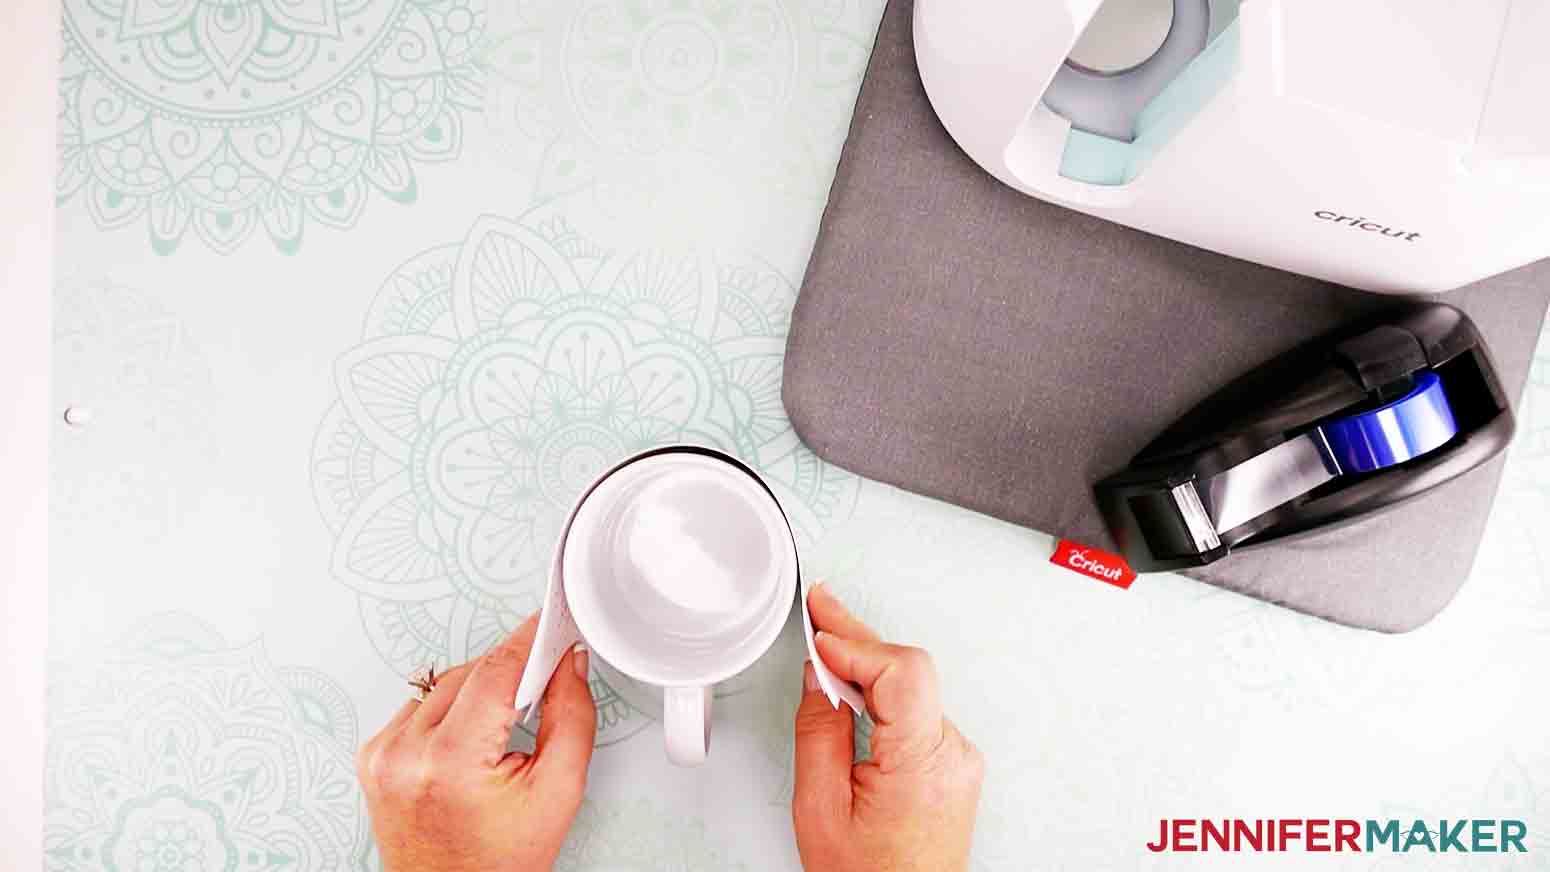
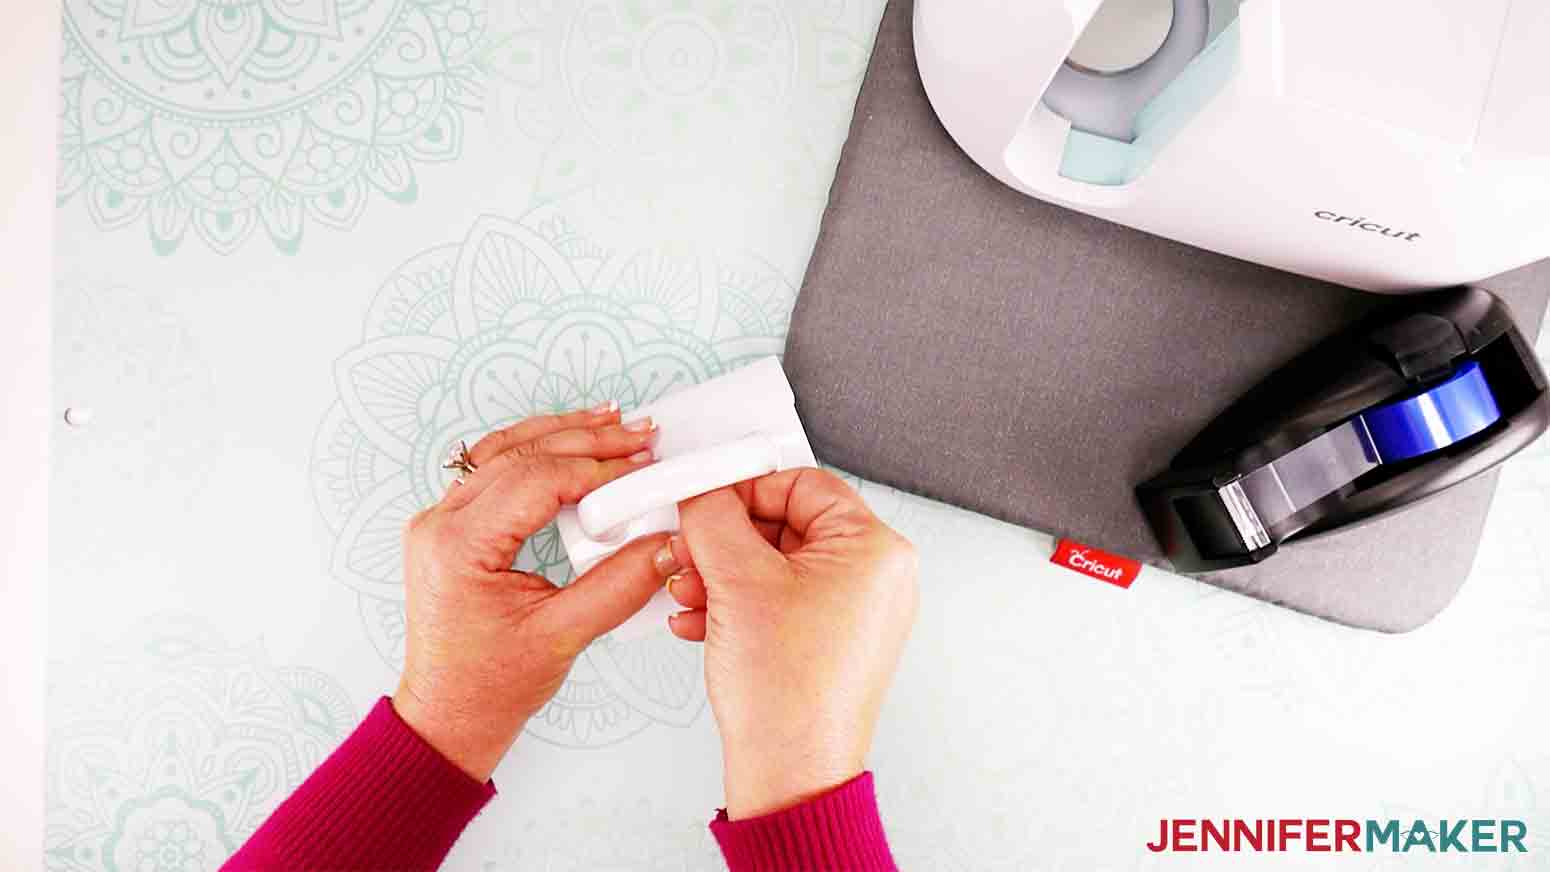
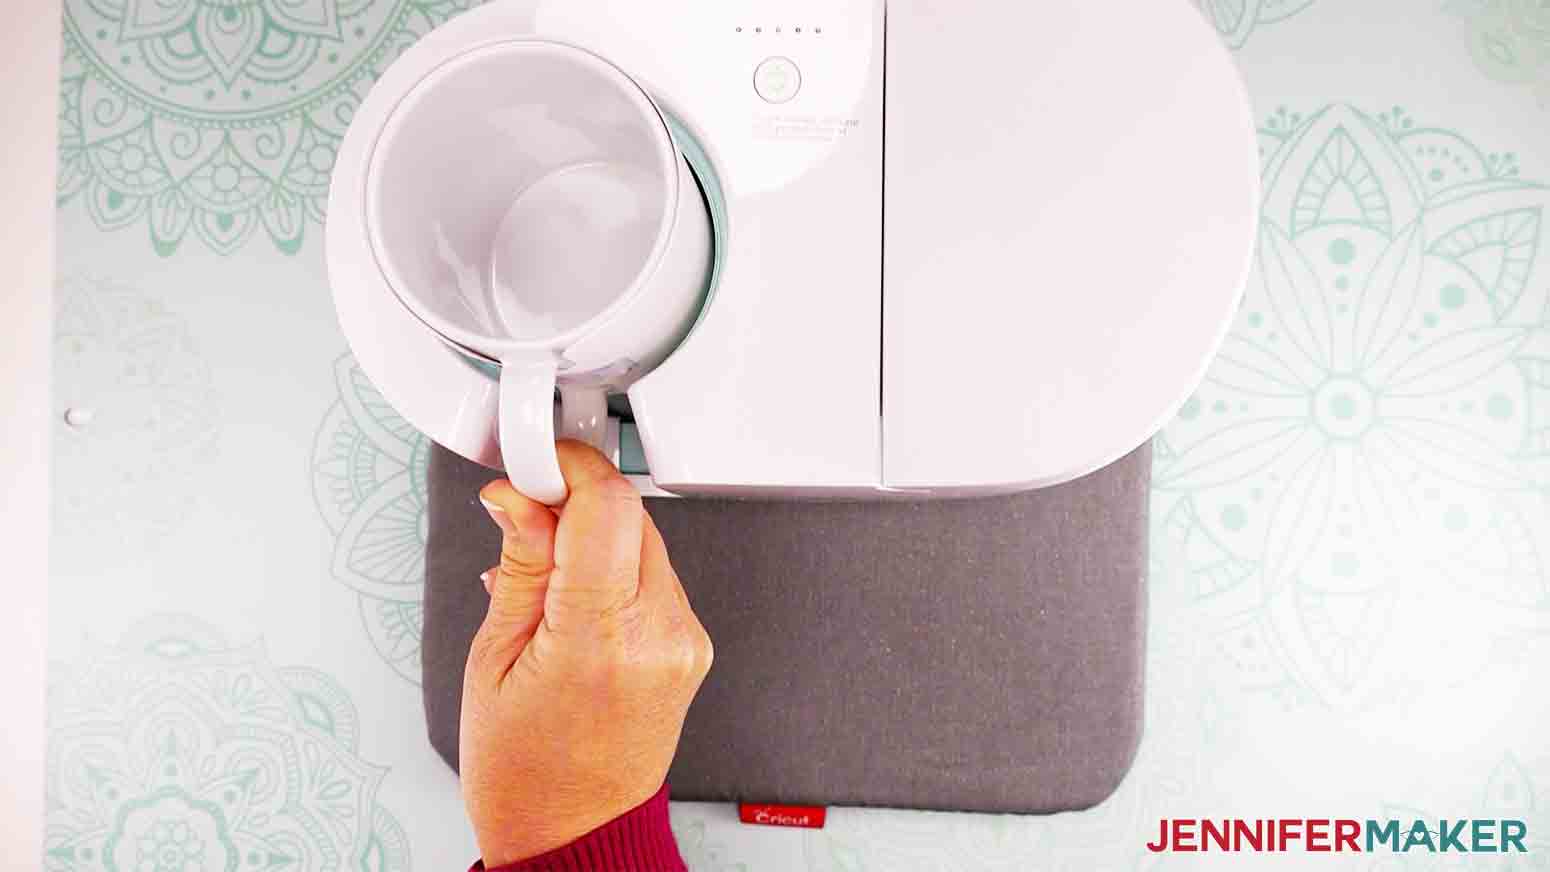
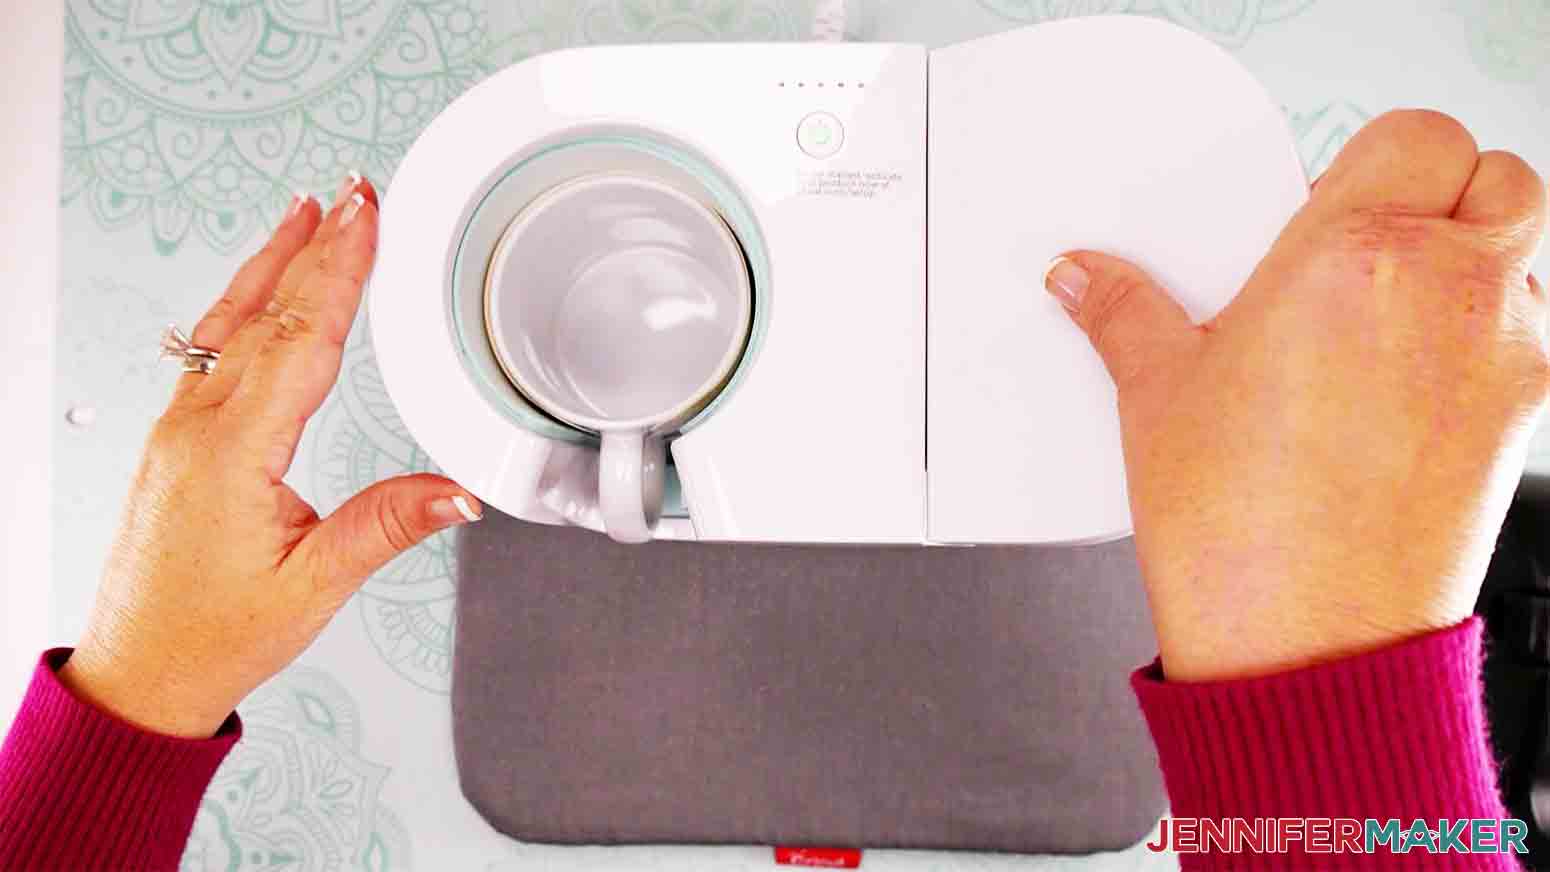
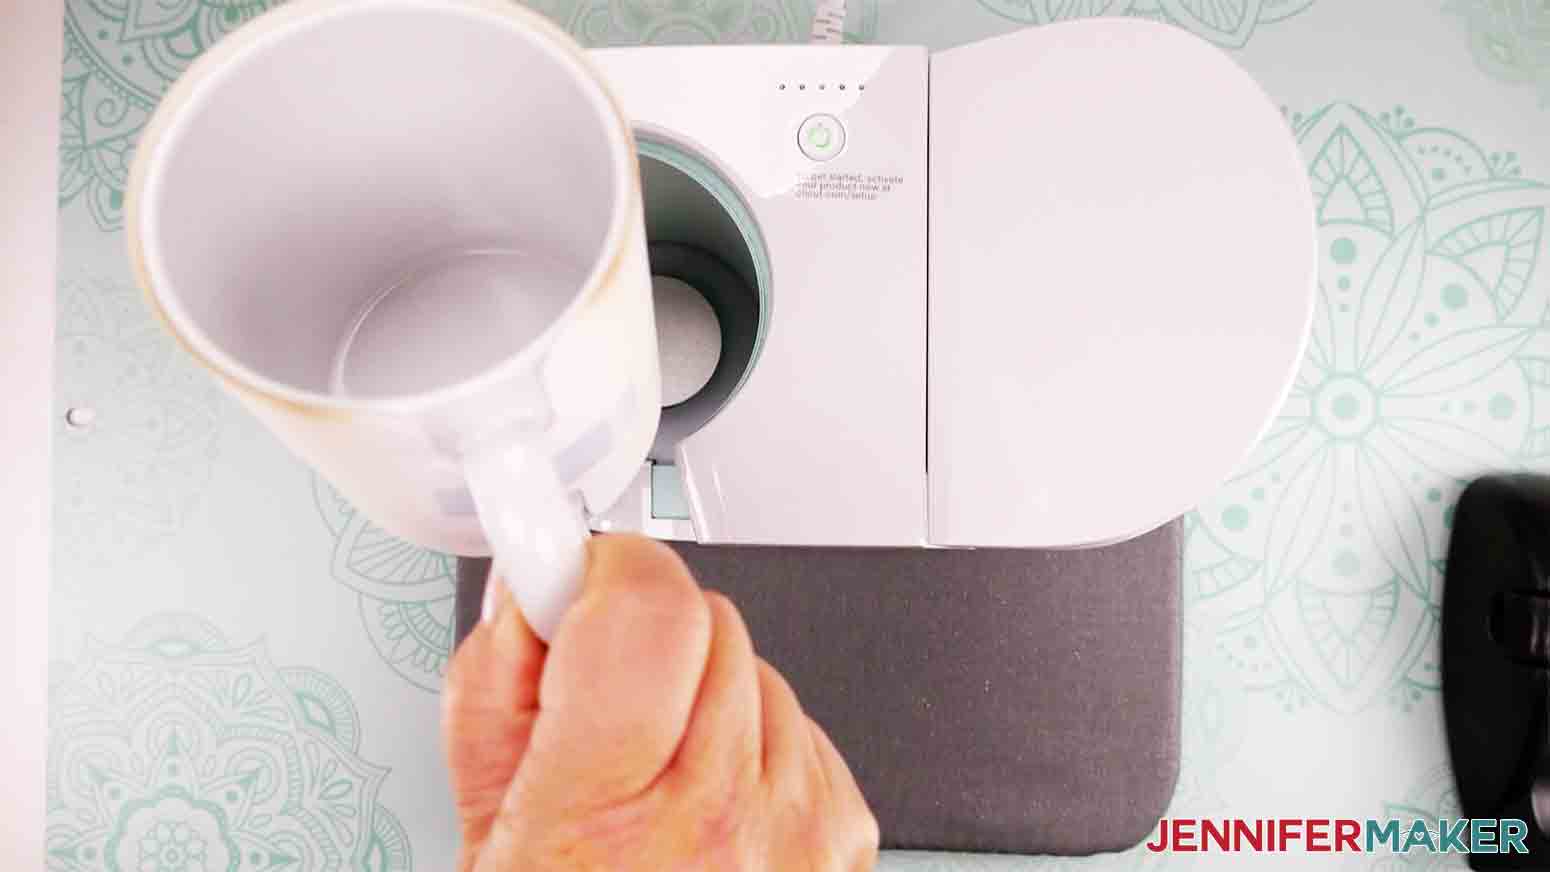
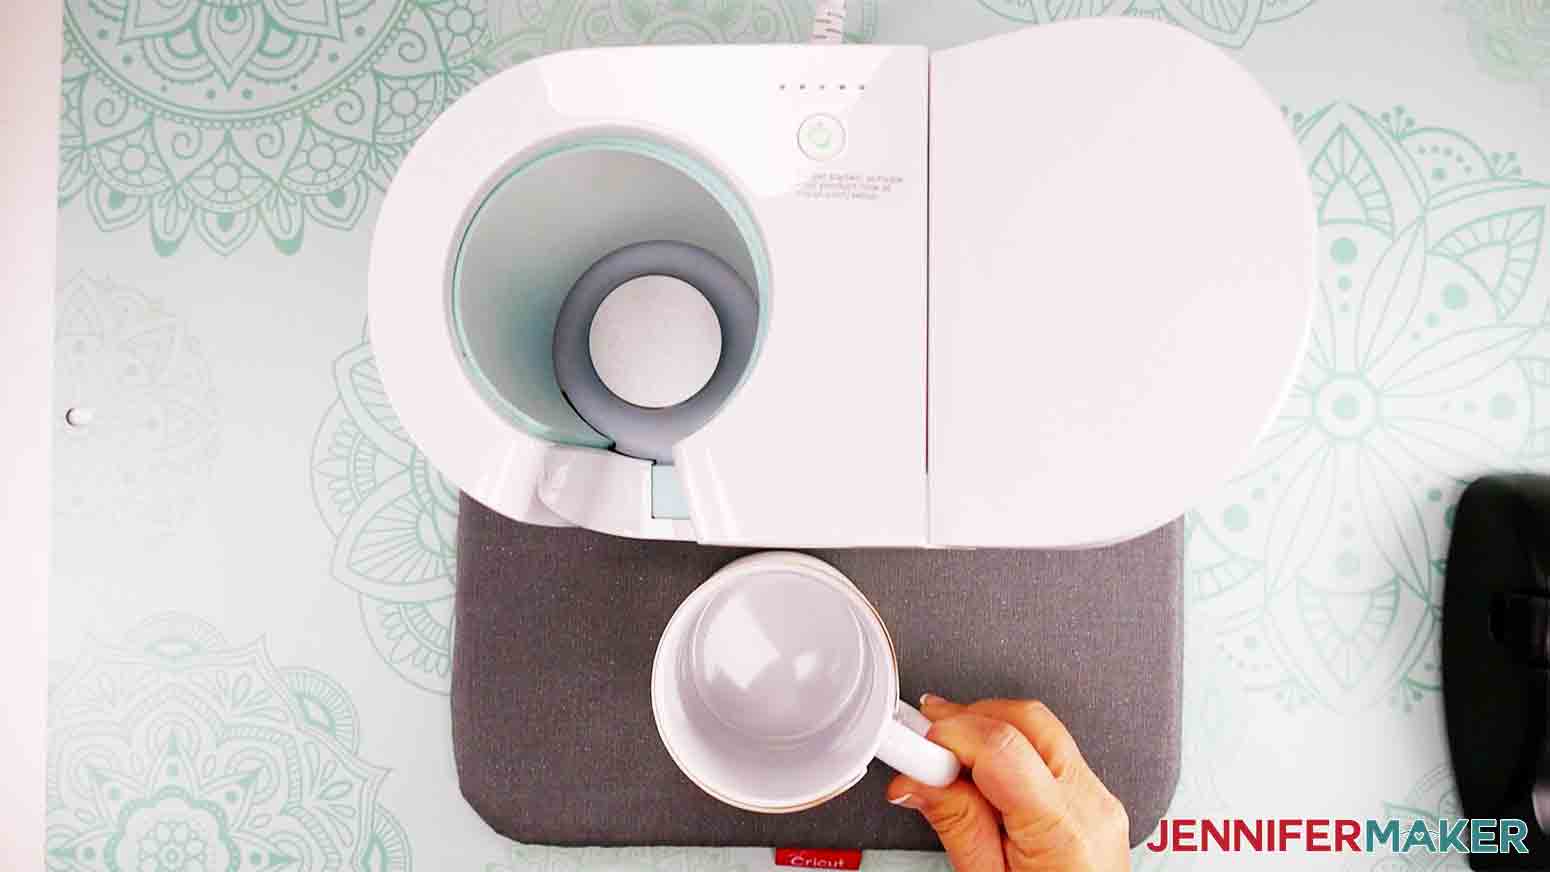
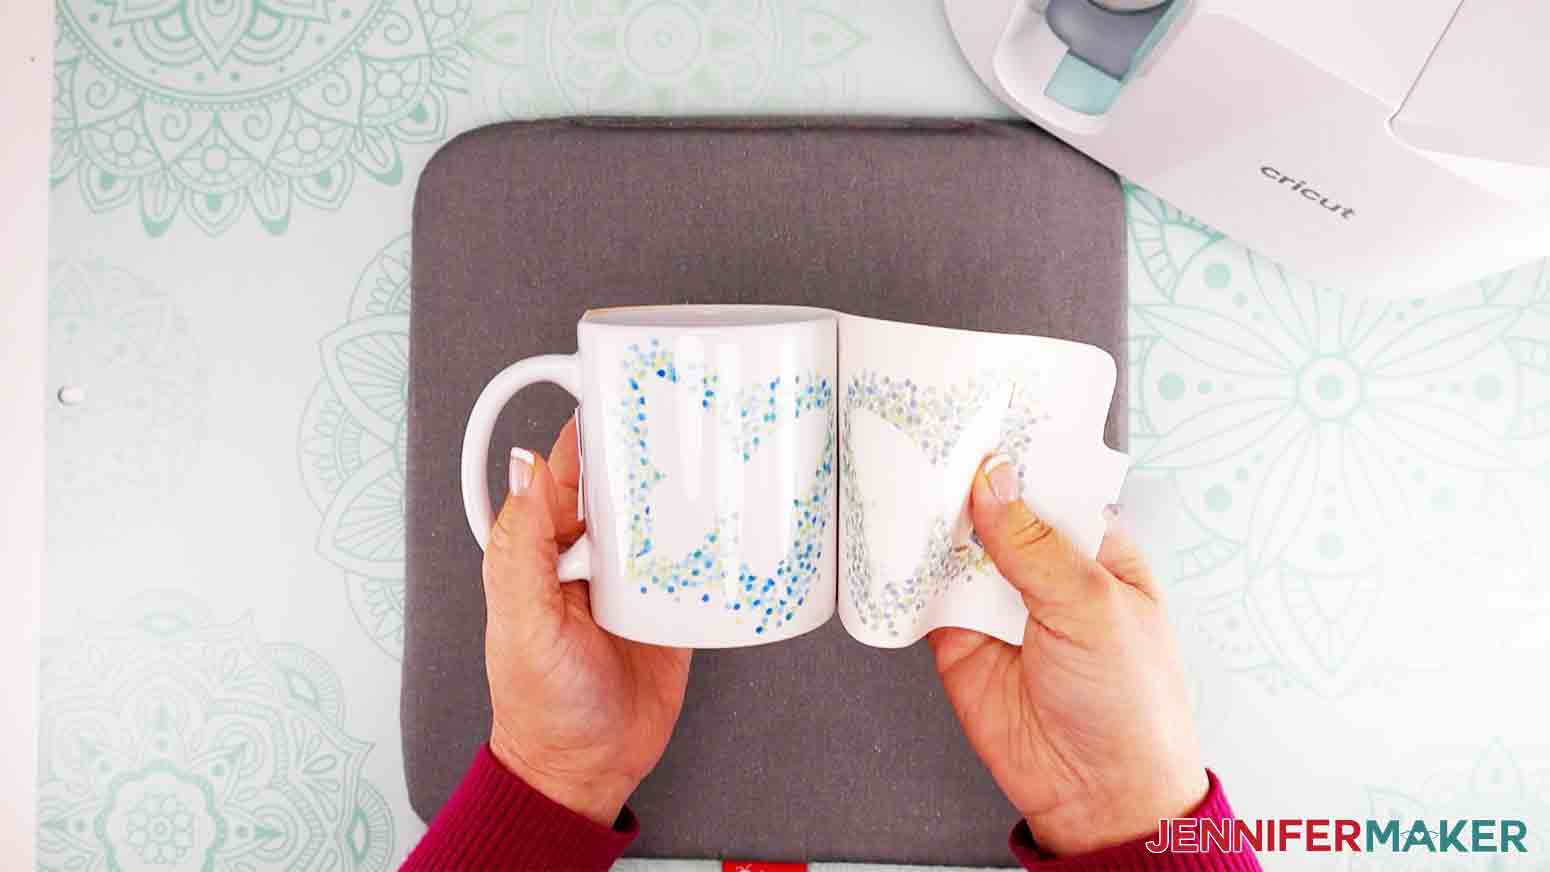
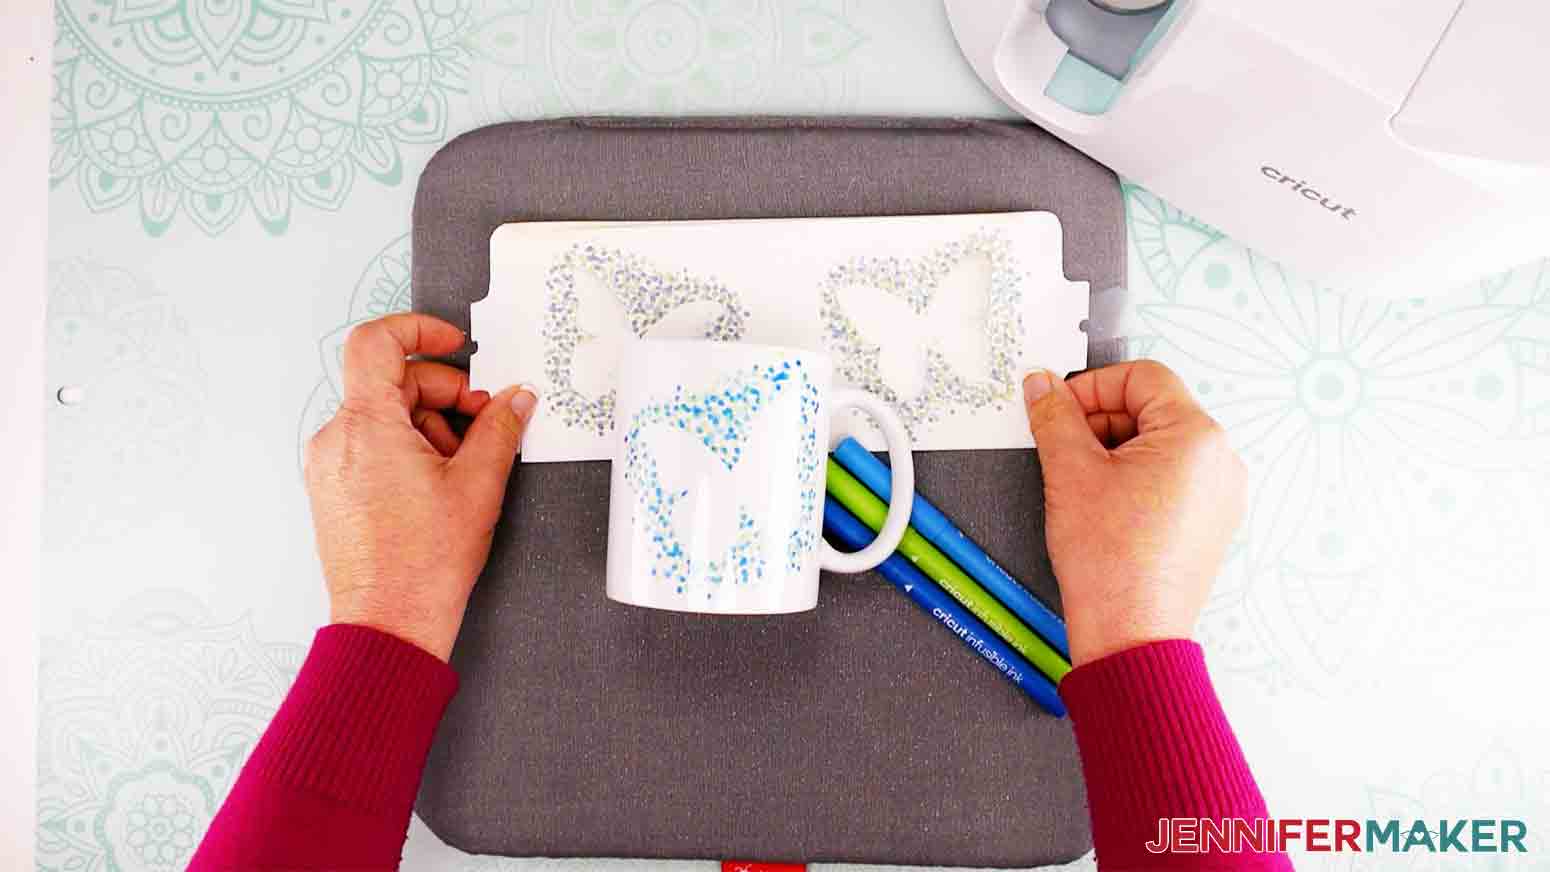
Learn how to use Cricut Infusible Markers to turn your mugs into works of art! First you need a freehand mug design! You can make a monogram, shapes like butterflies, or just draw it completely freehand. You can even trace an older drawing you may have -- I used one of my favorite drawings made by my daughter when she was little and traced it onto my pre-cut template. I really love how they all turned out! To make this super simple for you, I've created designs to help you get started and all you need to do is download them from my free resource library. Look for design #294 and click on it to download to your computer. Here's what each of the designs looks like in Cricut Design Space. These are the Dot Shapes (they are stacked on top of each other, so you'll want to ungroup and separate to find the one you want to make). Here's the dot monogram SVG cut files (again, they are stacked on top of each other): And here is the artwork template: For this tutorial I'm going to show you how to make a butterfly from the first set, a monogram "M" from the second set, and a drawing on the artwork template from the third set. Let's start by uploading your design — we'll begin with the dot monogram designs. NOTE: This step is the same for all three designs. First, open Cricut Design Space and upload the SVG file. For the Monogram Mug I have included all 26 letters of the alphabet, so choose whichever letter you want to use. If you're not sure how to upload a SVG cut file to Cricut Design Space, watch this helpful video training series I made for you. You will notice there are TWO sizes of mug designs in all of my files, the smaller one on top is for the 12 oz. mug, while the larger one on the bottom is for the 15 oz. mug. Both also include 3 extra cutouts, stacked on the right, that will be used to wrap and protect your mug in the Cricut Mug Press. The first thing you want to do is select "Ungroup" on the right at the top of the Layers panel. Then find the monogram you want (remember, 12 oz designs are in the top half and 15 oz designs are in the bottom half) and hide or delete everything else. Here I've chosen the 12 oz "M" design plus the three wrap layers (which you'll want to keep for any letter you choose): Now click "Make It." On the next screen on the far left you will see two mats. Be sure to "Mirror" the top mat. Just click on the toggle button where it says "Mirror" on the left and you will see it turn to green. Now click "Continue." NOTE: There is no need to Mirror the artwork template design, as it is symmetrical. All other designs intended for Infusible Ink mugs should be mirrored, however. Now it's time to choose your materials for your mug templates. To do this, click "Browse All Materials," then type "Laser" in the search window, and then click on "Laser Copy Paper." Then click "Done." On the next screen I always choose "More" under pressure. Now it's time to cut. First, place one sheet of 8 1/2" x 11" laser copy paper onto a Blue LightGrip Cutting Mat in Landscape Orientation, so wider than it is taller, just like this. Now load your mat into your machine by pressing the flashing arrow button. Then press the flashing Cricut button. When the cut is done, unload your mat, flip it over and slowly allow your paper to pull away from the mat. You can help it along, but be careful so it doesn't rip. All three designs include three extra cutouts that will be used to wrap your design and mug to protect it in the mug press. These are important to protecting the Cricut Mug Press from getting ink on the heat plates. Now load your second blue mat with the laser paper on it just like you did the first time and make the cut. Then unload your mat, flip it over and slowly peel it off the mat. Now this is the fun part! It's time to tap into your creativity and make your mug masterpiece. First, set the three extra cutouts to the side and grab an extra sheet of laser paper to protect your work surface. For the dot monogram mug, pick three to four Cricut Infusible Ink Markers. I'm using red, orange, yellow and green, but you can use whatever colors you like. For the mug featuring the butterflies, I used two colors: Blue and Yellow, again you can use your favorite color combo. Now place your design "Mirror side up" (so it should appear backwards) on your sheet of extra paper. Now grab your first Cricut Infusible Ink Marker and slowly start making dots around the perimeter of the design cutout. My technique is to make more dots around the immediate periphery and less as I moved away from the cutout, to be sure the design was very clear. Just straight up and down dotting motion so the dot was rounded. Here's what the dot design should look like when you are done. Of course it won't be exactly like mine, but that's the beauty of this technique, it's an original work of art... YOUR art! You will also have four sheets of cutouts for this design. You will notice one is different and has straight edges, that's the one you will draw on. Now I don't know about you, but seeing my little one's artwork just brings a big smile to my face... especially now that my daughter is not so little anymore. So that's why I love this design so much. This is really easy! Just grab your phone and snap a picture of your child's artwork. Now click "edit" on your phone and mirror the image...which is also the same thing as flipping it vertically. This is what it looks like: This way you can use the Cricut Infusible Ink Markers to trace the drawing backwards so you can get it onto your mug and it will look just the way it's supposed to. To trace it, I made sure to turn the brightness all the way up on my phone, turn down the lights in my room, and then I put the cutout with the straight edges over top of that and traced the drawing. I used the Azure Blue marker and the Red Marker for my drawing, but of course you can use whatever colors you want. I also drew a design on the other side of the paper so I would have art on both sides of my mug. You can do this too or leave it blank...totally up to you! Or why not give the sheet to a kid to draw directly onto? Just make sure they know it'll be reversed when they apply it, so any words need to be written in mirror image, too! This step will be the same for all three designs. First, grab your mug and use a lint roller to clean the surface of the mug. You want to get all the dust and debris off of it before you add the design. Now place the mug in front of you with the handle pointing back at you. Next, take those extra three pieces of paper you cut with your design and stack them all together. These will go BEHIND your design layer. So stack all four pieces together, with the design in front, facing you and right side up (this is really important and I learned this the hard way - lol!). Now wrap all four pieces of paper around the mug, make sure they are snug. The edges of the paper should meet up right inside the handle of the mug. Next, take a small piece of heat resistant tape and take these two edges together. That's it. With the Cricut Mug Press powered on and the power button green (which indicates it is ready), hold your wrapped mug by the handle and place it in the heating chamber. Pay attention to where the mug handle is and make sure the heat plate appears to be covering all of your design. I have found that moving the handle to the left a little bit helps. Now close the clamp on the top of the Cricut Mug Press and double check that the heat plates are completely covering your design. If not make sure to open the clamp right away and reposition the mug as needed and close the clamp again. Pushing down on the clamp starts the pressing process. There is no other button to push or settings to worry about. The Cricut Mug Press takes the temperature of your mug and the ambient temperature of your room, and determines the correct settings for you...isn't that great, takes all the guesswork out! The little lights on the top of the Cricut Mug Press indicate the progress of your press — an average mug takes about six minutes to press. When the Cricut Mug Press is finished, it will beep at you. Lift up on the lever to release it and pull the mug out by the handle, which will NOT be hot. Be careful not to touch the heat plate with the back of your fingers or touch any other part of the mug, as it will be quite hot. Note: You may notice some scorching on your paper when you remove your mug, especially at the edges, but don't worry -- this is normal and it won't hurt your design. Immediately place your personalized mug on a heat-resistant surface to cool. I place my mug on the same mat I am using for my Cricut Mug Press itself as it's right there and super convenient. Allow the mug to cool down before you peel off the tape and remove the paper. This takes anywhere from 15 to 30 minutes. When the mug is cool enough to handle, pull off the tape and paper and check out your beautiful creation! This is the personalized mug I designed with the butterflies... I just love how vibrant the colors look! I really love how all three of these beautiful artwork mugs turned out. They would all make great gifts for any occasion.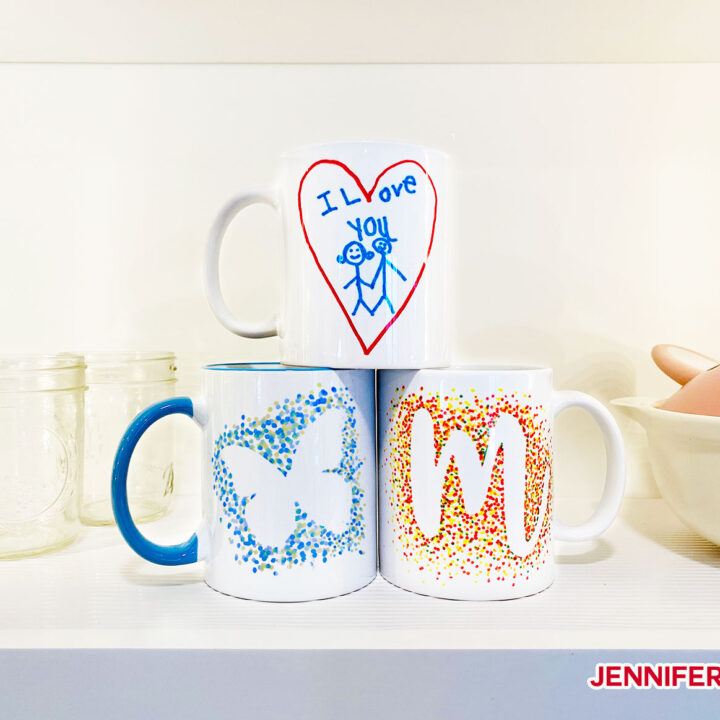
Freehand Marker Mugs
Materials
Tools
Instructions
STEP 1: CHOOSE YOUR MUG DESIGN

STEP 2: UPLOAD YOUR DESIGN TO CRICUT DESIGN SPACE

STEP 3: CUT YOUR DESIGN
STEP 4 : CREATE YOUR MUG MASTERPIECE
MONOGRAM & BUTTERFLIES MUG TECHNIQUE
TRACED ARTWORK DESIGN
STEP 5: WRAP YOUR DESIGN AROUND YOUR MUG

STEP 6: PRESS THE MUG WITH THE CRICUT MUG PRESS
STEP 7: SHOW OFF YOUR PERSONALIZED MUG
Answers to Your Questions about Making DIY Personalized Mugs
Q: When can I buy a Cricut Mug Press?
The Cricut Mug Press is NOW available in the Cricut shop, Amazon, Michaels, Joann, Target, HSN, Hobby Lobby, and Walmart.
Q: Can I use regular pens and markers?
No, you will need to use Infusible Ink Pens and Markers. They have a special chemical composition that turns to a gas under high heat and becomes a part of the mug itself! A regular pen or marker won’t be able to do that.
Q: What kind of mug can I use for my Infusible Ink marker mugs?
Your mug must have a poly coating and straight walls. It is important to look for sublimation (poly-coated) mugs. Other mugs will not work. The Cricut Mug Press accommodates mugs in sizes from 11 oz – 16 oz without any manual adjustment.
Q: Do I have to only use Cricut mugs?
You will need to use straight-walled, sublimation compatible drinkware. Cricut has tested their mugs and verified that they work the best, but you can use other brands. I’ve had great success with these sublimation blank mugs.
Q: Do I need to use a white mug?
For the best, most vibrant, results we suggest that you use a white mug for your Infusible Ink project, as the ink is transparent.
Q: Are Infusible Ink marker mugs made in the Cricut Mug Press safe for use in the microwave and dishwasher?
Yes, they are totally safe in the dishwasher and microwave immediately after they’re cooled enough for you to handle — there is no cure time!
Q: Where can I use the Cricut Mug Press?
You can use it anywhere you have good ventilation, so near an open window or with a fan going. Put your Cricut Mug Press on a heat resistant surface, such as an EasyPress pad, to avoid damaging anything underneath.
Q: How do I center my Infusible Ink marker design on my mug?
The trick I use is to keep the handle facing me and then wrap the design starting from the opposite side of the handle, keeping the wrap straight. If it doesn’t start to stick evenly, you can take it off and try again. Or just trim your design close to the edge and manually position it exactly where you want it to go on your mug!
Q: How long do I need to let my Infusible Ink marker mugs cool?
You need to wait the same amount of time as for other mug press designs — allow 15-30 minutes to let the mug cool down after coming out of the Cricut Mug Press before touching and removing the liner. The handle will stay cool to the touch, but the cup itself will be hot, so don’t touch.
Q: How close to the handle can my Infusible Ink marker mugs design be?
Your design can wrap to ½ inch from the handle. If your design is closer than ½ inch to the handle, the design cannot be heated thoroughly enough to transfer properly and you’ll see fading or discoloration. All of my free mug designs are set up so that they are not within that safety zone of the handle.
Q: Can I use any kind of tape to hold down my Infusible Ink marker mug design?
No, you have to use only heat-resistant tape. If you use regular tape, it will melt adhesive onto your design and mug press, so don’t do that.
Q: How long does this mug pressing process take with the Cricut Mug Press?
It depends on the temperature of your room and your mug, but it should take somewhere around 5-6 minutes or so. Your Cricut Mug Press will automatically determine the press time for you, so you don’t have to worry about timing anything.
Q: Why do I have blue dots or odd colors on my DIY personalized mug?
The blue dots are dust! It is very important to get the mug absolutely free of dust, which you do by using a lint roller on the mug right before you press it. You’ll also want to make sure that when you weed the Infusible Ink sheet that no little stray dots of ink accidentally fall onto the sections that should be clear. So always check both your liner and your mug before you press the design.
Get my free SVG files to make these dotted designs!
I can’t wait to see your DIY personalized mugs and your amazing artwork. Please share photos of your finished mugs in our Facebook group or tag me on social media with #jennifermaker.
Love,

Want to remember this? Save this DIY Personalized Mug Tutorial to your favorite Pinterest Board!


Jennifer, this is a fantastic idea! I am thinking of all kinds of cool things to do with this. I would like to make a “Love” mug. I think it would be neat to take a card where my dad wrote “I love you, Dad” and put that on the mug. I would also take cards from my mom, grandma, aunt, husband, etc where they wrote I love you and put that on the mug as well. I also have a paw print of my cat who passed and I think it would be cool to make a mug with that as well. So many ideas are going through my mind! Love it! Thanks for sharing with us!
My dad passed in December and I had him write his favorite saying in my birthday card. I am definitely going to make a mug to preserve this precious memory. Thank you for the tutorial! You do awesome job!
That is a wonderful project idea, Tracey! I am so sorry you lost your father!