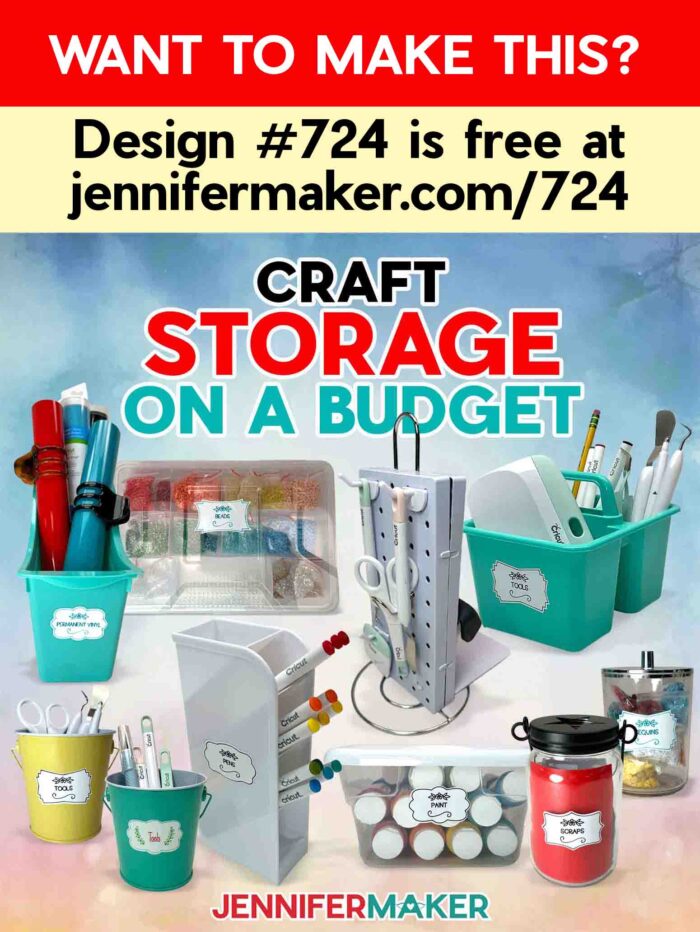
Learn how to save money organizing your tools and supplies with my best craft storage ideas on a budget!
Do your craft supplies play weird tricks on you, too? They can look so organized one day, and somehow take over my entire creative space the next. One minute I’m cutting vinyl, the next I’m hunting for a tool I literally just set down, and wondering why my paints are spread across the table like they’re staging a rebellion. Fancy organizing systems can help, but they’re often expensive, and you can save stress (and money) by working with the budget you’ve got. Over the years, I’ve discovered tons of craft storage ideas on a budget. Many of them came straight from Dollar Tree and Amazon, and I’ll share how to upgrade your craft area organization, without asking your wallet for permission!
Watch the full step-by-step tutorial on how to find and use craft storage ideas on a budget:

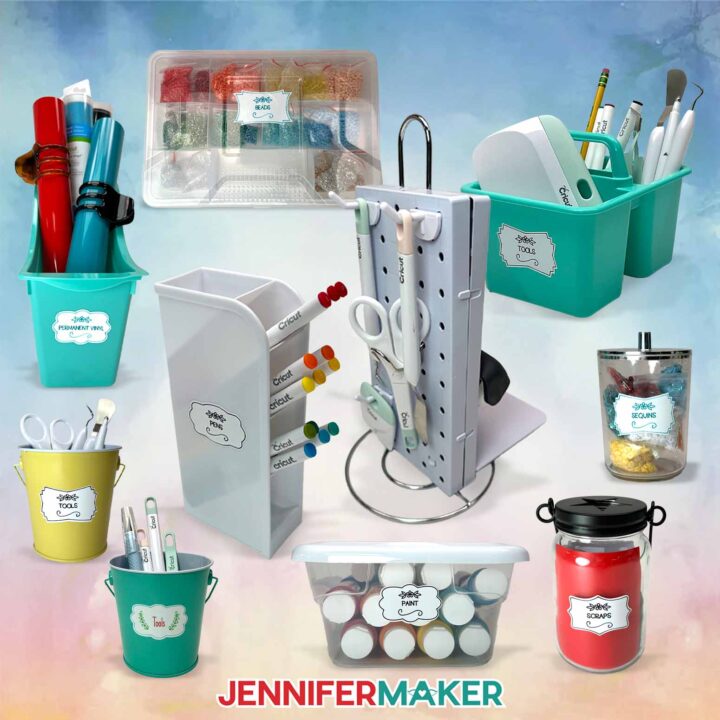
At this point in my crafting journey, I’ve accumulated a lot (and that’s putting it lightly) of stuff. Folks ask me all the time how I organize and store all my materials, tools, and creative supplies. So I’m sharing ten awesome Dollar Tree and Amazon products I used to create storage solutions that actually make sense in a small space. Plus, I’ll share the easy way I label everything so I can find what I need, fast… and I’m sharing the free labels with you, too! Because let’s be honest: finding a bin is only half the battle. If you can’t tell what’s inside at a glance, you’re still going to be wasting energy and time digging around when you could be creating.
New to label-making and want some extra support? Or, are you a labeling pro and just need a quick refresher? I’ve got a cheat sheet to help you customize the labels, reserved just for members of my ADVANCE with JenniferMaker program. Click here to learn more about the ADVANCE program!
So, before I even walk into the dollar store, my first step is having a game plan. It’s so easy to get distracted and overwhelmed in those aisles, so I go in thinking about my main goal: what problem am I trying to solve in my work space?

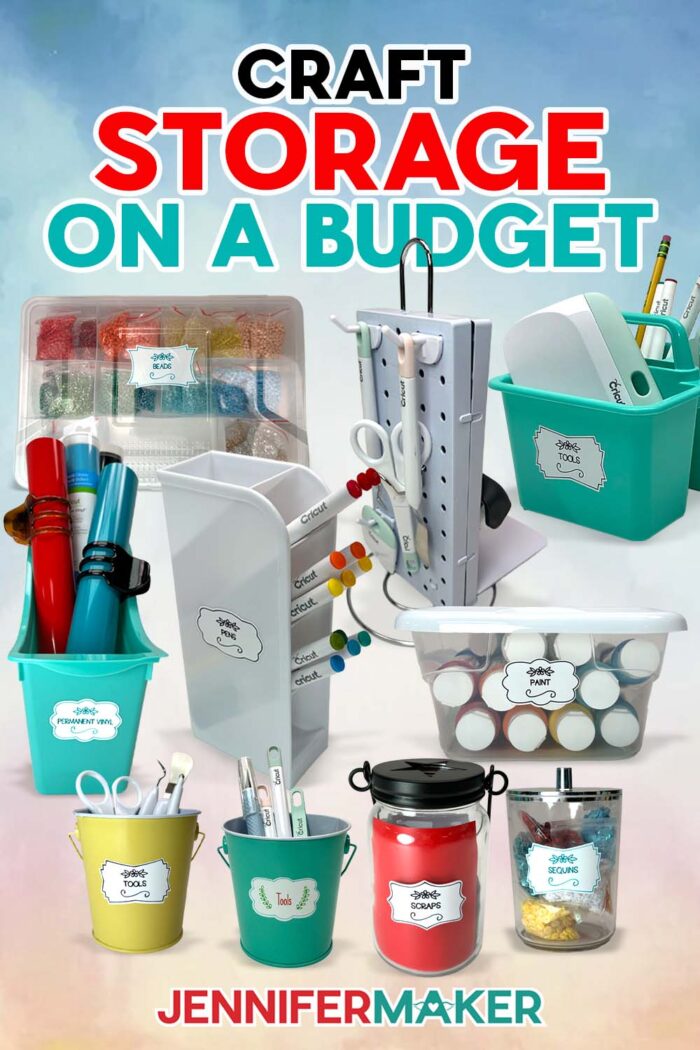
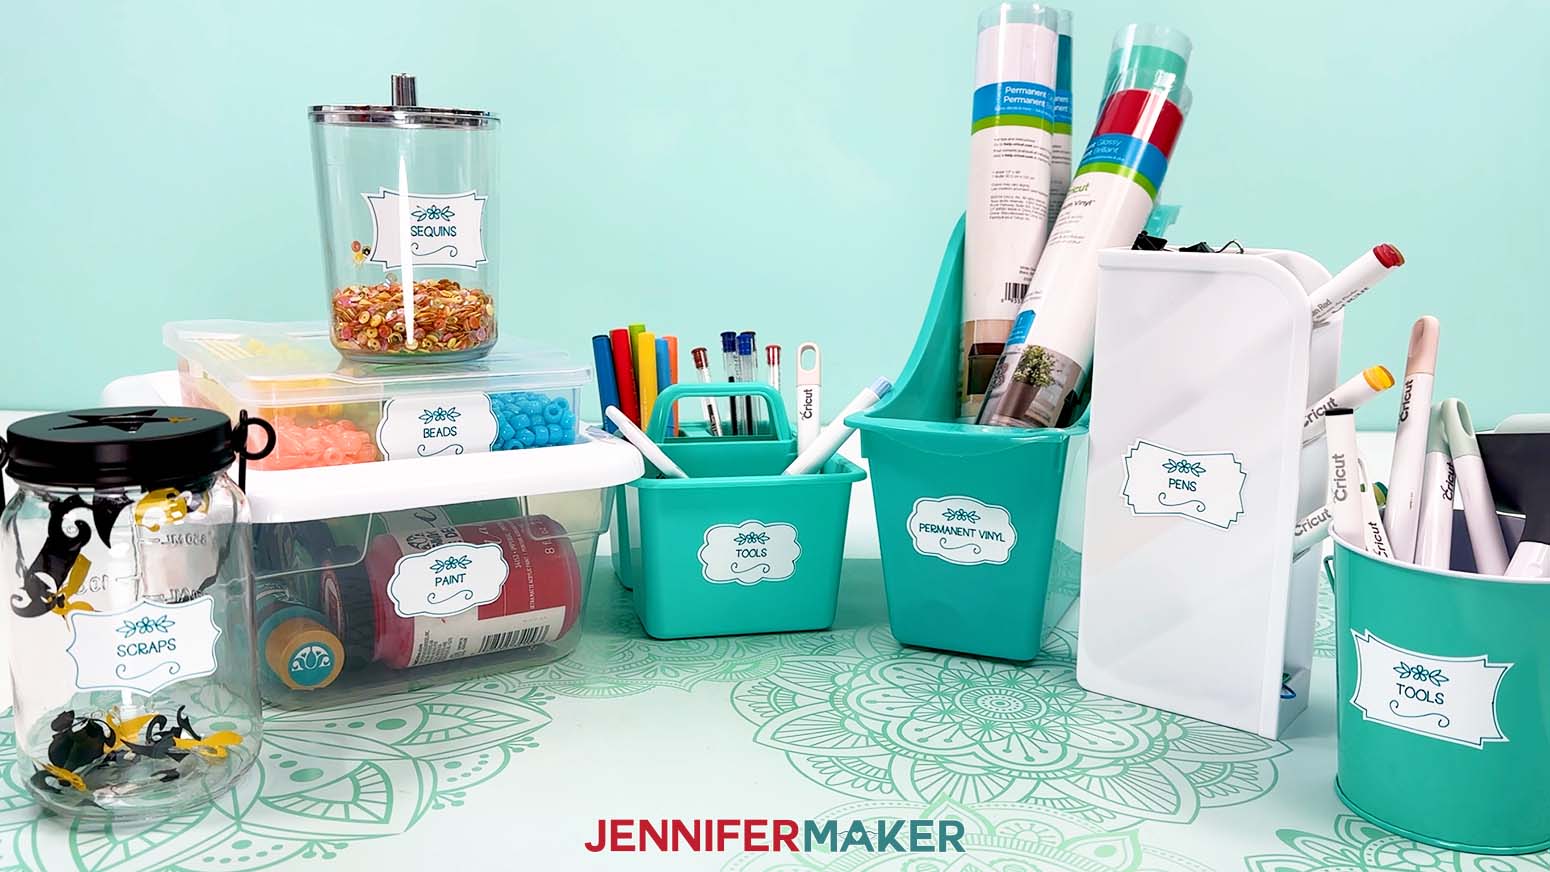
For me, vinyl rolls are one of the biggest headaches. They take up a ton of storage space, roll everywhere, and I can’t always tell which ones I’ve opened if they’re bundled together. I also have lots of small paint bottles and jars that take up too much horizontal room, so I want storage bins I can stack. Then there are tools and writing instruments. I want them in easy reach when I’m moving around my work area, but I also want a clean space when I’m done. And of course, tiny craft items like beads and sequins need compartments, or those little things turn into a mess SO fast.
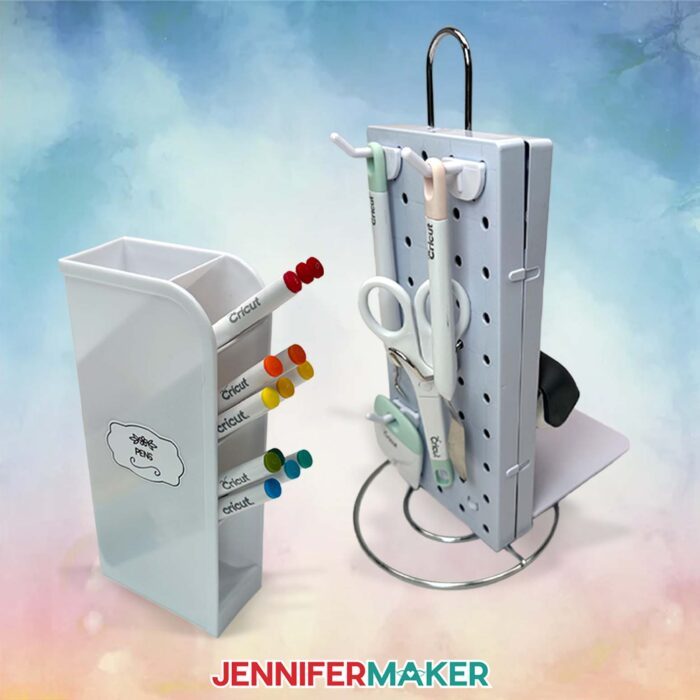
Having that plan is what helped me find great ideas all over the store. In the art supplies area, I grabbed a tiered pen holder that lets me separate pens and markers by type, and I love that the tiered setup keeps favorites in easy access.
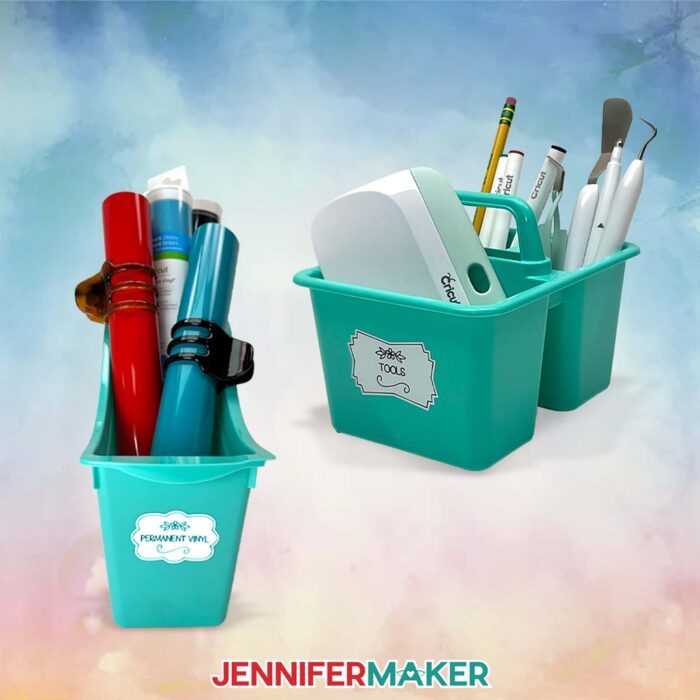
I also found adorable craft caddies that work as a grab-and-go craft organizers for scissors, tape, craft knives, and other Cricut supplies. For my paints, I found clear storage containers with lids that I can stack, which is the best way I’ve found to stop paint bottles from eating up my whole work space.
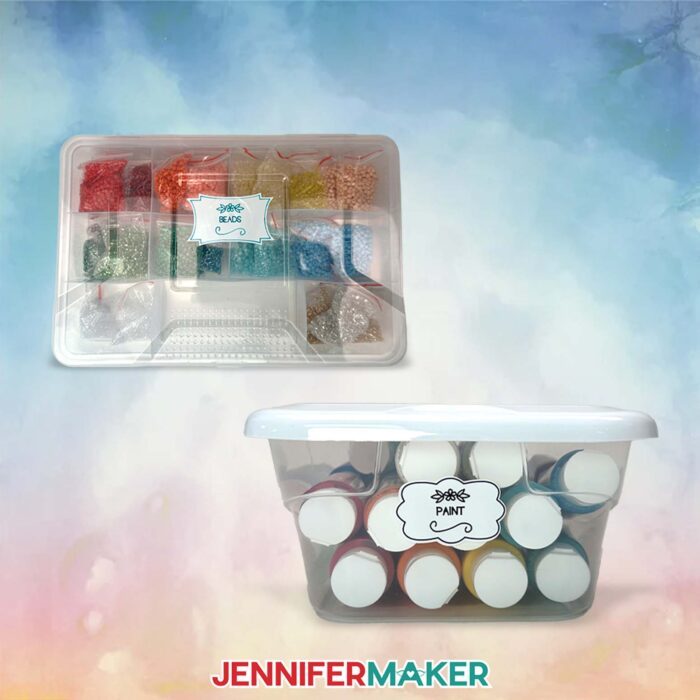
When I can’t find what I need in the obvious craft stores-style aisles, I check other sections, because repurposing is where the magic happens. Near the tools, I found a hardware storage case that was clearly meant for nails and screws, but it’s a perfect way to sort beads. It has nine compartments with different sizes, which makes it a great option for small items when you want to separate by volume.
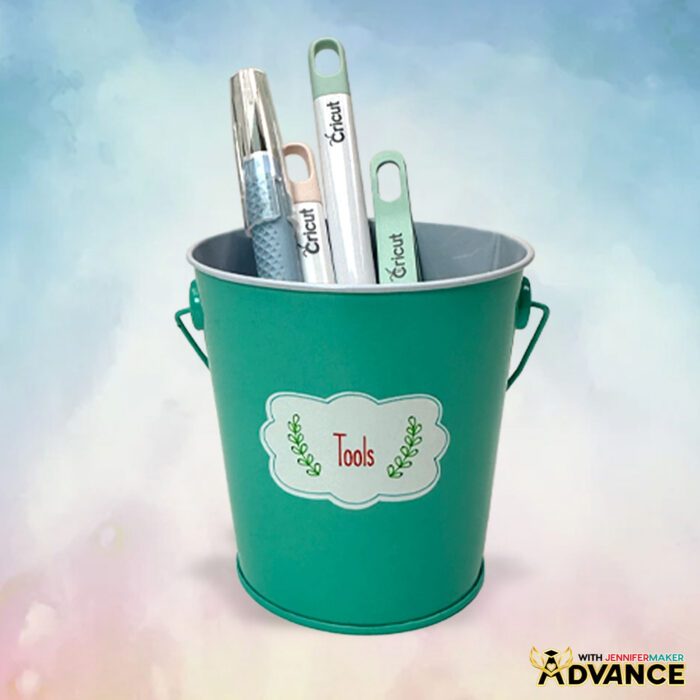
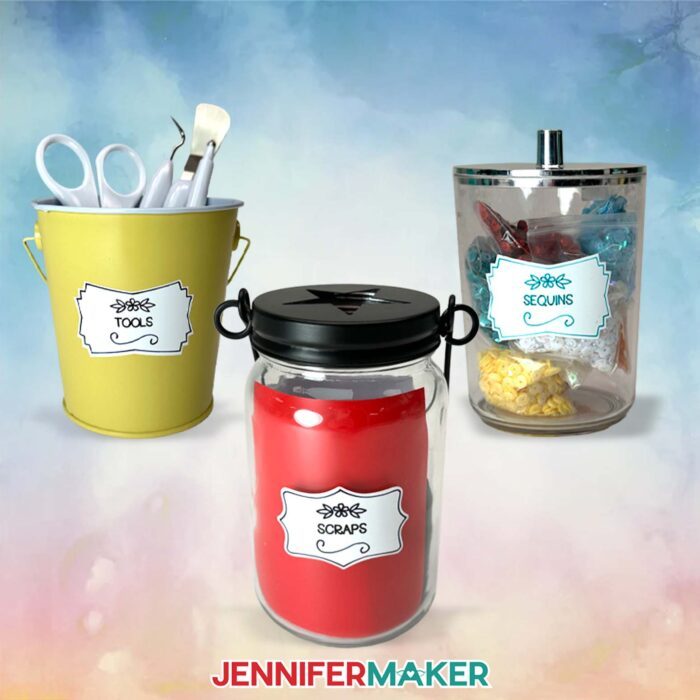
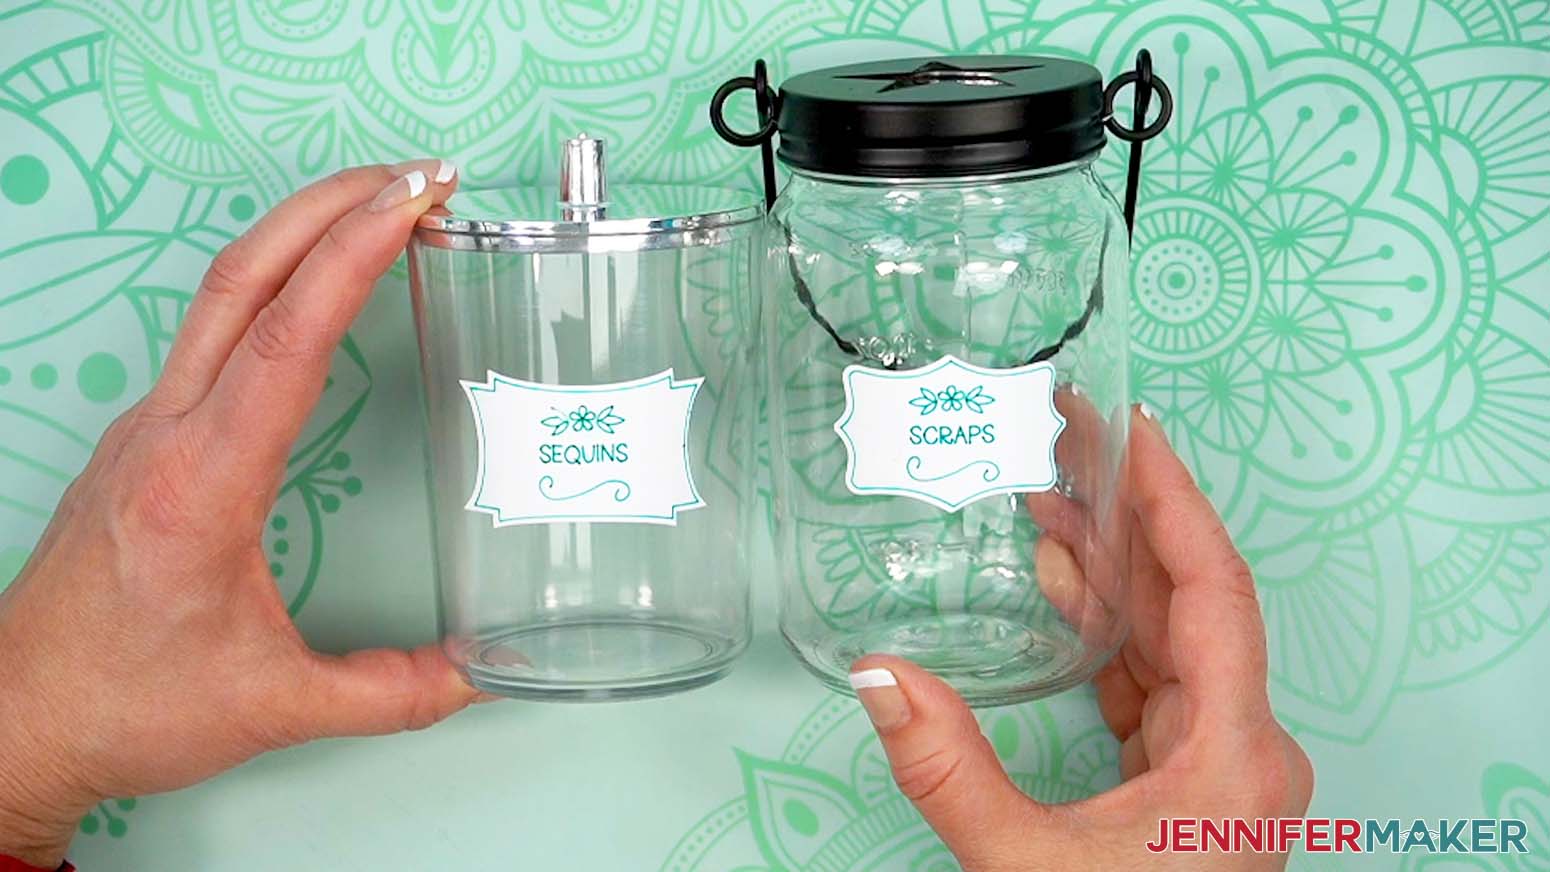
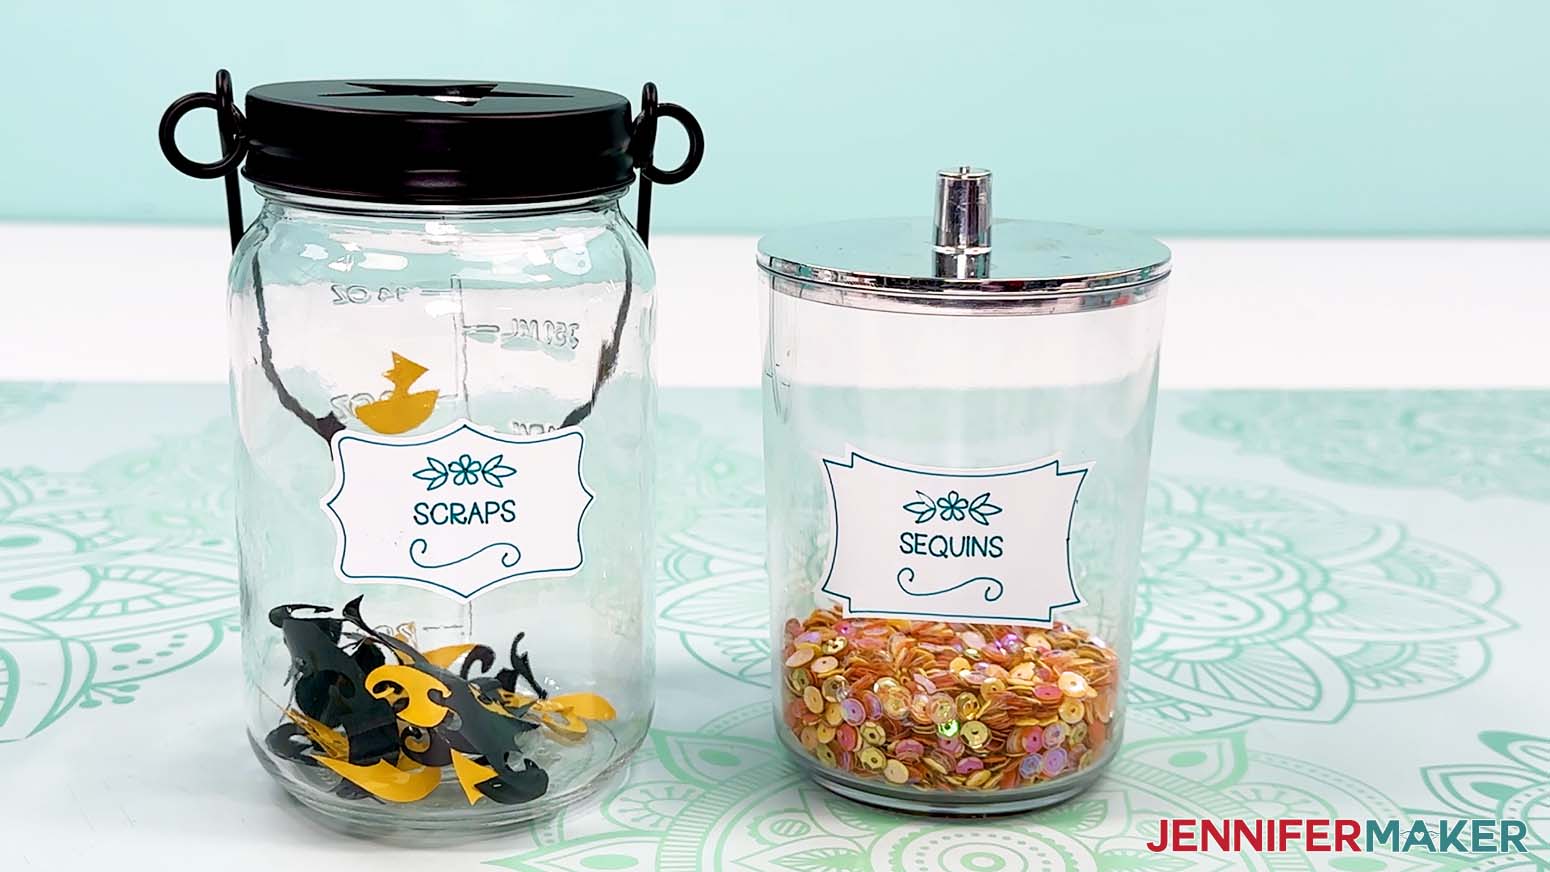
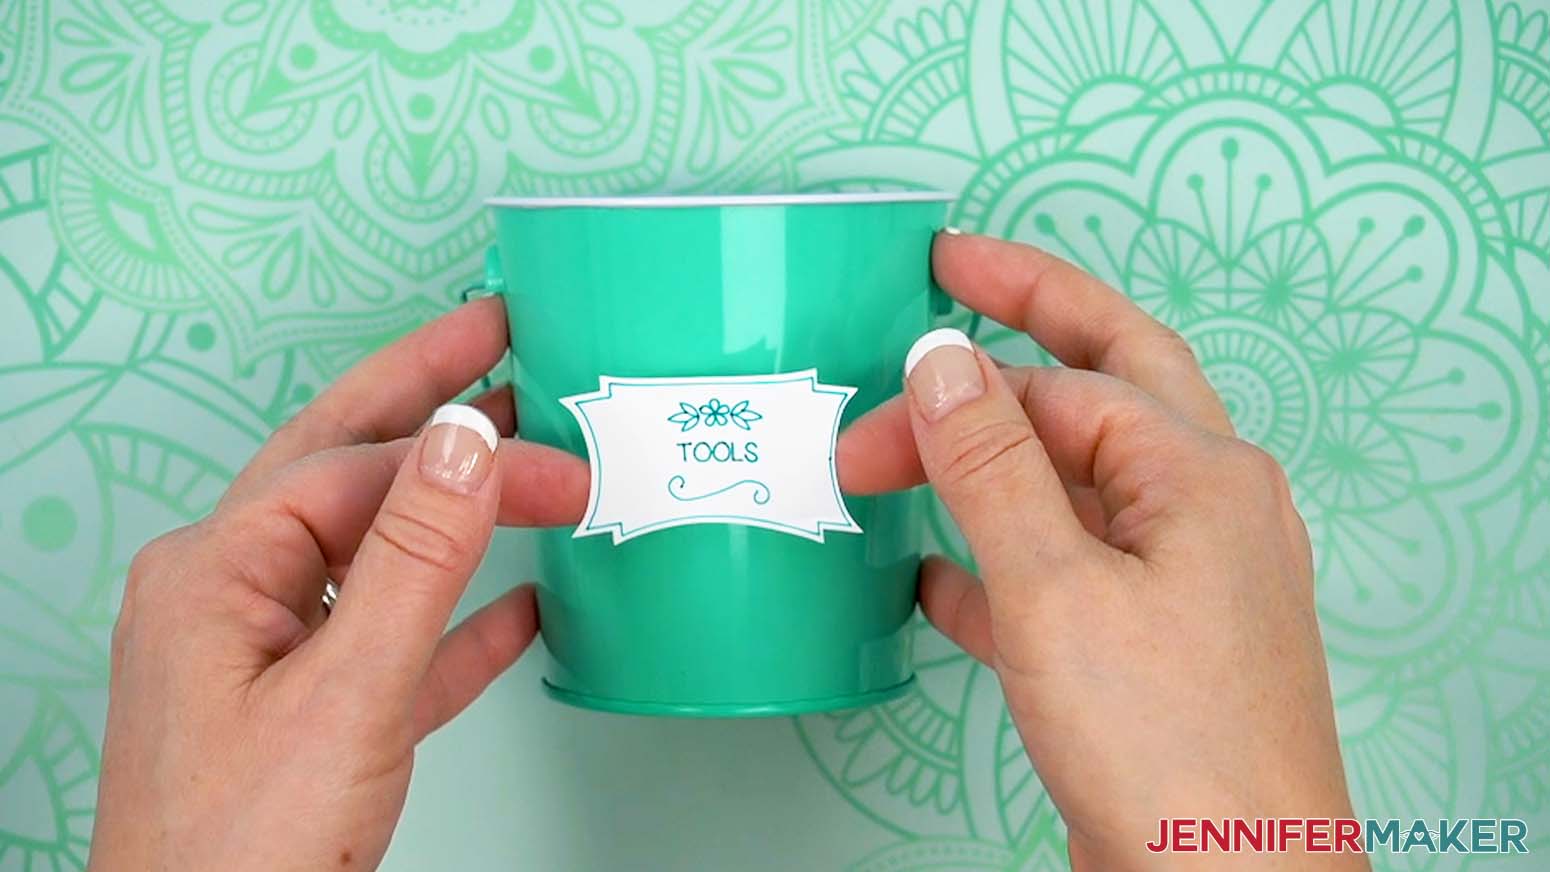
In party supplies, I picked up colored tin pails that keep my most-used tools in easy reach, and in kitchen and dining I found a glass canning jar that’s ideal for scraps. I can also pair it with a hanging jar lid with a star opening to catch bits of excess vinyl by scraping my weeding tool along the edges so they drop right in.
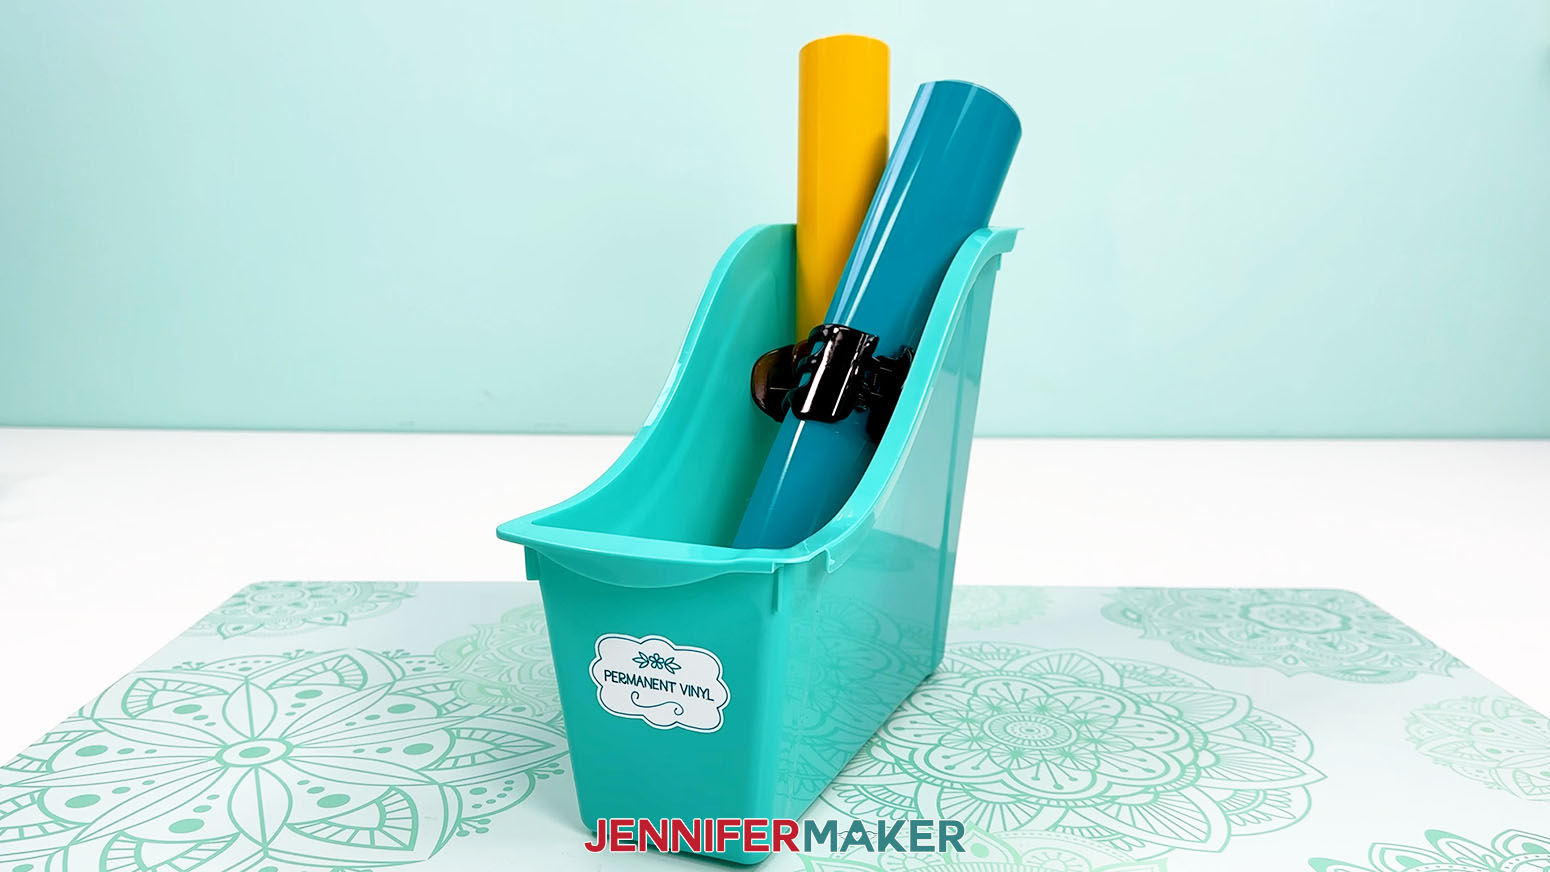
In the office supplies section, I found colorful book bins meant for magazines, but they’re honestly a great way to store vinyl rolls upright. The sides interlock, so if I need more storage options later, I can expand without redoing everything.
I also found a clear cotton ball jar with a lid in the bathroom section that is a perfect place for sequins. They stay neat and tidy, the jar is easy to grab, and the lid keeps everything from spilling.

And yes, I even grabbed claw hair clips from the beauty section! I clip them onto vinyl rolls so the rolls stay secured before I store them upright.
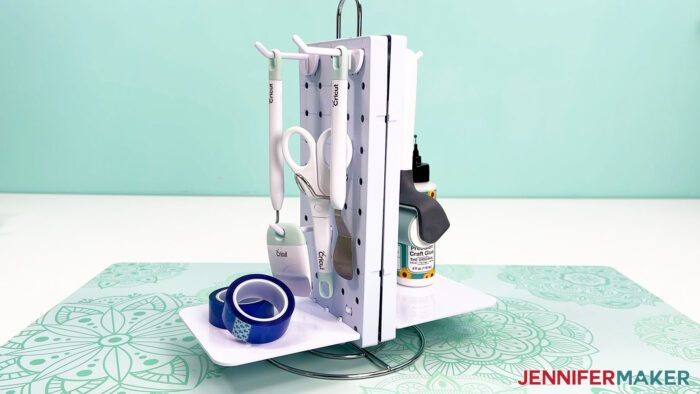
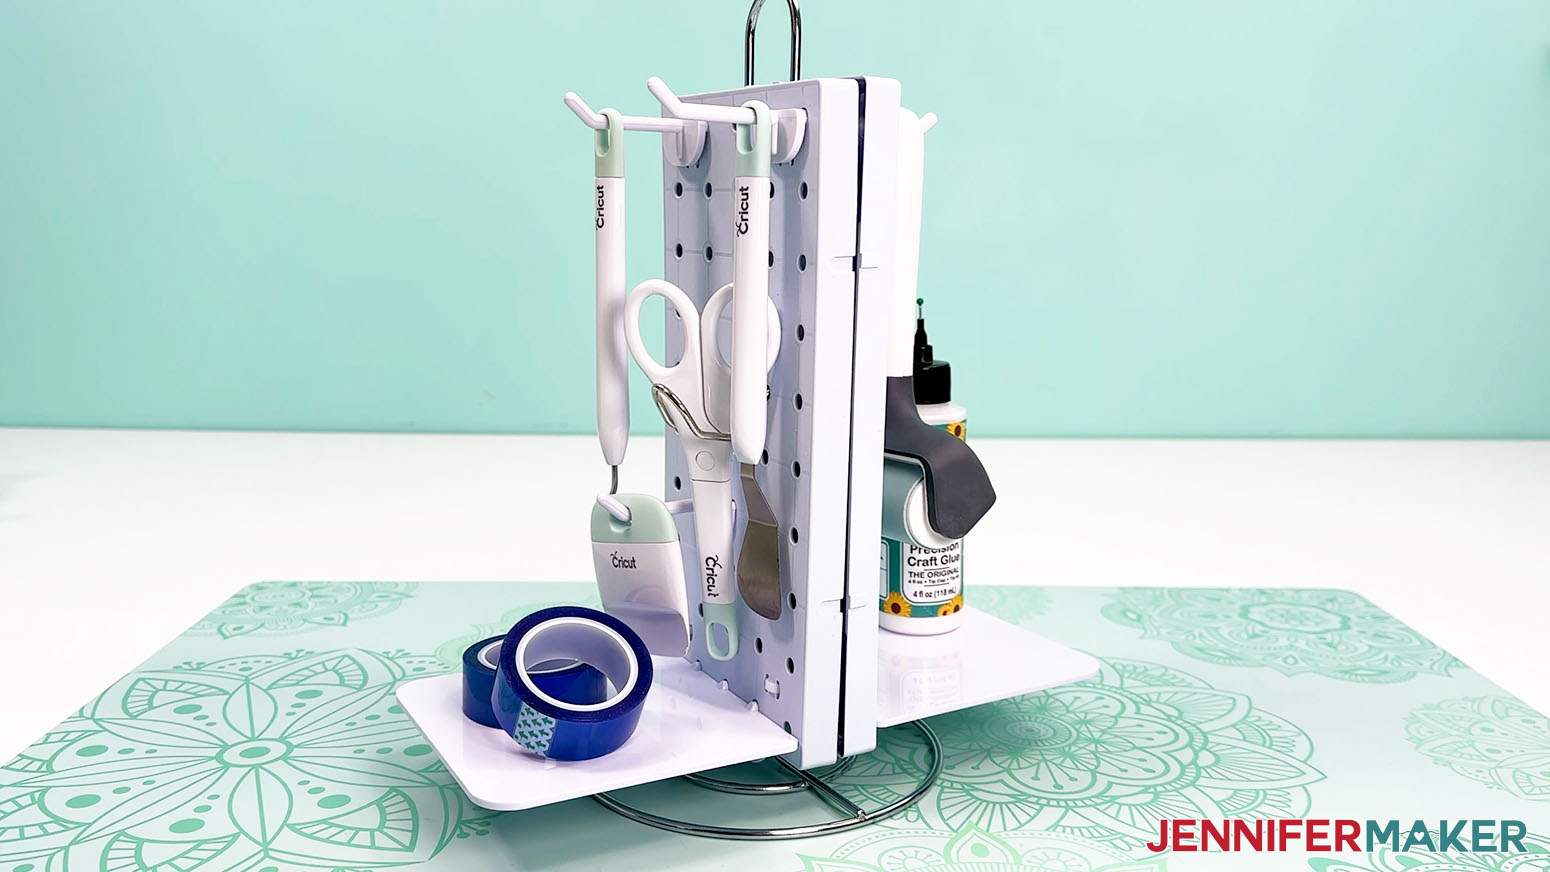
One of my favorite “combine a few things into something better” craft room ideas in this project is my peg board tool setup. I assembled it using two peg boards, a metal paper towel holder, and four zip ties. I place the pegboards back to back, loosely fasten zip ties through the corner slots, slide the paper towel holder between them, then tighten the ties and trim the excess. After that, I add hooks and shelves so my tools and scissors can hang neatly, and glue, tape, and other supplies can sit on the shelves. It’s a simple build, but it makes a functional craft room feel a lot more possible, especially when you’re working with limited space.
Once my storage solutions were ready, I moved on to labels… because labels are the easiest way to keep an organized craft space from sliding back into chaos.

I used my Cricut, and I cut the labels from Smart Label Writable Vinyl. This material is designed to go straight into a cutting machine without a mat on compatible models, but I also show in the video how to use smart vinyl on a mat if your machine doesn’t support Smart Materials. Just trim the vinyl with a paper trimmer or scissors so it covers the design area. After the drawing and cutting, I pull away the extra background vinyl with a weeding tool and keep the labels on the carrier sheet until I’m ready to apply them.
To customize your labels, use a set of of compatible Cricut fine point pens. I’ll show you how to prepare everything in Cricut Design Space so they’re ready to cut (and write!) with your Cricut.

Applying them to the items is simple, but do NOT skip the prep. Remove any packaging or stickers, clean the surface with isopropyl alcohol and a lint-free cloth, then peel and stick each label where it makes the most sense (front, side, or top) so everything is easy access and easy reach when you’re actually crafting. By the end, you’ll have storage bins and containers that look cohesive and make it so much easier to keep your craft supplies under control.
If you want craft room storage ideas that feel doable on a tight budget, watch the video tutorial to get inspired! My craft storage ideas on a budget are a great way to turn a messy craft area into a space that supports your creativity!
Do you want to learn how to find and use craft storage ideas on a budget? Let me show you how fun and easy it is with my tutorial and label designs! This post contains some affiliate links for your convenience (which means if you make a purchase after clicking a link I will earn a small commission but it won’t cost you a penny more)! Read my full disclosure policy.
Materials to Make Craft Storage Labels
View my Amazon shopping list with some of the items I used and alternatives, or below for Dollar Tree examples, too.
- Cricut Smart Label Writable Vinyl -OR-
- Cricut Joy Writable Permanent Vinyl
- Mason Jar -AND-
- Star Hanging Lid -OR-
- Plastic Cotton Ball Jar (Amazon alternative) -OR-
- Hardware Storage Case -OR-
- One (1) or More Pen Holders (Amazon alternative) -OR-
- Craft Caddy -OR-
- Interlocking Book Bins (Amazon alternative) -OR-
- One (1) or More Rectangle Storage Container with Lid (Amazon alternative) -OR-
- Tin Pail with Handle -OR-
- Claw Hair Clips -OR-
- Two (2) Pegboards (Amazon Alternative) -AND-
- One (1) Paper Towel Stand (Amazon alternative) -AND-
- Four (4) Zip Ties (Amazon alternative) -AND-
- Pegboard Hooks -AND-
- Loop Hooks (Amazon alternative) -AND-
- Two (2) Pegboard Shelves (optional)
- A way to cut your vinyl – I’m using the Cricut Maker 3, but you can also use a Cricut Maker series machine, a Cricut Explore Series machine, the Cricut Venture, the Cricut Joy Xtra, or the Cricut Joy
- Cricut Green StandardGrip Machine Mat 12″ x 12”
- Scissors
- Brayer
- Weeding Tool
- Cricut Dual-Sided Markers (Marker Tip & Fine Point Pen Tip) -OR-
- Joy-sized Cricut Dual-Sided Markers (Marker Tip & Fine Point Pen Tip)
- Isopropyl Alcohol -AND-
- Lint-Free Cloth
- Painter’s Tape
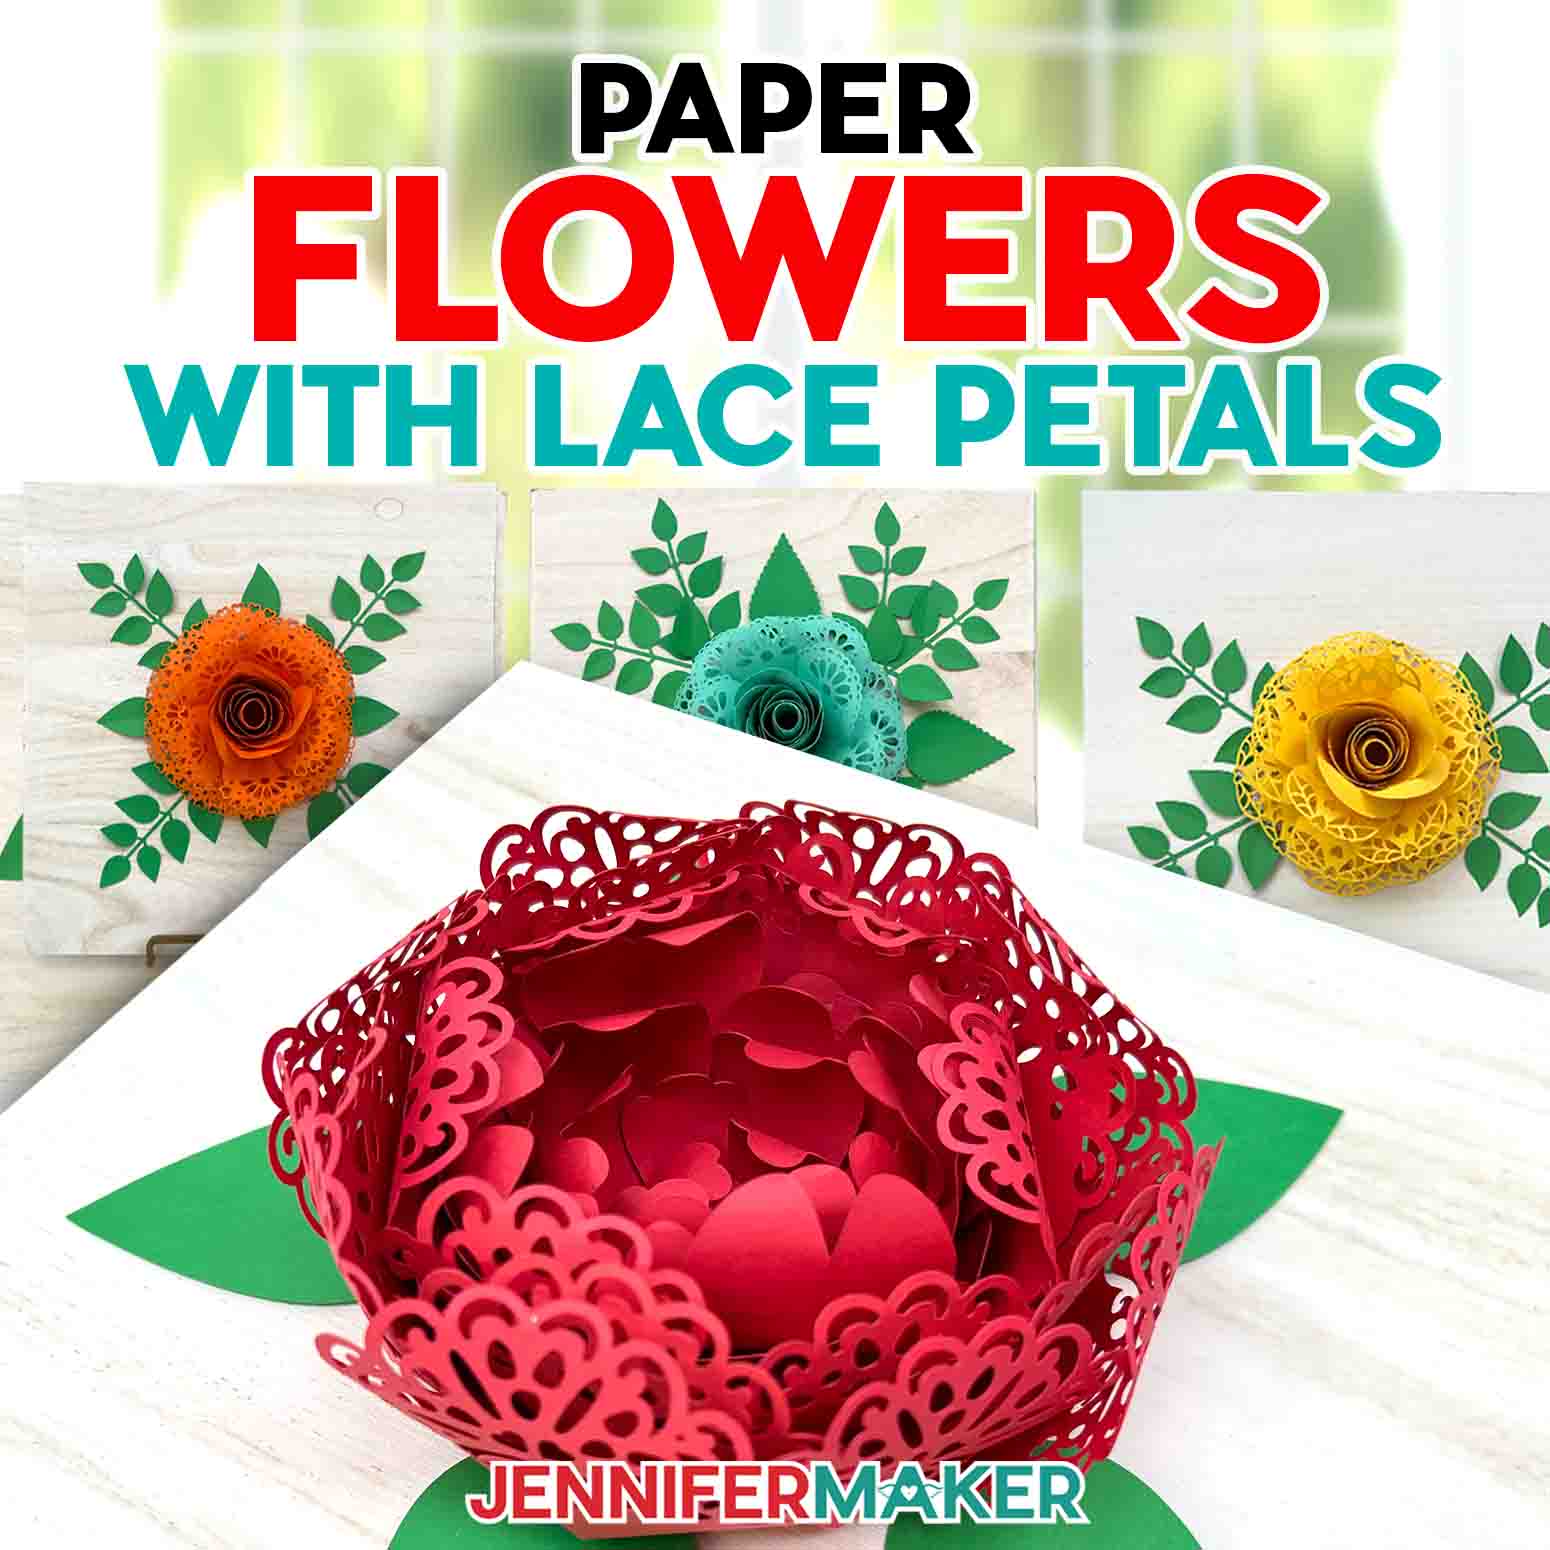
- Design #724 (My free SVG/DXF/PDF design files are available in my free library – get the password by filling out the form at the bottom of this page)
How to Make Craft Storage Labels & Use Craft Storage Solutions on a Budget
Craft Storage Ideas on a Budget
Find craft storage ideas on a budget and learn how to create labels using writable vinyl and pens!
Materials
- Cricut Smart Label Writable Permanent Vinyl -OR-
- Cricut Joy Label Writable Permanent Vinyl
- One (1) Mason Jar -AND-
- One (1) Star Hanging Lid -OR-
- One (1) Plastic Cotton Ball Jar -OR-
- One (1) Hardware Storage Case -OR-
- One (1) or More Pen Holders -OR-
- One (1) Craft Caddy -OR-
- One (1) Interlocking Book Bin -OR-
- One (1) or More Rectangle Storage Containers with Lids -OR-
- One (1) Tin Pail with Handle -OR-
- One (1) Claw Hair Clip -OR-
- Two (2) Pegboards -AND-
- One (1) Paper Towel Stand -AND-
- Four (4) Zip Ties -AND-
- Pegboard Hooks -AND-
- Loop Hooks (optional) -AND-
- Two (2) Pegboard Shelves (optional)
- Design #724 (My free SVG/PDF/DXF design files are available in my free resource library - get the password by filling out the form at the bottom of this page)
Tools
- A way to cut your vinyl - I’m using the Cricut Maker 3, but you can also use the Cricut Maker, a Cricut Explore Series machine, the Cricut Venture, the Cricut Joy Xtra, or even the Cricut Joy
- Cricut Green StandardGrip Machine Mat 12” x 12”
- Scissors
- Brayer (if loading Smart material onto a mat)
- Weeding Tool
- Cricut Fine-Point Pen Set -OR-
- Joy-Sized Cricut Fine-Point Pen Set
- Isopropyl Alcohol -AND-
- Lint-Free Cloth
- Painter's Tape
Instructions
STEP 1: GET MY FREE CRAFT STORAGE LABELS DESIGNS
First, download my craft storage labels files from my free library – look for Design #724. Alternatively, you can use the Save This Project form near the top of this post and the design link will be emailed to you.
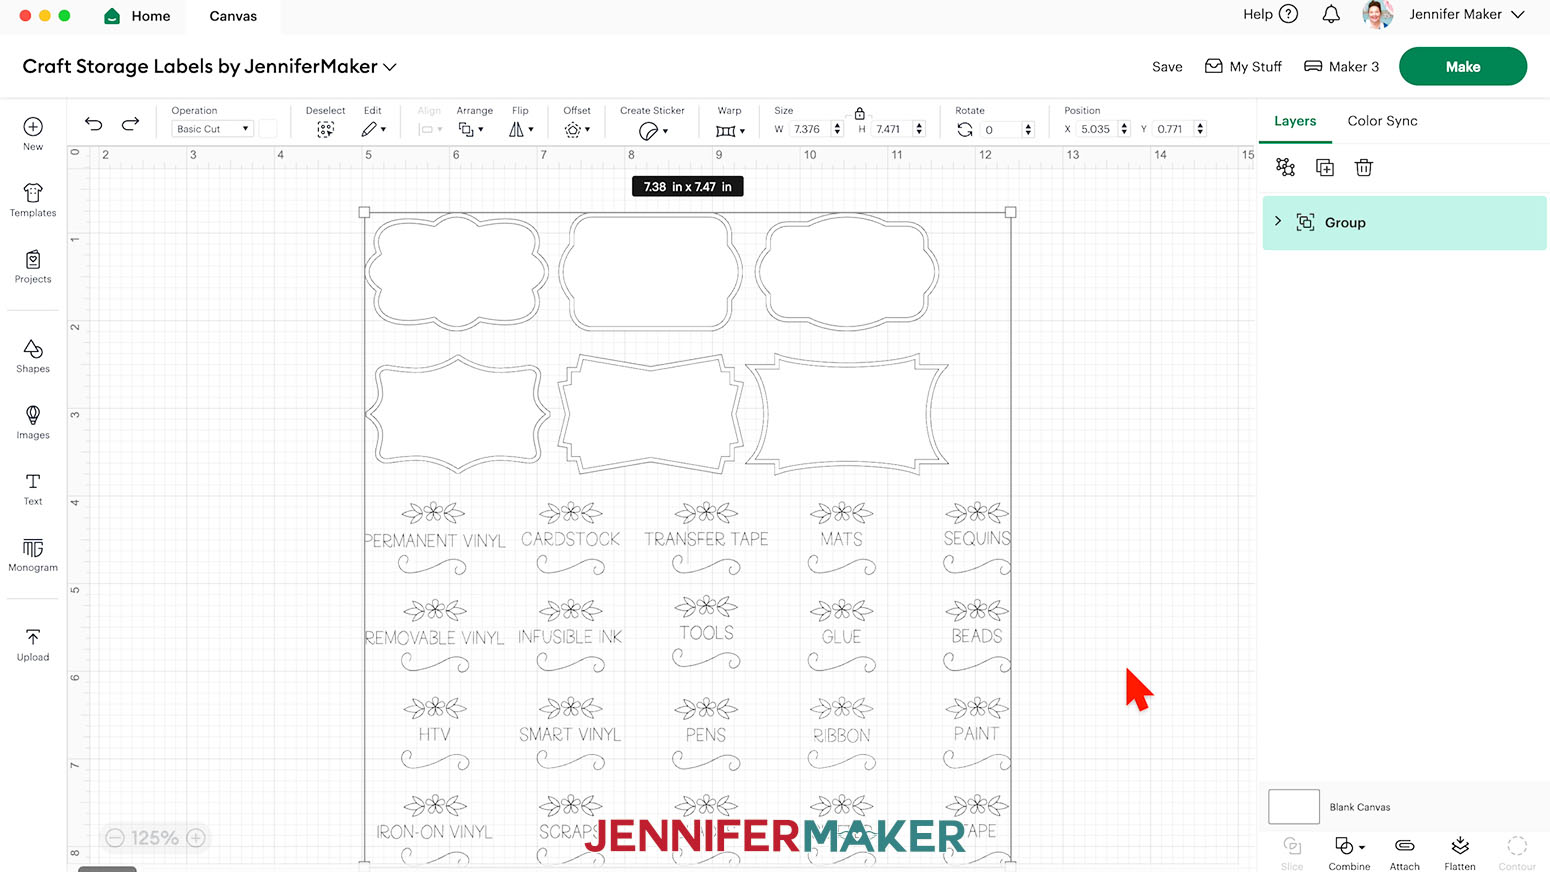
In the folder, you’ll find an SVG file of my design to cut on a cutting machine. There is also a DXF cut file, and a PDF version you can print and cut by hand.
Upload the SVG file to Design Space to get started.
TIP: If you’re not sure how to upload, go to jennifermaker.com/svgs to learn how to unzip and upload SVG files.
STEP 2: PREPARE AND CUT YOUR CRAFT STORAGE LABELS
CRICUT DESIGN SPACE
- In Cricut Design Space, open a blank Canvas.
NOTE: If you’re new to using Cricut Design Space, go to cricutkickoff.com for my introductory tutorial on Design Space basics. - Click “Upload” and then “Upload Image.”
- Click “Browse.”
- Select the SVG file.
- Click “Open,” and then “Continue.”
- Click “Upload” to add the design to your Canvas.
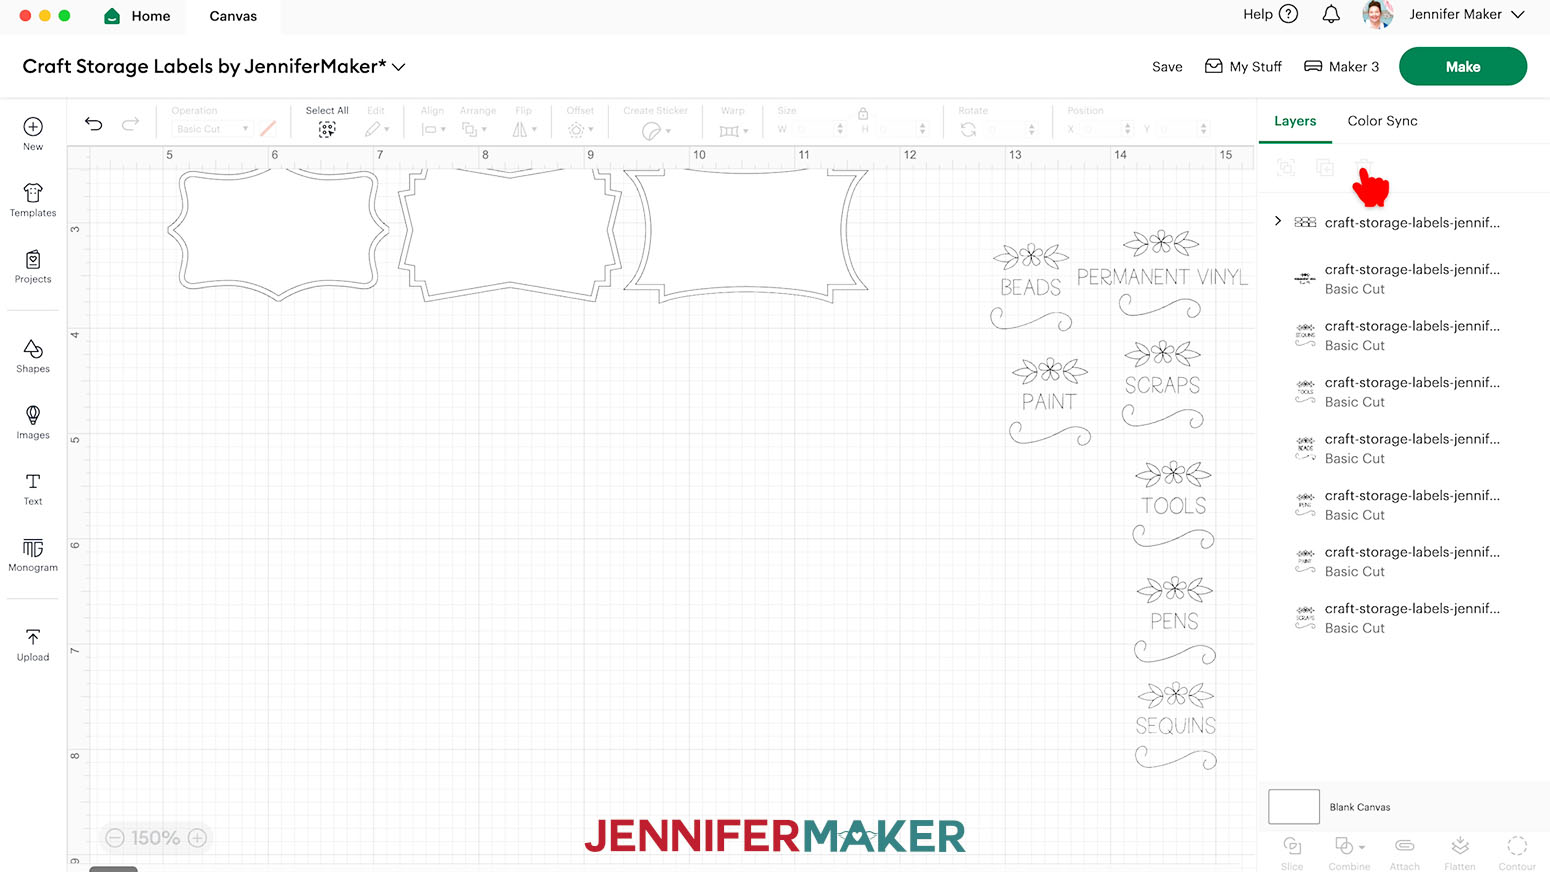
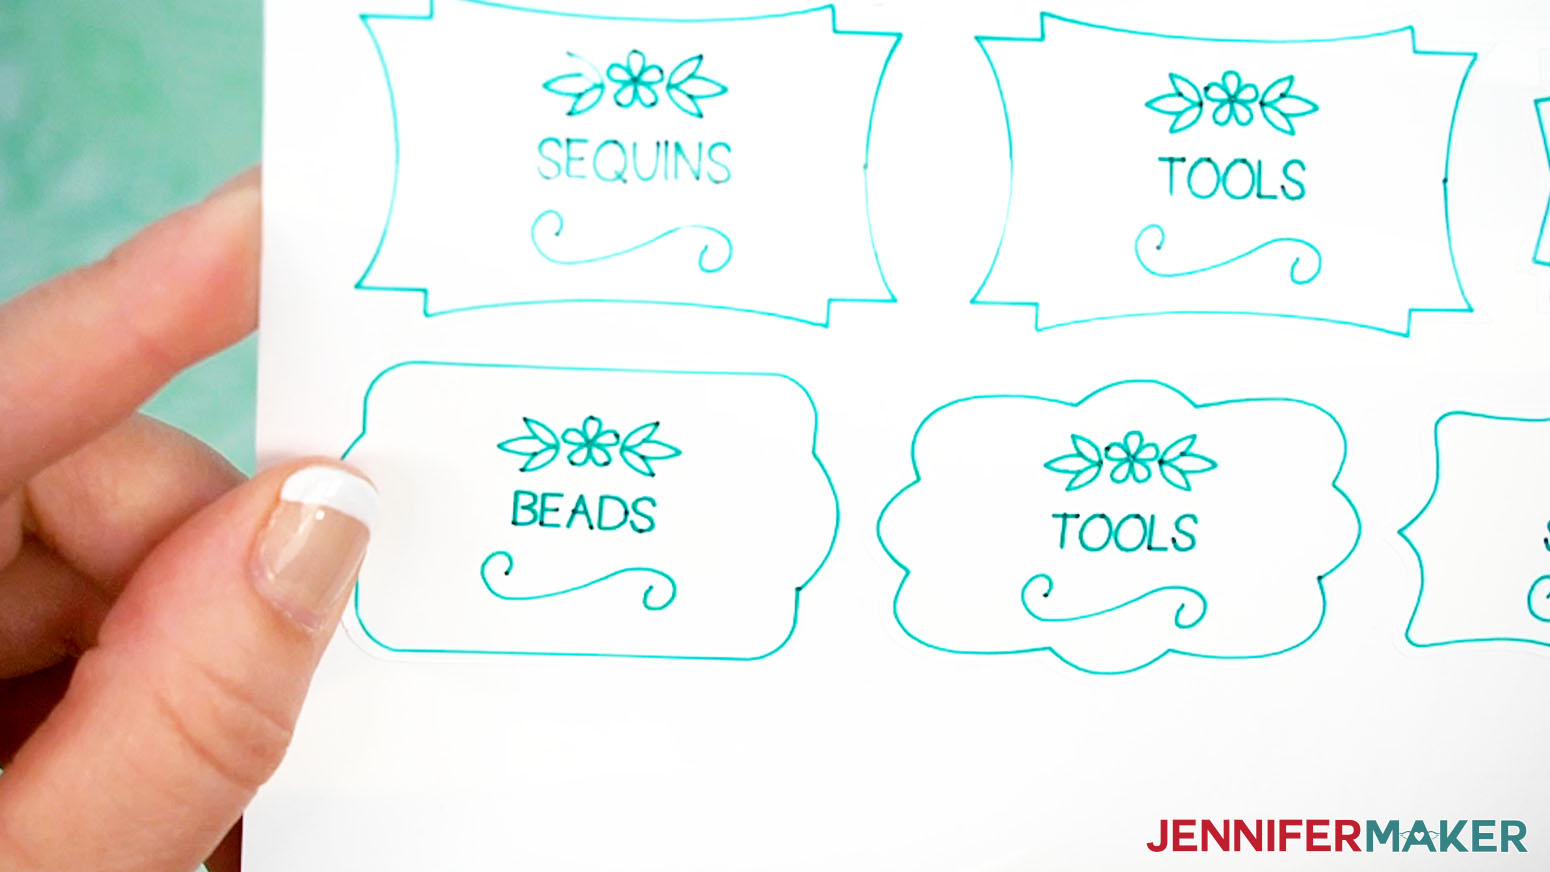
NOTE: This file contains six outer cut shapes, six inner cut shapes, and 20 text labels for your design.
- Click “Save” and give your project a name.
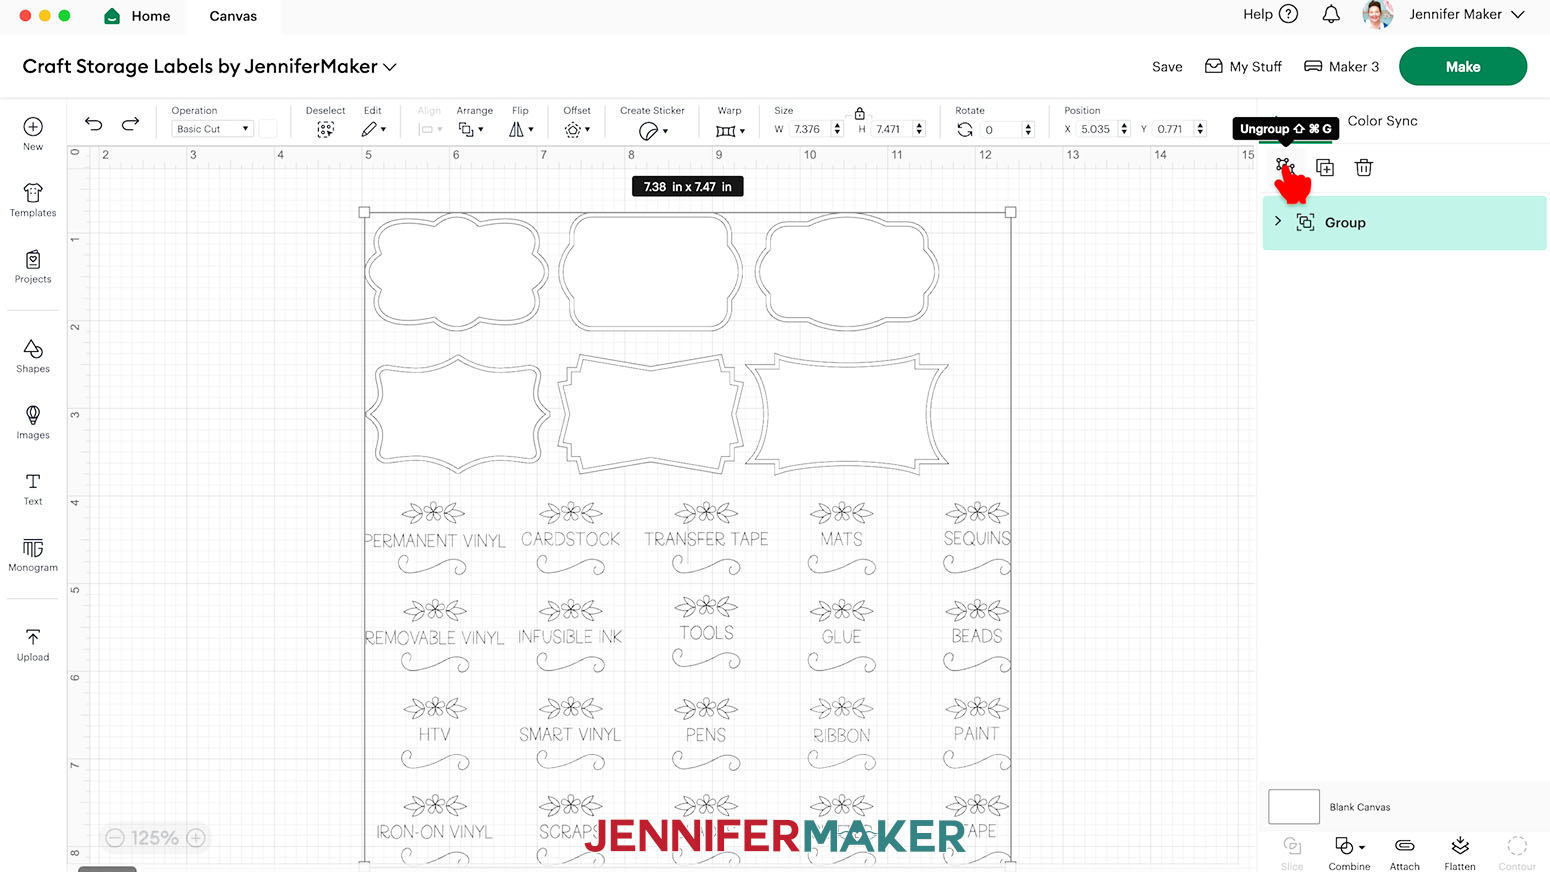
- Ungroup the design.
- In the Layers Panel, there are still two grouped layers indicated by a small arrow. Select the group that contains the text labels, then Ungroup it.
- Select any text you don’t plan to use and click the “Trash” icon to delete it.
NOTE: I’ll keep “Permanent Vinyl,” “Scraps,” “Tools,” “Pens,” “Sequins,” “Beads,” and “Paint.” - If you need to create a copy of any of the text labels, select the label and click the “Duplicate” icon.
NOTE: I’ll duplicate the “Tools” text label. - Drag a bounding box over your text labels to select all of them.
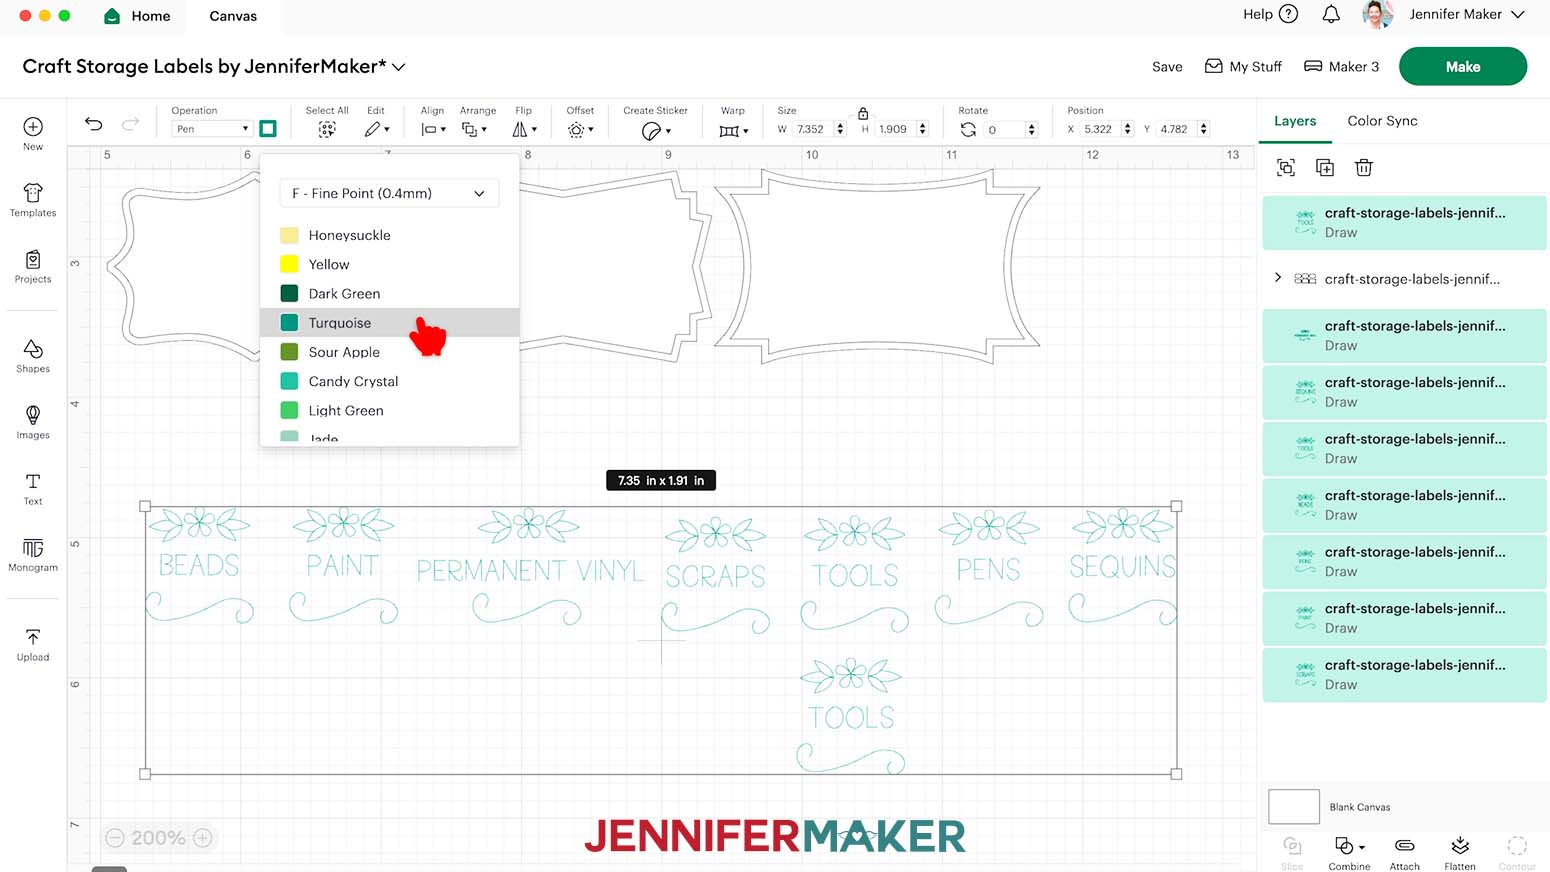
- Click on the “Operation” field and choose “Pen” from the dropdown menu so your machine knows to draw instead of cut this part of the design.
- With the labels still selected, click the Color Box next to the “Operation” menu and select the pen type and color you’d like to use.
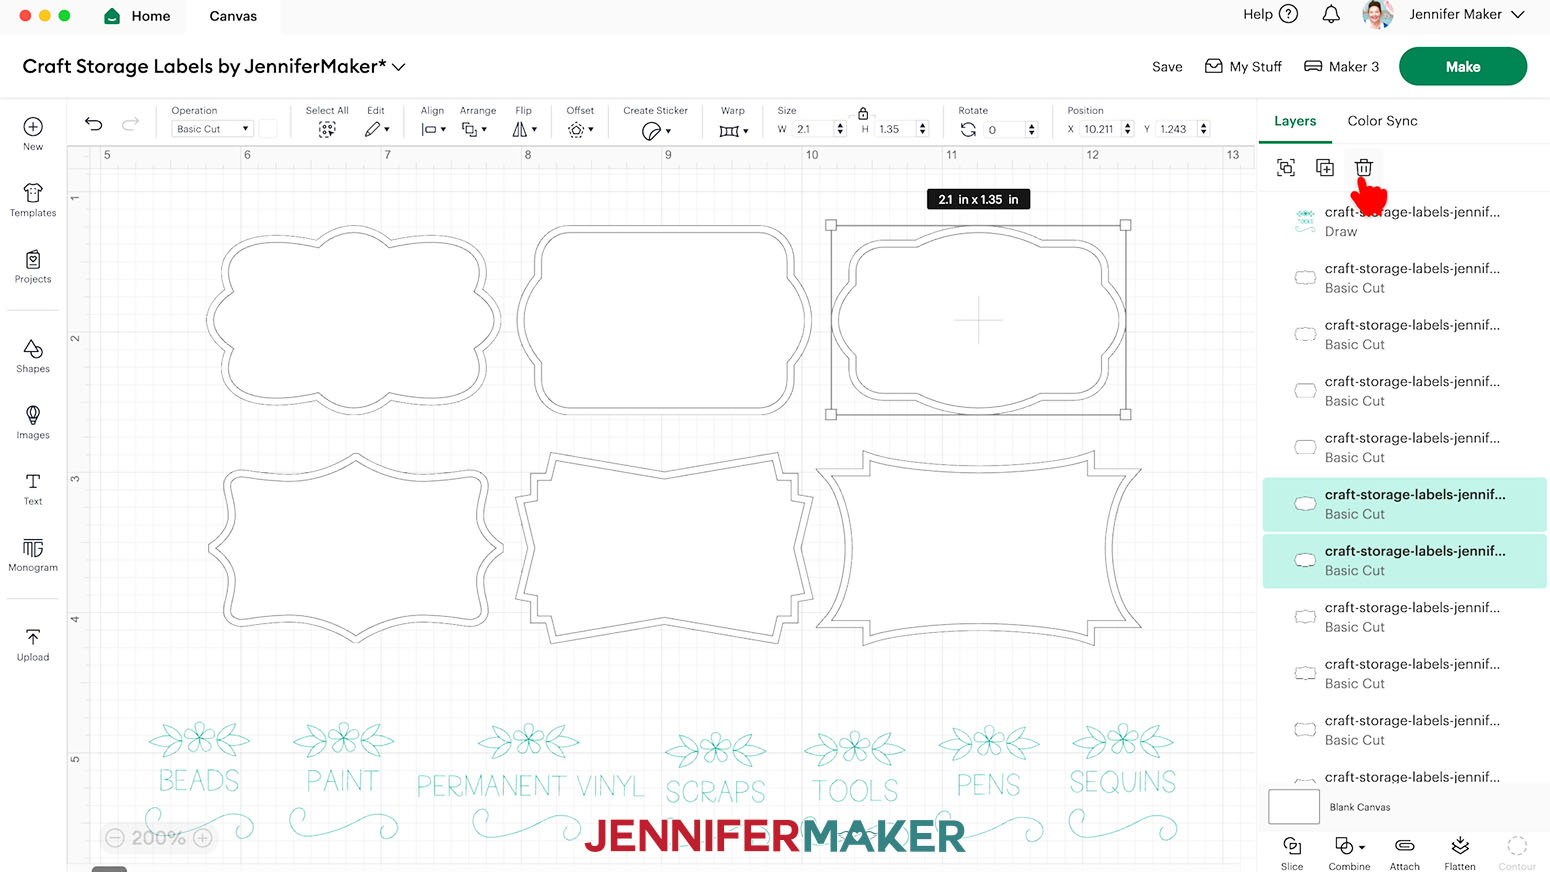
NOTE: I’ll select the Fine Point (0.4mm) pen in the color Turquoise for my text. - In the Layers Panel, Ungroup the layer with your label cut shapes.
- Decide if you want all of your labels to be the same shape, or if you want to use a variety of different shapes. Delete any shapes you don’t want to use.
NOTE: Don’t worry about duplicating any shapes just yet. - For each remaining shape, select the shape’s smaller inner layer, change it to a “Pen” Operation, then select your desired pen type and color.
TIP: If you click the label and the bounding box touches the outside of your shape, the larger shape is selected. Click closer to the middle to select the inner layer, or select the inner layer in the Layers Panel.
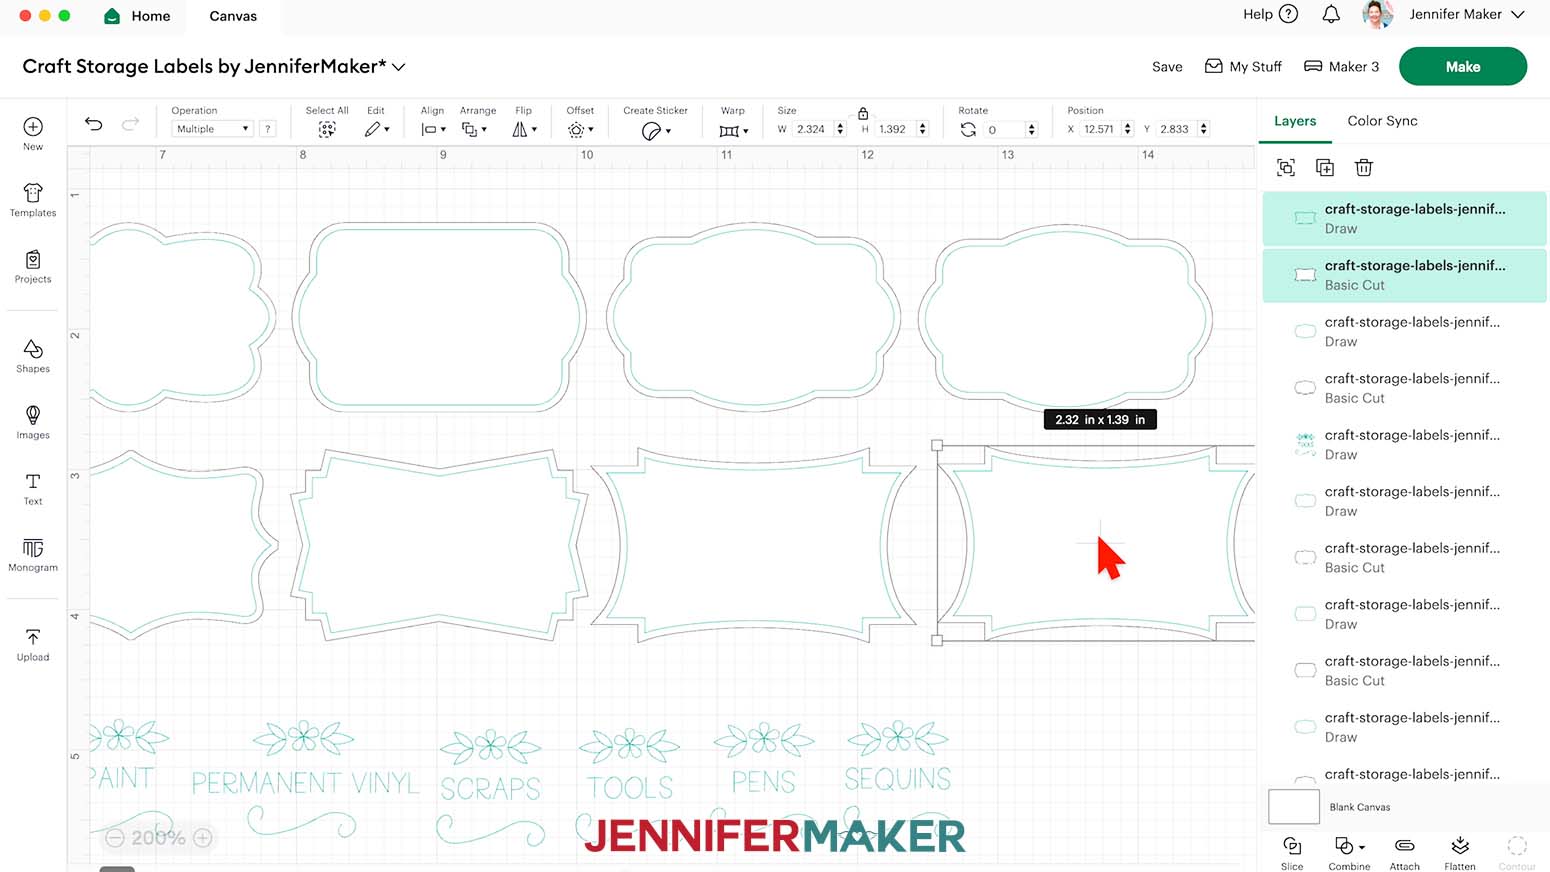
NOTE: I’ll continue to use my Fine Point Pen in Turquoise for the rest of my labels. - If you need to create a copy of one or more label shapes to match your number of text labels, make sure to select both of the shape’s layers, then click the “Duplicate” icon.
TIP: It’s easier to duplicate and move each label away from the original one at a time. - Drag a bounding box over all of the text layers, then click “Arrange” and “Bring to Front” so the text layers are on top of the shape layers.
- Drag a text label on top of the desired label shape.
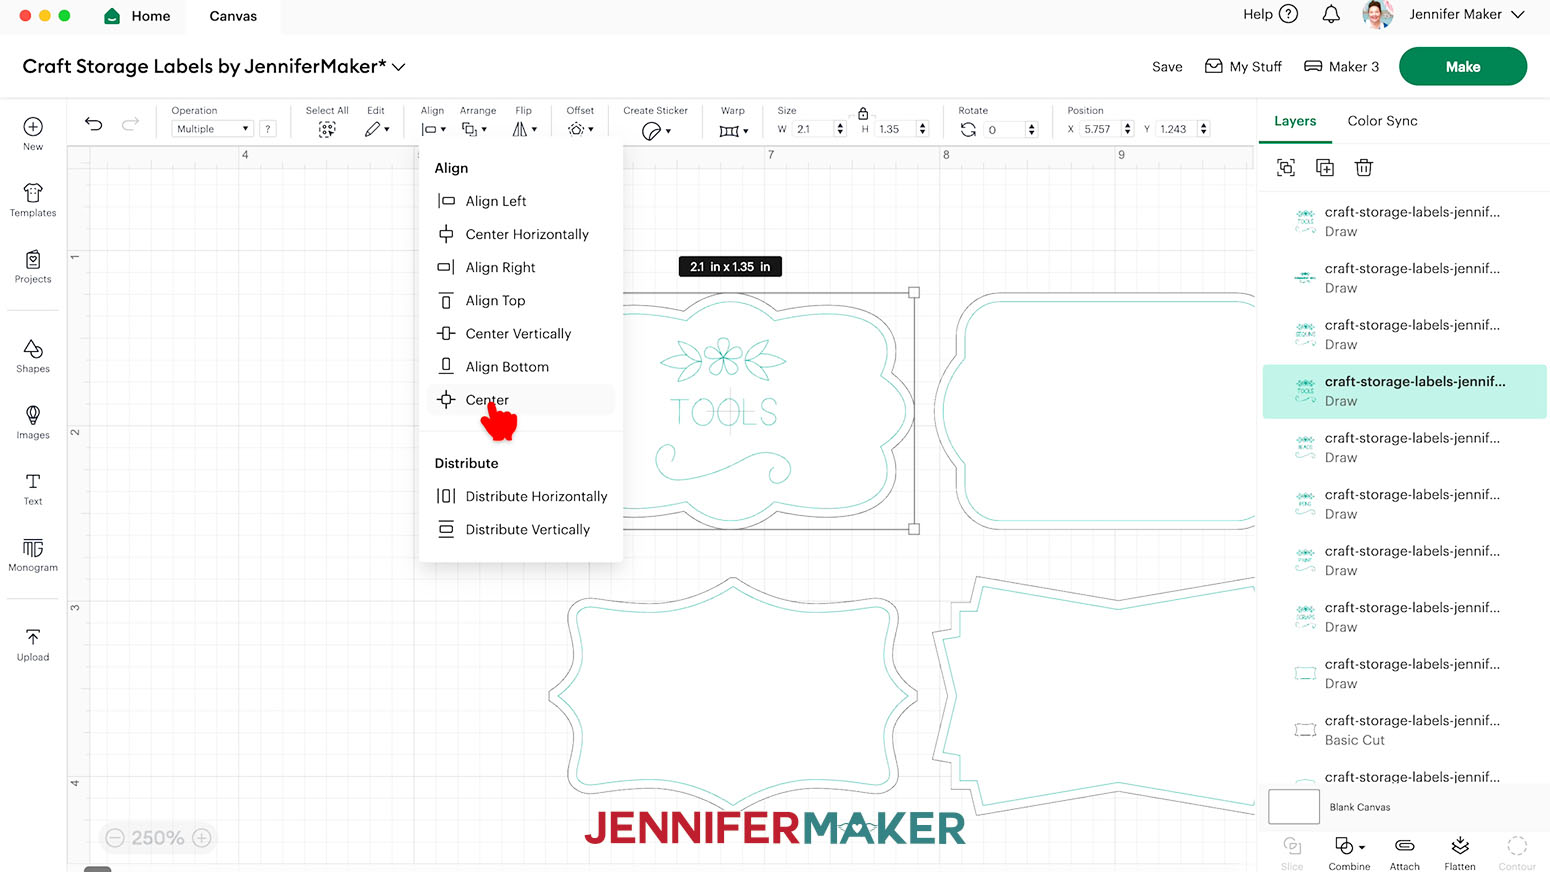
- Drag a bounding box around both shape layers and the text layer, then click “Align” and “Center.”
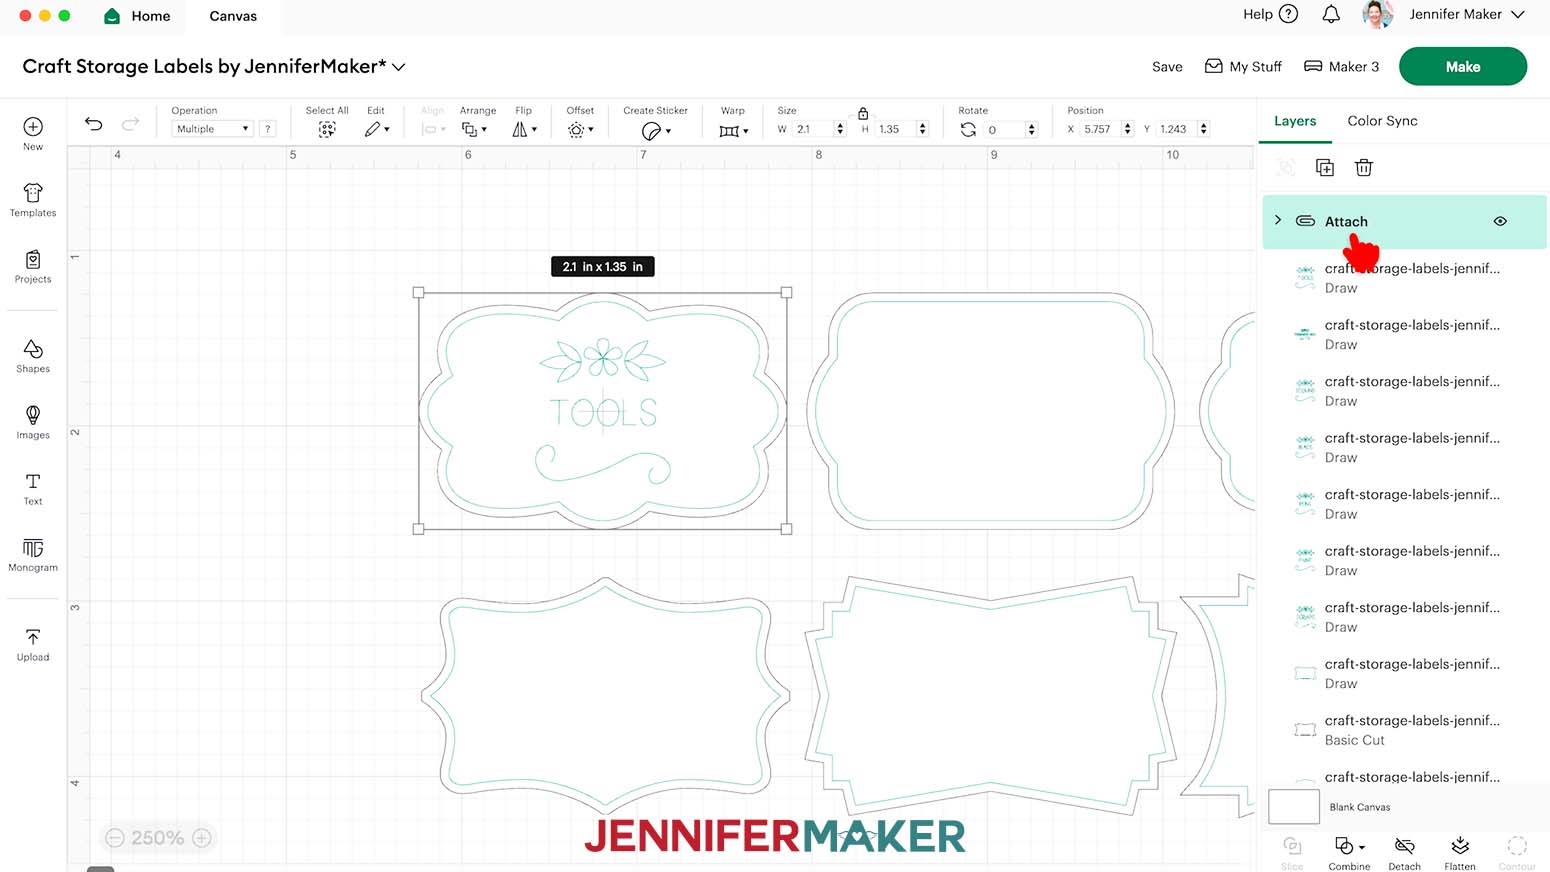
- With all three layers still selected, click “Attach” to keep the Cut shapes and Draw layers together.
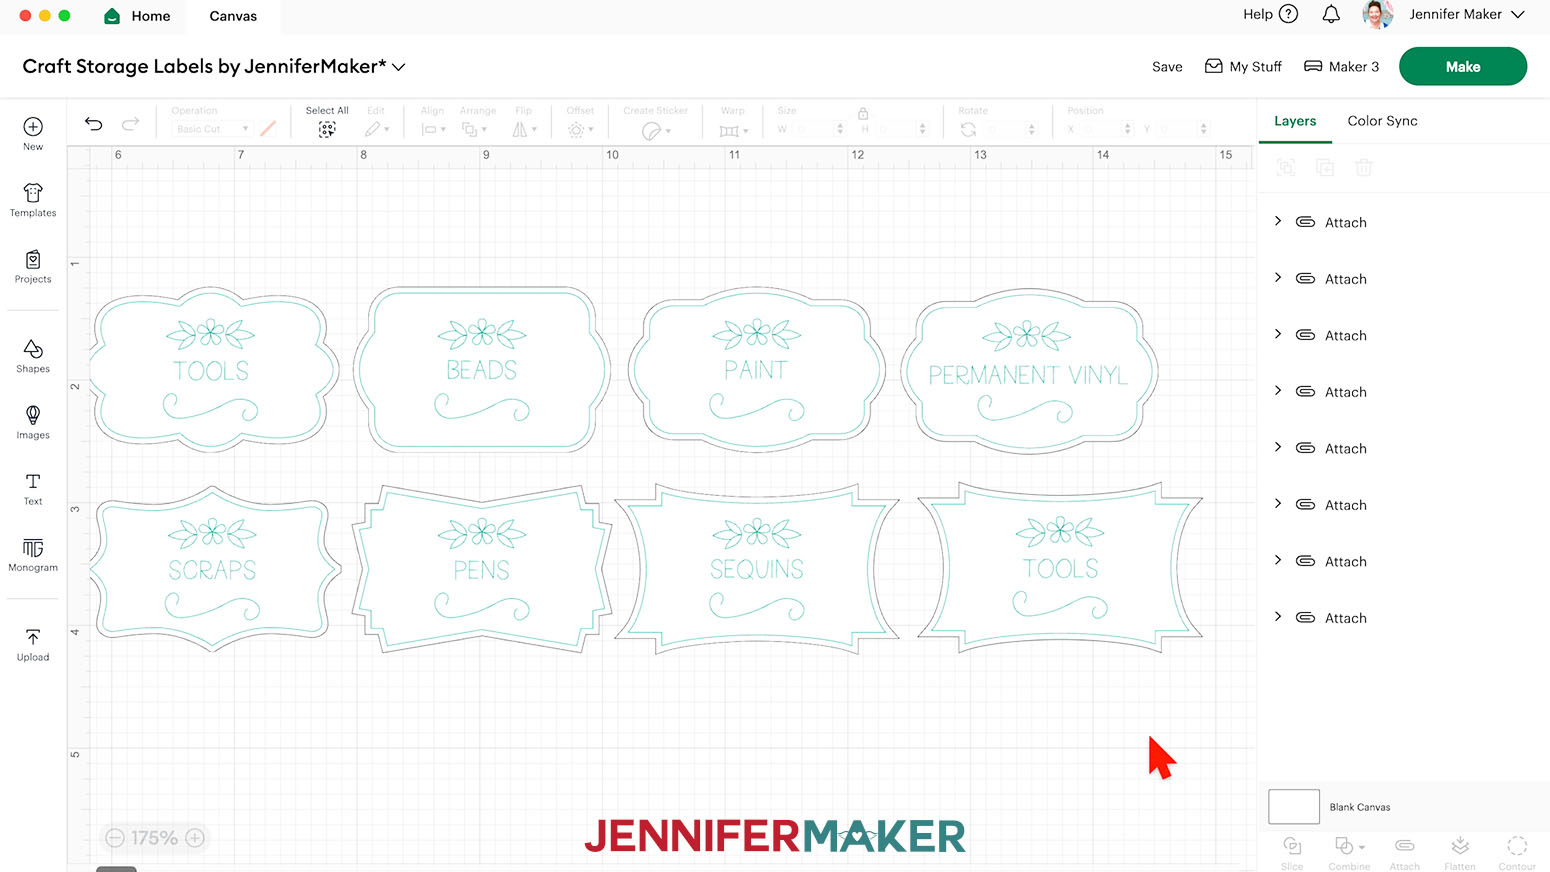
- Repeat Steps 20-22 for your remaining text labels and cut shapes.
- Once all your labels’ layers are attached, your project is ready to cut!

CUTTING
- Make sure the correct machine is selected in the top right.
- Click “Make.”
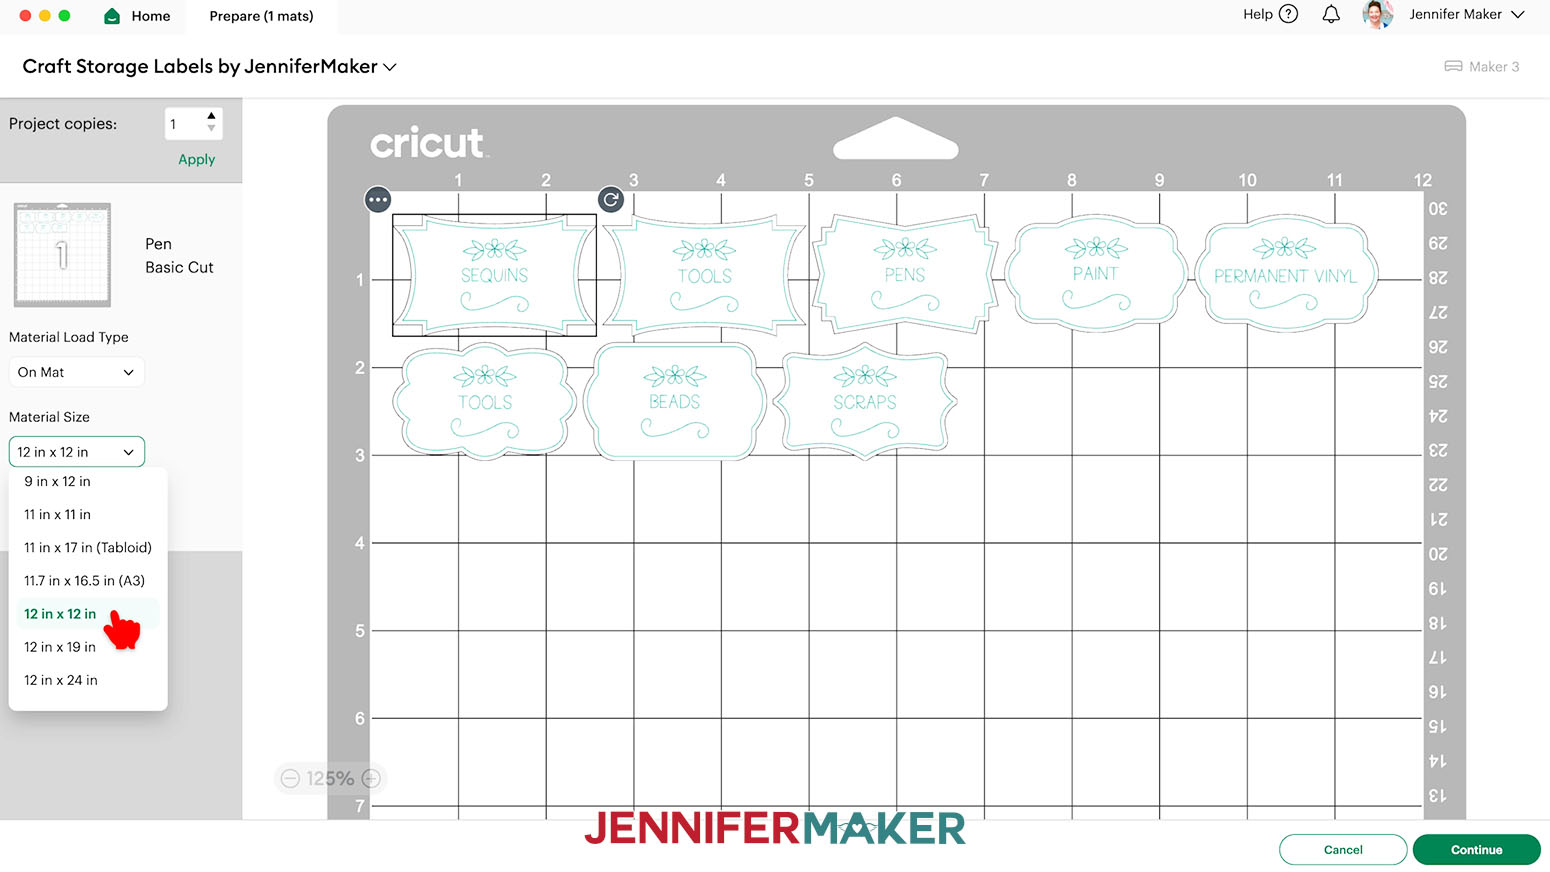
- On the Prepare screen, make sure the correct Material Size is selected for your mat.
NOTE: Since I’m using Smart Label Writable Vinyl with a machine mat, I’ll use the “12 in x 12 in” material setting and trim my material down to size. If you’re cutting your labels without a mat, click the “Material Load Type,” select “Without Mat,” and use the default 13” x 6” Material Size.
TIP: If you see a mat with just Pen lines, one or more of your “Draw” layers may not have attached correctly, so click “Cancel” to go back to the Canvas to check and adjust as needed. - Once you are satisfied with your mat layout, click “Continue.”
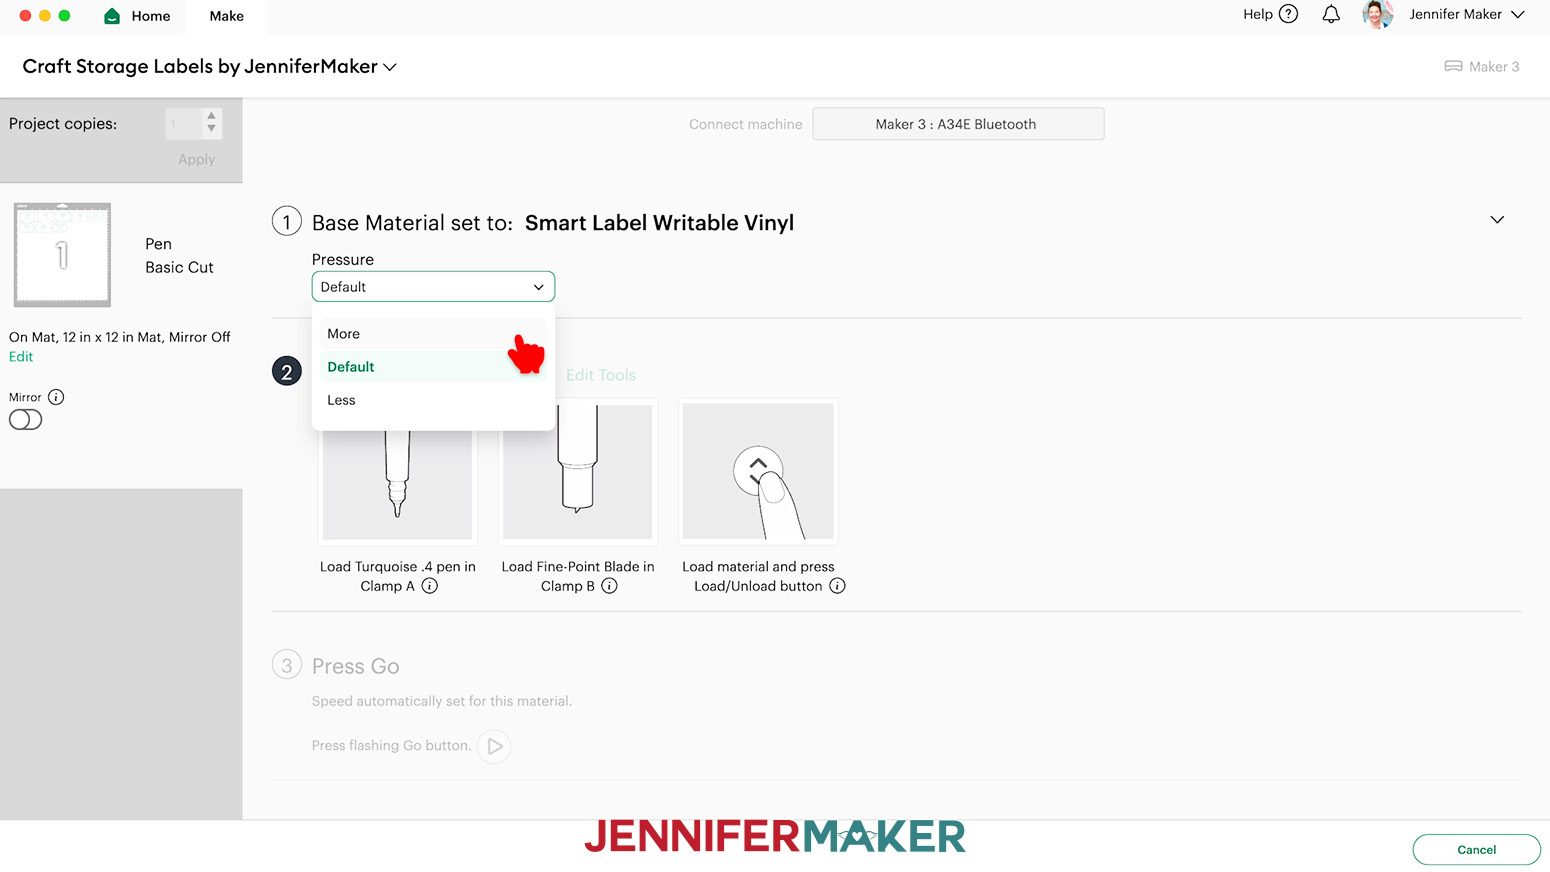
- On the Make screen, set the Base Material for your mat. I used the “Smart Label Writable Vinyl” material setting and changed the Pressure to “More.”
NOTE: If you don’t see “Smart Label Writable Vinyl” in your materials list, click on “Browse All Materials.” Search for “Smart Label” and select the correct option from the list.
NOTE: The “Smart Label Writable Vinyl” material setting is only available on the Maker 3, the Cricut Explore 3, the Cricut Venture, and the Cricut Joy. For other models, I used the “Premium Vinyl - Pearl” material setting with good results.
TIP: Changing the Pressure to “More” results in a cleaner cut. - Use a paper trimmer or scissors to trim your smart vinyl so it covers the design area indicated on your screen, plus an inch or so.
NOTE: Be sure to trim ½” from the sides of the material so the carrier sheet is flush with the vinyl. - Follow the screen prompts to select and add your pen in the clamp indicated.
TIP: Remove the pen’s cap (put it on the back so you don’t lose it) and test it on scrap paper to make sure it flows well first.
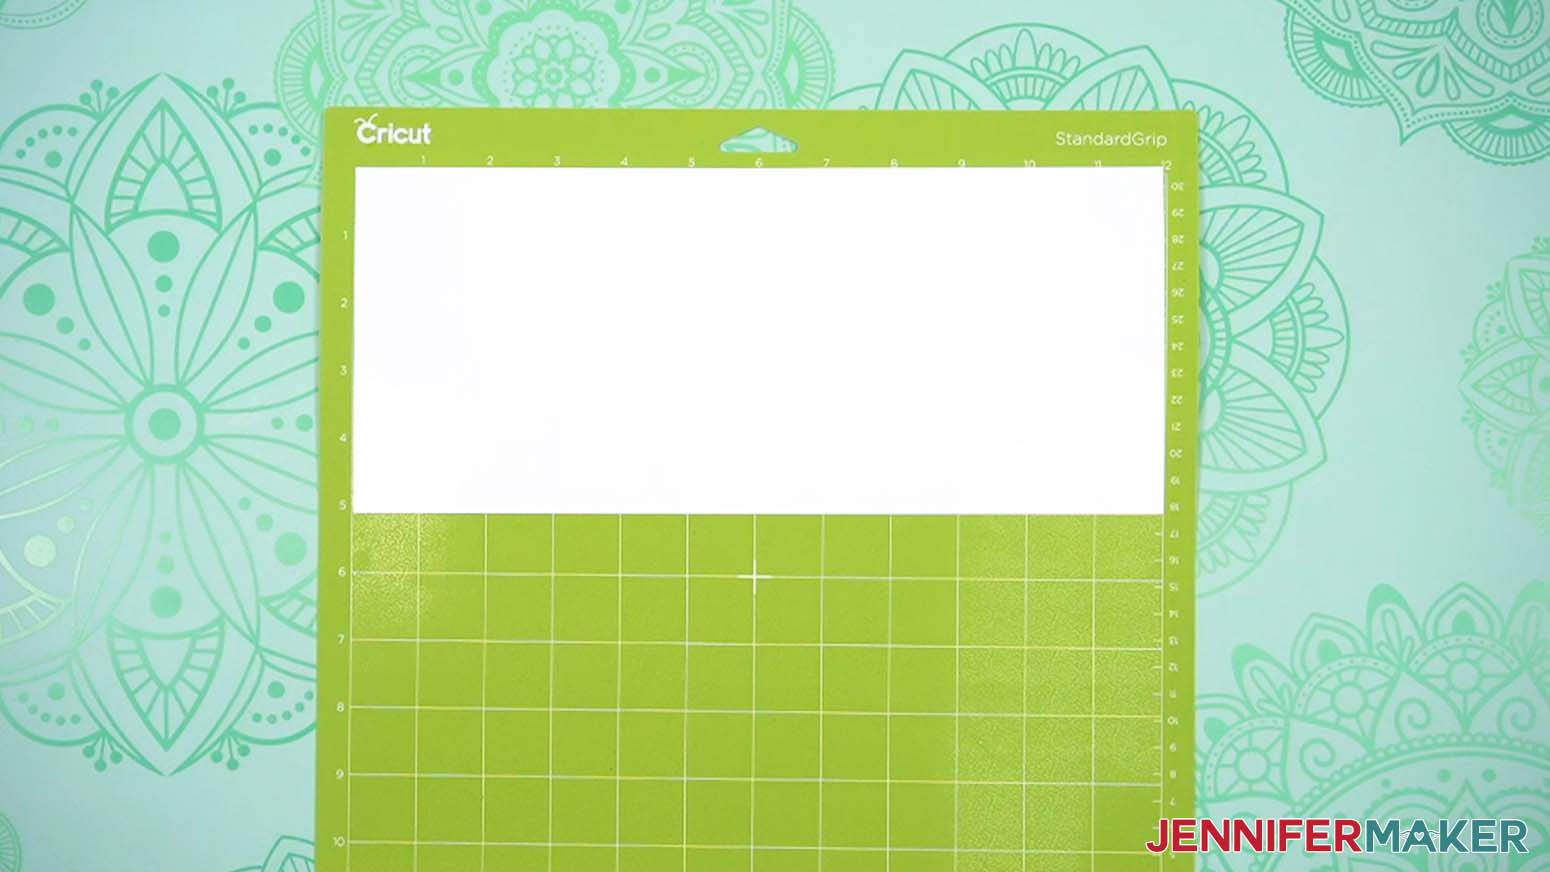
NOTE: If you’re making your labels on the Cricut Joy, you can only load one tool at a time. It will prompt you to draw first, and then cut, so make sure you have the right tool in the clamp at the right time! - Place the Smart vinyl shiny side up on a green StandardGrip machine mat.
- Use a brayer to make sure it’s fully adhered.
- Check that your Premium Fine-Point Blade is clean and in the clamp.
- Then press the flashing “Load/Unload” button to load it into your Cricut.
NOTE: To load the Smart vinyl without a mat, align the shiny-side-up material with the machine’s left material guide, slide it under the mat guides, and push it up against the rollers. Then press the flashing “Load/Unload” button to load it directly into your Cricut. - Press the flashing middle button to begin cutting.
- When it has finished cutting, don’t unload the mat right away. Gently lift a corner of the material to make sure the cuts went all the way through the material, but not the carrier sheet. If another pass is needed, remove the pen from its clamp so it doesn’t write a second time, then press the middle button to make a second pass of cuts in the same spots.
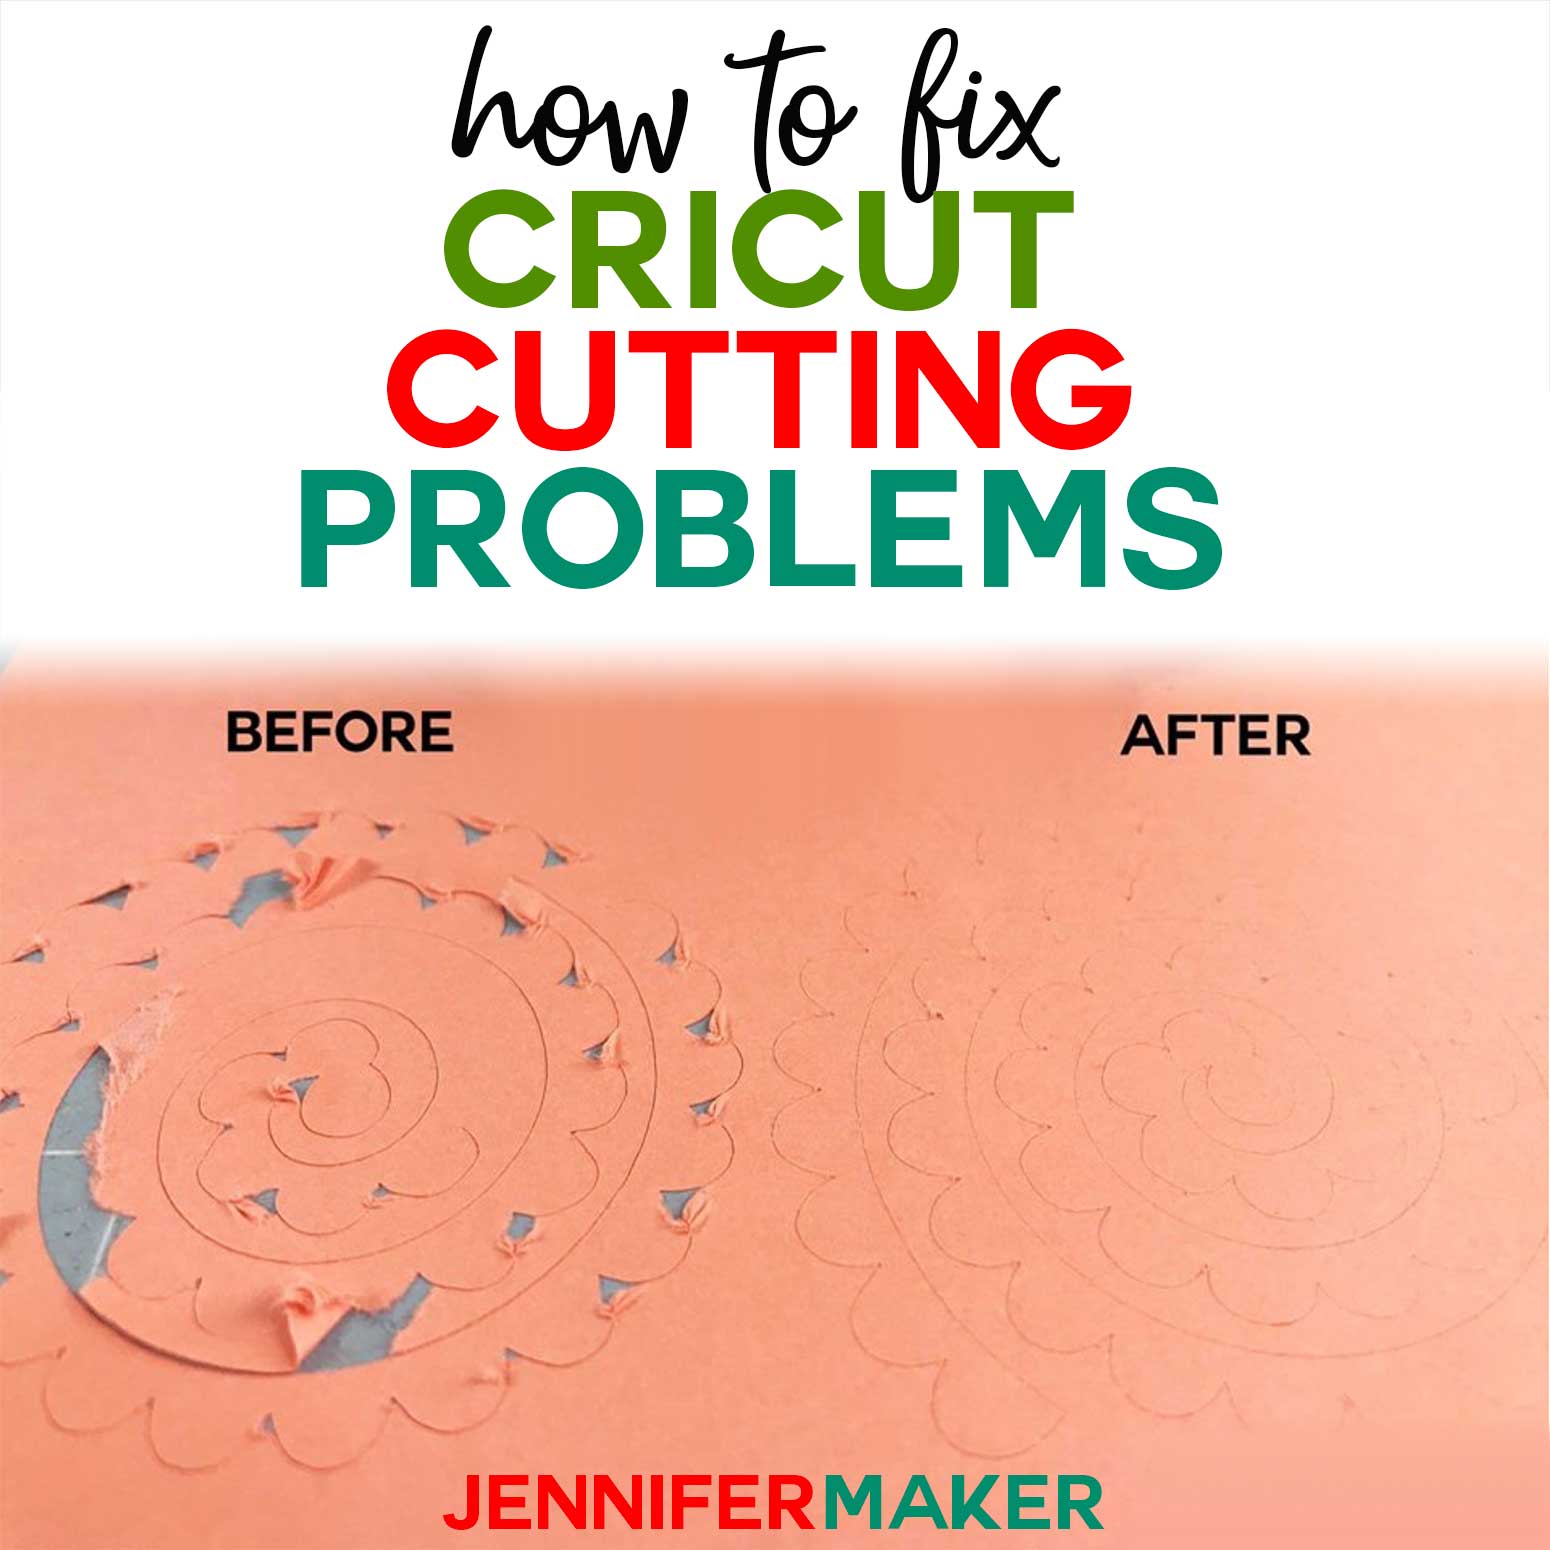
TIP: If you have any issues with your cuts, go to jennifermaker.com/cleaner-cuts. - When the cuts are complete, unload the Smart vinyl and use your weeding tool to carefully peel away the extra background vinyl around the labels.
- Leave your labels on the carrier sheet until you’re ready to use them.
STEP 3: ASSEMBLE YOUR STORAGE ORGANIZERS
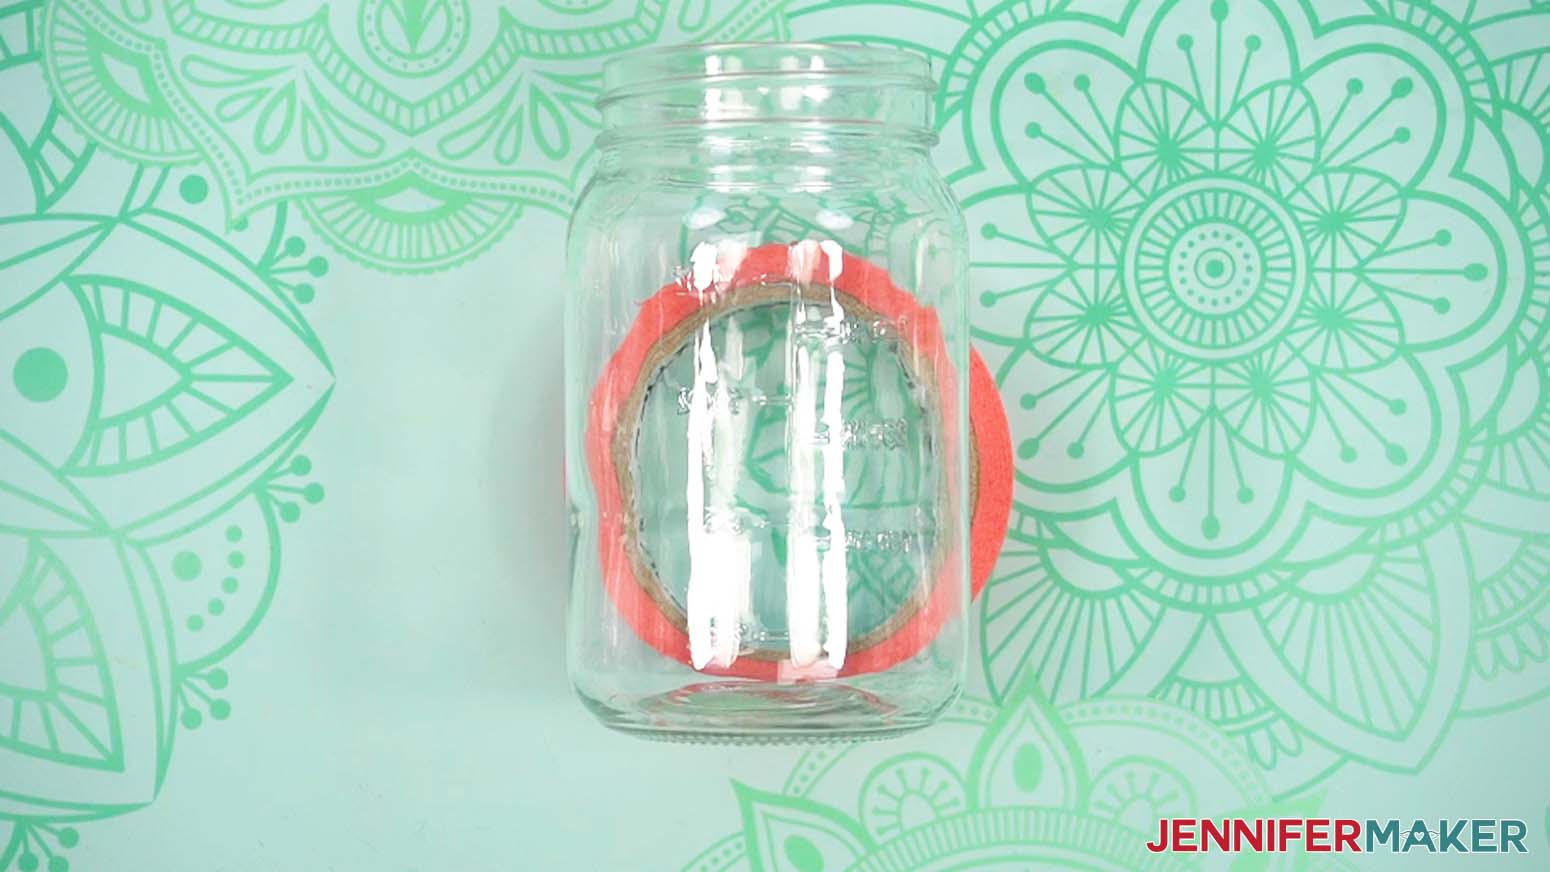
ASSEMBLE THE CANNING JAR AND COTTON BALL JAR
- Remove any packaging, stickers, or other labels from the jar.
- Clean the jar’s surface with isopropyl alcohol and a lint-free cloth.
- Turn the jar on its side and rest it on a roll of painters tape to hold it steady.
- Screw the star lid on the canning jar and remove its handle if desired.
- Peel your craft storage label from the vinyl’s carrier sheet and apply it to a smooth area of the jar.
- Use the canning jar to store scraps and the cotton ball jar to store sequins or other decorative accents.
PREPARE THE BOOK BIN, PEN HOLDER, TOOL CADDY, CLEAR STORAGE CONTAINER, HARDWARE STORAGE CASE, AND TIN PAIL
- Remove any packaging, stickers, or other labels from the storage container.
- Clean the storage container’s surface with isopropyl alcohol and a lint-free cloth.
- Peel your craft storage label from the vinyl’s carrier sheet and apply it to the appropriate storage container on a smooth front, top, or side.
NOTE: You can place a different label for each tier of the pen holder, if desired. - Store your matching items in each container.
NOTE: The clear storage container and hardware storage case can be stacked to maximize space.
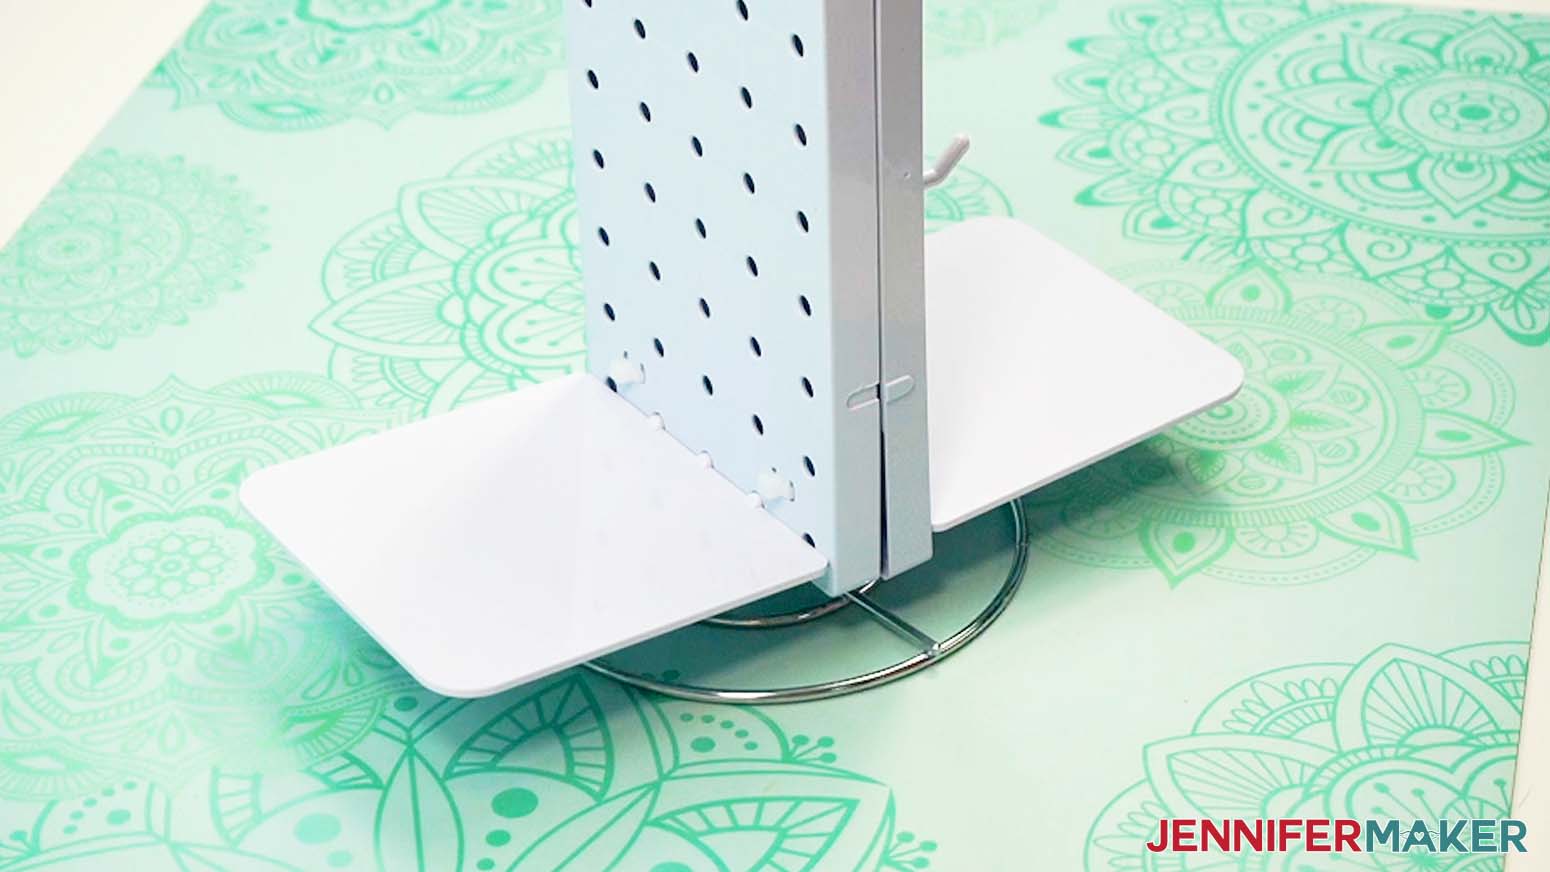
PREPARE THE PEGBOARD ORGANIZER
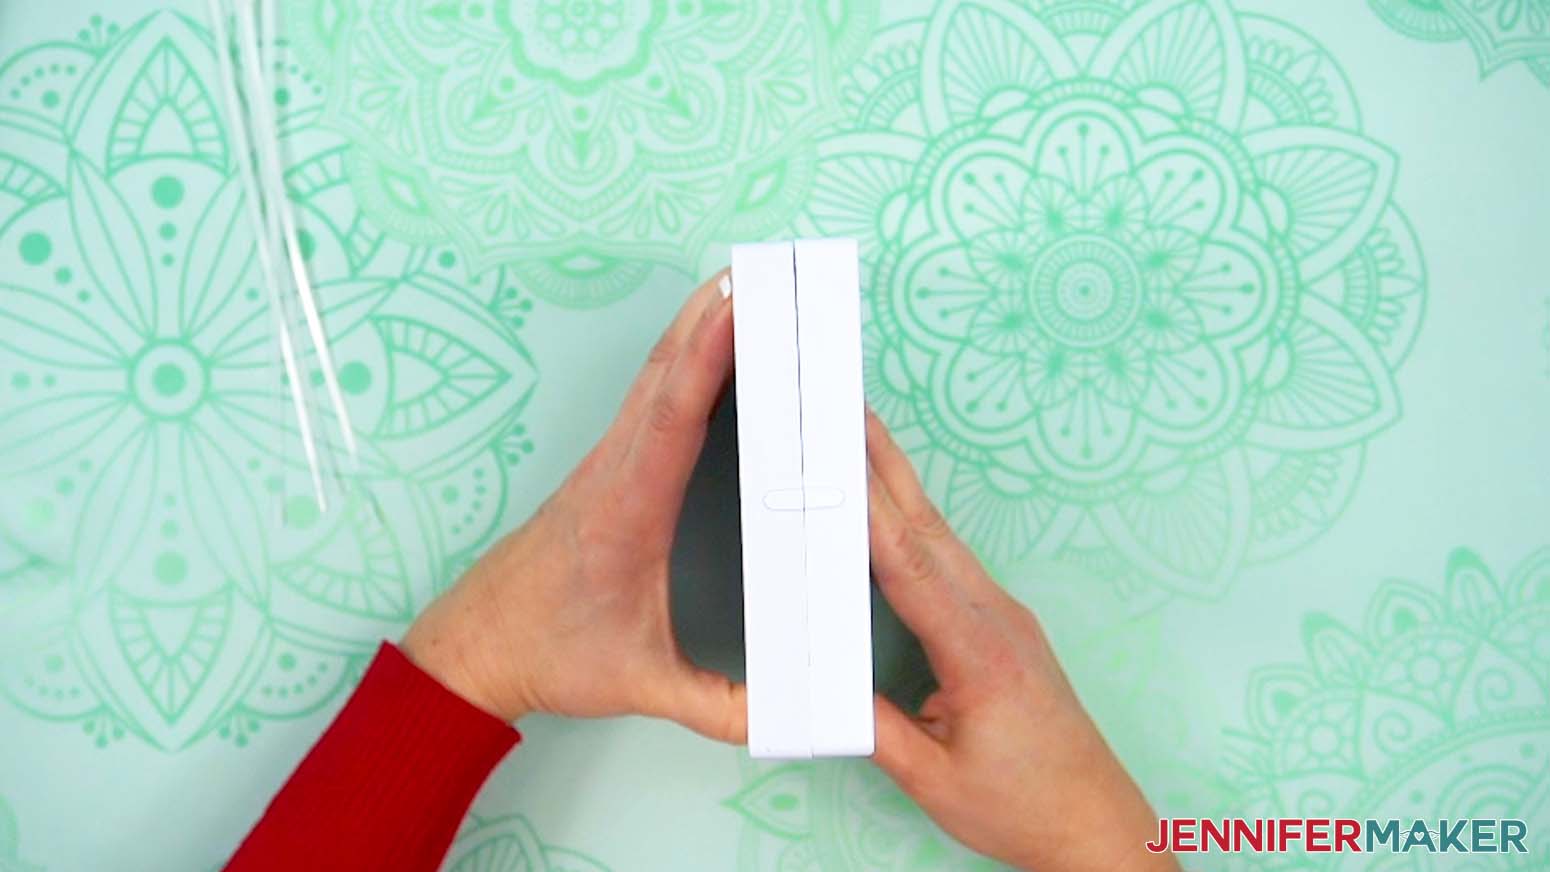
- Gather two peg boards, a metal paper towel holder, and four zip ties.
- Place the pegboards back to back.
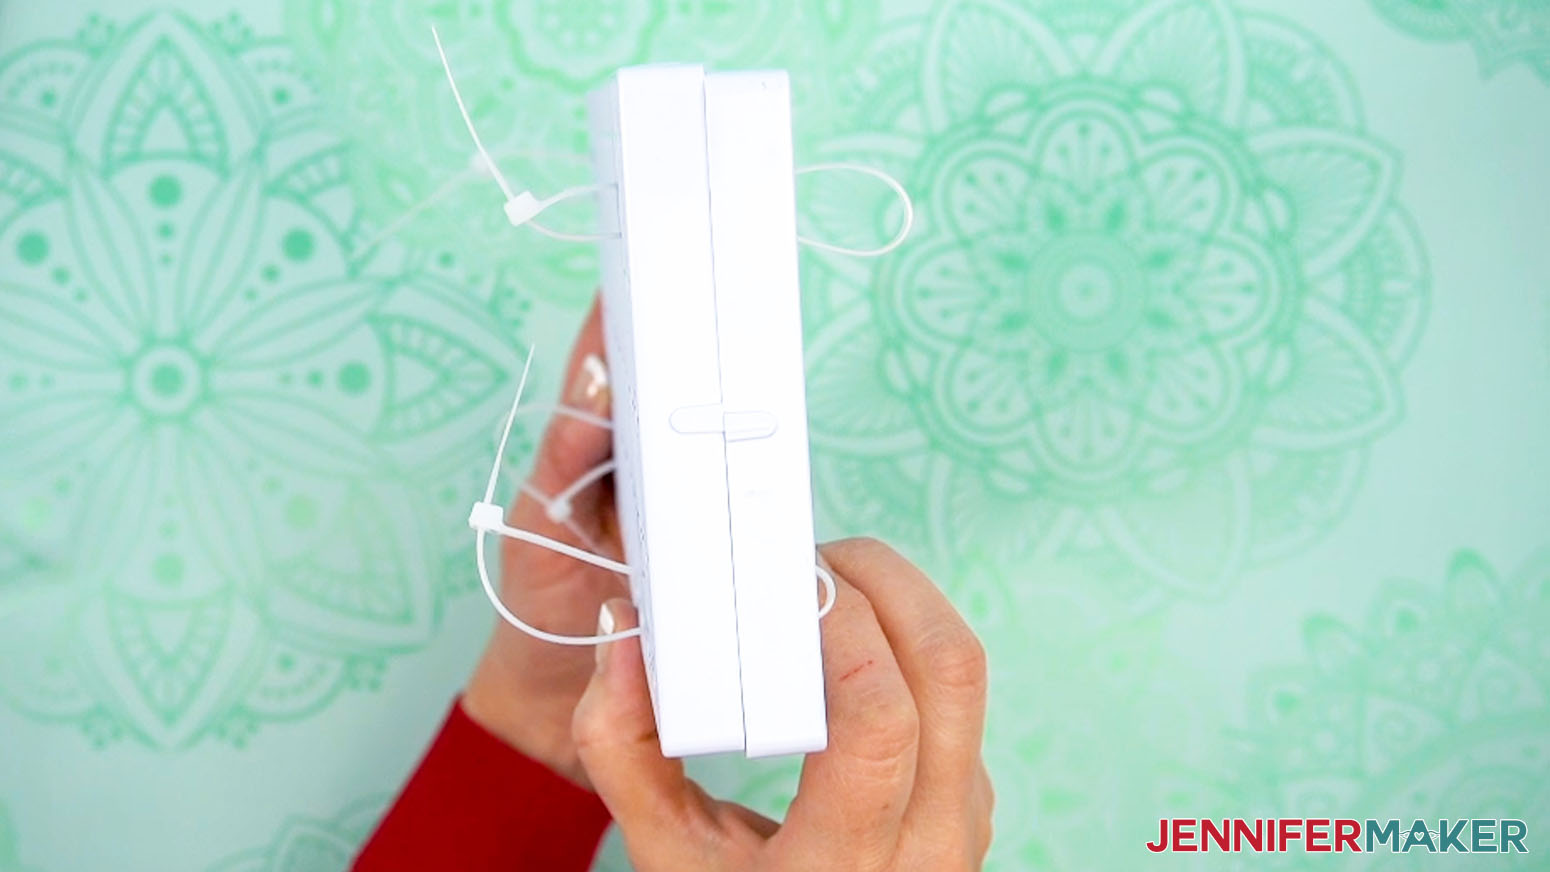
- Loop and loosely fasten a zip tie through the pairs of slots in each corner.
NOTE: Don’t pull too tight, or it will be difficult to insert the paper towel holder. - Insert the vertical prongs of the paper towel holder between the two peg boards.
- Tighten the zip ties on all four corners.
- Use scissors to trim away the excess length from the zip ties.
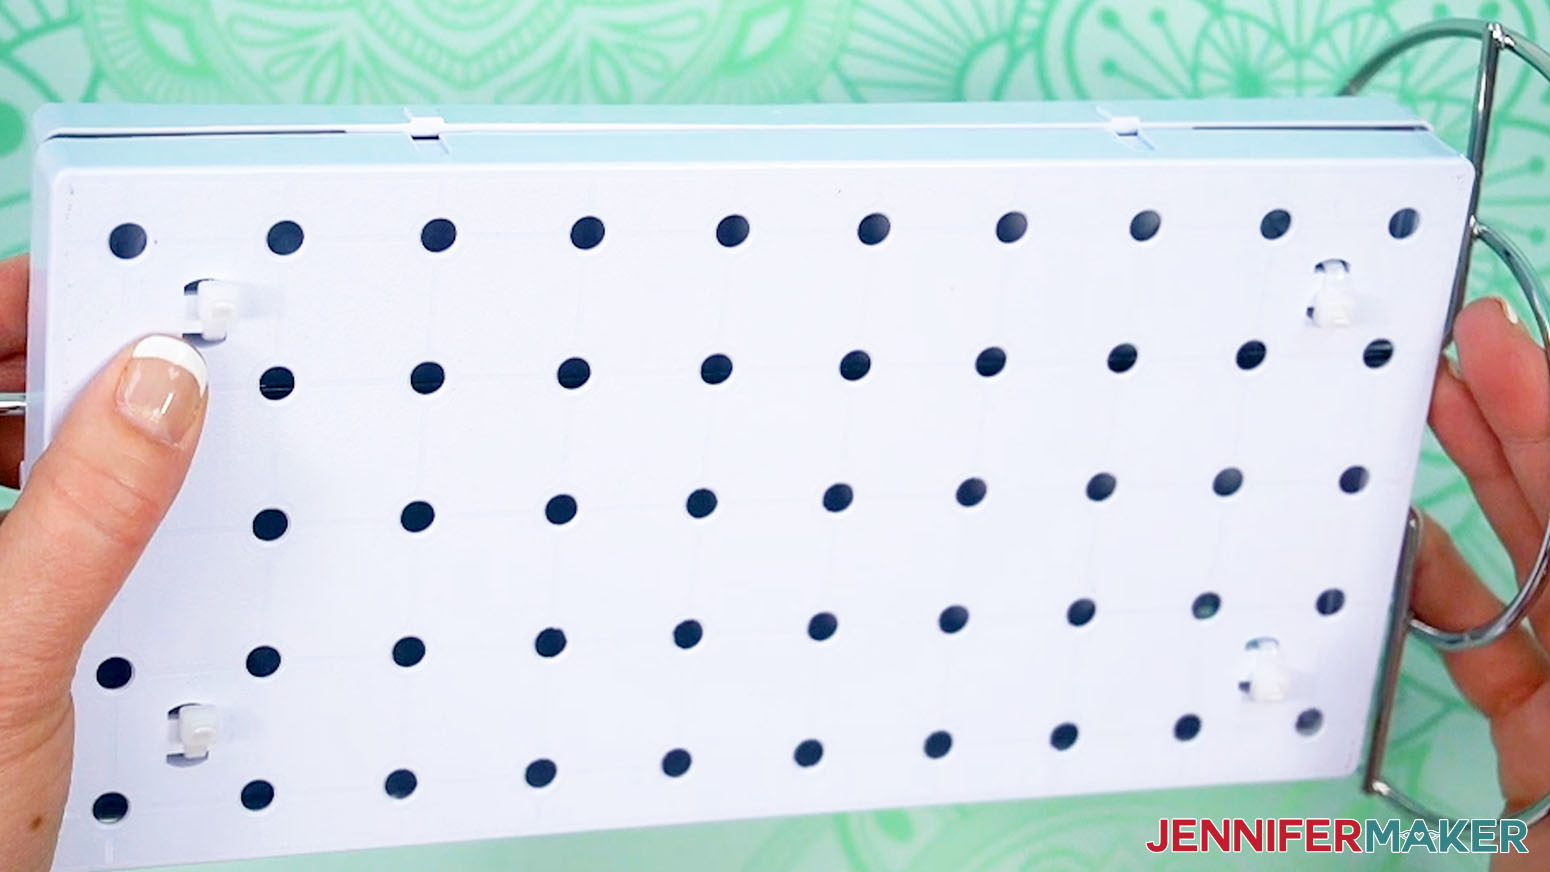
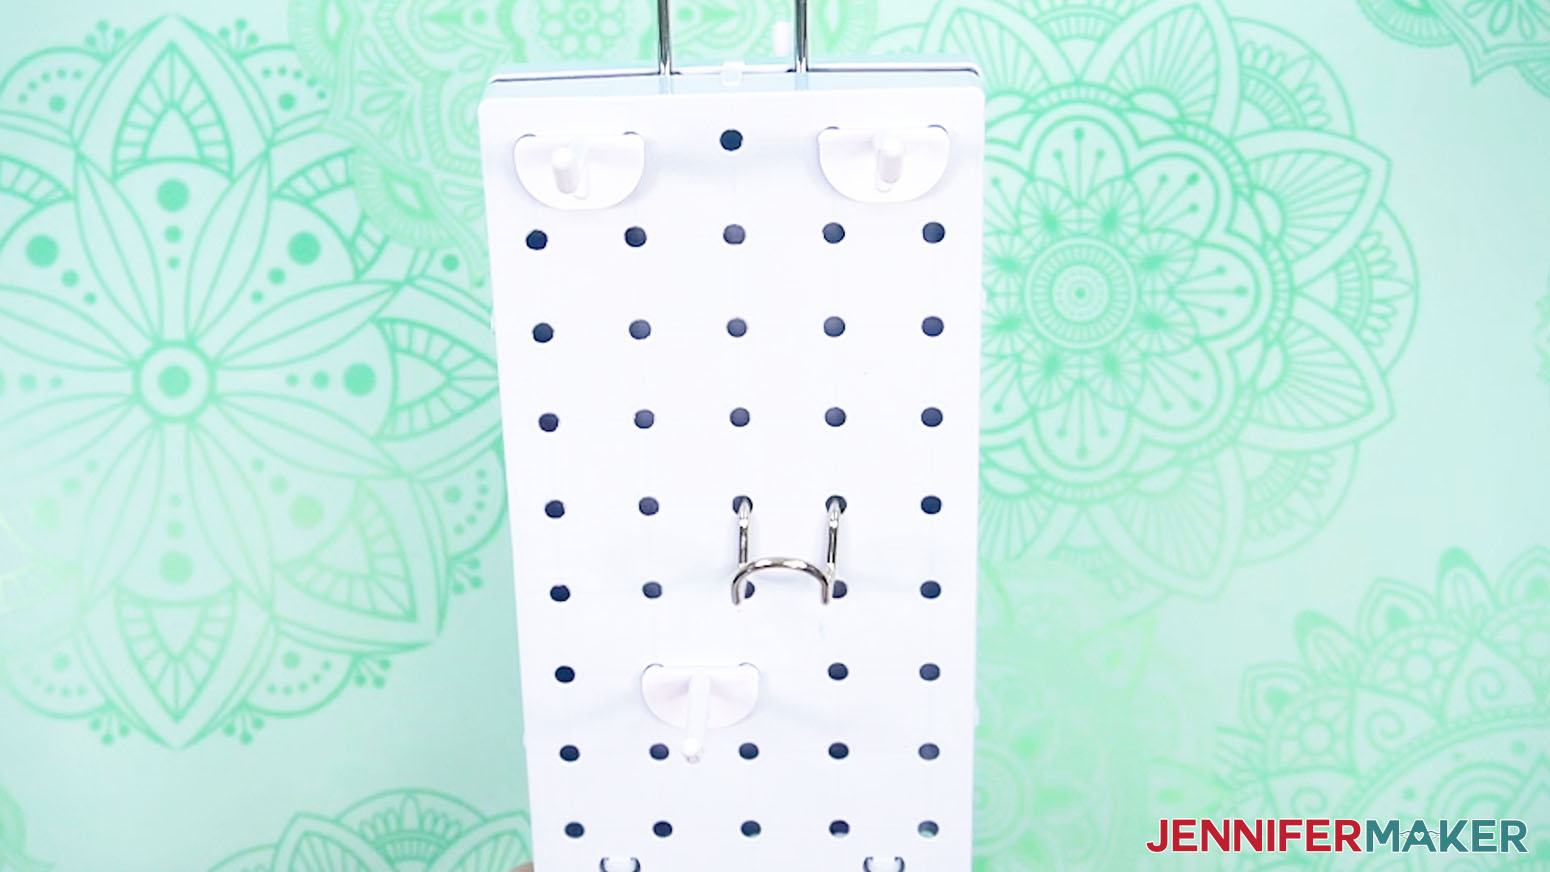
- Insert the hooks and prongs into the pegboard as desired.
- Insert a shelf under the bottom row of zip ties on both sides of the pegboard.
- Use the hooks to hang your Cricut tools, the prongs to store your scissors, and the shelves for glue, tape, and other items.
USE CLAW CLIPS TO SECURE VINYL ROLLS
- Squeeze the back ends of the claw clip to open it.
- Place a vinyl roll inside the clip, and gently release the clip to secure the roll.
- Store the secured vinyl roll as desired.
STEP 4: SHOW IT OFF
You now have an impressive set of storage and organization containers that work on a budget, plus labels for all of them!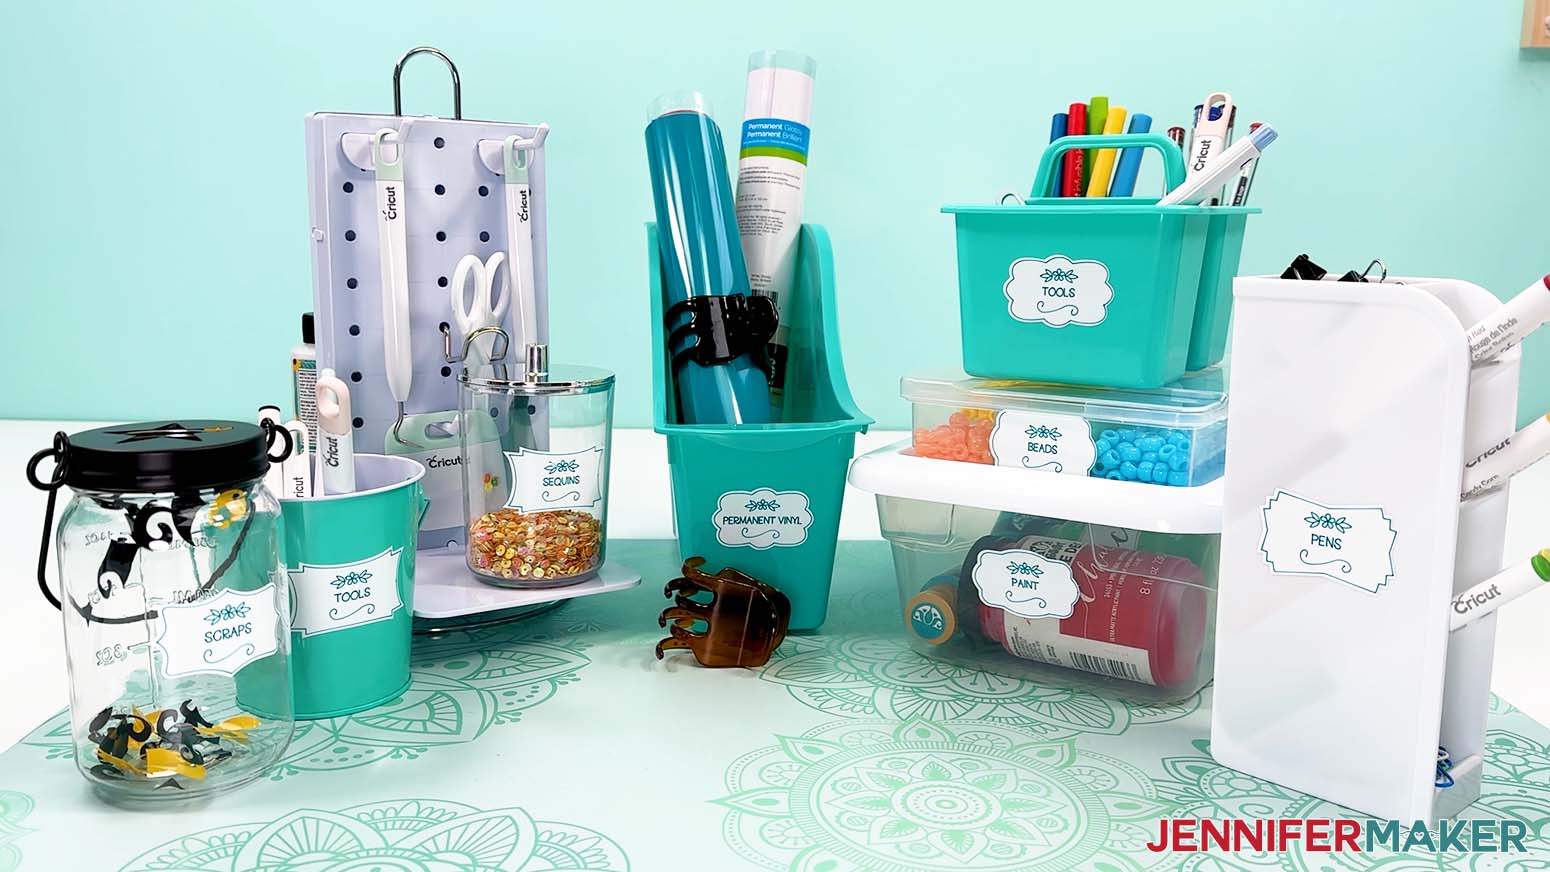
Answers to Your Questions About Craft Storage Solutions on a Budget
Q: Is there a cheat sheet on how to create custom craft storage labels?
A: You can download my cheat sheet on how to customize craft storage labels in my ADVANCE program. Learn more about ADVANCE here!
Q: What kind of label material do I use to make craft storage labels?
A: I used Cricut Smart Label Writable vinyl. It’s made for writing and cutting into cute label shapes, so they look awesome and stay readable.
Q: Do I need a Cricut to make craft storage labels?
A: Nope! A Cricut is the easiest way because it writes and cuts the labels for you, but I also include PDF files you can print to cut the labels by hand.
Q: Can I make craft storage labels with a Cricut Joy?
A: Yes, you can make my craft storage labels with any Cricut, including the Cricut Joy. Just be sure to use Joy-sized Cricut Pens and Joy-sized writable vinyl, and you’ll be all set.
Q: What is the most efficient craft storage?
A: The most efficient craft storage is the kind that simply works for you. Look for solutions that get the job done without being over the top or out of your budget, so you can save your money for what you really want: more crafting supplies!
Q: How do you make a craft room clutter free?
A: Give everything a “home” (and a name tag) with my craft storage ideas on a budget and free label designs! And if you want extra help staying on track, join my 30-Day Organized Craft Room Challenge!
Q: I don’t have a Dollar Tree nearby. Can I find these items at other stores?
A: Absolutely! You may not find the exact same products, but you can find very similar items at other stores or on Amazon. Use the items in this tutorial as inspiration for your own craft storage ideas on a budget. I’ve added some Amazon alternatives to the shopping list so you can order online, too!
Q: Do you recommend any other craft storage solutions?
A: I have a ton of crafty storage ideas! Check out some of my favorites:
- Craft Paper Storage Ideas
- Vinyl Storage Tower Organizer
- Hanging Storage System
- Over the Door Craft Storage
- Craft Paint “Wallflower” Organizer
- Fabric Organization Ideas
- Ribbon Storage Ideas
Q: Can you recommend how to organize craft supplies in a small space?
A: This is exactly why I love these Dollar Tree finds, The containers are compact, so they work really well in small spaces, and you can still keep your supplies in easy reach. And if you’re ready for a bigger upgrade down the road, my DreamBox by Create Room is my favorite way to create a truly organized craft space. It’s a fantastic long-term solution, and totally worth saving for.
Q: Help! My Cricut Design Space screen looks different from yours!
A: If you’re using the latest version of Cricut Design Space, your screen may have slight variations from the screen you see on the video tutorial. Good news! All of the same functions are there, they may just be in different spots or have new icons. Pause the video if you need, or follow along with the written tutorial. If you get stuck, ask for expert support in our Facebook group. Plus, you can catch the latest news on JenniferMaker tutorials and more.
Q: Can I make and sell craft storage labels using your design?
A: If you want to use my craft storage label designs for commercial use, please familiarize yourself with my important licensing information before selling your crafts.
Get my free SVG/DXF/PDF files to make your own labels for craft storage ideas on a budget!
(If you do not see the signup form above, click here.)
I absolutely love seeing your craft storage ideas on a budget! Once you’ve organized your supplies and tools, inspire others and share a photo of your crafty storage ideas in our Facebook group or tag me on social media with #jennifermaker.
Love,

Want to remember this? Save this Craft Storage Ideas On A Budget Tutorial to your favorite Pinterest Board!