
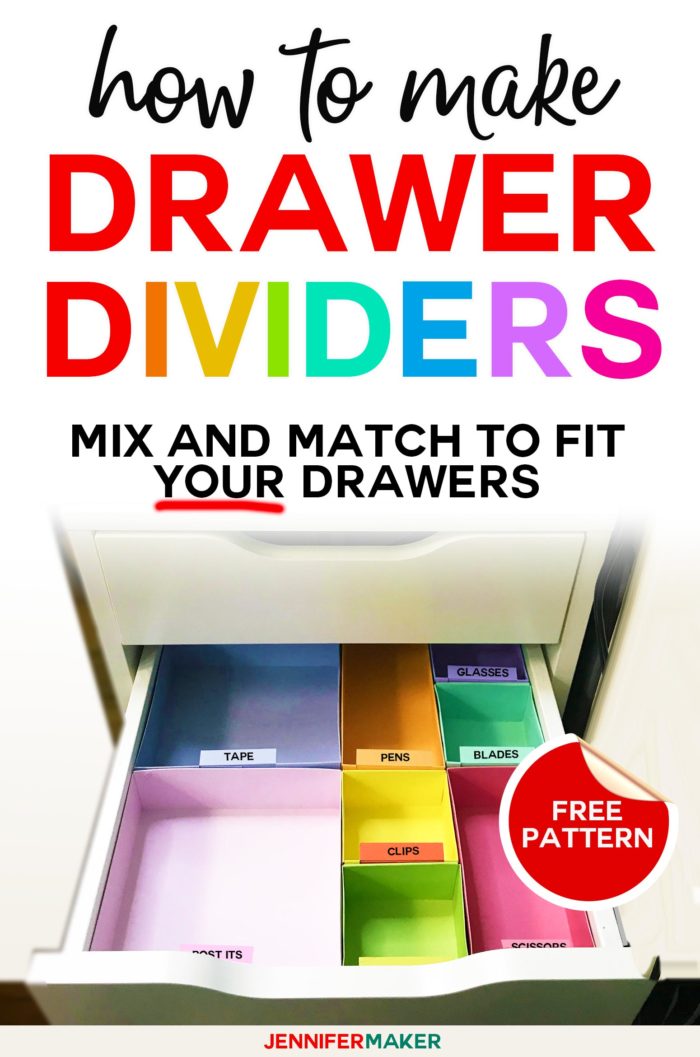
– Learn how to organize your drawers with easy DIY drawer organizers you can make by hand or on your Cricut! No more messy junk drawers!
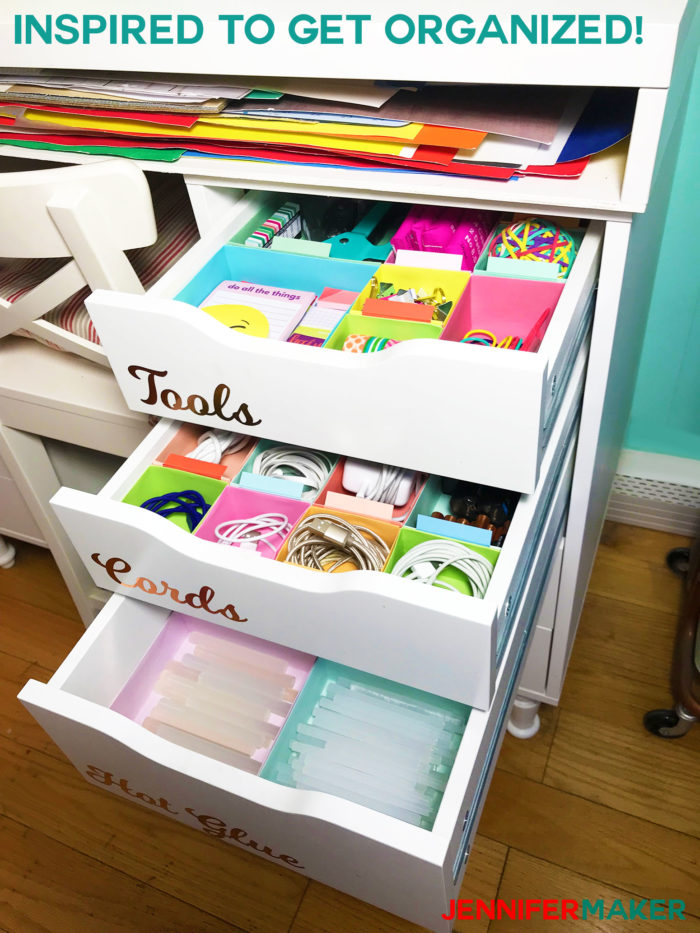
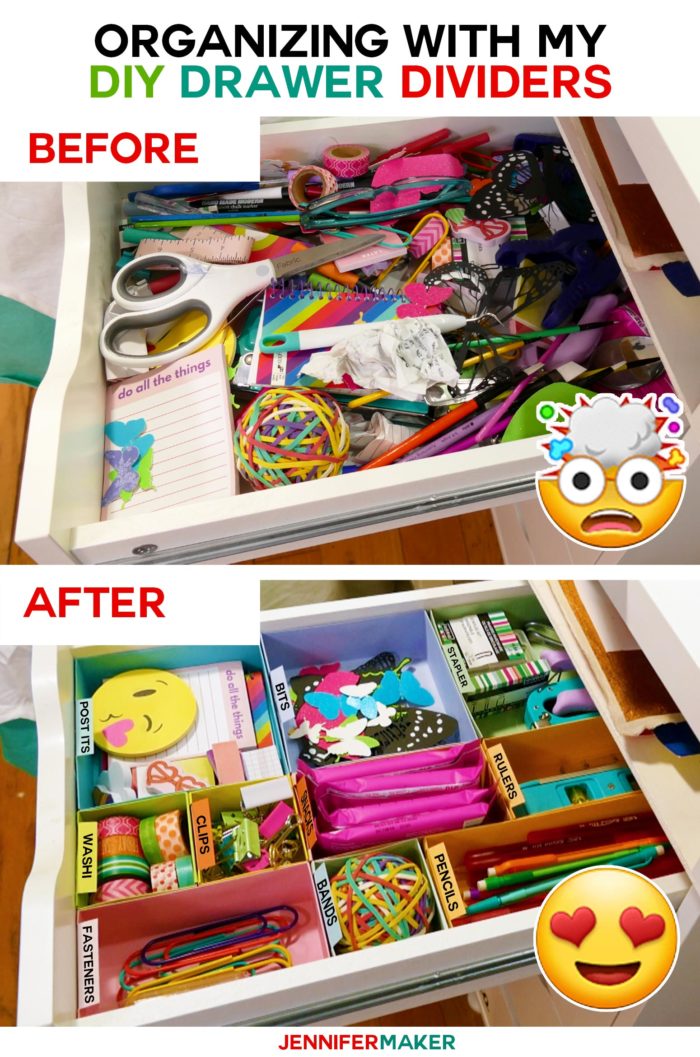
Ever since I joined Get Organized HQ, I’ve been SUPER STOKED about organizing. It’s been SO motivating and inspiring to see all of those organized rooms and closets and lives that I felt compelled to organize even more than I already have. So after I cleaned and organized my craft room last week, I decided it was time to tackle my messy and disorganized drawers. Not only have I been organizing all of my drawers, but I designed and made special DIY drawer dividers that fit perfectly together into my IKEA drawers!
THIS IS SO AMAZING!
And if you haven’t yet heard about Get Organized HQ, this is a truly amazing thing — it’s a FREE organizing summit with more than 100+ organizing experts (me included!) who are sharing all of their tips, tricks and secrets — and it’s all new for 2023! But you MUST have a ticket to view the sessions. Stay tuned for details on how to get a ticket for 2023!
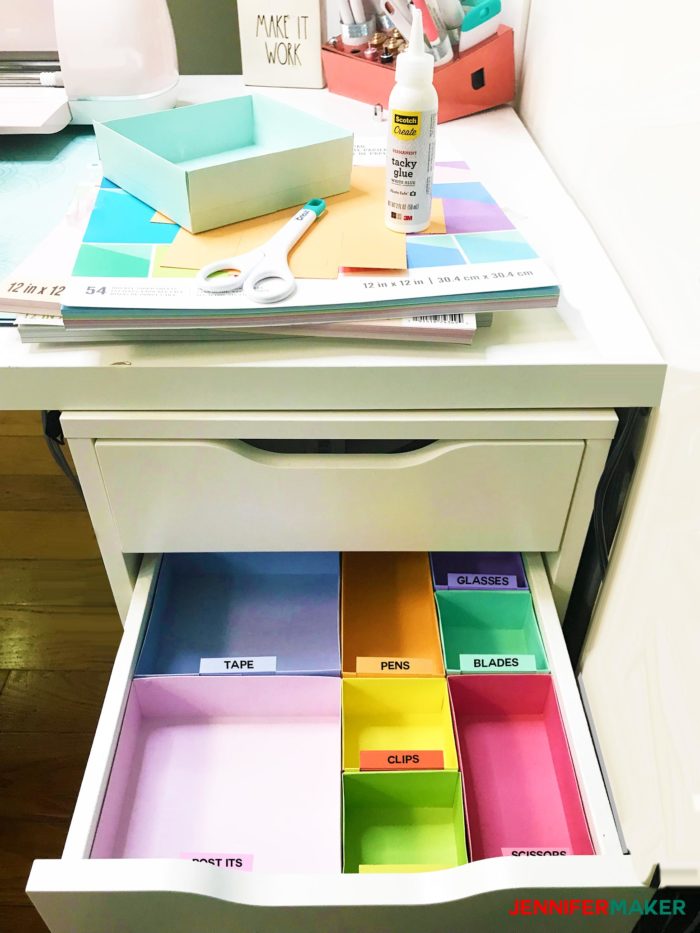
So I have a lot of drawers in my craft room, and while I’m pretty good about labelling them, I’m not as good at keeping them tidy. This is because the drawers have no structure to them, as it’s hard to find organizers and drawer dividers that fit my drawers. I have the IKEA Alex drawers (all versions) and they aren’t very high, so many traditional organizers and dividers are too tall to fit. And even when I did find them, they were crazy expensive — I could spent $50 on plastic dividers for a single drawer, which is outrageous. I’ve struggled with this for a couple of years now. Until now!!
My design skills have come along far enough that I can make anything I want, so why not make my OWN drawer dividers, I decided. And that’s just what I’ve done. I have designed five differently-sized boxes that all mix and match together to fit perfectly into IKEA Alex drawers (which means they’ll fit in nearly every other drawer out there). They fit both the wide IKEA Alex Drawers (23.5″ wide by 16.75″ deep, drawers are 2 1/8″ high) and the narrow IKEA Alex Drawers (11.5″ wide by 20 5/8″ deep, drawers are 2 1/8″ high).
I even designed my DIY drawer dividers to have little tabs that stick up so you can label them, then you always know where to put your things back! You can label them by hand, with a label maker, or with your Cricut — you decide!
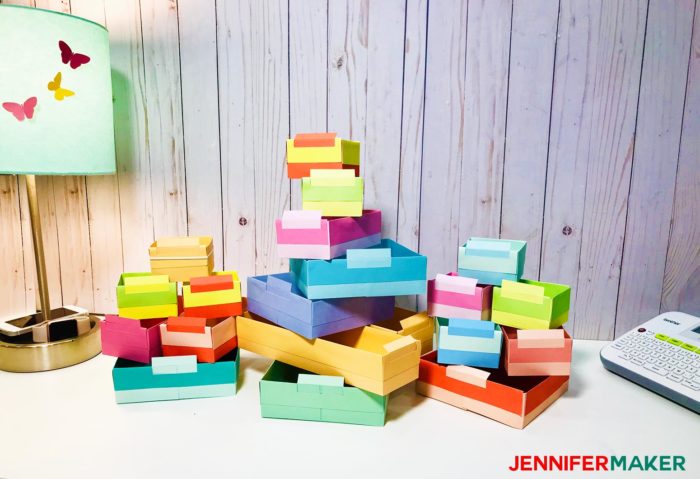
The DIY drawer dividers are easy to cut and easy to assemble and glue. And I designed them so they are self-reinforced along the edges, so they’ll last a long time. You’ll want LOTS of them!
Watch my full step-by-step video that shows how to organize a drawer using these DIY drawer organizers:
Ready to make some DIY drawer dividers? Let’s do this! This post contains some affiliate links for your convenience (which means if you make a purchase after clicking a link I will earn a small commission but it won’t cost you a penny more)! Read my full disclosure policy.
Materials Needed to Make the DIY Drawer Dividers
- 12″ x 12″ 80 lb. cardstock (this cardstock works great), 12″ x 24″ 80 lb. Cardstock (I used this exact brand), or 12″ x 12″ Kraft Board (I used this exact brand)
- Tacky glue (I do NOT recommend a tape runner) – if you really don’t want to glue them, get my “no-glue” version (see tip above) or use a rubber band
- (Optional) Label Maker (I use this exact one)
- Design #156 – My DIY drawer divider pattern and SVG files (available in my free resource library — get the password at the bottom of this page)
- A way to cut your drawer dividers (I used the Cricut Explore with the fine point blade and scoring stylus)
How to Organize Your Drawers
Tip: Watch for my video that shows you exactly how to organize how to organize a drawer quickly and efficiently! I’m editing it now and it will be online by the end of the day today (Saturday, September 7). Here’s a preview from the video!
Step A: Purge
Take everything out of your drawer and spread it out on a flat surface nearby. Discard or recycle any trash, anything outdated, anything broken, anything you haven’t used in six months (and truly don’t expect to use soon), and anything you no longer want.
Step B: Assess
Looking at what’s left, decide what’s going back into this drawer and what needs to go elsewhere. Remove the items that should go elsewhere so you have only the new drawer contents remaining.
Step C: Contain
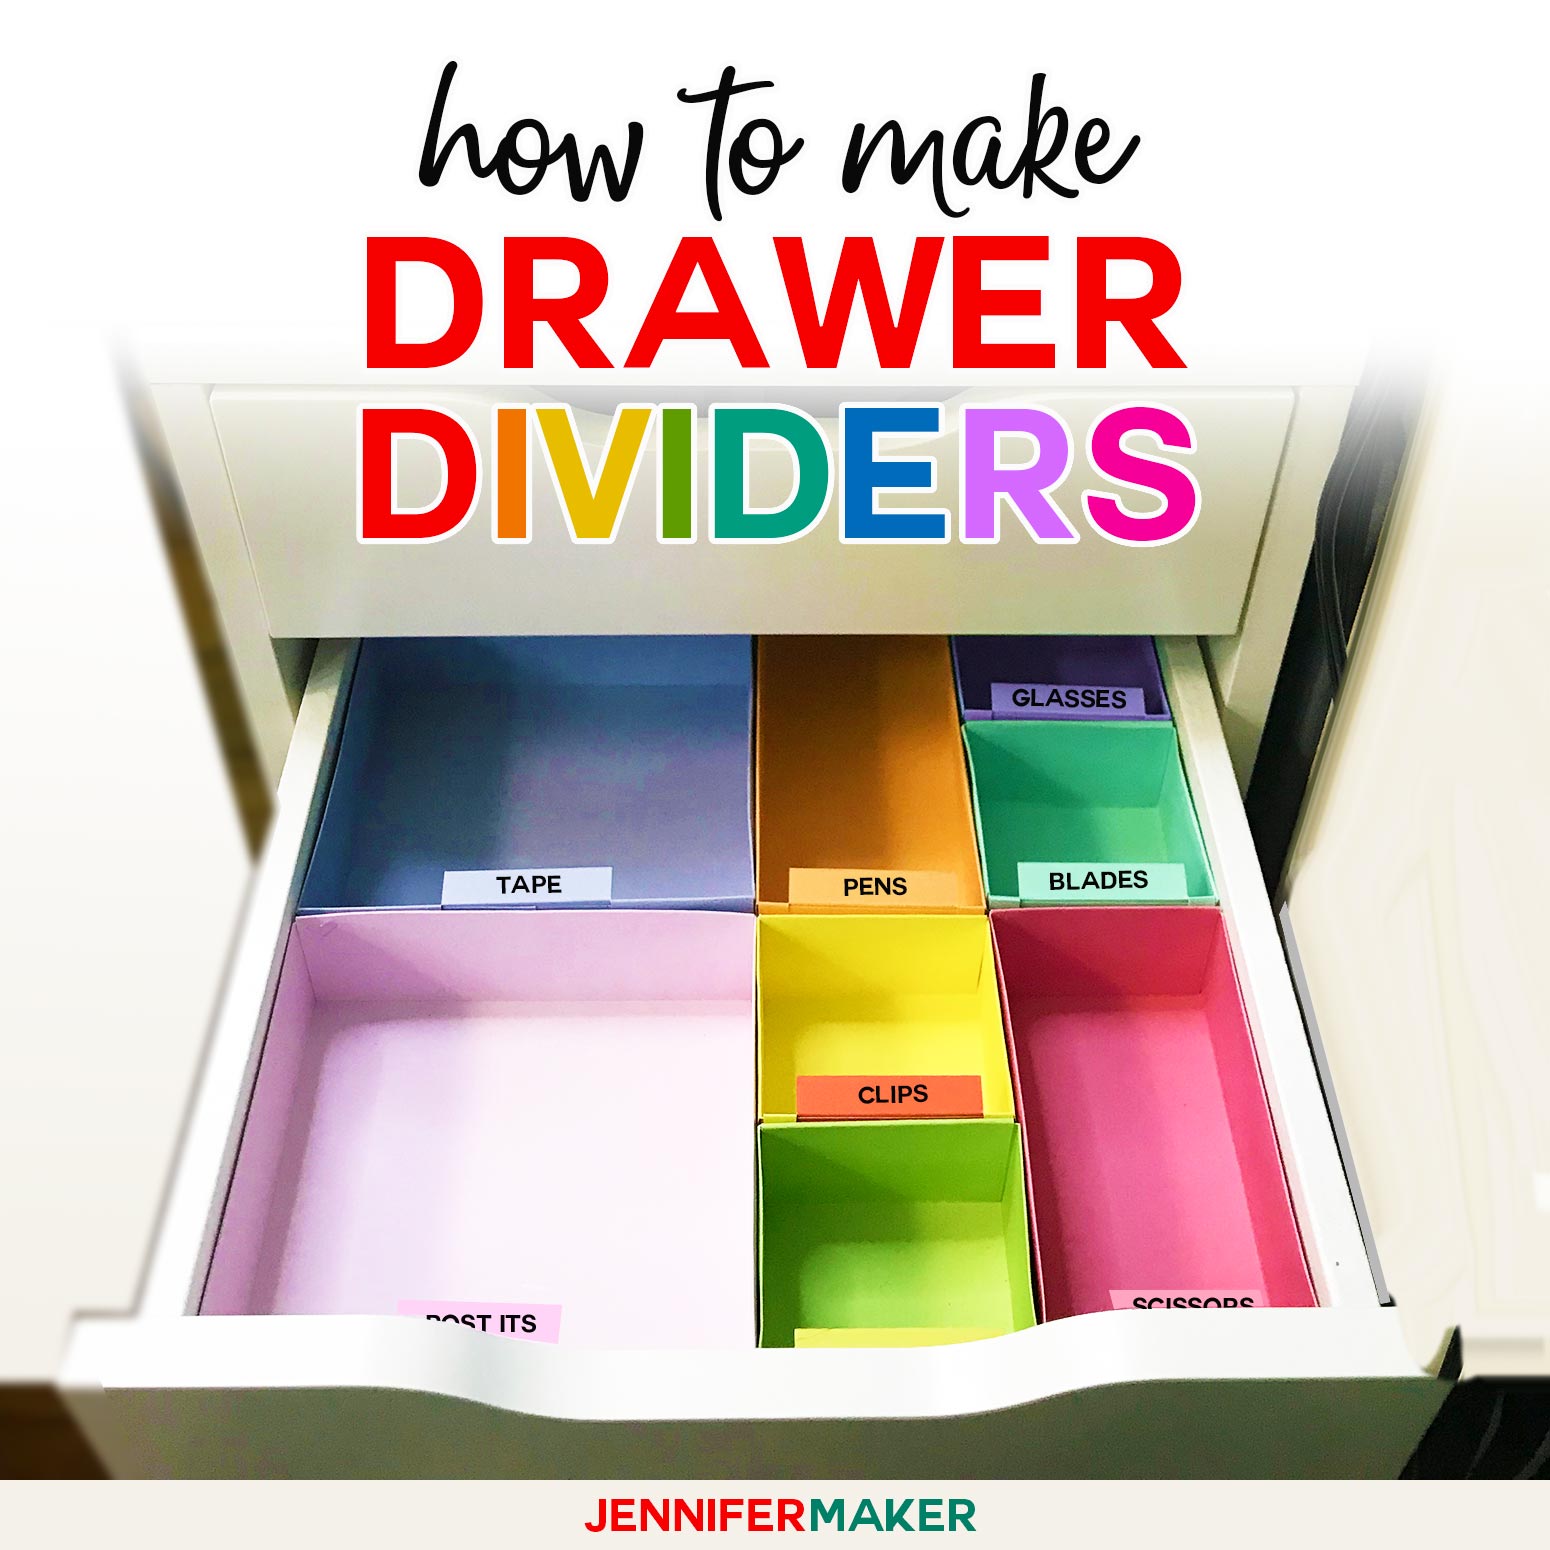
Take a piece of paper and cut it to the same size as the bottom of your drawer, then place it into your empty drawer. Place the drawer items on the paper in the order and arrangement you prefer—be sure to put items you use frequently near the front. Draw straight lines around the items. Remove the items and the paper. Match the sizes of squares on the paper to my DIY drawer dividers, then make as many dividers as you need (see the instructions below). Place your DIY drawer dividers into your drawer and put all of your items into the appropriate compartment, based on the paper you drew.
Step D: Tag
Label each compartment. Either write the name of the item on the tag, or use a label maker or your Cricut. Alternatively, you can even cut vinyl with craft icons to put in the bottom of each compartment if you need labels for pre-readers.
This is my P.A.C.T. organization system — I like to think of it as making a pact with myself to stay tidy and organized.
How to Make the DIY Drawer Dividers
Step 1: Get my DIY Drawer Divider Box Patterns
If you want to use the free DIY drawer divider boxes (Design #156) I used in this tutorial, you can download it from my free resource library. It is available as an SVG for your cutting machine, as well as a PDF (for hand cutting) and DXF.

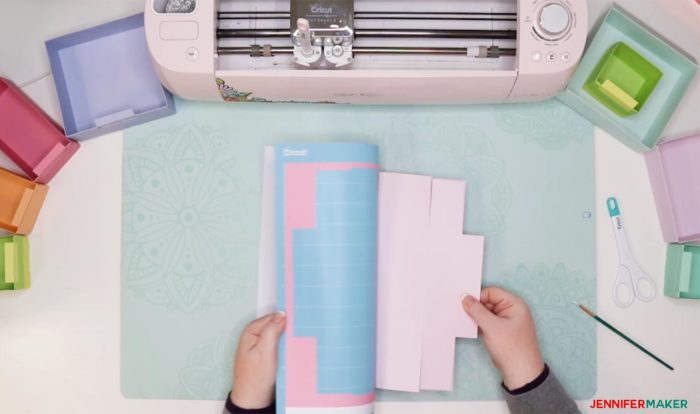
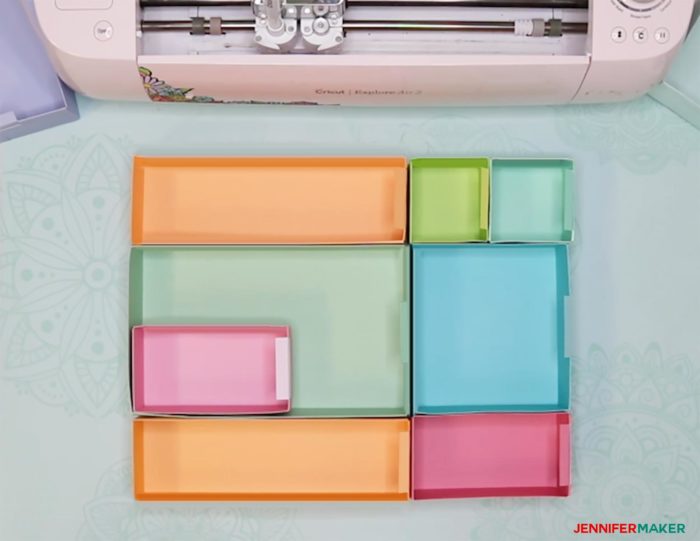
Step 2: Cut Out Your DIY Drawer Dividers
You can cut these dividers by hand or with a cutting machine like a Cricut. If you use a cutting machine (as I did), just upload the file to your design software. There are five different files – A, B, C, D, and E. A is the smallest and E is the largest.
NOTE: If you’re not sure how to upload an SVG file to Cricut Design Space, or you’re having issues (such as getting a message that says “unsupported file”), please watch my free training series, SVGs Made Simple. It will help you SO much!
Here’s what my drawer divider box template files looks like uploaded to Cricut Design Space:

IMPORTANT: These DIY drawer dividers have score lines which you need to set and attach to the base layer. Each drawer divider has two layers — a score line layer and a solid cut layer. You need to locate the score line layer and change it from “Cut” to “Score” in the Operation menu, then select both the score layer and the cut layer and click Attach so the divider itself is scored. If you’re not sure how to set score lines in Cricut Design Space, please check out my Scoring Guide.
When that’s done, go ahead and click Make It in the upper right corner of Cricut Design Space then confirm that your drawer divider design is set to both Score and Cut over on the left. If it looks good, click Continue, wait for your machine to connect, then choose your material. I select “Medium Cardstock” for my 80 lb. cardstock dividers, I also like to set the pressure to More to ensure a good clean cut.
For this project, we’re going to need some tacky glue — I do not recommend a tape runner as it probably won’t be strong enough to hold the box together. You may also want to use a scoring stylus or scoring wheel — either will work. For paper, I’m using this 80 lb. cardstock which has different colors on either side. You can also use Kraft board. And for the two largest drawer dividers, you’ll need to use 12” x 24” long cardstock like this.
I also recommend you use the blue LightGrip cutting mat when you’re cutting the cardstock — it makes weeding much easier!
Cutting Machine Users: When you remove your cardstock from your mat, be sure to flip your mat over and peel the mat away from the paper to avoid curling it. Go slowly so you don’t rip your paper.
Step 3: Fold your DIY Drawer Dividers
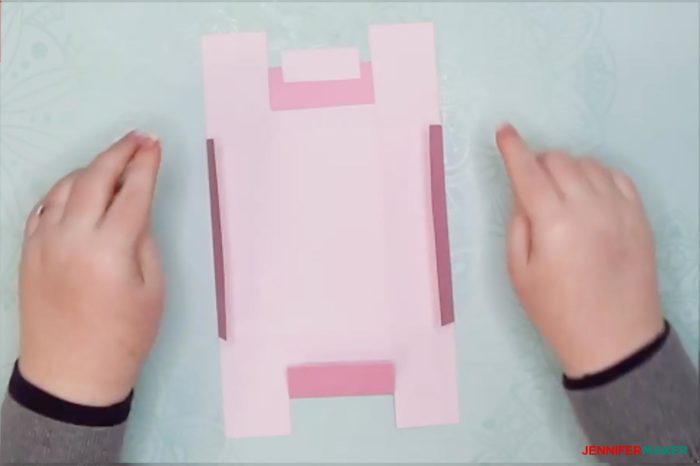
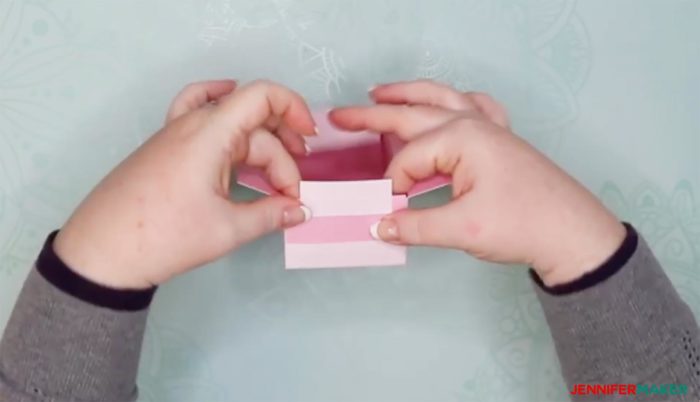
Now it’s time to fold your drawer dividers! Place your paper with the side you want to appear INSIDE face up. Below is a size B box with the dark pink side up.
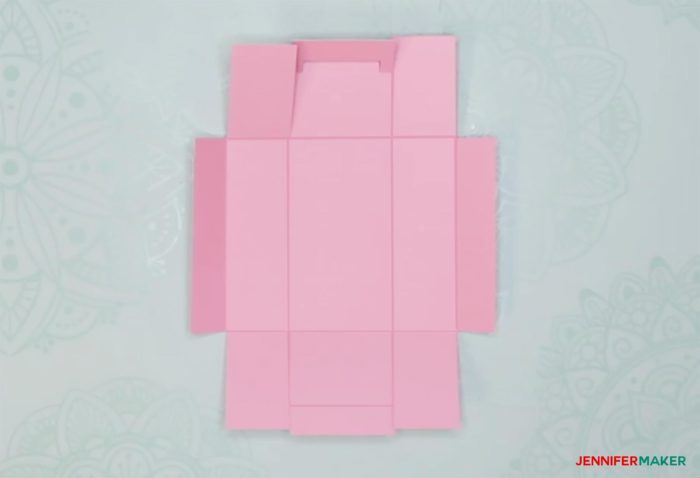
Fold your DIY drawer divider along the fold lines shown in the above photo. There are a total of 10 folds. You should fold them all INWARD to begin with.
Flip your paper over to the other side and fold in the four flaps so they are folded in the opposite direction, as shown in the photo below.
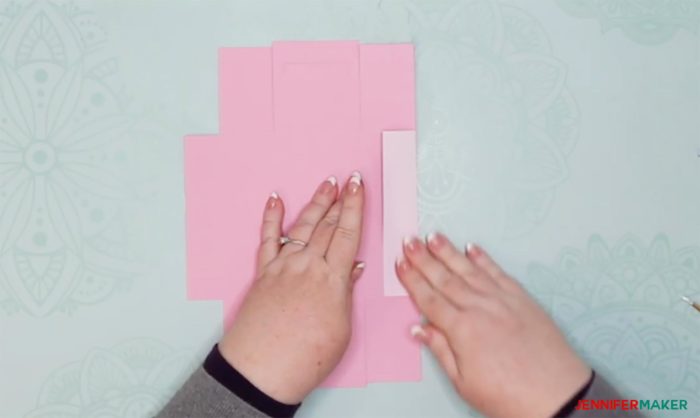
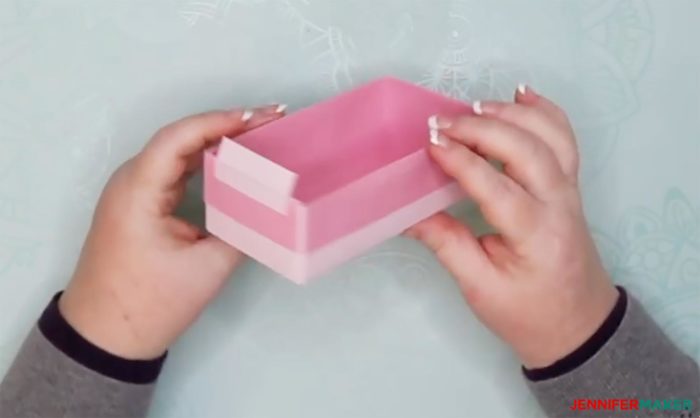
Step 4: Glue Your DIY Drawer Dividers
Time to glue your drawer dividers! Flip your folded paper back over and begin gluing the sides. I recommend you glue two sets of side wings at a time as shown below. If you’re not sure which side to glue on, try folding the box together first so you can see how it all assembles. And note that the wings go on the outside of the box, not the inside.
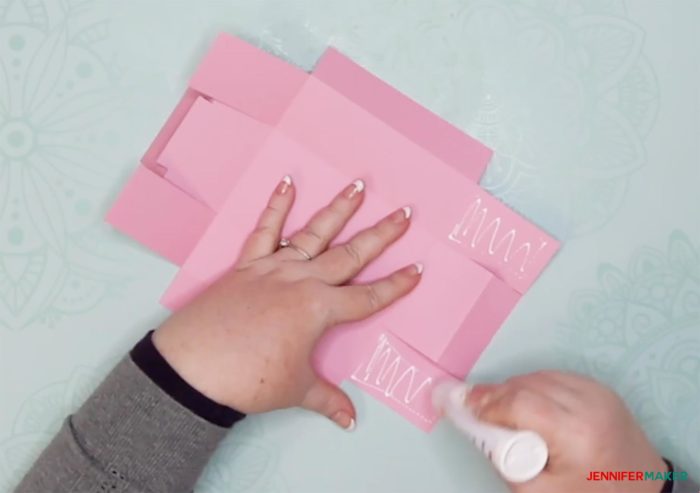
Once you have glue on your side wings, press down firmly and allow the glue time to take hold (about 30 seconds).
Turn the DIY drawer divider box over and glue the other side wings.
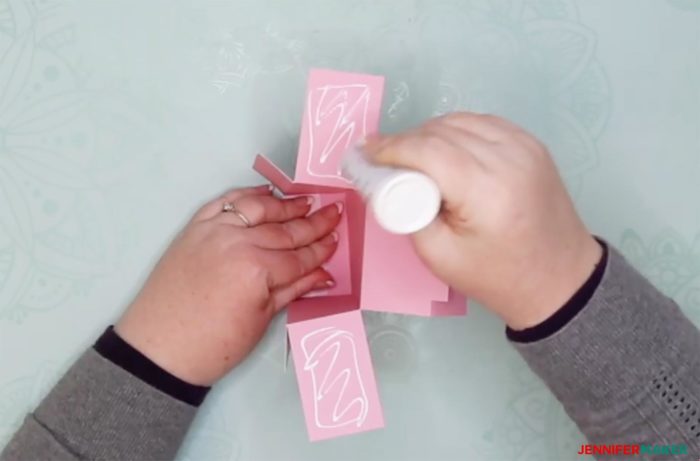
Now glue down all four side flaps to reinforce the top edges and strengthen your DIY drawer divider.
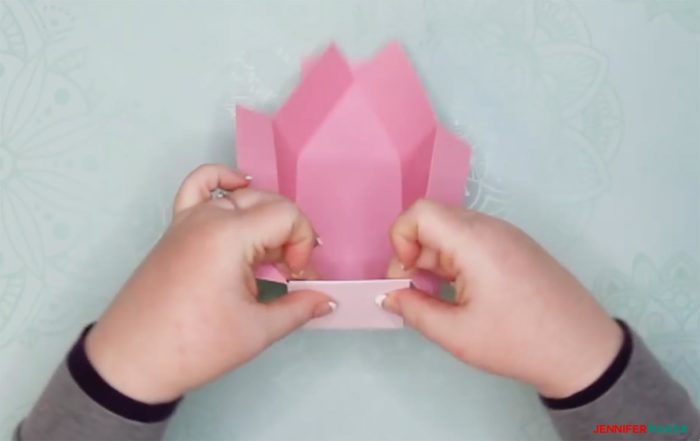
Your DIY drawer divider is now assembled!
Step 5: (Optional) Add a label to your DIY Drawer Divider
You can write on the tab that sticks up, or add some vinyl for a super fancy look! I’m using my Brother P-Touch Label Maker!
Step 6: Mix and Match Your DIY Drawer Dividers to Fit Your Drawers and Contents!
Get my free DIY Drawer Divider patterns/files
If you organize your drawers with my DIY drawer dividers, please share a photo in my helpful Cricut Facebook group or tag me on social media with #jennifermaker.
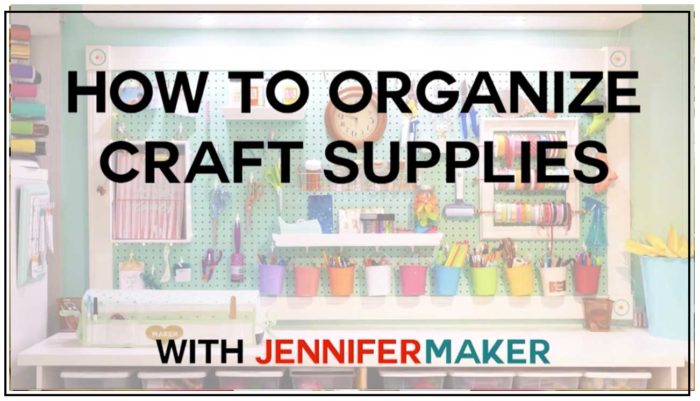
And if you haven’t yet joined Get Organized HQ, what are you waiting for?? It’s free and SO helpful! If nothing else, it’s way motivating … you will come away so inspired to get organized! Won’t you join us? I’d love for you to see my session on How to Organize Craft Supplies!!
Love,

Want to remember this? Save the DIY Drawer Dividers Tutorial to your favorite Pinterest board!
Thank you so much for all the wonderful things to make.
I LOVE this! Especially the bright, cheerful colors! Makes me want to run out to Ikea and buy an Alex set just so I can make these! I am new to Cricut, don’t even have one yet but doing the research and saving up! I def want a Maker! We homeschool and I sew/quilt and I am super-excited! I’ve been bingeing on your You Tube videos!
Hi, Louise! Aren’t these little boxes fun? And they WORK! My stuff is so much organized now thanks to these. I definitely recommend a Cricut Maker — watch for deals around the holidays!
Oh, be still, my heart! We have no less than SIX Alex chests in our house! Obviously, we love them, and now they Can be beautifully organized! I love this project! Thank you so much!
Wonderful! They are great pieces and a nice way to stay organized!
Love these little boxes and they are so much fun t o make. You are a wonderful teacher. I learn so much every time I use your files
I love these boxes, and luckily I have 3 sets of the IKEA Alex drawers! Only shame is the that the 2 longer ones don’t fit perfectly together lengthways, only widthways. How do you organise pens etc?
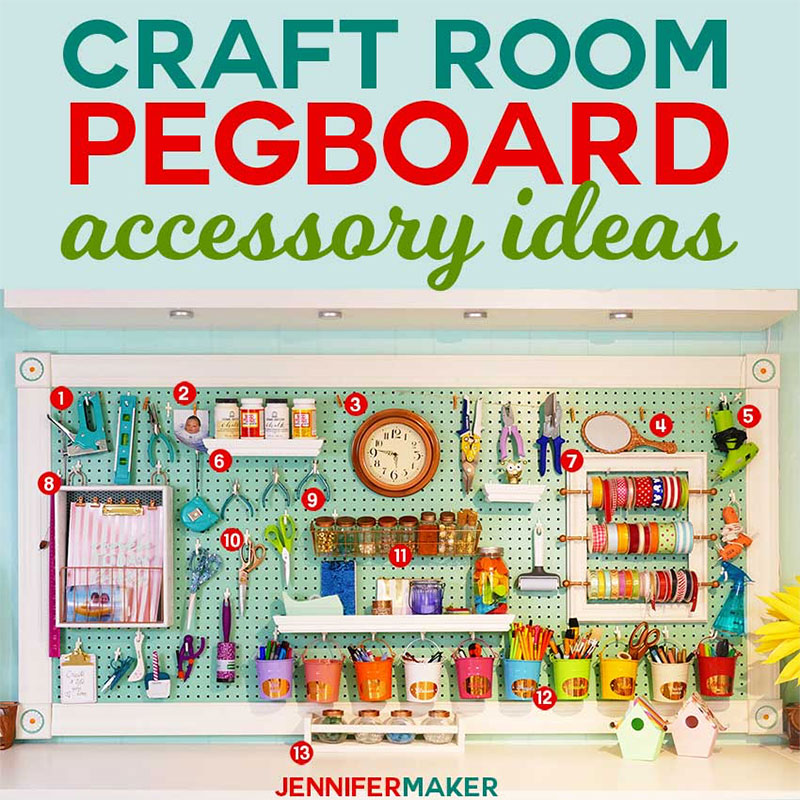
This post shows my entire craft room and how I organize everything!
I love the concept of these drawer organizers. However, I would love to be able to resize them to meet my needs. I want to leave the same height but, need to resize the inter holding areas to anything from 8″x4″ to 3.25″x2.75″ area. How can I size them without reinventing your wheel? Thank you so much for your support.
Hi Tricia, you can try ungrouping and playing around with it in Design Space but most likely that needs to be done in Inkscape or Adobe Illustrator.