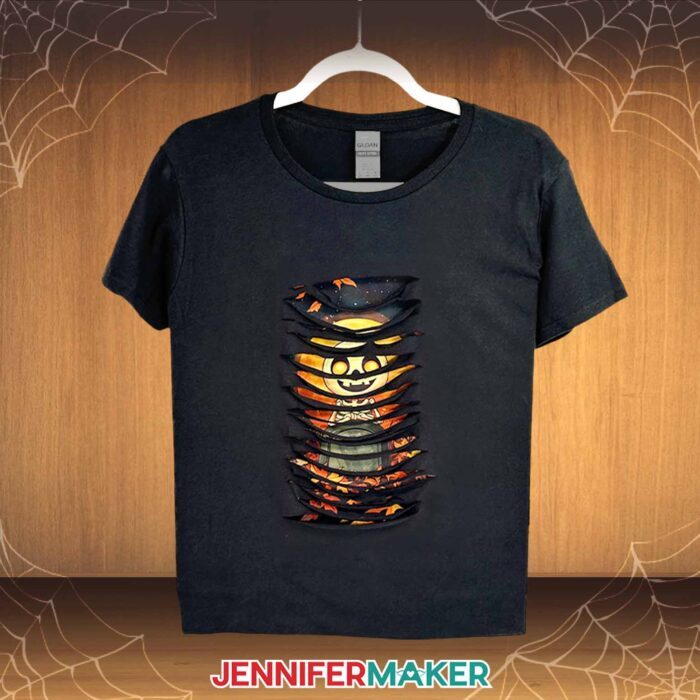
Learn how to make a peekaboo sublimation shirt with a spooky twist!
Since delving into the magical world of crafting, I’ve created many enchanting spins on a typical T-shirt. I now have a wardrobe full of unique, one-of-a-kind shirts that make dressing for the season even more fun! When I saw this new style with cuts and tears revealing a design underneath, I knew I had to learn how to make one — and share my findings with you, of course! Let’s learn how to create a Peekaboo Sublimation Shirt, with no sewing at all!
Watch the full step-by-step video tutorial on how to make a peekaboo sublimation shirt:

Peekaboo shirts have sublimated panels inside, which are visible through cuts or tears in the shirt. It’s almost like the design is hidden and trying to escape! You might think that sewing is involved, since we’re using two layers of fabric, but I’ve got good news — this is a no-sew project!

After playing around with making these peekaboo T-shirts, I found that they look best in darker colors which really allow the design inside to pop! Plus, we don’t often get to use dark shirts with sublimation projects, so this is the perfect way to do that without having to use more complex sublimation techniques. I love this sublimation project too because you get the beautiful, full range of color from a sublimated design, but with a shirt that’s more breathable and comfortable than polyester.

However, while we don’t have to use polyester shirts for this project, fiber content still matters when it comes to creating the rips in the shirt. Learn which T-shirts I recommend for peekaboo shirts — is 100% cotton the best, or a blend? I tested multiple kinds, and some worked well, but others not so much. Be sure to tune in to the video tutorial to find out which type passed the test!

In the tutorial, I’ll walk you through the whole process of creating a sublimated panel to attach to the inside of a T-shirt. Then I’ll show you how to place the cuts within the open area of your shirt so the sublimated design peeks out from behind.

Speaking of designs, I’ve got four new delightfully spooky designs to share with you. There’s a cat in a pumpkin, a sweet skeleton, a haunting ghost, and a glowing jack-o-lantern. They’re so cute, I can’t pick a favorite! You can use one of these, or another PNG to make your peekaboo sublimation image.
First, we’ll prepare the design in Google Docs, then print it using a sublimation printer onto sublimation transfer paper. Then we’ll press the design onto a panel of polyester fabric. But what if the panel and design are larger than your heat press? No worries! I’ll show you how to press your panel in sections for a beautiful, seamless transfer.
You’ll need the usual sublimation supplies like white cardstock, uncoated white butcher paper, and heat tape. Then, of course, you’ll need a heat source to press the printed design onto the polyester panel. I’ll demonstrate with my 12″ by 10″ Cricut EasyPress, but you can use any large heat press to do the job.

Next, we’ll cut the shirt using a rotary cutter. It might feel strange to cut a perfectly good shirt, but it’s part of the process! Just have fun with it!
You might be asking, “How do we get perfect placement of the design to make sure the cuts and tears on the shirt are in the right spots to let the design peek through?” I’ll show you how, using a printed template. Cutting the slits can cause your shirt to shed some fibers, so make sure you have a lint roller handy.

Finally, I’ll show you how to attach the sublimated design to the inside of the shirt with fabric tape. The tape is super sticky, so be careful when you’re placing it on your peekaboo panel!

Sublimated peekaboo shirts are a super fun, slightly edgy twist on a sublimation T-shirt. They’re a blast to wear for Halloween, but once you have the techniques down, you can create peekaboo shirts with other themes and designs, too!

Let me show you how to make a peekaboo sublimation shirt! This post contains some affiliate links for your convenience (which means if you make a purchase after clicking a link I will earn a small commission but it won’t cost you a penny more, there is no additional cost)! Read my full disclosure policy.
Materials to Make a Peekaboo Sublimation Shirt
View my Amazon shopping list for the exact items I used!
-
- 65% Polyester/35% Cotton Dark Heather Shirt -OR-
- 100% Cotton Dark-Colored Shirt (if you’re gifting a shirt, get pre-shrunk blanks. If you’re making your own, wash and dry it without fabric softener before beginning)
- White Polyester Material (larger than the design area)
- 8.5″ x 14″ A-Sub Sublimation Paper
- A way to cut your faux leather – I’m using the Cricut Maker 3, but you can also use the Cricut Maker, a Cricut Explore Series machine, the Cricut Venture, or even the Cricut Joy Xtra
- Cricut Purple StrongGrip Machine Mat 12″ x 12″
- Sublimation Printer or Printer Converted for Sublimation (I used a converted Epson EcoTank ET-2800) -AND-
- Sublimation Ink
- Heat Press – I used the Cricut EasyPress 12″ x 10″ -AND-
- Cricut EasyPress Mat 20″ x 16″
- 12″ x 12″ White Cardstock (for sublimation)
- Uncoated White Butcher Paper (for sublimation)
- Ruler
- Heat Resistant Tape
- Brayer
- Lint Roller
- Fan (for ventilation)
- Handheld Rotary Cutter
- Self-Healing Cutting Mat
- Scissors (to fine tune the slits)
- 1″ Painter’s Tape
- 5/8″ Wide Permanent Adhesive Fabric Tape (one roll is enough for about 5 shirts)

How to Make a Peekaboo Sublimation Shirt

Peekaboo Sublimation Shirt
Learn how to create a Peekaboo Sublimation Shirt!
Materials
- 65% Polyester/35% Cotton Dark Heather Shirt -OR-
- 100% Cotton Dark-Colored Shirt(If you’re gifting a shirt, get pre-shrunk blanks. If you’re making your own, wash and dry it without fabric softener if you want before beginning)
- 8.5” x 14” A-SUB 125g Sublimation Paper
- White Polyester Material larger than the design area
- Uncoated White Butcher Paper
- 12” x 12” White Cardstock
- Design #648 (My free PNG design files available in my free resource library - get the password by filling out the form at the bottom of this page)
Tools
- Sublimation Printer - I used a converted Epson EcoTank ET-2800
- Sublimation Ink
- Heat Press - I used the Cricut EasyPress 2 12” x 10”
- Fan for Ventilation
- Heat Resistant Tape
- Lint Roller
- Cricut EasyPress Mat, 20” x 16”
- Scissors (to fine tune the slits)
- Ruler
- Brayer
- Handheld Rotary Cutter
- Self-Healing Cutting Mat
- ⅝” Wide Permanent Adhesive Fabric Tape -one roll will be enough for about 5 shirts
- 1” Painter’s Tape
Instructions
STEP 1: GET MY FREE PEEKABOO DESIGNS
First, download my Peekaboo Sublimation Shirt designs from my free library -- look for Design #648. Alternatively, you can use the Save This Project form near the top of this post and the design link will be emailed to you.
There are four designs in the folder: a cat, a ghost, a jack-o-lantern, and a skeleton.
I used an AI art generator to create the designs, then made them even more fantastic with image editing software. If you want to learn more about the process, check out my workshop on creating and using AI-generated art in your crafts.
TIP: If you’re not sure how to upload, go to jennifermaker.com/svgs because the steps are similar with Google Docs and PNGs.
STEP 2: PREPARE AND PRINT YOUR DESIGN
- Open Google Docs in the Google Chrome web browser on your computer.
NOTE: You will need a free Google account to use the free Google Docs software.
TIP: You can also download and open the Google Docs app, but you won’t be able to install or access any printer profiles from a mobile device, and you’ll also have limited access to features, so I do not recommend it on a mobile device. - Click “Blank document” at the top left to open a new document.

- Go to the File menu and select “Page setup.”
- Check the box next to “Portrait.”
- Change your margins to “0” to use more of the page.
- Change your Paper Size to match your sublimation paper size. I’m using 8.5” x 14” or legal size paper.
- Click “OK” to apply the settings.
- Go to the Insert menu, select “Image,” and select “Upload from Computer.”
- Select the sublimation design you want to use.
NOTE: I’ll demonstrate with the cat design.
TIP: You’ll most likely find it in your Downloads folder. - Click “Open.”
- Click the area that says “Untitled document” at the top and type a name for the file.
- To resize the design, click “Image Options” at the top of the canvas.
NOTE: You can also open the menu by going to “Format,” “Image,” and “Image Options.” - Select “Size & Rotation.”
- Keep the “Lock aspect ratio” box checked to maintain the design’s proportions.
- Change the “Width” field to the design area you want to create. I’ll make my design 8” wide.
NOTE: If you’re making a different size shirt, you can adjust the panel and design size to fit the look you want as long as it will fit your printer paper. Keep in mind, the cuts should be 1-2” smaller than the design so the panel’s edges aren’t visible. - The “Height” field will automatically adjust proportionately.
- Click the image and select the “Wrap text” icon from the menu that appears below it.
NOTE: This setting lets you move the design anywhere on the page. - Click and drag the image to the center of your page, as that ensures it won’t get cut off at the edges.
- Go to the File menu and choose “Print.”
- Select your sublimation printer under “Destination.”
- Click the arrow beside “More Settings” to select “Print Using System Dialog.”
- Your print menu may look different - just make sure the sublimation printer is selected, that you “flip horizontally,” and select the highest quality matte paper setting.
- Load sublimation paper correctly into your sublimation printer.
NOTE: Check the packaging for information on how to load the paper. - Click “Print.”
- Allow the print to dry before handling it, as the ink can smear.
NOTE: The printed design will appear lighter before pressing. - Your project is ready to press!


STEP 3: PREPARE AND PRESS THE PEEKABOO PANEL AND SHIRT
IMPORTANT: Good ventilation is important any time you use sublimation. Have your windows open and a fan going to improve ventilation.
- Place your white polyester fabric on a self-healing mat.
- Put the print on top, then cut the fabric about an inch larger on each side.
NOTE: I used my handheld rotary cutter and kept my other hand safely out of the way. Check the safety features on your tools, especially around the sharp blade. If yours has a blade guard like mine, re-protect the blade as soon as you’re done with the tool. S - Set your heat press to the correct temperature and time. According to my Sublimation Cookbook, the EasyPress 2 needs to be set at 385 ℉ (196℃) to preheat polyester fabric for 10 seconds.
- Place your pressing mat on your work surface with protective white cardstock on top.
- Lint roll the polyester panel all over to remove dust or debris.
- Place the panel on the protected pressing mat.
- Lightly press the panel all over for 10 seconds to remove excess moisture from the material, and smooth out any extra wrinkles.
- Once the panel is cool, center the printed design face down on top of it.
- Use heat-resistant tape on all four sides to secure the design to the fabric, making sure it’s smooth.
- Place a piece of butcher paper on top of the panel and taped design.
- Set the EasyPress to 385℉ (196℃) and the timer to 40 seconds.
- Press the design with light pressure.
NOTE: If your design is larger than the pressing area, press it in two or more sections with little overlap. - After pressing, allow the design to sit for approximately 10 seconds to help prevent ghosting.
- Remove the butcher paper, tape, and transfer sheet to reveal the panel.
NOTE: Keep the used design sheet nearby because we’ll use it as a template in a later step. - While your press is still set to 385℉ (196℃), set it for 10 seconds to preheat the T-shirt.
- Fold your shirt in half vertically and press it for 10 seconds along the crease. When you open it up, you have a center line and smooth fabric on either side. Set it aside for now.
- With the fabric panel design-side-up on your self-healing mat, add permanent fabric tape right outside the ink on all four edges, leaving the backer papers in place.
TIP: This fabric tape is very sticky, so don’t let it stick where you don’t want it! It’s ok if the corners overlap. - Safely cut along the tape’s outer edges using your handheld rotary cutter.
TIP: The tape’s adhesive will help keep the edges from fraying, but you can trim any excess threads with scissors.


STEP 4: CUT YOUR PEEKABOO SHIRT
- Place the used design paper face up on your self-healing mat so we can make it into a cutting template.
NOTE: The design will be faded, but you should still be able to see enough to find the edges. - Add 1” painter’s tape to the edges overlapping the design to make a guide 1” in from the four edges.
- Bring the template’s long edges together to make a vertical crease down the middle.
- Place the T-shirt face up on your work surface with the vertical crease visible.
- Put the template on the shirt, centering the design by matching up the top creases.
TIP: You can also use my T-shirt Guide Rulers to help with design placement. - Use a ruler to find 3” down from the collar’s seam, then align the lower edge of the template’s top tape with that mark.
- Align the bottom crease on the template with the vertical line on the shirt.
- Use painter’s tape to hold the template in place on the shirt.
- Without shifting the design, slide a self-healing mat larger than the design area inside the shirt to protect the back of the shirt from the cuts.
- Adjust the shirt around the cutting mat so the layers are smooth, seams match, and the design is centered correctly.
- Safely holding the shirt and template in place, make cuts across the inside of the template, avoiding the taped-off sections.
TIP: To get a more “ripped” look, you can angle your cuts, randomize their widths, or make some shorter than the others. Just don’t make them too close together unless you’re ok with a section possibly tearing. I like the look of thinner sections near the middle and stopping my cuts about 1.5” from the bottom to avoid showing the tape if the fabric sags! - Remove the template and tape to see your slices!
TIP: If your blade didn’t go all the way through on any slices, you can either leave the pieces connected or cut them with scissors. - Remove the inside mat.
- Turn the shirt inside out with the front face up.
- Cutting the slits can create lint and loose threads, so lint roll all over the cuts and surrounding fabric very well so they don’t interfere with the fabric tape.
- Place the prepared design face down over the cuts to make sure the decorated area is inside them. The design’s taped edges should be on the uncut shirt sections.
TIP: The panel doesn’t have to be perfectly straight, but make sure the top is oriented correctly. - Once the panel is positioned, place your ruler on the design near the top edge to hold it in place, then carefully lift the taped section and remove the backing paper without letting the taped panel touch the shirt.
- Make sure the shirt is smooth, then lay the taped panel down and press it in place from the center outward to prevent any wrinkles.
TIP: Smooth any wrinkles before pressing the tape in place. - Once the top is secure, carefully smooth the shirt and panel down toward the bottom edge.
- Use Steps 16-18 to secure the bottom and then the side edges.
- Once all four edges are in place, use your brayer to really smooth the tape into place.
- Turn the shirt right-side-out and look at the design through the cut area.
- Adjust the slits and fabric strips as needed to create the look you want by pulling the edges to make them thinner, snipping small connections.
- If you find any wrinkles in the taped area, gently reach between the panel and shirt to grasp the top layer near the wrinkle.
- Hold the panel and shirt layer outside the tape steady with your other hand.
- Gently stretch the T-shirt layer in toward the design to help smooth out the wrinkle.


STEP 5: SHOW IT OFF!
Here is what my finished peekaboo sublimation shirt looks like!
Notes
Finished Size:
Print Size: 8” x 13.5”
Care: Wait at least 24 hours before washing. For best results, I recommend washing by hand in cold water with mild detergent. Hang to dry.
Answers to Your Questions About Making Peekaboo Sublimation T-Shirts
Q: I want to create my own peekaboo sublimation shirt. How do I design my own panels?
A: You can learn how to design your own peekaboo sublimation shirt using Canva in my ADVANCE program. Learn more about ADVANCE here!

Q: What can I use if I don’t have a sublimation printer?
A: You don’t need a sublimation printer to make a sublimated peekaboo shirt! Here are some ways to make this project without a sublimation printer:
- Use Infusible Ink transfer sheets to transfer a pattern onto a piece of polyester fabric.
- Order a sublimation print online from a vendor.
- Use printable HTV and heat-transfer onto a piece of compatible fabric. I recommend printing two copies of the design: one on copy paper to use as a template, and one on printable HTV.
- Use heat transfer paper or an iron-on design on a piece of compatible fabric.
- Use a piece of patterned fabric or cut the design out of an old or thrifted T-shirt.
Q: What lasts longer, sublimation or vinyl?
A: With proper care, both can last a long while, but sublimation will never crack, peel, or fade the way that HTV can. Take care to wash your sublimated shirt on a cold, gentle cycle with mild detergent and hang it to dry, and the sublimation design will last indefinitely.
Q: Is it worth buying a sublimation printer?
A: While you don’t absolutely need to buy a sublimation printer to make sublimation crafts, the flexibility, control, and convenience of not having to order prints was worth it to me. The most affordable way to buy a sublimation printer is to buy an Epson EcoTank printer and convert it for sublimation.
Q: Can I put sublimation ink in any printer?
A: No! While it’s possible to convert some inkjet printers for sublimation by filling them with sublimation ink, not all printers can do this. If you’d like to convert a printer for sublimation, I recommend using an Epson EcoTank that has never been used for inkjet printing before.
Q: What printer is best for sublimation?
A: “Best” is subjective, and depends on your unique needs and wants from your sublimation printer. Cost, print quality, software — these are all factors that need to be taken into consideration. Check out my Best Sublimation Printers blog post for help determining which sublimation printer is best for you.
Q: Do you peel sublimation hot or cold?
A: Sublimation projects may vary in whether or not the design should be removed while the blank is still hot or after it’s cooled. Refer to my Sublimation Cookbook for project-specific instructions. For the polyester panels in my peekaboo shirt project, you should peel them when they are cool to avoid ghosting (no pun intended) of the design.
Q: Can you heat sublimation too long?
A: Applying too much heat for too long can cause damage to the item and give it a brownish cast in areas. I recommend following my Sublimation Cookbook, which helps take the guesswork out of figuring out the right temperatures and times to press your sublimation project.
Q: How do I care for my peekaboo sublimation shirt? Can you wash sublimation shirts?
A: To get the longest life out of your shirt, I recommend you handwash it or wash it in your washing machine on a gentle cycle with cold water and mild detergent. Don’t use a clothes dryer — instead, dry it flat for the best results.
Q: Why did my sublimation wash off my shirt?
A: If you washed your sublimation shirt and found that the design faded a lot or is completely gone, you probably used fabric that wasn’t polyester or didn’t have a high enough polyester content. 100% polyester sublimates best, and never go below 65% polyester for sublimation projects.
Q: Why can’t you sublimate on black?
A: Sublimation ink is transparent, so it needs a light (ideally white) background to show up. Another important thing to note, is just like with inkjet printing, sublimation printing doesn’t include the color white. So if there’s white in your design, it will depend on the white from your blank to show through the ink. Always sublimate on a white (or very light colored) blank — otherwise your project likely won’t turn out how you expect.
Q: Why is my sublimation print color so dull?
A: Your sublimation print color will appear much more dull on the paper than it will after it is sublimated. If your image looks faded or the colors look wrong, don’t worry! The vibrant colors will appear when you use your heat press to transfer the image to your faux leather or another other sublimation blank.
Q: Can you show me how to fix sublimation mistakes?
A: Mistakes happen! I’ve been crafting for years and I still have the occasional mishap. Mistakes mean you’re learning! To help, check out my post Sublimation Mistakes I Made So You Don’t Have To for my best headache-saving sublimation tips (and pitfalls to avoid).
Get my free PNG files to make peekaboo sublimation shirts!
(If you do not see the signup form above, click here.)
I love seeing what you make with my designs and how you use them! Please share a photo of your peekaboo sublimation shirts and other sublimation projects in our Facebook group or tag me on social media with #jennifermaker.
Love,

Want to remember this? Save this Peekaboo Sublimation Shirt Tutorial to your favorite Pinterest Board!