
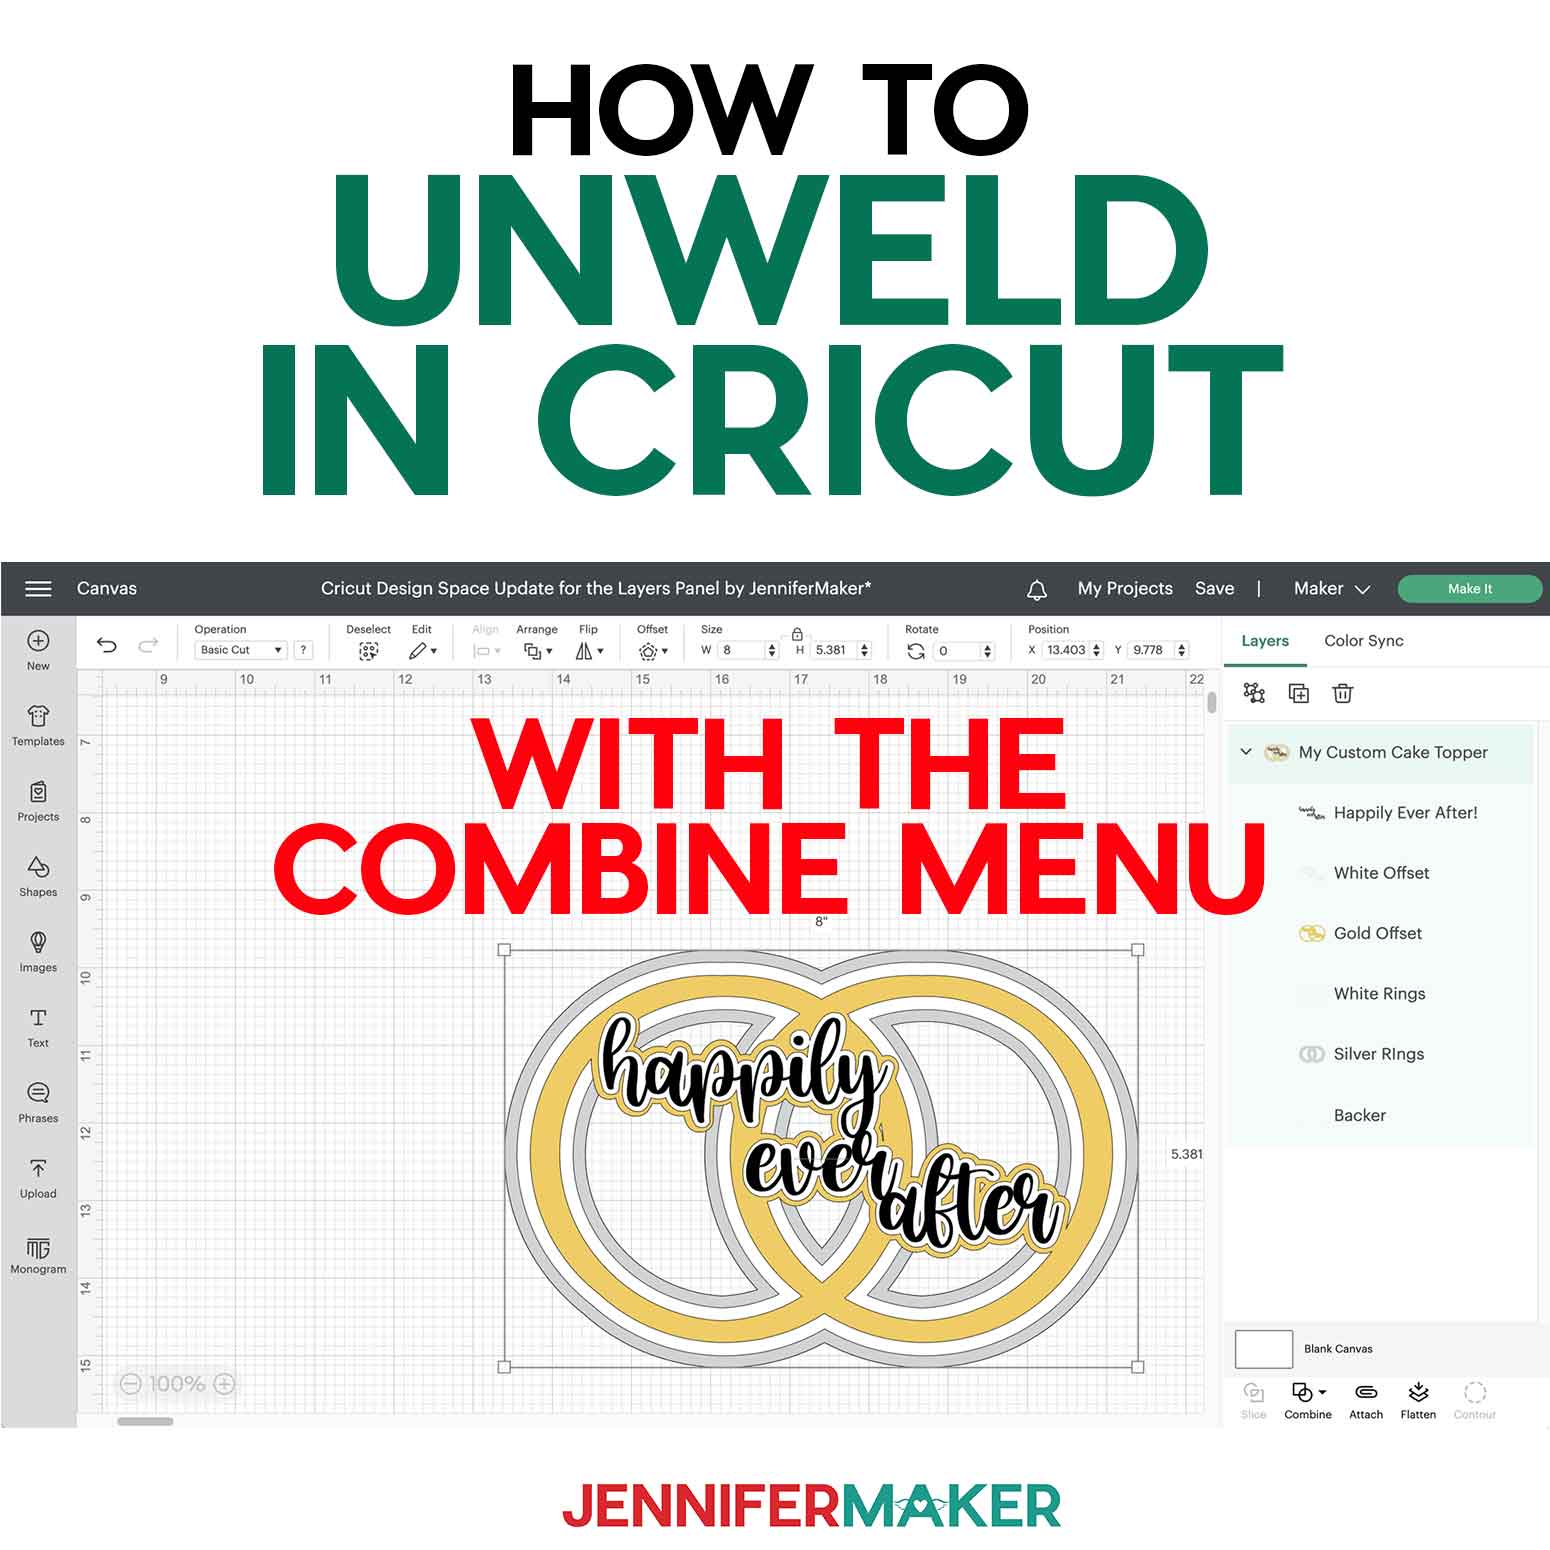
Learn how to unweld in Cricut by using Unite instead of Weld!
If you’ve ever used the weld feature only to later realize it just not in the right position or the way you want it, I have good news! There’s now a NEW feature that lets you reposition your layers without having to use the Undo button … it’s the new Combine menu with Unite, Subtract, Intersect, and Exclude. If you use Unite instead of Weld, you can reposition your layers to your heart’s content, but they will still cut out as if they are welded! Wanting to unweld is a common issue in Cricut Design Space, and I’m so happy we now have a way to do this!
Where is the Unweld button?
There is no “unweld” button. Rather, to “unweld,” you need to first use the right command, which is NOT the Cricut weld tool. If you’ve already welded, this method will not work — but you can use it for any new project so you can effectively get the unweld function from here on out. This is the only way to “unweld.”
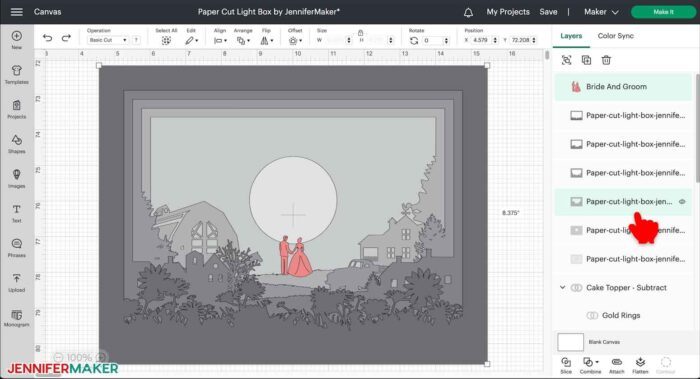
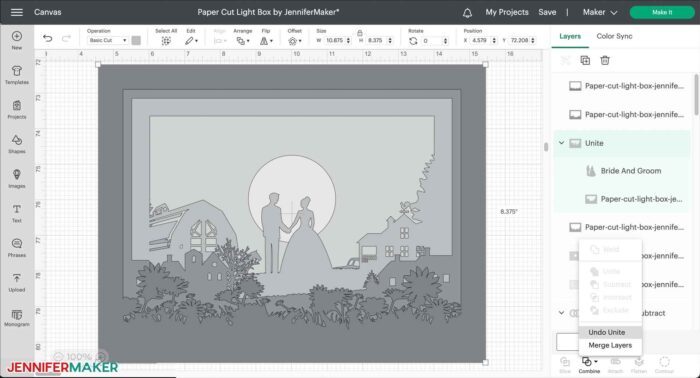
First select the different layers you want to be united together into a single image, like this couple and the farm layer. (The paper cut scene is one of my SVG files from my Paper Cut Light Box Tutorial along with a free image from Cricut Access.) Hold down the Shift key on your keyboard as you click to select two layers in different spots.
Second, go to the Combine menu in the lower right, click it, and select Unite. (Tip: You can also just right click and select Combine > Unite.)
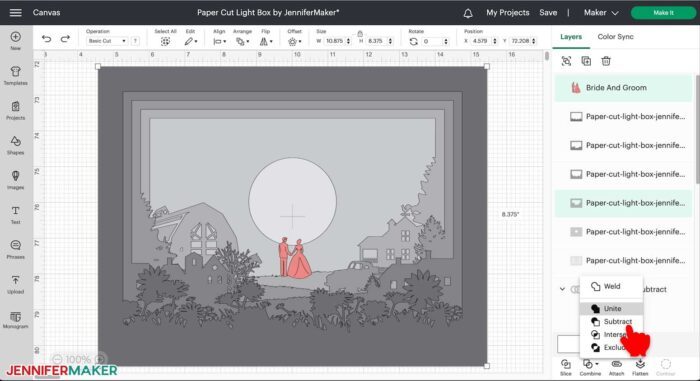
The two layers will unite and behave as if they are welded, except it is NOT permanent like weld. This tool works like weld in that turns separate images into new shapes. If the layers were different colors, as mine were, they become a single color and single shape. When you cut this united layer out on your Cricut, regardless of whether it is a Cricut Maker or Cricut Joy, it will be a single piece. All overlapping cut lines in these united layers will disappear.
Now to “unweld,” click the Combine menu again and choose “Undo Unite.”
The layers are now un-united and “unwelded,” and everything is back to being separate shapes! Unite (and Undo Unite) is the best way to “unweld” back to individual objects and a great tool for the Cricut Design Space software!
Note: If you have an older project with a welded image, you may be able to use the Contour Tool or Slice Tool to separate it to some extent.
The Unite function is part of a new update (version 7.20) with other awesome new changes! Keep reading this blog post to learn more.
Cricut Design Space Update
A new version of Cricut Design Space for Desktop – version 7.20 – is starting to roll out and there are several wonderful new features and important changes I want to show you, as they will change how you’re using the software for the better. The big change in this version is the Layers Panel and the Combine Menu – you can see how it looked before this version on the left side of the screen, and how it looks now on the right.
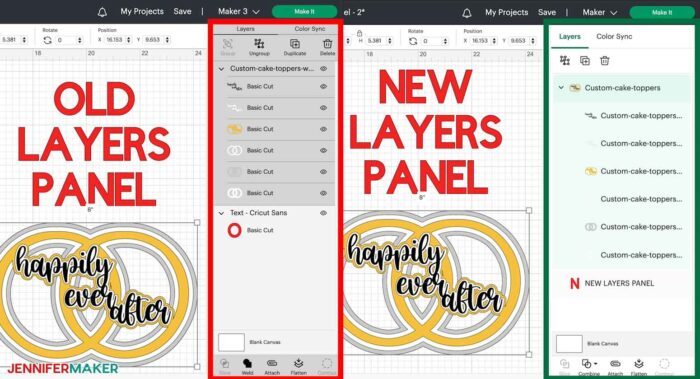
First, let me reassure you that EVERYTHING is still here and nothing has been removed. Note that the icons are still here at the top, though they have been streamlined in the new version. The layers are all here, but you can now rename them, and the buttons at the bottom are there … you’ll note that Weld appears to be missing, and in its place there’s a Combine button. If you’re watching this video to figure out where Weld went, it’s right under the Combine button… but as you’ll see, there’s so much more there now, too.
Let’s look closer at each change. I’ve made a whole video that walks you through all the changes here:
Group, Ungroup, Duplicate, and Delete
First, the buttons above the Layers Panel – before we had four buttons: Group, Ungroup, Duplicate, and Delete. Now we have Group & Ungroup merged into one button, and Duplicate and Delete just like before. The labels are no longer underneath the buttons, presumably to make more room for something yet to come, so if you can’t remember which button is which, just hover your mouse over them and the label pops up!
The Group button will darken when you have two or more layers selected, like this. And when you have a group selected, the button will change to Ungroup. I like this change – no need to have two buttons there when one will do.
How to Rename a Layer in Cricut Design Space
Below these buttons, in the Layers Panel itself, Cricut has added a feature that we’ve all been requesting for a long time – the ability to RENAME layers. To rename a layer, just double-click on a layer name and an edit box will appear that you can type right into. When you’re done renaming, just press the enter or return key on your keyboard, or click somewhere else on the Canvas. You can also rename a layer by right-clicking on it with your mouse or tapping on your trackpad with two fingers to access the drop-down menu and then just choose rename at the top.
Slice, Weld (Combine), Attach, Flatten, and Contour
Now down at the bottom of the Layers Panel, we used to have Slice, Weld, Attach, Flatten, and Contour, and these are all the same except the new Combine menu is where Weld used to be. Note that these buttons will all appear “greyed out” and unclickable until we select at two layers on the canvas, like these layers in my new cake topper. Now we can see all the options. If we click once on Combine, we get a menu with new options – Weld is at the top, followed by four new functions – Unite, Subtract, Intersect, and Exclude. These are really special functions that I think you’re going to love. Functions like this are included in software like Adobe Illustrator, which I’ve been using for over 30 years, and I’m excited to see them come to Cricut Design Space! Let’s see how each one works.
First, rest assured that weld works exactly as it did before. Whenever you want all selected layers to glue themselves together permanently, just select Weld. Your new layers become a Weld Result, which you can see listed in your Layers Panel. If you need to undo this, you can immediately click undo, but otherwise, this is a permanent change.
Unite
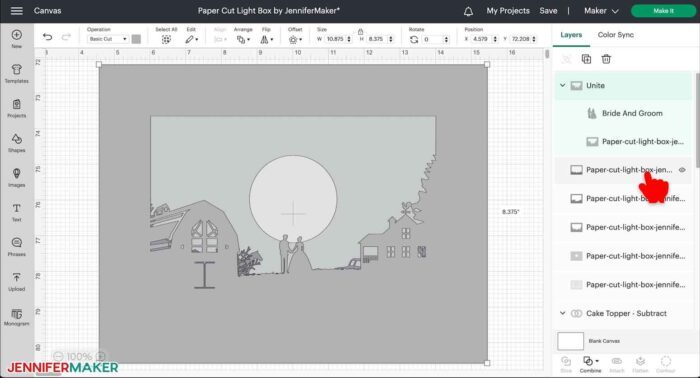
Now let’s look at the Unite function under Combine. Use Unite when you want to weld two or more layers together in a less permanent way. So if I click Unite on my rings now, everything appears to have welded together just like when I used the Weld command. But there’s a difference – look in the Layers Panel and note that my United object here has the original layers nested under it. I can actually click and hide each of those original layers individually. I can even move them. And when I release my mouse, the object appears welded again. And, here’s the best part, if I click on the Combine menu again, I can UNDO Unite and go back to having two unwelded layers again. For those of you who’ve longed for a way to unweld whenever you wanted to, THIS is the answer .Just use Unite instead of Weld, and you can undo it anytime you wish, even after you’ve saved and reopened your project.
And, it’s important to note, that if you use Unite, your project will cut out just as you see it on the screen – you do NOT need to weld it to get it to cut out as if it were welded. Unite acts just like Weld, it’s just repositionable anytime you want during the design process. But it will cut out as if you welded it!
So here’s a real-world example – this is one of my paper cut light box project. You can add in any image you want to it, like this bride and groom, select it and one of the layers, and click Unite. Now the new image and the layer are ONE and will cut out united, just like that! But if you don’t quite like the position of the couple, you can select just the bride and groom layer, and resize it, and it will unite back into the layer. Or select it again and reposition it. You can keep changing it until you like it! So if you’ve ever put something in a slightly off position, use Unite and you can just move it into place without having to undo and repeat your steps!
I recommend you try using Unite instead of Weld to give you more flexibility in your design work — it’s such a useful tool!
Just keep in mind that this is the one instance you might see something on the layers panel (like two elements used as a combine function) that doesn’t match what you see on screen. So keep an eye on your layers panel if you use these new tools!
Subtract
But what about those other options – Subtract, Intersect, and Exclude. Well, Subtract is a bit like Slice, but again, not permanent. You can also use Subtract on two or more layers, while Slice only works on two layers and no more than two, which is another useful thing about the new subtract function. Subtract works slicing the two bottommost layers, the higher layer from the lower layer. In order for it to work right, you’ll want to be sure your higher layer is not completely covering the bottom layer, as it will just subtract everything if it is. As you can see, Subtract looks a lot like Slice, except just like Unite, the layers you subtracted from one another remain in the Layers panel – again, you can hide, move, and delete those layers to fine tune your design to your heart’s content. Isn’t that cool? And if you decide later you don’t want your layers combined like this, just go back to the Combine menu and Undo Subtract. Easy Peasy!
Intersect
Now the Intersect function clips away the underlying layer, almost like a mask. If we use Intersect on our two rings, we get a brand new shape – the area inside the outline of the new rings. We could do this before with Slice – it was one of the leftover layers we usually deleted. But, like Unite and Subtract, our new Intersect function keeps the component layers intact and lets us hide, move, and delete the layers independently for fine tuning our design. And, of course, we can Undo Intersect, too.
Exclude
And finally, we have the Exclude function, which effectively inverts the layers. If I use it now, it will look like Subtract. But if we move one of our layers, you’ll see that it’s note the same. With Exclude, basically the higher layer inverts the lower layer, turning filled regions into holes and vice versa. In other words, it eliminates the overlapping areas and leaves behind the remaining stuff to create a whole new shape. I use Exclude the least of all of the functions, but it’s nice to have it on that rare occasion you need it.
This is a lot of new functions you may or may not need. If you don’t need them, just ignore them … but keep them in your back pocket for that special project. And if you do want to use them but feel confused about them, it’s no big deal. I’ve been using these tools for decades in Adobe Illustrator, and I still forget which one to use when. So what I do is just try them all until I like the results. So don’t feel funny if that’s what you do, too – it works!
Useful Tips for the Combine Menu
You can use these new functions – Unite, Subtract, Intersect, and Exclude – repeatedly on the same layers. So I can Unite the two rings, add in a heart from basic shapes, Subtract those two layers, Duplicate the layer, and then Exclude to make this fun new shape. And the layers remain modifiable – look what happens when I move one of the ring layers. Cool, huh?
Do note that after a while, your Layers Panel may start to get a little complicated, as each time you use one of these functions, it will need to create new layers to preserve the initial layers you began with. When you are done modifying things and just want all of these layers to go away, you can just go back to the Combine menu and choose Merge Layers. And now you have just one shape. Just be aware that you cannot undo Merge Layers unless you immediately press the Undo button, or undo all the way back to when you merged layers. This is intentional, as some people will want and need all of those layers produced by the new functions to essentially weld down into one, single, simple layer. So use it only if you feel confident you won’t want more changes.
Something else to keep in mind is that if you ever use Slice or Weld on layers that aren’t merged yet, which you CAN do, the act of slicing and welding will merge them anyway, and you won’t be able to unmerge unless you click Undo.
And note also that all of these new functions are always available with a right-click of your mouse, or a double-tap on your trackpad – I love this drop-down menu.
And right-clicking on the menu item in the Layers panel will show you the Image Info for multiple layers, so you always know what you used in a design, even after it’s merged, welded, or sliced.
Now it’s possible you’re reading this and looking at your version of Design Space and it just does not match. If you’re reading this tutorial soon after it came out, that just means the new version hasn’t been rolled out to you yet. The roll out happens over a period of a week or two for a smooth transition. So if you don’t see the changes yet, you will eventually.
If, on the other hand, it’s been a while since I made this tutorial and there’s a mismatch, Design Space has probably updated again. I always use the latest version of Design Space in my tutorials, so head on over to my channel and watch my most recent video about Cricut to learn how the latest version works.
And if you’re feeling at all frustrated by the changes, I hear you, but I want to encourage you to take a deep breath and just allow me to teach you and show you how they work. I’m here with you every step of the way. I think It’s really awesome that Cricut is continuing to develop and improve their software to meet our needs. And while that does require we learn and keep up with the changes, yes, just know that you can always look for my simple videos and step-by-step tutorials to get you up-to-speed fast so you can get right back to making beautiful things with your new skills!
And, if you’re curious about the ring cake topper I showed in this tutorial, you can learn all about it over at jennifermaker.com/custom-cake-toppers – I’ll be teaching everyone how to make these for free during Maker Academy Weekend. Get a ticket to my free weekend event at makeracademy.com/weekend – there are over 20 free workshops on all the latest and greatest projects you’ve been asking me how to make!, including shaker cake toppers like this anniversary topper and a birthday topper!
If you have any questions about these Cricut Design Space changes, please leave a comment below this video and we’d be happy to help! I also invite you over to my fabulous Cricut Crafters Facebook group – this is a fantastic place to learn about new features and how to use them in your projects.
Love,

Want to remember this? Save this Cricut Unweld Tutorial to your favorite Pinterest Board


You are an amazing teacher. I appreciate the videos on “what you should know before..” It’s quite helpful to have your classes on YouTube so I can review when actually starting a project.
Thank you, thank you.
Oh, thank you, Cheryl!