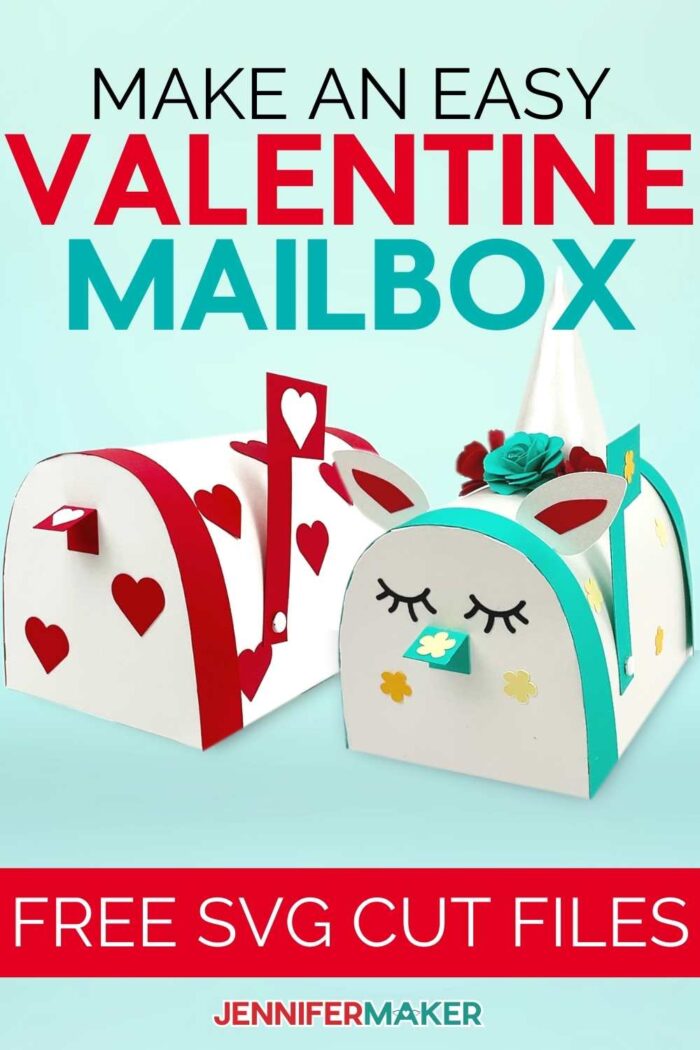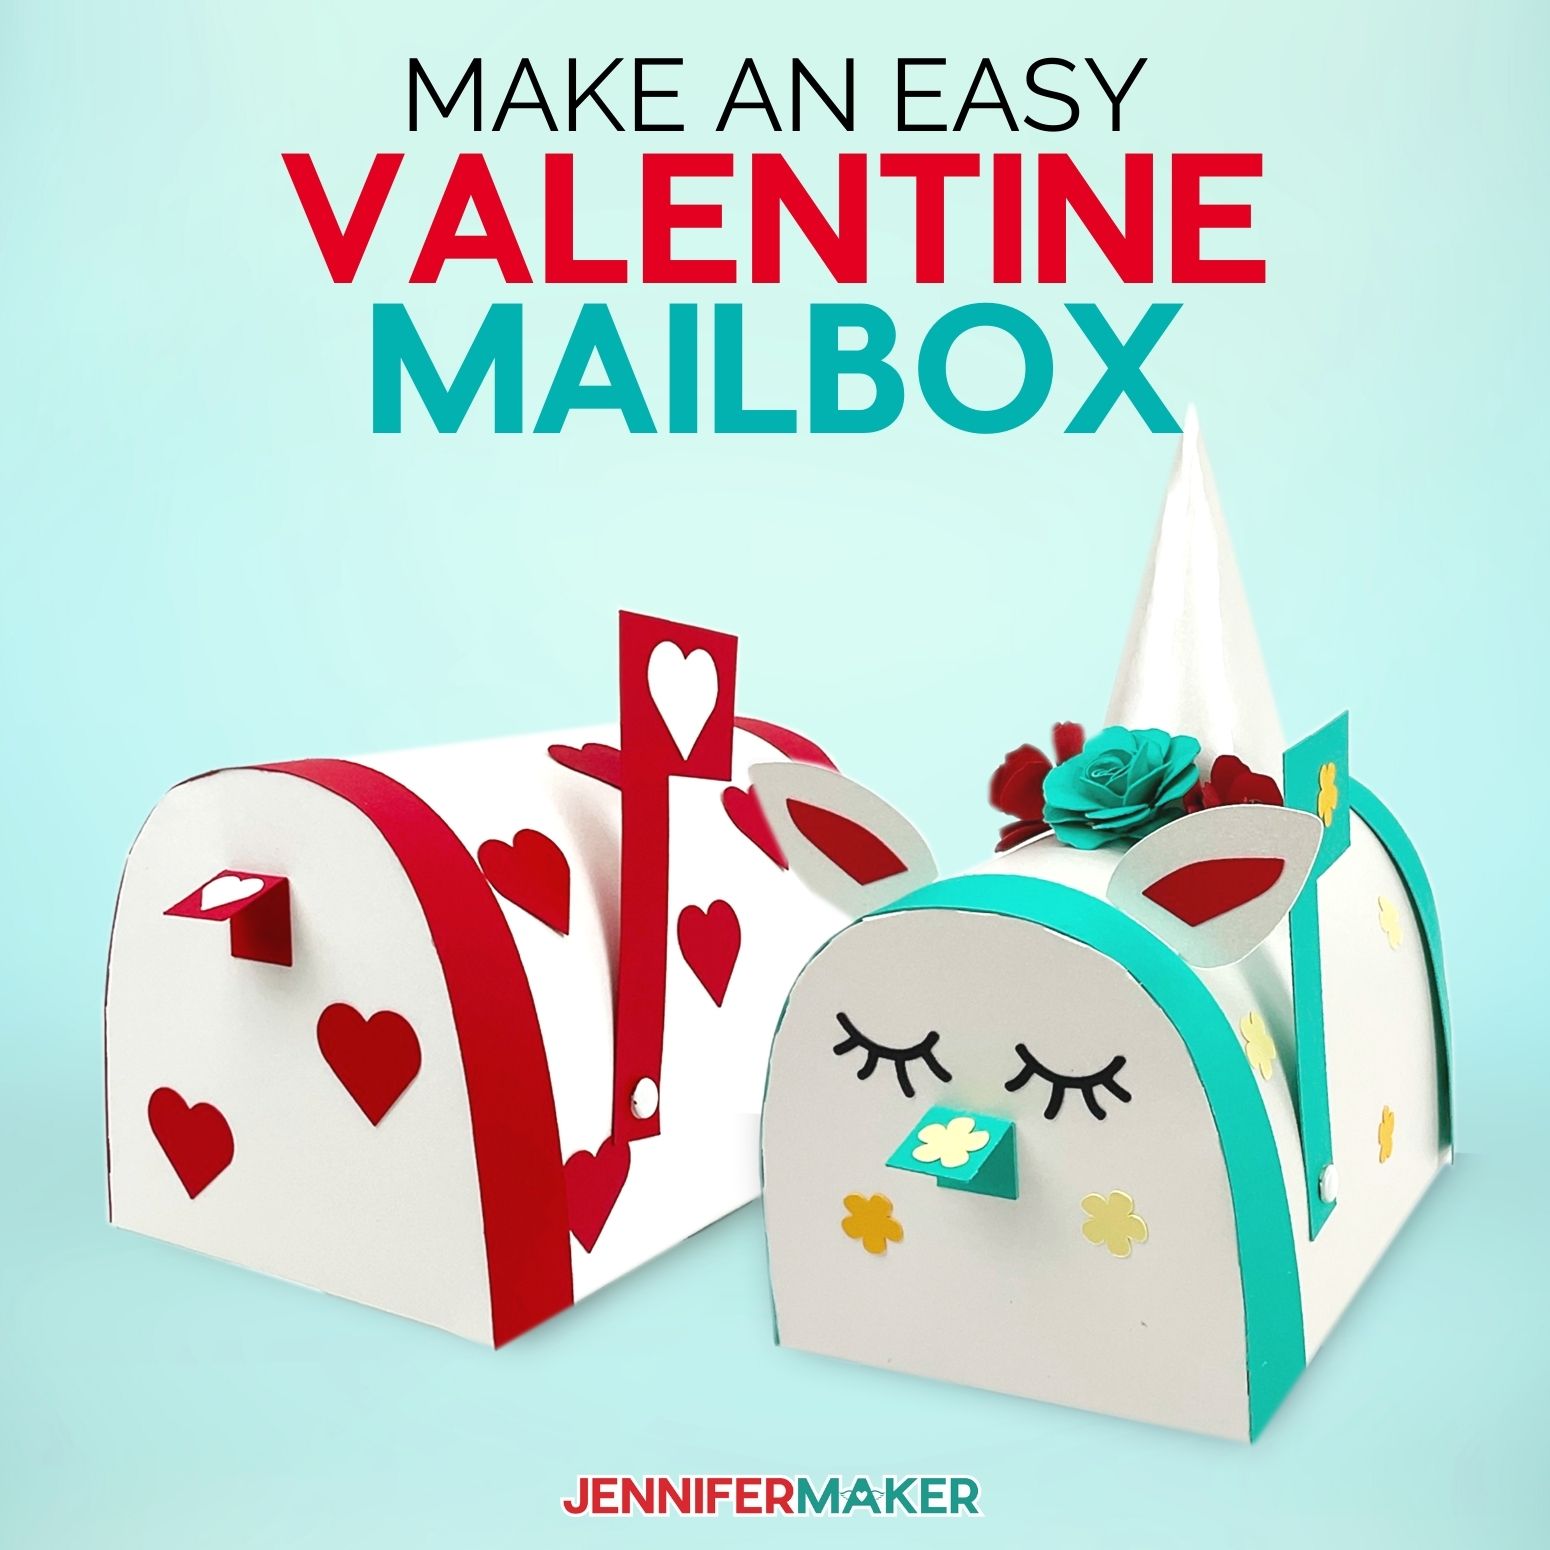
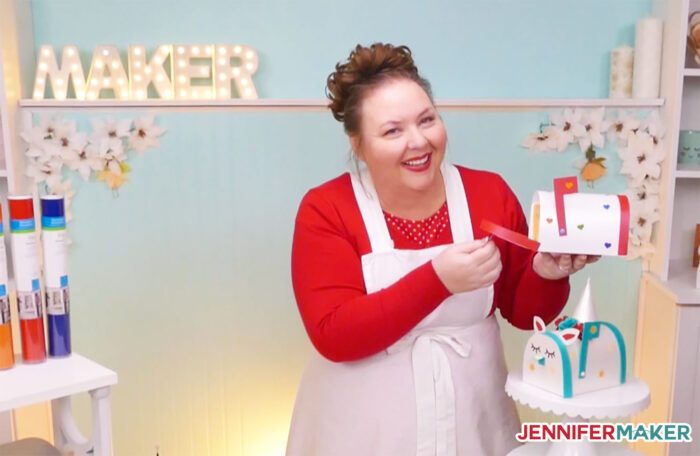
Learn how to make a Valentine mailbox craft with printables and custom decorations!
I’m convinced that crafting is a superpower. I love seeing things in a store and thinking … KNOWING, “I can make that!” Do you ever think that? I hope so, because YOU CAN! Believing in and challenging yourself is powerful, but the Super part is making your own one-of-a-kind creation. That’s how I made my 3D layered paper cut flower after falling for an expensive version at the mall. I saw a cute decorative mailbox at a craft store and guess what I thought? It sure looked like I could recreate the mailbox’s pieces using simple shapes in cardstock. And making it open up for Valentine mail would be fun! I got to work and am IN LOVE with the result that I’m sharing with you. I’ll show you the basic steps to make a Valentine mailbox craft and share some personalization ideas!
Watch the full step-by-step tutorial video on how to make a Valentine mailbox craft:

My basic Valentine mailbox craft is easy to make! We’ll cover how to add score lines to cardstock, which is a great way to create 3D shapes from flat materials like paper. I’ll also share one of my favorite craft glues to use on your tabs. It’s perfect for applying just the right amount of sticky to small spots!
Of course, the best part of a mailbox is getting cards in the mail! I’ll show you some secrets to create a flag that rises smoothly (Hint: see that mini brad on the supply list?) and a front door that’s easy to open and close.
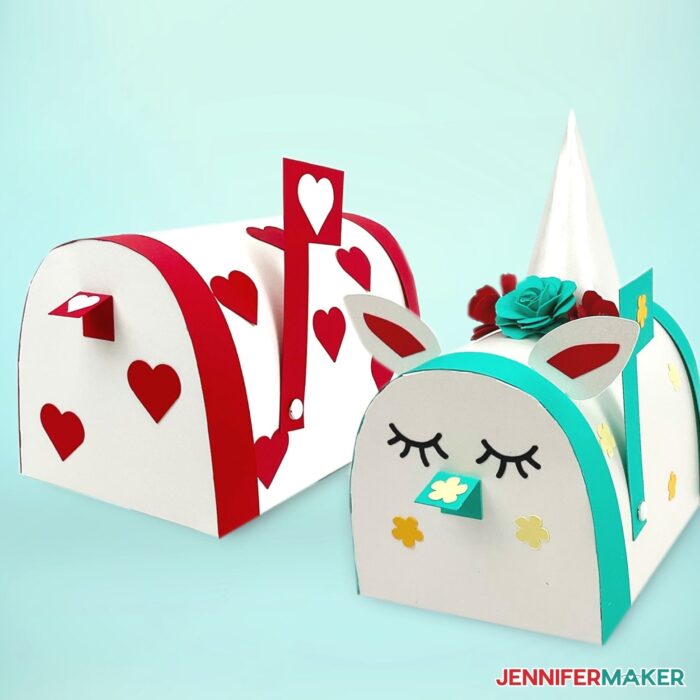
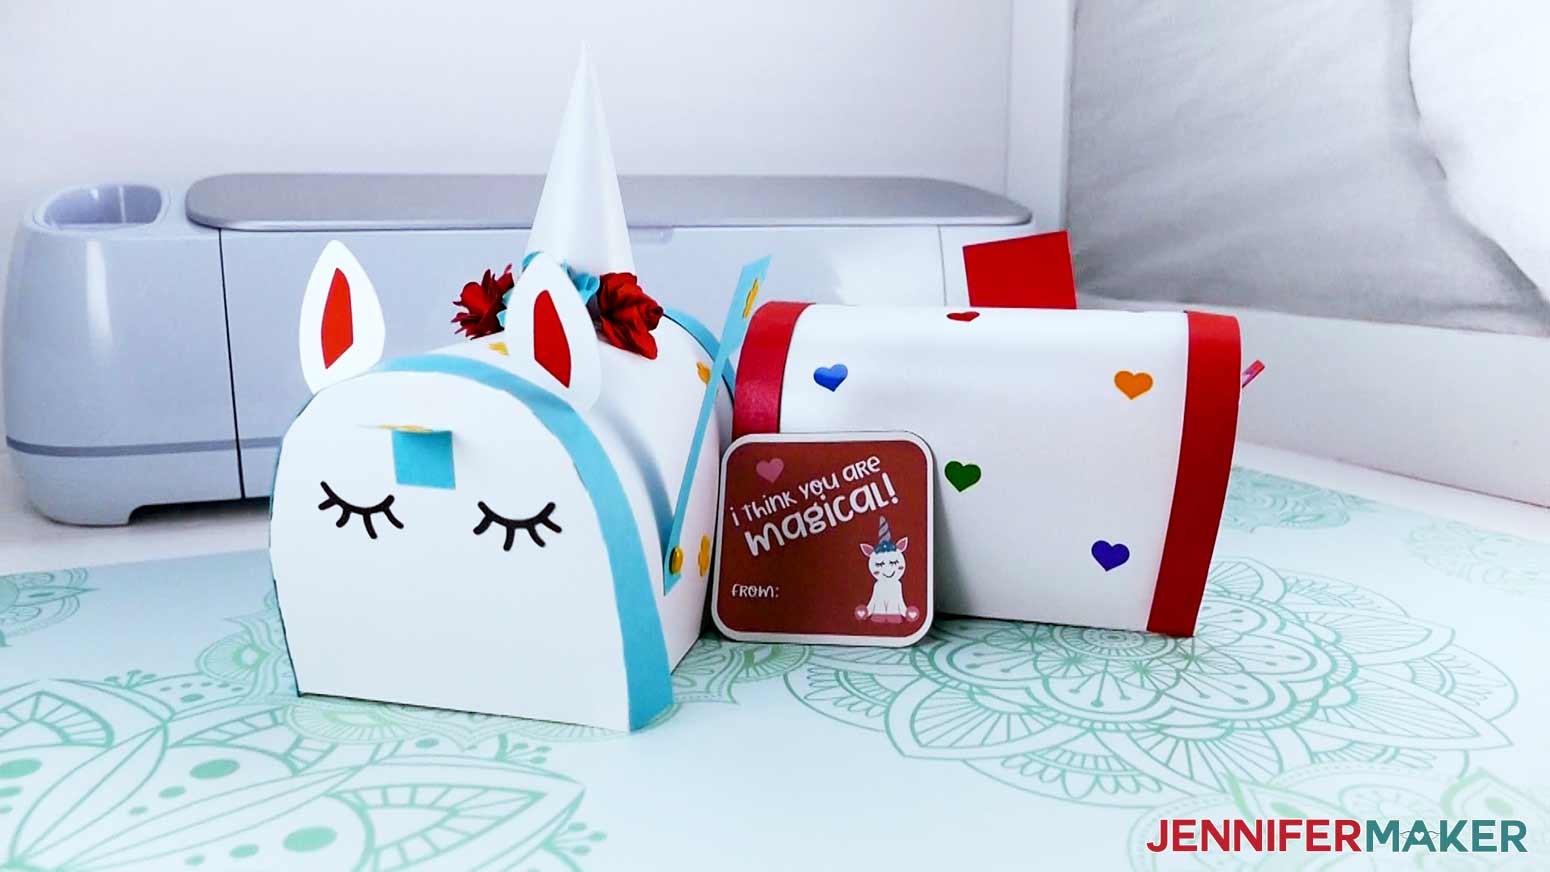
To make your Valentine mailbox craft officially magical, we’ll create a sleepy unicorn version in the tutorial! I’ll show you the best spots to attach our new friend’s horn, ears, and eyes to complete their look. The mailbox is similar in size to a childrens’ shoebox, so placement is important.
Now, I always feel loved when I get cards in the mail, and we want our unicorn to feel the same. So we’ll make some pretty rolled paper flowers with a quilling tool. You can add whatever you like in any colors! Vinyl hearts, glitter stars, or even a name would be perfect!

My FREE Valentine mailbox craft download includes adorable printable cards. They feature our cute animals from our layered vinyl color changing cup project and encouraging sentiments sure to spread the love. You do need a color printer and a Cricut Maker or Cricut Explore series to use the Print Then Cut feature
You can cut the cardstock by hand, but a Cricut cutting machine will help this go so much faster! If you use a Cricut, you’ll also want a green machine mat, Fine-Point Blade, Scoring Stylus (or Scoring Tool), scraper, and brayer.
If you choose to add paper flowers, you’ll need a hot glue gun and glue sticks to secure them to the mailbox. Also, a weeding tool will help with vinyl decorations
My adorable Valentine Mailbox craft is simple to make and I’m sharing these free SVG cut files and the printable cards for free! See the material list below for links to everything you need to craft along with me!
Ready to make this Valentine Mailbox Craft and Print then Cut cards? I’m super excited to show you how! This post contains some affiliate links for your convenience (which means if you make a purchase after clicking a link I will earn a small commission but it won’t cost you a penny more)! Read my full disclosure policy.
Materials to Make Valentine Mailbox Craft and Printable Cards
View my Amazon shopping list with the exact items we used to make this project!
- Three (3) Sheets of White Cardstock (Any Weight) 8.5″ x 11″ or 12″ x 12″ (8.5″ x 11″ can also be used for Valentine’s Cards)
- One (1) Sheet of Colored Cardstock (Any Weight) 8.5″ x 11″ or 12″ x 12″ for flag and trim, I used teal for the unicorn
- One (1) Mini Brad to attach your flag to the mailbox
- One (1) Package of Assorted Cardstock (Any Weight and Size) for unicorn horn, ears, flowers, eyes, and other decorations
- Permanent Vinyl — this is optional, but assorted colors are an easy way to add heart/shape decorations
- A method to score and cut your designs — I used the amazing Cricut Maker 3 but you can also use a Cricut Maker, Cricut Explore Series. You can use a Cricut Joy if you don’t make the cards.
- Cricut Green StandardGrip Machine Mat 12″ x 12″
- Scoring Stylus
- Craft Glue — I used Bearly Art Precision Glue
- Brayer
- Cricut XL Scraper
- Cricut Weeding Tool optional, for vinyl detail
- Design #371 — My free SVG/PDF/DXF cut and printable files (available in my free resource library — get the password by filling out the form at the bottom of this page)
If you want to make the unicorn details and Print Then Cut cards as I did in this tutorial, you also need:
- Quilling Tool OR DIY Quilling Tool to roll flowers
- One (1) 1/8″ Wooden Dowel for shaping paper flowers
- Hot Glue Gun and One (1) Hot Glue Stick for adding flowers
- Finger Guards optional, but safer when holding pieces with Hot Glue
- Printer for the Valentine’s Day Cards (Optional) — I used my HP Envy 7155, but any color inkjet will work
How to Make a Valentine Mailbox Craft with Unicorn Details and Cards
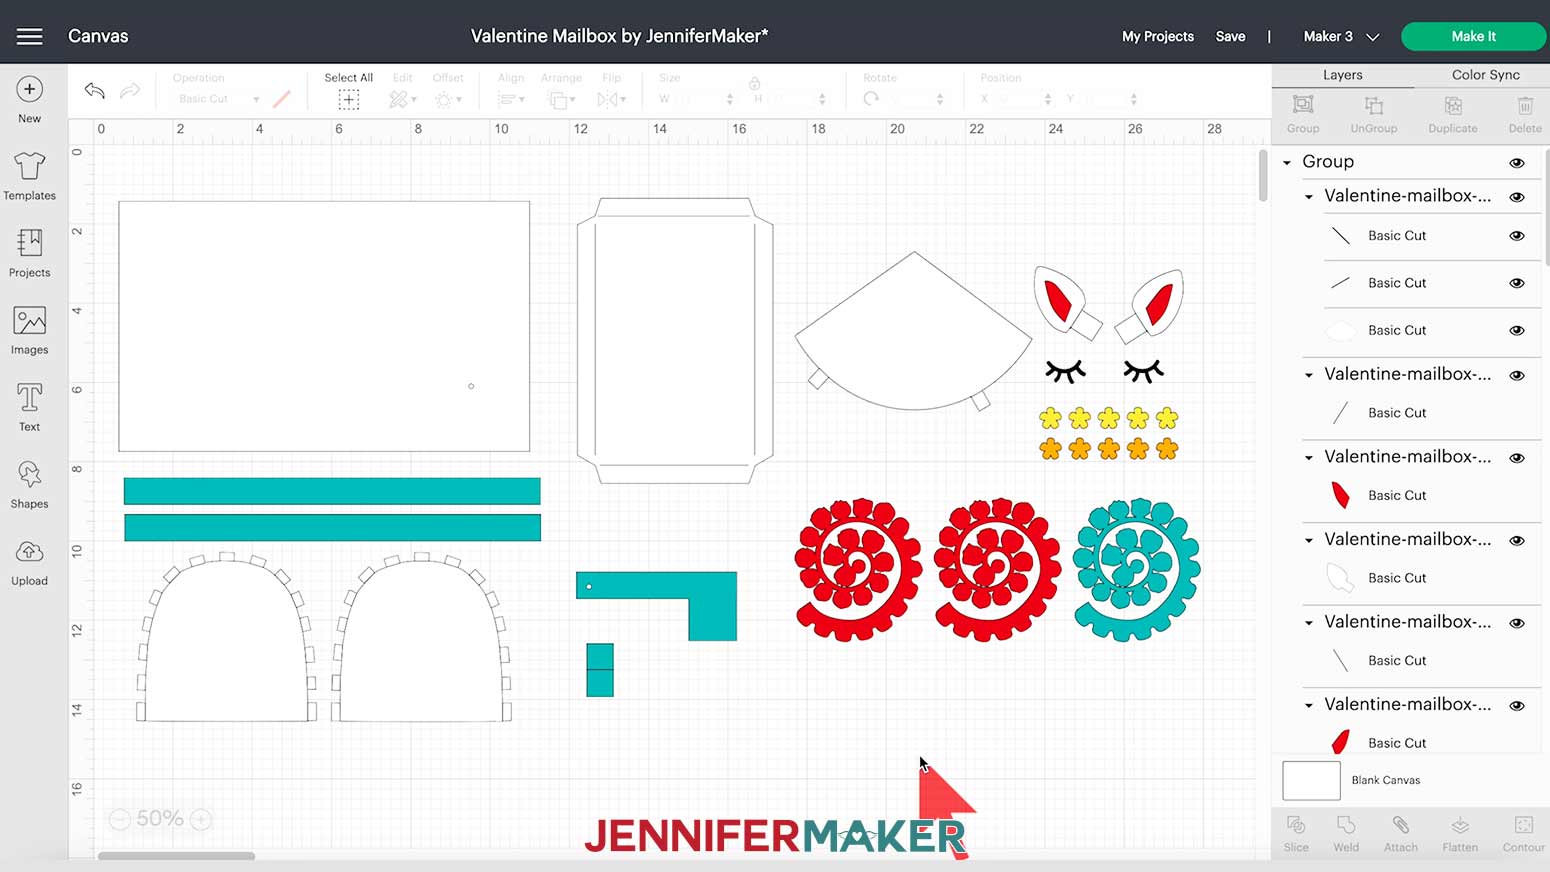
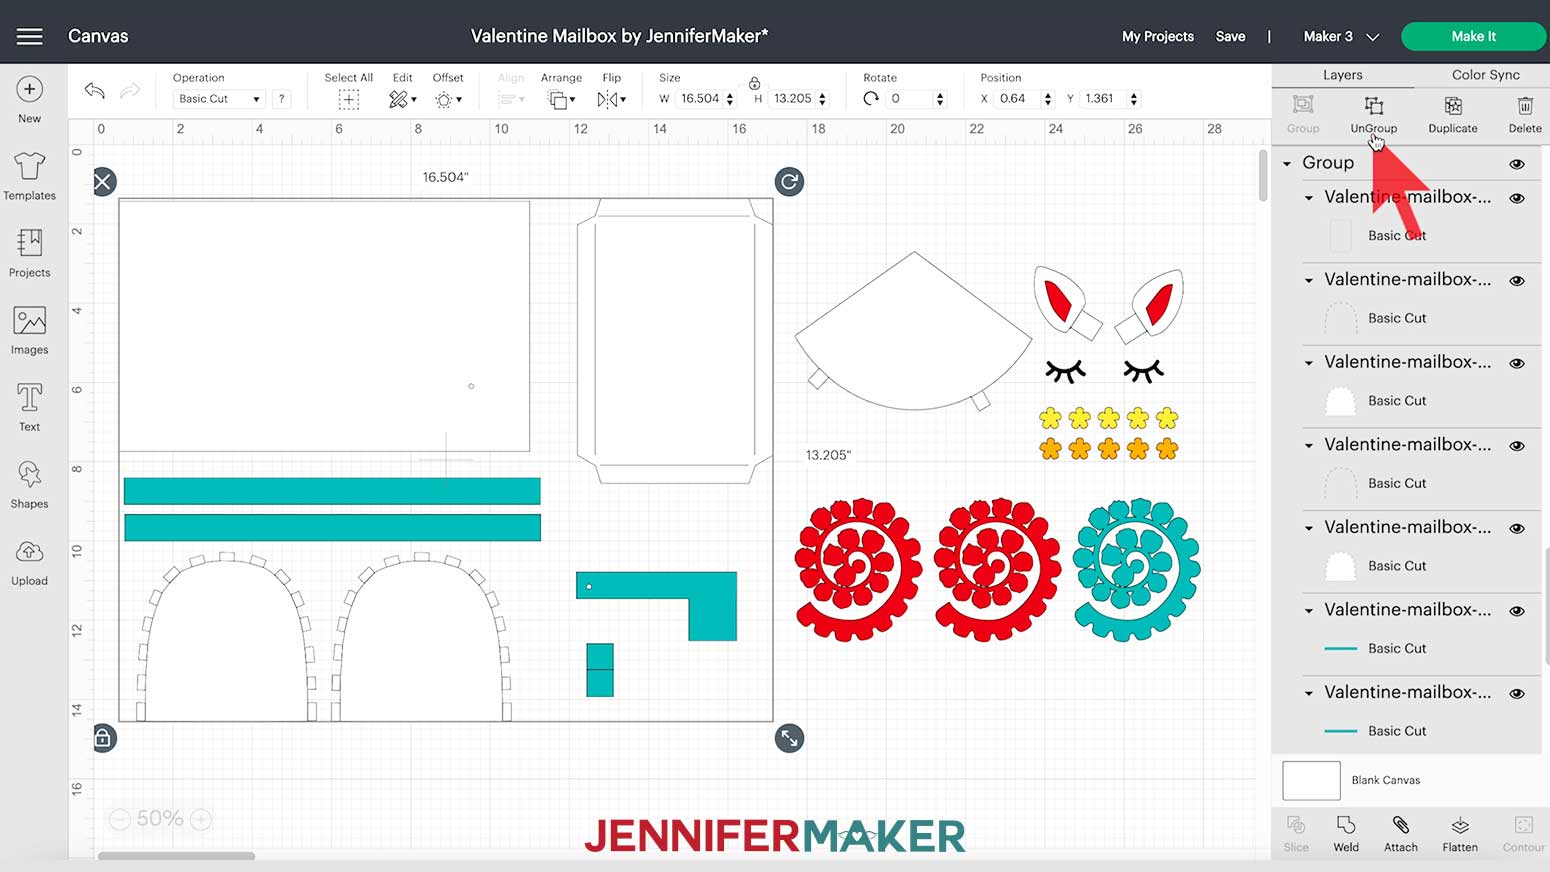
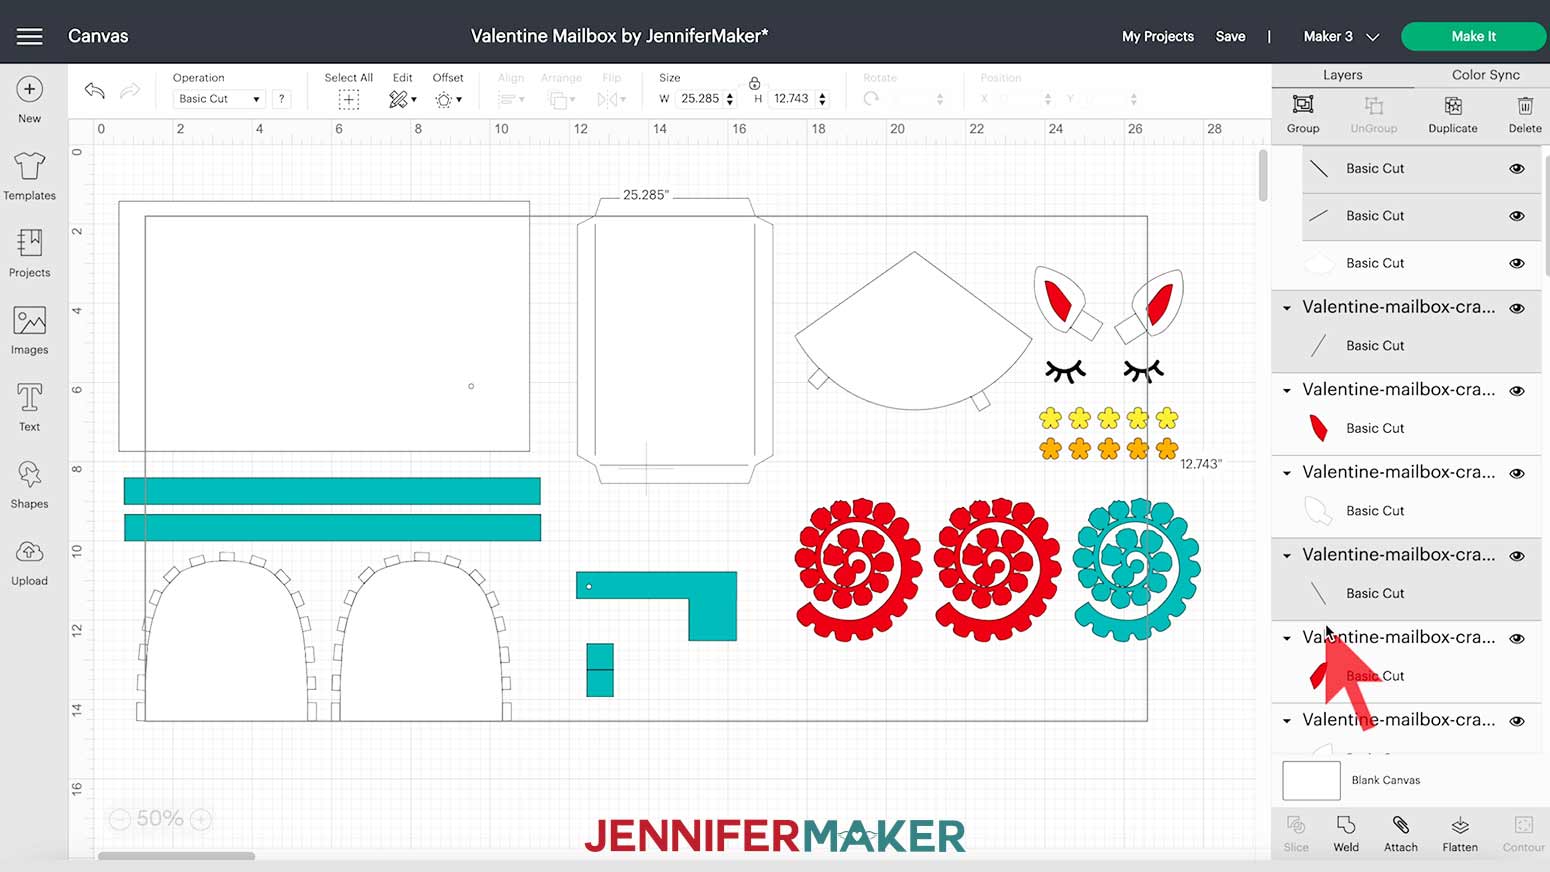
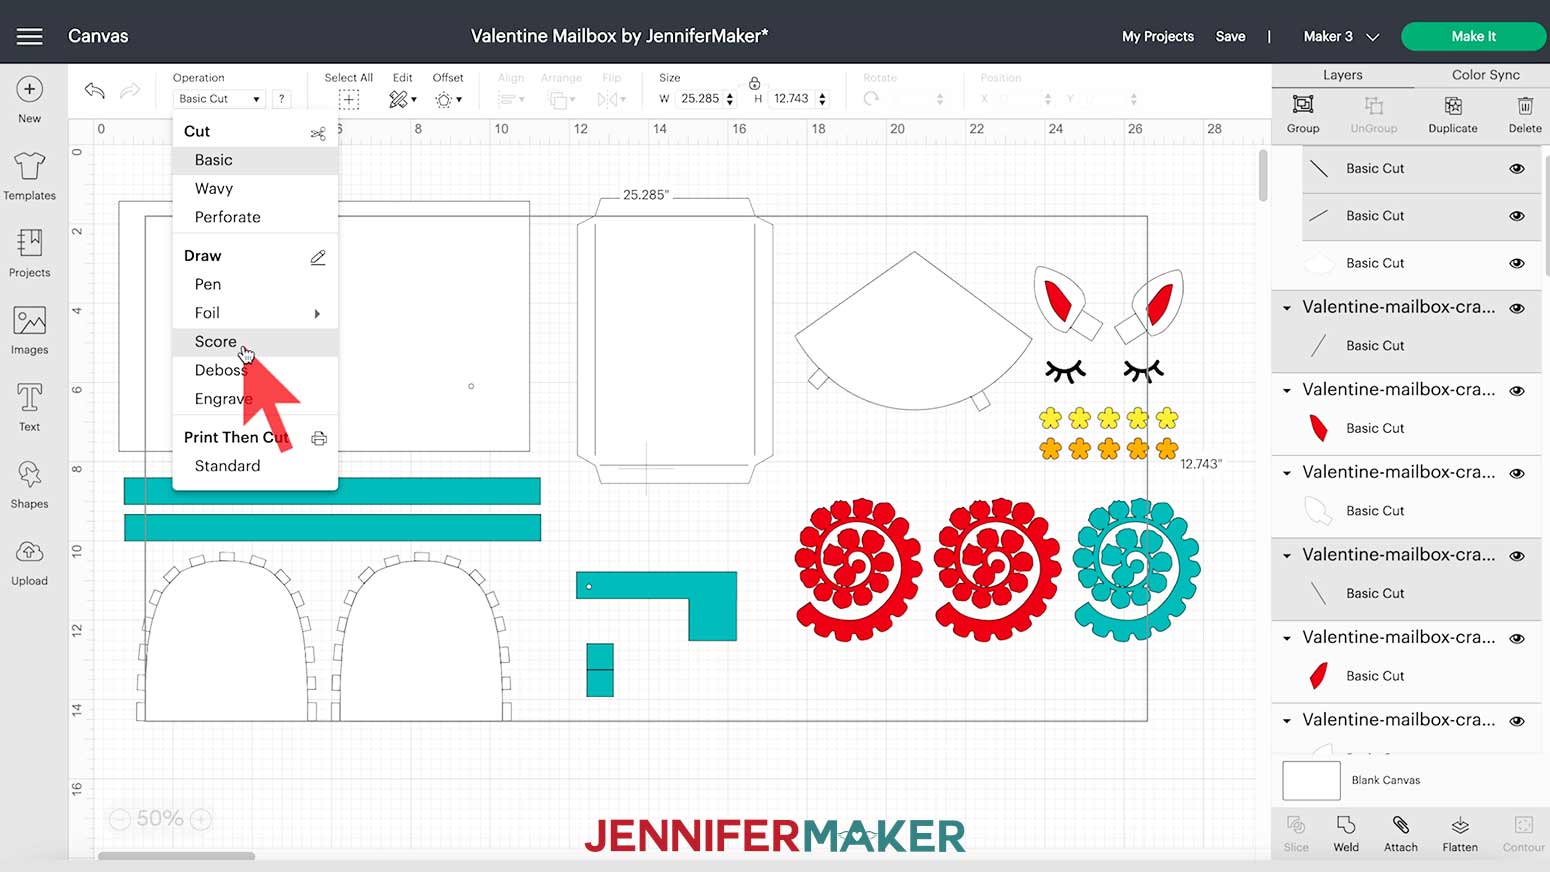
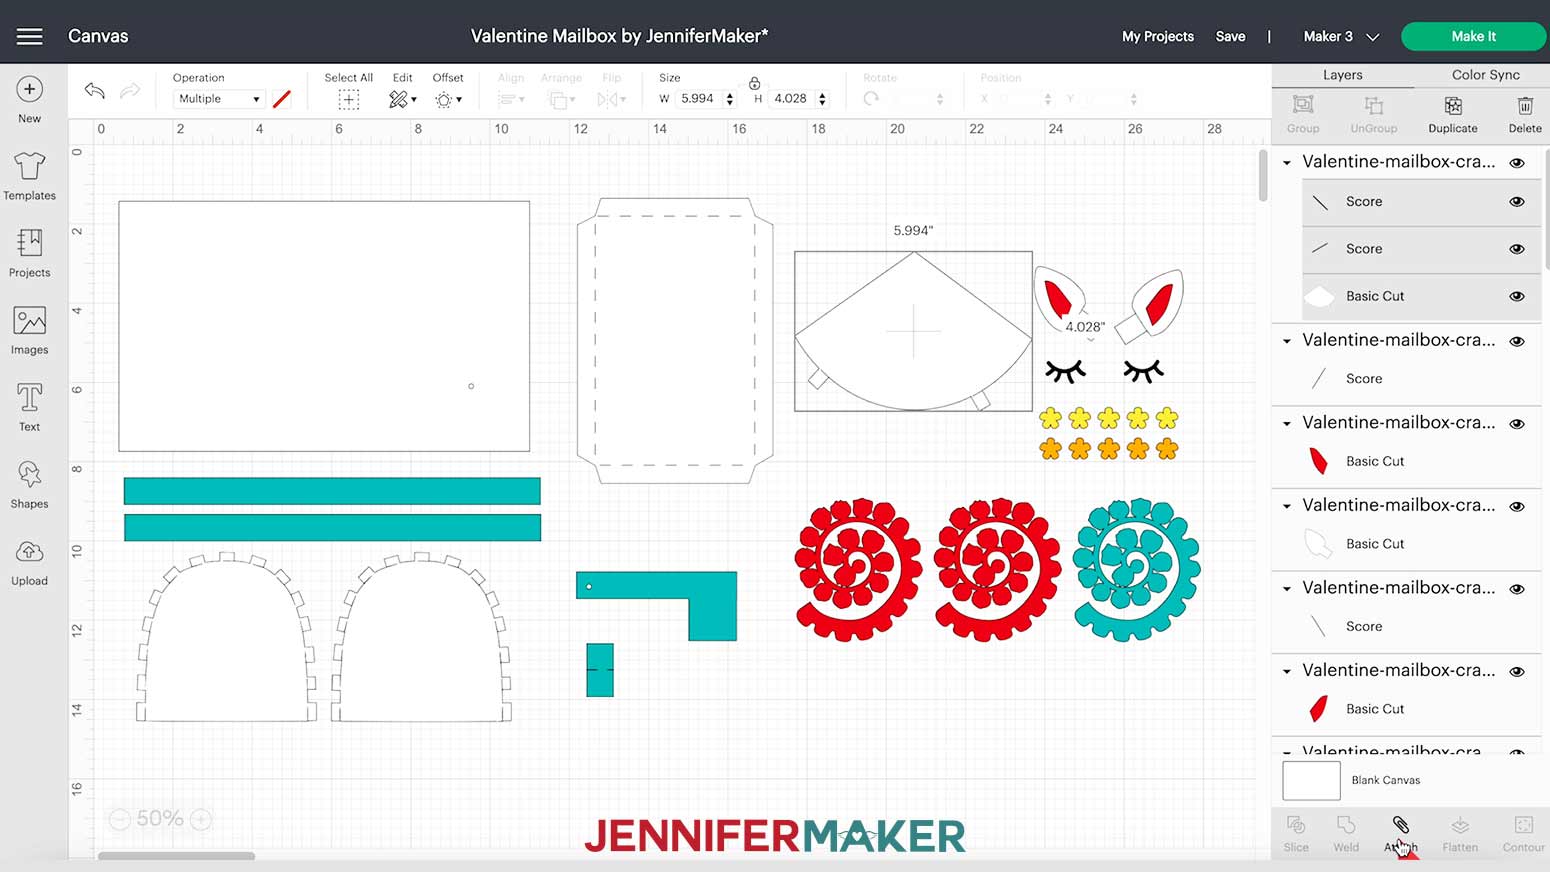
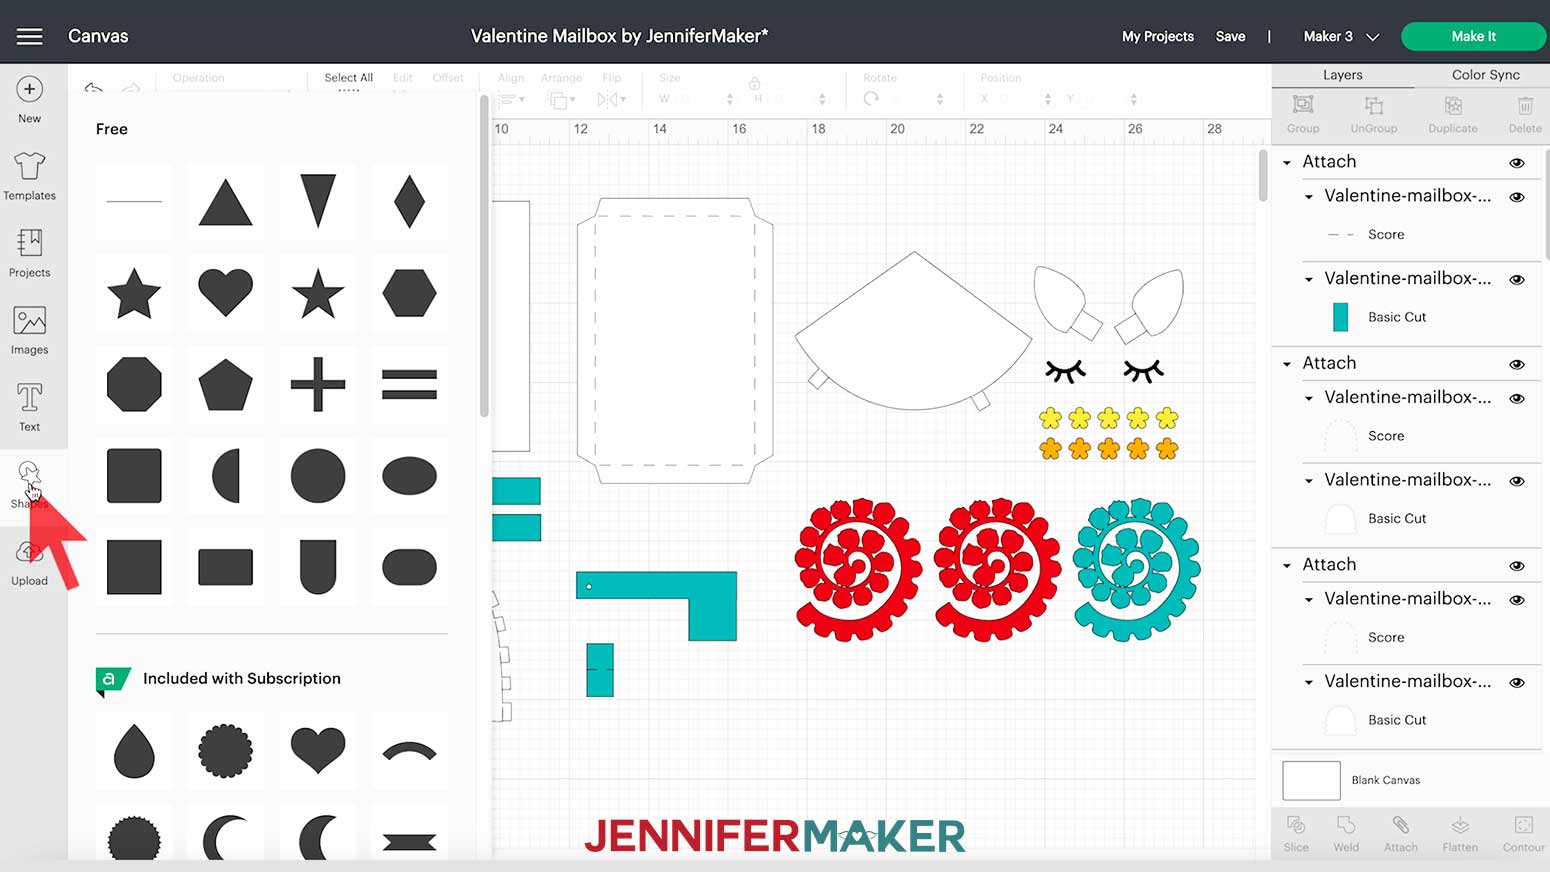
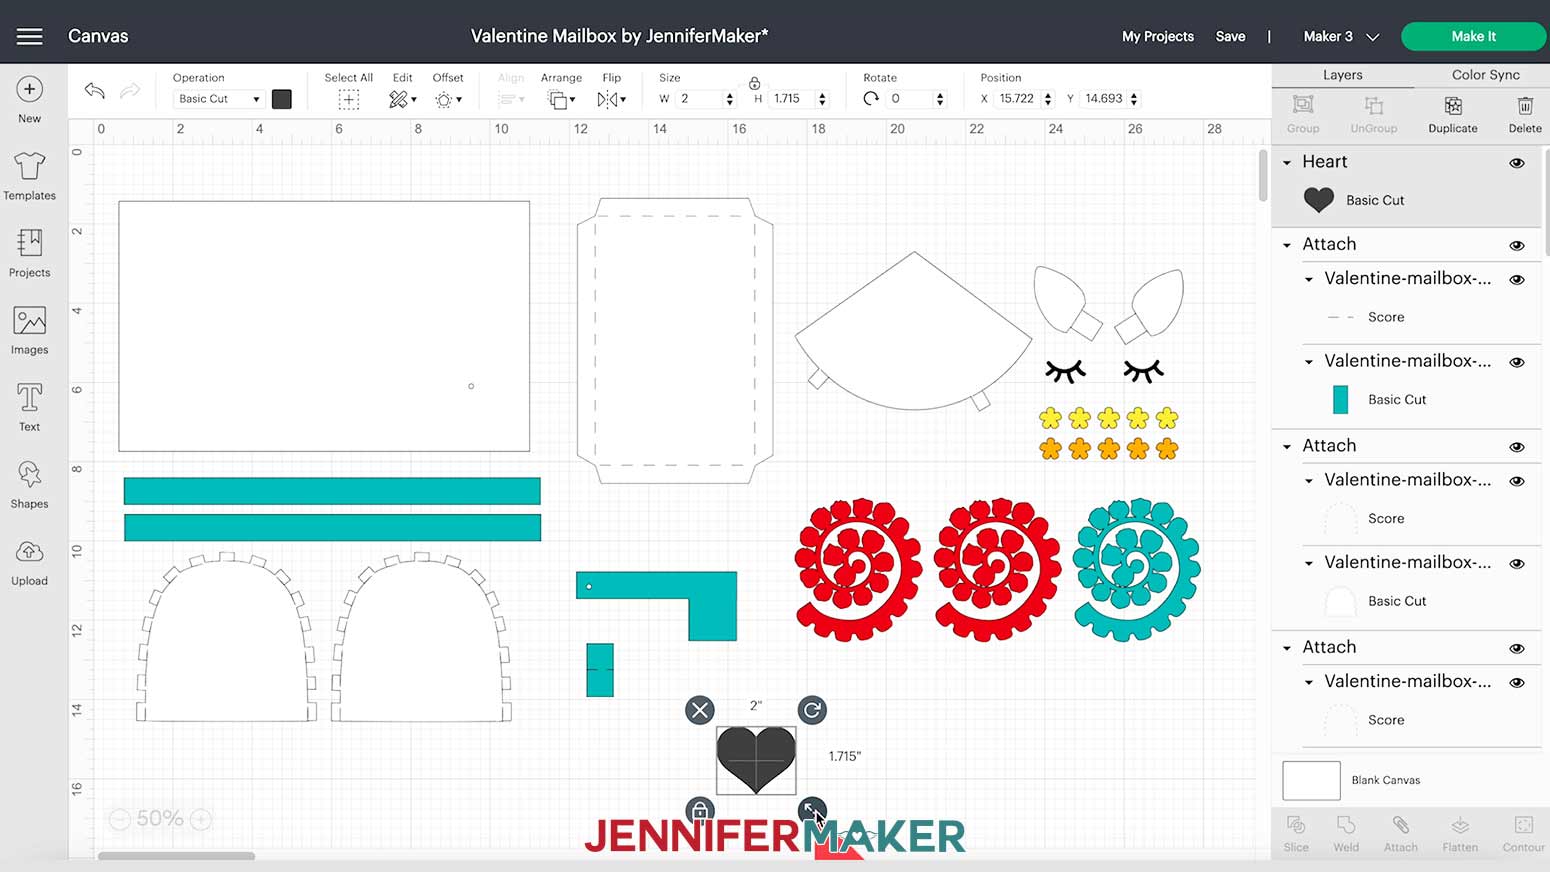
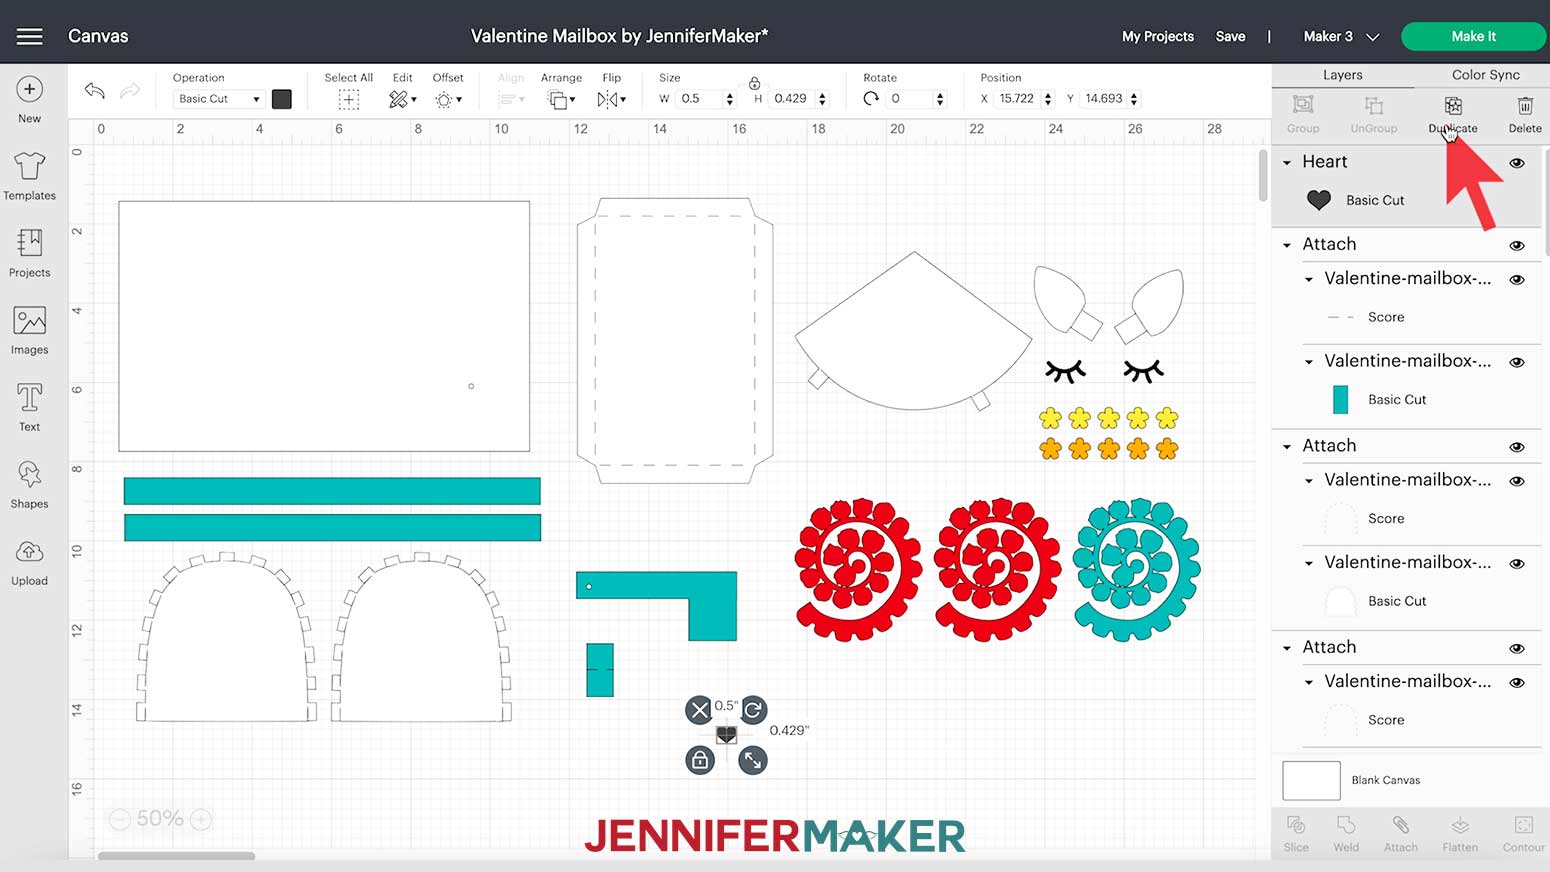
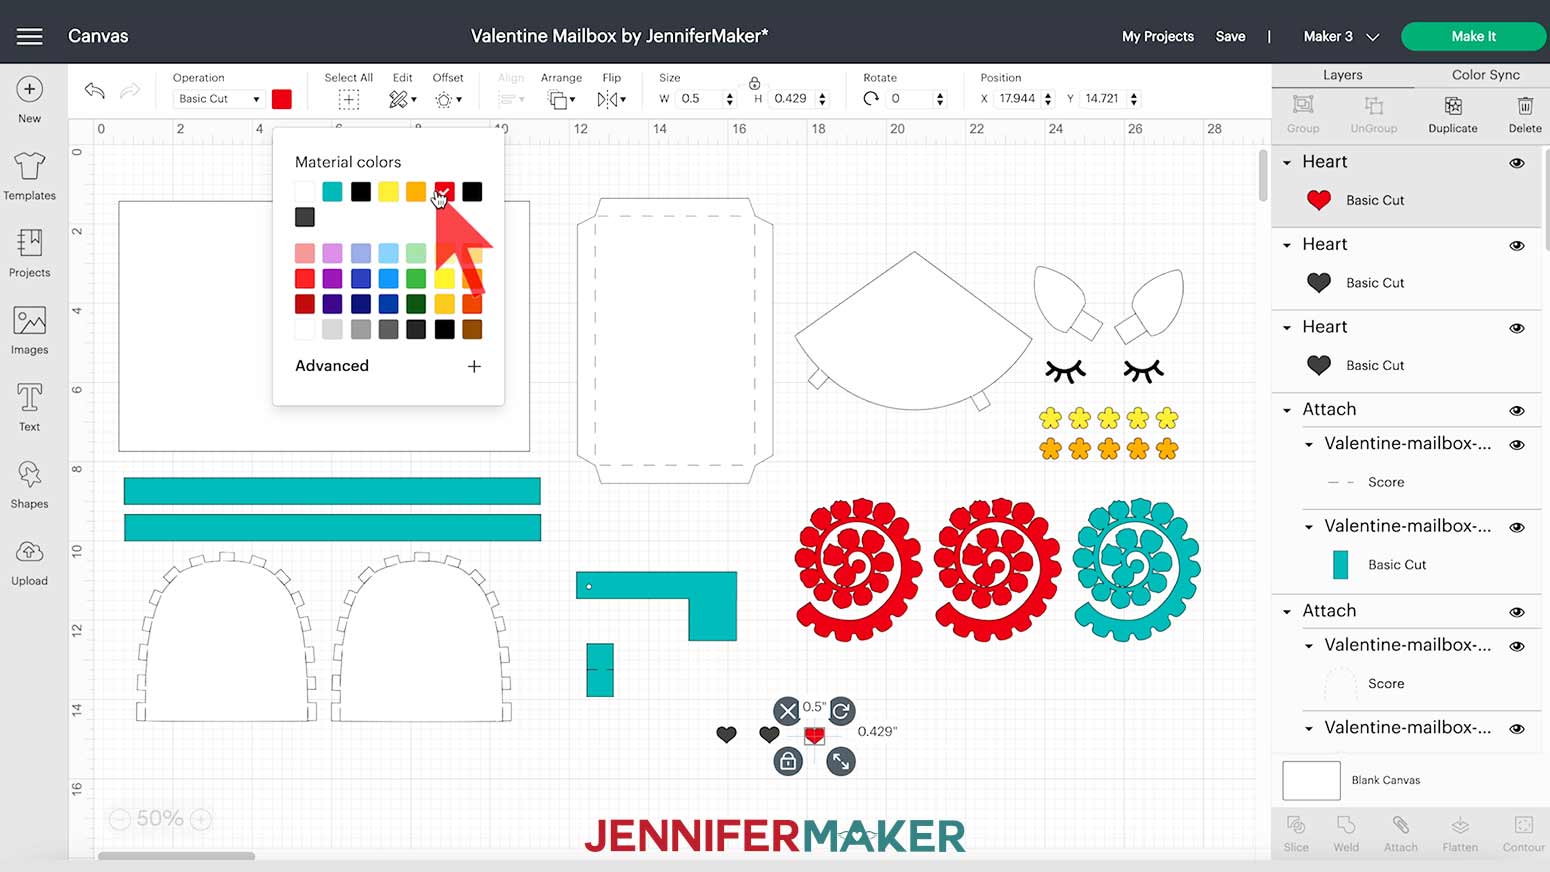
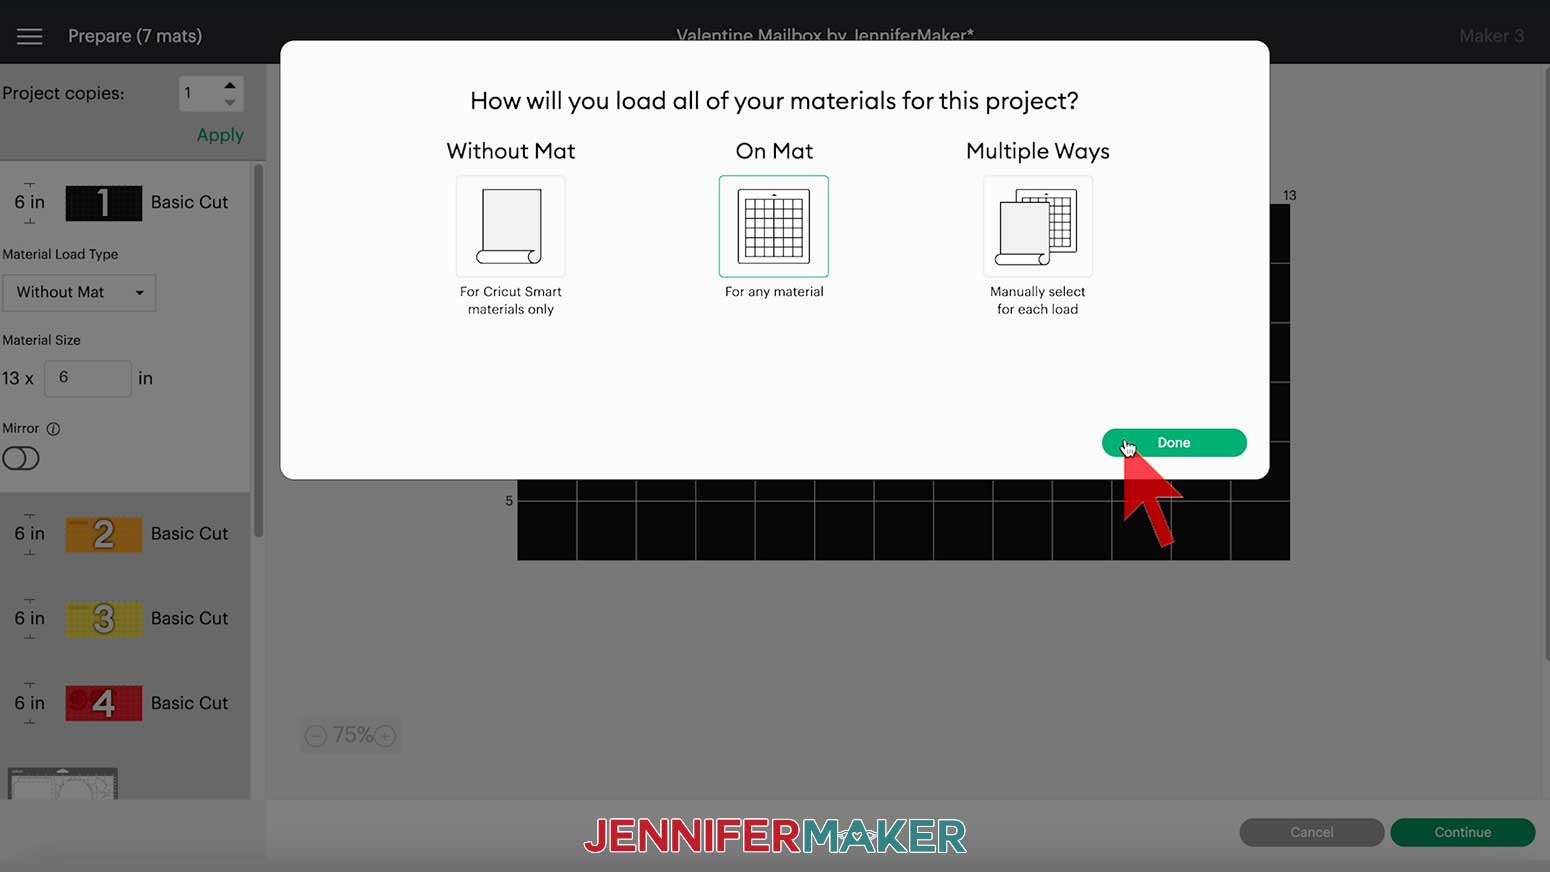
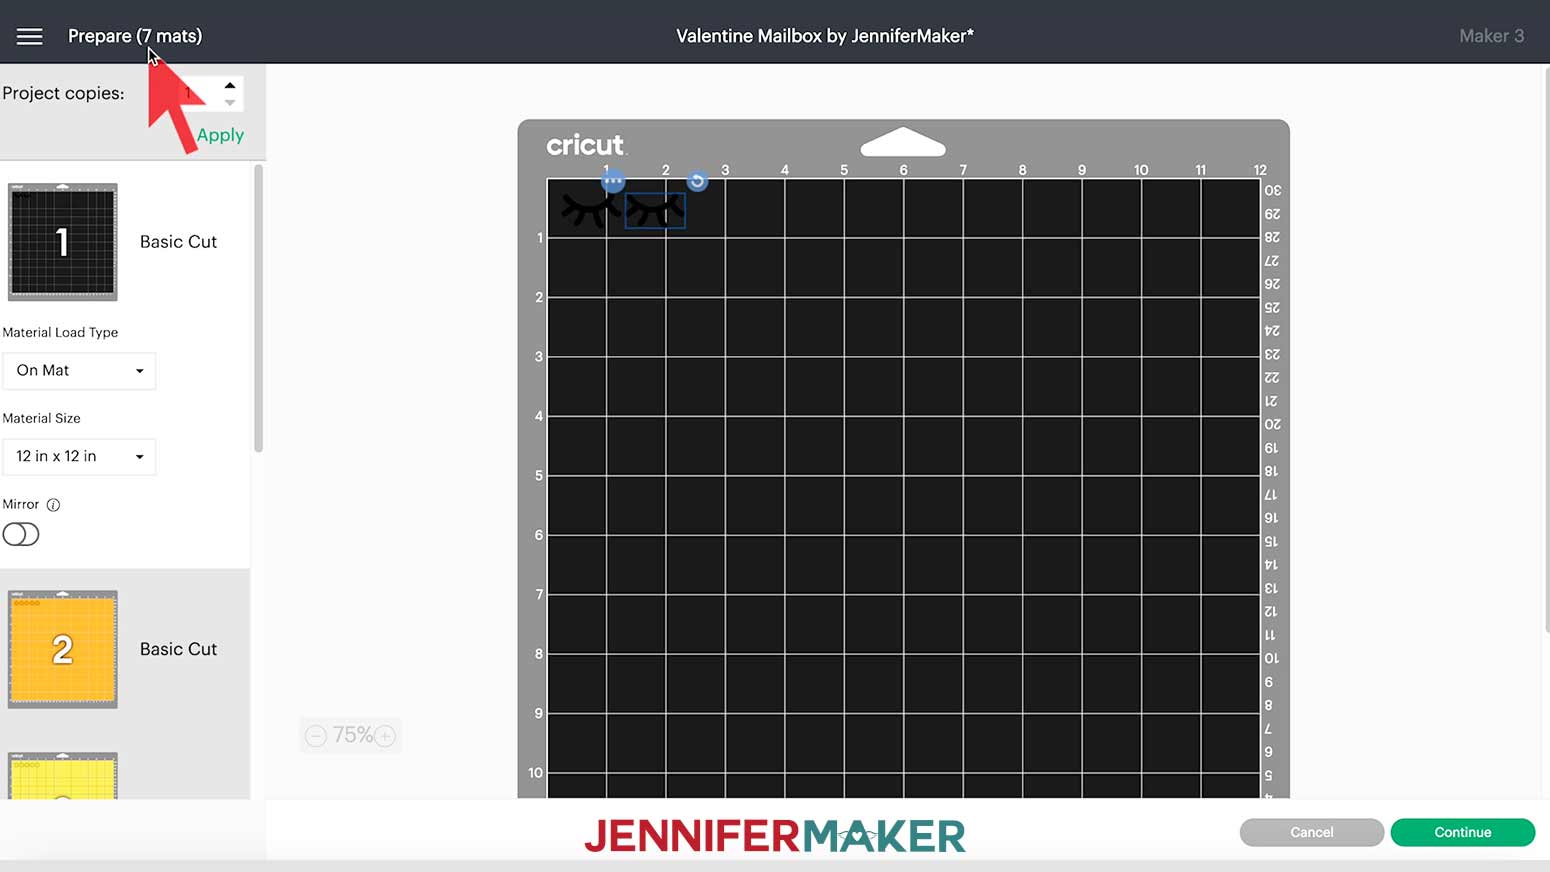
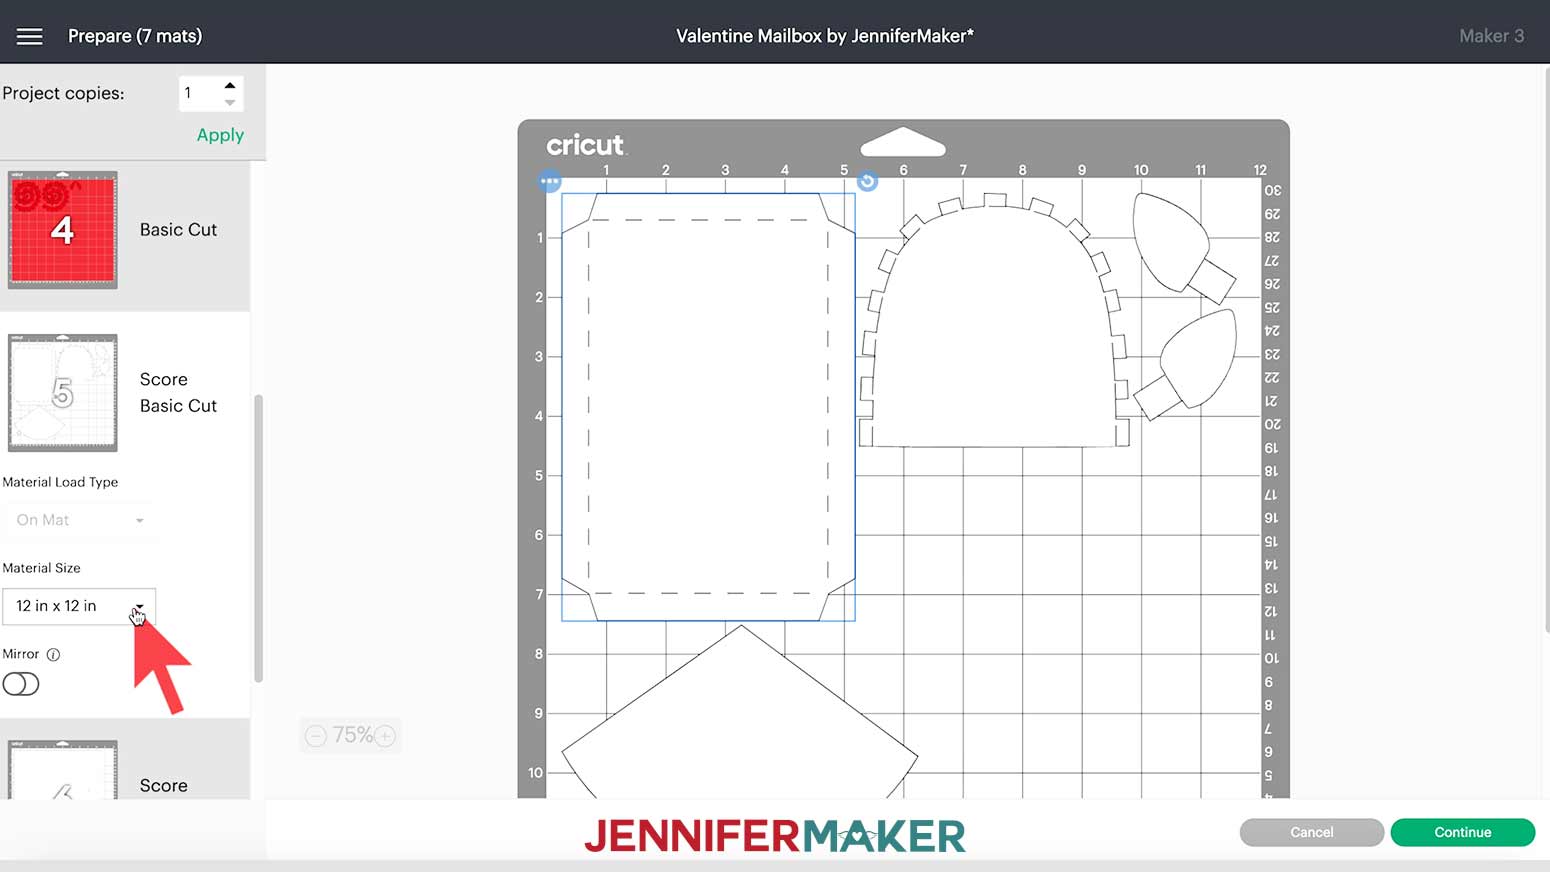
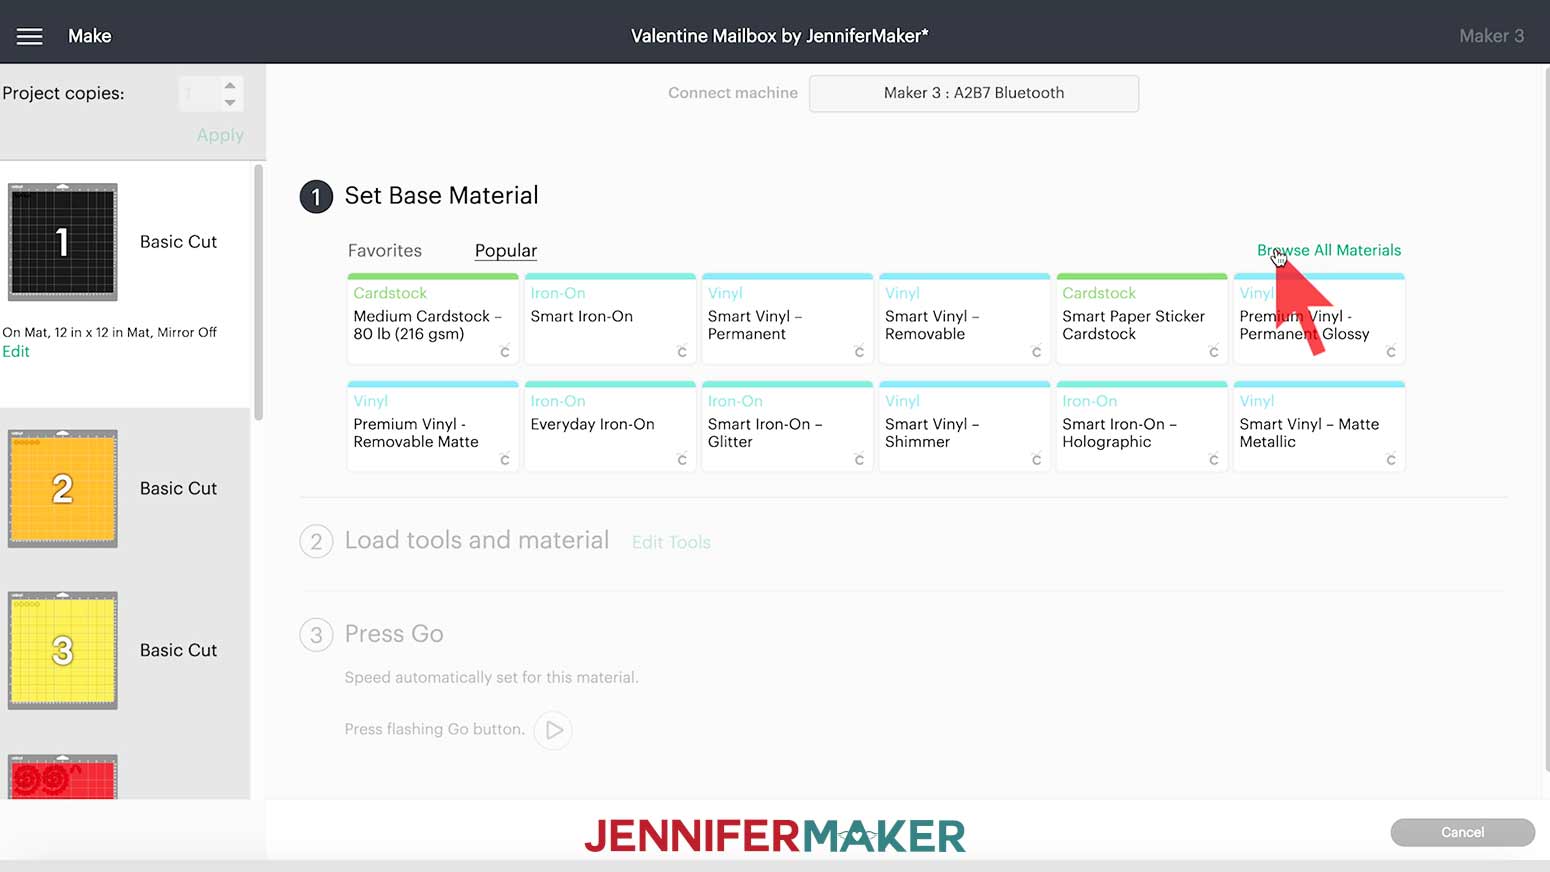
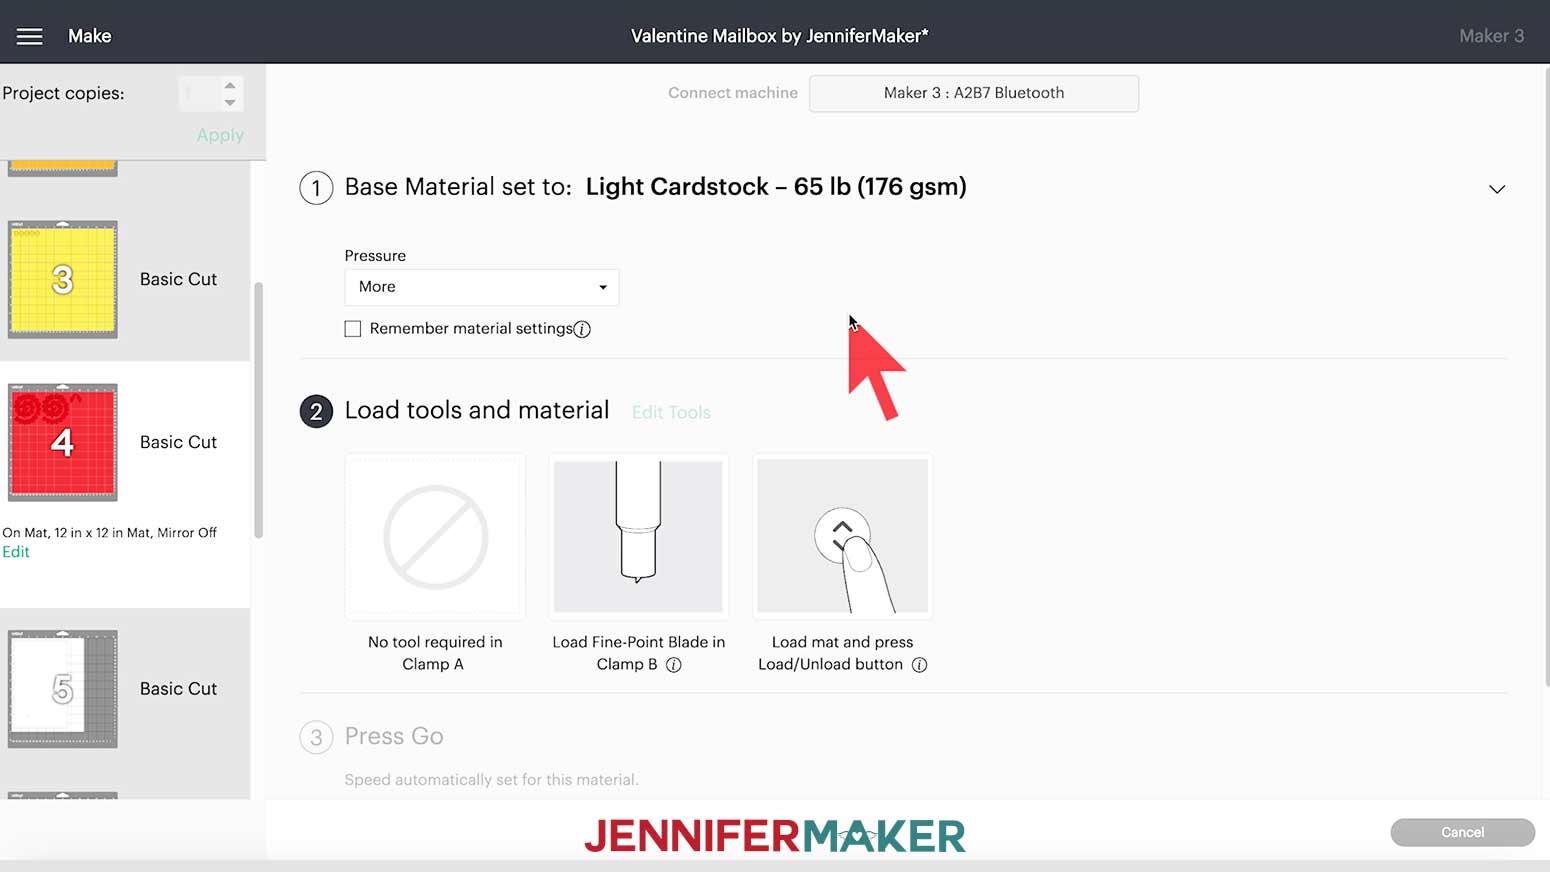
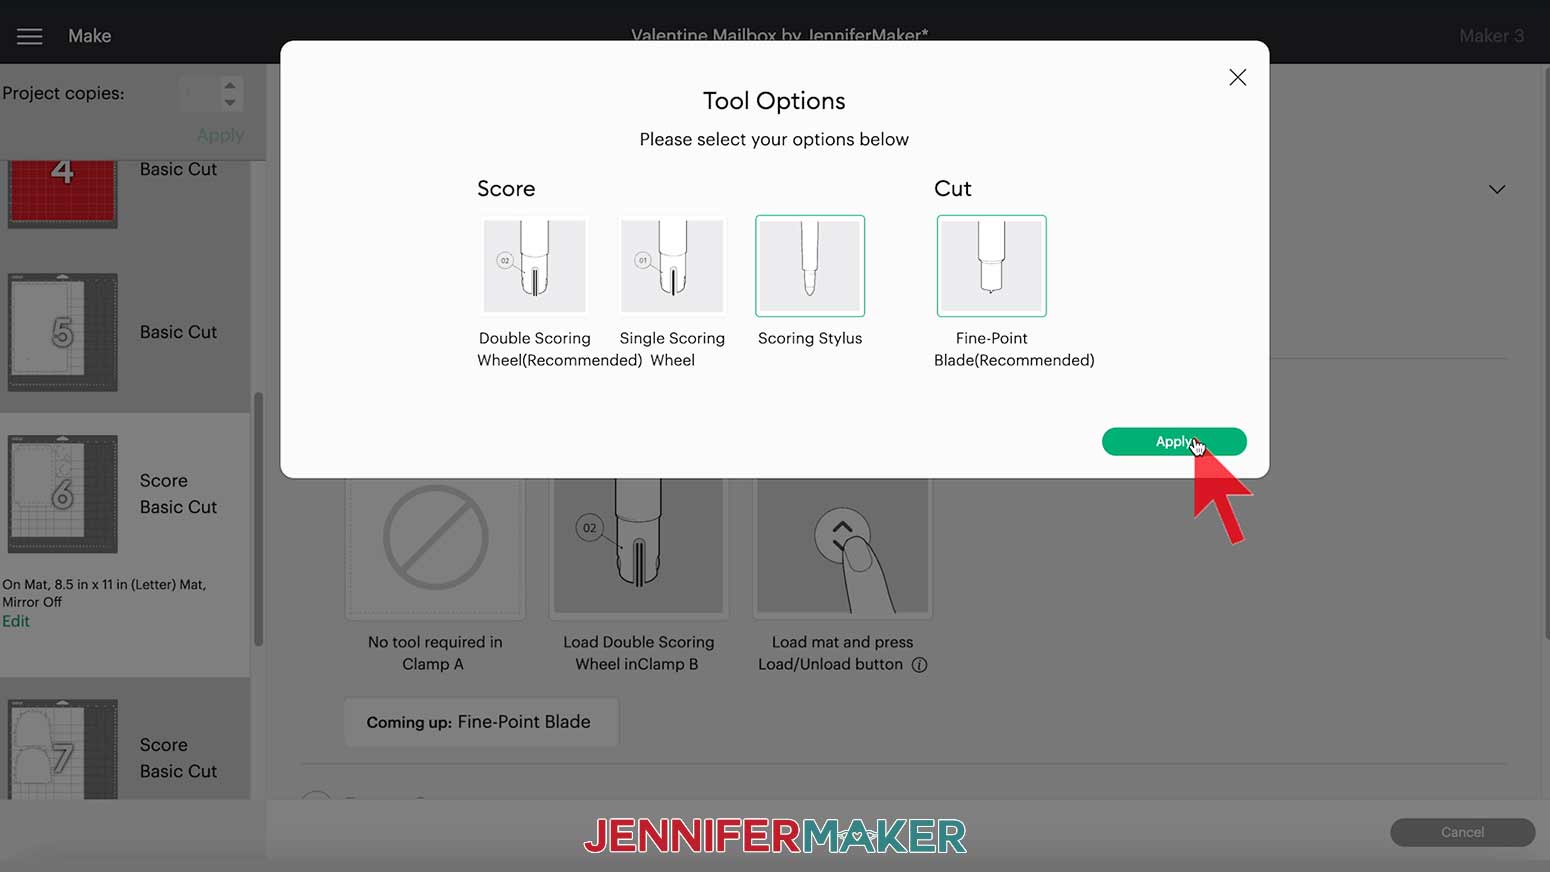
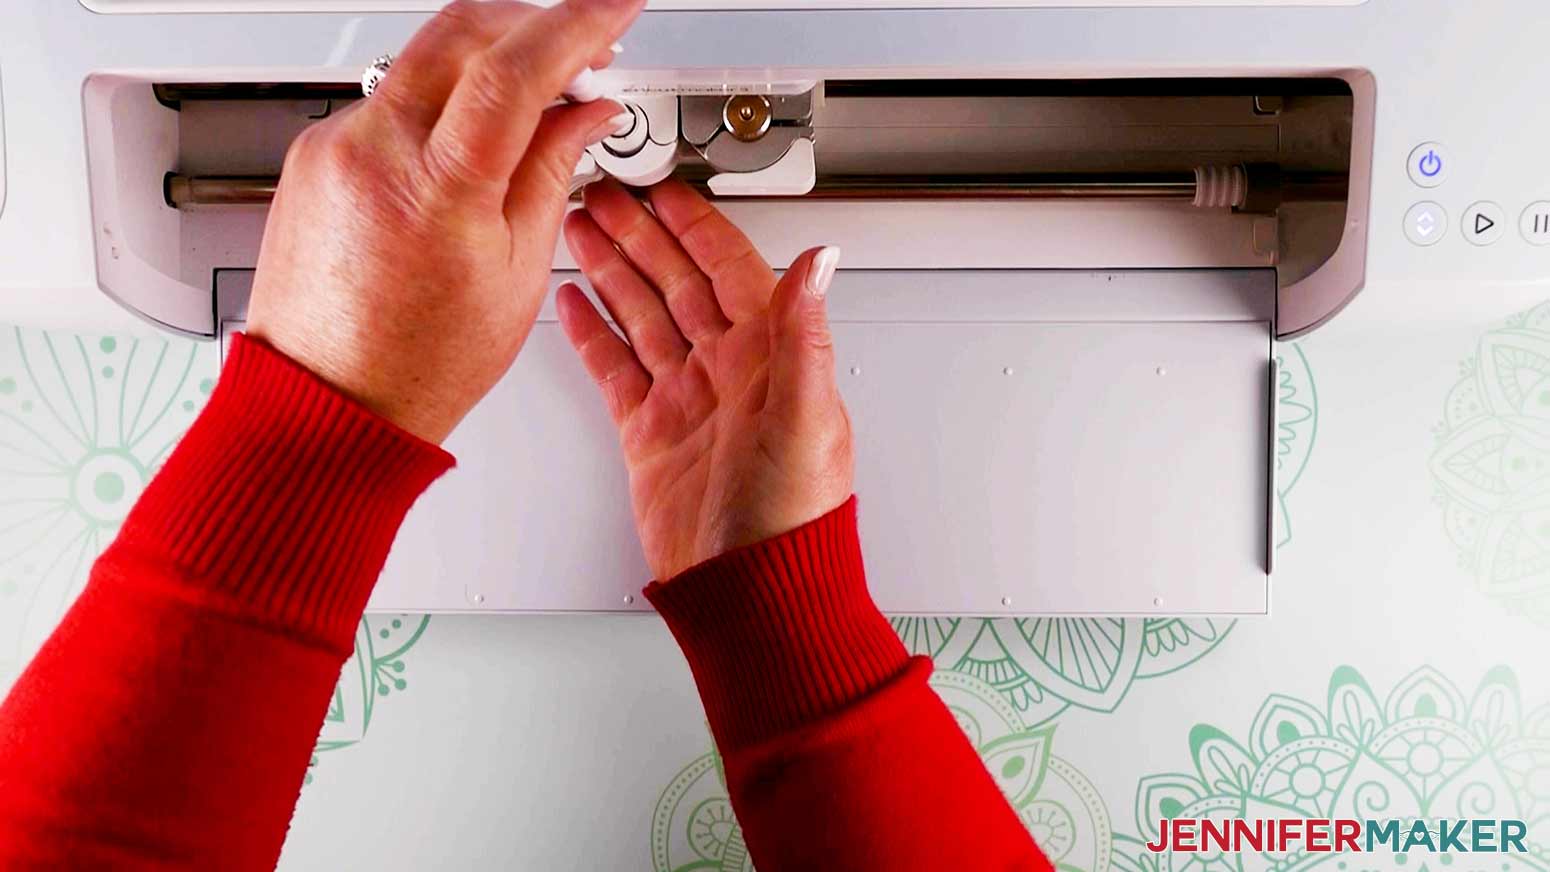
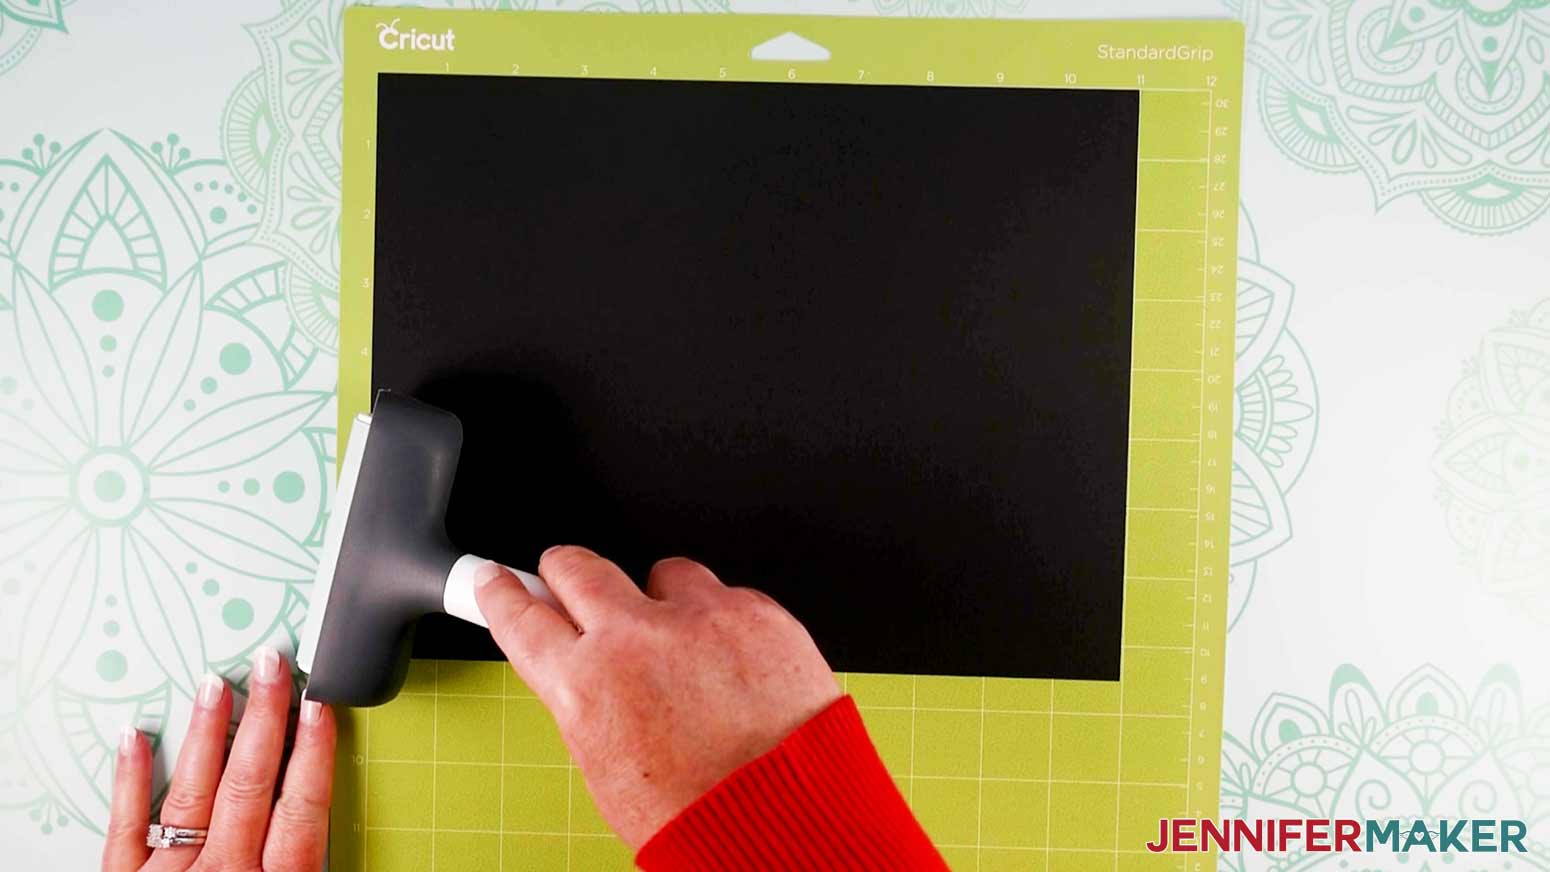
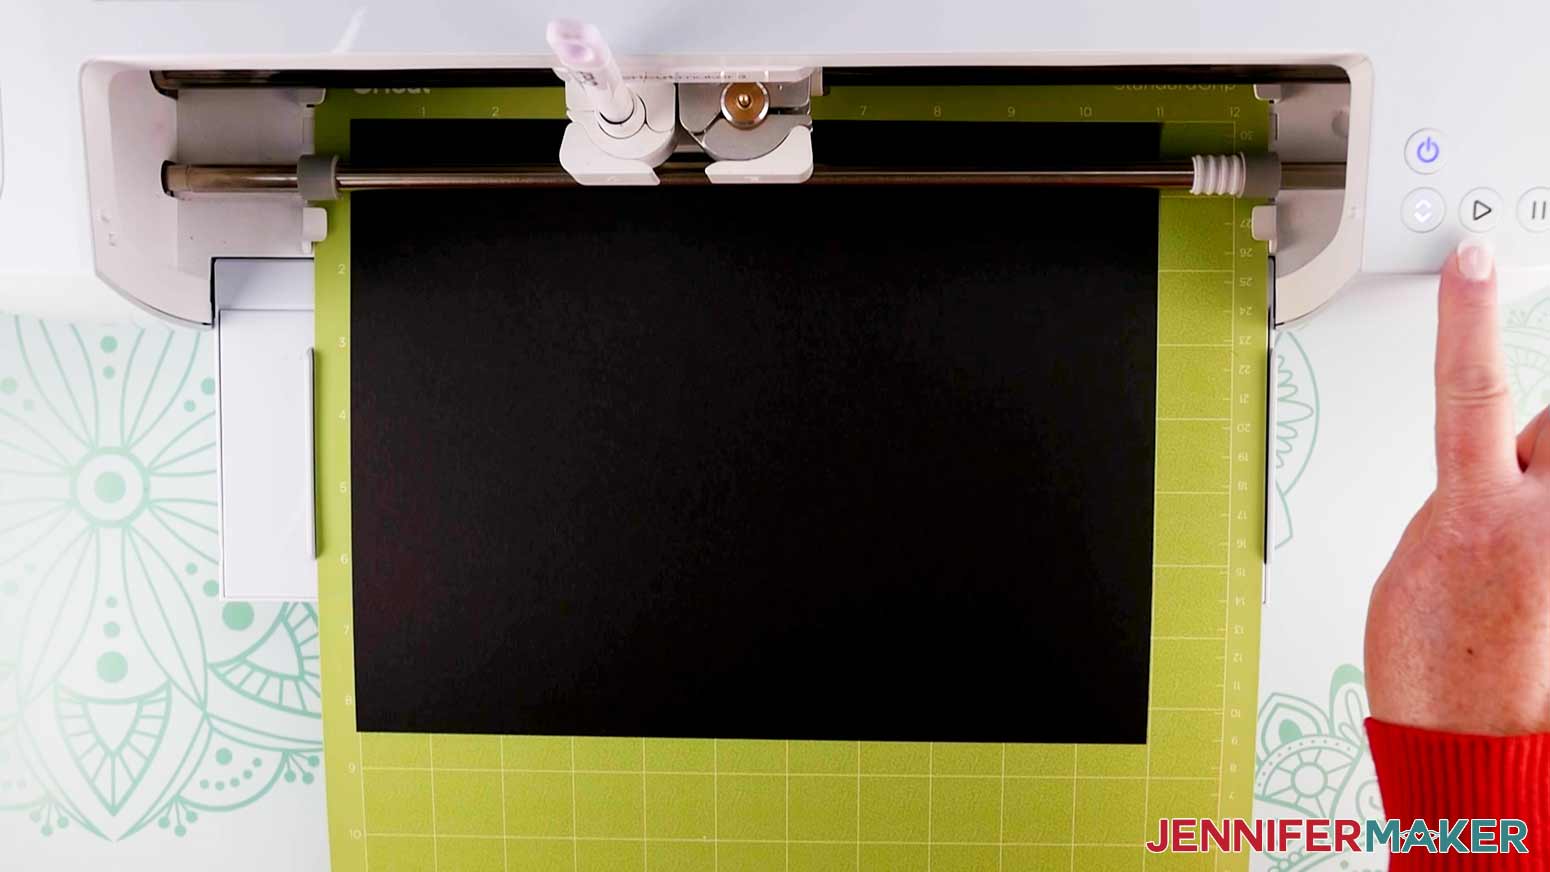
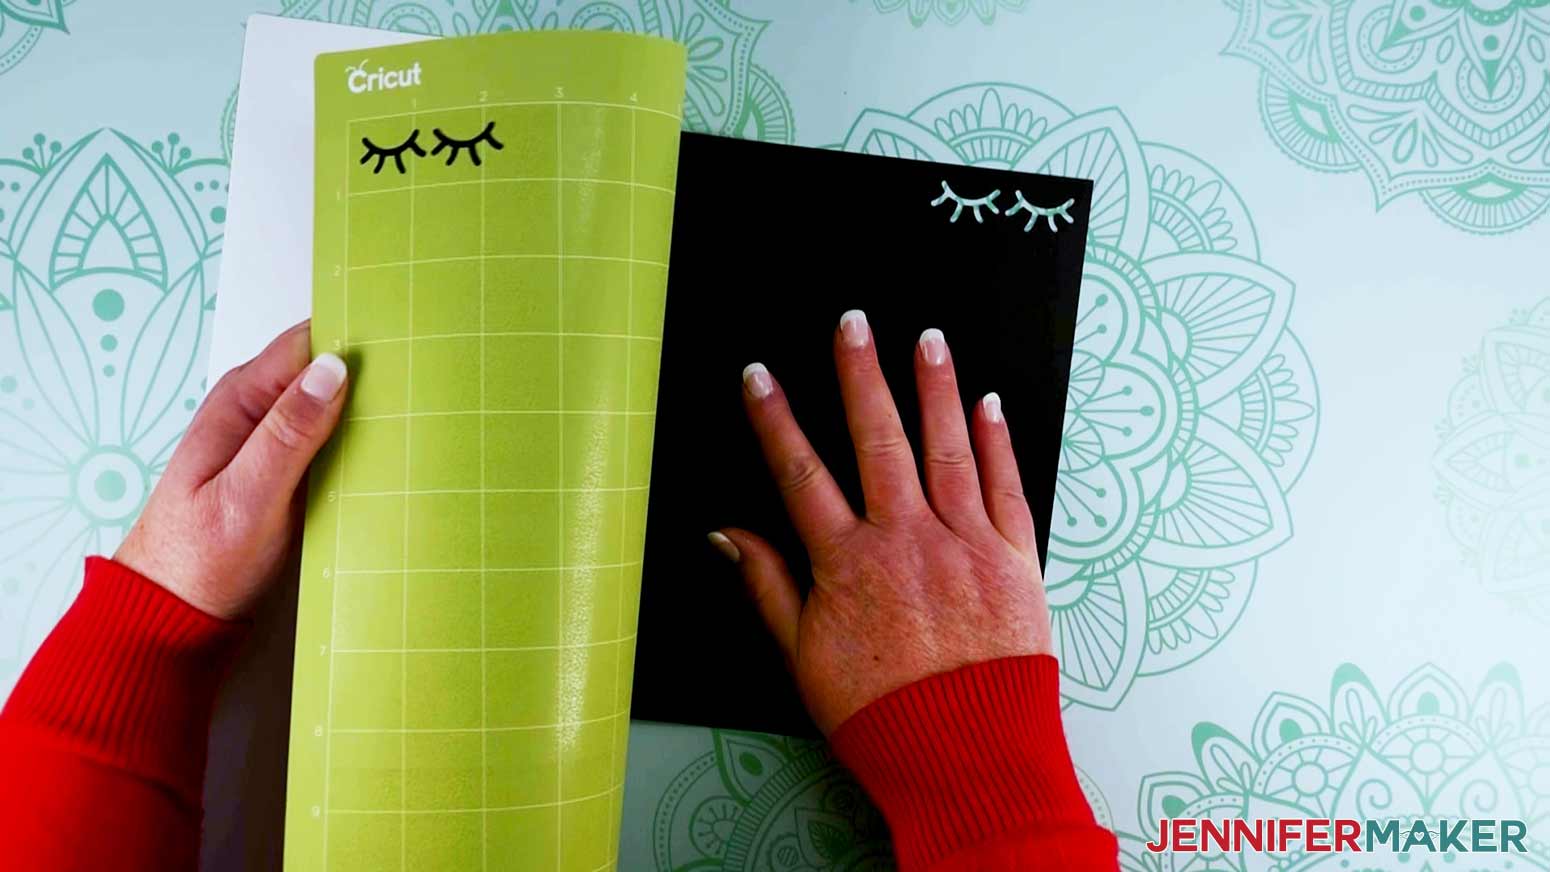
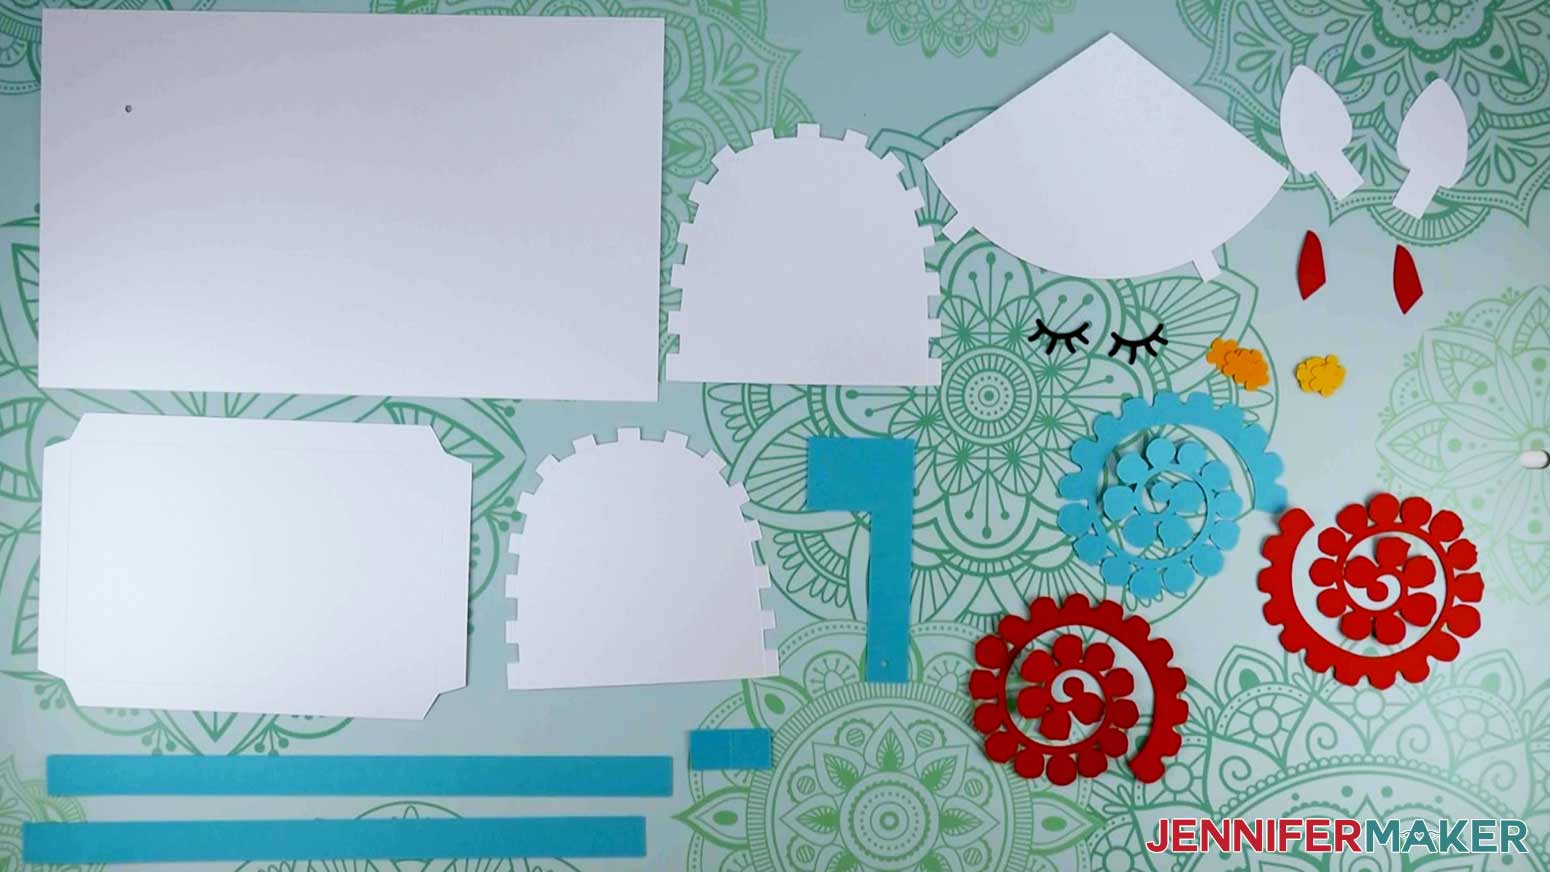
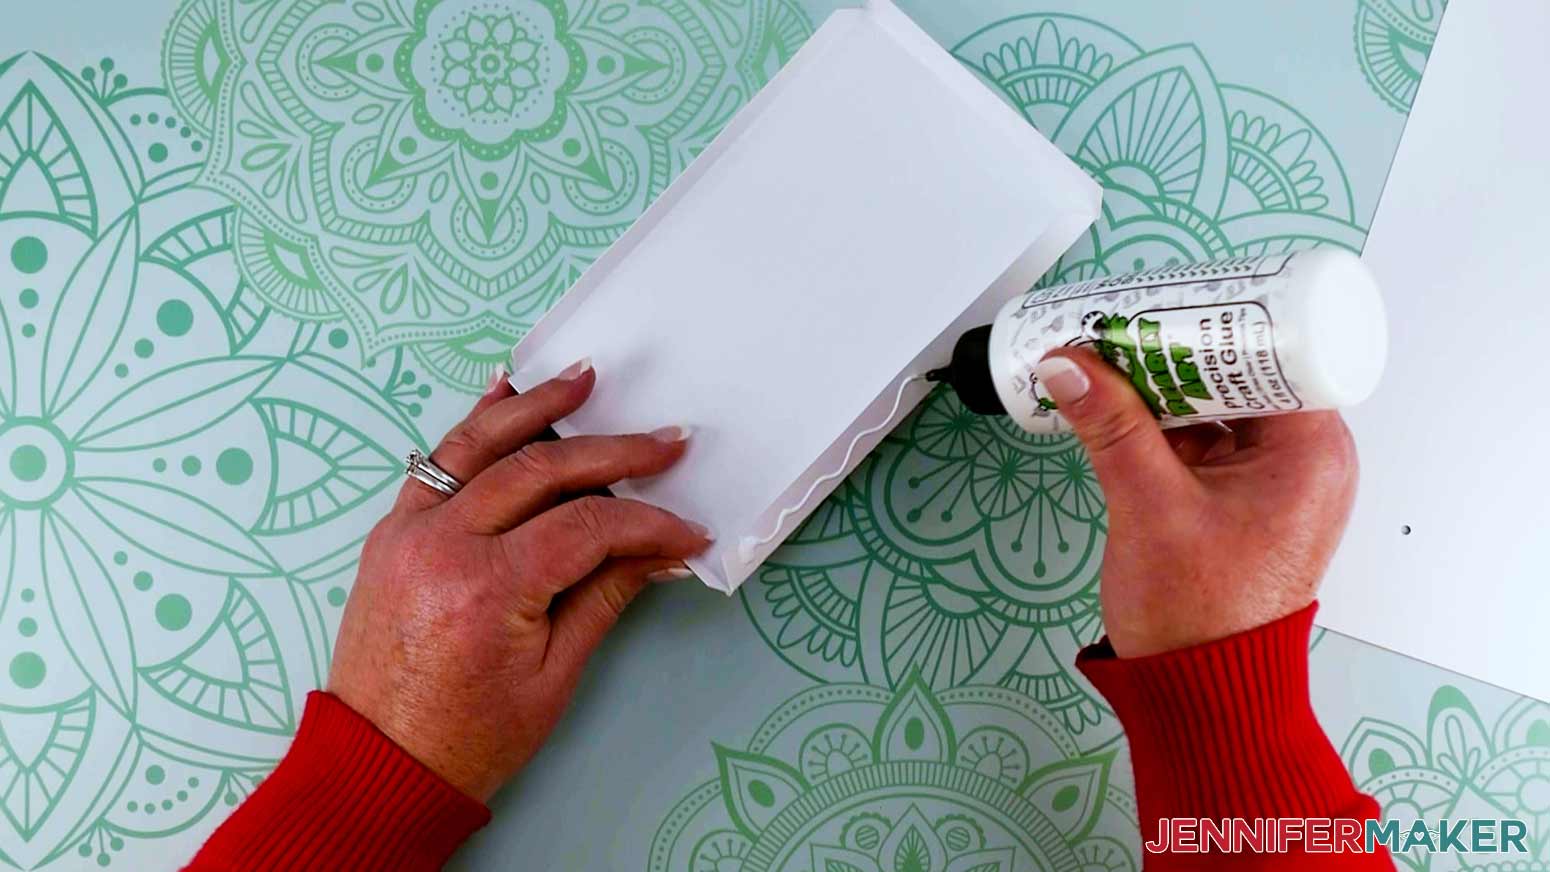
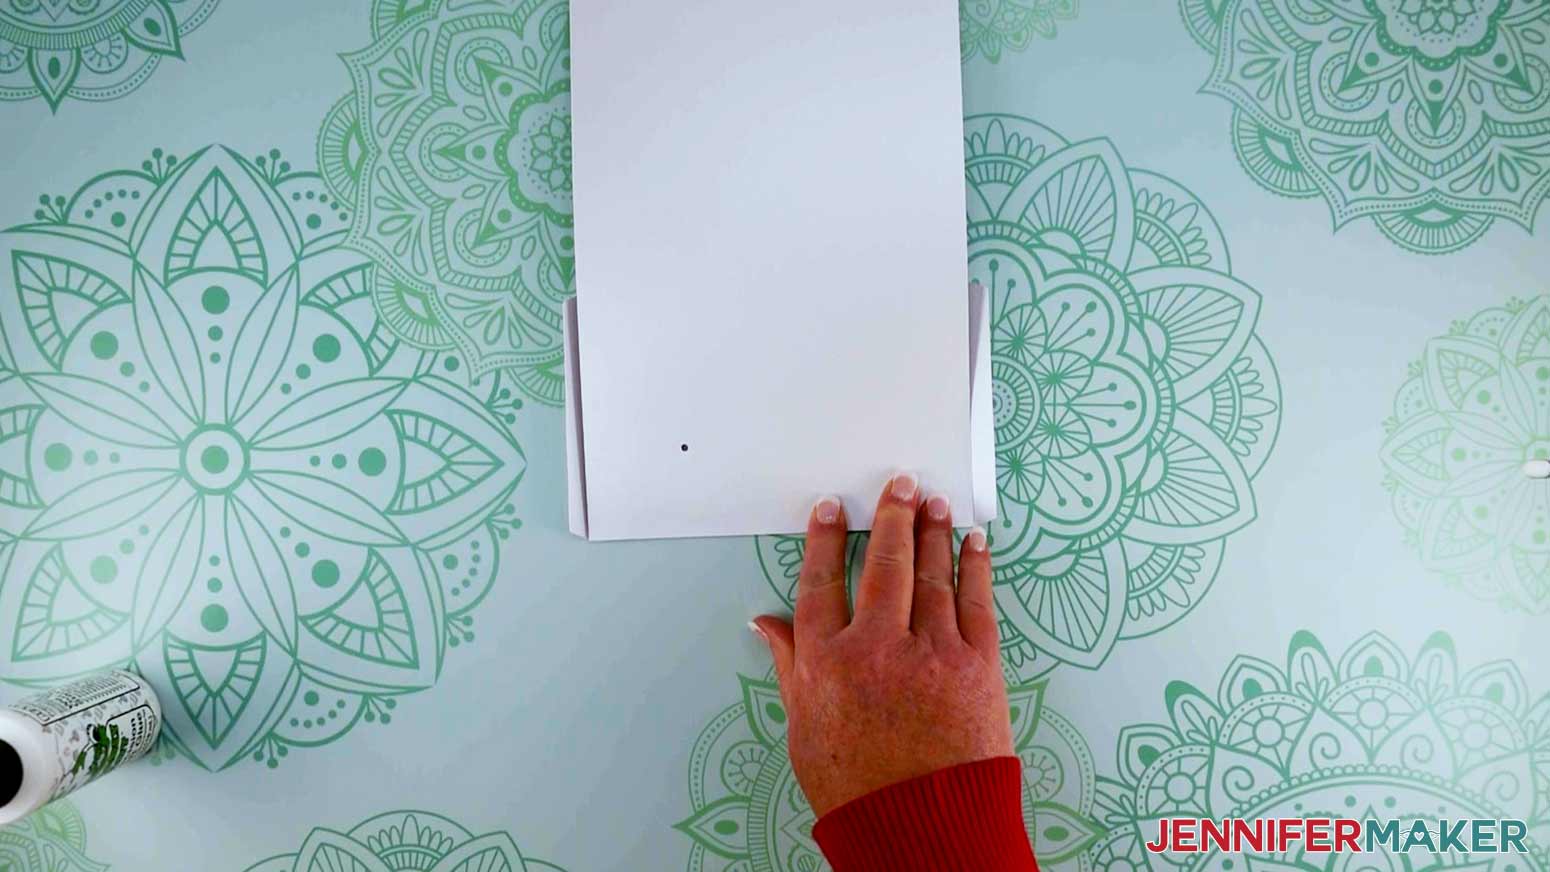
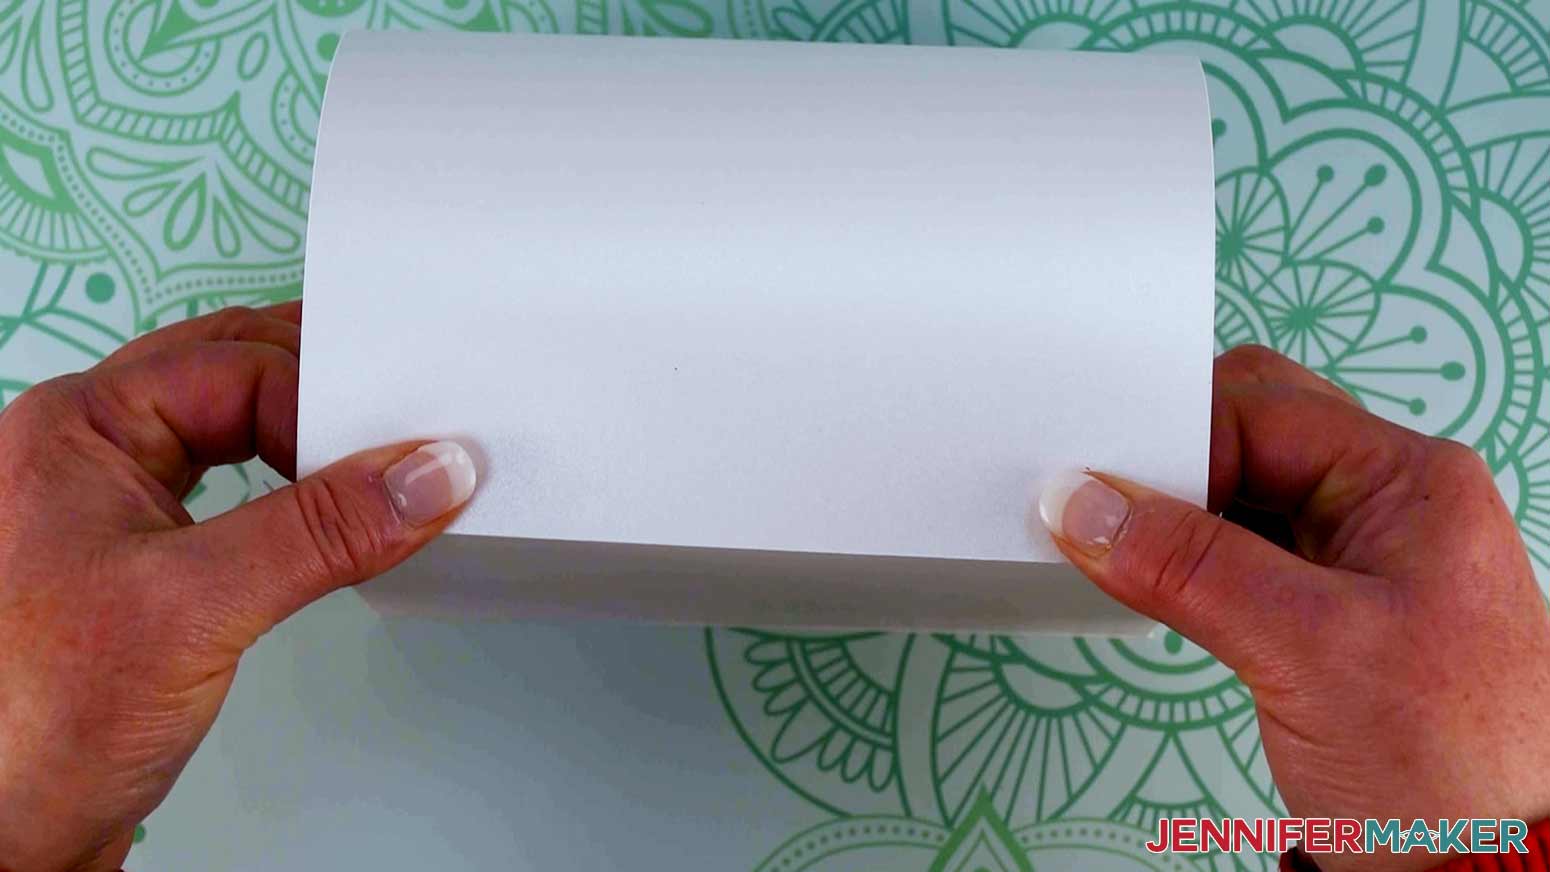
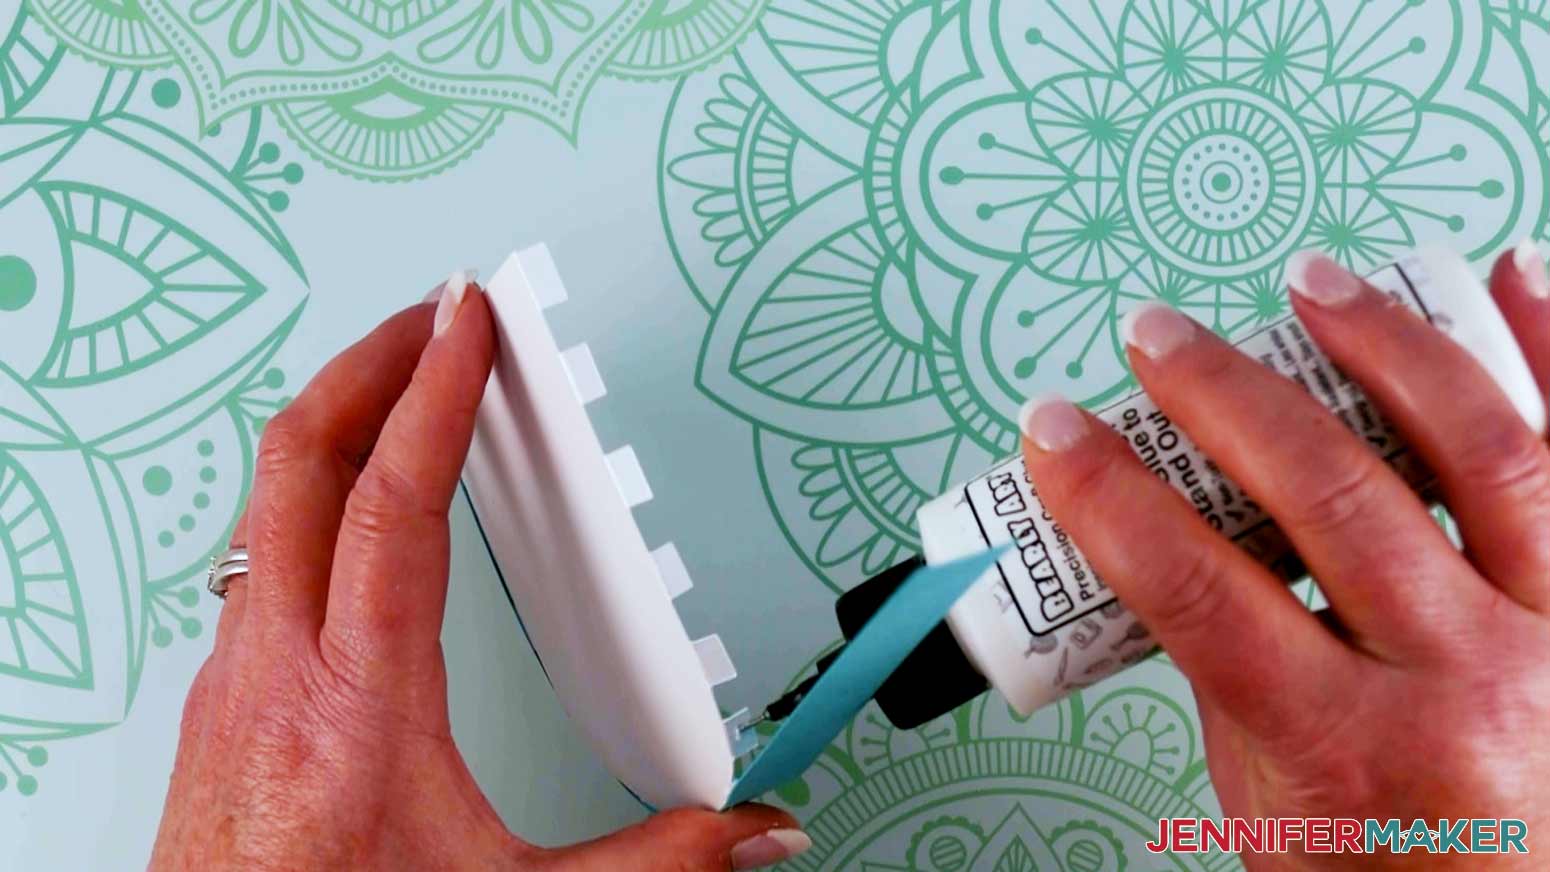
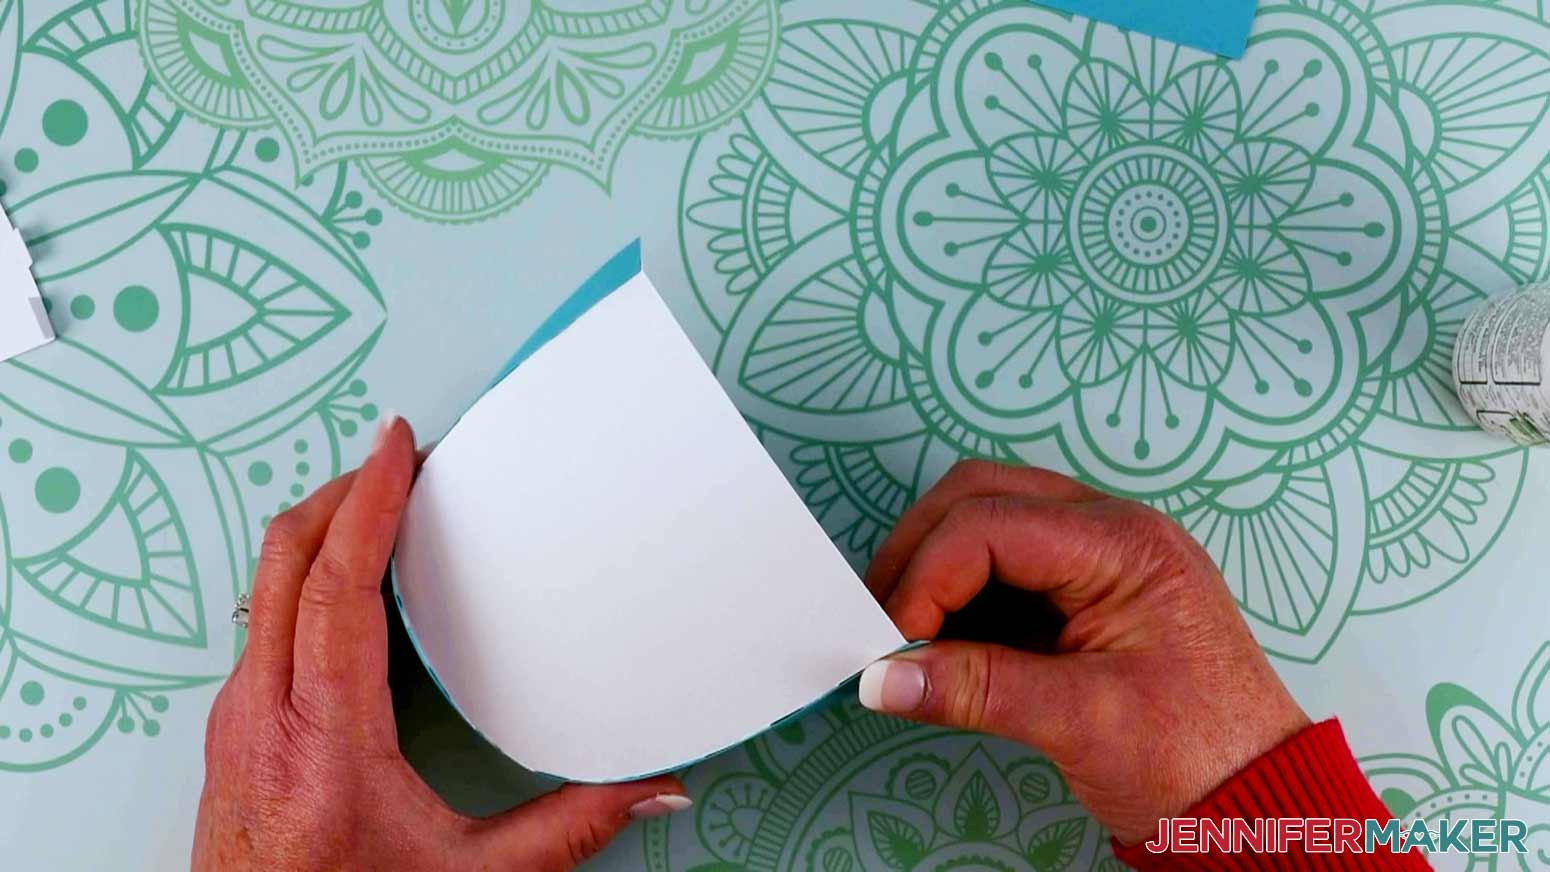
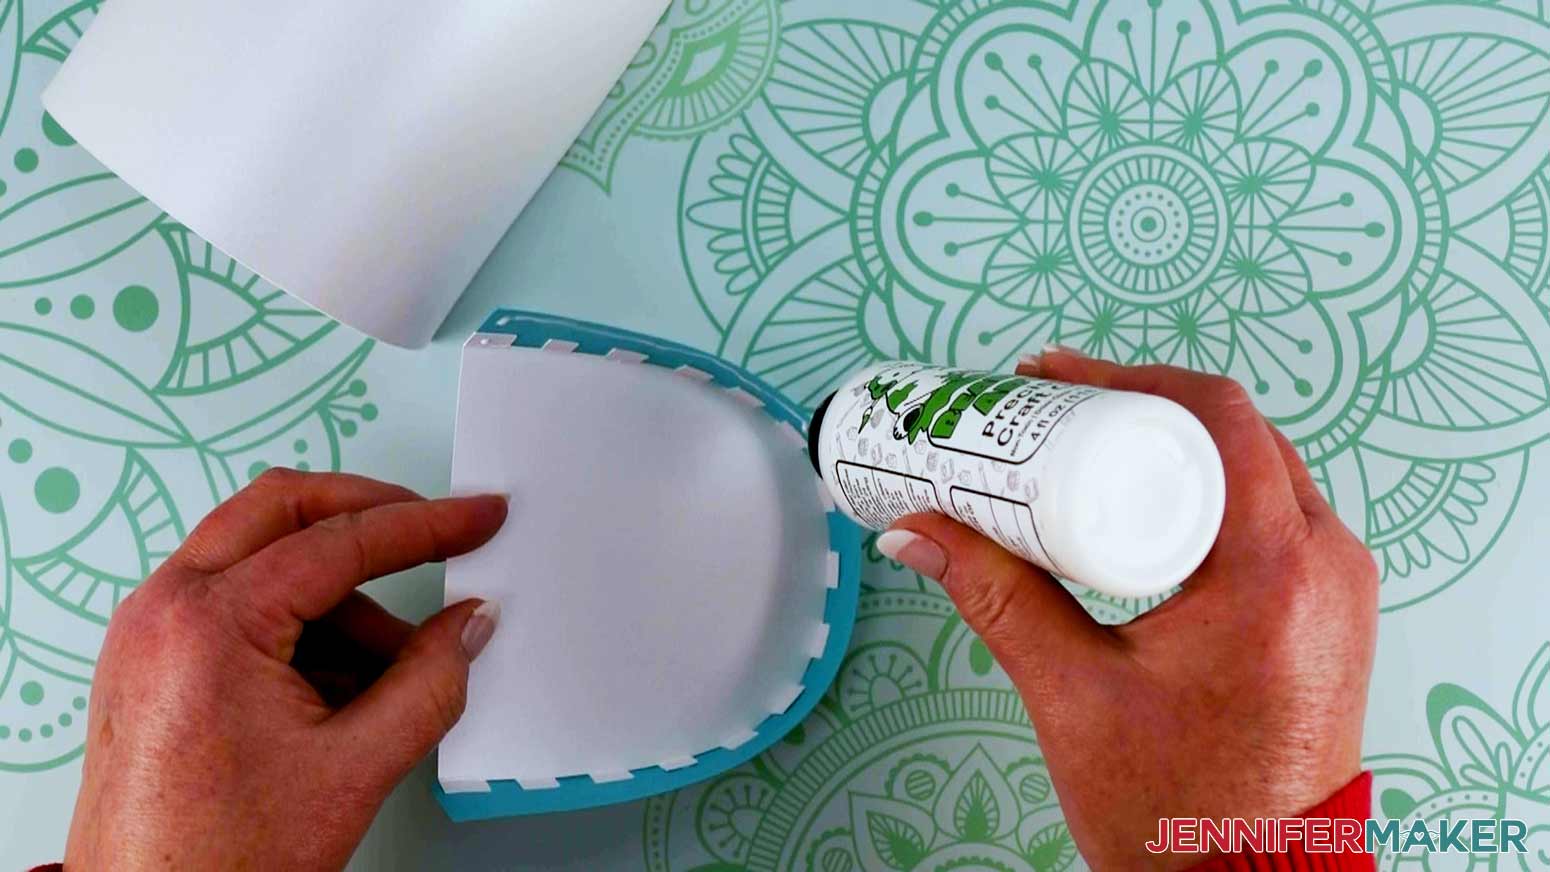
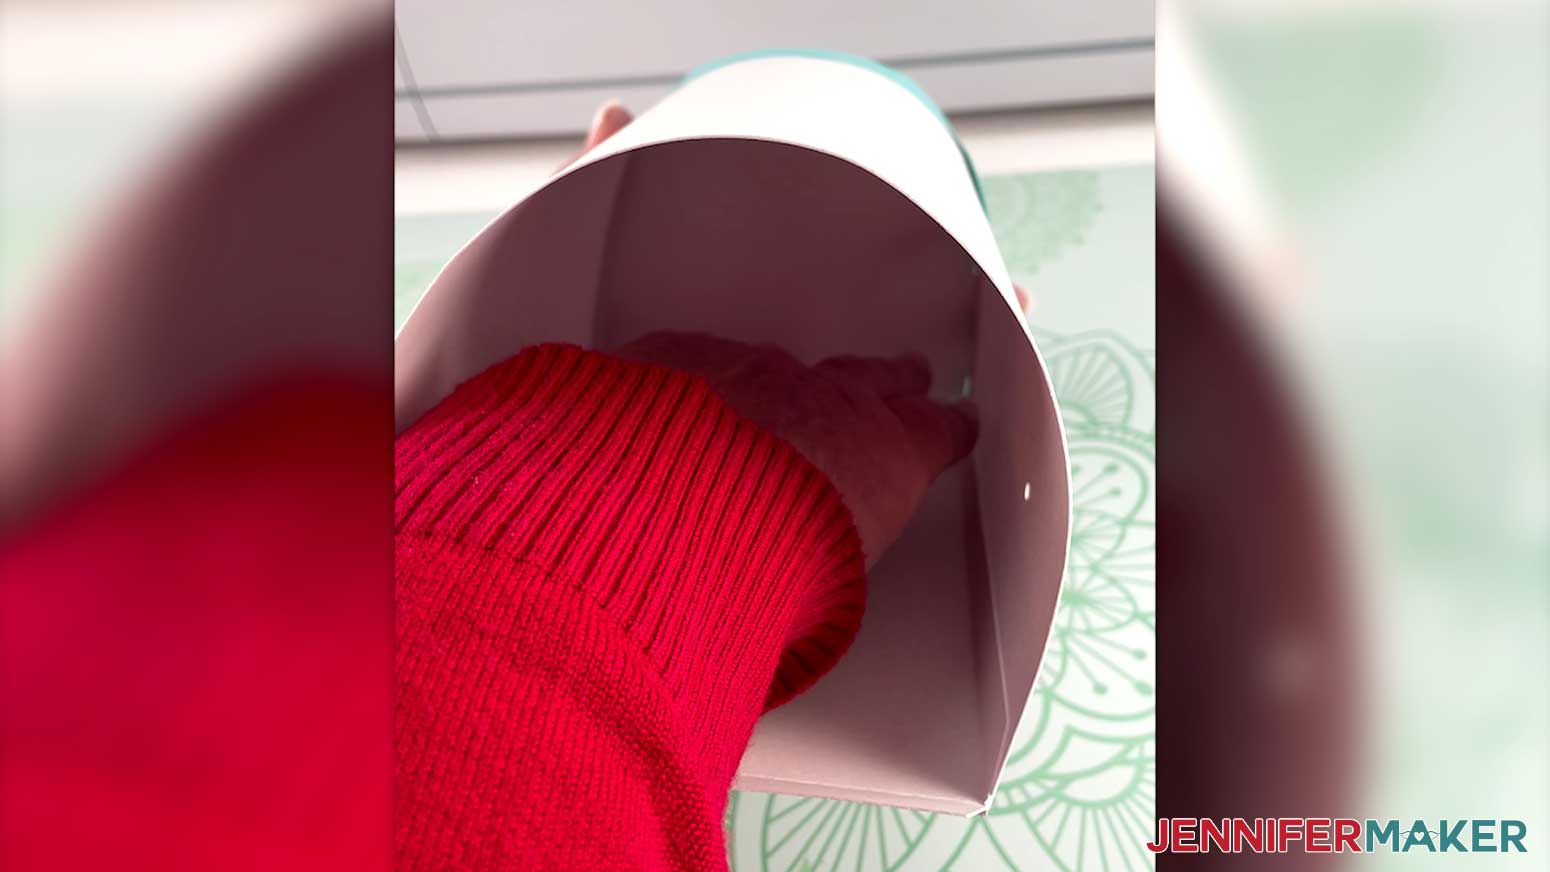
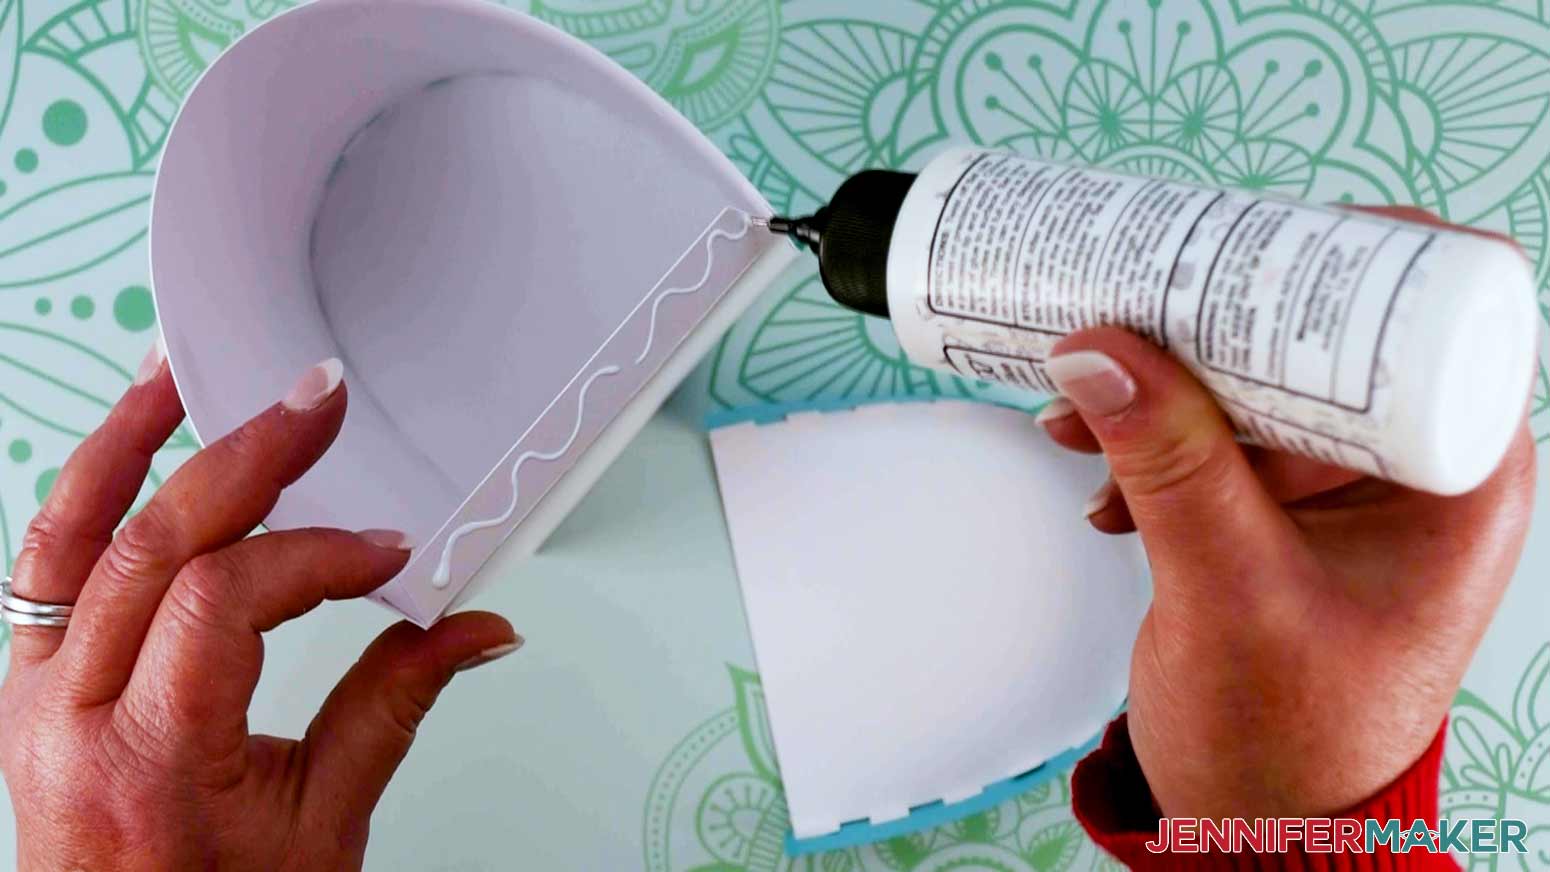
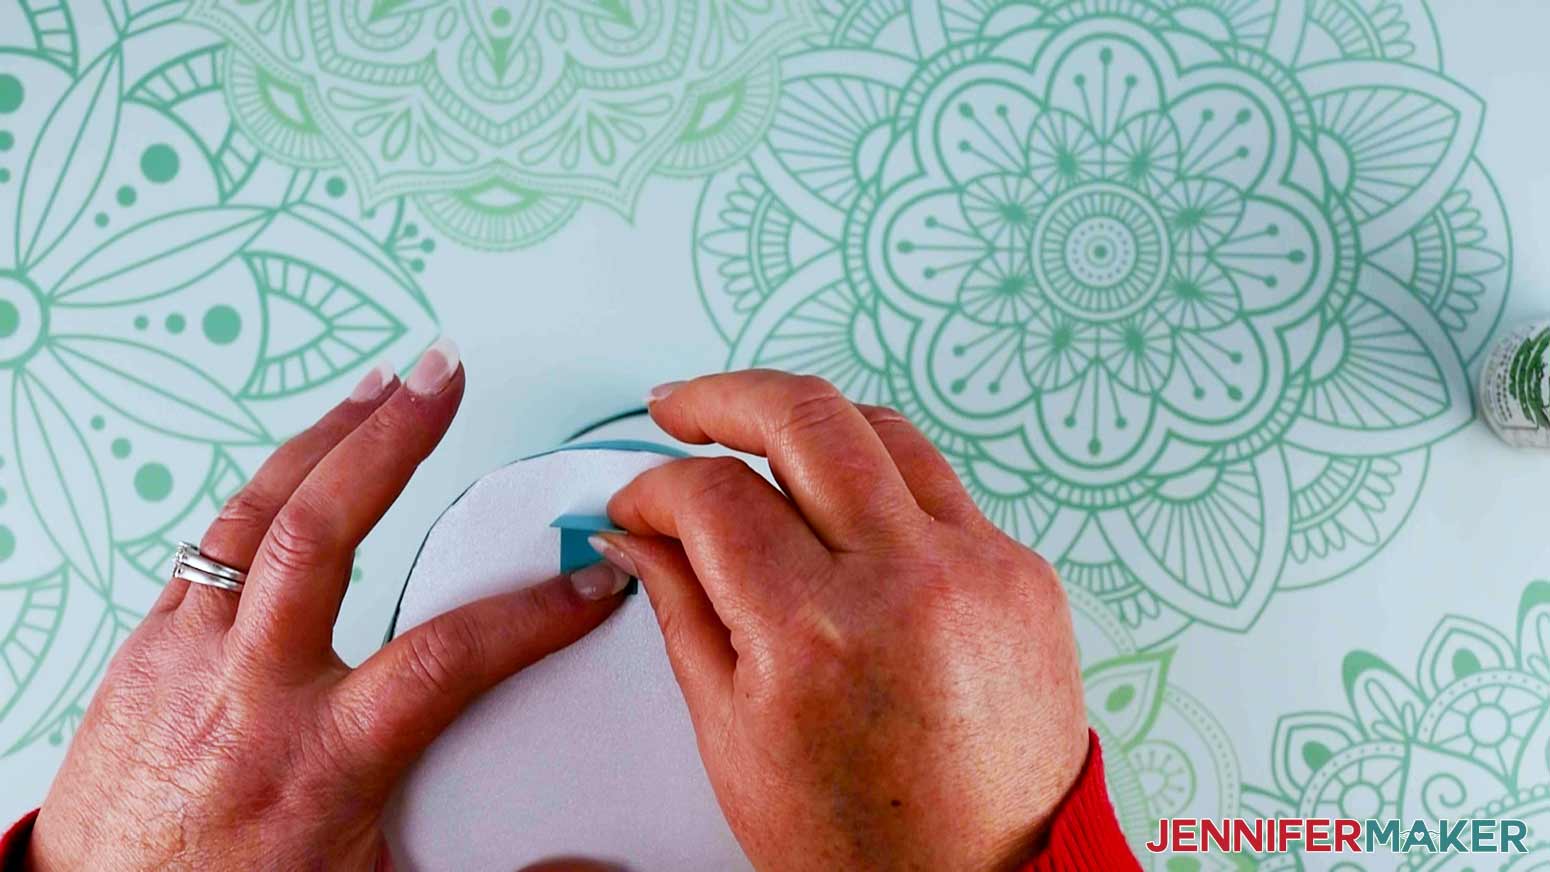
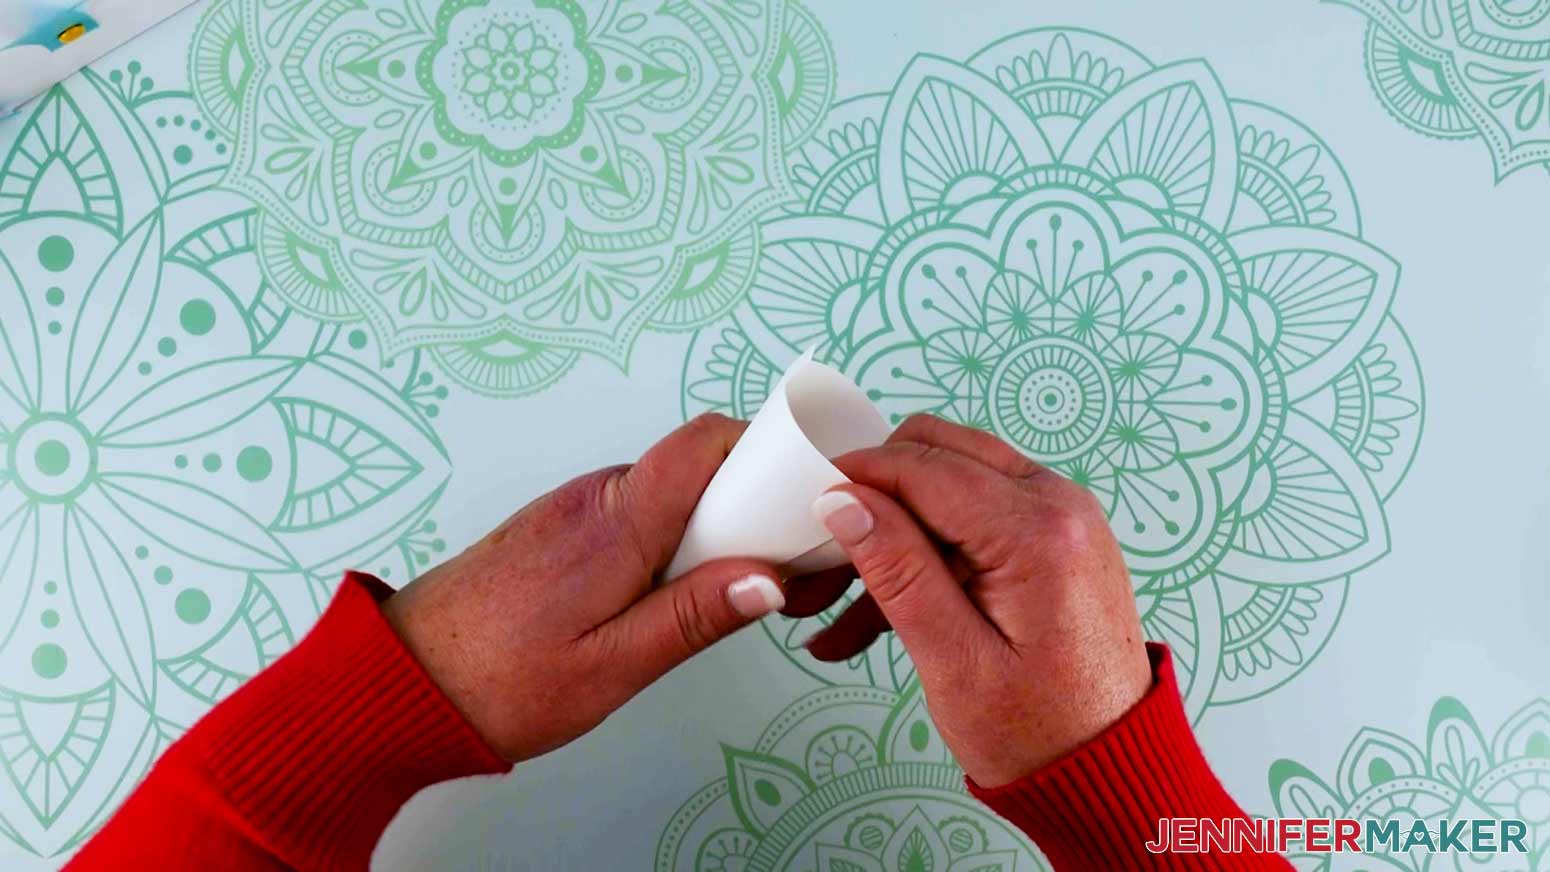
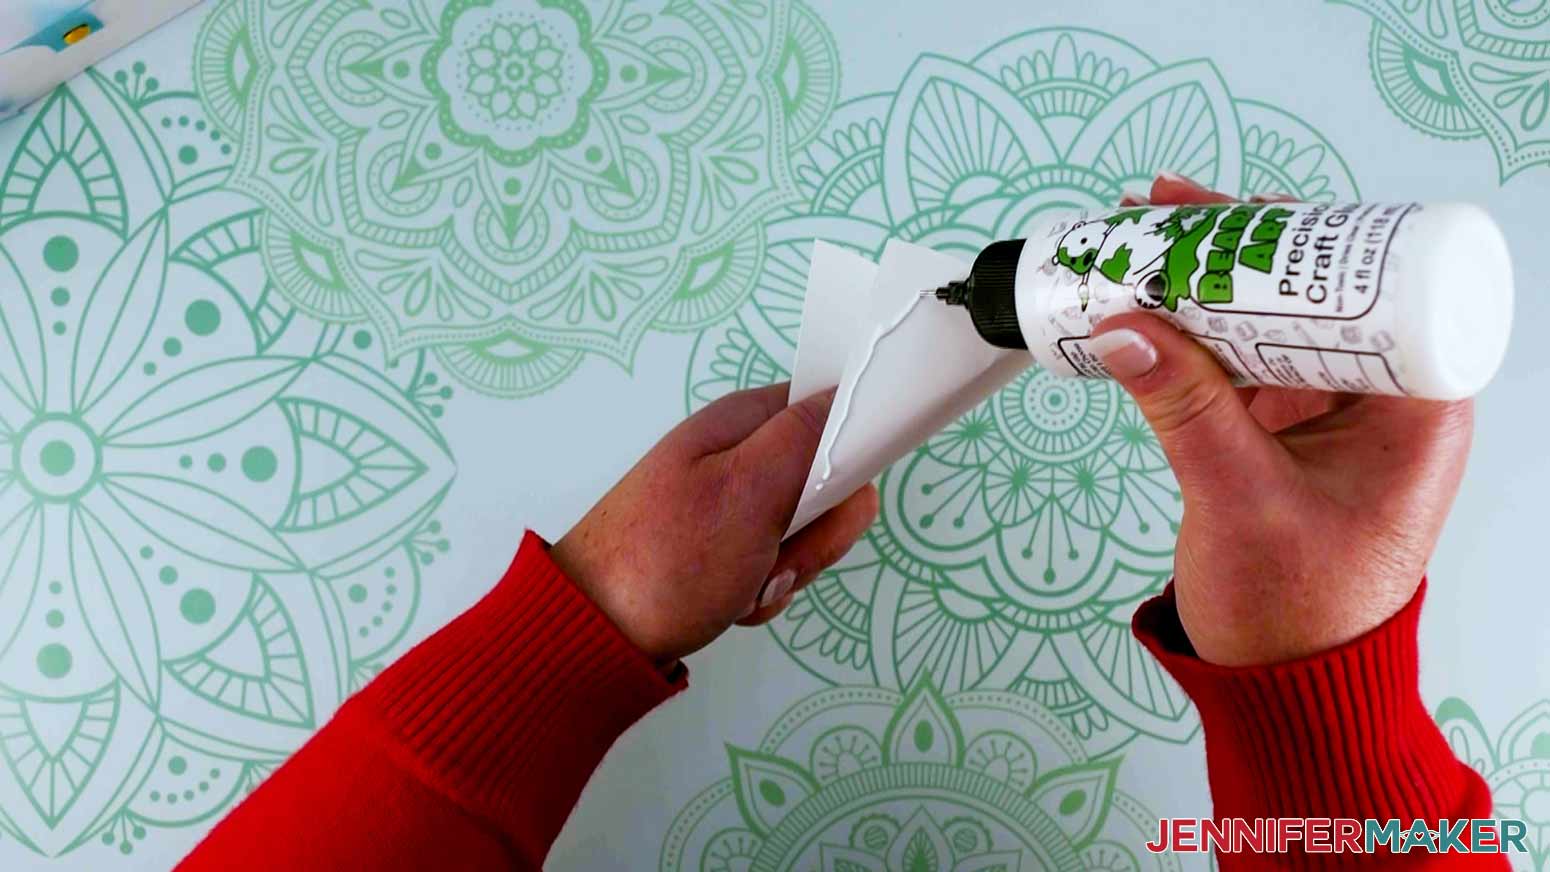
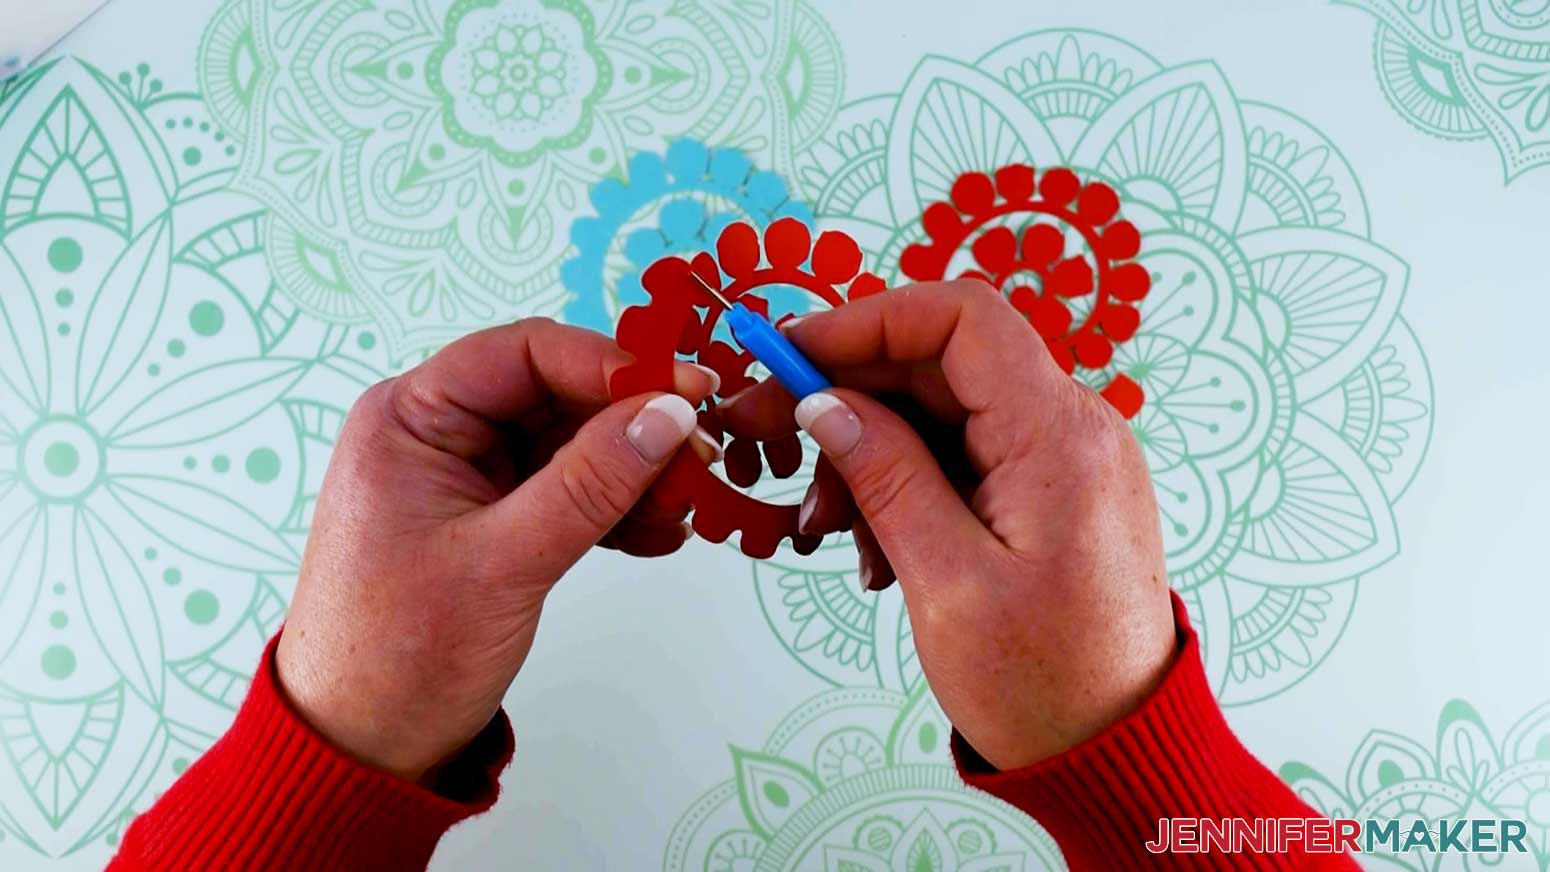
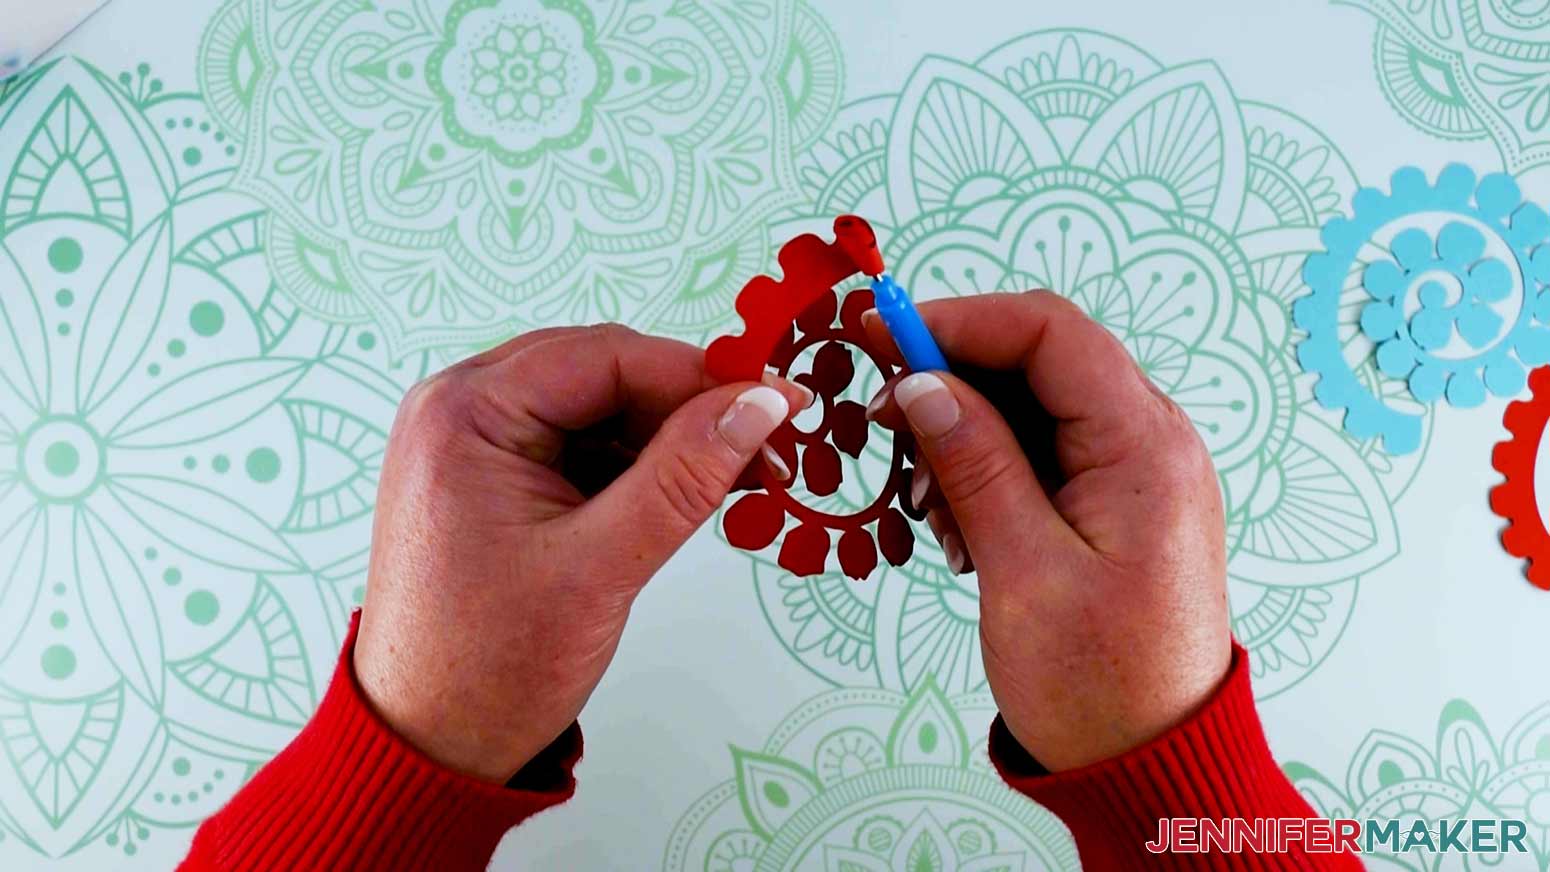
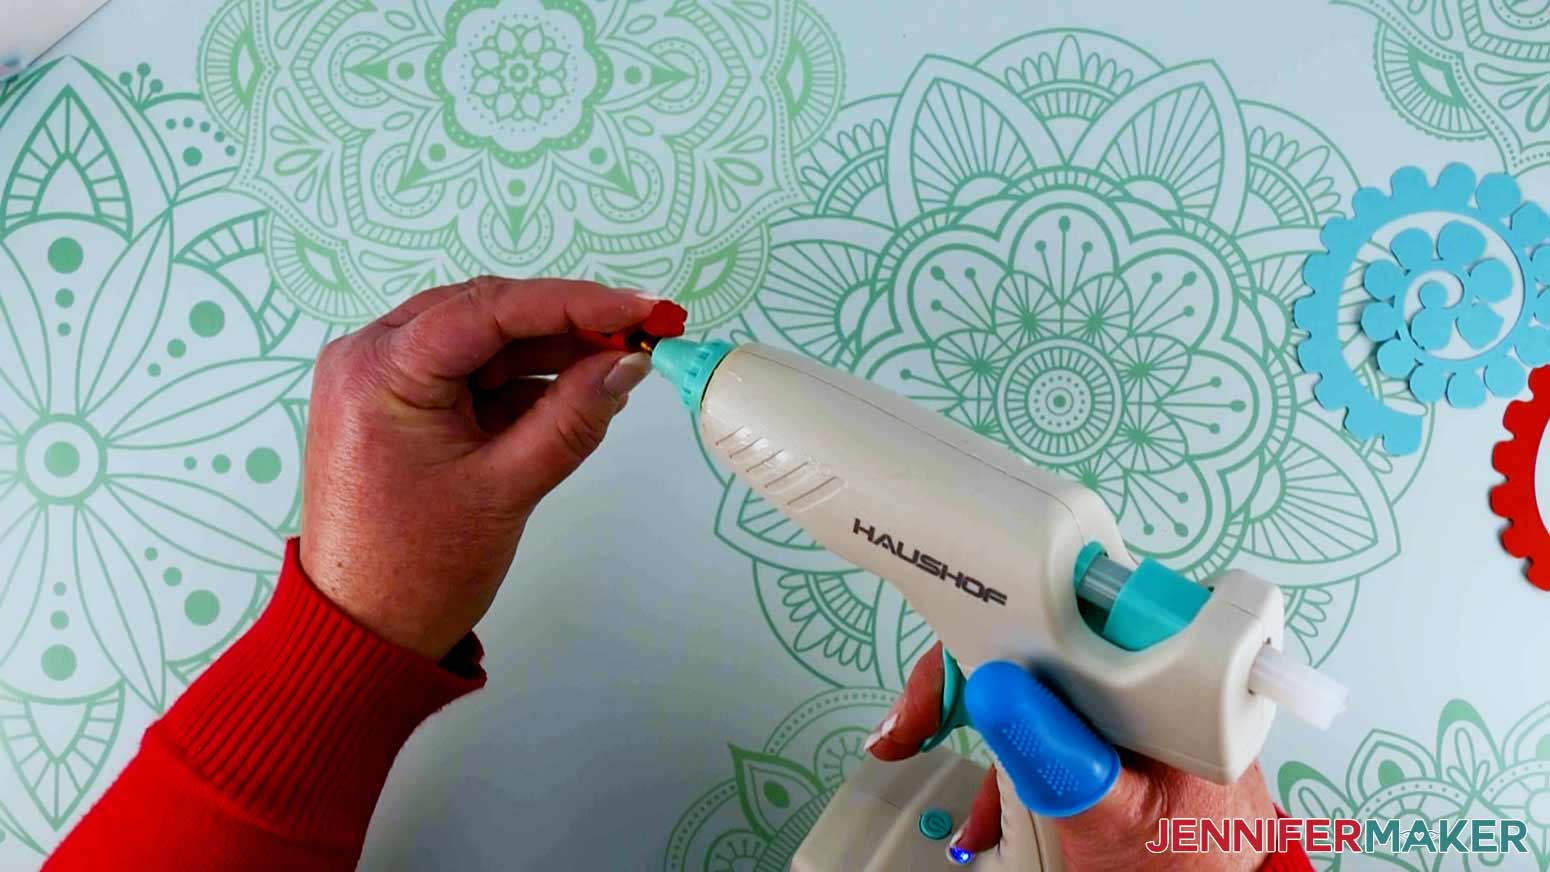
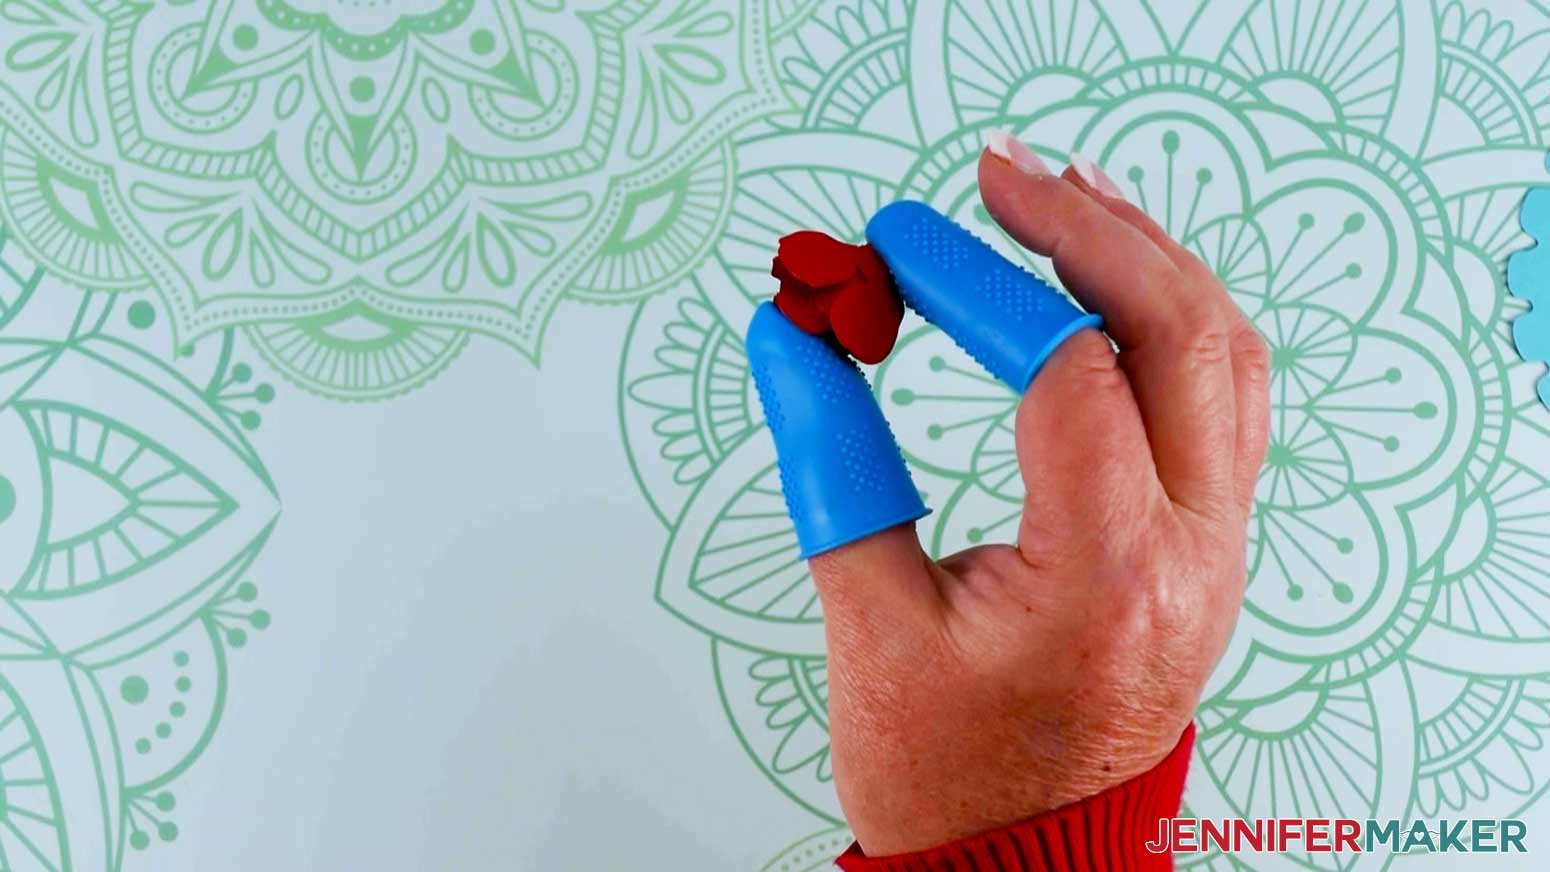
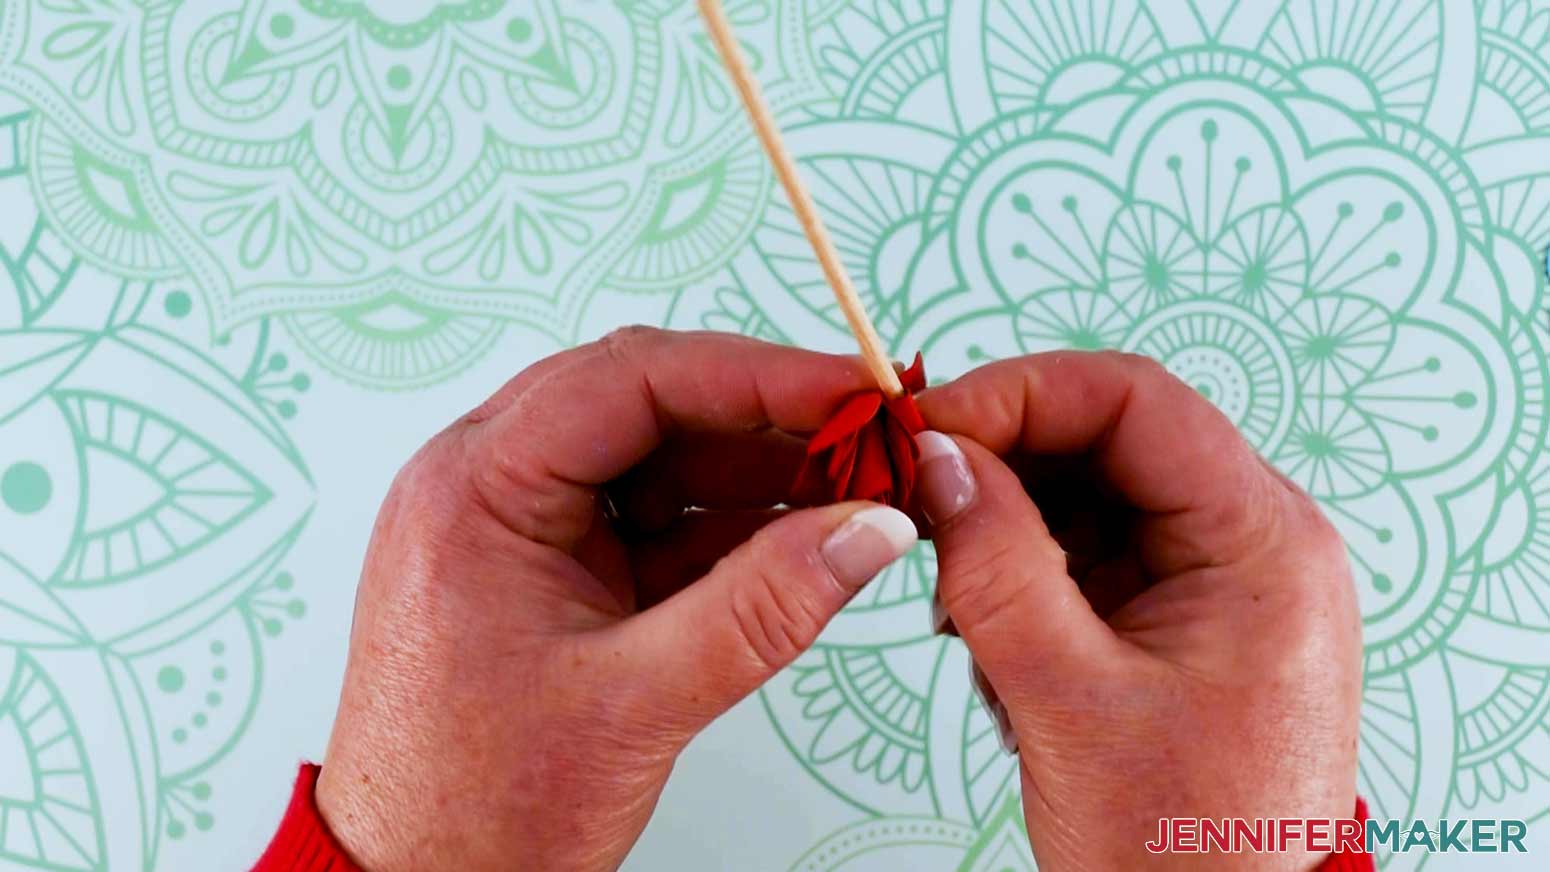
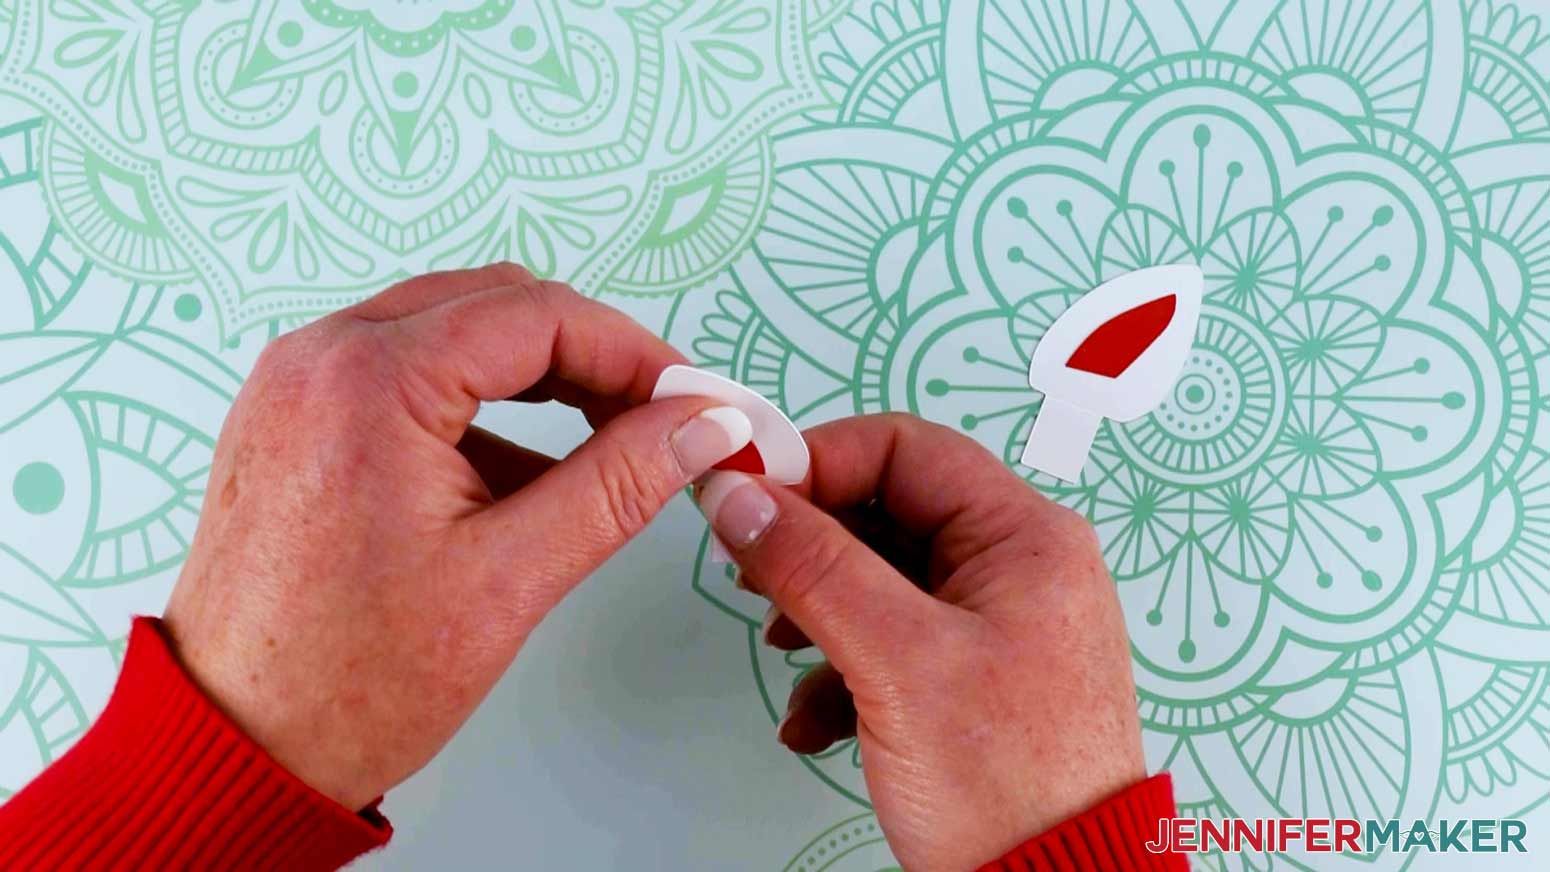
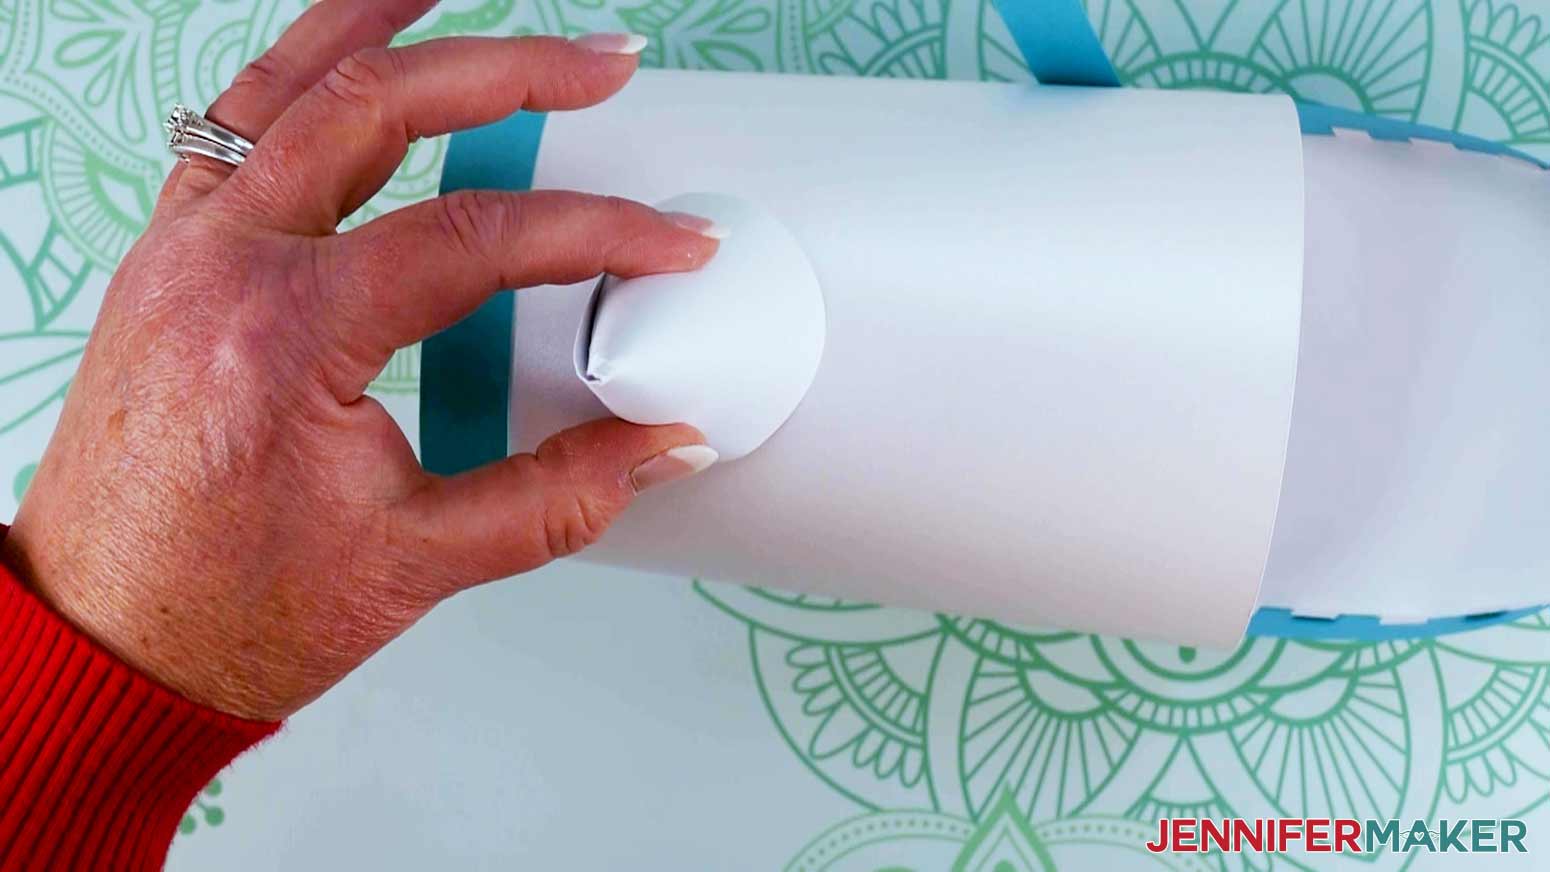
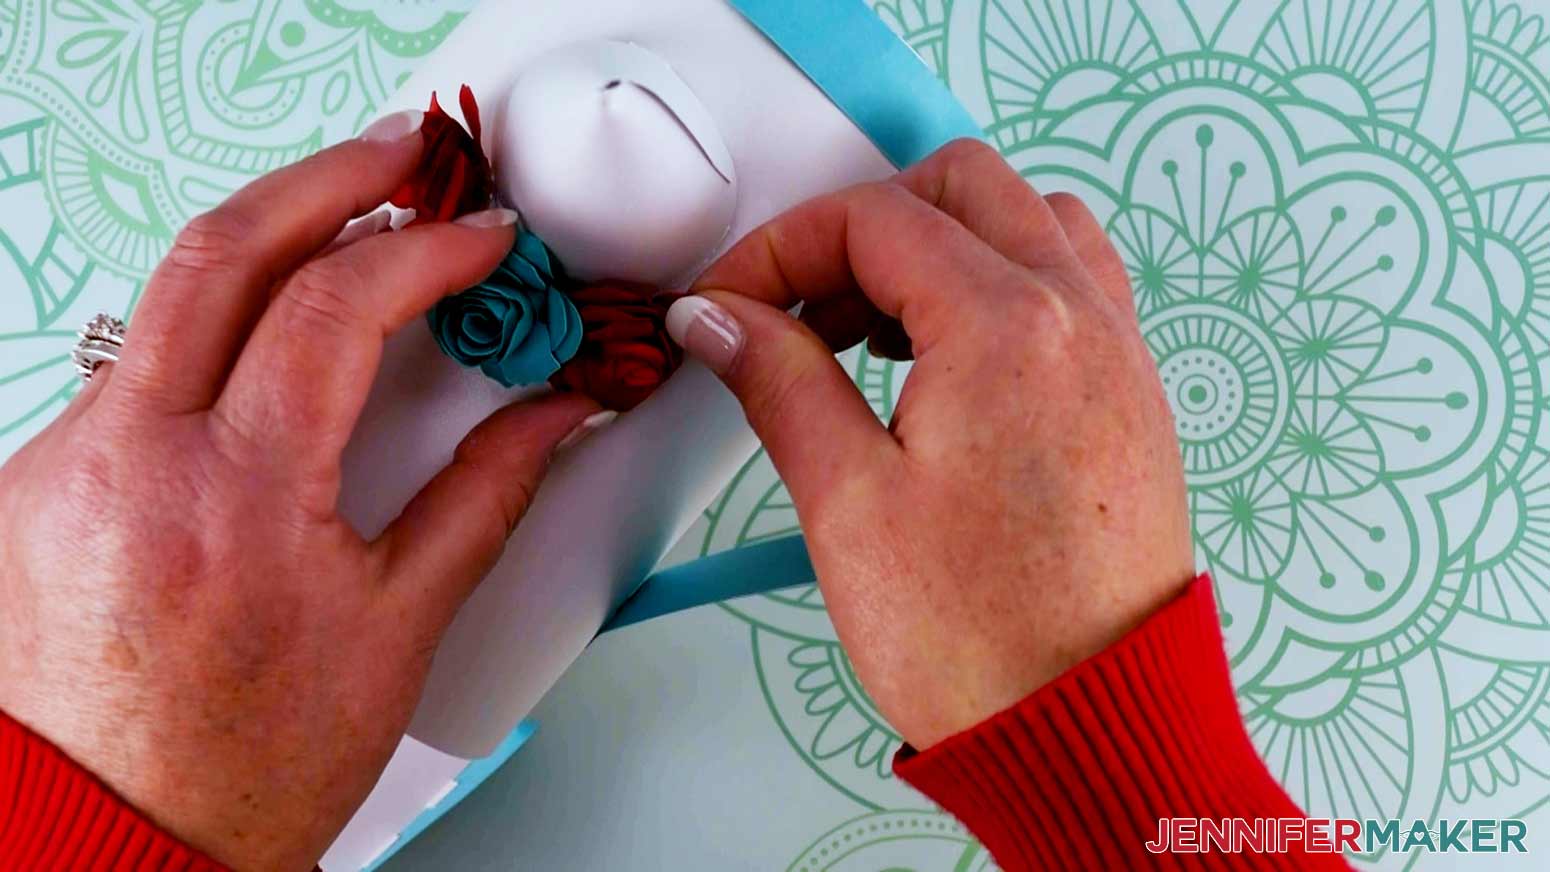
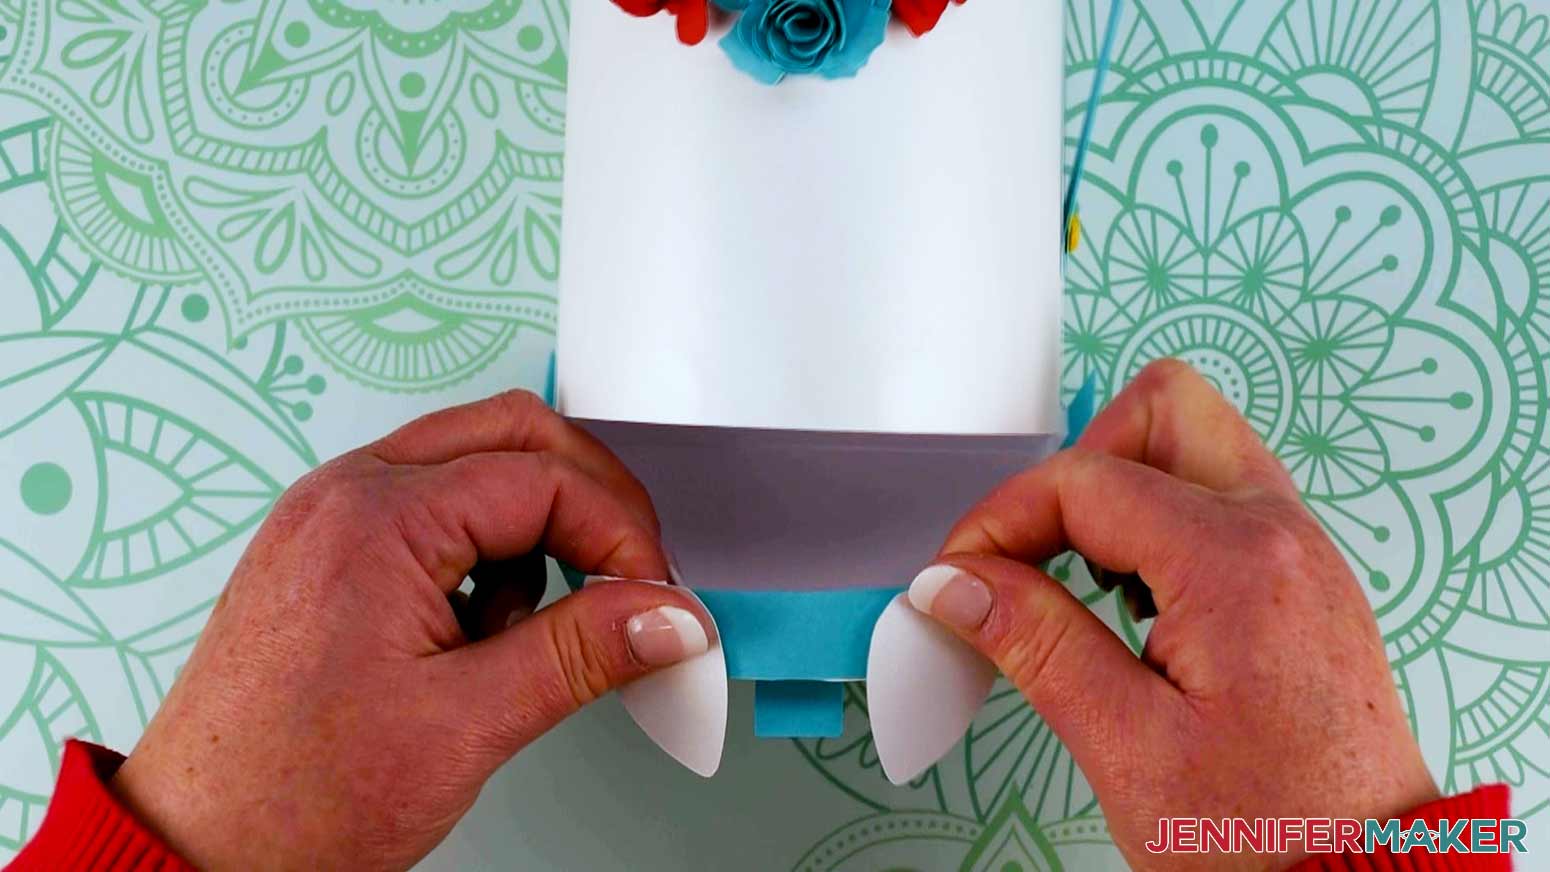
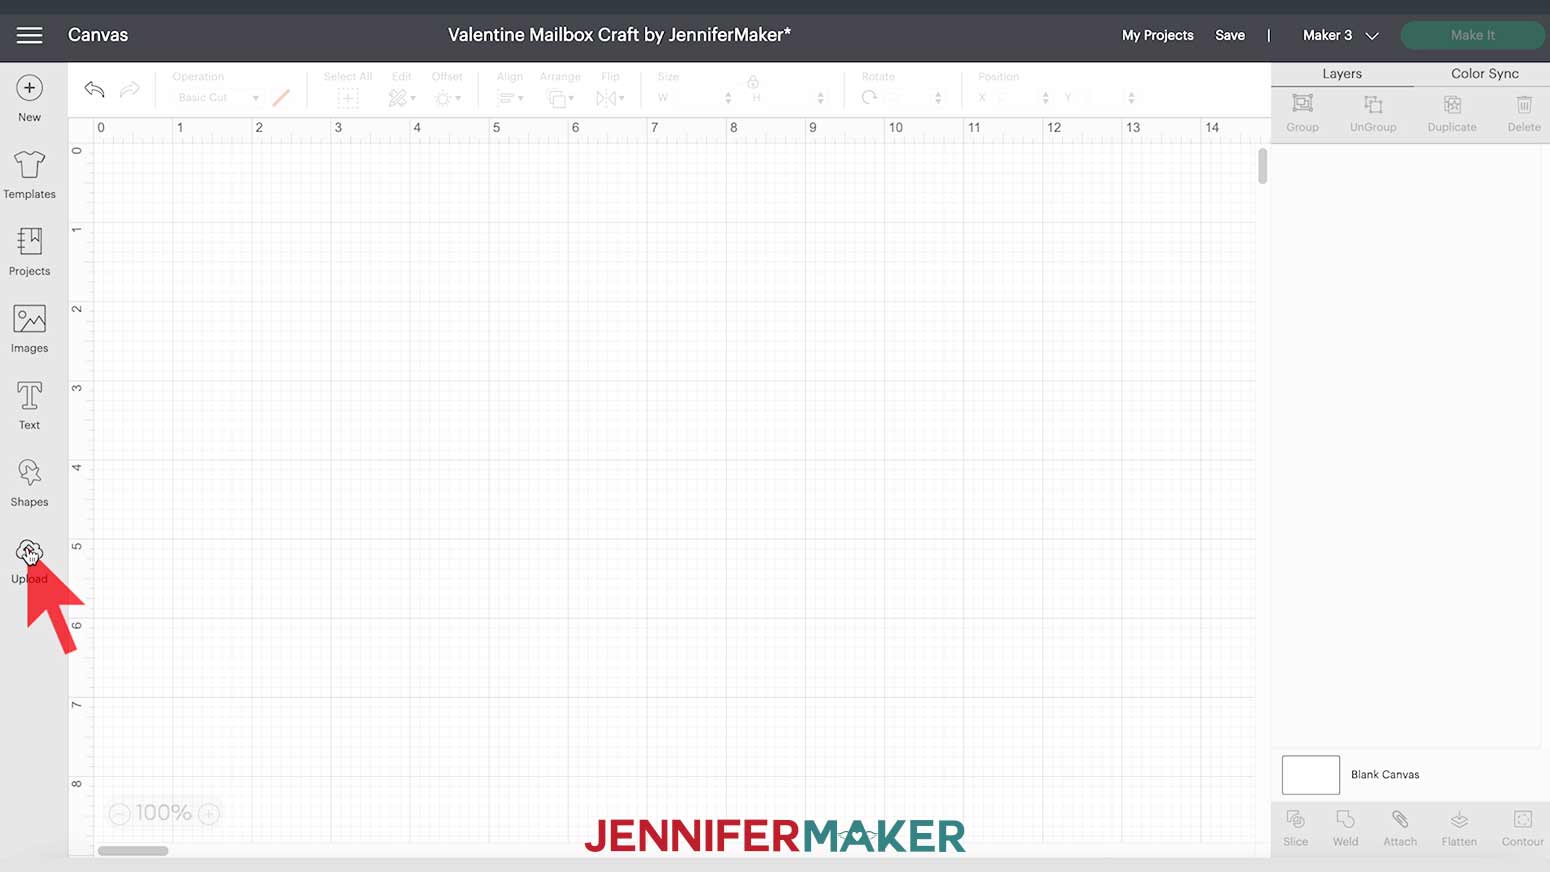
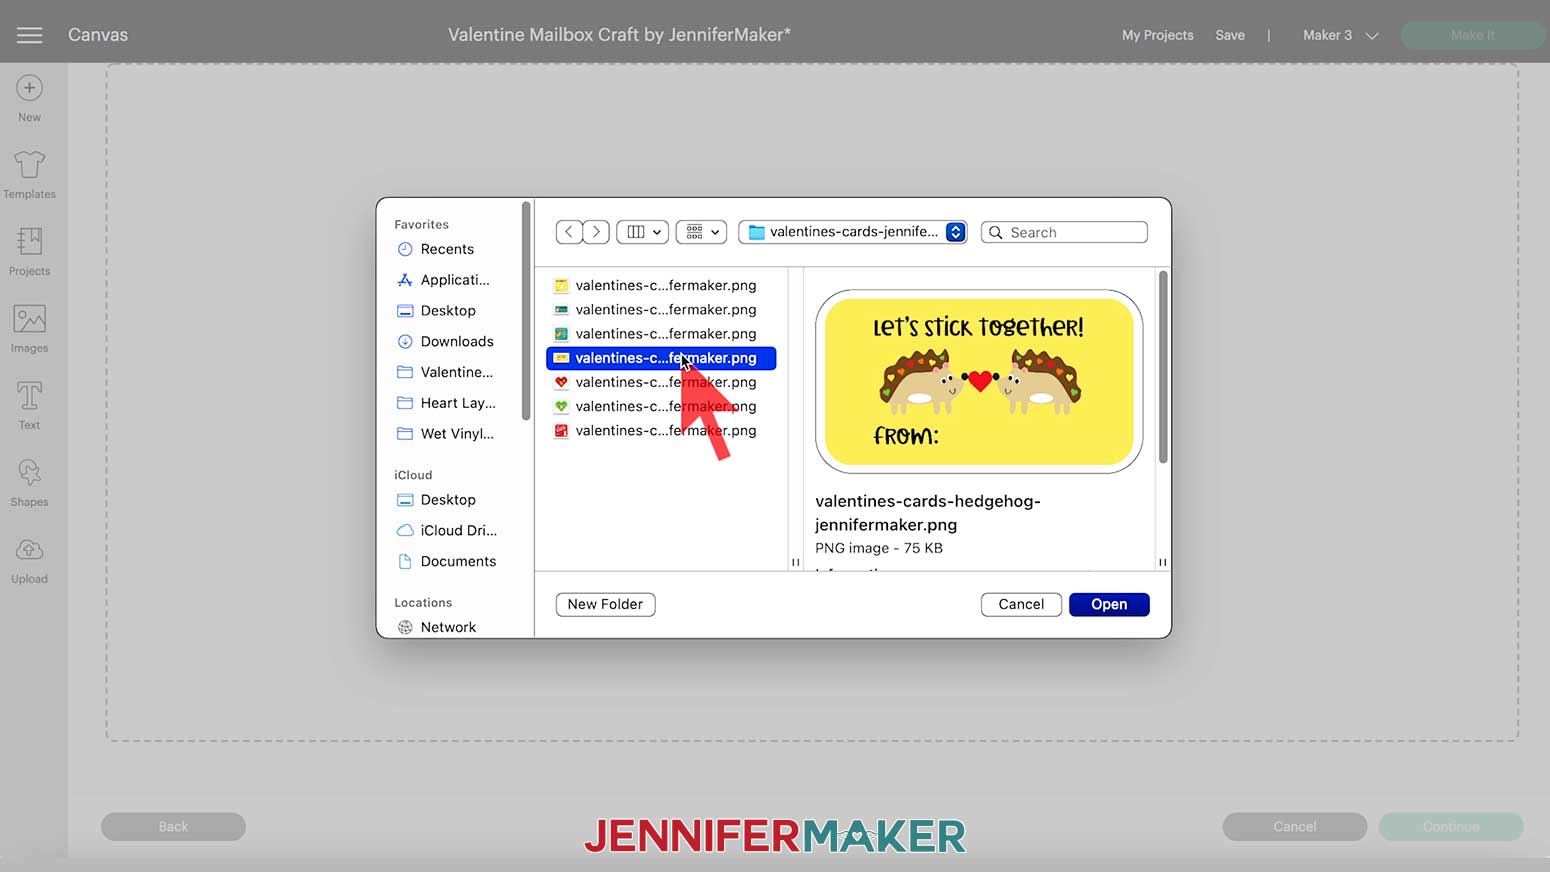
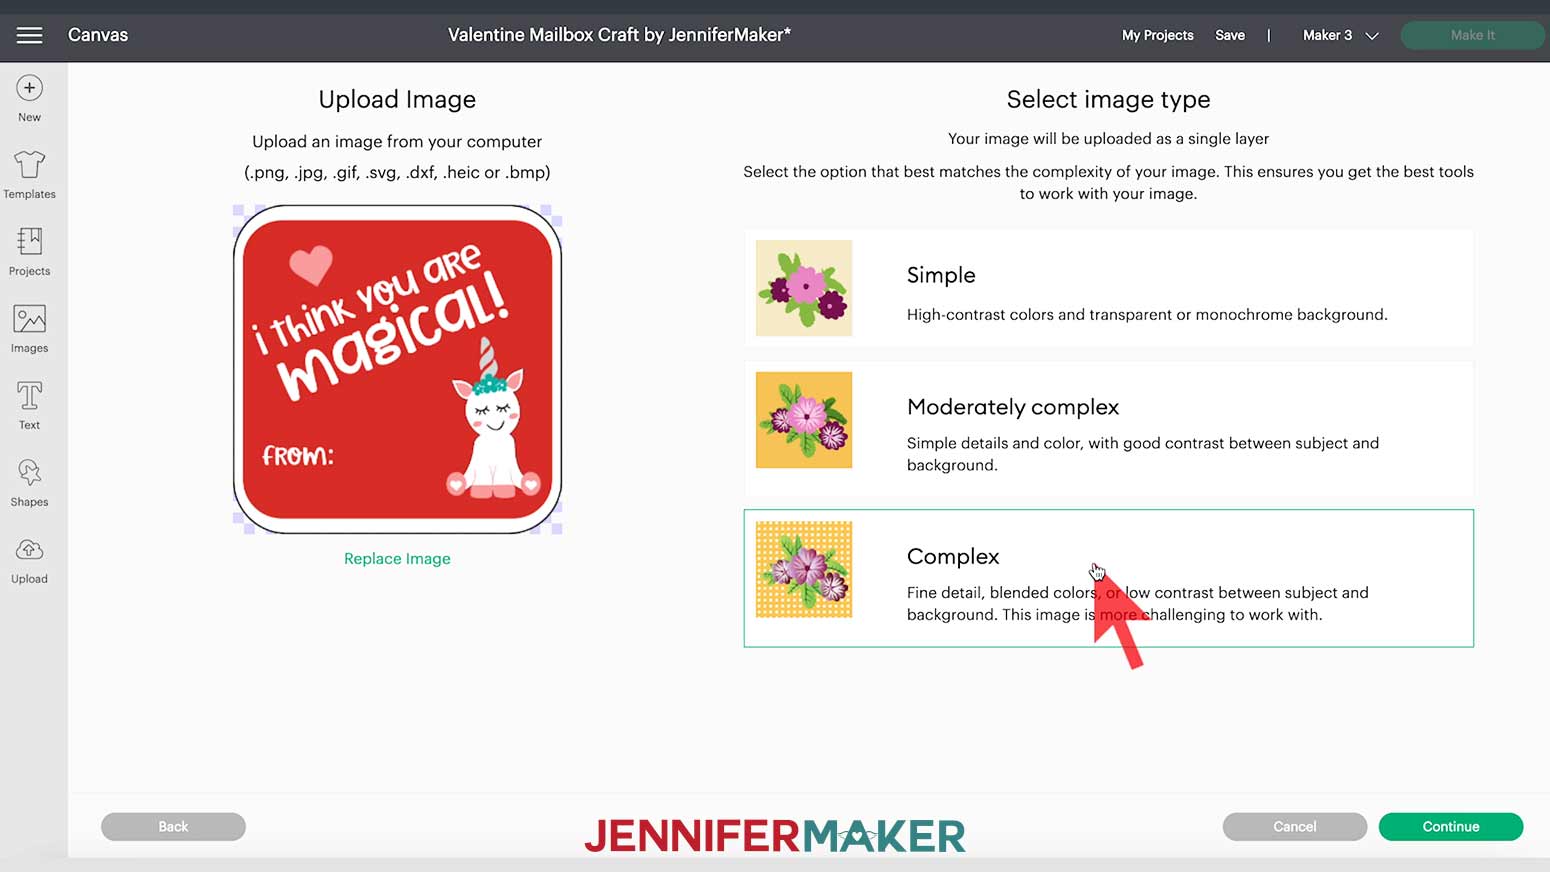
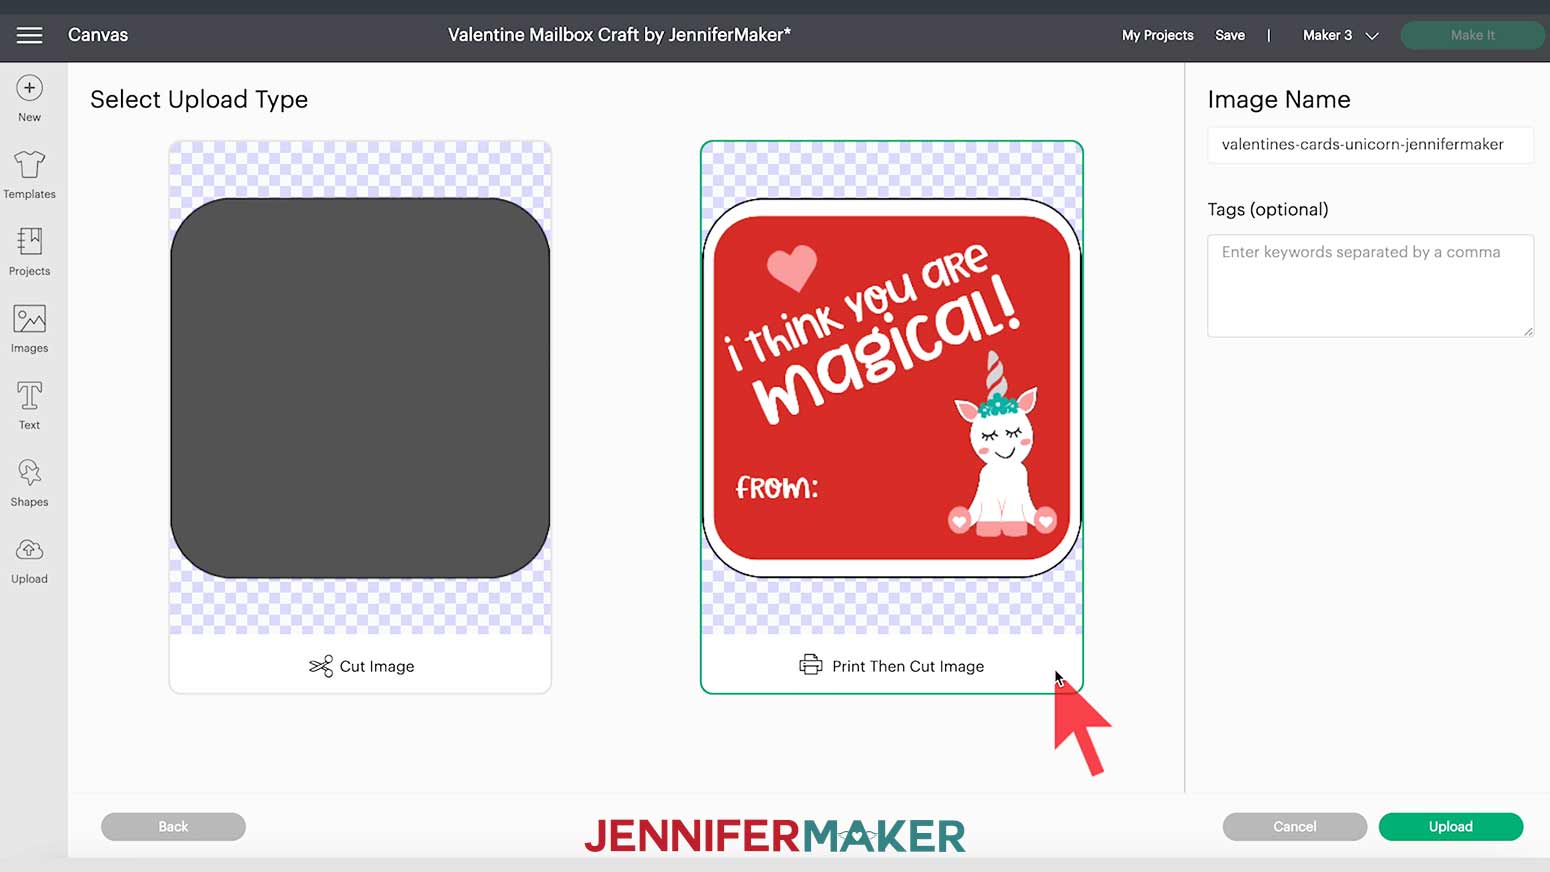
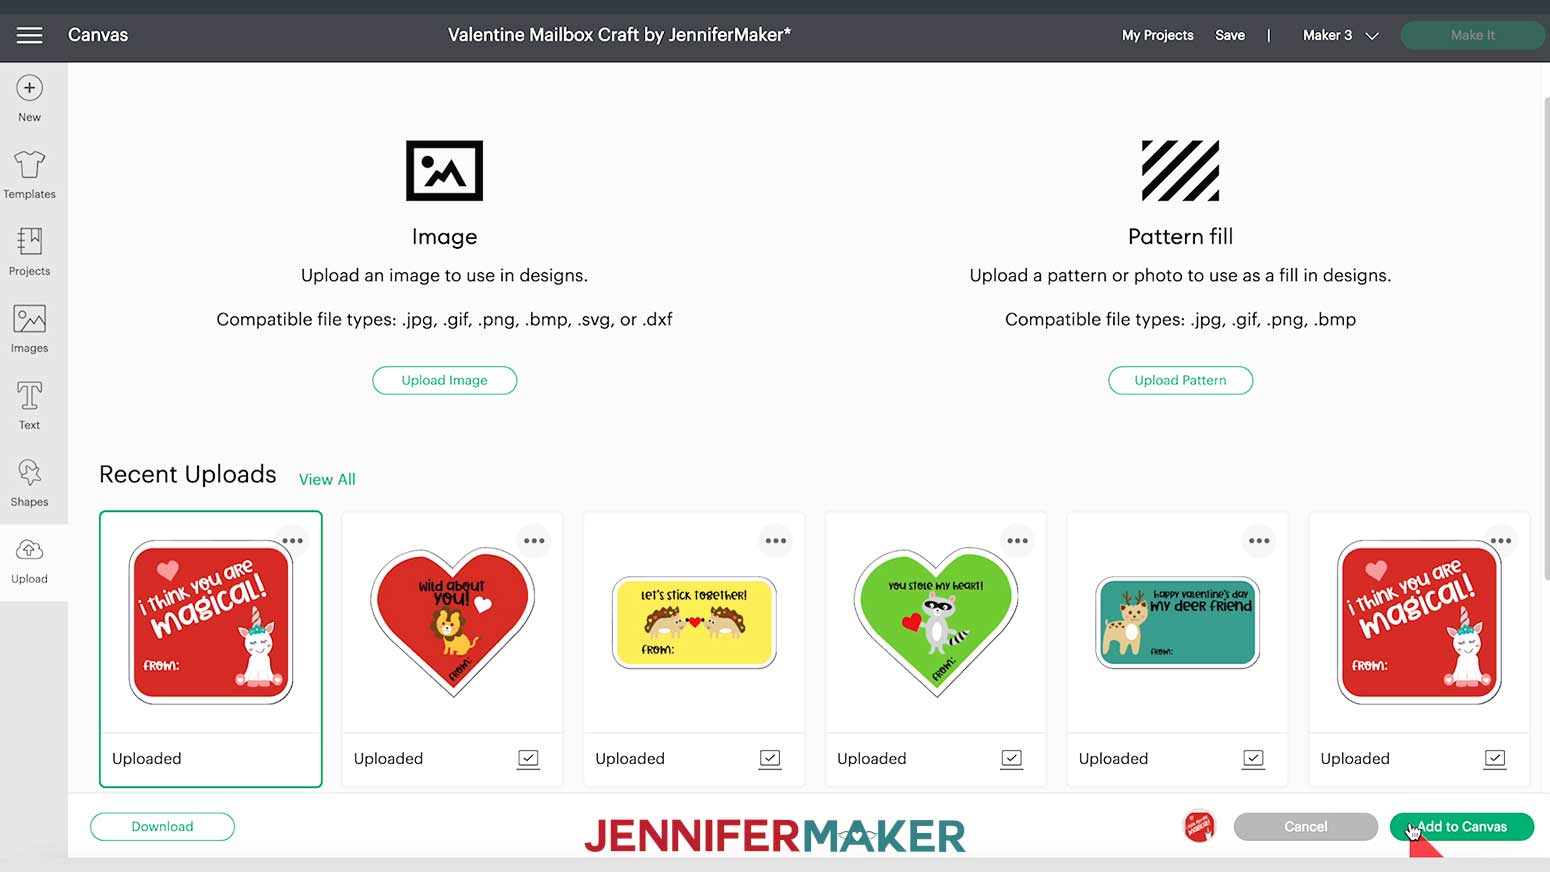
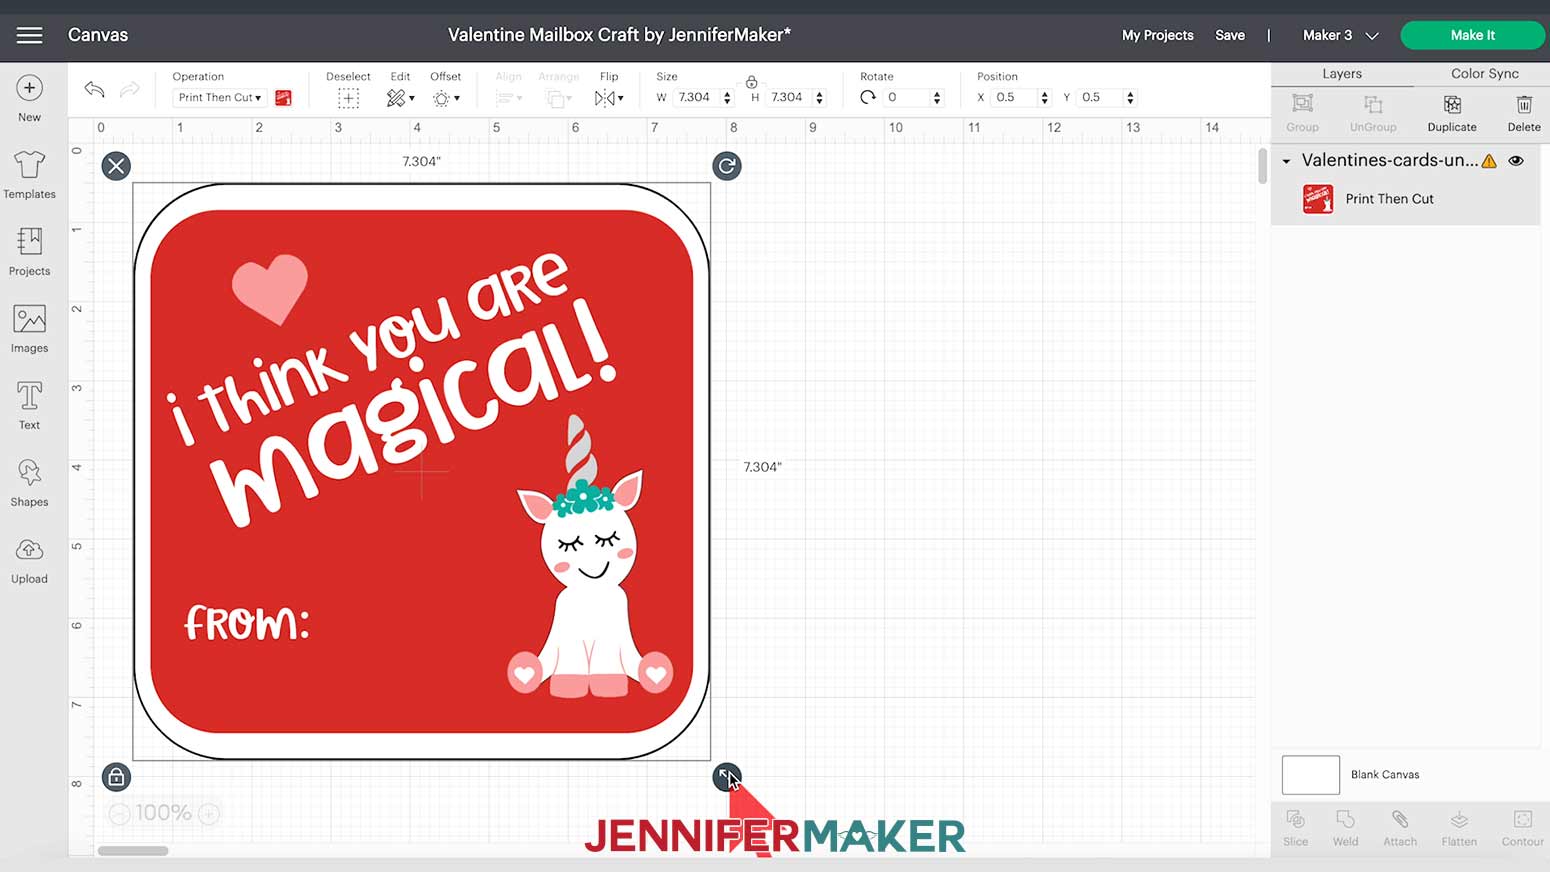
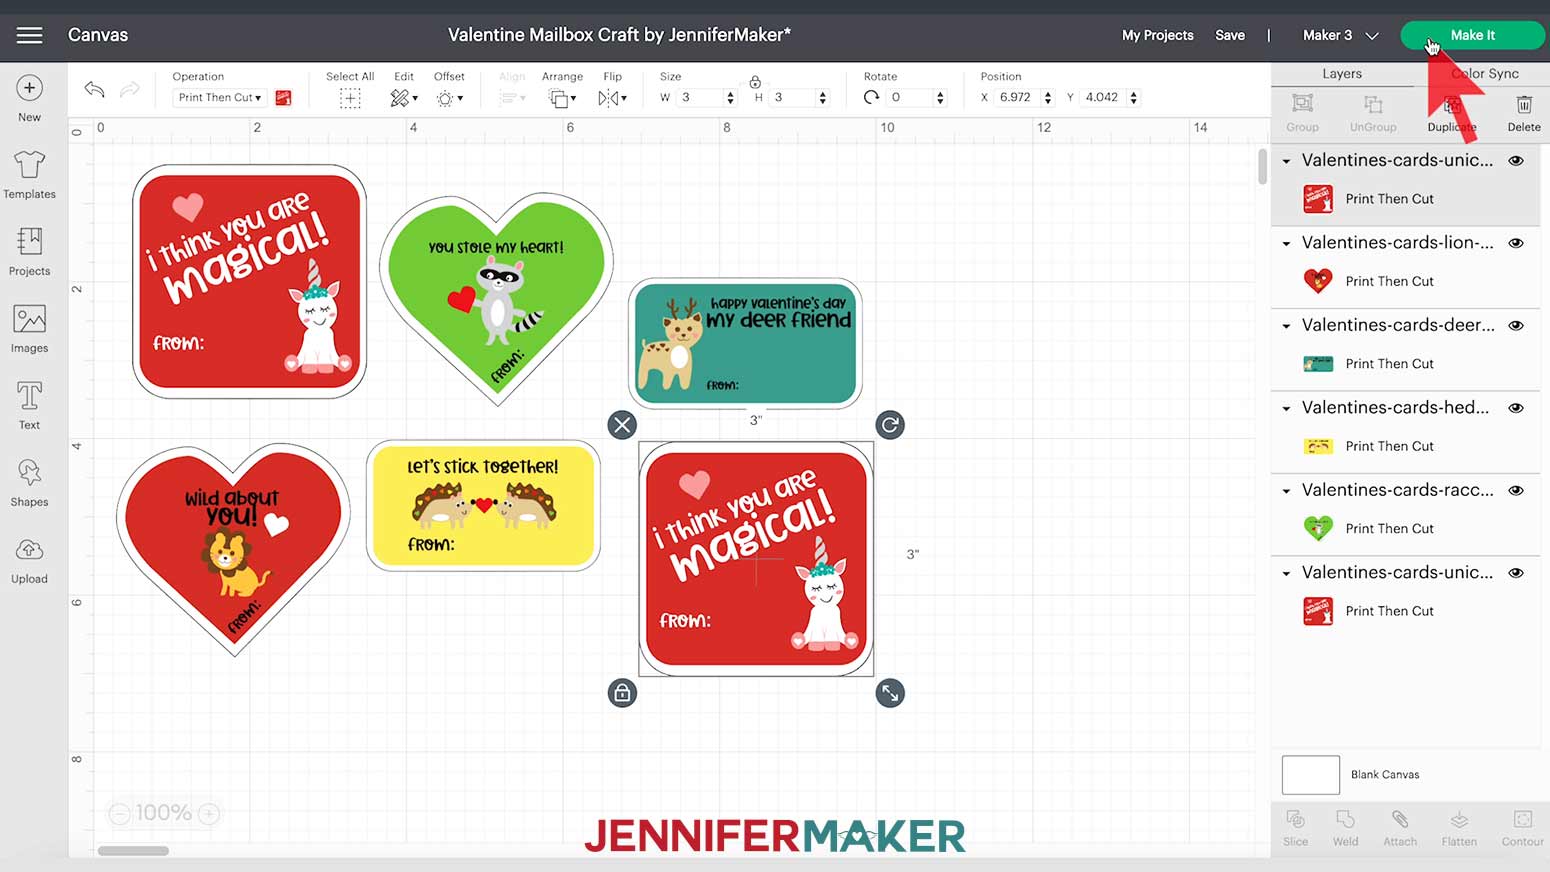
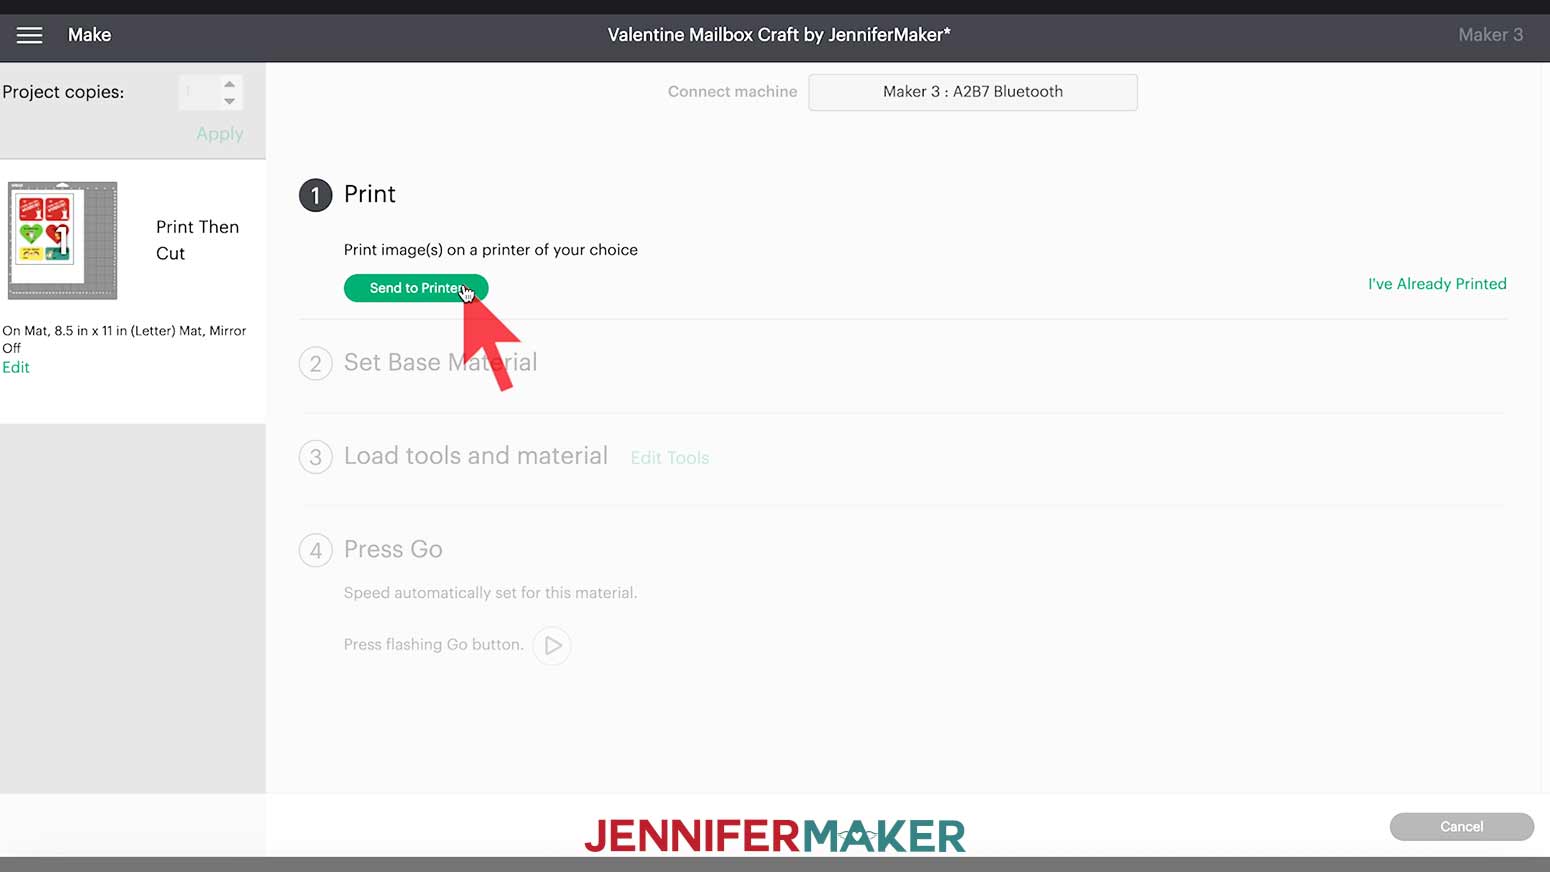
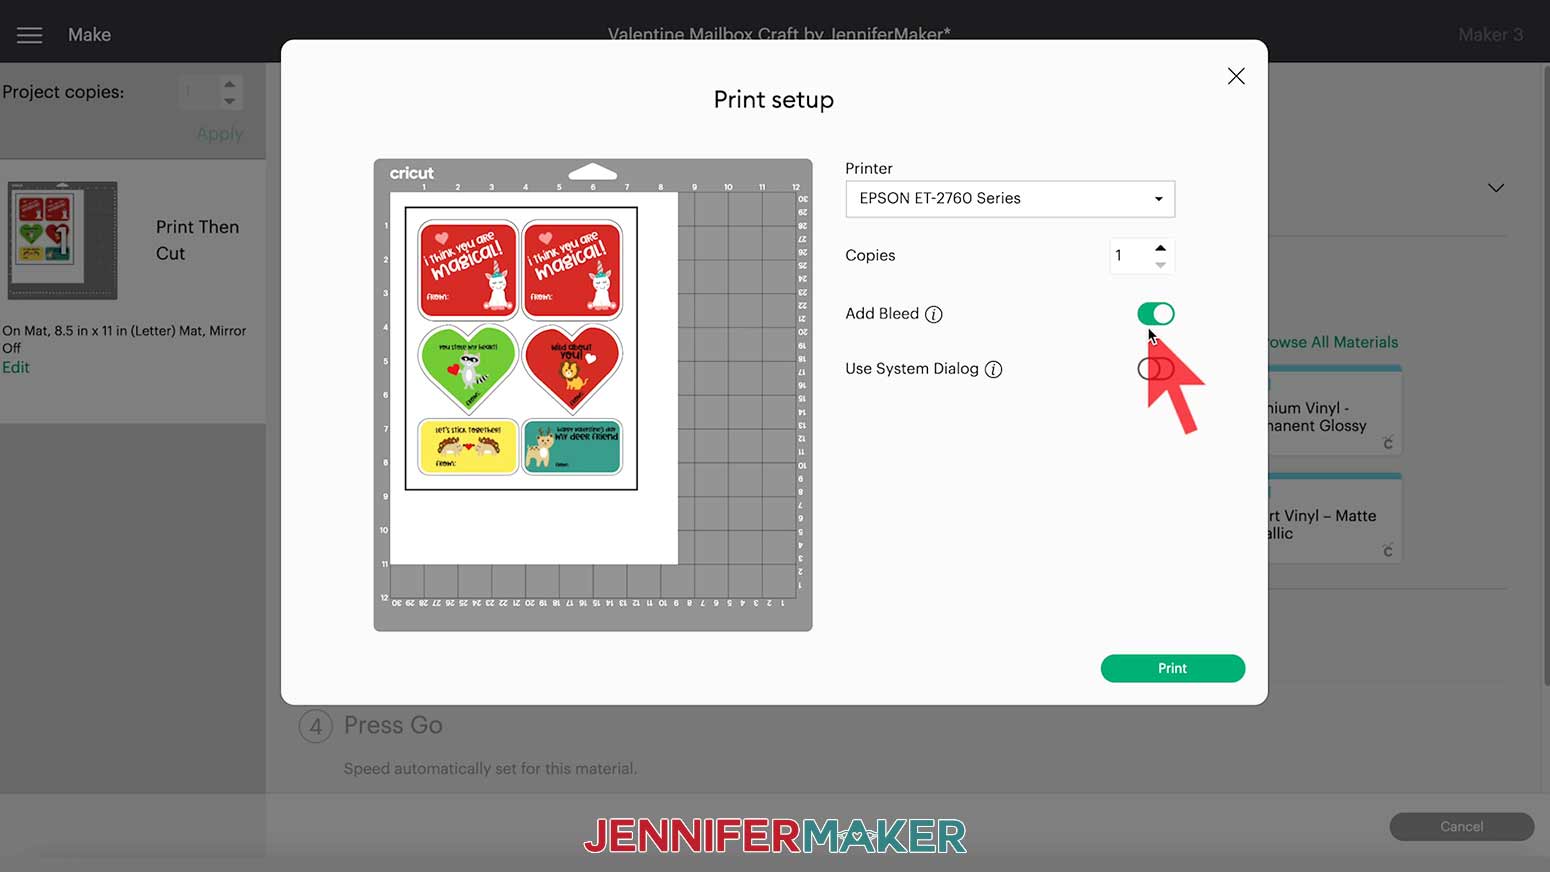
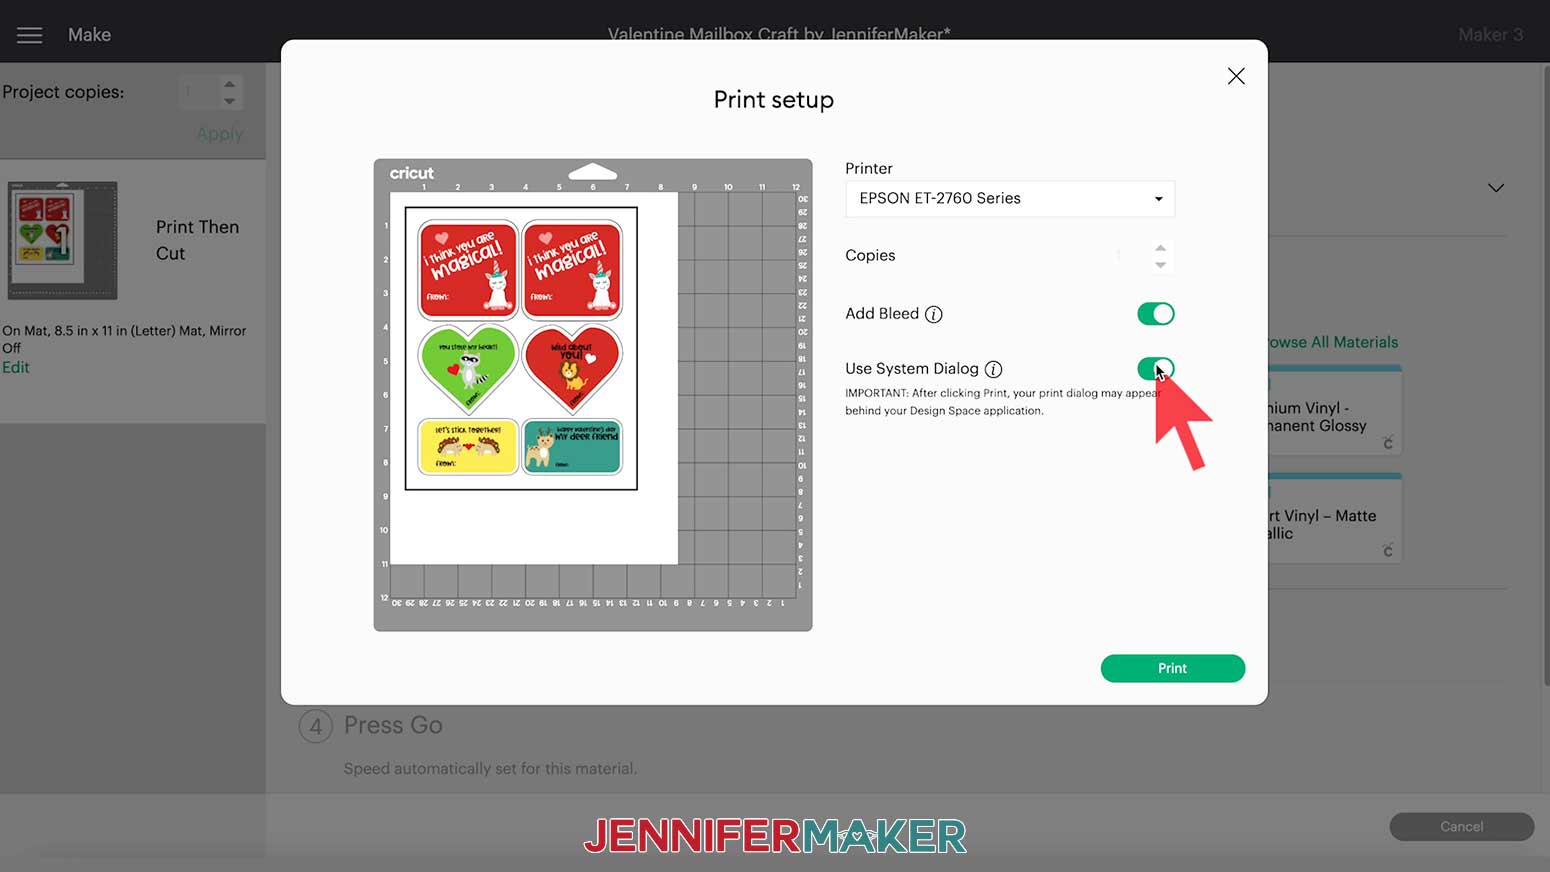
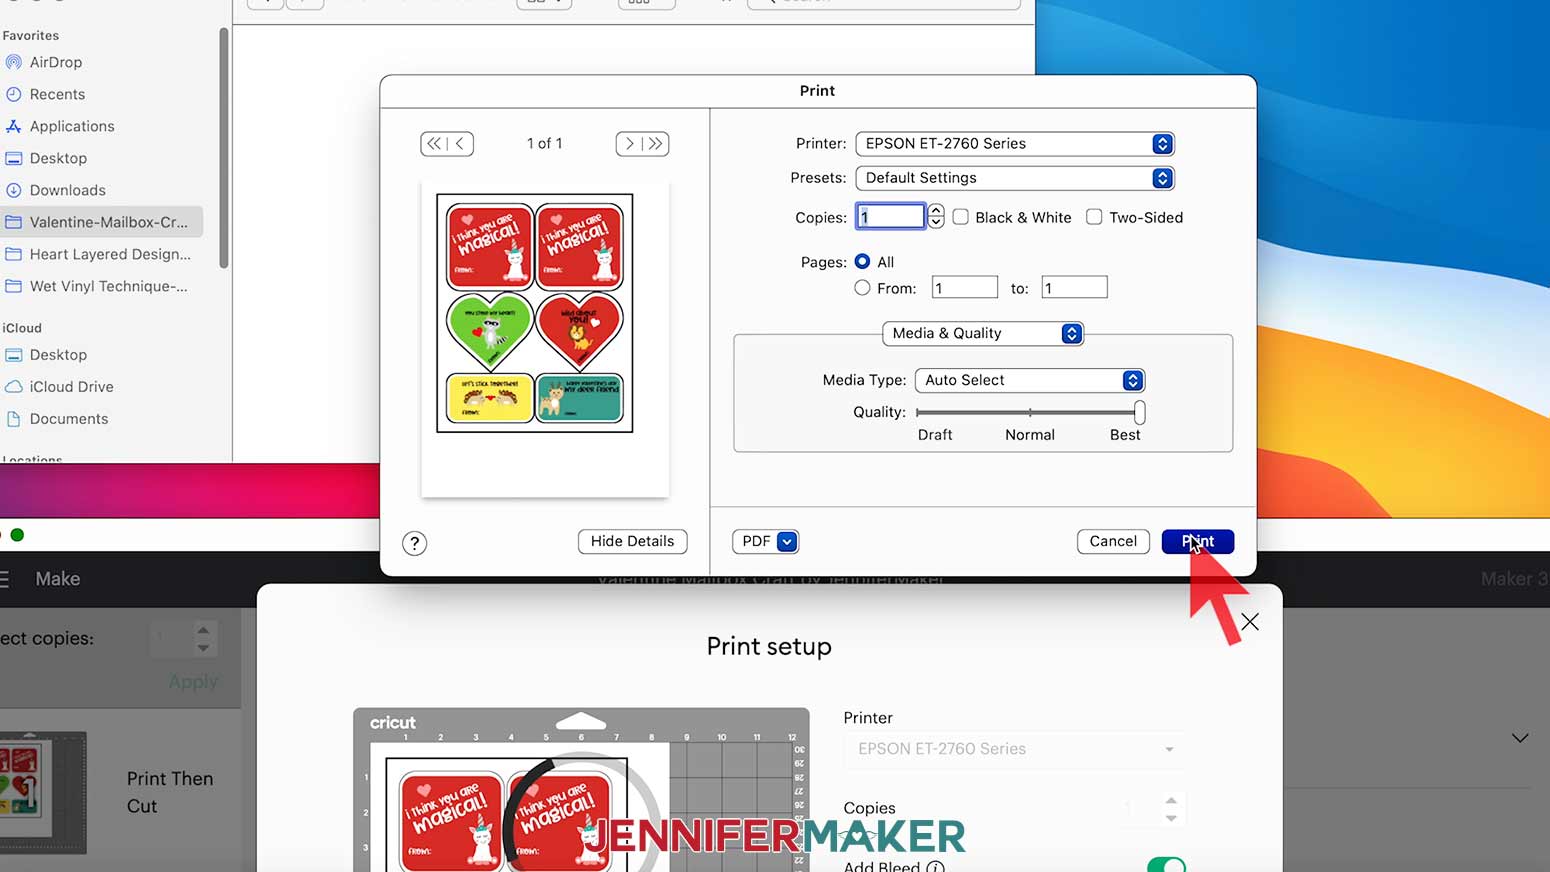
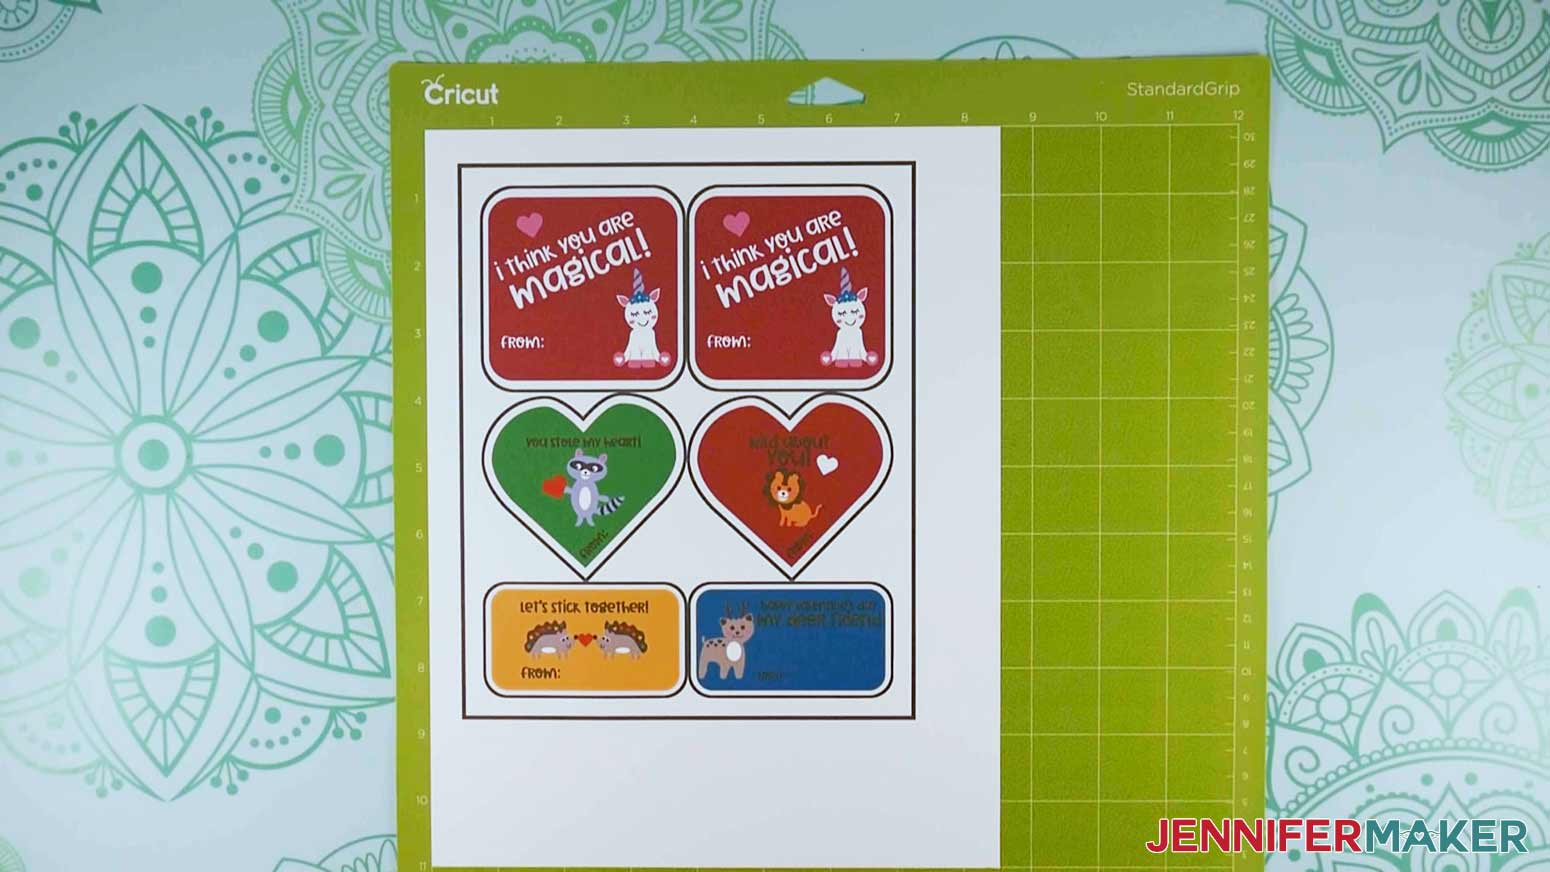
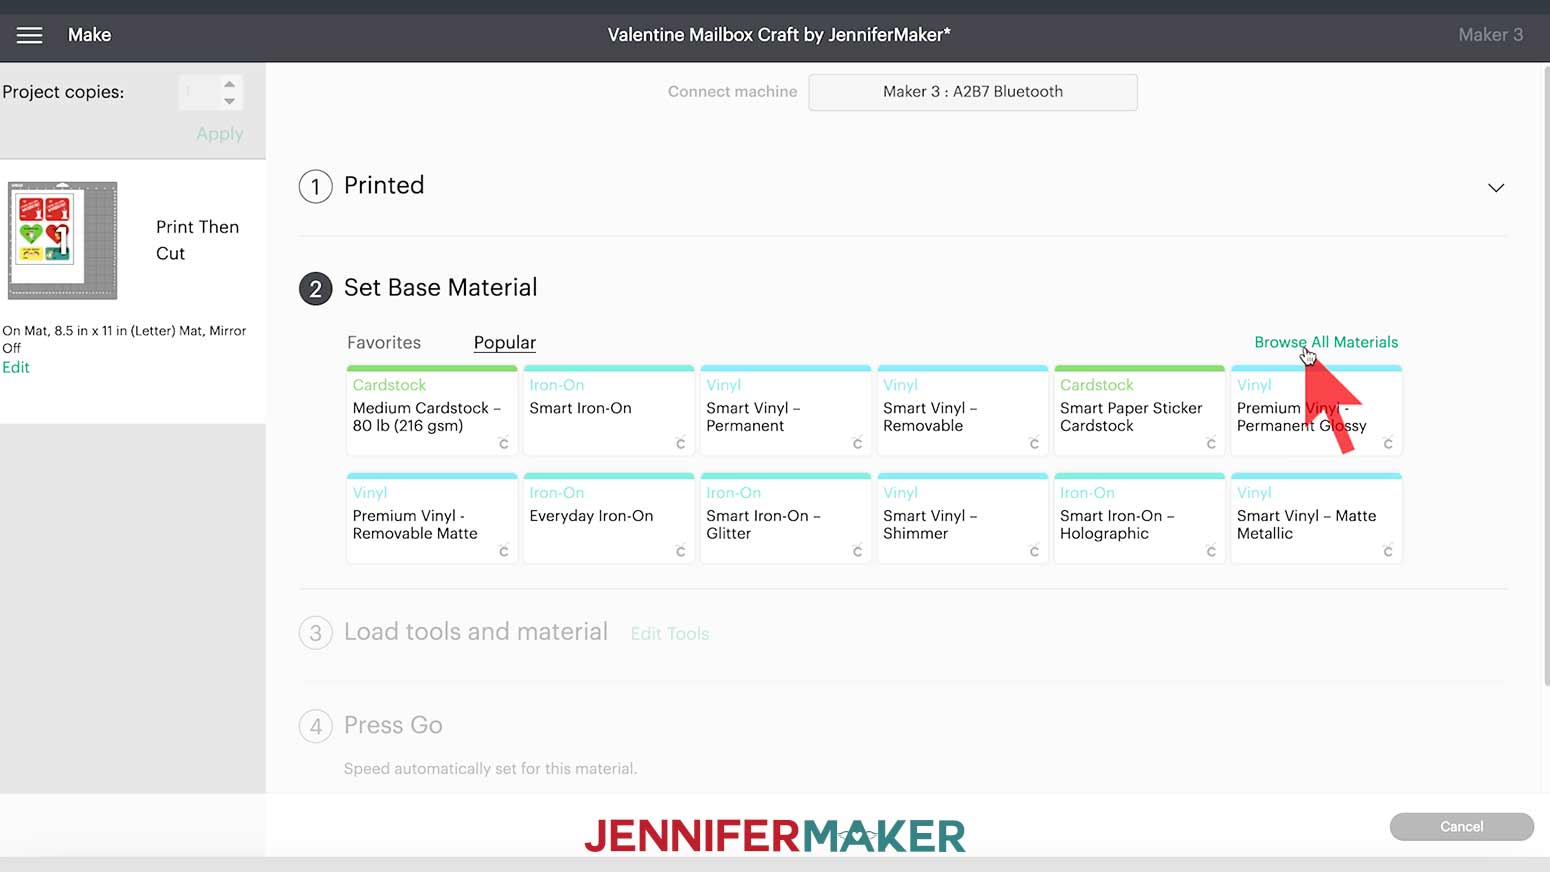
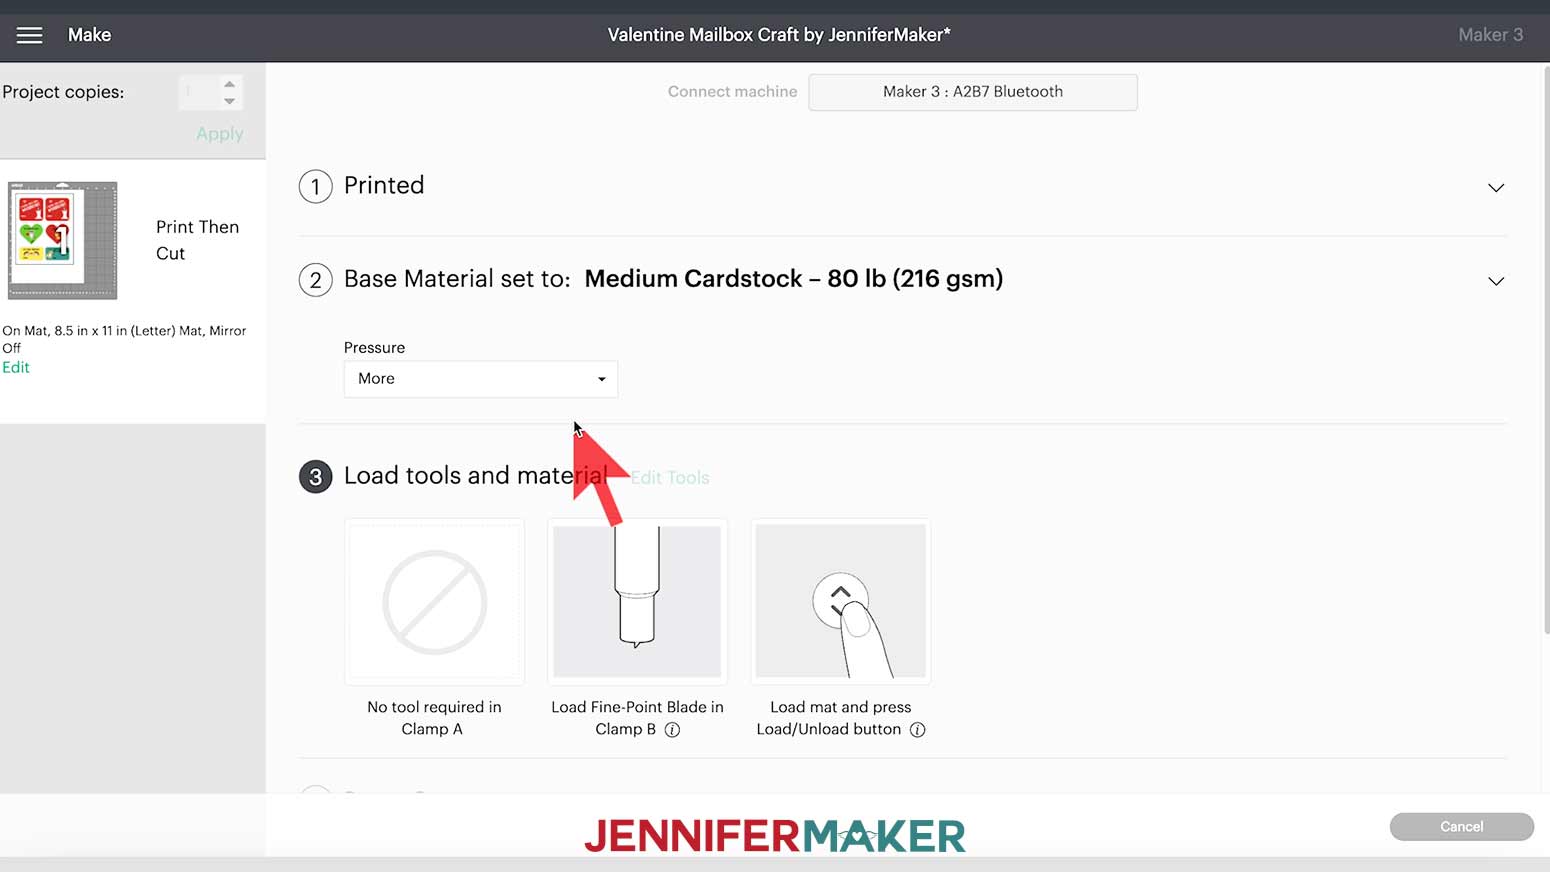
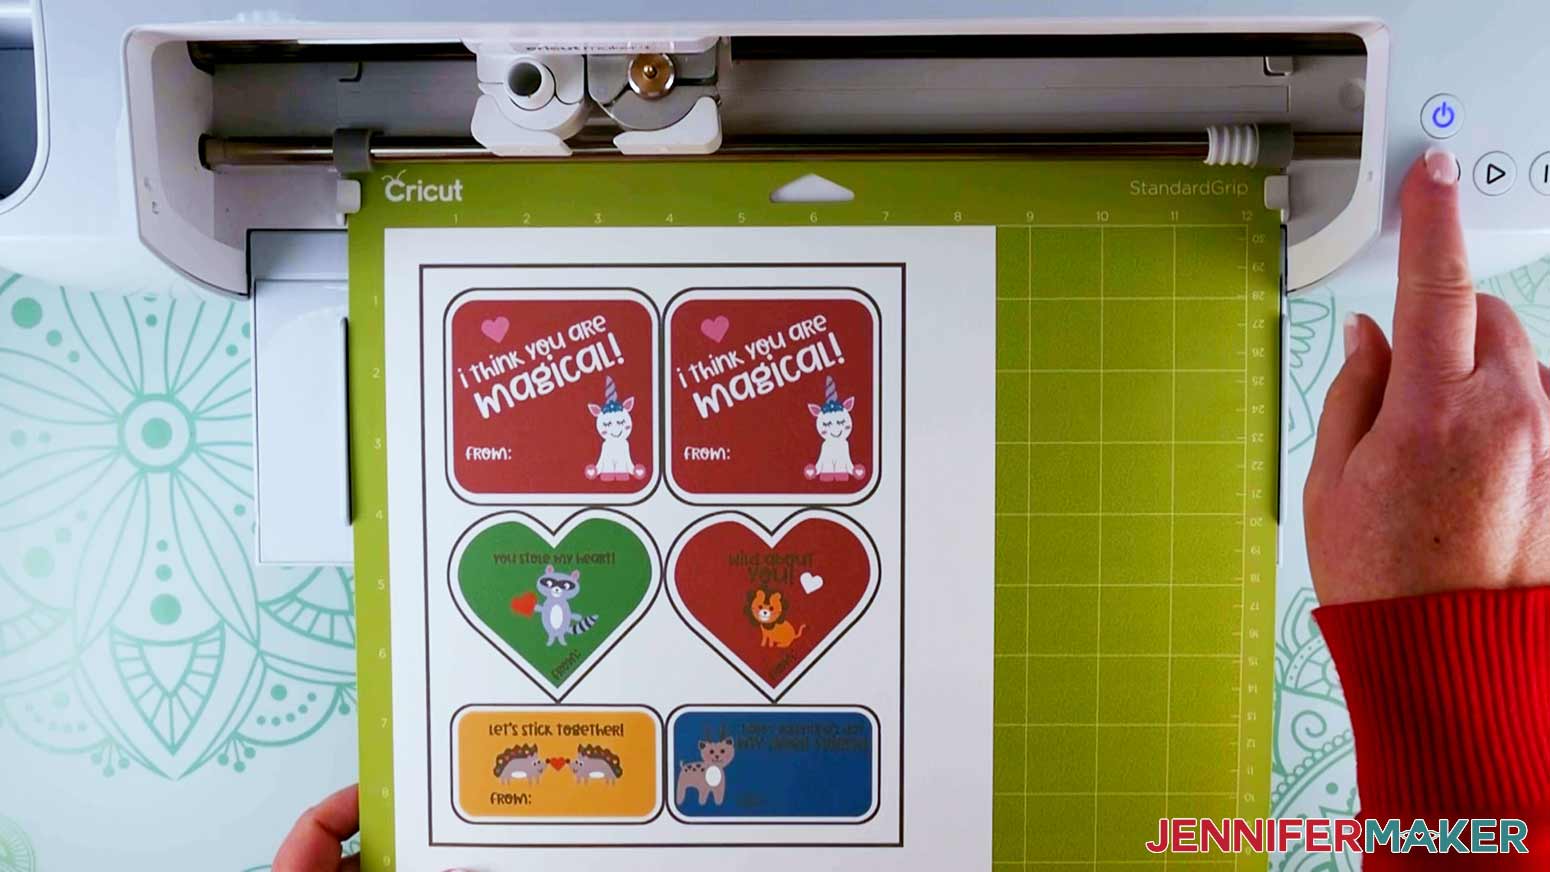
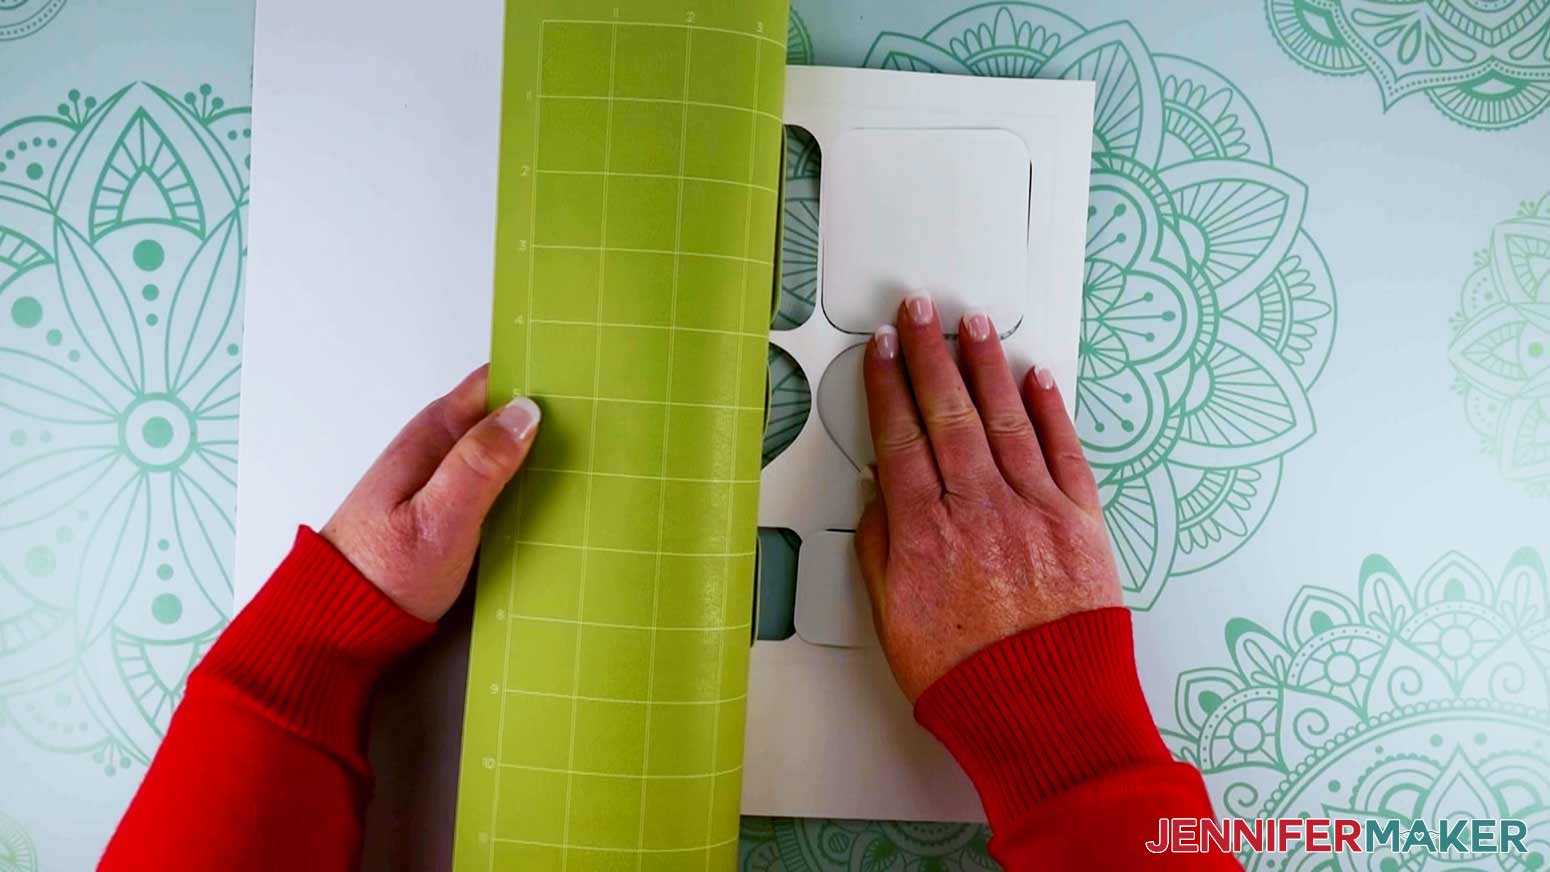
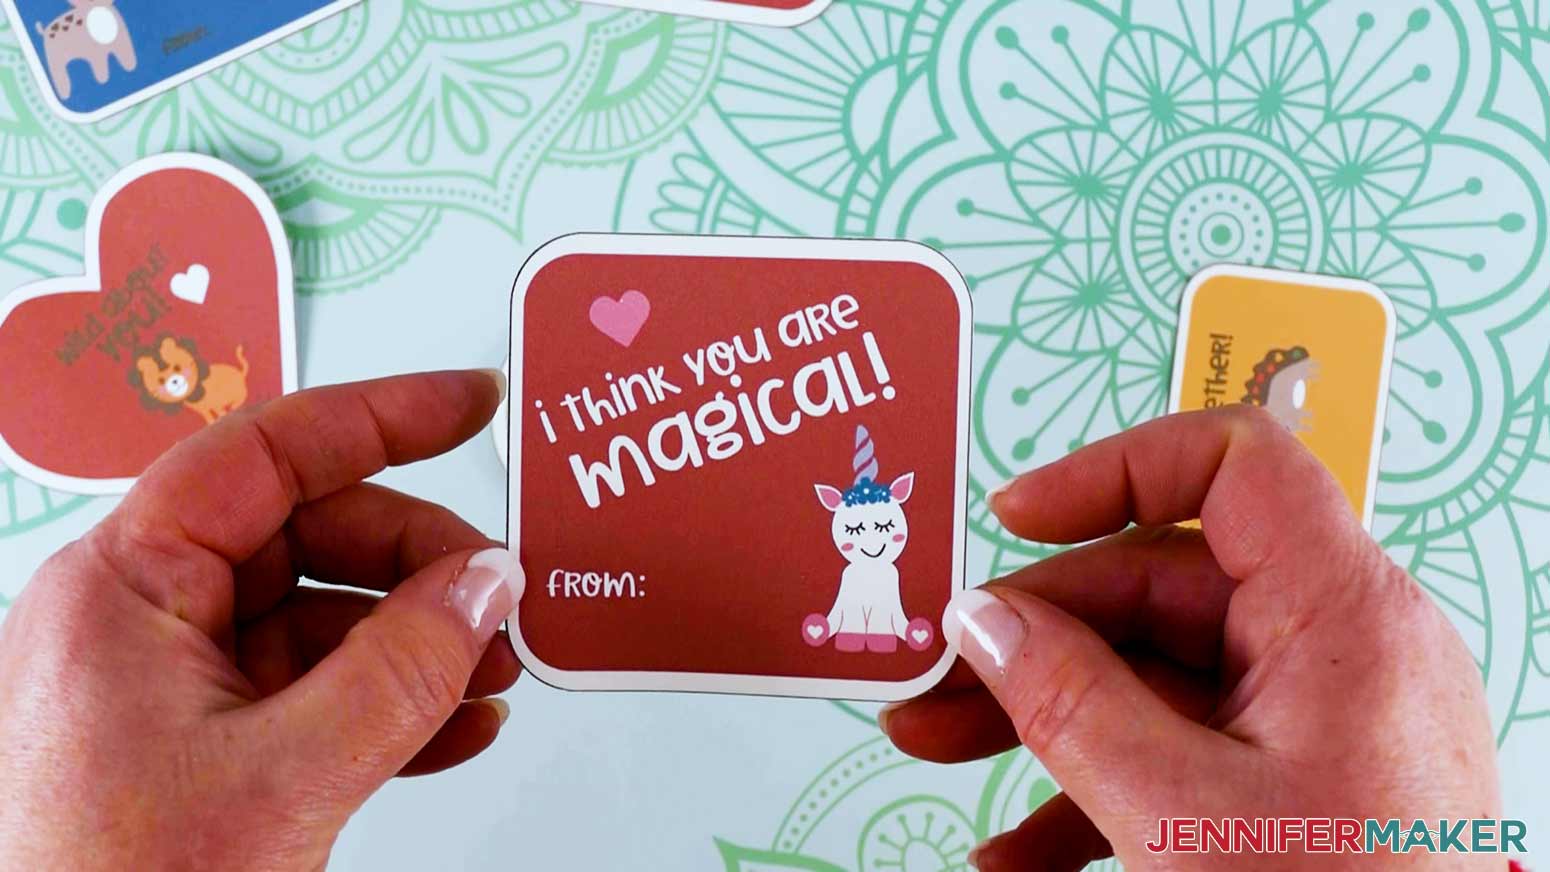
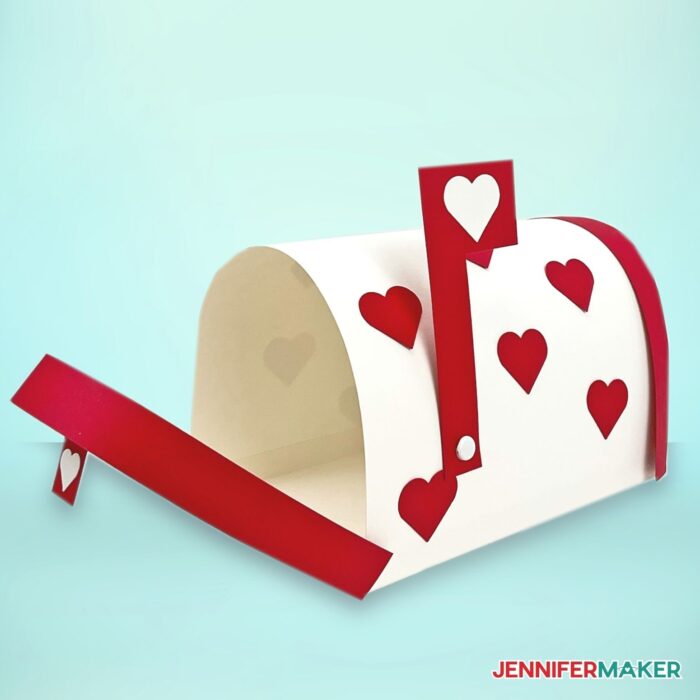
Make a fun and cute Valentine mailbox craft using paper for special deliveries! The first step is to download my Valentine Mailbox Craft files from my free resource library — they're design #371. TIP: If you are not sure how to upload an SVG cut file to Cricut Design Space, watch this helpful video training series I made. If you are on an iPad or iPhone, here is how to download and upload SVG files to the Cricut Design Space app. This is what my Valentine Mailbox Craft SVG files look like when they are uploaded to Cricut Design Space. As you can see, there are two SVG files. One is for the basic mailbox and one includes the pieces for the unicorn version. I’m going to show you how to make my adorable Unicorn Valentine Mailbox Craft, so I will keep both SVGs on my Canvas. If you only want to make the basic version and add your own decorations later, you don’t need to upload the unicorn file. The first thing we need to do is ungroup all the pieces. To do this, select the mailbox SVG and click “UnGroup” at the top of the Layers Panel on the far right. Then click on the unicorn SVG and do the same. The reason we ungrouped is so that we can change some of our Cut lines to Score lines. The Score lines will make it easier to fold the cardstock after it’s cut. There are eight Cut lines that need to be changed. These should appear as black lines or black outlines in the Layers Panel. You can select and change these one at a time or all at once, which is what I will do. In the Layers Panel, start from the top and select the first line we want to change to Score by clicking on it. Now, hold the SHIFT key and click on the other layers that need to be changed. There are eight total: the two tabs on the unicorn horn, the two unicorn ear tabs, the tabs for the front and back doors, the middle of the open tab, and the folds of the base of the mailbox. With all of the indicated layers selected, click in the drop-down field under “Operation” in the top menu where it says “Basic Cut” and scroll down and click on “Score.” You will notice that all the selected layers that said “Basic Cut” have changed to “Score” in the Layers Panel. Now we need to Attach each Score line to the design piece it belongs to. In the Layers Panel, start at the top and click on each layer and its corresponding score line(s). With both selected, click “Attach” at the bottom of the Layers Panel. Repeat these steps until all the Score lines are attached to their corresponding layers. You might notice that when you Attach the Score lines to the outer part of the unicorn ears, the pink piece seems to disappear, but that’s not the case. When you Attach the Score line to the outer ear piece, the pink layer moves to the back, but it’s still there. You can see this if you look in the Layers Panel. Whether you are using 8.5" x 11" or 12" x 12", this project is ready to cut without resizing. NOTE: If you would like to make a smaller mailbox, you can click "Select All" in the top menu and use the resize handle to adjust the design's size. It’s important to select all the pieces together so they change in proportion to one another. If you want to add even more details to your mailbox, Cricut Design Space has many fun shapes you can use for decorations. To see all the options, click on "Shapes" on the left side of your Canvas. I made another mailbox covered in rainbow-colored hearts cut from permanent vinyl. First, I selected the heart shape to bring a copy on to my Canvas. I adjusted the heart's size to fit my project by clicking and dragging the resize handle. You can also change the dimensions in the top menu using the Size fields. Once I was happy with the heart size, I duplicated it by right-clicking my mouse on it and scrolling down to “Duplicate.” You can also do that by clicking “Duplicate” at the top of the Layers Panel. Then, I changed the color of each heart. I selected them one at a time, clicked on the color picker box next to “Basic Cut” in the top menu, and then selected the color I wanted. You can use these steps on any shapes to decorate your mailbox! Click "Make It" in the upper right corner. If you are using a Maker 3 or Explore 3, you will be asked if you want to cut your designs without a mat, with a mat, or in multiple ways. Select "On Mat" and click "Continue." If you are making the unicorn mailbox like me, you should see seven (7) mats on the “Prepare” screen. NOTE: If you see any additional mats, you may not have attached all of your Score lines to their corresponding layers. If that’s the case, simply click “Cancel” to return to the Canvas and fix that. If you are using 12" x 12" cardstock, you don't need to change anything on the mats. Click "Continue" to select your material. If you are using 8.5" x 11" cardstock (or any other size), you need to change the size of your material. On the left side of the screen, click on the arrow under "Material Size" to select the appropriate paper size for each mat. Once you're finished making changes, click back on the first mat and click "Continue" in the lower right corner. You will be prompted to select your material settings and place your material for each layer on your machine mat. I started by selecting "Light Cardstock" since I am using 65 lb cardstock for the colored pieces. Of course, if you choose to make this project with a different weight cardstock or maybe you want to add vinyl to your design, select the correct material for each mat. Additional material options are listed under "Browse All Materials." TIP: If you are using different weights of cardstock, make sure to change your material setting for each mat for the best cut results. Once you have your material selected, I recommend selecting "More Pressure” for the cleanest cut. Since some of our mats have score lines, we need to add a scoring tool. I’m going to use my Scoring Stylus. If you are using a Maker or Maker 3, Design Space may prompt you to use a Scoring Wheel. You can, of course, but you can also click "Edit Tools" and select the Scoring Stylus. I’m going with the Scoring Stylus because otherwise I will need to switch the Scoring Wheel in and out for every mat because the fine-point blade and the scoring wheel both go in Clamp B, while the Scoring Stylus goes into Clamp A. This way, there’s no need to switch the Scoring tool and blade in and out, which takes less time. And I’m all about saving time! Place your cardstock on your mat. I recommend using your brayer to adhere your cardstock securely to the mat. Load your mat into your machine and press “Go.” When your machine is done cutting, unload your mat. Flip your mat over and gently peel it away from the cardstock. This helps prevent your cardstock from curling or ripping. Sometimes pieces can be a little tricky and stay on the mat. Your scraper tool is a great help in removing any little bits from the mat. Prepare the next color of cardstock on a mat and repeat the steps until your whole project is cut. First, we're going to secure the body of the mailbox to the base. Gently fold the tabs of the base along the Score lines. You can use your scraper to help get a nice crease. Apply a thin line of glue along the outside of one of the long side tabs. Before gluing the body of the mailbox to the base, notice the small hole cutout, which marks where you will attach your flag. Flip the body of the mailbox until the flag hole is where you want it. Align the edge of the rectangular body piece to the sticky base tab and hold it in place. I held mine for about 10 seconds, but it may vary depending on the type and amount of glue you use. Once the first side is attached, repeat the same steps to attach the other side to create the main part of your mailbox. Once the main part of your mailbox is assembled, it's time to put the back on. Gently fold the tabs of one front or back piece along the Score lines. NOTE: The front (door) and back pieces of the mailbox are exactly the same so it does not matter which one you use first. Once all the tabs are folded, apply glue to two or three tabs at a time. Align one of the long rectangular trim pieces to the edge and press and hold it in place. Once the first few tabs are set, repeat the process along all of the tabs by gluing a few at a time. Once your back piece is complete. it's time to attach it to your mailbox. Add glue along the tab on the base of the mailbox and along the inside of the curve of the back piece you just assembled. Gently align the back to the mailbox and press it in place. You may find it helpful to reach through the inside of your mailbox to apply pressure from both sides. Repeat the same steps to add a trim rectangle to the remaining front piece to create the door. Add glue just to the bottom tab on the base of the mailbox. Don't apply glue around the arch or the door will be stuck shut! Align your door and press it against the tab to adhere it together. You're almost done! Fold the small rectangle piece along the Score line to make an L-shape. Apply glue to one outside surface and press the pull tab onto the door of your mailbox. Choose a mini brad fastener to compliment your mailbox. Poke it through the hole in the bottom of the flag arm and then through the hole in the body of the mailbox. Open the brad inside the mailbox to secure it in place. If you are making a basic mailbox, you're all done with the assembly. Feel free to decorate it however you like. If you're making the unicorn, let's get those pieces added. Let's start with the horn. Gently roll the horn piece into a cone shape. Apply a thin line of glue on the inside of the horn's long edge and hold the cone together until the glue sets. Gently fold the horn base tabs outward so they are ready to glue on to your mailbox. Next, let's roll some flowers using a paper quilling tool or my DIY Quilling Tool. Place the outside end of the paper rose into the quilling tool. Begin rolling the paper flower around the quilling tool until you get to the end. Pull the rolled paper rose off the quilling tool to remove it. Add hot glue to the bottom of the rolled paper flower then fold the circle piece on top the hot glue. TIP: To avoid burning any fingers, you can use hot glue finger protectors. Manipulate the petals by spreading them out. You can also use a small wooden dowel to curl the petals. I am using a 1/8" wooden dowel to curl my petals by rolling the petals around the wooden dowel. Repeat these steps for the other two flowers and set them aside so we can prepare our unicorn ears. Glue the inner parts of each ear to the outer ear. Fold the tabs forward to prepare them to glue to the inside of the door. We now have all of our unicorn pieces ready to attach to our mailbox. Let's glue the horn first. Add a small dab of glue to the tabs of the horn. Gently place and hold the horn in the center top of the mailbox. I placed my horn about 2.5" from the front edge. Next, let's add the flowers around the base of the horn. You can add them however you'd like. I'm going to place one in the middle front and the other two hugging the middle one on each side. Let's give our cute unicorn some ears. I have about 1.5" between my unicorn ears. Apply a small dab of glue to the ear tab and press it along the inside of your door trim so the pink will be visible once it's closed. I recommend keeping your mailbox door open while the ears dry so that you don't accidentally glue the door closed. I’ve also included a cute set of Valentine’s Day cards to use with the mailbox. There are seven different Print Then Cut designs to choose from. You can Upload one or all seven and print as many as you like! If you’d like to use them, here’s how: In Design Space, on the left side of your screen, click the "Upload" icon and then click “Upload Image.” Click “Browse.” Locate the folder titled “valentine-mailbox-cards-jennifermaker” and open it. You will see all seven designs. Select the one you want, click on it and then click “Open.” Once the image preview opens in Design Space, choose “Complex” for the image type and hit “Continue.” On the next image editing screen, there is nothing to do so click “Apply & Continue” on the bottom right of the screen. Next, click on “Print then Cut Image” and click “Upload” on the lower right. Under “Recent Uploads” select the card you just uploaded and click “Add to Canvas” on bottom right. The card will now be on your Canvas. Here, you can resize the card to any dimension you like in one of two ways. Use the resize handle on the lower right of the card's bounding box to make it smaller or larger by dragging the double arrows. I prefer to enter the width ("W) I want under "Size" and the height ("H") will automagically adjust. Make sure to keep the padlock locked to maintain the proportions of the design. I'm making my card 3" wide and I’m ready to print. If you want to add more cards to the Canvas and print them all at once, you can do that now, just repeat the steps above. If you’d like to print multiples of this card, simply click on it and then click “Duplicate” as many times as you like. Once you have all the cards ready to go, make sure you have the right machine selected at the top of the Canvas and click “Make It.” NOTE: Print Then Cut Images can only be made on the Explore or Maker series cutting machines. On the “Prepare” screen, there’s nothing to change so click “Continue.” Now on the “Make” screen, it’s time to Print. Click “Send to Printer.” Make sure you have 8.5" x 11" white cardstock in your printer if you want to make your cards heavier than normal printer paper. The Printer setup window appears. Make sure "Add Bleed" has a green slider. The bleed is a small border around each image that allows for more precise cutting. The bleed is trimmed off during the cutting process resulting in a precisely cut image. You can continue by clicking "Print," however, I like to change the slider to green for "Use System Dialog" before I click "Print." This brings up a system dialog window for my printer, which allows me to specify the paper tray my printer will pull from as well as the quality of the print job. NOTE: You will need to minimize or move your Design Space window to see the system dialog window as it pops up behind Design Space. There is a chance the system dialog box will not work on all printers. Each printer is different, so consult your printer's user guide for additional support. In the system dialog box, I will select “Best” for print quality. Make sure your cardstock is loaded in your indicated printer tray and click “Print.” Once printed, make sure to let the ink dry to avoid any smears during the cutting process. This is what my printed card sheet looks like. You will notice a black box around my cards. This is called a registration box and is used by your Cricut cutting machine to tell it exactly where to cut your project. Now that we’ve printed our cards, click "Browse All Materials” to select our base material. I’m using Medium Cardstock for my cards, but make sure to select the material you are using. Under “Pressure” I always select “More” to ensure the best cut. Now place your printed cards on a green StandardGrip machine mat and use a brayer to make sure the cardstock is adhered. Load the mat into your machine and press the “Go” button. The machine will use its sensors to read the registration marks, then make the cut. When the cut is finished, unload your mat, flip it over and gently peel it away from the card stock. And there you go… adorable Valentine’s Day cards to give to friends or put in your mailbox! Here’s a look at my finished mailboxes. I love how they all turned out. Remember, you can use the basic mailbox design and decorate it any way you like. Add cutout hearts like I did or maybe other shapes like stars to make a 4th of July version or shamrocks for St. Patrick’s Day…the possibilities are endless! I can't wait to see all of your creative designs! Font used for Valentine Cards: Girl Crush Final measurements are about 6.5" long, 4" wide, and 4" tall.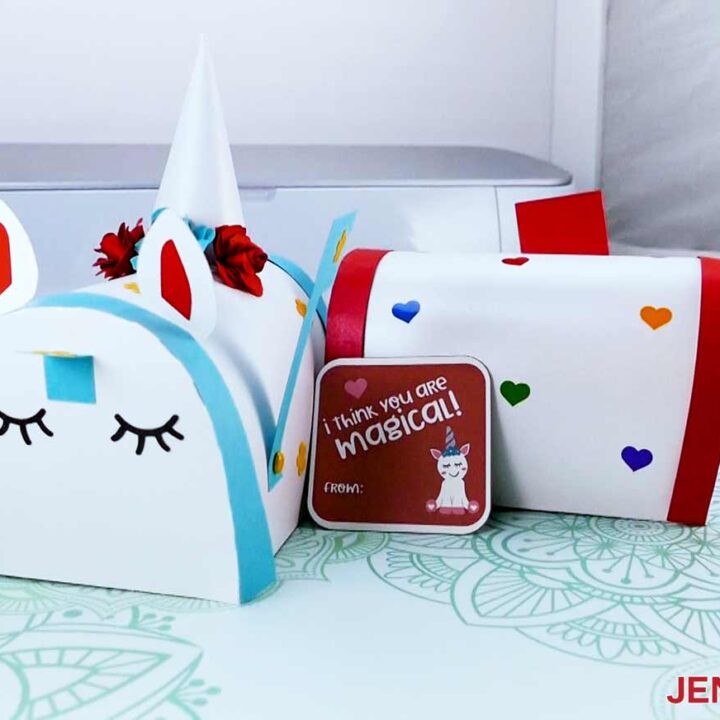
Valentine Mailbox Craft
Materials
Tools
Instructions
STEP 1: GET MY FREE VALENTINE MAILBOX CRAFT FILES
STEP 2: CUT YOUR VALENTINE MAILBOX CRAFT DESIGN

STEP 3: ASSEMBLE YOUR VALENTINE MAILBOX CRAFT


UNICORN DECORATIONS
STEP 4: PRINT VALENTINE'S DAY CARDS (OPTIONAL)

STEP 5: SHOW IT OFF
Notes
Questions About Valentine Mailbox Craft and Cards
What is a Valentine box?
The paper mailbox is a fun way to give Valentine gifts and decorate your home! Some people also bring a box like this to work or school around Valentine’s Day to receive cards they make for each other. I like to store favorite notes and small keepsakes in them to treasure throughout the year.
What is the best paper to use for this project?
We used 110 lb. cardstock to make the mailbox sturdier, but you can also do this with 65 lb. and 80 lb. cardstock!
How should I decorate my Valentine’s mail box?
However you like! Adding a name in marker is a quick custom decoration. You could also tape your favorite Valentines to the sides! Or go crazy like we did and cover it in hearts or paper flowers!
What should I put in my Valentines mail box?
Well, anything you want, really, but this Valentine mailbox craft is perfect for gifting and receiving cards or gifts! You can keep your favorites inside and revisit them for a little dose of love year round. Or, give a mailbox to a friend and sneak mail into it when you visit!
How do you make a Valentine mail box out of a shoebox?
If you don’t want to make a box in the mailbox shape or want a sturdier structure for moving around, just cut out the details and add them to a shoebox! The ears, horn, and flowers can easily be glued to the outer top and I would attach the eyes on a short end of the box itself. You can even still use the movable flag by adding your mini brad to the side of the box. Then keep decorating!

Get my free SVG files for the Valentine Mailbox Craft!
Now, I’d love to see your Valentine mailbox projects and the decorations you use! If you make a mailbox, Valentine’s Day cards, or anything else with these designs, please share a photo in our Facebook group, email it to me at [email protected], or tag me on social media with #jennifermaker.
Love,

Want to remember this? Save the Valentine Mailbox Craft Tutorial to your favorite Pinterest Board