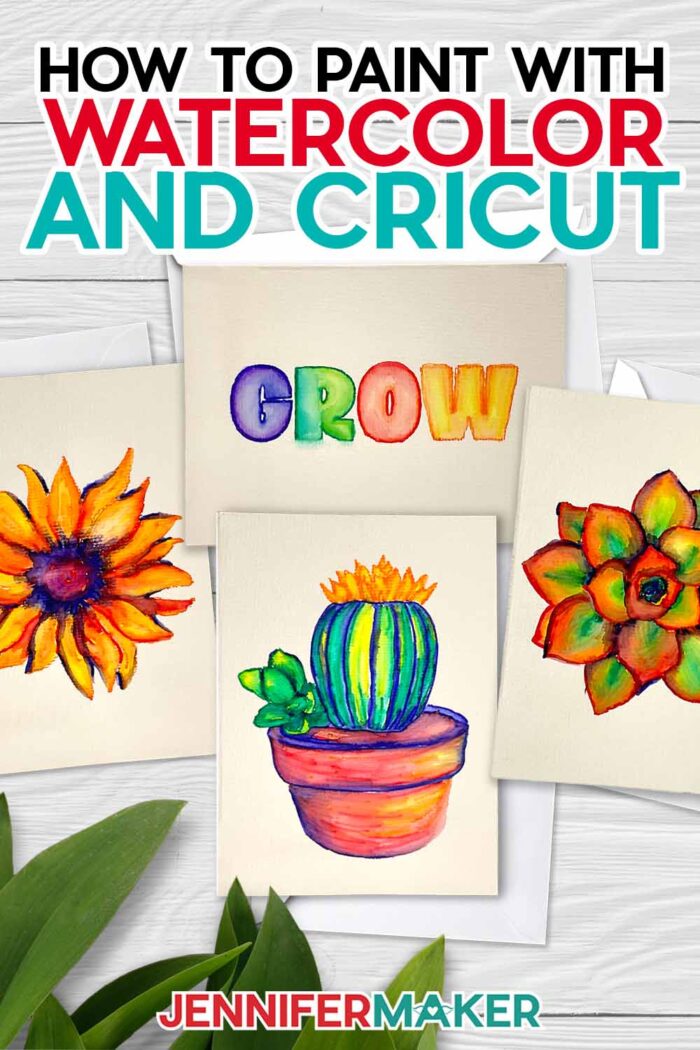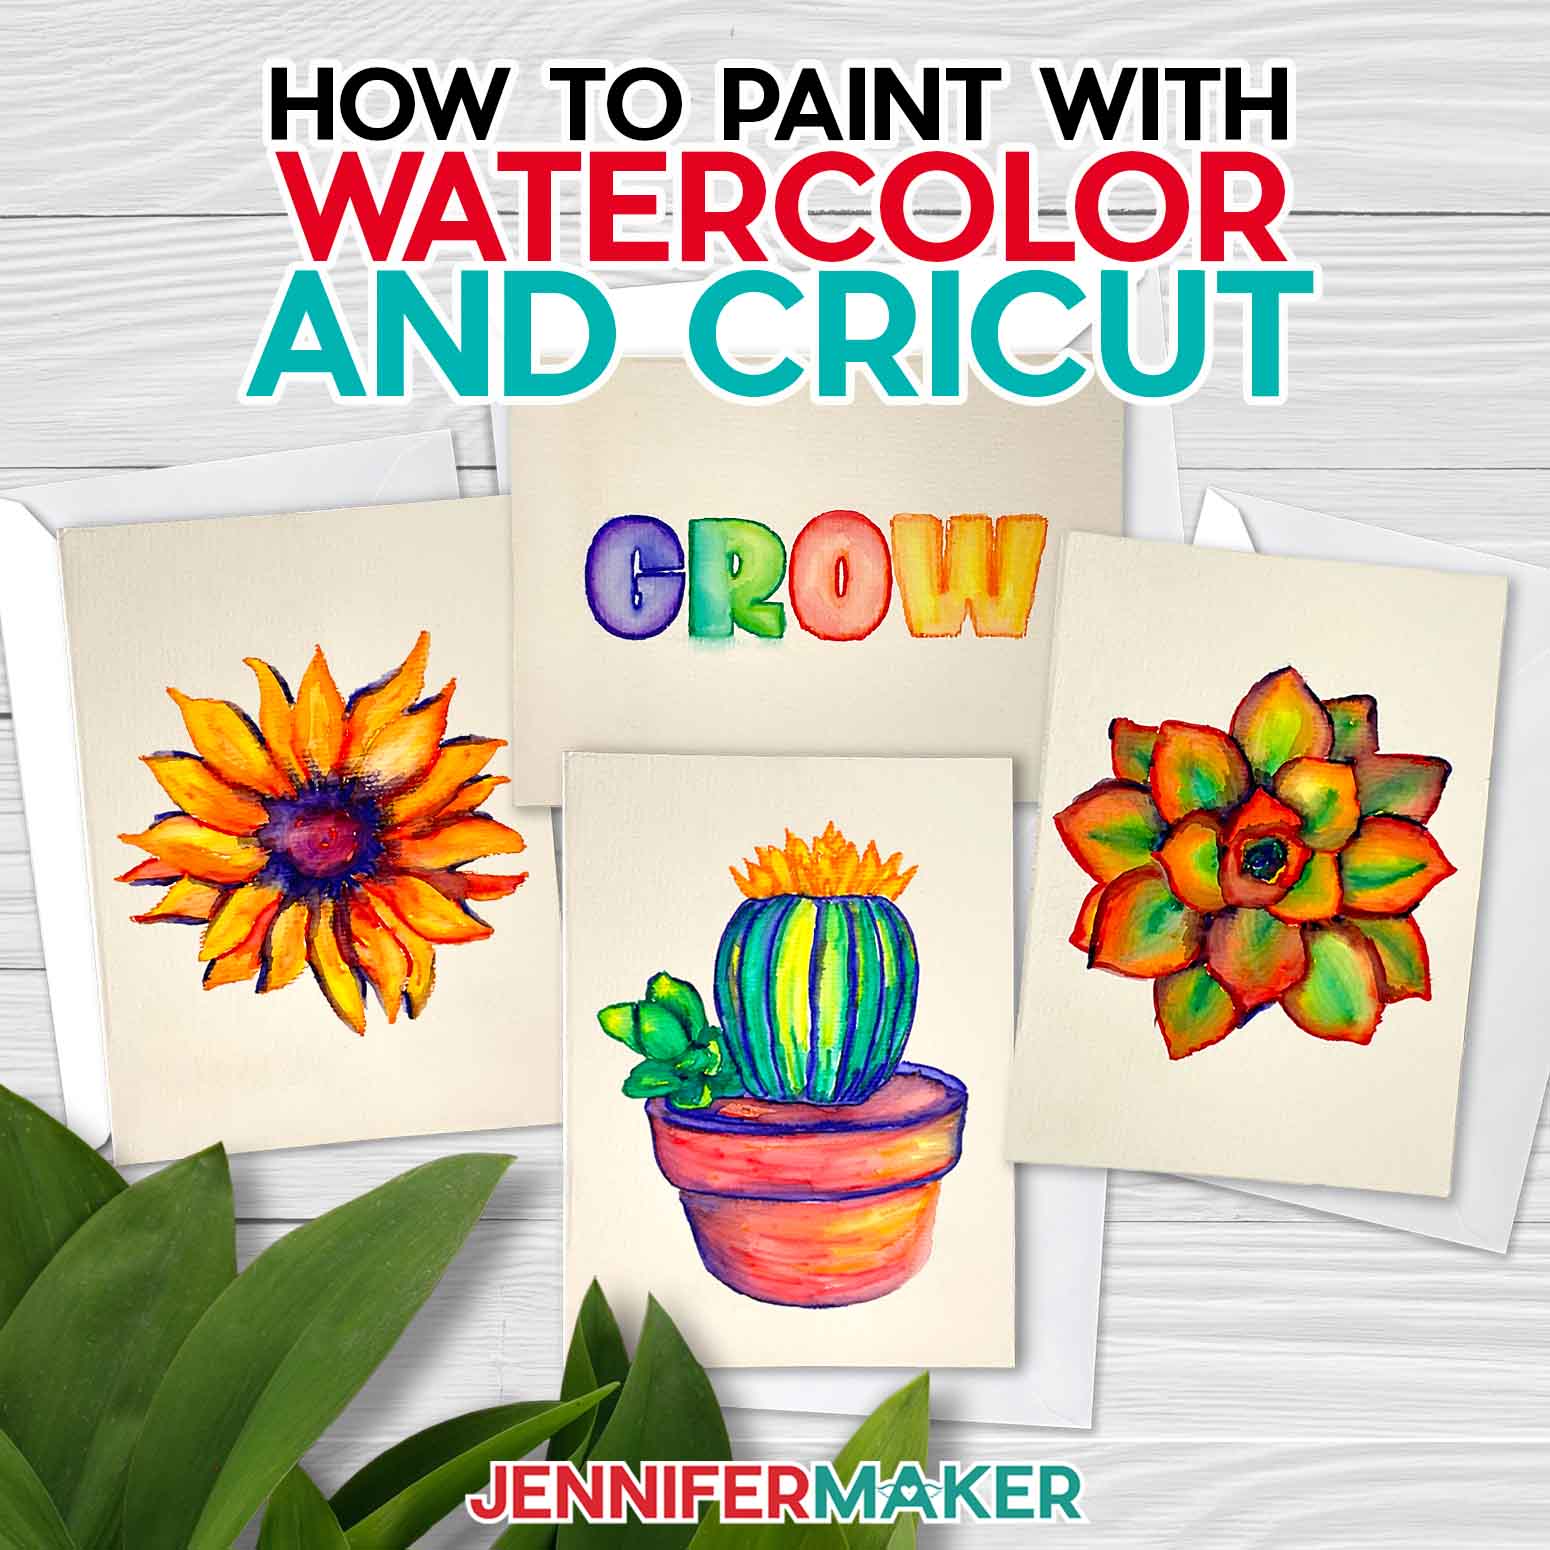
Learn how to paint watercolor plants with a Cricut!
Watercolor paintings are so whimsical and pretty, aren’t they? I just love the flow of the water and pigment as it spreads across the paper, creating colorful blends and ethereal, translucent effects. But, like many art projects, it can take some practice to get going. But we all start somewhere, myself included! Enter the Cricut. Now, I know what you’re thinking: “Jennifer, how on earth did you use your Cricut cutting machine to paint a picture?” Well, if you know me at all, you know that if I can involve my Cricut in a project, I probably will.
So, how does this all work? With watercolor markers, that’s how! Using your Cricut’s drawing feature, you can draw designs using watercolor markers, and then bring them to life with a paintbrush and water! So while your Cricut isn’t doing any actual painting, it does make creating beautiful pictures like this possible — even if you have no watercolor painting experience.
Learning to watercolor paint might seem like a daunting task, but that good news is that this tutorial makes it SO EASY. My step by step guide starts by walking you through preparing your file in Cricut Design Space, then using watercolors and your Cricut to draw a fun image on notecards or watercolor paper for you to paint!
Watercolor painting involves using a water-soluble pigment that usually comes in a solid pan form, a liquid tube form, or in this case, watercolor pencils! It’s super different than working with acrylic paints or oil, and the results are too! I equally love the bright punchy vibes and ethereal layered looks you can make — they’re pretty magical!

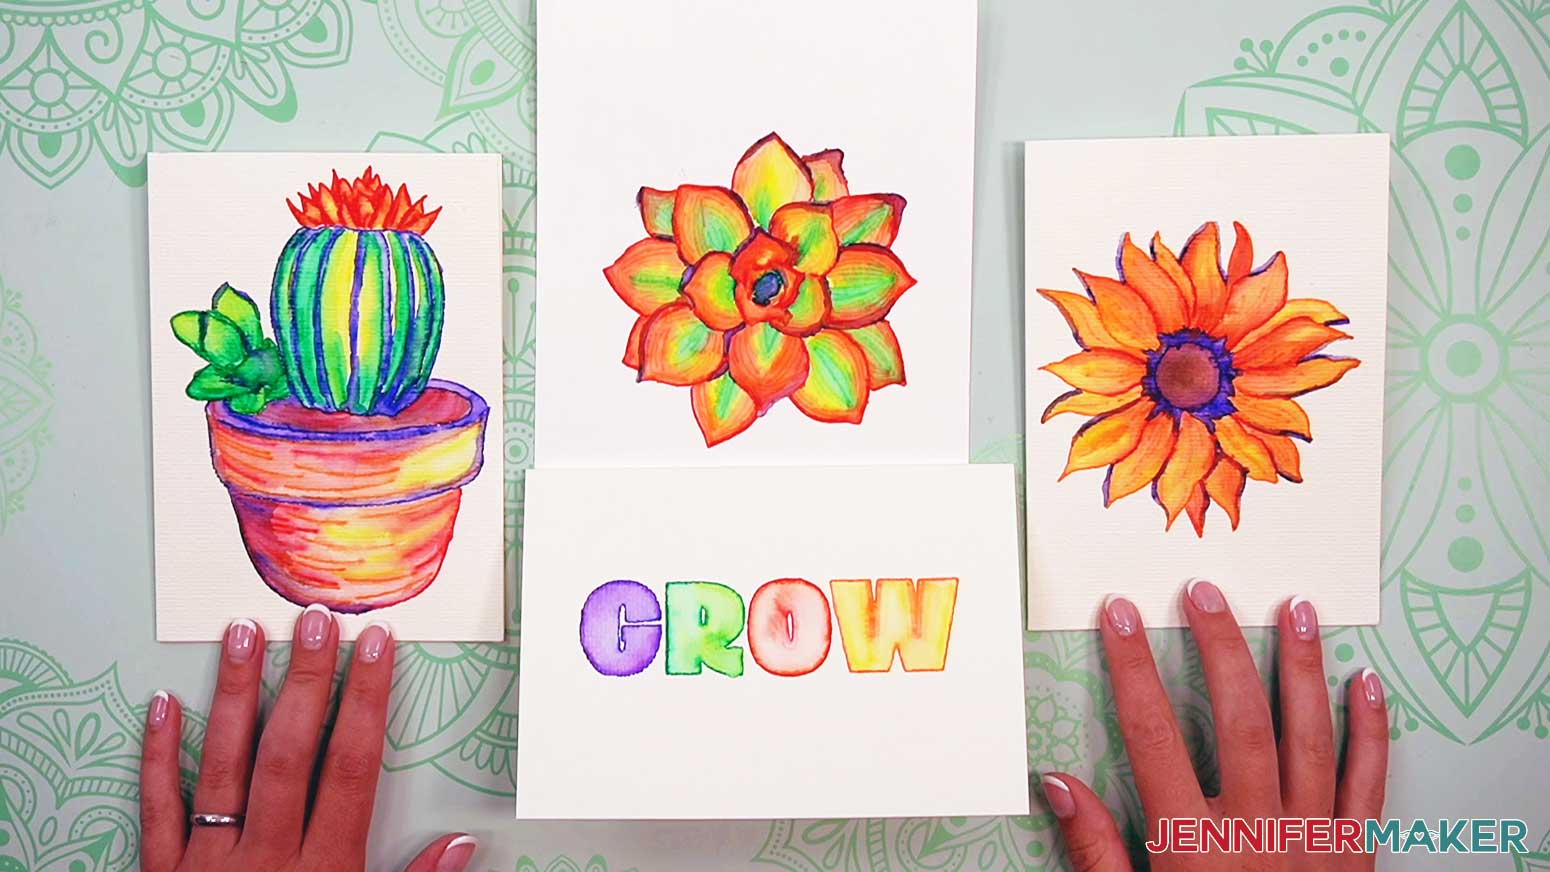
This tutorial comes with three plant designs for you to draw with your Cricut and paint, plus one practice design to get used to the techniques — both in preparing your file as well as painting it! Before painting begins, you first need to prepare your file in Cricut Design Space. I’ll show you how to adjust the settings to use different colored markers, so your image looks the way you want it to! After your test run, you’ll see how fun and easy it is to create unique and impressive watercolor art! It might just become your new favorite hobby.
I’ll show you different techniques for creating areas of solid color as well as mixing different colors to create textured effects and shadows within our plant elements! Then I’ll show you a fun watercolor technique to blend colors for an ombré effect. I’ll even give you my special tips for avoiding wet paint bleeding into other wet paint so your painting turns out the way you imagined (or better)!
After you’ve painted a plant or two, you’ll have a nice foundation to begin creating your own unique and beautiful watercolor paintings and cards!
You’ll discover how watercolor paint acts differently on dry paper versus wet paper, and I’ll show you the finished paintings done with not just the Cricut watercolor markers, but also another brand I found called Realike. Which did I prefer? You’ll have to watch my tutorial video to see which brand gave me the best results!
This project was seriously so fun, and I can’t wait to display and gift the paintings I’ve created! Gifting a piece of art is a lovely way to show someone they’re special to you! Looking for an extra neat gift for a budding artist (or someone who just likes to make stuff)? Gift them a drawn but not-yet-painted watercolor design on watercolor paper, and bundle it with a paintbrush! How cool!
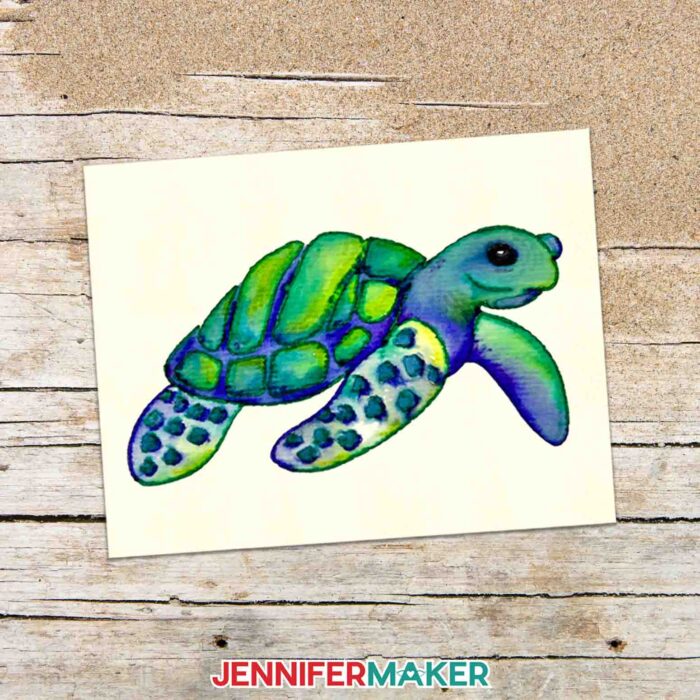
Want more designs to paint? I’ve got some fabulous sea animals and bird designs for you to try, too. You can even use the watercolor markers to draw your own paintable freehand designs. I absolutely love introducing crafters to new and exciting ways of making beautiful things and expressing their creativity! Frame individual watercolors as eye-catching home decor, or give stunning hand-painted cards to family and friends. There are so many possibilities, and I hope you’ll share them with me and our community of crafters! Have fun, and happy painting!
Ready to learn how to paint watercolor plants with the help of your Cricut? This post contains some affiliate links for your convenience (which means if you make a purchase after clicking a link I will earn a small commission but it won’t cost you a penny more)! Read my full disclosure policy.
Materials And Tools to Learn How to Paint Watercolor Plants With a Cricut
View my Amazon shopping list with the exact items we used to make this project
- Cricut Watercolor Markers and Watercolor Brush Pen -or-
- Realike Markers -AND- Watercolor Brush Pen
- Cricut 4.75″ x 6.6″ Watercolor Paper Notecards -or-
- Watercolor Paper 5.8″ x 8.3” Extra Fine Grade
- A method to draw your design — I used the amazing Cricut Maker 3 but you can also use the original Maker or an Explore, or a Joy or Joy Xtra with the correct-sized markers
- Cricut StandardGrip Green Machine Mat, 12″ x 12″ -or-
- Cricut Card Mat 2×2
- Brayer
- Paper Towels
- Cotton Swabs (optional, for shading)
- Bowl of Water (to fill your brush)
- Design #557 – My free Paint Watercolor Plants SVG/PDF/DXF files (available in my free resource library—get the password at the bottom of this post)

How to Paint Watercolor Plants Using a Cricut
Paint Watercolor Plants
Learn to paint beautiful watercolor plants using your Cricut!
Materials
- Cricut Watercolor Markers and Water Brush Pen -or-
- Realike Markers -and-
- Watercolor Brush Pens
- Cricut 4.75" x 6.6" Watercolor Paper Notecards -or-
- Watercolor Paper 5.8" x 8.3” Extra Fine Grade
- Design #557 (My free SVG/PDF/PNG/DXF design files available in my free resource library - get the password by filling out the form at the bottom of this page)
Tools
- A method to draw your design — I’m using the Cricut Maker 3 but you can also use the Cricut Venture, Cricut Explore Series, Cricut Joy Xtra, and Cricut Joy for this project!
- Cricut StandardGrip Green Machine Mat, 12" x 12" -or-
- Cricut Card Mat 2x2
- Brayer
- Paper Towels
- Cotton Swabs (Optional, for shading)
- Bowl of Water
Instructions
STEP 1: GET MY FREE PAINT WATERCOLOR PLANTS DESIGNS
First, download my Watercolor Plants designs from my free library – look for Design #557. Alternatively, you can use the Save This Project form near the top of this post and the design link will be emailed to you.
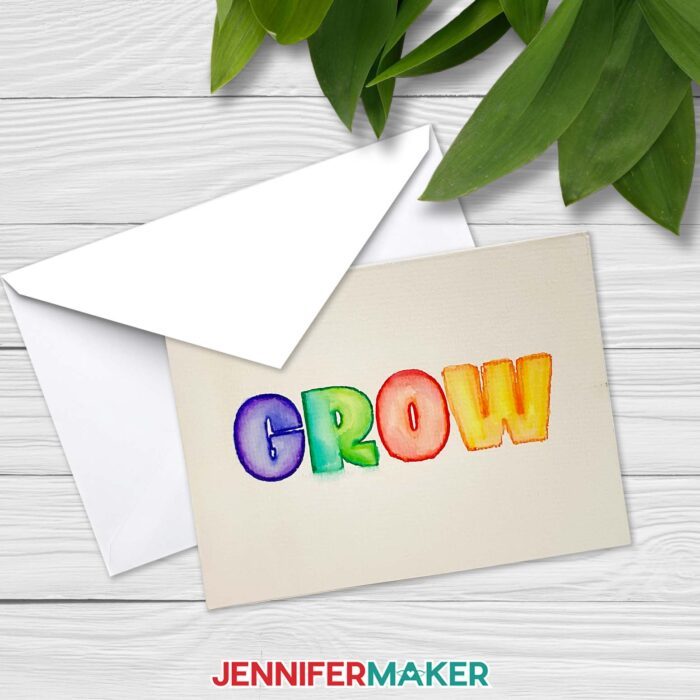
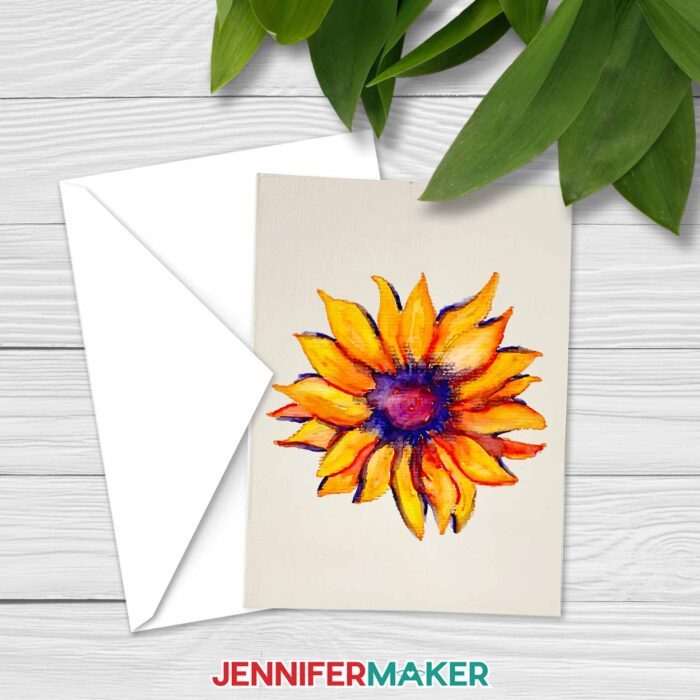
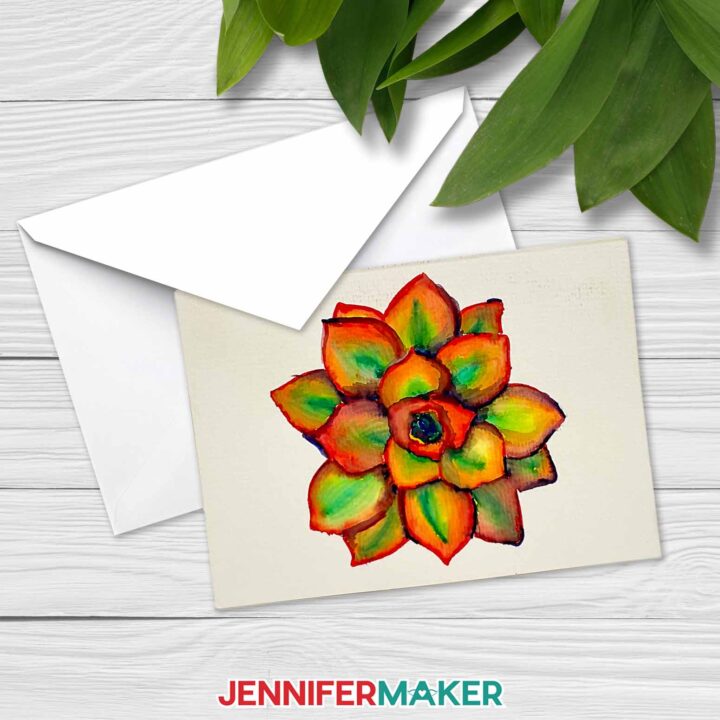
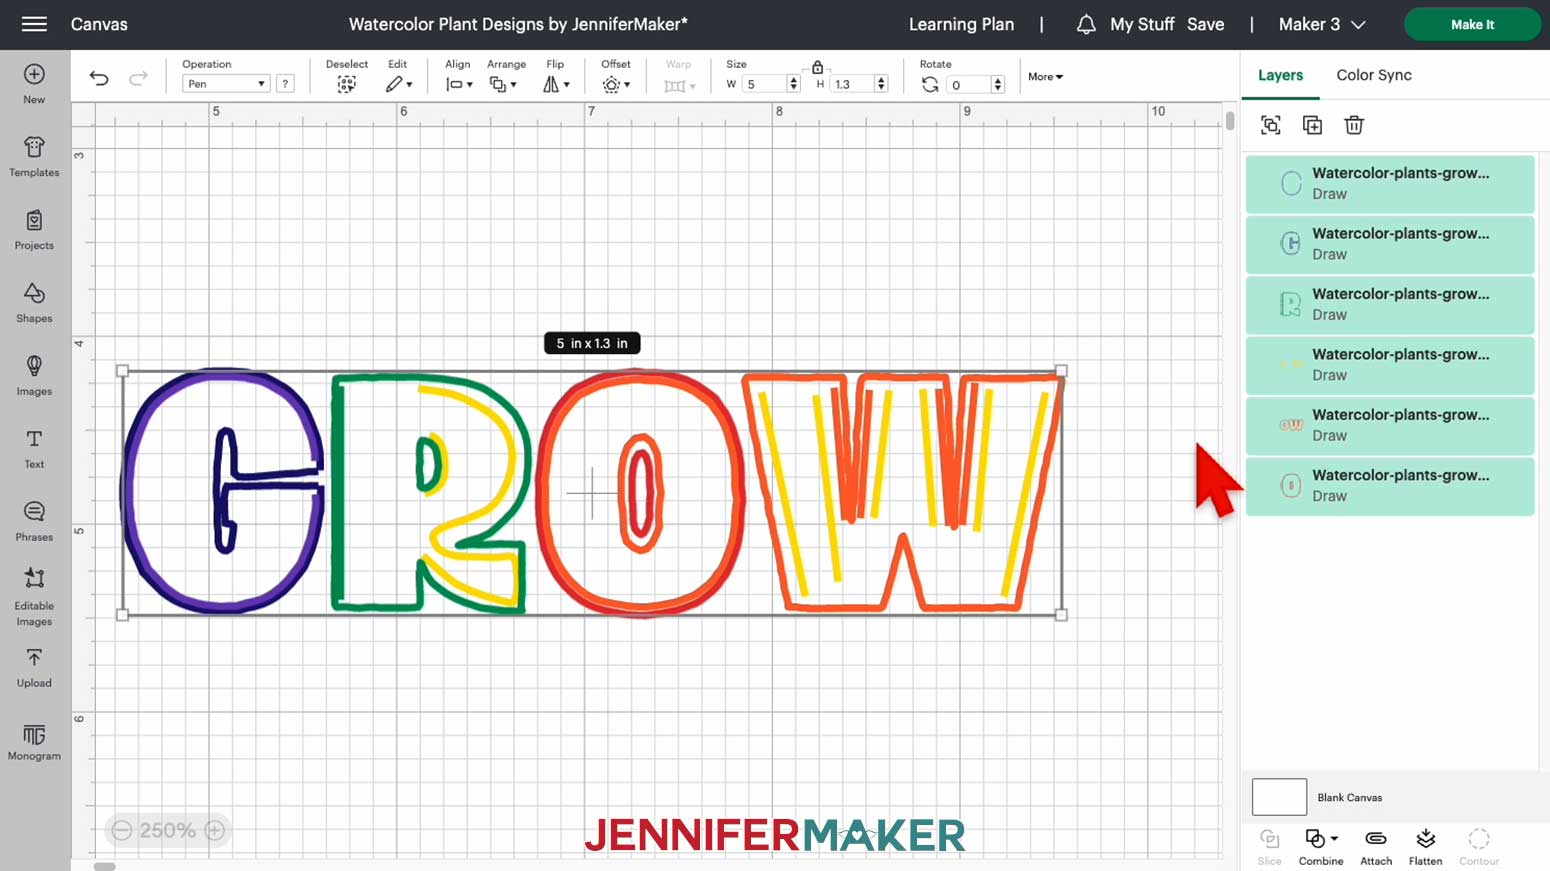
There are four different designs for you to choose from: a GROW warm-up design, a succulent, a potted cactus, and a sunflower.
I suggest starting with the warm-up design. Upload the file you want to your software and add it to the Canvas.
If you’re not sure how to upload, go to jennifermaker.com/svgs to learn how to unzip and upload SVG files.
STEP 2: PREPARE AND DRAW YOUR PRACTICE DESIGN
CRICUT DESIGN SPACE
1. Open Cricut Design Space
2. Click “Upload”
3. Click “Browse”
4. Select the SVG file
5. Click the green “Upload” button
6. Select your design in “Recent Uploads” and add it to the Canvas
watercolor-plants-grow-upload
7. With the design selected, click the Operation menu and select “Pen”
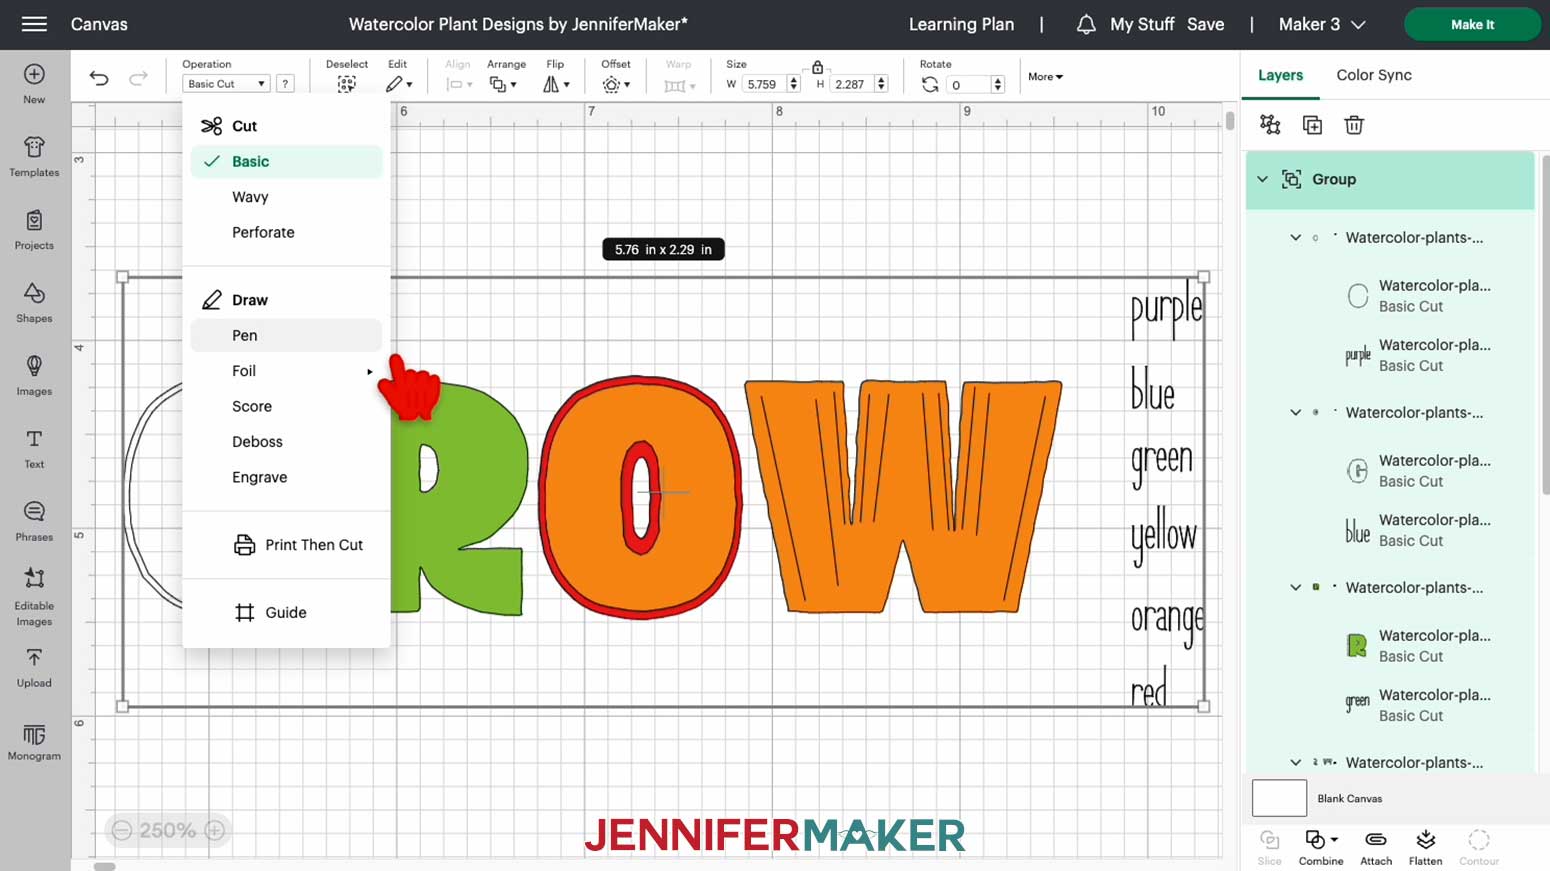
8. Next click "Ungroup" in the Layers Panel.
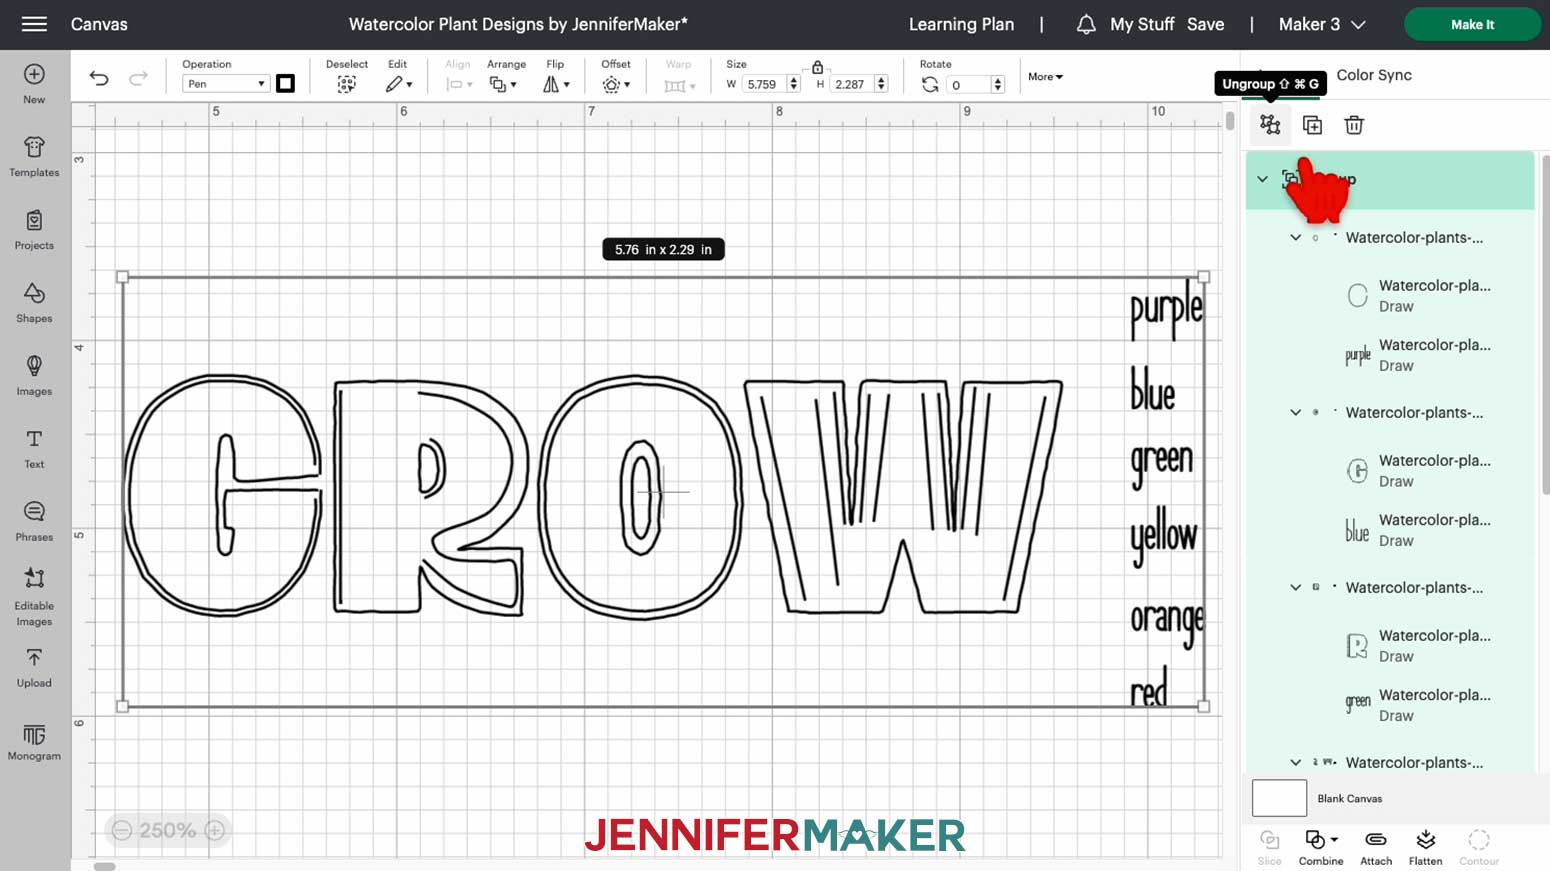
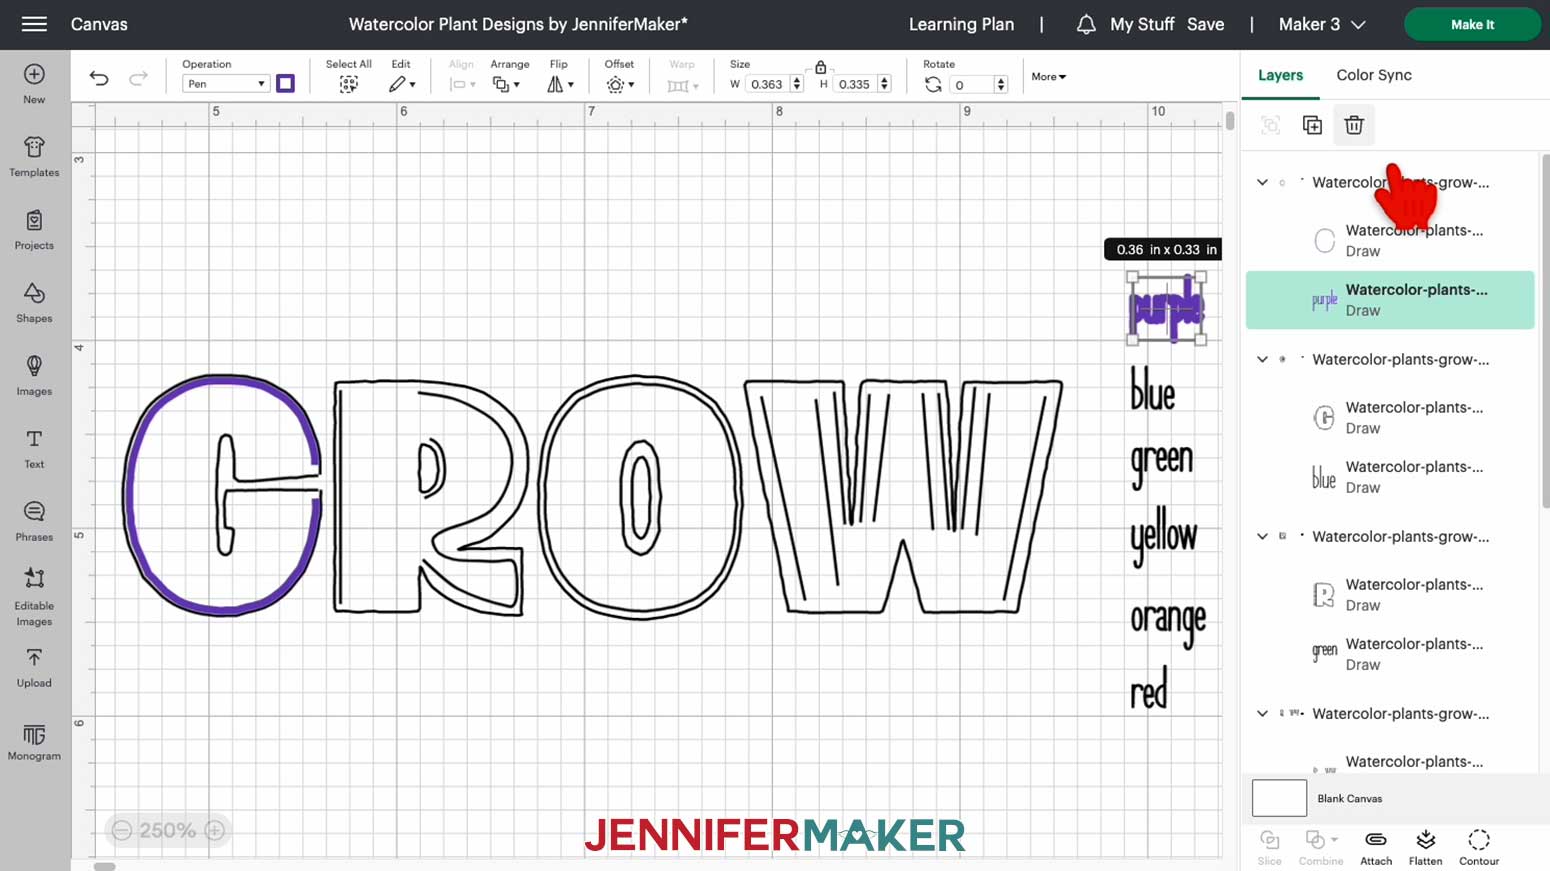
9. Select the first group in the Layers. You will see in this grouping that the color you need to select is purple.
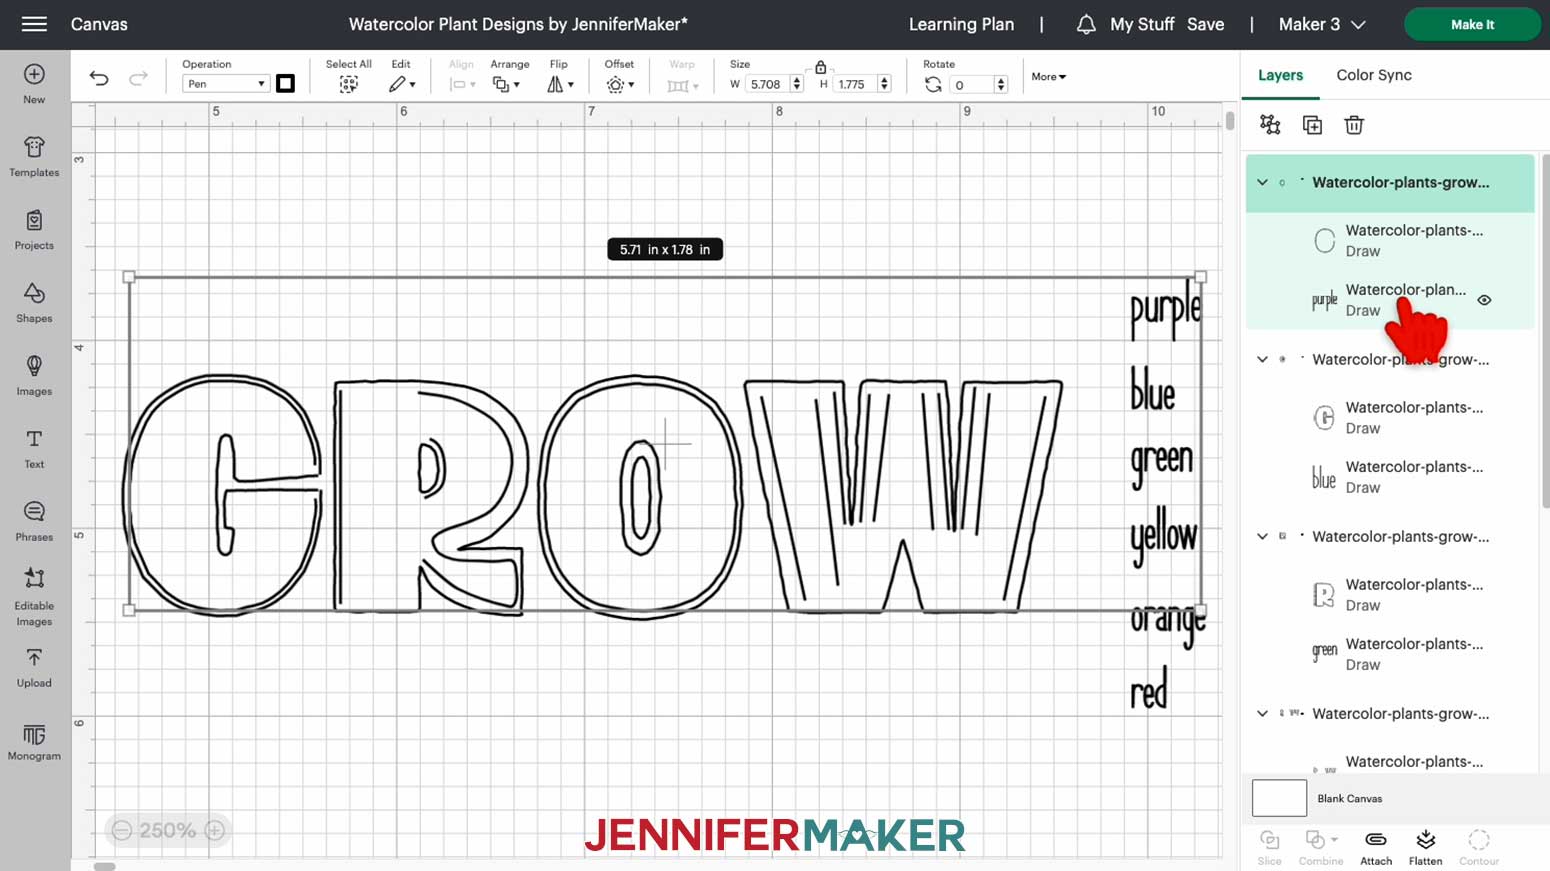
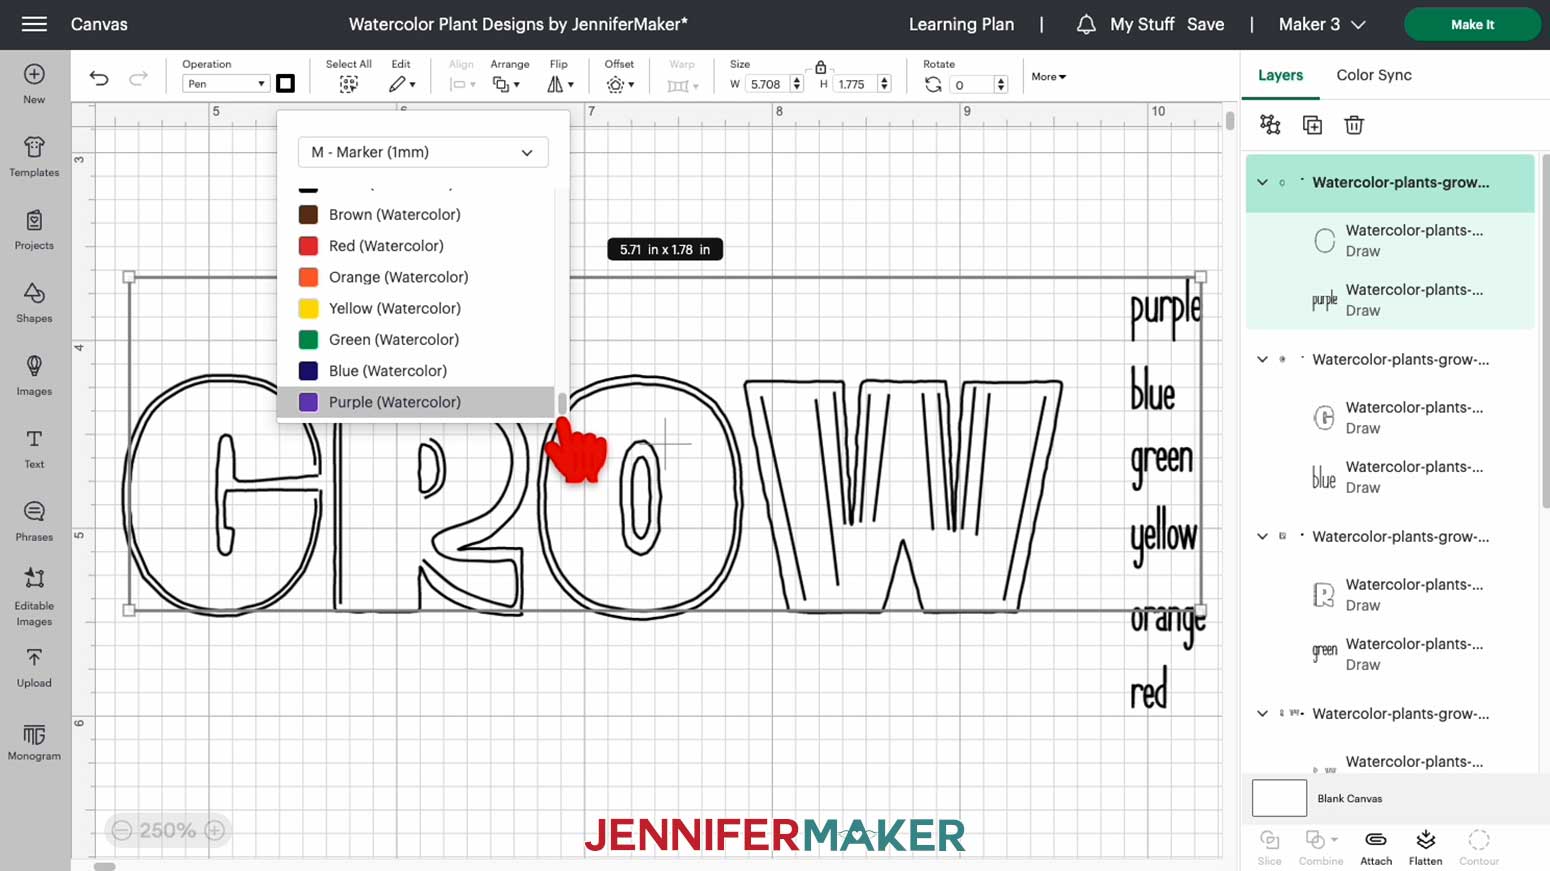
10. Click on the color box next to the "Operation" menu. Select "M-Marker (1mm)" and then "Purple (Watercolor)"
11. Select and delete the layer that shows the word "purple" in the Layers Panel.
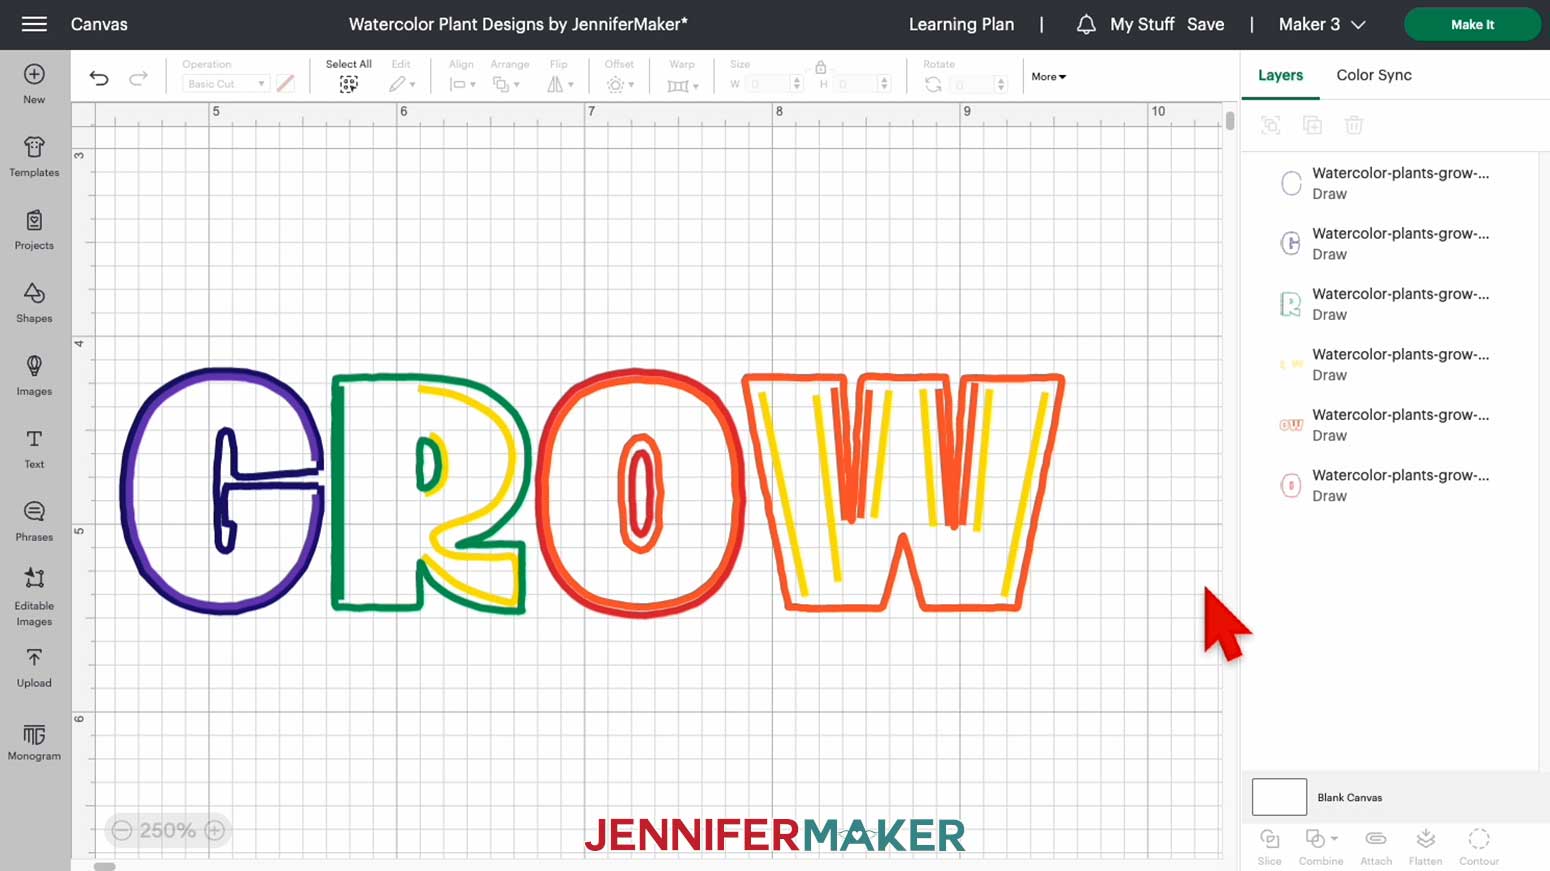
12. Repeat steps 9-11 above for the rest of the groups in the Layers Panel, making sure to select the appropriate color that matches each layer description. Your design should now be just the word GROW.
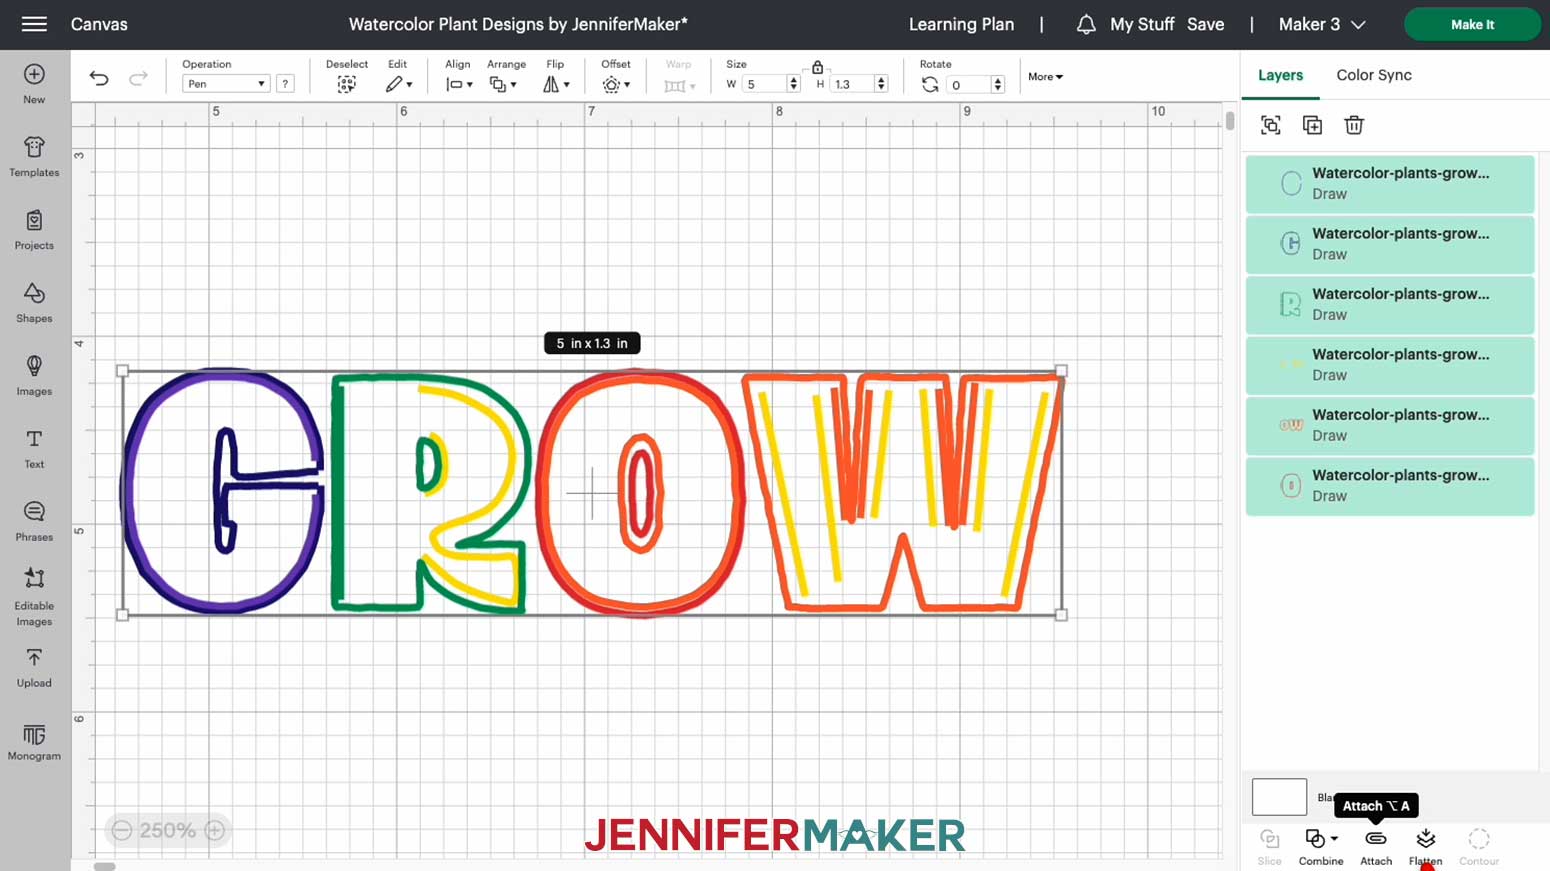
13. Select all the layers and click "Attach.”
14. Make sure the correct machine is selected and then click "Make it".
15. If prompted, click “On Mat,” choose your mat size, and click “Confirm.”
16. On the Prepare screen, leave “Mirror” turned off.
17. Prepare the Green StandardGrip machine mat to determine where to place the image in Design Space.
18. This image is horizontal, so open a Cricut 4.75" x 6.6" (R40) size card and hold it face up with the crease running horizontally and the front panel at the bottom.
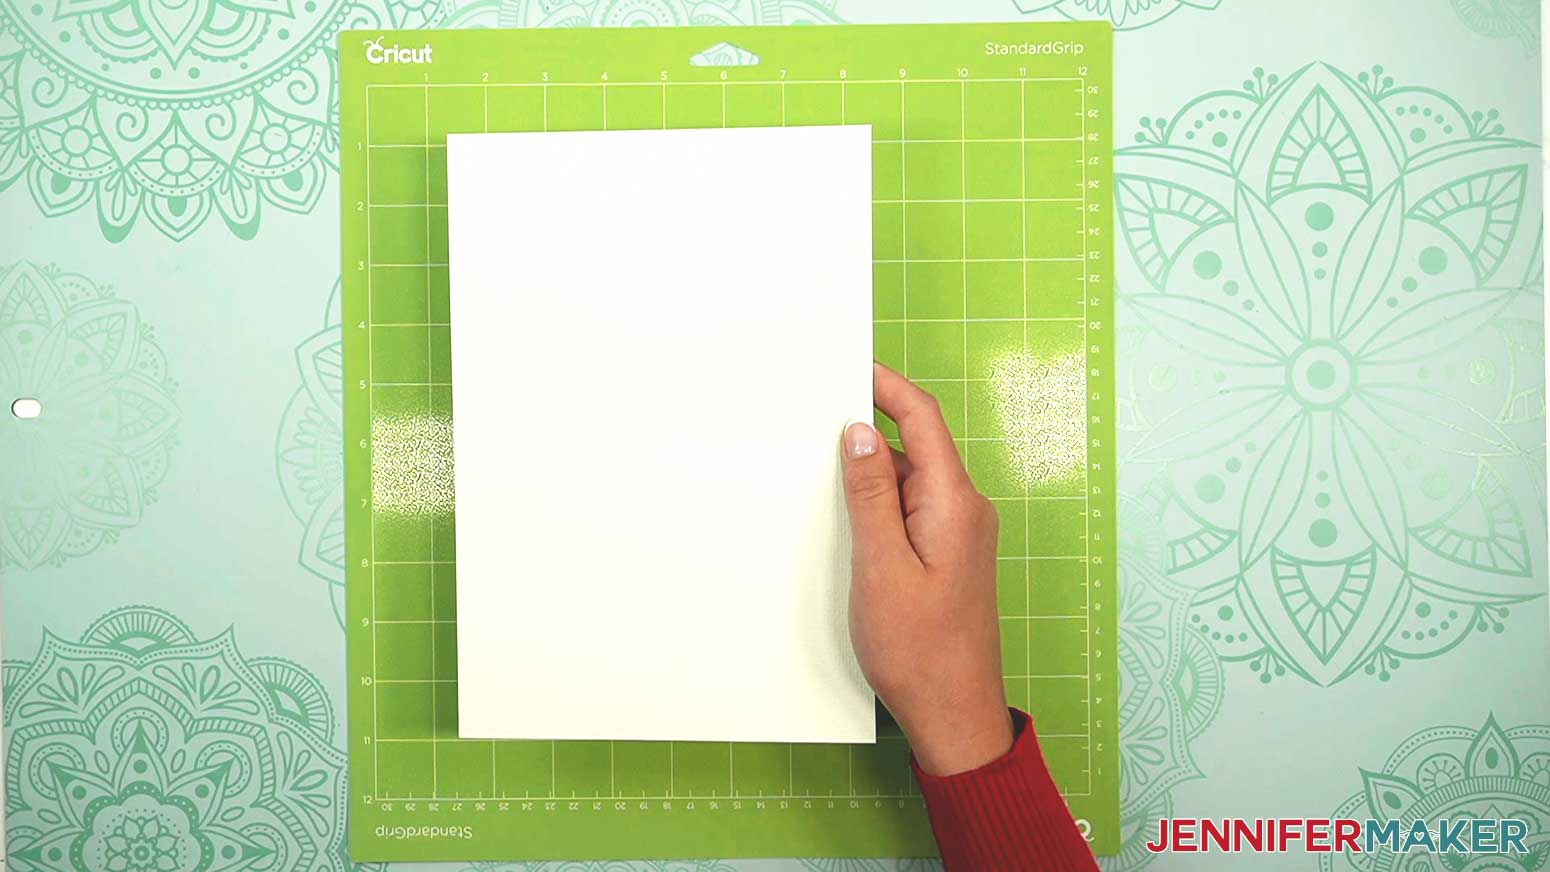
19. Match the crease to a horizontal line on the mat and line up the left edge with a vertical mat guide. For this size card, place the crease at the 5" mark and the left edge at 1". The front panel is between 1" and 7.5" horizontally and 5" to 9.75" vertically.
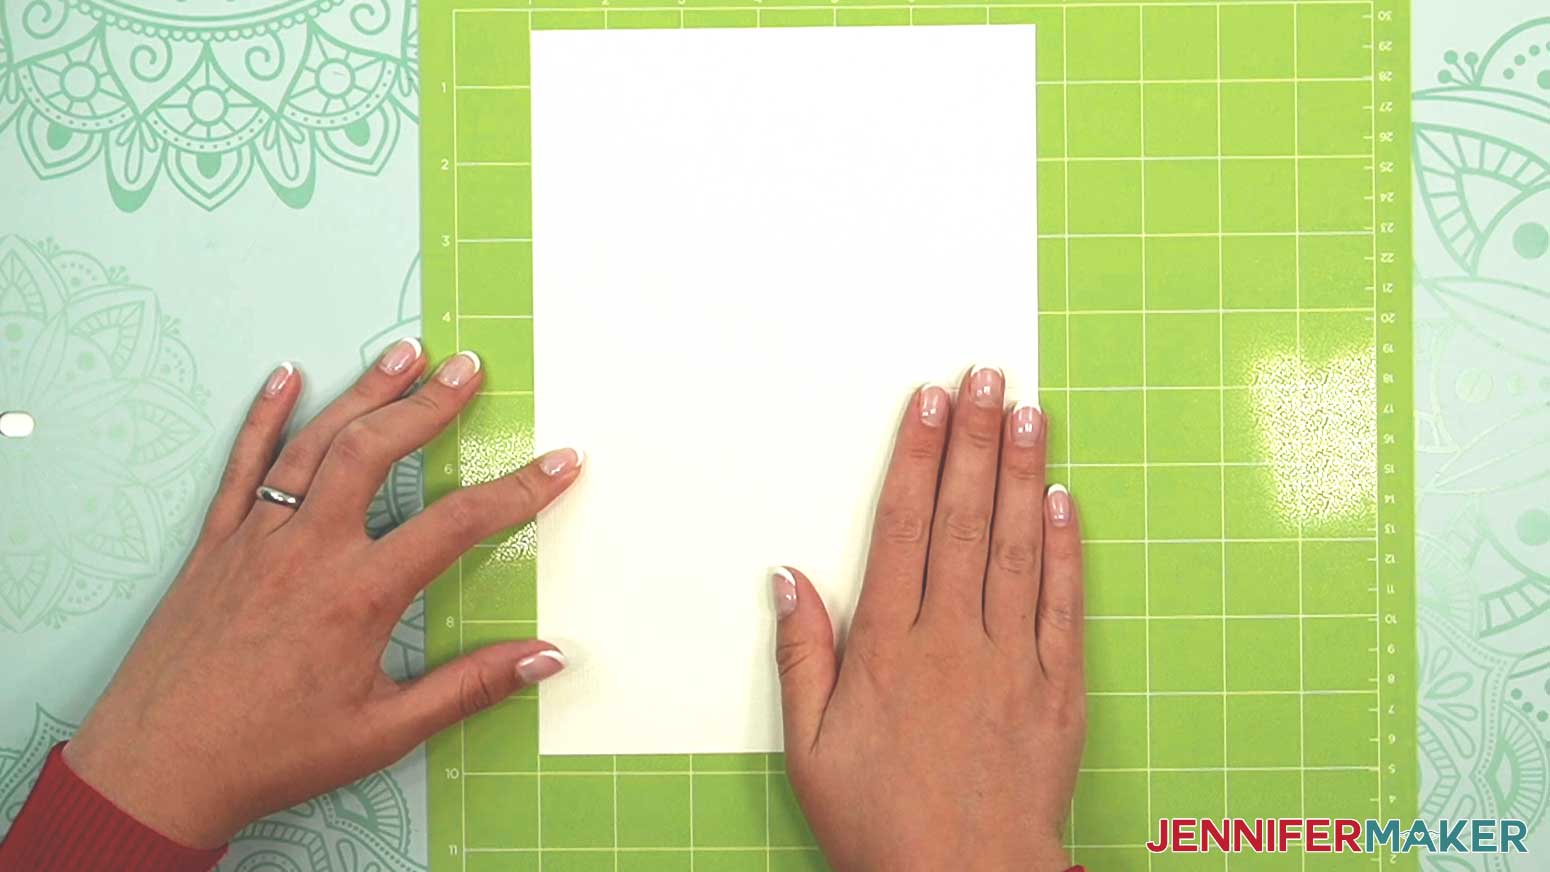
20. Press it down with the brayer.
21. Back in Design Space, click and drag the image to the mat area where the card’s “front” is located.
22. Roughly center it in the card's horizontal area, making sure it's below the horizontal 5” line but above 9.75".
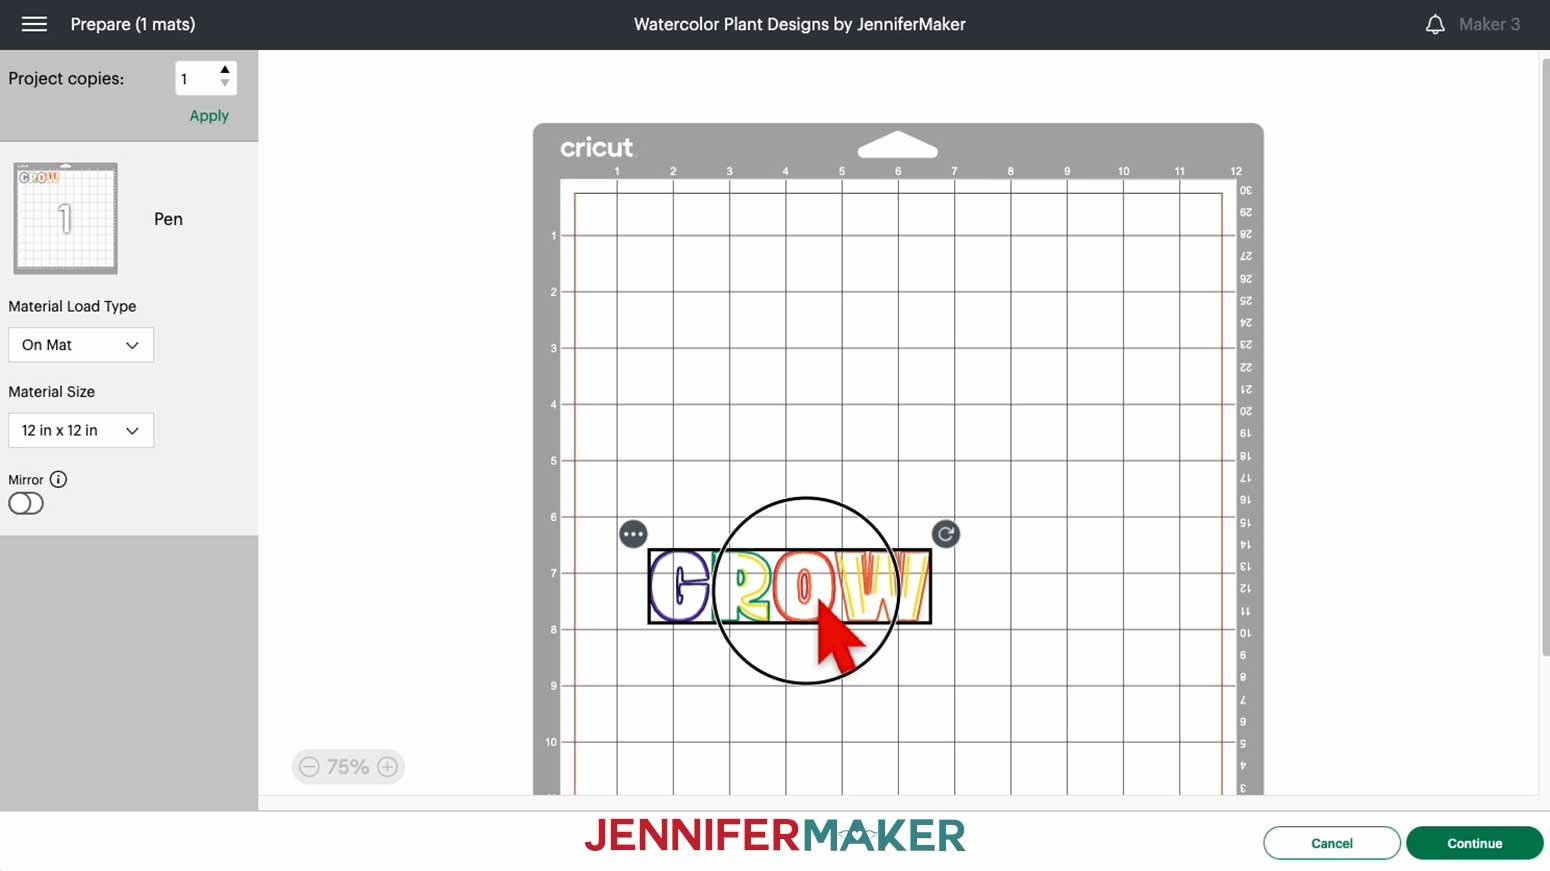
23. Click “Continue.”
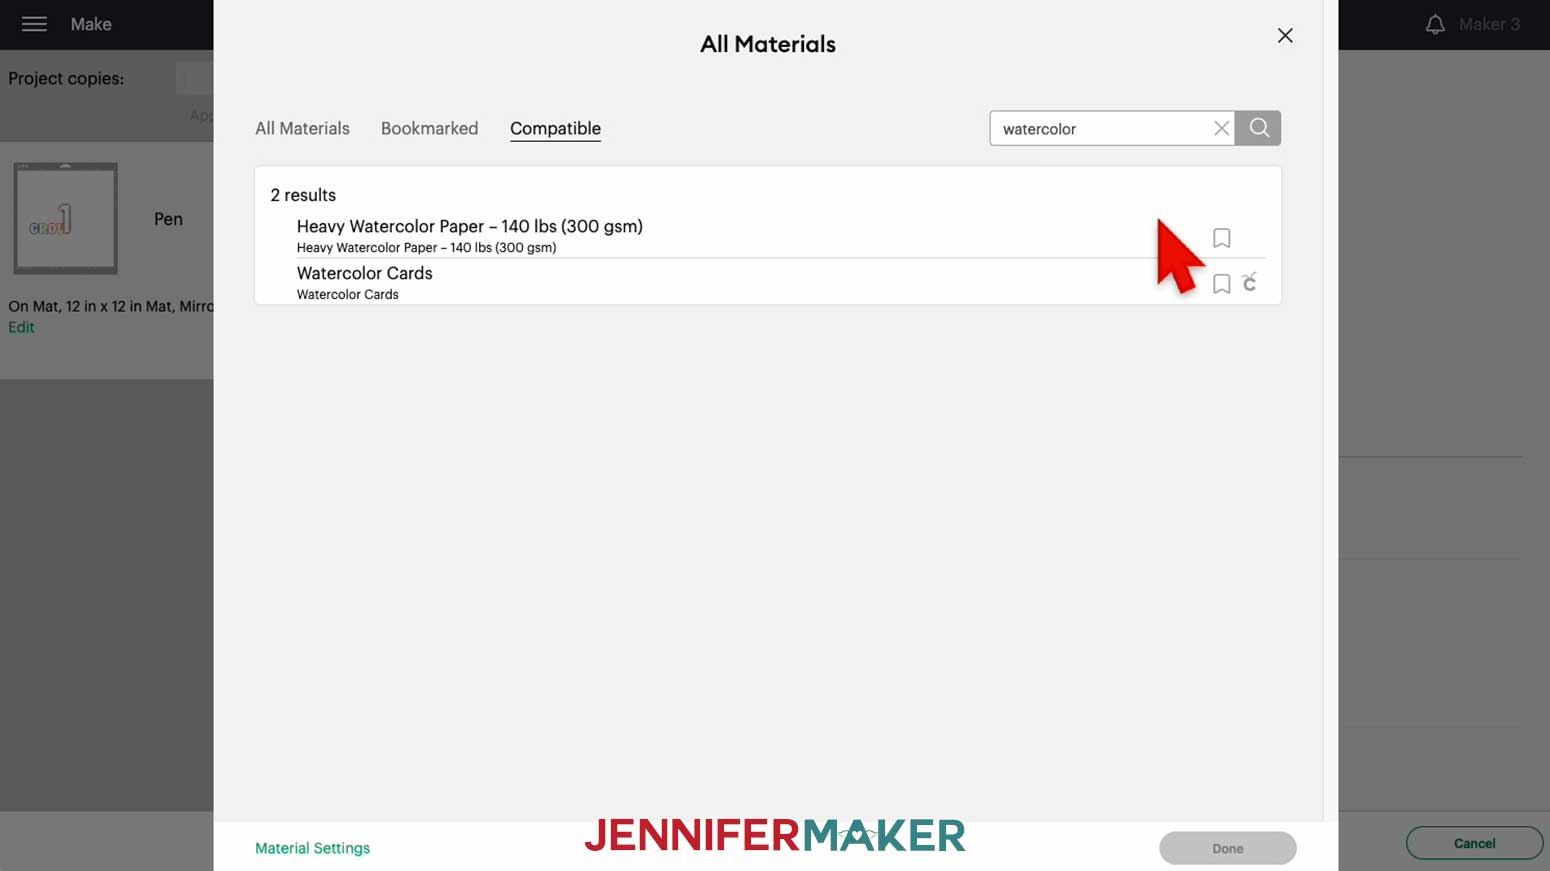
24. On the Make screen, click “Browse All Materials” and search for “Watercolor.”
25. Select "Heavy Watercolor Paper - 140lbs (300 gsm)".
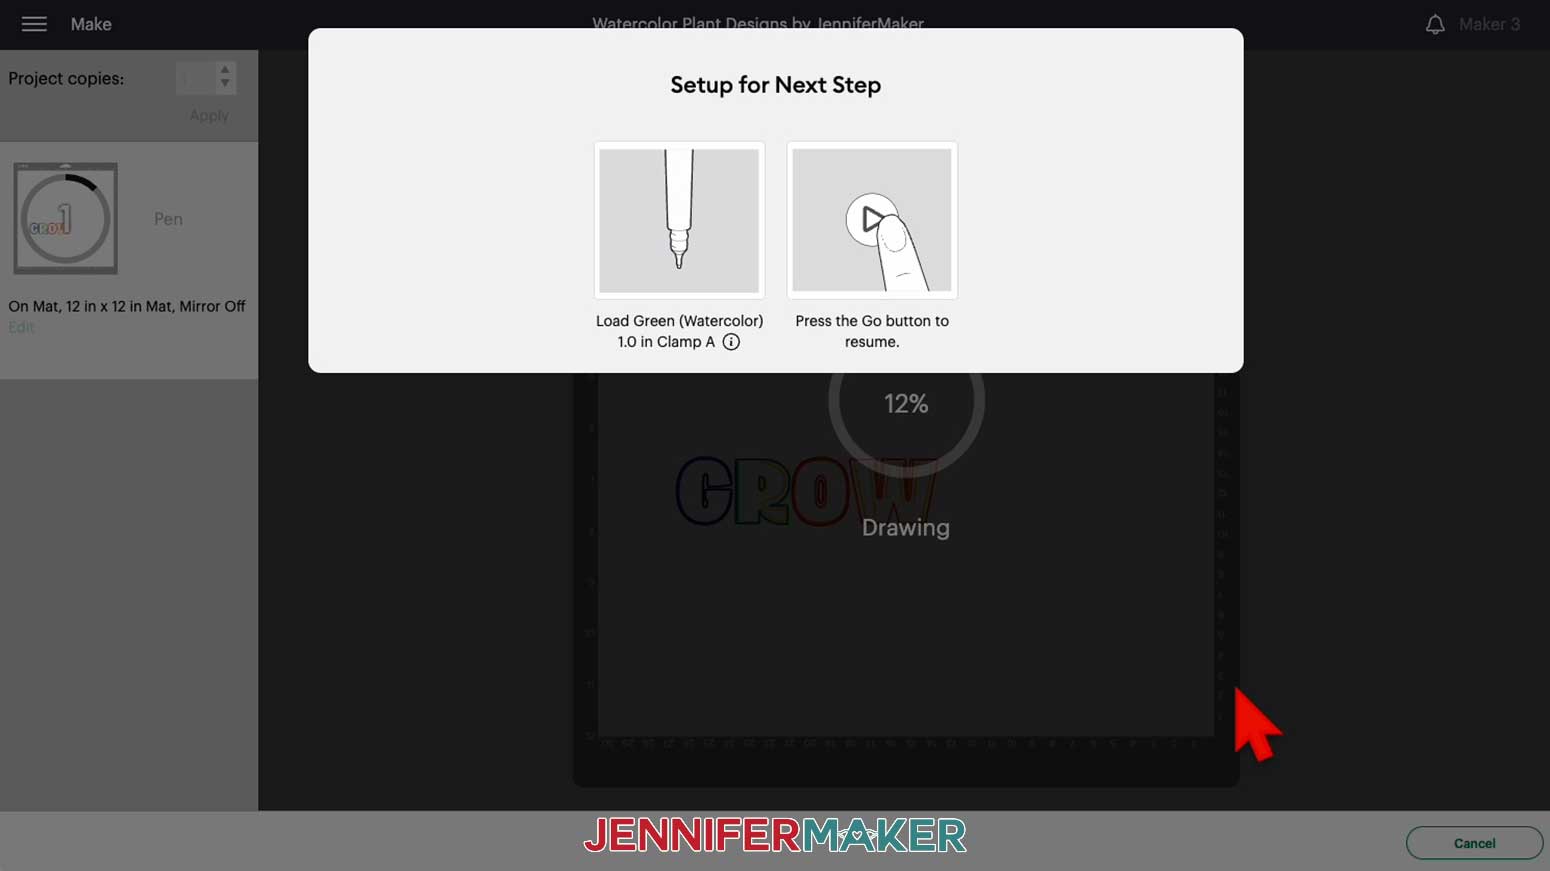
26. Load the first watercolor marker into Clamp A following the prompt on the screen for the correct color.
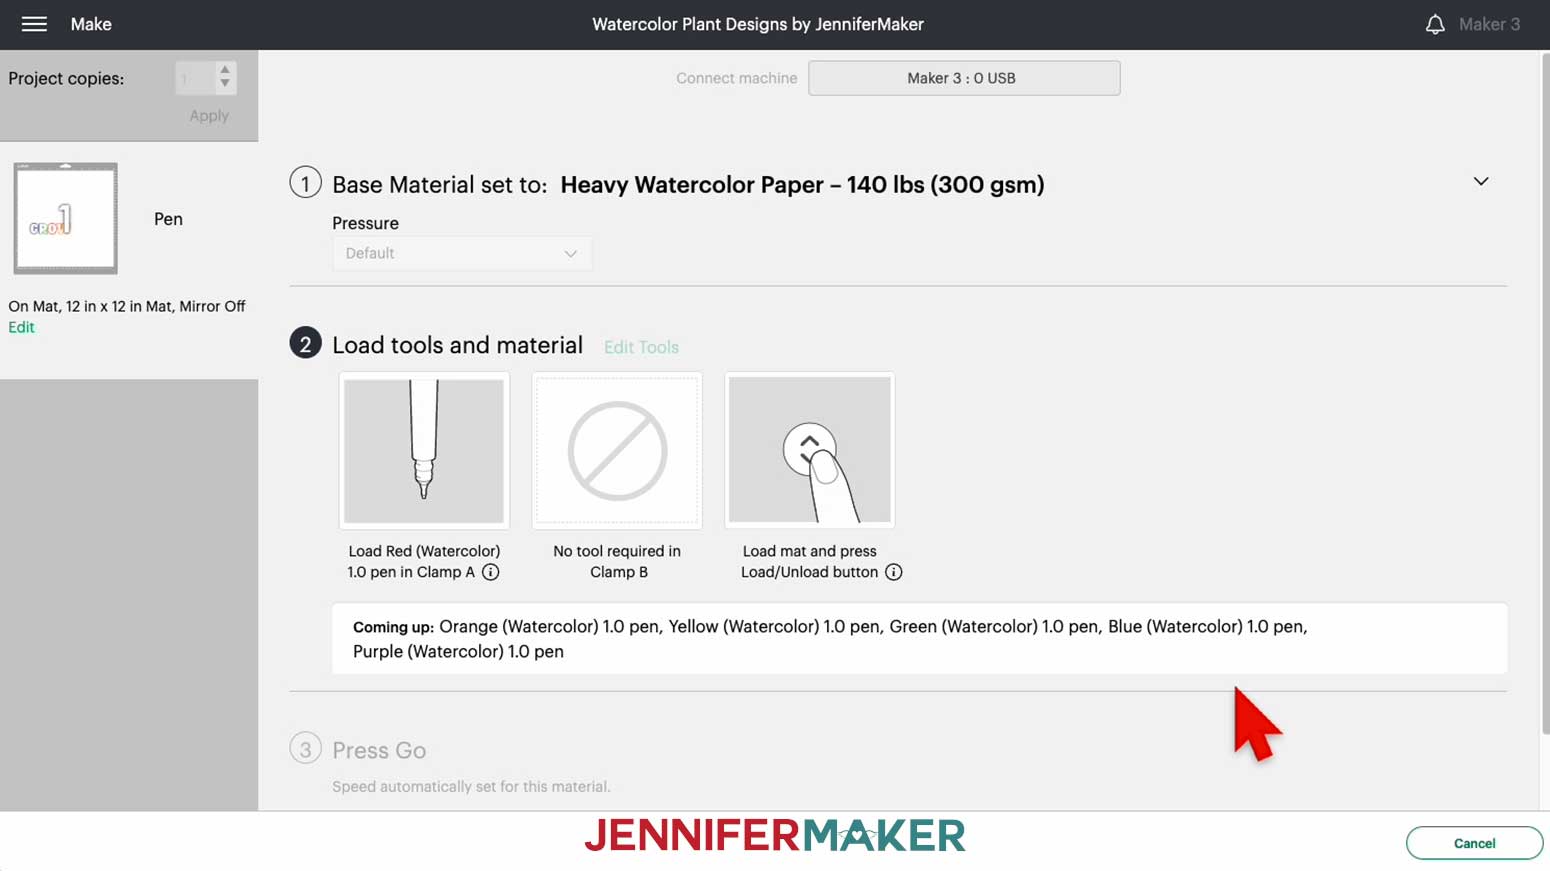
27. Load the machine mat, making sure the card orientation and placement matches the screen.
28. Press the flashing button to begin drawing.
29. The Cricut will pause and prompt you to swap the colors of the markers when it's ready.
30. When the image is complete, unload the mat.
31. Flip it over and roll it back to release the notecard without curling.
STEP 3: PAINT YOUR PRACTICE DESIGN
1. Prepare the brush.
2. Unscrew the brush tip from the water chamber.
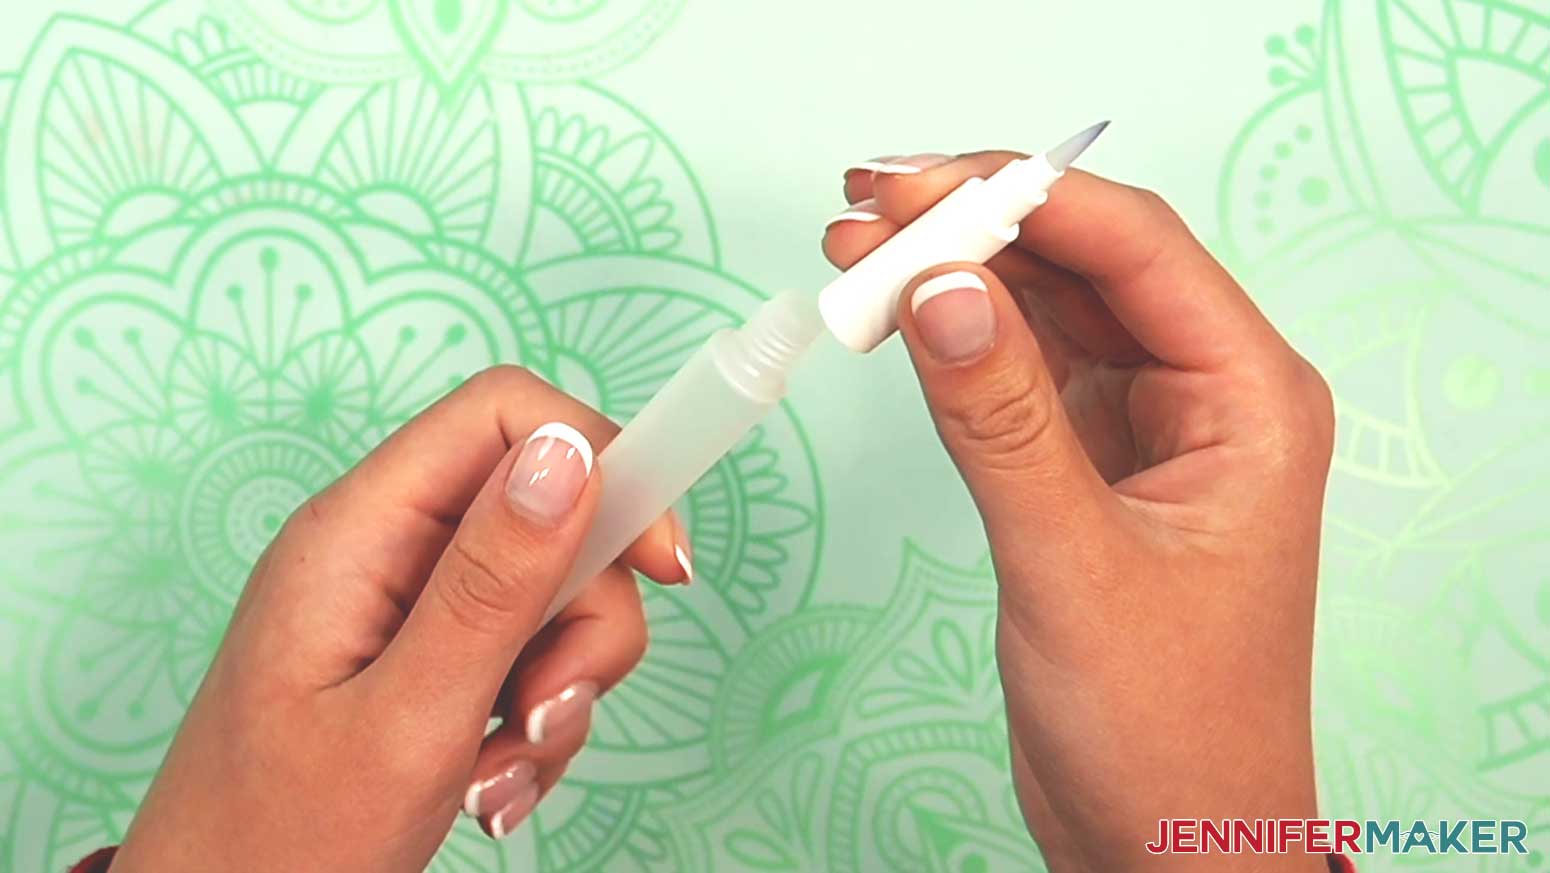
3. Fill the chamber with water, leaving about a thumb's width unfilled.
4. Put the brush tip back on.
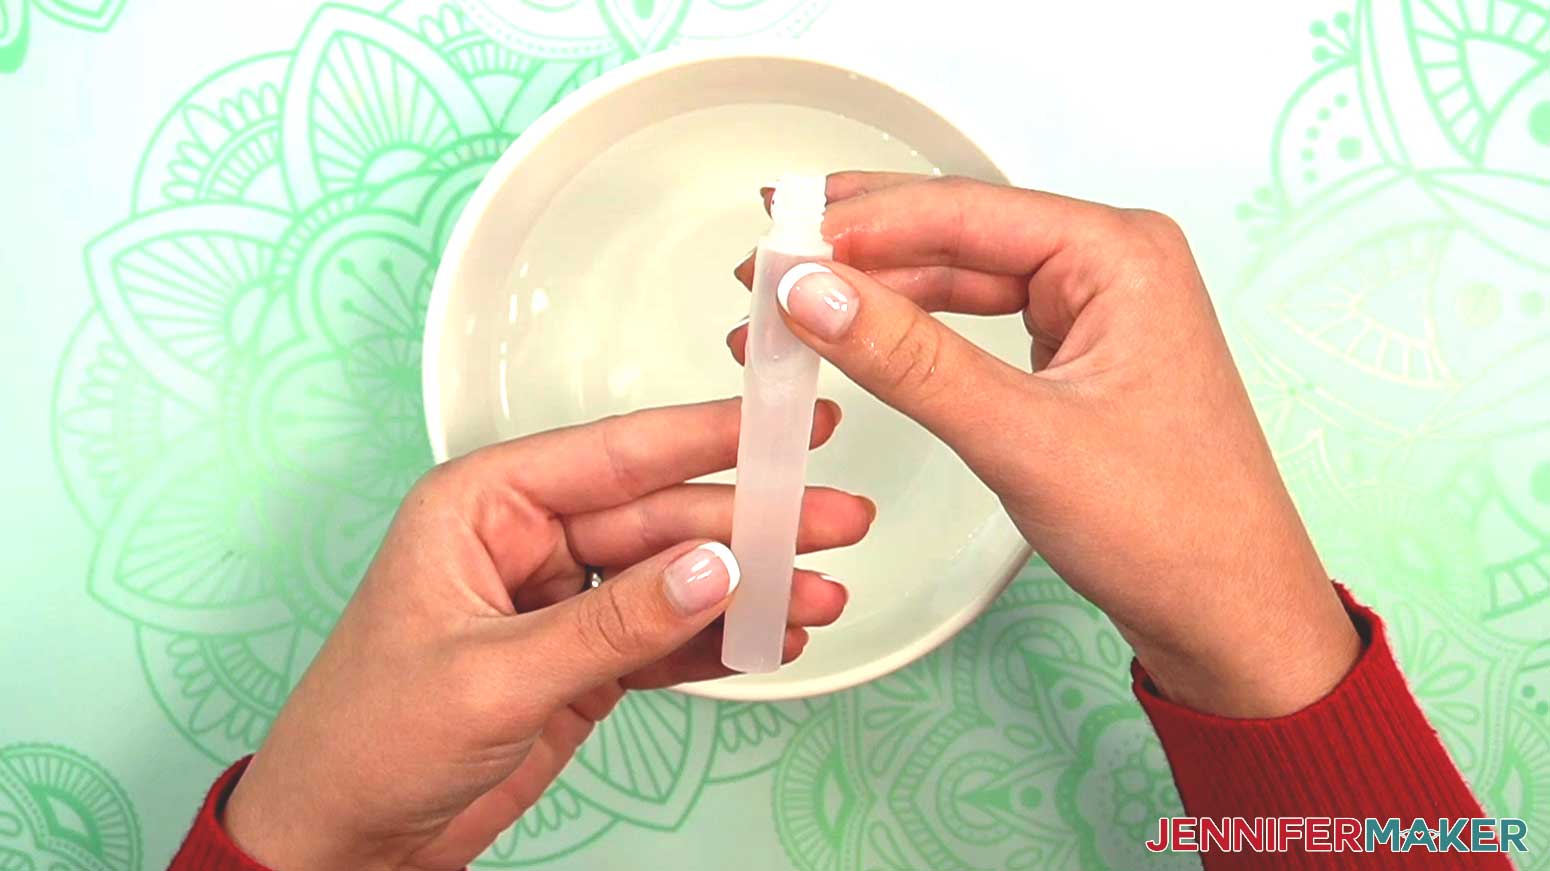
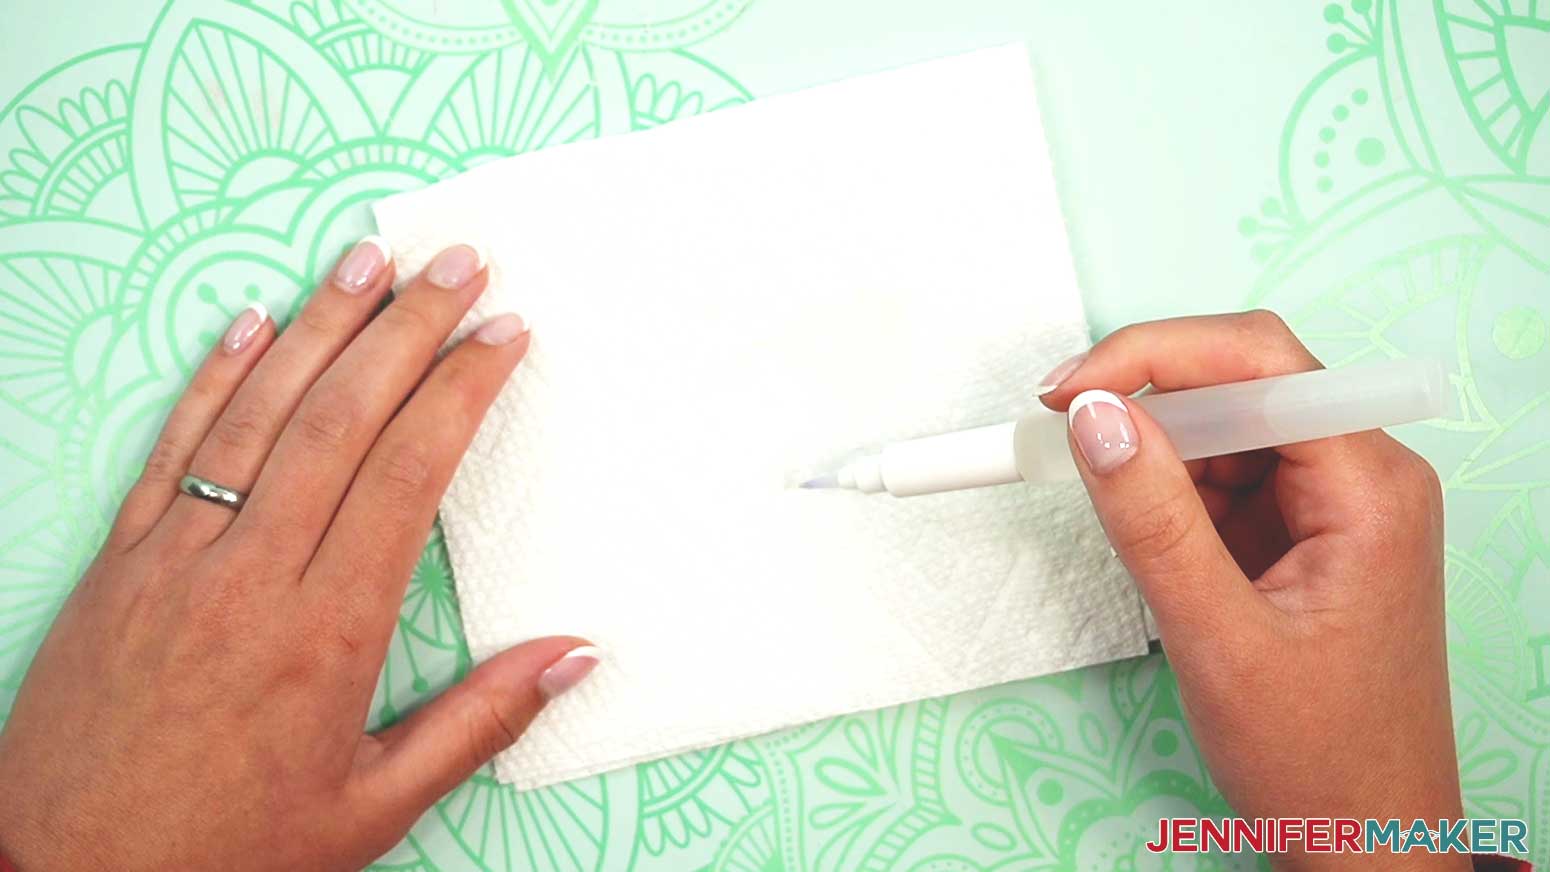
5. Hold the brush over a paper towel and gently squeeze the water chamber until water starts coming through to the bristles.
6. Drag the damp brush along the inside edge of the letter G.
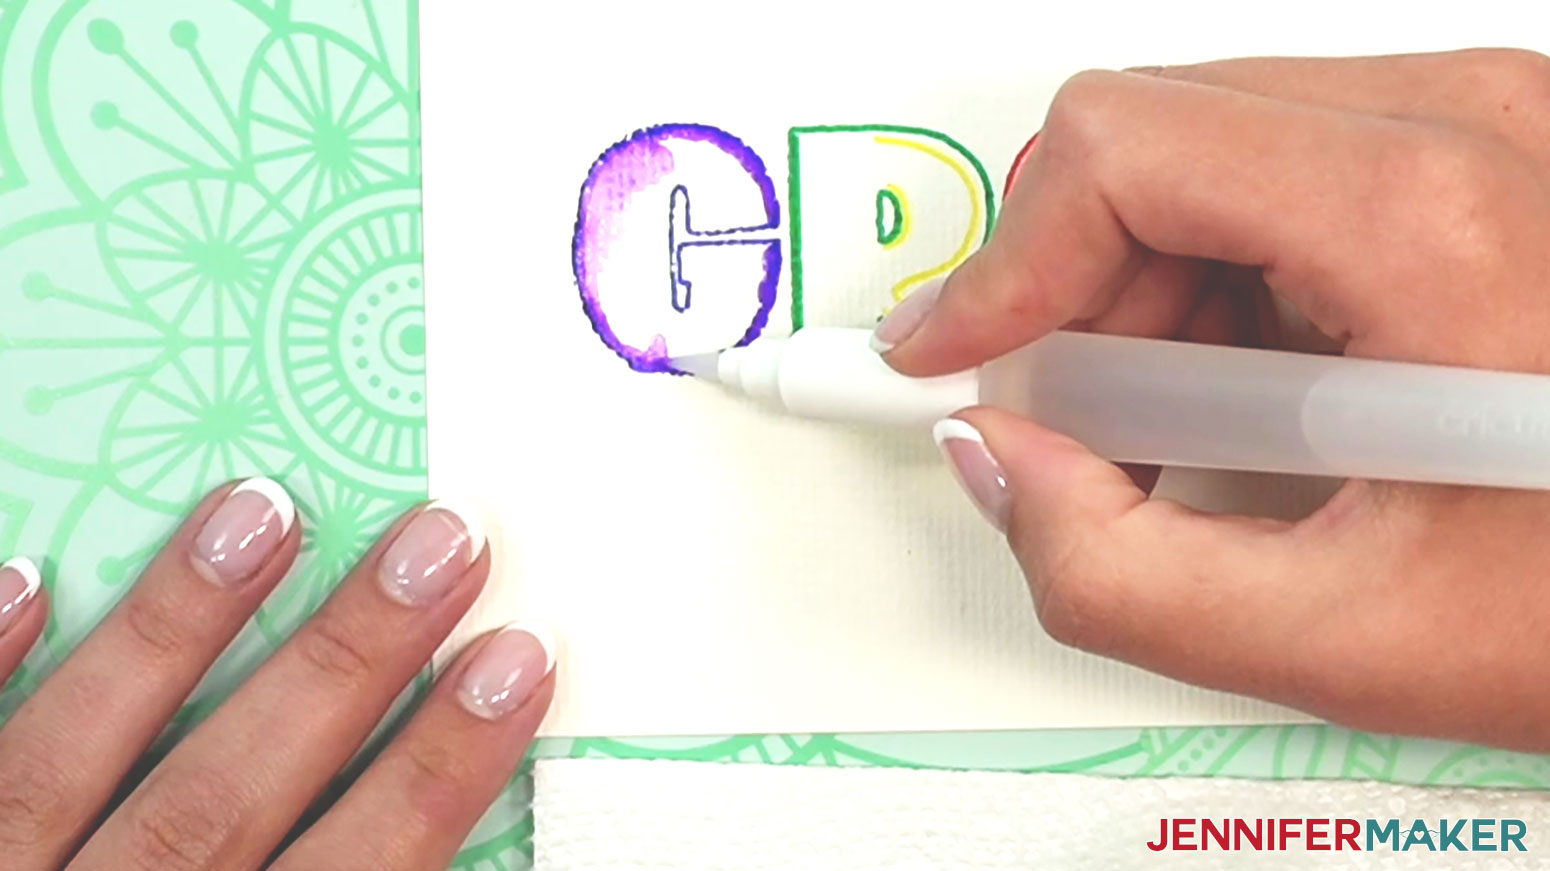
7. Pull the purple and blue colors away from the edges into the center of the letter.
8. Continue to brush along the inside lines of the G. (If your brush seems dry, gently squeeze it to draw more water to the tip.)
TIP: When refreshing your brush with water, test the wetness on a paper towel to make sure you don't have too much water on it.
9. When you have completed the first letter, clean your brush by squeezing and blotting on a paper towel until no color shows.
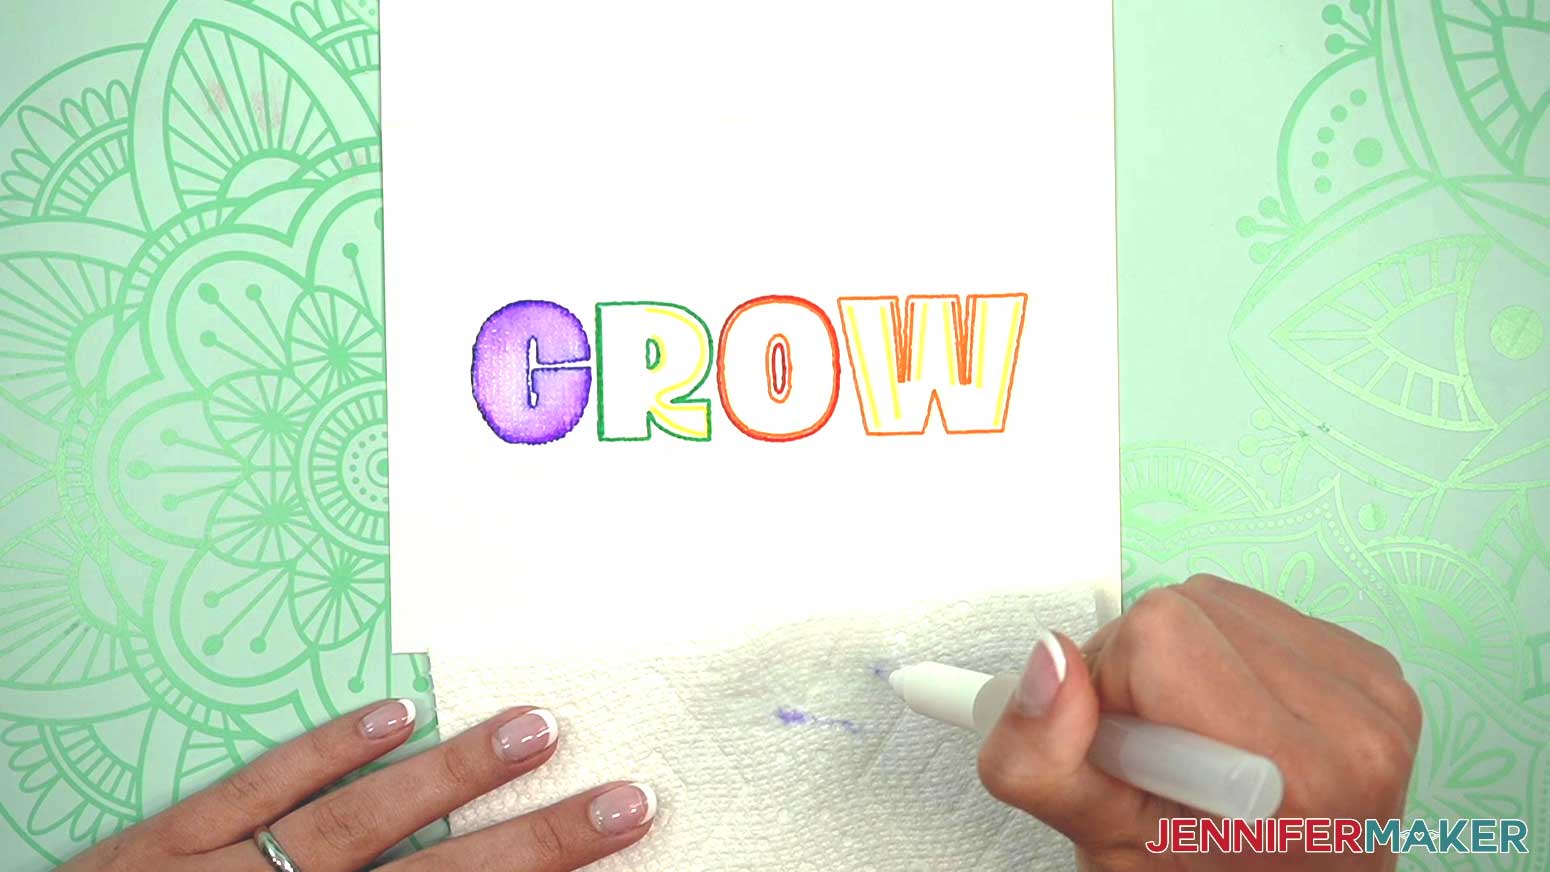
10. Continue the same method with the other letters.

TIP: Feel free to experiment with different amounts of water on your brush. You can lighten dark areas by applying a clean, dry cotton swab to an area of paint. When the swab touches this part of the painting, it will lift some of the colored water off of the paper. You can continue lifting color off until you are satisfied.
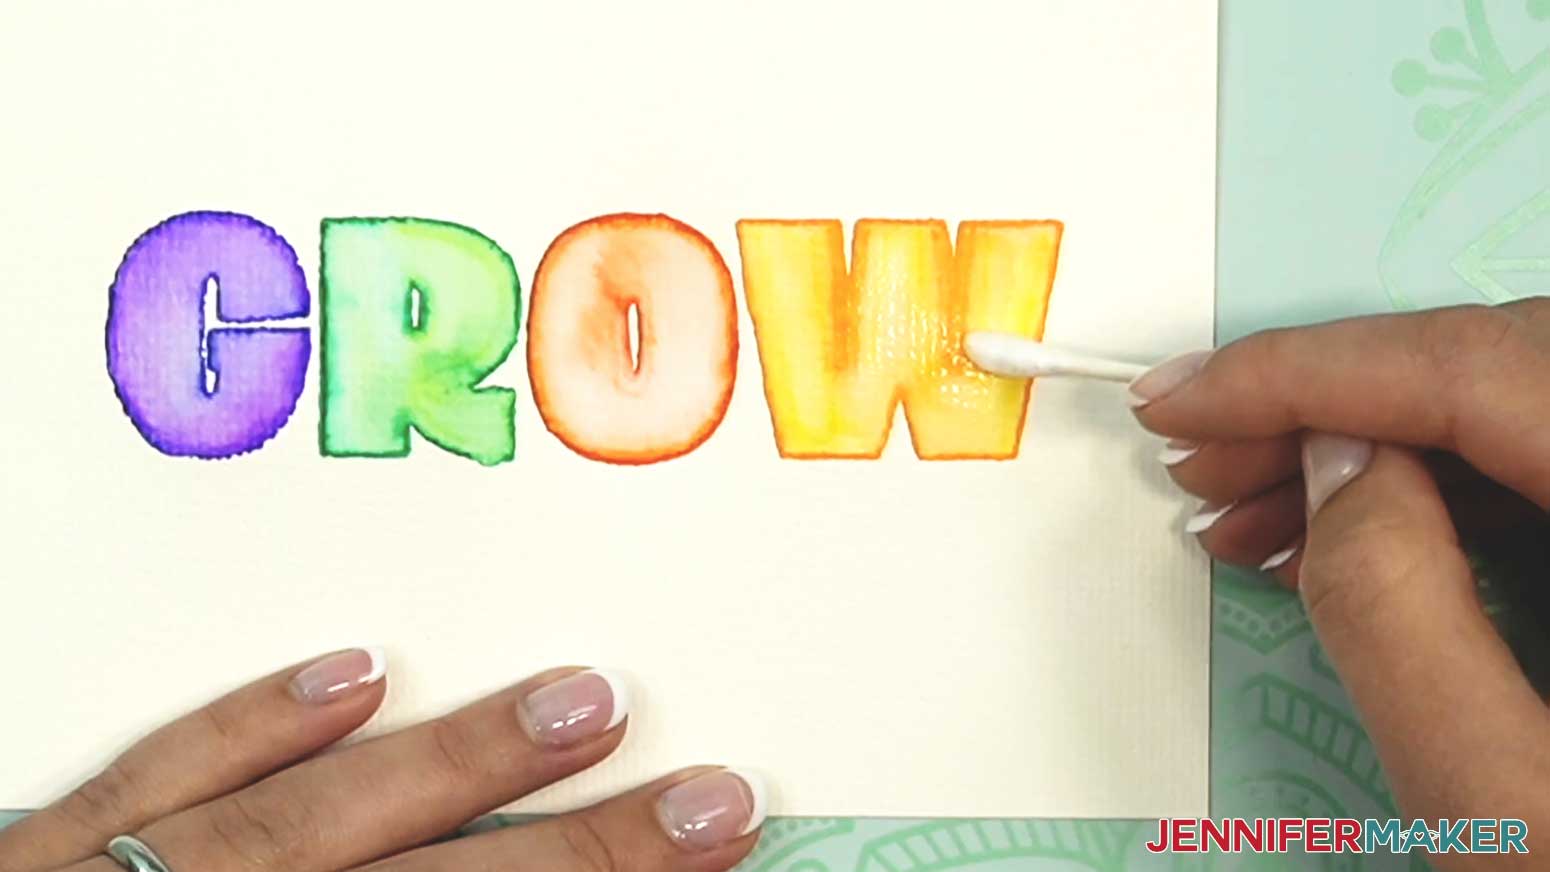
11. Let the painting dry for about 30 minutes to an hour.
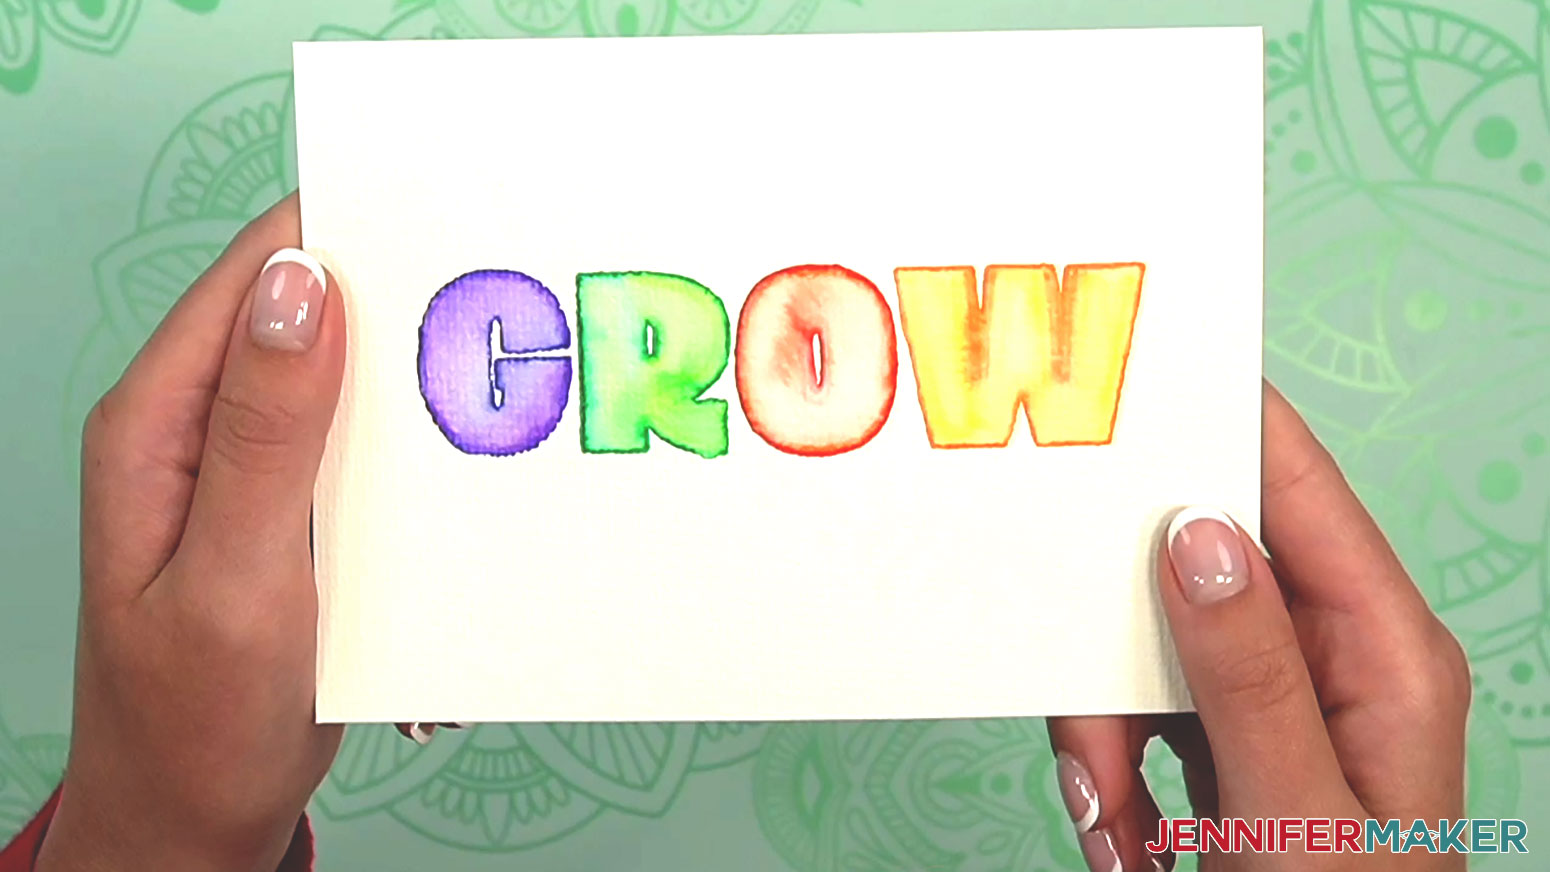
12. The finished card is ready.
STEP 4: PAINT THE OTHER DESIGNS
Follow STEP 2: PREPARE AND DRAW YOUR PRACTICE DESIGN to draw each of the designs, then follow the instructions below to paint each image.
TIP: Make sure to change your drawing location in STEP 2: Line 22 based on the correct orientation of the card or paper on which you are drawing. You can also use a Cricut Card Mat to hold your cards when drawing on them with the Cricut. For more information on using a Cricut Card Mat, check out my Easy Cricut Insert Cards!
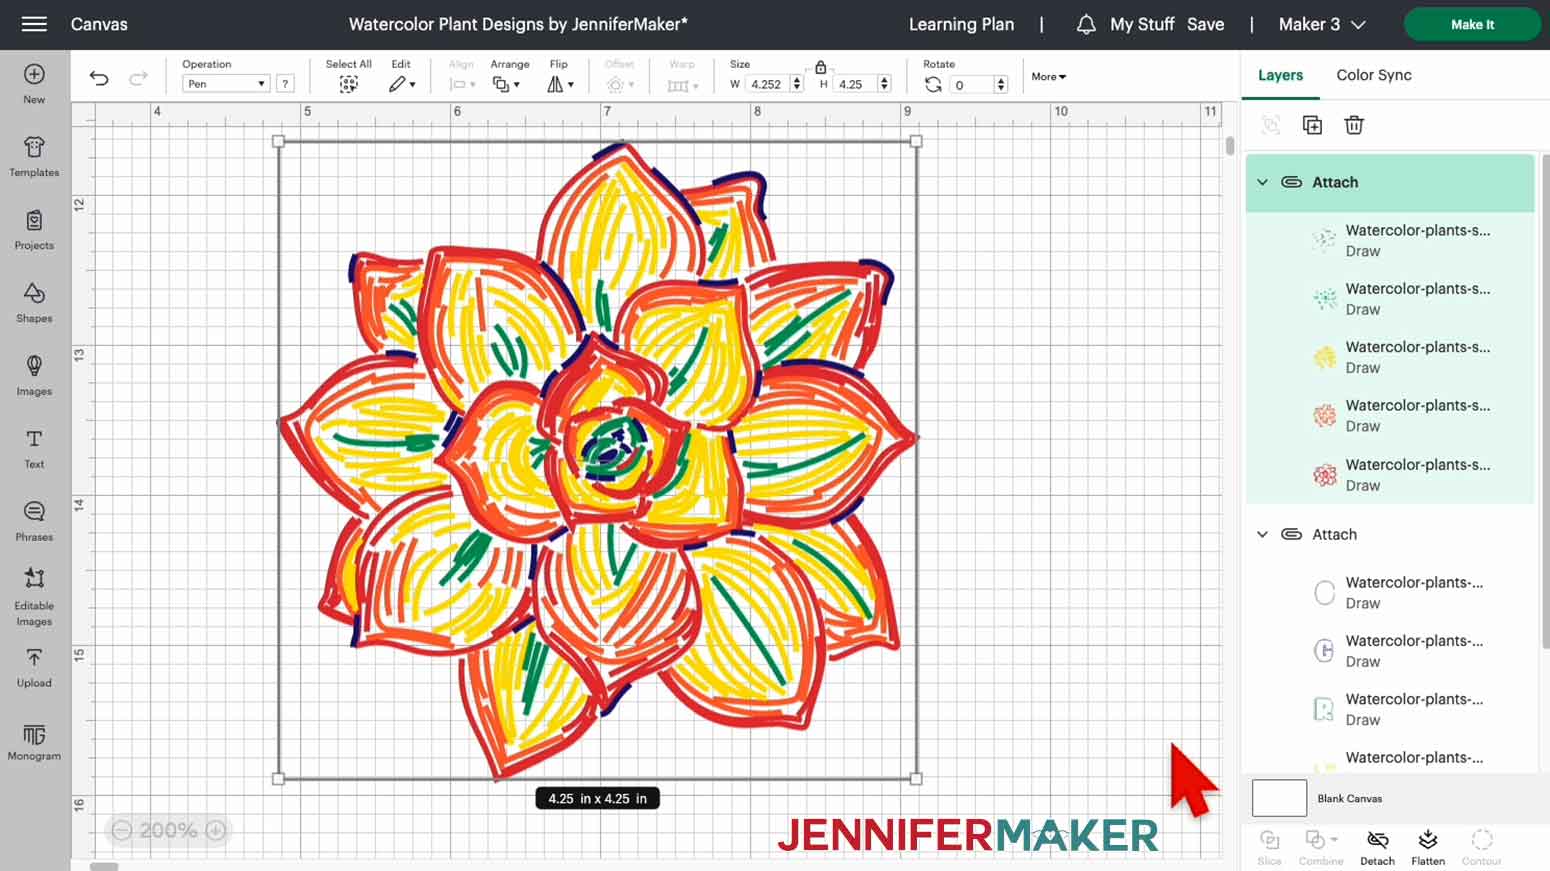
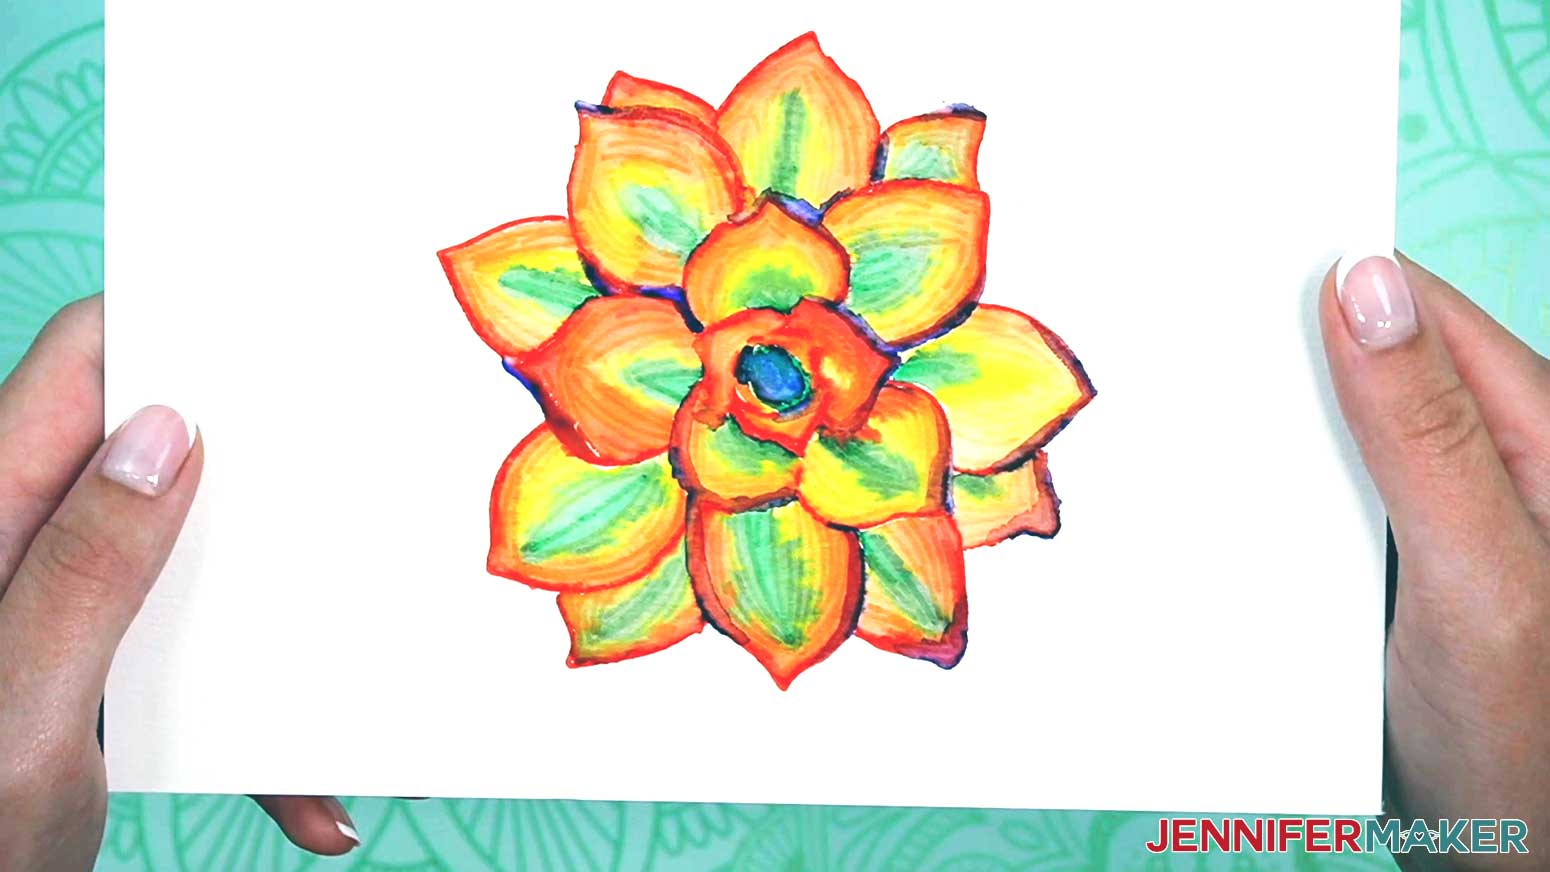
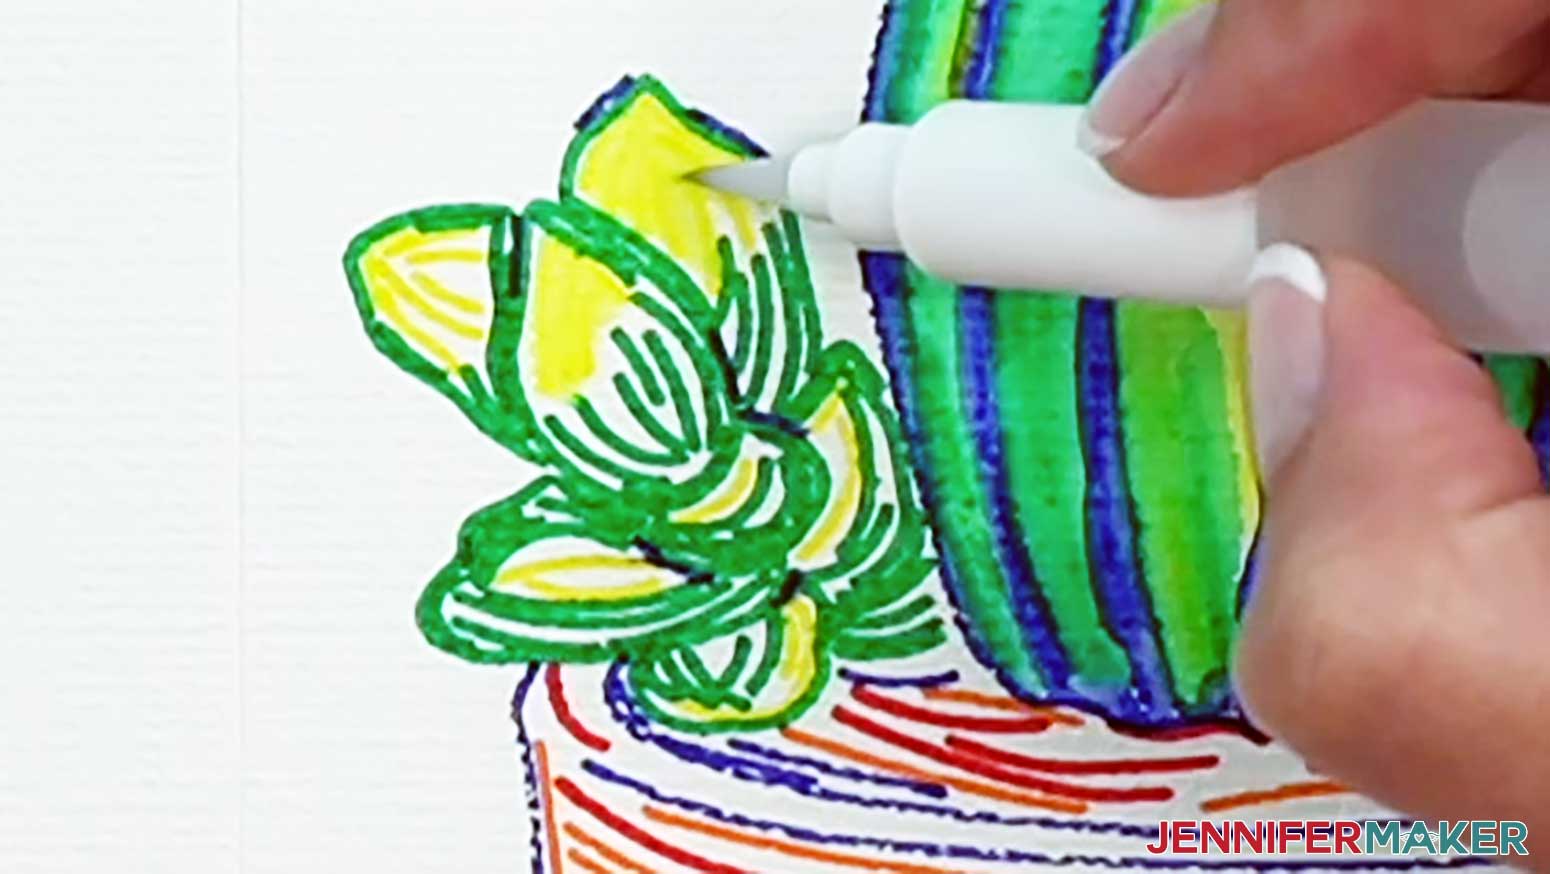
SUCCULENT
1. This is what the Succulent looks like right after it’s drawn.
2. With a damp brush, choose a large “petal” of the succulent on which to start.
3. Brush the yellow lines toward each other until the color fills a solid area.
4. Clean the brush.
5. While the yellow is still damp, brush the red and orange lines together in toward the center of the petal, letting the orange mix slightly with the edges of the yellow area while the red stays darker on the outer edges of the orange.
6. Clean the brush.
7. While the yellow is still slightly damp, use a damp brush to paint over the green area on the same petal.
8. The green will form a solid area, but should also mix with the yellow to make a yellow-green area on the petal radiating out from the center.
9. Clean the brush.
10. Let the petal dry while moving on to the next petal. (Choose a petal on a different area of the succulent so the colors of the two petals do not accidentally run together while the first petal dries.)
11. Continue to follow steps 2-10 above until each petal of the succulent is filled in.
12. Allow the petals to fully dry to the touch (about 30 minutes) before moving on to the darker center.
13. Use a slightly damp brush to lightly touch the green lines in the very center of the succulent.
14. Draw the green color toward the blue lines.
15. Mix the colors so there is a range of green, blue-green, and blue areas.
16. Clean the brush.
17. Using a damp brush, lightly paint the blue lines on the rest of the succulent.
18. Spread the color slightly to form dark shadows in between each petal of the succulent. (The red areas may mix with the blue to form dark purple or red-purple shadows. This is ok!)
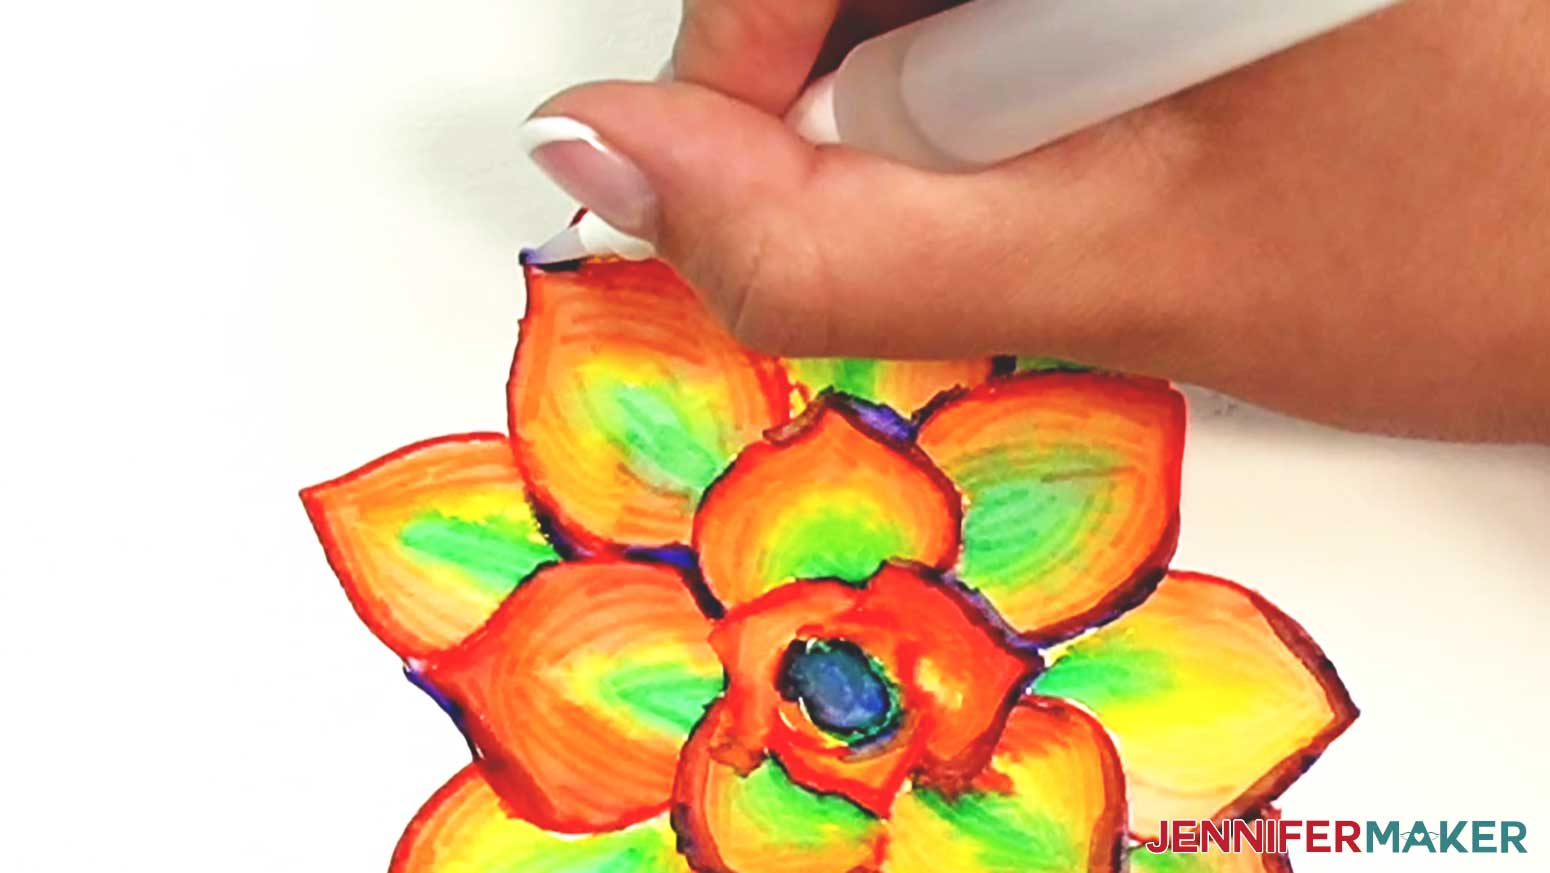
TIP: A cotton swab can soak up areas where you may have applied too much water. Cotton swabs can also soak up a little bit of color and be swiped lightly over already dry lighter areas of color to make shading.
19. Let the painting dry for about 30 minutes to an hour.
20. The succulent is ready to display!
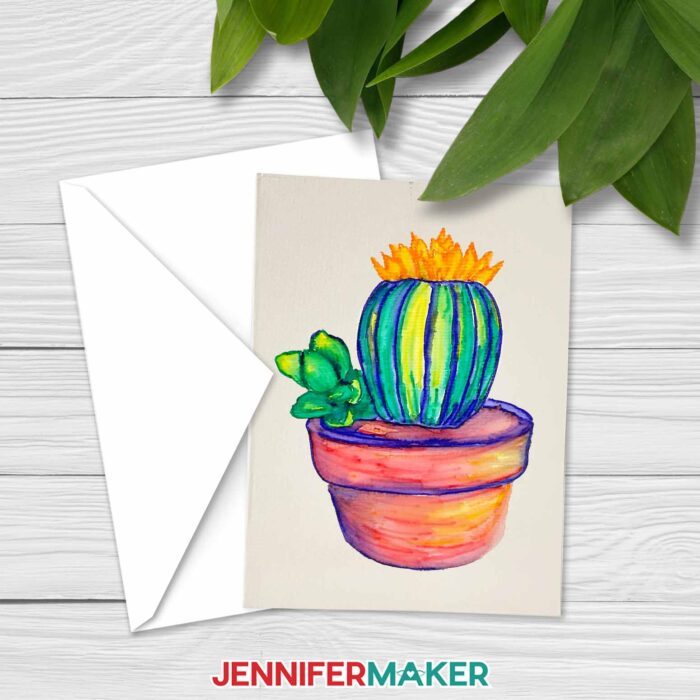
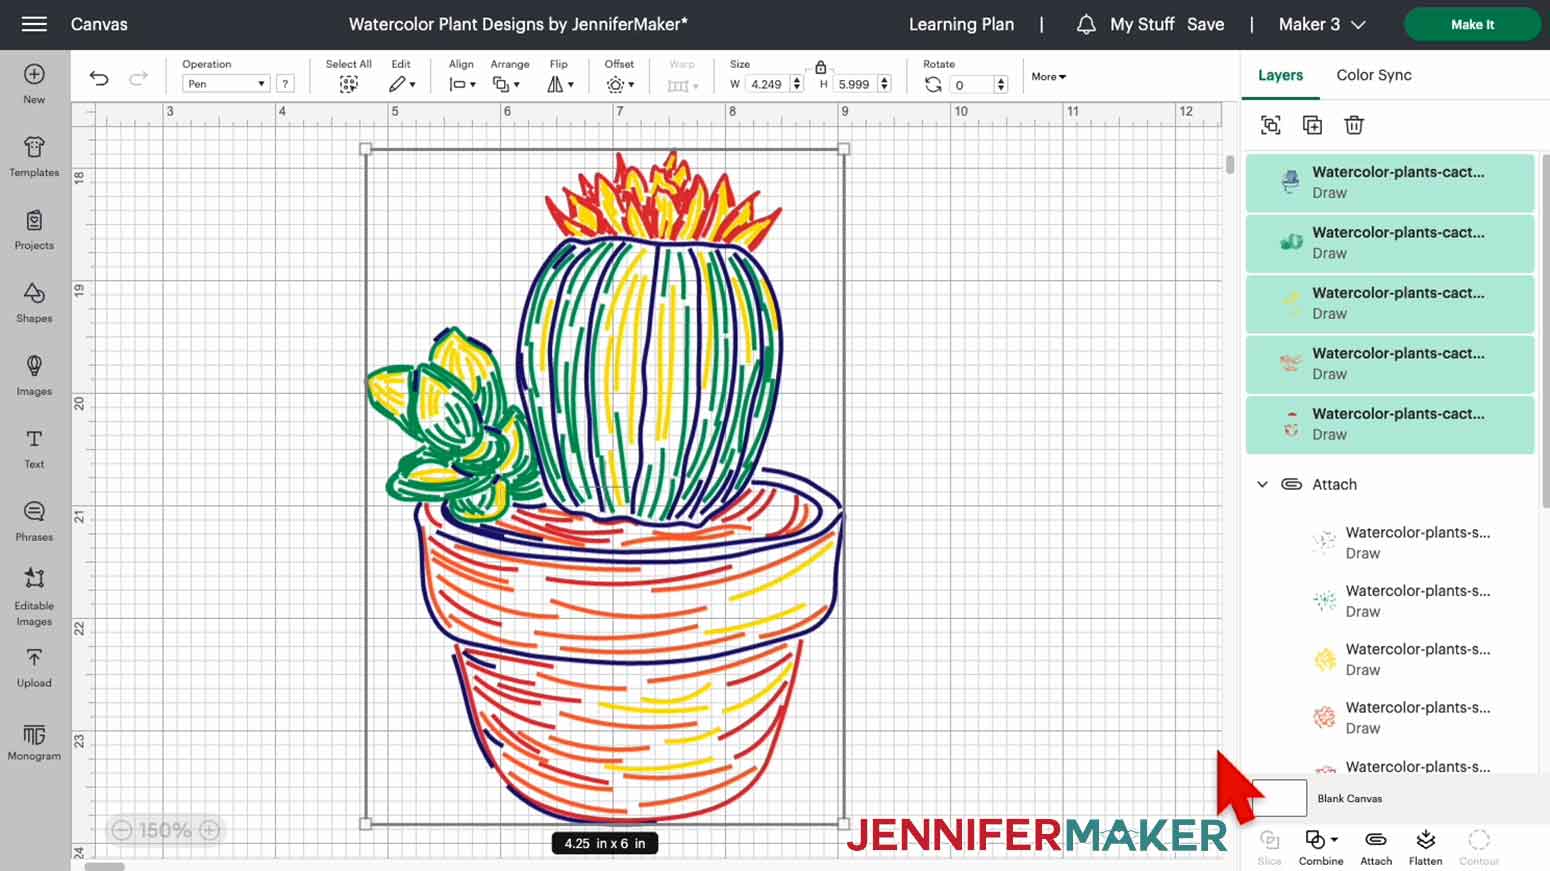
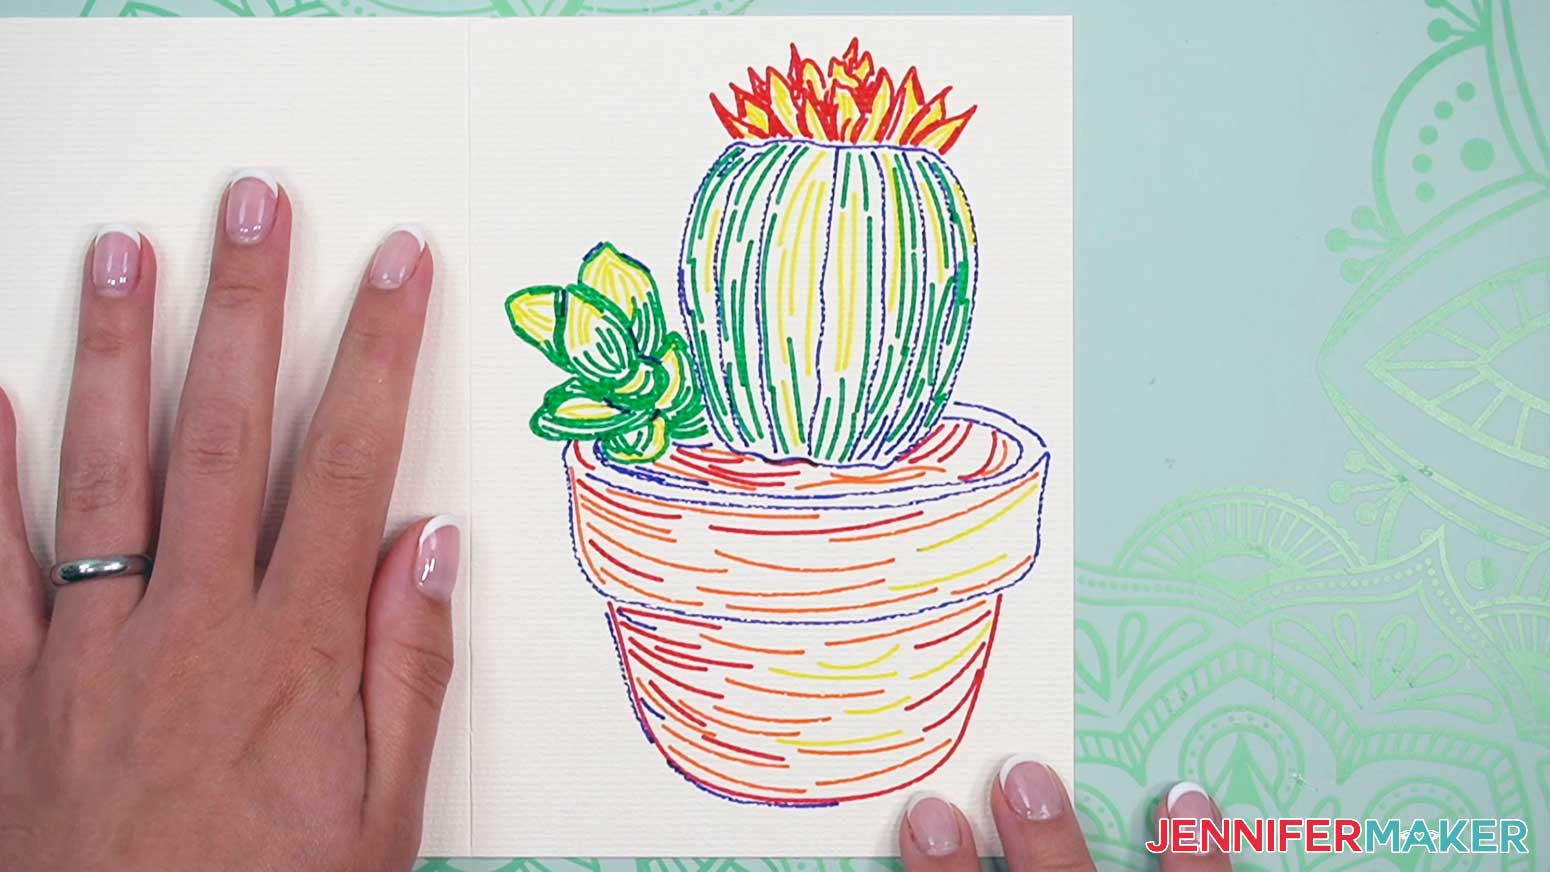
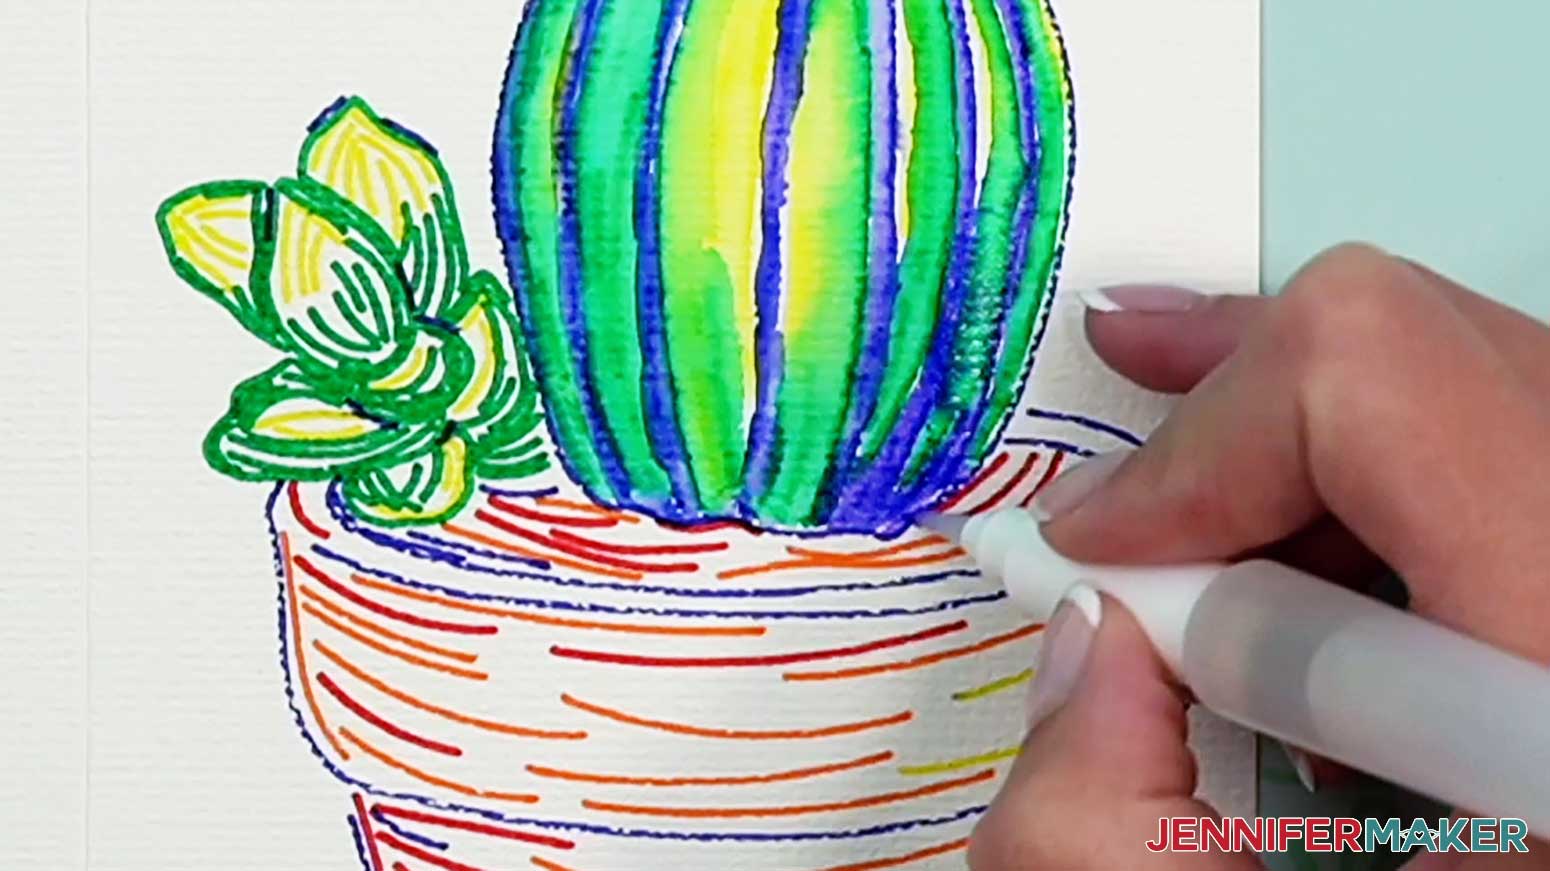
CACTUS
1. This is what the Cactus looks like right after it’s drawn.
2. Using a damp brush, paint over the yellow lines in the Cactus to form areas of solid yellow where the lines were drawn.
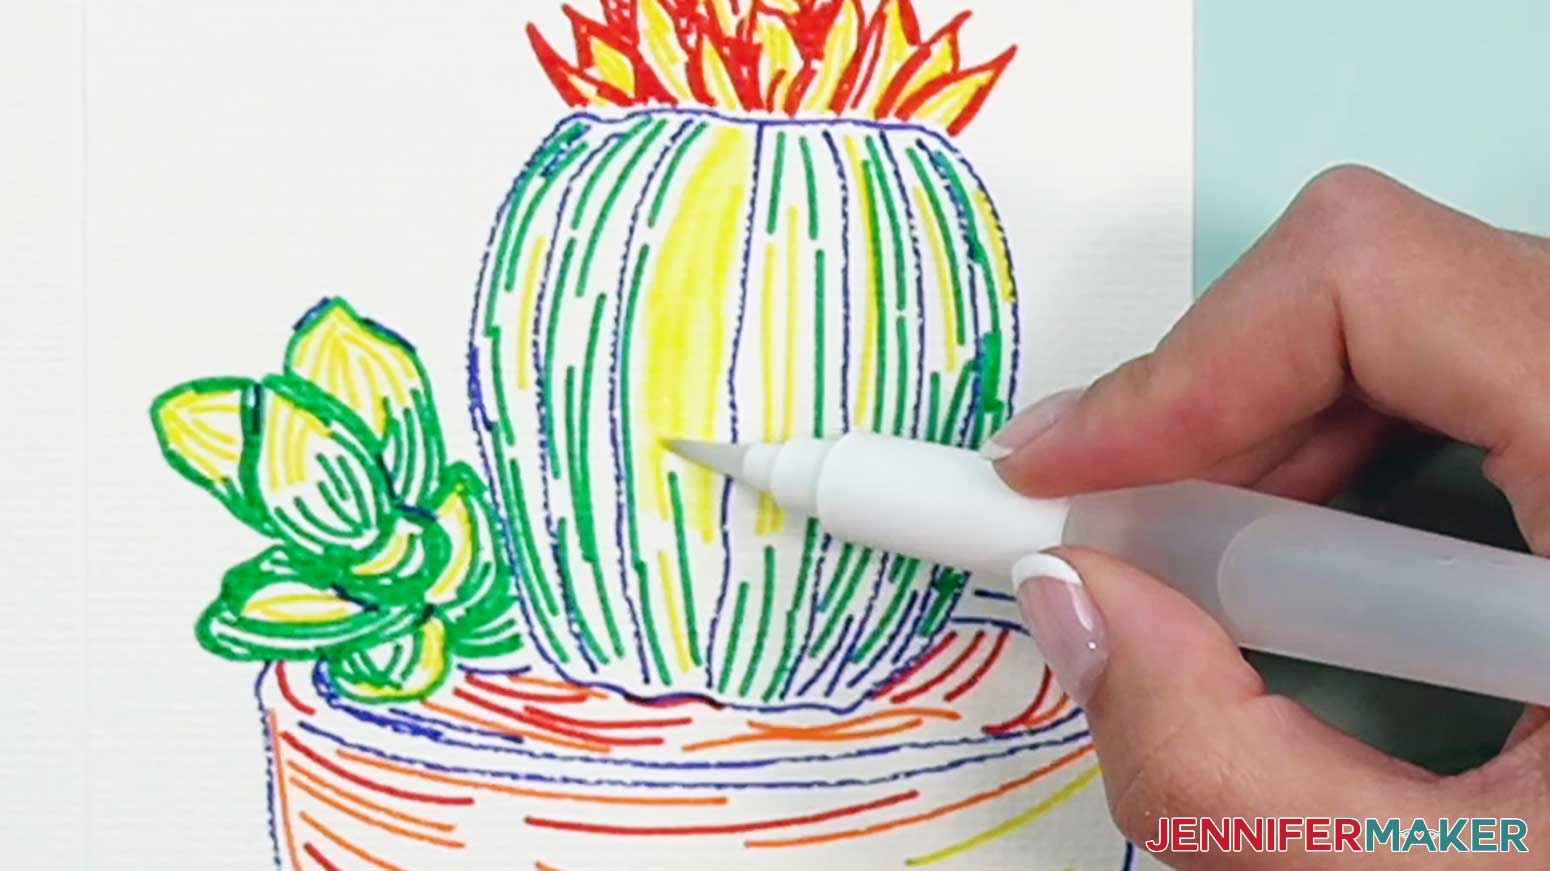
3. Without cleaning the brush, touch the green lines on the outside of the yellow areas to color in solid green colors. (Do your best to not yet touch the blue lines.)
4. Allow the green areas to touch the edges of the yellow to form a shading from green to yellow in those places.
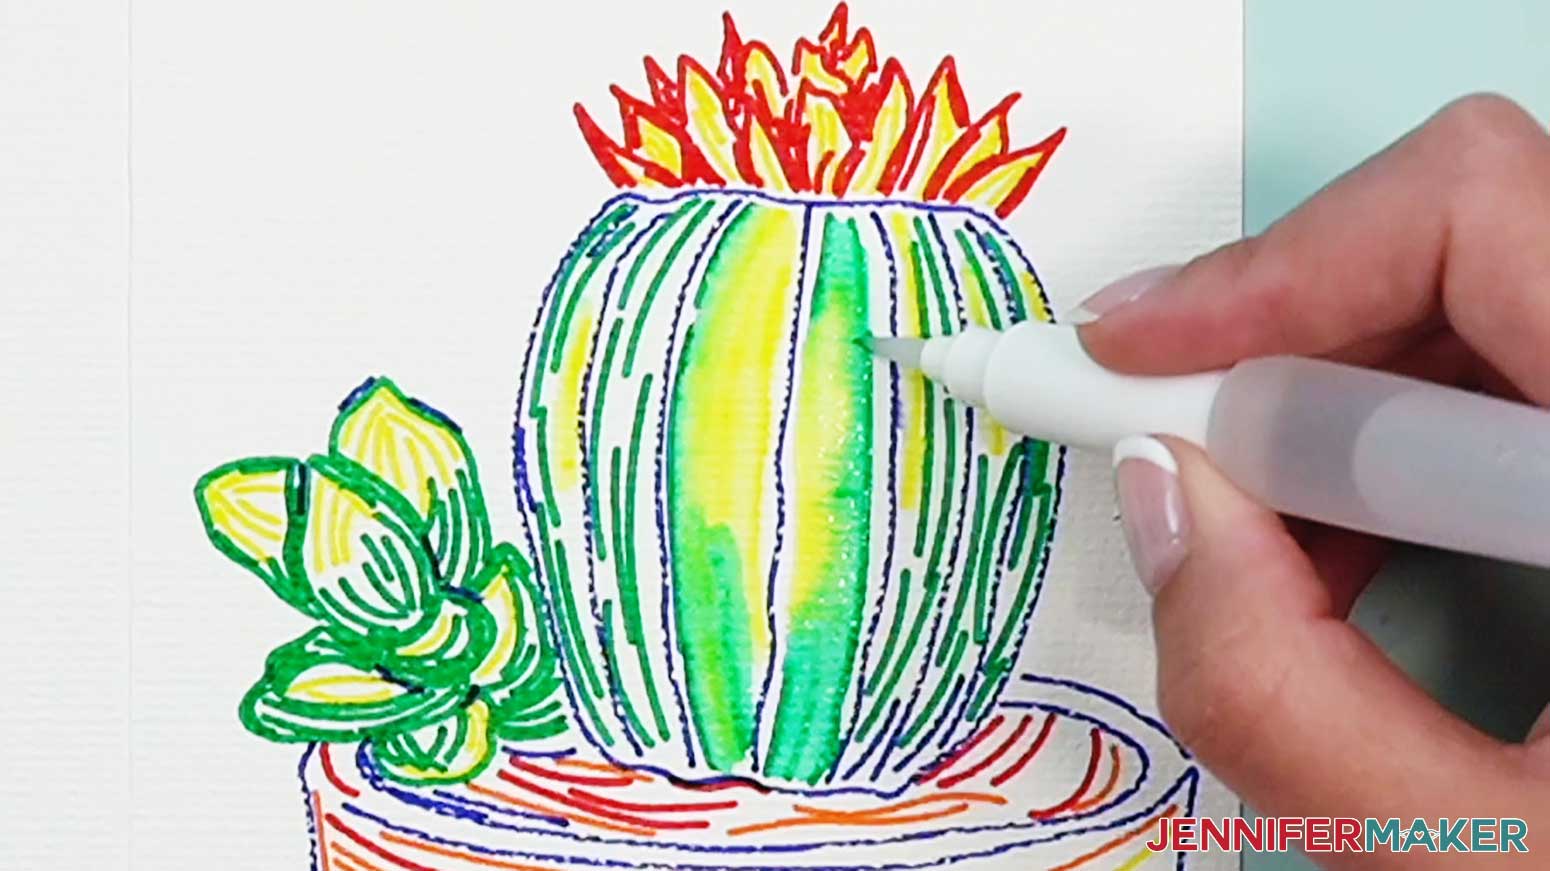
5. Clean your brush.
6. Let the green and yellow areas in the cactus dry slightly, but not completely.
7. Using a slightly damp brush, touch each of the blue lines on the cactus to form solid edges of blue down the sides.
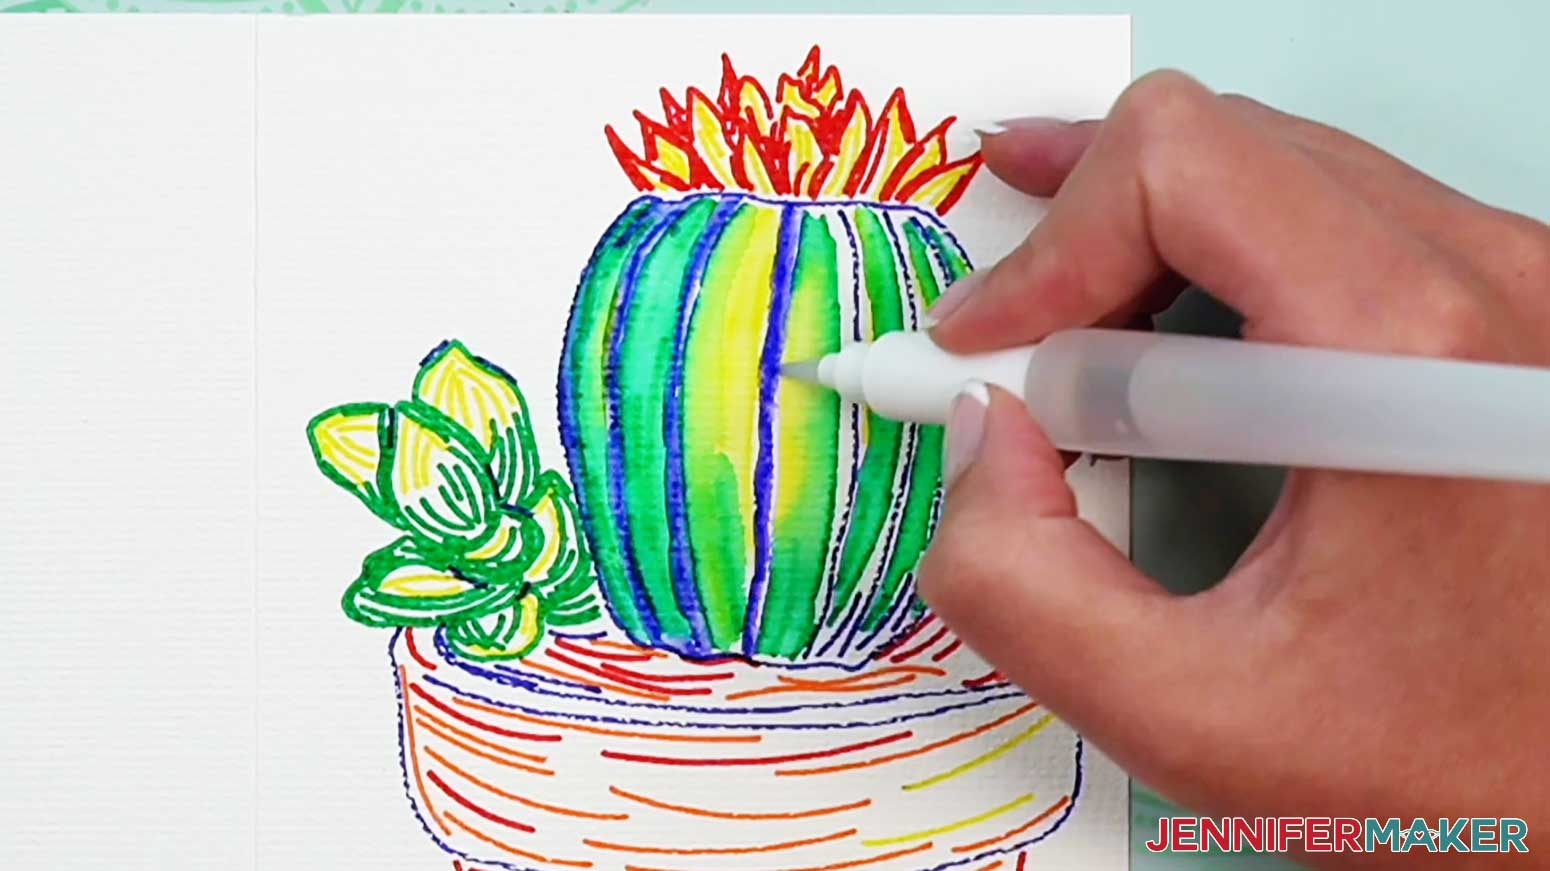
8. Allow the blue to mix with the edges of the green to form a shading of blue to green.
9. Using the lines at the bottom right of the cactus, form small areas of solid blue to create a darker shaded area on the bottom edge of the cactus.
10. Clean your brush.
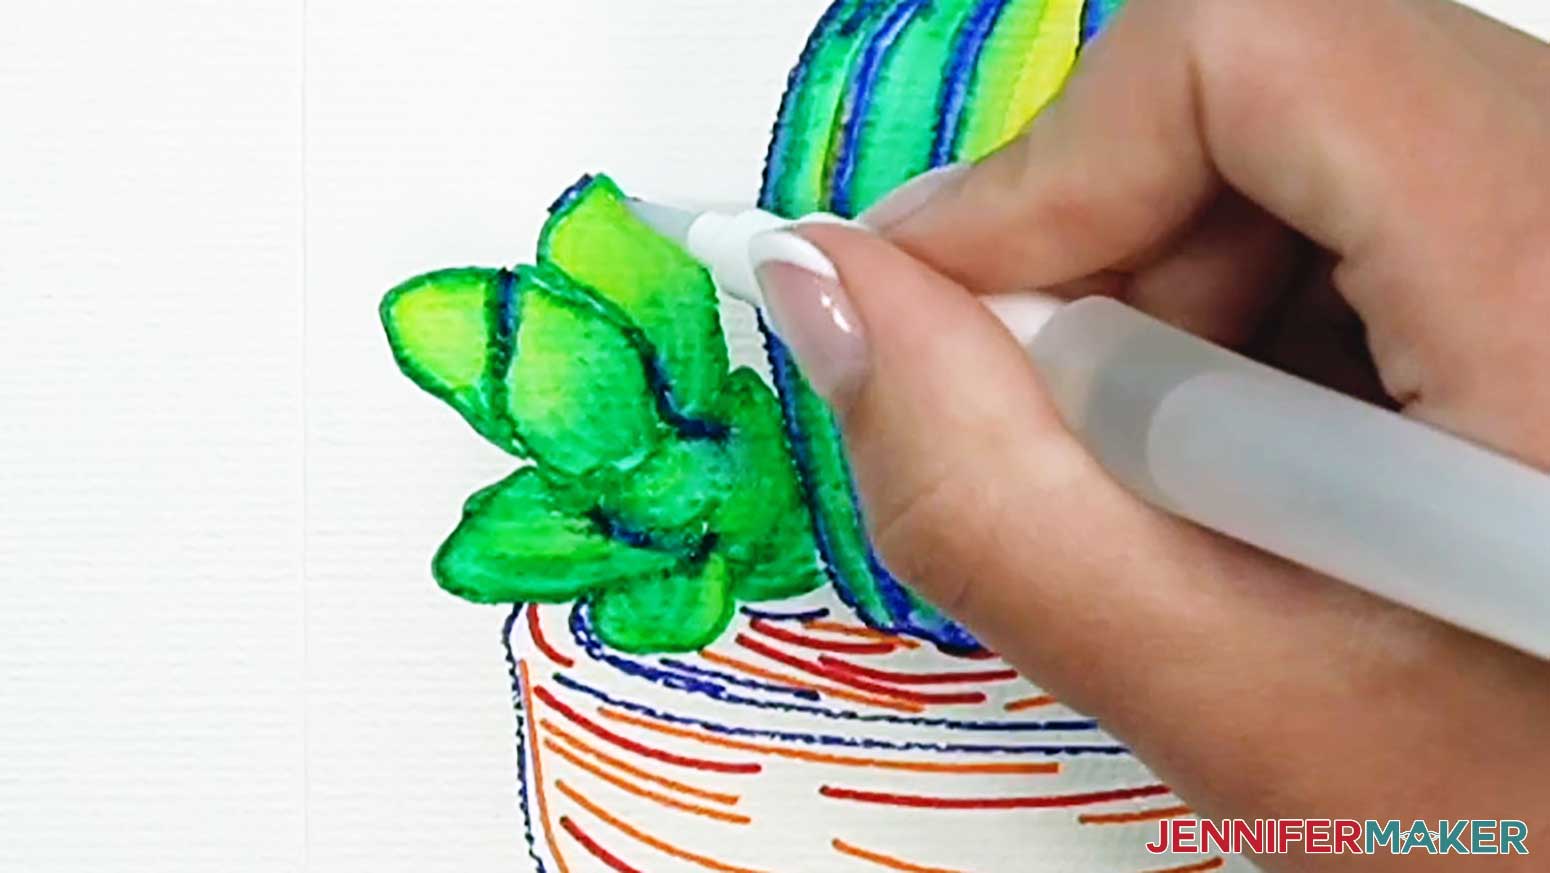
11. Using a damp brush, fill in the yellow areas of each of the small succulent petals on the left of the cactus.
12. Paint over the green lines to form solid areas of green.
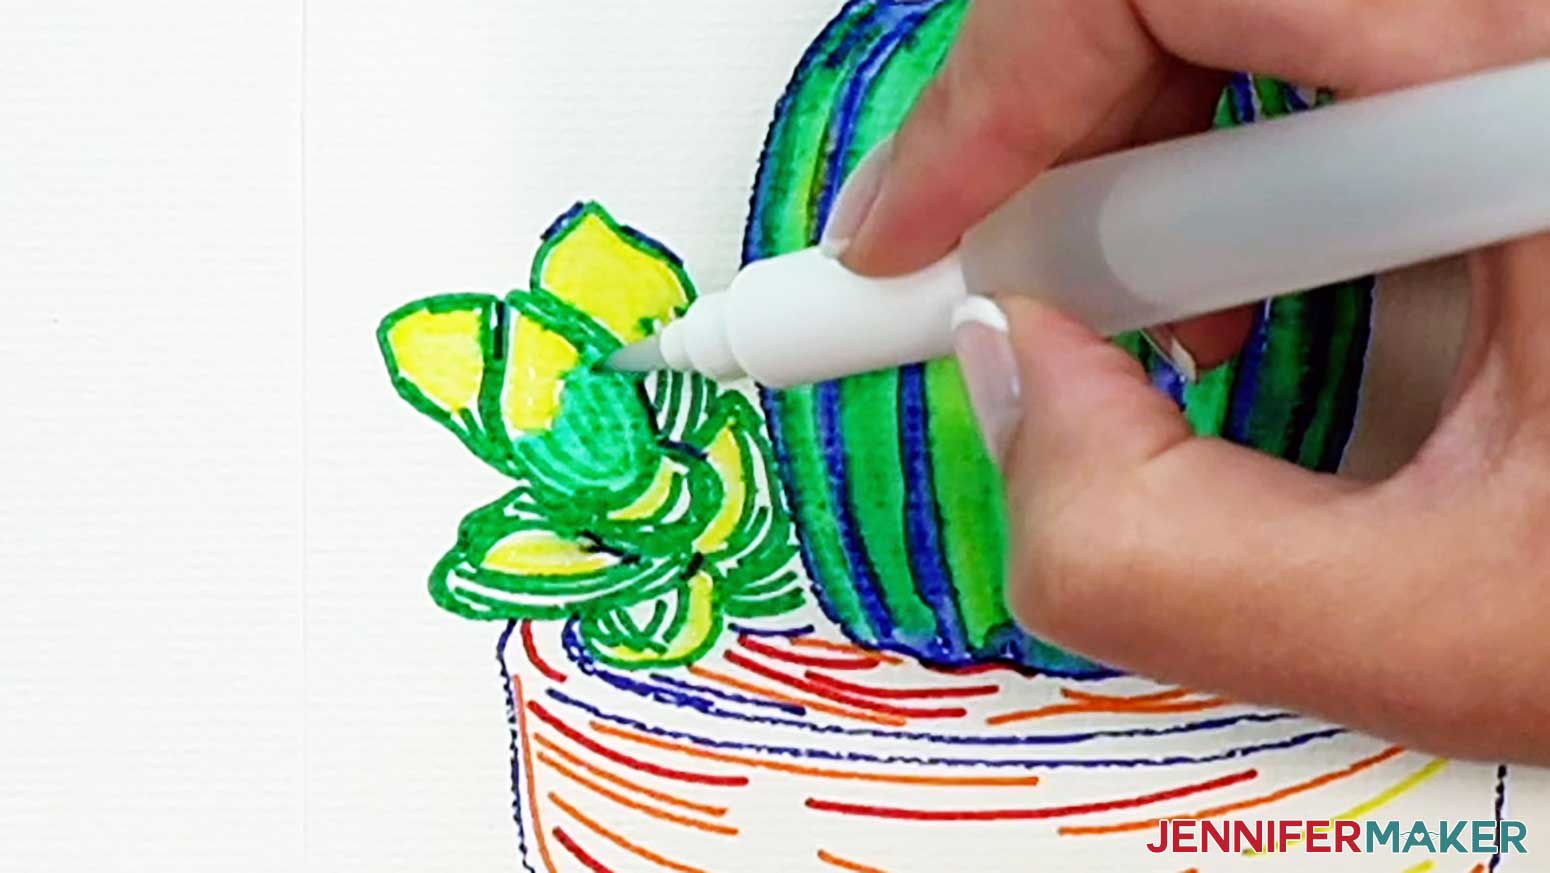
13. Mix the edges of the green into the yellow areas, leaving a shading of green to yellow.
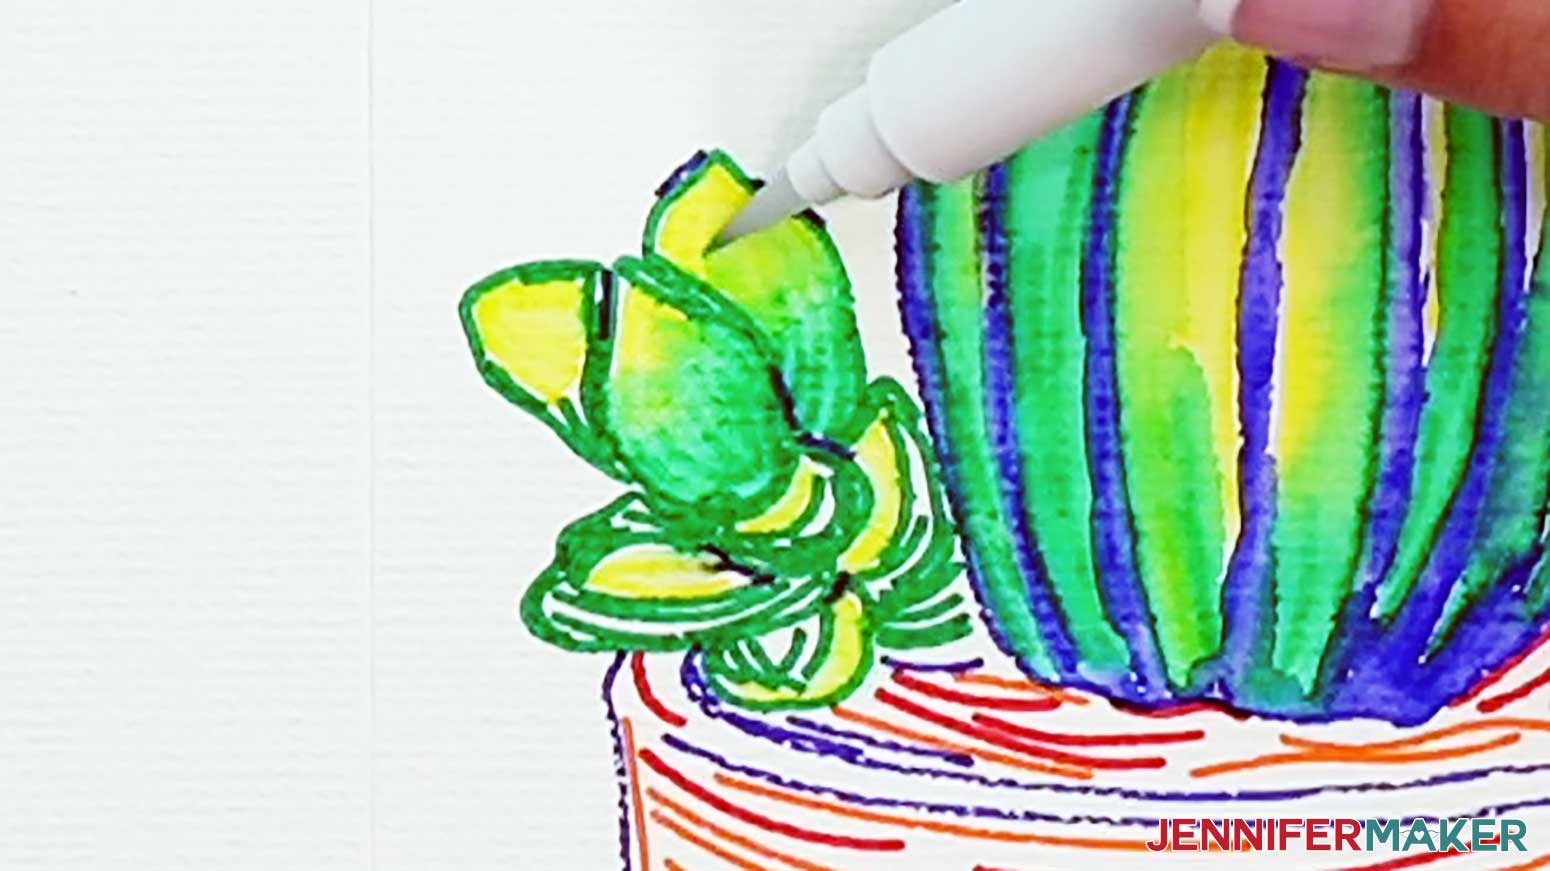
14. Lightly touch the blue lines to form dark shadows between each “petal” of the succulent.
15. Clean your brush.
16. Allow your painting to dry for about 10 minutes before continuing.
17. Using a damp brush, paint the yellow areas of the flowers on the top of the cactus.
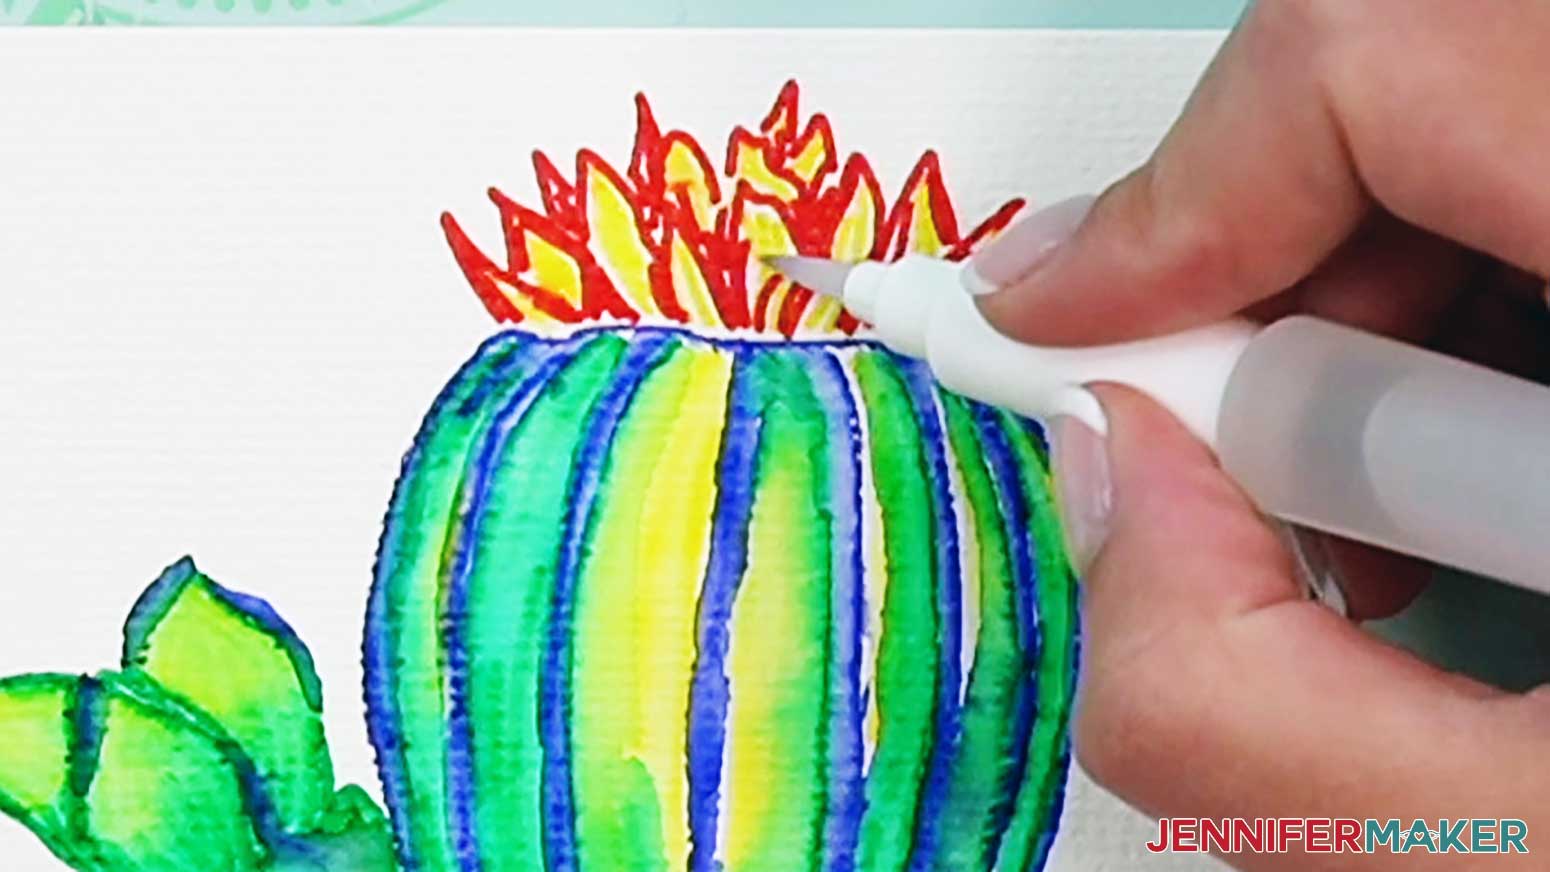
18. Without cleaning your brush, paint over the red lines and allow them to mix with the yellow to form darker and lighter shades of orange and yellow-orange to form each shape of the flower petals.
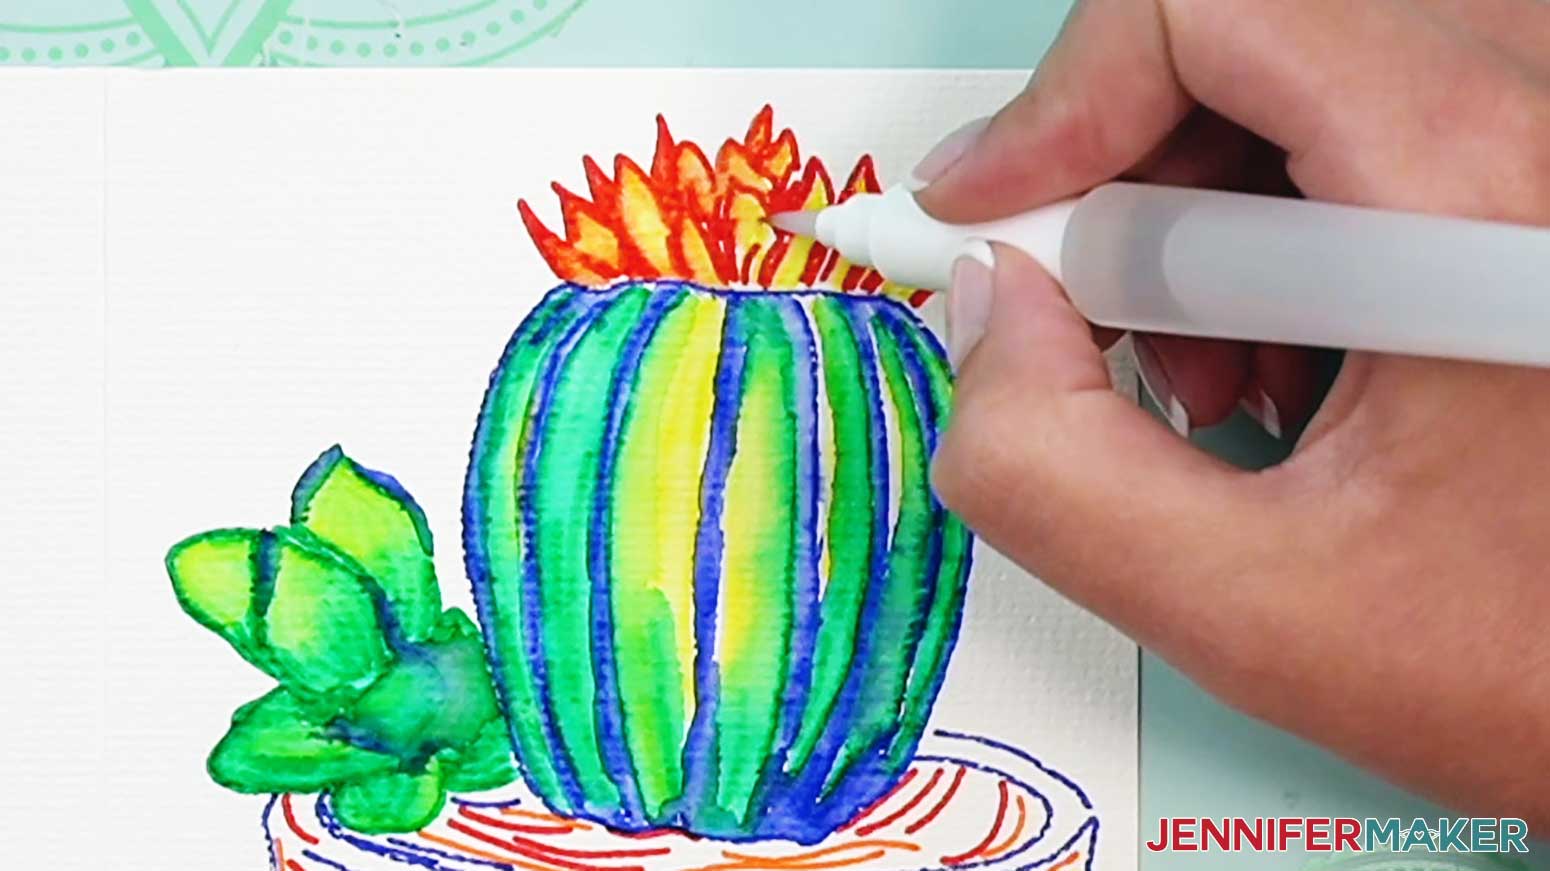
19. Clean your brush.
20. Paint over the red lines in the “dirt” area of the pot.
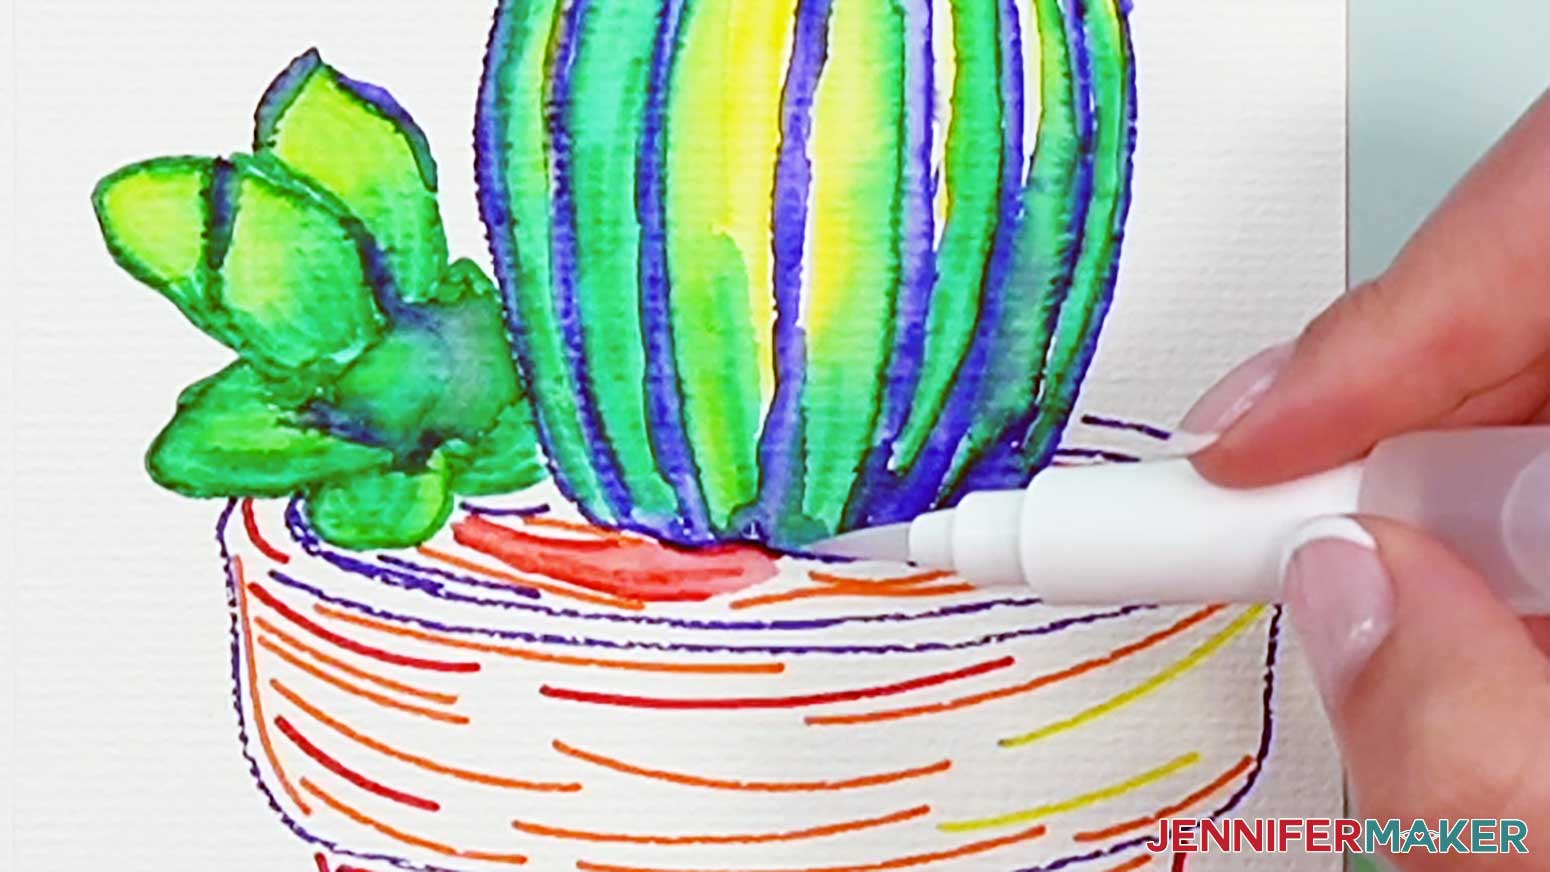
21. Pull the wet paint over onto the orange lines in the “dirt” area, allowing them to mix.

22. Use the single blue lines at the base of the succulent to form darker spots in the “dirt” by mixing the blue color with your wet brush, then lightly drawing over the areas of “dirt” you’d like to shade darker.
23. Continue to “dip” your paintbrush in the fresh blue area to pick up more color to add blue to areas of dirt that need to be darker.
24. Clean your brush.
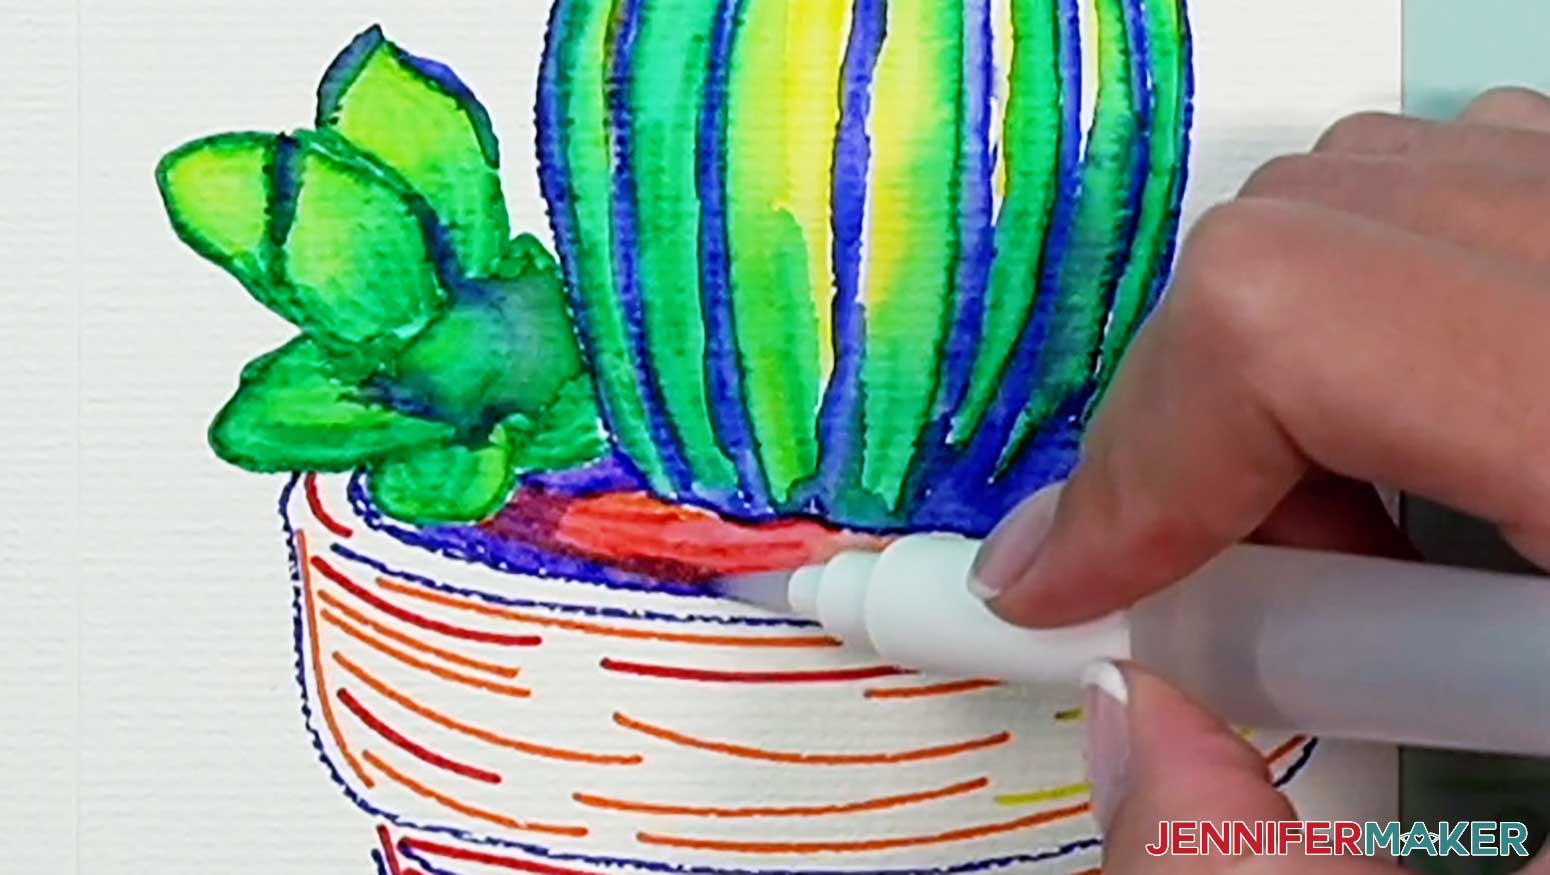
25. Paint around the edges of the pot where the blue lines are to form a solid ring of blue/purple at the top of the pot. (The slightly damp edges of the dirt may still mix with the rings to form the purple areas.)
26. Clean your brush.
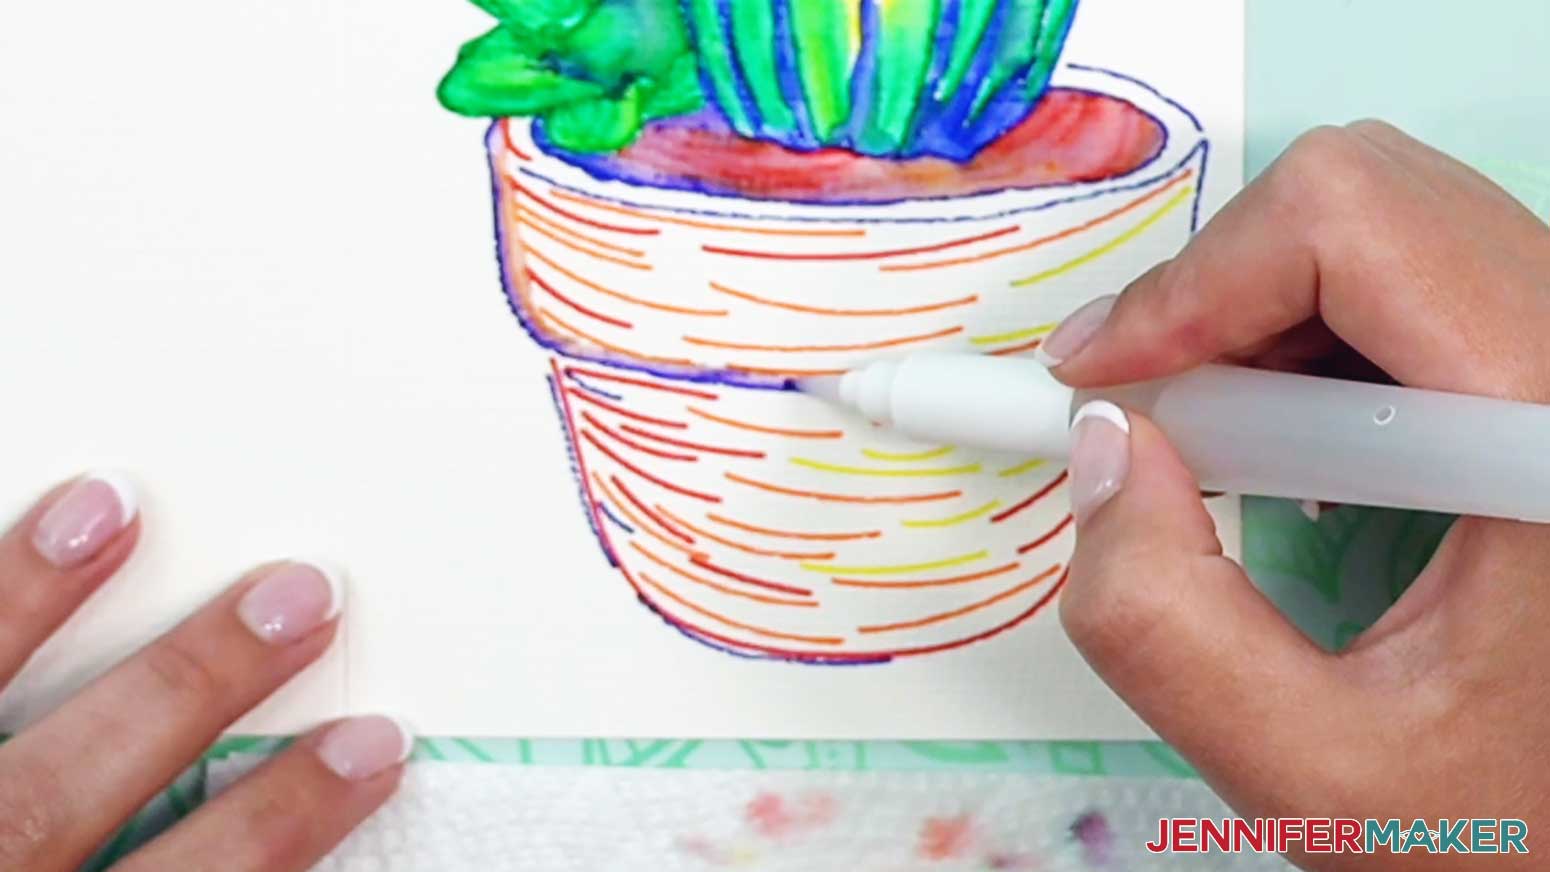
27. With a very damp brush, paint the yellow lines on the right and center parts of the pot into the orange lines and then into the red lines on the left side. (It’s ok if the drawing lines are visible here as it gives texture to the pot.)
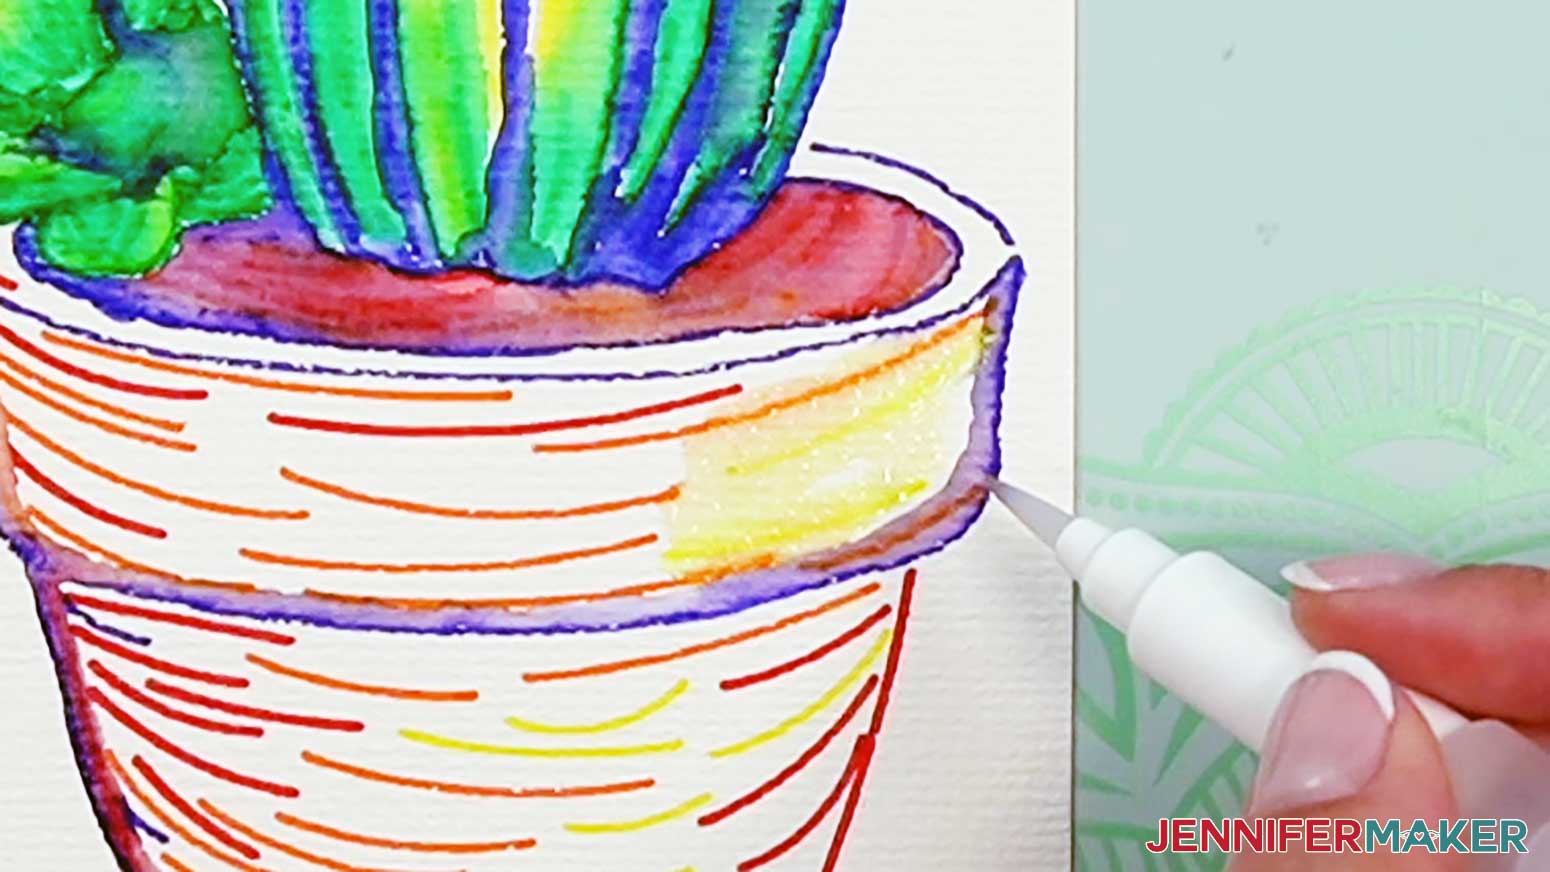
28. Clean your brush.
29. With a less damp brush, lightly paint over the blue lines around the upper edges of the pot and around the left and base of the pot.
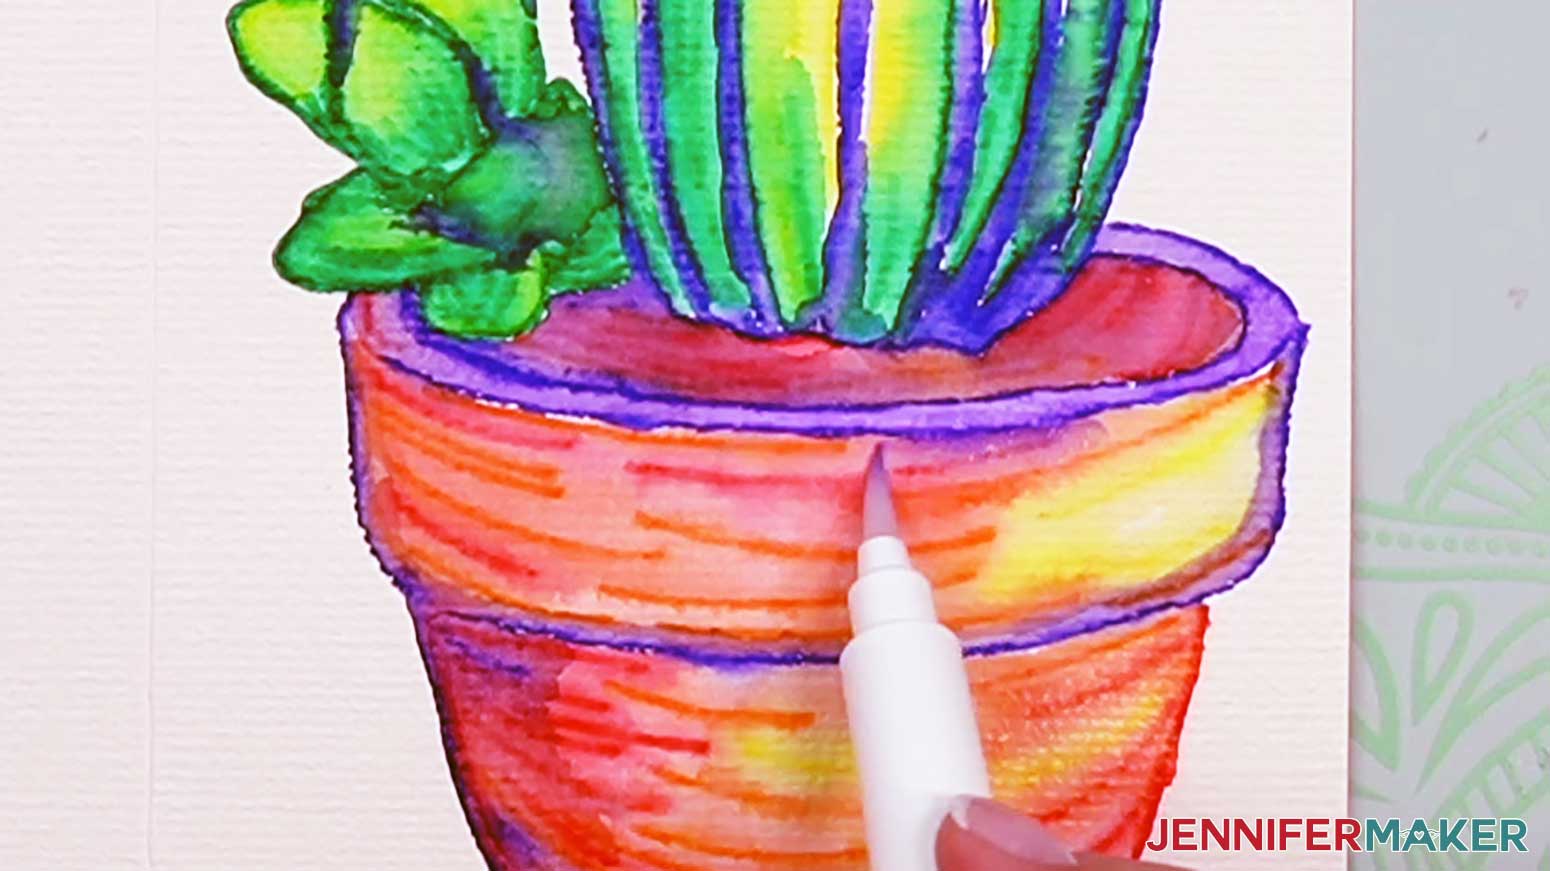
30. Allow the blue color to mix with the red to form areas of darker red and purple shadows.

31. Let the painting dry for about 30 minutes to an hour.
32. The cactus is ready to display!

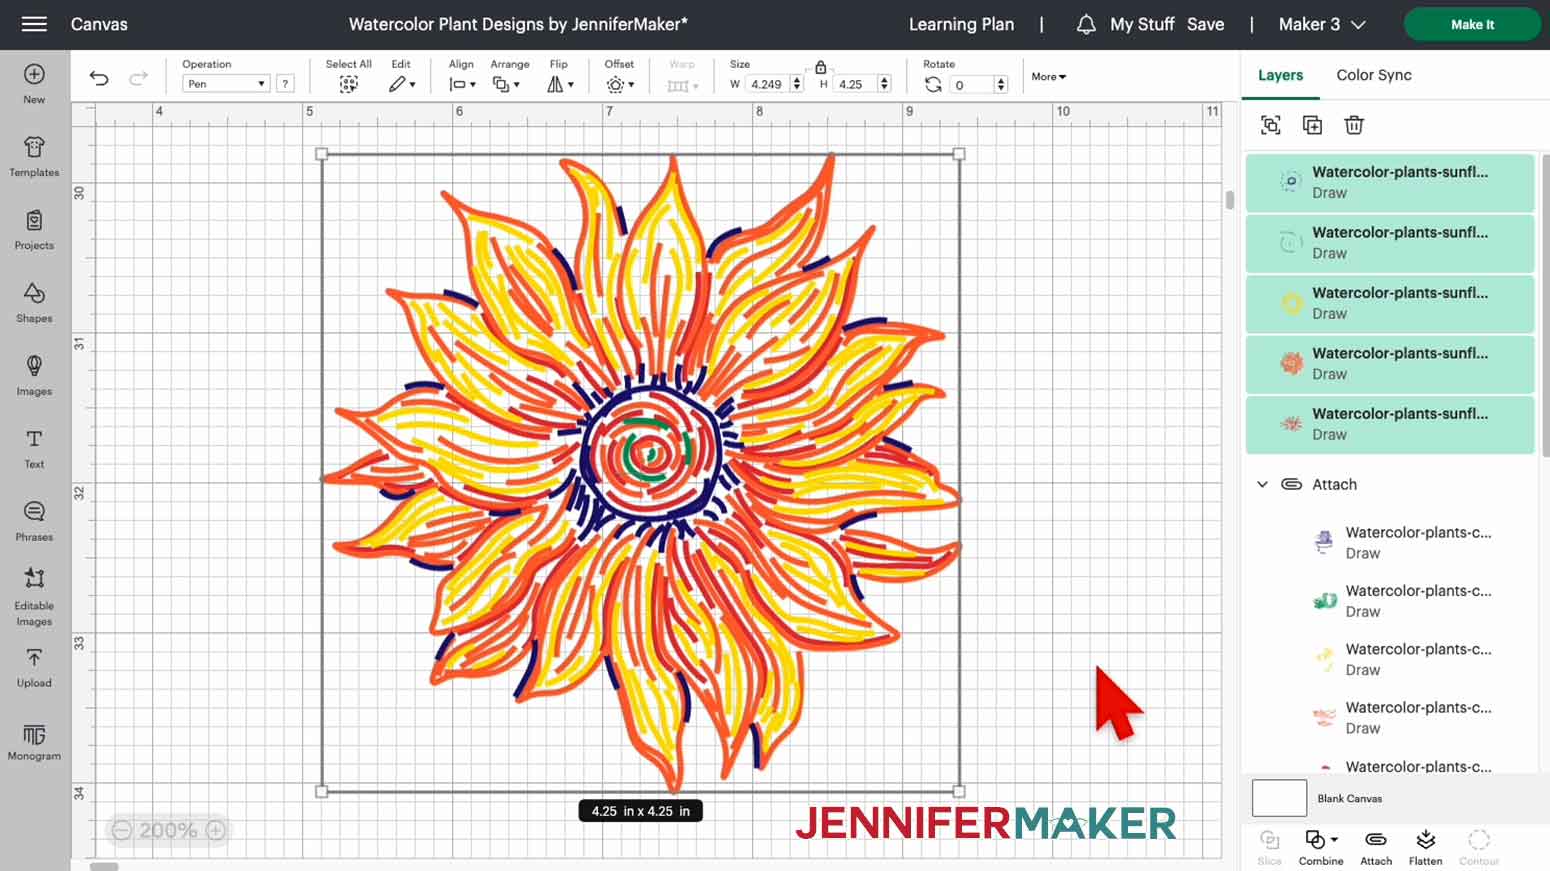
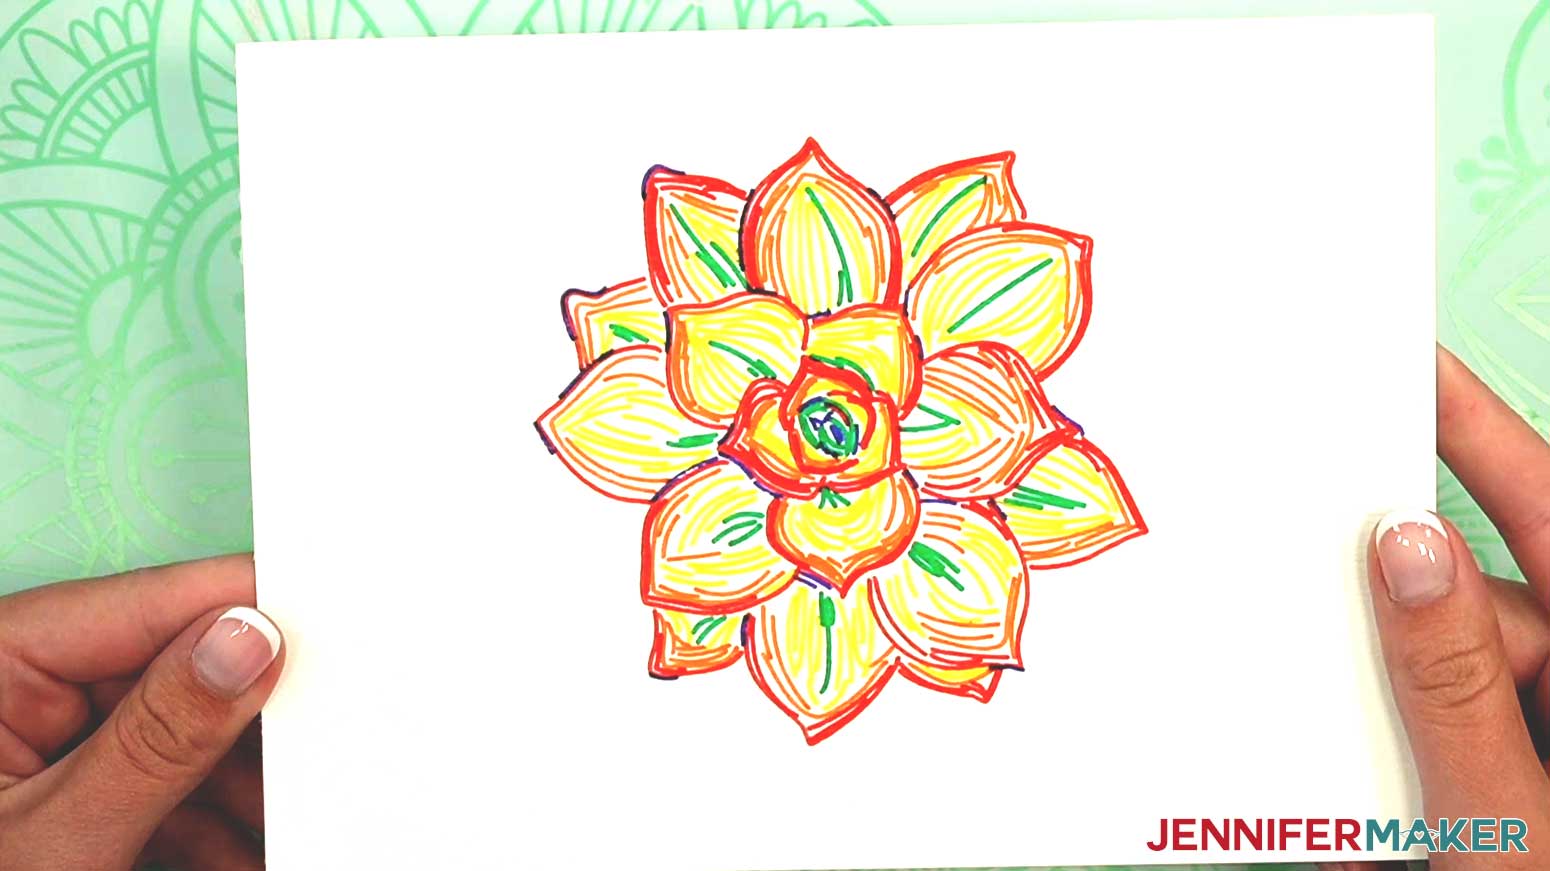
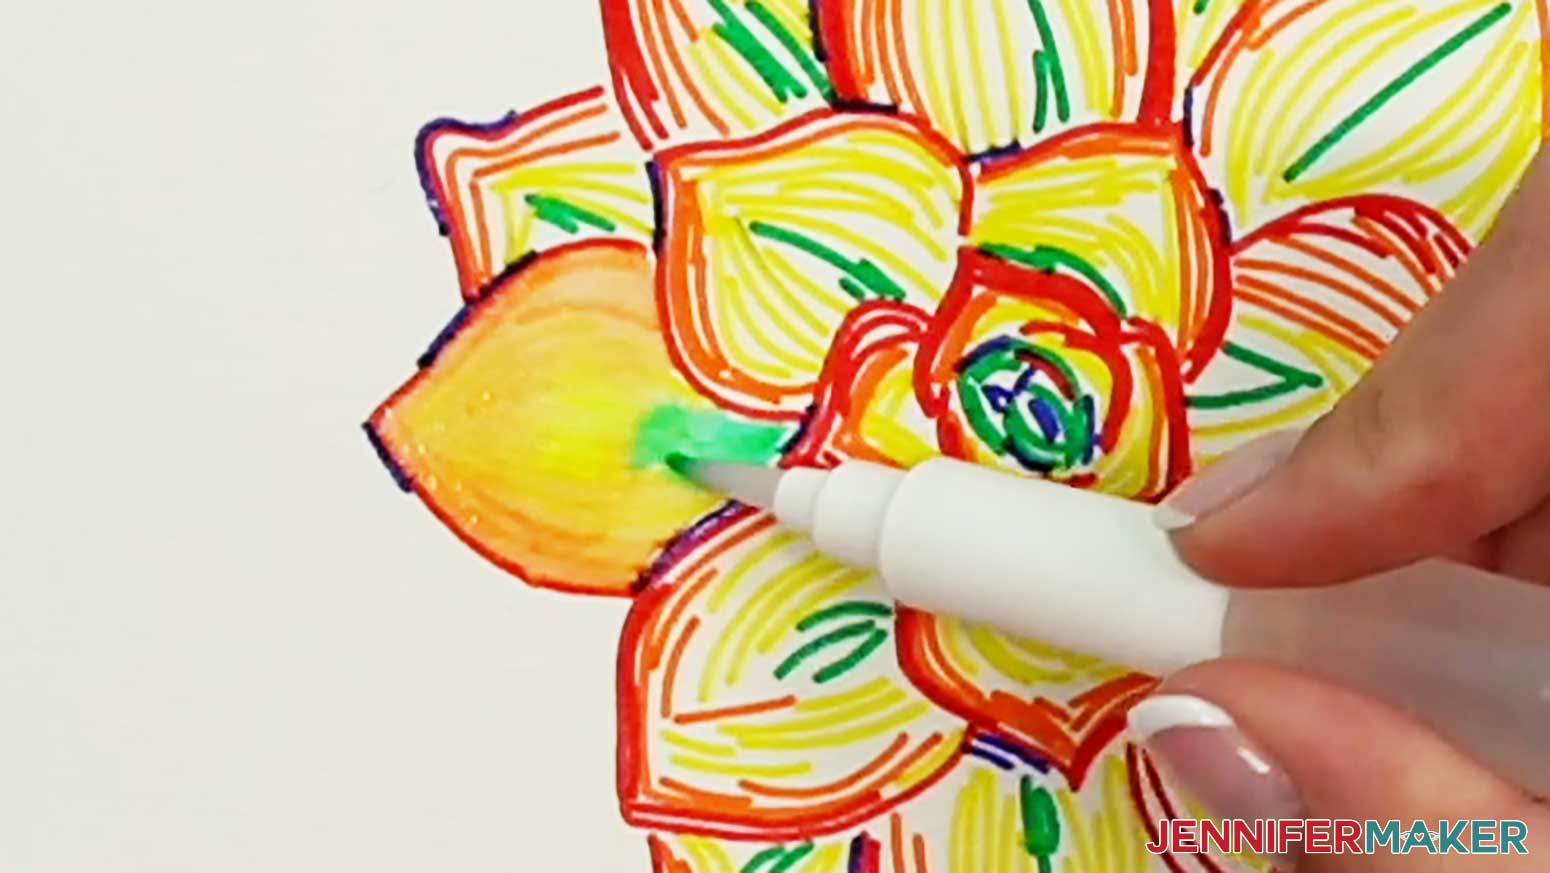
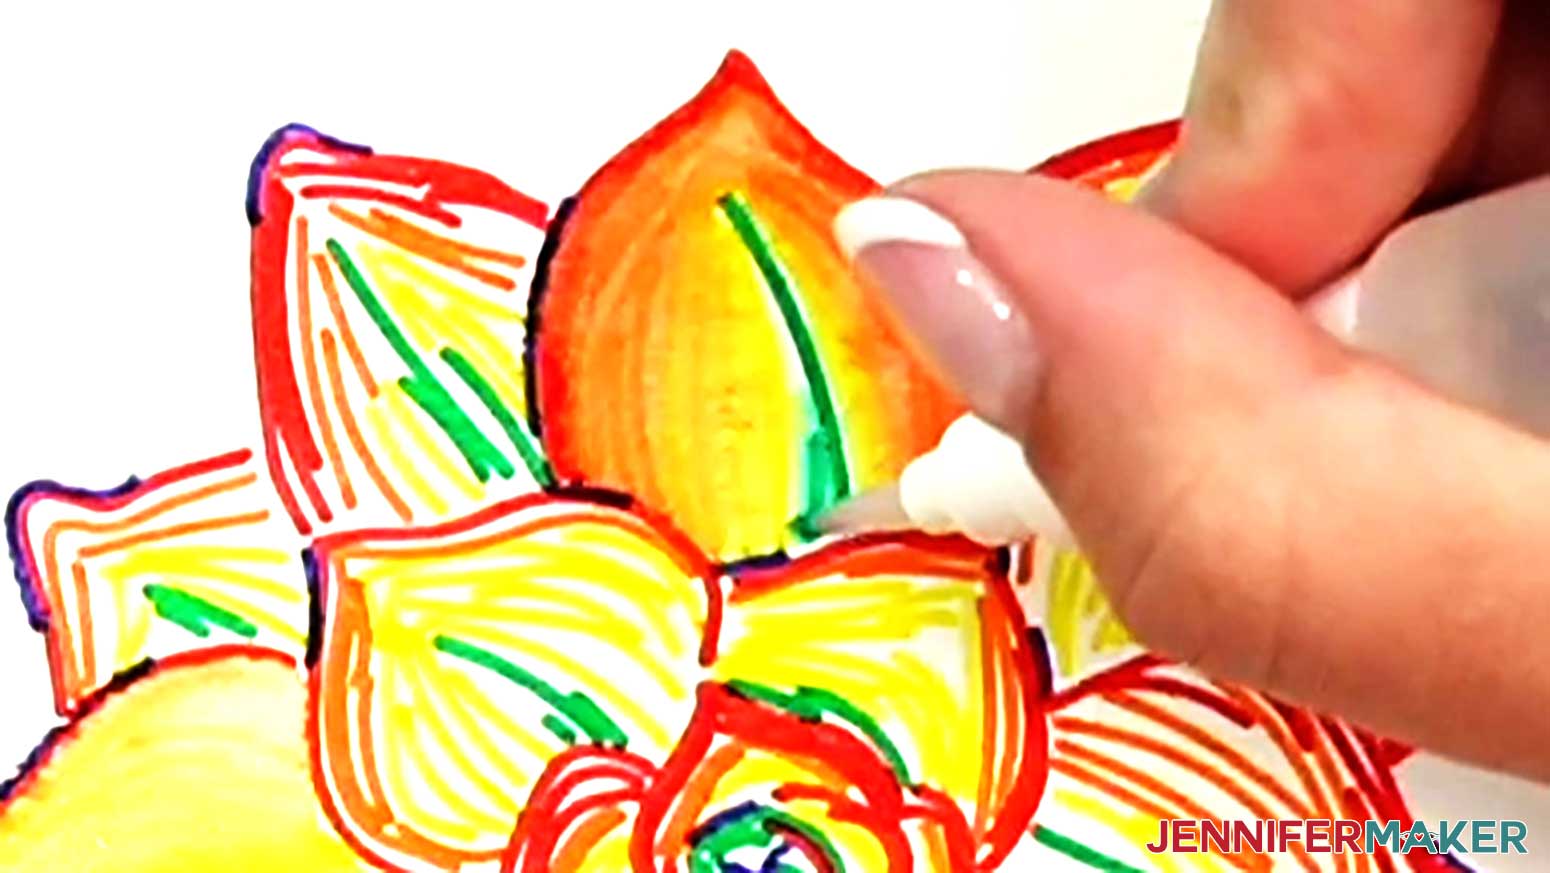
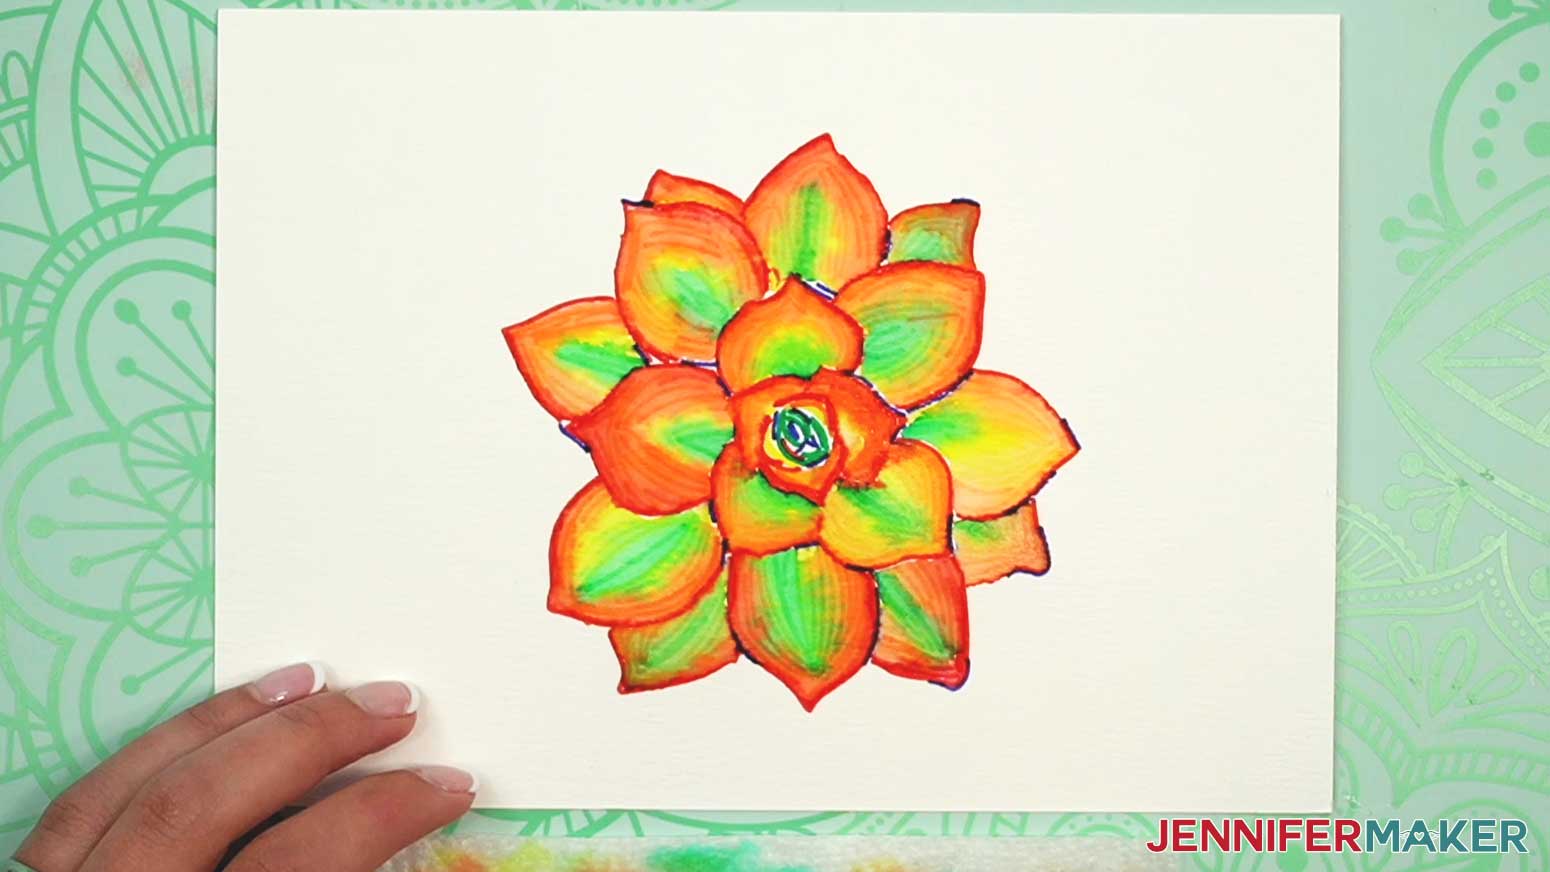
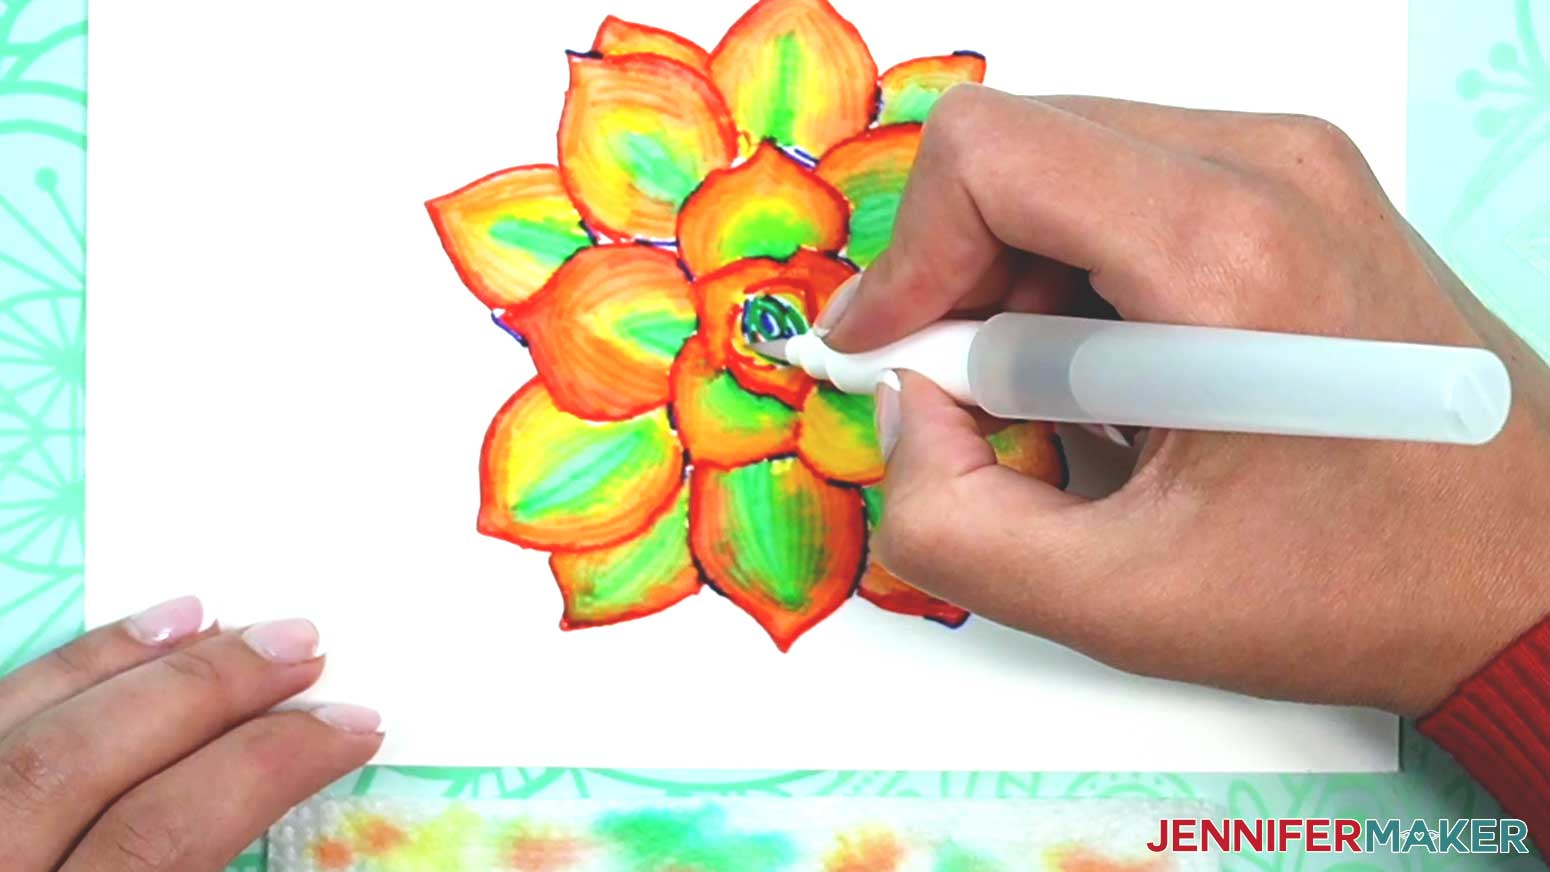
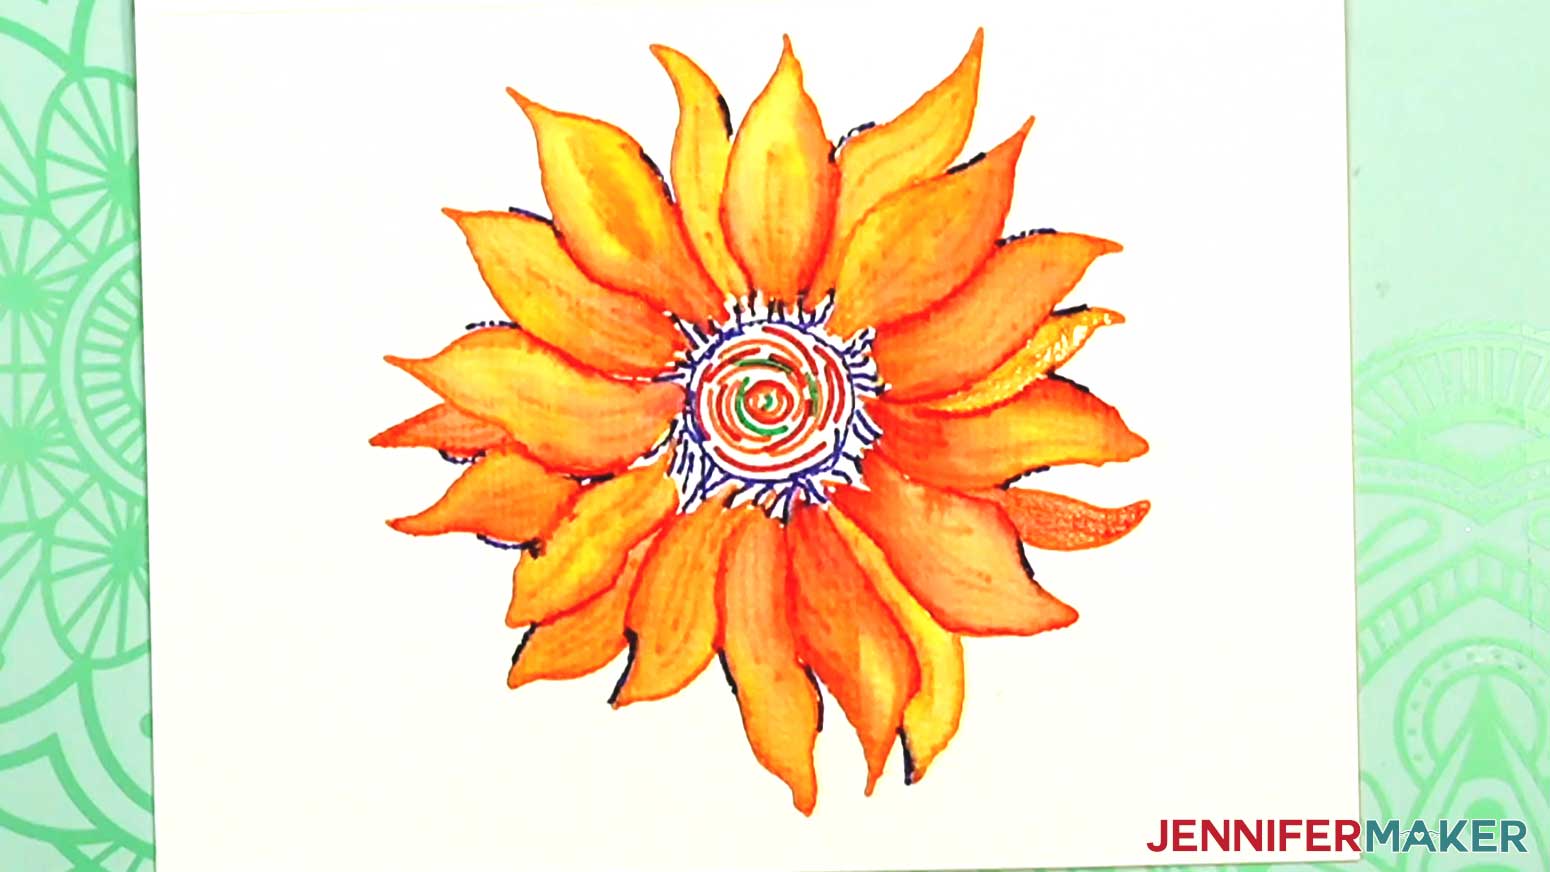
SUNFLOWER
1. This is what the Sunflower looks like right after it’s drawn.
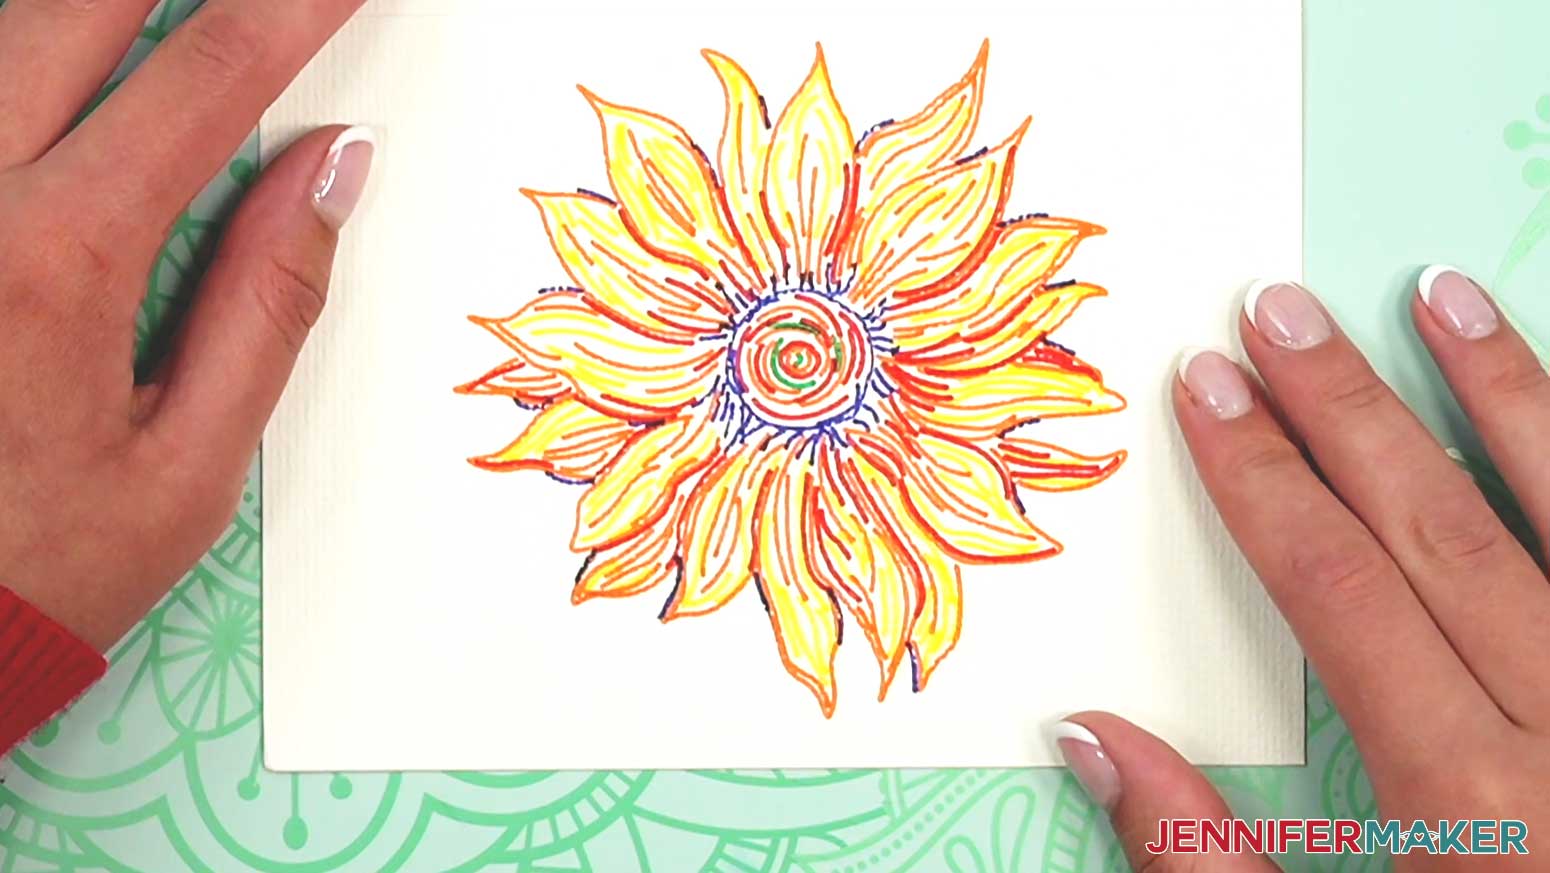
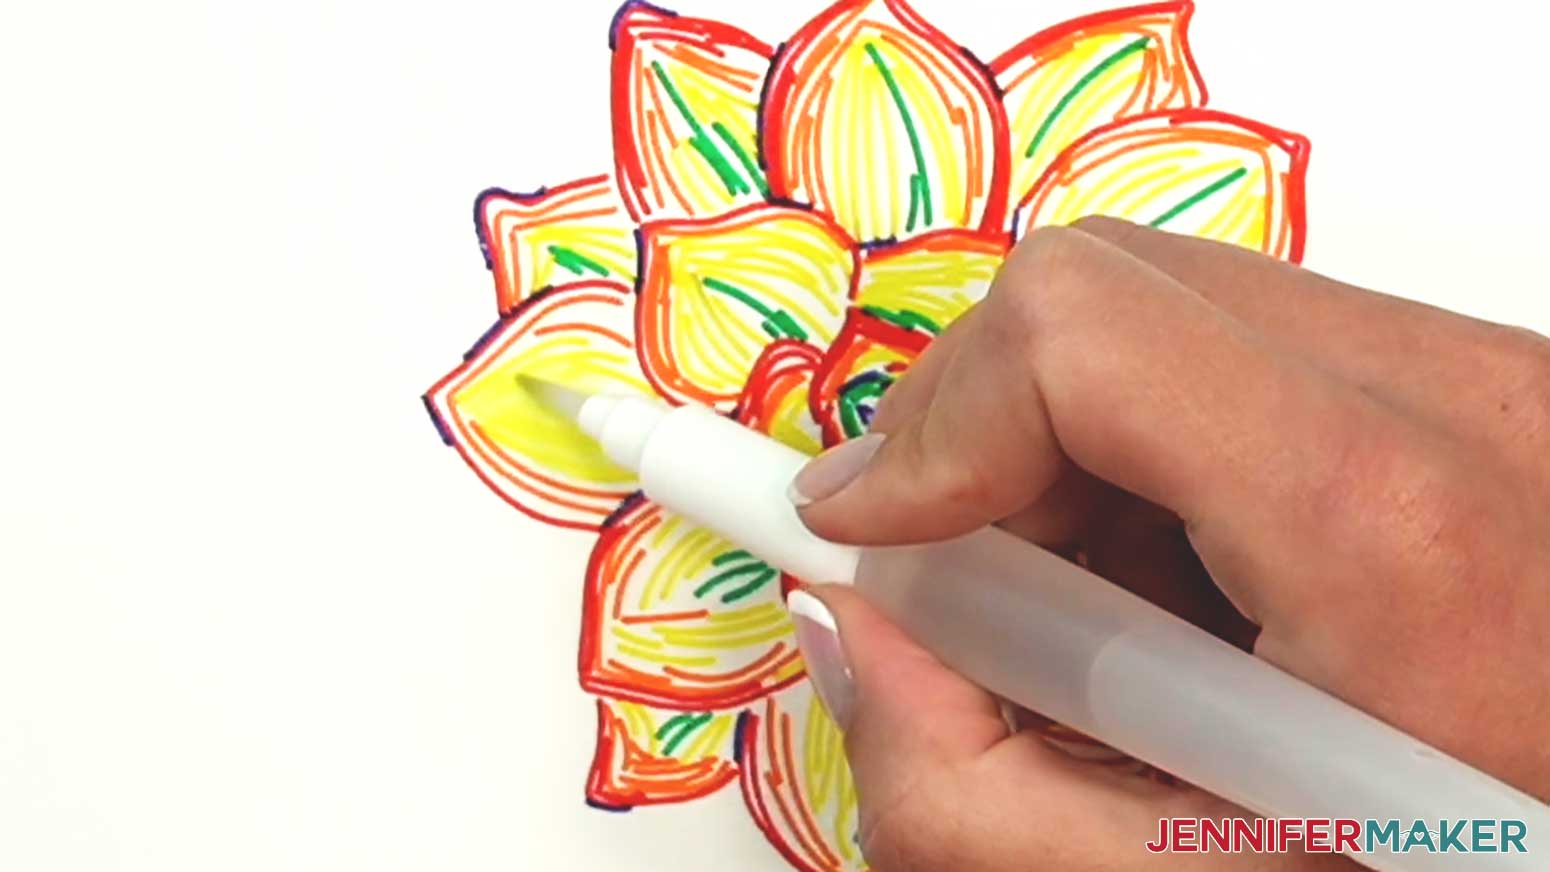
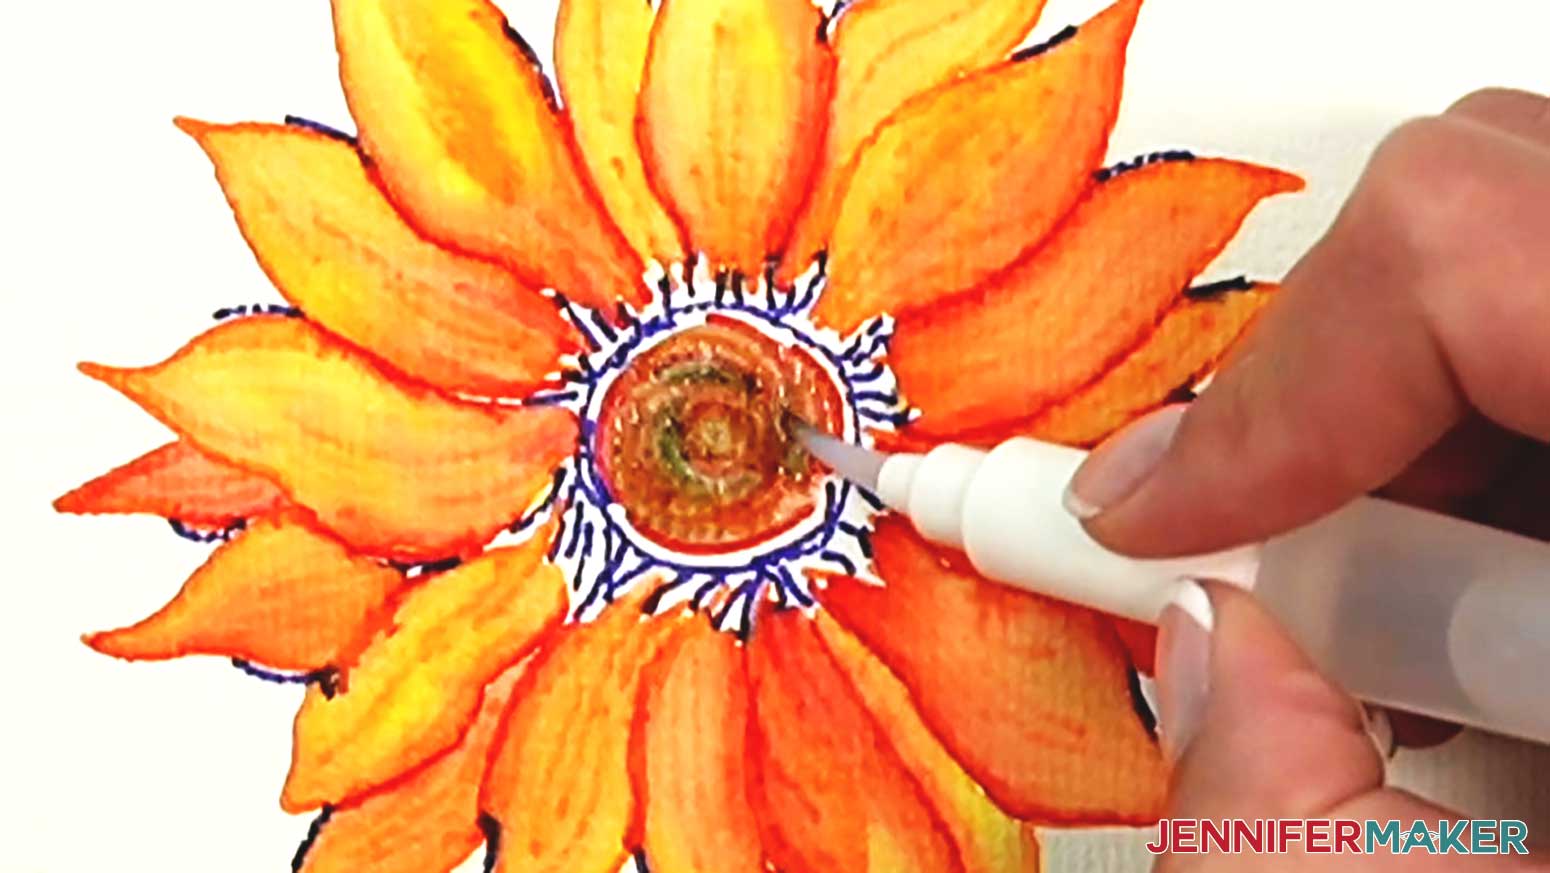
2. Choose a petal to start, then, using a wet brush, start painting the yellow lines.
3. Once the yellow areas are filled, begin painting the orange lines in the same petal and allow them to mix into the edges of the yellow areas to create “folds” in the petals.

4. Using a slightly damp brush, begin painting the red edge lines of the petal into the orange areas to form darker areas around the edges of the petal. (Do your best to not yet touch the blue lines.)
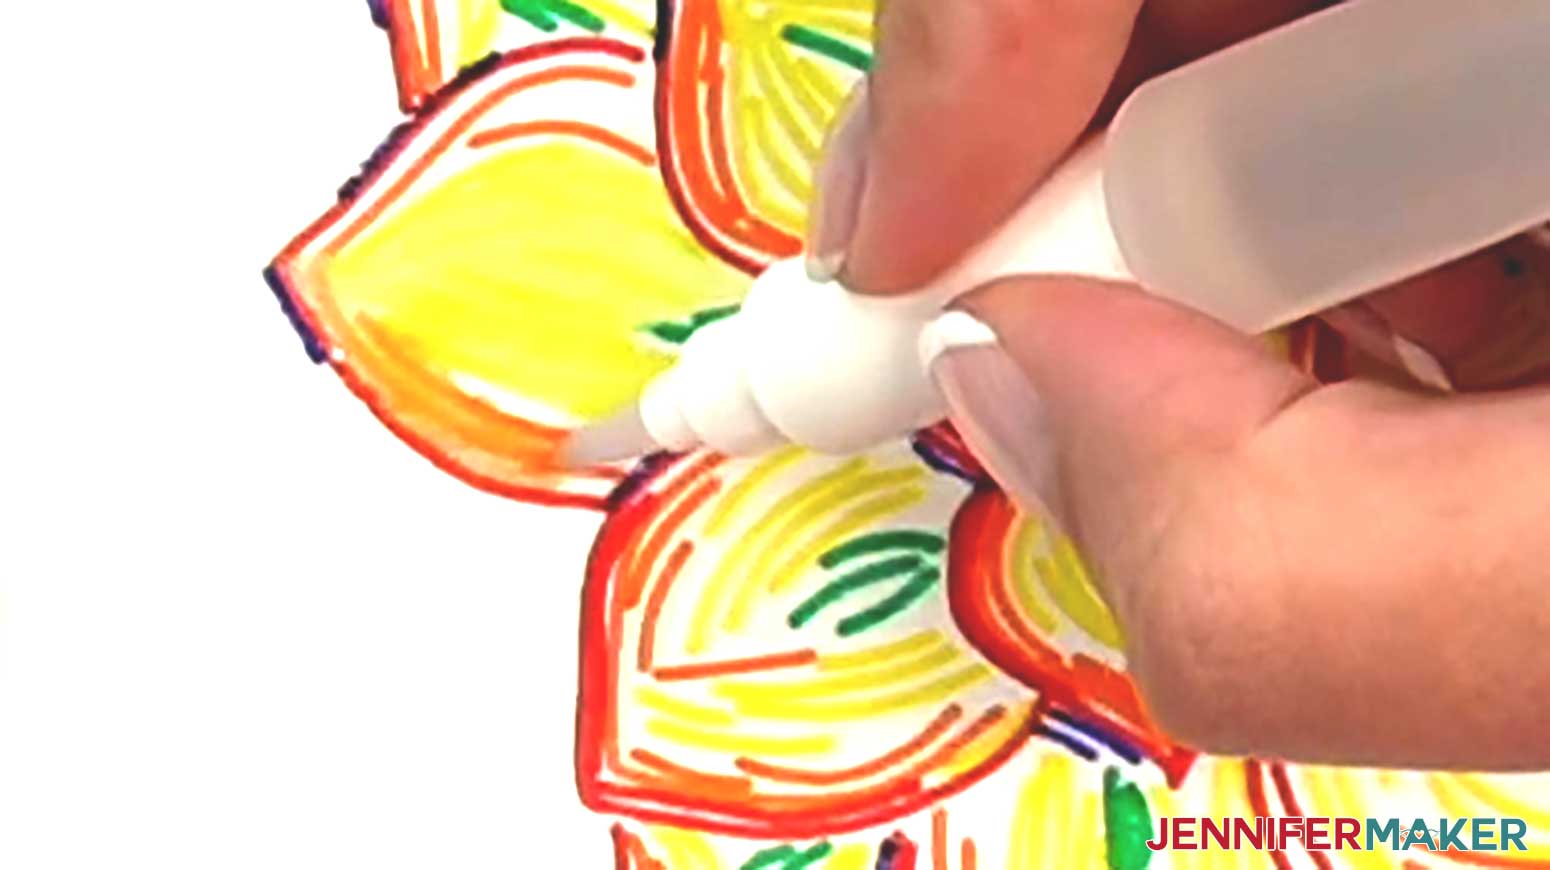
5. Clean your brush.
6. Let the petal dry while moving on to the next petal. (Choose a petal on a different area of the sunflower so the colors of the two petals do not accidentally run together while the first petal dries.)

7. Continue to follow steps 2-6 above until each petal of the sunflower is filled in.
8. Clean your brush.
9. Allow the petals to fully dry to the touch (about 30 minutes) before moving on to the darker center.
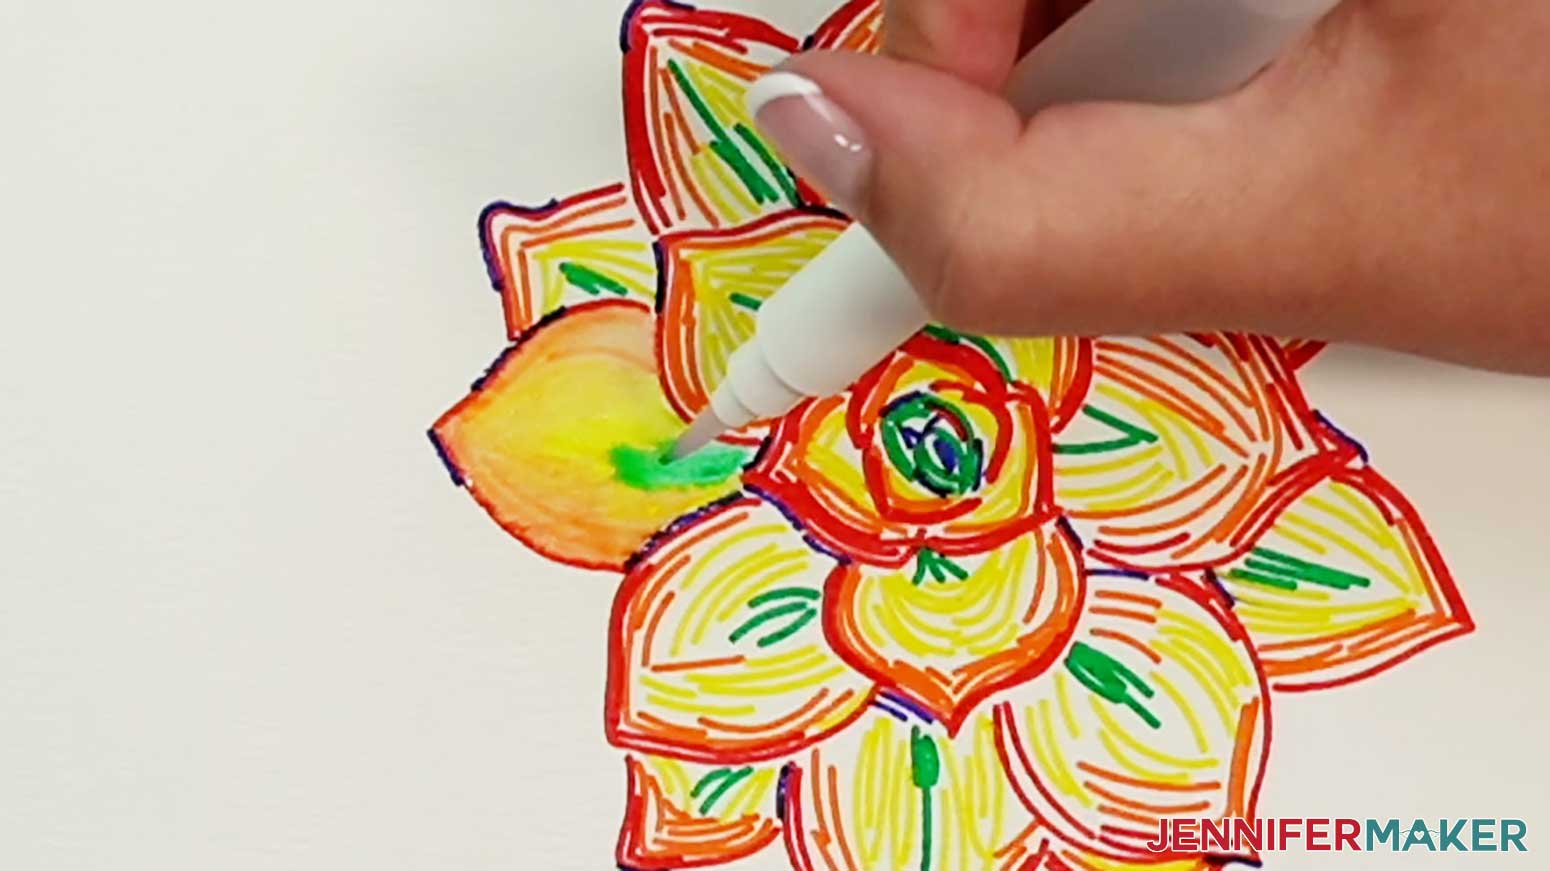
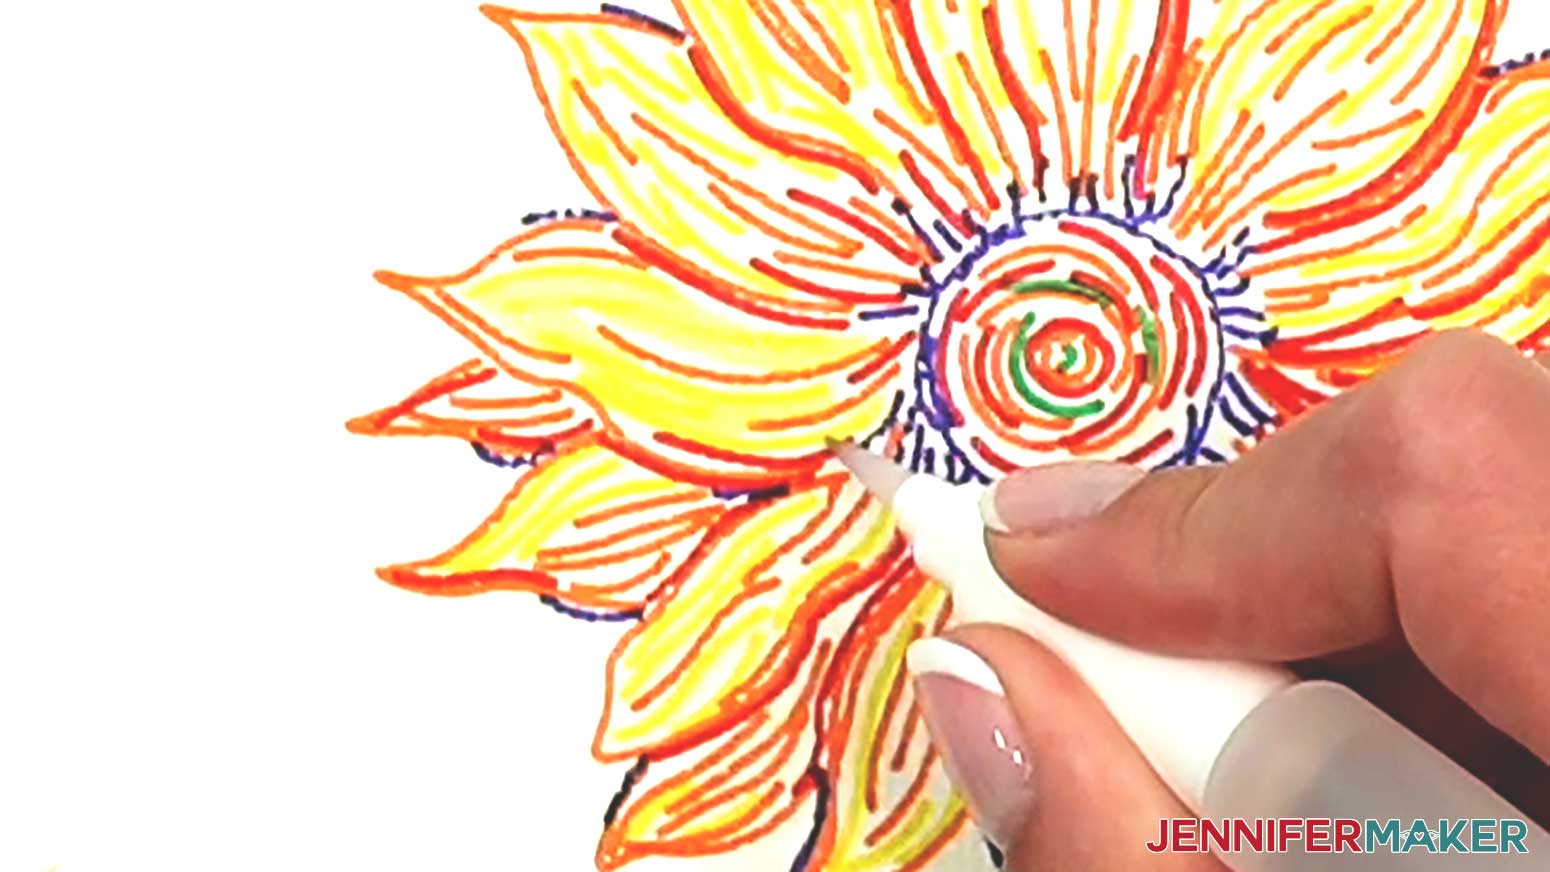
10. Begin painting with a slightly damp brush on the green lines in the very center.
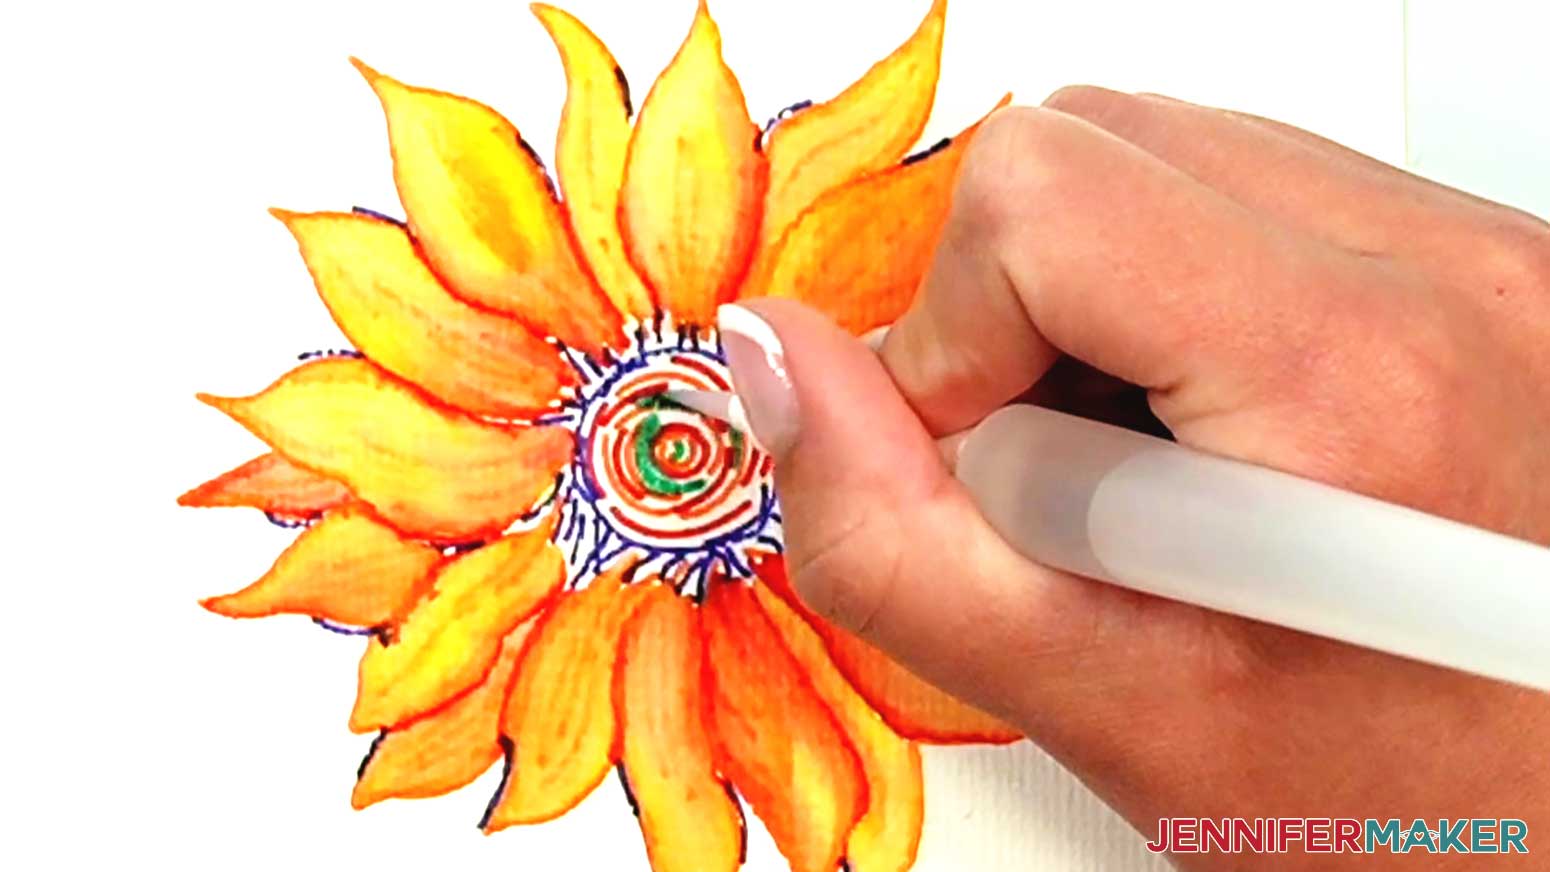
11. Once the green lines are wet, dampen the orange and red lines next to them and allow the colors to mix to form areas of light and dark reds and browns.
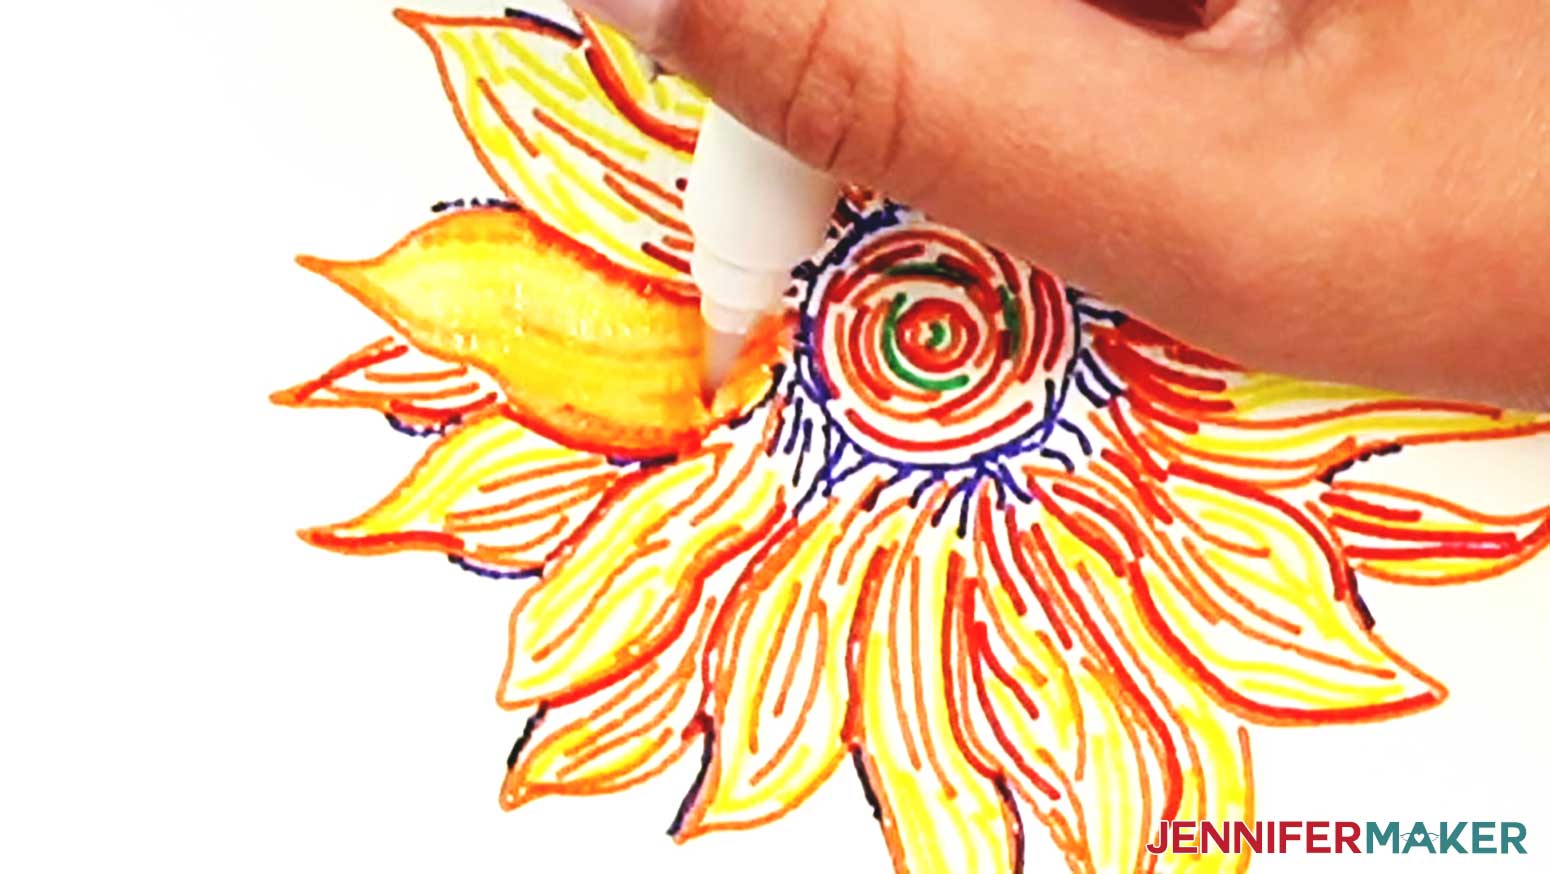
12. Using a slightly wet brush, add a little bit of water to the blue circle around the center and slowly pull the blue paint in toward the red/brown center to form shading where the petals and center of the flower meet.
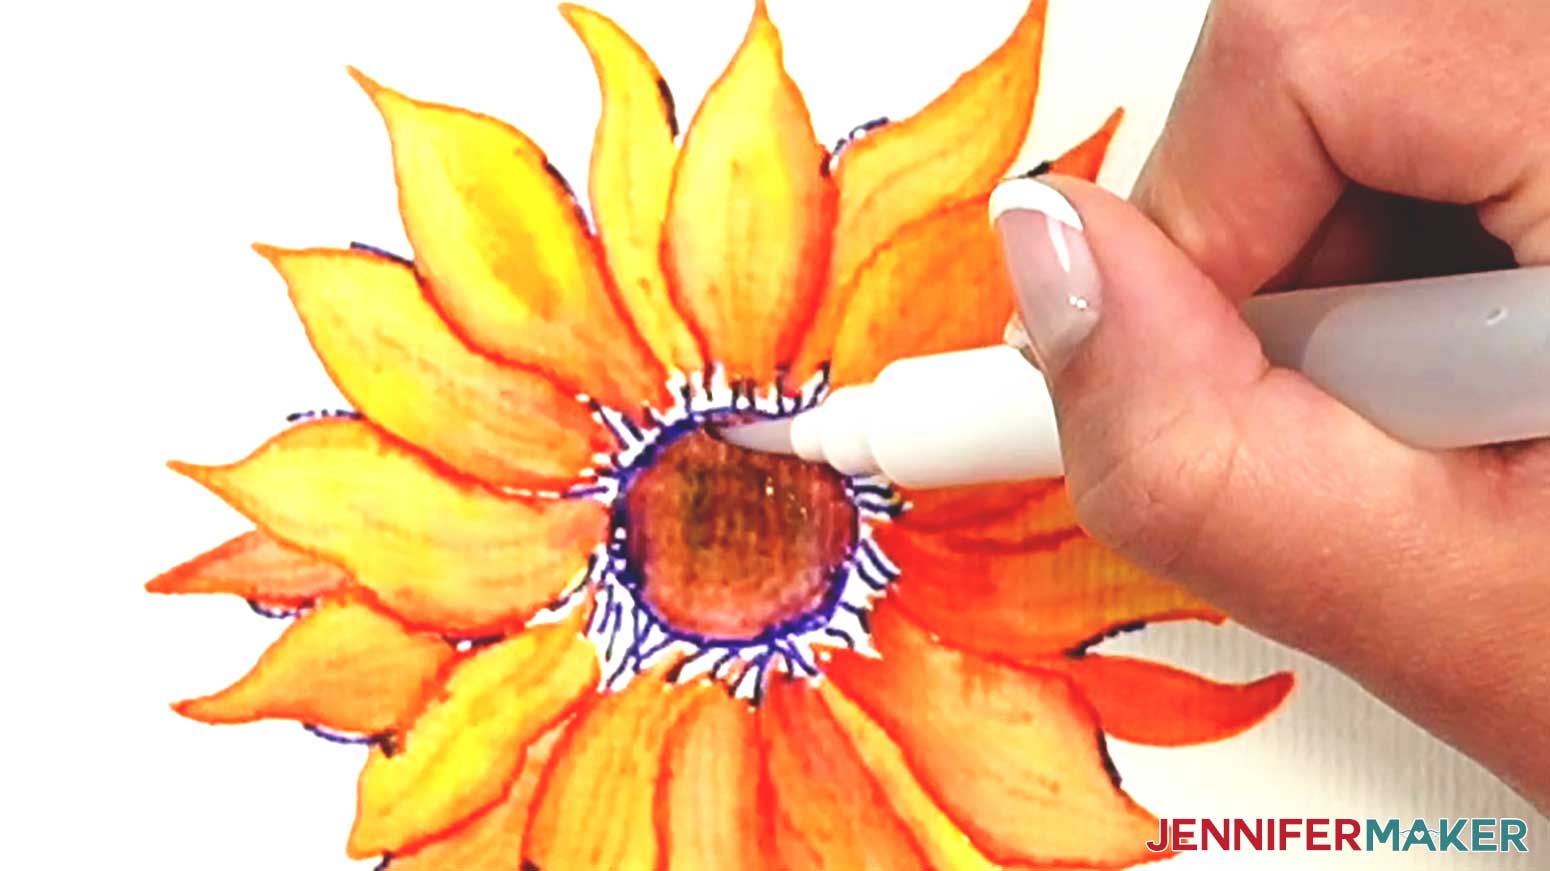
13. Clean your brush.
14. Paint the short blue lines in and around the petals to add shadows between the petals.
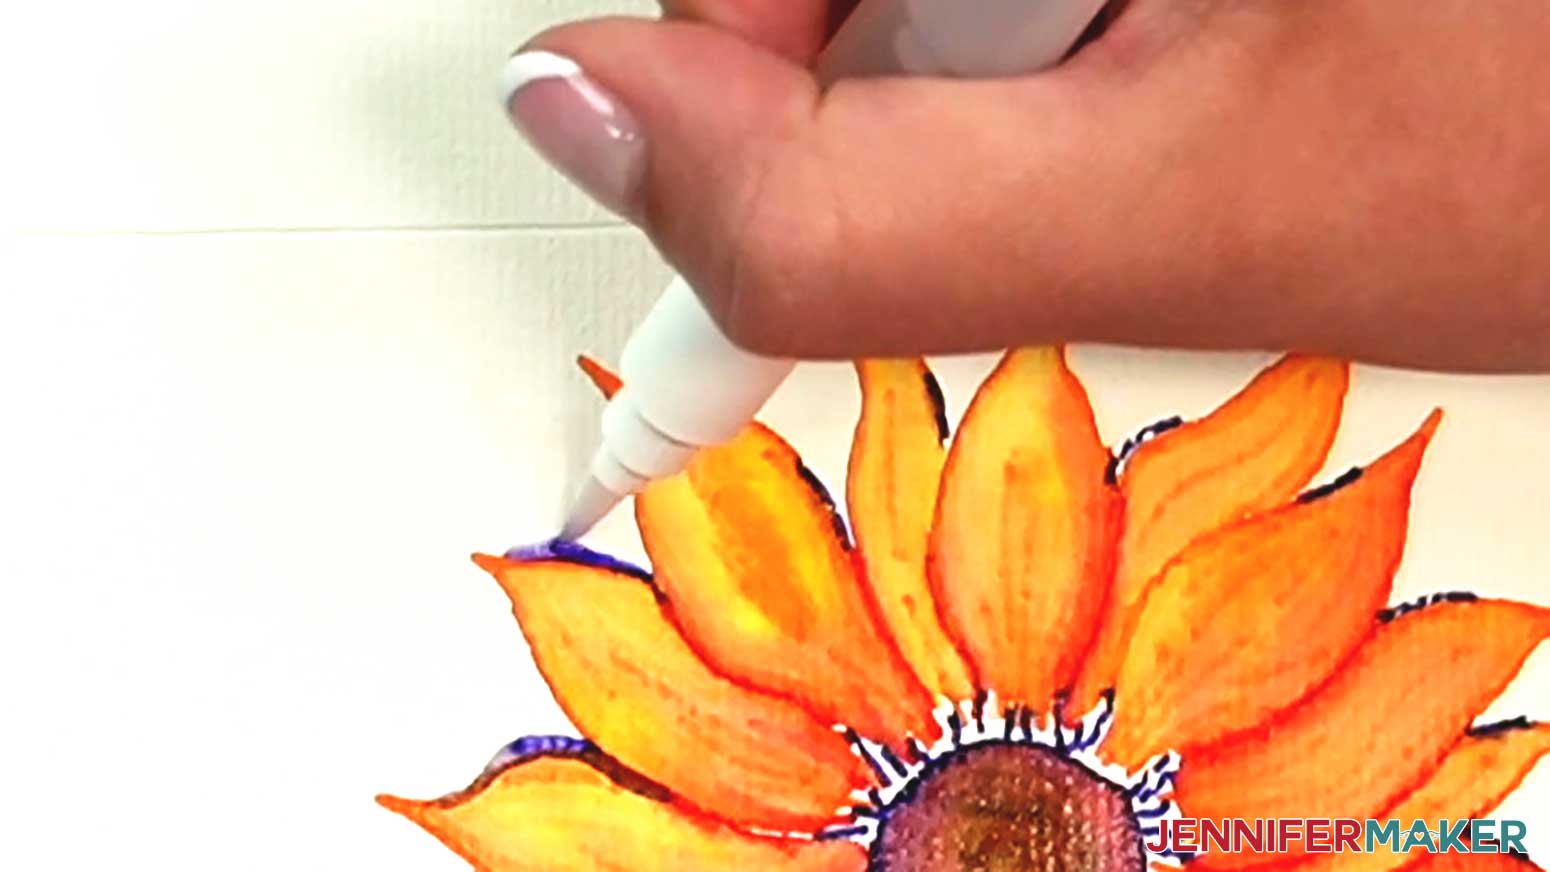
15. Carefully pull small amounts of blue paint out from the center to shade the base areas of the petals. (The colors may form purple, blue, or red-purple shadows. No two watercolor paintings will be alike!)
REMINDER: A cotton swab can soak up areas where you may have applied too much water. Cotton swabs can also soak up a little bit of color and be swiped lightly over already dry lighter areas of color to make shading.
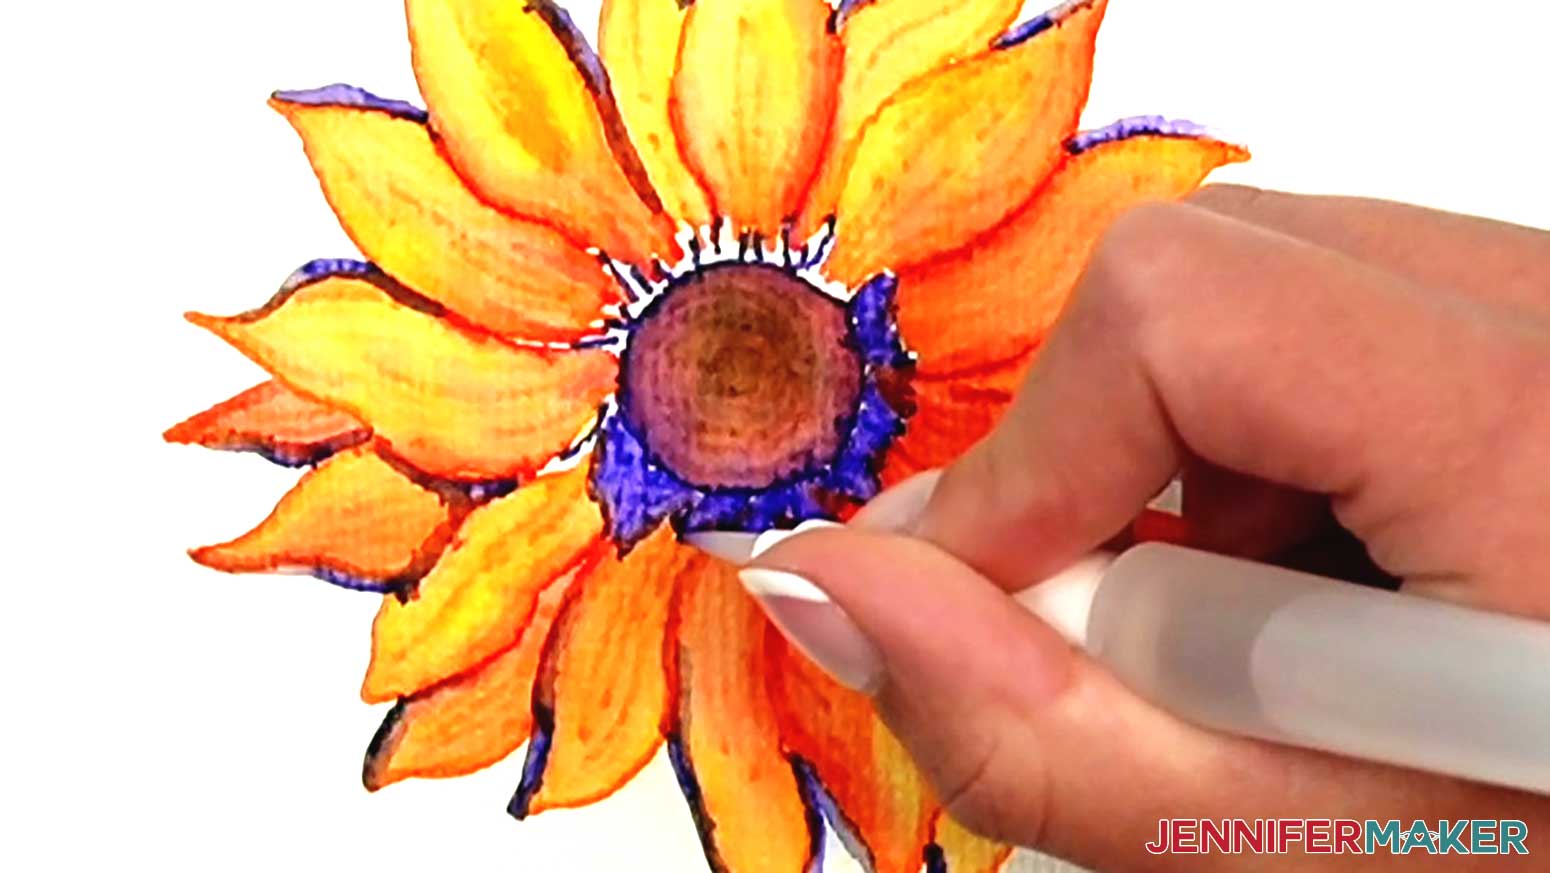
16. Let the painting dry for about 30 minutes to an hour.
17. The sunflower is ready to display!
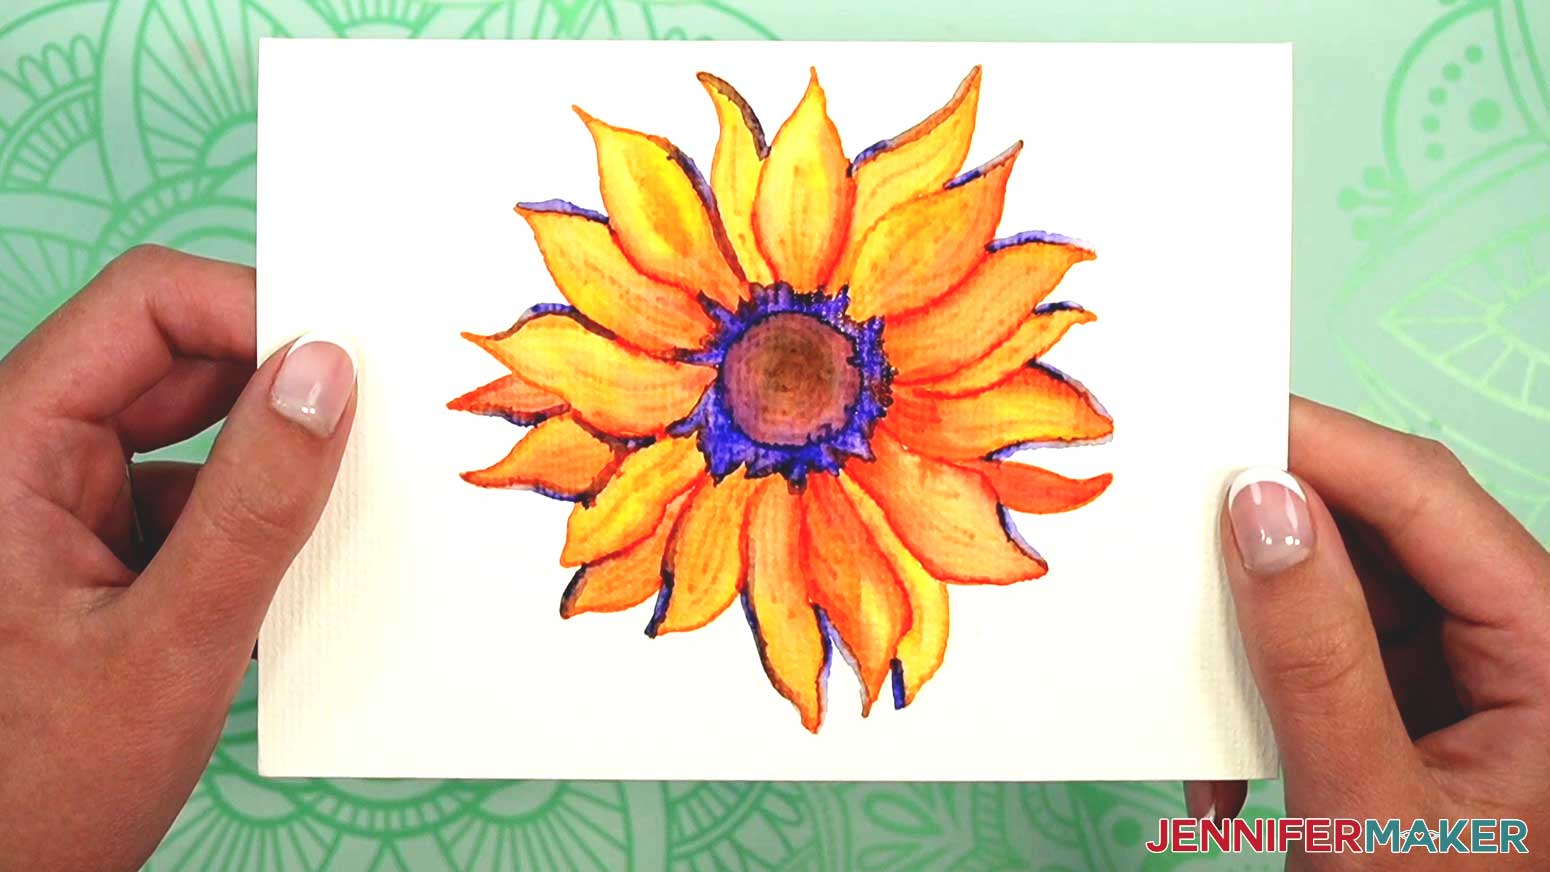
STEP 5: SHOW IT OFF!
Frame individual watercolors as eye-catching home décor or give cards as gifts to family and friends.
For more beautiful animal watercolor designs, see my DIY Watercolor Card project!
Notes
Typeface: SunshineBridge SansPress
Design Sizes:
GROW 5” x 1.3”
Succulent 4.25” x 4.25”
Cactus 4.25” x 6”
Sunflower 4.25” x 4.25”
Answers to Your Questions About How Paint Watercolor Plants with a Cricut
Q: How do you paint watercolor plants?
A. There are different ways to paint watercolor plants, but I’ve found that painting watercolors is super easy with a Cricut! Using watercolor markers, you can tell your Cricut to draw a design onto paper. Then when you add a little bit of water, the magic happens! You can paint three different plants without any experience by following my watercolor tutorial!
Q. Can you watercolor over Cricut pens?
A. You can use a wet paintbrush on drawings made from Cricut watercolor pens to create awesome watercolor paintings. You don’t even technically need to use your Cricut, either — use the pens to create freehand drawings if you like! Once the watercolor pen marks on your paper or notecard get wet, the paint activates and looks just like watercolor paint you’d use from a pan or tube!
I also did some tests using another brand of watercolor markers called Realike, which I found on Amazon. They come in a much wider range of colors than the Cricut markers, but I did find that the paintings done with Realike watercolor markers dried a bit lighter and less saturated-looking than those made with the Cricut ones. For best results, I’d recommend the Cricut watercolor markers.
Q. How do you use watercolor markers on Cricut?
A. To use watercolor markers with a Cricut, first you need to have a compatible Cricut machine. Currently, almost every Cricut cutting machine (except for the original Cricut Joy) can draw or write! Watercolor markers, pens, and other markers can be inserted into your Cricut’s clamp. When you have a project in Cricut Design Space with its Operation set to Draw, your Cricut will use the marker or pen in the clamp to draw that design on the material on your machine mat. It’s SO cool, and one of my favorite Cricut features!
Q. How do you paint watercolor leaves for beginners? How do you paint realistic watercolor leaves?
A. If you’re an absolute beginner, using your Cricut and watercolor markers to draw a design you can paint is a great way to dip your toe in and learn watercolor painting techniques! Painting leaves, flowers, and other watercolor greenery are extremely popular choices for watercolor paintings, and this tutorial is a nice start to show you some basic watercolor techniques. I recommend you watch the Succulent painting portion of the tutorial especially, because it specifically covers painting gorgeous but easy watercolor leaves! I walk you through how to blend colors for a realistic ombré look, and create dynamic shadows to make your leaves pop.
Q. Can you use watercolor paper with Cricut?
A. Yes, you can adhere watercolor paper to a green StandardGrip machine mat and have your Cricut draw a design onto it. I recommend only using extra fine grade watercolor paper or Cricut’s watercolor cards. For other types of drawing projects, you can use Cricut pens and markers with any type of paper in your Cricut cutting machine, as long as it fits on your machine mat,
Q. Do I have to use a Cricut to do watercolor paintings?
A. Of course not! While it’s a super fun and easy way for beginners to get the feel of watercolor painting, once you get some experience, branch out and take your art to the next level! Get your own watercolor paints, then try your hand at autumn leaves, tropical leaves, an oak leaf or maple leaf, a monstera plant, watercolor branches — and these are only a few examples from the natural world! Be sure to experiment with different color combinations, too! There are endless possibilities for inspiration, and at the end of the day (if you’re anything like me) as long as you flex your creative muscles, you’re bound to have fun!
I’d love to see YOUR beautiful watercolor plant paintings! Please share a photo in our Facebook group or tag me on social media with #jennifermaker.
Love,

Want to remember this? Save this tutorial on How to Paint Watercolor Plants Using Your Cricut to your favorite Pinterest Board!