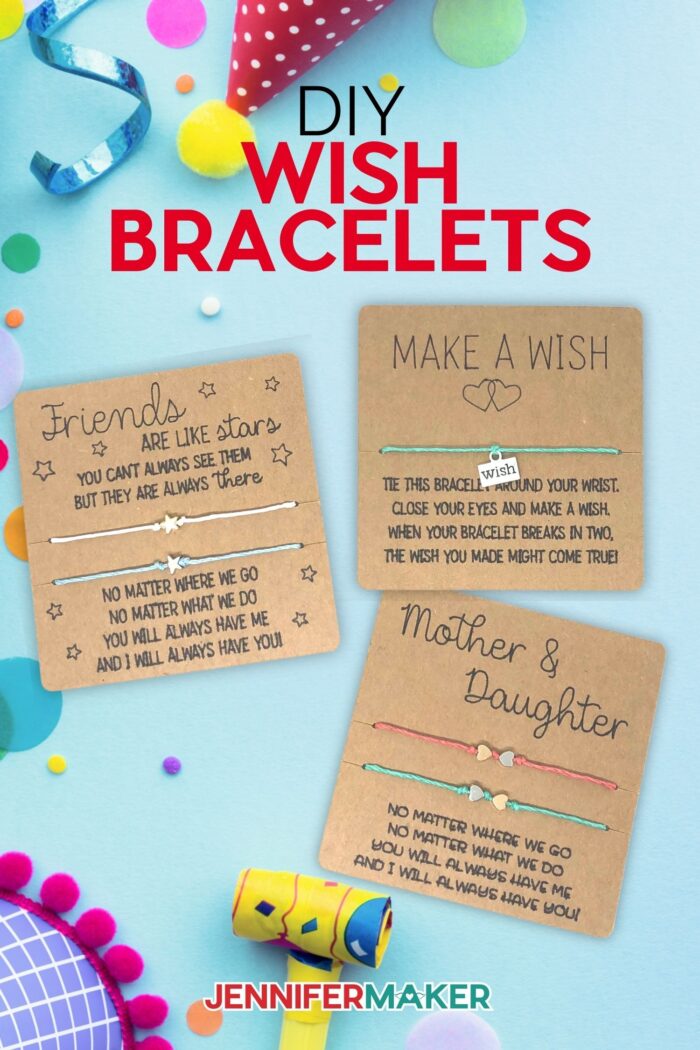
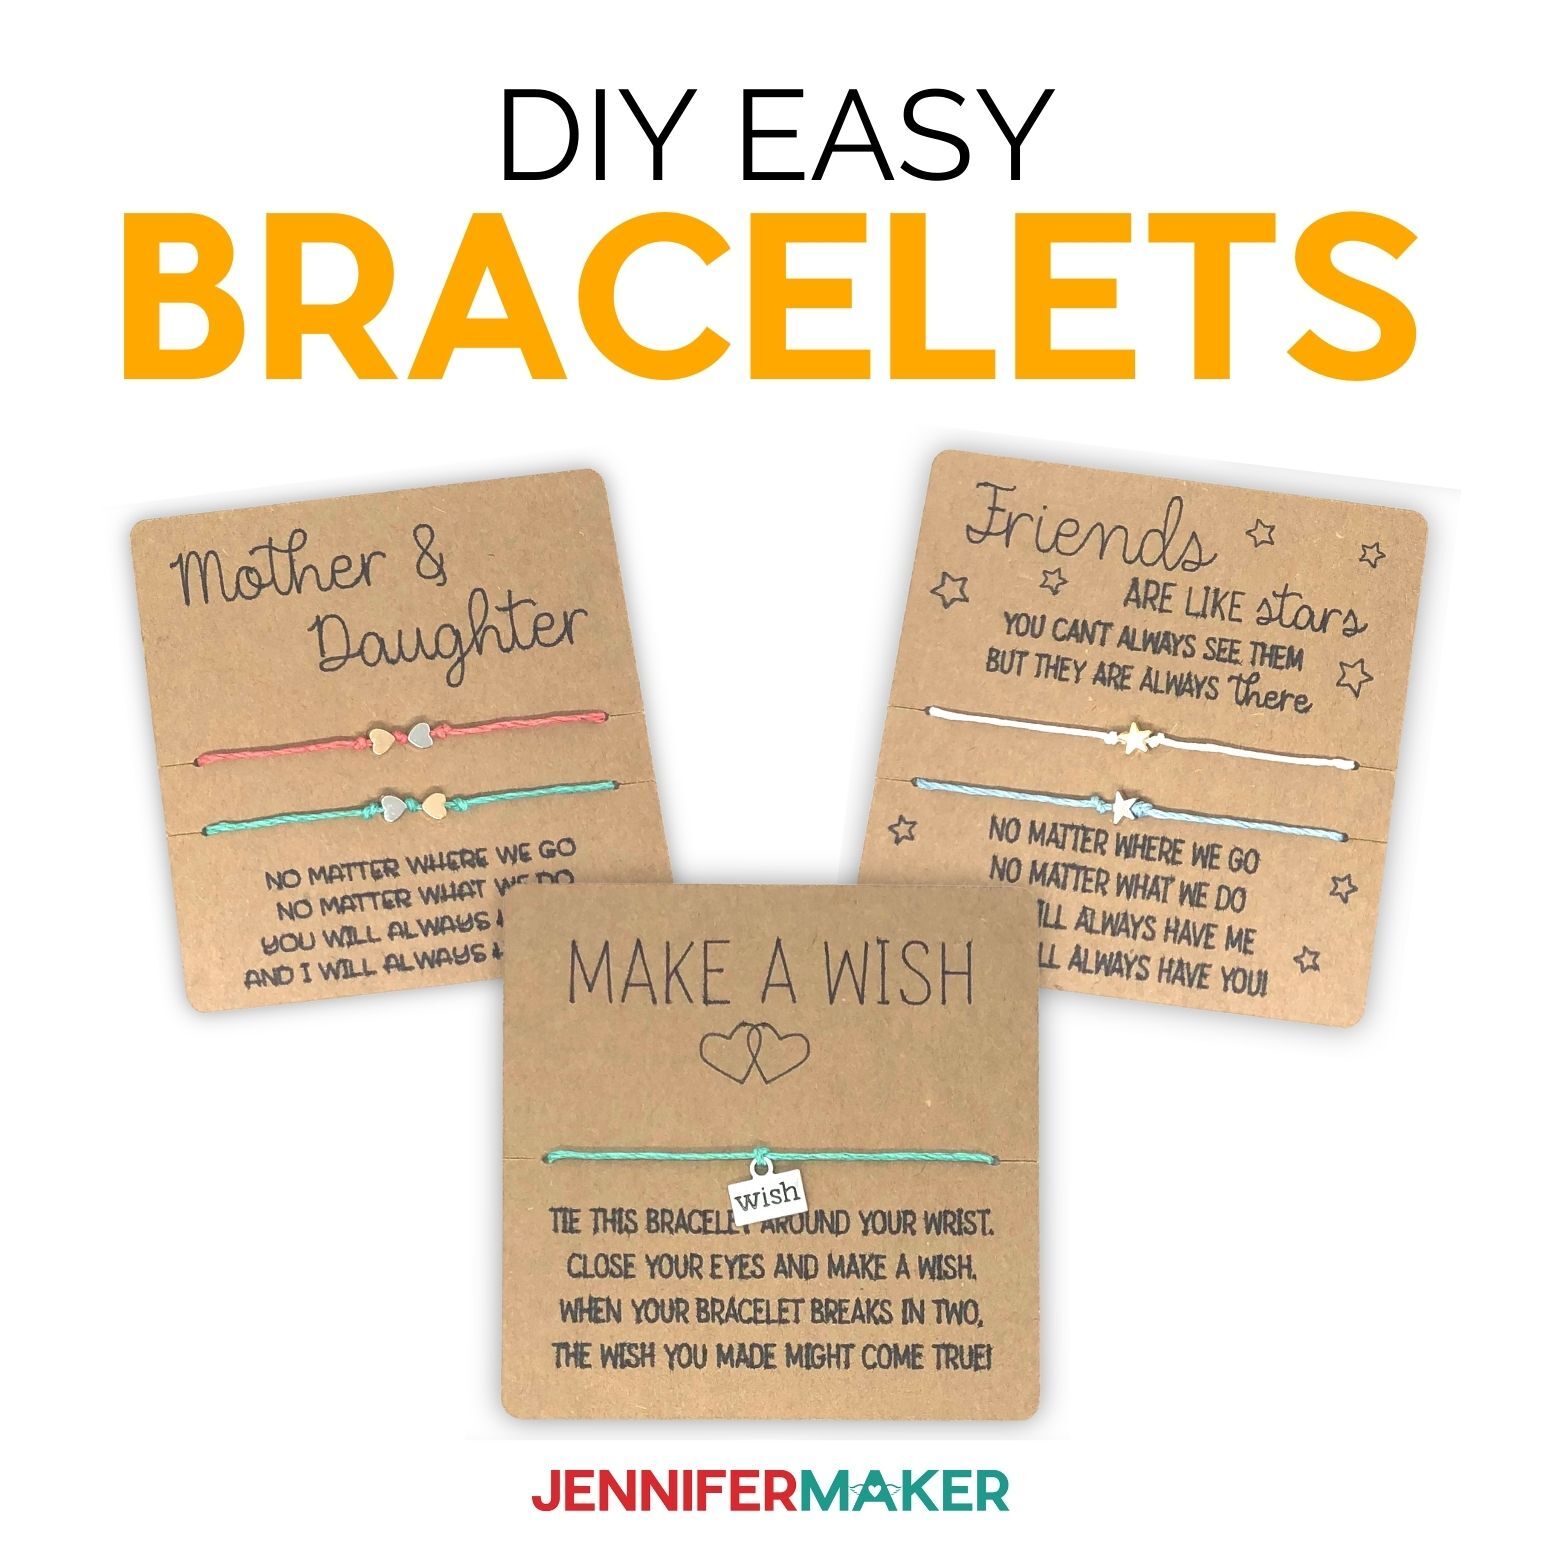
Learn to make wish bracelets with this tutorial. These easy bracelets and cards are the perfect gift for family and friends!
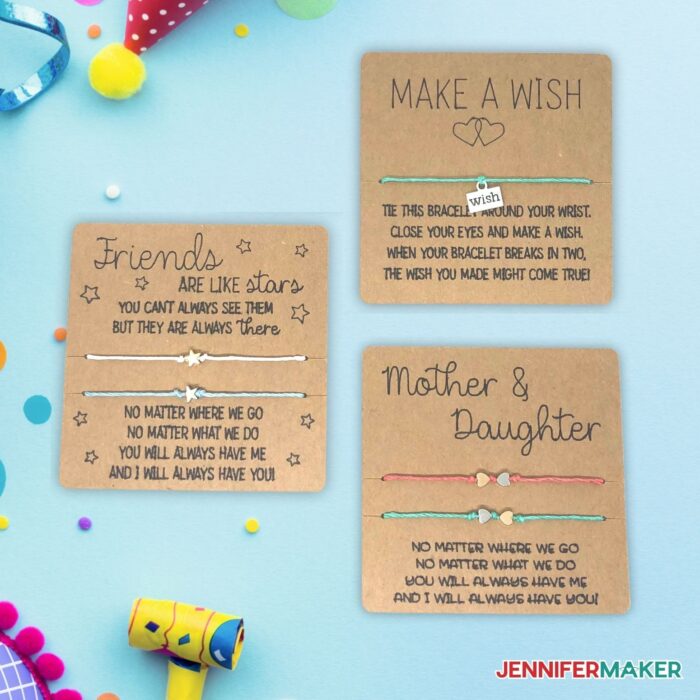
Have you ever heard of a wish bracelet? These super popular bracelets are typically made from hemp string and charms and come on a cute card with a sweet poem or sentiment for the recipient. The idea is that you make a wish when you put the bracelet on. Over time, the wish bracelet eventually breaks down and the charm or beads fall off. Once the charm or beads are gone, your wish will come true!

This fun bracelet project is definitely a must-try. Not only are they so easy to make, but it’s also a gift that everyone loves to receive. The best part is that you only need a few materials and they can be done in about 30 minutes or less!
These wish bracelets are so much fun to make and I just love the meaning behind them. Make some for your friends and family or even better, make bracelets together! I’ve provided you with a few special designs to choose from so you can create the perfect custom bracelet for someone, or yourself!
Aren’t they just adorable?
Making these bracelets is pretty easy and they only take a few materials to make!
We’ll use cardstock to make the backing to hold the bracelet. You can really use any weight or color of card stock, but heavier is better. We’ll also need twine and some beads and charms. And finally we’ll need a Cricut fine-point pen, our Cricut Cutting machine, a mat, weeding tool and scissors. Yes, that really is all you will need to make these amazing bracelets!
Here’s a supply list of what you need to make wish bracelets! This post contains some affiliate links for your convenience (which means if you make a purchase after clicking a link I will earn a small commission but it won’t cost you a penny more)! Read my full disclosure policy.
Materials to Make Wish Bracelets
View my Amazon shopping list with the exact items we used to make this project
- Cardstock (Brown Kraft OR White Shimmer)
- Braided Twine
- Small Beads OR
- Butterfly Charms
- Cricut 0.4 Fine Tip Pen – Black
- Word Charms
- (Optional) Fonts (I used Dear Agatha and Pinsetter Line)
- A method to draw and cut your designs, I used the amazing Cricut Maker 3 but you can also use the Cricut Maker, Cricut Explore Series, or Cricut Joy
- Cricut Green StandardGrip Machine Mat
- Weeding Tool
- Scissors
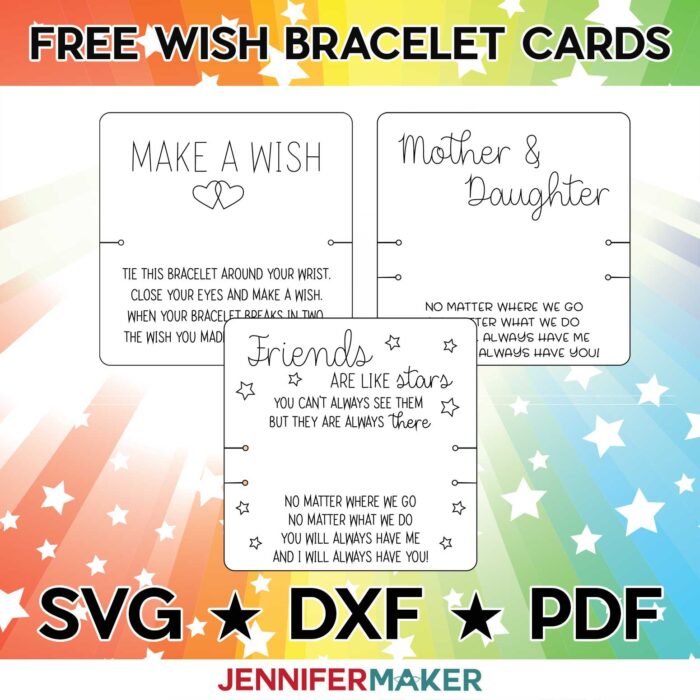
- Design #333 – My free SVG/PDF/DXF design files are available in my free resource library (get the password by filling out the form at the bottom of this page)
How to Make Your Own DIY Wish Bracelets

Wish Bracelets
Learn to make wish bracelets with this tutorial. They are the perfect gift for family and friends!
Materials
- Here is a shopping list of the actual items I used to create this project! This list contains affiliate links. As an Amazon Associate I earn from qualifying purchases.
- One (1) Sheet of 80lb Brown Kraft Cardstock OR
- One (1) Sheet of 105lb White Shimmer Cardstock
- Braided Twine (12" - 15" per Bracelet)
- One to Two (1-2) Small Beads OR
- One to Two (1-2) Butterfly Charms
- Cricut 0.4 Fine Tip Pen - Black
- Font - Dear Agatha
- Font - Pinsetter Line
Tools
Instructions
STEP 1: GET MY FREE WISH BRACELET FILES
First, download my Wish Bracelets designs from my library – look for Design #333. (Bulk Gift Ideas).
TIP: If you are not sure how to upload an SVG cut file to Cricut Design Space, watch this helpful video training series I made. If you are on an iPad or iPhone, here is how to download and upload SVG files to the Cricut Design Space app.
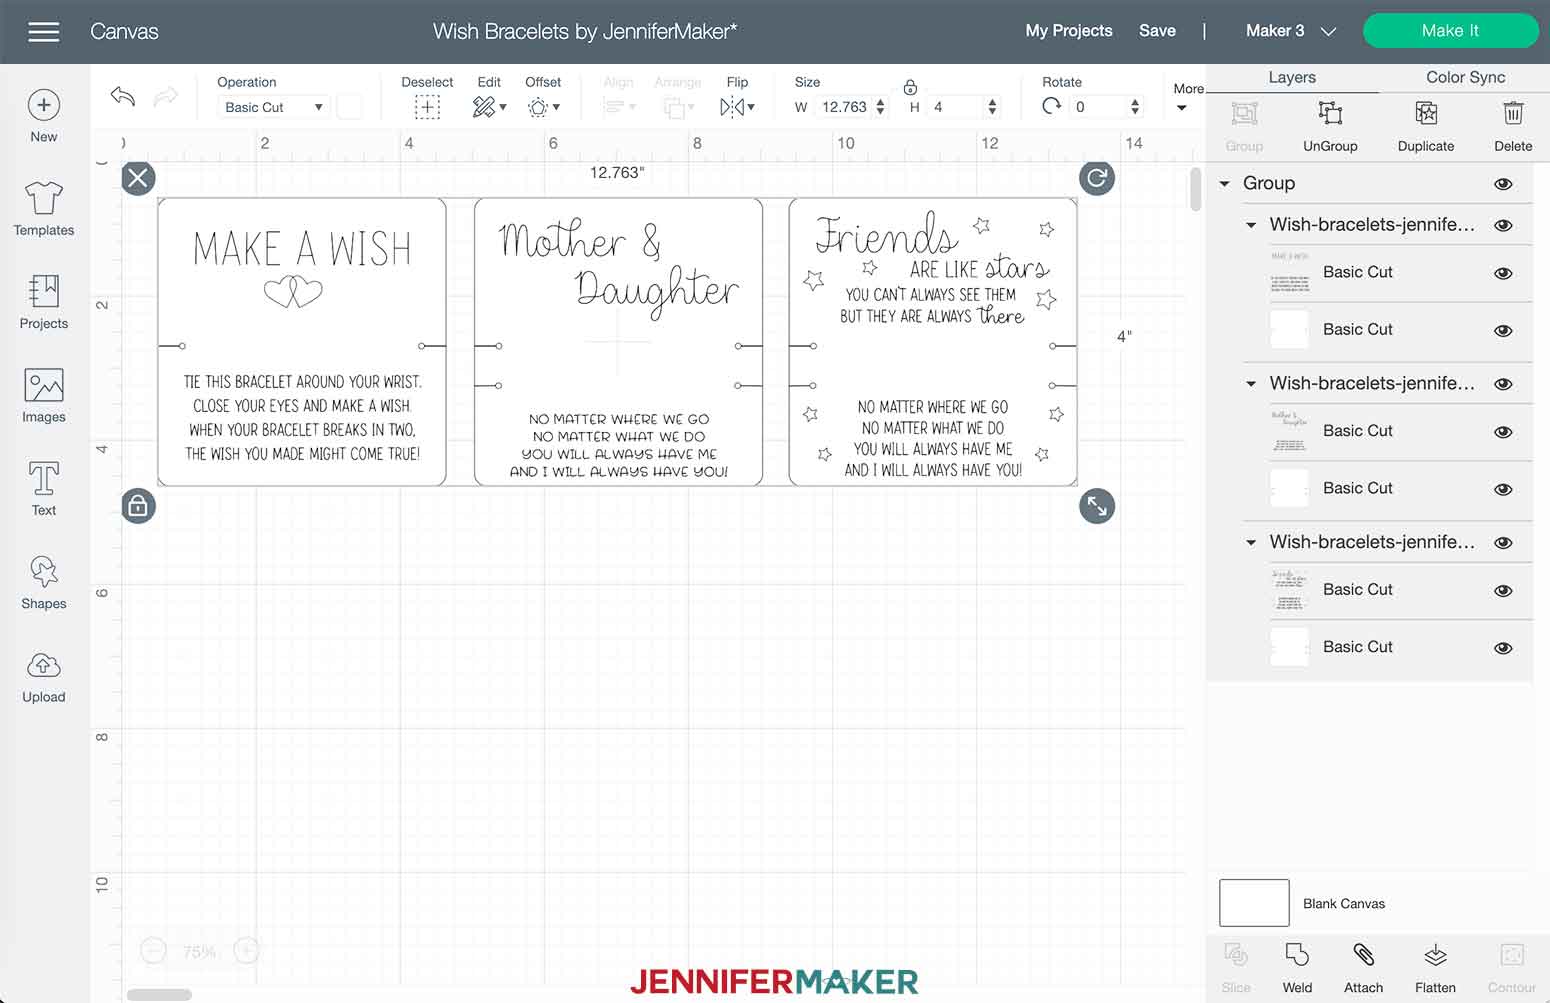
This is what my Wish Bracelets SVG file looks like when uploaded to Cricut Design Space. I've included three designs to choose from, you can make one, two or all three!
STEP 2: PREPARE YOUR DESIGN AND CUT YOUR DESIGN
First, you will need to ungroup the designs. If they are not still selected, click on the designs to select them and click Ungroup.
Hide or delete any of the designs that you do not want to make.
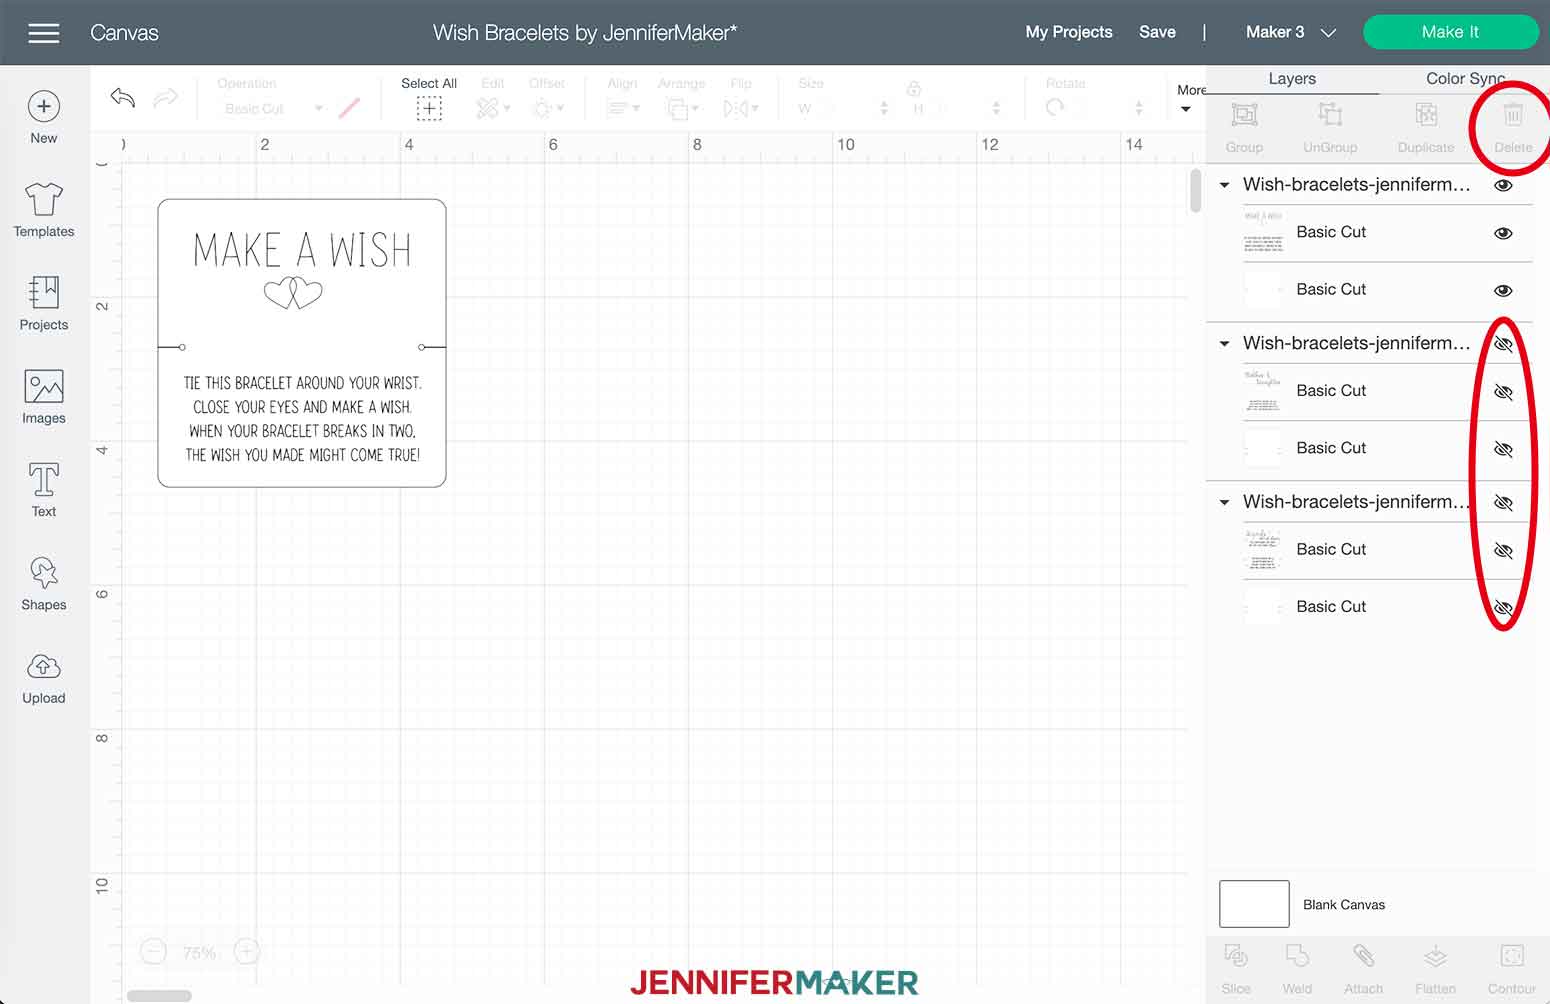
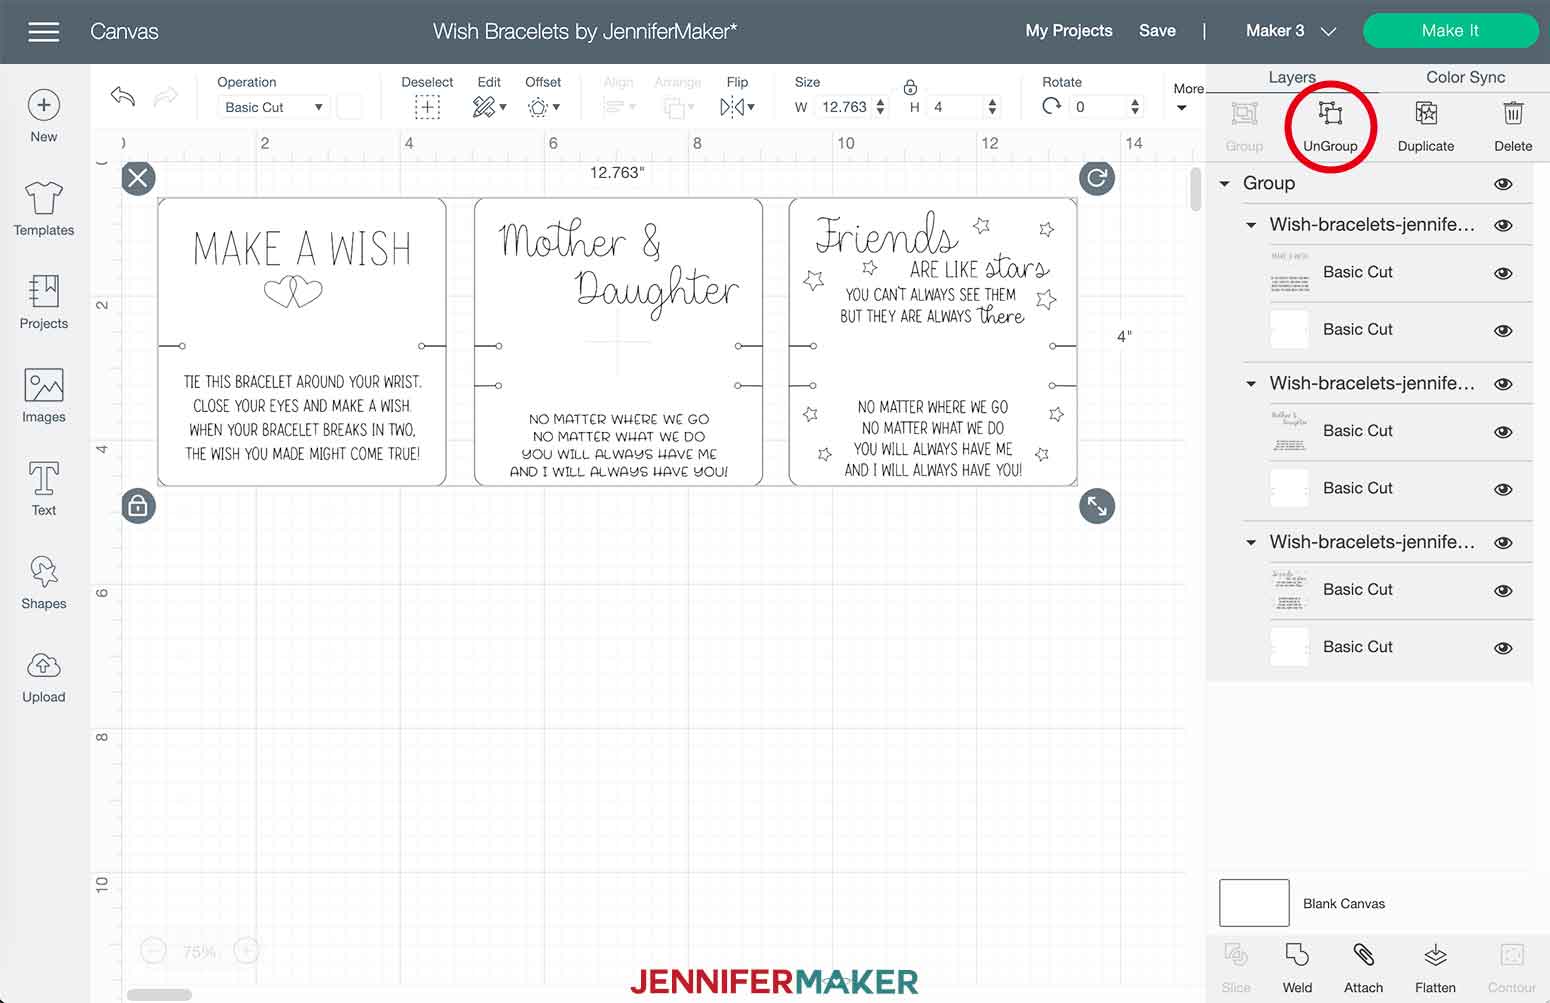
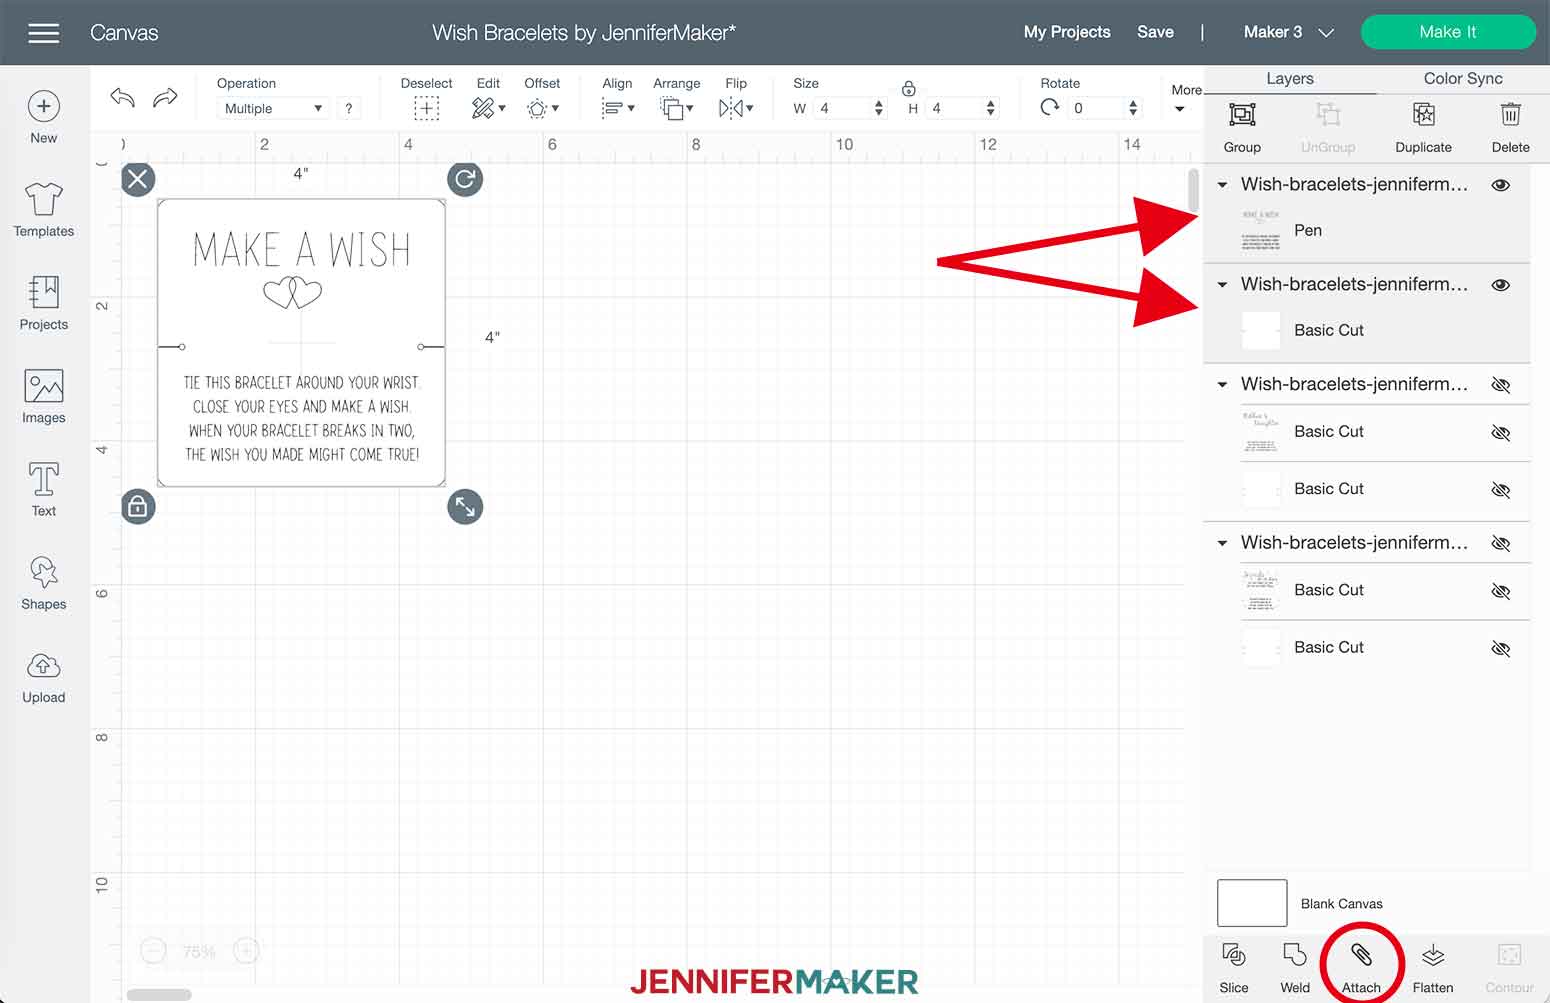
Now, we need to change the writing layer operation so that your Cricut knows to use the pen tool for your wish bracelet. Click on your bracelet design and again, click on Ungroup.
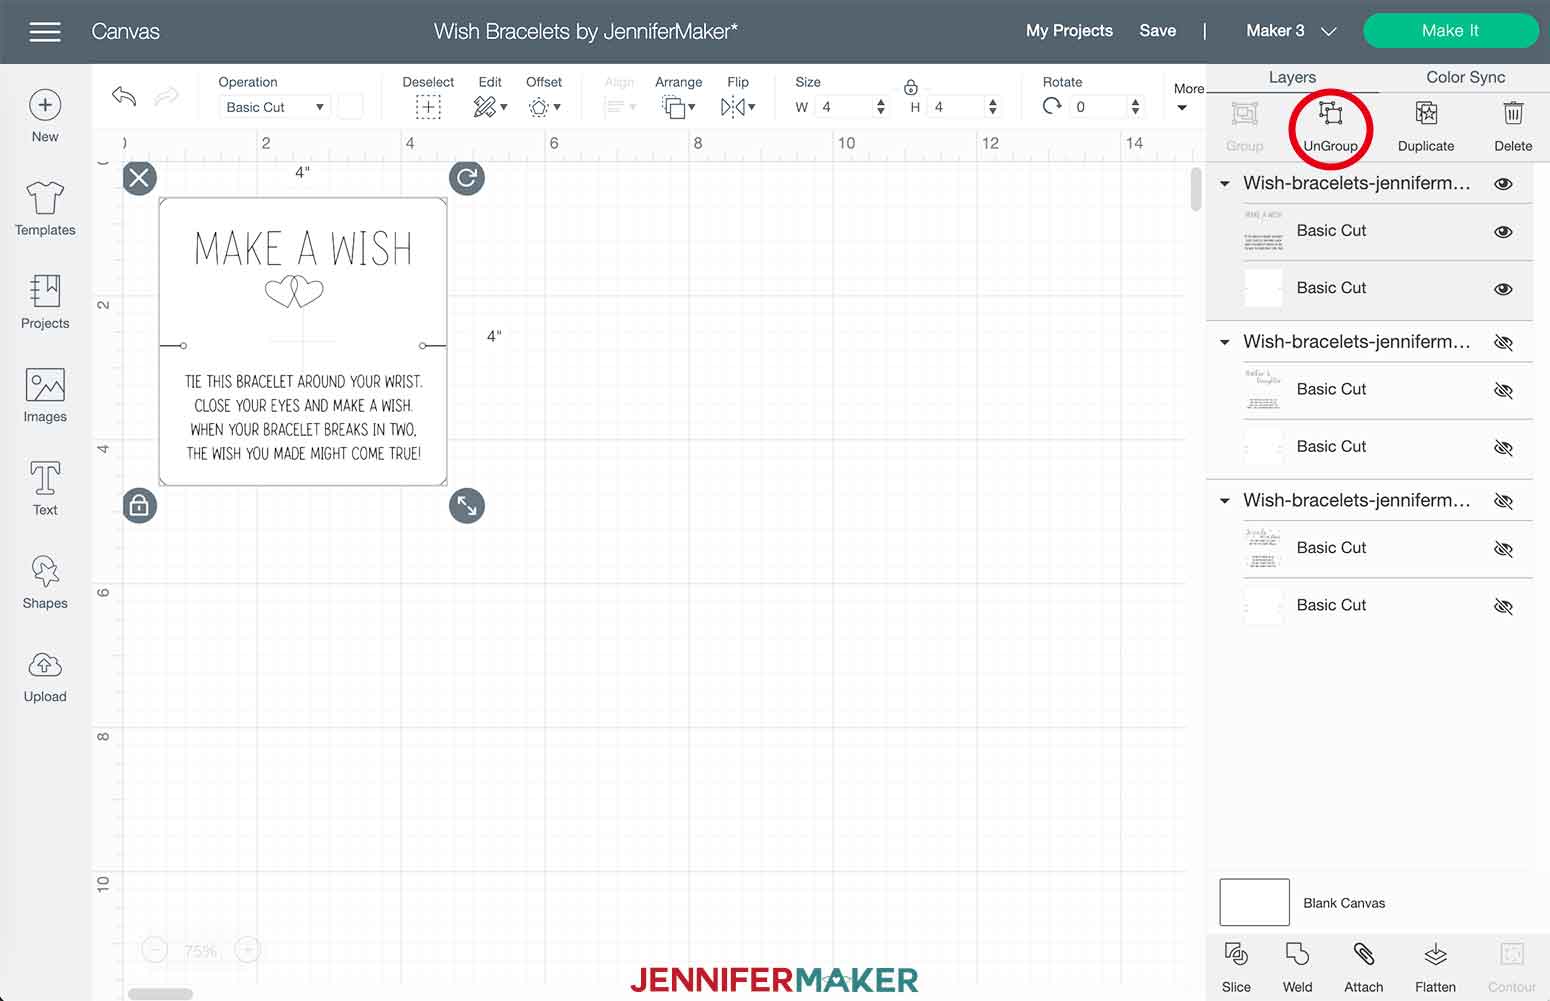
Select the text layer and then click on Operation and select Pen.
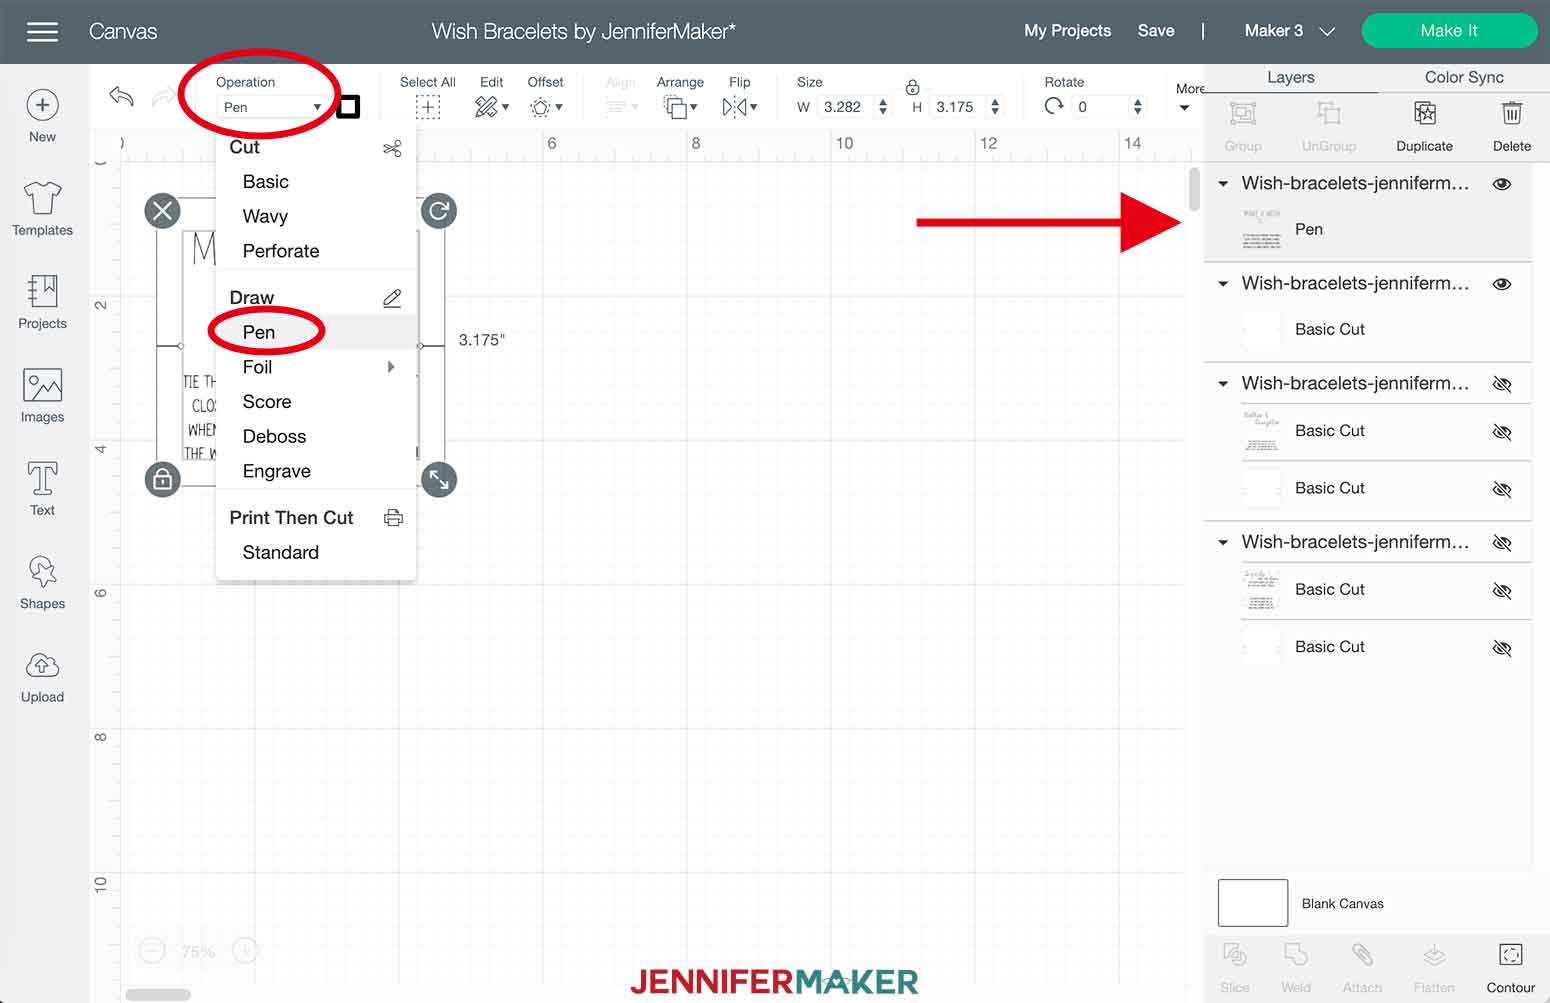
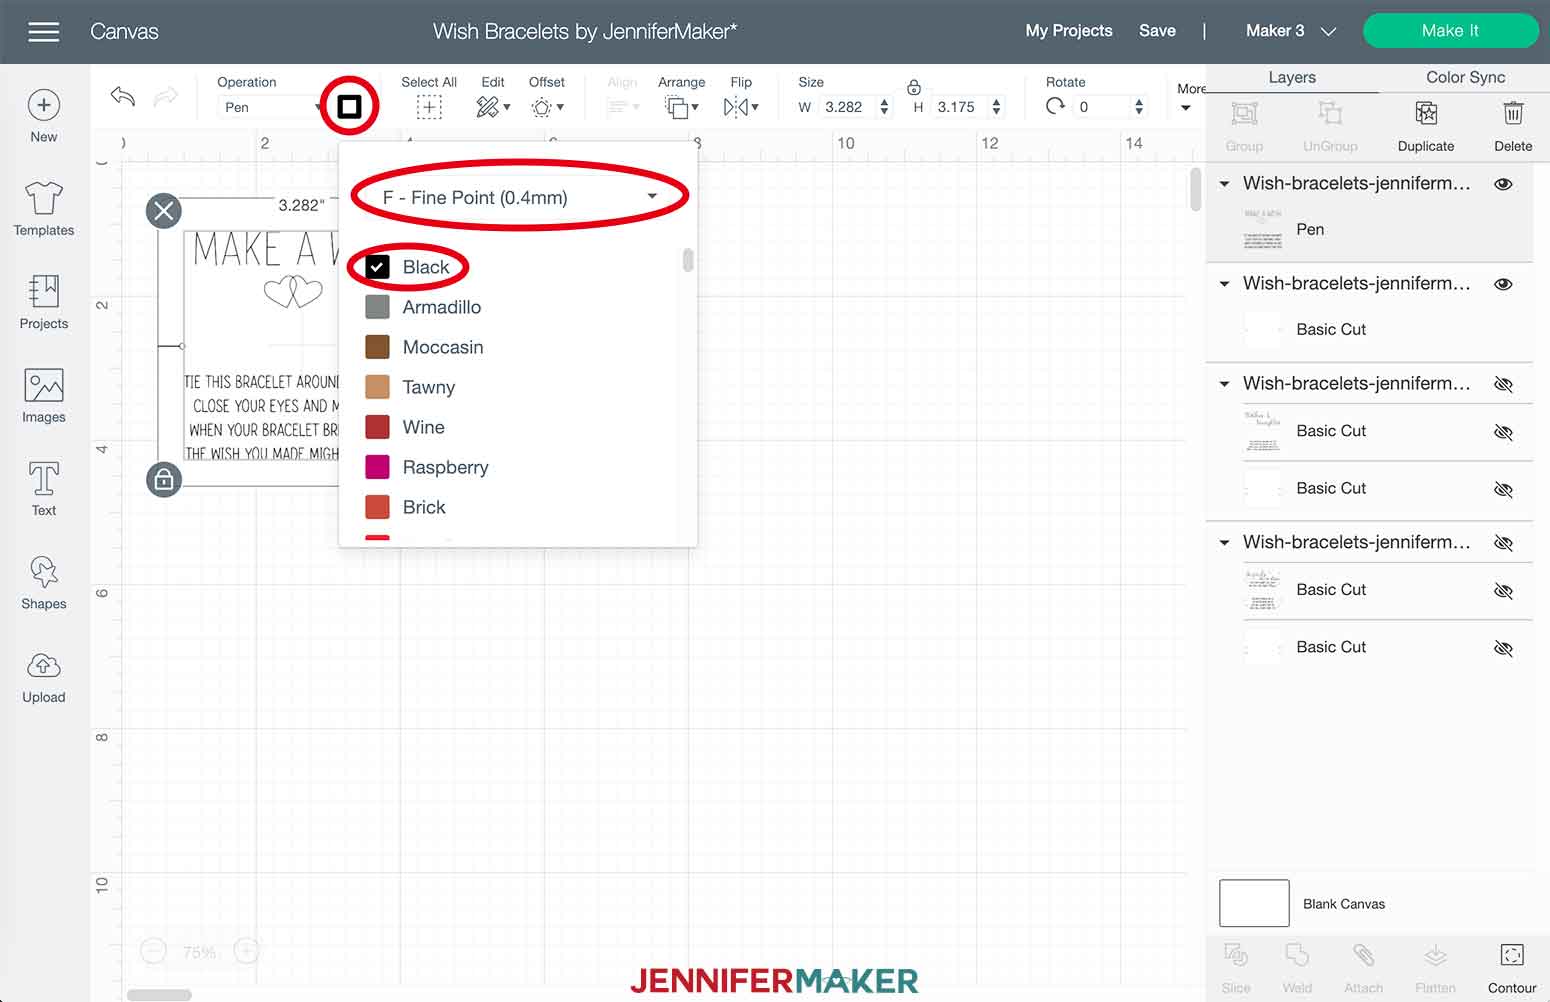
To change the pen type and color, click on the little square icon or color picker next to Operation. I recommend using a Fine Point 0.4 Pen in black, but feel free to use a different color if you like.
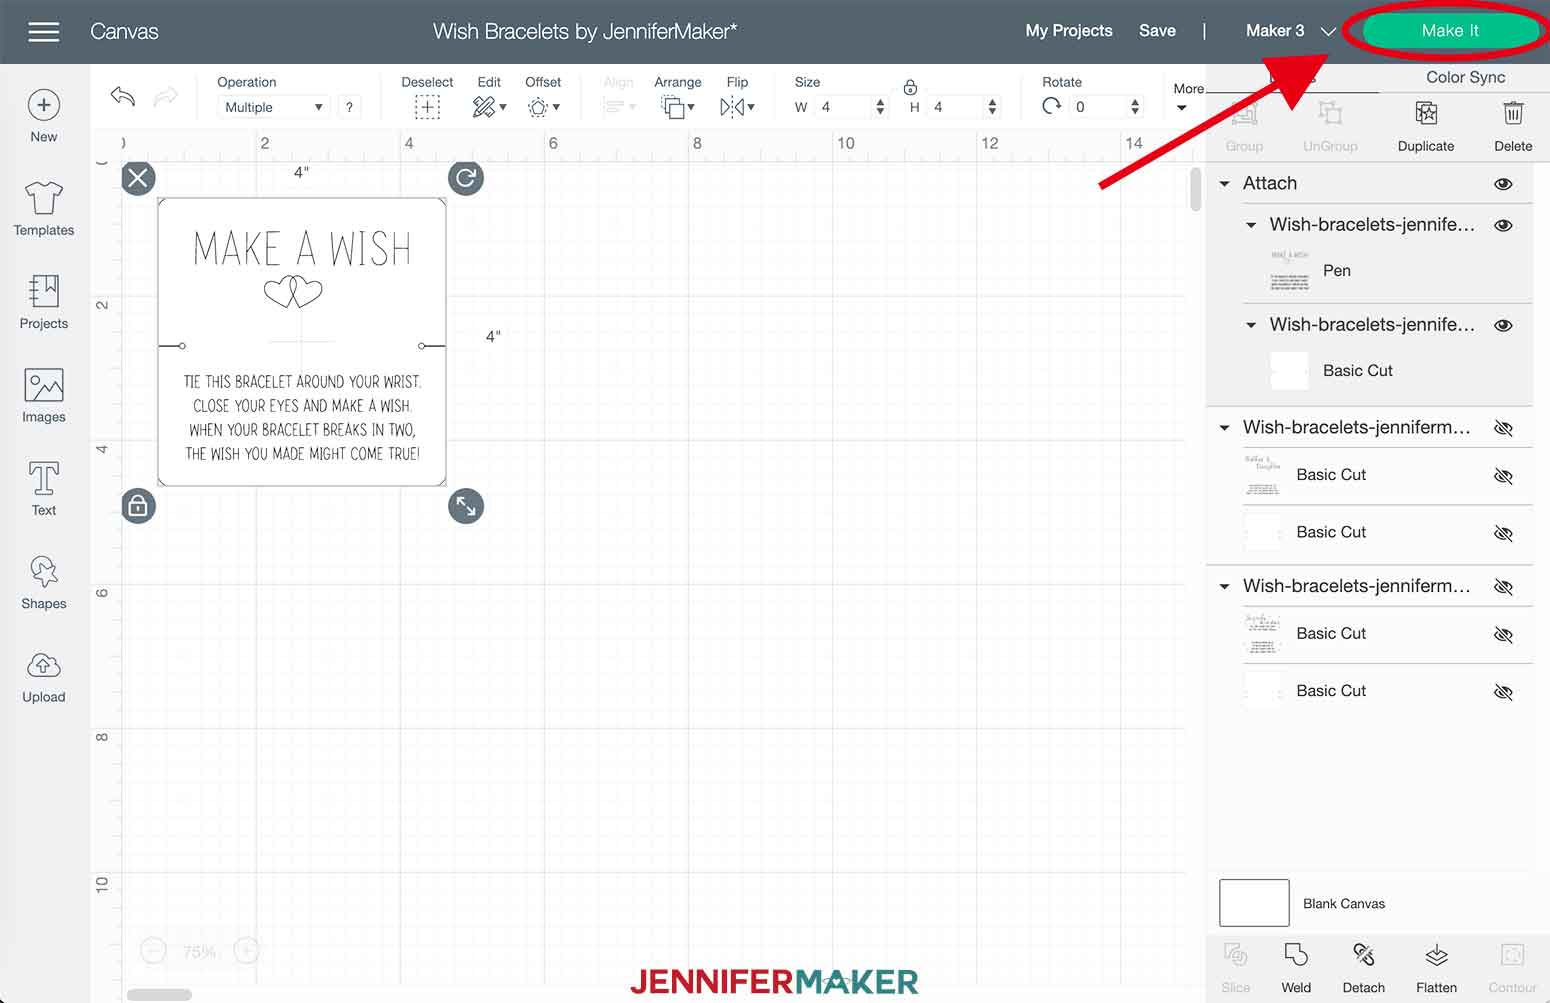
Now that your pen layer is set, select both the wish bracelet card layer and pen layer and click Attach.
Click Make It in the upper right corner.
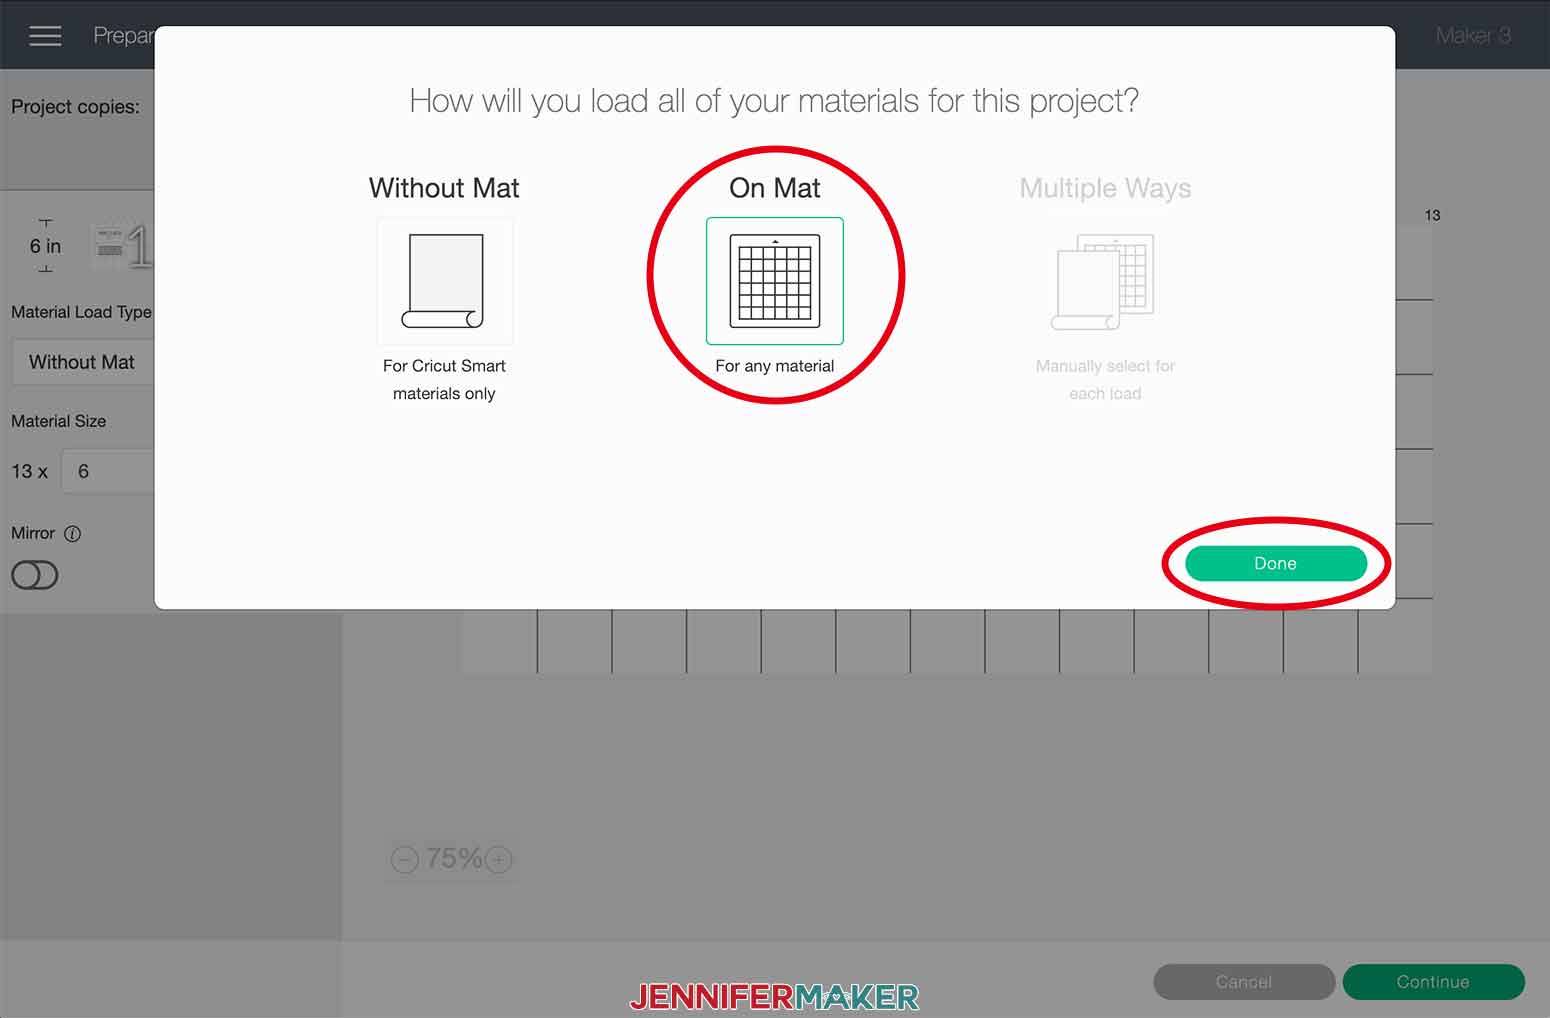
If you are using a Cricut Maker 3, Explore 3, or Joy, you will be asked if you are cutting your designs without a mat, on a mat, or multiple ways. Remember that only Smart Materials may be used without a mat. I am not using Smart Materials with this project so I will select "On Mat" and click "Done."
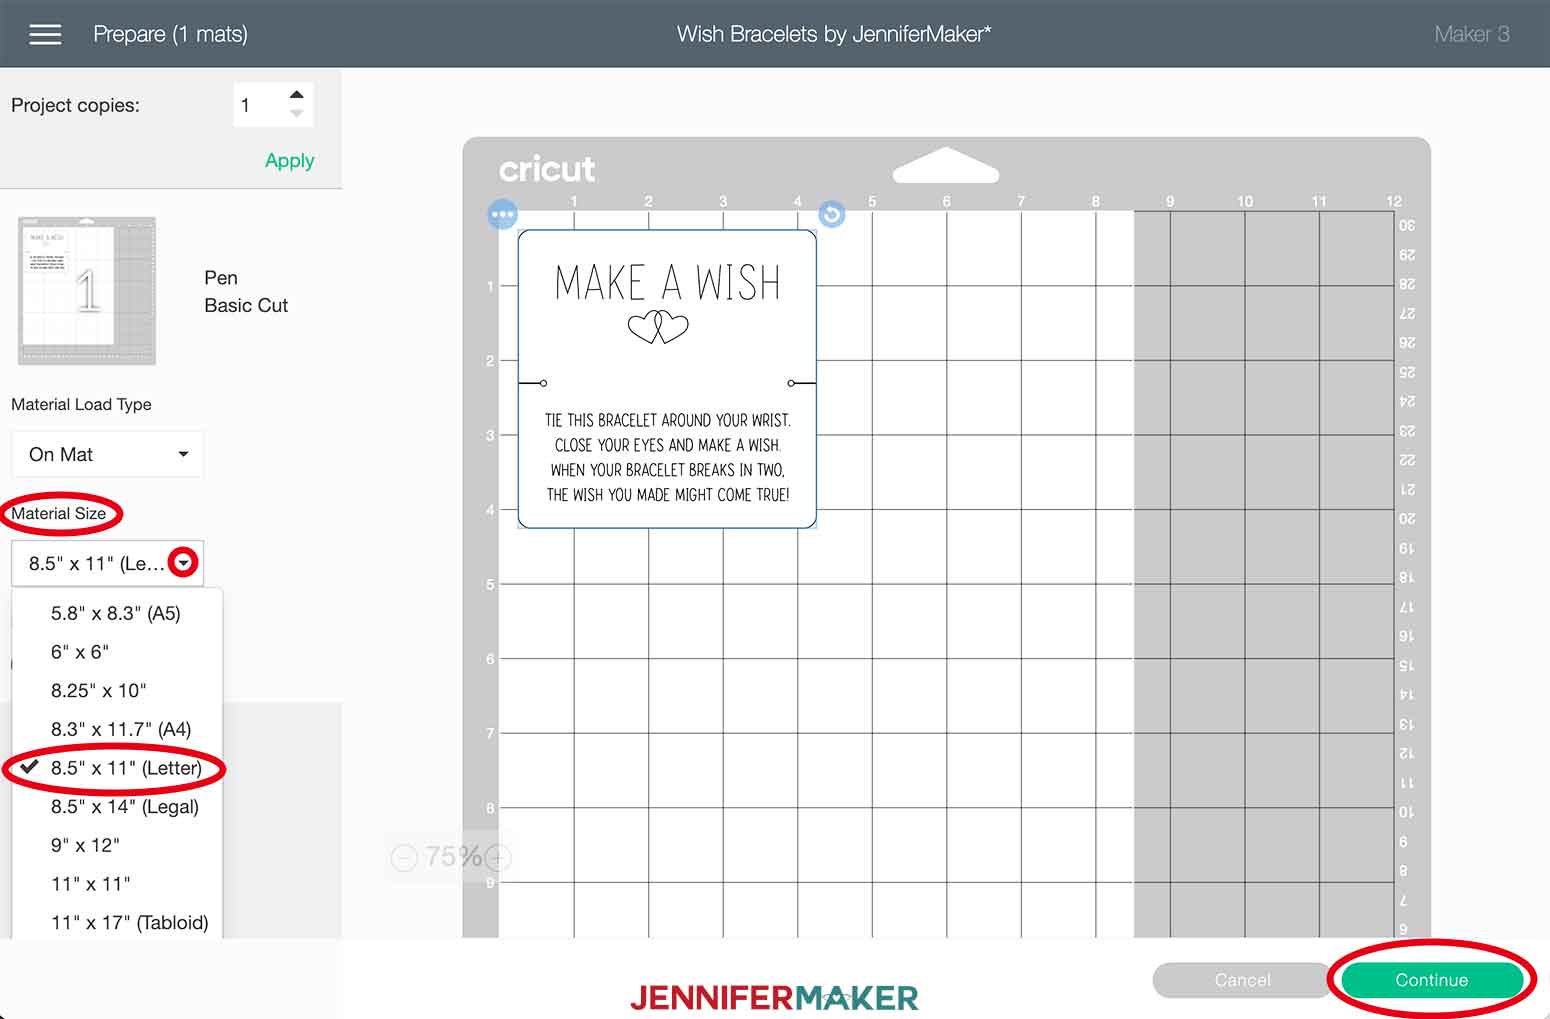
If you are using the same cardstock as me, you will need to change the material size for the cardstock. Click on the dropdown and select 8.5 x 11". Click Continue in the lower right corner.
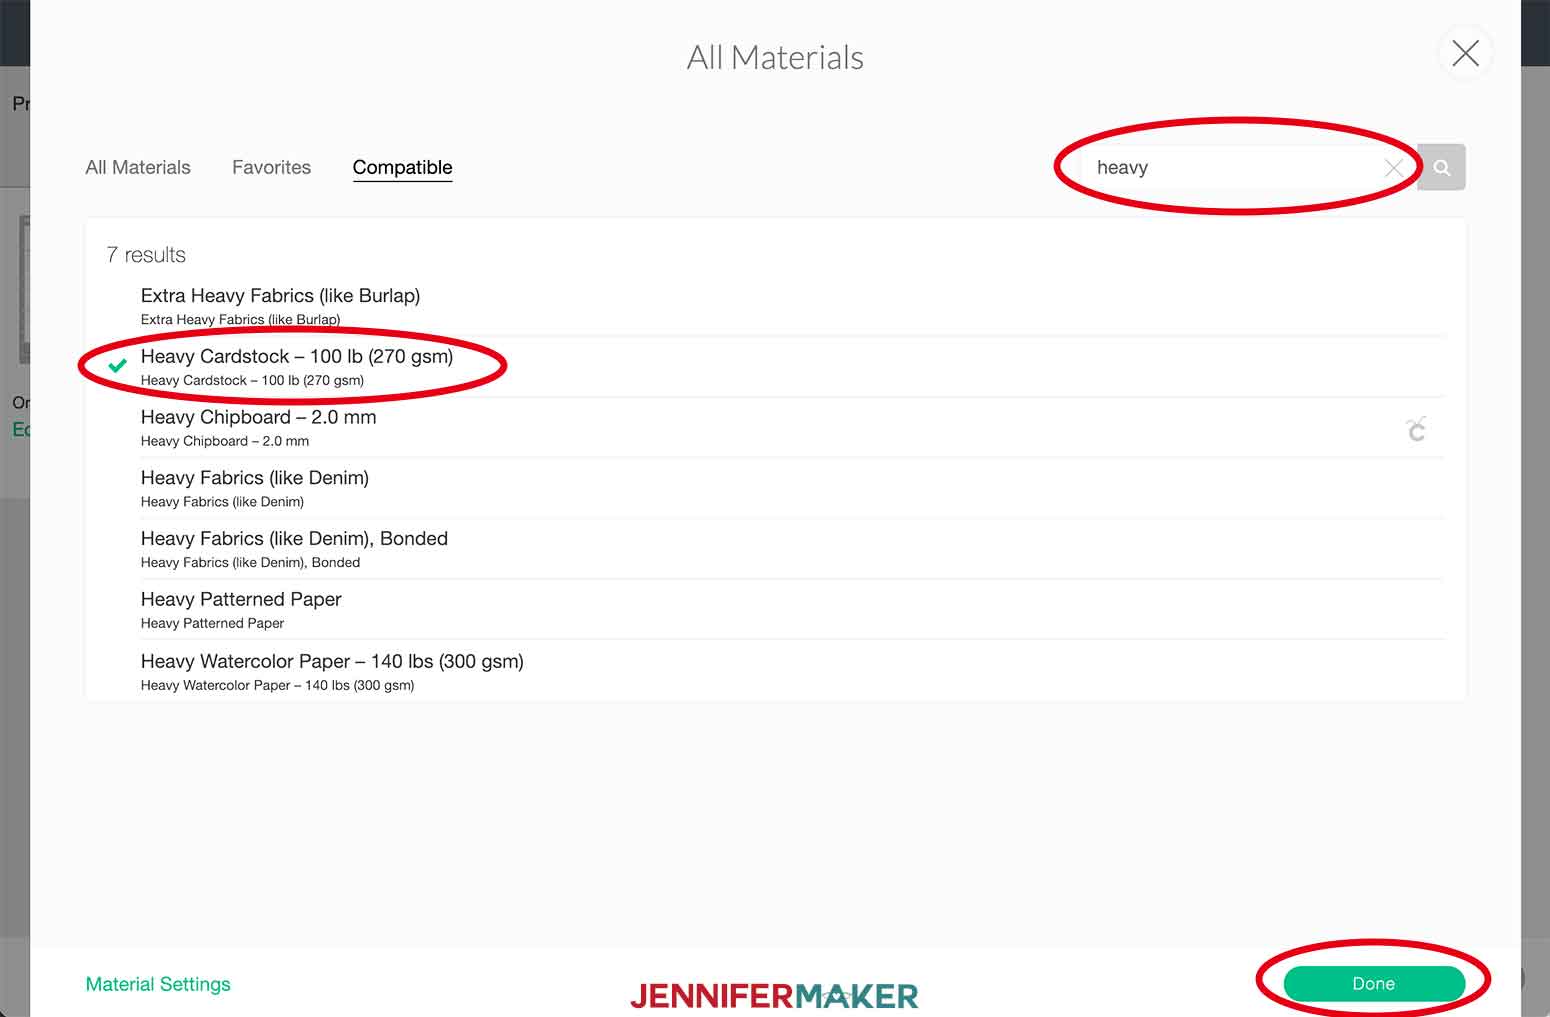
Now we are going to select our material type. Click on Browse All Materials.
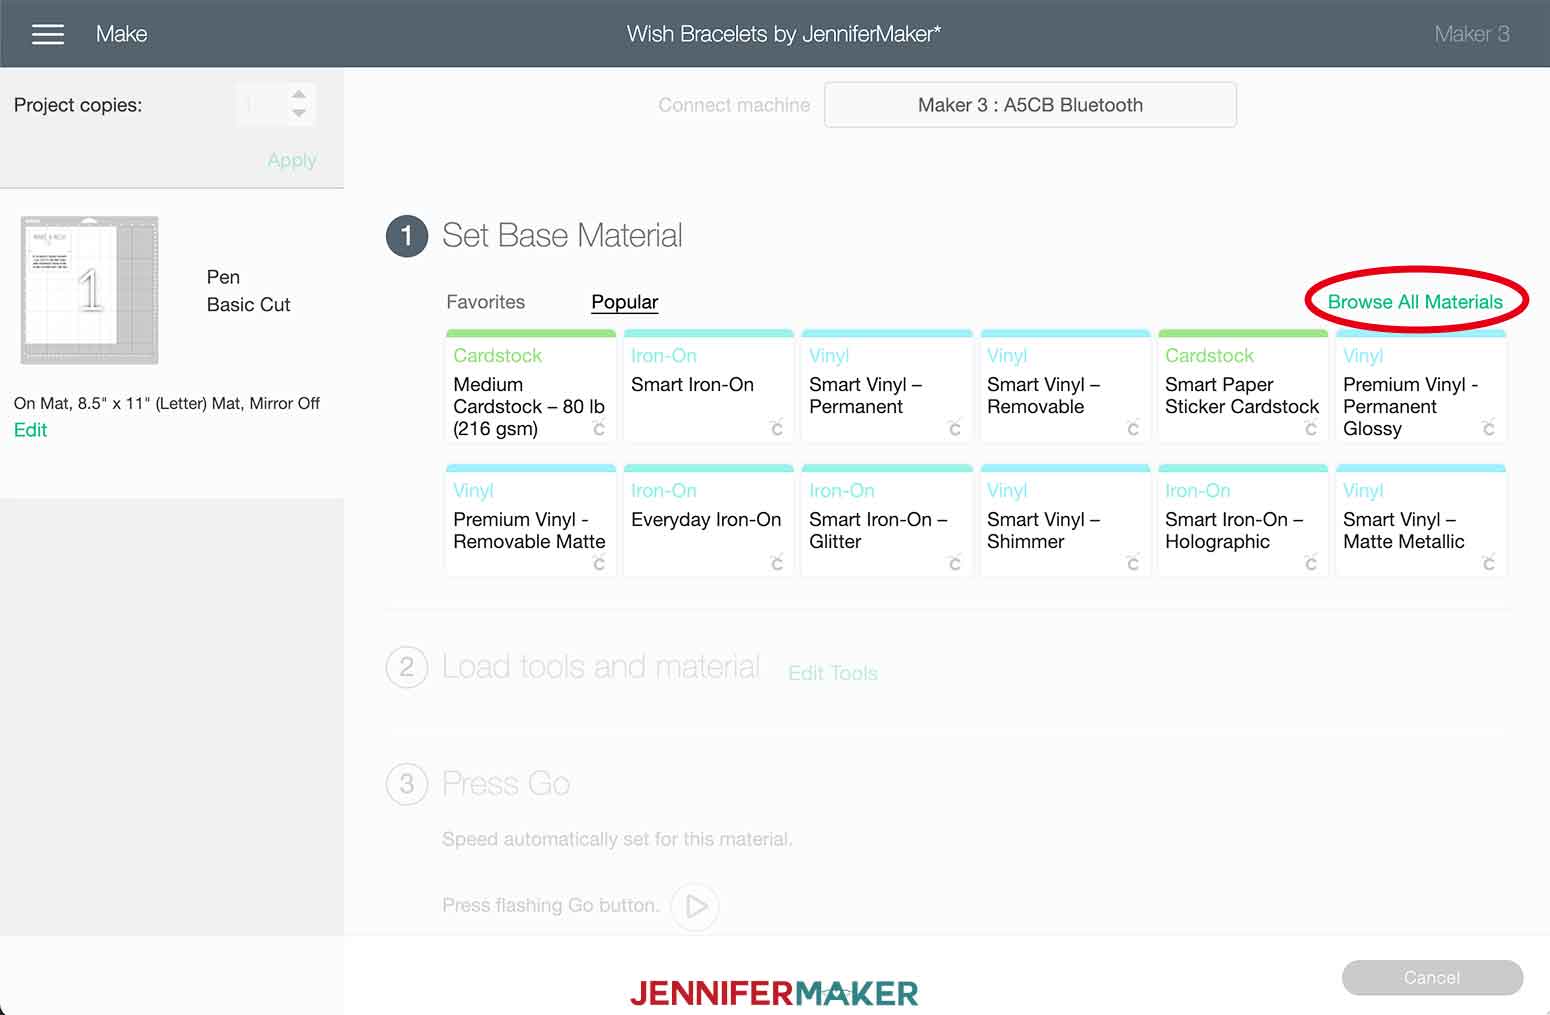
You can scroll to find the material or use the search function. I chose to search "heavy" for Heavy Cardstock. Select it and click Done.
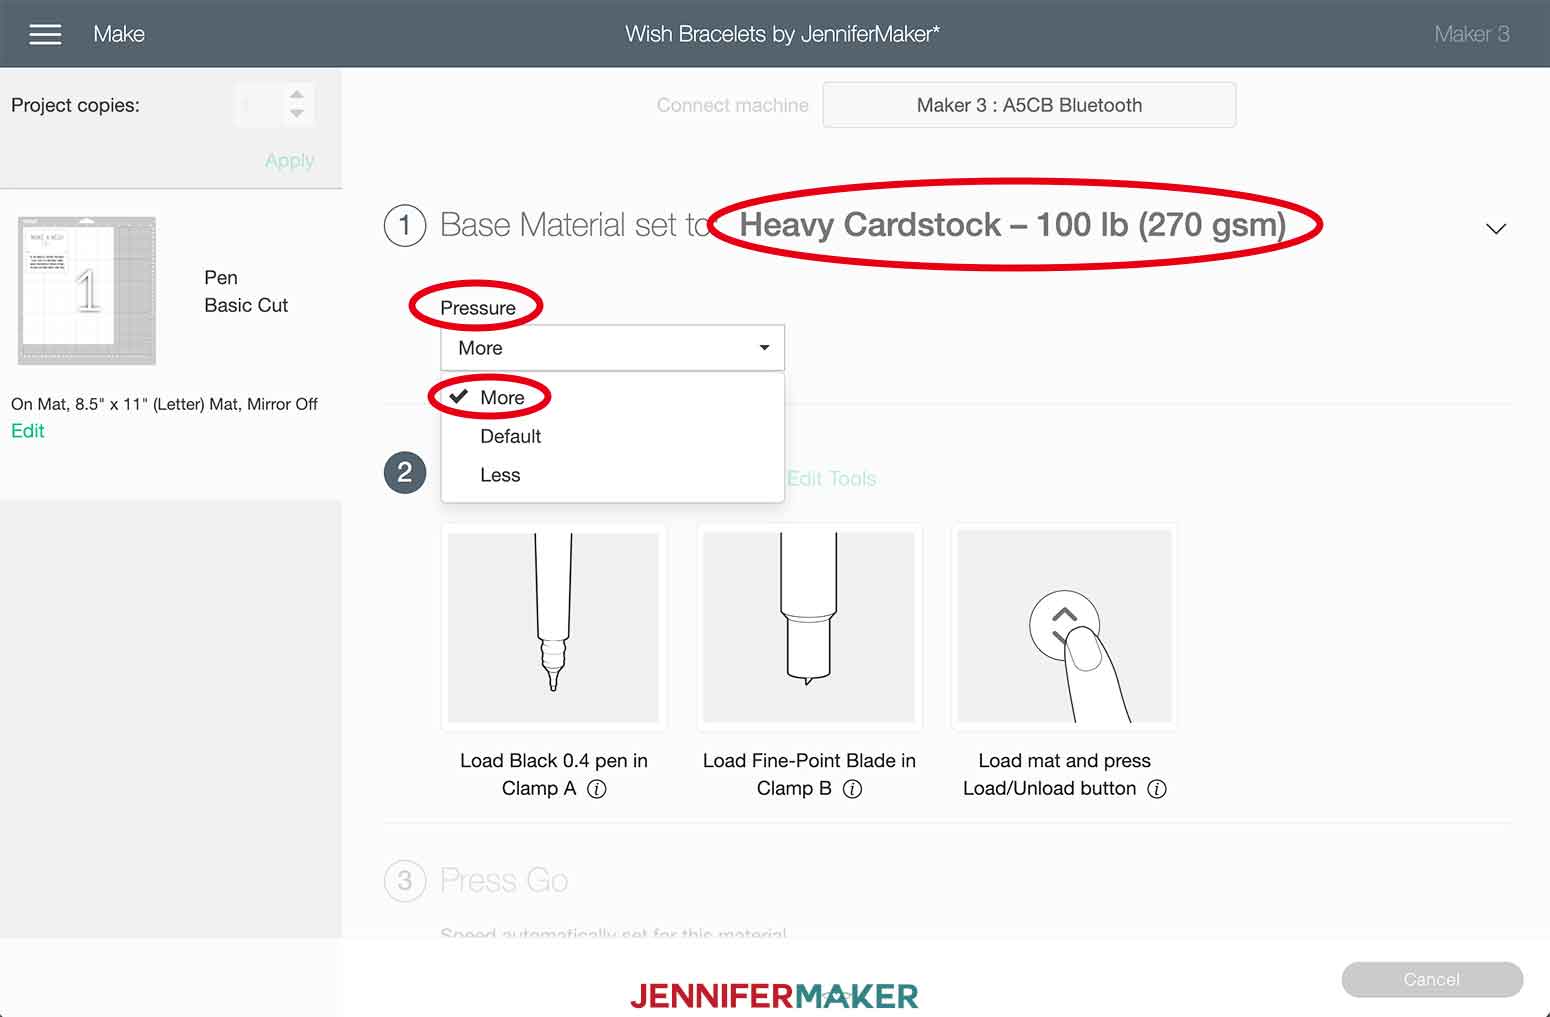
I recommend setting the pressure setting to More for a clean cut.
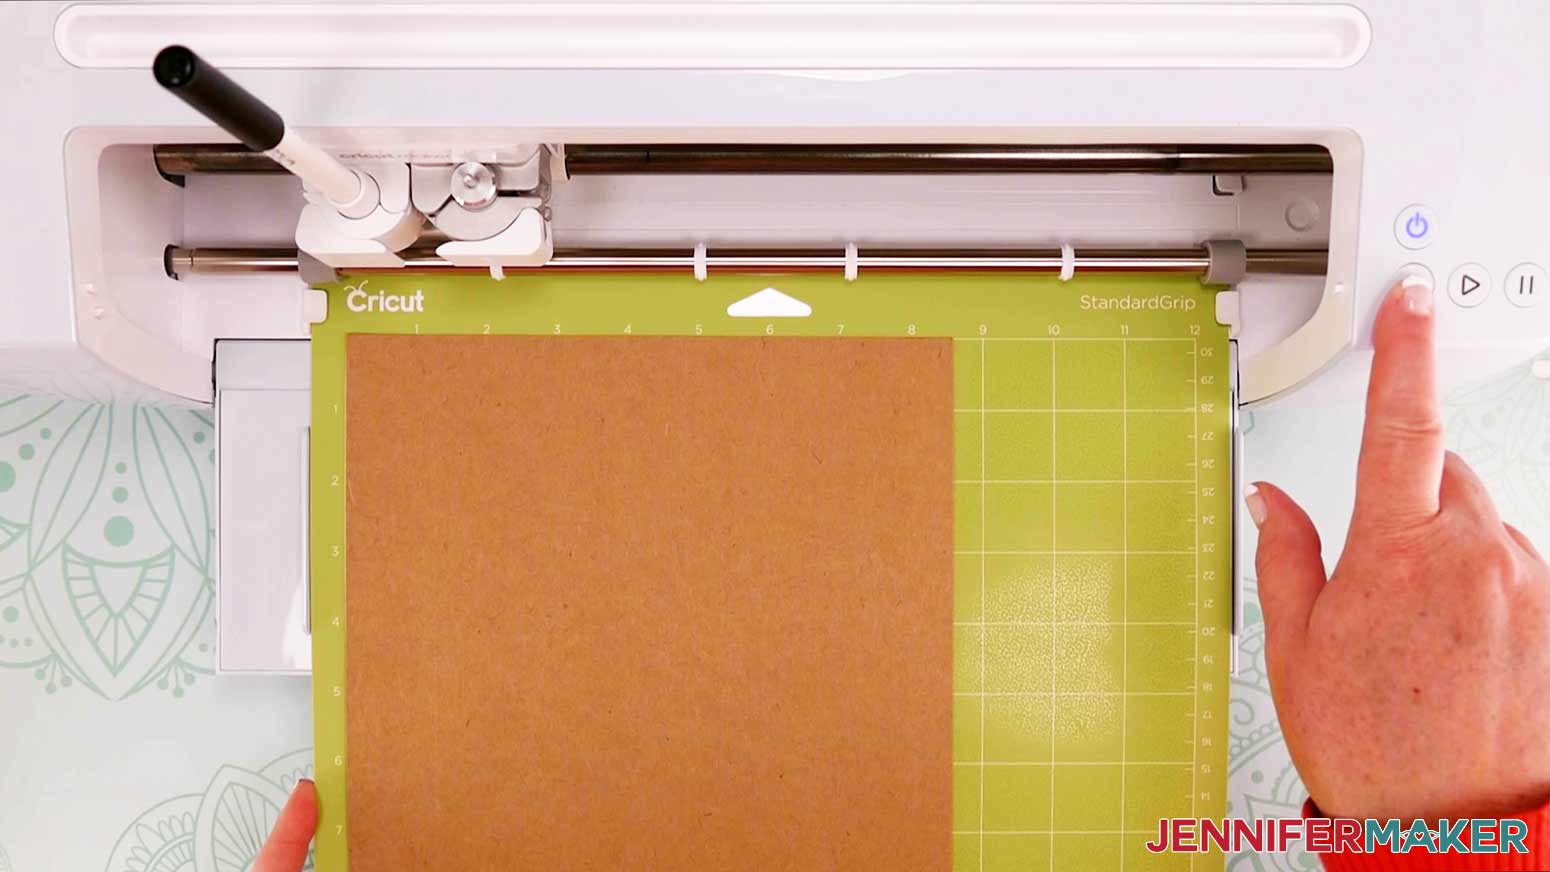
Place your cardstock on your Green StandardGrip mat.
Insert your Fine Point 0.4mm Black pen into clamp A.
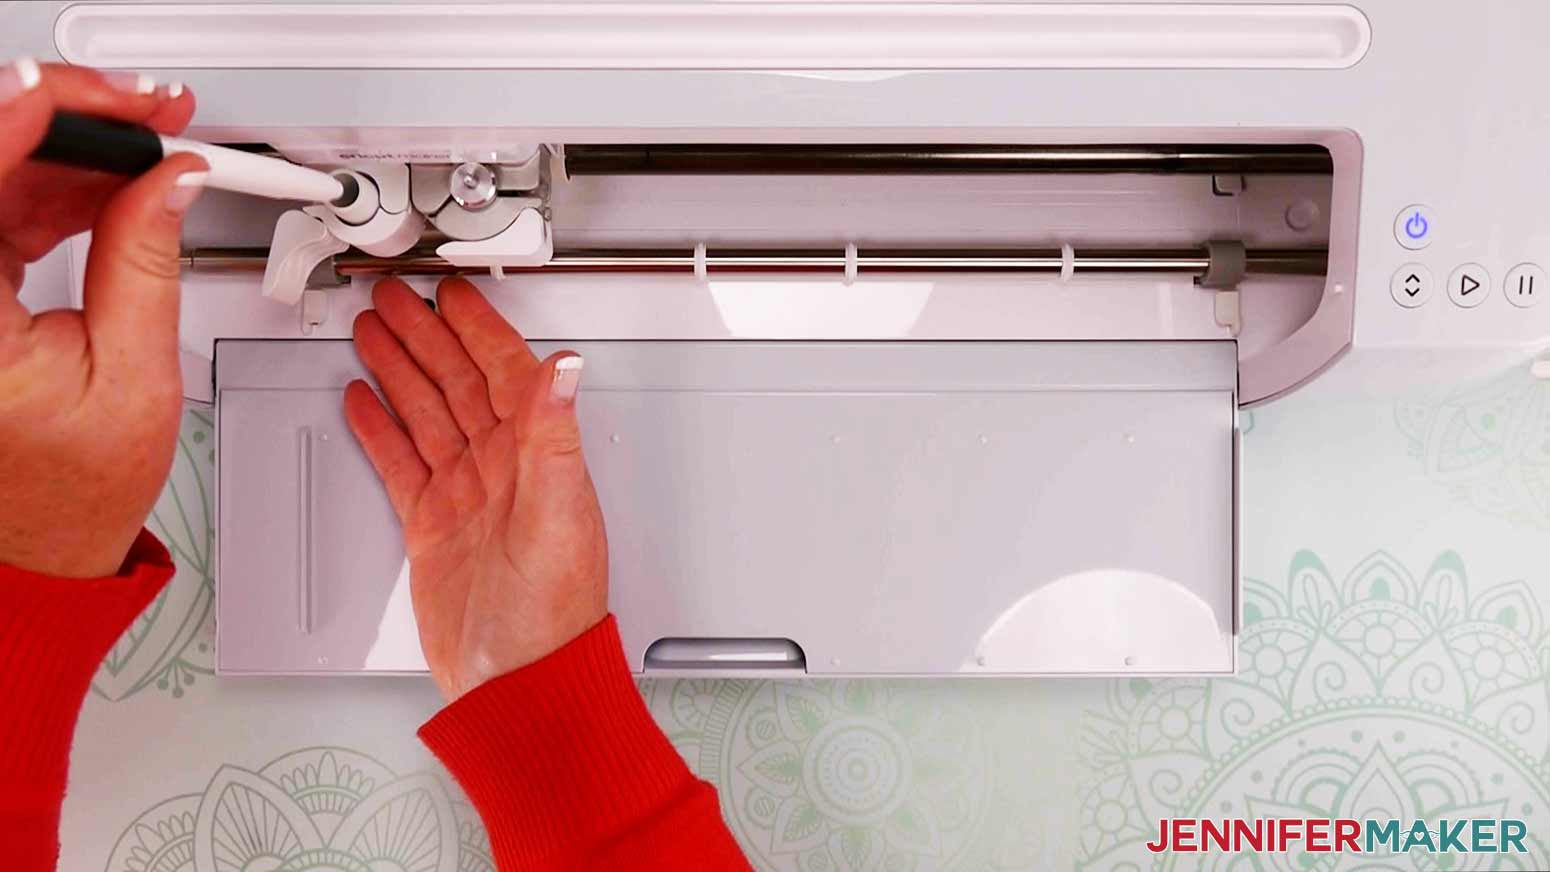
Now load the mat into your Cricut. When the middle light is flashing, press it to begin making your wish bracelet cards.
When your Cricut is done drawing and cutting, first unload and recap the pen. Now unload the mat, flip the mat over onto your work surface, and peel the mat away from the cardstock carefully.
NOTE: You may need to use your weeding tool to poke out some of the small cut holes in the cardstock.
STEP 3: ASSEMBLE YOUR WISH BRACELET
Select your desired color of twine and any beads you like. Make sure to cut a long enough piece of twine so you have room to attach a charm, tie around a wrist and tie in a bow around the back of the card. I would suggest a 16” piece of twine.
Now, string your beads and then gently insert the bracelet through the small holes in the back card.
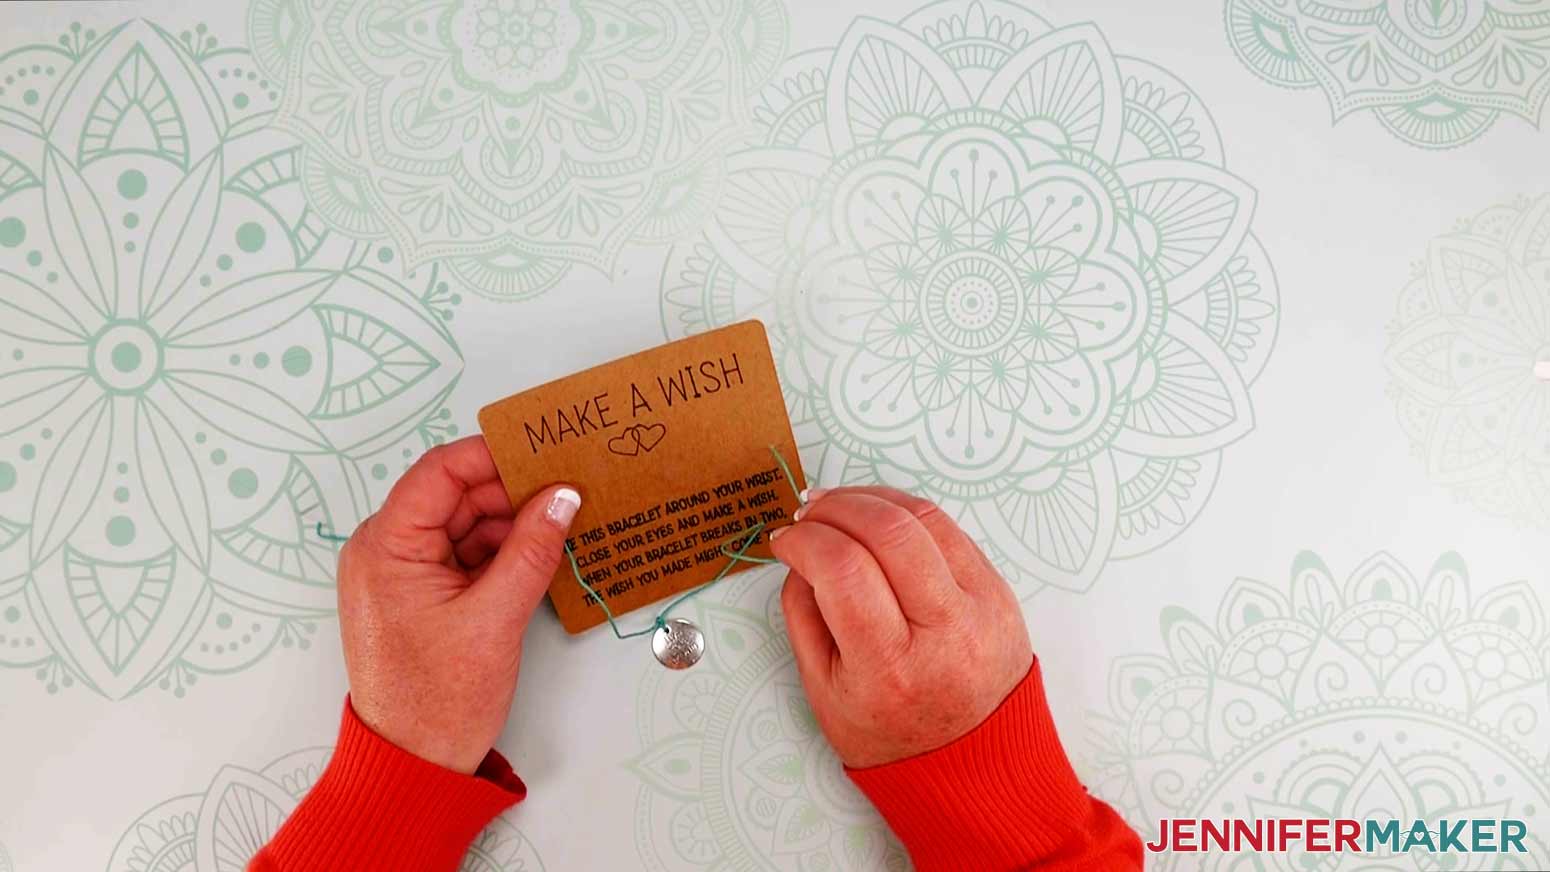
Turn the card over and gently tie a bow to secure your bracelet. And that's it...such a cute project that makes a great gift!
These are so fun and easy to make and the Cricut does most of the work!
Notes
FONTS USED
Make a Wish - Dear Agatha
Mother & Daughter - Dear Agatha, Pinsetter Line
Friends - Dear Agatha
Recommended Products
As an Amazon Associate and member of other affiliate programs, I earn from qualifying purchases.

The detailed step-by-step assembly video on how to create personalized round wood door hangers is part of Maker Academy Weekend 2021. Get a pass to watch all 20+ workshops, each with a printable handbook, transcript, audio files, design files, and support with a VIP pass below:

Answers to Your Questions About How to Make DIY Wish Bracelets
Q: Where is your tutorial for this project?
This is a special project we made for our free Maker Academy Weekend 2021 event! A complete and detailed step-by-step video premiered during the event November 4-7, 2021 — specifically, this tutorial video was available to watch for free for 24 hours beginning November 5 at 2:00 pm ET! Get the workshop video and a 15-page printable handbook that details how to make this beautiful project with a VIP Pass to Maker Academy Weekend 2021, which comes with other perks and bonuses, too!
Get the free designs for my DIY Wish Bracelets!
I love seeing what you make with my designs and how you use them! Please share a photo of your wish bracelets in our Facebook group or tag me on social media with #jennifermaker.
Love,

Want to remember this? Save this DIY Wish Bracelets Tutorial to your favorite Pinterest Board!