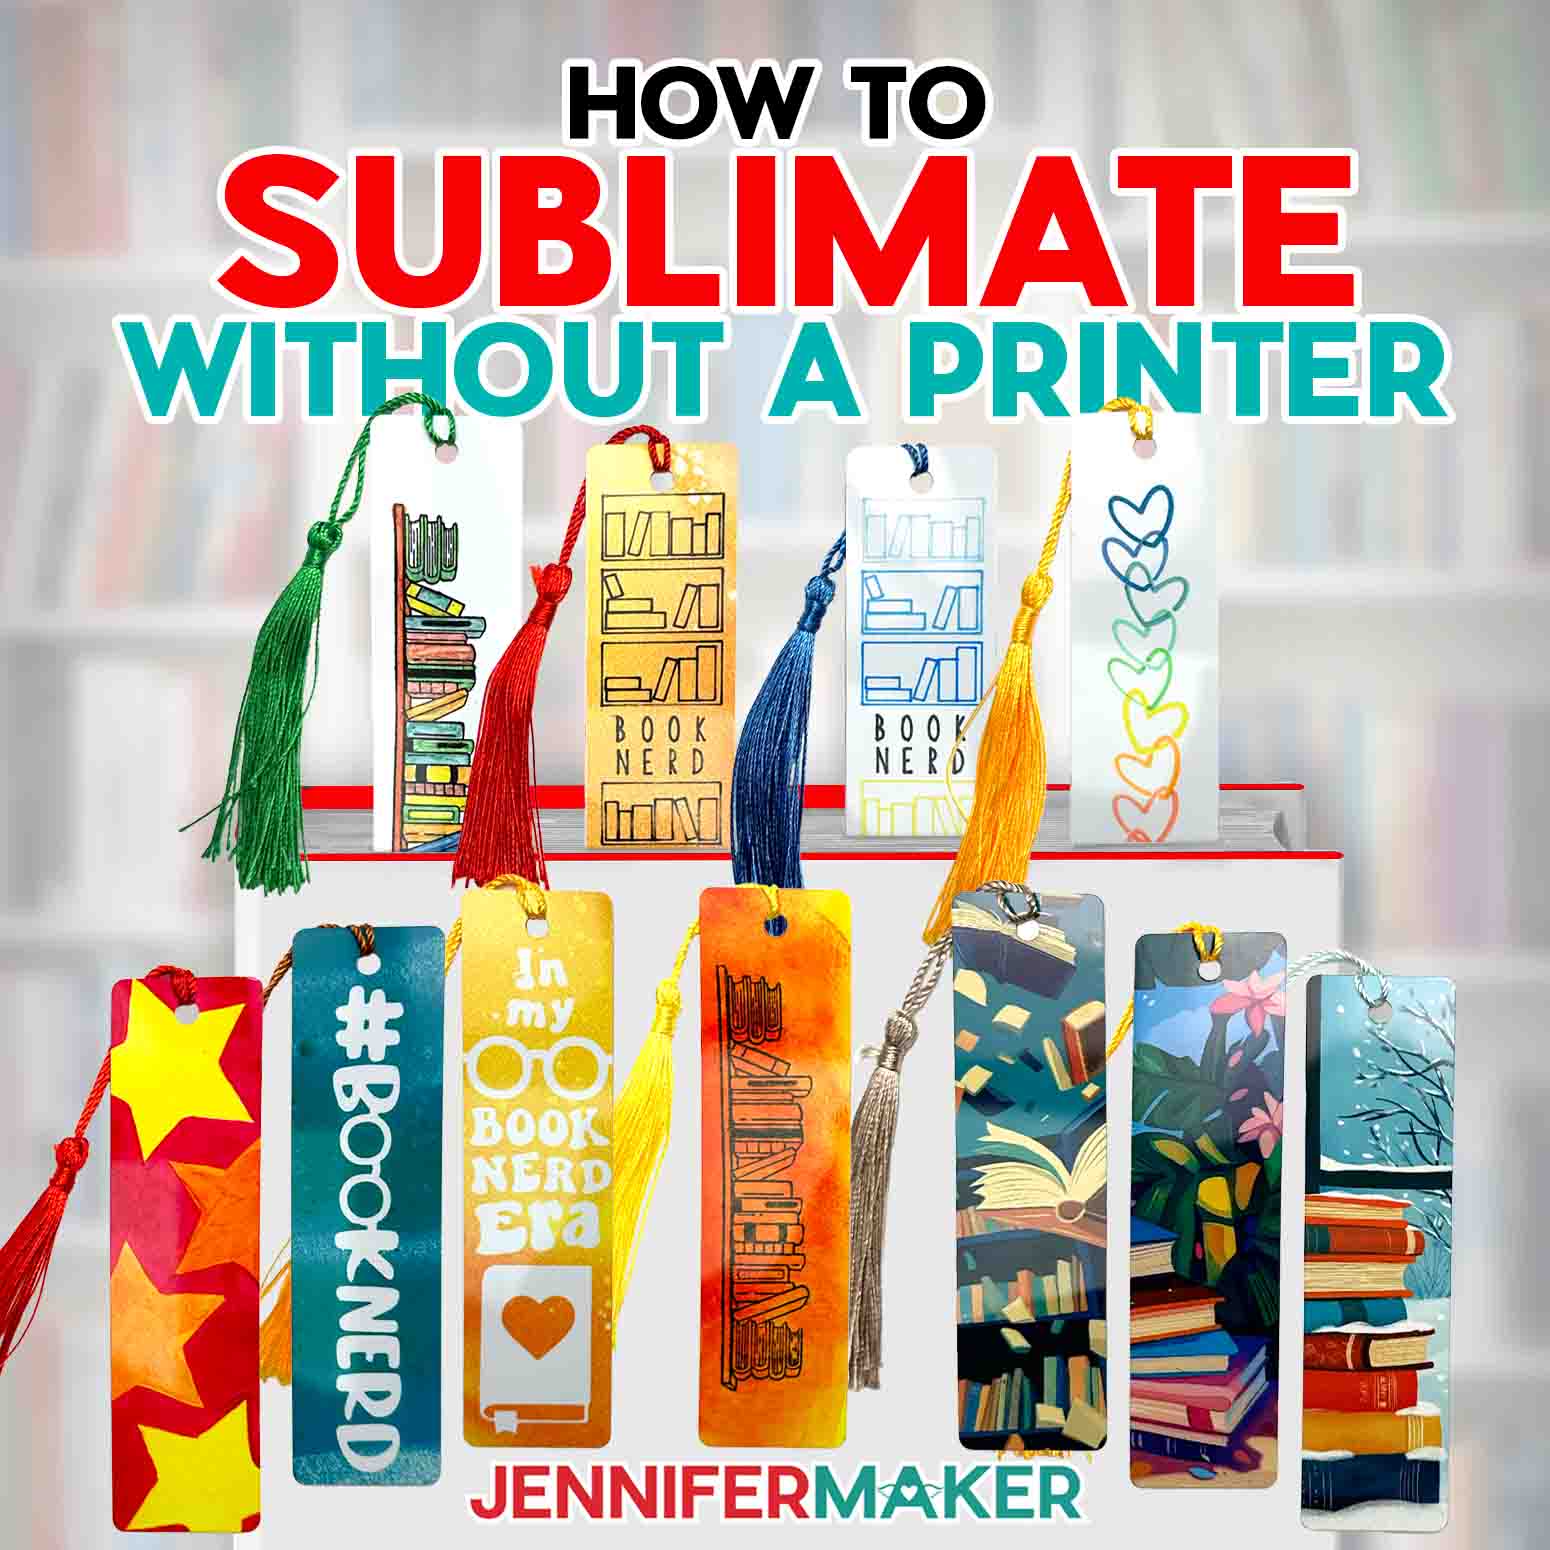
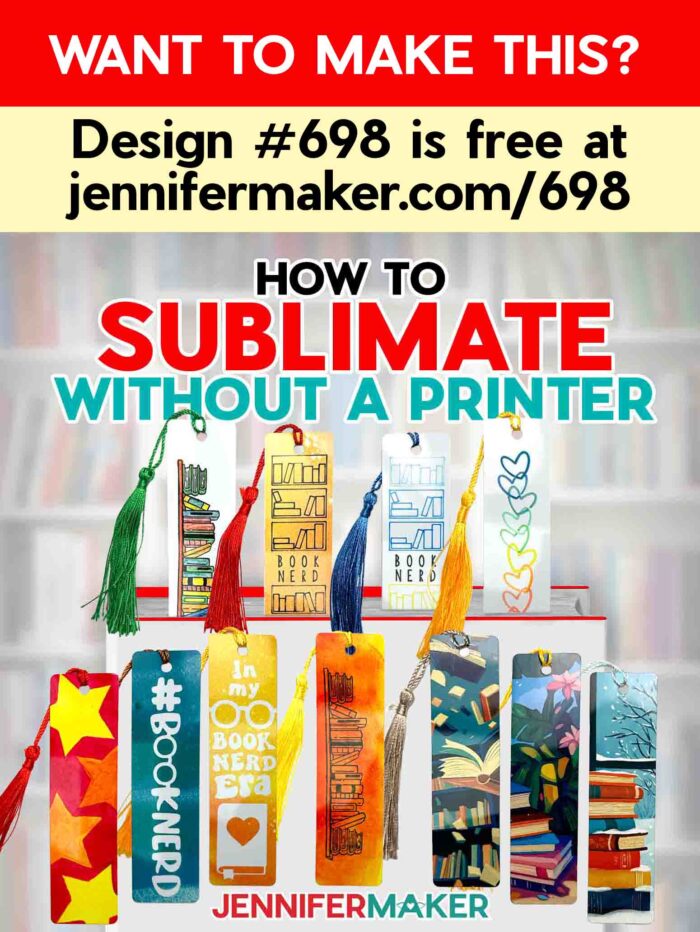
Learn how to sublimate bookmarks and other blanks without a sublimation printer!
Want to try sublimation before investing in a sublimation printer? There are alternative methods that can achieve beautiful effects! Not having a printer doesn’t have to stop you from achieving the vibrant, permanent results possible with sublimating, even if you’re away from your craft supplies. The truth is, there are sublimation techniques you can try almost anywhere! Using these methods, I’ve crafted a variety of unique bookmarks, and you’ll be surprised at how easy (and fun!) they are to make.
Watch the full step-by-step video tutorial on how to sublimate without a printer:

Life at Maker Farm has been bustling lately. As we close in on completion of our new studio, it’s been a near-constant flurry of projects and challenges. Don’t get me wrong – the work is incredibly rewarding, but sometimes I just need to disconnect and unwind. One of my favorite ways to do this is by escaping into a good book. I like to create moments of magic by bringing a story with me wherever I go, and taking moments of rest to get lost in its pages. But what about when it’s time to get back to work? I need something to mark my page – like a bookmark I made myself!
Unlike reading, though, some hobbies don’t seem very portable – like print sublimation.
If you’re brand new to sublimation printing, it is a popular technique for creating long-lasting, full-color designs on compatible materials like white polyester fabrics and sublimation blanks with a white background. Typically, this process requires a dye sublimation printer and special inks to transfer designs. But what if you don’t own a sublimation printer? Don’t worry! There are plenty of creative ways to explore the world of sublimation without investing in a dedicated printer. In this tutorial, we’ll dive into different techniques that yield stunning results! Bookmarks are a fantastic first-time project for experimenting with sublimation techniques, so I’ll demonstrate with those.
Sublimation printing uses high temperatures and sublimation dyes to infuse designs into a polyester T-shirt, a tote bag, a hat, or polymer-coated blanks like bookmarks, coasters, mugs, and more. The dye sublimation process bonds the ink directly into the fibers or coating of the item, ensuring vibrant colors and a durable, long-lasting design.
In this tutorial, I’ll show you five different ways to sublimate bookmarks without using a sublimation printer, plus tips and tricks for the best results!

Infusible Ink Transfer Sheets
Infusible Ink transfers are a fun and accessible way to sublimate designs. With the help of a cutting machine like a Cricut, you can cut intricate designs from Infusible Ink sheets and transfer them to sublimation blanks using heat. I’ve included two Infusible Ink SVG designs in my download folder: A “#booknerd” design and a “book nerd era” design. I’ve also included DXF files if your cutting machine uses those, as well as PDF versions in case you’d like to try cutting the designs by hand.
Infusible Ink Pens Drawn with a Cricut
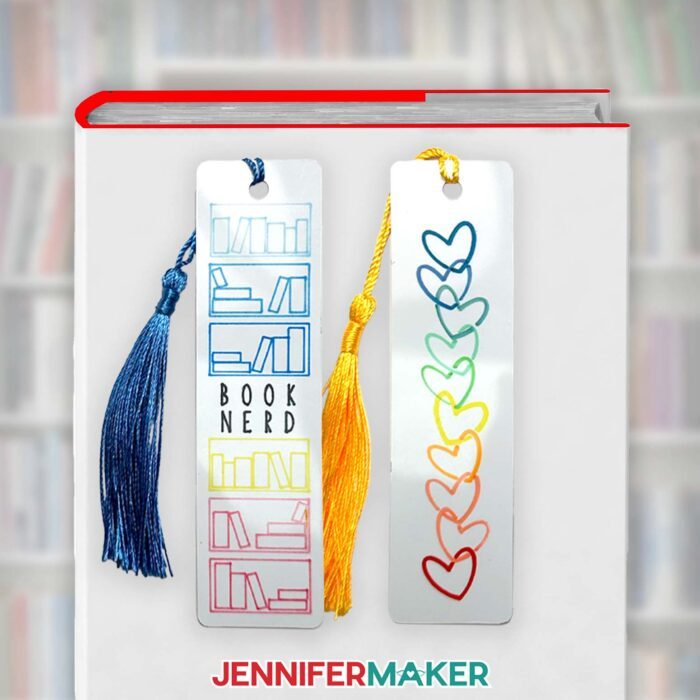
Infusible Ink comes in different formats, too! I’ll share how to use Infusible Ink pens and markers to draw or write directly onto plain white laser copy paper. You can even use a Cricut to draw the designs for you! I’ll show you how with my “bookshelves SVG design, but the hearts design in the download folder is perfect for this method, too. Once your image is complete, you can use a heat press to transfer the artwork to your blank. This technique is great for personalizing projects with a hand-drawn look.
Sublimation Paint
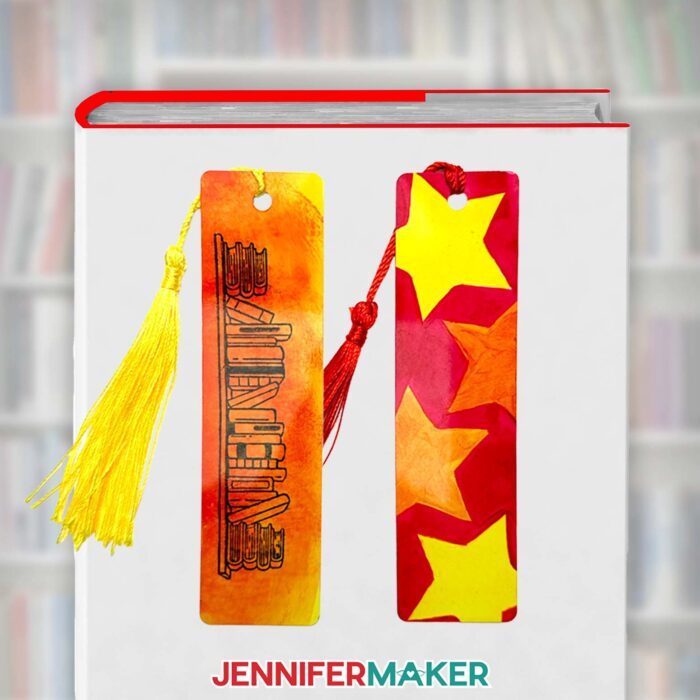
Sublimation paint is a medium I had never tried before, but I ended up loving the results! It’s a special type of paint that allows you to create custom artwork and colors that can be infused into sublimation blanks. Simply use a brush to paint your design on plain white laser copy paper, let it dry, and then use a heat press to sublimate it onto the item. In this method, I’ll show you how to make your Cricut draw a stars SVG design onto the paper for you, and then demonstrate how to fill it in with sublimation paints. I found that the paint brushes on the paper really smoothly! Just be aware, though, that the paint tends to dry darker than you might expect, so trying to remix and match a certain color might be difficult.

Stamps with Sublimation Ink Pads
Stamping is another creative way to sublimate without a printer — or a Cricut! I’ll show you how to use sublimation ink stamp pads and rubber stamps to create designs on sublimation transfer paper. The stamp pads are filled with special dye sublimation ink that sublimate the same way as any other sublimation method. You can even blend colors with a brush for a rainbow or ombré effect! Just be sure to rinse your brush really, really well before using other colors.
Use a Sublimation Printing Service
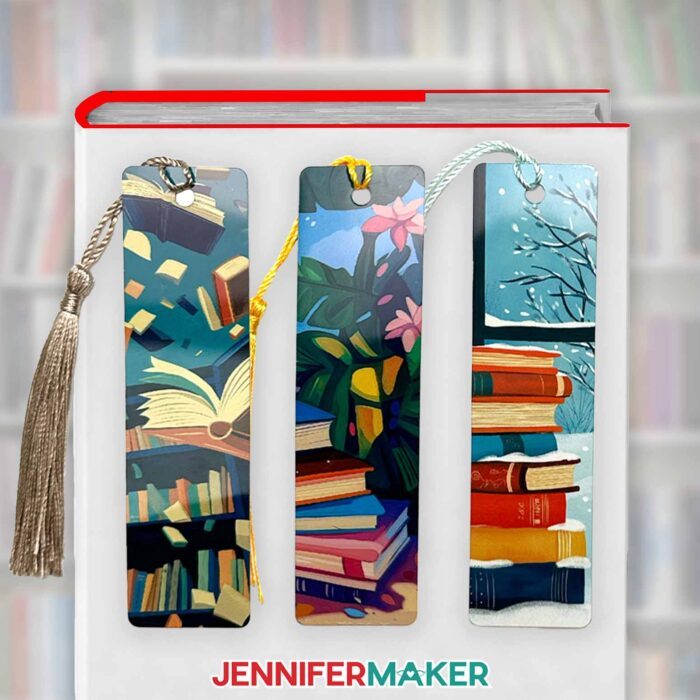
Want a specific printed image that you just can’t render using the methods above? Consider using a sublimation transfer printing service. These services allow you to upload your designs and receive ready-to-use sublimation transfers in the mail. You can then apply these to your blanks at home with a heat source.
When choosing a business or Etsy seller to order prints from, consider the following:
- Is there a minimum number of prints required to place an order?
- Do they offer digital proofs?
- Do they require you to mirror your image, or do they mirror it for you?
- Do they scale images to fit the paper size you order, or do they print images at the original size you upload?
- How fast do you need the print? What is their print time and shipping speed?
- How much does shipping cost?
- Does the company have reviews? Are they mostly positive or negative?
Some important tips:
- Measure your sublimation blank’s sublimatable surface and make sure the design you provide to the printing service measures at least ⅛” larger on all sides for full-coverage projects.
- Making a bunch of small projects? Create a page with multiple smaller images to save money!
- Order a few extra prints in case you make a mistake.
- Order designs you’ll make again in bulk to save money and time – they can be stored indefinitely!
I found and used an online sublimation print vendor called Jiffy. Here’s what my experience was like:
- You can order your prints pre-cut so they include a white paper border to help secure them to your blank.
- My prints were shipped using UPS Ground and arrived in a single day! Jiffy uses partner printers to provide their prints, which means shipping will be fast, but results may vary depending on which service printed your transfer.
- The prints arrived rolled, rubber banded, and placed in a plastic bag, which was then shipped in a cardboard box.
- The paper is very thin compared to the A-sub sublimation paper I normally use, but the prints pressed well.
- When comparing Jiffy print results with A-Sub paper results after pressing, the prints from Jiffy are a little darker and grainier than the prints I made myself, but they still turned out beautifully when sublimated.

Whichever method you use, you’ll need some basic sublimation supplies and tools like heat-resistant tape, butcher paper, and white cardstock to transfer your finished sublimation design onto your bookmark or other blank.
No matter which method you use, you’ll also need a fan or an open window for proper ventilation. Safety first! Check the materials list below for a list of tools and supplies you’ll need for each method, and for the sublimation process.
Since I’m demonstrating on bookmarks, a flat heat press machine works great to sublimate them and other flat items. I’ll demonstrate with my Cricut EasyPress, but any other heat press will work — just make sure your blanks fit fully underneath the heat plate. If you’re sublimating a more three-dimensional object like a mug, you’ll need a different heat source like a craft-purposed sublimation oven or a mug press.
So, it turns out you CAN sublimate without a printer! These methods work on all types of compatible blanks, so you’re not just limited to bookmarks, either. For the ultimate guide on pressing sublimation projects, check out my Sublimation Cookbook for times, temperatures, and techniques for beautiful sublimation results!
Let me show you how to sublimate without a printer! This post contains some affiliate links for your convenience (which means if you make a purchase after clicking a link I will earn a small commission but it won’t cost you a penny more, there is no additional cost)! Read my full disclosure policy.
Materials to Sublimate Without A Printer
View my Amazon shopping list for the exact items I used!
For Infusible Ink Transfer Sheets:
For Infusible Ink Pens:
For Sublimation Painting:
For Sublimation Stamps:
For all projects:
For Infusible Ink Transfer Sheets:
For Sublimation Painting:
-
- A way to draw and cut your design, any Cricut will work
- Cricut Green StandardGrip Machine Mat 12″ x 12”
- Brayer
- Weeding Tool
- Tweezers
- Spatula
- Scissors
- Paint Brush
- Paint Palette
- Paper Cup -AND- Water (to rinse your brush between colors)
For Sublimation Stamps:
For Print Sublimation:
-
- Scissors -OR-
- Paper Trimmer
For all projects:
-
- Heat Press – I used the 9” x 9” Cricut EasyPress
- Cricut EasyPress Mat
- Fan (for ventilation)
- Heat Resistant Gloves
- Heat Resistant Tape
- Isopropyl Alcohol (to clean your blank) -AND-
- Lint-Free Cloth
How to Sublimate Without A Printer

Sublimate Without A Printer
Learn how to sublimate a bookmark without a printer in several different ways!
Materials
- For Infusible Ink Transfer Sheets:
- Two (2) Cricut Infusible Ink Transfer Sheets (12" x 12" Teal and Orange Splashpad Print)
- For Infusible Ink Pens:
- Cricut Infusible Ink 0.4mm Pens
- One (1) Sheet of 8.5” x 11” Premium Laser Copy Paper
- For Sublimation Painting:
- Iron-on-Ink Sublimation Acrylic Paint Set (I used yellow and red)
- Cricut Fine Point (0.4mm) Pen (in a light color, I used Honeysuckle)
- One (1) Sheet of 8.5” x 11” Premium Laser Copy Paper
- For Sublimation Stamps:
- Black Iron-on-Ink Stamp Pad for Sublimation
- Yellow Iron-on-Ink Stamp Pad for Sublimation
- Orange Iron-on-Ink Stamp Pad for Sublimation
- One (1) Sheet of A-SUB 125g Sublimation Paper 8.5" x 11"
- For all projects:
- One (1) 1.25” x 4.75” Sublimation Blank Bookmark
- One (1) 12" x 12" Sheet of White Cardstock
- White Butcher Paper
- Design #698 (My free SVG/DXF/PNG/PDF design files are available in my free resource library - get the password by filling out the form at the bottom of this page)
Tools
- For Infusible Ink Transfer Sheets:
- A way to cut your materials - I’m using the Cricut Maker 3, but you can also use the Cricut Maker, a Cricut Explore Series machine, the Cricut Venture, the Cricut Joy, or Cricut Joy Xtra
- Cricut Green StandardGrip Machine Mat 12" x 12”
- Brayer
- Weeding Tool
- Tweezers
- Spatula
- Scissors
- For Sublimation Painting:
- A way to draw and cut your design - I’m using the Cricut Maker 3, but you can also use the Cricut Maker, a Cricut Explore Series machine, the Cricut Venture, the Cricut Joy, or the Cricut Joy Xtra
- Cricut Green StandardGrip Machine Mat 12" x 12”
- Brayer
- Weeding Tool
- Tweezers
- Spatula
- Scissors
- Paint Brush
- Paint Palette
- Paper Cup -AND- Water (to rinse your brush between colors)
- For Sublimation Stamps:
- Bookshelf Stamp
- Acrylic Stamp Blocks
- Craft Ink Blending Brush
- Pencil
- For Print Sublimation:
- Scissors -OR-
- Paper Trimmer
- For all projects:
- Heat Press - I used the 9” x 9” Cricut EasyPress
- Cricut EasyPress Mat
- Fan (for ventilation)
- Heat Resistant Gloves
- Heat Resistant Tape
- Isopropyl Alcohol (to clean your blank) -AND-
- Lint-Free Cloth
Instructions
STEP 1: GET MY FREE SUBLIMATION BOOKMARK DESIGNS
First, download my sublimation bookmark designs from my free library – look for Design #698. Alternatively, you can use the Save This Project form near the top of this post and the design link will be emailed to you.
I made some of these designs with the help of AI art generation and adjusted them with image editing software. They are sized to fit the sublimation bookmark blanks in my materials list.
The SVG and DXF folders contain five designs. Two designs (a “Book Nerd Era” design and a “#booknerd” design) can be cut out of Infusible Ink transfer sheets, which I’ll show you how to do using a Cricut cutting machine. Two more designs (a rainbow “Hearts” design and a “Shelves” design) can be drawn with your Cricut using Infusible Ink pens. There’s also a “Stars” design you can draw using your Cricut, then paint with brushes, like a paint-by-number.
The PNG file contains three more designs you can print from a sublimation transfer printing service.
I’ll also show you how to create a bookmark using a rubber stamp, sublimation ink stamp pads, and a blending brush.
TIP: If you’re not sure how to download zip files and upload designs, go to jennifermaker.com/svgs.
STEP 2: PREPARE YOUR BOOKMARK DESIGN
OPTION 1: INFUSIBLE INK TRANSFER SHEETS
CRICUT DESIGN SPACE
- In Cricut Design Space on a blank Canvas, click “Upload.”
- Click “Upload Image.”
- Click “Browse.”
- Find and select the SVG you want to use.
NOTE: I’ll demonstrate with the “Hashtag” design, but the “Era” design follows the same process. - Click “Open” and then “Continue.”
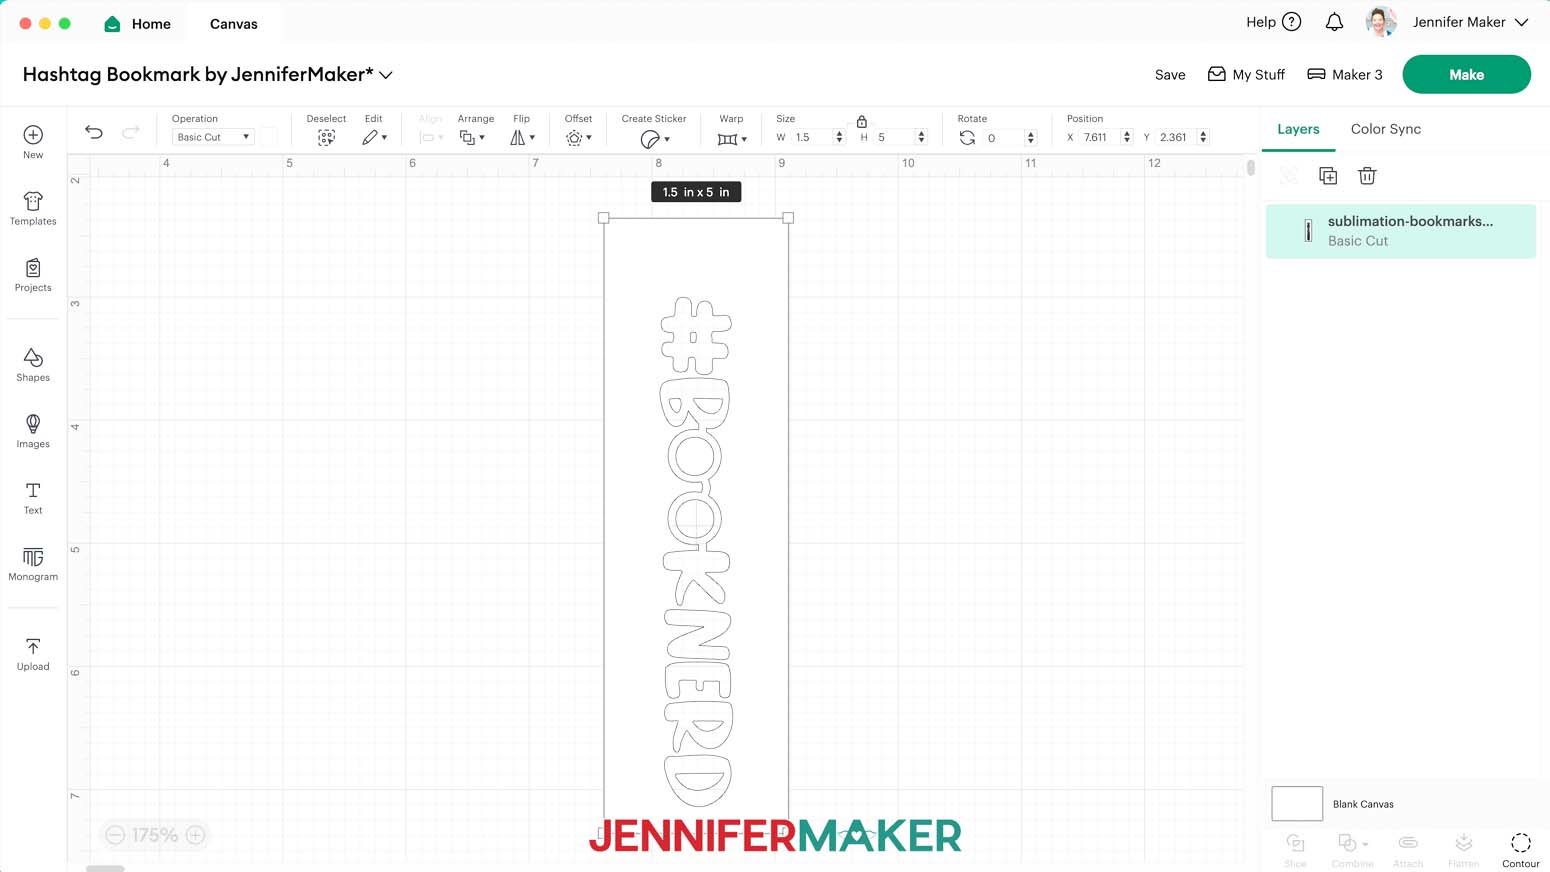
- Click “Upload” to add the SVG to your Canvas.
- Here is how the Hashtag design looks on my Canvas.

- The design is already sized perfectly to fit the bookmark blanks in my materials list, and is ready to cut!
CUTTING
- Make sure the correct machine is selected.
- Click “Make” in the upper right corner of the screen.
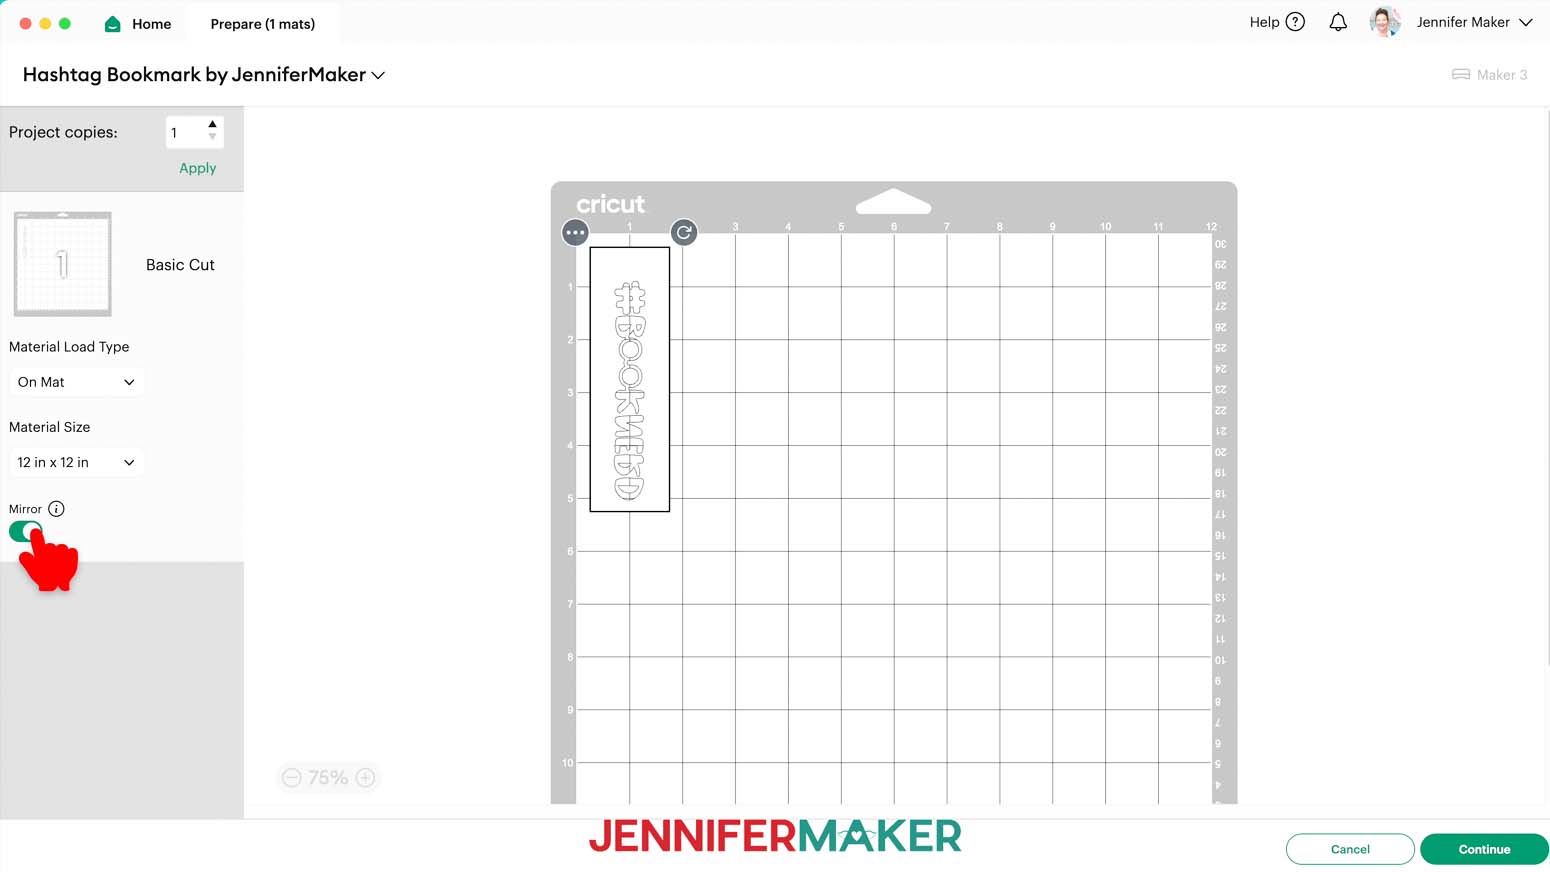
- On the Prepare screen, make sure that “On Mat” and “12 in x 12 in” are selected, and toggle “Mirror” ON so the design will transfer correctly.
NOTE: If you’re using different sizes of Infusible Ink transfer sheets, adjust your “Material Size” settings to match. - Click “Continue.”
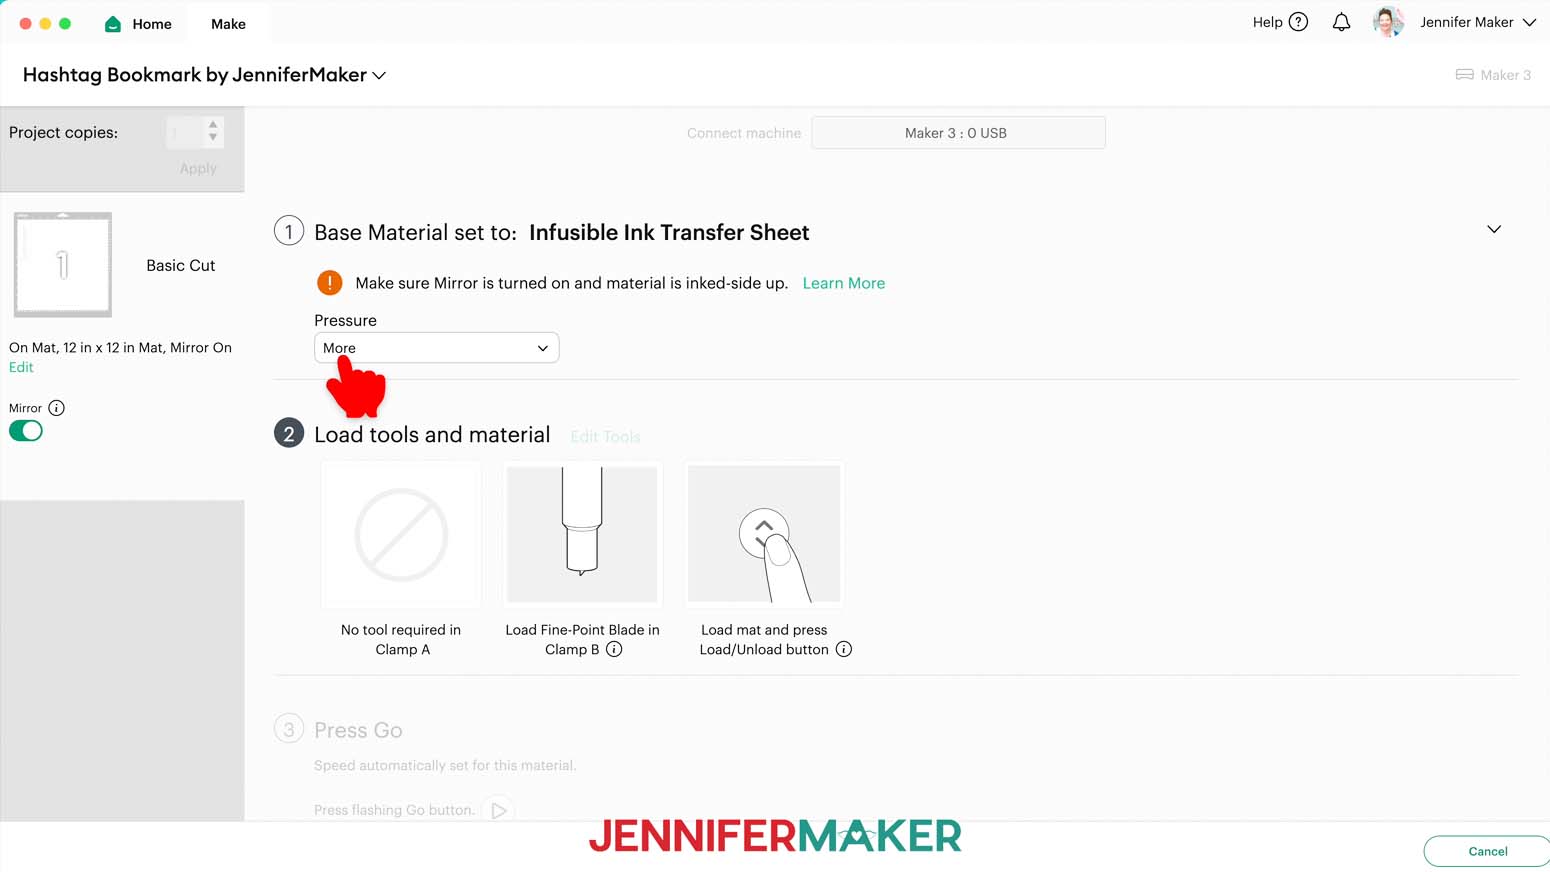
- On the Make screen, choose “Infusible Ink Transfer Sheet” as the material and choose “More” pressure for a cleaner cut.
TIP: If you touch the Infusible Ink, your skin oils can interfere with the transfer, so wash and dry your hands well before handling the transfer sheet. - Place your Infusible Ink sheet pretty side up on a green StandardGrip machine mat so it covers the design area on the screen.
- Use your brayer to smooth the sheet down and make sure it’s adhered well.
- Make sure your Premium Fine Point Blade is clean and in the correct clamp.
- Insert your prepared mat into your cutting machine so it matches the screen’s orientation, and press the flashing button to load it.
- Press the flashing “Go” button to begin the cuts.
- When it has finished cutting, don’t unload the mat just yet. Instead, use your weeding tool to gently lift a corner of the design to see if the cut went all the way through the sheet in the correct spots.
- If it’s not cut through, smooth the material back down and press the middle “Go” button again so your Cricut can go back over the cuts one more time.
- When the cut is finished, press the flashing button to unload the mat.
- Flip your mat over and peel it away from the Infusible Ink Sheet.
- If there is a lot of extra Infusible Ink transfer sheet uncut next to your design, use scissors or a paper trimmer to cut it off and save it for smaller projects.
- To weed Infusible Ink transfer sheets, gently roll and bend the cut areas until the edges of the design start to lift up from the carrier sheet.
TIP: You might hear some cracking noises, but don’t worry, this is normal. - Use your fingers to gently bend the carrier sheet and pull the extra ink pieces off of it.
TIP: You can use a weeding tool or tweezers to help lift sections you don’t want, or hold design elements in place on the carrier sheet while removing extra sections. - Be sure to remove all of the extra pieces that aren’t part of your design. Try to keep your fingers off of the carrier sheet to keep it as clean as possible.
- Once your Infusible Ink sheet is completely weeded, flip it over and look at it from the back. This is how your design will appear on your bookmark.
NOTE: Make sure that you didn’t miss any extra bits when you weeded.
TIP: If any small pieces of Infusible Ink pop off of the carrier sheet, gently use tweezers to reposition them and pat them in place, ink-side up. Use the Design Space Canvas or slight cut indents on the carrier sheet to help with correct placement. - Your weeded Infusible Ink design is ready to sublimate!


OPTION 2: INFUSIBLE INK PENS DRAWN WITH A CRICUT
CRICUT DESIGN SPACE
- In Cricut Design Space on a blank Canvas, click “Upload.”
- Click “Upload Image.”
- Click “Browse.”
- Find and select the SVG you want to use.
NOTE: I’ll demonstrate with the “Shelves” design, but the “Hearts” design follows the same process. - Click “Open” and then “Continue.”
- Click “Upload” to add the SVG to your Canvas.
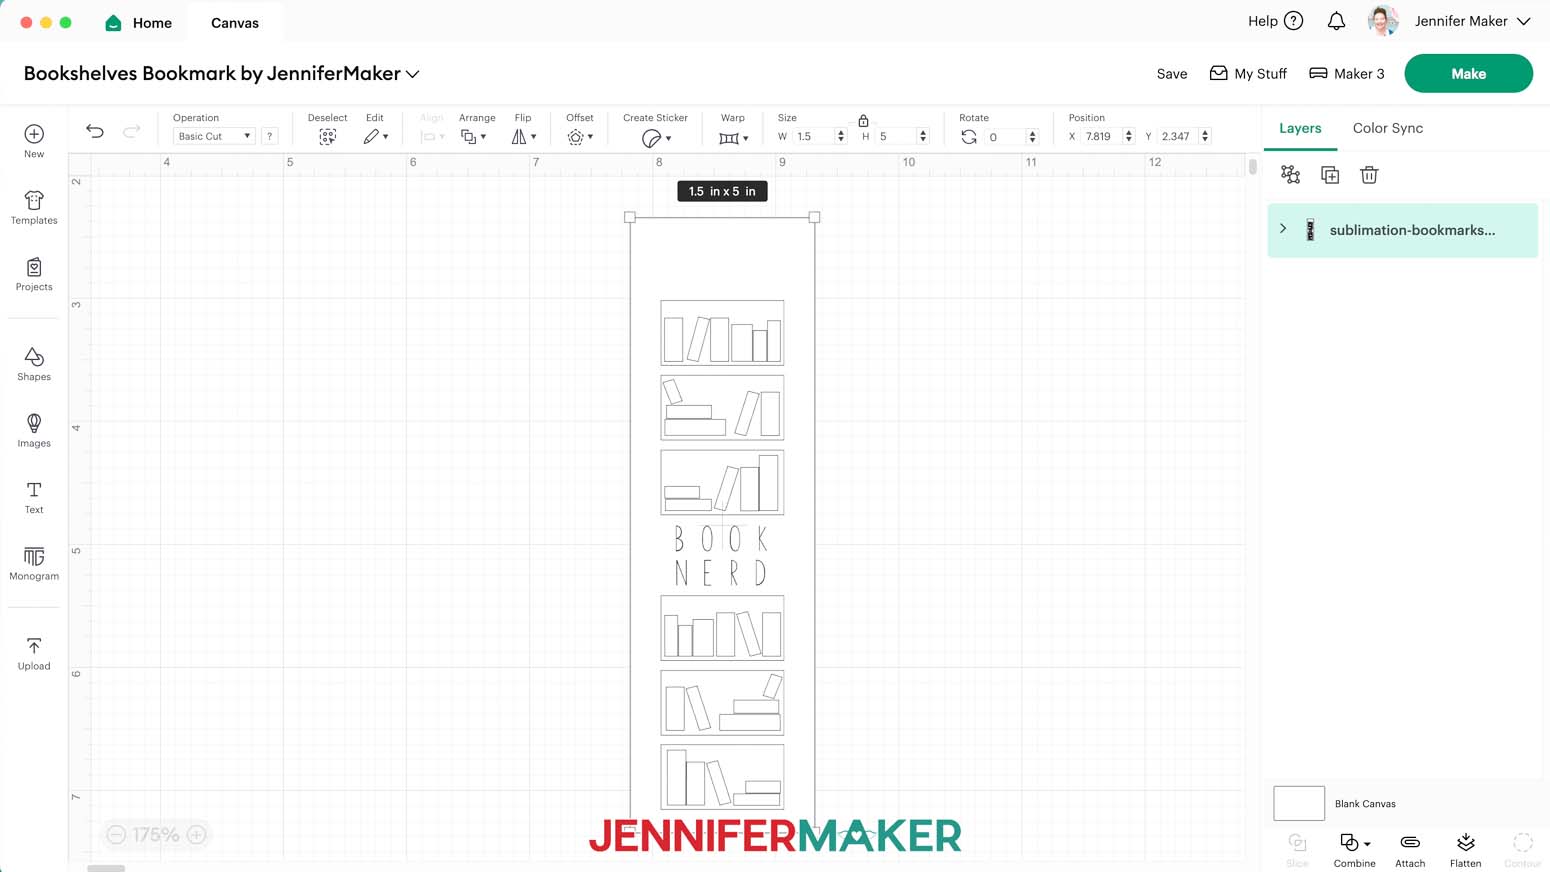
- Here is how the Shelves design looks on my Canvas.
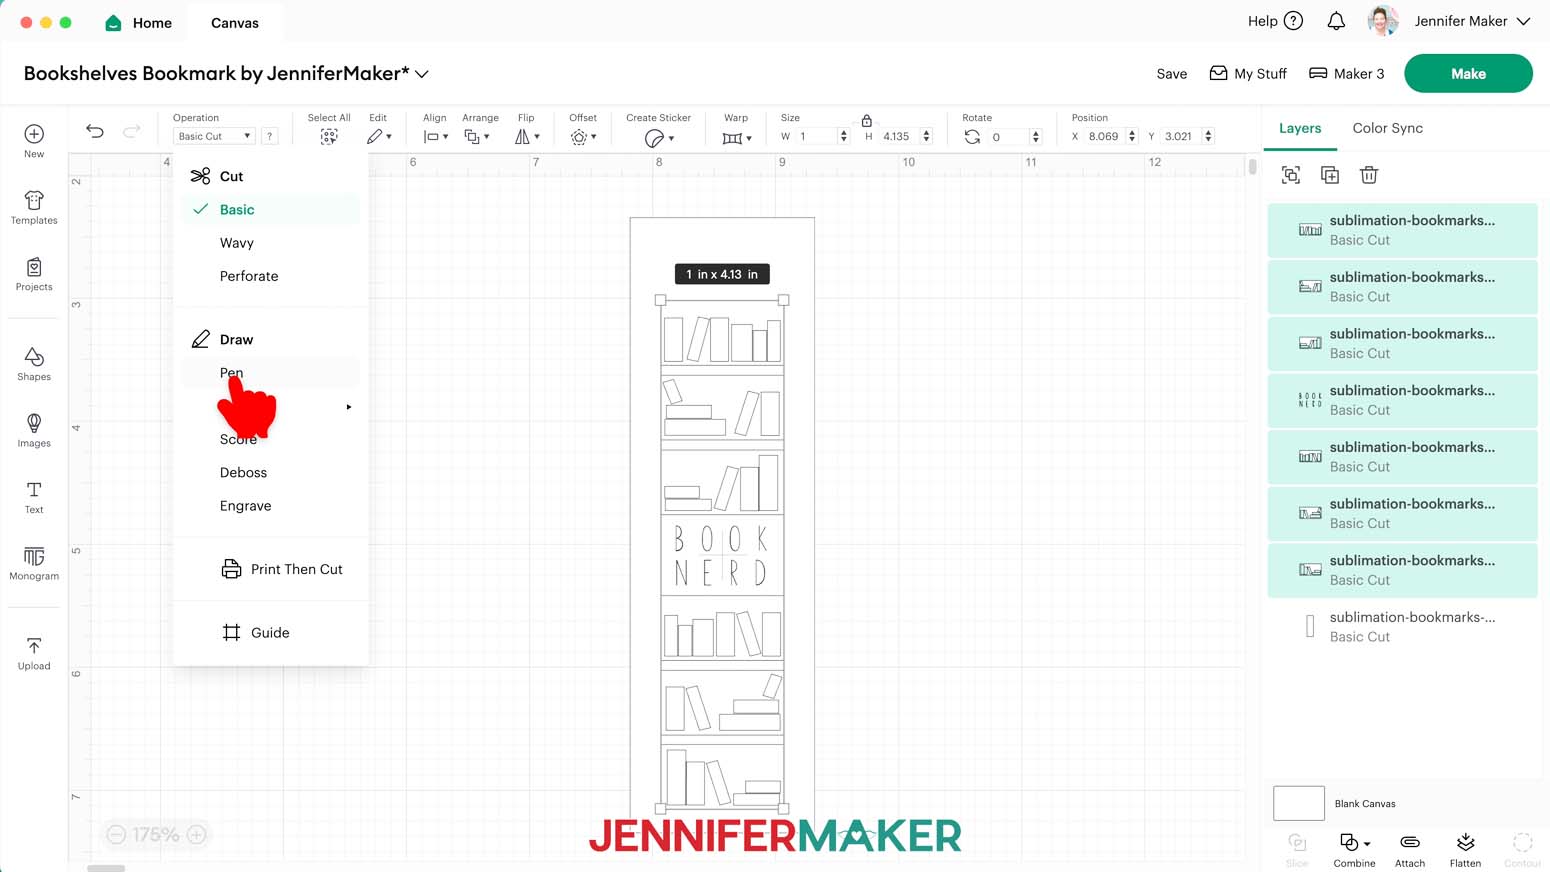
- Ungroup the design.
- In the Layers Panel, hold your “Shift” key and select the first seven layers. Leave the eighth layer, which is just a white rectangle shape, unselected.
- Under “Operation,” select “Pen” to change these layers to Draw layers.
- Select the first layer in the Layers Panel, which is the top shelf.
- Click the Color Box next to the “Operation” menu, and make sure “F - Fine Point (0.4mm)” is selected.
- Scroll down and select an Infusible Ink pen color from the list. I’ll select “Bright Teal (Infusible Ink)” for the top shelf.
NOTE: Be sure to select Infusible Ink pen colors. They are notated with “(Infusible Ink)” after the color name. - Repeat steps 11-13 for the remaining six Draw layers. I used the following Infusible Ink pen colors (in order): Blueberry for the second shelf, Neon Blue for the third shelf, Black for the sentiment, Tangerine for the fourth shelf, Red for the fifth shelf, and Fuchsia for the sixth shelf.
- Drag a selection box around the entire design (all eight layers).
- Click “Attach” to make sure the Cricut draws the designs in the correct spots on the background layer.
- The design is already sized perfectly to fit the bookmark blanks in my materials list, and is ready to cut!


CUTTING AND DRAWING
- Make sure the correct machine is selected.
- Click “Make” in the upper right corner of the screen.
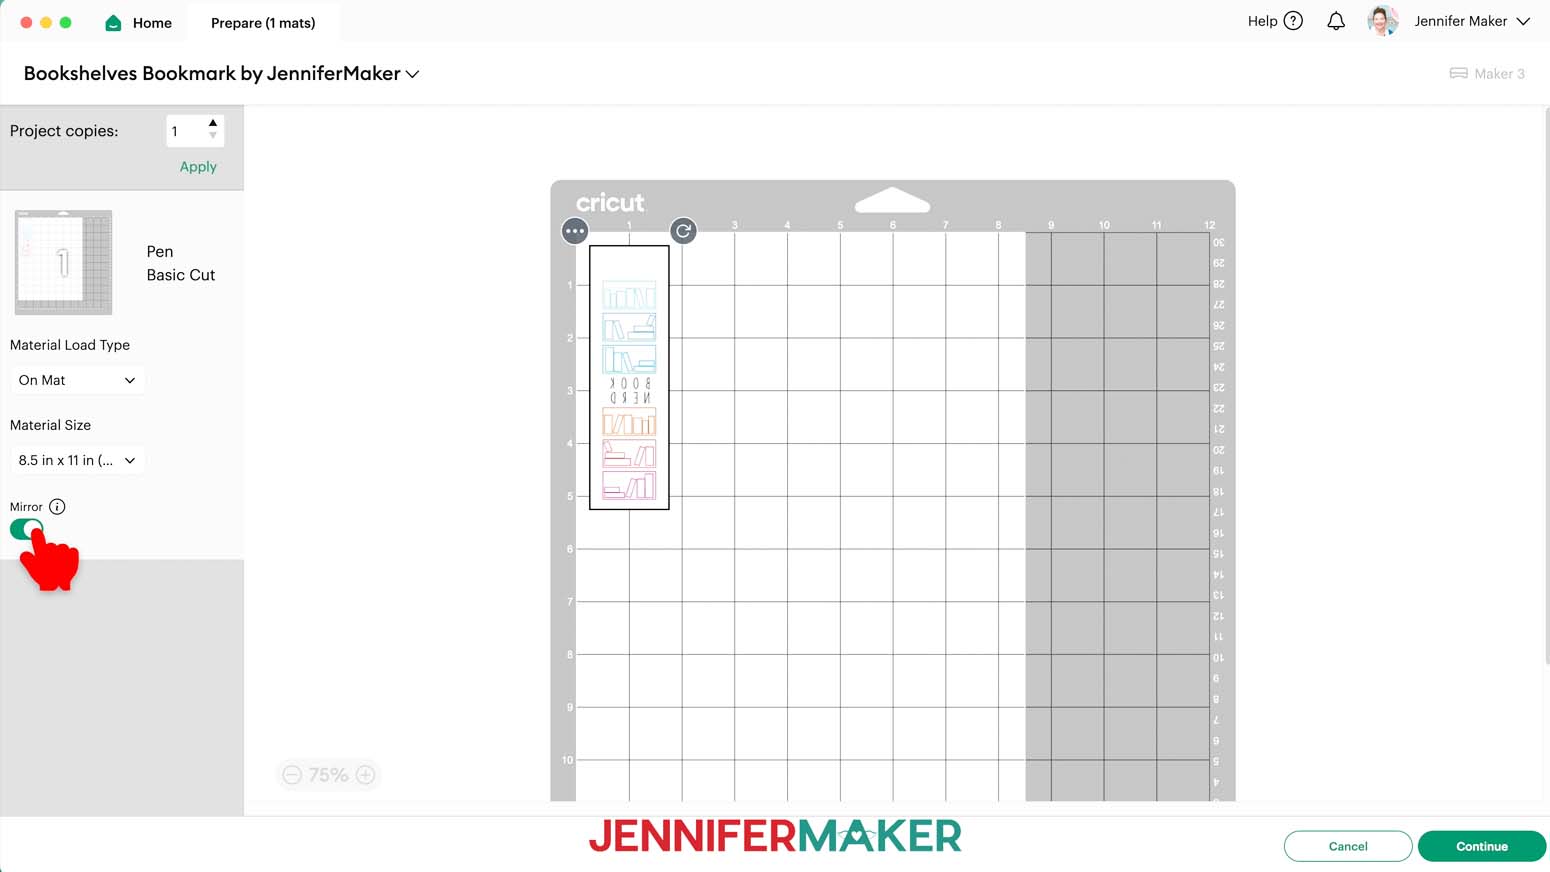
- On the Prepare screen, make sure that “On Mat” is selected and change the Material Size to “8.5 in x 11 in (Letter).”
- Toggle “Mirror” ON.
- Click “Continue.”
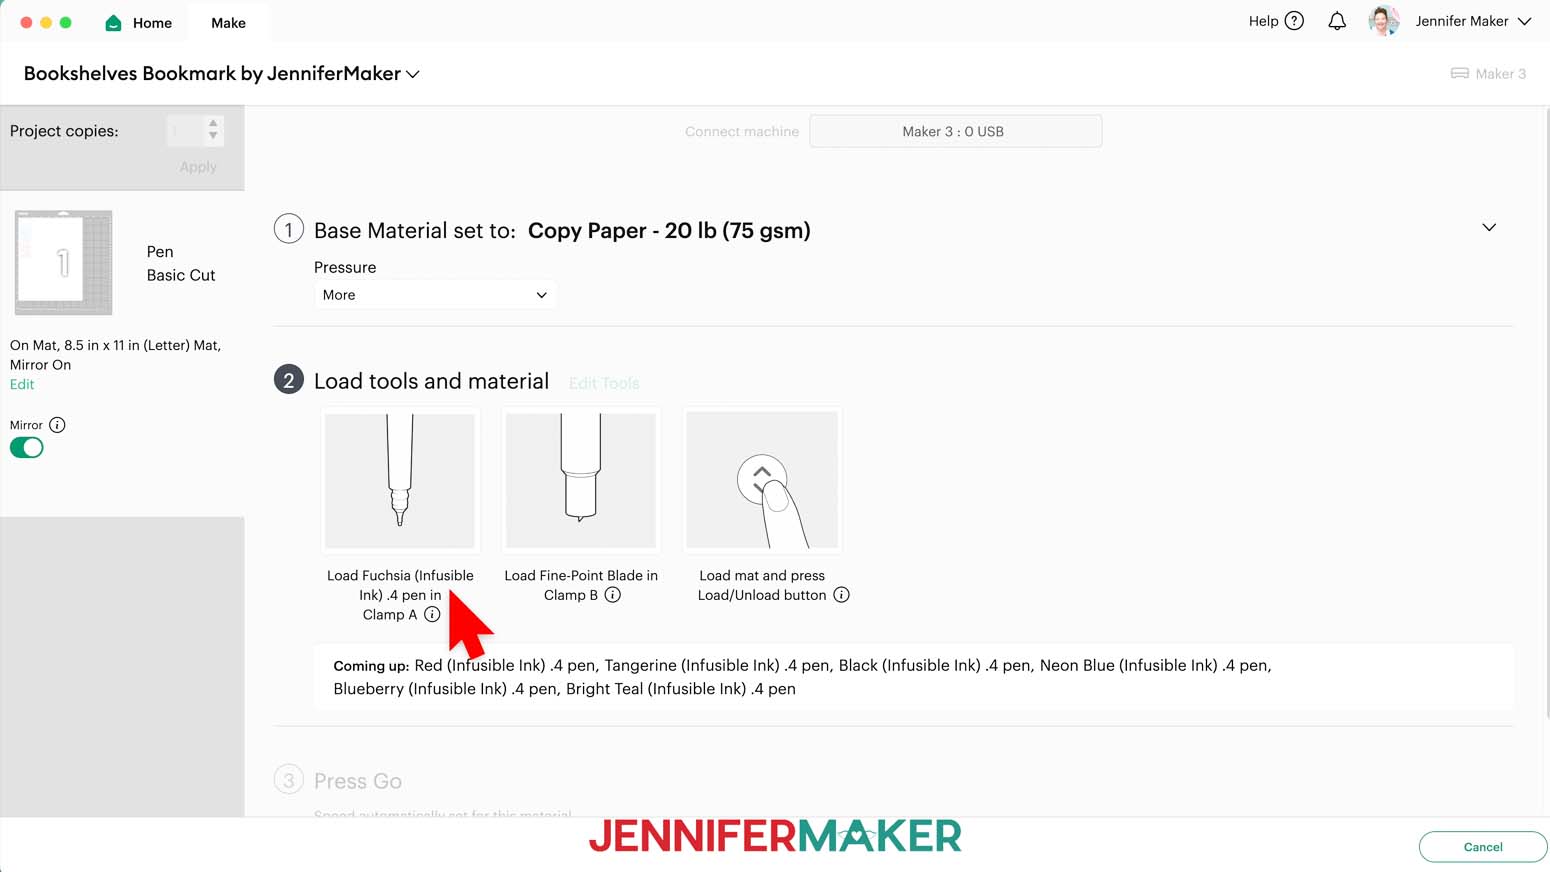
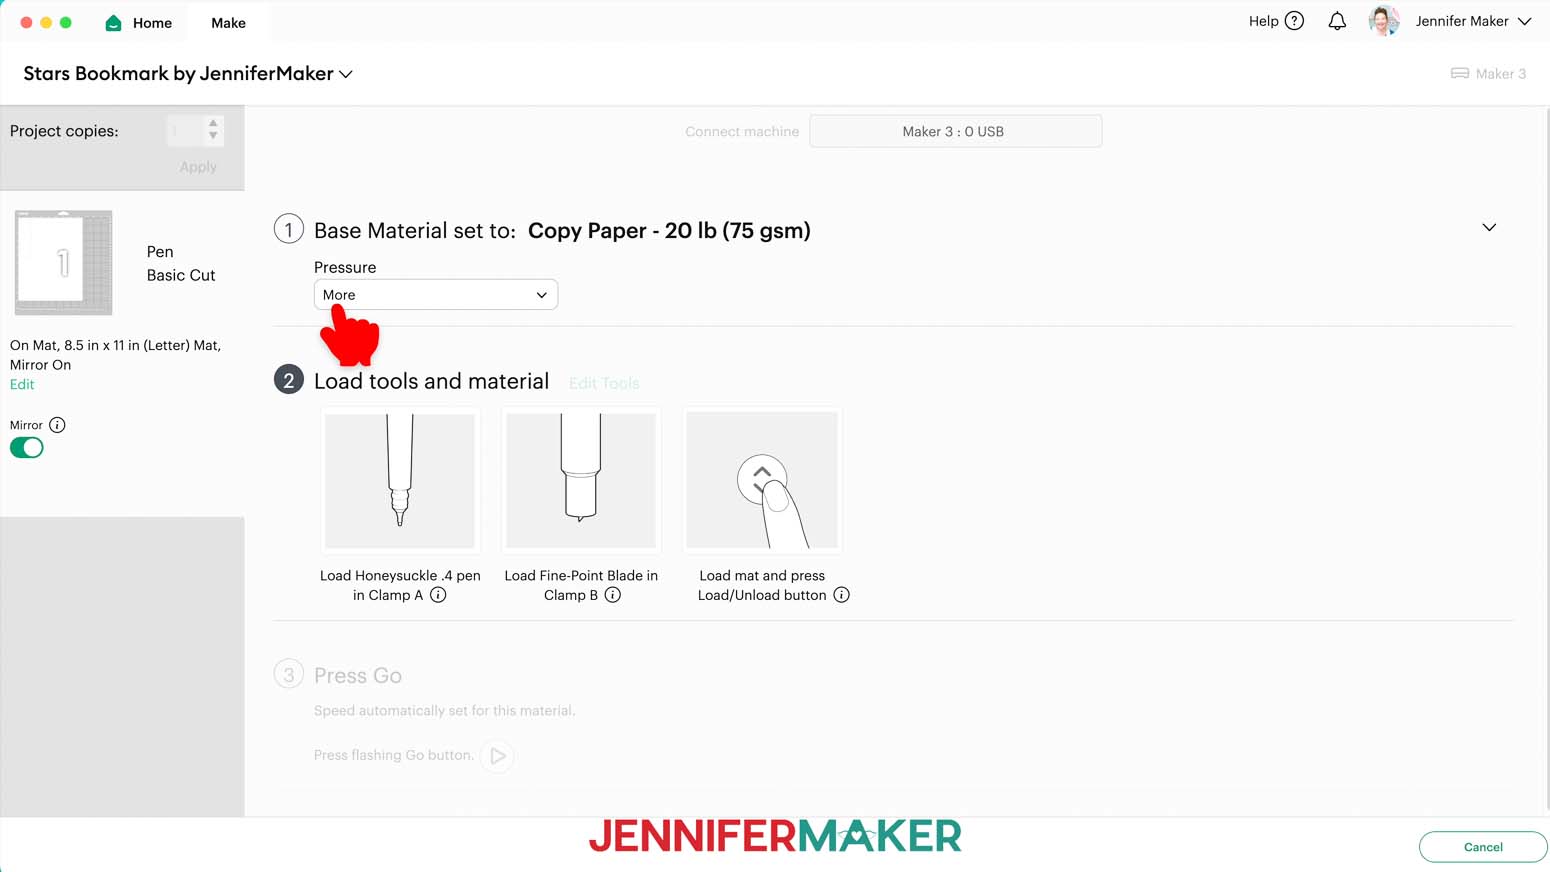
- On the Make screen, choose “Copy Paper - 20 lb (75 gsm)” as the material and choose “More” pressure.
- Place your copy paper on a blue LightGrip machine mat so it covers the design area on the screen.
- Use your brayer to smooth the sheet down and make sure it’s adhered well.
- Make sure your Premium Fine Point Blade is clean and in the correct clamp.
- Load your Cricut pens into the correct clamp when prompted. Be sure to pay attention to which color pen you should insert when.
- Insert your prepared mat into your cutting machine so it matches the screen’s orientation, and press the flashing button to load it.
- Press the flashing “Go” button to begin cutting and drawing.
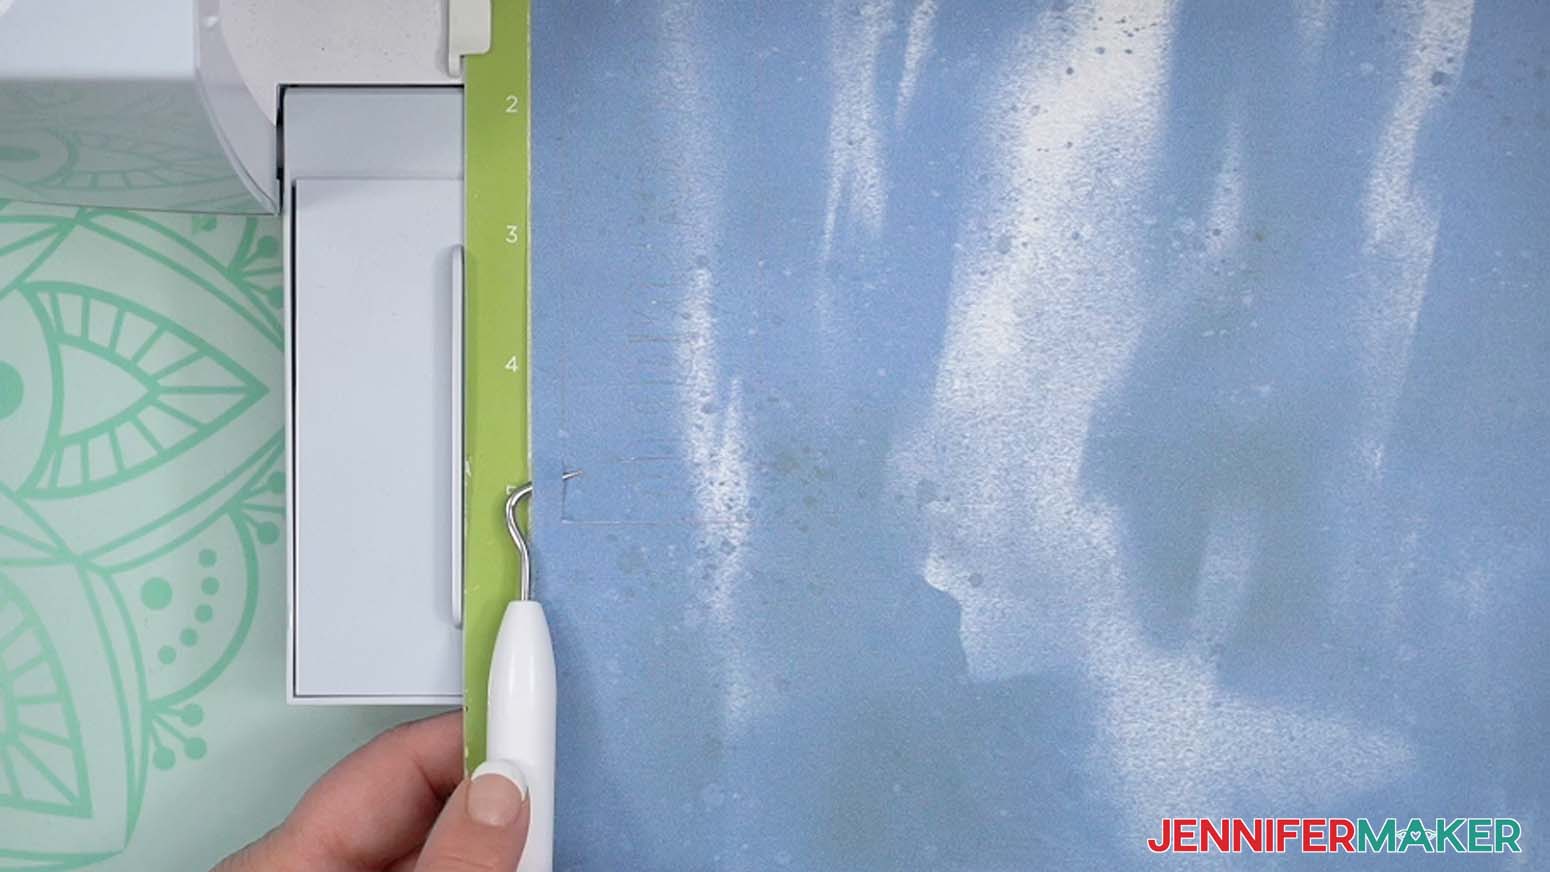
- When the cut is finished, press the flashing button to unload the mat.
- Flip your mat over and peel it away from the copy paper.
- Your drawn bookmark design is ready to sublimate!


OPTION 3: SUBLIMATION PAINT
CRICUT DESIGN SPACE
- In Cricut Design Space on a blank Canvas, click “Upload.”
- Click “Upload Image.”
- Click “Browse.”
- Find and select the “Stars” SVG.
- Click “Open” and then “Continue.”
- Click “Upload” to add the SVG to your Canvas.
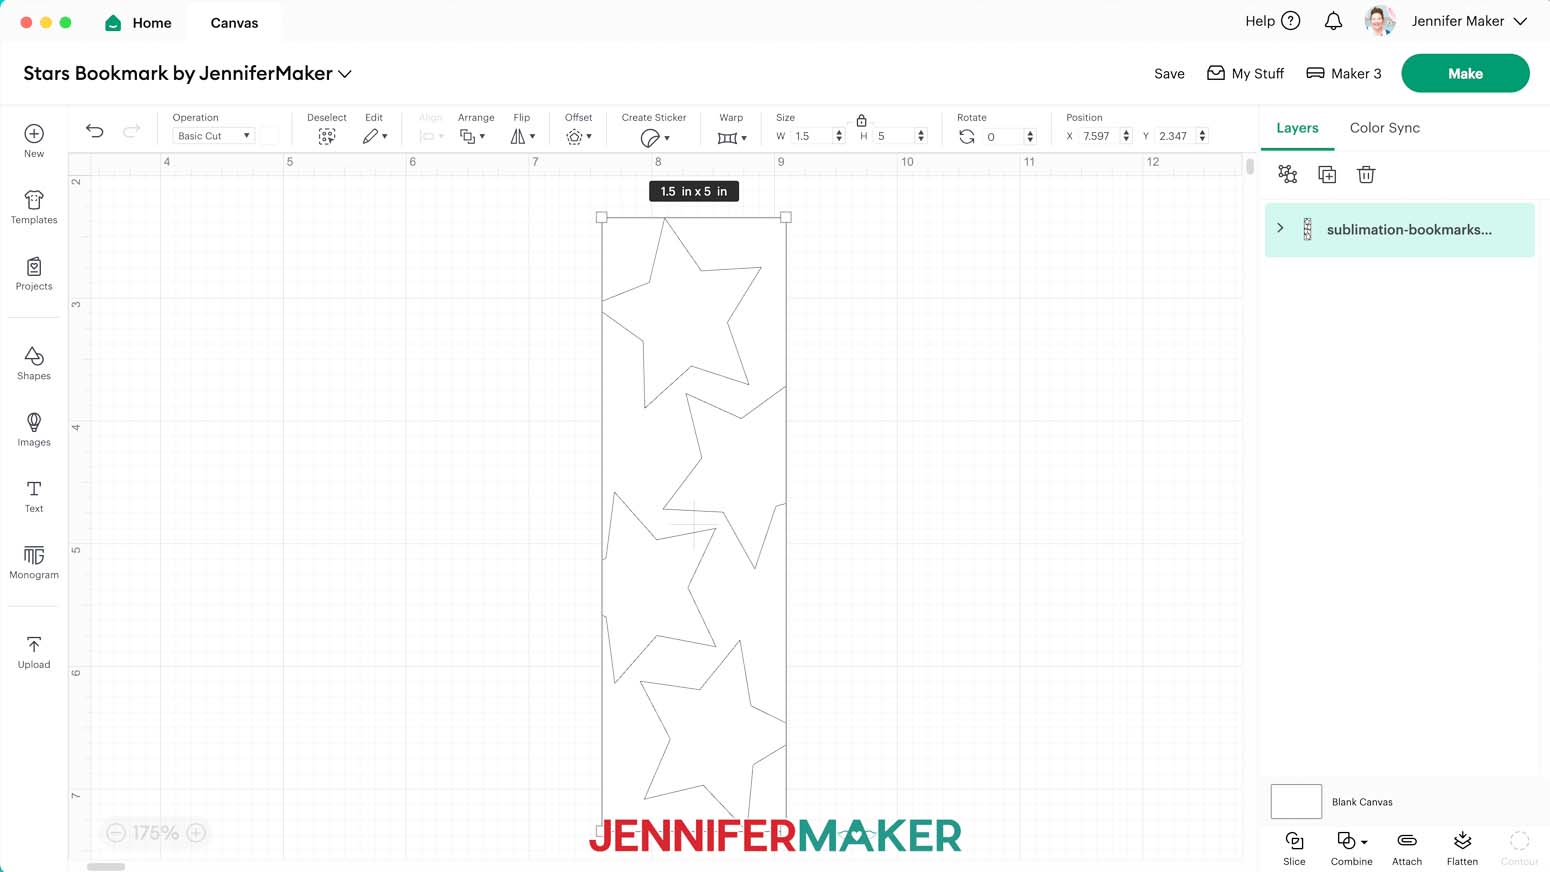
- Here is how the Stars design looks on my Canvas.
- Ungroup the design.
- In the Layers Panel, select the layer with the stars.
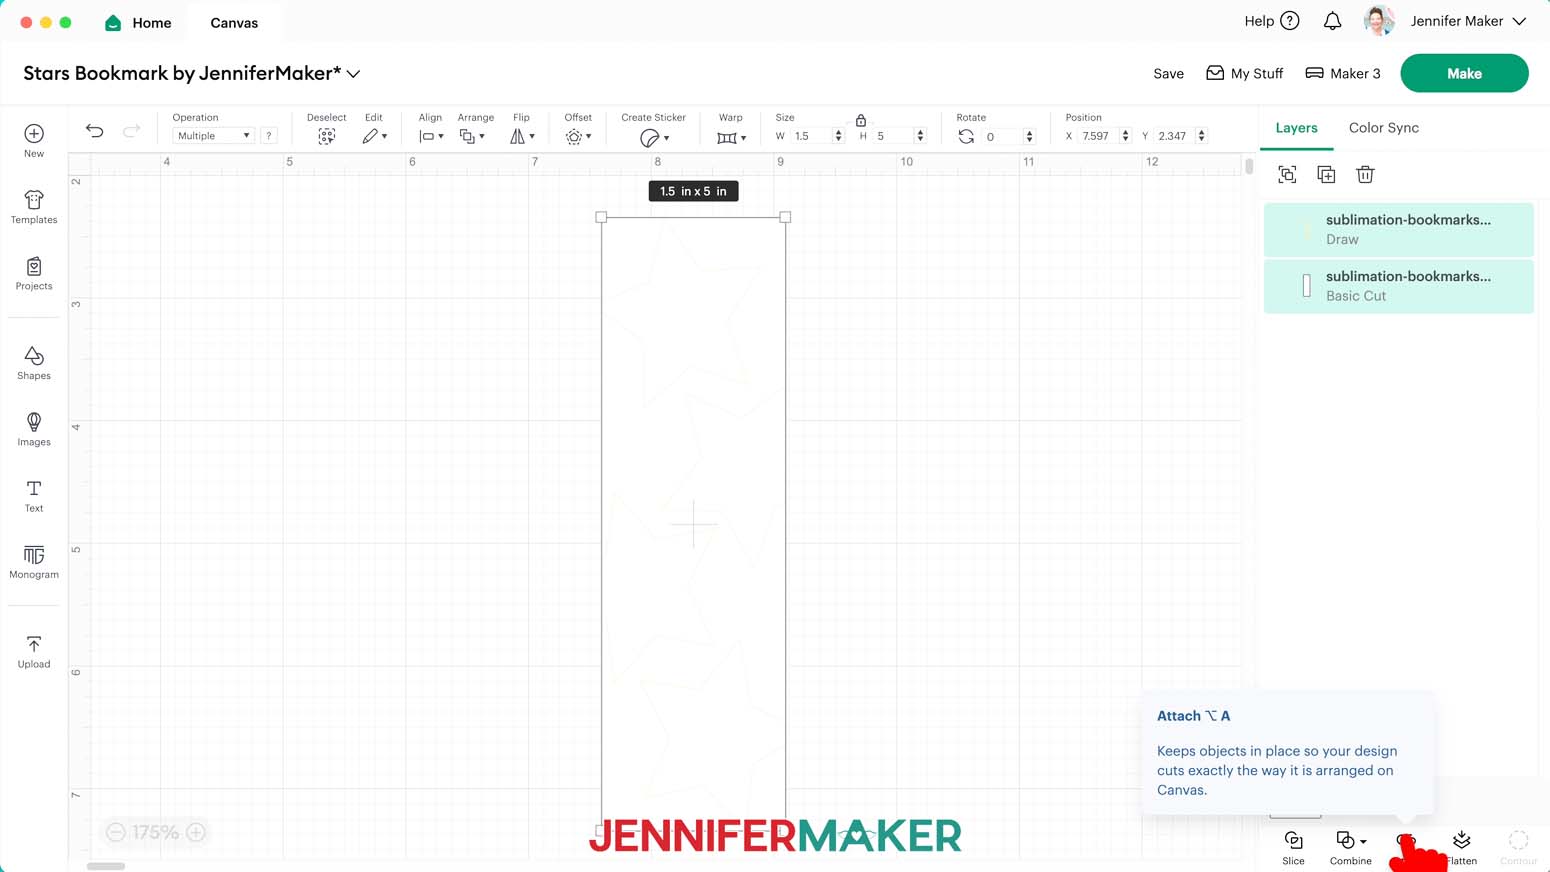
- Under “Operation,” select “Pen.” We’ll use this to draw an outline we can paint inside later.
- Next to the drop-down menu, click the Color Box to select a new color pen. Make sure “F - Fine Point (0.4mm)” is selected. Choose a very light color that can be painted over. I chose “Honeysuckle.”
- Drag a selection box around both layers.
- Click “Attach” so the Cricut will draw the stars in the correct spots on the background shape.
- The design is already sized perfectly to fit the bookmark blanks in my materials list, and is ready to cut!
CUTTING
- Make sure the correct machine is selected.
- Click “Make” in the upper right corner of the screen.
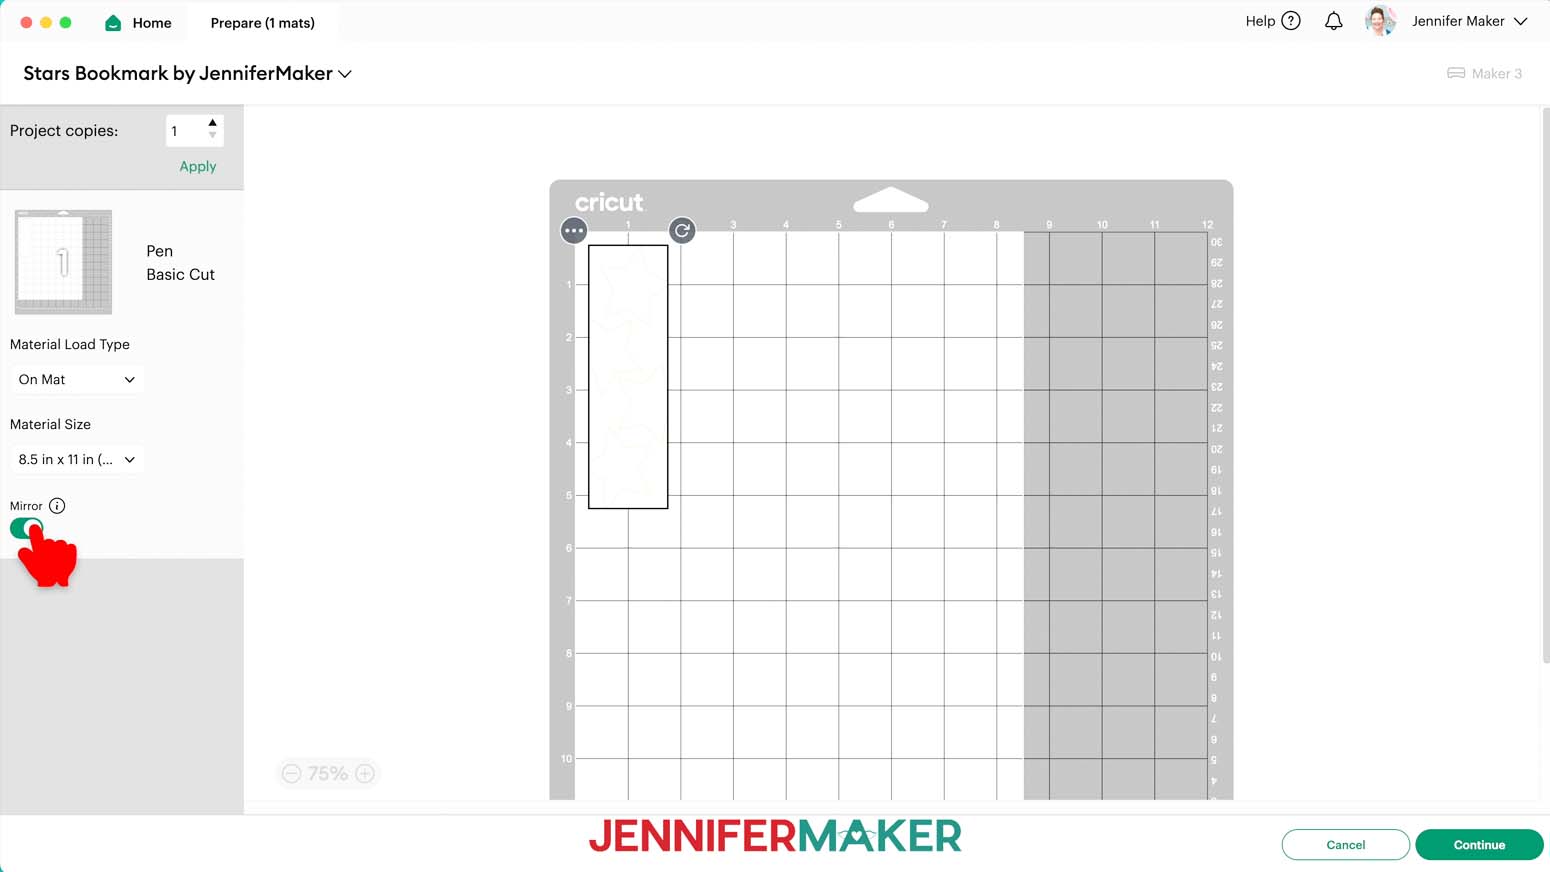
- On the Prepare screen, make sure that “On Mat” is selected and change the Material Size to “8.5 in x 11 in (Letter).”
- Toggle “Mirror” ON.
- Click “Continue.”
- On the Make screen, choose “Copy Paper - 20 lb (75 gsm)” as the material and choose “More” pressure for a cleaner cut.
NOTE: Cricut Fine Point pens do not write well on the sublimation transfer paper from my materials list. I tested multiple different types of paper and found that premium copy paper worked best. - Place a sheet of premium copy paper on a blue LightGrip machine mat so it covers the design area on the screen.
- Use your brayer to smooth the sheet down and make sure it’s adhered well.
- Make sure your Premium Fine Point Blade is clean and in the correct clamp.
- Load your light-colored Cricut Fine Point pen into the correct clamp when prompted. Make sure you’re using a regular pen and not an infusible ink pen, as we don’t want the lines to transfer to our sublimated bookmark.
- Insert your prepared mat into your cutting machine so it matches the screen’s orientation, and press the flashing button to load it.
- Press the flashing “Go” button to begin cutting and drawing.
- When the cut is finished, press the flashing button to unload the mat.
- Flip your mat over and peel it away from the copy paper.
PAINTING
- Lay a sheet of butcher paper on your work surface to protect it from paint.
- Grab your paintbrush, paint, and a palette.
- Add a small amount of paint to the palette in whichever colors you’d like. I’ll use yellow and red.
- Using the paintbrush, paint each star. Be sure to rinse the brush between colors if you don’t want the colors to mix. Squeezing the water out of your brush after rinsing will make your brush strokes less noticeable.
NOTE: I started with painting the top and bottom stars yellow, then added some red and painted the second star light orange, then added some more red and painted the third star dark orange.
TIP: Check out the Artesprix paint color mixing chart for guidance on combining colors.
NOTE: Multiple coats of paint will help your brush strokes be less noticeable. Let each coat dry fully before you add the next. The paint will look less vibrant than it will when sublimated. - When the stars are completely dry, paint the background. I used red paint.
- When you’re finished painting, rinse the palette and your paint brush until the water runs clear.
- When the paint is completely dry, your design is ready to sublimate!

OPTION 4: STAMPS WITH SUBLIMATION INK PADS
- Lay a sheet of butcher paper on your work surface to protect it from ink.
- Place a piece of sublimation paper on your work surface.
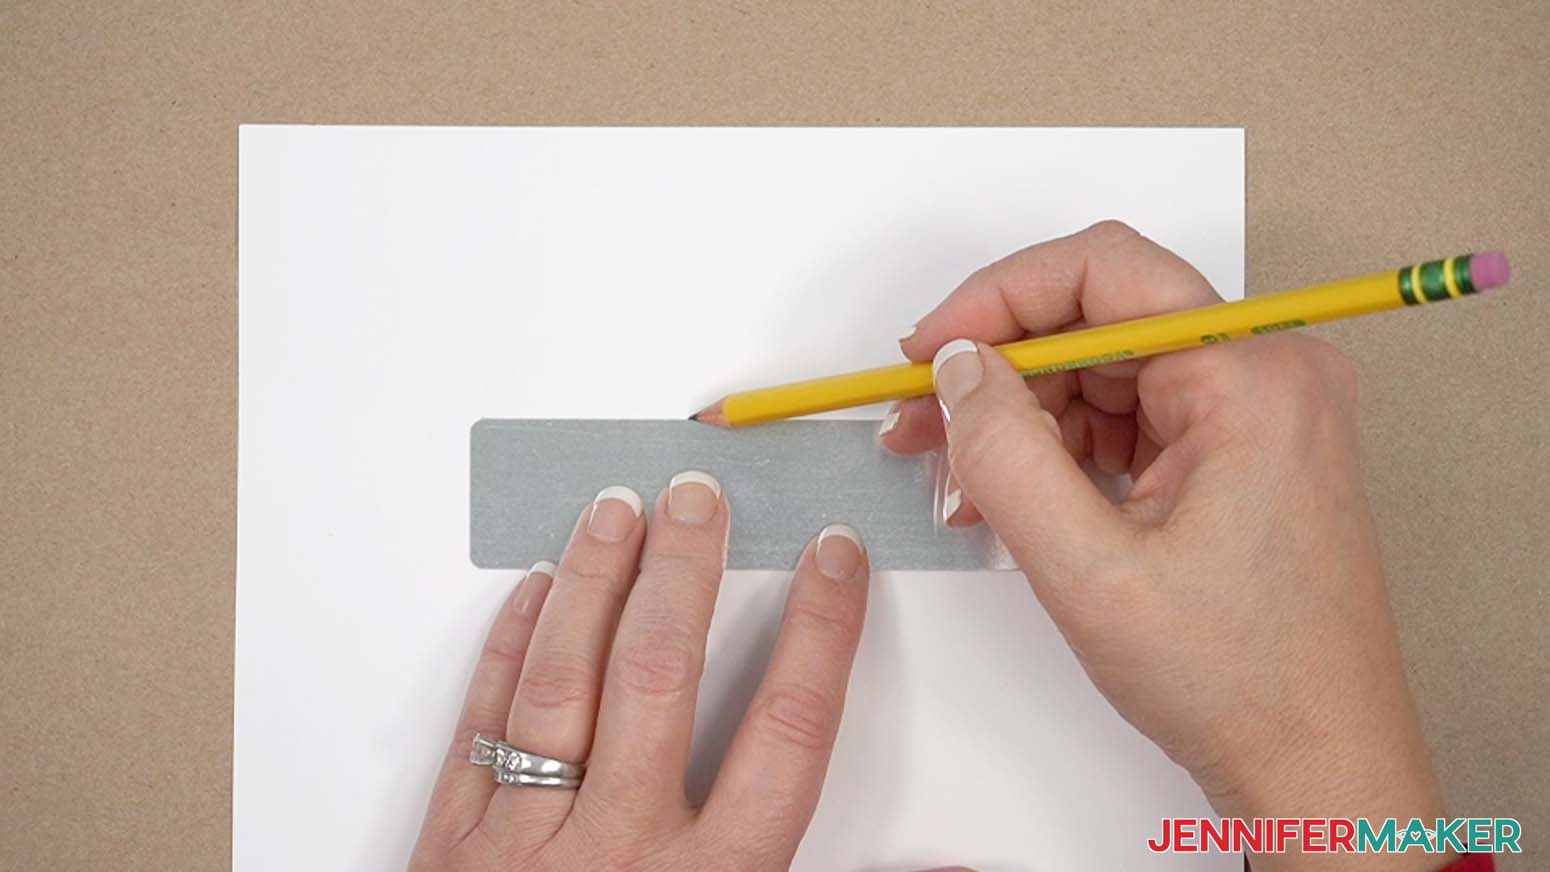
- Place your bookmark white-side down onto the paper, leaving at least an inch between it and the edges of the paper.
- Using a #2 pencil (not a pen), trace around the edges of the bookmark and inside the hole onto the paper.
NOTE: Be sure to use a pencil, not a pen, to trace the outline. Pencil will not transfer onto your bookmark when pressed, but an Infusible Ink pen or a regular ballpoint pen will. - Set your bookmark and pencil aside.
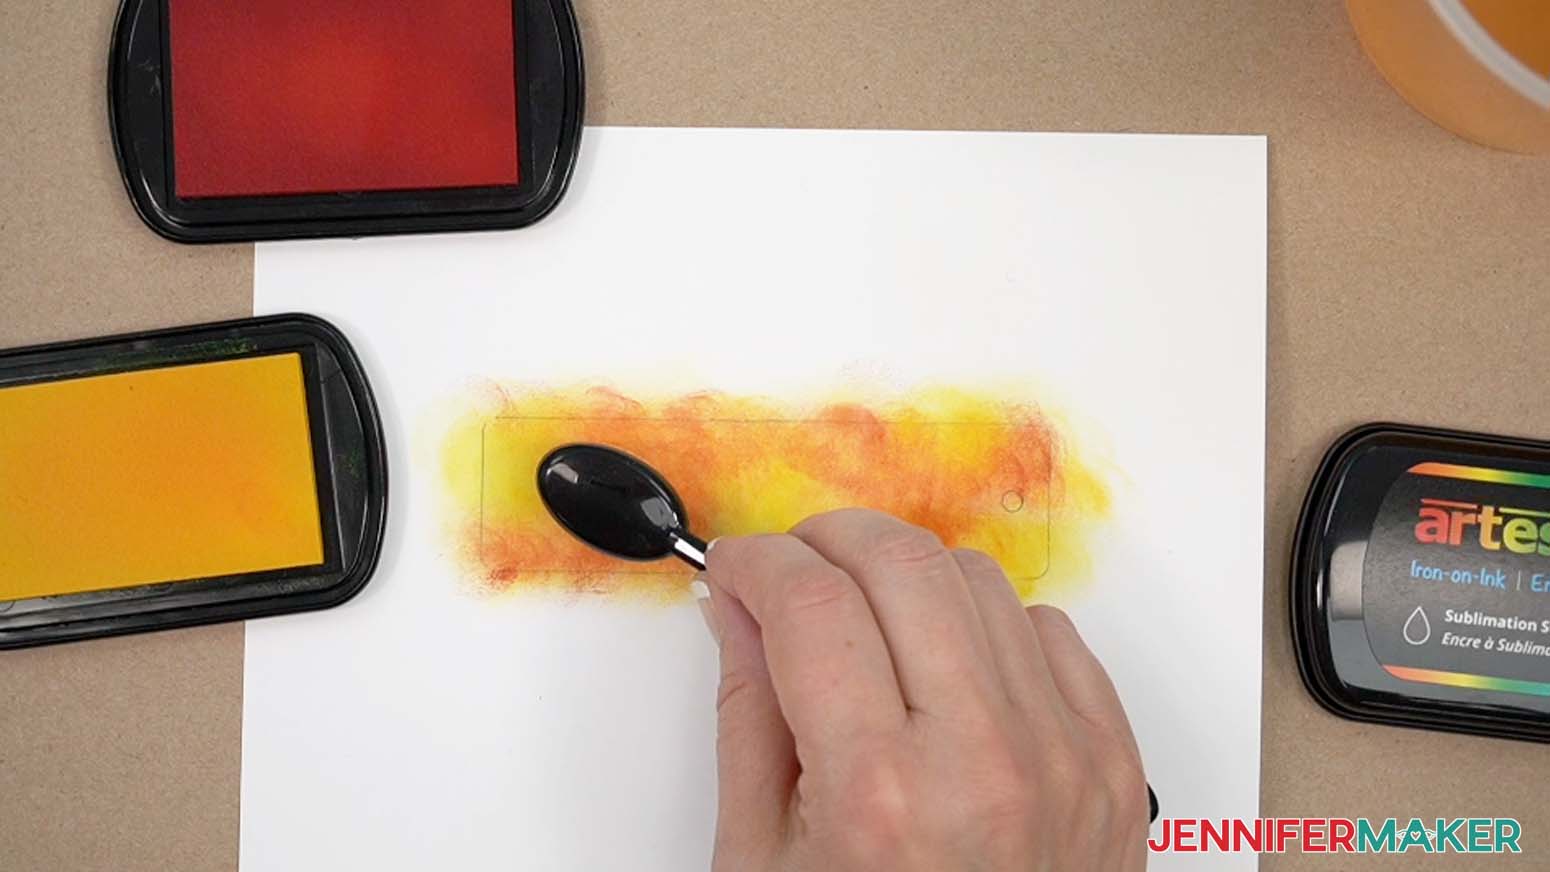
- Grab and open your choice of colored sublimation ink pad(s).
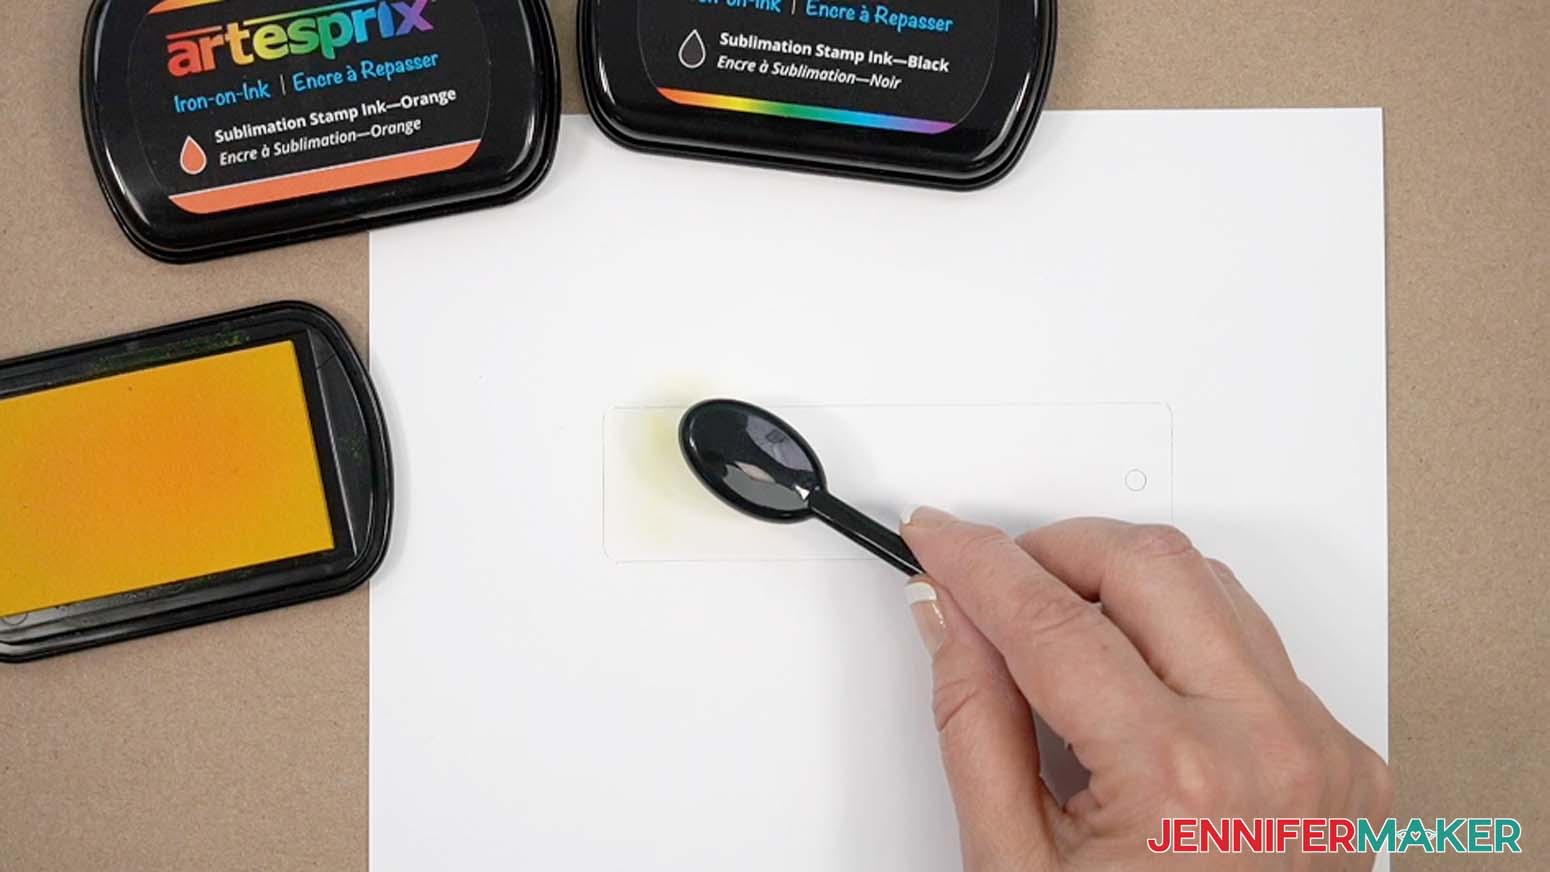
- Slide your blending brush across one of the sublimation ink pads. I used a yellow ink pad. Press firmly to get more ink onto your brush.
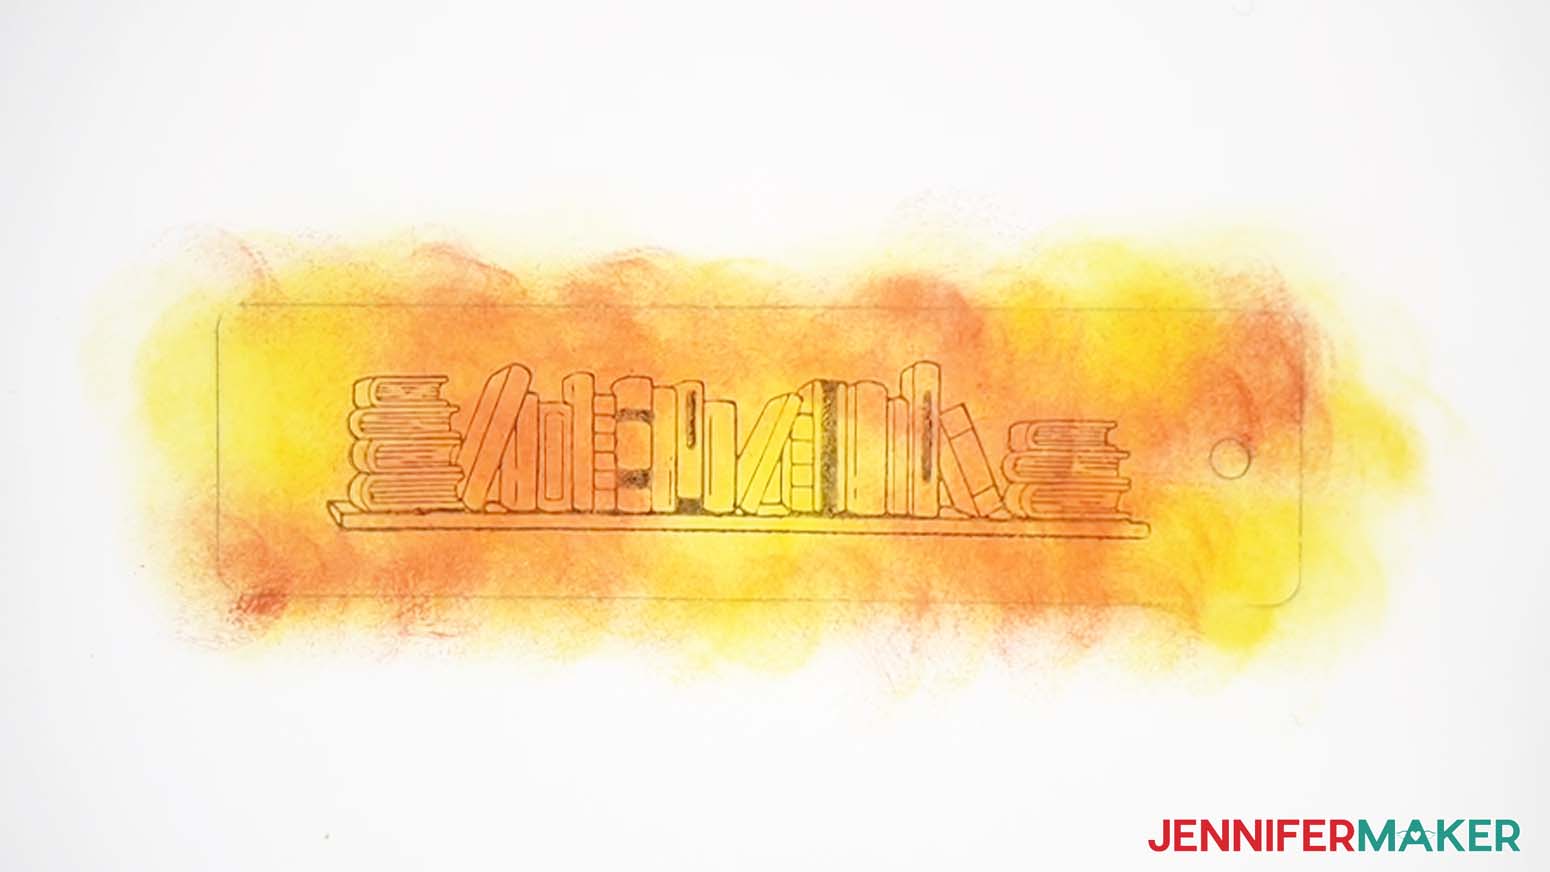
- Brush the ink onto the inside of the bookmark outline you drew with your pencil. Don’t worry about going over the pencil line, or smearing the pencil. Remember, the pencil will not transfer onto your bookmark when pressed.
- To add more colors, slide your blending brush across another color of sublimation ink pad. I used an orange ink pad.
TIP: If you don’t want the ink colors to mix, rinse your blending brush with water between colors. - Repeat step 8 to apply the ink to the bookmark template. Blend it with the previous color ink you applied.
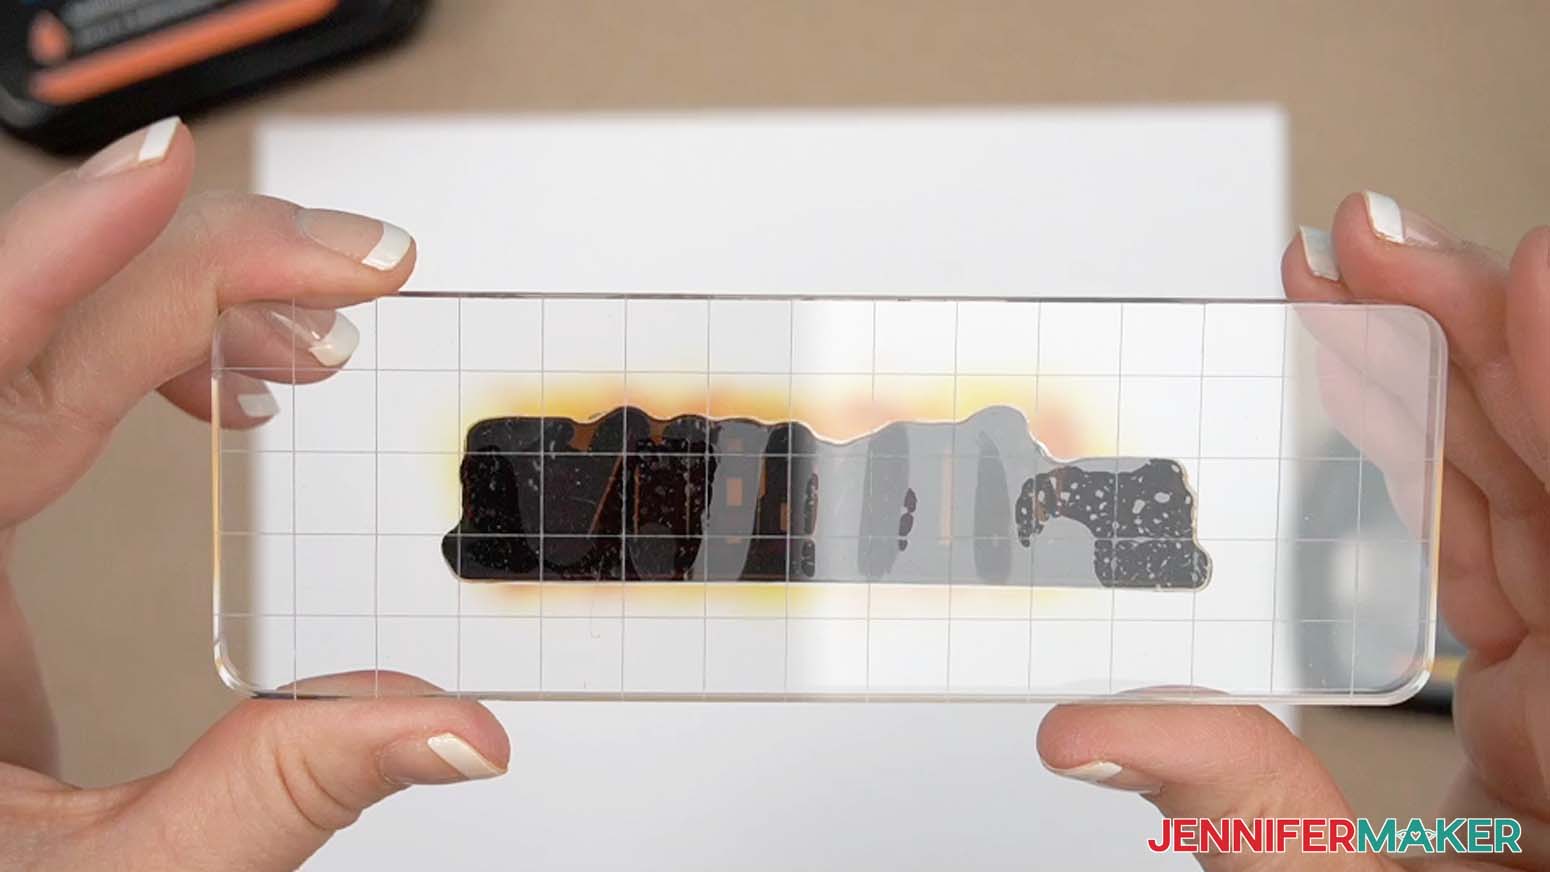
NOTE: The ink doesn’t dry immediately, but it does become more difficult to blend once it fully absorbs into the paper. - Attach your rubber stamp design onto your stamping block. Use the grid lines to help attach it straight.
NOTE: Make sure your stamp design doesn’t have any words or letters on it. Otherwise, they will be backwards after sublimating them onto your bookmark. - Press the stamp firmly into a contrasting color ink pad (I used black) a few times to pick up the ink.
- Align the stamp block with the bookmark outline on the sublimation paper, keeping it as straight as possible and avoiding the hole.
- Press the stamp down firmly onto the sublimation paper.
- Lift the stamp up straight.
- Let the ink dry completely.
- Use scissors to trim around the bookmark outline, leaving at least ½” extra around the edges.
- Your stamped design is ready to sublimate!

OPTION 5: USE A SUBLIMATION PRINTING SERVICE
There are many resources available online for ordering printed transfers that you can sublimate at home. A Google search for “order sublimation prints online” yielded hundreds of results. You can also find sublimation print sellers on Etsy.
When choosing a business or Etsy seller to order prints from, consider the following:
- Do they offer pre-made designs, custom designs, or both?
- Is there a minimum number of prints required to place an order?
- Do they offer the right size sublimation print for your project?
- Do they offer digital proofs? How much do they cost? Do they have other means of quality control?
- Do they require you to mirror your image, or do they mirror it for you?
- Do they scale images to fit the paper size you order, or do they print images at the original size you upload?
- Do they have contact information listed, and are they easily available if you have questions?
- How fast do you need the print? What is their print time and shipping speed?
- How much does shipping cost?
- Does the company have reviews? Are they mostly positive or negative?
Some more tips:
- Measure your sublimation blank’s sublimatable surface and make sure the design you provide to the printing service measures at least ⅛” larger on all sides for full-coverage projects.
- Making a bunch of small projects? Create a page with multiple smaller images to save money!
- Order a few extra prints in case you make a mistake.
- Some companies offer discounts for signing up for their email list, or they may have other loyalty programs to save money.
- Order designs you’ll make again in bulk to save money and time – they can be stored indefinitely!
I found and used a sublimation print vendor online called Jiffy. Here’s what my experience was like:
- You can order your prints pre-cut so they include a white paper border to help secure them to your blank.
- My prints were shipped using UPS Ground and arrived in a single day! Jiffy uses partner printers to provide their prints, which means shipping will be fast, but results may vary depending on which service printed your transfer.
- The prints arrived rolled, rubber banded, and placed in a plastic bag, which was then shipped in a cardboard box.
- The paper is very thin compared to the A-Sub sublimation paper I normally use, but the prints pressed well.
- When comparing Jiffy print results with A-Sub paper results after pressing, the prints from Jiffy are a little darker than the prints I made myself. Again, results may vary since they are using a network of providers.
When you receive your sublimation print and are ready to sublimate it onto a bookmark, go to Step 3.
STEP 3: SUBLIMATE YOUR BOOKMARK
Follow these steps for all five bookmark design methods.
NOTE: Before you begin, open a window and/or turn on a fan for ventilation.
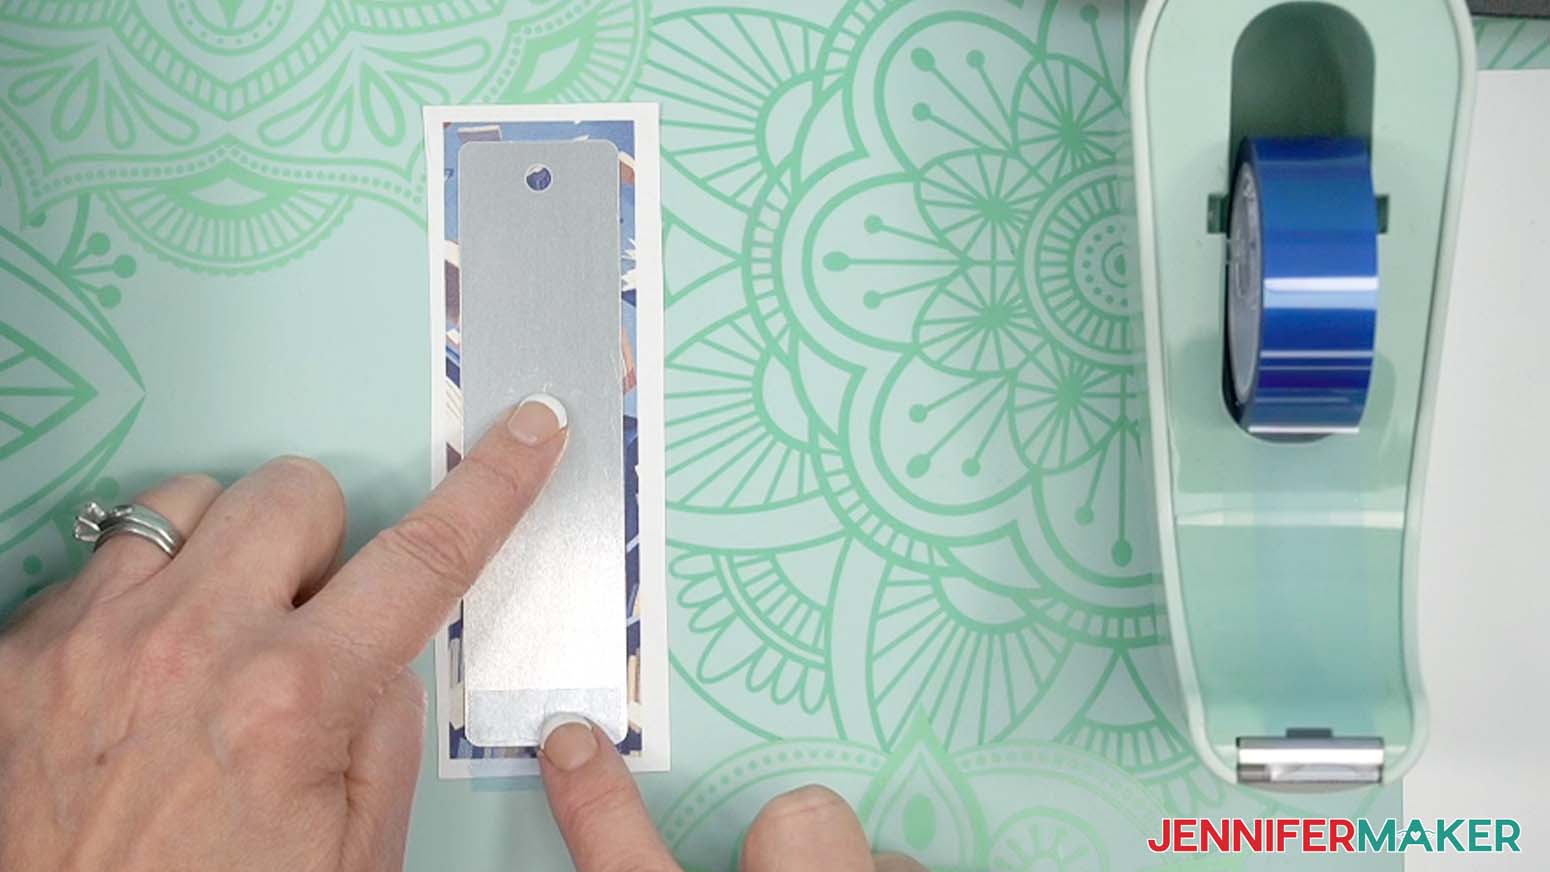
- Peel off the protective film on your bookmark.
- Clean the bookmark’s white surface with isopropyl alcohol and a lint-free cloth.
- Place the sublimation design face up on your work surface.
- Place the bookmark’s white side (the side you’ll sublimate) down onto the design so there’s an even border all the way around it. Make sure the bookmark’s hole is pointing toward the top of the design. The bookmark may be slightly arched, so make sure it’s pressed firmly down onto the paper or Infusible Ink sheet.
- Cut a piece of heat-resistant tape about 1.5” long.
- Press the tape first onto a short edge of the bookmark, then down onto the border of the design.
- Repeat steps 5-6 with the other short edge of the bookmark so it’s firmly and flatly attached to the design.
- Place your pressing mat on your work surface. I used a Cricut EasyPress mat.
- Place a 12” x 12” piece of clean, white cardstock onto the pressing mat.
- Place the bookmark and design onto the cardstock bookmark-side down. The design should be on top.
- Place a piece of clean, white, uncoated butcher paper over the bookmark.
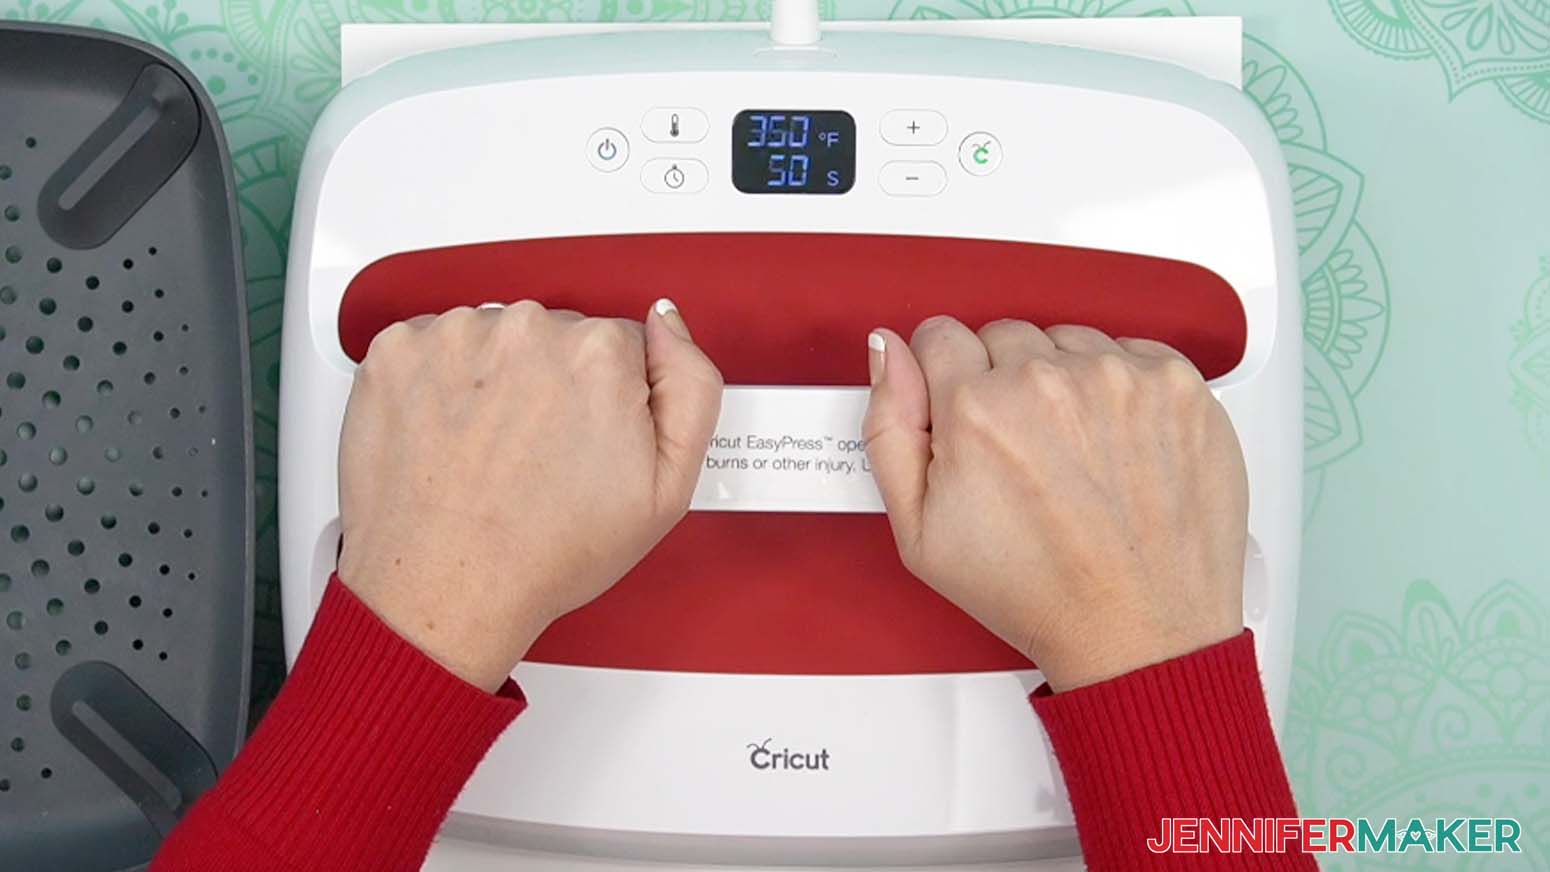
- Follow the settings in my Sublimation Cookbook and preheat your heat press to 350° F and set the timer for 50 seconds.
- Press the bookmark with firm pressure for 50 seconds.
- When the time is up, lift the heat press straight up and place it back onto its cradle.
- Let the bookmark cool completely before peeling off the tape and removing the design.


STEP 4: SHOW IT OFF
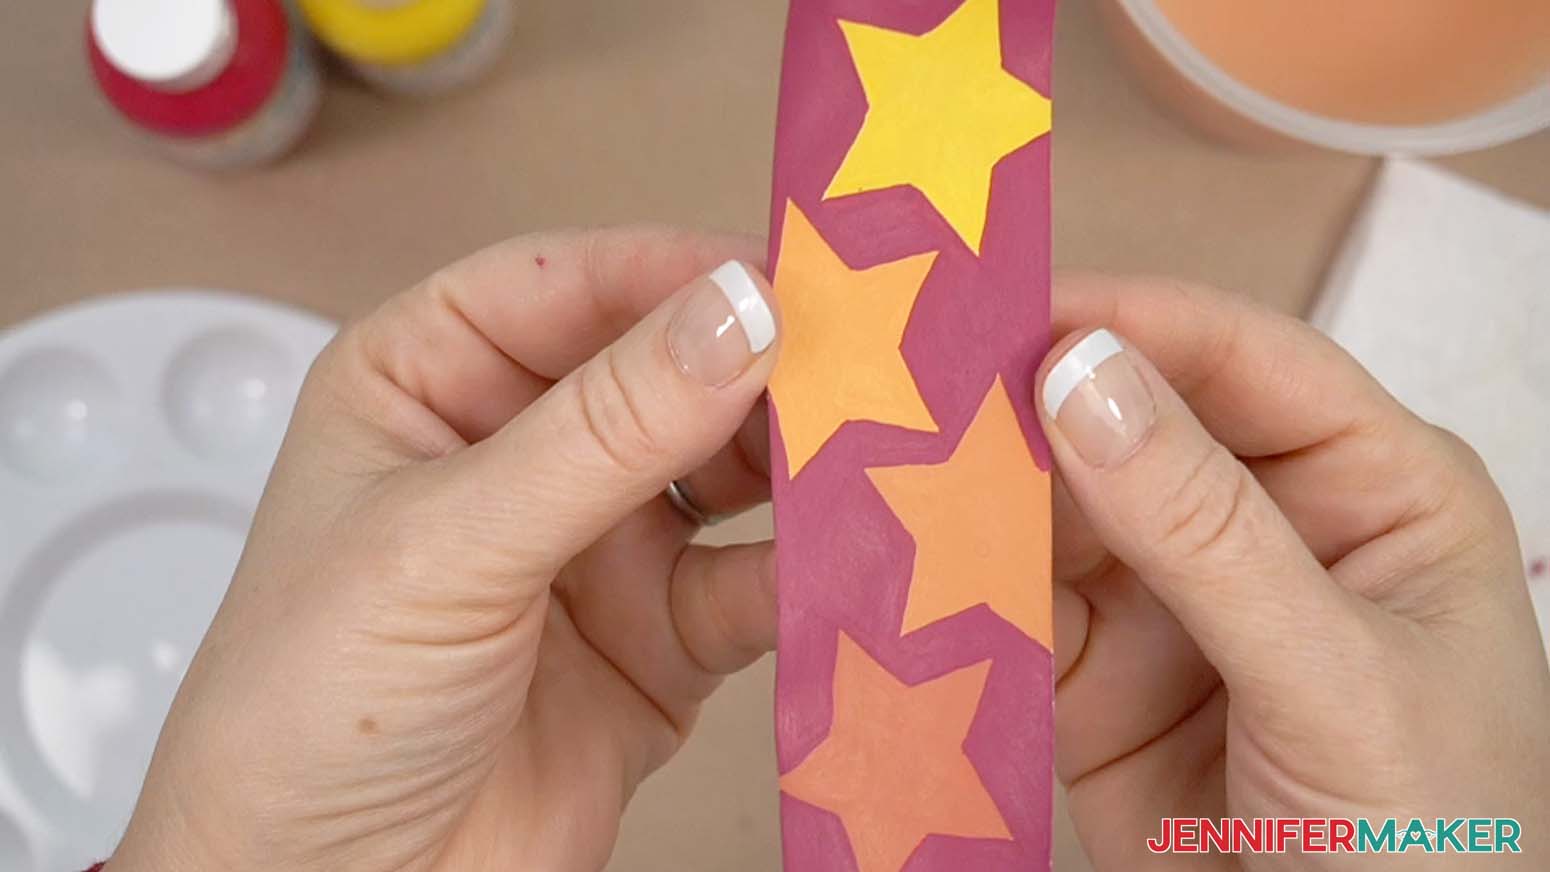
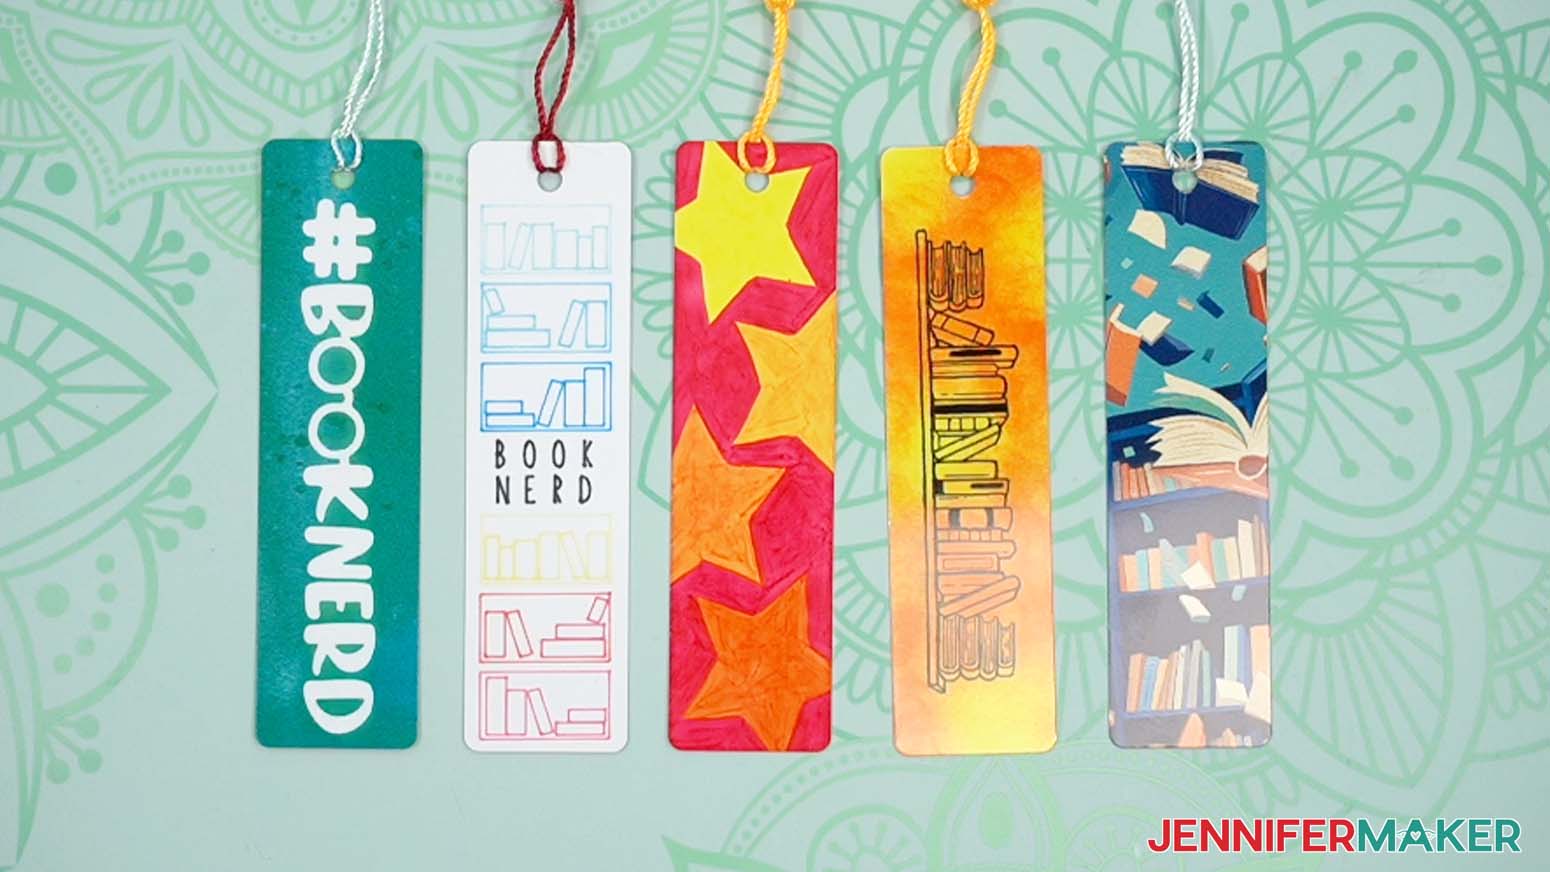
Here are the finished bookmarks using all five methods!
Answers to Your Questions About How to Sublimate Without A Printer
Q: I want combine sublimation techniques. Can you show me how?
A: You can learn how to combine sublimation techniques for mixed-media projects without a printer in my ADVANCE program. Learn more about ADVANCE here!
Q: Can you do sublimation without a printer?
A: Absolutely, you can! In this tutorial I share five different ways to create sublimation crafts without a sublimation printer.
Q: Can you do sublimation on a Cricut?
A: While you can’t actually sublimate with a Cricut, a Cricut cutting machine can be a useful tool for cutting sublimation transfers, drawing outlines for filling in with sublimation markers or sublimation paint, and I love using my Cricut heat presses to press my sublimation transfers!
Q: How do I know if my design is the right size?
A: Not sure if your design is uploading at the correct size? If you are using Cricut Design Space Beta for Desktop, try switching to the Live version as this has worked in our testing. Here are the dimensions you should see for each design on your Canvas:
sublimation-bookmarks-blkshelves-jennifermaker-SVG: 1.5″ x 5″
sublimation-bookmarks-hashtag-jennifermaker-SVG: 1.5″ x 5″
sublimation-bookmarks-era-jennifermaker-SVG: 1.5″ x 5″
sublimation-bookmarks-stars-jennifermaker-SVG: 1.5″ x 5″
sublimation-bookmarks-hearts-jennifermaker-SVG: 1.5″ x 5″
sublimation-bookmarks-shelves-jennifermaker-SVG: 1.5″ x 5″
If you need help resizing your design, see my Resizing Guide.
Q: Should you clean the bookmark before sublimation?
A: Yes. Cleaning the bookmark before sublimating will remove dust, debris, and skin oils that could interfere with your transfer. Use isopropyl alcohol and a soft cloth to wipe the outside of your bookmark down before sublimating.
Q: Where can I find the supplies and tools to make sublimation bookmarks?
A: My sublimation bookmark files can be made with simple supplies you may already have in your sublimation crafting stash. I like to shop on Amazon for their free shipping with my Amazon Prime membership (just make sure to look for sellers with 5-star reviews). You can also find most, if not all of the supplies and tools at your local craft store.
Q: Can I make and sell these sublimated bookmark designs?
A: I love supporting creative entrepreneurs! If you want to use my designs and projects for commercial use, please familiarize yourself with my important licensing information before selling your crafts.
I do not permit sale of my digital items, but you can sell the creative goods you make with them — as long as you follow my licensing requirements. That means you cannot sell the bookmark SVG files, but you can sell item that you made with the files on platforms like Etsy. Whether you use the Etsy app or the browser version, you’ll find a global marketplace filled with thousands small businesses, and interested buyers can find thousands of made-to-order items. I love to see creative crafting businesses thrive with the help of my designs and inspiration!
Q: I’m new to sublimation. Can you help me learn more about it?
A: Need a little extra help understanding how to get started with sublimation? Join Sublimation Startup for a logical, step-by-step guide to getting setup for success with sublimation! You can ask questions and feel confident that you’ll get help! The Sublimation Startup mini-course is also great for those who enjoy learning from Jennifer’Maker’s easy-to-understand, calm, and clear method of teaching. This is a no-fluff, no-mess, no-distraction workshop … it’s like sitting down with Jennifer in her craft room to learn directly from her! We work in logical steps to build your understanding and confidence with sublimation, and then provide support to keep helping you as you continue on your journey! Register now!
Q: I’ve tried these methods and love them, but I still want to buy a sublimation printer. Can you help me choose which one to get?
A: I have a helpful post all about dye sublimation printers and choosing the right one for your needs! If you’re looking for my personal recommendation, some Epson printers (specifically the Epson EcoTank series) can be converted for sublimation. Check out this post to learn how to do it!
Get my free SVG/DXF/PDF/PNG files to sublimate without a printer!
(If you do not see the signup form above, click here.)
I love seeing what you make with my designs and how you use them! Please share a photo of your sublimation projects in our Facebook group or tag me on social media with #jennifermaker.
Love,

Want to remember this? Save this Tutorial on How Sublimate Without A Printer to your favorite Pinterest Board!