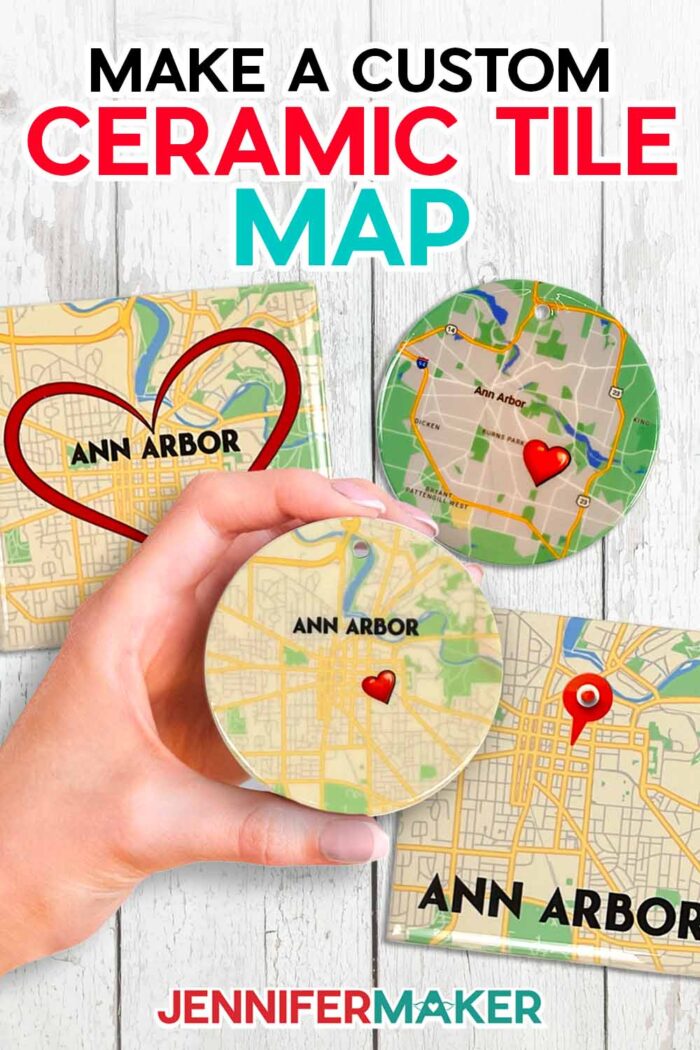
Learn how to sublimate a ceramic tile map!
Besides guiding us to our destination, maps represent important places we’ve been, places we’re going, or places that hold a significant meaning in our lives. I’ll show you how to take a map of any location (thank you, Internet!) and turn it into a beautiful ceramic tile map keepsake you can display in your home or on your Christmas tree! I’ll even show you how to customize it, too.

These make great mementos of a vacation, your hometown, or anywhere else that holds a special place in your heart. Whether the location is in the United States or another country, you can find a map for it!
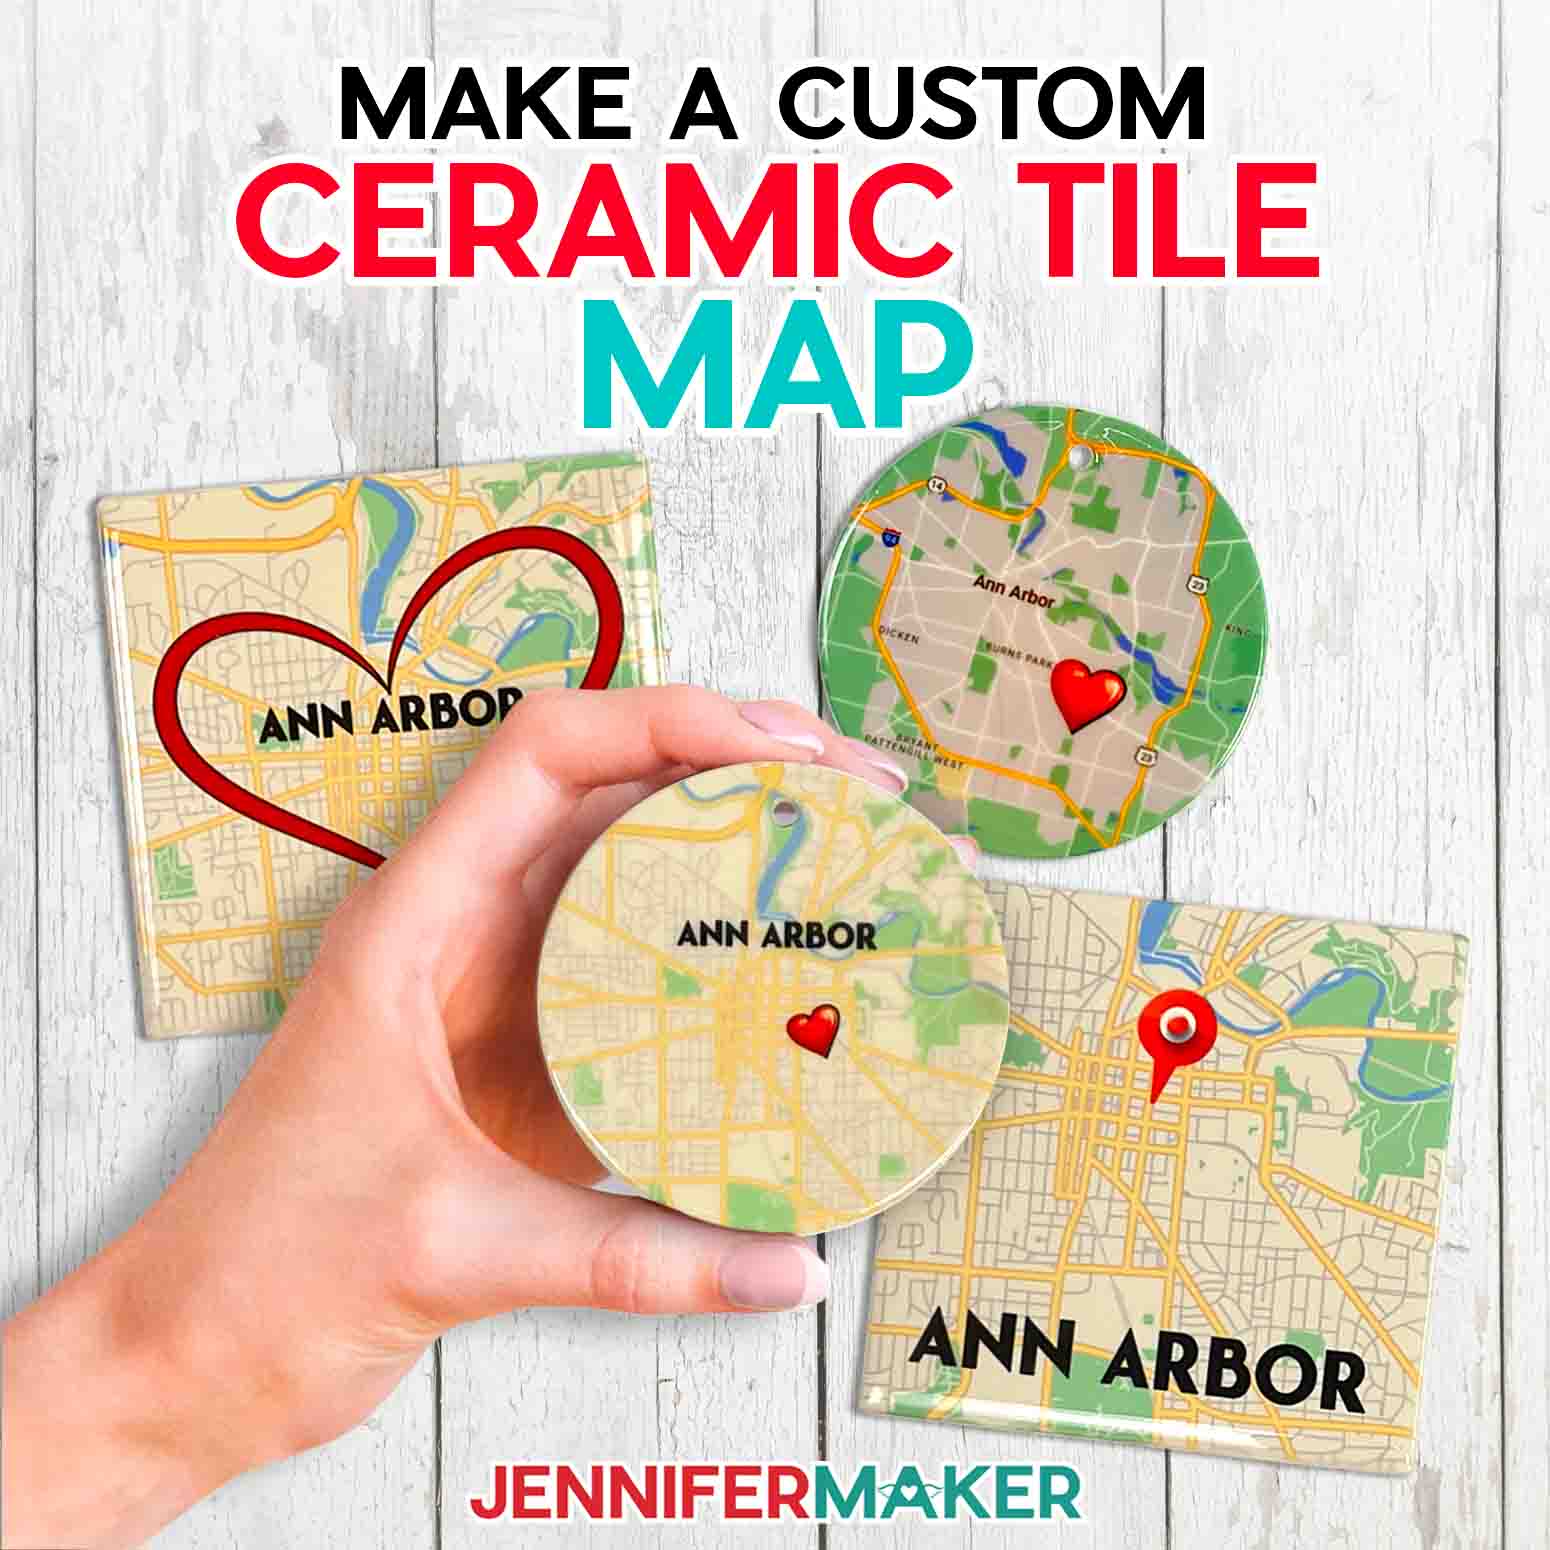
There are so many possibilities, and I just love how they look, don’t you?
So, how do you find a map? There are free map resources online like Google Maps, but be aware that there are copyright laws that prohibit the sale of crafts using maps from certain sources. If you’re looking to sell ornaments or tiles with maps on them, be sure to purchase a royalty-free map from a source like Deposit Photos.
Because they’re free (and accessible for all), I’ll show you how to source a map from Google Maps.
How will we get the map on the tile? Sublimation! It’s become one of my favorite ways to craft, and there are so many amazing things you can make using sublimation techniques.
I’ll break down how to sublimate on tile, and show you all my best tips for getting a flawless transfer. And because I wanted a way to put an even more personal spin on the map, I’ll show you how to add text and the free icons you can download as part of this tutorial. Use them for cute markers of your special spot on the map!
But, are all ceramic tiles able to sublimated? Yes … and no! Since sublimation ink can only be infused into material made of polyester or another polymer, only tiles that have been coated and are marketed as “sublimation blanks” can be sublimated. Plain ceramic tiles are not sublimatable.
But you know me … and you know I’ll find a work-around! Using a neat material called PolyGloss, you can turn your plain tile into a sublimation blank.
The preparation time is on the long side, mainly because of the drying and curing involved — but it’s SO worth the wait. To be safe, use an apron to protect your clothes, disposable gloves, safety goggles, and a mask when working with PolyGloss. And as a bonus, one mixed batch of PolyGloss is enough to coat a number of tiles — even up to three or four!
You WILL need some basic sublimation materials, including one you may have never used before.
So, are you ready to memorialize your favorite place with an awesome ceramic tile map ornament or keepsake? Follow my written tutorial and learn how!
Ready to learn how to make a ceramic tile map? This post contains some affiliate links for your convenience (which means if you make a purchase after clicking a link I will earn a small commission but it won’t cost you a penny more)! Read my full disclosure policy.
Materials And Tools to Sublimate a Ceramic Tile Map
See my full and complete Amazon shopping list for the exact items used in this project!
- One (1) 3.5″ Round Ceramic Ornament Sublimation Blank -OR- One (1) 4.25″ Square Glazed Ceramic Tile -AND-
Dyepress PolyGloss Sublimation Coating For All Hard Substrates (please see the complete safety information sheet for details) - Disposable gloves
- Respirator with eye protection and the correct cartridges
- Arm covers
- Apron
- One (1) Sheet of A-SUB Sublimation Paper 8.5″ x 11″
- Sublimation Printer – I used a converted Epson EcoTank ET-4700 Inkjet Printer
- Sublimation Ink – I used Hiipoo Ink
- Cricut EasyPress 12″ x 10″ -OR- Cricut AutoPress
- Cricut EasyPress Mat 12″ x 12″
- Craft-Purposed Convection Oven
- Oven Thermometer
- Fan
- Nylon Paint Brush
- Heat Resistant Gloves
- Heat Resistant Tape
- Silicone Baking Mat
- Butcher Paper
- Scissors
- Isopropyl Alcohol -AND- Coffee Filters
- Cooling Rack
- OPTIONAL: Acrylic Clear Spray (to protect finished tiles) -AND- Small Plastic Tote (to spray into)
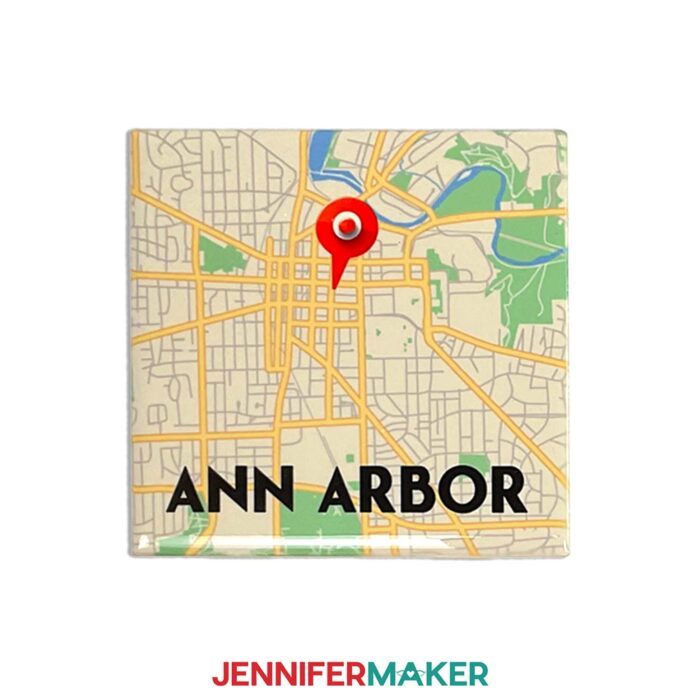
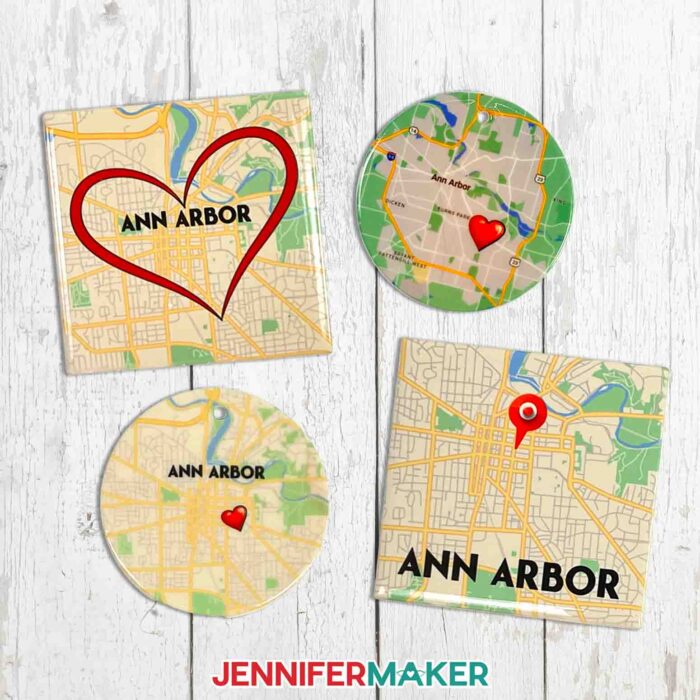
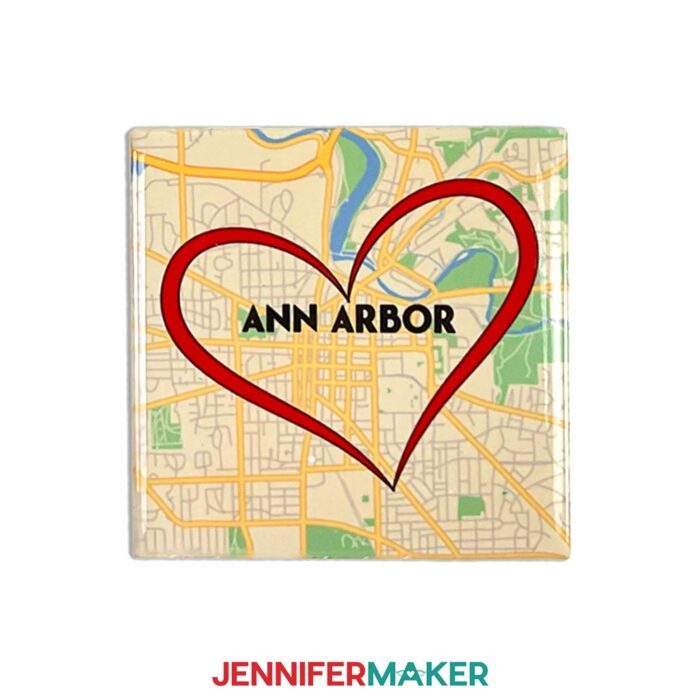
- Design #550 – My free map icon PNG/SVG/DXF/PDF design files are available in my free resource library – get the password by filling out the form at the bottom of this page

How to Make a Ceramic Tile Map!
Ceramic Tile Map
Learn how to create a custom ceramic tile map using sublimation!
Materials
- One (1) 3.5" Round Ceramic Ornament Sublimation Blank -OR-
- One (1) 4.25" Square Glazed Ceramic Tile -AND-
- Dyepress PolyGloss Sublimation Coating For All Hard Substrates
- One (1) Sheet of A-SUB Sublimation Paper 8.5" x 11"
- Design #550 (My free PDF/PNG design files available in my free resource library - get the password by filling out the form at the bottom of this page)
Tools
- Sublimation Printer - I used a converted Epson EcoTank ET-4700 Inkjet Printer
- Sublimation Ink
- Cricut EasyPress 12" x 10" -OR-
- Cricut AutoPress
- Cricut EasyPress Mat 12" x 12"
- Convection Oven
- Oven Thermometer
- Fan
- Nylon Paint Brush
- Heat Resistant Gloves
- Heat Resistant Tape
- Silicone Baking Mat
- Butcher Paper
- Scissors
- Isopropyl Alcohol -AND-
- Coffee Filters
- Cooling Rack
- OPTIONAL: Small Plastic Tote
- OPTIONAL: Acrylic Clear Spray (to protect finished tiles)
- Respirator with eye protection and the correct cartridges
- Disposable Gloves
- Apron
- Arm covers
Instructions
STEP 1: GET MY FREE CERAMIC TILE MAP DESIGNS
First, download my Ceramic Tile Map designs from my free library – look for Design #550. Alternatively, you can use the Save This Project form near the top of this post and the design link will be emailed to you.
While not necessary to complete the project, these 21 fun map icons can be used to liven up your maps!
STEP 2: PREPARE AND PRINT YOUR MAP
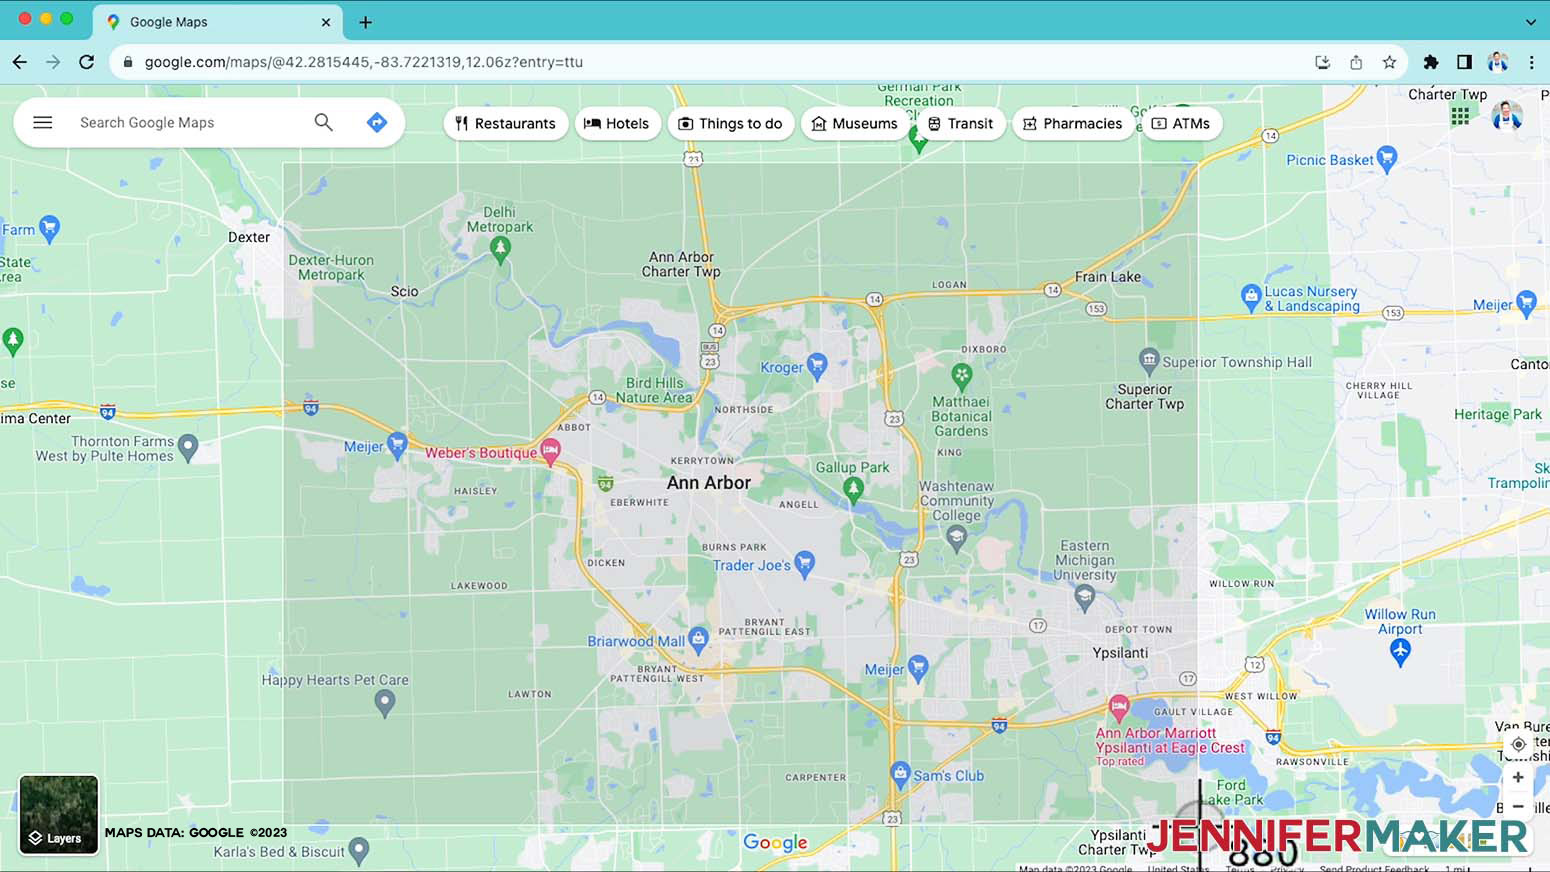
Source your map from websites that provide royalty-free designs or by purchasing maps from map providers. While there are many useful websites to choose from, Google Maps and Deposit Photos worked best for me.
Make sure any downloaded map image is high quality, and be aware of copyright permissions if you intend to sell your finished project. Screenshots of maps will be lower quality than downloaded image files, but they are a great option for smaller crafts.
Google Maps screen captures are a great source for map imagery. Just be aware that Google Maps images are for personal use only. You will not be able to sell your finished projects with Google Maps images.
TO GET A SCREENSHOT FROM GOOGLE MAPS
1. Open a web browser and navigate to maps.google.com.
2. Search for your city or location.

3. Zoom in or out of the map using the plus (+) and minus (-) controls on the lower right to show as much or as little detail as you prefer.

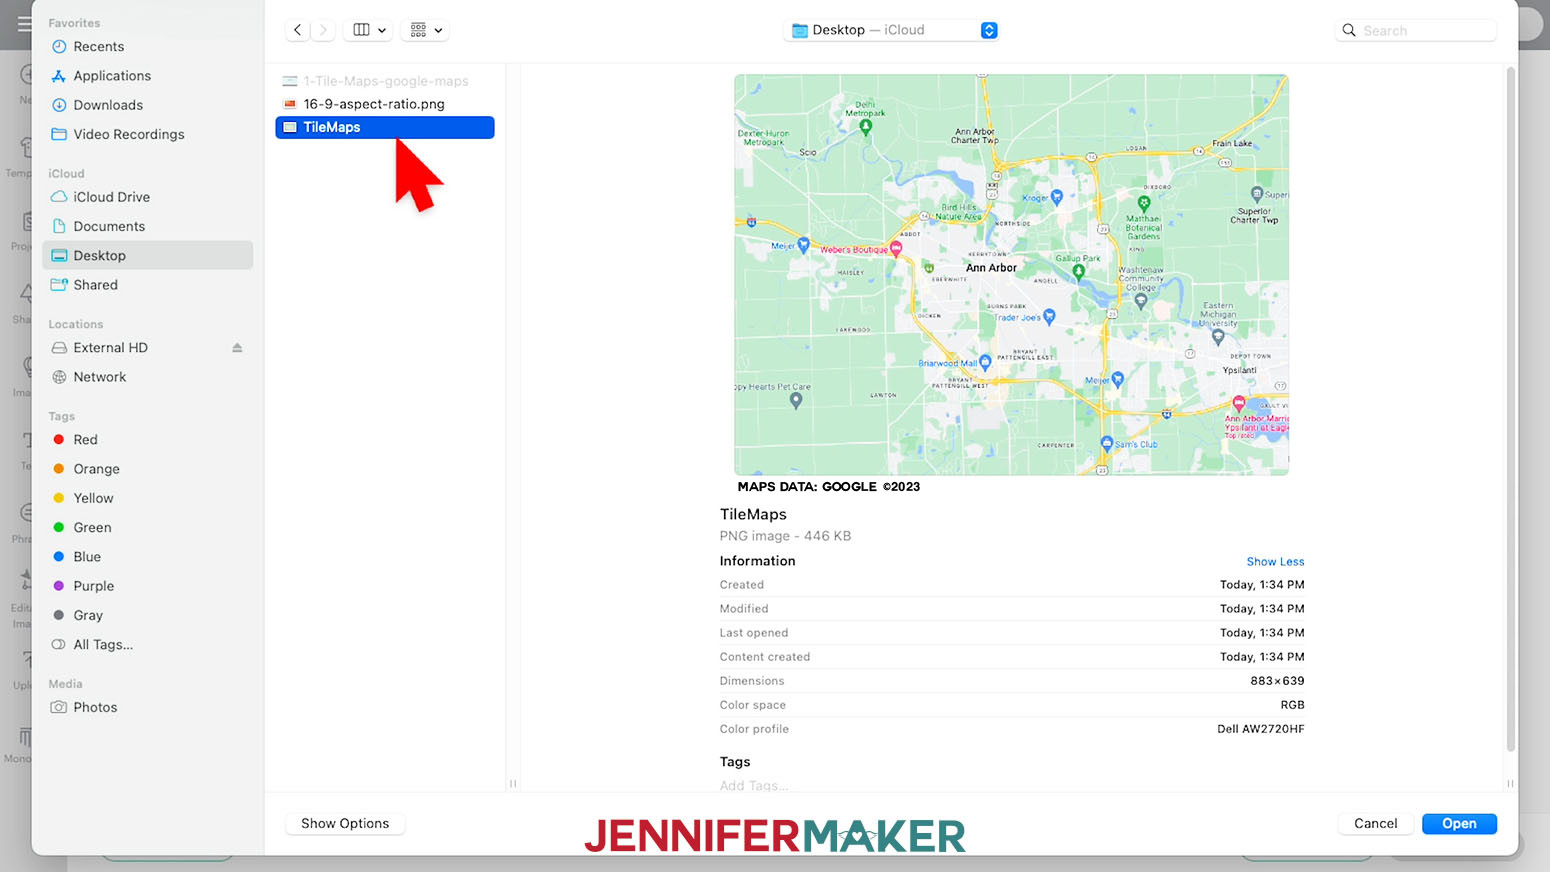
4. Take a screen capture of the map area and save to your computer. (Windows users can use the Windows Snipping Tool for a precise area screen capture, while Mac users can use the keyboard shortcut Shift+Command+4 to save a screenshot.)
5. Use your favorite method to set up and print the file on a sublimation printer. I used Cricut Design Space to edit the map shape and add extra elements on top.
CRICUT DESIGN SPACE
1. Open Cricut Design Space and click “New Project”
2. Click “Upload” and then “Upload Image”
3. Click “Browse”
4. Select your saved map file.
5. On the Upload Image screen, select “Complex” and click “Continue”
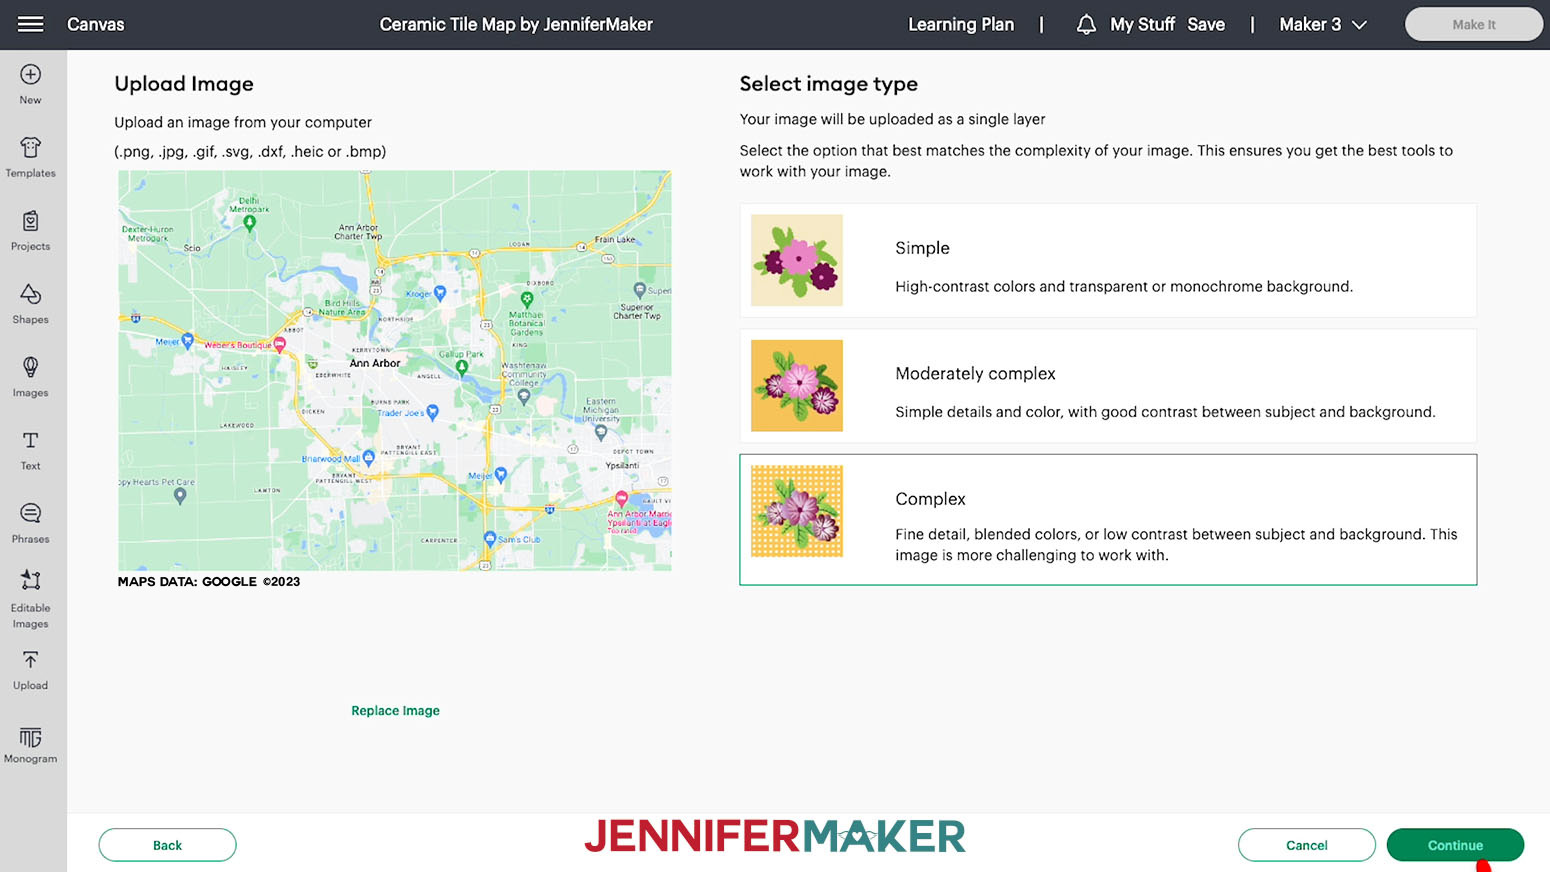
6. No background needs to be removed at this step, so click “Apply and Continue”

7. On the next screen, select “Print Then Cut Image” and click “Upload”
8. Select your design in “Recent Uploads” and add it to the Canvas
9. Add any icons you’d like by following steps 2-8 above
10. In the Free Shapes Menu on the left, choose the Square or Circle. The shape you choose will depend on your tile shape.

11. Change the size of the shape to match the size of your tile by entering the dimensions in the Size menu at the top
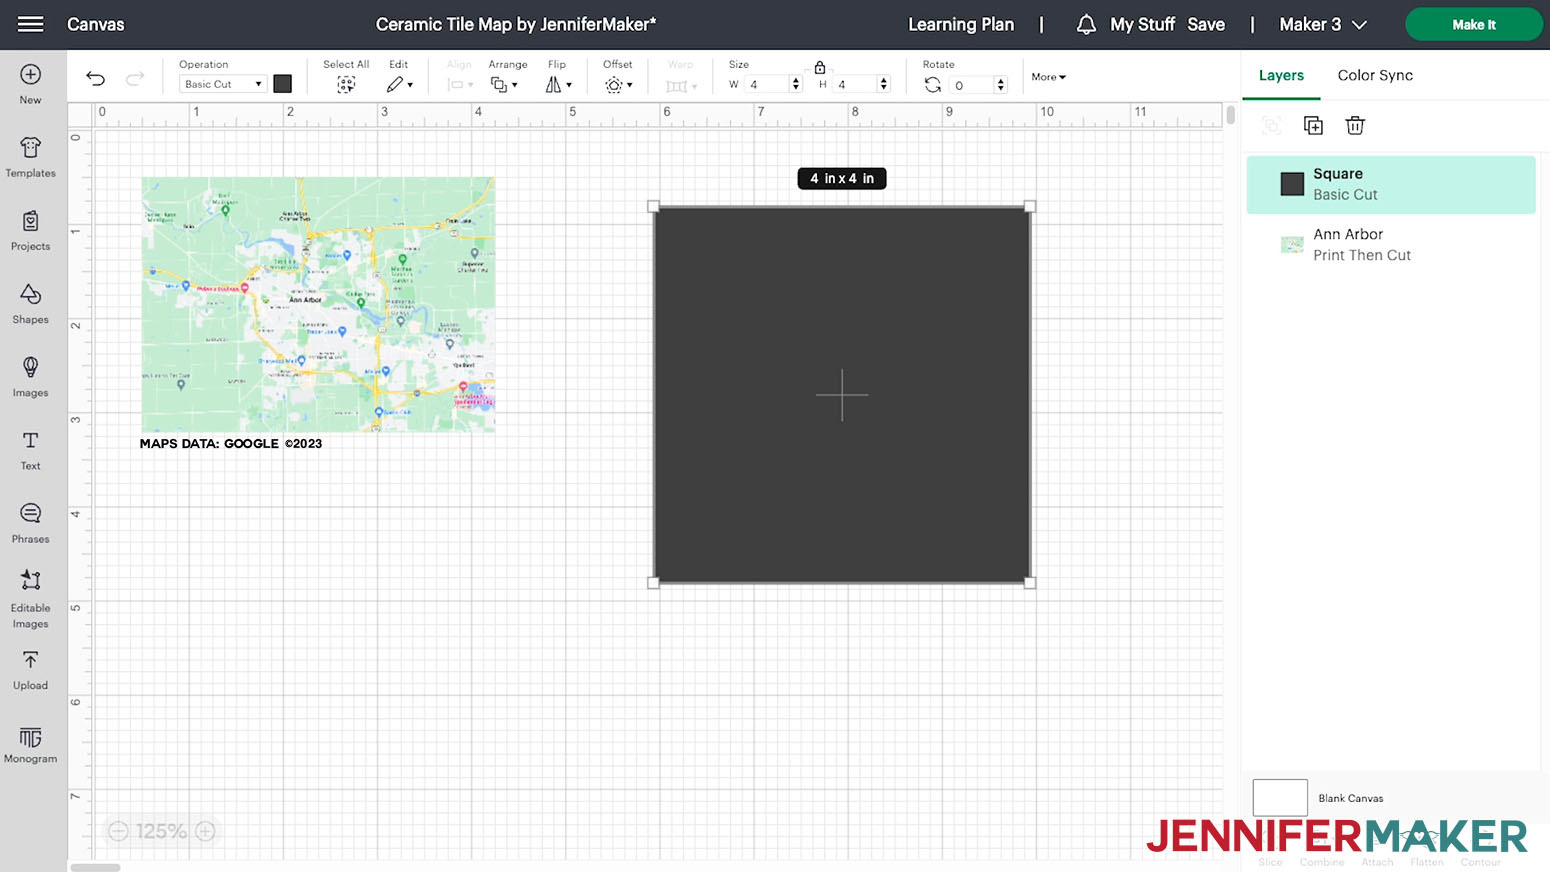
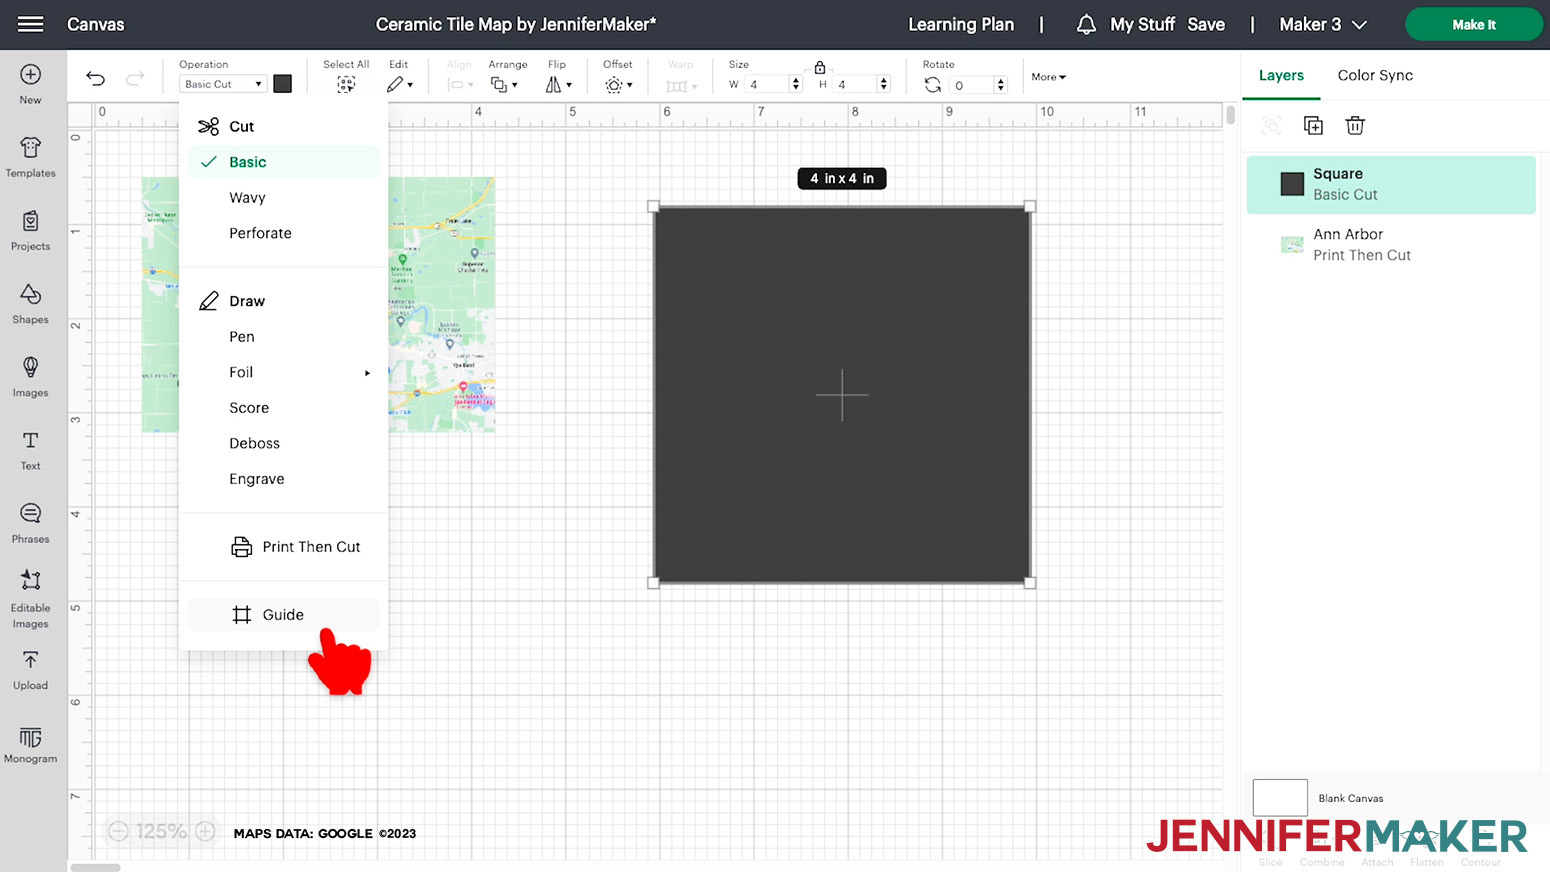
12. With the shape selected, click the “Operation” dropdown and choose “Guide” to make the shape into a guide outline.
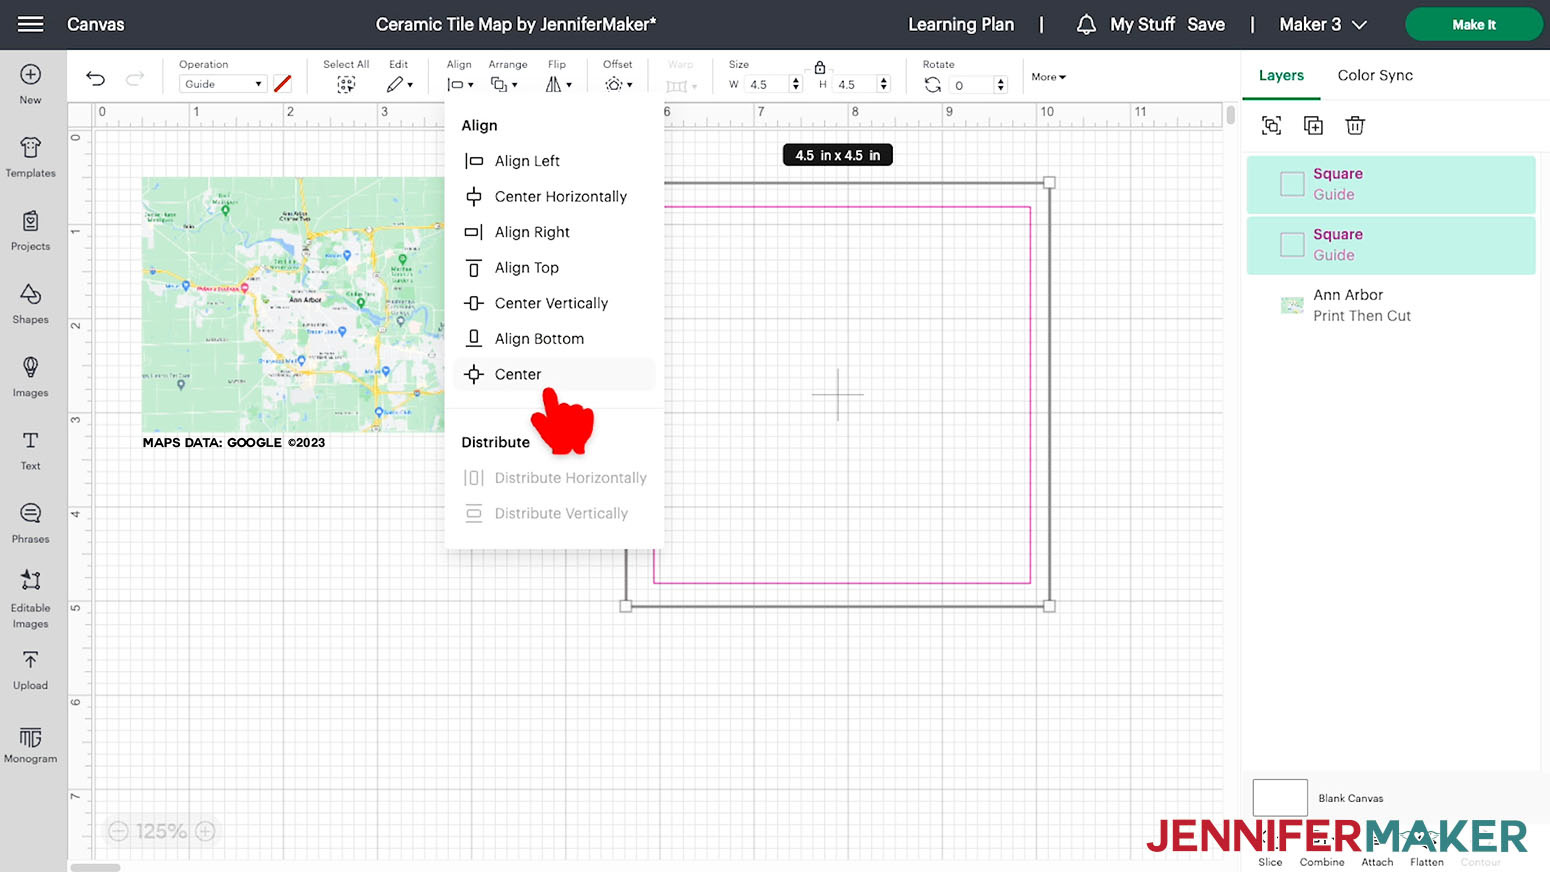
13. Duplicate the guide by right-clicking on it and selecting “Duplicate”
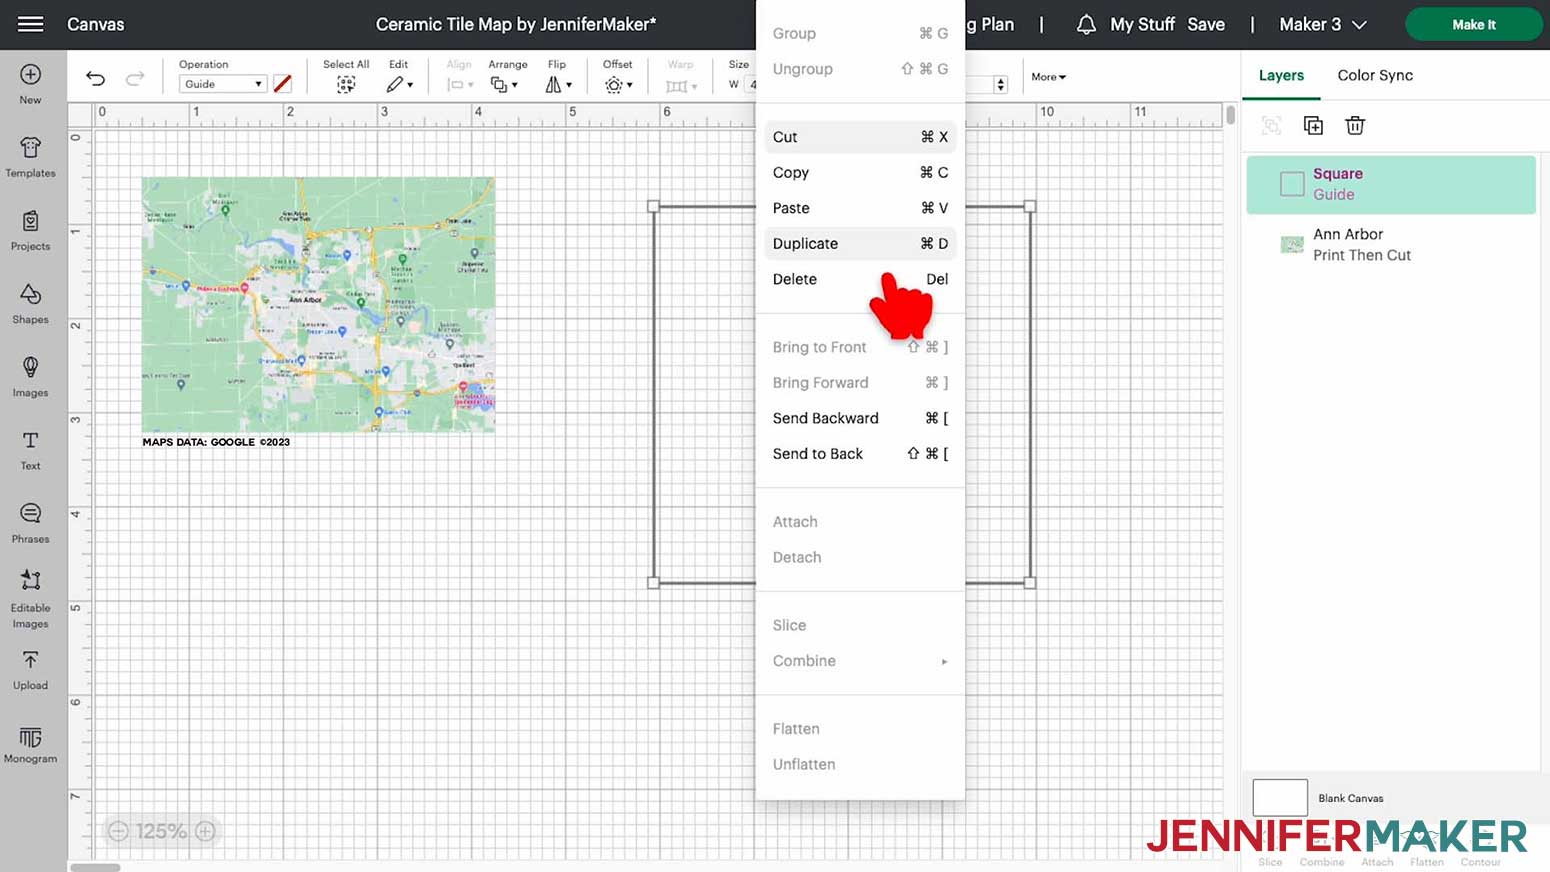
14. Change the new guide to a size 0.5” wider and taller than the actual size of the tile.

15. Center the larger guide over top of the smaller guide by selecting both and choosing Align, then Center. (The inside line will show the edge of the actual tile area, while the outside line will give extra image area to bleed the design off the edge of the tile.)
16. Select the map image. Move and/or resize it to fit the important areas inside the smaller guide.
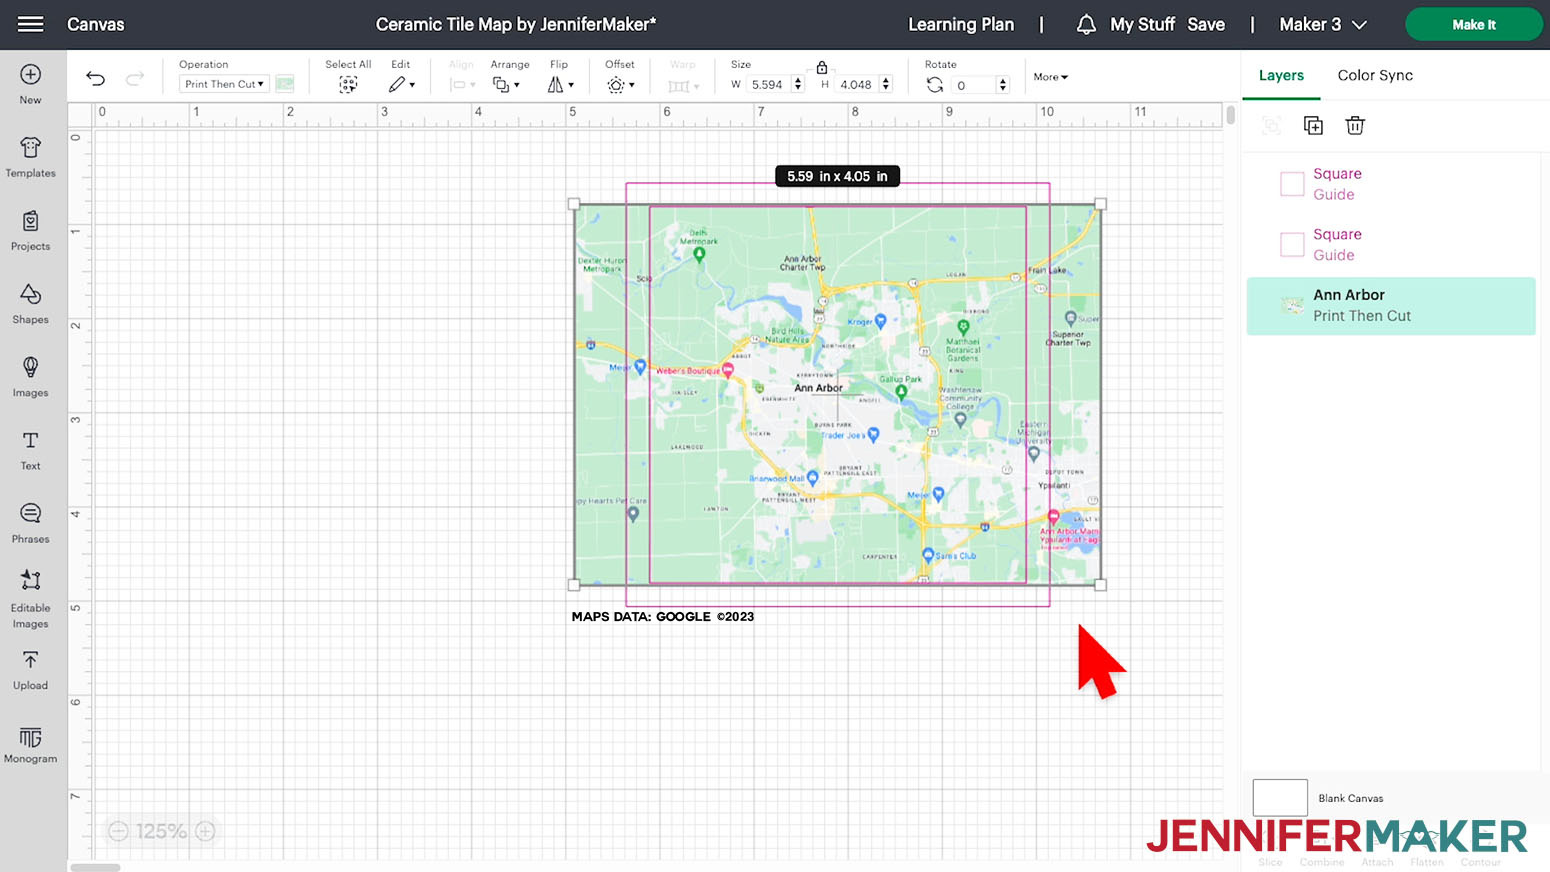
TIP: If any of the space between the two guides is blank, enlarge the map slightly and re-center it within the guides to ensure there is adequate coverage.
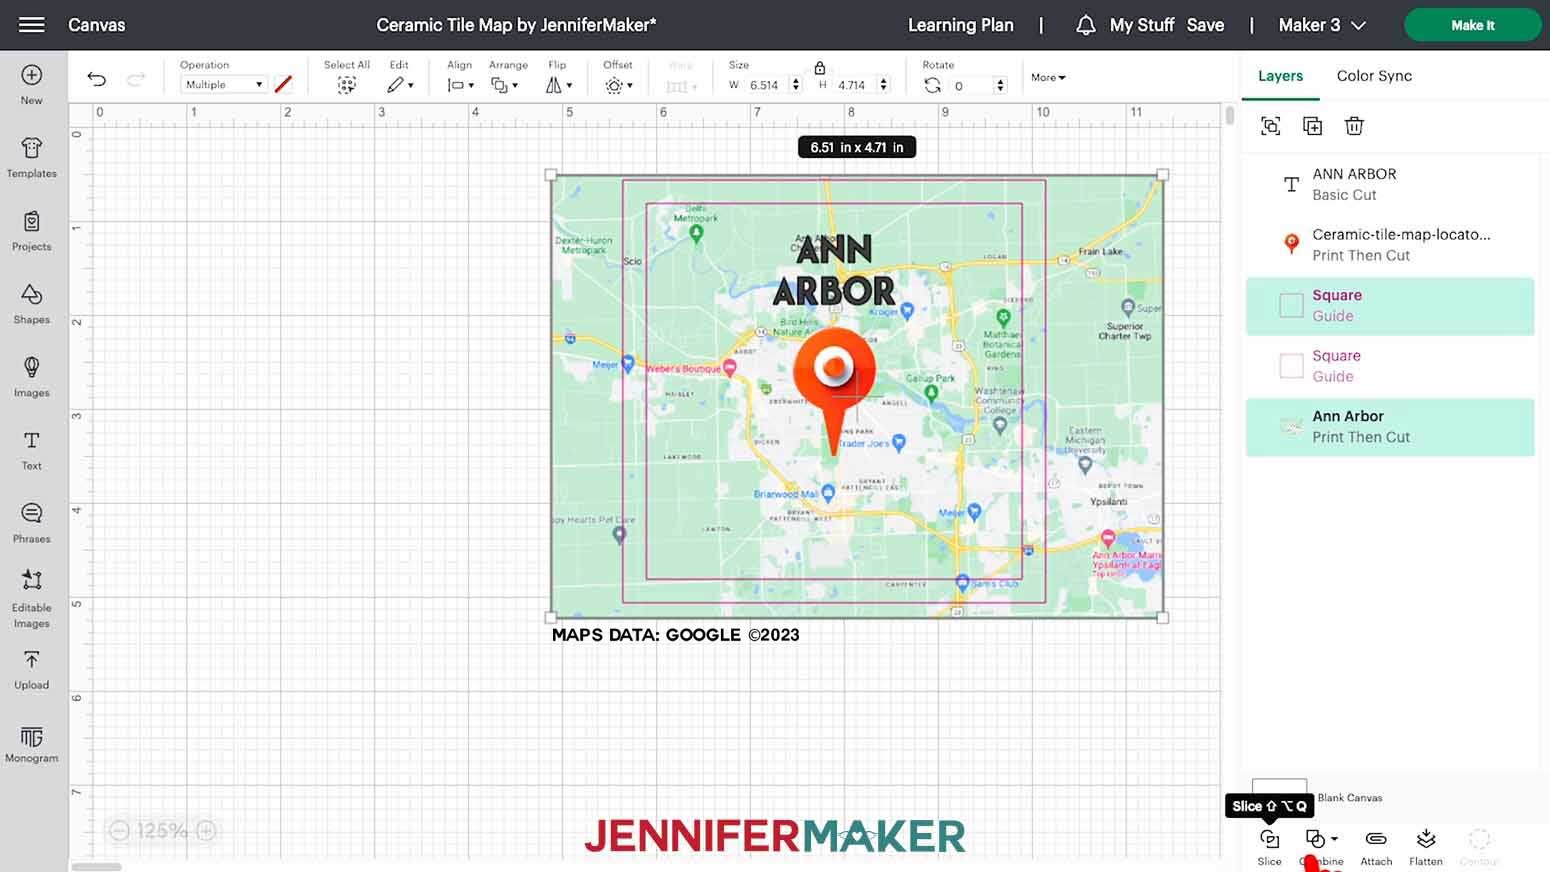
17. Add any extra images or text on top of the map by resizing them and moving them into place inside the smaller guide
![]()
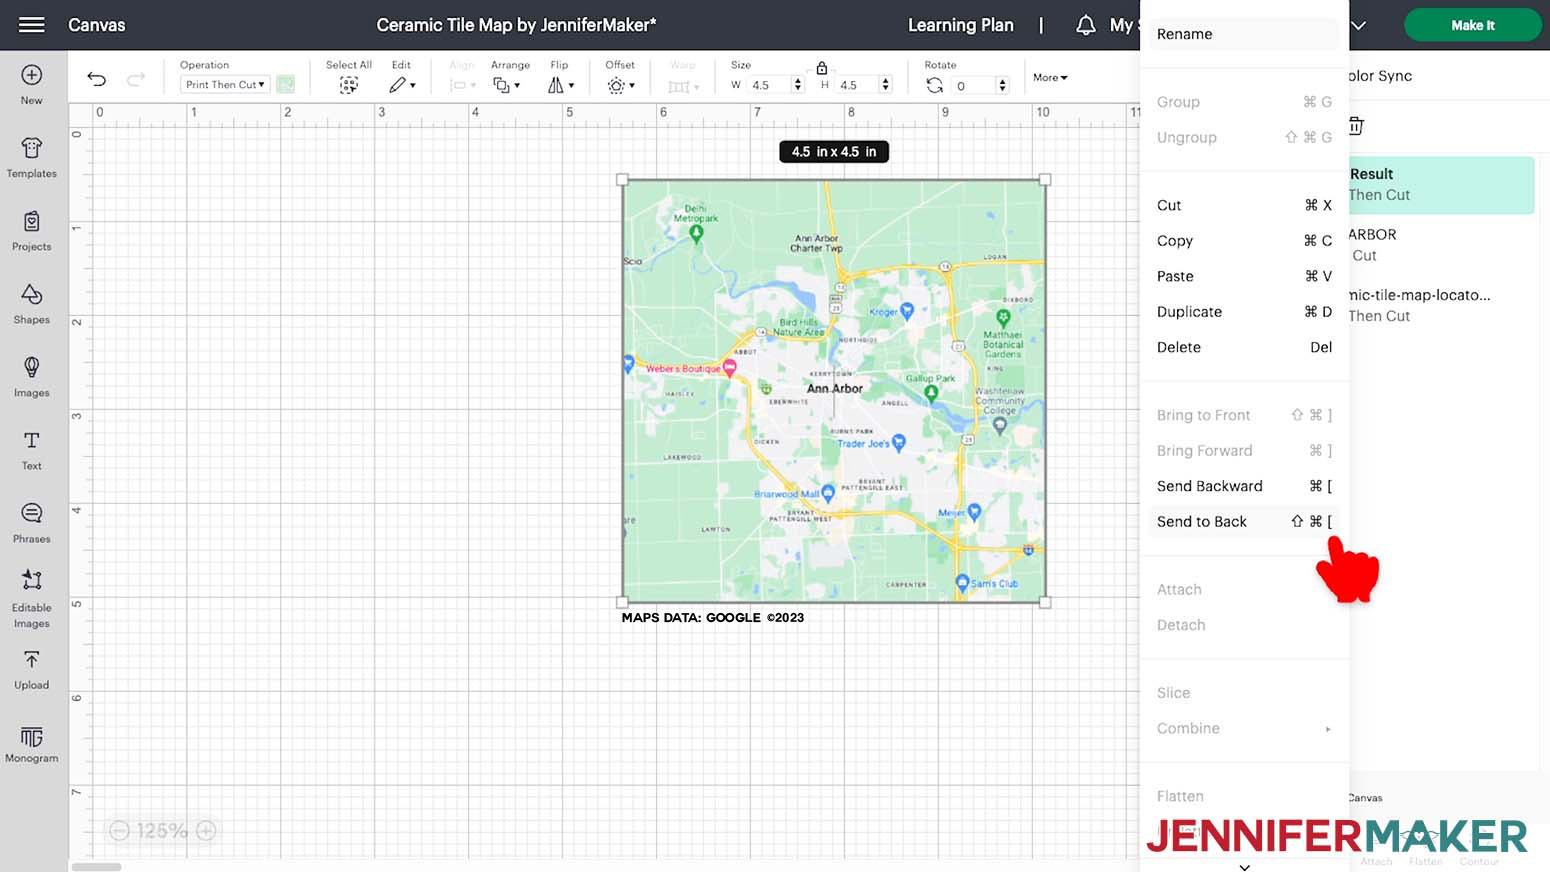
18. Select only the larger guide and the map and click “Slice”
19. Delete the outer edge of the map outside the sliced guide area
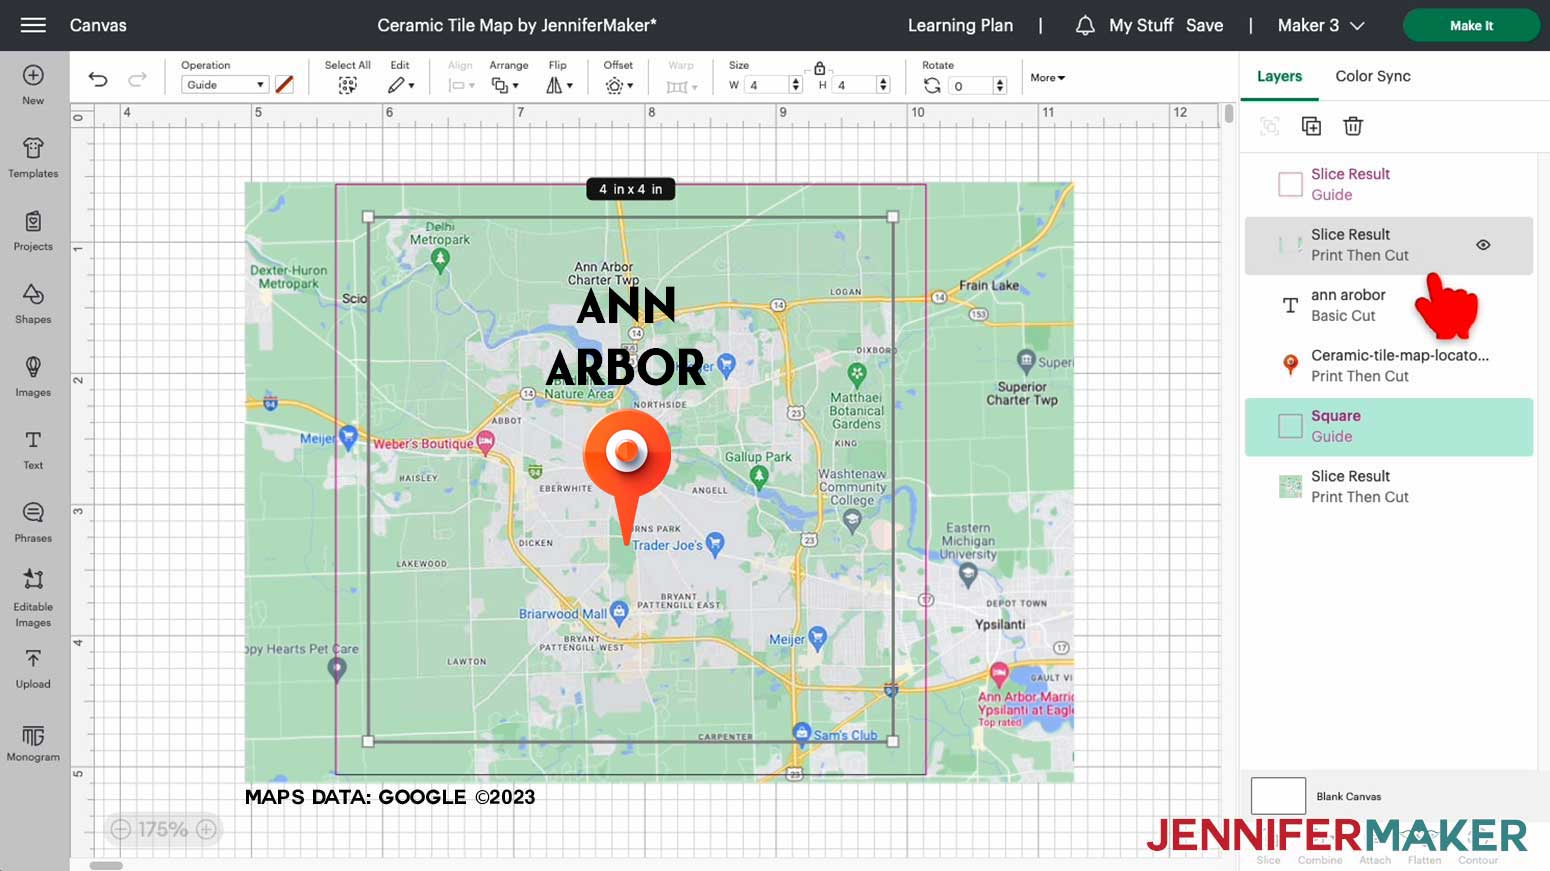
20. Right-click on the remaining map area and choose “Send to Back” to show your original guide and any extra images and/or text
21. Delete the two guides

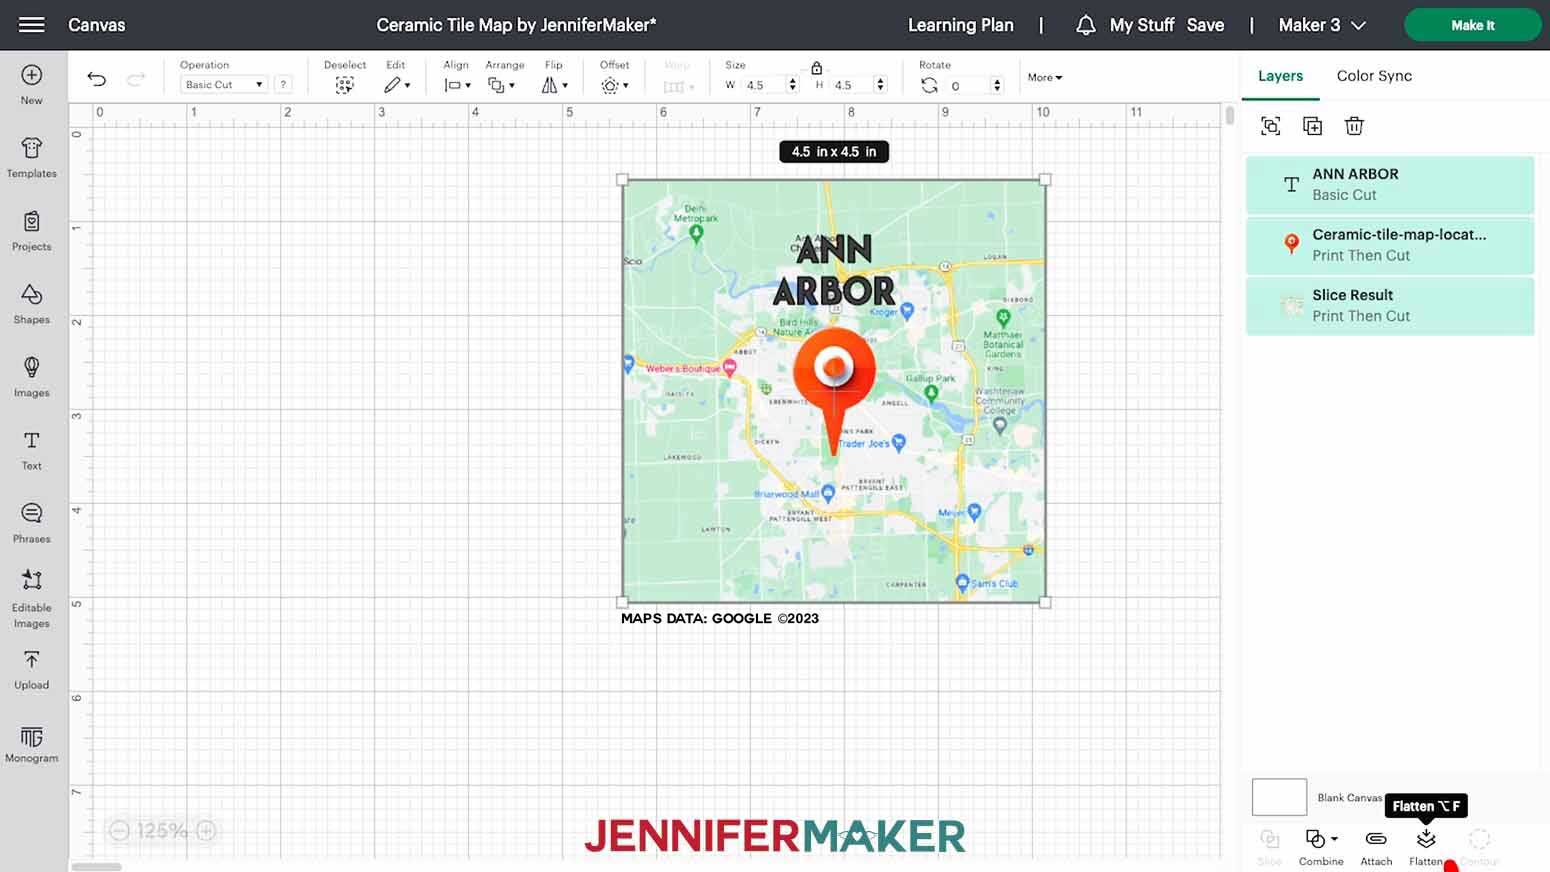
22. Select your cropped map along with any icons and text you’re using and choose “Flatten” at the bottom of the Layers Panel to create a Print Then Cut image
23. Make sure the correct machine is listed in the top right and click “Make It”
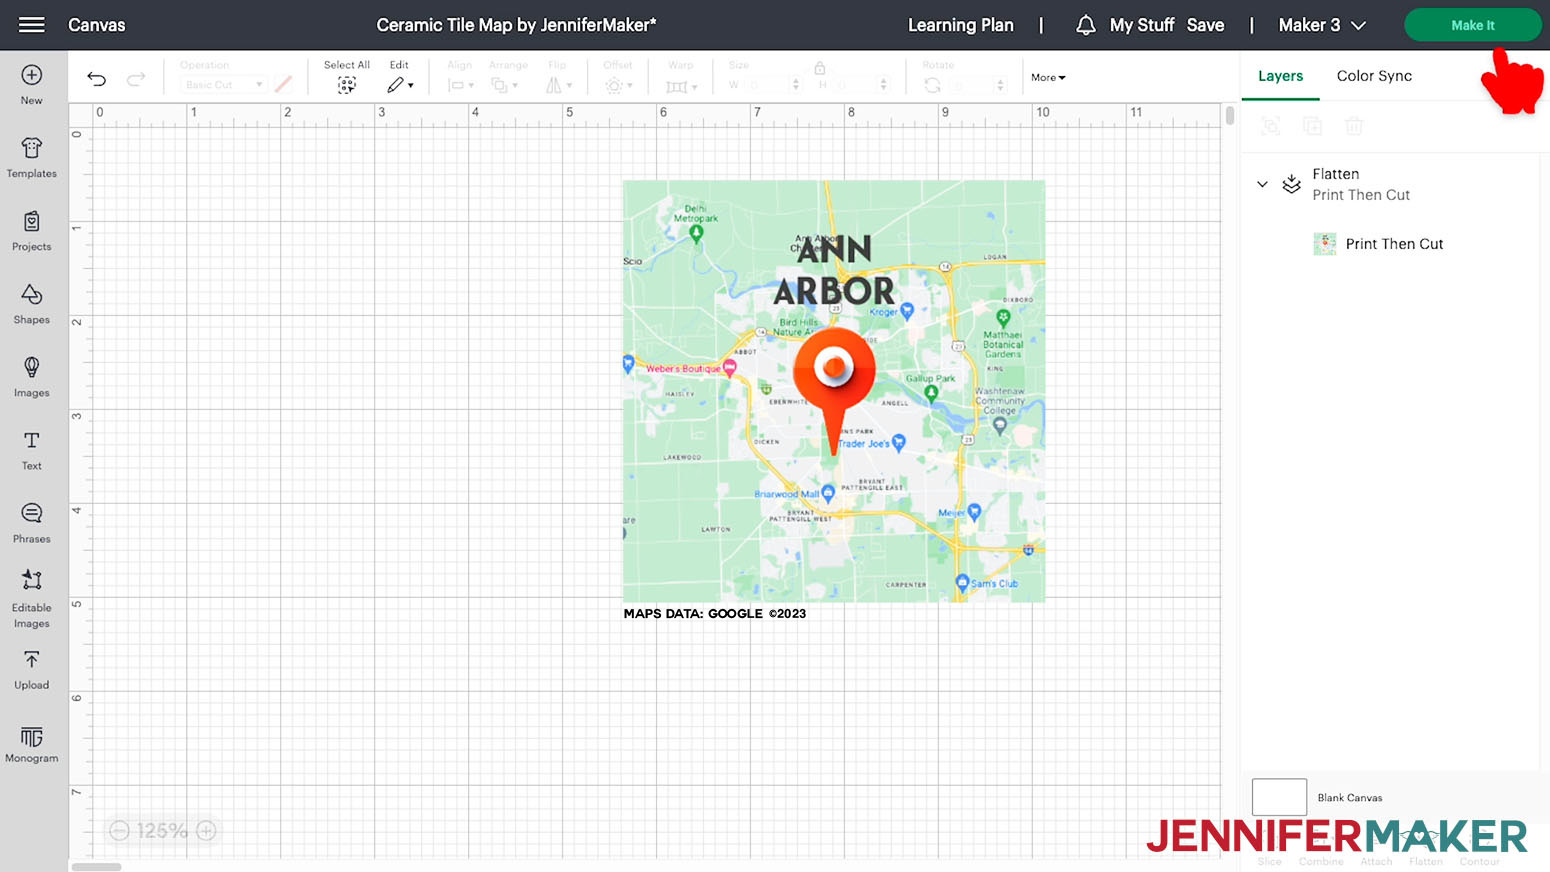
24. On the Prepare Screen, make sure your Print Then Cut mat’s paper size is set to 8.5” x 11”
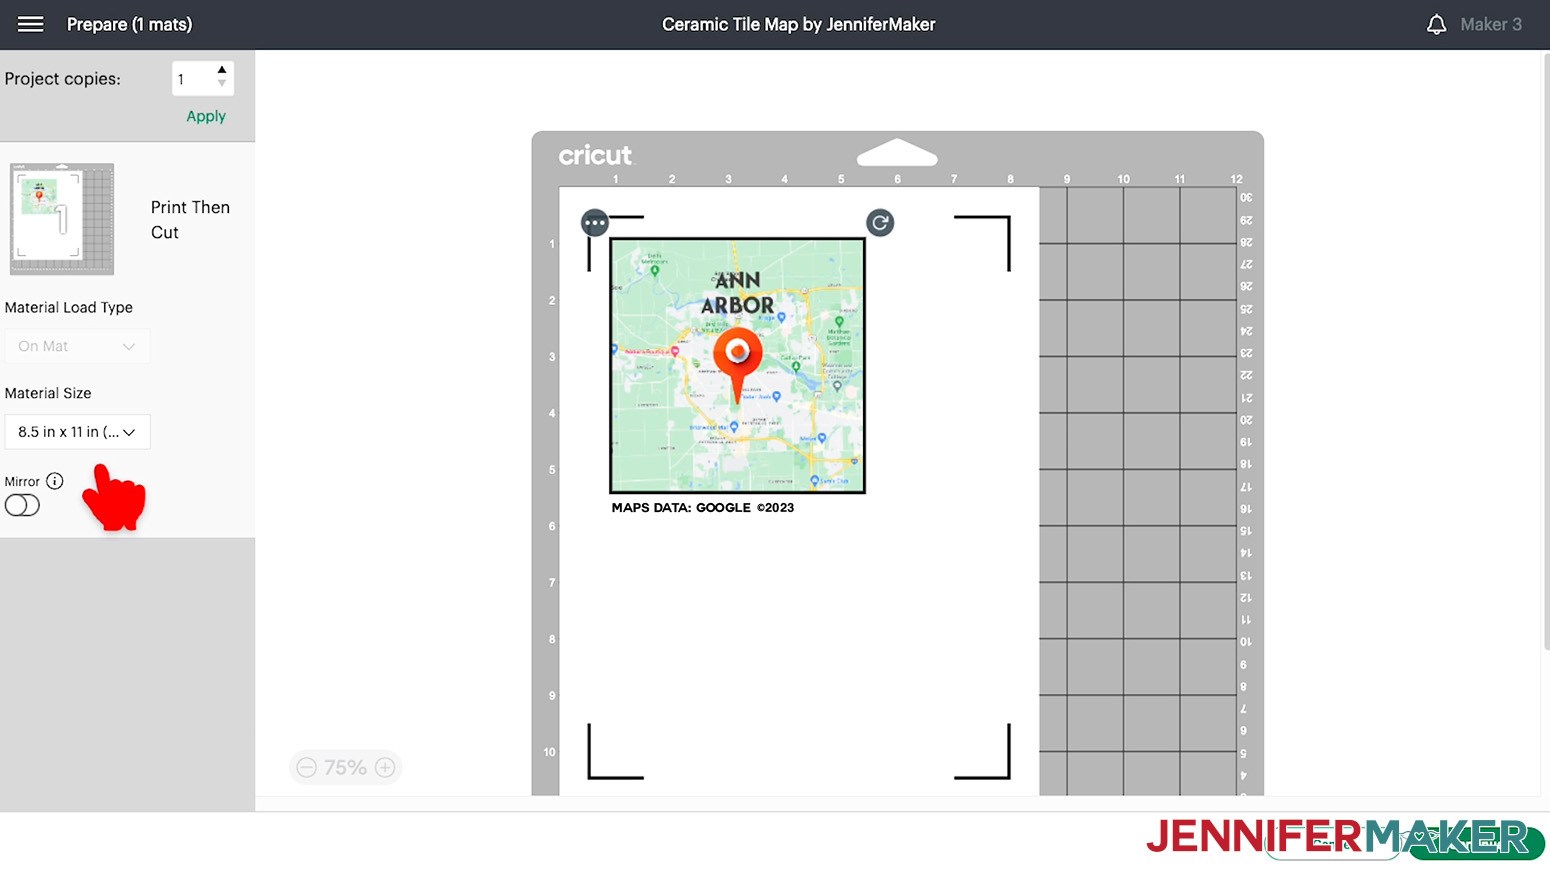
25. Turn on the “Mirror” toggle
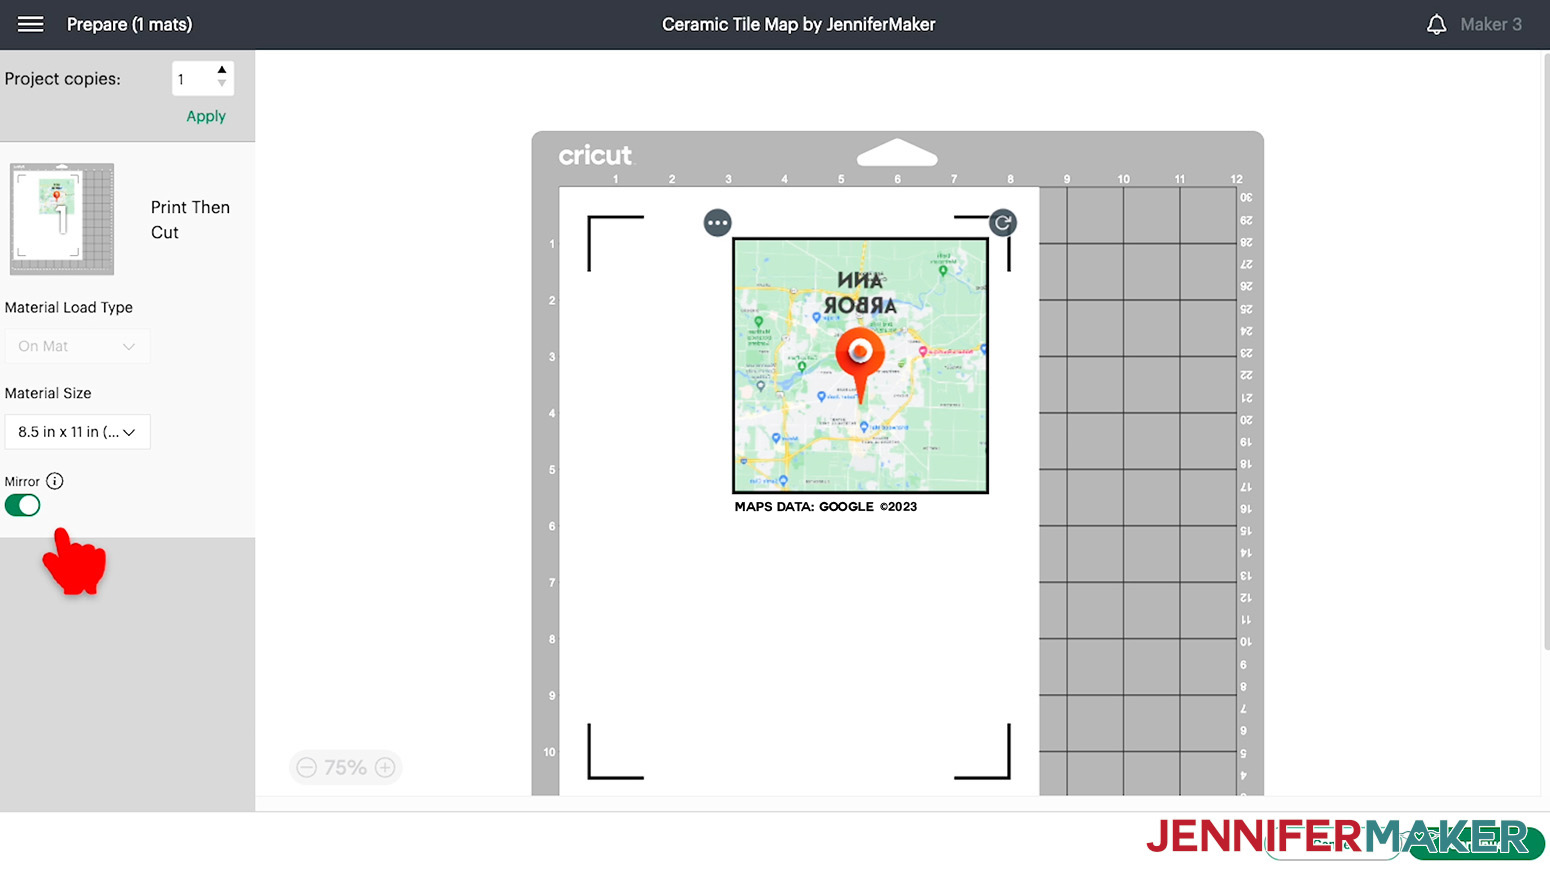
26. Click “Continue”
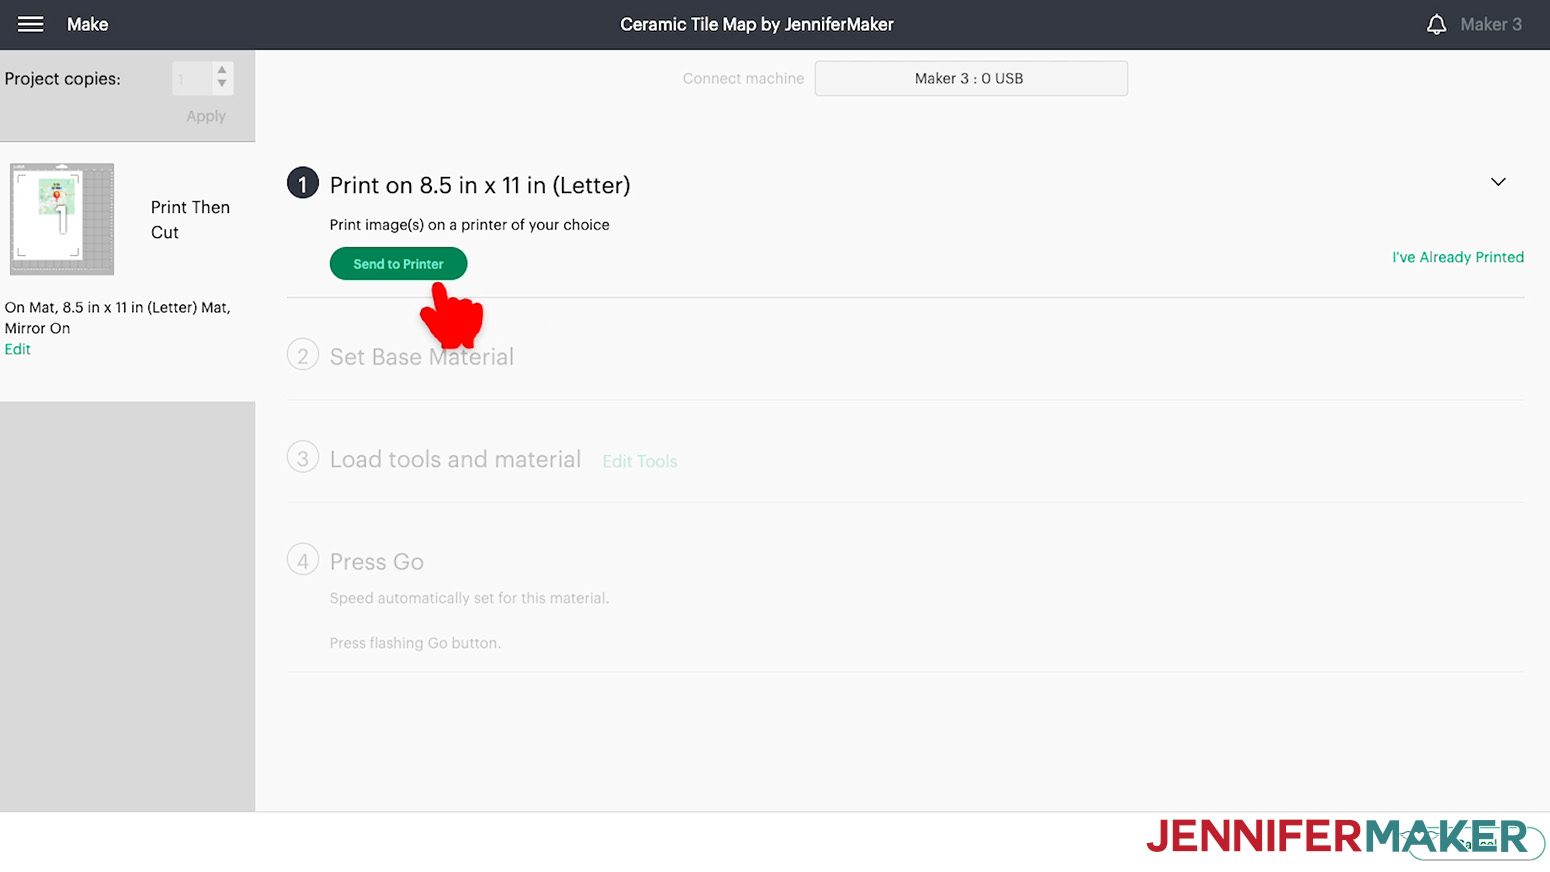
PRINTING
1. On the Make Screen, click “Send To Printer”
2. On the “Print Setup” menu, choose the correct printer, turn off “Add Bleed,” and turn on “Use System Dialog”
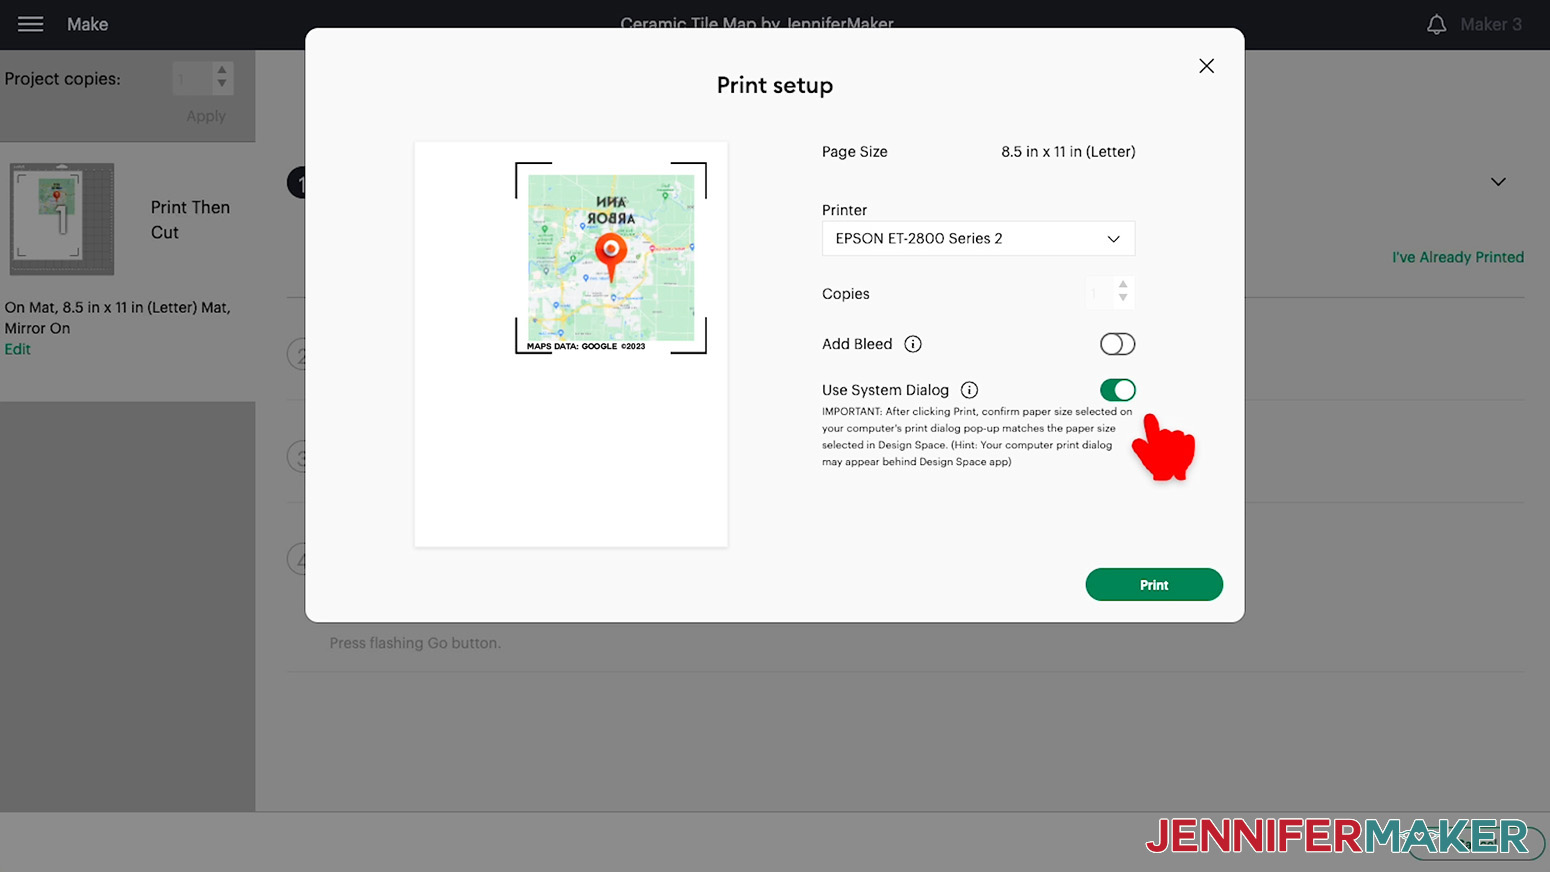
3. Click “Print”
4. Choose the settings needed to produce the highest quality print on your printer’s system dialog box, then click “Print”
NOTE: Cutting the image on the Cricut is not necessary. Once the image prints, it is OK to cancel the Print Then Cut operation in Design Space.
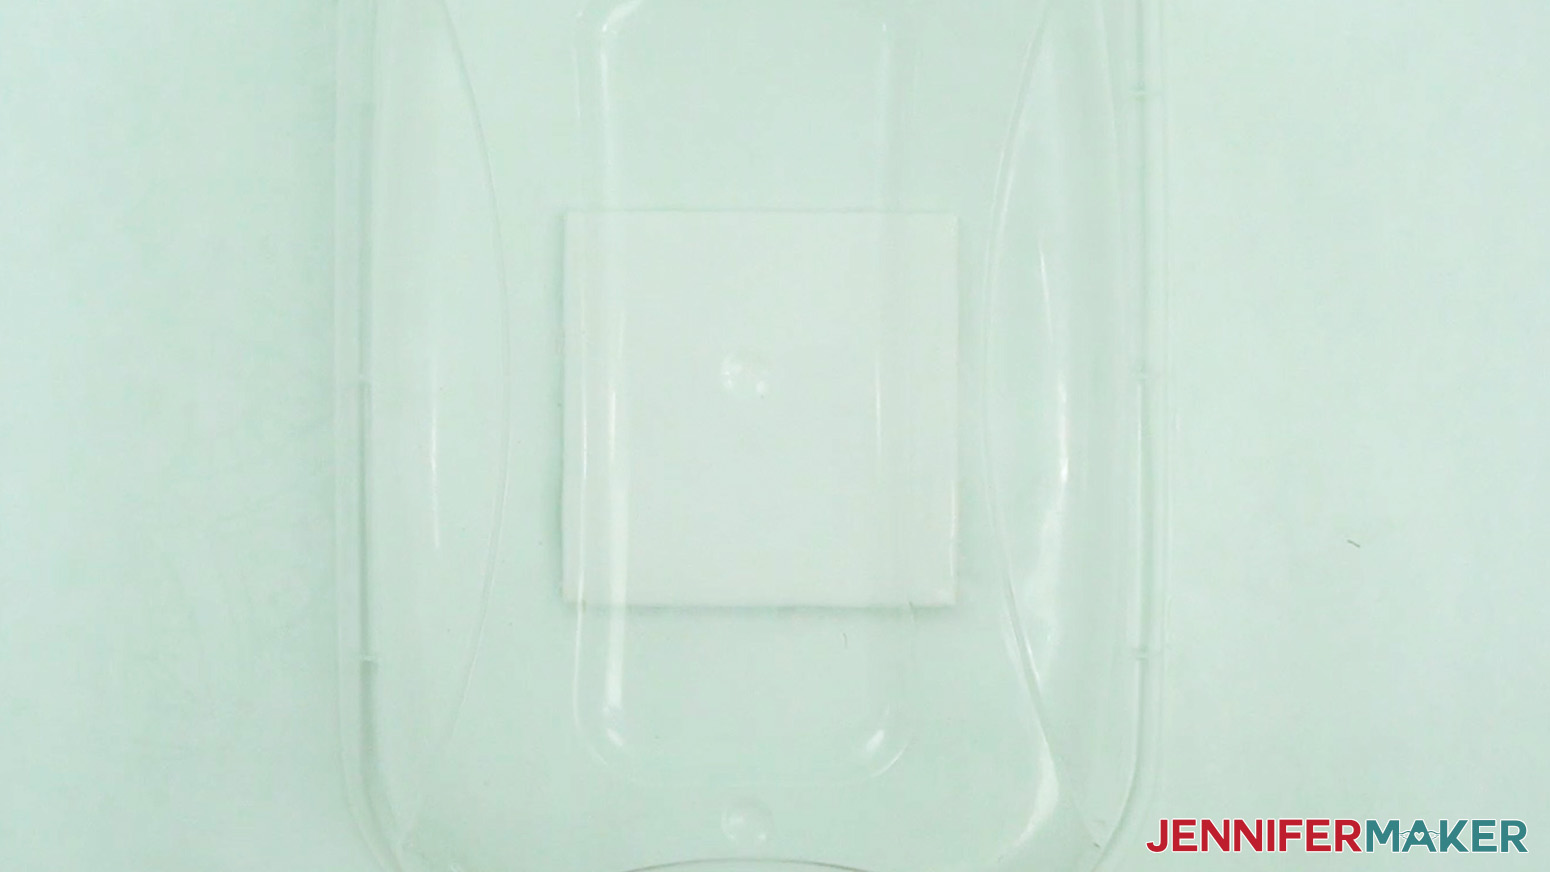
5. Allow the print to dry thoroughly
6. Trim the print around the edge to remove the excess paper

STEP 3: PREPARE THE CERAMIC TILE
IMPORTANT: When preparing and using PolyGloss, it's safest to wear an apron, disposable gloves, arm covers, and a respirator with eye protection and the correct cartridges in a well-ventilated place with open windows and a fan.
1. Clean the tile with alcohol and a lint-free cloth or coffee filter
NOTE: If the tile is already sublimation-ready, skip to "STEP 4: SUBLIMATE THE PREPARED TILE." If the ceramic tile needs a PolyGloss coating, follow the next set of instructions.
2. Cover your work area with butcher paper to protect the surface
3. Place the tile face up on the work surface
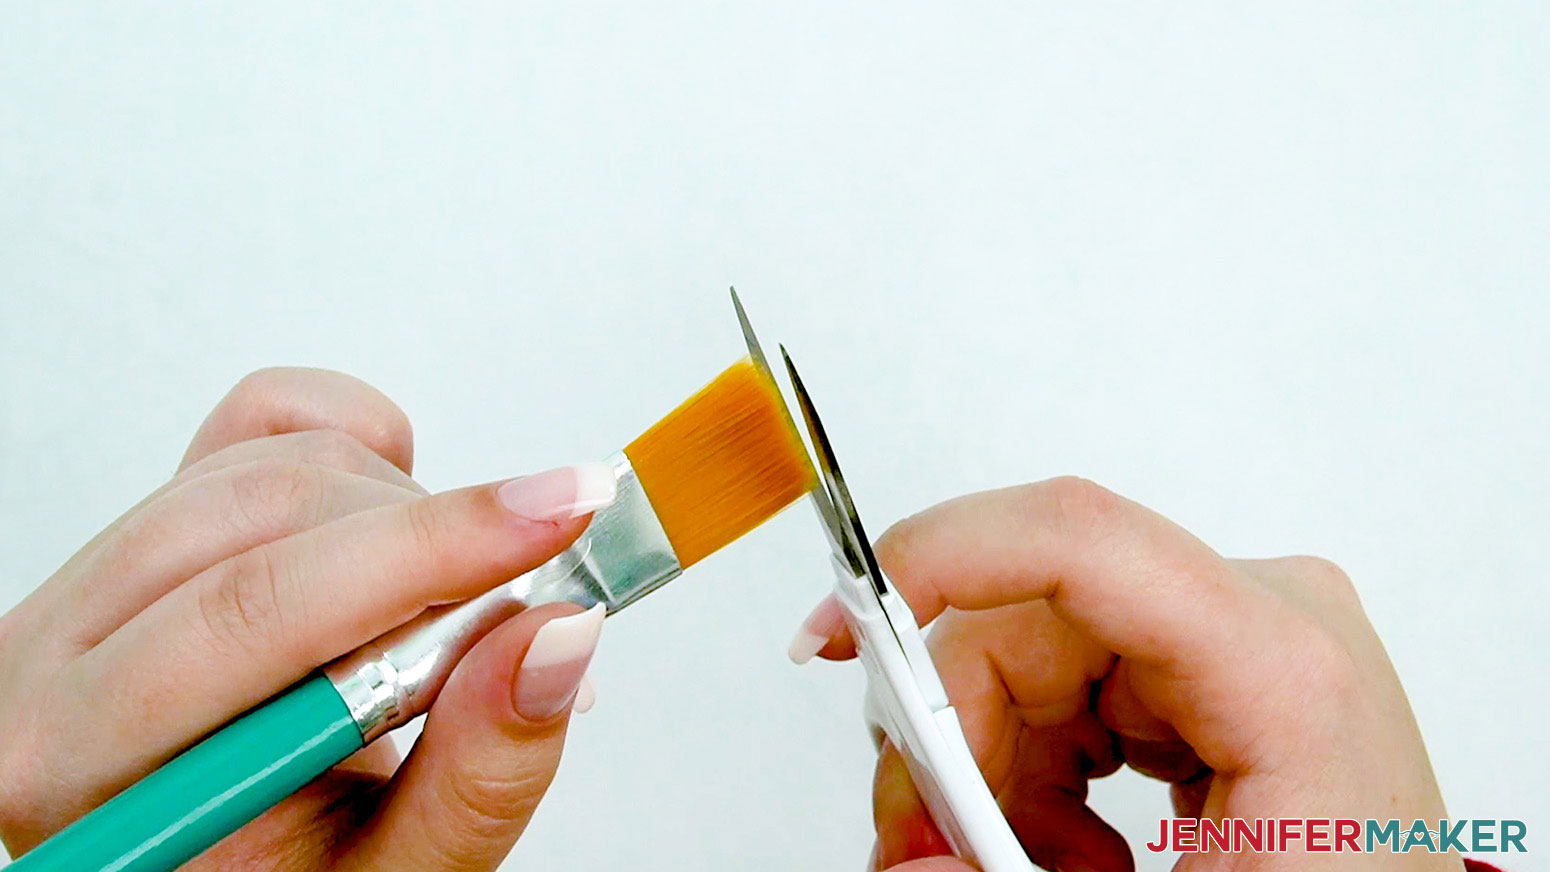
4. Gather the PolyGloss kit materials and a nylon brush
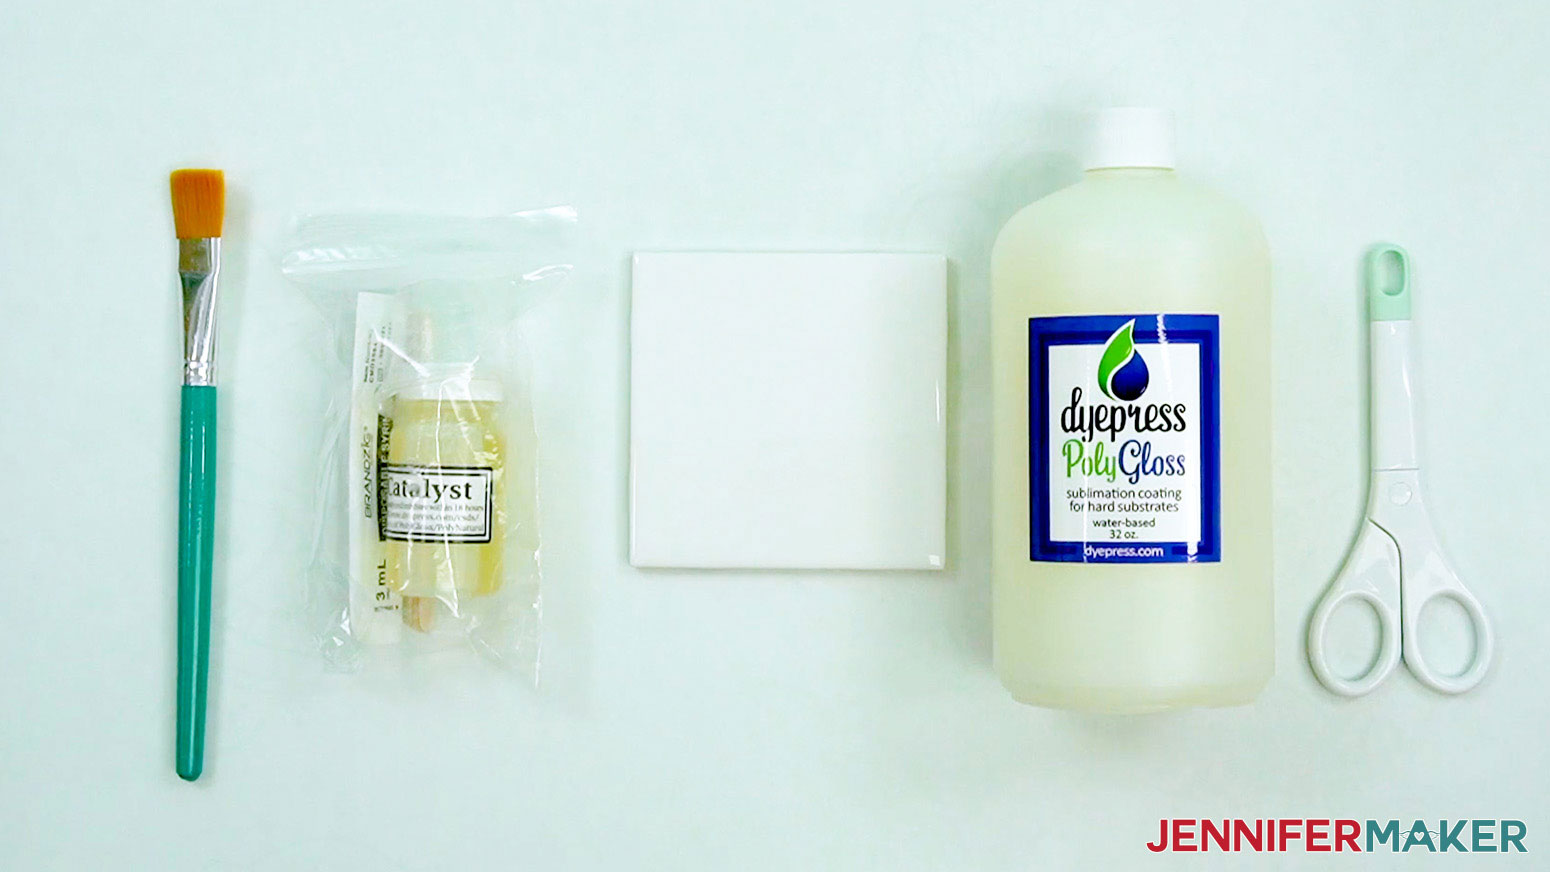
5. If the brush fibers have an uneven edge, trim with scissors to minimize paint lines in the PolyGloss application
6. Mix the 2-part PolyGloss polyester resin according to the manufacturer’s directions (1 milliliter catalyst to 1 ounce PolyGloss)
7. Pour a small amount of mixed PolyGloss onto the surface of the tile
8. Use the brush to spread the PolyGloss across the tile, making sure to cover the entire surface
9. Any bubbles in the coating will pop as the PolyGloss dries
TIP: If you are in a dry environment, cover the tile with a plastic container for about 10 minutes to help slow the drying process and give the bubbles more time to disappear.
10. Allow the PolyGloss to dry thoroughly to the touch (this can take 2-6 hours depending on your local humidity and temperature)
11. Look closely at the surface of the dried PolyGloss coating. If there are too many uneven surface areas, or there is any exposed tile, remove the coating by carefully scraping an edge and peeling it all away from the tile. Then coat the tile again following the steps above.
TIP: If you have trouble removing the coating, hold the tile under hot water to soften it so the coating can be removed more easily. The coating can not be removed once it is heat cured in an oven.
12. Once the PolyGloss coating on the tile is dry and free of surface issues, heat it in an oven to cure the coating. I used a convection oven at a temperature of 300°F (148°C) for 22 minutes.
NOTE: A standard kitchen oven CAN be used because PolyGloss is considered food safe. Using a kitchen oven requires slightly more heat at 340°F (171°C) for 22 minutes. Though a kitchen oven can be used, we still recommend using a dedicated convection oven for curing the PolyGloss coating.
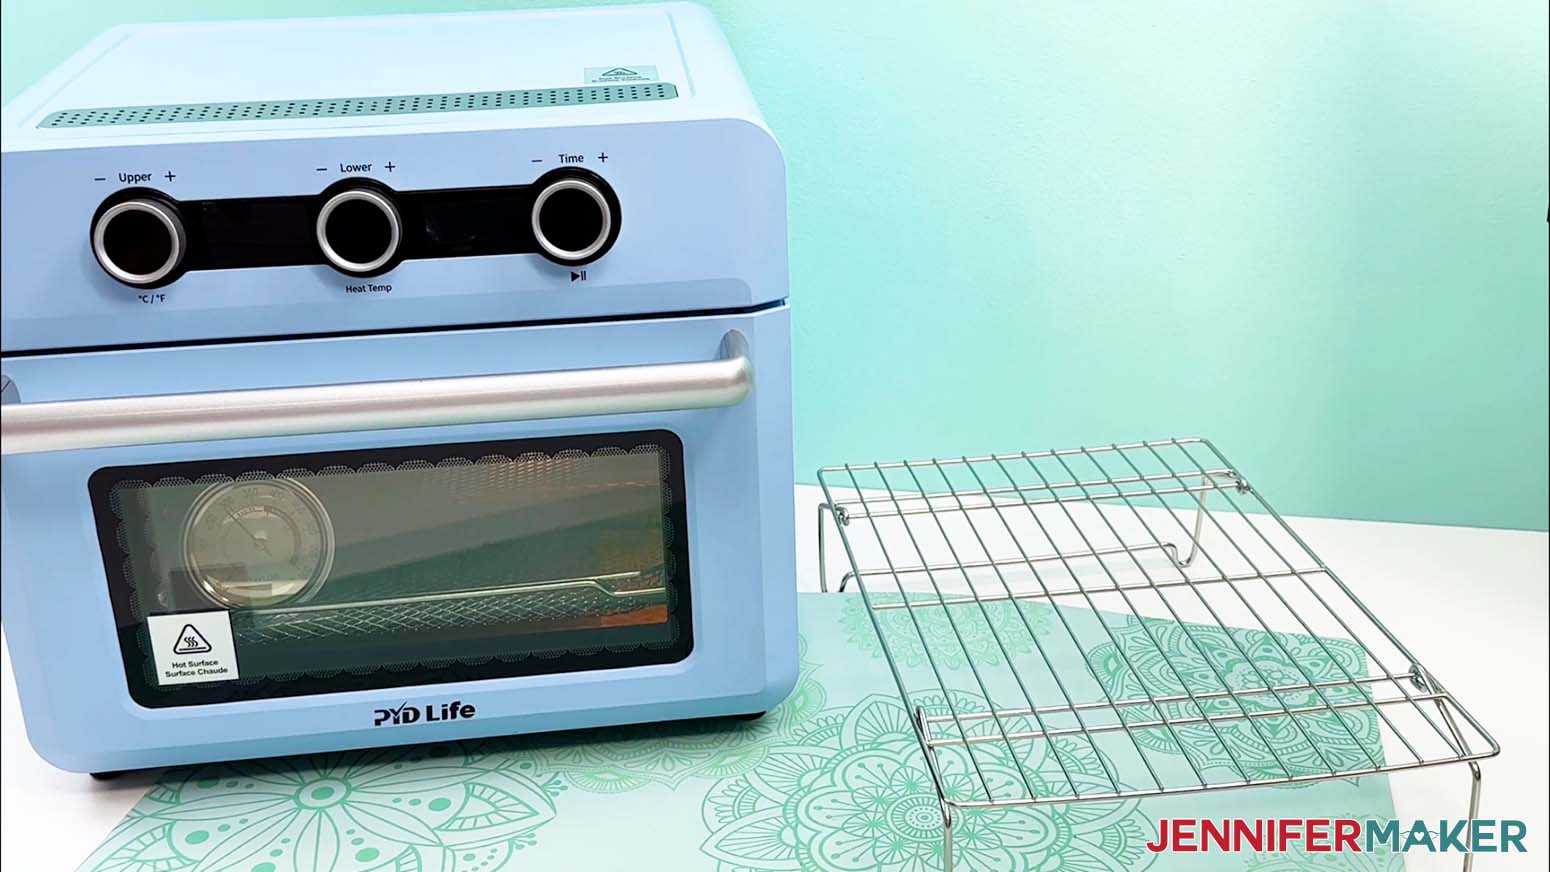
SAFETY TIP: Be sure to put on heat resistant gloves prior to removing the tile from the oven to prevent burns.
13. Remove the tile from the oven and sit it on a cooling rack to cool approximately 15-20 minutes
STEP 4: SUBLIMATE THE PREPARED TILE
Before you begin, make sure you have proper ventilation by opening a window or turning on a fan.
NOTE: If you are sublimating onto a sublimation-ready ceramic blank, see my Sublimation Cookbook for temperatures and times. The following instruction is specifically for PolyGloss-coated ceramic tiles.
1. Preheat your Autopress or EasyPress to 400°F (204°C) and set the time to 600 seconds (10 minutes)
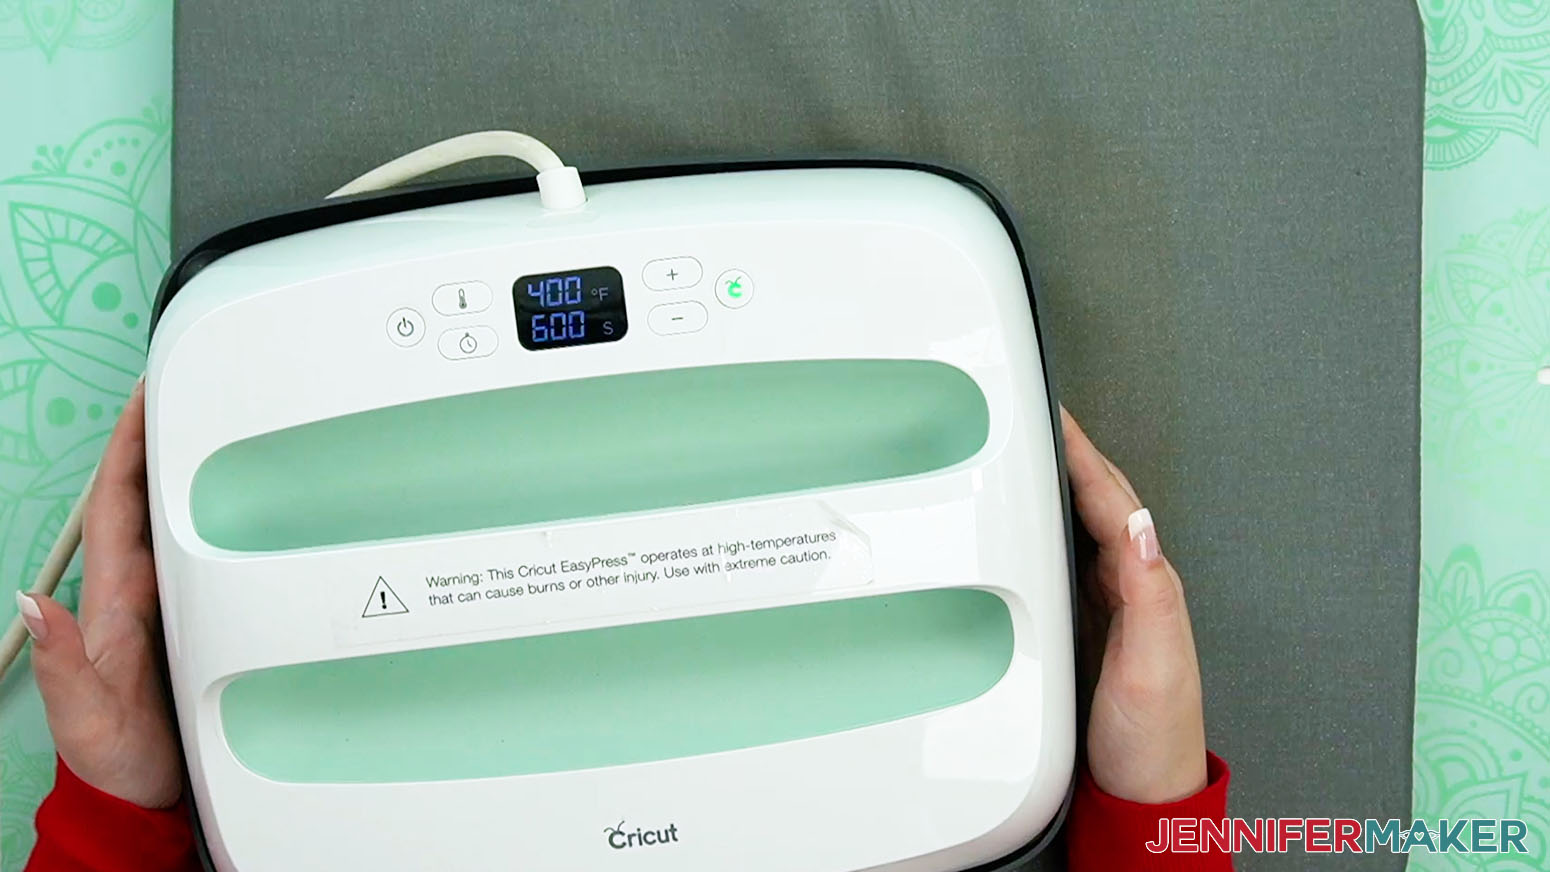
NOTE: This instruction is for larger-than-tile images. Smaller-than-tile images can be pressed this way, but can also be pressed tile face-up at a temperature of 400°F (204°C) for 5 minutes.
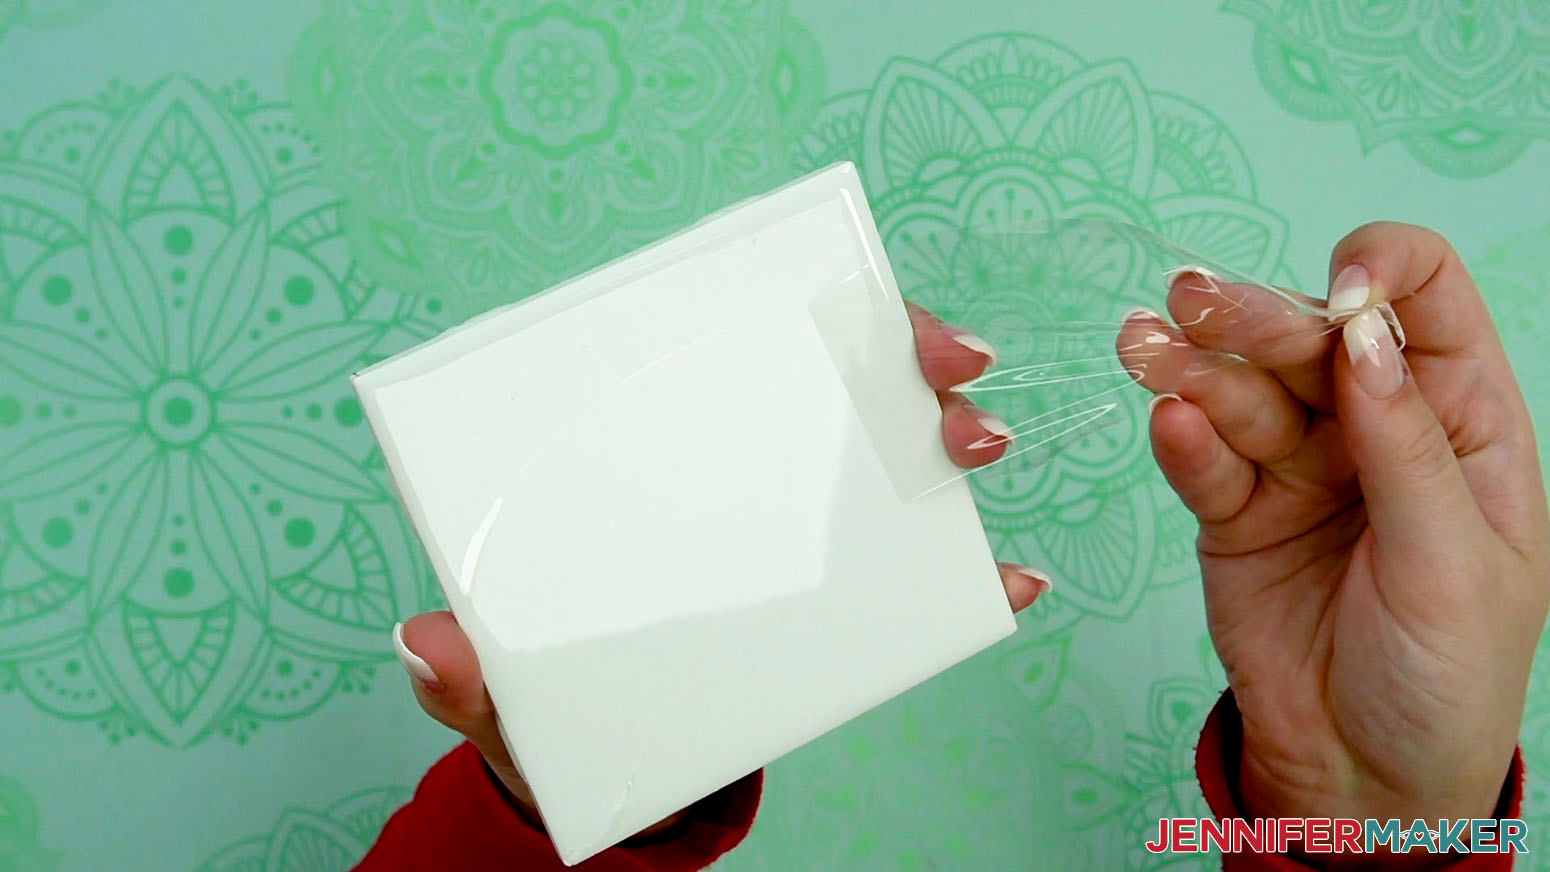
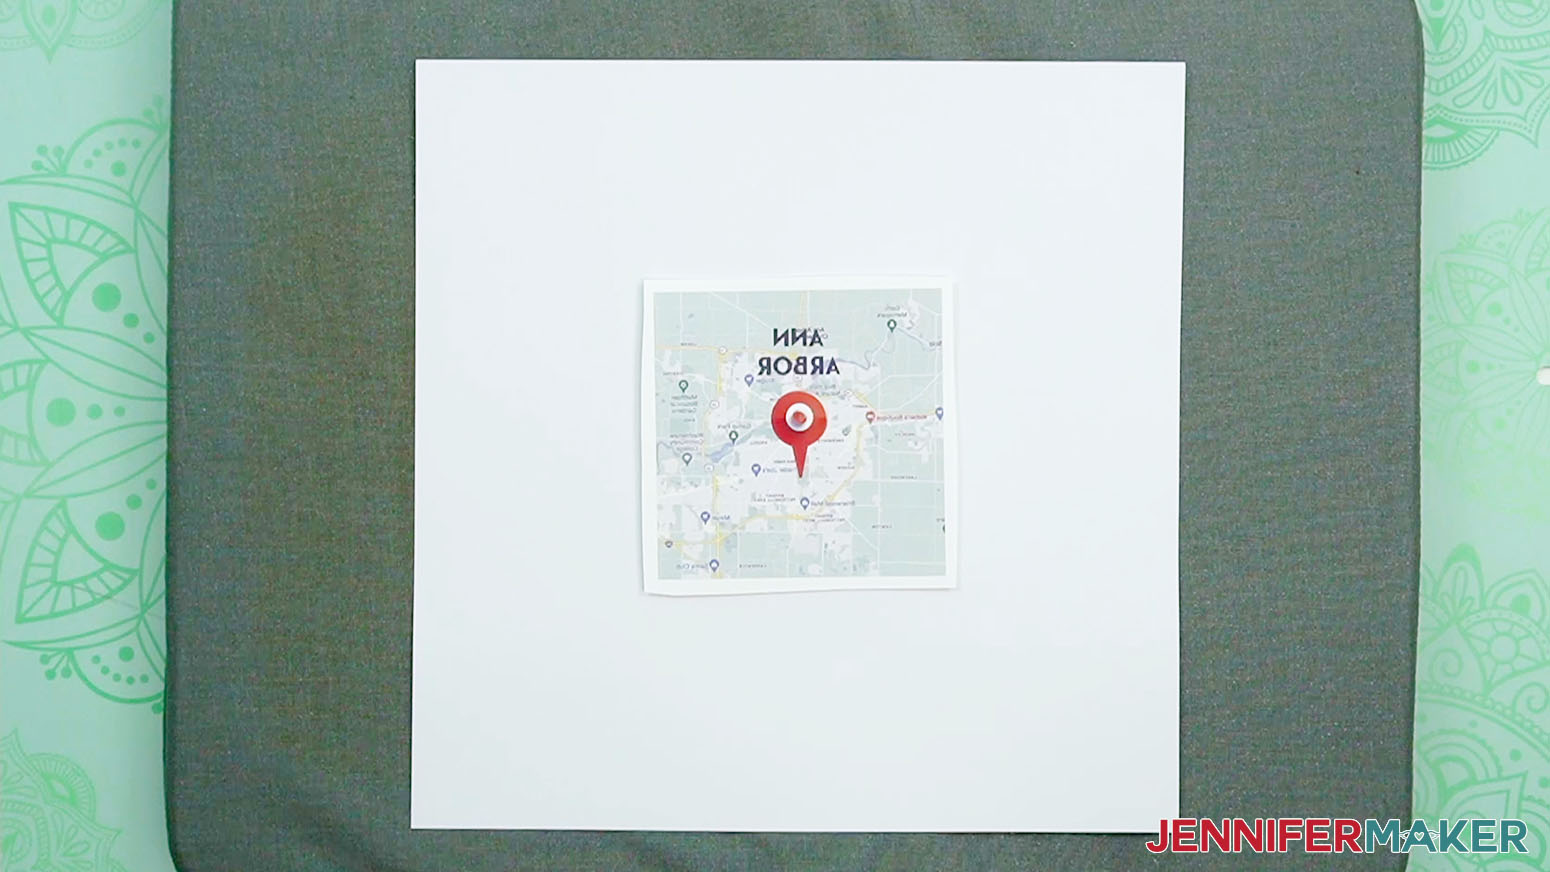
2. Place a piece of white 65 lb. cardstock onto a pressing pad

3. Place the sublimation print face-up on the center of the cardstock
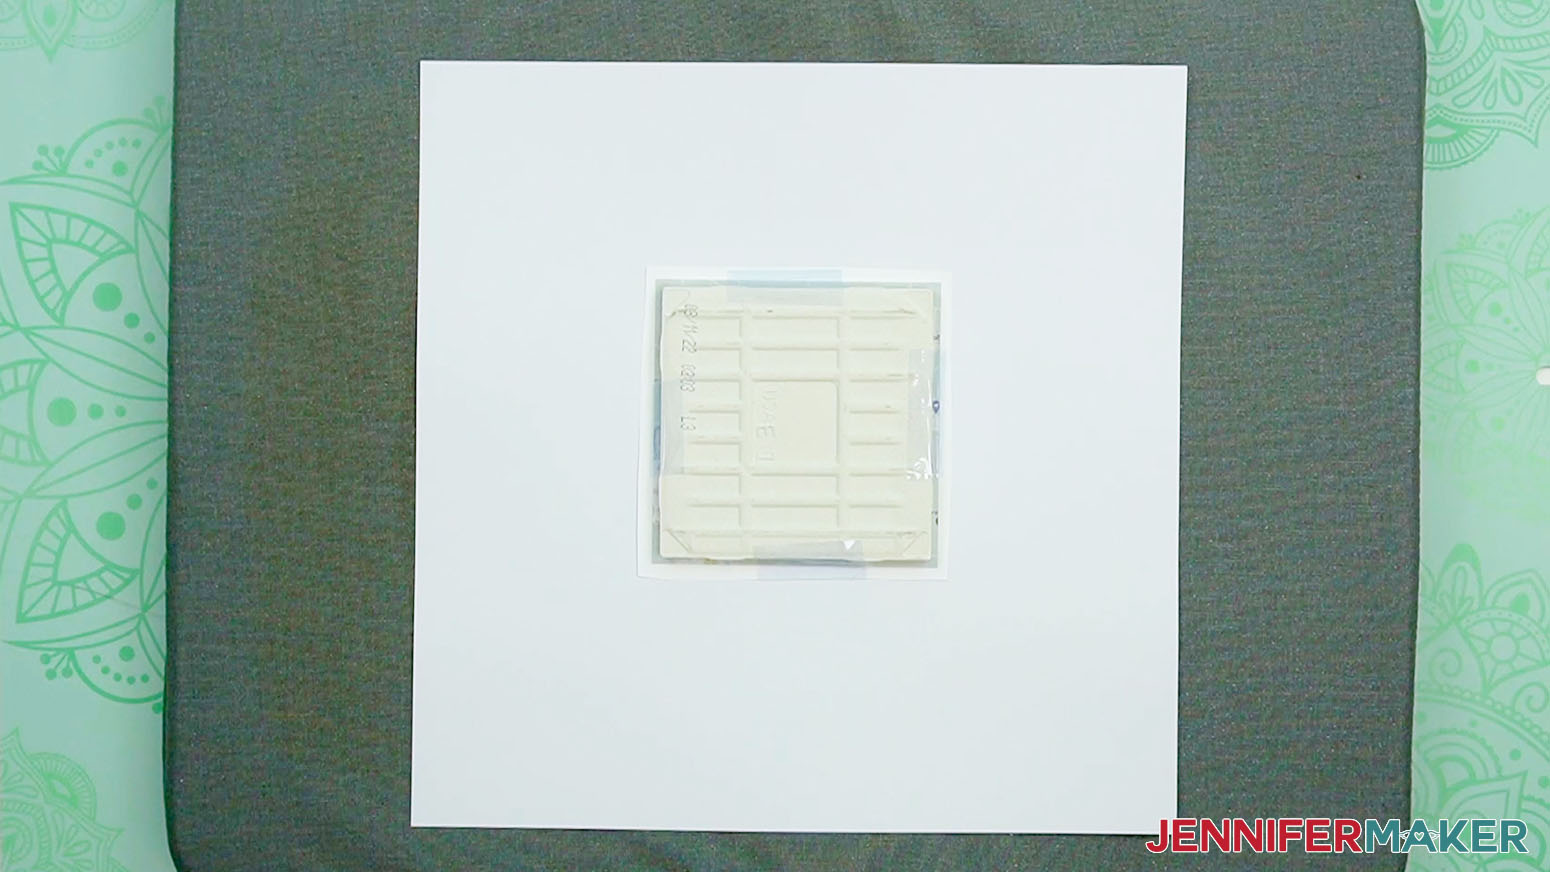
4. Center the tile face down on the sublimation print

5. Secure the tile to the print with pieces of heat-resistant tape
6. Drape a silicone cooking mat over the tile to help heat the tile evenly.
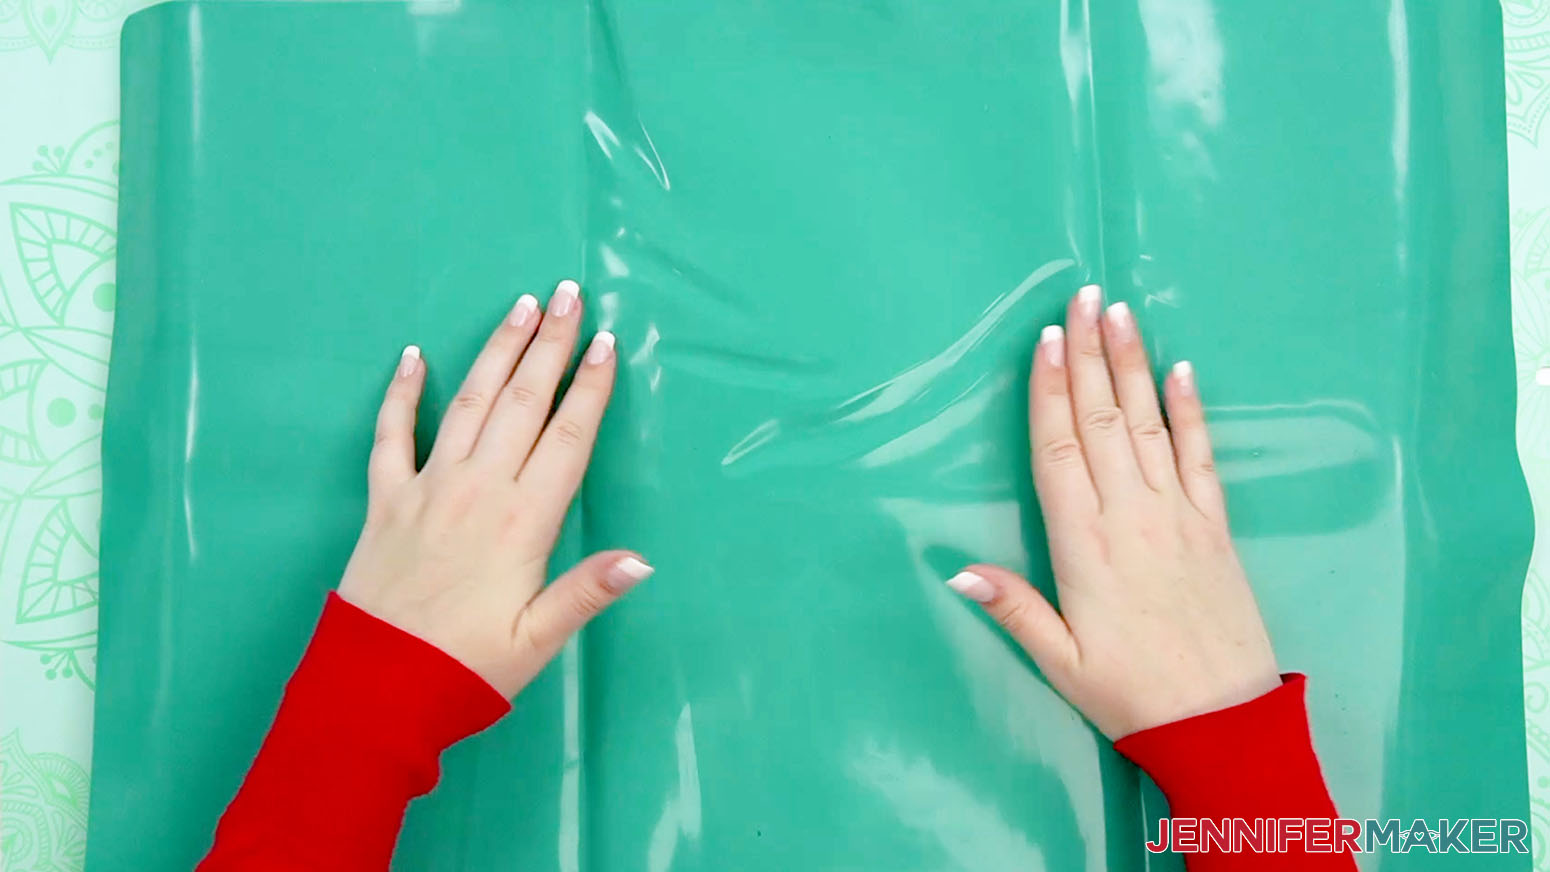
7. Press for 10 minutes (use firm pressure if using an EasyPress)
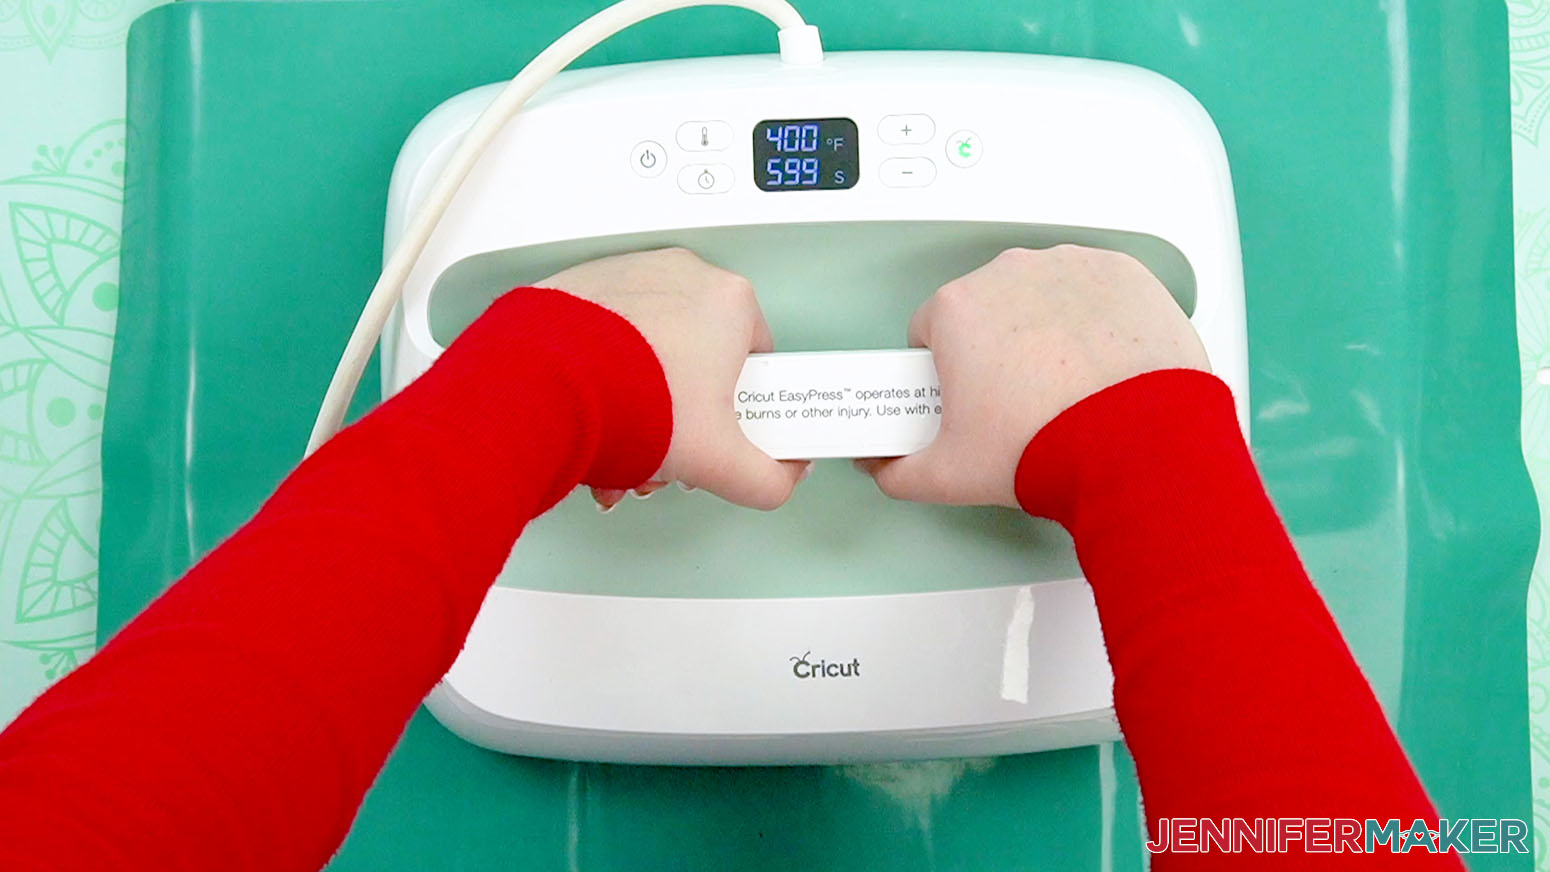
SAFETY TIP: Be sure to put on heat resistant gloves before touching the silicone mat and ceramic tile to prevent burns.
8. Remove the silicone cover, then wait approximately 15 seconds before removing the tile from the sublimation paper to help prevent ghosting
9. Allow the tile to cool thoroughly

OPTIONAL: To help prevent fading to the sublimated image, apply a thin layer of clear acrylic spray to the tile after it has cooled.
STEP 5: SHOW IT OFF
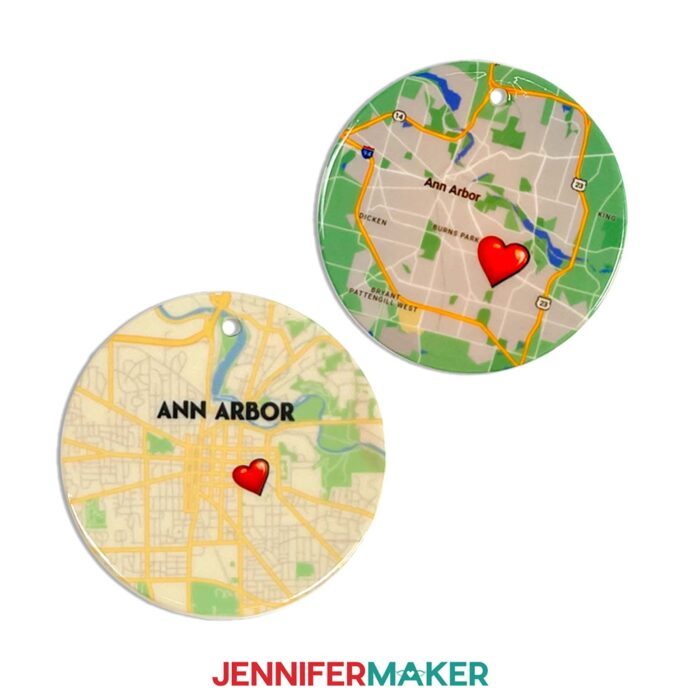
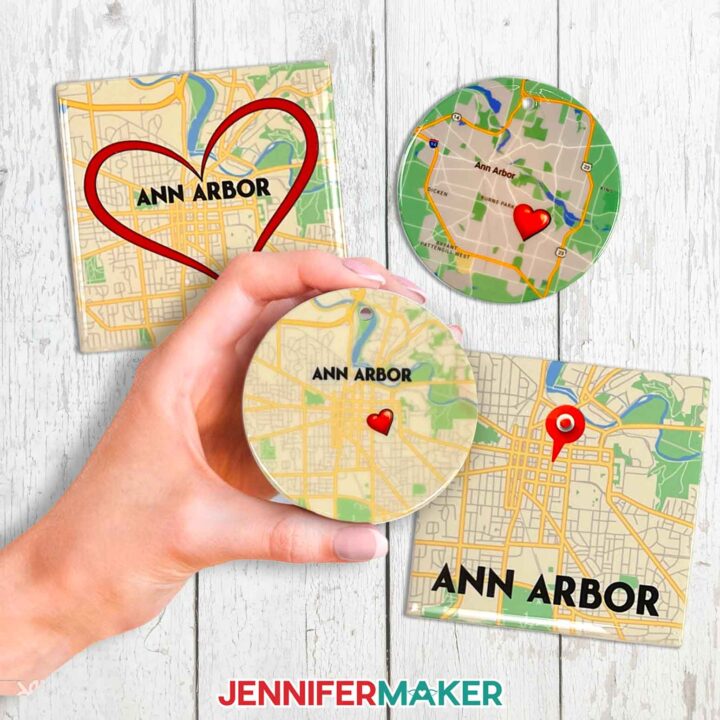
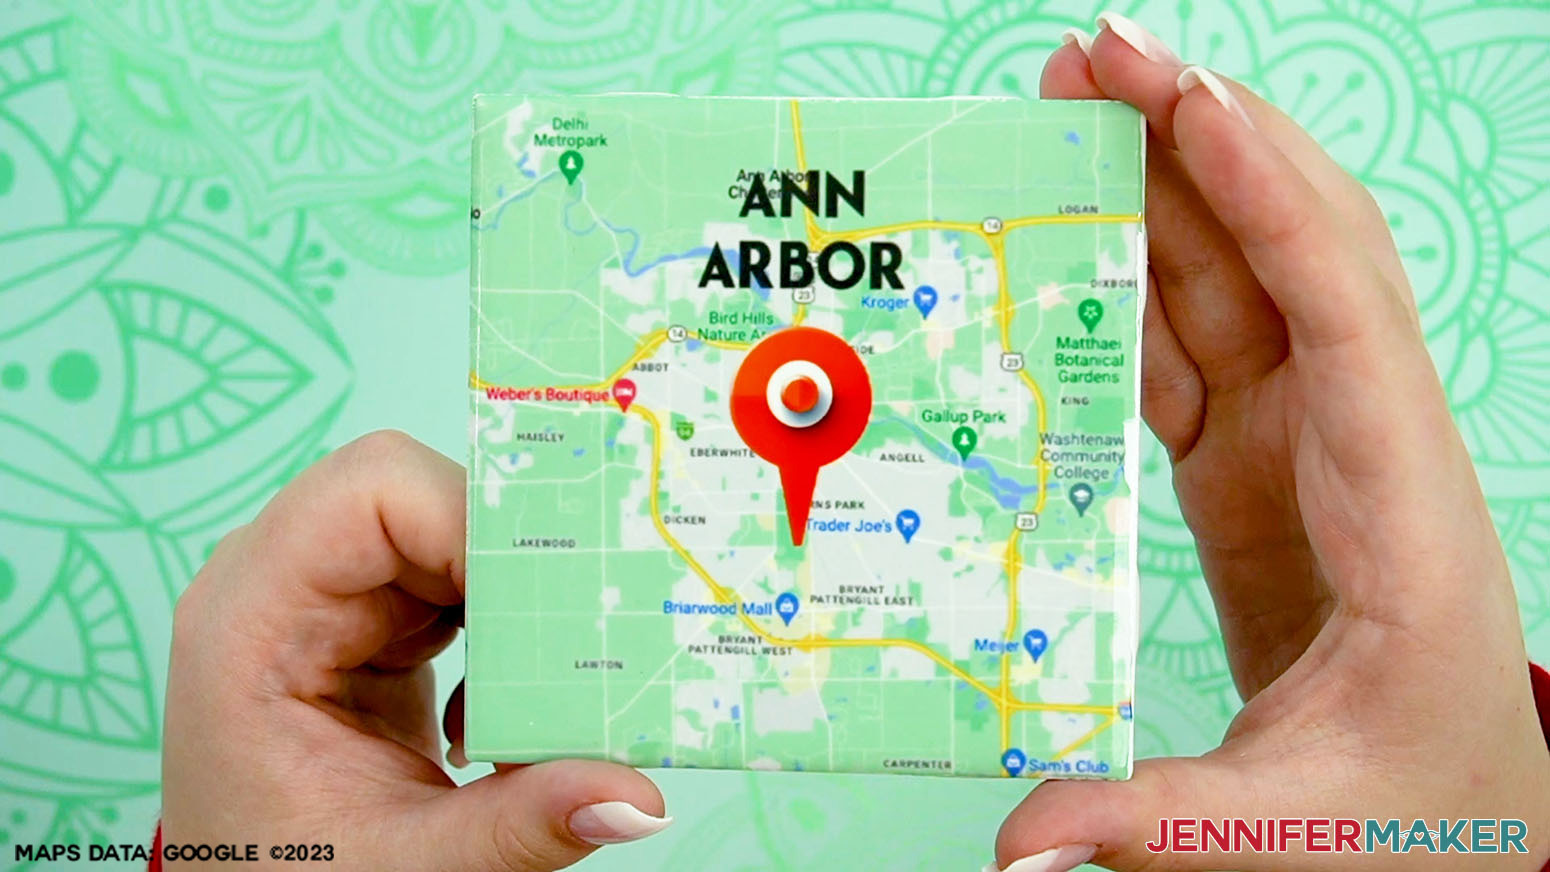
Here is what my finished ceramic tile map looks like! Map tiles are great for coasters, ornaments, shelf decorations, gifts, and more! They can be a wonderful memento of a trip or favorite location.
Notes
Image file types that can be used: PNG, JPG, SVG
Typeface:
Puerto Vintage , Free Alternative: Nexa
Map Sources:
Answers to Your Questions About How to Sublimate a Ceramic Tile Map
Q: Can I use ceramic tiles for sublimation?
A: Yes! But with a catch. If your tile is not manufactured for the purpose of sublimation, it lacks the proper coating it needs to accept the sublimation ink transfer. This tutorial walks you through how to prepare a plain ceramic tile for sublimation using a coating called PolyGloss. Read the tutorial to find out how you can do this too!
Q: How do you sublimate ceramic tiles?
A: To learn to make decorative tiles with sublimation, this tutorial is a great place to start. Read through the tutorial for the step-by-step process and answers to many of the questions you might have.
Q: What temperature do you sublimate ceramic tile?
A: To sublimate the ceramic tiles from my materials list using the techniques in this tutorial, follow these directions: For a PolyGloss-prepared tile, you’ll press for 600 seconds (or 10 minutes) at 400°F (or 204°C). For a sublimation-purposed tile that already came with the coating, you’ll press for only 240 seconds at 400°F (or 204°C). If you’re using a different sublimation tile than the one in my materials list, check the packaging for instructions or consult my Sublimation Cookbook for temperature and pressing times.
Q: How hot is too hot for ceramic?
A: Ceramic can withstand temperatures of over 1000°F, much hotter than the temperatures used for sublimating or for curing PolyGloss. Don’t worry, the tile can handle it!
Q: How long does sublimation take on ceramic?
A: For the ceramic tiles in my materials list (using the techniques in this tutorial), press a PolyGloss-prepared tile for 600 seconds (or 10 minutes) at 400°F (or 204°C). For a tile that already came with the sublimation coating, press for 240 seconds at 400°F (or 204°C). If you’re using a different sublimation tile than the one in my materials list, check the tile package or my Sublimation Cookbook for temperatures and pressing times.
Q: Are maps copyrighted?
A: Maps are treated like any other artwork or intellectual property (IP) under copyright law. So generally, nobody should publish a map they don’t own without specific permission from the author or owner. The copyright owner who has the right to decide where a map is published and how, so be very careful.
Q: Can I use Google Maps for commercial purposes?
A: For information on Google Maps imagery usage guidelines and attribution requirements, visit about.google/brand-resource-center/products-and-services/geo-guidelines.
Q: Can I sublimate other things on tiles besides maps?
A: Of course! You can print any image on a sublimation printer and infuse it into a sublimation tile. Sublimate your own designs, photos, geometric patterns, artwork, vintage patterns, quotes, and more of the most desirable tile designs for personal or commercial use — there are infinite possibilities with these. They’re super fun to make into Christmas ornaments, or to integrate into your interior design! You could even create tile murals with multiple sublimated tiles! Just make sure your image isn’t copyrighted if you intend to sell any of your creations.
Q: Can I sublimate larger tiles than these?
A: Absolutely, as long as your tile size is small enough to fit under your heat press, you can sublimate it.
Get my free SVG files to make Ceramic Tile Map Keepsakes!
(If you do not see the signup form above, click here.)
I’d love to see YOUR super cool ceramic tile maps! Please share a photo in our Facebook group or tag me on social media with #jennifermaker.
Love,

Want to remember this? Save this tutorial on How to Sublimate a Ceramic Tile Map to your favorite Pinterest Board!