
Wondering how to get your Cricut to cut in order? Learn the secret to getting your mats to cut in a logical order in Cricut Design Space!
Have you ever uploaded or designed a project in Cricut Design Space with a LOT of different colored layers only to find that the Cricut sorts the mats in a way that makes no sense to you? But it turns out there is some sense to it … and the secret is in the rainbow! Rainbow colors, that is. Cricut Design Space will sort your mats by saturation and hue, from lowest to highest. So basically in rainbow color beginning with white and black (low and high saturation), then going through in order from red to orange to yellow to green to blue to purple (these are the hues)! So in this tutorial, I will how you how to color your layers so your Cricut mats cut out in an order that makes sense to you!
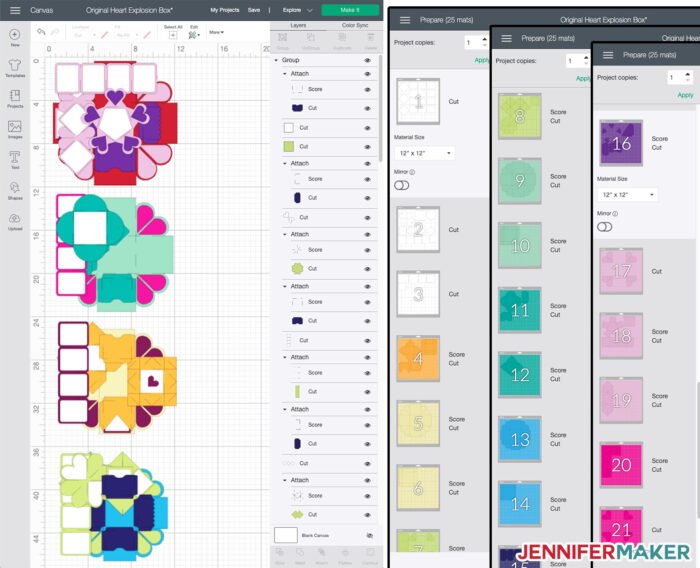
In order to explain this better, let me show you an example. Below is our upcoming heart explosion box design in a variety of colors. The box was layered and arranged in order, but when we click Make It, we get the pieces of the box cutting in what appears to be a random order. The first box (at the top) is in magentas and purples, but those don’t cut until near the end, meanwhile later box pieces are cutting at the start or middle. This is very UNHELPFUL because it’s hard to know what piece goes with what box.
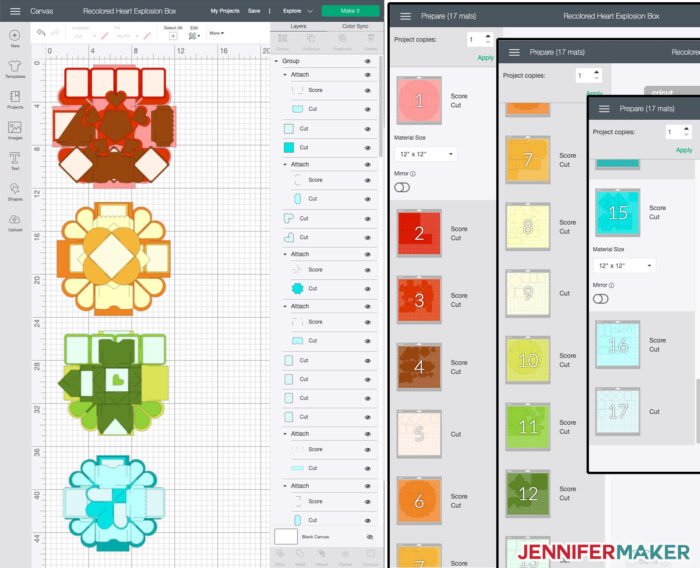
Now, when we re-color the heart explosion box so that the first box color begins at the start of the rainbow (a light pink) and the last box finishes at the end of the rainbow (a light purple-blue) and then click Make It, this is how Design Space for Desktop orders our cutting mats:
Note: The iOS app does not order your mats in rainbow colors — only Design Space for Desktop.
As you can see, the layers of this project will now cut in the same order that we’ll assemble them, from the first box at the top to the last box at the bottom, which makes MUCH more sense. There are exactly the same number of pieces in these two projects — recoloring them allowed us to get them into fewer mats. And we’re “tricking” the Cricut into cutting the light-colored notecards with each box by choosing colors but setting them at a low saturation level (11%).
Now it’s important to remember that just because you’ve chosen these colors in Cricut Design Space, you can still put ANY color of material on your mat when you go to cut it. So you can use this trick to force your Cricut to cut things in order, but then just put whatever color or pattern of material you want on your mats as you load them and cut.
Cricut Cutting Mat Color Order
To help you understand the order of the colors when your mats are sorted, let’s look at the Color Picker in Cricut Design Space. To access it, go to the top of your screen in Cricut Design Space for Desktop and click on the square to the right of the Linetype menu.
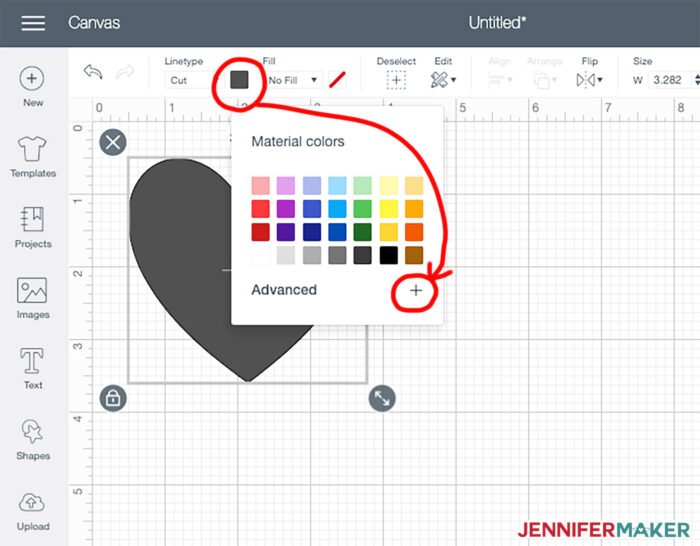
Then click on the + sign in the lower right corner to expand the Advanced color options.
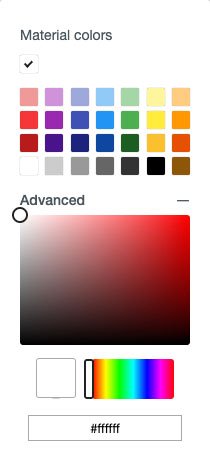
You now see a color palette box and a hue spectrum bar at the bottom. This hue spectrum bar is the key to understanding the Cricut mat order, because this is the exact order your mats will be sorted and cut in! Let’s get a bigger look at that Cricut color hue spectrum:
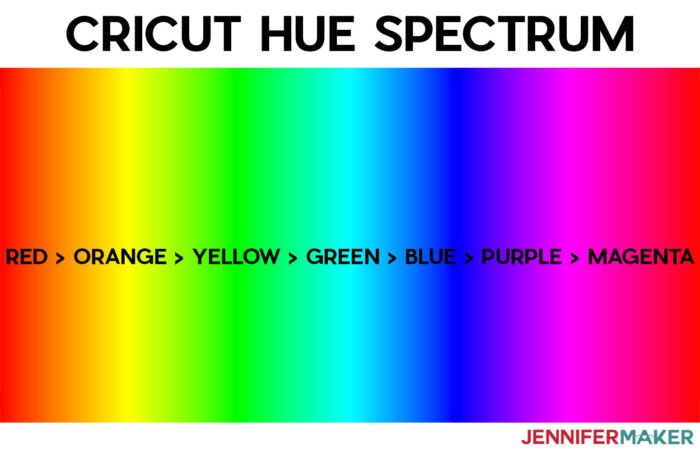
Note that pure red and orange-reds are first and the magenta-reds are last, as this might be confusing if you just think “red is first.”
So you can choose colors along this spectrum and they will cut out in this order (as shown above) so long as you don’t go too light or too dark. Colors with a saturation of 10% of less will be cut first after pure white, and colors with a saturation of 90% or higher will be cut after the black, which cuts right after the white and light colors.
To select a color along this spectrum in the color picker, just position your mouse of the part of the spectrum you want and click. In this image below, I am choosing a green:
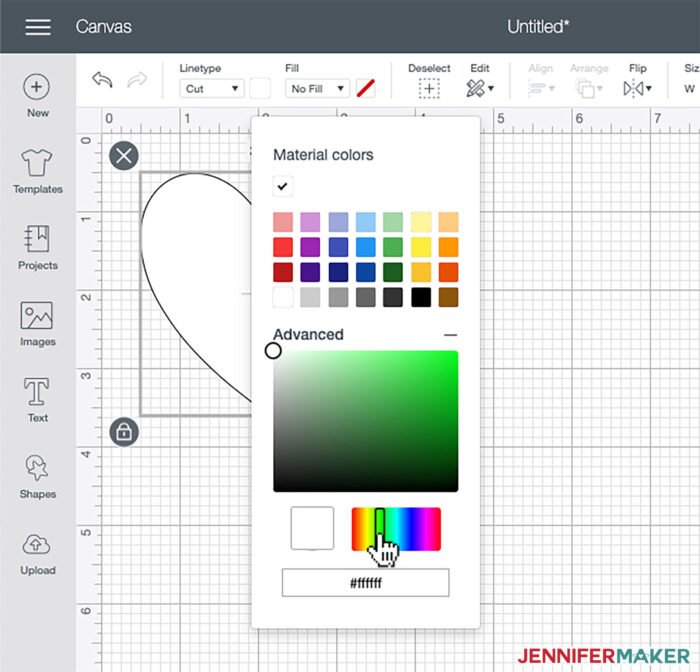
Now you’ll note that it still looks white — that’s because the saturation is at 0%. You can select the saturation with the shaded box above it. 0% saturation starts at the top left corner and goes down to 100% saturation in the lower right corner. If you have two colors that are same hue but one is a lower saturation than the other, the one with the lower saturation will cut first.

What order do the default colors in Cricut Design Space cut?
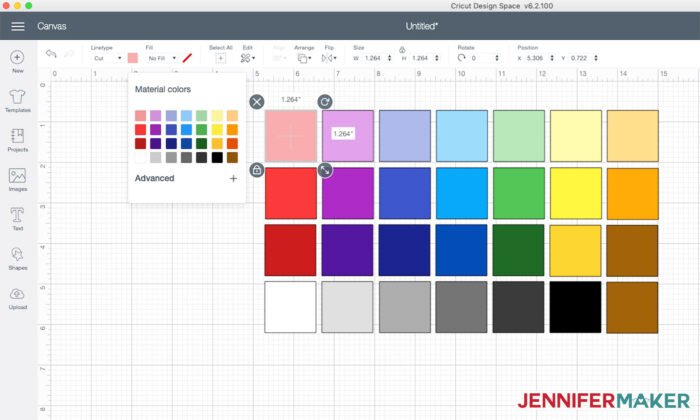
If you don’t want to mess with this advanced color picker at all, you can just use the default colors that appear at the top of the color picker. To help you see what order these default colors will cut in, I made squares and assigned each square to the default colors, like this:
When I click Make It, they sort into this order:
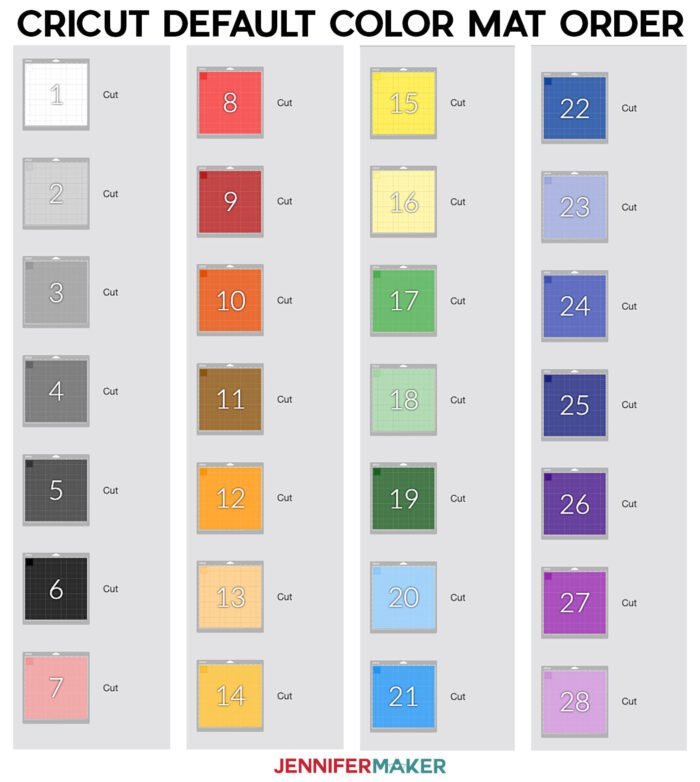
If we match those mats up with the colors in the Color Picker, we get this:
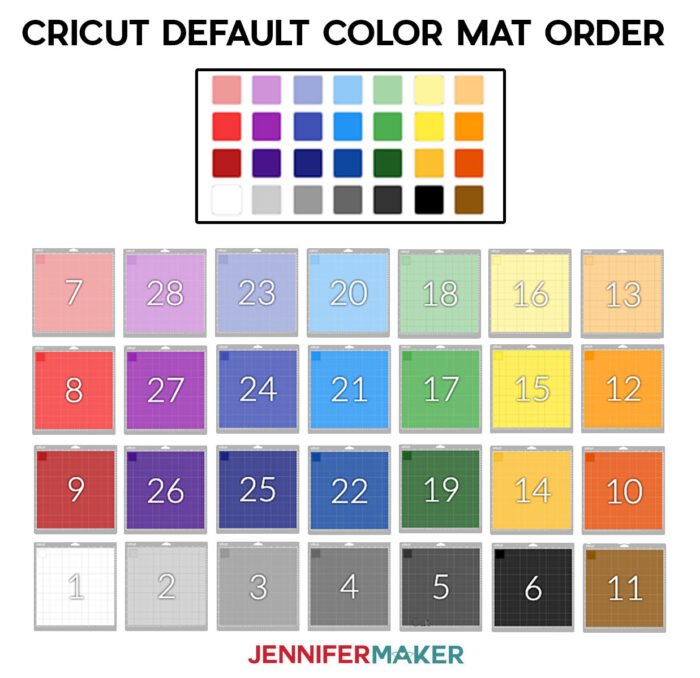
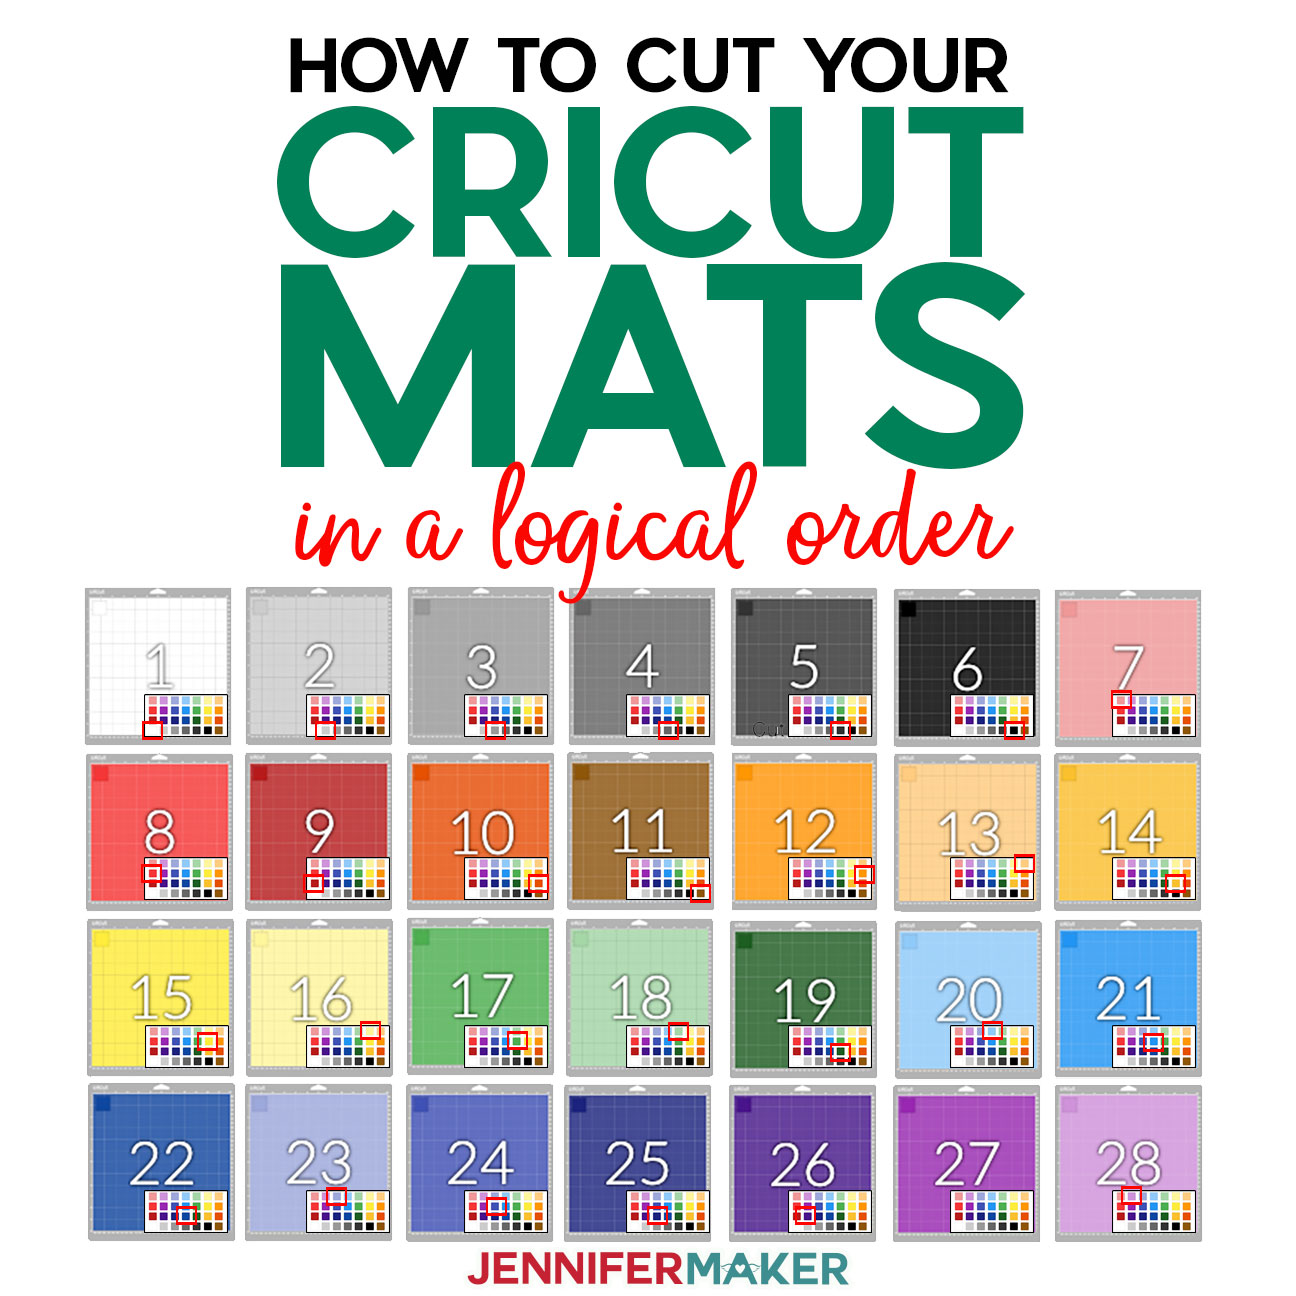
Now if you like to use those default colors, you know exactly which order they will cut in on your Cricut! Here’s a handy color chart in cutting order — I’ve included the location of the color in the default color palette to help you identify it.

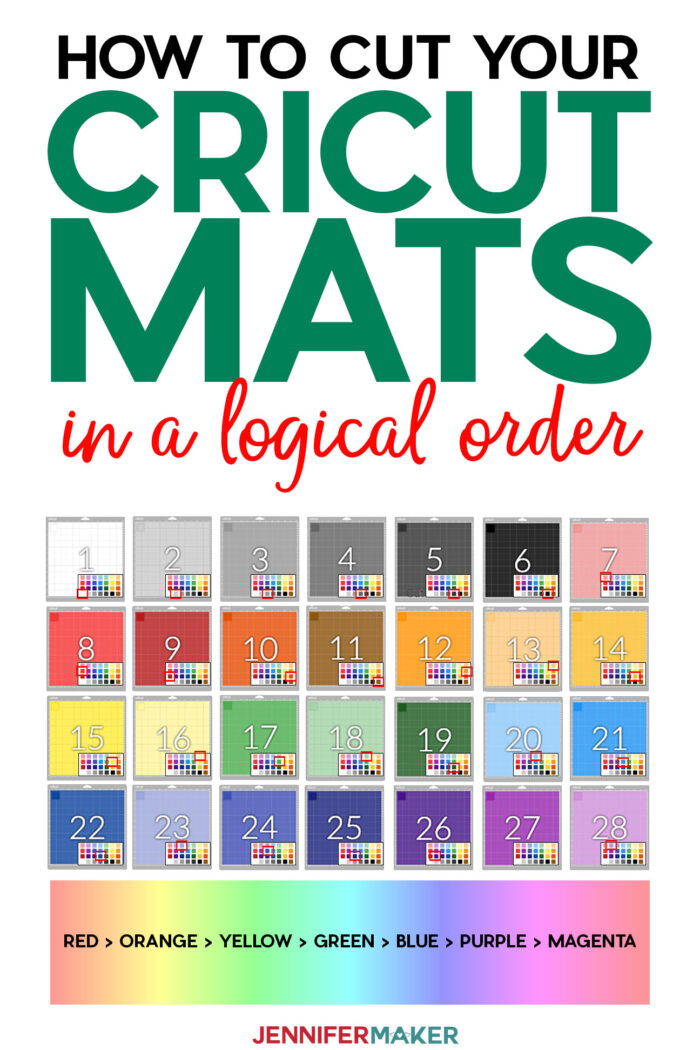
So how do I cut my Cricut in order?
Simply change the color of your cut layers to match the color order shown here — remember, white goes first, then black, then rainbow colors from red to orange to yellow to green to blue to purple!
I hope you found this little Cricut cutting mat order tutorial helpful! Please let me know if you have any questions!
Love,

WANT TO REMEMBER THIS? SAVE THIS CRICUT MAT CUTTING ORDER TUTORIAL TO YOUR FAVORITE PINTEREST BOARD!

Thank you! This has been bugging me.
I am so happy this helps!
I wish there was a way to reorder the way they will cut like you can do on the iPad
Is it possible to print out the chart with the colors?
Hi Linda! You could take a screenshot of it from the blog post above and there you go!
I did a right-click (Cmd-click on Mac) and chose “Open Image in New Tab”, click on the tab and then File > Print. Each image take almost a full Letter sized page.
Is there a video for this I am lost
Hi Debbie! I don’t currently have one, this is why I made this blog post.
Me too!
Thank you! ROYGBIV! Red, Orange, Yellow, green, blue, indigo, and violet.
You are most welcome, Renee!
Does this work for the other things like debossing and writing? I tried to devour something and then wrote over it to accentuate it on leather. It chose to write first and then devoid, smearing the ink. 😞
We haven’t determined what order Design Space takes when using different tools but it is worth looking into!
Thank you for the color mat order. It is very helpful. I decided to make my own so I started with heart shapes. Lined them up and then changed their colors following the order on the color palette. I then added numbers; grouped and attached the numbers to their shape. I discovered that numbers 7 thru 28 stayed in the same order Jennifer has, but numbers 1 thru 3 and 4 thru 6 changed their order depending on how I manipulated them (ie. group and attaching). This was a fun and good exercise for moving shapes around, duplicating, grouping and attaching, ordering items front to back and lining shapes up. I use a laptop running windows 10.
That is awesome that you played around with it, Julie!