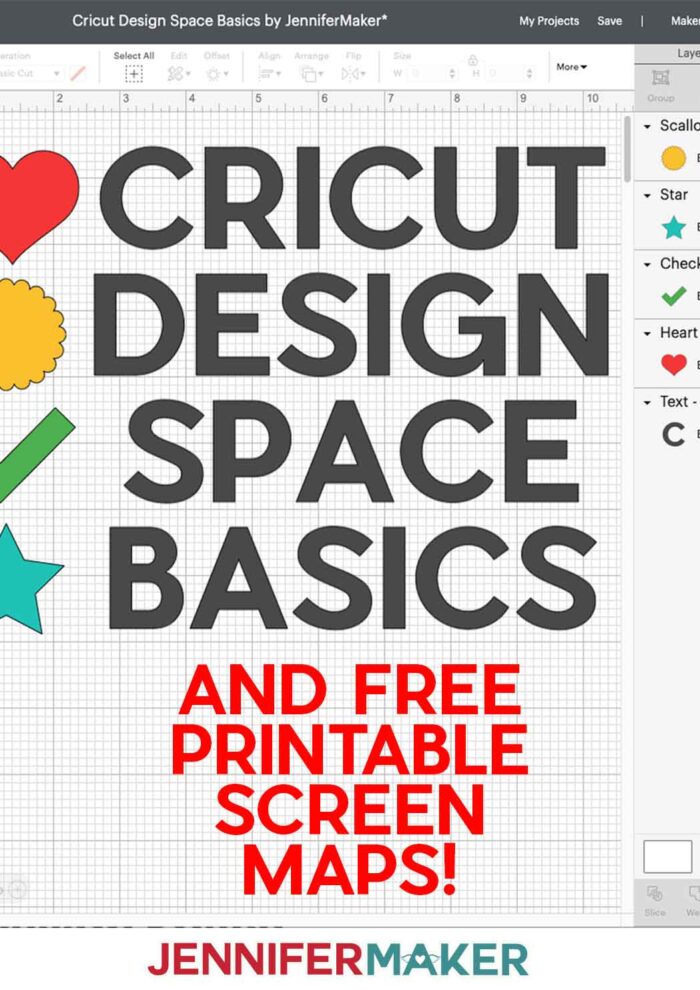
Get a tour of Cricut Design Space and learn the basics of how to use it!
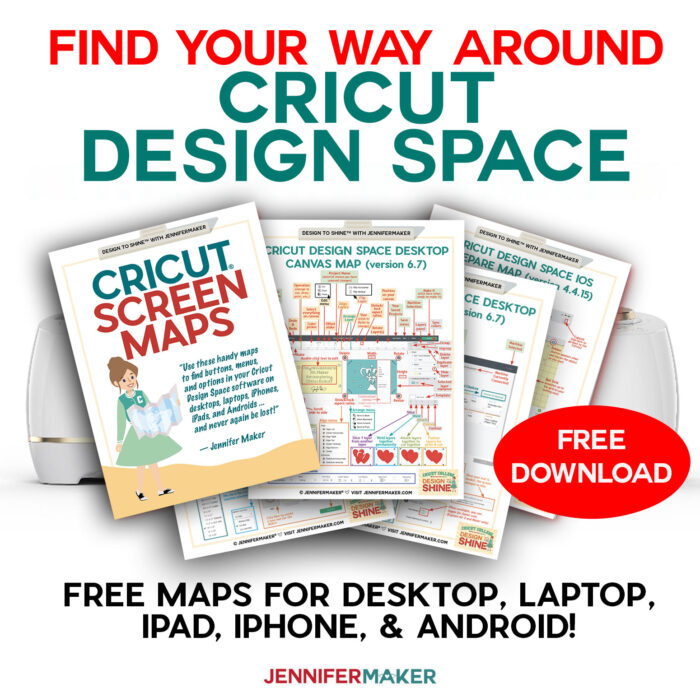
So many new people are getting Cricut cutting machines this time of the year, so let’s talk about how to use Cricut Design Space! First, you should know that Cricut Design Space is the free use software that allows your computer or device to talk to your Cricut machine and tell it what to do. This beginner-friendly post will go over the basics of how to use the Design Space for Desktop program, show you where to find everything, and share some helpful tips for making beautiful projects! I’m also sharing my free Cricut Design Space Screen Maps printable cheat sheets, that you’re welcome to print out and keep near your Cricut so you’re never lost!
Get Started with Cricut Design Space
To begin, download Cricut Design Space from design.cricut.com, which works on Windows and Mac. If you’re on iOS, download it from the App Store. If you’re on Android, download it from the Google Play Store. Do note that this post will cover Cricut Design Space for Desktop — to learn about iOS and Android, enroll in my free Cricut Kickoff course here!
Once you have the Cricut Design Space DMG file (Mac) or EXE file (Windows) downloaded, double click it to install it, then open up Cricut Design Space.
If you’re on a Mac, the Cricut icon appears in your dock as a white icon with “cricut” in green type, like this:
![]()
If you’re on Windows, the Cricut icon also appears in your dock as a white icon with “cricut” in green type, like this:
![]()
If this is your first time using Cricut Design Space, you’ll need to create a free account and login.
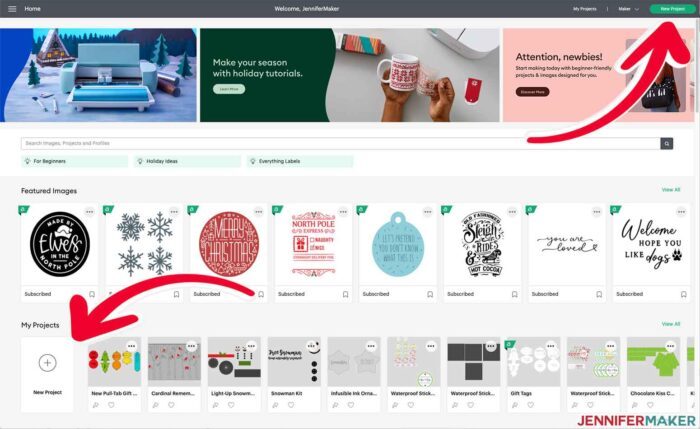
Once Cricut Design Space is opened, you should see a screen like the one below — this is the “Home” screen:
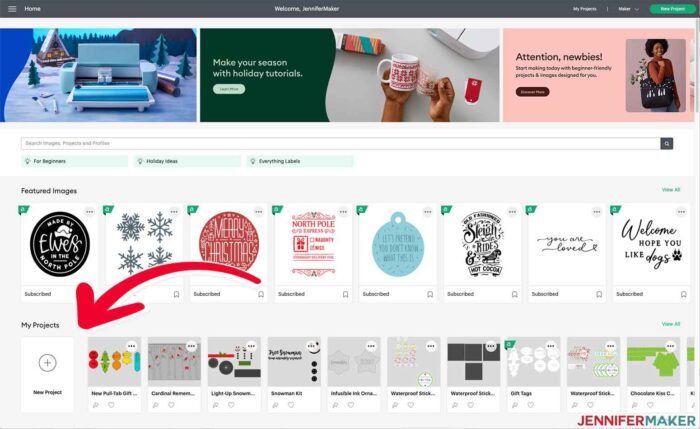
The very top row is promotional information from Cricut — so that means sales, new features, or anything else they want to call your attention to.
Below that is a search bar you can use to find images, projects, and people.
Below that is a row called “Featured Images” from Cricut, highlighting images that Cricut thinks you may find useful.
And below that is a row called “My Projects.” This is where saved projects live in reverse chronological order. To continue working on a saved project, click on the project. To view all of your saved projects, click the “View All” link at the far right side of the screen.
Let’s see what’s below that if we keep scrolling…
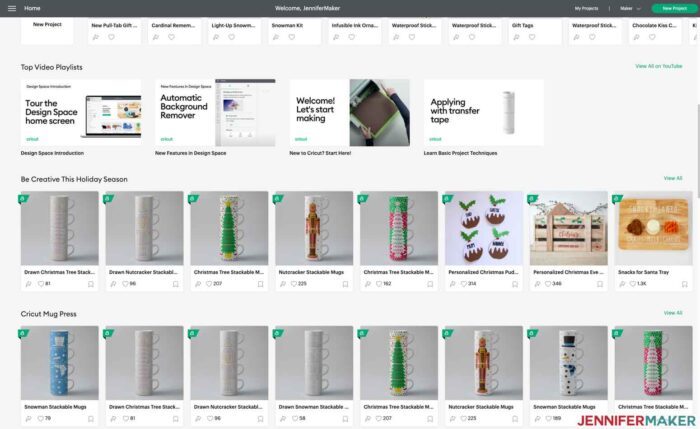
You’ll find Top Video Playlists by the Official Cricut channel to help your learn more about using your Cricut. And below that are Ready to Make projects. Ready to Make projects are easy “done-for-you” projects that include material lists and simple instructions for completion. You can click on “View all” on the right side to see all of the projects in each category if you wish!
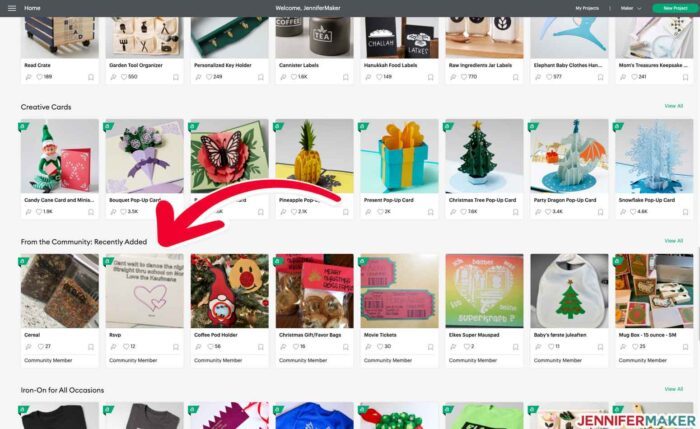
And if you scroll a little further down the opening window of Cricut Design Space, you’ll find recently added Community projects made by other Cricut crafters like yourself. Again, you can click “View All” to see more. You can make these projects, too!
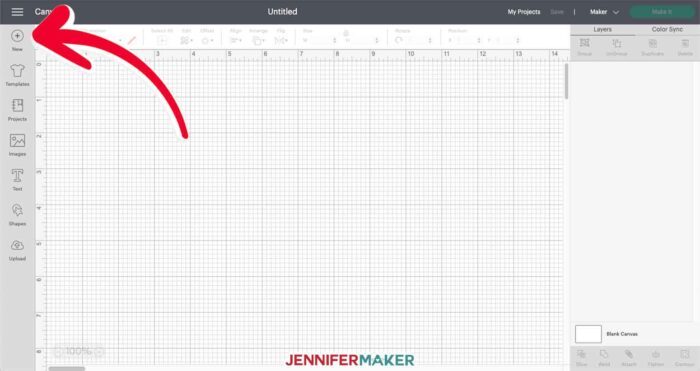
When you’re ready to start a project, scroll back up to the first screen I showed you and click on the big PLUS SIGN icon called “New Project” in the “My Projects” row. Alternately, you can click on the green “New Project” button in the upper right corner of the window.
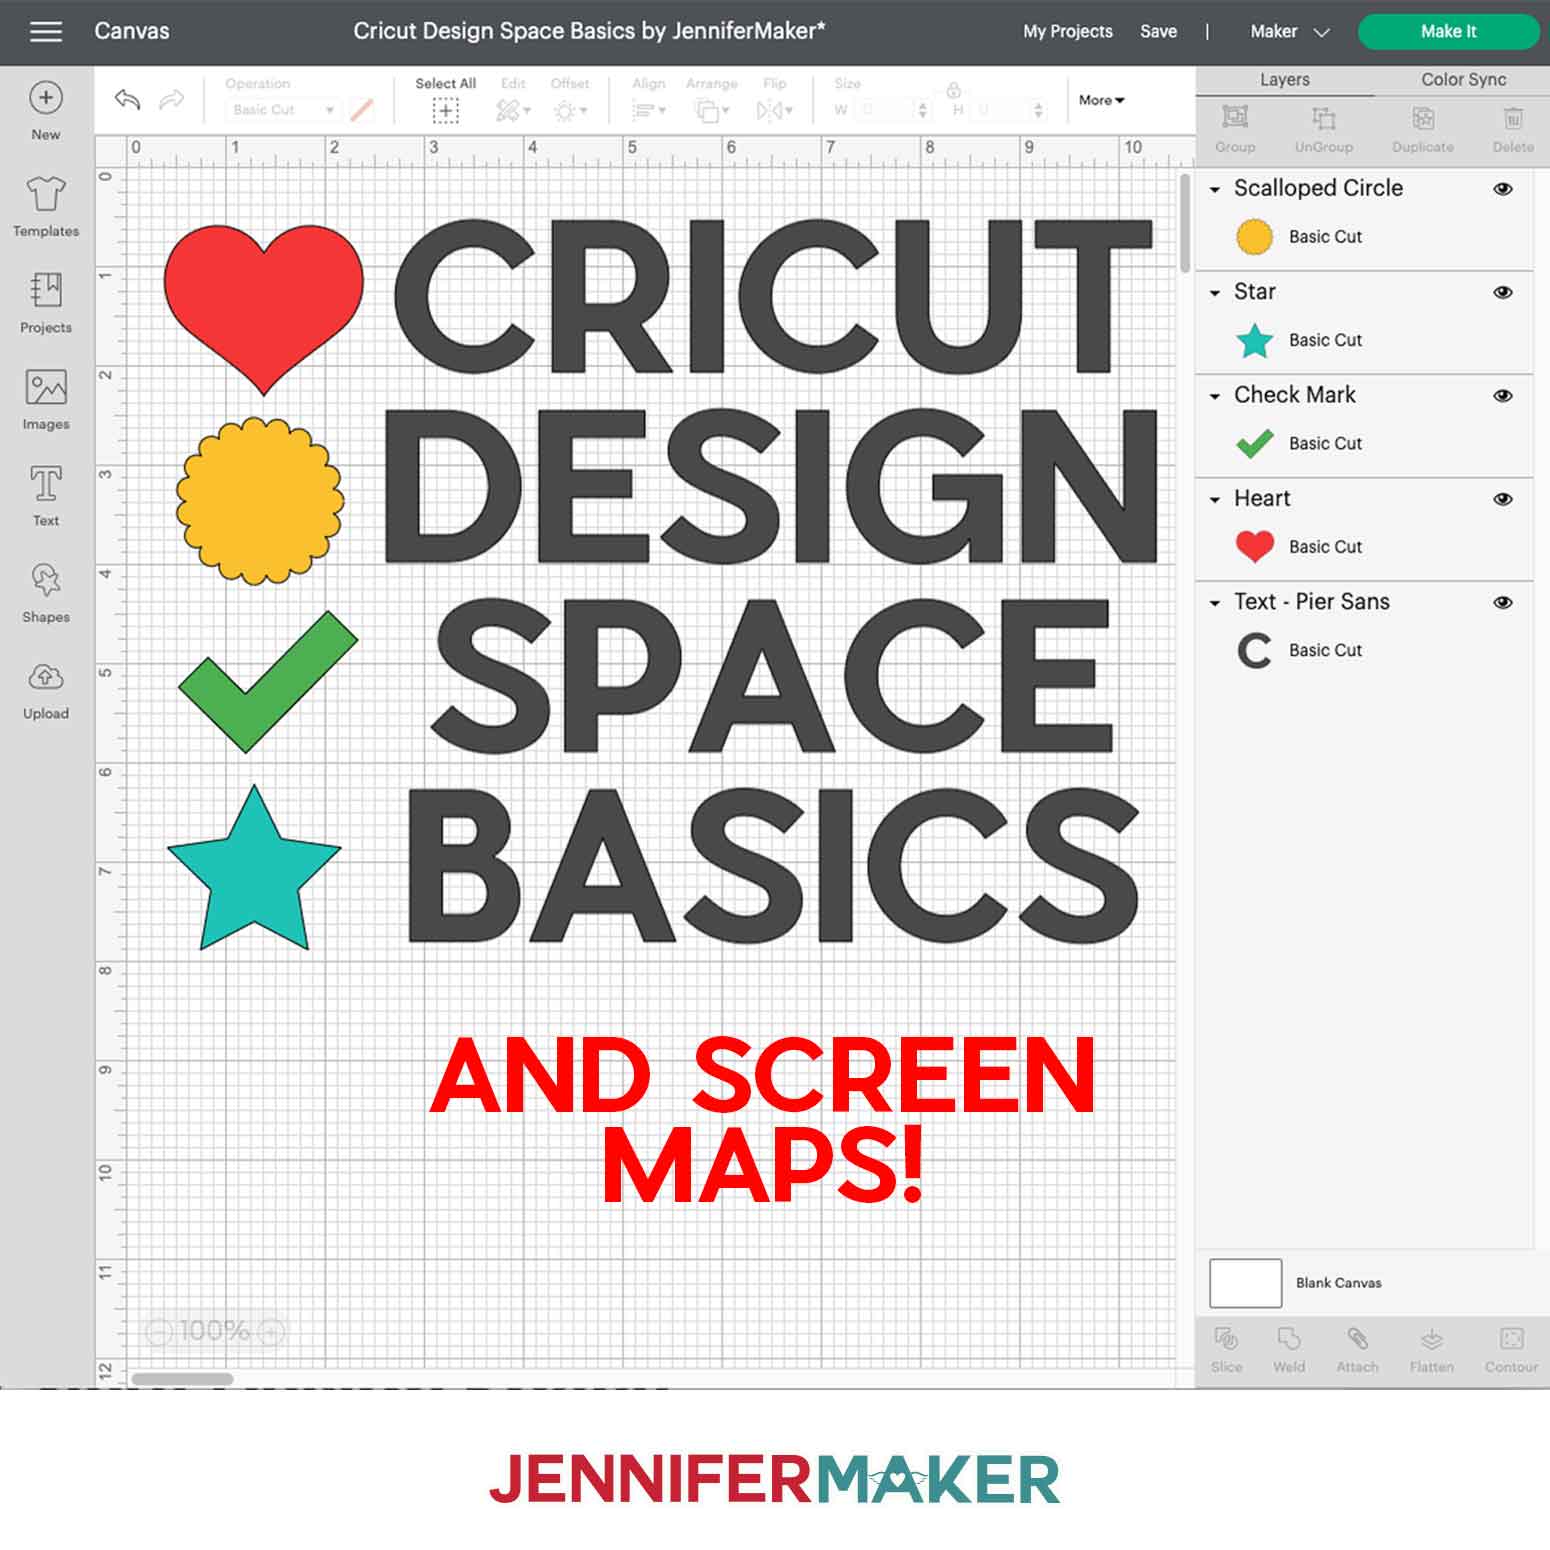
This takes you to your Canvas where you can design projects for your Cricut to make. The top of the screen will say “Untitled” and there are icons along the left side, top edge, and bottom right corner.
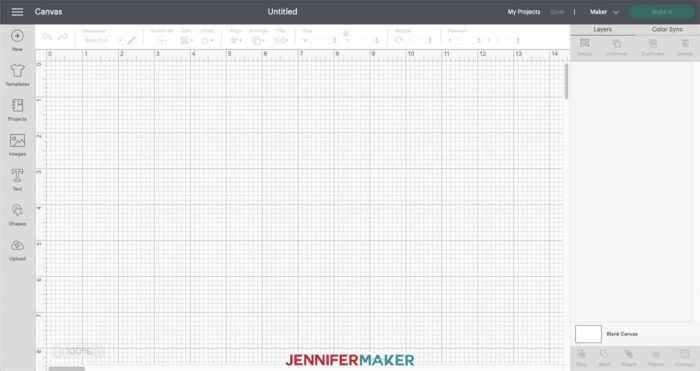
Icons along the left side of your Cricut Design Space Canvas window are as follows:
- SETTINGS (the one with the three lines in the upper left corner)
- NEW
- PROJECTS
- IMAGES
- TEXT
- SHAPES
- UPLOAD
Let’s look at what each Cricut Design Space menu item does:
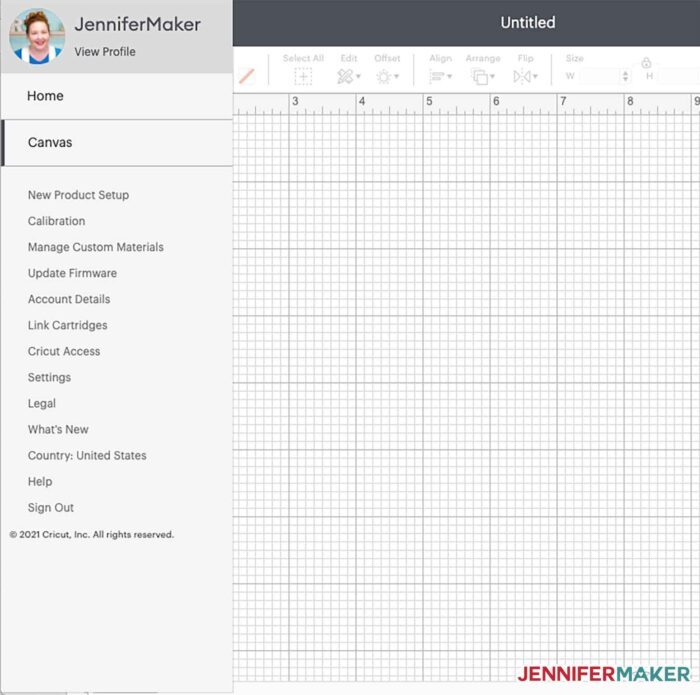
Cricut Design Space Settings Menu
This menu gives you the ability to go back to your Home screen at any time, as well as access your New Product Setup, Calibration, Custom Materials, Firmware Updates, Account Details, Cartridges, Cricut Access, More Settings, and What’s New. Here’s what that menu looks like:
Cricut Design Space New Project
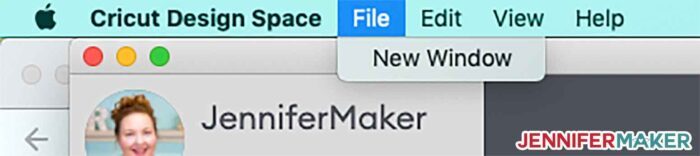
Use this menu item whenever you want to start a new project. Always save your work before you start a new project, or be willing to discard it, because a new project will replace what is on the screen. (Tip: If you want a new window for a new project, go to the top of your computer screen, click on the File menu, and select “New Window.”
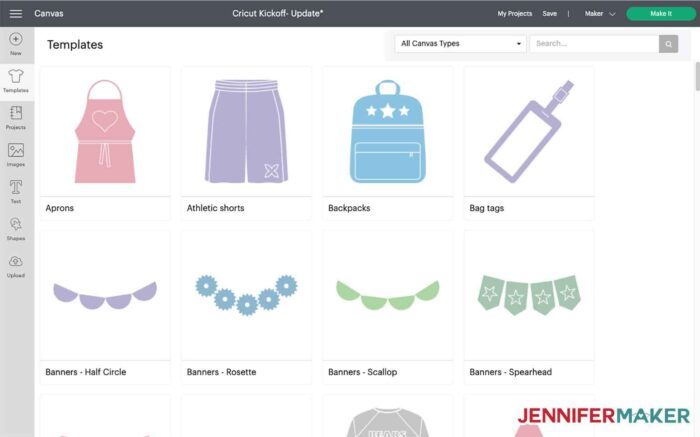
Templates Button
Templates is a feature that’s only available on desktop and clicking on it lets you choose a template to help you design something. Once you choose a template, it will put the outline onto your canvas for you. You can even resize it to be a different size, if you want. Click in the size boxes at the top of the menu to resize it. It’s important to note that this template only shows up on your Cricut Design Space canvas for designing. Templates can be useful, if you like them. If not, and you can hide and show it with the little eye icon right beside them at the bottom of the Layers Panel.
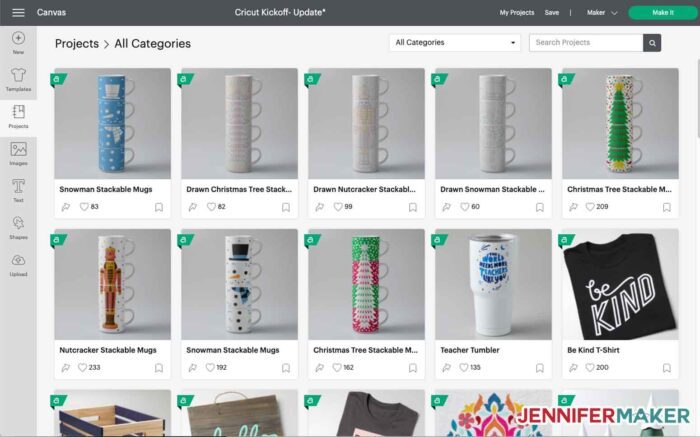
Projects Button
The Projects area is where Cricut displays its many Ready-to-Make projects You can just browse to find something you like.
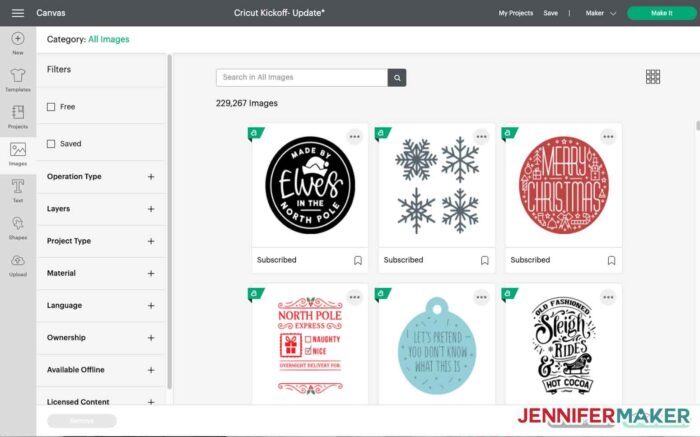
Images Button
There’s over 200,000 images in Cricut, and you access them in Images.
Text Button
Same for text. We’ll talk about text a little bit.
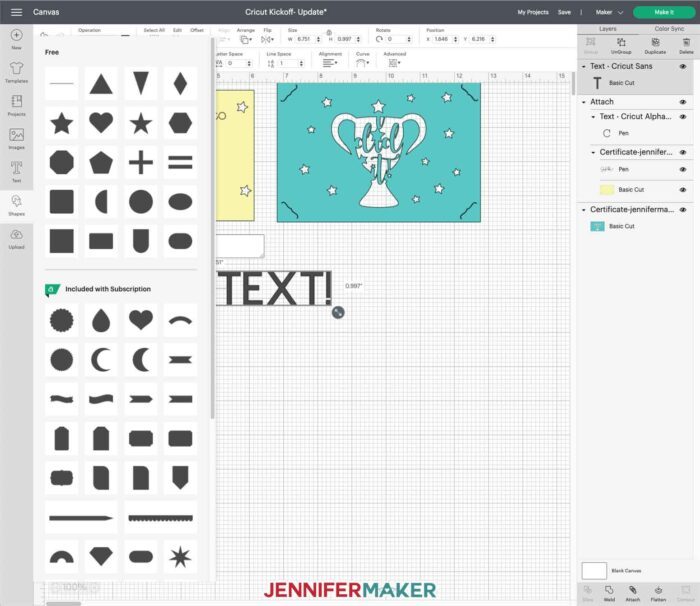
Shapes Button
Shapes brings up a menu of available images that you can use to design things with. The ones at the top are free for everyone; the ones below that are free for Cricut Access subscribers, or available for purchase if you are not a subscriber. Simply click on one to place it on your Canvas.
Upload Button
The Upload button allows you to upload a variety of images to your Canvas. To learn how to upload SVG cut files, please watch my detailed training series at SVGs Made Simple.
The Cricut Design Space Canvas
Watch my step-by-step video for a detailed tour of Cricut Design Space Canvas:
The following is a transcript from the video if you’d like to read it rather than watch it (or do both). The transcript begins at seven minutes into the video where all the good stuff is shown!
Tip: NEW Design Space classes are coming up! Register here FREE!
So this is your canvas for working on. Now, let’s take a look, and there’s zoom in, just a little bit more so you can see this even clearer. I think we can get one more time there. This is, by the way, right here is a zoom. So the plus makes it bigger, and this is not the actual item getting bigger, just your view of it. And the minus will make the view of your design smaller, so if you need to get in there and see fine details. All right, so here’s our heart. When we click on it, that means that we’re selecting it. So if I click away, you’ll see that that box that was around it disappears, and when we click on it, the box comes back and it goes all around the edges of the image. And when you see that box around it, it means that you selected it and you can work with it. You’ll also see it over here in the layers panel and it will highlight. So when I click away, also the highlight over here goes away. When I click on it again, it’s selected. Now when it’s selected, we have, you can see its measurements right here and right here on this side. That’s really helpful. We also have access to these four tools.
DELETE TOOL
So the circle with the X in it is a delete, and I’m gonna click that right now so you can see it just goes away. And then I’m gonna point you to my favorite tool of all of these things, which is this arrow right here.
UNDO TOOL
This is the back arrow and it is the undo. We’re gonna undo that. You’re gonna use undo a lot. Do not be afraid of it or ashamed of using undo. It’s a very important tool. All right, so we’ll select it again.
ROTATE TOOL
All right, so over here in the top right, we have our rotate. So if we click, hold, and drag our mouse or a finger on a track pad, we can rotate it. If you hold down the shift key as you do this, it rotates in increments that are easier. So this is, see, this is straight. Whereas if we do it by hand, it can be harder to get it straight. But once I hold down that shift key, it goes in, oh, it looks like maybe 15-degree increments.
RESIZE TOOL
And then in the lower right corner, this is the resize handle. If you click, hold and drag it, it makes it smaller and bigger. And you’ll notice it maintains its ratio. It doesn’t get like skinny, even if I go like this. See my mouse moving here? Or I go like this. It still is keeping the shape, and if we don’t want that, let’s say we wanted a chubby heart, we would go over here to the fourth icon in the lower left corner. And if we click it, it’s a lock icon. And if we unlock it, that unlocks, it’s a ratio lock on it so that it no longer maintains the ratio between the height and the width. And now I can make, use that resize handle to make a tall, skinny heart or a short, chubby heart. But I want to have a normal heart, so I’m gonna undo that and it goes back to there.
CHANGING COLORS
We can change the color of it. And if we go up here to the line type menu, next to the menu that says cut, which is our default, our default choice is to cut, we have currently a dark gray box. This is the color picker box, and if I click on it, I get access to a menu of common colors. I could choose one like red, and now it’s red. Now, if you click on advanced here, which is the little plus sign, you get access to whatever color you want. So if you really want like a more of a pink, you can just use this grid here. It’s not really a grid, the spectrum, the shader. You can also use this one down here to get lots of different colors.
So now we have a red heart. So we can change the line type. So line type is right next to the color picker. So, because we’re using the Maker right now and I have chosen the Maker, you can see over here, I have optimized my experience for the Maker. If you have a Joy or Explore, you would wanna choose those. When you set up your machine, it shows this for you, but if you have more than one you can choose between them, and it will make a difference. It keeps track of the sizing and whether you have the tools for that sort of thing. But we have that, we’re set to the Maker right now and so if I go to line type, I get a whole bunch of options on what I can do with this heart. So I can cut it, which is the default. I could draw it instead. And if I do that, I just get an outline, because this is just gonna draw around the outline. I can change it to scoring, and we will see this dotted line and it will score the heart, which means really just deboss it and put, you know, the shape of a heart into a piece of card stock or something. We can engrave it, like a piece of acrylic or something like that. We can, and of course, this is if you have the tools, right? The tools come separately. With your Maker, you get the fine point blade and the rotary blade and the other ones, as we discussed in lesson two, are available separately. So there’s also deboss, wave, perf, which means perforate, and then foil and the different tips.
We wanna cut this though, so I’m gonna put it back on cut and go back and change it to red. Of course, I could also have just undone it back to red, okay? Now what I’d really like to do, this isn’t much of a design, just a red heart. I would like to make my own design and so I’m going to duplicate this heart. Let’s see, so one way is to right click on your mouse, if you’re using a mouse and you get the contextual menu. This is a really useful menu. It lets you do a lot of things right from here. If they’re grayed out like these are, that means that that’s not option right now because of the image that you’ve chosen. But right now, I can cut it, by the way, cut means not to cut it on your machine. It means to remove it from your canvas, but keep it in your copy buffer, just like on, you know, your word processor. I can copy it, I can duplicate it, and I can delete it. What I wanna do is duplicate. So I’m gonna just click that and I get two hearts. I like to use that menu a lot. I find it really useful. You can, of course, just do a copy and paste instead of doing that duplicate. It’s really up to you what you wanna do. And the third way, of course, is right here. So you can click on this and you can get a third heart. So there’s three ways to duplicate, basically, but I only want two hearts. So I’m gonna go back. There we go.
Now, what I’d like to do is join these two hearts together permanently. So I’m gonna kind of offset them like this and create a new shape that looks like two hearts together. Now, right now, they’re two separate hearts. We can tell because when I click on them, the border is around that each one individually and over in the layers menu, I have one heart here and one heart here. And even though I’ve arranged them the way that I want, they will not cut out this way yet. We have to give our Cricut more instruction than this. So I wanna show you what happens if we tried to cut it out like this right now, because some people might expect that it’ll stay exactly the way you see it on the screen, and I want you to see that it doesn’t. So when we’re ready to make a project, we click on the green make it button here in the upper right-hand corner. So I’m gonna go ahead and click that.
That takes us to our mat preview screen, and as you can see here, I’ve got two hearts side by side and they are not overlapping and offset the way that I designed it to be. So this is not yet ready for us, okay? So I’m gonna click on cancel. So we need to get these two hearts joined permanently. Now there’s a number of ways that you can join things and they’re easy to confuse with one another, so let’s talk about them.
So what I’m gonna do is select both of them. I can do this a couple of ways. I can click and drag a box around them both, and then I can see both of them and they’re both selected in the menu over here. I can click on one layer and I can hold down my shift key and I can select another layer. So now I’ve also selected both. So that’s an alternate way of selecting two things and I can select here and hold down my shift key and select that one. So three different ways of selecting, whatever one works the best for you, or you see a tutorial where someone is doing something that’s unusual, it’s helpful to know that. All right, so I have both of my hearts selected. Now down here at the bottom of the layers panel are some very important tools and the tools right now are slice, weld, attach, and flatten, okay? I’m gonna talk about what each one of these do. We also have some here at the top. We have group, we have duplicate, which you’ve seen, and, of course, delete which will just delete our project all entirely. https://jennifermaker.com/cricut-design-space-basics
GROUP TOOL
So group is, one might think that group would do what we wanna do, but group really is more of an organizational thing and I’ll do it right now so you can see. So it puts them together and it keeps them together.
And so now if I want to just, I can de-select that, but I wanna just select the group now. Now I can move it around as a unit, right? But, when I go to cut it, I’m still not going to get them overlapping. They’re still gonna be side to side. So group is something that we do to keep files together as we’re designing, but not something we do to keep files together all the time. Now, down here, here at the bottom, when we have, we have other options. So we have slice, which is very different.
SLICE TOOL
Slice will actually remove parts of the image. I will do that so you can see what it looks like. So I’m gonna slice these two. By the way, when you do slice, make sure you have just two items selected. If you have more than two, it doesn’t work. Okay, so, but we have two, so we’re good. So I click slice and now we have, this new shape has appeared in the middle and what’s happened is actually sliced part of that heart out, right? So this is basically the opposite I was looking for. This is a broken heart. This is not it. So let’s undo all the way until we no longer see that line and we’re back to our two layers. And I’m gonna select them both again by clicking and dragging around them. All right, our next choice is to weld. Now, if we weld, it will actually put them together permanently, which is what I’m looking for. So I’m gonna do that and what you’re going to see when I weld is that this line here that’s separating them and showing them basically as overlapped, that line is going to disappear and it’s going to become a new shape entirely. So I’m gonna click on weld and there we go. So now we’ve just created a new shape that didn’t exist before until we made it, and this is now and something that we could cut out and it will cut out right around the edges like this. When I go to make it, you’ll see it retained that shape. So this is how you can create designs from scratch. And, of course, now go ahead and click cancel, you know, you may not have any interest in doing two hearts like this, but you could do so many things with these tools. There’s really a lot of options. Now, the one thing that I didn’t show you, and let’s just go back so I can be complete here, we’re gonna undo and go back until got, our two hearts are separate again. Oop, they’re grouped. Let’s ungroup. So now we have the ungroup option here, so I’m gonna click that and now they operate independently again.
ATTACH TOOL
All right, so another option that we could have done is we can select him again and we can click on attach, right here. So you’ll notice the line is still here between the two hearts. So attach is something between group and weld, and what happens with attach is that they will stay in place on your canvas exactly where you tell them to, and that’s important, but these two, there will still be a cut line wherever you see those black lines, those are still, still be a cut line. So when we go to click, make it, you see this black line here, it’ll cut there. So you’ll have one complete heart and one partial heart, which probably isn’t what you wanted, but maybe it was. You never know. Maybe you’re making puzzle. No, my best advice here is to play with Cricut Design Space. Do not be afraid of it. Press all the buttons and try all the menu items. You’re not going to break it. This really is very user-friendly software. All right, so let’s talk about using the images that are in Design Space. So I’m just gonna go ahead and select these and we’ll delete them off our canvas. All right, so this button right here, maybe I didn’t. Okay, so there are over 200,000 images in Cricut Design Space. It actually tells you how many there are. They’re always adding new images. So there’s a variety of different images in here. There’s ones that are free, there are ones that you have to buy, and then there’s ones that are part of Cricut Access.
CRICUT ACCESS
Cricut Access is a subscription plan that allows unlimited use of over 100,000 of Cricut’s graphics and fonts and ready-to-cut Cricut projects. So Access subscribers also get discounts on www.Cricut.com purchases, they get priority member care line to contact, like for help, special offers on products that are reserved just for Access subscribers, but the Access is an optional subscription plan. It has benefits and, you know, includes images and fonts and projects for free, but it’s optional. A lotta people confuse Cricut Access with Cricut Design Space, but they are not the same. Cricut Design Space is the free software that you use to create and upload your designs and cut them on your Cricut. All Cricut Explore, Makers, and Joys need to use the free Cricut Design Space software, which is what we’re using right now. They do not need to pay for Cricut Access unless they want it, okay? So this is an optional thing. A lotta people ask me if I think Cricut access is worth it, and I think it is if you’re going to use it. So basically the benefits are that you get access to all those images, and they add new images all the time. There’s access to over 500 fonts, including writing fonts, which are difficult to find. So that’s a big reason that I like it. And if you are buying any images from Cricut, the Access subscription pays for itself very quickly. If you’re having issues, the priority support can help a lot. And then, of course, the 10% savings on stuff adds up if you’re buying stuff from Cricut. And if you’re not doing any of those things, then you shouldn’t get Cricut Access. When you have Cricut Access, you can get the mystery boxes with the really cute little Cricut Cutie figures that you see people going nuts about in my Facebook group. If you want to learn more about Cricut Access, I have a link here. Yes, if you go to www.jennifermaker.com/cricutaccess, it answers the questions for you, it helps you decide. Maybe not everyone here is new, but I’m guessing most of you are new and just set up your Cricuts. So if you did, that means that you have a free trial, but if you go up to your hamburger menu, again, that’s this one of the three lines and you go to Cricut Access right here, it’ll, first of all, it tells you whether you have it. So if you are subscribed and you’re not sure if you are, it tells you right here whether you are or not. So I have Cricut Access monthly and it tells me what, you know, but if you don’t have it, it tells you about it and it tells you how you can sign up. So you can learn about it here too. Here we go. So this one right here, it says Nia purpose, this has a green access symbol on it, and down here it says subscribed. That means it is a part of Cricut Access. When you see this, but it says free, that means it’s currently a free image, so you can use it, but it may not stay free. They have free images every week, okay? So they’ll be part of Cricut Access but you can use it free right now. So if you don’t have it, so it’ll show up there. And then there’s ones that, even though I’m in Cricut Access, not everything in Cricut access is free. So a smaller number of images that have special licensing, there’ll be a price here if it’s not included in Access. So, and there’s no symbol here, right? So that’s how we can tell the difference.
FREE IMAGES
Okay, now, if you don’t have Access, you’ll want free images. So now if we go to ownership and we click on that little plus symbol here, we can click on free and it shows us just free images. So there’s some calendars here. There’s actually a fair number of free things, and you can scroll through and you can make, they have some cute cards. This would be a fun thing to make right now, not dissimilar from our project that we’re doing today. So lots of things that you could do for free. Okay, so that’s how you would find there. So there’s a lot more to filtering through images that we don’t have time to talk about today, but, again, I want you to come in here and poke around and click and learn how it works. It’s really the best way is to just try things yourself. So let’s just search for something right now in the free section and I’m gonna search for happy and see what comes up. So lots of cute things. This is a card. Some really cute calligraphy things that would look super cute on a shirt. A butterfly. Look at this adorable deer. All right, I’m gonna click on this deer.
SELECTING AN IMAGE
So once I select an image, I get the green box around it like this. That means I’ve selected it and I can then insert it onto my canvas. You’ll notice a little icon with that same image shows up here. You can select more than one at a time, so I can click on that butterfly too, and it shows up right next to it. So I know what I’ve selected. So if I keep scrolling and I’m like, oh, hey, I want a snail too. Then I see all three. But I just want the deer, so we’re gonna go up and unselect that one. And I wanna click on insert images. This will put the image onto my canvas so I can manipulate it just like those two hearts that we had. So there’s our cute little deer, our cute little fawn, smelling a flower. So we can do all the same things that we did with the heart with the deer that we did with the heart. So we can resize it, rotate it, change its colors.
By the way, there’s two layers here, so I can select each layer and I can have a purple flower and I can make this deer, oh, I don’t know. Let’s make him green, right? So we have all of the options that we wanted to do. And now these two, they are grouped, and you can always tell, because the ungroup becomes an option. And if we needed to ungroup them, we can just click ungroup and then we can move these things down. And let’s say I just really wanted the flower to be more like this and then we can group them again right here, or we can attach them. And then if we attach them, they’ll stay together on the canvas. Now, since they’re two layers, it’s really not. They’re gonna cut on different colors of paper, but sometimes it’s still useful to do that. If we welded them right now, what will happen is they become one image and they will change to be the same color. So now they’re both purple, and they’re one image. They’re not separate anymore. They’re glued together permanently. The only way to undo a weld is to like immediately undo it. Well, there are some other ways actually, but not the way that you just did it. You can’t just go, oh, I decided, you know, like a day later to undo it. Now there’s things that you can do with slice and contour, but we’re not gonna cover those in today’s class. I don’t wanna overwhelm anybody. All right, so let’s go to my blog so I can get a file for you. So I have prepared a file for us to cut together tonight. So it’s on my blog at jennifermaker.com.
FREE LIBRARY
And like I said, I love to design things, so, and I keep all of my free designs in my library. So to get to my library, you go to the red bar at the top of my blog and you either click get a password, if you don’t yet have one. It’s free to request a password. Or, once you’ve got your password, you click enter the library. And once you’re in here, you will see, and there’s a little video that shows how to use it if it’s at all confusing to you, but once you’re in here, you can click on these to like, just go to categories. But most people just scroll this list. They’re in reverse chronological order. There’s nearly 400, although by the time that you’re watching this video into the future, there could be a lot more. So right now, this project that we’re doing tonight is at the top of the list, but it might not be when you see it. What matters is the number. So it’s number 277. All my projects are numbered so you can find them easier. All right, so when you are in my library, the first link that you see goes to the file itself.
HOW TO DOWNLOAD SVG FILES
So when you download the file, when you click this link right here, it downloads the file so I’m gonna do that for you right now. And that’s what it did, it went there. So it just went right to my computer and let’s see, and we can go to my computer where it actually downloaded, but I just need to close one of these windows. Here we go. There’s a download window. It’s right here. And my Mac actually unzips it for me. It is right here. It’s very easy for me. I have it set, Chrome, actually, Google Chrome, which is what I’m using, I have it set to unzip all my files. So it’s super easy. I don’t ever have to worry about it, and here is the file itself that we will be using. Now, I think more of you use a Windows computer than a Mac computer. Here we are in the library, and this is is a video of me on my Windows computer.
So I just showed you how to download on a Mac, so I wanna show you how to download on a Windows too. And we’re just downloading a file right now, and the same time, we clicked the link, just like here, and it downloads once we click it. Okay, so that first link in my library will download the link. And it shows up over here in the corner where the arrow is. You can click it, the a little arrow next to it, and it opens and it goes to your file manager or whatever you call it. I think there might be a different for it. Click on downloads because files are downloaded. We’ll go to the downloads folder, all right, if you’re ever having an issue with that. So if you can’t find a file you downloaded, it’s in your downloads folder. I like to click open when done, because I think that it helps, but you can also do show in folder or show in, yeah, and it’ll show you where it is. So this is the ZIP file that we’ve just downloaded, right?
HOW TO UNZIP ZIP FILES
It’s just a ZIP file. It’s not extracted yet. Now my Mac extracted it for me, but on Windows, I think most people have to do an extra step and you notice, it says .zip on it. It says it’s a compressed. So to unzip it, we right click on it and we do extract all, all right? So you’re right clicking with your mouse and doing extract all.
You can choose where you want it to go by clicking the browse button. That’s up to you. And so it’s a good idea to pay attention to where it’s going so you don’t lose it. And then you go ahead and extract it, and it will look like this once it’s opened up. That Mac OSX folder you can ignore. That just is a Mac thing. The file that was below it, that’s the one that has all the goodies in it. So if you double click on that one or just choose open, you will see that inside there are the files that we want, and you’re looking for the SVG file.
Now, you may notice that you don’t see an SVG file. So on some Windows computers, they’re called Chrome HTML or Edge HTML, because they’re pushing the Microsoft Edge browser in Windows, I think. Something like that, I don’t use windows a lot, so… But if you ever are missing your SVG file, because it doesn’t say it and you see something that says HTML documents, that is the SVG. I know that’s confusing. I’m sorry. It’s not my fault. I actually now will put the SVG in the file name to help you find it. The actual video that this came from, this is in a series called jennifermaker.com/svgs.
So we have downloaded the file and we need to go to our finder. So I’m back on my Mac. So at this point, the instructions are identical, whether it’s Mac or Windows. So here is what’s inside tonight’s project, the Cricut Kickoff certificate. This is just like an about file, and this is just a thing for more help with Design Space. But this right here is the SVG file. This is the design file that I made for you, and you’ll see, I put SVG right in the name since I realized that there’s a lot of issues with that so that you can spot it. It makes a big difference since I started doing this. So this is the following one.
HOW TO UPLOAD A SVG CUT FILE TO CRICUT DESIGN SPACE
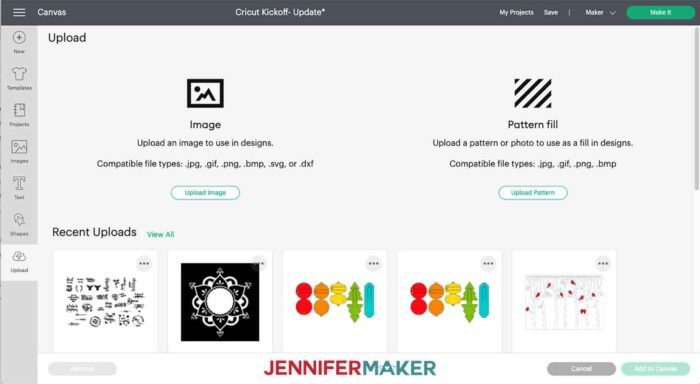
Now don’t go double clicking this file. It’ll just be confusing and it won’t lead you. It won’t like open up magically in Design Space, which would be wonderful, but it doesn’t do that. Instead, we need to go back to Design Space. So I’m going to click on upload over here on the left and I click on that and we get several options. The one that we care about is this one that says image, and this is where you can upload images, right here with this button. By the way, down here are all the images I’ve uploaded recently.
So it stores everything you upload. Unless you tell it to delete, it keeps and that’s very useful. All right, so we’re gonna click on upload image and then we click on browse. Now, you can drag and drop files here. I never do it because I just find it’s not reliable. Instead, I always click on browse and I go find the file I downloaded. That’s why it’s important to remember where it went and if you can’t find it, dollars to donuts, it’s in your downloads folder and both Mac and Windows have a downloads folder. All right, so here it is right here.
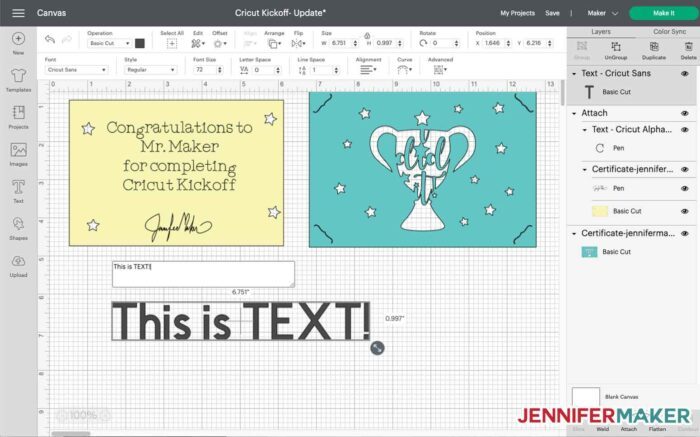
It says SVG in it right here in the file name. Certificate, Jennifer Maker, SVG. This is the one we want, and we click open. If you ever get a message that says, this is an unsupported file format, that means you’ve uploaded the wrong image and you probably need, you probably uploaded the ZIP, all right? So here’s our project and this looks good. And so we go ahead and click Save, and that saves it to the Cricut cloud. So we have access to the image, no matter which device we log into, so long as we’re using our same Cricut ID. So we can access these uploaded images from our iPhones or tablets or whatever, so long as we’re logging in with the same ID, which is really cool. All right, so we’re going to click it again. So just like with the image that we saw in Cricut’s images, when we select it, we get the little green highlight box around it, and then you can see it over here, the little thumbnail here as well and then you click insert images and it goes right onto your canvas. Now let’s make this screen a little bit smaller, so I’m gonna click the little minus sign here in the lower left corner so we can see what it looks like. So this is a certificate that you’re going to create. So this is the inside, and this is the outside, this blue layer here, is a trophy that says I did it. And the yellow layer is where you are going to write your certificate and put your name in for the Cricut Kickoff, okay?
So you can see right now that these two items are grouped. Whenever we upload something that has more than one layer, Cricut automatically groups them. It’s just what it does. So it’s a great idea to just un-group right away, because it makes it easier. Just get into the habit of ungrouping them, unless, you know, you’re following a tutorial that says, just go for it and click make it, ’cause I have lots of tutorials like that. But for this one, I want you to ungroup them because that allows us to operate and use these layers independently, which is important. All right, so this layer here, it’s all ready to go, so we’re just gonna put this down here out of our way. This layer here is special. So this will be your certificate and it has two parts to it and one is my name. I’m gonna put my signature in here. And the other is the certificate paper.
And you need to put the actual message on there, so I’m gonna show you how to do that with a text tool. So I want you to go over to the left and click on text and what you’ll get is this white box here, which is your text input field. So you are going to type this or something like it. You, of course, can do whatever you want here, but I’m suggesting that you type “Congratulations to:” and then press the return key on your keyboard to go to a new line, okay?
And then you type your name, whatever your name is I’m gonna make this one for Greg. So I’m gonna type Mr. Maker, another return, press the return key again to go to a new line, and then “For completing” and then press the return key one more time, and then type “Cricut Kickoff” okay? So this is text and we are going to have our pen draw, write, this text onto our certificate, along with my signature there. So there’s a few issues right away, as you can tell. That’s not gonna fit on our certificate. Also, I don’t think the pen is gonna write that. We need, and also it’s like, not even like centered or anything. It doesn’t look like a certificate to me, so we need to do a few things here.
One, we need to resize it so it fits onto our yellow certificate card. Number two, we need to align it so it’s centered and pretty, and number three, we needed to change the font so what’s a writing font for our pen, because fonts come in all different types. All right, so let’s first resize it. And if you remember the way to do that is you select it and then you get access to these four icons and then you can click on your resize handle and click and drag it until it seems like it’s a good size. So about there, and then we click and drag it over to our card. It seems a little bit big, so let’s make that a little smaller. Right here, just like this.
And let me zoom in so you can see that better. All right, so we’ve got it resized. You can also resize up here if you would like. All right, so I want to align this to be centered, so I’m gonna go to the alignment menu right here. And you’ll notice that once I’ve selected my text box, there’s this whole sub menu of things here. We’re not going to go into all of those tonight. We would be here for hours. Just know that there’s lots of things that you can do and I have many tutorials explaining them if you want to know, but for now I wanna center it. So I’m gonna go to Alignment and choose center and now our text is centered. Awesome, so now we need to change this font to a writing font.
Over here on the left is our font menu and it’s defaulted to Cricut Sans. If we click it, we get access to all of the fonts. Now, just like with the images, we can tell when a font is available for Cricut Access with the little green symbols that we see here. And when it’s not and it costs money, there’ll be a price at it. So look for this. So this one is a whopping $7. I hope it’s really good. It says, oh, it’s a Disney font. Well, that makes sense. So this font, if I wanted to use it, I’d have to pay for it. I’m not gonna do that, and I also want a writing font. So what I’m gonna do is go up to the filter menu here in the upper right of that font menu. And I can sort these fonts by multi-layer, single layer, and writing, and we’ll save for offline too, but we’re not doing that right now. So I’m gonna click writing and it’s gonna show me only fonts that will have a writing option. They’re not just writing, usually.
Sometimes they are, like this one, but often there are multiple versions. So this is a single layer cutting and writing, okay? So I’m going to look for Cricut Alphabet, because that is free for everyone to use, whether you have Access or not and I want everyone to be able to make this the same. So here we go. Cricut Alphabet right here. This should be a free font for everybody, so we can click it. By the way, if you wanted to save it for offline, you could go ahead and click download here if you’re going to be doing anything offline without internet, so you could save it so that you could access it later. We’re not gonna really go over that tonight, but just know that you can definitely do that.
You can save things for offline to work without internet, but so I’m gonna select it here and change it to this. Now you see it’s really big. Let’s go ahead and change its style, because right now its style, and here’s the style menu, it’s set to regular. Well, regular is the cutting font. We need the writing font, the writing style. Here’s the writing style. I’m gonna select that and it’s gonna change, so it actually changes quite a bit. So this here is, and those Gs are just the way they are, it’s just the style of the font, it’s not a mistake. So this is still a little bit too big. Once you change the font, you’ll get changes like that happening, but that looks good. Congratulations to Mr. Maker for completing Cricut Kickoff. And if we wanna align these things so they’re perfectly centered, if you’re not very good at eyeballing it, you can click, drag, and release to select all these layers here and then you can go to the align menu up here and you can do a line up align center horizontally. And that centers it. That looks a little off to me. Maybe it’s the stars that’s doing it. So I’m gonna move it over a little bit. Even though that’s probably centered, I like this better. It was probably that little star there that’s doing that for me. All right, so now we’re almost there.
HOW TO EDIT TEXT
Just by the way, if you ever need to edit your text, you can just double click on it and you get your edit box again and you can change whatever you want, but I don’t. I like it. It’s good the way it is. And it is over here in the layers panel, you can see that it’s set to draw, which is what we want. If, for some reason, it wasn’t, you would wanna go up to the line type menu and select draw, okay? ‘Cause we want to use our pen to draw it onto our certificate.
And my signature here is already preset to draw for you, I did that. And you’ll notice that it’s also already attached to the card, but this new layer that we’ve made is not attached. We need to attach that to our card. Otherwise, your Cricut will want to write this on nothing. So right now it’s just a text, but we haven’t said where we’re gonna put it, and it’s independent. It’s not attached to anything. So like, it’s just out there floating around, even though we stuck it out here, that doesn’t mean anything to… It’s just a place that we could put it. We could stick it over here and it would mean the same thing, essentially. So we need to attach it to this card so that, when we go to use our pen, it actually it goes onto our card itself, right? So all we’re gonna do is select all of this everything that we want to be attached, to stay together, and we’re going to click the attach button down here in the lower right. And now it’s all attached and ready to go. And just to make sure I’ve explained, I don’t remember if I explained this part yet, this is my third class today.
GROUP TOOL
So grouping is an organizational thing, but it doesn’t really keep the things together on your mat. If you need to keep things together on your mat, you need to use attach. We have our certificate layer here and then we have our frame. This is our frame for our certificate and we are ready to go. I always like to do a double-check, so here’s our layer, it’s set to cut. That’s great. And here’s this layer, everything is attached. All everything that we want to draw is set to the draw and the layer that we want to cut, which is the yellow layer, is set to cut. All right, well, I think that we’re ready to go ahead and click make it and actually make this.
PREPARE SCREEN
So when we click the green make it up here, we go to our Mat Prepare screen. And this is another place for us to double check our work before we continue on. So we’re looking to make sure that things are on the mats the way that we think they should be. Do we see our drawing where we expect it to be? Over here, it’ll say, these are the two colors. So we have the blue layer and the yellow layer. And we see our writing on our card is not somewhere else, and it says draw and cut here. And this one says just cut, which is what we want. So this looks great, right? And these are pretty small. We don’t have to worry about sizing on them, but, you know, if you did, this little menu here can help you with sizing ’cause you can go up all the way to 12 by 24, if you have the larger mat, right? These are actually really small, and it doesn’t matter.
Sometimes it’s helpful to like, say I want to use a smaller size, if you only have a little bit of material that you’re working with, but otherwise you can mostly just ignore this, okay? And this little toggle here for mirror is only if you’re doing iron-on vinyl, which we’re not doing tonight, so we will ignore that. If for some reason you wanted to make multiple copies of your certificate, you can change this here and click apply and it will duplicate for you, and it will do that. Well, I’ll have to do it a bunch of times. If you click apply, it just duplicates it for you right on the screen. We don’t need to cut four of these, but if you ever wanted to do a bunch of things, that’s really useful and it will fill your mat for you and it will make new mats as necessary.
Let’s go back up to one. So don’t forget that, so by default, your project will cut in the upper left corner of your mat, but you certainly can move it around to another place on your mat if you want by clicking and holding and dragging it around and then letting go. So you can just move it wherever you want. If your mat is getting old and busted and it’s, ’cause you’re always cut here, you can move it over here to extend the life of your mat, for example. Another thing that you can do is actually move things to the same mat. So for example, if you click these three little dots, gives you a menu, you can hide it, of course, if you don’t wanna cut it, but you can move it and I can move it to my yellow mat. And then, of course, it changes to yellow, but I could say put a piece of blue paper here and put a piece of yellow paper here and cut it at the same time to save myself a little time. So we are ready to cut this so let’s go ahead and click Continue.
SELECTING MATERIALS
All right, so now we’re on the material selection screen. Now we’re using the Cricut Maker tonight. Both the Maker and the Joy will show you this menu by default that says set base material. If you’re using the Cricut Explore, you definitely would need to change your dial to custom to see this lovely menu here and all of the choices, lots and lots of material choices. Okay, so you wanna change that dial to custom if you’ve got an Explore, but the Maker and the Joy, they just default to custom so you don’t have to worry about that. All right, so we are gonna cut this on cardstock, plain old, normal, boring card stock. And my go-to for cardstock is medium cardstock, 85 pound, right? Even if it’s a 65 pound, I don’t care, I still cut it at a medium cardstock. This setting works really well for cardstock in general and I tend to change my pressure whenever I cut to more, because it means I get cleaner cuts when there’s just a little bit more pressure. You may or may not wanna do it that way. It’s completely up to you. So it’ll tell you what tools you need for your mat after you’ve chosen your material. So, for this one, I need the midnight black pen, and I need my fine point blade. So we’re gonna take off the cover. So, here’s my yellow paper. So for your yellow paper, you match up your corners and so it goes into the upper left corner when we put it on our mat. We wanna try to get it on there straight as you can and you press
it down. Okay, so it’s well adhered to our mat. So our paper’s on our mat.
HOW TO DRAW WITH A CRICUT PEN
All right, so here is the pen that came in our box. So I’m gonna take off the cap right here, and you’ll notice that there is an arrow on it. So I always like to put it in with the arrow facing towards me, because it helps me make sure that it’s in the machine properly. And it goes through the clamp A. This is clamp A here. This is clamp B, remember? So we press it in and we usually are listening for it to click. (machine clicks) There we go. So now it’s in and we close the clamp so it doesn’t wanna jiggle around and stuff. And the fine-point blade is already in here from lesson one and then your pen cap, do yourself a favor right now and put it on top of your pen so you don’t lose it. Here’s our mat with our paper loaded. We are going to put it under our mat guides, which are the little white things on either side, right here. Here we go. So there’s our mat guides right here and we’re gonna press against the rollers lightly with the mat like this, and then we’re gonna press the load and unload button that’s flashing right here. (machine whirs) And it loads in for us. So it knows that we’ve loaded our material. It says right there in step number two. Tools and material loaded. So step number three is to press go. So when it’s flashing, that means it’s ready to go, so let’s press it. And what it’s gonna do is it’s first. gonna draw with the pen, and then it’s gonna cut. And if we hop over to the Design Space right now, we see this. It’s giving us our progress, so we can see here, 15% is done. So you can see my signature is there and it is writing the rest of it. It’s going from the top and it’s going down. You probably can’t see. I’ll let it keep showing. it for a little while longer. All right, so now it’s going to cut. When it’s done, the load unload button here flashes and we just press it and it spits it out for us like that, and this is what it looks like. Isn’t that cool? So you can see it cut out some stars and there, that’s all made with the pen, and you can see my signature at the bottom. Isn’t that cool?
HOW TO REMOVE MATERIAL FROM A MAT
Okay, let’s show you what not to do. I think that’s useful. If you go like this and just peel it off. What you get is curled a piece of paper. You don’t want curled pieces of paper, because paper, whatever, especially a certificate, it should be nice and straight. So instead what we do is we flip our mat over like this, onto our surface and we peel our mat away from our project. And it basically just comes off for you, I mean, not always, but oftentimes it does. And it’s perfectly straight, see? Little stars. So there is our certificate. All right. All right, so now we’re gonna do the blue layer and I’m gonna use the same color so that we don’t confuse anybody, but of course, remember that if you changed your mind and you didn’t actually want blue, you can put whatever color you want on the mat. You don’t have to do what you designed. You can change your mind at the last minute. It doesn’t care. I didn’t know what color you’re cutting. Again, it goes under the two guides on either side. Make sure it’s under that one, and we press that load-unload button, putting on some light pressure on the mat and it brings it in for us. And when it’s ready, it flashes and we press the button. (machine whirs) That’s so cute, isn’t it? Look at that. I love the writing. That’s super cute. So this will take about the same amount of time to cut. It’s just a couple of minutes. It’s not bad. All right, so it says that it’s all done and we can unload our material. You get this little box at the top and you can just dismiss it up here. And unloading, again, is the flashing arrow that’s up and down here. There we go. This one’ll be harder to see, but I’ll try to show it to you anyways. There we go. You can see that, right? So look at how beautiful and clean that cuts. When we go back to Design Space, it knows that we’ve finished and it takes us back to this page. Now, if you wanted cut another one, you certainly could from this page, but usually what you’ll wanna do now is click on finish and immediately go save it. So I’m gonna show you right now. So save is right here. So I’m in the upper left corner next to like your machine selection. So you click on that and you type in a name. So let’s call this Cricut Kickoff desktop, ’cause this is the third one we’ve done, and I will click Save.
All right, so if we, and you’ll notice that if you like make a change and go back up to here, you get another option. So you have save, and if you click save again, it’ll save on top of the one you have. So it’ll save it with that change, but if you do save as, then you can save a different copy of it in case you wanted to preserve the first one for some reason, like you’re making one for, I don’t know, every person and you want them to be in individual files. So here is our mat. Now, again, this one will be a little harder to get off the mat because it’s more detailed, but we do it the same way. We flip our mat over onto our surface and we peel the mat away instead of the other way. Now, don’t just rip it off because you have a lot of little detail here. So I just go in here with my finger. If you wanna use your spatula tool, you can too, but it’s usually fine. That’s nothing we wanna keep. You don’t wanna just rip it off because you might accidentally just, you know, rip it. It is supposed to be a nice, delicate piece. There we go. And there we go. So there is our trophy and it says I did it. And what we do is, this is the frame, so we flip it over so it’s like, you know, the other side and you take your certificate and you put it into these little slots here at the top and this is your frame for it. So you don’t need any glue or tape or anything, and it goes right into the little corners like this. There’s a little bit of paper there. And all four corners, just like that. And you have a cute little frame with your name on it and I signed it. And, on the other side, you have a cute little trophy and you can put this next to your Cricut and you can feel good about having done this, because this is a great way to learn your Cricut.
More Questions About Cricut Design Space?
So if you’ve got questions about Cricut Design Space for desktop, please let me know. Leave your question below this video or ask over in my really super awesome Cricut Crafters Group at jennifermaker.com/cricutcrafters where you can get help and guidance from hundreds of thousands of Cricut crafters, just like you. We’re over 430,000, if you can believe that. It’s really cool. Now, if you wanna learn how to use Design Space on an Android or on the iPhone or the iPad, because they are quite different than what I just showed you, I have lessons on those devices as well. Get links to those classes at cricutkickoff.com.
Now, if you wanna learn more about Cricut Design Space, I invite you over to my blog at www.jennifermaker.com for hundreds of free Cricut tutorials and projects. I also have a helpful guide called the Cricut Coach Playbook that contains dozens of cheat sheets for Design Space. This is a very popular guide that has been used by over 300,000 Cricut owners. Seriously, we just ticked over that at the time that I’m recording this video and I personally find it helpful and so do they. It’s really nice to have it all just like spelled out for you. So if you wanna learn more about the Cricut Coach Playbook and get a free page for it, go to www.cricutcoach.com. Now I also offer Cricut classes, workshops, and courses over at www.makeracademy.com. Come on over, visit, and sign up for something fun today. Thank you so much for joining me for your Cricut Kickoff. I hope this has helped you get on the path to success in making all of those awesome things that you can imagine and wanna fill your home with and give to your family and friends. And if you do, please share photos in my group. I truly love to see your creations.
Click below to get my free printable Cricut Screen Maps cheatsheet:
Did this Cricut Design Space Basics tour help you out? Let me know — I love to know I’ve helped you! You can share your success in our Facebook group or tag me on social media with #jennifermaker.
Love,

Want to remember this? Save this Cricut Design Space Basics tutorial to your favorite Pinterest Board!