
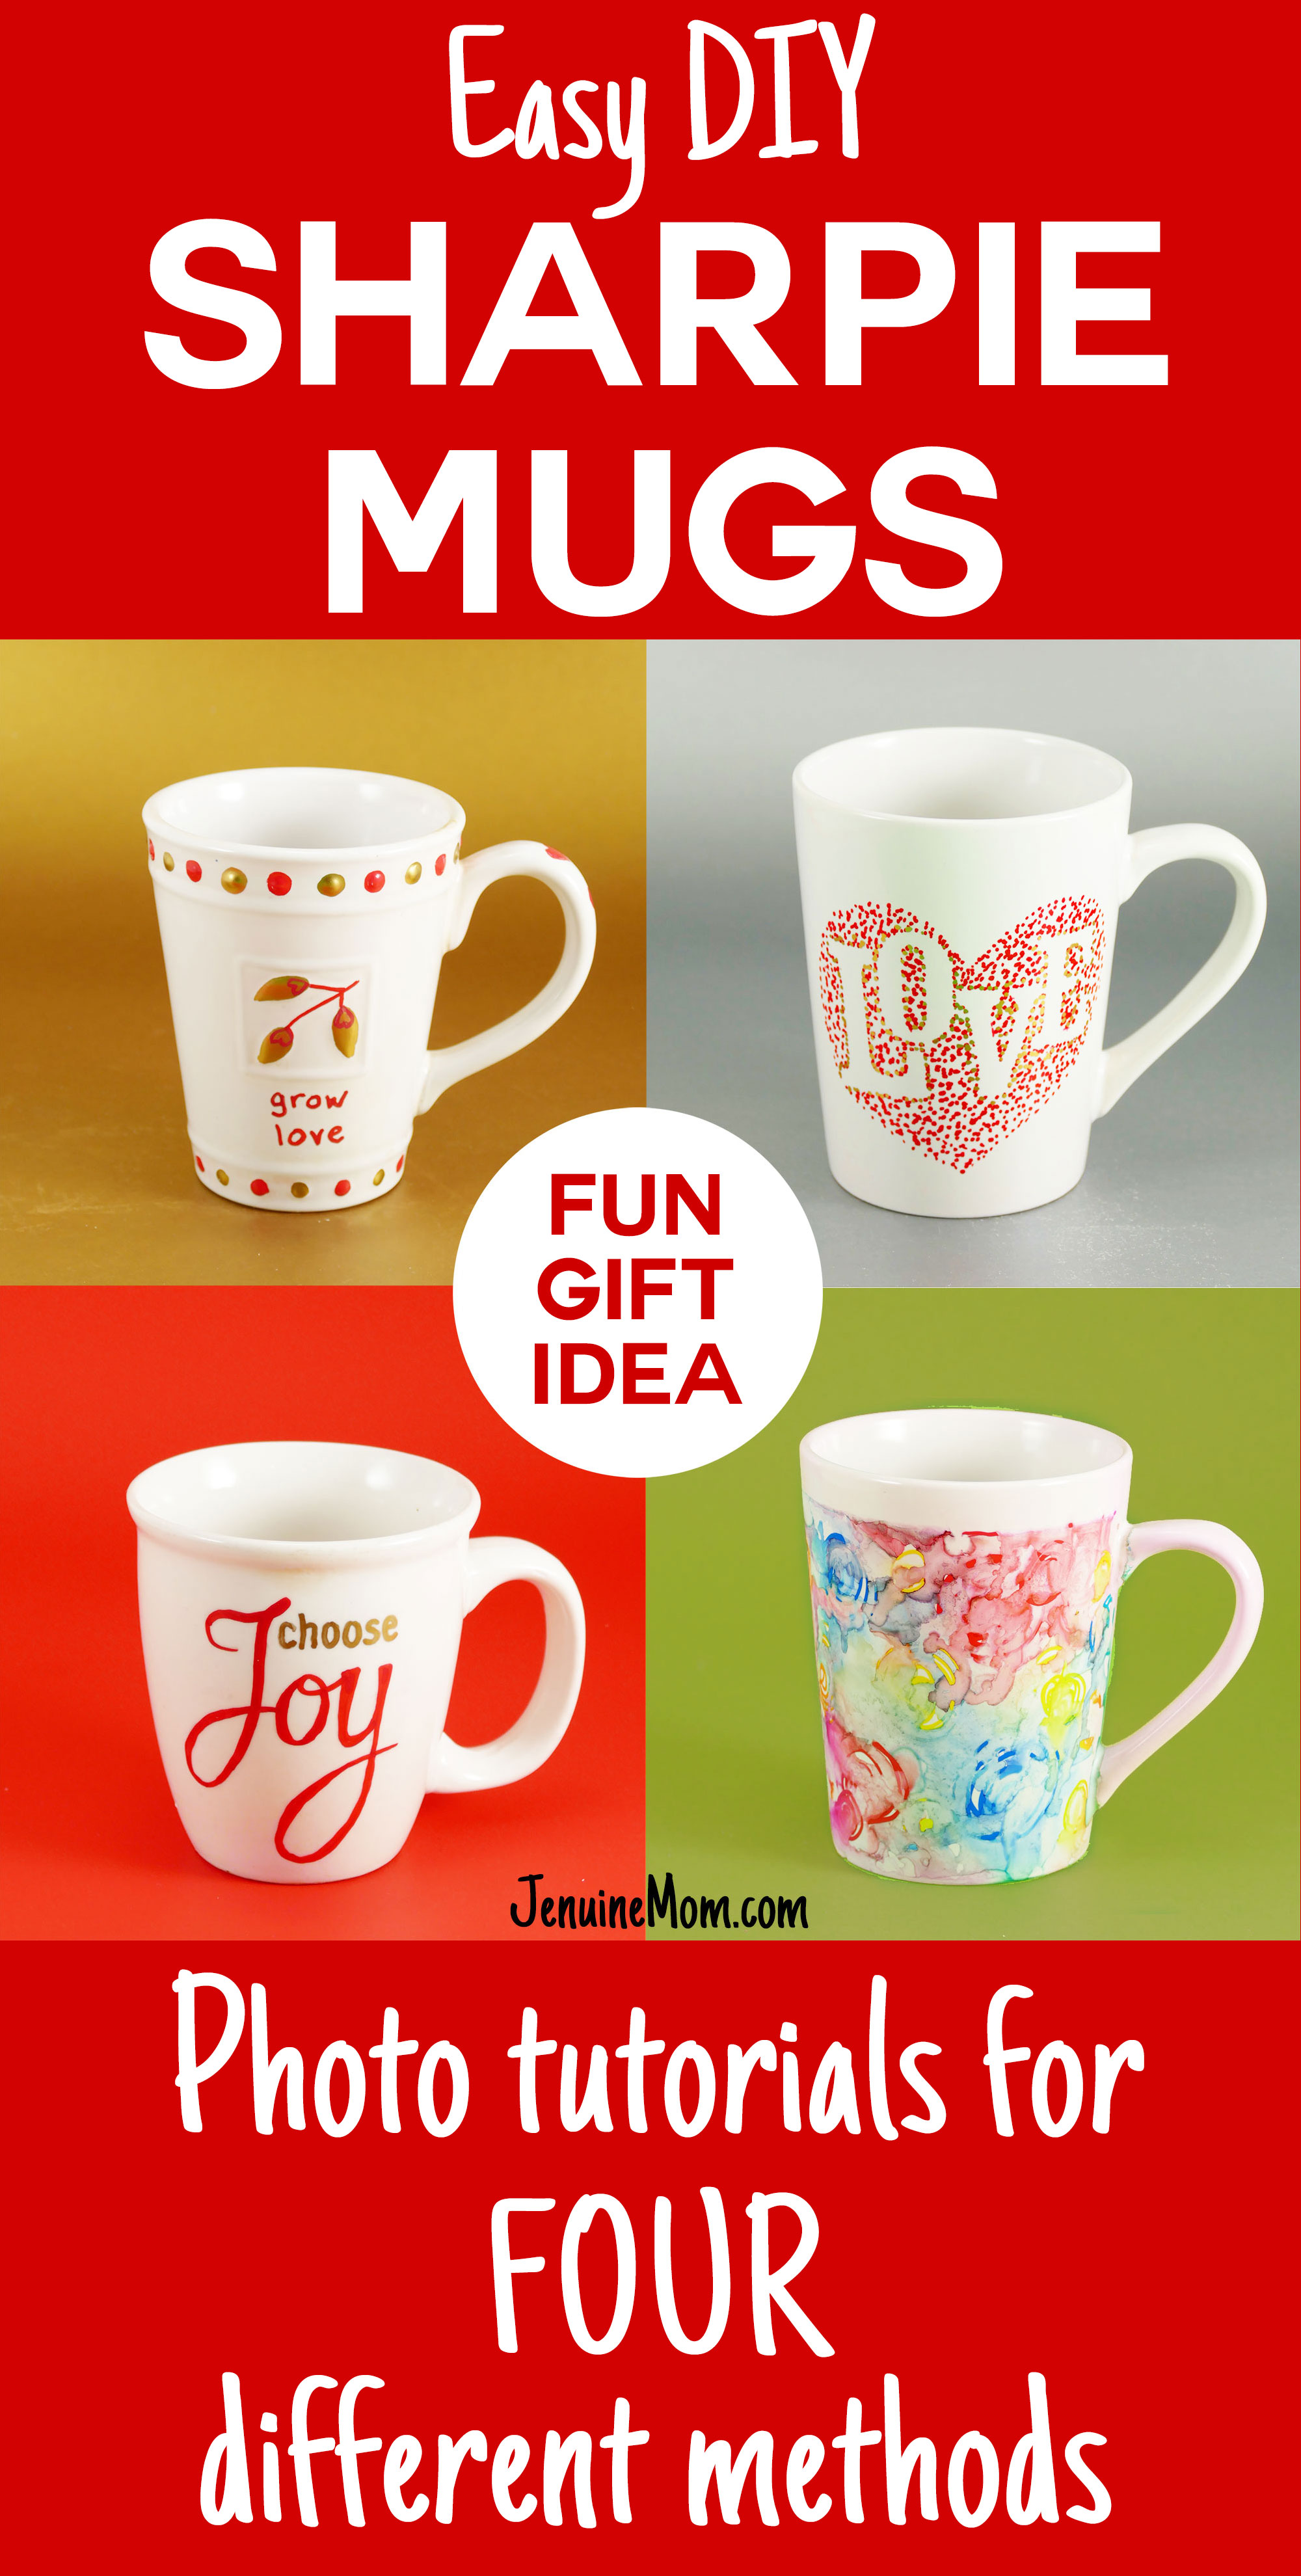
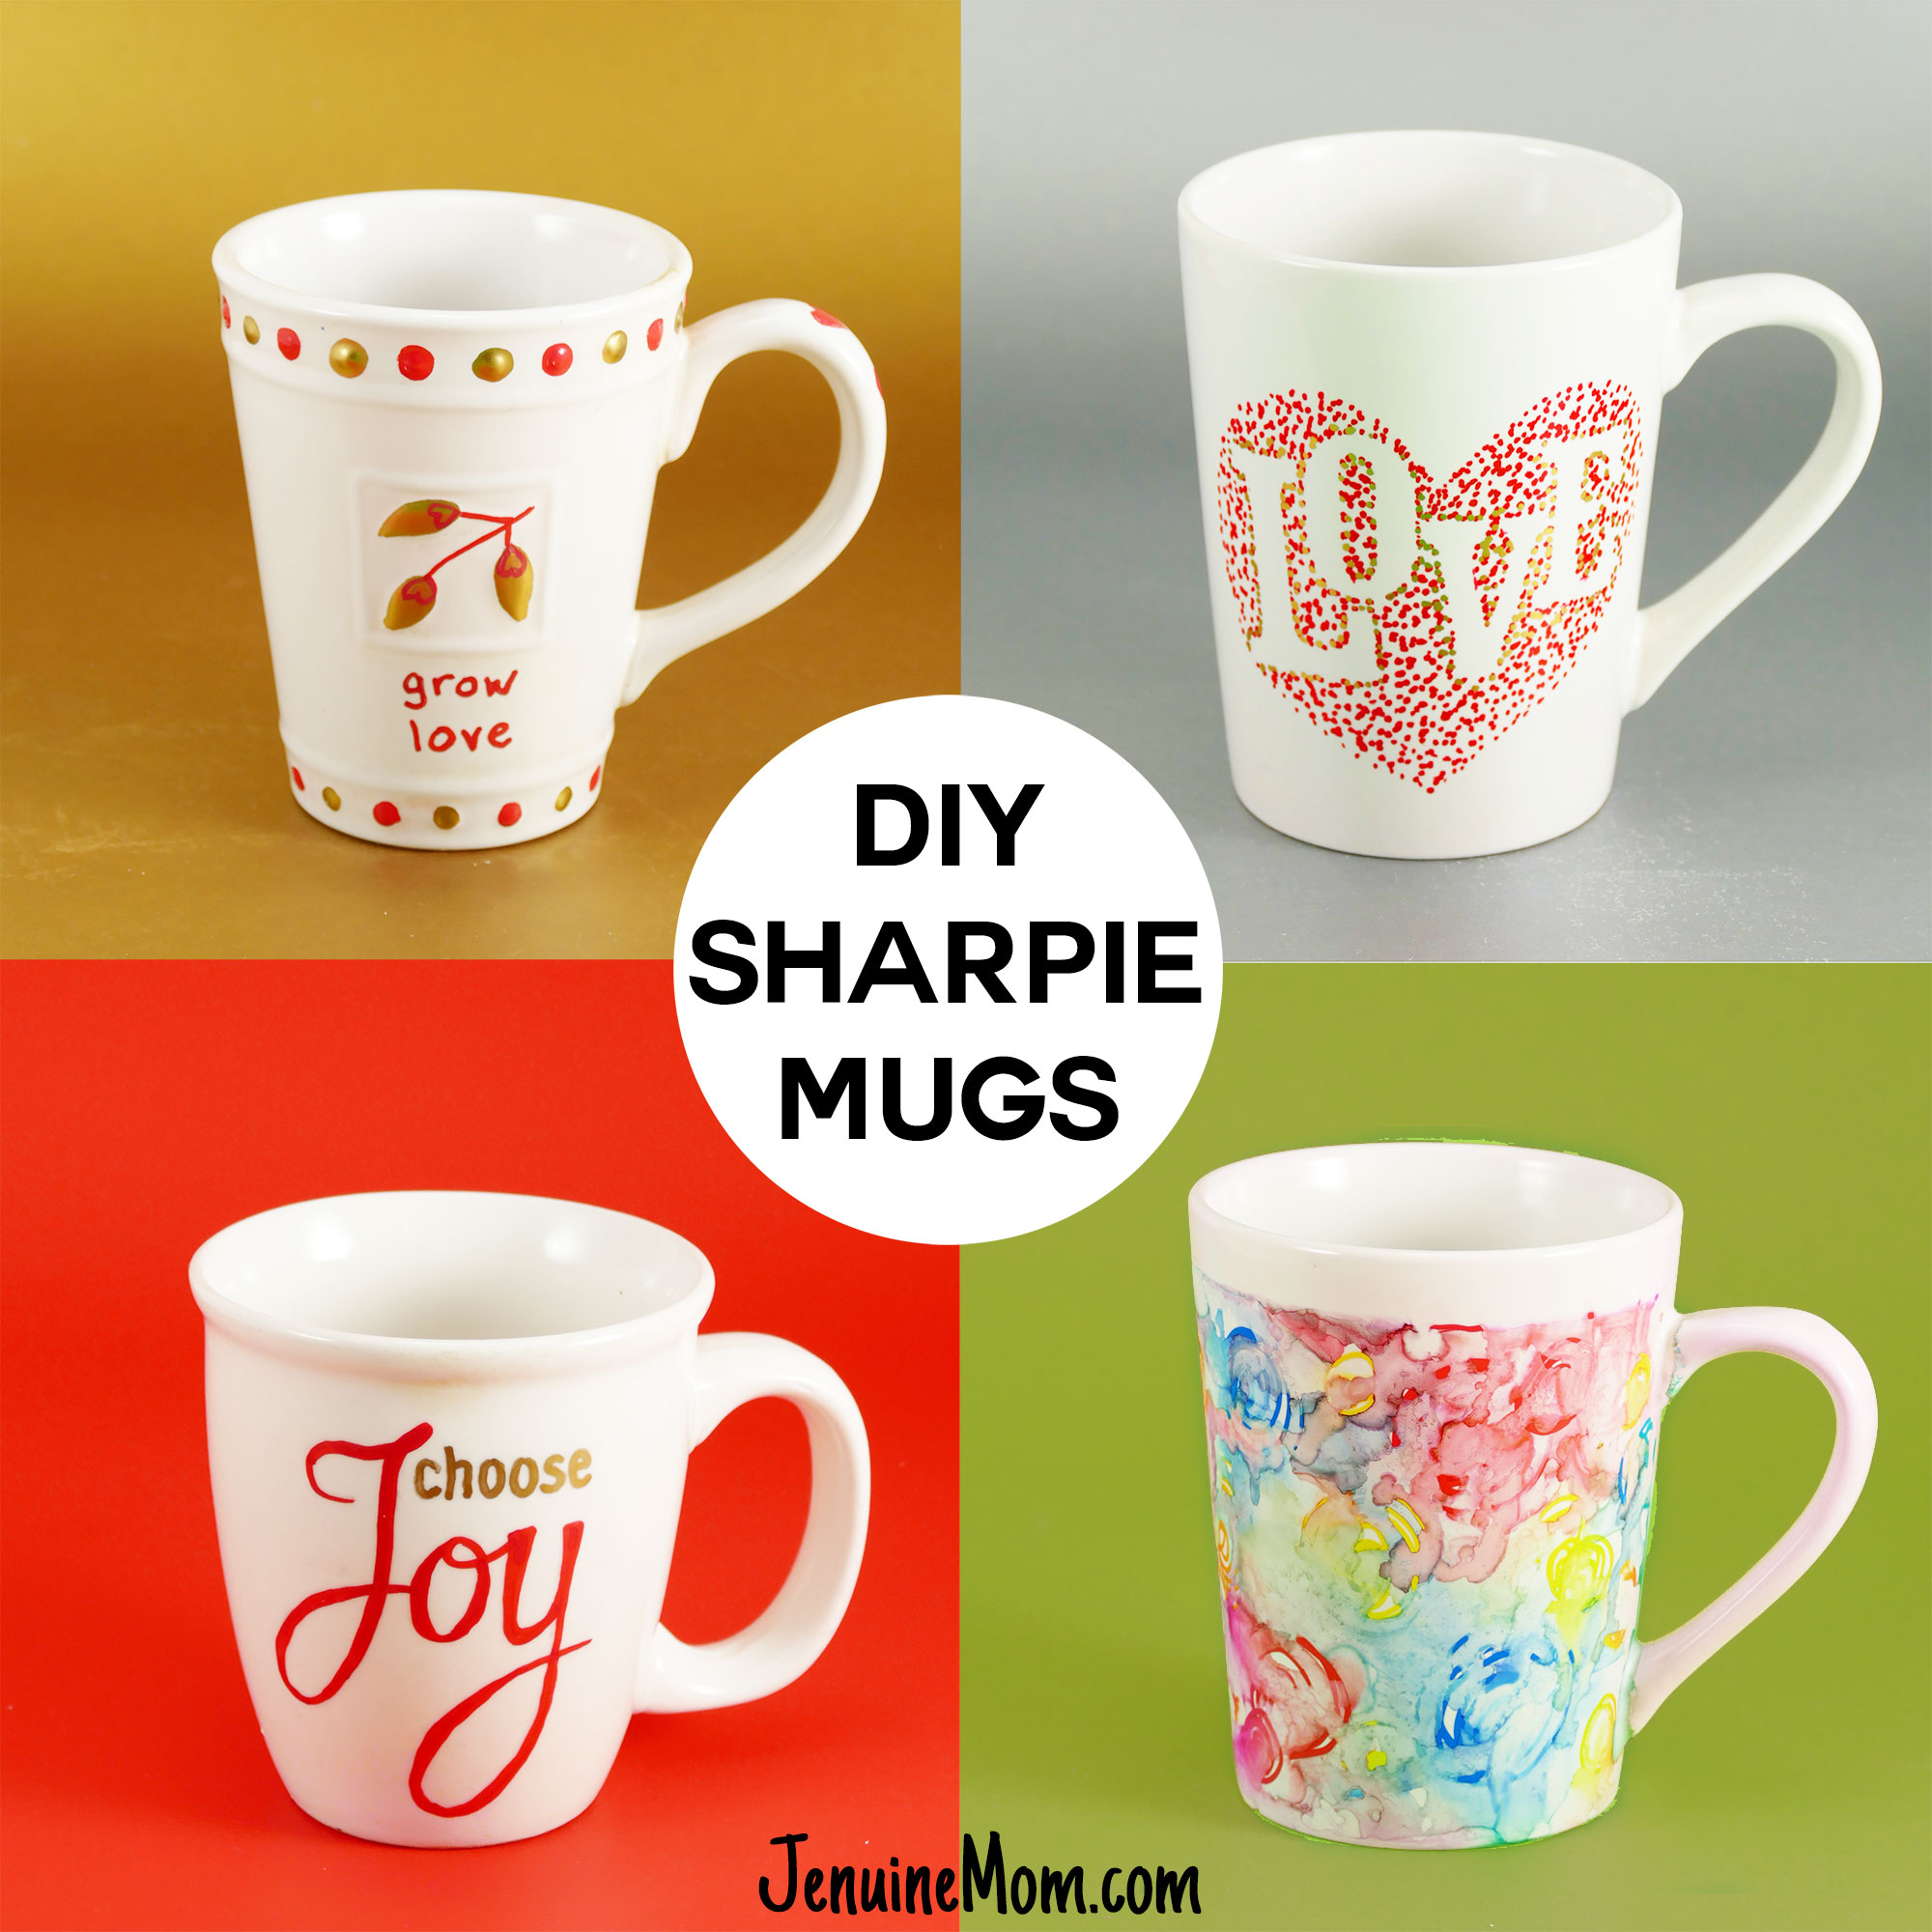
A few years ago I received a gift I cherish. It sits on my desk every day and makes me smile. What is it? A personalized mug from my partner Greg. He bought a Create-Your-Own Mug from Starbucks for $14.95 (I know this because he accidentally left the sticker on the bottom). I looked it up online and it came with the mug and a dual-tip black-and-white “glazing” marker. He personalized the mug for me, baked the mug in the oven, and put it under the Christmas tree for me. I loved this mug so much, the following year I learned how to make my own DIY Sharpie mugs to give to my family!
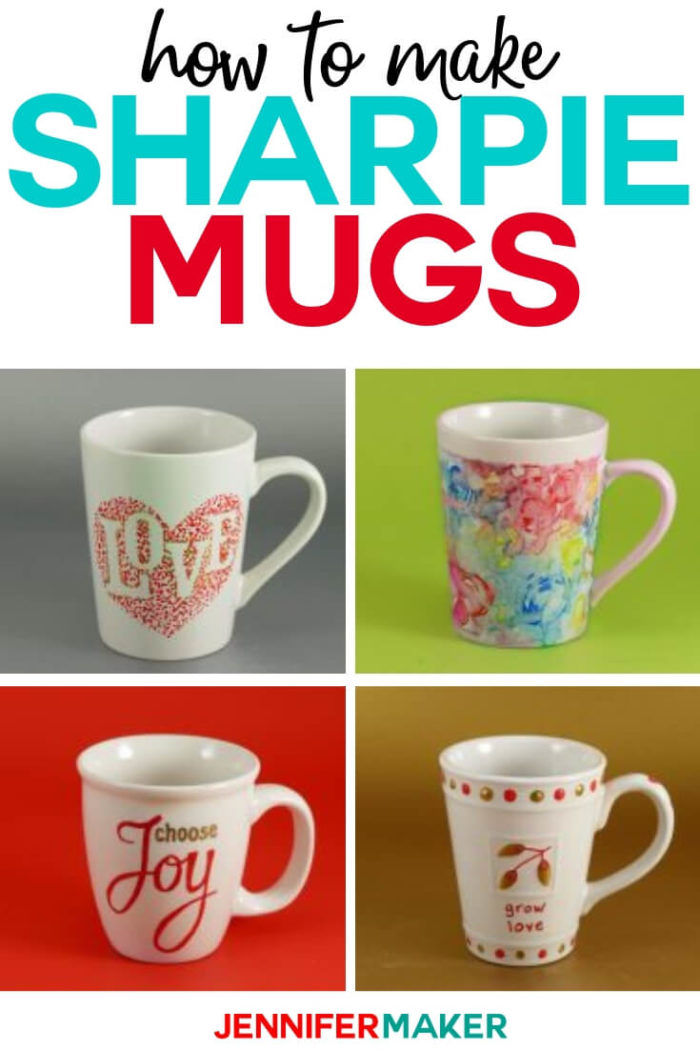
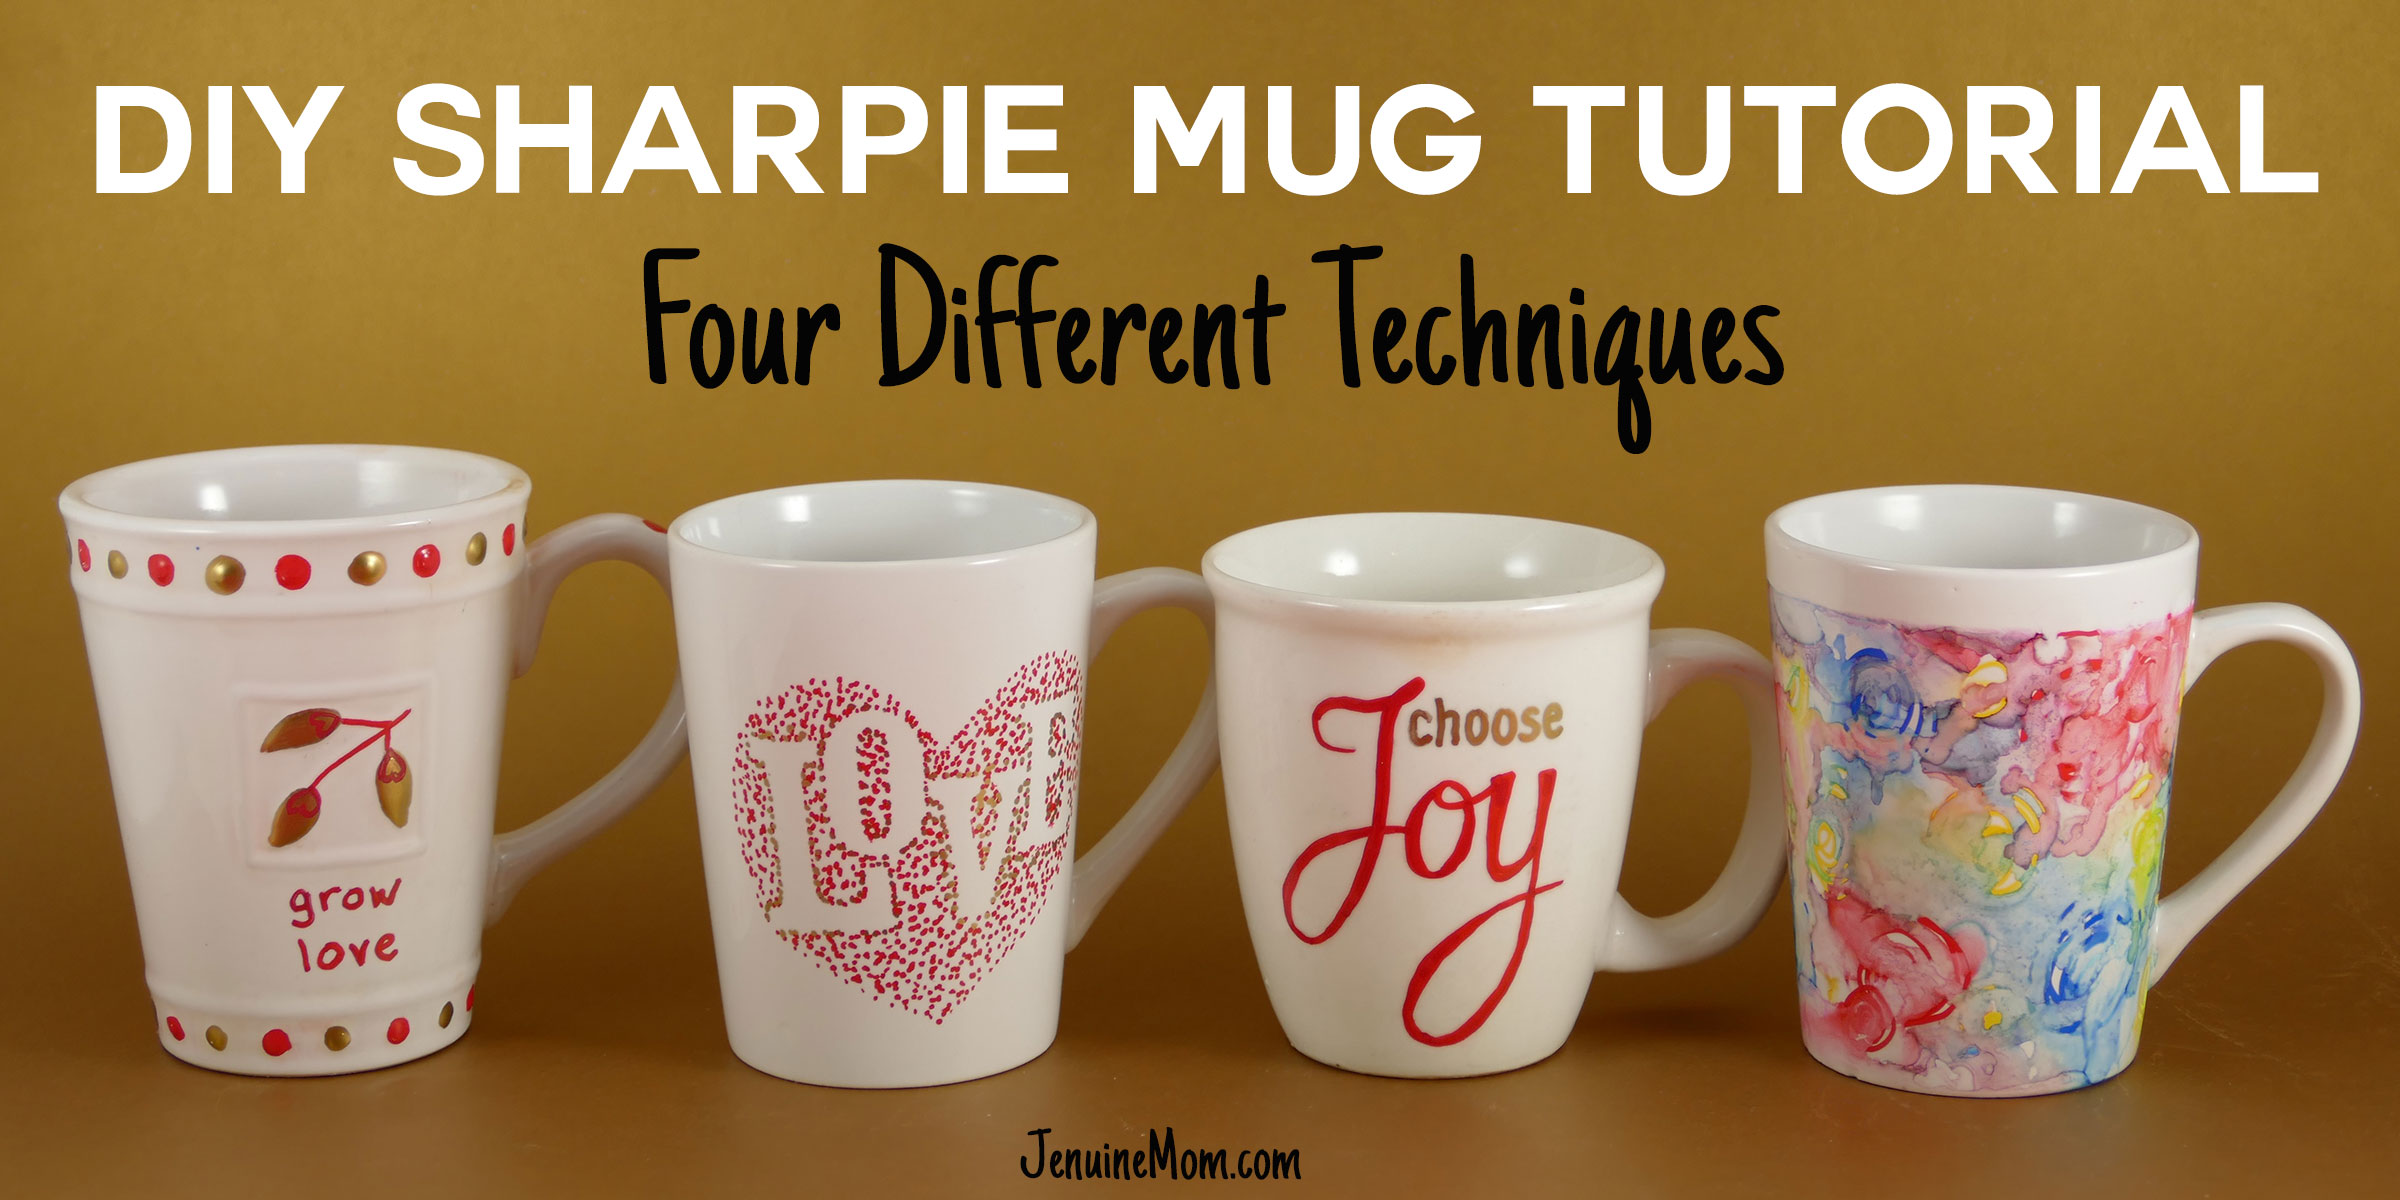
This mug is one of the easiest and most personalizable DIY gifts you can make! You can mark up a mug in just a few minutes, then let it bake it for 30-60 minutes. I have four different ways to make these marker mugs, and I explain each one below for you! The tie-dye mug is a technique I came up myself after much trial and error! You can click each photo to go right to the type you want, too!

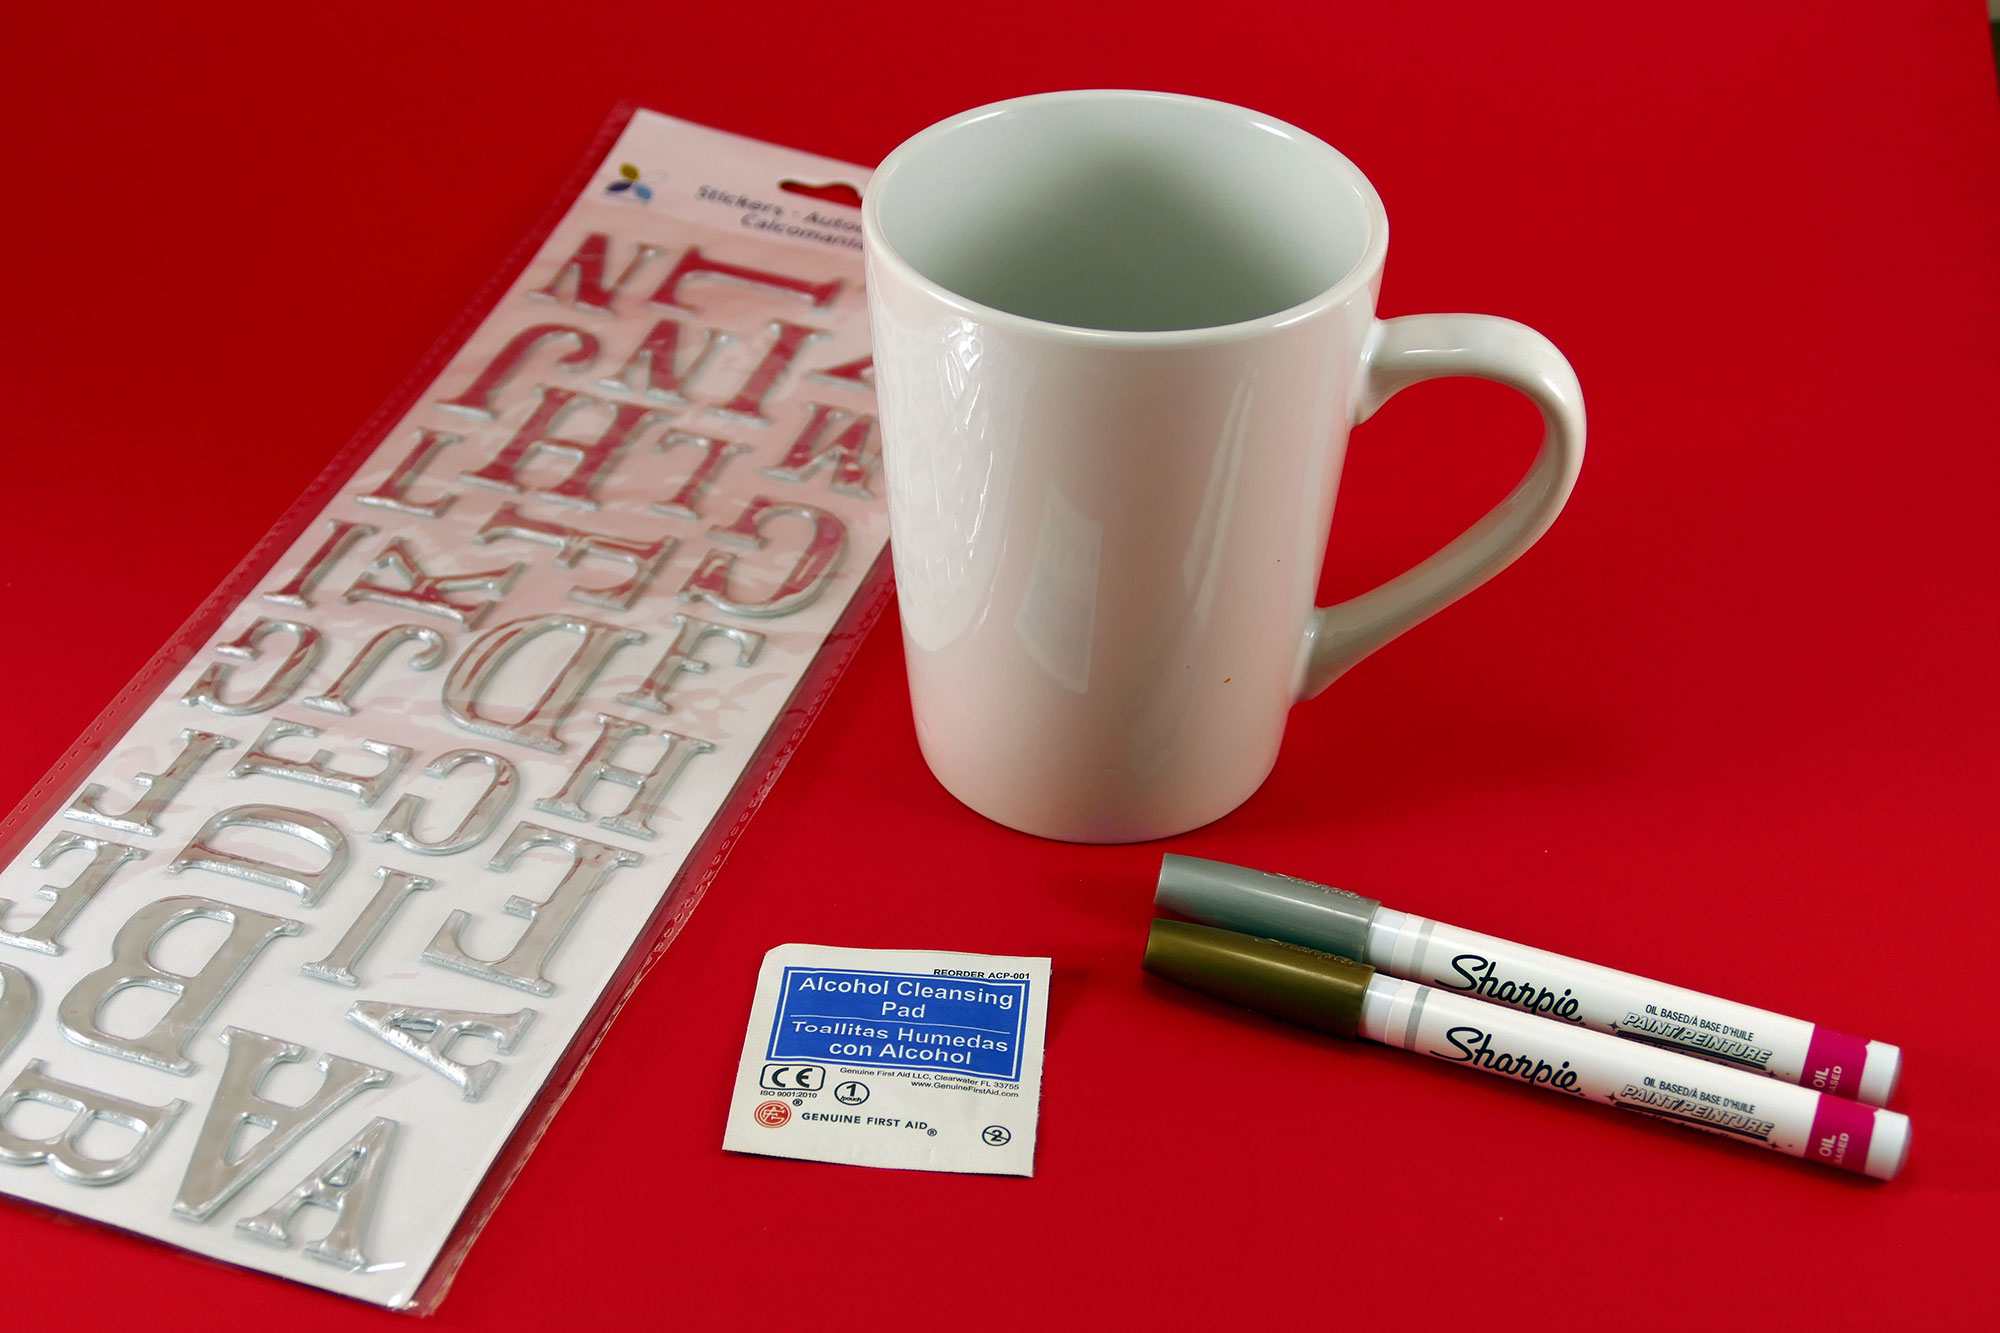
Materials for DIY Sharpie Mugs
This post contains some affiliate links for your convenience (which means if you make a purchase after clicking a link I will earn a small commission but it won’t cost you a penny more)! Read my full disclosure policy.
- Special Paint Sharpies
- Rubbing alcohol (for cleaning the mug surface, for erasing mistakes, and for the tie-dye technique)
- White mugs (you can get them at the dollar store for $1/mug, at a thrift store for less (mine were 25 cents/mug, or online at Amazon)
- Paper towels
- A way to protect your work surface from ink and alcohol
- (Optional for transfer technique) A pencil, tape, and patterns
- (Optional for letter technique) Sticker letters
- (Optional for tie-dye technique or extra washability of any technique) Special Coating Spray
Answers to Your Questions About Making A DIY Sharpie Mug
Q: What kind of Sharpies do I need?
A: You must use the right type of Sharpie for this to work. So many people hear “Sharpie” and think the normal kind will work, but it will fade and rub off over time. What you want is the “Paint” Sharpie, which is an oil-based marker. You can buy Paint Sharpie at craft stores — they aren’t difficult to find. Paint Sharpies are also available on Amazon in a variety pack, holiday colors, just metallics, and the full 15-color set.
Q: What kind of mugs do I need?
A: You need white ceramic that has been fired and glazed. So no unfinished or bisque mugs, which you aren’t likely to find anyway). Just your typical, cheap white ceramic mug. I find straight sides to be easier to work with, but curved sides can be lovely. Mugs that have raised designs on them (you’re more likely to find these at thrift stores) can be fun as long as you incorporate the mug’s pattern into your design. Be sure to wash them well before using them. First with dish soap, and then again with the rubbing alcohol.
Q: What kind of letter stickers should I get?
A: Flexible, flat letters work best. Avoid anything that is rigid or raised. You can use your Cricut to make vinyl stickers, too!
Q: Can I wash Sharpie mugs?
A: Yes! Baking them in the oven sets the marker paint. And if you have any concerns about their washability, use the coating spray I mentioned above to seal it after you bake it.
How to Make a DIY Sharpie Mug
Step 1: Prepare Your Mug
- Wash your mug well and dry it.
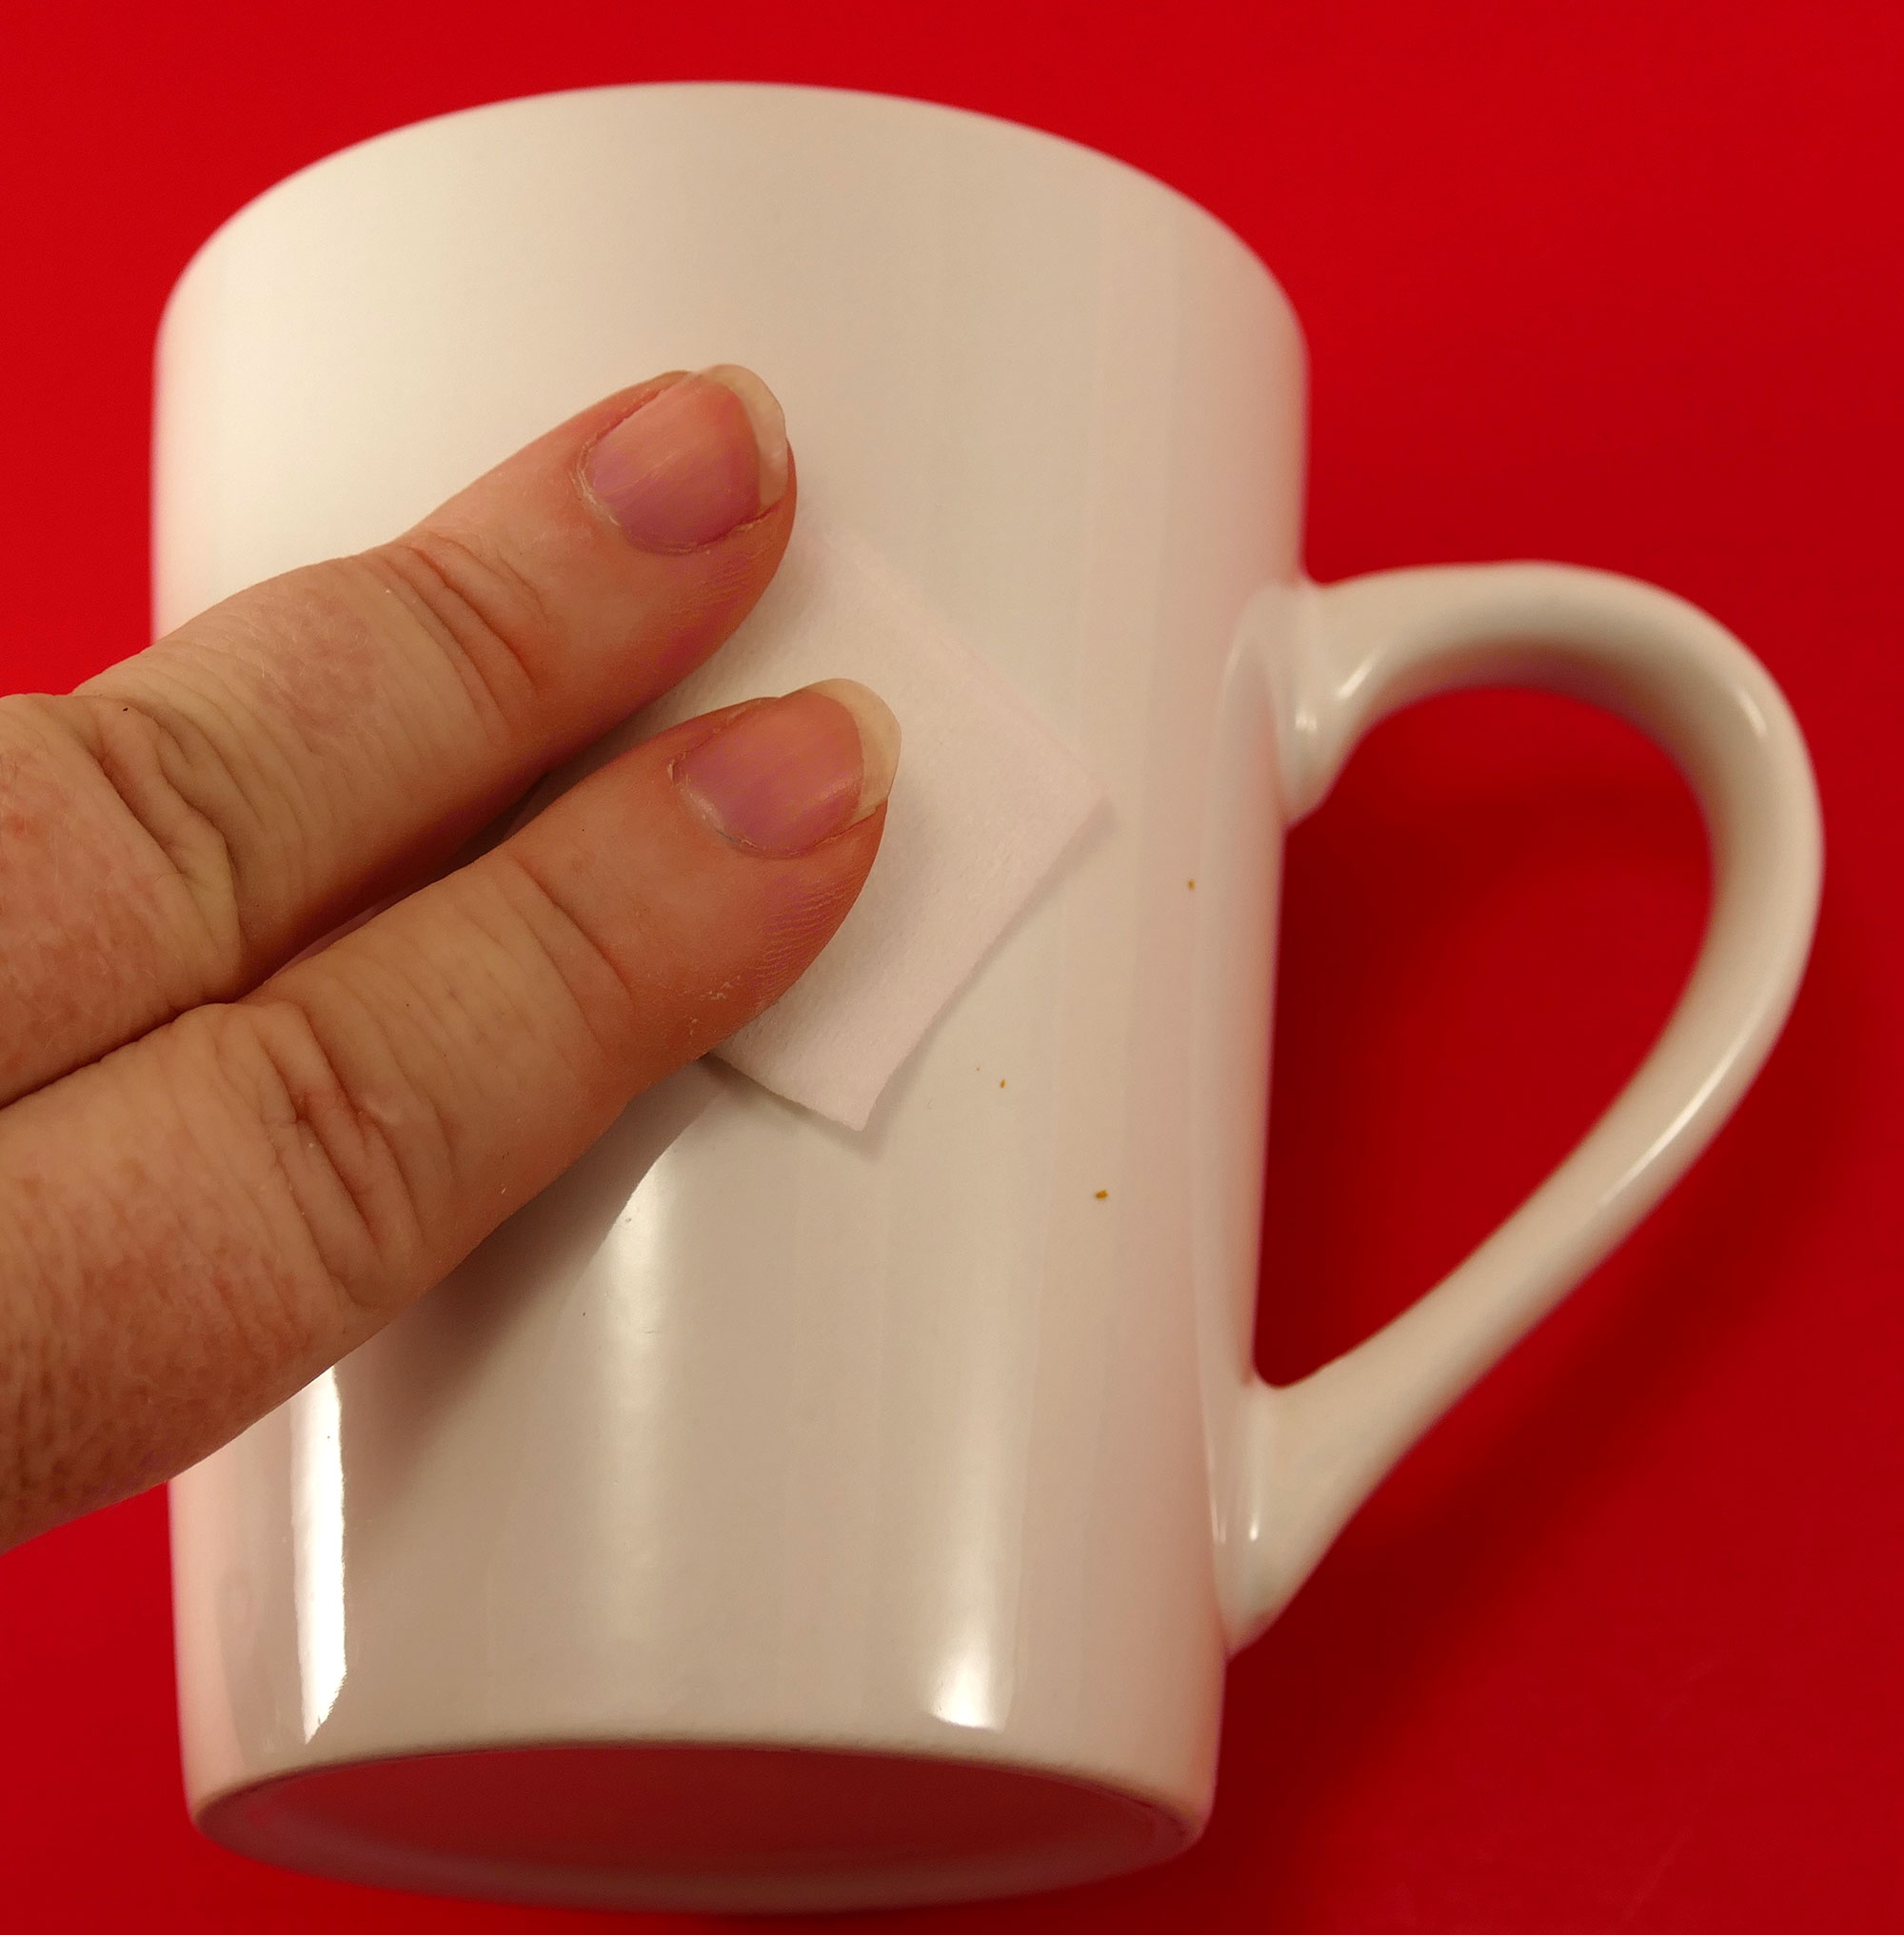
- Clean your mug again with rubbing alcohol and allow it to evaporate (this takes a few minutes). Avoid touching the surface you intend to put the paint Sharpies on with your fingers, as your oil can cause the paint to not adhere properly. I like to put my hand inside the mug while I decorate it.
Step 2: Design Your Sharpie Mug
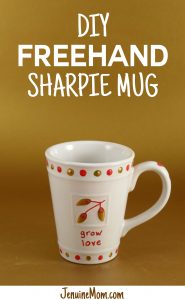
#1 Freehand Sharpie Mug Step-by-Step Tutorial
This is probably the simplest version:
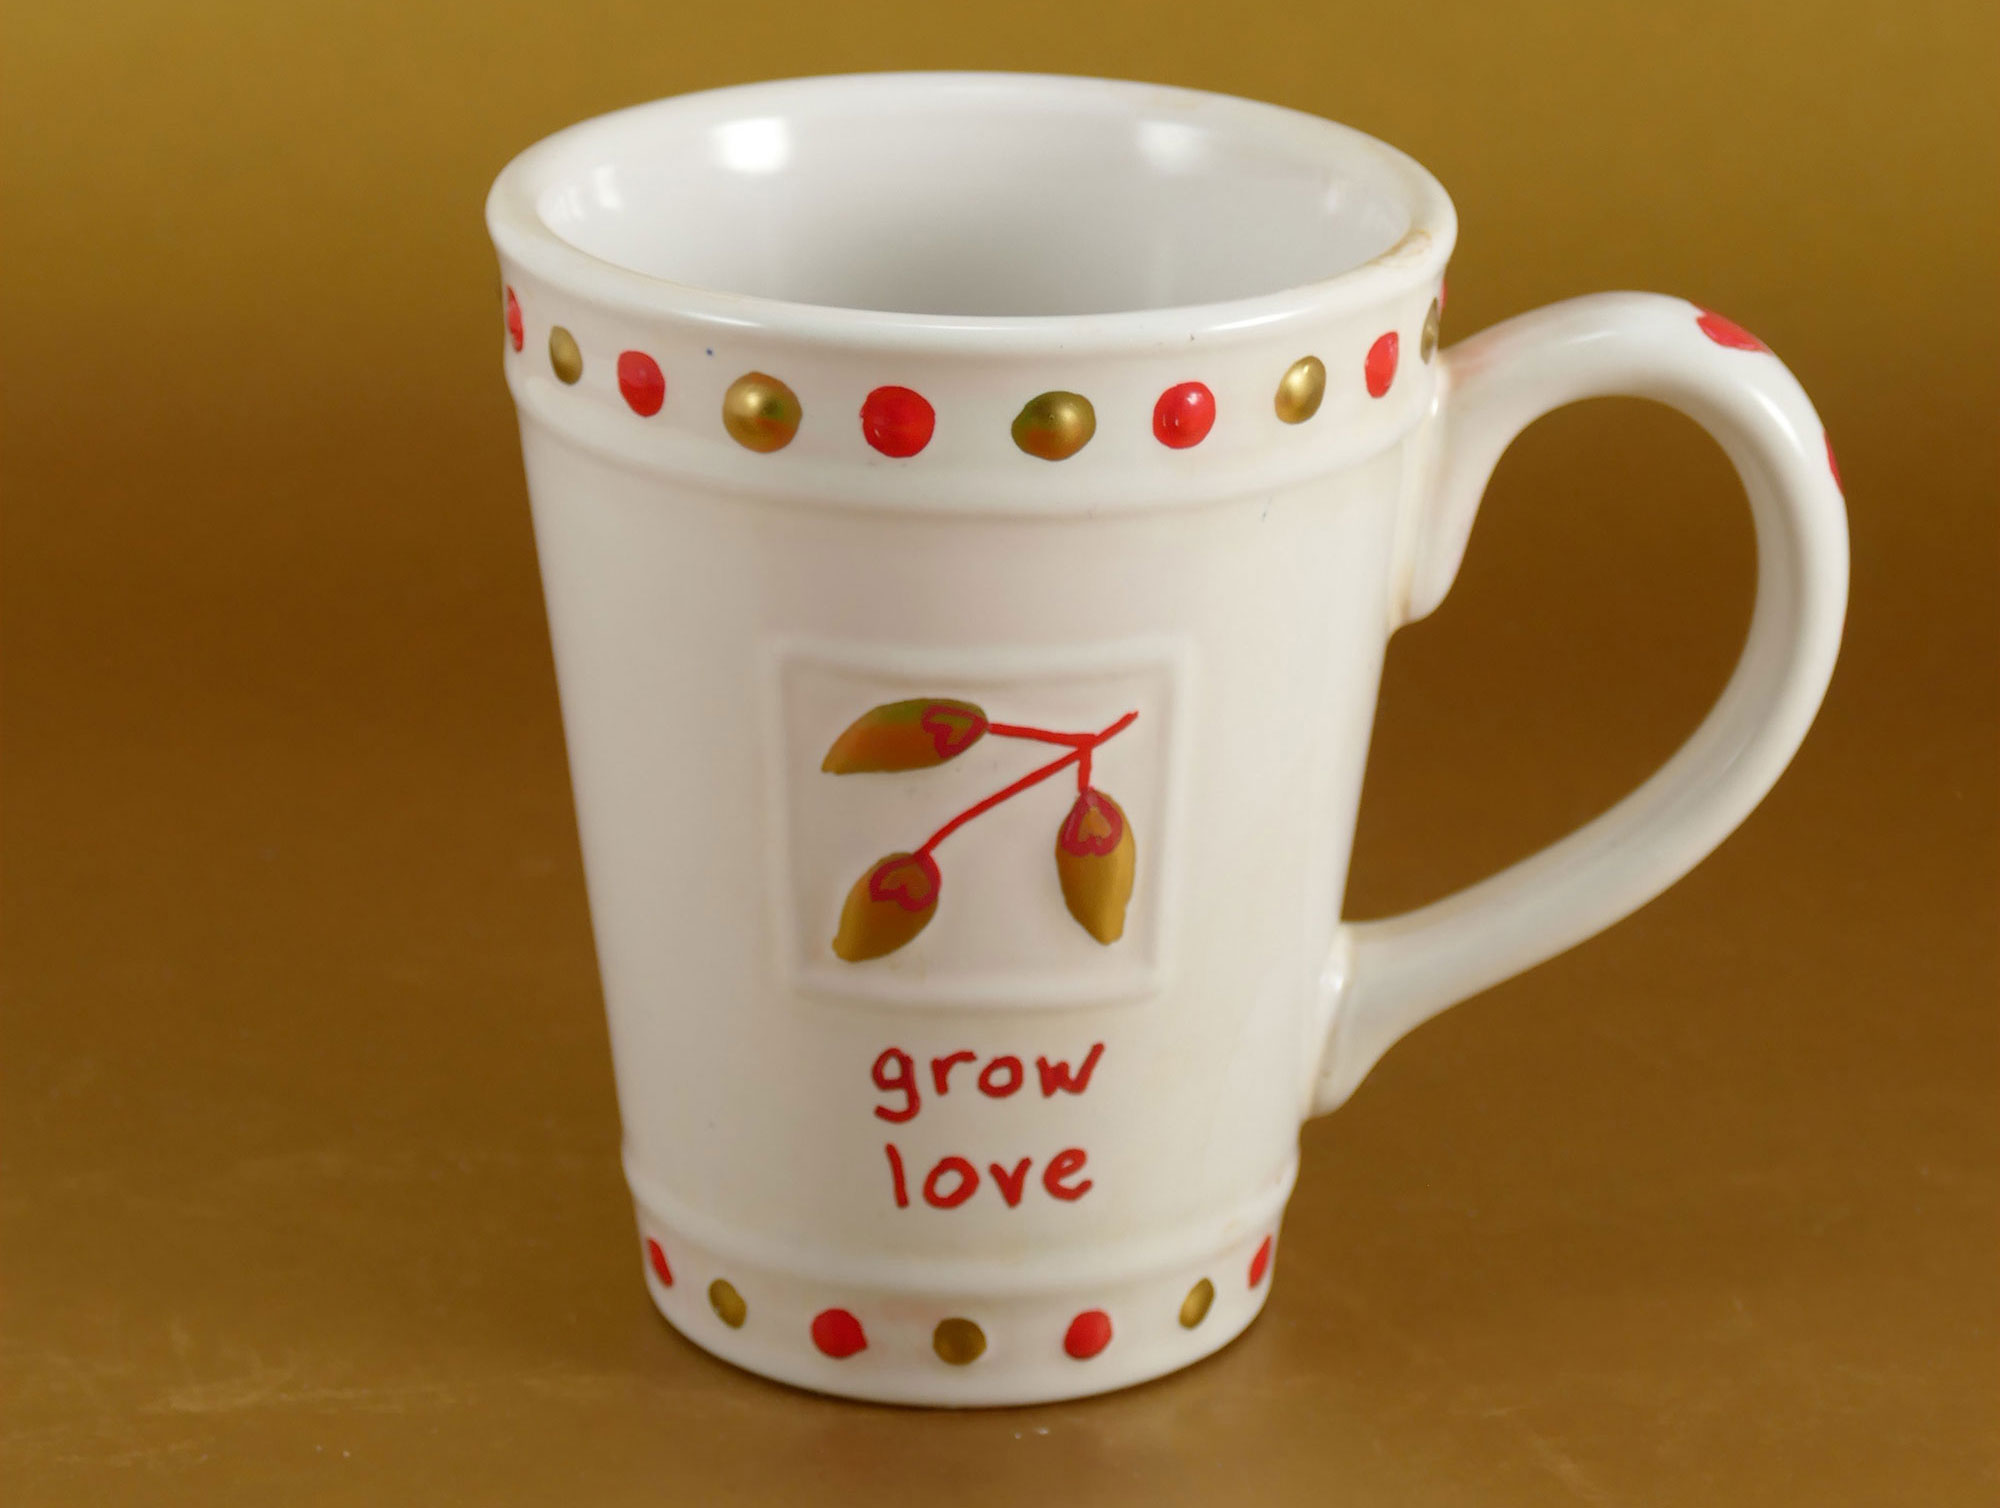
Step 1: Prepare your mug using the directions above.
Step 2: Start drawing on the mug with your Paint Sharpie. You could do something as simple as a name, a loved one’s nicknames or pet names (this is our favorite). You could also draw a cute picture. Whatever you think your recipient will enjoy!
Step 3: If you make a mistake, just wipe it off with rubbing alcohol.
Step 4: Dry and bake your mug following the directions further down the post.
Step 5: Spray your mug with the coating spray for extra washability.
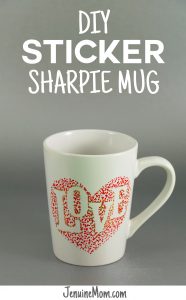
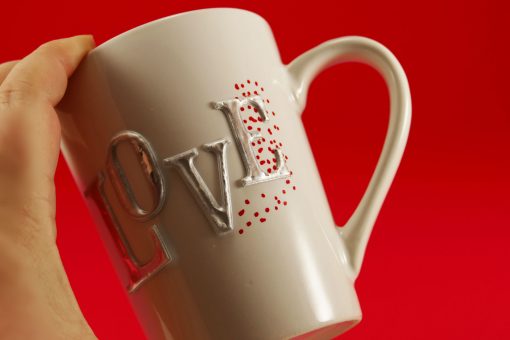
#2 Vinyl Letter Sharpie Mugs
The vinyl letter technique produces a stylish mug regardless of your artistic skills! It’s a great DIY craft for all ages. Here’s how you do it:
Step 1: Prepare your mug using the directions above.
Step 2: Stick the letter(s) you want on your mug. Be sure to leave space in between letters if you use more than one sticker. (Note: You can see that I didn’t use flat, flexible letters, as I recommend earlier. This is why I caution you against using rigid, thick letters. They didn’t stick well and it was harder to work with. It did work though.)
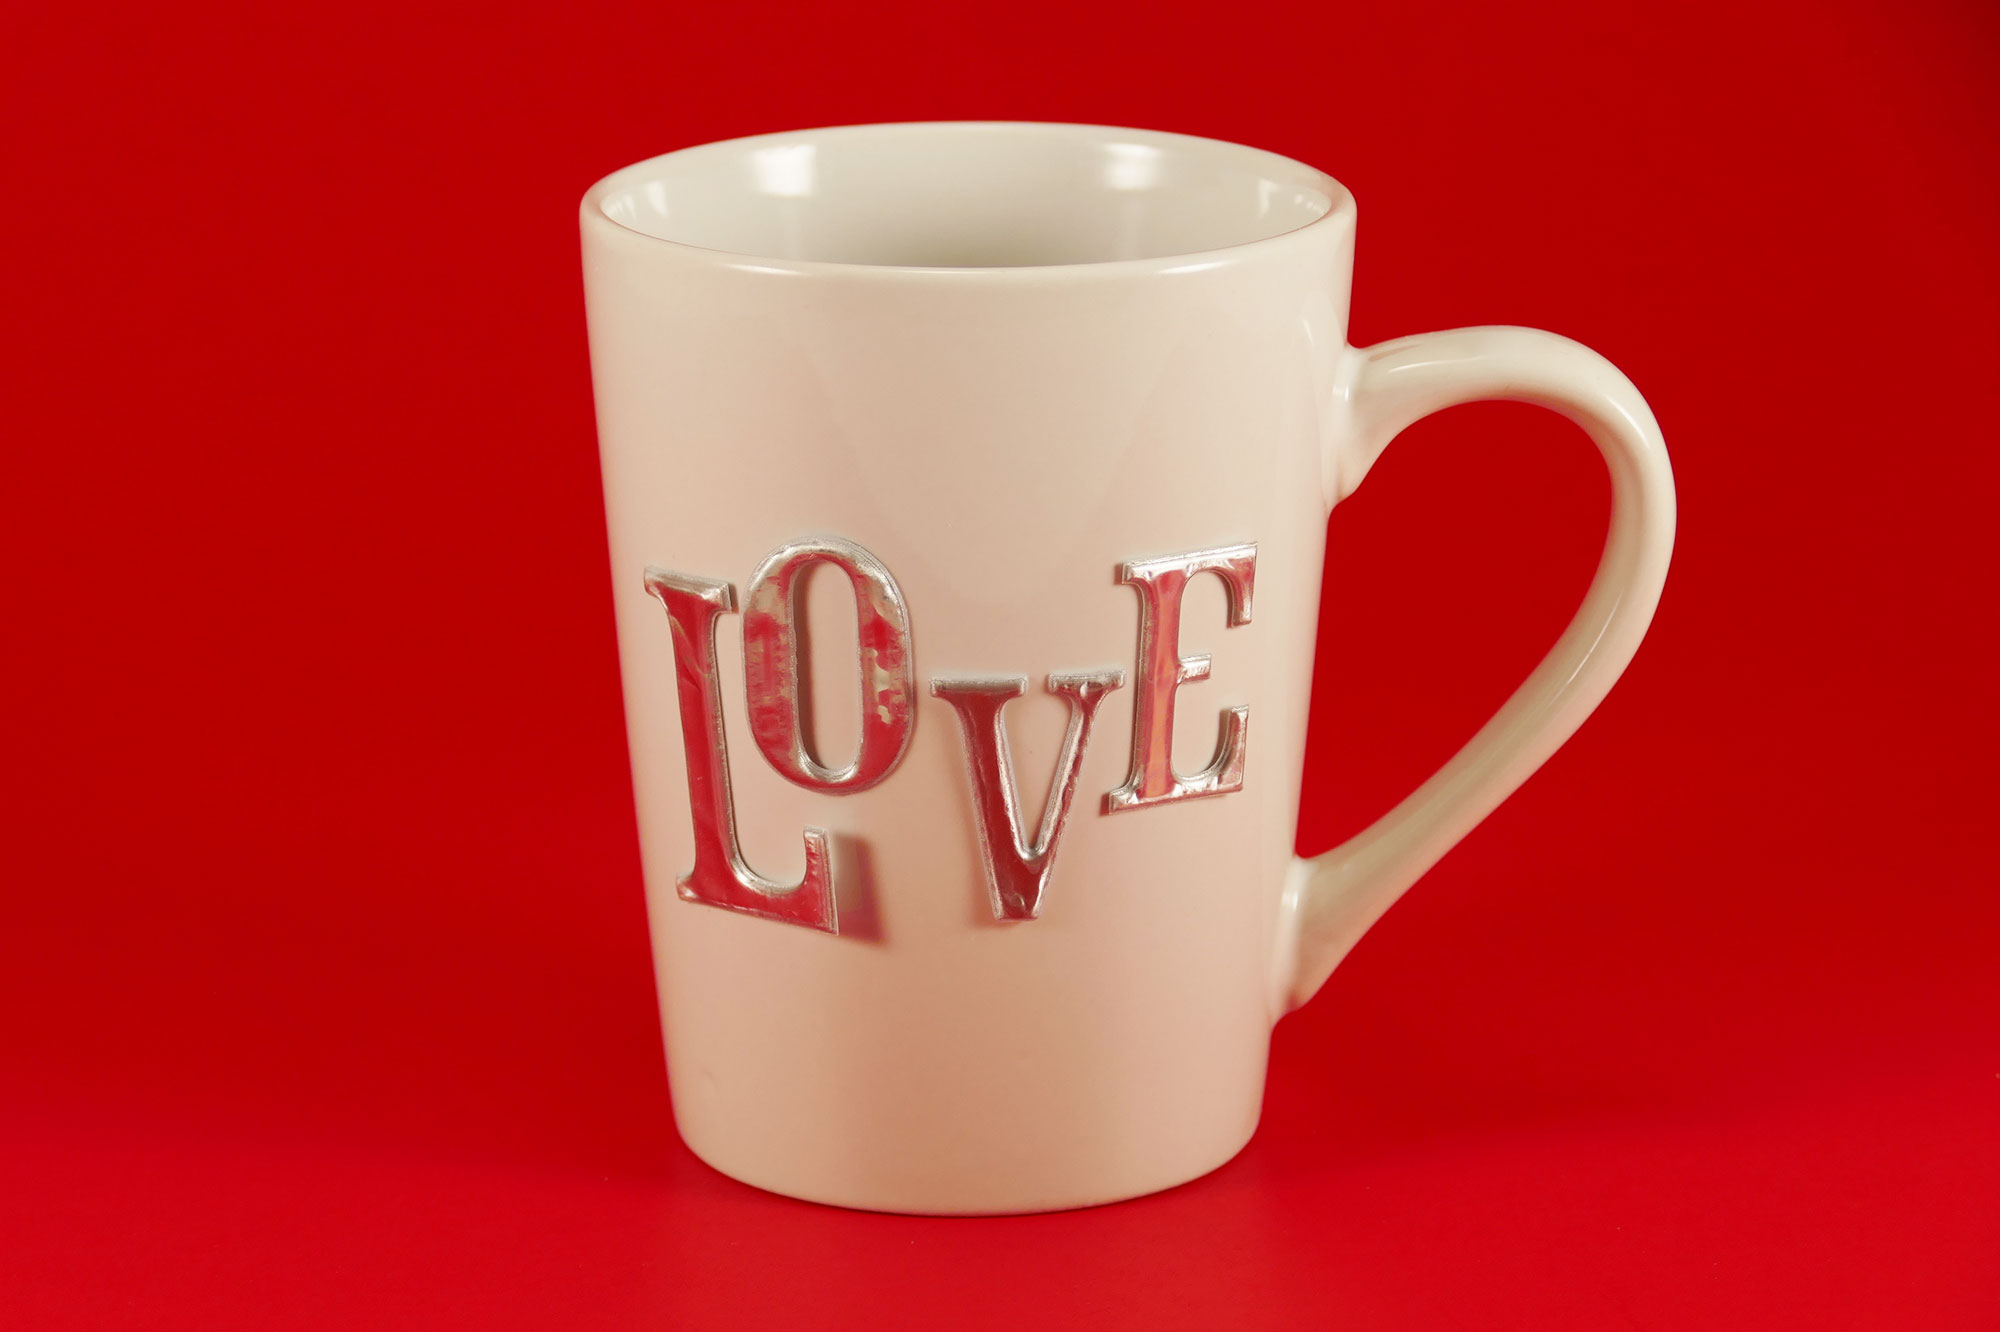
Step 3: Using your Paint Sharpie, dot around the letter in a halo. Be sure to get right up against the edge of the sticker. Do it again with another color paint Sharpie for an even better effect!

Step 4: Remove the sticker(s) to see your design.
Dry and bake your mug following the directions further down the post.
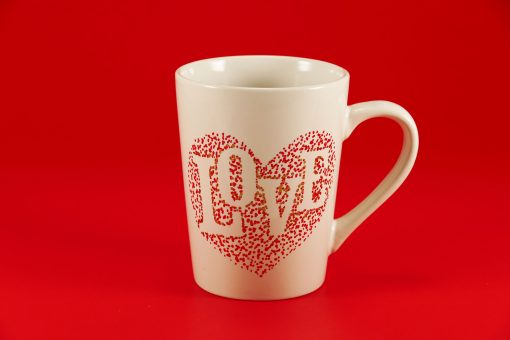
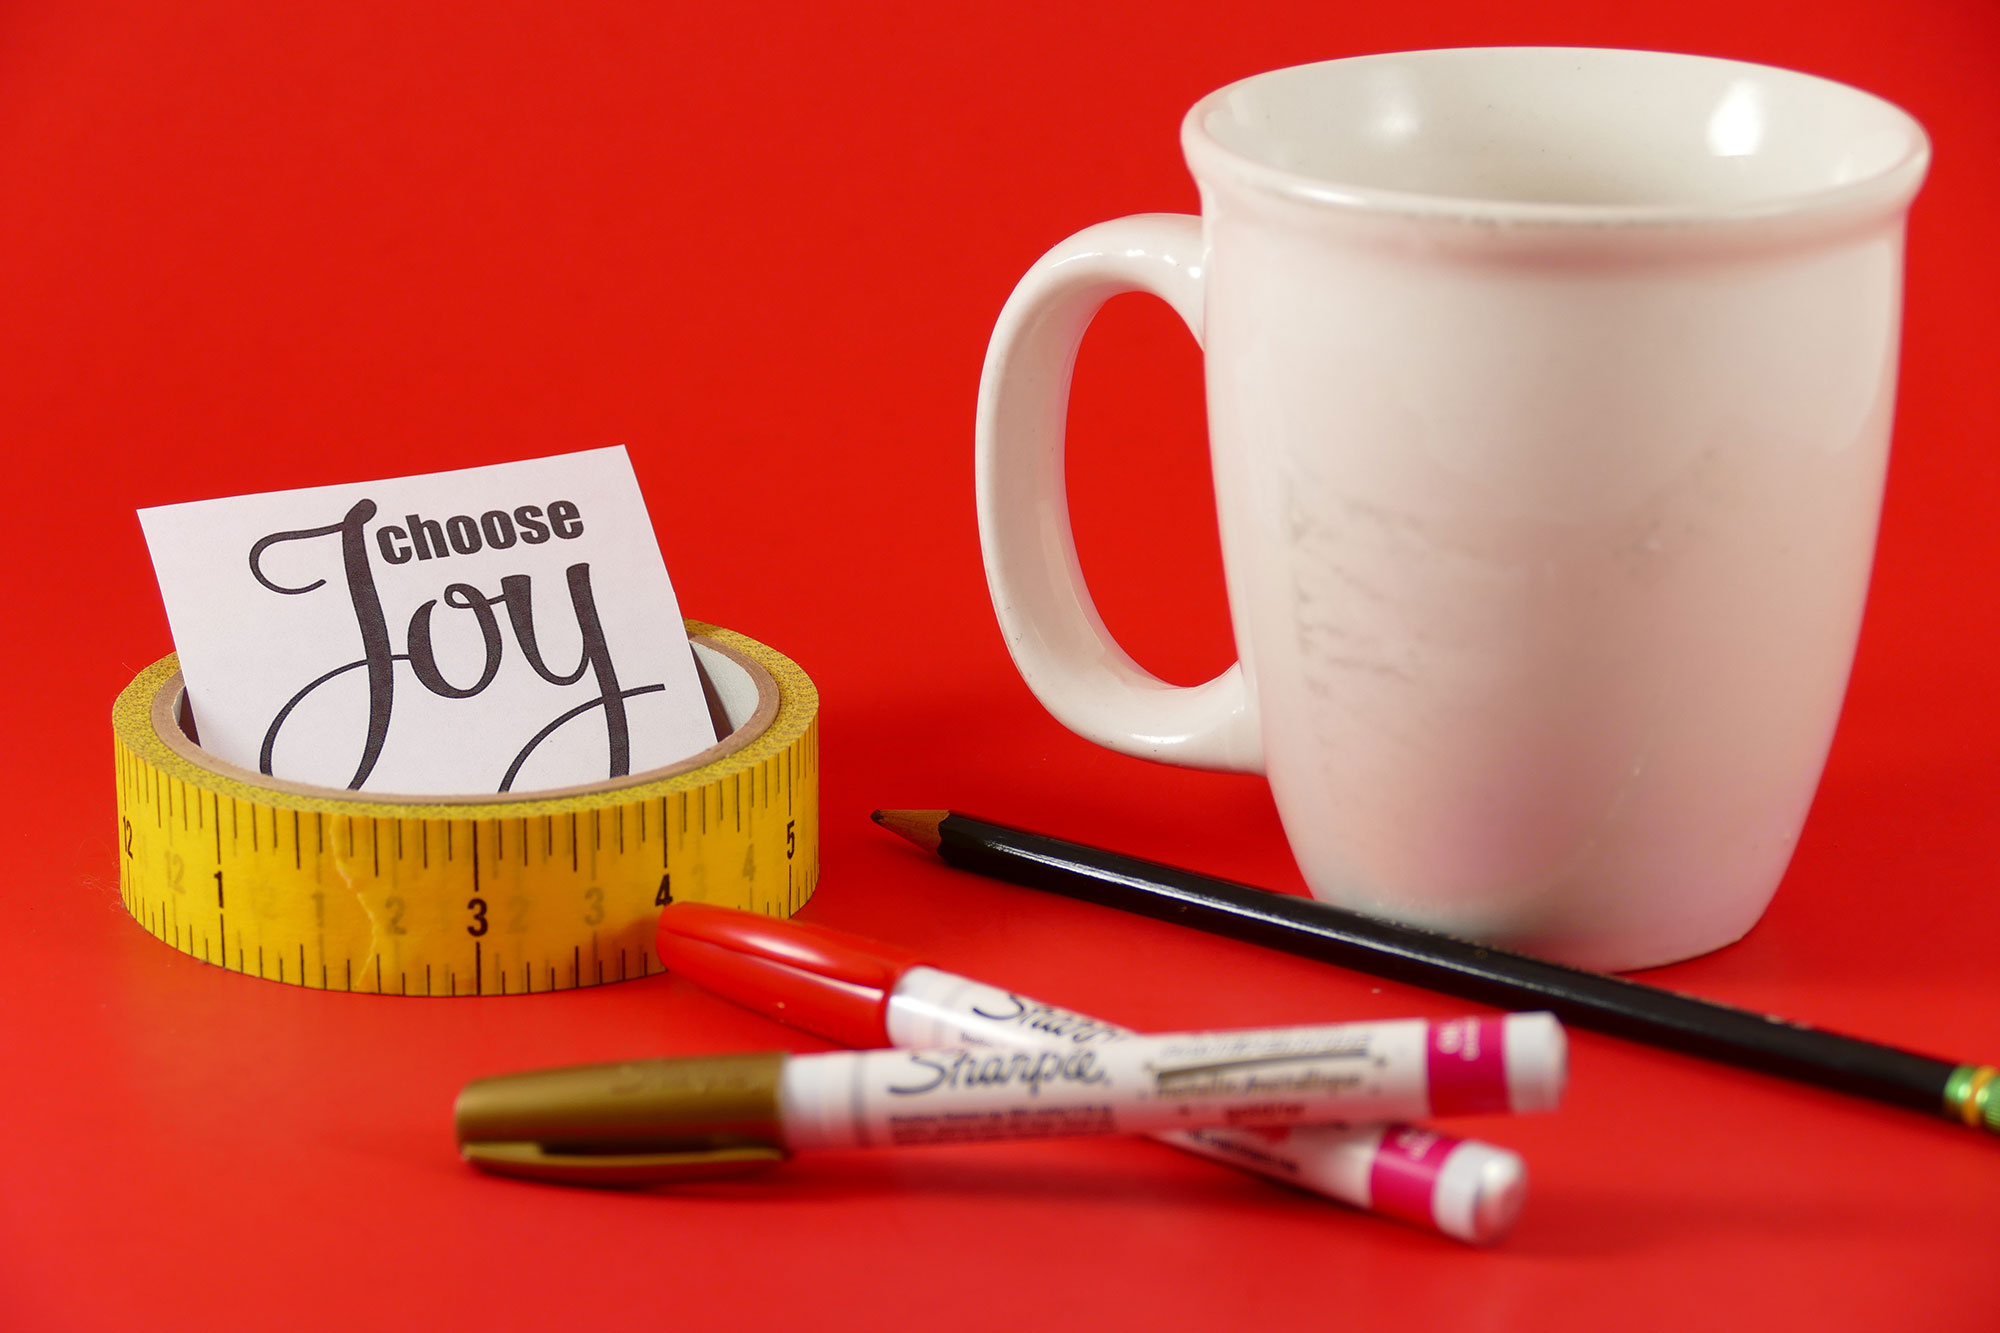
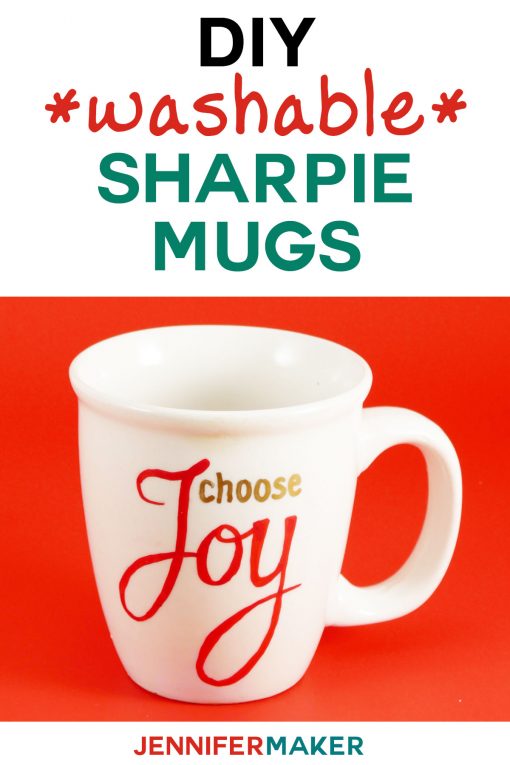
#3 Pencil Transfer Sharpie Mugs
When you have a design you want to transfer to a mug without errors, this is the way to go! I used this method for my Cupcake ATM and Choose Joy mugs.
Step 1: Prepare your mug using the directions above.
Step 2: Print out your design.
Step 3: Shade the back of your design with a pencil (see The Pencil Transfer Method for the exact steps on how to do this)
Step 4: Tape your design to your mug and trace it with a firm hand.
Step 5: Take off the taped design and go over all pencil with your Paint Sharpie.
Step 6: Dry and bake your mug following the directions further down the post.
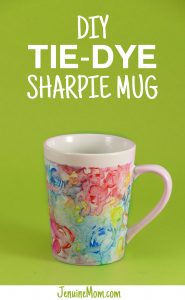
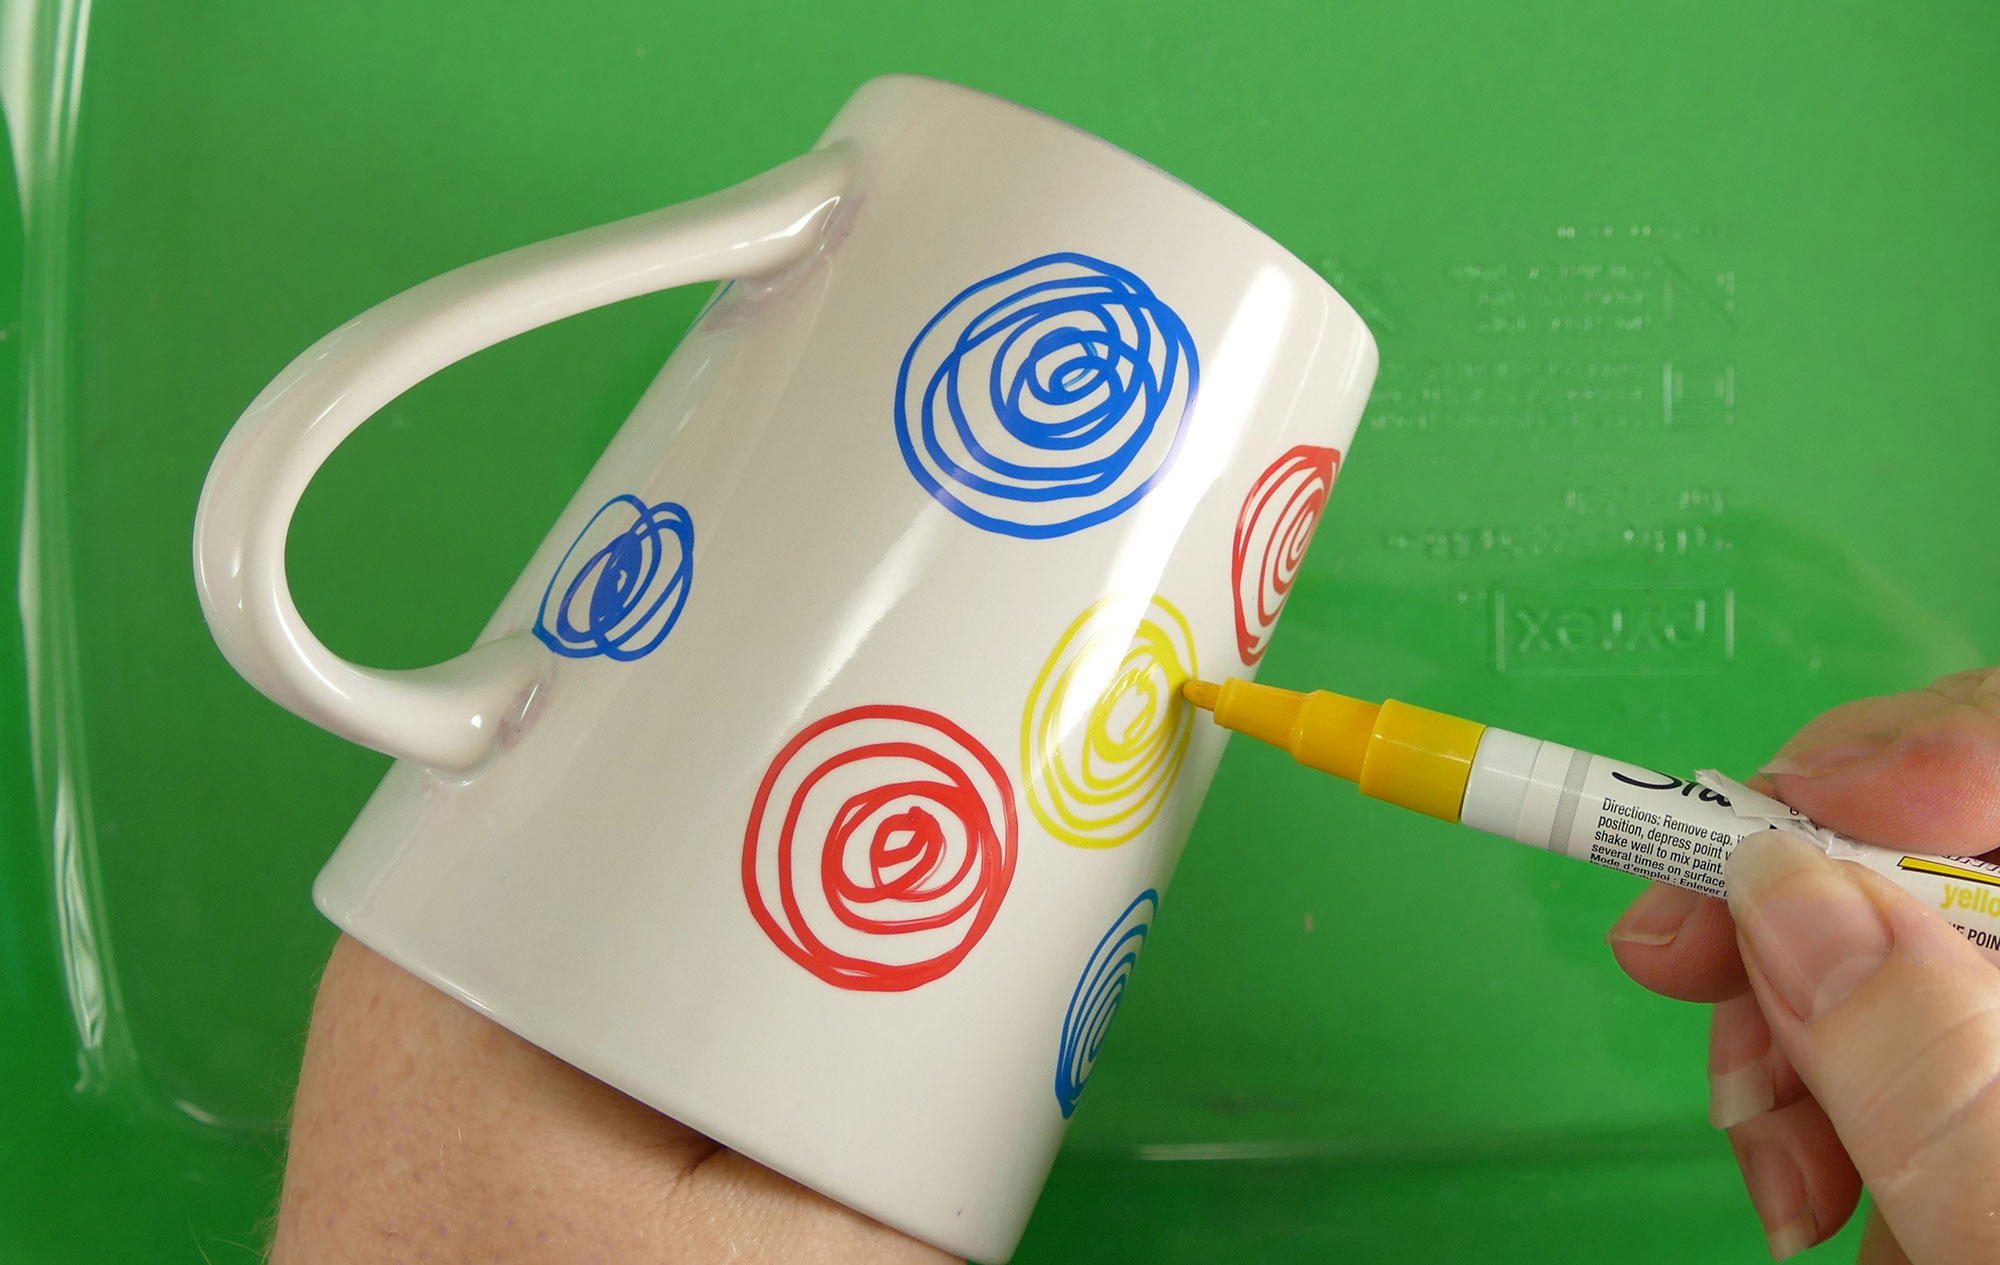
#4 Tie Dye Sharpie Mugs
A fun, new way I developed to make a unique, colorful mug! For this marker mug, be sure to have a trash bag protecting your work surface as it’s a bit messy.
Step 1: Prepare your mug using the directions above.
Step 2: Using a variety of different color Paint Sharpies, scribble circles of color all over the sides of the mug. (Tip: I would avoid the metallics for tie-dye mugs — they end up just looking muddy after they run.)
Step 3: Once your mug is colored, slowly drip one drop of rubbing alcohol on each circle of color. Keep rotating the mug around, up, and down as the rubbing alcohol makes the colors run. If a patch of color seems untouched, add more rubbing alcohol to that area and continue rotating the mug to distribute it. If you end up with a bare spot, wait until the rubbing alcohol has evaporated, add another circle of color, and do another drop of rubbing alcohol. Repeat until you like the way it looks.
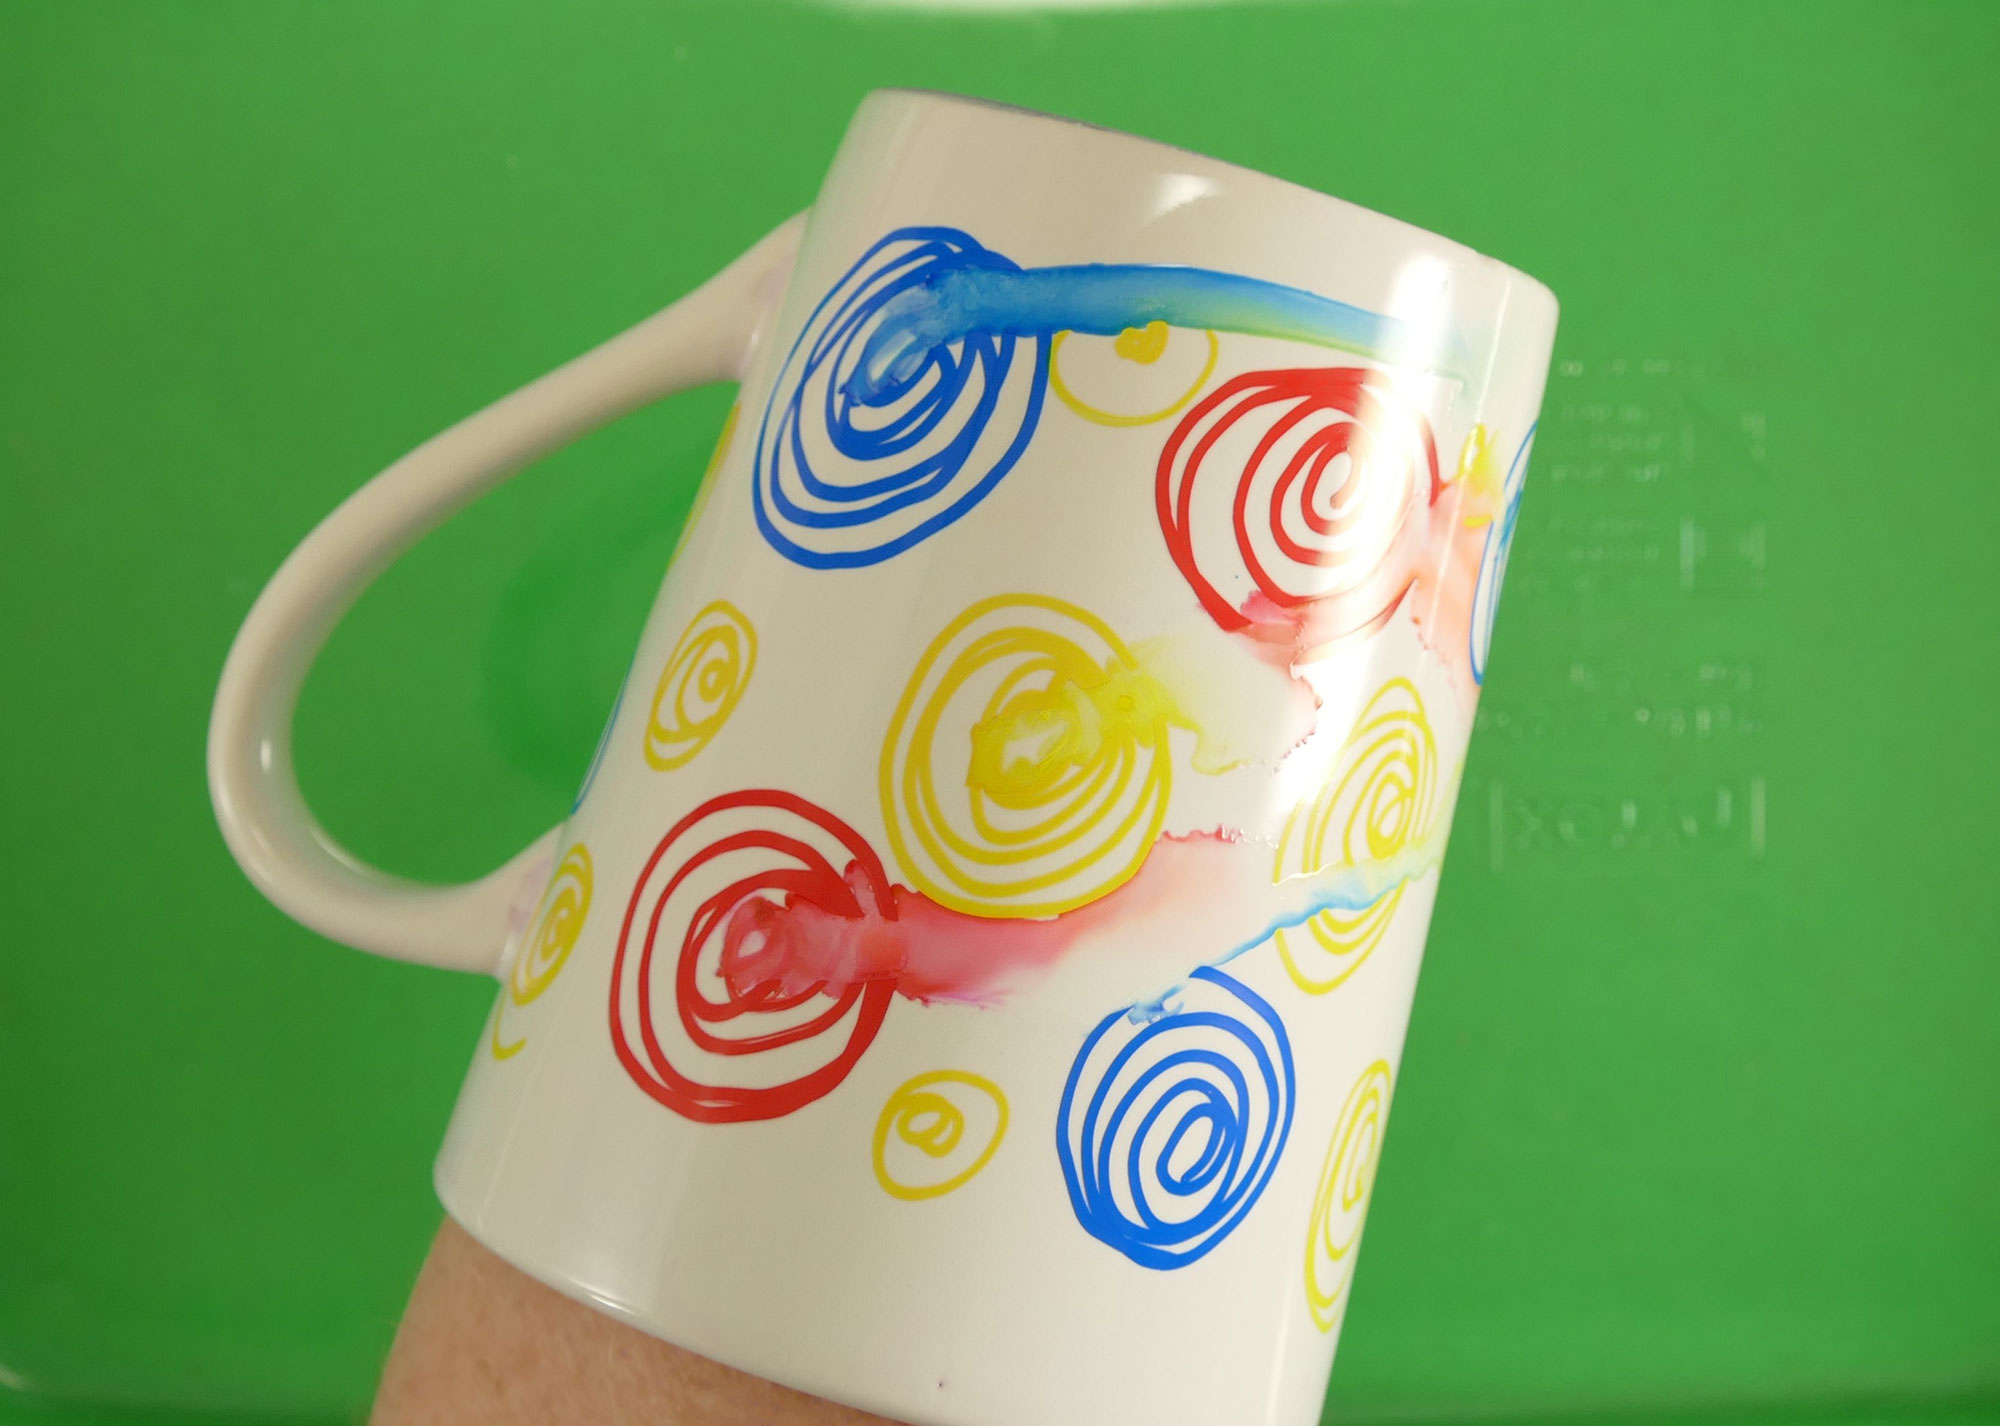

Step 4: Once the rubbing alcohol is no longer making the paint run, use a little rubbing alcohol on a paper towel or Q-tip to clean any places you don’t want color, such as the rim or handle. You can also clean an area to draw in a heart or write a name if you wish.
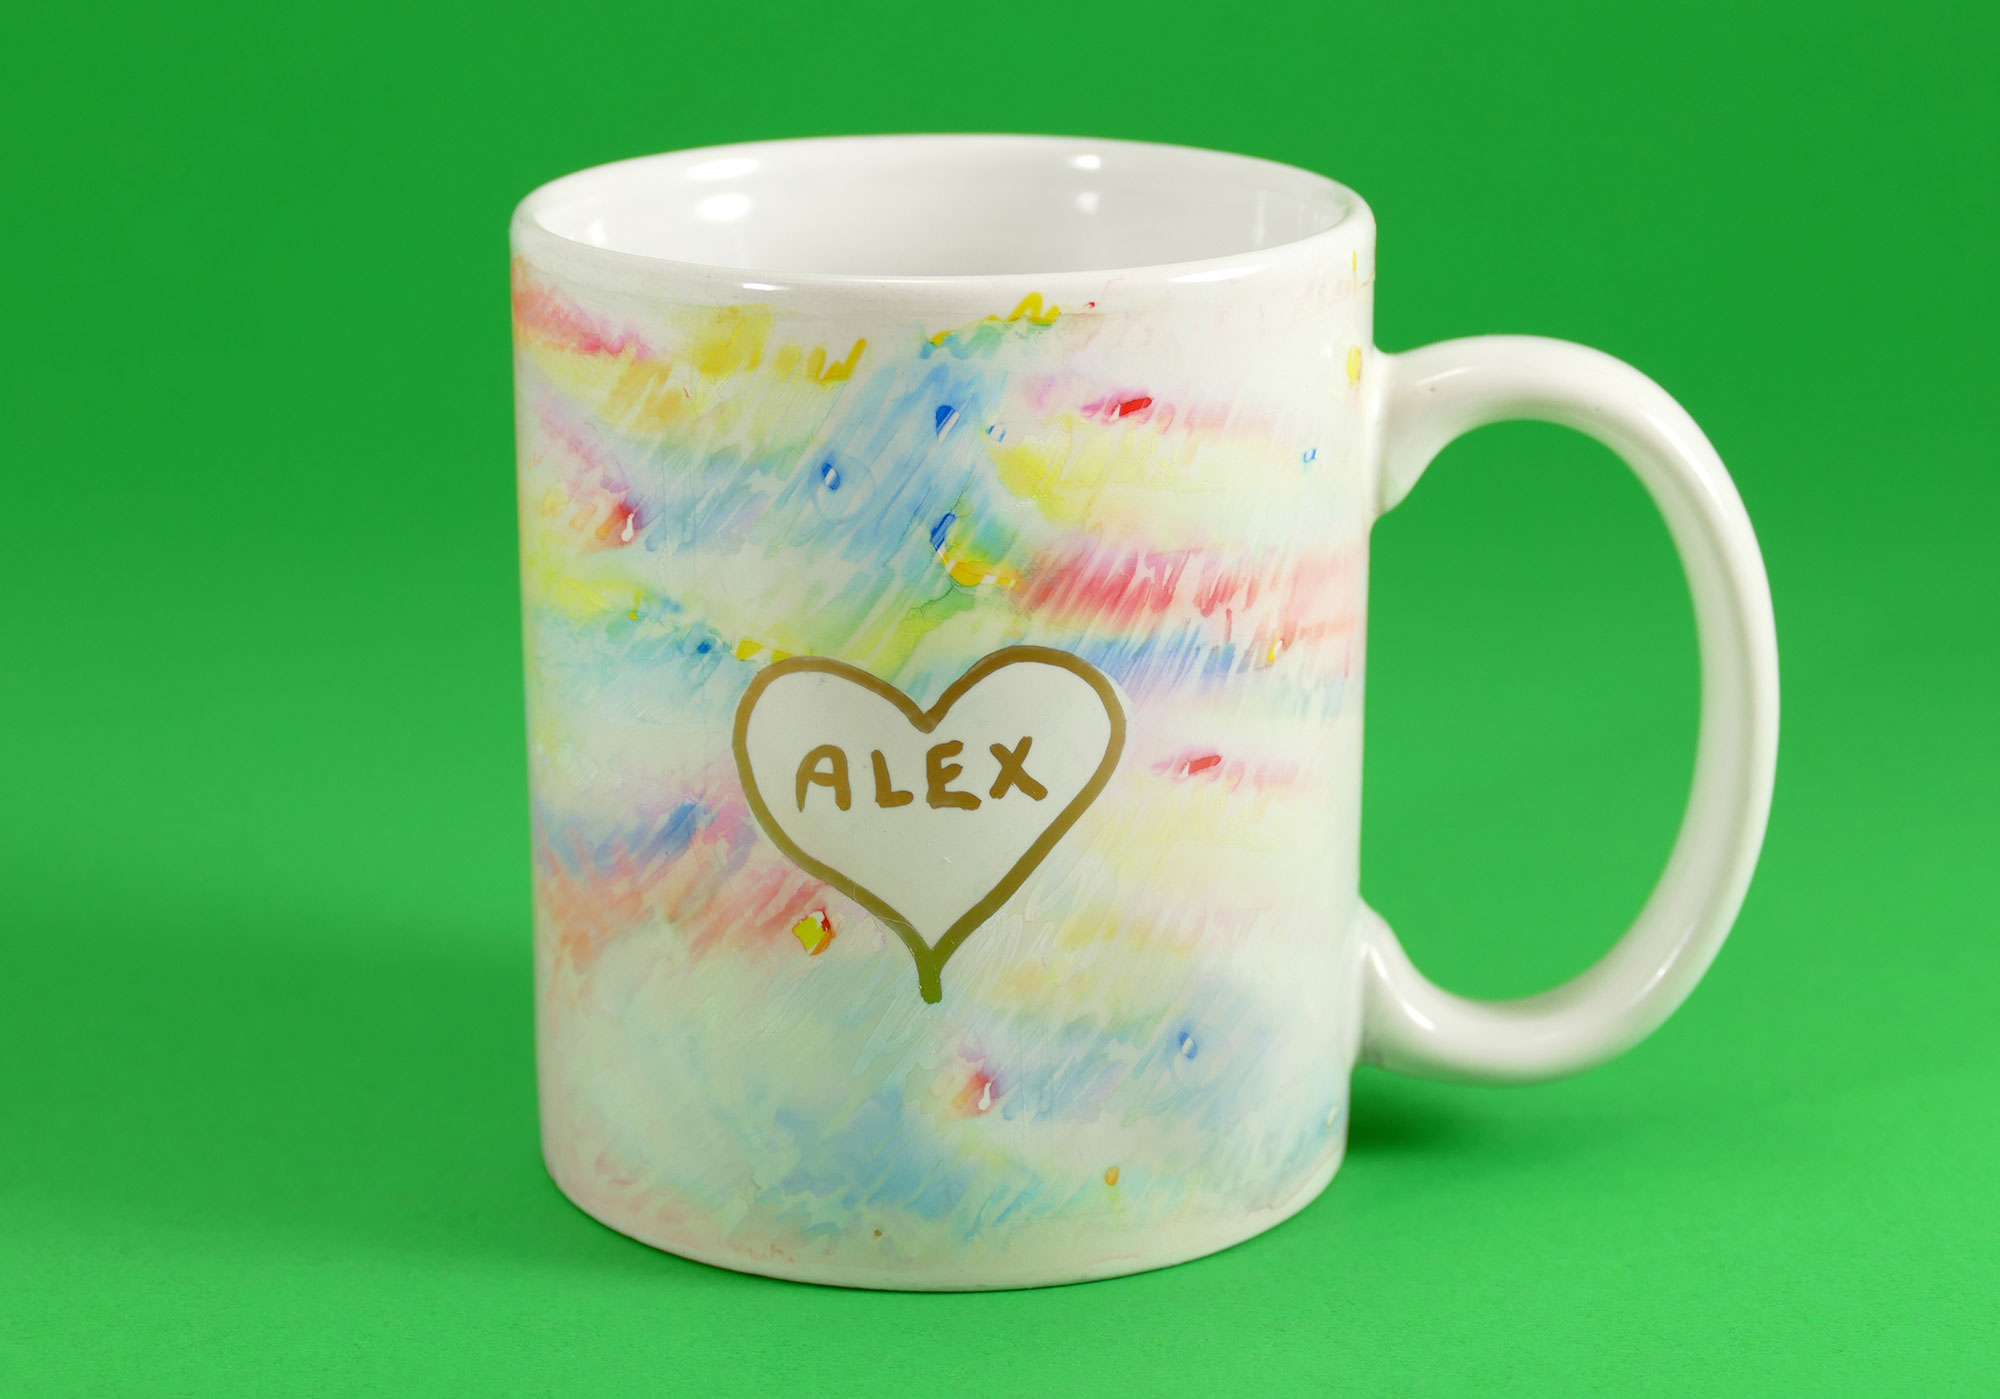
Dry and bake your mug following the directions further down the post EXCEPT, in the case of the tie-dye mug, you should bake it at a lower temperature (350 F) for one hour. After it has cooled, spray it with a clear coat, such as Krylon Crystal Clear Acrylic Coating Aerosol Spray. The tie-dye mug needs to be treated a bit differently because the ink is diluted and thus easier to fade.
Step 3: Bake your DIY Mug
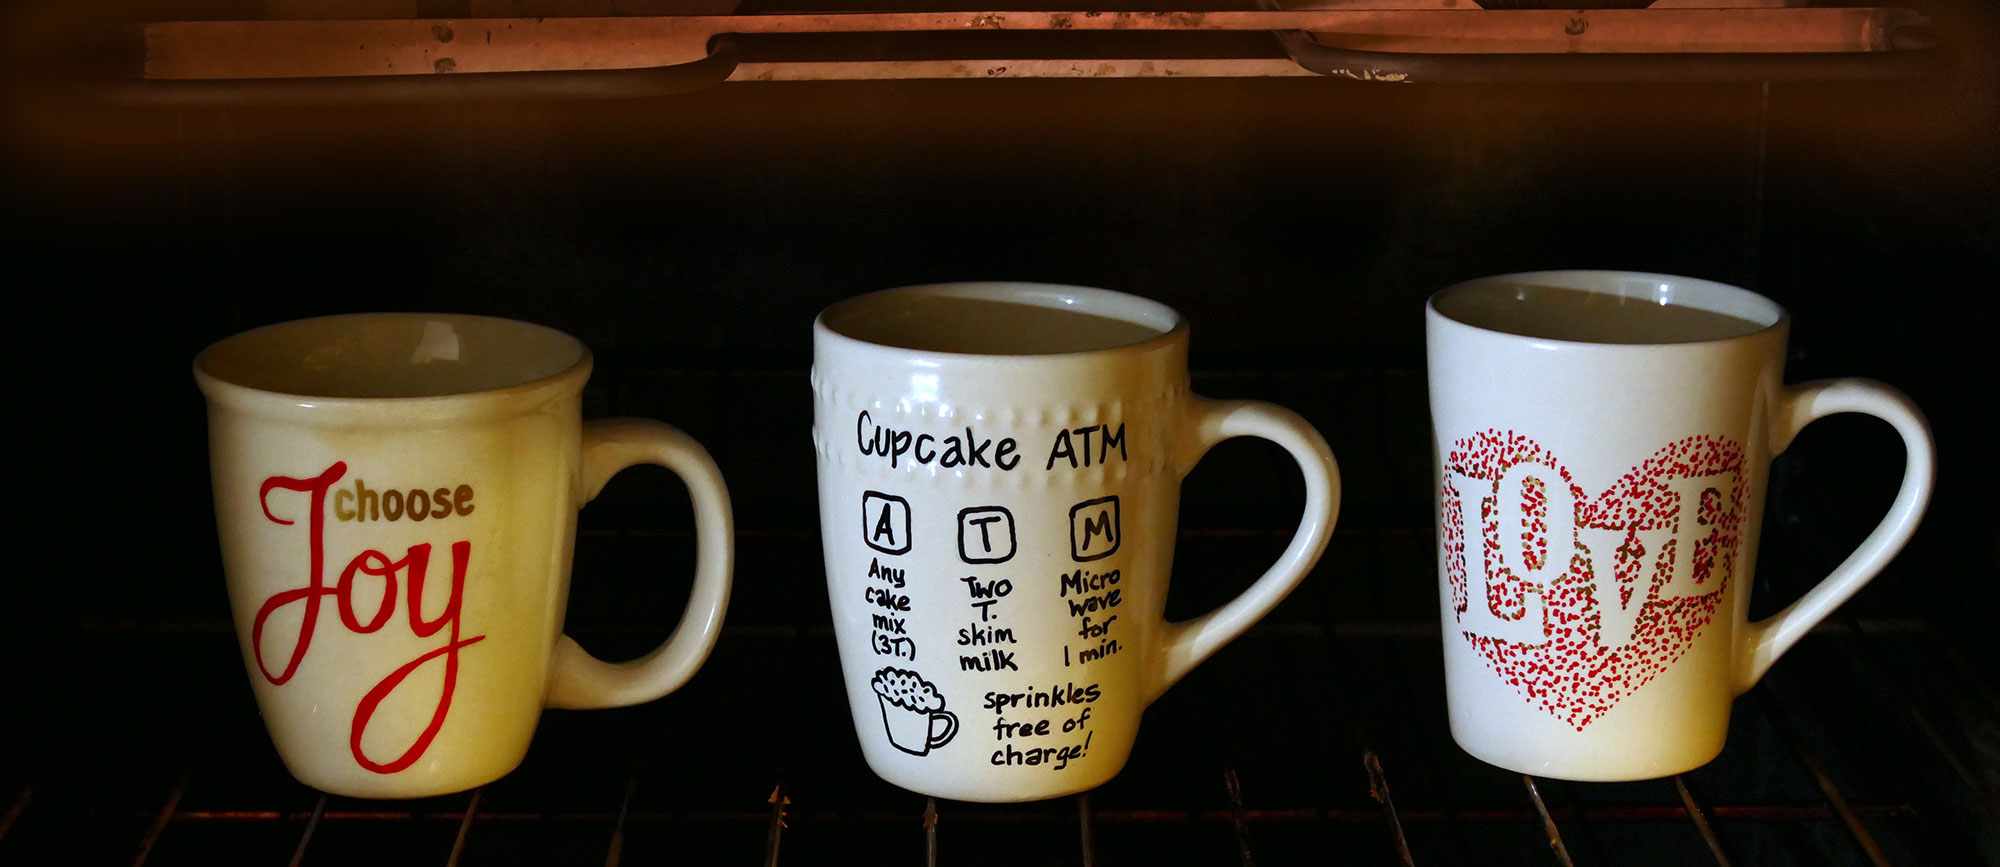
- Allow your marker mug to dry at least 24 hours for the best results.
- Put your mug in a cold oven, then turn up the temperature to 450°F, and bake for 30 minutes (350°F for 60 minutes for tie-dye mugs)
- After baking, turn off the temperature and leave the mugs in the oven for 15 more minutes. Then crack open the oven door (for ventilation) and keep the mugs in the oven overnight.
Tips for Making Awesome Mugs
- Allowing the mug to dry 24 hours before baking it in the oven really helps reduce fading.
- Don’t forget the baking step. If you do not, your beautiful design will come off with when you wash it.
- Once baked, the mugs are safe to wash. Some people say it’s fine to put them in a dishwasher, but it really depends on the mug and the dishwasher, and if it fails, it’s too late. Use the acrylic coating spray on your mugs to make them dishwasher safe. If you’re still worried just handwash them to be safe. I always prefer to wash the tie-dye mug by hand.
- Be sure you allow the mug to heat up and cool down WITH the oven by putting it in a cold oven and allowing it to stay in the oven after you turn off the heat. This will avoid heating or cooling too fast, which could cause breakage in an inexpensive mug.
- My fellow bloggers believe that cheap mugs work best because of the inexpensive glaze they use. Something to keep in mind! (I got this tip from 21 Tips for DIY Sharpie Marker Mugs.)
- Avoid having Sharpie paint at the rim where lips might touch it, just to be on the safe side.
- Colors will dull a bit after you bake them. This is normal. For example, pink will fade a bit to a more orangey color. Check out The Ultimate Guide to Sharpie Mugs to see how the color fades when baked at 450°F.
I really think these mugs make fantastic gifts! Everyone drinks. And if their house is anything like my house, one never has enough mugs and cups to drink from!
Please let me know if you have any questions about making mugs!
Love,

P.S. Check out my other fun DIY gift tutorials to help you make wonderful homemade and inexpensive gifts!


Want to remember this? Save this DIY Sharpie Mug tutorial to your favorite Pinterest Board


This is an awesome idea for a cute budget friendly gift!
Thank you, Lauren! It is very budget friendly!
Thank you for sharing! Can I just use my toaster oven so I don’t have to heat up my entire oven?
I don’t know if a toaster oven will get hot enough, to be honest.
Hi Jennifer I was drawn to your site by photograph which may have been an inspiration to the apple blossom tree. Wow what a wealth of other similar crafting information you have uploaded. Thank you for all that work. It makes me think that my crafting is in fairly clear lines, maybe fences there is a whole lot more areas that I might try.
I love this idea. Would be great for all ages. Sounds like perfect family night activity.
This would be so fun to do with my daughter!! She loves crafts and this would be a nice gift for grandparents too!
these are so so clever! I especially love the ‘LOVE’ one!
-Stefanie
http://www.thestylesafari.com
I absolutely love the swirls and the alcohol one!! Great idea!!
Looking for some party inspiration? Check out my blog http://www.shaylaclay.com/blog
Super cute craft!
What a fun idea! This would be great for Christmas!
Love this idea and your designs! So pretty and makes the perfect gift!
Thank you so much, JeeYoung!
These are such fun ideas! What a great gift!
Oh my gosh! These are the cutest! What a perfect fun gift idea!
Thank you, Alexis!
These are so cool! I love them for personalized gift giving!
Can you put more than one mug in the oven at a time? I need to make 14 of them….
Thank you!
Yes! I baked all of mine at the same time. Have fun!
I normally do a annual Christmas party and last year I did these for my guests. The sticker ones came out the best. I like to look to see how other people did them. All your mugs look great!
That’s great! I think the sticker ones look fantastic and are easy to do!
I would like to do a mug of a picture of my friend and myself , how do I do that ? Thanks so much
You can use Waterslide Transfer Paper to print your image and transfer it to a mug. You’ll also need some Krylon Crystal Clear Sealer. Here’s a video that shows you how to do it: https://www.youtube.com/watch?v=1KpnpaIKkgY
I wonder….. couldn’t this technique be used to make trivets with ceramic tiles? Love the idea!
Totally! You can make personalize trivets with paint Sharpies, too. I’ve also seen shoes!
Oh how much fun is this thank you but then I came across the beeswax and now I’m going to do that as I have beeswax right here thank you
Love your tutorials
Thank you for visiting, Jeanne! And thank you for the kind words. 🙂
I lovethe ideas for the mugs be sure I will be playing with them.
Great to hear, Pat!
Thank you Jennifer, I Love your ideas. I will make some of this mugs, they look super fun and easy to do.
Thank you, Ileana! 🙂
Very fun ideas! I’ve only made a coffee cup once and it was a great way to make/give a unique gift idea. Visiting from Inspiration Galore party.
Thank you, Victoria!
These are wonderful! I can tell you right now these will be on my list of things to do with my grandchildren. Especially my granddaughter loves to design her own projects. Thank you for sharing!
Hooray! Happy to hear that, Teresa!
What a fun and memorable project (and I can use it everyday)! Yeah….Pinned!
Very cute idea – pinned and shared
I’ve seen similar mugs like this, but never ones as cute as these! Thanks for sharing with SYC.
hugs,
Jann
I am so pleased I found you, because I’ve been wanting to do this for my own home. Thanks for all your wonderful ideas and tips. I plan to give it a try this week.
Happy to hear this, Ivory!
This will be great to do for the kids thank you so much fab Idea for gifts.
My pleasure!
Love the idea of decorating mugs with sharpie. Thanks for the tutorial. Can we use these sharpie designed mugs in microwave for heating milk or making mug cakes? Thank you!
Wow!! These ideas are amazing.Thankyou for sharing.I’m determined to share that design with the love shaped heart.Simple but soo effective.
Hi Jennifer. If you haven’t tried this already, Alcohol Inks would be another way to decorate the mug.
Love them all my favorite has to be the Tie Dye mug! Thank you for sharing!?☕
Jennifer, I absolutely LOVE these mugs! They would make a fun project for any group of ladies/girls, don’t you think? Wedding attendants party. Girl scout troup. Birthday party craft. Whatever!
Sinea
Can these mugs be used in the microwave? Not made using the microwave but used in the microwave to heat up drinks or make mug brownies, etc.
Yes, that should be fine. 🙂
OMG! thank you!!! loving the mugs!
Awesome! Thank you for sharing. I am going to make this a fun project to do with my granddaughter.
Hello! I was very excited to do these but when I baked them most of the colors changed..blue turned gold and red turned purple. I saw the color chart and that didn’t happen to them so I’m unsure why it happened to me. Also, some of the black faded in some parts after baking as well.
Oh, I’m so sorry to hear you had that experience, Emma! I haven’t experienced that myself; however, you can also ask in my private Facebook group to see if any of the group members have experienced the same issue.
Thanks for sharing such great and useful information here with us. You have done a great job and keep it up with your good work.