
Cricut Design Space automatically resizes all uploaded SVG files that are over 12″ down to a maximum of 12, which can create problems if your project is larger. Learn how to resize SVG files in Cricut Design Space so they cut at the correct size!
Have you ever uploaded an SVG to Cricut Design Space, cut it out, and realized it was too small? If so, you’re not alone. A Cricut Design Space update in fall 2024 quietly released a new feature — namely, when you upload ANY SVG file that measures over 12″ (either wide or high), Cricut Design Space will now automatically resize SVG files to 12″ on its longest side.
Unfortunately, all this Cricut Design Space update has done is cause a whole bunch of designers’ projects to now import too small, including many JenniferMaker projects. The good news is we’re going through my projects one-by-one and updating them so there is a “stacked SVG” that allows import without resizing. But what about all those projects I haven’t fixed yet? Or the projects from other designers that won’t ever be fixed? That’s where THIS tutorial comes in to help you learn how to resize SVG files in Cricut Design Space!

First, if you’re unfamiliar with how to upload an SVG file to Cricut Design Space, check out my SVGs Made Simple video series that shows you exactly how to do it on a desktop, laptop, iPhone, or iPad. You may also find this tutorial helpful: How to Upload SVG Files to Cricut Design Space App on iPhone/iPad
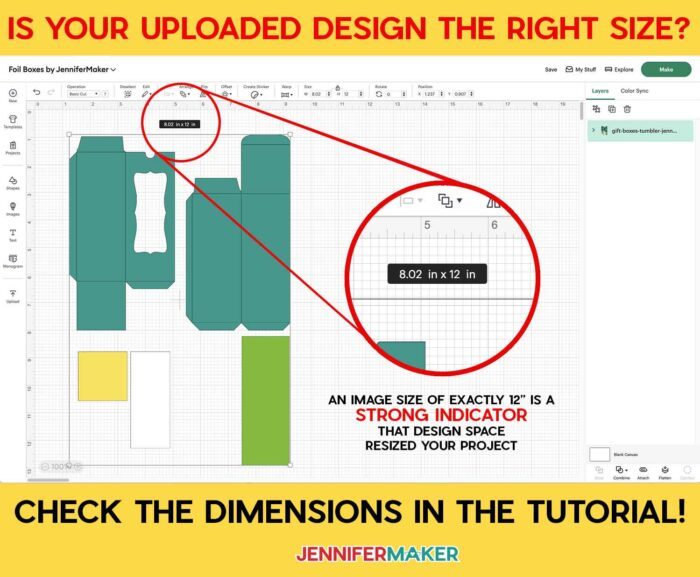
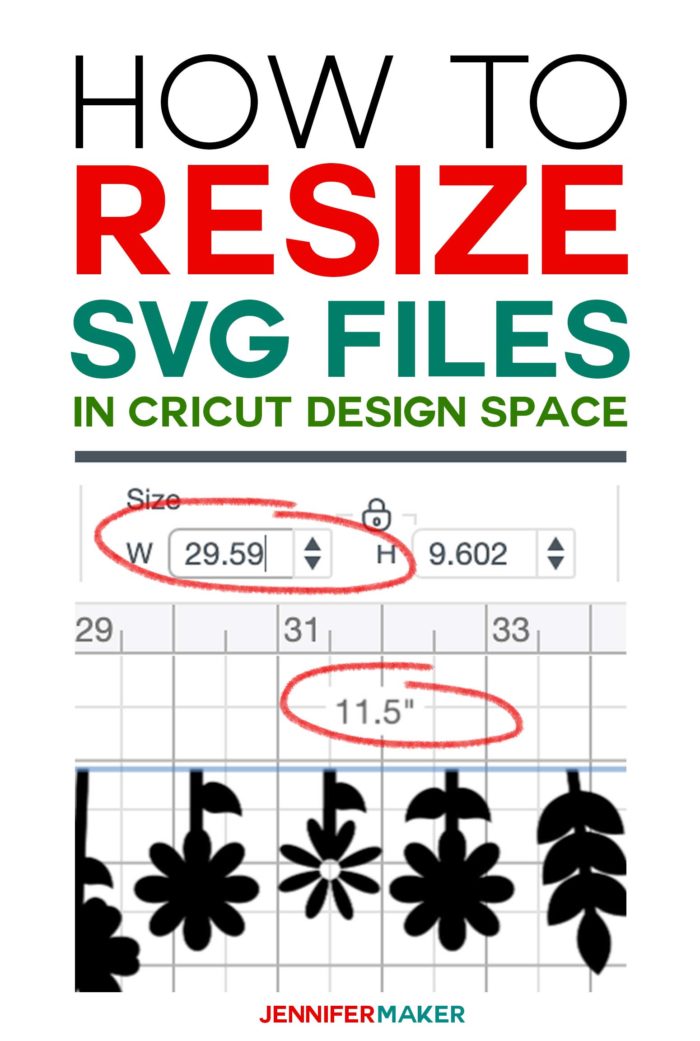
Once your image is uploaded, you can place it on your canvas. Unfortunately, Design Space will NOT inform you that it is resizing a too-large image. So you may not be aware of the resize. Thus, I recommend you always check the size of your image — if it is exactly 12″ on either side, chances are very good Cricut resized this SVG file. Consider this 12″ measurement to be a big red warning that your project is now the WRONG SIZE.
The above SVG file, which I made for my 2022 gift boxes project, should actually be 14.22″ wide by 21.34″ high. How do I know this? The proper dimensions are listed in the blog post on the Gift Boxes for Treats, Tumblers, and Trinkets. Most of my tutorials include the dimensions somewhere either in the post or in the video. Look for a screen shot of the image in Design Space with the dimensions shown (usually in step 1), so be sure to look for this if you suspect the file is not the right size. If you are ever unsure of the proper dimensions for a project, just ask us at [email protected].
Tip: If you have another designer’s file and cannot determine the proper size from their information, there’s another way you can see the right size. Download and open Inkscape (free software), then open the original SVG from inside Inkscape (do an Open, not an Import). Then select all elements in the design and note the total size.
Now that you know the proper size, it’s time to resize the SVG file back to the correct size. But how do you do this? Read on!
How to Resize SVG Images in Cricut Design Space
Select your uploaded SVG image that you’ve placed on your canvas. Selecting it means to click on the image until you see the selection box appear around it. In the example below, this image is 11.5″ wide.
Note: Be sure all of the pieces of the SVG file are grouped together before resizing. SVG files should import grouped by default, but if they are not grouped, select all pieces and click the Group icon in the upper right corner. But uploaded images come in grouped, so you probably won’t need to do this for a new upload.

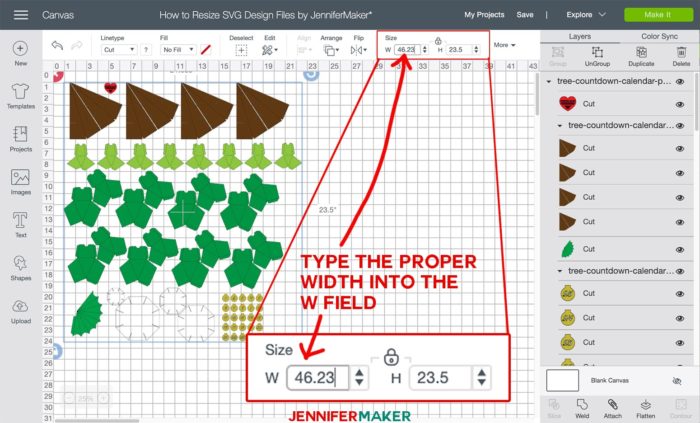
Now go up to the Size fields at the top of the Cricut Design Space window, make sure the lock is on (the lock icon appears closed), and type the proper width in the W field. In this case, I’m changing the width to 14.22″ which I’ve determined is the right size for this project.

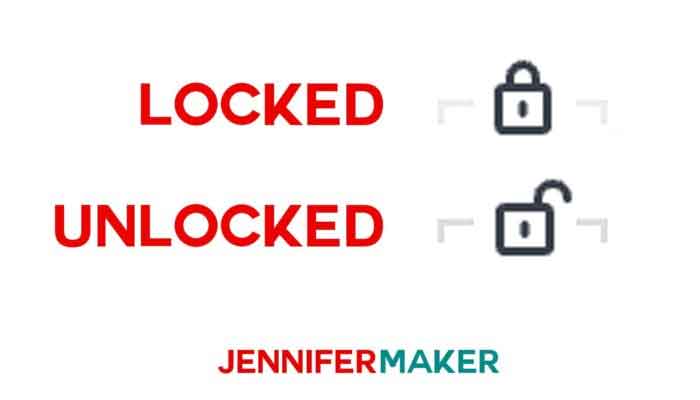
Here’s what the lock icon looks like when it is “locked” or closed. Your lock SHOULD be locked by default.
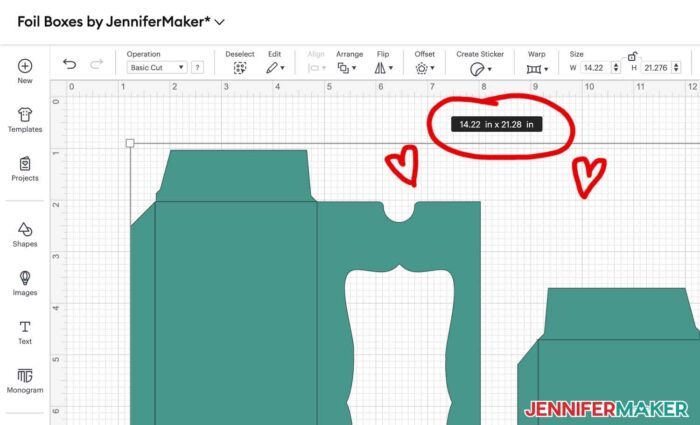
Now press the Return or the Enter key on your keyboard. The SVG will resize, keeping its proportions so long as that lock icon was on. This SVG is now 14.22″ wide by 21.28″ high (not quite 21.34″ from the original design, but definitely close enough).
And that’s all you have to do!
Note that if you re-upload or re-insert an uploaded SVG onto your canvas, it will resize down to 12″ again. So be sure to Save this project with the menu in the upper right so you have the correct size for the next time you want to make this project.
How to Resize SVG Images Larger Than Mat
Now what if you need to resize an SVG image and it’s too big to cut on a single mat? We call this “bigger than mat.” The good news is there is a way to break up the image so it fits the mat then reassemble it after you cut it all out. To learn how to resize and cut a larger-than-mat project, check out this tutorial: Large Wall Decal: Larger Than Mat Cricut Projects
If you want to get more Cricut tips and tricks, check out this list of 45+ Cricut tips and tricks!
Love,

Want to remember this Resize SVG Files Tutorial? Pin it to your favorite Pinterest board!


Thank you so much for another wonderful lesson – As always!
I never even thought of using Inkscape to check what the true image size should be. I’ve started including notes on sizes along with my personal SVG designs. I never know what is going to happen when I upload them to Design Space.
I have been designing a stencil project. While designing the image, I have continually received the warning triangle claiming that my images are too big. The letters are being cut out individually, and the images are also cut by themselves. The letter size is only 8×7 inches designed to fit a 12×12 mat. The image decal measures only 3-4 inches, but I again receive the warning that the image is too large. I have yet to connect my computer to the cricut explorer, as I am in the design phase. After the warning, I am blocked from correcting the size, in case it may have save wrong. I have rebooted my cpu, quit the cricut site multiple times. Each time I run into the same problem. I have recently designed a similar project, and did not encounter an any trouble. I have never run into this problem over the past year and a half working through design space. It seemed that all the problems started when cricut updated my account. Currently the warning sign is displayed on my created decal, but the image is only 3 inches tall and wide. Please let me know what the problem could be. I am in a time crunch on projects.
Thank You
Hi Charron! The only thing I can think is in the upper right-hand corner of Design Space make sure the machine selected is the appropriate one. You might accidentally have it set to Cricut Joy in which case your design would be too big for.
Hi Jennifer,
Happy New Year! I am glad I found this discussion about image sizes. I have a problem with image size consistency and I wonder if you have any idea what I should do. So, I wanted to cut multiple objects from a large digital image using my Cricut Maker. I crop each object from the large image and import them to Cricut Design Space separately. However, I found that Cricut Design Space does not keep the objects to scale. Some are large than others. Do you have any suggestions for me how to keep all the objects to scale? Thanks!!
-ricky
IOS has a glitch where it imports some images just fine, and some it resizes. Although frustrating, you will need to manually resize the ones that are imported in in the wrong size.
I’m having the worse time resizing a imagine. Ive been hitting the lock button & the resizing arrow, but nothing will move. UGH…. I’m so lost & disappointed
Hi Denise! Try signing out of Design Space and signing back in to see if that helps with your project.
Hi I discovered that some designs that are together to make a project come onto the canvas in different sizes so when I have resized the main one I need to resize subsequent ones in the same ratio, say 65%
You need to be a mathematician as well as a crafter.
Please can you tell me why some media gets chewed up even on ‘less’ pressure when I use the fine blade as it says?
Thank you
Hi Angela, Every design can be different in the way it performs. This is also true of the materials you are using. Material can only perform up to a certain level before it starts to fail. Try different materials. I also encourage doing test cuts with a 1-inch diameter circle to see what setting is best for your machine before cutting out a whole project.