
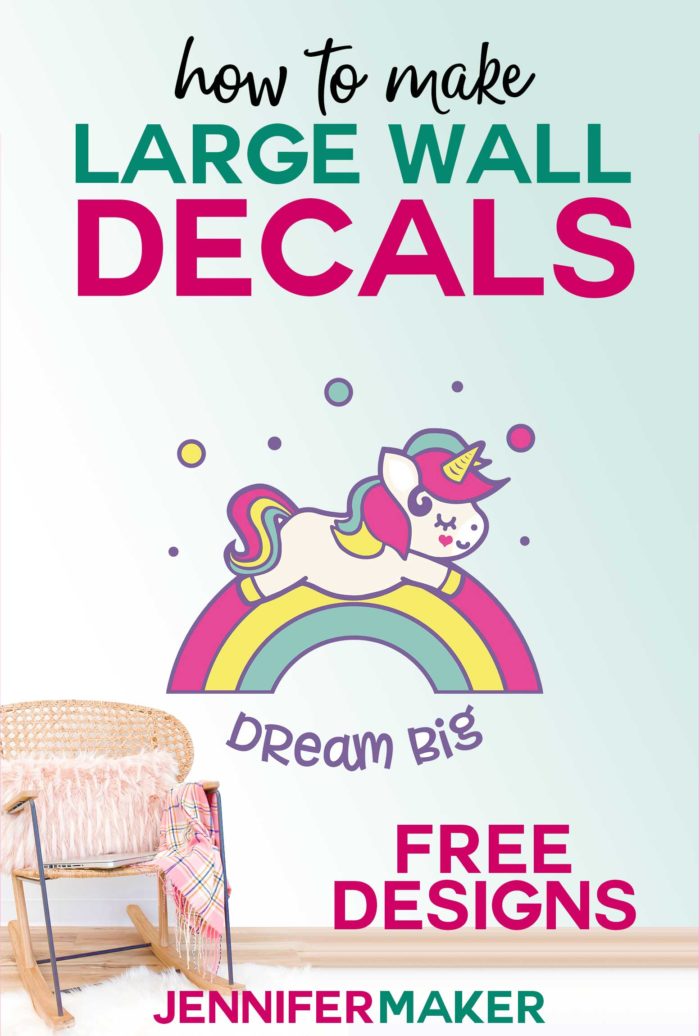
Learn how to cut larger than mat projects on your Cricut so you can make amazing and large wall decals from vinyl or even cardstock!
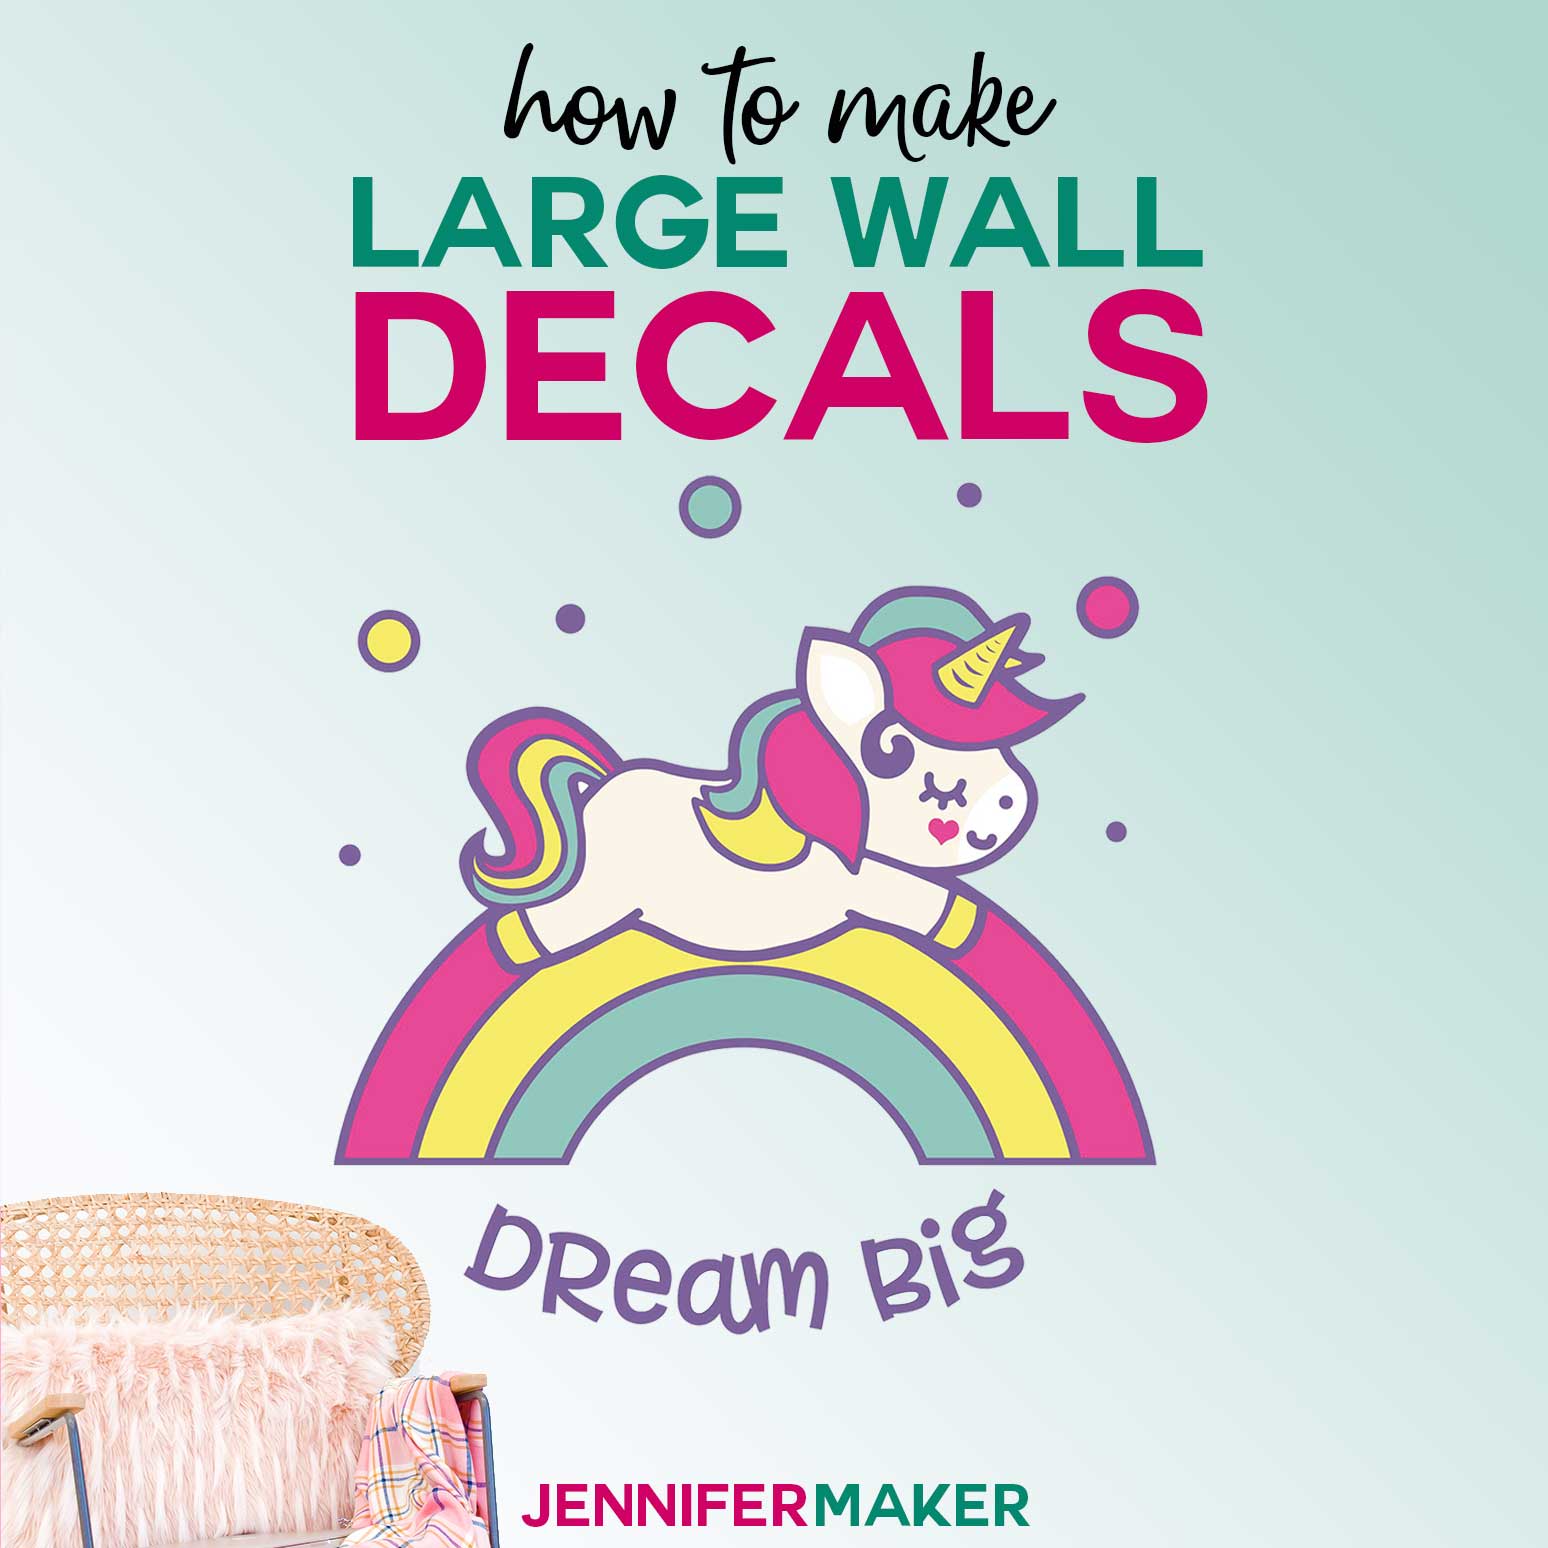
I love decorating the walls in my house. I’ve been known to paint them with murals and cover them with photos. But now that I have a cutting machine, it’s SO easy to create my own wall decor with vinyl! But here’s the thing — I like to make wall decor that is BIGGER than what will fit on a standard 12″ x 12″ cutting mat. At first it might seem impossible, but you CAN totally do it and I’m going to show you how to make these large wall decals and larger-than-mat projects.
First, let’s consider the type of walls that work best — these large vinyl decals are going to work best on smooth walls. You’ll find it a challenge if you have textured walls. For this tutorial, I had Greg paint a 4′ x 4′ board with an interior flat paint, exactly the same stuff most of us have on our walls. And I put large, 3-foot square vinyl decoration on it. Also, be sure your wall is clean and free of dust.
Next, the vinyl! It’s important that you use removable vinyl on your walls — if you don’t, then when you go to remove your large wall decal because it’s time to move or you want to refresh your look, you might accidentally take some drywall off with it. But, if you use removable vinyl, you won’t have any issues removing it. Cricut says it is removable for up to two years, no doubt because adhesives do break down over time. So keep that in mind, especially if you’re a renter.
And what about the mat? You CAN use a standard 12″x12″ mat to do this if that’s all you have, but if you can get a 12″x24″ mat — it’ll mean less work for you! I used a 12″ x 24″ cutting mat. In fact, I used two so I could get the next mat ready while the other one was cutting.
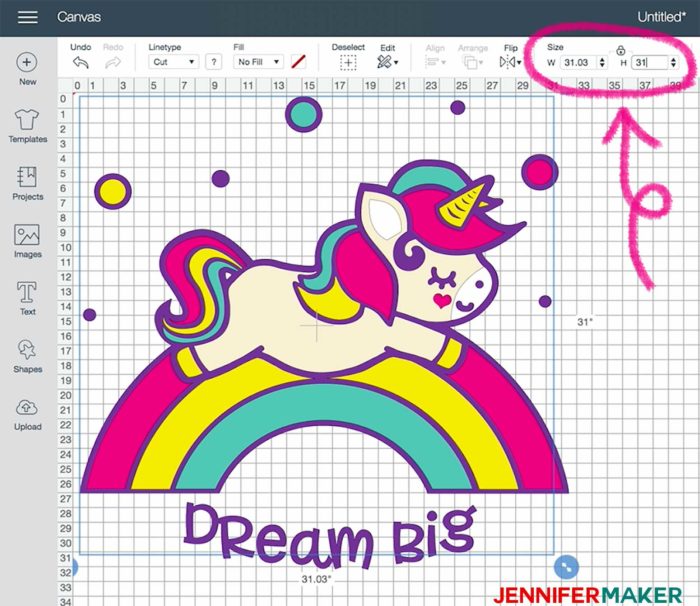
Finally, you need to consider the design. Not all designs will translate well to the wall — you’ll want to start with a high-quality SVG, not a PNG or other lower resolution image. For this tutorial, I drew a couple cute unicorns. They’re sized at 10″ in the file, but you can scale them up to whatever size you want (I went to 31″ high). Now, as 31″ high is too big to all fit on one mat, you need to separate it into mat-sized pieces, and then join it after you cut it. You can get the flying unicorn decal designs in my free resource library!
This step-by-step video tutorial shows you how to cut a large wall decal — larger than will fit on a mat — on a Cricut:
I’m excited to show you how to cut a wall decal! This post contains some affiliate links for your convenience (which means if you make a purchase after clicking a link I will earn a small commission but it won’t cost you a penny more)! Read my full disclosure policy.
Materials for Large Vinyl Wall Decals
- Removable vinyl, preferably in rolls (I used the Cricut brand — one roll each of Cream, Caribbean Blue, Sunshine Yellow, Flamingo Pink, and white, plus two rolls of Grape)
- A 24″ long cutting mat (if you don’t have one, you can use a 12″ cutting mat and cut the design into smaller sections)
- Transfer tape (I used three rolls of Cricut transfer tape)
- Painter’s tape
- Weeding tool and Scissors (You can get the items in the Cricut Basic Tool Set)
- Cricut knife, Craft knife or X-acto knife
- A way to cut your vinyl (I used the amazing Cricut)
- Design #138 – My free SVG/DXF/PDF cut files/patterns (available in my free resource library—get the password at the bottom of this post)
How to Cut Larger Than Mat Vinyl Wall Decals
Step 1: Get a design you can scale up and prepare it for cutting
Download my free flying unicorn files (Design #138) from my free resource library (you can get a password for it by signing up at the bottom of this page). I recommend you cut these decals with a cutting machine like a Cricut. Upload the file to your design software.
If you’re not sure how to upload an SVG cut file to Cricut Design Space, watch this helpful video training series I made. If you’re on an iPhone or iPad, here’s how to download and upload SVG files to the Cricut Design Space app.
Watch our video to see this step in detail!
Step 2: Prepare and cut your vinyl
The unicorn decal will import at about 10″. So your first task is to resize it to fit the space you have. In this tutorial, I am going to resize the unicorn design to 31″ high. You can resize with H and W fields at the top of the Cricut Design Space window.
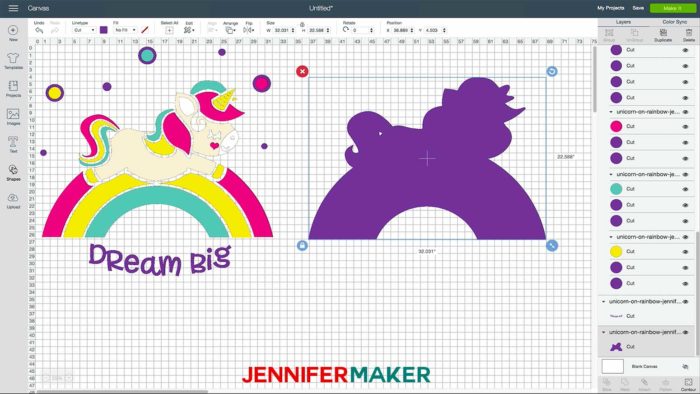
If you were to try to cut this at 31″ however, you would get this error:

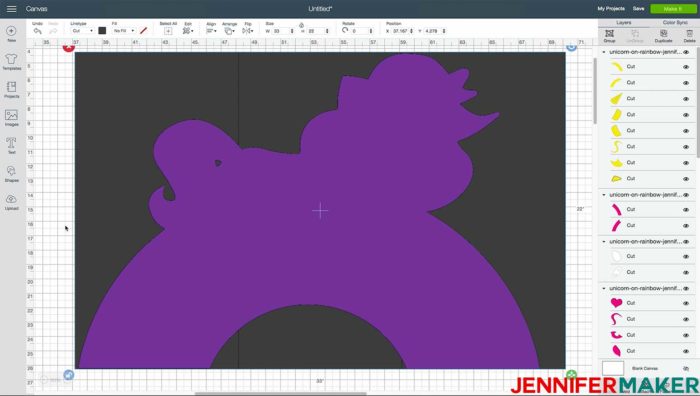
This error means you have one or more layers that needs to be smaller. But if you want it this big, you can’t simply make it smaller. Instead, you need to break the too-large layer into mat-sized pieces. Start by finding and isolating the layer(s) that is too big. In the case of the rainbow unicorn, that’s the purple layer. So first ungroup everything until the purple layer is not in a group, then click and drag it over to the right so you can view it on its own.
Now we need to create a mat-sized rectangle. Click on Shapes, then Square, then resize the square to be 11″ wide by 22″ high. Move the rectangle on top of the purple layer, like this.
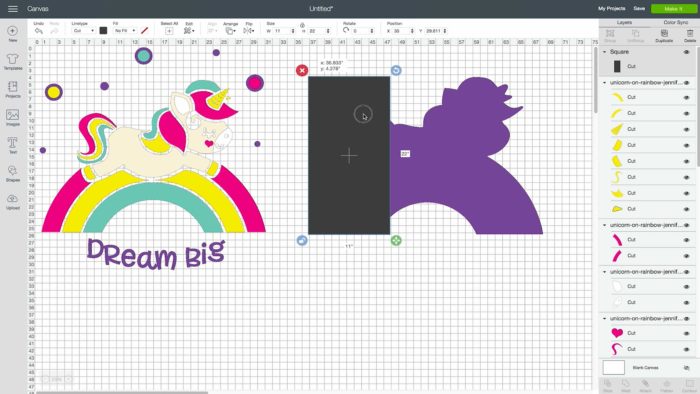
Now right-click the rectangle and select Duplicate twice to create two more rectangles the same size. Position them over your purple layer, side by side (no overlap) and align them all at the top.
Send all three rectangles to the back so you can see them and your purple layer in Cricut Design Space:
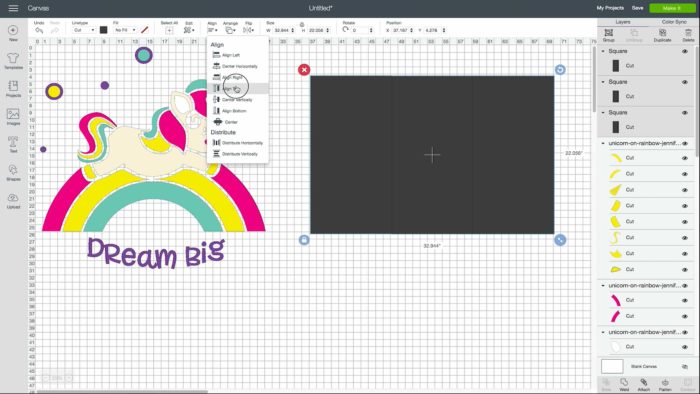
Now select one of those rectangles and your too-large image (the purple layer) and click Slice.
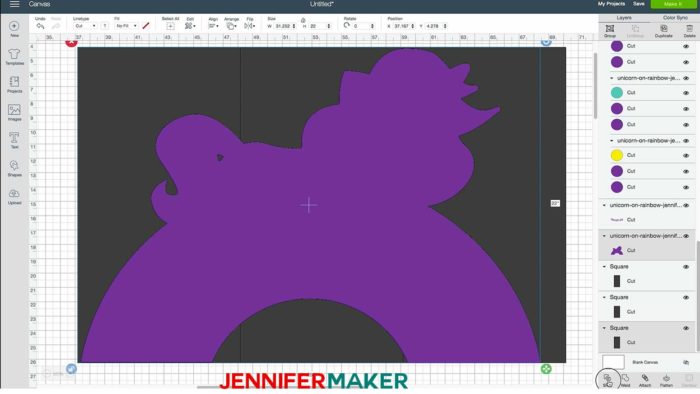
Once sliced, you’ll have three new layers — two will be black and one will be purple. Delete the two black ones, but keep the purple one. This purple layer is now sized for your mat and can be cut!

Repeat this until you have all of your too-large layer into mat-sized piece. If you’re working with a different design, you may have fewer or more pieces. What matters is that you get all layers down to mat size.
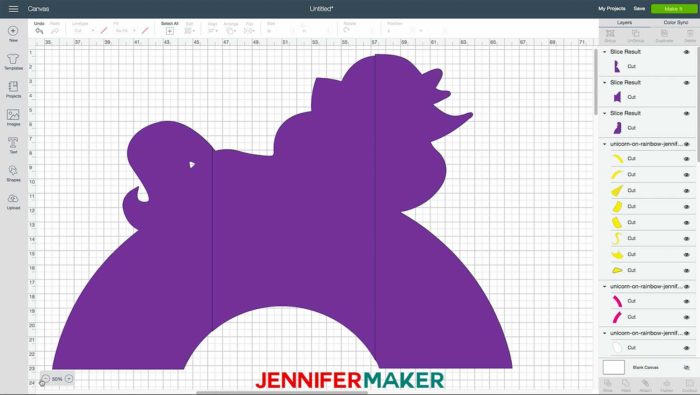
Once all layers in your design will fit on a mat (just click “Make It” to find out if they all fit), it’s time to cut!
Watch my step-by-step video to see how I separate the design in Design space so I can cut it on my mat.
Step 3: Weed your vinyl for your wall decal
Weed your design carefully, removing all of the excess vinyl you do not need. I usually have my weeding tool, craft knife and scissors on hand. Sometimes if you can’t get it off, I will cut away the corner of the vinyl and bend it so I have a place to start. I find that if I keep or return my vinyl to a cutting mat or tape it down to my work space, it’s a lot easier to weed because it lays flat and stays put. I also use my scissors to cut away big pieces of vinyl I’m removing as I go. Make sure you have a place to put the vinyl you remove so it does not attach itself back to your weeded design.
Tip: I have lots of weeding tips on my Cricut Best Tips and Tricks article.
Use your scissors to cut apart the pieces of the design. For example, the sheet of yellow has pieces for the tail, mane, horn, hooves, rainbow and one of the “sunspots” all on one sheet. So I cut those apart so I can layer it correctly.
Watch my step-by-step video for directions!
Step 4: Assemble and layer your design
Start by putting the pieces in order. Refer to your image to help you. There are two ways to assemble the design. First, you can go one layer at a time putting each layer on the wall as you go.
The second option is if you have a design with lots of different layers, you can layer it first and then apply it all as one design. For this tutorial, I layered the design at my work table and then applied the layered design to the wall.
Start with the bottom layer, with the design upside down on your table, pull one of the seam edges away from the backing paper and fold the backing paper so there is approximately 1 inch of exposed vinyl. Then position the sticky exposed vinyl so it is right up to the edge of the other piece it joins with. You don’t want any overlap or space showing between the two pieces of vinyl.
Now, flip the design so it is face down, unfold the backing paper and tape it down again. Flip the design back over and fix any wrinkles or bubbles that you might see in the design.
To layer your design, you can remove pieces of vinyl and layer it on top of the bottom layer. This method is easer when you don’t have intricate or very large pieces. You can also use transfer tape which is helpful when the piece is larger. Tip: I like to trim excess transfer tape away before placing the layers on each other so my transfer tape is not sticking to all the other pieces of my design.
Watch my step-by-step video for directions!
Step 5: Apply your transfer tape
Once your design is weeded and assembled, cut a piece of transfer tape the same size as your design. For this large design I had to use multiple pieces of transfer tape. Tip: You want to minimize the number of seams you’ll have. So you can place your transfer tape either horizontally or vertically depending on which direction would result in the fewest seams.
Remove the backing from the transfer tape. Once you remove the backing, the transfer tape will stop being so curly. Be careful with your large piece of transfer tape so it doesn’t stick to anything else. Apply the transfer tape to your vinyl decal by holding the transfer tape in the shape of a taco or a “U” shape then putting the bottom of your “taco” onto the middle of your design. Smooth the tape over the decal from the center outward. For the second piece of transfer tape you will overlap it slightly by about a half inch so it is essentially one big piece of transfer tape.
With the transfer tape in place, use a scraper tool or other hard and flat edged item (like a store loyalty card) to burnish the vinyl to the transfer tape. With removable vinyl you don’t want to burnish it too aggressively as the vinyl may move.
With a large design like this, flip it over and make sure that all of the seams of the vinyl backing paper are all taped together so the backing is all one piece.
Watch my step-by-step video for directions!
Step 6: Put your large decal on your wall
Now, take your large design (with the backing still attached) and position it on the wall. For this design we will have sunspots above the unicorn and wording below it. So we want our middle decal to be centered and level.
Always check the placement of your decal before you put it on. Use a ruler to make sure it is centered. Use a level to make sure it is level. For this design I measured at the bottom of the rainbow because it was the straightest part of the design.
Tape along the top edge of the transfer tape using painter’s tape. This ensures that your design stays in position. Flip your design up, remove the backing paper, and then flip the design back over smoothing from the top as you go. Make sure you smooth from the center of the design outward. Remove the painter’s tape at the top holding your design to the wall. Using your scraper, work from the center outwards to get bubbles out of your design and adhere it to the wall.
Remove your transfer tape going slow and gentle. Again, use your scraper tool and work from the center outward to get rid of bubbles and to adhere the design. If there are bubbles that are hard to smooth out, using a knife with a sharp point, poke a hole in the middle of the bubble so the air escapes and you can flatten the vinyl.
Watch my step-by-step video for directions!
ANSWERS TO YOUR QUESTIONS ABOUT LARGE VINYL WALL DECALS
Q: Do I have to use removable vinyl?
A: Removable vinyl, in addition to being removable, is matte. Glossy designs such as permanent vinyl reflects the light and will make some portions of your design difficult to see. So, I’d suggest avoiding glossy (even if it is removable) because of the difficulty seeing it.
Q: Do I have to layer my design in advance if it is just one or two colors?
A: You do not have to layer in advance. However, if you’re putting your design in a space that is difficult to work at then you may want to layer in advance on a table.
Q: Can I do this type of project with paper?
A: Yes, you can make a paper design that is larger than your mat. See my step-by-step tutorial for making a large Baby Yoda cardstock figure.
Q: What font did you use for the “Dream Big” words?
A: It’s called “Allspice” and you can get it here.
Get my free rainbow unicorn and cloud unicorn SVG cut files
Download my free unicorn cut files by subscribing (free) below to get the password to my resource library.
So I’m hoping you now see how to make large projects that are bigger than your cutting mat. It’s not difficult to do — you just need to separate whatever you want to make into mat-sized pieces and then put them together again after you cut them out.
I’d love to see your project! If you make a large vinyl design, please share a photo in our Facebook group or tag me on social media with #jennifermaker and #makershowandtell.
Love,

Want to remember this? Save the Large Wall Decal Step-by-Step Tutorial to Your Favorite DIY Pinterest Board!


Awesome Video…Thank you
Amazing tutorial. Thank you so much. It certainly answered a lot of questions about placing vinyl on walls.
Thanks Jennifer, I was wondering how to do a big wall project. Keep up the great work and awesome tutorials!
Thanks Jennifer for sharing this creative sequence of DIY steps. I would definitely like to try this. Hopefully I could also make a wall decal to give my boring wall a new look.
I’m sooo behind the times. LOL I just found how to comment on a blog post. I’m pretty excited tho!
This is amazing! I never imagined something like this could be accomplished with a 12″wide cutting machine. Thank you very much!
You are most welcome, Michele!