
Share the love!
![]()
Get early access to the supply and tool lists for many of our planned projects during the 2023 Merry Maker Mingle.
Please note that these projects may change entirely, may be swapped out, or may have their supplies and tools changed or updated, so please use this as a general guide only. When we feel confident about what we’re making each day, the links below leads to an Amazon shopping list and a preview of the project, supplies, and tools so you can see the items we used to create each project. Note that each project’s list can be printed independently if you find that useful — just click the “Print” button on each list! This post contains some affiliate links for your convenience (which means if you make a purchase after clicking a link I will earn a small commission but it won’t cost you a penny more)! Read my full disclosure policy.
Note: This page is a work in progress, and not all links currently work. Please check back later this week!
 Day 1: Advent Calendar Village
 Day 1: Advent Calendar Village
Amazon Shopping List
Techniques: How to make intricate cuts in cardstock, cut vellum or copy paper, assemble a cardstock project, apply glitter, add tea lights or fairy lights to illuminate a project
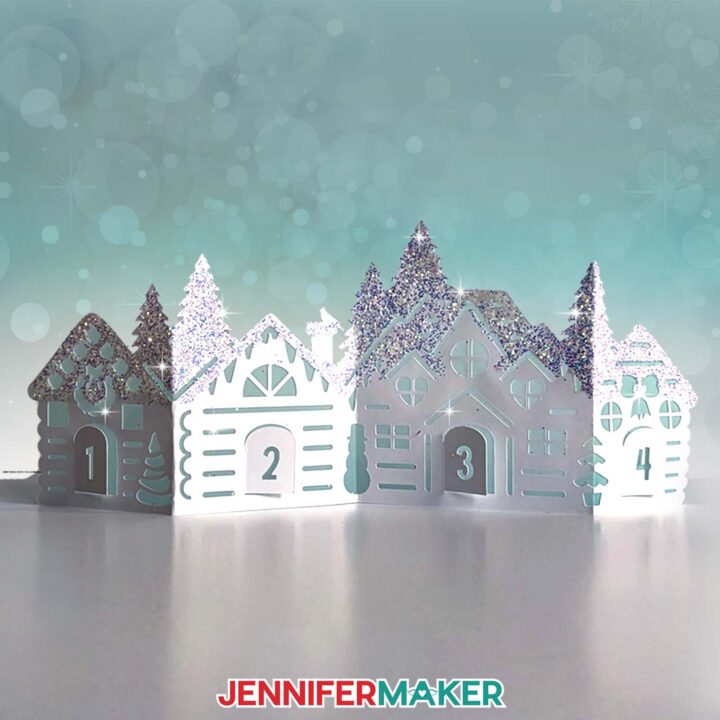
PREVIEW of Advent Calendar Village
Make an easy paper advent calendar village that you can use to count down to a big day! The village looks beautiful on a mantel, table, or desk.
Materials
- Two or Three (2-3) Sheets of 8.5” x 11” or 12" x 12" 65 lb. Cardstock (any color) -OR-
- Six (6) Sheets of 12" x 24" 100 lb. Cardstock (optional for larger houses, any color)
- Three (3) Sheets of 8.5” x 11” Vellum (optional for diffuser layer) -OR-
- Three (3) Sheets of 8.5" x 11" Copy Paper (optional for diffuser layer) -OR-
- Two (2) Sheets of 12" x 12" Wax Paper or Parchment Paper (optional for diffuser layer) -OR-
- Six (6) 12" x 24" Sheets of Vellum or Tracing Paper (optional for larger house diffusers)
- LED Tea Lights -OR-
- Fairy Lights
- Glitter (optional) - I used "Flurries" semi-translucent glitter from TheGlitterGuy.com — use code JENNIFERMAKER for a 10% discount at checkout!
- Butcher Paper (optional to keep your work surface clean when applying glitter)
- Design #548 (My free SVG/DXF/PDF design files are available in my free resource library – get the password by filling out the form at the bottom of this page)
Tools
- A way to cut your materials - I’m using the Cricut Maker 3, but you can also use the Cricut Maker, a Cricut Explore Series machine, the Cricut Venture, the Cricut Joy Xtra, or even the Cricut Joy.
- Cricut Green StandardGrip Machine Mat 12" x 12"
- Cricut Blue LightGrip Machine Mat 12" x 12" (for optional diffuser layers)
- Cricut Green StandardGrip Machine Mat 12" x 24" (optional for larger houses)
- Craft Glue (I used Bearly Art Precision Glue)
- Scoring Stylus (optional for score version) -OR-
- Single Scoring Wheel (optional for score version)
- Brayer
- Spatula
- Scraper -OR-
- XL Scraper (optional for larger houses)
- Weeding Tool (for popping out small pieces from intricate areas)
- Paint Brush (for evenly applying glue to adhere glitter)
- Clear Scotch Tape (optional)
Instructions
This tutorial is now available at https://jennifermaker.com/advent-calendar-village/.
Notes
Typeface Used: Wonderful Display Font (for house numbers)
Finished Sizes:
Small Houses: Each piece is approximately 10.5" W x 3.75" H
Large Houses: Each piece is approximately 22" W x 8.5" H
Recommended Products
As an Amazon Associate and member of other affiliate programs, I earn from qualifying purchases.
Day 2: Gnome Paper Shadow Box
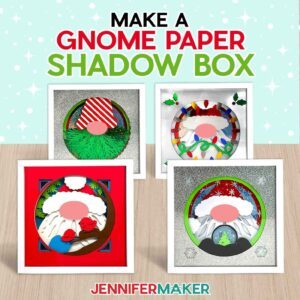 Day 2: Gnome Paper Shadow Box
Amazon Shopping List
Techniques: How to make intricate cuts in cardstock, how to layer cardstock to create depth and shadow, how to place layers in a shadowbox

PREVIEW of Layered Paper Gnome Shadowbox
Learn how to make a layered paper gnome using various types of paper and materials!
Materials
- Recollections Solid Core Cardstock 8.5" x 11"
- Silver Glitter Cardstock 12" x 12"
- Iridescent Cardstock Mirror Paper Sheets 8.5" x 11"
- Color Foil Mirror CardStock 8.5" x 11"
- White Glitter Cardstock 8.5" x 11"
- Cricut 12" x 12" acetate sheets - optional
- Patterned Paper 8.5" x 11"
- 8" x 8" Shadow Box White Frame
- Adhesive Foam Dots Squares
- Craft Glue
- Design #549 (My free SVG/DXF/PDF design files are available in my free resource library – get the password by filling out the form at the bottom of this page)
Tools
- A way to cut your printed design and cardstock - I’m using the Cricut Maker 3 but you can also use the original Maker, an Explore series machine, the Venture or Joy Xtra.
- Cricut Green StandardGrip Machine Mat 12" x 12"
- Scraper Tool
- Spatula
- Cricut Blue LightGrip Mat 12 x 12"
- Measuring Tape
- Isopropyl Alcohol
- Lint Free Cloth
- Weeding Tool - optional
- Scissors
Instructions
This project tutorial is available at https://jennifermaker.com/gnome-beard-layered-shadow-box/
Recommended Products
As an Amazon Associate and member of other affiliate programs, I earn from qualifying purchases.

Day 3: Ceramic Tile Maps
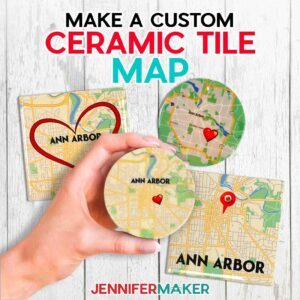 Day 3: Ceramic Tile Maps
Amazon Shopping List
Techniques: How to get a map of any area and customize it, how to make a sublimation print, how to sublimate on ceramic tiles with the right pressing times, temperatures, and pressures
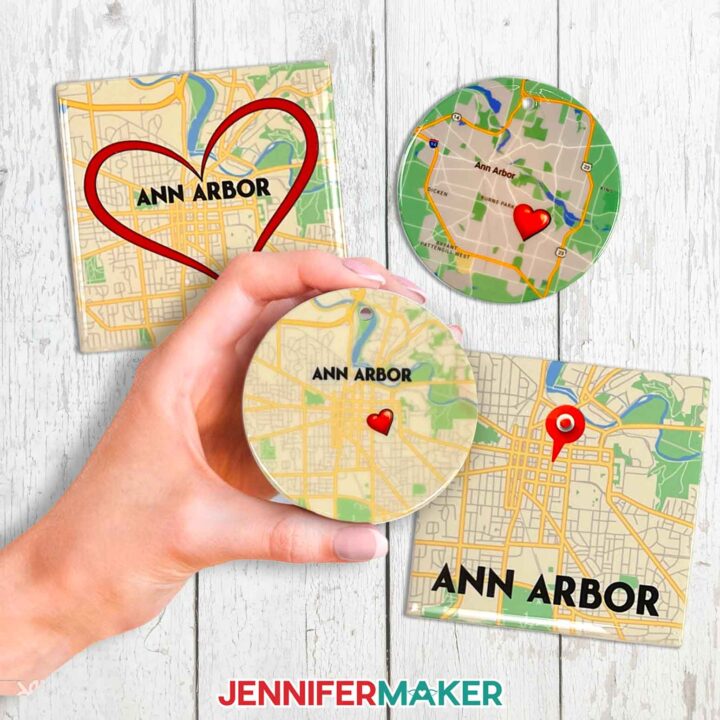
PREVIEW of Ceramic Tile Map
Learn how to create a custom ceramic tile map using sublimation!
Materials
- One (1) 3.5" Round Ceramic Ornament Sublimation Blank -OR-
- One (1) 4.25" Square Glazed Ceramic Tile -AND-
- Dyepress PolyGloss Sublimation Coating For All Hard Substrates
- One (1) Sheet of A-SUB Sublimation Paper 8.5" x 11"
- Design #550 (My free PDF/PNG design files available in my free resource library - get the password by filling out the form at the bottom of this page)
Tools
- Sublimation Printer - I used a converted Epson EcoTank ET-4700 Inkjet Printer
- Sublimation Ink
- Cricut EasyPress 12" x 10" -OR-
- Cricut AutoPress
- Cricut EasyPress Mat 12" x 12"
- Convection Oven
- Oven Thermometer
- Fan
- Nylon Paint Brush
- Heat Resistant Gloves
- Heat Resistant Tape
- Silicone Baking Mat
- Butcher Paper
- Scissors
- Isopropyl Alcohol -AND-
- Coffee Filters
- Cooling Rack
- OPTIONAL: Small Plastic Tote
- OPTIONAL: Acrylic Clear Spray (to protect finished tiles)
Instructions
This tutorial is now available at https://jennifermaker.com/ceramic-tile-map.
Notes
Image file types that can be used: PNG, JPG, SVG
Typeface:
Puerto Vintage , Free Alternative: Nexa
Map Sources:
Recommended Products
As an Amazon Associate and member of other affiliate programs, I earn from qualifying purchases.
Day 4: Crepe Paper Garland
 Day 4: Crepe Paper Garland
Amazon Shopping List
Learn how to cut crepe paper with your Cricut to make a beautiful paper floral garland with poinsettias, holly leaves, and pine branches. I’ll teach you how to use the rotary tool on the Maker, but you can also cut by hand.

PREVIEW: Paper Floral Garland
Learn how to cut crepe paper with your Cricut to make a beautiful paper floral garland with poinsettias, holly leaves, and pine branches.
Materials
- One (1) Package of Winter Garden Heavy Crepe Paper (I used the Snowflake, Peppermint, Holly Berry, Spearmint, Pistachio, and Pine colors)
- 24 Gauge Green Floral Wire (for stems)
- At Least 6' of Thick Floral Wire (for garland base)
- 1/2" Wide Green Floral Tape
- Artificial Holly Berries
- LED Fairy Lights (optional)
- Design #551 (My free SVG/PDF/DXF design files are available in my free resource library - get the password by filling out the form at the bottom of this page)
Tools
- A method to cut your heavy crepe paper - I'm using the Cricut Maker 3 but you can also use the original Cricut Maker.
- Cricut Rotary Blade with Housing
- Cricut Purple StrongGrip Machine Mat 12" x 12”
- Craft Glue (I used Bearly Art Precision Glue)
- Wire Cutters
- Brayer
- Spatula
- Scissors
- Scraper
- Measuring Tape or Ruler
- Painter's Tape (optional)
- Tweezers (optional)
Instructions
This project is now available at https://jennifermaker.com/paper-floral-garland/.
Notes
Finished Sizes:
Garland: Approximately 6' Long
Single Poinsettia: Approximately 8" W x 8" D x 11" H
Single Holly Stem: Approximately 6" W x 6" D x 4" H
Single Pine Branch: Approximately 1.5" W x 1.5" D x 9" H
Day 5: Custom Family Sign Post
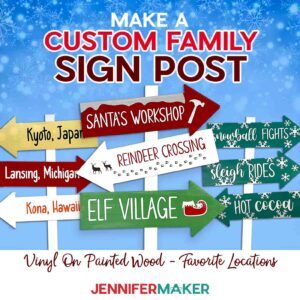 Day 5: Custom Family Sign Post
Amazon Shopping List
Techniques: Make a custom family sign post to honor special people and places! Great for the holidays, too! You’ll learn how to paint, apply vinyl, and affix to a signpost.
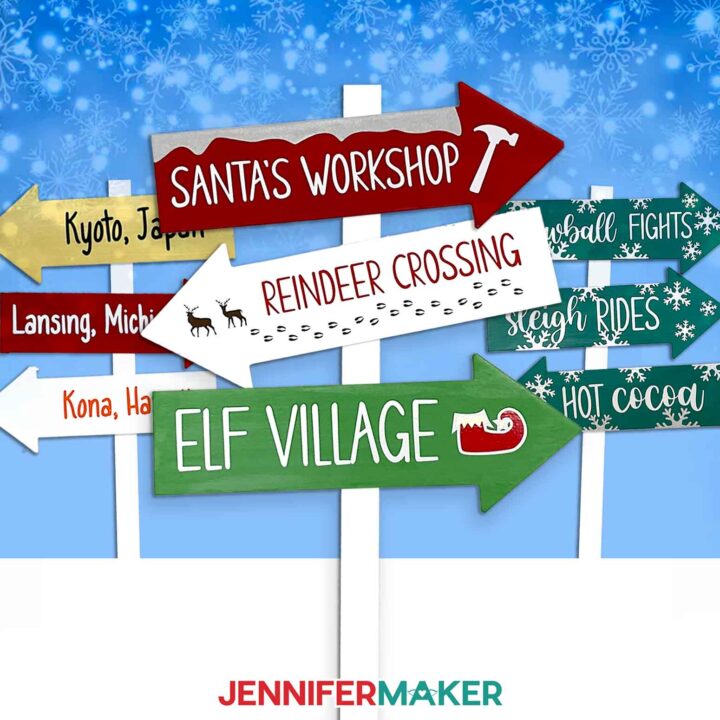
PREVIEW: Custom Family Sign Post
Learn how to make a custom family sign post!
Materials
- Three to Four (3-4) Dollar Tree Arrows
- One (1) 3 ft. Wood Stake
- Chalk Paint - White Adirondack
- Chalk Paint - Imperial Red
- Chalk Paint - Grotto (Teal)
- Chalk Paint - Summer Porch (Yellow)
- Chalk Paint - Irish (Green)
- Chalk Paint - Cascade (Light Blue)
- Polycrylic Matte
- Cricut Permanent Shimmer Vinyl - Silver
- Cricut Permanent Shimmer Vinyl - Gold
- Cricut Permanent Vinyl - White
- Cricut Permanent Vinyl - Black
- Cricut Permanent Vinyl - Bracken (Brown)
- Cricut Permanent Vinyl - Tomato Red
- Cricut Permanent Vinyl - Orange
- Cricut StandardGrip Transfer Tape
- Cricut StrongGrip Transfer Tape
- Outdoor Velcro
- Design #552 (My free SVG/DXF/PDF design files are available in my free resource library – get the password by filling out the form at the bottom of this page
Tools
- A way to cut your vinyl - I’m using the Cricut Maker 3, but you can also use the Cricut Maker, a Cricut Explore Series machine, the Cricut Venture, the Joy, or the Joy Xtra!
- Cricut Green StandardGrip Machine Mat, 12" x 12"
- Brayer
- Weeding Tool
- Scissors
- Needle Nose Pliers (To Remove Staples from Arrows)
- Mini Sander Kit
- Foam Brushes
- Synthetic Paint Brush (for Polycrylic)
- Butcher Paper
- Paper Towels
- Paper Plates
- Disposable Gloves
Instructions
This project tutorial is now available at https://jennifermaker.com/custom-family-sign-post/.
Notes
These Custom Family Sign posts stand 36” tall and are about 12” wide with the arrows attached.
Typefaces:
JM Sweet
Goldie Rainbow / Free Alternative: Goldie Rainbow
Farm Dream / Free Alternative: Skinny Flower
Day 6: Fold-Top Gift Bag
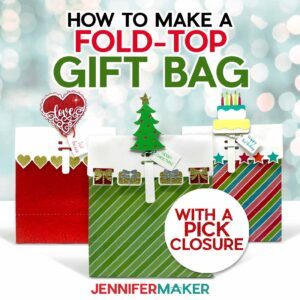 Day 6: Fold-Top Gift Bag
Amazon Shopping List
Techniques: You’ll learn how to cut, crease, layer, and adhere cardstocks to make a sturdy gift bag held shut by a decorated pick.
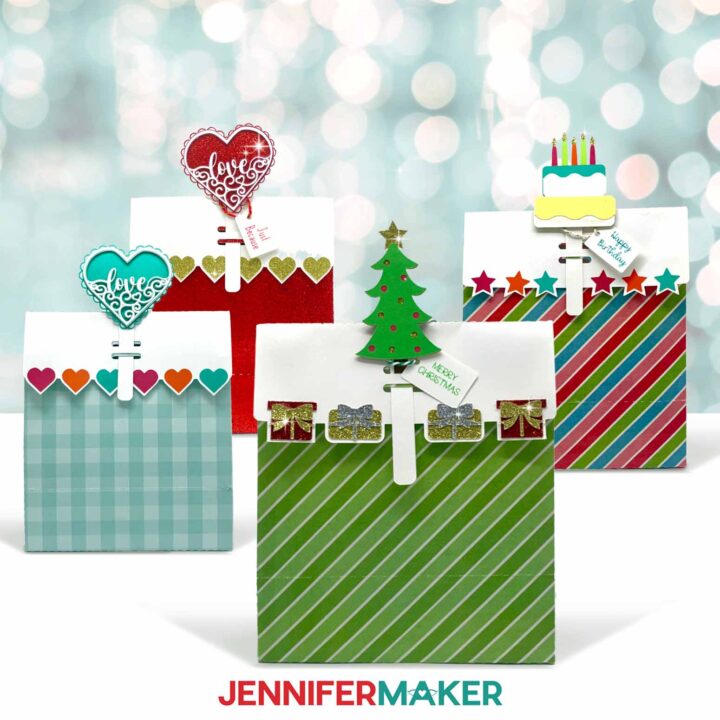
PREVIEW: Fold-Top Gift Bag with Pick
Learn how to make a fold-top gift bag with pick for a birthday, Christmas, or just because!
Materials
- Recollections Essentials 12" x 12"
- Single-sided 12” x 12” 80 lb Pattern Cardstock -OR-
- Double-Sided 12” x 12” Pattern Cardstock -OR-
- Cricut 12” x 12” Glitter Cardstock - Brights
- Cricut 12” x 12” Glitter Cardstock - Classic
- 8.5” x 11” Recollections 110lb White Cardstock
- 8.5” x 11” Foil Cardstock
- 8.5” x 11” Recollections Mint Hues
- Cricut Ultimate Fine Point Pen Set, 0.4mm
- Twine
- Design #559 – My free template (available in my free resource library—get the password at the bottom of this post)
Tools
- I’m using the Cricut Maker 3 but you can also use the Maker, Explore series, Venture and Joy Xtra for this project!
- Cricut Green StandardGrip Machine Mat, 12" x 12"
- Craft Glue (I used Bearly Art Precision Glue)
- Brayer
- Spatula
- Scraper
- Weeding Tool
- Hot Glue Gun & Glue Sticks (for Glueing Glitter Cardstock)
- Foam Adhesive
- Scissors
Instructions
This project is now available at https://jennifermaker.com/fold-top-gift-bag-with-pick/.
Notes
Typeface Used: Dear Agatha, JM Tall, That Girl
Finished Sizes: Bag is 8x7x4" Pick is 5-6"
Day 7: How To Paint Watercolor Plants
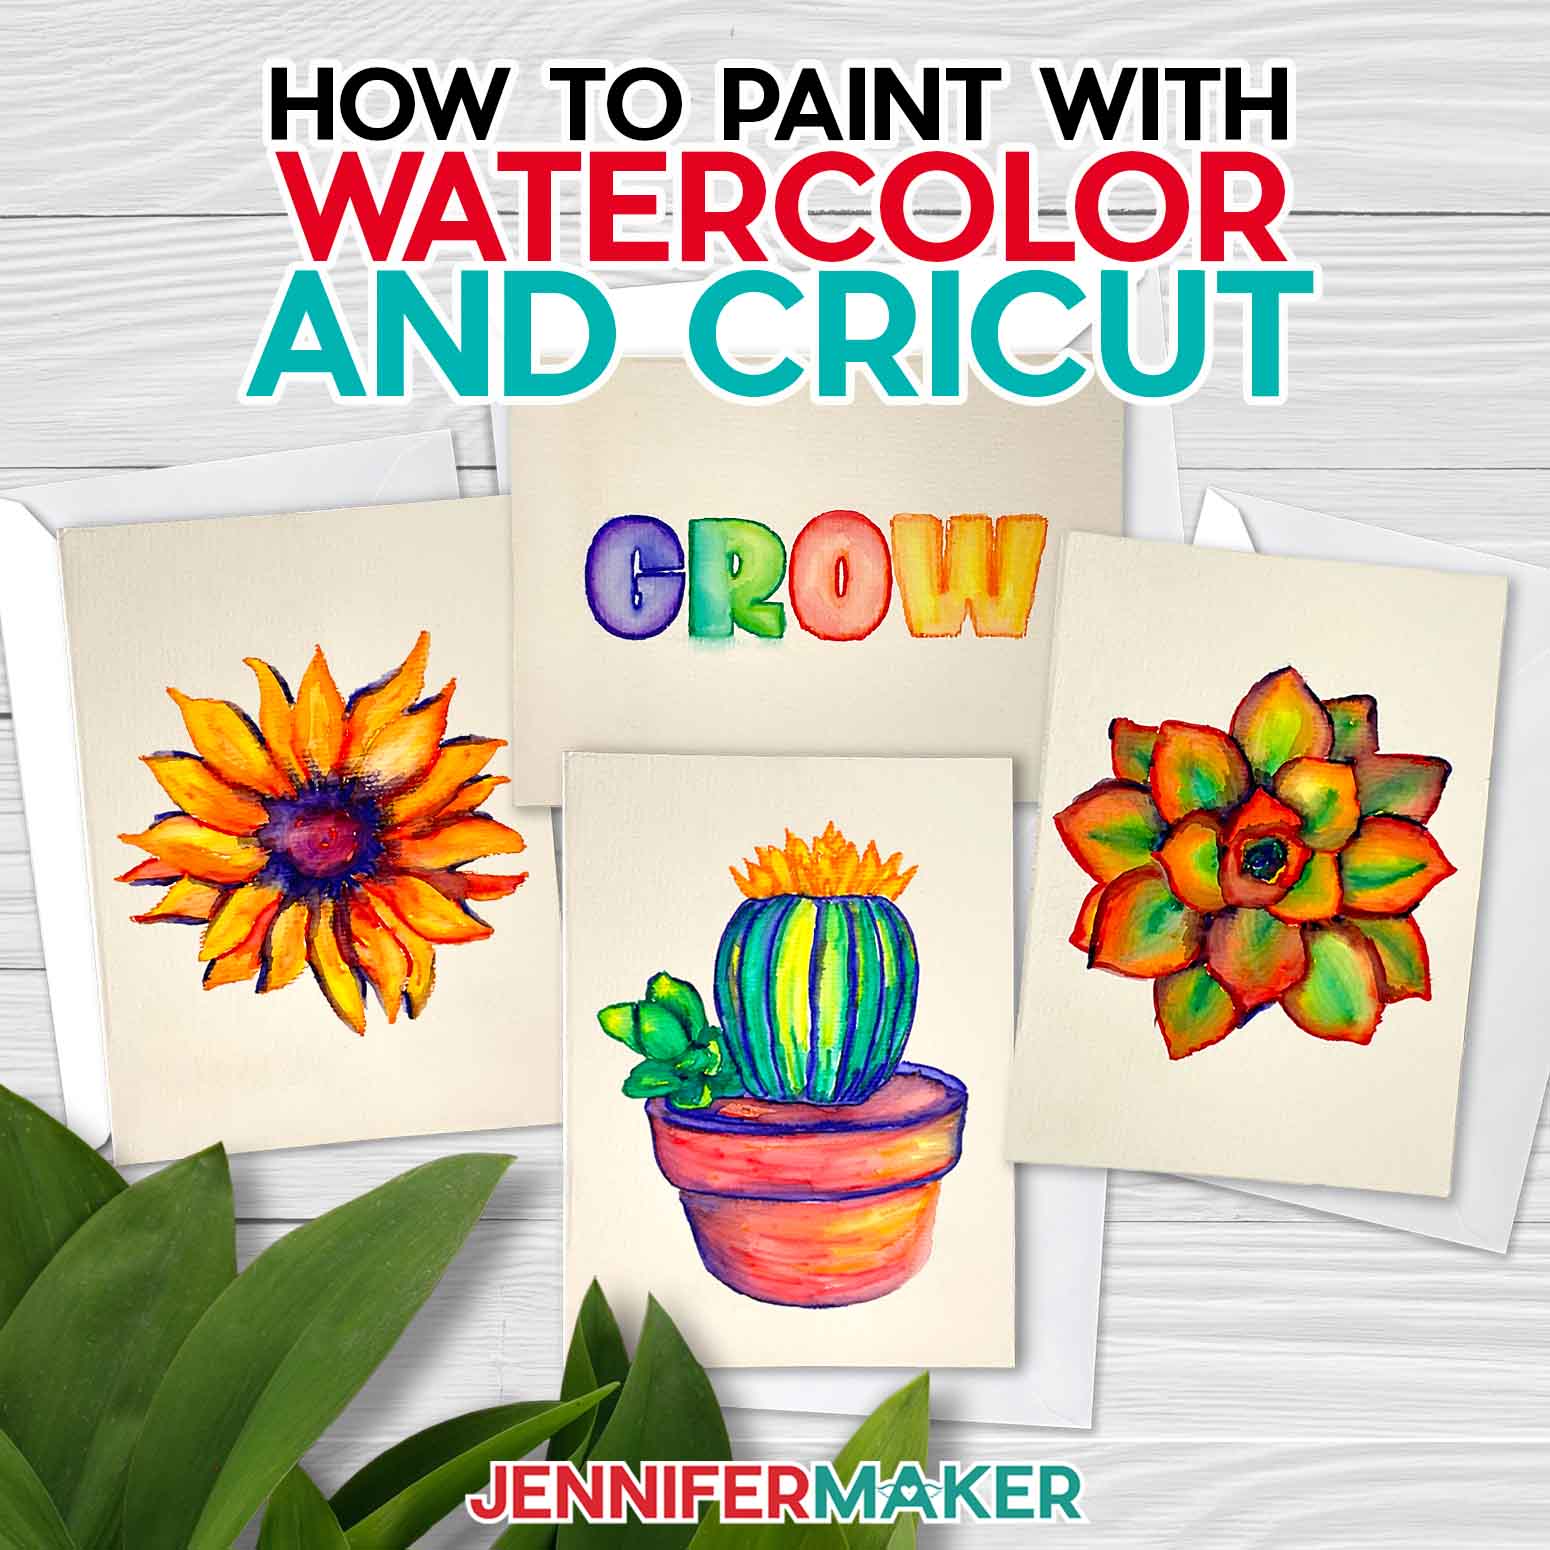 Day 7: How To Paint Watercolor Plants
Amazon Shopping List
Techniques: Learn how to use the Cricut watercolor markers to make vibrant plant cards!
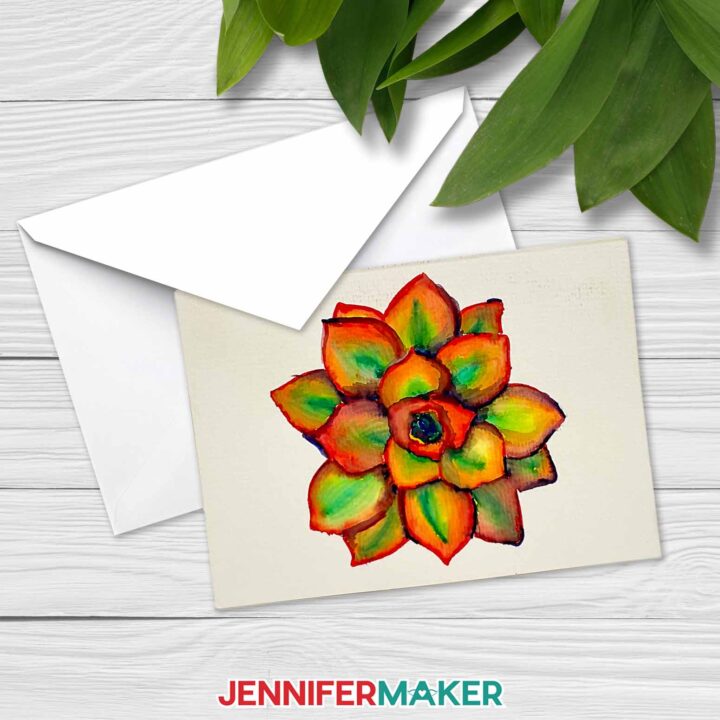
PREVIEW: Paint Watercolor Plants
Learn to paint beautiful watercolor plants using your Cricut!
Materials
- Cricut Watercolor Markers and Water Brush Pen -or-
- Realike Markers
- Cricut 4.75" x 6.6" Watercolor Paper Notecards -or-
- Watercolor Paper 5.8" x 8.3” Extra Fine Grade
- Design #557 (My free SVG/PDF/PNG/DXF design files available in my free resource library - get the password by filling out the form at the bottom of this page)
Tools
- A method to draw your design — I’m using the Cricut Maker 3 but you can also use the Cricut Venture, Cricut Explore Series, Cricut Joy Xtra, and Cricut Joy for this project!
- Cricut StandardGrip Green Machine Mat, 12" x 12" -or-
- Cricut Card Mat 2x2
- Brayer
- Paper Towels
- Cotton Swabs (Optional, for shading)
- Bowl of Water
Instructions
This project is now available at https://jennifermaker.com/paint-watercolor-plants/.
Notes
Typeface: SunshineBridge SansPress
Design Sizes:
GROW 5” x 1.3”
Succulent 4.25” x 4.25”
Cactus 4.25” x 6”
Sunflower 4.25” x 4.25”
Day 8: Shadow Box Ornaments
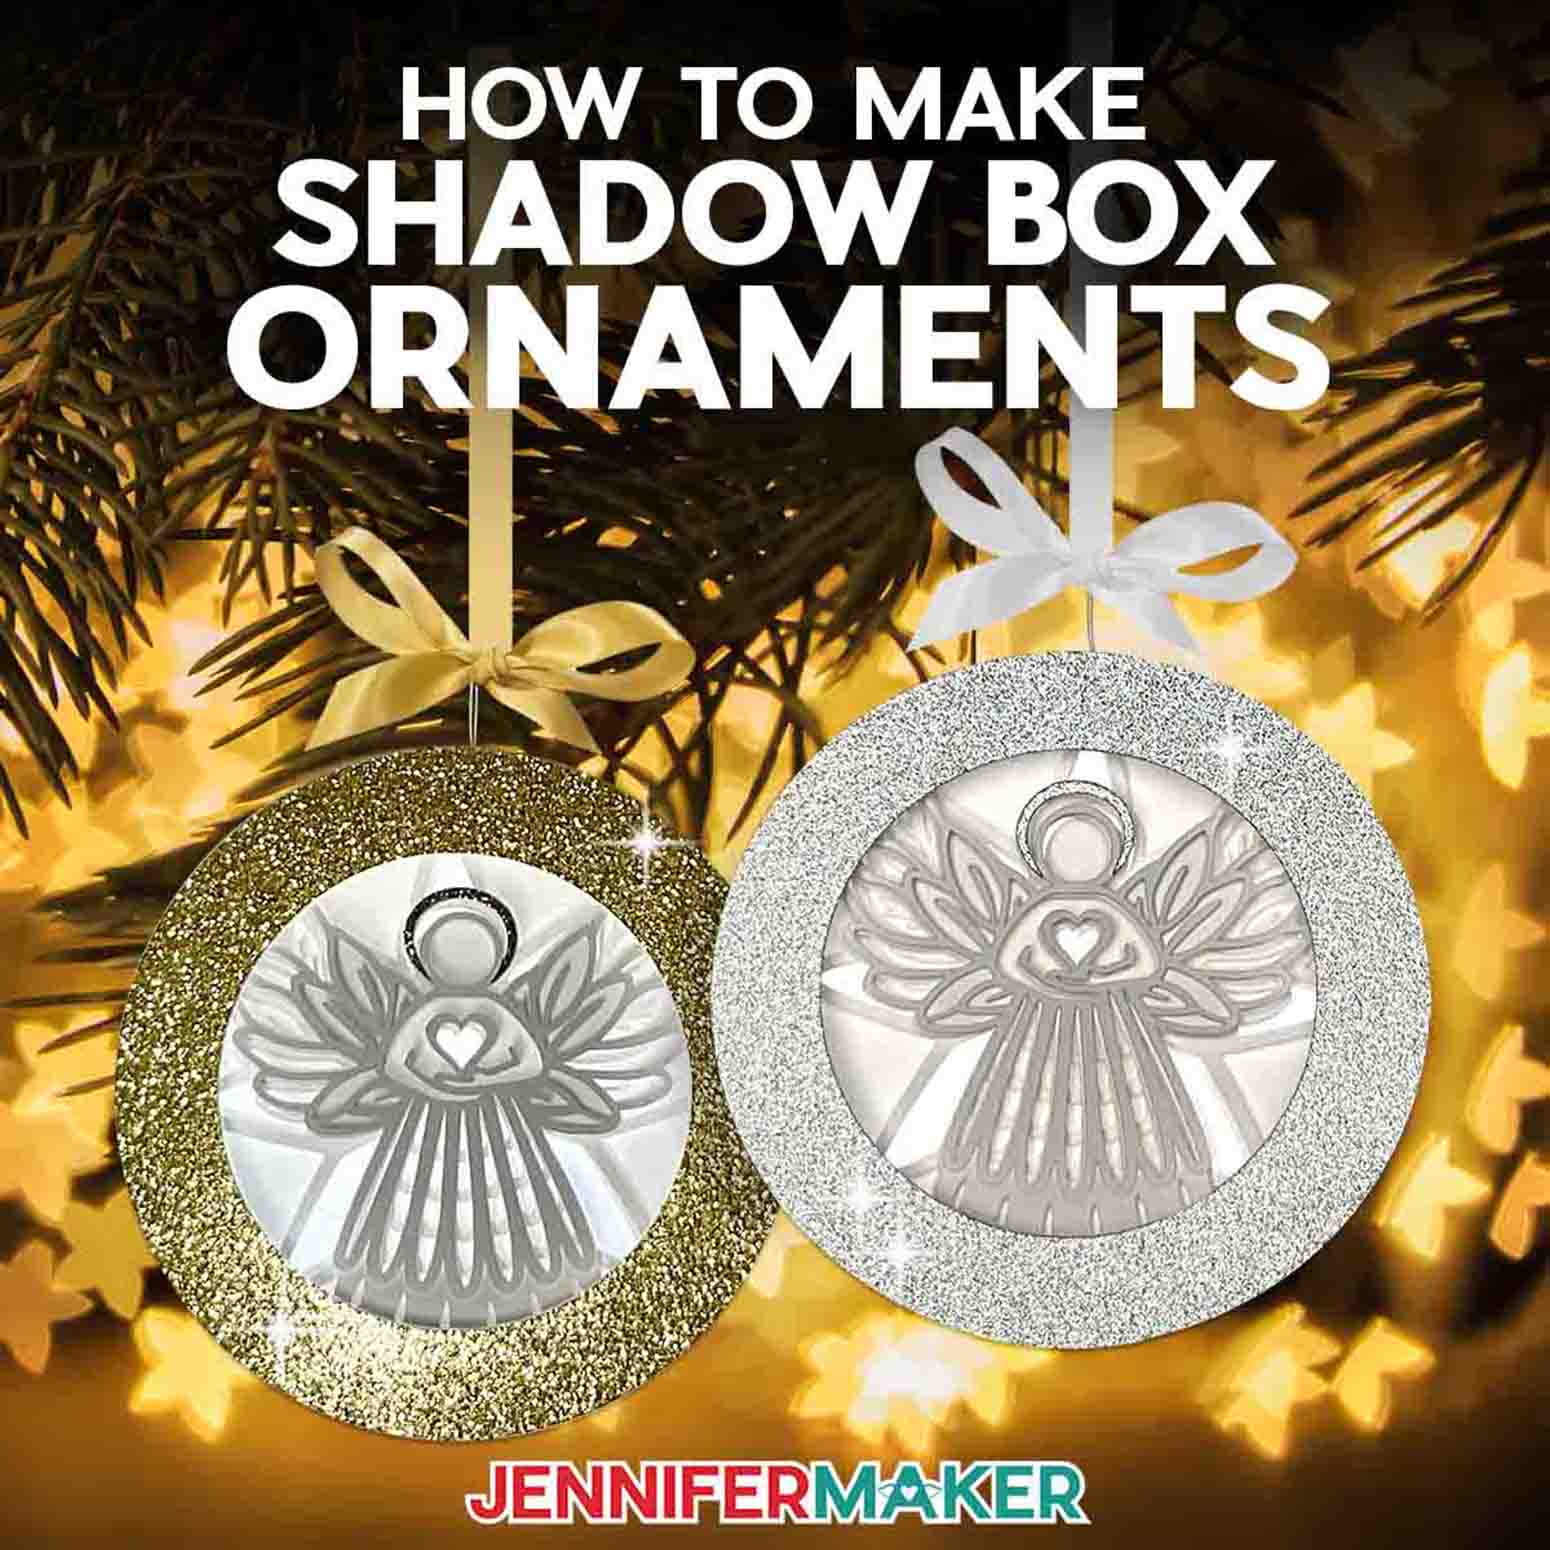 Day 8: Shadow Box Ornaments
Amazon Shopping List
Techniques: Learn how to cut and assemble a layered paper ornament with lights, and no glue necessary! Plus, learn how to customize your own version!

PREVIEW: Shadow Box Ornaments
Learn how to create round shadow box ornaments from just cardstock - no glue or tape required!
Materials
- Two (2) Sheets of 12" x 12" 65 lb. White Cardstock -OR-
- Three (3) Sheets of 8.5" x 11" 65 lb. White Cardstock
- One (1) Sheet of 8.5" x 11" or 12" x 12" Glitter Cardstock (optional for the decorative frame, any weight)
- 24″ of 1/4" Wide Ribbon (optional for hanging)
- One (1) Strand of LED Fairy Lights
- Design #555 (My free SVG/PDF/DXF design files are available in my free resource library - get the password by filling out the form at the bottom of this page)
Tools
- A way to cut your cardstock - I’m using the Cricut Maker 3, but you can also use the Cricut Maker, a Cricut Explore Series machine, the Cricut Venture, the Cricut Joy, or the Cricut Joy Xtra
- Cricut Green StandardGrip Machine Mat 12" x 12"
- Scoring Stylus (optional for files with score lines) -OR-
- Single Scoring Wheel (optional for files with score lines)
- Brayer
- Spatula
- Weeding Tool
- Scraper
- Scissors (optional for cutting the ribbon)
- Tweezers (optional)
- Bearly Art Precision Craft Glue (optional for halo piece)
Instructions
This project is now available at https://jennifermaker.com/shadow-box-ornaments.
Notes
Finished Size: Approximately 4.5" W x 5.375" H x 1.25" D
Day 9: Pull Tab Gift Tags
 Day 9: Pull Tab Gift Tags
Amazon Shopping List
Techniques: Learn how to write on different kinds of cardstock with you Cricut and the right cut settings to use to make the shapes, plus, how to glue secret tags to surprise your friends and family!
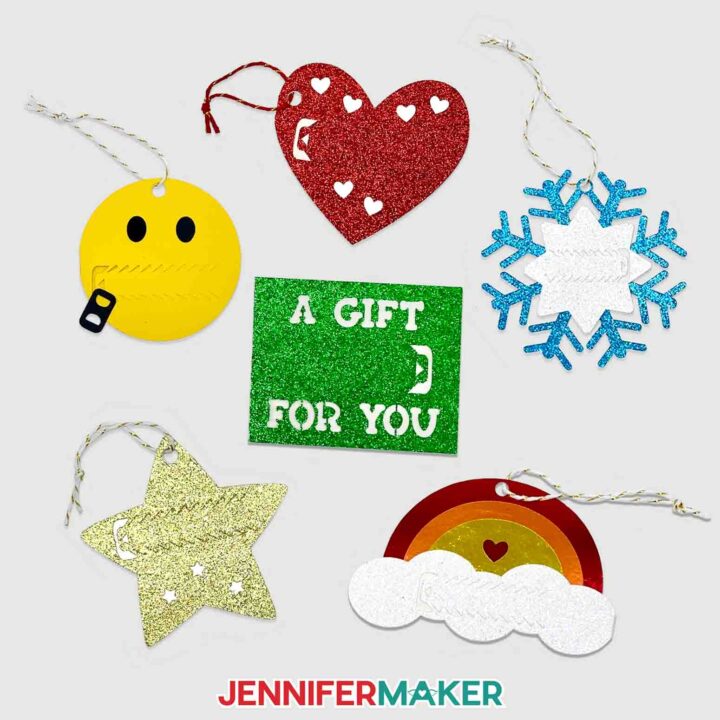
PREVIEW: Pull-Tab Gift Tag
Learn how to make a pull-tab gift tag for any occasion!
Materials
- One (1) Sheet of 12” x 12” 65 lb. Cardstock (for Emoji)
- Cricut Glitter Cardstock Classics Sampler (for Rainbow, Snowflake, Santa Hat, and Star)
- Cricut Glitter Cardstock Brights Sampler (for Snowflake, Heart, and Gift Card)
- Recollections Foil Cardstock (for Rainbow and Santa Hat)
- Twine
- Cricut Fine-Point 0.4mm Black Pen
- Design #560 (My free PNG/PDF design files are available in my free resource library – get the password by filling out the form at the bottom of this page)
Tools
Instructions
This project is now available at https://jennifermaker.com/pull-tab-gift-tags.
Notes
The finished size of the gift tags is under 4".
Day 10: How To Sublimate Hoodies
 Day 10: How To Sublimate Hoodies
Amazon Shopping List
Techniques: Learn how to prepare, print, and sublimate designs on polyester hoodies! Covering front, back, and even arm placements, plus which tools are worth it!
PREVIEW: How To Sublimate Hoodies
Learn how to sublimate designs onto both sides of a hoodie as well as the sleeve!
Materials
- One (1) White 100% Polyester Hoodie
- One (1) Sheet of Sublimation Paper 8.5" x 11"
- Butcher Paper
- 12x12 White Cardstock
- OPTIONAL: Polyester Material for Practice
- Design #561 (My free PNG/PDF design files available in my free resource library - get the password by filling out the form at the bottom of this page)
Tools
- Sublimation Printer - I used a converted Epson EcoTank ET-4700 Inkjet Printer
- Sublimation Ink
- Heat Press - I used the Cricut EasyPress 2
- Fan for Ventilation
- Heat Resistant Tape
- Ruler
- Lint Roller
- Cricut EasyPress Mat -OR-
- Heat Pressing Pillows
- OPTIONAL: My T-Shirt Ruler Guides
- OPTIONAL: Scissors
Instructions
This project is now available at https://jennifermaker.com/how-to-sublimate-hoodies/.
Day 11: Layered Paper Stained Glass
 Day 11: Layered Paper Stained Glass
Amazon Shopping List
Techniques: Learn how to size a SVG file for any Cricut machine in Cricut Design Space and how to assemble paper layers to resemble stained glass windows!
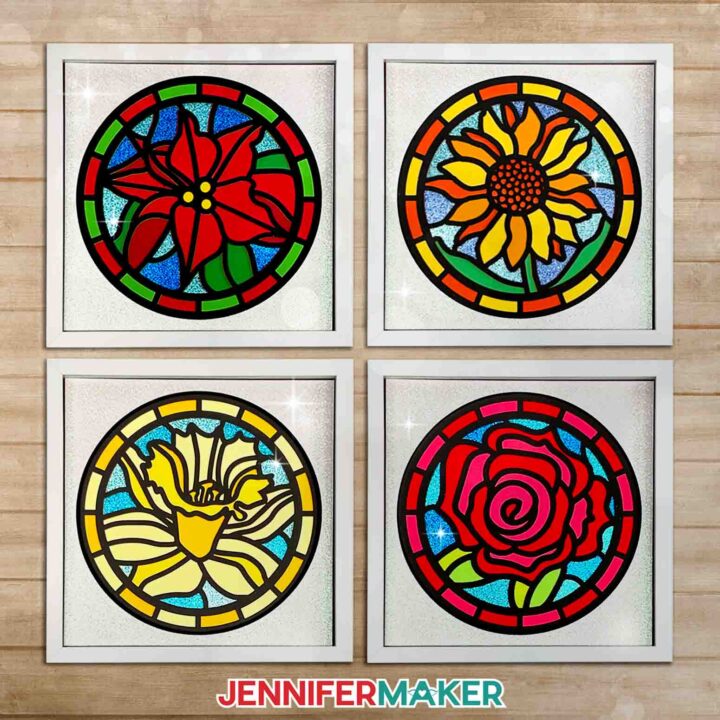
PREVIEW: Layered Paper Stained Glass
Learn how to make faux layered paper stained glass art!
Materials
- One (1) Sheet 12” x 12” White Glitter Cardstock
- One (1) Sheet 12” x 12” 65 lb. Black Cardstock
- One (1) Pack 12” x 12” Recollections 65 lb. Glitter Blues (I used one sheet each of two shades for each design)
- A variety of colored 65 lb. cardstock, depending on the design. I used the following:
- One (1) Pack 12” x 12” Recollections Red Palette (One sheet each of two shades for the Rose and one sheet each of two shades for the Poinsettia)
- One (1) Pack 12” x 12” Recollections Green Palette (One sheet each of two shades for the Rose, one sheet of one shade for the Poinsettia, and one sheet of one shade for the Sunflower)
- One (1) Pack 12” x 12” Recollections Orange & Yellow Palette (One sheet each of three shades for the Daffodil and one sheet each of three shades for the Sunflower)
- One (1) Pack 24” x 28” Cricut Cardstock Sampler, Bright Bow - (Optional: One sheet each of 7 shades for the Cricut Venture version of the Sunflower)
- One (1) Pack 28” x 22” Orange Posterboard - (Optional: One sheet for Cricut Venture version of the Sunflower)
- One (1) 12" x 12" Shadow Box Frame
- Design #563 (My free SVG/DXF/PDF design files available in my free resource library - get the password by filling out the form at the bottom of this page)
Tools
- A method to cut your cardstock: I’m using the Cricut Maker 3, but you can also use the Cricut Venture, Cricut Maker, Cricut Explore Series, Cricut Joy Xtra, or Cricut Joy for this project!
- Cricut Green StandardGrip Mat 12″ x 12″
- Brayer Tool
- Spatula
- Weeding Tool
- Scraper (For cleaning machine mats between cutting each layer)
- Ruler
- Bearly Art Glue
- OPTIONAL: Bearly Art Adhesive Foam Squares
- OPTIONAL: 1" Double-Sided Adhesive Foam Tape
Instructions
This project is now available at https://jennifermaker.com/layered-paper-stained-glass.
Notes
Finished size:
11.5” x 11.5” for each design
(12” x 12” in frame)
Day 12: How To Sublimate Coasters
 Day 12: How To Sublimate Coasters
Amazon Shopping List
Techniques: Learn how to prepare designs for different shapes, how to sublimate on neoprene, MDF, Cricut’s square Infusible Ink coasters, and Cricut’s round ceramic Infusible Ink coasters. Plus, how they handle moisture and stains!
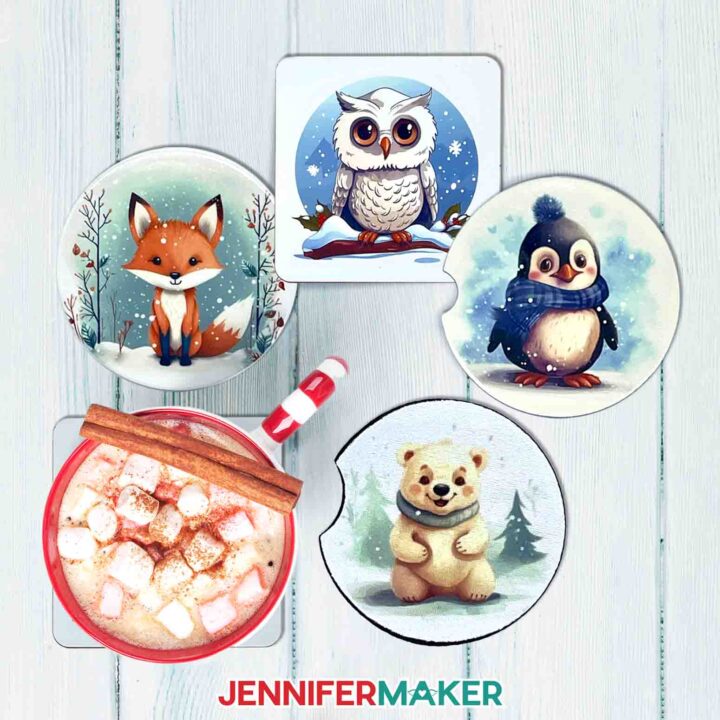
PREVIEW: How to Sublimate Coasters
Learn how to sublimate coasters with cute winter designs!
Materials
- Four (4) MDF Sublimation Coasters
- Four (4) Neoprene Sublimation Costers
- One (1) 4-Pack of Cricut Square Infusible Ink Coasters
- One (1) 4-Pack of Cricut Round Ceramic Infusible Ink Coasters
- One (1) Sheet of 8.5” x 11” A-Sub Sublimation Paper
- One (1) Sheet of 12” x 12” White Cardstock (for Sublimation)
- White Butcher Paper
- Design #562 (My free PNG/PDF design files are available in my free resource library – get the password by filling out the form at the bottom of this page)
Tools
- Sublimation Printer or Printer Converted for Sublimation
- Sublimation Ink
- A way to cut your sublimation print - I’m using the Cricut Maker 3 but you can also use the original Maker, an Explore series machine, the Venture or Joy Xtra.
- Heat Press - I used my EasyPress, but you can also use an Autopress or a traditional heat press
- Cricut EasyPress Mat
- Cricut Blue LightGrip Machine Mat, 12" x 12"
- Proper Ventilation - I like to use this fan
- Heat Resistant Tape
- Brayer
- Lint Roller
- Measuring Tape
Instructions
This project is available at https://jennifermaker.com/how-to-sublimate-coasters/.
Day 13: How To Design Side Edge Cards
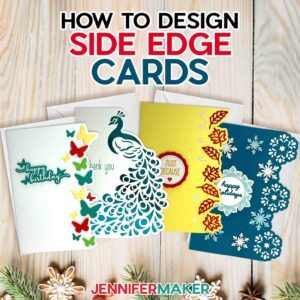 Day 13: How To Design Side Edge Cards
Amazon Shopping List
Techniques: Learn how to create your own side edge cards using elements from my templates for perfectly aligned back and front pieces.
PREVIEW: Side Edge Cards
Learn how to make fun side edge cards with some cardstock, glue, and foam adhesive.
Materials
- Several Sheets of 8.5" x 11" or 12" x 12" 65 lb. Cardstock (various colors)
- One (1) Sheet of 8.5" x 11" or 12" x 12" 65 lb. White Cardstock
- One (1) Sheet of 8.5" x 11" or 12" x 12" White Glitter Cardstock (optional for snowflakes)
- One (1) Sheet of 8.5" x 11" or 12" x 12" Blue Metallic Cardstock (optional for peacock card liner)
- One (1) 3” x 2” Piece of Permanent Vinyl (optional for sentiment)
- One (1) 3” x 2” Piece of StandardGrip Transfer Tape (optional for sentiment)
- Design #564 (My free SVG/PDF/DXF design files are available in my free resource library - get the password by filling out the form at the bottom of this page)
Tools
- A way to cut your materials - I’m using the Cricut Maker 3, but you can also use the Cricut Maker, a Cricut Explore Series machine, the Cricut Venture, or even the Cricut Joy Xtra.
- Cricut Green StandardGrip Machine Mat 12" x 12"
- Scoring Stylus (optional for files with score lines) -OR-
- Single Scoring Wheel (optional for files with score lines)
- Craft Glue (I used Bearly Art Precision Glue)
- Adhesive Foam Squares
- Brayer
- Spatula
- Scraper
- Weeding Tool
- Tweezers (optional)
Instructions
This project is now available at https://jennifermaker.com/side-edge-cards/.
Day 14: How to Sublimate Pens
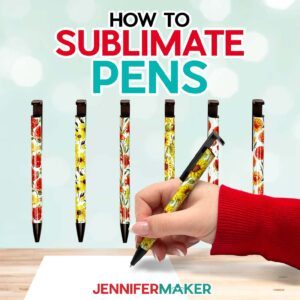 Day 14: How to Sublimate Pens
Amazon Shopping List
Techniques: Learn how to add names or custom elements to pen wraps in Cricut Design Space, how to use a helpful tool, and how to sublimate pens in a convection oven or air fryer!
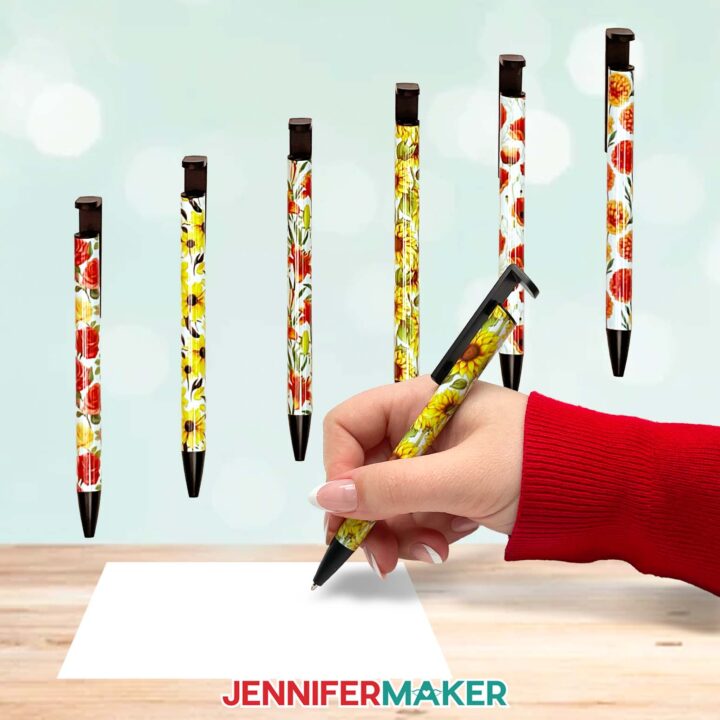
PREVIEW: How To Sublimate Pens
Learn how to sublimate pens with custom designs!
Materials
Tools
- Sublimation Printer - I used a converted Epson EcoTank ET-4700 Inkjet Printer
- Sublimation Ink
- Convection Oven -OR-
- Air Fryer (The air fryer I used is currently unavailable but there are many other great options.)
- Pinch Perfect Sublimation Pen Pincher
- Oven Thermometer
- Fan for Ventilation
- Heat Resistant Gloves
- Heat Resistant Tape
- Heat Gun
- Shrink Wrap Sleeve (Look for these in your pen kit!)
- Silicone Mat
- Looped Tape Measure
- Scissors -OR-
- Paper Trimmer
- Scraper
- Isopropyl Alcohol -AND-
- Coffee Filters
- Cooling Rack
Instructions
This project tutorial is now available at https://jennifermaker.com/how-to-sublimate-pens/.
Notes
Typefaces:
“Alexa” - Biosha Script Free Alternative: Bonspire Script
“Smell the Roses” - ZP Gingerbread Cake Free Alternative: Chickens Lovers
Size:
Ink Pen Total Length: 5.5”
Ink Pen Sublimation Area: 4.25” Length x 1.26” Circumference
Care Instructions:
Clean only the barrel of the pen with soapy water after removing the pen mechanism. Allow to air dry.
Day 15: Layer HTV on Canvas
 Day 15: Layer HTV on Canvas
Amazon Shopping List
Techniques: Learn how to cut iron-on vinyl to save scraps, how to layer different colors with perfect alignment, and the differences between pressing vinyl on canvas boards vs stretched canvases with frames.
PREVIEW: How to Layer HTV on Canvas
Learn how to layer HTV on canvas to make wall art.
Materials
- 10 x 12 inches Green Apple Cricut Everyday Iron-on Vinyl
- 10 x 12 inches Cherry Cricut Everyday Iron-on Vinyl
- 10 x 12 inches Teal Cricut Everyday Iron-on Vinyl
- 10 x 12 inches Yellow Cricut Everyday Iron-on Vinyl
- 10 x 12 inches Black Cricut Everyday Iron-on Vinyl -OR-
- 10 x 12 inches Green Apple HTVRont HTV
- 10 x 12 inches Red HTVRont HTV
- 10 x 12 inches Turquoise HTVRont HTV
- 10 x 12 inches Yellow HTVRont HTV
- 10 x 12 inches Black HTVRont HTV
- 10 x 10 inch canvas panels -OR-
- 10 x 10 inch Stretched Canvas
- Design #568 (My free SVG/PDF/DXF design files are available in my free resource library - get the password by filling out the form at the bottom of this page)
Tools
- A way to cut your cardstock - I’m using the Cricut Maker 3, but you can also use the Cricut Maker, a Cricut Explore Series machine, or the Cricut Venture
- Cricut Green StandardGrip Machine Mat 12" x 12"
- Brayer
- Weeding Tool
- Scissors - optional
- Cricut EasyPress 2 Heat Press 12" x 10" -or-
- Cricut Autopress
- Cricut EasyPress Mini Heat Press -optional
- Cricut EasyPress Mat 16" x 20"
- Pencil
- Pliers - for stretched canvas
- Flat Head Screw Driver - for stretched canvas
- Heat Resistant Tape
- Staple Gun - for stretched canvas
Instructions
This project is now available at https://jennifermaker.com/htv-on-canvas.
Day 16: Reminder Stickers For Cricut Beginners
 Day 16: Reminder Stickers For Cricut Beginners
Amazon Shopping List
Techniques: Learn how to customize PNGs in Cricut Design Space, make kiss cut stickers, and pick up good Cricut habits along the way.
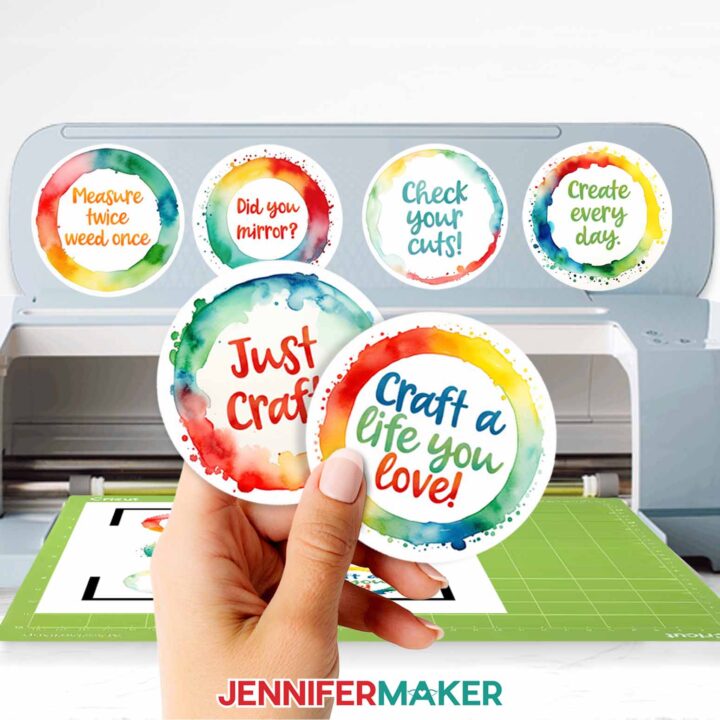
PREVIEW: Cricut for Beginners Reminder Stickers
Learn how to make cute reminder stickers!
Materials
Tools
Instructions
This tutorial is now available at https://jennifermaker.com/cricut-beginner-mistakes.
Notes
Typeface: Forever Grateful
Day 17: Personalized Snowflake Ornaments
 Day 17: Personalized Snowflake Ornaments
Amazon Shopping List
Techniques: Learn how to design a custom name snowflake in Cricut Design Space, cut intricate designs, and layer paper for sturdy results.
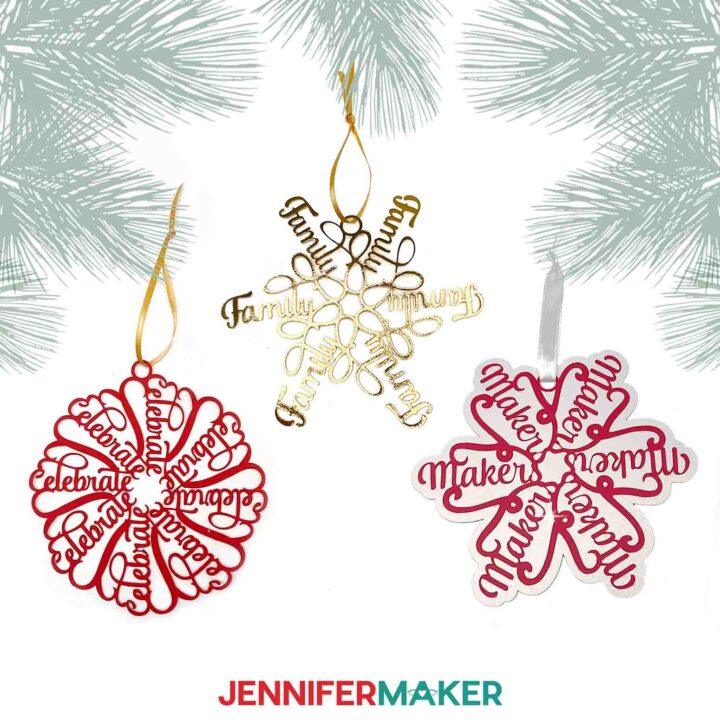
PREVIEW: Make A Personalized Snowflake Ornament
Learn how to make a personalized snowflake ornament with a name using Cricut Design Space and paper.
Materials
Tools
- A way to cut your cardstock - I’m using the Cricut Maker 3 but you can also use the original Maker, an Explore series machine, the Venture, the Joy, or the Joy Xtra.
- Cricut Green StandardGrip Machine Mat, 12" x 12"
- Brayer
- Scraper
- True Control Knife
- Bearly Art Precision Craft Glue
- Scissors
- Weeding Tool
Instructions
This project is now available at https://jennifermaker.com/personalized-snowflake-ornament.
Notes
Day 18: How to Draw with Cricut
 Day 18: How to Draw with Cricut
Amazon Shopping List
Techniques: How to draw with Cricut pens and markers to make cards, posters, and Infusible Ink mugs using the many different options available.

PREVIEW: How to Draw With Cricut
Learn how to draw with Cricut pens and markers while creating note cards, sublimation mugs, and large-scale posters!
Materials
- Cricut Fine Point 0.4 mm Pens (for card)
- Cricut Venture Permanent Markers 2.5 mm (for poster)
- Cricut Infusible Ink Pens (for mug)
- Cricut Infusible Ink Markers (for mug)
- One (1) Cricut Cold-Press Watercolor Card, R40 Size (for greeting card)
- One (1) Sheet of 24” x 28” White Cardstock (for poster)
- One (1) Cricut Infusible Ink Compatible Mug, 12 oz (you can also use non-Cricut sublimation mugs)
- Two (2) Sheets of 8.5” x 11” Laser Copy Paper (for infusible ink mug)
- You can also try these designs with other pens and markers:
- Cricut Watercolor Marker and Brush Set
- Cricut Joy Metallic 1.0 mm Markers
- Cricut Gel 1.0 mm Pens
- Cricut Extra Fine Point 0.3 mm Pens
- Cricut Glitter Gel 0.8 mm Pens
- Cricut Opaque Gel 1.0 mm Pens
- Design #569 (My free SVG/DXF/PDF design files are available in my free resource library – get the password by filling out the form at the bottom of this page)
Tools
- A way to draw and cut your images - I’m using the Cricut Maker 3, but you could also use the Cricut Maker, an Explore Series Machine, the Cricut Joy, the Cricut Joy Xtra, or the Cricut Venture.
- Cricut Green StandardGrip Machine Mat 12" x 12" -OR-
- Cricut Green StandardGrip Machine Mat 24” x 28”
- Cricut Mug Press
- Heat Resistant Pad
- Heat Resistant Tape
- Brayer
- Scraper
- Lint Roller
Instructions
This project is now available at https://jennifermaker.com/how-to-draw-with-cricut
Notes
Card Finished Size: 4.75” x 6.625” when folded
Poster Finished Size: 24” x 28”
Mug Finished Size: 3.25” x 7.75” print
Typefaces are all hand-drawn
Day 19: Custom Family Name Ornaments
 Day 19: Custom Family Name Ornaments
Amazon Shopping List
Techniques: Learn how to design a custom name tree or round ornament in Cricut Design Space, cut intricate designs, and layer paper for sturdy results.
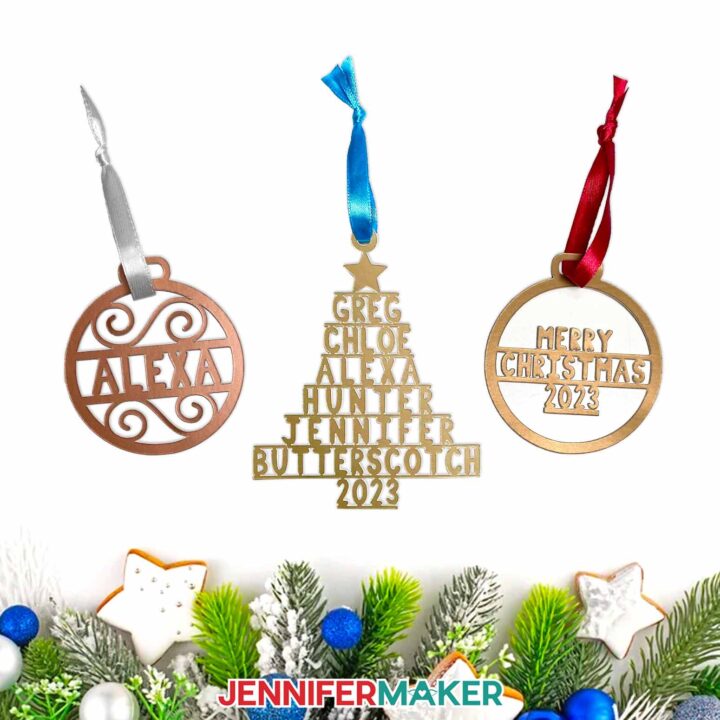
PREVIEW: Custom Family Name Ornament
Learn how to make a custom family name ornament with Cricut Design Space!
Materials
Tools
- A way to cut your cardstock - I’m using the Cricut Maker 3 but you can also use the original Maker, an Explore series machine, the Venture, the Joy, or the Joy Xtra.
- Cricut Green StandardGrip Machine Mat, 12" x 12"
- Brayer
- Scraper
- True Control Knife
- Bearly Art Precision Craft Glue
- Scissors
- Weeding Tool
- Spatula
- Self-Healing Cutting Mat
Instructions
This project is now available at https://jennifermaker.com/custom-family-name-ornament.
Day 20: Faux Leather Bracelets
 Day 20: Faux Leather Bracelets
Amazon Shopping List
Techniques: How to size a design for your wrist, cutting faux leather, pressing iron-on vinyl on leather, how to add snap closures to leather.

PREVIEW: How To Make Leather Bracelets
Learn how to make leather bracelets with your Cricut!
Materials
- One (1) Sheet of Colored Faux Leather - OR-
- Cricut Everyday Iron-On - Gold
- Cricut Iron-On Vinyl - White Glitter
- Cricut Everyday Iron-On - Yellow
- Snap Fastener Kit
- Design #571 (My free SVG/DXF/PDF design files are available in my free resource library – get the password by filling out the form at the bottom of this page)
Tools
- A way to cut your faux leather and vinyl - I’m using the Cricut Maker 3 but you can also use the original Maker, an Explore series machine, the Venture, Joy, or Joy Xtra.
- Cricut Deep-Point Blade (Optional)
- Cricut Purple StrongGrip Machine Mat, 12" x 12"
- Cricut Green StandardGrip Machine Mat, 12" x 12"
- Brayer
- Weeding Tool
- Heat Press - I used my EasyPress, but you can also use an Autopress or a traditional heat press
- EasyPress Mat
- Soft Measuring Tape
- Scissors
- Painter's Tape
- Ruler
- Hammer or Mallet
- Butcher Paper
- Cricut Trimmer
- Self Healing Mat
Instructions
This project is now available at https://jennifermaker.com/how-to-make-leather-bracelets.
Day 21: Metallic Puff Iron-On Vinyl
 Day 21: Metallic Puff Iron-On Vinyl
Techniques: How to use the right preparation, heat, and pressing steps to get consistent results using metallic puff iron-on vinyl.

PREVIEW: How To Use Metallic Puff Vinyl
Learn how to make shirts with metallic puff iron on vinyl!
Materials
- Cotton T-Shirt Teal -or-
- Cotton T-Shirt Teal
- HT Puff Metal silver
- HT Puff Metal gold
- Siser Smooth Glitter HTV - Gold - optional
- Siser Smooth Glitter HTV - Silver - optional
- Siser Smooth Glitter HTV - Clear - optional
- Reflective Rainbow HTV - optional
- Design #572 (My free SVG/PDF/DXF design files are available in my free resource library - get the password by filling out the form at the bottom of this page)
Tools
- [A method to cut your vinyl]( — I used the amazing Cricut Maker 3, with the Fine-Point Blade but you can use any Maker or Explore
- Cricut Green StandardGrip Mat, 12" x 12"
- Cricut EasyPress 2 - 12"X10"
- Cricut Autopress
- Cricut Brayer
- Cricut Scissors
- Cricut Spatula
- Cricut Weeding Tool
- Wood Cutting Board - 16" X 11" X 1"
- Lint Roller
Instructions
This project is now available at https://jennifermaker.com/metallic-puff-iron-on-vinyl.
Notes
Typeface used: Point Panther, The Bold Font (free alternative)
Day 22: Layered Paper Lantern
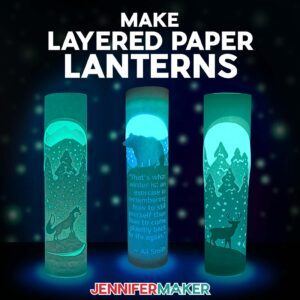 Day 22: Layered Paper Lantern
Amazon Shopping List
Techniques: How to cut vellum and cardstock, selecting a font that will remain legible when cut from paper.
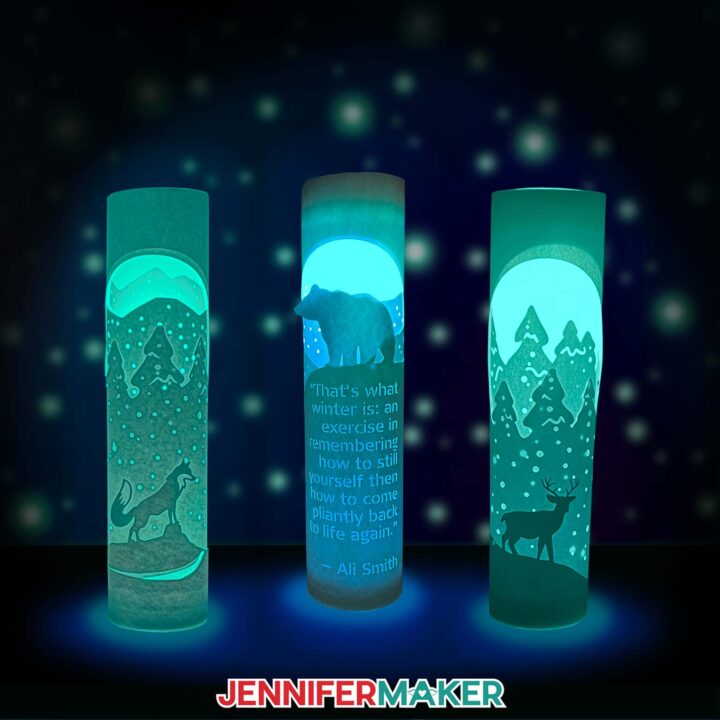
PREVIEW: Paper Lanterns with Lights
Learn how to make paper lanterns with lights using a little glue, some cardstock, an LED light, and about 45 minutes of your time!
Materials
- Three (3) Sheets of 12" x 12" 65 lb. Cardstock (I used white)
- Two (2) Sheet of 12”x12” Vellum
- ¼” Double Sided Tape
- A way to light up your layered pillar luminary, such as One (1) Battery-Operated LED Puck Light -AND-
- Three (3) AAA Batteries
- Fine Point Permanent Marker
- Design #573 (My free SVG/DXF/PDF design files are available in my free resource library – get the password by filling out the form at the bottom of this page)
Tools
- A method to cut your cardstock: I'm using the Cricut Maker 3, but you can also use the Cricut Maker, a Cricut Explore Series machine, or the Cricut Venture
- Cricut Green Standard Grip Machine Mat 12" x 12"
- Brayer
- Scraper
- Spatula
- Weeding Tool (for popping out small cutouts from intricate areas)
- Craft Glue
Instructions
This project is now available at https://jennifermaker.com/paper-lanterns-with-lights.
Day 23: How To Sublimate Glass Cans
 Day 23: How To Sublimate Glass Cans
Amazon Shopping List
Techniques: How to size and print a sublimation design to fit a round blank, how to sublimate a design on clear or frosted glass projects.

PREVIEW: Sublimation Beer Can Glass
Learn how to decorate a beer can glass with sublimation or vinyl!
Materials
- One (1) Sublimation-Ready Frosted Beer Can Glass -OR-
- One (1) Sublimation-Ready Clear Beer Can Glass
- One (1) Sheet of A-SUB 125g Sublimation Paper 8.5" x 14" -OR-
- Butcher Paper
- Design #570 (My free PNG/PDF design files available in my free resource library - get the password by filling out the form at the bottom of this page)
Tools
- Sublimation Printer - I used a converted Epson EcoTank ET-4700 Inkjet Printer
- Convection Oven
- Oven Thermometer
- Sublimation Ink
- Fan for Ventilation
- Heat Resistant Gloves
- Heat Resistant Tape
- Looped Tape Measure
- Scissors -OR-
- Paper Trimmer
- Scraper
- Painter's Tape
- Isopropyl Alcohol -AND-
- Coffee Filters
- Cooling Rack
Instructions
This project is now available at https://jennifermaker.com/sublimation-beer-can-glass/.
Day 24: HTV Mistakes To Avoid
 Day 24: HTV Mistakes To Avoid
Techniques: Learn lots of tips and ideas to avoid heat transfer vinyl mistakes while making cute foodie T-shirts!

PREVIEW: HTV Mistakes
Learn how to avoid some of the most common HTV mistakes when making these cute and fun food-themed shirts!
Materials
- One (1) Hanes Women's Perfect-T Short Sleeve Cotton Crewneck T-Shirt -OR-
- One (1) Cricut Shirt Blank - Women’s V-neck -OR-
- One (1) Cricut Shirt Blank - Men’s Crew Neck
- Glitter Iron-on White Vinyl
- Iron-On Black Vinyl
- Iron-On Orange SportFlex Vinyl
- Iron-On Blush Vinyl
- Iron-On Green Apple SportFlex Vinyl
- Iron-On Vinyl Wanderer Pack (Teal/Raspberry/Grey)
- Iron-On Vinyl Elegance Pack (Red/Black/White)
- Design #575 (My free SVG/PDF/DXF design files are available in my free resource library - get the password by filling out the form at the bottom of this page)
Tools
- A way to cut your vinyl - I’m using the Cricut Maker 3, but you can also use the Cricut Maker, a Cricut Explore Series machine, the Cricut Venture, or even the Cricut Joy or Joy Xtra.
- Cricut Green StandardGrip Machine Mat 12" x 12"
- Heat Press - I used the EasyPress but -
- You can also use the Autopress -or-
- Home Iron
- Pressing Pad
- Brayer
- Weeding Tool
- Heat Resistant Tape
- Lint Roller
- Butcher Paper
- Scissors
- Ruler
- Optional: My T-Shirt Ruler Guides
Instructions
This project is now available at https://jennifermaker.com/htv-mistakes.
Notes
Care:
Let the vinyl sit for at least 24 hours. Then, wash your shirt inside out and do not use any bleach.
Typefaces Used:
JM Lemonade
JM Groovy
JM Sweet
Beachwood
Finished Sizes:
Taco: 10” x 6.927”
Pizza: 9.997” x 6.736”
Coffee: 10.002” x 8.673”
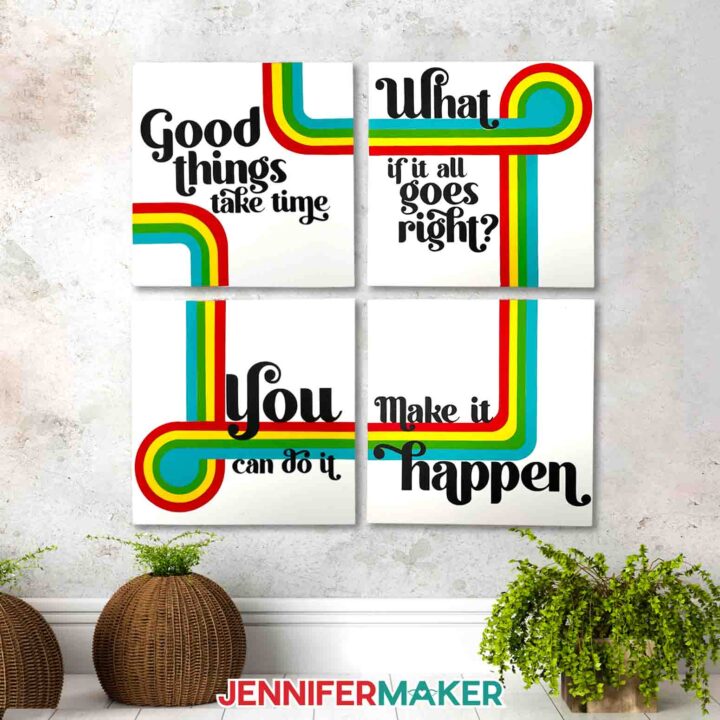
Day 25: Top Cricut Tips
 Day 25: Top Cricut Tips
Techniques: Lots of my best tips, plus instructions on how to get my new font, JM Merry, and prepare to use it in Cricut Design Space.
PREVIEW: Top Cricut Tips of 2023: Upload A New Font to Cricut Design Space
Learn my Top 10 Cricut TIps 2023 for better Cricut crafting!
Instructions
This project is now available at https://jennifermaker.com/cricut-tips-top-10.
Notes
Fonts used: JM Merry