
Learn how to make designs that fit using my free floating ornament size chart!
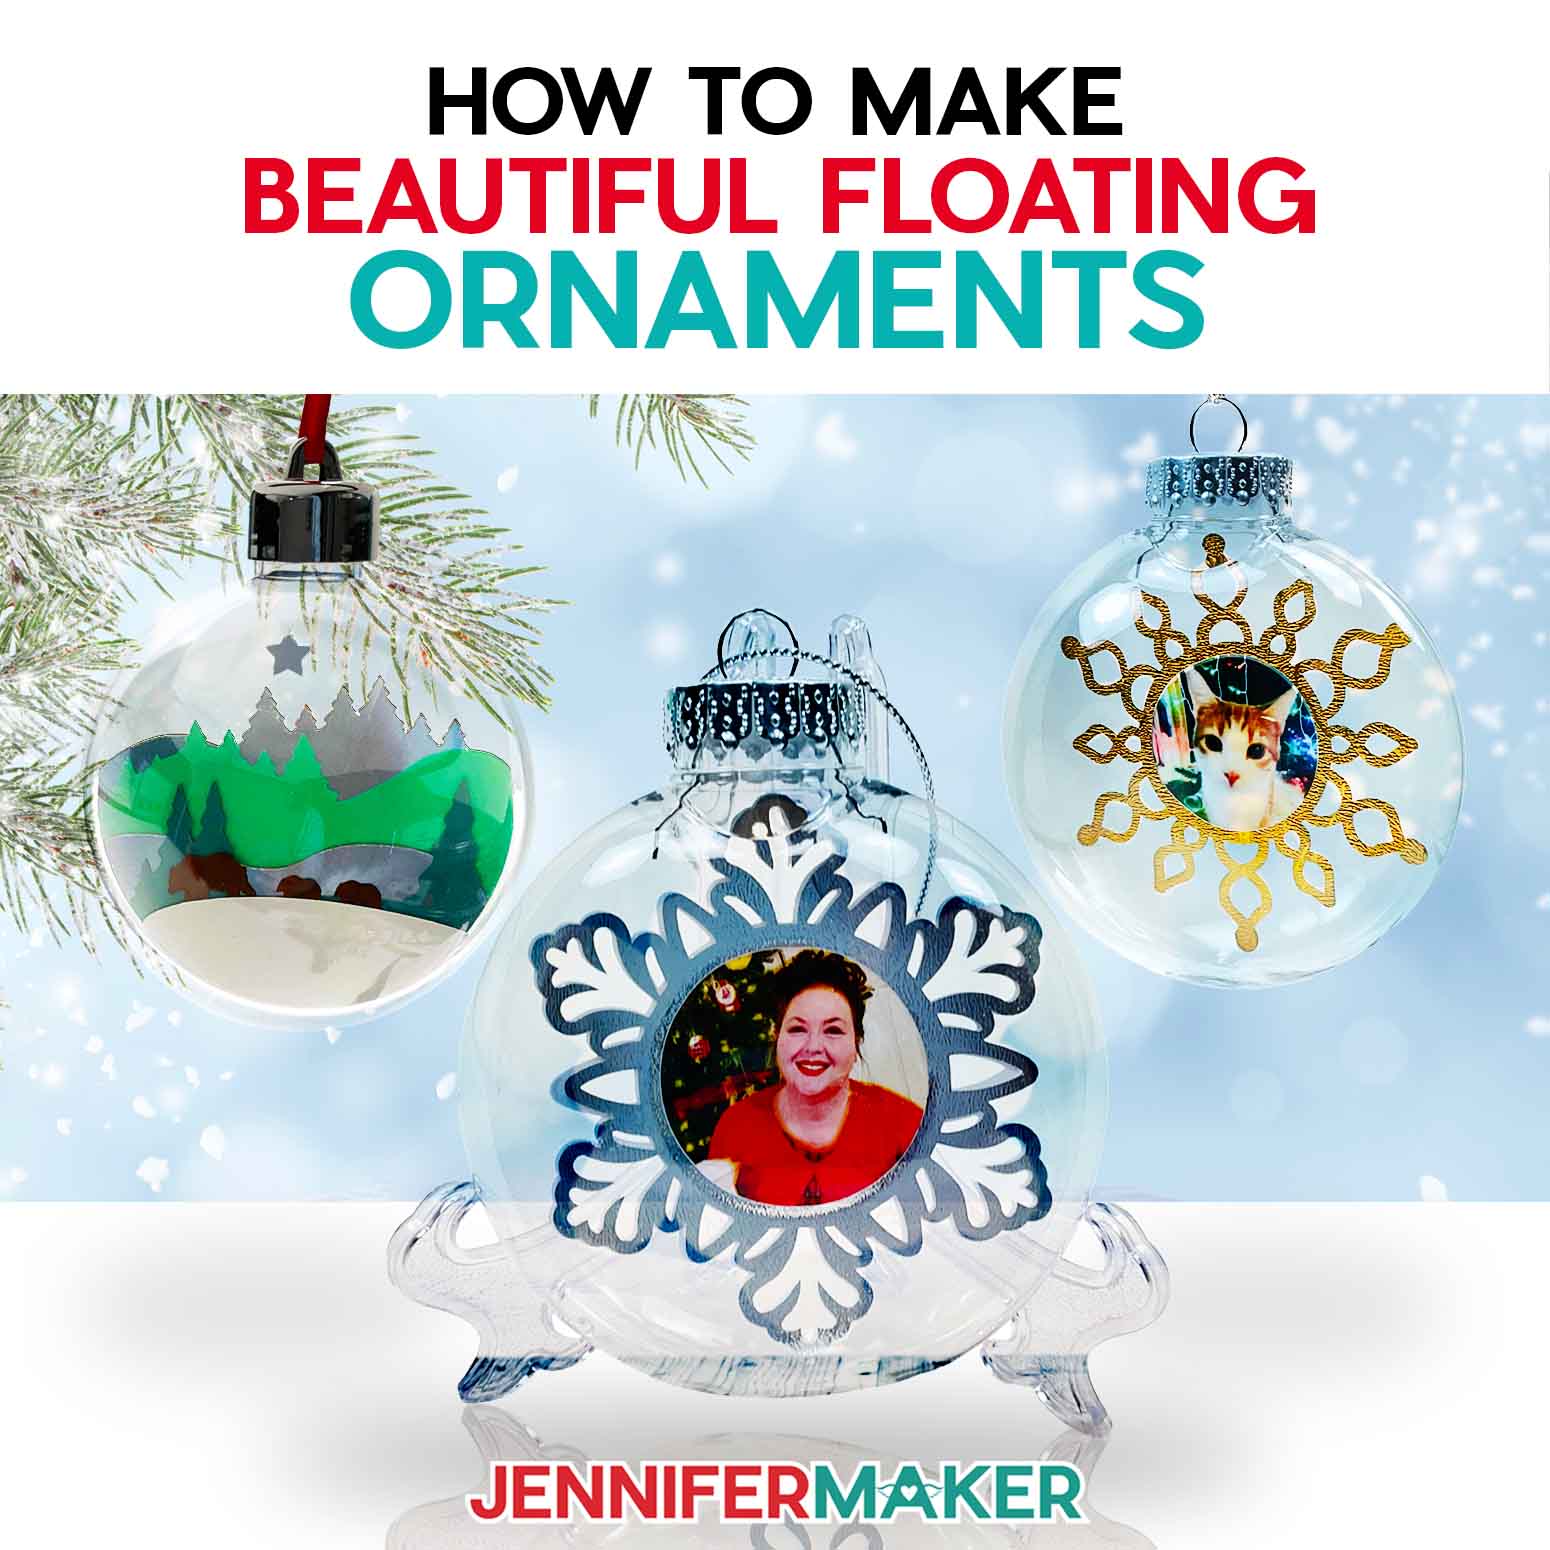
Having trouble printing or cutting designs to fit inside your disc or round Christmas ornaments? You can save time and supplies with my floating ornament size chart! I’ll show you which sizes fit in the most common ornaments, and how to adjust them for others. Plus, I have some great ideas about making custom floating ornaments by printing on clear materials. It’s easier than you think, once you know the right materials and tools!
Want to save this project? Enter your email below and we’ll send the project straight to your inbox.
If you’ve ever tried to make floating ornaments like this before, you know that it can be tricky to get the insert looking right. You end up using a lot of trial and error, and instead of creating some great gifts, you just end up frustrated.
Don’t worry — I can help! The key is cutting materials at the right size, so I’ve made a floating ornament size chart to make things easier. I’ve done all of the testing for you, and am happy to share my findings so you can save yourself some headaches!
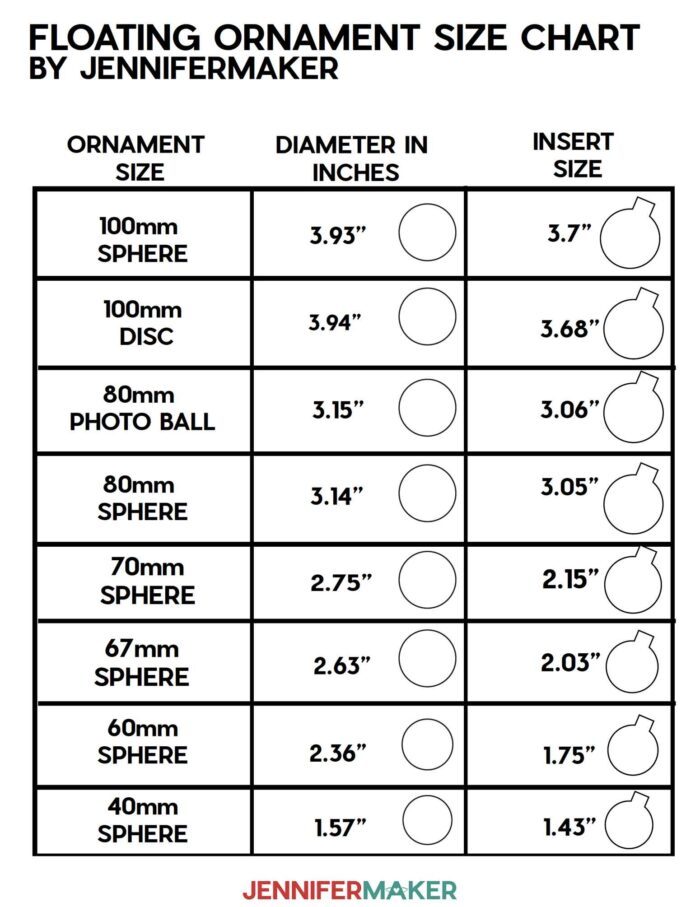
My handy size chart shows you exactly what size insert you need based on your ornament’s size, cutting way down on the guesswork involved in getting these ornaments looking their best.
First, I’ll show you how to measure different ornament styles to determine what size they actually are — which is not necessarily the size printed on the package. With these, every millimeter matters for a good-fitting insert!
We’ll use this size to create a template in Cricut Design Space, then cut it out of acetate using a Cricut cutting machine. We’ll use the template to make sure we’ve got the perfect size insert. If it fits, you’re good to go!
Why acetate? It’s rigid and springs open inside the ornaments, allowing you to get a really accurate read of the size of the inside (and how big your final inserts should be).
You may have noticed, though, that I said we’d cut down on the guesswork, not eliminate it. That’s because even though my size chart and measuring tutorial can help you get really, really close to the right insert size, there’s still room for error.
If your template ends up being a little too big, you can trim it by hand until it fits perfectly. If it’s too small, you can adjust the size in Design Space, then re-cut it out of another piece of acetate.

So, even though some trial and error might still be required, this process ensures that you will always have the perfect insert size figured out for all ornaments you’ll ever make of that size and style (and brand). Don’t skip making and using the acetate template, it’s definitely worth it!
If you’re using multiple sizes and styles of ornament, you can create a whole set of ornament templates to make this part a breeze! Then if you ever want to make an ornament with your own design, your template will already be ready to go.
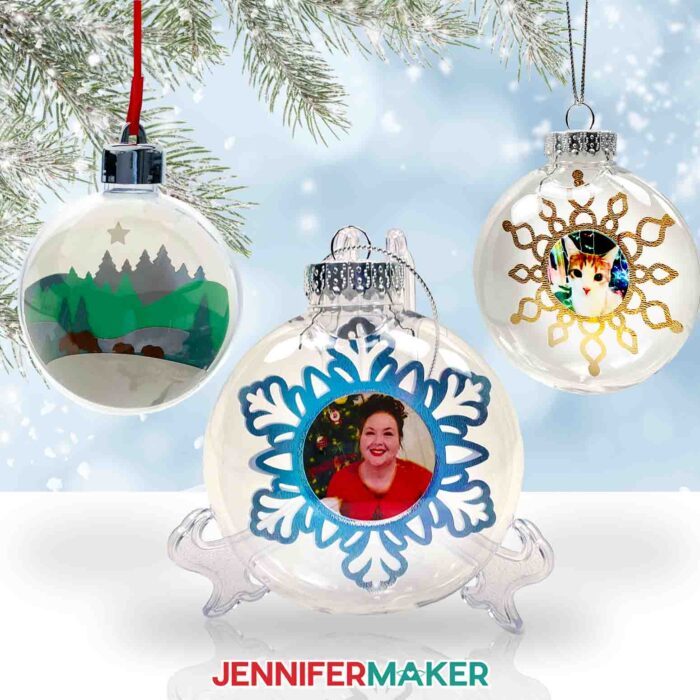
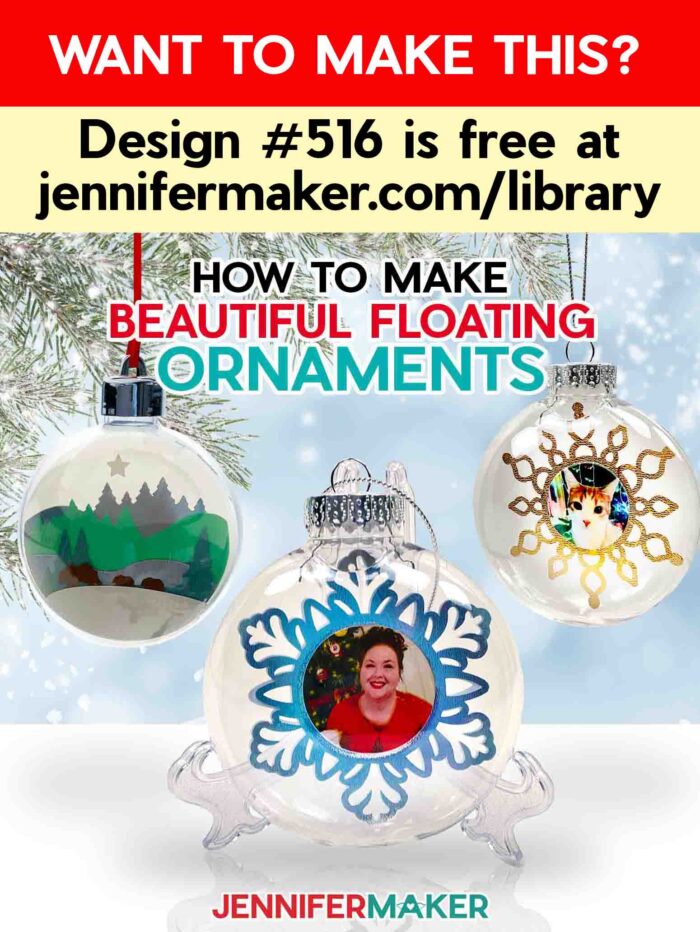
You can find the printable size chart in the download folder for this project, along with three free ornament design files for you to cut with your Cricut and “float” inside a clear ornament. There are two snowflakes meant to use as photo frames, and one layered scene featuring a family of bears in a snowy forest. They are SO cute!
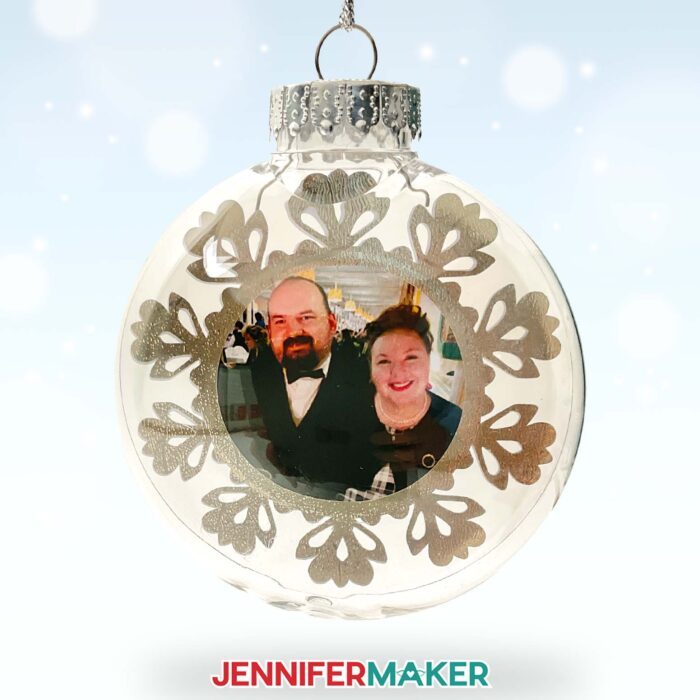
Speaking of photo ornaments, I’ll show you how to create them on two different materials for two different effects. For our first project, I’ll show you how to print a photo onto printable transparency film using your regular inkjet printer. The transparency film is thinner than acetate, and able to be printed on! This is a super cool idea, because the light from your tree will shine through the clear ornament and acetate, making the photo glow! After that, I’ll show you how to create a photo ornament insert out of printable vinyl (also using a standard inkjet printer) then add a vinyl snowflake frame.
Photo ornaments are a great way to add your favorite memories to the holiday! So, which photo method was my favorite, printable vinyl or printable acetate? You’ll need to watch my video tutorial to find out.
After I demonstrate the photo ornaments, I’ve got an bonus floating ornament design to share with you, too! It’s an adorable winter scene you can make it out of cardstock, featuring a sweet mama bear and her two babies walking through a snowy forest. You’re going to love it!
Before you get started, it’s important to know that this project involves a lot of detailed cutting — but it’s so worth the time! I recommend reviewing my Tips for Cleaner Cuts to get the best results on your ornament cut-outs.
When you’re finished creating and assembling your insert and ornament, reattach the top of the ornament and add a string or ornament hook to hang it. You can also add decorative accents to the top like small bows or faux holiday greenery. Have fun with it, and make it your own!
This is such a fun project idea to give as a special ornament gift, or add some joy to your own tree with some treasured memories from years gone by. Christmas time gets busy, so make a bunch with this year’s family photo for last-minute gifts, too!
Here’s a supply list of what you need to make a floating ornament using my floating ornament size chart! This post contains some affiliate links for your convenience (which means if you make a purchase after clicking a link I will earn a small commission but it won’t cost you a penny more)! Read my full disclosure policy.
Materials and Tools to Make a Floating Ornament
View my Amazon shopping list with the exact items we used to make this project
- 80 mm Clear Hanging Photo Ball Ornament -Or- 60 mm Clear Fillable Plastic Ornaments -Or- 100 mm Clear Plastic Fillable Christmas Ornament Discs
- 12″ x 12″ Acetate sheets
- Printable transparency film
- White Printable adhesive vinyl
- Color Inkjet Printer – I used my Epson Eco Tank
- Permanent adhesive vinyl – I used Cricut Textured Metallic Vinyl sampler pack with Gold, Silver, and Platinum – optional for frames
- Cricut Strong Grip Transfer Tape – to use with the textured metallic vinyl
- Green Cricut StandardGrip Mat 12″ x 12”
- Cricut Blue Holographic Adhesive Vinyl – optional for frames
- A way to cut the materials – I used the amazing Cricut Maker 3 but you can also use the original Maker or an Explore series machines
- Weeding Tool
- Brayer
- Scraper
- Tweezers
- Chopstick or Wooden Dowel or Pencil’s eraser side – to move ornament inserts into place
-
Optional – Assorted Cardstock – I used colors from this pack for the Bear ornament
-
Optional – Bearly Art Precision Glue (for Bear ornament)

- Design #516 – (My free SVG/PDF/DXF design files are available in my free resource library (get the password by filling out the form at the bottom of this page)
How to Make Your Own Floating Ornament
The detailed step-by-step assembly video on how to use the ornament size chart to make floating ornaments debuted during Maker Academy Weekend 2023, held online November 1-5, 2023. Get an on-demand pass to watch all 30+ workshops, each with a printable handbook, transcript, audio file, design files, and support with a VIP pass below:

Answers to Your Questions About How to Use a Floating Ornament Size Chart and Make Your Own
Q: Where is your tutorial for this project?
A: These floating ornaments and the size chart are a special project we made for our free Maker Academy Weekend 2023 event! A complete and detailed step-by-step video premiered during the event November 1-5, 2023 — this tutorial video was available to watch for free for 24 hours only during the event. If you missed it, you can get access to the full video, the 15-page printable handbook that details how to make this beautiful project with a VIP Pass to Maker Academy Weekend 2023, which comes with other perks and bonuses, too! Look at all the star ornaments made by our VIP passholders in the lead up to our big event!
Q: What size is a regular ornament?
A: There are several common sizes for Christmas ornaments, and my floating ornament size chart includes eight of the most common: 100mm sphere, 80mm sphere, 70mm sphere, 67mm sphere, 60mm sphere, 40mm sphere, 80mm photo ball, and 100mm disc shaped ornaments.
Q: How do you measure the size of an ornament?
A: When you’re measuring the size of your ornament, measure them across the widest spot. I find round sphere and disc shaped ornaments to be the easiest to create inserts for, so I’ve included eight different sizes of those sphere and disc styles in my floating ornament size chart PDF.
Q: Why do you recommend leaving bleed off for the transparency and on for the printable vinyl?
A: You can leave bleed on for transparency. Why? If bleed was off for the white vinyl, you’d have a white vinyl edge visible if the cut didn’t cut perfectly. Transparency, however, hides these kinds of mistakes really well — if your cut is slightly off, you’re unlikely to even be able to tell. Having bleed turned off also helps to save some ink!
Q: How do you cut your cardstock so intricately without tearing and ripping?
A: The key is to use a clean sticky machine mat and a clean fine point blade. Learn more about getting cleaner cuts on your Cricut cardstock projects in my Cricut Cutting Problems guide.
Q: Are there another layered paper ornaments like this I can make?
A: There sure are! My Layered Star ornament, DIY Photo Snowglobe ornament, and 3D Light Up Ornament are great projects with layered cardstock elements you’ll love to hang on your Christmas tree. I also have a Layered Star Lantern ornament tutorial that’s new this year!
Q: What size ornaments should I use for my tree?
A: The size of ornaments you choose to hang from your tree is ultimately a personal choice, but a good rule to follow is the bigger the tree, the bigger the ornaments, and vice versa. Large Christmas trees with strong branches can support the weight of bigger, heavier ornaments, but can also look really pretty decorated with a lot of smaller ornaments as well. For a tiny tree, you’ll want to opt for smaller, lighter ornaments that the branches are strong enough to handle.
Get my free SVG files to create these ornaments!
Get FREE access to this design and ALL of my SVG cut files!

Subscribe (free!) to my newsletter with updates and tips PLUS get instant access to my resource library with this file and all of my other free files, printables, and patterns! Once subscribed, I will send you a newsletter with details about my new free and helpful files each week.
Enter my free resource library for my latest files, printables, and patterns! Password is 'craft' -- please copy and paste that in at the link above. Thanks for being a subscriber!!
I SO hope you’ll make projects using our floating ornament size chart! Please share a photo of your ornaments in our Facebook group or tag me on social media with #jennifermaker.
Love,

Want to remember this? Save this Floating Ornament Size Chart and tutorial to your favorite Pinterest Board!