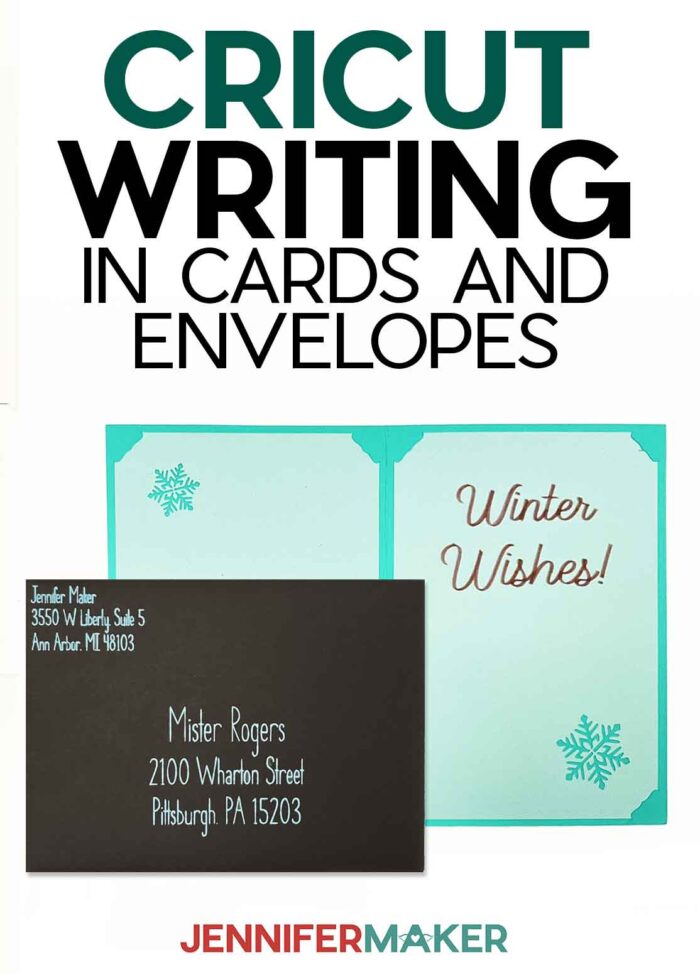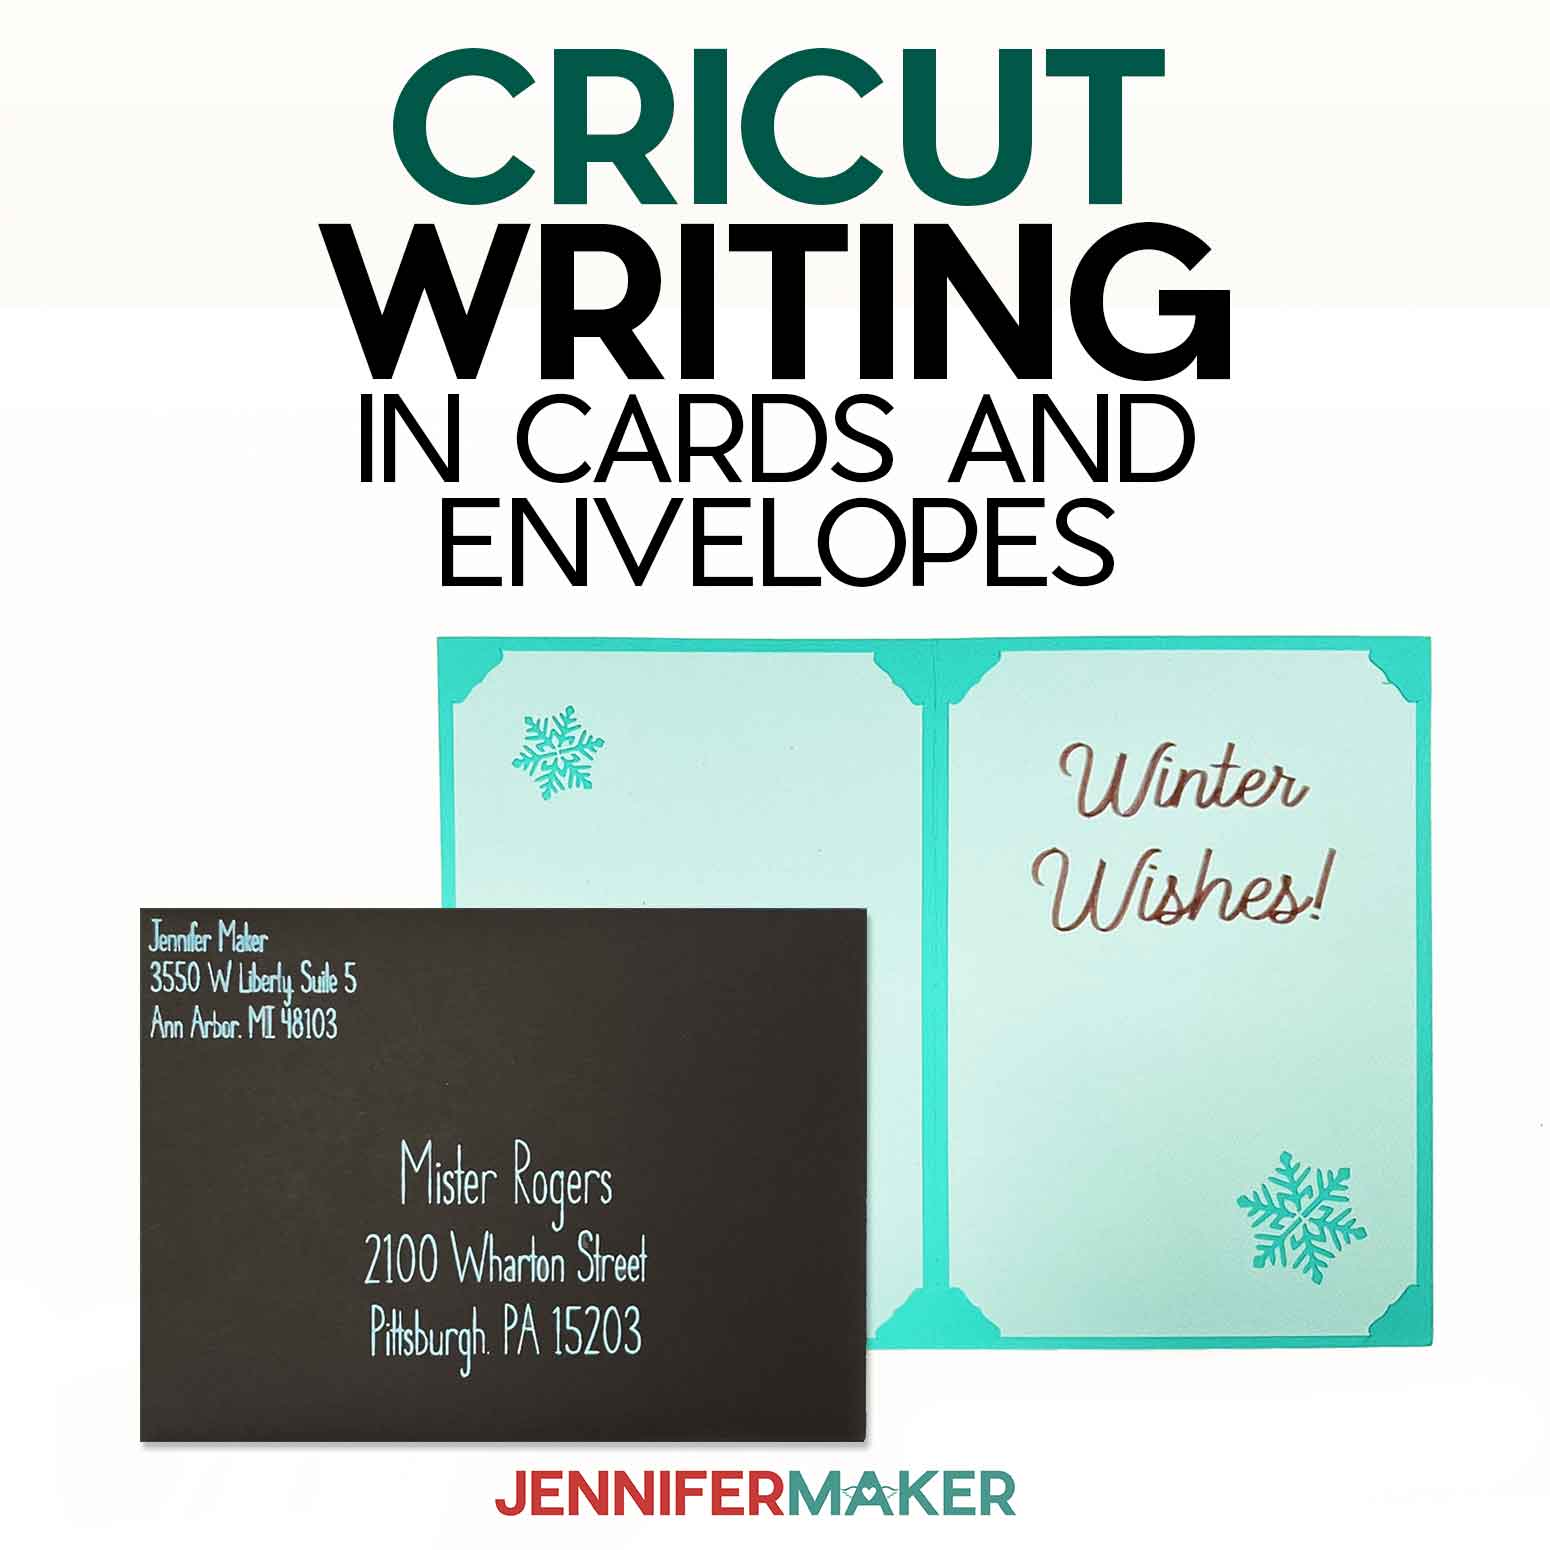
Learn how to use Cricut writing fonts to add perfect penmanship to projects!
Not every crafter has perfect penmanship, and that’s ok! But how can you add handwritten messages to cards if you (like me!) struggle with handlettering? Use the hundreds of Cricut writing fonts available! I’ll show you how to add written details to new and existing projects, including addressing envelopes or customizing labels. Better yet, I’m giving you two free writing fonts designed just for your Cricut.
Want to save this project? Enter your email below and we’ll send the project straight to your inbox.
Watch my step-by-step tutorial on how to use Cricut writing fonts:

Sometimes, a handwritten card can make all the difference. And if you have a Cricut and some single line fonts, you can it write for you! The message still comes from the heart, even if it’s written by a cutting machine, right?

After lots of trial and error, here are my top three tips for using Cricut writing fonts with the text tool:
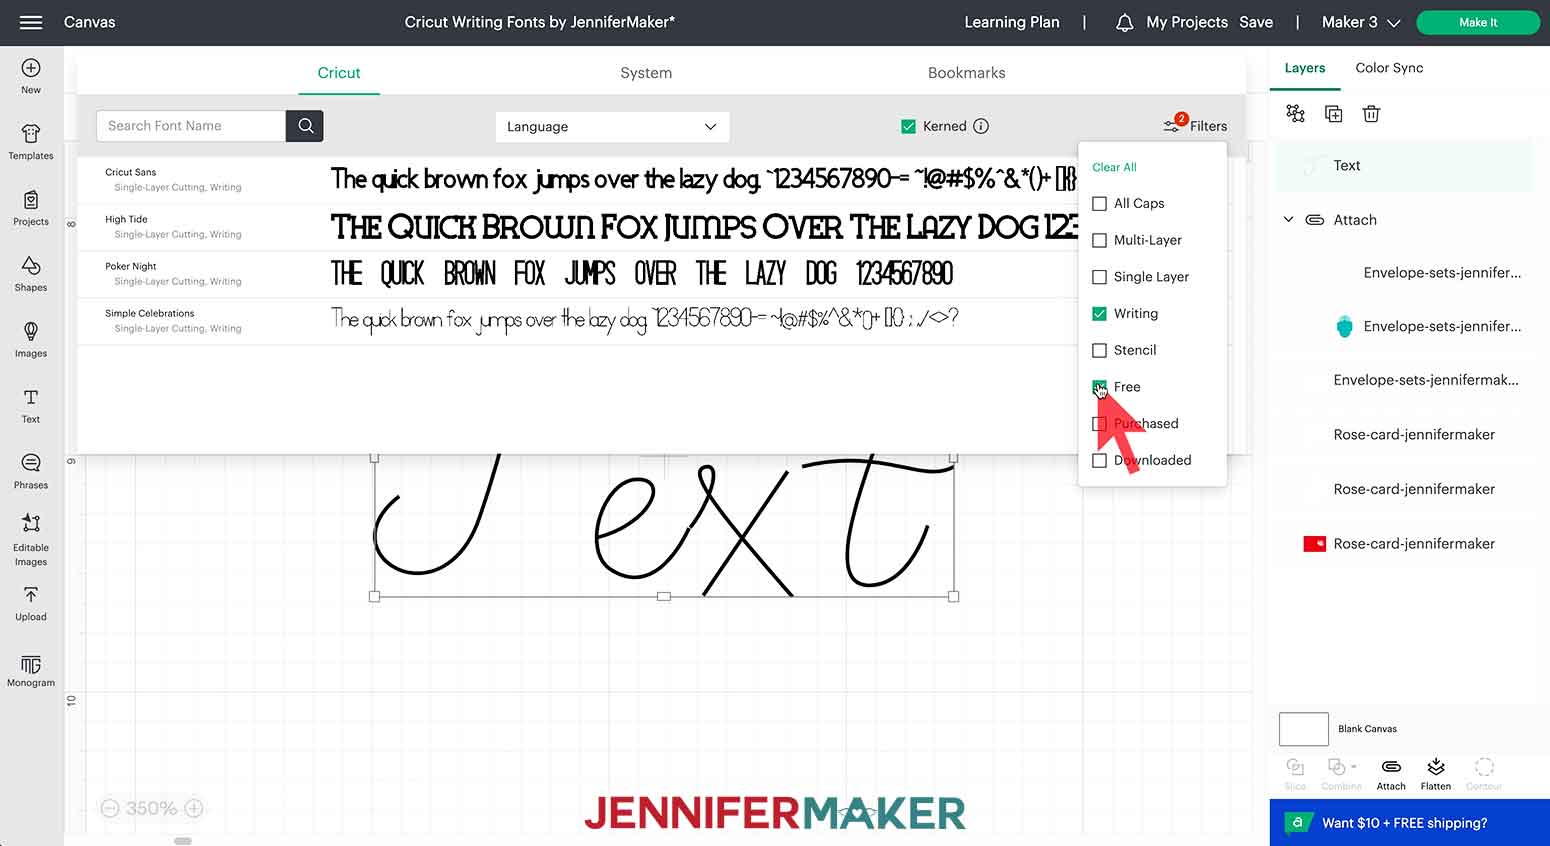
- Make sure the font you pick has a Writing style below its name in the Font menu. That means that the Cricut will be able to create the shapes using a single line at a time when you switch the Operation to Draw. If not, the pen will trace the outline of the letter where the cut lines would go, creating bubble letters! To see the differences, add a phrase to your Design Space canvas using Cricut Sans and make copies using the different operations and styles.
- To see the best writing fonts, use the Font Filters to select “Writing” and make sure the “Kerned” box is checked. Kerned fonts have good letter spacing, so Cricut writing fonts with that characteristic are going to look nicer than those without!
- Use the right tool for the design! After you change the Operation of a design to Draw, use the color box to set the writing tool to the size and type you plan to use. The design on the Canvas will change to look similar to the actual result, allowing you to see if a thicker or thinner pen or marker is a better choice. It’s always good to test different pens before you commit on a special project!
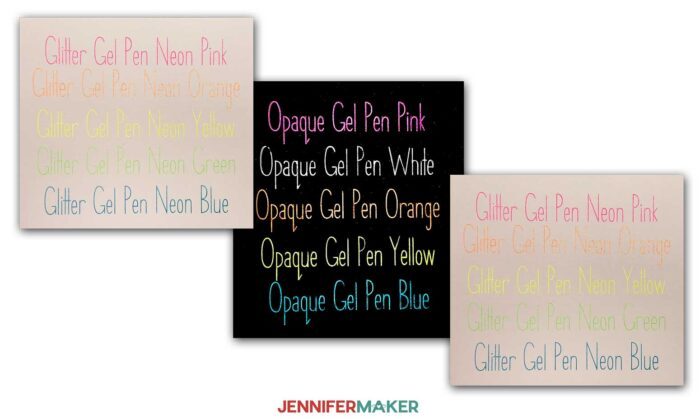
Cricut is always coming out with new tools and materials, giving us lots of new creative outlets! I’ve used lots of writing tools in other projects, but I really love some of the new Cricut pens! I used the brand’s opaque gel pens, glitter gel pens, and fine-point pens for different parts of these projects and love all the results!
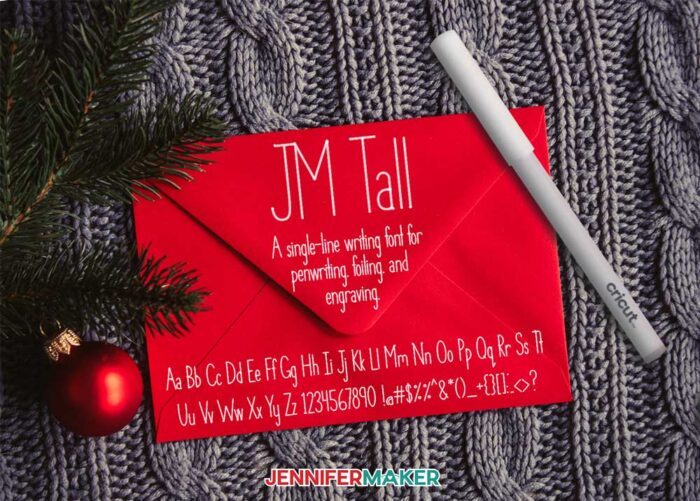
But it can be hard to find free writing fonts that work perfectly with our cutting machines. With that in mind, I’m proud to introduce JM Tall! It’s a cute font with a tall, skinny style. The single stroke is easy to use with lots of Cricut writing and drawing tools.
This new font joins my earlier font, JM Penwriting. I love to use this writing style font in place of handwritten messages and addresses, because it’s based on my own handwriting! It takes a lot of work to make your own fonts, but you can try it, too, at Fontself.
In the tutorial, I’ll show you how to add writing to existing cards or envelopes, and how to cut and write Cricut projects at the same time.
I used my Cricut Maker, which saves time since you can leave both your writing and cutting tools in the machine’s two clamps. You can also use a Maker 3, an Explore series machine, or a Joy for smaller projects. I used a 12″ x 12″ Blue LightGrip Machine Mat for most of the projects, but a 12″ x 24″ mat is helpful if you want to make one of my pre-made envelope designs. I’ll show you how!
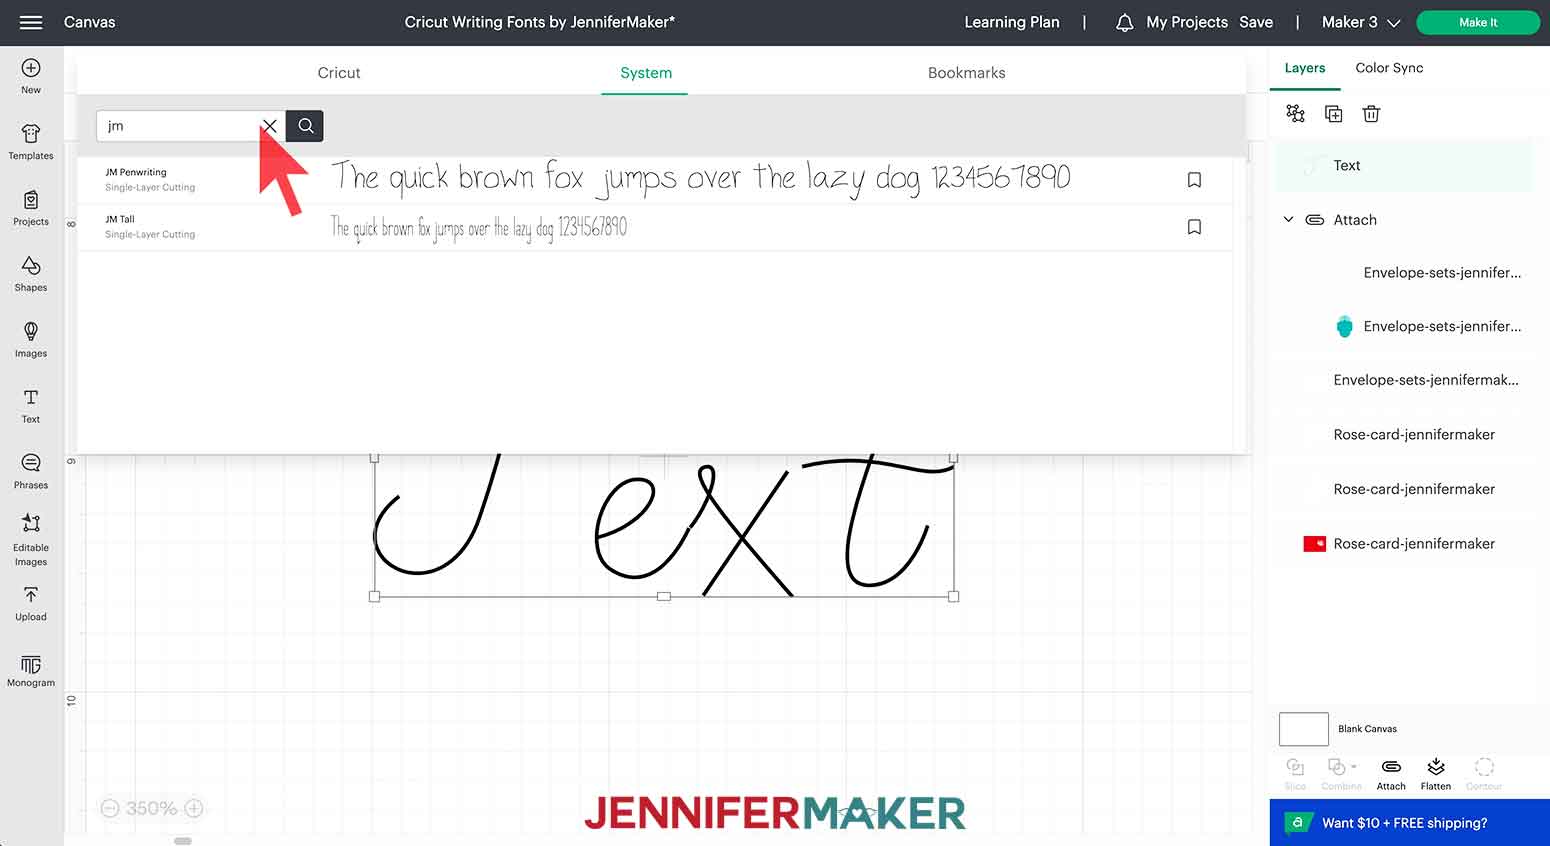
If you need help uploading these new fonts to Design Space, check out my handy tutorial! And when you search for them in Design Space, remember to look under “System” to access fonts you’ve downloaded, or system fonts.
Check out my Font Finder! It has information on different fonts in Cricut Design Space and how to pick the perfect font for personal projects. It has some of the best fonts I love!
Ready to make projects with my Cricut writing fonts? I’m super excited to show you how! This post contains some affiliate links for your convenience (which means if you make a purchase after clicking a link I will earn a small commission but it won’t cost you a penny more)! Read my full disclosure policy.
Materials to use with Cricut Writing Fonts
View my Amazon shopping list with the exact items we used to make this project.
If you’re making and writing on a card or envelope at the same time, I used:
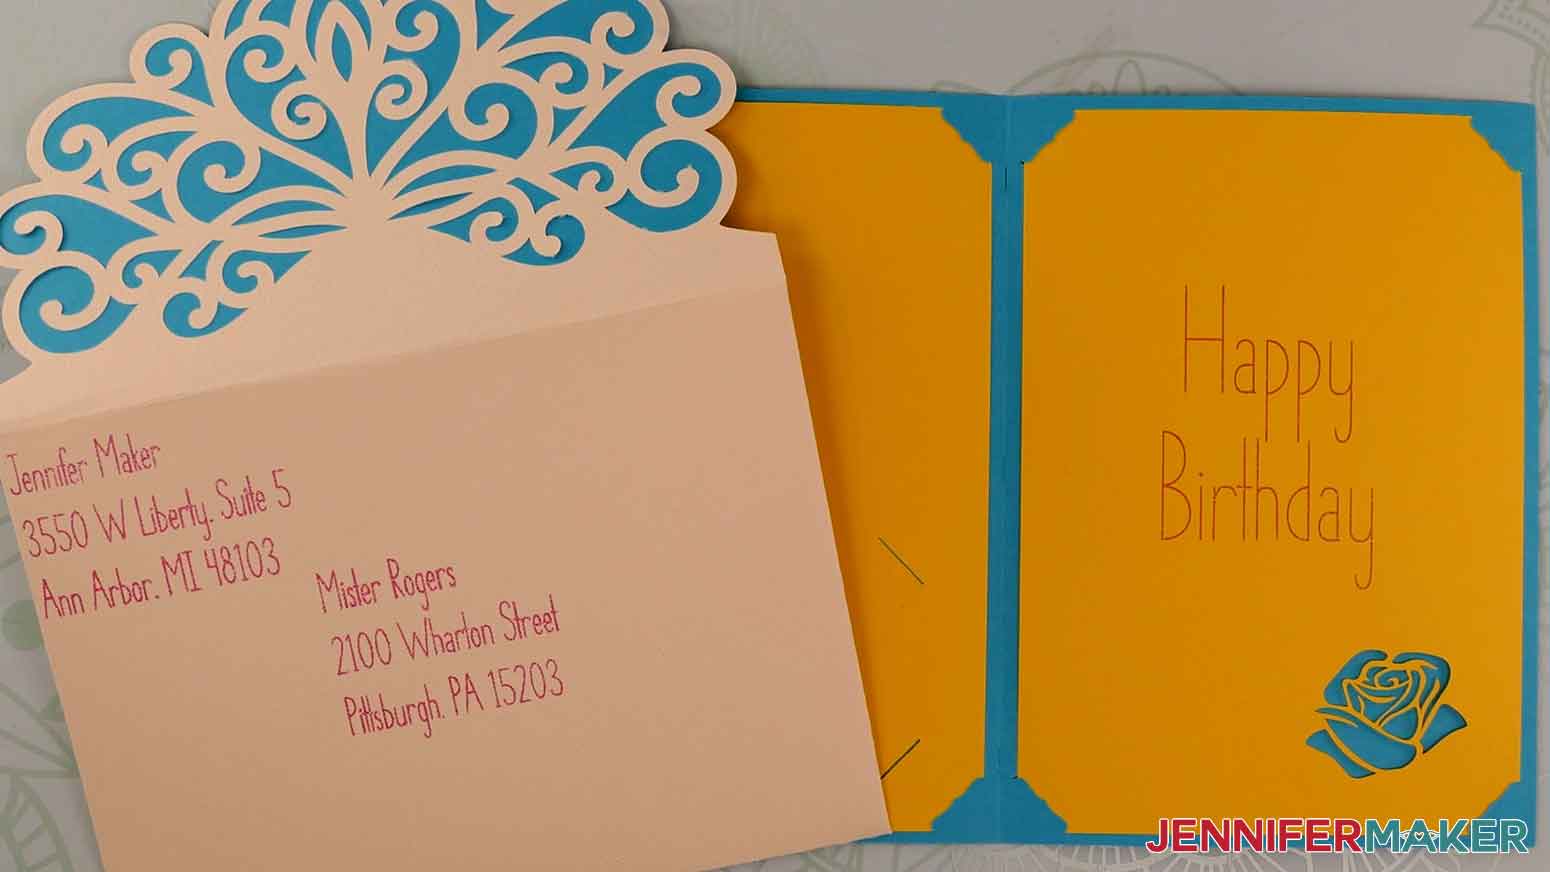
- 65 lb 12″ x 12″ Assorted Cardstock to make my examples using the rose card from Design #42 and a 5″ x 7″ envelope from Design #373.
- To make the larger envelope, I used Cricut 80 lb 12″ x 24″ Basic Sampler Cardstock and a Cricut Green StandardGrip Machine Mat 12″ x 24″
Or, you can add Cricut writing fonts to:
Using:
- Cricut Variety Pen Set
- Cricut (.4) Fine Point Pen Set
- Cricut (.8) Glitter Gel Pens or
- Cricut (1 mm) Opaque Gel Pens
- A method to cut and write on your cardstock, cards, or envelopes. I used the amazing Cricut Maker but you can also use the Cricut Maker 3, Cricut Explore 3, the Cricut Explore, or even the Cricut Joy for smaller projects. I used a Cricut Blue LightGrip Machine Mat, 12” x 12
- Tools including Craft Glue, a Brayer, and an XL Scraper
- Design #437 (My free Cricut Writing Font files (JM Tall and JM Penwriting) and example decals available in my free resource library – get the password by filling out the form at the bottom of this page)
How to Use Cricut Writing Fonts
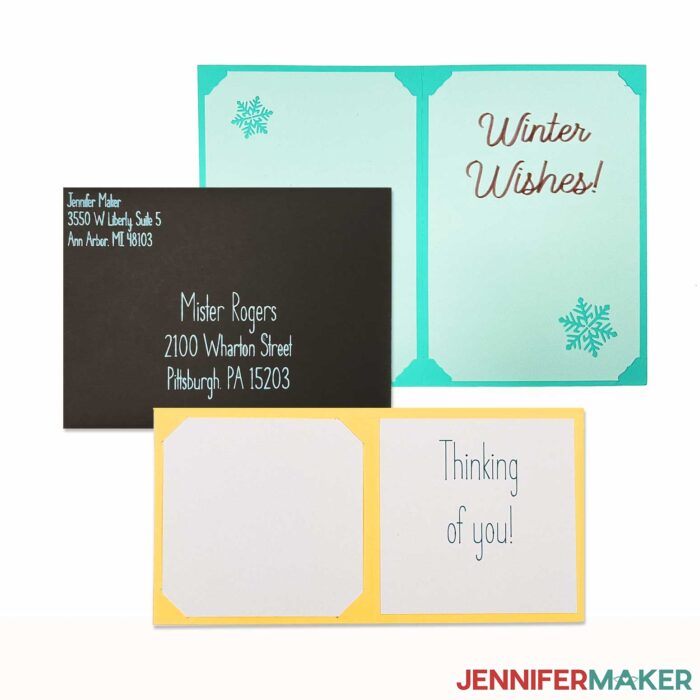
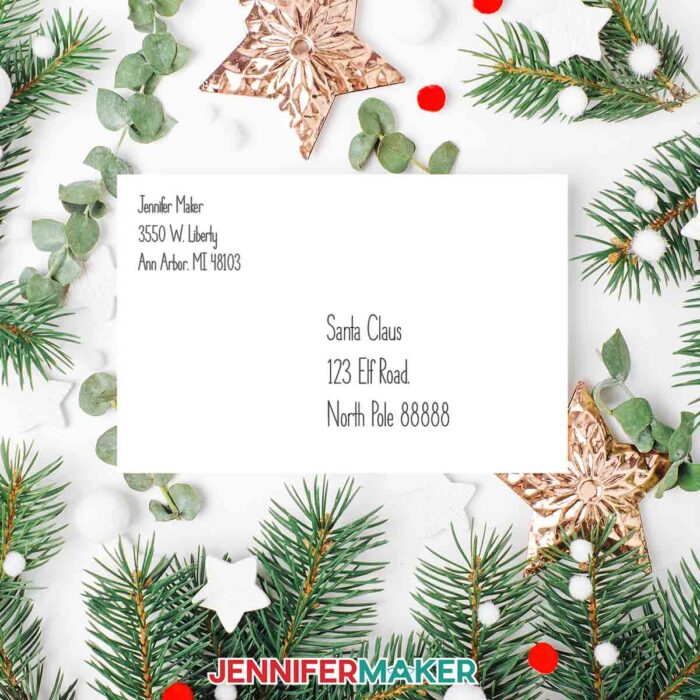
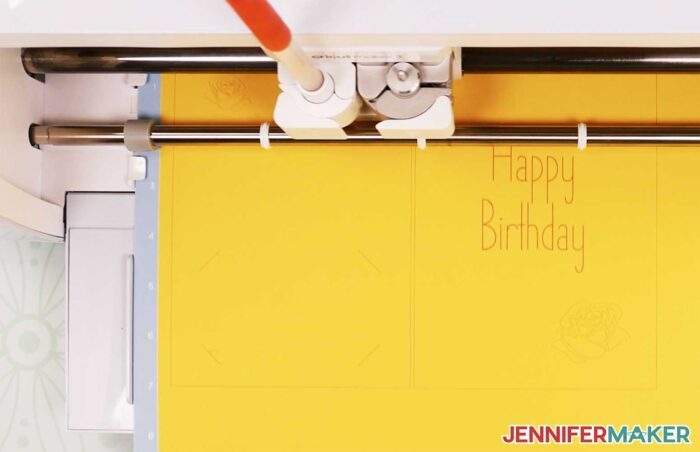
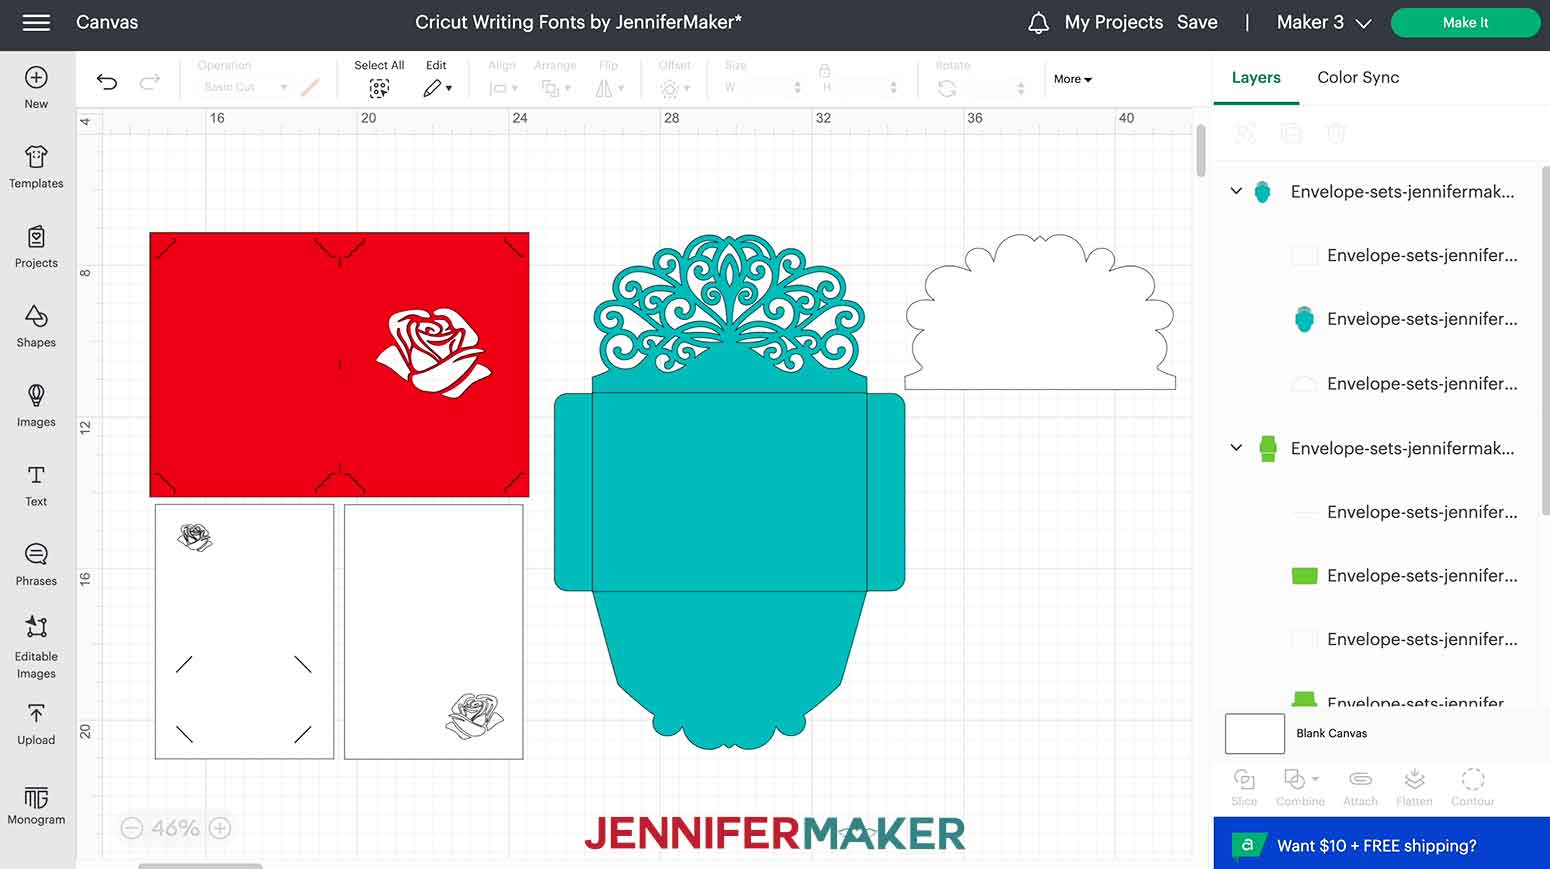
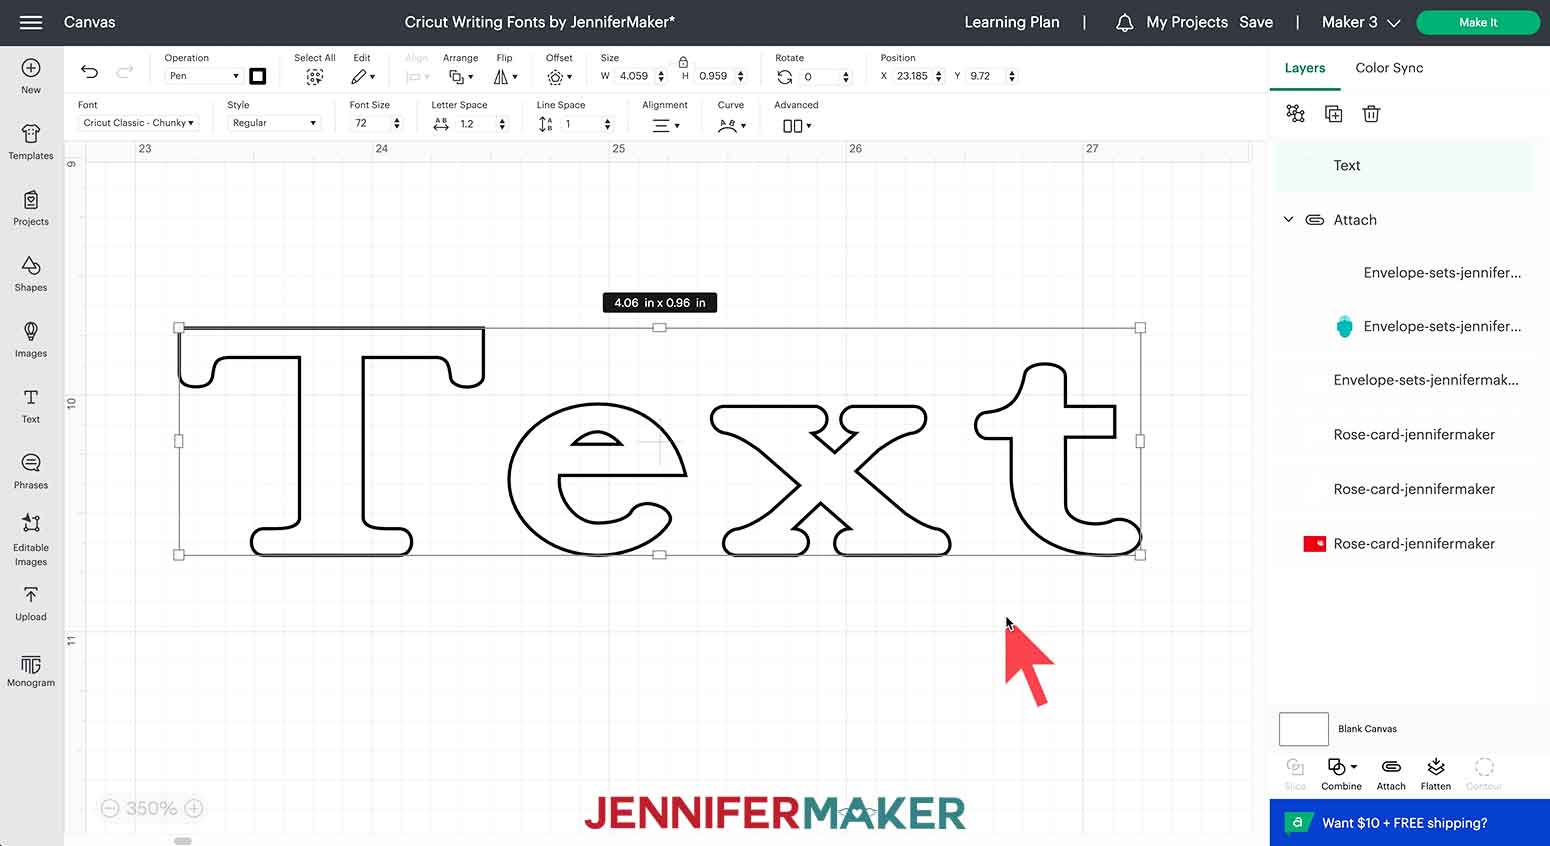
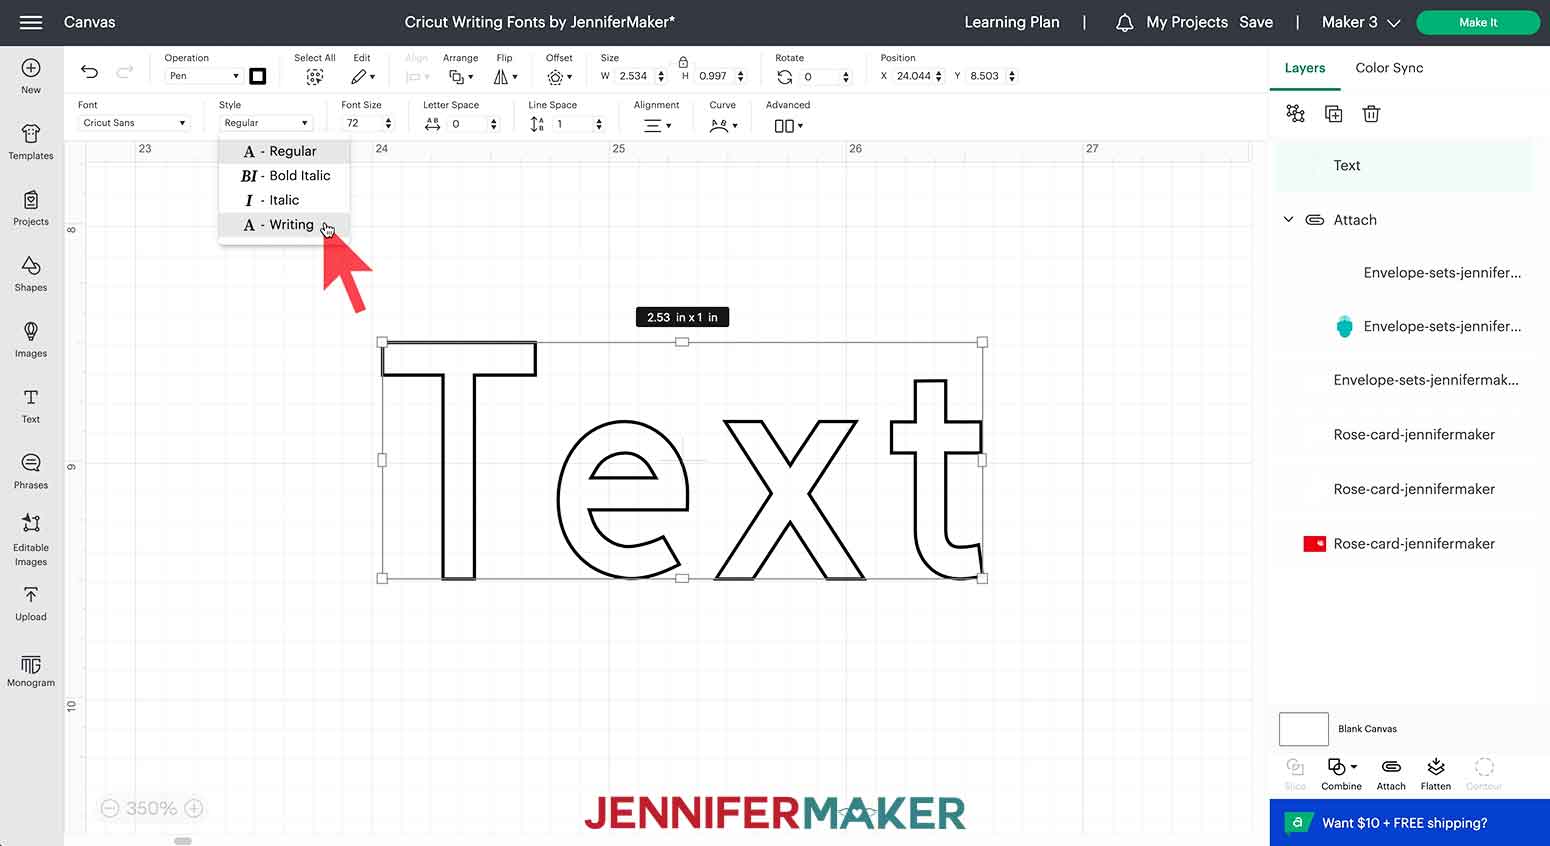
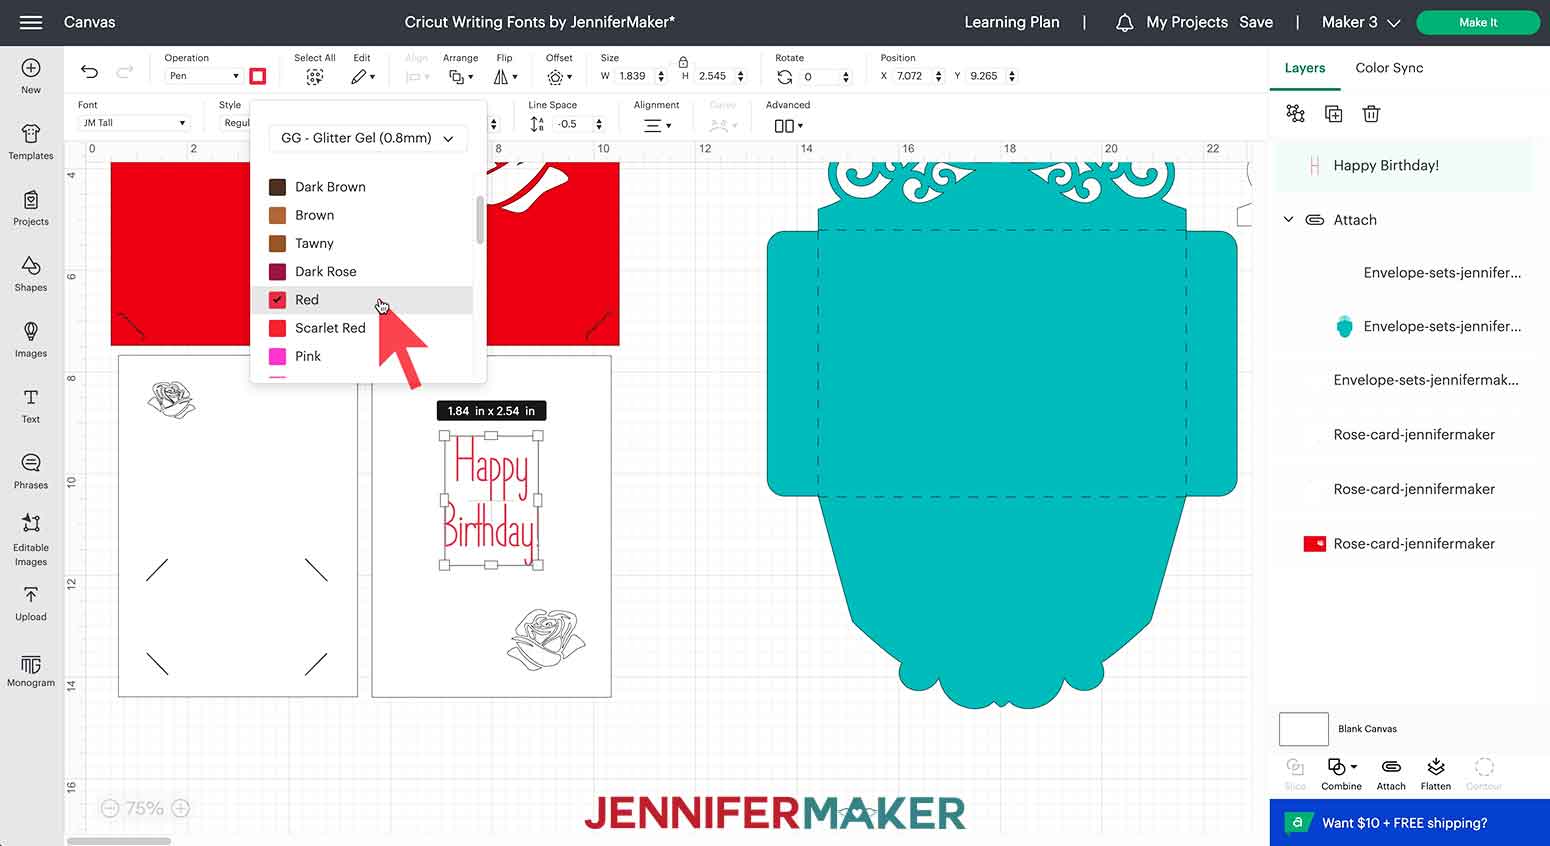
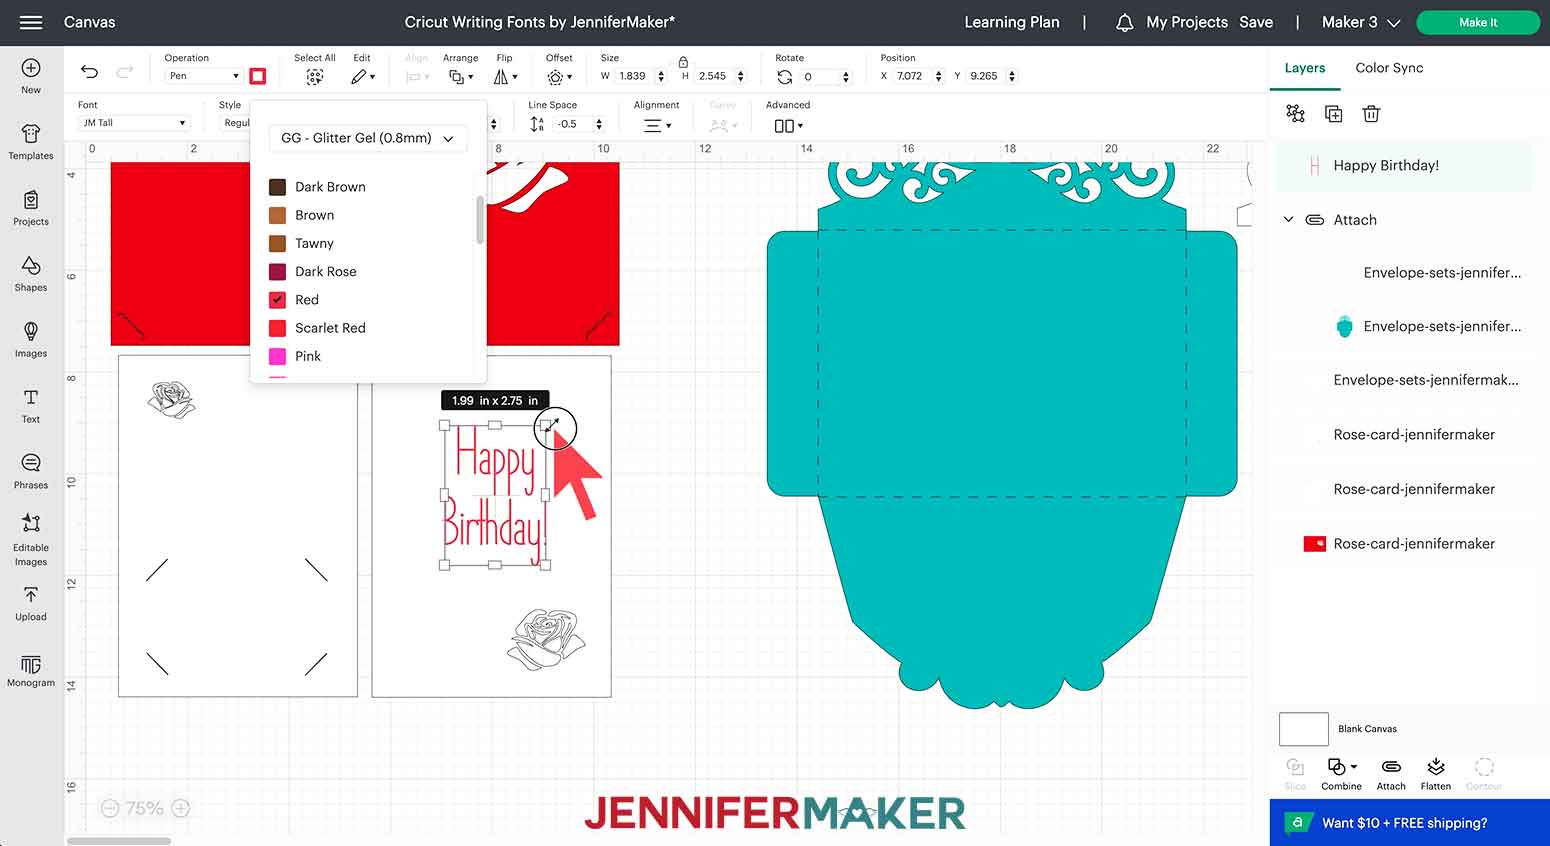
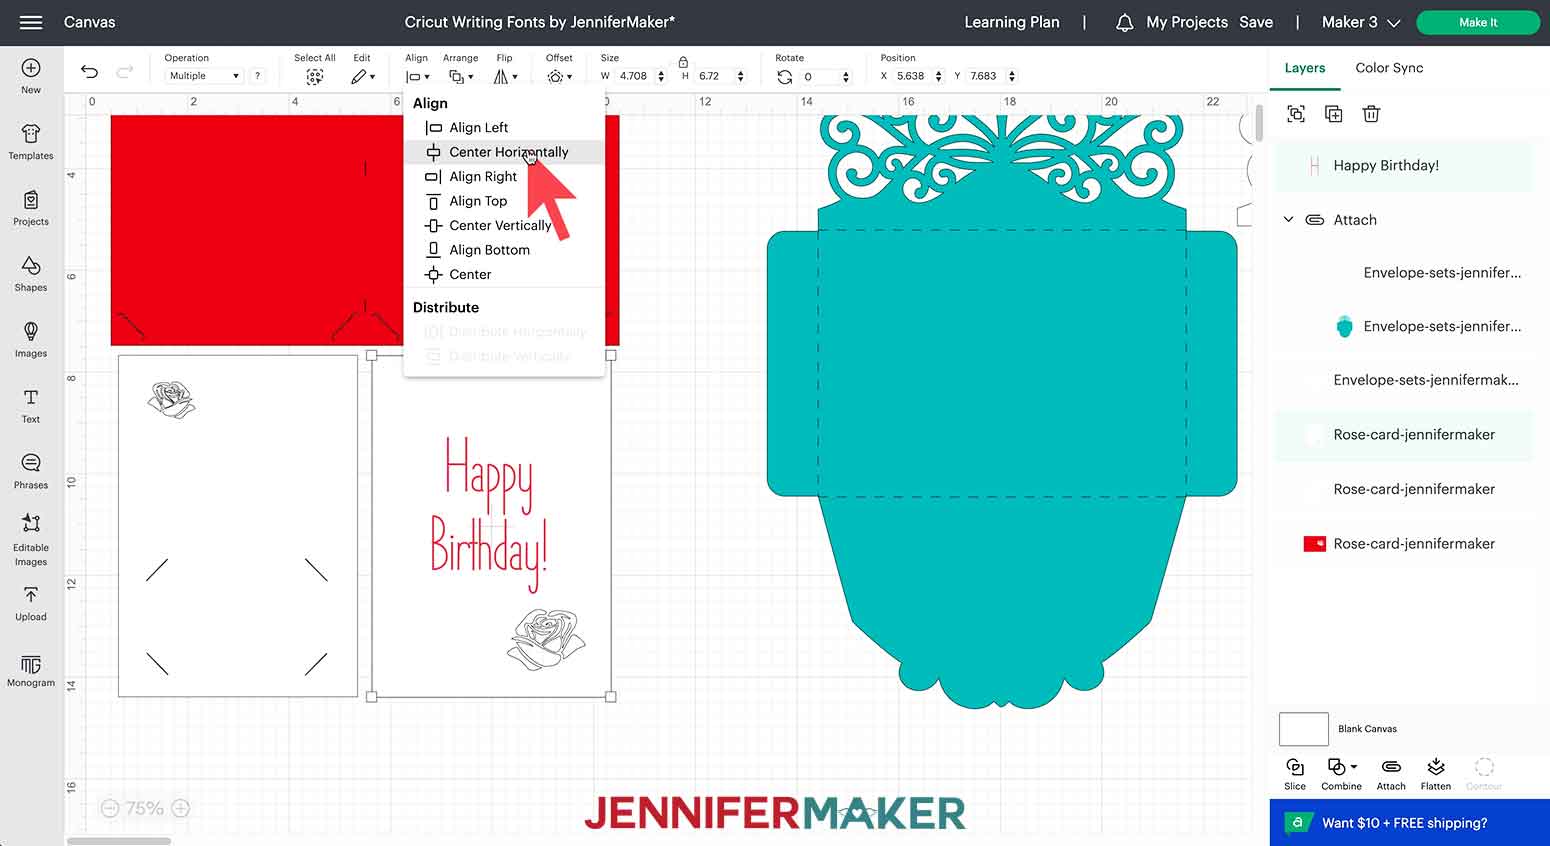
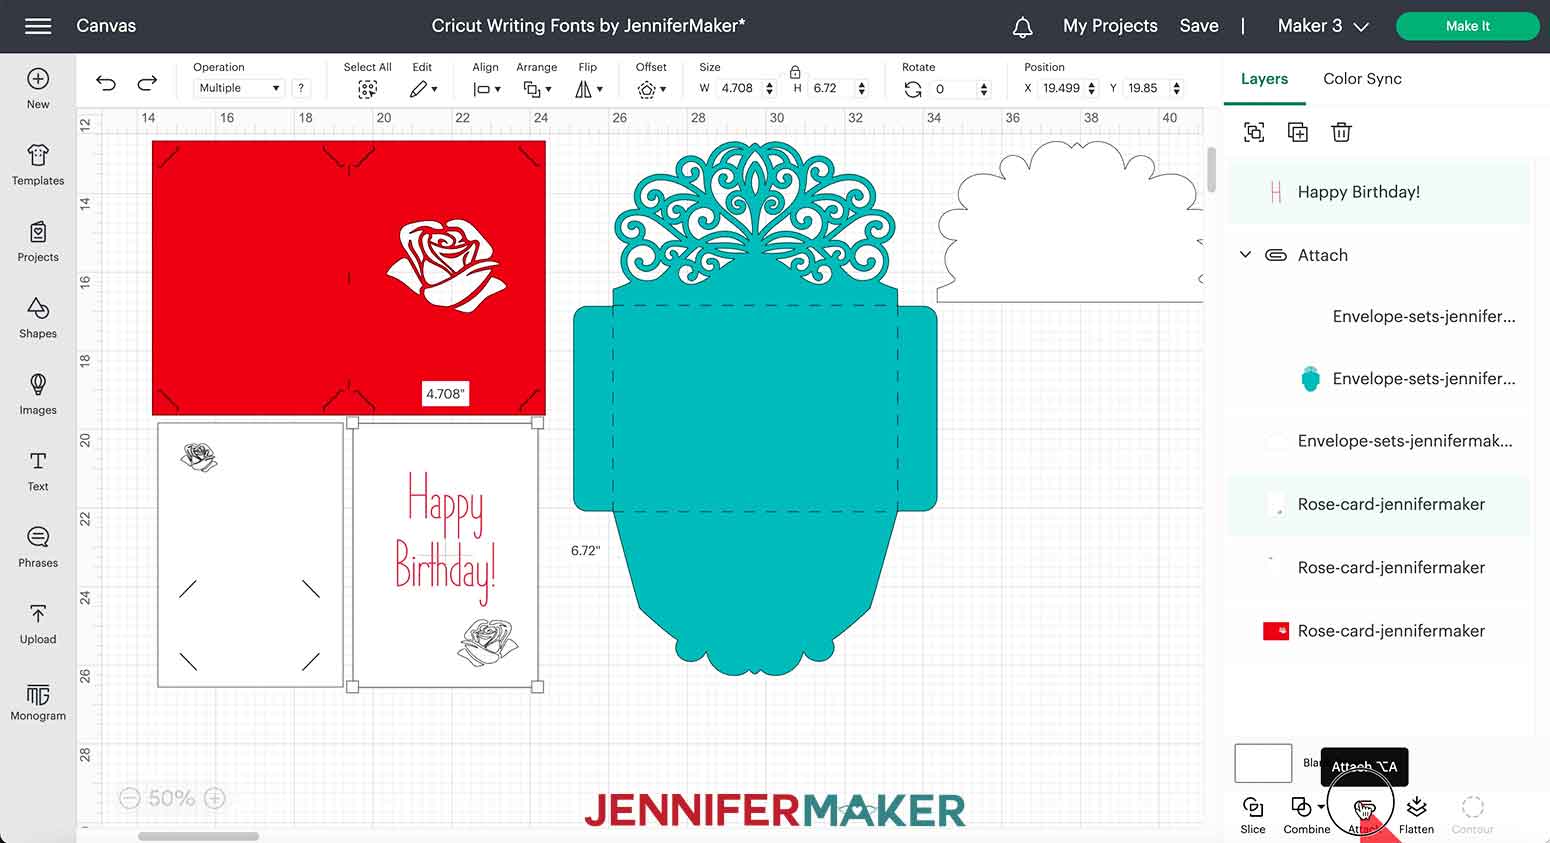
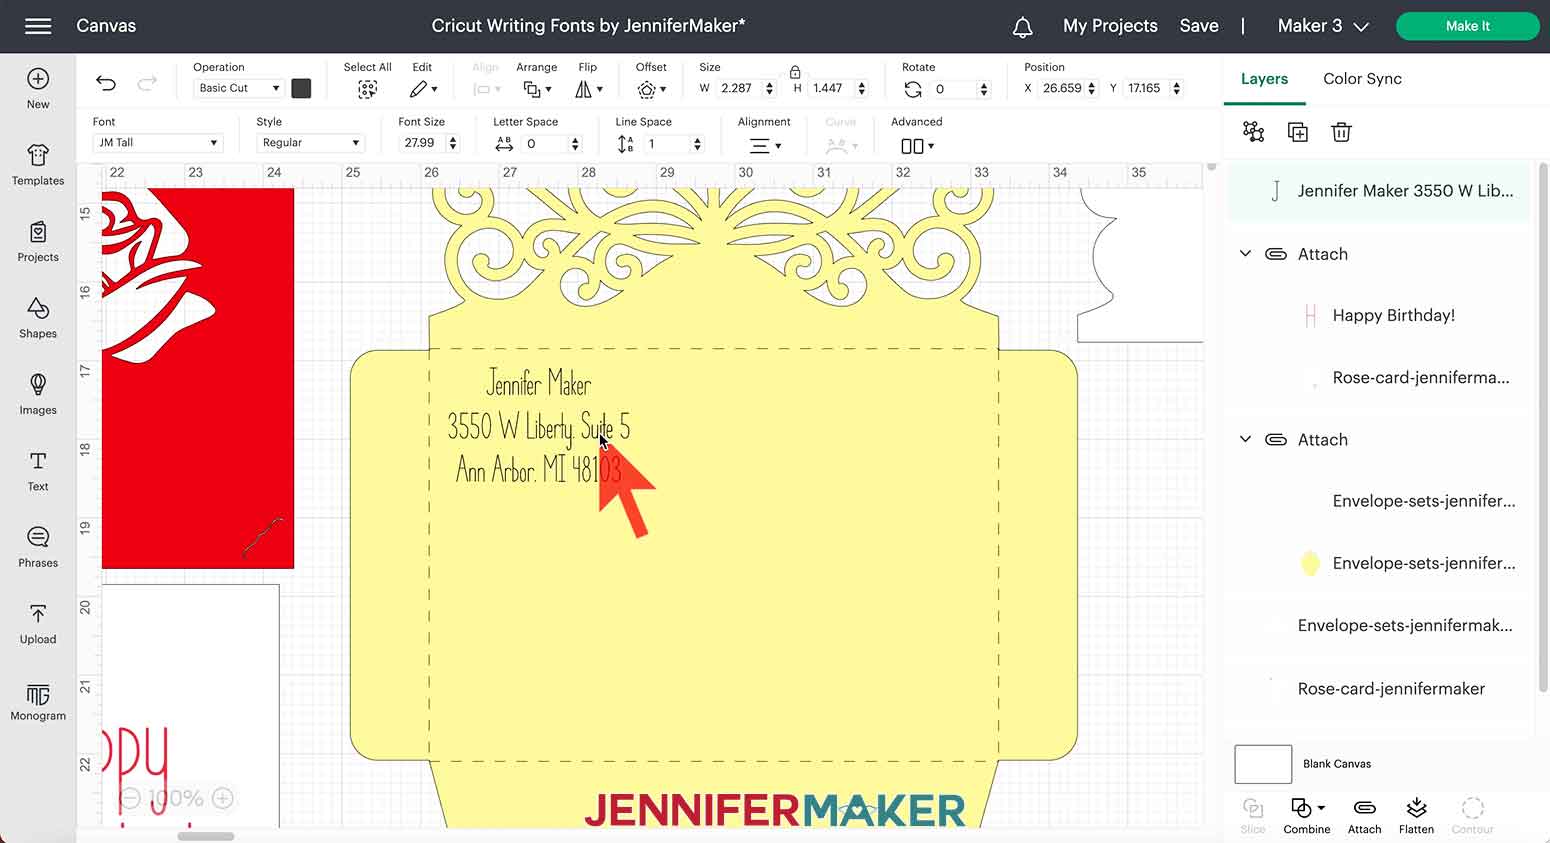
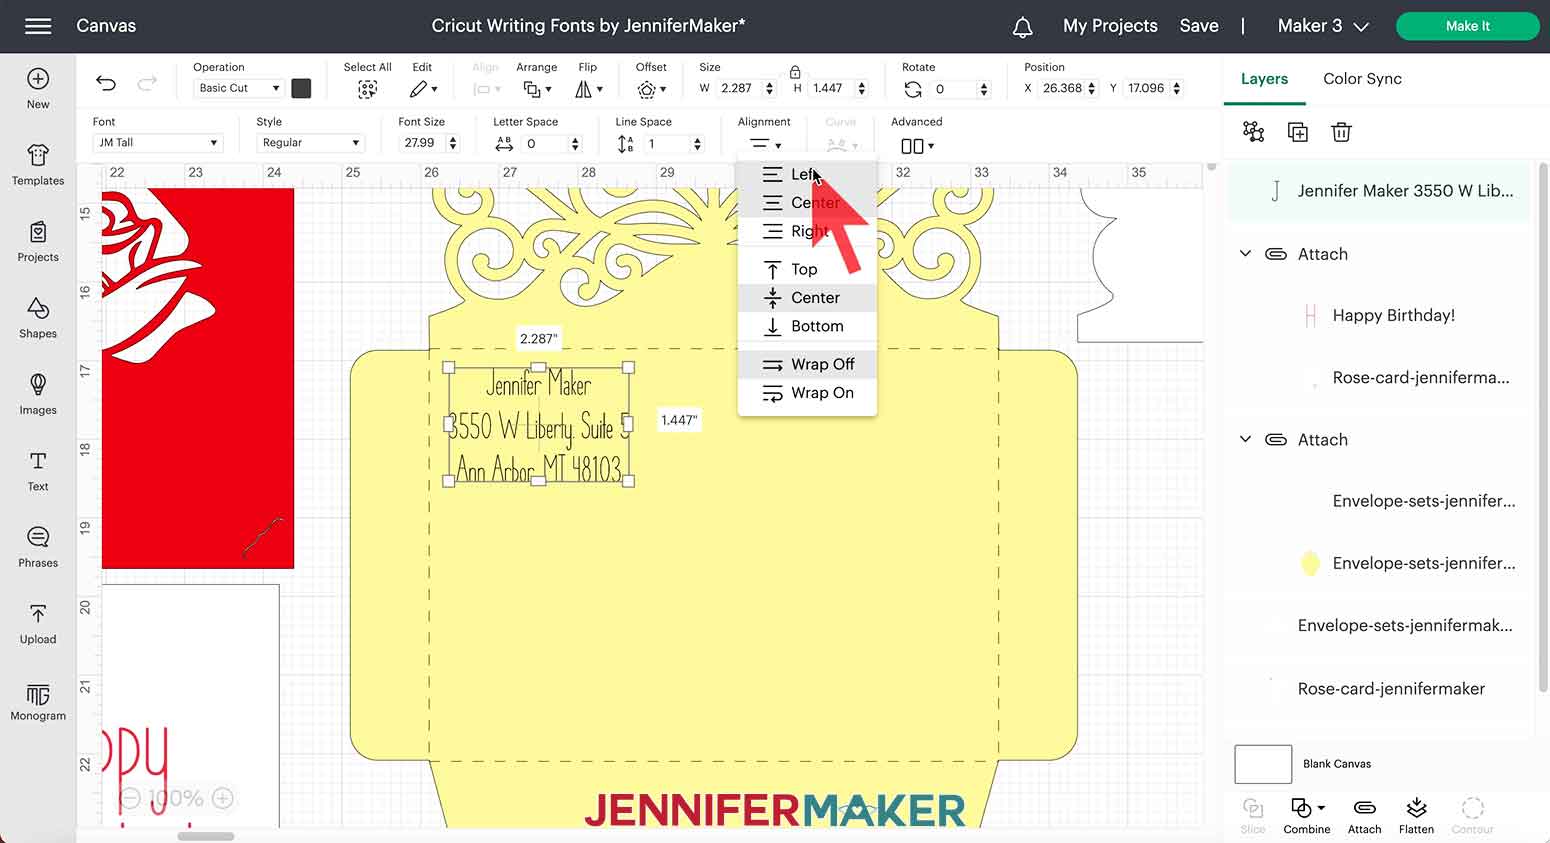
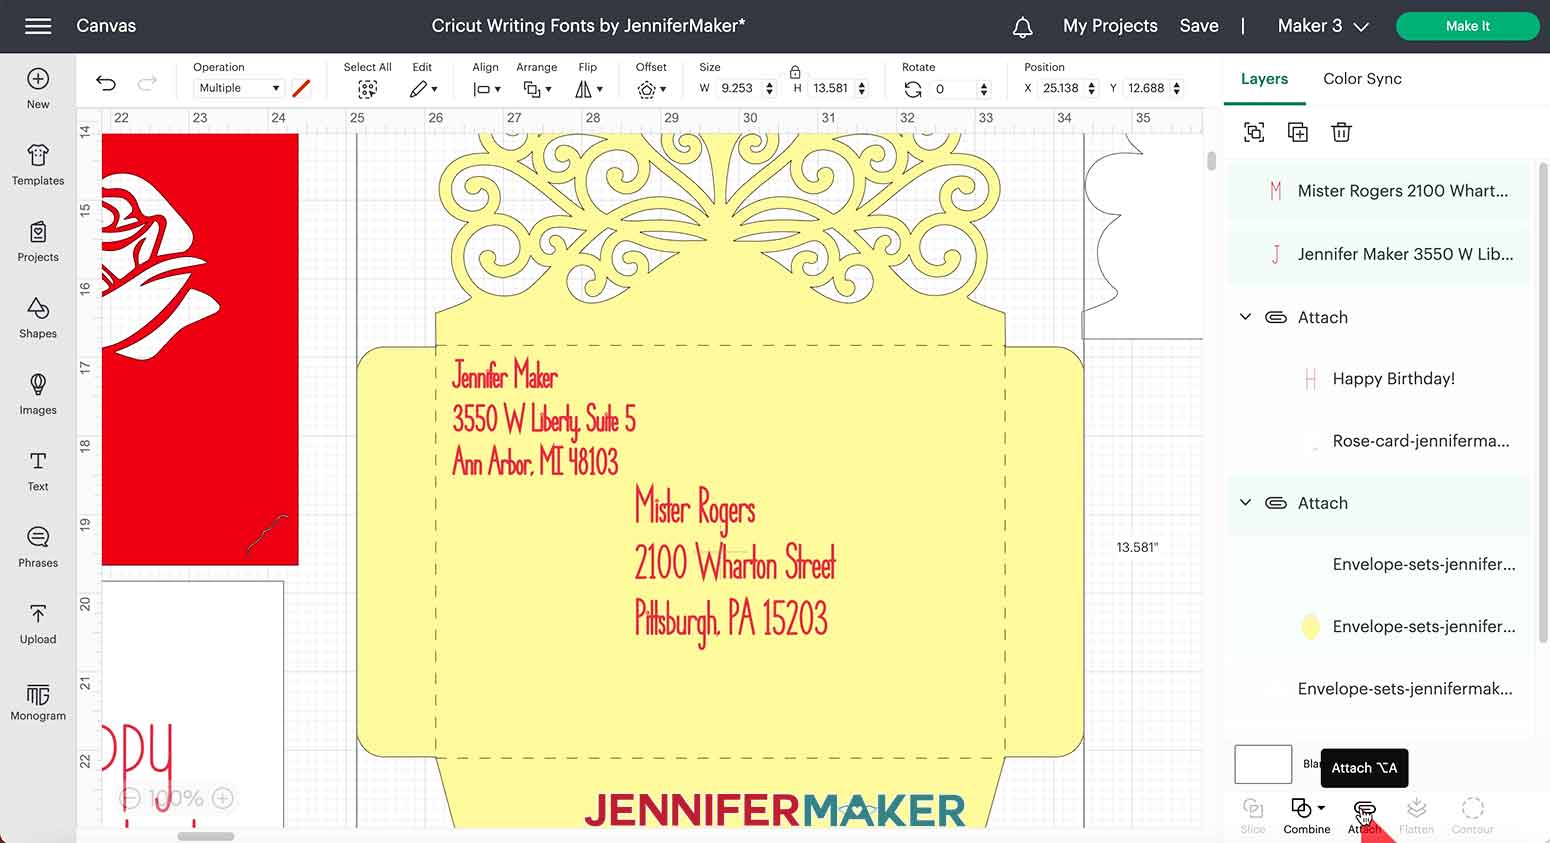
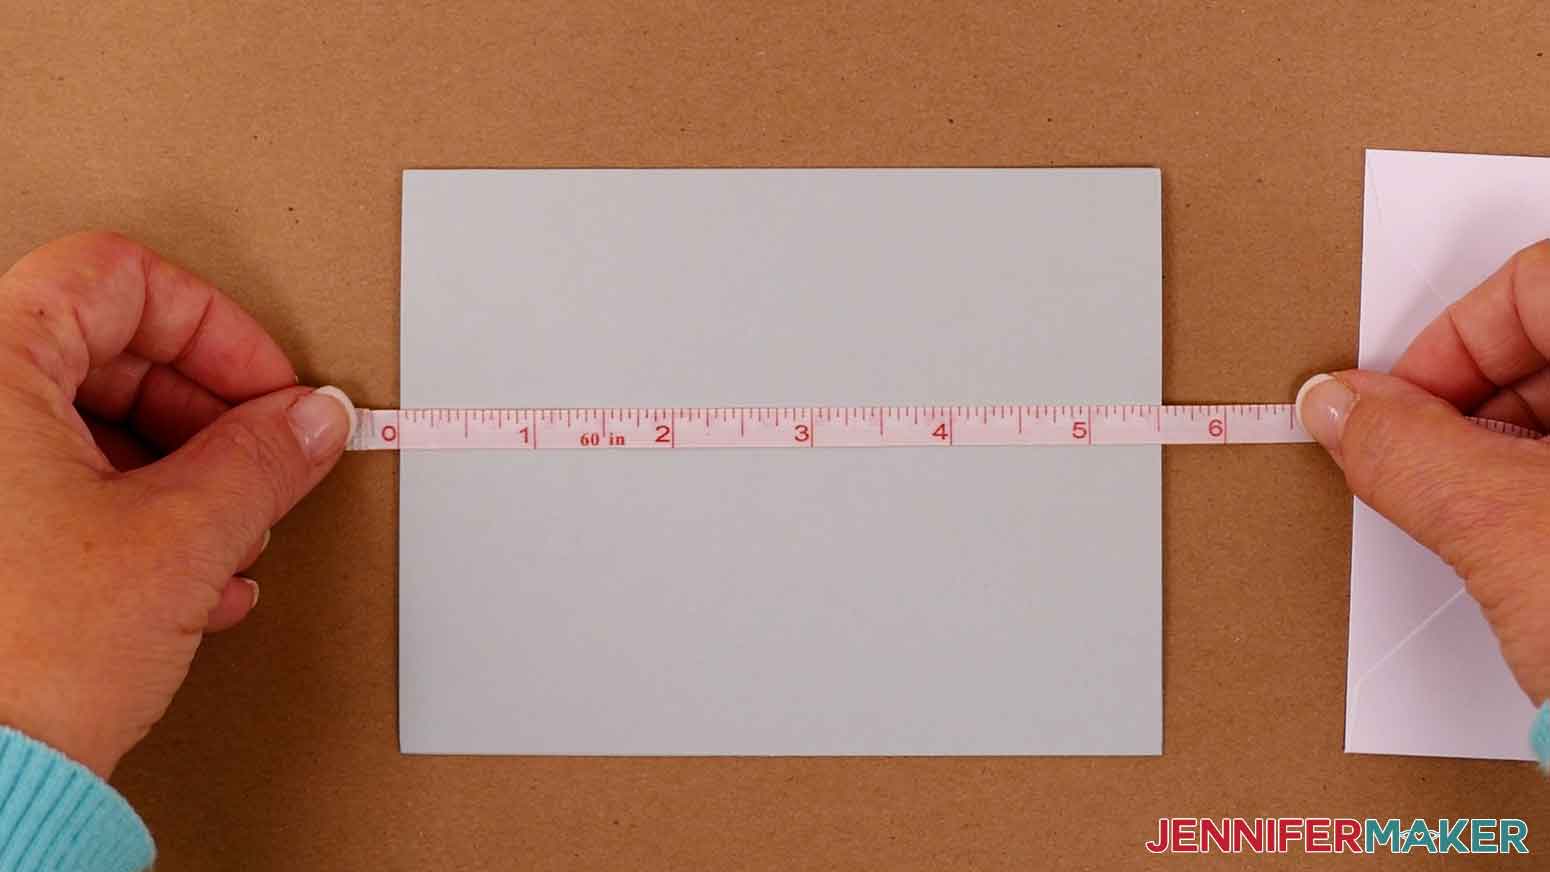
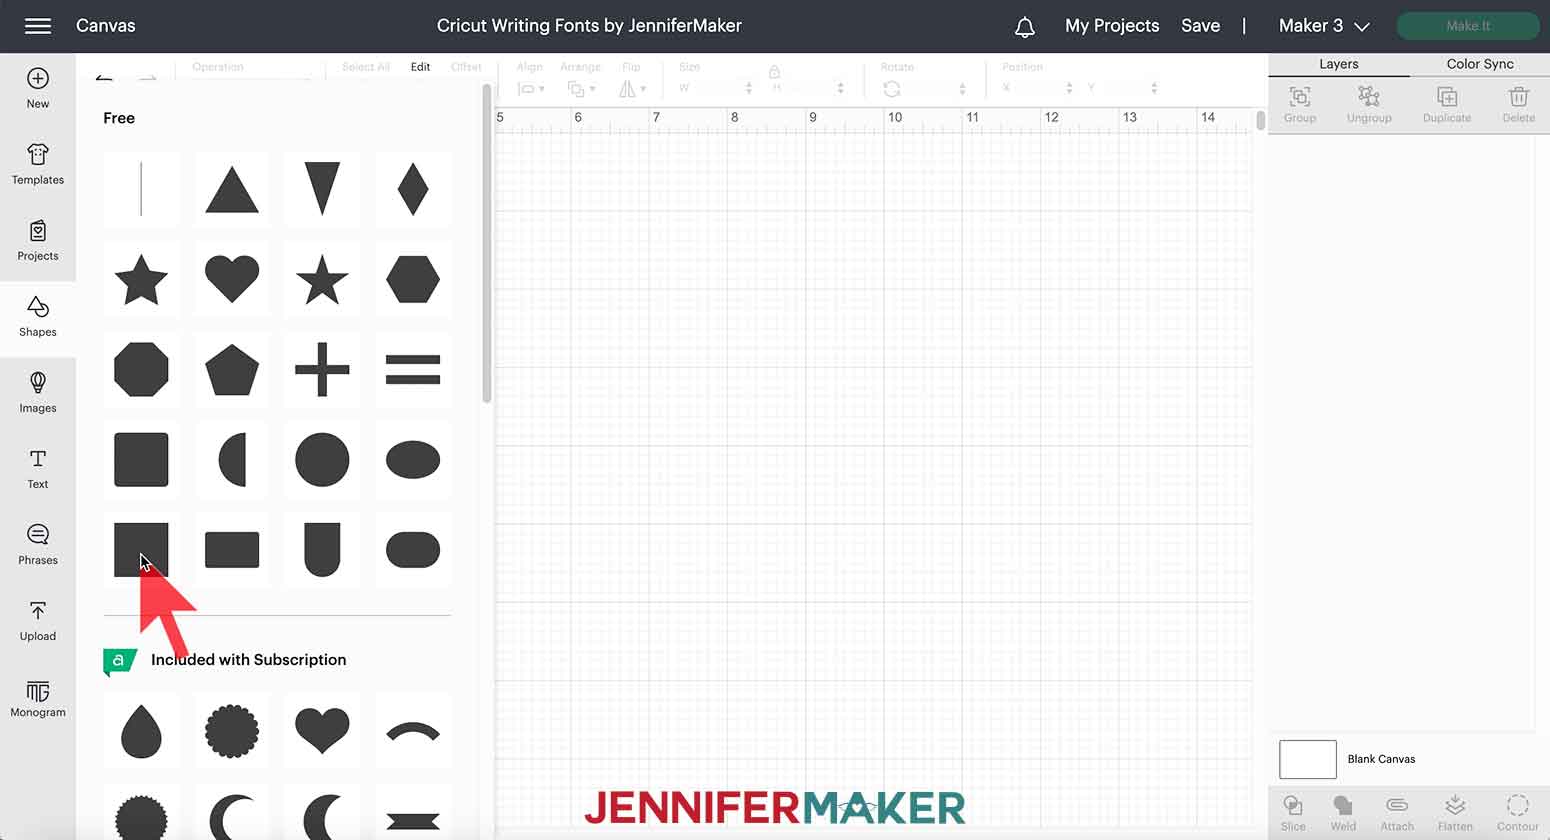
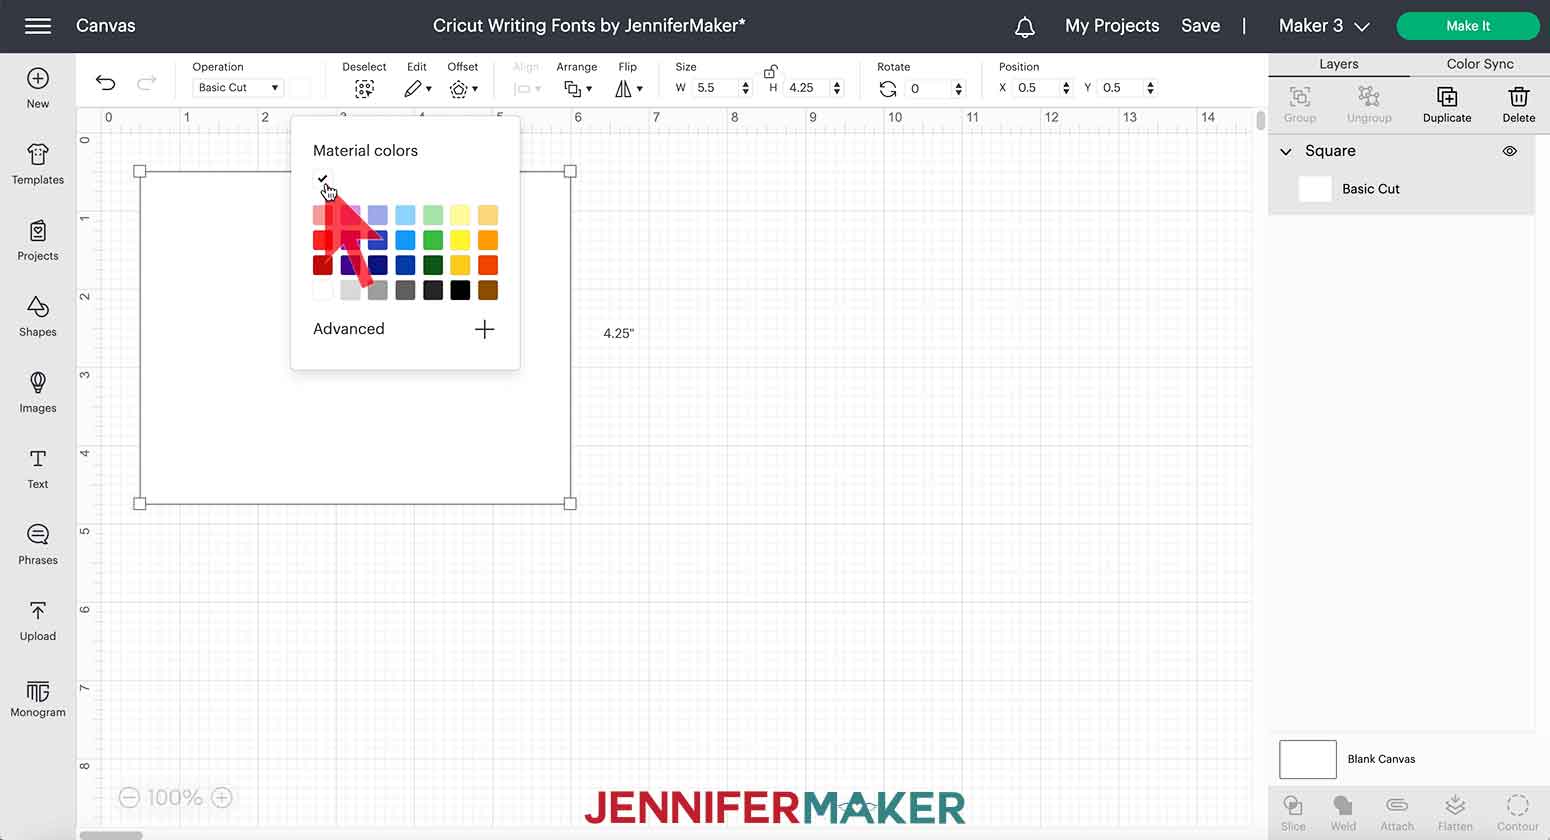
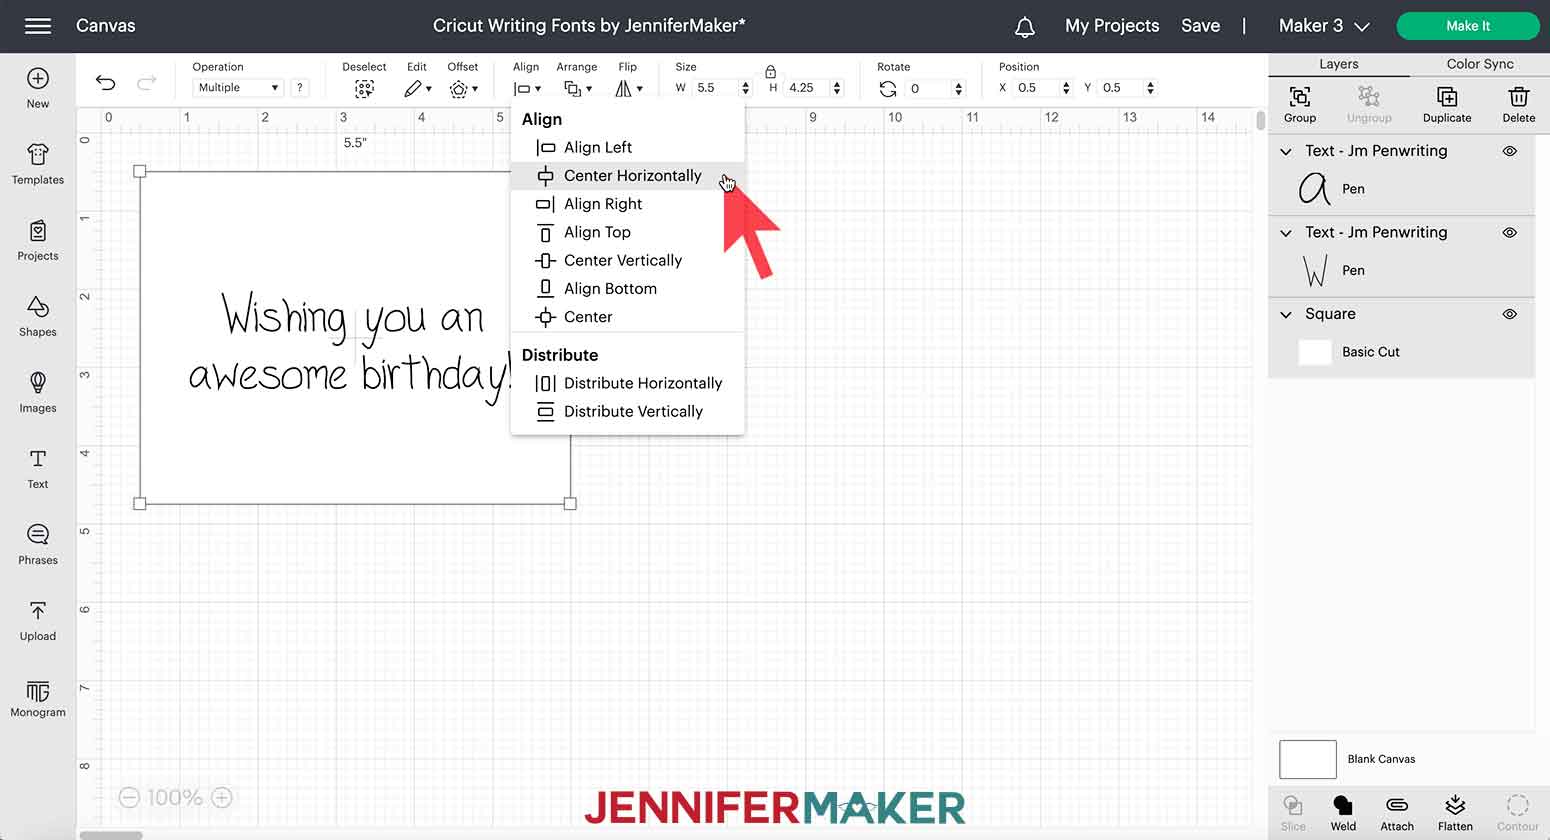
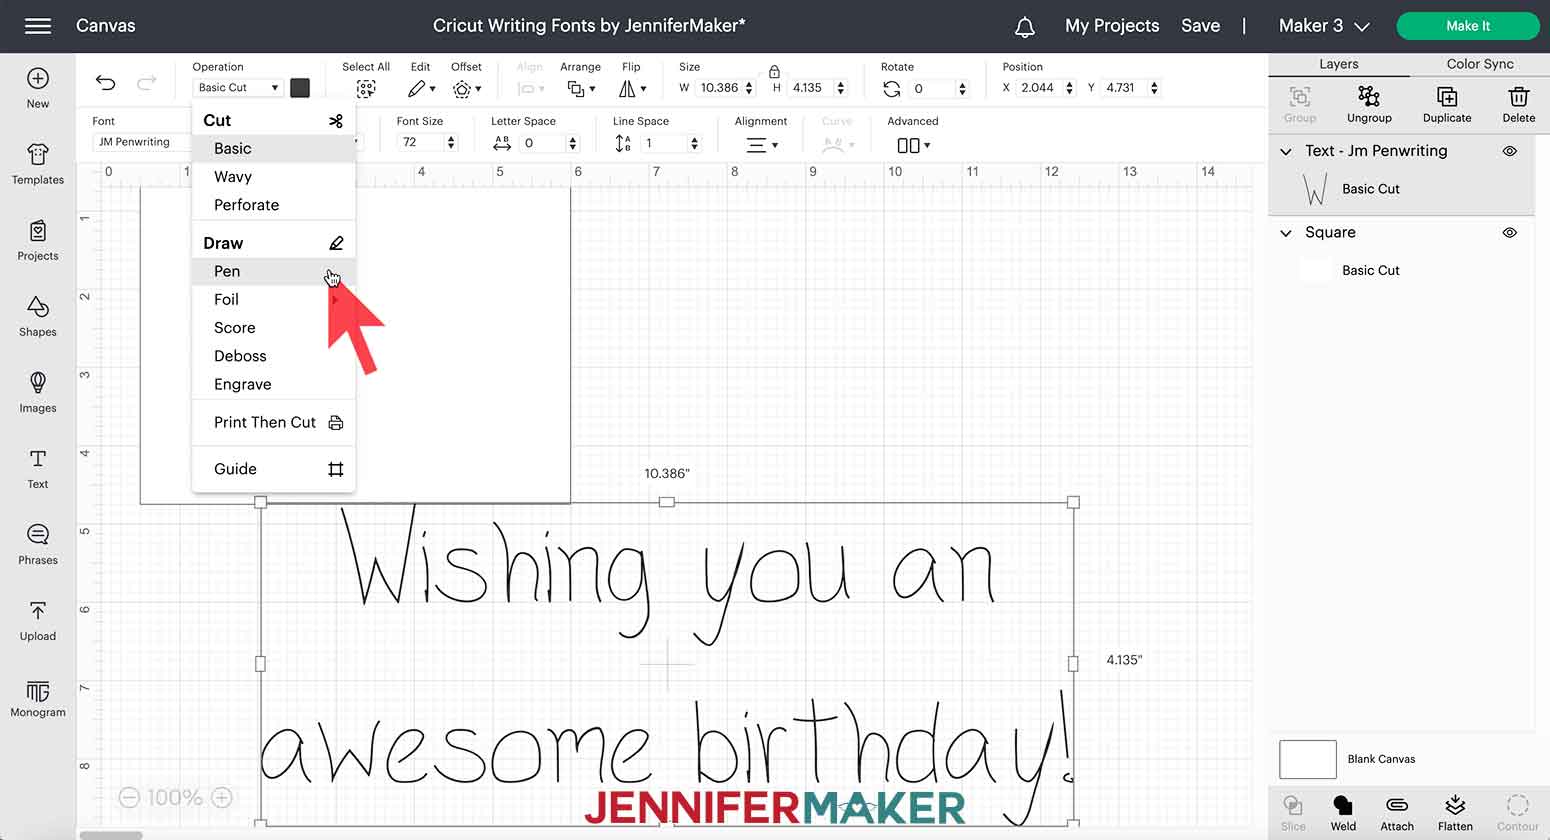
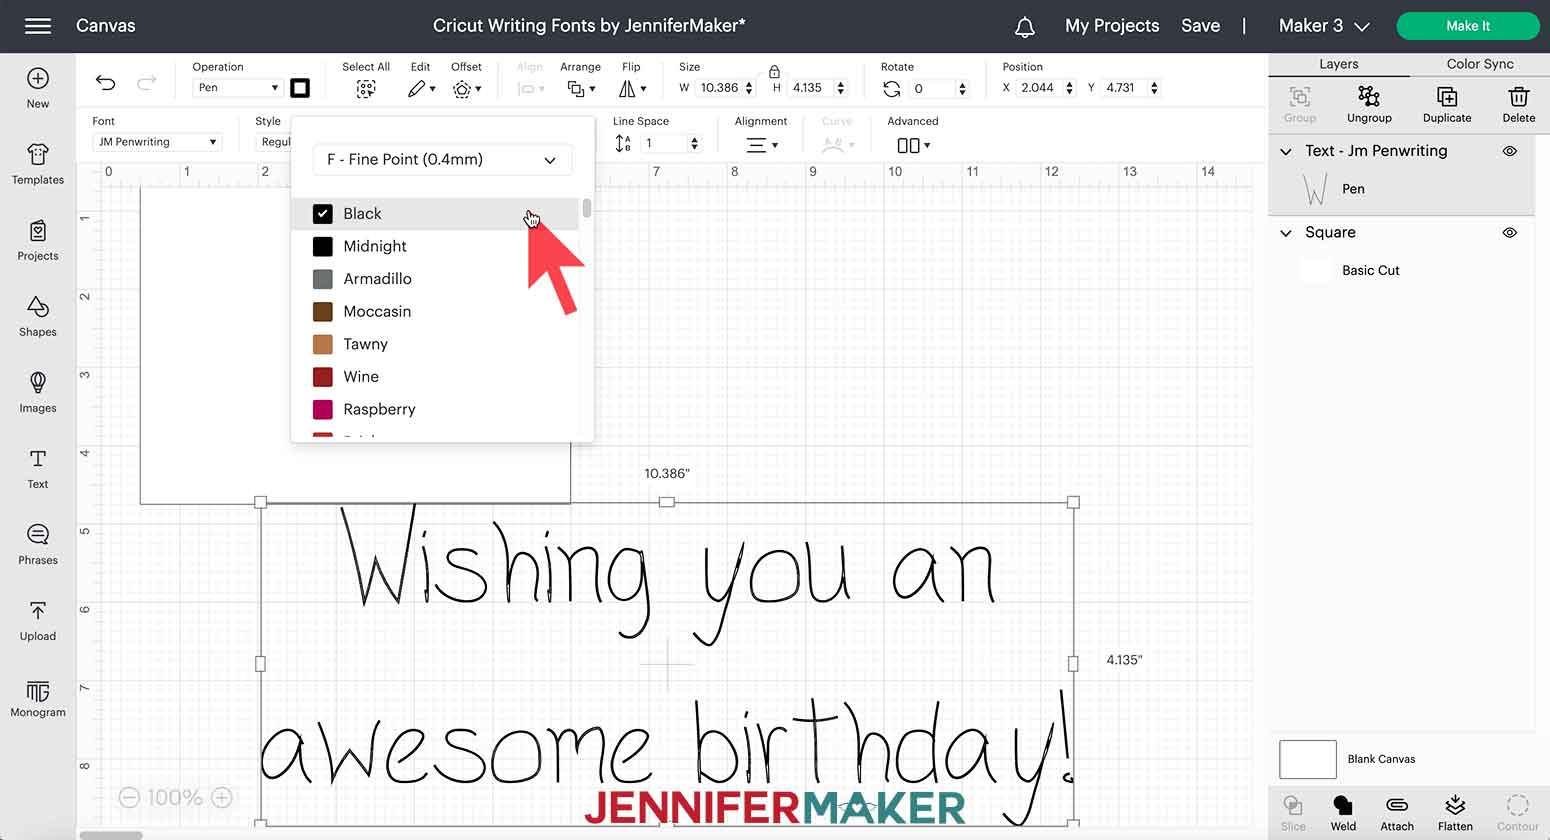
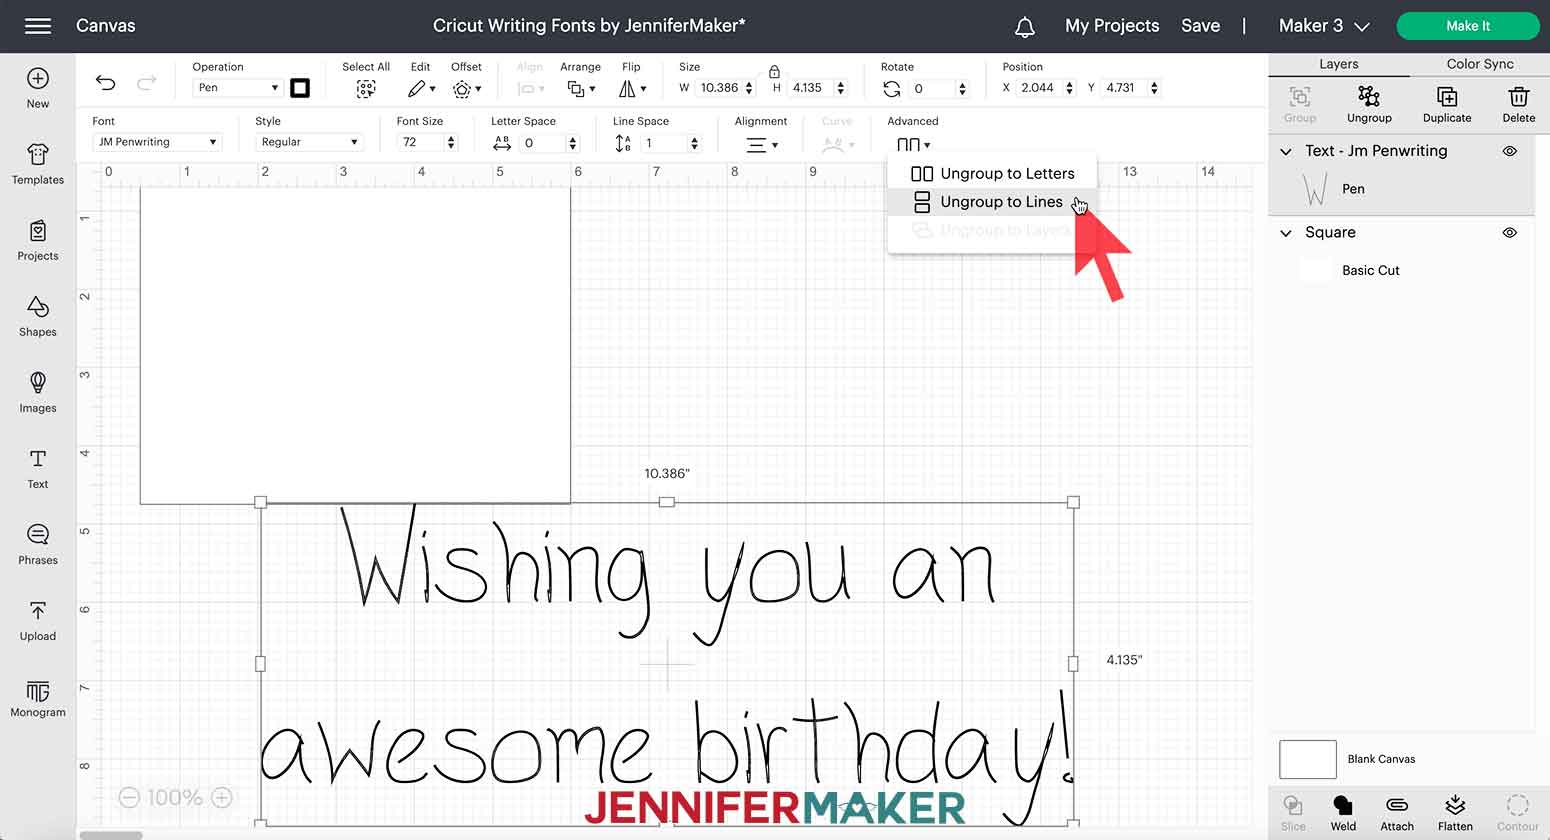
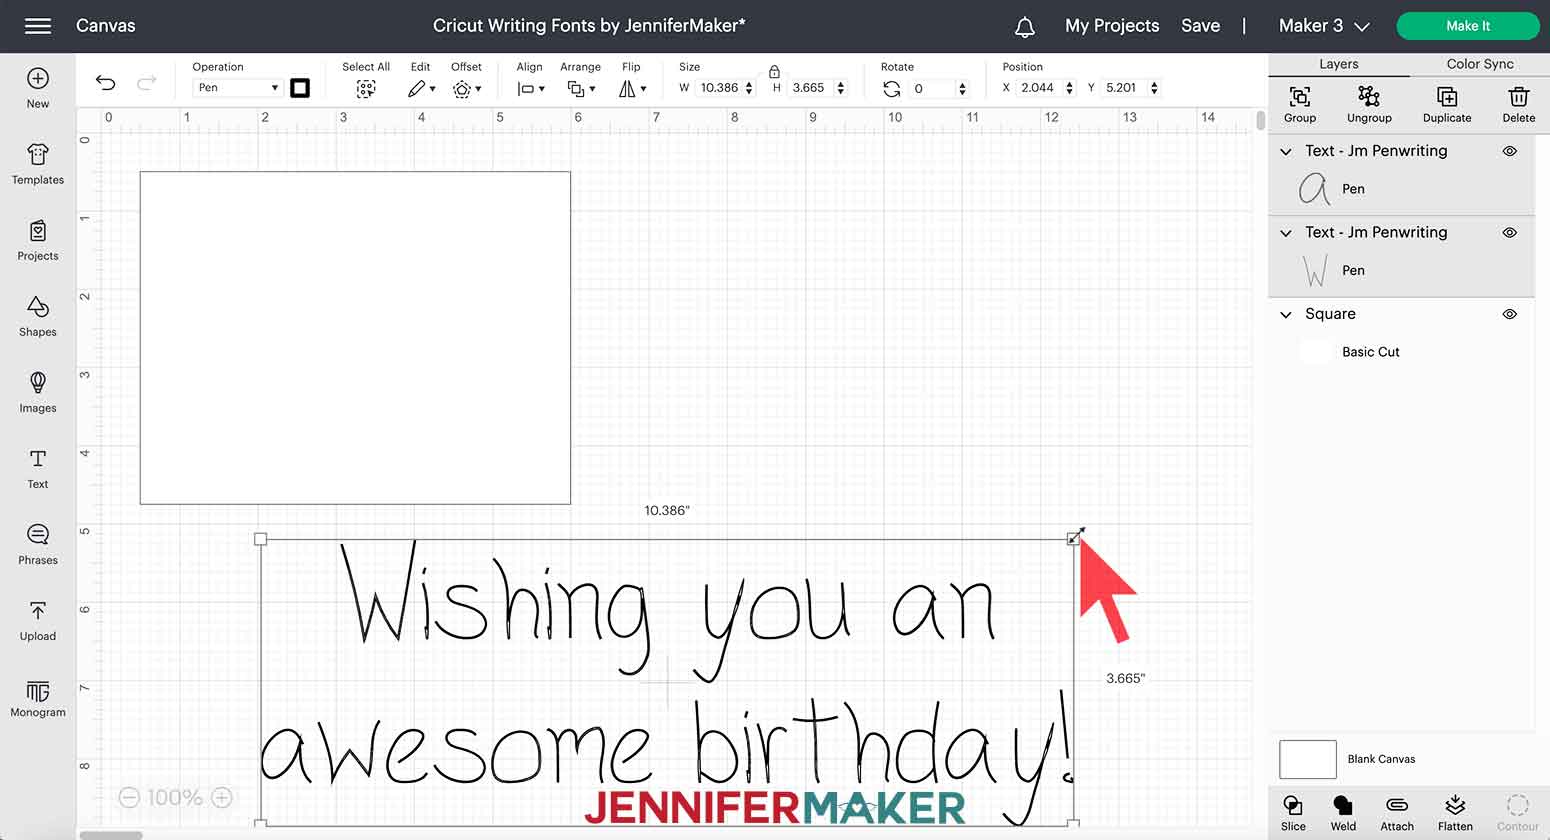
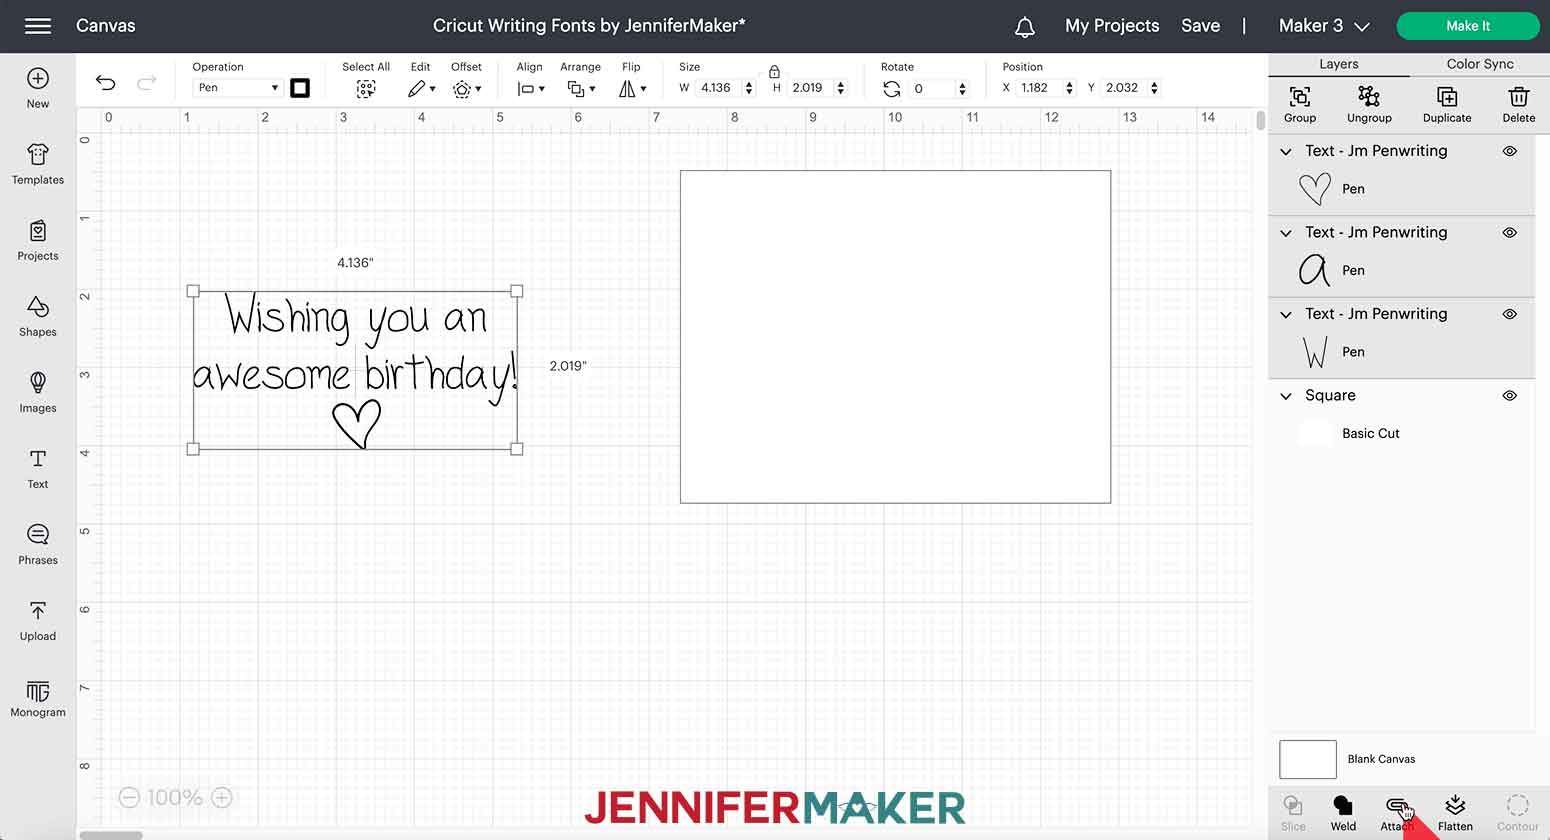
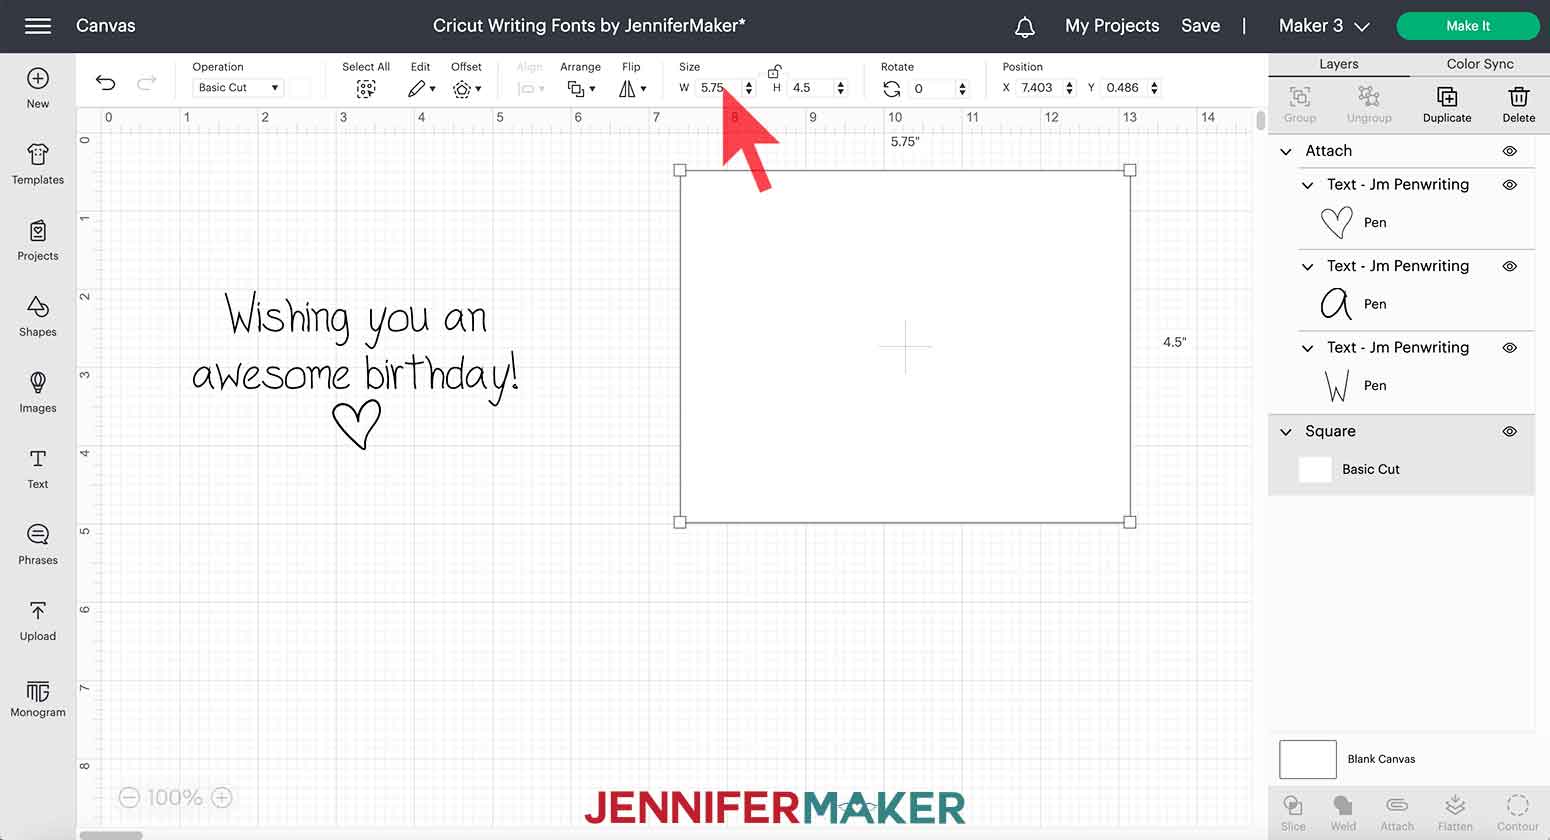
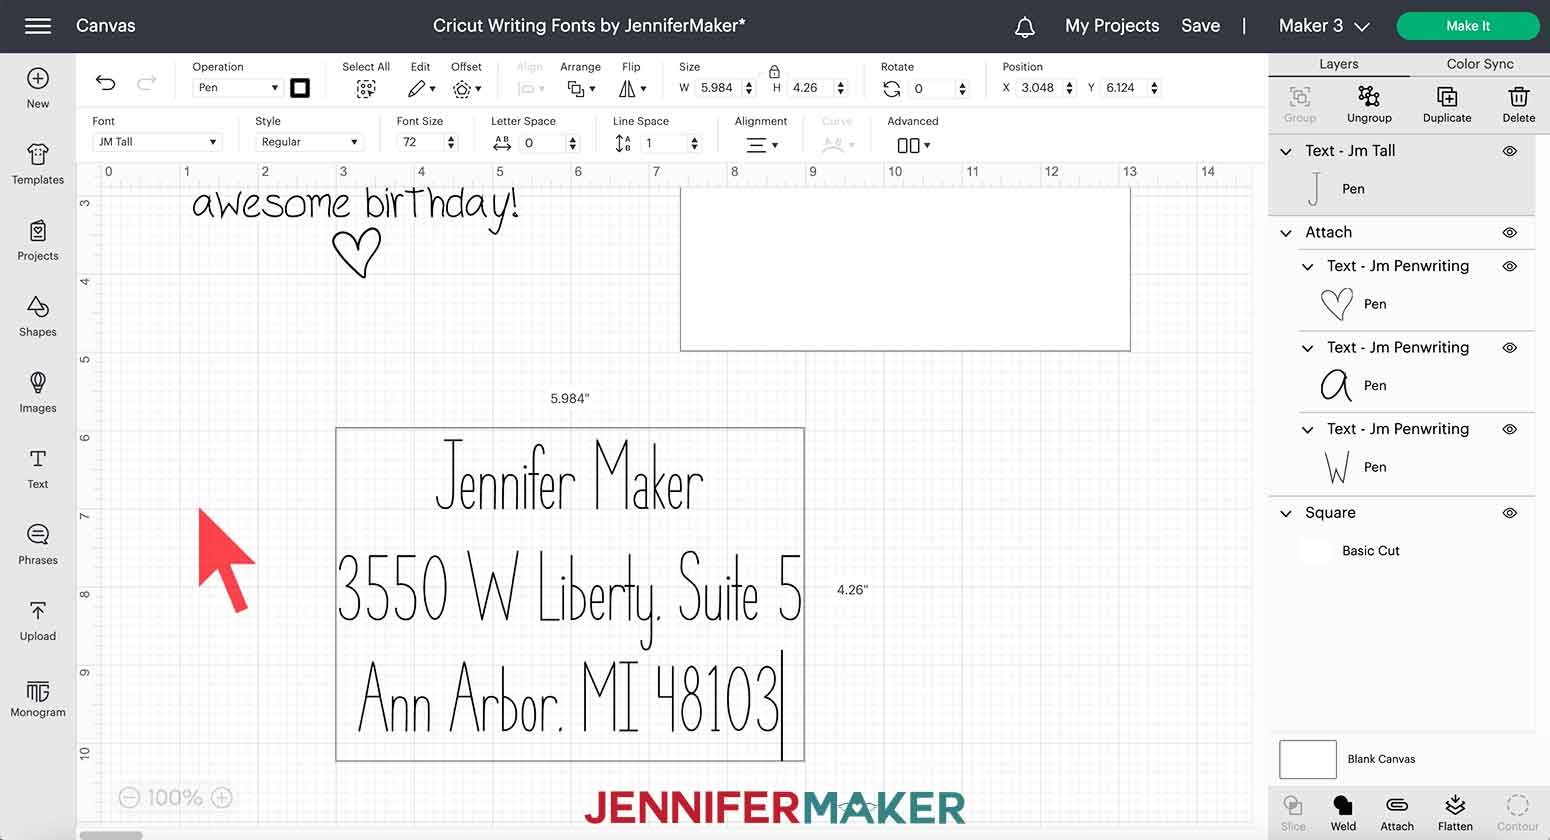
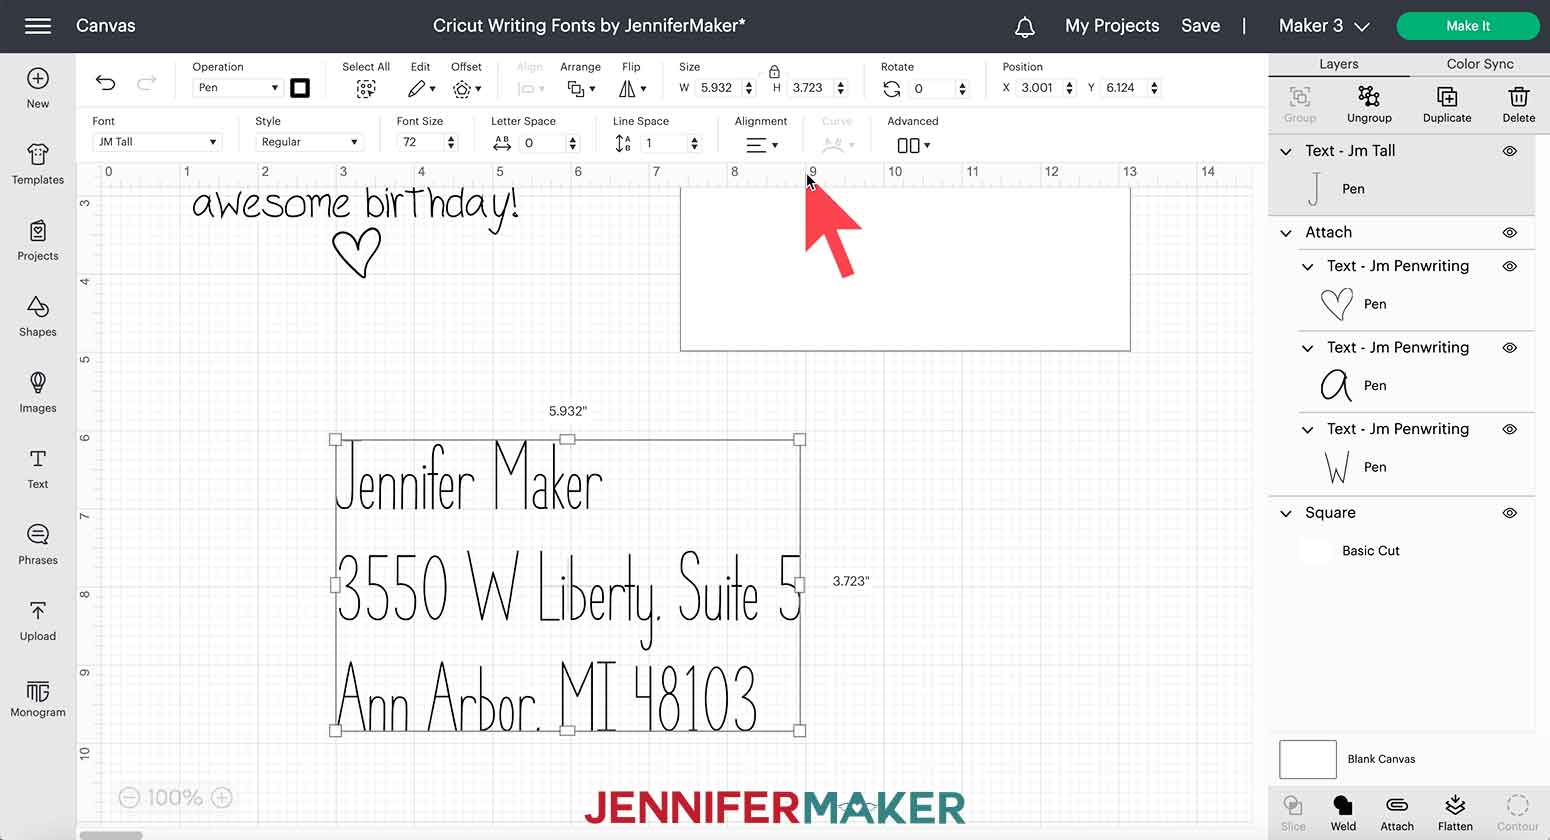
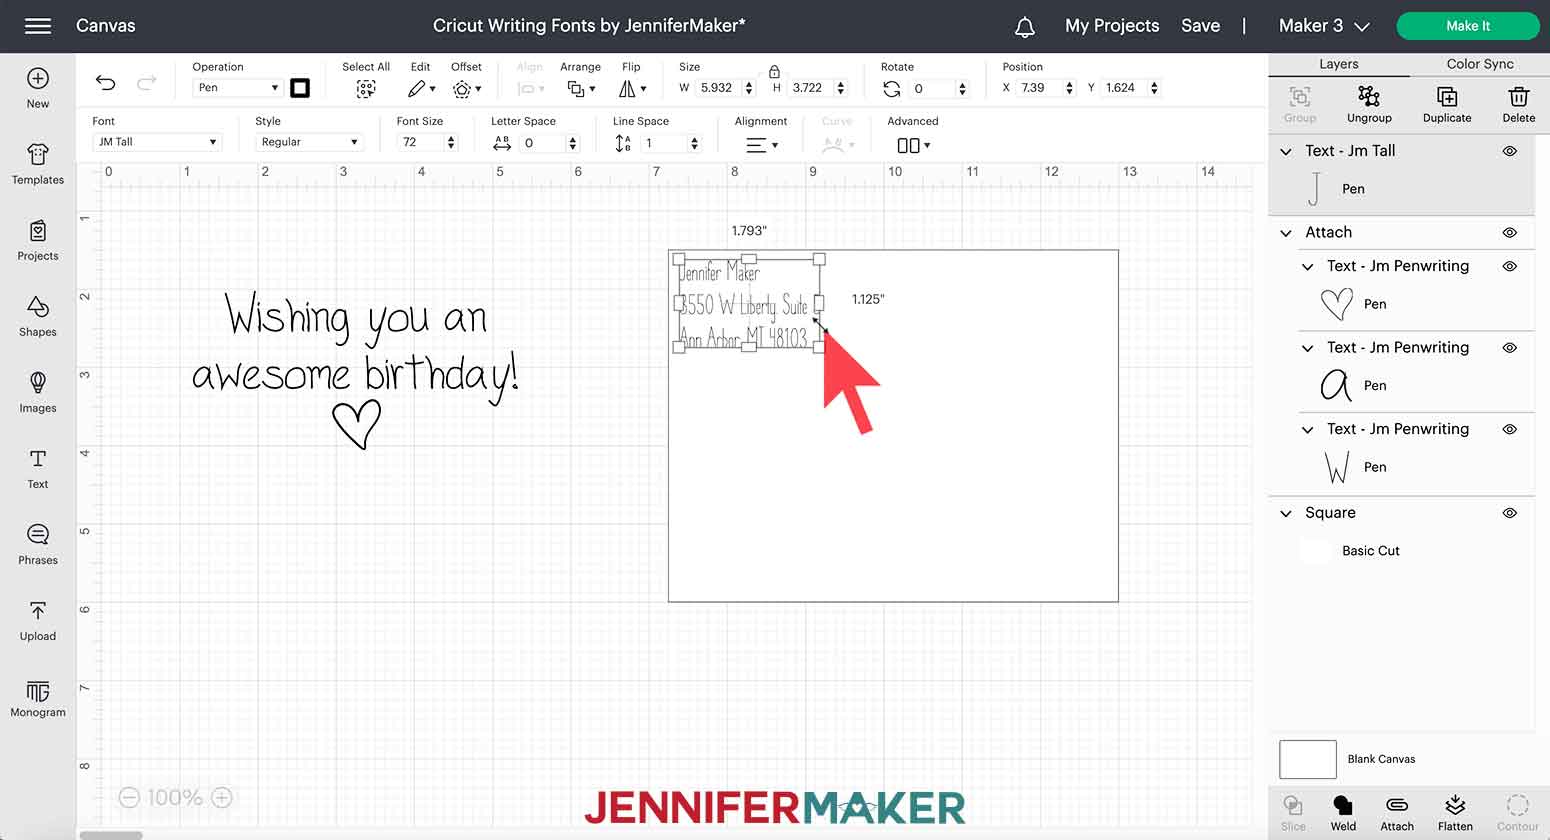
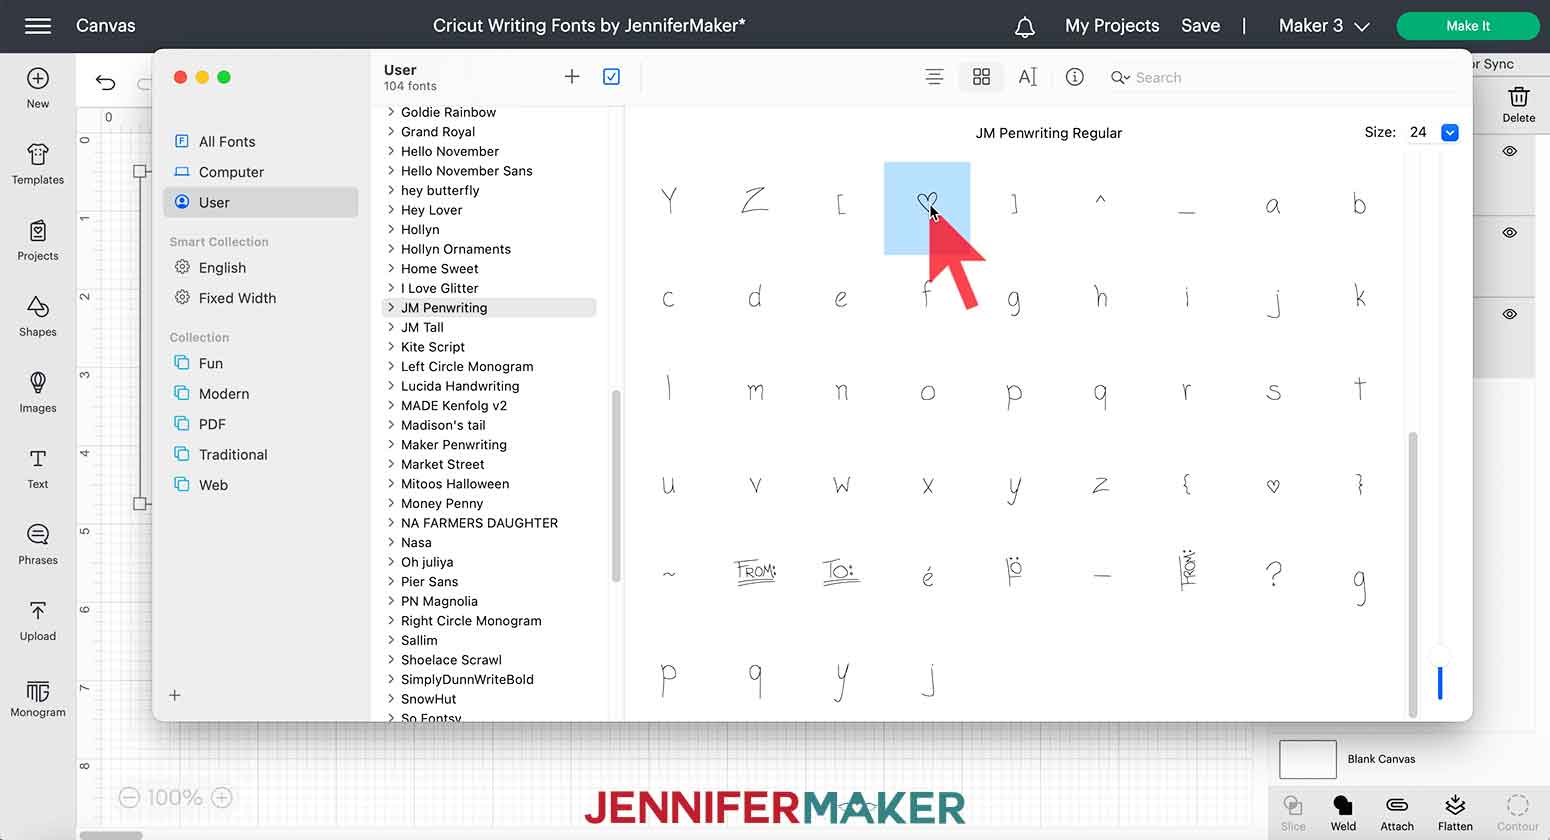
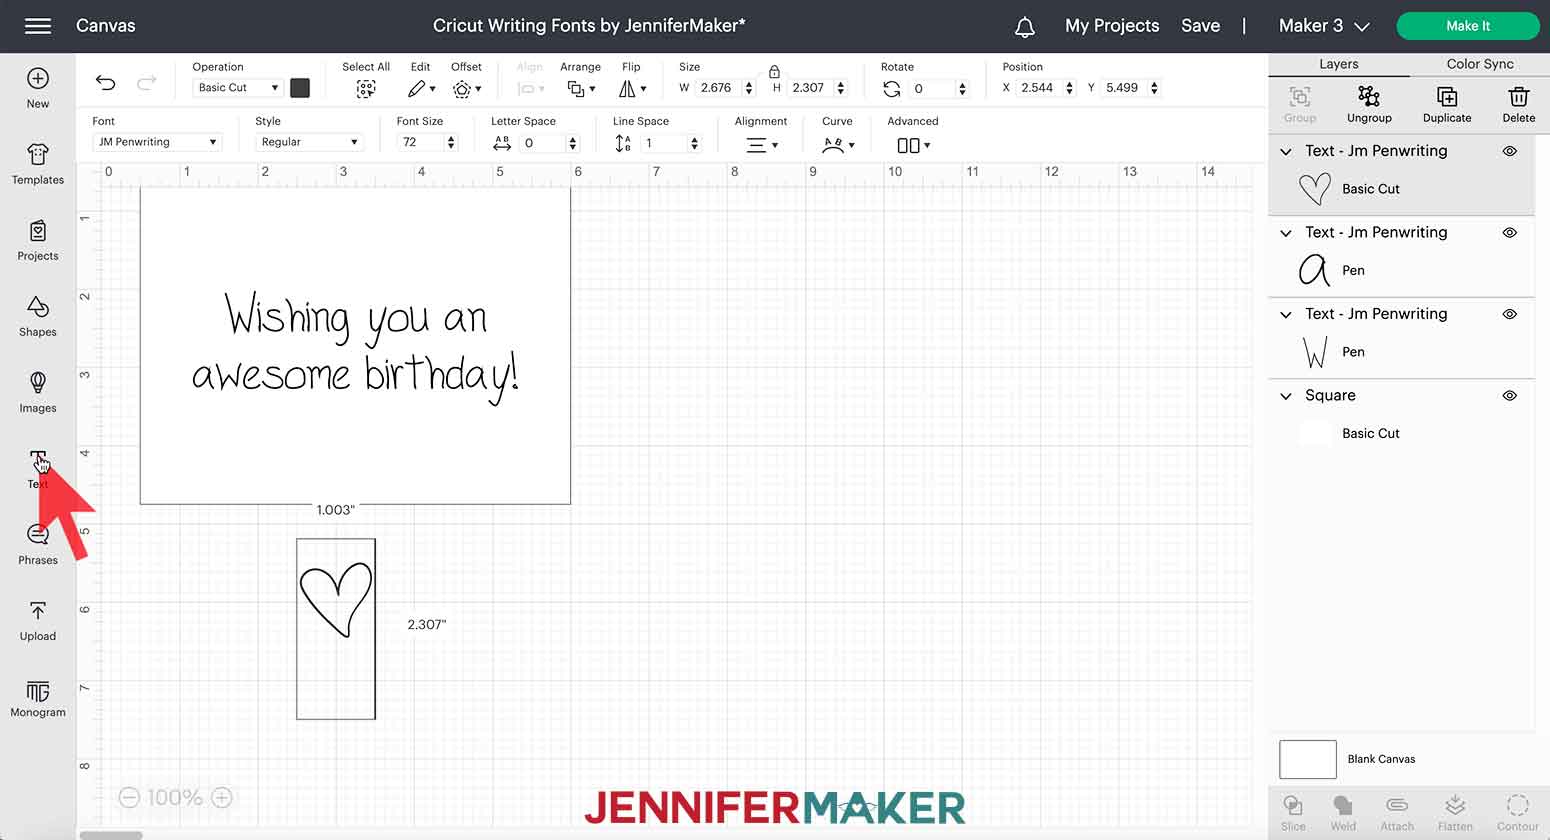
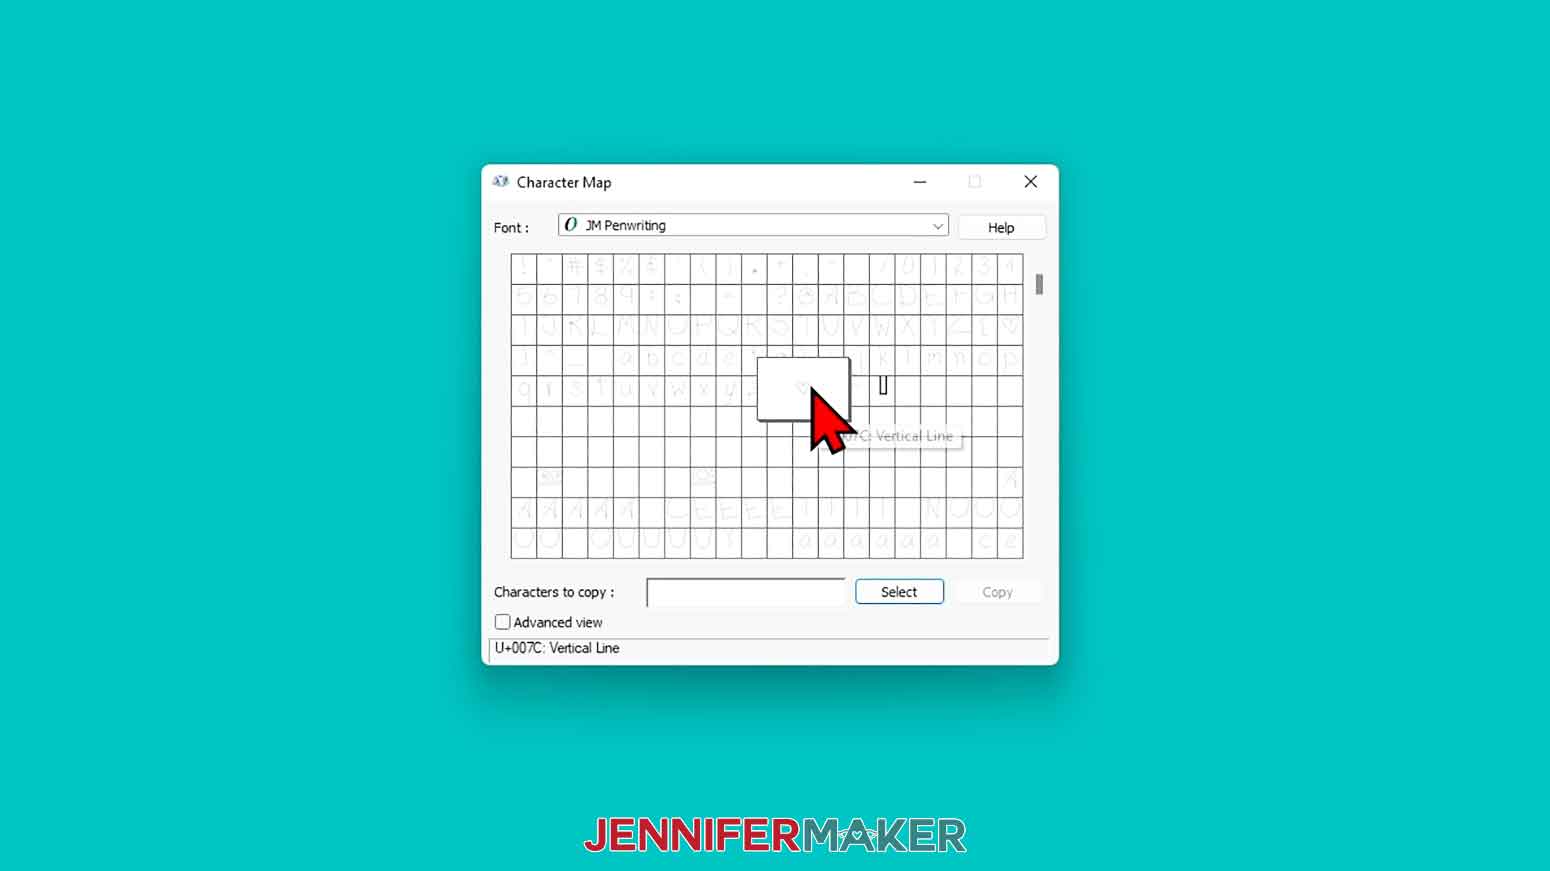
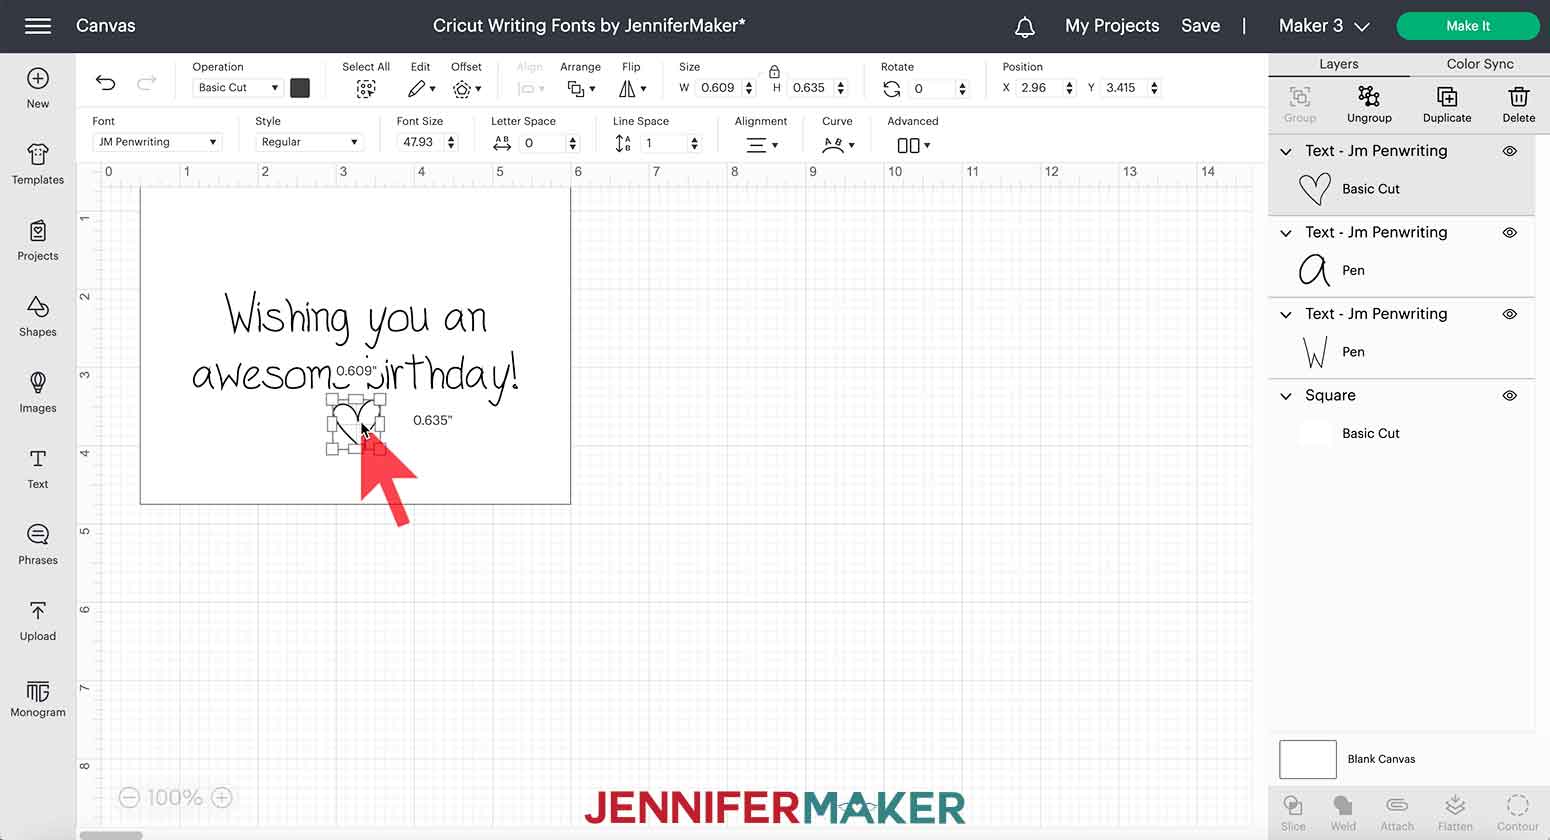
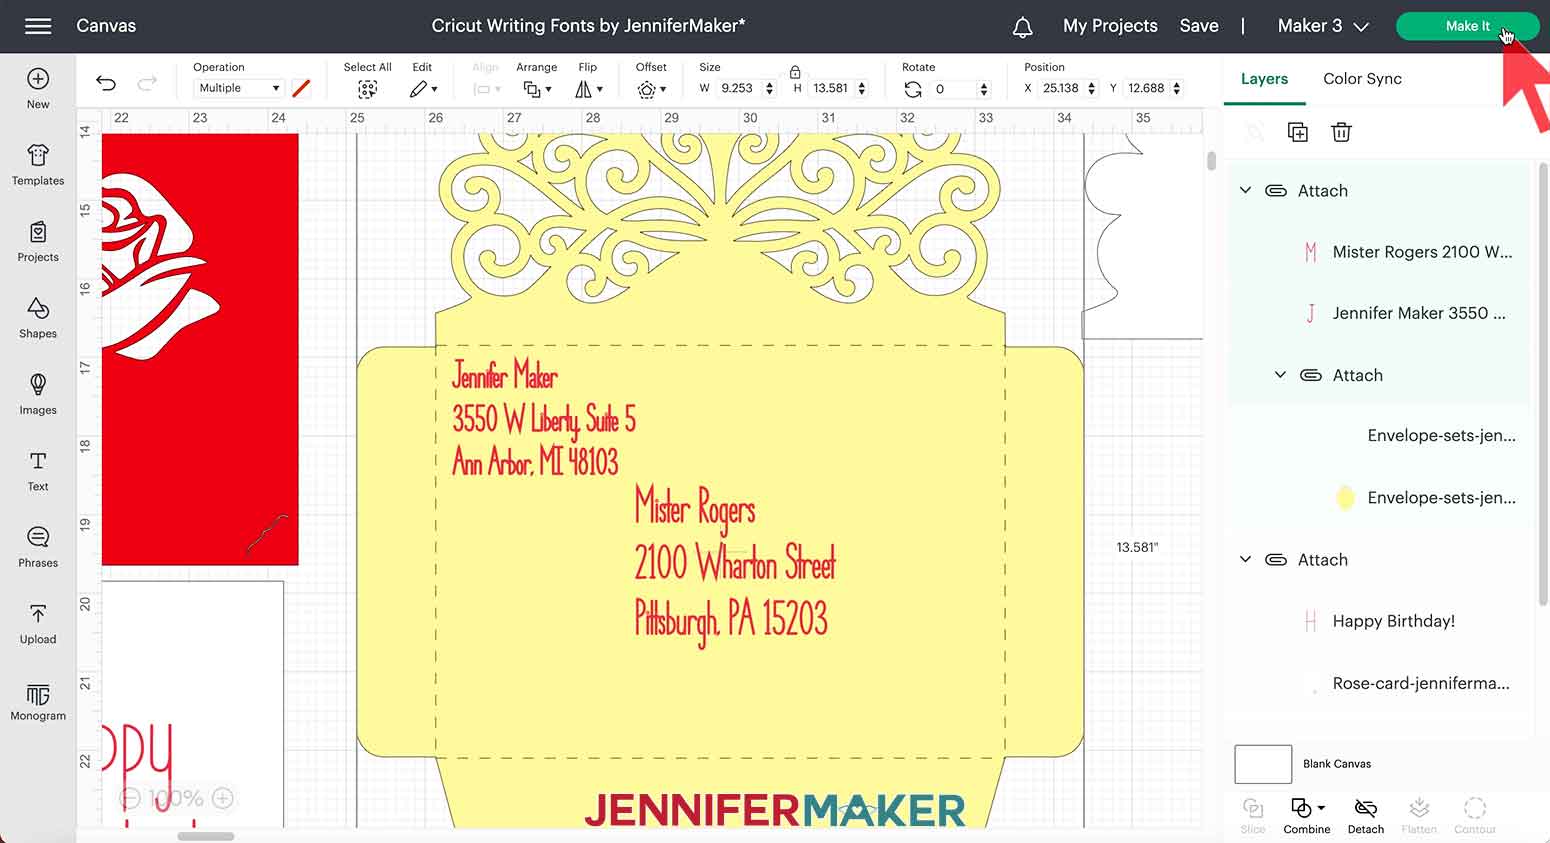
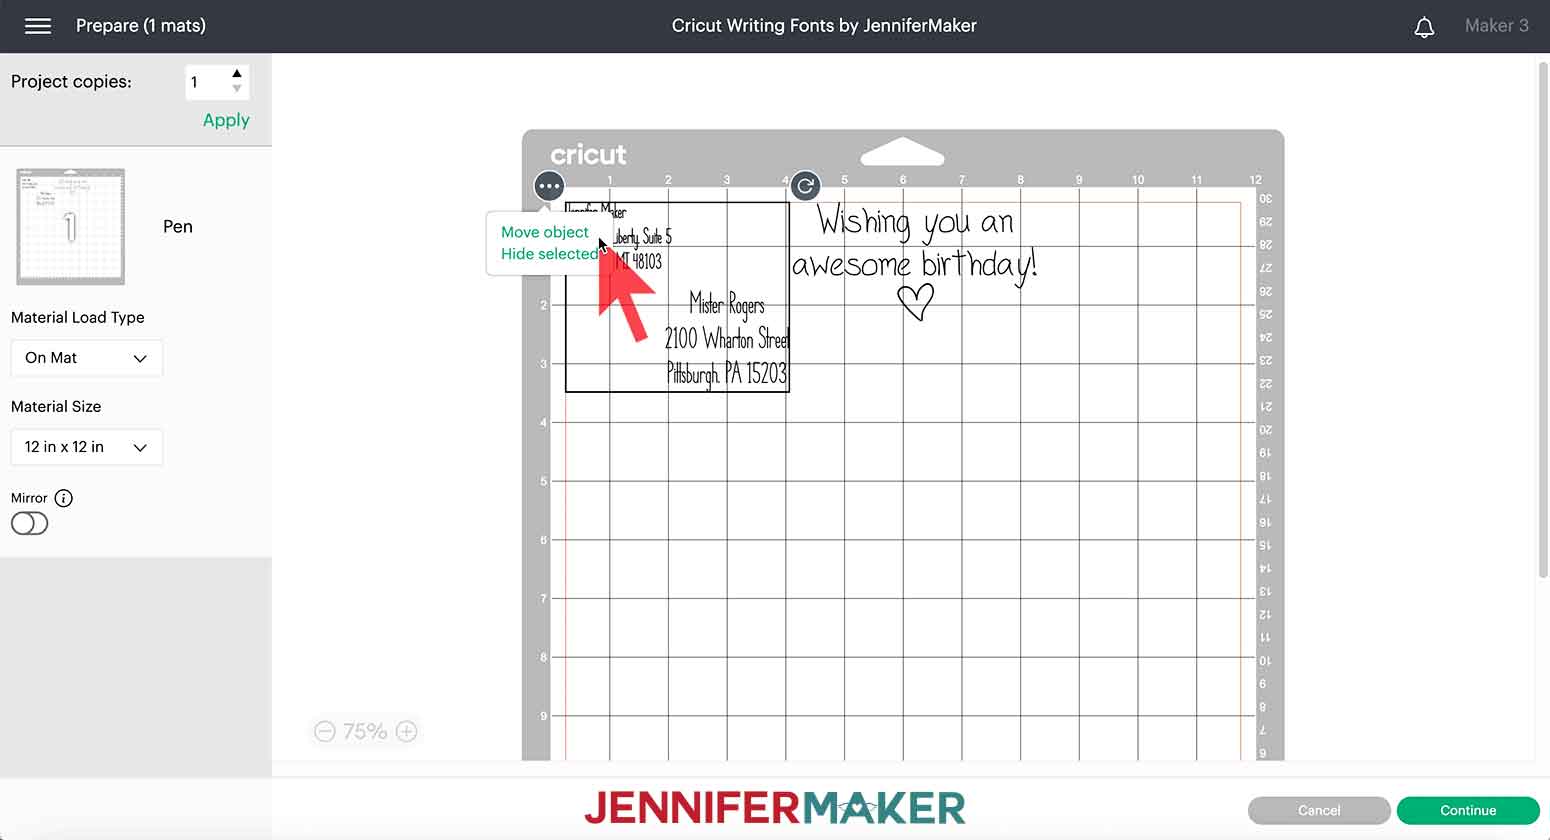
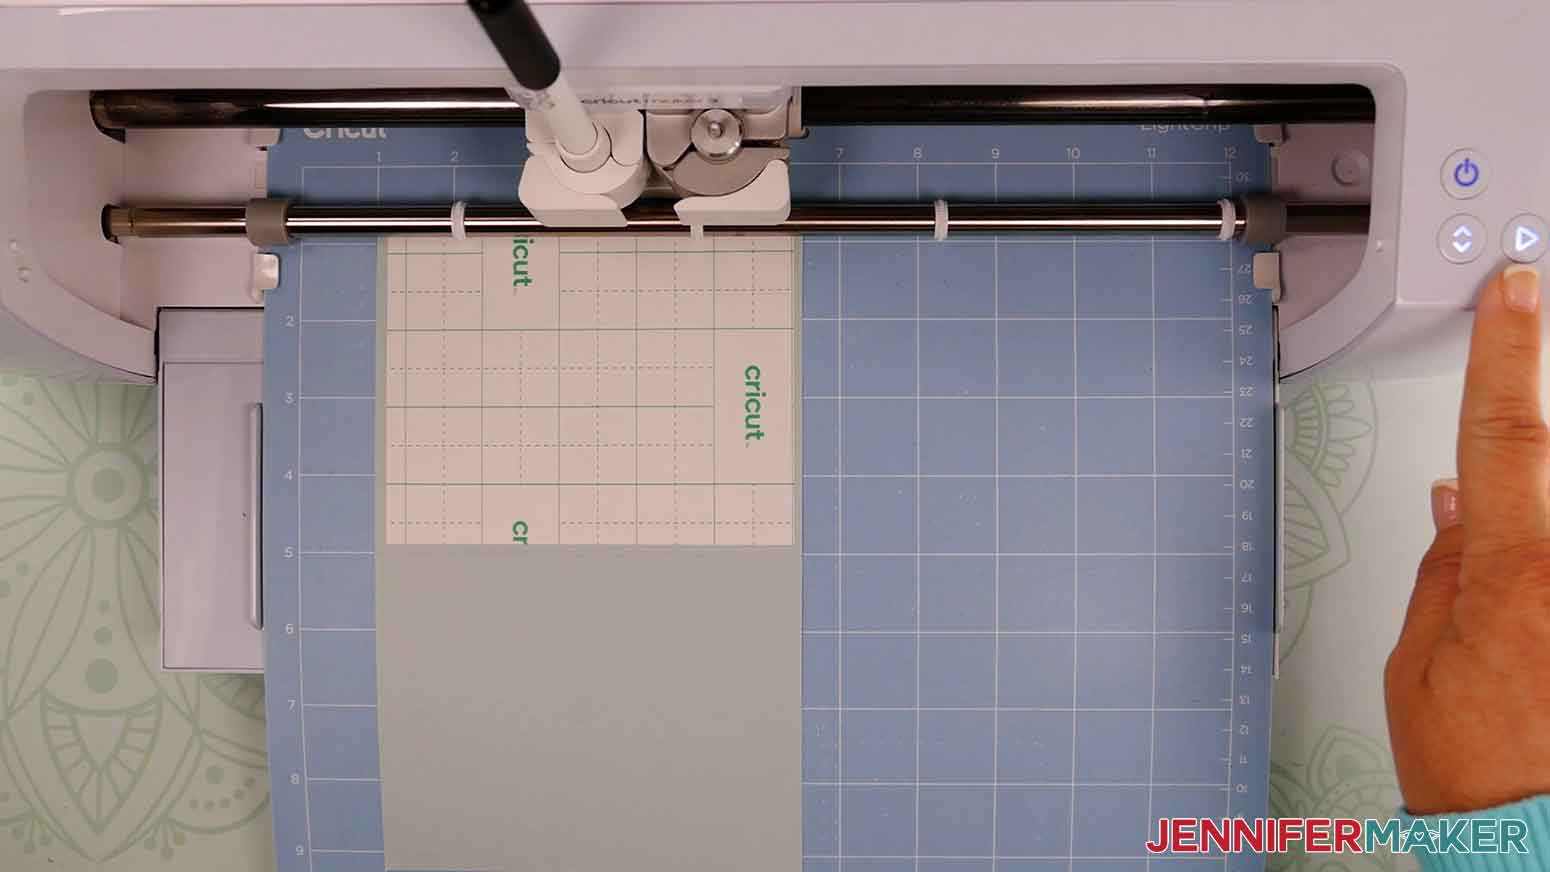
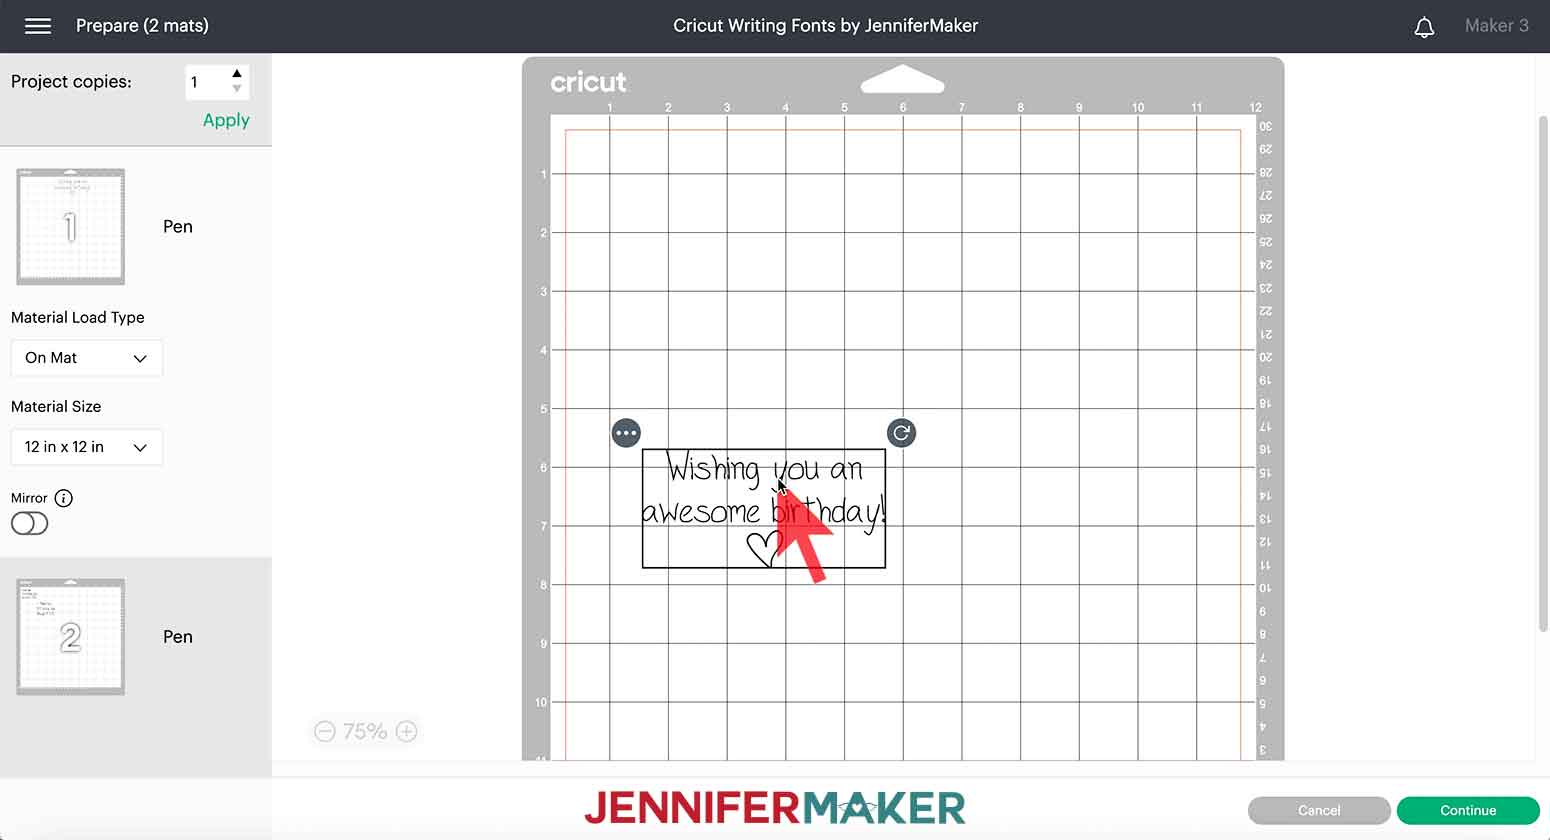
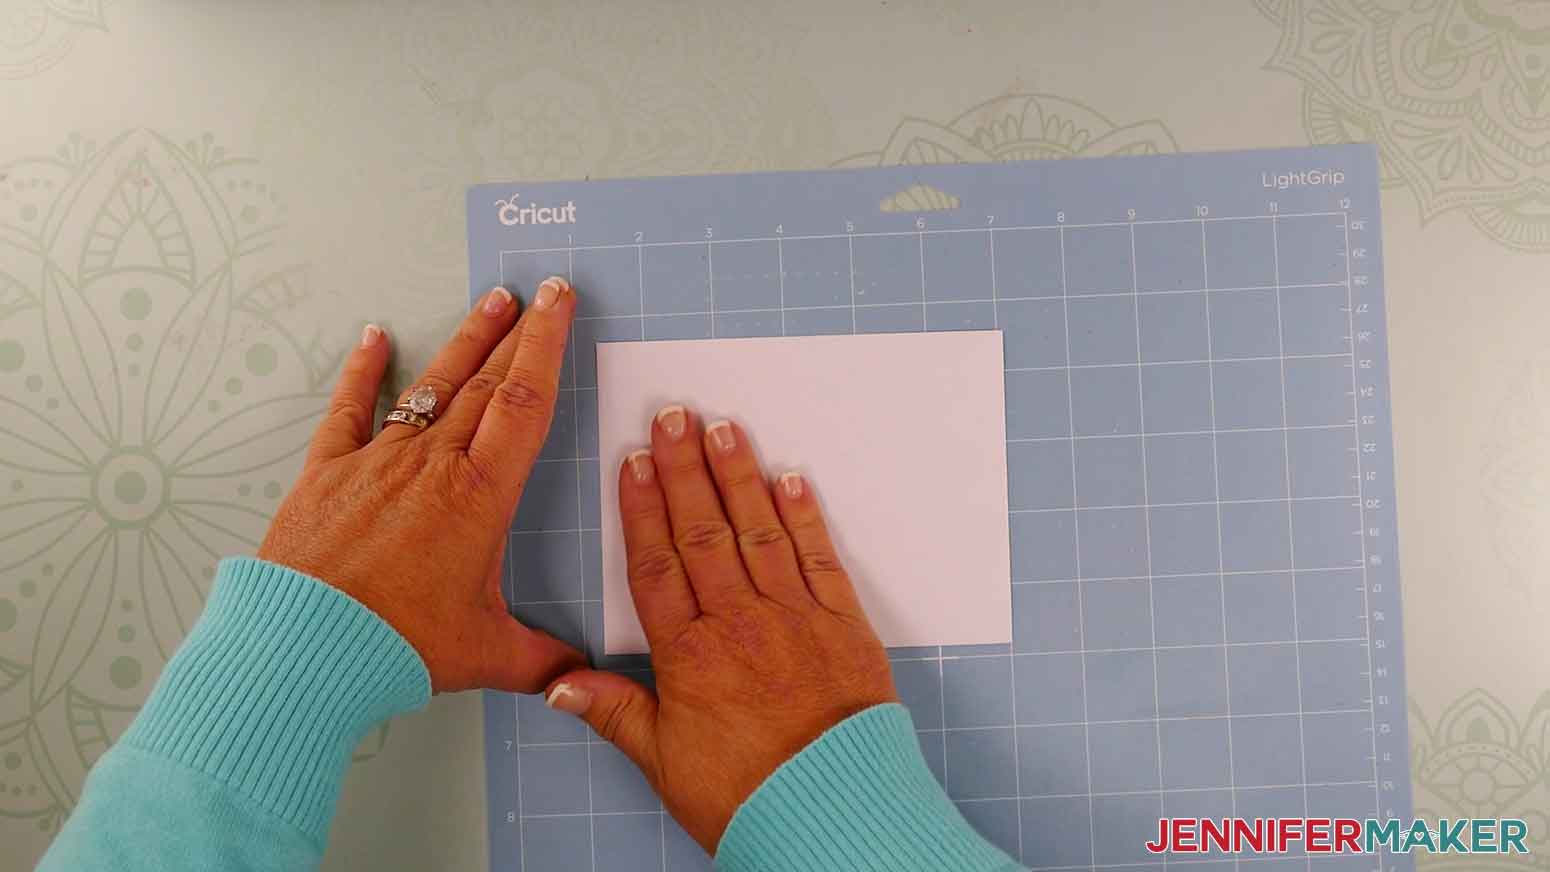
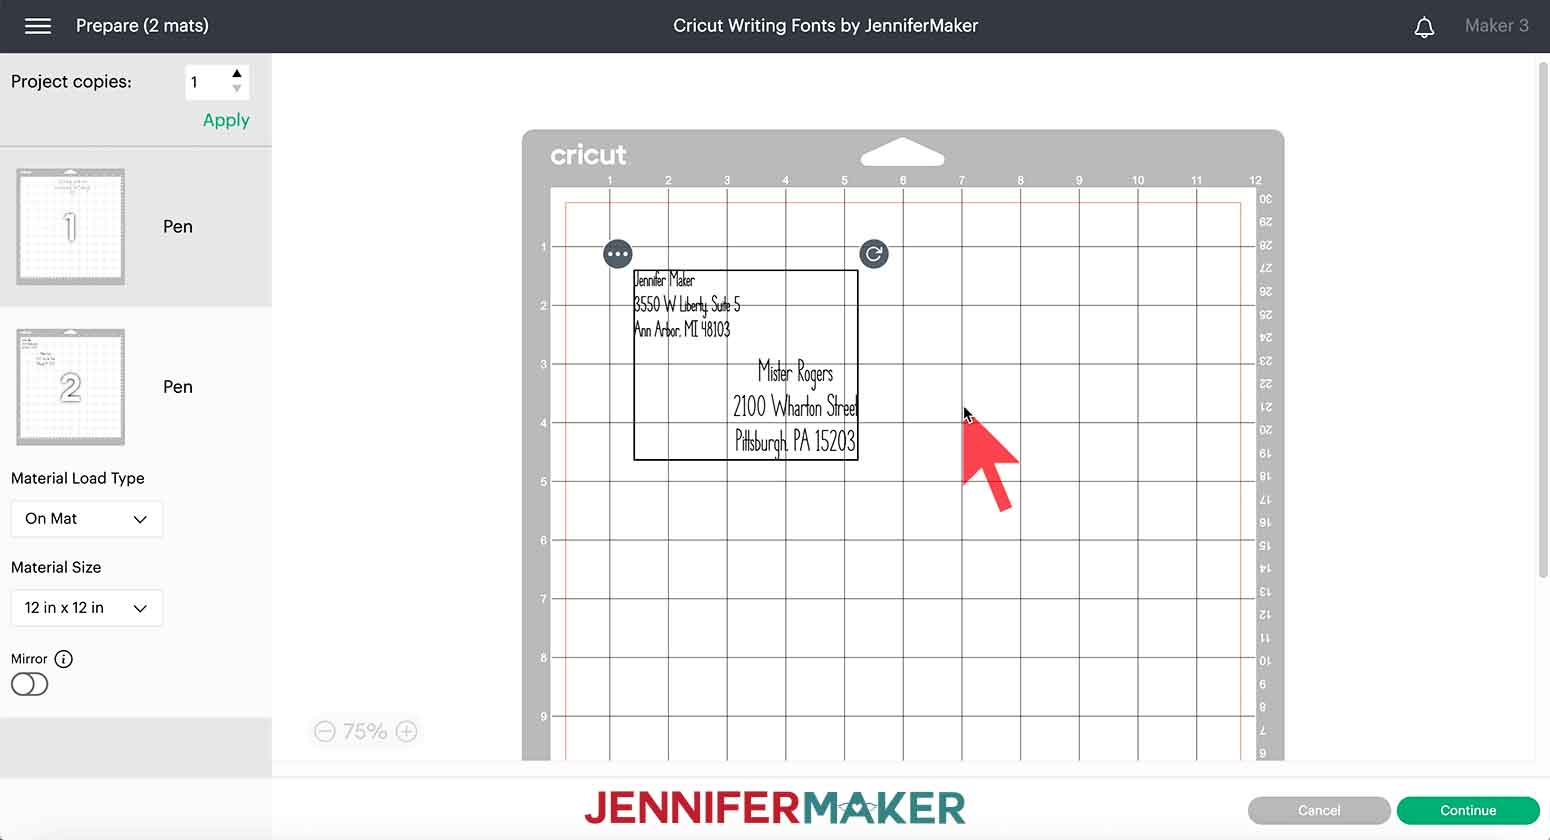
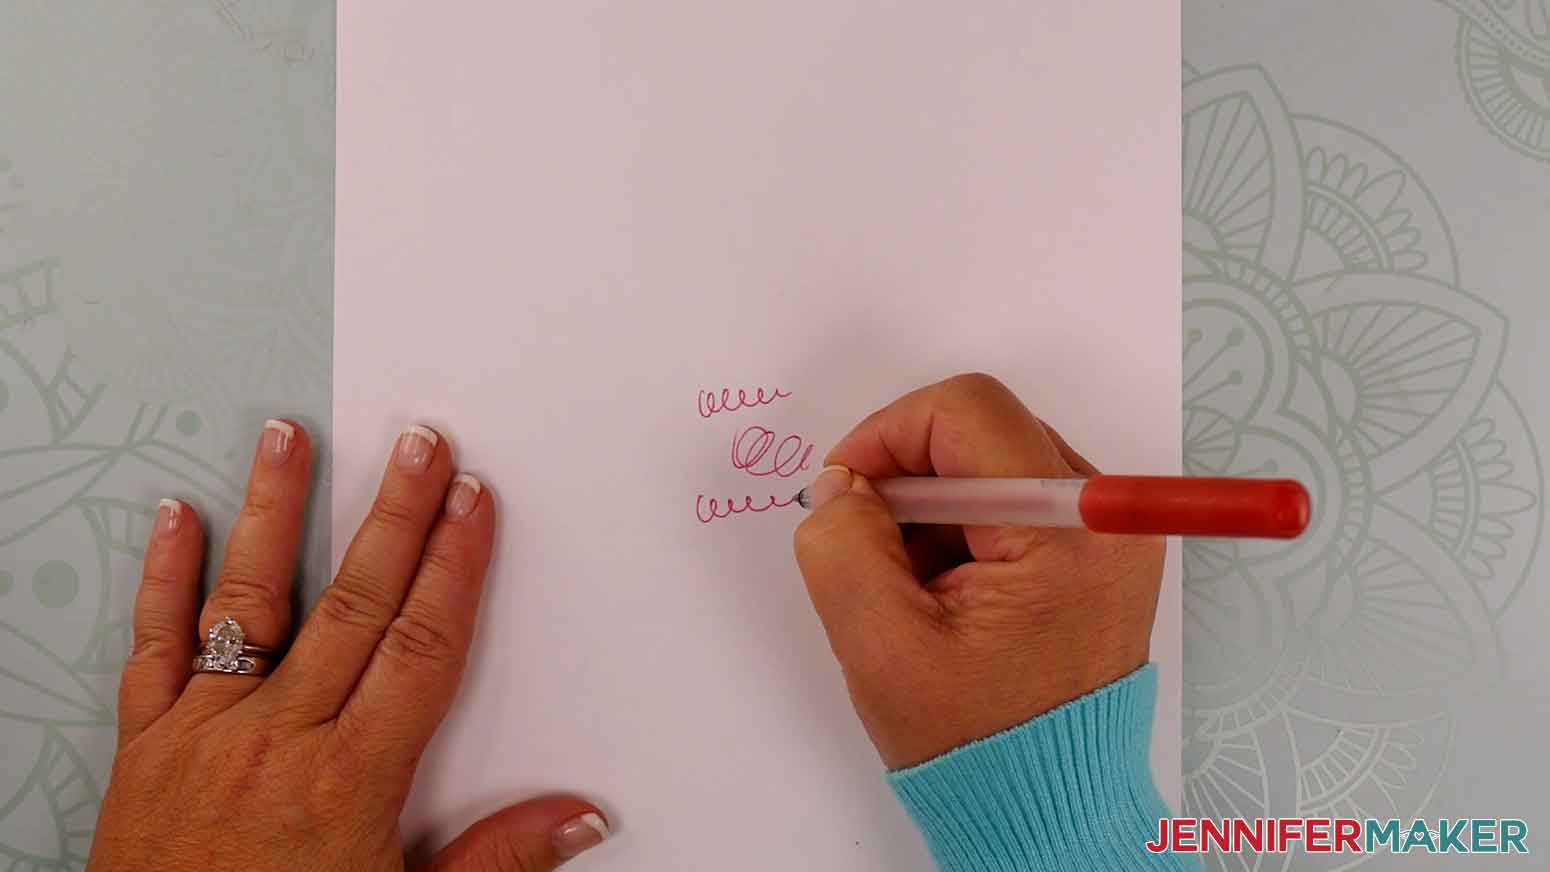
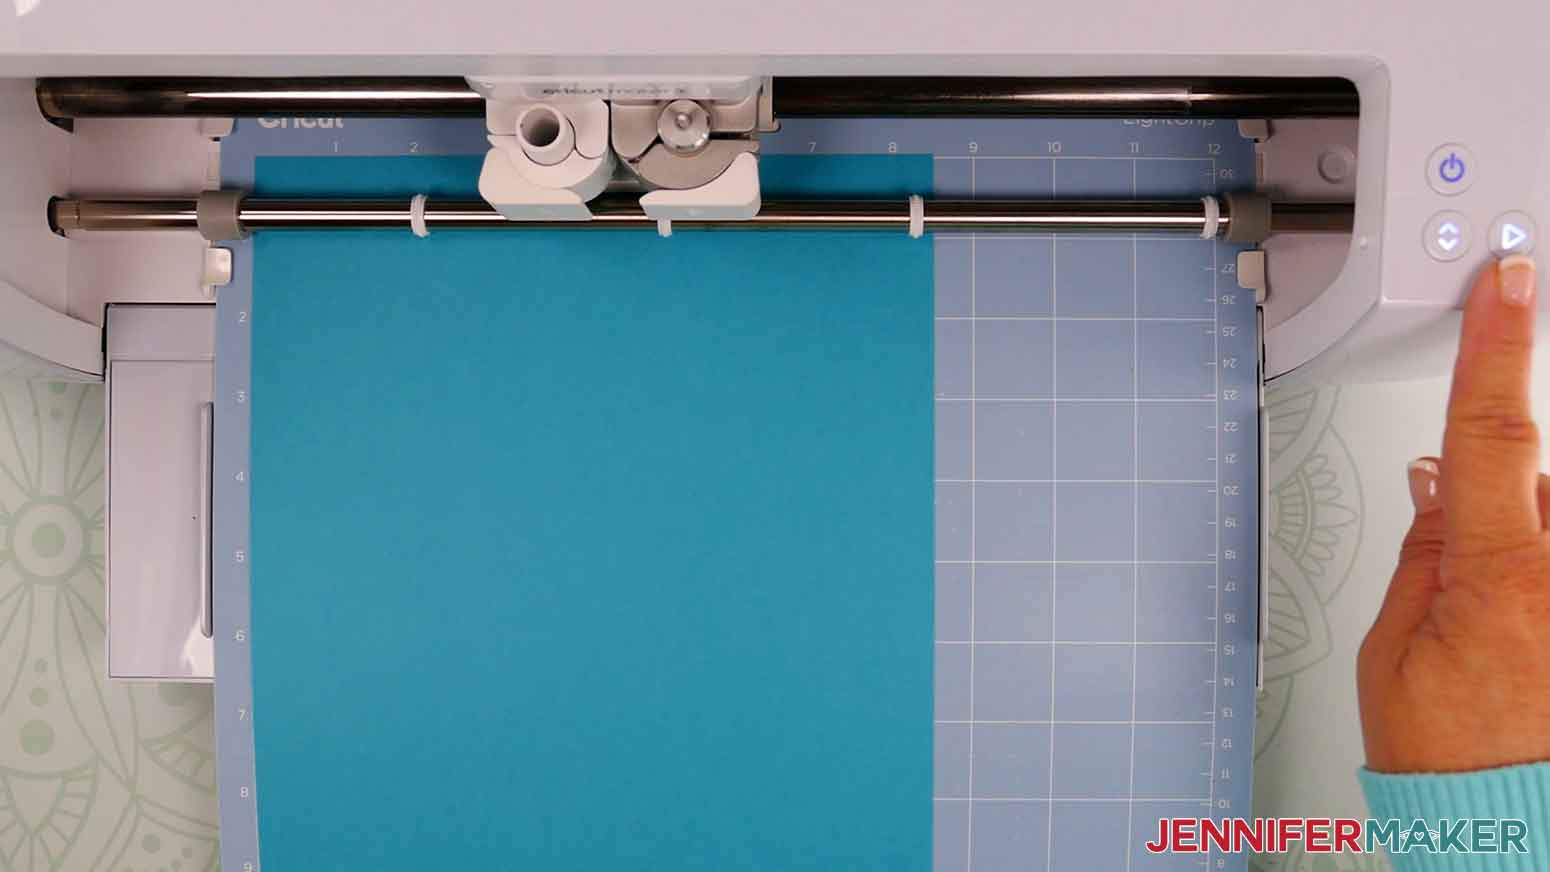
Learn how to use Cricut writing fonts to personalize a card or envelope and get my two free fonts! The first step is to download my two fonts, JM Penwriting and JM Tall, from my free resource library -- they're in Design #437. Next, you'll need to install the fonts on your computer and make sure they work in Cricut Design Space. If you aren't sure how to do that, I have a helpful blog post that will guide you through the steps! You’ll need to install my font(s) on your computer and THEN open (or reload) Cricut Design Space in order to use it. NOTE: If these fonts aren't the writing style you're looking for, that's okay! You don't have to use these fonts to write with your Cricut. There are other options online and within Cricut Design Space. I'll show you what to look for to make sure you're selecting the right kind. First, I'll show you how to write on a card and envelope you can make, and then how to add writing on ones that are already made. I'm going to upload a beautiful 5" x 7" (A7) rose card from my DIY Greeting Card Set as an example, but you can use these steps for any card SVG. The file is in the free resource library -- it's Design #42. There are a lot of other fun designs in this folder if you're looking to make a card for a certain occasion! TIP: If you are not sure how to upload an SVG cut file to Cricut Design Space, watch this helpful video training series I made. If you are on an iPad or iPhone, here is how to download and upload SVG files to the Cricut Design Space app. I am also going to make one of my A7 envelopes to fit the card from my How to Make an Envelope tutorial, so download Design #373 if you'd like! Add the SVG with "A7" in the title to your Canvas. This file requires a 12" x 24" mat, but there is an envelope design with an extra cut to all fit on a 12" x 12" mat. See the How to Make Envelopes tutorial for more information! You may need to click the minus in the lower left to zoom out to see everything. I'm only going to make one envelope today so I'll select the collection, click "Ungroup," and delete the ones I don't want to make. You should have one card design and one envelope design on your Canvas. NOTE: The envelope design file also includes a rectangle that needs to be changed to a Score line. Select the rectangle from the Layers Panel and change the Operation to "Score." Then, "Attach" the score layer to the envelope and the envelope text. If you need more detailed instructions, please check out my How to Make Envelopes! How to Add Writing on a Card's Insert and/or Envelope I'm going to start with the rose card. The card has two insert pieces. You can write on one or both of the pieces. I'm just going to write on the right insert piece but the steps would be the same for the left side. First, select the card and click "Ungroup" to separate the card layers. Click the "Text" icon on the left side of the Canvas. Next, click the arrow on the drop-down Font menu. If you happen to choose another font that isn't for writing, it will only draw the outline of the letters when you change the operation to Draw with a pen. There is nothing wrong with that, if you want bubble letters, but at the time of this tutorial in November 2022, the Cricut machines do not fill in drawn letters. Let me show you what I mean. I'm going to select Cricut Classic Chunky as my font. We can leave the text box to say "Text" while I show you this. Click "Operation" and select "Pen." See the bubble letters? This will happen with fonts that are not designed for writing. I do want to note that Cricut Sans actually does have a writing variation. If you do not see the writing version when you select "Pen," you need to click the drop-down under "Style" and select "Writing." Now, back in the font menu, you can filter through Cricut fonts. Click "Filter" and select "Writing" to see some of your options. You can also click "System" and search for writing fonts that you have installed, like JM Tall! Click to select the font you'd like to use. I'm going to use JM Tall. NOTE: If you choose a Cricut font with multiple styles, you may need to select "Writing" from the Style drop-down menu. This is just to the right of the font menu. Double click in your text box to type your message. I'm going to go with a simple "Happy Birthday!" You can press the Enter key after "Happy" to move to the second line. When you're done with your message, click anywhere out of the text box to get out of the edit mode. TIP: If you don't like the look of the spacing between lines, you can click the arrows next to "Line Space" to manually adjust the distance between the letters. Even though we chose a writing font, the Operation defaults to Basic Cut. Click once to select the text layer. If you have more than one text layer, press and hold the Shift key to click and select them in the Layers Panel. With the text layer(s) selected, click on the Operation drop-down menu. Select "Pen" under the "Draw" section. Now is also a good time to select the type of pen and color you will use. For this project, I'm going to use a Medium Glitter Gel 0.8 in Red. Click the color box next to Operation to select your pen details. Now that the font shows the actual look with the pen, you may wish to resize it. With the text layers still selected, you can click and drag the corner of the text box to resize it. If you haven't already moved your text, you can now click and drag the text (hold the Shift key to select multiple Layers if needed) over the card insert. You can also press and hold the Shift key to select the text line(s) and the insert and then click "Align" and "Center Horizontally." If you wish to add any additional text, feel free to do so. Remember to change the operation to "Pen." Once you are happy with your text and the placement, click and drag your mouse over the insert card and the text. Then, click "Attach" at the bottom of the Layers Panel. Now that our card is set, let's work on our envelope! I'm going to select the envelope and change the envelope to a more readable color. Click the color menu if you'd like to do the same. Just like with the card, click the "Text" icon to add a new layer of text. Your text will default to the last font you chose. If you want the same one, continue to the next step. If you'd like something different, select your writing font from the Font menu. First, let's type our return name and address. Click the Enter key to move to the next line as needed. Once your text is complete, click on the Canvas, outside of the text box, to exit the editing mode. Then, you can single-click on the text to activate the resize corner. Click and drag the corner to resize your return address. Then, click and drag the text over the area you'll want it on your envelope. You may need to resize and reposition the text a few time to get your desired look. Cricut Design Space text defaults to Center alignment. If you'd like your return address to be aligned to the left of the envelope, select the text, click "Alignment," and select "Left." Repeat the same steps for the address on your envelope. Type the address for the recipient. NOTE: You can select the text box, click "Advanced," and "Ungroup to Lines" if you'd like to make the top line of an address larger than the other lines. Press and hold Shift and click and select all of the text layers for the envelope. With the layers selected, click "Operation" and select "Pen." Click the color menu to confirm your pen type and color. Once set, single click in an open area of the Canvas and then click and drag your mouse over the envelope and writing layers. Click "Attach" at the bottom of the Layers Panel. Your card and envelope are ready! If that's all you are making today, you can skip the rest of this step and move on to Step 4. How to Add Writing to a Premade Card or Envelope To write on an existing card or envelope, we'll create the text within Design Space and then use the guidelines of our Cricut mat to place the items for accurate writing. I'm going to add some writing to a Cricut Cutaway card that I previously made. First, let's measure to confirm the size of the folded card and the size of the envelope. The card I'm using measures 4.25" x 5.5" and the envelope measures 4.5" x 5.75". In Design Space, I am going to use shapes to help with our writing placement. Click on "Shapes" and select a square in the Free area. Open the lock icon at the top of the Canvas and enter "5.5" in the width box and "4.25" in the height box. Click enter to see your square turn in to a rectangle. With the rectangle still selected, select white from the color box. This will be the template for what we want to write inside the card. Click the "Text" icon and select the font you'd like to use. This time I'm going to use JM Penwriting in the System section, but you can use any writing font you'd like. Type the message you'd like to write inside your card. You can use the enter key if you'd like text to move to the next line. I'm going to type "Wishing you an awesome birthday!" Click anywhere on the Canvas out of the text box to exit the editing mode. Single click the text box to select it, click "Operation" and select "Pen." Click on the color box and select the type of pen and color you're going to use. I would prefer the text lines to be a little closer together. Like I showed earlier, I can use "Line Space or you can click the Advanced icon and select "Ungroup to Lines." It is helpful to use this feature when you aren't keeping your text aligned. Select the top line of text and use the down arrow on your keyboard to to move it closer to the second line. Once the line spacing looks good, you may wish to adjust the size of the text. Press and hold the Shift key to click both text layers. Use the corner handle to click and drag the text to resize the lines at the same time. This keeps them proportional. When you're happy with the sizing and spacing of your text, click and drag your mouse to select the text lines and the rectangle template. Click "Align" and "Center Horizontally." The purpose of the rectangle was to make sure the text we want to write on the card will fit how we'd like it to. Since the card is already made, we do not need to keep the template with the writing. So, move the rectangle template out of the way. Click and drag the mouse over the text lines and click "Attach" at the bottom of the Layers Panel. Let's repeat this process for the envelope. First, we need to resize the rectangle template to be slightly larger based on what we previously measured. Select the template and enter "5.75" for the width and "4.5" for the height. Click the Text icon to create a text box for the return address. If you'd like to use a different font, you may select it now. I'm going to stick with the JM Tall font for the envelope. Type your return address and remember to press the Enter key to move to a new line. If you'd like your return address to be aligned to the left of the envelope, select the text and click "Alignment" and select "Left." Click anywhere on the Canvas to exit the text editing mode. Single click back on the return address and click and drag the corner to resize the text box. NOTE: You may also "Ungroup to Lines" if you wish to change any of the line spacing. I'm going to leave mine the way it is. Just remember to select the address layers and click "Align" and "Center Horizontally" if you decide to use "Ungroup to Lines." Repeat the same steps for the address on your envelope. Type the address for the recipient. Change the text layer Operation to "Pen" and select the appropriate pen/marker and color. Now, you can hide or delete the template. Select all envelope address layers and click "Attach" at the bottom of the Layers Panel. GLYPHS A quick note on glyphs! The JM Penwriting fonts includes several cute glyphs. What are glyphs? They are extra special characters, letter forms, flourishes, ligatures, and stylistic alternatives. To access glyphs on a Mac, open Font Book, and choose the JM Penwriting font. Single click to select the glyph you want in the font press Command C. Then in Design Space, click Command V to paste the glyph. If it doesn't look like it did in Font Book, make sure JM Penwriting is selected from the font menu. To access glyphs on a PC, click on the Start menu, and search for Character Map. When it opens, search for the font, You can see all of the characters in the font, select the glyph you want, click Select and then click Copy. In Design Space, press Control V to paste the glyph into a text box. For a video tutorial on glyphs, check on Make Knockout Designs in Cricut Design Space. Click and drag the heart near the message. If you chose to add a glyph, be sure to select the glyph and rext daus to We are now ready to make our awesome cards and envelopes! Make sure you have the appropriate Cricut machine selected - I'm using an original Maker today - and click "Make It" in the upper right corner. If prompted, select "On Mat," "12 x 12" and click "Continue." NOTE: You may see a warning across the top about an image needing a longer mat if you are using the same envelope file as me. Remember, if you don't have a 12" x 24" green StandardGrip mat, see the How to Make an Envelope tutorial to make one using a 12" x 12" mat. The Prepare screen is very important for arranging the text that will go on a premade card and envelope. If you are both making cards and writing on premade cards, you might have to do some rearranging of mats. The text-only layers will each need to be on their own mat. Click the three dots in the upper left corner of the text-only layer and select "Move Object." Select "New" to create a new mat. Any color is okay. I'll choose the white option. NOTE: If you are using a Maker 3 or Explore 3, you will need to move both text-only layers to a new mat. If using the original Maker or Explore Air 2 then you will only need to move one of the text-only layers. Different machines have different layouts but ultimately, you should end up with five mats if you are making the same cards and envelopes as me. I now have five mats: Now, let's position the mat for the premade card and envelope. The important placement for the text going inside the card is to align the text over the area where the open card will be on the Blue LightGrip mat. I found it easiest to align the lower part of my card. Open the card and align the crease of the card along a line on your machine mat. Also, align the left side of the card to a line on the cutting mat. The left side of the crease should be at a cross point on the mat. I am going to align my card one square, or inch, in and place the crease along the 5" line on the mat. Press the card in to place. Now, select the mat that has the premade card's writing on it. Click and drag the text to the mat area where you have placed your card. The card is between the 1" and 6.25" area so center it between that on your mat on the screen. You'll want to place the text just below the 5" line so that it writes under the crease of your card. Always double check your measurements and text placements. We need to do the same thing for the premade envelope mat. This placement is a little easier since the return address aligns in the left corner. Choose where you will place your envelope on your mat. Because Cricut Design Space creates a small margin around the edge of the mat, I am going to place the envelope one square in and one square down. In Design Space, click on the mat with the envelope writing. Click and drag the text using the grid lines to align it where the envelope is placed. The other text we added is going to write directly on to the inserts of the card so no movement is necessary. When you're comfortable with your text placement., click back on the first mat. Click "Continue" in the lower right corner. Select your material for the project. I am using Light Cardstock 65lb. If you don't see it as an option, click "Browse All Materials" and search for "Light Cardstock." Select it and click "Apply." TIP: Before placing each pen in your Cricut, I recommend scribbling it on a scratch piece of paper. If they are new, they may need to be primed a bit to get the ink going, so you’ll want to do that BEFORE your Cricut uses them on your project. This will help the ink be ready to flow and get the best results for your project! On a Maker, pens and markers will get inserted in to Clamp A. Follow the prompts in Design Space to insert the correct pen at the correct time. Place the cardstock or premade card or envelope on your cutting mat and press the flashing arrows to load it in to your machine. REMEMBER: Don't forget to place your premade cards and envelopes in the same spot you aligned the text in Design Space. When you pen is loaded in Clamp A and your Fine Point Blade is in Clamp B, press the flashing middle button to create your design. When the mat is done, press the flashing arrows to unload it. Flip the mat over and peel it back to release the materials without curling or ripping them. Place your next material on the mat and continue the same steps until everything is complete. TIP: If you have selected multiple pen types for pieces on the same mat, Design Space will prompt you to change the pen. When everything is done, assemble any cards and envelopes. You can refer to my other tutorials if you need any assistance. I can't wait to see your amazing designs with writing fonts. I hope this tutorial helps build your confidence when it comes to your Cricut writing on and inside your cards and envelopes. 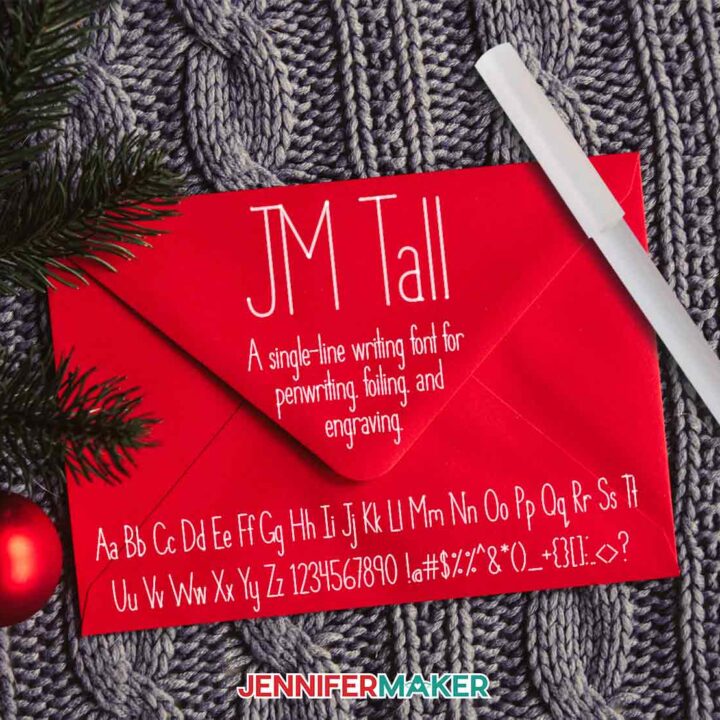
Cricut Writing Fonts
Materials
Tools
Instructions
STEP 1: GET MY FREE CRICUT WRITING FONTS
STEP 2: UPLOAD YOUR CRICUT CARD OR ENVELOPE DESIGN TO DESIGN SPACE (OPTIONAL)
STEP 3: ADD PERSONALIZED TEXT TO YOUR CARD AND ENVELOPE
![]()
STEP 4: MAKE YOUR CARDS AND ENVELOPES WITH CRICUT WRITING FONTS
STEP 5: SHOW IT OFF
Answers to Your Questions About Cricut Writing Fonts
Q: What fonts are good for writing on Cricut?
A: There are so many font style options available! Use my Font Finder to see some of my favorite fonts available, with or without a Cricut Access subscription. On the cheat sheets, I share my favorite serif fonts, outline fonts, single-line fonts, and many options for Cricut tools!
To find more writing style fonts for Cricut, visit Font Bundles, Creative Market, Creative Fabrica, Envato Elements, or search other online marketplaces offering premium fonts. They’re the best places! If you plan to sell your designs or products in addition to personal use, remember to purchase a commercial license or other usage rights if necessary.
Q: Where are Cricut writing fonts?
A: Under the Font menu, use the Filters tool to select “Writing” to narrow the results to options with a writing style. If you’re looking for a font file you’ve downloaded and added to your font manager (like FontBook on a Mac) click the “System” tab to search for fonts on your computer. Then type the font name you’re looking for in the search bar.
Q: What is a pretty cursive font on Cricut?
A: Currently, there aren’t many free script fonts in Design Space that are similar to cursive writing, unfortunately. There are some fun font options that come up if you search for “script” that are similar to cursive, though!
Q: How do you get cursive writing on Cricut?
A: While there isn’t a way to get just cursive results when searching Cricut fonts, using the Filters to select Writing and searching for “script” returns many results with connected letters and styled like cursive fonts.
Q: How do you make the Cricut write?
A: Make sure to change the Operation of your design to Draw and select the correct pen or marker in the color box. Change the Style to Writing so the Cricut expects a tool other than a blade, too. Design Space will prompt you to add a marker to a specific clamp when it is ready to write the lines you indicated.
Q: How do you tell if a font is a writing font?
A: In Cricut Design Space, fonts that have a Writing style will show that tag under their name in the Font picker drop-down.
Get my free download of Cricut Writing Fonts here:
If you make a project using my Cricut writing fonts, I’d love to see it! Please share your projects in my Cricut Crafters & Makers group where you’ll find hundreds of thousands of crafters like you, sharing their tips, projects, and inspiration.
Love,

Want to remember this? Save this Cricut Writing Fonts project to your favorite Pinterest Board!