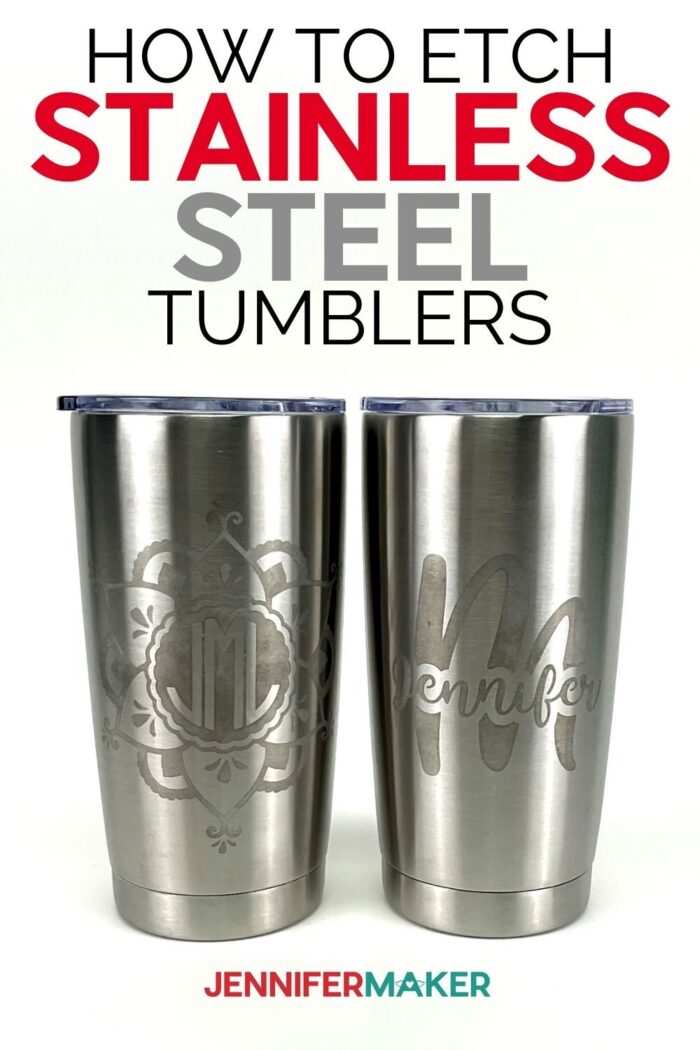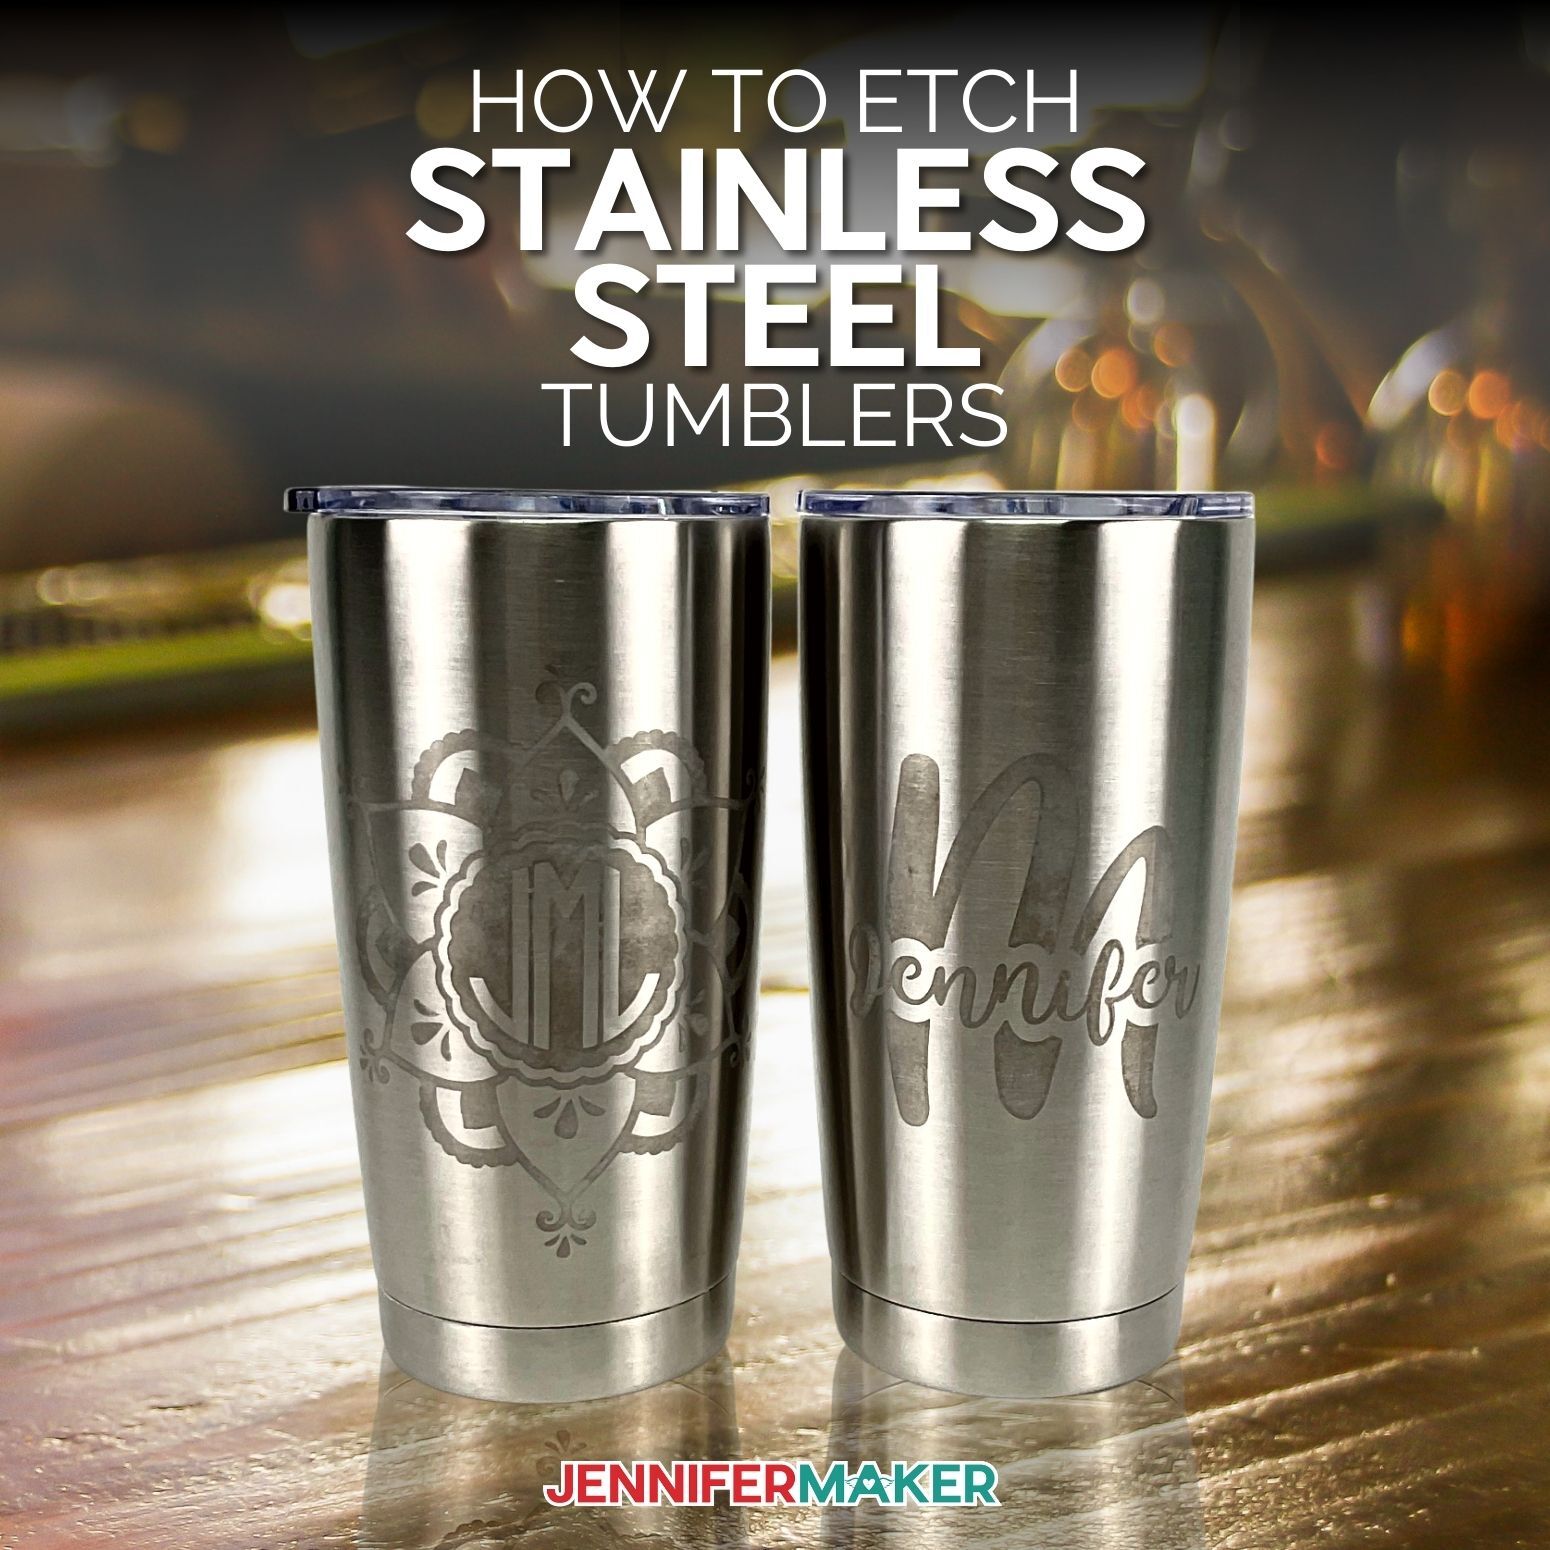
Learn how to make these awesome stainless steel etched tumblers … it’s easier than you think!
I’m always looking for new techniques and project ideas to share with you. Especially when it’s something that might seem impossible to do or something you might not think you can do with your Cricut. For example, did you know you can etch a design on stainless steel? Can you believe it? Pretty amazing huh? I’ve showed you how to etch glass before, but this project is all about how to make awesome etched stainless steel tumblers!
Watch my step-by-step tutorial video!

Now this may look hard, but I’m going to walk you through the process step by step and by the end of this tutorial you will be a pro at etching stainless steel. Yes, you read that correctly. And, who knows, you might even have a new hobby or better yet, something really cool you can sell or give as a gift!
I’m always amazed at all the things I can make with my Cricut. Of course you know I love paper crafts. Especially making paper flowers and 3D shadow boxes. I also love that I can make so many fun gifts with iron-on vinyl. Anything from t-shirts, tote bags and pillows. Honestly, the Cricut has opened up a whole new world of possibilities when it comes to crafting.
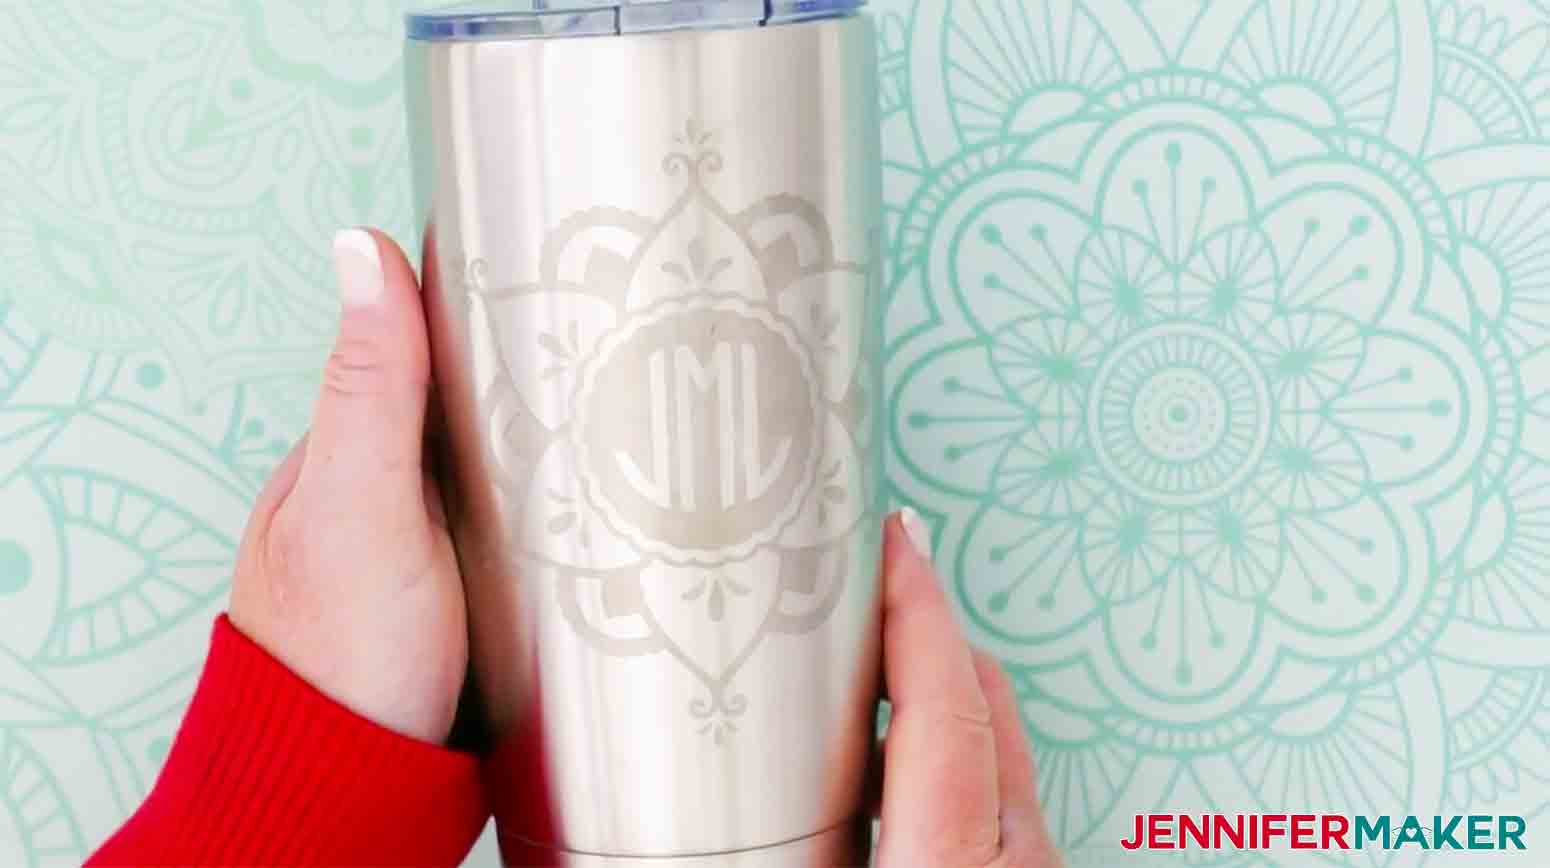
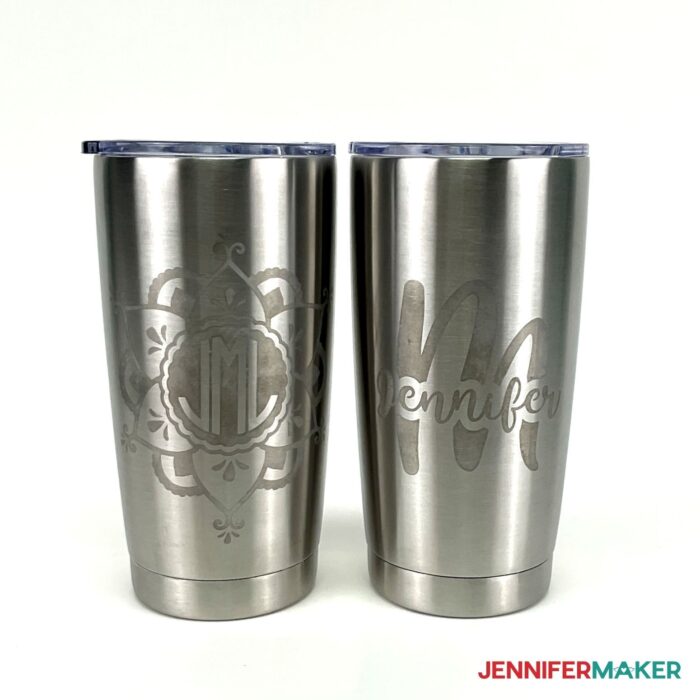
Etching is also in my top favorite Cricut-crafting projects because of how great these projects turn out. Look at this tumbler, doesn’t it look like something you would get custom made? Seriously, SO cool!
We will need a few materials to make this awesome project. First, we will of course need a stainless steel tumbler. I found this one on Amazon, it’s a 20 ounce tumbler but you can really use any size as long as the design you add fits. You can even make matching ones for the family and have them in all different sizes, how fun!
To add our design to the tumbler we will use Ferric acid, cotton balls, (Q-Tips are fine as well) and some baking soda as well. And since we are working with chemicals, safety first! I always recommended Personal Protective equipment or PPE, such as gloves, a respirator and something to protect your eyes. Also, remember to stay in a well ventilated room or outside when you do this. This is really important as you don’t want to be in a closed room breathing in all the fumes and chemicals.
And I know working with chemicals can sound pretty intimidating, but I promise…this is SO EASY!
We will cut our design with the Cricut Cutting Machine and you can use any machine for this, even the Joy!
We will also need some permanent vinyl. Any color is fine since we are using it as a stencil. Last but not least, you will need some transfer tape, a weeding tool, scraper and brayer. Other helpful items to have on hand are a measuring tape, disposable bowls and some sort of a timer.
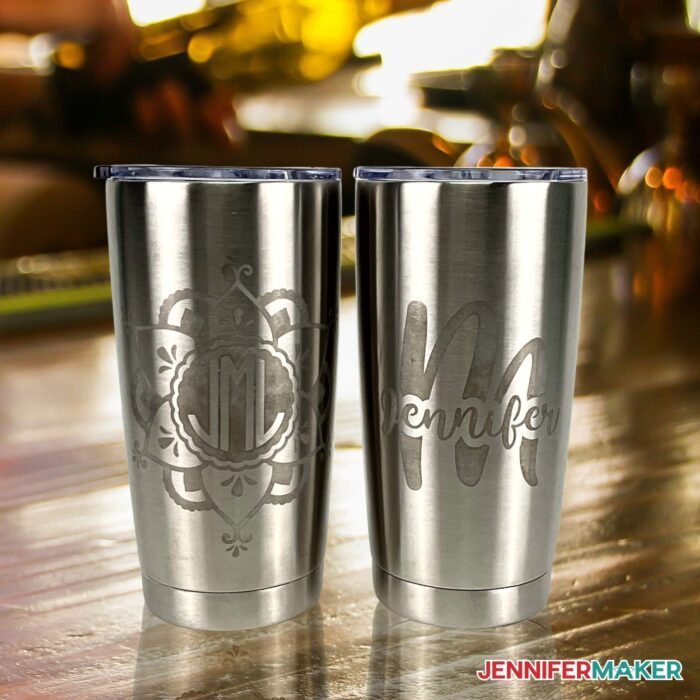
I’ve made one really fun design for you AND I’m going to show you how to make a personalized design from scratch. I can’t wait for you to try this project!
These etched tumblers make great gifts for friends and family! Friendly reminder that they should be washed by hand to keep them looking their best. There are so many options for designs! You can add a favorite sports team, company logo, favorite hobby, or saying. Keep in mind that the simpler the design the better the tumbler turns out.
Let me show you how easy it is to make this etched stainless steel tumbler project! This post contains some affiliate links for your convenience (which means if you make a purchase after clicking a link I will earn a small commission but it won’t cost you a penny more)! Read my full disclosure policy.
Materials to Make Etched Stainless Steel Tumblers
View my Amazon shopping list with the exact items we used to make this project
- Stainless Steel Tumbler (I used a 20 oz. tumbler)
- Ferric Chloride Copper Etchant Solution
- Permanent Vinyl
- StandardGrip Transfer Tape
- Baking Soda
- Cotton Balls
- Dawn Dish Soap
- Q-tips (optional)
- Painters Tape (optional)
- (Optional) Fonts: I used Circle Monogram, Miss Merryweather, and Tingler Script
- A method to cut your Vinyl — I used the amazing Cricut Maker 3, but you can also use any Cricut cutting machine.
- 3M Full Facepiece Respirator
- P100 Filters – Organic Vapor Cartridges (the pink magenta ones)
- Disposable Gloves
- Vinyl Apron
- Green StandardGrip Mat (12″ x 12″)
- Weeding Tool
- Scraper Tool
- Brayer Tool
- Measuring Tape
- Two Disposable Paper Bowls
- Kitchen Timer
- Design # 361 (My free SVG/PDF/DXF design files are available in my free resource library – get the password by filling out the form at the bottom of this page)

How to Make Etched Stainless Steel Tumblers
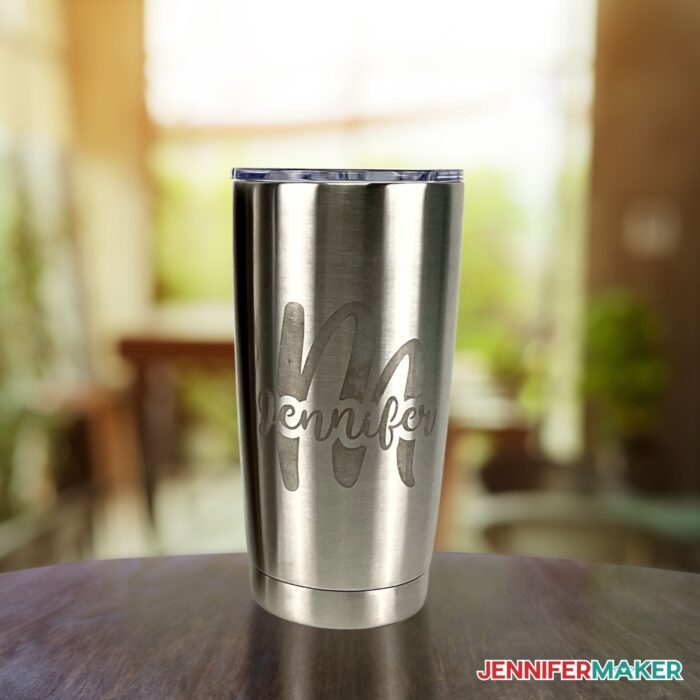
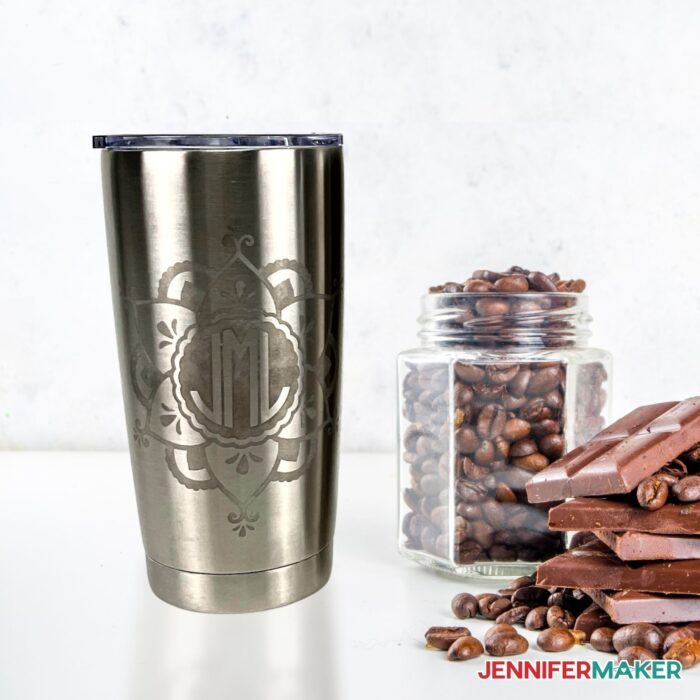
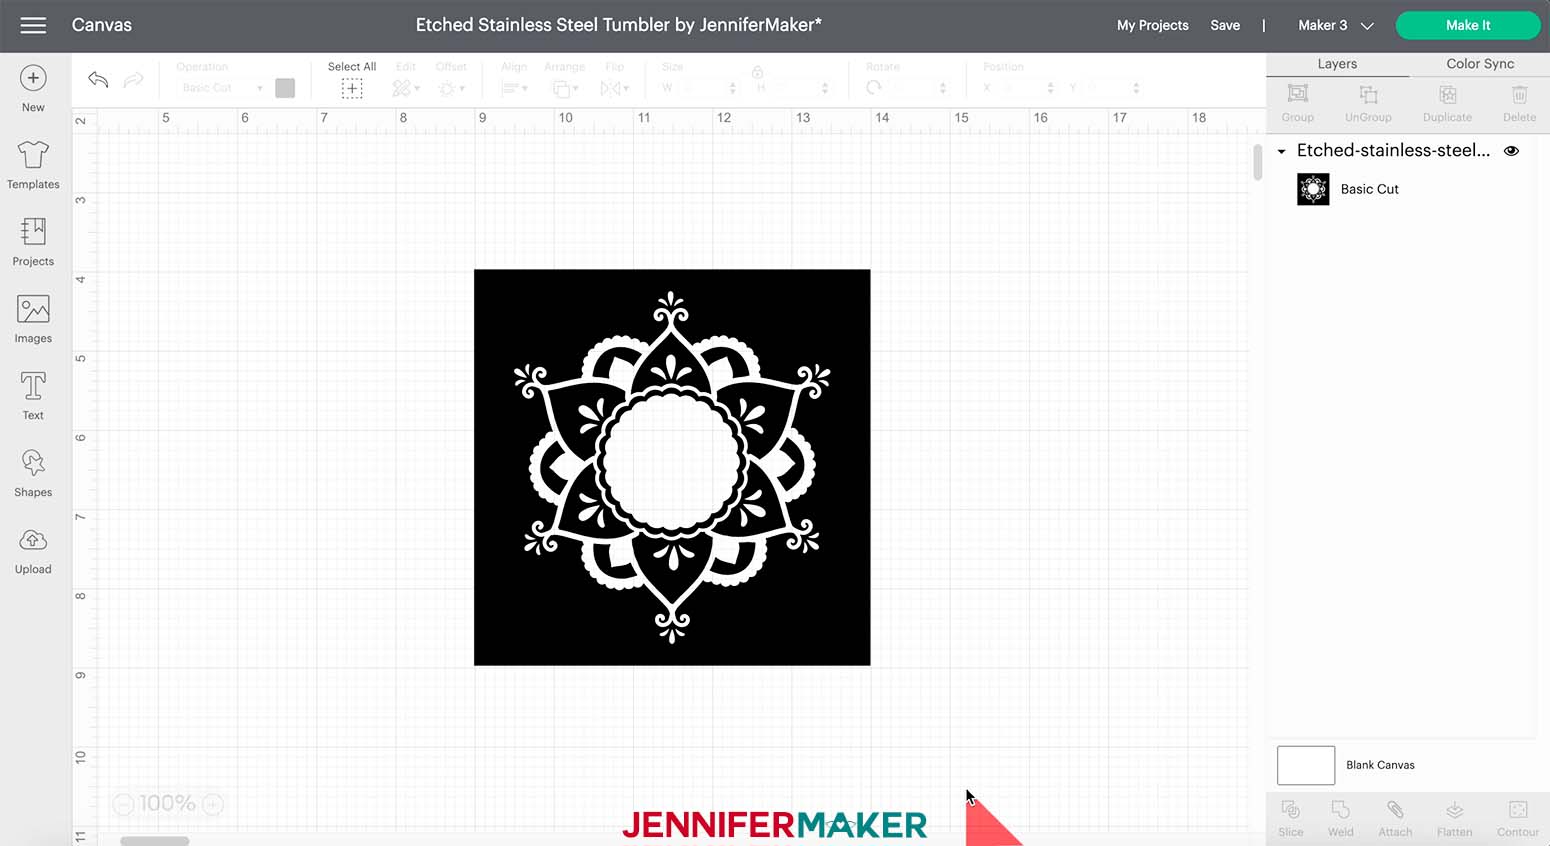
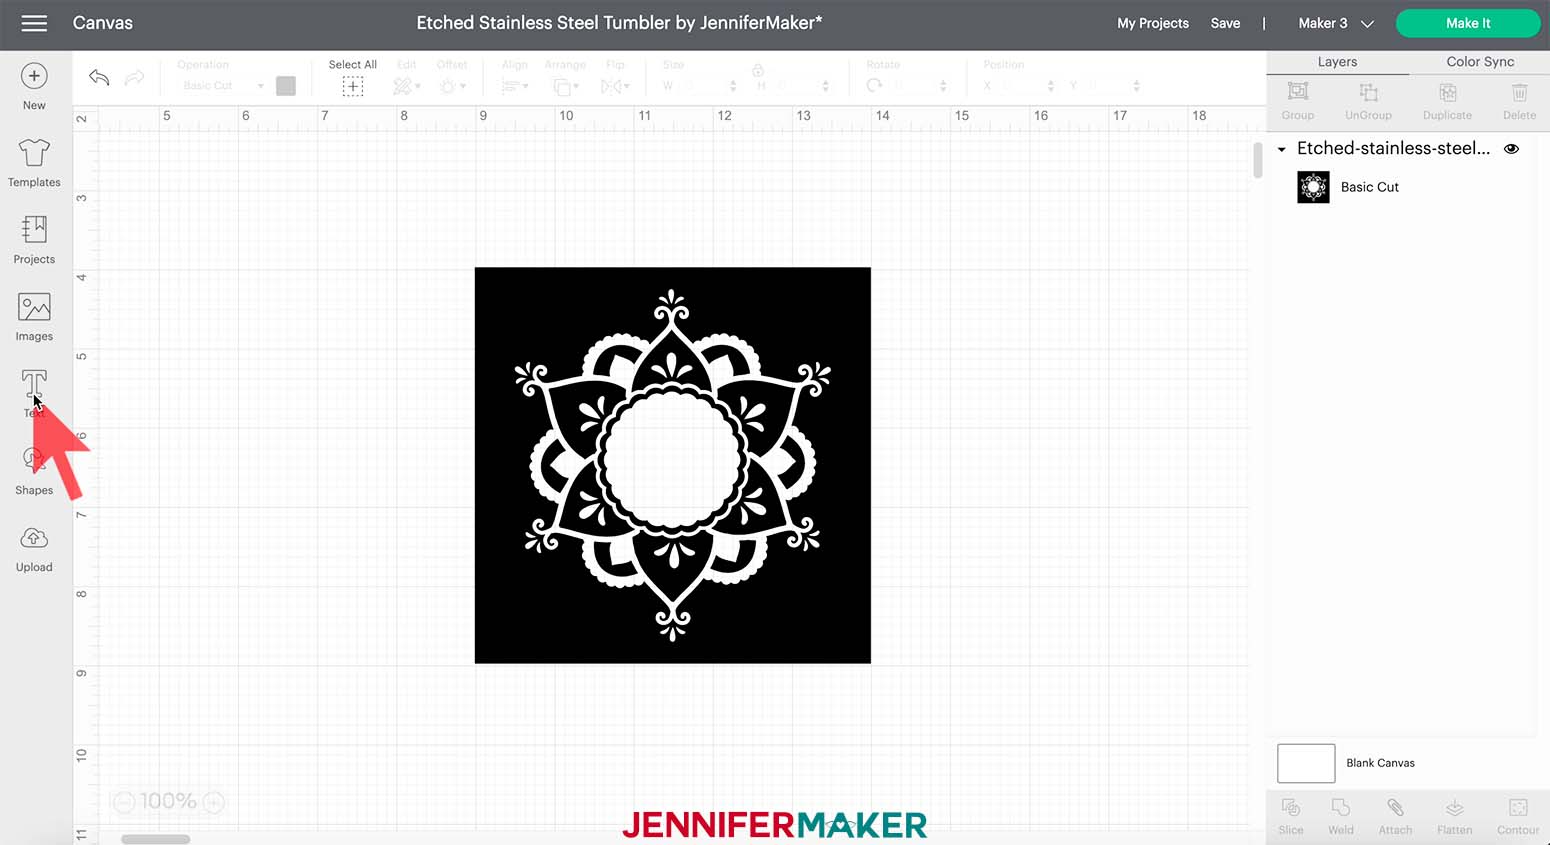
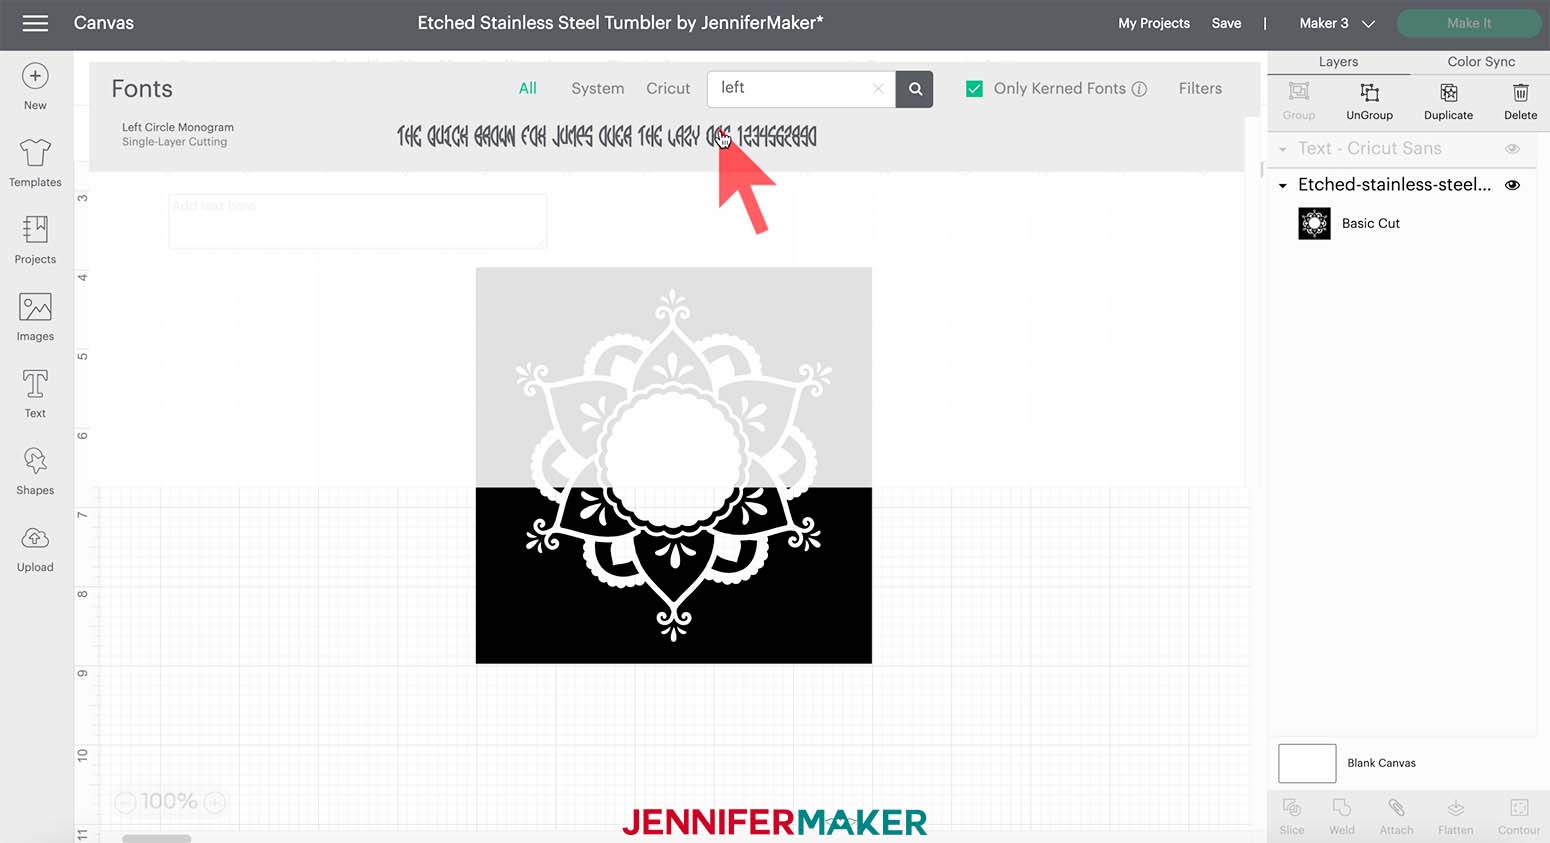
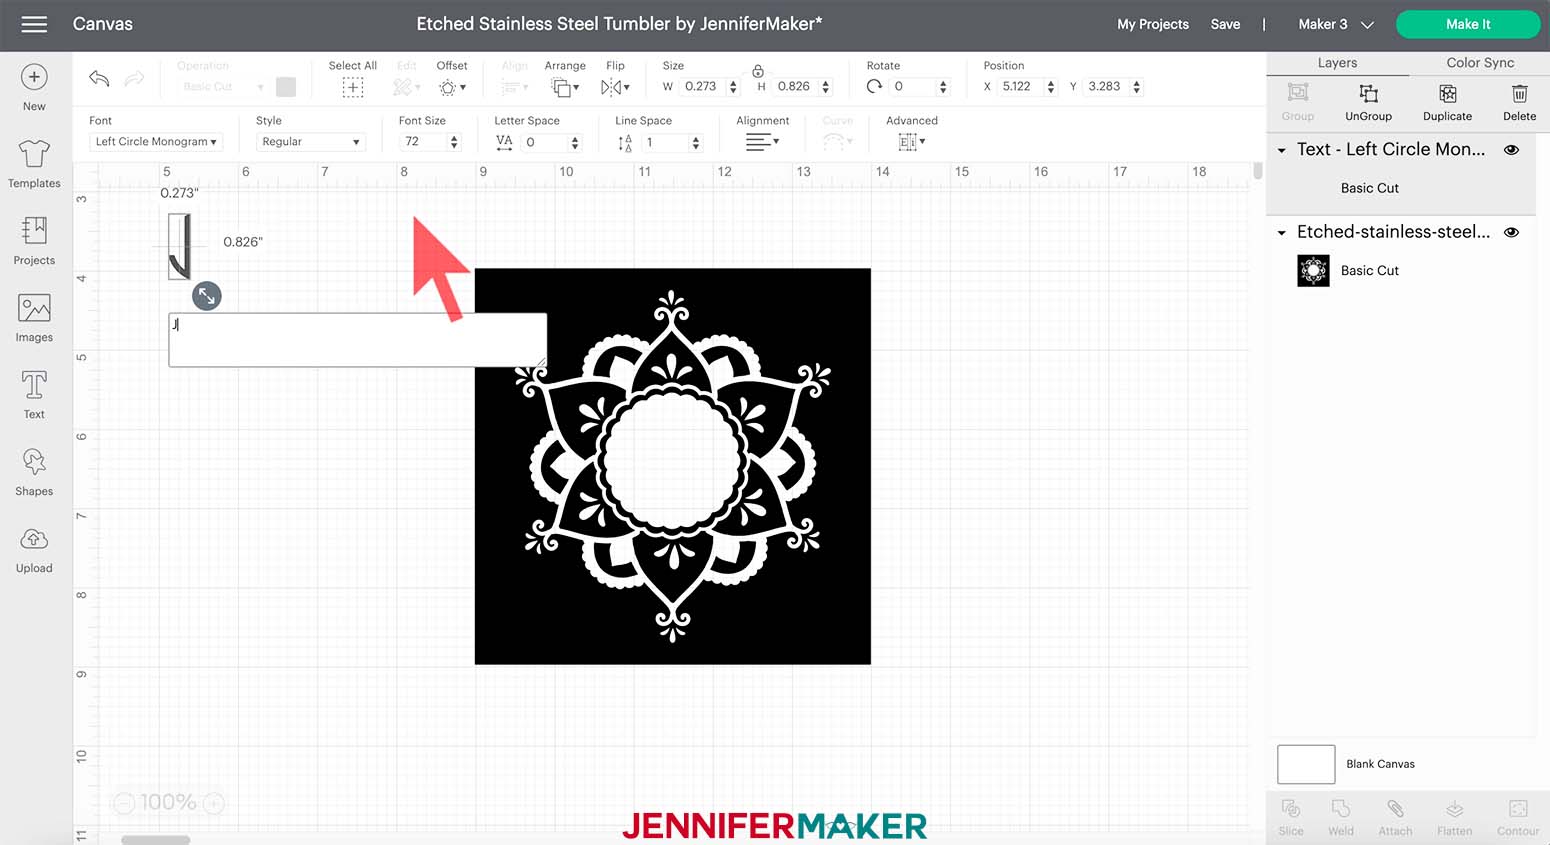
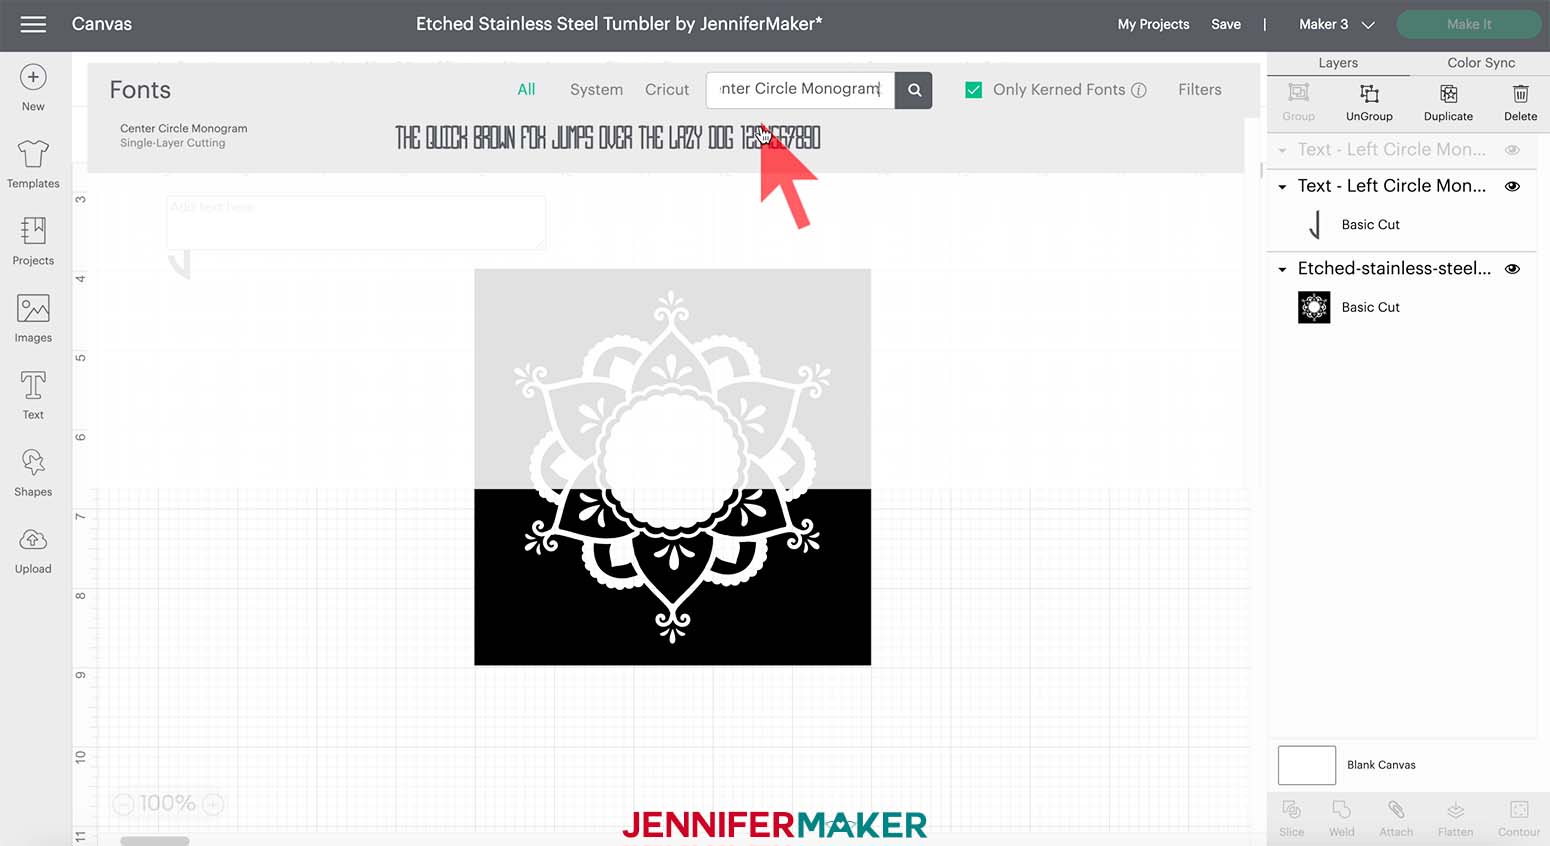
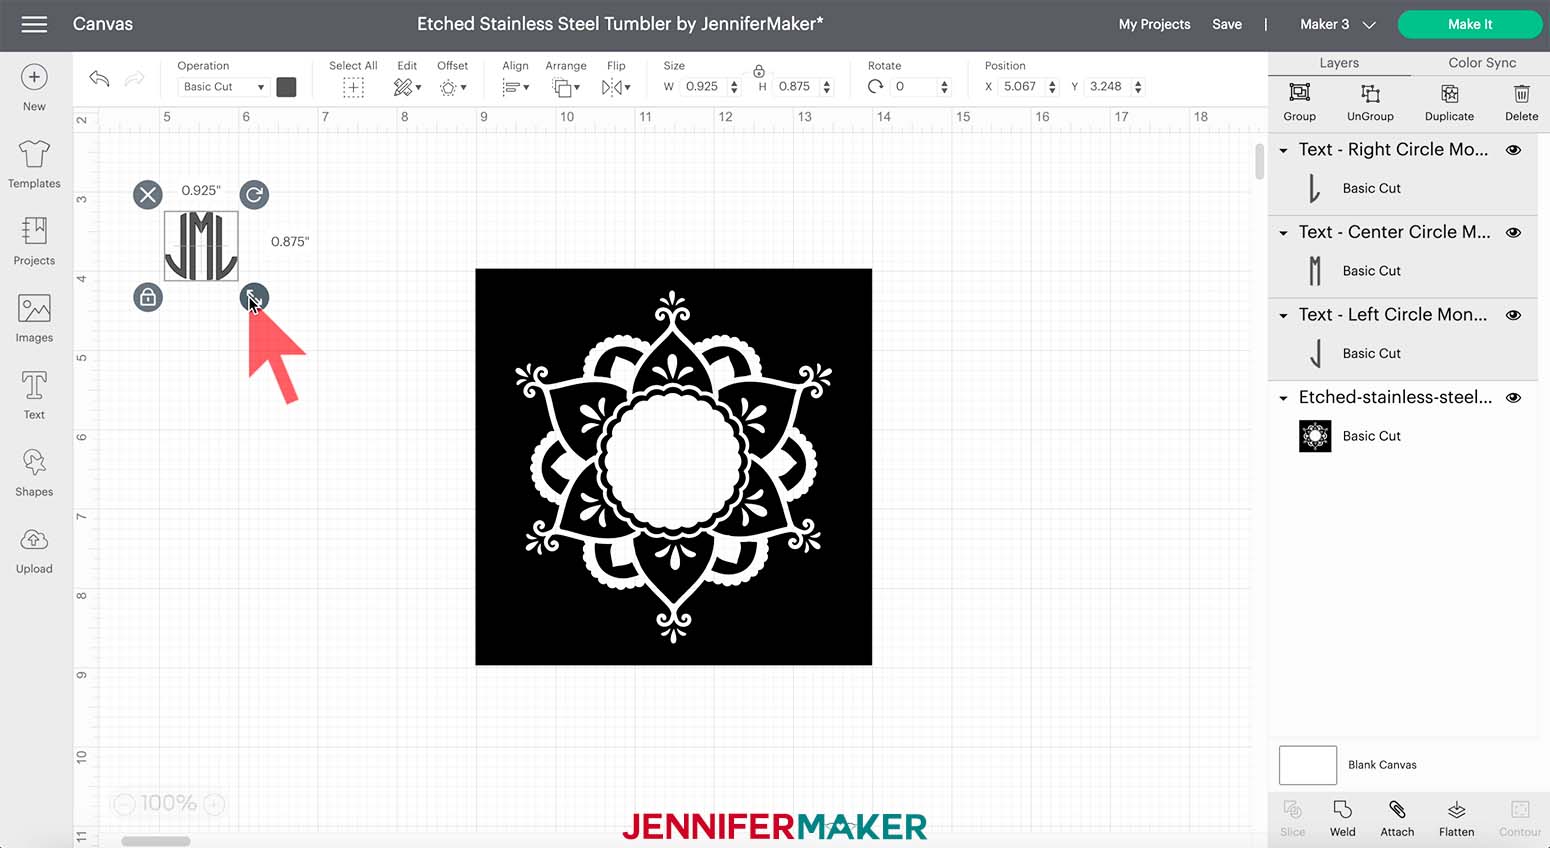
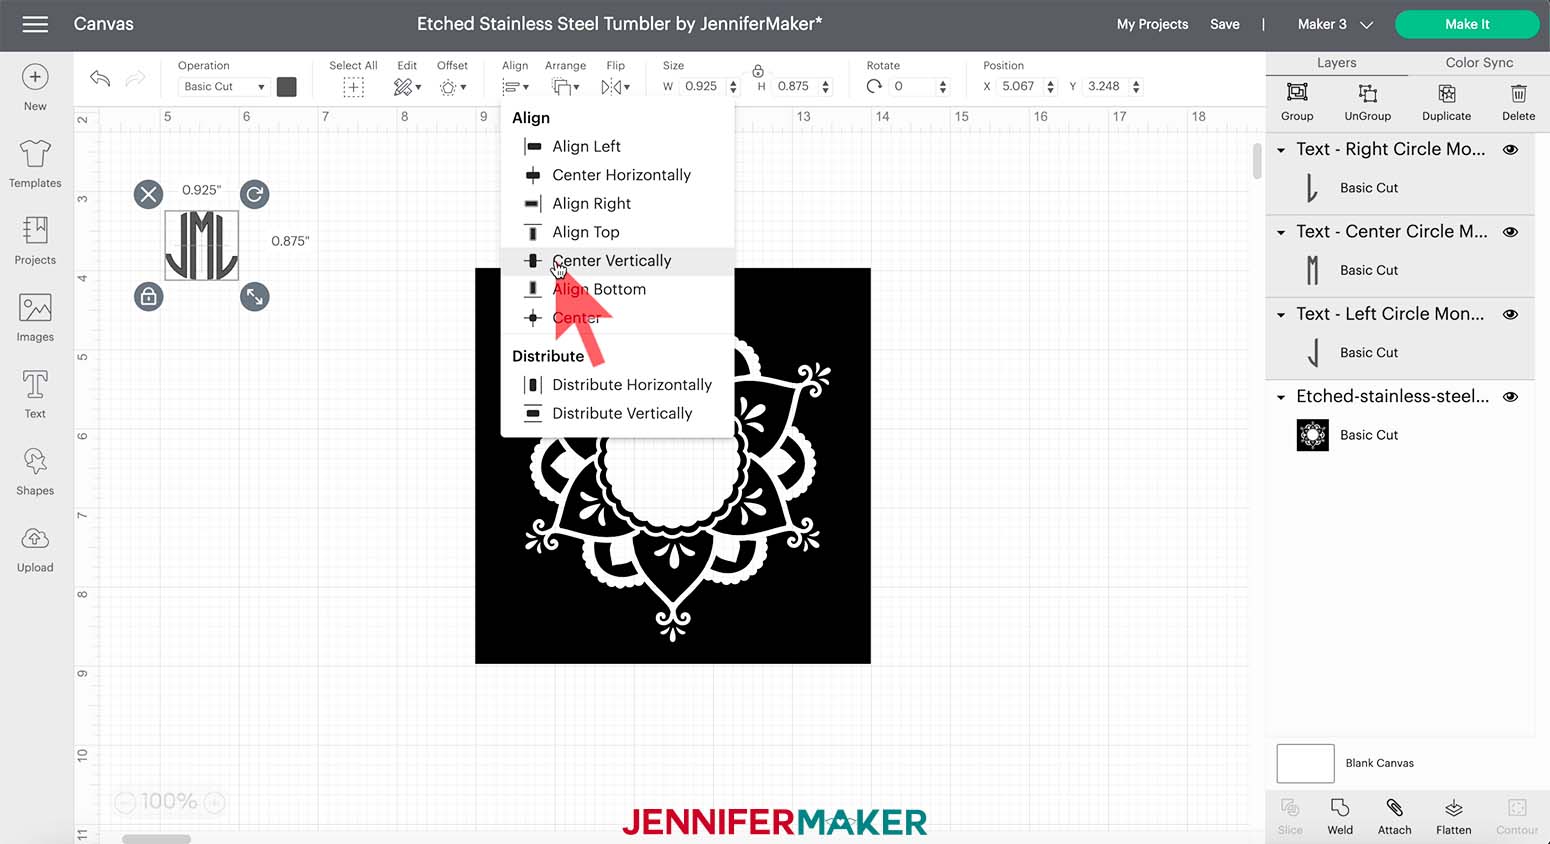
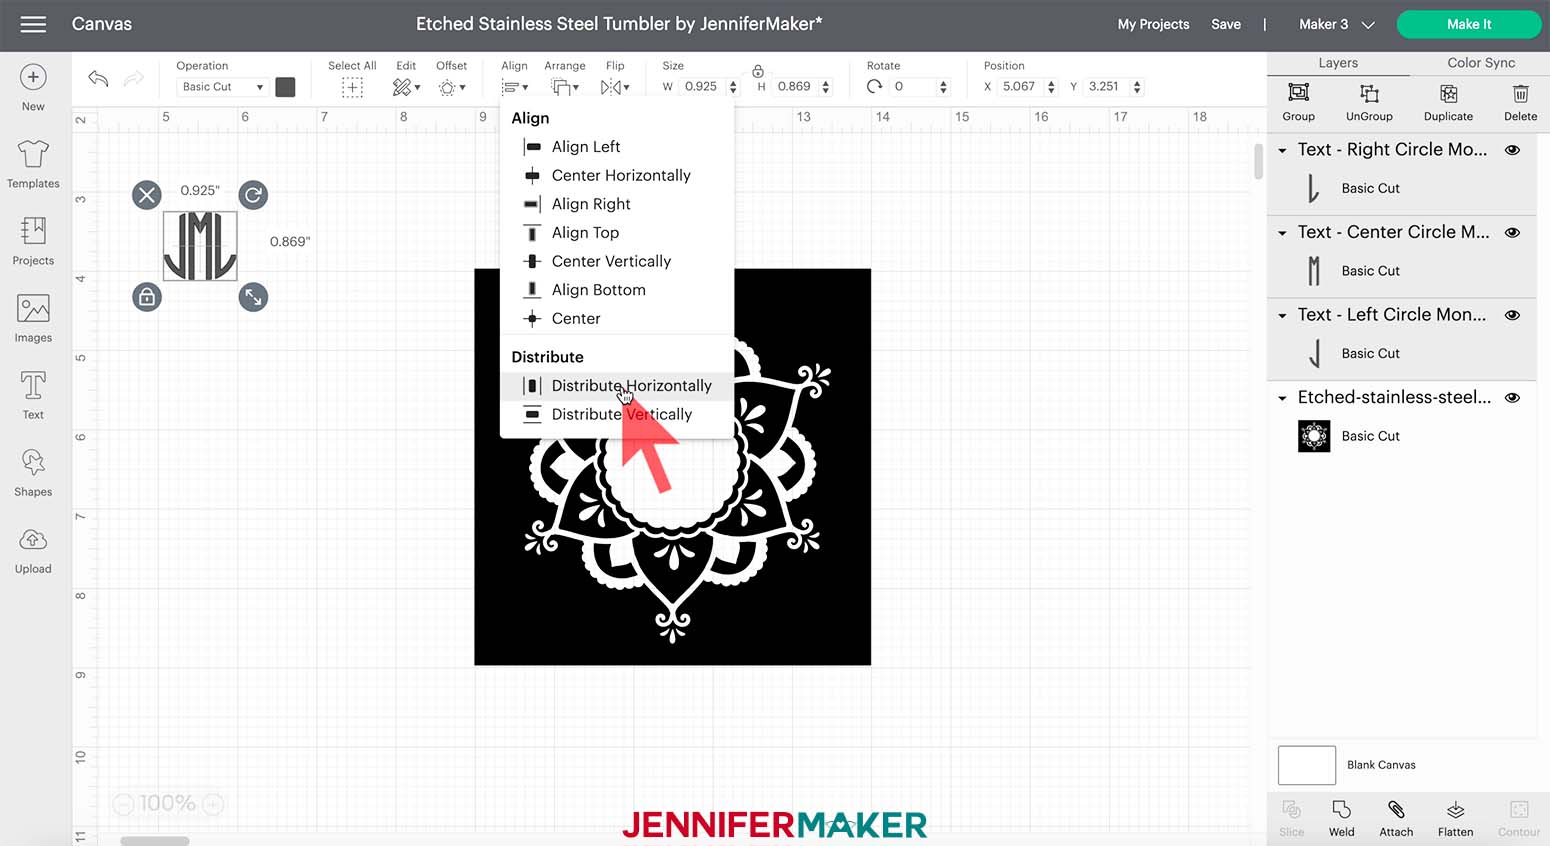
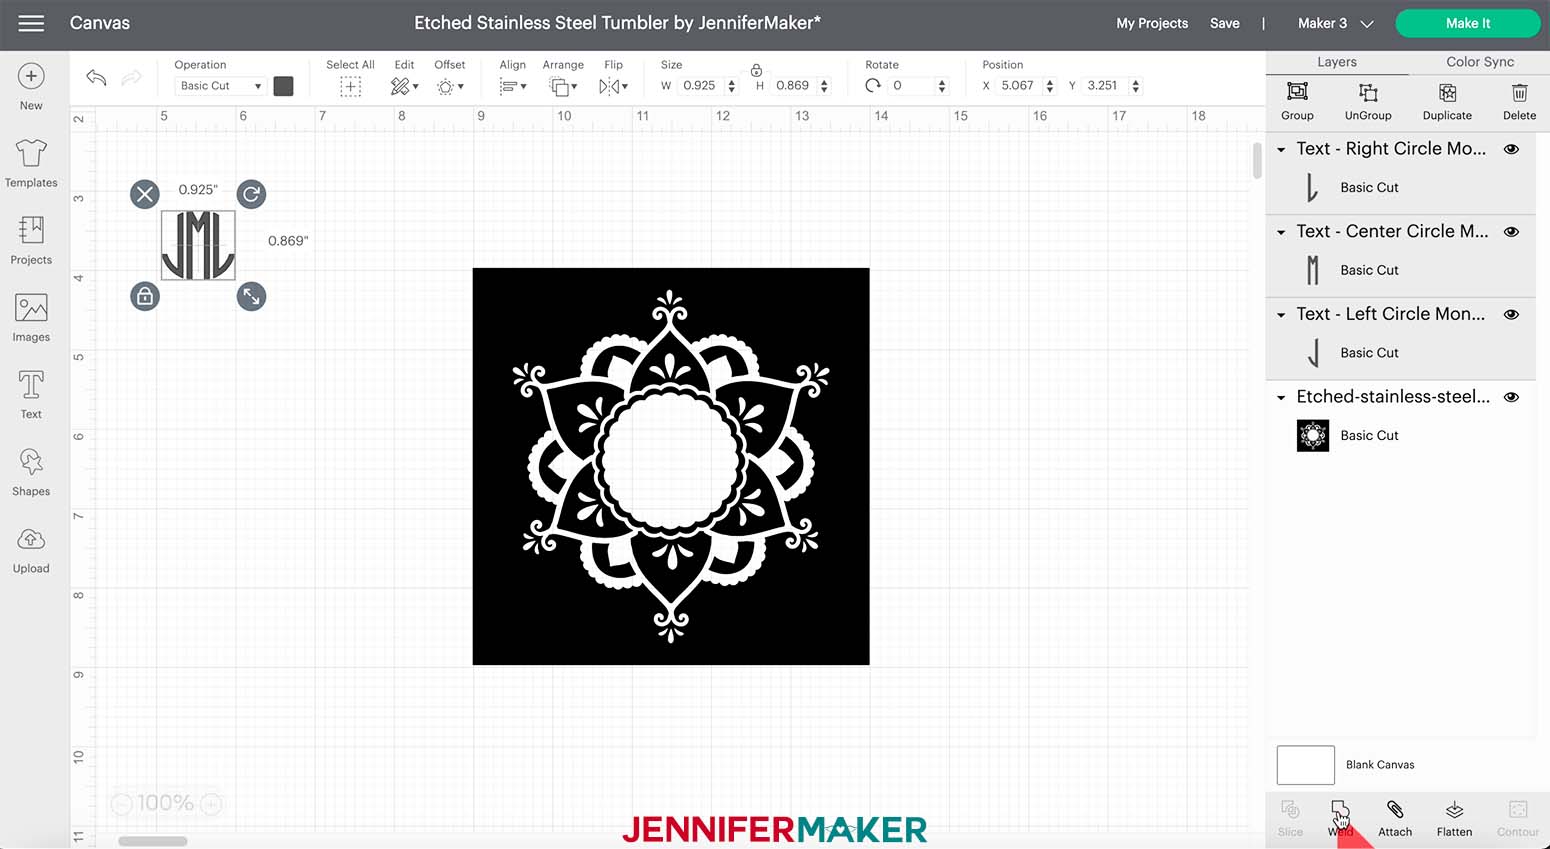
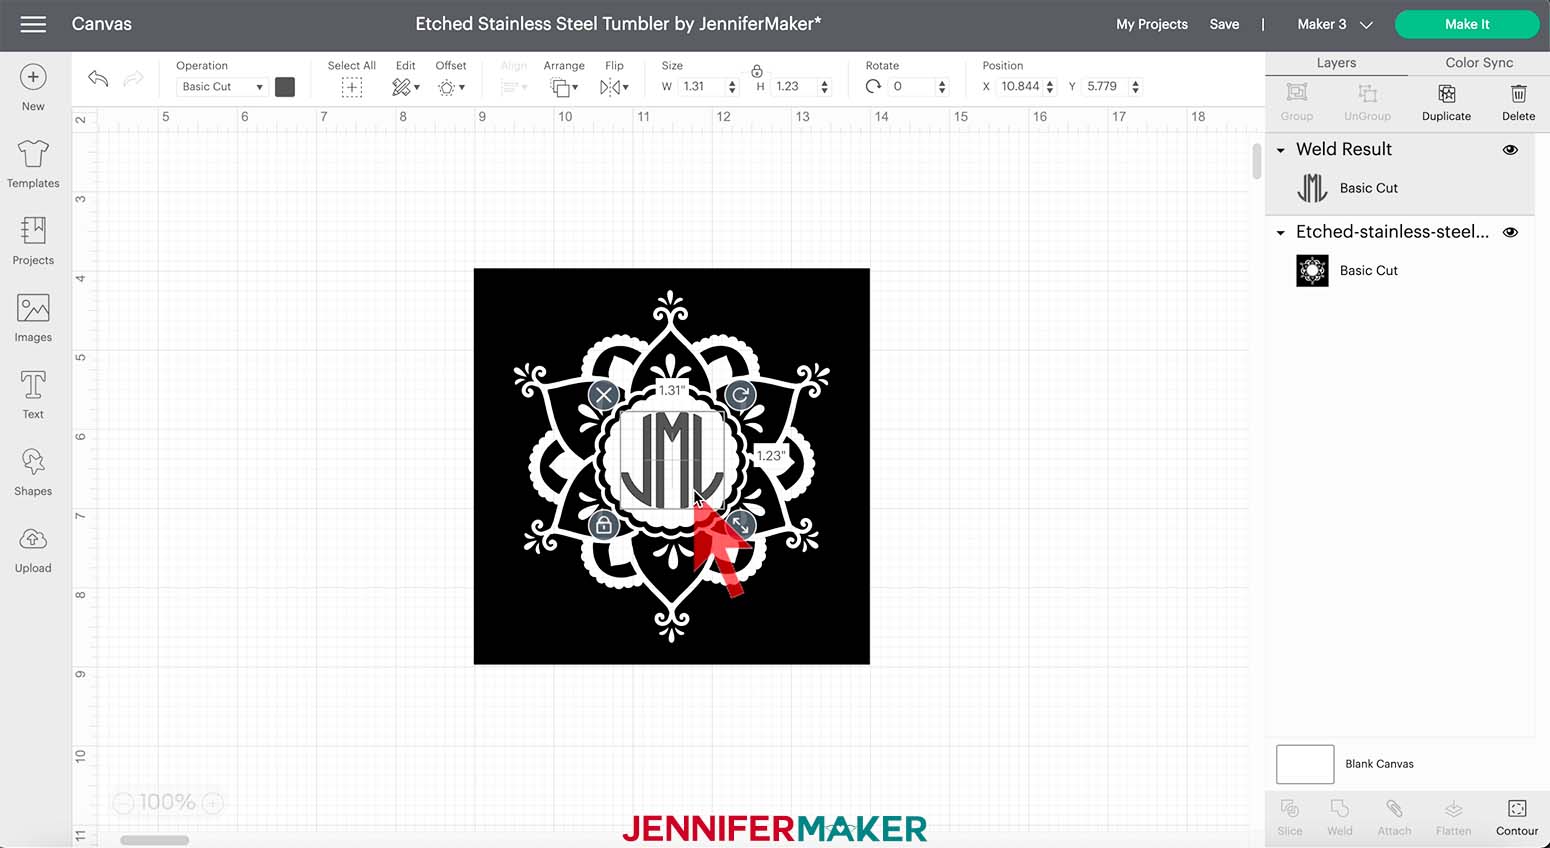
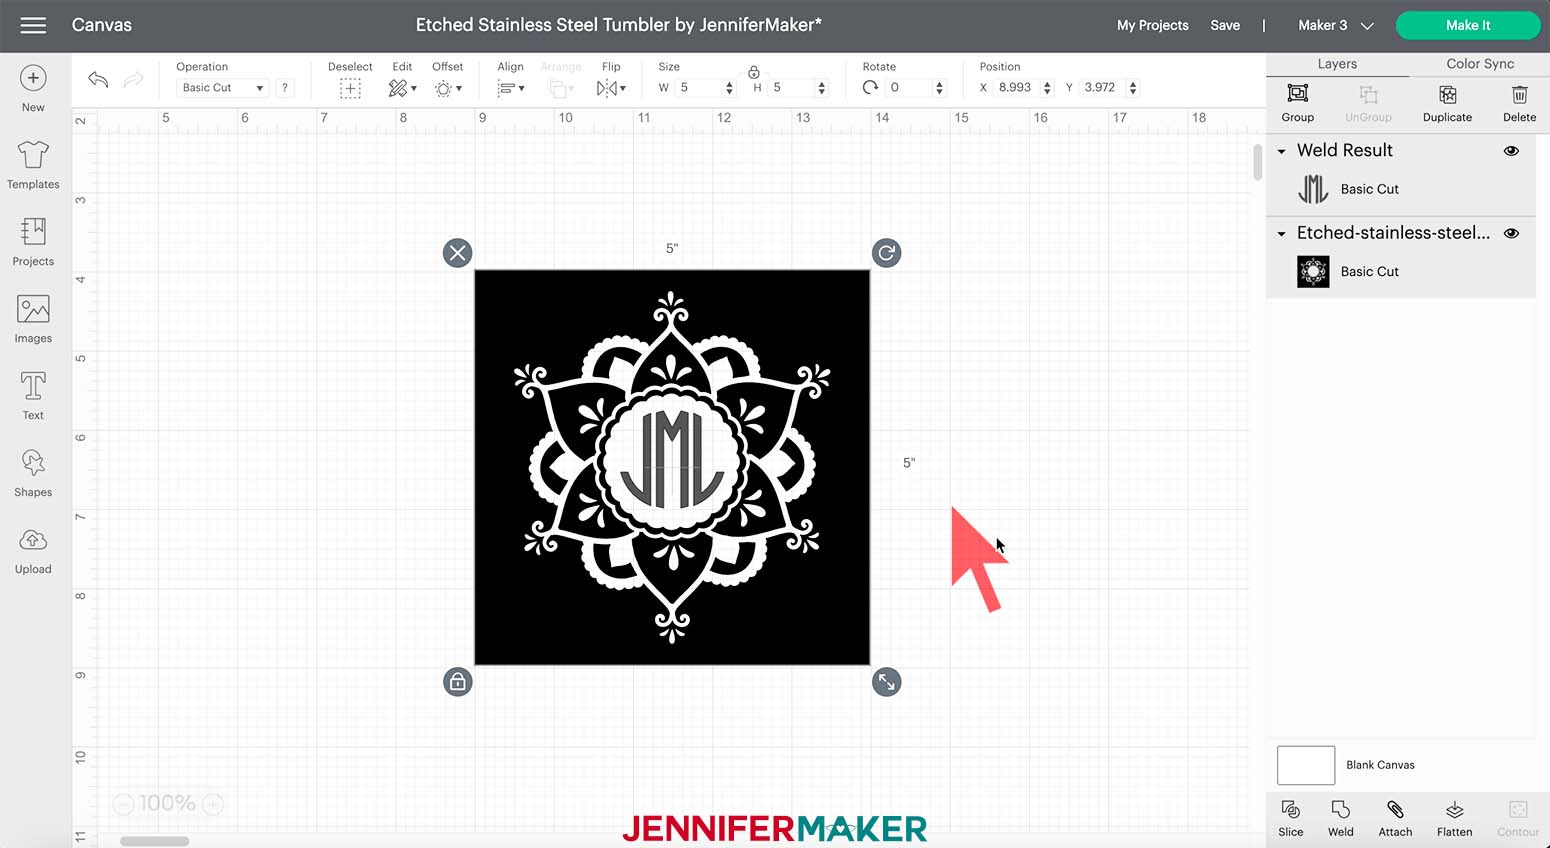
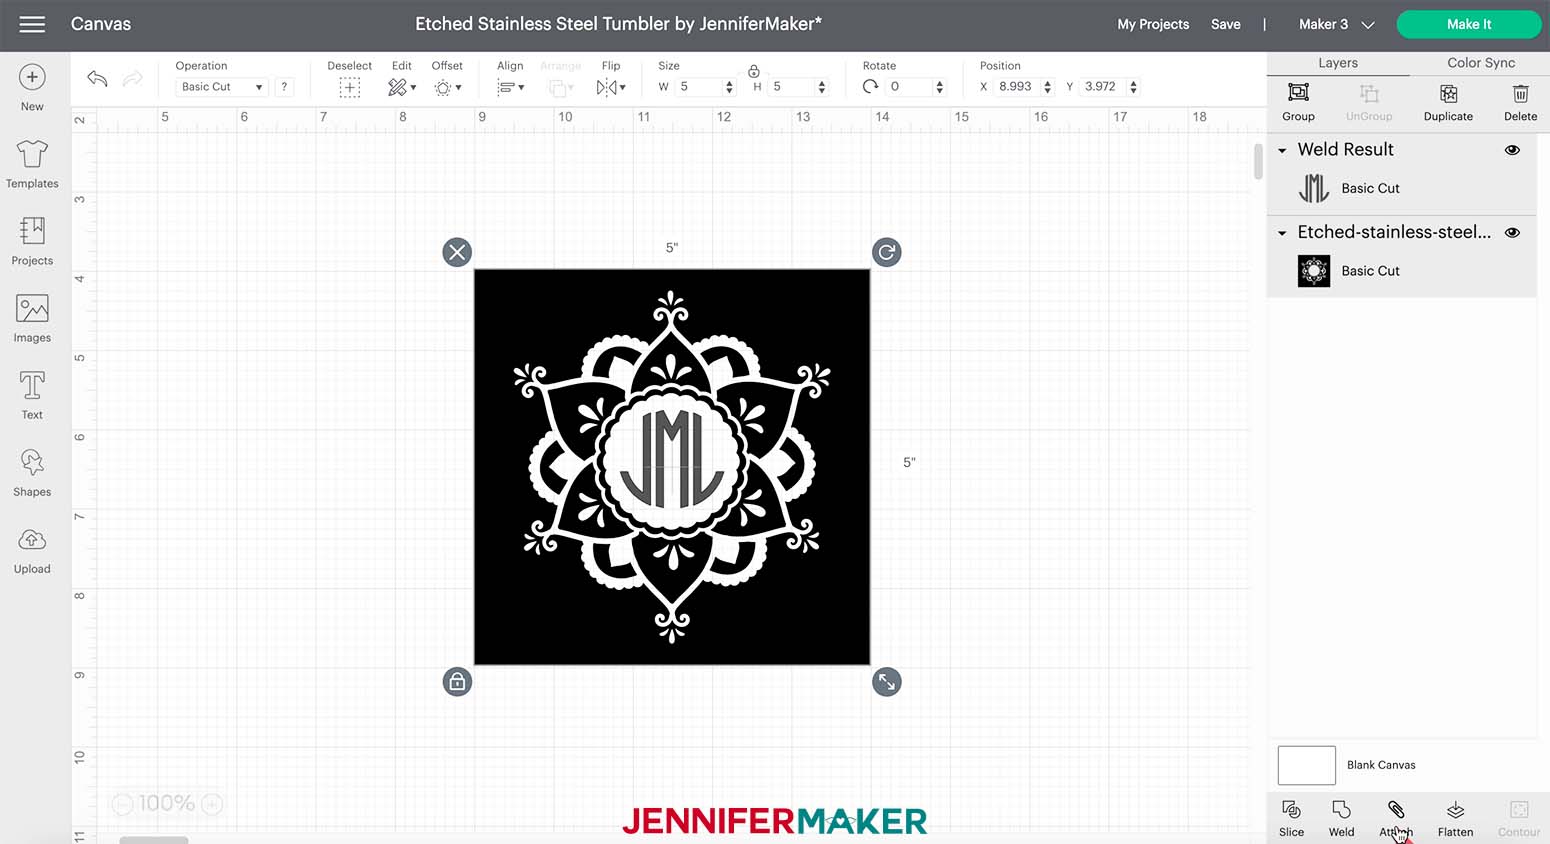
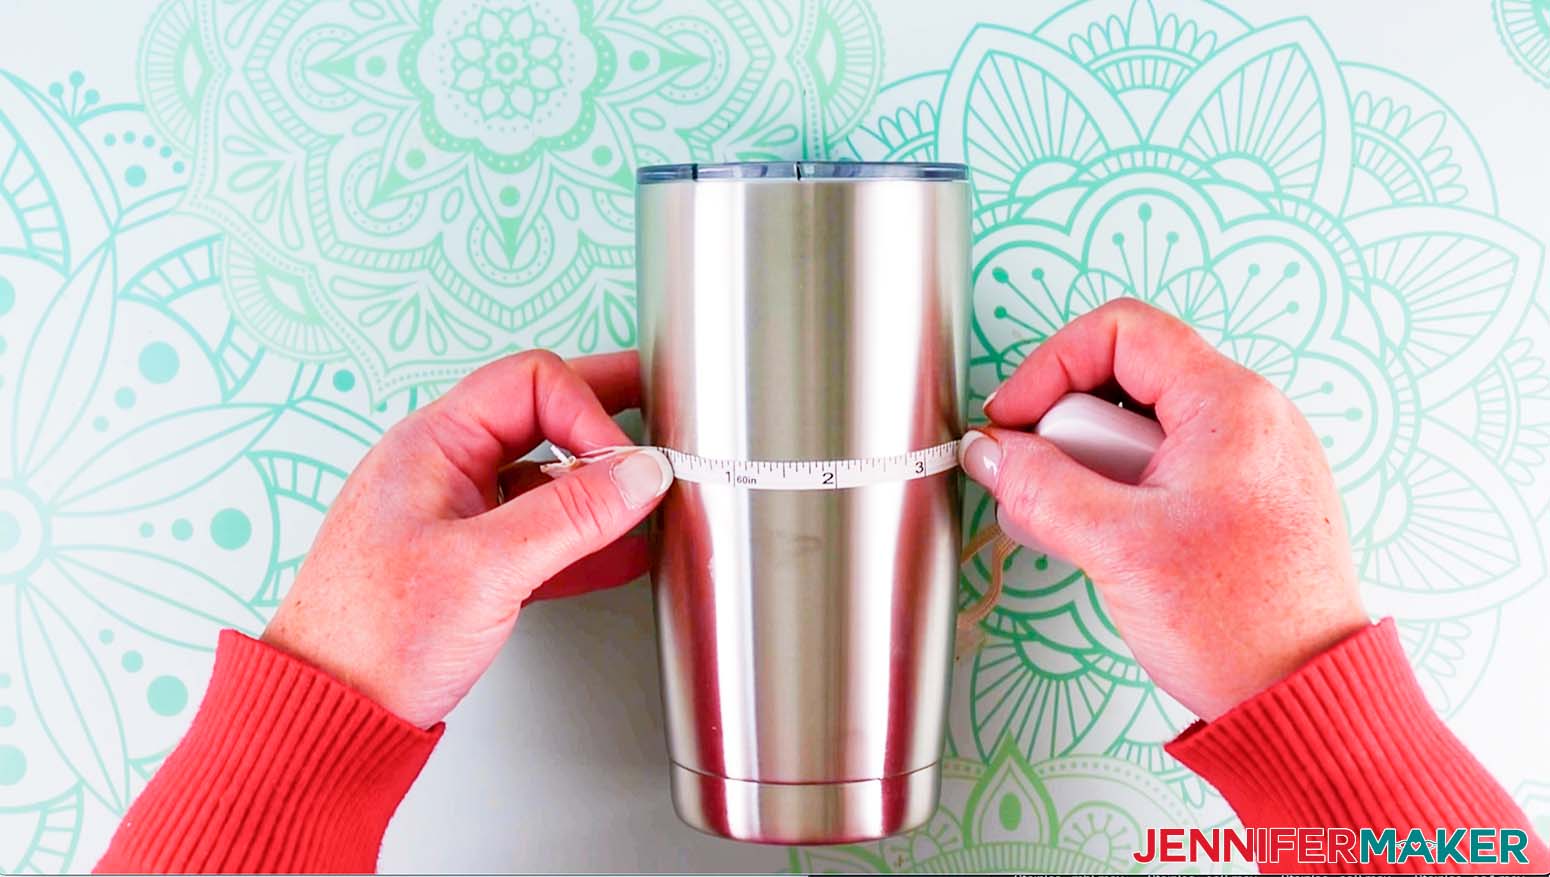
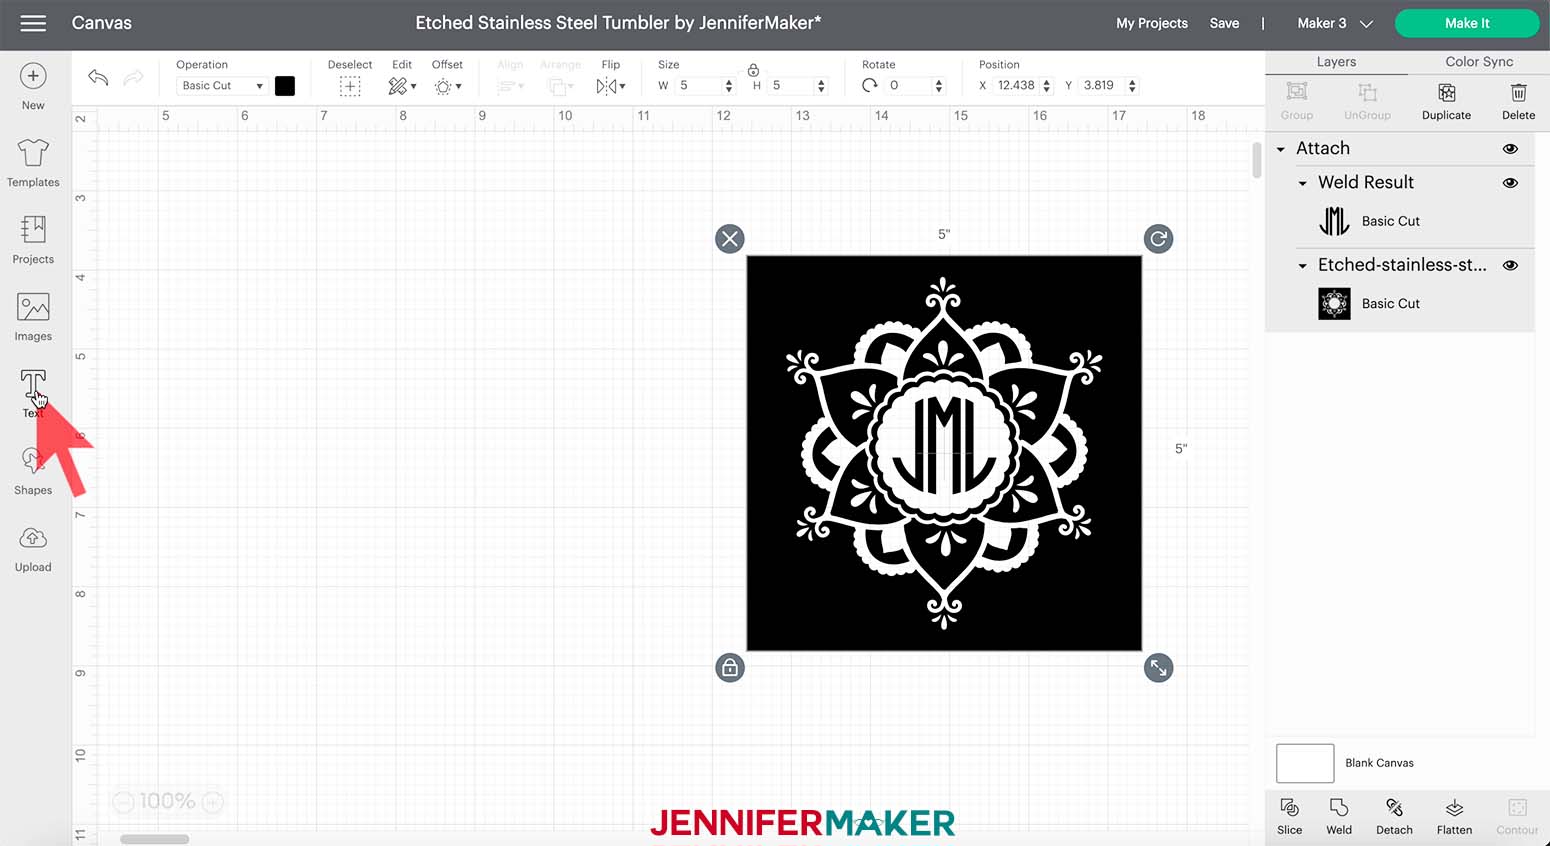
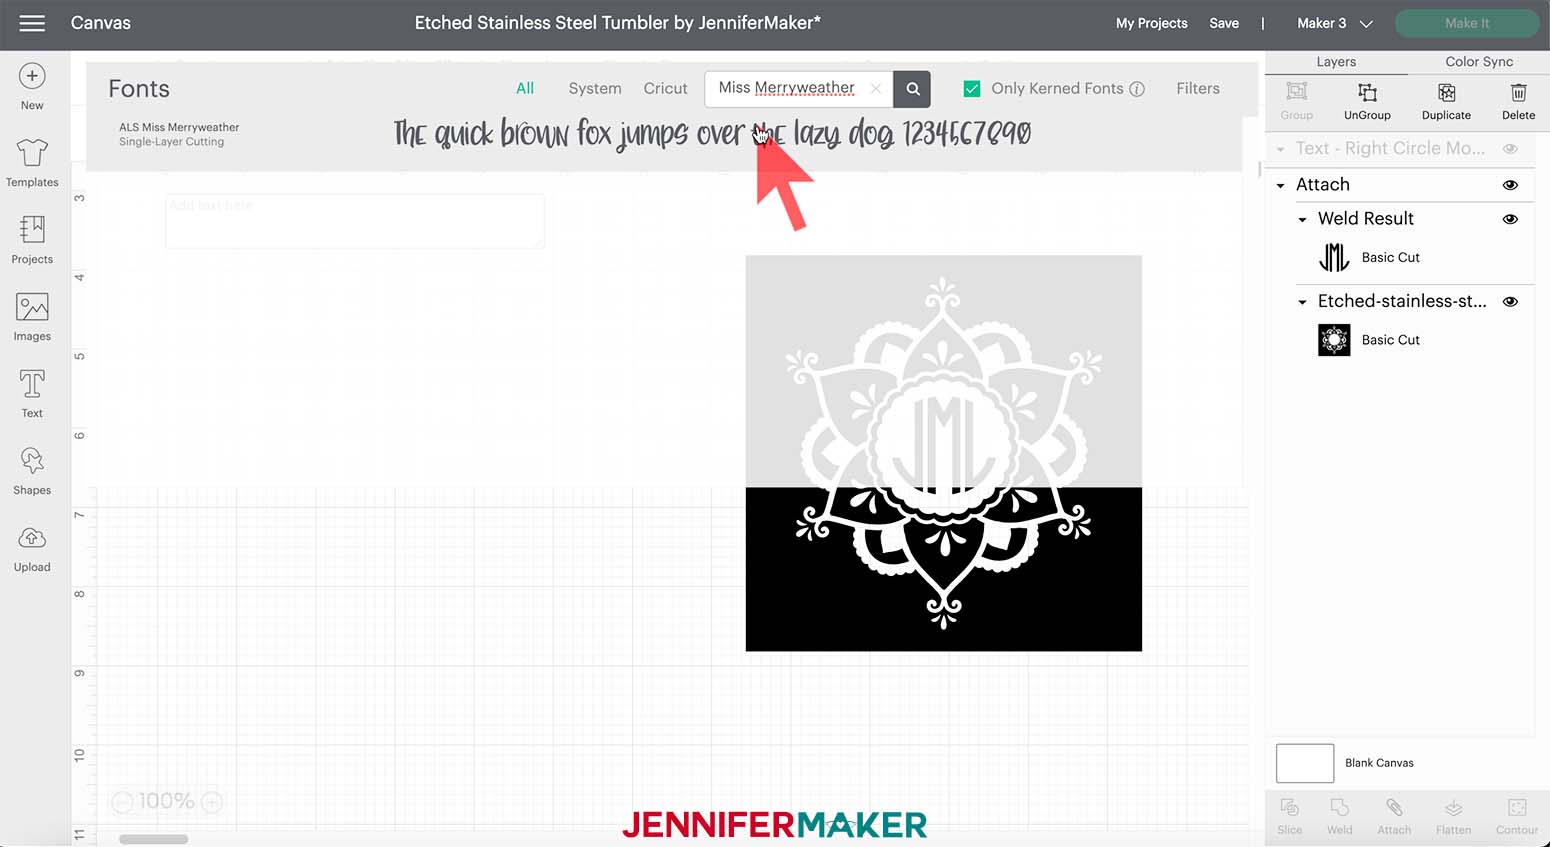
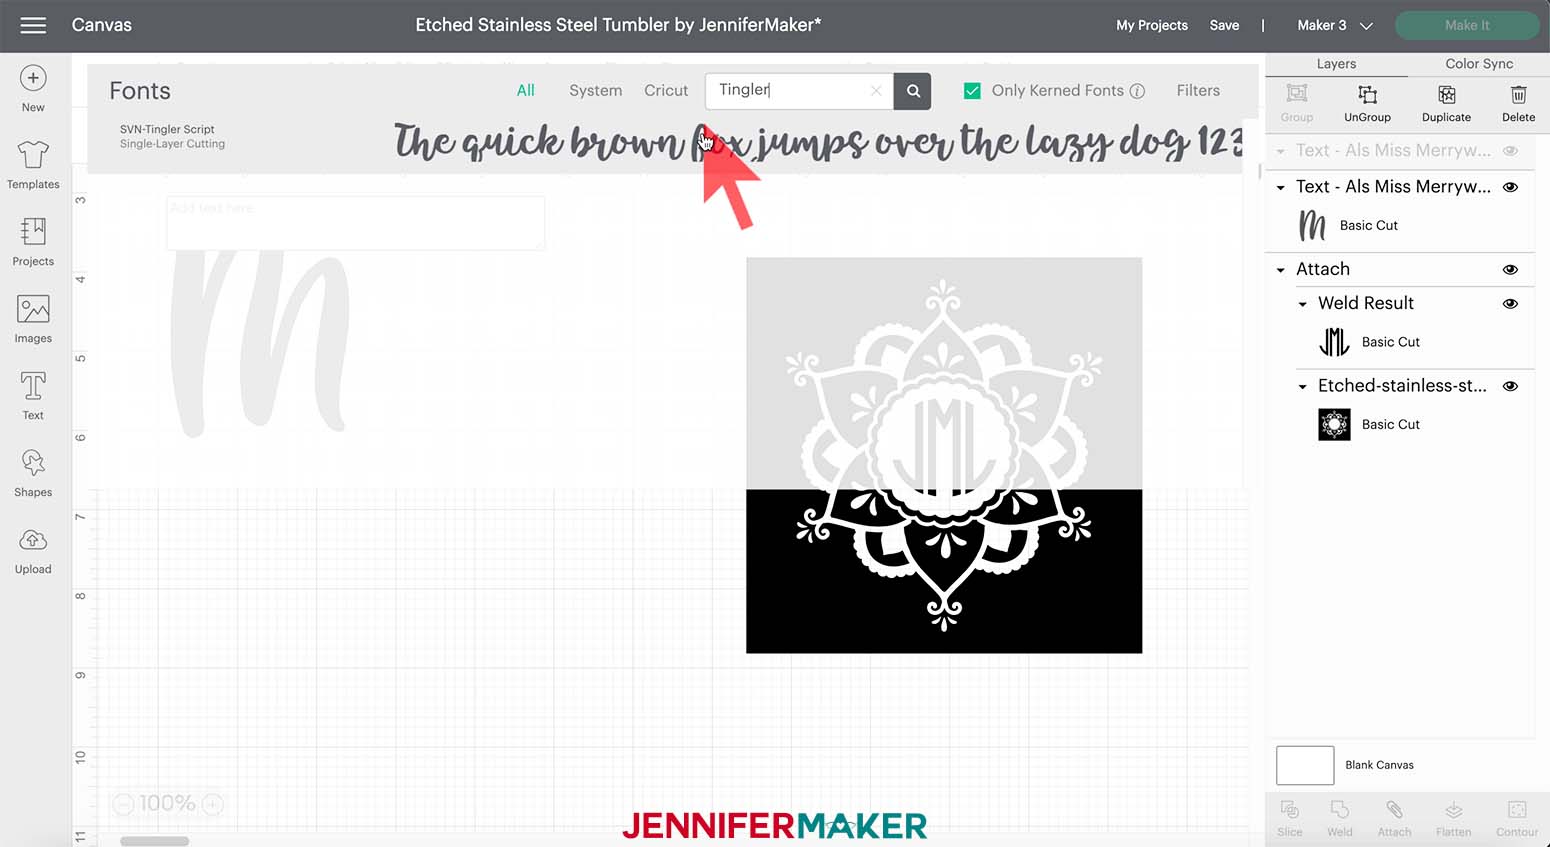
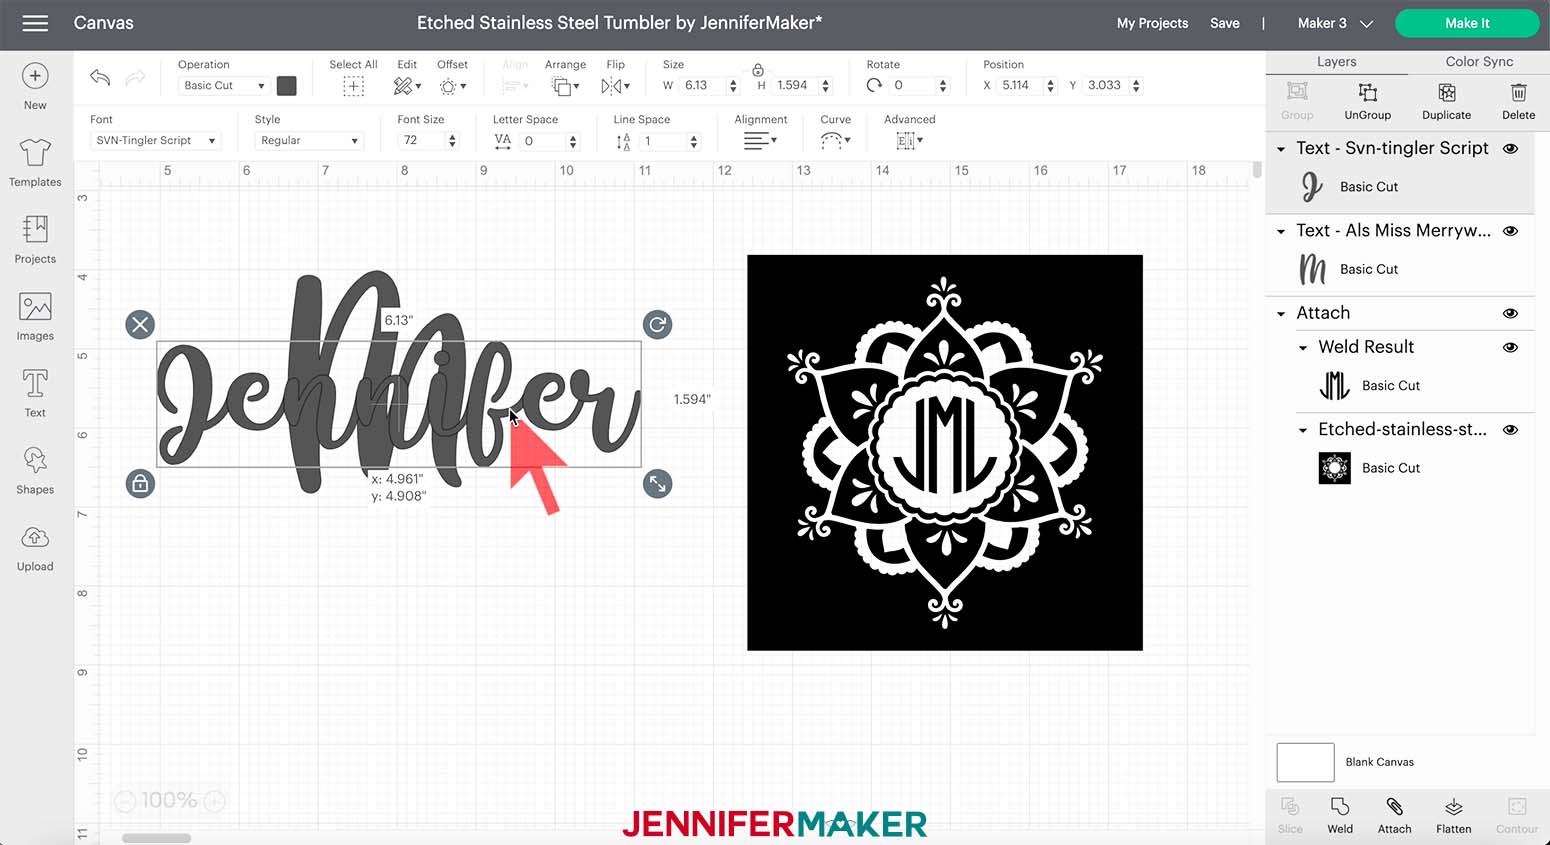
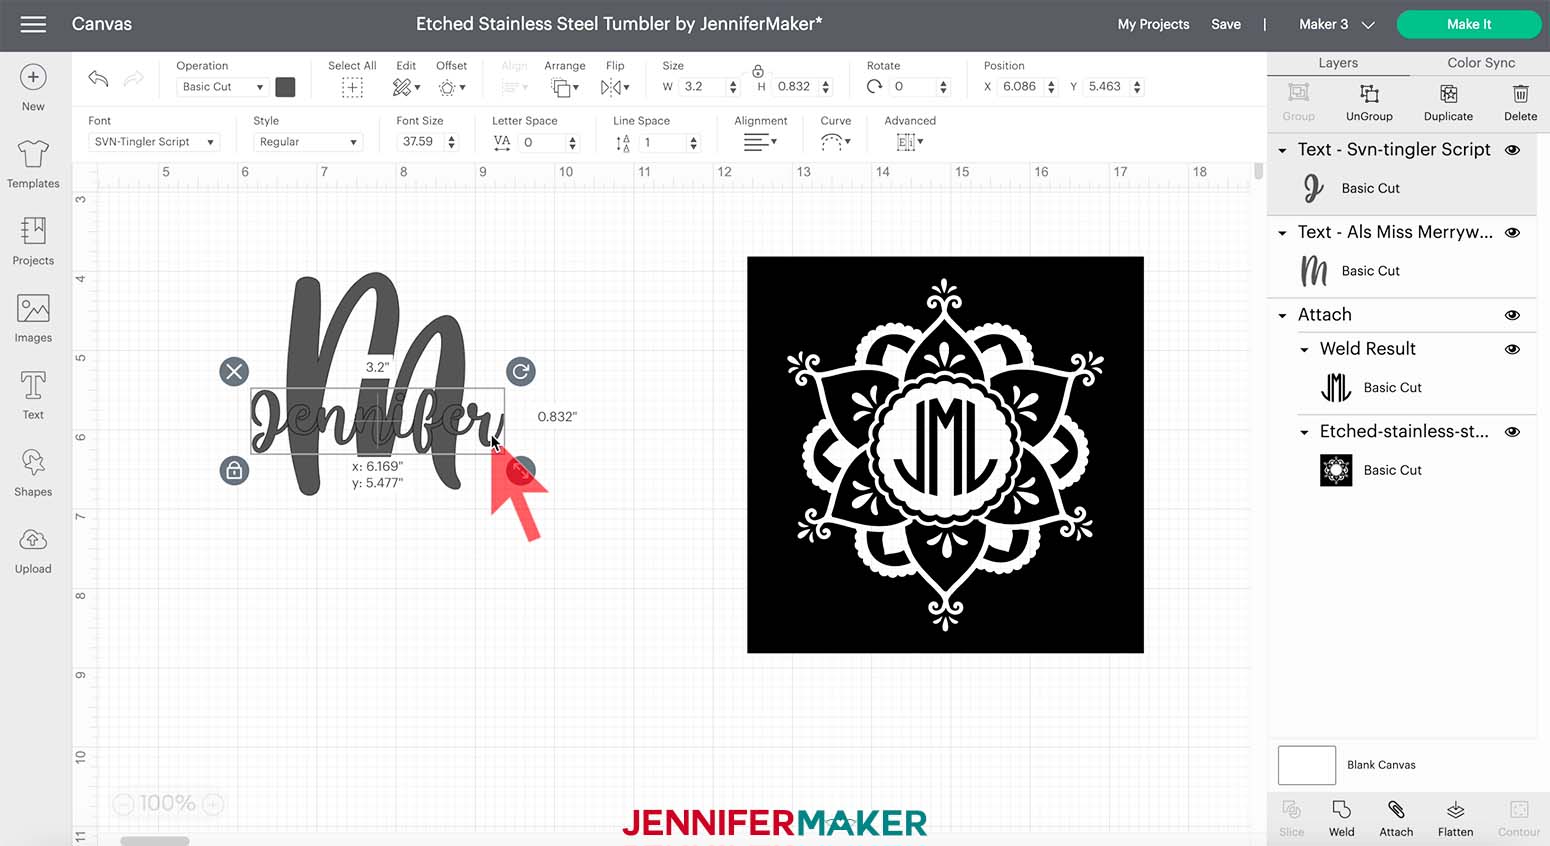
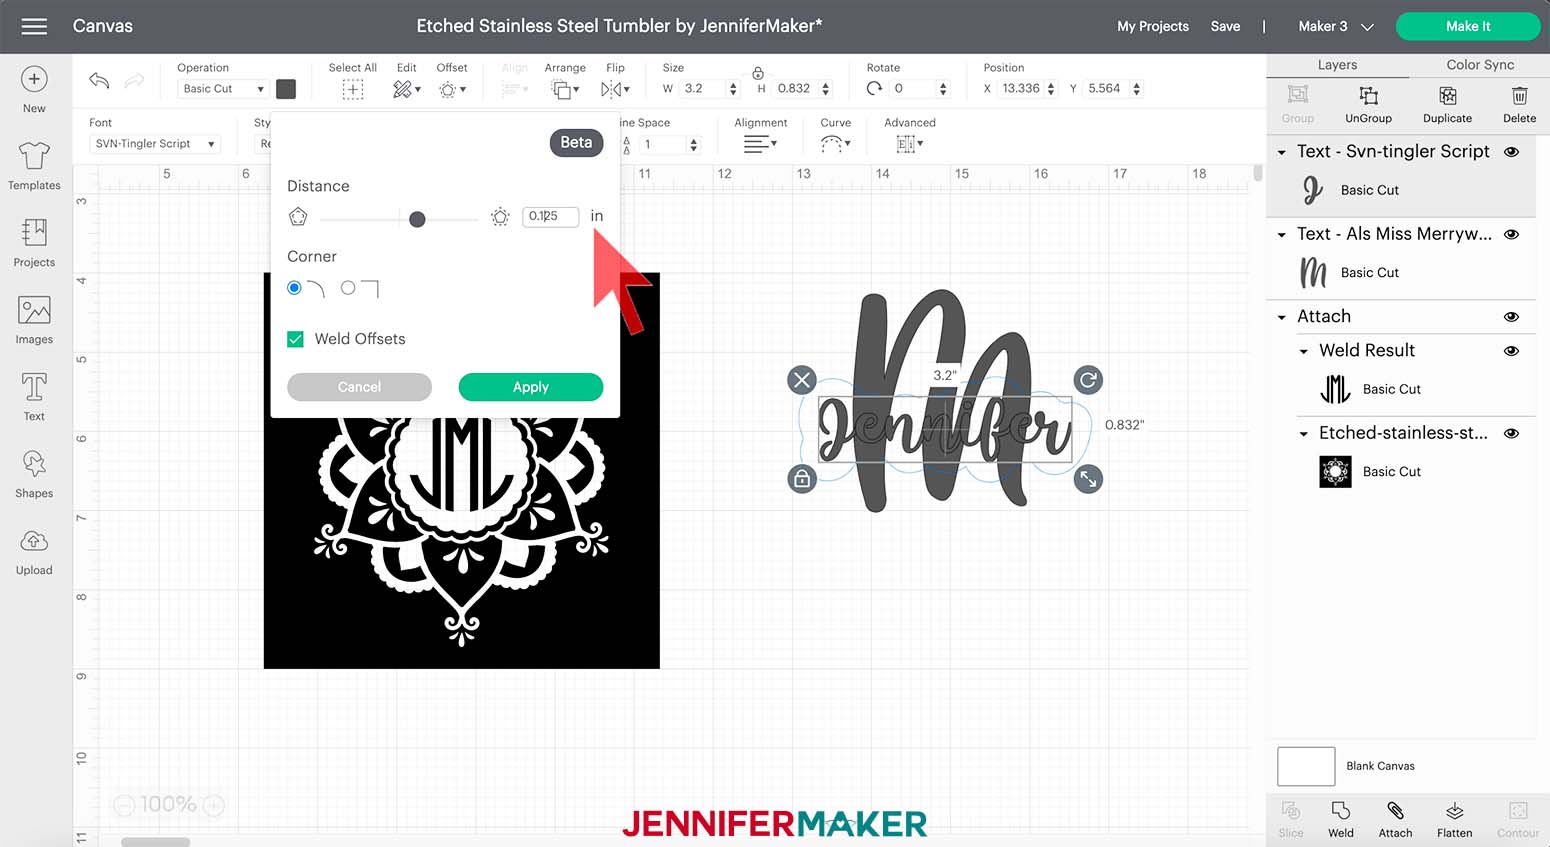
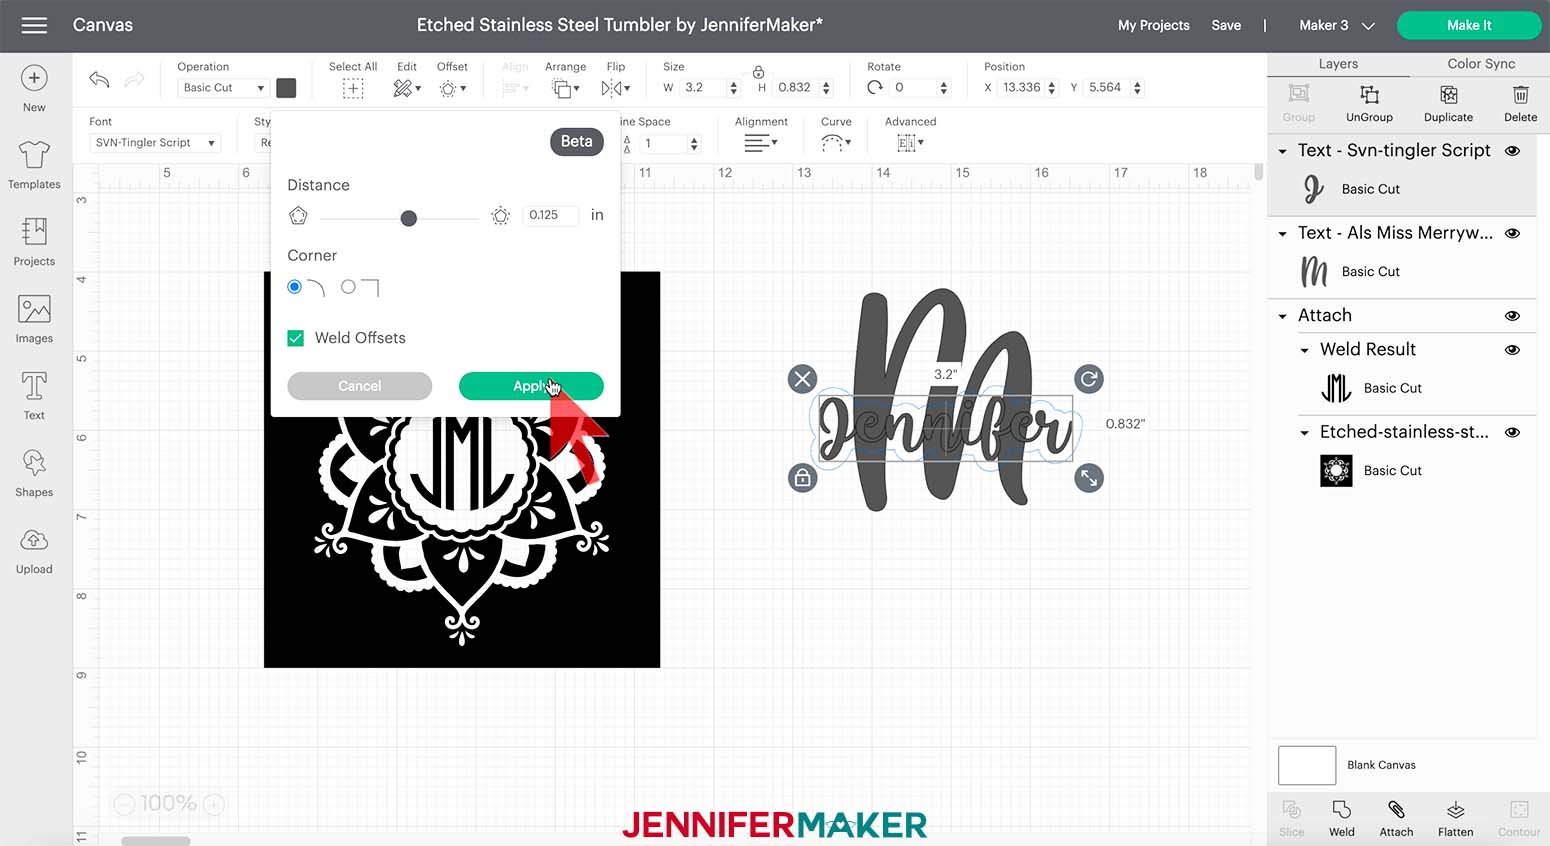
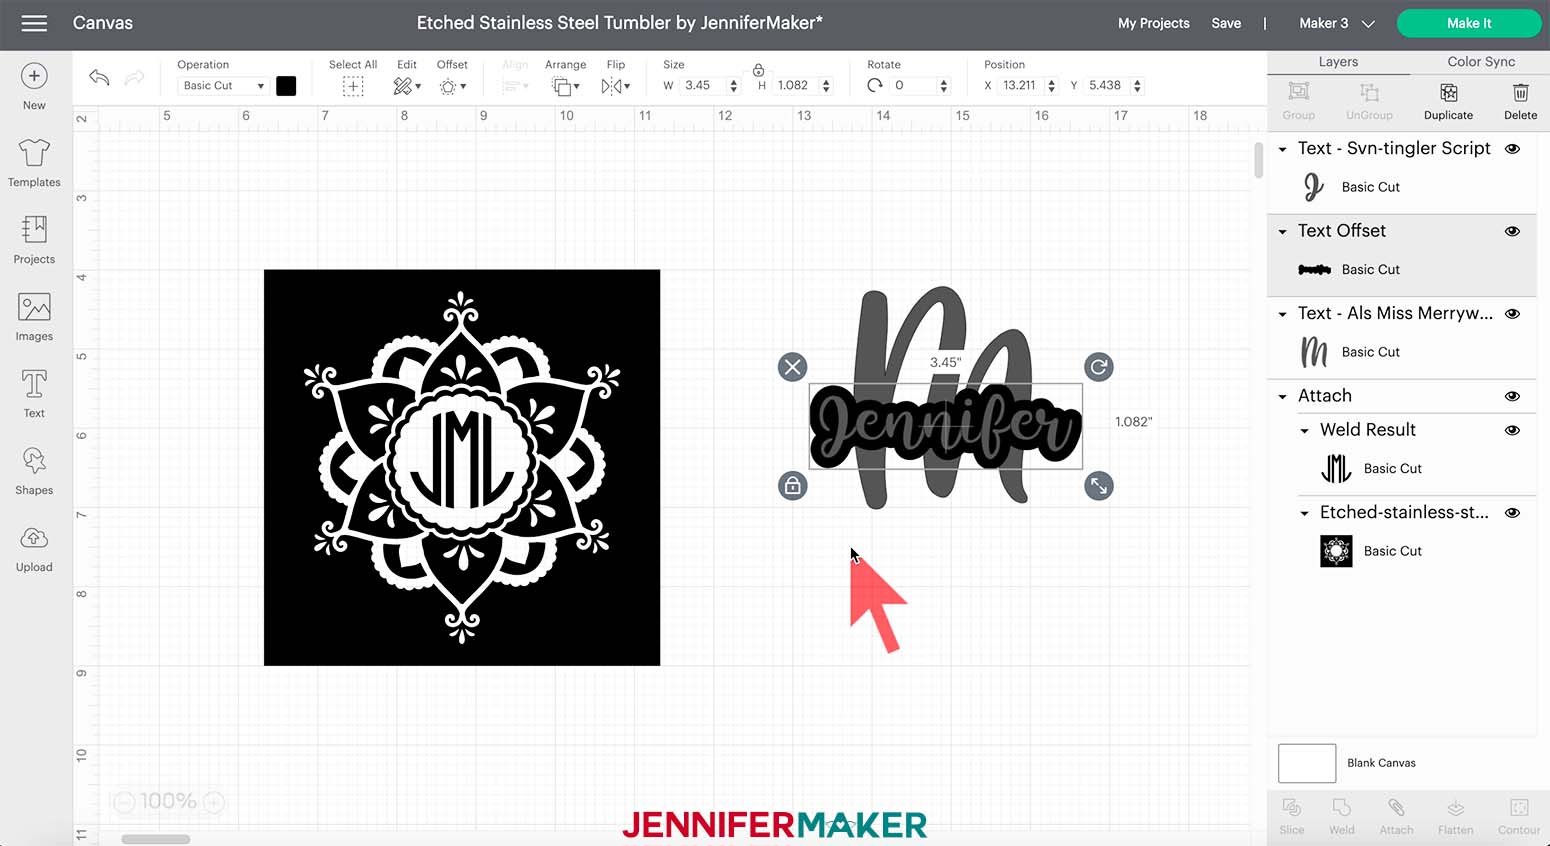
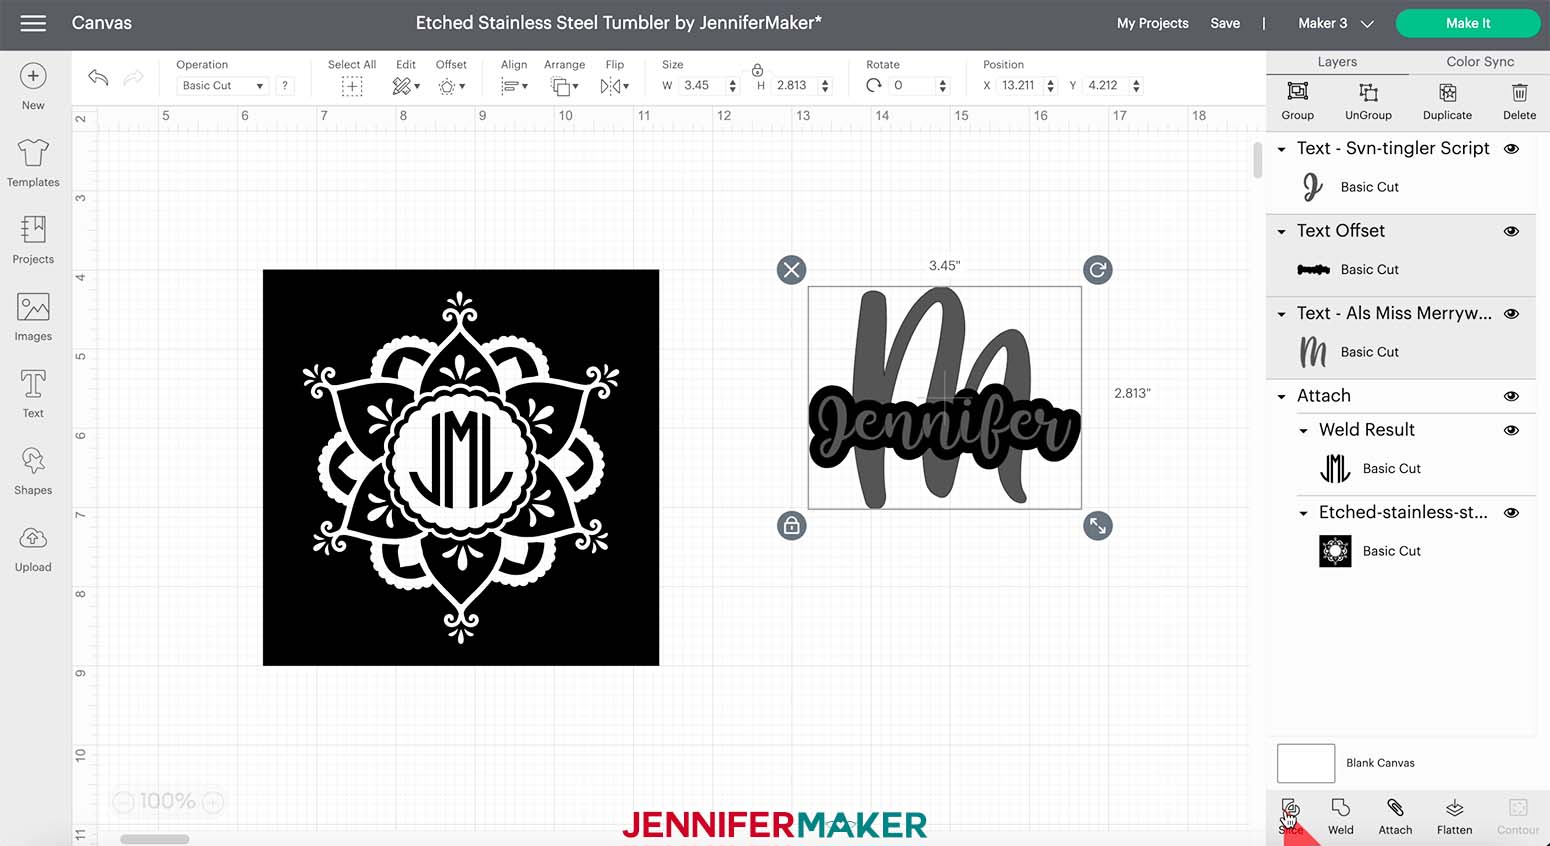
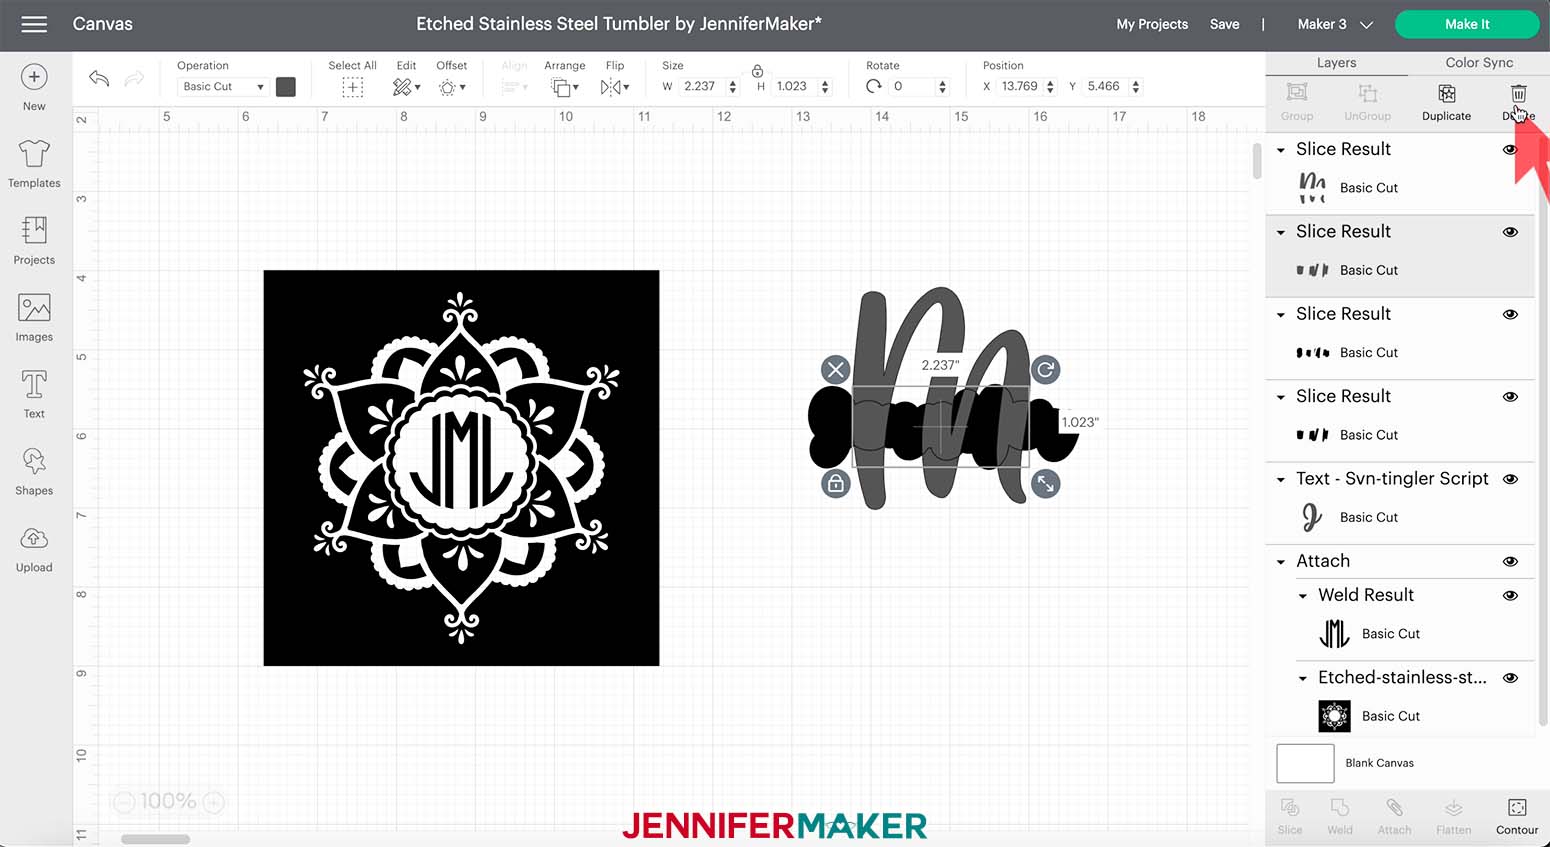
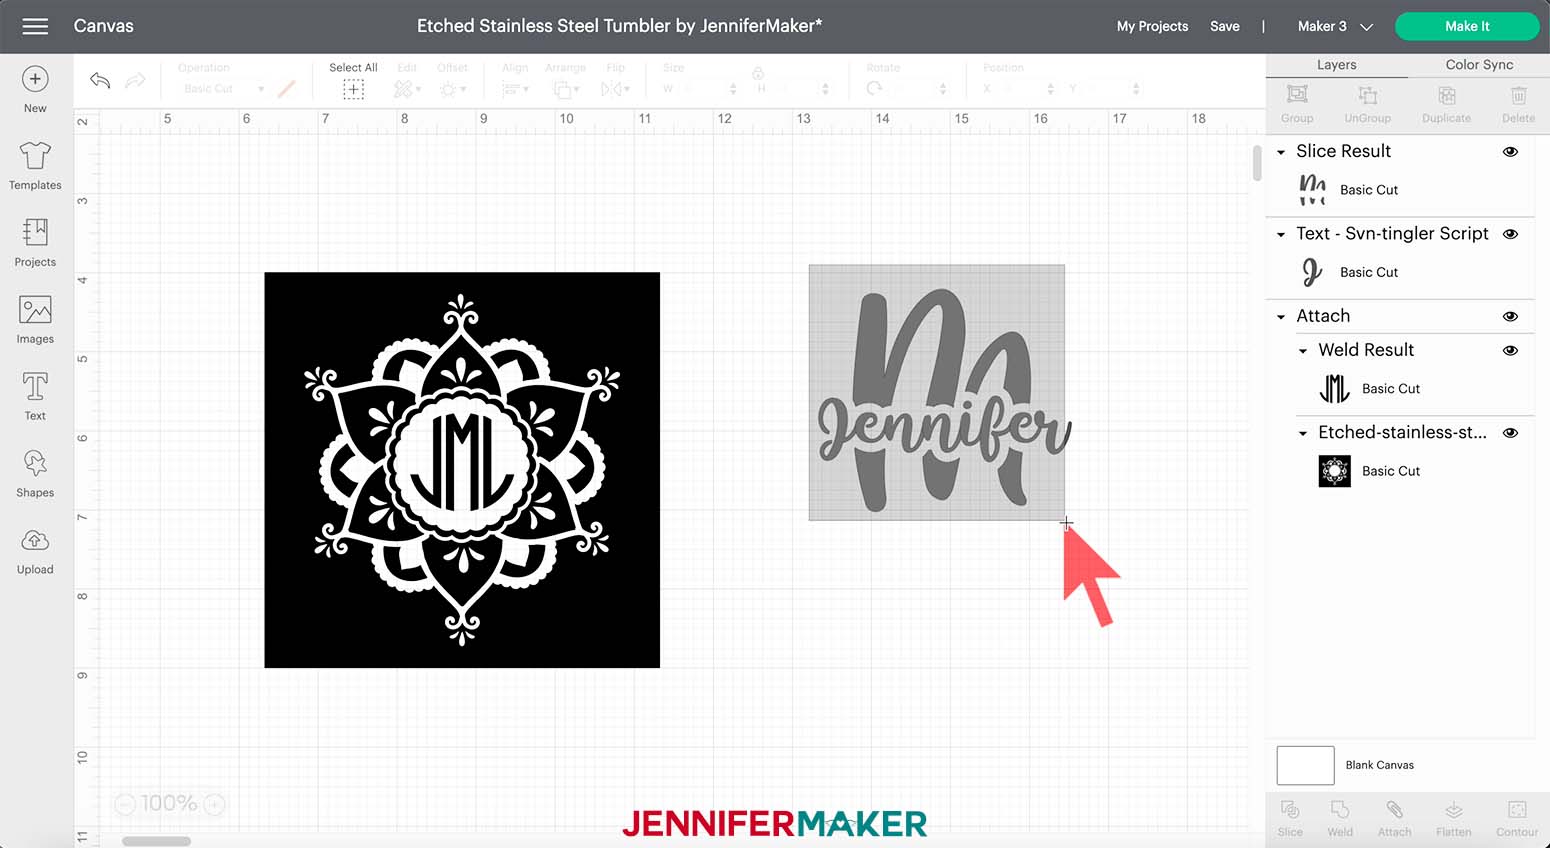
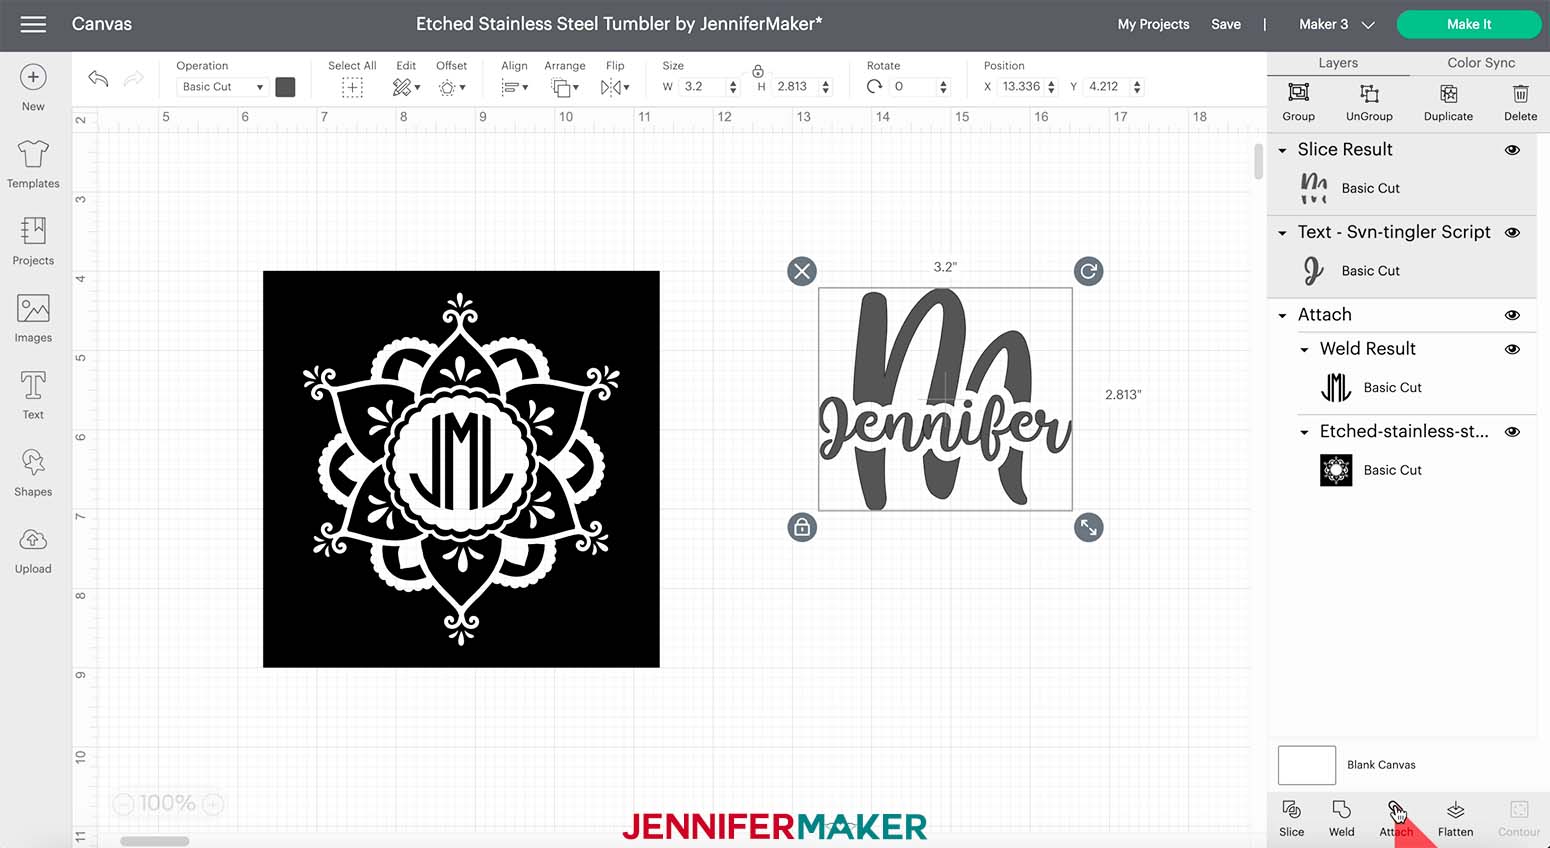
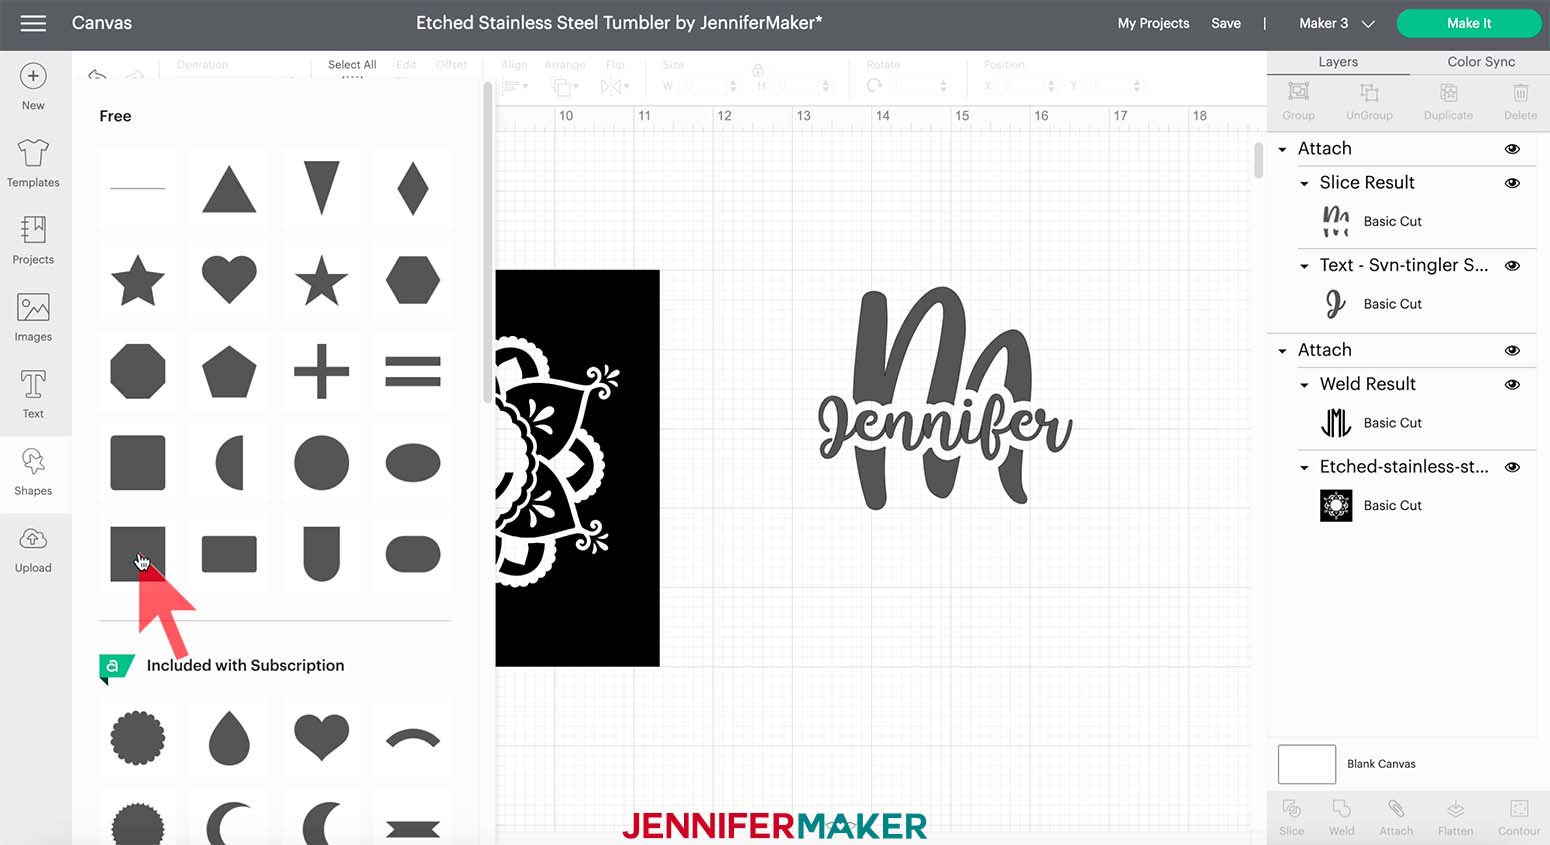
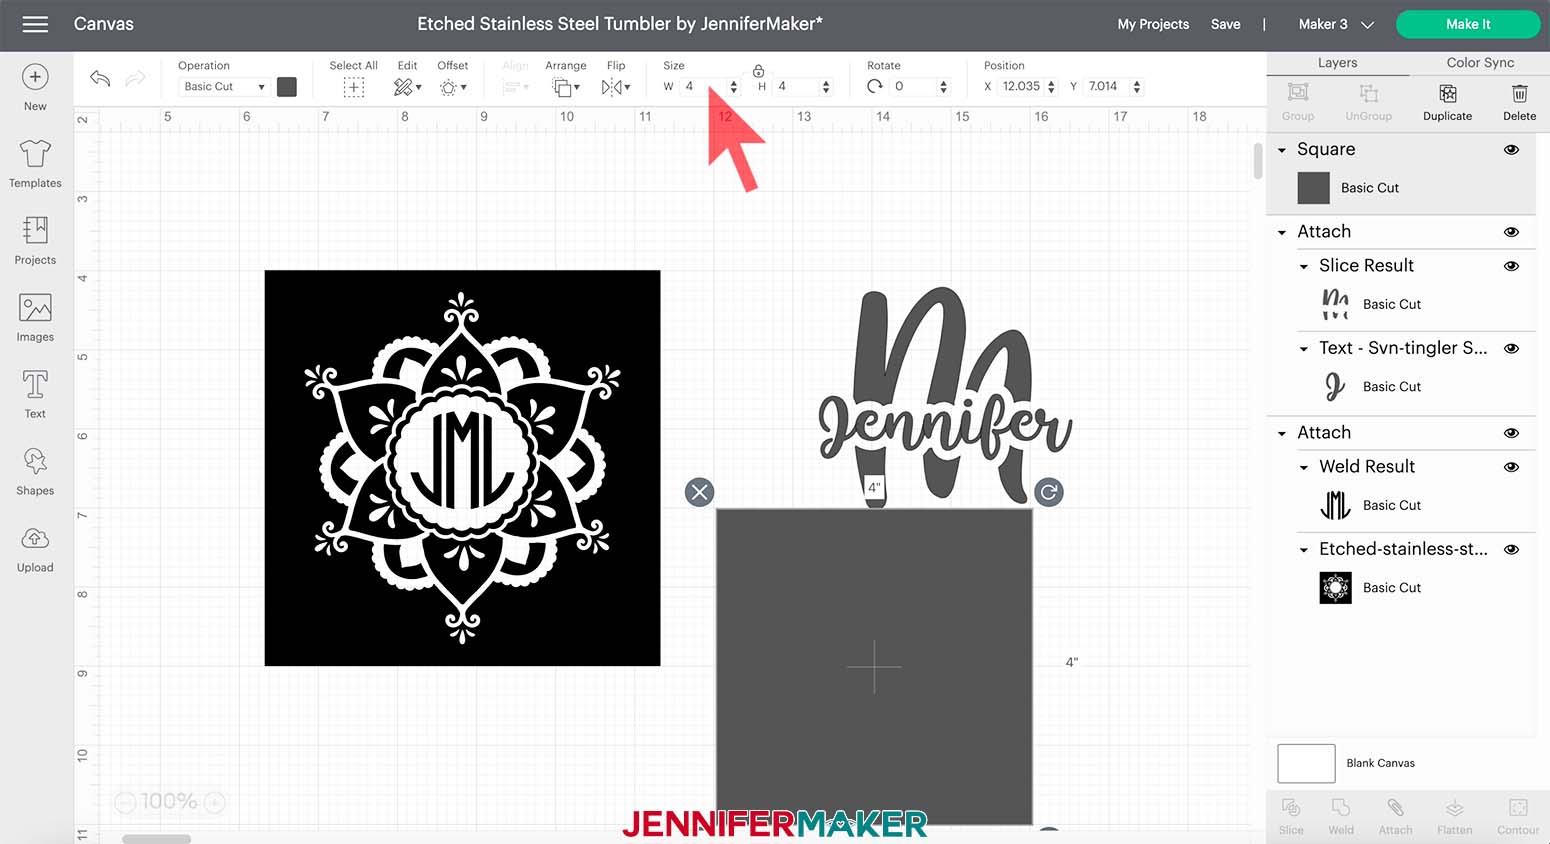
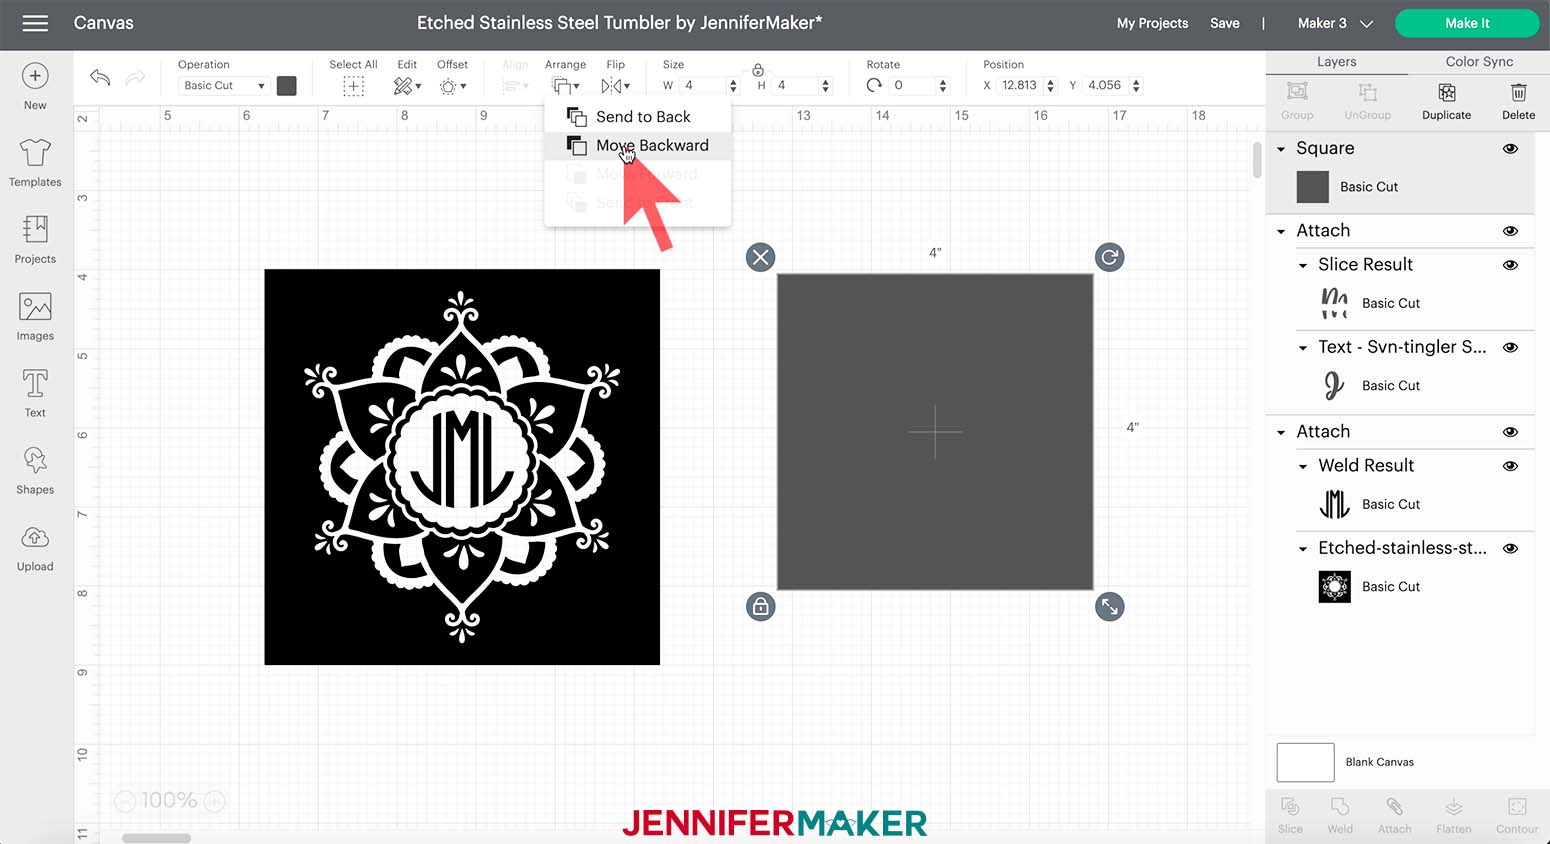
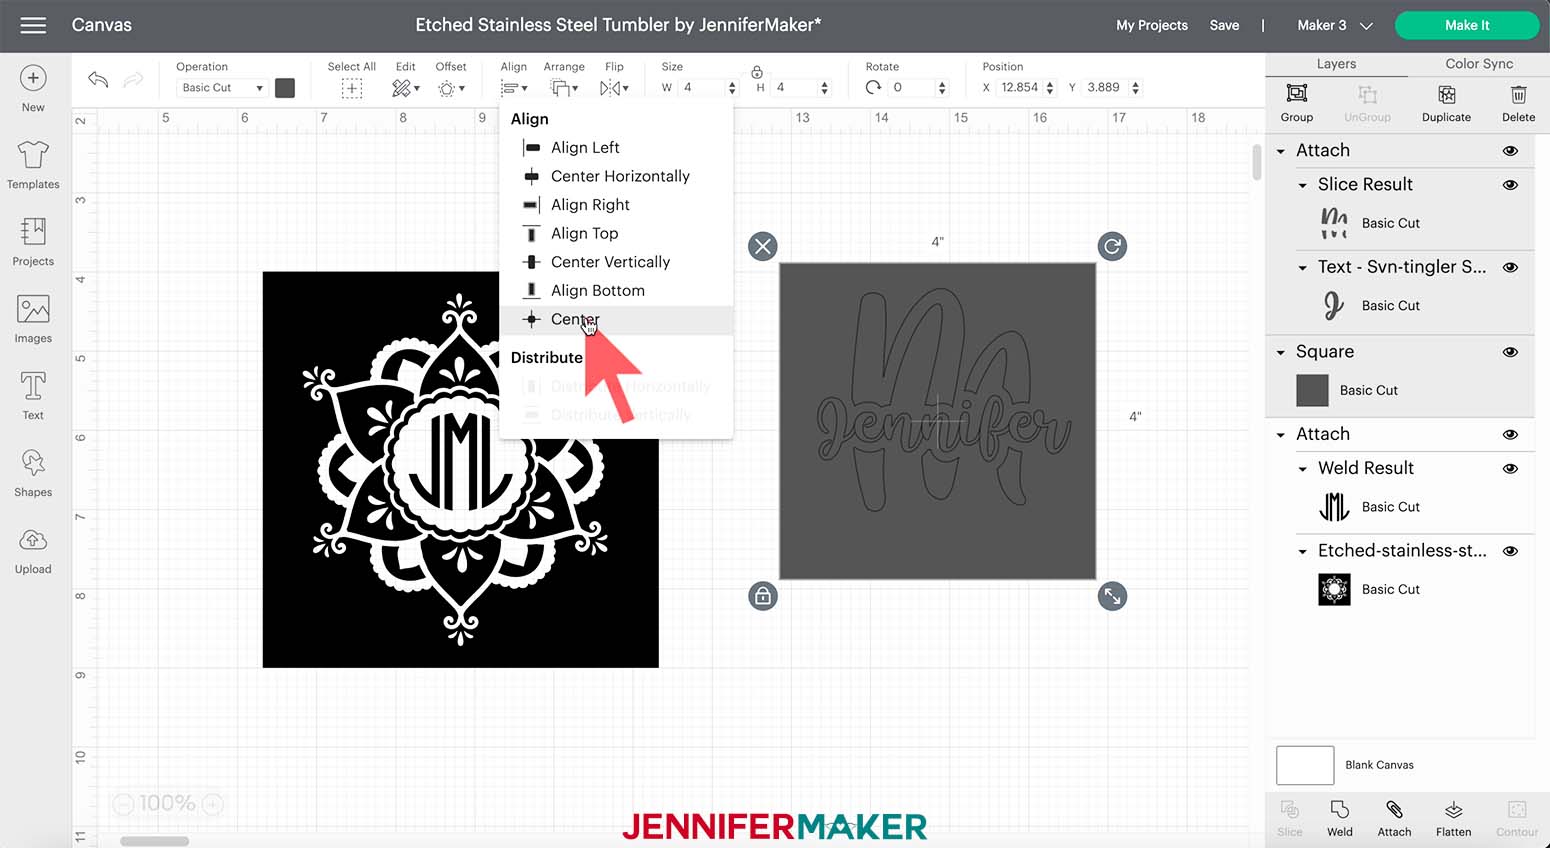
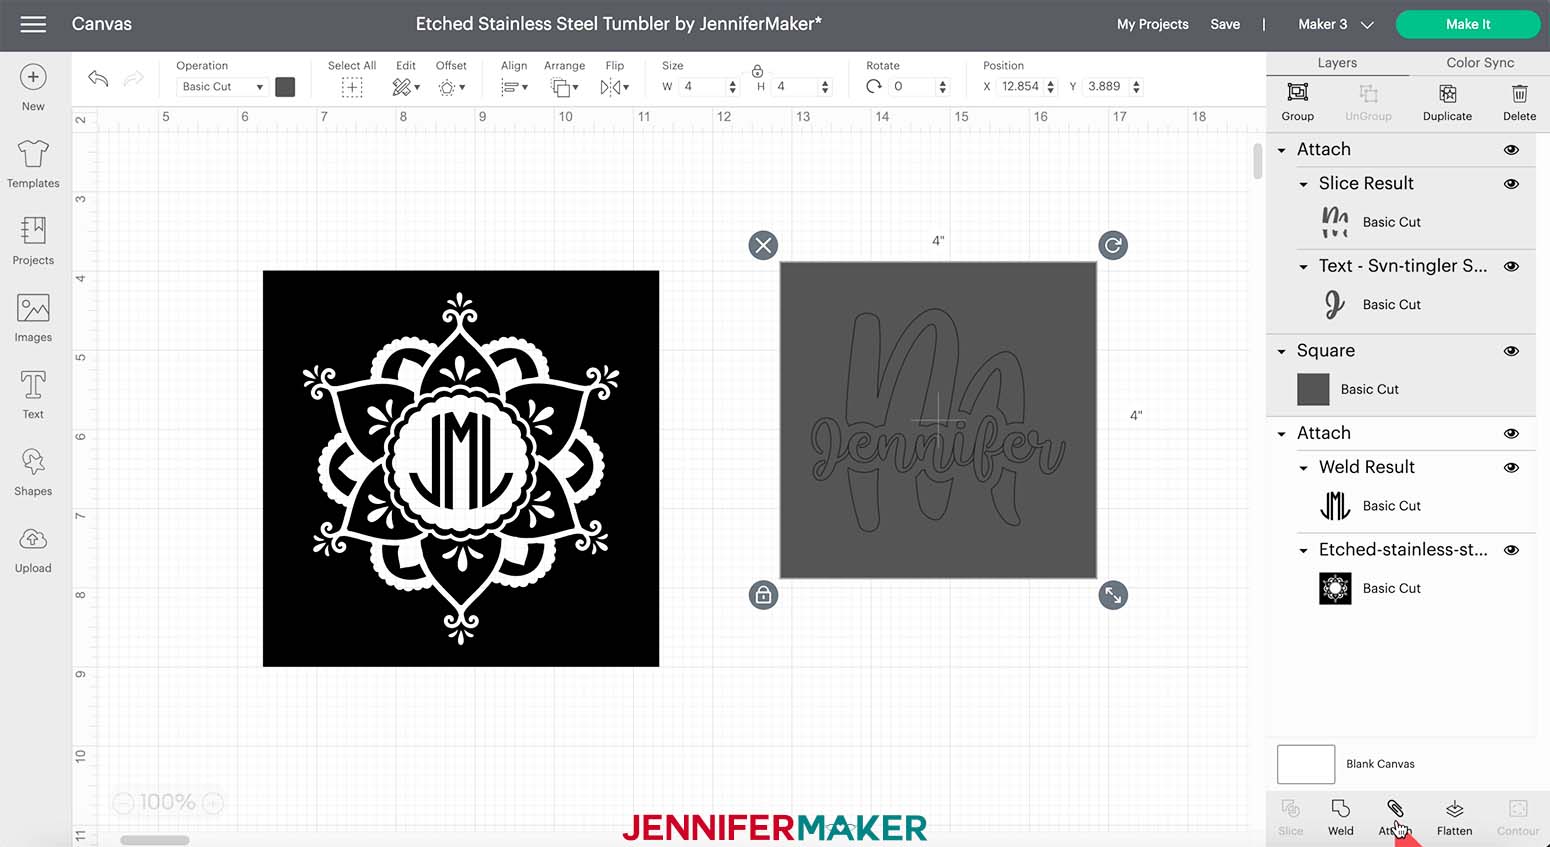
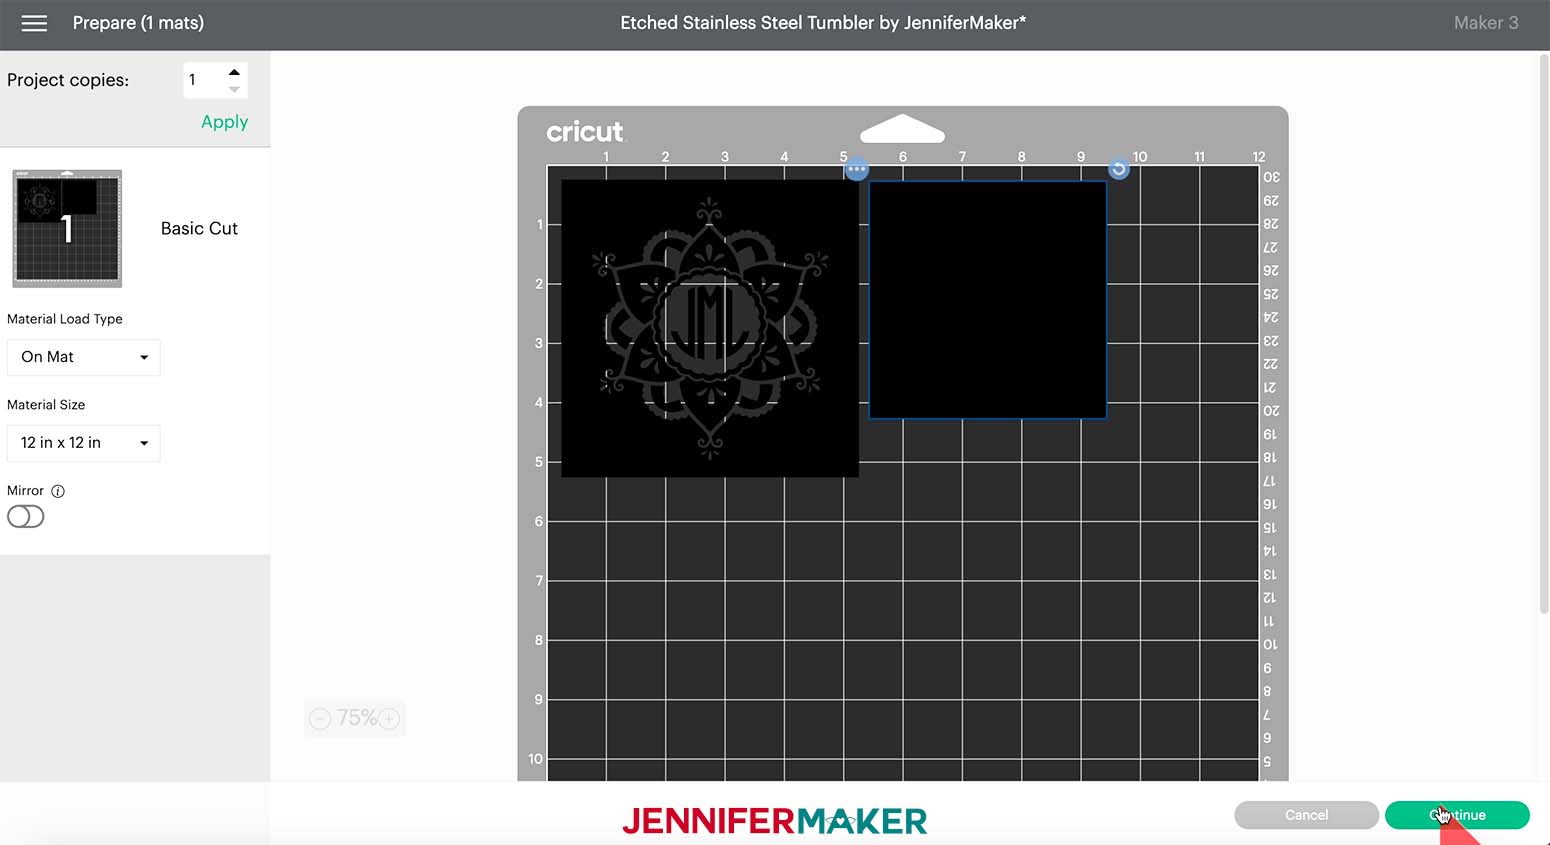
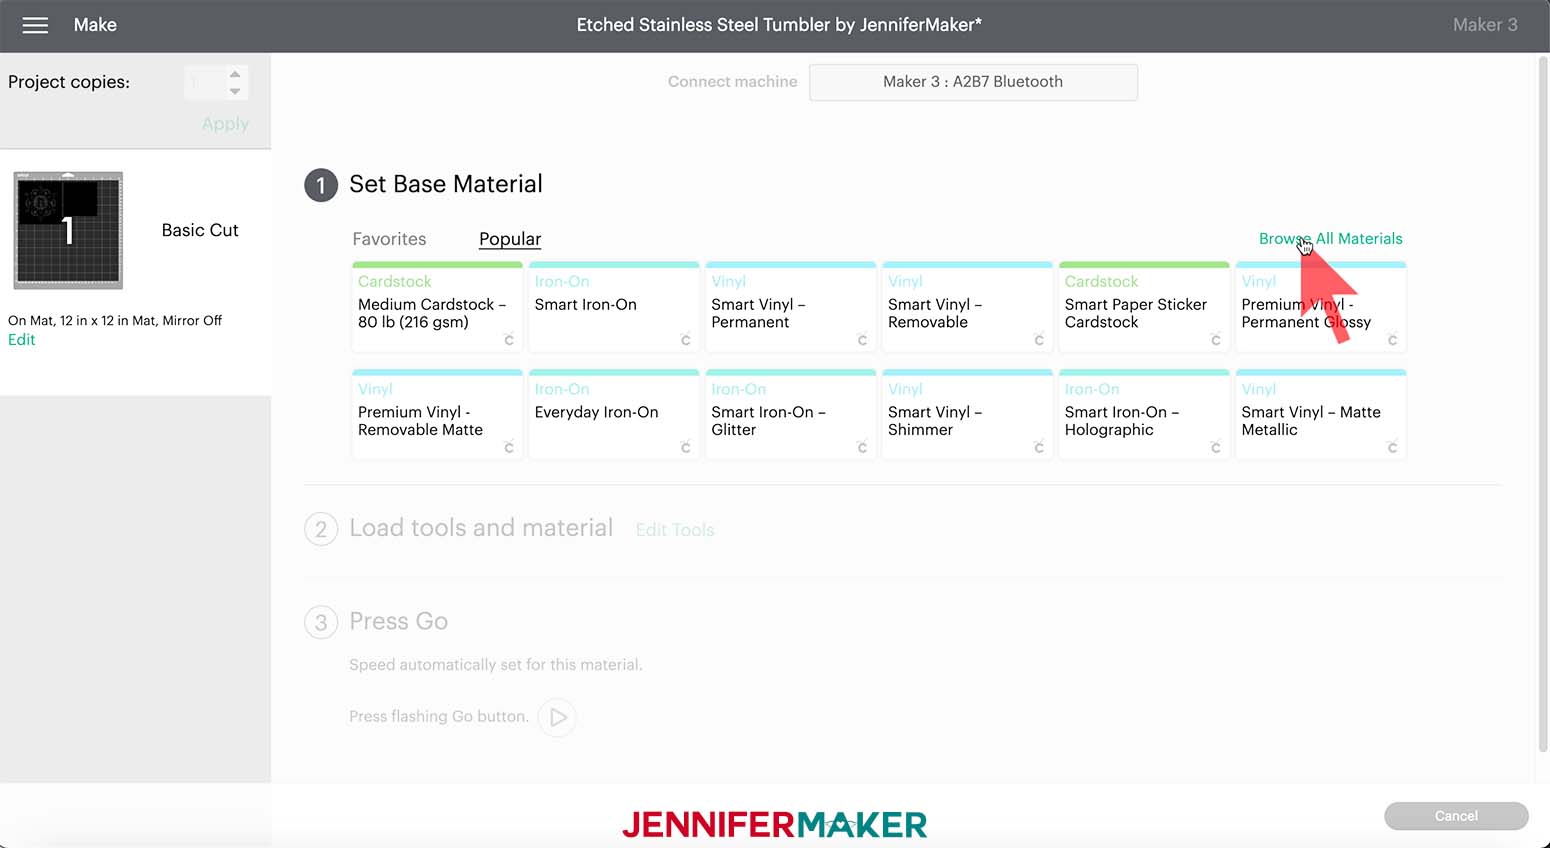
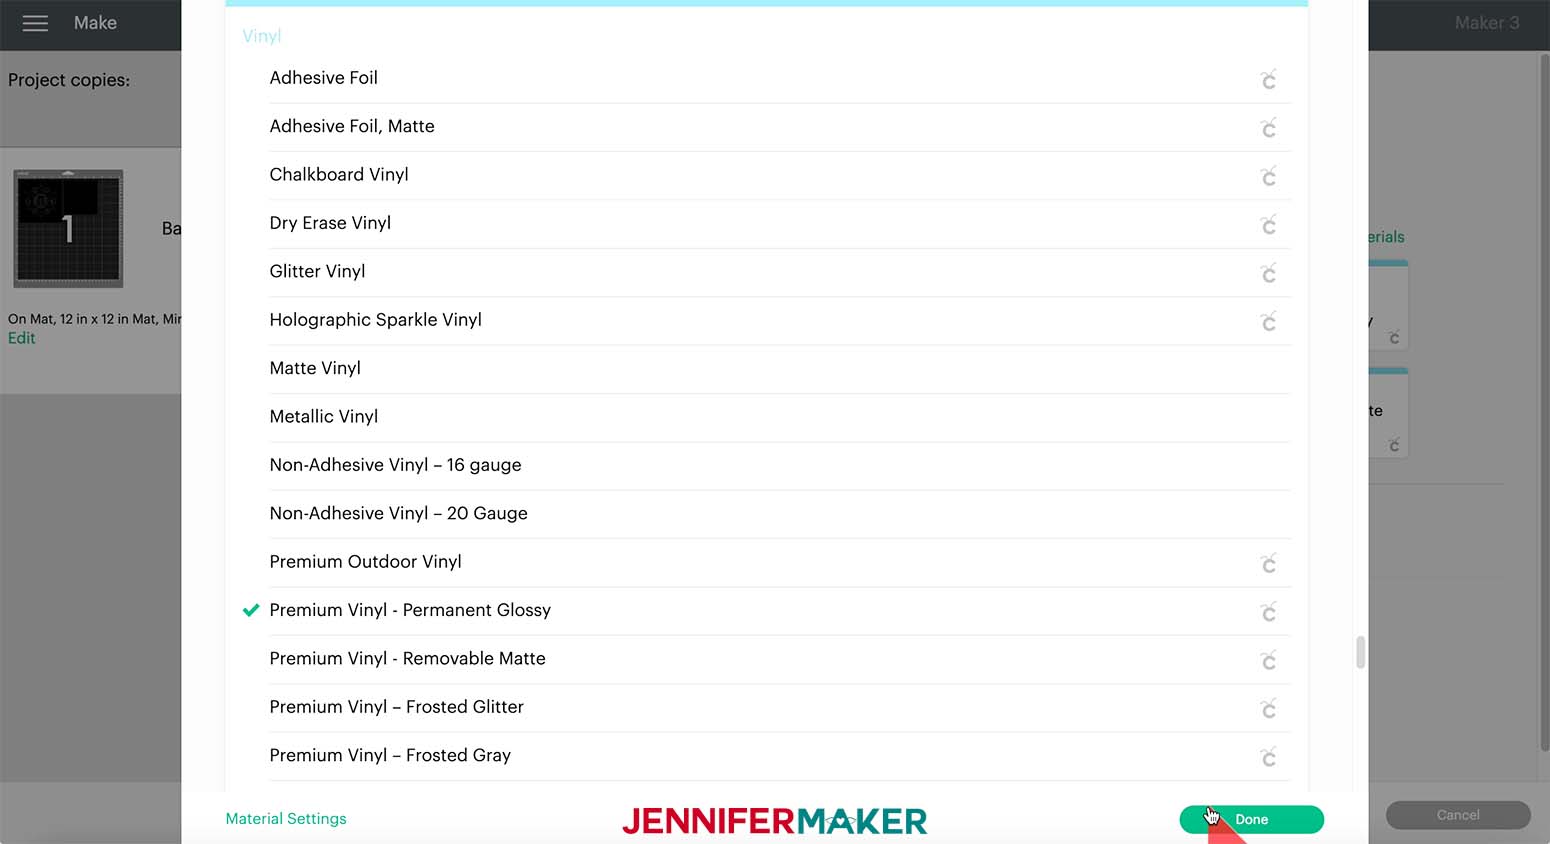
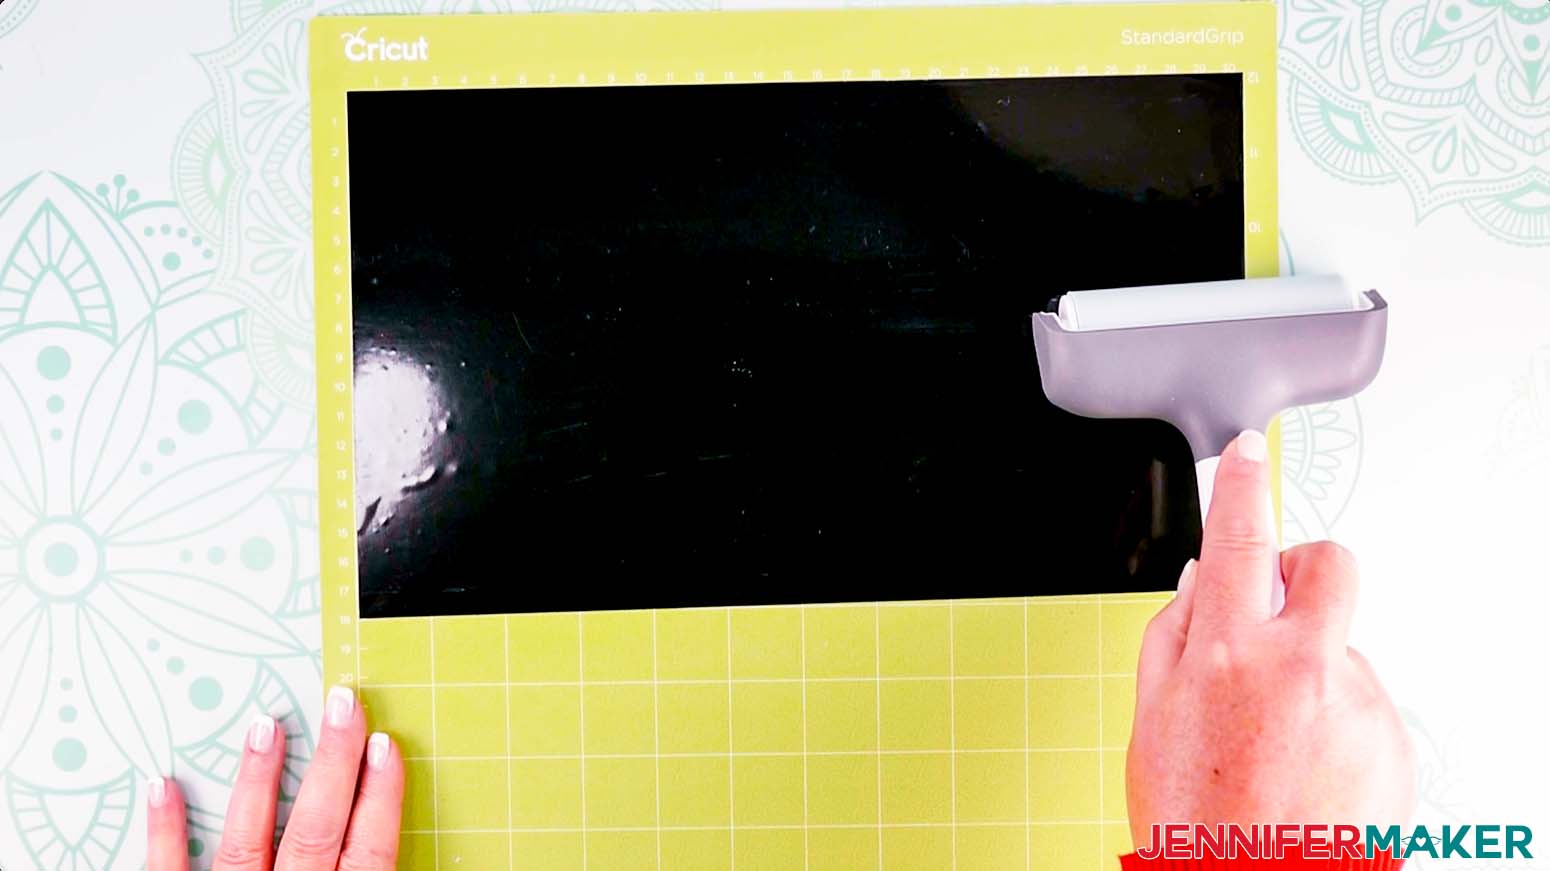
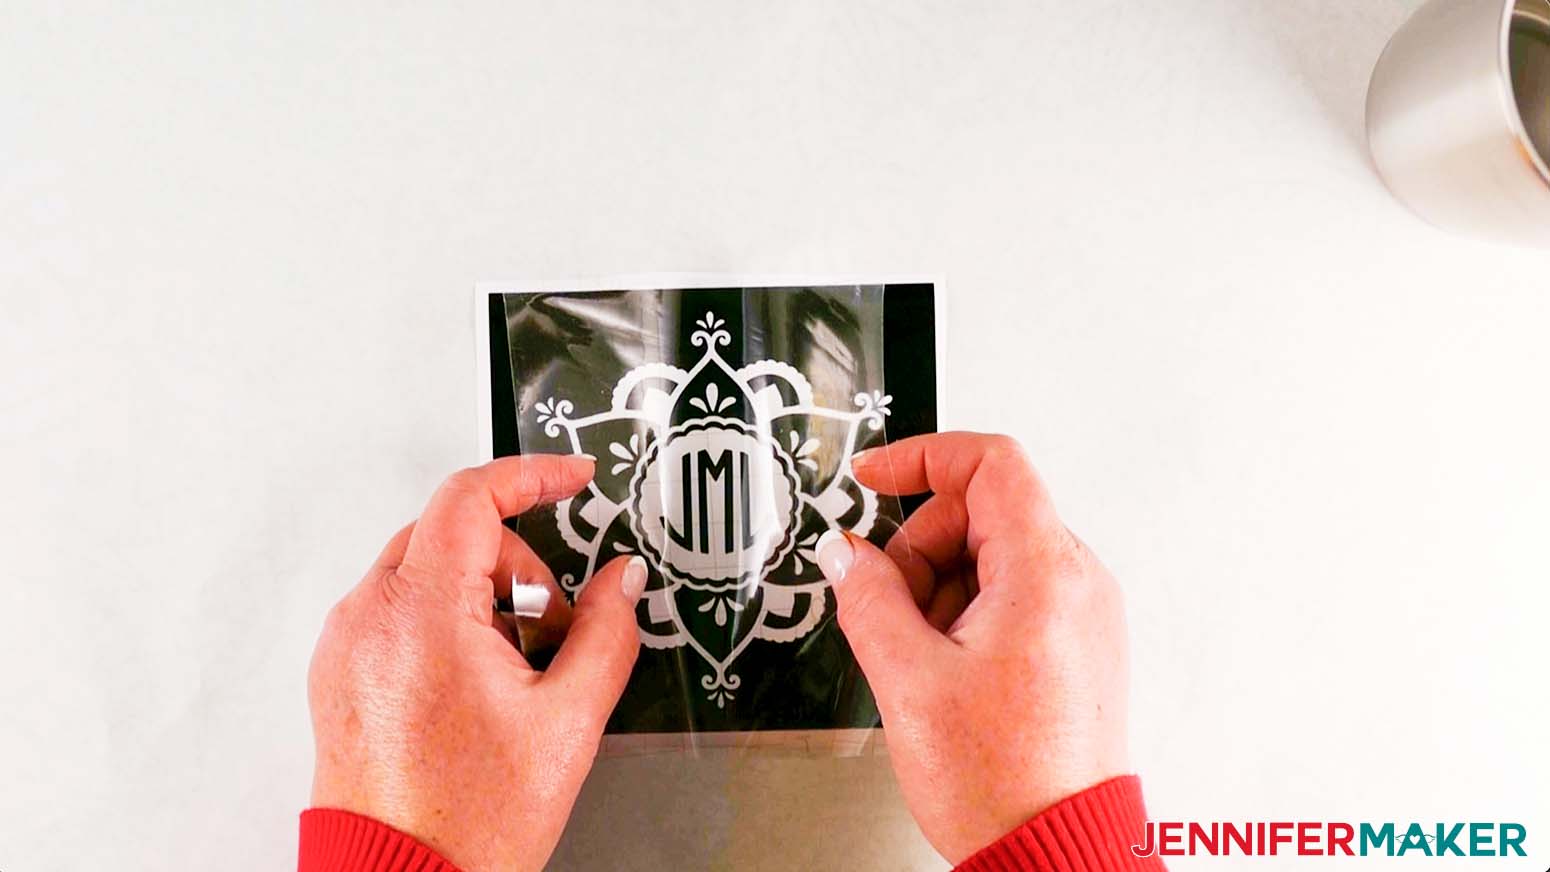
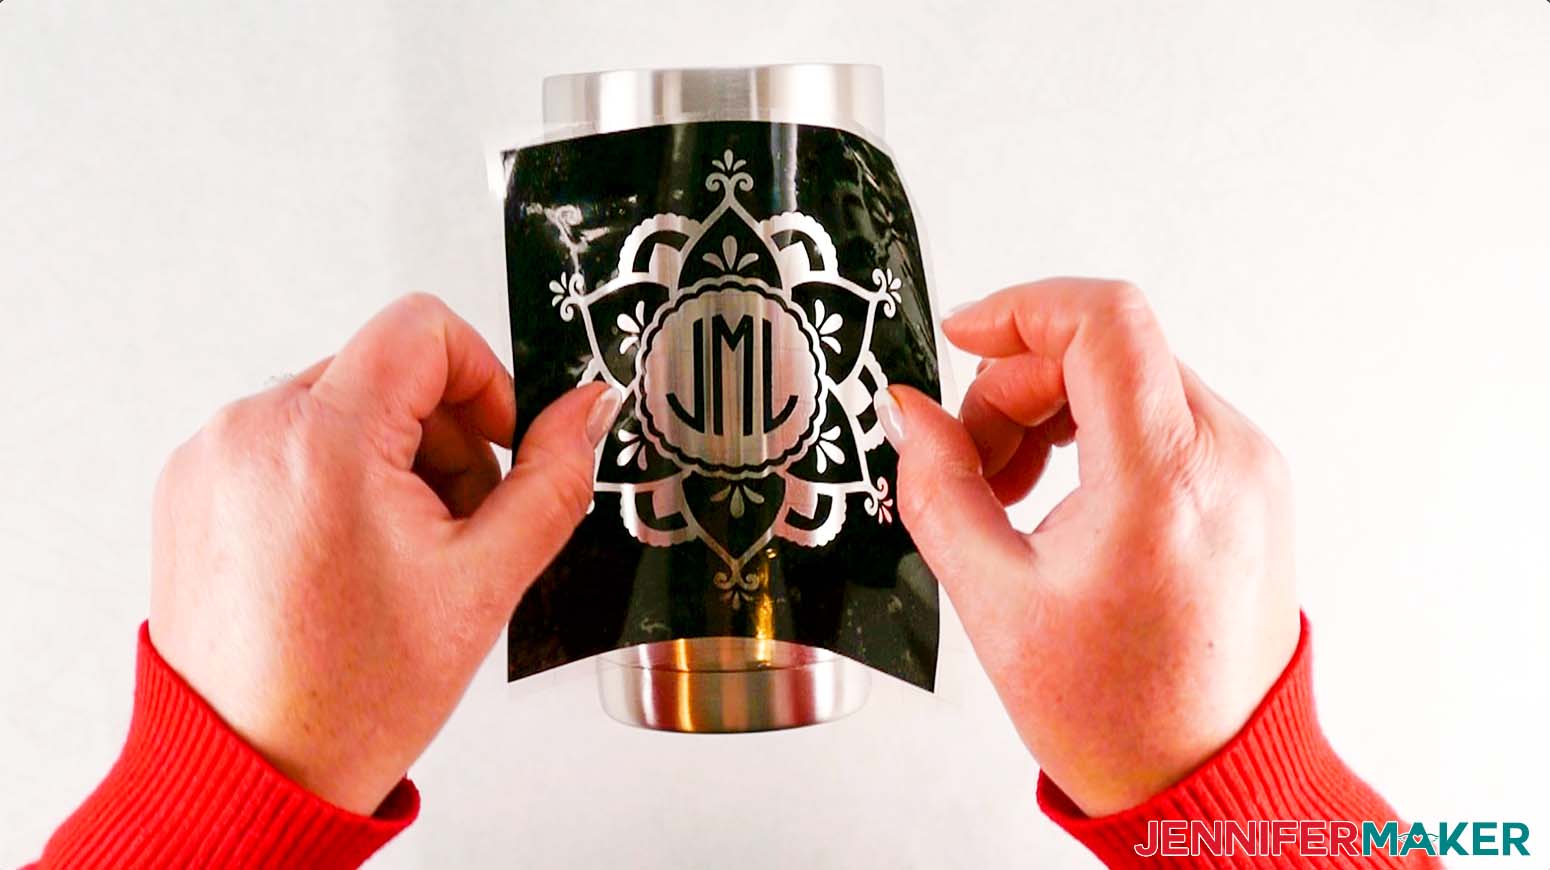
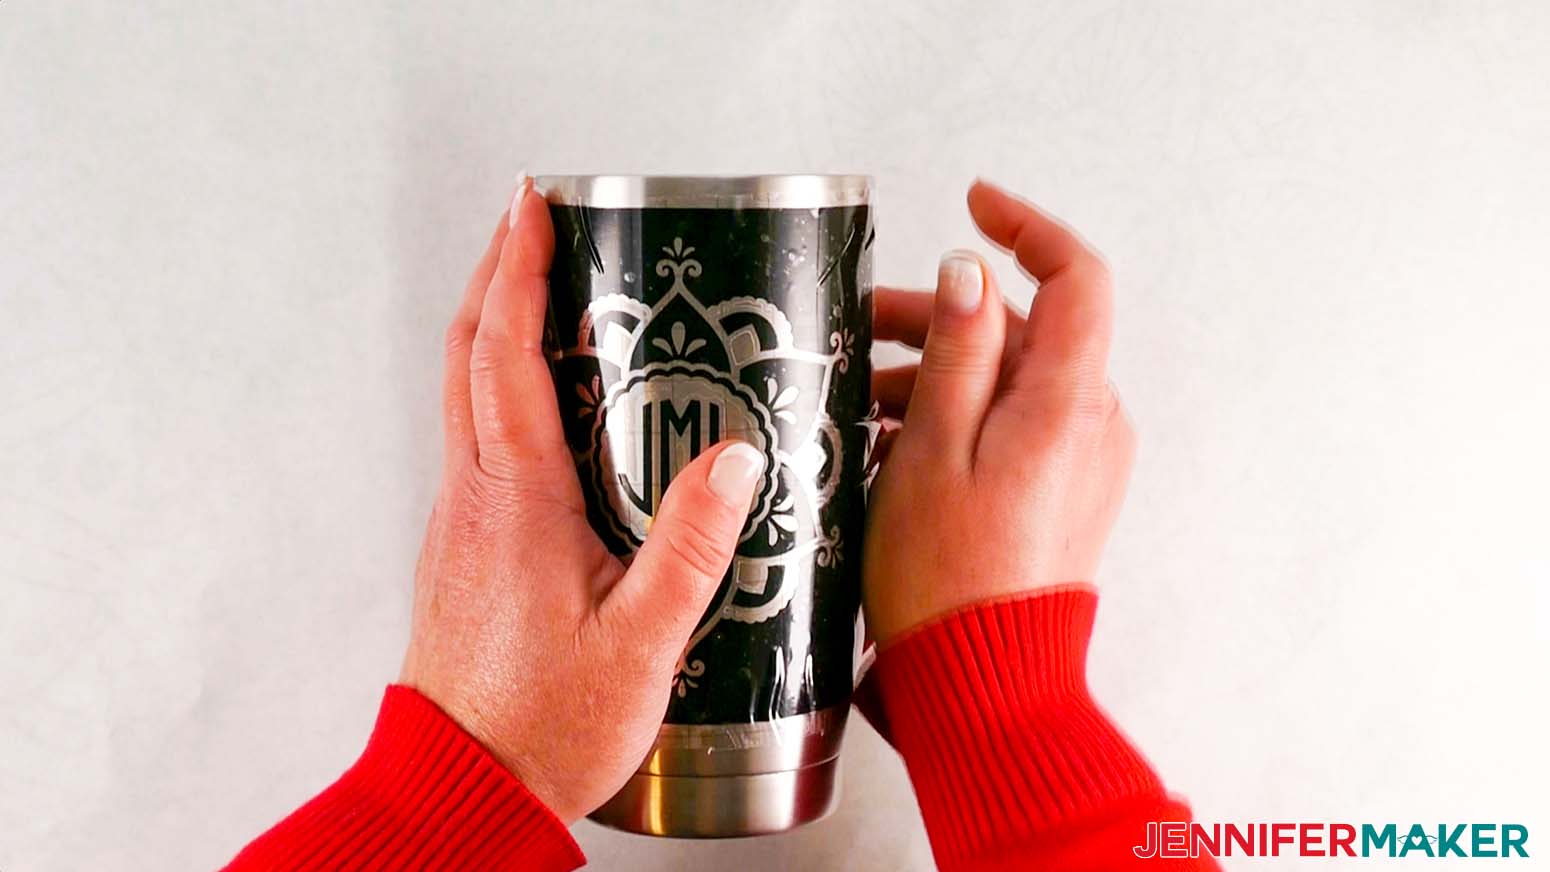
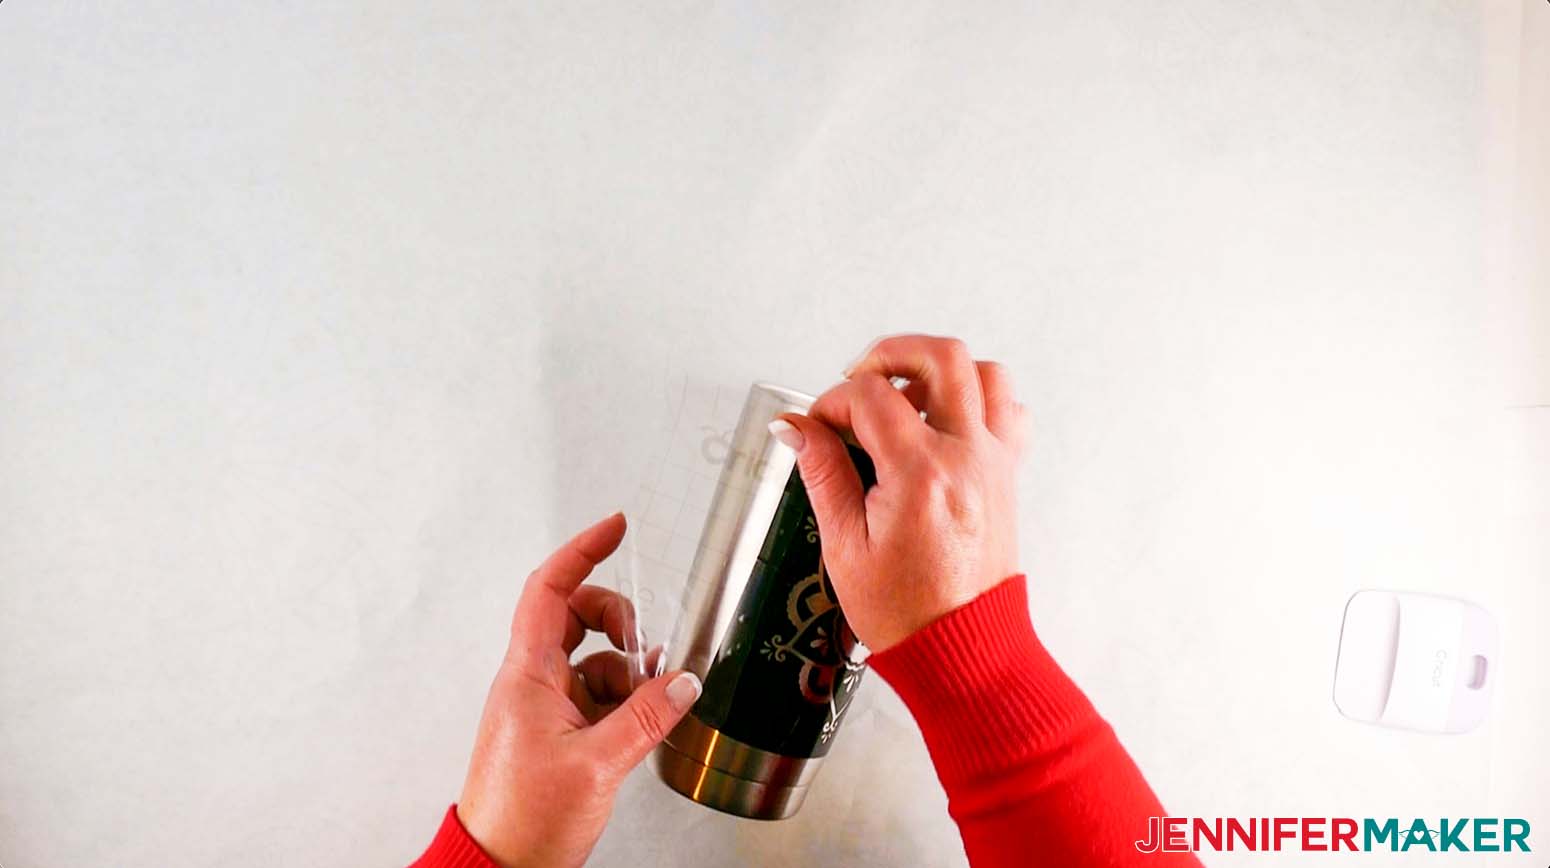
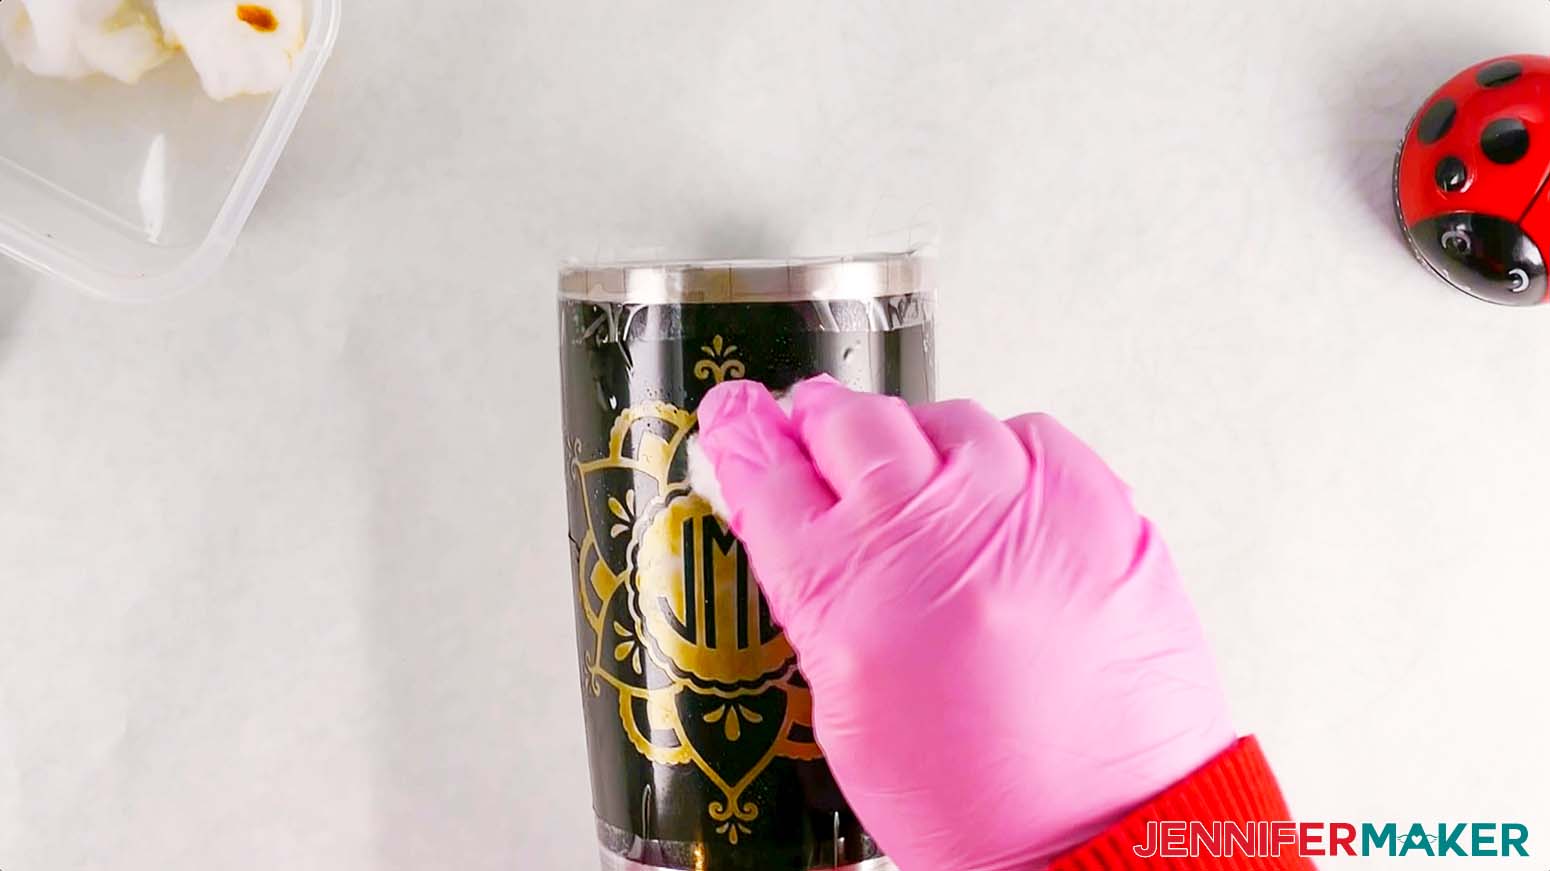
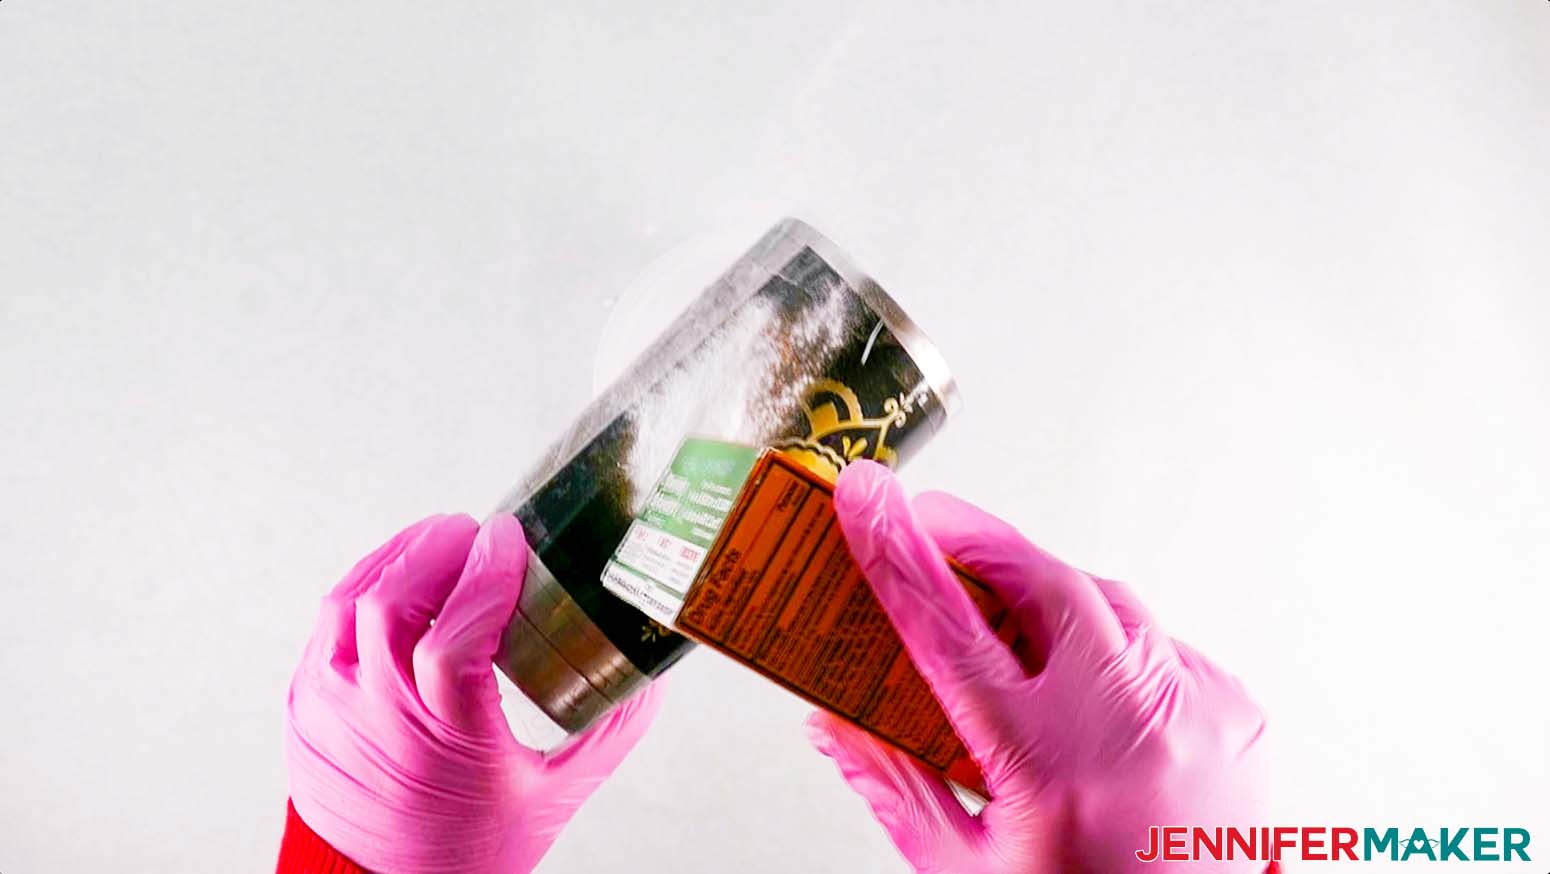
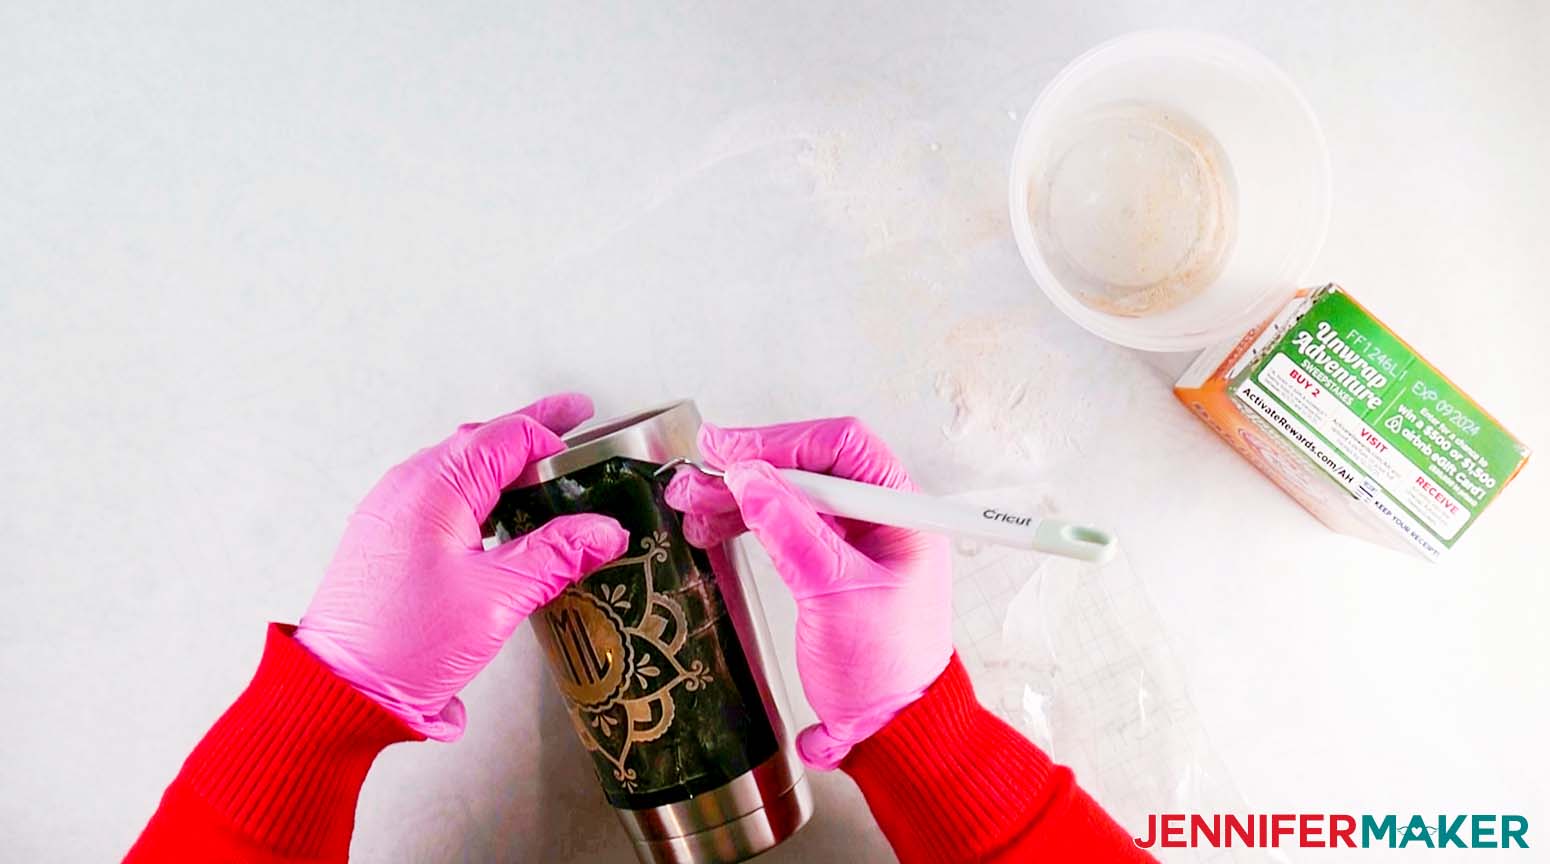
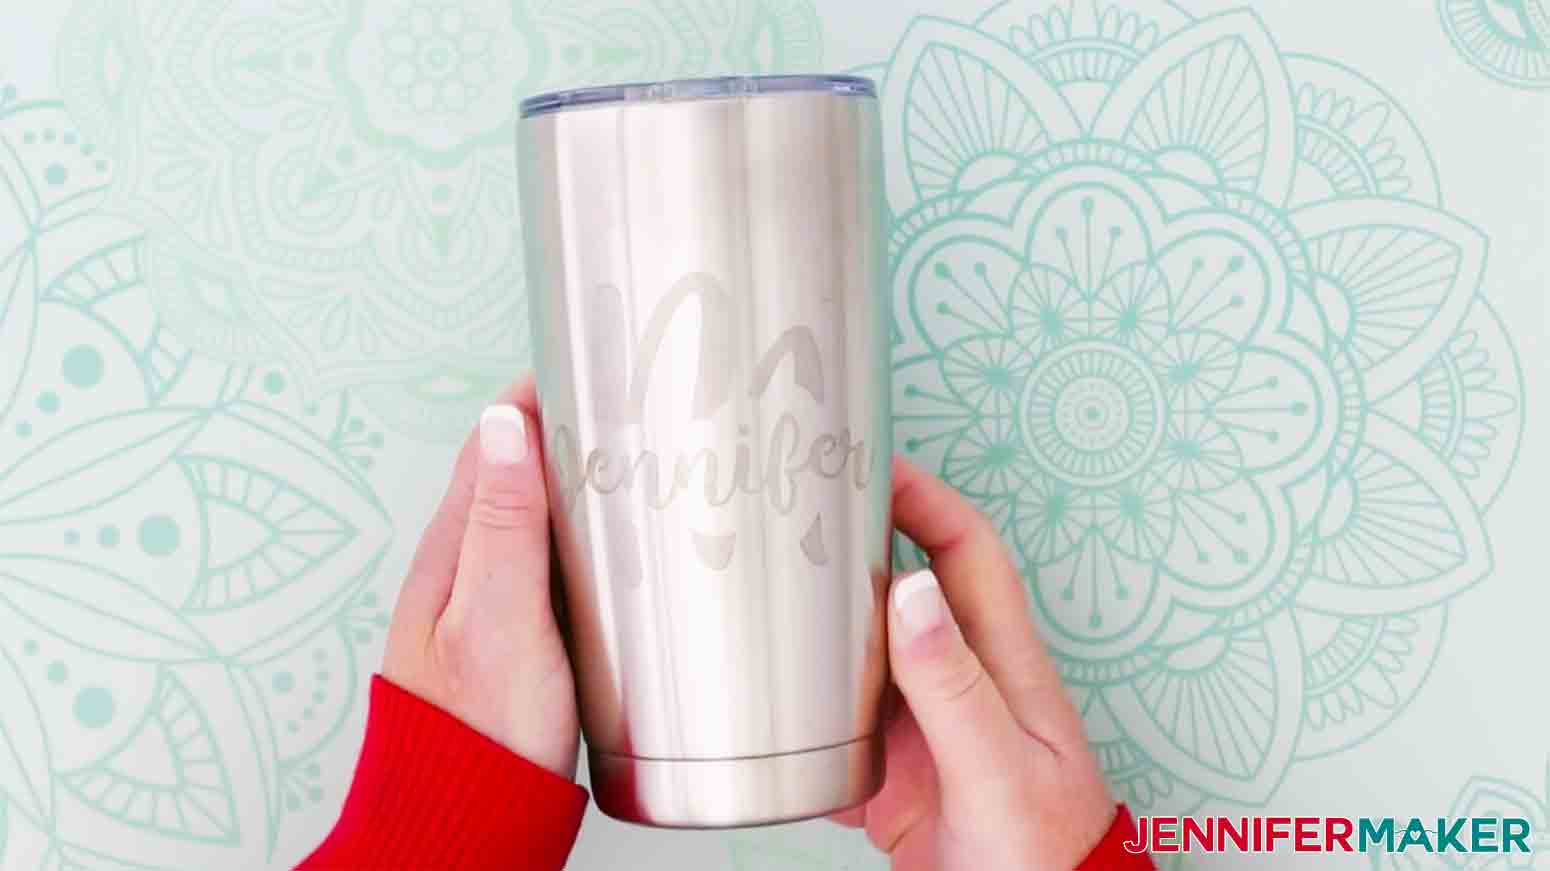
Learn how to make these awesome etched tumblers! My Etched Stainless Steel Tumbler design is available in my free resource library — look for design #361. The ZIP file contains an SVG file for cutting on a Cricut or another cutting machine, DXF file, and a printable PDF for cutting by hand. TIP: If you are not sure how to upload an SVG cut file to Cricut Design Space, watch this helpful video training series I made. If you are on an iPad or iPhone, here is how to download and upload SVG files to the Cricut Design Space app. For this project, I have included two SVG files, one with the original design and one with the stencil version of the design. This is what my Etched Stainless Steel Tumbler SVG looks like in Cricut Design Space. This file is what we will use to make our Etched Stainless Steel Tumbler. In this tutorial, I am going to show you how to personalize my mandala design and show you how to make your own personalized monogram in Design Space. So let’s get started! To start, we are going to add our initials to the mandala. So, we are going to select the "Text" tool, and then, I am going to select a font from the drop-down menu at the top left of the screen. I am going to use "Left Circle Monogram" from the “Circle Monogram Font” found on FontBundles.net, but feel free to choose a font you like! To find the font I will type "Left" in the search window and then click on it. TIP: If you are not sure how to upload fonts to Cricut Design Space, check out my tutorial "How to Upload Fonts to Cricut Design Space" on my blog. Now, click on the text box on the screen and type in your first initial. Next, click on the “Text” tool again and search and select “Center Circle Monogram” from the font drop-down menu. Then type your middle initial in the text box (this is usually the initial of your last name). To add the third initial, we are going to do the same as we did before, just search and select “Right Circle Monogram” for the font. Now, we need to move the letters out from under each other by clicking and dragging them into place; lining them up the best we can. We want our first initial on the left, then our last initial in the middle and our middle initial should be on the right. Position them close together, but not on top of one another. To make these letters completely straight, we are going to select them all by clicking and dragging our bounding box over them. With all the letters selected, click “Align” in the drop-down menu at the top of your screen and select “Center Vertically.” Now, all your letters are centered vertically, but not necessarily evenly distributed. To fix this, we are going to go to the “Align” drop-down menu, again, this time selecting “Distribute Horizontally.” Just like that, they are the same distance apart from each other. Once we have them all perfectly aligned the way we want, we are going to click “Weld” on the lower right-hand side of the screen. This will make the letters one layer and they will not lose their alignment. Next, we are going to click on our initials and drag them to the center of the mandala and resize them, if needed, using the resizing handle located on the bottom right of the design. Now, we are going to center the initials by clicking “Select All” at the top of the screen, and then go to the “Align” drop-down menu and select “Center.” If the initials look off-center, click on the canvas to deselect both pieces then select only your initials and use your arrow keys to adjust the letters so they are visually pleasing. Once you have your initials in place, click “Select All” at the top of the screen and then select “Attach” on the lower right side of the screen. This way everything will cut out together as one piece. Next, I am going to show you how to make your own monogram. NOTE: If you are making both designs you can hide the mandala design while we set this one up if you'd like. To do this, click on the “eye icon” next to that layer in the layers panel. First, we need to measure the width of our tumbler so we know how big to make our monogram. Mine measures 3.5" wide, so I will make my monogram around 2.25" wide. Next, we are going to select the "Text" tool, and select the font. I am going to search for and select "Miss Merryweather" a font I purchased from FontBundles.net. You can pick any font you would like. Once you have picked your font, click on the text box and type the first letter of your last name. Now we will resize our initial. You can do this two ways: use the resize handle like we did earlier or you can go to the top and type the width in the box under size. Make sure to keep the padlock locked so they letter will maintain the correct proportions. Again I'm going to make mine around 2.25” wide, so that's what I will type, but yours might be different depending on the size and type of tumbler you are using. Next, we are going to use our “Text” tool again, and type out our name. I am using the font “Tingler Script," another font I purchased from FontBundles.com. I'm going to drag my name over the top of my initial if it's not already there. Then using the resize handle this time, resize the name so that the first and last letters hang about 3/4" off the front and back side of my initial. Now, we are going to click and drag our name to where it looks best on the letter. We are adjusting manually because when you "Align" then "Center" makes the position of the name on the initial look off. Every name and initial are different, go with what you think looks best. Next, we are going to offset our name by using the offset tool. To do this, we are going to make sure our name is selected and click the “Offset” drop-down menu located at the top of the screen. The blue line around your name is the offset. We can adjust this using the slider or the text box to make it bigger or smaller. I am going to adjust mine to around .125”. You can also type this into the size box. Then, we can make the offset have pointy corners or rounded corners. I am going to keep mine with rounded corners but you can choose what you like best. Once you have it all set, click “Apply.” This will create a solid black offset the size of the blue outline. Now we will select both layers. In the layers panel, select the offset layer. Hold down the shift key and click the letter layer, not the name layer. With these selected, click “Slice” at the bottom of the layers panel. This will separate the letters from the offset shape. Next, we need to clean up the sliced pieces. The easiest way to do this is by going to your layers panel. You should see four layers that say "Slice Result." You want to keep the one that looks like your letter with the middle cut out and delete the rest. To do this, select the other "Slice Result" layers, the ones that are the cutout middle pieces, and click delete at the top. Repeat for the remaining extra pieces. Now that we have our monogram designed, we need to attach the name and the letter together in order for them to be cut out in one piece. To do this, we are going to select them by clicking and dragging our bounding box over them, and then select “Attach” at the bottom right of the screen. Now, we need to turn our design into a stencil. Select a square shape from the “Shapes” menu from the left side of the screen. Then, adjust the size of the shape to be an inch more than your design. So for mine, since my designs is around 3", I am going to make a 4” square. You can use the resize handle to make the square larger. Next, we are going to move the design above the square in the layers panel. To do this, select the square and go to the “Arrange” drop-down menu, and select “Move Backward.” Now, we are going to center our design inside it. Use the bounding box to select the design. Next, go to the “Align” drop-down menu and select “Center.” Then, click on “Attach” on the bottom corner, and now you have your stencil. NOTE: In this instance, we are using "Attach" instead of "Slice" because it's simpler and it gets us the results needed. Think of "Attach" as holding everything in place like a paperclip therefore none of its parts move out of alignment and each individual piece gets cut out. Where "Slice" is like a cookie-cutter it cuts a hole in the design in the shape of the top shape we are using. Like in baking this leaves us with extra pieces that we need to discard. If we were to use "Slice" in this instance we would have to delete all the extra pieces and then "Attach" or "Weld" our name to the letter as well which would be more steps than what we need to do here using "Attach." Once we have our stencil, we need to change the color to match the other design, and they can be cut out on the same mat. To do this, we need to select the design and go to the color selection menu. This can be found by the “Operation” menu. Then select black. Now that we have everything prepped and ready, we are going to click “Make It” at the top right of the screen. Next, we are going to cut out our designs. I will be using the Cricut Maker 3 for this tutorial, but you can use any Cricut cutting machine for this project. If applicable, select “On Mat” on the next page. There is nothing to change on the prepare screen. So, we can select “Continue” at the bottom right of the screen. TIP: Move the right stencil over slightly to make it easier to weed. Now, it is time to select the materials we are going to use for our mat. I am using black Premium Vinyl for this mat so, I am going to select “Browse All Materials” and click “Premium Vinyl - Permanent Glossy.” Then press “Done.” Then, I am going to select “More Pressure” to get a cleaner cut. Now, place the black vinyl, with the shiny side up, on your Cricut Green Standard Grip Mat, and burnish the vinyl to the mat using the Brayer Tool. Load your mat, and select the blinking "Arrow/Go" button to start the cut. When it has finished cutting, unload your mat. Remove the vinyl from the mat by flipping the mat over and pulling the mat away from the vinyl; this prevents the material from curling. IMPORTANT: When weeding vinyl for a stencil, make sure to remove the parts that you want to etch. Now the fun part, it is time to etch! Move your supplies to a well-ventilated room or set up an area outside. You will want to cover the area you are using with butcher paper or some sort of protective covering. You will also need: cotton balls, two disposable bowls (one to throw your used cotton balls/vinyl in and one for used baking soda), isopropyl alcohol, baking soda, your vinyl stencils, scissors, Ferric Chloride, and transfer tape. Once you are set up, start by cleaning your tumbler(s) with isopropyl alcohol to remove any dirt or oil. Next, cut a piece of transfer tape the size of your design and remove the backing. Then, place the transfer tape on top of the vinyl and burnish it, using the scraper tool to make the vinyl adhere to the tape. I like to use the taco method. By holding the transfer tape in the shape of a taco, put the bottom of your “taco” onto the middle of your design. Smooth the tape over the decal from the center outward using the scraper tool. Gently pull the transfer tape off; the vinyl should come up with it. If the vinyl does not stick to the transfer tape, place the transfer tape back down and burnish it with the scraper tool again. Now apply your stencil to the tumbler. I rested my tumbler on a roll of painter’s tape to keep it from moving. Smooth the vinyl down from the center outward, using your finger or the scraper tool. IMPORTANT: Make sure to do your best to smooth out any bubbles in the vinyl especially right by the design cut out. Otherwise the bubbles can cause bleeding in your design. Of course this is easier said than done, sometimes vinyl doesn’t want to cooperate, but just do the best you can. If the creases won’t smooth out all the way you can use your fingernail or a scraper tool and make sure the part closest to the cutout part of the design is sealed off. Add 2” pieces of transfer tape on each side of the design, this way if you get Ferric Chloride on your gloves you don’t get it on your tumbler. NOTE: Ferric chloride will “eat” right through the painter's tape, but it does not go through vinyl or transfer tape, and that is why we have to use either transfer tape or vinyl to cover our tumbler. Once the stencil is secured to the tumbler, it’s time to put on our personal protective equipment. For this project we are using chemicals, more specifically Ferric Chloride, which is an acid, so we need to protect ourselves in case any would spill. We also want good ventilation due to the vapors. When I work with chemicals like this, I protect myself from touching or inhaling them by wearing proper personal protective equipment (PPE). That means gloves, I recommend nitrile gloves, a respirator, and an apron over a long-sleeve shirt. Now that we are properly protected, let’s start etching. First, you will need to open the Ferric Chloride and remove the seal. Next, take a few cotton balls and place them up against the Ferric chloride opening and tip the bottle over so the solution goes right into the cotton balls. DO NOT get them supersaturated. Too much solution on the cotton balls will cause run-off when pressed on the tumbler. NOTE: You can use Q-tips for this too. Take your cotton balls and dab the solution onto the stencil making sure to get every detail covered. Apply the solution evenly and leave for a minute or two, then apply another coat using new cotton balls. Continue doing this for a total of 10 minutes (3-4 coats). Once you have the coats finished, pour baking soda on the design to neutralize it. I recommend pouring it over a bowl so the baking soda is contained. Now brush off the excess baking soda with your fingers or tip your tumbler right side up and let the baking soda fall off. Once most of the baking soda is gone remove the vinyl using your weeding tool. And so you know, I didn’t have any issues with the sharp tip of the weeding tool scraping the tumbler. I was concerned about that, but thankfully it didn’t happen. Once you have the vinyl off, immediately wash off the tumbler using dish soap and water. If the design looks rusty, rub more baking soda onto the design until all the acid is neutralized. NOTE: I used Dawn Dish soap and rinsed it off in the sink because the acid has been combined with baking soda it is now neutralized and is safe to go down the sink. Even so, I would not wash the tumbler in the sink if there are dishes in the sink just to be on the safe side. You can also rinse your tumbler off with a hose outside. Do not use just a wet rag to wash the baking soda away. This causes some of the solution to stay on the tumbler and it leaves a stain. Now you have an awesome personalized etched tumbler! These make great gifts for friends and family! These tumblers should be washed by hand. There are so many options for designs! You can add a favorite sports team, company logo, favorite hobby, or saying. Keep in mind that the simpler the design the better the tumbler turns out. Fonts Used: Circle Monogram Font from FontBundles.net Tingler Script from FontBundles.net Miss Merryweather from FontBundles.net Free Fonts: Round Monogram from Dafont.com Timblerly from FontBundles.net Great Wishes from Dafont.com Additional Notes: Since the tumbler is etched you do not need to seal them.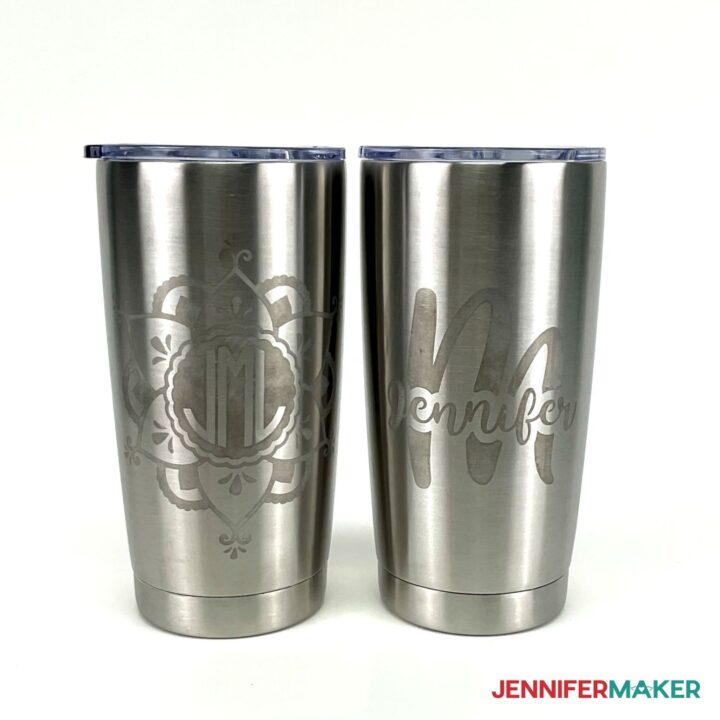
Etched Stainless Steel Tumbler
Materials
Tools
Instructions
STEP 1: GET MY FREE ETCHED STAINLESS STEEL TUMBLER DESIGN FILE


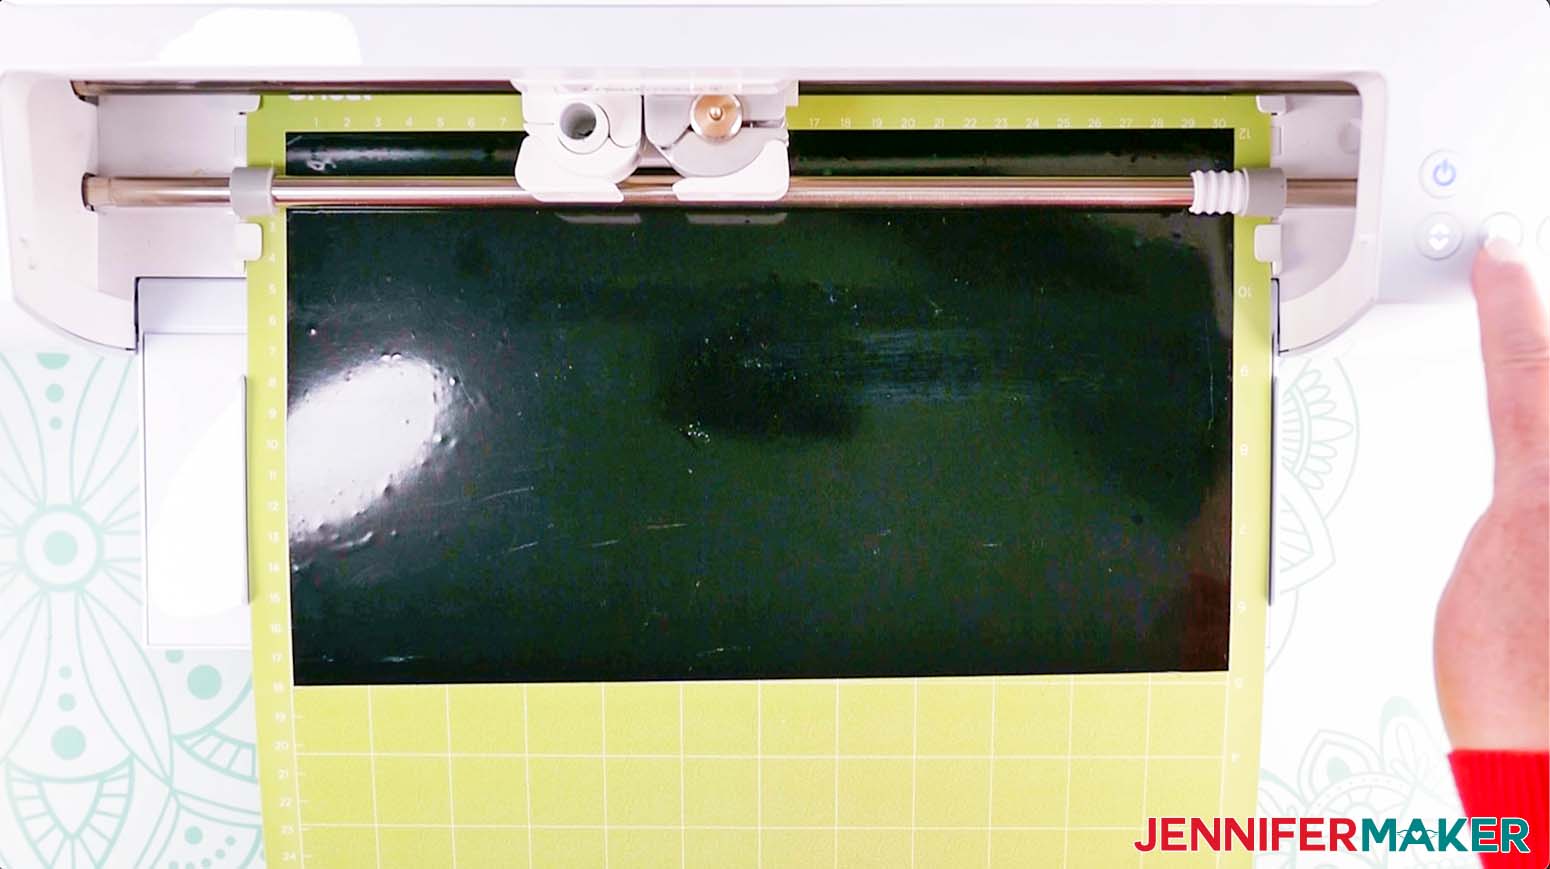
STEP 2: CUT THE ETCHED STAINLESS STEEL TUMBLER DESIGN
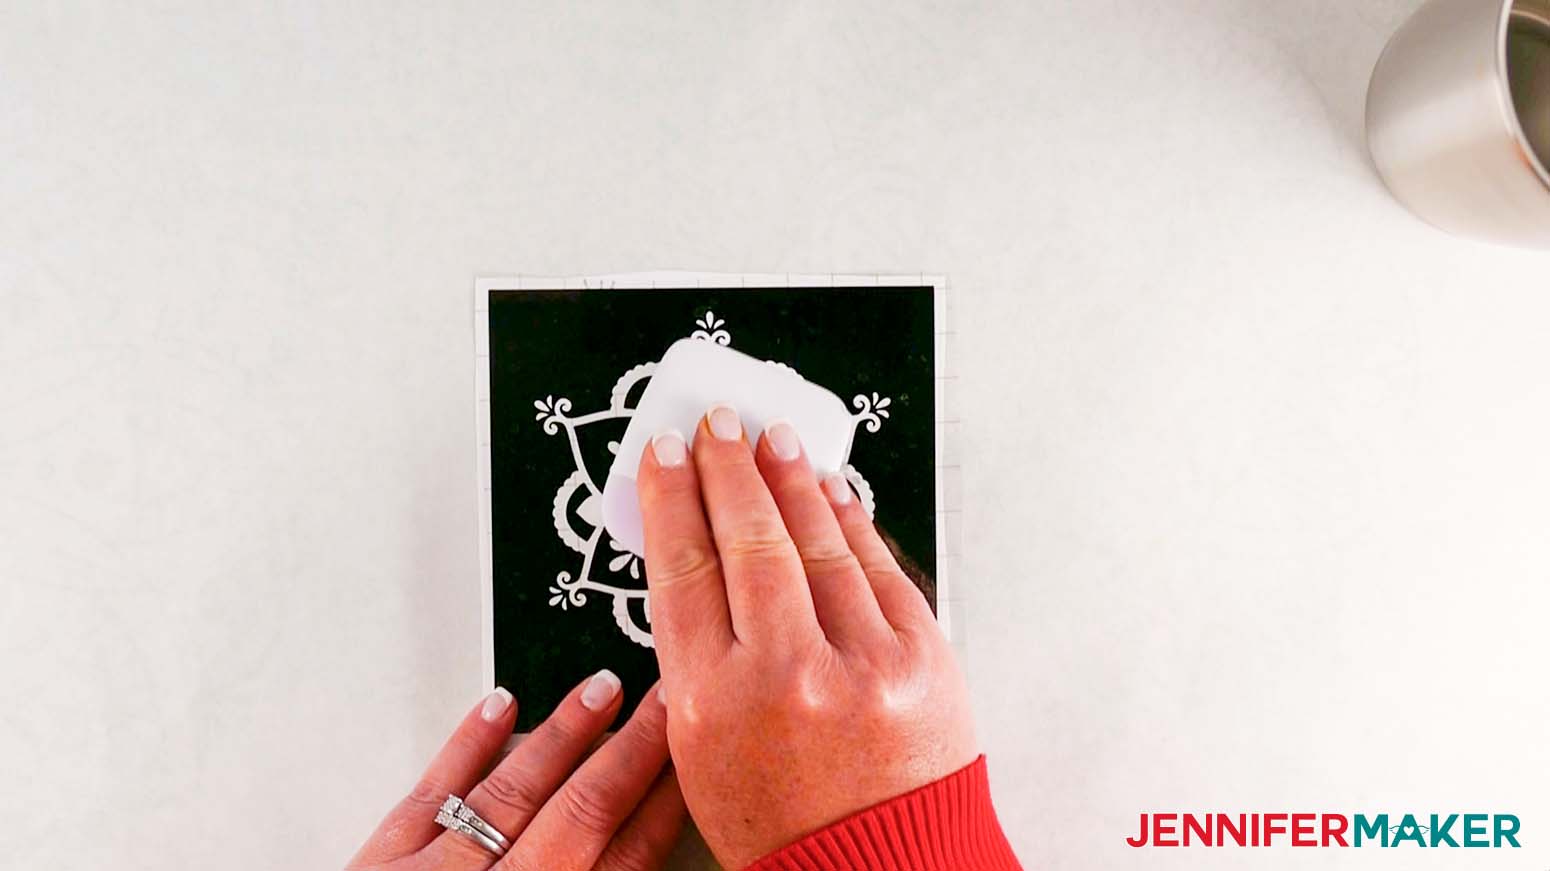
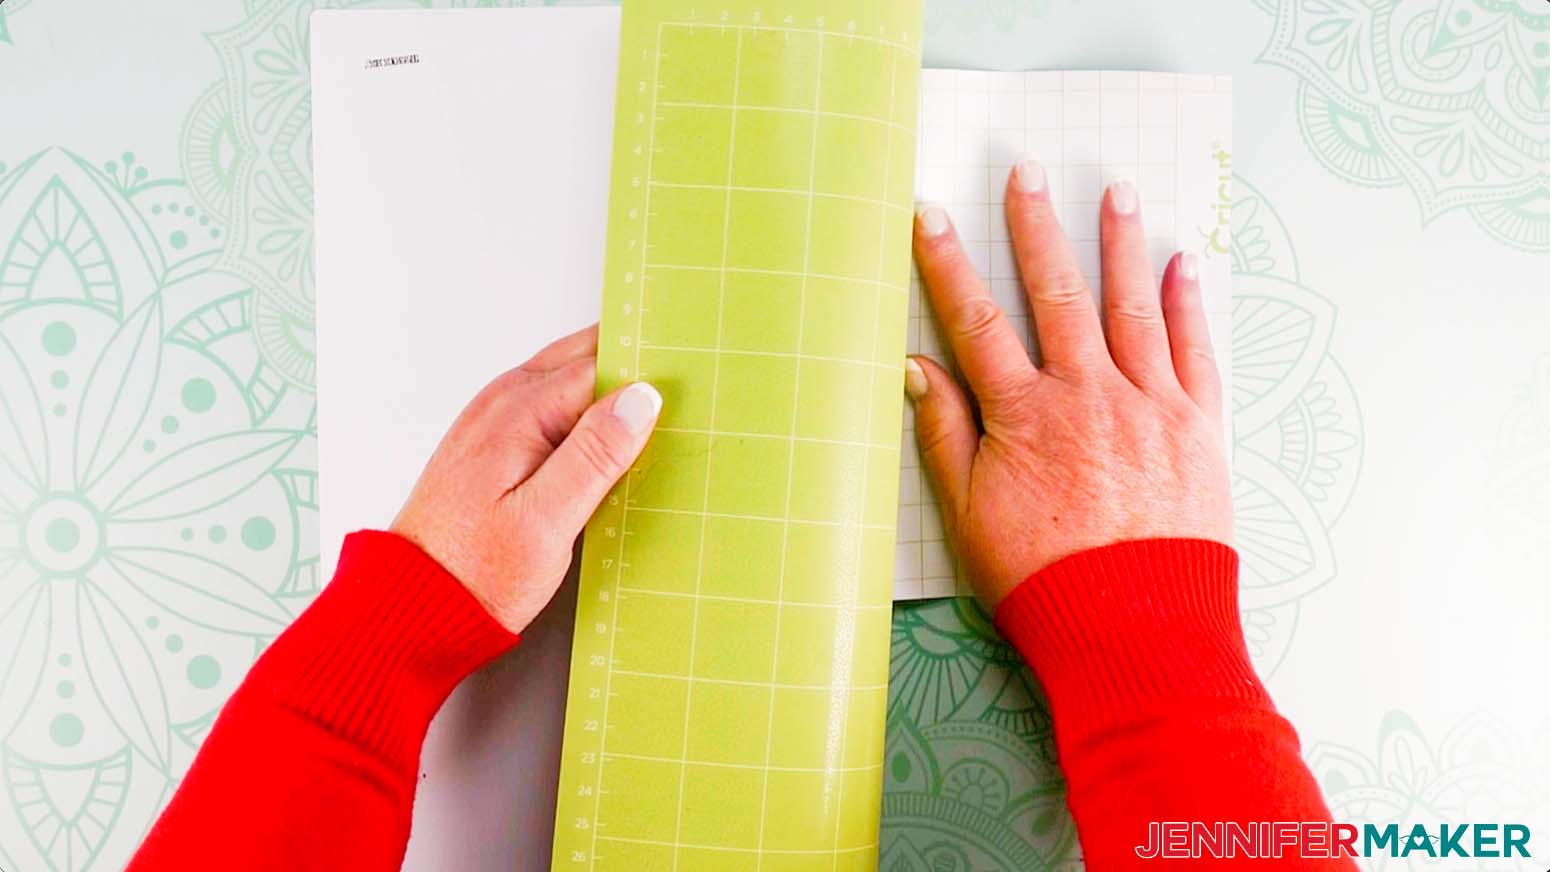 Once your vinyl is cut, you will need to remove the excess vinyl and WEED everything.
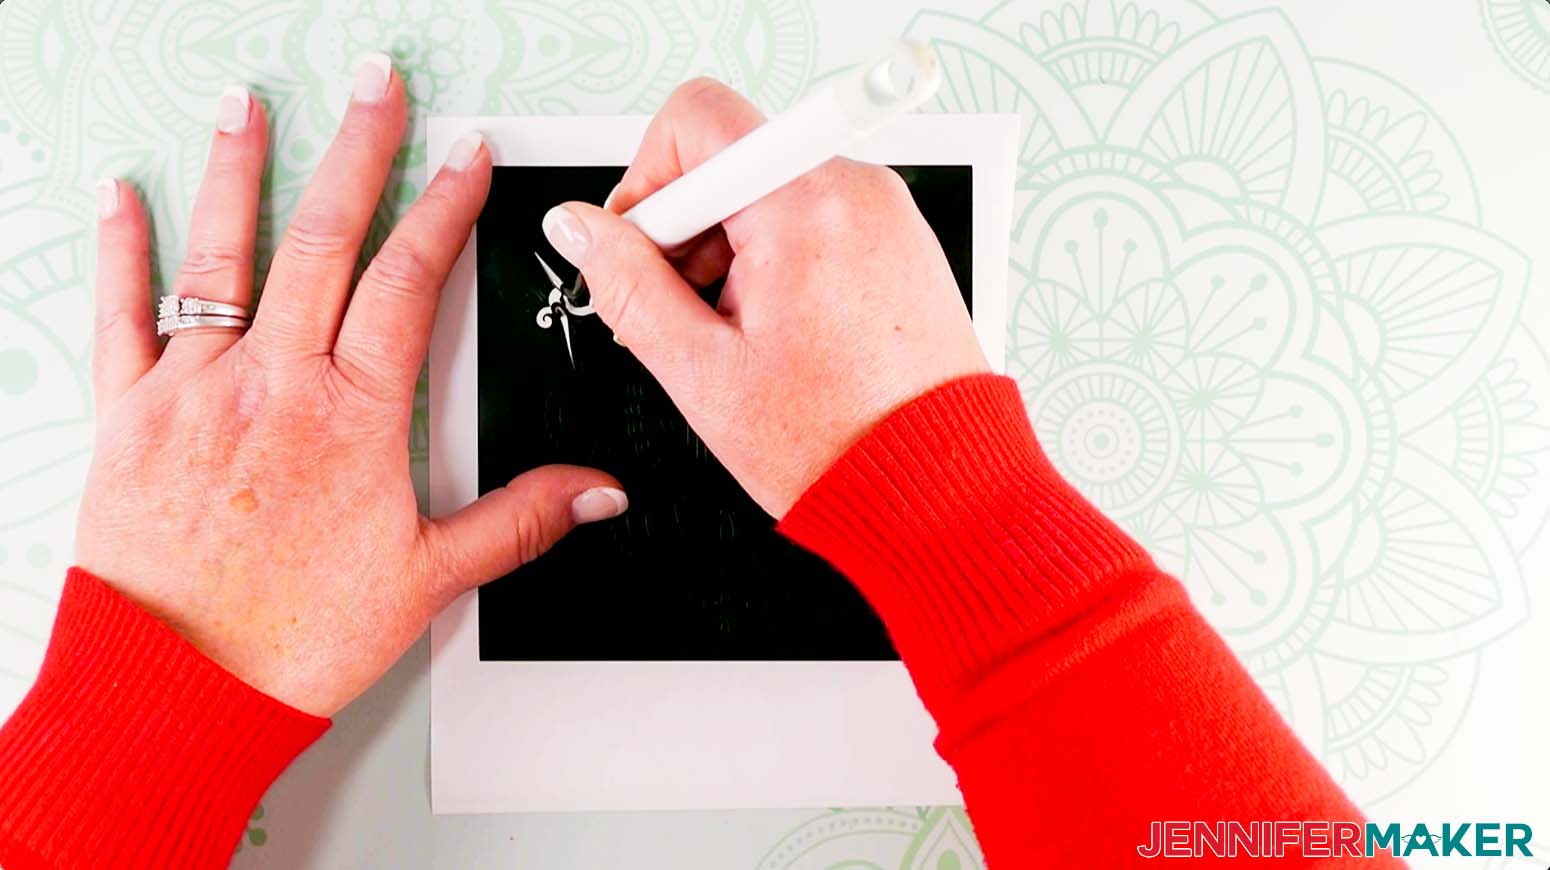
STEP 3: ETCH YOUR STAINLESS STEEL TUMBLER

 Next, rub the baking soda into the design with your fingers, thoroughly, making sure to get every corner and crevice. Repeat a few times.
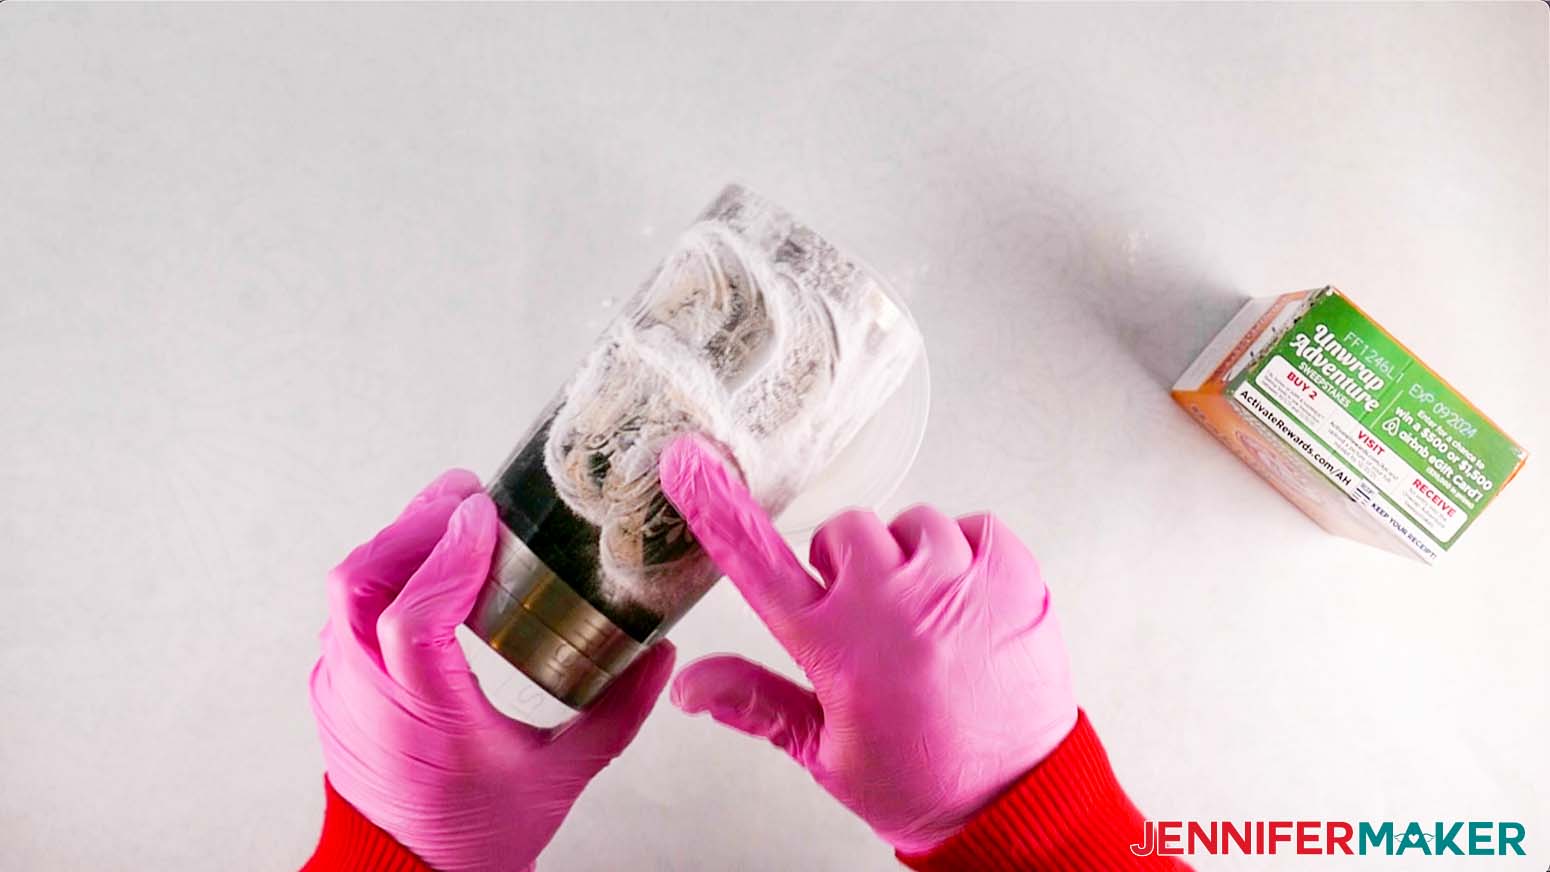
STEP 3: SHOW IT OFF!
Notes
Answers to Your Questions on How to Make Etched Stainless Steel Tumblers
Q: Can you use reusable vinyl?
No. Etching cream can potentially get under the repositionable vinyl, so you want to use permanent vinyl instead. It takes a few days for permanent vinyl to cure, so using it for this will give you the strength of permanent to give you a nice clean etched edge, and it will still be easy to remove!
Q: Can I use any shape of tumbler?
The sides of your tumbler need to be straight up and down. If you are using a rounder shape, it will be more difficult to put on the stencil. It can be done, but it will be more of a challenge.
Q: Can I use the Cricut Joy?
Of course! You can certainly shrink your image or slice your image into smaller parts that fit on your mat.
Q: Can I reuse my stencil?
No, the stencil will not retain its shape or integrity in this project. This will be a one time use stencil only.
Get my free SVG files to make etched stainless steel tumblers
I love seeing what you make with my designs and how you use them! Please share a photo of your etched stainless steel tumblers in our Facebook group or tag me on social media with #jennifermaker.
Love,

Want to remember this? Save this DIY Etched Stainless Steel Tumbler Tutorial to your favorite Pinterest Board!