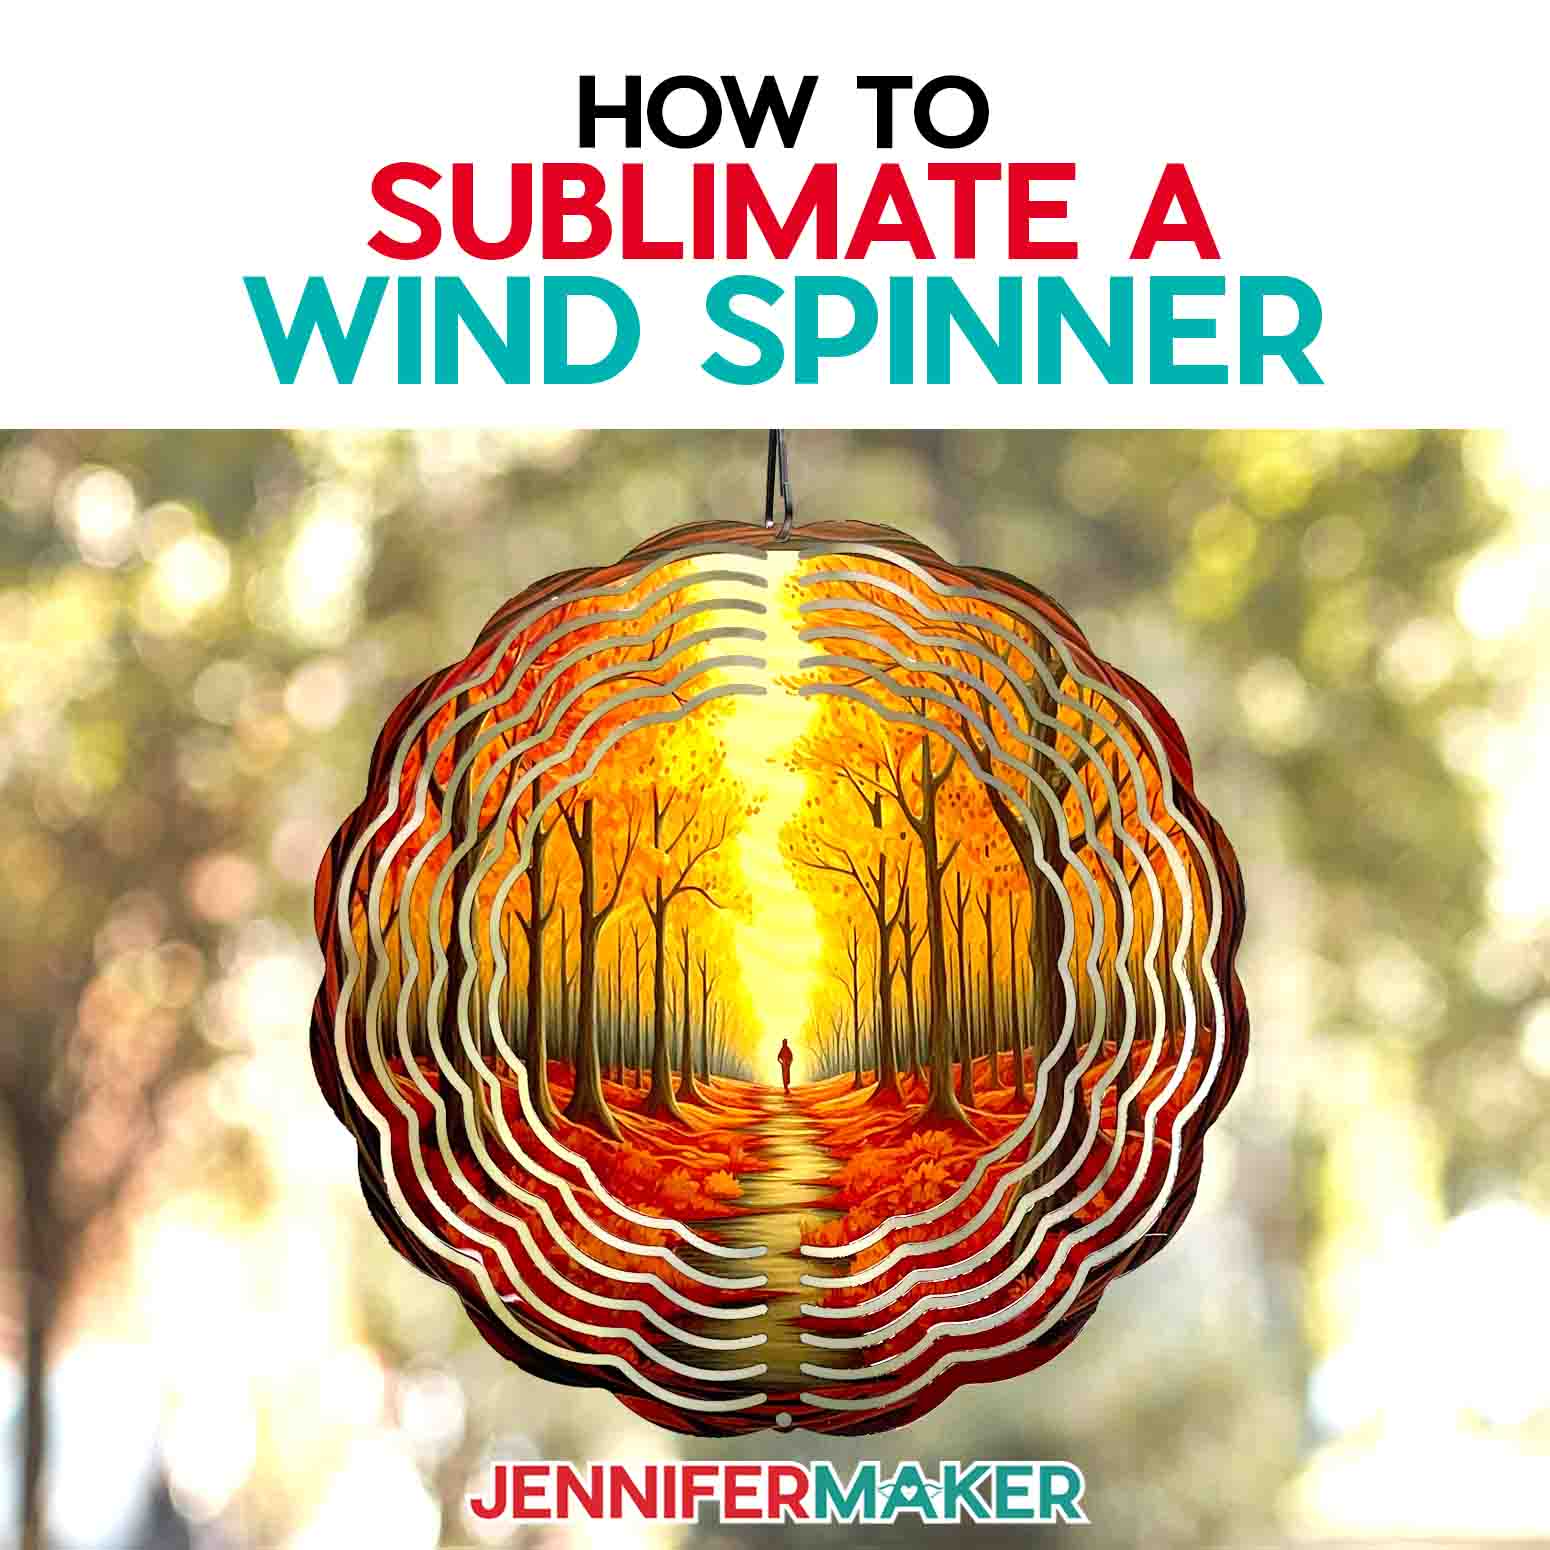
Learn how to make a DIY wind spinner with color to withstand the elements!
My garden is one of my favorite places on the planet, and I love to add customized outdoor decorations to make it my own. Ready to add some color and movement to your yard with a DIY wind spinner? I’ll show you how to apply my seasonal sublimation designs, plus how to apply an infusible Ink design cut with a cutting machine. Did you know that when you hang your beautiful wind spinner outside, not only does it make for a lovely piece of garden decor, but it also serves a purpose?
Want to save this project? Enter your email below and we’ll send the project straight to your inbox.
A wind spinner can keep birds from gathering where they’re not welcome, while also deterring bugs, squirrels, and other outdoor pests. Hang a wind spinner on your front porch, your garden, or even use one to add some bug-repelling fun to your porch, deck, or kids’ outdoor play space. I love fun DIY projects that also have a function!

First, I’ll show you how to prepare the files to make your own DIY wind spinner with a printed sublimation design from my PNG collection. After that, I’ll show you how to make a super cool “Tree Of Life” wind spinner using your favorite Infusible Ink Transfer Sheet and my tree SVG file.

Along with the tutorial, I’ll also share my best tips for ensuring that your DIY wind spinner turns out beautifully the first time. For example, when handling the spinners, only touch the edges to avoid getting skin oils on the surfaces, and keep the metal as flat as possible. Oils or bumps can mess up the sublimation later!
You can use most styles of heat press, but I’ll use a Cricut EasyPress. My Sublimation Cookbook has the temperatures and times for other options, too. Be sure to wear heat gloves — the aluminum can stay hot a lot longer than you think!
When you’re finished, you’ll have a beautiful customized wind spinner for your yard that is sure to impress all of you neighbors. Plus, I’ll show you how to space out the rings around the central axis so it will spin in the slightest breeze. These spinners look great outdoors on a breezy day, and since they’re sublimated, they’ll hold up to a season or two of sun, especially with some extra protection.
If the spinner will get a lot of sun, it’s a great idea take it outside with some UV Resistant Clear Coat Spray and a cardboard box. Good ventilation is super important when working with the clear coat. Put the spinner in the open box to protect it from debris, and to protect the area from the spray. Next, spray a light coat over the spinner and let it dry for 10 minutes. Once it’s totally dry, flip the spinner over and coat the other side, too. You can protect all of the spinners this way. Once it’s dry, string some fishing line through the small hole at the top, hang your new wind spinner up, and enjoy!
No place outdoors to hang it? You can totally use your DIY wind spinner indoors! I’ve listed a small motor you can hang the wind spinner on. Just attach the motor’s clip to the top hole instead of the swivel clip and set it for 10 rotations per minute.
A colorful wind spinner is a great way to add a personal touch to your outdoor space. These are a great beginner’s project if you’re just getting started with sublimation, and are one of those easy crafts you can do with kids of all ages.
Here’s a supply list of what you need to make a DIY wind spinner! This post contains some affiliate links for your convenience (which means if you make a purchase after clicking a link I will earn a small commission but it won’t cost you a penny more)! Read my full disclosure policy.
Materials and Tools to Make a DIY Wind Spinner
View my Amazon shopping list with the exact items we used to make this project
For sublimation:
- Sublimation Printer – I used a converted Epson EcoTank ET-2800 Inkjet Printer
- Sublimation Ink
- Sublimation Paper
For infusible ink:
- Cricut Pattern Infusible Ink Sheets – I used rainbow watercolor splash
- A method to cut your ink sheets — I used the amazing Cricut Maker 3, with the Fine-Point Blade but you can use any Maker or Explore
- Cricut Green StandardGrip Mat, 12″ x 12″ -OR- Cricut Blue LightGrip Mat, 12″ x 12″
- Cricut Brayer
- Tweezers
- Weeding Tool
For both methods:
-
- 8 Inch Sublimation Wind Spinner Blanks 3D Aluminum
- Cricut EasyPress 2 Heat Press Machine (9 in x 9 in)
- Cricut EasyPress Mat 12 in x 12 in
- Heat Resistant Tape
- Heat Resistant Gloves
- Box Fan
- Lint Roller
- Cricut Metal Ruler
- Pencil
- White Butcher Paper
- 12 x 12 white cardstock
- Display Motor with Remote
- UV Resistant Clear Coat Spray – optional
-
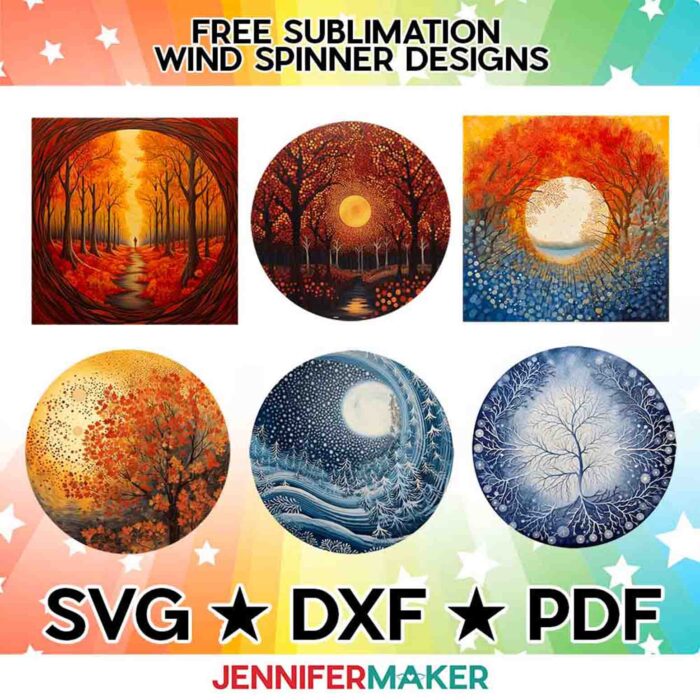
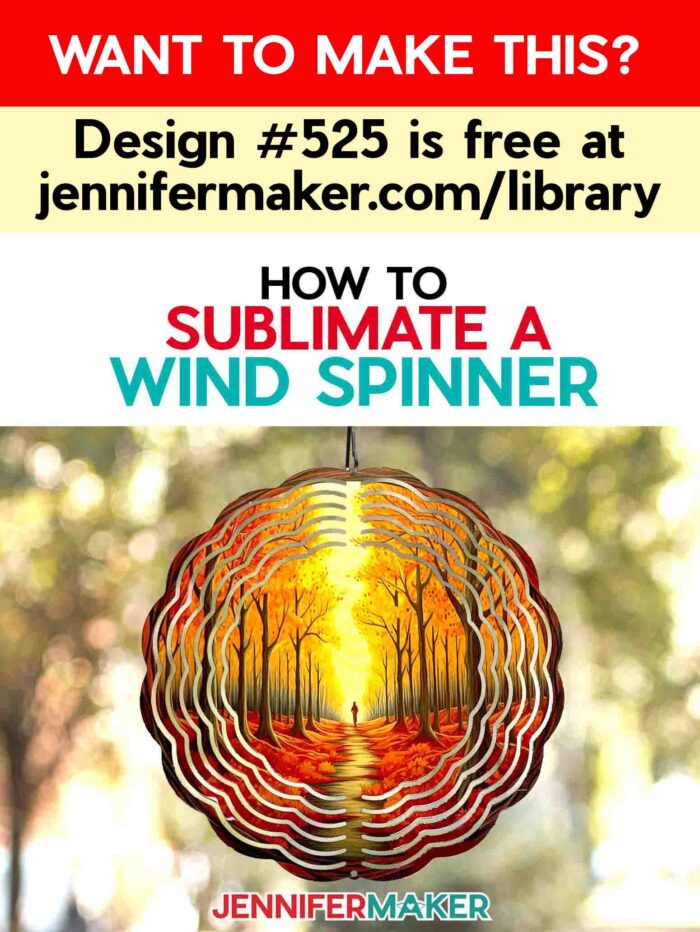
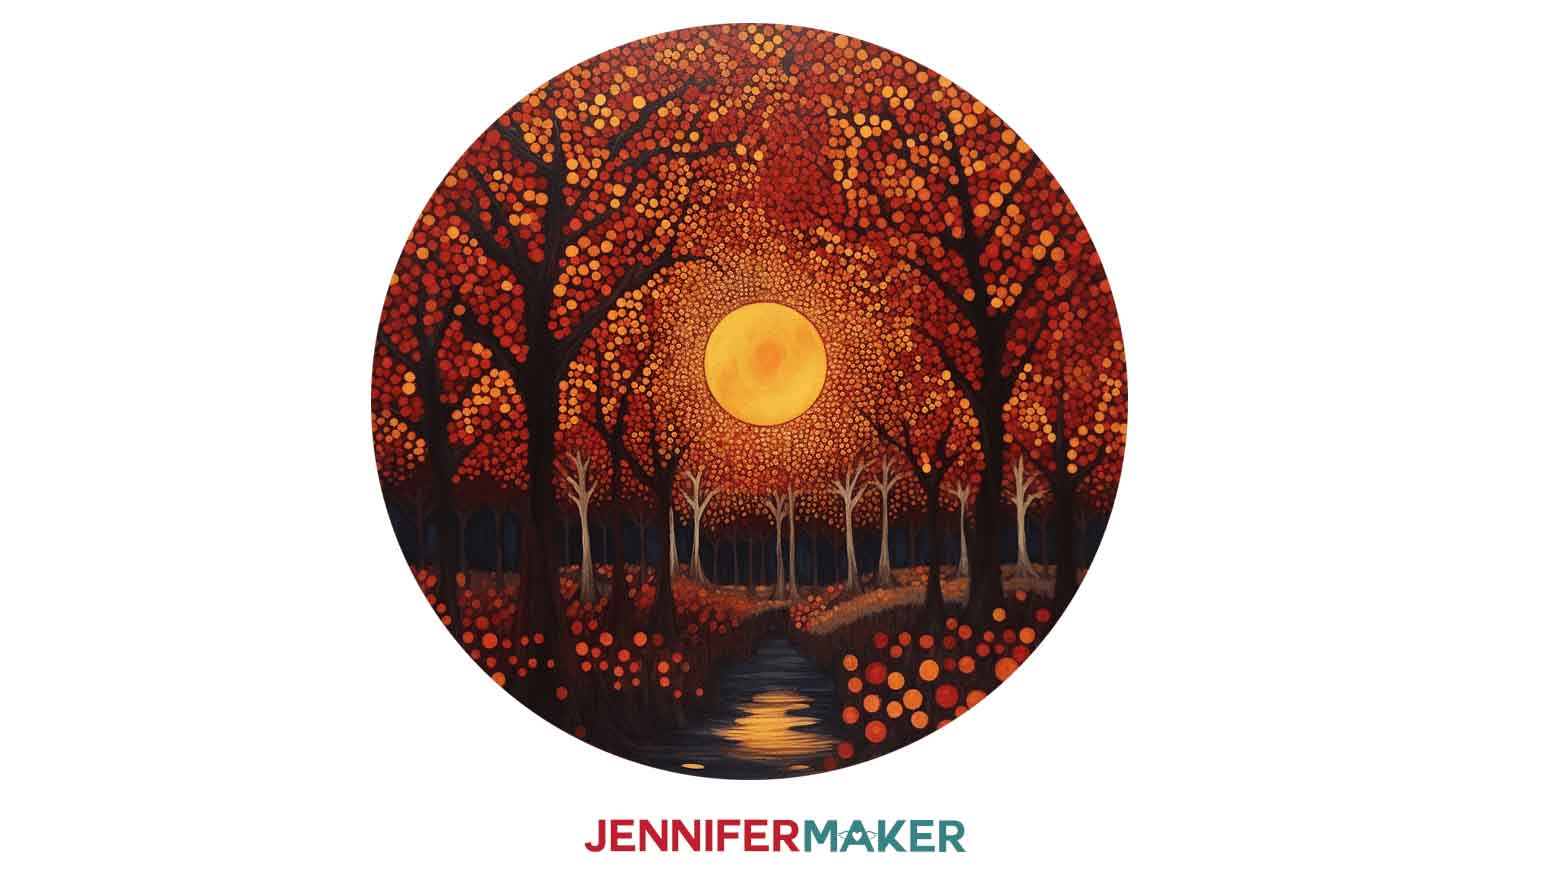
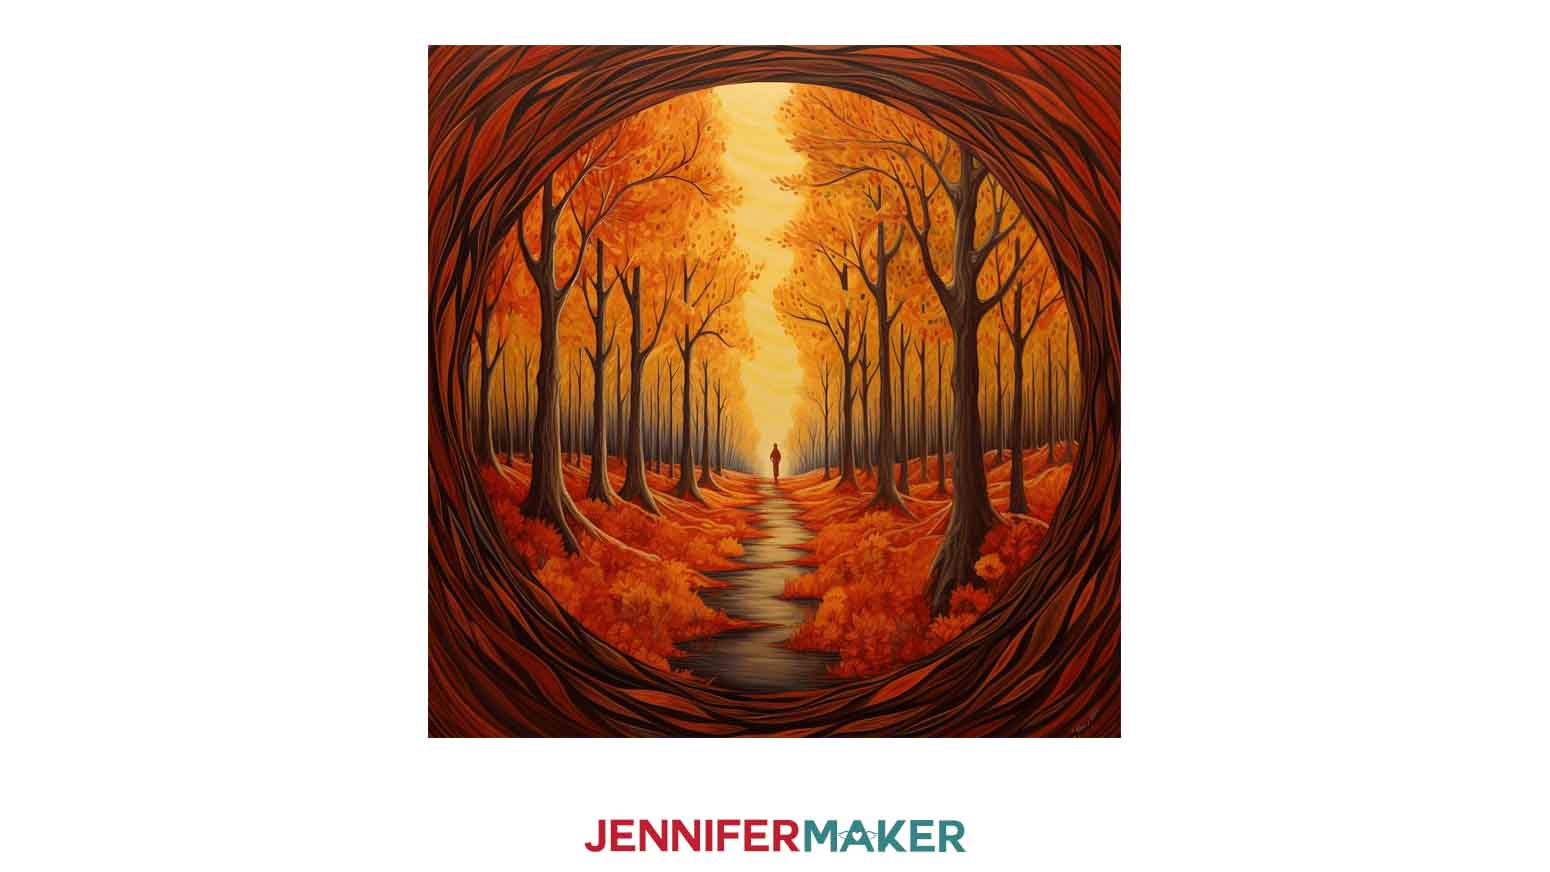
- Design #525 – My free autumn PNG design files (available in my free resource library – get the password by filling out the form at the bottom of this post)
How to Make Your Own Sublimated Wind Spinner
The detailed step-by-step assembly video on how to make sublimated wind spinners debuted during Maker Academy Weekend 2023, held online November 1-5, 2023. You can use my new 4th of July sublimation wind spinner designs with the same process, because I’ve added the written instructions below. If you want more of the original tutorial, you can get an on-demand pass to watch all 30+ workshops, each with a printable handbook, transcript, audio file, design files, and support with a VIP pass below:


DIY Wind Spinner
Learn how to make a DIY Wind Spinner!
Materials
- Here is a shopping list of the actual items I used to create this project! This list contains affiliate links. As an Amazon Associate I earn from qualifying purchases.
- 8 Inch Sublimation Wind Spinner Blanks 3D Aluminum
- Sublimation Paper
- White Butcher Paper
- 12 x 12 white cardstock
- Display Motor with Remote
- Cricut Pattern Infusible Ink Sheets-I used rainbow watercolor splash
- UV Resistant Clear Coat Spray - optional
Tools
- Sublimation Printer - I used a converted Epson EcoTank ET-2800 Inkjet Printer
- Sublimation Ink - I used Printers Jack Sublimation Ink
- Cricut EasyPress 2 Heat Press Machine (9 in x 9 in)
- Cricut EasyPress Mat 12 in x 12 in
- A method to cut your ink sheets — I used the amazing Cricut Maker 3, with the Fine-Point Blade but you can use any Maker or Explore
- Cricut Green StandardGrip Mat, 12" x 12" -OR-
- Cricut Blue LightGrip Mat, 12" x 12"
- Cricut Brayer
- Tweezers
- Weeding Tool
- Box Fan
- Heat Resistant Tape
- Heat Resistant Gloves
- Lint Roller
- Cricut Metal Ruler
- Pencil
Instructions
STEP 1: GET OR PREPARE AND PRINT A SUBLIMATION DESIGN
You can use my DIY Wind Spinner files from this page.
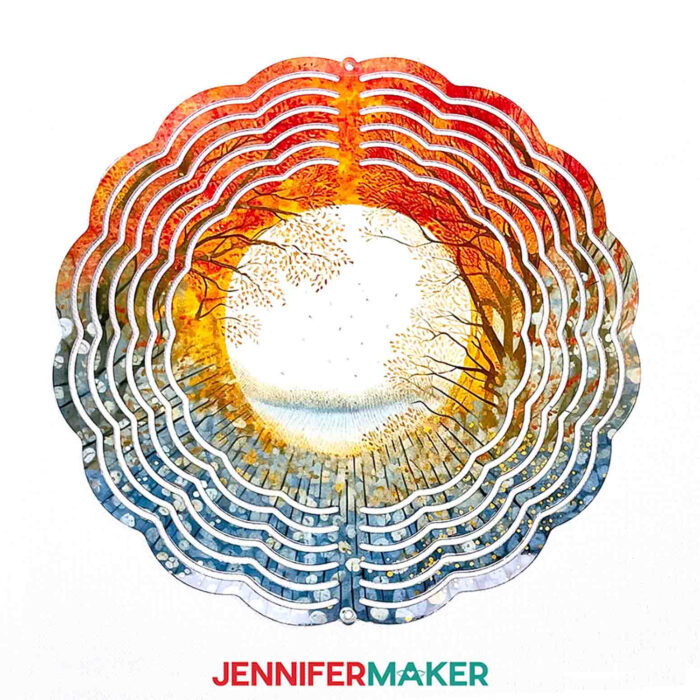
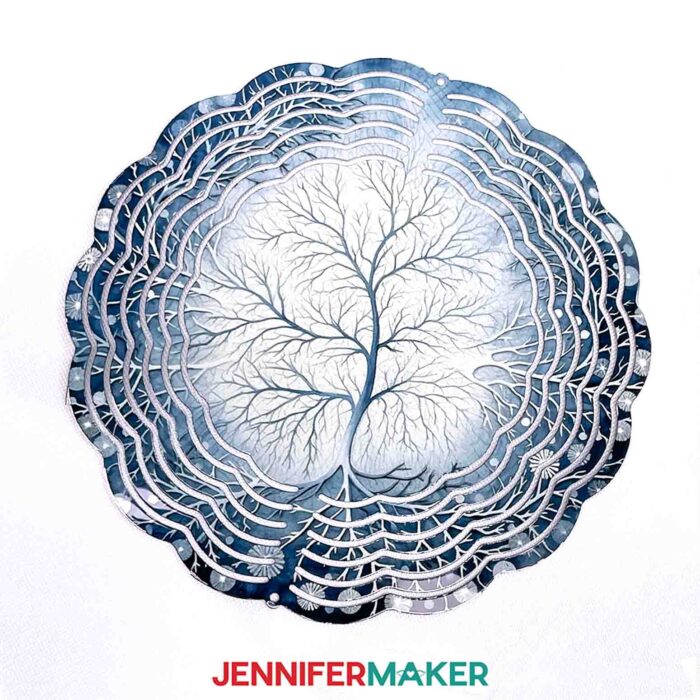
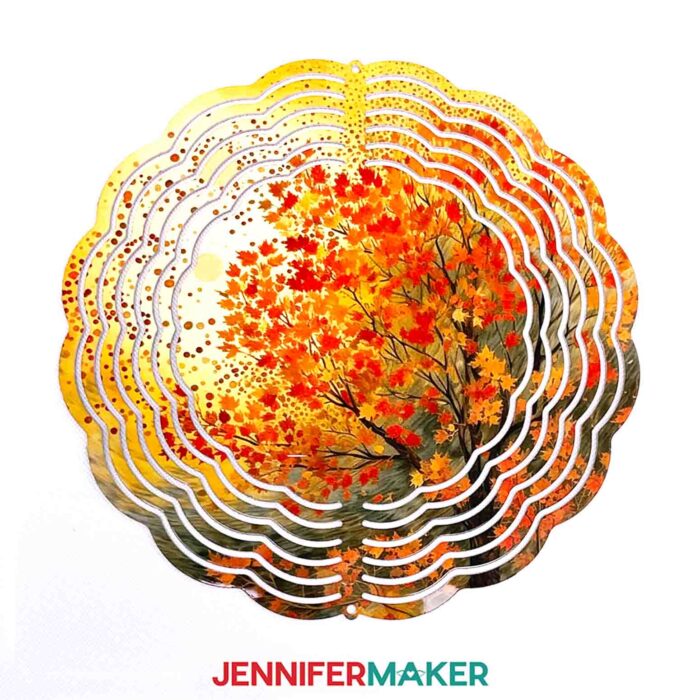
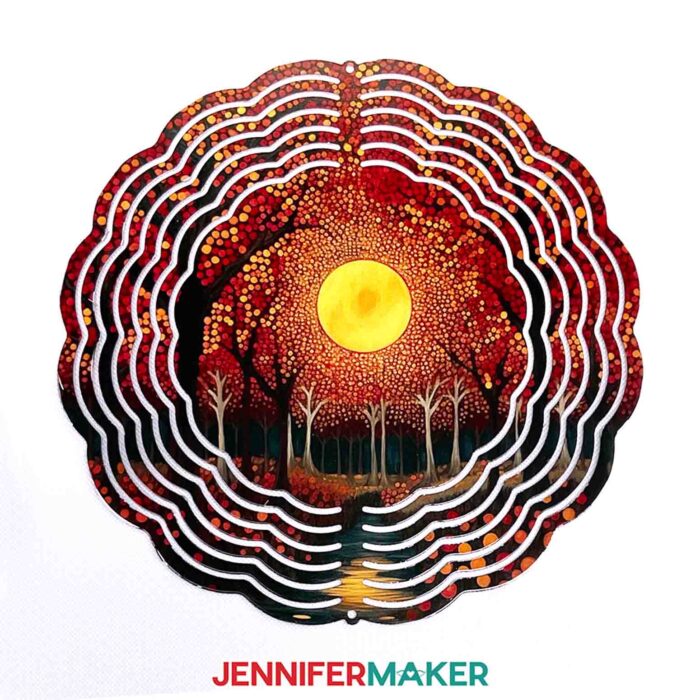
I have six designs, or you can create your own. I've also included a vector version of the Tree of Life for use with infusible ink transfer sheets.
- Autumn Moon
- Autumn Path
- Autumn Scene
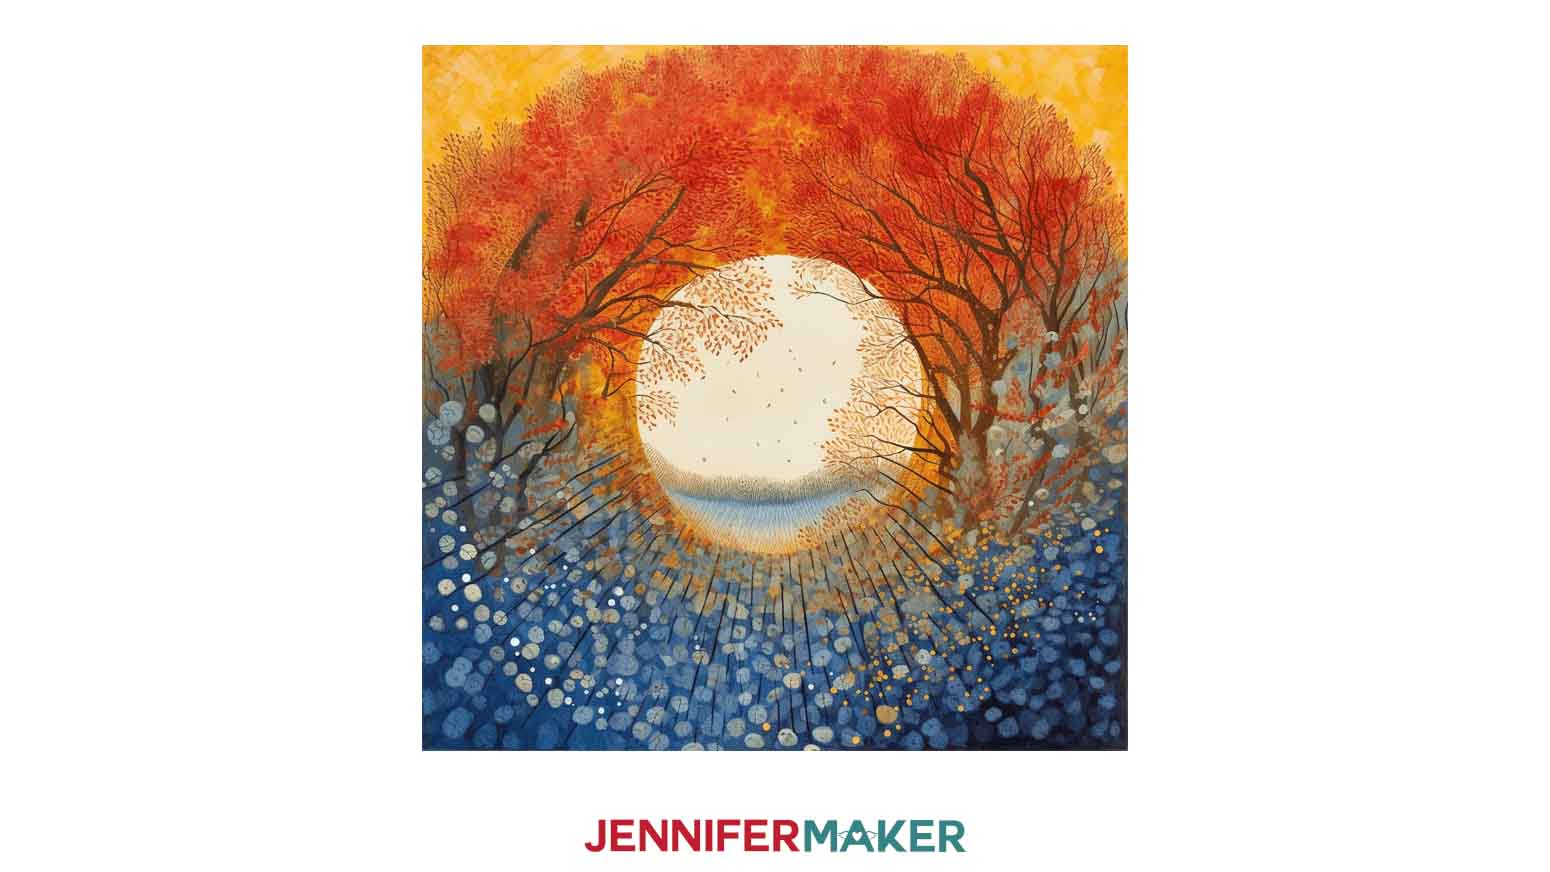
- Autumn Tree

- Winter Moon
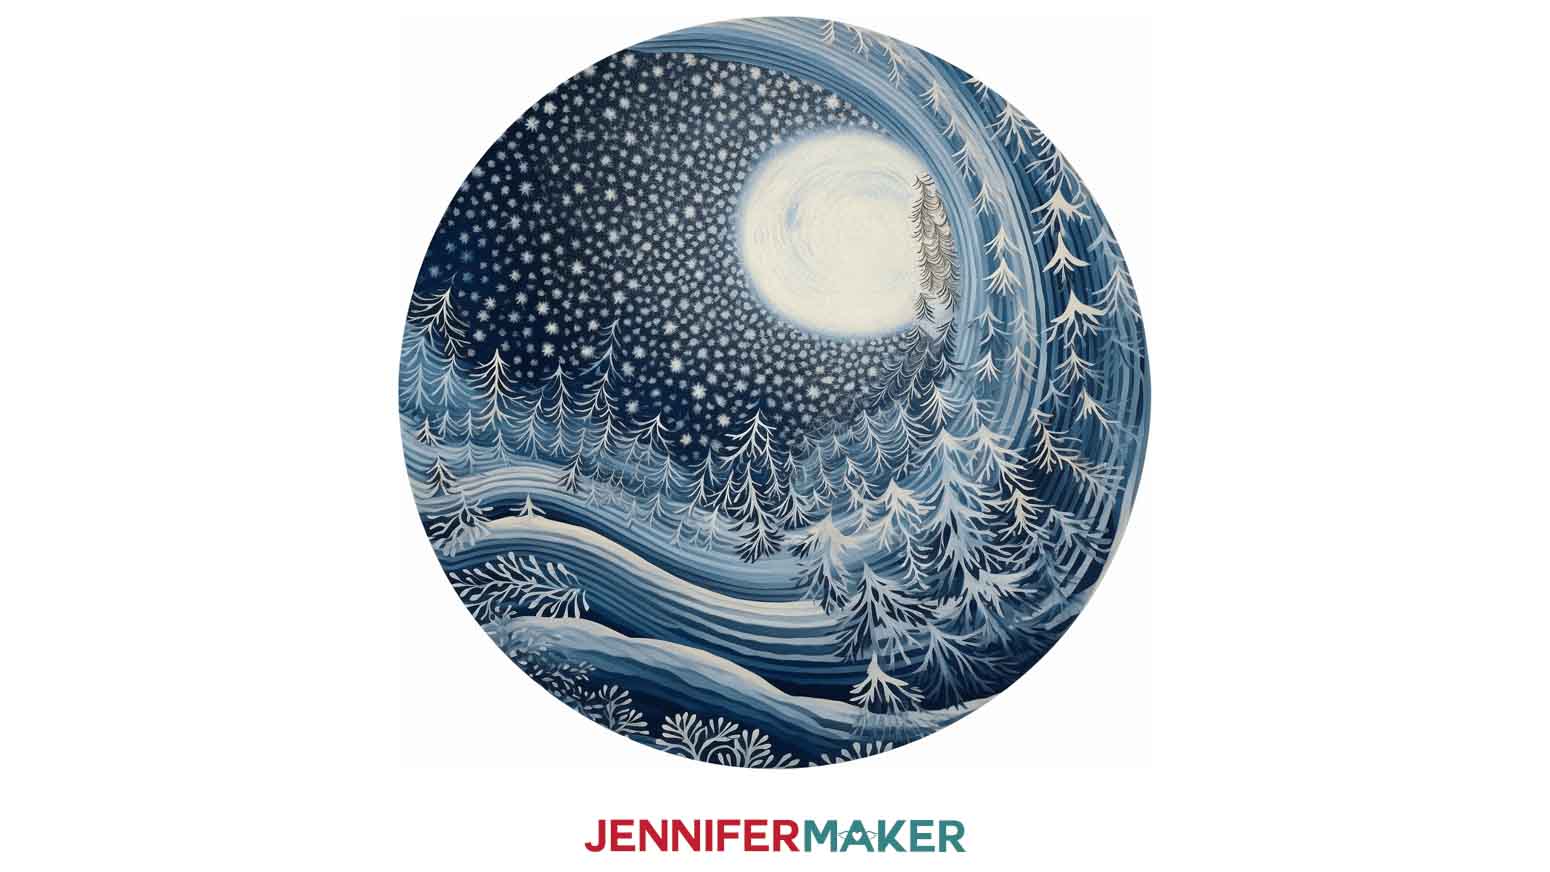
- Winter Tree

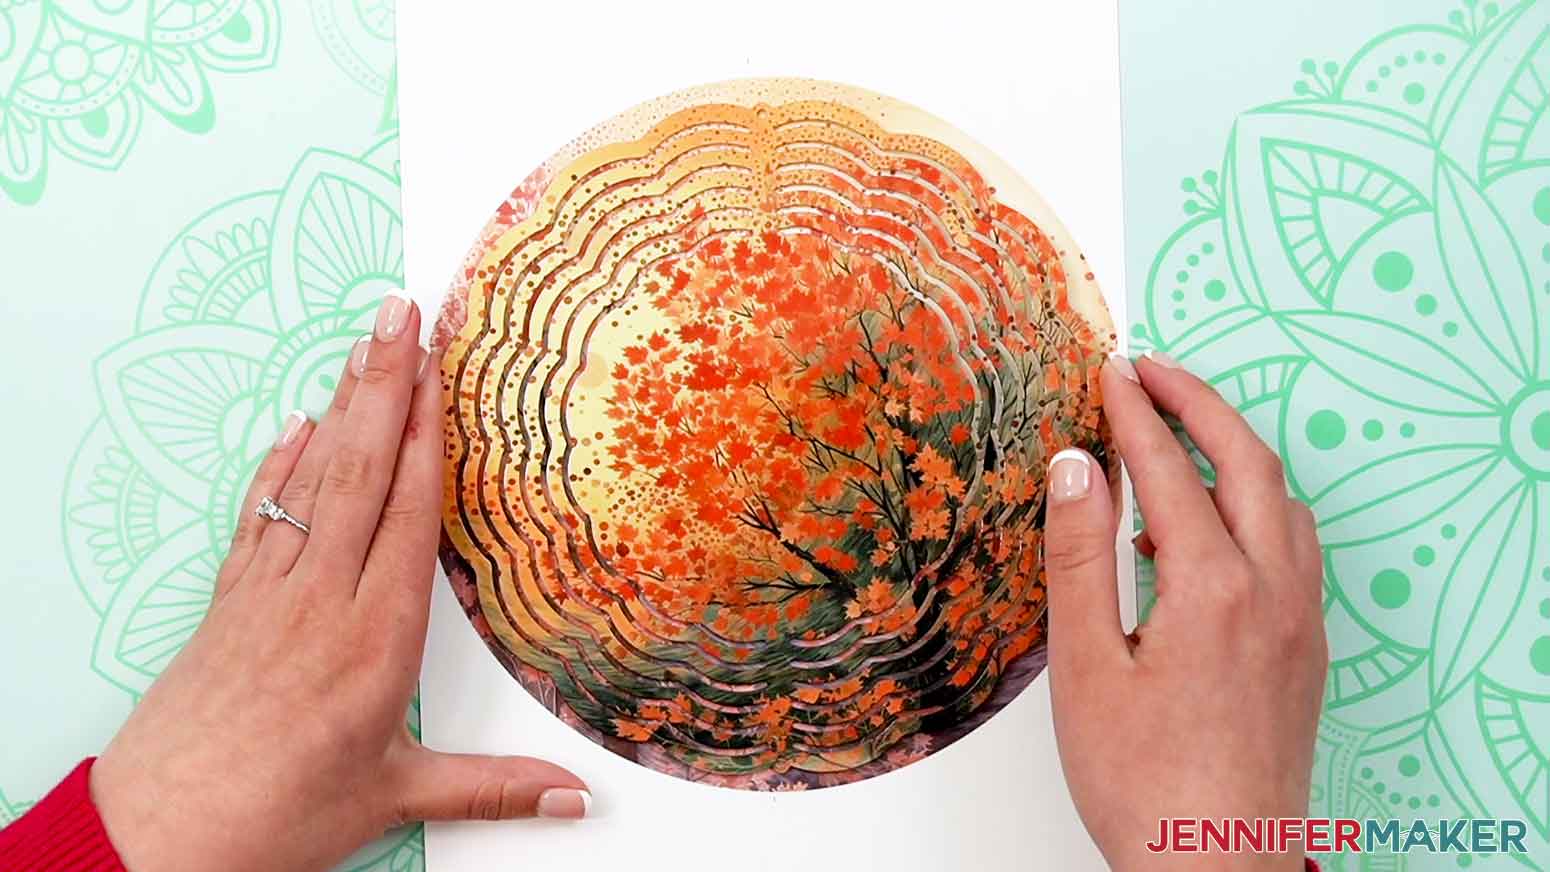
Today, I’m going to make the Autumn Tree design, but you can use these steps for any of the designs.
We'll print the design on a good-quality sublimation paper for the best results. I’m using A-SUB paper in my Epson EcoTank with Hiipoo ink.
Measure your blank wind spinner and make sure your image size is correct before printing. I’m using these 8” wind spinners, with 8.25" designs, so we can fully sublimate them using 8.5” X 11” paper.
NOTE: It is best to make the print a little larger than the blank. This also makes it easier to tape the blank in position, and we can sublimate all the way to the edges. Make sure to purchase 8" wind spinners, and not 10" or larger if using standard 8.5" X 11" paper to print and sublimate.
You can use image editing software to prepare your design. If you need help printing for sublimation please check out my Sublimation T-Shirts for Beginners for detailed information on printing using Google Docs.
Don't forget, that since we will be sublimating both sides of the wind spinner, we will need to print two copies of the design.
STEP 2: SUBLIMATE YOUR WIND SPINNER BLANK
Before you begin, make sure you have proper ventilation by opening a window or turning on a large fan.
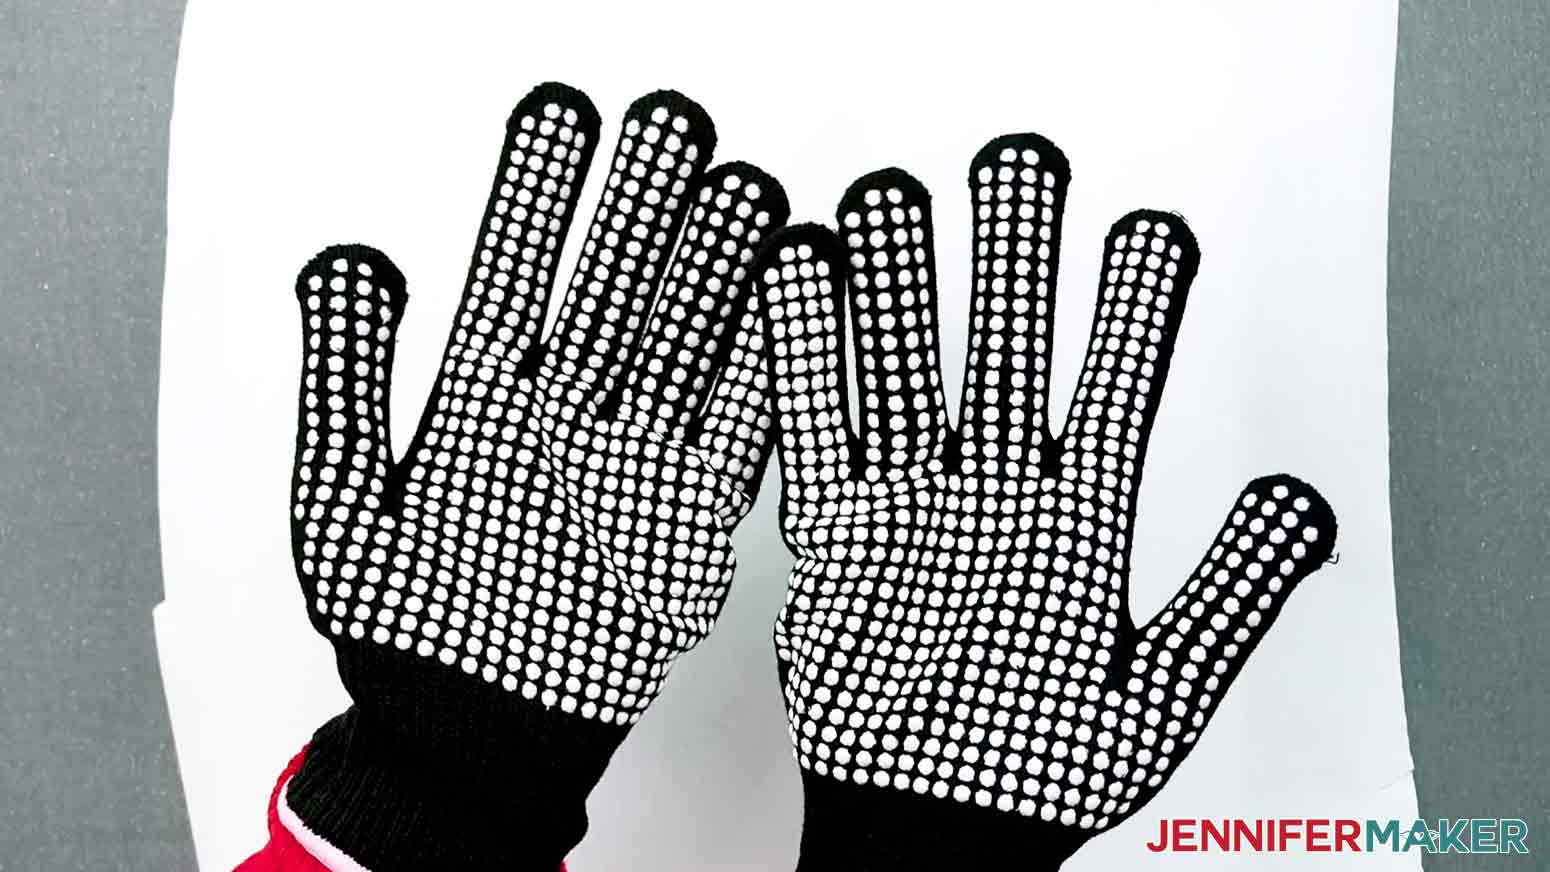
Warning: you will be working with materials that will be heated to a high temperature. It is strongly recommended that you wear heat resistant gloves when handling these materials.
Preheat your EasyPress to 360°F (192°C) and set the time to 120 seconds. 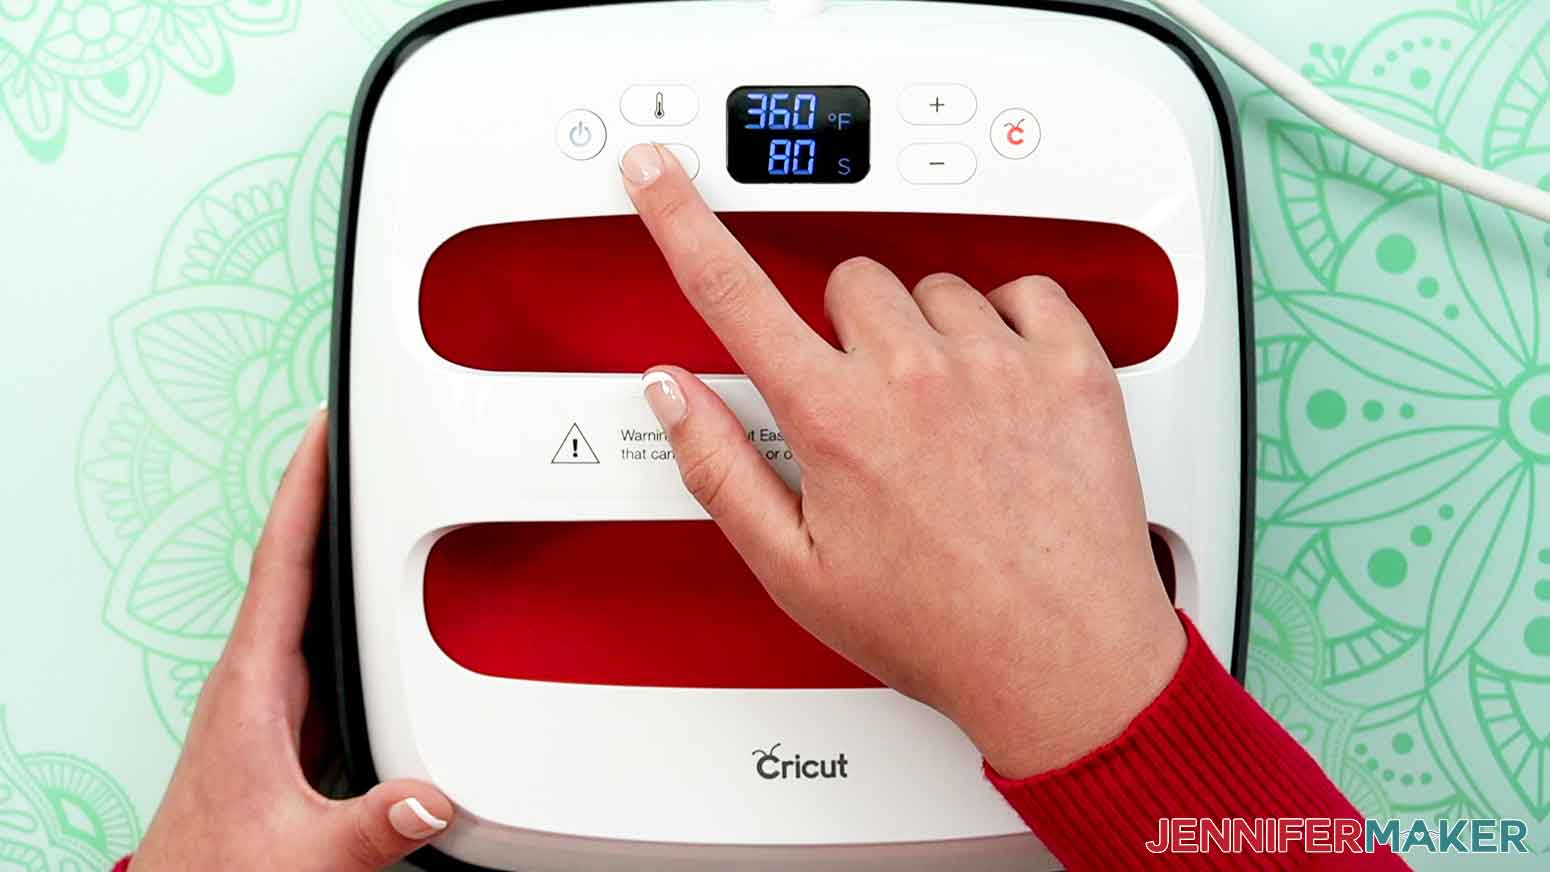
Make sure to peel off the protective coating from BOTH sides of the wind spinner blank prior to pressing.
Lint roll your blank to remove any dust and debris. You'll want to do this to each side, before sublimating. Don't forget to lint roll the second side after the first is pressed, as more debris can be introduced while pressing the first side.
With the sublimation print face up on the table, place the blank face down. Either side works fine. Secure with heat resistant tape. I used eight pieces to secure it properly. I found that using only four pieces of heat tape allowed the print to lift more than when taping all the way around the wind spinner.
If the paper is not taped securely enough, the image can 'ghost', and some of the sublimation ink can be carried to the other side of the blank.
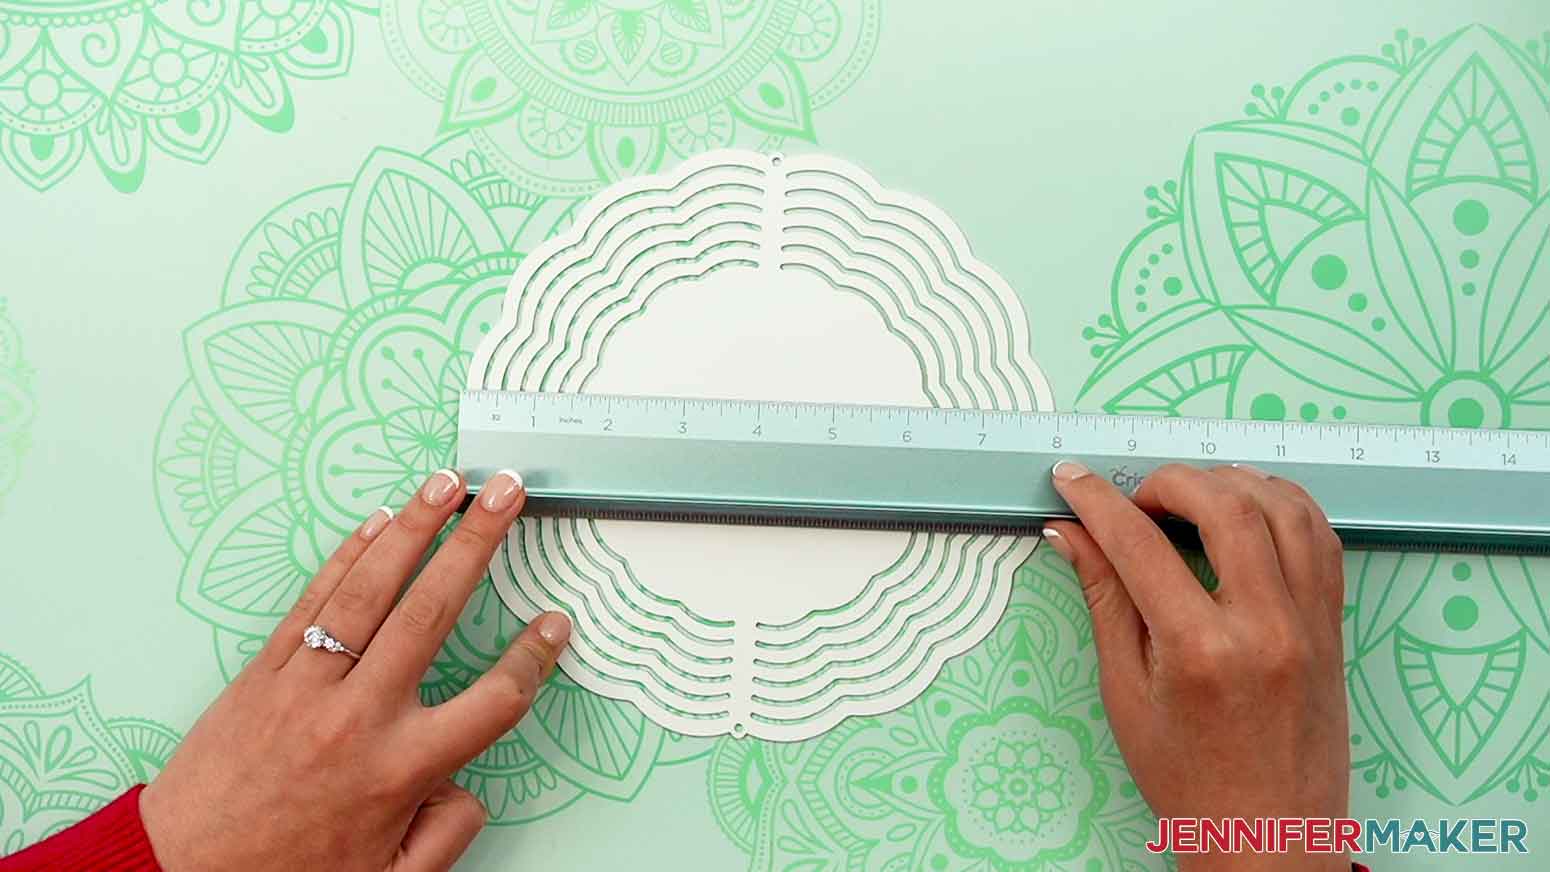
To find the center of your print, use a pencil and ruler and mark it on the top, and side margins with a pencil on both prints.

Place a clean sheet of white card stock on your heat mat. We do not want to sublimate our heat mat! 
Place your blank on the white card stock, sublimation print will be face down. 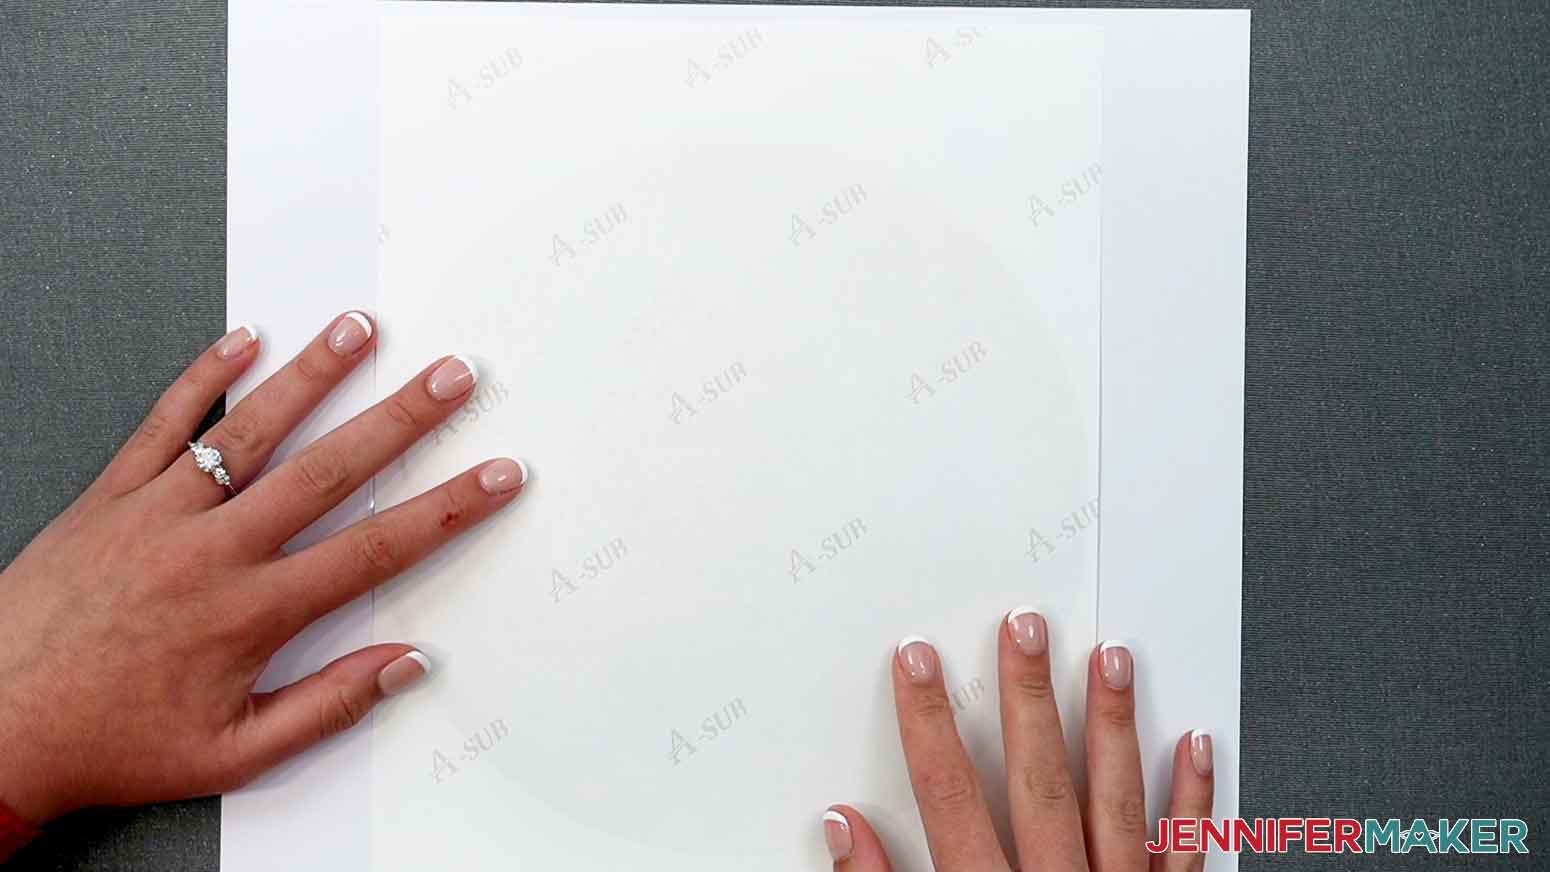
Use caution to not bend the aluminum wind spinner. While handling before and after sublimating.
We'll need to wear gloves, to protect our hands from heat. The spinners are not sharp on the edges, so can be handled without gloves while preparing.
Place a clean sheet of butcher paper on top of your print.
Place the Easypress on top of the sublimation print and blank, and click the 'C' button to start the timer. Use medium pressure, and do not slide, or move the Easypress off the print. Hold still!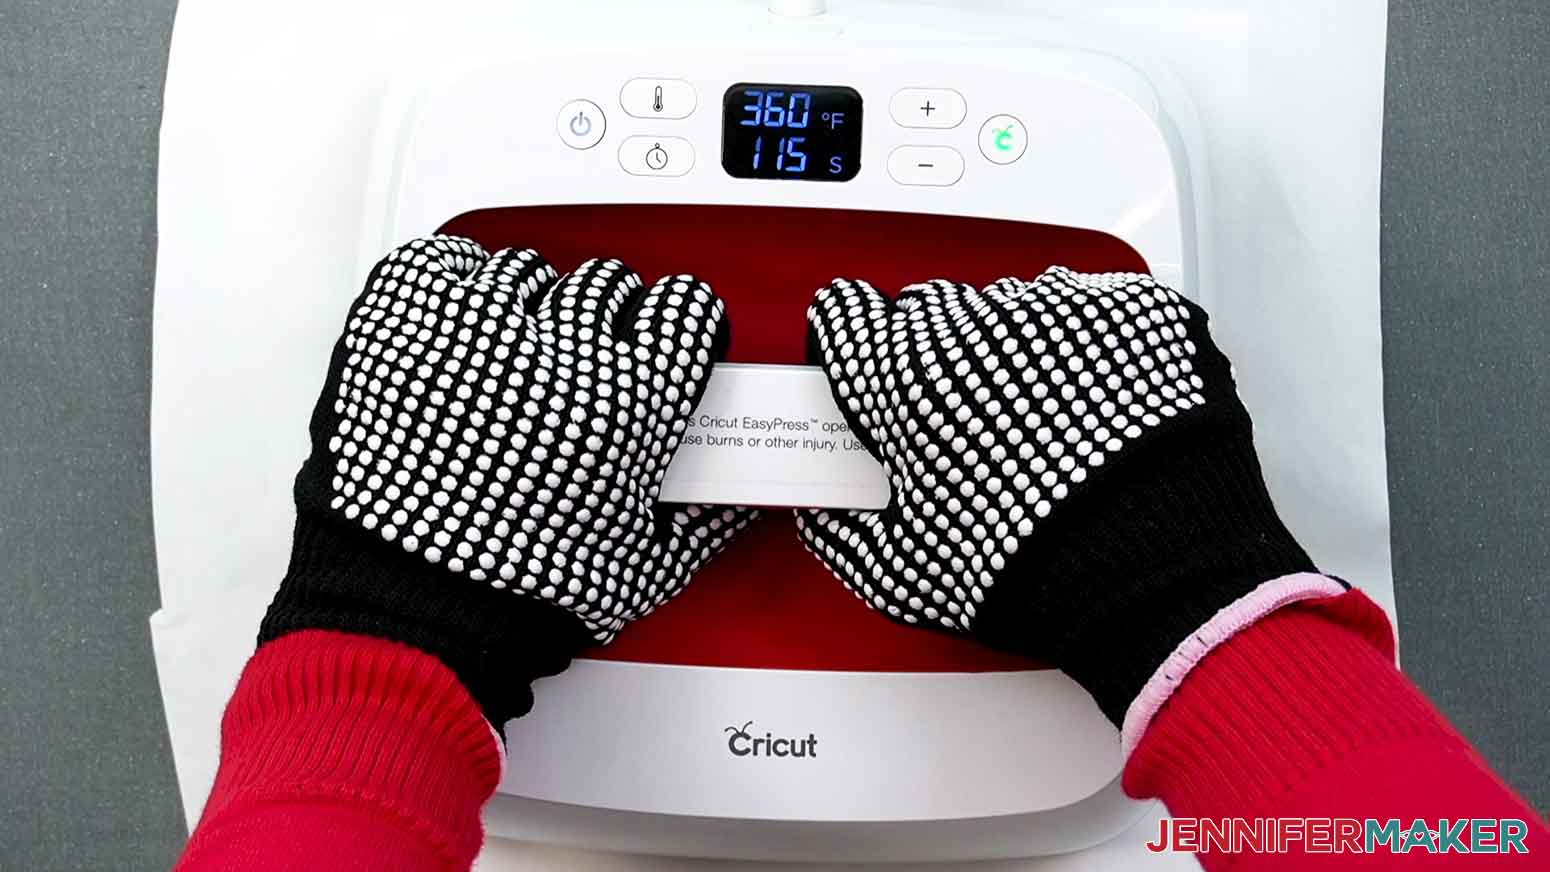
When the time is up, lift the EasyPress straight up and return it to its stand. Use caution not to lift the print and blank up with the heat press. Also, make sure to move the press straight up, and not off to the side, as removing the print diagonally can produce 'ghosting'. Wait for one minute to let the spinner cool down a bit.

Get ready to remove the print. It can be tough to remove all of the tape while still wearing your gloves, but don't worry, you can remove the rest later.
Once your blank has cooled, you will want to repeat the same steps to press the same design on the back of the wind spinner blank. Make sure you sublimate the back with the top facing the same direction as the other side. And make sure that there is equal distance around the print, and you use the pencil marks to center the blank.
STEP 3: INFUSIBLE INK SHEETS VERSION
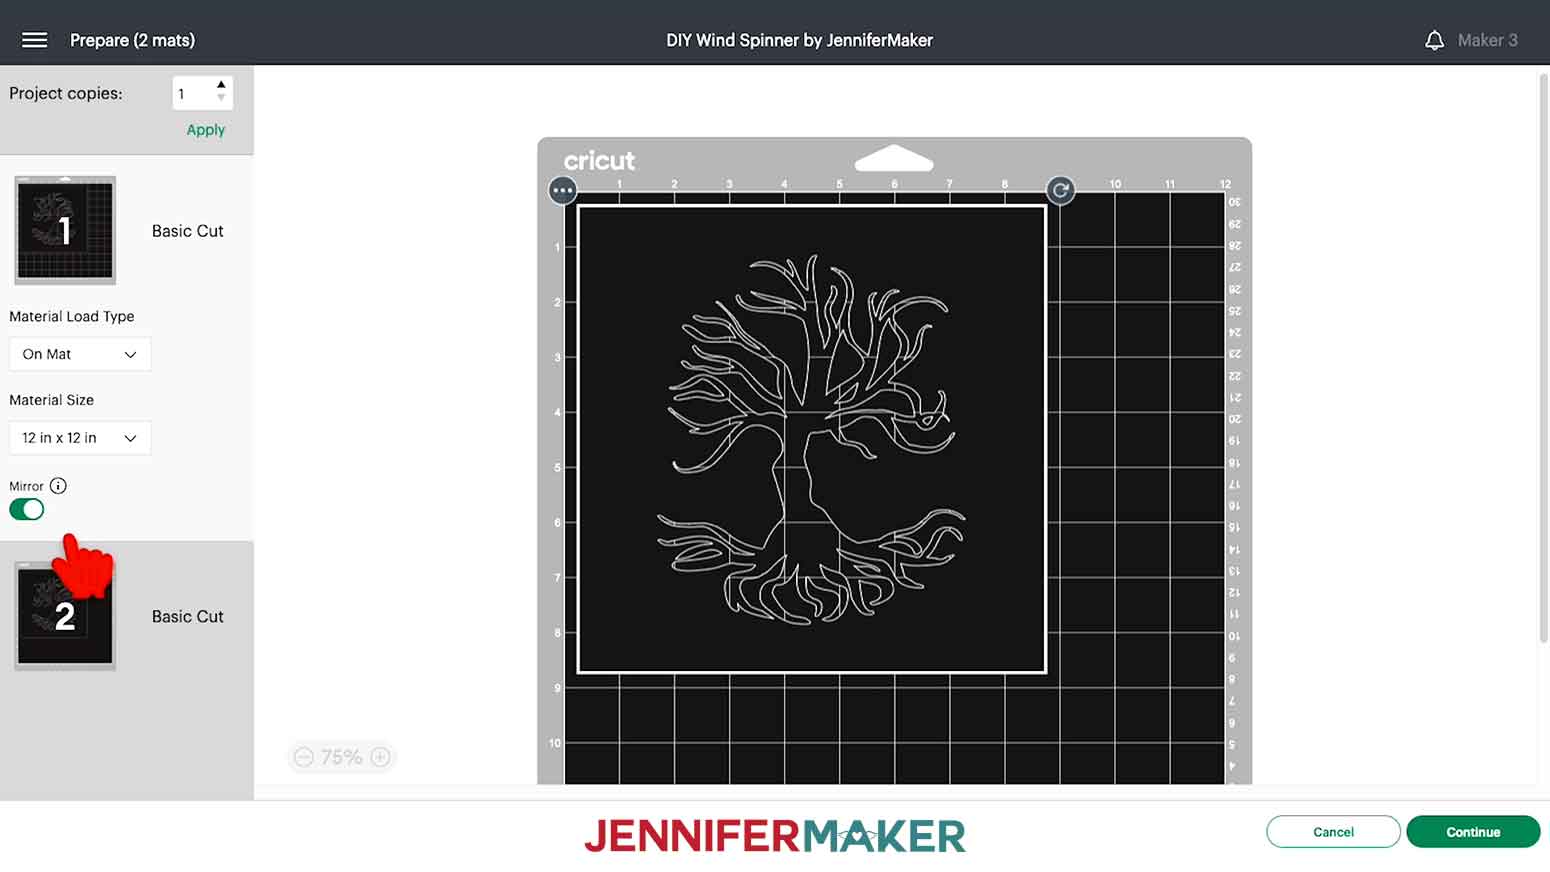
Upload the Tree of Life SVG file to Cricut Design Space and add it to your Canvas.
This is what my SVG file looks like on my Canvas. You can zoom out to see all of the design by clicking on the minus (-) sign on the lower left.

Make sure the outer layer is sized to 8.25” so we can sublimate off the edge of our wind spinner blanks.
Select the tree and click Duplicate. Drag the duplicate to the side.
Make sure you have the right machine selected and click "Make It."
If prompted, click "On Mat," "12 in x 12 in," and "Confirm."

On the Make screen be sure to Mirror your design on both mats.
Move your image to the center of the mat.
Choose the ‘Infusible Ink Transfer Sheet’ material setting and the pressure to more.
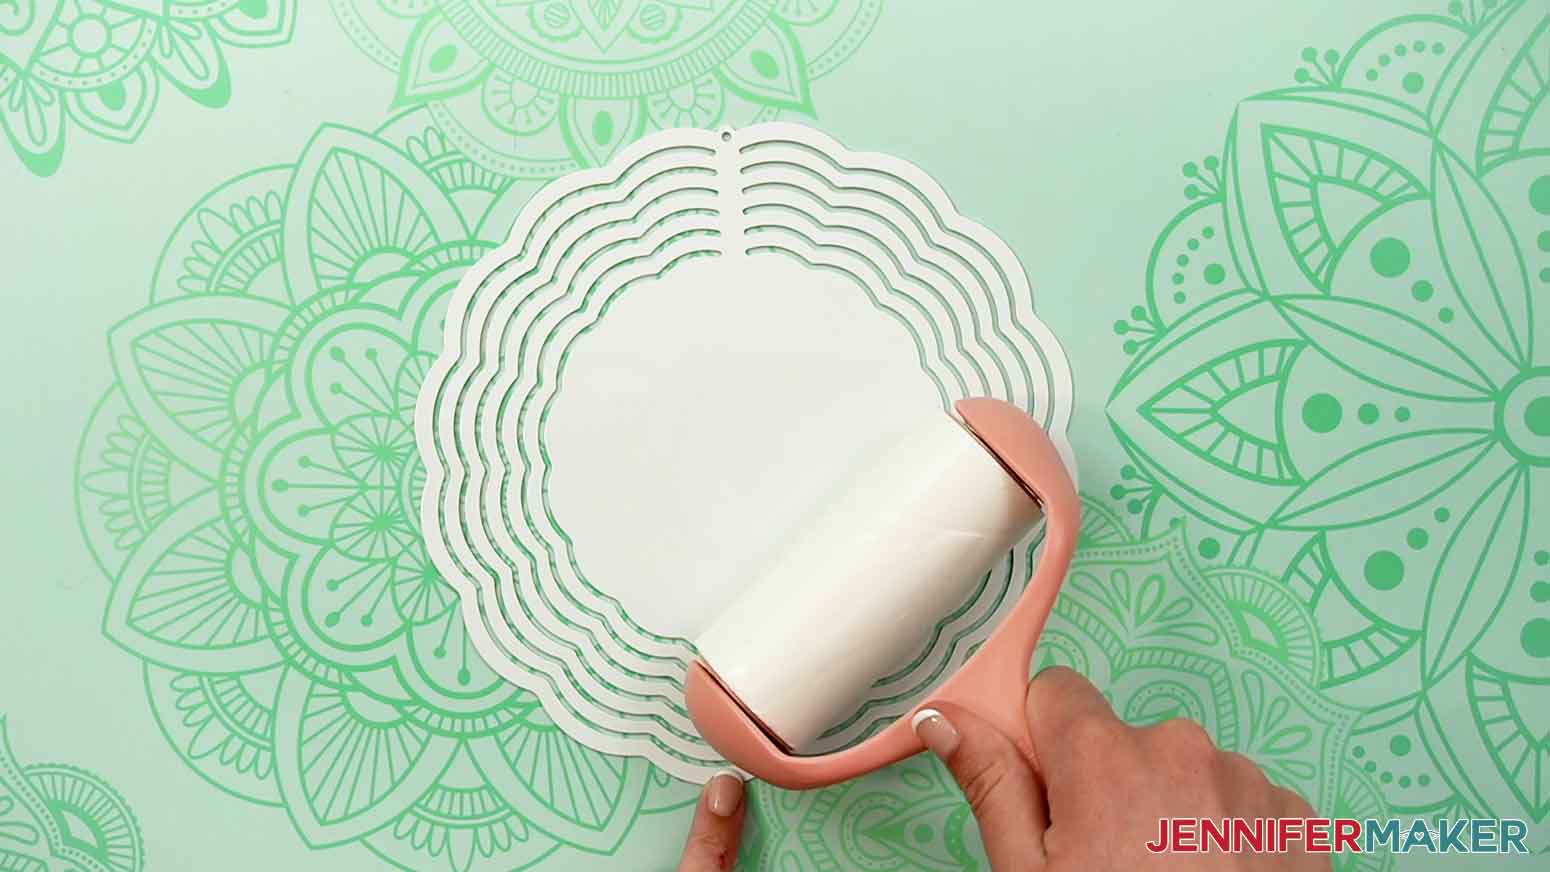
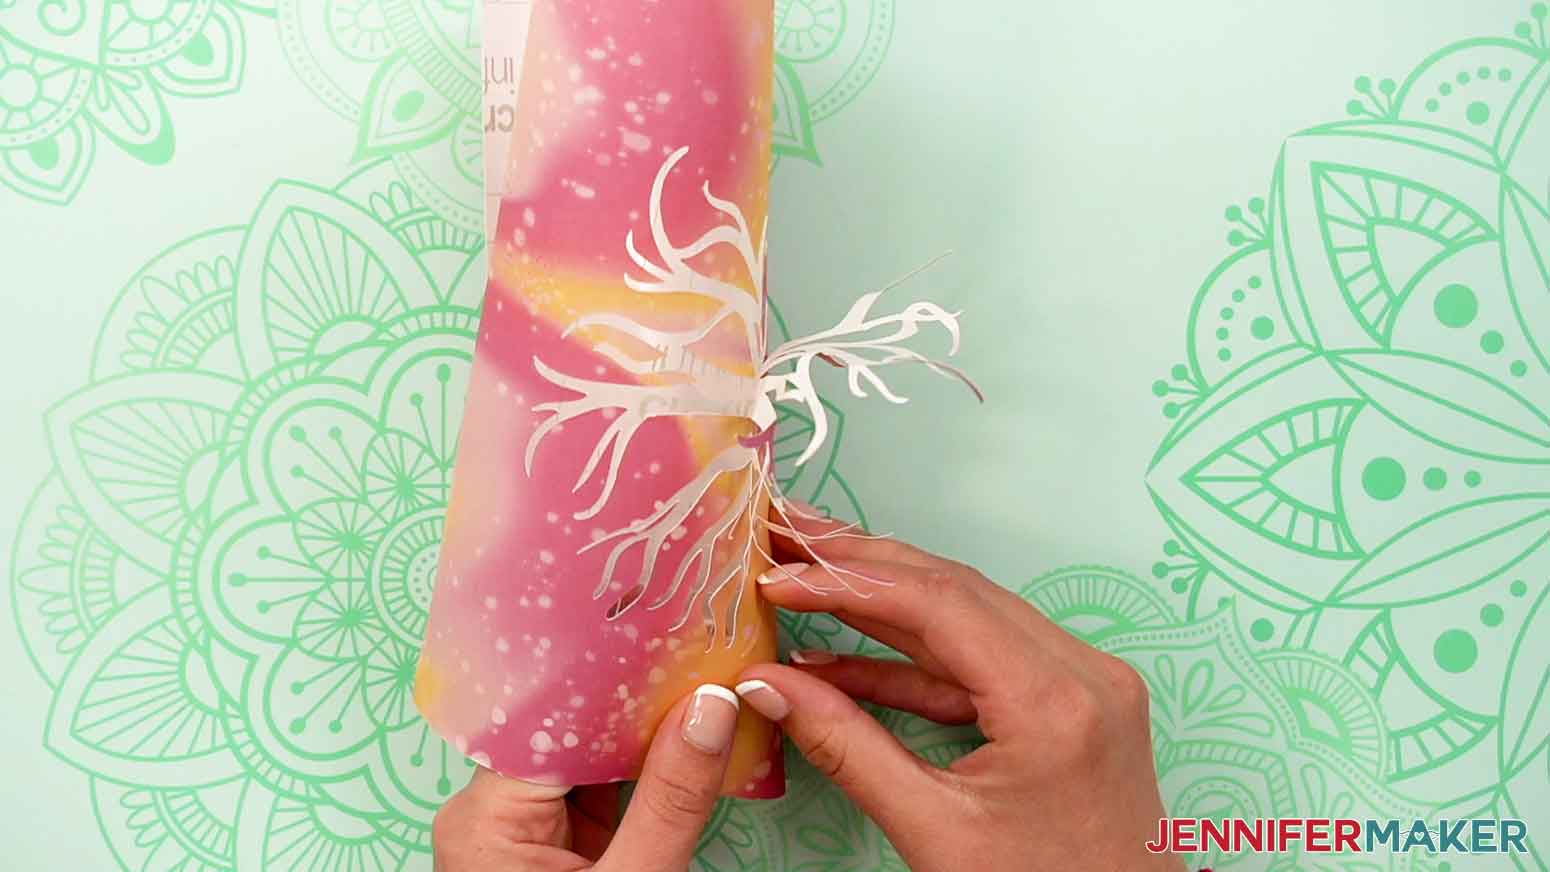
Place your Infusible Ink Transfer Sheet onto a green StandardGrip Mat, with the finished side facing up. Use a brayer to secure the sheet to the mat.
TIP: The Infusible Ink patterns are directional, so keep that in mind if you want the patterns to go in the same direction.
Make sure you have a clean Fine-Point Blade in the correct clamp.
Load the mat, and press Go.
Once the cut is complete, unload the mat and remove the ink sheet.

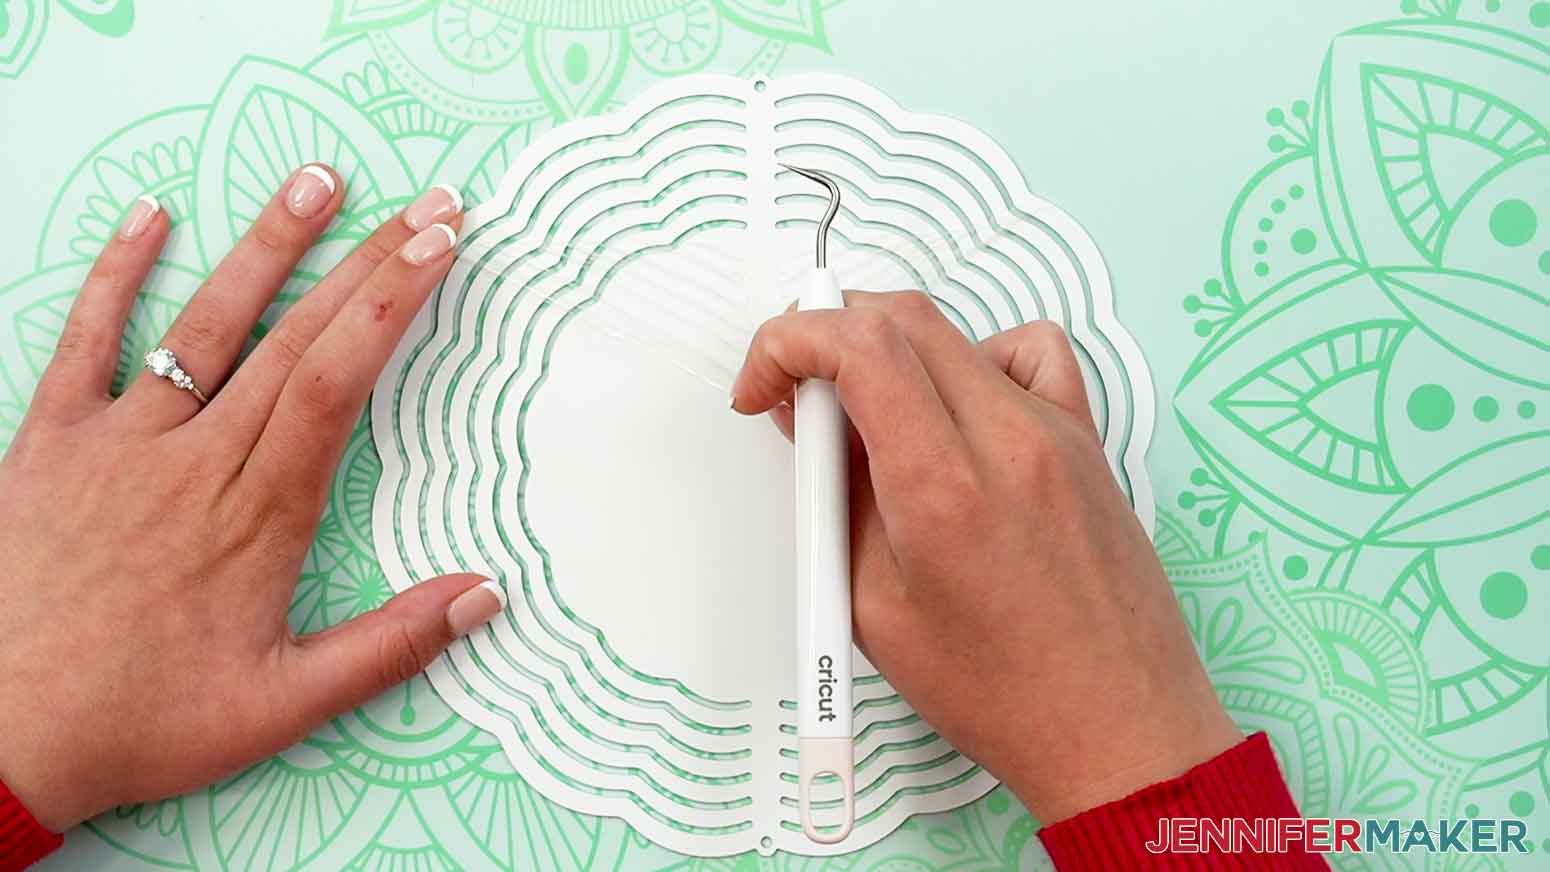
Roll the design and start 'cracking' the cuts to allow easier removal around the design elements.
Remove the tree shape from the carrier sheet.
TIP: If a design piece shifts, like the ink within the tree branches just gently put it back in place with the tweezers. This stuff is pretty sturdy!
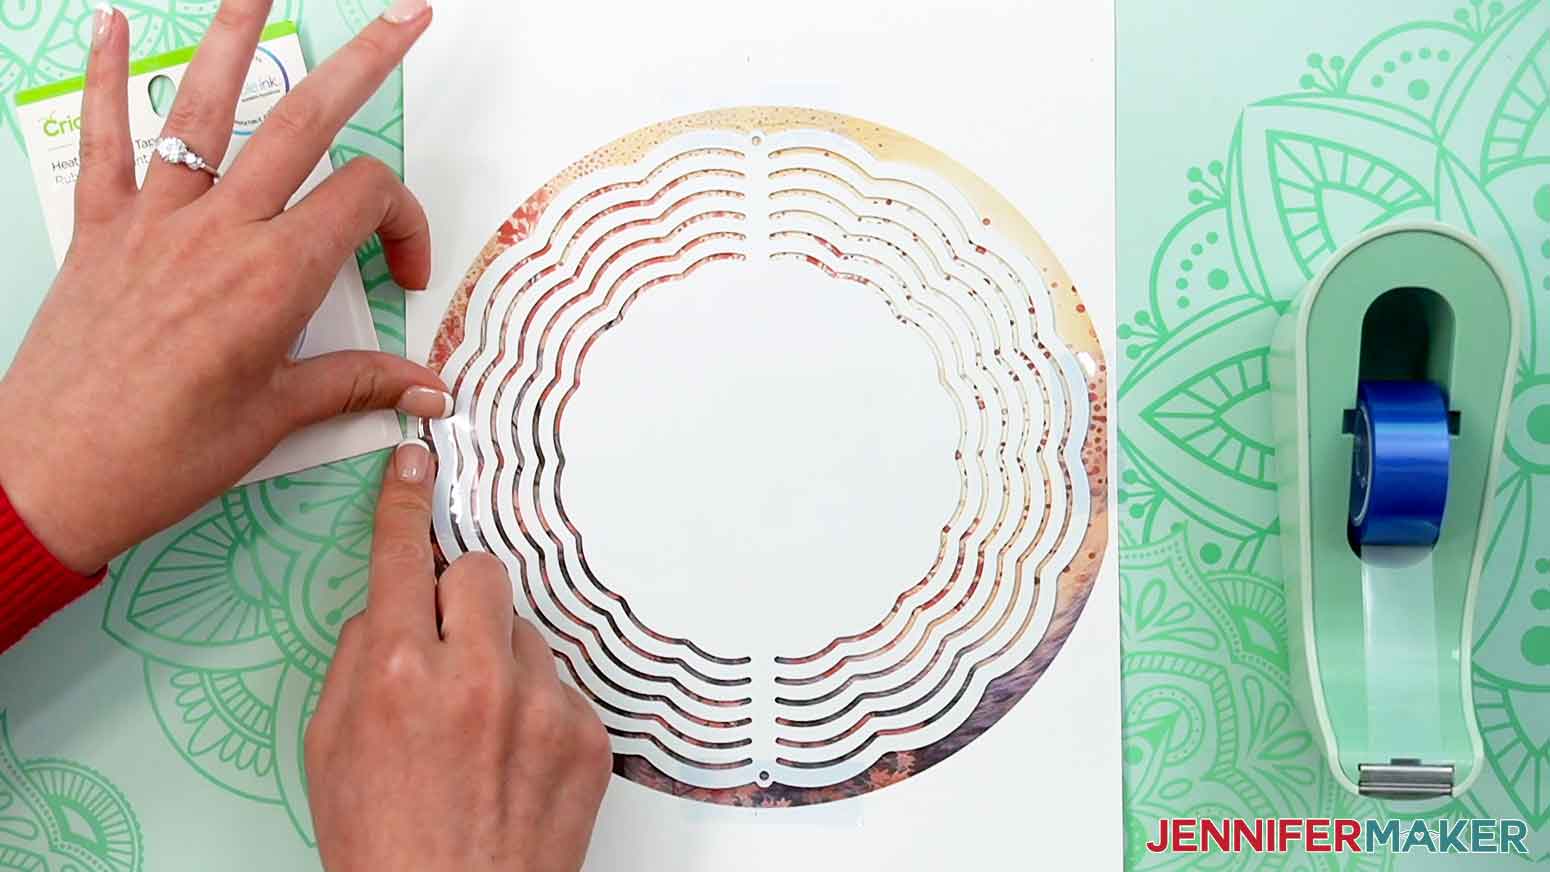
Cover your heat mat like we did earlier with white card stock and place the blank on the design.
Use heat tape and tape down the sides. I like to use eight pieces all the way around the wind spinner.
Now, flip the blank and taped design over and add butcher paper on top to protect your press.
Make sure your heat press is at the correct temperature and time settings.
Hold the heat press on the blank at 360°F (192°C) for 120 seconds using light pressure. The infusible ink sheets require light pressure and a little less time then the sublimated version. Hold still!
When the time is up, lift the EasyPress straight up and return it to its stand. Use caution not to lift the print and blank up with the heat press. Also, make sure to move the press straight up, and not off to the side, as removing the print diagonally can produce 'ghosting'. Wait for one minute to let the spinner cool down a bit.
Remove the tape and sublimation paper.
If you plan to hang your wind spinners outdoors in a sunny spot, you might want to consider spraying a UV Resistant Clear Coat to prevent fading. In an outdoor space, place your wind spinner at the bottom of a box. Spray the UV Resistant Clear Coat on on side of the wind spinner. Wait for it to completely dry - about 10 minutes and repeat in the other side.
STEP 4: BEND YOUR WIND SPINNER
Now it's time to bend our wind spinner rings into position!
The instructions state to spin the center part last, but I like to keep the center aligned with the hanging holes.
No need for gloves since the spinner has cooled down after sublimating, and the edges of the aluminum spinner can be handled without gloves. They are not as sharp as they look!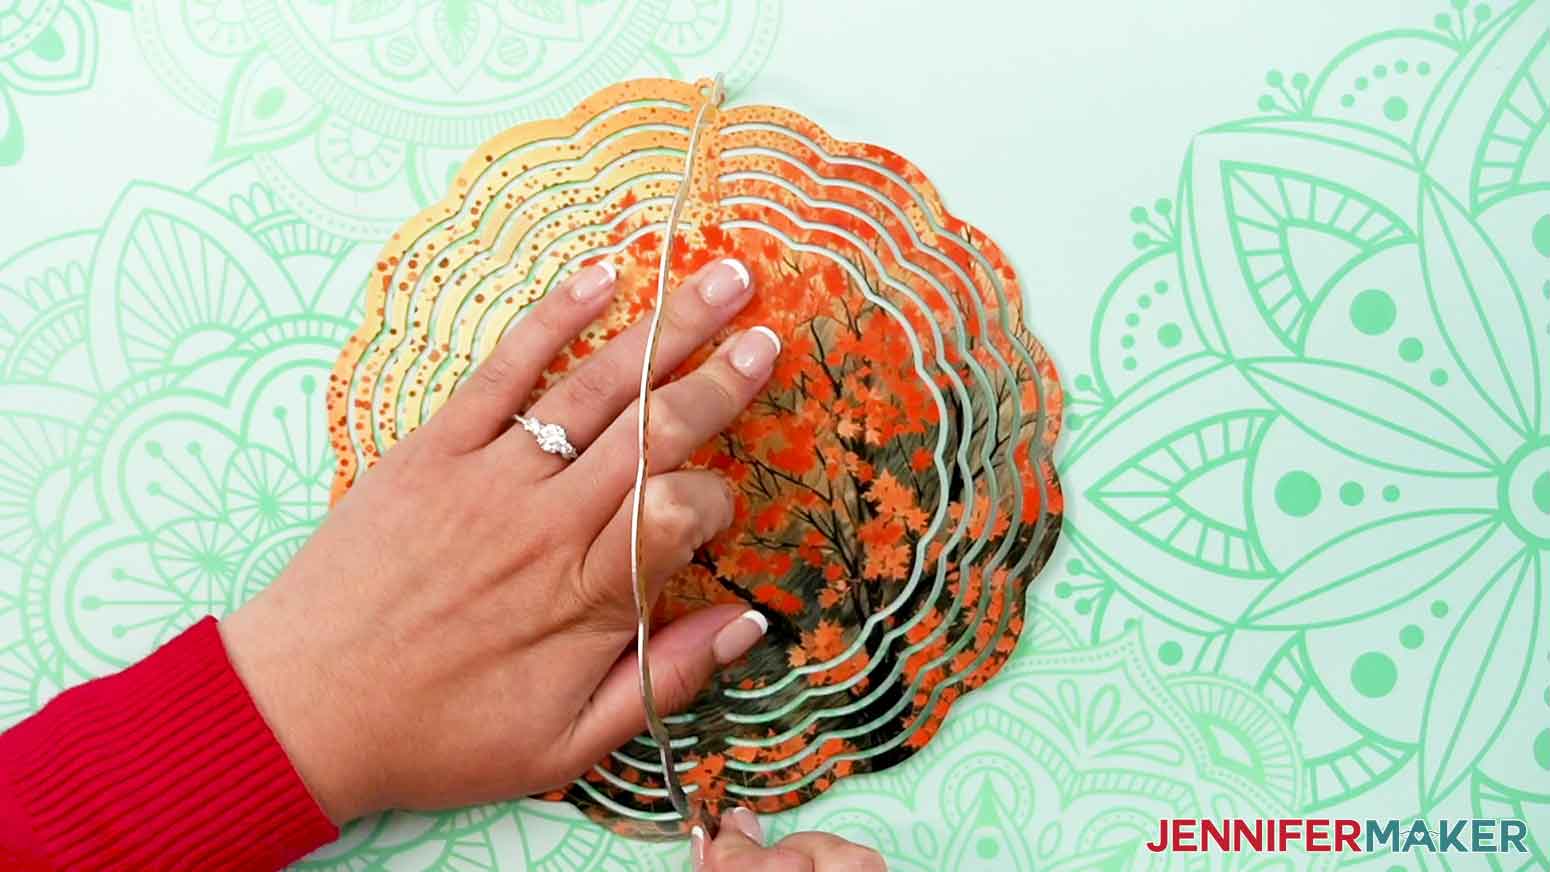
I start with the left side. Bend the outer most ring to about 45° inward toward you. I like to stabilize the bottom of the blank on a sturdy surface while bending. Then with the next smaller ring bend forward, but not as much. Do the same for each ring until you reach the center. Try and place even distance between each ring.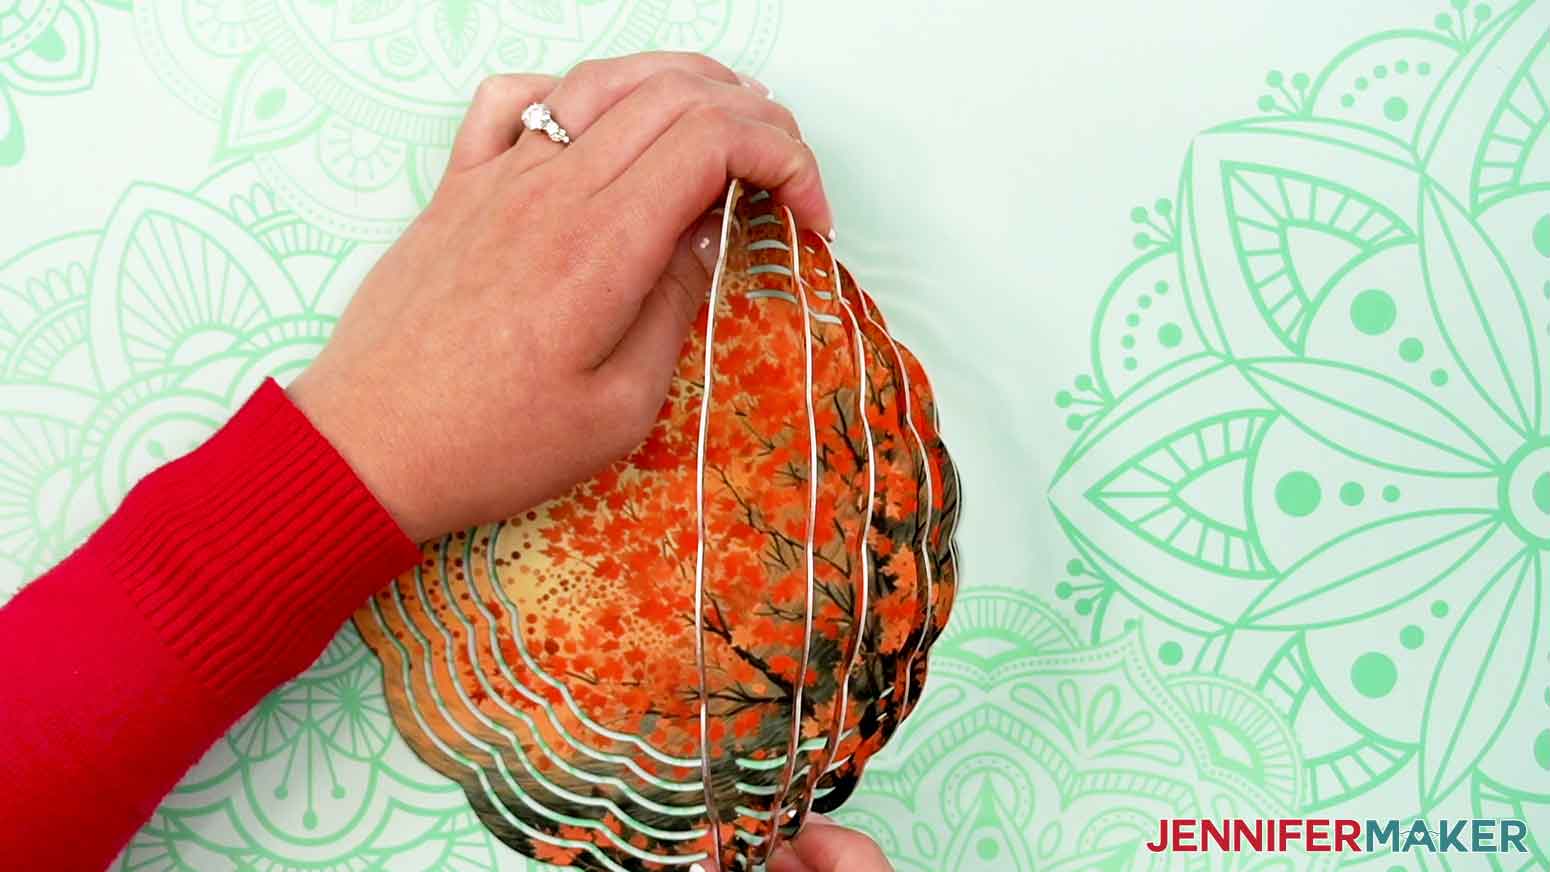
Then flip, and do the same with the other side of the wind spinner. Work from the left side again.
You can adjust each ring trying to make symmetrical. I like to view the wind spinner from the top to make sure each sides' rings are aligned, so that when spinning, the design is stable and stays true and symmetrical.
Optional Motor
The wind spinners have small mounting holes at the top and bottom. You can use the supplied swivel clips to attach them, outdoors, with line, or a shepherd's pole. You could also mount from the bottom hole, using a garden ornamental stake, but you would have to attach it securely with a small bolt, etc.
Since there is a top and bottom hole, you have the option to daisy-chain these. Imagine the possibilities!
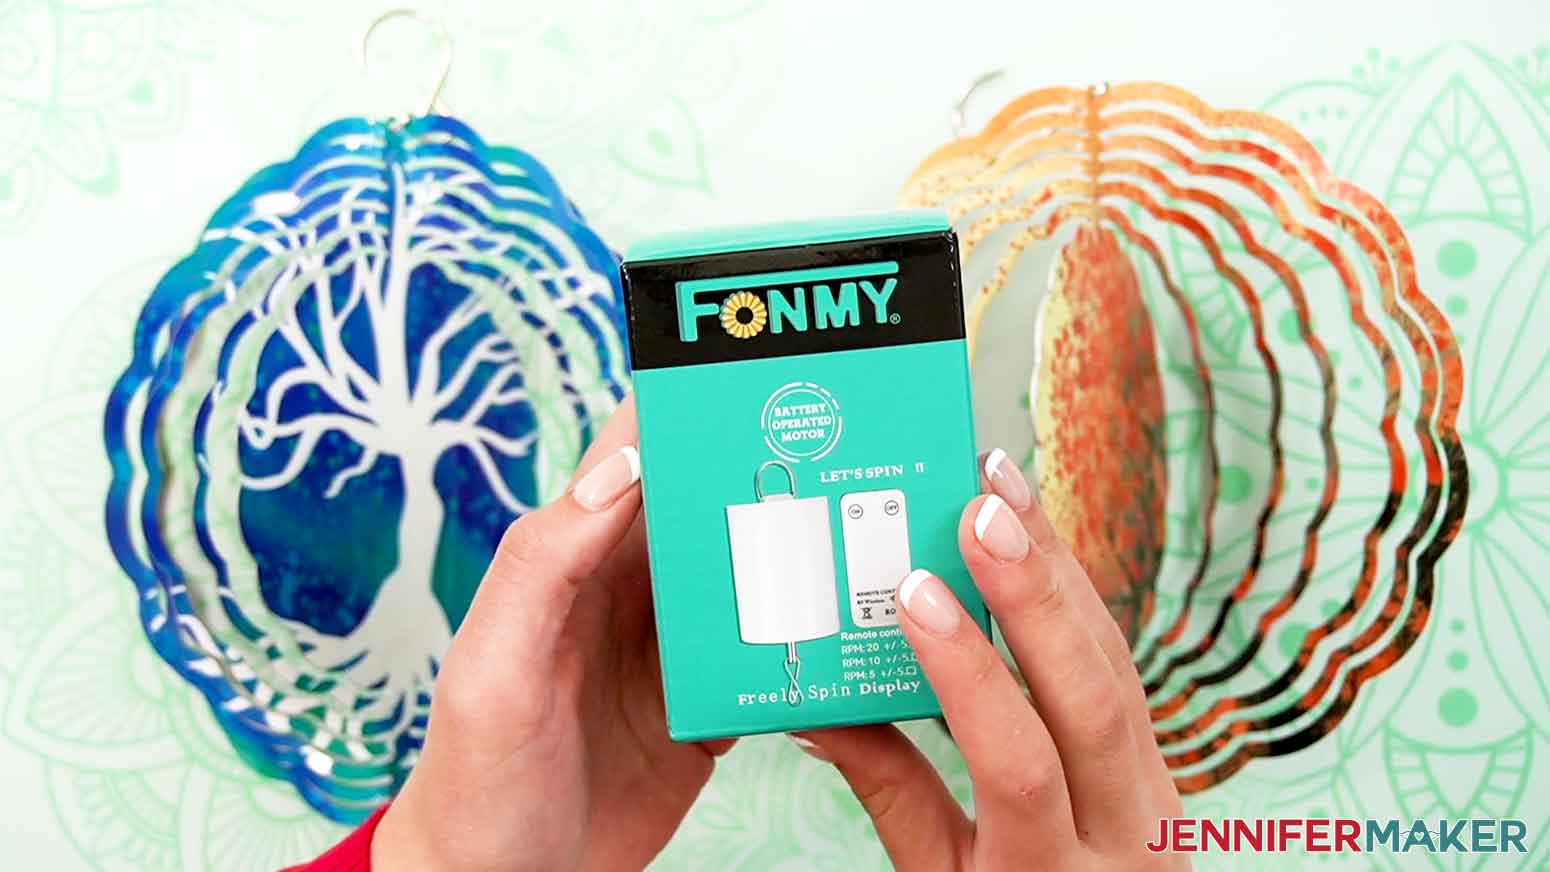
While these aluminum wind spinners look great, and last, outdoors, you might want to display them indoors as well.
To replace the lack of wind indoors, I used a small battery and remote operated motor to spin the wind spinner at 10rpm. 20rpm was a little fast for me.
Note that the swivel joint needs to be removed if using the motor. We want to turn the wind spinner, not free-spin the swivel.
You can simply use the clip the swivel was attached to. Open the clip with your finger and place the small opening in the hole on the bottom of the motor. The large opening on the clip can be placed on the wind spinners' top hole. Make sure not to scratch your beautiful design!
STEP 5: SHOW IT OFF
These wind spinner look great outdoors, or even indoors, for year-round enjoyment.

Answers to Your Questions About How to Make Your Own DIY Wind Spinner
Q: Where is your video tutorial for this project?
A: These sublimated wind spinners are a special project we made for our Maker Academy Weekend 2023 event! A complete and detailed step-by-step video premiered during the event November 1-5, 2023 — this tutorial video was available to watch for free for 24 hours only during the event. If you missed it, you can get access to the full video, the 15-page printable handbook that details how to make this beautiful project with a VIP Pass to Maker Academy Weekend 2023, which comes with other perks and bonuses, too!
Q: How do you make a garden wind spinner?
A: Follow my tutorial! I’ve got the steps detailed above, or you can watch my video for play-by-play instructions. I outline everything you need to know about sublimating or applying infusible ink to your our own wind spinner. It’s easier than you think and a great project for anyone who loves fun and interesting decorations for their outdoor space!
Q. How do you sublimate wind spinners?
A. If you don’t have a sublimation printer, you can still make DIY wind spinners using infusible ink transfer sheets. I’ll show you how to do a cool tree of life design using the SVG in the download folder, but you can also use a regular uncut sheet of infusible ink. If you really want to customize it, you can use infusible ink — check out tutorial on that. What temp do you sublimate wind spinners? I recommend 360°F (192°C) for 120 seconds for both methods.
Q: How do you shape a wind spinner?
A: The metal’s edges may be sharp, so wear gloves for extra protection, then stabilize the spinner’s bottom point on a sturdy table. Hold the spinner in place with one hand, and use your other hand to gently pull the right outermost ring toward you until it’s perpendicular to the flat section. Then pull the next ring just a little bit less than you pulled the first, and so on until you’ve bent all the rings on that side. Then rotate the spinner and repeat these steps for the other side. Look at the spinner from the top down to make sure the rings are bent evenly, and adjust them as needed. The spacing doesn’t need to be perfect, but having the rings evenly spaced will make the image easier to see.
Q: Do wind spinners keep bugs away?
A: Many folks do report fewer pests around where they hang their wind spinner! When the wind spinner spins, it makes a subtle buzzing sound that deters insects, birds, and even that pesky squirrel that keeps getting into your bird feeder.
Q: Is Infusible Ink the same as sublimation?
A: Infusible Ink is a fun material that comes in different colors and patterns, and works very similarly to sublimation transfer sheets. Infusible ink transfer sheets can be cut with scissors or your Cricut, and then sublimated onto any surface suitable for sublimation — like our wind spinner blanks. Infusible ink pens are another way to sublimate without a sublimation printer! Simply use the pens to draw a design onto sublimation paper, then sublimate it onto your blank.
Get my free PNG files to create a wind spinner!
(If you do not see the signup form above, click here.)
I SO hope you’ll make a sublimated DIY wind spinner! Please share a photo of your wind spinners in our Facebook group or tag me on social media with #jennifermaker.
Love,

Want to remember this? Save this DIY Wind Spinner tutorial to your favorite Pinterest Board!