Learn how to create a little whimsical flower fairy doll using a peony or a daffodil! These two fairy dolls are a delightful addition to your home!
I love spring and summer and being able to be outside again! As I have talked about before with my Fairy House Card, I associate fairies with the onset of beautiful weather. Today, I bring you the cutest little flower fairy doll! You can find these adorable little fairies hanging around my indoor plants, adding a fun, whimsical touch to my home.
Watch the Flower Fairy Doll assembly video here:
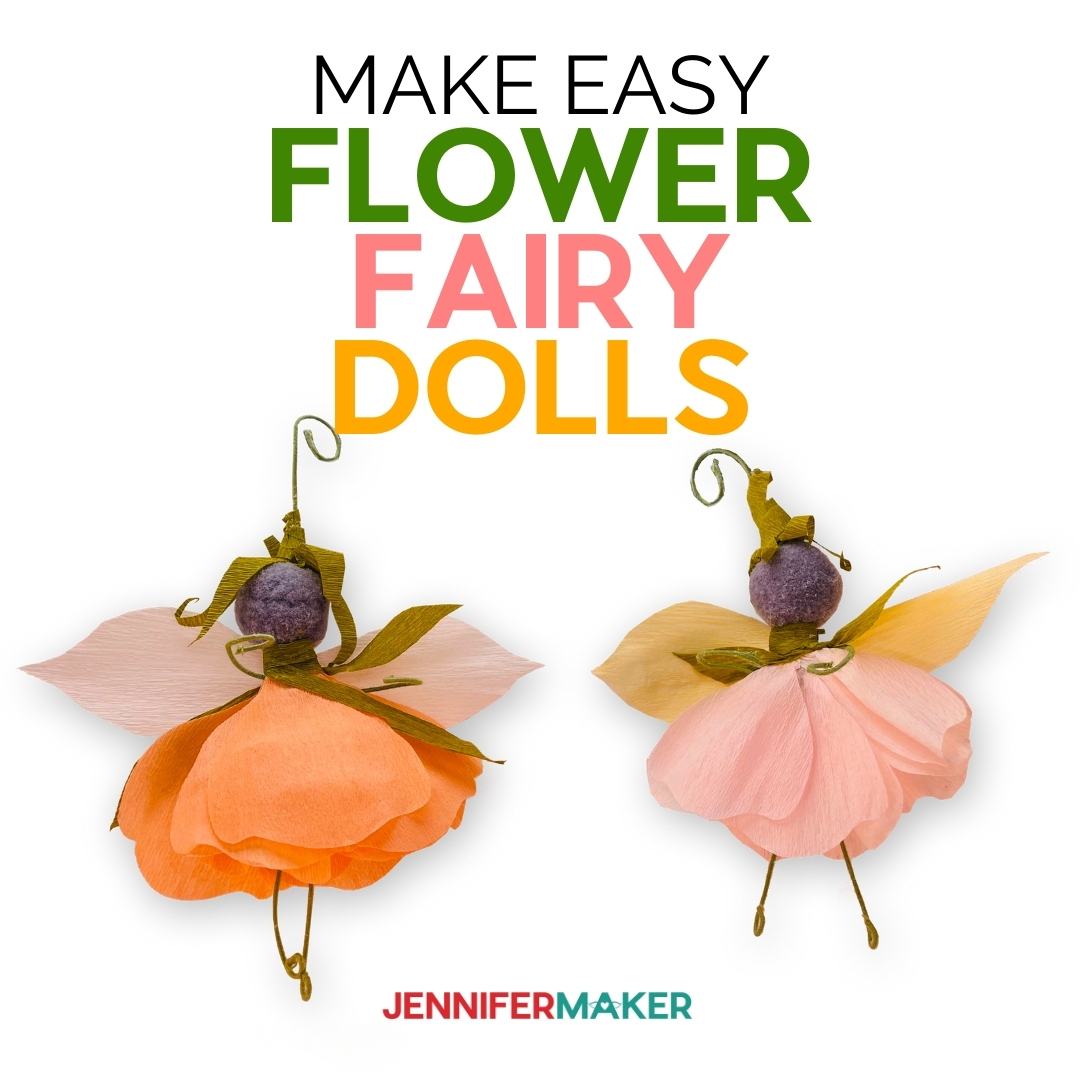

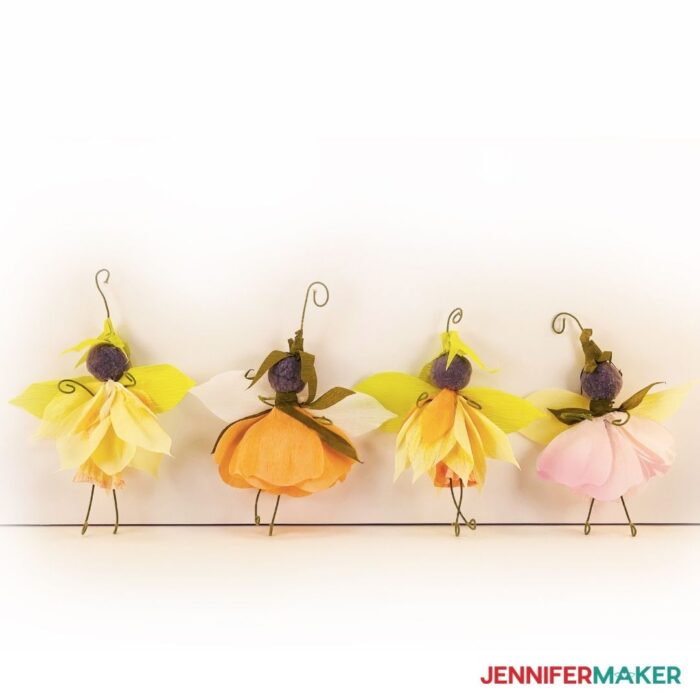
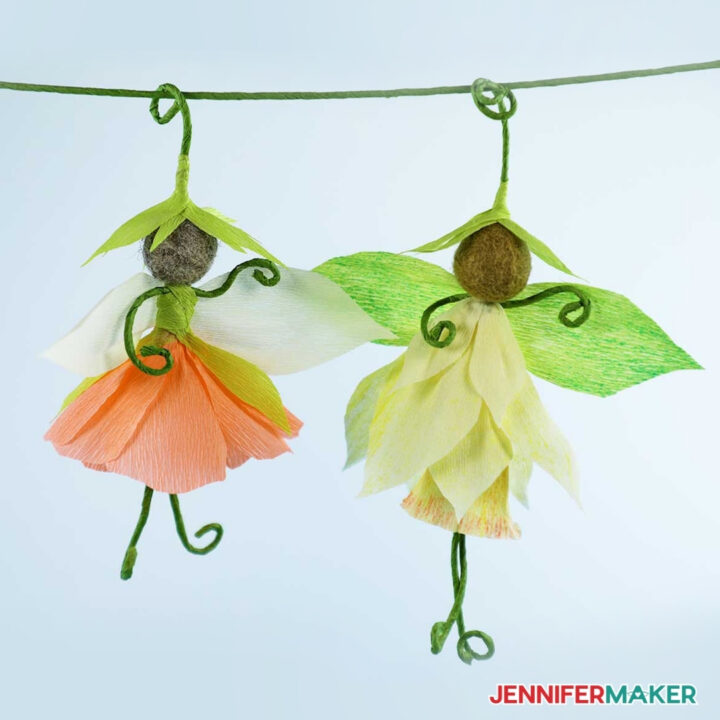
These cute Flower Fairy Dolls are a fun project you can make with your kids or grandkids, or even just yourself! Who doesn’t want a cute little fairy hanging about, cheering you up? And you only need a few supplies and they do not take much time to assemble. Once assembled, the fairies will measure about 6″ tall — perfect for hanging in any room of your home.
Since they are quick and easy to make, it’s impossible to just make one fairy! I needed an entire fairy family! There’s no end to the different combinations of colors and designs you can come up with on your own once you start!

To make your Flower Fairy doll, you need a wool felt ball and a 14 gauge green paper-wrapped floral stem wire 16″ inches long to create the body and head of the flower fairy doll.
For the fairy doll skirt, you will need three sheets of 12″ x 12″ extra fine crepe paper.
IMPORTANT CUTTING MACHINE NOTE: Crepe paper can only be cut on the Cricut Maker with the Rotary Blade, not on any other cutting machine (including the Cricut Explore). You CAN cut the crepe paper by hand, just use the PDF pattern provided.
Tip: If you DO use your Maker to cut the Flower Fairy Doll skirt, make sure that the grain of the paper is vertical, not horizontal, when you place the crepe paper on the Machine Mat.
Let me show you how easy it is to make this pretty flower fairy doll project! This post contains some affiliate links for your convenience (which means if you make a purchase after clicking a link I will earn a small commission but it won’t cost you a penny more)! Read my full disclosure policy.
Materials to Make a Flower Fairy Doll
- One (1) Glaciart One Wool Felt Ball
- Three (3) 12″ x 12″ Pieces of Lia Griffith Extra Fine Crepe Paper in Assorted Colors
- Two (2) 16 Inch 14 Gauge Green Paper Wrapped Floral Stem Wires
- Optional: Crayons or Pastels
- Cricut Blue LightGrip Machine Mat 12″ x12″ (alternative)
- Cricut Rotary Blade
- Cricut Straight Weeding Tool
- Cricut Brayer
- Cricut Spatula
- Wire Cutters and Pliers
- Tacky Glue
- A method to cut your crepe paper – I used the amazing Cricut Maker but you can also cut this design by hand.
- Design #307 for your Flower Fairy Doll – My free SVG/PDF/DXF design files are available in my free resource library – get the password by filling out the form at the bottom of this page
How to Make Your Own Flower Fairy Doll
Flower Fairy Doll
These little whimsical flower fairy dolls are a delight to make.
Materials
- One (1) Glaciart One Wool Felt Ball
- [Three (3) 12" x 12" Pieces of Lia Griffith Extra Fine Crepe Paper in Assorted Colors ]
- [Two (2) 16 Inch 14 Gauge Green Paper Wrapped Floral Stem Wires ]
- Optional: Crayons or Pastels
- Design #307 (My free SVG/PDF/DXF design files are available in my free resource library - get the password by filling out the form at the bottom of this page)
Tools
Instructions
STEP 1: GET MY FREE FLOWER FAIRY DOLL DESIGN FILES
First, download my free Flower Fairy Doll SVG/DXF/PDF, Design #307, from my free resource library. There are two different designs, a peony fairy doll and a daffodil fairy doll, which are both approximately six inches tall once assembled and are perfect for hanging on your favorite plant in your craft room!
If you're going to cut the crepe paper on your cutting machine, upload the file to your design software.
TIP: If you're not sure how to upload an SVG cut file to Cricut Design Space, watch this helpful video training series I made.
If you're on an iPhone or iPad, here's how to download and upload SVG files to the Cricut Design Space app.
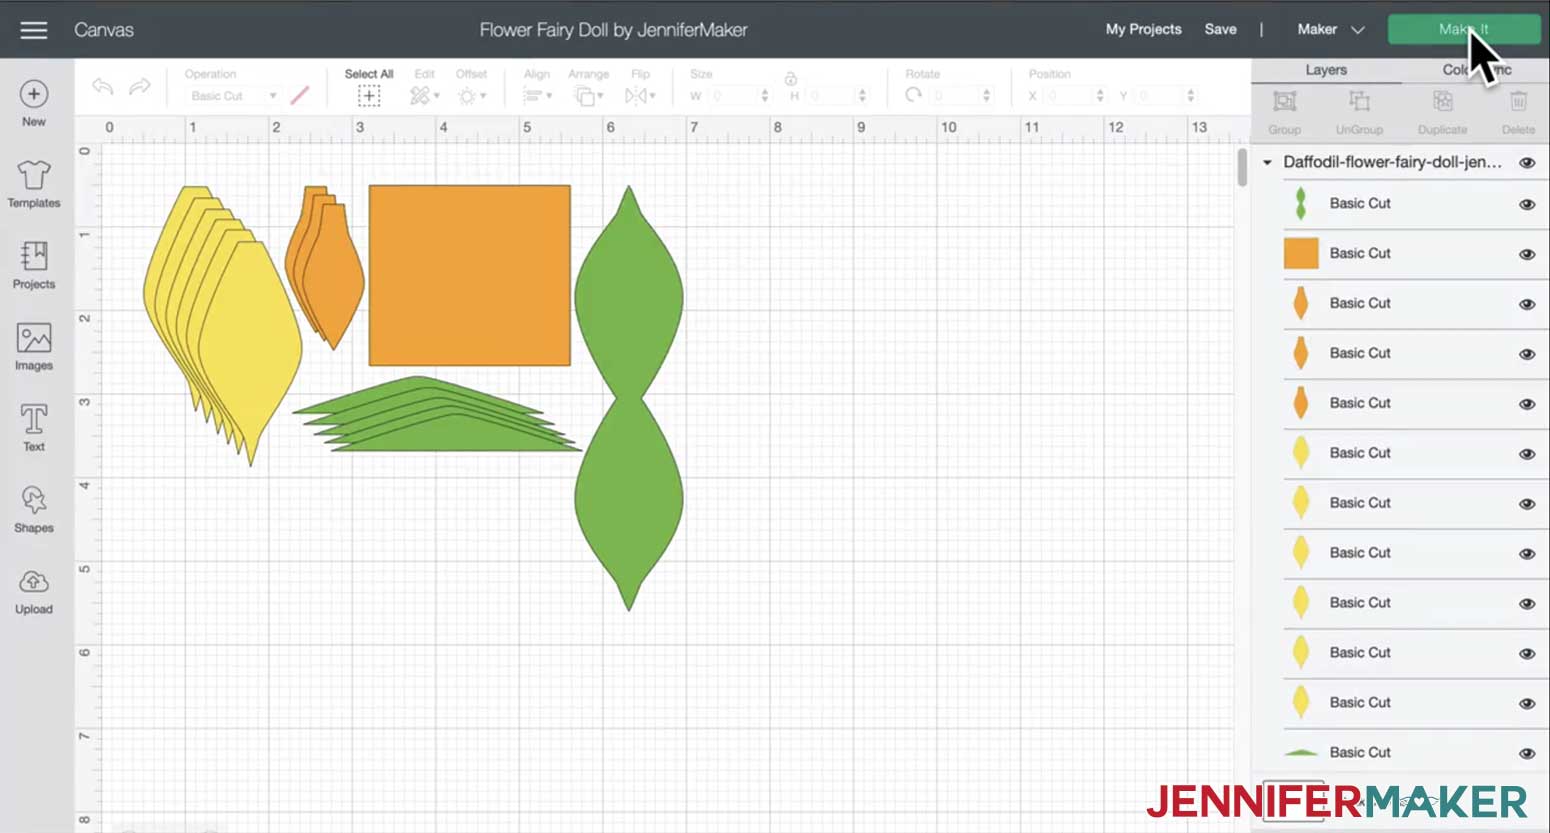
This is what the files look like in Design Space when you import them. Unless you want to resize them, everything is ready to cut!
Peony Flower Fairy Doll:

Daffodil Flower Fairy Doll:
STEP 2: CUT THE FLOWER FAIRY DOLL DESIGN
Click "Make It" and you will be prompted to select your material settings and place your crepe paper on your cutting mat.
TIP: When placing your crepe paper on the mat, smooth it out really well with a brayer or scraper so you don't have any creases (you can slightly stretch it if you need to). Make sure that the grain of the paper is vertical, not horizontal on your mat.
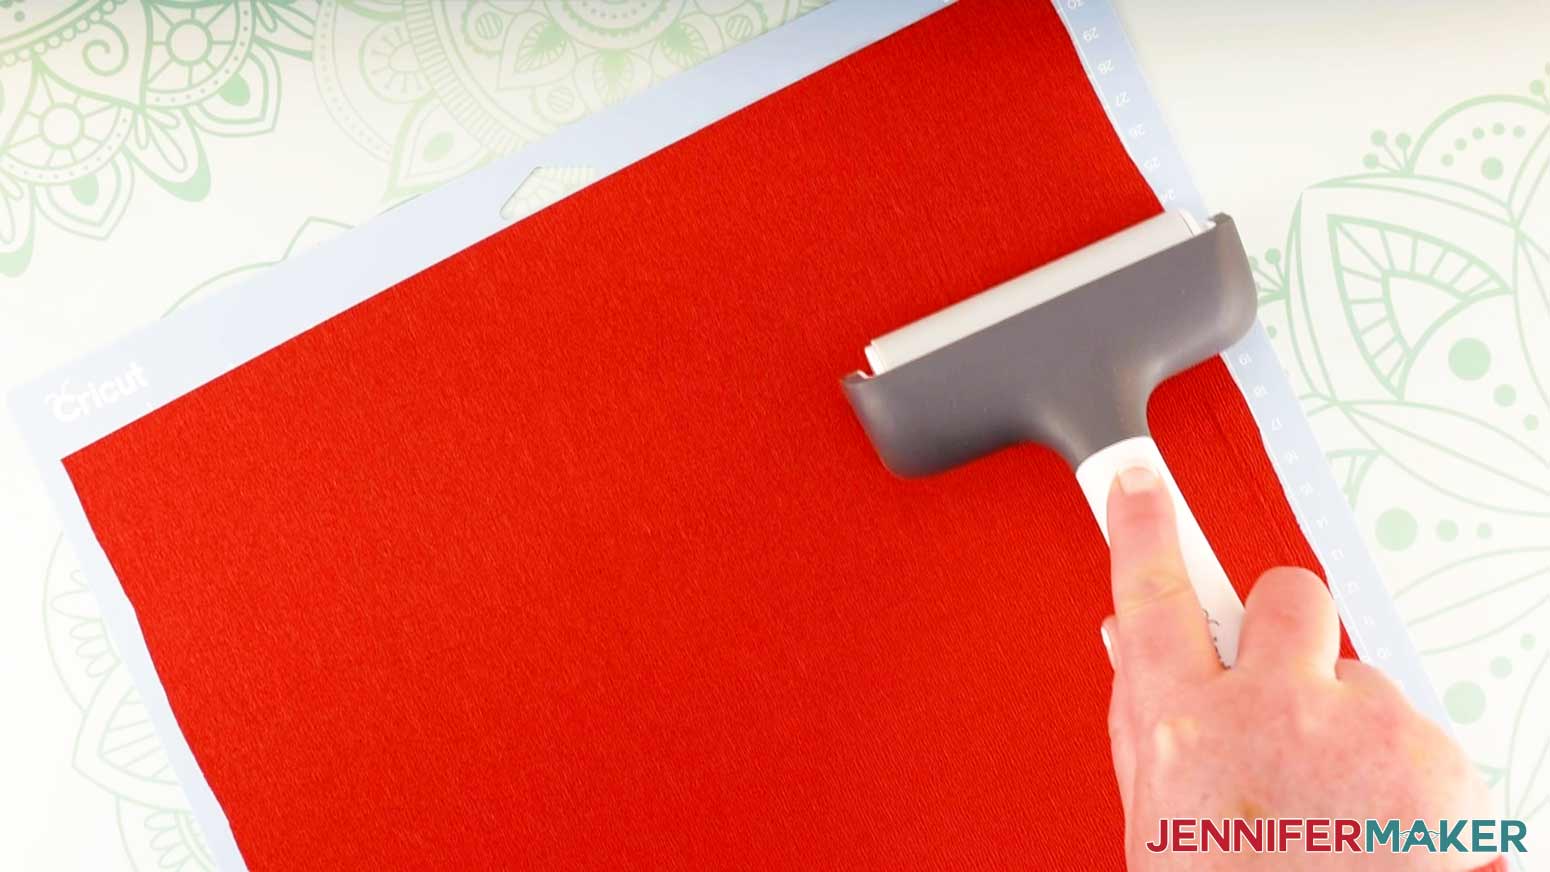

Follow the prompts to load the mat and tools into your Cricut. You will load the Cricut Rotary Blade into Clamp "B" on your Cricut Maker and choose "Crepe Paper" as your material.
When your pieces are finished cutting peel up and discard the outer waste piece, leaving your petals and leaves on the mat. Using a scraper or spatula, carefully remove each piece from the mat.
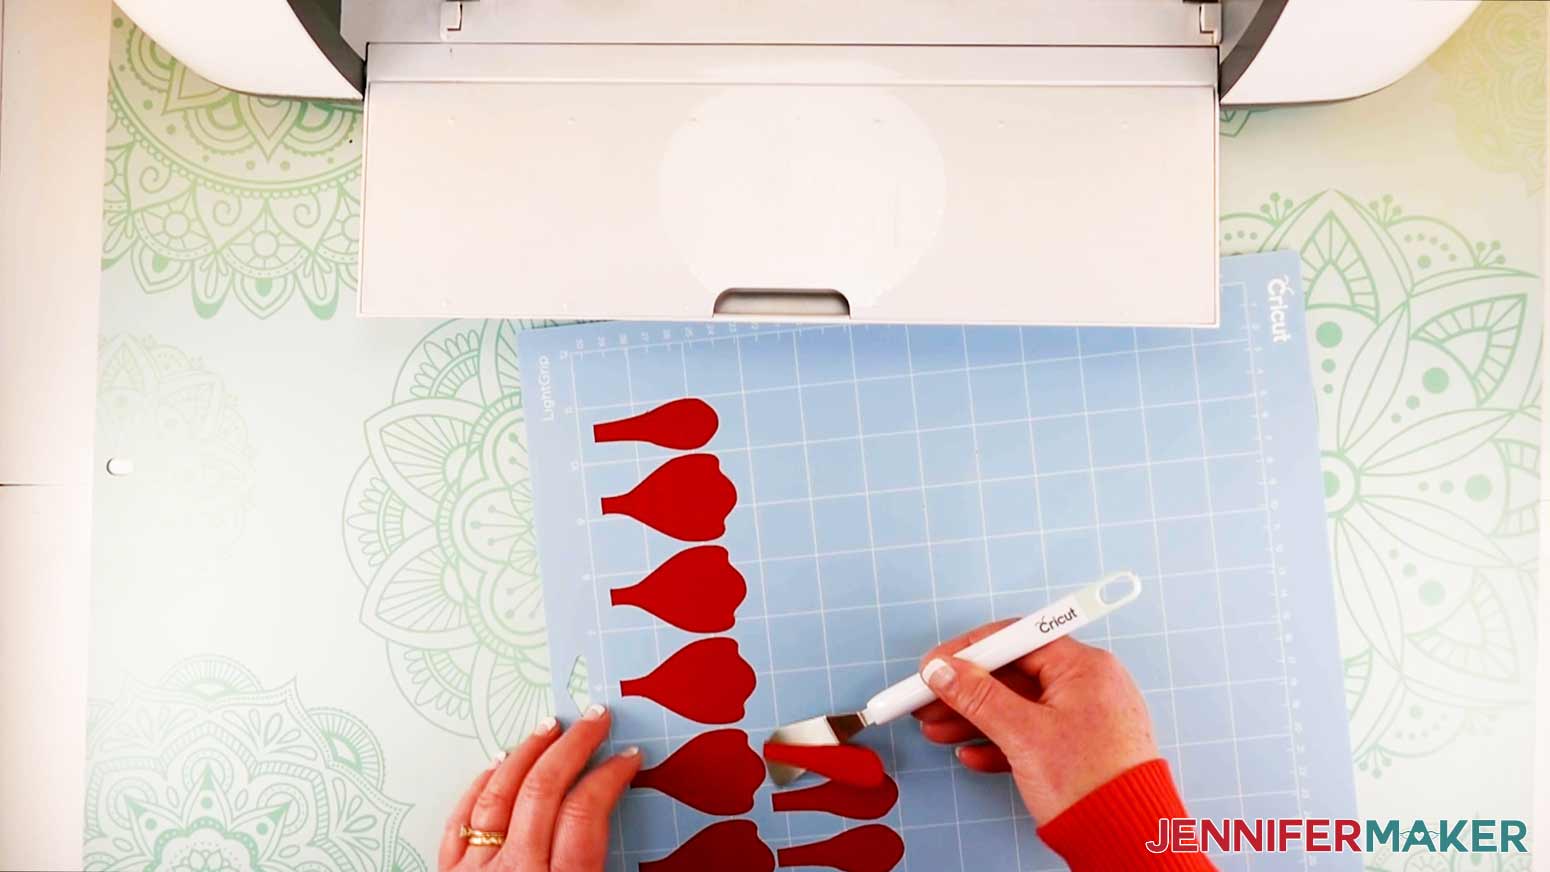
These are the pieces you’ll have when you’re done cutting:
Peony pieces:
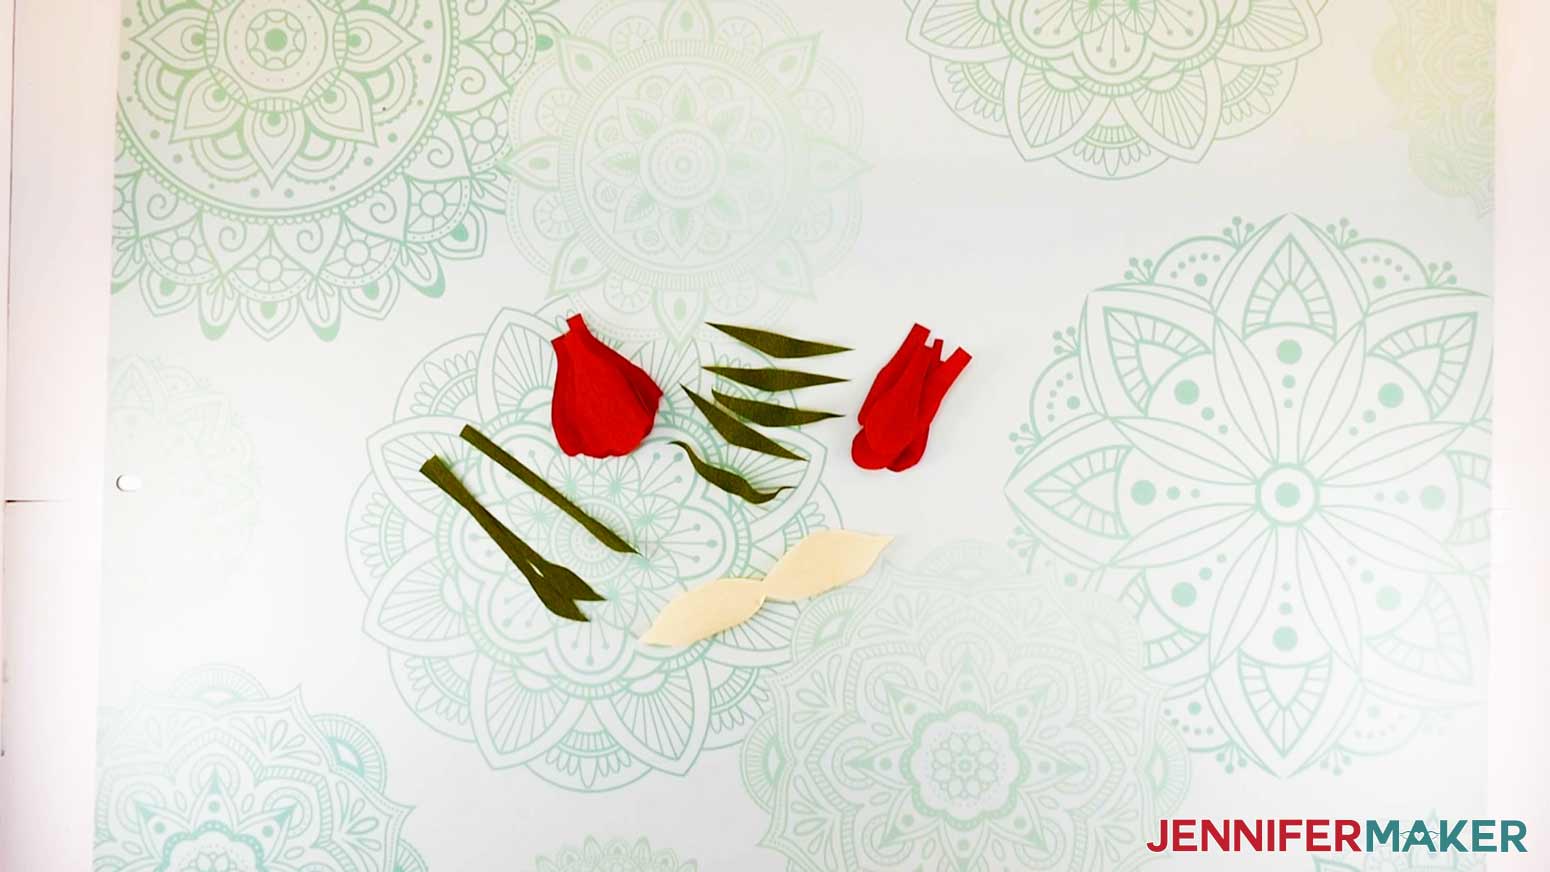
Daffodil pieces:
STEP 3: ASSEMBLE THE WIRE BODY OF THE FLOWER FAIRY DOLL
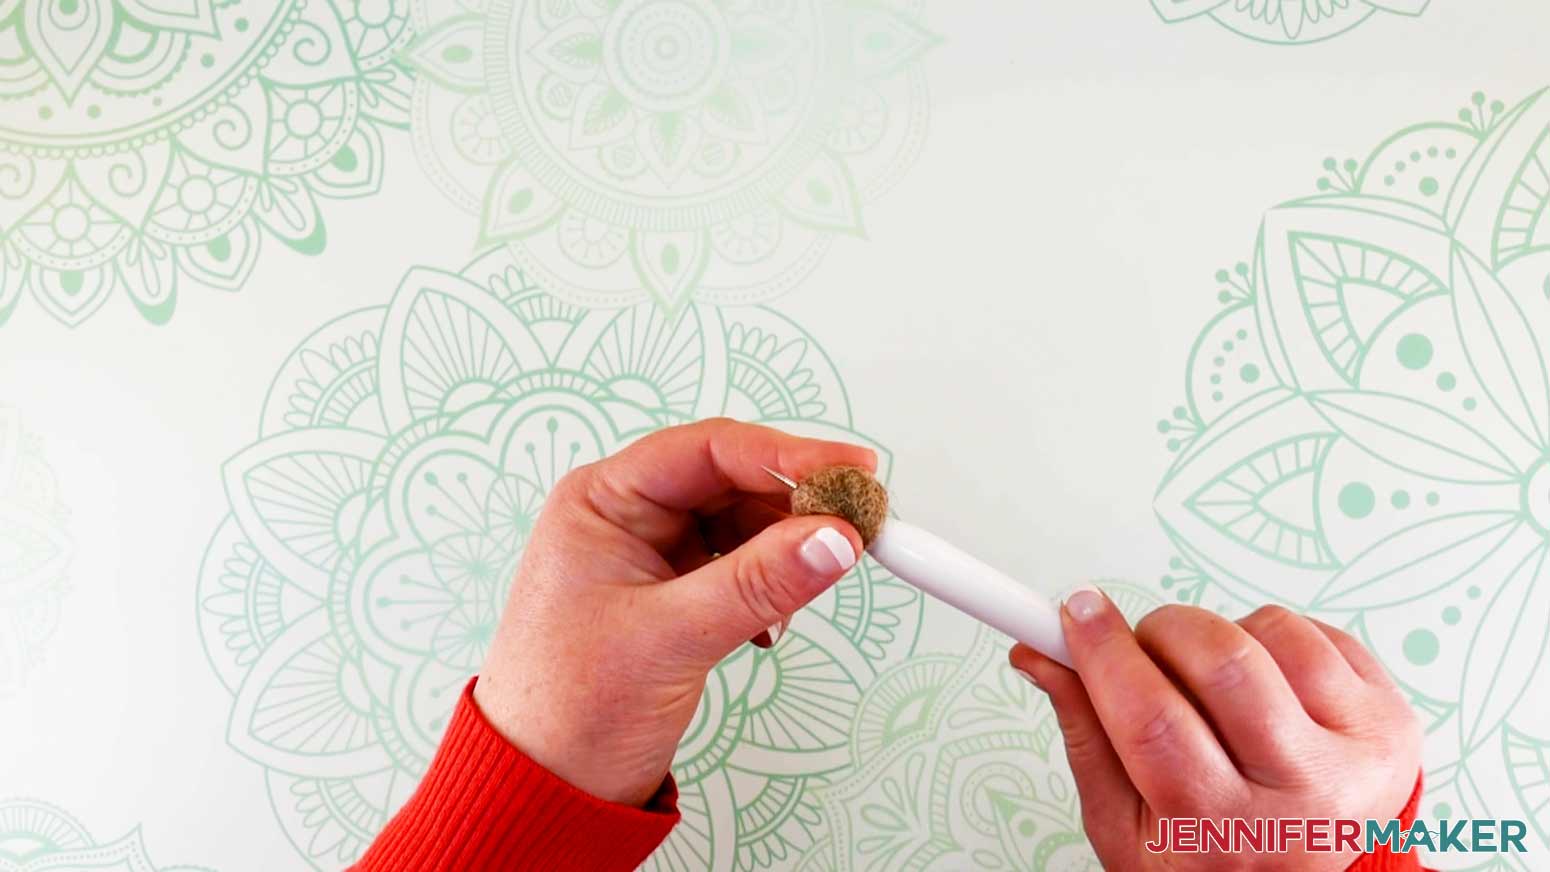
First, let’s thread a wool ball onto a single piece of 14 gauge wire. These two pieces will become the fairy doll’s head and body. Using a Cricut Straight Weeding Tool, pierce a hole through the center of the wool ball. Jiggle it around to widen the hole.
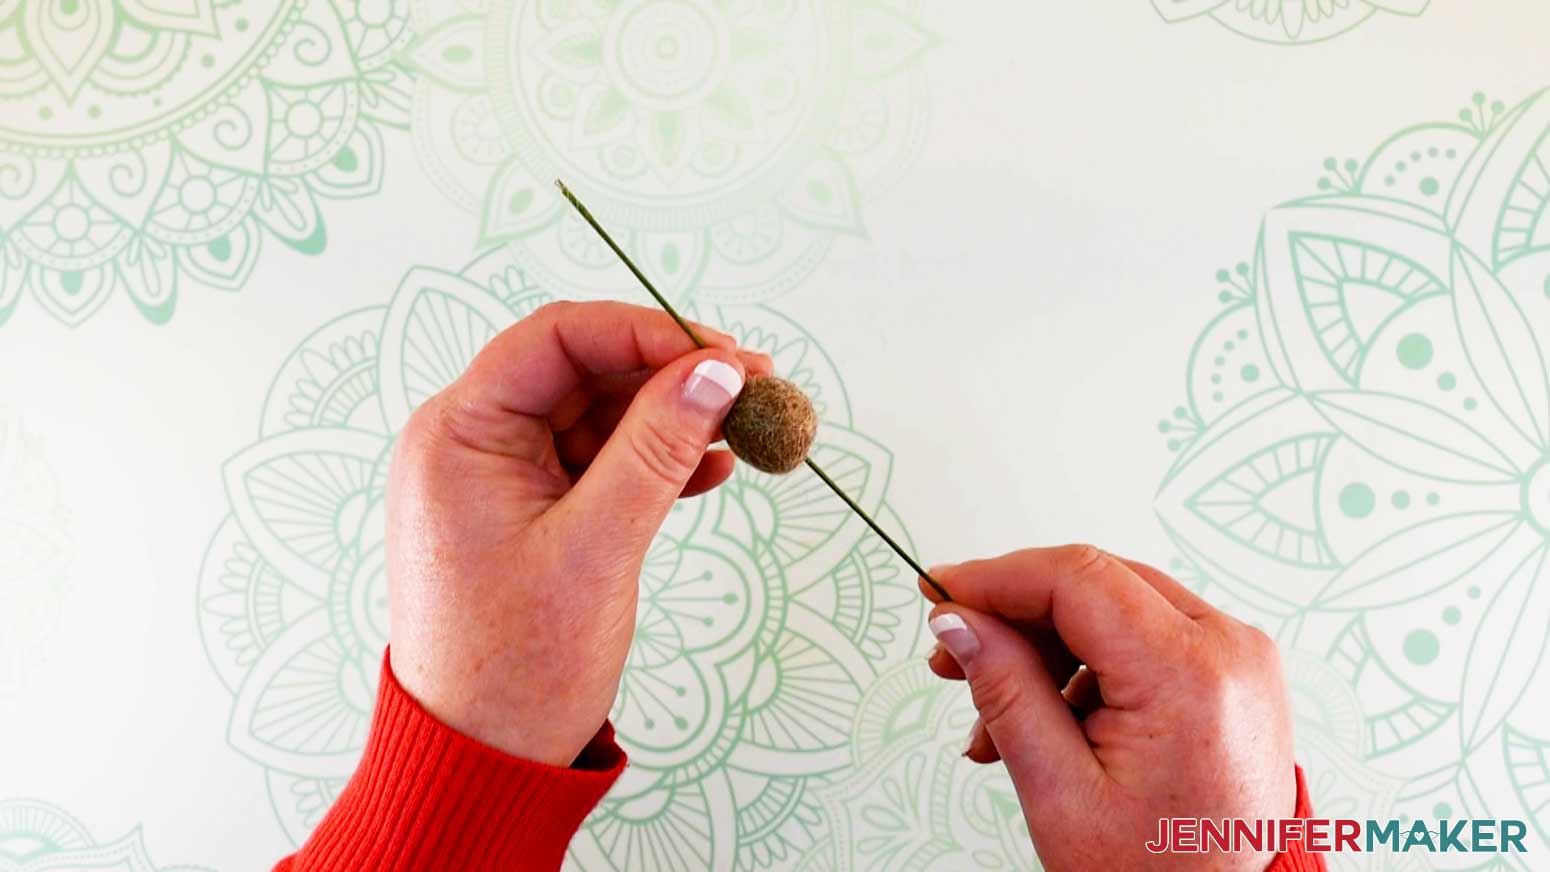
Line up a piece of 14 Gauge Green Paper Wrapped Floral Stem Wire to the hole and feed it through. Some of the paper may not feed through at first, but keep working it until both the wire and paper are through the hole.
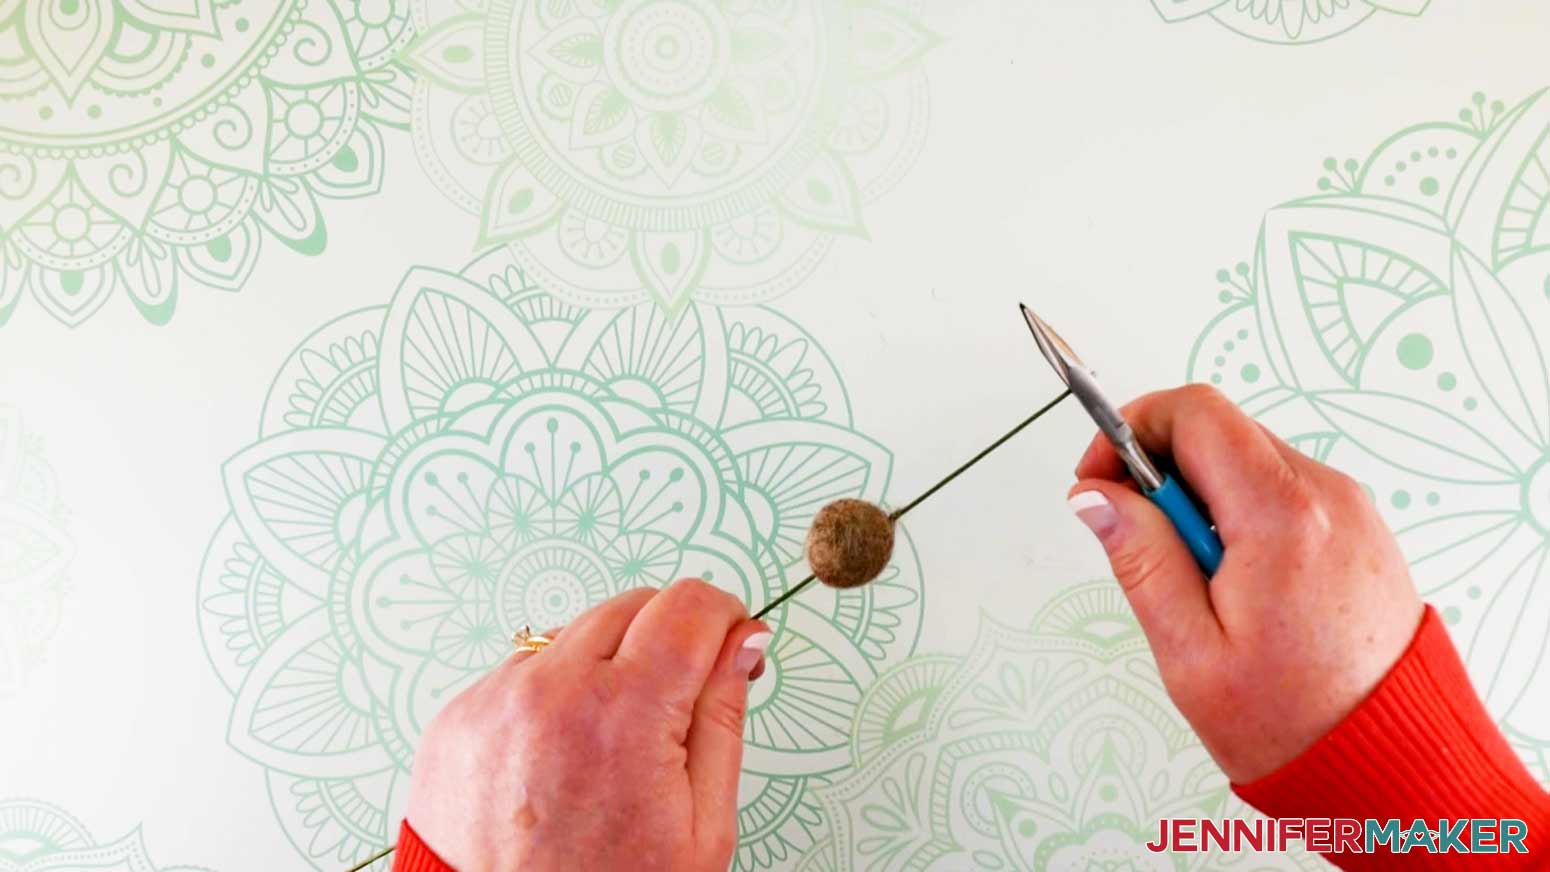
Using your wire cutters, trim off the end of the wire where the paper wrapping is damaged.
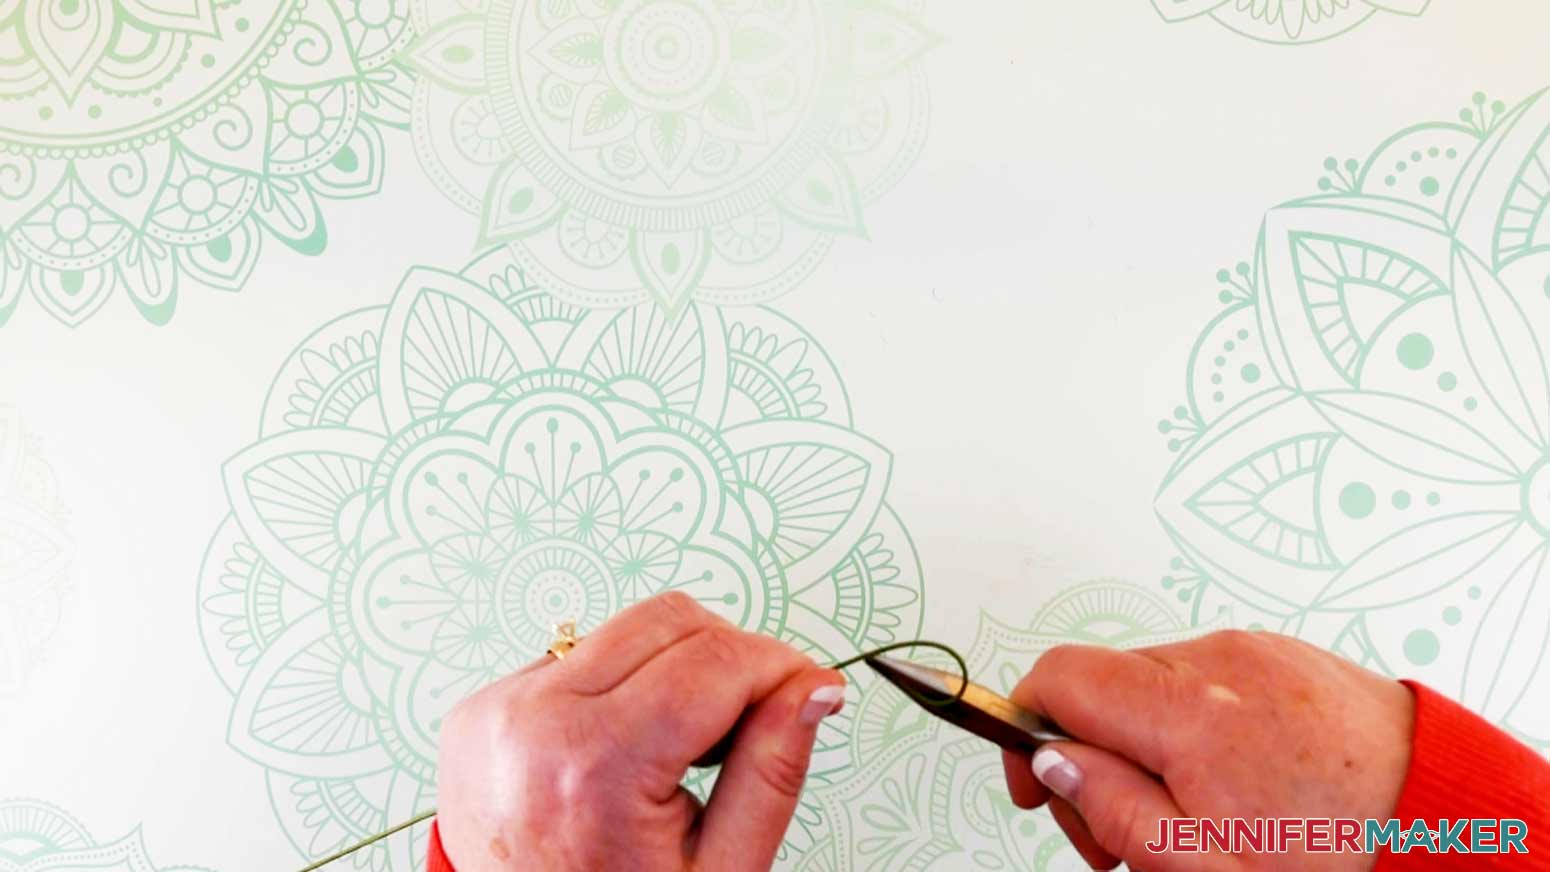
Position the wool ball a few inches down the wire. Use your wire pliers to curl the top of the wire (the part above the flower fairy doll’s head) to make a whimsical curlicue hook!
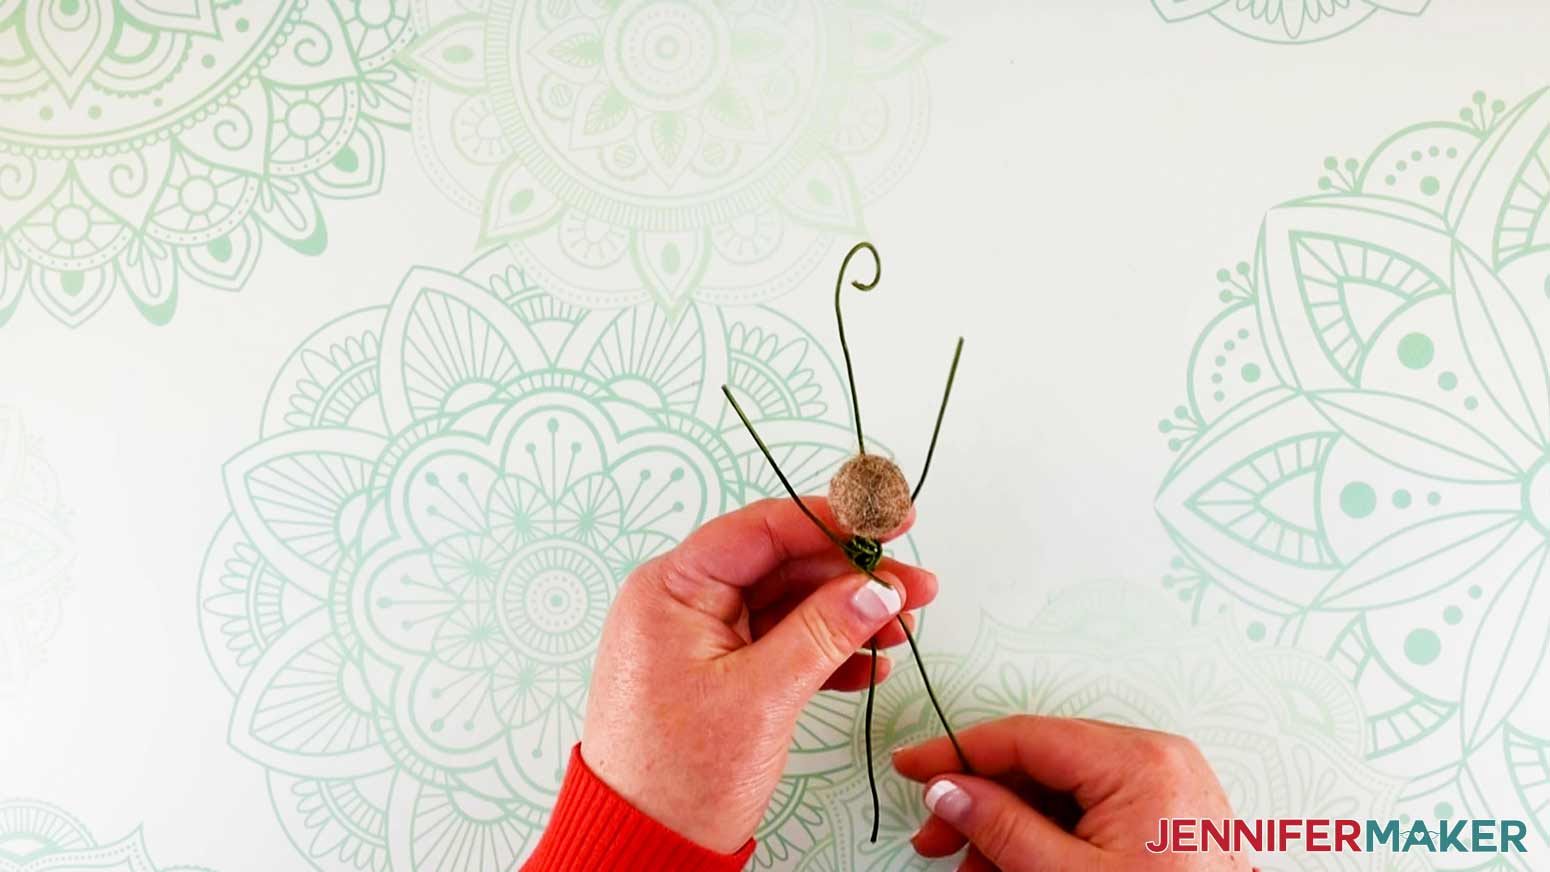
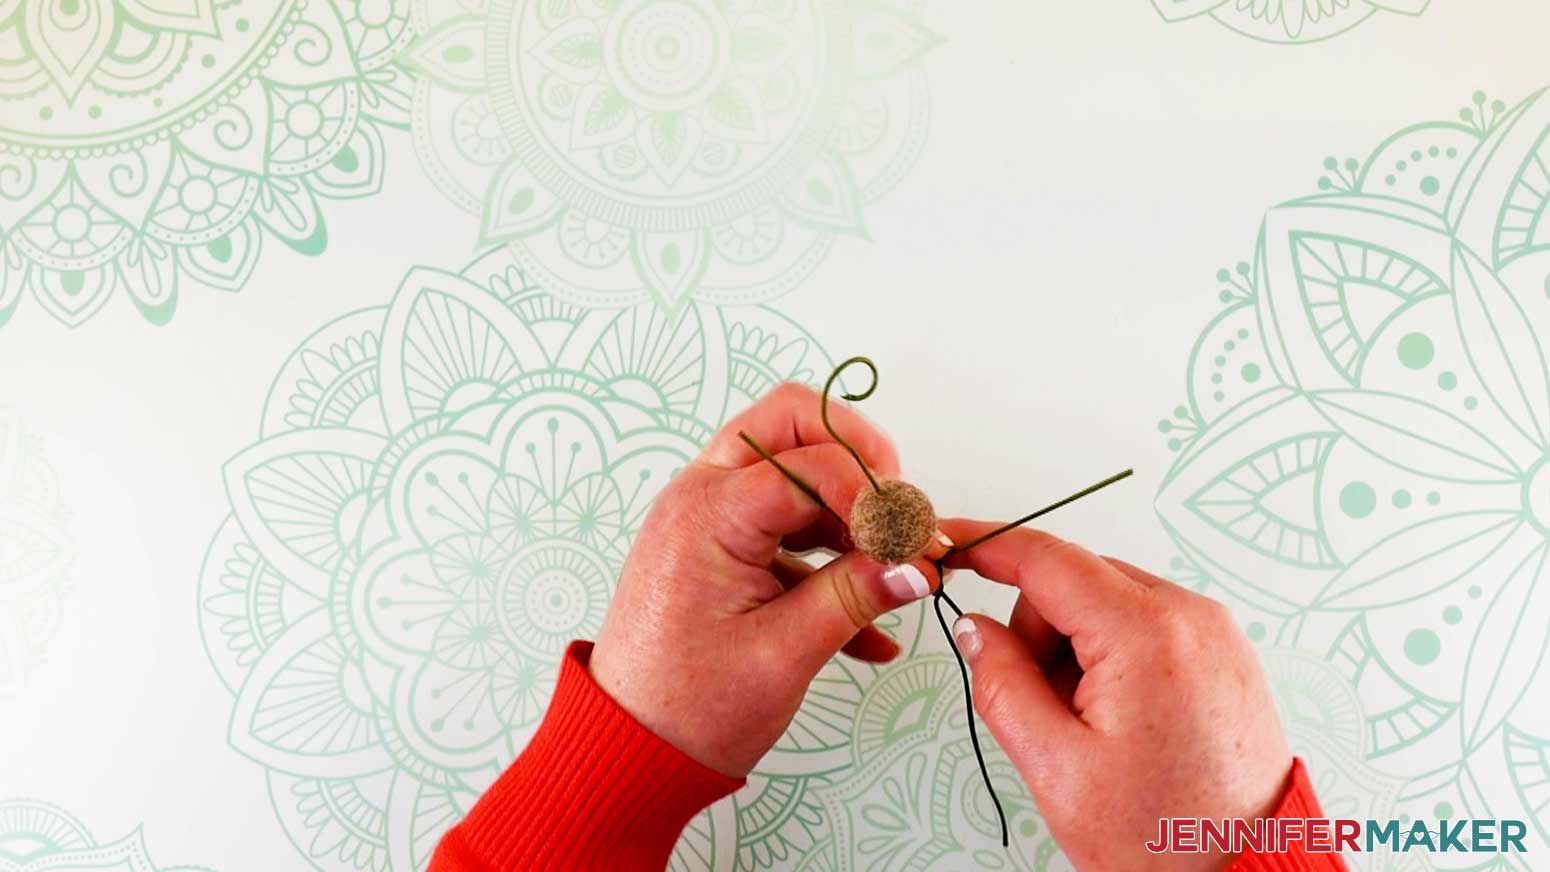
Now, take your second piece of wire and cut it in half.

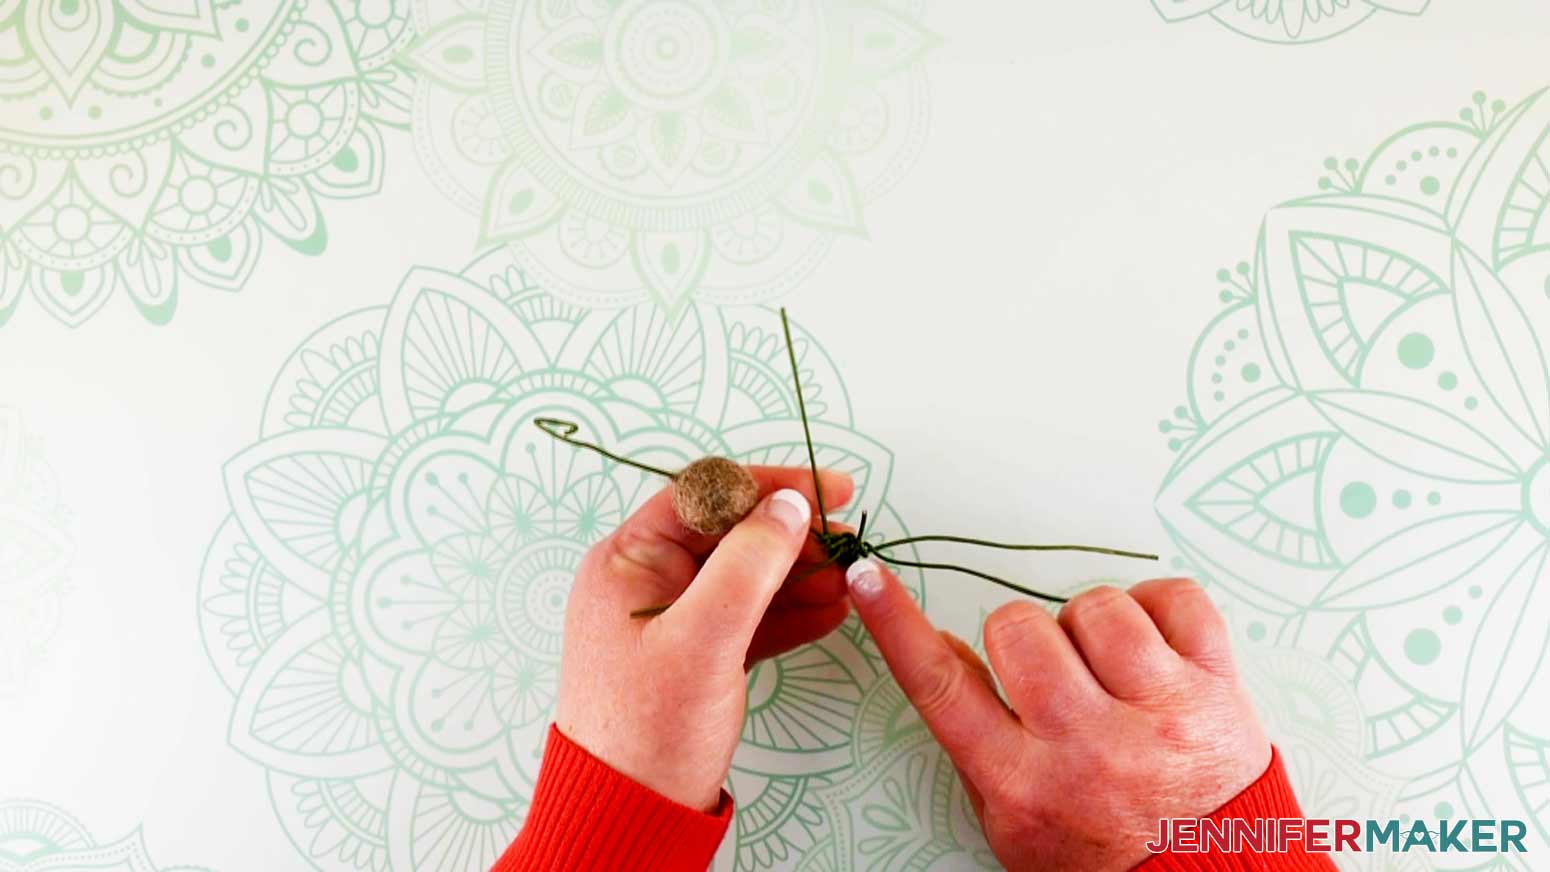
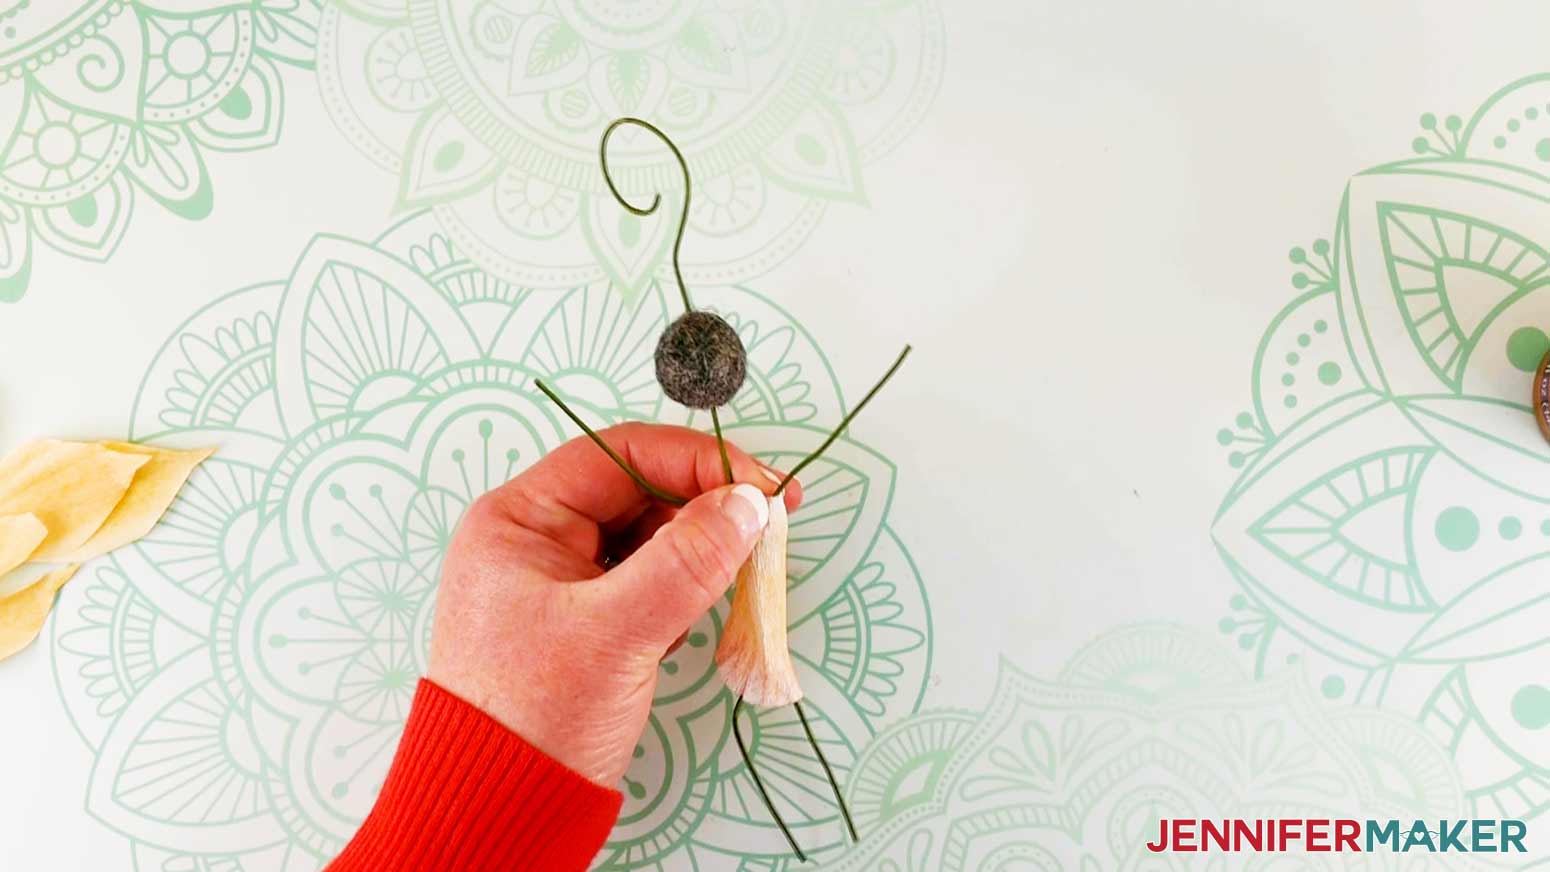
Take one of the halves and align it perpendicular to and behind the body wire so you have a "T" shape. Allow three inches for the arm, and curl the remaining wire around the central body wire a couple of times. Bring the end of the wire parallel to the body wire. This end will be one of the legs.
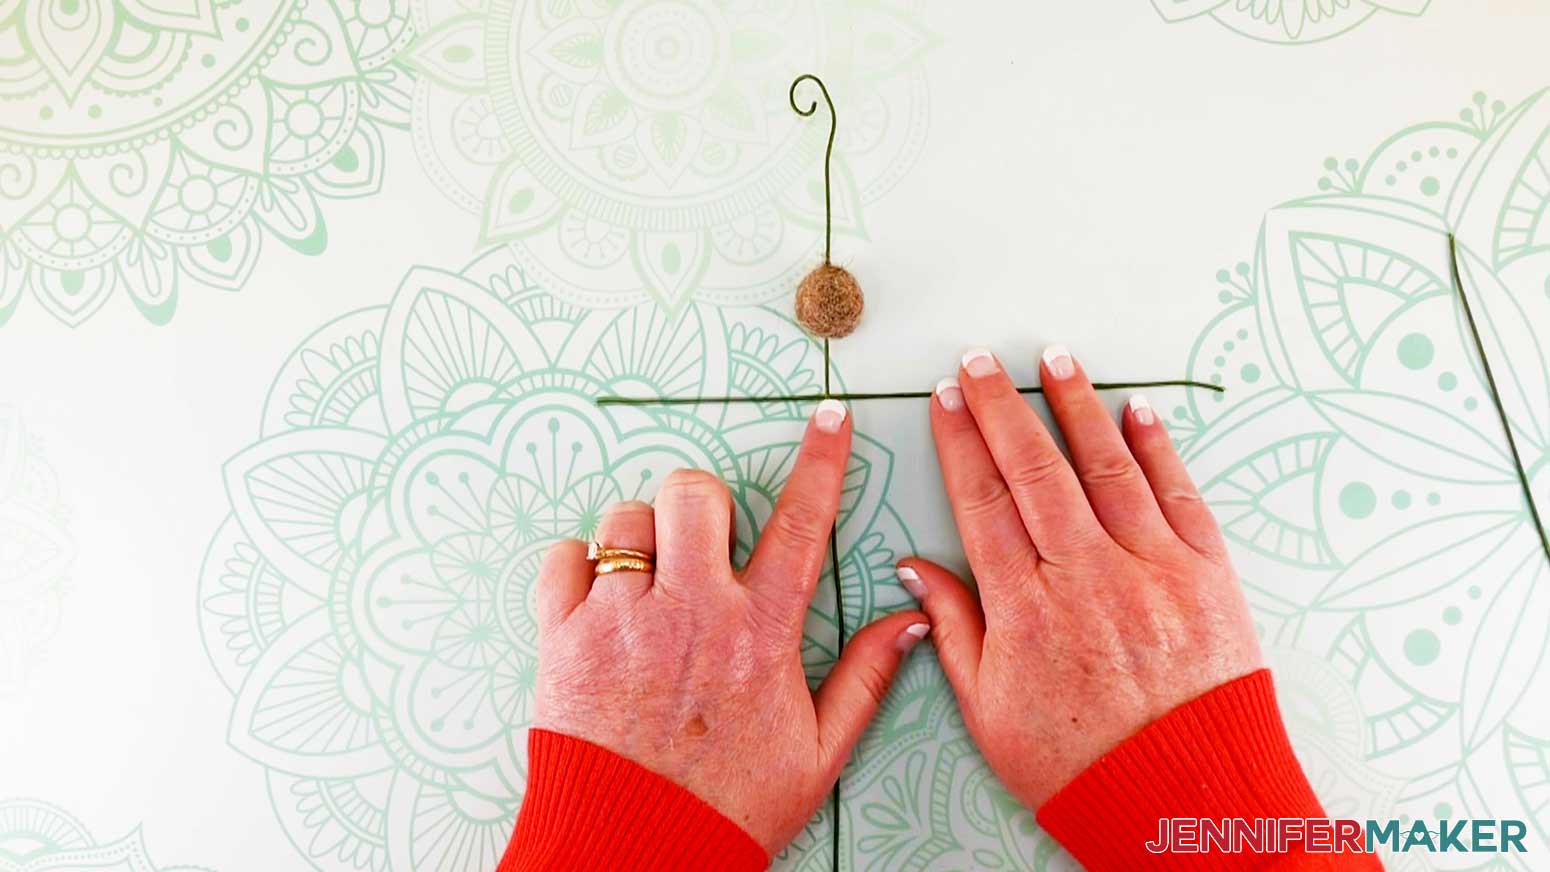

Using the other piece of cut wire, repeat the process to make the other arm and leg.
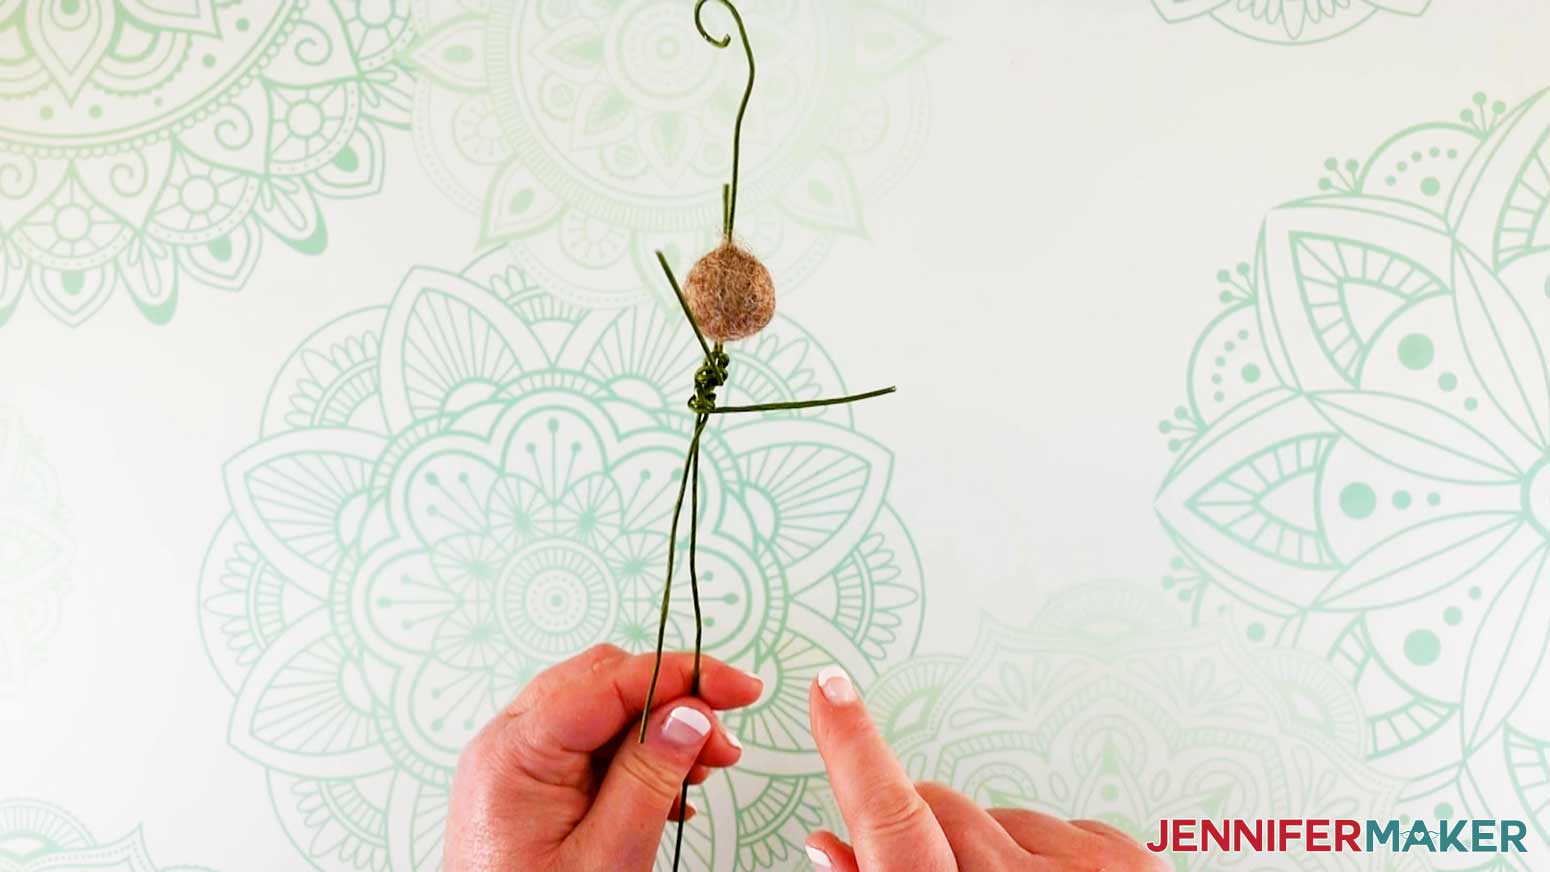
Making sure your wool ball is positioned a couple of inches from the curly top of the wire and push the arms upward until they rest just under the ball.
When everything is aligned correctly, pull the central body wire up and back, almost like you’re making a tail.
Wrap the tail up and around all the wires a few times to tighten everything into place.
Trim the excess wire using your wire cutters and pinch in any stray ends.
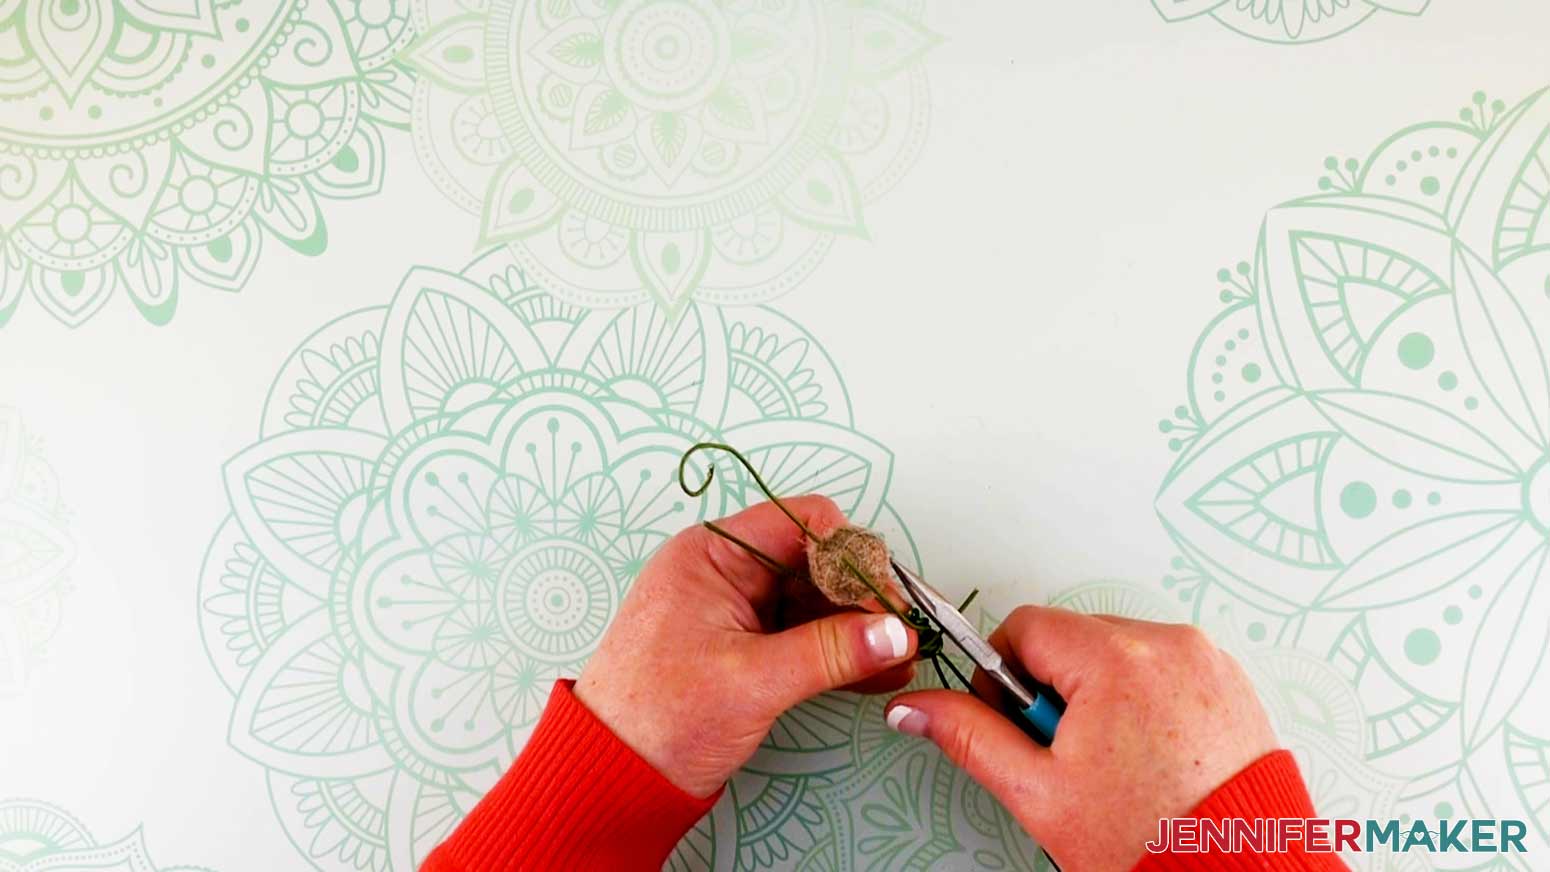
Now we have the Flower Fairy Doll basic head and body complete!
STEP 4: MAKE THE FLOWER FAIRY DOLL SKIRT
Once the Fairy Doll body is ready, it’s time to decorate it with the crepe paper pieces. I’ll walk you through the steps for decorating both the Peony Flower Fairy Doll and the Daffodil Flower Fairy Doll.
PEONY FLOWER FAIRY DOLL
To make the Peony Fairy, we first shape all the crepe paper pieces into realistic looking petals and leaves. To do this, gently grasp the middle edge of each petal and pull carefully to “cup” them. The crepe paper will stretch and form a depression in the paper and the resulting petal will look so realistic!
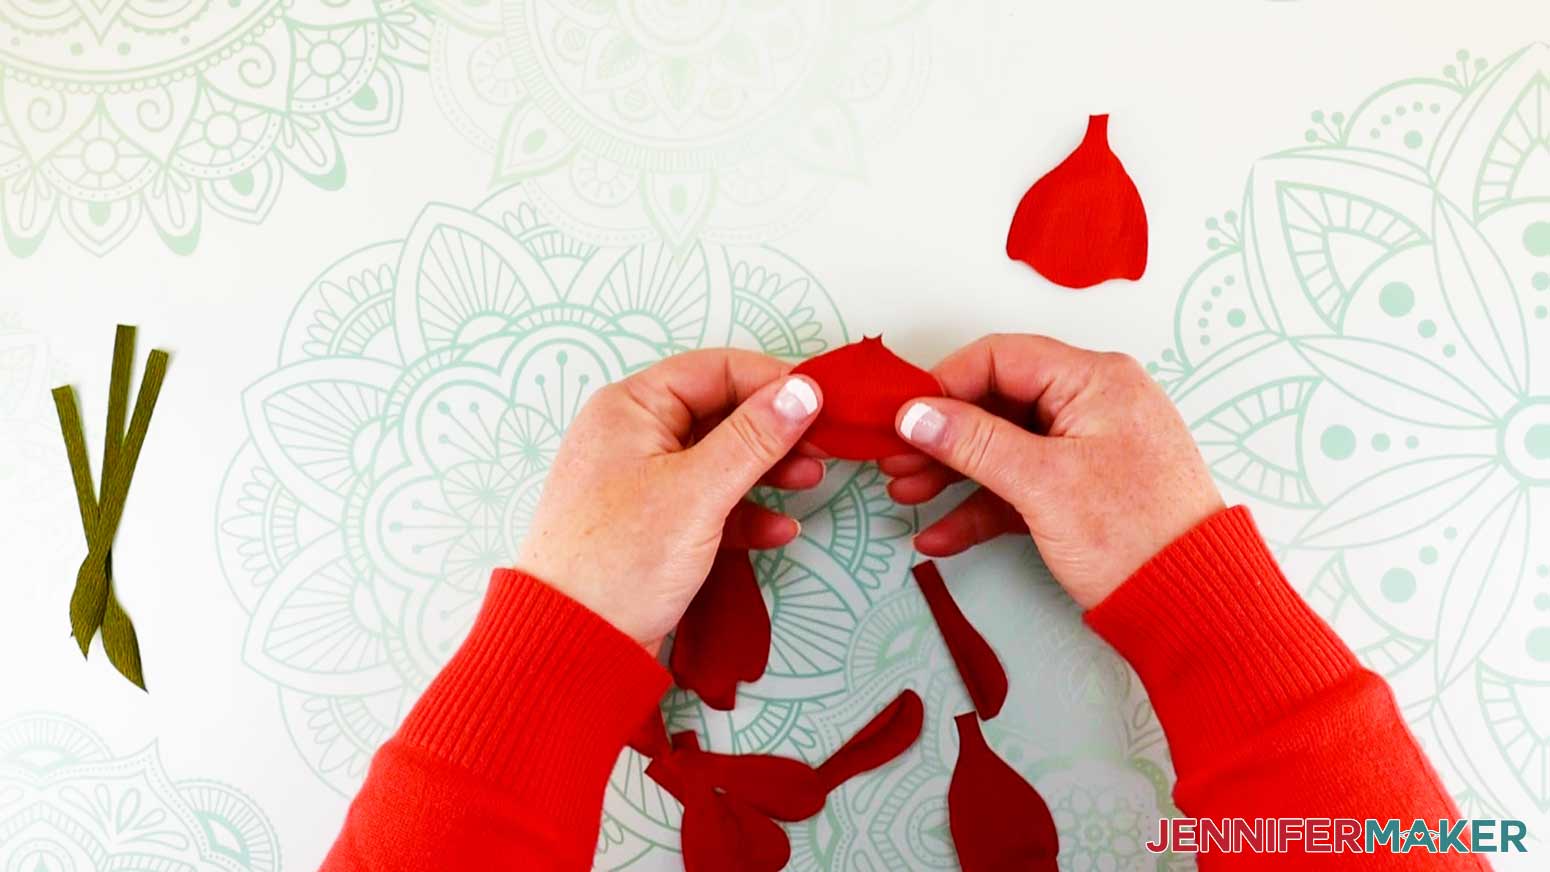
Repeat the process for shaping the leaf part of the bodice leaves.

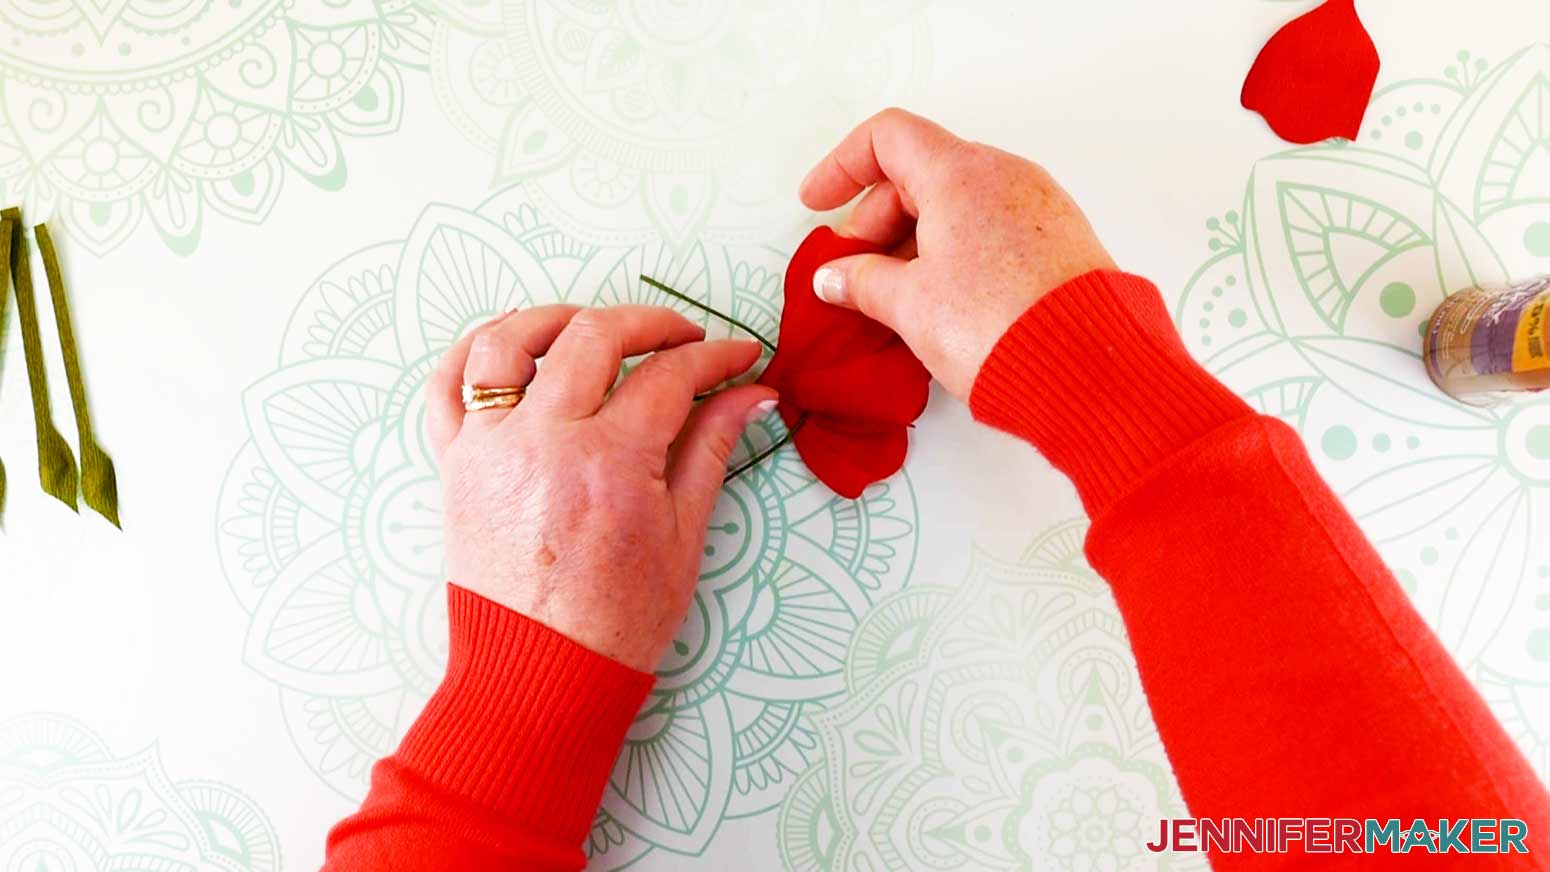
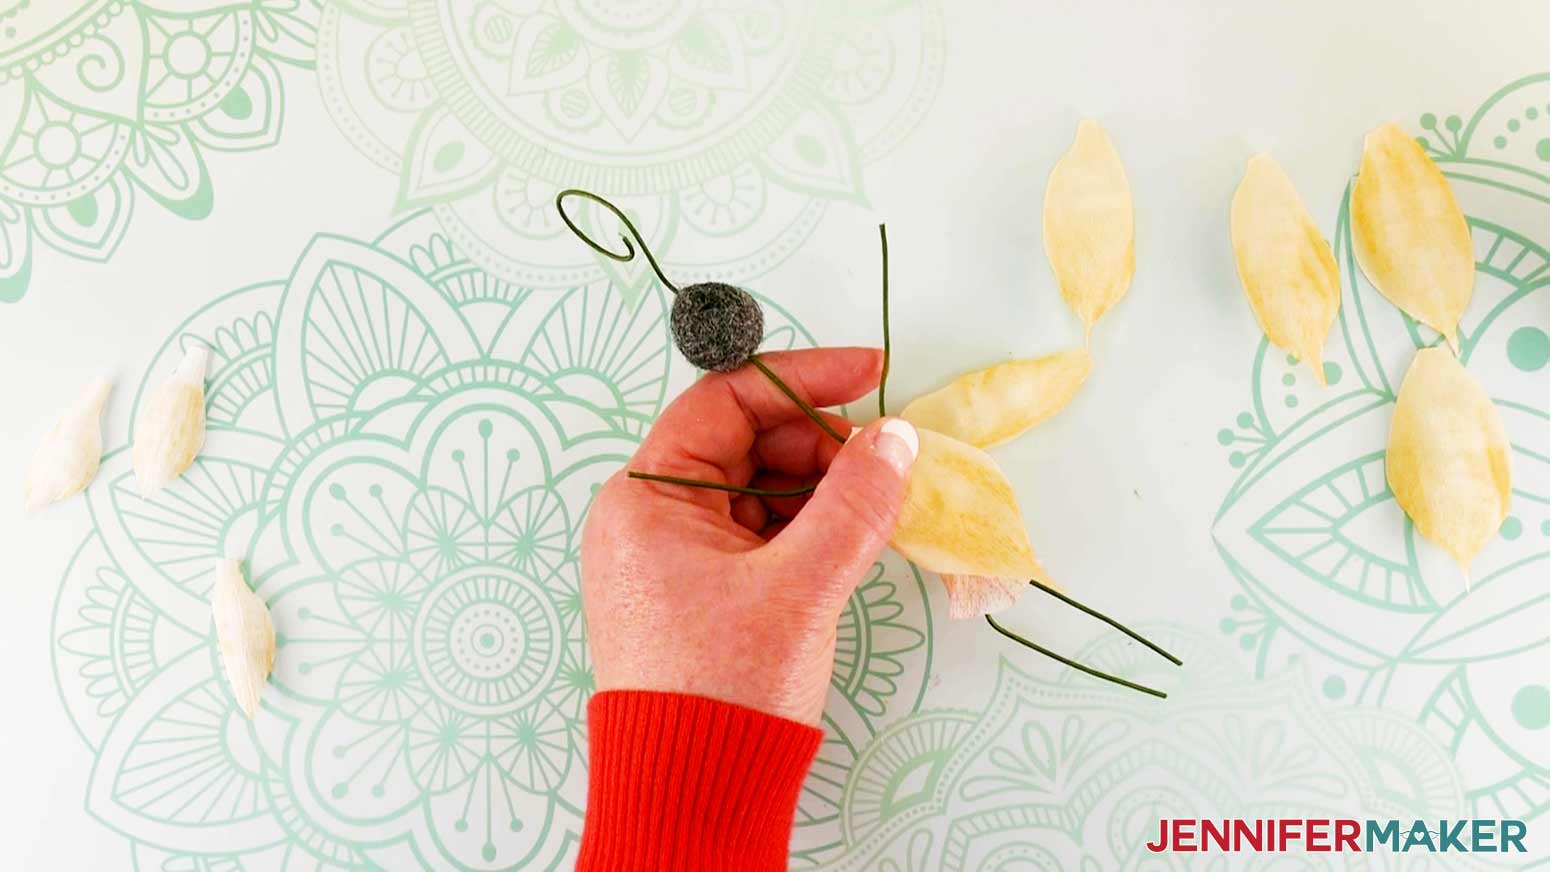
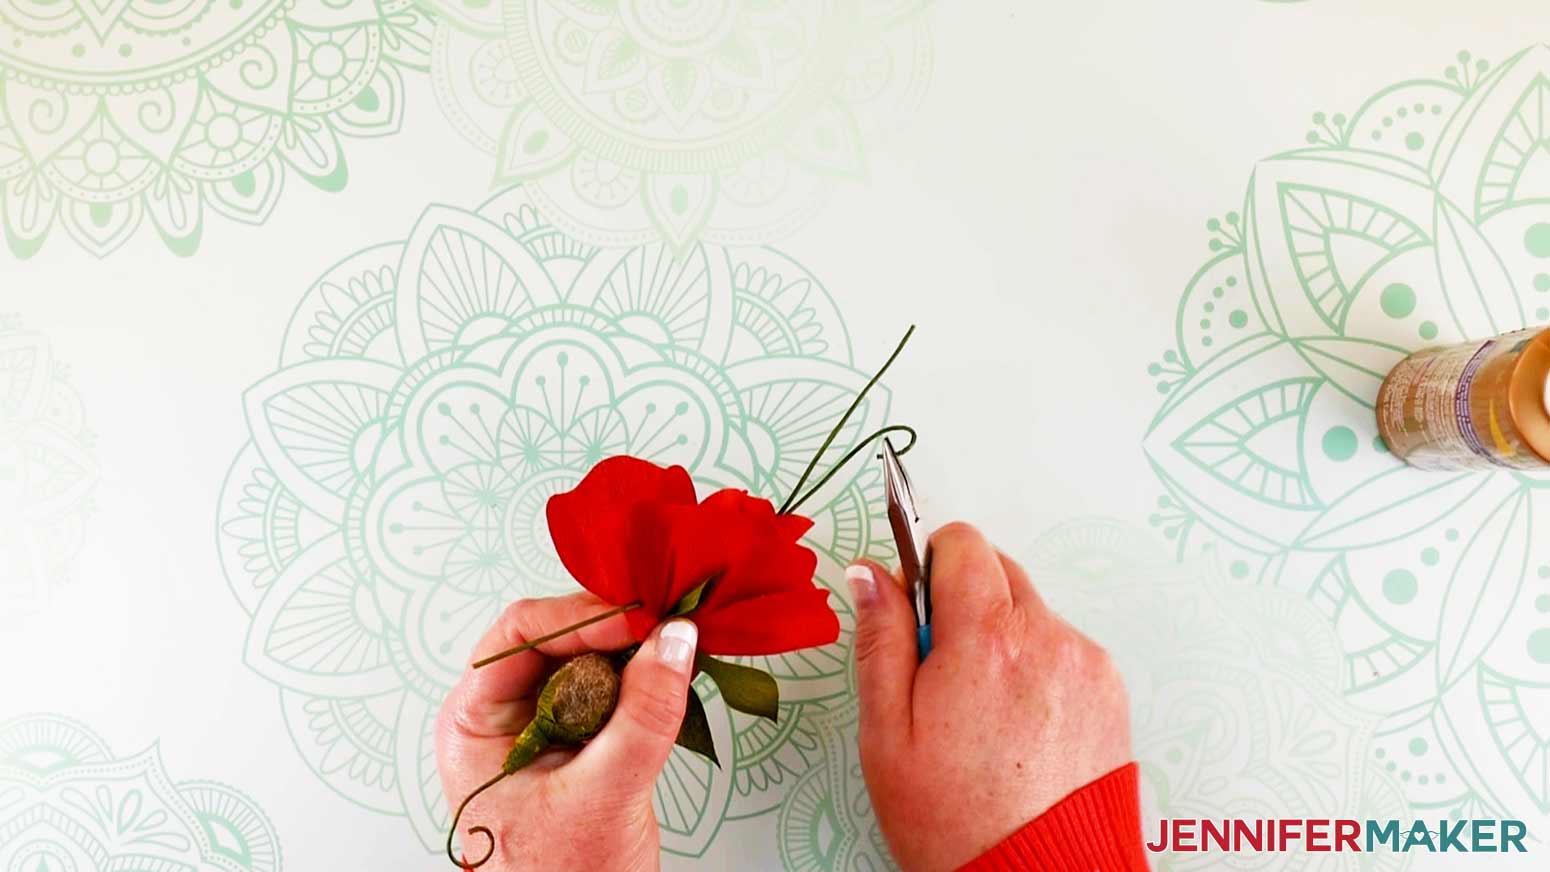
Once all the petals and leaves are shaped, it’s time to glue them to the Flower Fairy Doll body. Start with the smaller petals first. Dab a bit of glue on the base of a petal and align it just under the doll’s head. Press it onto the wire until it adheres, making sure that the petal’s cup curves inward around the doll’s body.
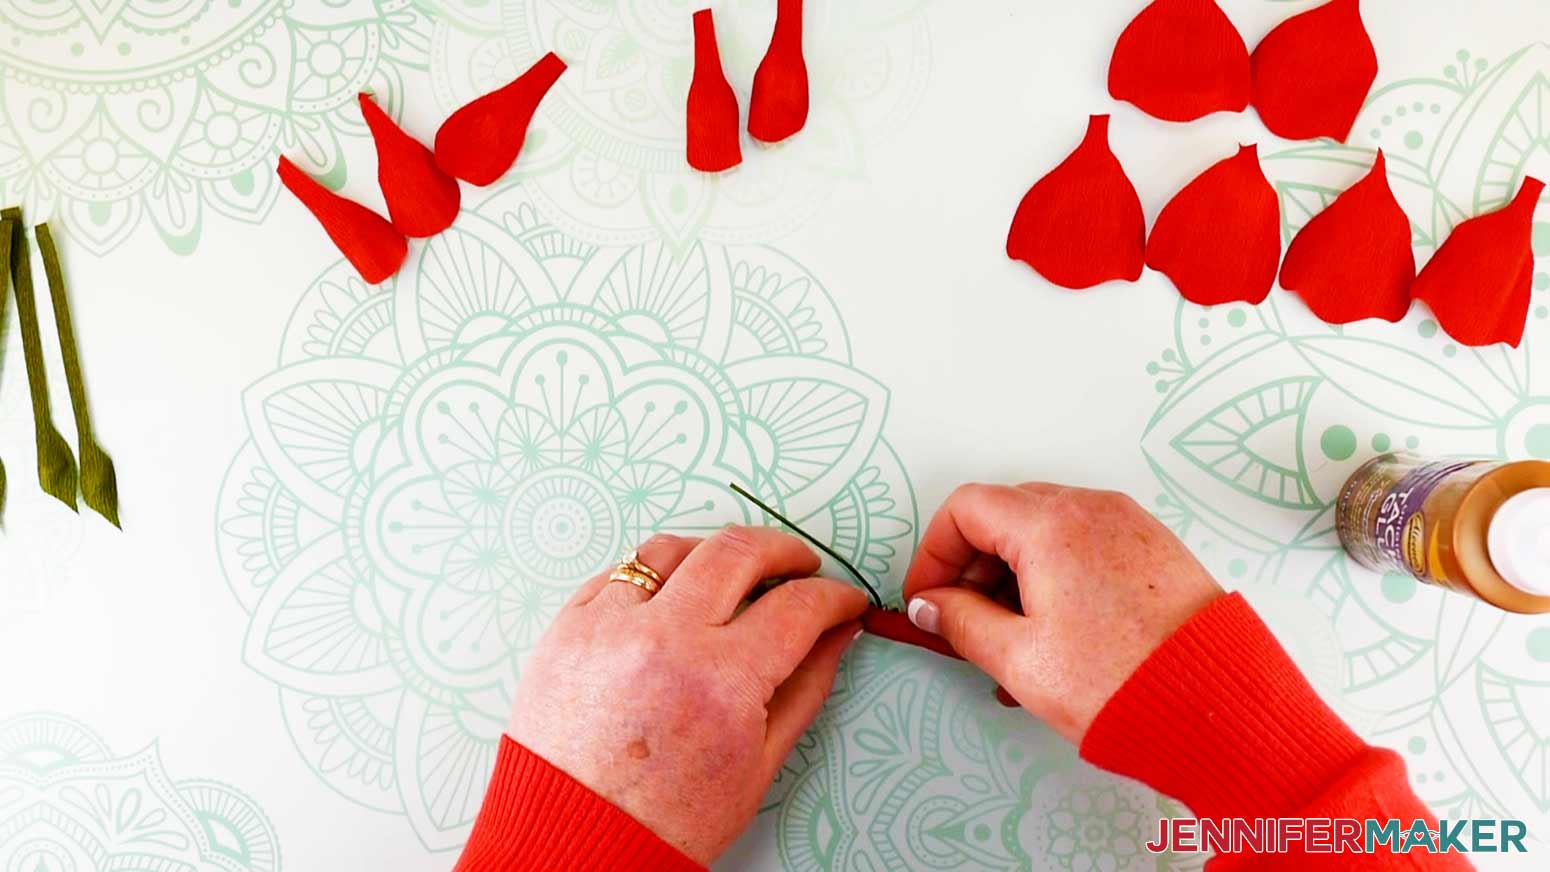
Continue gluing the smaller petals onto the wire. You’ll want to slightly overlap them so they look realistic. I like to attach them in this order: the front petal first, then slightly overlapping the front side petals over the first petal. I then repeat the same process for the back.

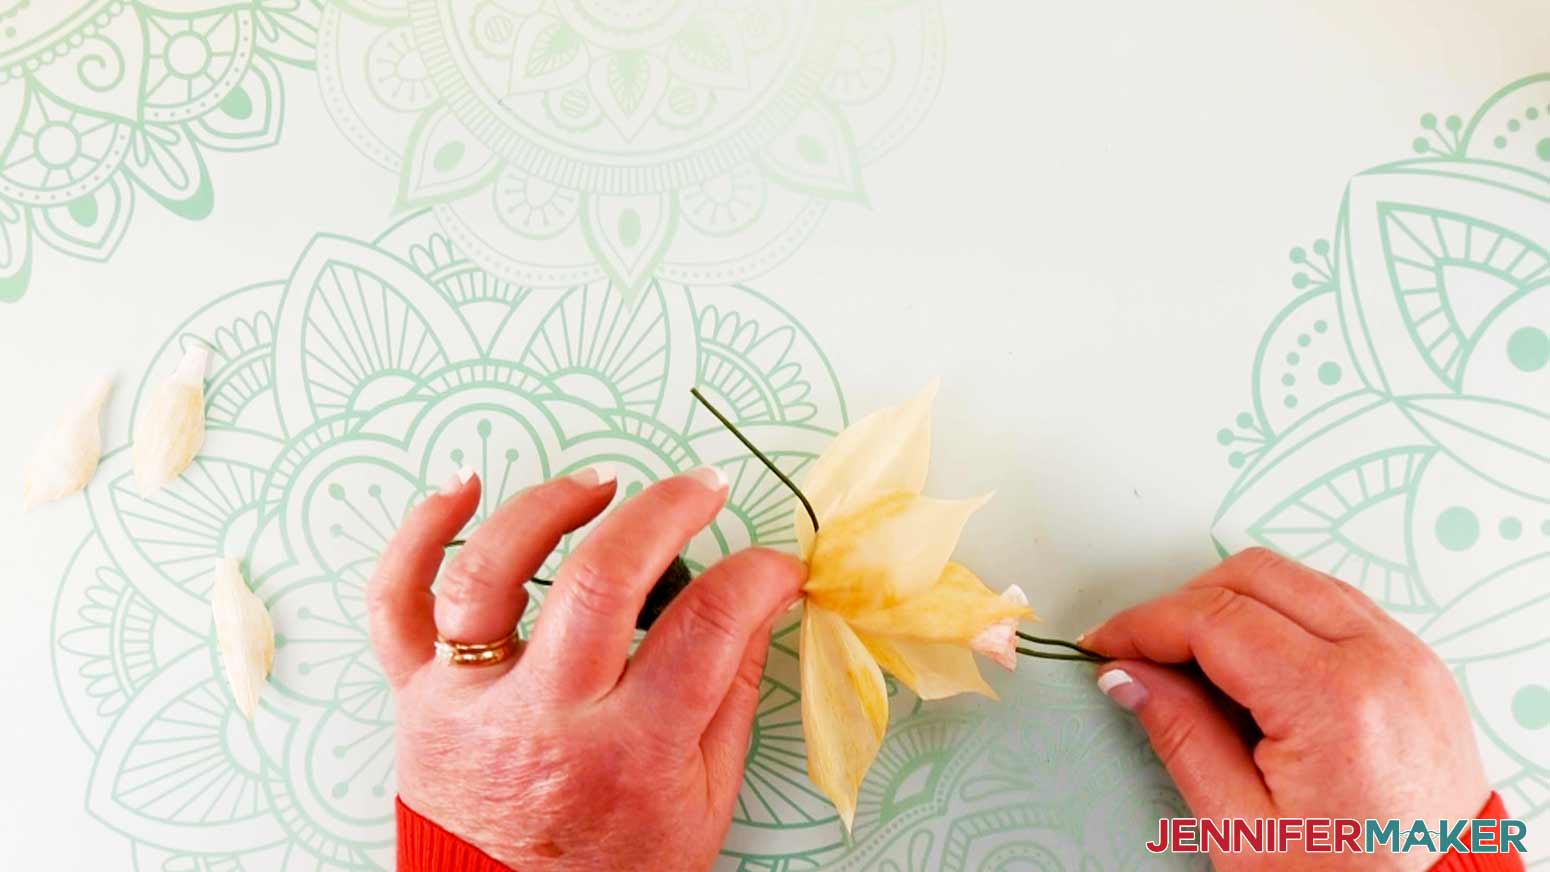
Once all the small petals are attached, we start attaching the large petals. I start with the front petal and follow the same process of overlapping them until all petals are attached.
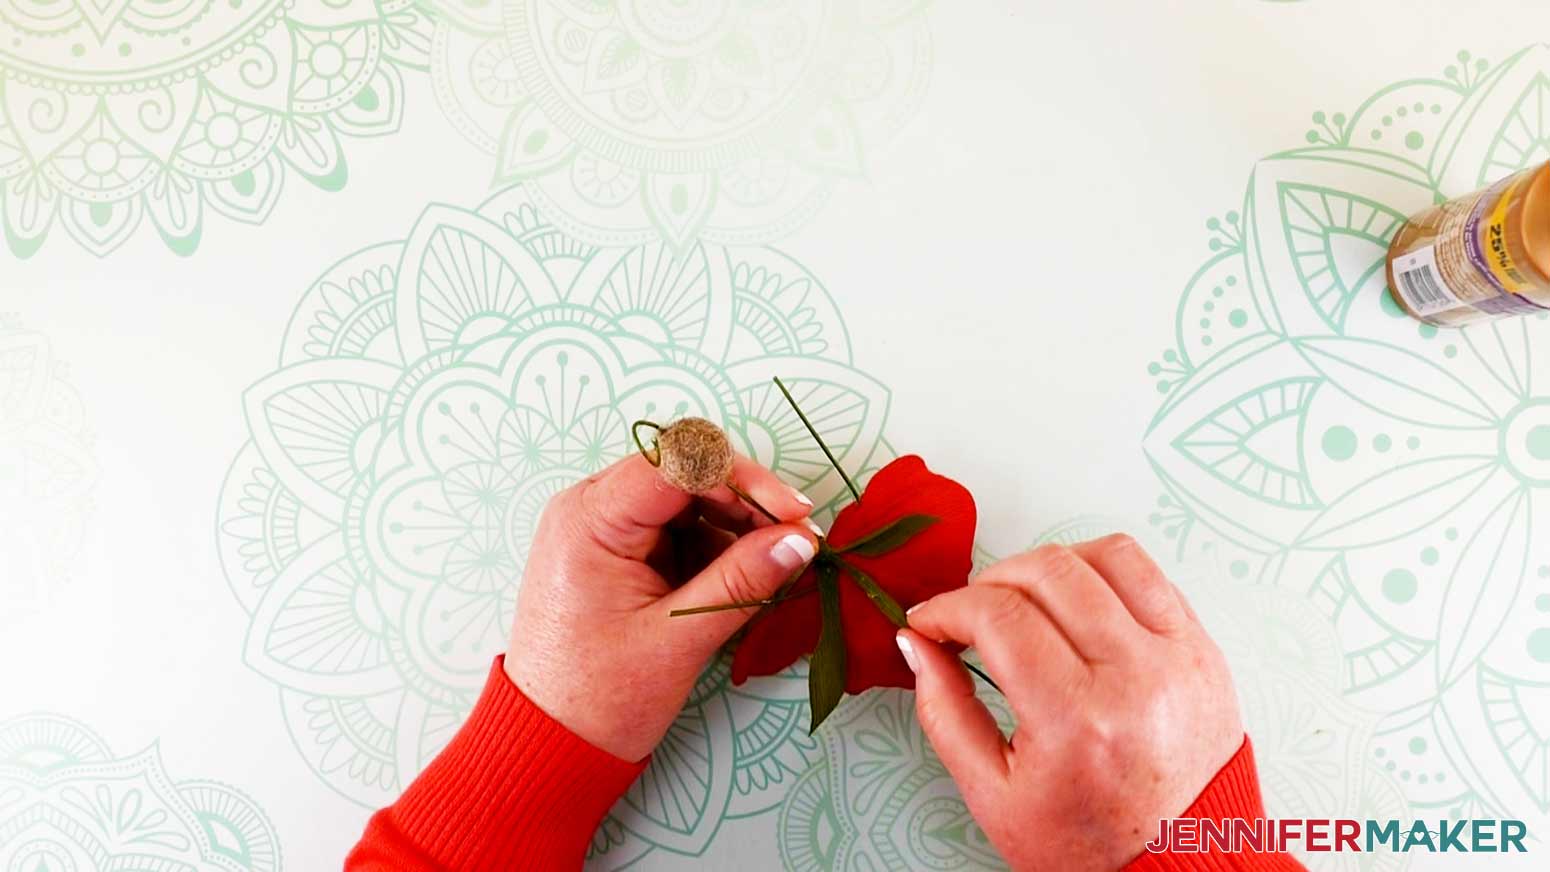
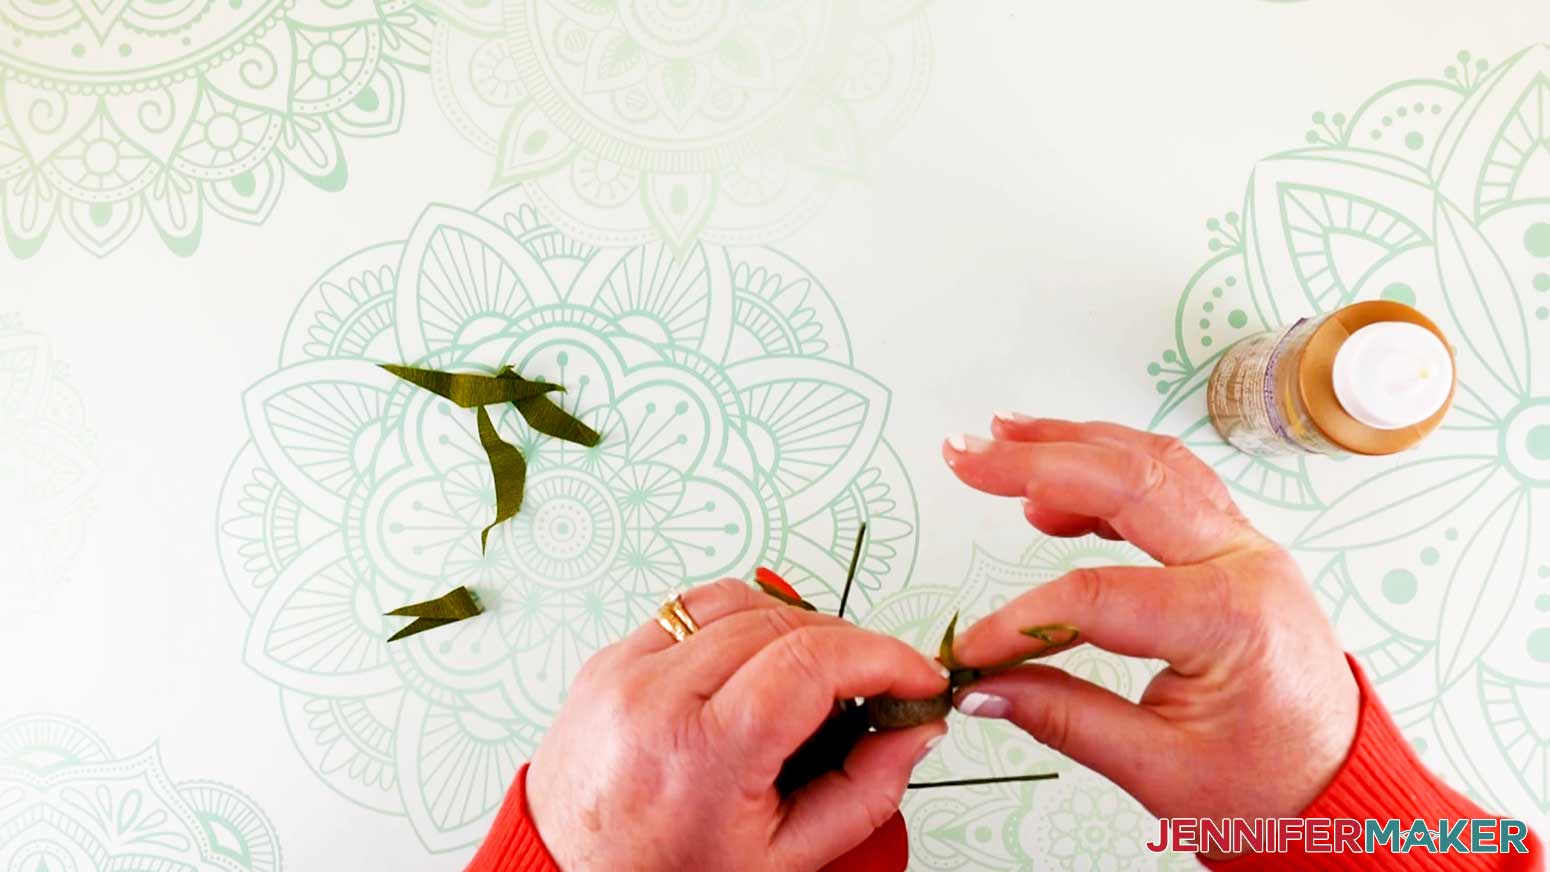
Now dab glue on the long base of a bodice leaf. Hold the leaf in place over one side of the front skirt with one hand while wrapping the long end up and around the doll’s body. The leaf will cover the ends of the petals and should reach just under the wool head.


Repeat with the remaining two leaves. Be sure to add the second one to the other side of the front of the skirt. The last one is aligned on the back of the skirt. When you’re done attaching all the bodice leaves, the bodice, and the base of all the petals, should be neatly covered.

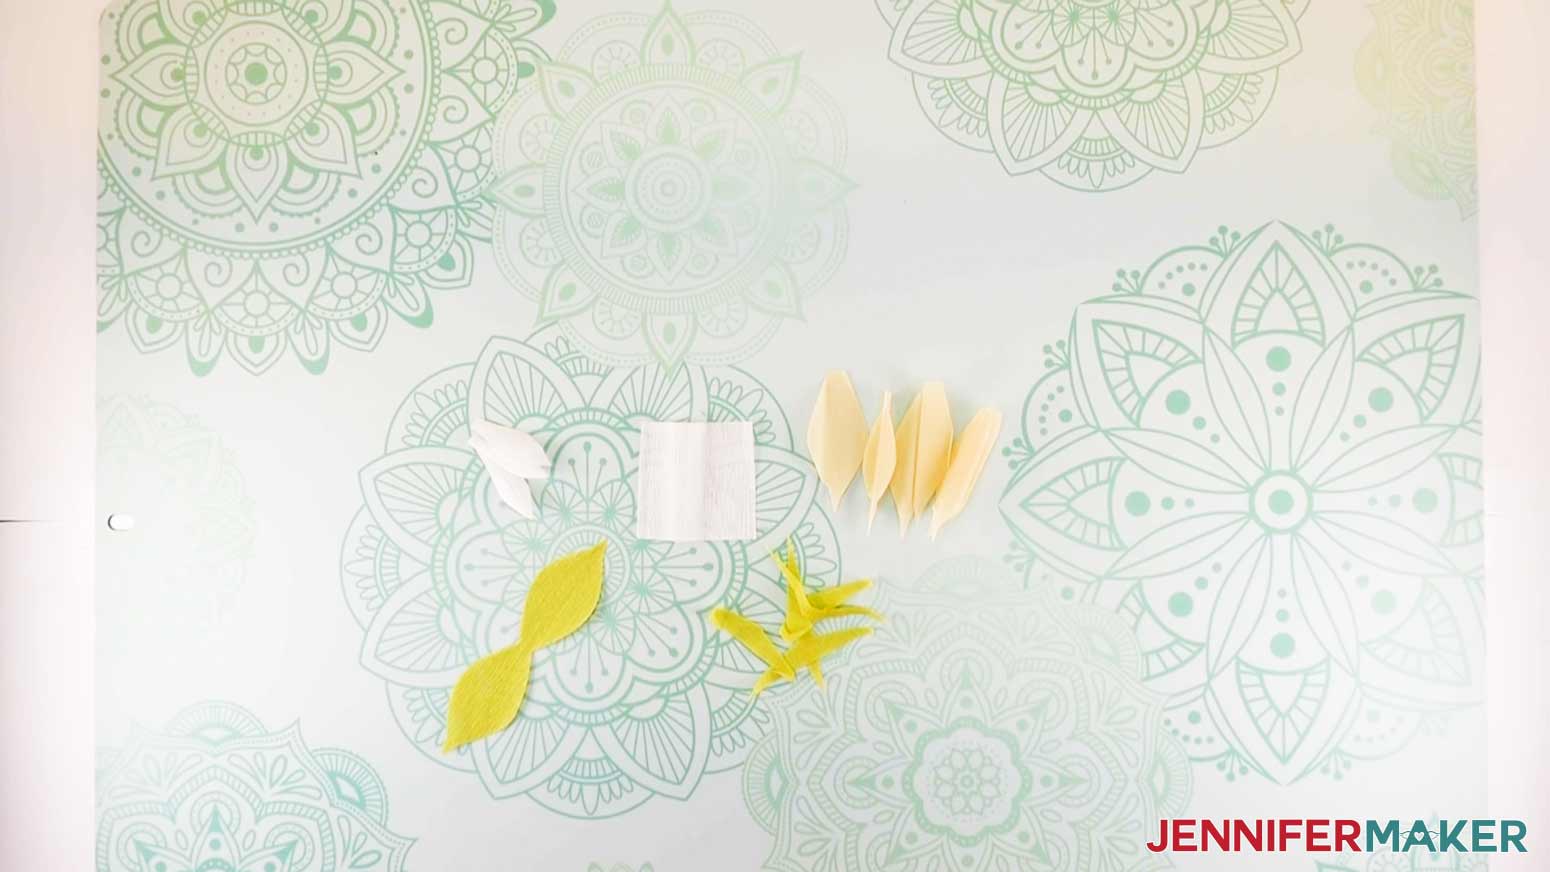
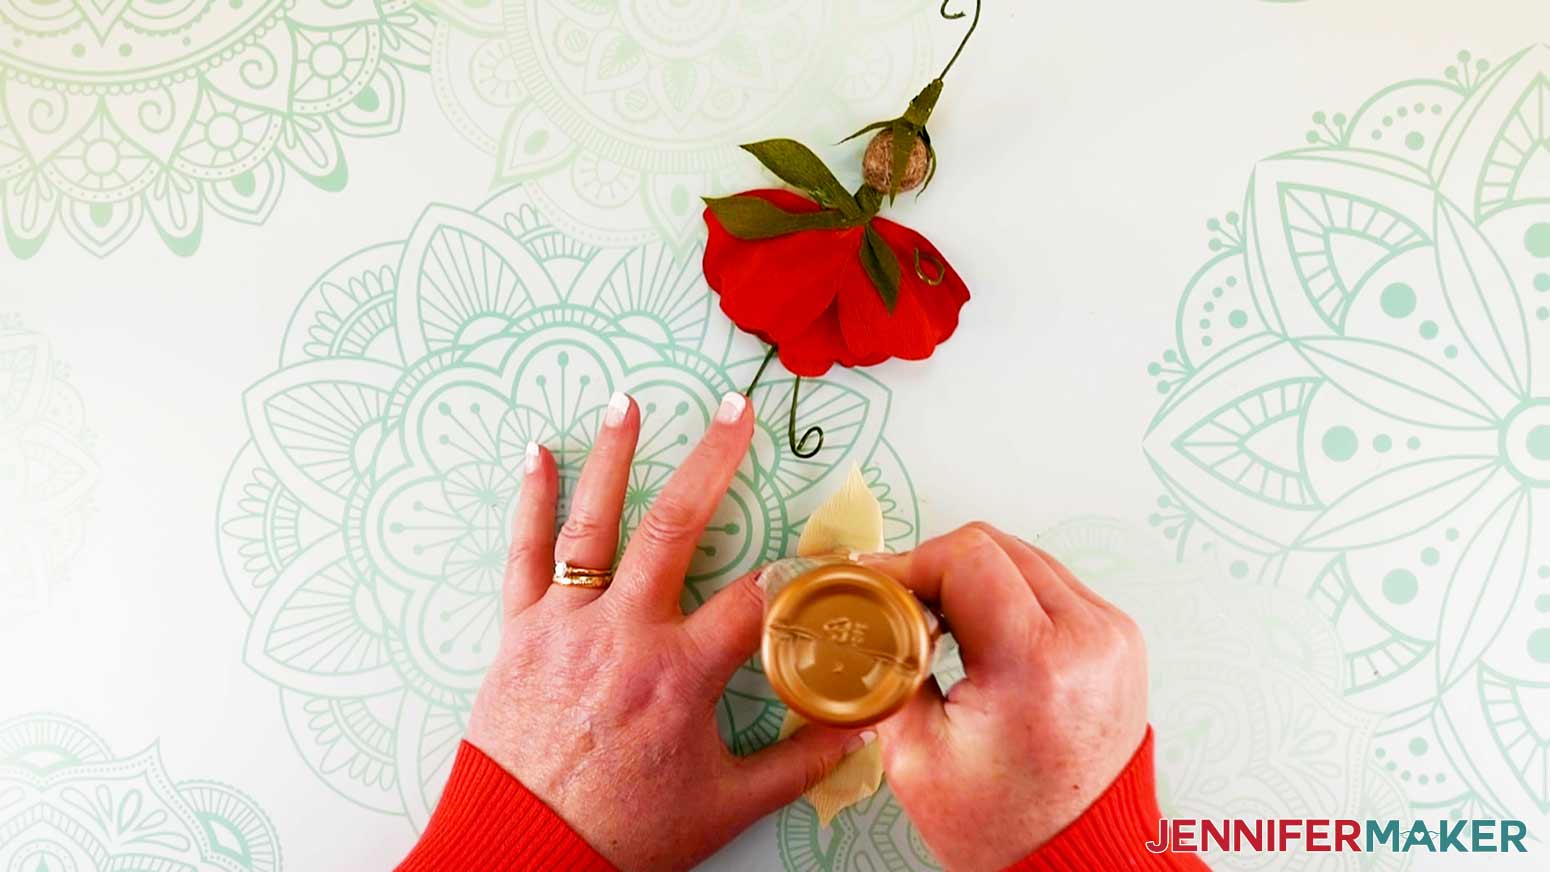
DAFFODIL FLOWER FAIRY DOLL
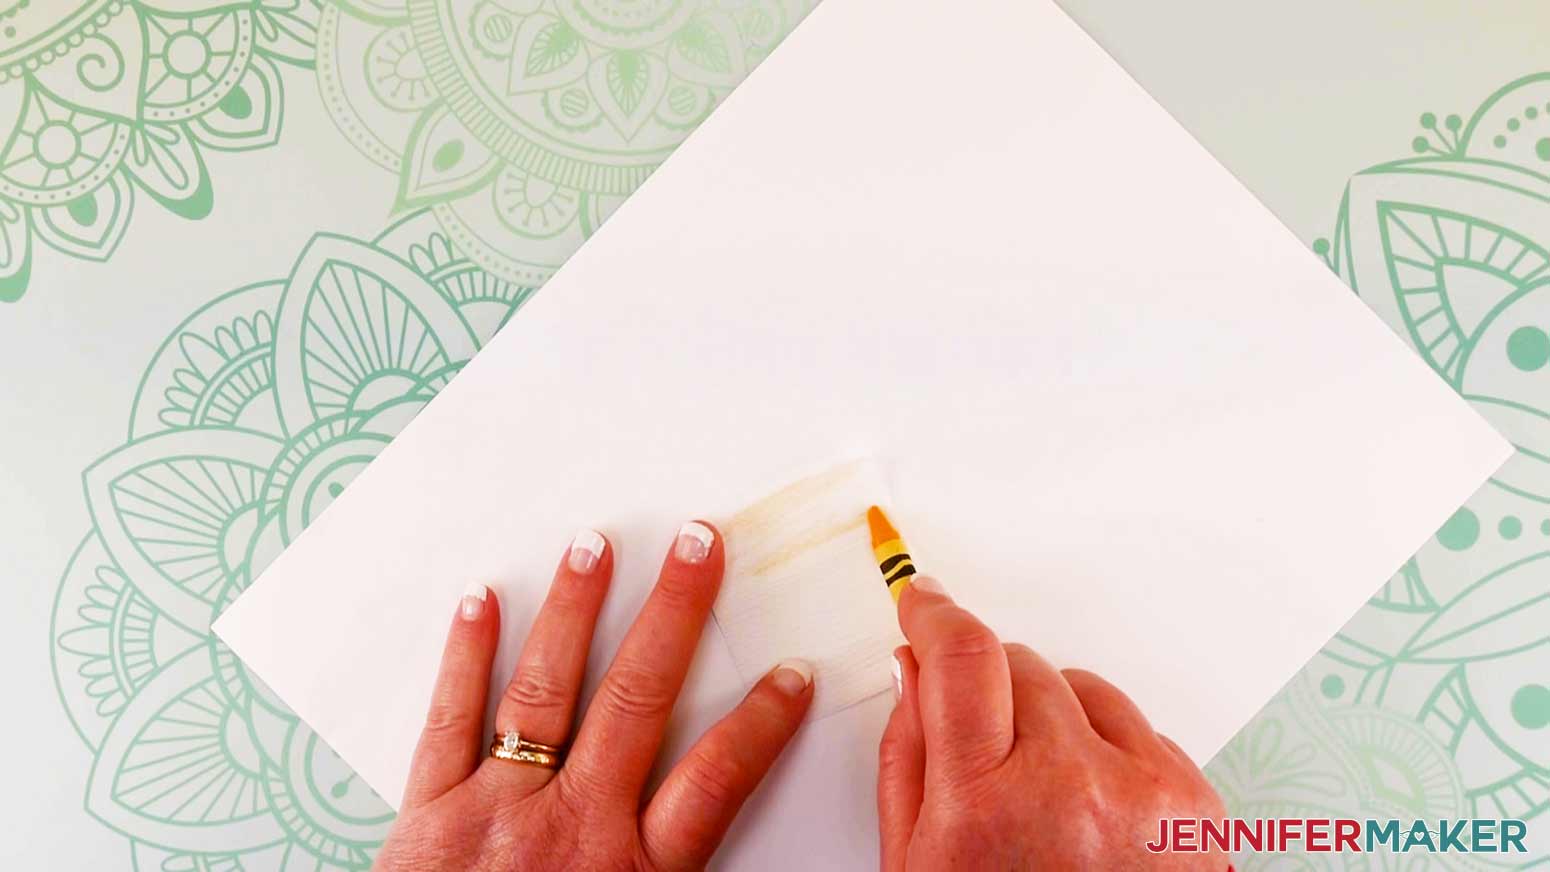
We follow similar steps to make the Daffodil Flower Fairy Doll, but a couple of parts are different. First, let’s color our crepe paper with crayons to add more detail! Take the long side of a yellow crayon to color all the petals and the rectangular skirt piece.
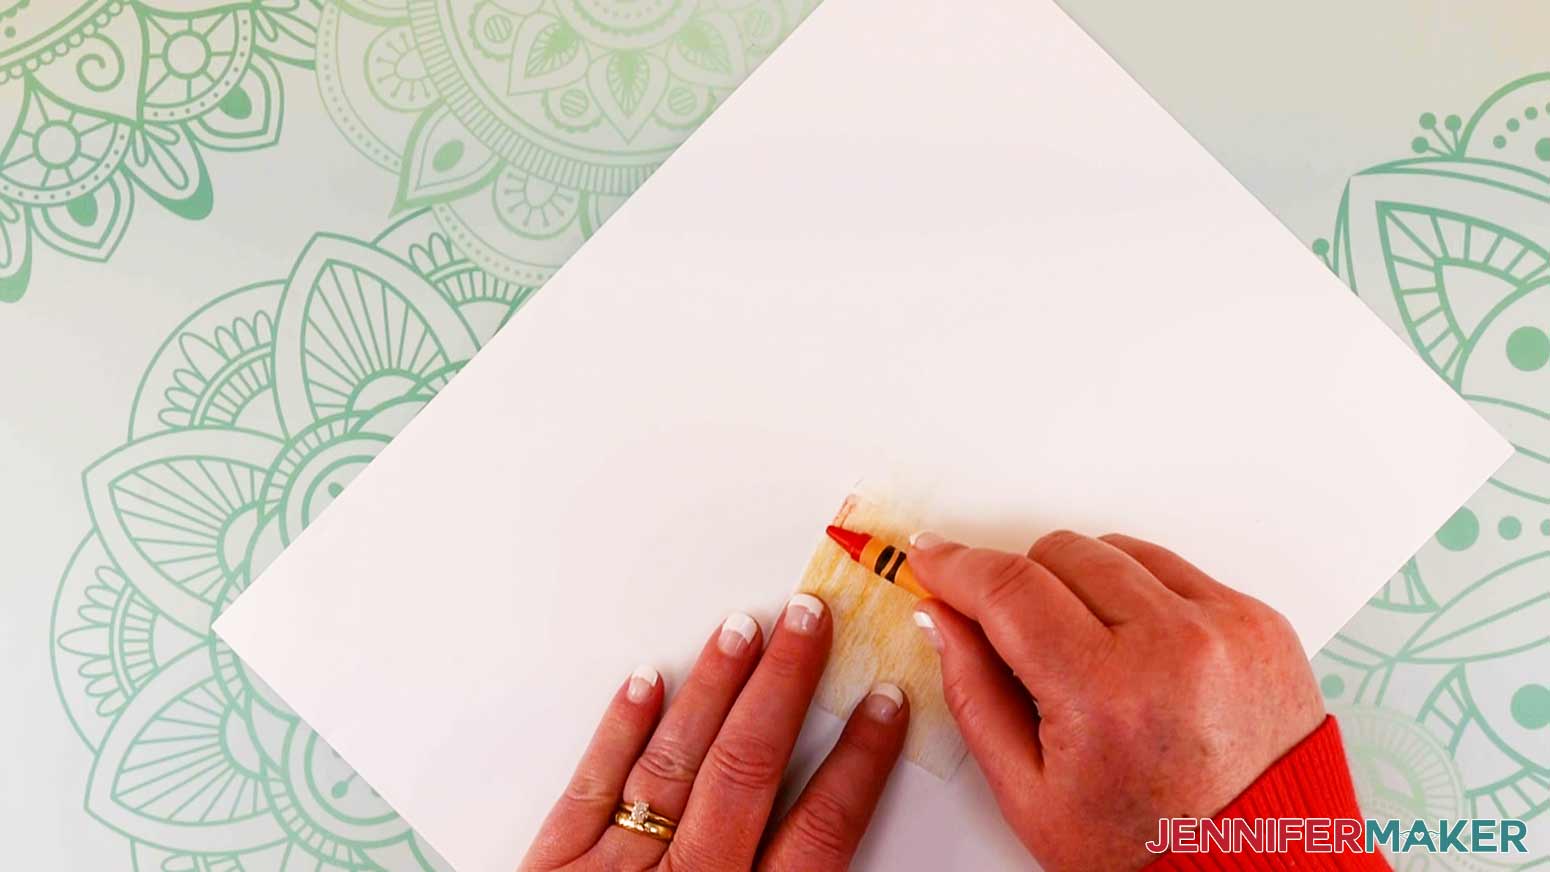
Now take an orange crayon and color only the END of the long edge of the rectangular skirt. You may want to add some red detail, too.
You may also choose to add a little orange detail to the small petals, too, as I did.
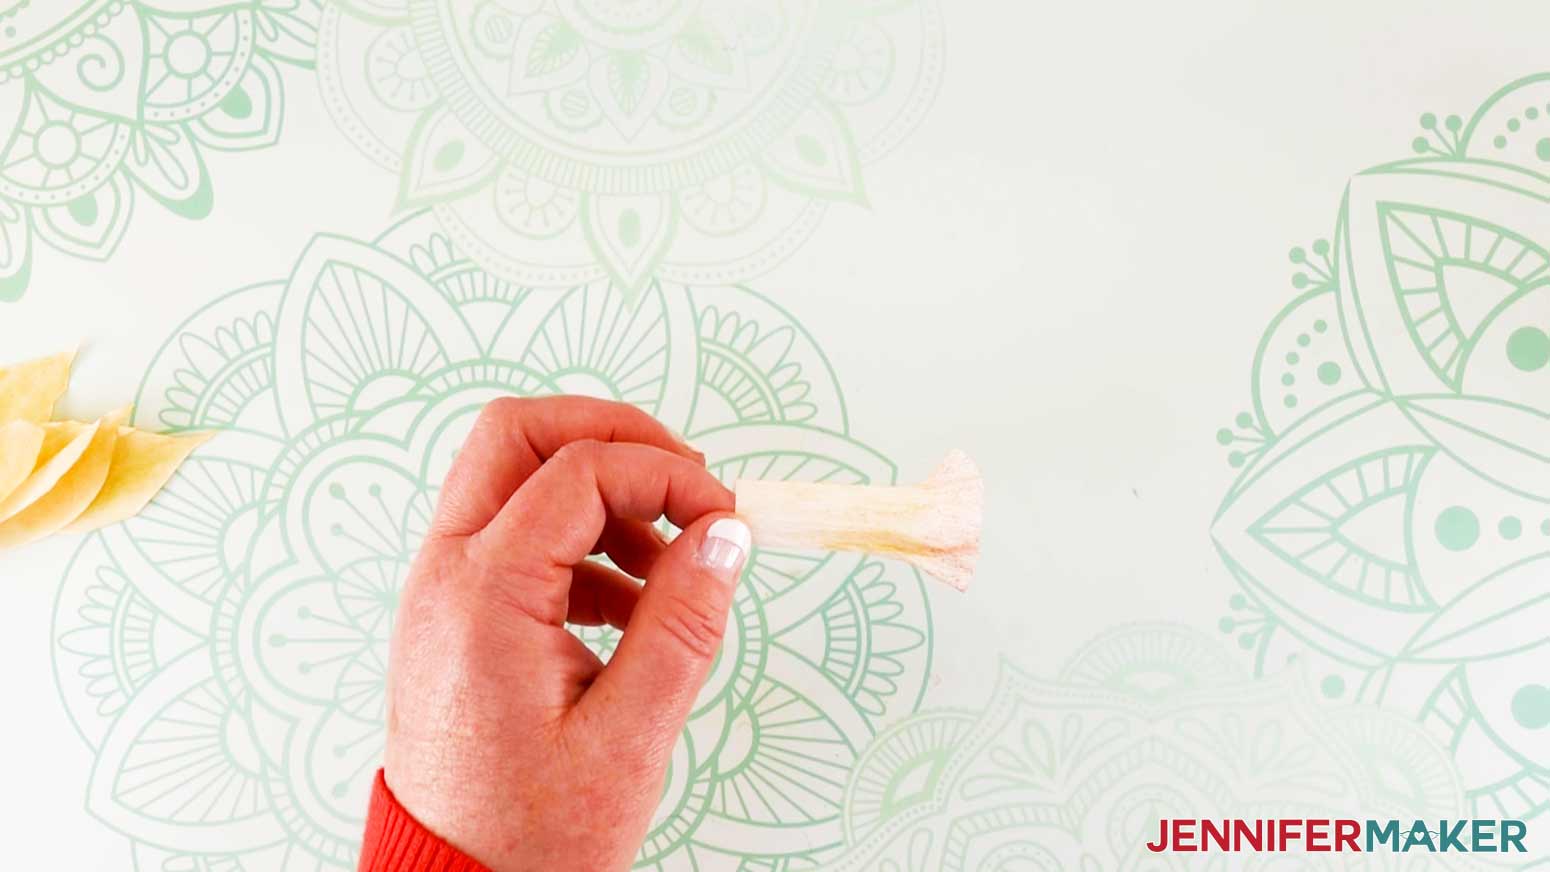
Now, let’s shape the inner skirt. Run a line of glue along the short end of the rectangle. Bring it around to attach to the other short end. Make sure your colored side is facing outward. Now we have a tube shape.
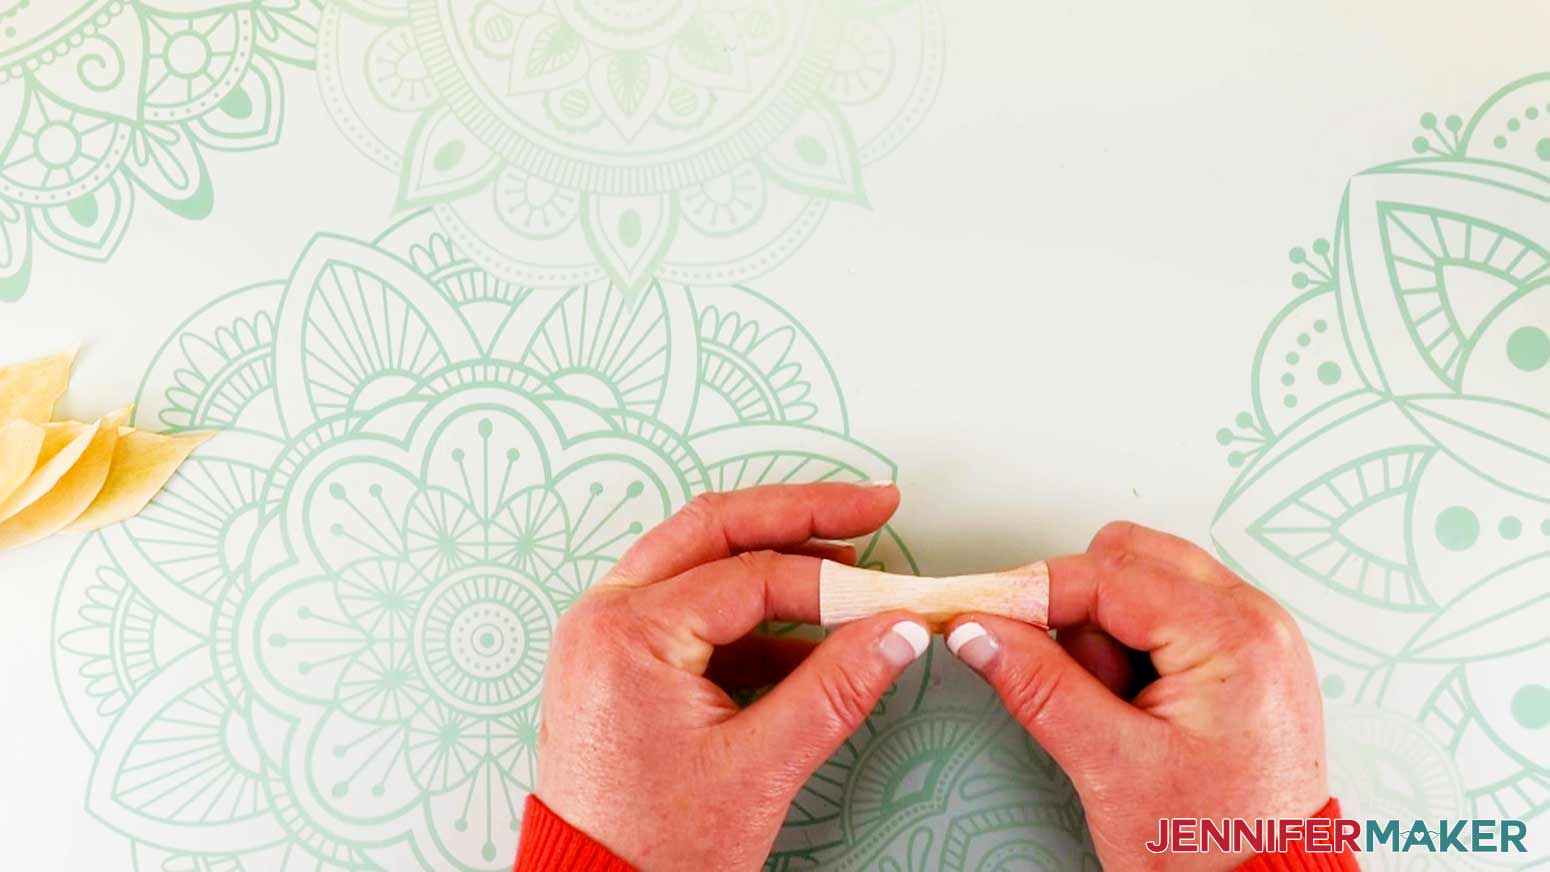
While the glue dries, let’s shape all the crepe paper petal pieces into realistic-looking petals. To do this, gently grasp the middle edge of each petal and pull carefully to “cup” them. The crepe paper will stretch and form a depression in the paper and the resulting petal will look so realistic!
Here’s what all the petals look like once they are shaped.
Now ruffle the edge of the skirt. This should be the bottom side of the skirt which you colored with orange or red accents.
Dab some glue to the inside top of the skirt. Thread the Flower Fairy Doll’s wire legs through the skirt and attach it below the bodice.
TIP: The skirt will not reach all the way up to the wool ball because you want the skirt to hang a little lower than the petals.
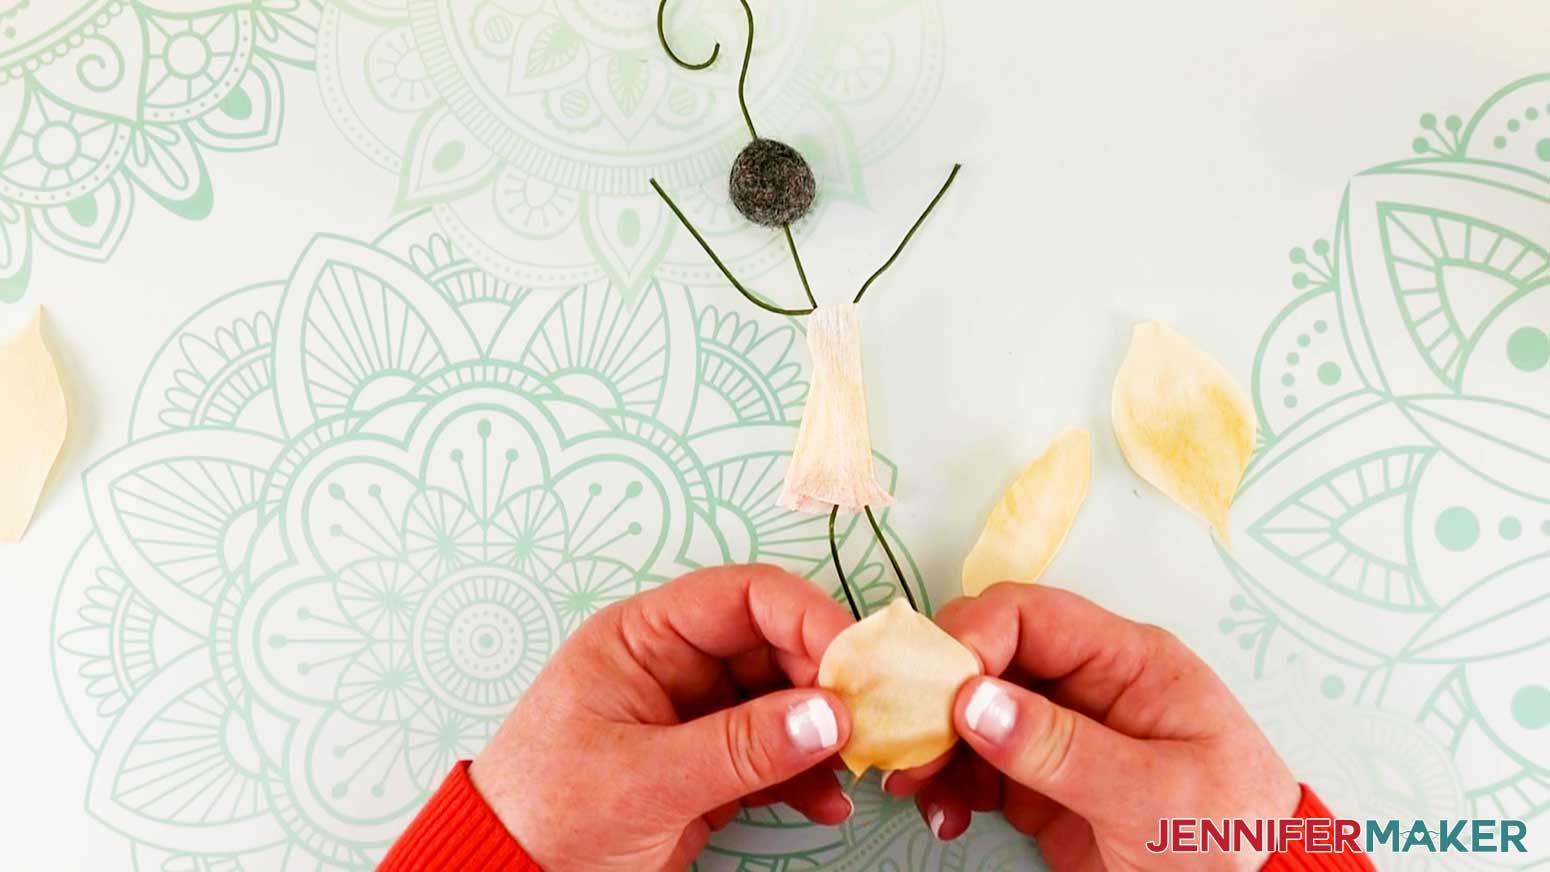
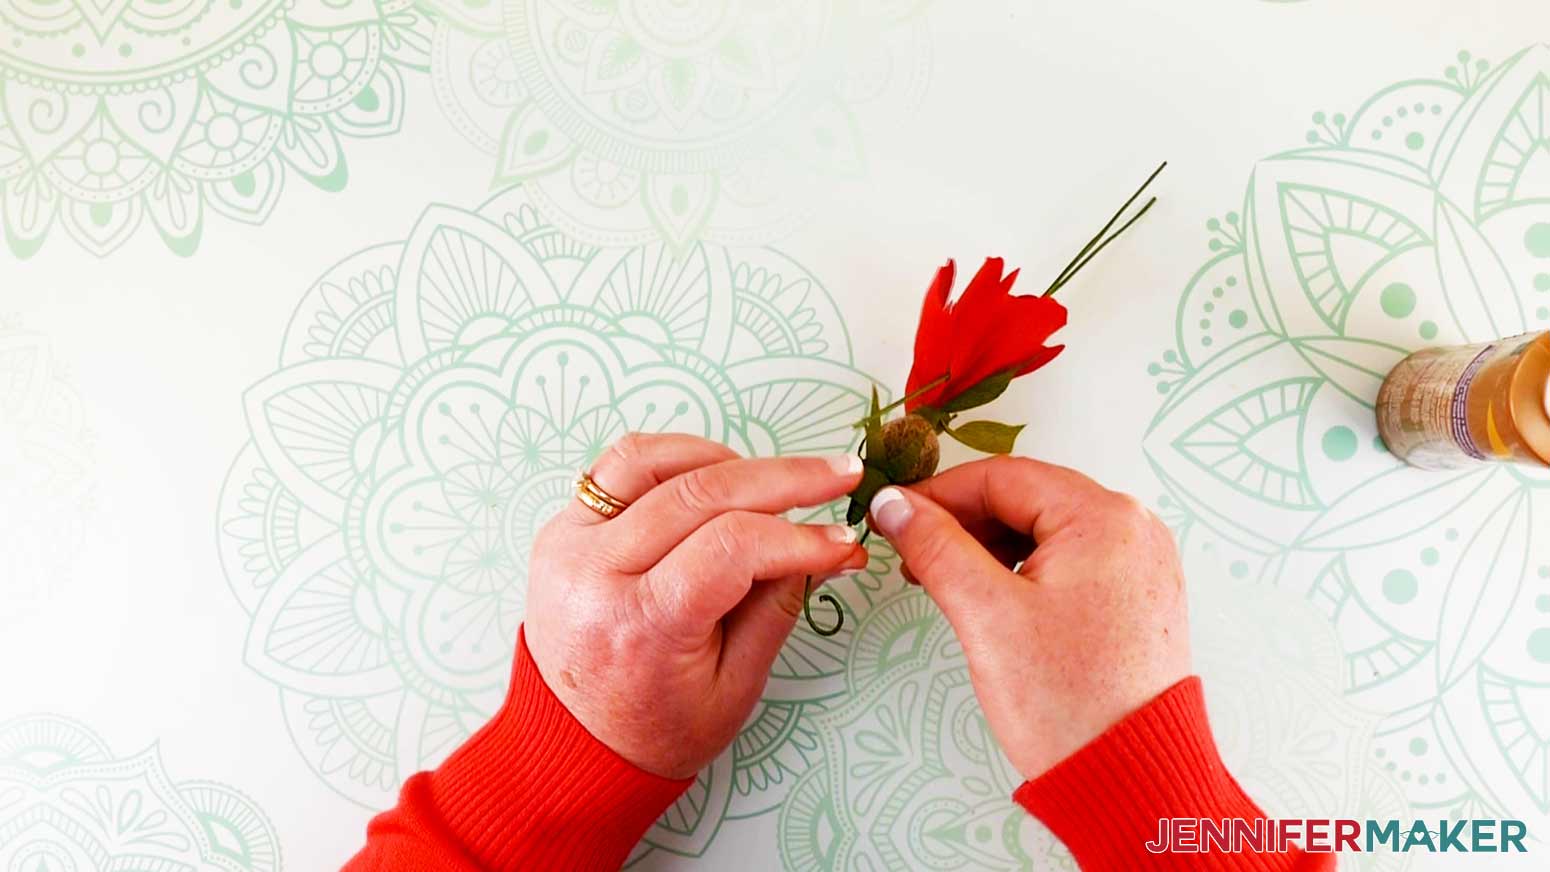
Once the skirt is attached, it’s time to glue the petals to the Fairy Doll’s body. Start with the larger petals first. Dab a bit of glue on the base of a petal and align it just under the doll’s head. Press it onto the wire until it adheres and making sure that the petal’s cup curves inward around the doll’s body.
Continue gluing the larger petals onto the wire. You’ll want to slightly overlap them so they look realistic. I like to attach them in this order: the front petal first, then slightly overlapping the two front side petals over the first petal—one on each side. I then repeat the same process for the back of the Fairy Doll.
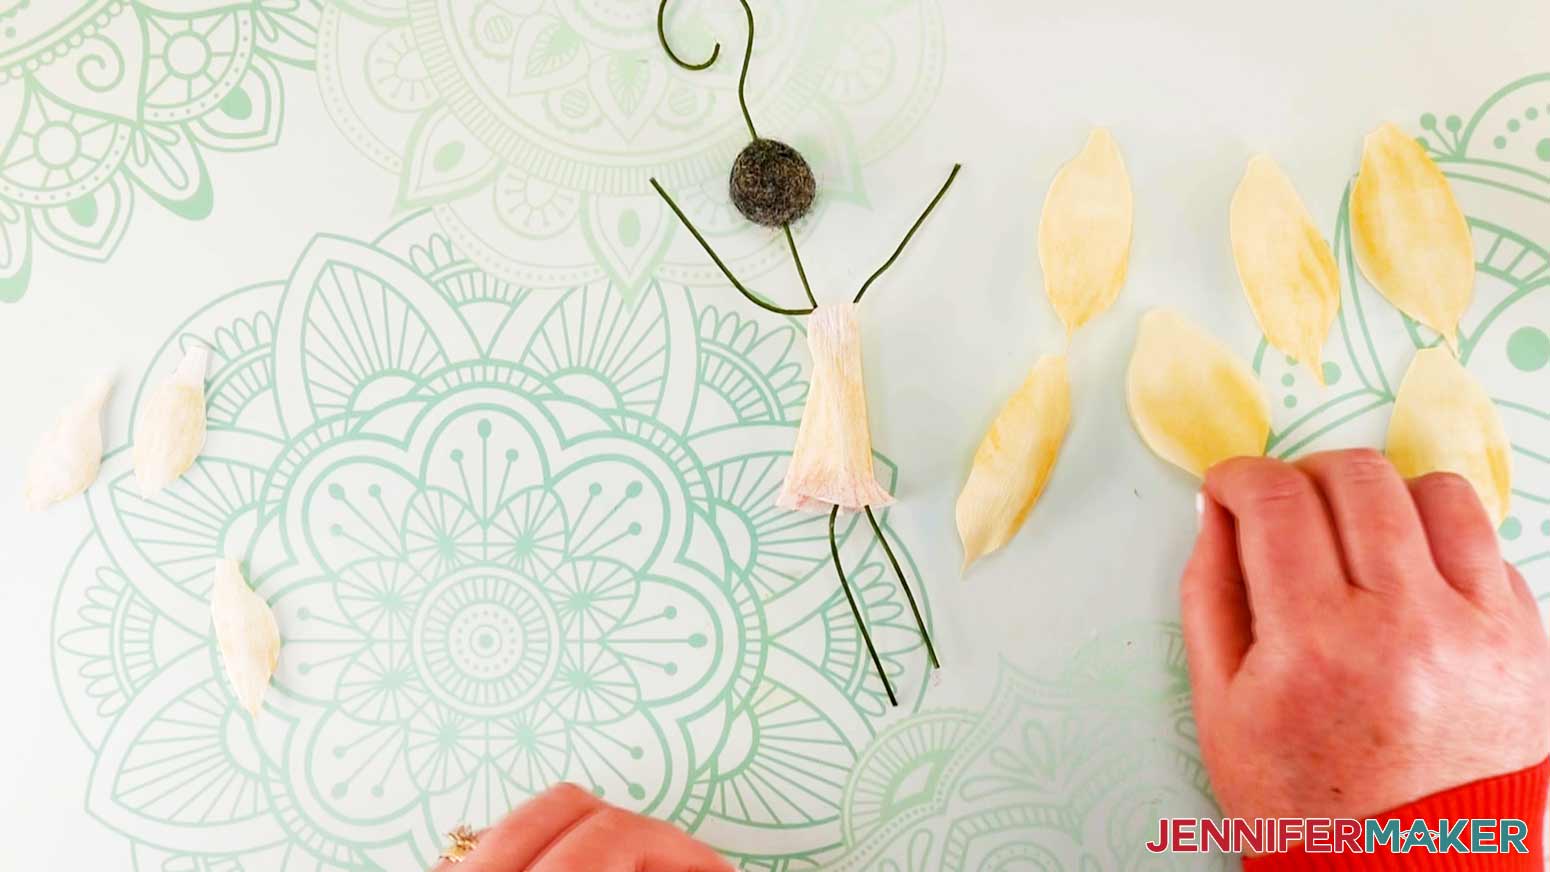
Once all the large petals are attached, we start attaching the three small petals to make a frock. I like to position them so two are on the front sides and one is on the back.

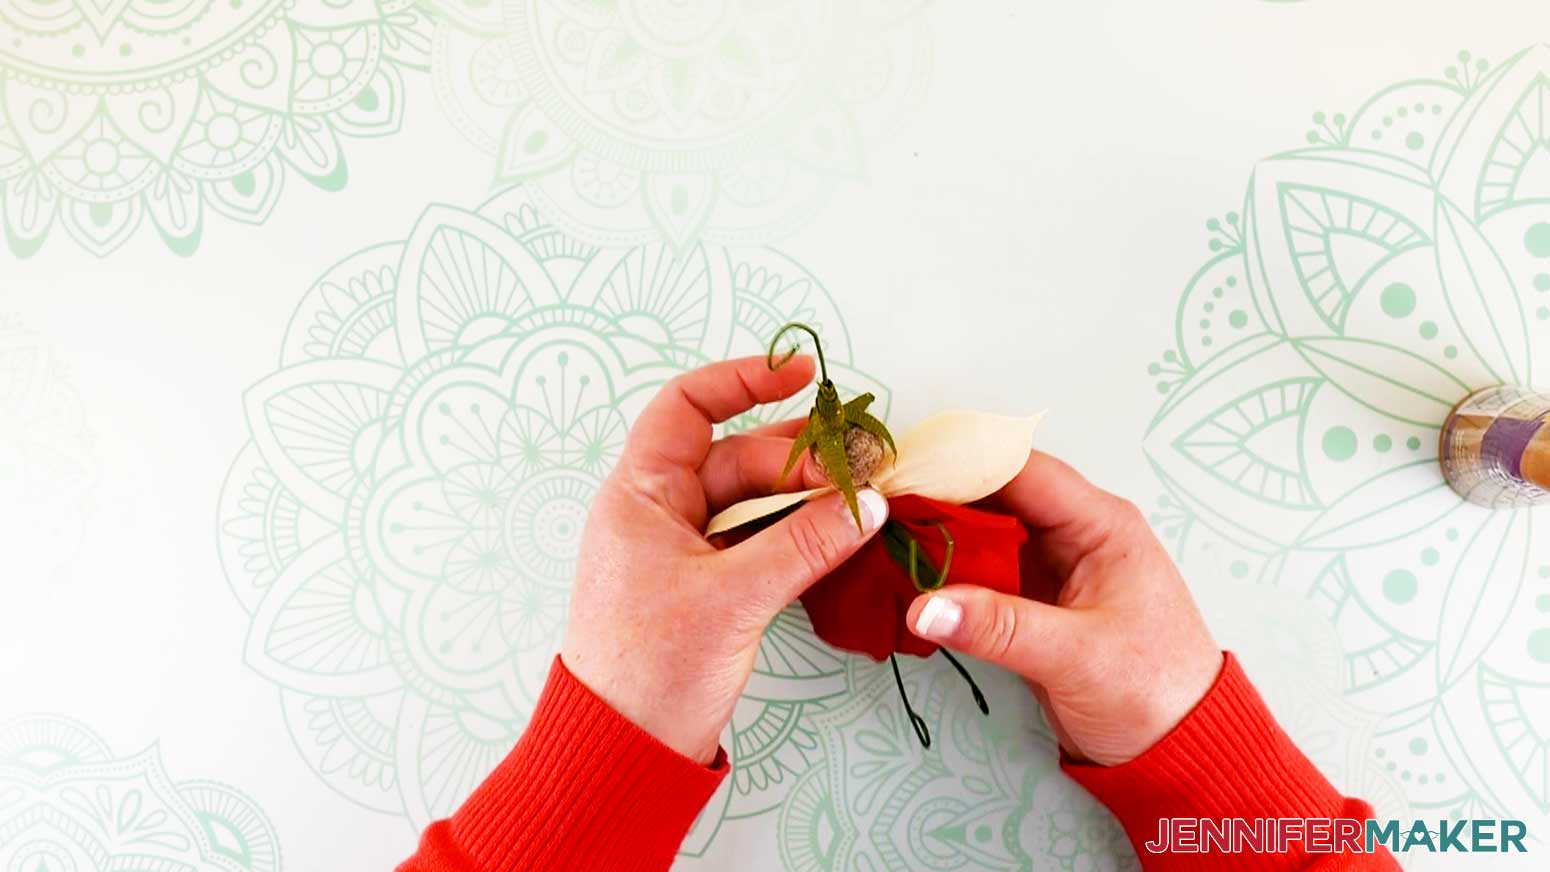
STEP 5: ATTACHING LEAF HEAD "HAT" PIECES TO THE FLOWER FAIRY DOLL
Now let’s add the leaf detail to the top of our Flower Fairy Doll head to make little hats for them! Position one end of a leaf on top of the wool ball where a side fringe framing a face might be. Add glue to the wire or crepe paper and twist the other end of the leaf around the wire a couple of times. Position the other end of the leaf on the opposite side of the wool ball head.
Hold another leaf on the other side of the wool ball where the other side fringe framing a face might be. Attach it to the wire with a dab of glue while wrapping it around and positioning the other end over the wool ball.
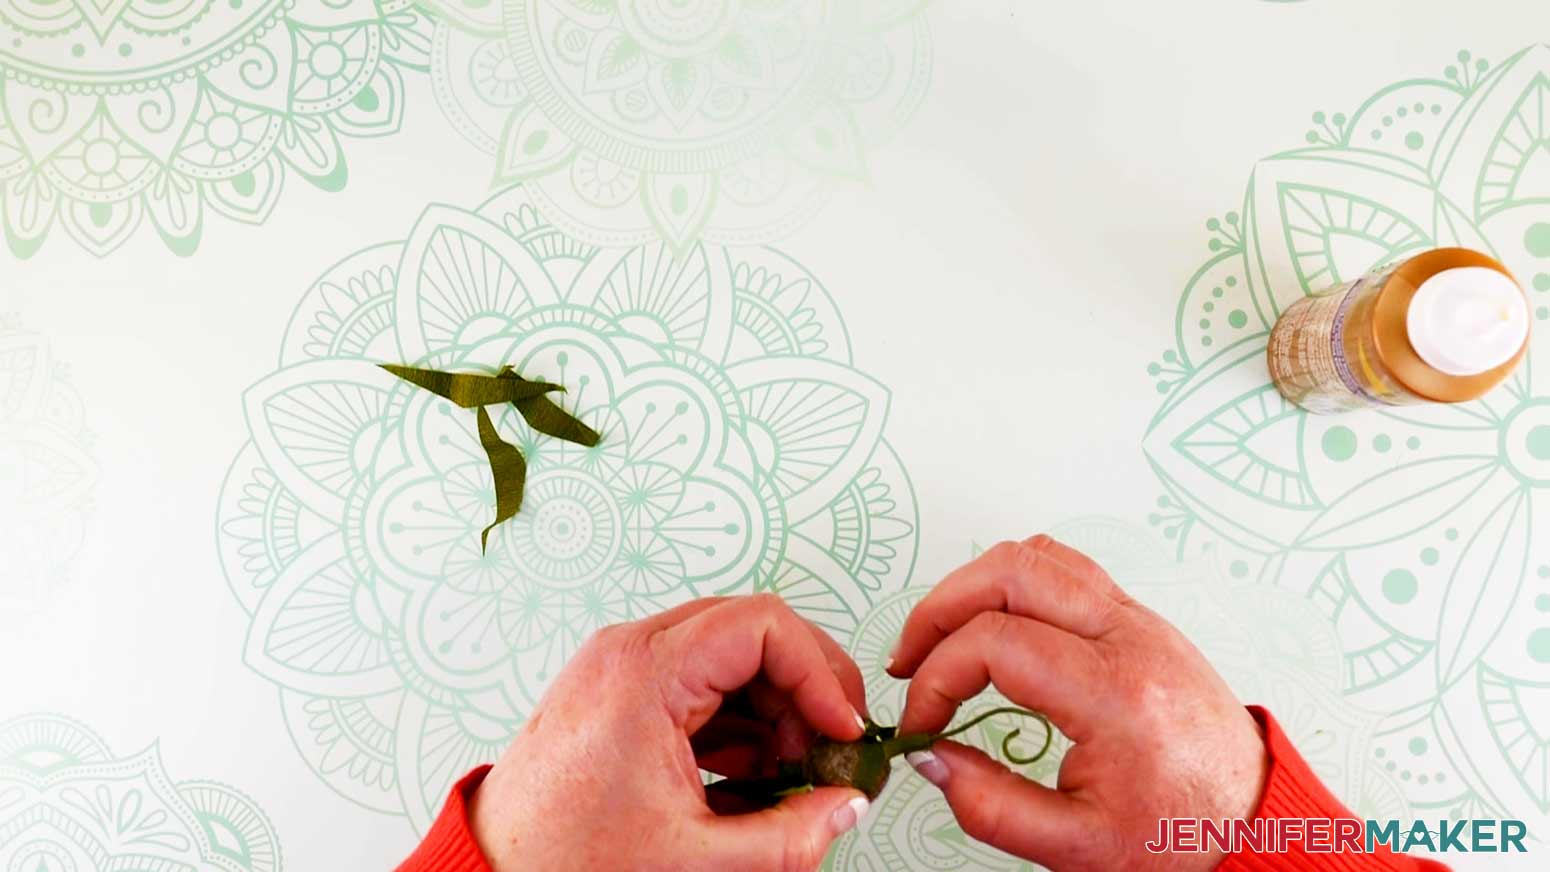
Repeat with the remaining leaves or until you get the look you want. Make sure your last leaf is wrapped multiple times around the wire and is glued until it blends in with the top wire like this:
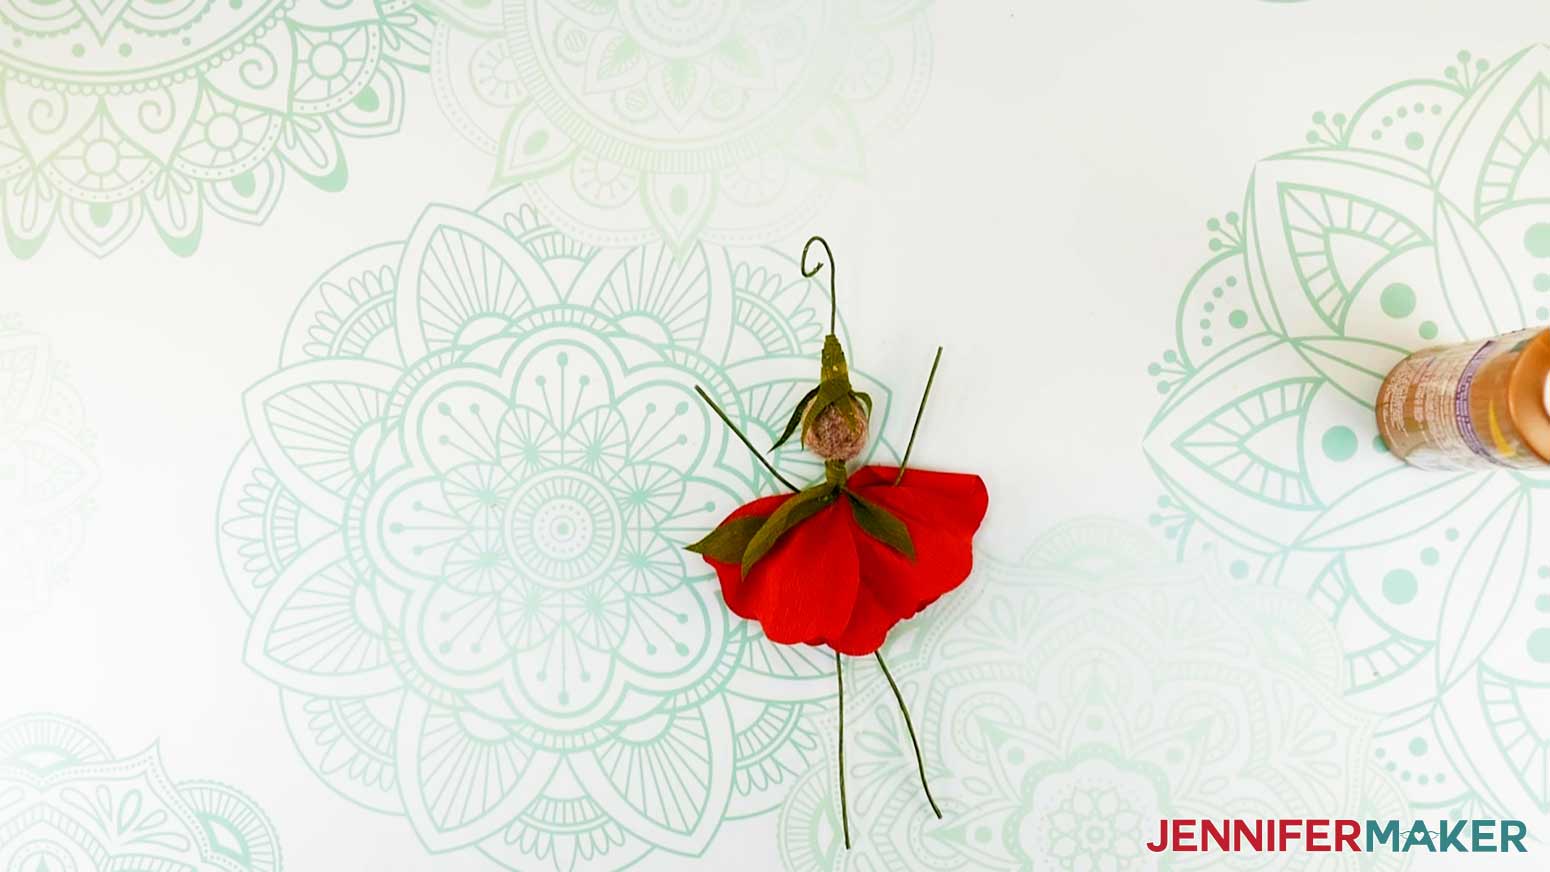
STEP 6: ATTACHING WINGS AND SCULPTING WIRE LIMBS OF THE FLOWER FAIRY DOLL
Once all the petals and leaves are attached, it’s time to make our Flower Dolls into true Flower 'Fairy' Dolls! First, use your wire pliers to shorten the arms and legs and even them out if necessary. Use the pliers to curve the ends of the arm wires and give the hands and arms some interesting curves and curls!
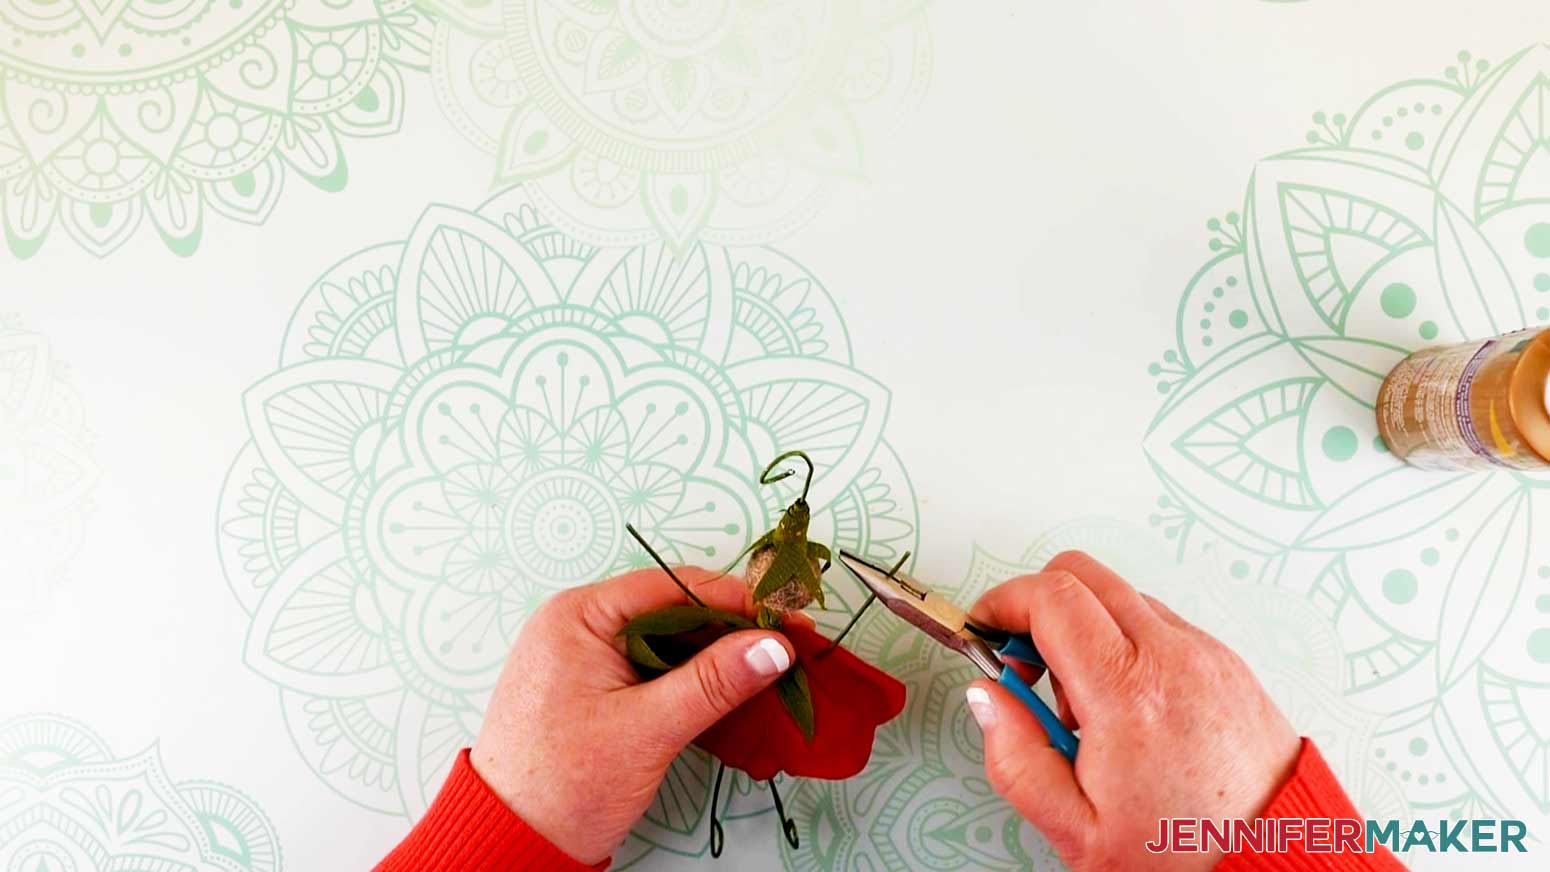
Now curl the ends of the legs into feet, and shape the legs until they look pleasing.
If the paper wrapping is loosening from the wire, add a dab of glue and smooth it back into place.
Once you like the way your Flower Fairy Dolls look, it’s time to make them into real fairies! Cup and shape the wings the same way you shaped all the petals.

Dab a dot of glue to the center of the wings and position it on the back of the doll.
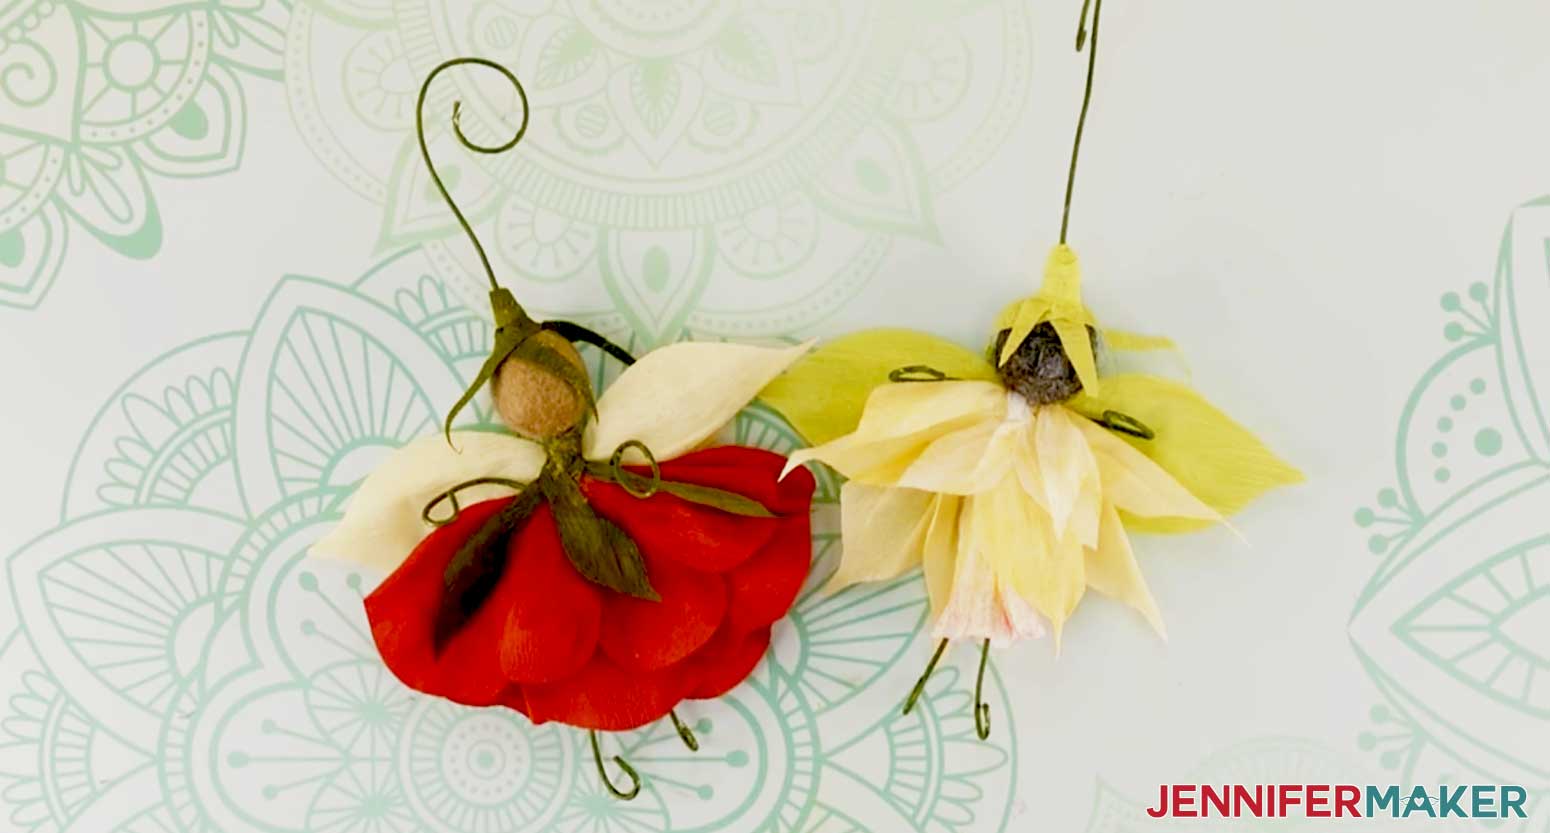
Now your Flower Fairy Doll is complete!
STEP 7: SHOW IT OFF
This is what my Flower Fairy Dolls look like!
Notes
The final approximate size of each Flower Fairy Doll is 6 inches tall.
Answers to Your Questions About How to Make a Flower Fairy Doll
Q: Can I cut the Flower Fairy Doll on a Cricut Joy?
This particular project can’t be cut with a Cricut Joy. Crepe paper can only be cut on a Maker (original Maker or Maker 3) because a Cricut Rotary Blade fits only on a Maker. The Rotary Blade has a gliding, rolling action, which makes it able to cut delicate paper, like crepe paper, without tearing it. A regular Cricut cutting blade, like the ones used for the Explore family or the Joy, cannot do that.
Q: So I have to own a Cricut Maker to create this project?
No, not at all. You can download the PDF copy of the file in our Library, print it off on your computer printer, and cut it out by hand using a scissor or craft knife!
Q: Do I have to use 14-gauge floral stems, or will another thickness work?
You can use any gauge that looks pleasing to your eye! Or that you may have in your stash. If you can’t find 14 gauge, though, we recommend going with a thinner gauge wire such as 16 or even 18 gauge. A thicker gauge, like 12 gauge, would be too hard to mold into those cute curlicues that give the Flower Fairy Doll her whimsy!
Q: Why do I have to use a straight Weeding Tool?
That is how you make a hole in the Flower Fairy Doll’s head in order to attach the body wire! If you have another straight sharp tool with a small diameter, such as a small ice pick or similar tool, that will work also!
Q: I can’t find wool felt balls! Are there options?
Sure! Any sort of small felt ball will work just fine and will make your Flower Fairy Doll uniquely your own! You could even try pompons to see if you might like the look of those! And you can always use whatever is available to you locally and you like the look of! You don’t HAVE to perfectly duplicate what our projects look like. That is where YOUR creativity comes into play!
Q: I’m not sure which one is the Rotary Blade?
You should have gotten a Rotary Blade along with your Maker! If you aren’t sure which one it is (it is easy to get the blades confused, isn’t it?), there is a picture for you on your “Mat Preview Screen” in Design Space under “Load tools and materials”!
Q: It seems so difficult to get the floral wire threaded through the ball. Do you have any hints?
Sure do! After you make the hole all the way through the ball with your Weeding Tool, take a small pair of scissors with a sharp tip and place the tip into one of the holes. Move it around to enlarge the hole just a little bit more and start threading your floral wire here. Instead of threading the wire up, you can also try screwing the head down onto the floral wire!
Get my free SVG files to create a Whimsical Flower Fairy Doll
I’d love to see YOUR beautiful flower fairy doll projects and how you choose to decorate them! Please share a photo in our Facebook group or tag me on social media with #jennifermaker.
Love,

Want to remember this? Save this Flower Fairy Doll Tutorial to your favorite Pinterest Board!