
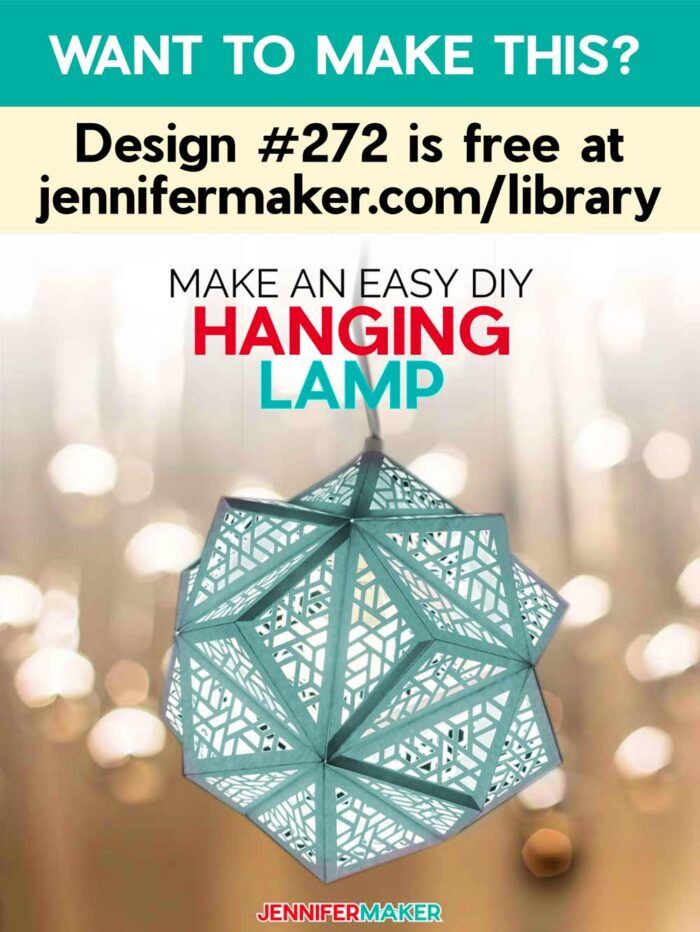
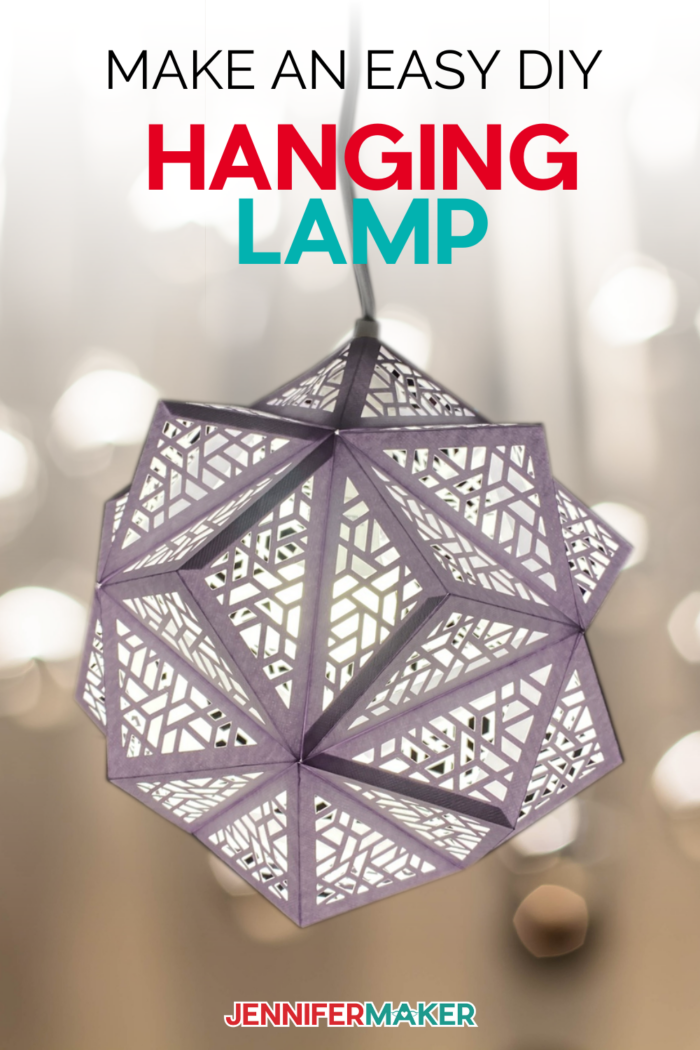
Let me show you how to make this eye catching and unique DIY Hanging Lamp with cardstock and a simple LED light!
Want to add a unique lighting fixture to your home? I am going to show you how to take ordinary cardstock and turn it into this amazing paper lamp. Seriously! I really like projects I can illuminate. There’s just something magical about light streaming through cardstock! This DIY hanging light reminds me of my incredibly popular Paper Star Lantern project and is such a fun twist on my other lantern designs. So for Day 21 of The Great Maker 25-Day Gift-Away Challenge, I showed you how to create a beautiful DIY Hanging Lamp!
Want to save this project? Enter your email below and we’ll send the project straight to your inbox.

See exactly how to make this hanging lamp from cardstock in my tutorial video (or keep scrolling if you prefer a printable step-by-step photo tutorial):

 What is The Great Maker 25-Day Gift-Away? This is an annual tradition here at JenniferMaker! Every day for the first 25 days of December we gift you with a brand new project, design, tutorial, and video. On top of that, we host a giveaway with 25 prizes. Some of the amazing prizes are Cricut cutting machines, sewing machines, gift cards, and beautiful print editions of our popular Cricut Coach Playbook. You can even earn bonus entries for sharing photos of the daily projects! Click here to learn more about The Great Maker 25-Day Gift-Away!
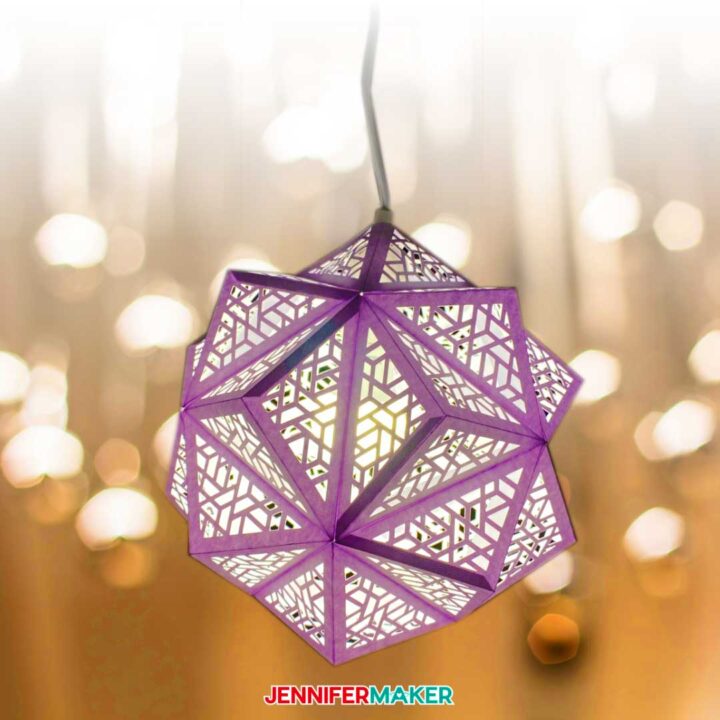
Isn’t this hanging lamp gorgeous? It reminds me the trendy lighting figures you’d find at IKEA … and I love me some IKEA designs!

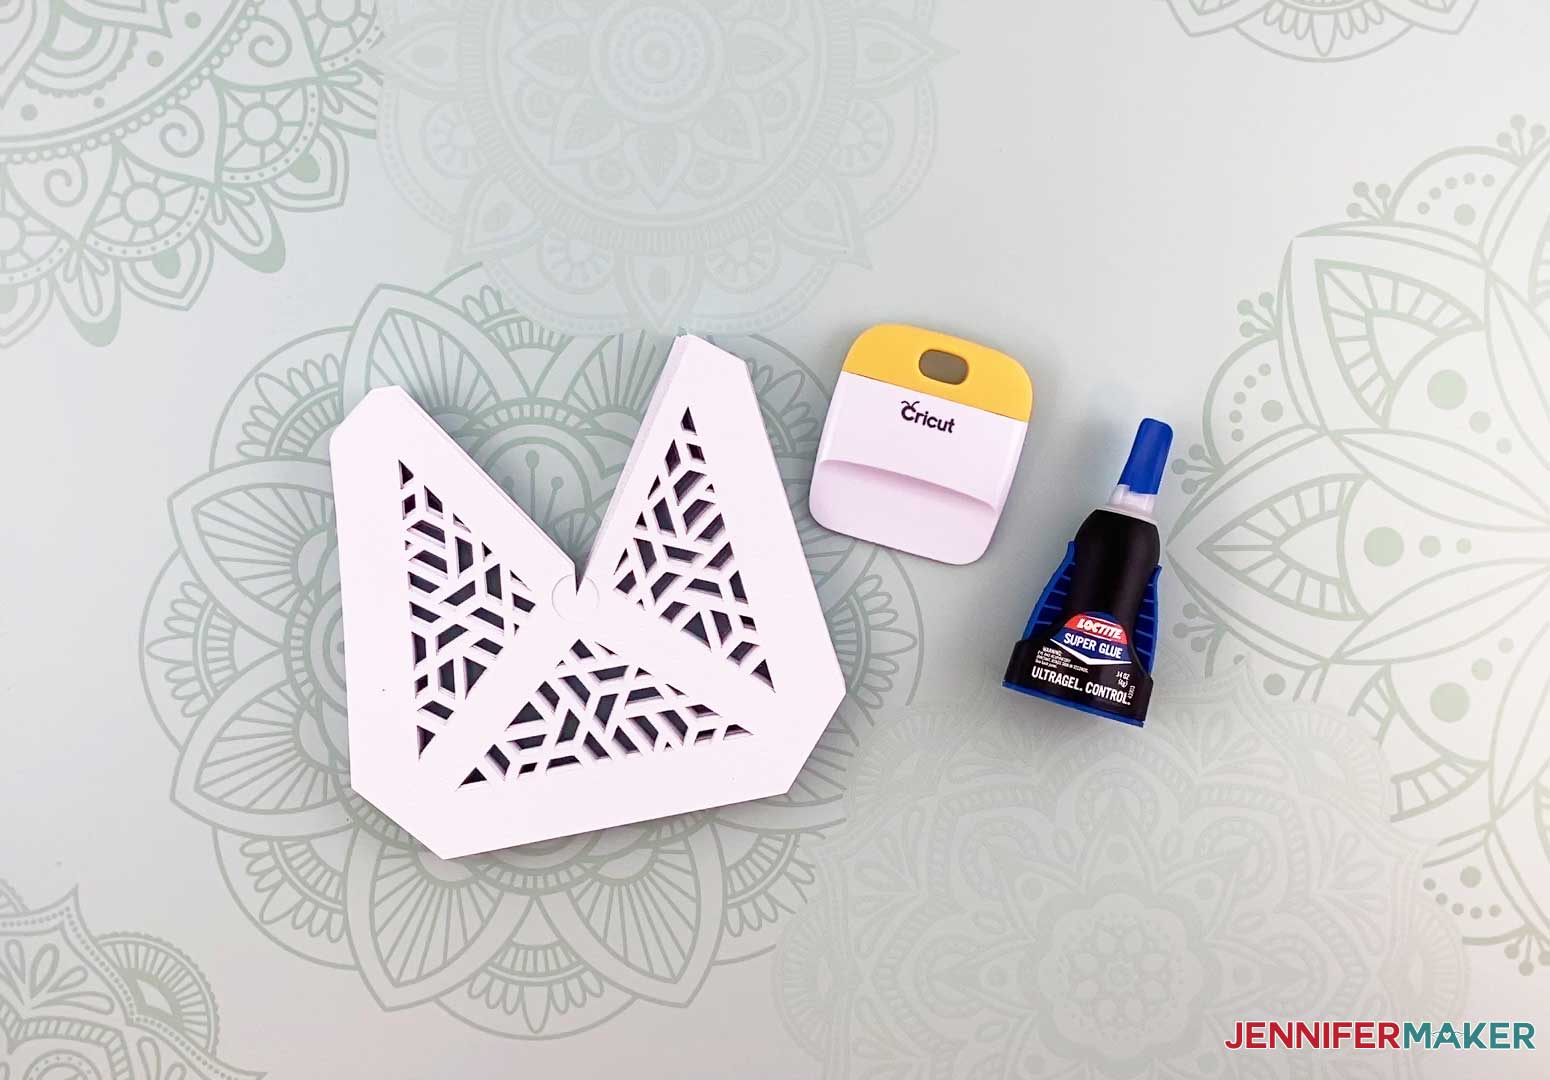
To make this hanging lamp, you need just FIVE sheets of cardstock in 65 lb. to 80 lb. weight. You’ll want the 12″ x 12″ size of cardstock. I used regular cardstock, but feel free to get fancier with specal cardstock, like holographic foil Kraft board. Just keep in mind that glitter cardstocks can be harder to glue. You’ve been warned. (laugh)
As for glue, you can use anything that keeps it together. For example, a hot glue gun and glue sticks work great. You can also use tacky glue or a gel super glue. If you use a cardstock with a texture, like glitter, you may need to experiment with glues or even double-sided tape to find the best adhesive for your paper.
The only other item you’ll need to get is the light itself. For this project, we’re using an LED light, forty watts or the equivalent. It’s VERY important you use only an LED light in your lamp, as it will not generate any infrared heat. Do not put any light source that will generate heat into this paper lamp!
I used my Cricut cutting machine to cut the gorgeous intricate cuts in the lamp, along with the Cricut Fine-Point Blade, the Scoring Stylus or Scoring Tool, and a Green StandardGrip Machine Mat. You’ll also find a Scraper Tool helpful in folding this 3D paper structure, too!
So let me show you where to find the designs, and then I’ll show you how to cut and assemble your hanging lamp! This post contains some affiliate links for your convenience (which means if you make a purchase after clicking a link I will earn a small commission but it won’t cost you a penny more)! Read my full disclosure policy.
Materials to Make A DIY Hanging Lamp from Cardstock
View my Amazon shopping list with the exact items we used to make this project!
- One (1) 40 Watt Equivalent LED Light
- One (1) Extension Hanging Lantern Cord
- A way to glue your lamp, such as Loctite Ultra Gel Super Glue, hot glue, or tacky glue
- Five (5) 12”x12” sheets of 65-80 lb. cardstock
- Cricut Green StandardGrip Cutting Mat
- Cricut Single Scoring Wheel (for the Maker)or or the Cricut Stylus Scoring Tool
- Scraper Tool
- Something to sit the project on to hold it in place (like a roll of painter’s tape or a cup)
- Cricut TrueControl Knife (optional)
- A way to cut your cardstock — I used an amazing Cricut Maker series machine, but you could also use a Cricut Explore series, Cricut Joy series, Cricut Venture, or cut by hand
- Design #272 – My free DIY Hanging Lamp SVG (available in my free resource library/get the password by filling out the form at the bottom of this page)
How to Make A DIY Hanging Lamp
DIY Hanging Lamp
Want to add a unique lighting fixture to your home? I am going to show you how to take ordinary cardstock and turn it into this amazing DIY paper lamp that reminds me of some of the trendy lighting fixtures you'd find at IKEA.
Materials
- One (1) 40 Watt Equivalent LED Light
- One (1) Extension Hanging Lantern Cord
- One (1) Loctite Ultra Gel Super Glue
- Five (5) 12”x12” sheets of 65-80 lb. cardstock (I used AC Cardstock)
- -OR- Five (5) 12"x12" sheets of Cricut Holographic Foil Kraft Board
- Design #272 - My free DIY Hanging Lamp SVG (available in my free resource library/get the password by filling out the form at the bottom of this page)
Tools
- A way to cut your cardstock — I used the amazing Cricut Maker, but you could also use a Cricut Explore or cut by hand
- Cricut Green StandardGrip Machine Mat
- Cricut Single Scoring Wheel (for the Maker)
- -OR- Cricut Stylus Scoring Tool
- Scraper Tool (I used the one by Cricut)
- Something to sit the project on to hold it in place (like a roll of painter's tape or a cup)
- Cricut TrueControl Knife (optional)
Instructions
STEP 1: GET MY FREE DIY PAPER LAMP FILE
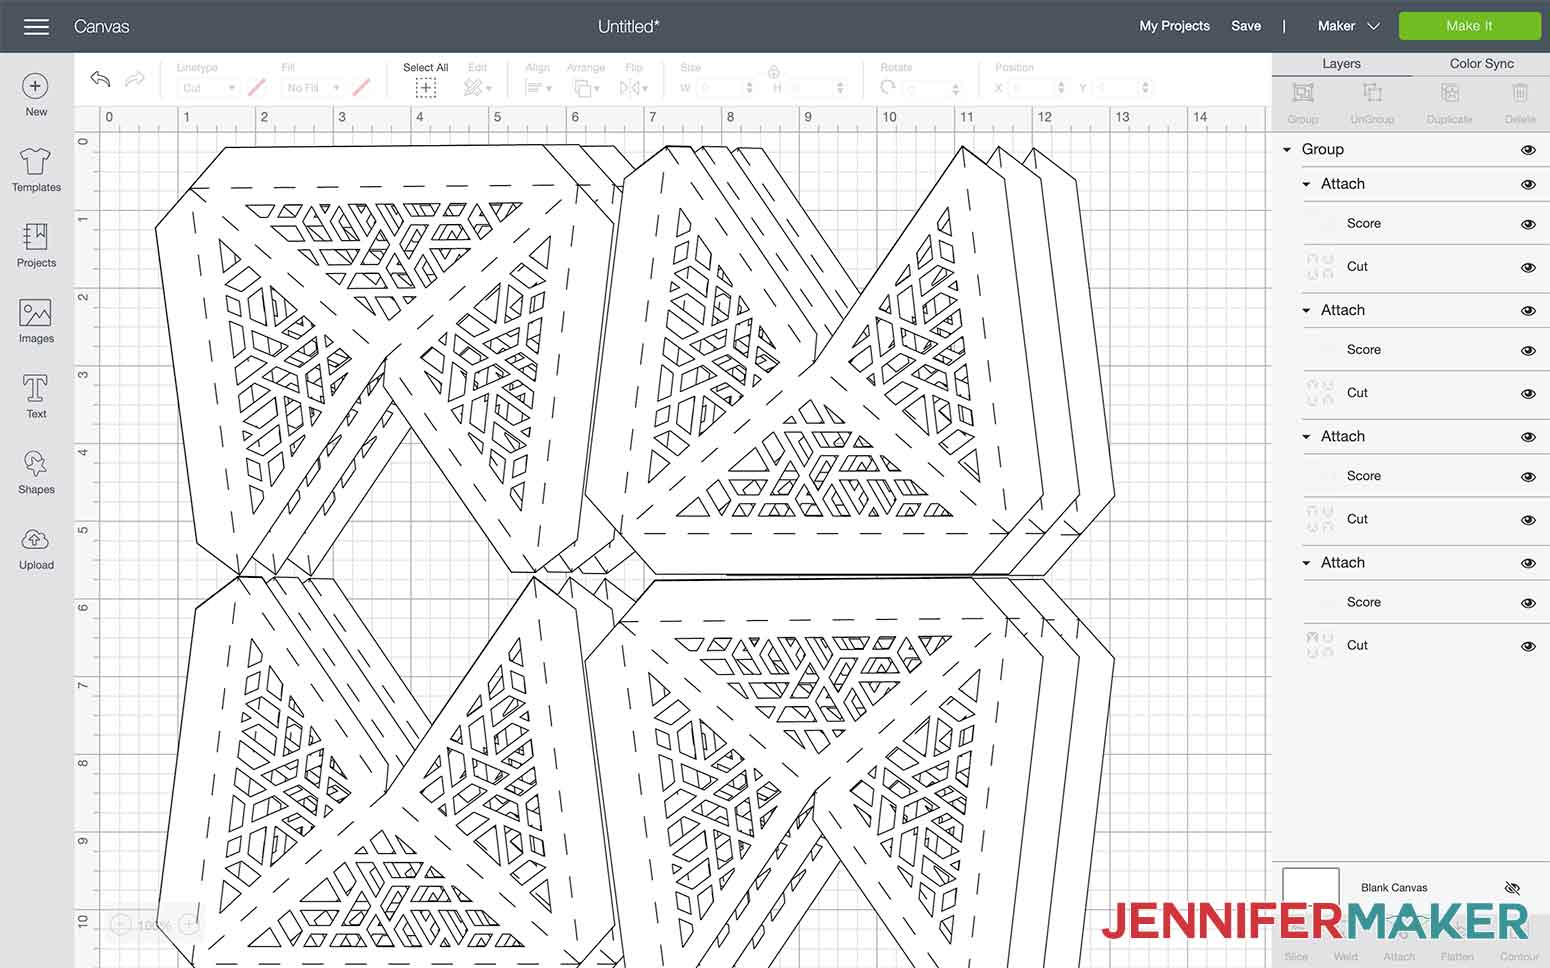
First, download Design #272 which is my free DIY Hanging Lamp SVG/DXF/PDF from my free resource library. You can get the password to the library by filling out the form at the bottom of this post. If you're going to cut it on your cutting machine, upload the file to your design software. This is what my DIY Paper Lamp SVG file looks like in Cricut Design Space.
Tip: If you're not sure how to upload an SVG cut file to Cricut Design Space, watch this helpful video training series I made. If you're on an iPhone or iPad, here's how to download and upload SVG files to the Cricut Design Space app.
STEP 2: CUT THE DESIGN
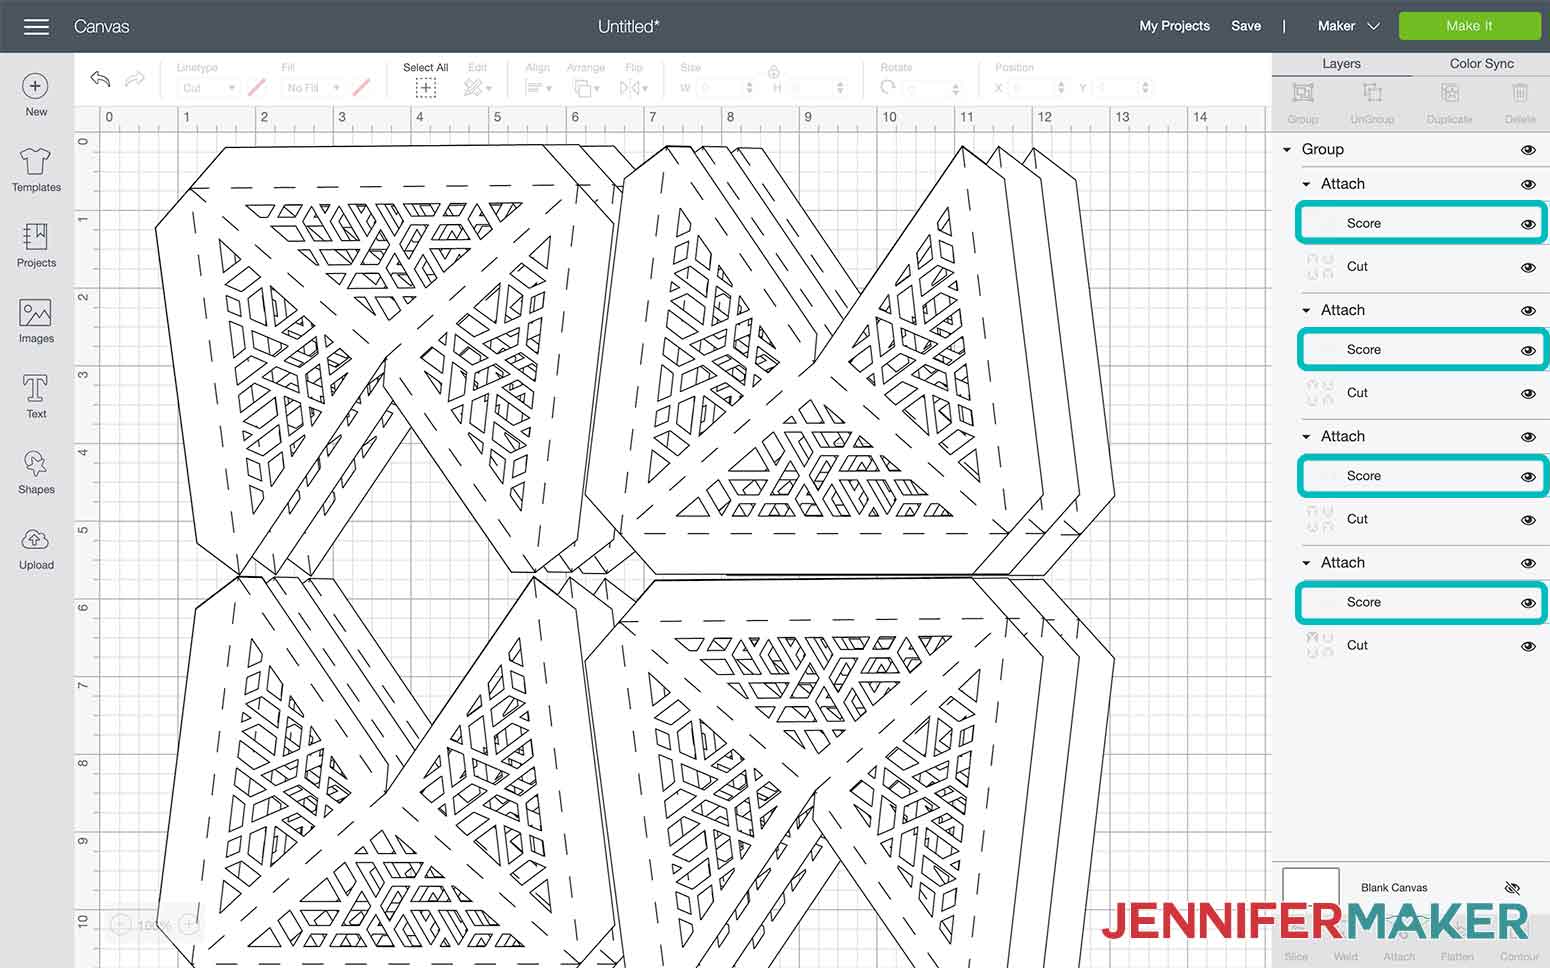
You will need five sheets of 12" x 12" cardstock for this project. Having a scoring tool will make assembly much easier, however, it is not required. If you are not using a scoring tool, hide the four scoring layers by clicking the eye icon for the score layers.
I cut this design using 80 lb. cardstock. To get the best cuts, I changed the "Pressure" on the mat preview screen to "More" and used the Cricut Green StandardGrip Machine Mat. I found the Blue LightGrip mat is not strong enough for these intricate cuts and can cause issues. Once cut, flip the mat over and carefully remove the mat away from the cardstock.
If you have any issues with the small pieces in the design not popping out, use a blade, like the Cricut TrueControl Knife, to release them by slicing on the cut line. You can also try using the cardstock setting for intricate cuts. For additional assistance, please see my Tips and Tricks for Cleaner Cutting.
STEP 3: ASSEMBLE THE DIY HANGING LAMP
Gather your cut pieces, a scraping tool to assist in folding, and adhesive.
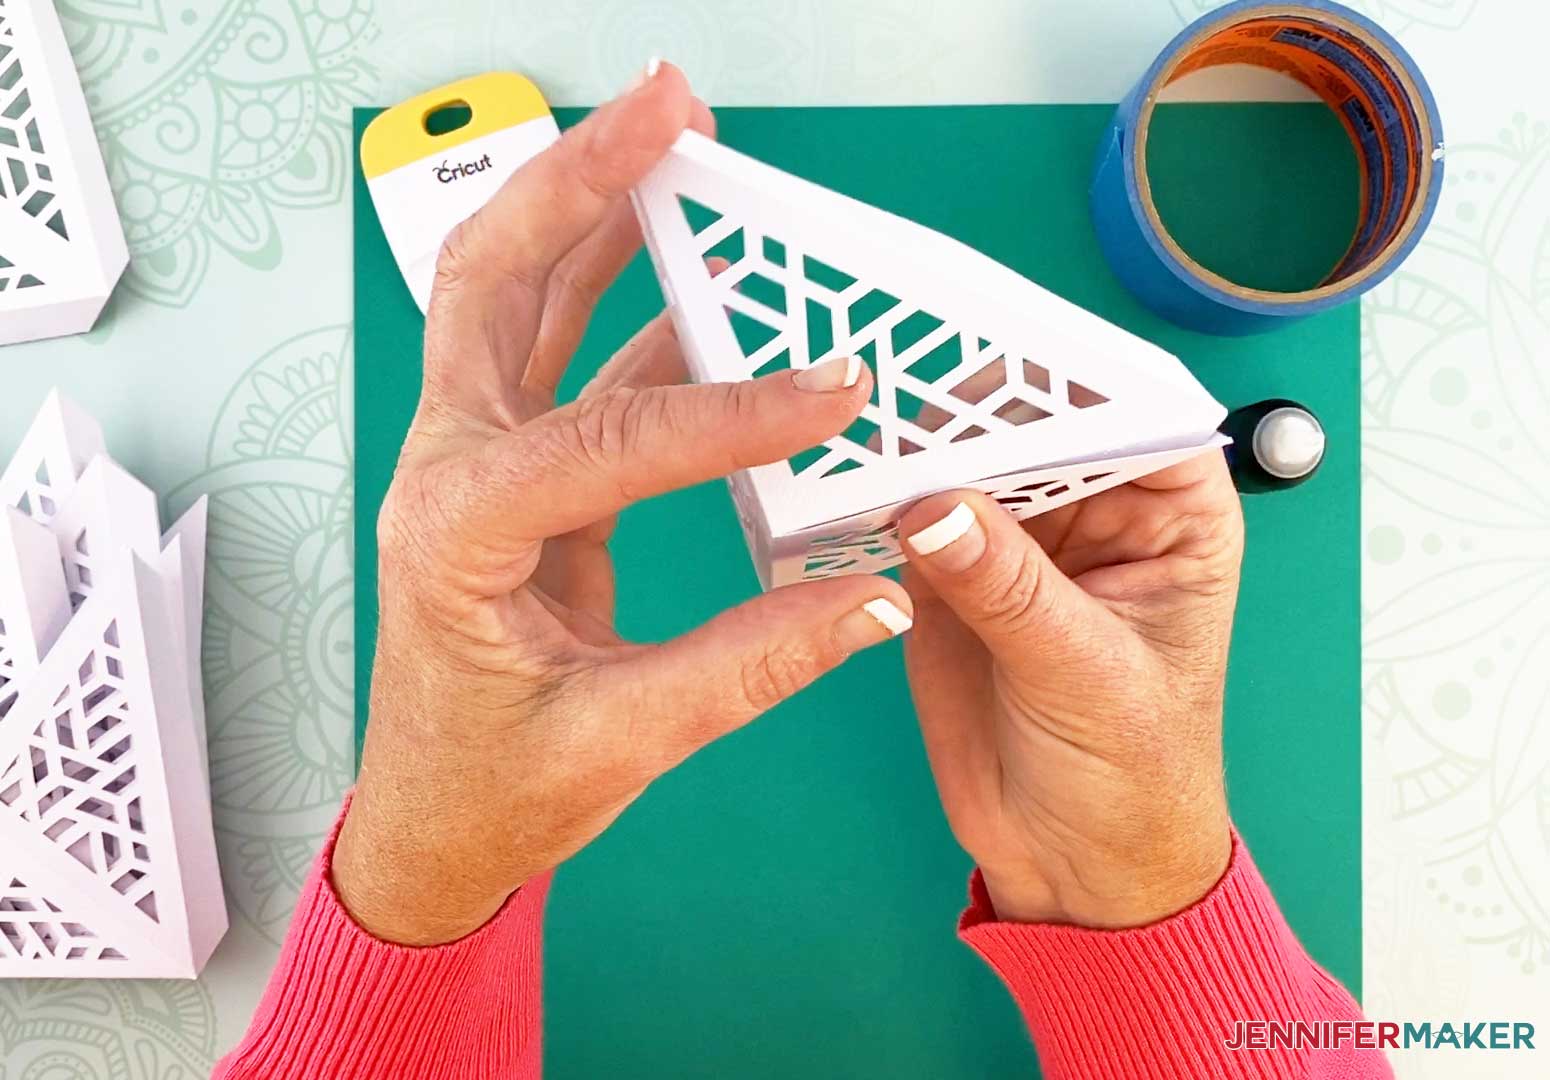
Begin by folding the six fold lines for each of the 20 pieces.
Fold each piece on the score lines.
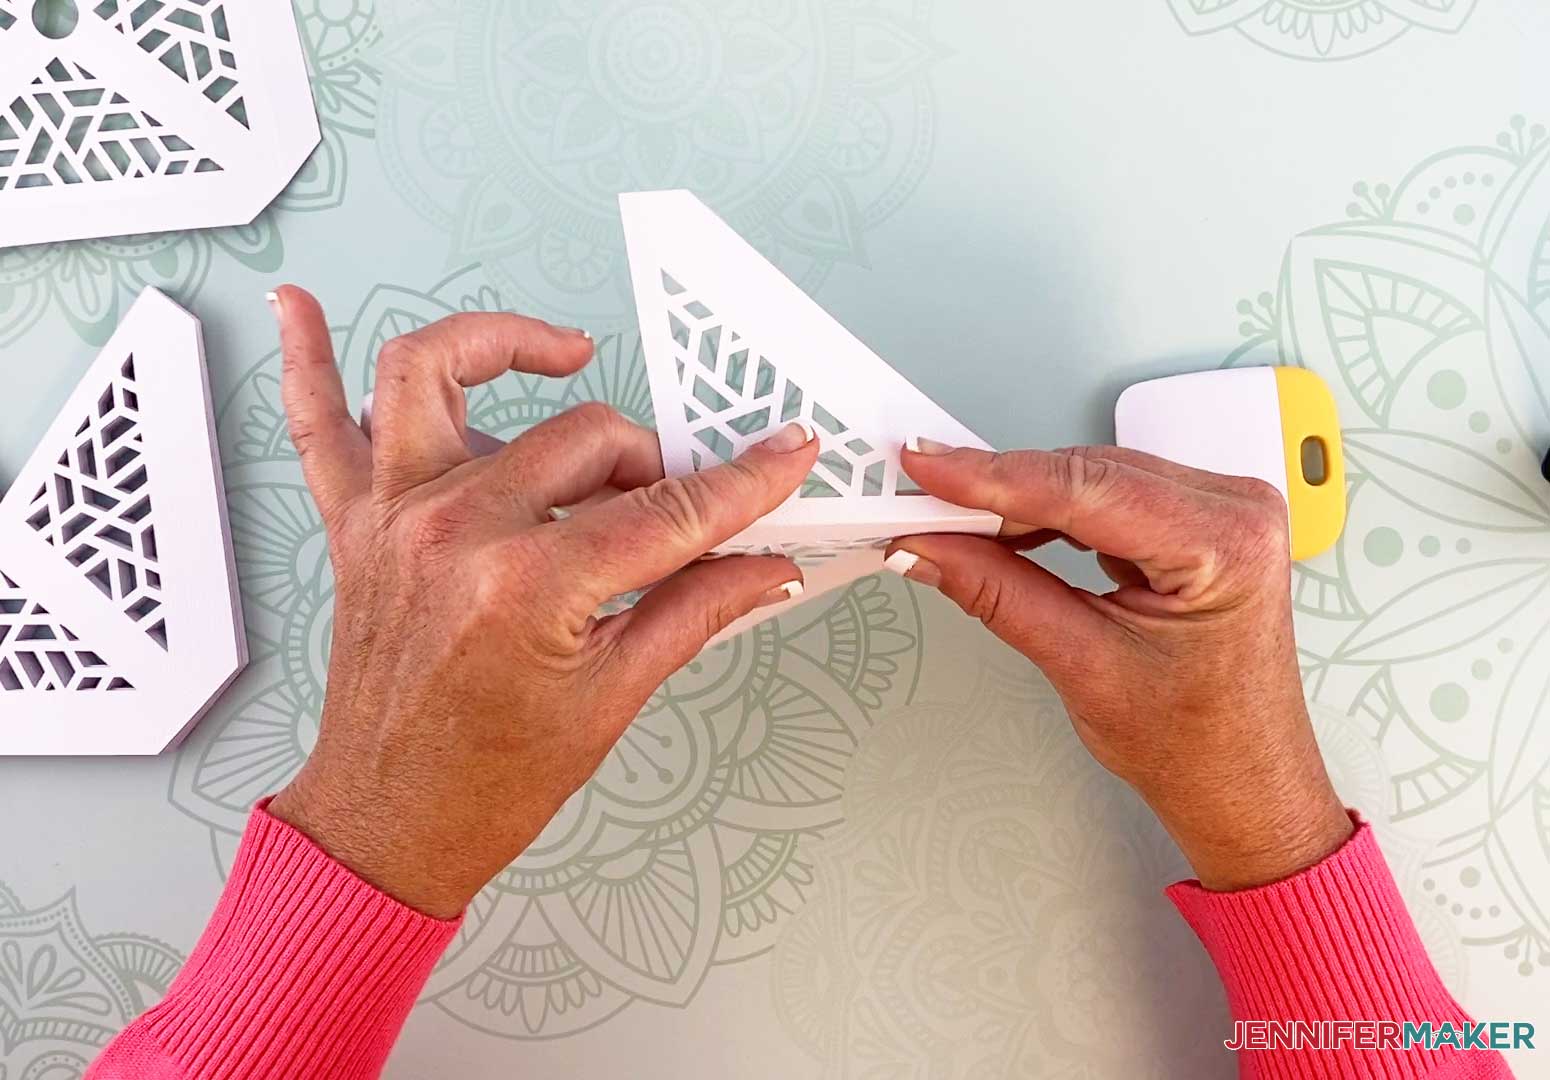
Use a scraper tool for a crisp fold line.
Continue folding each of the 16 pieces.
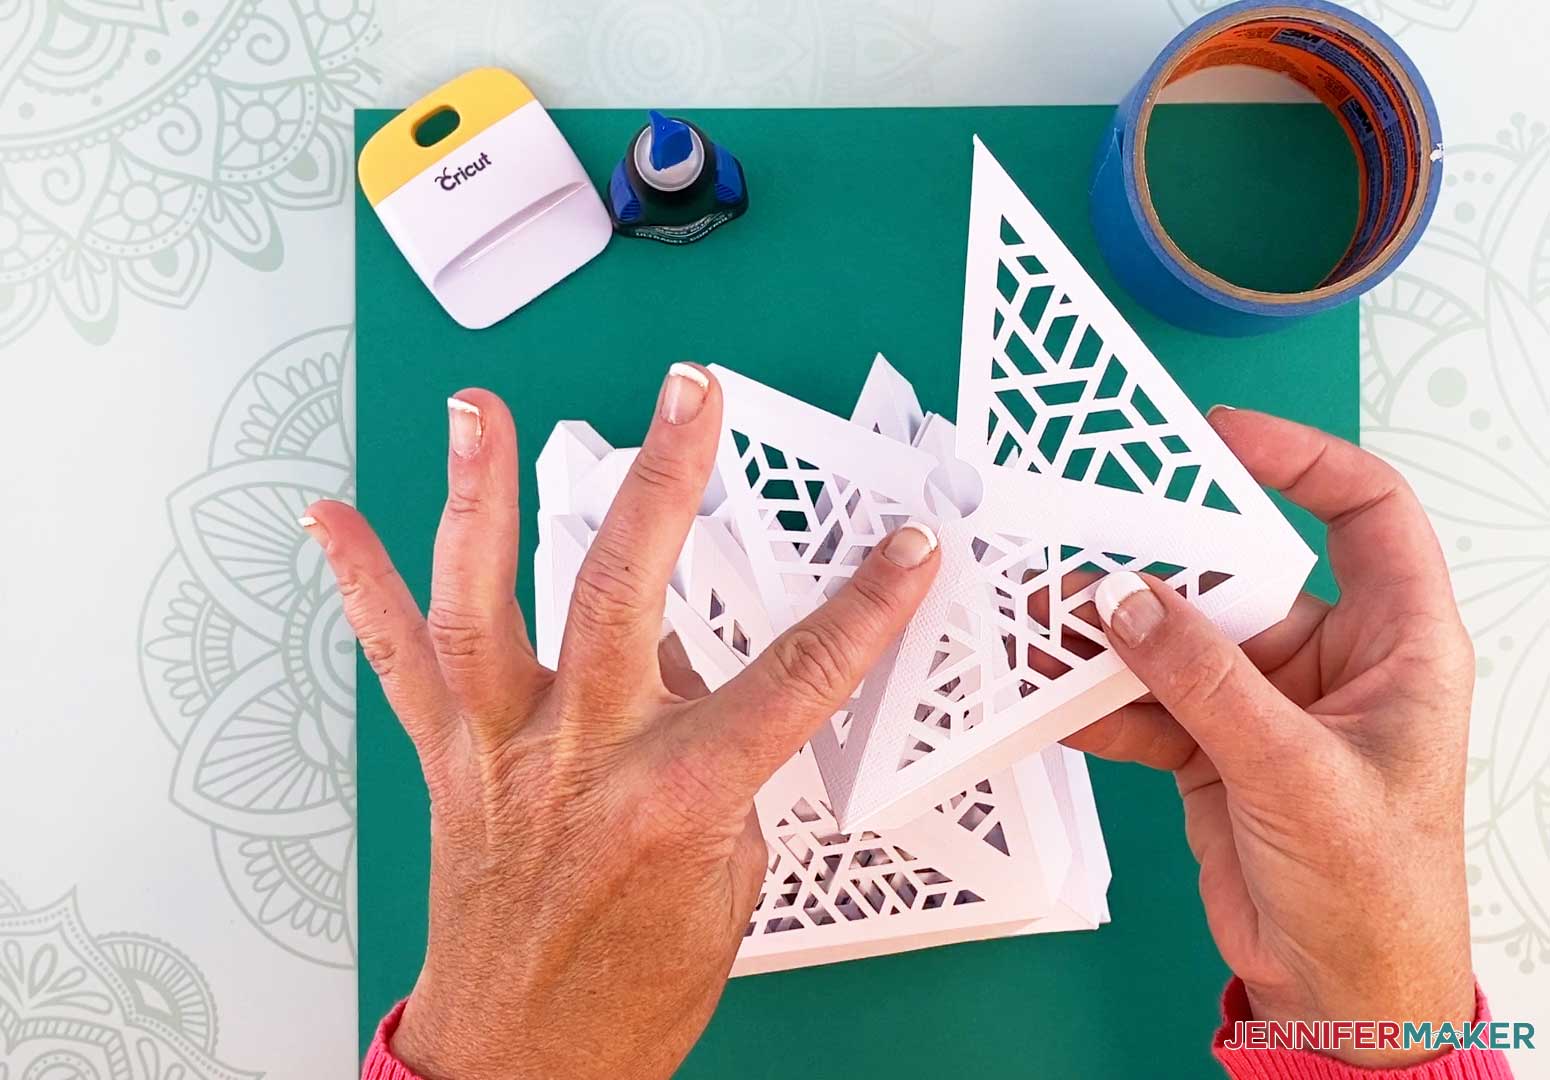
Now that all the pieces are folded, its time to begin assembling the pieces together.
IMPORTANT: Take the one piece that has a circle cut out in the center and set it aside at this time.
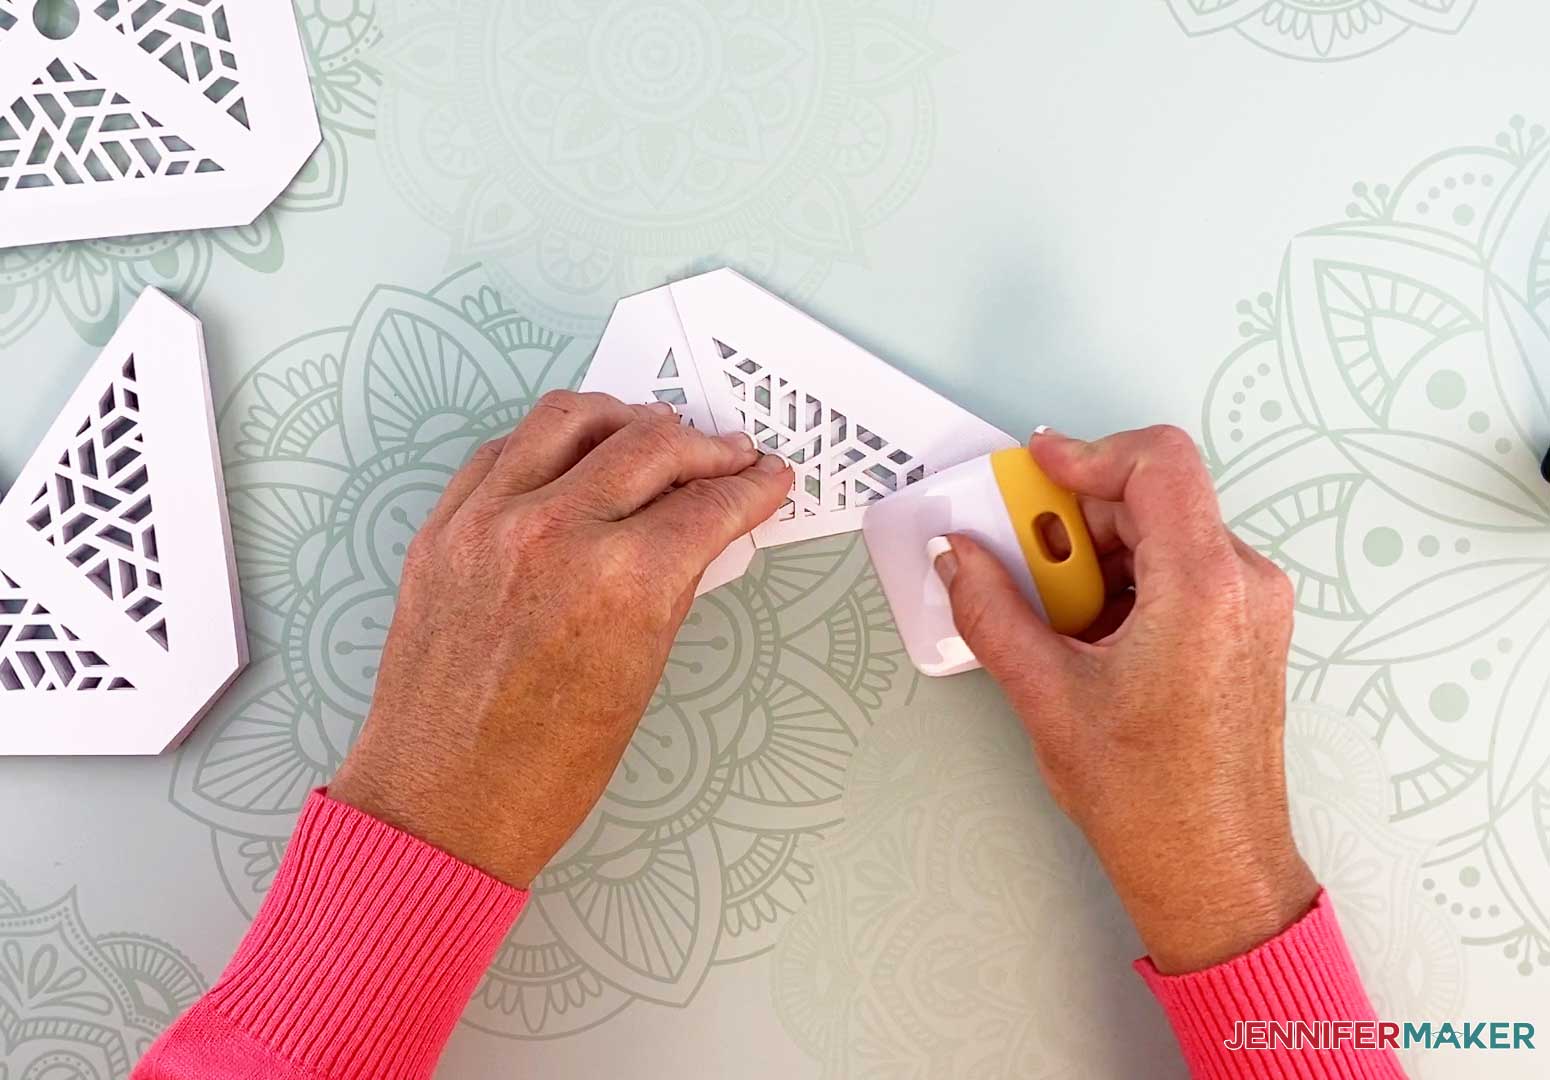
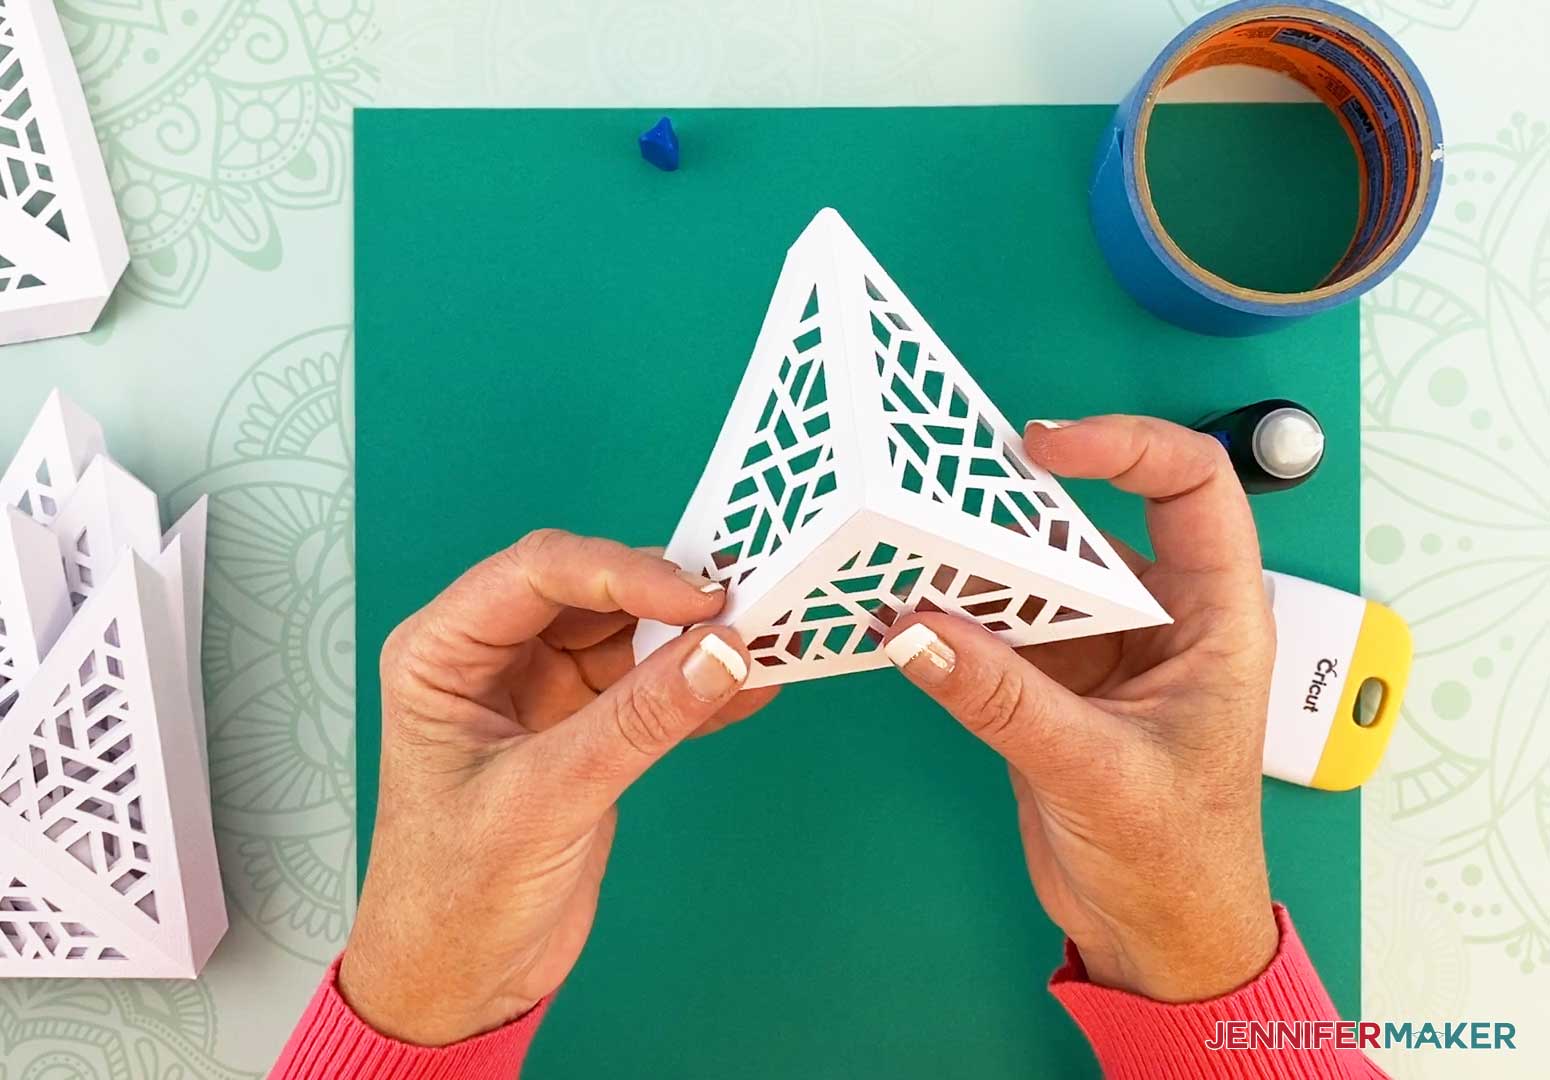
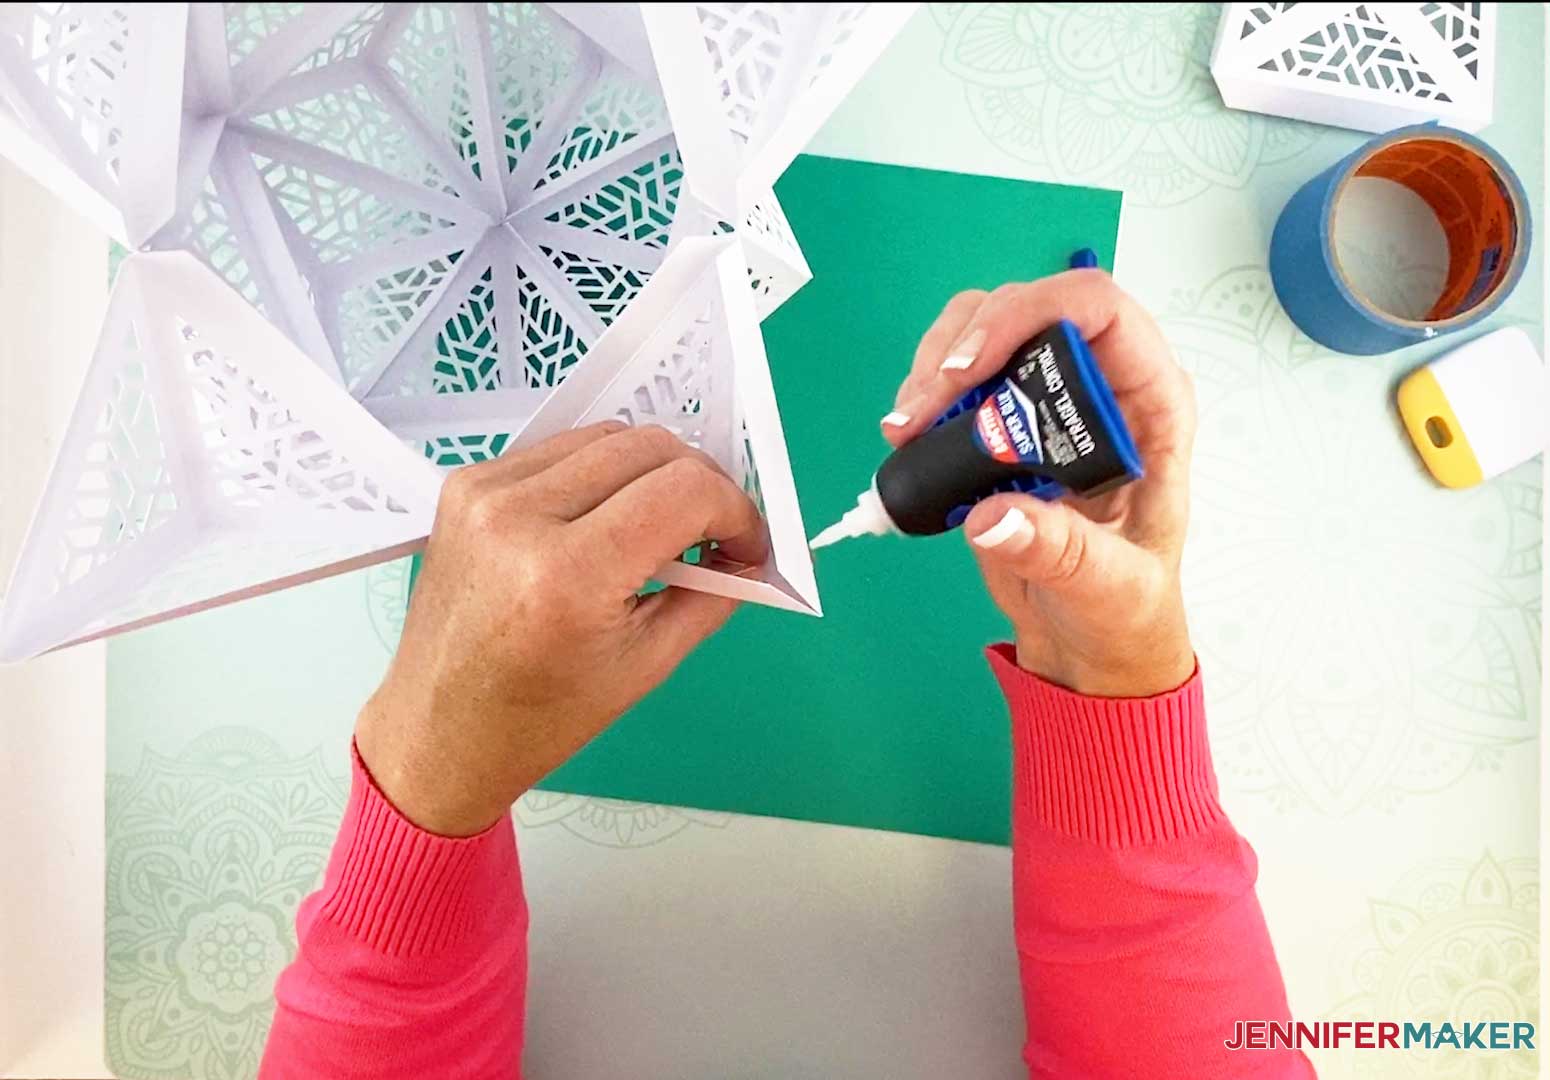
Grab one of the other 19 pieces and apply glue to the narrow flap in the inside of the piece.
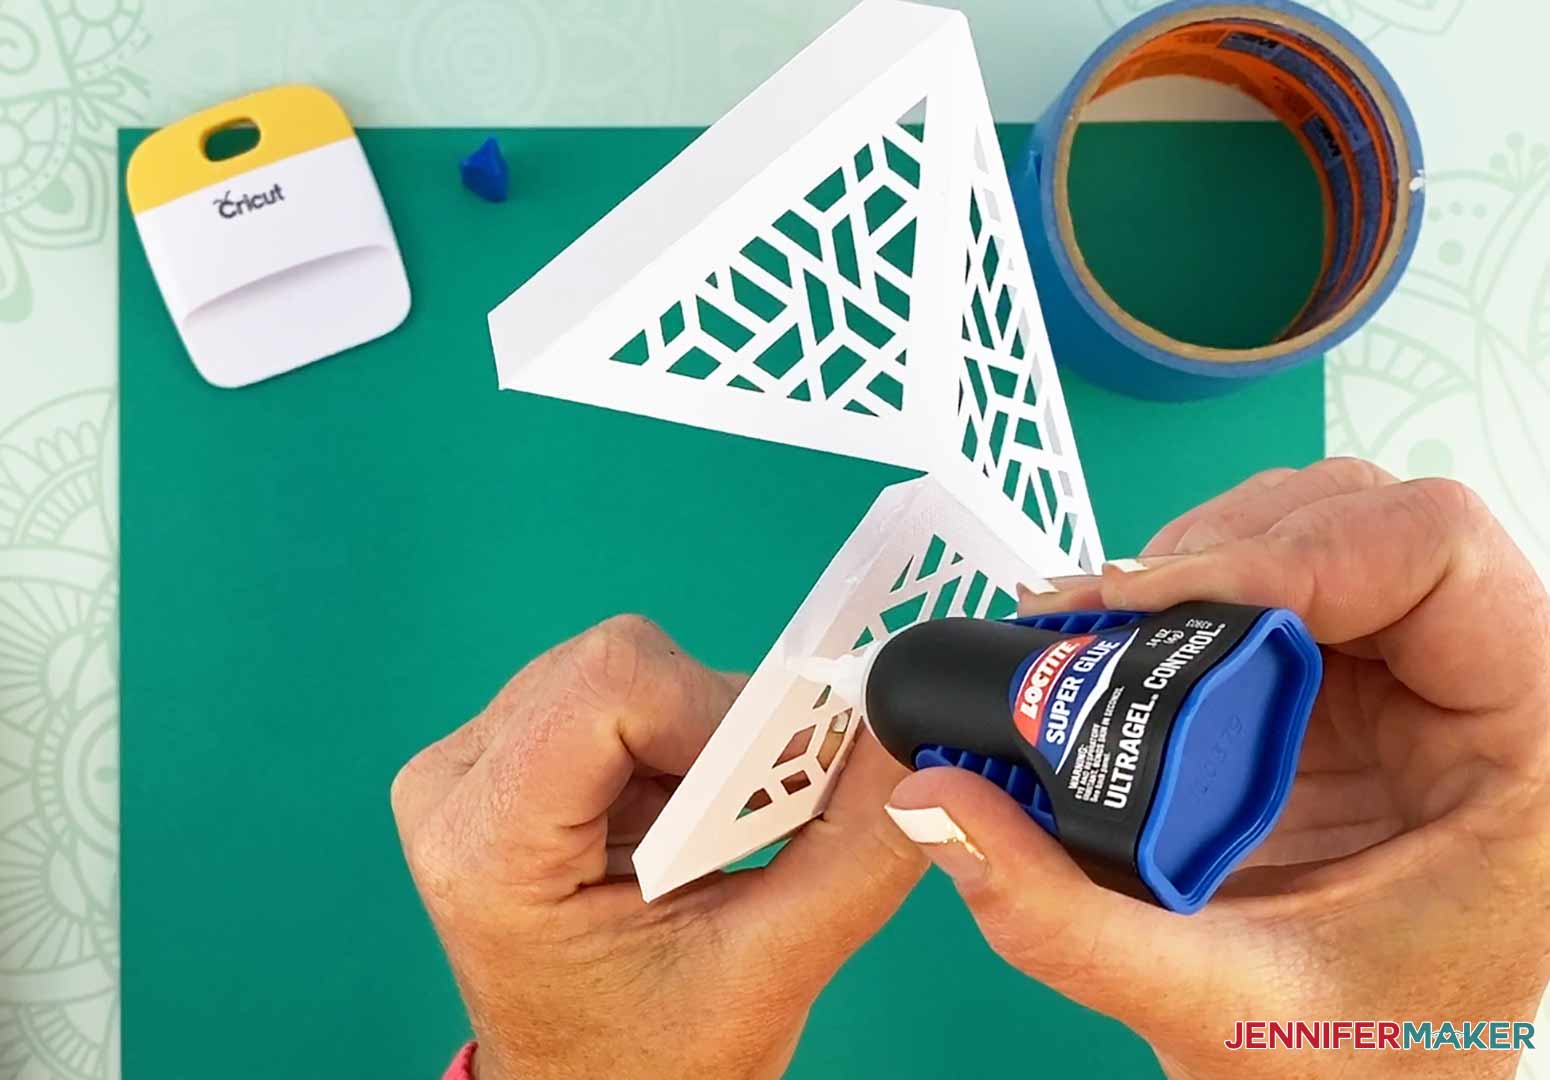
Glue this flap to the underside of the opposite side of the piece.
Press together until glue is dry.
This is what an assembled piece looks like. Repeat these steps and glue the other 19 pieces together. Remember, do not glue the piece that has the circle cut out in the center of the piece.
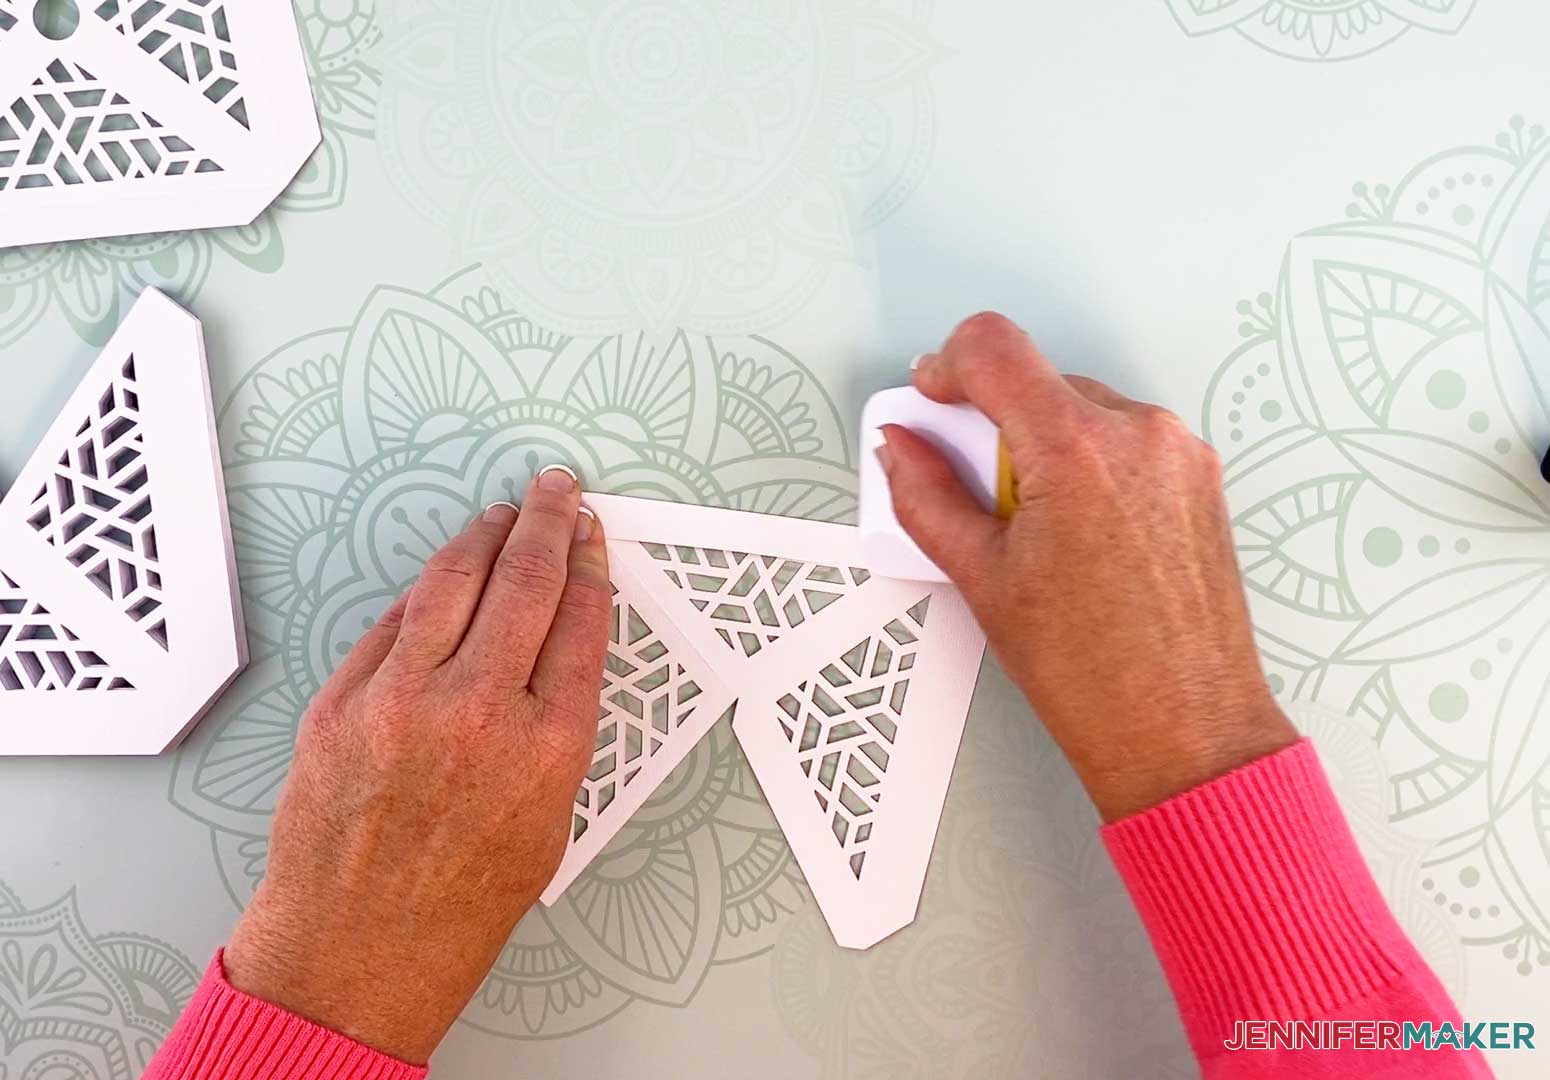
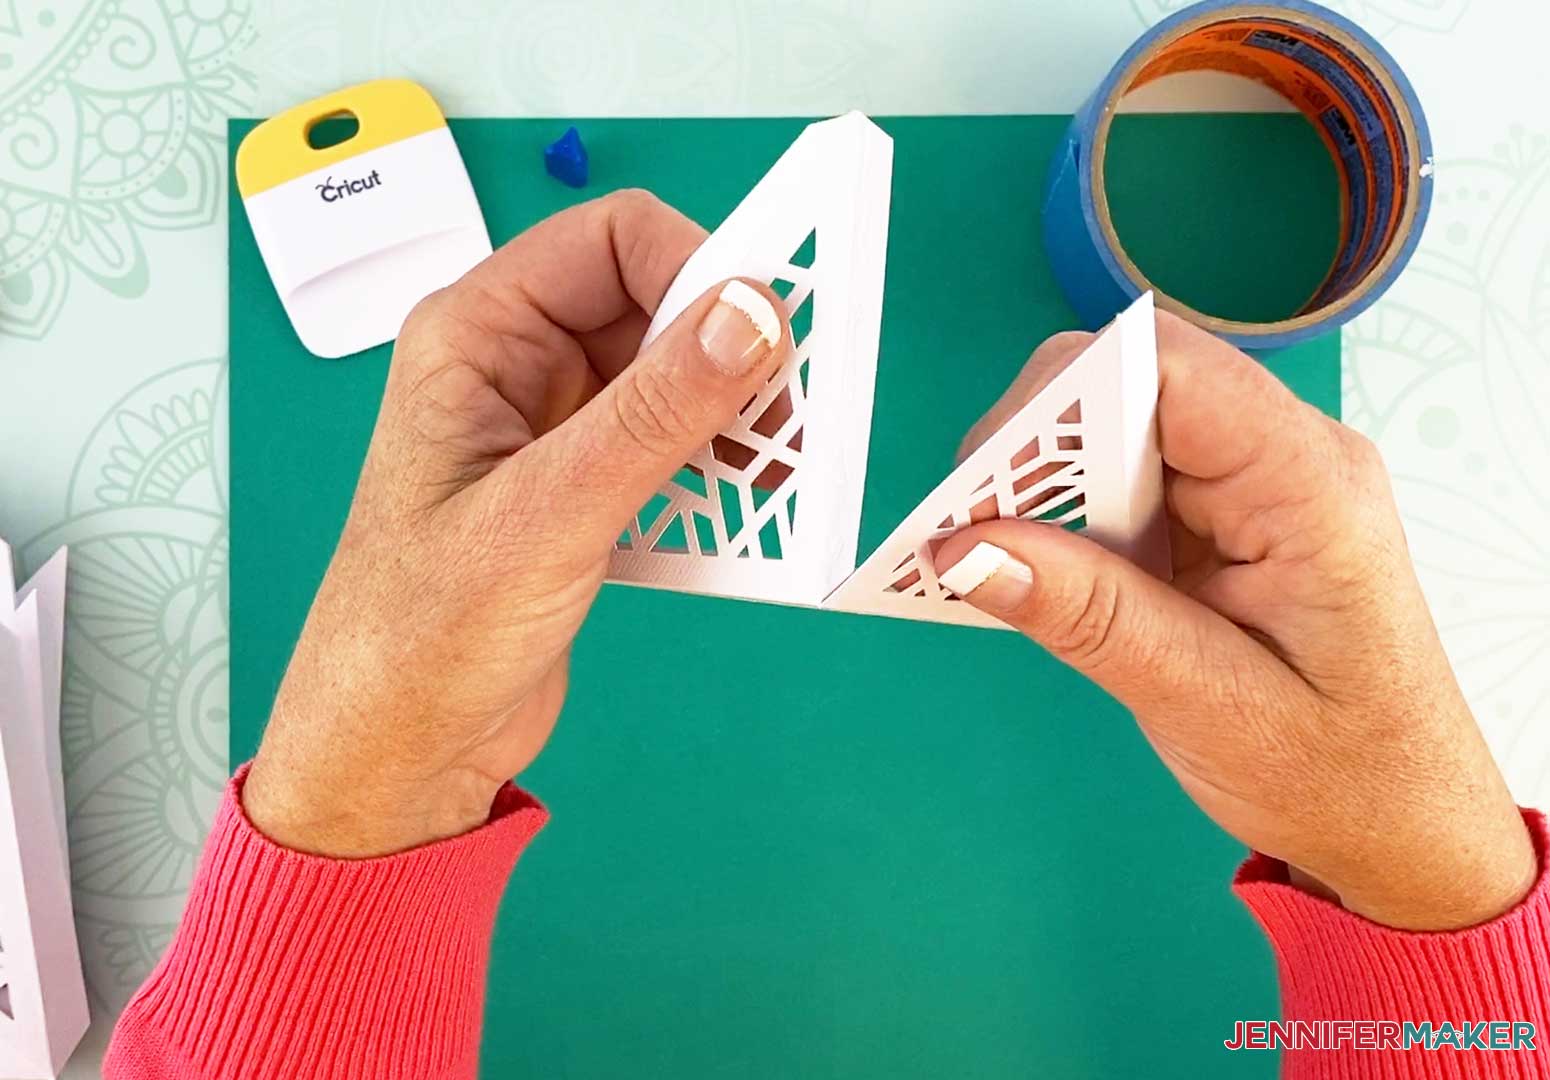
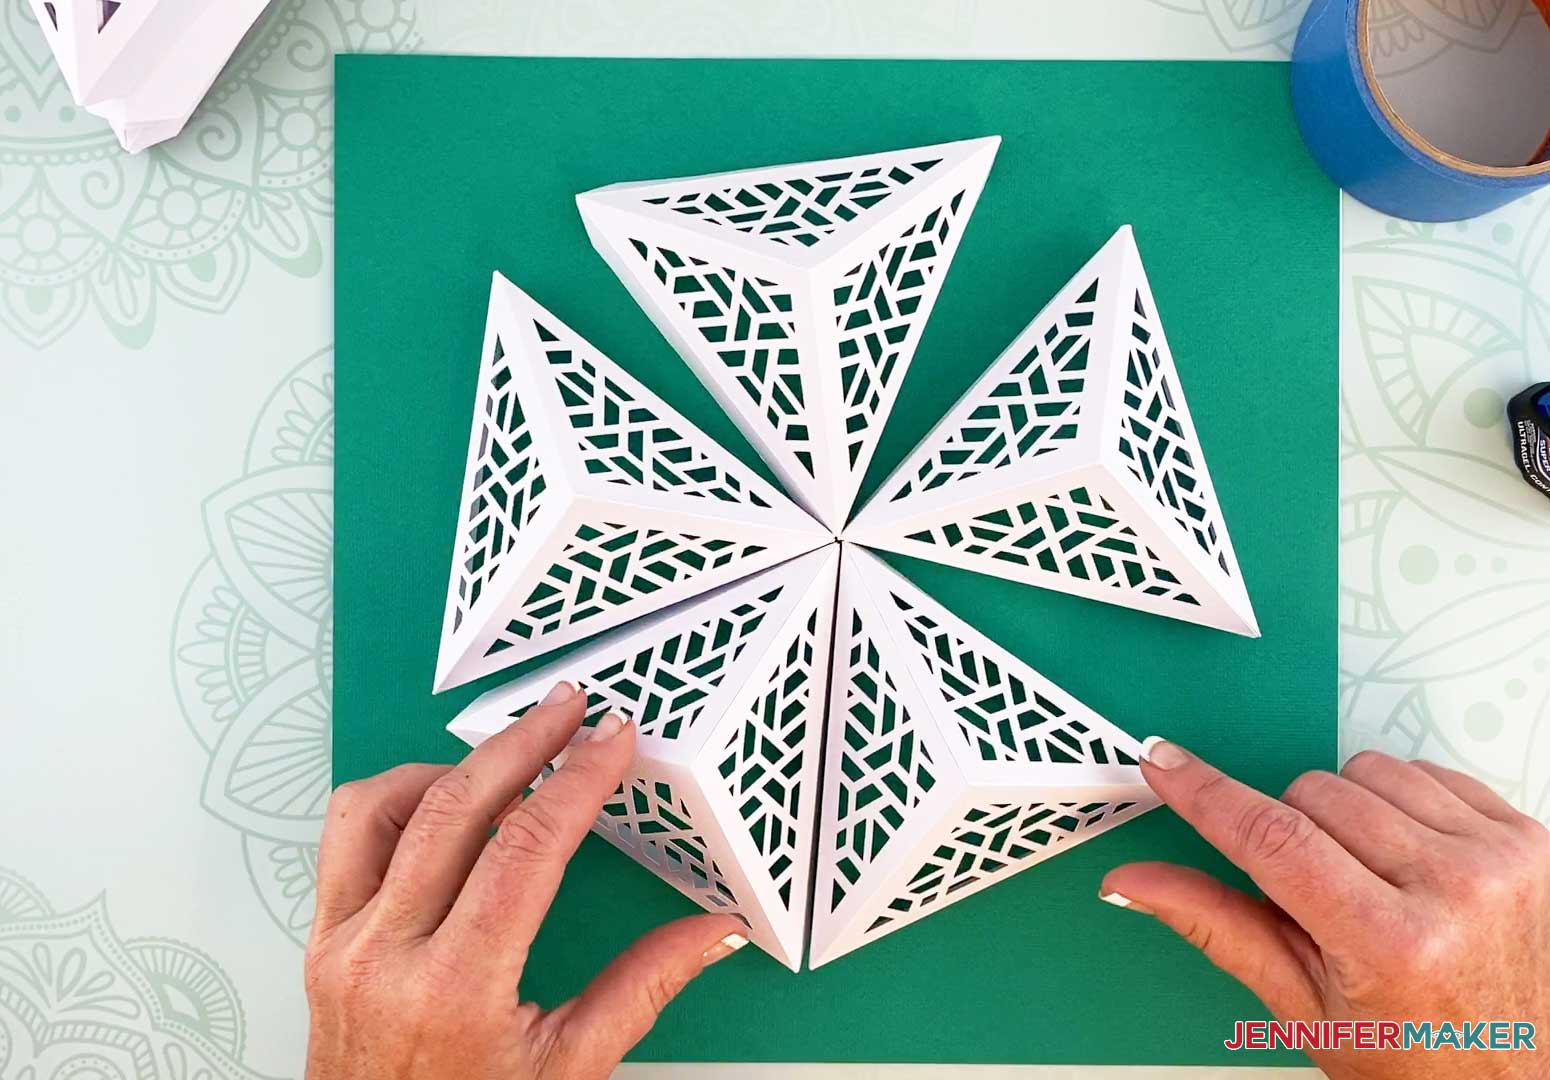
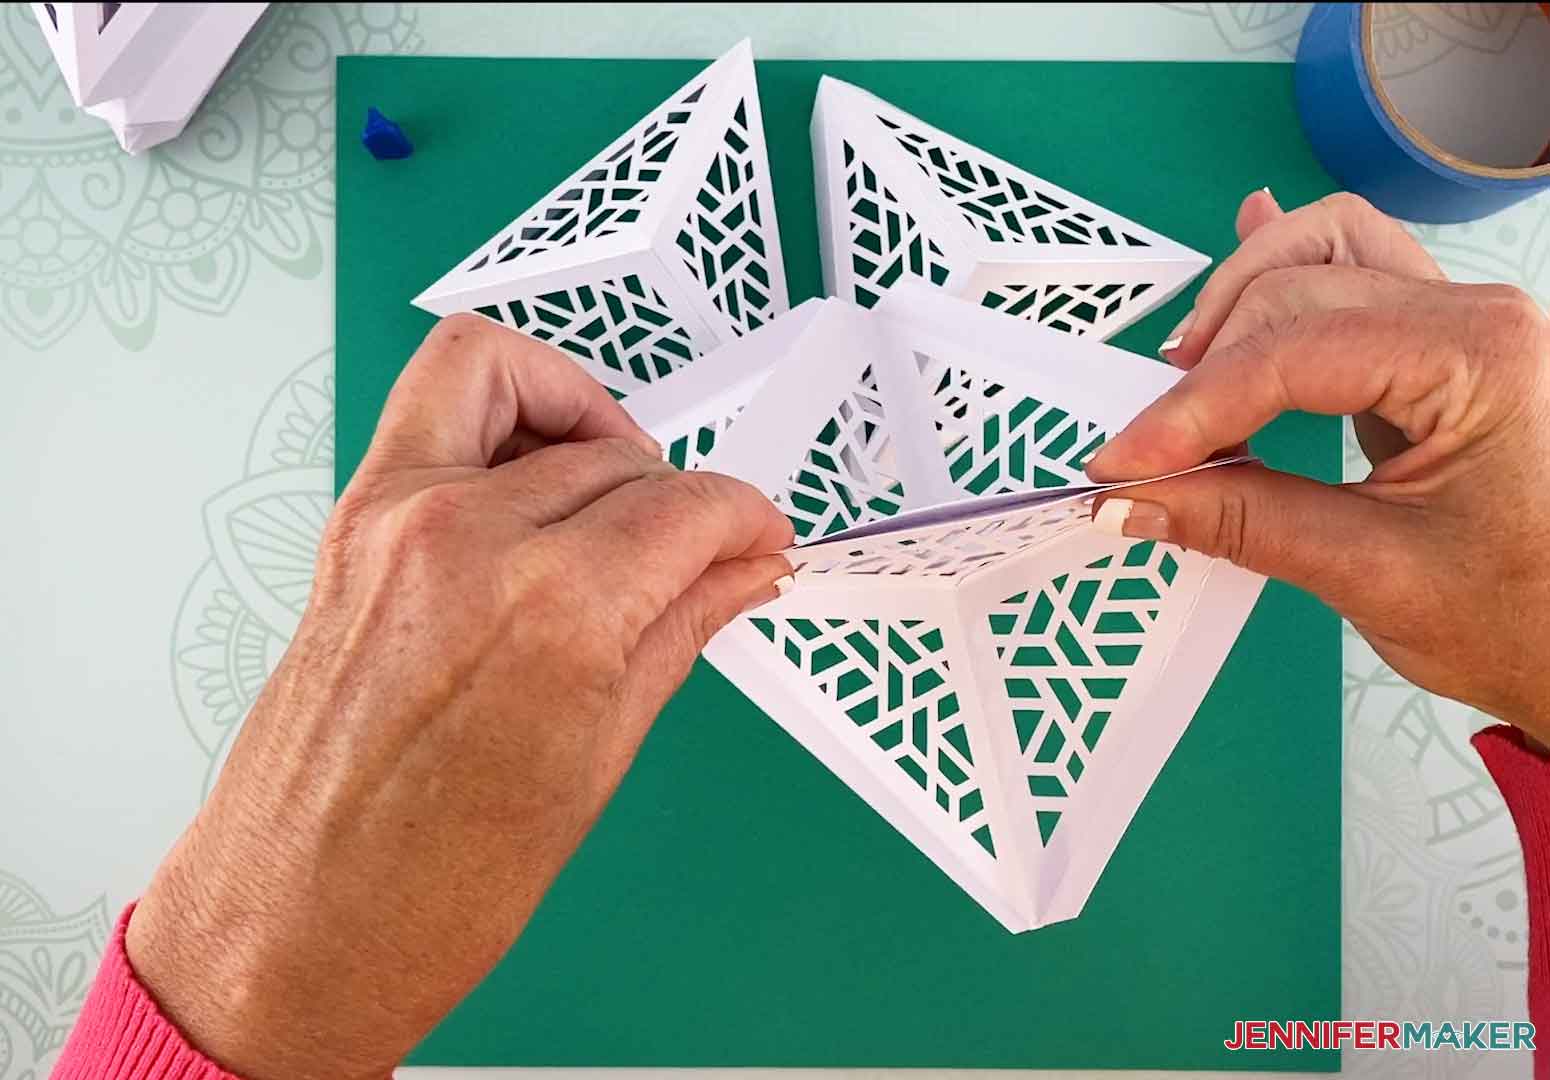
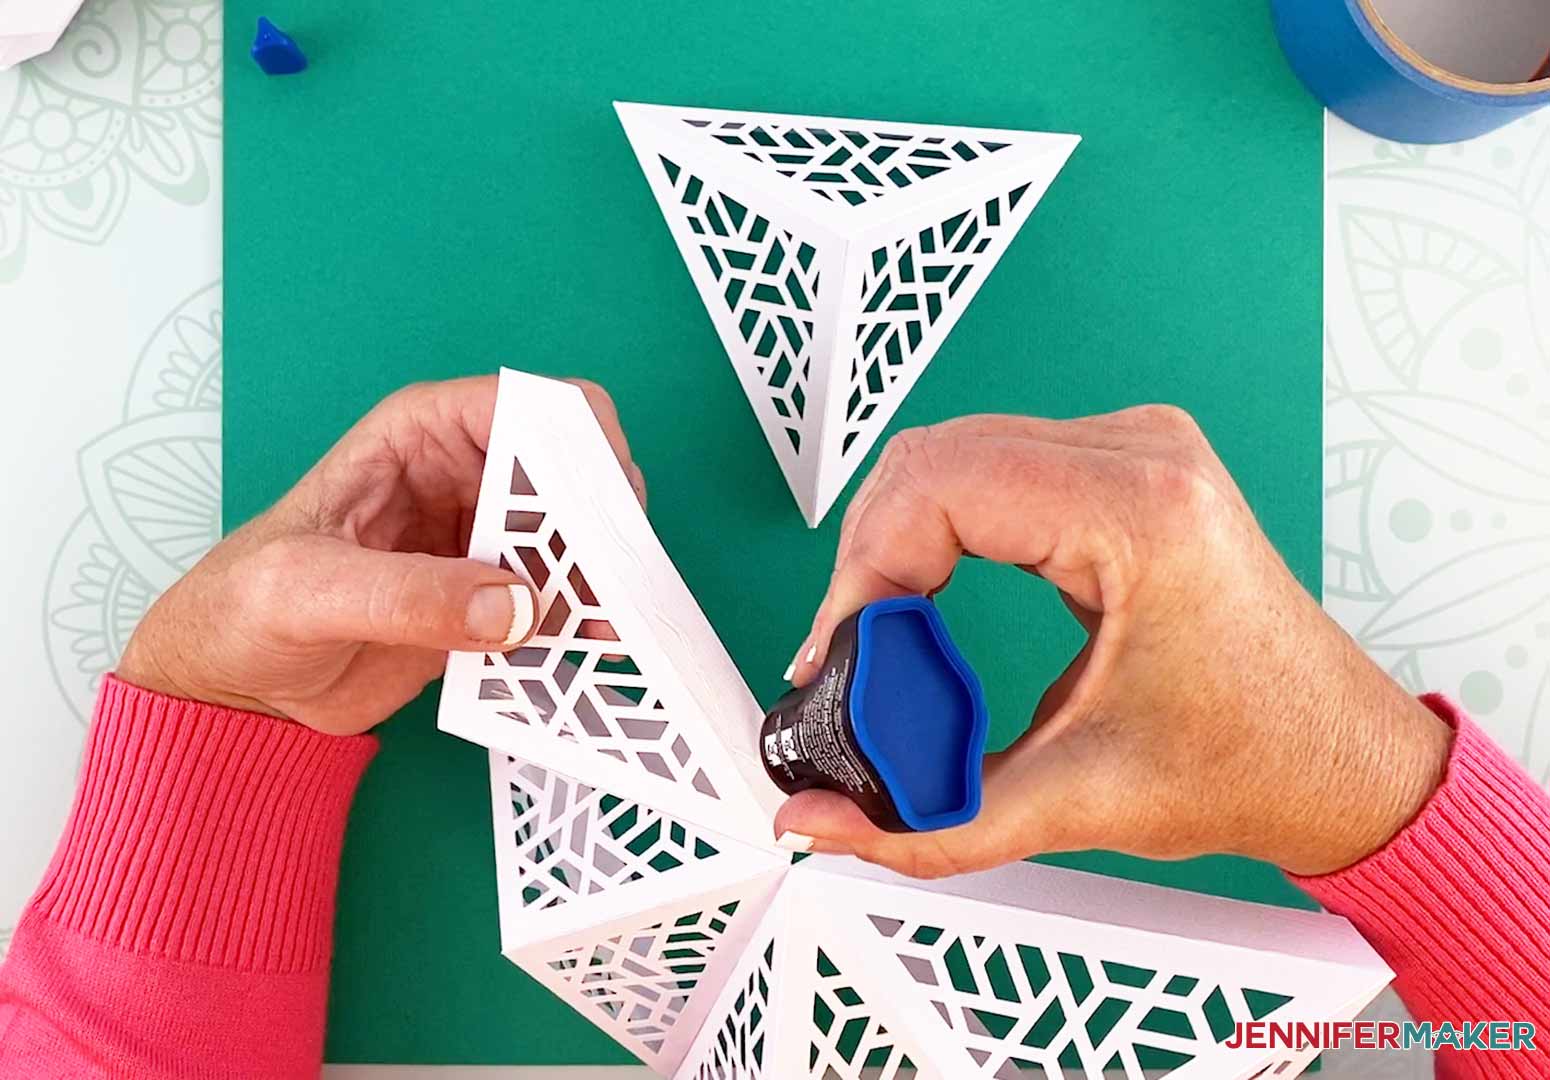
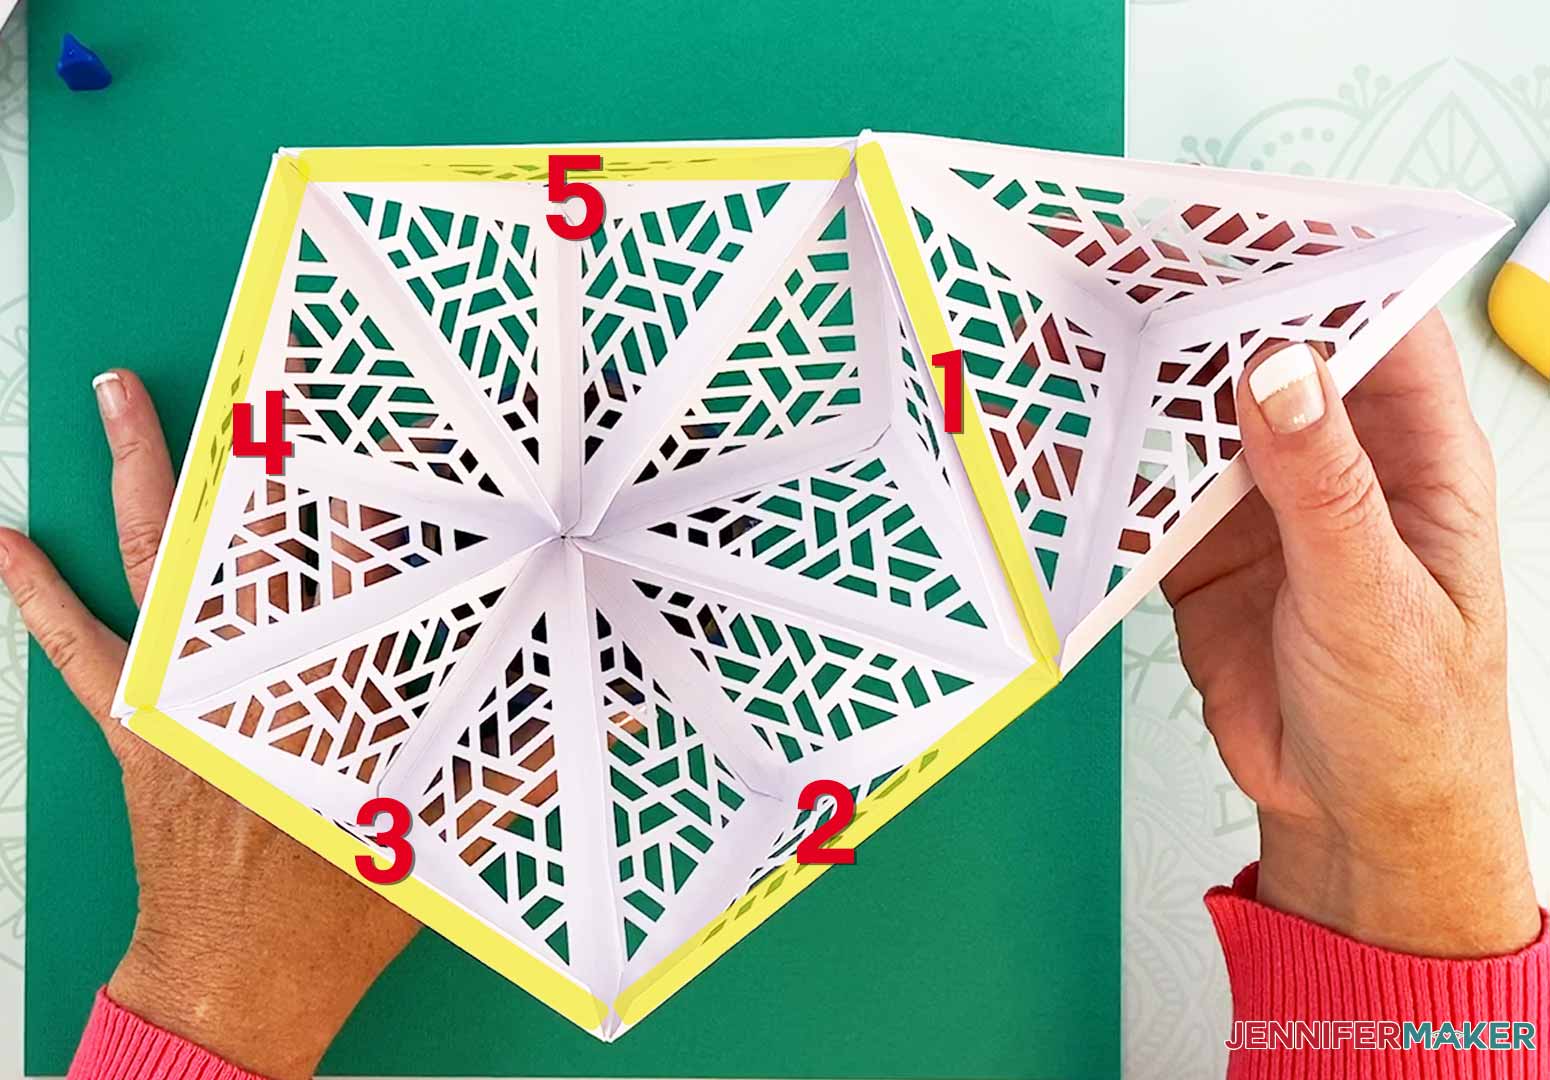
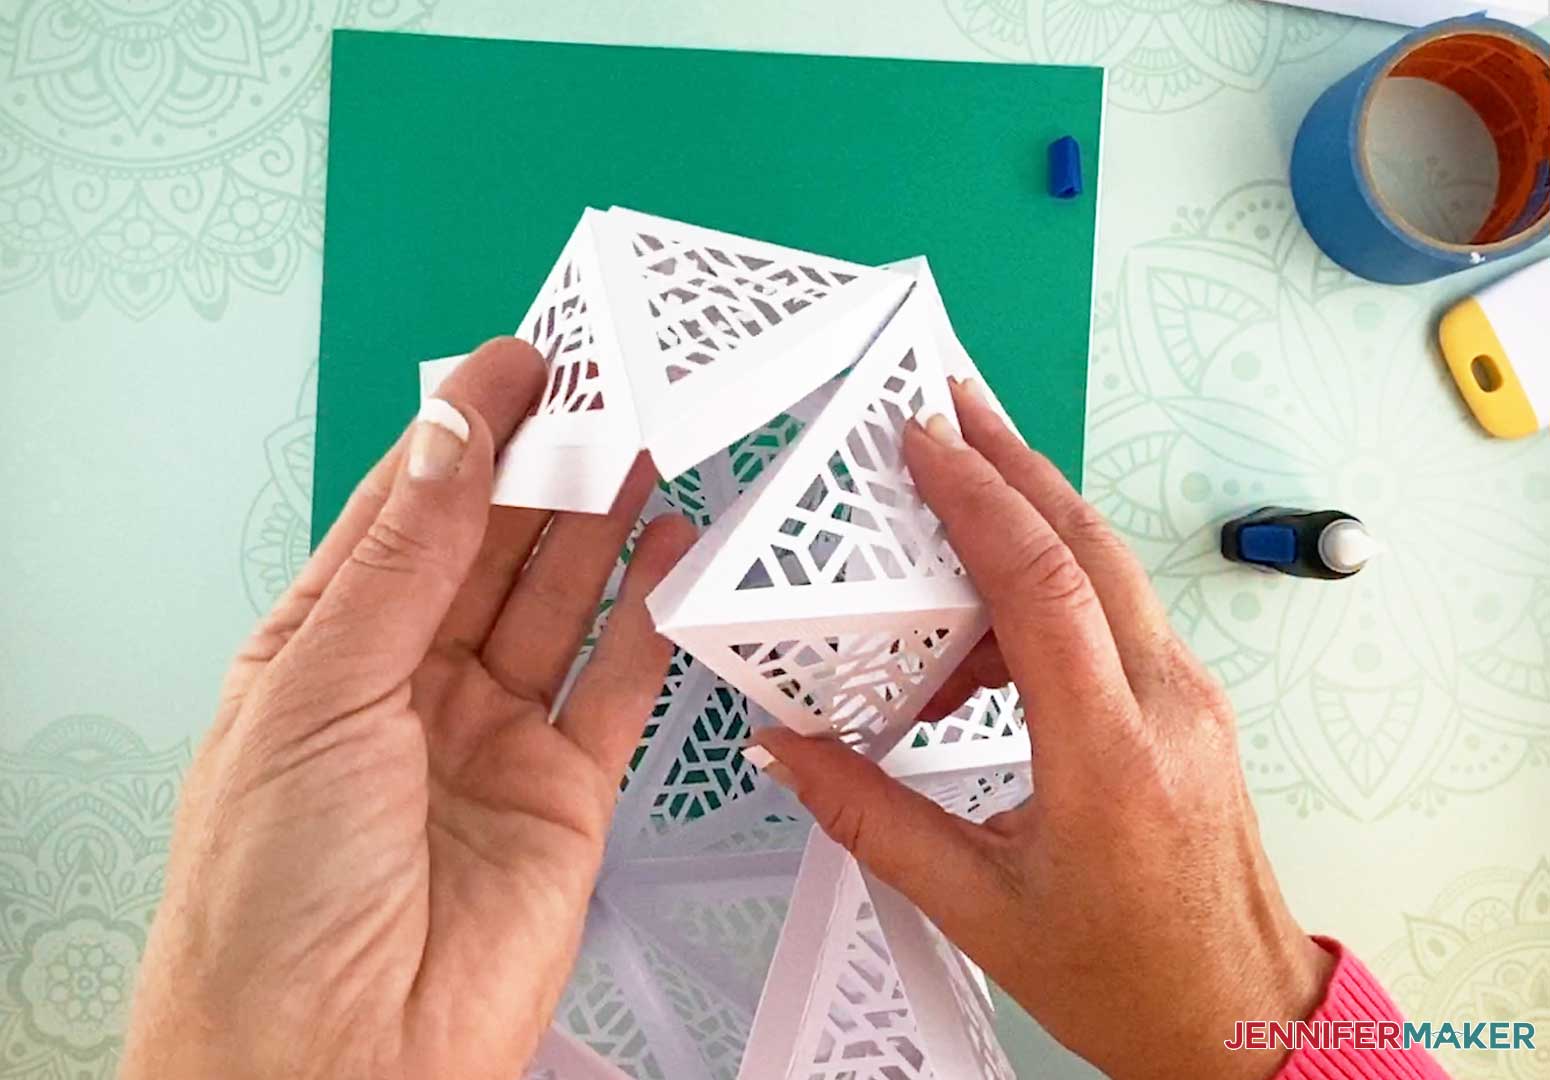
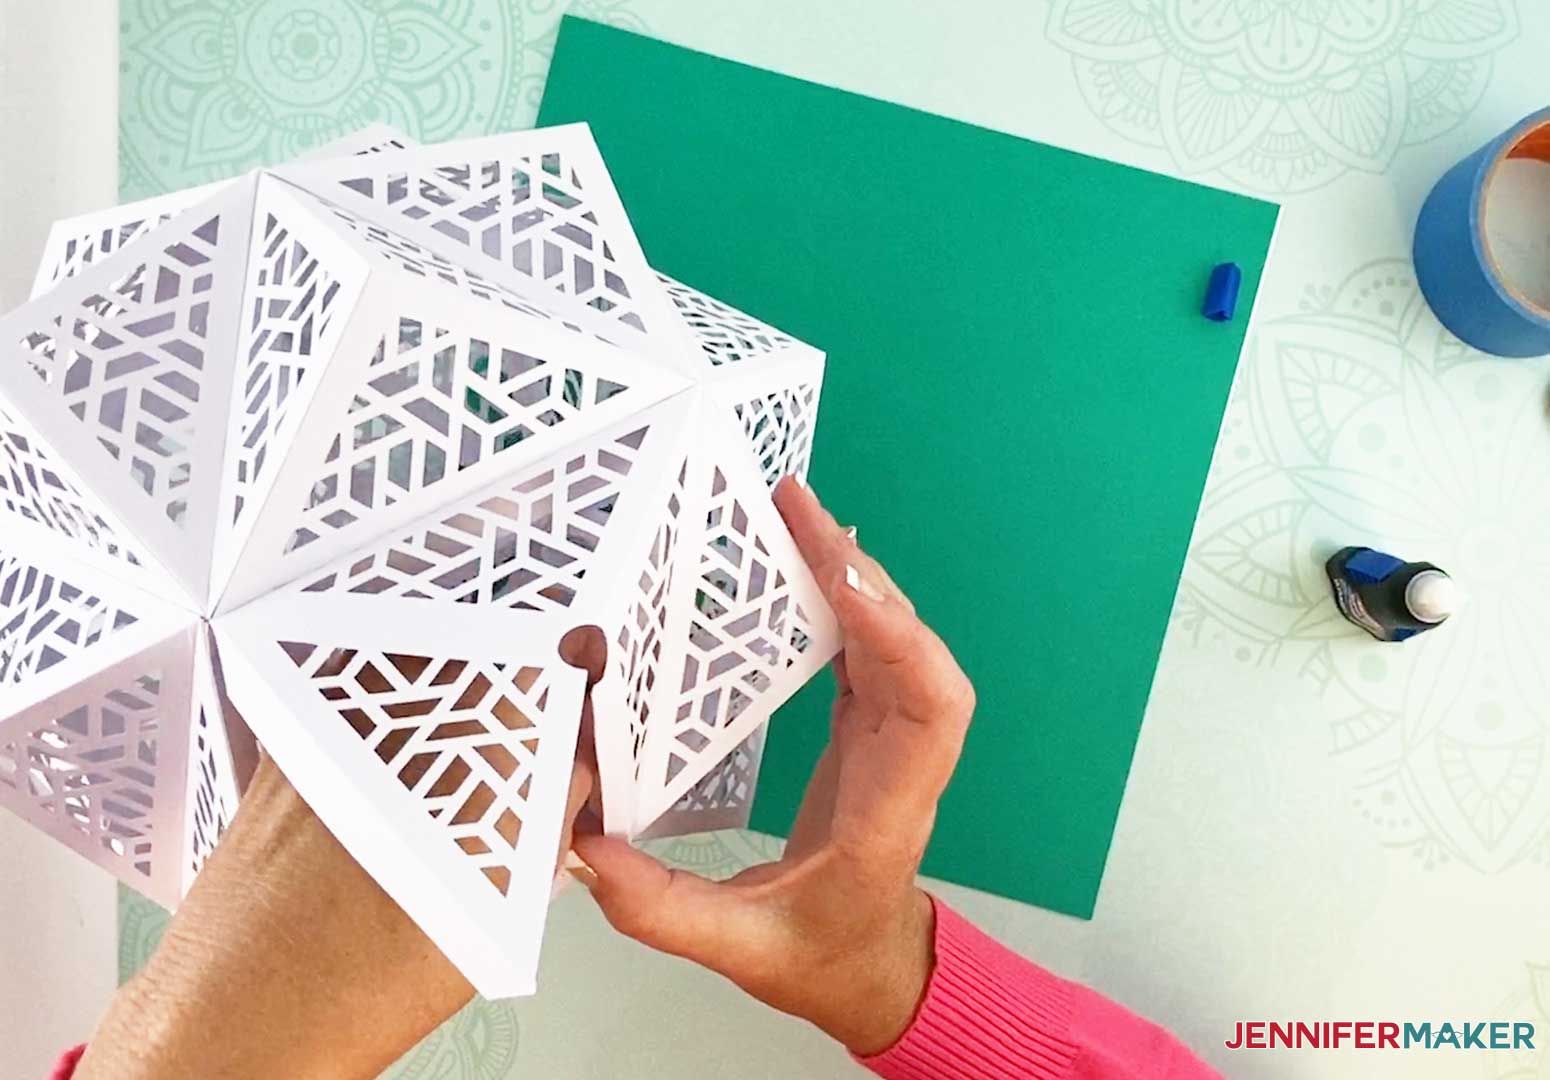
Take five of the assembled pieces and lay them out like the image below. We will be gluing these five pieces together as shown.
Take one piece and apply glue to a flap.
Glue a flap from a new piece to the piece you just applied the glue on.
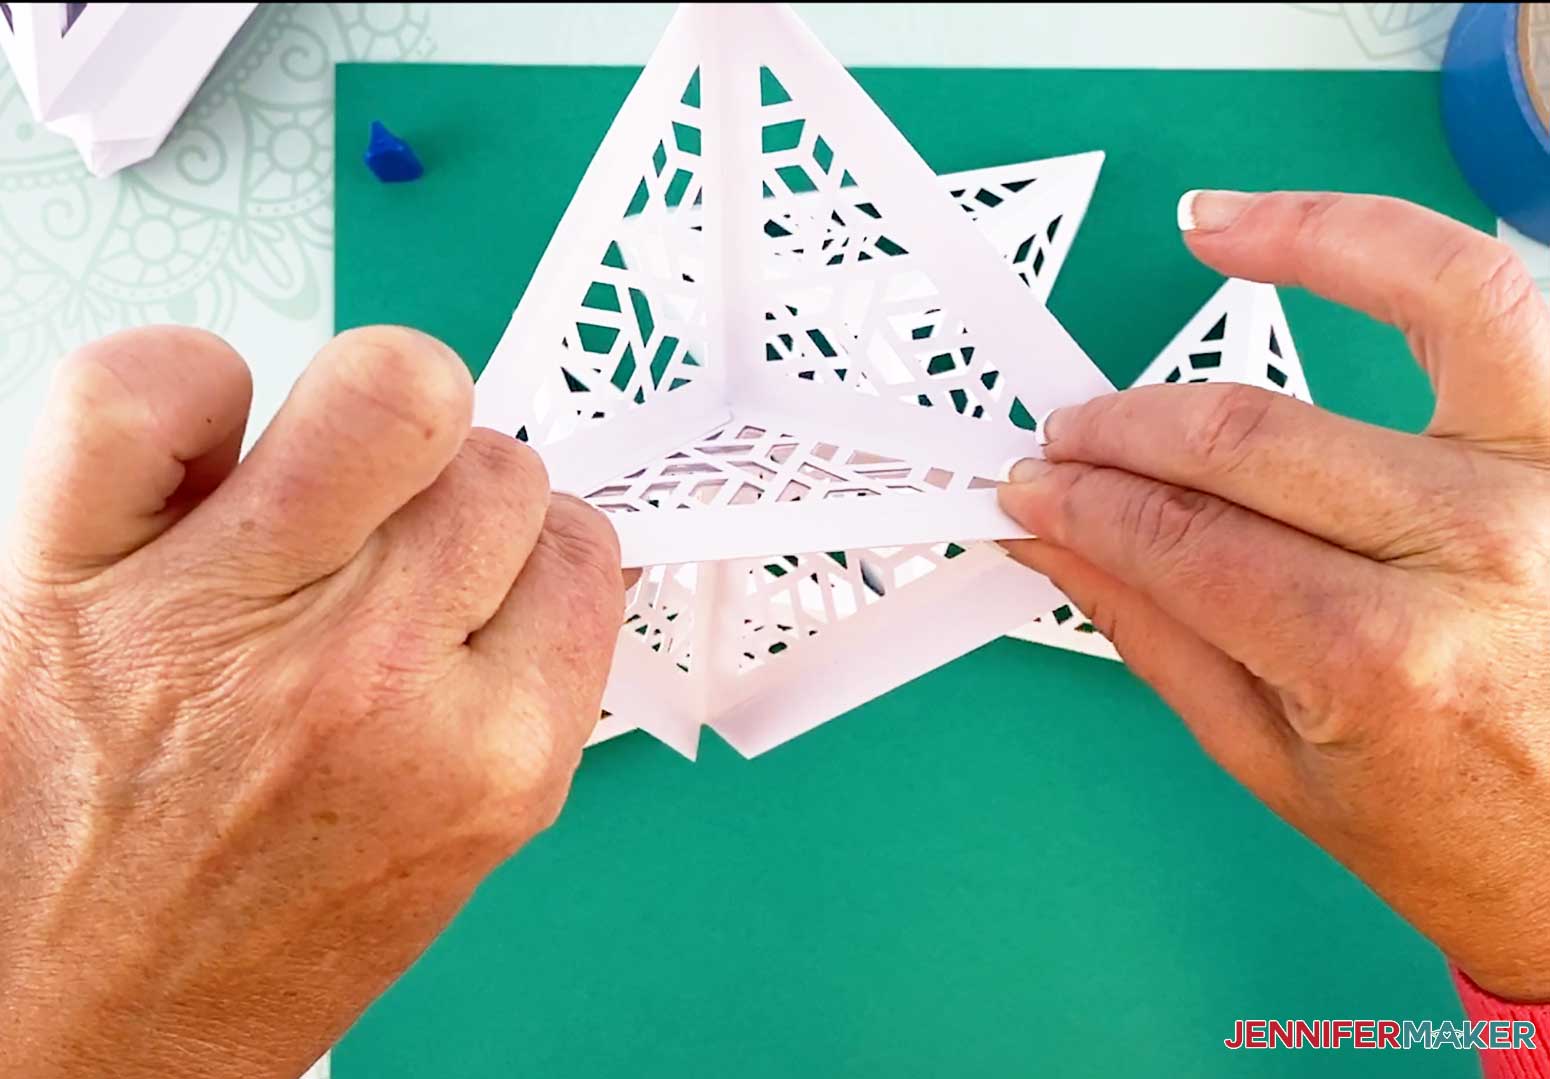
This is what the first two pieces look like glued together.
Next, you will be adding glue to the flaps highlighted on the other pieces and connecting them to the adjoining piece as the red arrows indicate.
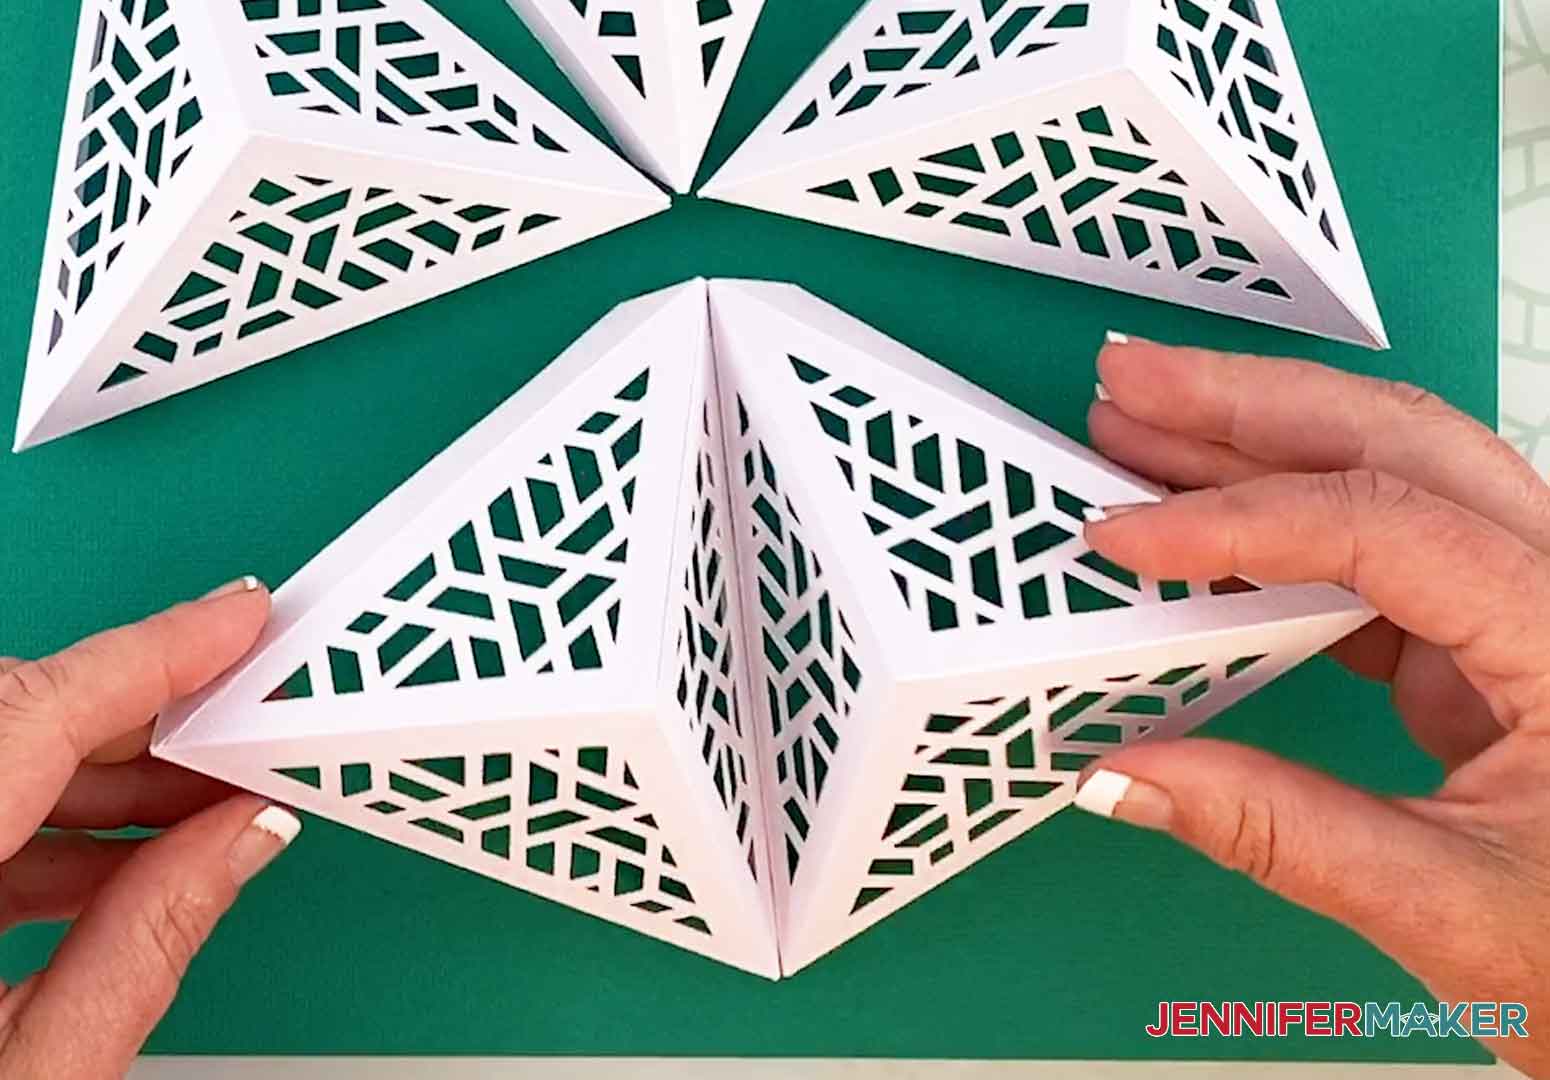
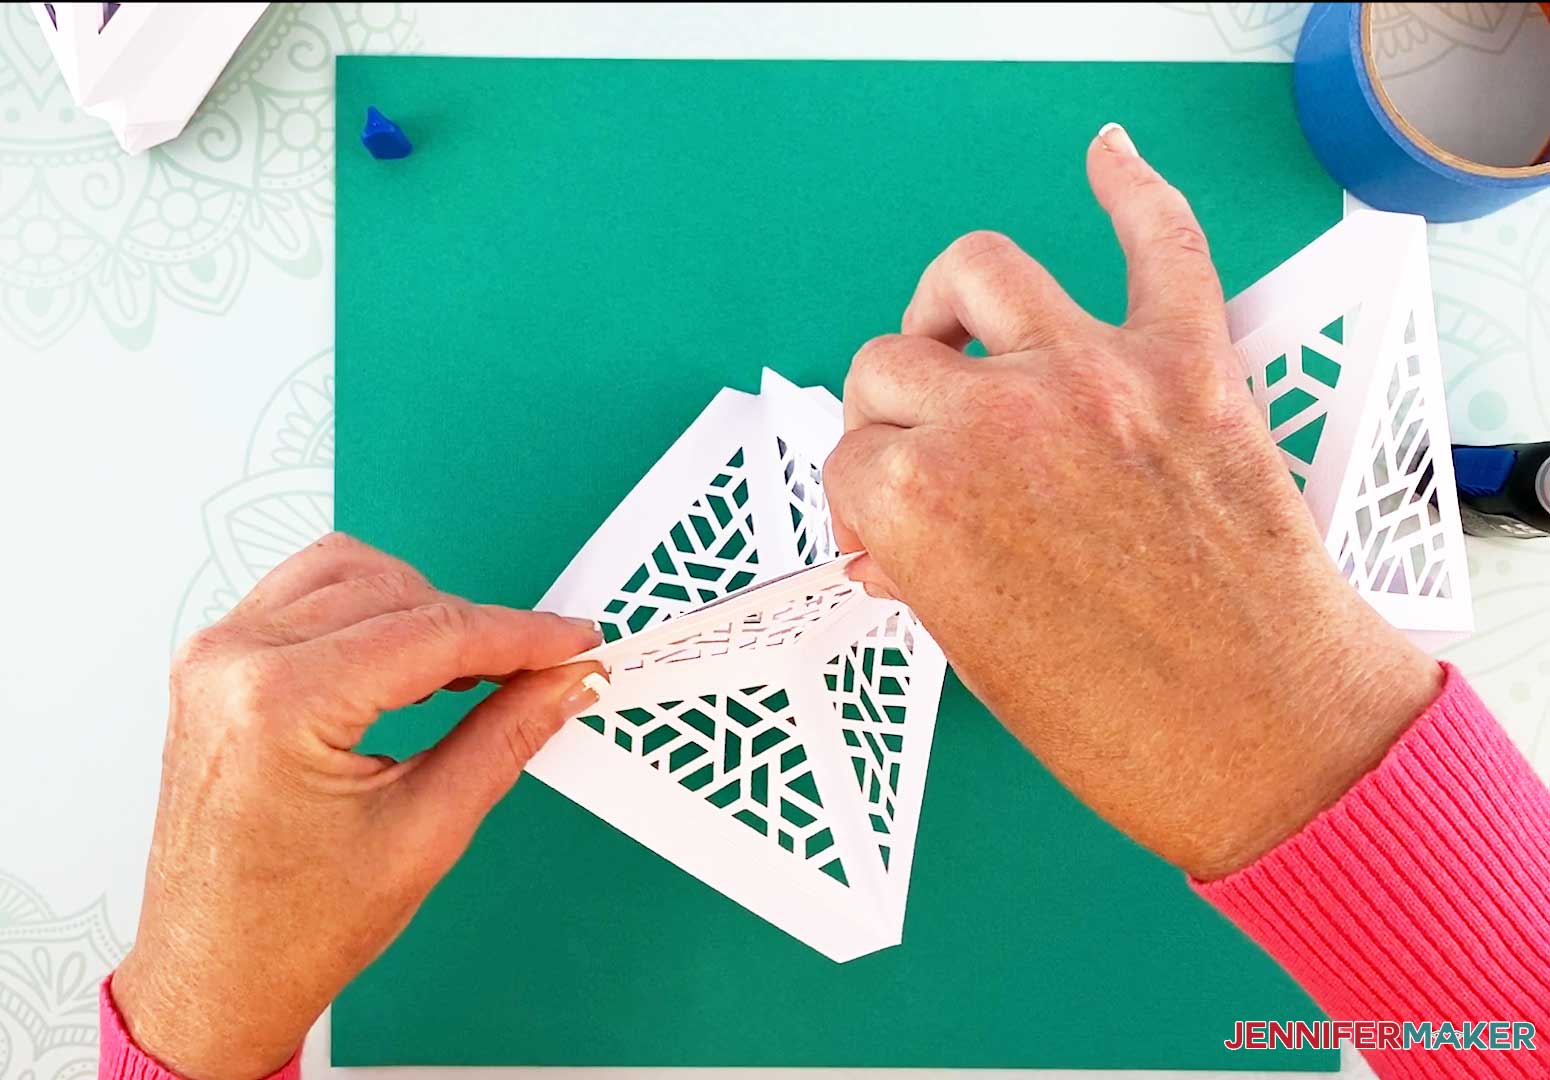
Add glue to the outer flap of the first two pieces.
Take the third piece and glue it to the first two pieces making sure you align the edges of the tabs for both pieces.
This is what the first three pieces look like glued together.
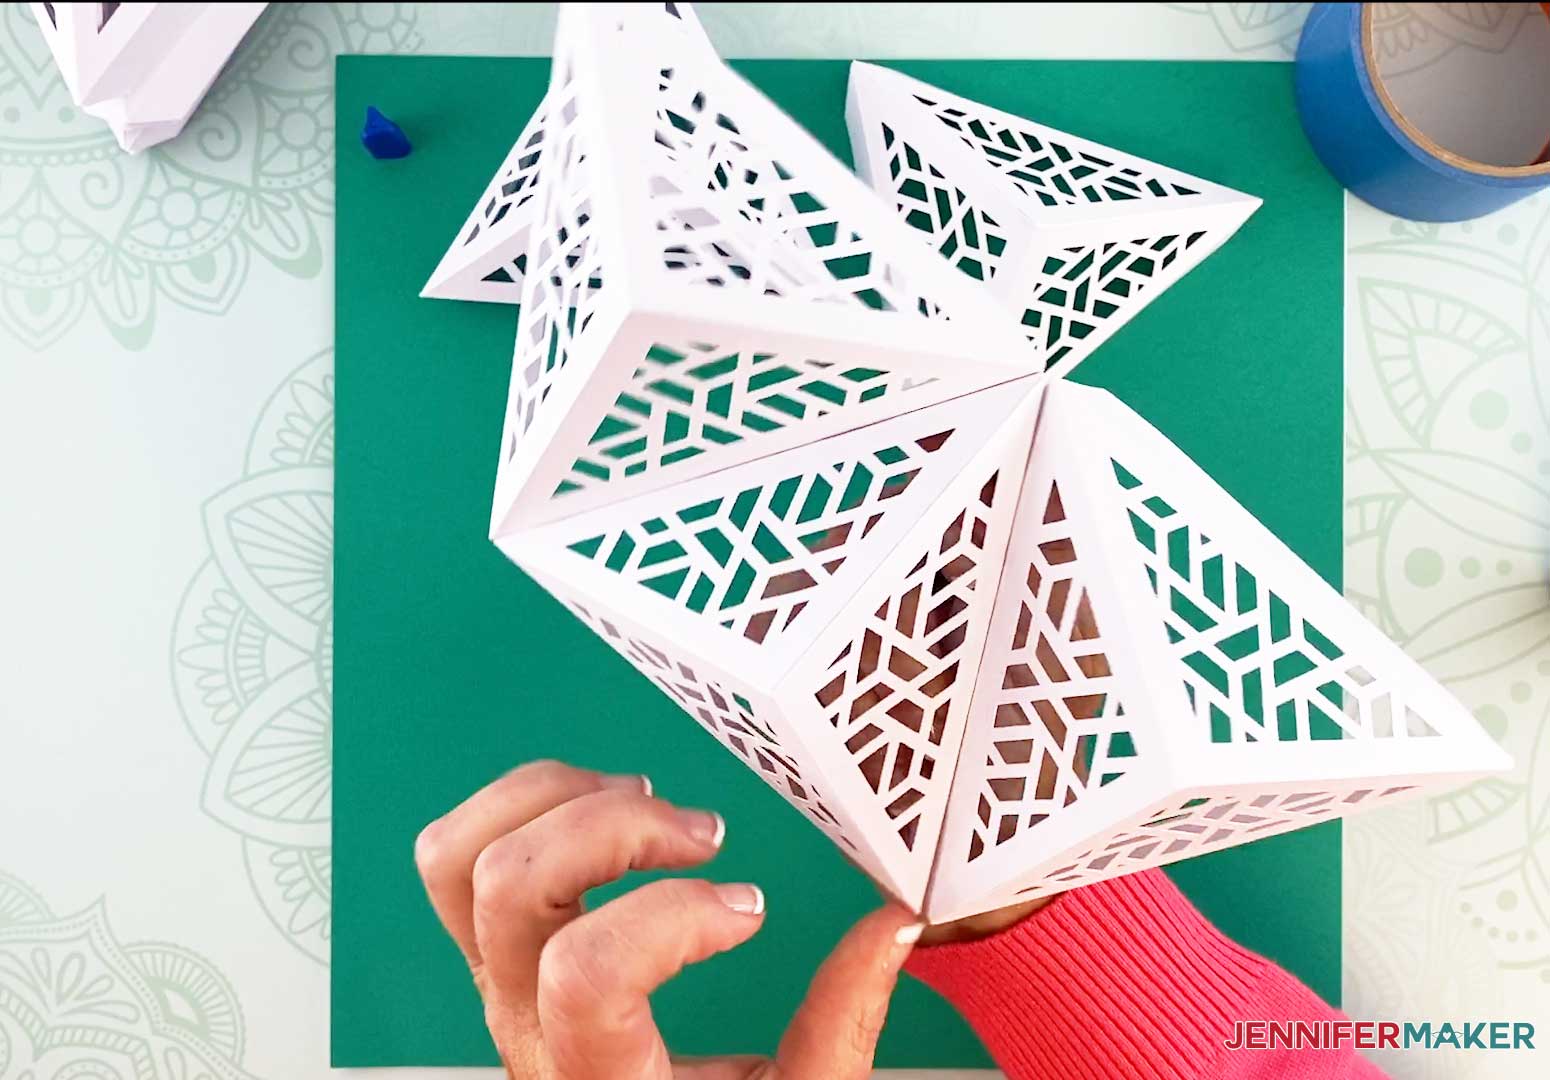
Add glue to the flap of piece three.
Connect the fourth piece making sure to align the flap edges.

This is what the first four pieces look like glued together.
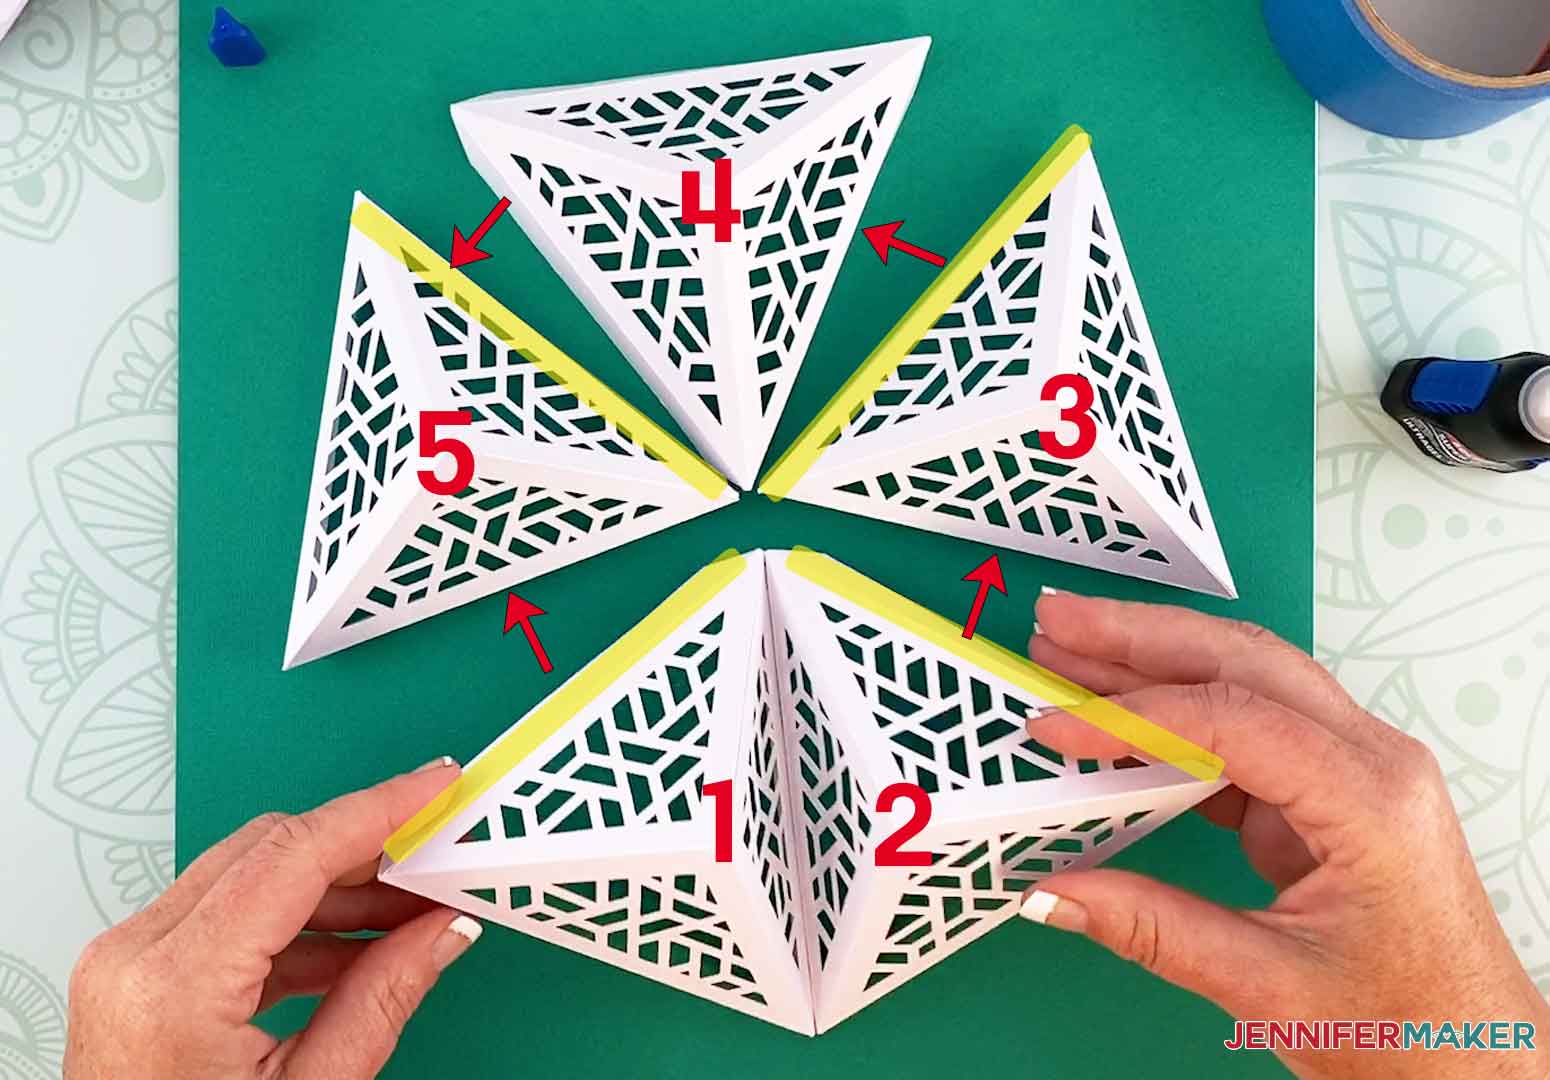
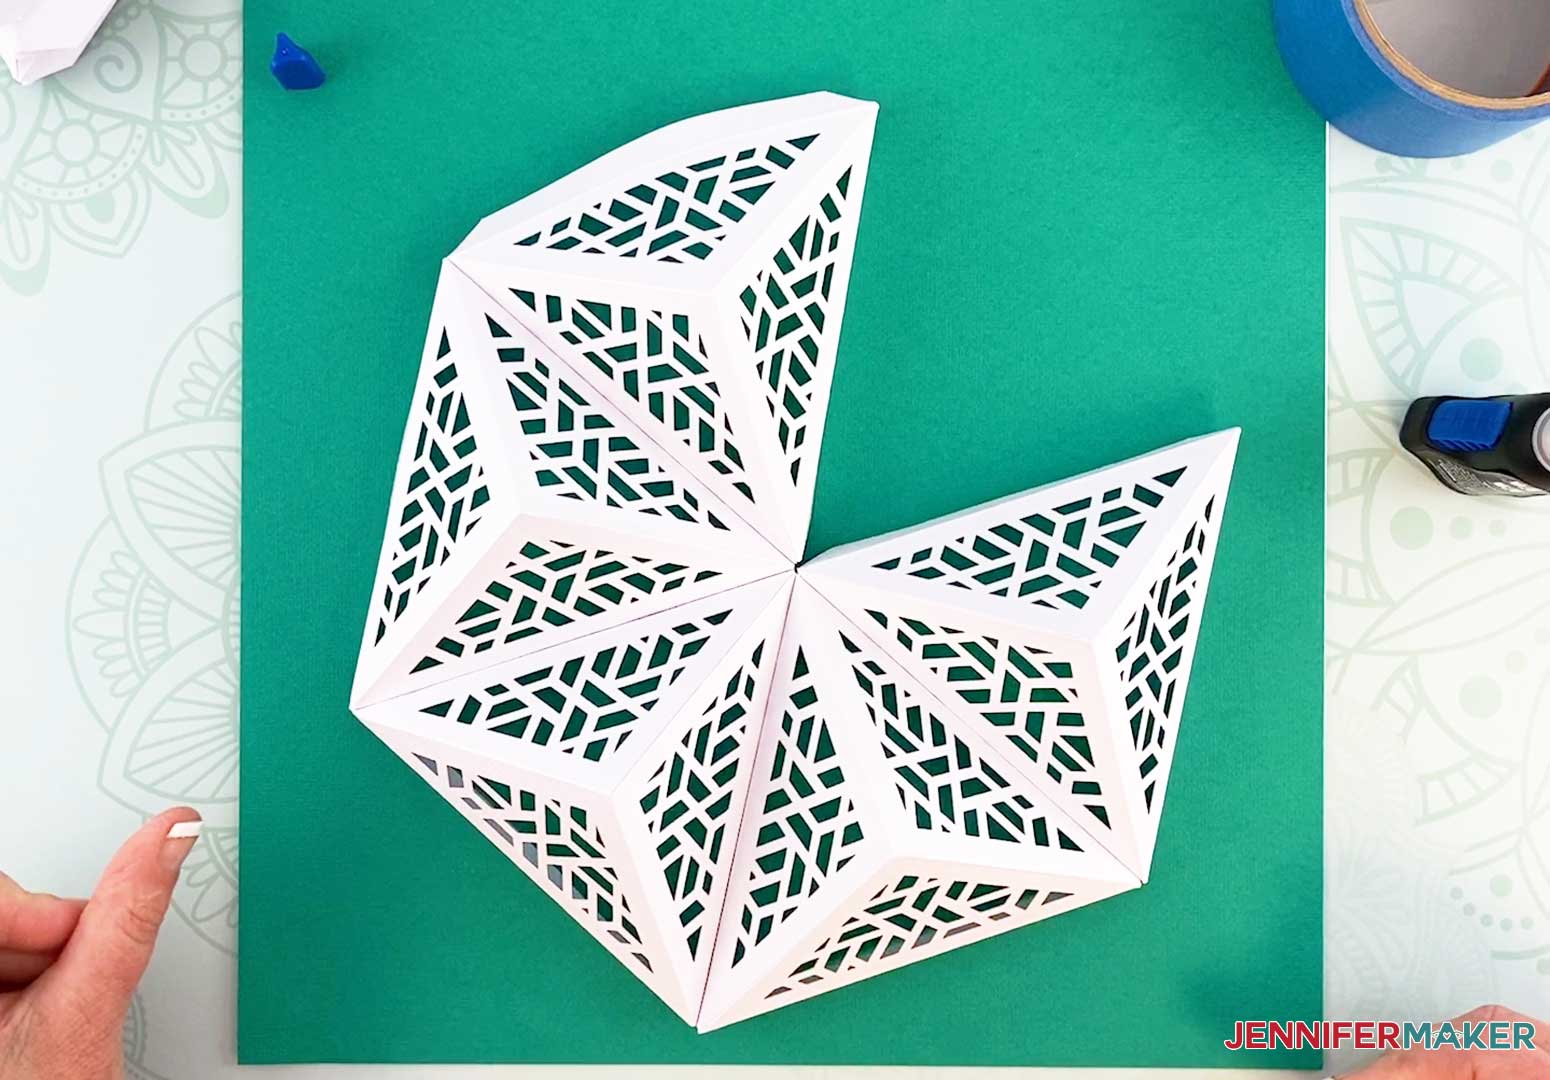
Add glue to one of the the flaps of the four connected pieces.
Connect the fifth piece making sure to align the flaps.
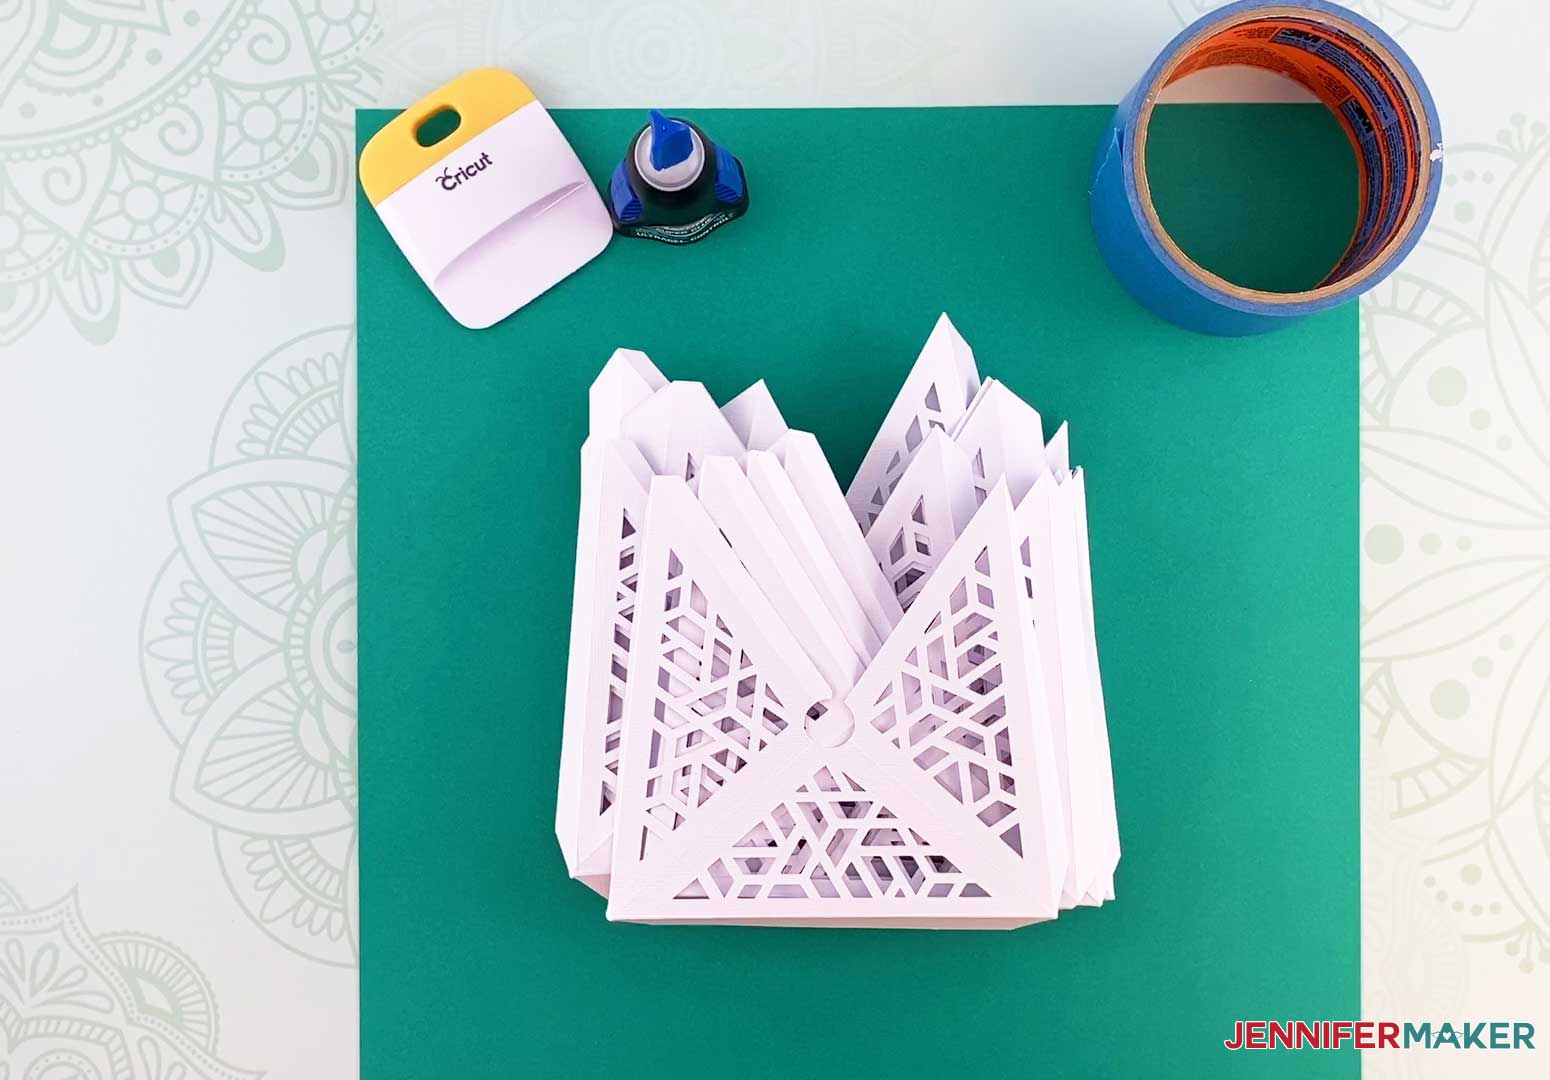
This is what your DIY Hanging Lamp should look like.
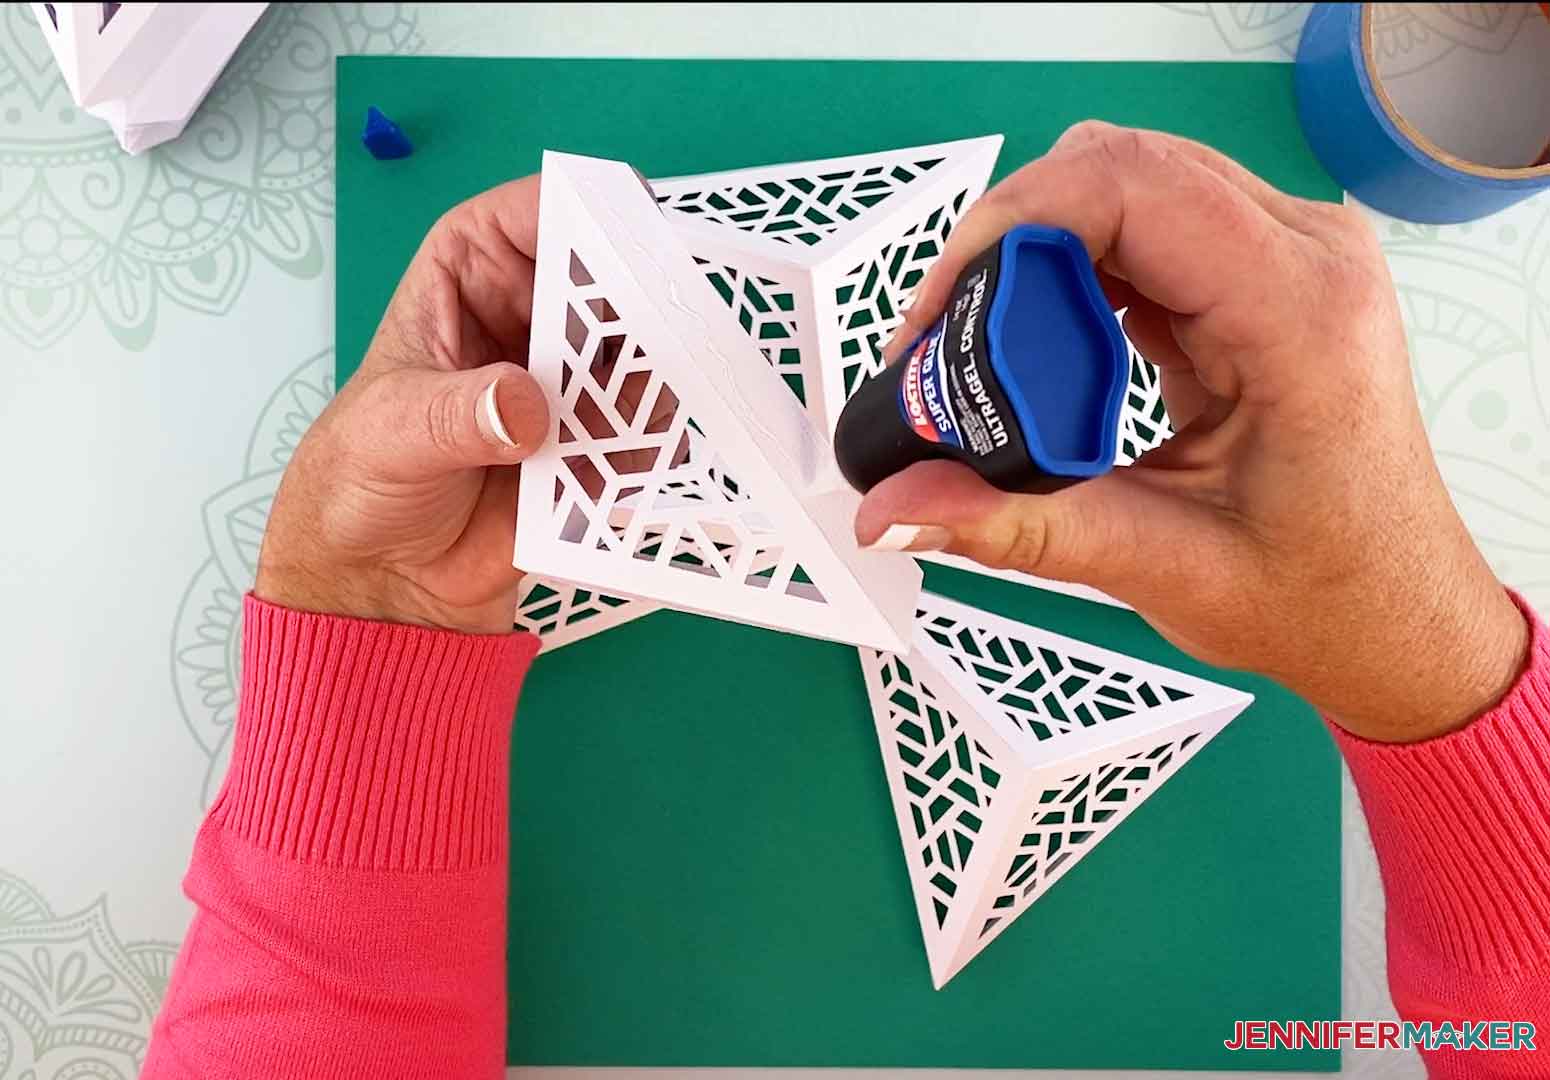
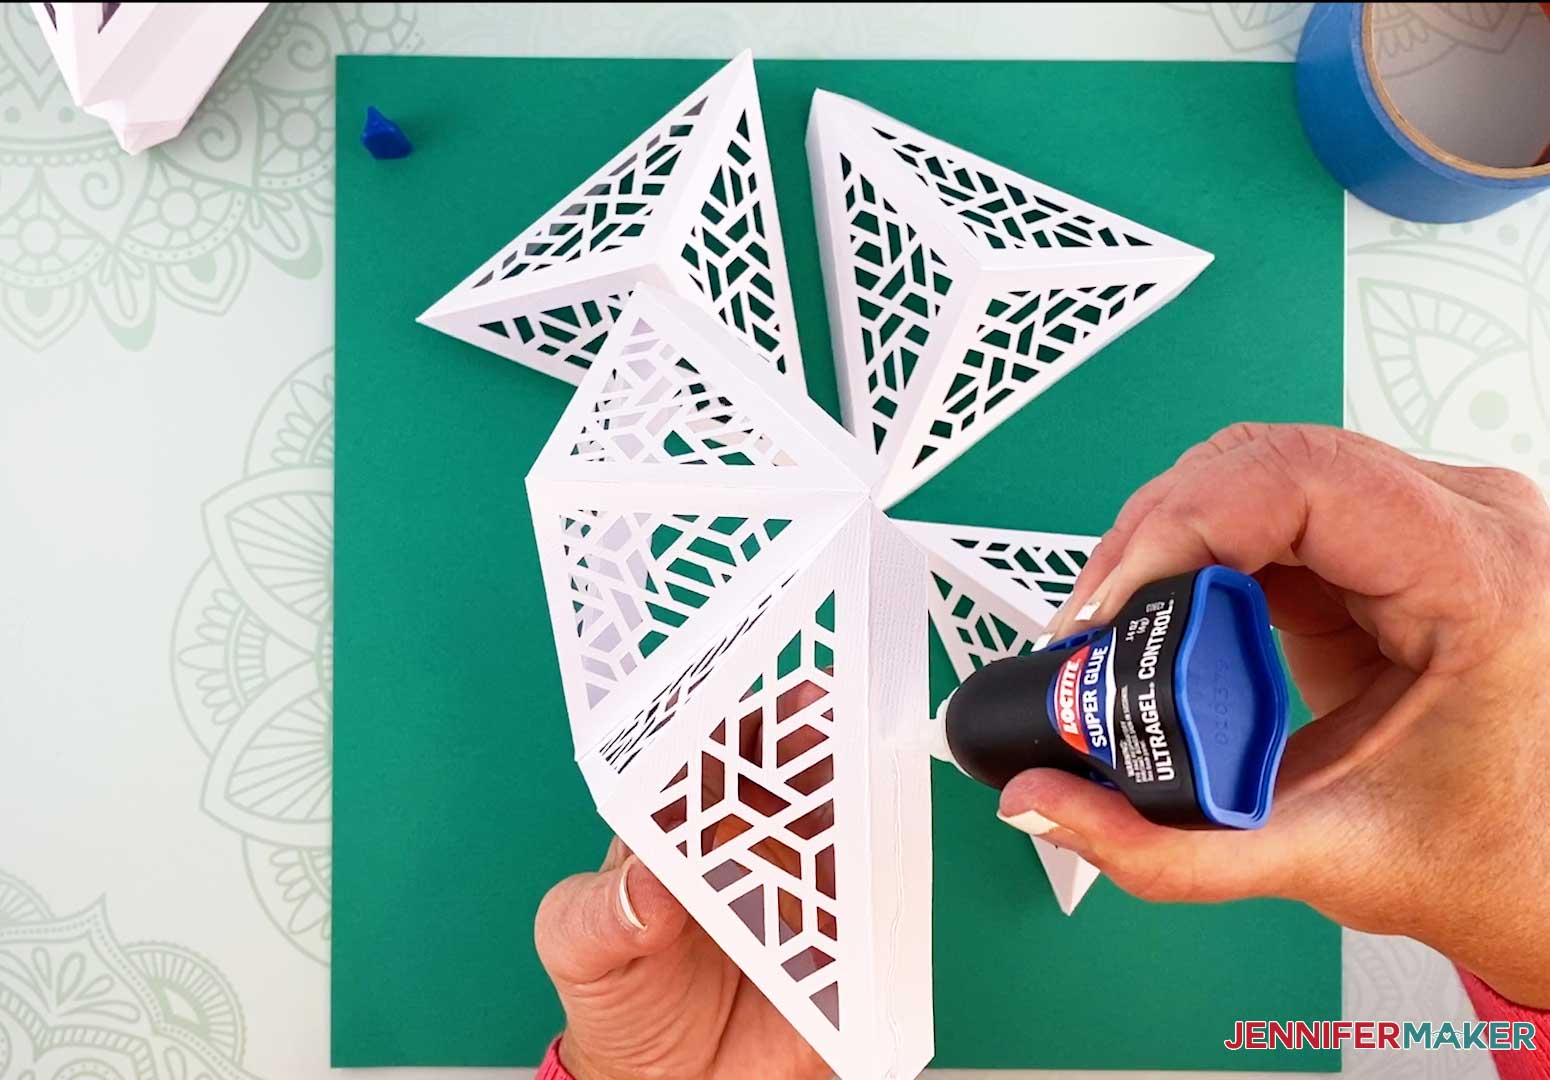
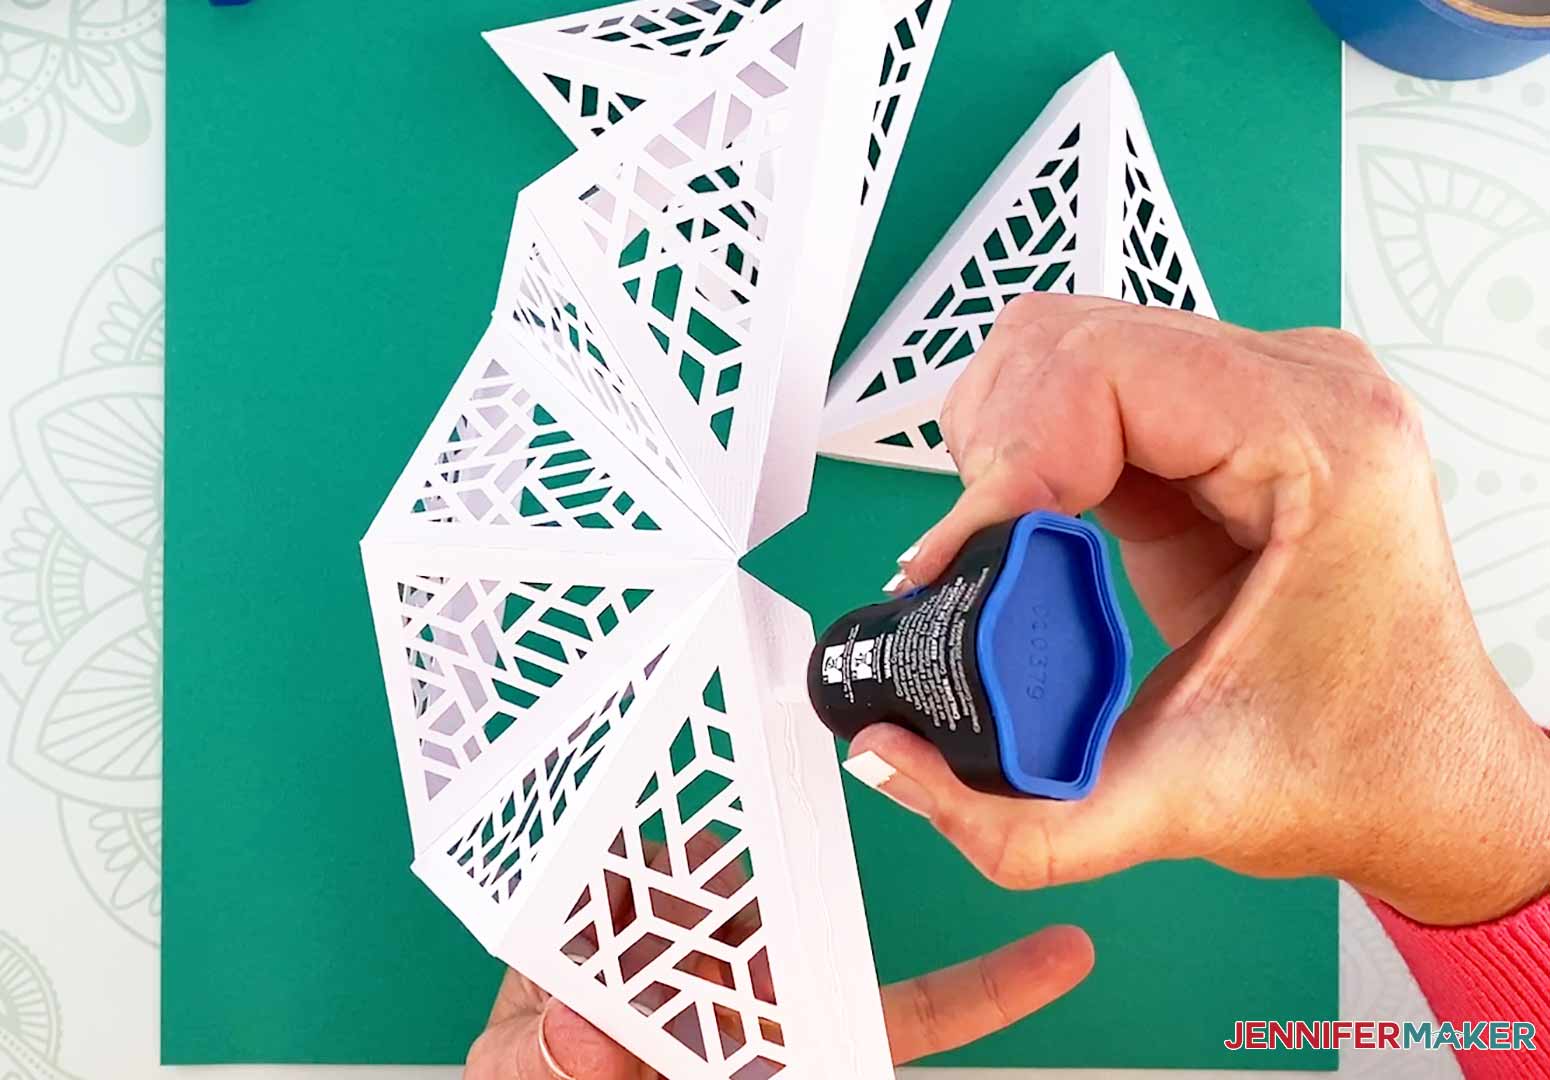
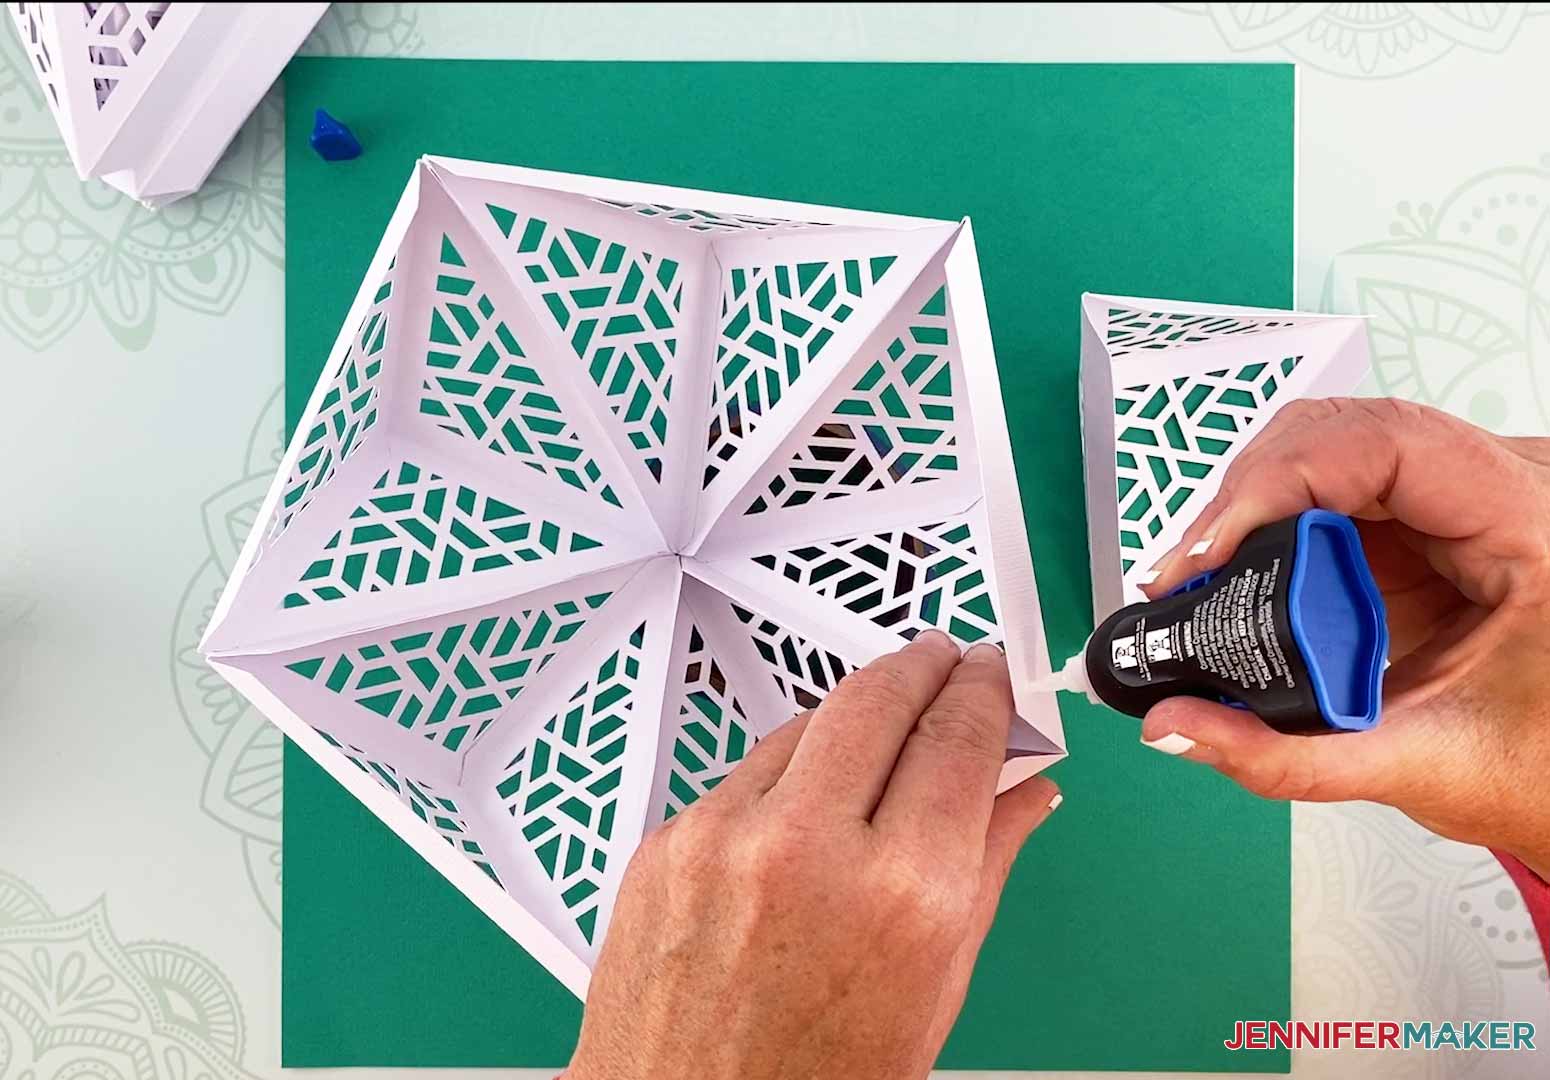
Now we will glue the final two flaps together. Add glue to one flap.
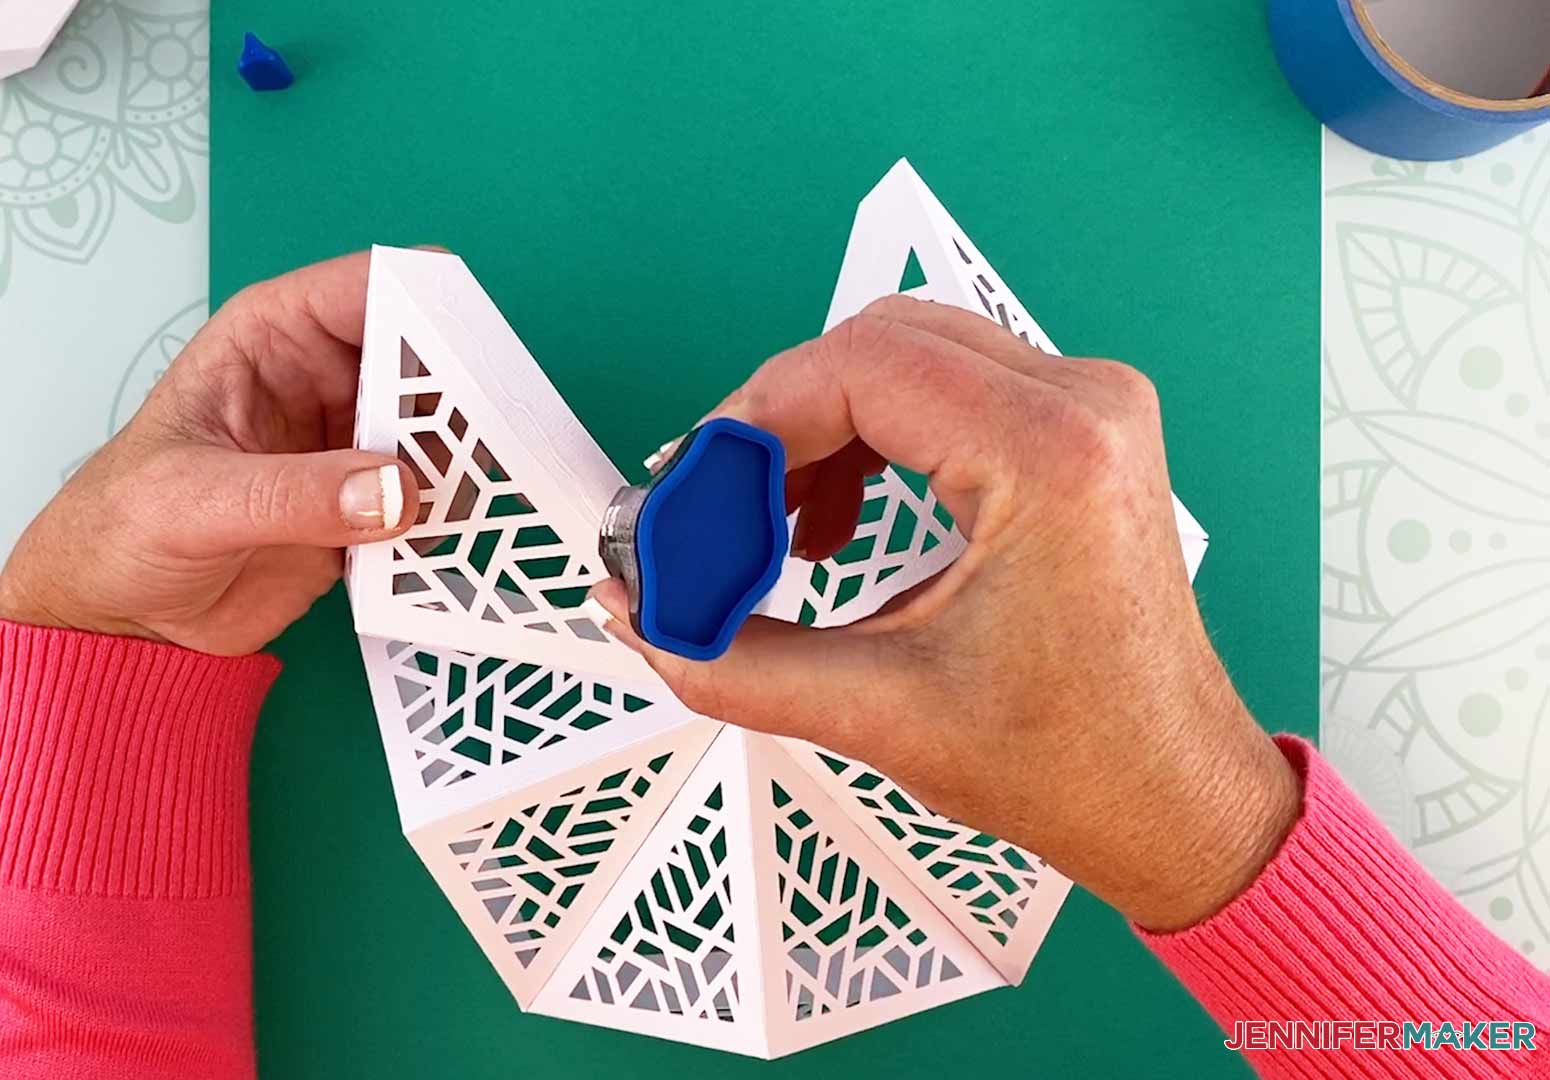
Bring the two flaps together and align the edges.
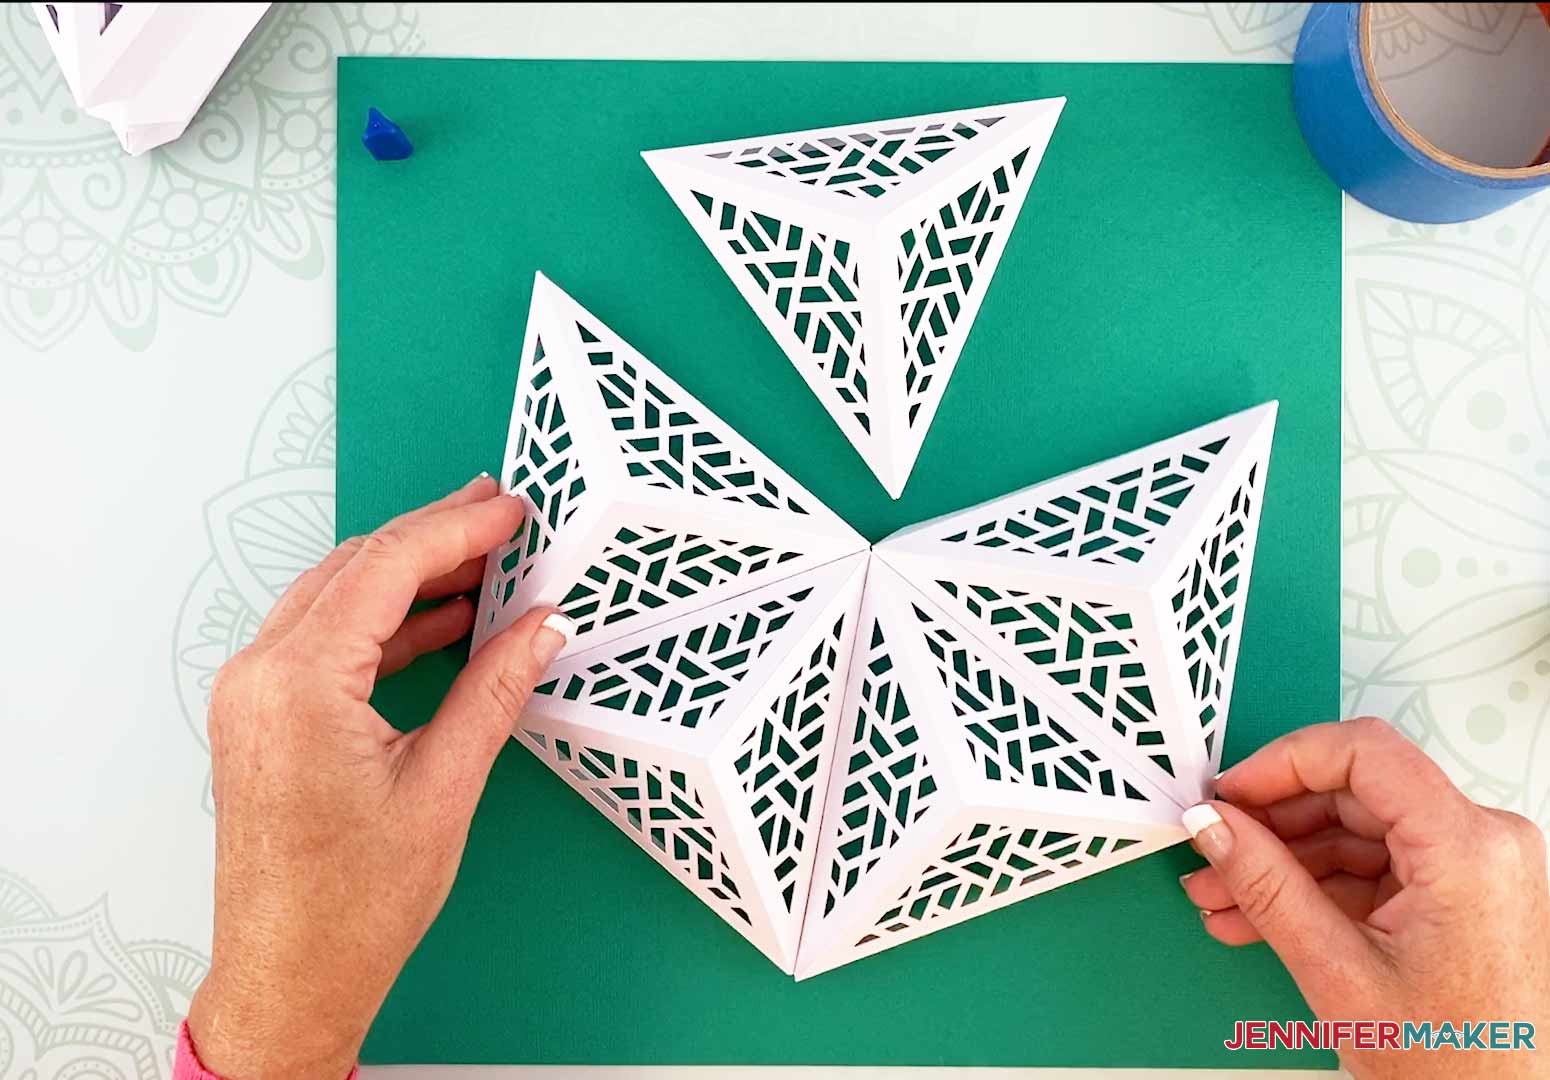
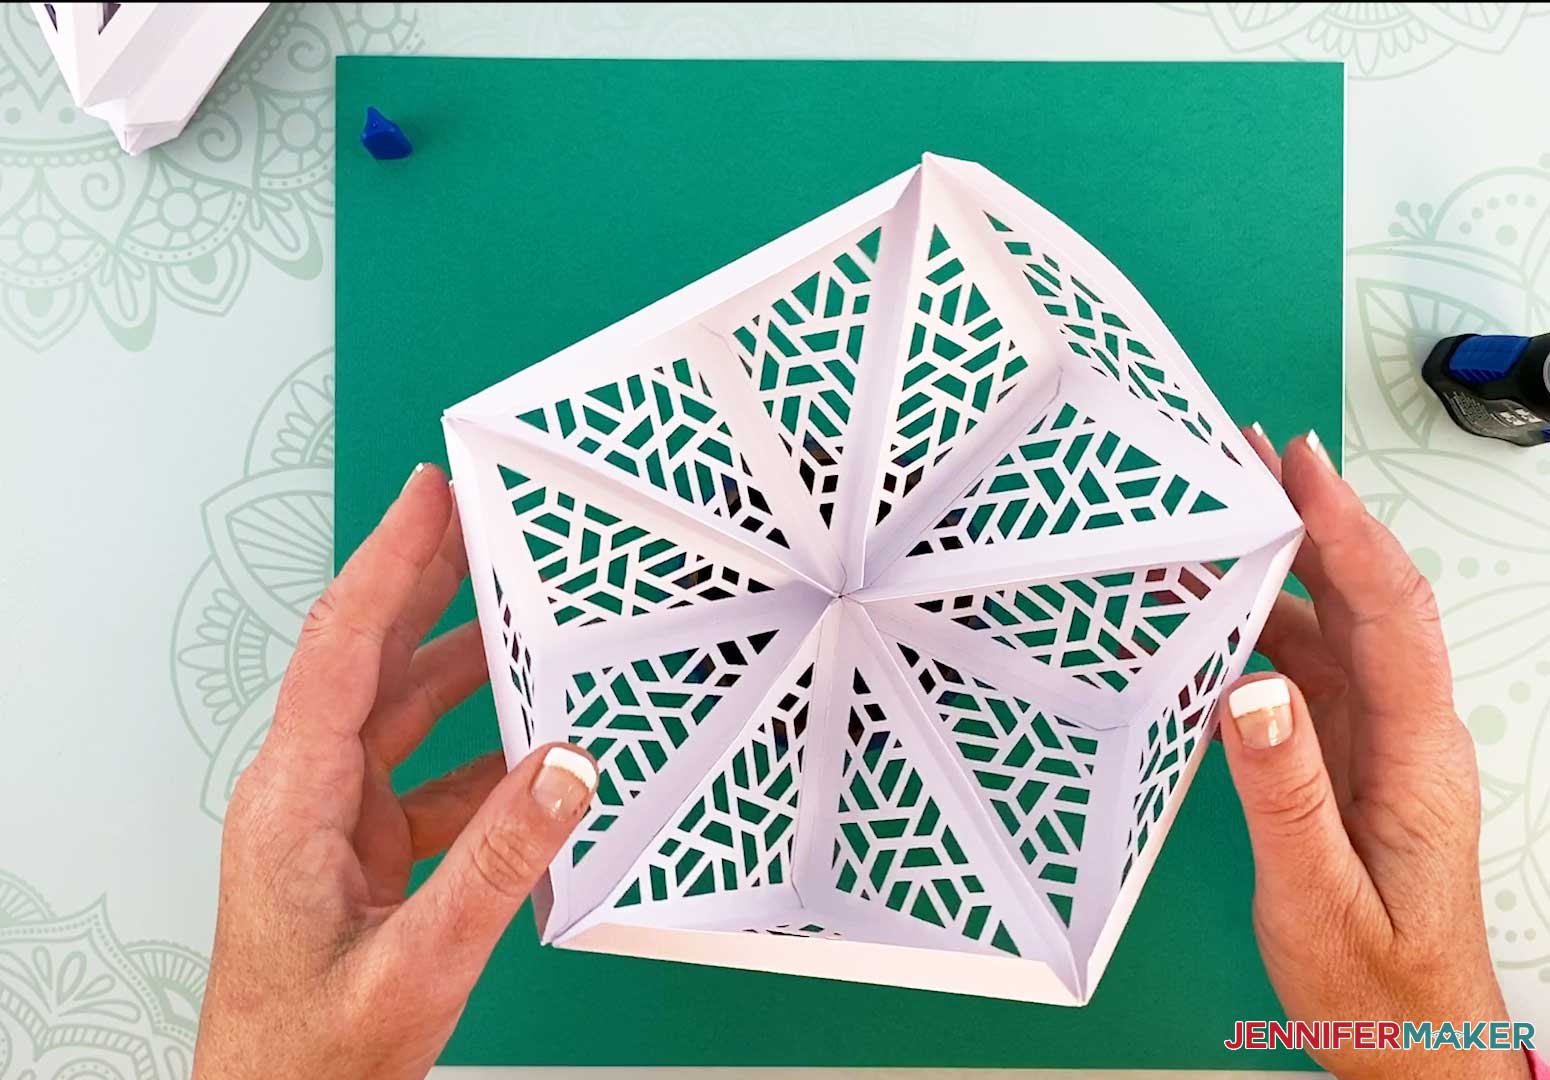
This is what the first five pieces look like assembled.
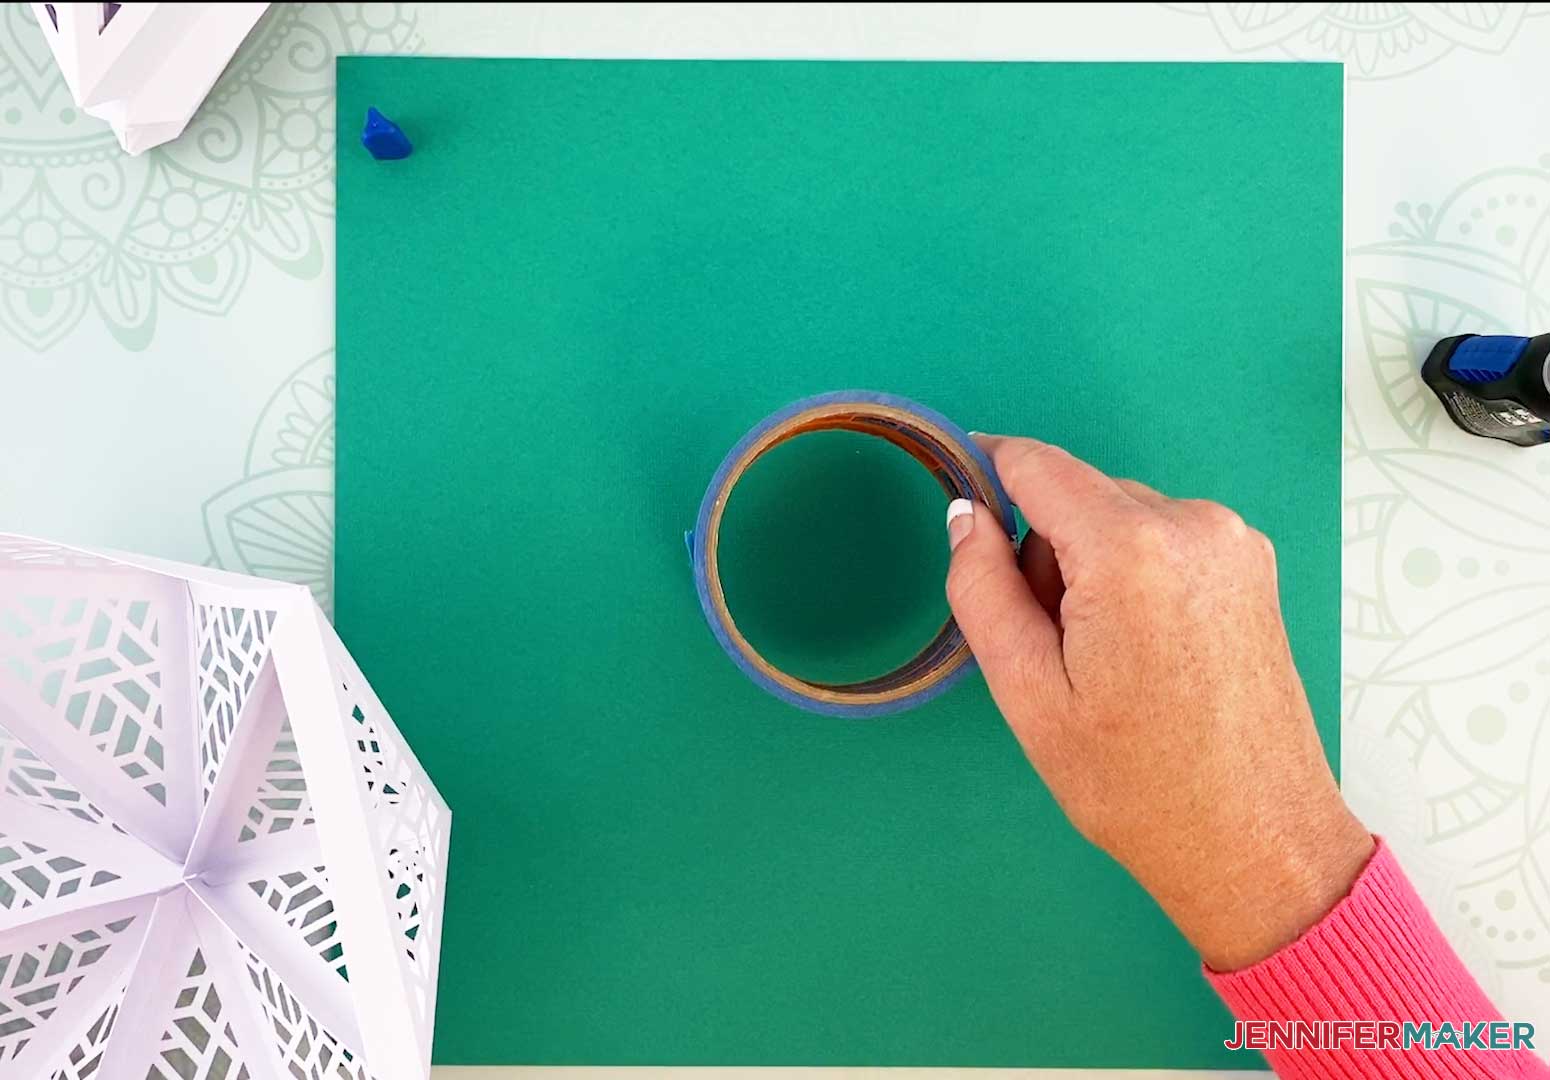
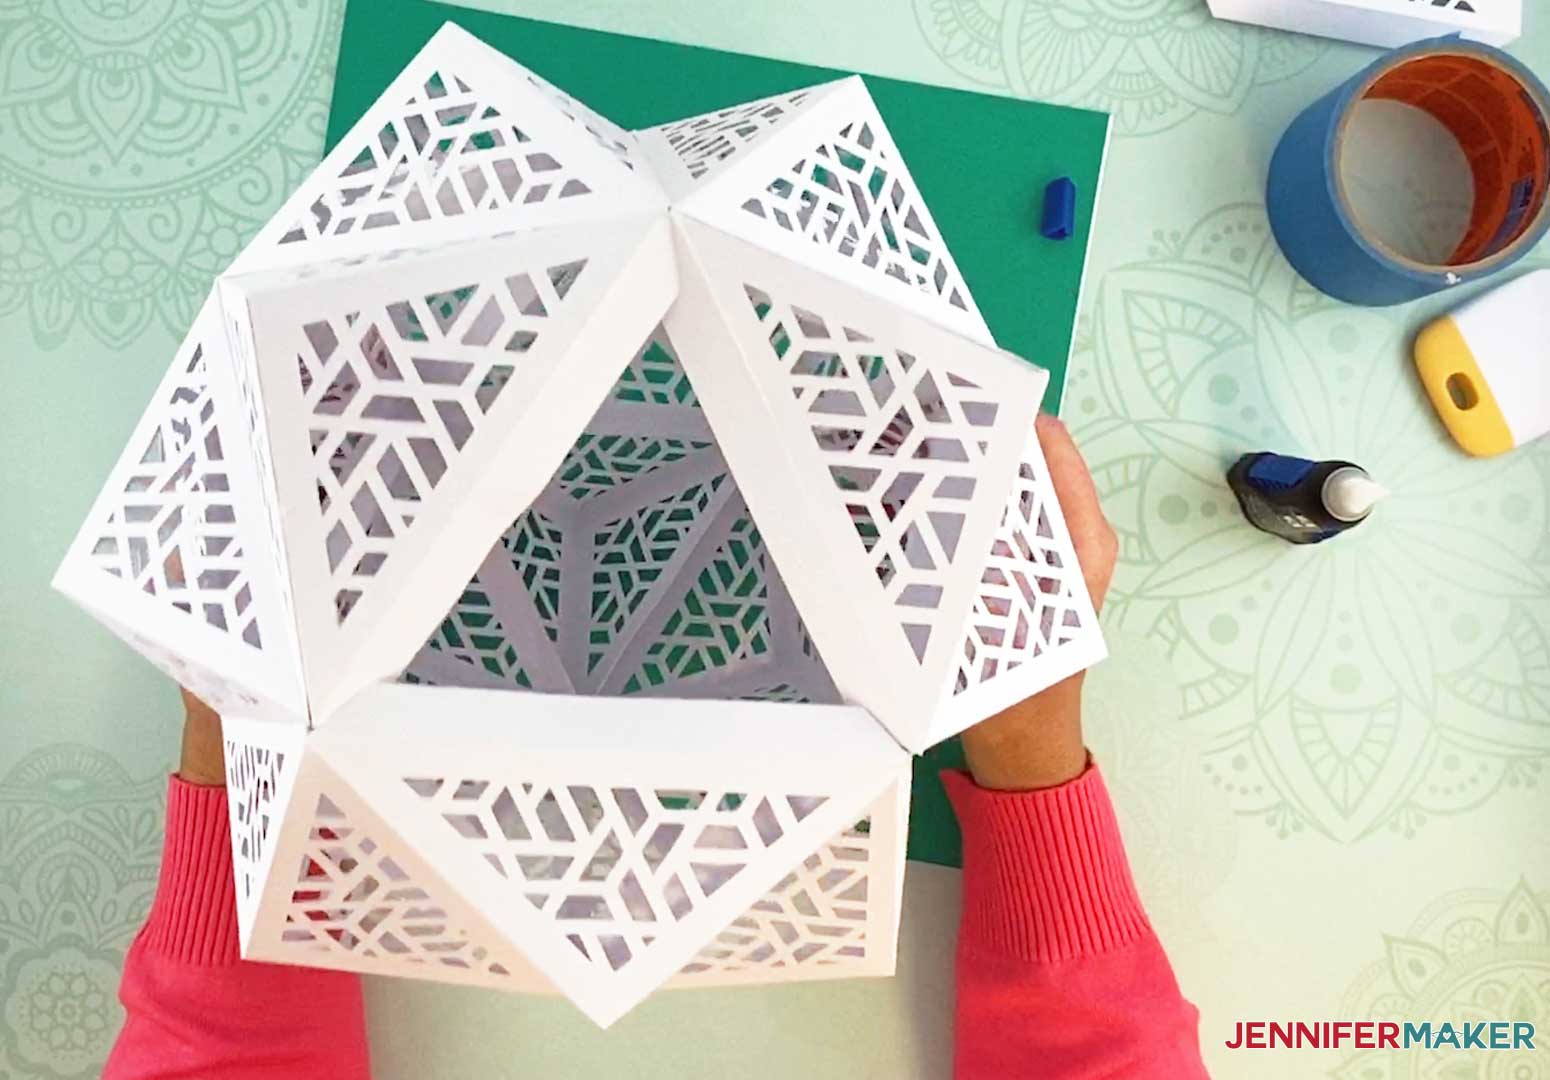
Now we will begin building up the DIY Hanging lamp from the base we just created. I find it very helpful to use something to set the base on as we add the other pieces. I am using a roll of painter's tape but a bowl could work as well.
Place the base on the roll of tape with the open side facing up.
We will be adding a piece to each of the five tabs highlighted below.
Add glue to the first tab.
Take a piece and press and align the two tabs together.
Add glue to the second tab.
Pick up another piece and align and press the two tabs together.
Add glue to the third tab.
Take another piece and align and press the two tabs together.
Add glue to the fourth tab.
Take another piece and align and press the two tabs together.
Add glue to the fifth tab.
Take another piece and align and press the two tabs together.
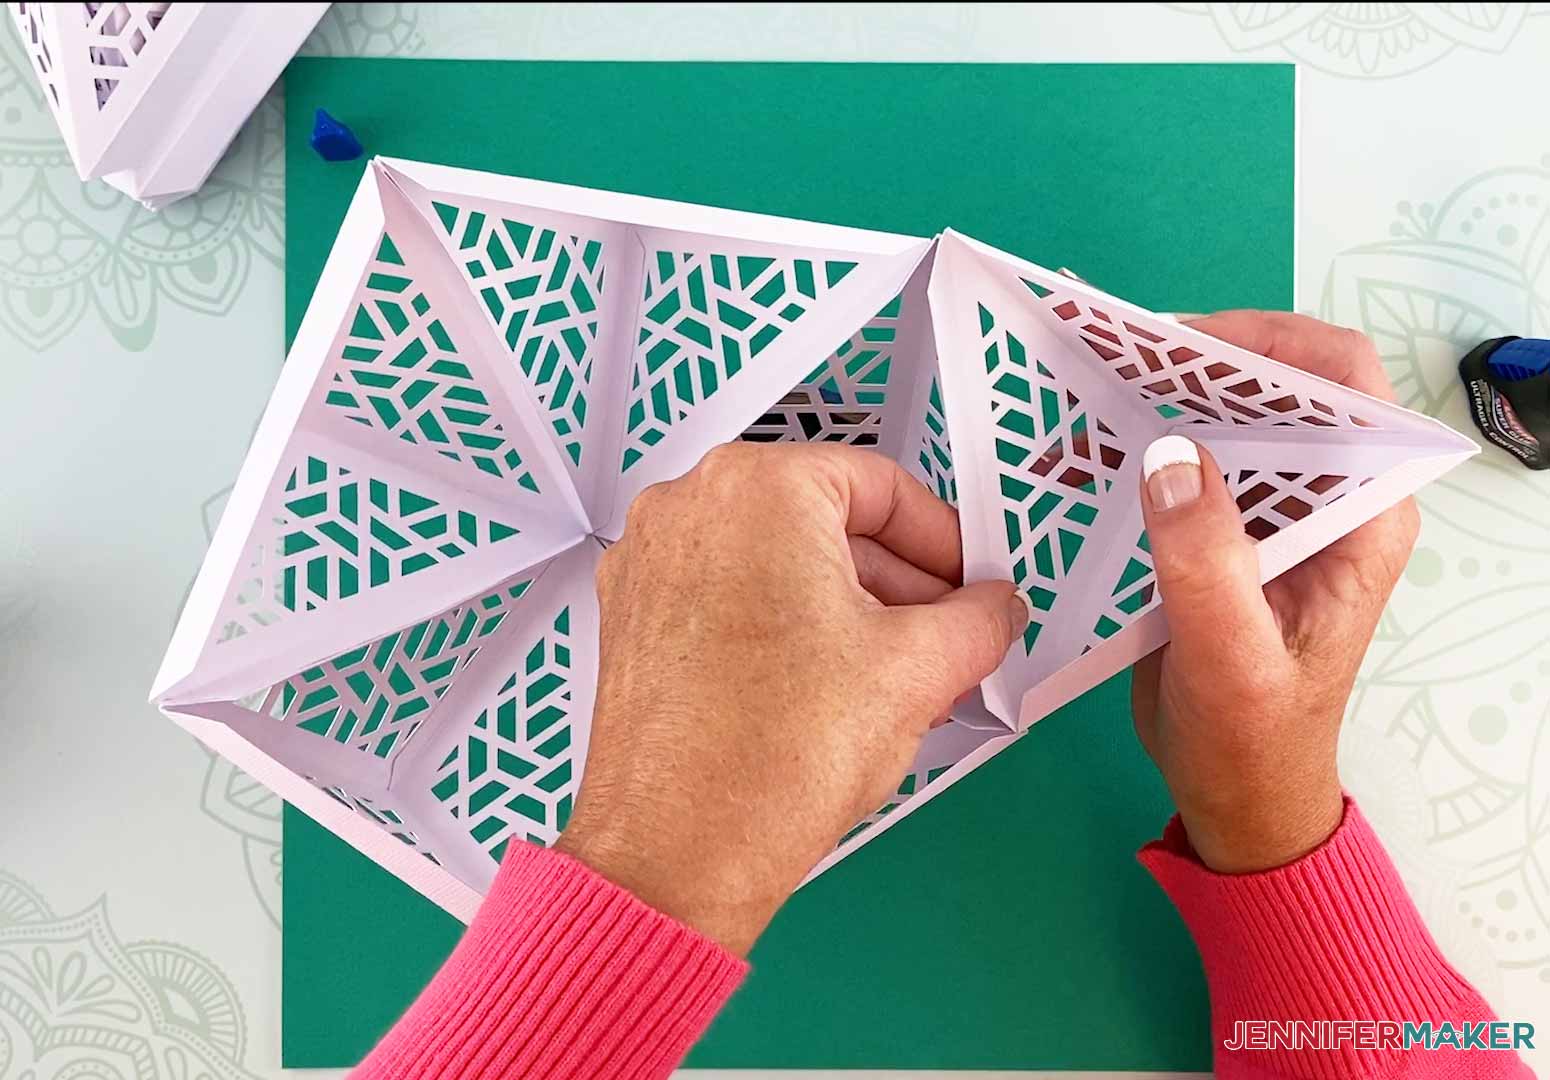
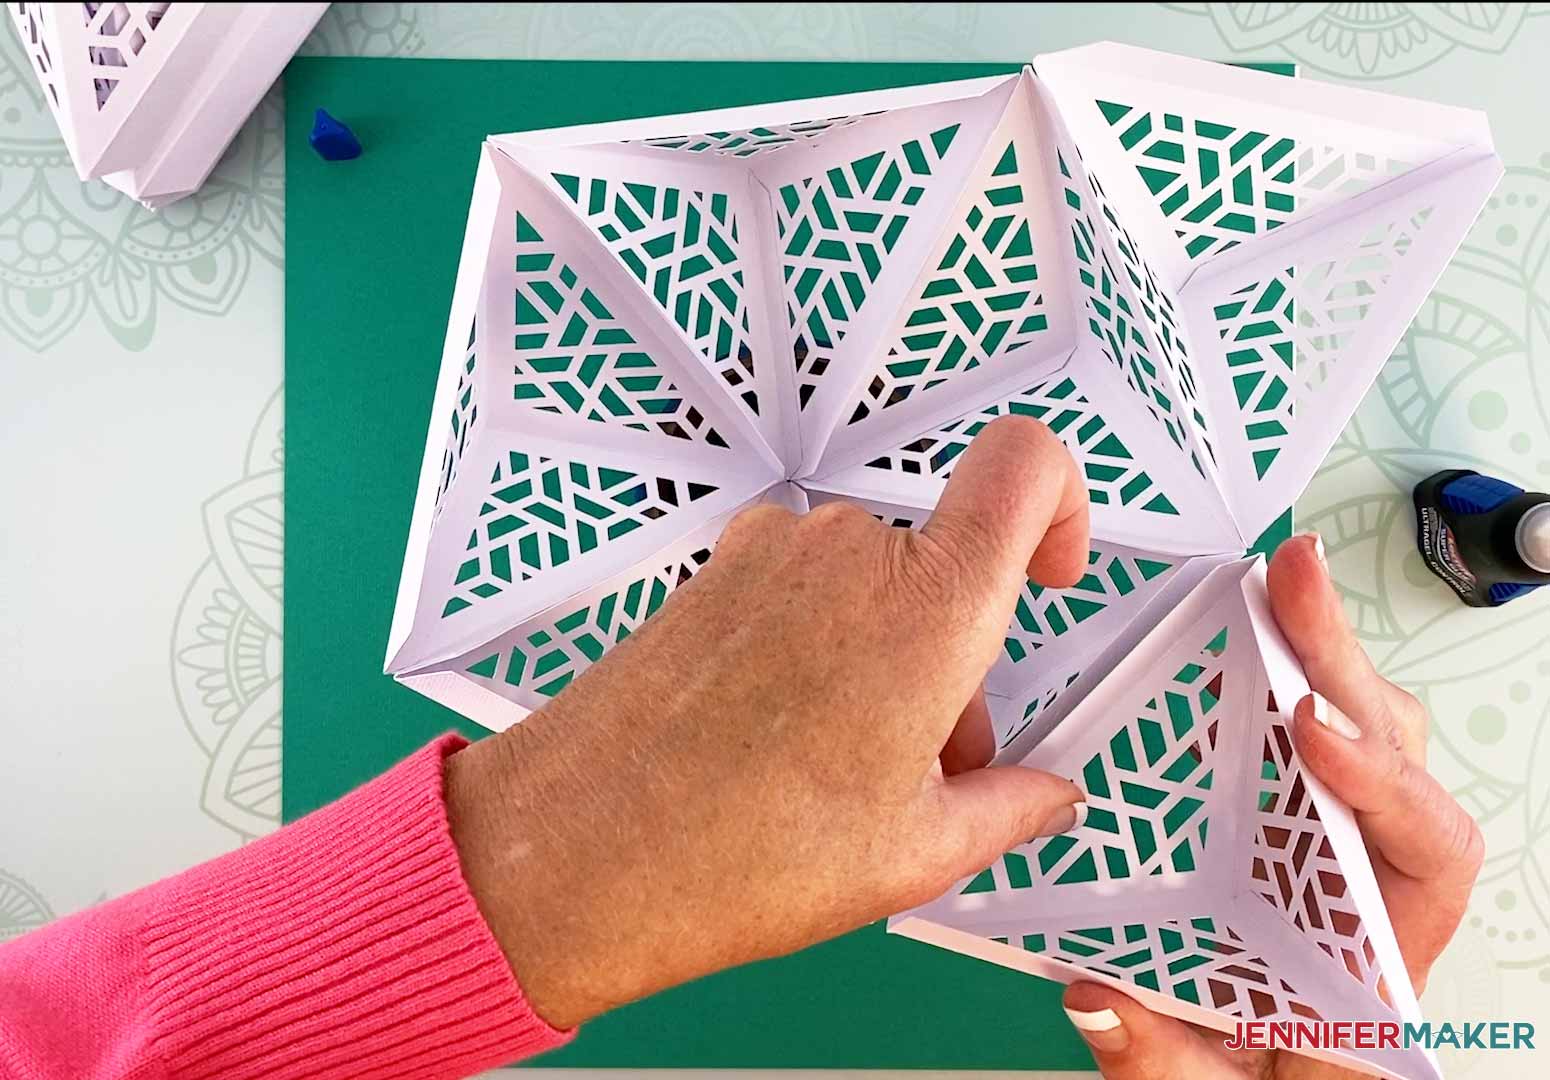
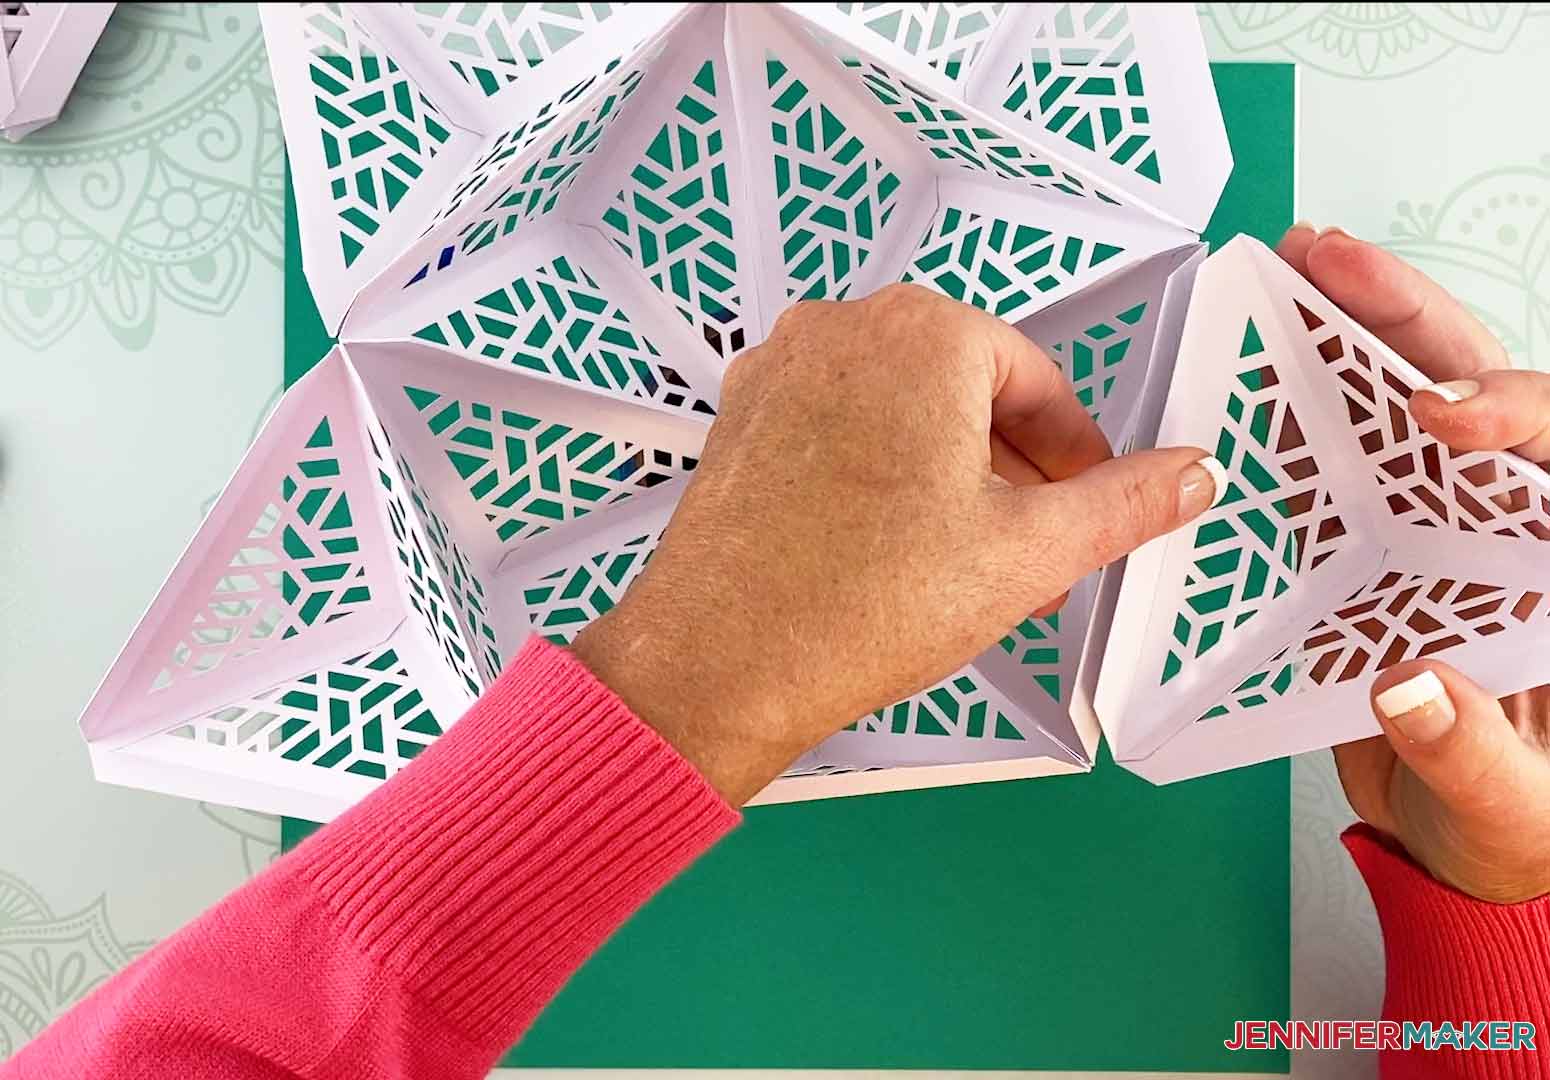
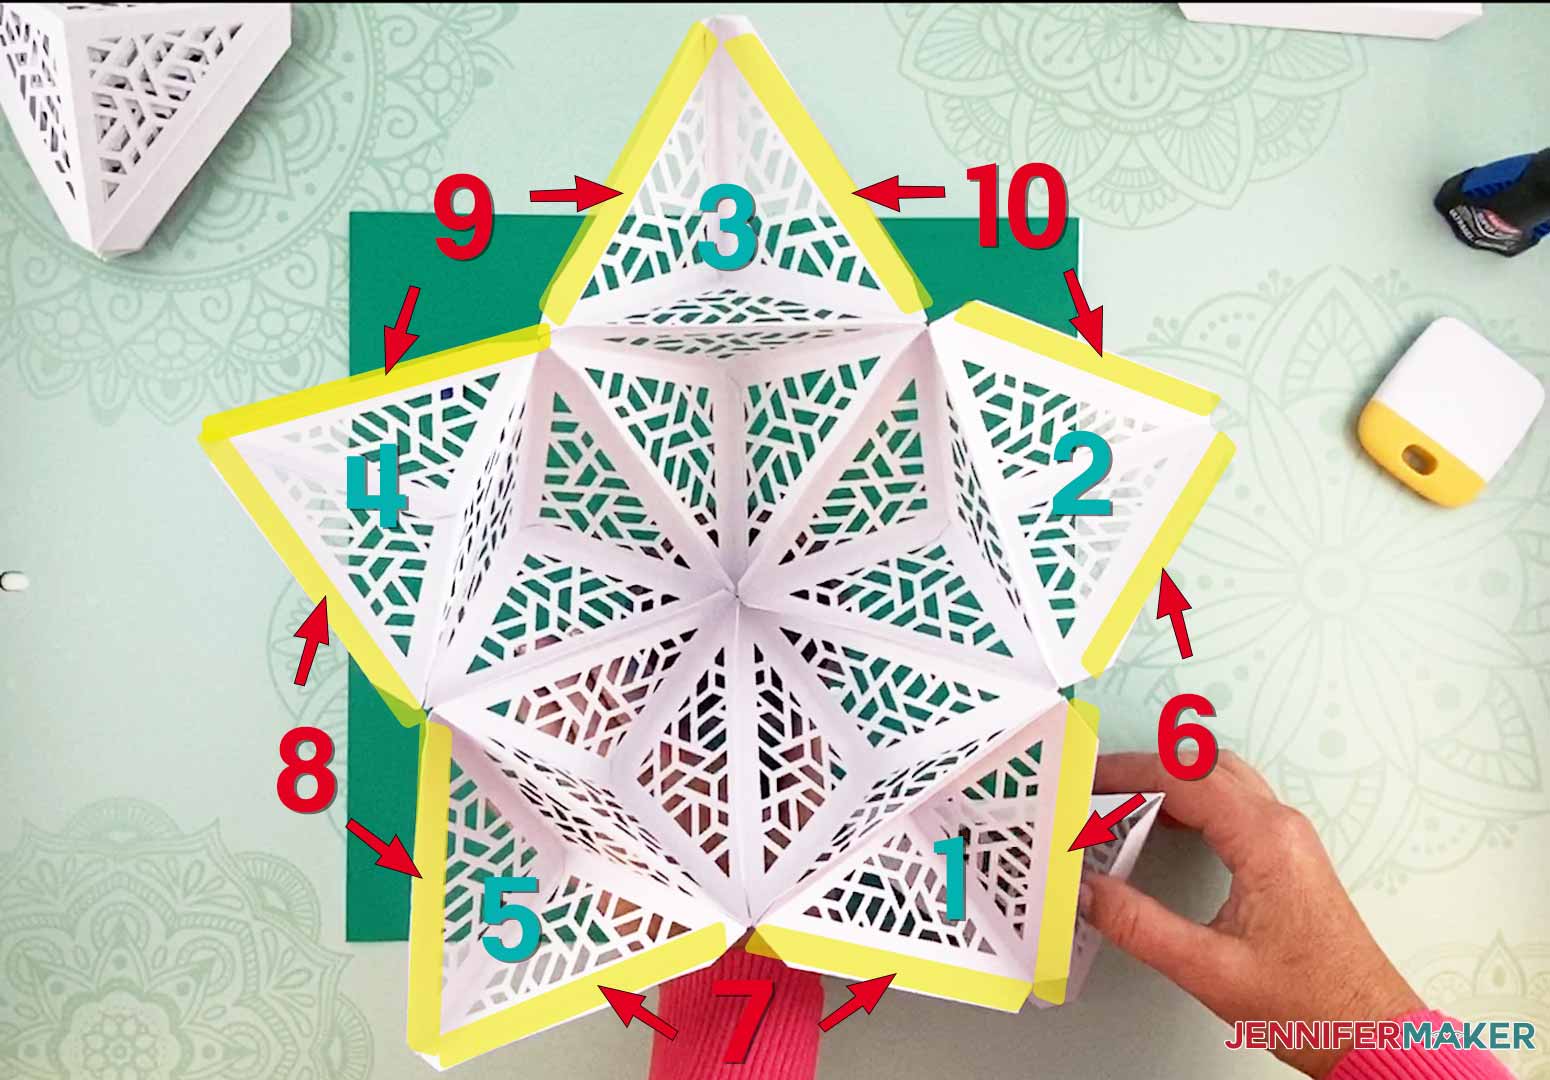
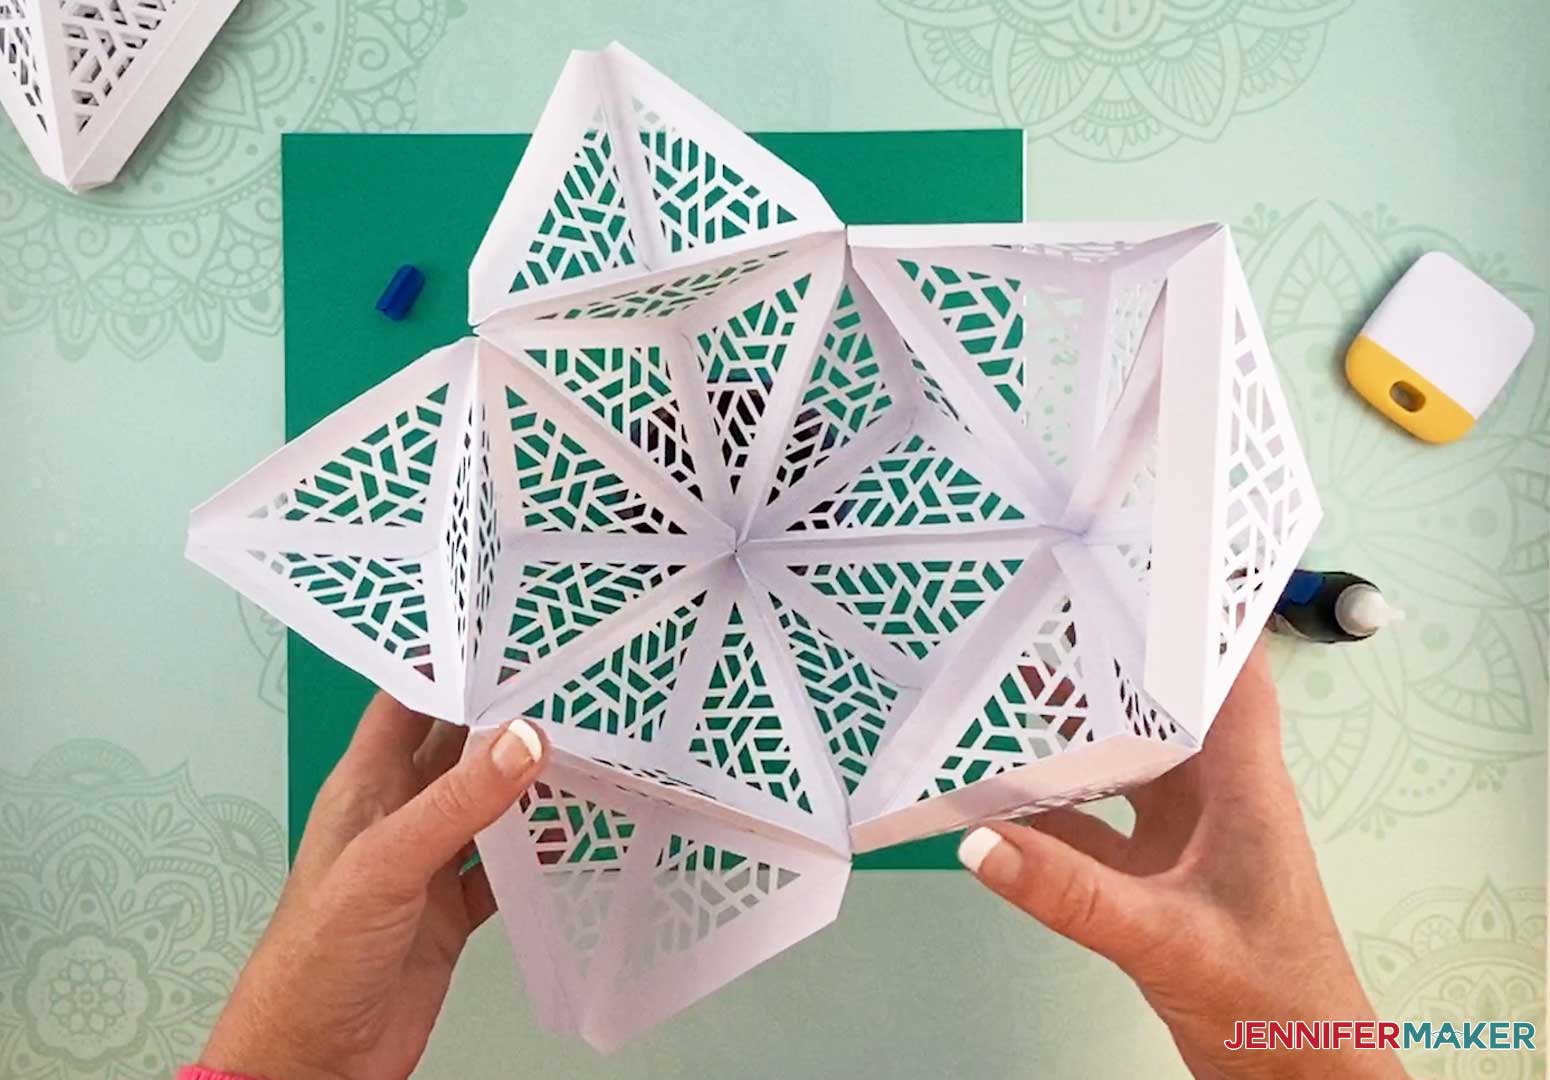
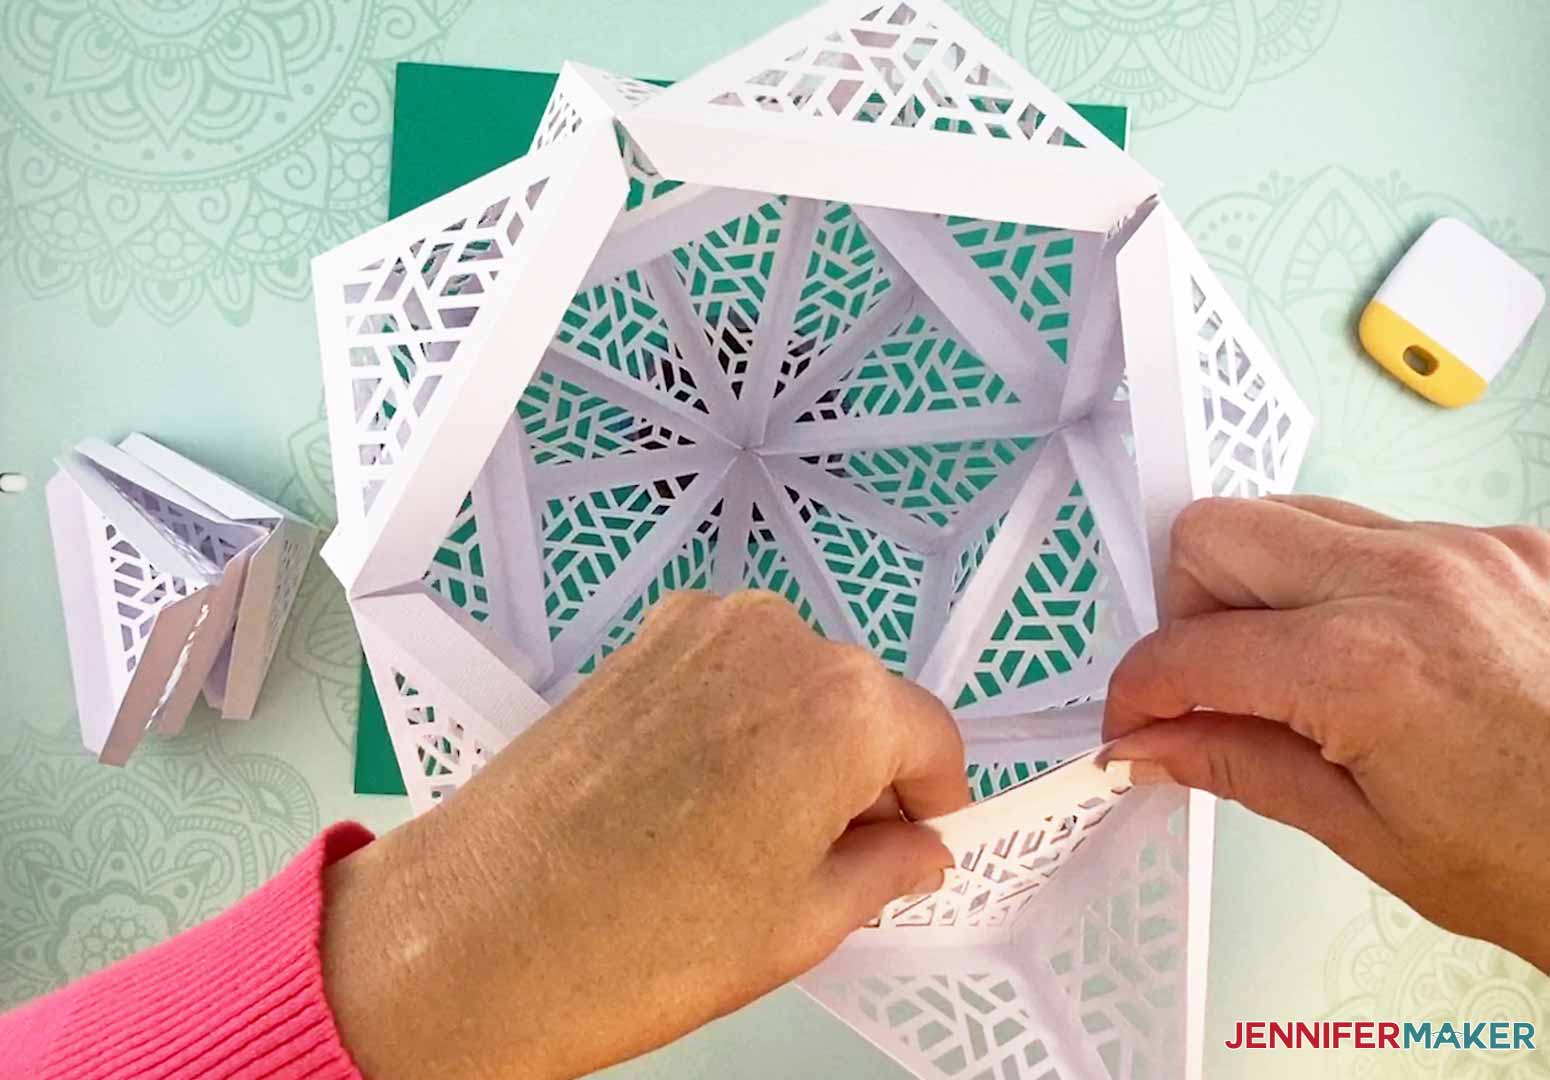
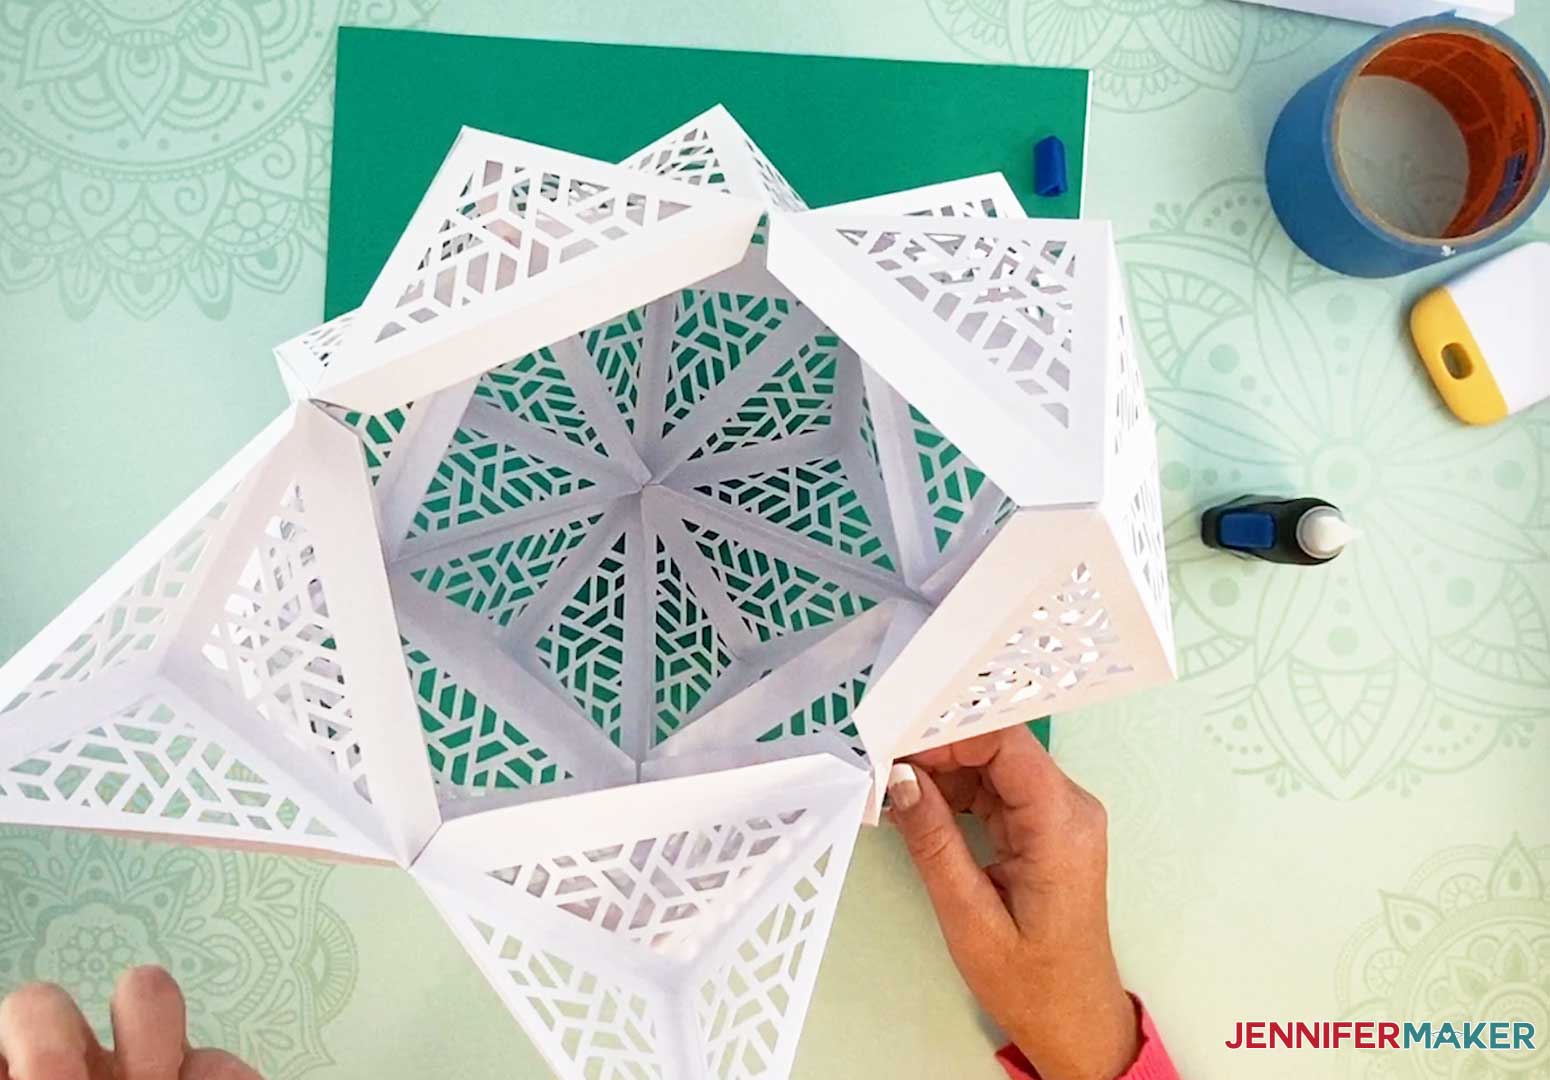
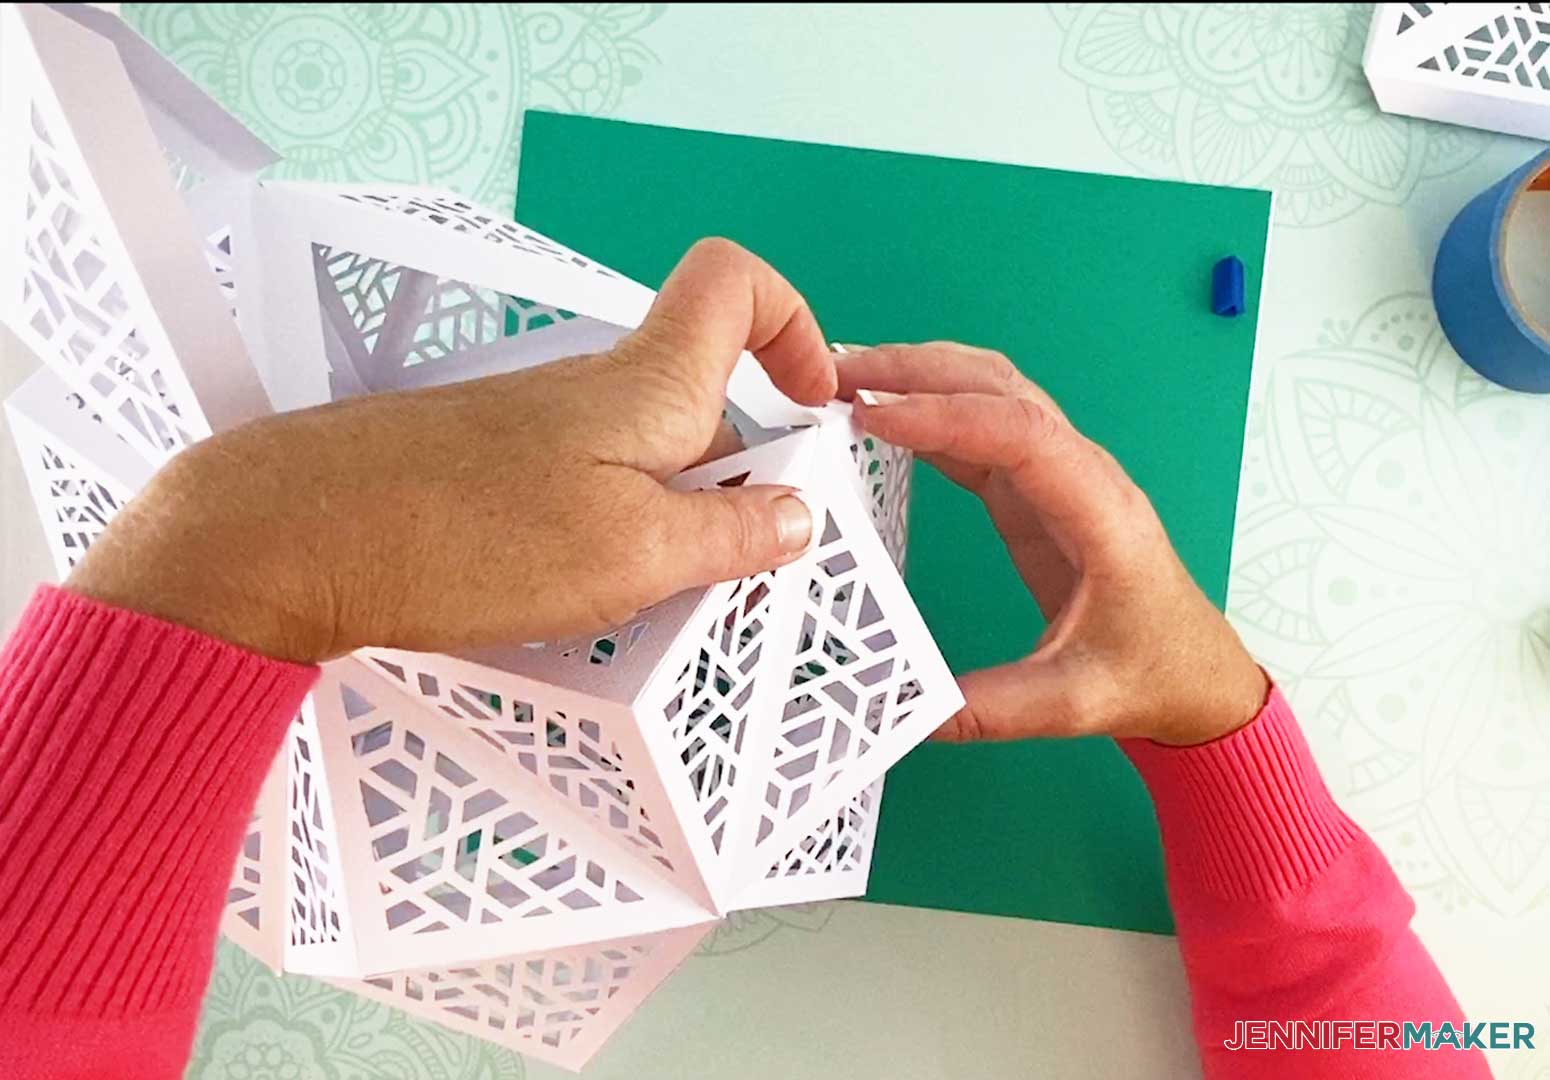
Next, we will be adding pieces between the five pieces we just added as the second layer of my DIY Hanging Lamp. Each of the new pieces inserted in areas 6-10 below and will connect to the highlighted tabs of the adjoining pieces.
Let's begin by adding a new piece 6 which will connect to pieces one and two as shown above. Begin by adding glue to the right side of piece one.
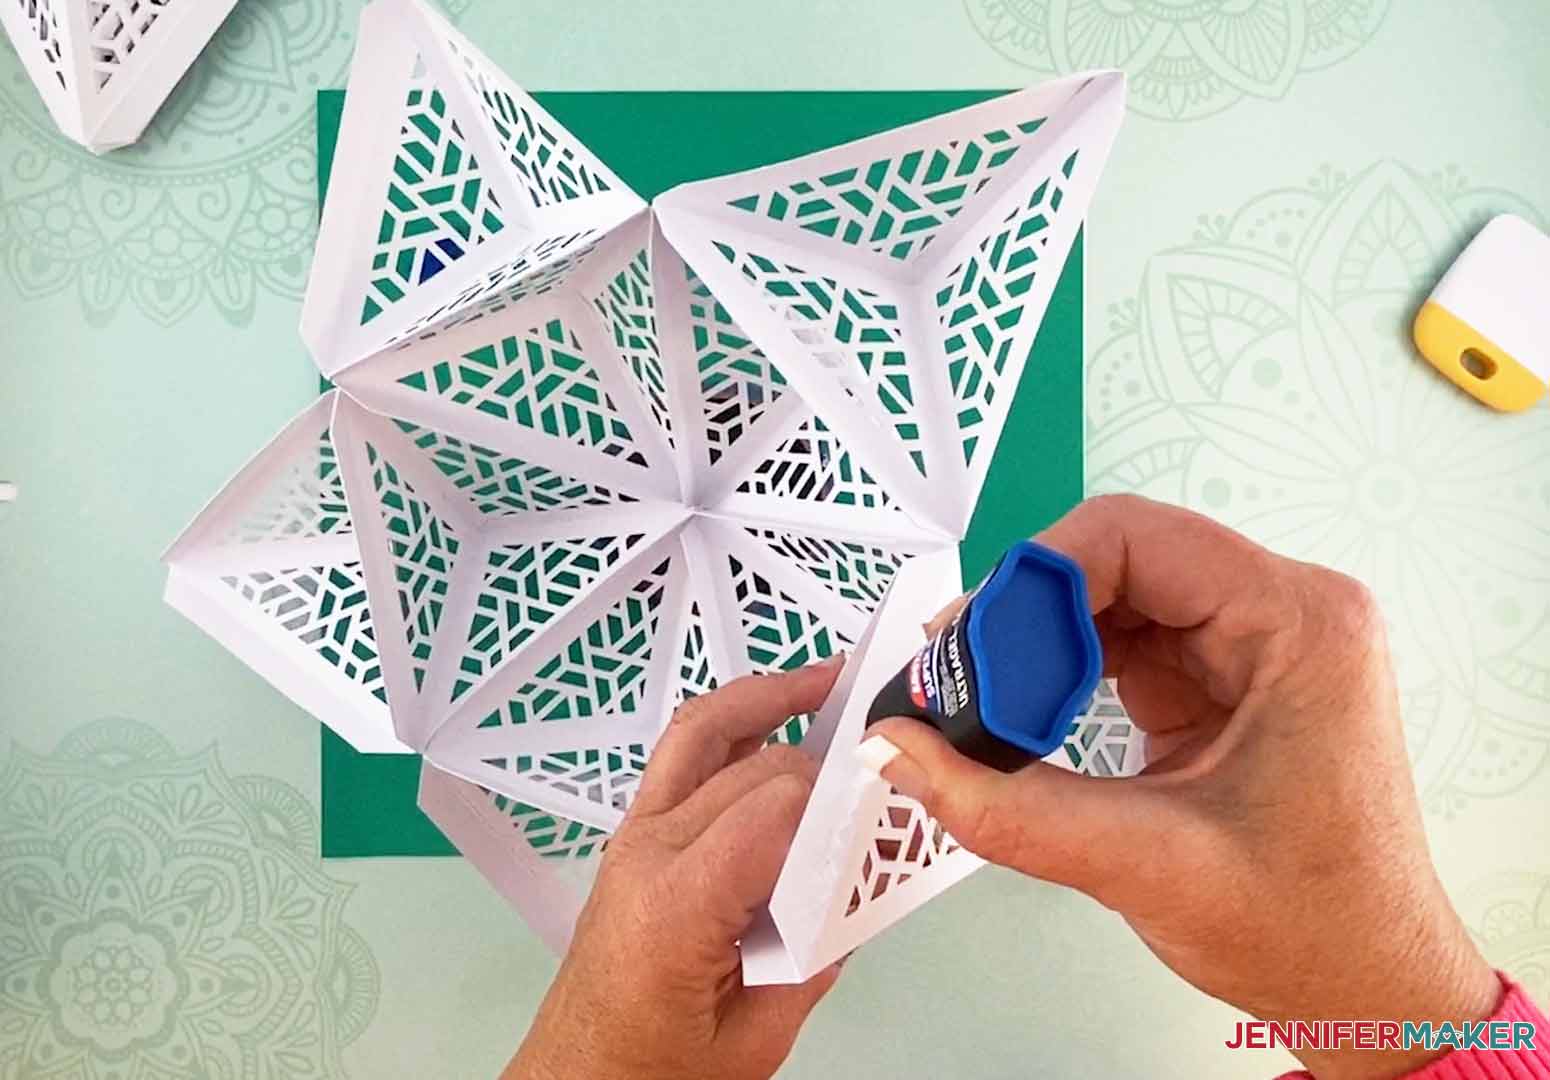
Connect a new piece by aligning the tabs and pressing together until the glue dries.
Add glue to the adjoining tab of piece two.
Connect the tab of piece two to the tab of piece six.
This is what your DIY Hanging Lamp should look like with piece 6 added to the DIY Hanging Lamp.
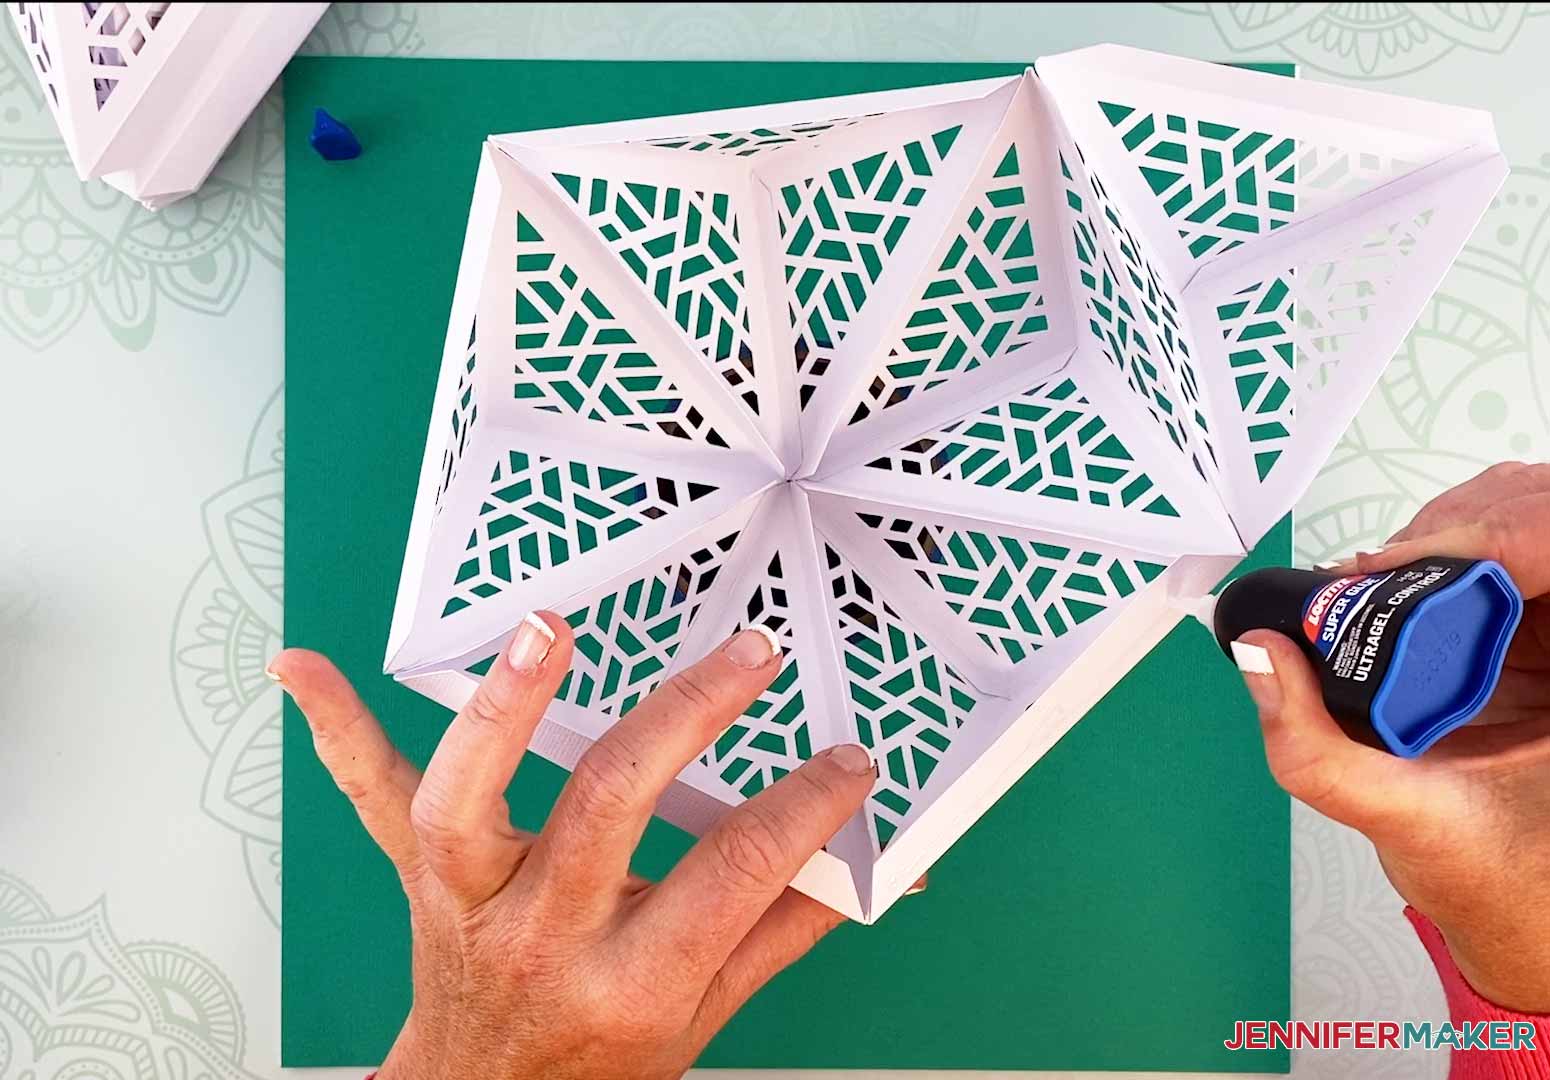
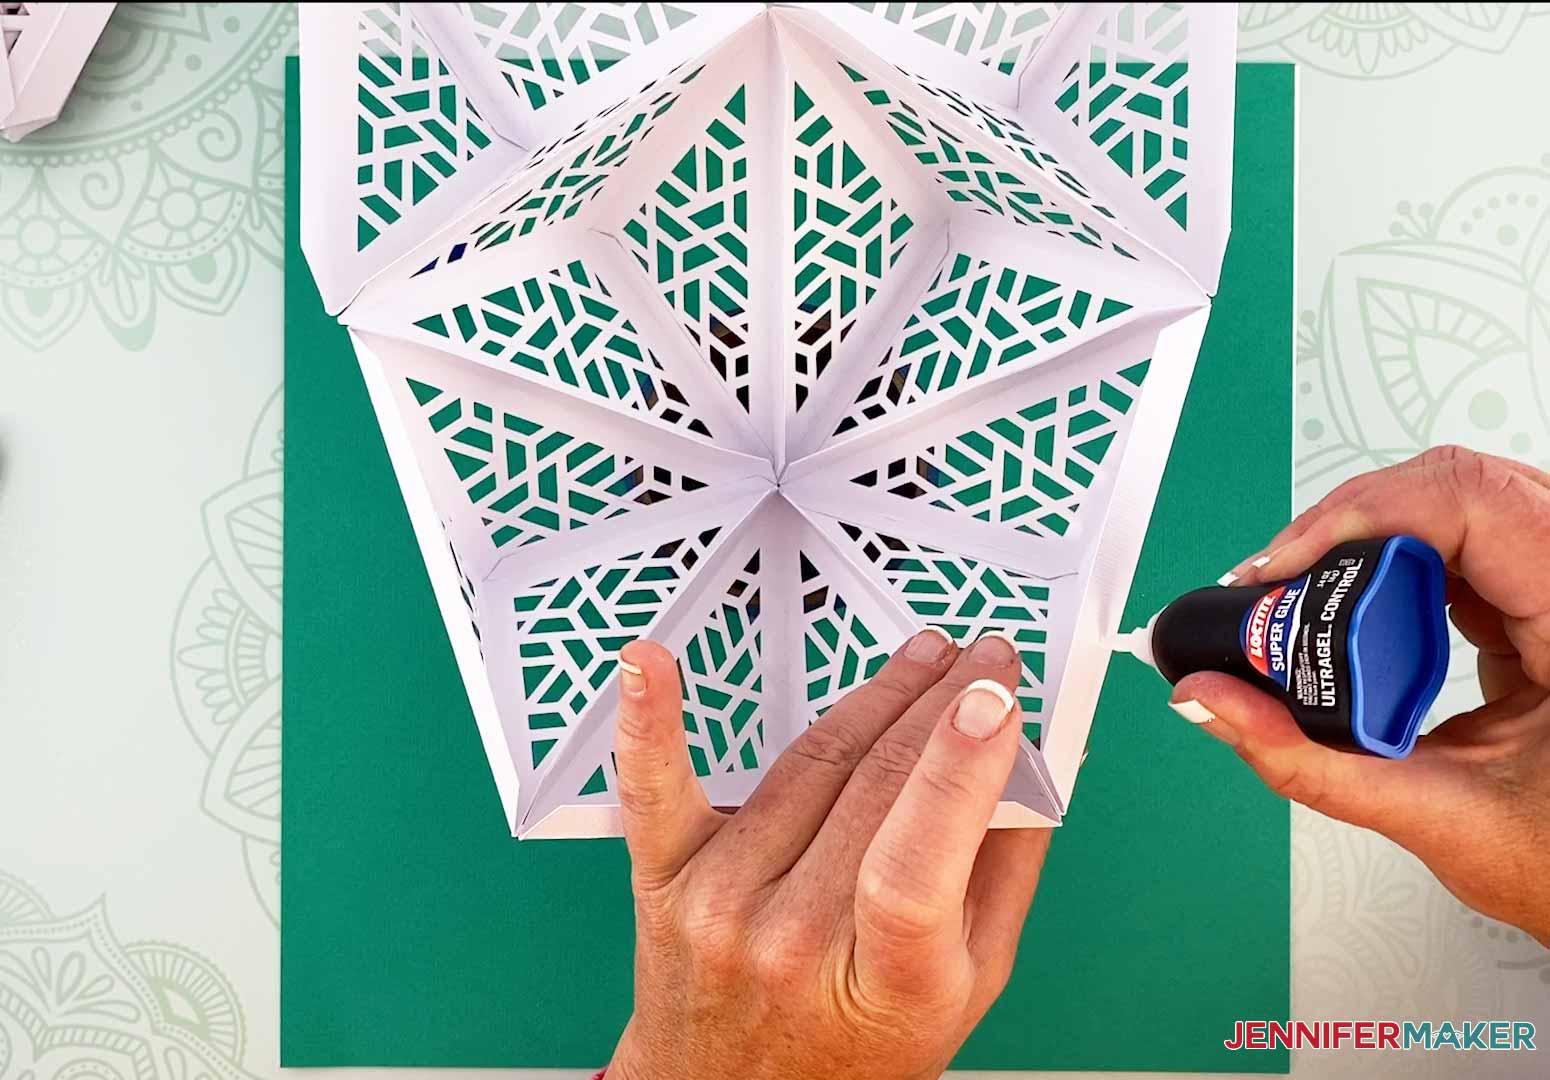
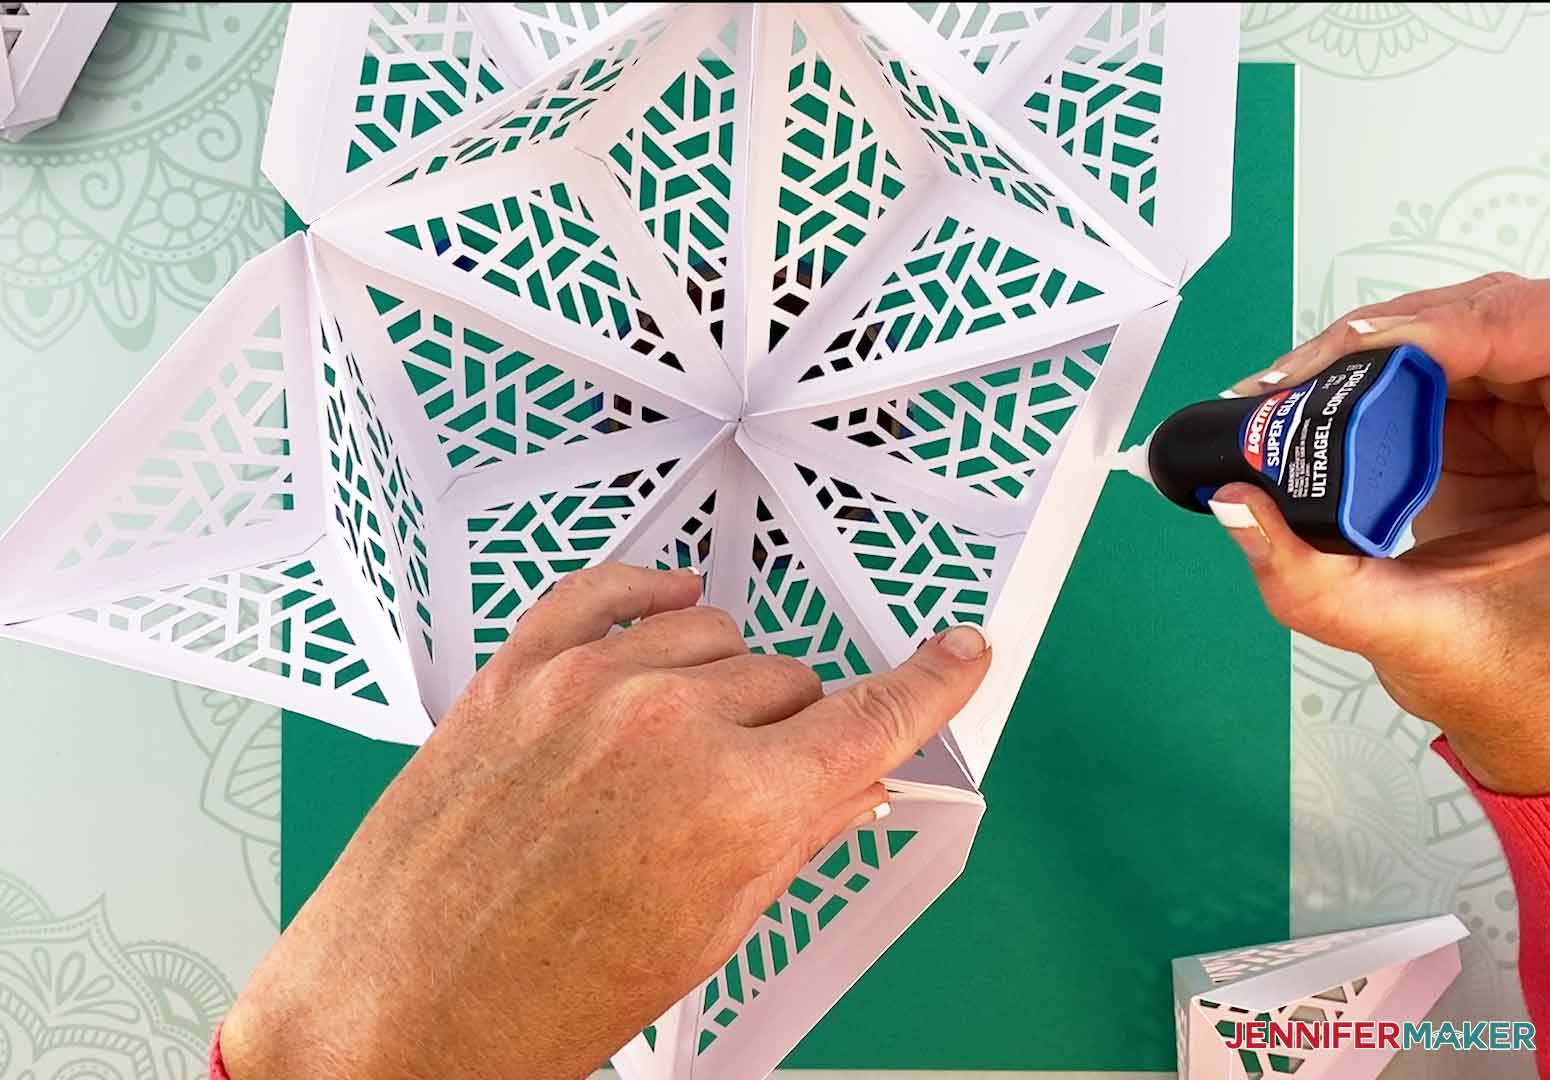
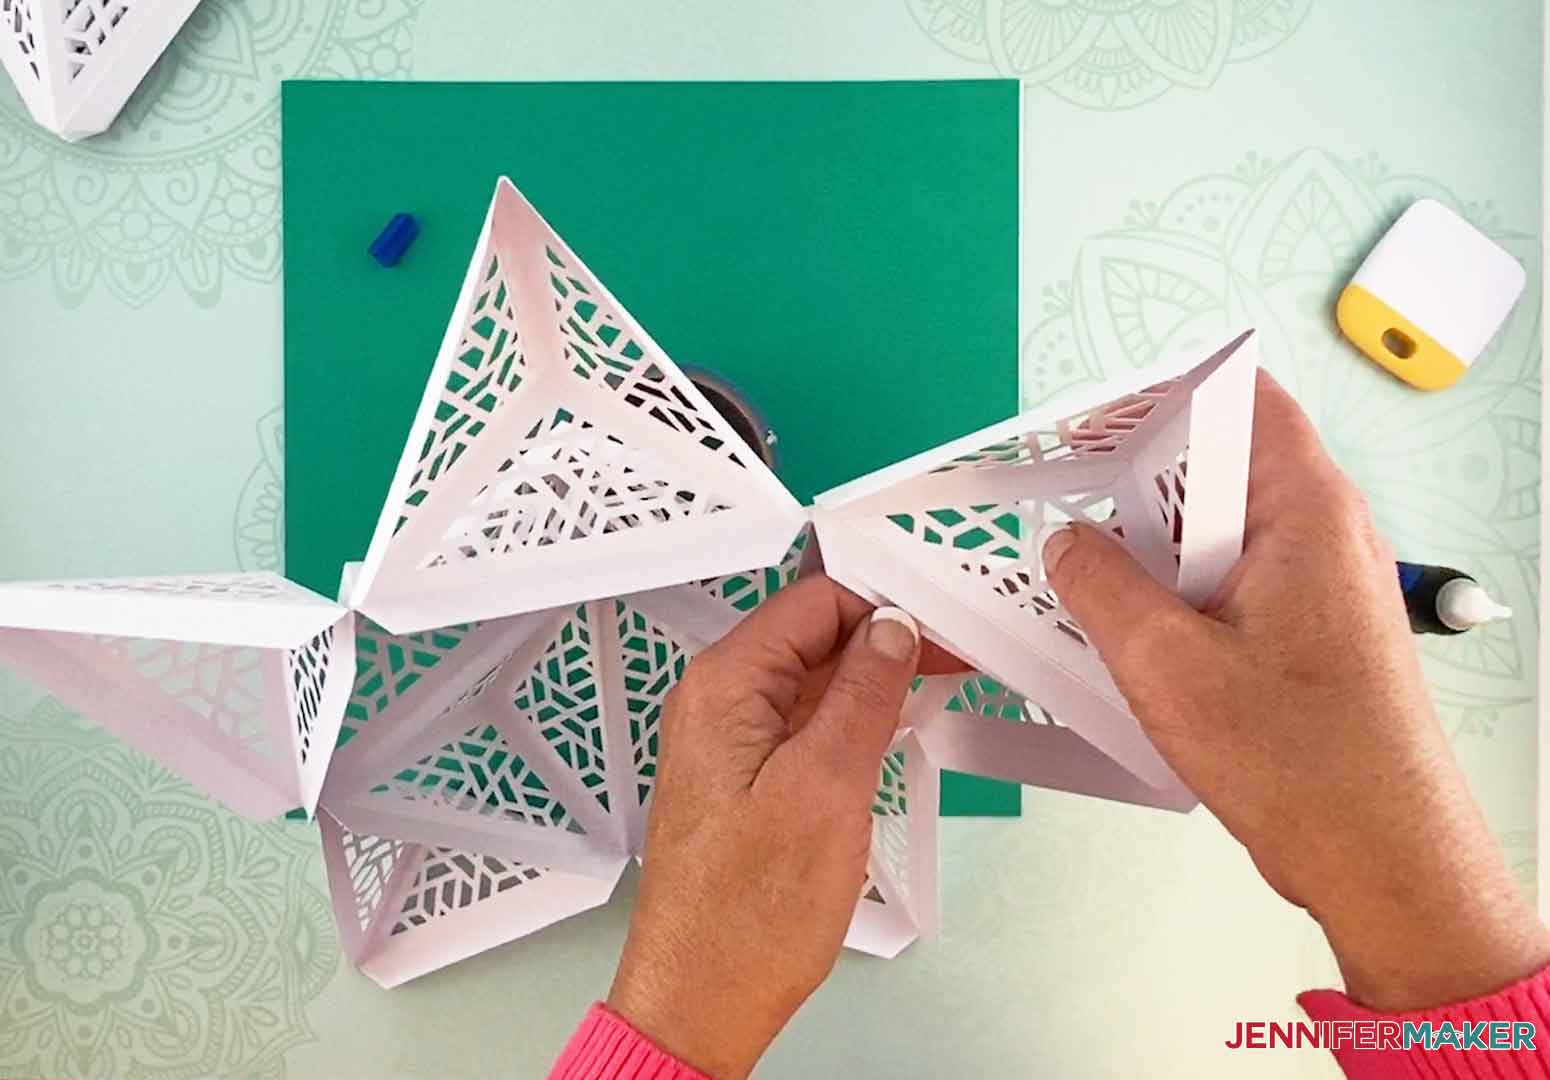
Repeat these steps to add a new piece in sections 7-10. This is what your lamp should look like with pieces 6-8 added to the DIY Hanging Lamp.
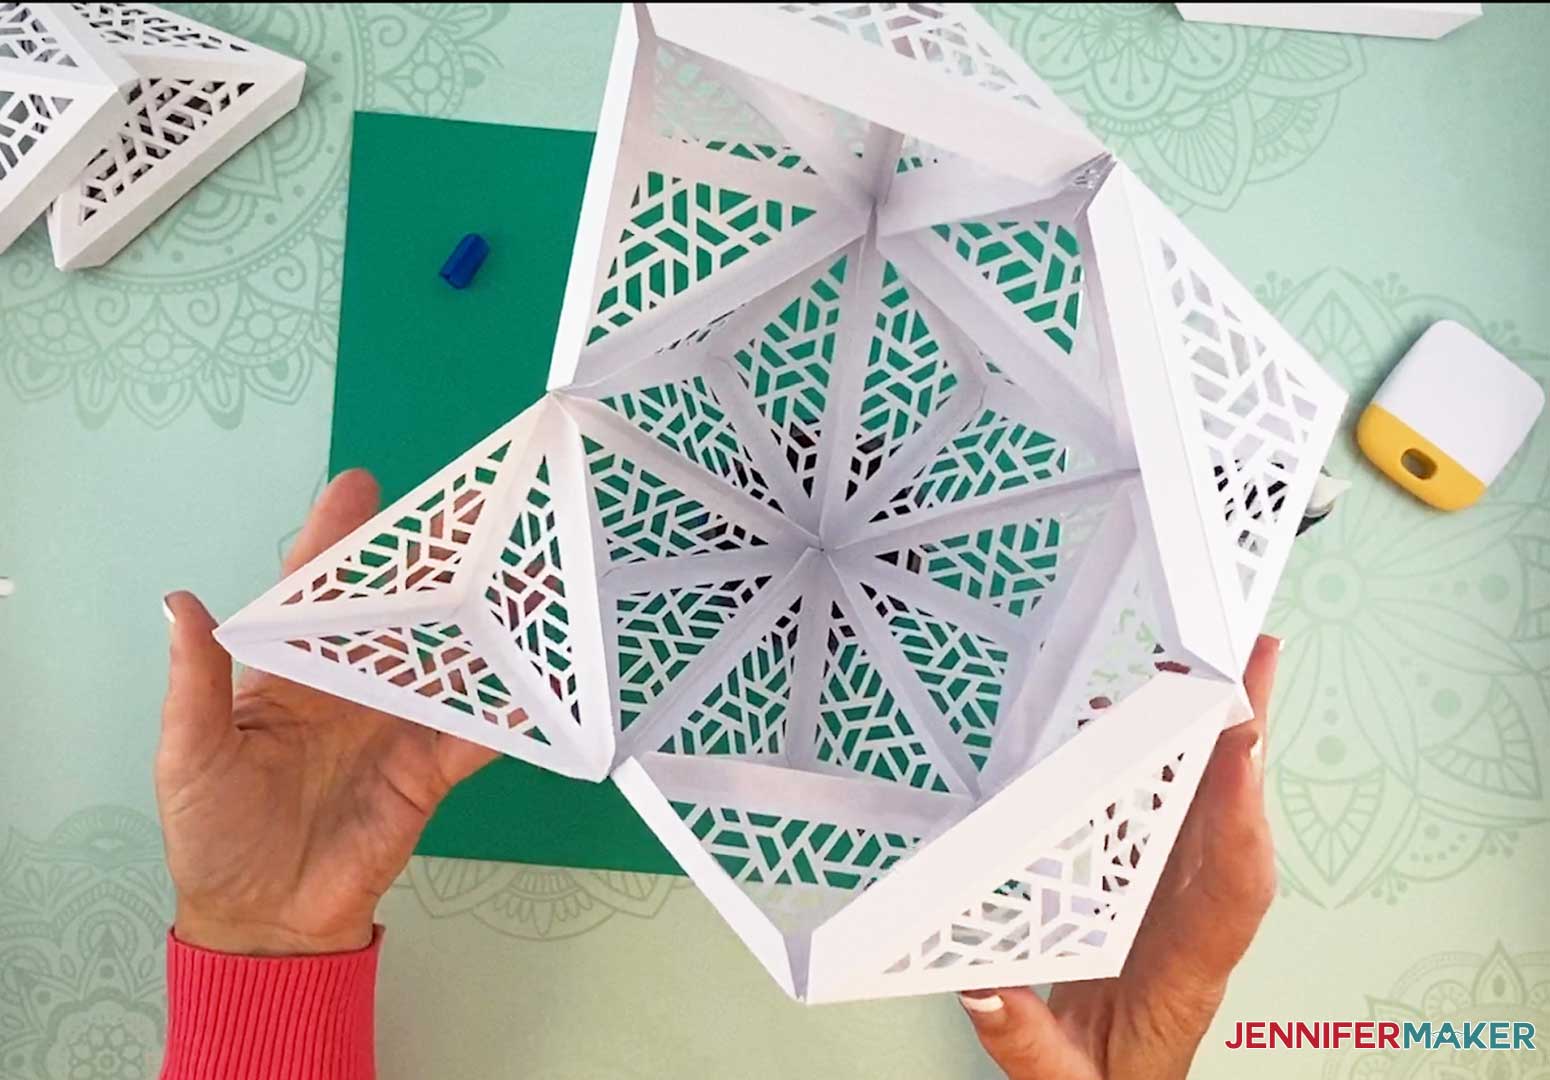
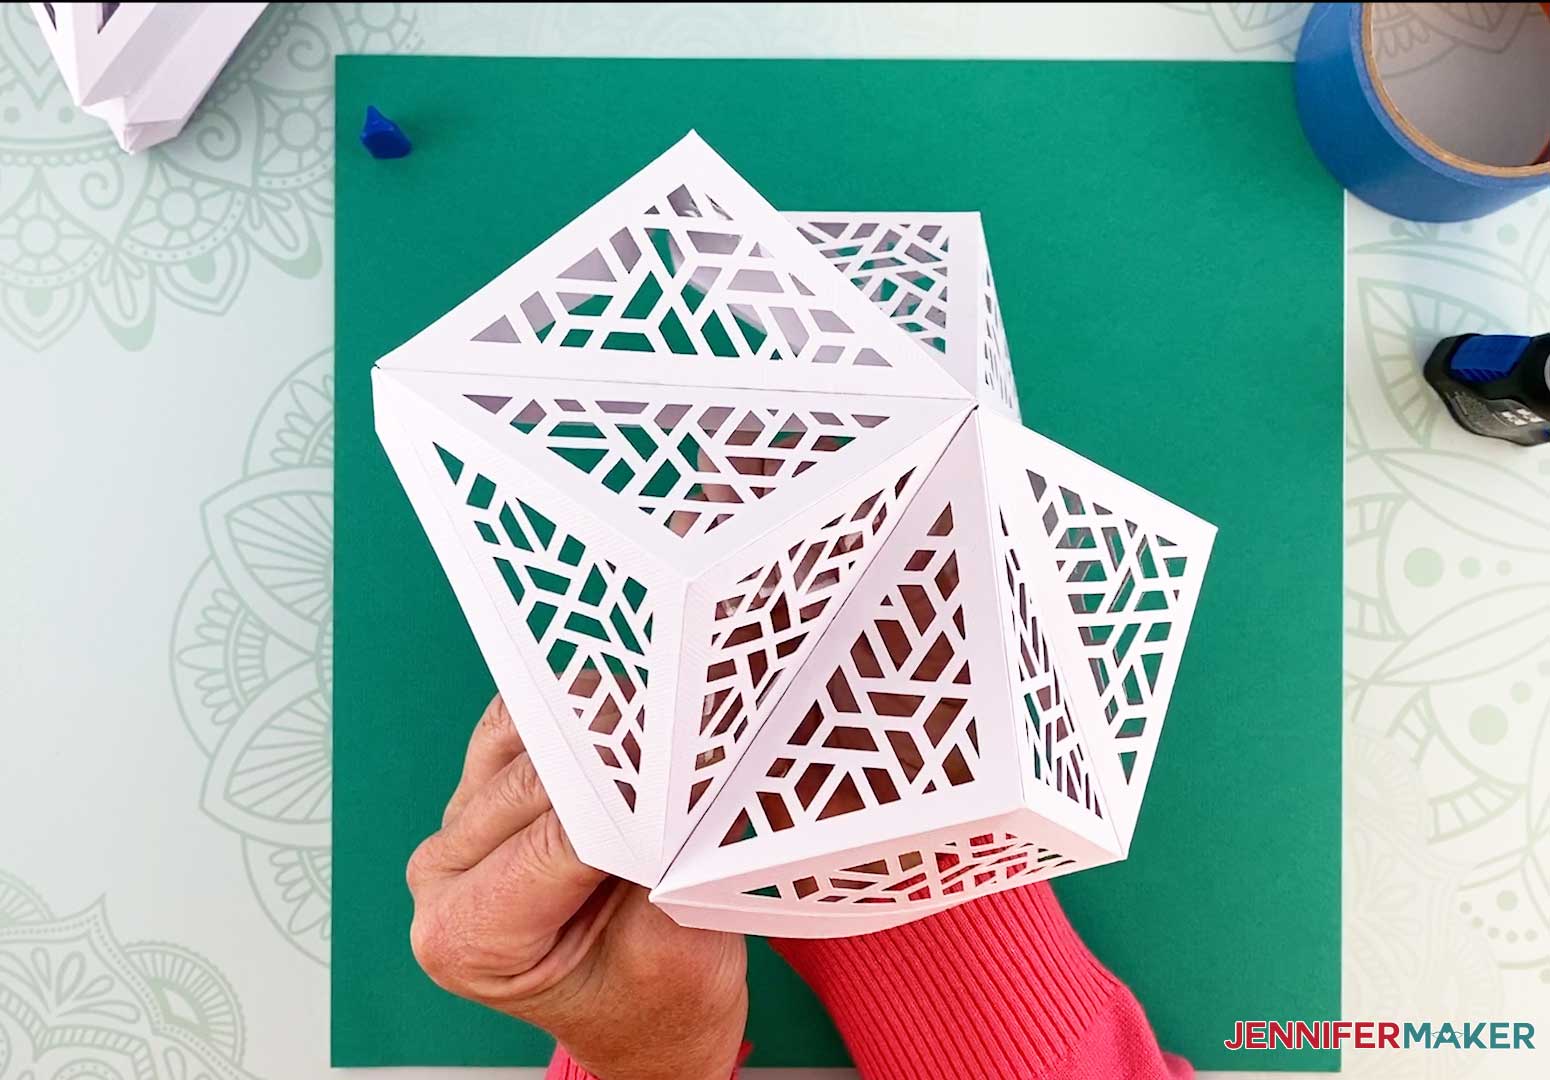
Continue adding the last two pieces. One piece above and one piece below the piece I am holding in my left hand.
This is what your DIY Hanging Lamp should look like with pieces 6-10 added.
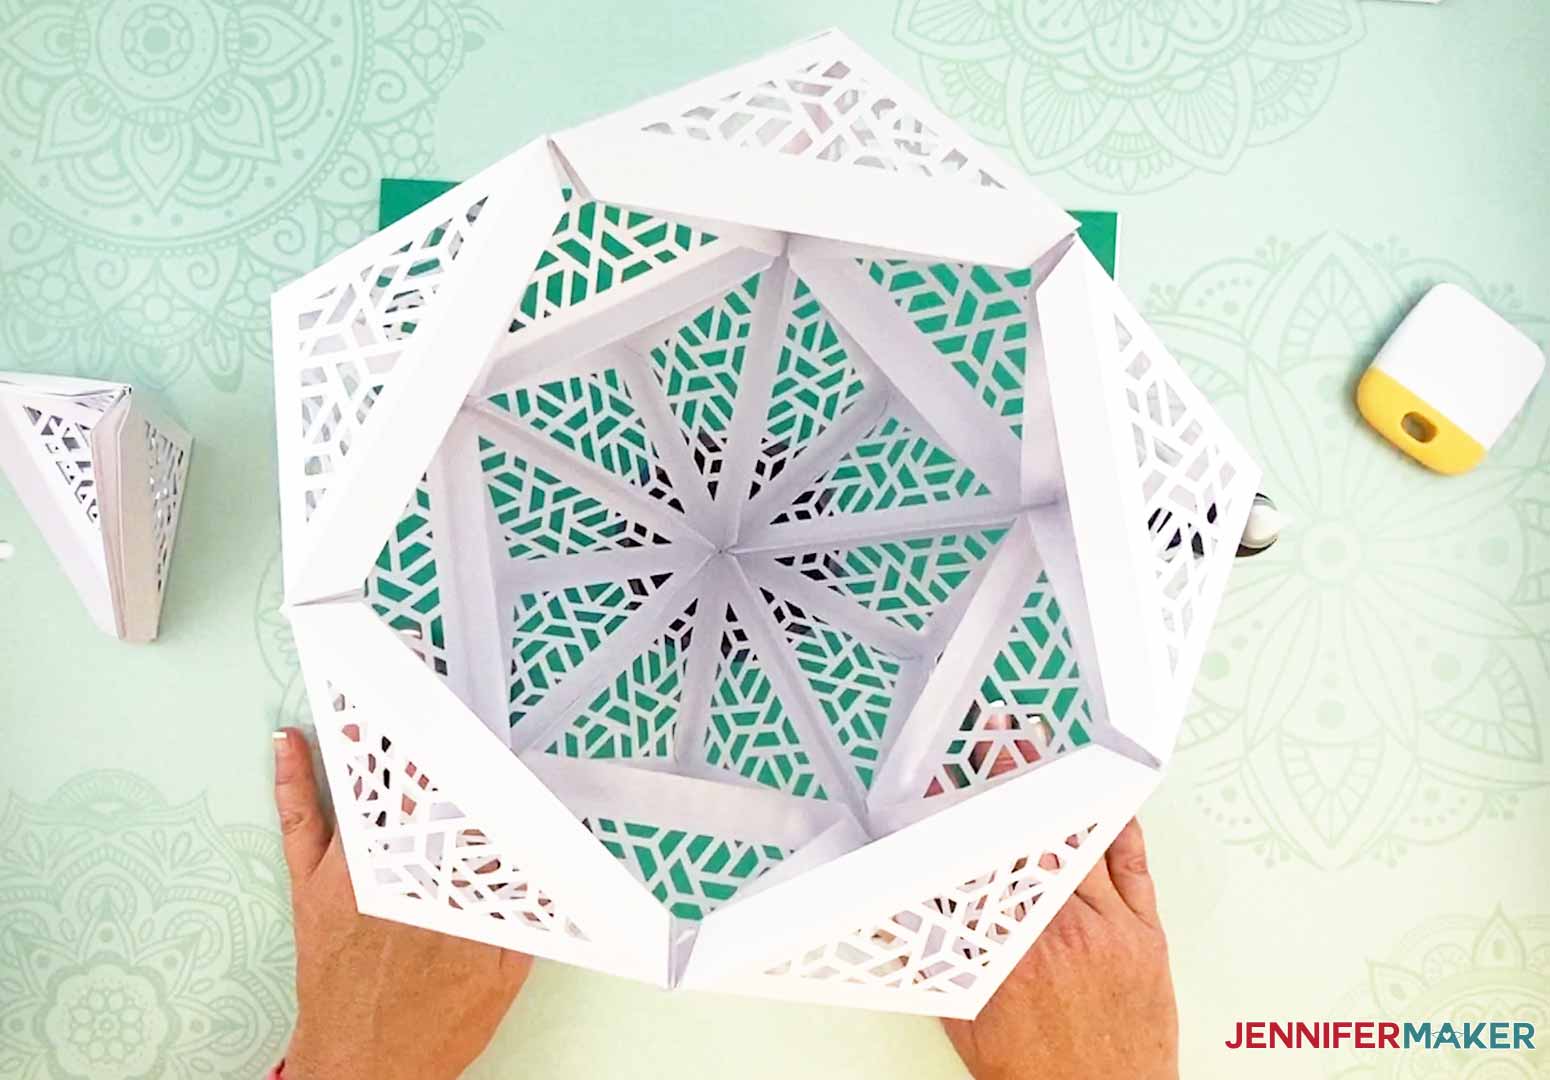
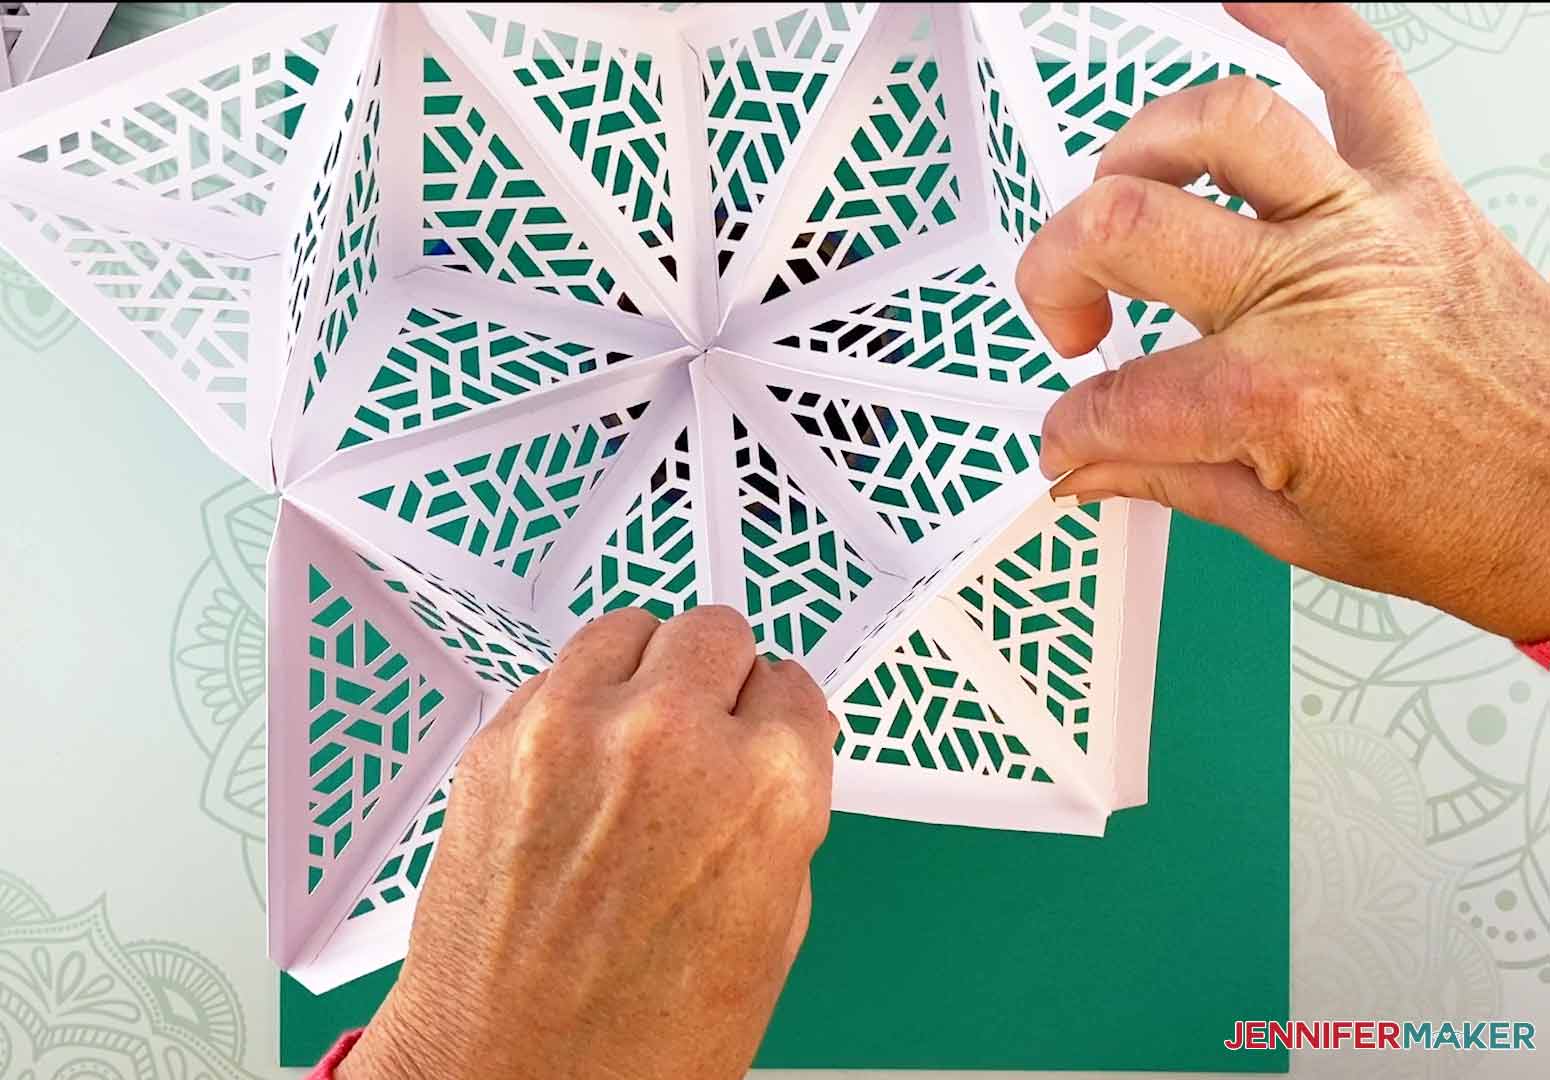
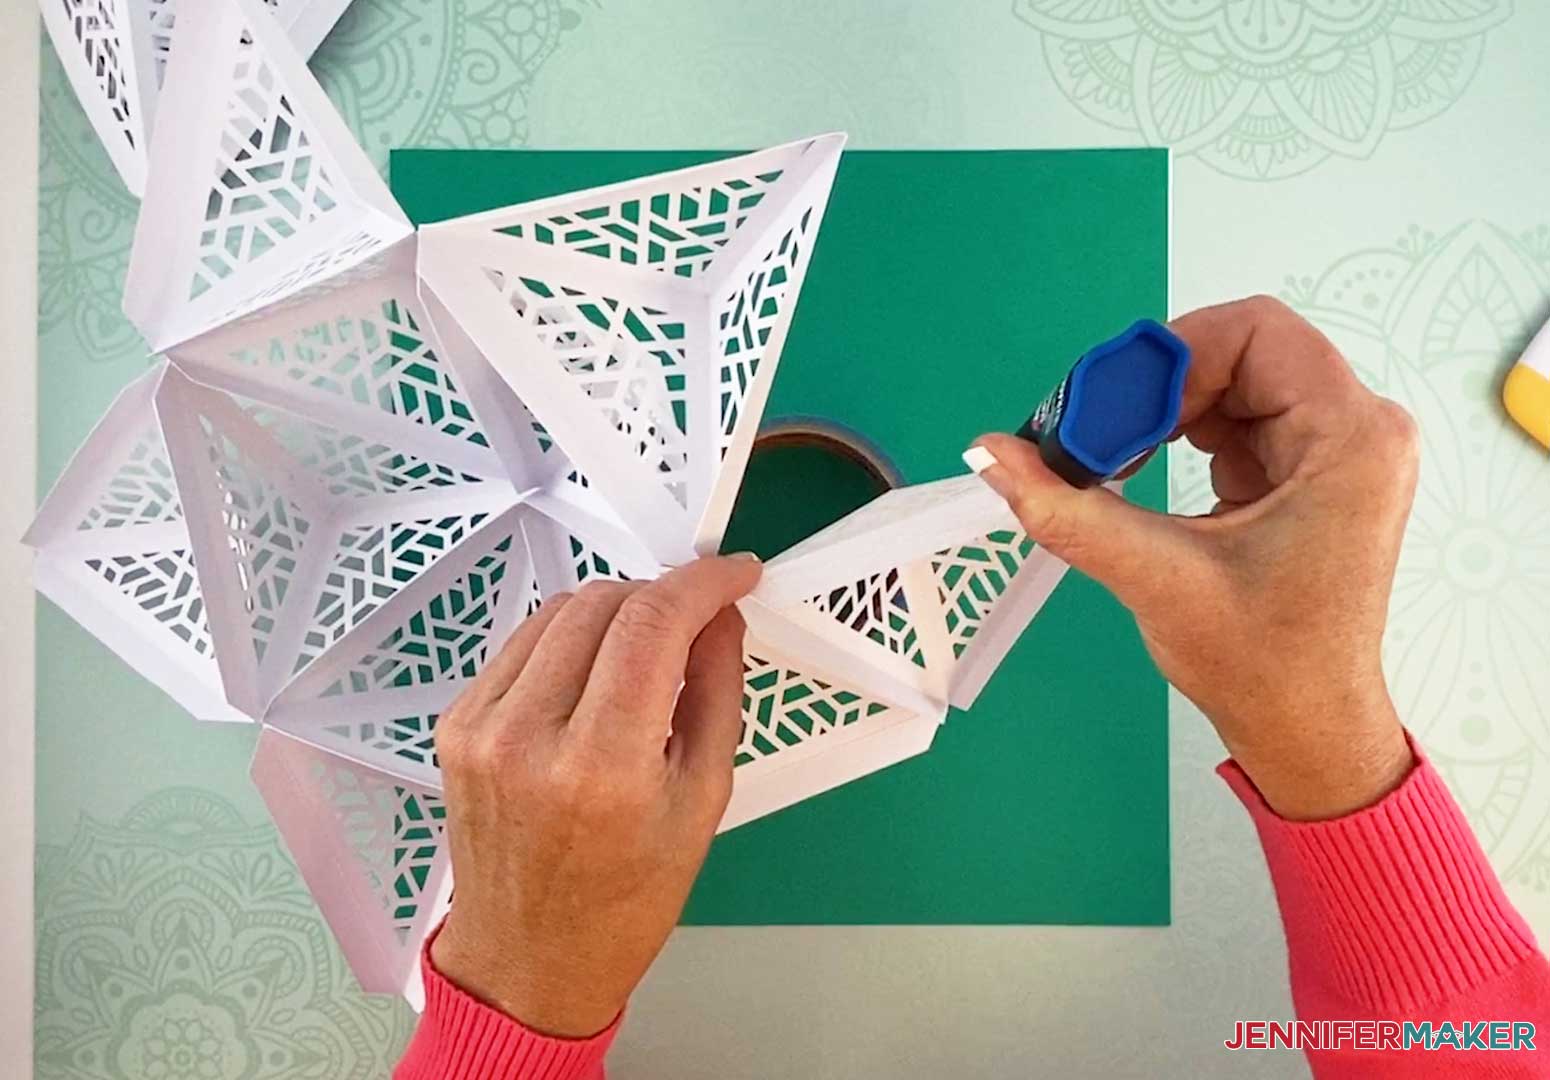
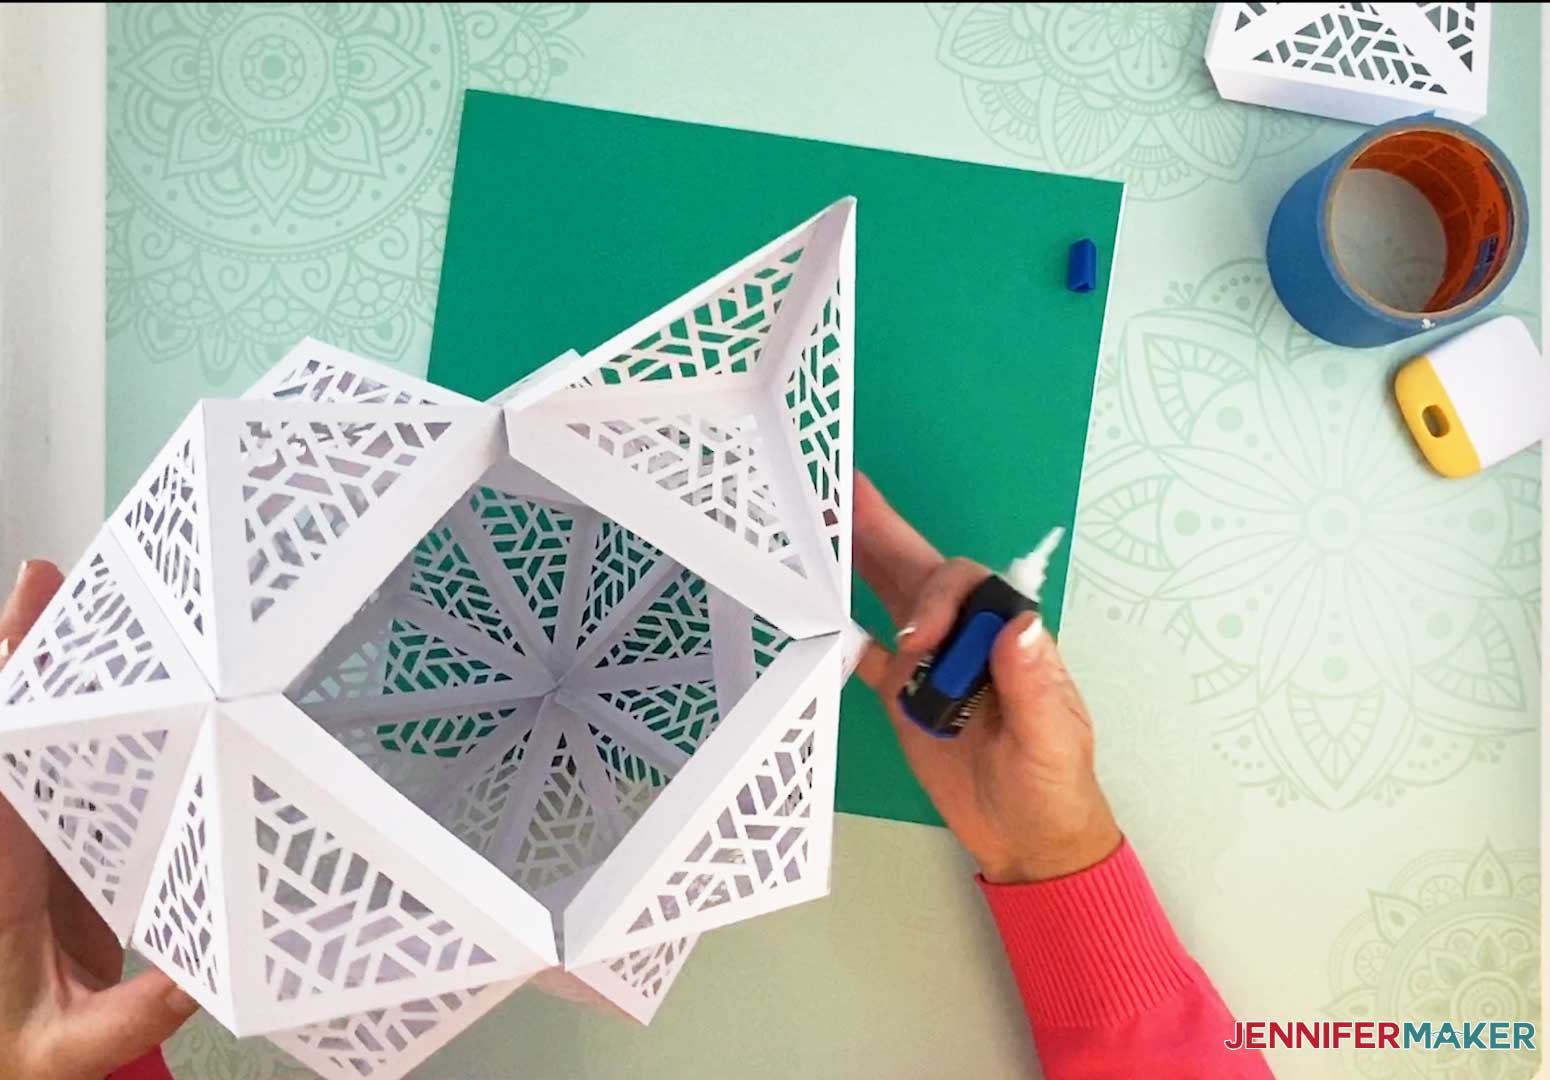
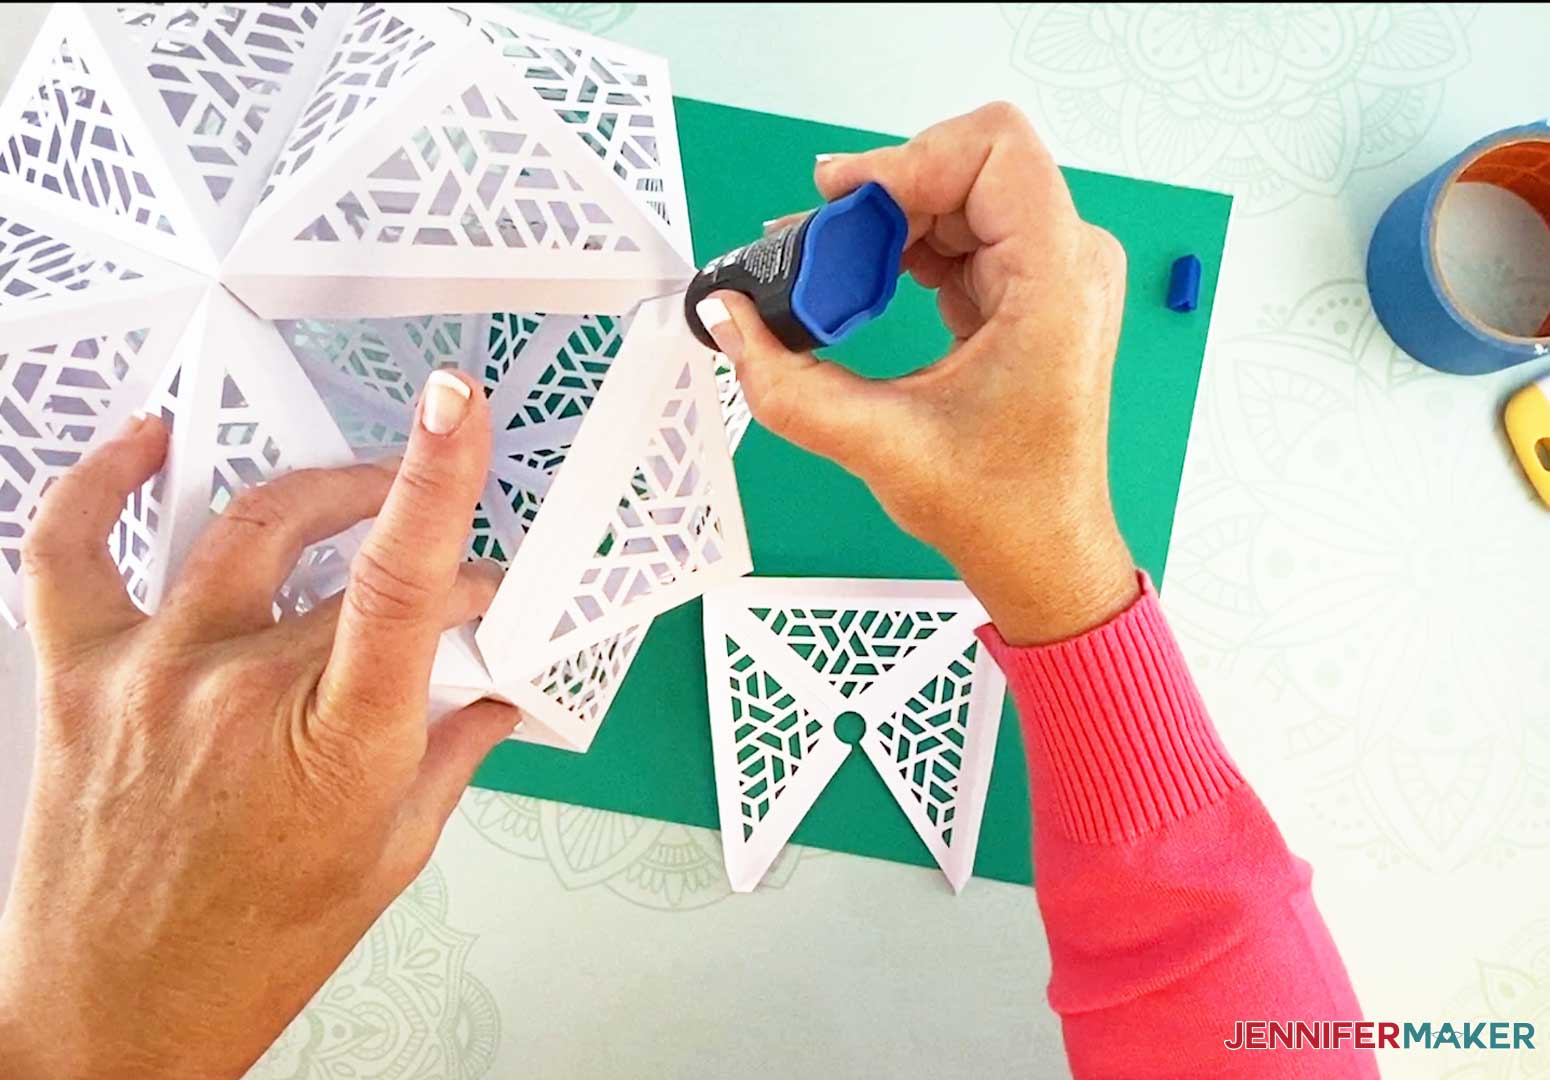
Now we will be adding four pieces to the tabs highlighted below.
Add glue to the first tab.

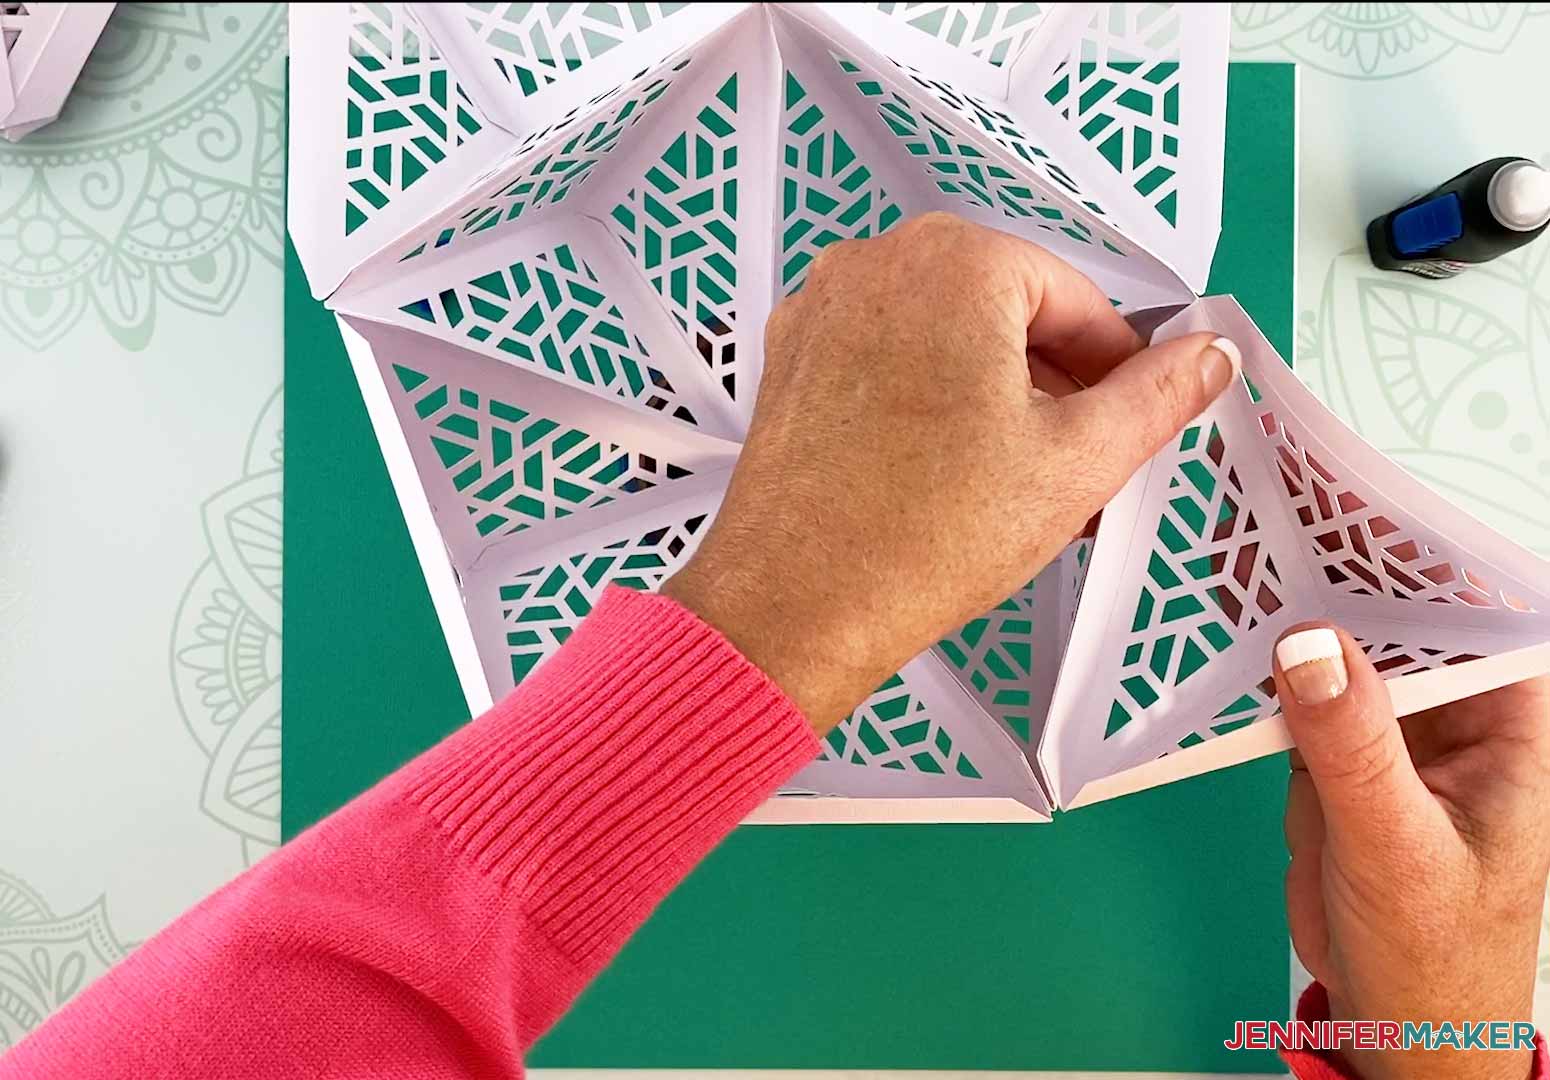
Adhere a new piece to the glued tab and align pieces.
This is what my DIY Hanging Lamp looks like with the first piece added to layer four. Continue adding pieces to three additional tabs.
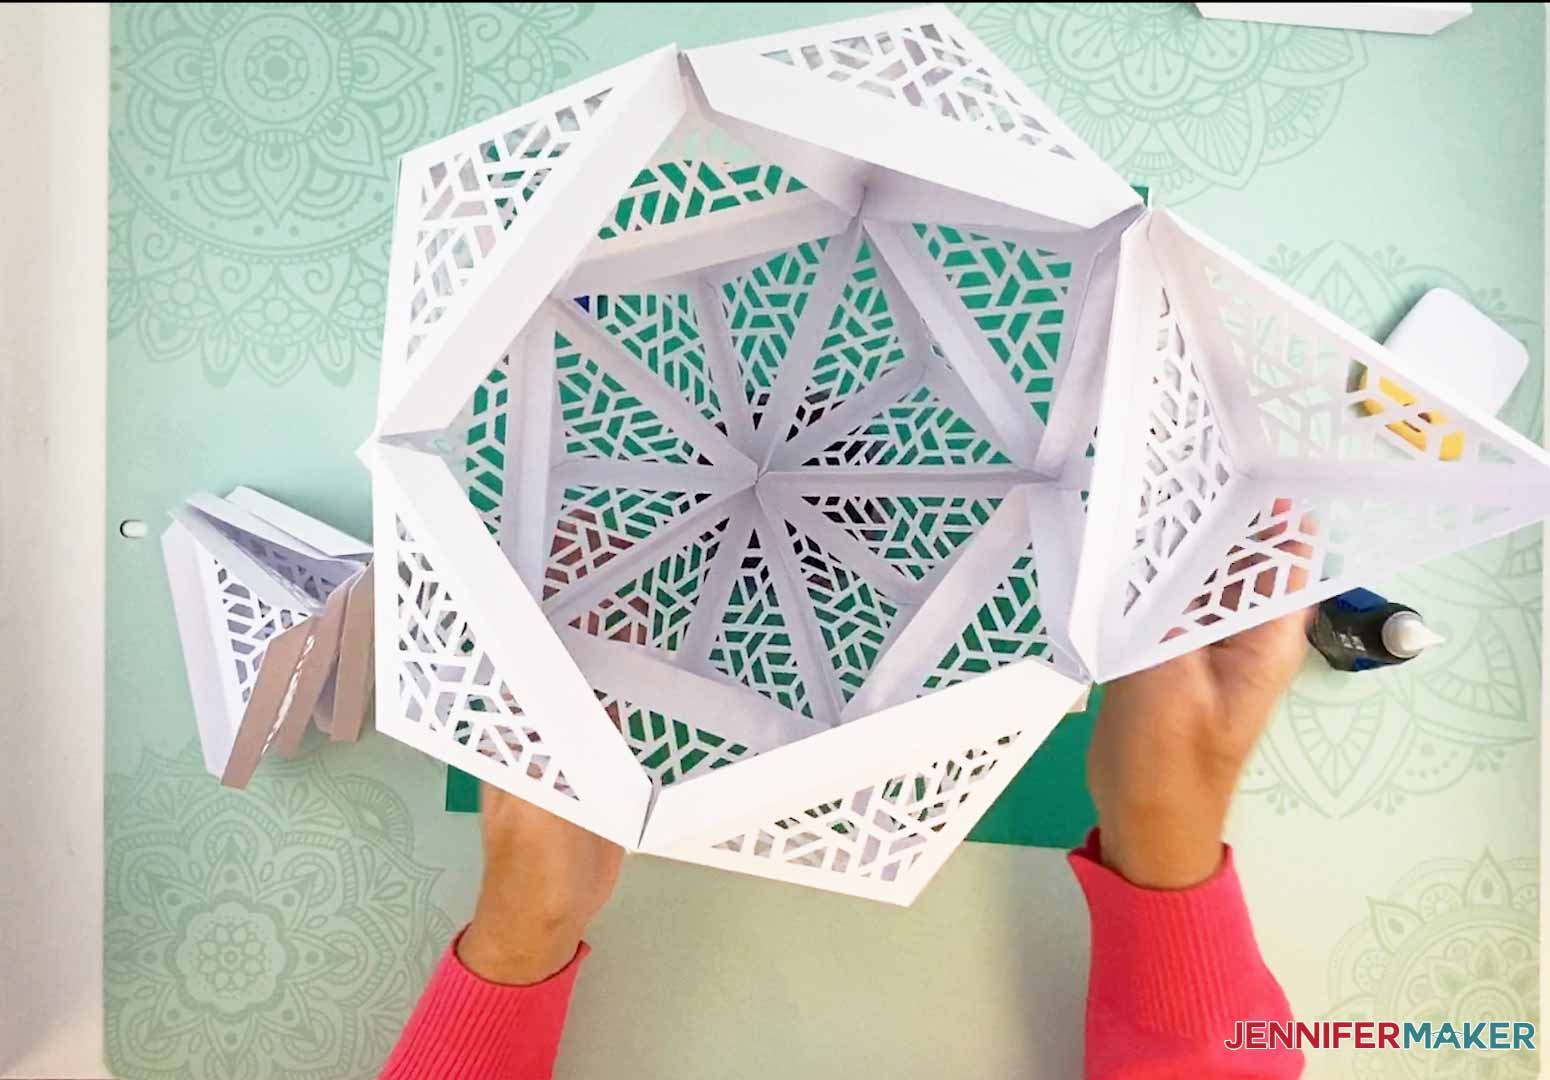
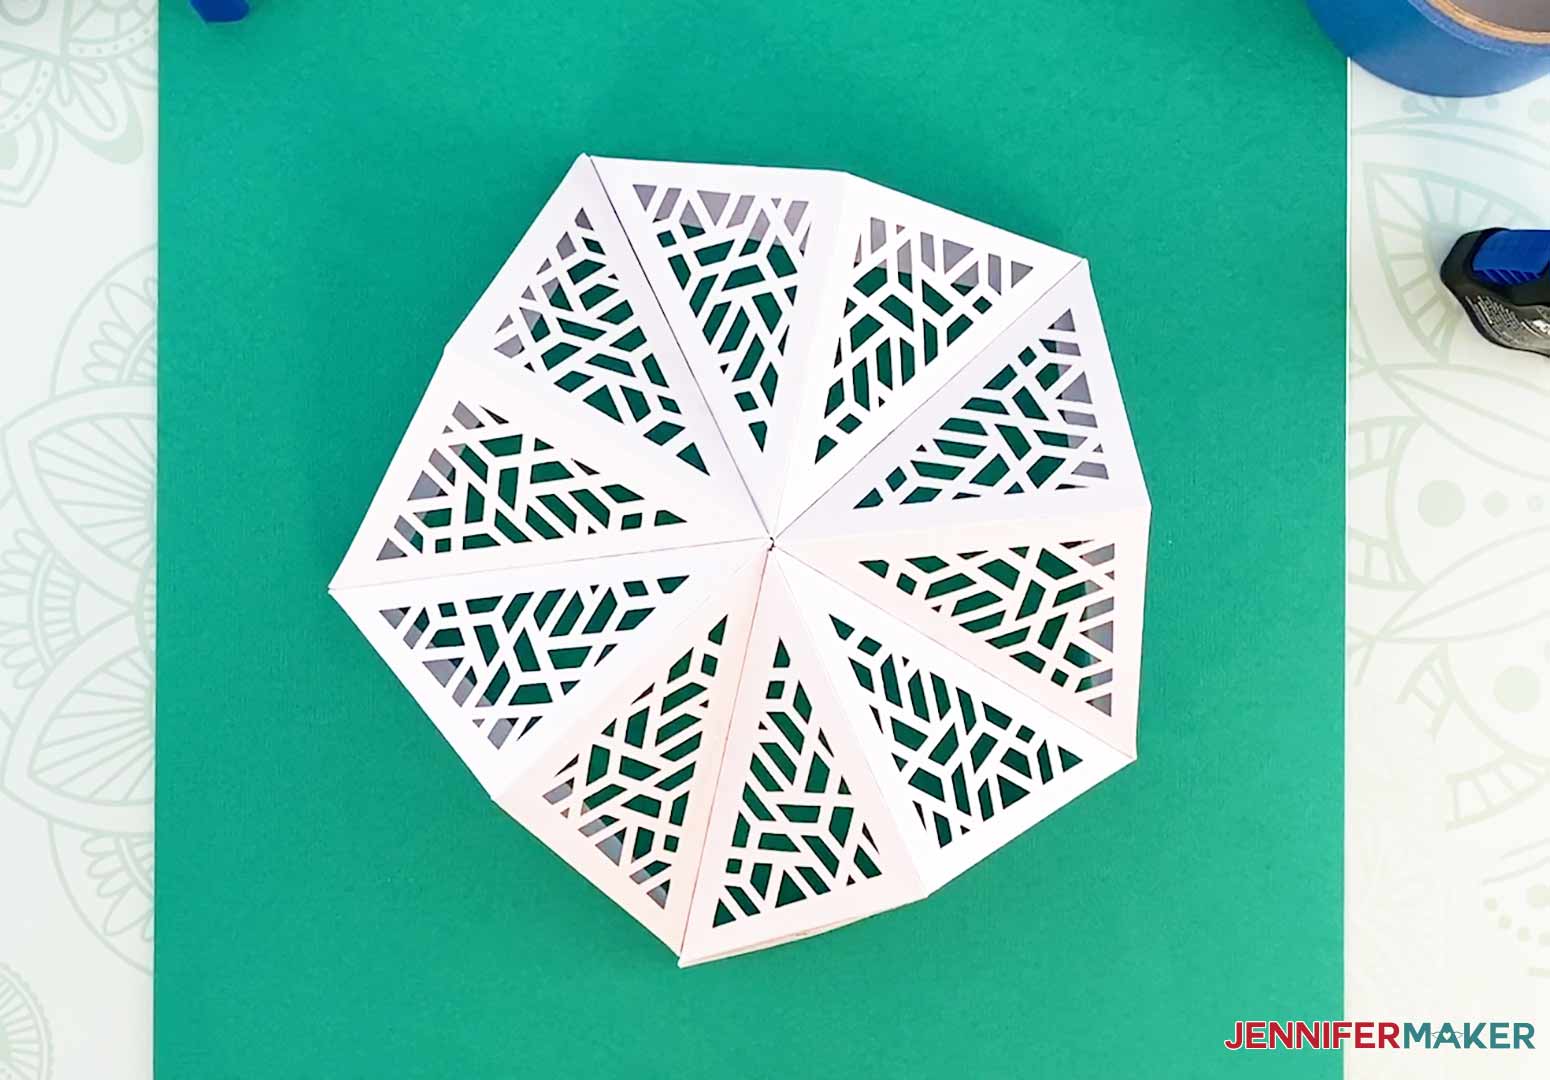
This is what my DIY Hanging Lamp looks like with the four pieces added.
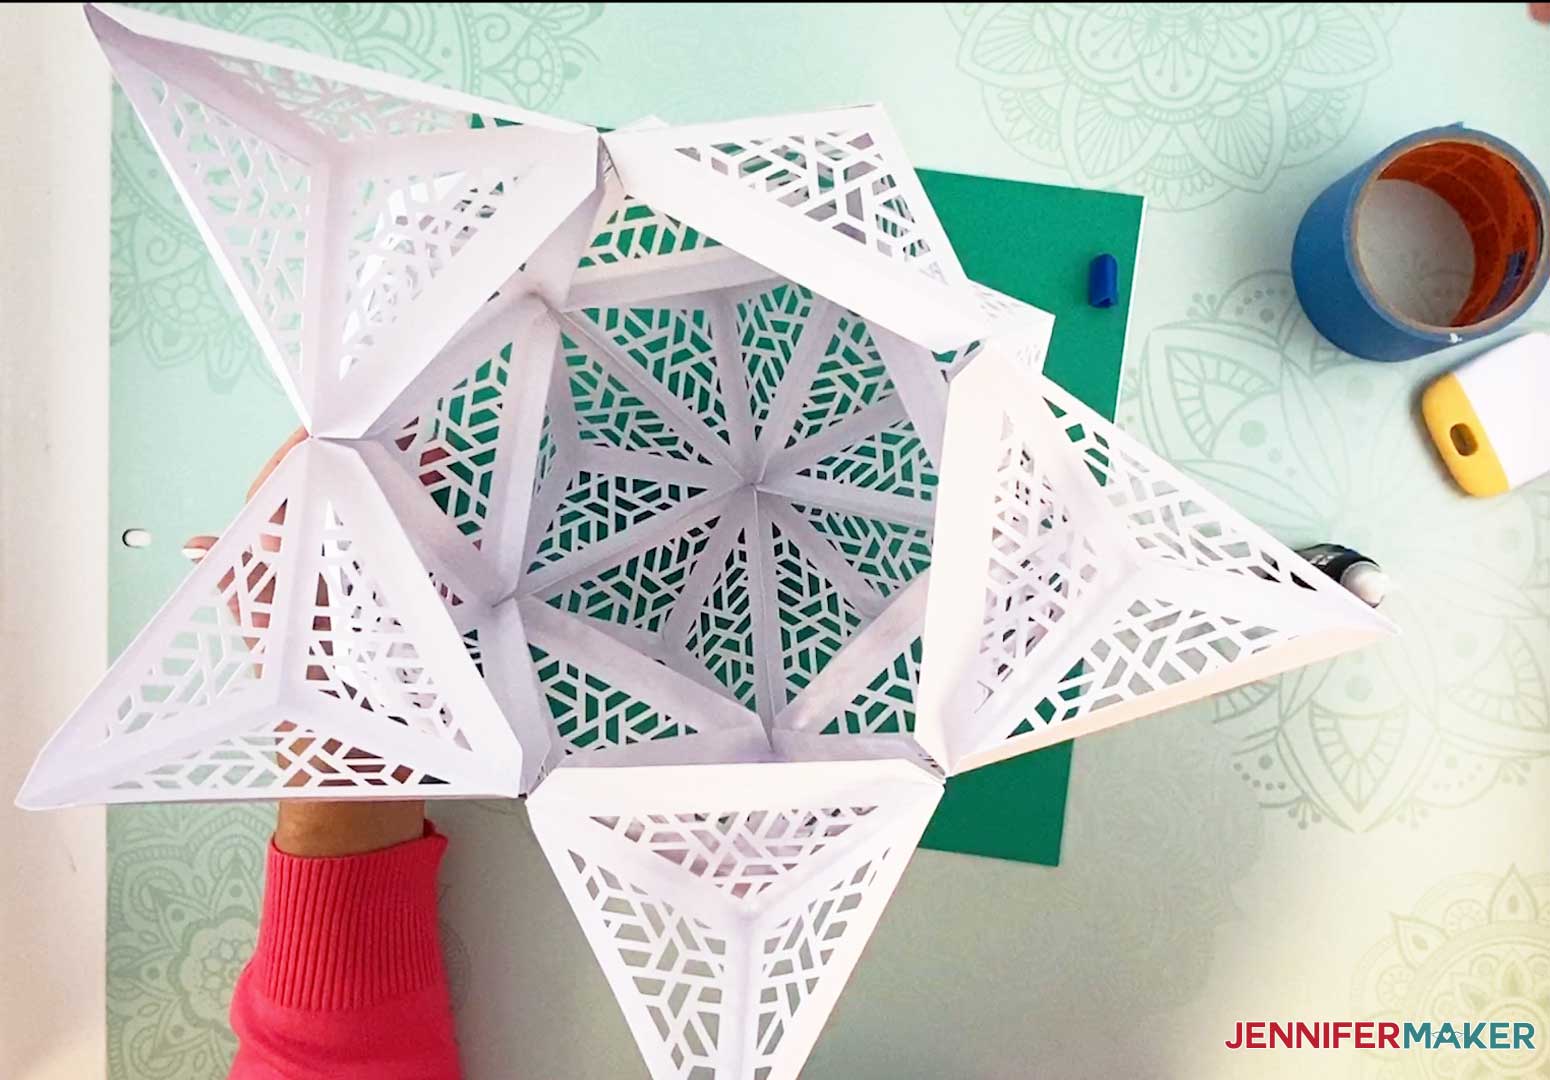
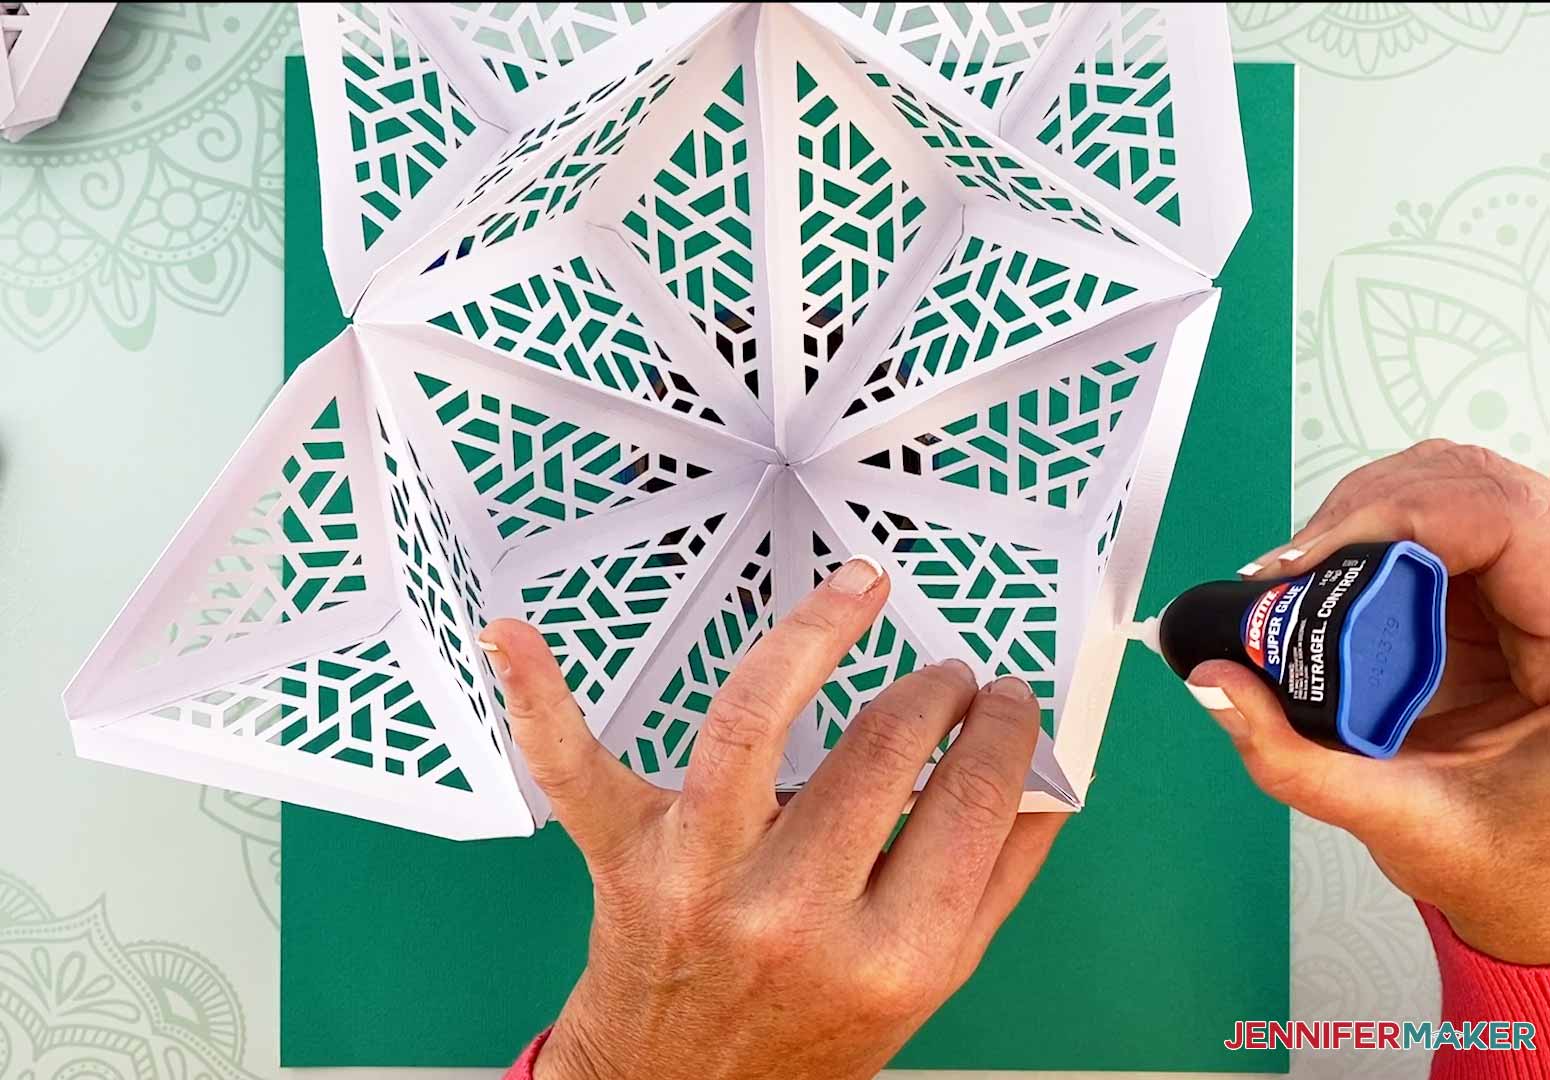
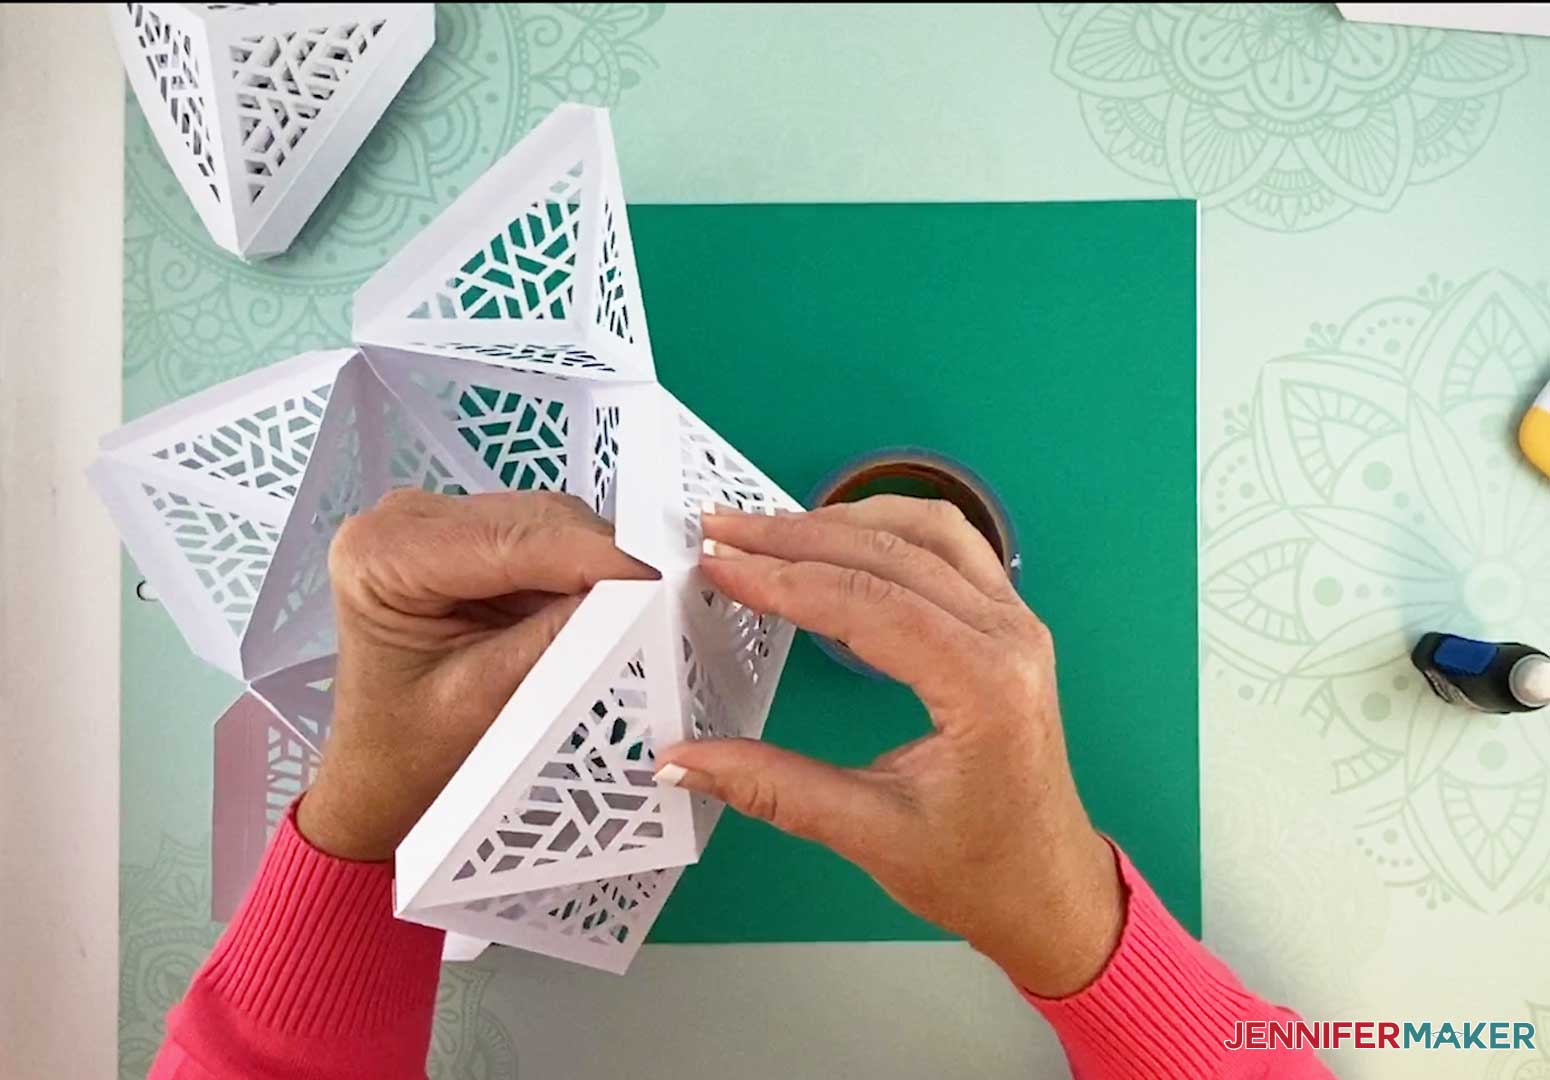
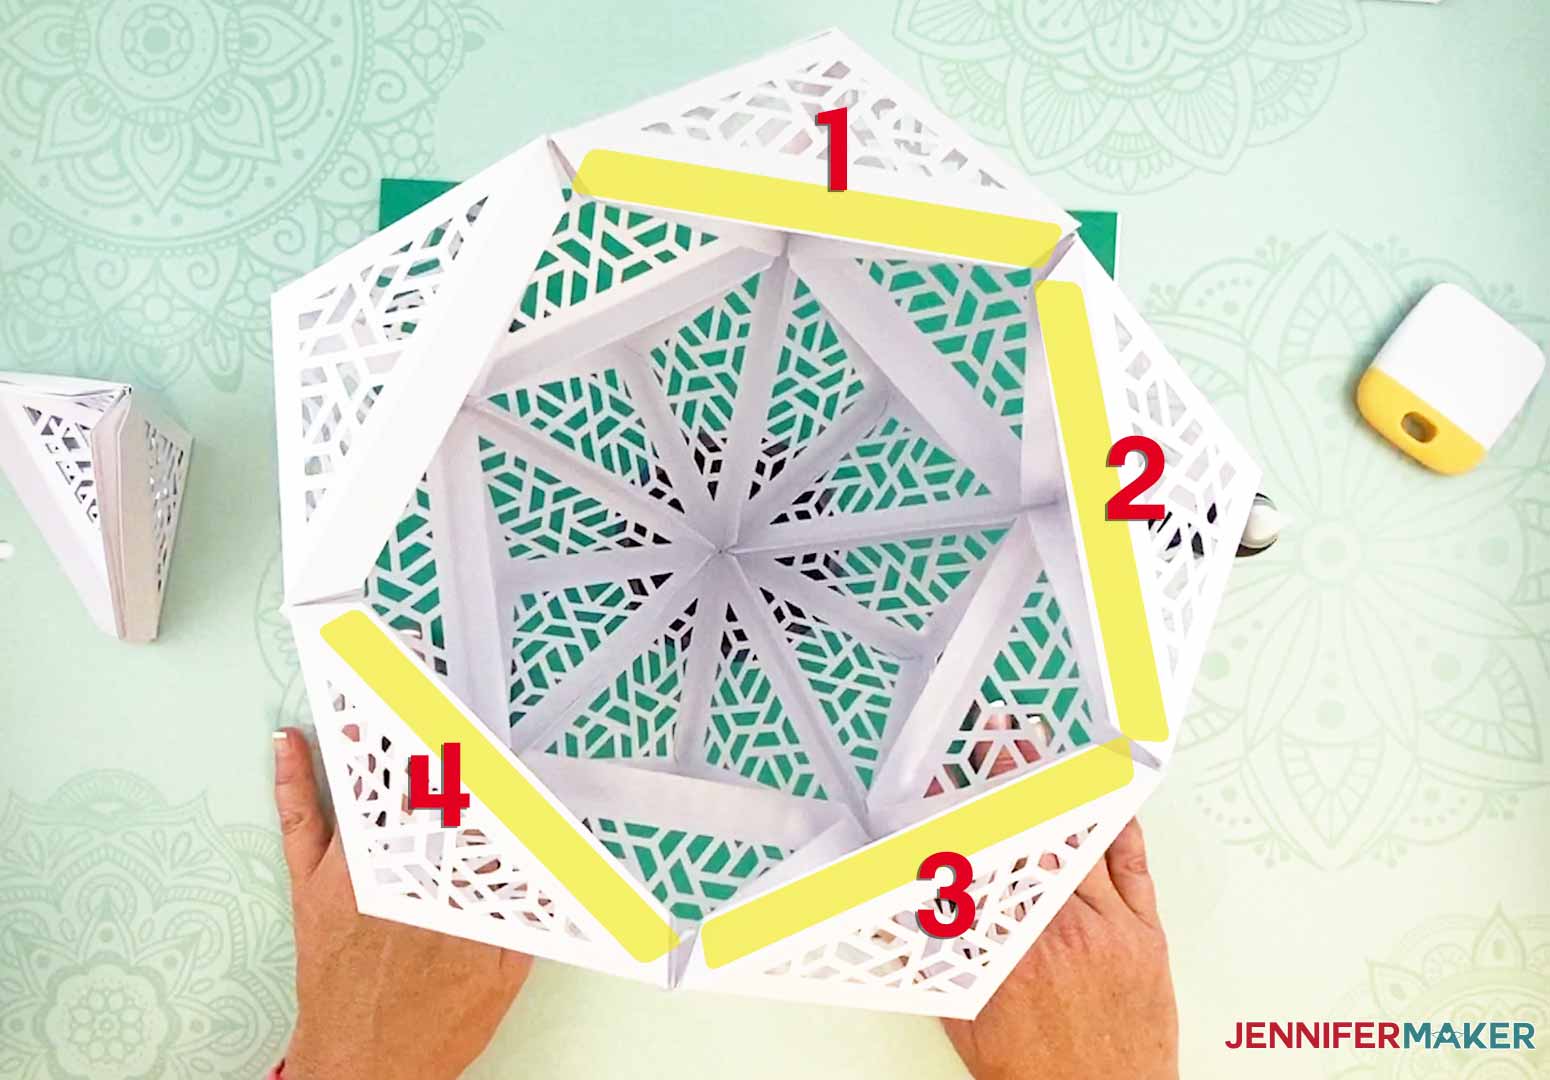
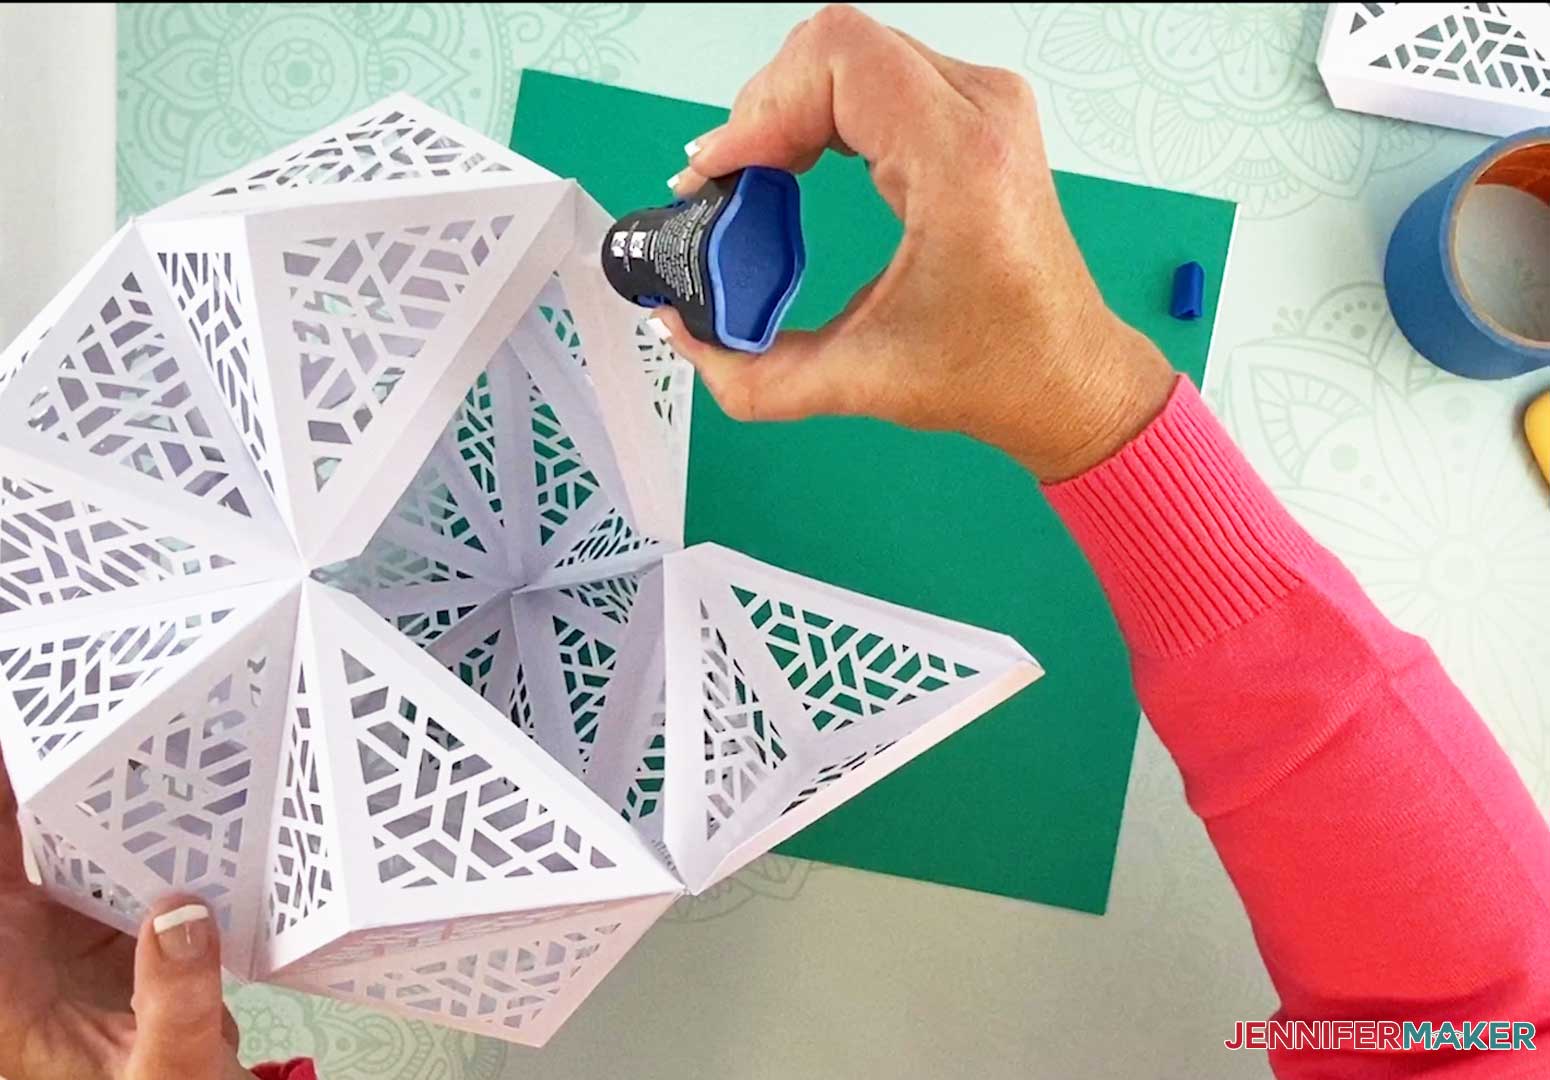
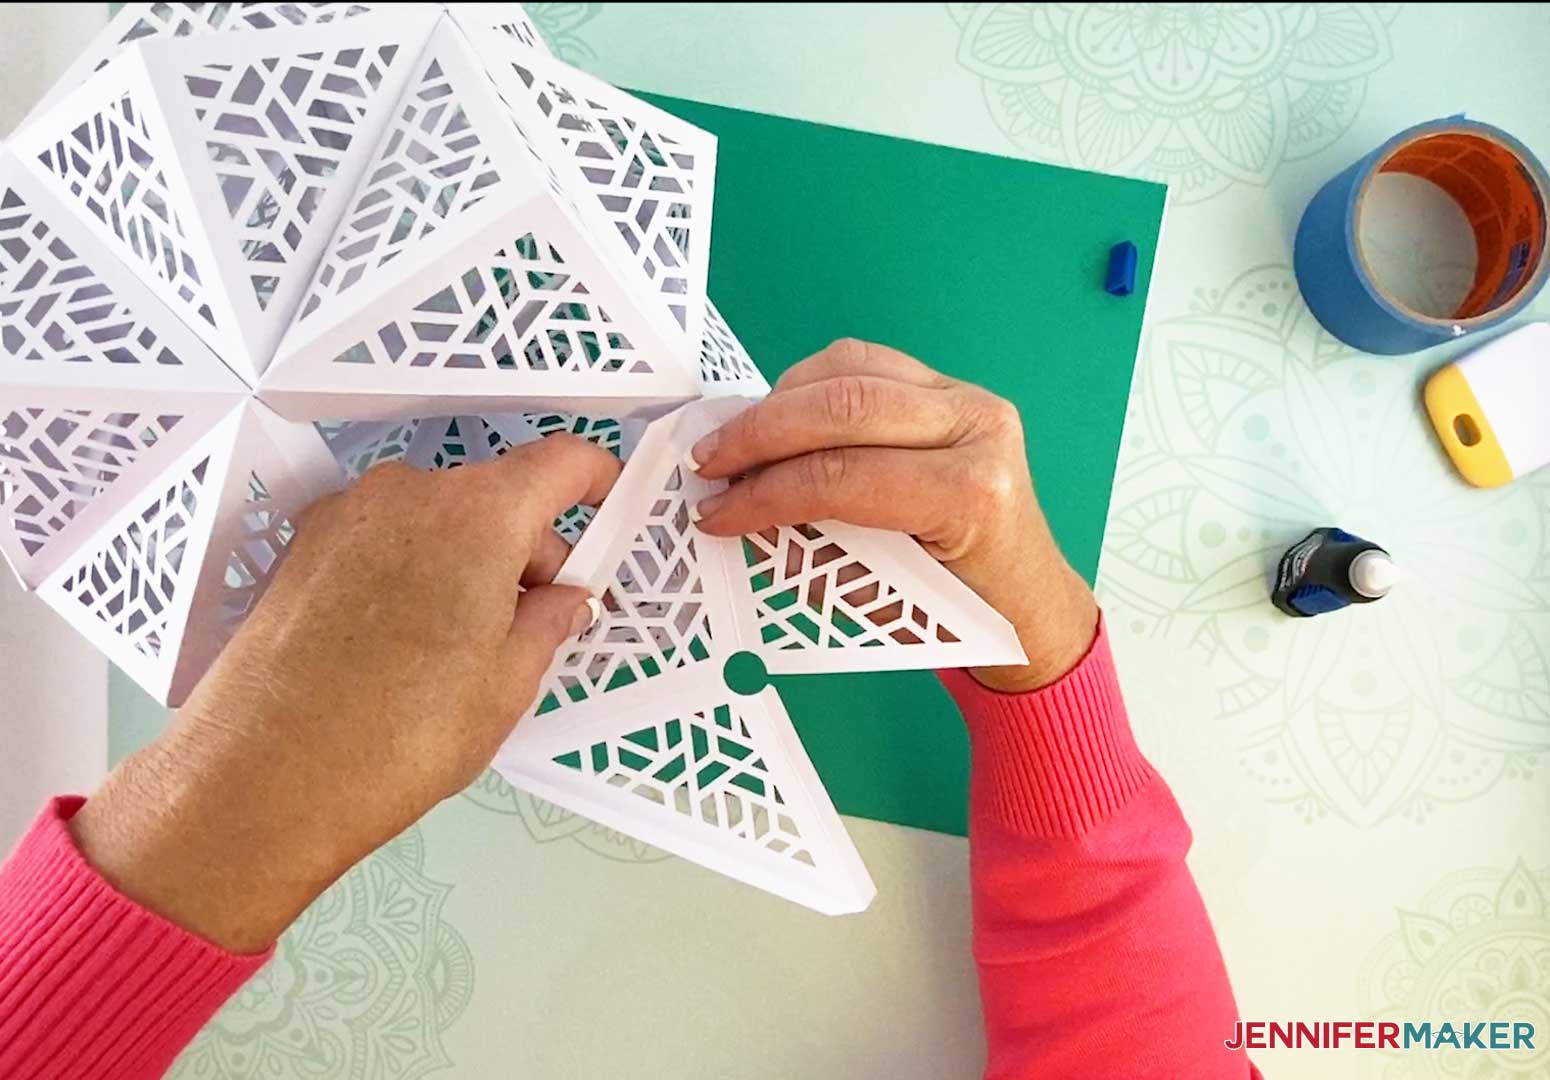
Next, we will glue the pieces together as indicated in the diagram below.
Add glue to the tab of one of the pieces to glue.
Connect the glued tab to the tab of the adjoining piece.
This is what your DIY Hanging Lamp should look like with the first two pieces connected.
Add glue to the tab of the next piece.
Connect this piece to the tab of the adjoining piece.
This is what your lamp should look like showing one last piece to connect.
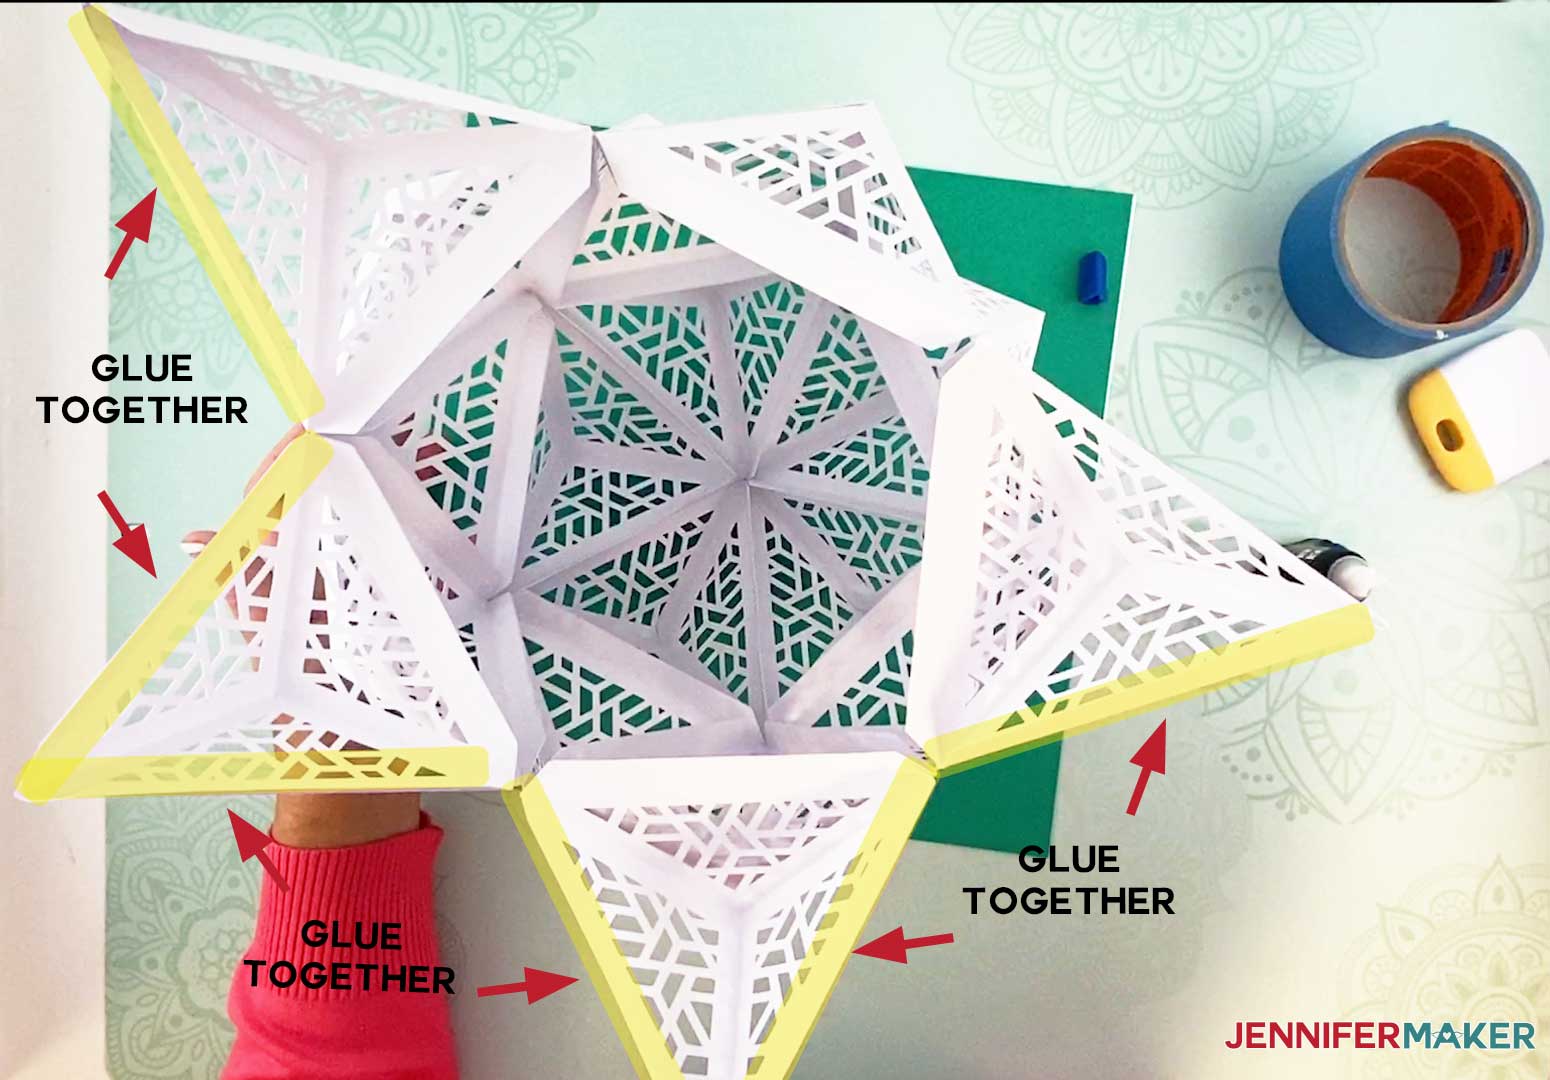
Add glue to the tab to connect the last piece.
Connect to the tab of the adjoining piece.
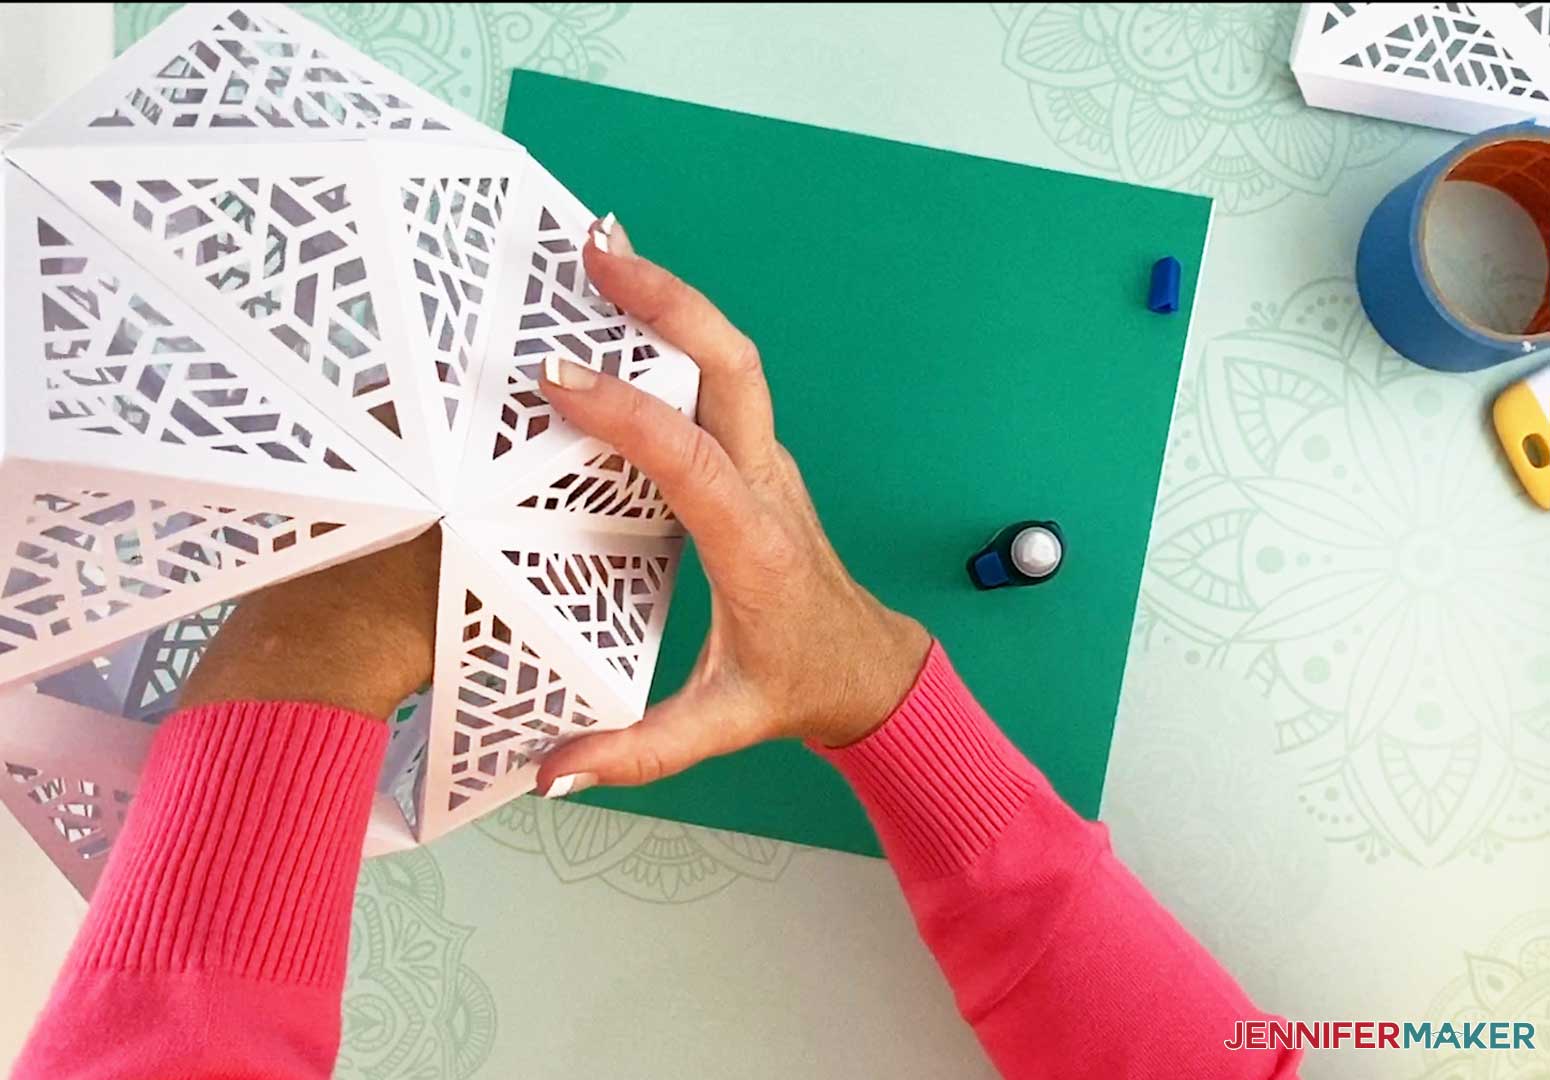
This is what your DIY Hanging Lamp should look like.
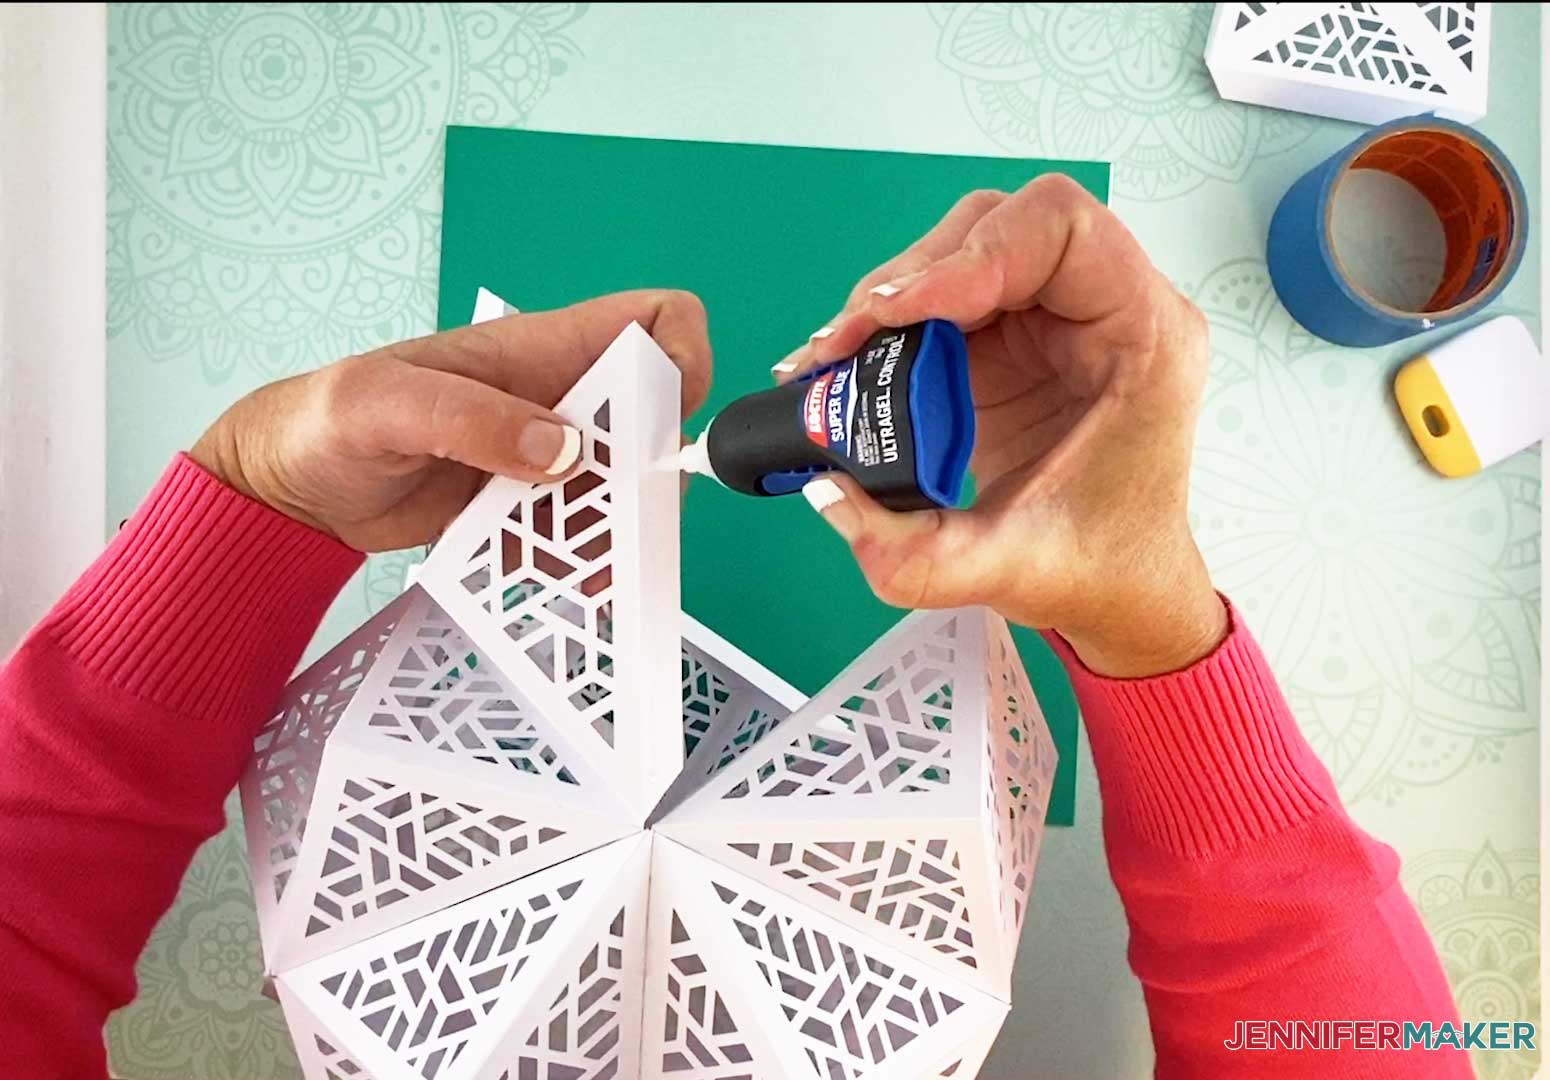
Add glue to one of the three tabs. It doesn't matter which tab.
Grab the last piece, which is the one with the circle cut into the center, and align the bottom tab to the tab you just glued.
Add glue to one of the tabs adjacent to the last piece you just added.
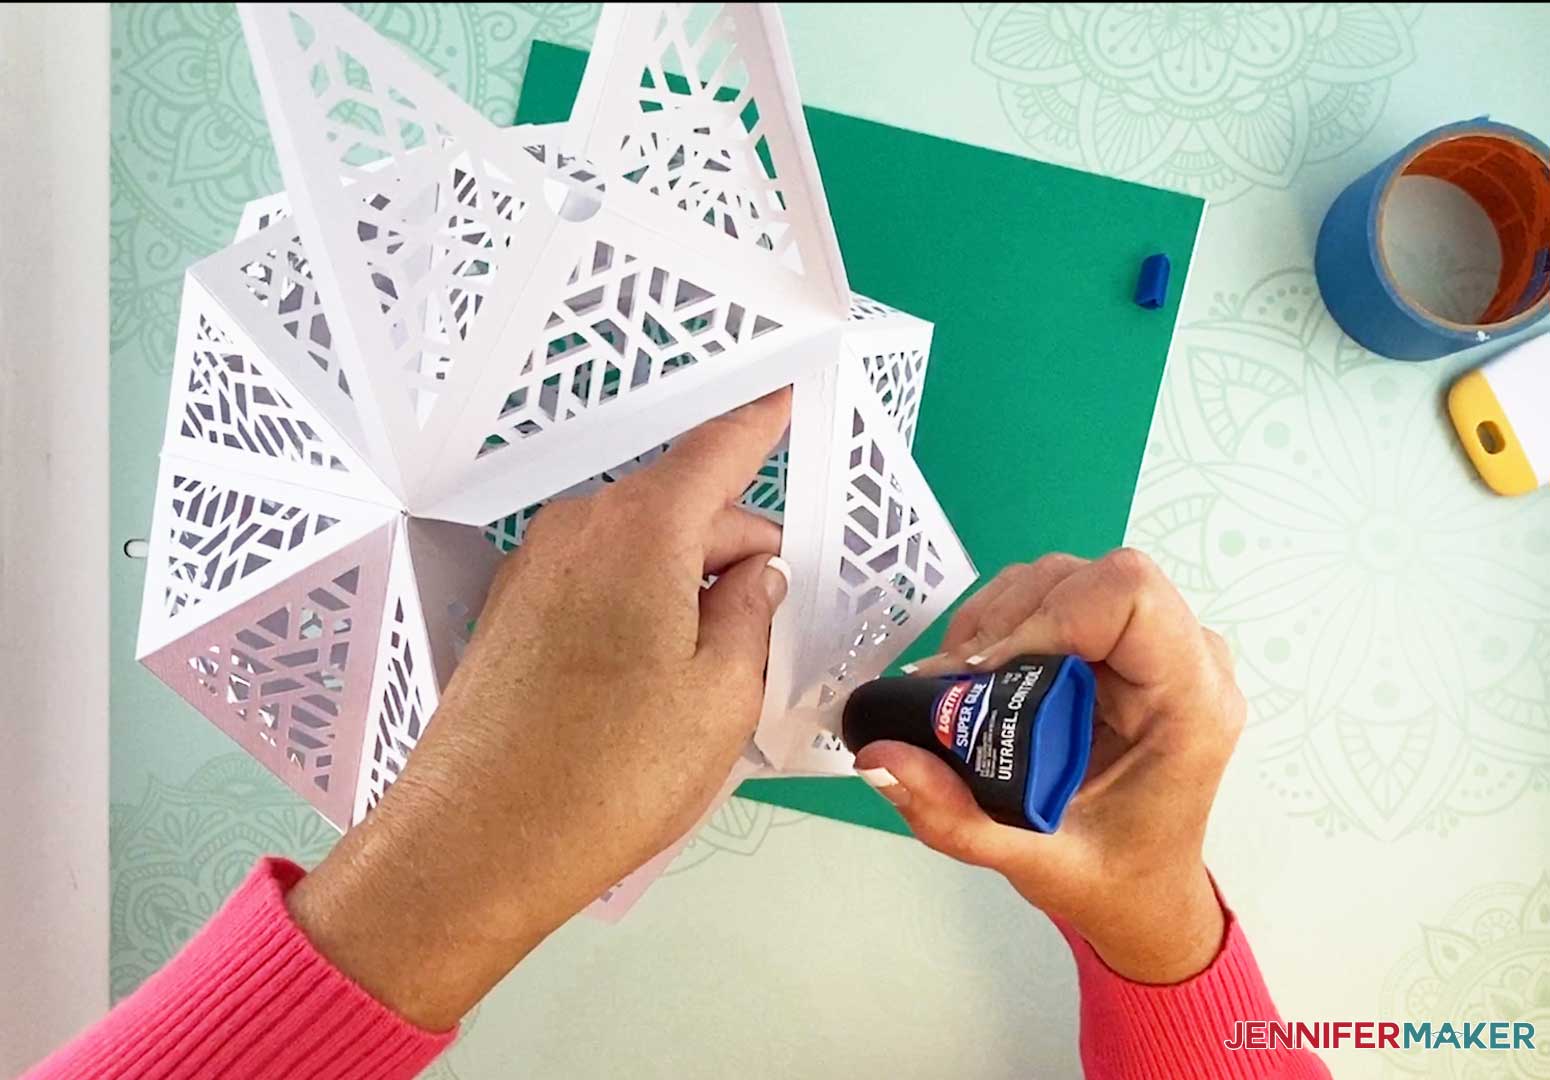
Connect the two tabs together.
Your DIY Hanging Lamp should now look like the image below.

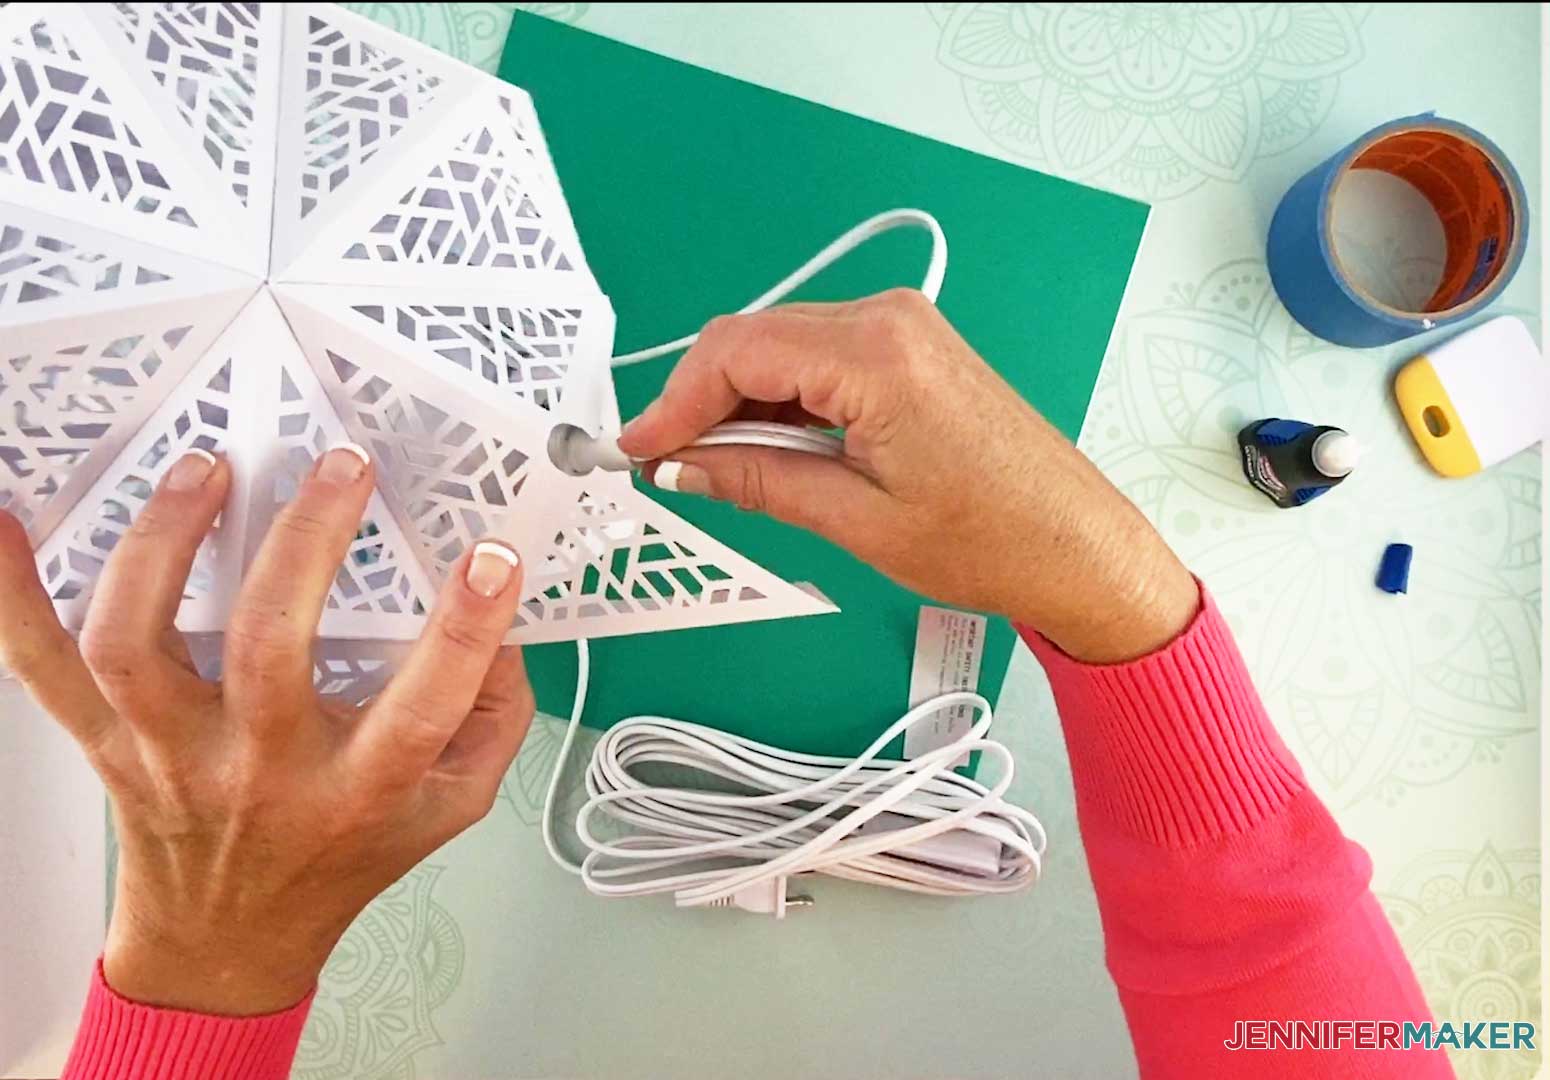
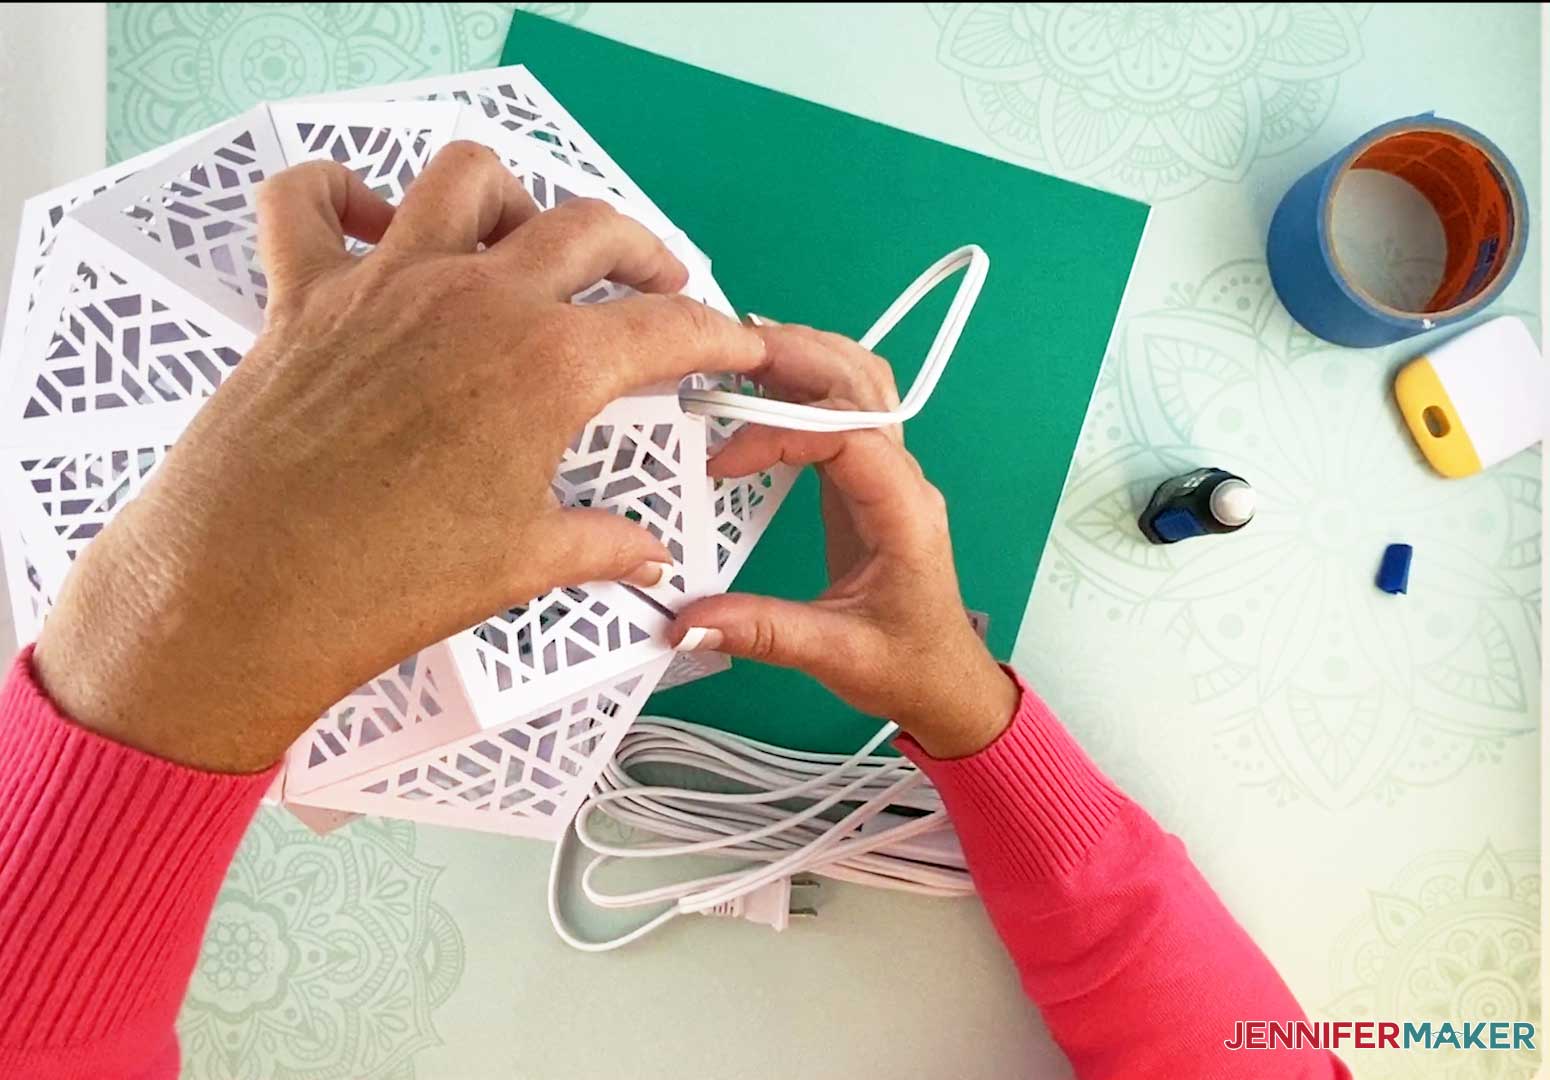
Screw-in your lightbulb to the hanging lantern cord and insert the bulb end into the DIY Hanging Lamp.
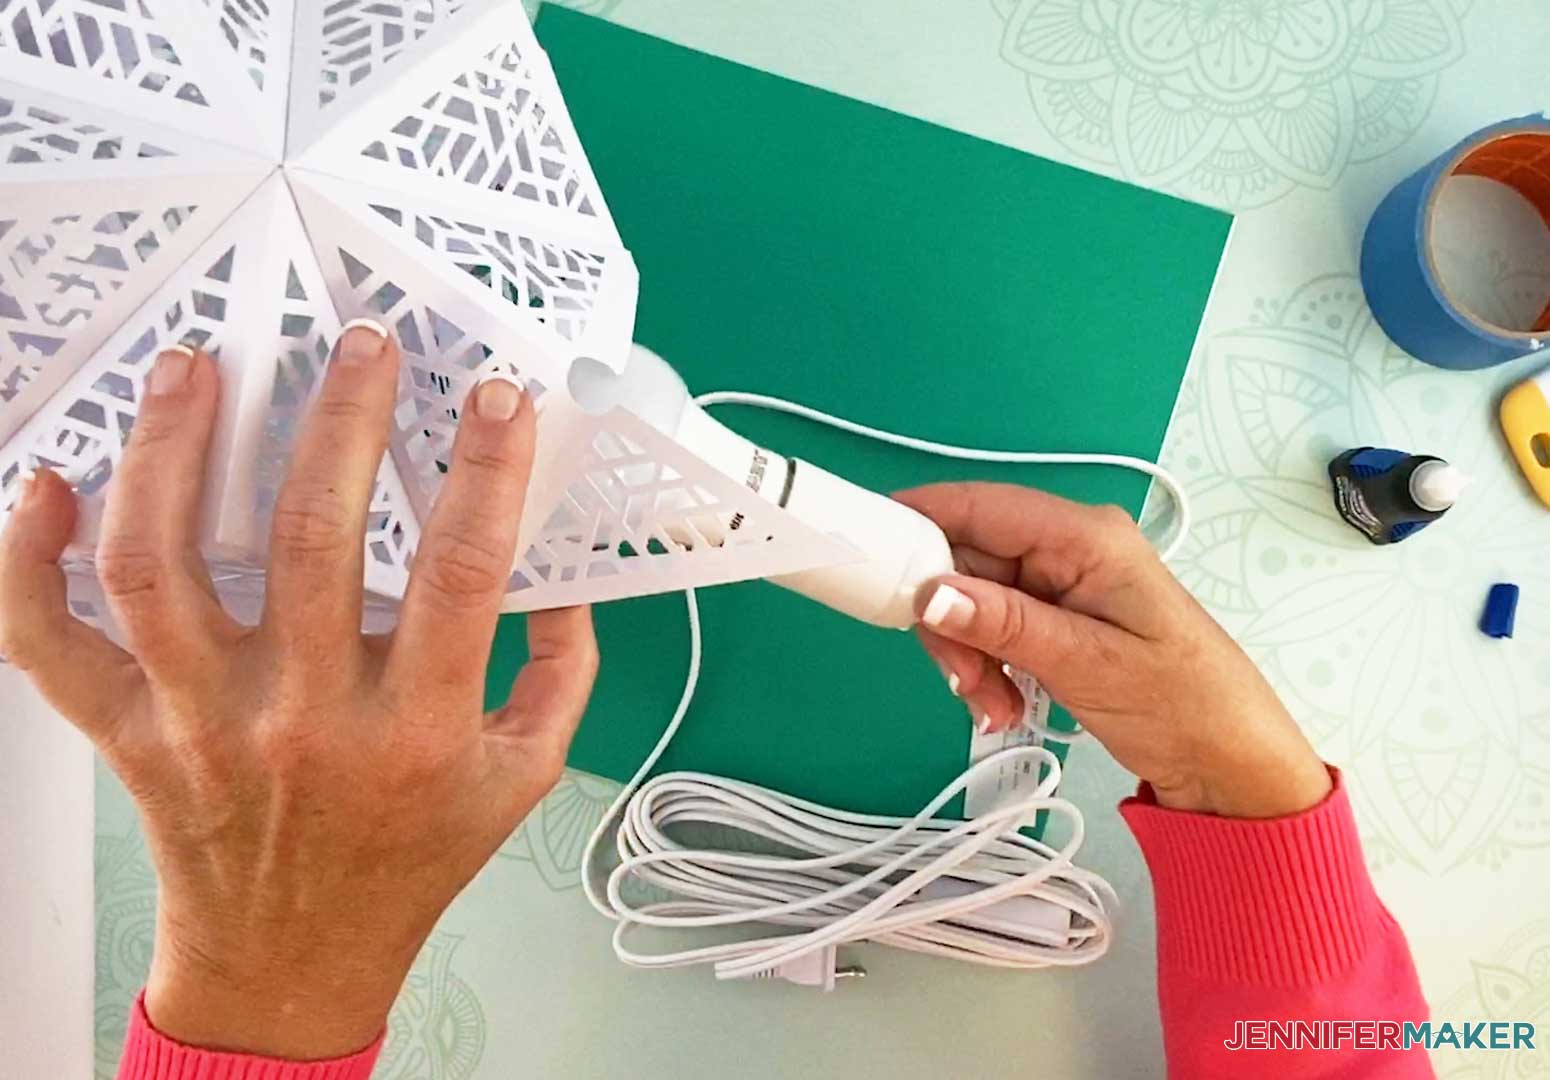
Bring the lantern cord out through the center hole.
Add glue to the narrow inner tab of this last piece.
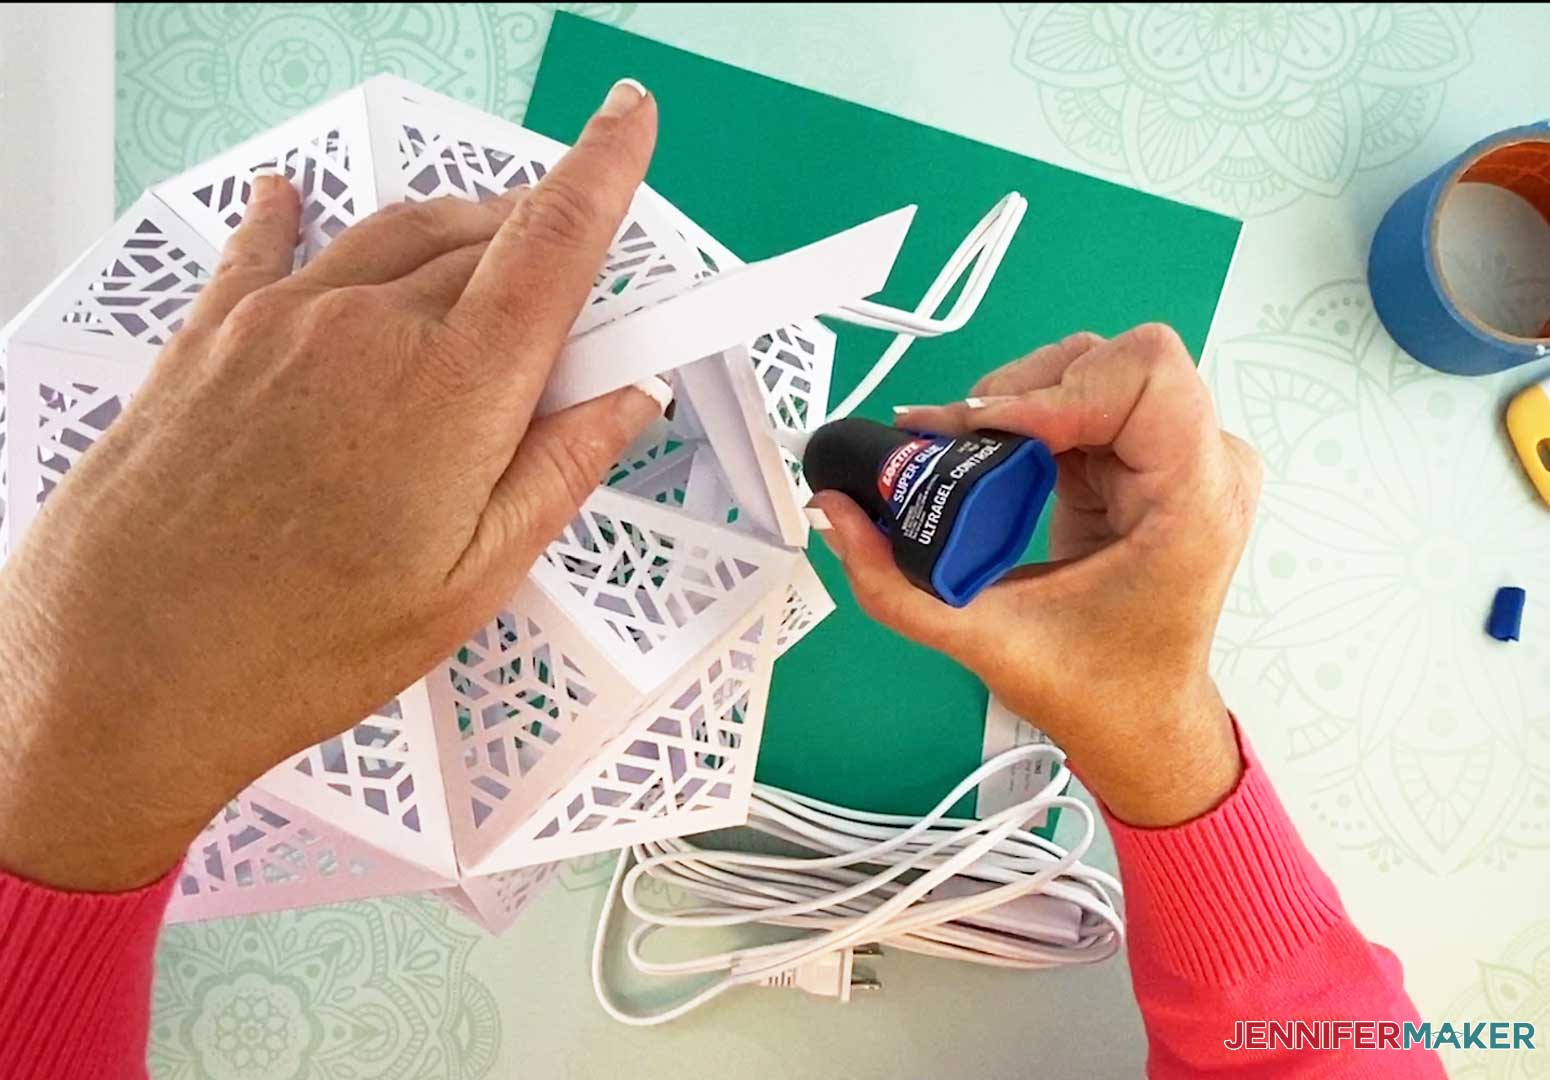
Connect the narrow tab to the adjoining side. There is no tab on the side that joins this tab.
Add glue between the last two tabs that have not been glued by sticking the tip of the glue between the two pieces.
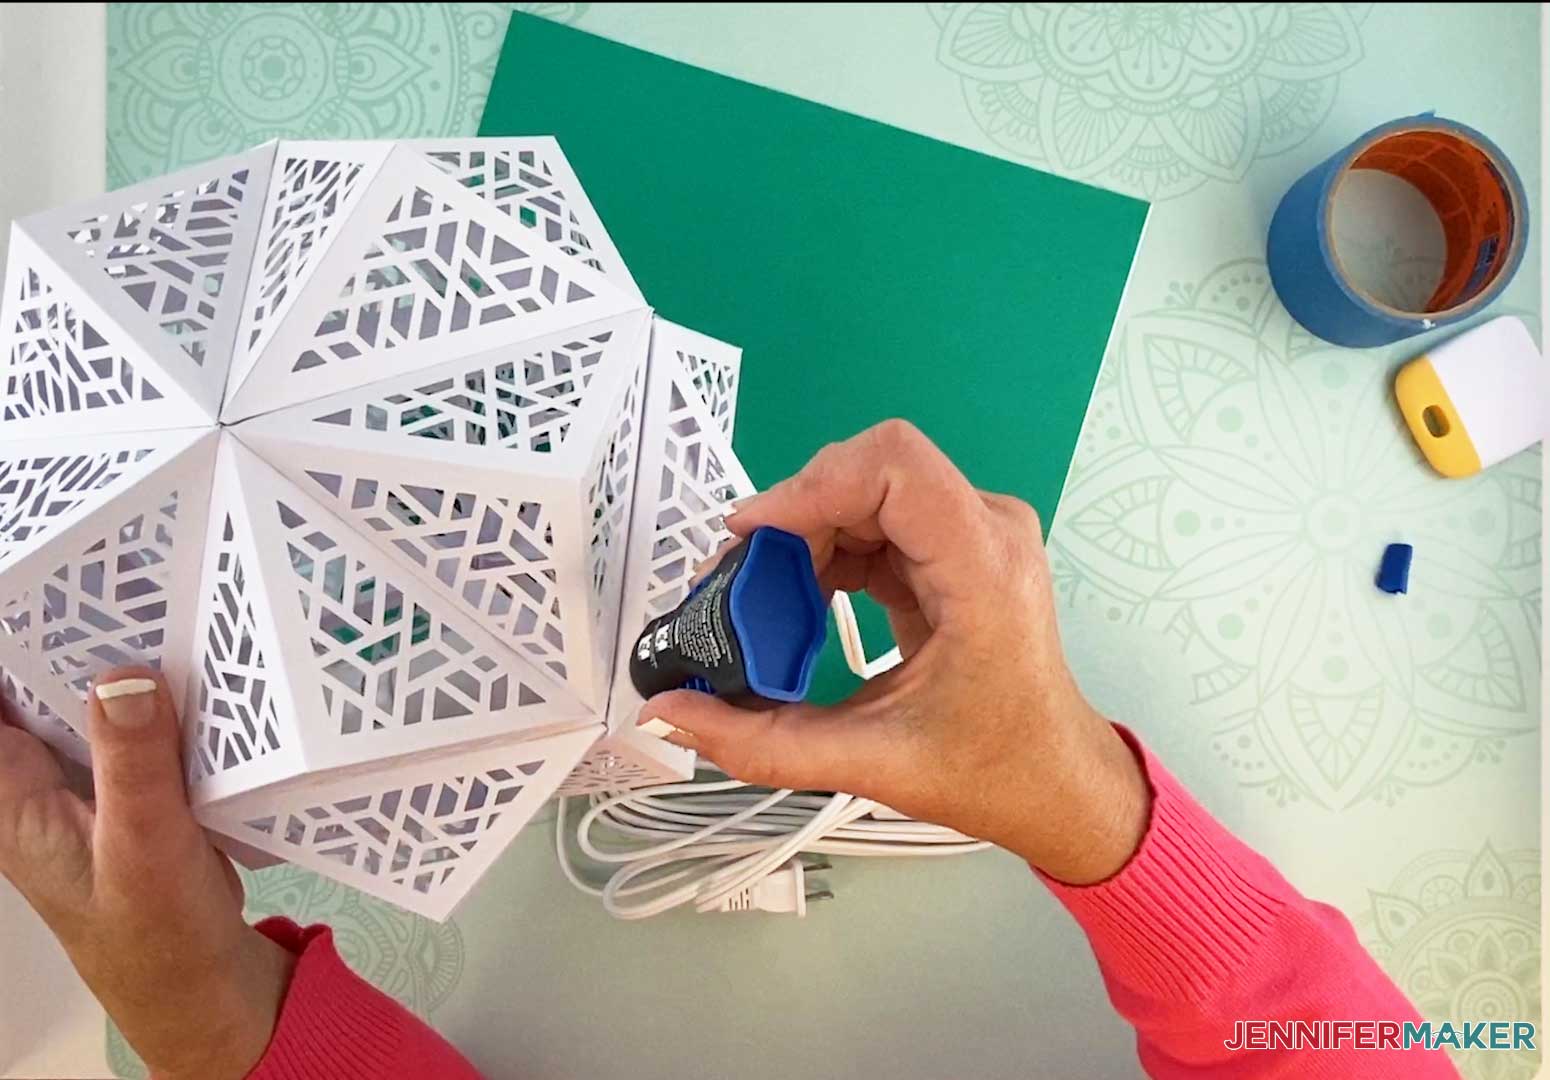
Connect these two pieces together.
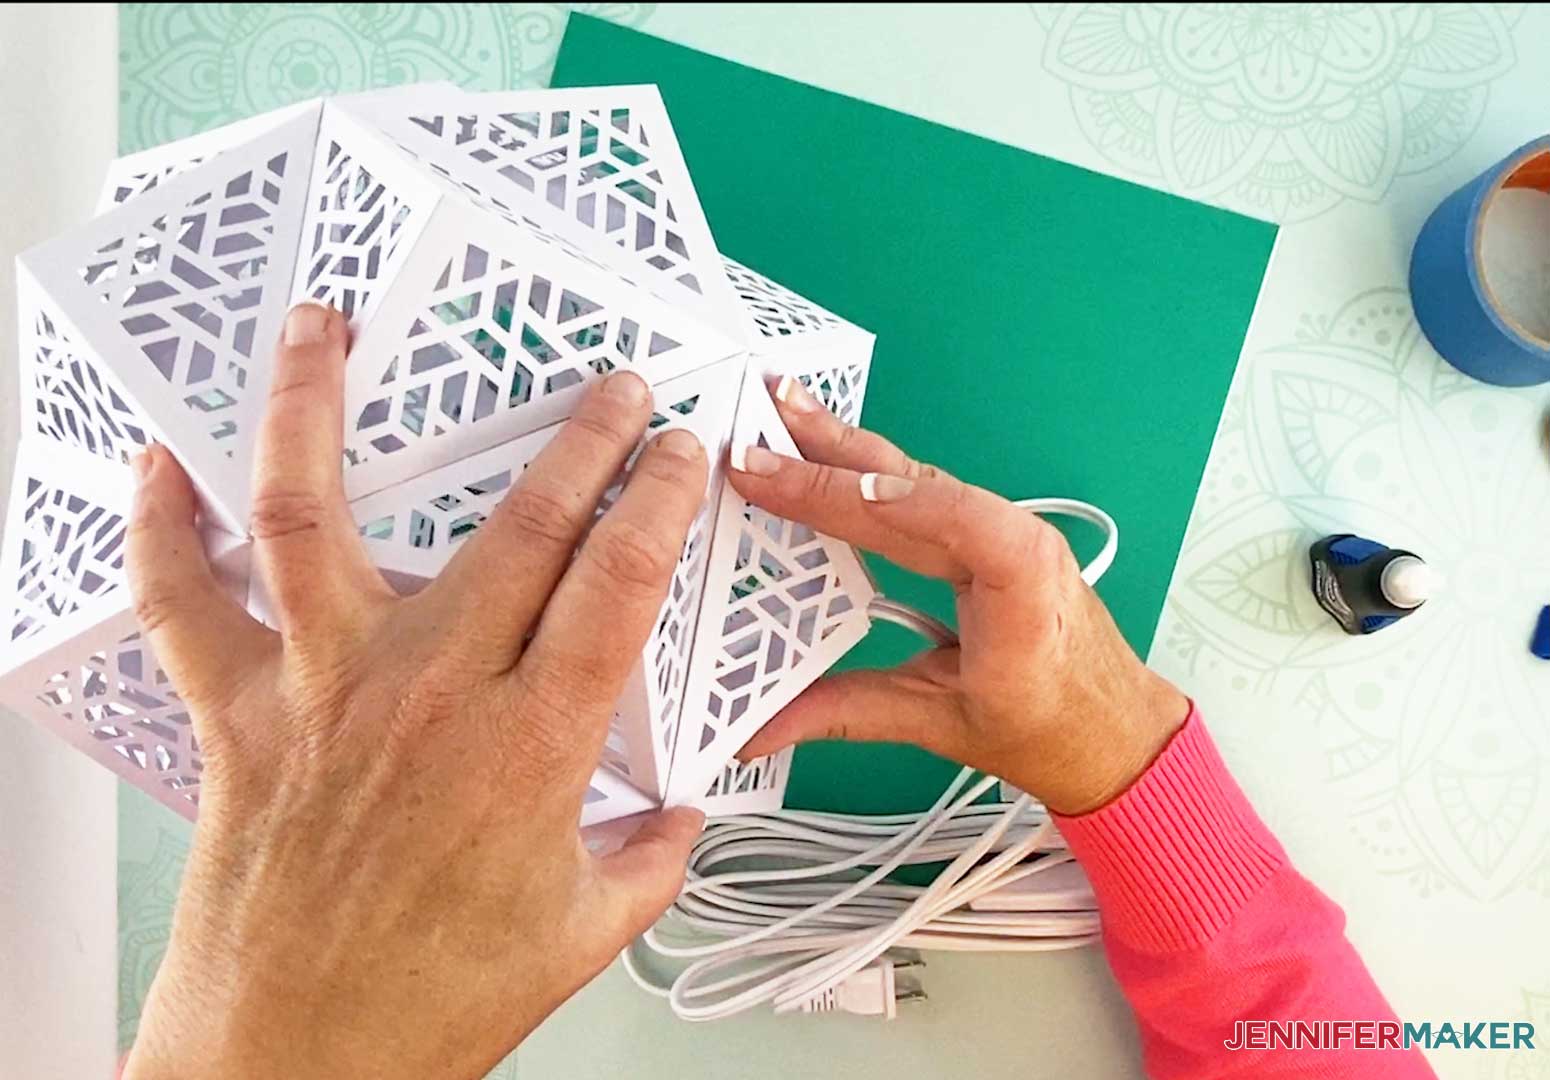
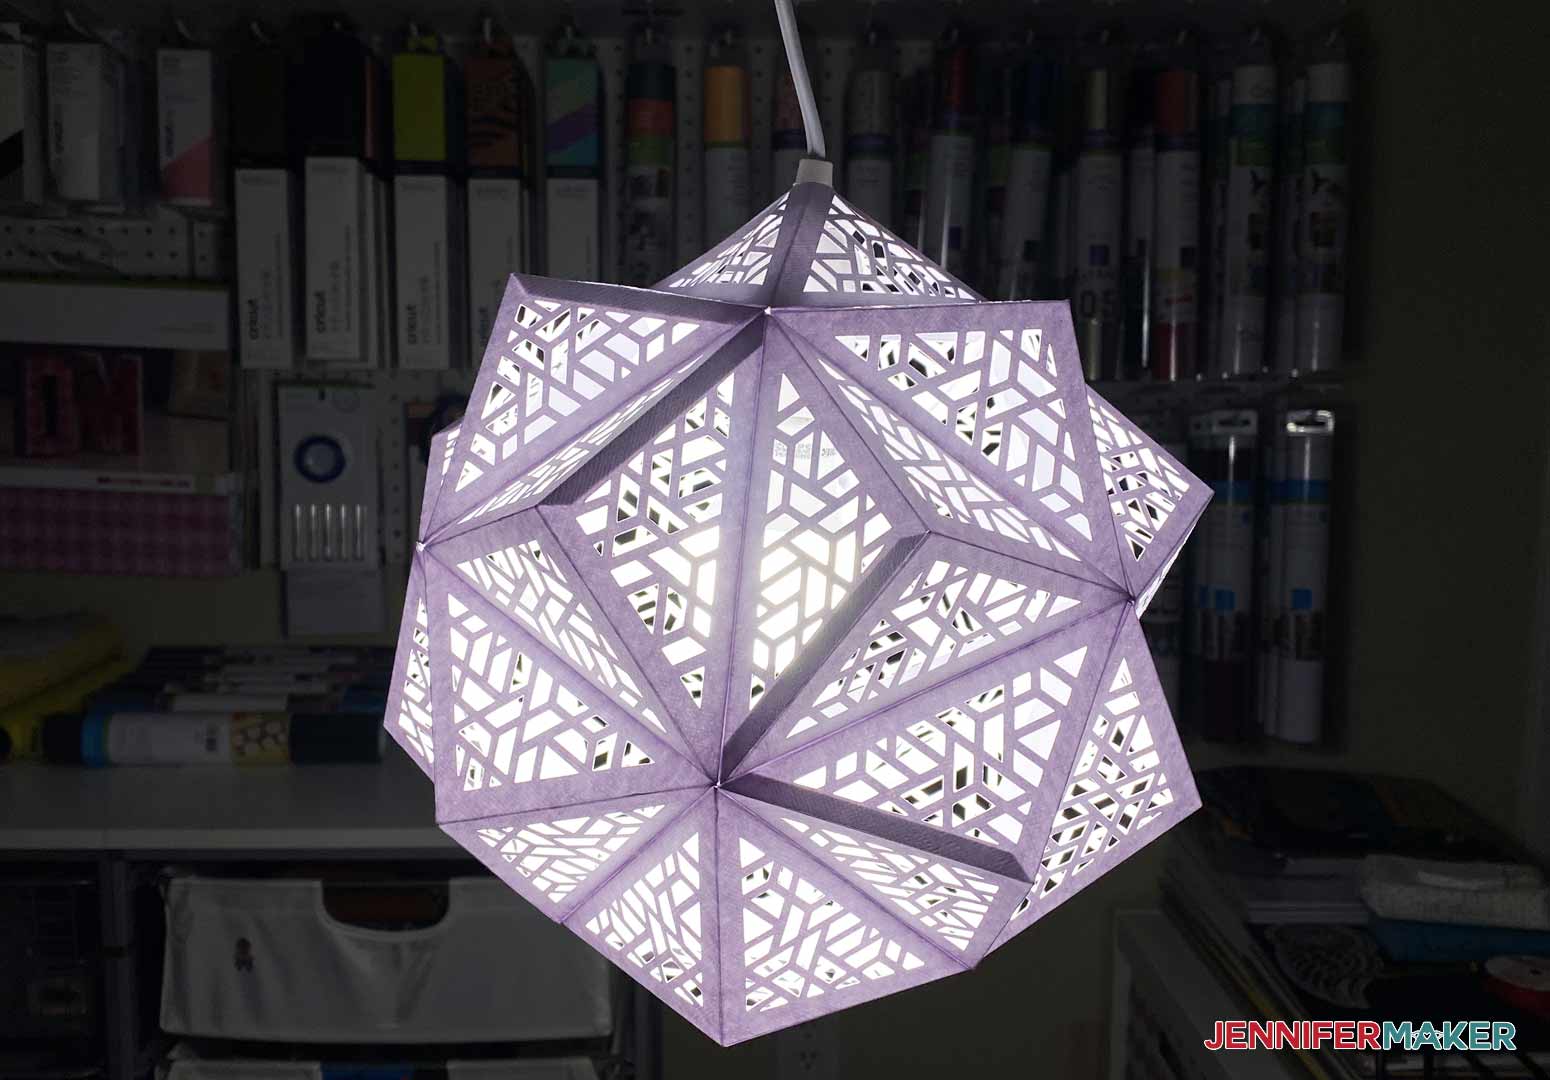
And this is what my finished DIY Hanging Lamp looks like.
STEP 4: Show it Off
You now have a beautiful hanging lamp to add to the decor of your home!
Notes
ACKNOWLEDGMENTS
Special thanks to the JenniferMaker Design Fairy Team, specifically Design Fairy Caitlin, for helping me design and assemble this awesome design.
Answers to Your Questions About Making a DIY Hanging Lamp
Q: What do you need to do if you change the lightbulb?
If you use the LED bulb we recommend for this project, it is rated for an average of 13 years using it 3 hours a day! By this point, many people would be ready to change out their lamp, but if you would still like to keep yours, just slice one of the tabs open at the top with a craft knife, reach in to replace the bulb, and tape it back up.
Q: Won’t the lightbulb get too hot?
It is important to use LED bulbs that will not generate heat!
Q: What kind of cardstock can I use?
You can use any quality cardstock. I personally like the holographic foil kraftboard the best for these.
Get my free SVG files to make DIY Hanging Lamp
Isn’t this lamp just stunning? And you don’t have to use this just as a lamp. It can be a pretty decorative sculpture on a table, or even a gift box! This is essentially a very pretty paper ball, so the possibilities are endless!I’d love to see your fun flour sack towels. Please share a photo in our Facebook group or tag me on social media with #jennifermaker.
See all of the projects, tutorials, and free designs in The Great Maker 25-Day Gift-Away Challenge!
Love,

Want to remember this? Save this Hanging Paper Lamp Tutorial to your favorite Pinterest Board!


It seems that you can’t change the lightbulb!???!!!
The winners names are not listed since December 16th. I am checking it several times a day. I screen shot it just incase. Thank you for all the craft projects. I am learning so much watching your videos. Thank you.
How small do you think these could be? I would love to make some tea light sized ones for gifts.
You can definitely adjust the size, but some people make them this size and just use a tealight instead. The one thing you need to consider is the smaller you make it, the more challenging it will be to assemble. But, this is a perfect project to experiment with!
could you use led fairy lights or led string lights in your paper lanterns ?
Absolutely! Those would look so pretty!
I needed this to hang over my desk! I looked at buying one and didn’t see anything I liked. And this was so much economical! Thank you Jennifer!
Awesome, Teresa!
What am I doing wrong? When I upload the hanging lantern design to Cricut design space the image is lumped together and very tiny. I’ve reviewed the tutorial to upload sag files but can’t figure out what I’m doing wrong. I am using an iPad that is completely updated so no worries there. Thanks for your help.
Hi Corene! Currently, any SVG will import into Design Space on an iOS system improperly. All you need to do is resize it to 11.5″x11.5″ and you will be good to go!
I’ve had a lot of problems with this svg. The score lines came out as basic cuts and some were missing entirely. Am I missing something when uploading to DS? Also, some pieces didn’t have cuts on them and were solid.
I just test the SVG again, KJ, and it seems to be fine. This is a large file – if you are working on an older computer with a little less memory, you may have problems. You may know to do all this, but try closing all of the other programs and apps you have open. Clear your computer cache, and then upload the file again, making sure you have grabbed the SVG and not one of the other file types. Hang in there – this is an awesome project once you get it completed!!! 😁