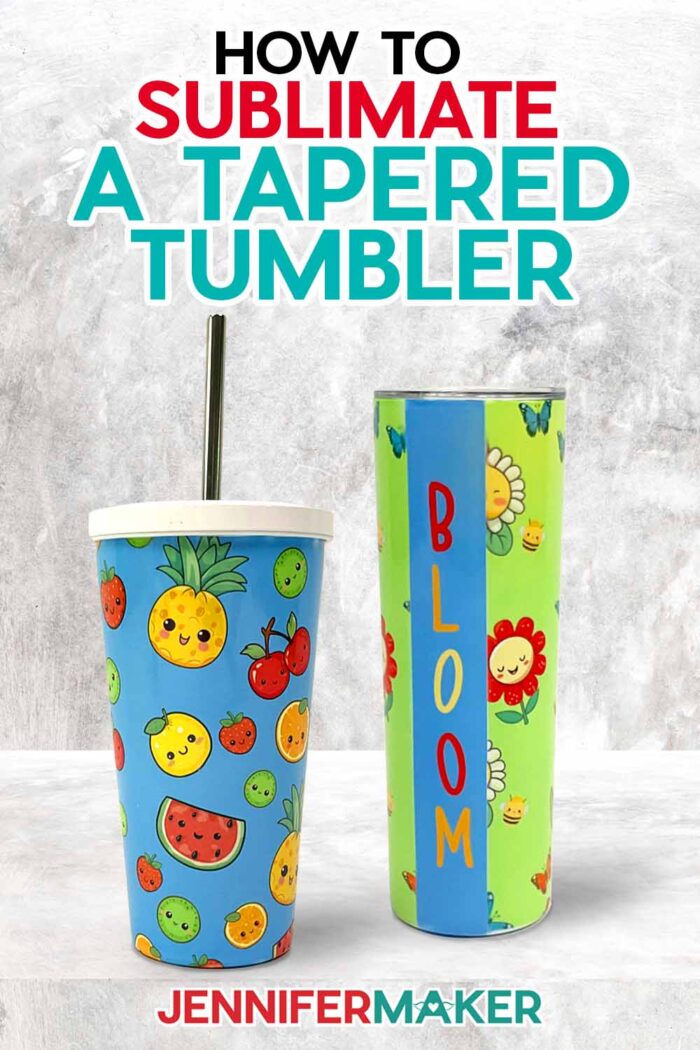
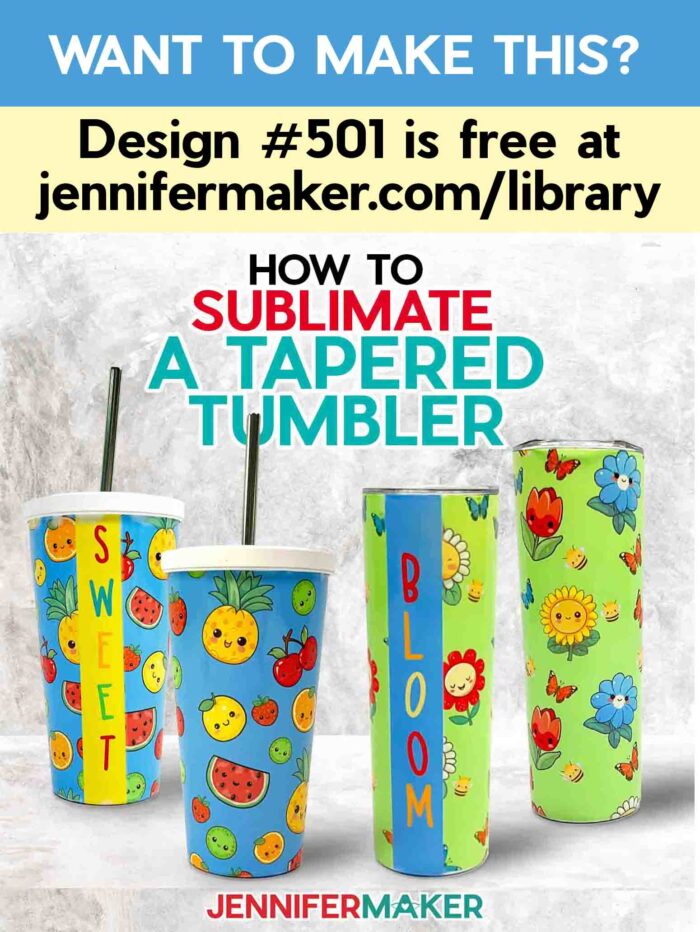
Learn how to sublimate tapered tumblers!
What’s better than a tasty cold beverage on a summer day? A yummy drink in a super cute cup! I recently showed you how to sublimate mugs, which are so fun to make for hot coffee and tea. This summer though, sublimated tumblers are all the rage, and they’re perfect for cold beverages to keep you cool at the pool, the beach, or during your summertime road trip. However, learning how to sublimate tapered tumblers can be tricky! Since the sides of the cup are slanted instead of straight up and down, how do you prepare and sublimate your tumbler so you get the best result?

First, we’ll prepare the image. I created some super cute Kawaii-inspired wrap designs just for this tutorial using an AI generator! We won’t use Cricut Design Space for this project, but we will be using Canva, Google Docs, an online template maker, and an online file converter. Don’t worry, all of these websites are free to use, and I’ll walk you through all the steps on how to use your tumbler’s measurements to create and print the perfect wrap to fit your cup. And I’ll share how to use my cute word ribbons to disguise the seams!
For this project you’ll need a tapered sublimation tumbler blank. Regular white or blank tumblers won’t work — look instead for tumblers labeled for sublimation. They come in a variety of sizes, but for this tutorial I’ll be using 19 ounce tumblers with straws that I purchased from Michaels. They are stainless steel tumblers that are coated with material that can be sublimated. I did several tests on different tapered tumblers, and I liked this brand the best because it yielded the most consistent results. I have some alternatives in the materials list, though!
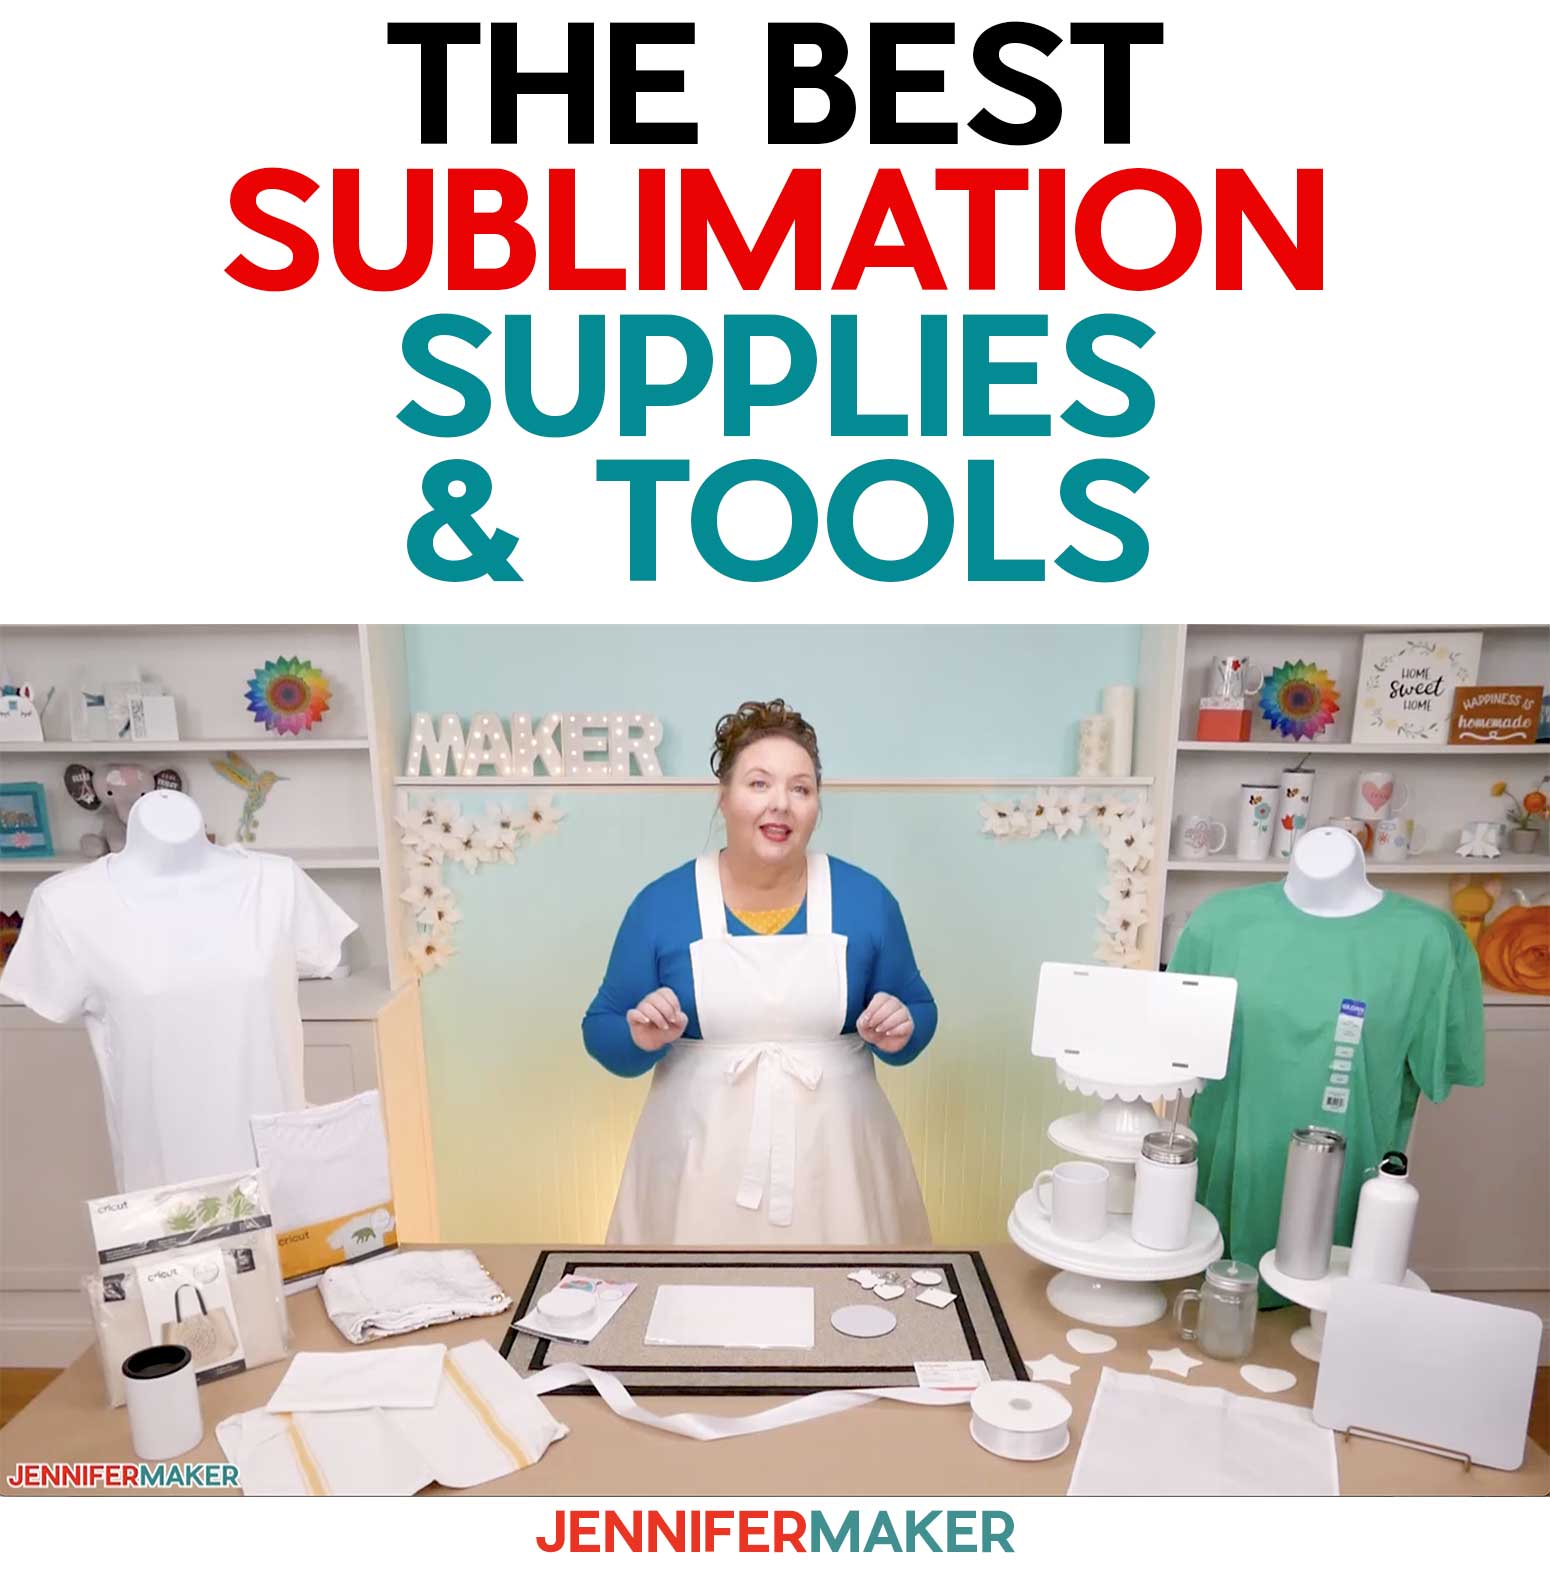
You’ll also need a few other sublimation supplies, like a craft-purposed convection oven or air fryer, 8.5″ x 14″ sublimation transfer paper, a lint roller, and some other supplies you can find in my materials list if you scroll down. Don’t forget a fan for ventilation!
When we’re ready to begin the sublimation process, I’ll show you three different ways to prepare your tumbler using a shrink wrap sleeve, silicone bands, or a silicone wrap.
After this tutorial, you’ll know all about how to sublimate tapered tumblers and you can create them for yourself, your family, and friends — or even to sell!
Ready to learn how to decorate tapered sublimation tumblers? This post contains some affiliate links for your convenience (which means if you make a purchase after clicking a link I will earn a small commission but it won’t cost you a penny more)! Read my full disclosure policy.
Materials And Tools to Make Tapered Sublimation Tumblers
- 19 oz. Make Market Tapered Sublimation Tumbler Blank -OR-
- 16 oz White Glitter Tapered Tumblers – Note that these are a different size and you will need to measure them and adjust the template details.
- 8.5” x 14” Sublimation Printer Paper – I used A-SUB brand
- Sublimation Printer – I used a converted Epson EcoTank ET-2800 Inkjet Printer
- Sublimation Ink – I used Hiipoo ink
- Craft-Purposed Convection Oven – I formerly used an Oster Convection Oven (see my safety update below) -AND- Oven Thermometer
- Cricut EasyPress Mat 12″ x 12″
- Silicone Tumbler Wrap -OR- Silicone Bands for Sublimation -OR-
Shrink Wrap for Sublimation Tumblers - Fan for Ventilation
- White Butcher Paper
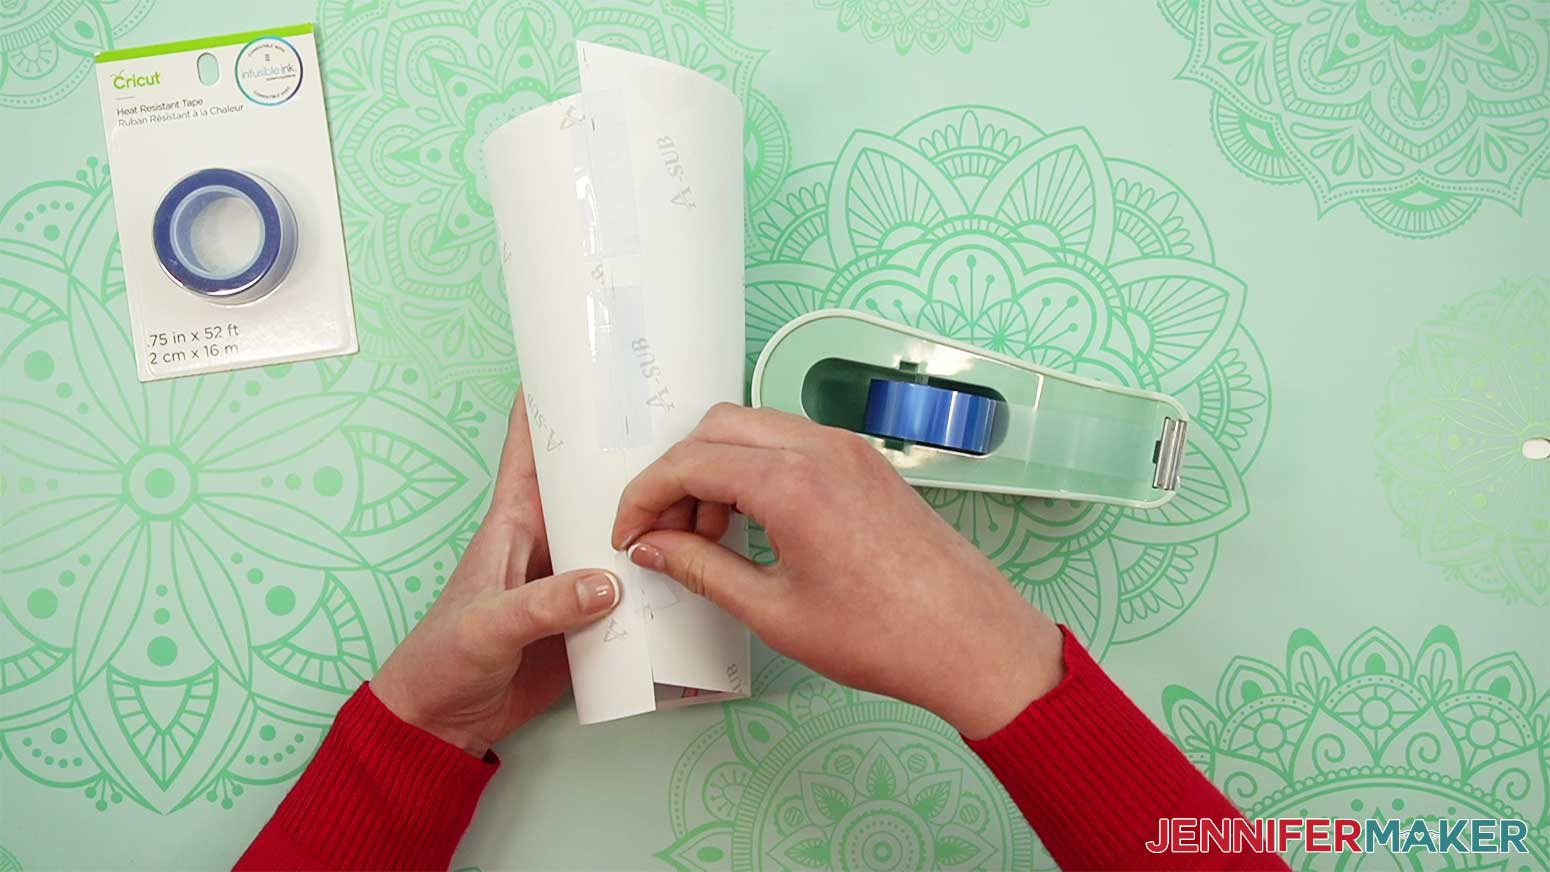
- Heat Resistant Tape
- Heat Resistant Gloves
- Measuring Tape
- Paper Trimmer
- Lint-Free Cloth -AND- Isopropyl Alcohol for cleaning the tumbler
- A way to make a template – I used onlinelabels.com -AND-
- A PDF to PNG convertor – I used image.online-convert -AND-
- Canva (Free Version) -AND-
- Google Account
- Pencil
- Design #501 – My free designs (available in my free resource library—get the password at the bottom of this post)
How to Sublimate Tapered Tumblers

How to Sublimate Tapered Tumblers
Learn how to sublimate a tapered tumbler with custom designs using a template, Canva, and a convection oven.
Materials
Tools
- Sublimation Printer (I used a converted Epson EcoTank ET-4700 Inkjet Printer)
- Sublimation Ink (I used Hiipoo ink)
- Craft-Purposed Convection Oven
- Cricut EasyPress Mat 12" x 12"
- Silicone Tumbler Wrap -OR-
- Silicone Bands for Sublimation -OR-
- Shrink Wrap for Sublimation Tumblers
- Fan for Ventilation
- Heat Resistant Tape
- Heat Resistant Gloves
- Oven Thermometer
- Measuring Tape
- Paper Trimmer
- Lint-Free Cloth
- Isopropyl Alcohol
- A way to make a template - I used this website -AND-
- A PDF to PNG convertor - I used this website -AND-
- Canva (Free Version) -AND-
- Google Account
- Pencil
Instructions
STEP 1: DOWNLOAD MY FREE DESIGN FILES
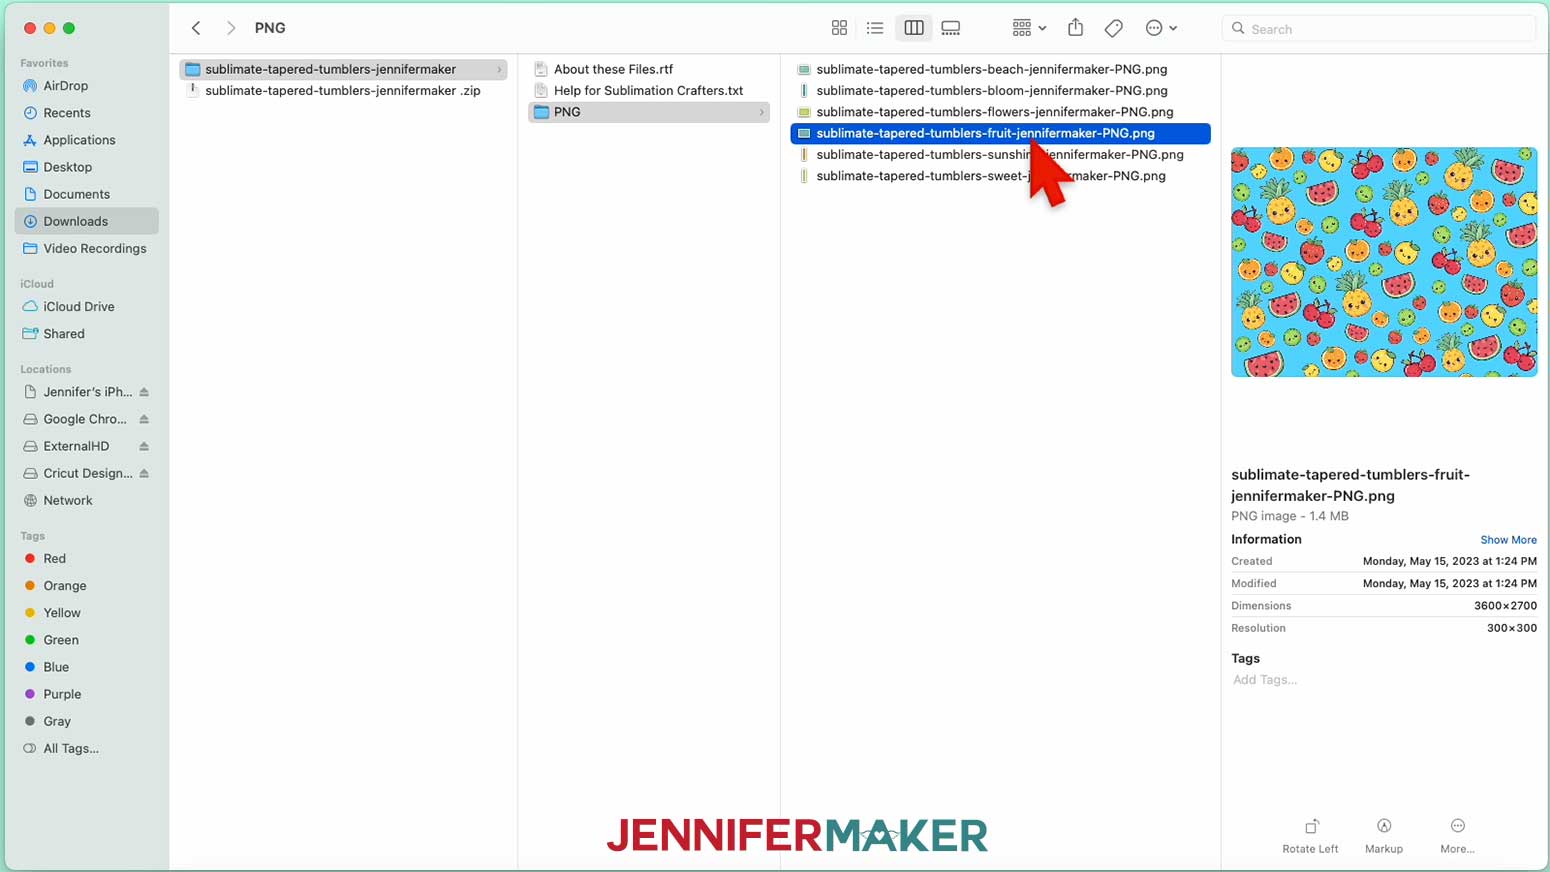
First, download the PNG files from my free resource library. It's Design #501.
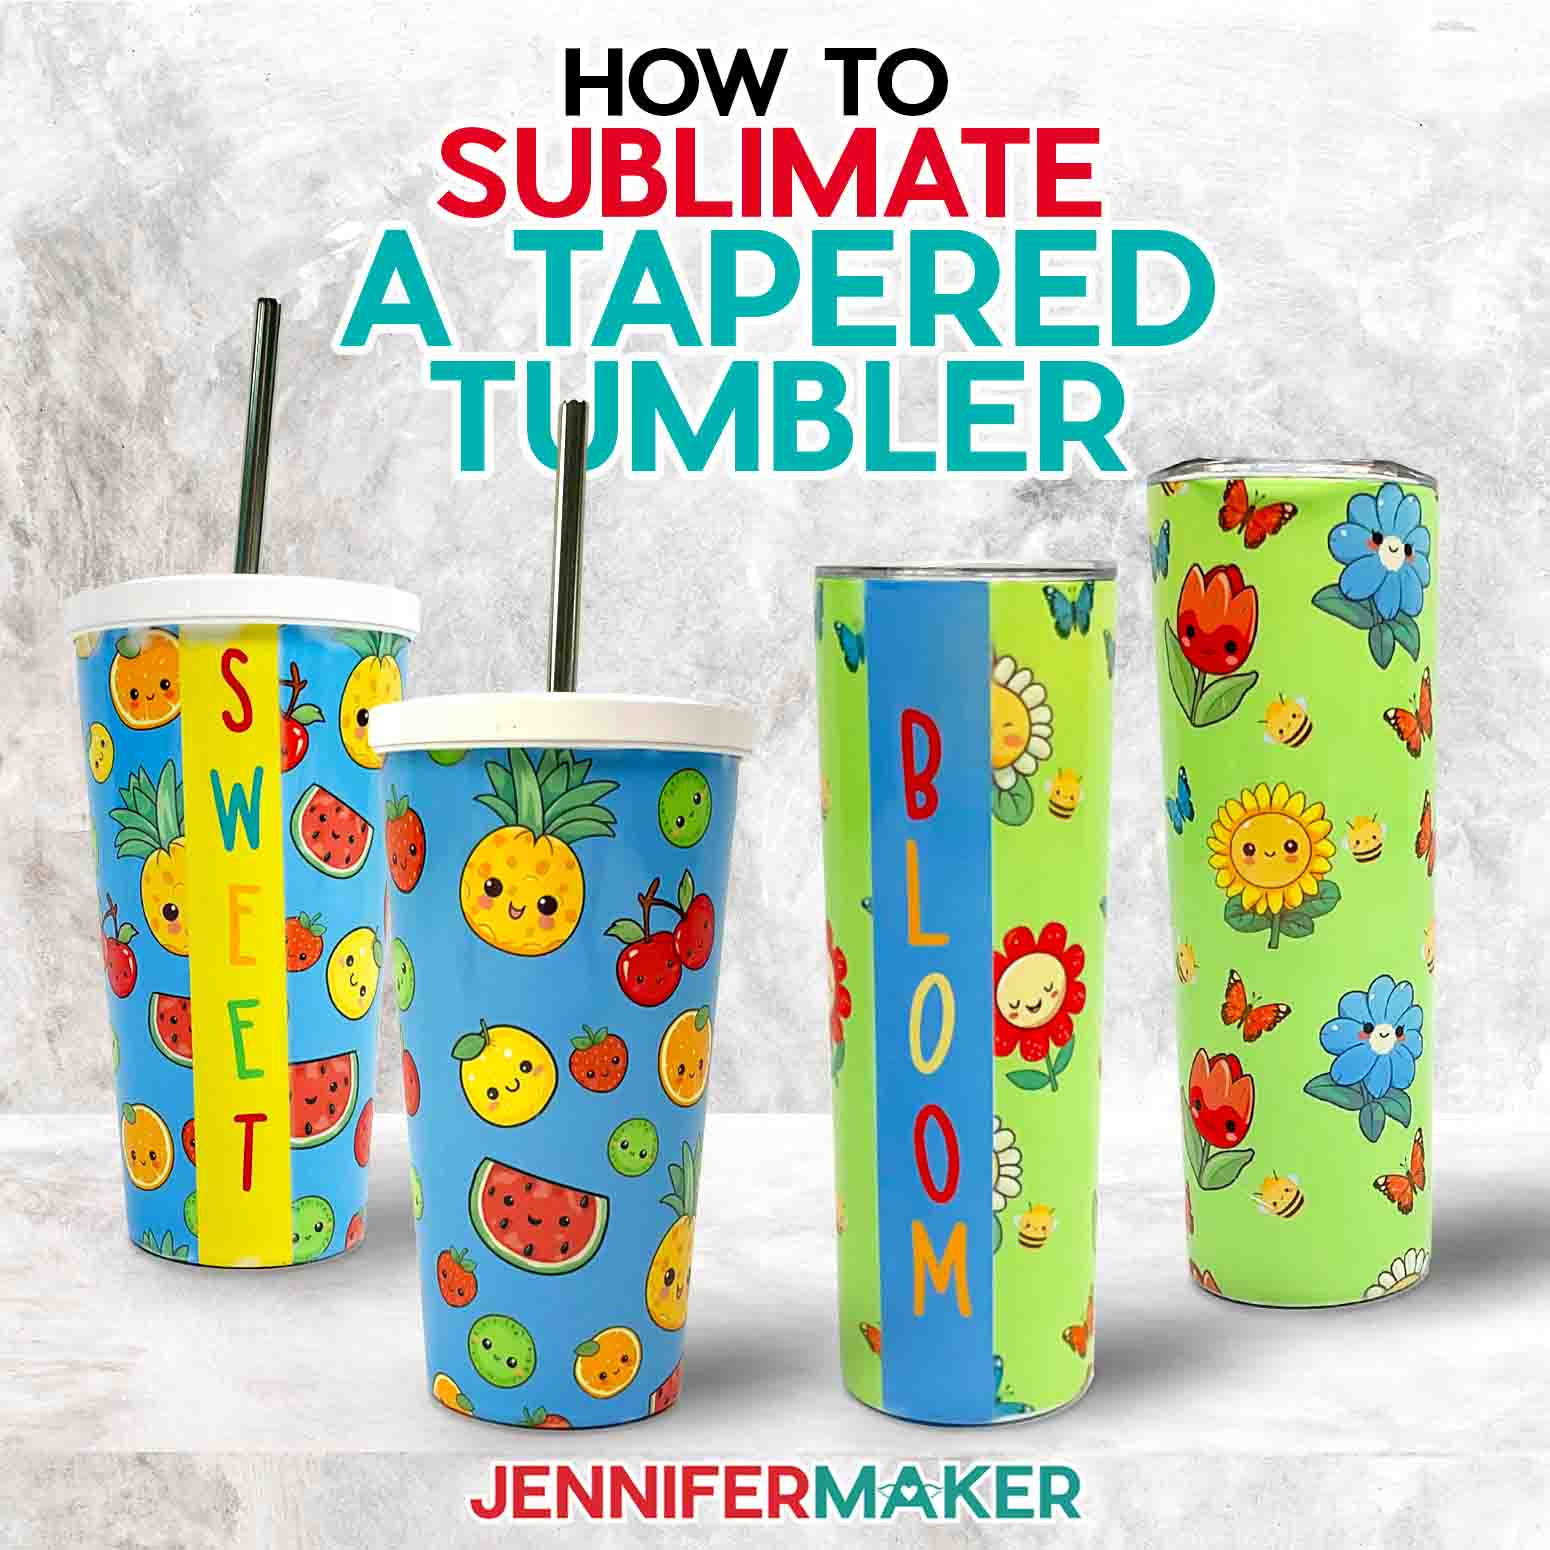
I have included three adorable Kawaii-themed backgrounds for tumblers.
A beach theme
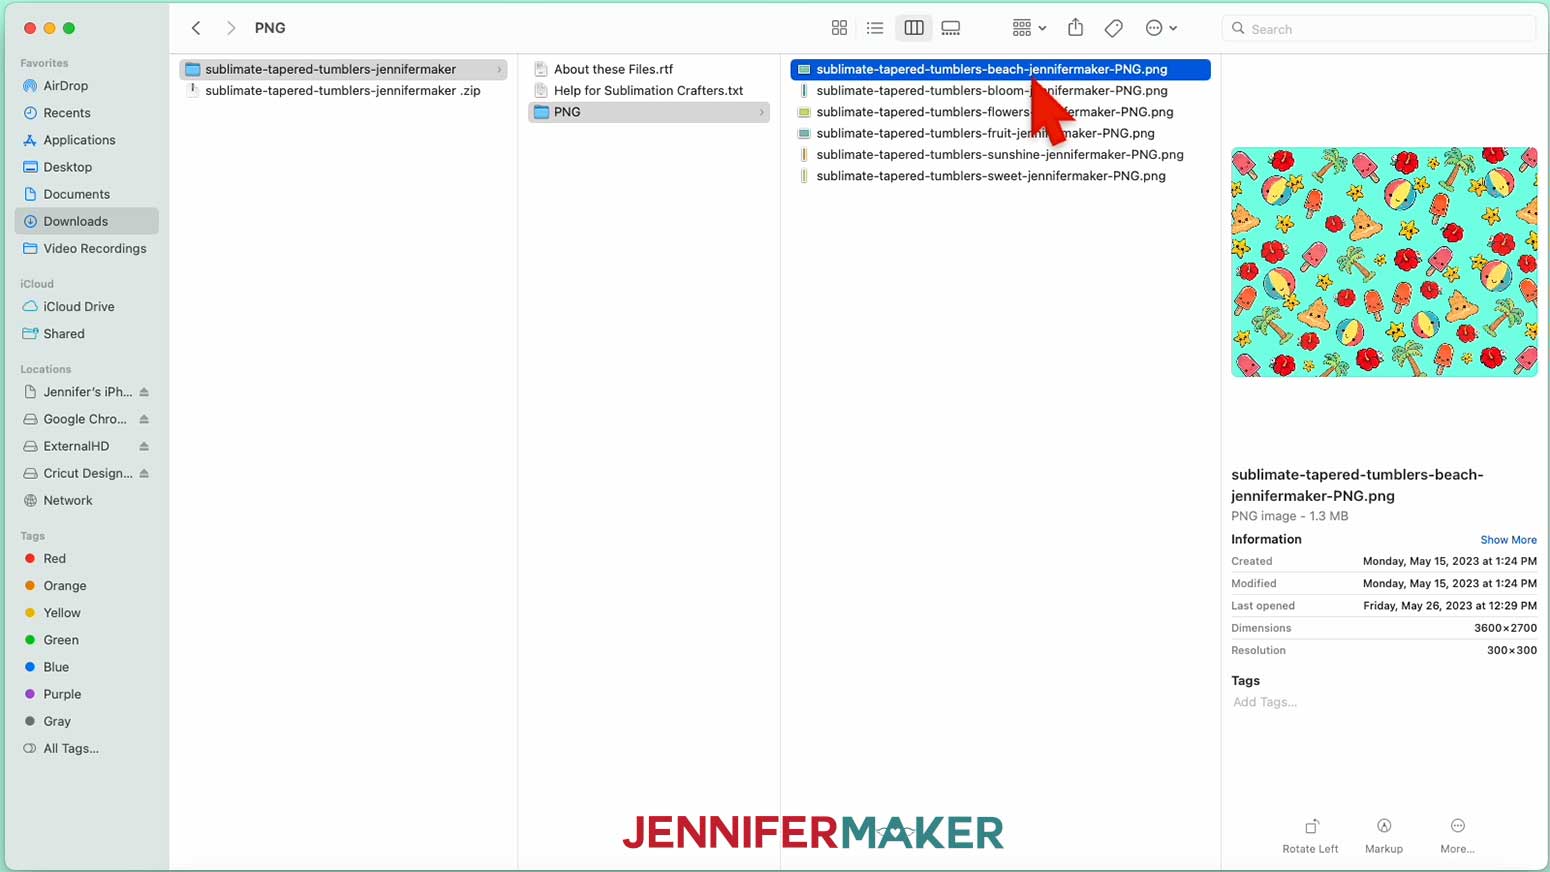
A tropical fruits theme
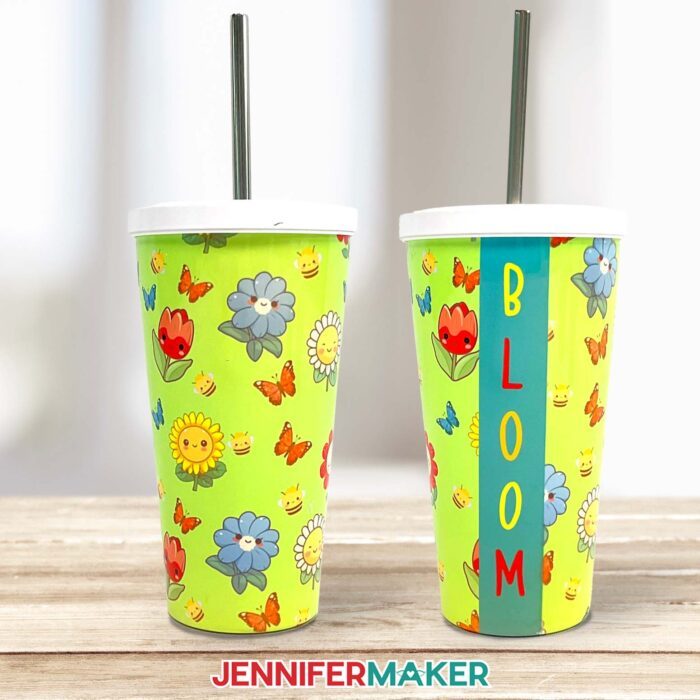
And a flowers and bees theme
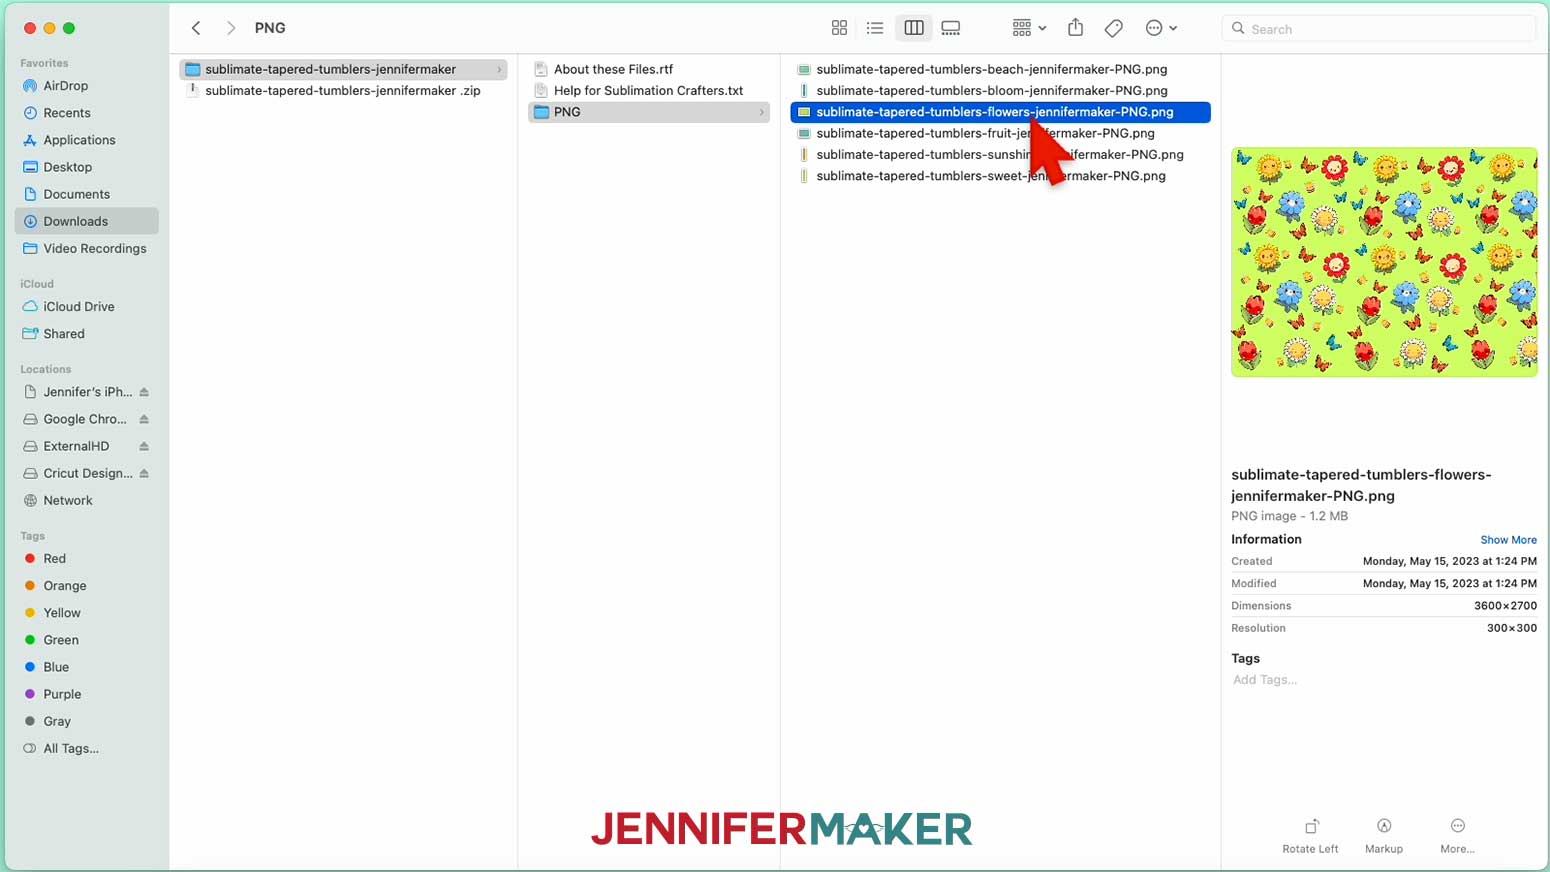
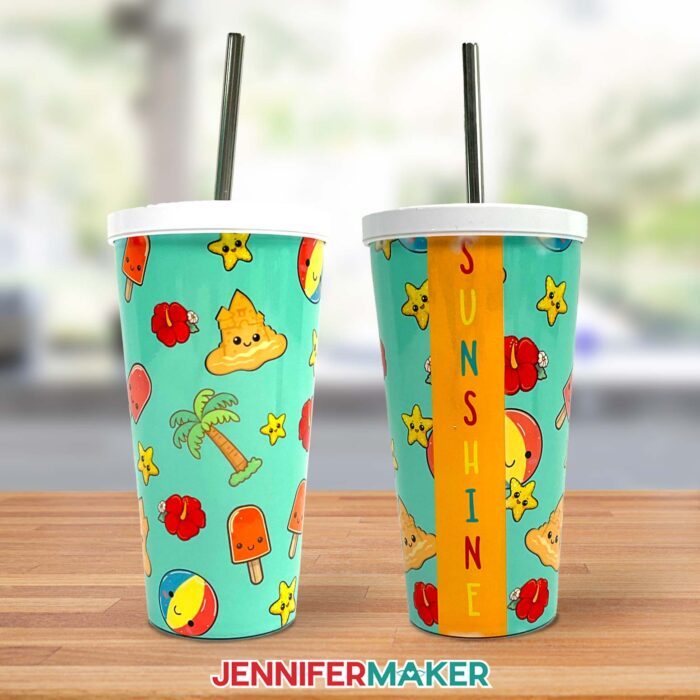
I've also included accent bands for where the edges meet. They say "Sweet," "Bloom," and "Sunshine."

We'll also be using a free Canva account, a free template maker website (email required), a free file conversion website, and Google Docs to print.
STEP 2: MEASURE YOUR TUMBLER AND CREATE A TEMPLATE
Begin by opening the free template maker website.
Using a flexible measuring tape, measure the top and bottom circumference of the tumbler and its height.
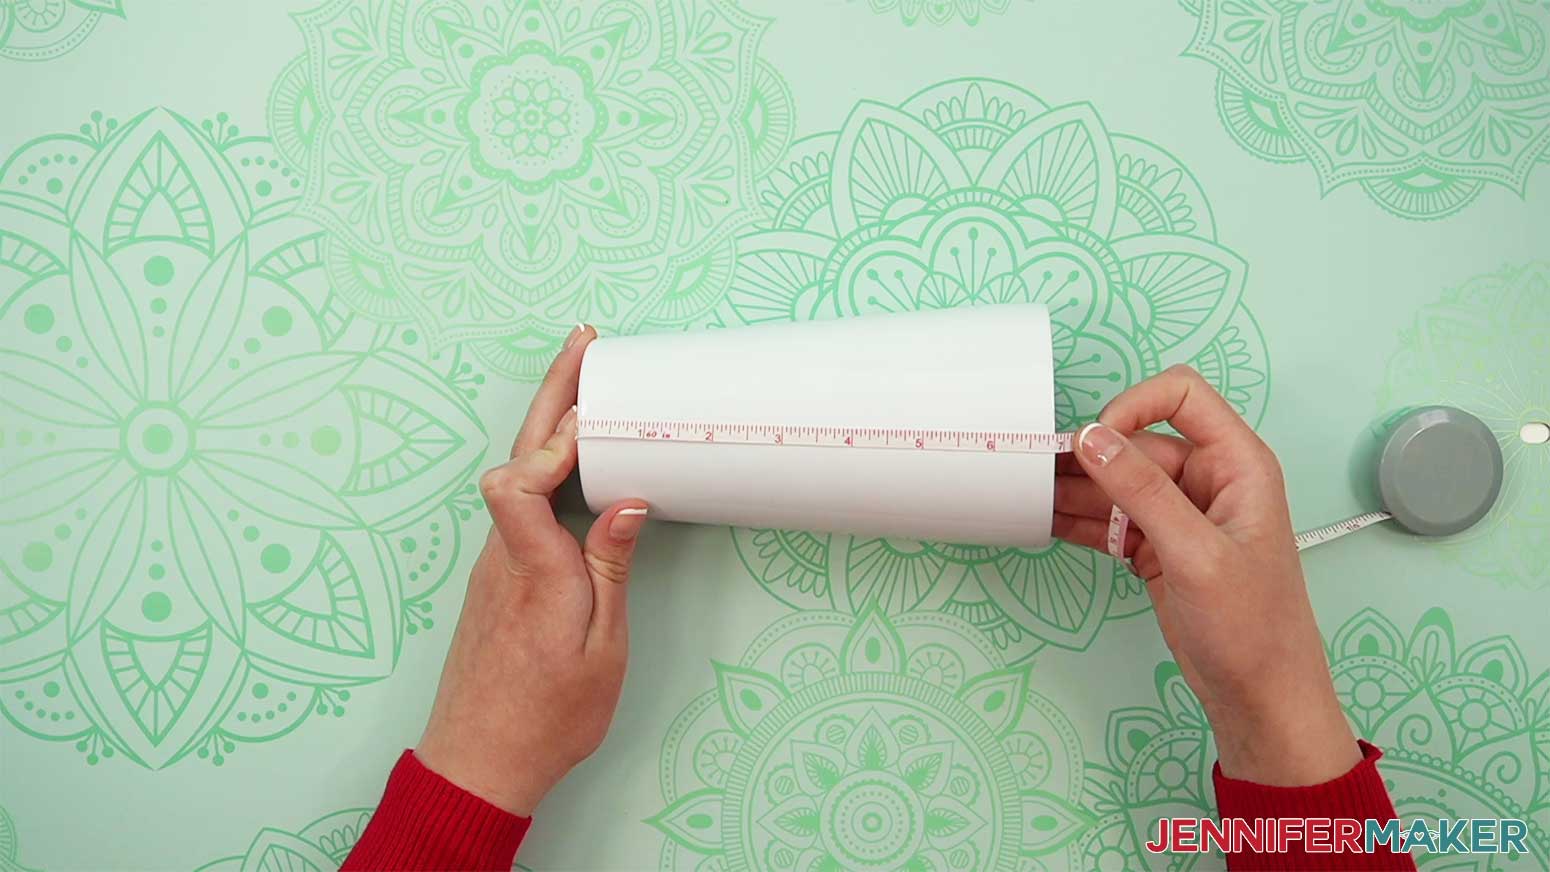
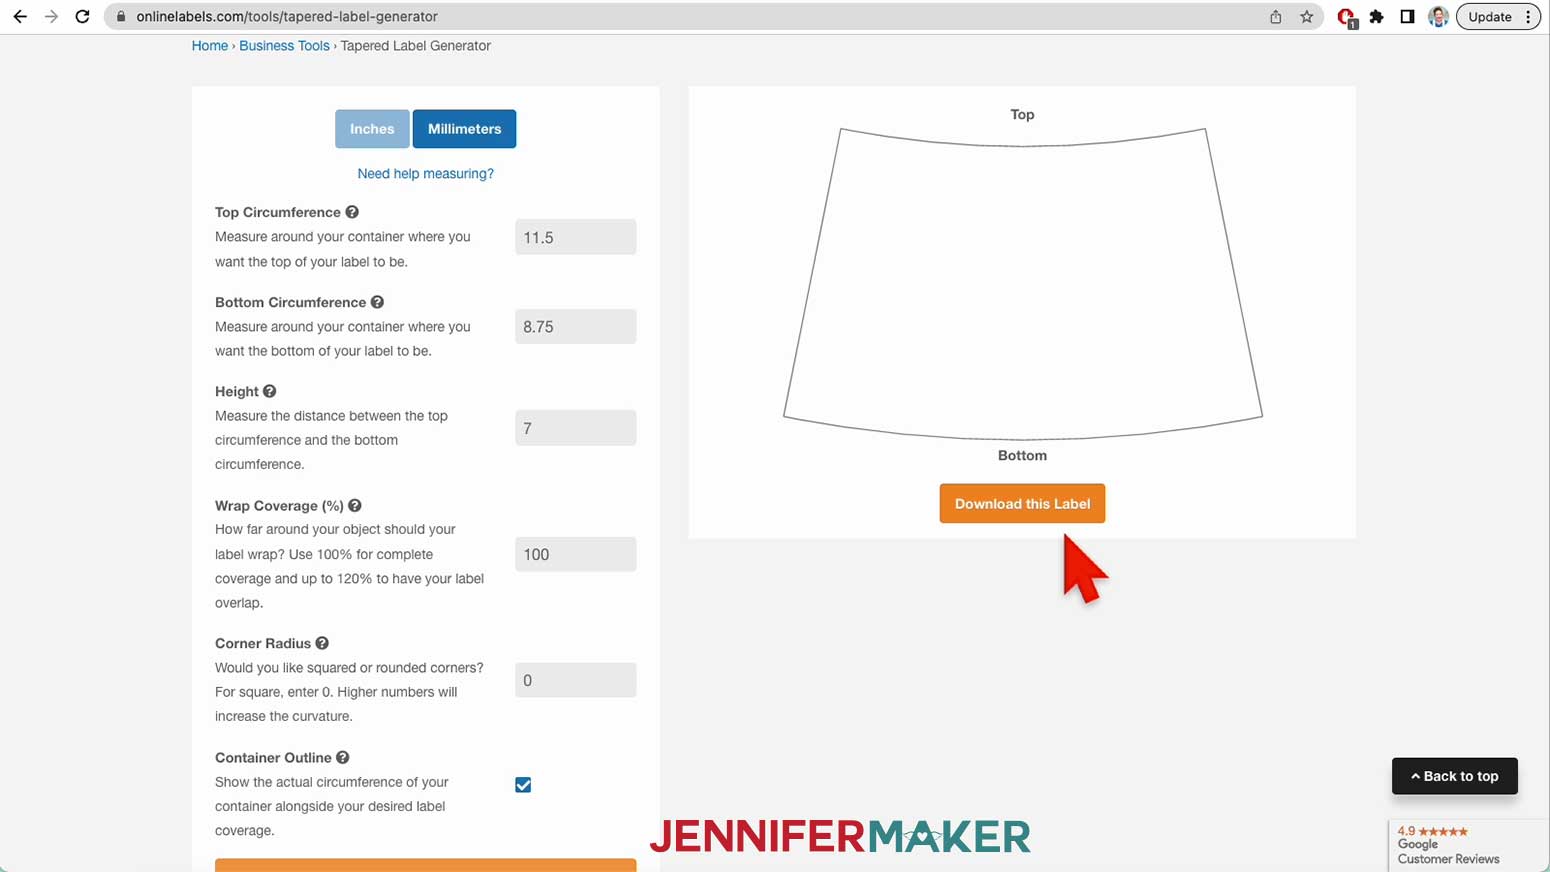
Fill in the Top Circumference, Bottom Circumference, and Height fields with those measurements. My tapered tumbler measures 11.5" at the top, 8.75" at the bottom, and 7" tall.
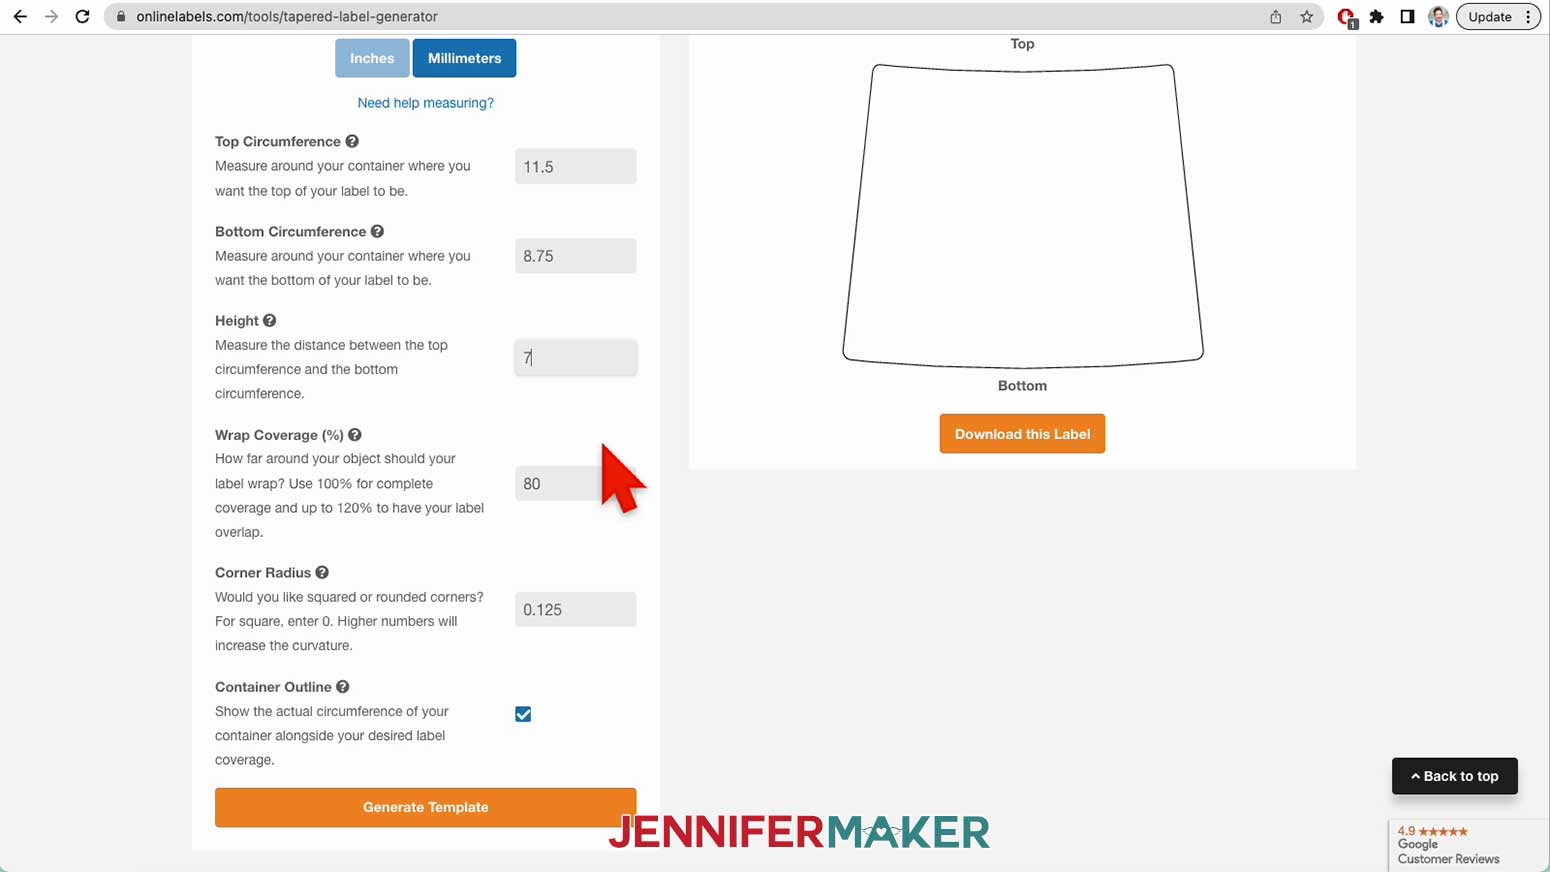
The next selection is Wrap Coverage. I want the wrap to cover my tumbler 100%, so I'll enter "100" in that field. I want the corners to be squared, so I will enter "0" in the Corner Radius field, and I'll leave the Container Outline box checked.

I'll press "Generate Template" to preview my wrap. If everything looks good, click the orange "Download This Label" button. The website will ask for your email address. Enter your address and click the "Sign Up" button in order to begin the free download.
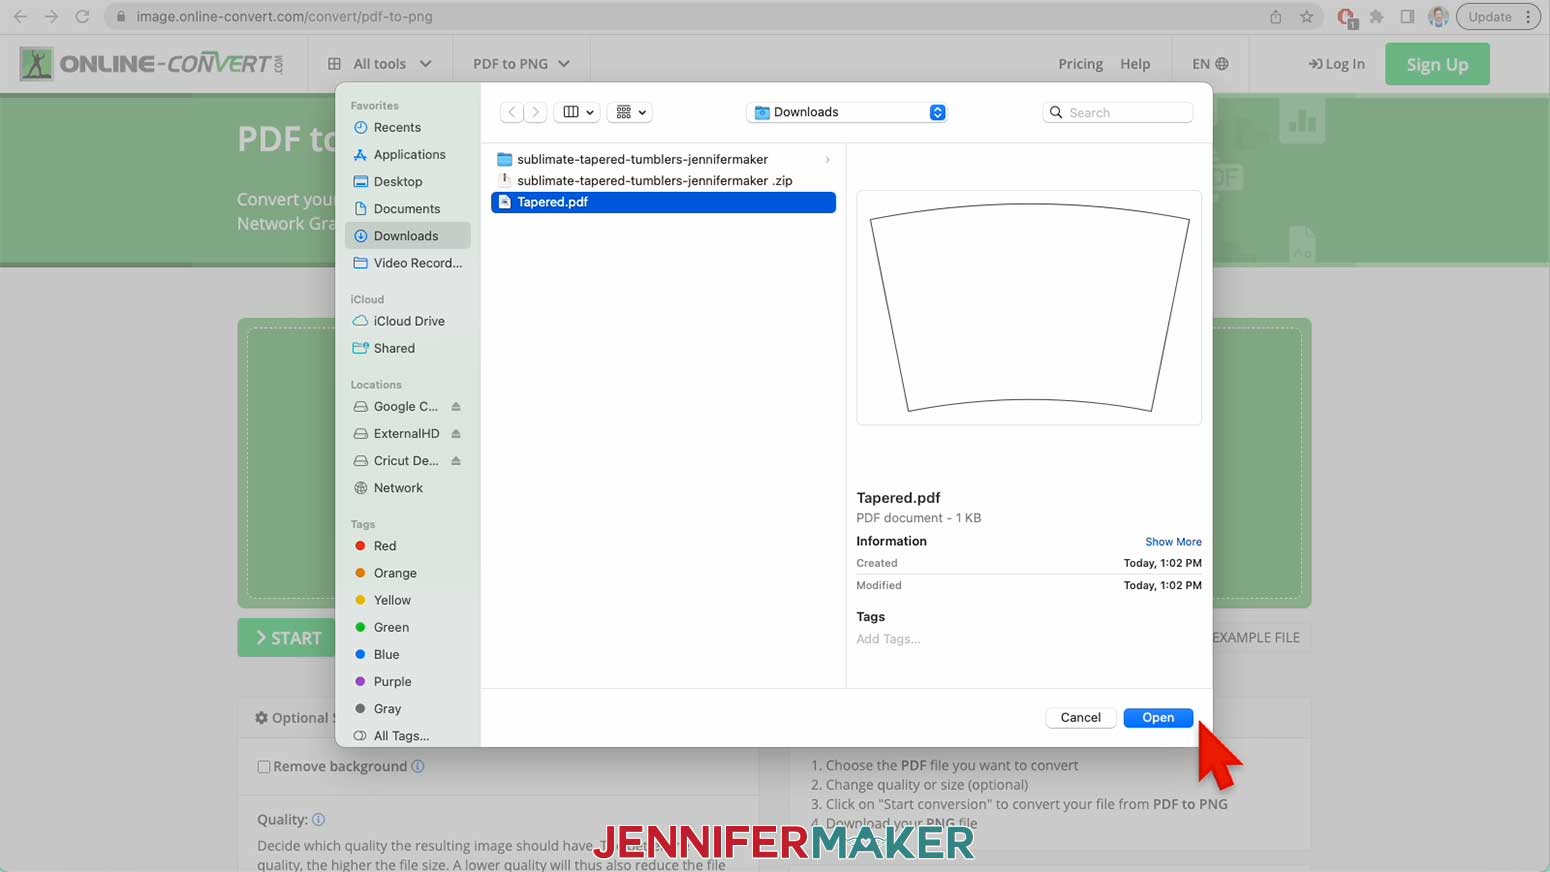
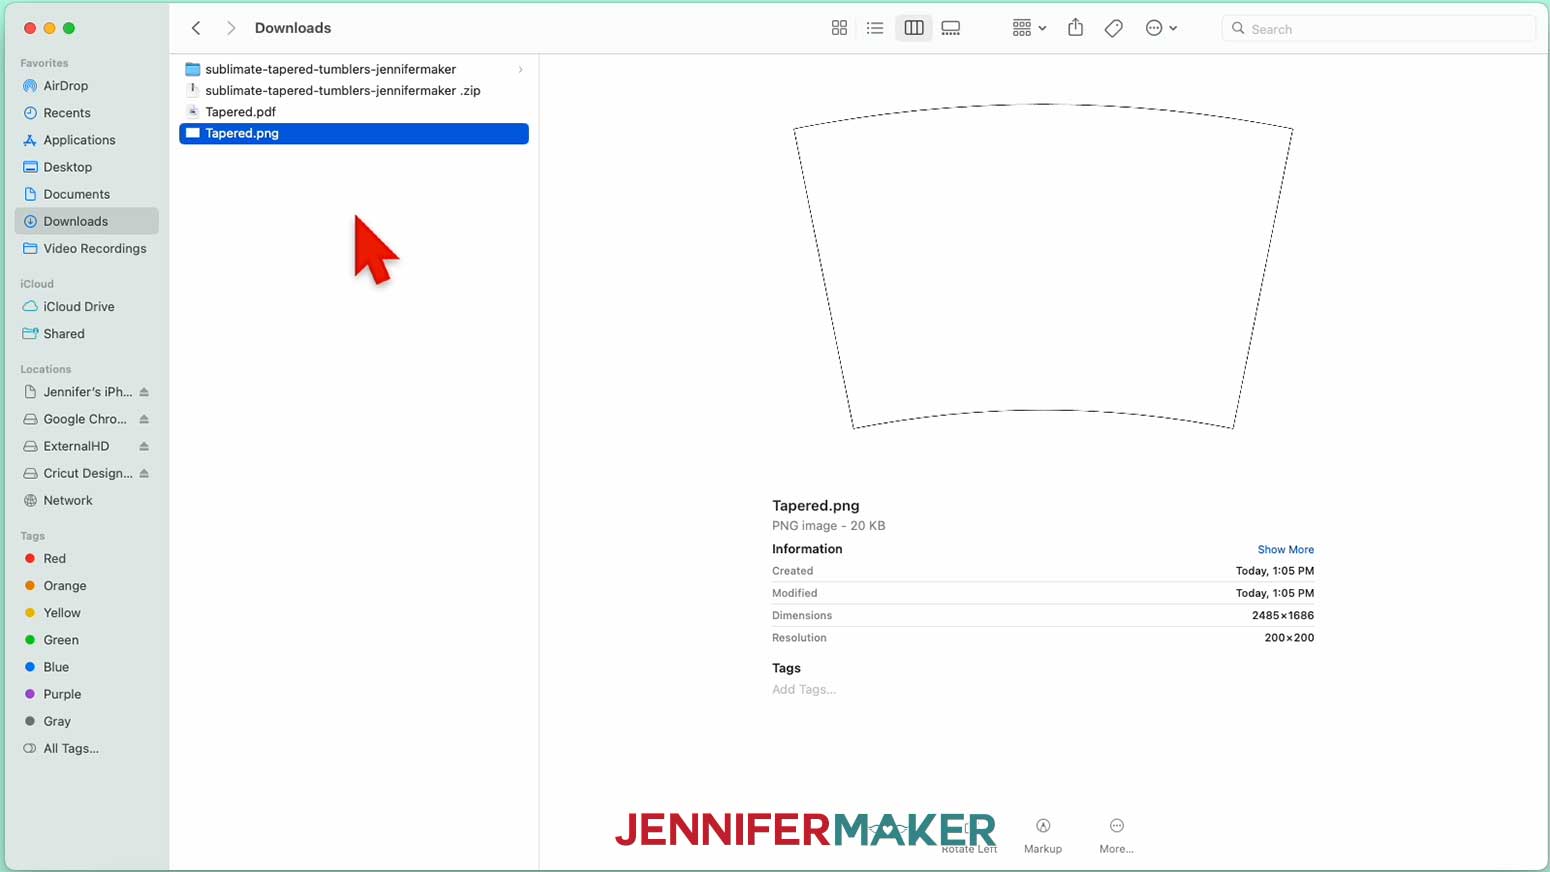
In order to upload this into Canva, we need to convert the template into a PNG file. I will use this conversion website to convert the PDF to a PNG and remove the background.
On the conversion website, click on the "Choose File" button in the large green upload rectangle on the screen and select "From Device." I'll select the template PDF I saved and click "Open."
Just below that, in the Optional Settings, click to make a checkmark next to "Remove Background."
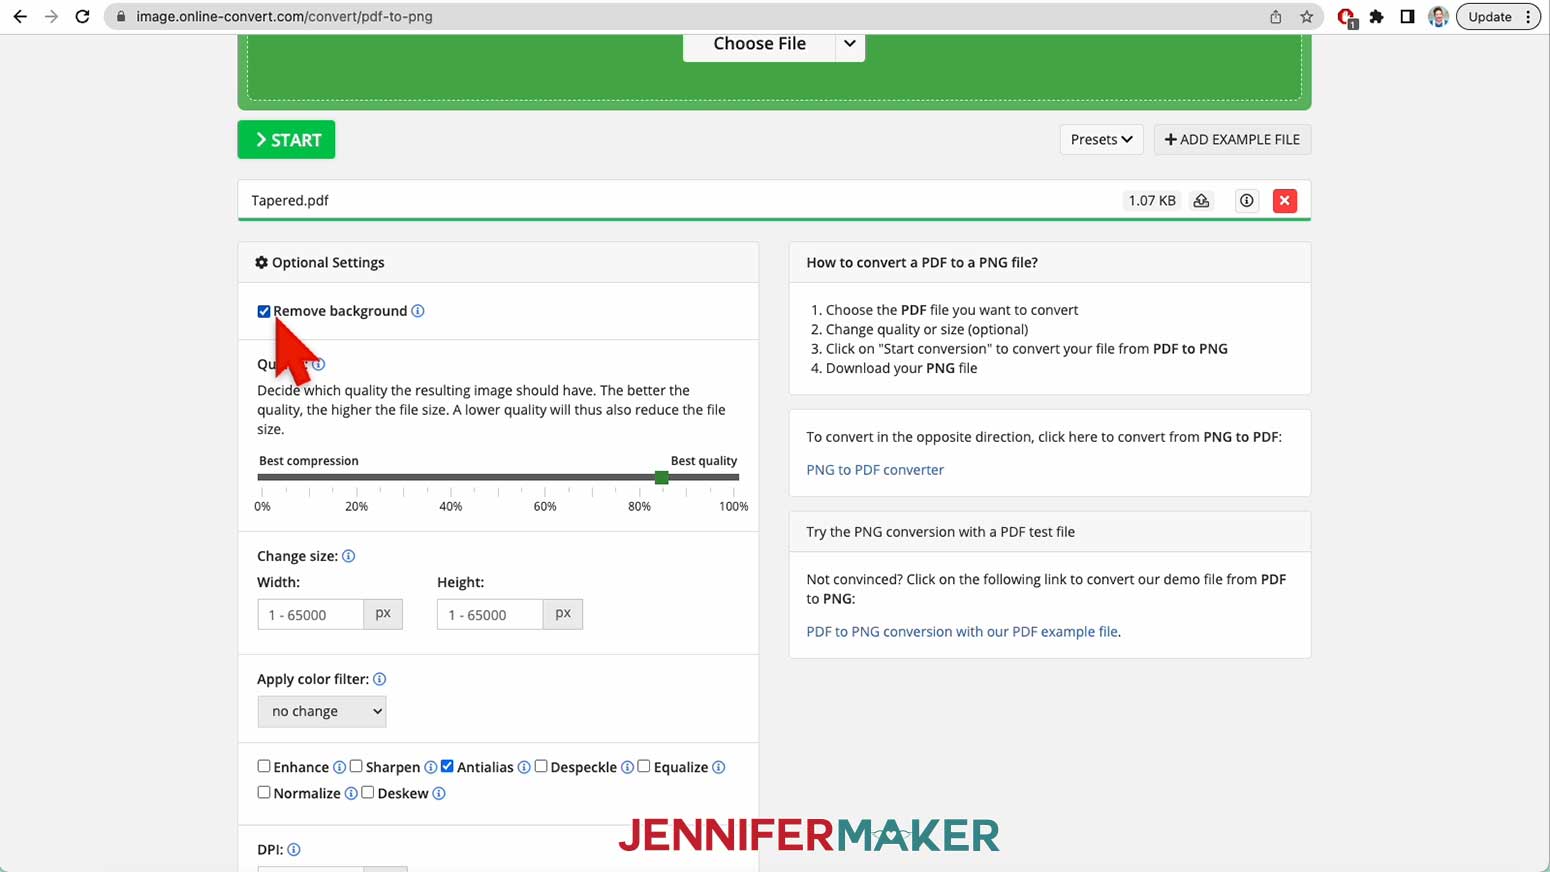
Scroll past the rest of the options, leaving them on their default settings, and click the green "Start" button at the very bottom. After a few moments, the webpage will refresh. The file will download automatically. If it doesn't, just click the green "Download" button.

Now that my template has been downloaded, I'm ready to open my file in Canva!
STEP 3: UPLOAD YOUR TEMPLATE AND DESIGN FILES TO CANVA
I am using the free version of Canva for this project.
First I'll sign into my account. If you don't have an account, don't worry. It's free to sign up.
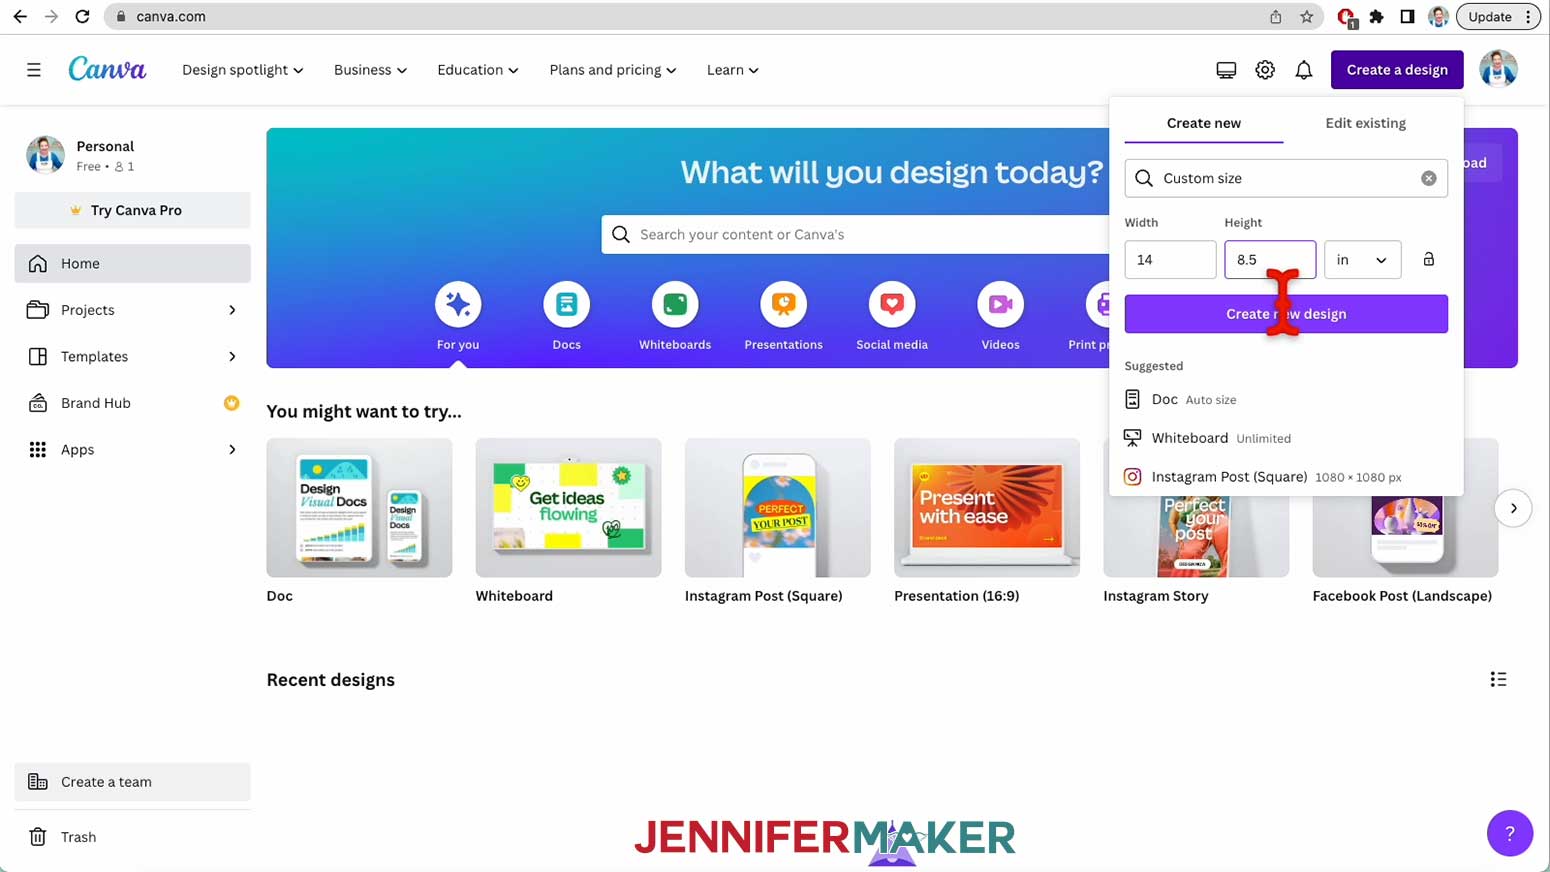
On the Home screen, choose "Custom Size" in the upper right corner of the screen. Use the small drop-down to change your units from "px" to "in." Then enter "14" for the width and "8.5" for the height and click "Create new design."
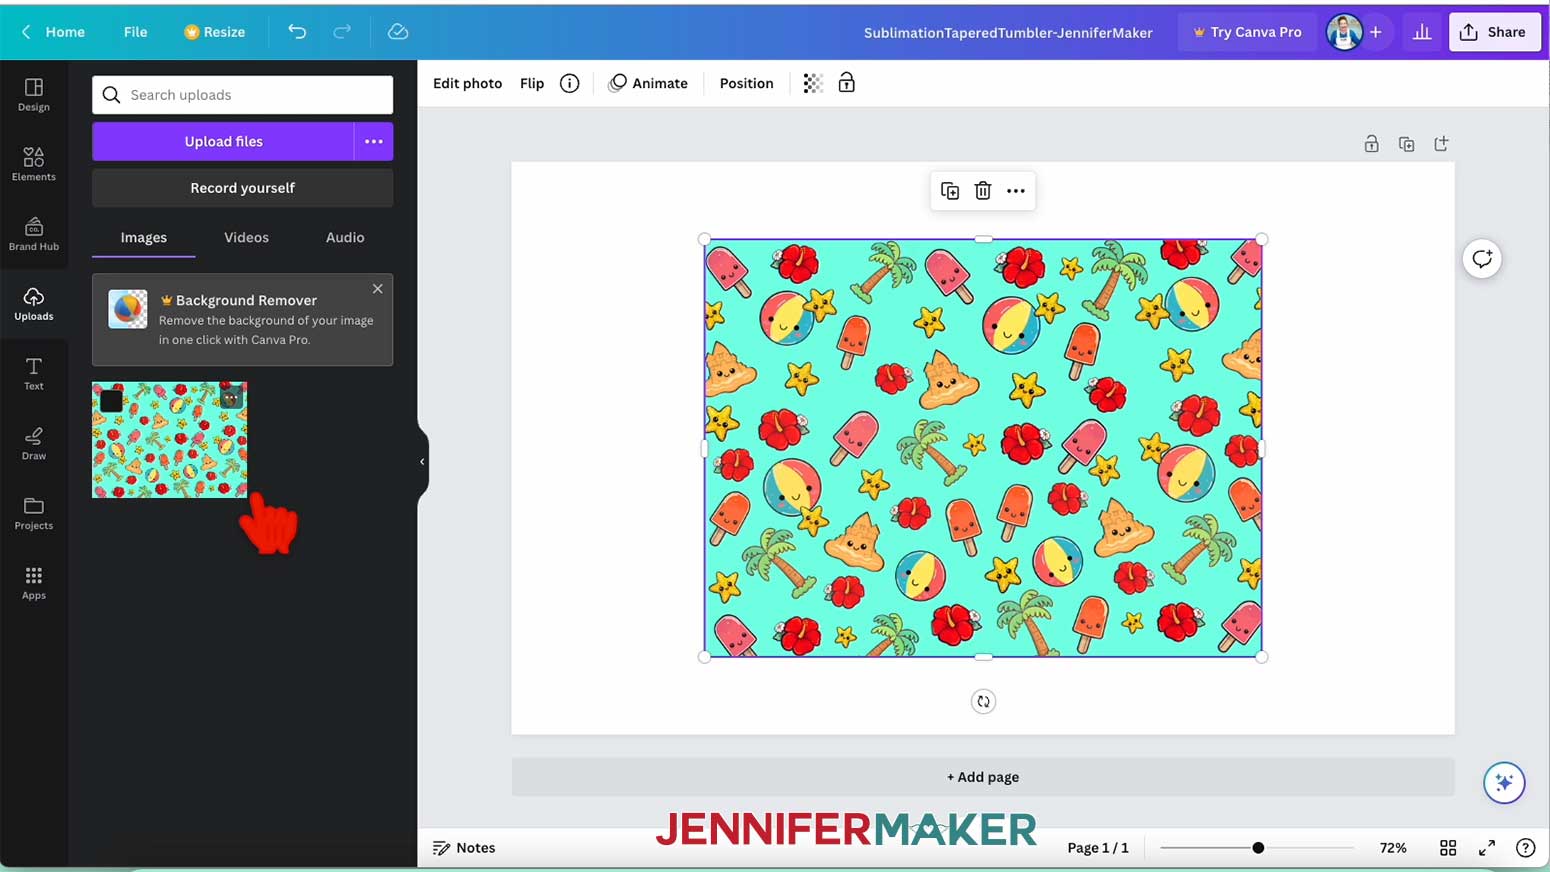
Choose a background image or color you want to use for your design. You can use an image from Canva's library or upload your own. I will be using my adorable Kawaii designs for my tapered tumblers.
To upload your own image, click "Uploads" on the left side of the canvas and the purple "Upload Files" button to select the image file from your computer.

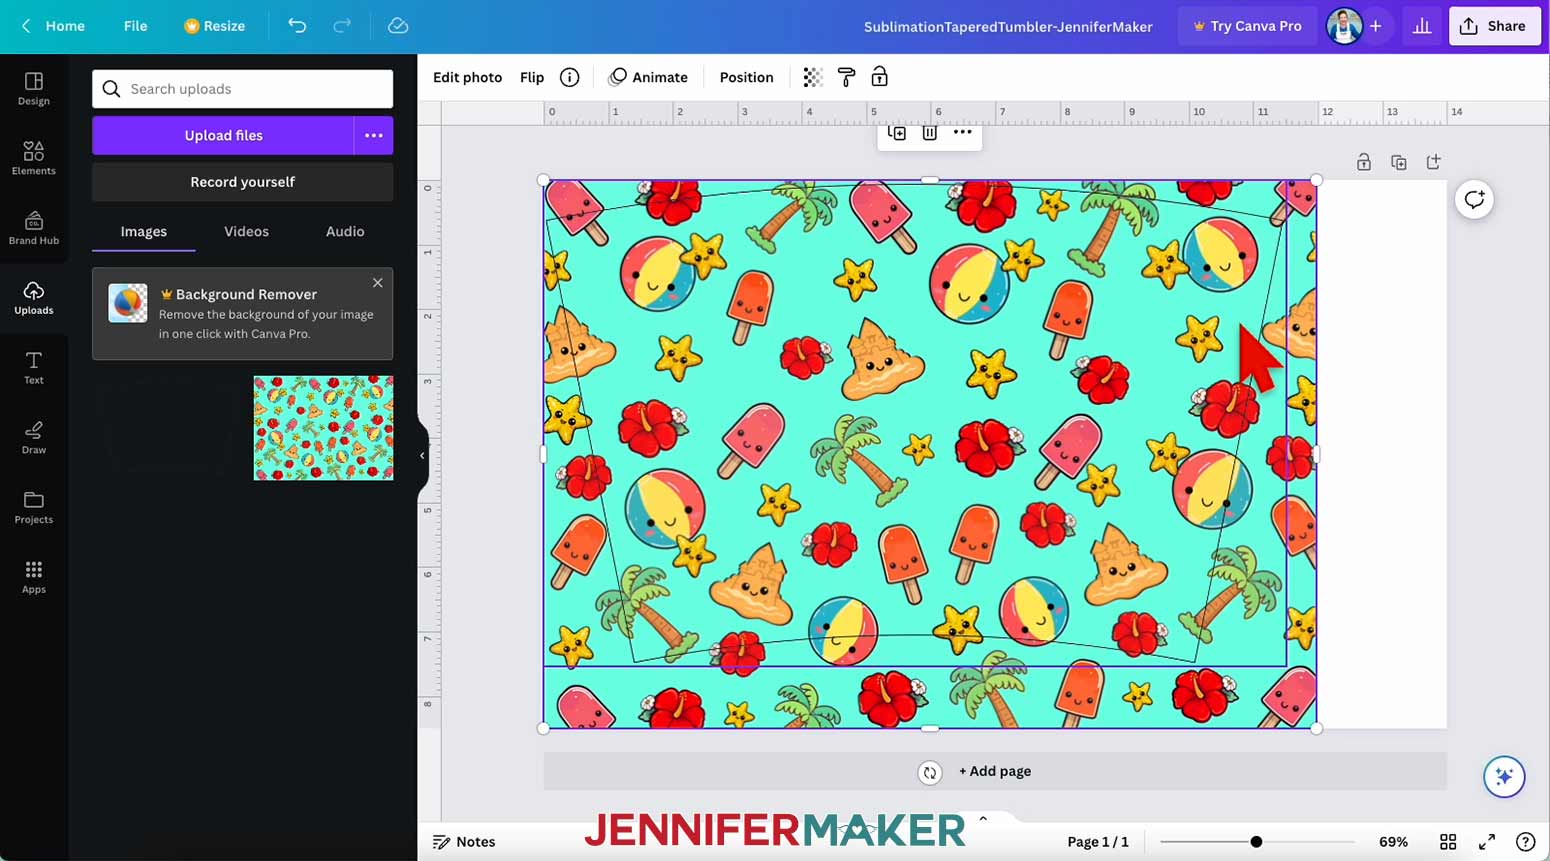
I will use the beach theme image on my tapered tumbler, so I will select that PNG from my downloaded files and upload it to Canva. Clicking on the file from the Uploads menu on the left adds it to my canvas.
Next, I will upload the template PNG to Canva and crop it slightly. After uploading, the template PNG will appear black in the Canva Uploads menu but don't worry, it's there. Click on the black box to add the template to your canvas.
You'll notice some rectangles on the sides of the bounding box. I will move those handles on the sides of the bounding box inward until the upper edges of the template and the bounding box are almost touching. Repeat this for both the top and bottom of the template as well. This will make it easier to measure the template and ensure it's the correct size.

Next, I'll use the rulers on the screen to adjust the template size. If you don't see rulers on your canvas, click "File" (next to "Home" at the top) and then "View Settings." Select "Show rulers and guides."
Using the ruler on top of the canvas, line up the top left corner of the template to the "0" mark in the upper left-hand corner. Use the circle handle in the bottom right-hand corner to resize the width of the template to the 11.5" mark.
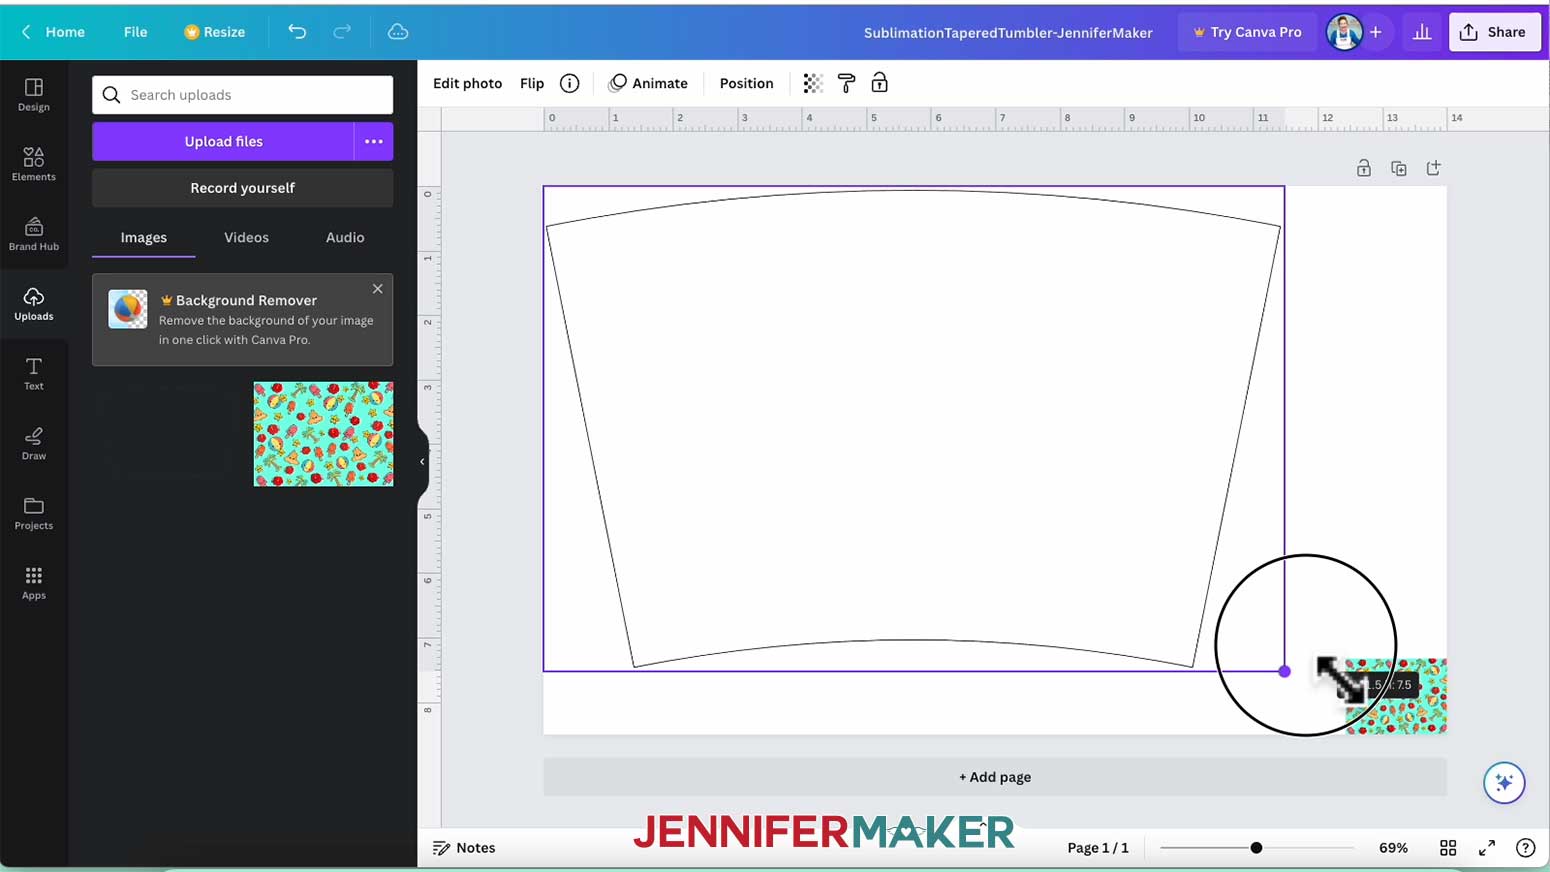
Since I have the template set, I can use the resize circles on the corners of the bounding box and adjust the size of the background image. I will resize it to 12" wide x 8.5" tall.
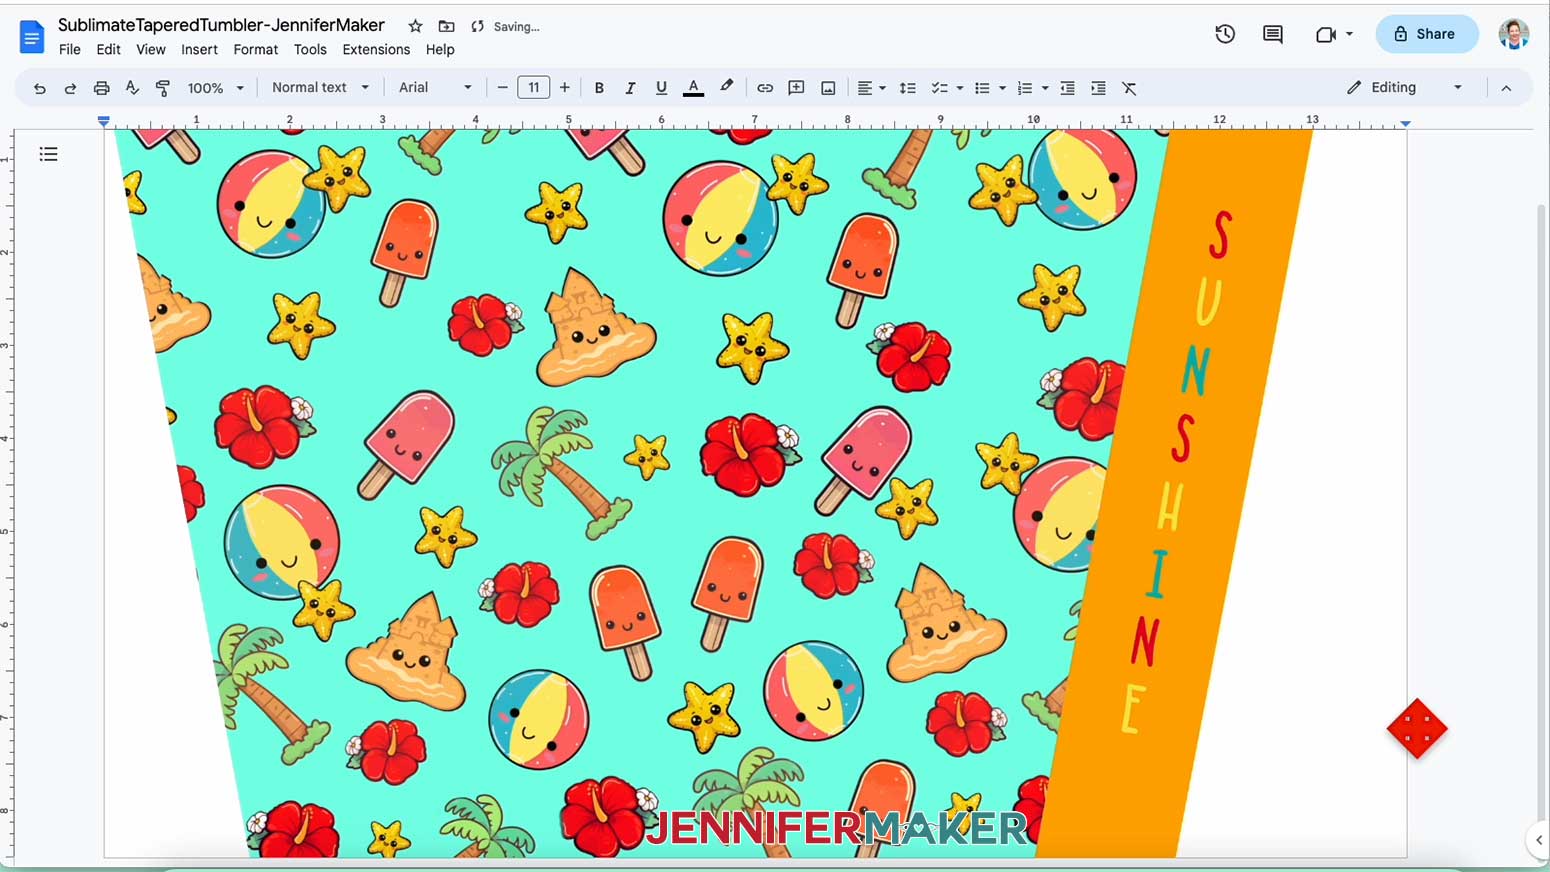
Now that I have the background and template uploaded and resized, it's time for the accent band that will help create a seamless tumbler wrap. I'll click on "Upload files" again in the Uploads tab, locate the "Sunshine" accent band PNG, and add it to my canvas.
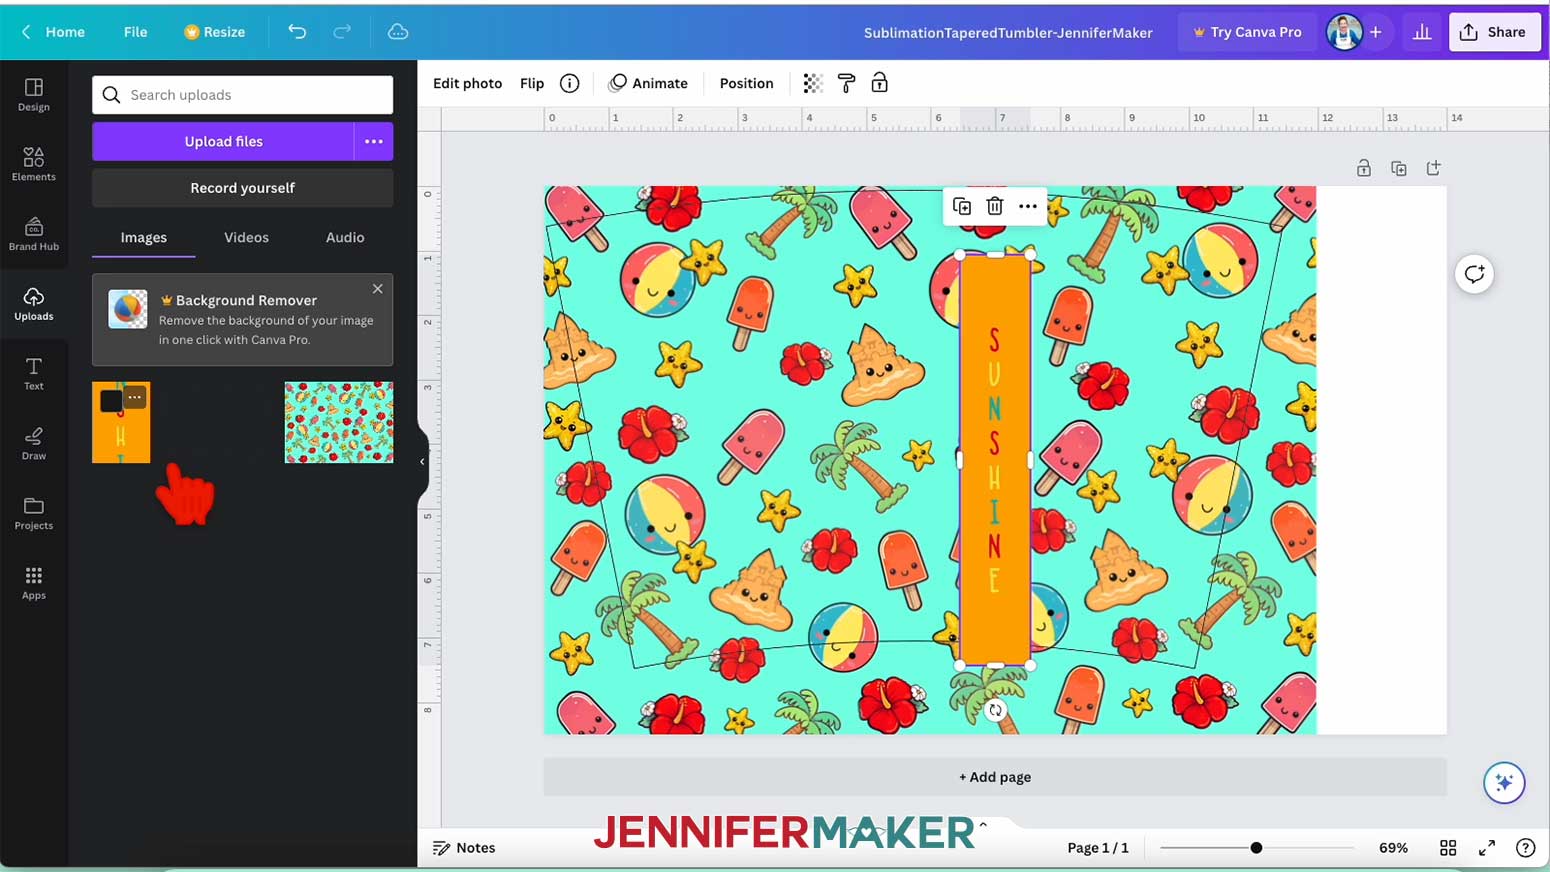
Now, I will drag it to the right-hand side of my tumbler template, and use the rotate handle on the bottom of the bounding box to angle it 11° until it lines up with the edge of the template.

Use the rectangles on the top and bottom of the bounding box to resize the accent band to 8.7" so that the edges are pushed just off the canvas.
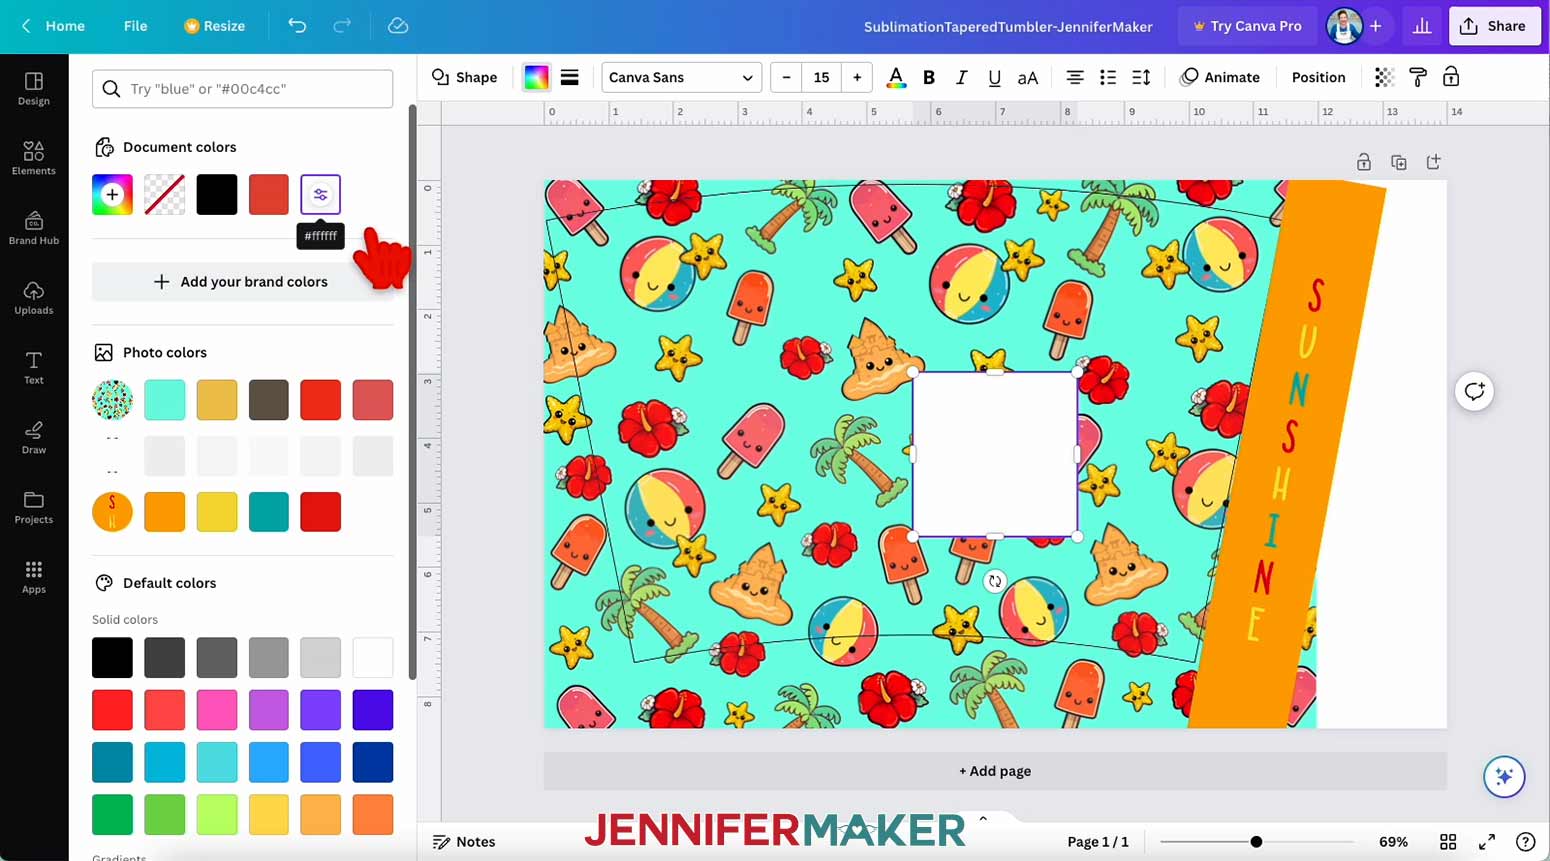
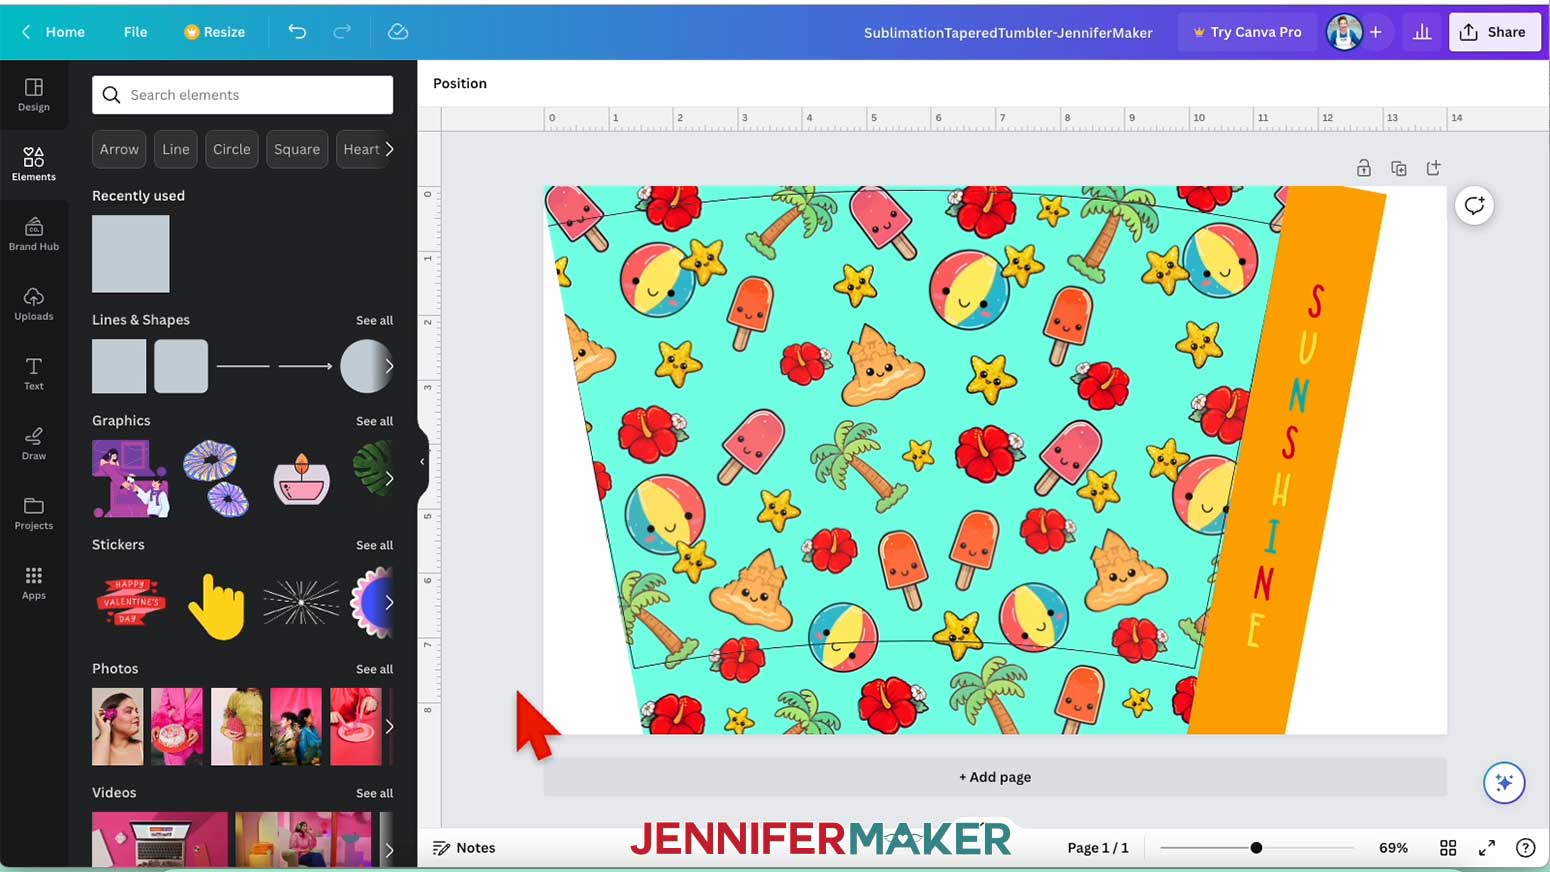
I will mask off the sides of the design using squares from the Elements menu on the left side of the screen. Since I don't need to fill the entire page with ink, I will create rectangles to cover the parts of the design I'm not going to use. And since my tumbler is tapered, the edges will need to be at an angle.
To add a square shape, click on the "Elements" tab on the left-hand side of the canvas and then select the square from the "Lines & Shapes" category. After adding the square to my canvas, I will change the color to white by clicking on the color box at the top of my canvas.
Using the circle on the bottom corner of the bounding box, drag the edge of the square until it's 8.7" tall. Line it up with the left side of the template and use the rotate icon below it to angle the rectangle -11° until it lines up with the edge of the template.
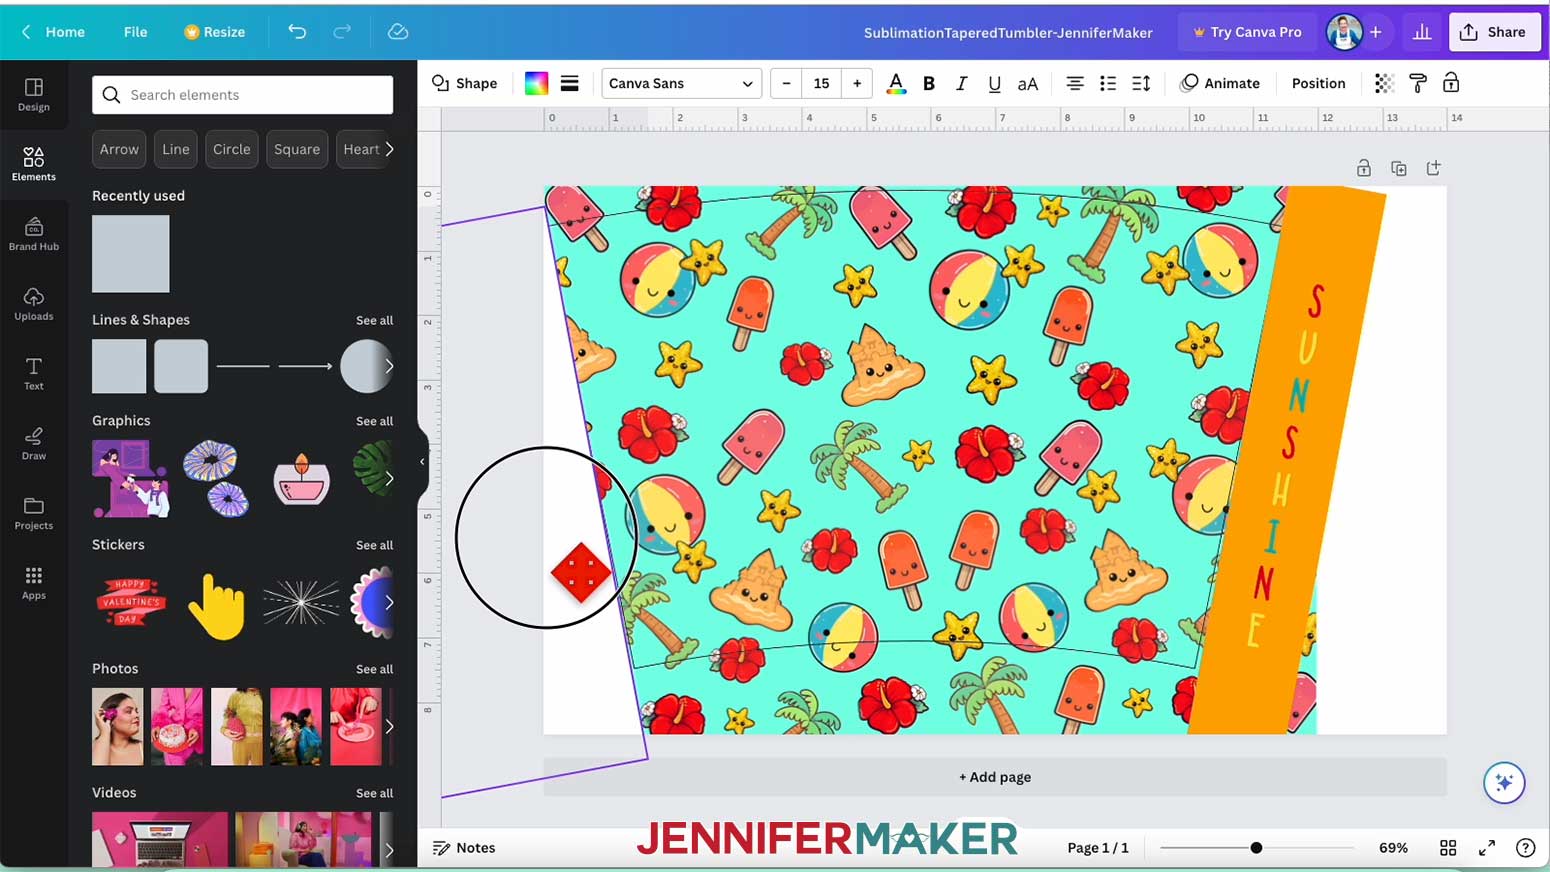
Repeat with the right side, aligning another white rectangle to the edge of the template and rotating it 11°.
Resize the rectangles off the edge of the canvas until the background image is no longer visible except for the area inside the template.
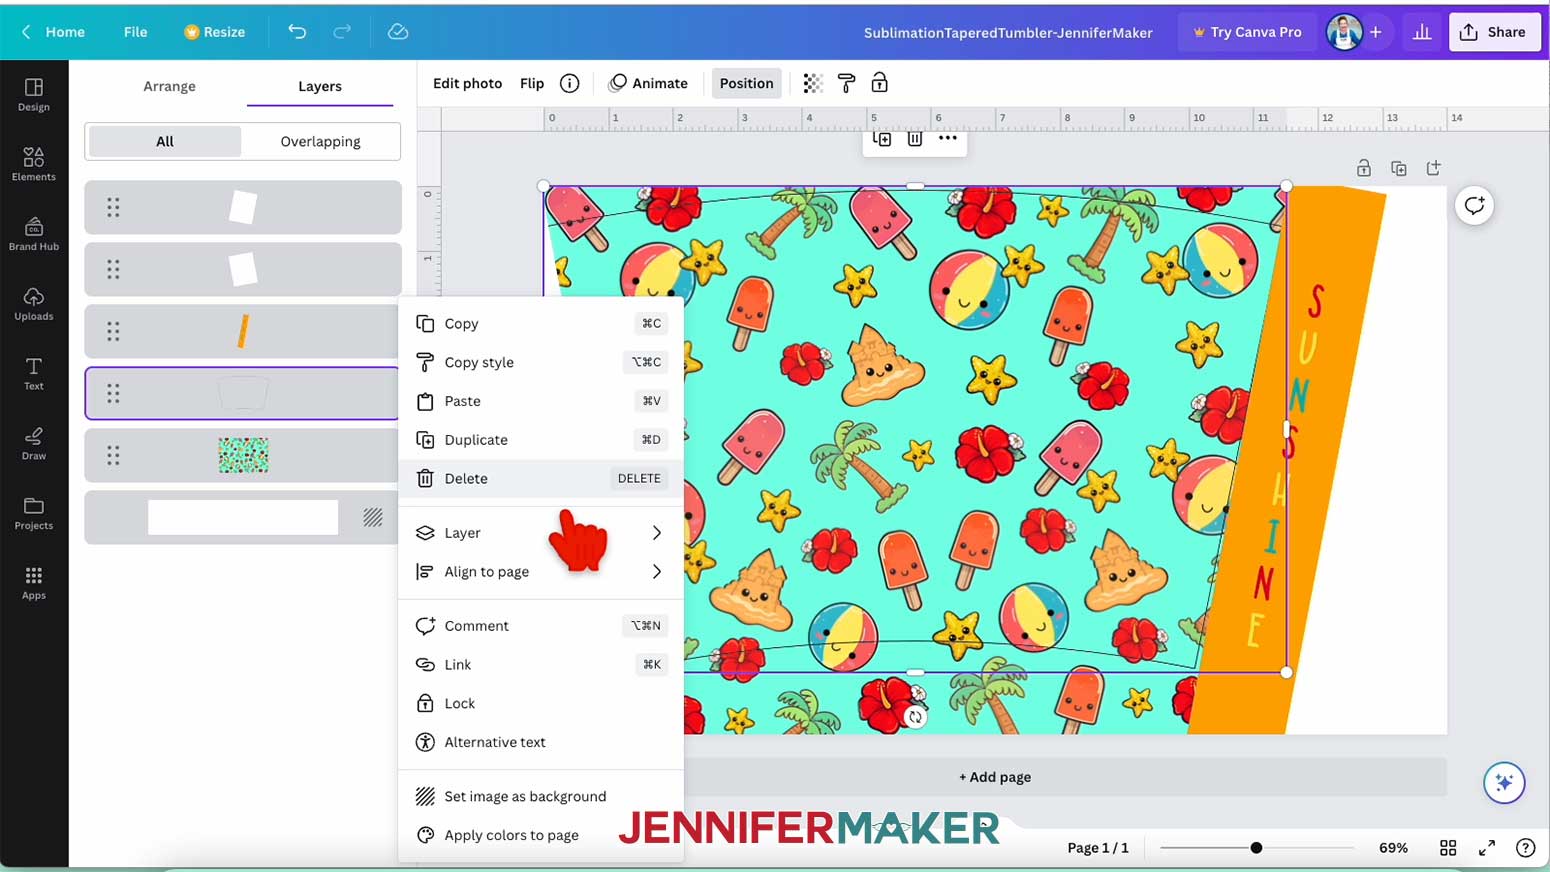
Click on the "Position" button at the top of the canvas. Select the "Layers" tab and "All" in the menu that appears on the left. Find the template layer and hover your cursor over it. Click the three dots that appear in the top right corner and click "Delete" to delete the layer.
Now I will select everything on the canvas by clicking and dragging a box over all the objects on my canvas. With everything selected, click "Group."
My tumbler wrap file is almost finished! All that is left to do is click the "Share" button at the upper right-hand corner of the canvas. When a new menu opens, click "Download." I will leave the file type as "PNG" and click the purple "Download" button.
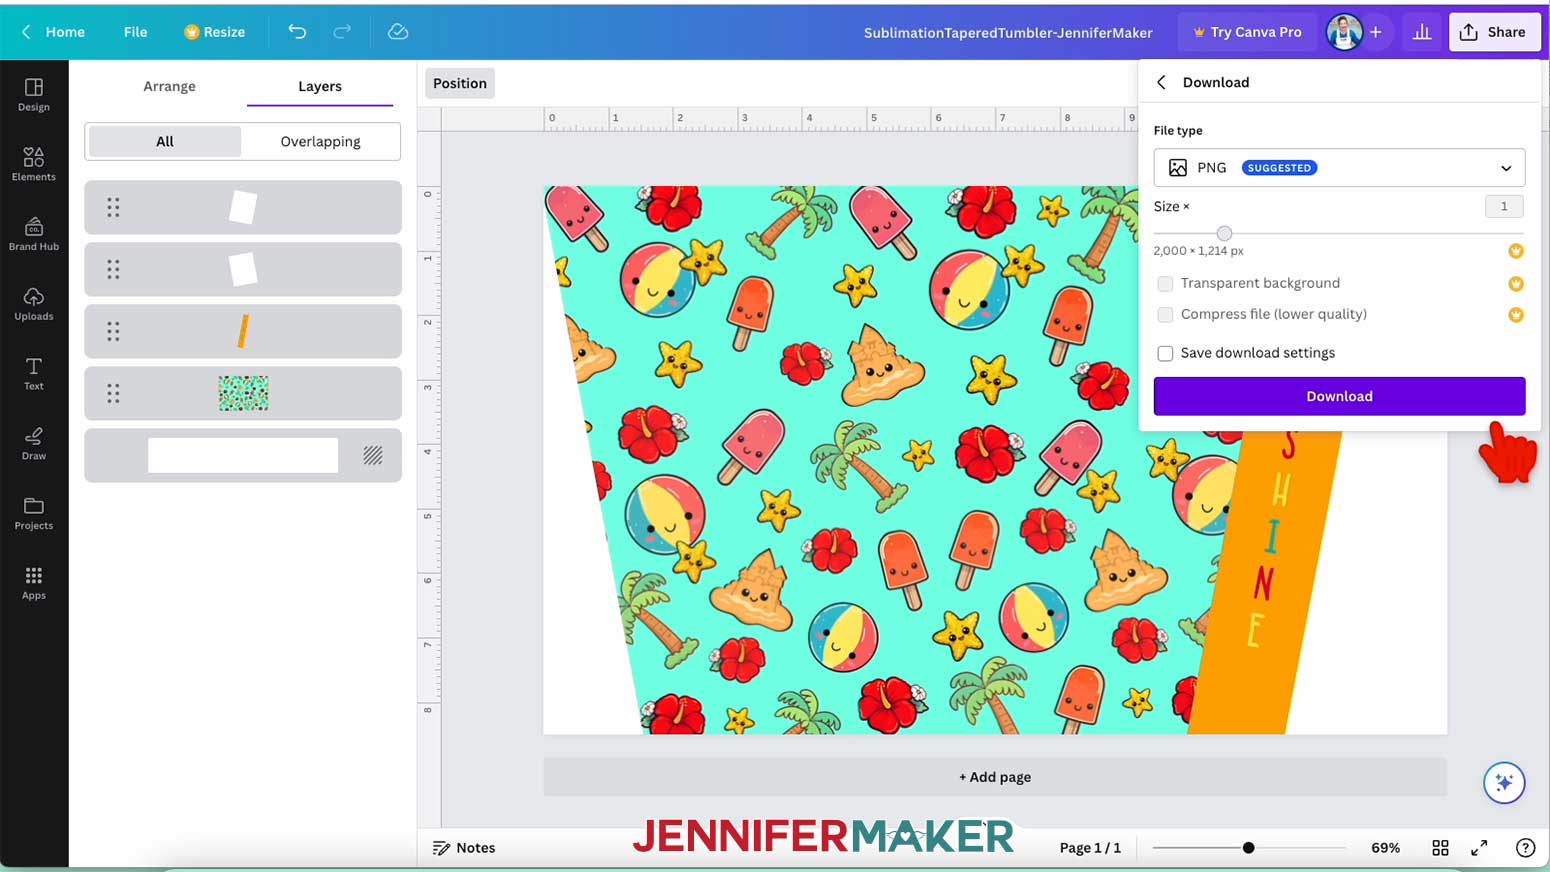
NOTE: If you have a free account, you cannot adjust the file size, but that's OK! The default size works perfectly.
TIP: If you want to learn more about designing your own files, check out my Canva workshop! I’ll teach you how to make several kinds of designs with their free, fun, and powerful tools! You can find more information at jennifermaker.com/canva-workshop.
STEP 4: USE GOOGLE DOCS TO PRINT YOUR TUMBLER WRAP
Next, I'll be printing my tapered tumbler wrap using Google Docs.
NOTE: If you're not logged into your Google account, you will be prompted to do so.
Create a new document by clicking on the multicolored plus sign. Next, readjust the size and settings for your page using the File menu at the top of the screen. From "File," select "Page Setup." Adjust the settings to match mine:
- Apply to: Whole document
- Orientation: Landscape
- Margins all set to 0
- Paper size: Legal (8.5" x 14")
Click "OK" to save the settings.

Next, click on "Insert" at the top, select "Image," and click "Upload from computer". Navigate to the file you saved earlier. It may be in your recent files or the Downloads folder.
The design will be added to the page at the correct size. Now we're ready to print!
Click on the Printer icon at the top and proceed through the print settings. Be sure to change the paper size to Legal (8.5" x 14") and the scale to 100. Under Layout, make sure "Flip horizontally" is checked. For Print Settings, select "Premium Presentation Paper Matte" and "High Quality."
NOTE: Due to variances between printers, computers, and operating systems, your settings might not look exactly like mine. The most important things to keep in mind are mirroring your design and selecting the highest print quality.
Make sure you have sublimation paper loaded correctly into your printer and click "Print."
I will use my converted Epson Ecotank with Hiipoo ink, but feel free to use any sublimation printer and sublimation ink you'd like.
After printing your page, allow it to dry for a few minutes.
STEP 5: SUBLIMATE YOUR TAPERED TUMBLER
I'll double-check the time and temperature for sublimating tapered tumblers by consulting my Sublimation Cookbook, page 36.
Preheat the convection oven to 375°F (190°C). I like to use an oven thermometer placed right in the center to ensure the temperature is correct before I place my tumblers inside.

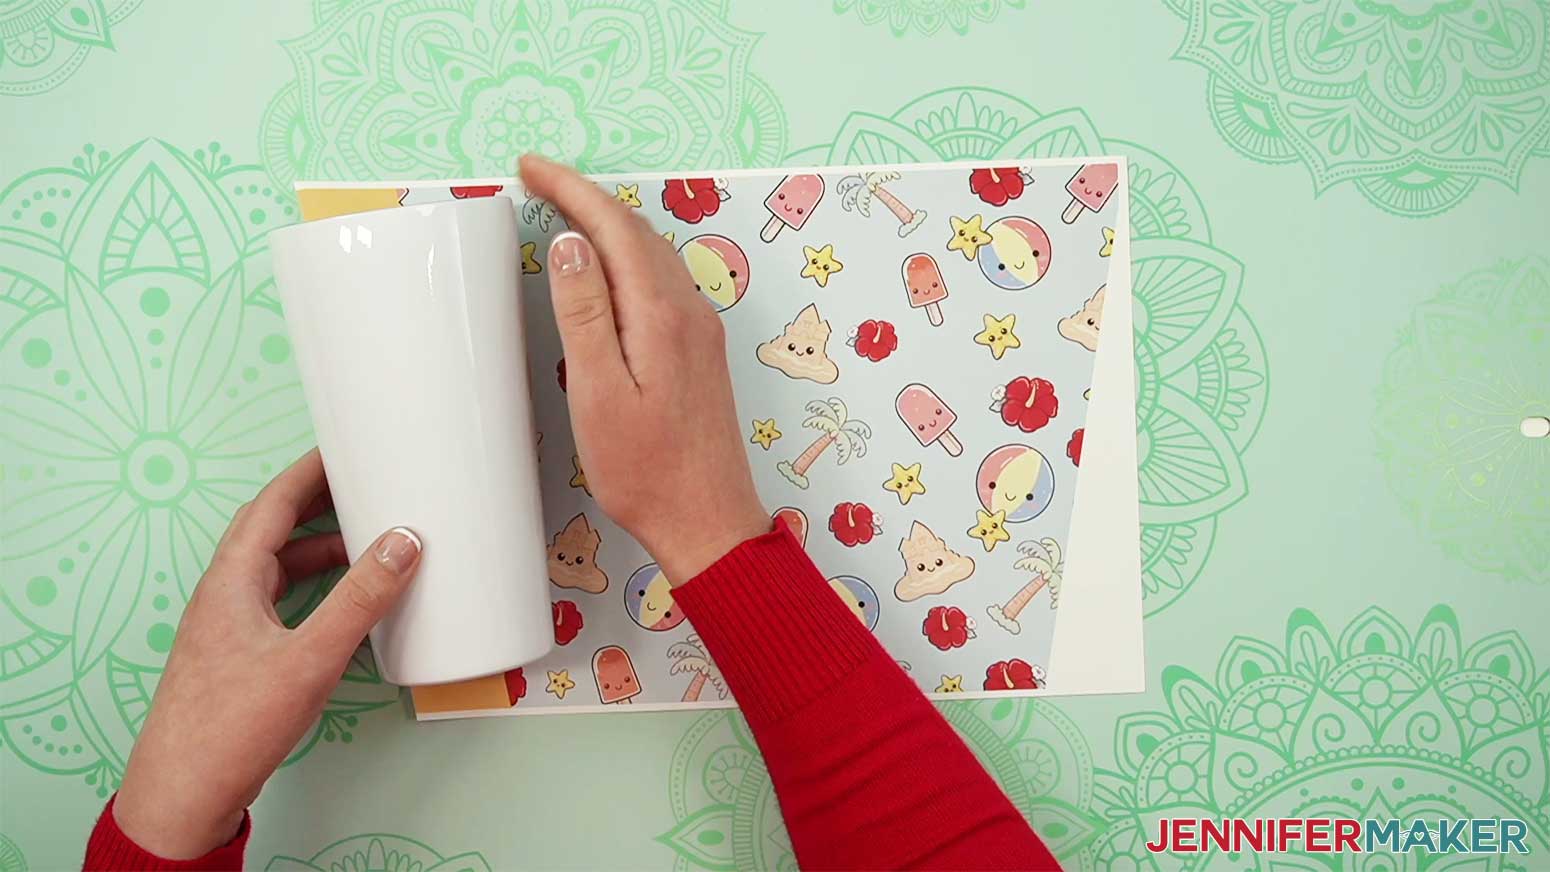
While waiting for the convection oven, I will prep my tapered tumbler. Use a small amount of alcohol and a lint-free cloth to wipe down the outside of the tumbler to remove any oils or lint from the surface.
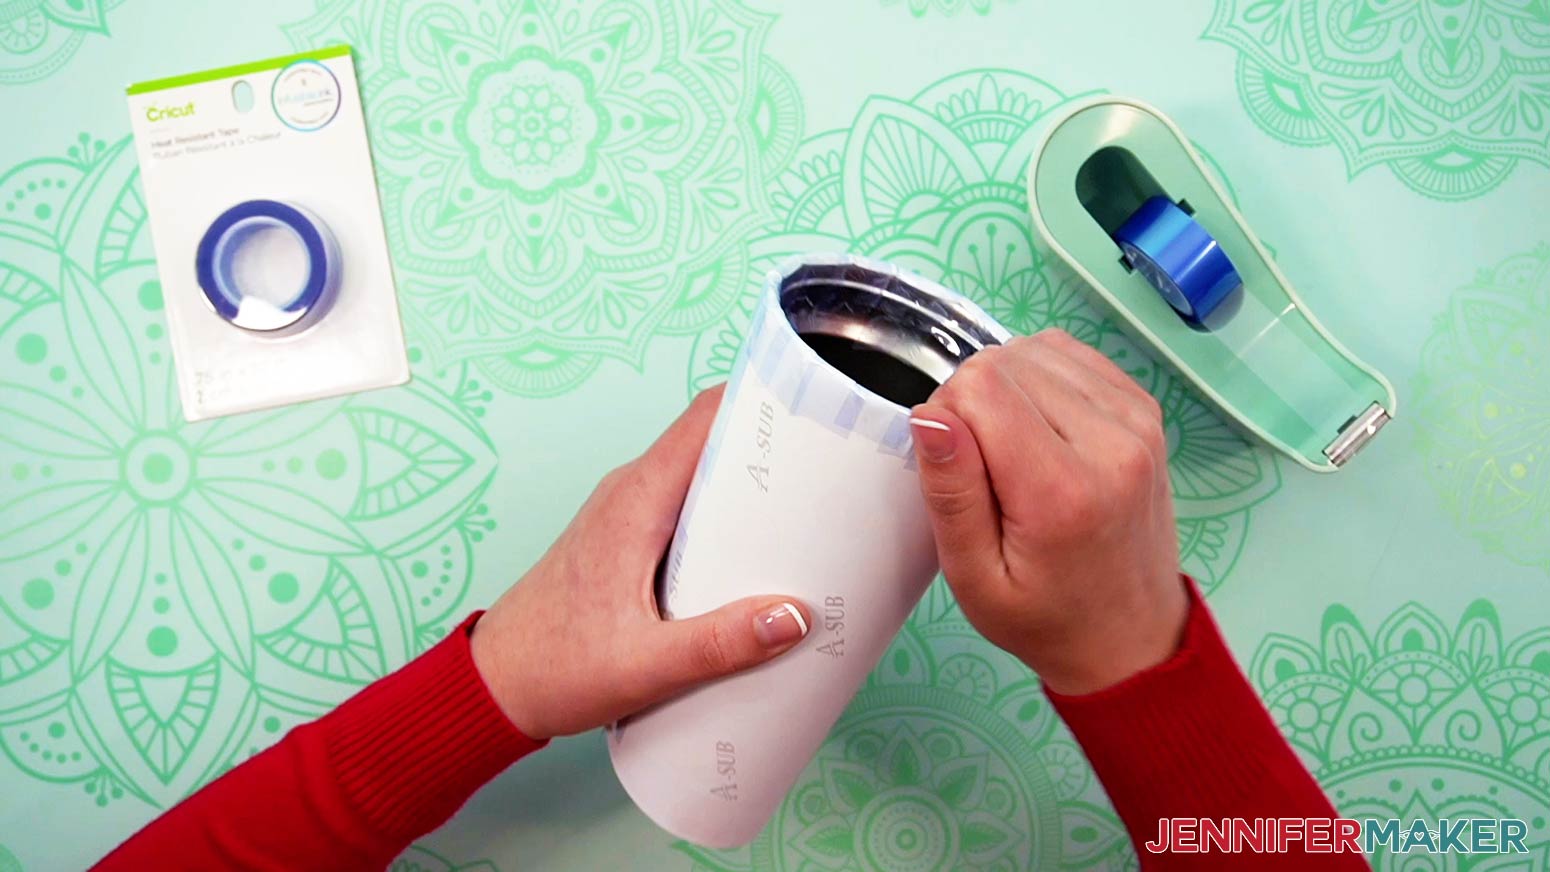
With the printed side facing the tumbler, begin with the accent band side of the wrap and roll the paper around the tumbler, leaving the accent band ends visible at both the top and bottom of the tumbler. Ensure the accent band is positioned vertically.
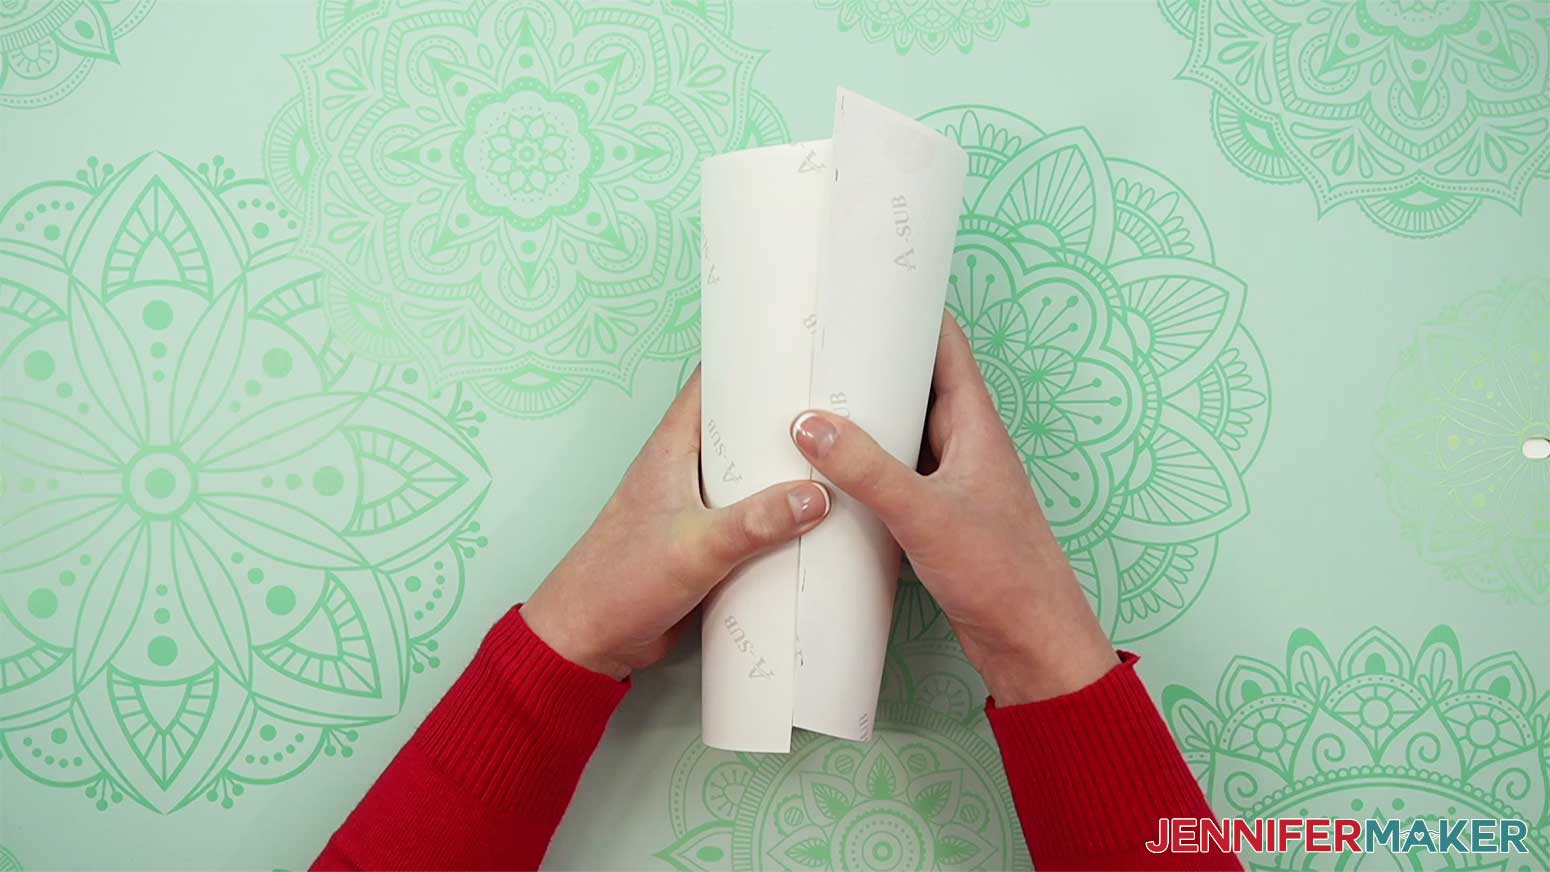
Once you've wrapped the sublimation print around the tumbler, slip the left-hand edge of the paper under the accent band, and use a pencil to make a line along the edge. Use a paper trimmer or scissors to trim the excess and wrap the tumbler again. The trimmed edge will overlap the accent band just slightly.
Use 3 pieces of heat-resistant tape -- at the top, middle, and bottom -- to hold the wrap in place tightly around the tumbler. Continue taping over the seam, keeping the wrap tight.
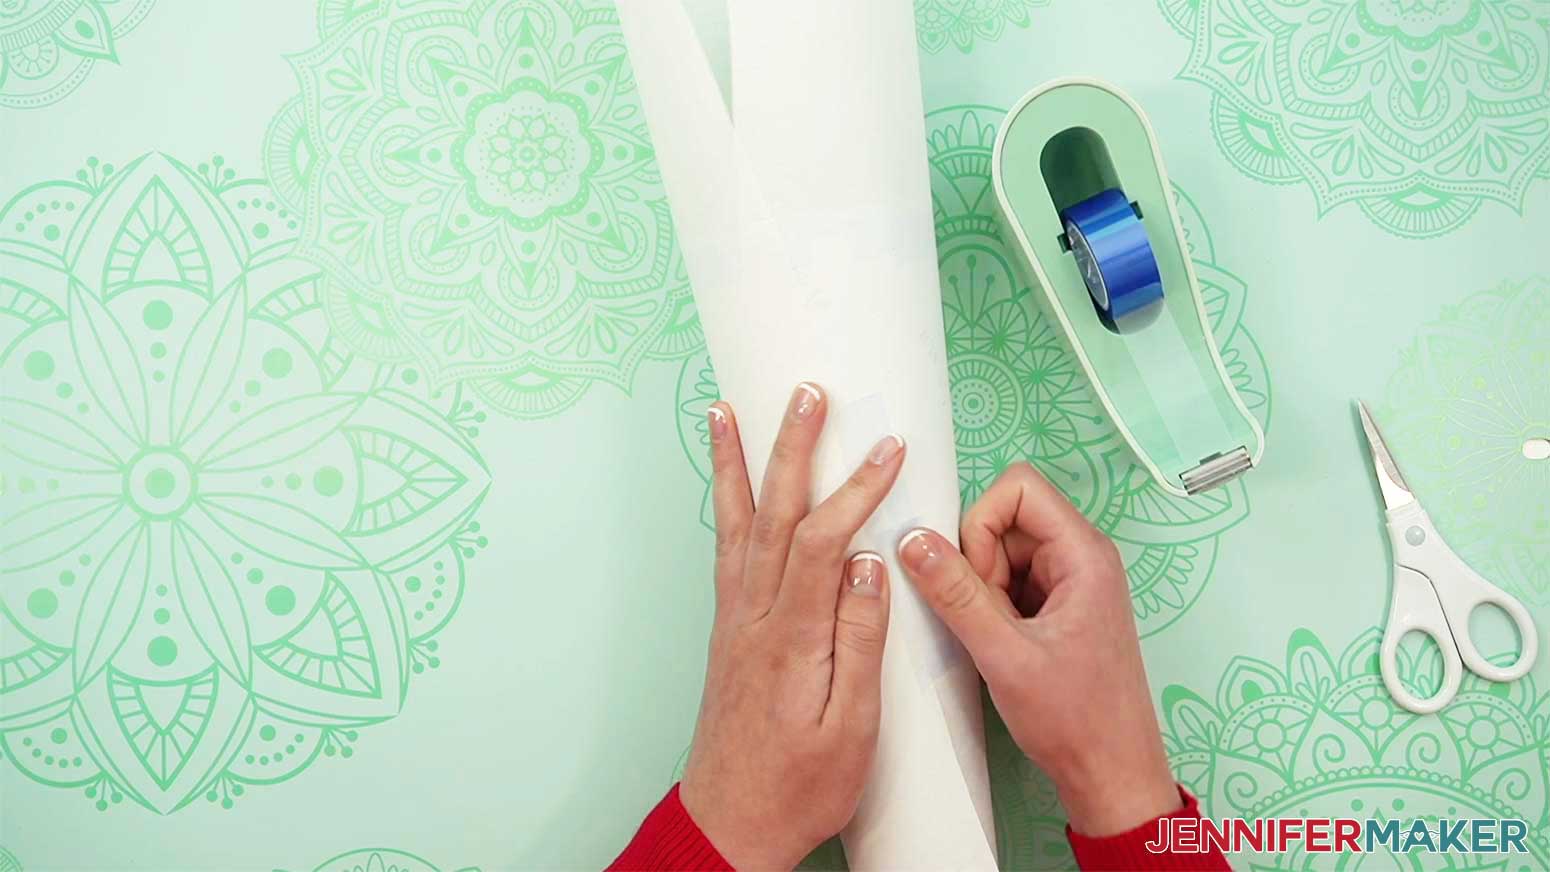
Use a pair of scissors to trim away the excess paper just above the rim of the tumbler.

Use several short lengths of heat-resistant tape along the top edge of the tumbler, starting with the North, South, East, and West points, then filling in the space between.
Next, trim the excess wrap away from the bottom of the tumbler. Use several short lengths of heat-resistant tape along the bottom edge of the tumbler, starting with the North, South, East, and West points, then filling in the space between.
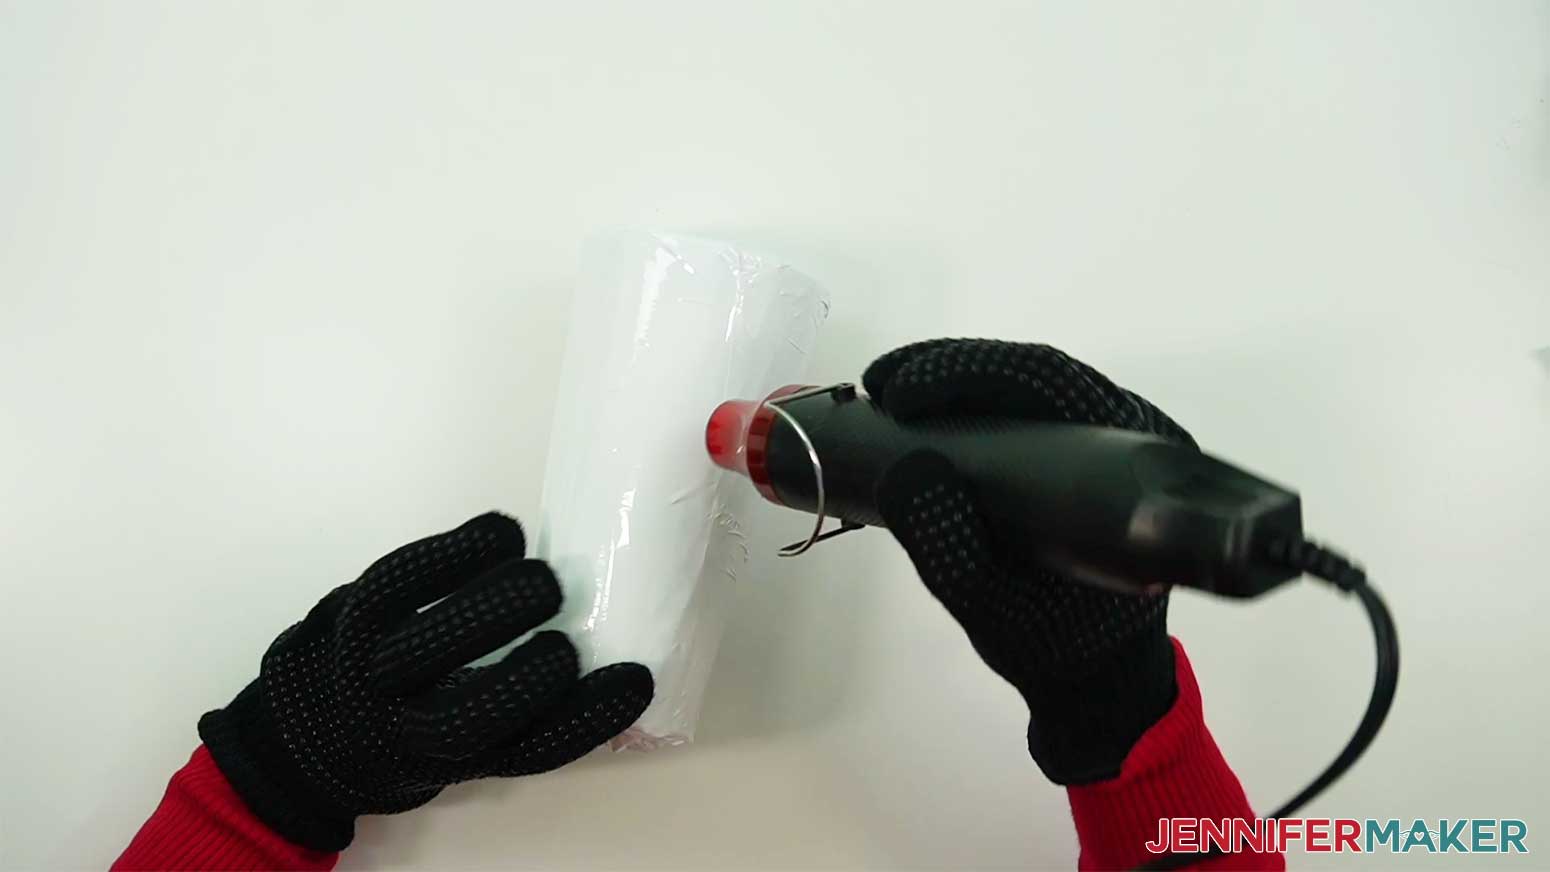
Cover the tumbler in a layer of butcher paper and tape it in place.
There are a few different ways to wrap a tapered tumbler for sublimation. The first option is to use shrink-wrap tubes as I did in my previous Sublimation Tumblers tutorial.
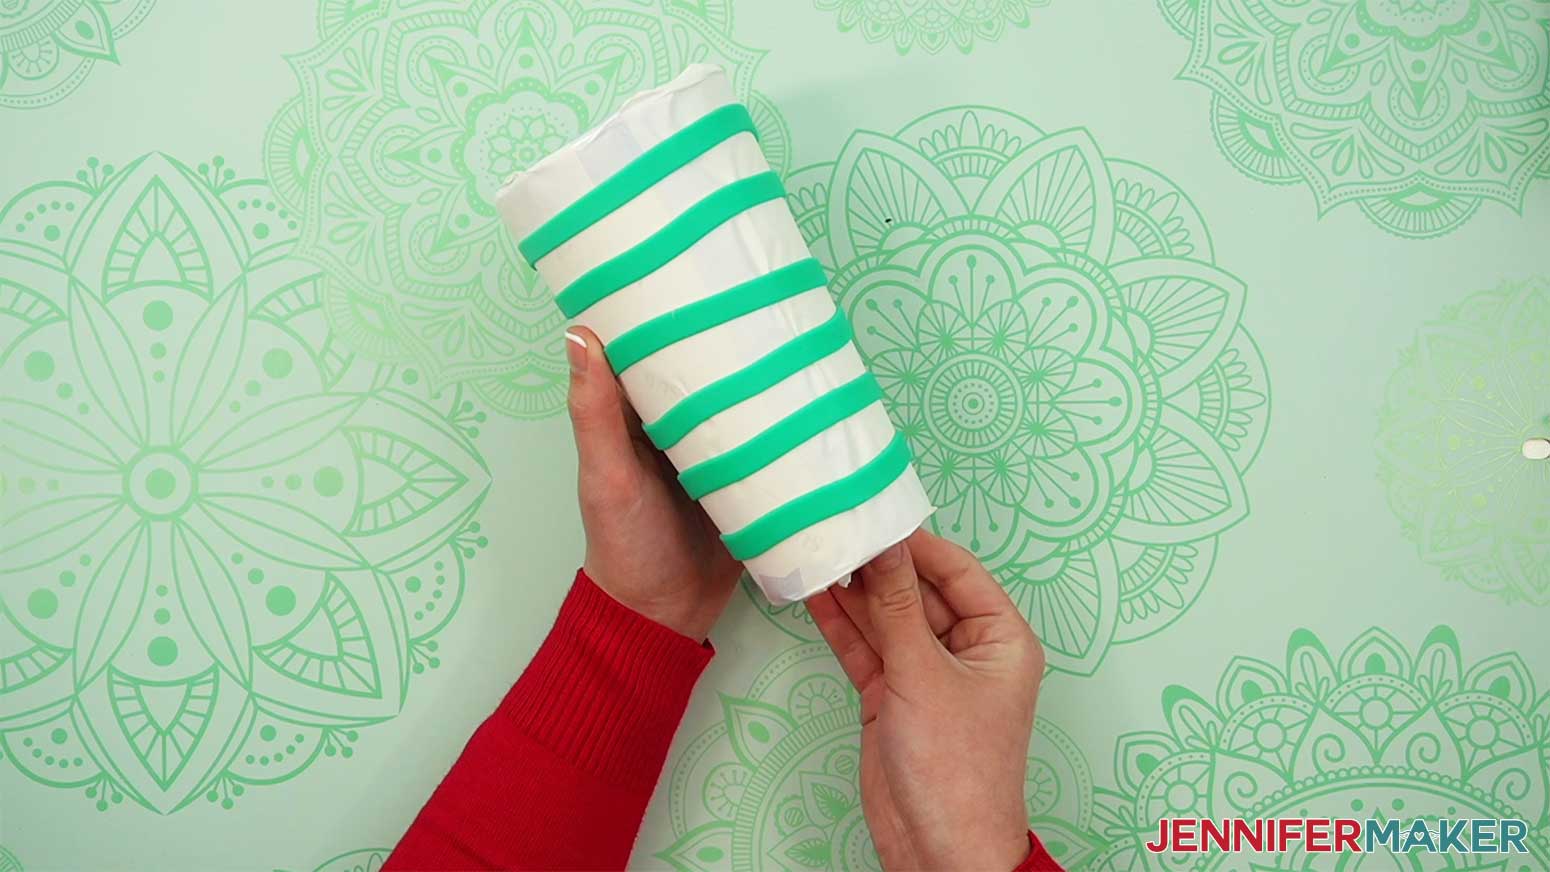
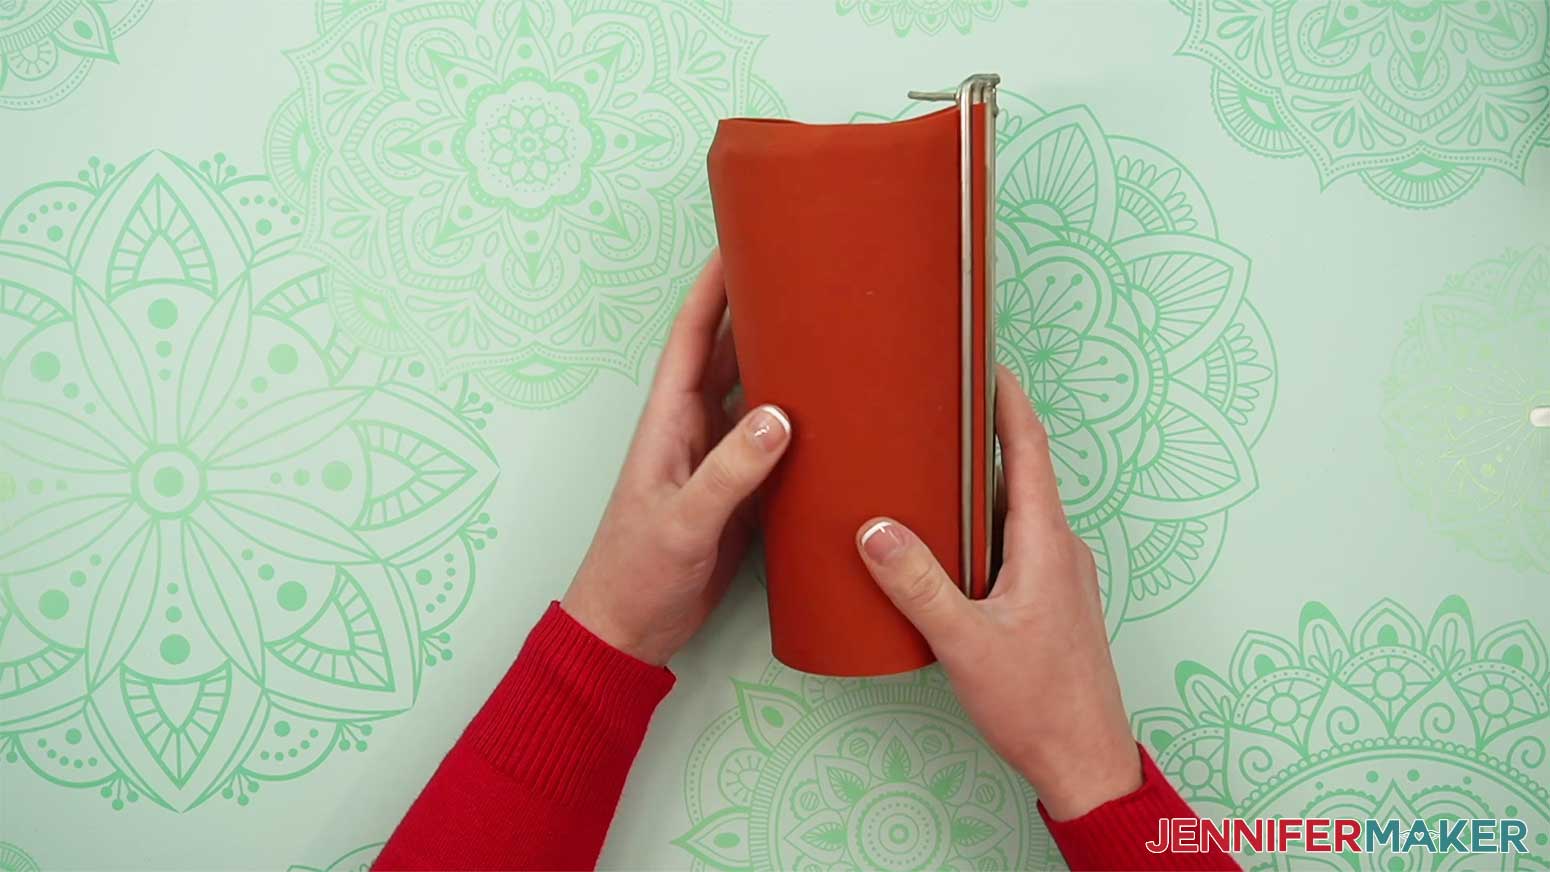
Another option is to use thick silicone bands to hold the wrap in place. These work very well spaced out evenly over the tumbler.
The third option is to use a silicone sleeve. It's easy to use and locks with a click. You can also make it tighter by pulling the edge pieces.
When the convection oven is preheated, carefully place the prepared tumbler in the oven and set a timer for 6 minutes, rotating it 180° halfway through. Be sure to wear your heat-proof gloves!
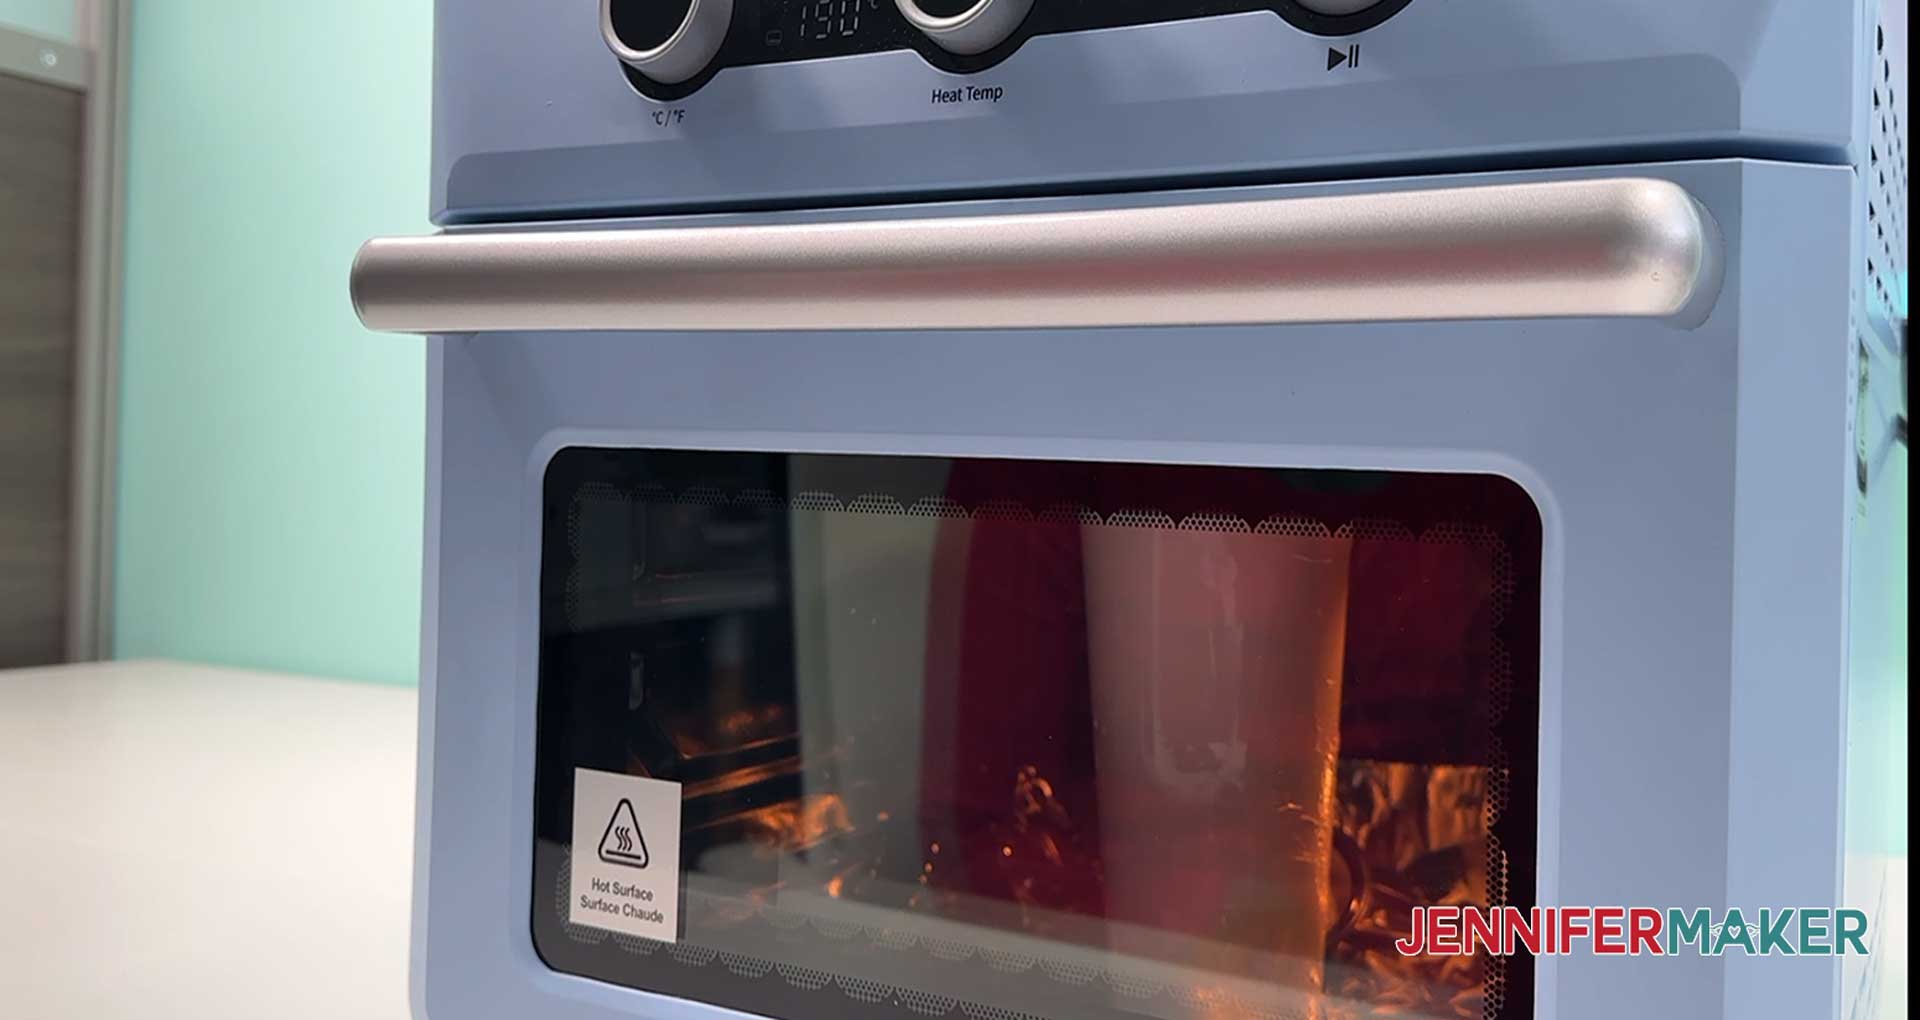
After the time is up, remove the tumbler from the oven with a heat-proof glove and allow it to cool for about 15 to 20 minutes.
Remove the shrink-wrap or silicone sleeve, tape, and paper, and enjoy!
STEP 6: SHOW IT OFF!
Here is my adorable Kawaii-themed tapered tumbler all finished.
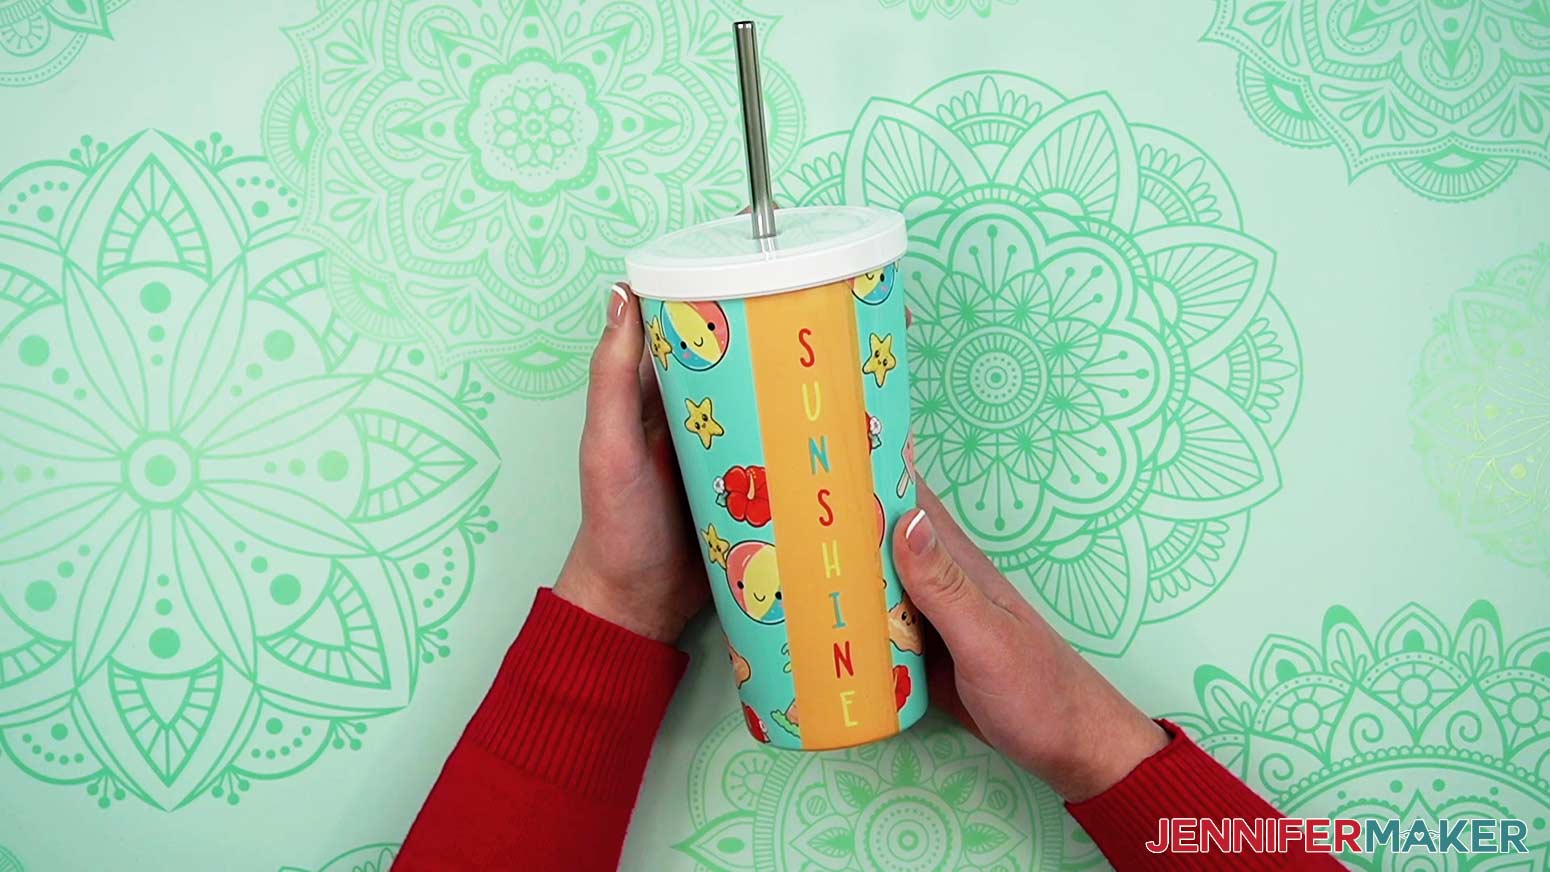
These adorable, cheerful designs are perfect for taking a drink to the pool, or the park, and also make a fabulous gift!
To make your sublimation print last, only handwash the tumblers with warm soapy water. Remember to check your tumbler's instructions in case they're different!
Notes
Typeface used on accent bands: JM Sweet - available as Design #496 in my free resource library
Answers to Your Questions About How to Sublimate Tapered Tumblers
Q: How do you taper an image for a tumbler?
A: The easiest way I’ve found to taper an image for sublimation on a tapered tumbler is to first measure the height as well as the top and bottom circumference of the tumbler. Then you input those measurements into an online tapered tumbler templates generator, and use that to modify your image into the perfect shape. If it sounds complicated, it’s not! I’ll walk you through every step in this tutorial.
Q: How do you tape a sublimation tumbler for perfect edges?
A: When I taught myself how to sublimate tapered tumblers, I had plenty of mistakes. That’s why I want to share my techniques so I can save you time, frustration, and materials! To get perfect seams, first I tightly wrap my sublimation paper design around the tumbler, with the design side facing the cup. The loose end will overlap the first end a little bit. Then you want to tape it in place all the way up the seam, starting with top, middle, and bottom before filling in the gaps. Then find the first end of the paper UNDER the overlapped end, and use a small scraper tool or your fingernail to press down right where they overlap. Watch my YouTube video tutorial to see this in action. Using this method helps to get the ink as close to the tumbler as possible, for the least noticeable seam.
Q: What makes a tumbler sublimatable?
A: A tumbler isn’t sublimatatable unless it’s coated with a material that can be sublimated. A regular white tumbler won’t work because it’s not made from or coated with material that accepts dye sublimation.
Q: How do you heat press a tapered tumbler?
A: While some have success by using a heat gun, I recommend using a craft-purposed convection oven, craft-purposed air fryers, or a regular size craft-purposed oven. I can’t over-emphasize the importance of the oven being craft-purposed — that means ONLY used for sublimation crafting, and not cooking. Once an oven or air fryer has been used to sublimate tumblers, mugs, or anything else, it’s no longer safe to cook food in. Please be safe! If you have a tumbler press, it’s unlikely to work for tapered tumblers — it’s meant more for straight sided cups.
September 2025 UPDATE: In the past, I have mentioned countertop ovens as suitable sublimation equipment options, including some by Oster. If you purchased an Oster Convection Oven, 8-in-1 Countertop Toaster Oven, XL, Stainless Steel French Door, please stop using it immediately and review the Consumer Product Safety Commission’s safety alert for information on what you should do and where you can seek assistance to continue using the oven safely. Now, I recommend a PYD Life Craft Oven.
Q: Do I wipe a tumbler with alcohol before sublimation?
A: Yes. Cleaning your tumbler with alcohol and a lint-free cloth removes any oils from your hands, smudges, label residue, or anything else that might interfere with your sublimation results. Use a lint roller to make sure there is no fuzz or dust left on your tumbler, too!
Q: How long and what temperature to sublimate a tumbler?
A: To sublimate a tumbler, set your craft-purposed convection oven to 375°F (190°C) for 6 minutes. If you’re using a craft-purposed air fryer, set it to 385°F (196°C), also for 6 minutes.
Q: Do you let sublimation cool before removing?
A: While different sublimation projects have different directions, when sublimating tumblers you absolutely want to let the wrap and paper cool completely before removing it, or it can cause ghosting, smudging, or under-sublimation on your finished product.
Q: How do you get a perfect seam on a sublimation tumbler?
A: Hold the wrap tightly around the tumbler with one hand, and use your other hand to apply heat-resistant tape to secure the top, middle, and bottom. Continue taping over the rest of the seam, keeping the wrap nice and tight. Trim away the excess paper just above the rim of the tumbler, then use several pieces of heat-resistant tape along the bottom edge, starting with the North, South, East, and West points, then filling in the spaces between. Next, trim the excess wrap away from the bottom of the tumbler. Tape along the bottom edge of the tumbler, again starting with the North, South, East, and West points before filling in the spaces between. Now feel for the edge of the paper underneath the seam. Take your small scraper tool or your fingernail and press along that line, pushing the paper and the ink into the cup as close as possible. This is the best way to get the ink to transfer nicely with a less obvious seam.
Get my free PNG files to learn How to Sublimate Tapered Tumblers!
(If you do not see the signup form above, click here.)
I’d love to see YOUR adorable tapered sublimation tumbler! Please share a photo in our Facebook group or tag me on social media with #jennifermaker.
Love,

Want to remember this? Save this tutorial on How to Sublimate Tapered Tumblers to your favorite Pinterest Board!