Learn how to sublimate mugs AND create designs for them!
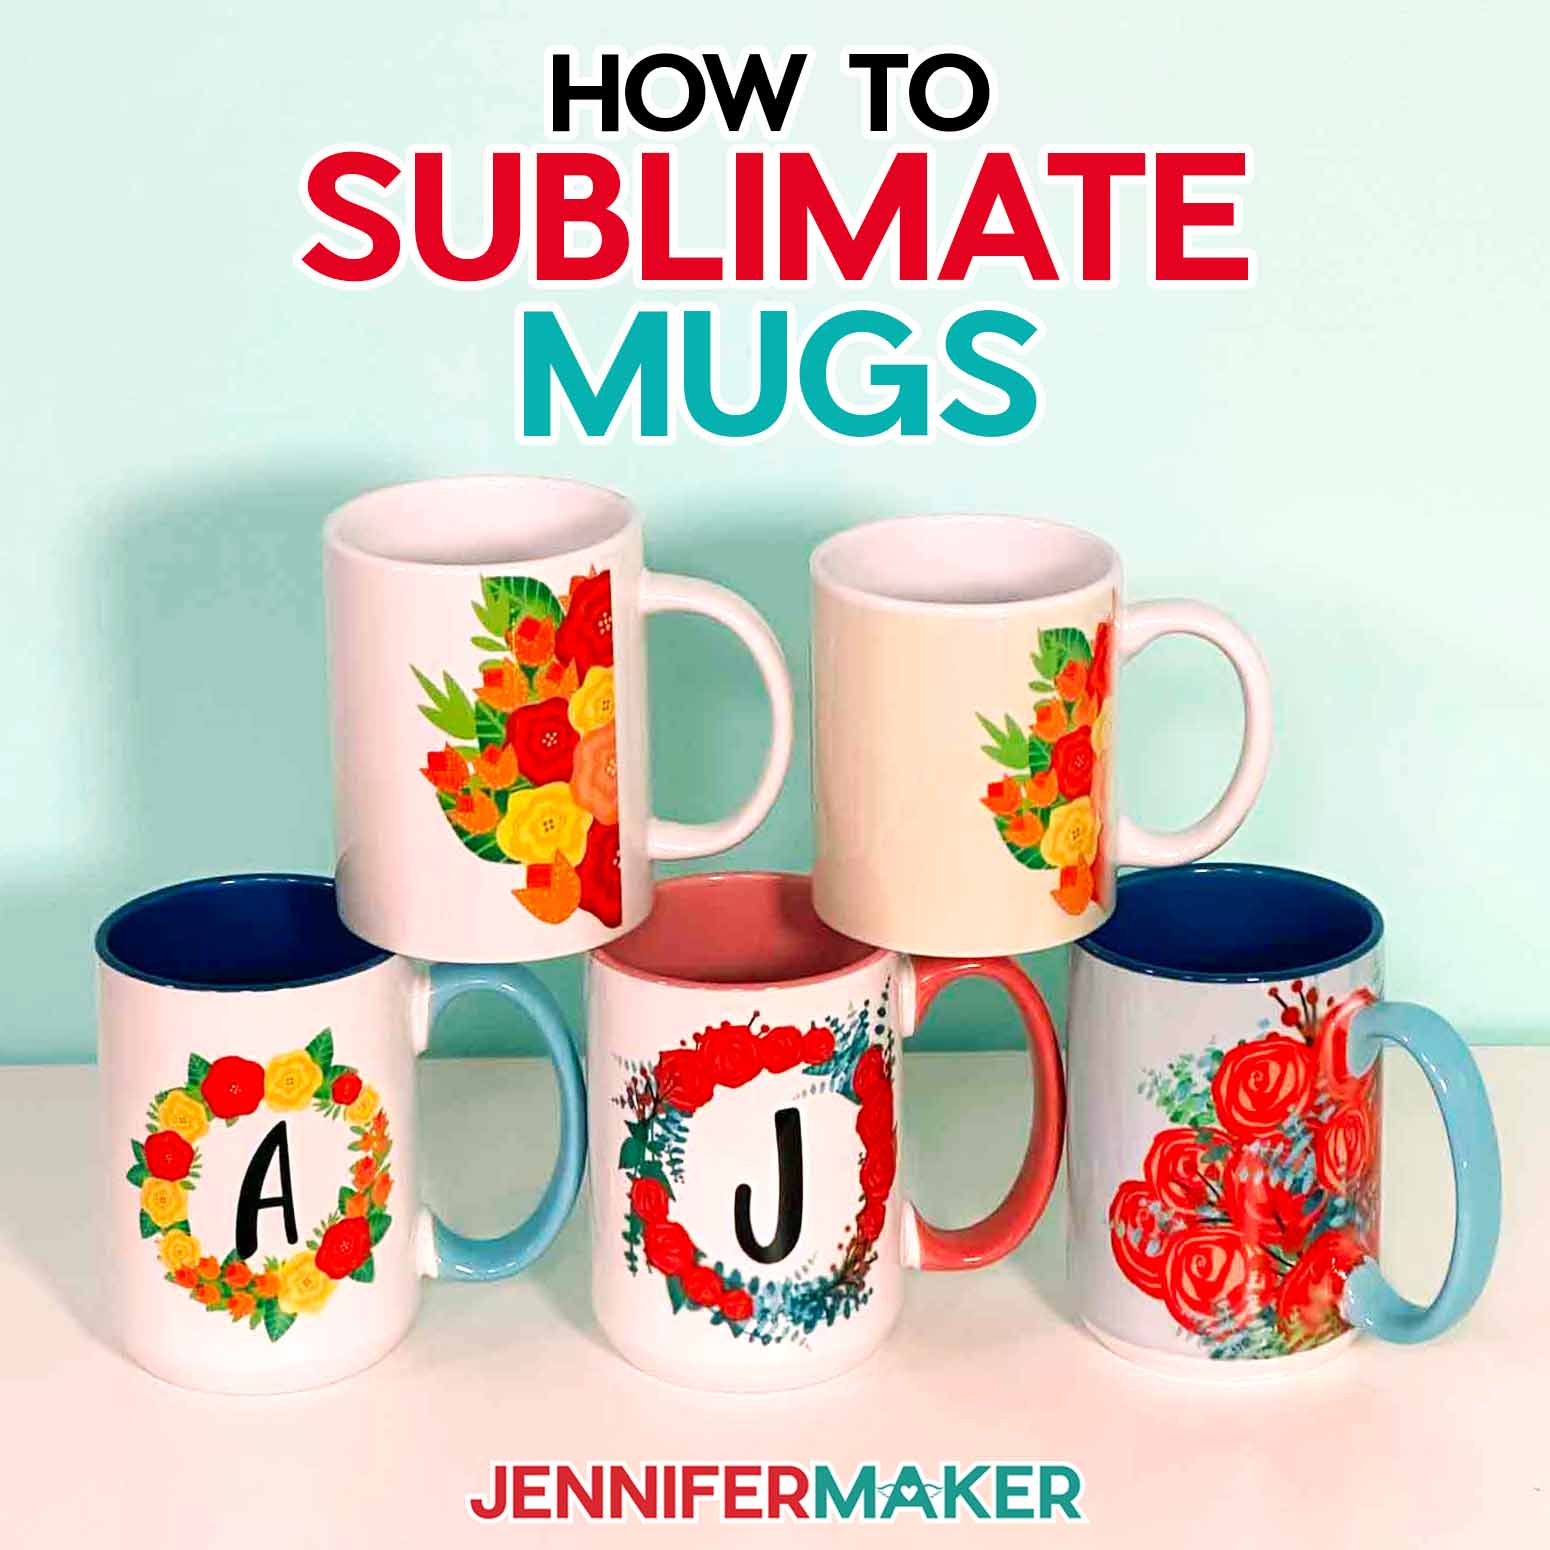
When I started crafting, I had no idea I’d ever learn to make something so cool. Making mugs that look like something you’d buy in a store? Even better: custom mugs? How neat is that!? I’ve shared some of my basic mug tutorials with you already, but today I’ll show you how to sublimate mugs from design, to print, to press in three different ways — mug press, convection oven, and air fryer! I’ll walk you through creating three styles of mug wraps (including a FULL wrap), customizing them, and then using the slice tool in Cricut Design Space to make them the perfect size for your item. I’ll share all my tips and tricks from start to finish, using free gorgeous floral designs I created just for you.

This is a Cricut Mystery Box project — it uses the same Cricut Mug Blank that you could have gotten in the “World of Enchantment” mystery box in April 2023. While this mystery box is no longer available, you can still purchase the mugs below in my material list. Learn more in my Cricut Mystery Box Guide.
Sublimation is more of an art than a science. Sure, there are a bunch of steps, temperatures, sizes, and times to adhere to for the best results. But when you break it down, it’s still an art form — and a variable one at that.
Colors may sublimate different than you imagine, smudges or inconsistencies may appear in your final result, but you know what? In the end, you made that mug — and even if it’s not quite “gift quality”, it will still hold your water or coffee while you craft. So, are you ready to let go of perfection and start learning how to sublimate mugs?
Our first step is to learn how to customize designs in Cricut Design Space. Then we’ll use the Slice tool to fit them exactly to your size mug template. We’ll cover how to create two designs that form a border around the handle of the mug, as well as one full wrap design that goes completely around your mug, even under the handle.
Next we’ll use Cricut’s Print then Cut feature to print mug wrap designs on sublimation paper using a sublimation printer. Since these wrap designs are large, you will need legal size 8.5″ x 14″ paper and a 12″ x 24″ green StandardGrip Machine Mat from Cricut. A regular inkjet printer will NOT work for this project! Then we’ll cut our designs and sublimation liners from butcher paper using a Cricut cutting machine. This project can be cut with any Cricut Maker or Explore series machine, but not on the Joy a it does not have Print then Cut capabilities. If you don’t have a cutting machine, you can just cut your mug wraps and liners out with scissors.
Sublimation involves using high heat to transform sublimation ink into a gaseous state, which is then infused into the mug’s surface. Remember, not all mugs can be used for sublimation — you need to use mugs sold as “sublimation blanks” to get results!
Now comes the fun part! There are a few different ways to sublimate mugs, and we’ll delve into two of my favorites: a Cricut Mug Press and a dedicated convection oven. Both methods require some preparation of your blank sublimation mug, and then the magic happens! Simply wait for it to sublimate, let your mug cool, then peel off the paper and liners (and shrink wrap if you used the oven method) to reveal your beautifully sublimated mug design!
But remember how I just said there are a few different ways to sublimate mugs? Later on in the tutorial, I’ll show you two more bonus methods you can try when sublimating coffee cups: The silicone wrap method, and the dedicated air fryer method. I honestly love how crafts like sublimation use so many methods to create similar results, so you can pick whichever one works for you! And I think that discovering your unique way of crafting is half the fun.
Sublimating mugs at home is a great way to create high-quality crafted gifts that are personalized and from the heart. After this tutorial, you’ll know all about how to sublimate mugs and be ready to start gathering supplies and creating! Imagine how excited your friends and family will be when you gift sublimation coffee mugs made just for them!
Ready to learn how to sublimate mugs? This post contains some affiliate links for your convenience (which means if you make a purchase after clicking a link I will earn a small commission but it won’t cost you a penny more)! Read my full disclosure policy.
Materials And Tools to Make a Sublimation Mug
Get my complete shopping list with the exact items I used to make these mugs on Amazon!
- Sublimation mugs — I used the 15 oz, 12 oz, and color ones in “Ocean” and “Miami”
- Sublimation Printer – I used a converted Epson EcoTank ET Printer (see my tutorial here to learn how to convert it to sublimation)
- Sublimation ink – I use this sublimation ink
- Legal size 8.5″ x 14″ sublimation paper – I use this Sublimation Paper
- (Optional) A way to cut your mug wrap – I used the Cricut Maker 3 but you can use any Cricut with the Print then Cut feature or just use scissors
- Green StandardGrip Mat, 12″ x 24″ – note that this is the long one
- A pair of Scissors
- Heat Resistant Tape
- Brayer
- Fan
- Heat resistant gloves
- Ruler
- Lint Roller
- Design #493 – My free sublimation mug PNG and SVG designs, available in my free library (get the password at the bottom of this post.)
For Cricut Mug Press method:
- Mug Press — I use the Cricut Mug Press
- Cricut EasyPress Mat
- One sheets of White Uncoated Butcher Paper
For Convection Oven or Air Fryer method:
- Dedicated Convection Oven or Air Fryer– do NOT use your kitchen oven or other appliances for this project or you will not be able to use them to cook food afterward
- Oven Thermometer – optional but helpful to get the temperature perfect
- White Uncoated Butcher Paper
- Shrink Wrap Tubes and a heat gun or blow dryer – I used this heat gun
- Silicone Mug Wrap – make sure you get one that fits your mug!
How to Sublimate Mugs

How to Sublimate Mugs
Learn how to design and sublimate mugs using Cricut Design Space and the Cricut Mug Press.
Materials
- Cricut Sublimation Mug, 15 oz -OR-
- Cricut Sublimation Mug, 12 oz -OR-
- Cricut Sublimation Blank Mug 15 oz in Ocean -OR-
- Cricut Sublimation Blank Mug 15 oz in Miami
- Sublimation ink - I used Hiipoo
- Legal size 8.5" x 14" sublimation paper I used A-SUB 125 g Sublimation Paper
- White Uncoated Butcher Paper
- Mug shrink wrap tubes
- Design #493 – My free designs (available in my free library—get the password at the bottom of this post.)
Tools
- A way to cut your design - I used the wonderful Cricut Maker 3, but you can use any Cricut with Print then Cut
- Sublimation Printer - I used a converted Epson EcoTank ET-4700 Inkjet Printer
- Cricut Mug Press -AND-
- Cricut EasyPress Mat -OR-
- Dedicated Convection Oven (Don't use your kitchen oven for this project)
- Scissors
- Heat Resistant Tape
- Brayer
- A Fan for ventilation
- Heat resistant gloves
- Dedicated Air Fryer (Alternative Method)
- Ruler
- Oven thermometer optional
- Cricut Green StandardGrip Machine Mat, 12" x 24"
- Heat gun or Blow Dryer - I used a SEEKONE heat gun
- Silicone Mug Wrap that fits your mug
- Lint Roller
Instructions
STEP 1: GET MY FREE DESIGN FILES
You can use any of my floral sublimation design files in Design #493 from my resource library, or any one of the many designs in my library. You can also use your own design.
Sublimation, especially on objects like mugs, is more of an art than a guaranteed scientific success. There are many variables at work - ink, print quality, pressure, getting a flat design to fit a round surface, time, heat variability, and more! So please don't expect a perfect, gift-quality result on your first try. Learning any new skill involves experimenting and making a few mistakes. You may also use up materials faster while you learn, so start with extra paper, prints, mugs, and shrink-wrap tubes if possible. Remember, an "imperfect" decorated mug will still hold your coffee perfectly while you craft!
Download the files from my free resource library and pick your design.
Open Cricut Design Space and upload the SVG file. If you’re not sure how to upload an SVG cut file to Cricut Design Space, watch this helpful video training series I made for you.
I've included templates for both the 12 oz and 15 oz Cricut Mug blanks as well as four designs that you can upload in Design Space and customize.
In the file you'll find two floral frames and two wrap-around patterns that fit under the handle.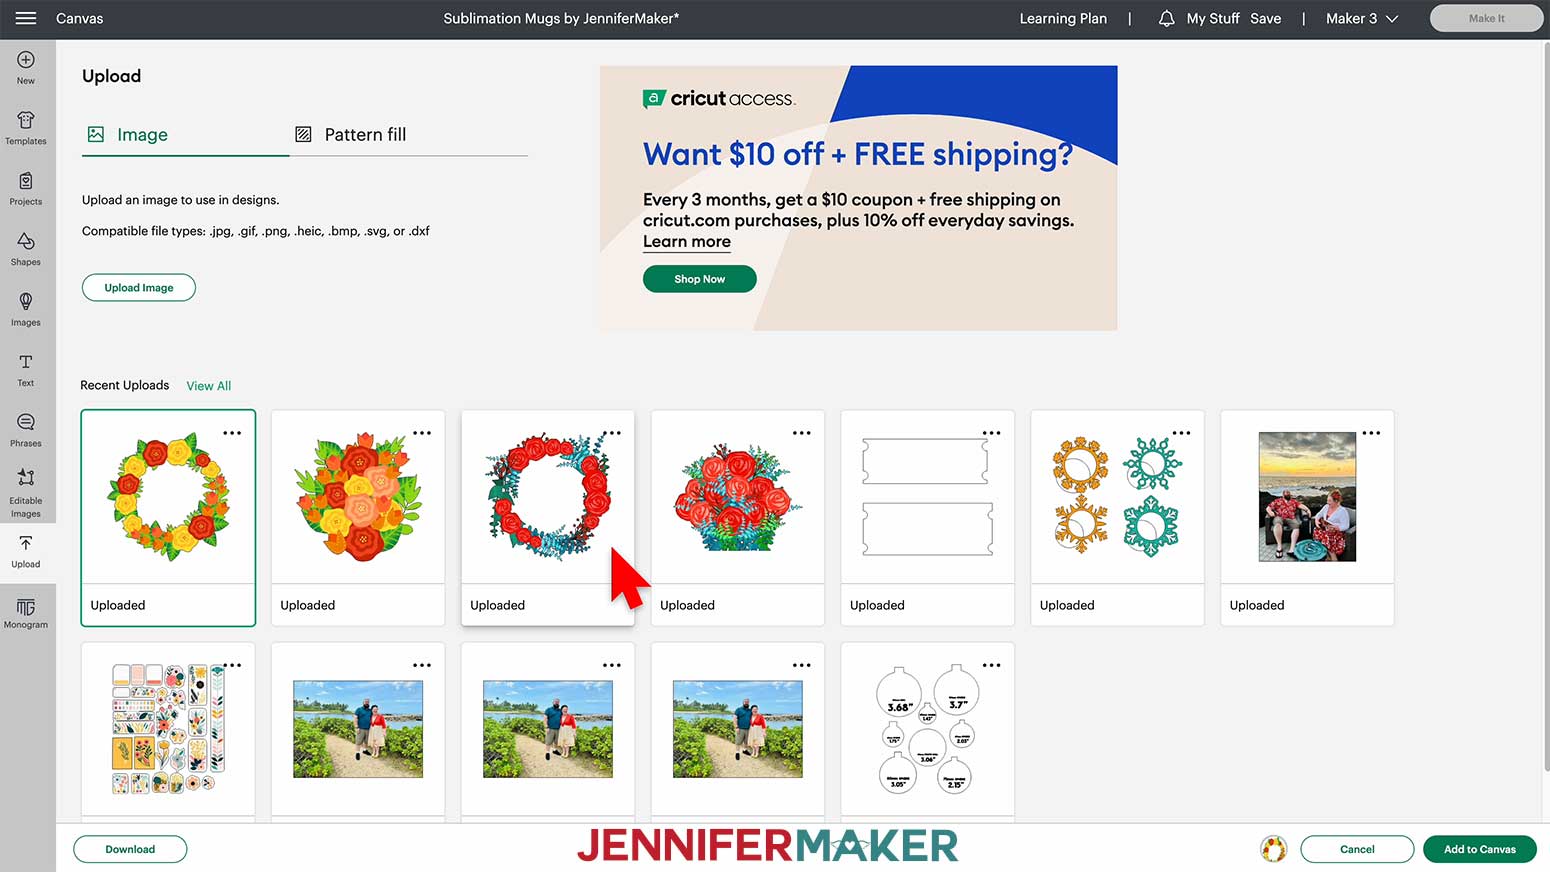
I'll show you how to customize your mug using my beautiful designs in Cricut Design Space.
Open Design Space, click on New Project in the upper right of the screen and click on Upload on the left side of the canvas.
Click Upload image, and then browse to find the project folder. First, select the mug template SVG file and press upload in the lower right-hand corner.
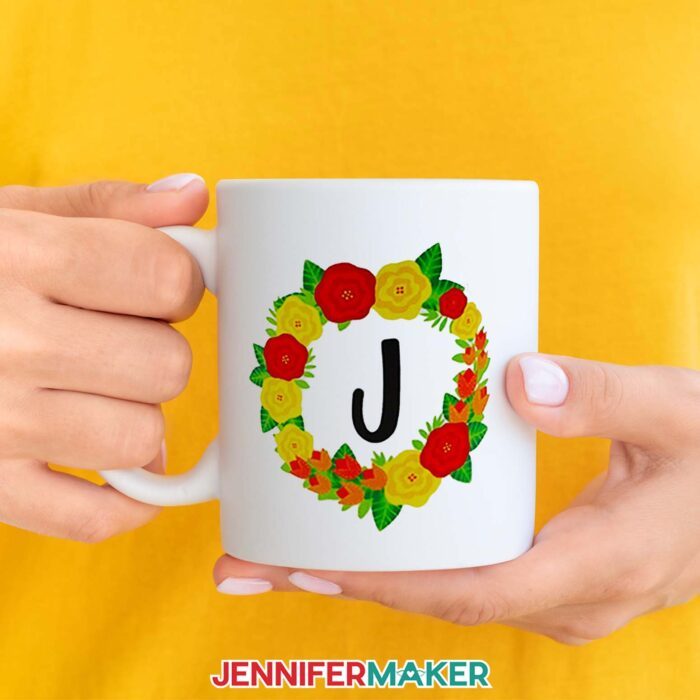
Next, click upload again and locate the PNG folder, click open, and you’ll see all 4 of my PNG files. Select one. I’ll be using the floral wreath with yellow flowers. Click Open.
At the upload screen, click Complex, and Continue. There is nothing we need to do on the next screen, so press Apply & Continue. Click the box with the Print then Cut Image, and select Upload.
Right-click to select the floral wreath and the template SVG and then select Add to Canvas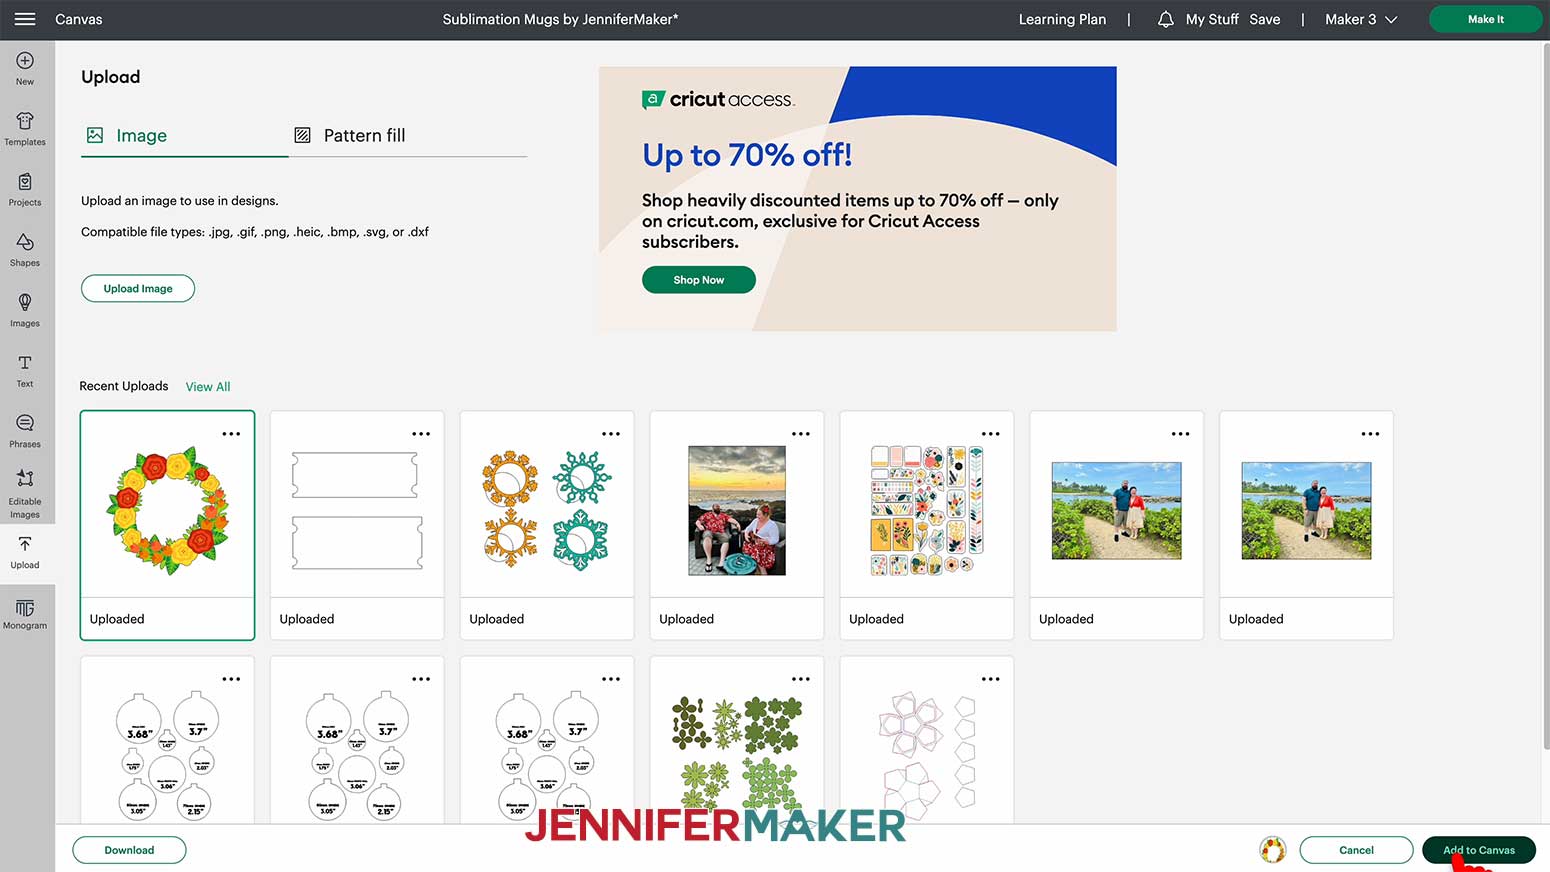
STEP 2: CUSTOMIZE THE FILES
PNGs tend to load a lot larger in Design Space. Click on the wreath and check the lock icon is closed in the top menu and change the width to 3”.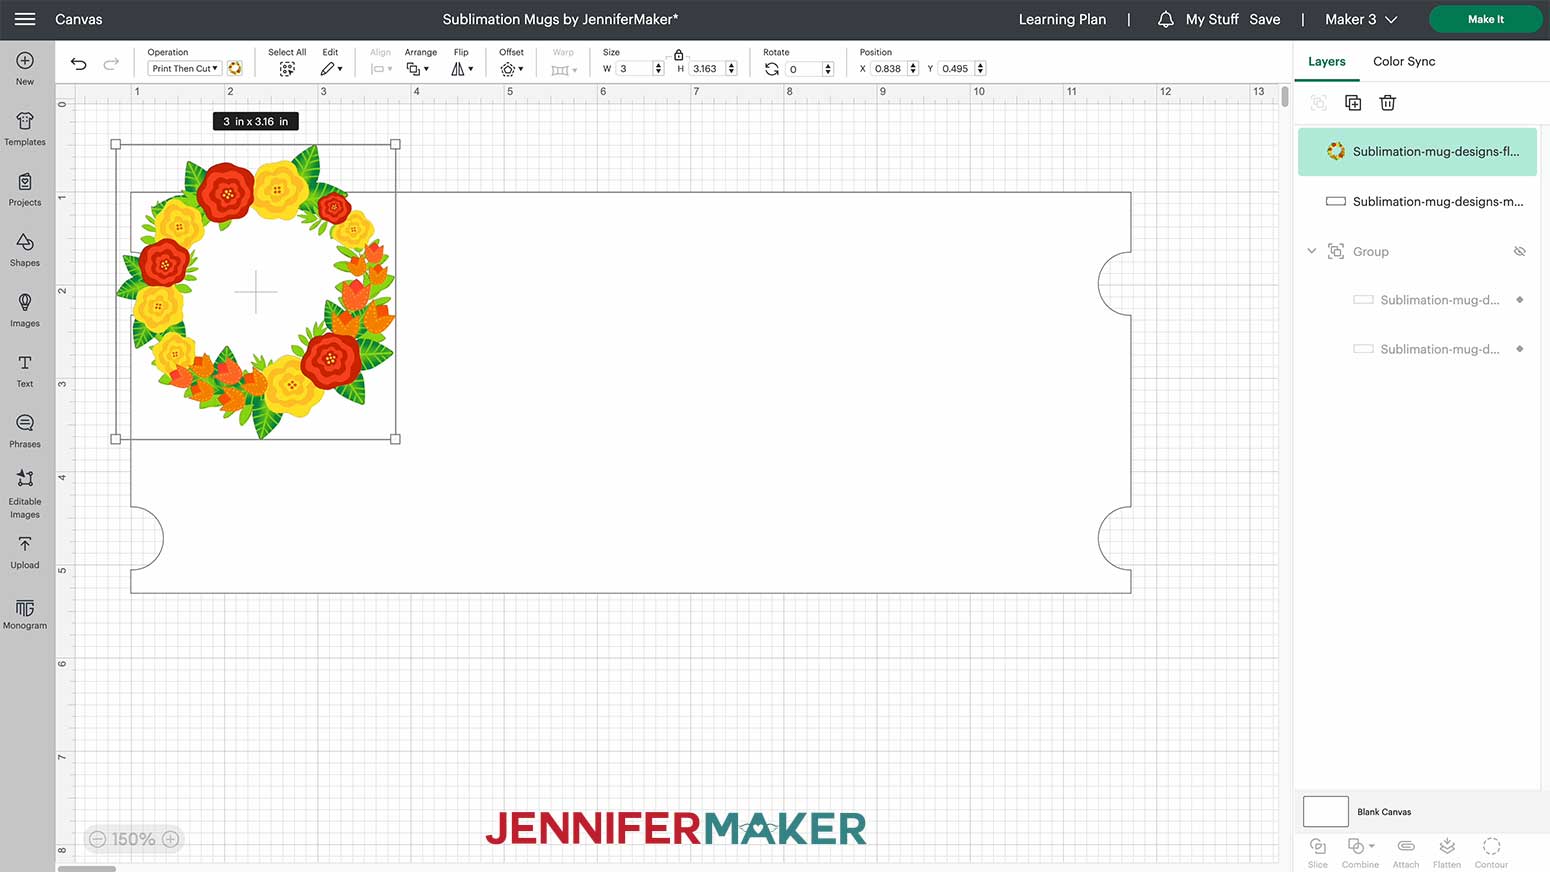
I will be personalizing the wreath with an initial and sublimating it on my 12 oz mug in my Cricut Mug Press, it's the template on the top. After I ungroup the templates, I will delete the template I'm not using.
Make three duplicates of the template, group them, right-click on the group, and select Send to Back. Hide the group using the eye icon. I will be cutting these out of butcher paper later. Since I am using printed sublimation sheets I will need to protect My Mug Press from extra ink.
Next, I'll move the mug template 1-inch mark in the upper left of the canvas and use the rulers on the canvas to place my design on the mug wrap template. You may have to right-click the wreath and select "Bring to Front". Drag the floral wreath design over the mug template, lining up the left edge of the bounding box with the 2-inch mark on the ruler along the top edge of the canvas. This will ensure that the design is spaced properly on each side of my mug.
Next, I’m going to add my initial. I will click the Text box on the left-hand side of my canvas and use the font drop-down menu and select the system tab. I'll change the font to Beachwood Sans which is available here: Beachwood Font Duo
You can also use a Cricut font or a free font called Lobster which is available at this link: Lobster Font
If you're unsure of how to upload fonts to Design Space, check out my helpful tutorial How to Upload New Fonts to Cricut Design Space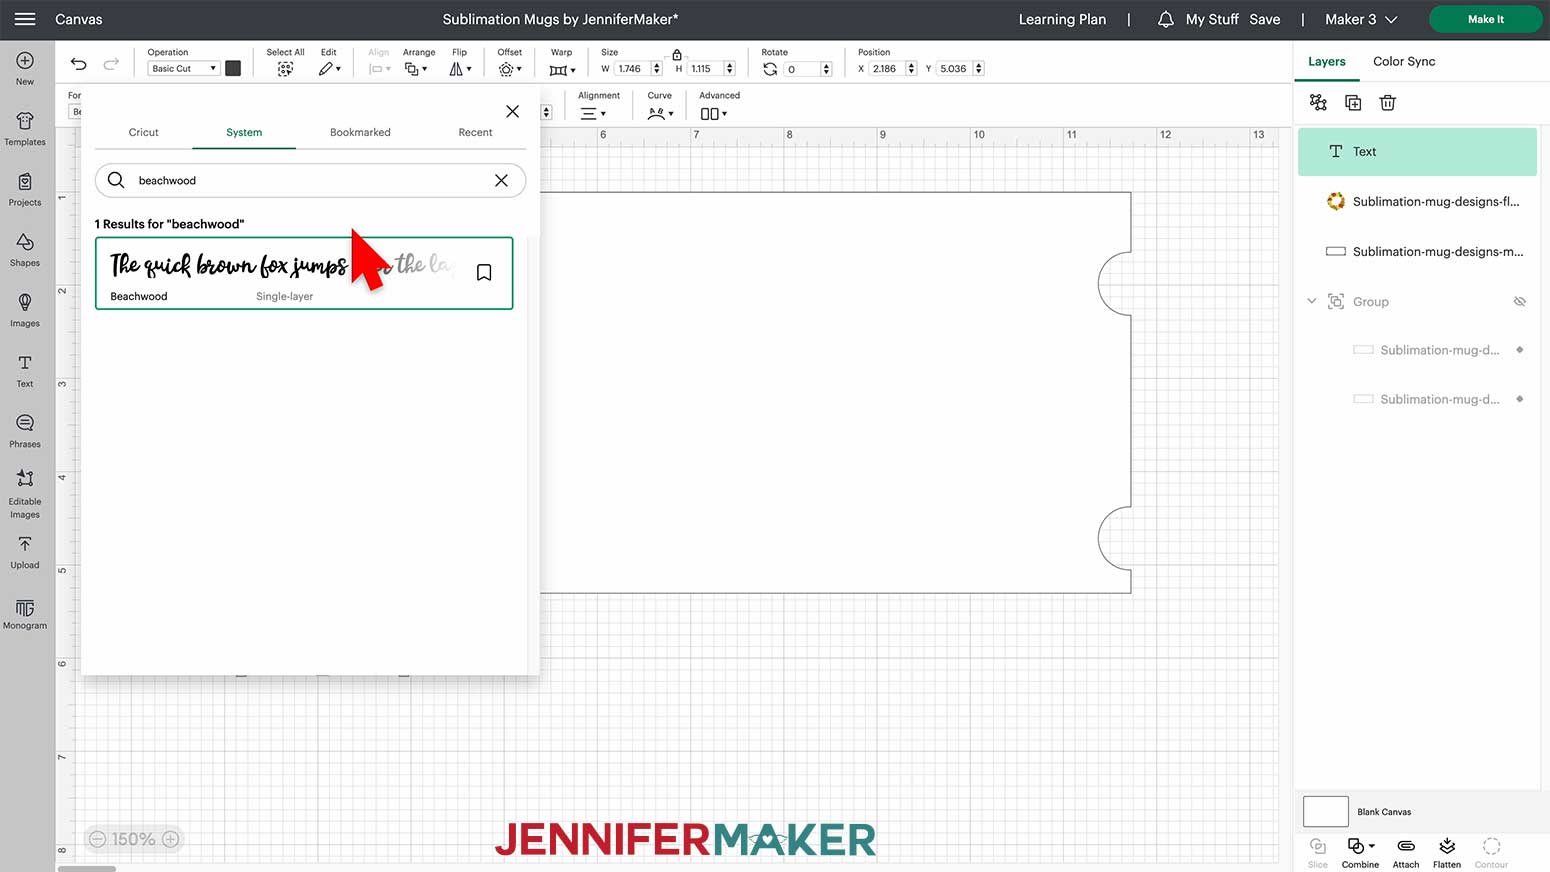
After I add the letter A to my canvas I’m going to change the color to black by clicking the color box in the operation menu at the top of my canvas and moving it over the floral wreath I'll resize it to 1.38” tall.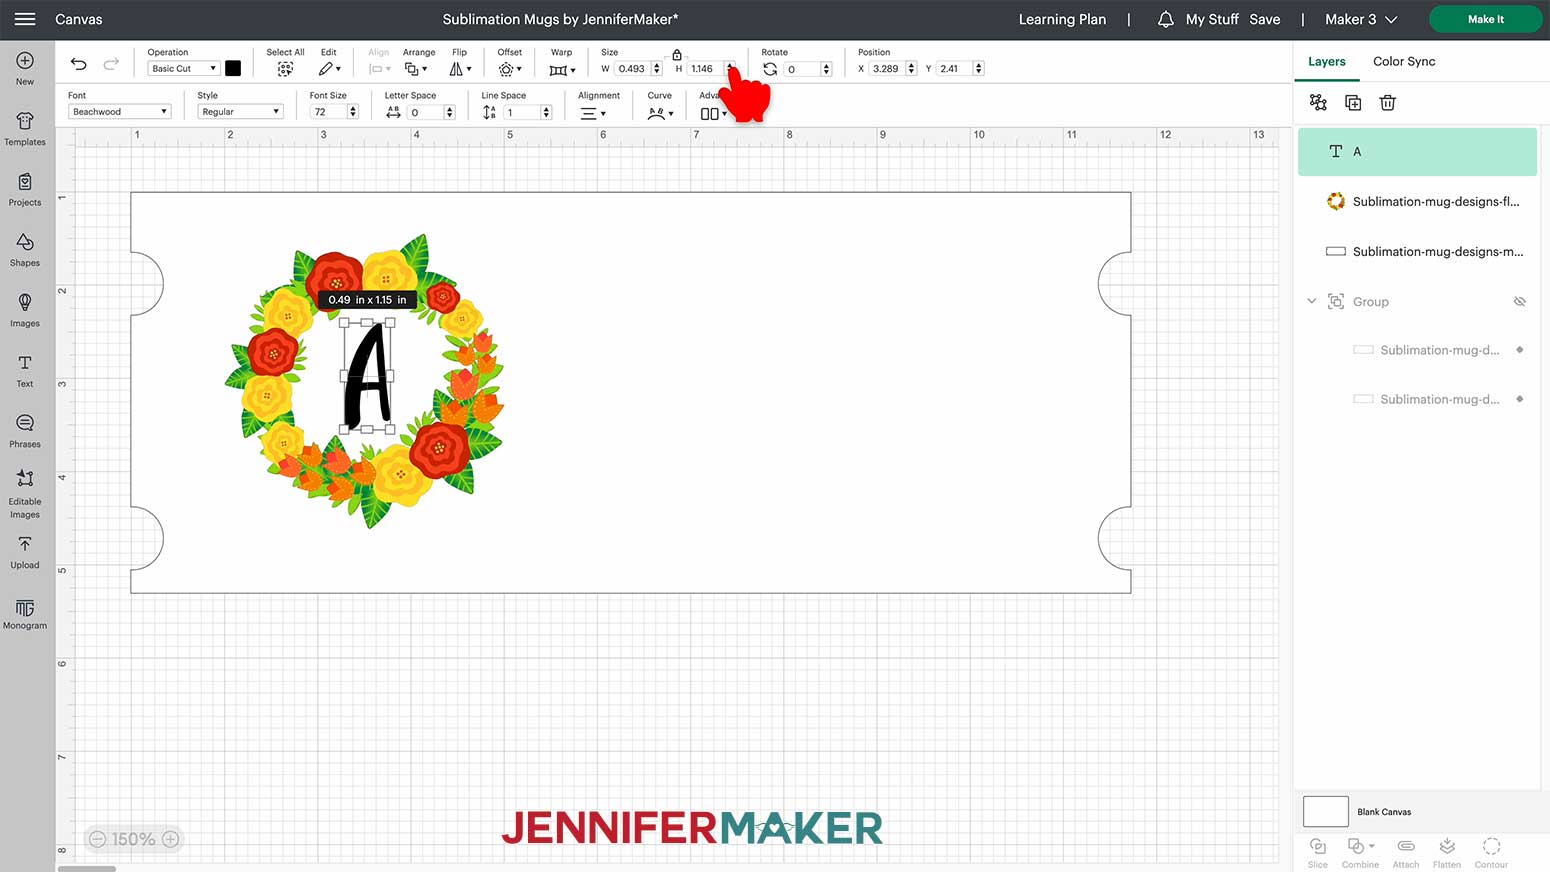
Next, I will select both the letter and the frame by holding down the shift key and selecting them in the layers panel. With the two layers selected click on Align in the top menu and Center. I think this placement looks nice so I will flatten the layers.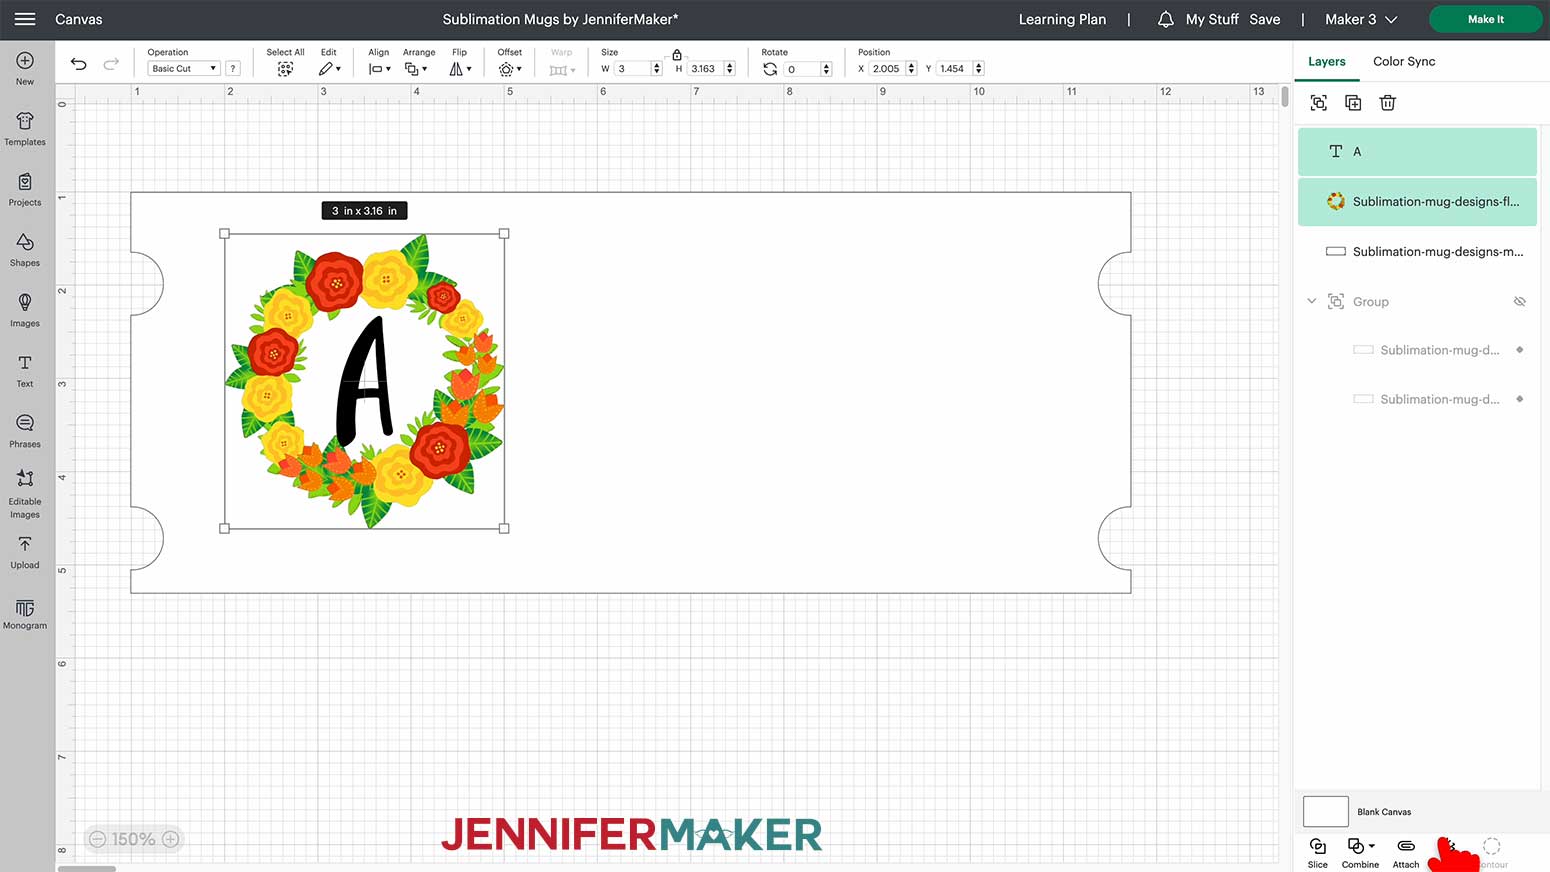
Next, make a copy of the wreath design by right-clicking on it and selecting “Duplicate.” Align the right side of the bounding box with the 10.6" mark on the ruler.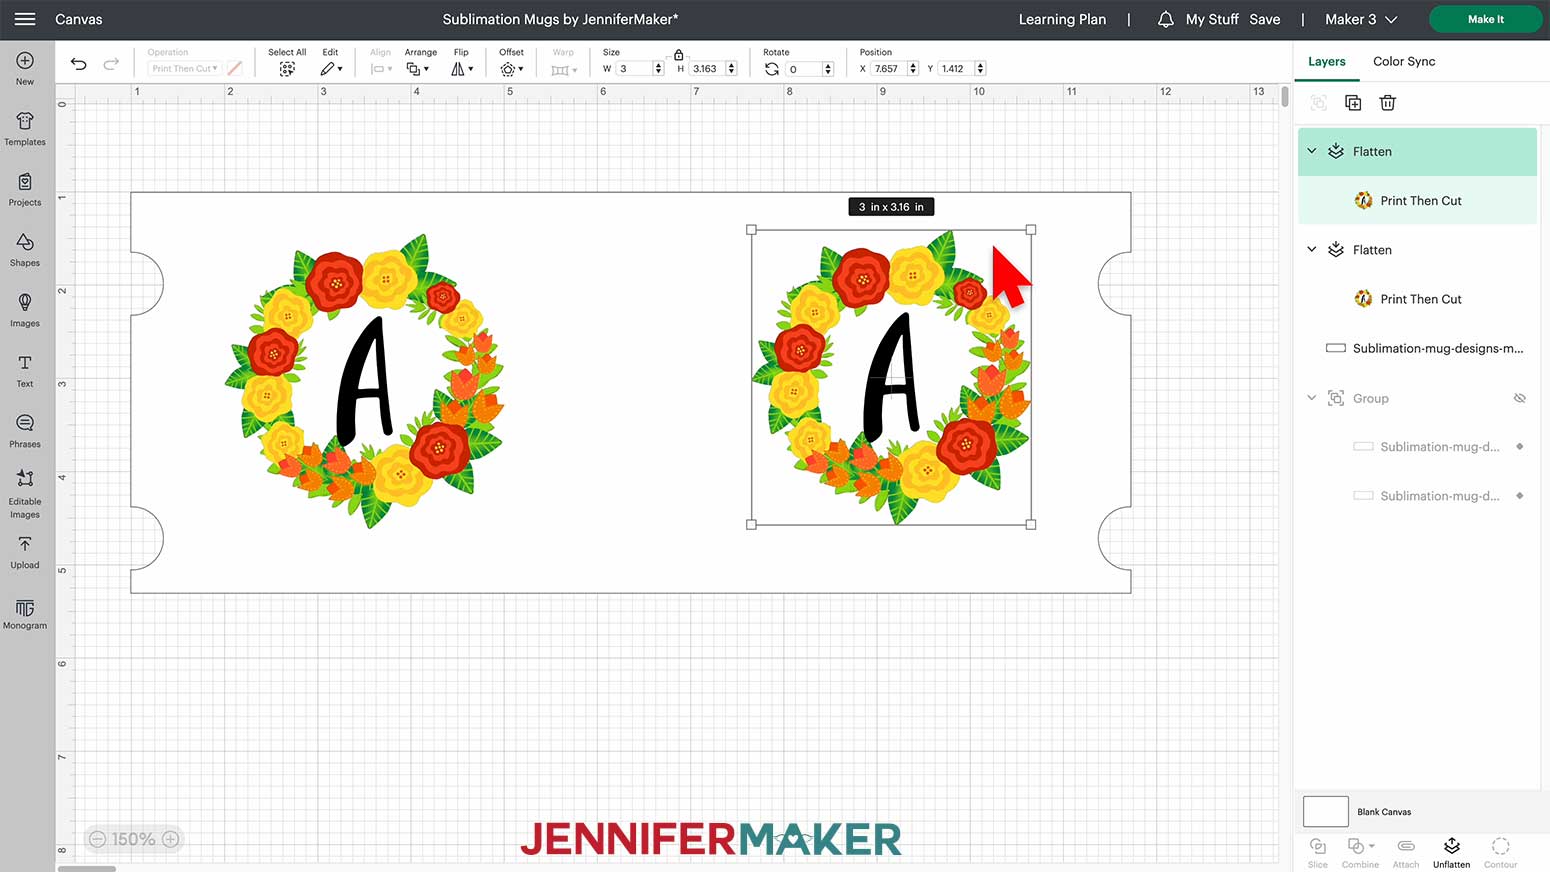
Now I’m going to drag a bounding box to select all three layers and click on Align menu at the top of my canvas, but this time we will be Centering vertically with all the layers still selected, I will flatten my design on the template, and unhide the group of templates.
I’m now ready to press Make It!
VARIATION 2: FULL MUG WRAP DESIGN
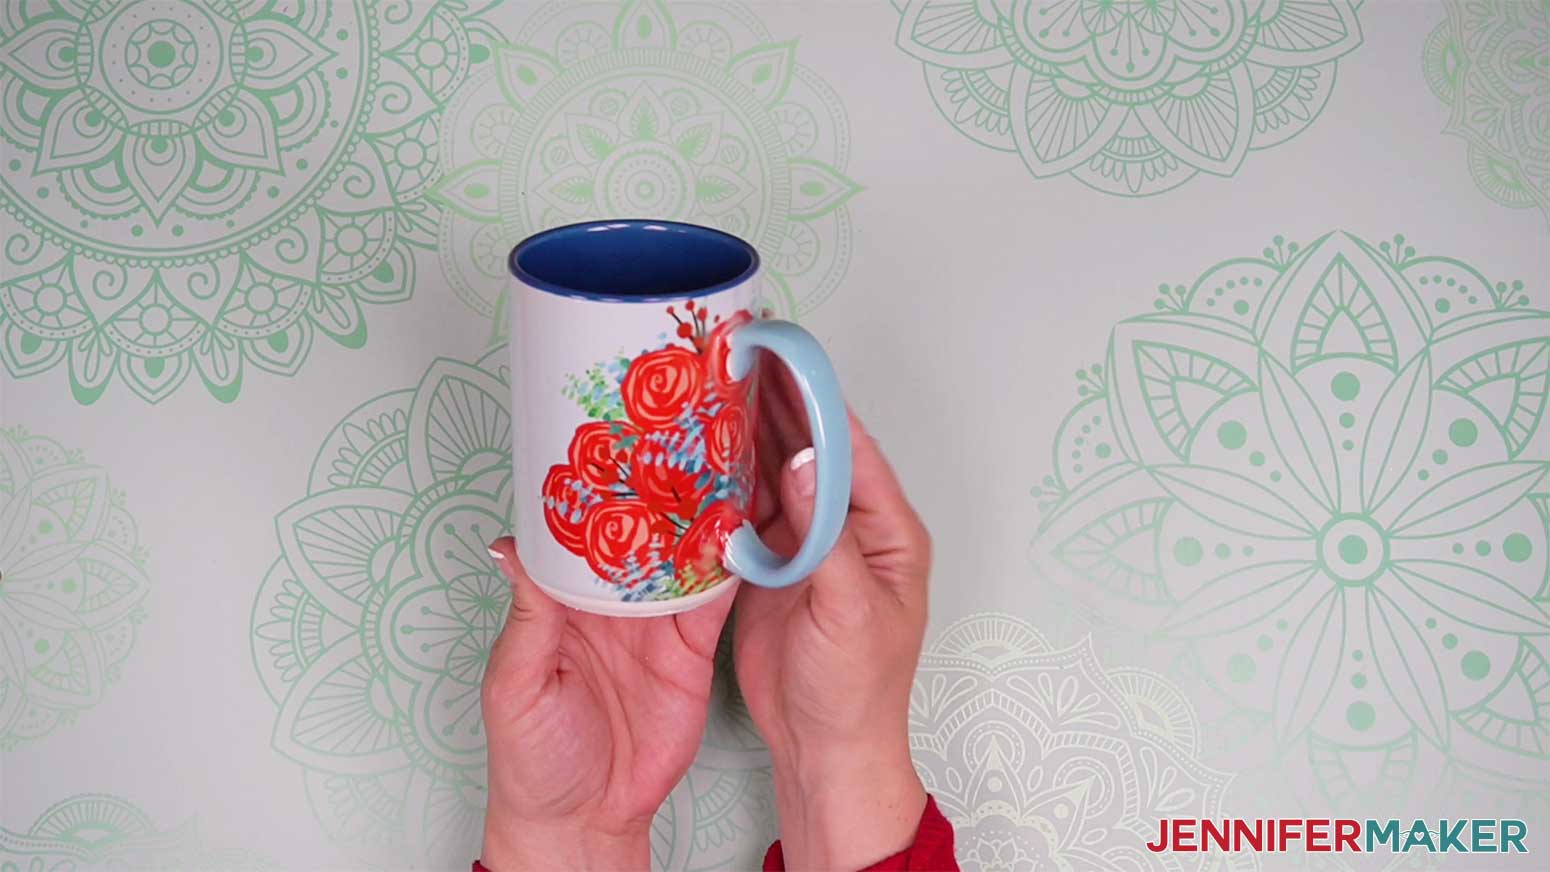
I'm using this beautiful beveled mug blank from Cricut in "Ocean" and sublimating a design on it that wraps under the handle. I will upload the mug template SVG from the project file folder, and ungroup the file. I'll be using the larger template to wrap my design under the handle so I will delete the smaller template on top.
With the blank template selected, right-click and select Duplicate, do this three times, group, and hide them. These will be cut out of butcher paper and go between the sublimation paper and the wrap.
Click on the upload button on the left side of the canvas.
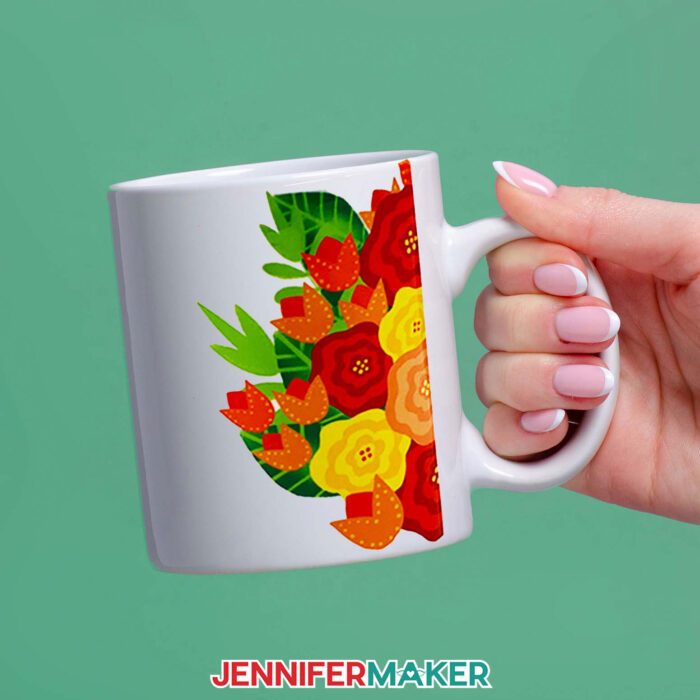
Next, I will upload another one of the PNGs from my file folder, press Upload Image, browse, and select a different PNG from the folder. I will choose this rose bouquet.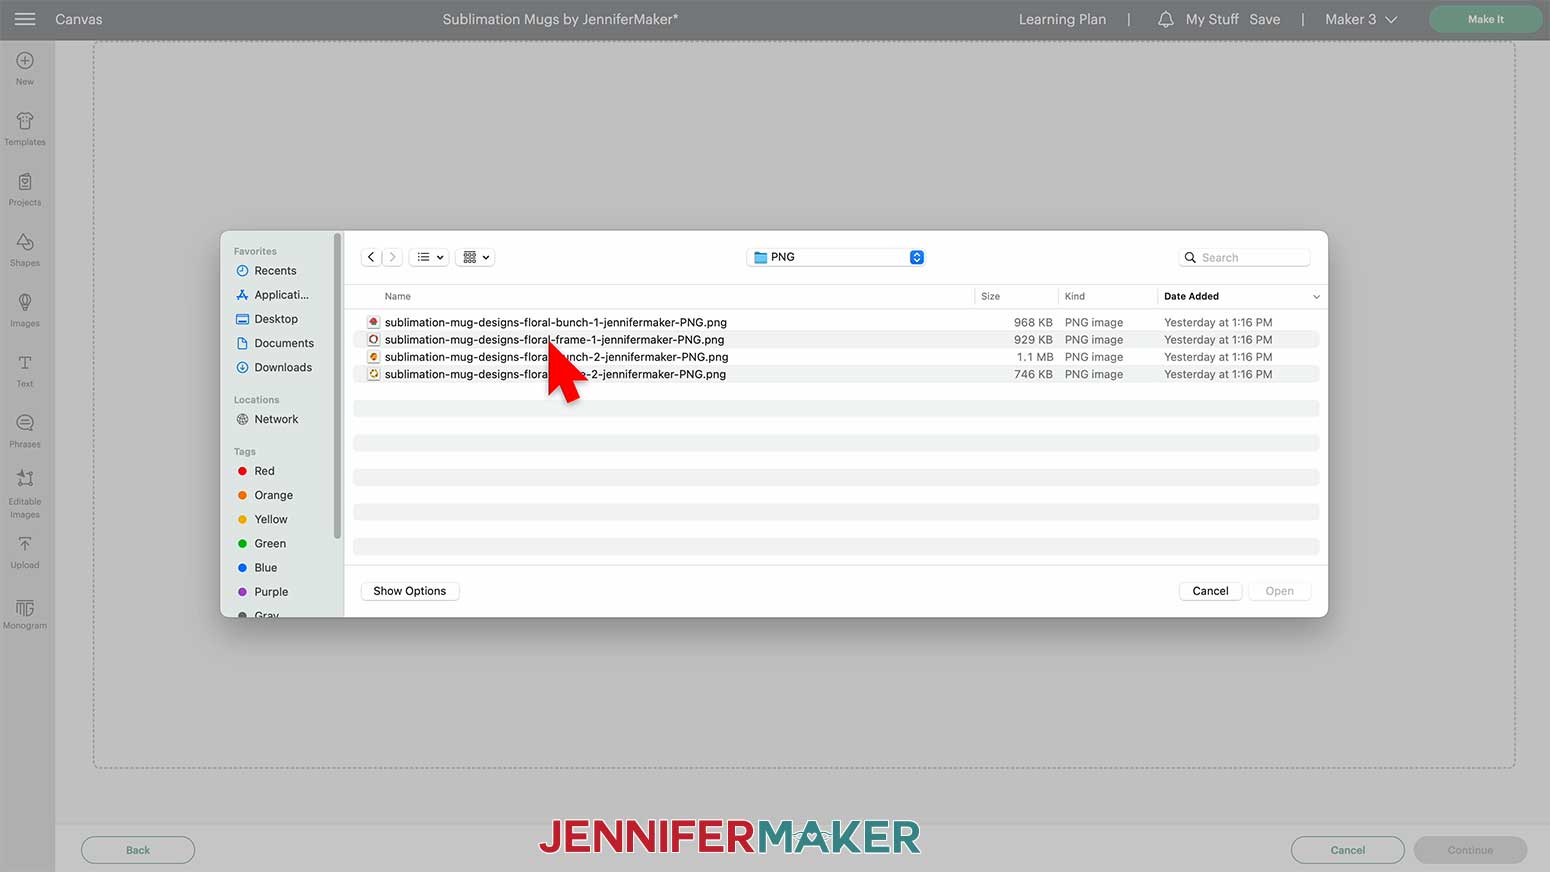
I will select Complex on the first screen and then click Apply and Continue on the next screen. Choose the Print Then Cut version and click Upload. I will click on the roses design image in my recent uploads screen and click Add to Canvas in the lower right corner. 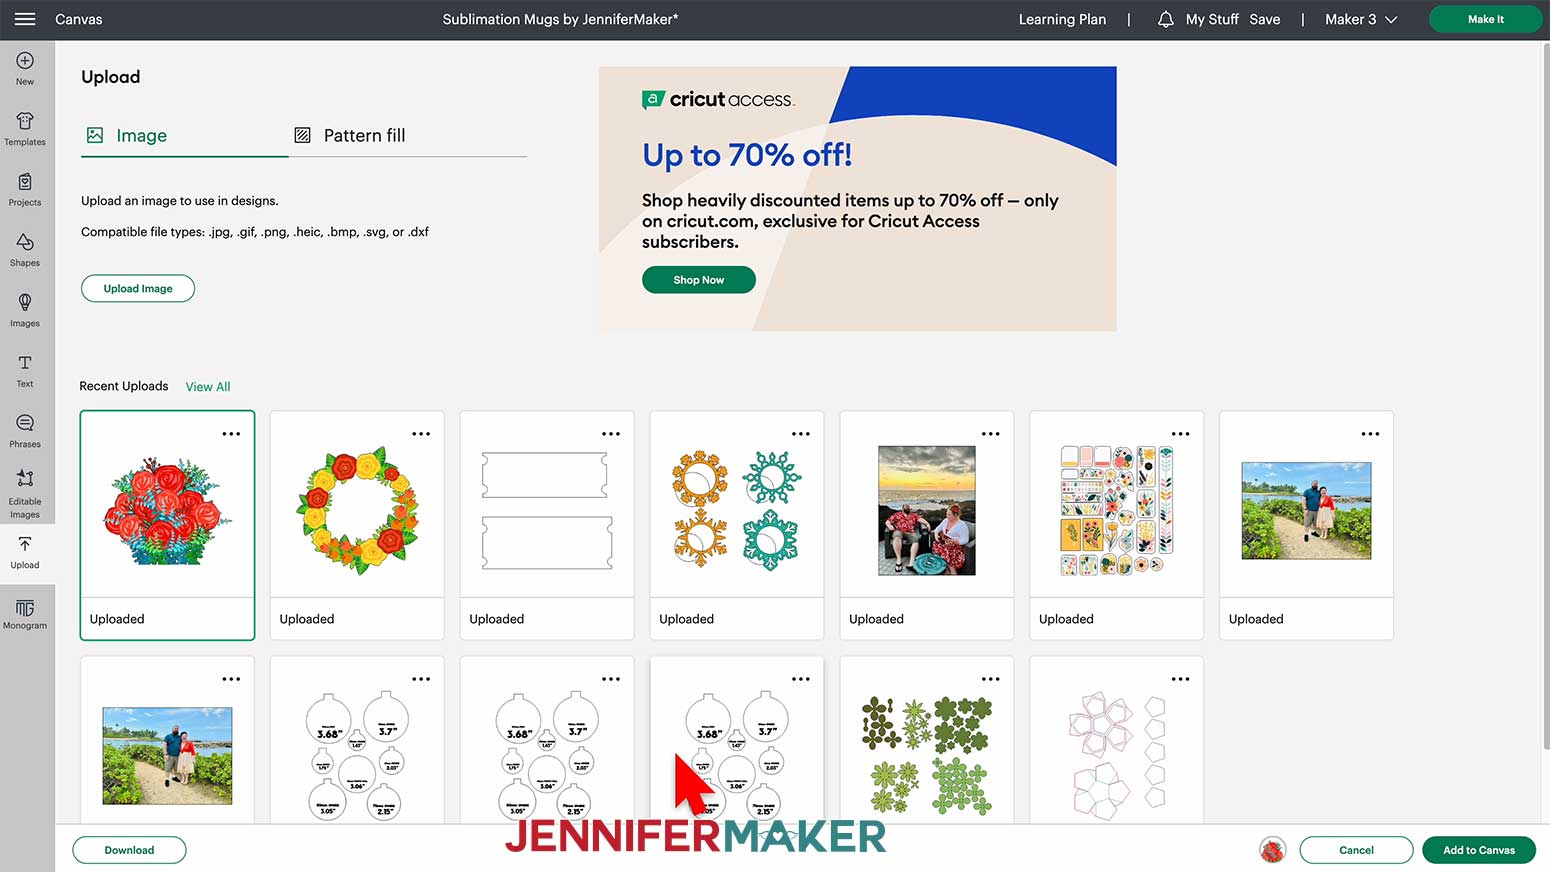
Since PNG files upload very large to the canvas, make sure the lock icon at the top of the canvas is closed. I will change the size to 6 inches wide to start. 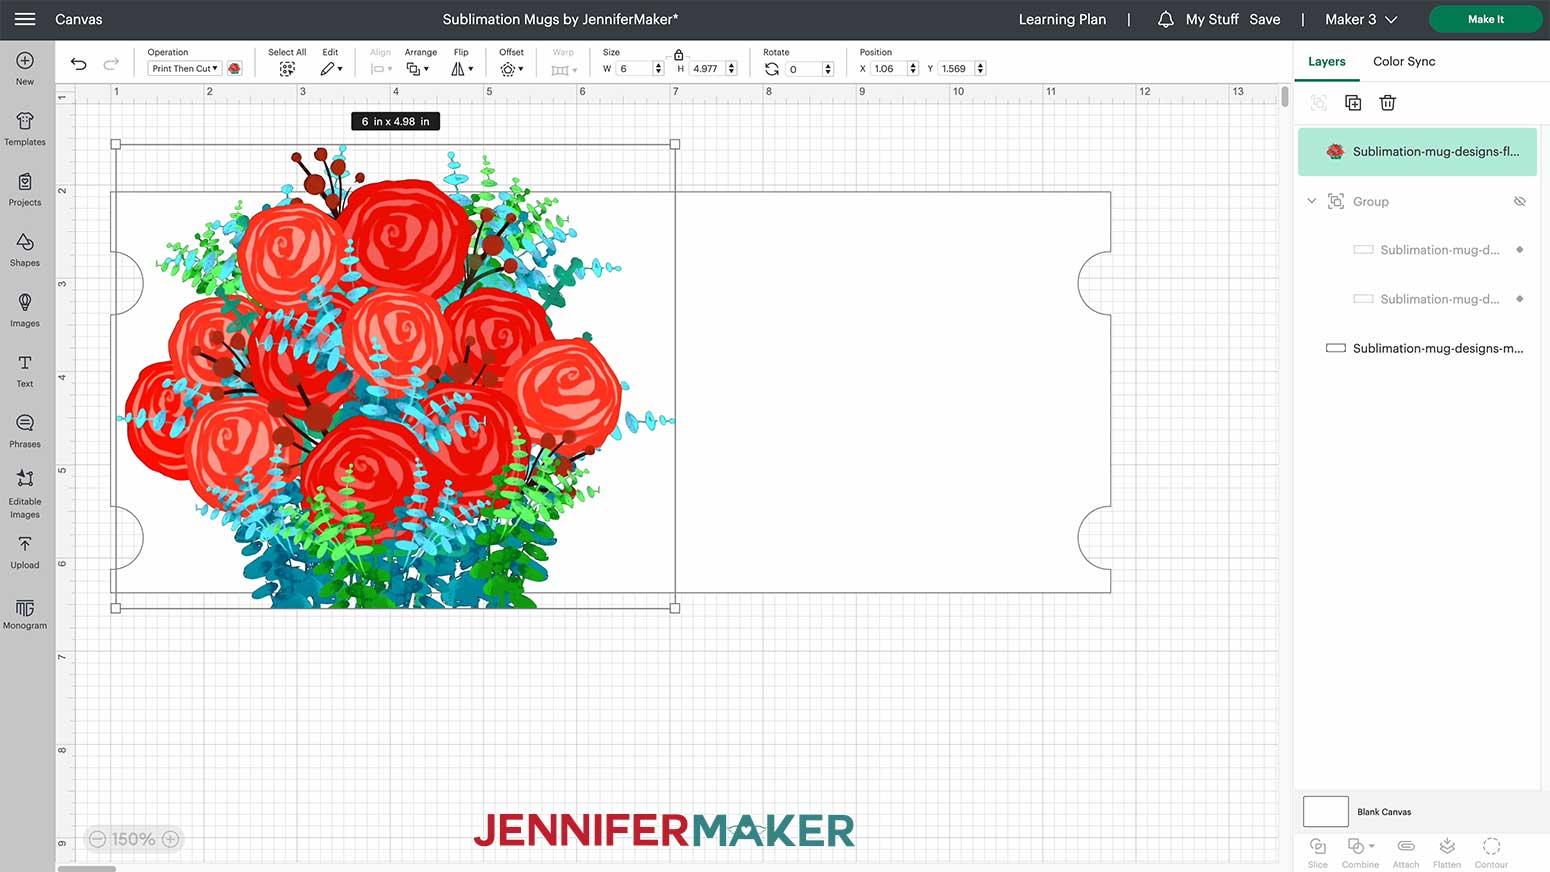
In order to create a wrap with a design that fits under the handle I will slice the rose bouquet top and bottom, to the width of my mug wrap.
I will click on the shapes menu on the left side of the canvas and select a square, I'll change it to pen using the operation menu at the top of my canvas. This will help us to see exactly where I'm slicing the image.
Next, I will click on the lock to unlock the shape, and noting the height of my template and width of the rose bouquet I will change the size of the square to 7” x 4.3” and lock the shape again.
Drag the rectangle over the rose bouquet. Select both then use align at the top of the canvas and select center vertically.
With both selected, click slice to trim the design. 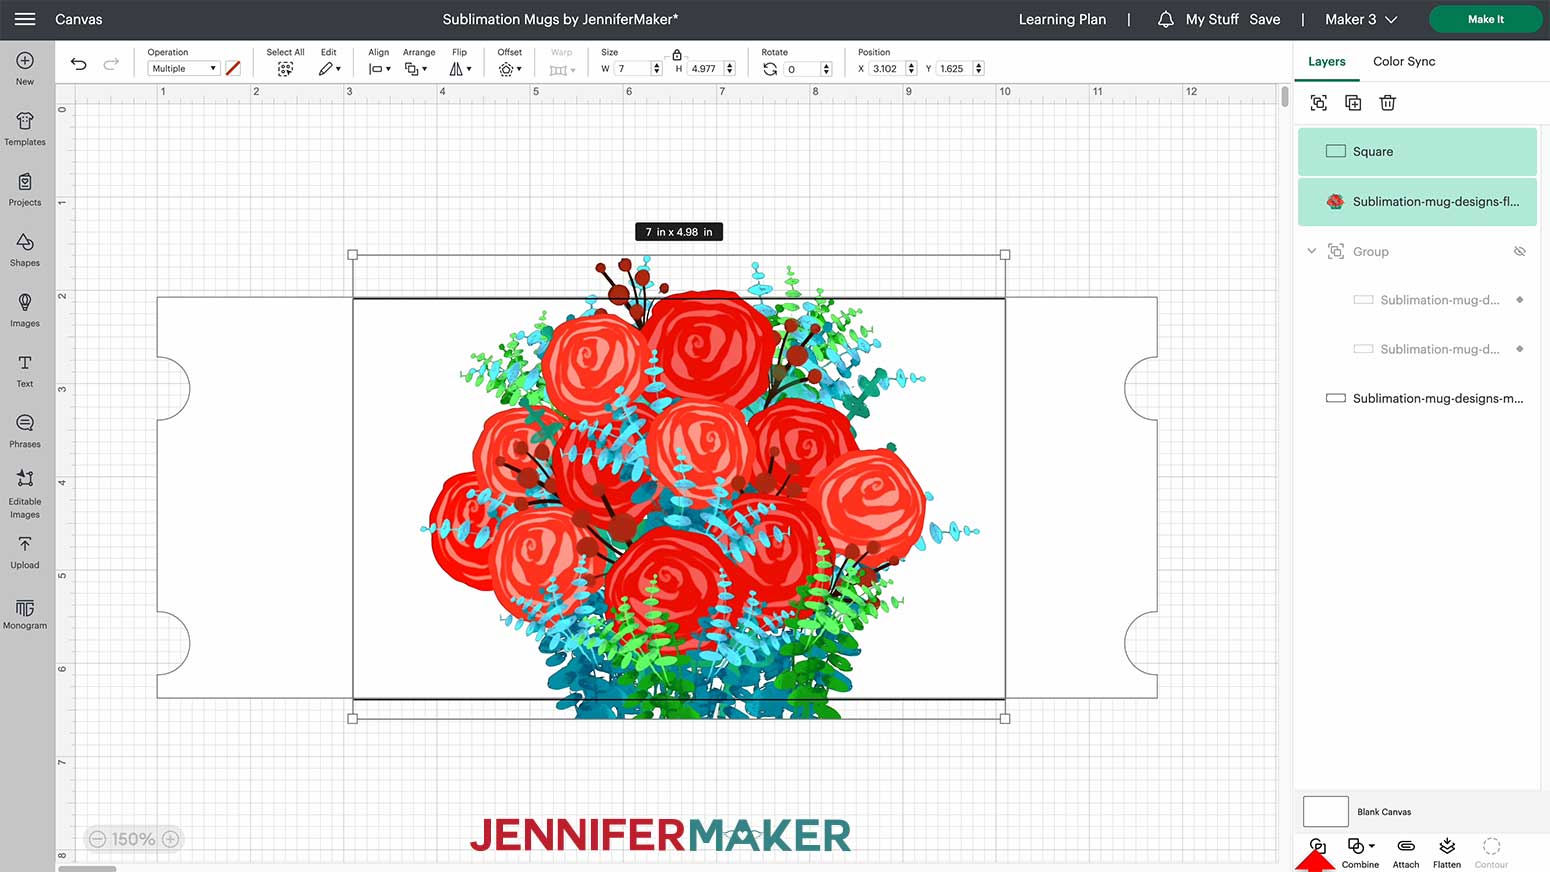
After the PNG is sliced I will delete any of the leftover shapes by selecting them from the layers panel by clicking the trash can at the top.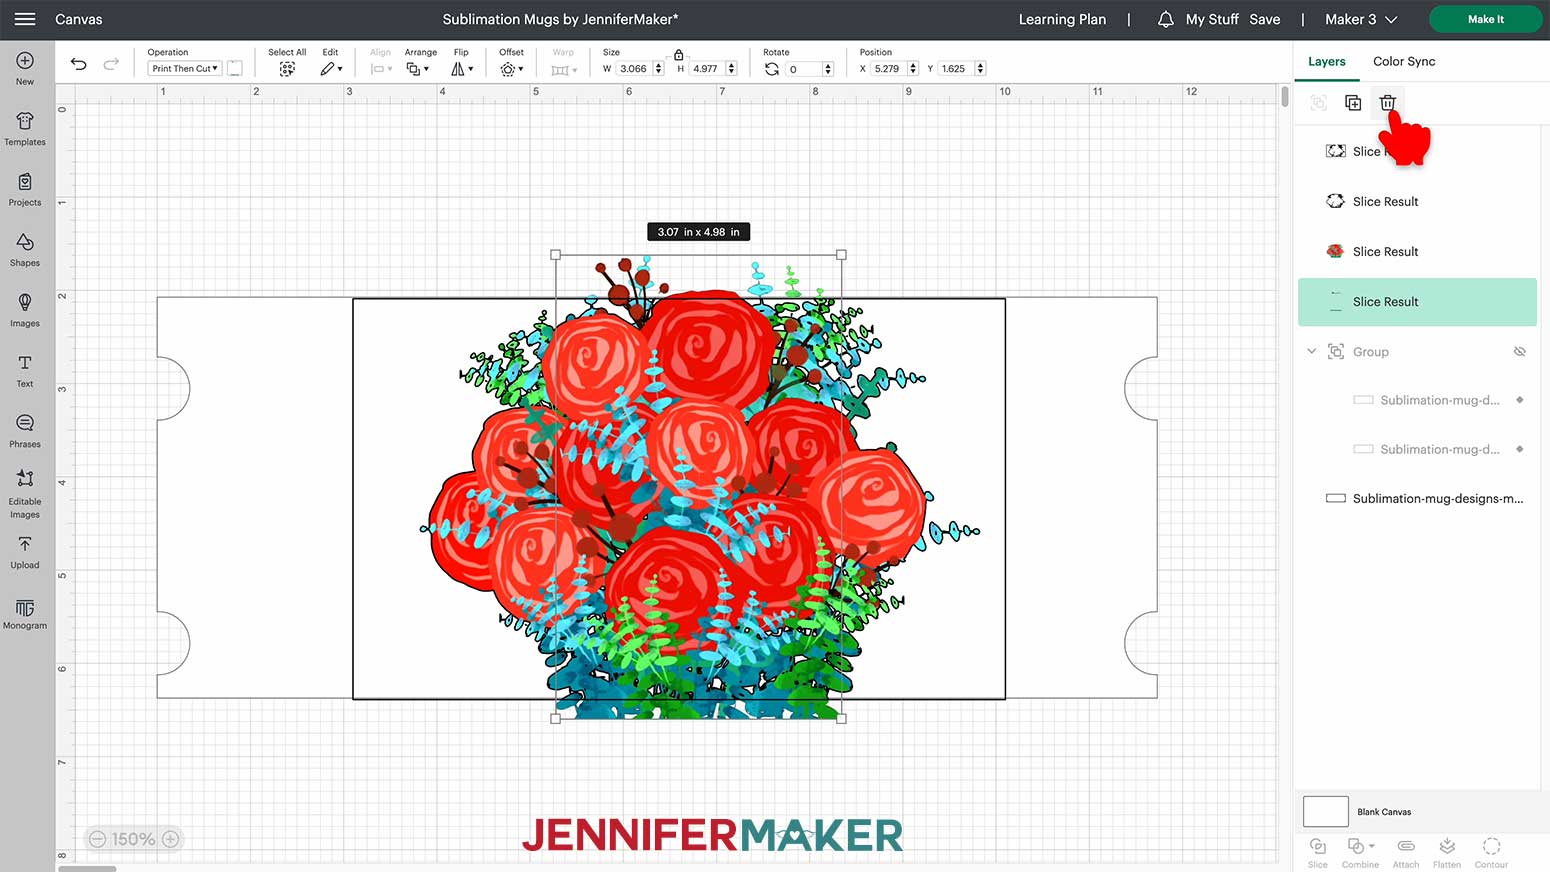
Next, I will cut the rose bouquet in half vertically by going back to the shapes menu and selecting another square and changing it to pen in the operations menu. Bring the rose bouquet image to the upper left corner of the canvas to measure its width using the canvas ruler. The rose bouquet is 6" across so I will change the width of my square to 3" x 5", I will cut it in half and line up the edges with the edge of the template.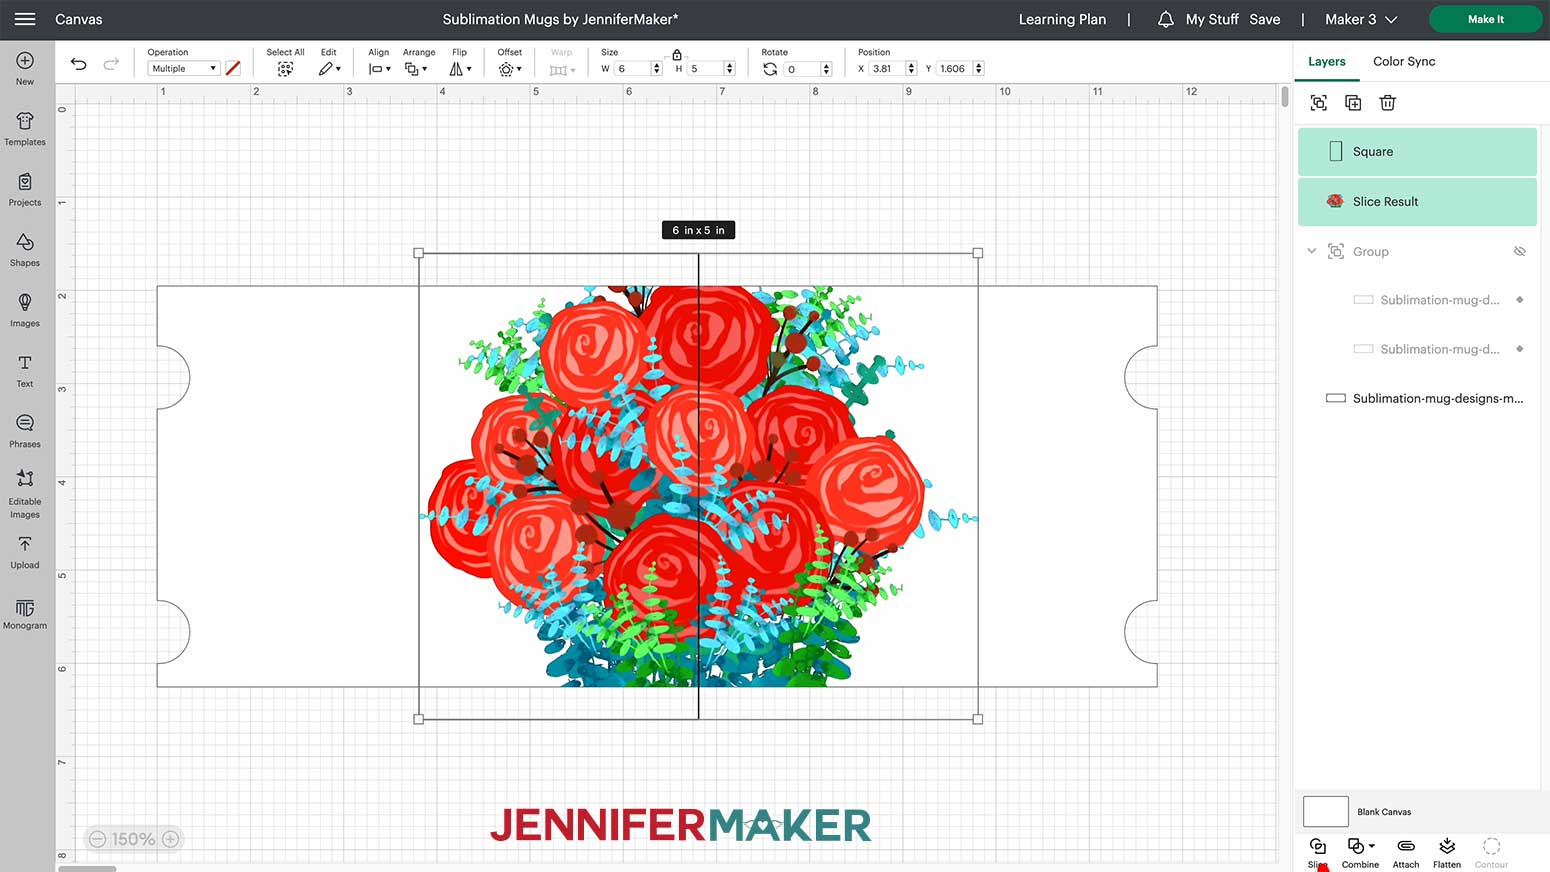
Holding down the shift key, select the square and rose bouquet in the layers panel. With both layers highlighted, I will click Slice in the bottom right corner of my canvas. Now I will select the leftover shapes in the layers menu and delete them using the trash can icon.
Now that my PNG is sliced in half it’s time to slice out the handle notches so the design will come together seamlessly under the handle of my mug. I am lining up the flat edge of each half of my design with the edge of my mug template and dragging a bounding box over all three, using Align at the top of the screen and selecting Center Vertically. 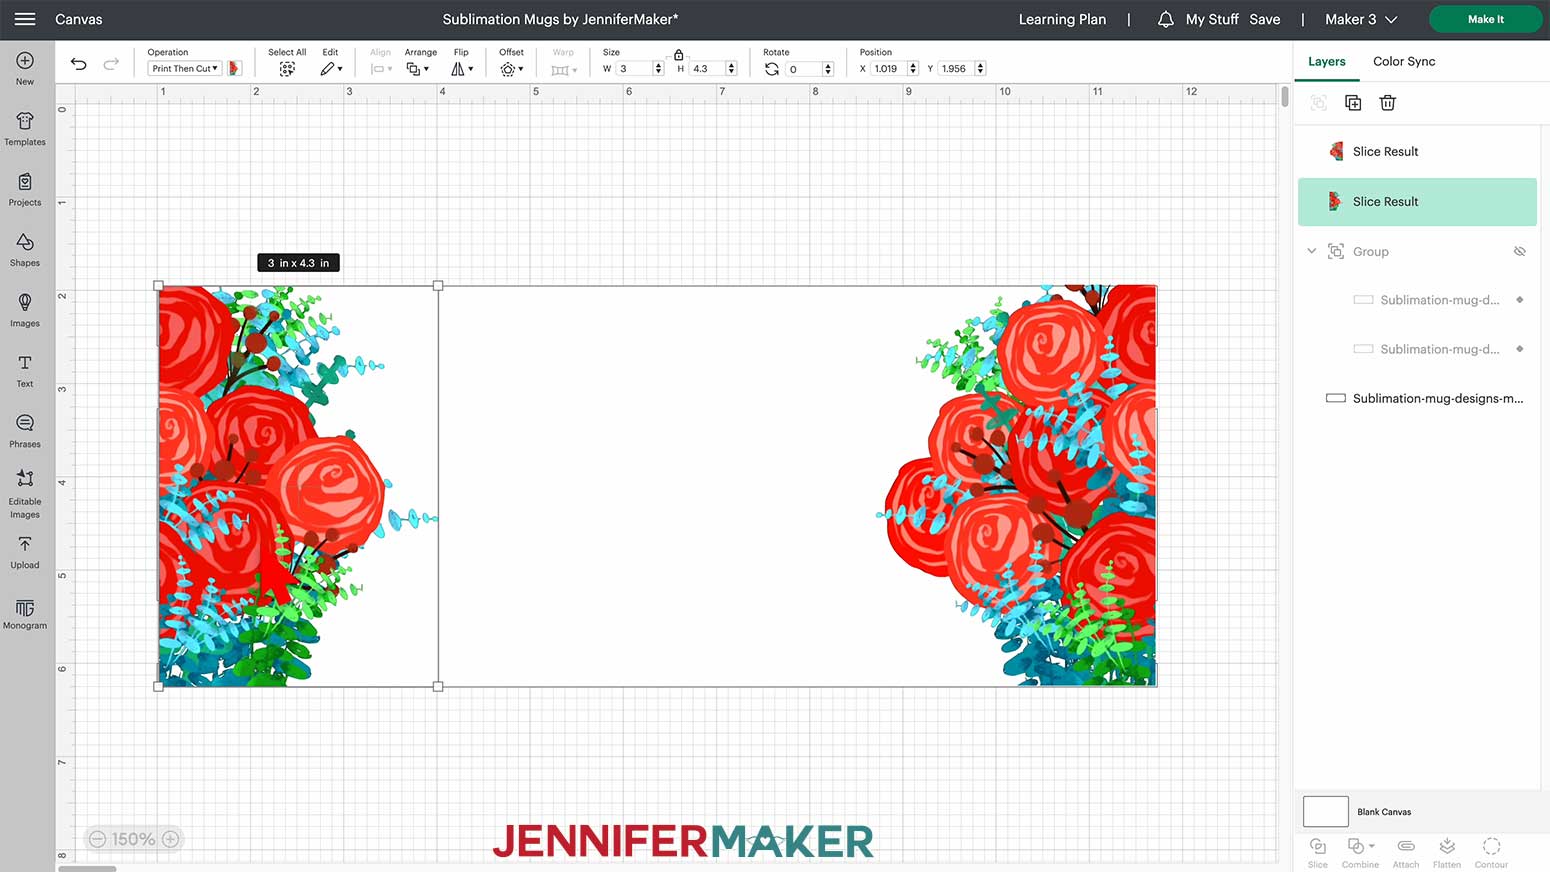
Next, I will select one half of the design and the template by holding down my shift key and selecting both layers in the layers panel. When I have two layers selected the Slice icon will darken. Click on Slice. 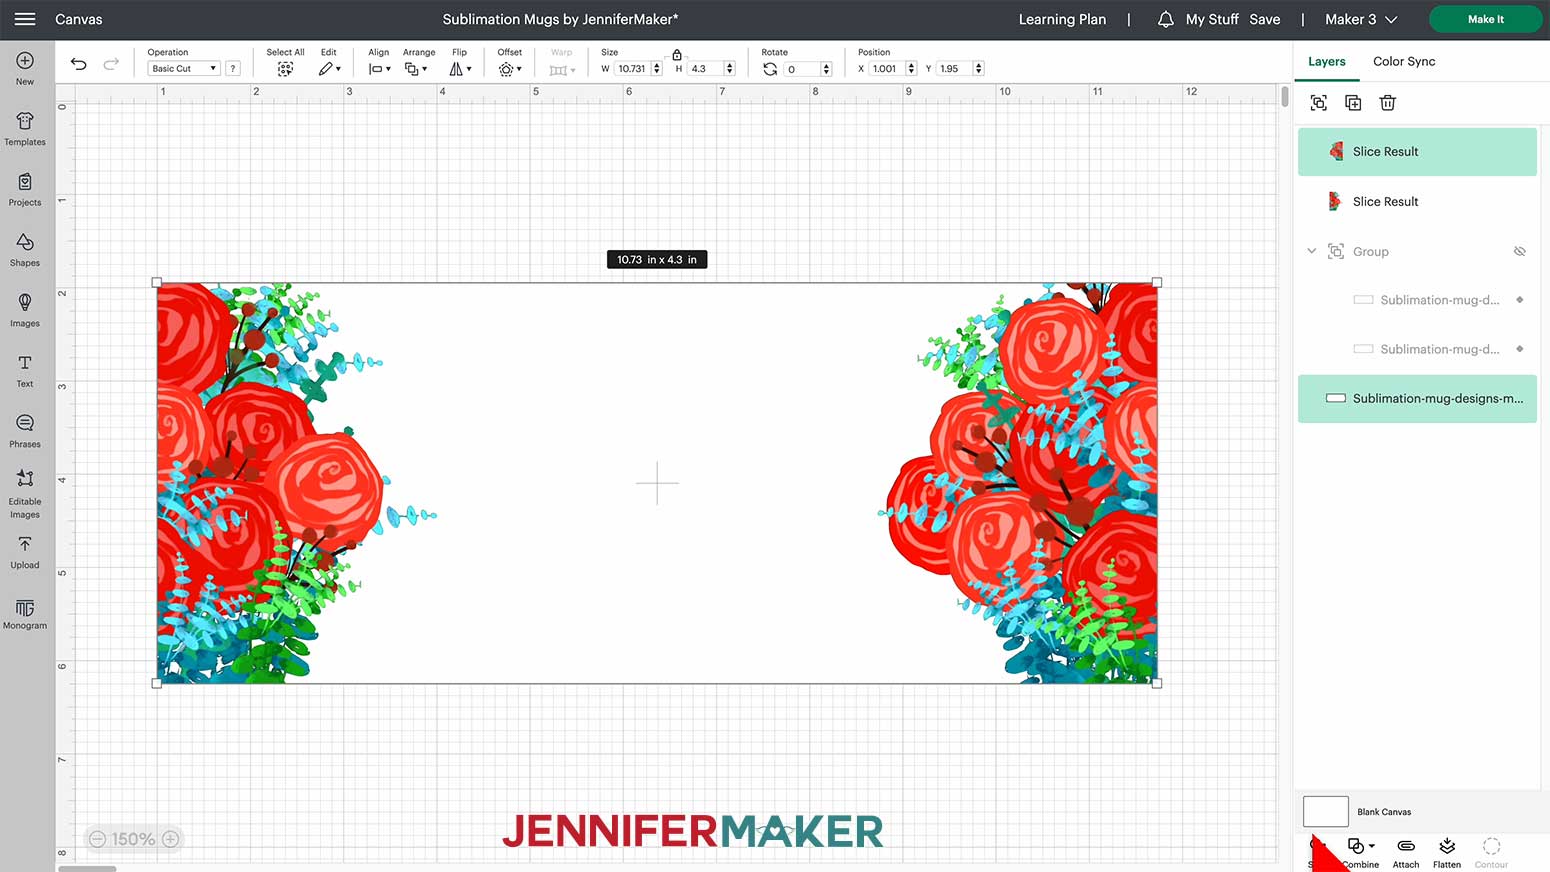
Next, I will select the other half of the design and the template again by holding the shift key and selecting the two layers from the layers panel on the right side of my canvas, and then clicking Slice. Now my layers panel has seven layers labeled Slice Result.
Holding down my shift key I will select the three template pieces from the layers panel. Click the Combine menu at the bottom right and weld the template back together, dragging it to the bottom layer.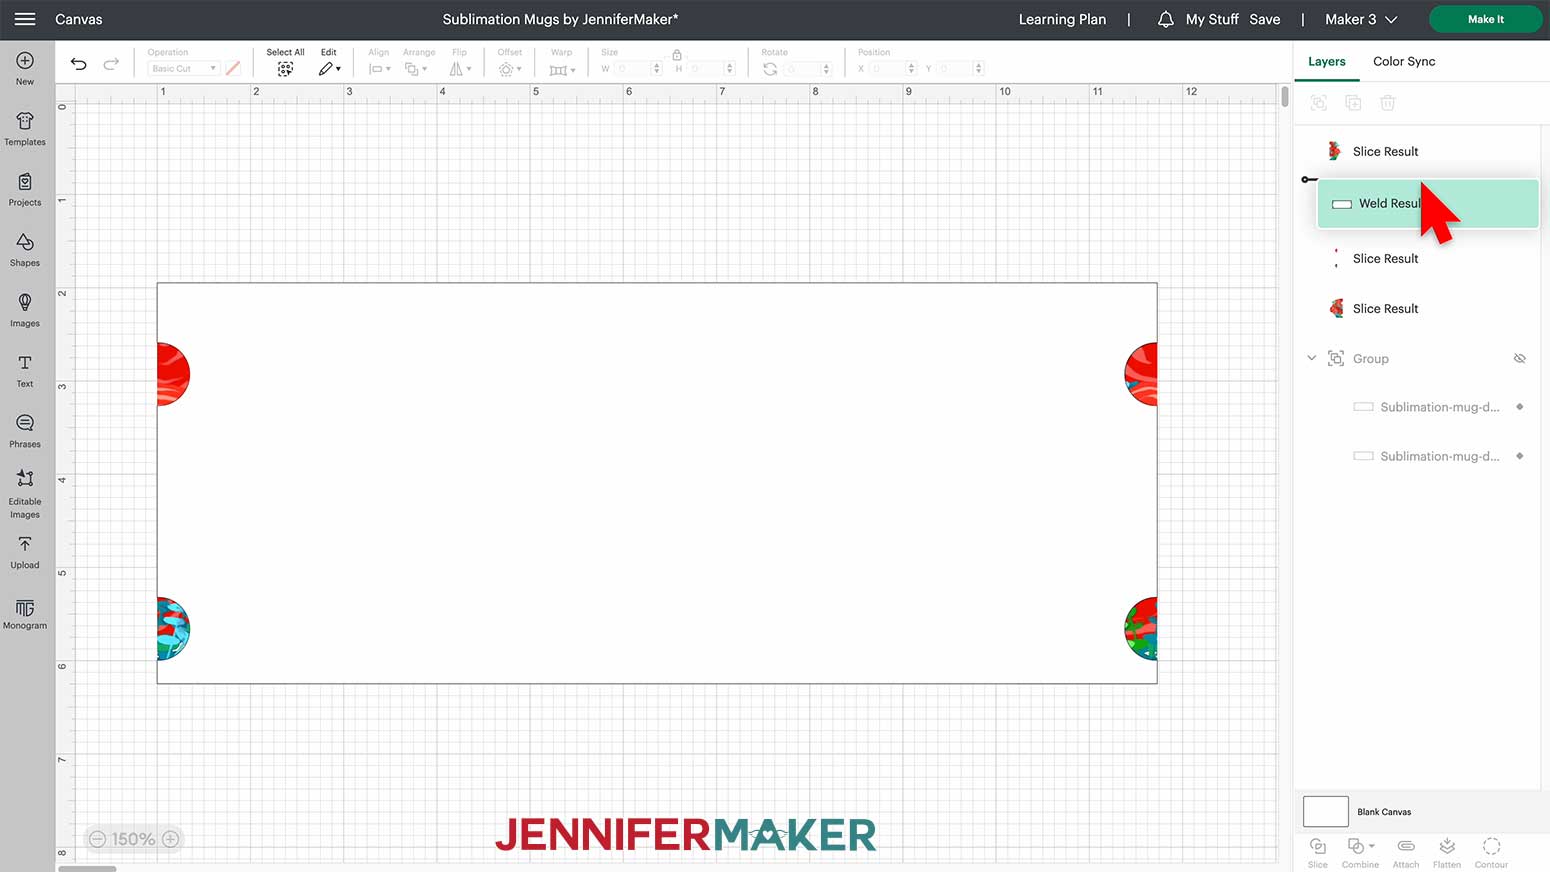
I’d like my mug to have a pale blue background. With the template selected, I will click on the color box in the operation menu and click Advanced. I selected #d0f3fd. 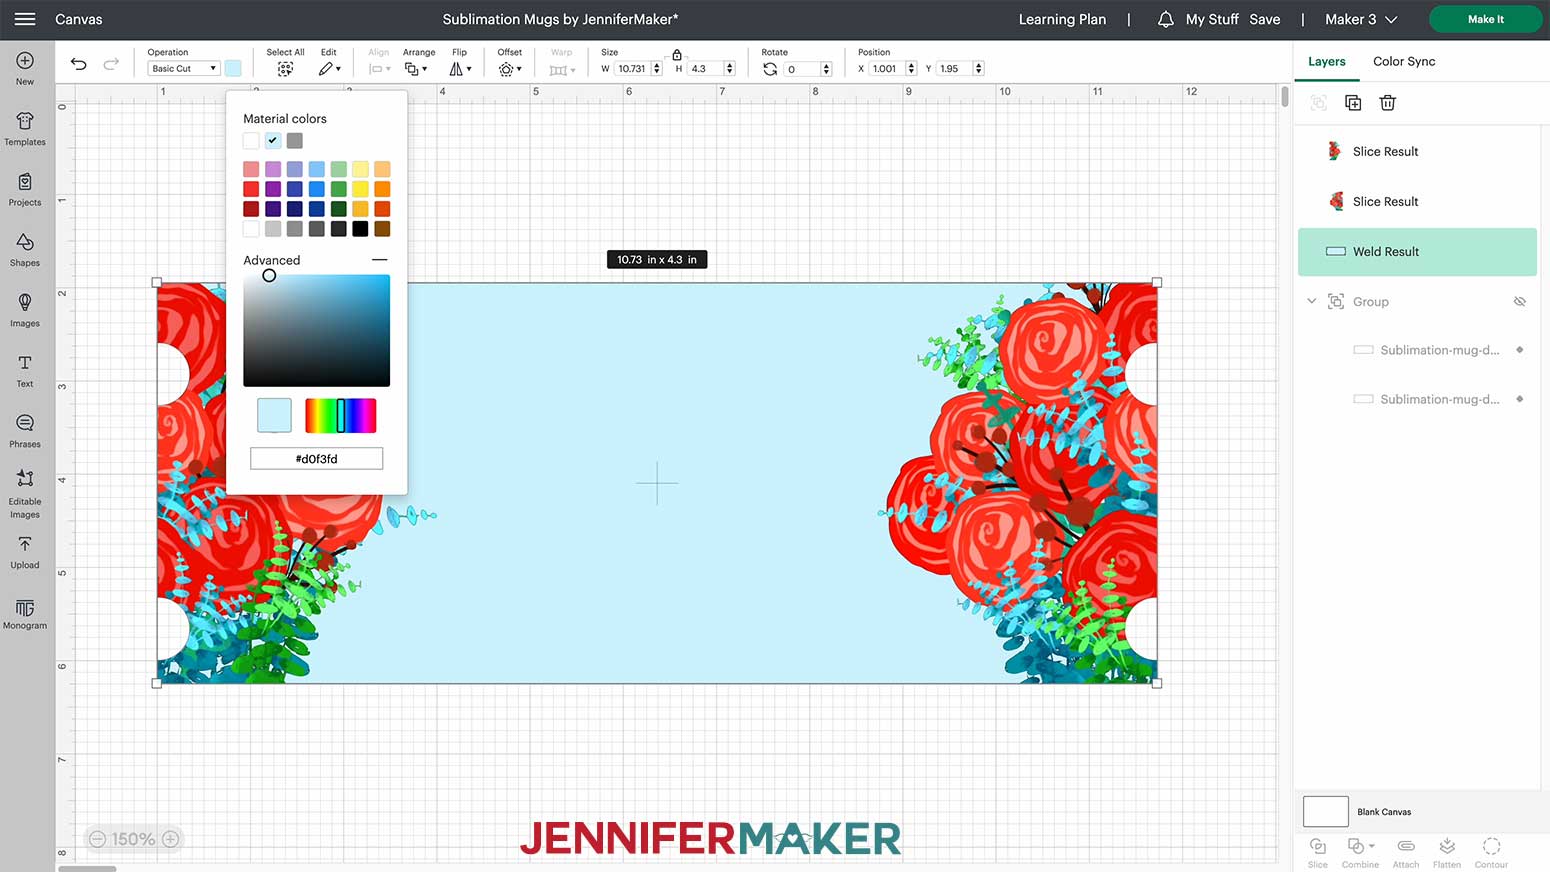
Now that my mug wrap has a pretty background and everything is centered, I will hold down my shift key and select both the flower layers and the template layer from the layers panel on the right and flatten.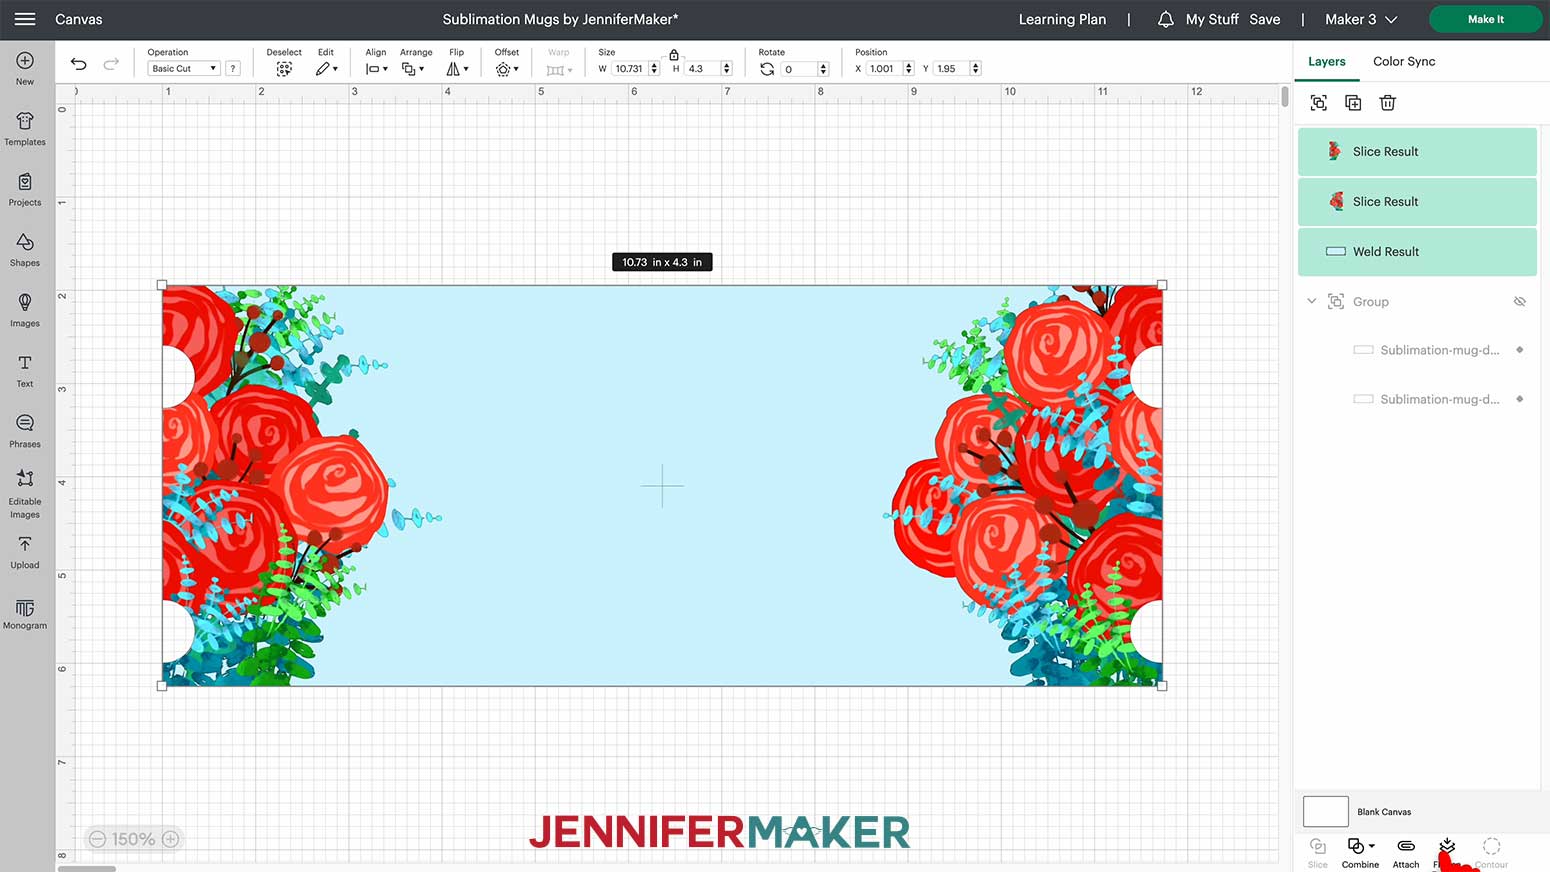
I can now safely delete the remaining sliced shapes from my canvas and I’m ready to Make it!
VARIATION 3: SLICE DESIGN FOR MUG PRESS
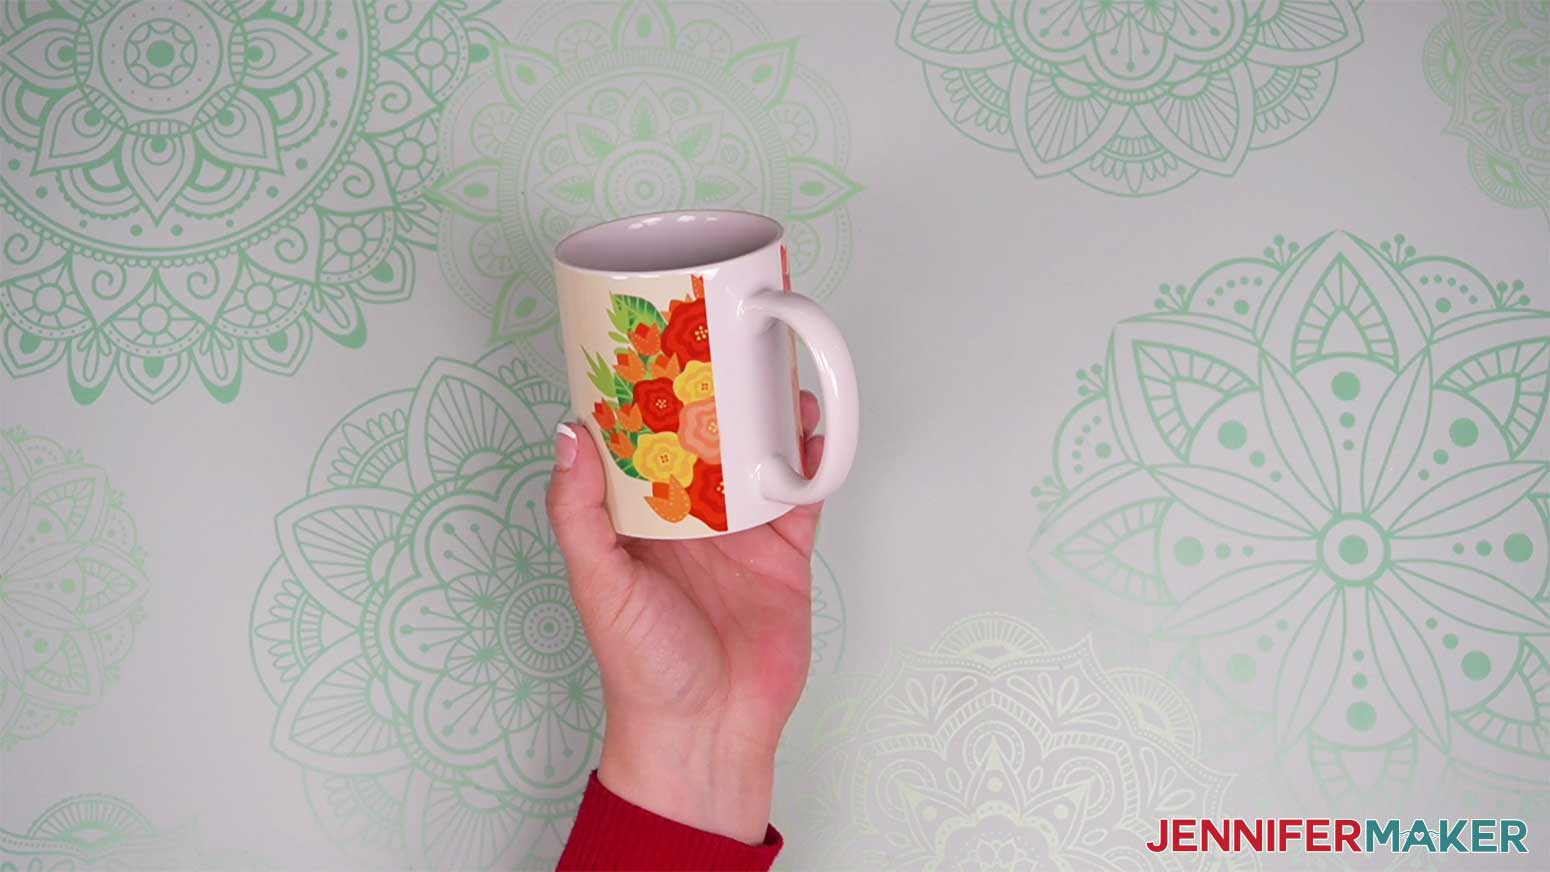
I’m not able to sublimate under the handle of my mug in the mug press, but I can still create a beautiful design with the same templates. First I will upload another mug template from my recently uploaded menu. I'll use a 12 oz. mug and my beautiful yellow bouquet design.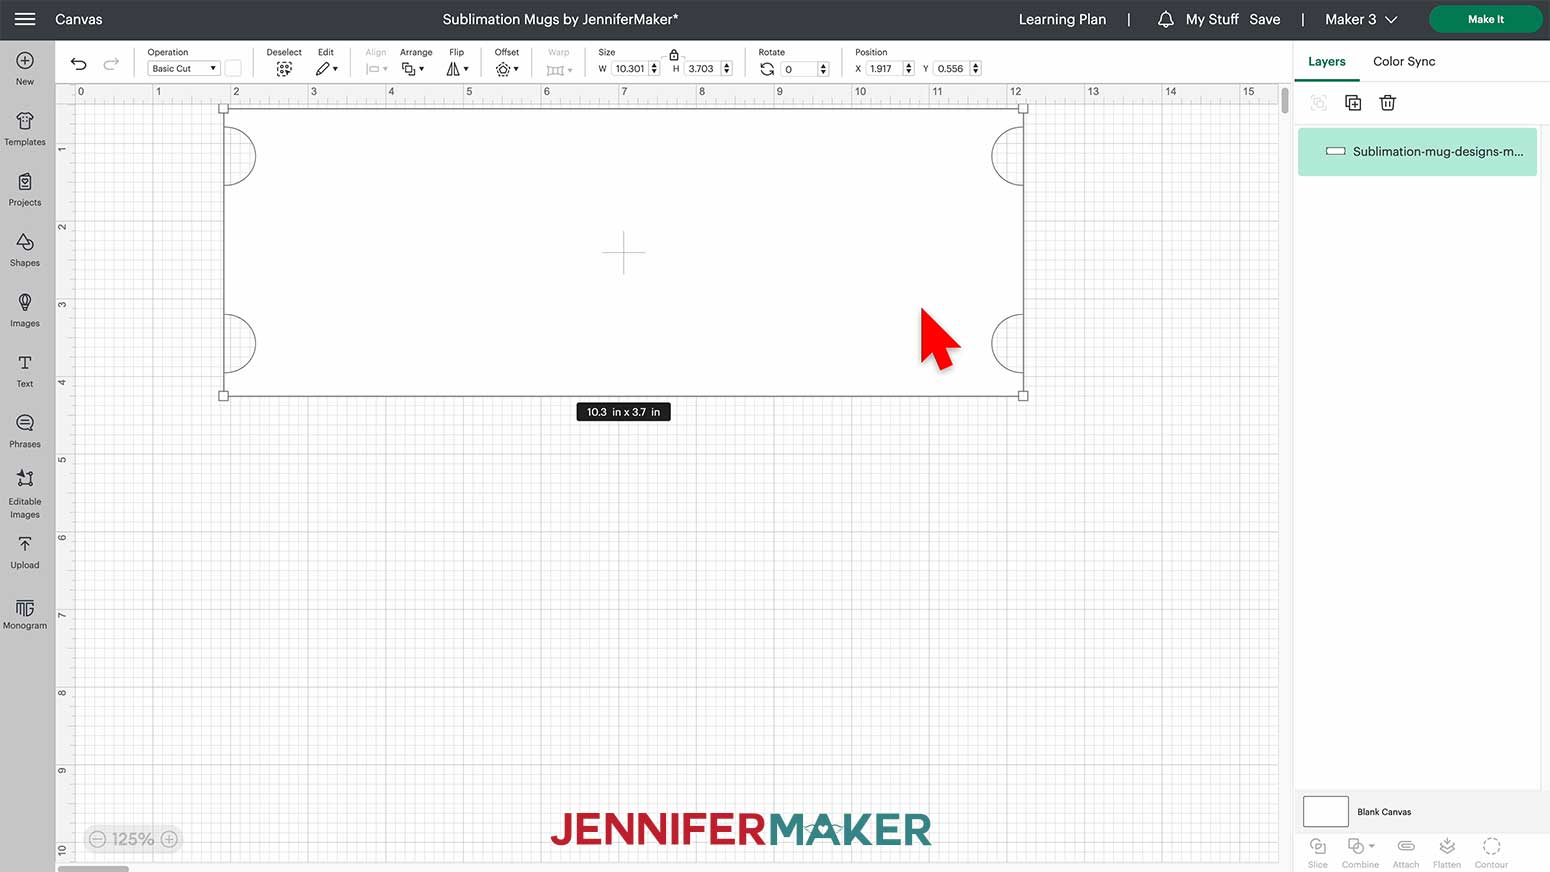
Next, I will make three duplicates of the 12 oz. template that I will cut out of butcher paper to protect my Mug Press from any escaped ink. Hold down the Shift key to select Group to keep them together, right-click and send them to the back and hide the group using the eye icon in the layers panel.
Next, I will select the yellow bouquet from my recent files. The yellow bouquet will load very large on my canvas, so with the lock icon closed I will resize the height to match the template height at 3.7”. 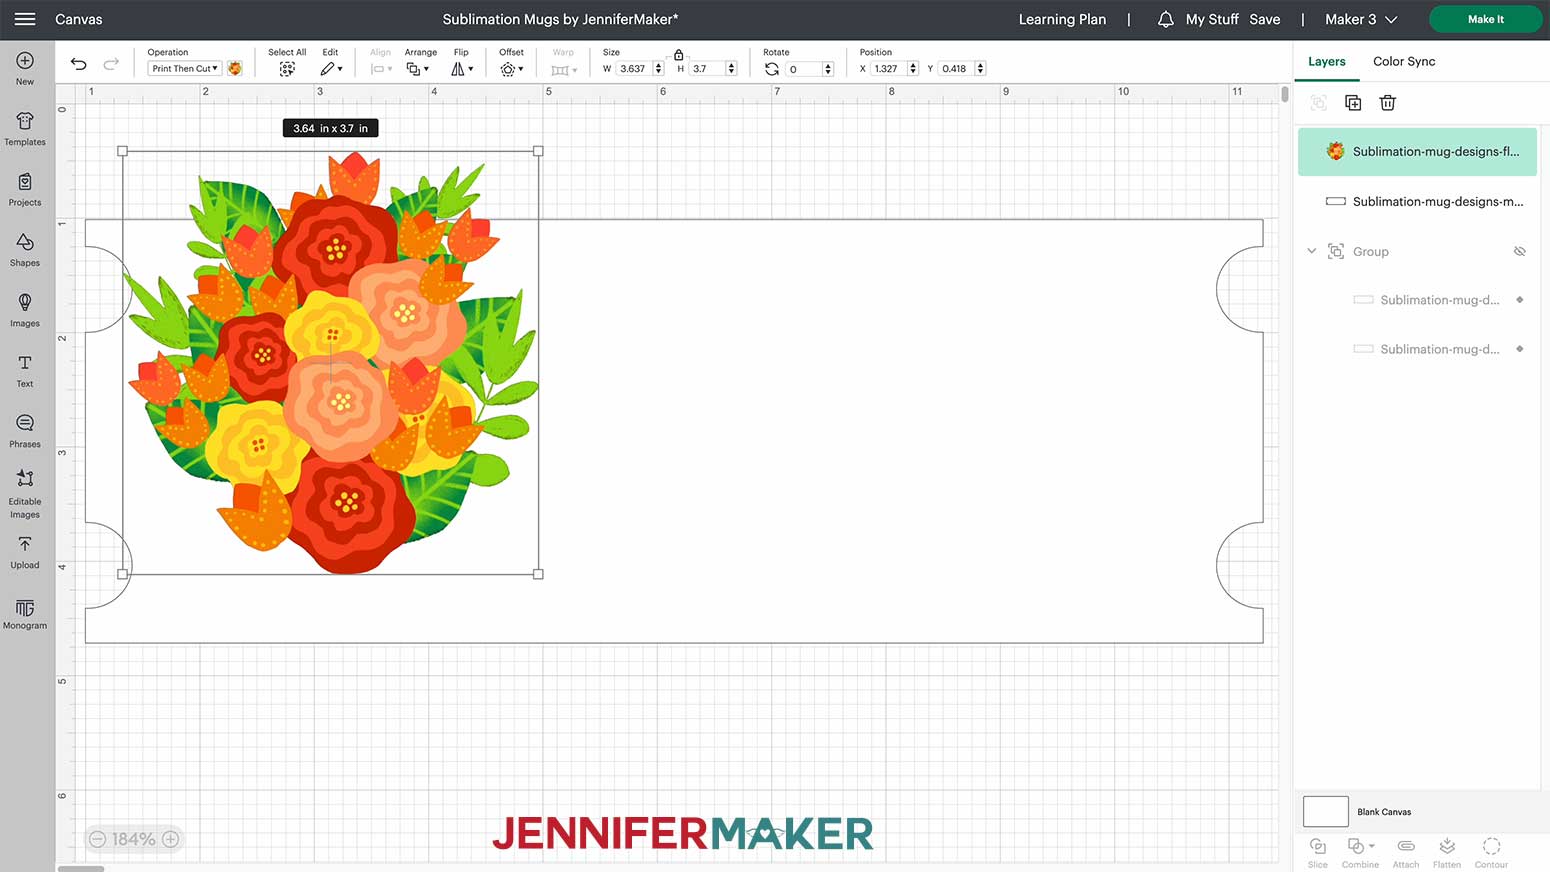
Next, I will slice the yellow bouquet to get the effect I’d like on my mug and to create a border at the handle.
Click on the shapes menu on the left side of the canvas and select a square, change it to Pen in the Operation menu. This will help me to see where I'm slicing. Unlock the lock icon on top of the canvas and drag the right bottom corner of the square to cover half of the yellow bouquet. 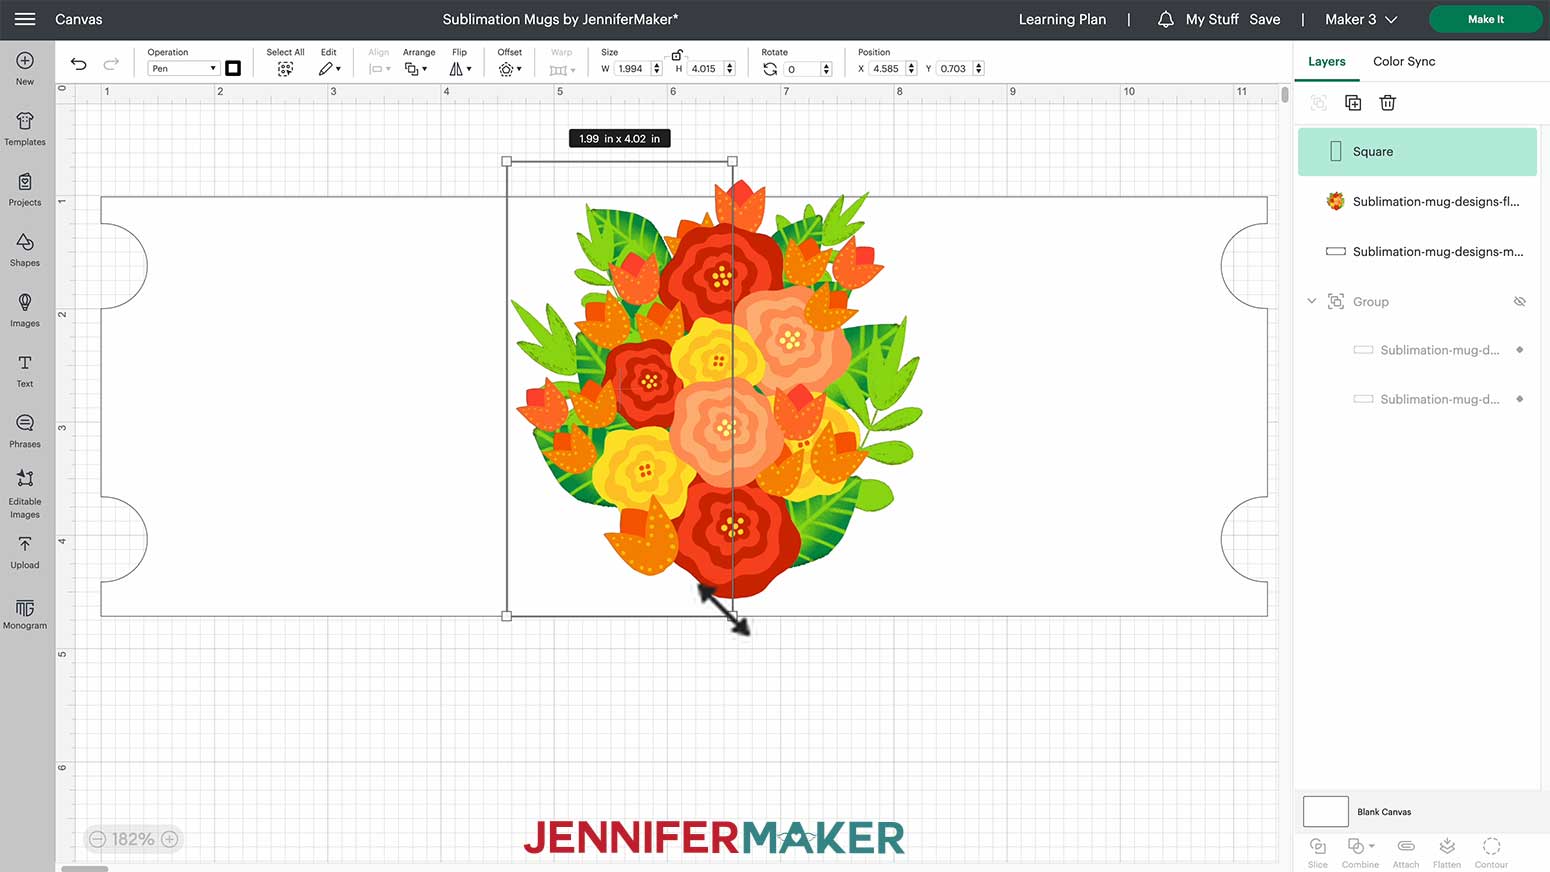
Now I will drag a bounding box around both layers and with the Slice icon darkened, click Slice on the bottom right corner of the canvas.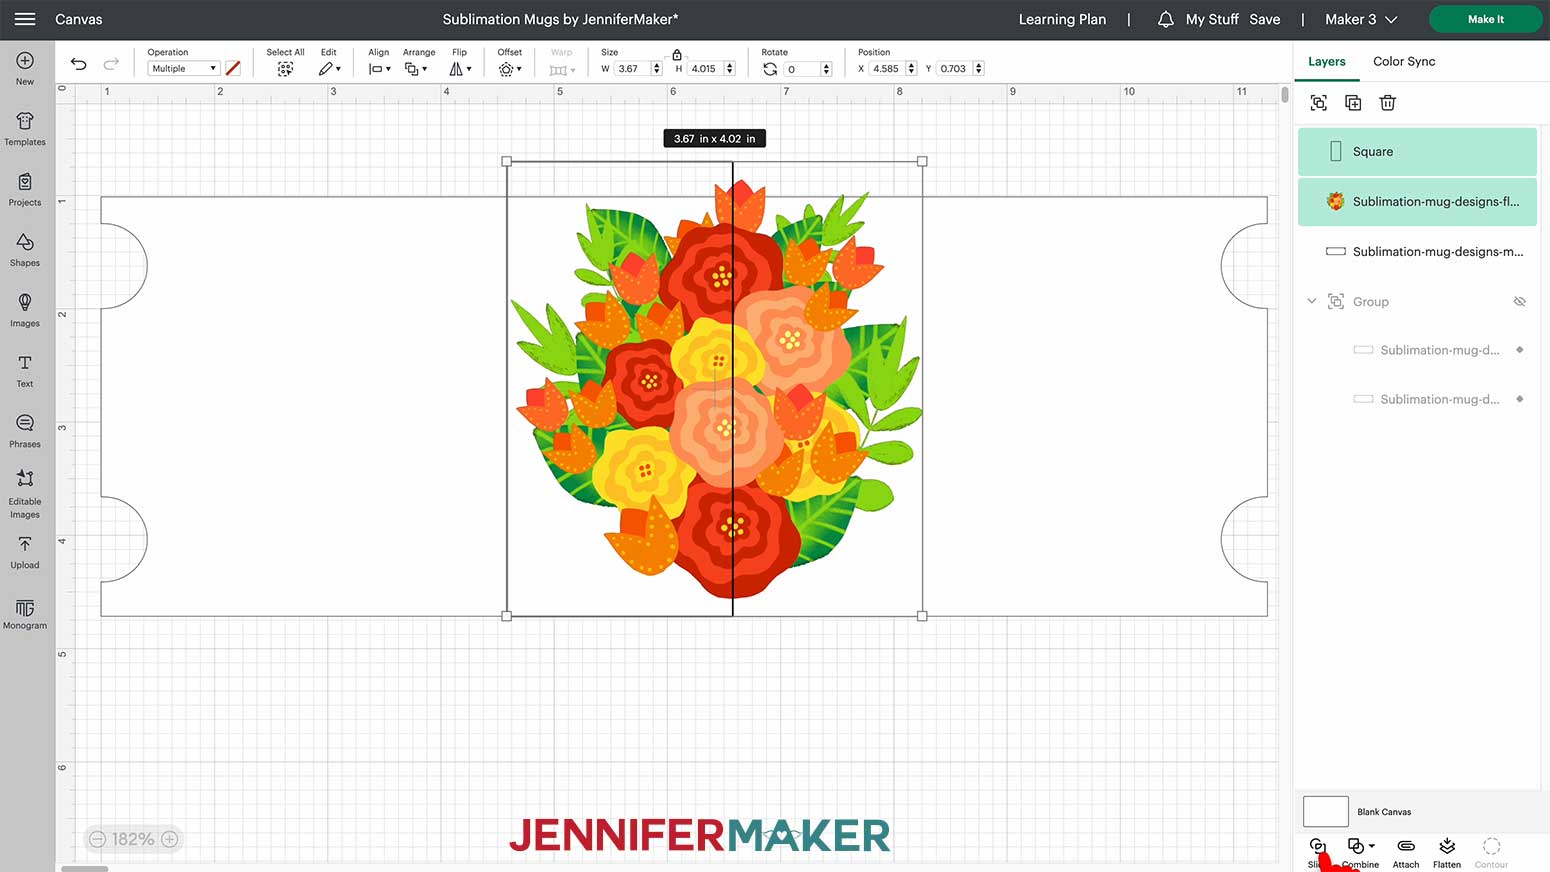
After the Slice is complete I will delete the leftover shapes by holding down the shift key and selecting the extra layers from the layers panel on the right of my canvas. Then I'll delete them by clicking the trash can icon.
Drag the left piece of the bouquet to the right side of the template, and the right side of the bouquet to the left side of the template.
Using the top ruler, align the straight, right edge of the bouquet piece on the right side at about 10.75". Then line up the straight, left edge of the other side at 1.75".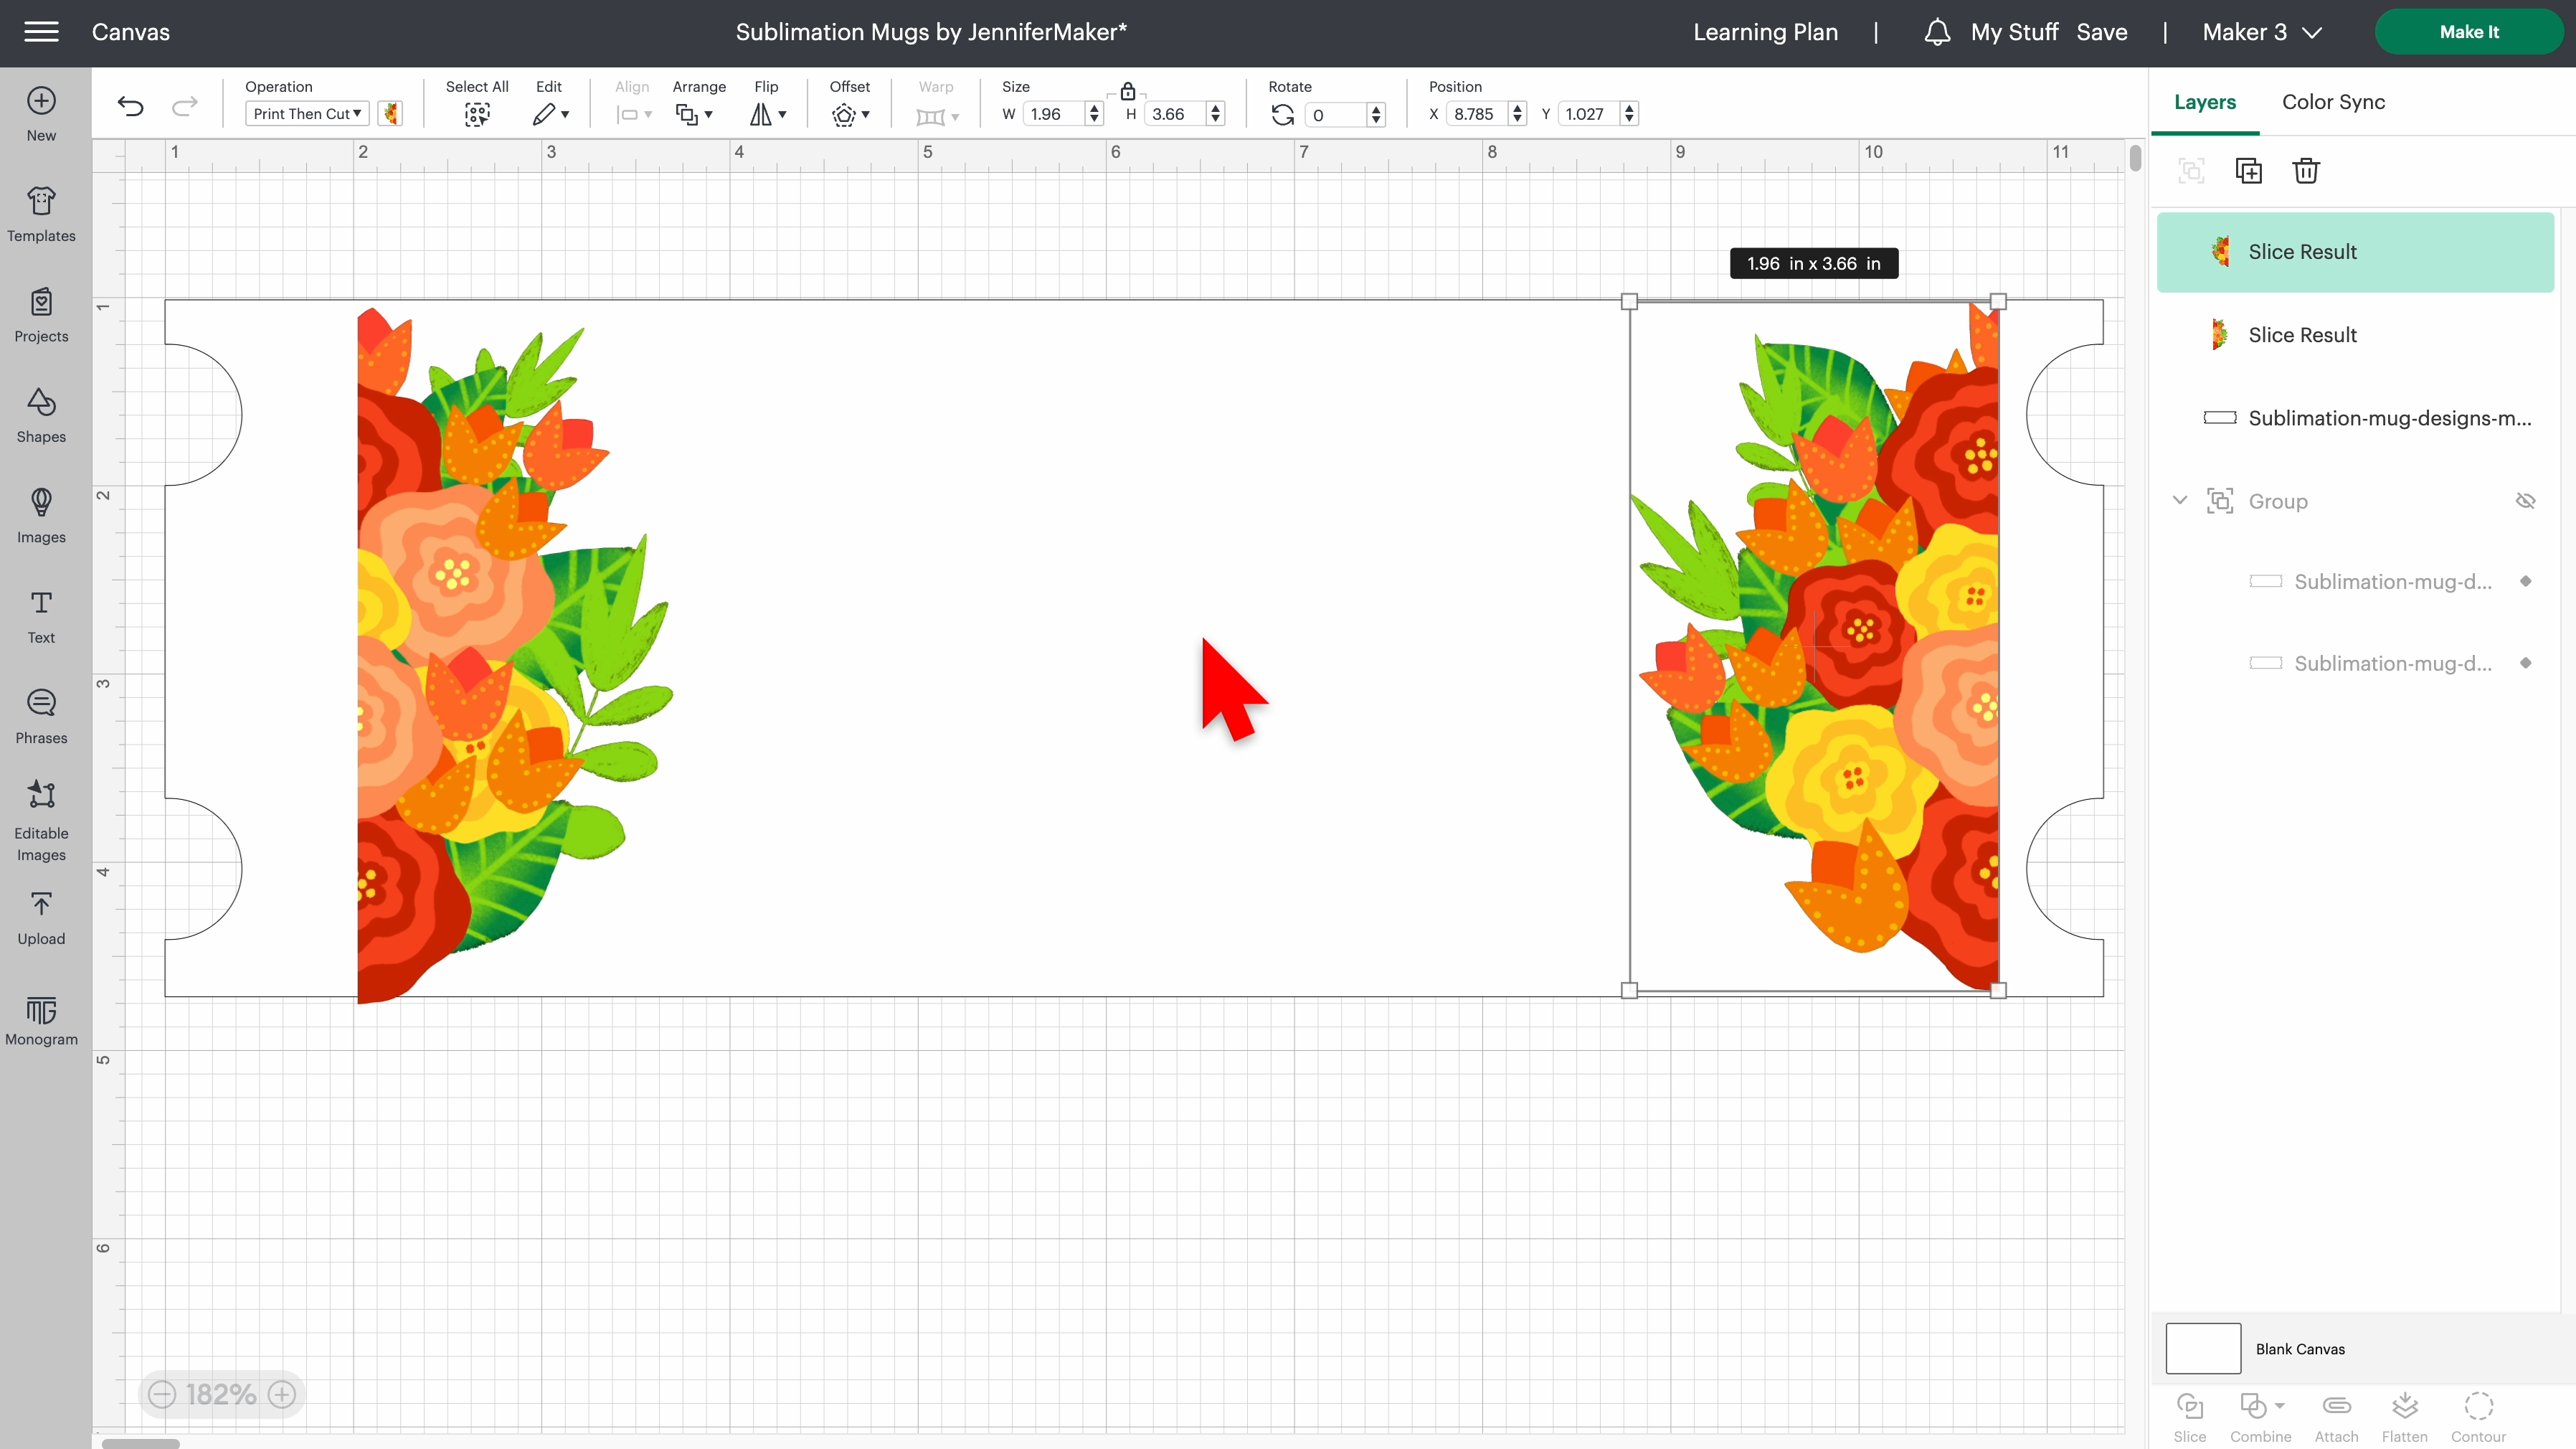
Select everything and click “Align”, then “Center Vertically.”
I’d like to change the background color for this wrap as well, but instead of changing the whole template color, and since my design has an edge, I will click the shapes menu and select a square. Click the unlock button and line the left edge of the box to the edge of the flower design at the 3/4” mark and drag it to the opposite corner of the template. My rectangle is 8.5" x 3.7".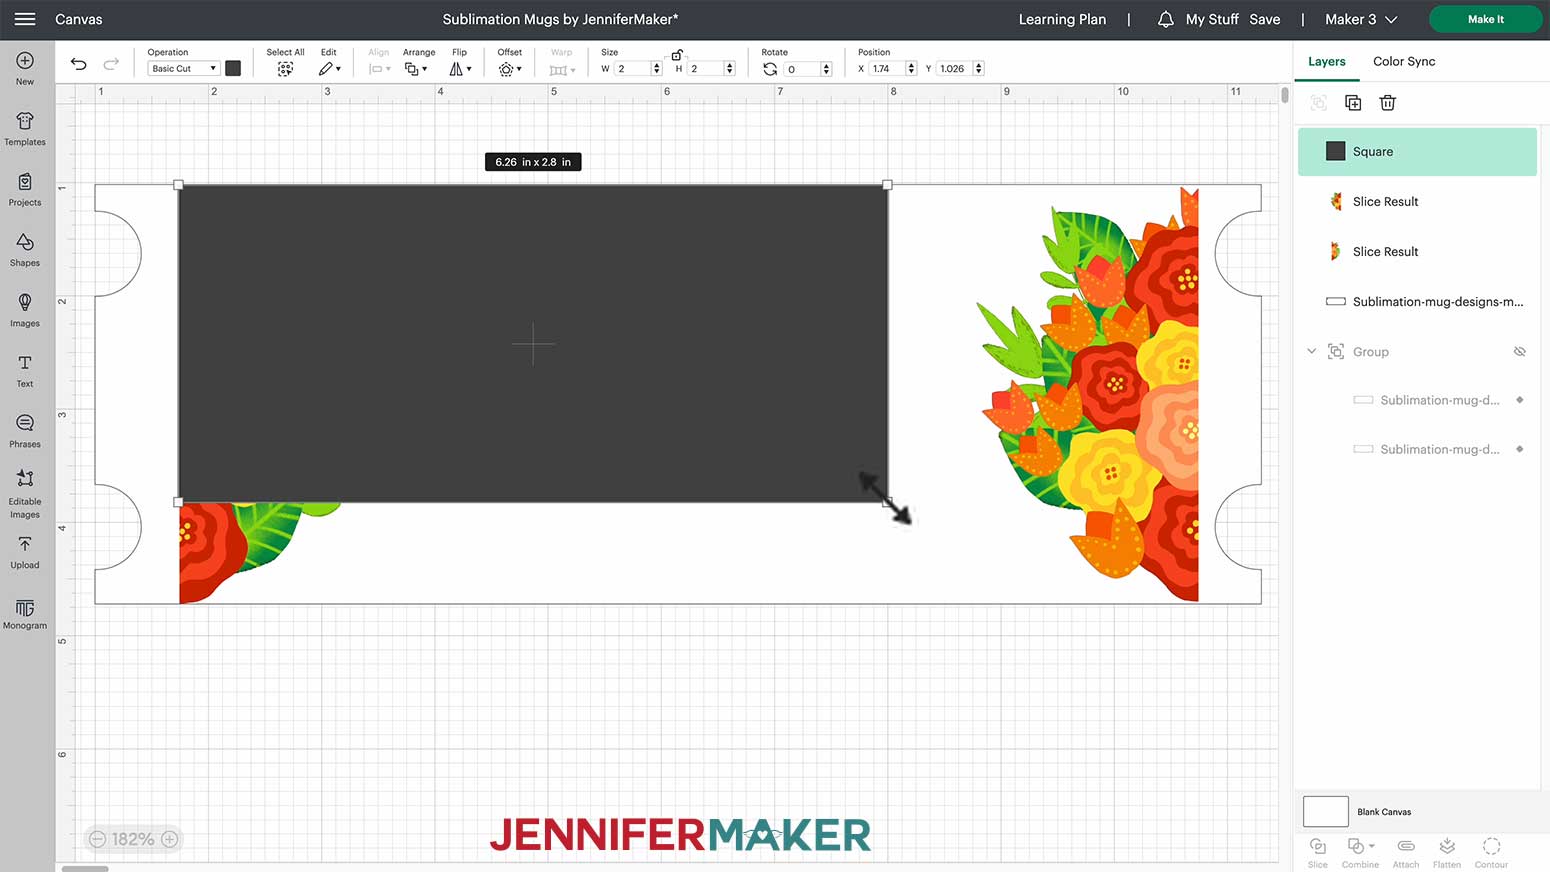
In the layers panel on the right-hand side of the canvas, I will drag the square to the layer below our design and change the color by clicking the color box in the Operation menu at the top of the canvas. I don’t see the right shade of pale yellow I’d like to use so I will click on Advanced. I found a lovely pale yellow, #fbf8de.
Now that my template and design are to my liking I will drag a bounding box over all four layers and Flatten.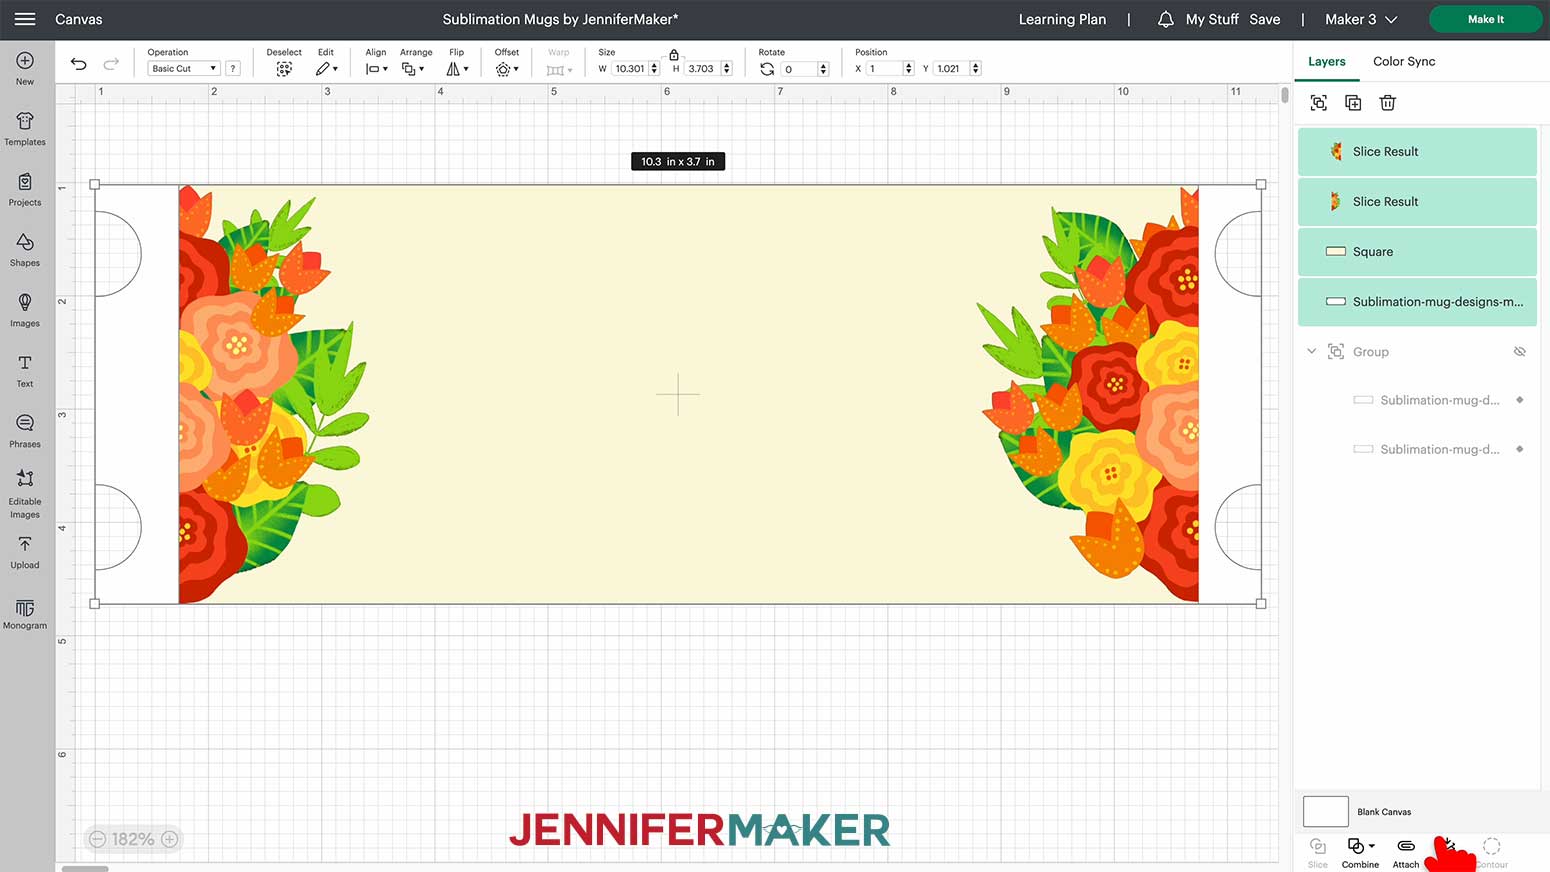
I will also unhide the extra templates and cut them out of butcher paper.
Make sure the correct machine is selected and click "Make It".
STEP 3: PRINT THEN CUT THE MUG WRAP
Since we’re using the Print then Cut feature on our Cricut, I highly recommend you calibrate your Cricut before beginning this project. See my DIY Money Holders tutorial at http://jennifermaker.com/calibration to learn how.
NOTE: In order to print then cut at a larger size, check the settings in the "hamburger" menu in the upper left of your canvas. Click on Settings and then select the tab that says "Load Type".
The first setting should list the machine you're using. Mine says Maker 3.
The next setting is Load Type. That should be set to "On Mat- 12x24 in".
The last setting is the default paper size. Set this to 11x17 in. (Tabloid).
These settings can be adjusted using the same steps.
[how-to-sublimate-mugs-load-type]
If prompted, select "On Mat" and "12 in x 24 in" then click Continue. I'm going to make full-size wraps so I will select the 12"x24" mat.
On the Prepare Screen, I will check that the material size on the right side of my screen is set to 8.5" x 14" and Mirror is toggled on, if given the option select "On Mat".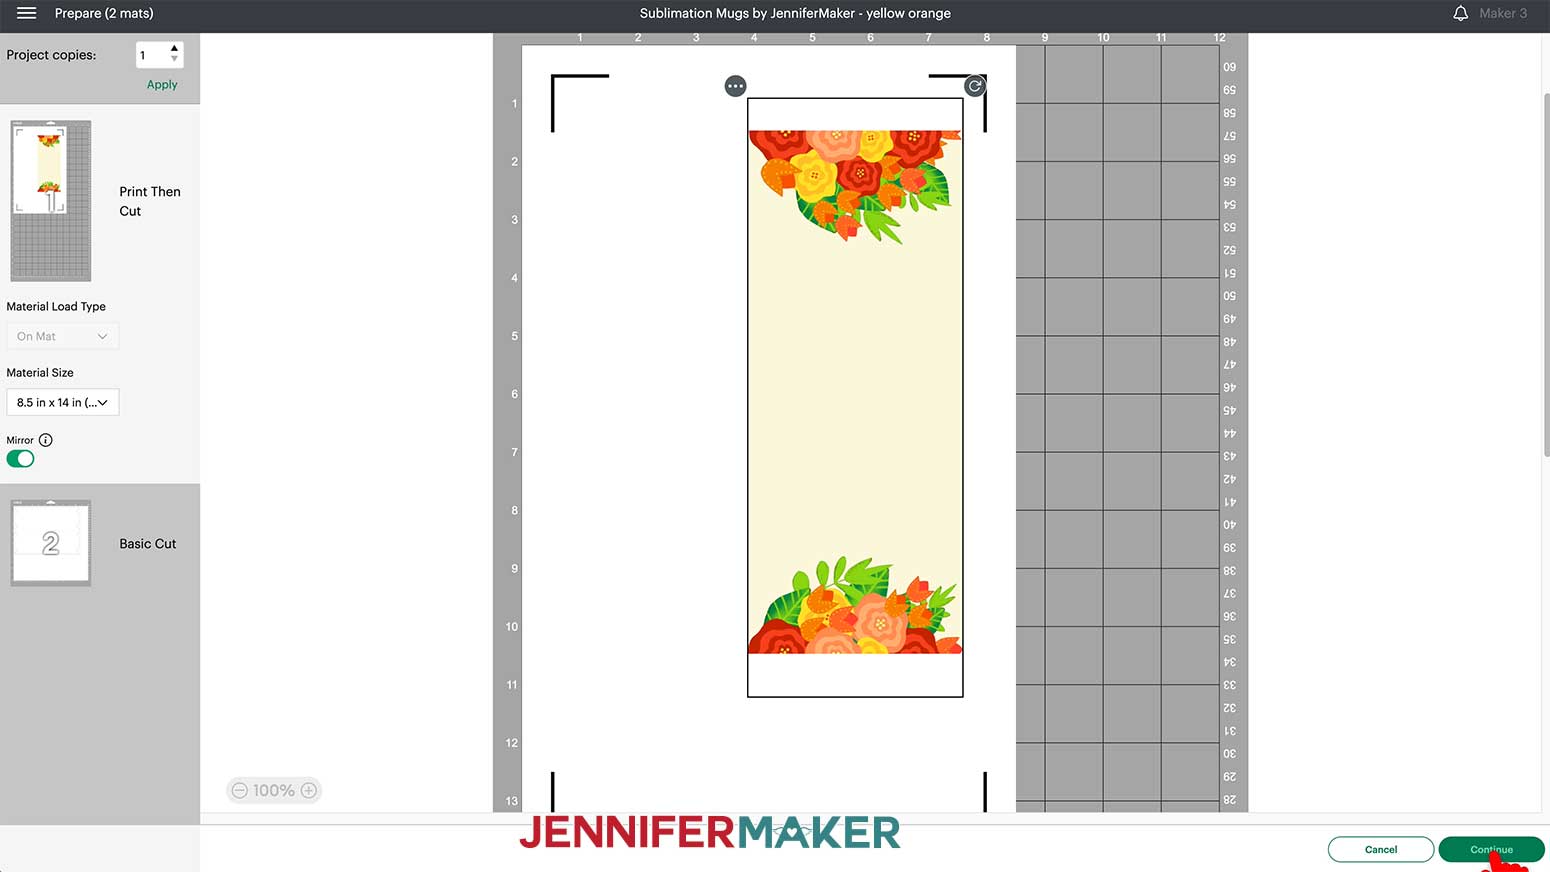
NOTE: Check your printer manual and paper packaging for help identifying the right side to print on and how to load it.
On the Make screen, I’ll click the green "Send to Printer" button in the upper middle of the screen to prepare to print my design.
I’m making sure my sublimation printer is listed. Then I turn on “Add Bleed” and turn on “Use System Dialog” before clicking the "Print" button.
NOTE: Your printer’s controls will appear but might be hidden behind Cricut Design Space. Minimize your Cricut window to find it and it may look different depending on your printer, computer, and software. Use my settings as a guideline, but adjust as needed to fit your tools.
Making sure my sublimation printer is selected under "Printer". I’ll use the drop-down menu to select "Layout" and then uncheck "Flip horizontally" since we already mirrored the design. I will adjust the paper handling to 'Premium Matte" and to "Best" quality.
Before I print I will make sure my paper is loaded correctly in my printer then press Print.
After my design has printed, I set it aside until the ink is completely dry to avoid any smears while I prepare it.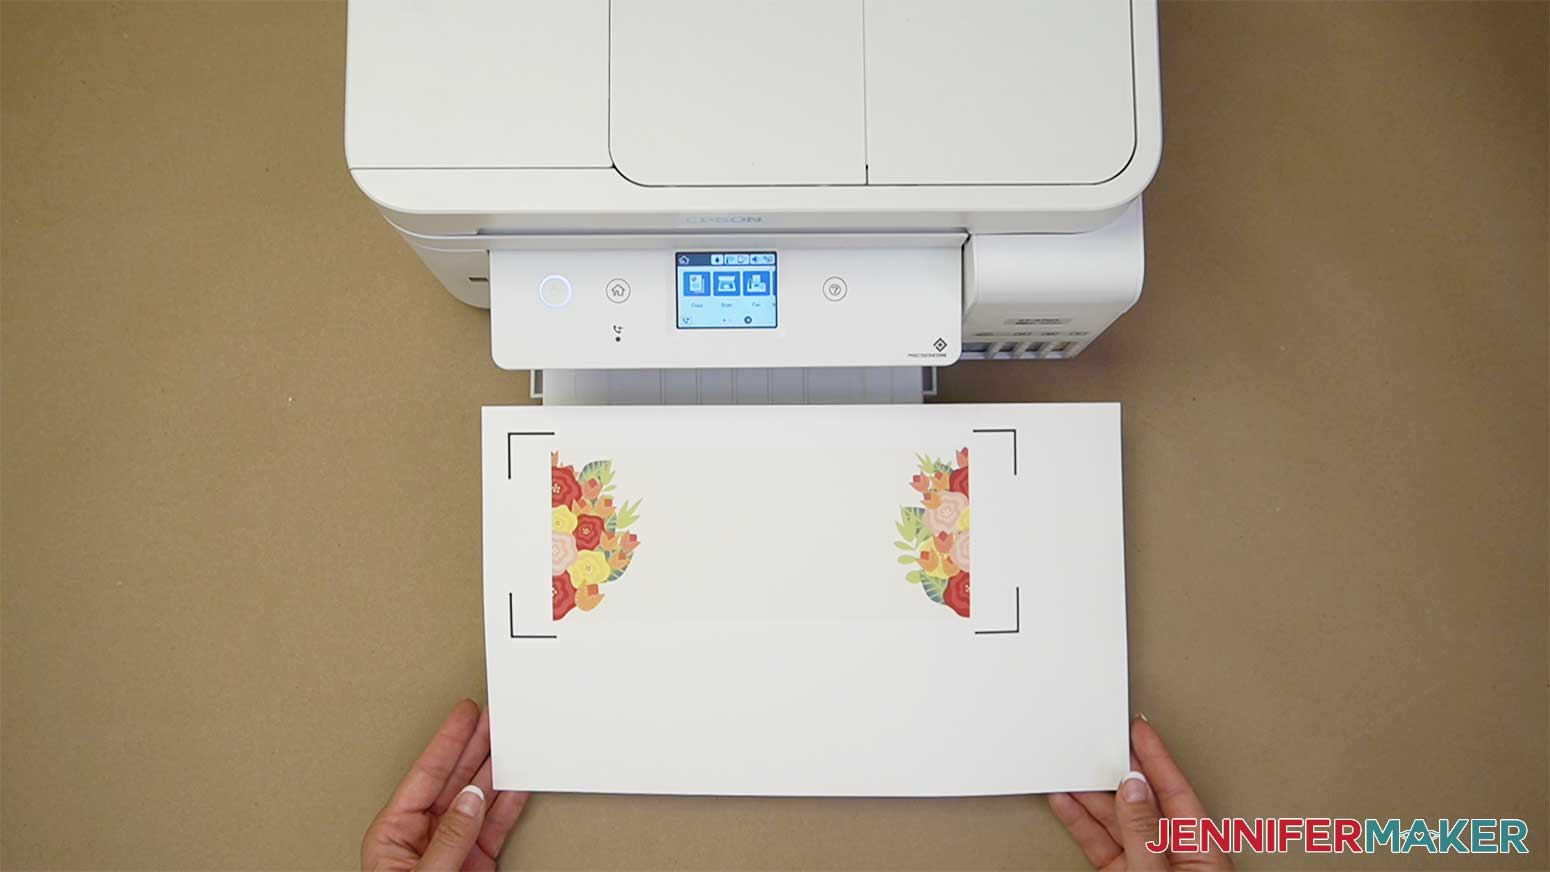
NOTE: Since these techniques use the Cricut to cut Print then Cut designs, calibrate your printer before beginning. See my DIY Money Holders tutorial for the steps.
I will smooth down my printed sublimation sheet on my 24” StandardGrip mat with my brayer, ensuring that the paper adheres to my mat and that my Cricut has enough clearance behind it since I’m using a longer mat than usual. In the Make screen, I will select medium cardstock and click the pressure menu to select More.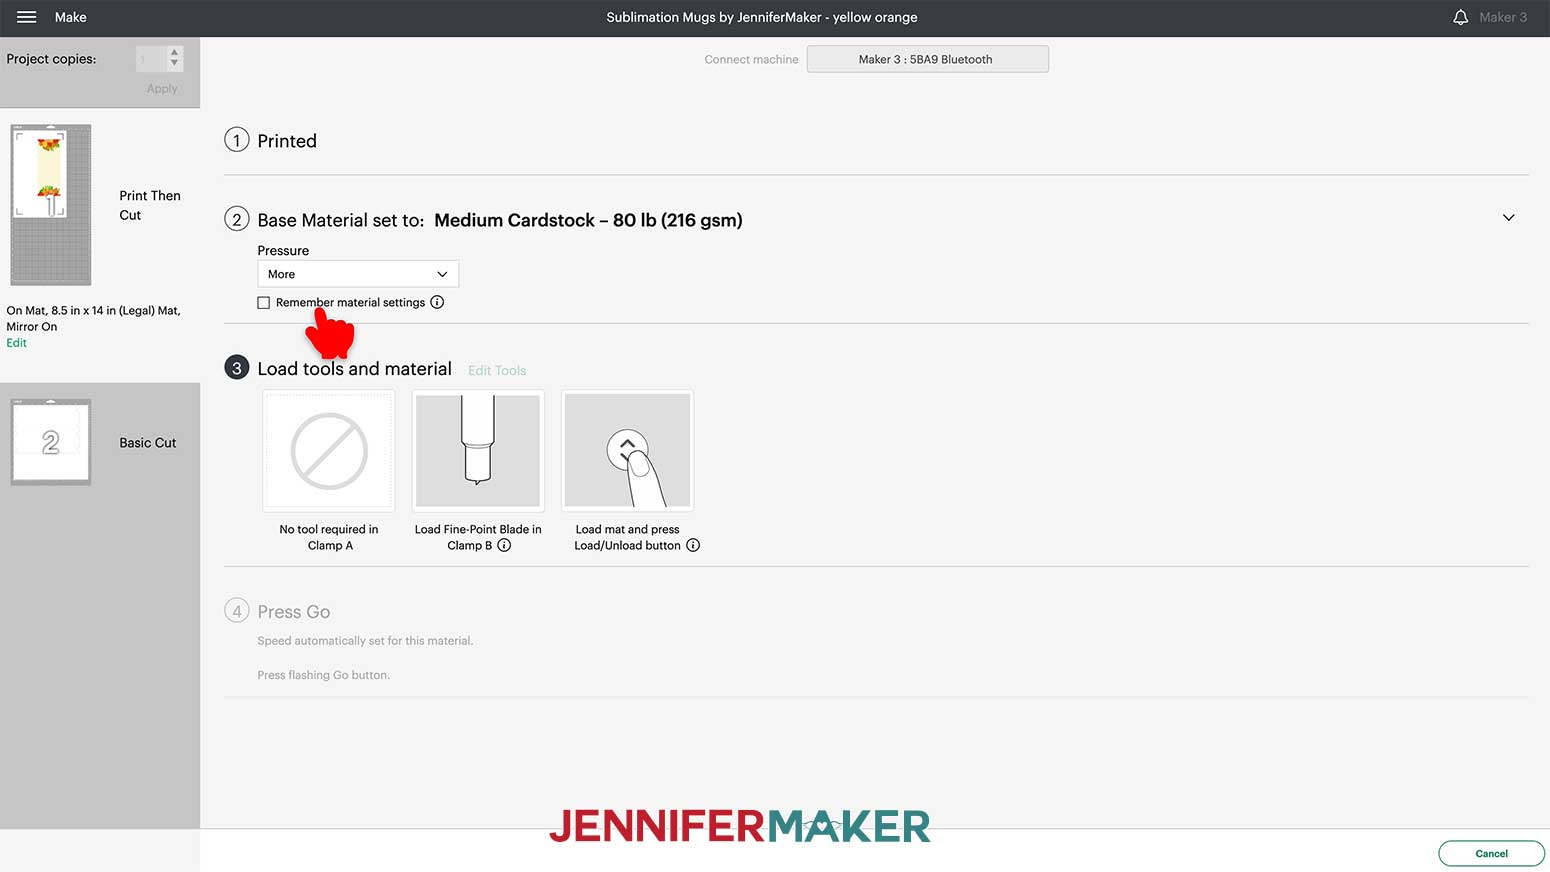
Next, I will line up my mat with the guides on my Cricut until the top of my mat is touching the rollers and press the flashing load button Next, my Cricut will sense the length of the mat.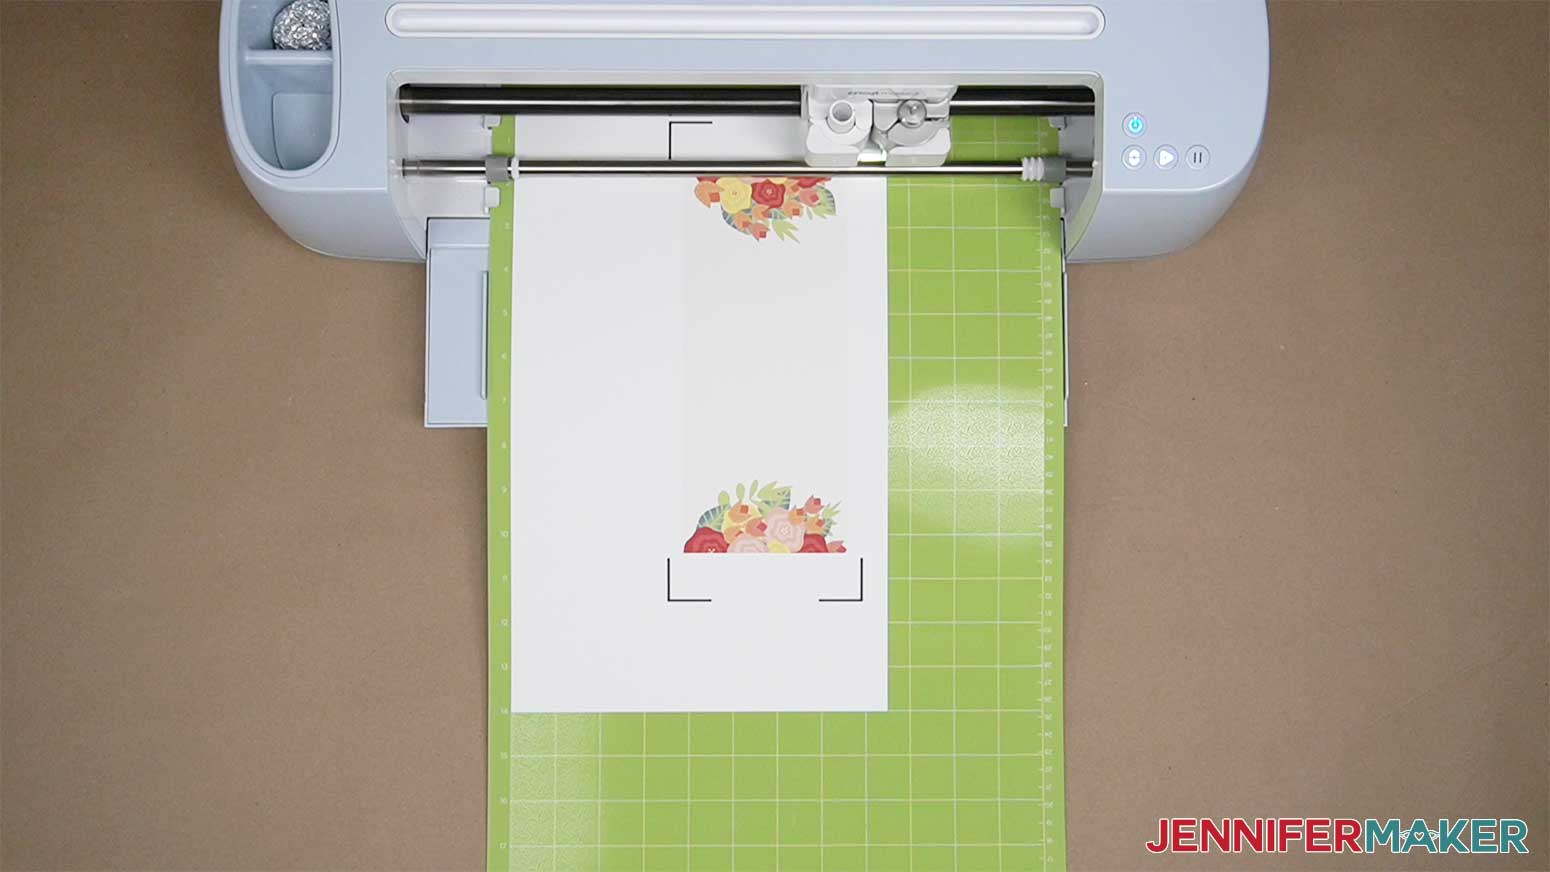
Next, I will press the flashing Go button. Now the Print then Cut sensor will read the black registration marks on the paper and cut my mug wrap perfectly.
After my mug wrap is cut I will flip over my mat and gently peel it away from my paper. After the Print then Cut is complete, cut the extra templates out of butcher paper using the correct Material Settings.
STEP 4: WRAP THE MUG
Now it’s time to wrap the design around my mug!
To get the wrap straight and centered, I’ll position the mug with the handle pointing toward me. Now I will position the wrap behind the mug, with the printed color side facing the mug, and wrap the paper around the mug until the notches are in place around the handle. 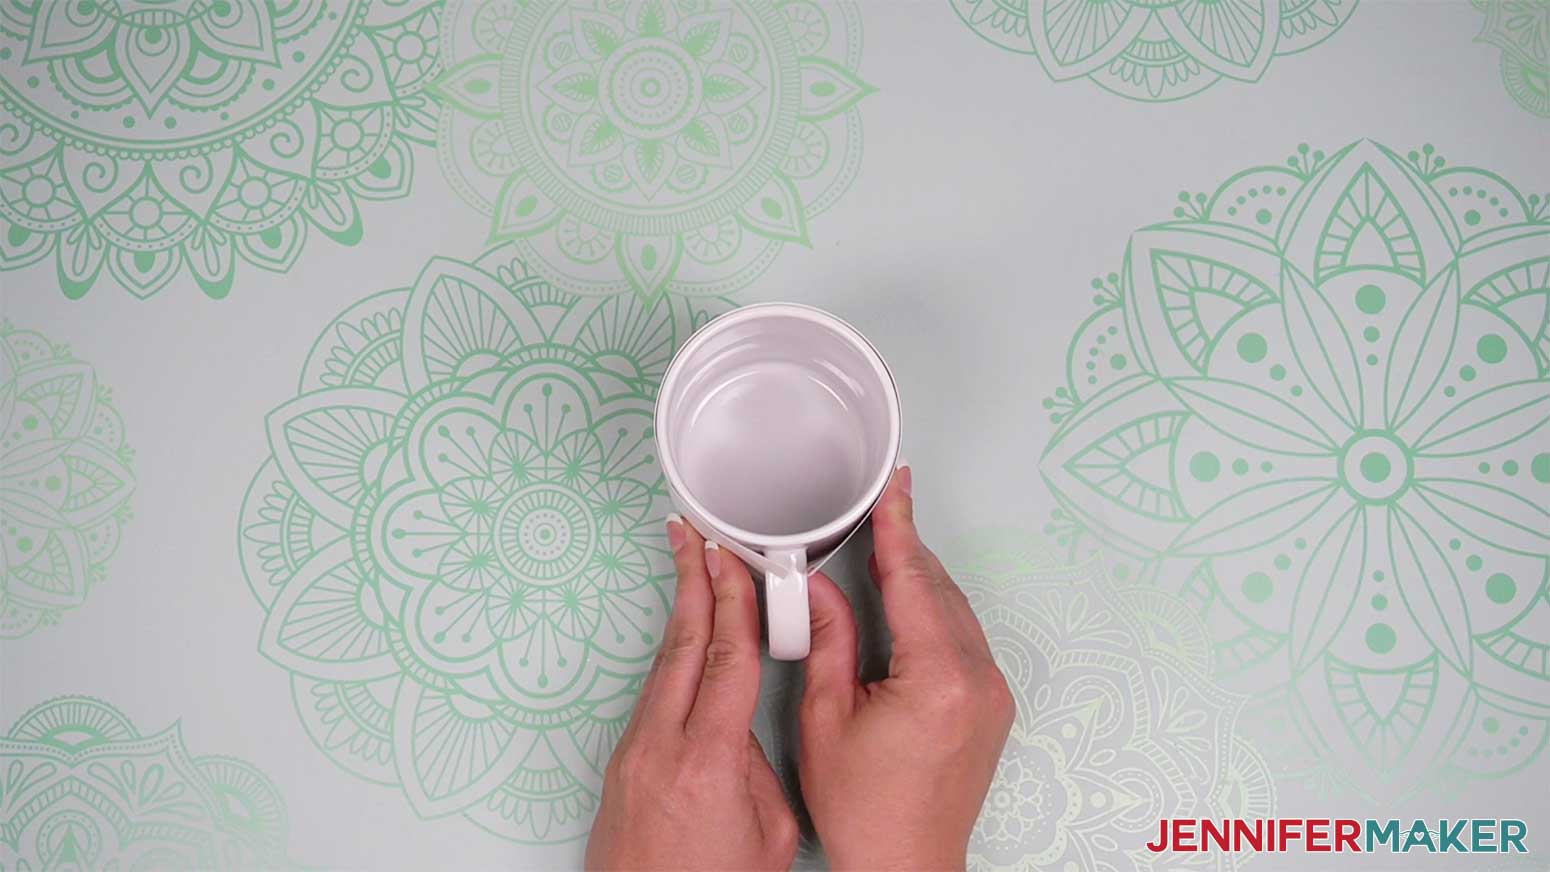
I found it useful to tape the right side of the wrap in place vertically along the handle and use another inch of tape, placing it horizontally on the left edge in the center, pulling the heat-resistant tapeunder the handle to tighten the wrap, like a belt buckle.
My goal is to stretch the design tightly across the mug so the ends meet under the handle. I will also use heat-resistant tape to secure the paper, starting on the seam under the handle, then the bottom and top seams.
Now I will use more heat-resistant tape and tape down the top and bottom of the mug, using my fingers to smooth the tape down over and under the edge of the mug. I will use the same technique to wrap the butcher paper templates around the mug and tape them in place.
STEP 5: SUBLIMATE THE MUG
Good ventilation is important any time you use sublimation. Have your windows open or a fan going to help the fumes dissipate quickly. And don’t breathe in very close to the project while it’s still warm.
MUG PRESS METHOD
For the 12 oz mugs I've designed I’m going to use my Cricut Mug Press, I will also wrap and tape the duplicate templates to the outside of my mug, to protect my Mug Press from extra ink. 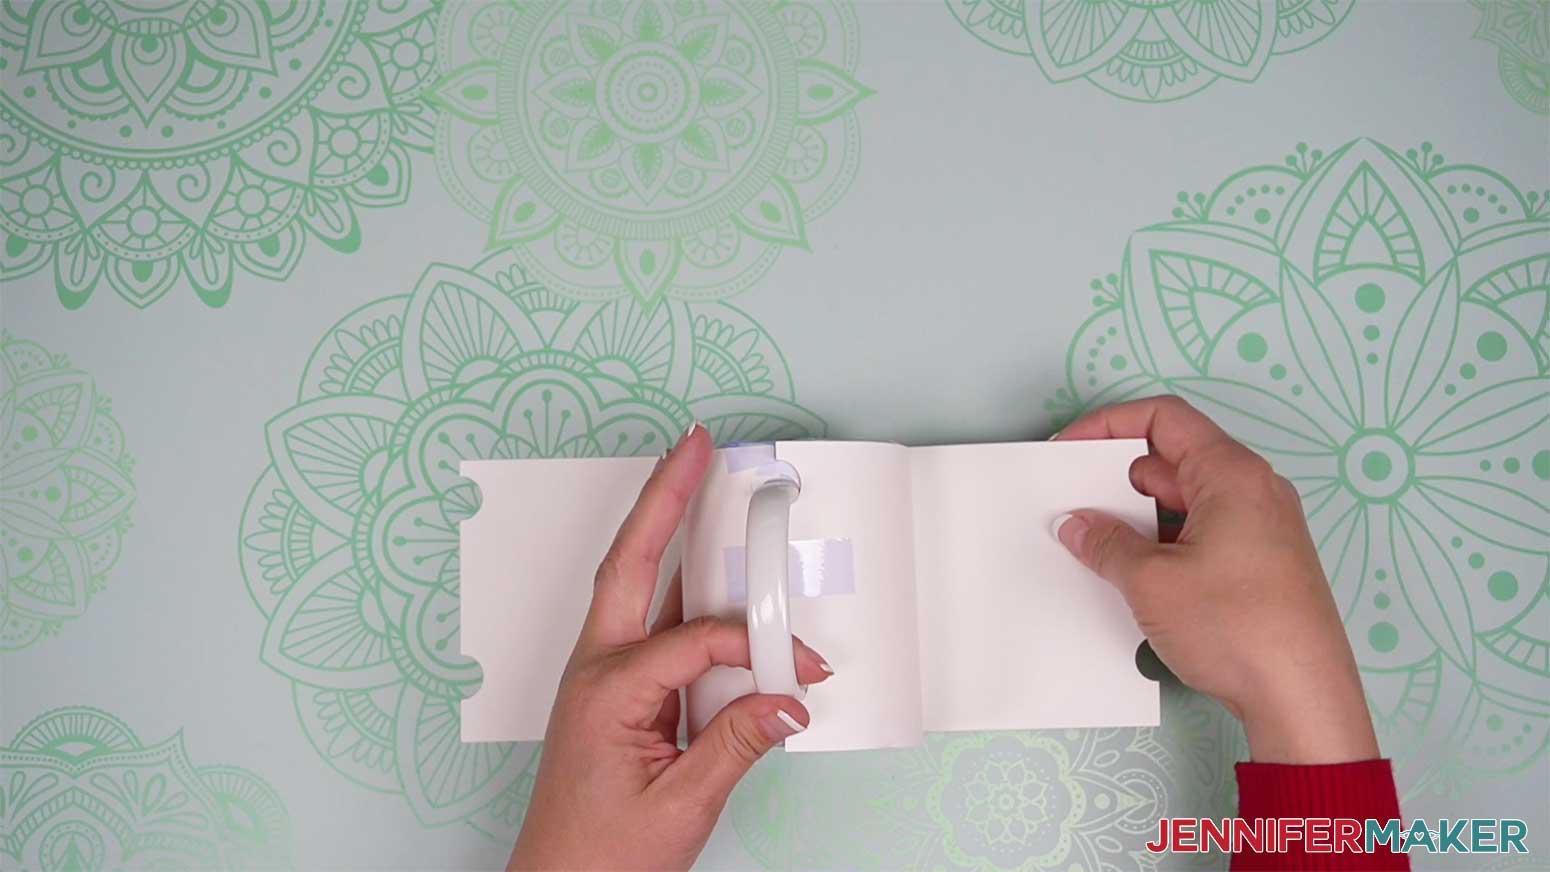
I like to set my Cricut Mug Press on my 12"x12" Easy Press mat to protect the work surface.
With the Cricut, Mug Press powered on and the power button green (which indicates it is ready), hold your wrapped mug by the handle and place it in the heating chamber. 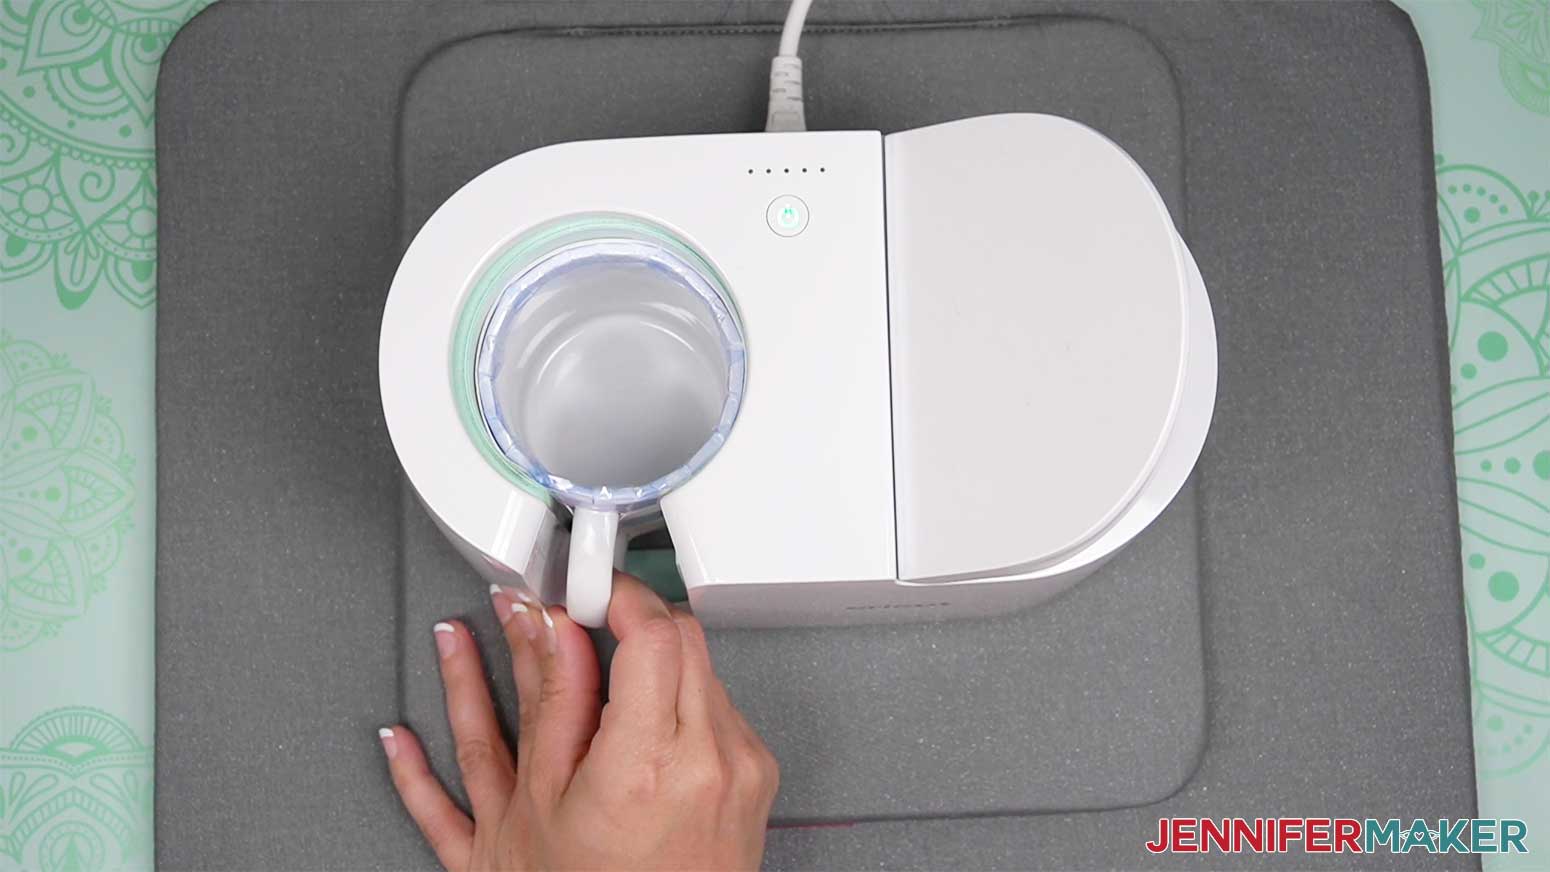
Pay attention to where the mug handle is and make sure the heat plate appears to be covering all of your design. I usually move my handle a bit to the left rather than center it.
Now close the clamp on the top of the Cricut Mug Press and check that the heat plates are completely covering your design. If not, immediately open the clamp, reposition the mug (you'll probably want to rotate the handle a bit to the left), and close the clamp again.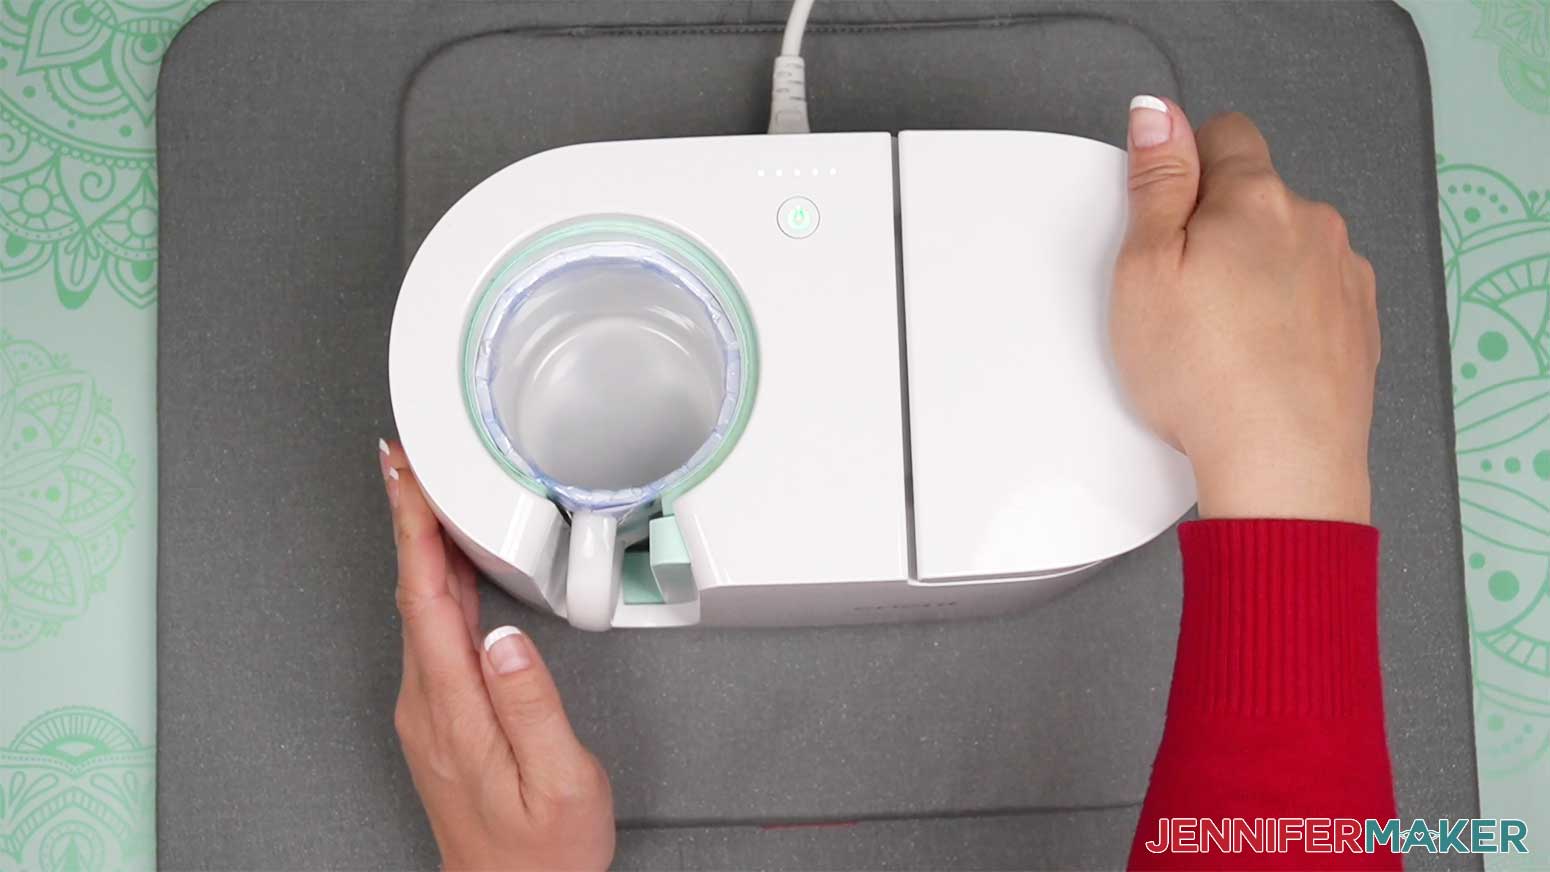
Closing the clamp starts the pressing process. There is no other button to push or settings to worry about. The Cricut Mug Press takes the temperature of your mug and the ambient temperature of your room and determines the correct settings for you.
The little lights on the top of the Cricut Mug Press indicate the progress of your press — an average mug takes about six minutes to press.
When the Cricut Mug Press is finished, it will beep. Lift up on the clamp to release it and pull the mug out by the handle, which will NOT be hot. Be careful not to touch the heat plate with the back of your fingers or touch any other part of the mug, as it will be quite hot. 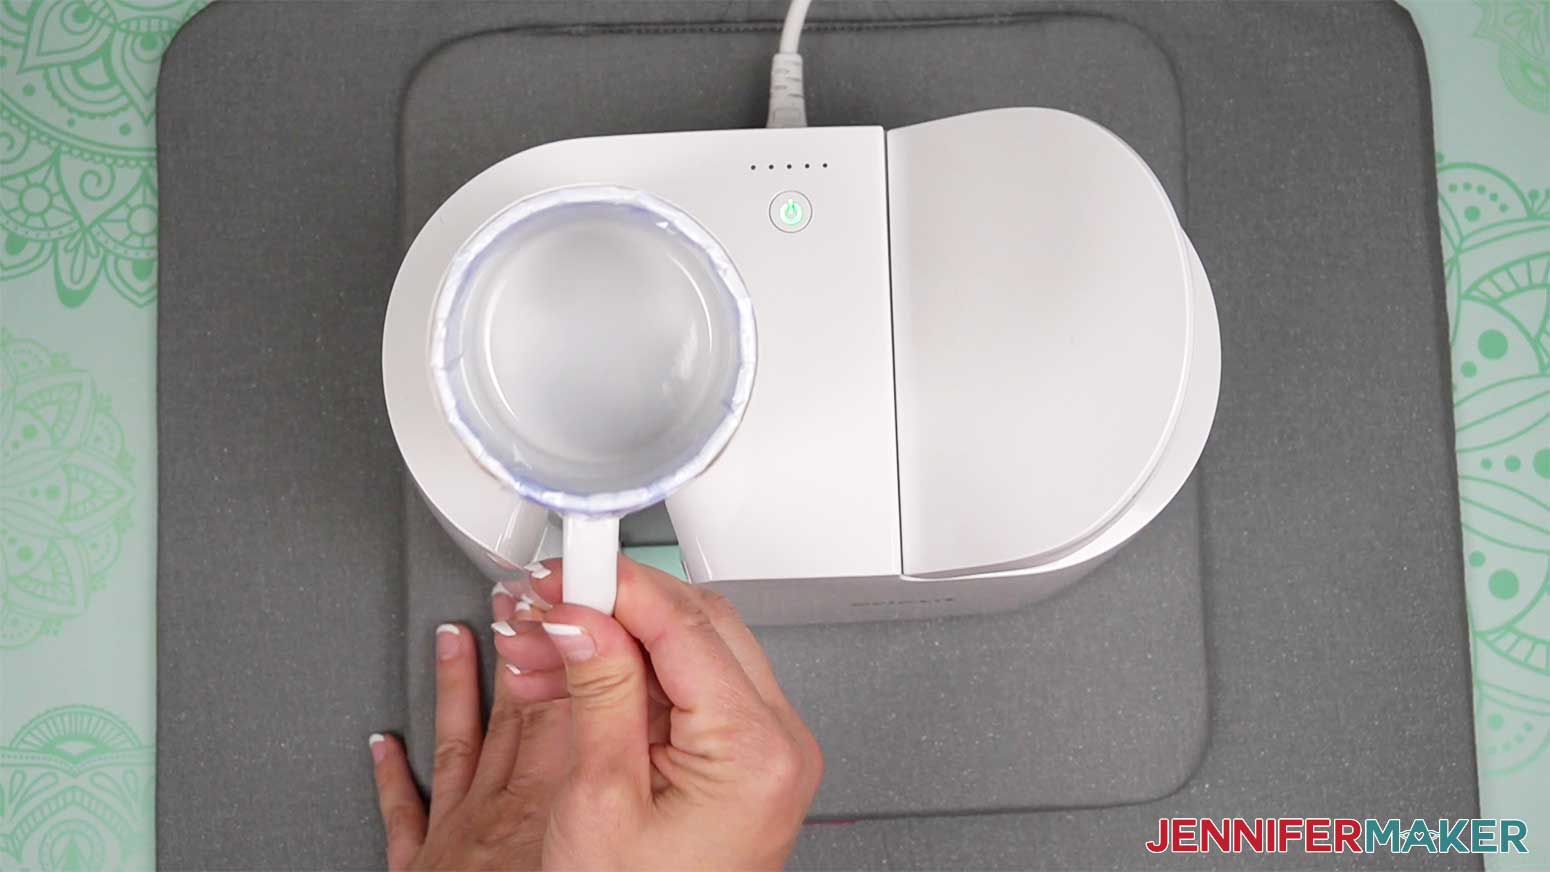
Immediately place your mug on a heat-resistant surface to cool. I place my mug on the same mat I am using for my mug press itself as it's right there and super convenient.
Allow the mug to cool down before you remove the butcher paper and transfer sheet. This takes anywhere from 15 to 30 minutes.
SHRINK WRAP/CONVECTION OVEN METHOD
I will begin by wrapping my mug with my printed mug design using the same technique as I did before.
I will also use heat-resistant tape to secure the paper, starting on the seam under the handle, then the bottom and top seams. Next, I will wrap the butcher paper templates I cut out around the mug as well, also using heat-resistant tape to secure it to the mug.
Next, I will consult the Sublimation Cookbook for the correct time and temperature to sublimate my mug.
I'll preheat the convection oven to 400° F (203° C)
I like to use an oven thermometer to measure the actual temperature of my convection oven and adjust the dial accordingly.
I’m going to use the shrink-wrap method referenced in my Sublimation Tumblers tutorial
I must trim the wrap since it’s much taller than my mug. I laid the mug down on the wrap as a guide and using scissors I trimmed 3” off the top of the wrap. 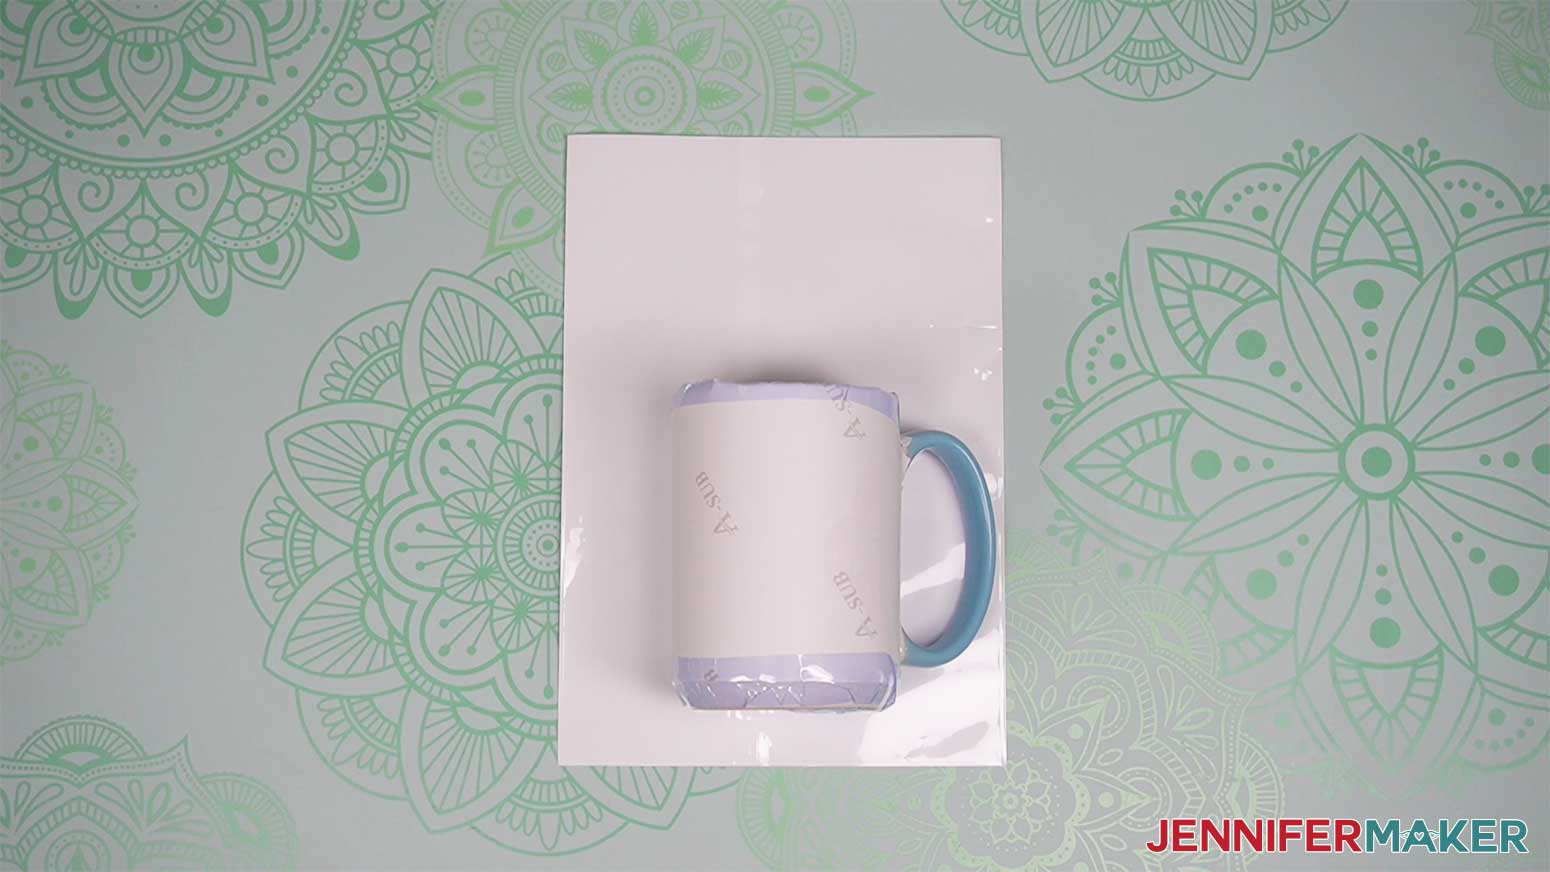
Holding the wrap at one of the folded edges, I will slide my mug into the wrap with the handle pointing up. Pinching the wrap with my index finger and thumb over the handle push the mug an inch into the wrap. 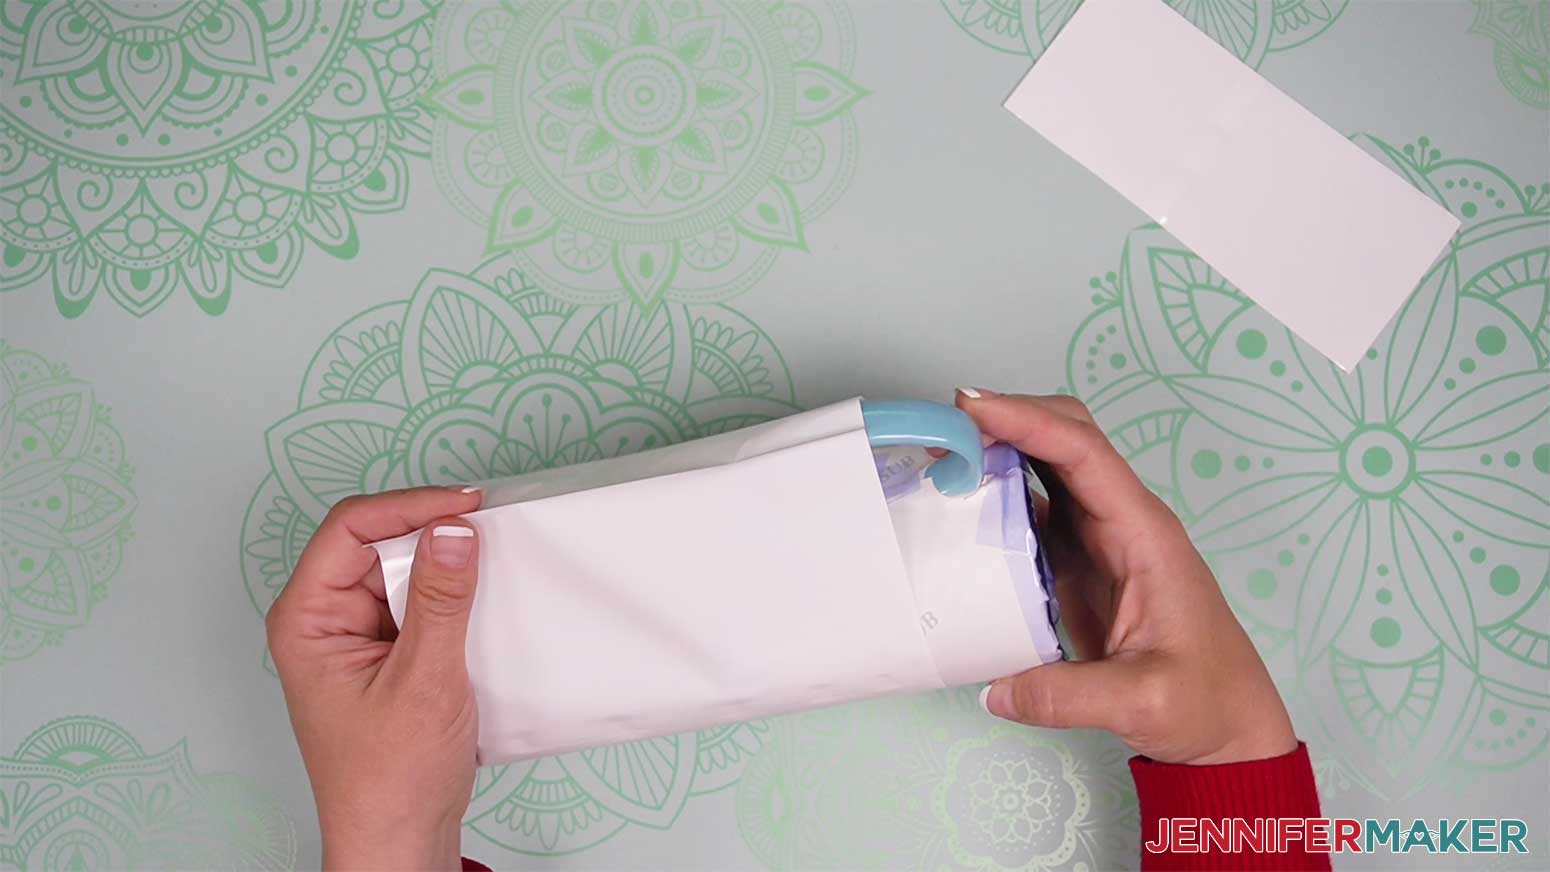
I will also cut the wrap at the top and bottom of the mug handle in a straight line down to the mug inside it. Now I’ll cut along the edge to make a hole for the handle to fit through.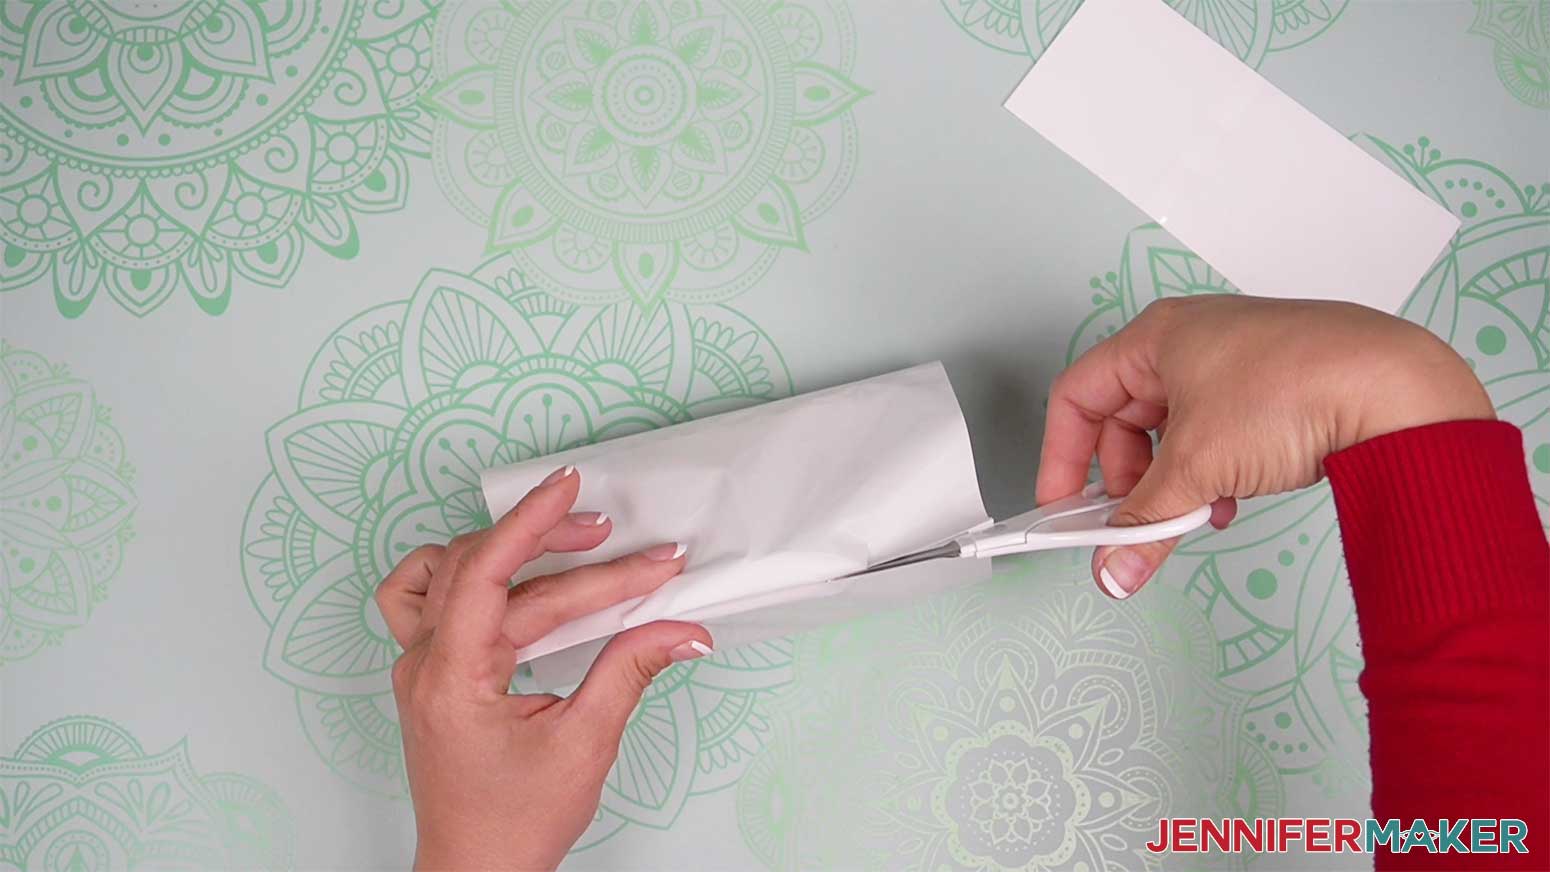
Fold the left tab under the right side and secure it in place with a piece of heat-resistant tape to the sublimation paper on the mug.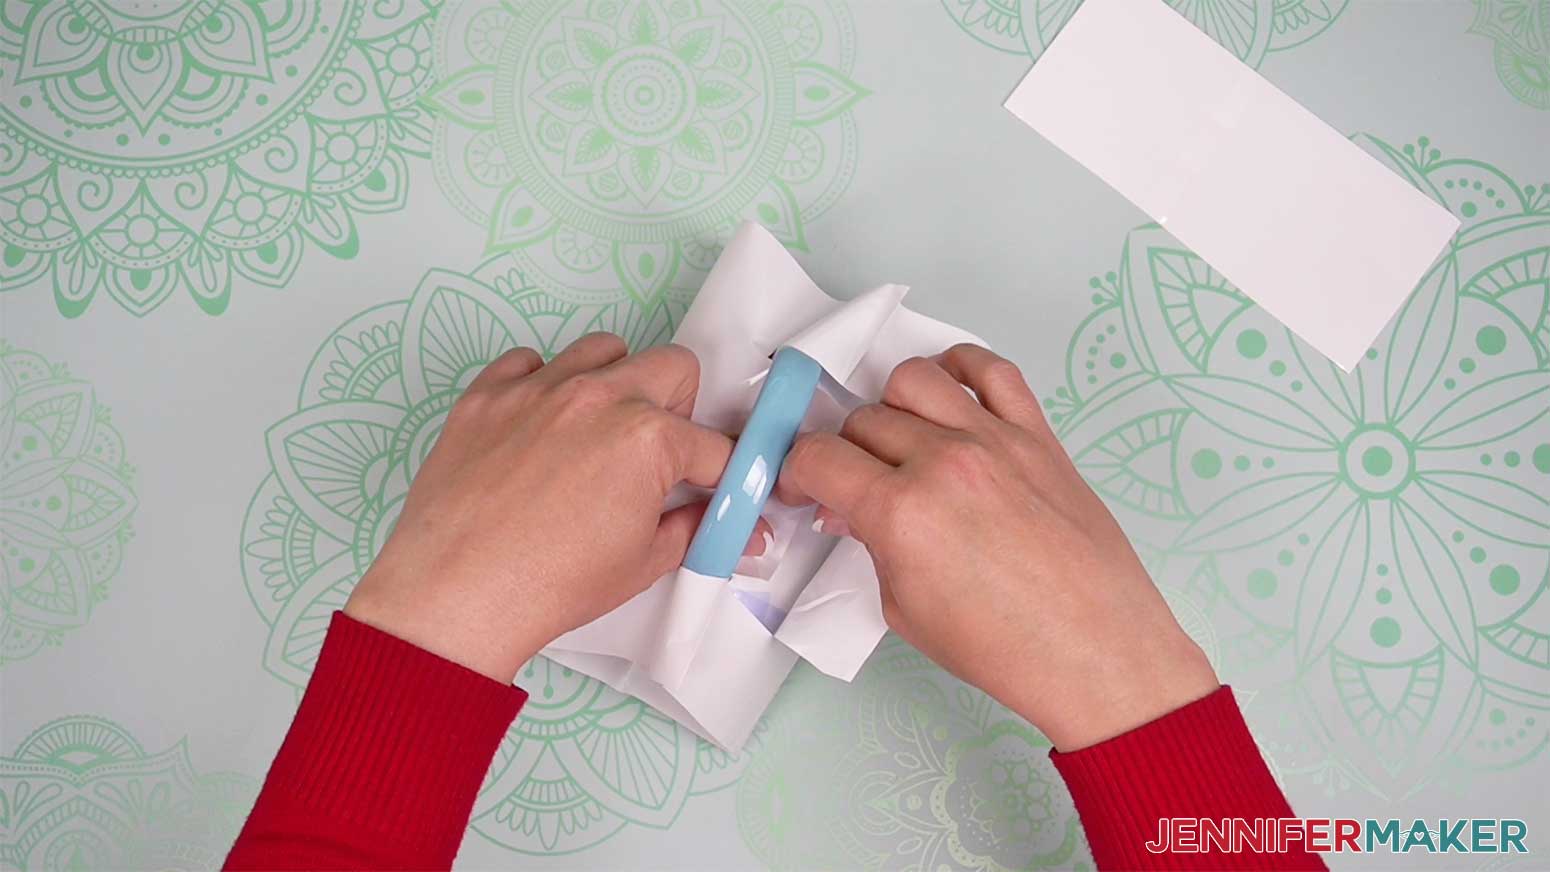
Next, I'll pull the right tab over the handle and secure it on the left side with another piece of tape.
Now I’ll fold the tabs on the top and bottom to one side of the other and tape them down.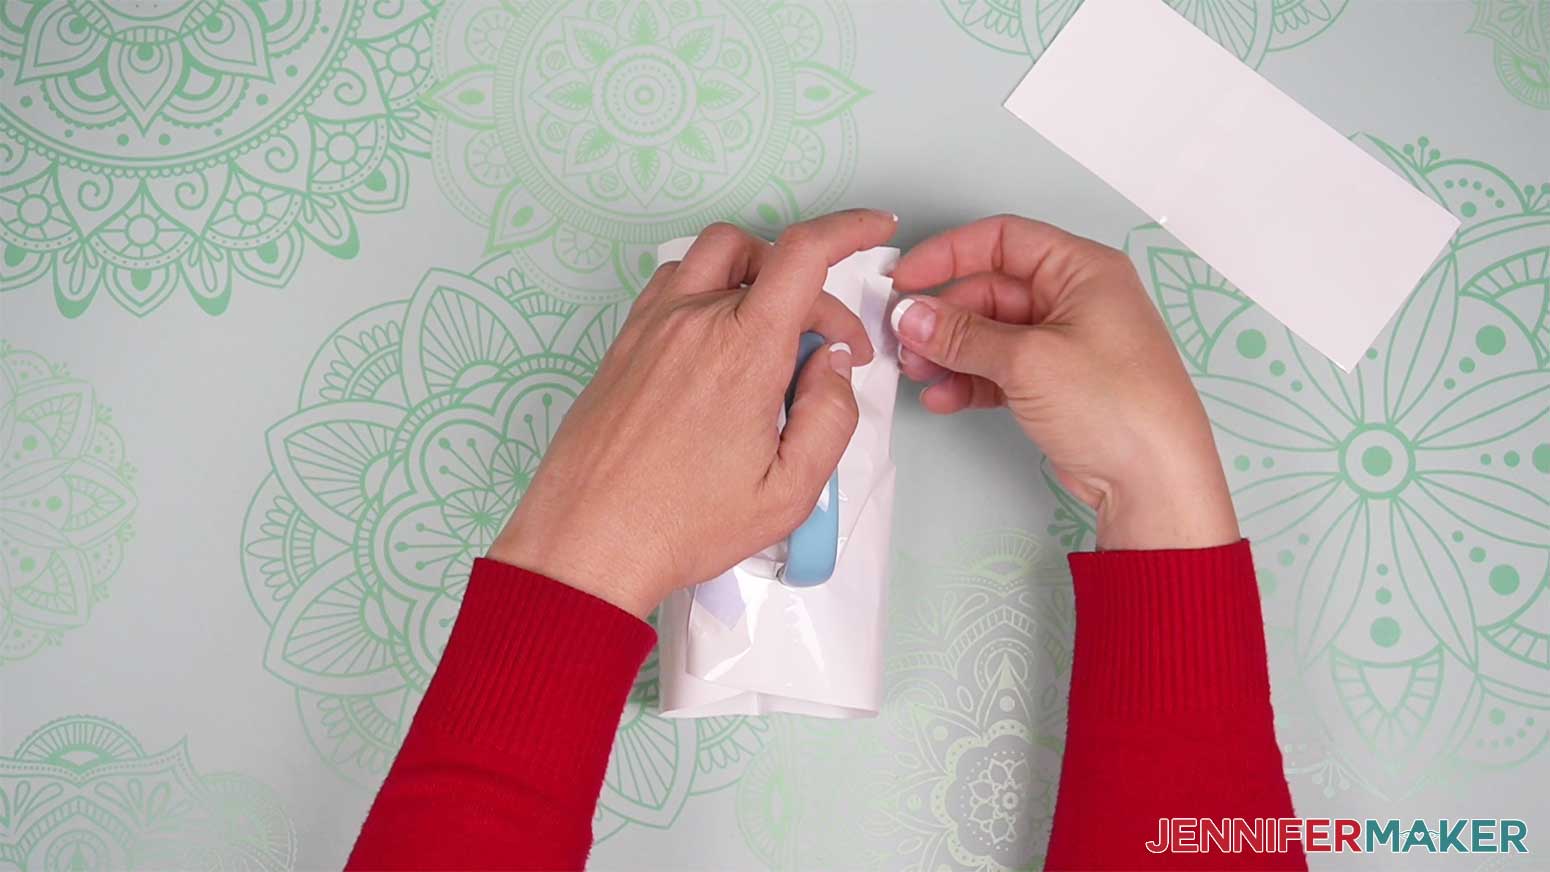
I’ll use the 3" of wrap I trimmed from the top and cut along the seam, pull the wrap under the handle, and tape it in place on the opposite side of my mug.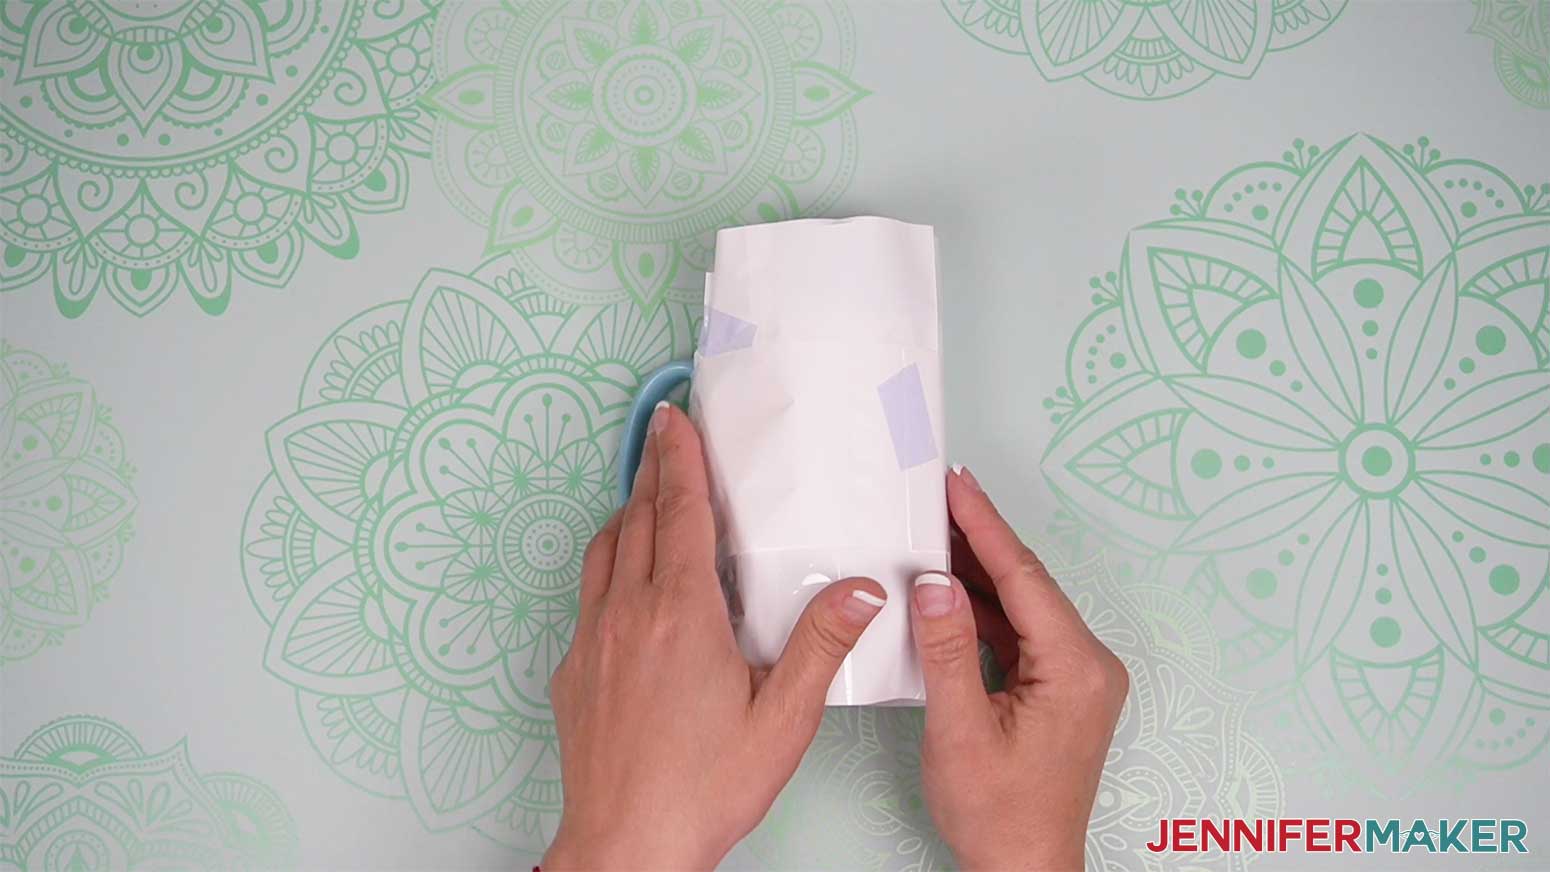
Next, it’s time to put on my heat-resistant gloves and use the heat gun to slowly heat the shrink wrap as it conforms to my mug. Make sure most wrinkles are clear, I focused on the area around the handle but don't make it too tight or it will pull apart in the oven.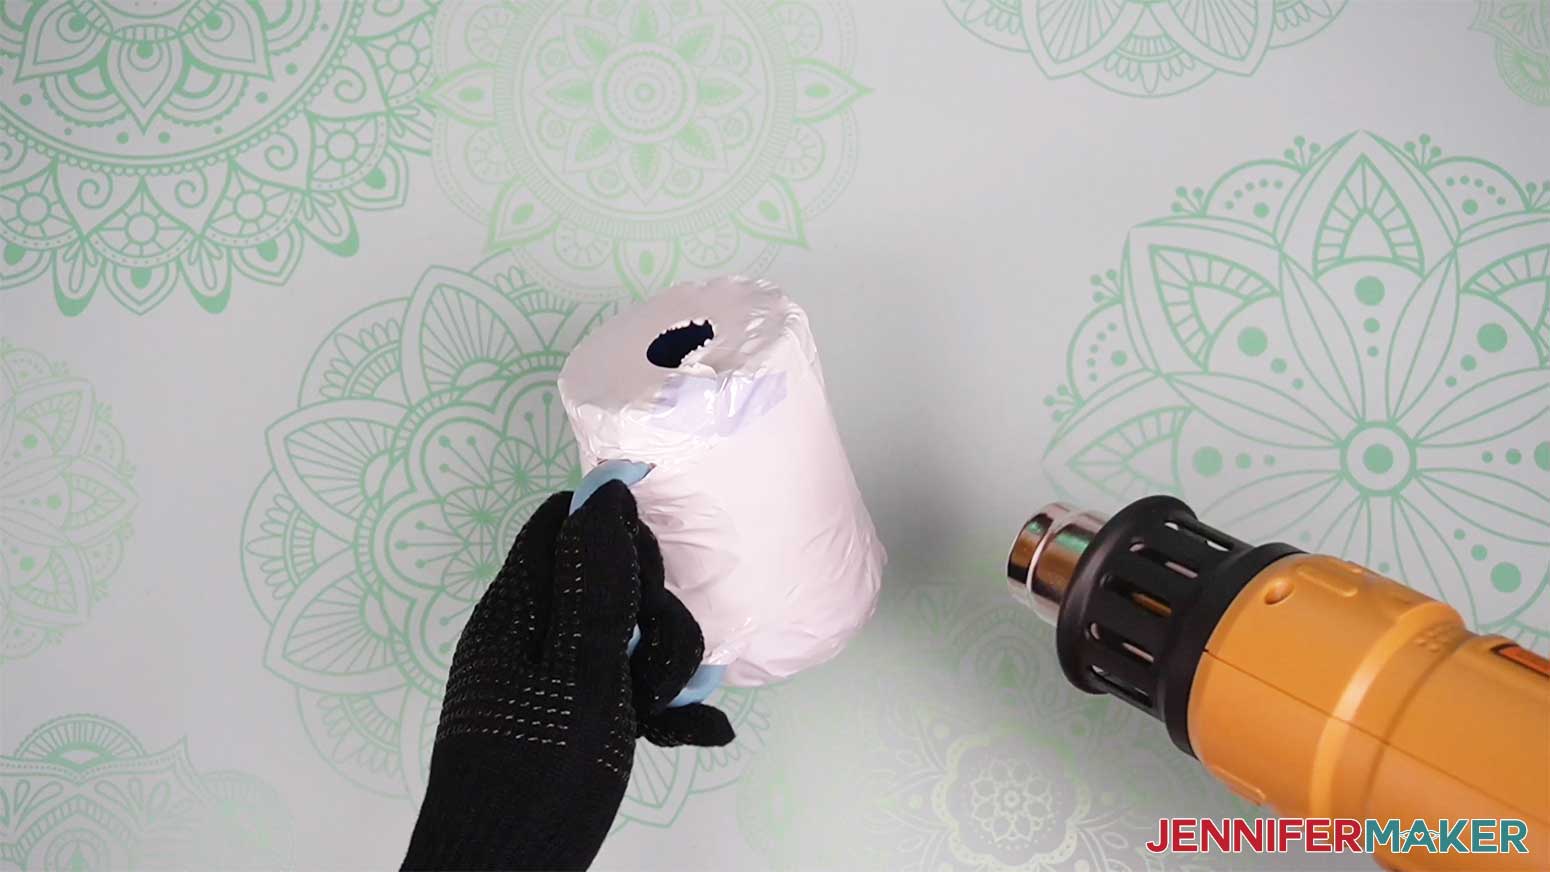
Place the mug in the center of the oven and heat for 15 minutes.
NOTE: Some ovens create a better result if you rotate the tumbler (with your heat-resistant gloves!) 180° halfway through the heating process.
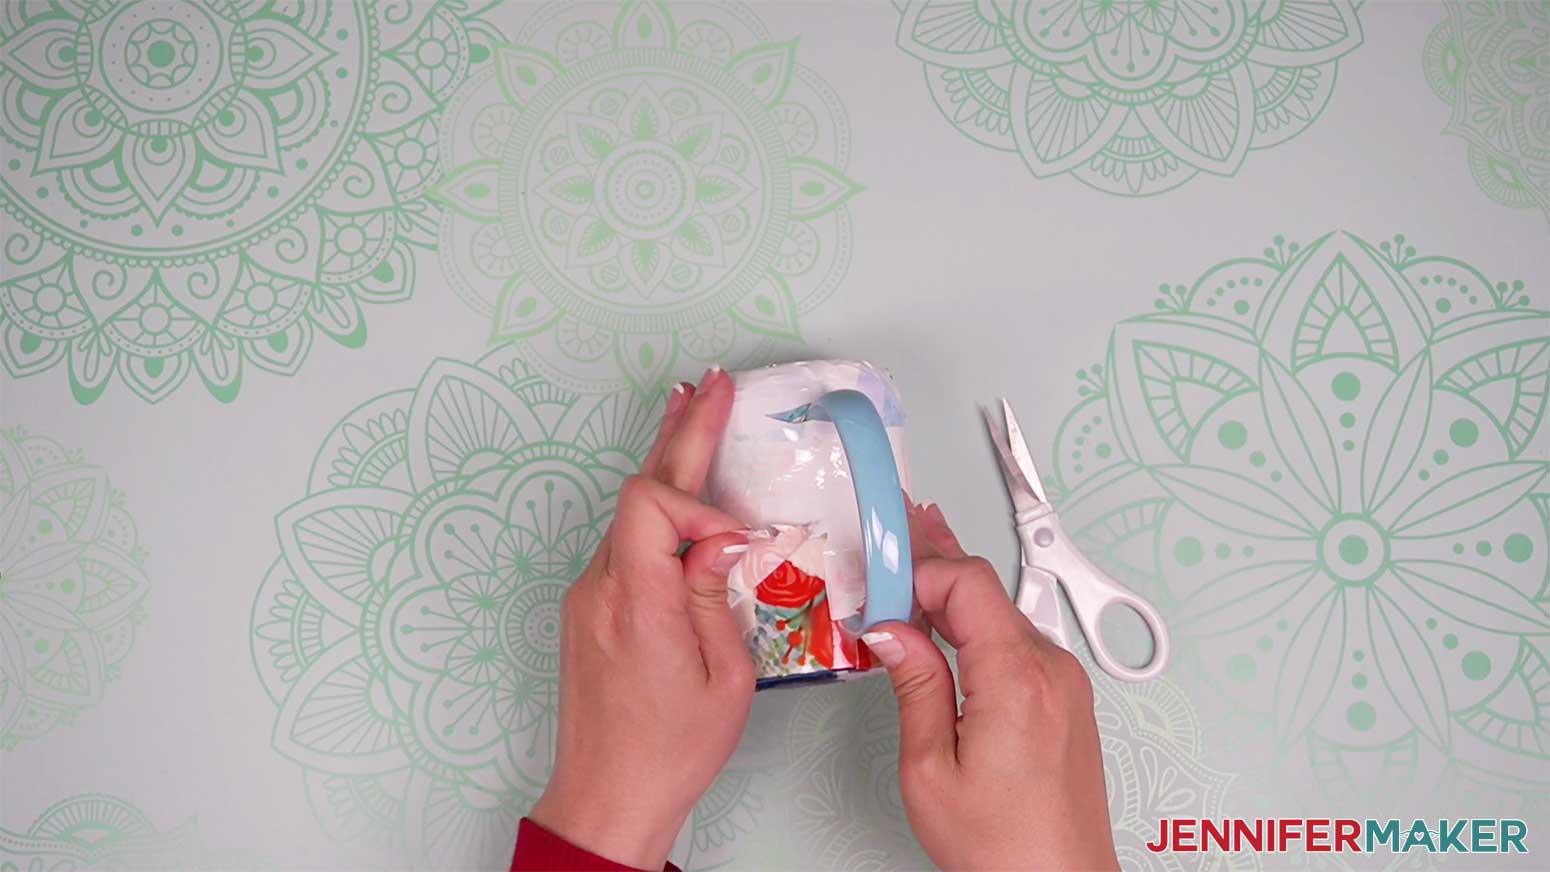
Remove the mug from the oven after the time is up, place it on a heat-resistant surface, and let it cool for 15 to 30 minutes. Remove the shrink wrap and sublimation paper carefully with scissors.
AIR FRYER METHOD
Alternatively, did you know that you can also sublimate mugs in an air fryer? 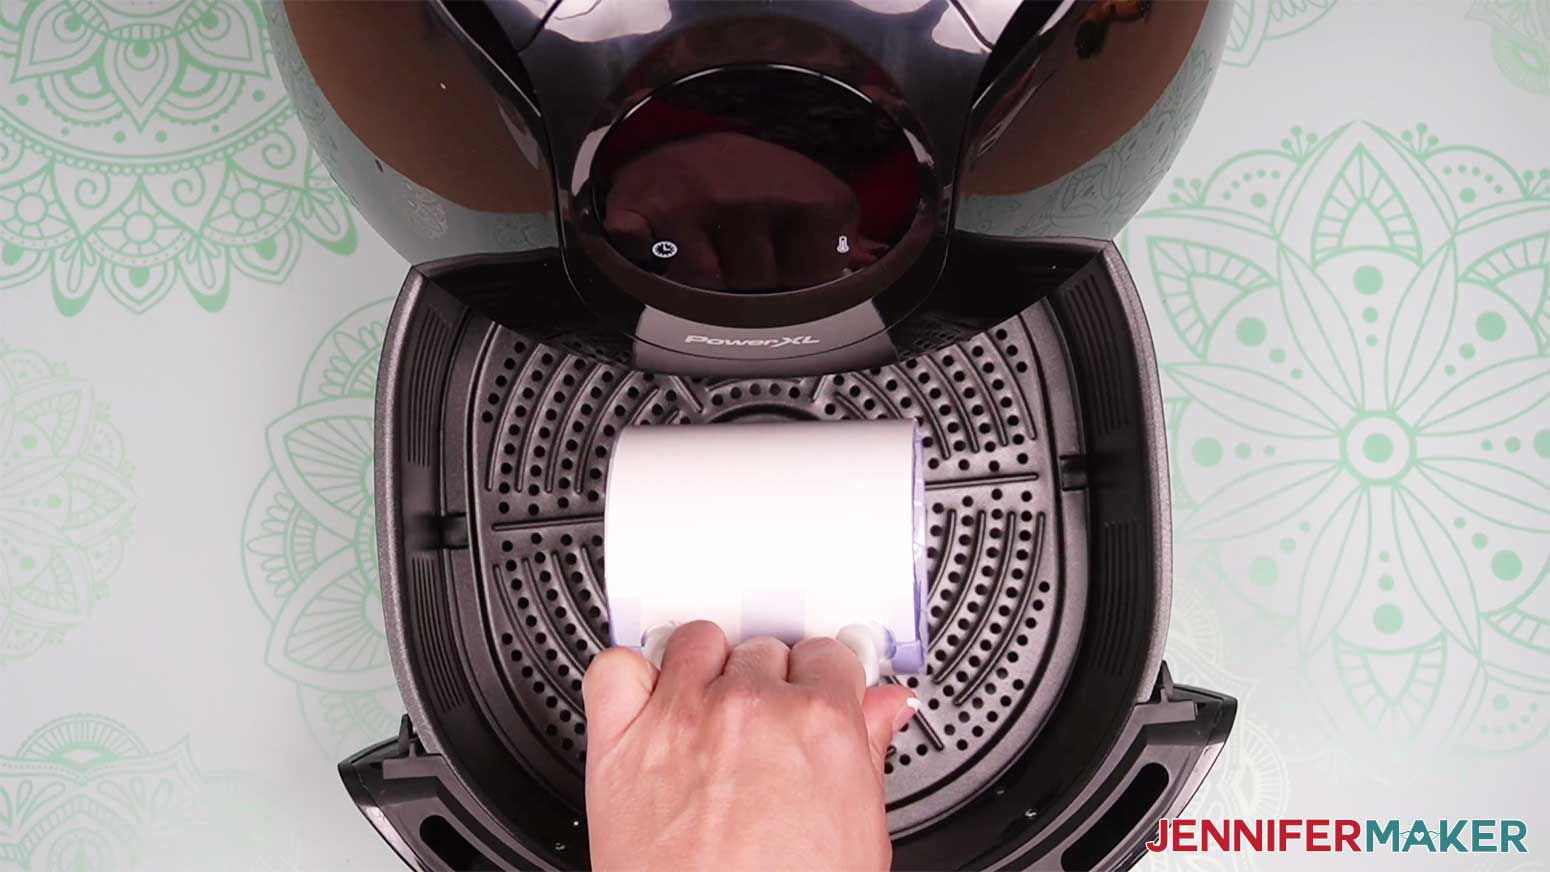
Similar to the convection oven method, your air fryer will need to be craft-purposed and never used for cooking.
Follow the same wrap instructions, then heat at 400° F (or 204°C) for 8-9 minutes.
Remove carefully while wearing heat-resistant gloves.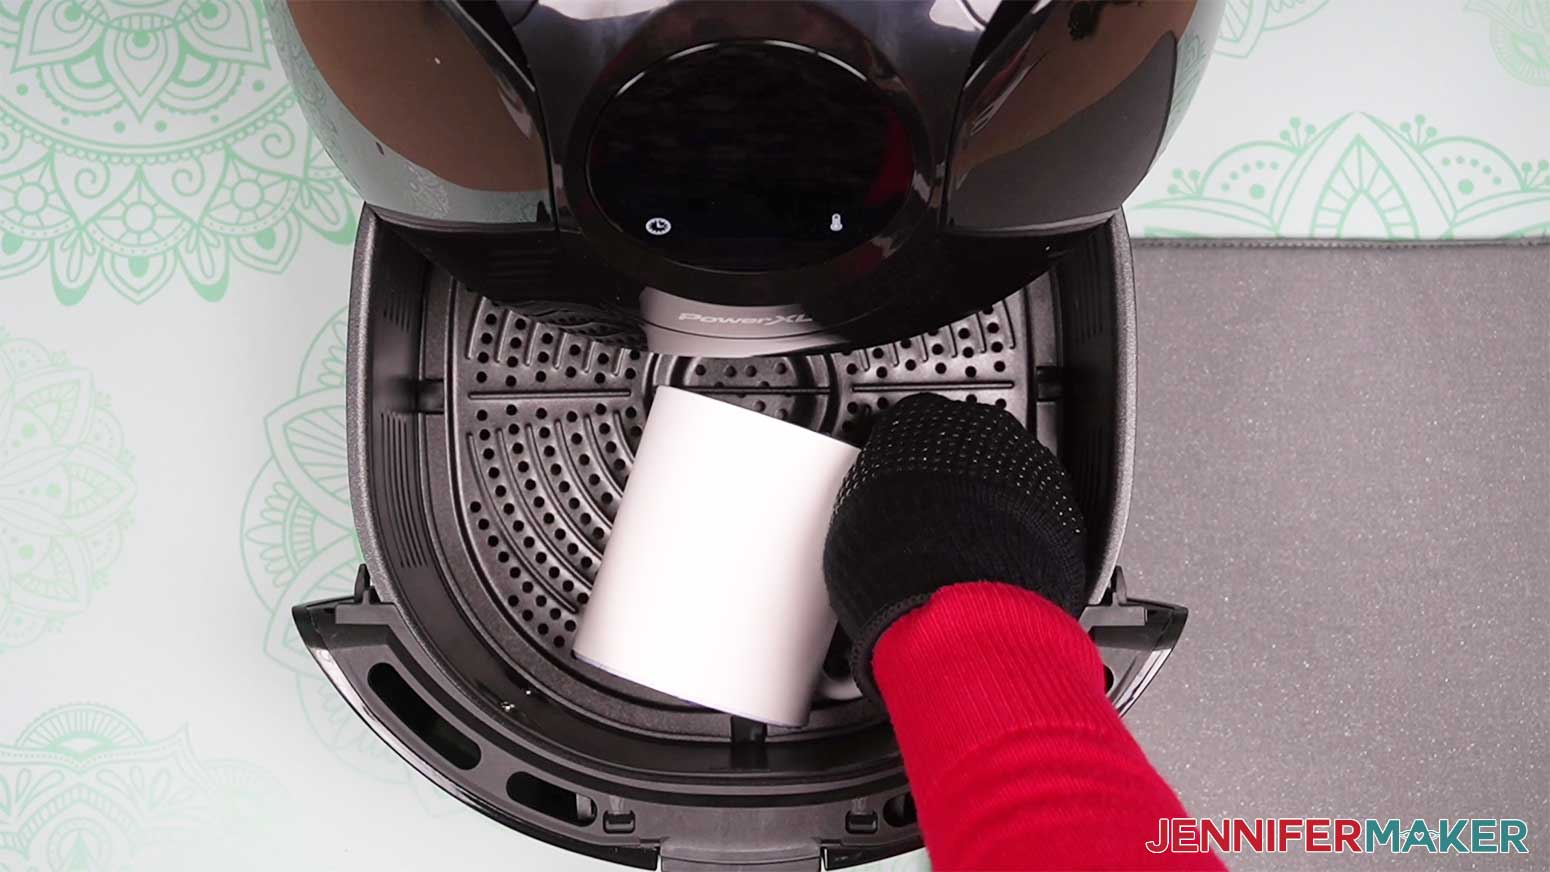
SILICONE WRAPS
You can also use silicone wraps instead of shrink sleeves. You just wrap your design around your mug and tape it as we just did. Then wrap your mug in butcher paper and tape it under the handle. Now just place the silicone wrap around your mug and close it.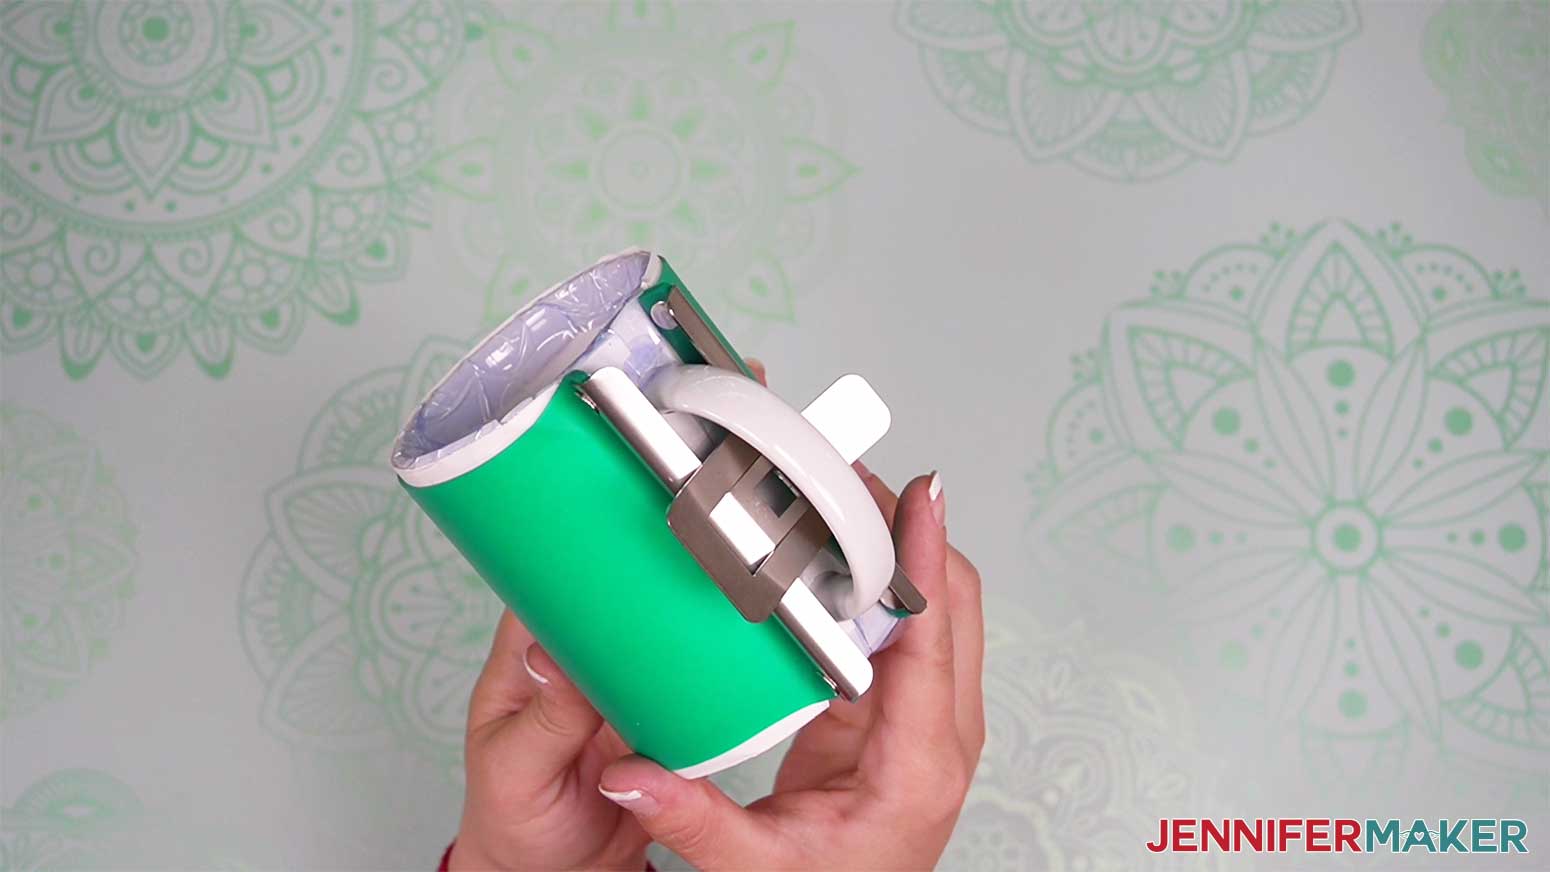
Then heat for the same temperature and time – so 375° F (or 191°C) for 15 minutes. Follow the rest of the directions to cool and unwrap your mug. Super easy!
STEP 6: SHOW IT OFF!
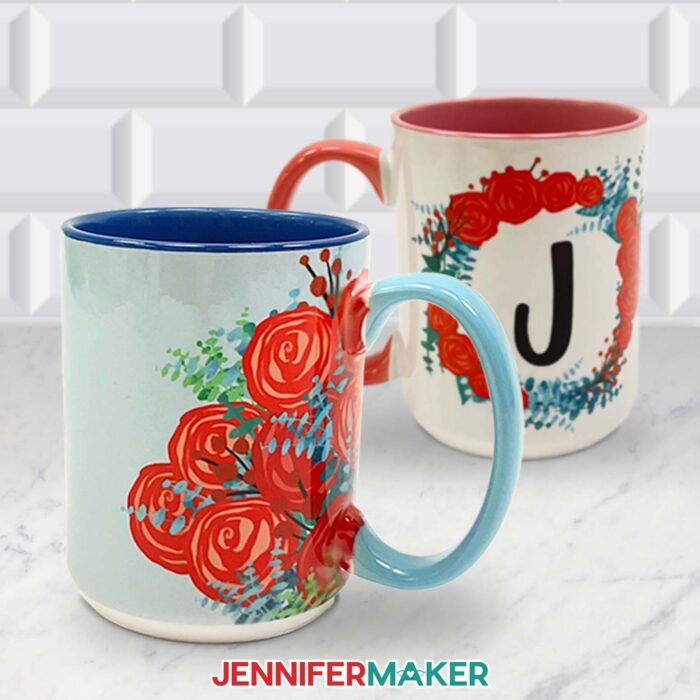
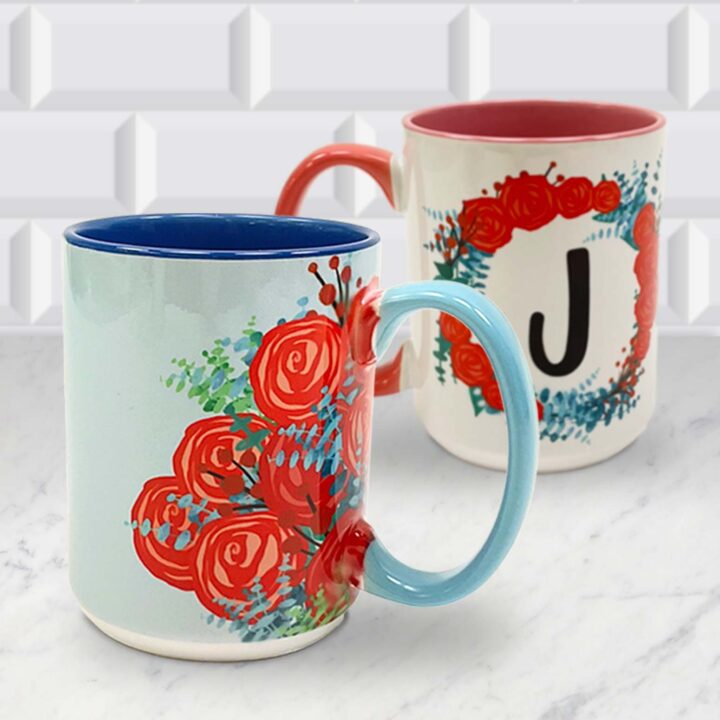
Here are all of my sublimated mugs! 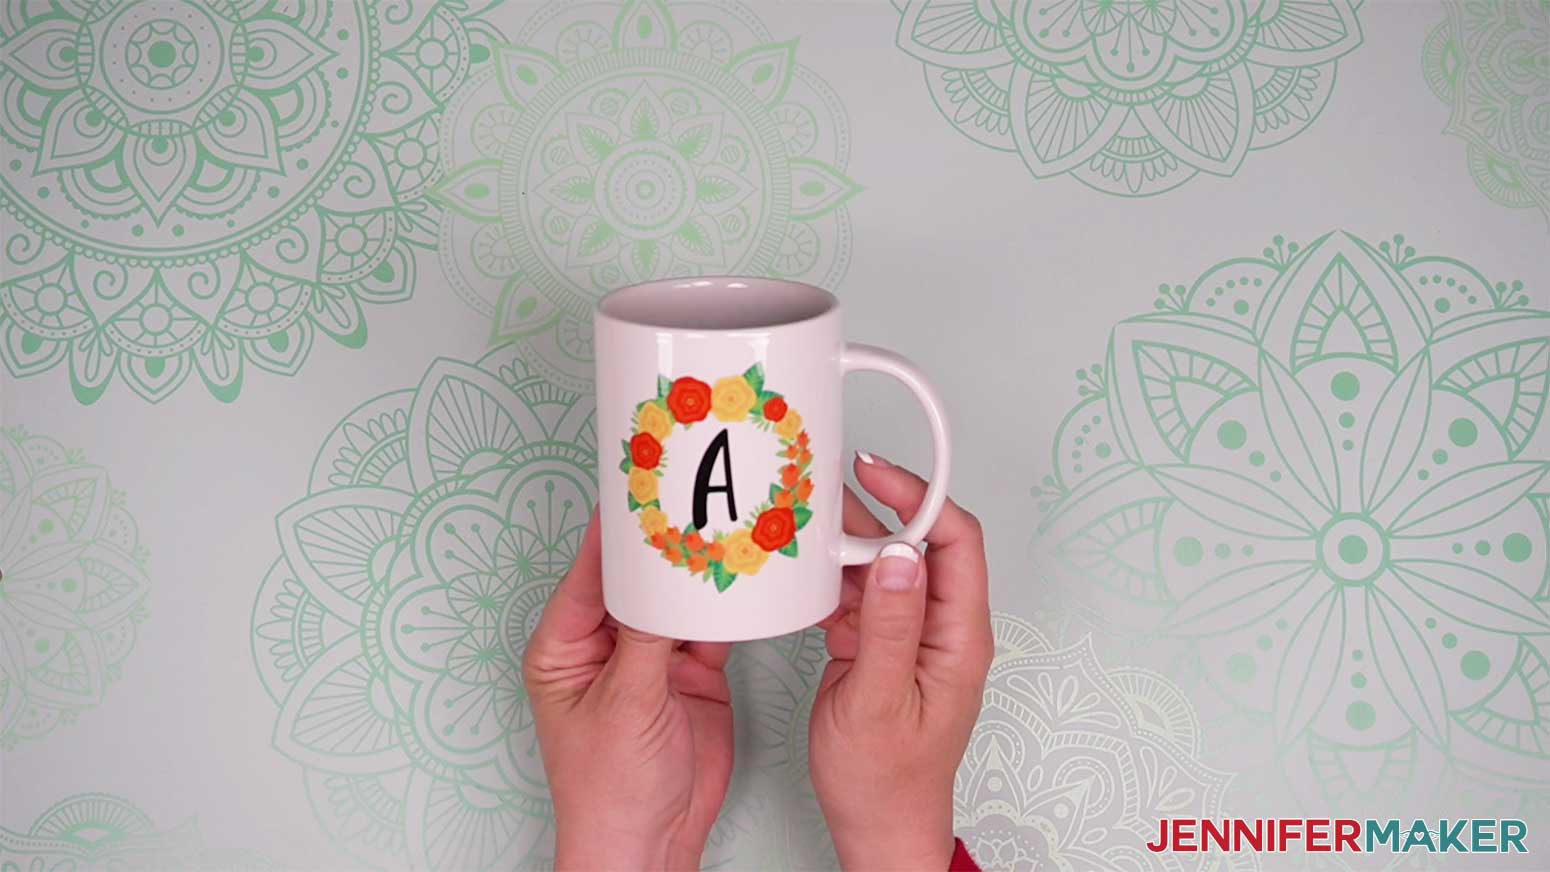
Notes
Font - Beachwood Font Duo
Free alternative - Lobster
Recommended Products
As an Amazon Associate and member of other affiliate programs, I earn from qualifying purchases.
Answers to Your Questions About How to Sublimate Mugs
Q: What is needed to sublimate mugs?
A: To sublimate mugs, you’ll need the following things: Blank mugs that are meant for sublimation, a sublimation printer, a cutting machine (optional), and a mug press -or- dedicated convection oven or air fryer. That’s not all — other supplies you’ll need which are method-specific can be found in my materials list below!
Q: Can all mugs be sublimated? Can you sublimate on a regular ceramic mug?
A: Not all plain white mugs can be sublimated. In fact, most cannot! Regular ceramic mugs do not have the special coating needed to accept sublimation ink. Look for mugs sold as “sublimation blanks”, as they will be made out of the right material.
Q: Can I use Dollar Tree mugs for sublimation?
A: While there are plenty of items at Dollar Tree suitable for sublimation, the blank mugs sold there will not work for sublimation projects.
Q: How long do you press a mug for sublimation?
A: Using a Cricut Mug Press, sublimation usually takes around 6 minutes. Using the convection oven method, you’ll want to sublimate your mug for 15 minutes.
Q: Do you peel sublimation hot or cold?
A: Sublimated mugs should ONLY be peeled after they’ve cooled down a bit, because sublimating continues even after the mug is removed from the heat source. Touching the design paper while the mug is still hot can cause smudging, ghosting, or shifting in your final sublimated design.
Q: Can I use parchment paper for sublimation?
A: Parchment paper is not recommended for sublimation because it is coated and holds in too much moisture. Don’t use Teflon sheets for sublimating either. Butcher paper is different, and I find it works best.
Q: What temperature do you sublimate a mug?
A: The Cricut Mug Press senses the ambient temperature in the air and adjusts the press automatically to the exact time and correct temperature to achieve the best results. If using the convection oven method, sublimate your mugs at 375° F (or 191°C). I recommend using an oven thermometer for best accuracy! Be sure to place the thermometer near where the mug will sit in the oven for the most accurate temperature read.
Q: Can I sublimate mugs if I don’t have a sublimation printer?
A: Not everyone has access to a sublimation printer, and that’s okay! There are other options. You can create a super fun sublimated design on a mug using Cricut Infusible Ink pens, Infusible Ink Transfer Sheets, and pre-printed sublimation paper designs available through small businesses on Etsy! And just a note on the Cricut Infusible Ink pens: You can insert them into your cutting machine and have your Cricut draw designs for you. Isn’t that the coolest thing ever?!
Get my free PNG/SVG files to make a Sublimation Mug!
(If you do not see the signup form above, click here.)
I’d love to see YOUR gorgeous sublimation mug! Please share a photo in our Facebook group or tag me on social media with #jennifermaker.
Love,

Want to remember this? Save this tutorial on How to Sublimate Mugs to your favorite Pinterest Board!