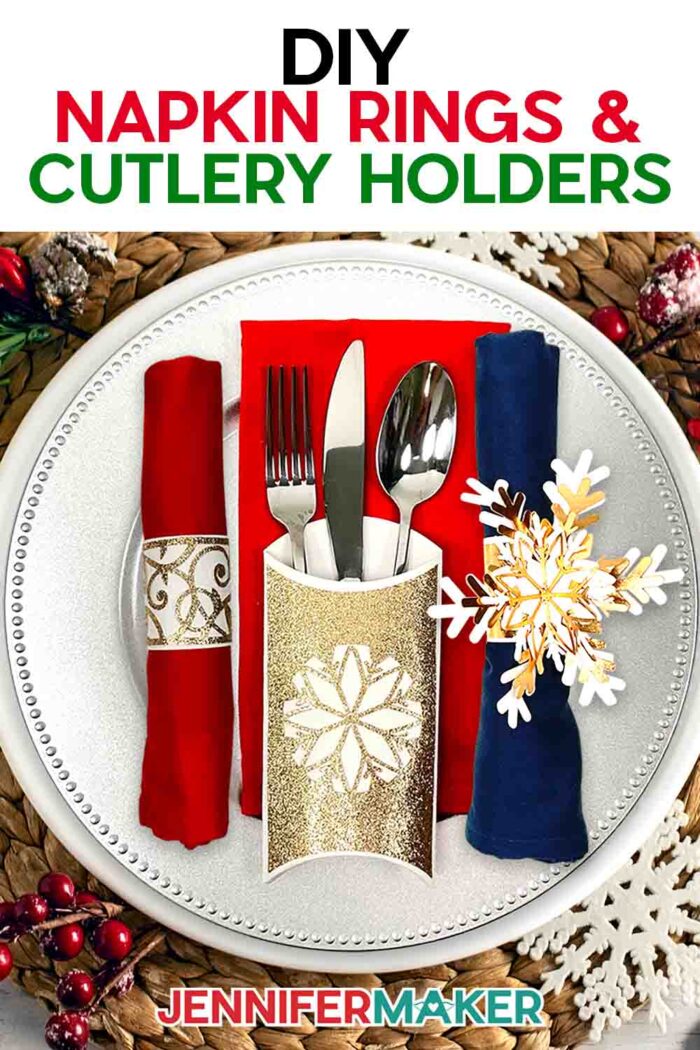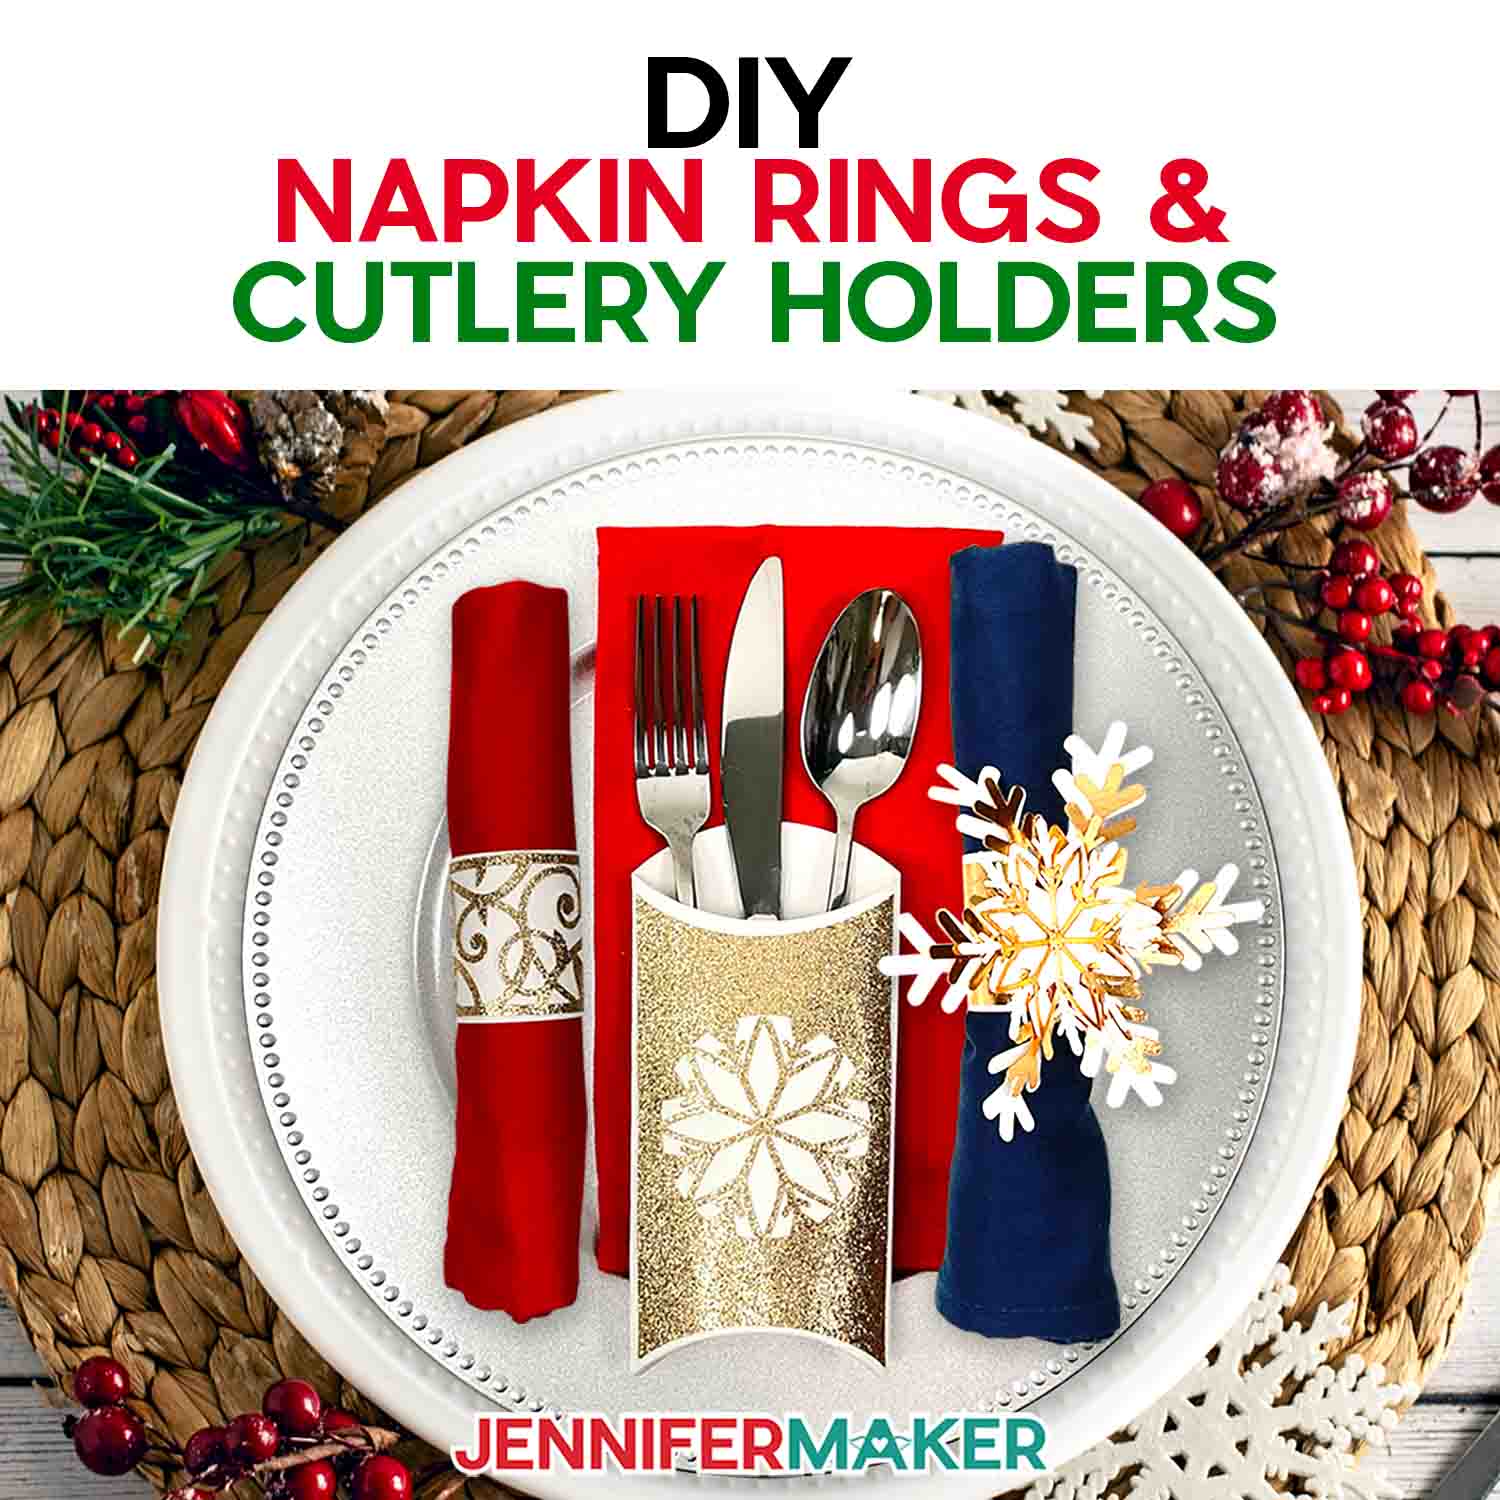
Learn how to make matching DIY napkin rings and more for your next party!
Do you need the last special touch to make your dinner party extra special? Make some easy DIY napkin rings to match your theme! I have holiday and year-round designs ready for you to make in any color you want! And for an extra special table setting, you can even create customized cutlery pouches to match. Let me show you how quickly (and easily) they come together!
Want to save this project? Enter your email below and we’ll send the project straight to your inbox.
These beautiful napkin rings and cutlery holders are the perfect addition to special occasions like Thanksgiving dinner, or to add some elegance to your Christmas table! Making your own napkin rings to dress up drab place settings is a great way to take your holiday table decor to the next level.
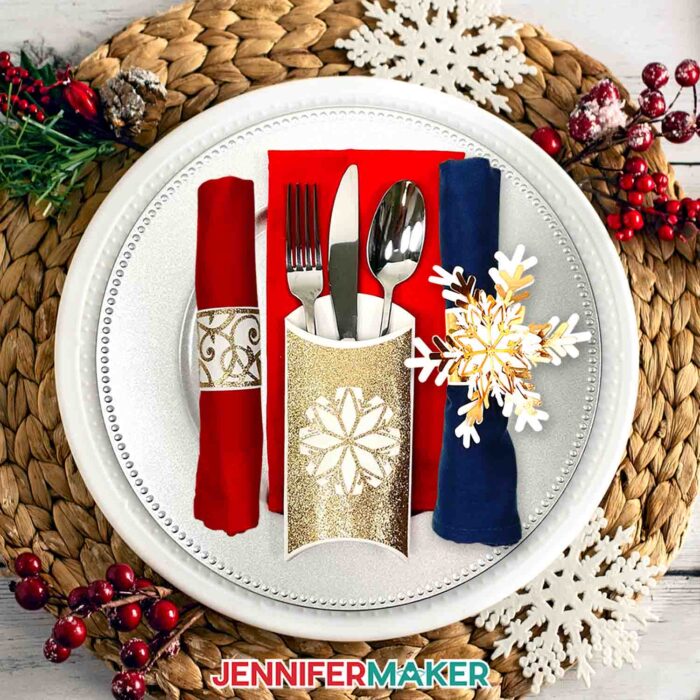
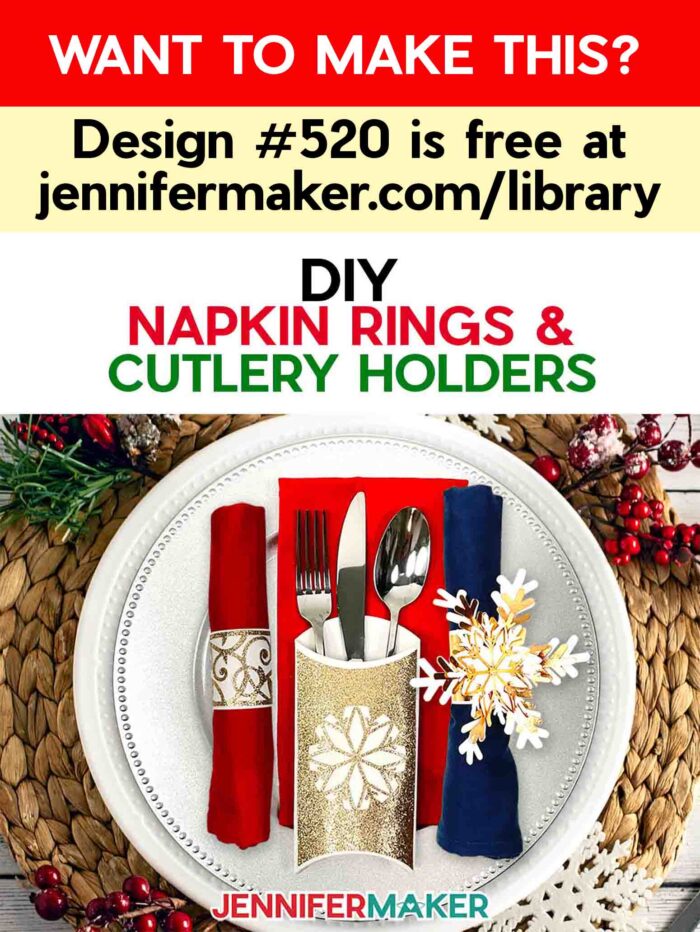
In the download folder, you’ll find files to make three different designs: A simple napkin ring you can use all year round, a beautiful snowflake napkin ring, and an elegant cutlery holder that I’ll show you how to personalize with an initial cutout to show the glitter cardstock underneath. I used one of my favorite typefaces, Beachwood, but you can try others, too!
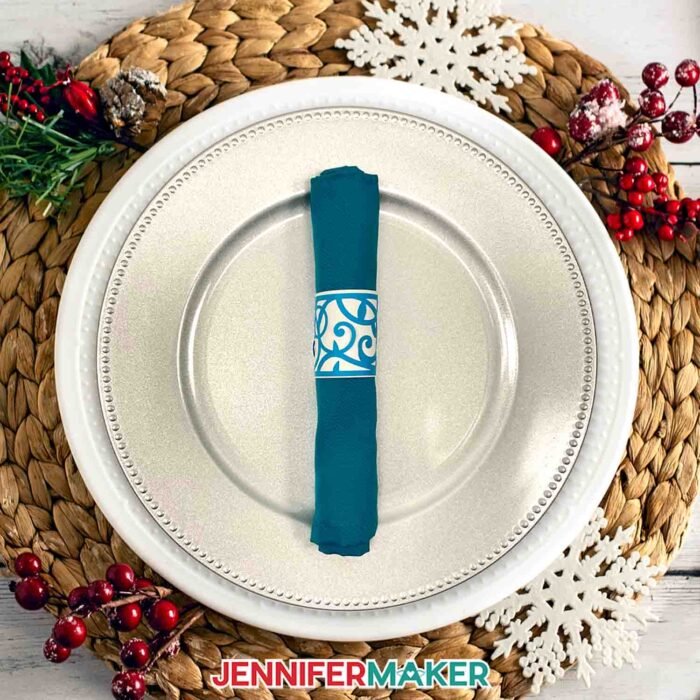
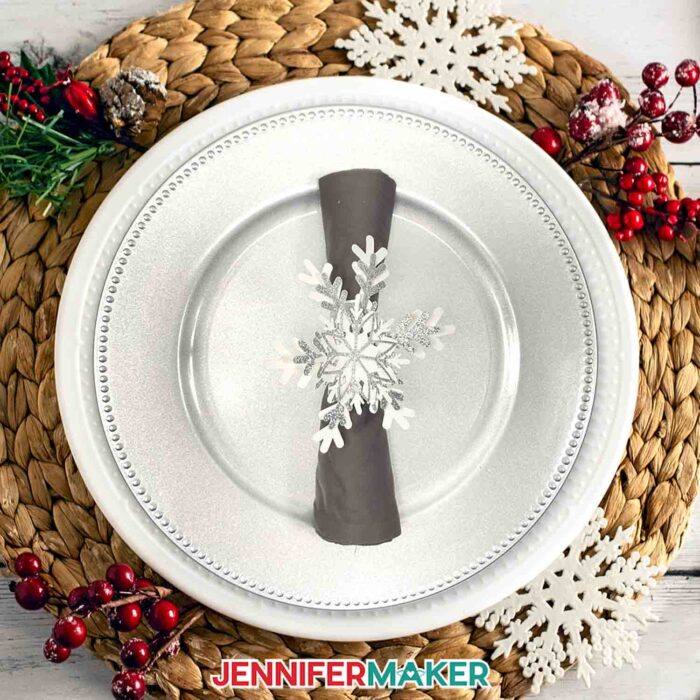
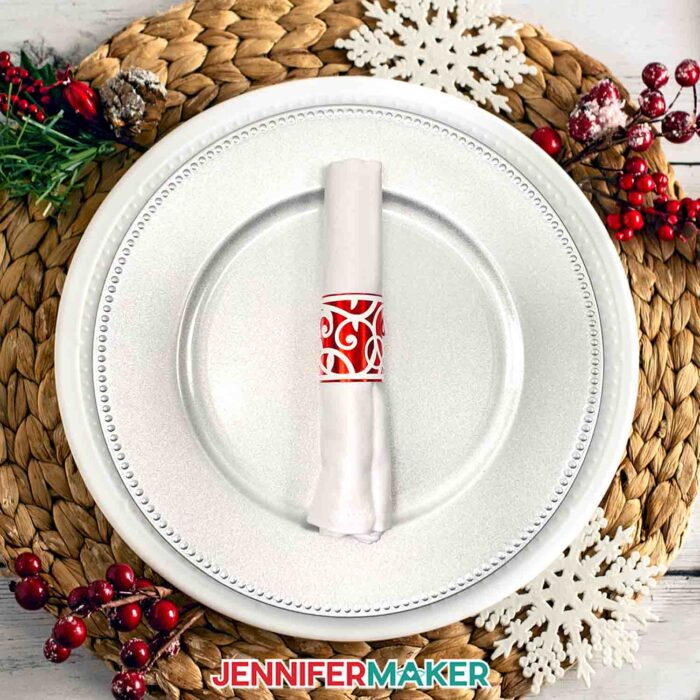
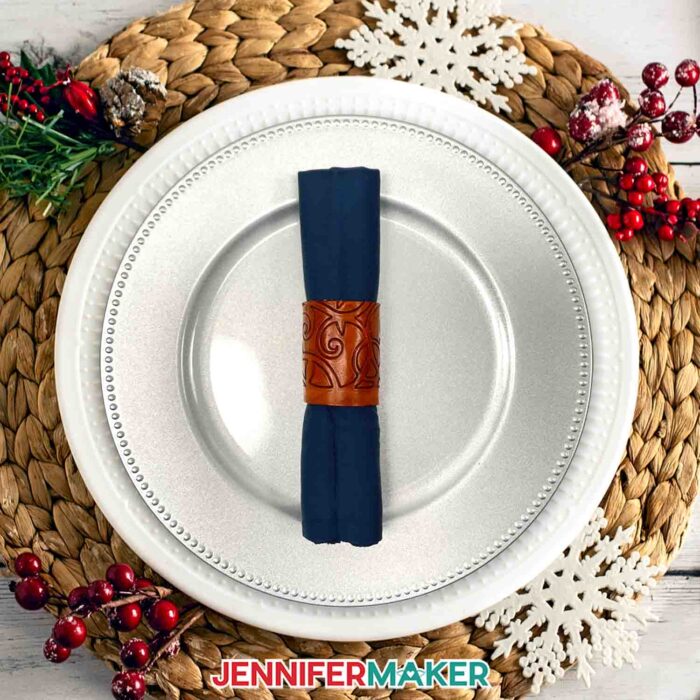
The year-round design is simpler with just two pieces for the ring. The snowflake napkin ring has five parts: two pieces that will create the ring, and three decorative snowflake layers. The cutlery pouch design comes with two options to choose from: A blank layer, and a decorative layer.

I’ve designed everything the perfect size to fit standard-size silverware and 18″ x 18″ cloth napkins, so you don’t need to adjust the sizes on any of the files. The’ll look great sized as-is on your dinner table.
First I’ll guide you through how to prepare the files in Cricut Design Space. I’ll walk you through how to create a monogram personalization cutout on the cutlery holder, and show you what cut setting to use to make sure the intricate designs come out looking nice and clean.
After you’ve cut your napkin rings and cutlery holders, we’ll move on and put them together! I’ll show you exactly how to assemble the cutlery holder so it looks its best, then we’ll do the napkin rings.
The snowflake napkin ring has a few extra pieces and steps, but it’s so worth it! When you’re gluing together the layers, you can either line up or stagger the points on the snowflake for different looks! Then you can take the sections of each snowflake and carefully spread them apart, which creates a fuller look.
For even more variation and customization, switch up your materials! It’s a lot of fun to change up the colors, textures, and even patterns of your cardstock for a completely different look that matches your home decor, your party theme, or whatever you like! However you decide to decorate them, they’re sure to impress each and every dinner guest.
I loved using foil cardstock with these projects because it makes the designs pop really beautifully! It comes in a variety of colors and adds an elegant flash to holiday projects. I tried it instead of the glitter layers on some of the them, and just love the results. Just make sure you change your cut settings when you change your cardstock type, so your Cricut does its best job of cutting it.
One thing to keep in mind when using foil cardstock, though, is that the material does show creases and dried glue very easily. I recommend going slow and really taking your time if you decide to use it! And if you’d like to try it for the cutlery holder, I recommend using the score tool version with a scoring stylus for the best results. I found that creasing along the dashed cut lines ended up showing the white paper on the back of the foil show through, and I didn’t really like the look of it.
If you decide to use glitter cardstock for your base pieces, make sure you really hold the glued sections in place while they dry. The glittery texture means that the glue needs a little more help to set.
So, you may be thinking: How long will my set of napkin rings hold up? Can I re-use them next year? Maybe! While the cardstock versions will show some wear and tear after a use or two, I did find a couple options if you want to make them out of more durable material.
Kraft Tex Fabric Paper is durable enough to last several uses and won’t tear! It cuts well using the Medium cardstock setting with More pressure, but it’s a bit more tedious to weed than regular cardstock. The assembly is exactly the same though, and you can use the same glue as you did with the regular cardstock.
If you want napkin rings made to last, the simpler year round design worked great on leather! Yes, really! If you’re new to working with leather, check out the basics in my DIY leather journal tutorial.
If real leather isn’t your thing, you can also make the year round napkin ring design with faux leather. I’ve got a tutorial to help you learn the basics of working with this fun and versatile material, too.
These lovely cutlery pouches and elegant napkin rings are the perfect project to add some gorgeous elegance to your Christmas or Thanksgiving table — or anytime, really! I can’t wait to see how yours turn out!
Here’s a supply list of what you need to make DIY napkin rings! This post contains some affiliate links for your convenience (which means if you make a purchase after clicking a link I will earn a small commission but it won’t cost you a penny more)! Read my full disclosure policy.
Materials and Tools to Make DIY Napkin Rings
View my Amazon shopping list with the exact items we used to make this project
- 12″ X 12″ 65 lb Cardstock – I used white and blue -OR- 12″ x 12″ Glitter Cardstock – I used silver and champagne -OR- 8.5″ x 11″ 65 lb Foil Cardstock – I used red in variations -OR- 8.5″ x 11″ 65 lb Foil Cardstock – I used gold and rose gold in variations
- 18″ x 18″ Cotton Napkin -OR- 18″ x 18″ White Cotton Blend Napkin
- Craft Glue – I used Bearly Art Precision Craft Glue
- A method to cut your cardstock — I used the amazing Cricut Maker 3, with the Fine-Point Blade but you can use any Maker or Explore
- Cricut Green StandardGrip Mat, 12″ x 12″ -OR- Cricut Blue LightGrip Mat, 12″ x 12″
- Cricut Brayer
- Cricut Scissors
- Cricut Spatula
- Cricut Scoring Stylus – optional for scored versions
- Aluminum foil – to clean your blade after cutting glitter cardstock
- 8.5″ x 11″ Kraft Tex Paper Fabric – optional for more durable rings and holders
- Design #520 – (My free SVG/PDF/DXF design files are available in my free resource library (get the password by filling out the form at the bottom of this page)

How to Make Your Own DIY Napkin Rings
The detailed step-by-step assembly video on how to make DIY napkin rings and cutlery holders debuted during Maker Academy Weekend 2023, held online November 1-5, 2023. Get an on-demand pass to watch all 30+ workshops, each with a printable handbook, transcript, audio file, design files, and support with a VIP pass below:

Answers to Your Questions About DIY Napkin Rings
Q: Where is your tutorial for this project?
A: These DIY napkin rings and cutlery holders are a special project we made for our free Maker Academy Weekend 2023 event! A complete and detailed step-by-step video premiered during the event November 1-5, 2023 — this tutorial video was available to watch for free for 24 hours only during the event. If you missed it, you can get access to the full video, the 15-page printable handbook that details how to make this beautiful project with a VIP Pass to Maker Academy Weekend 2023, which comes with other perks and bonuses, too! Look at all the star ornaments made by our VIP passholders in the lead up to our big event!
Q: What can I make napkin rings out of?
A: You can make napkin holders or rings out of a bunch of different materials and methods, and I’ve seen projects involving carving your own wood napkin rings to repurposing a toilet paper roll! In this tutorial, though, I’ll show you how to make them easy and inexpensively with cardstock. Another option for more durable napkin rings is Kraft Tex Fabric Paper. It cuts well using the Medium cardstock setting with More pressure but is a bit harder to weed than normal cardstock. Just take your time, then glue it together just like the cardstock versions!
As far as decorating your napkin rings and cutlery holders, the sky’s the limit! Adapt the simple napkin rings and the cutlery pouch for any time of year or occasion by using glue, twine, or hemp cord to attach elements like paper flowers, faux flowers and greenery, polymer clay beads, cinnamon sticks, and more. If you like shiny things, add some sparkle to your paper rings with glitter, foil, or even holographic cardstock! There are literally so many options, so raid your craft stash or check out your local craft store or dollar store for ideas — and have fun with it!
Q. How do you make a round napkin ring?
A. Making a set of basic napkin rings is super easy, and I walk you through the steps in this tutorial. Following my easy DIY napkin ring tutorial is one of the easiest ways to bring some magic to your dining table any time of the year.
Q. Can you use paper napkins in napkin rings?
A. Of course! You can use paper napkins in my napkin holder designs, but I recommend using paper napkins on the bigger, thicker, higher-quality side. Small paper napkins will not fill up the napkin rings sized as they are. You can experiment and resize the file, but it may take some trial and error before they fit your napkins perfectly.
Q: How do you cut your cardstock so intricately without tearing and ripping?
A: The key is to use a clean sticky machine mat and a clean fine point blade. Learn more about getting cleaner cuts on your Cricut cardstock projects in my Cricut Cutting Problems guide.
Get my free SVG files to create DIY napkin rings!
Get FREE access to this design and ALL of my SVG cut files!

Subscribe (free!) to my newsletter with updates and tips PLUS get instant access to my resource library with this file and all of my other free files, printables, and patterns! Once subscribed, I will send you a newsletter with details about my new free and helpful files each week.
Enter my free resource library for my latest files, printables, and patterns! Password is 'craft' -- please copy and paste that in at the link above. Thanks for being a subscriber!!
I SO hope you’ll make some DIY napkin rings! Please share a photo of your table settings in our Facebook group or tag me on social media with #jennifermaker.
Love,

Want to remember this? Save this DIY Napkin Rings tutorial to your favorite Pinterest Board!