
This mini-course has been replaced and updated with a NEW series of free classes called Cricut Kickoff!
![]()
Cricut Kickoff walks you through the entire process of setting up, registering, and making your first cuts. It also covers all of the materials and things you can make on your Cricut, how all the mats, blades, accessories, and tools work together (and when to use which one). Then we delve into Cricut Design Space so you can create ALL THE THINGS.
Register for Cricut Kickoff FREE here!
If, on the other hand, you’re still interested in the old and outdated Love Your Cricut mini-course lessons, here they are. Please note that the lessons below cover only the Explore and Maker, and may reference items and projects that no longer exist on Design Space. For that reason, I highly recommend Cricut Kickoff over the older lessons.
Lesson 1: Meet the Cricut
Time to watch/read: 20 minutes
Time to apply: 10-20 minutes
Total: 30-40 minutes
Whenever I teach something, I like to start at the very beginning to make sure we have a good foundation. So, in this first lesson, I’m going to introduce you to your new best friend, the Cricut.
I’ll explain just what a Cricut is — both a Cricut Explore and a Cricut Maker — and what the different versions can do. You’ll watch me unbox a brand new Cricut Explore Air so I can show you exactly what it comes with and how you get it set up. I’ll also introduce you to a Cricut Explore Air 2 as well as a Cricut Maker. I will name all the parts and show off some of the hidden features of each machine. And then we’re going to setup the Cricut in an optimal location, one that works well for both you and your Cricut.
So pause this, get yourself a coffee or tea, pull up a chair in my craft room, and let’s get started!
So, what is a Cricut? The Cricut is a cutting, scoring, and writing machine, all guided by computer. It does exactly what you tell it to do, precisely and efficiently. And because of its remarkable ability to cut, score, and write what you tell it to, you can make a lot of things faster, easier, and better.
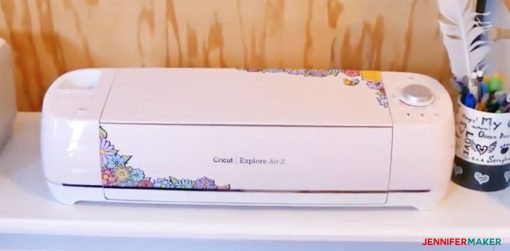
The Explore and the Maker are the two current models of the Cricut being sold today, and these are the ones I know and can teach you all about.
The Explore and Maker are very similar. Both cut out a wide variety of materials. And both have an accessory tool clamp that you can use to write or score with. The Maker also has an Adaptive Tool System that allows you to cut with two additional blades — a rotary blade and a knife blade — so you can cut things like fabric and thin wood easier.
I use my Explore and Maker quite a bit, and they’ve been out of their boxes for a while. But I really wanted to show you a brand new, fresh Cricut, because I know many of you just got your machines or maybe haven’t taken yours out of the box yet. So, just for this mini-course, I bought this Cricut Explore Air so we could open it up and set it up together. The Explore and Explore Air 2 models are essentially the same setup as this machine. The Maker has a few extra bits, and I’ll show you that, too.
So let’s open the box!
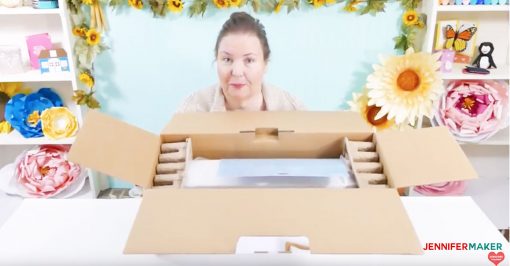
The first thing we see is a package called “Start Here.” This includes the setup guides for your computer or mobile device, a Learn more packet, the warranty, and the materials we’ll use for our first project. But let’s look at the Cricut machine first.
There’s also a 12″ x 12″ LightGrip cutting mat — it gets a little curved in the box, but it WILL flatten out — not to worry!
There’s also the power supply cord, a USB cord, and a pen. We’ll set these aside for now.
Here is a Cricut Explore Air — this is the Pink Poppy color!
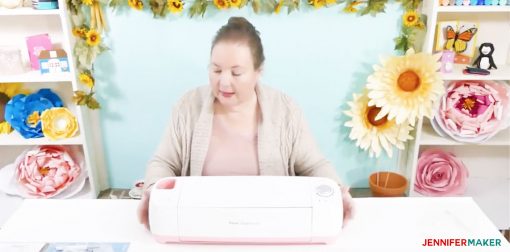
Let’s start by opening our Cricut — the Explore Air has an open button, which will automagically open the front and top lids for you! I love that part.
All of the Cricuts ship with this packaging foam around the carriage. To remove it, just pull it out. Your blade and blade housing come pre-installed. The carriage has two clamps — clamp A is for your accessories, like the pen or an optional scoring stylus, and clamp B is for your blade. Just remember A is for accessories and B is for blades.
Now let’s checkout the storage compartments. There’s a cup over here to store tools. I like to put my pens here.
The small storage compartment is for different blade housings. I keep my deep-cut blade housing here, which is something you can purchase separately. There’s even a cool little magnetic strip here in this compartment that lets you store your replacement blades without housings!
The larger compartment can hold larger tools, which you can purchase separately.
Now let me explain the controls over here. This big dial is the Smart Set Dial. You can choose your materials on this dial, or set it to Custom (which is what I like to do) and set your material from within Cricut Design Space.
Then we have the power button at the top, the Mat Load/Unload button, the Big C button for starting a cut, and the Pause button.
And that’s the Cricut Explore Air!
Now let’s see what’s different on the Cricut Maker. You’ll see it has an accessory cup (two of them!), but where are the buttons! The Maker has no Open button. Instead, we open the lid simply by pulling up on the top lid and the front lid opens too. Inside we see the Mat Load/Unload Button, the Cricut Cut button, and the Pause button. You’ll note there is Smart Dial on the Maker — instead, we always choose our materials from within Cricut Design Space, which is my preference anyway. The Maker has the same storage compartments in the front lid as the Explore does. But the Maker has one extra thing I really like — you can plug your iPad or smart device into the USB charging jack on the side and rest it in the built-in stand here on the top. Isn’t that cool?
If you’d like to see me unbox the Maker, I have a video of that from the day I brought it home! Here is the Maker unboxing video.
To setup your new machine, I recommend you follow the setup guide that comes with your Cricut. So let’s go ahead and do that.
Let’s first get it plugged in. With the USB symbol facing upward, plug the square end of the cable into the back of your machine. With the symbol facing upward, plug the rectangular end of the cable into a USB port on your computer.
Now plug the round end of the power cable into the back of your machine, and then plug it into a power source.
Now turn on your Cricut!
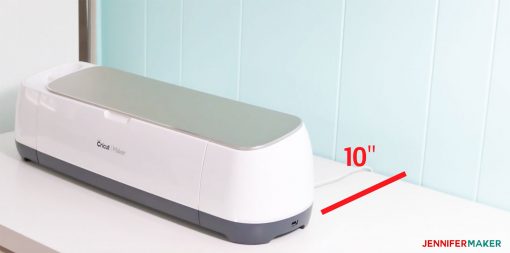
Now before we go, I want to talk about WHERE to put your Cricut for optimal crafting. I recommend one of two different places, based on your needs. The first is to put your Cricut near where you’ll be crafting so you have easy access to it. For example, I like to craft here on this table, so I keep my Cricut Maker over on the side of my room here so I can get to it easily. It’s really important you have at least 10″ or more behind your machine so your mat has room to move. If you’ll be using the 12″ x 24″ mat, you need at least 22″ behind your machine.
The second place I recommend putting your Cricut is right next to your computer, which is where my Cricut Explore lives. This makes it SO easy to design on my computer and cut on my Cricut, without any wasted movements.
In our next lesson, I will show you how to register your Cricut, get onto Cricut Design Space, and make your first project. I’ll also go over all the different sorts of materials your Cricut Explore or Cricut Maker can cut.
Class Exercise: Setup your machine in a good location, not far from either your computer or where you will craft if you’re using a mobile device. Take a photo and share it in our Facebook group!
Still eager for more? Read my “New Owner’s Guide” article with helpful information about getting started!
Next: Lesson 2: Create Your First Project (and What You Can Cut!)