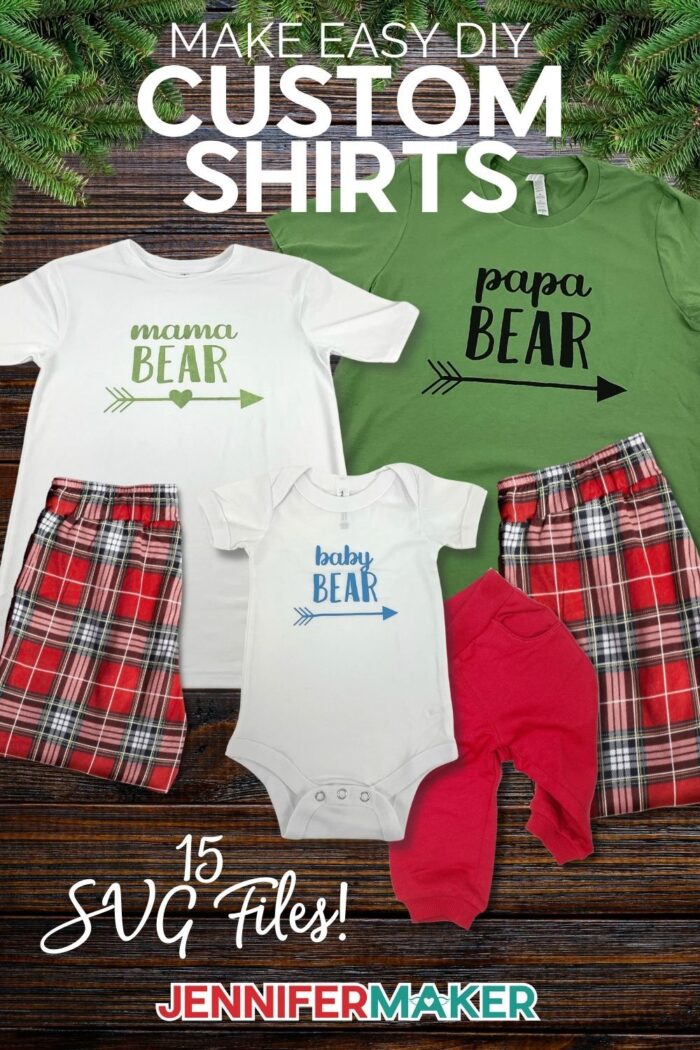
Make fun, personalized T-shirts for yourself, family, or as gifts!
I make all kinds of things with my Cricut Cutting machine, but the most popular project, hands down, is making T-shirts! In fact, if you visit my YouTube channel you will see the two most popular videos are about making T-shirts and have been viewed more than 4.5 million times! Crazy, right?! So I thought it would be fun to show you how to make a bunch of different shirts for the whole family using both iron on vinyl and Infusible Ink!

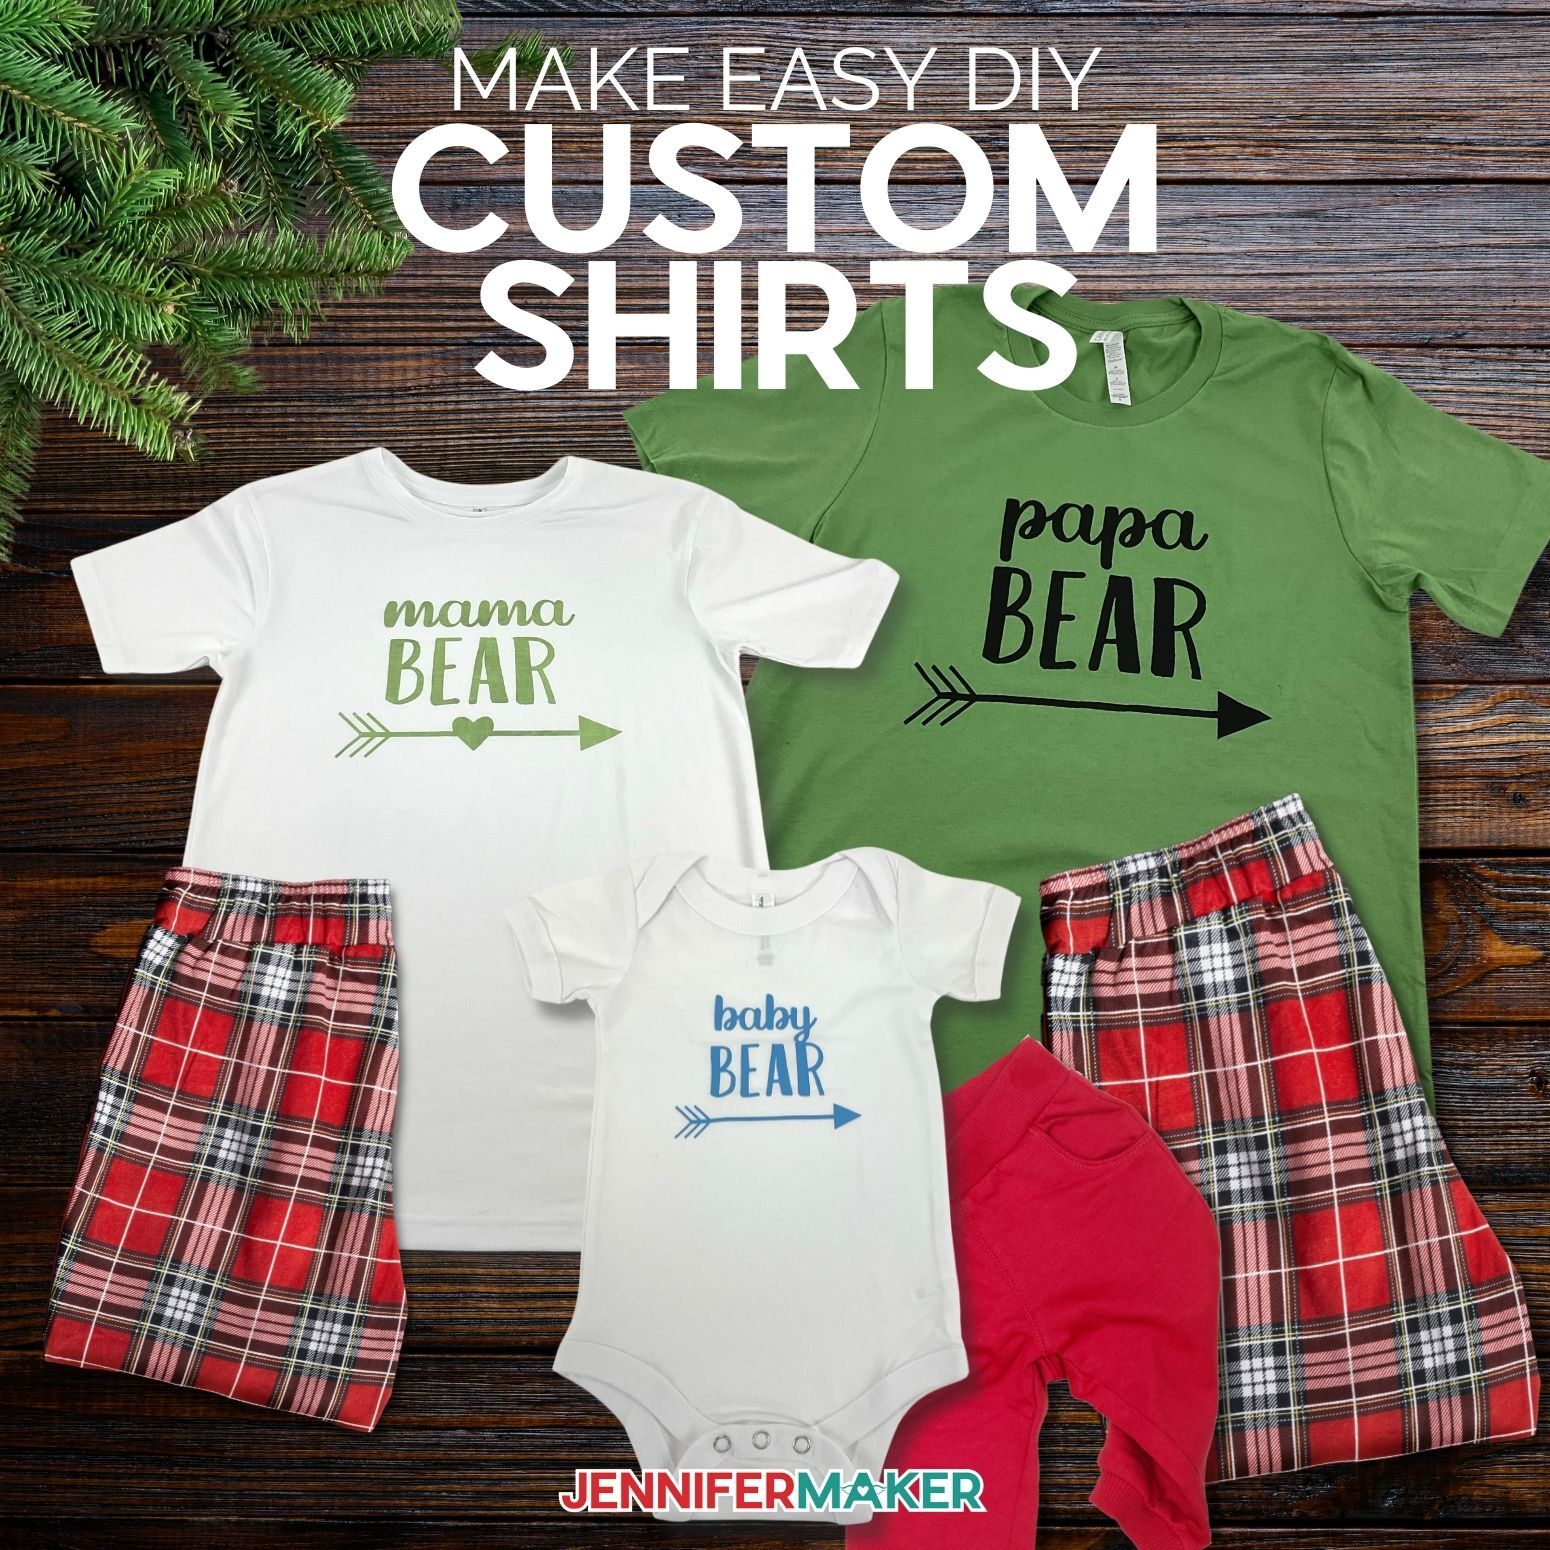
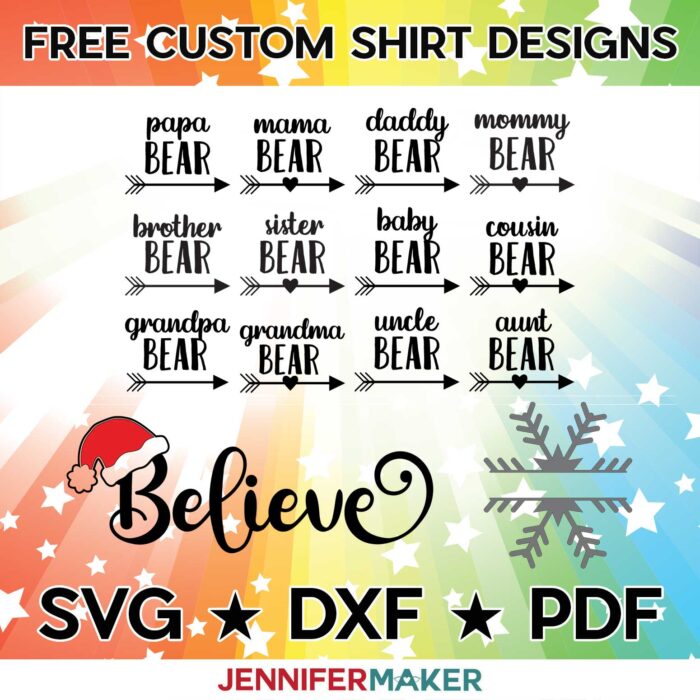
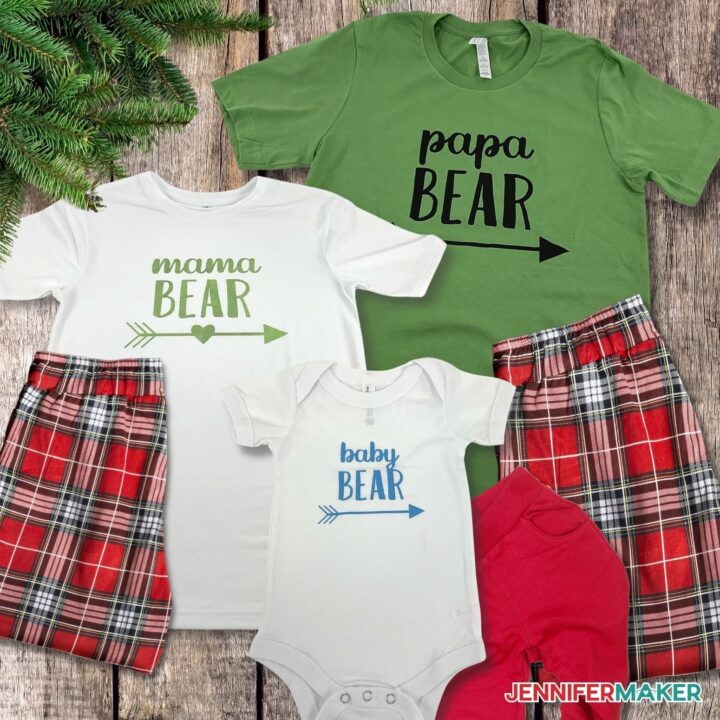
For these custom T-shirts, we use both iron on vinyl and infusible ink to make four different T-shirt designs…the “Bear family collection”, a customizable “split snowflake” design, two versions of a “Believe” design, and I’m also going to teach you how to create your own knockout design in Cricut Design Space!
With this fun project, you can create some amazing handmade gifts. You can also make them with your friends and family so you can all have your very own customized T-shirts to wear!
Here’s a look at what we will need to make these shirts. Of course we will need a plain T-shirt. You can really use any blank T-shirt you like, but my favorite brand is Bella + Canvas. It’s really soft, made of 100% combed cotton and true to size.
I used Infusible Ink for my snowflake design, so I used Cricut’s compatible Infusible Ink T-shirt. This shirt is made of 95% polyester and 5% spandex.
And I used a variety of Iron-on vinyl, including Smart Iron-on that can be used with the Explore 3 and Maker 3.
I also used a green cutting mat, weeding tool, Cricut EasyPress and mat, but you can also use a household hot iron and a towel if you don’t have an EasyPress. And we’ll also need some white card stock to use with the infusible ink, butcher paper that comes with the infusible ink, parchment paper or teflon sheets, a lint roller, a ruler and a brayer.
I think these would be so much fun for family PJs during the holidays. I just love that you can personalize some of the designs. They sure would make a great option for some fun gifts!
Another great thing about creating your own custom T-shirt design is that they truly don’t require a lot of hard work once you know what you’re doing. You can also customize each design to your desired size. Just be sure to work on a flat surface for best results!
Here’s a supply list of what you need to make your custom t-shirts! This post contains some affiliate links for your convenience (which means if you make a purchase after clicking a link I will earn a small commission but it won’t cost you a penny more)! Read my full disclosure policy.
Materials to Make DIY Custom T-Shirts
View my Amazon shopping list with the exact items we used to make this project
- Cotton T-Shirt (Best for Iron-On Vinyl)
- Polyester T-Shirt (Best for Infusible Ink)
- Infusible Ink
- Smart Iron-On Vinyl OR Everyday Iron-on Vinyl (get the right material for your cutting machine)
- Smart Iron-On Glitter or Cricut Iron-On Glitter
- (Optional) Fonts (I used Timberly Font, Caferus Font, Christmas Jellyshake Font, Breethy Font, I Love Glitter Font, Times Font, and Cricut Sans
- A method to cut your iron-on vinyl or infusible ink (I used the Cricut Maker 3 but you can use the Cricut Maker, Cricut Explore Series, or Cricut Joy)
- Green StandardGrip Machine Mat 12″ x 12″ (when you’re not using Smart materials)
- Weeding Tool
- EasyPress (or another heat source to transfer your design to your T-shirt)
- EasyPress Mat (or a folded towel)
- White Cardstock (if using Infusible Ink)
- Butcher Paper (Included with Infusible Ink)
- Parchment Paper or Teflon Sheets (for Layered Vinyl Designs)
- Lint Roller (to clean T-shirt before applying Infusible Ink)
- Ruler (Optional)
- Brayer
- Scissors (Optional)
- Design #335 – My free SVG/PDF/DXF design files are available in my free resource library (get the password by filling out the form at the bottom of this page)

How to Make Your Own DIY Custom T-Shirts
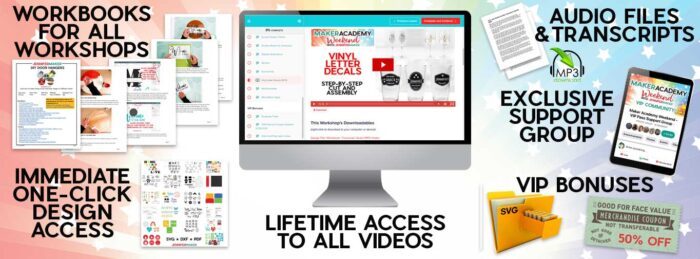
The detailed step-by-step assembly video on how to create these personalized vinyl letter decals was broadcast during Maker Academy Weekend 2021. Get a pass to watch all 20+ workshops, each with a printable handbook, transcript, audio files, design files, and support with a VIP pass below:
Custom T-Shirts
Make fun, personalized shirts for yourself, family, or as gifts!
Materials
- Bella + Canvas T-Shirt (Best for Iron-On Vinyl)
- Cricut T-Shirt (Best for Infusible Ink)
- Cricut Infusible Ink
- Cricut Smart Iron-On Vinyl OR
- Cricut Everyday Iron-on Vinyl
- Cricut Smart Iron-On Glitter OR
- Cricut Iron-On Glitter
- Timberly Font
- Caferus Font
- Christmas Jellyshake Font
- Breethy Font
- I Love Glitter Font
- Times Font
- Cricut Sans
- Design #335 (My free SVG/PDF/DXF design files are available in my free resource library - get the password by filling out the form at the bottom of this page)
Tools
- A method to cut your iron-on vinyl or infusible ink - I used the Cricut Maker 3 but you can use the Cricut Maker, Cricut Explore Series, or Cricut Joy
- Cricut Green StandardGrip Machine Mat 12" x 12" (For All Non Smart Materials)
- Cricut Weeding Tool
- Cricut EasyPress (or Another Heat Source to Transfer Your Design to Your Shirt)
- Cricut EasyPress Mat (or a Folded Towel)
- White Cardstock (if Using Infusible Ink)
- Butcher Paper (Included with Infusible Ink)
- Parchment Paper or Teflon Sheets (for Layered Vinyl Designs)
- Lint Roller (to Clean Shirt Before Applying Infusible Ink)
- Ruler (Optional)
- Brayer
- Scissors (Optional)
Instructions
STEP 1: GET MY CUSTOM T-SHIRTS SVG FILE
Start off by getting your free Custom T-Shirts file from my free resource library. You'll find three files to choose from:
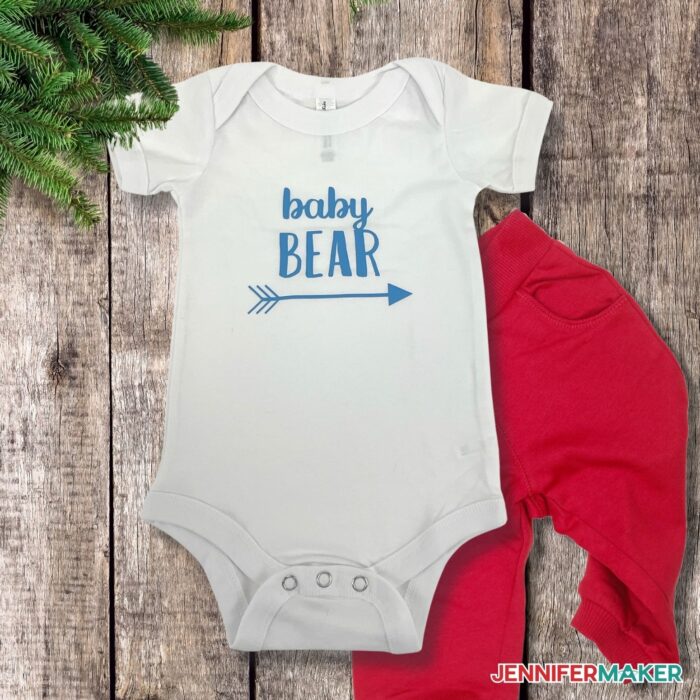
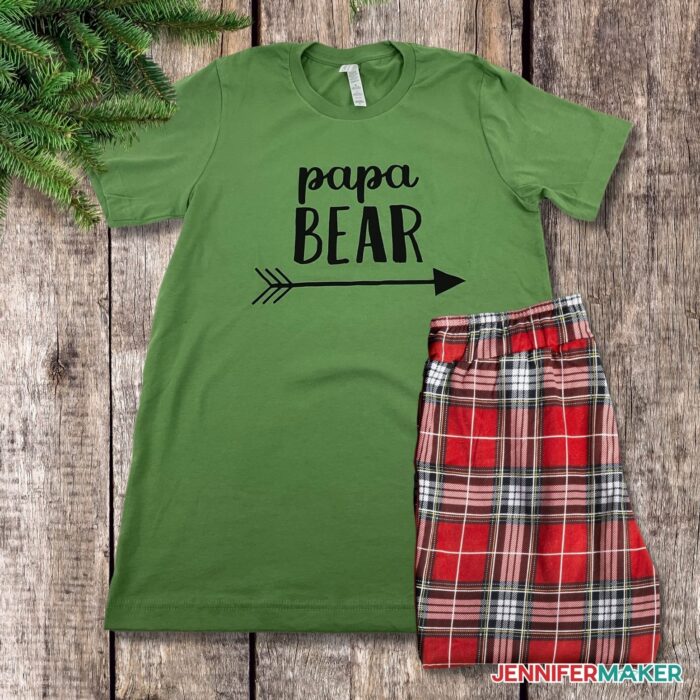
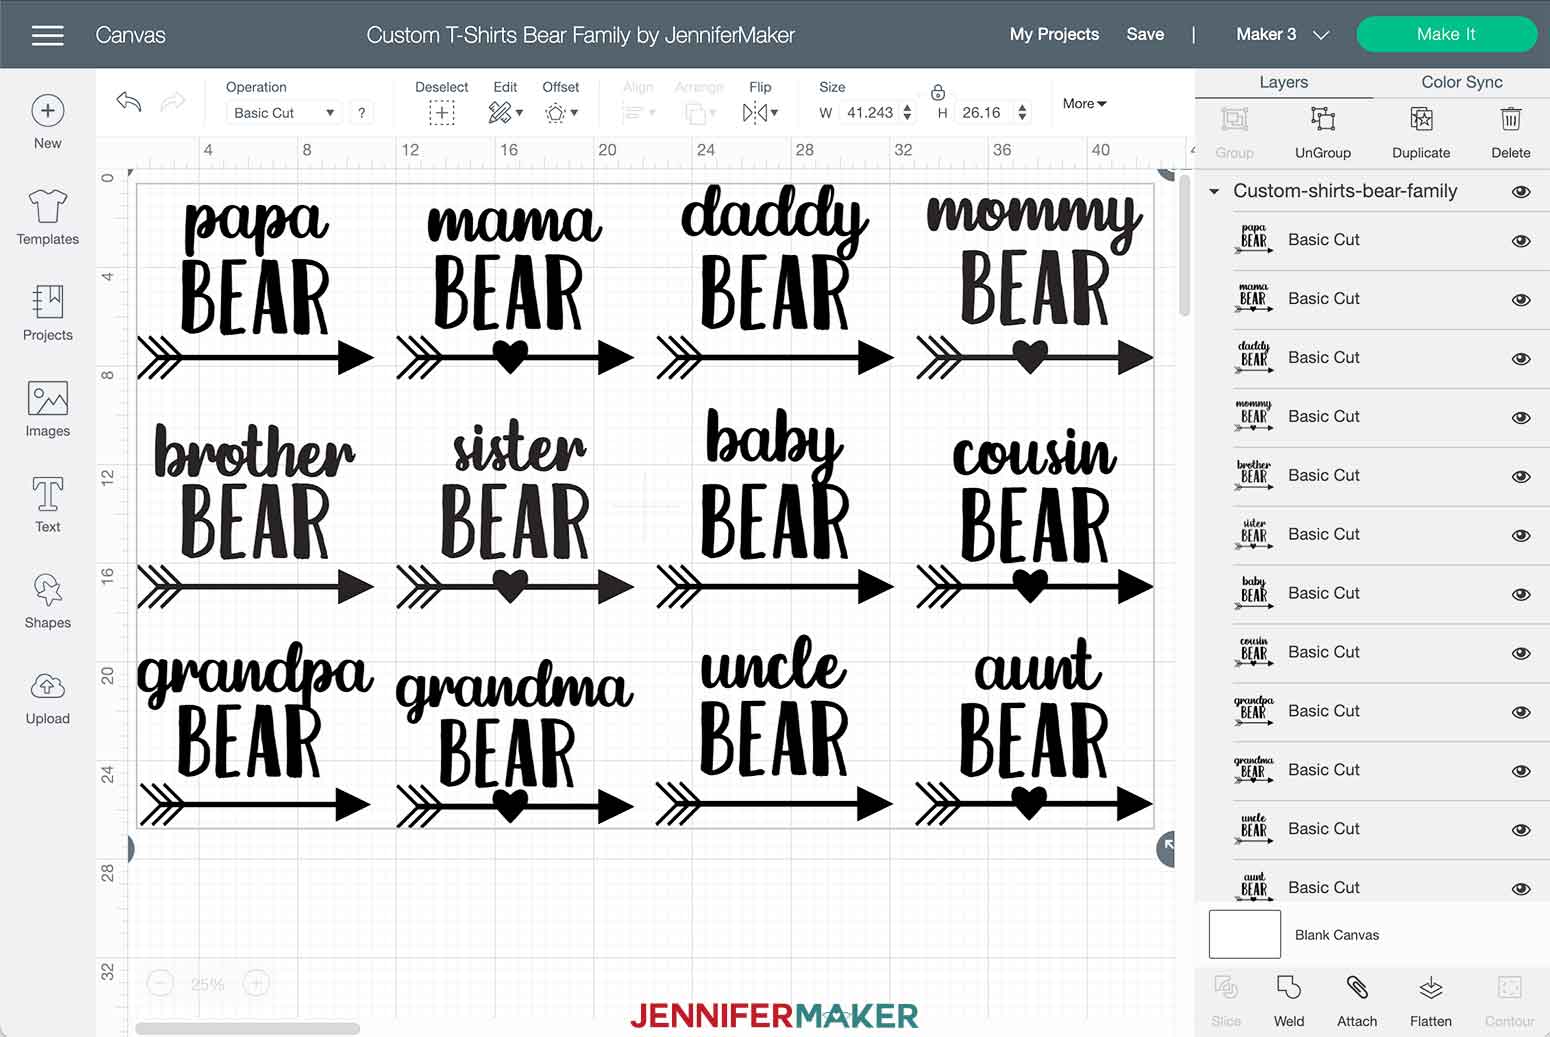
1. Family "Bear" designs
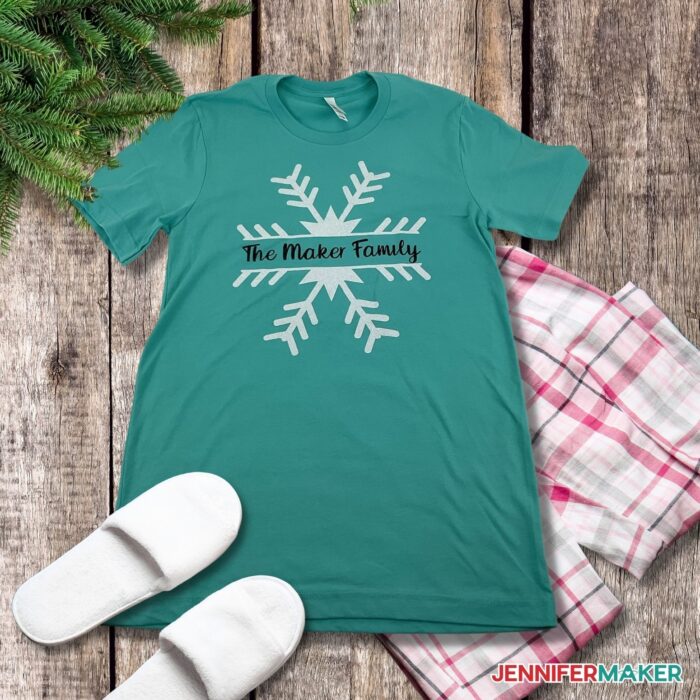
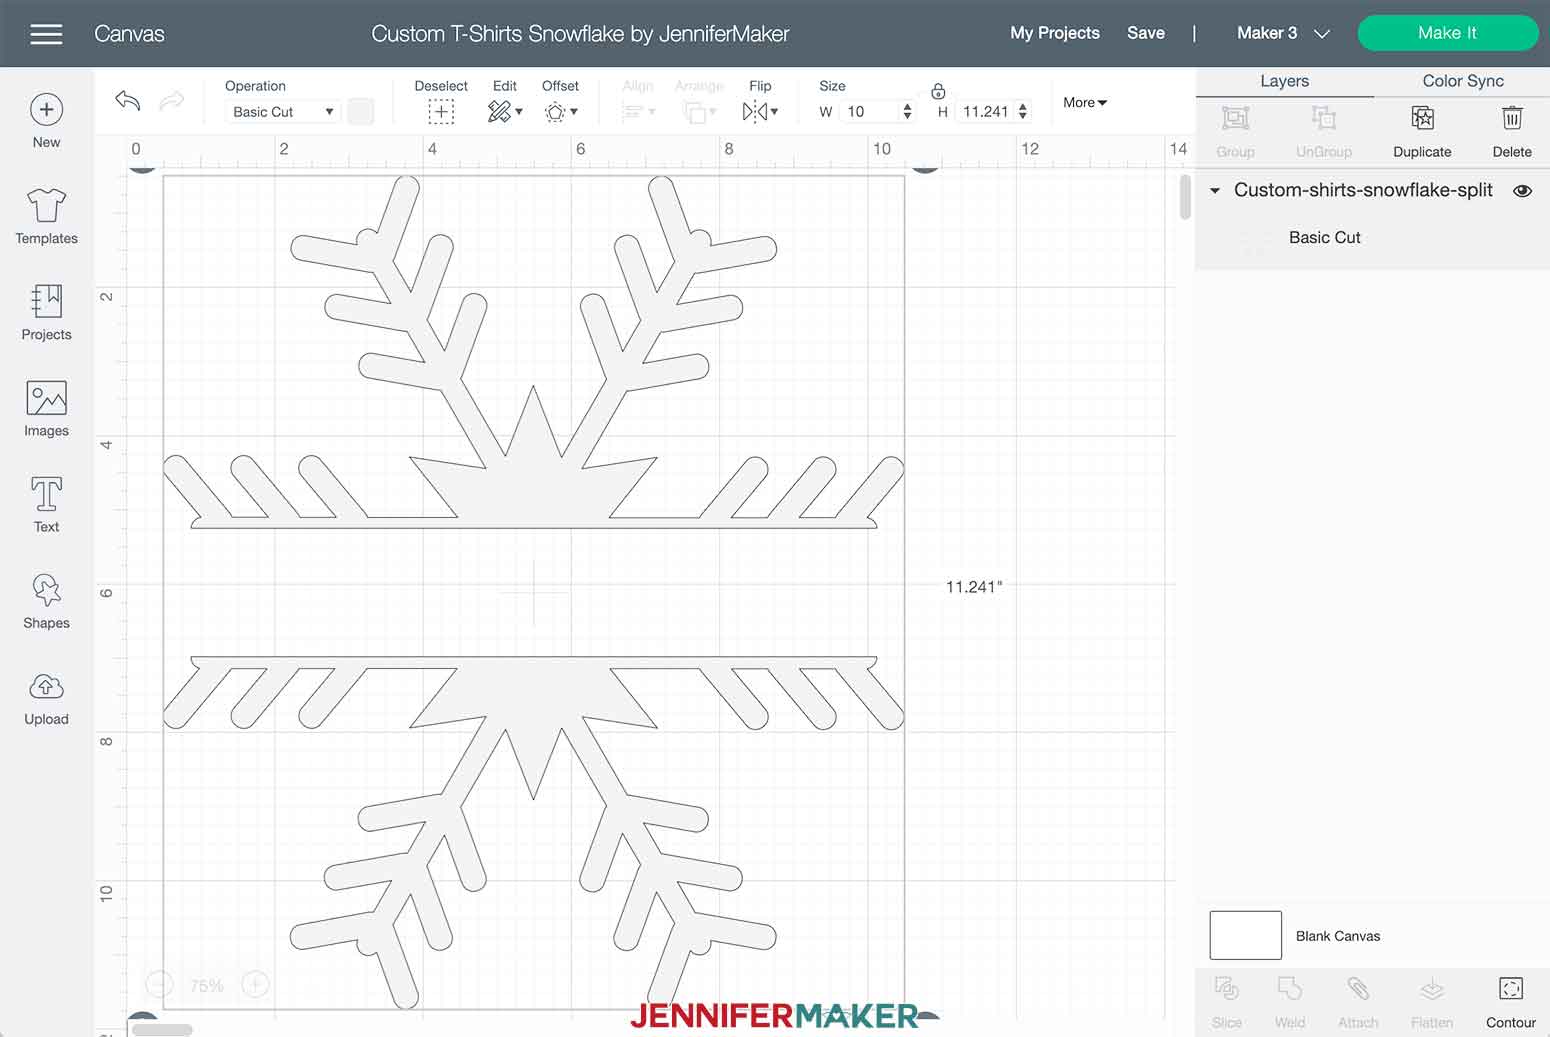
2. A Customizable "Split Snowflake" design
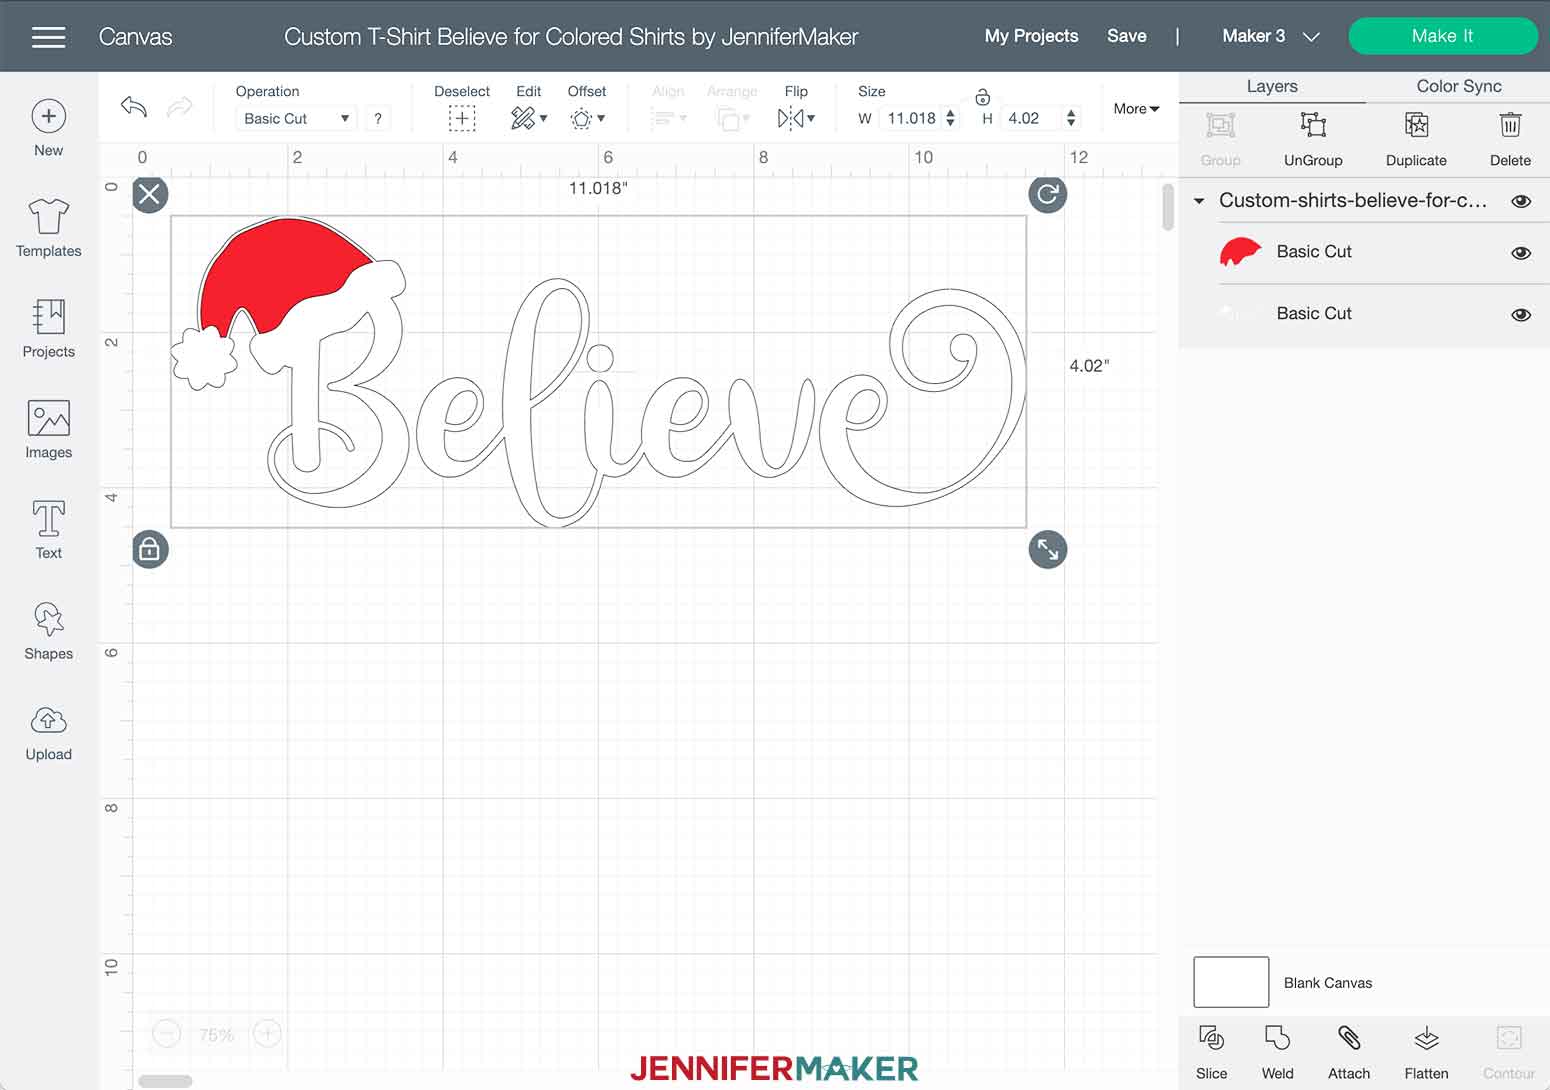
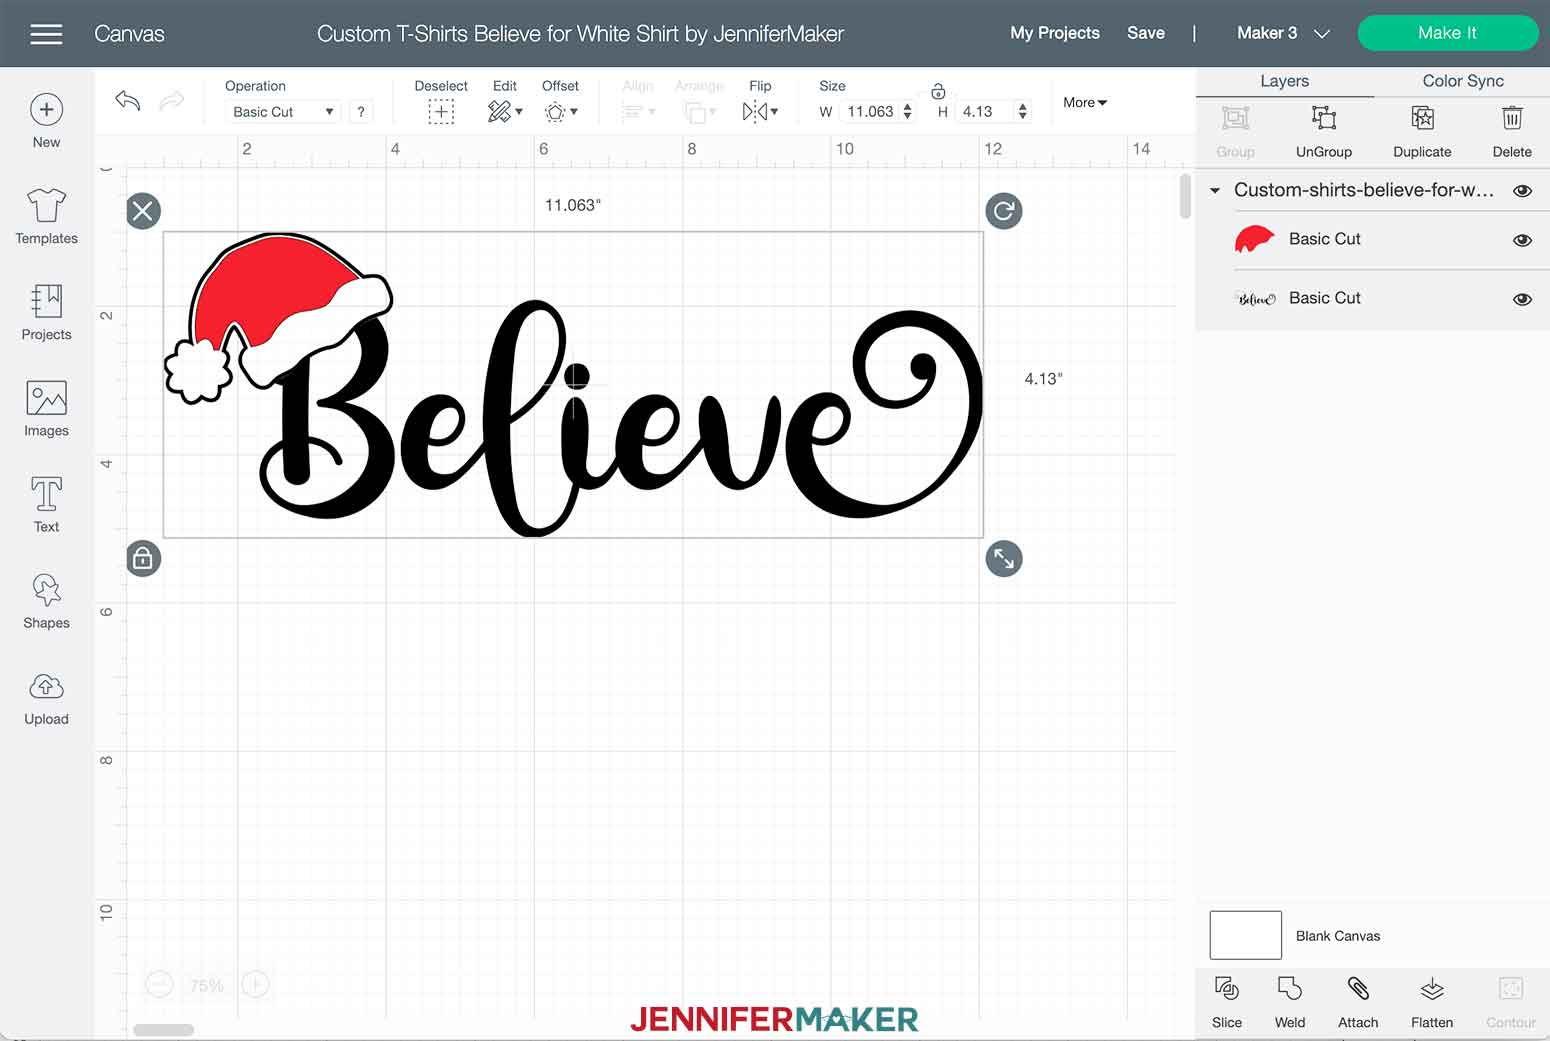
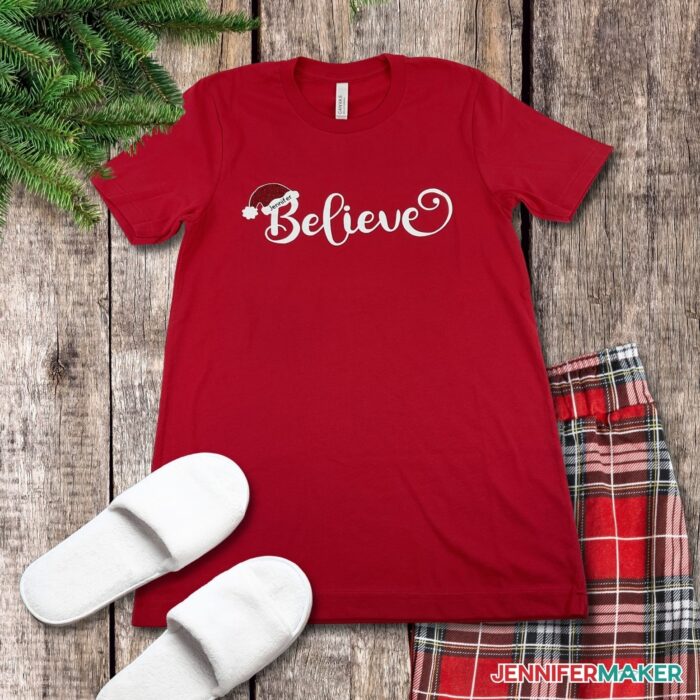
3. Two versions of the Customizable "Believe" design (one for white shirts and one for colored shirts).
4. I'm also going to teach you how to create your own knockout design in Cricut Design Space!
TIP: If you are not sure how to upload an SVG cut file to Cricut Design Space, watch this helpful video training series I made. If you are on an iPad or iPhone, here is how to download and upload SVG files to the Cricut Design Space app.
This is what my Custom T-Shirts SVG files will look like in Cricut Design Space.
STEP 2: PERSONALIZE YOUR DESIGNS
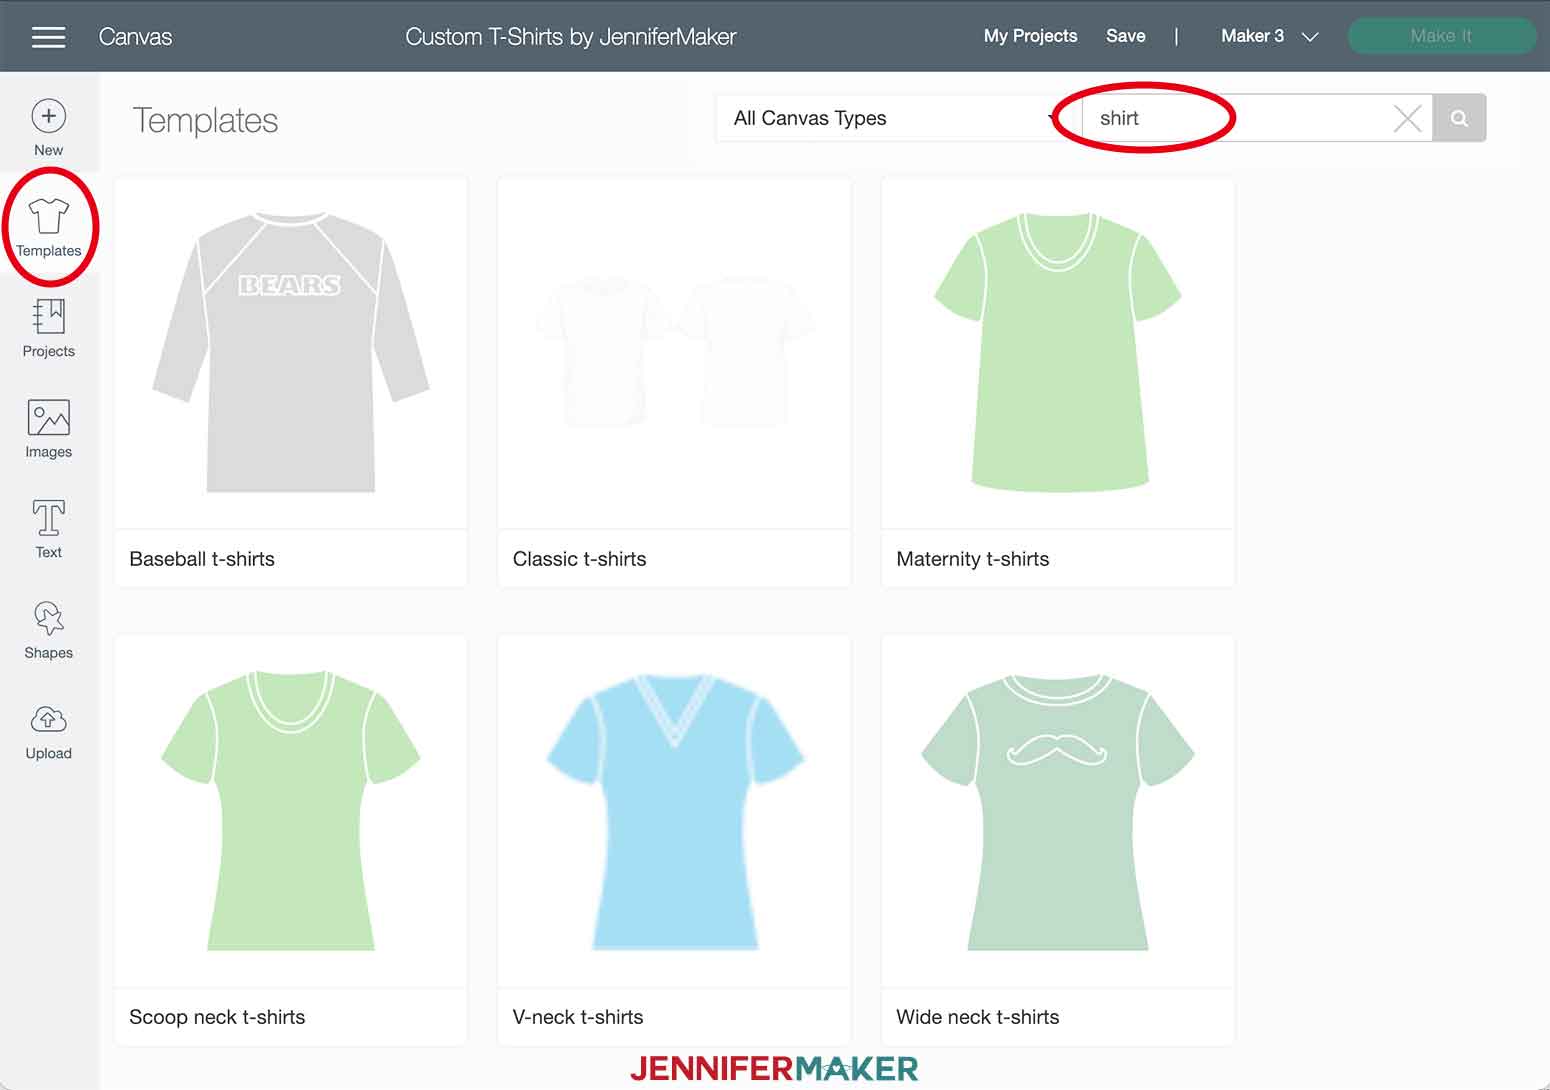
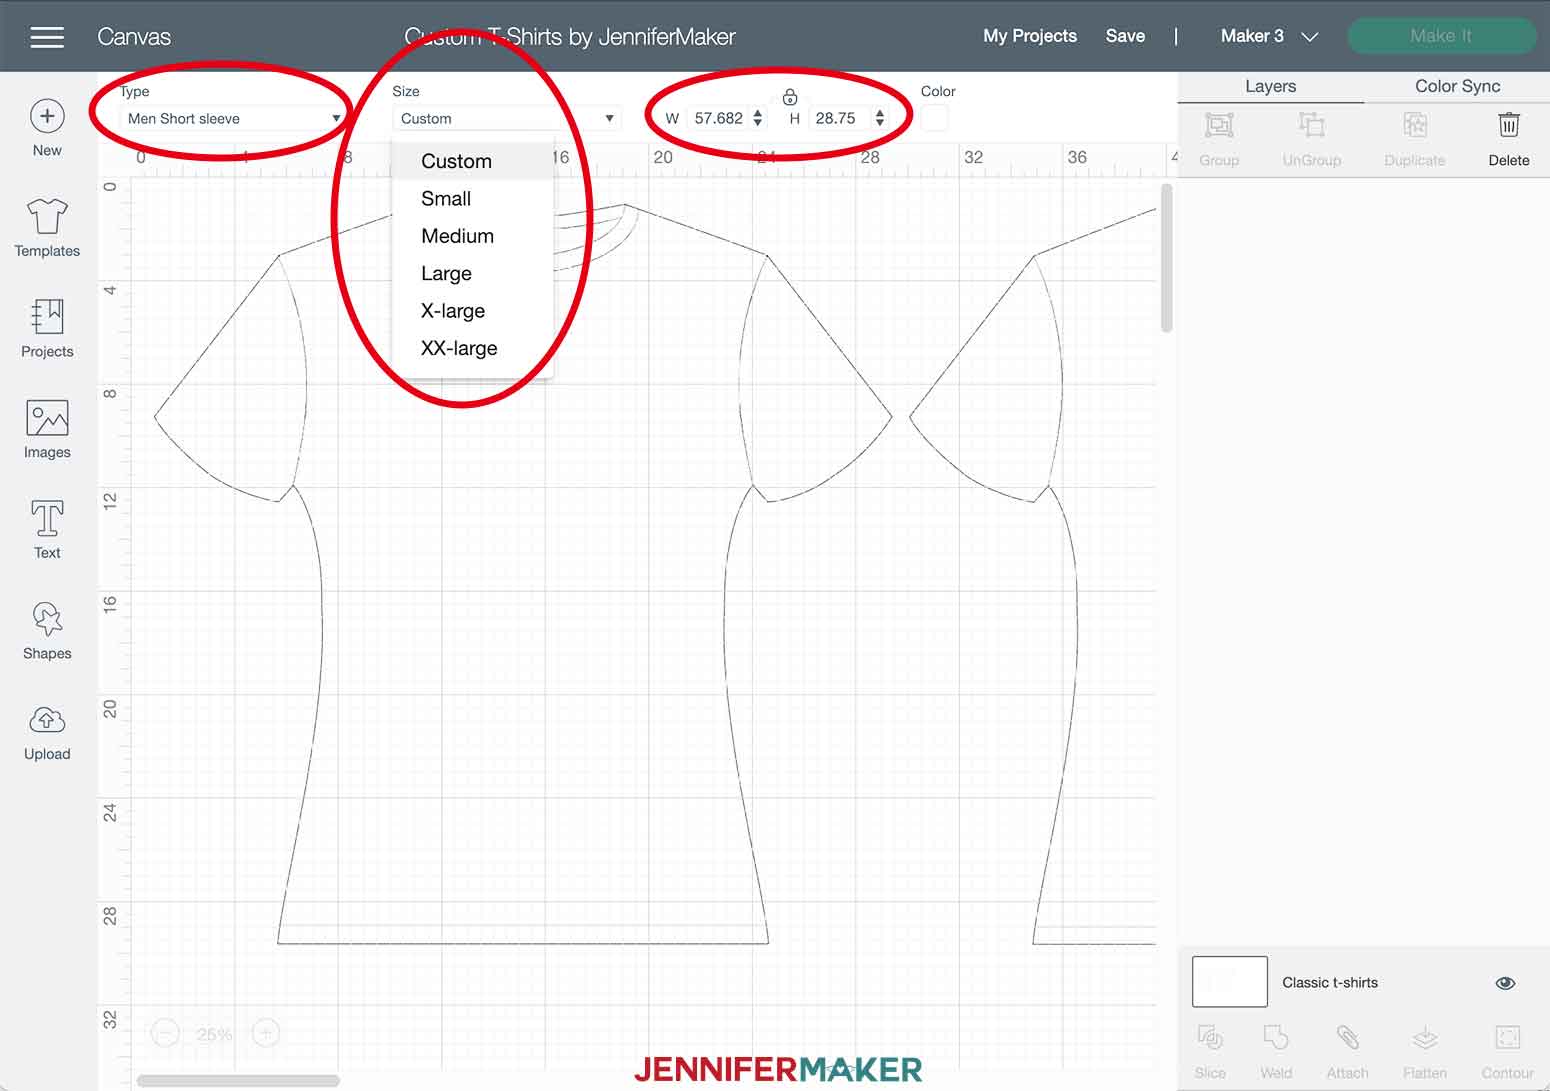
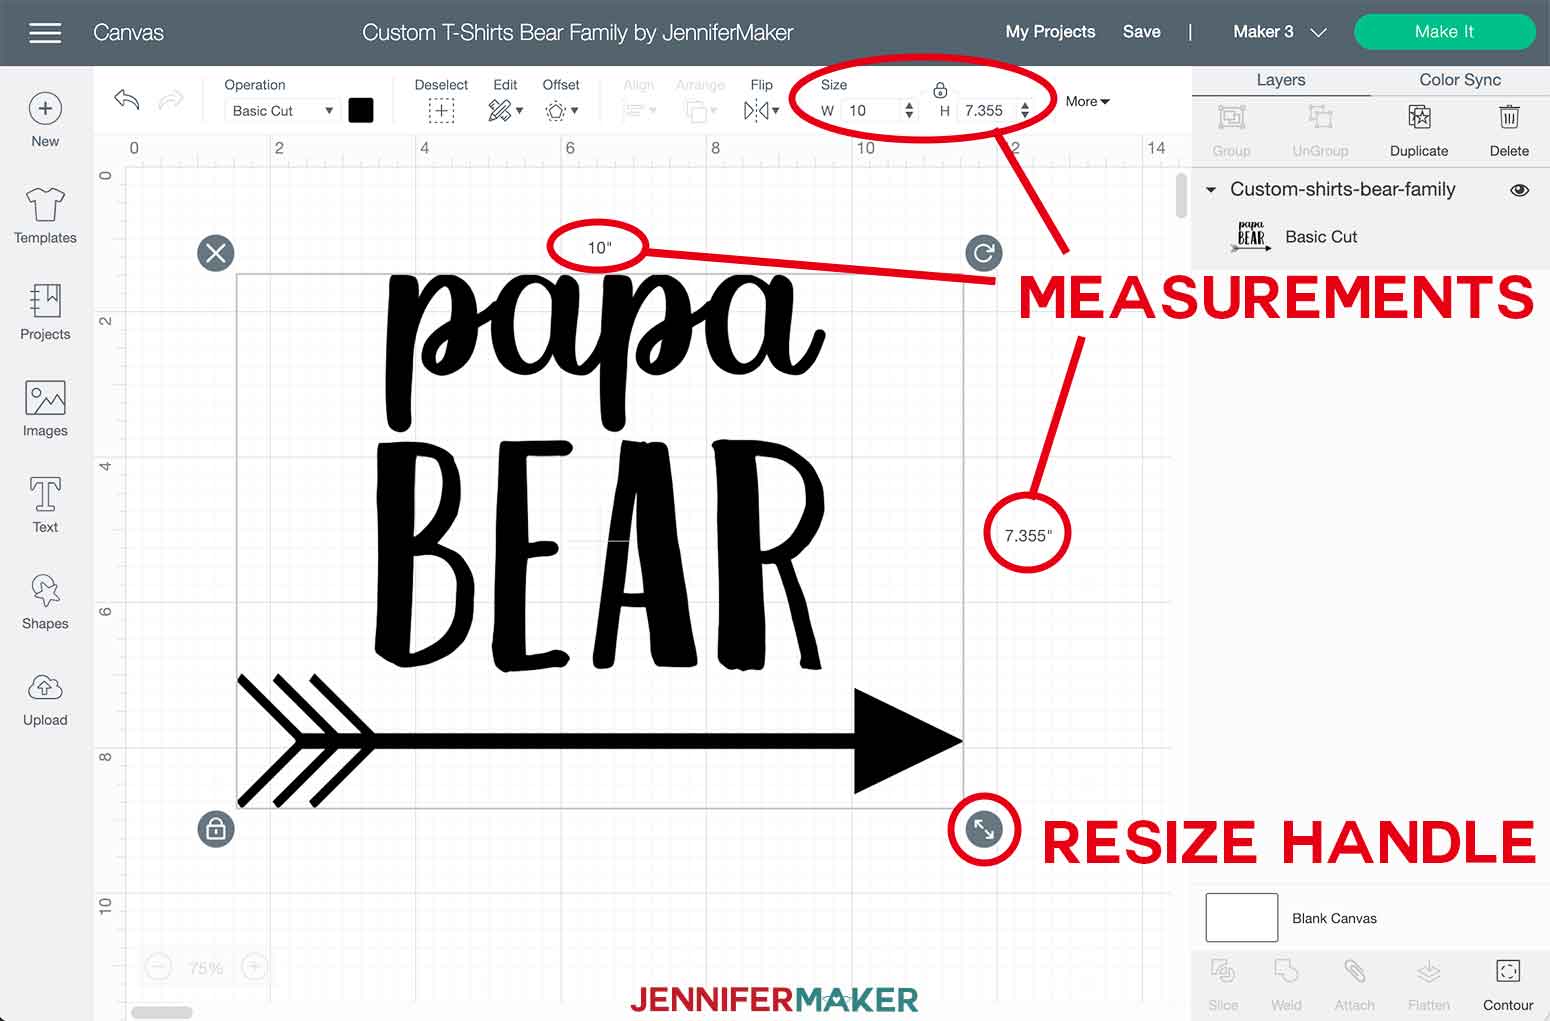
All of these SVGs are sized to fit on a men's small shirt. Be sure to check the dimensions of your shirt so you can resize your designs if you need to. I recommend you use the shirts template in Design Space to help you visualize and size your SVG correctly. Click on "Templates" on the left side of your screen. Type in "shirt" in your search bar and select the style that best matches your shirt.
You can choose a custom design and enter the exact measurements for your shirt.
BEAR FAMILY DESIGN: You can choose to make one or all of the designs! First, with the SVG selected, click "Ungroup" at the top of the layers panel.
For the designs you don't want to use, you can hide or delete them. Click on the design you do not want and click the eye icon or "Delete" at the top of the layers panel.
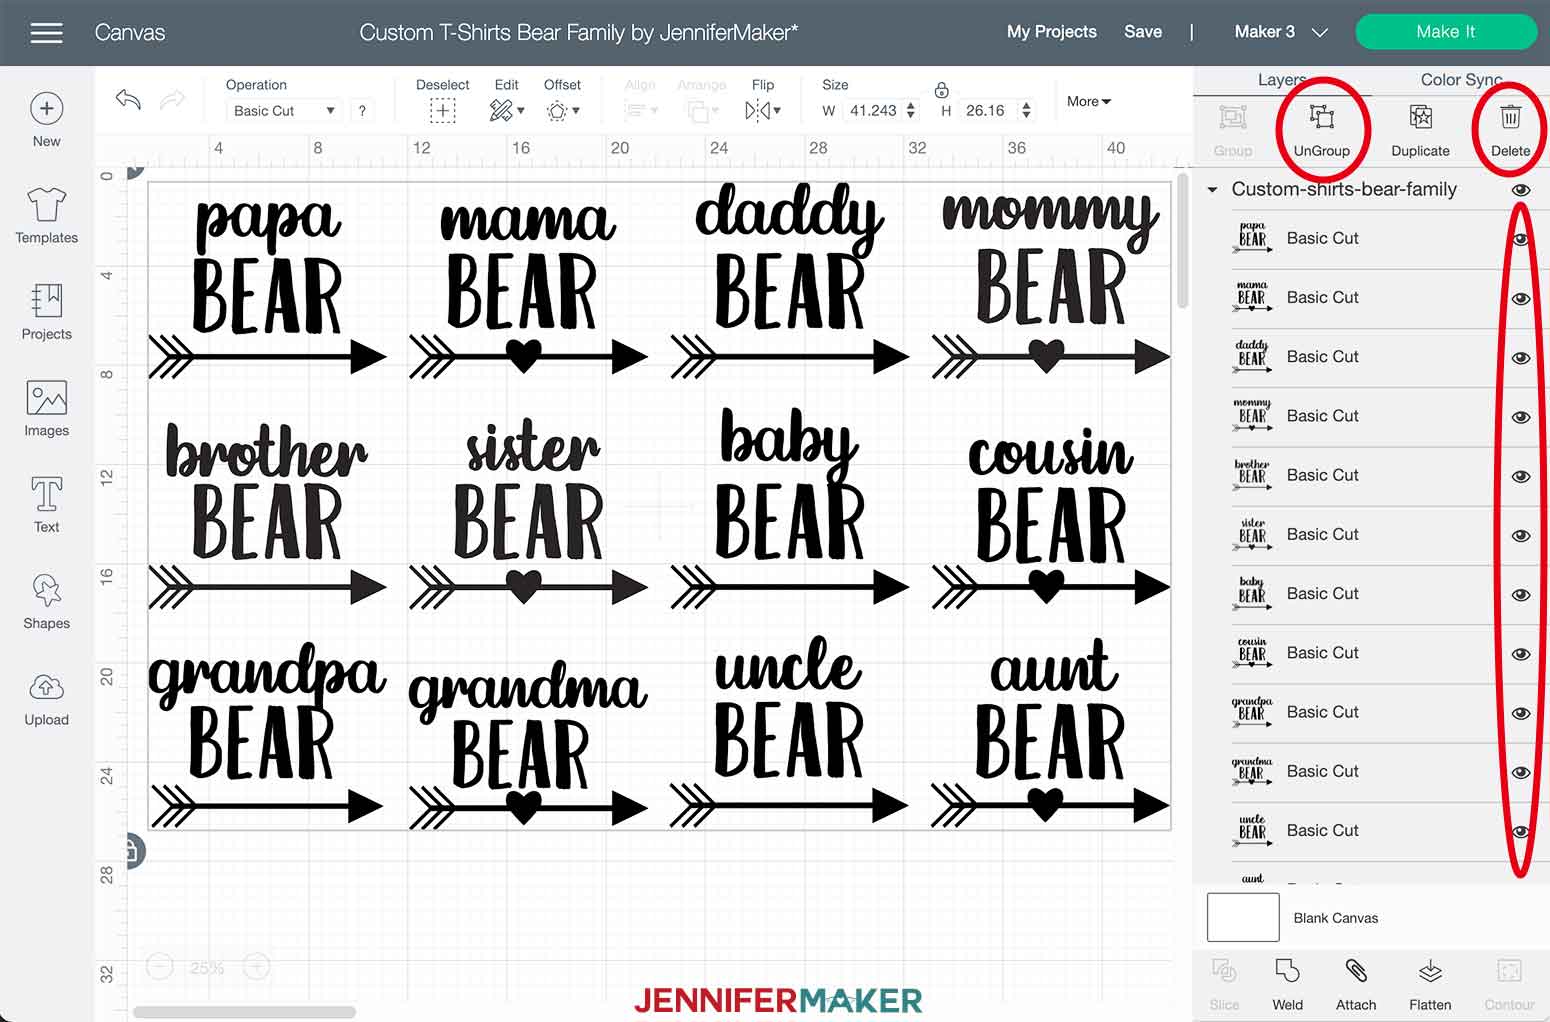
Next, make sure you check your measurements so you can resize the design if needed.
That's it for this design, you're ready to click on "Make It" in the upper right hand corner and continue to STEP 3 below!
BELIEVE DESIGN: This design has two SVGs. One is if you plan to make the design on a white shirt (so the Santa hat is an outline for the white shirt to show through) and one is if you decide to make a colored shirt (so that the white part of the Santa hat is a solid piece of vinyl). Be sure to use the correct file before you begin personalizing it. You may also choose to leave the design as it is! Once you've uploaded the SVG into design space, remember to check your measurements.
Once you have your design sized correctly, click the Text icon. I chose to use Cricut Sans to add my name but you can use any font you'd like!
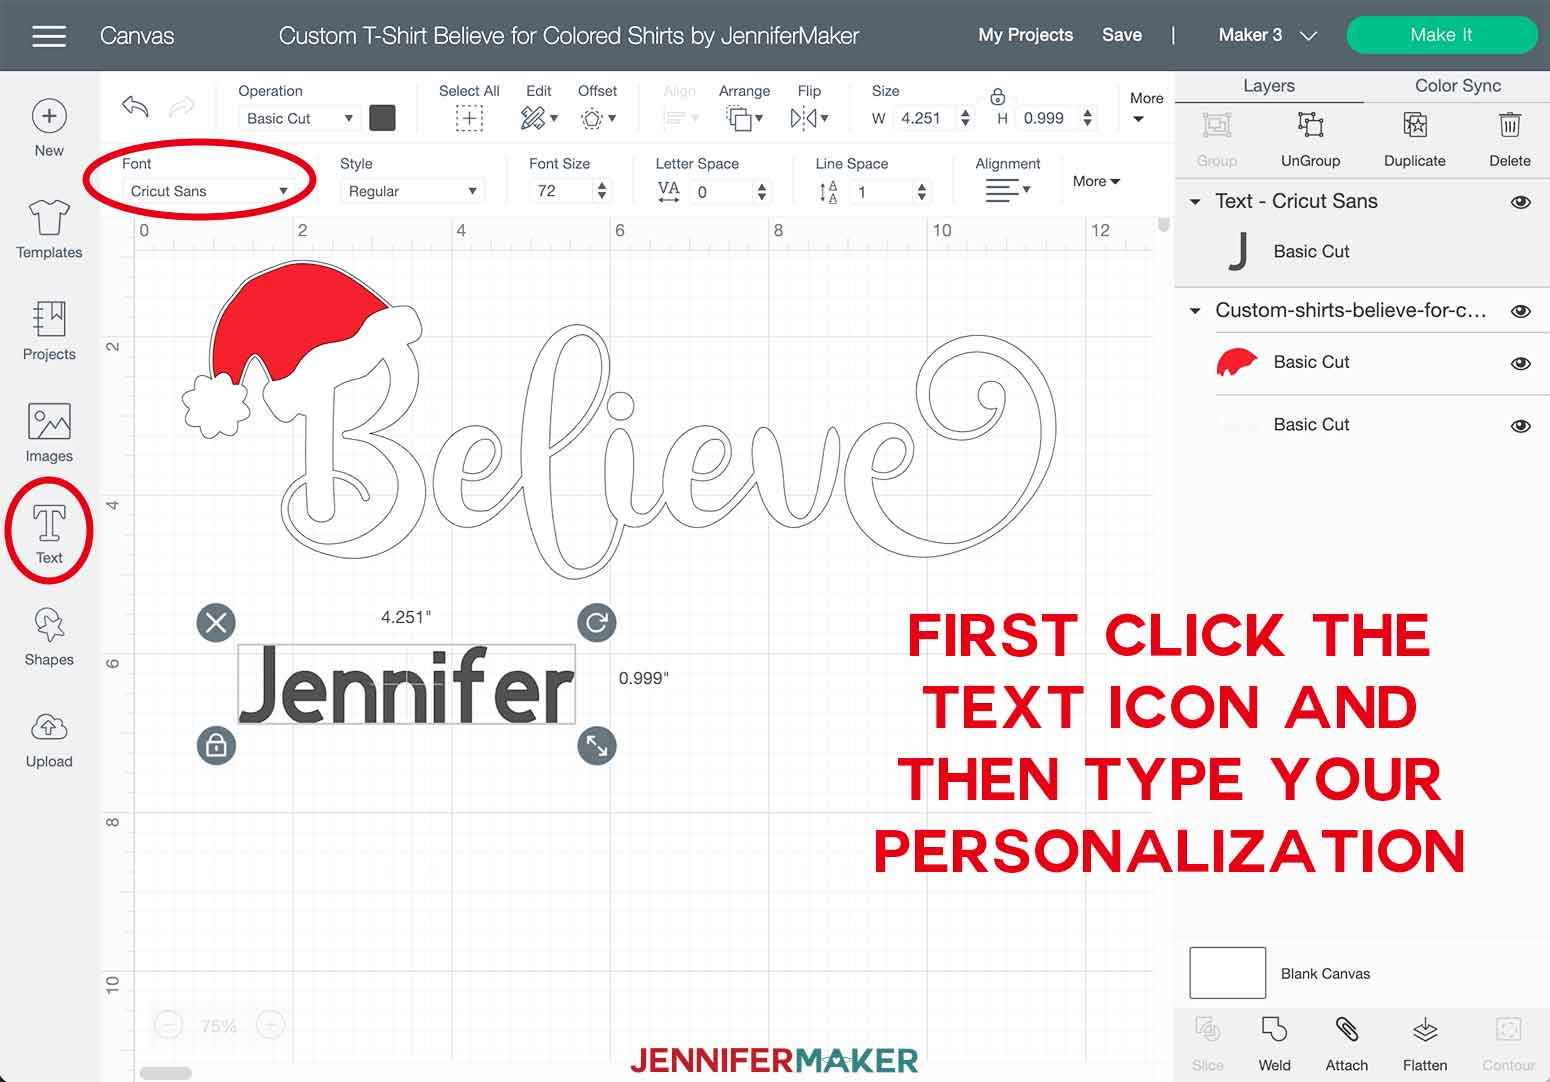
After you finish typing your name, click out of the text box to exit edit mode. Click once on your text to select it and use the resize handle to adjust your name to the appropriate size to fit on the hat. You'll also use the rotate handle to adjust the name at the correct angle.
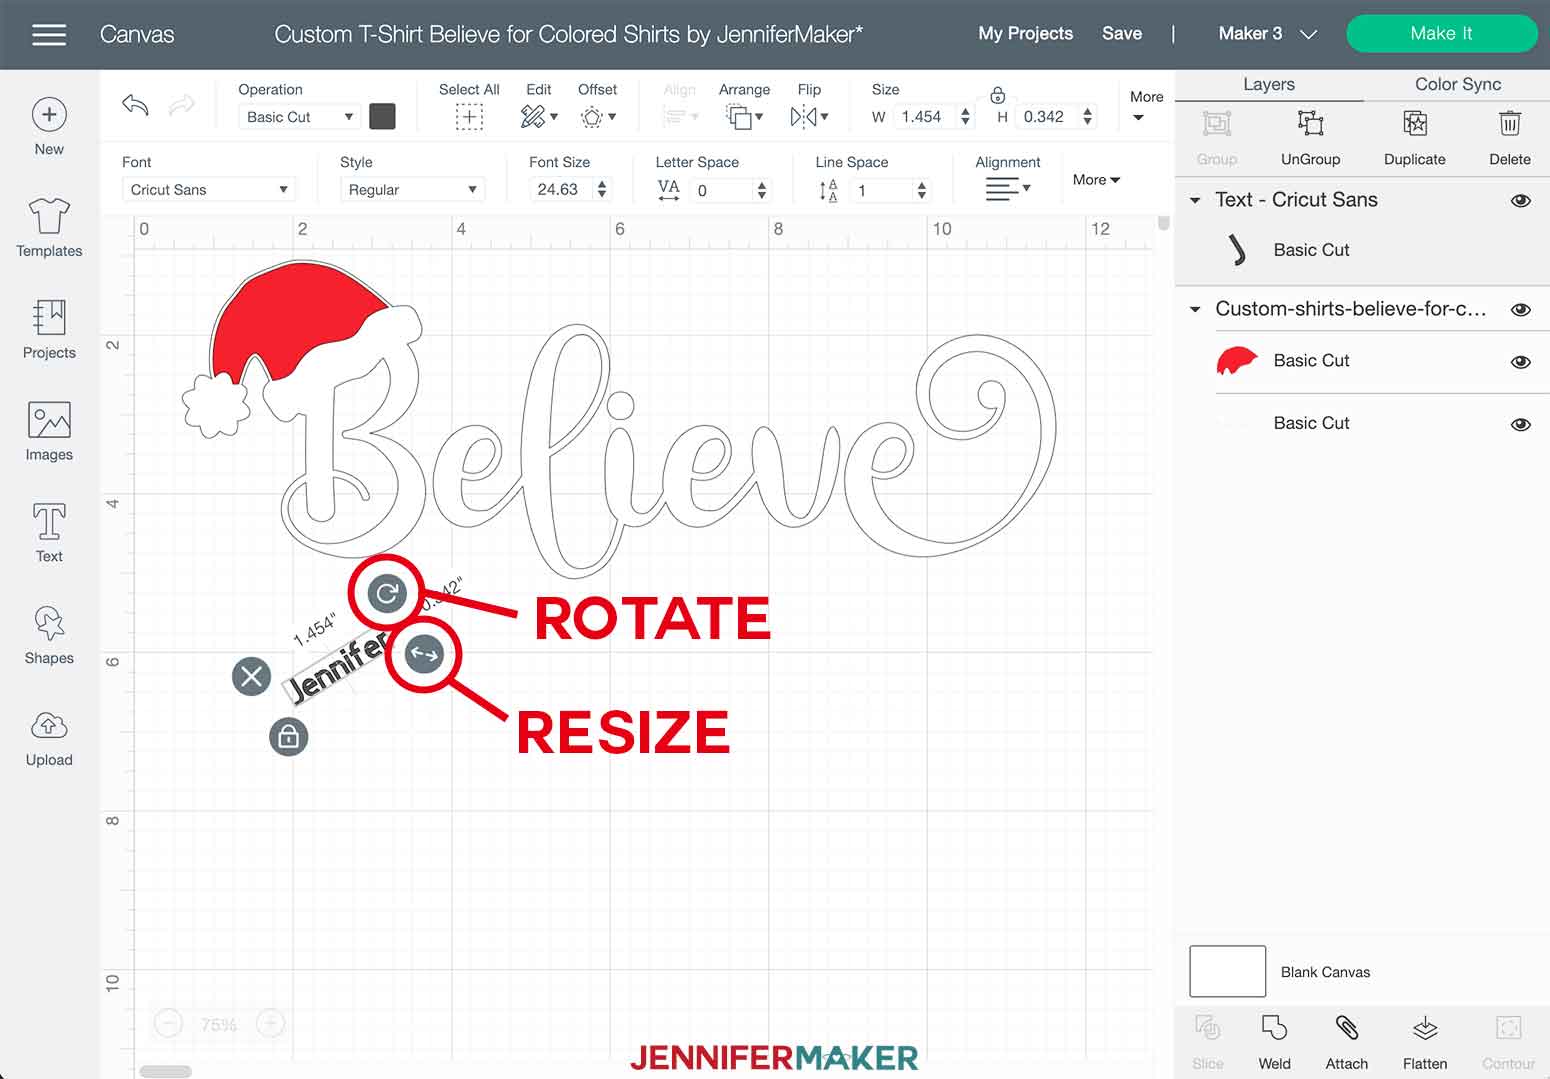
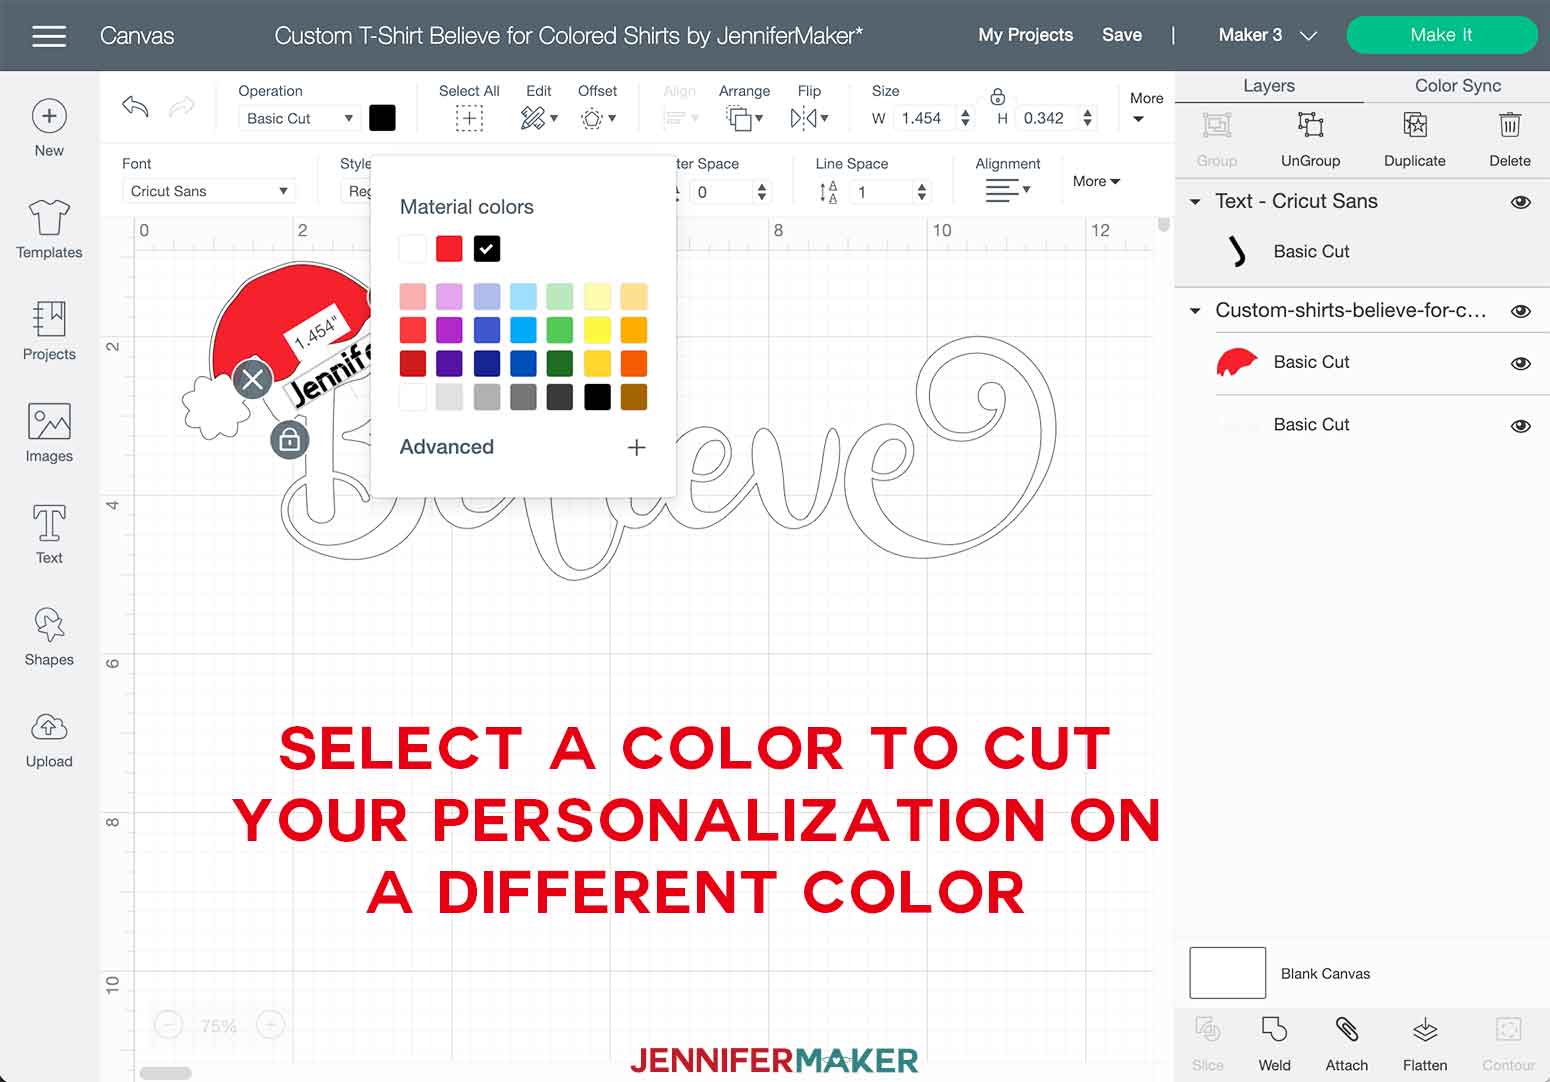
FOR BELIEVE ON A COLORED SHIRT: You do NOT want to attach the name to Believe if you are making a colored shirt or you won't be able to see it. I chose to make the name black. Select the name and choose a color from the Materials Color Menu that is different from the color of "Believe" so that you have contrast.
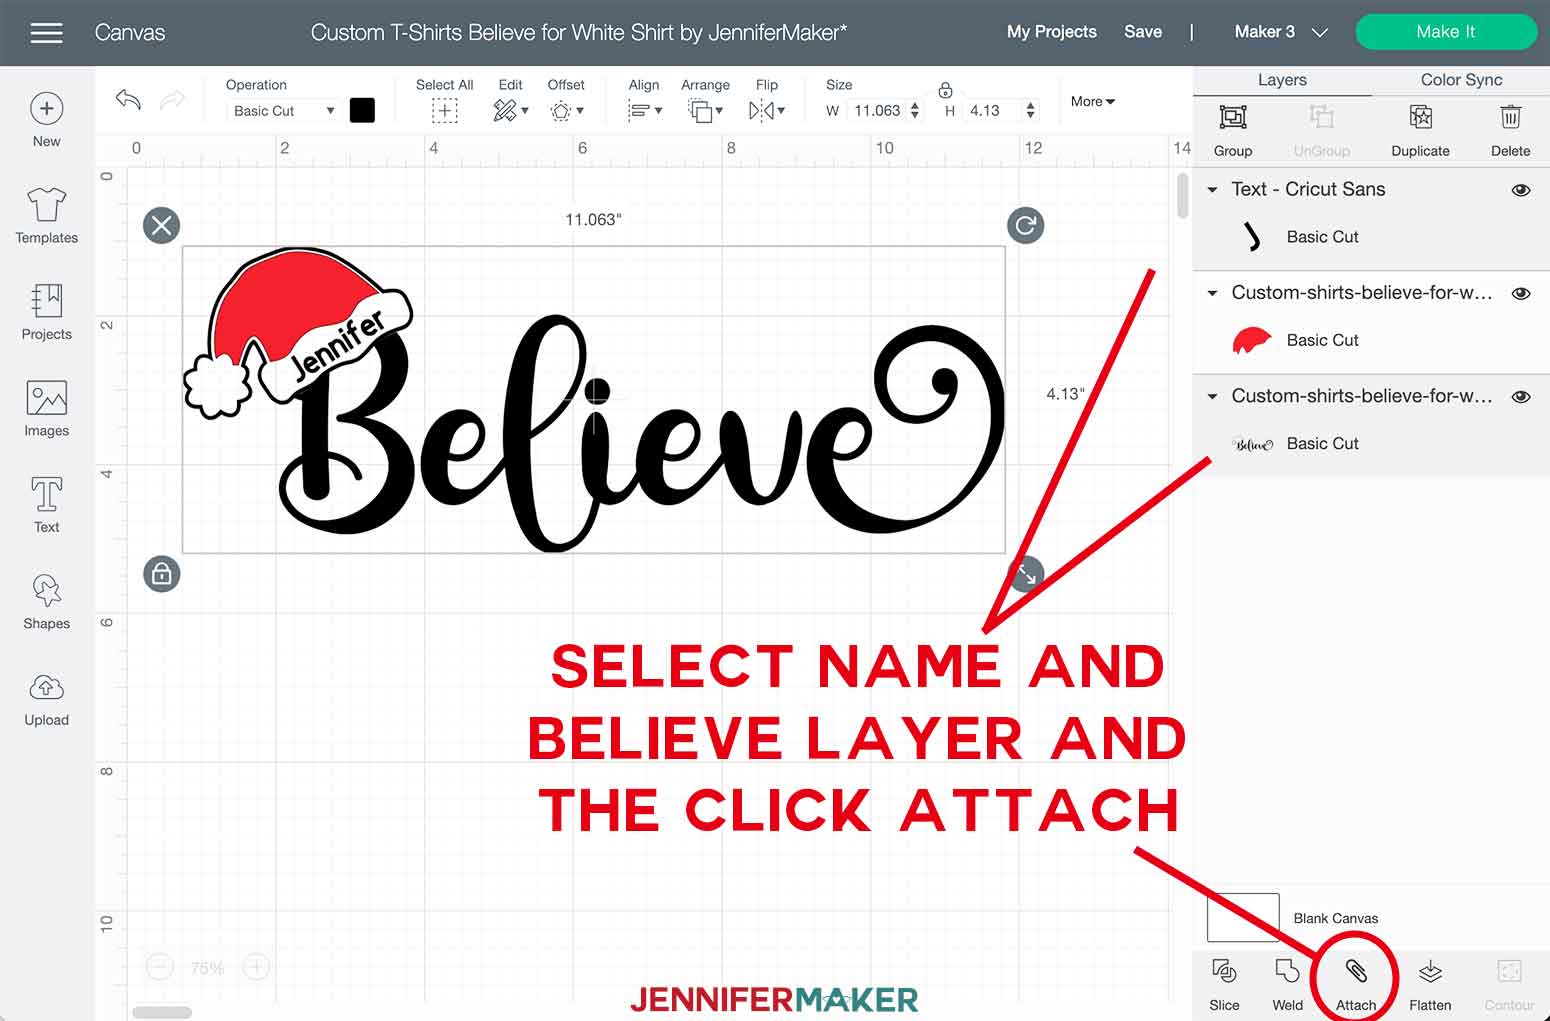
FOR BELIEVE ON A WHITE SHIRT: If you want your name to be the same color as the text "Believe," first ungroup your design and then select both the name and "Believe" in the layers panel and click "Attach."
Once your name is set, and you've sized your SVG correctly, you're ready to click "Make It" in the upper right corner and move on to STEP 3 below!
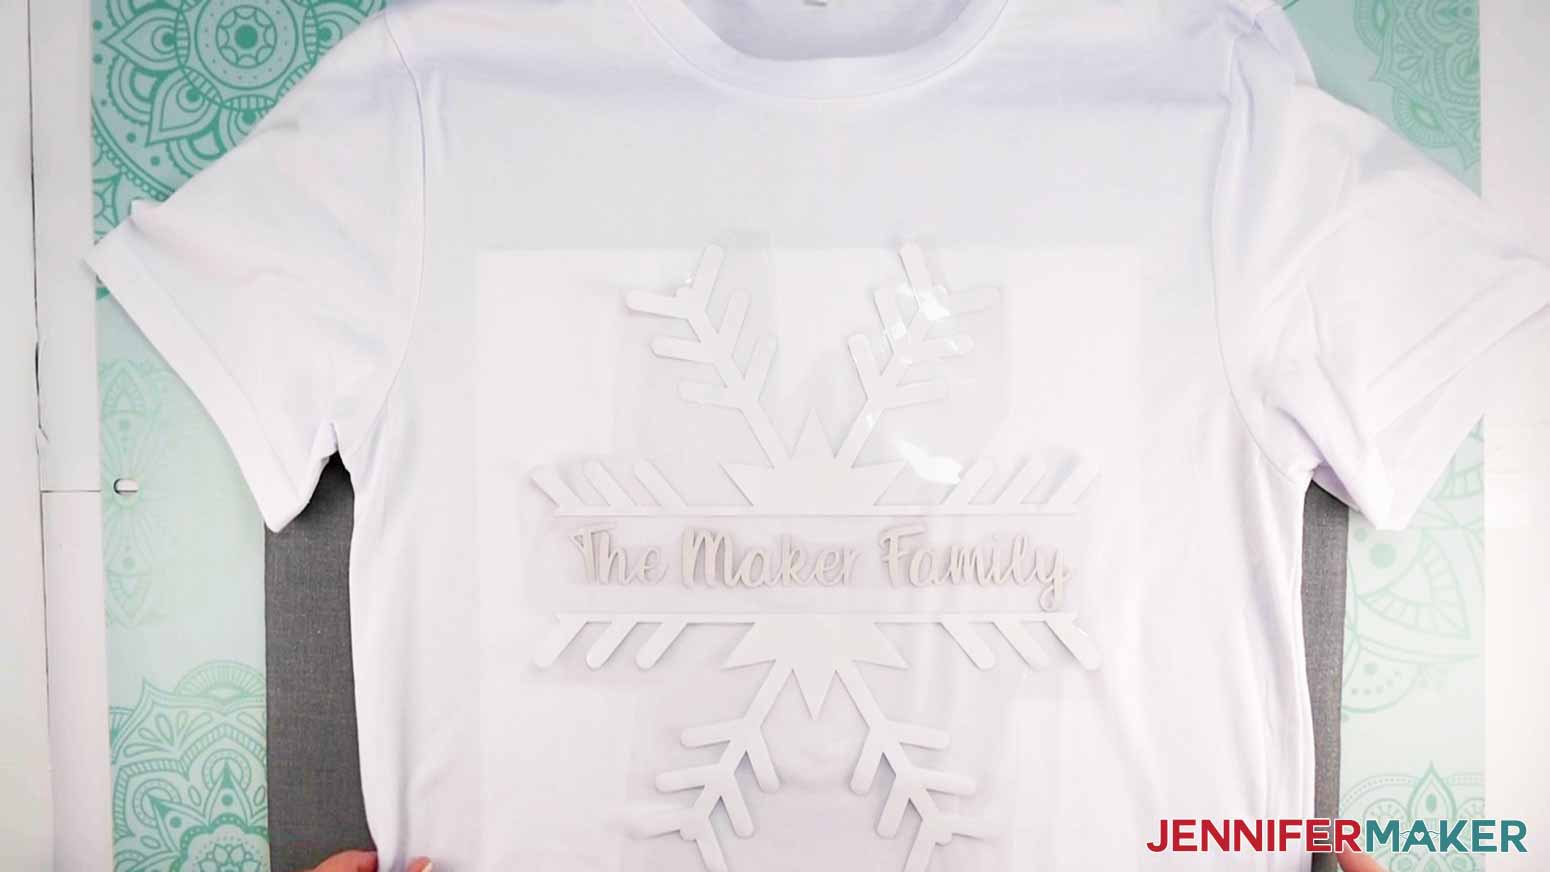
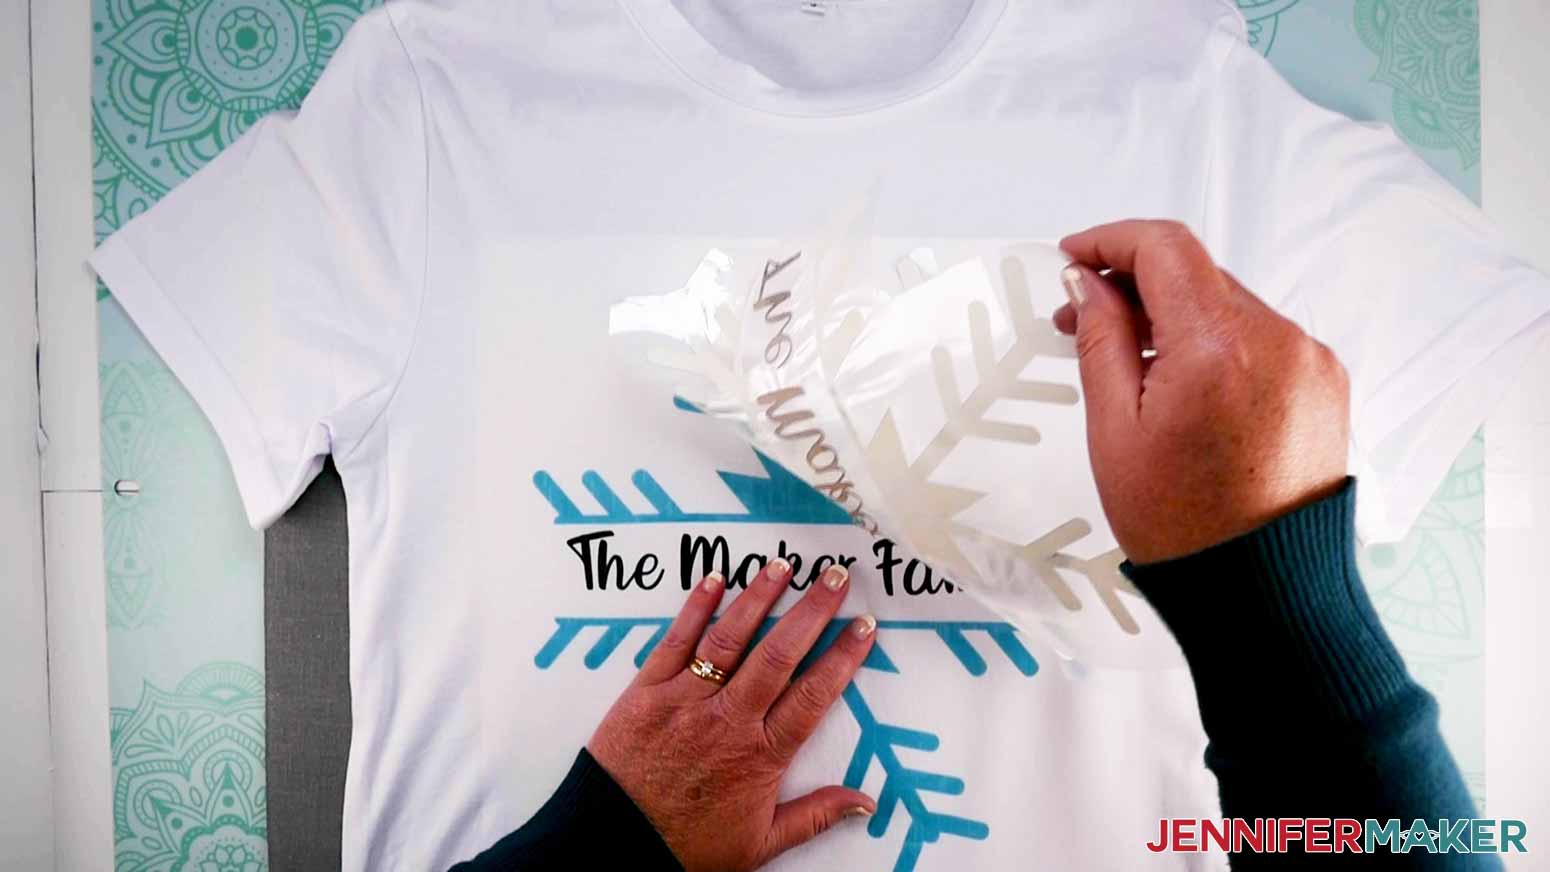
SNOWFLAKE DESIGN: The split snowflake SVG is ready for you to personalize however you'd like! I chose to put my family name and I used the font Breethy. Again, you can use any font you'd like!
TIP: Need help installing a font in Cricut Design Space? Check out this video and blog post I made that explains everything step by step.
Click the Text icon and type whatever you'd like for your personalization and then click the dropdown arrow next to Font to choose your font.
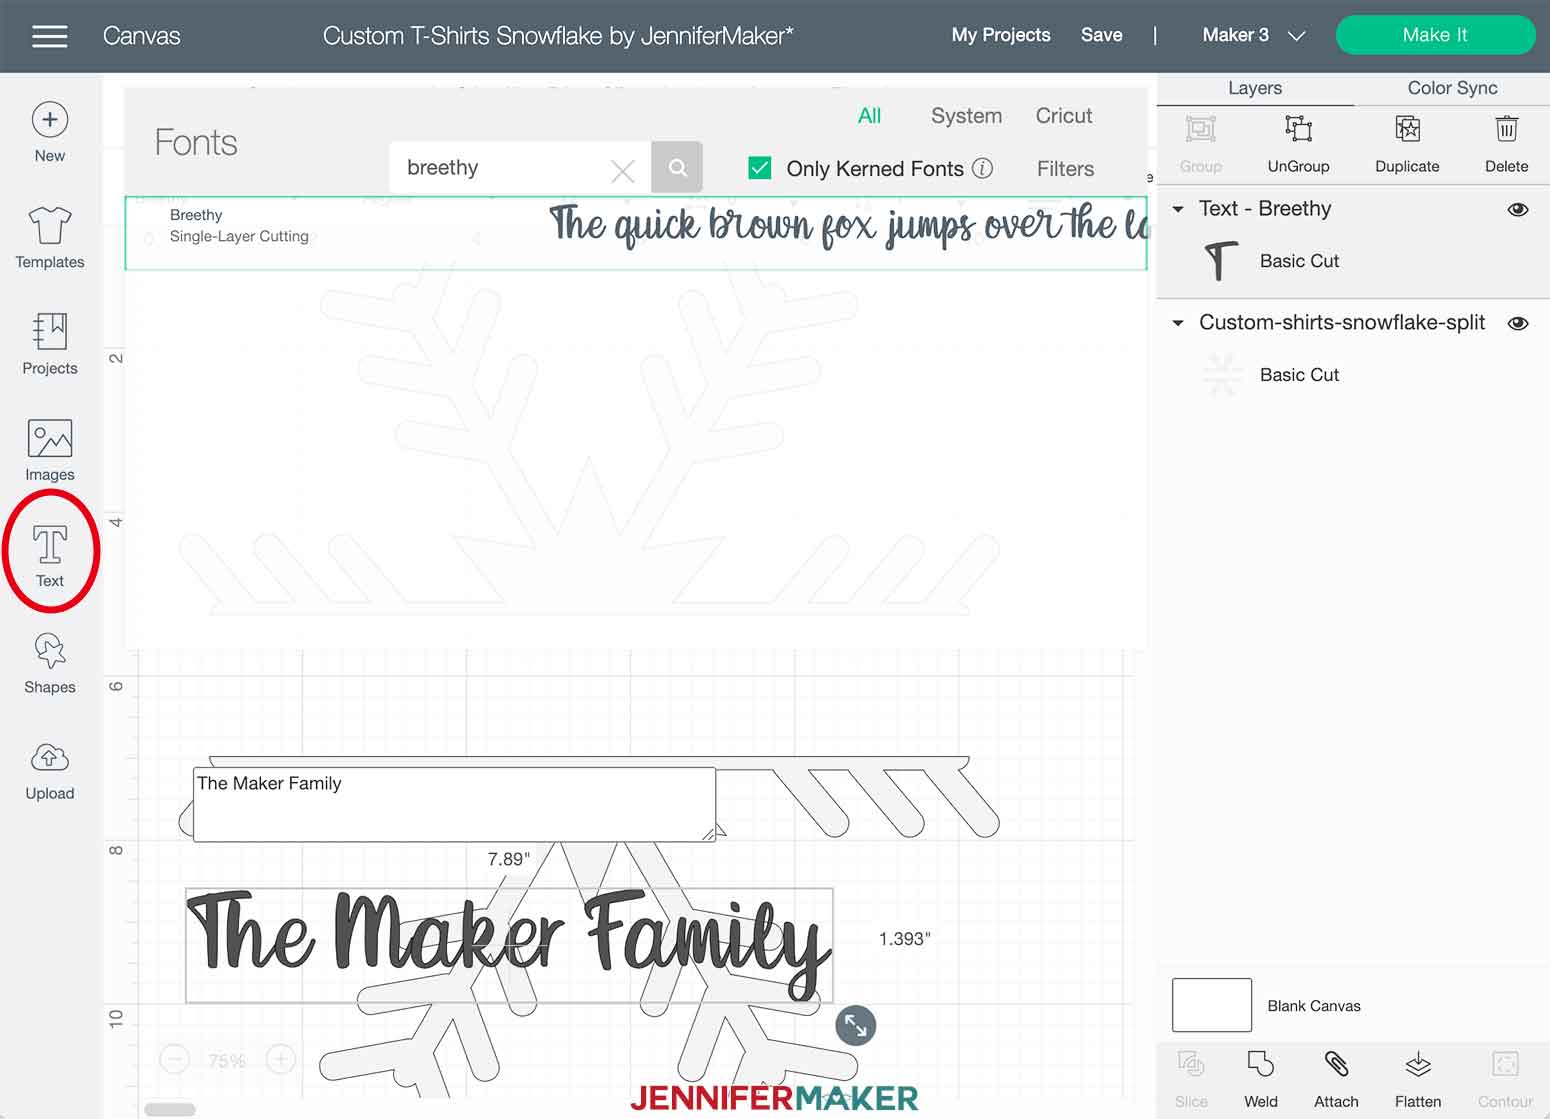
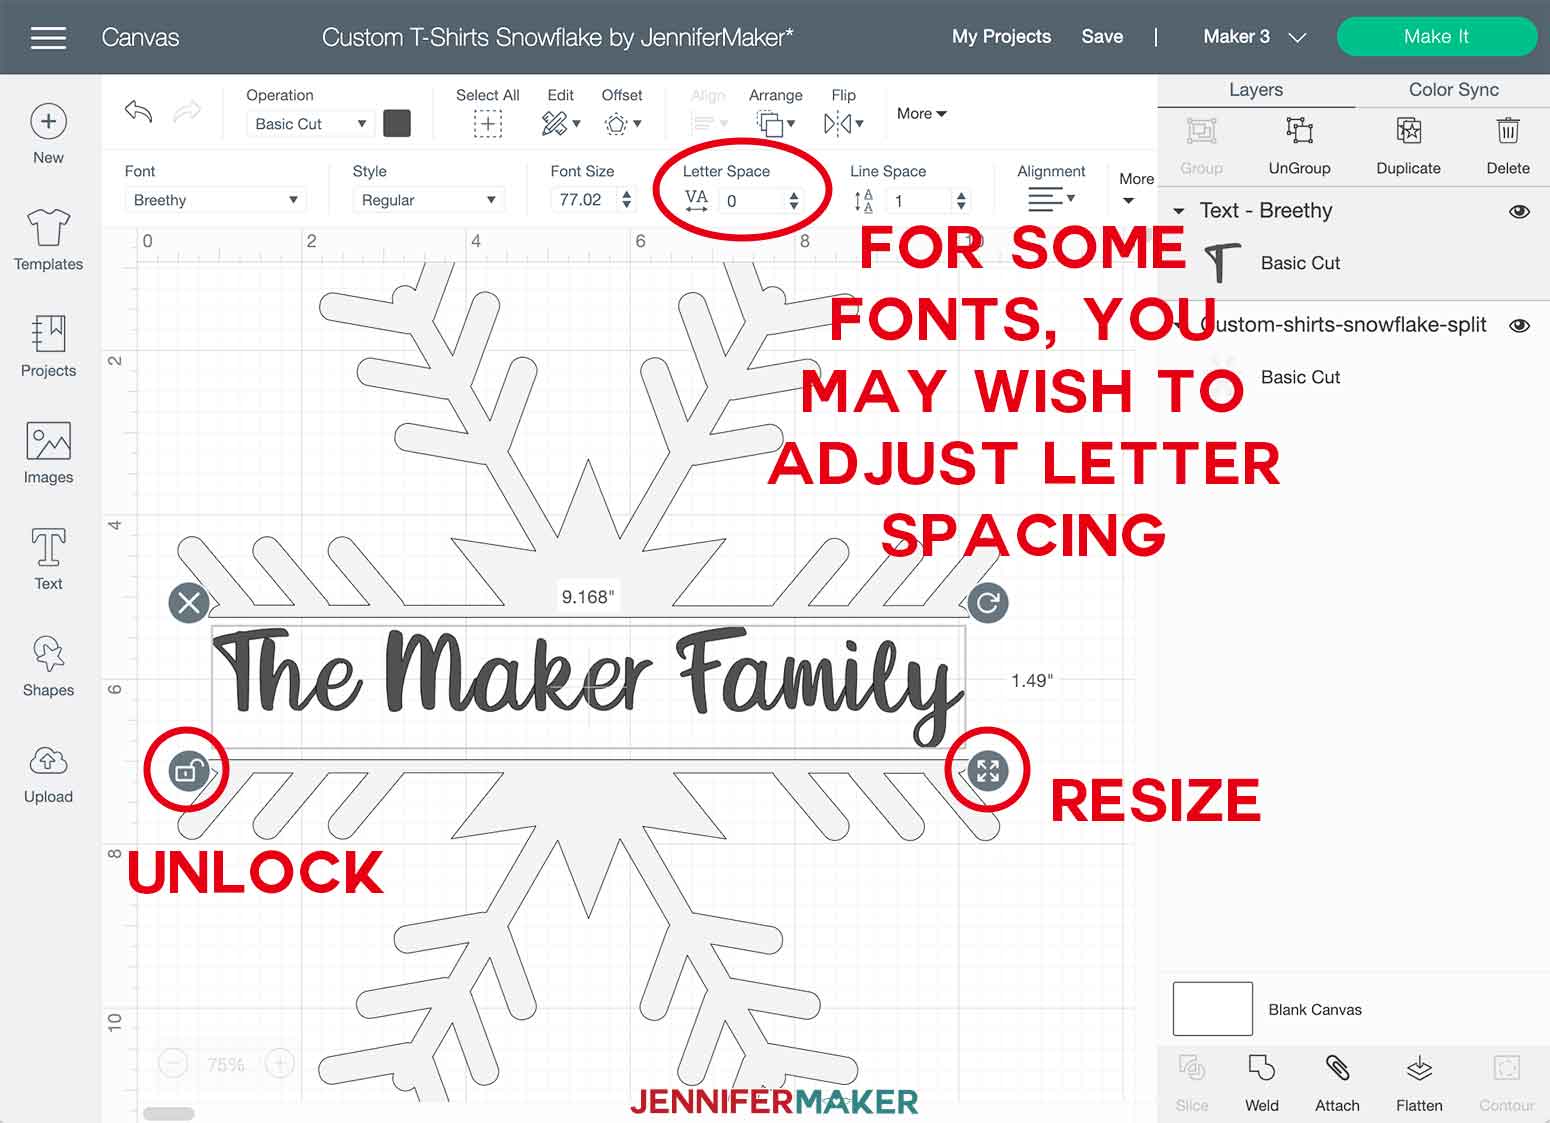
Once you decide on a font, you can use the resize handle to fit your personalization in the middle of the snowflake.
TIP: If your name isn't fitting how you'd like, you can unlock the text box to adjust just width or height. You can also adjust your letter spacing if you need to.
If you would like your snowflake and personalization the SAME color, select both layers in the layers panel and attach them.
If you plan to have your snowflake and personalization DIFFERENT colors, then no need to do anything more. You're all set and can click "Make It!" You're ready for STEP 3 below!
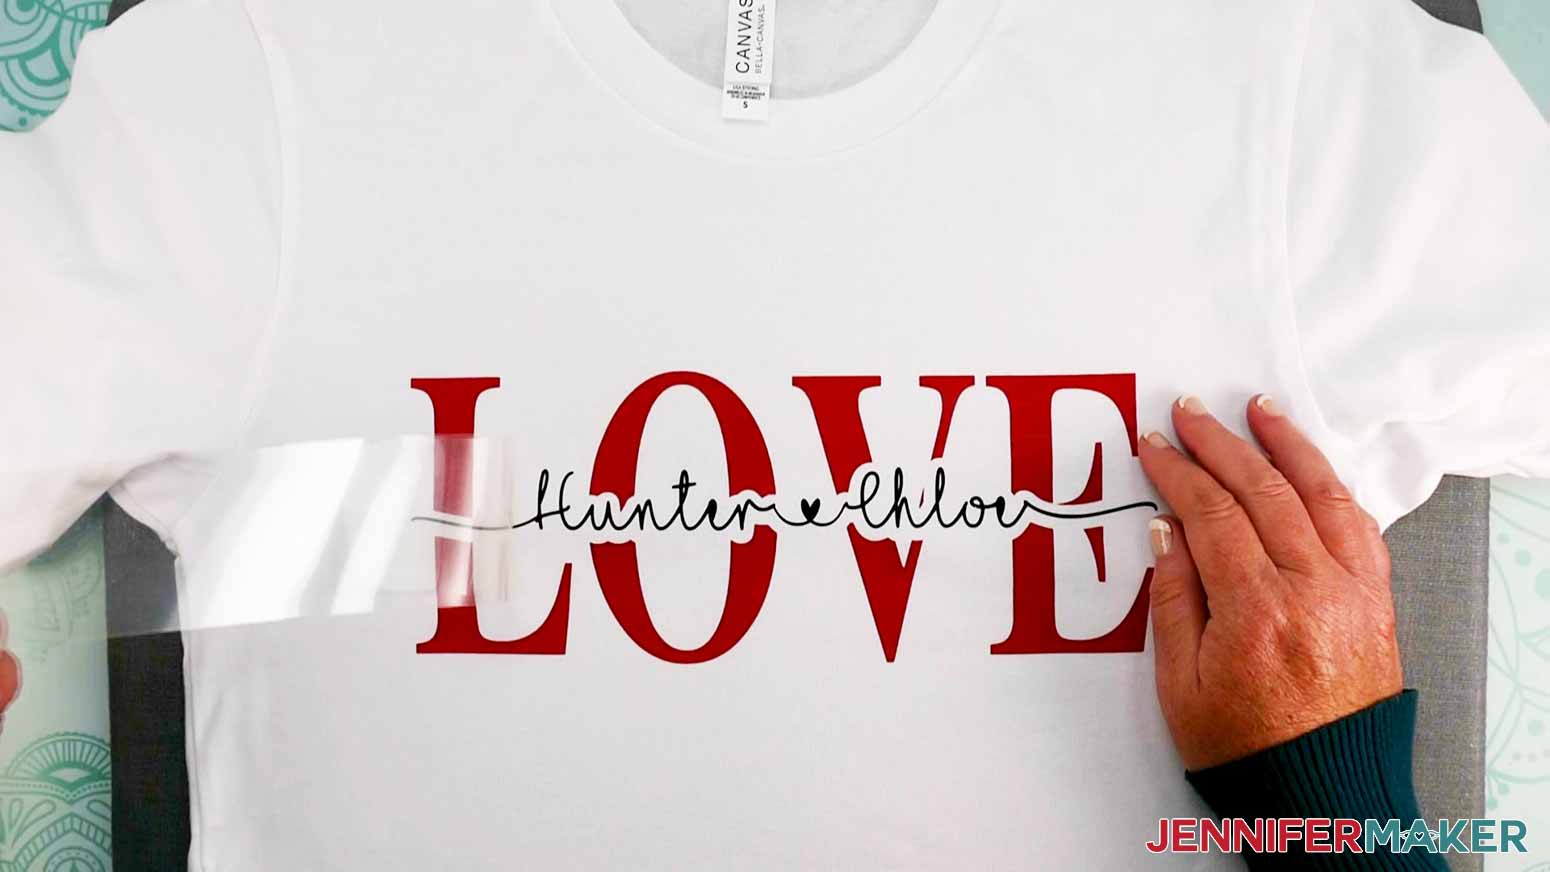
HOW TO MAKE YOUR OWN KNOCKOUT DESIGN:
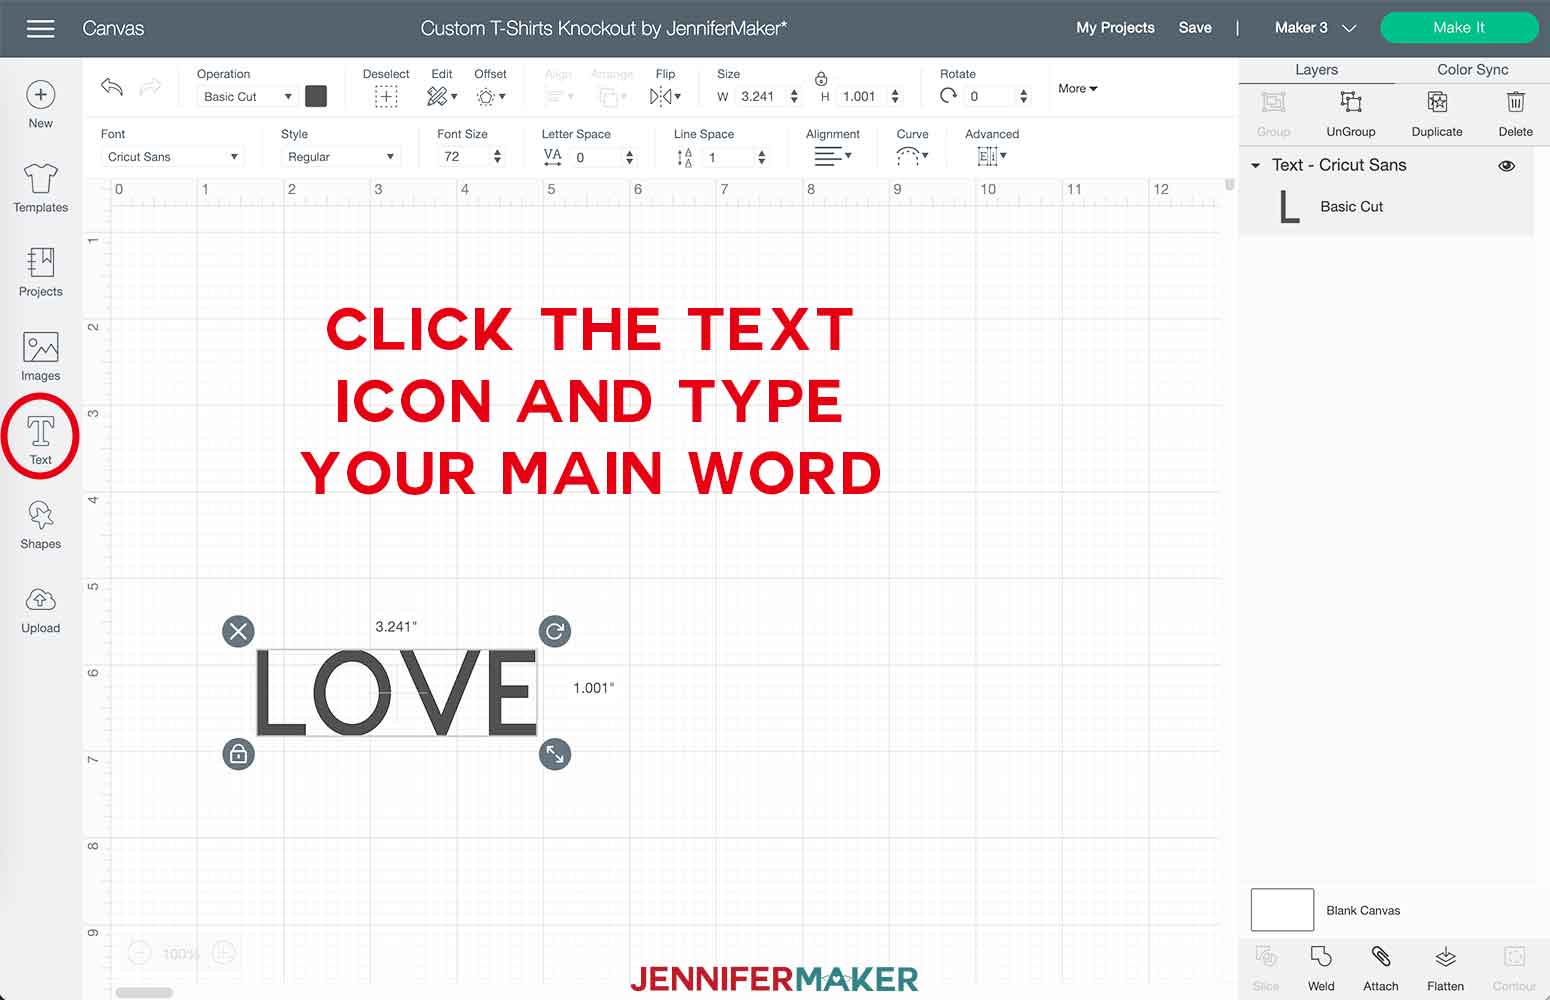
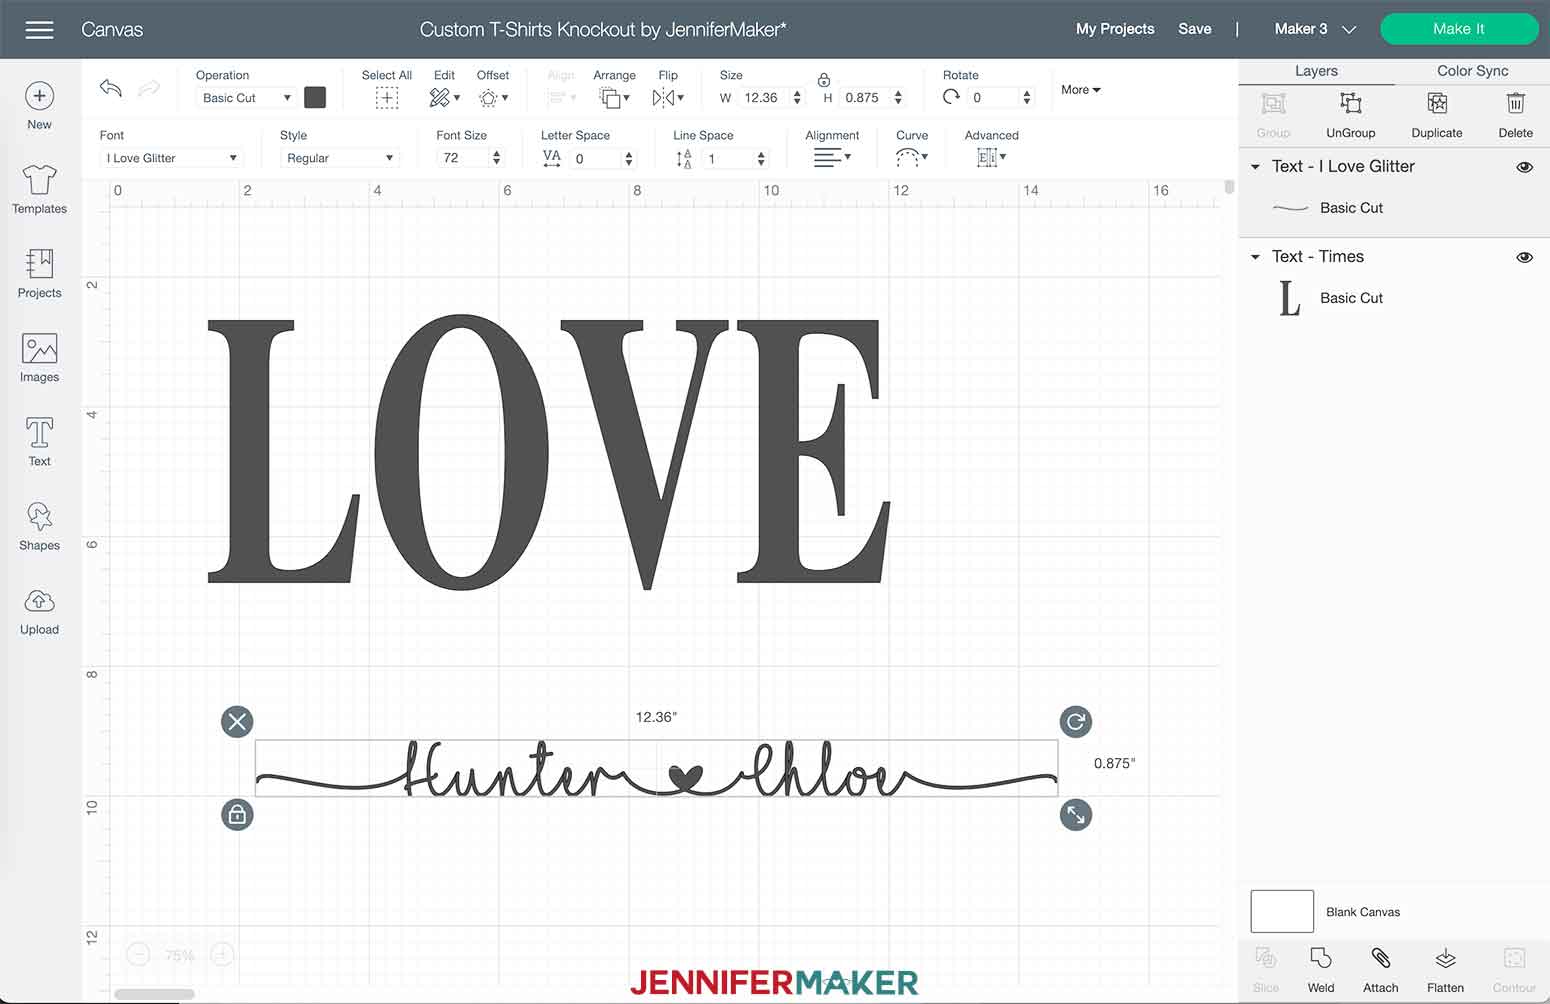
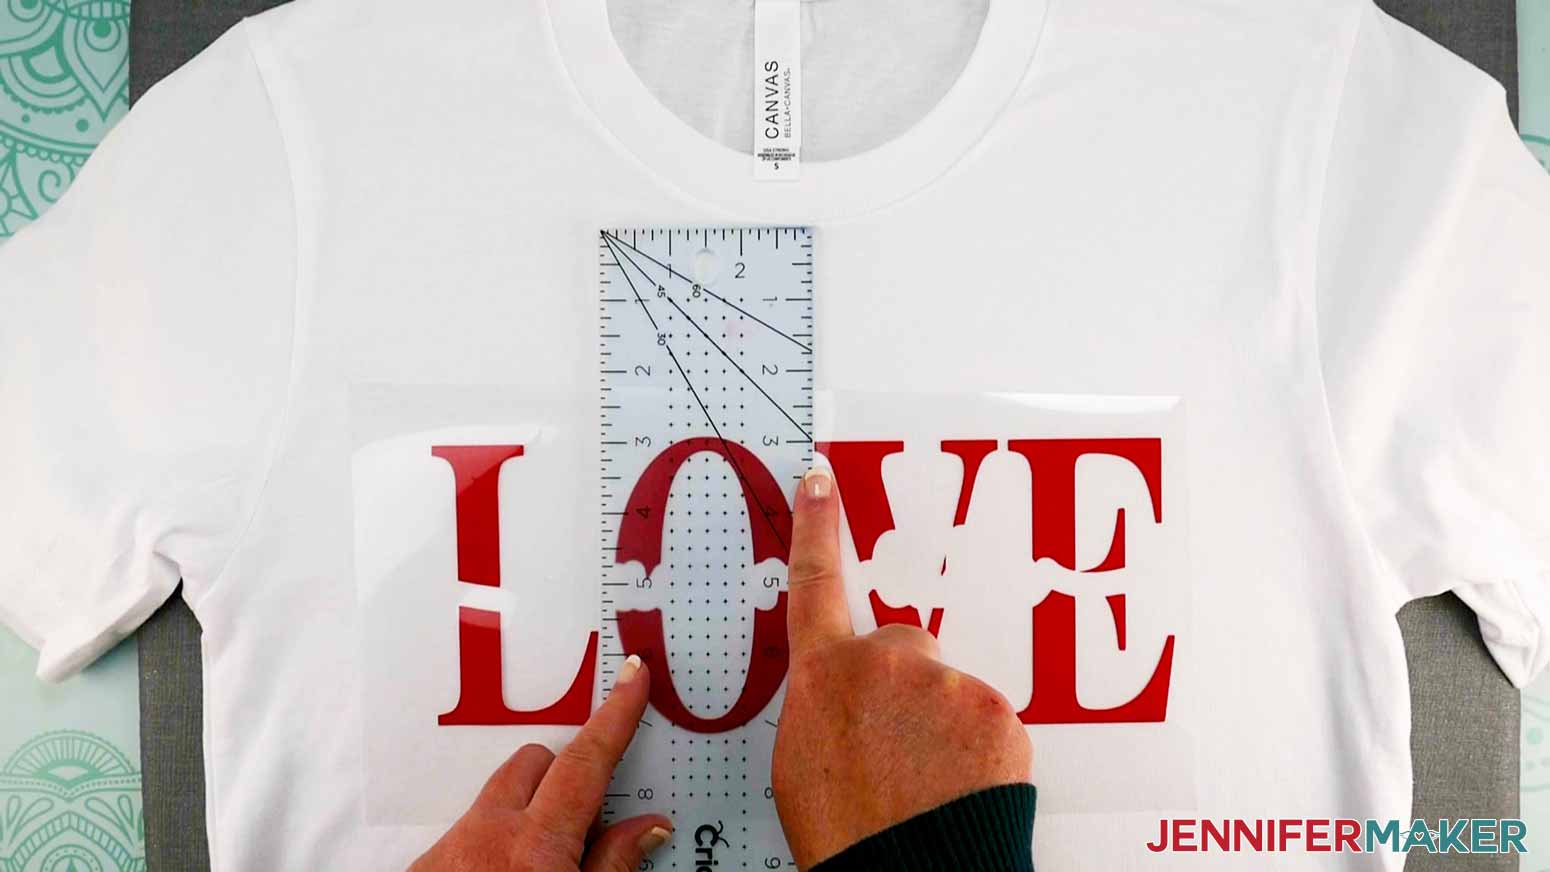
The first step is to make the large word. I chose "LOVE" for my shirt but the fun thing is you can use this technique with any word(s) you'd like! Click the Text icon on the left side of your Design Space screen. Type the word you'd like to use. I recommend using all caps for this word.
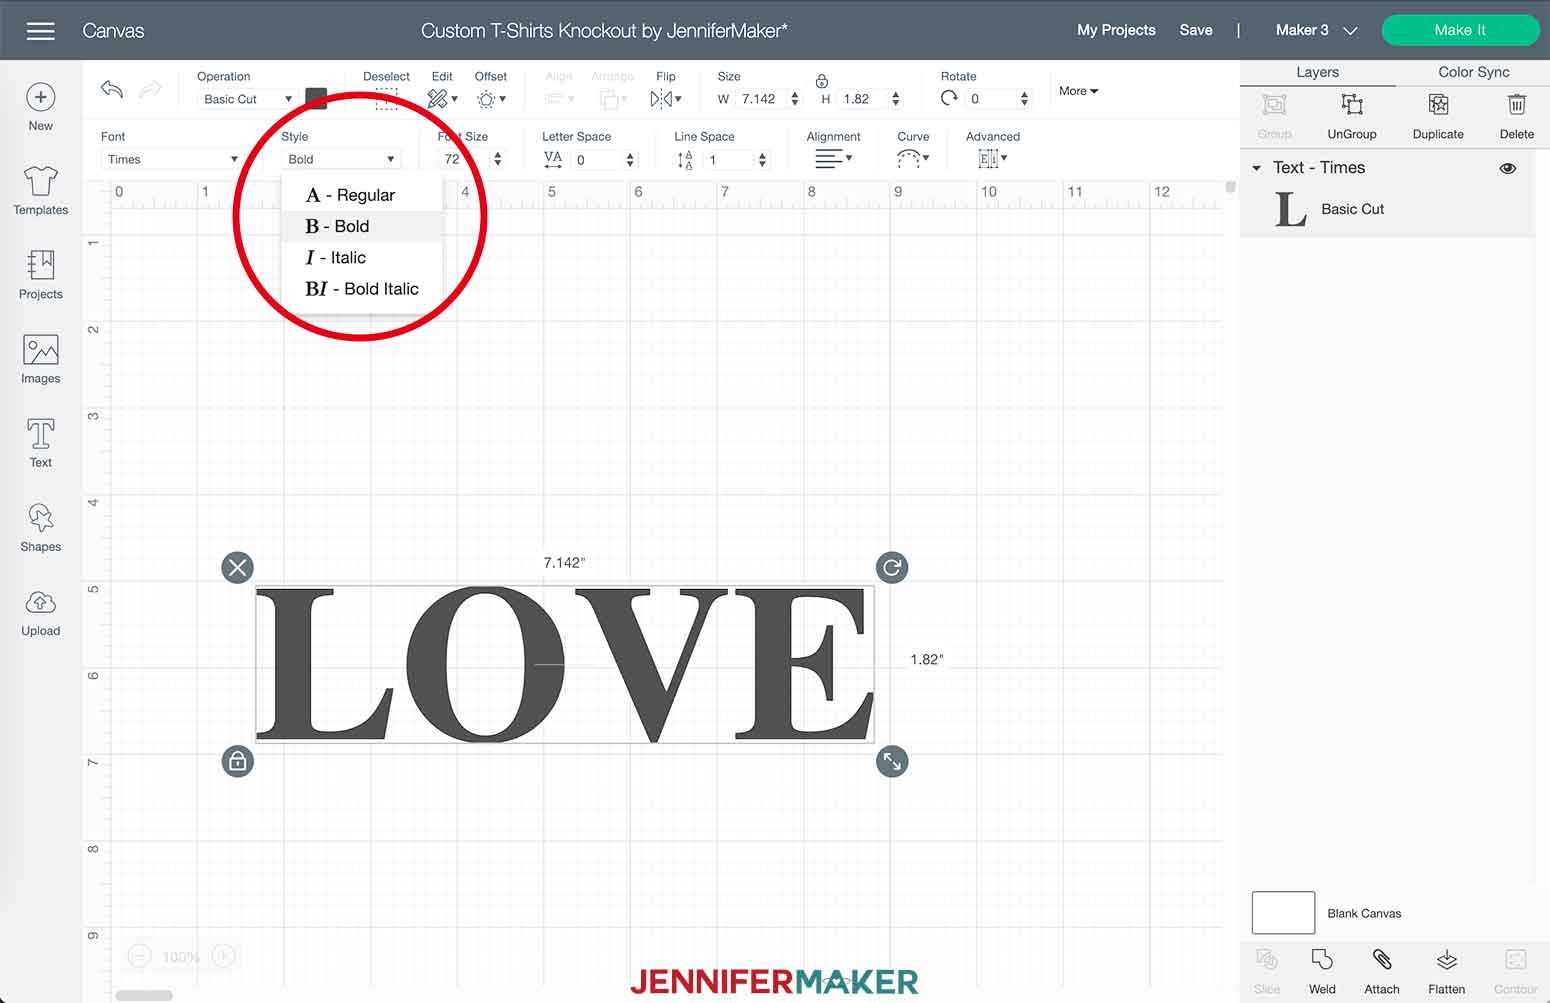
Next, I'm going to change the font. I think the knockout style looks best with a bold font. I chose to use Times Bold. Select Times from the Font Menu and then change the Style to Bold.
Isn't that already looking better? It is thicker but we need it to be taller so the knockout portion allows us to still read this main word. To do this, we need to unlock our text so that we can adjust the proportions. Select the text (if it isn't still selected) and click the Unlock icon in the bottom left of the text box. You can then use the Resize handle to change your text.
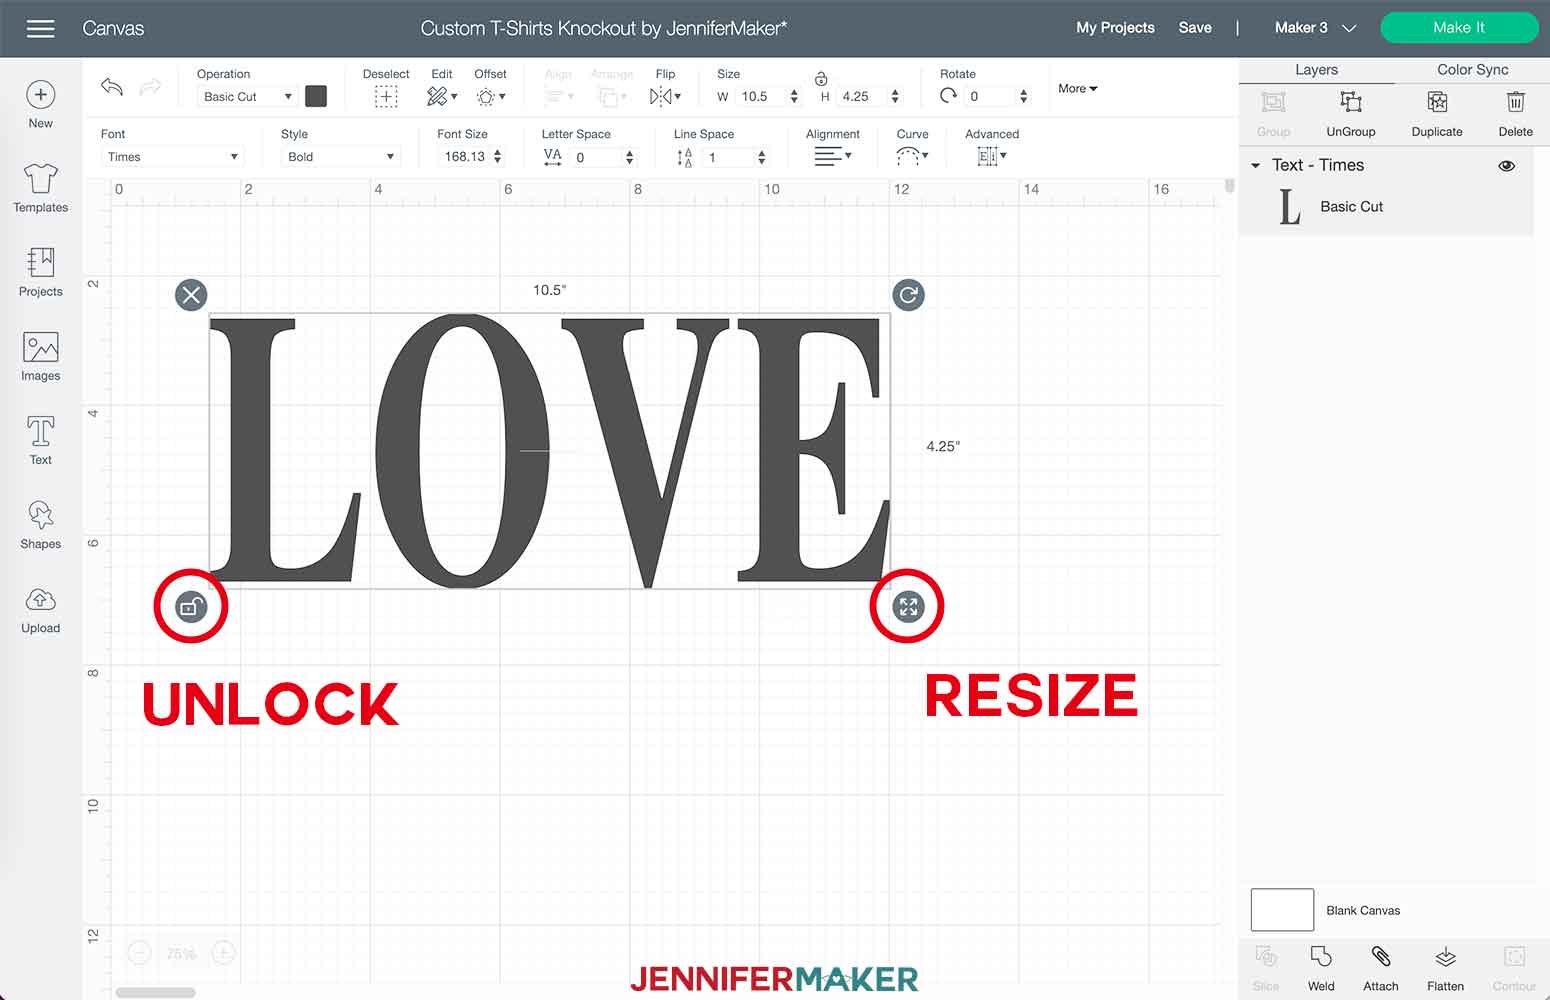
You can make your word any size you want. I chose to make mine 10.5" wide by 4.25" tall. You can also adjust your sizes at the top of the screen.
NOTE: I zoomed out on my screen to 75% to better view my work area.
Once you're good with your size, it is time to make your center accent text. I chose to use the font I Love Glitter. Again, click the Text icon and type your accent words.
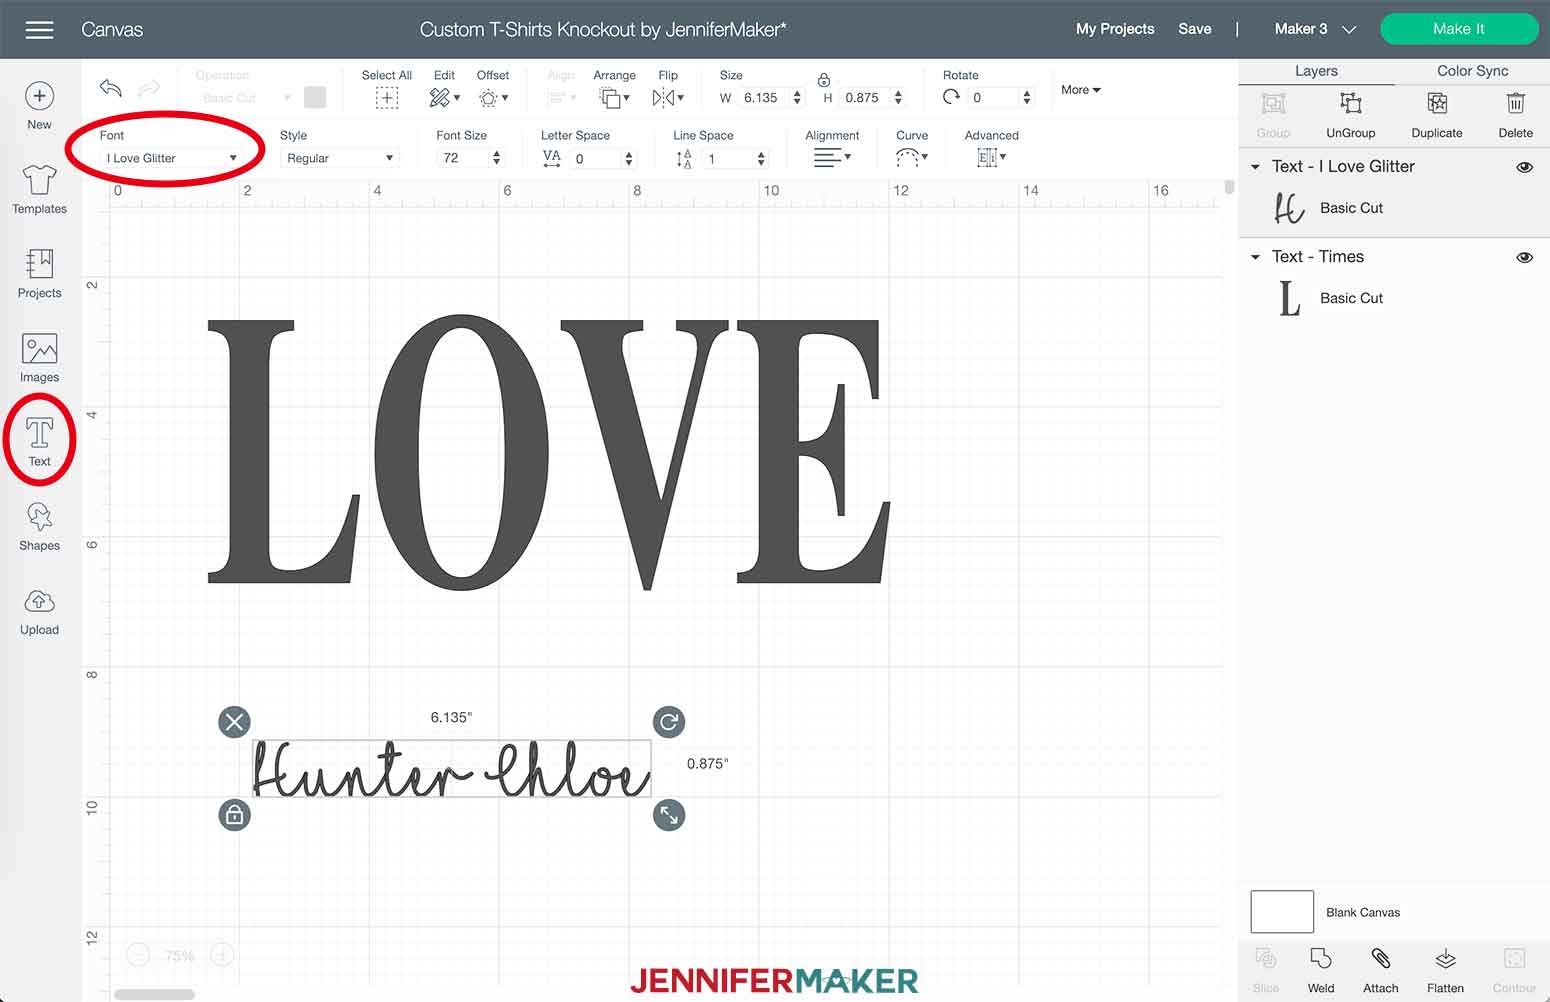
The fun thing about I Love Glitter font is that it comes with cute options in the Character Map (Windows) or Font Book (Mac). You can access these features by copying and pasting them into your Design Space text box from Character Map (Windows) or Font Book (Mac).
TIP: Here's a helpful video I made that explains everything you need to know about glyphs.
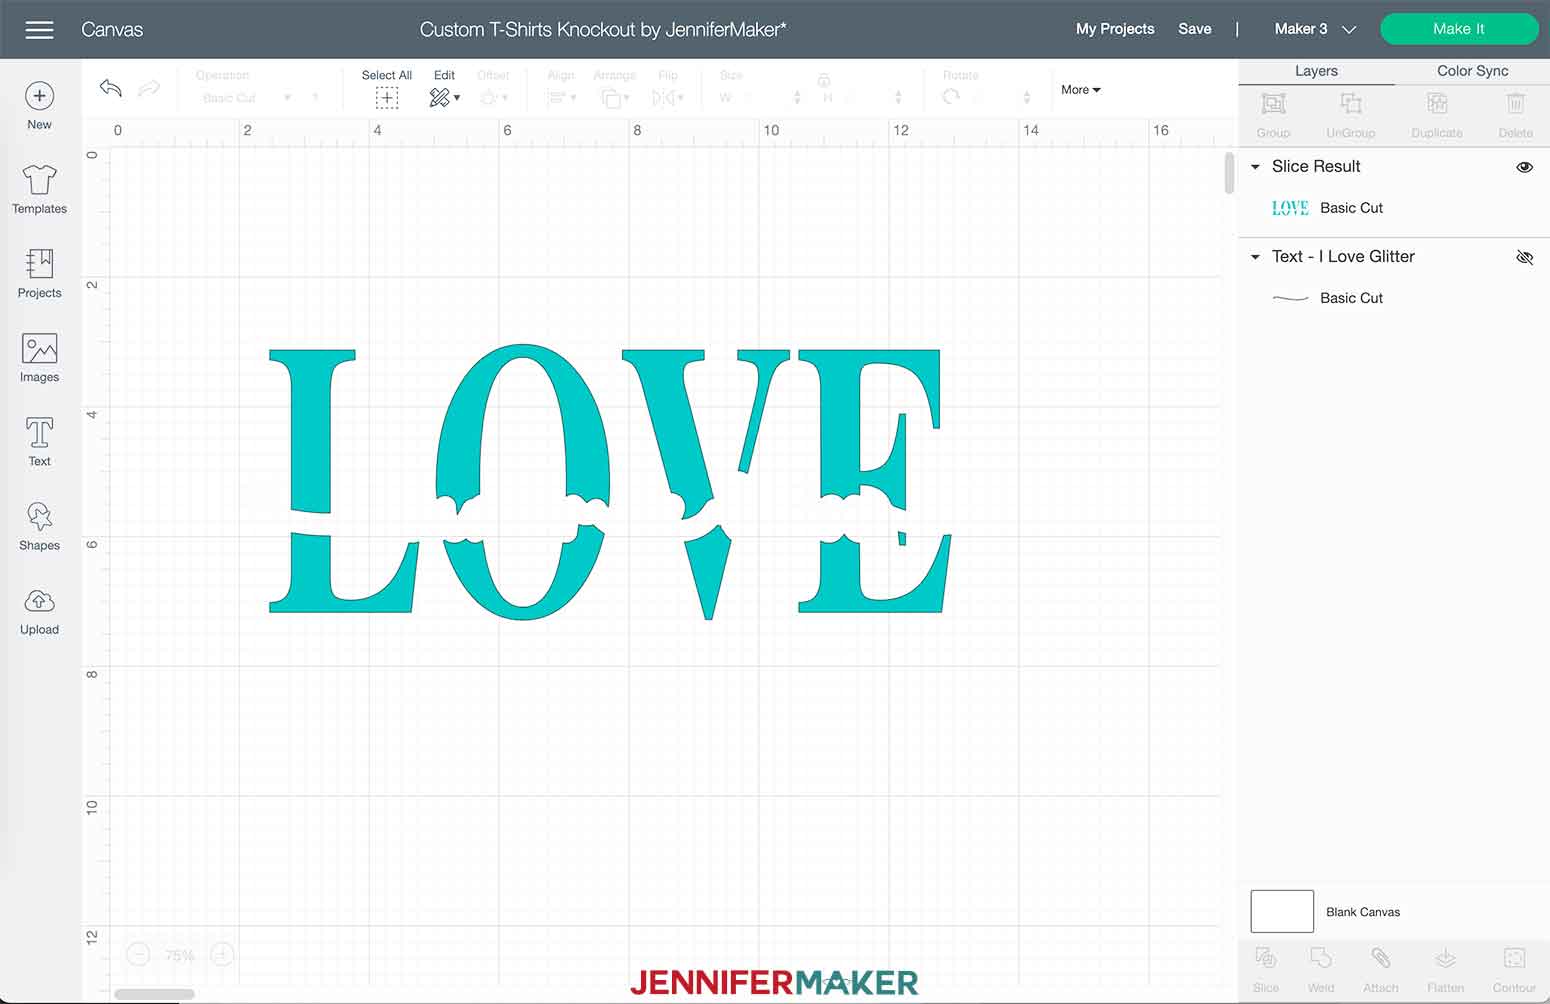
Now it is time to knock it out!
To see things a little better, I changed the color of my main word. You'll want two different colors if you plan on cutting two different colors of vinyl. Click and drag your accent text over the main word. You can manually place the text however you'd like it or you can use the Align feature to center the text. Select both text layers and click "Align" and then "Center Horizontally."

Next, click the accent text only. You may need to click on a blank space in the canvas and then back on the accent text or you can select it by clicking the layer in the layers panel. Then, click Offset. I chose to use 0.15. You can adjust offset amount to your liking. Click "Apply."
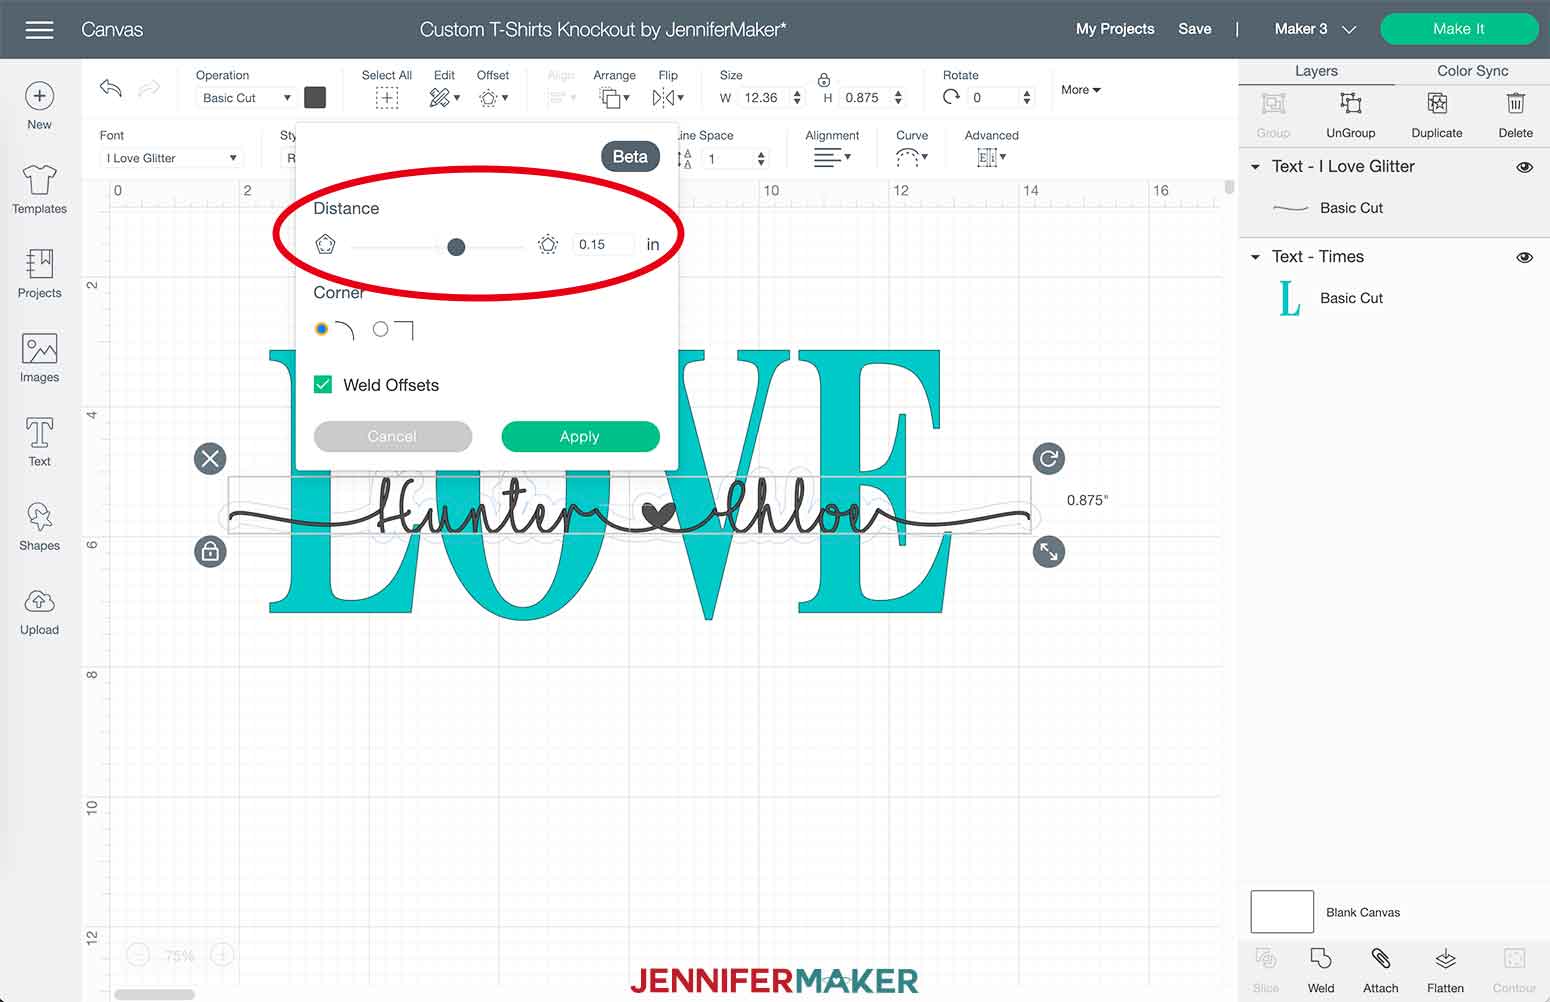
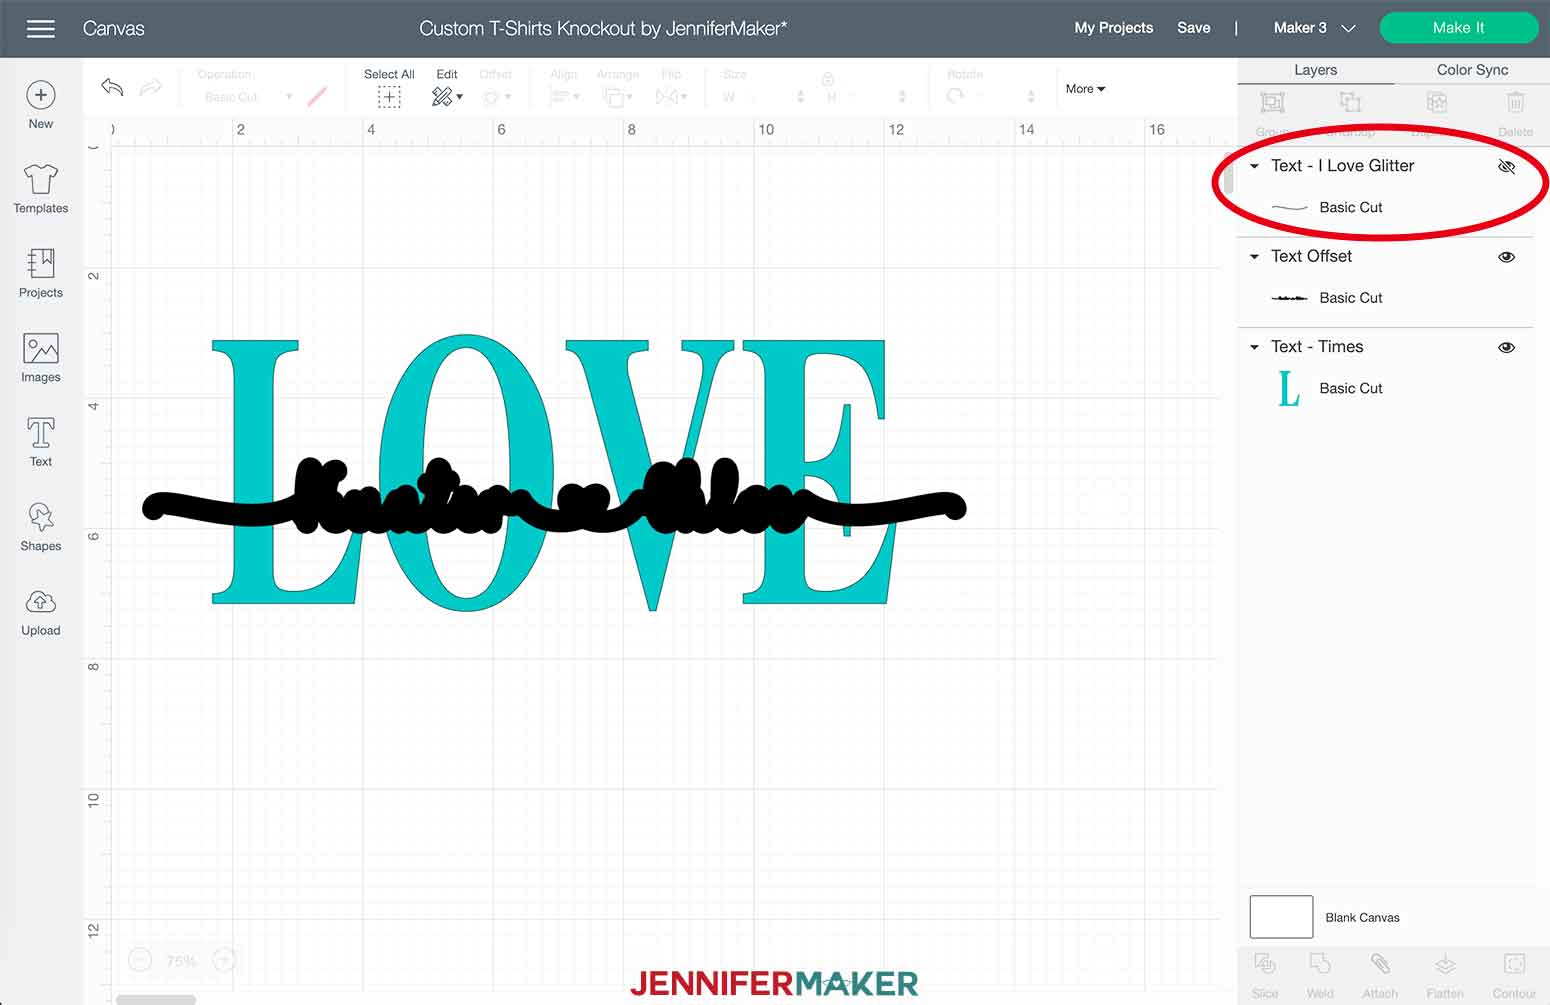
You will now see "Text Offset" in your layers panel. Before moving on, select your accent text layer (NOT offset), and click the eye icon to hide the layer.
Now, select both layers or click "Select All" at the top of the screen and then click "Slice" in the lower right corner.
NOTE: Because your accent text layer is hidden, these steps won't change that layer.
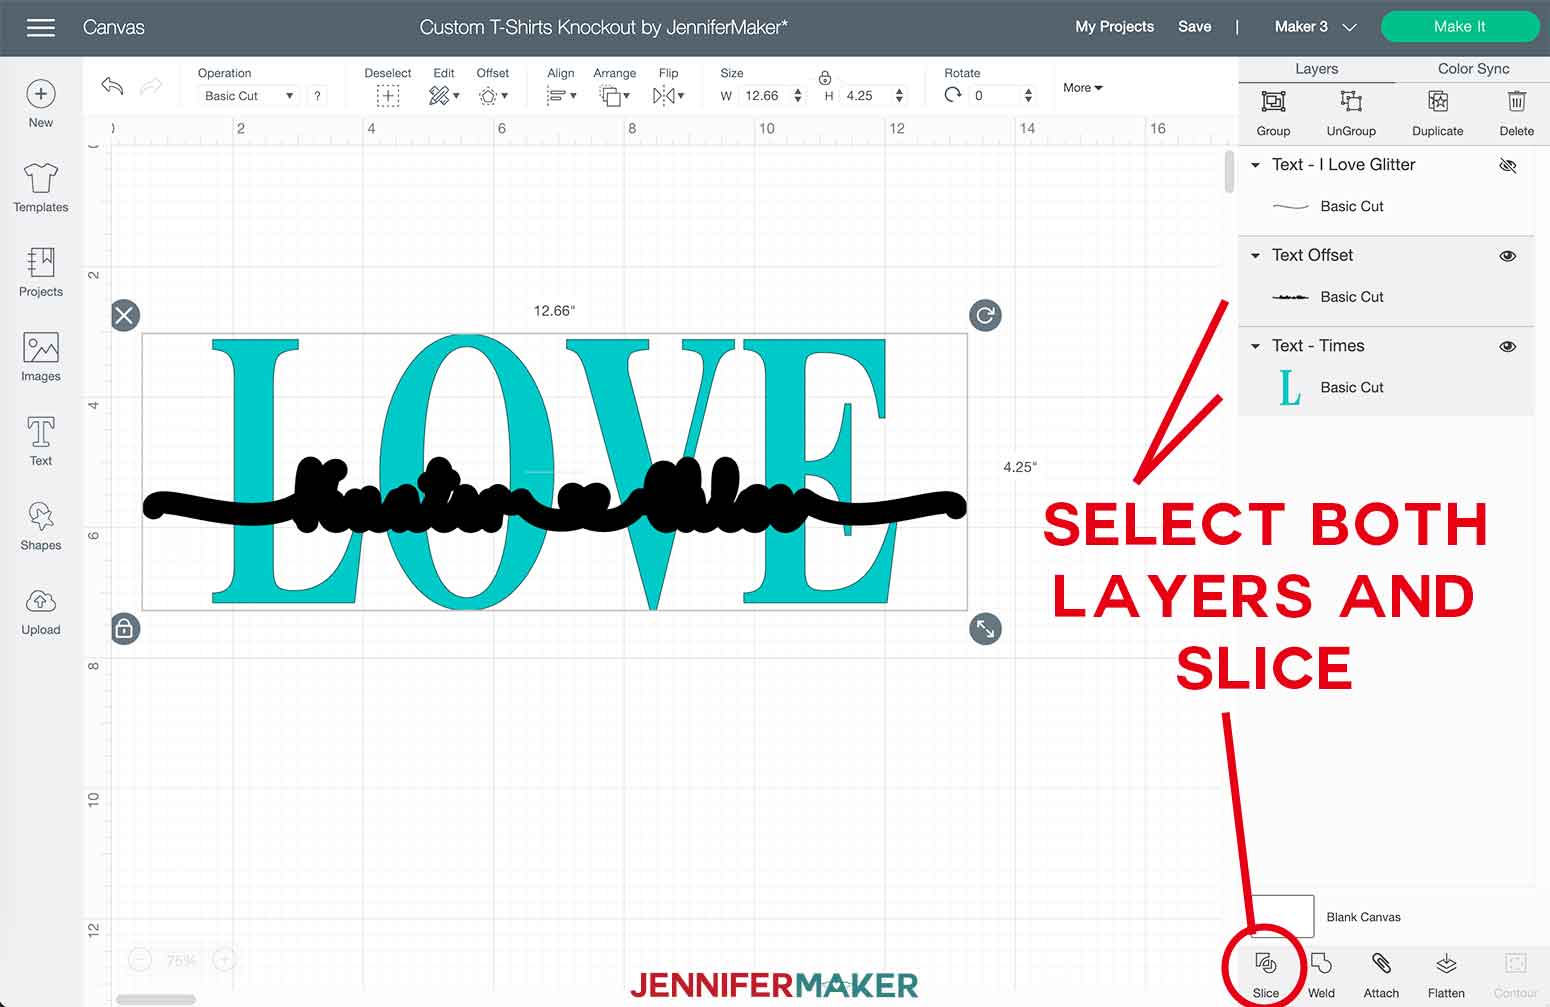
You'll now see several Slice Result layers in your layers panel. I recommend hiding your main word and then select all of the remaining slice results and delete them. The only two layers we want are the ones that are hidden.
Once you have deleted your unnecessary Slice Result layers. You can unhide your main word and see the knockout outline running through the center like this.
Now go ahead and unhide your accent text. You'll see it beautifully appear right in the middle of your main word (if you didn't move your main word from where it originally was).
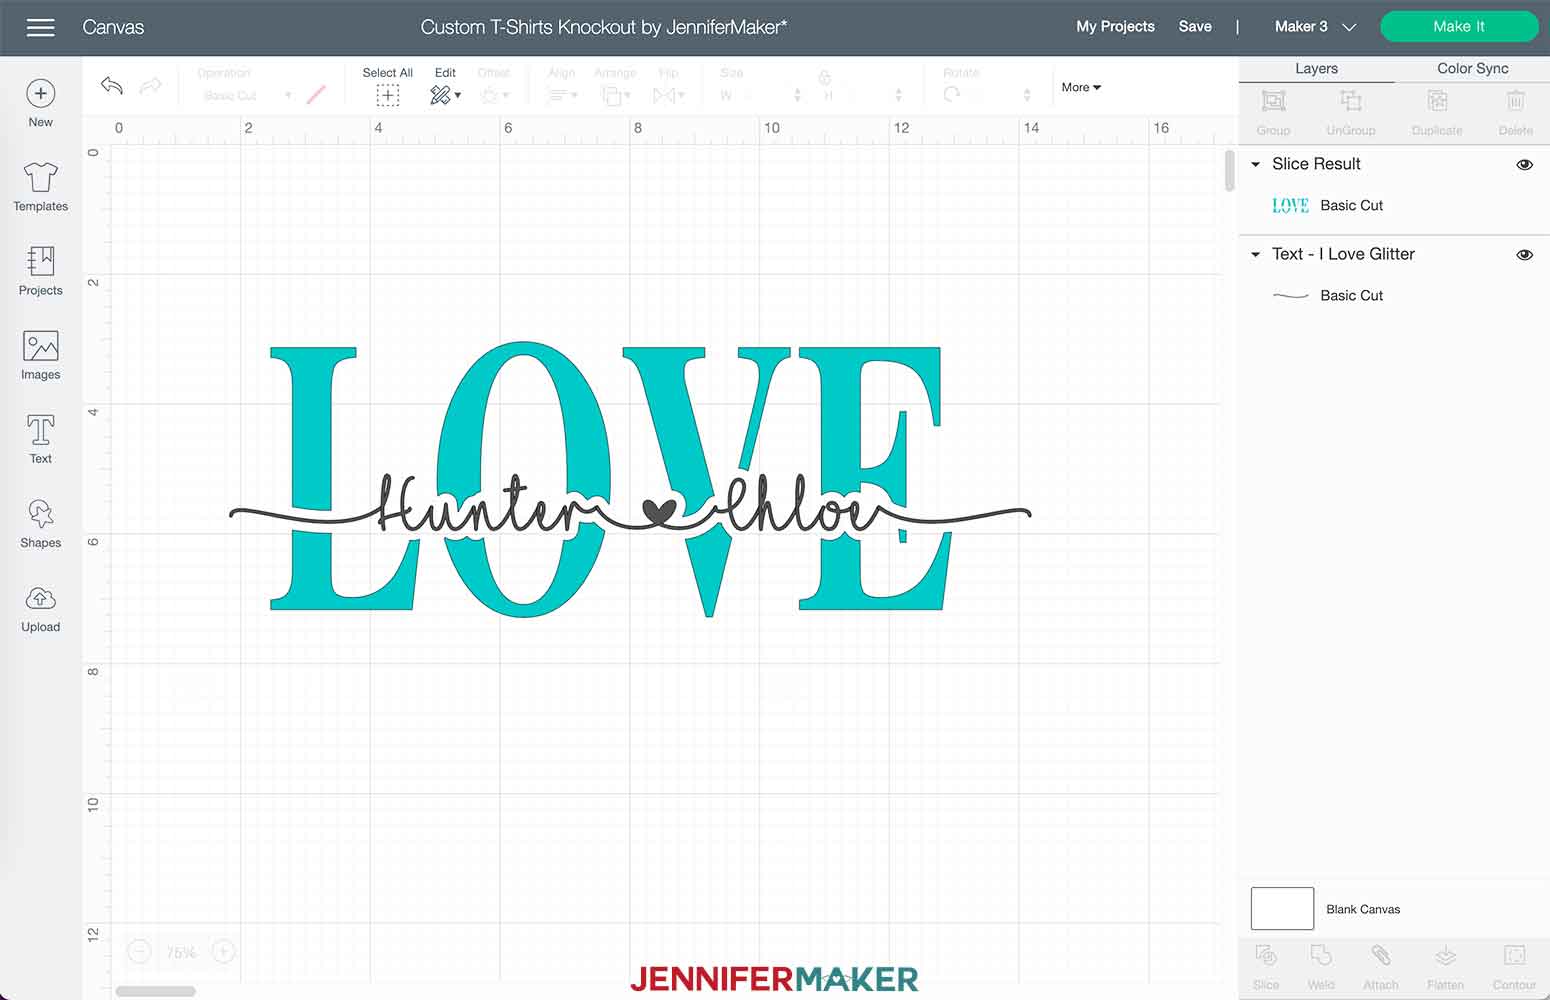
Great job! Now you are ready to confirm your sizing.
TIP: Select both layers to make changes to the size of both layers together. Refer to the template instructions at the beginning of STEP 2 to make sure your design is sized correctly for your shirt. Then click "Make It" and move on to STEP 3!
STEP 3: CUT, WEED, AND APPLY YOUR VINYL OR INFUSIBLE INK
After clicking "Make It," follow the prompts to choose your machine and your material.
TIP: Remember to MIRROR your design for iron-on vinyl and infusible ink. I always recommend cutting with "More" pressure, regardless of which material you are using for these shirts.
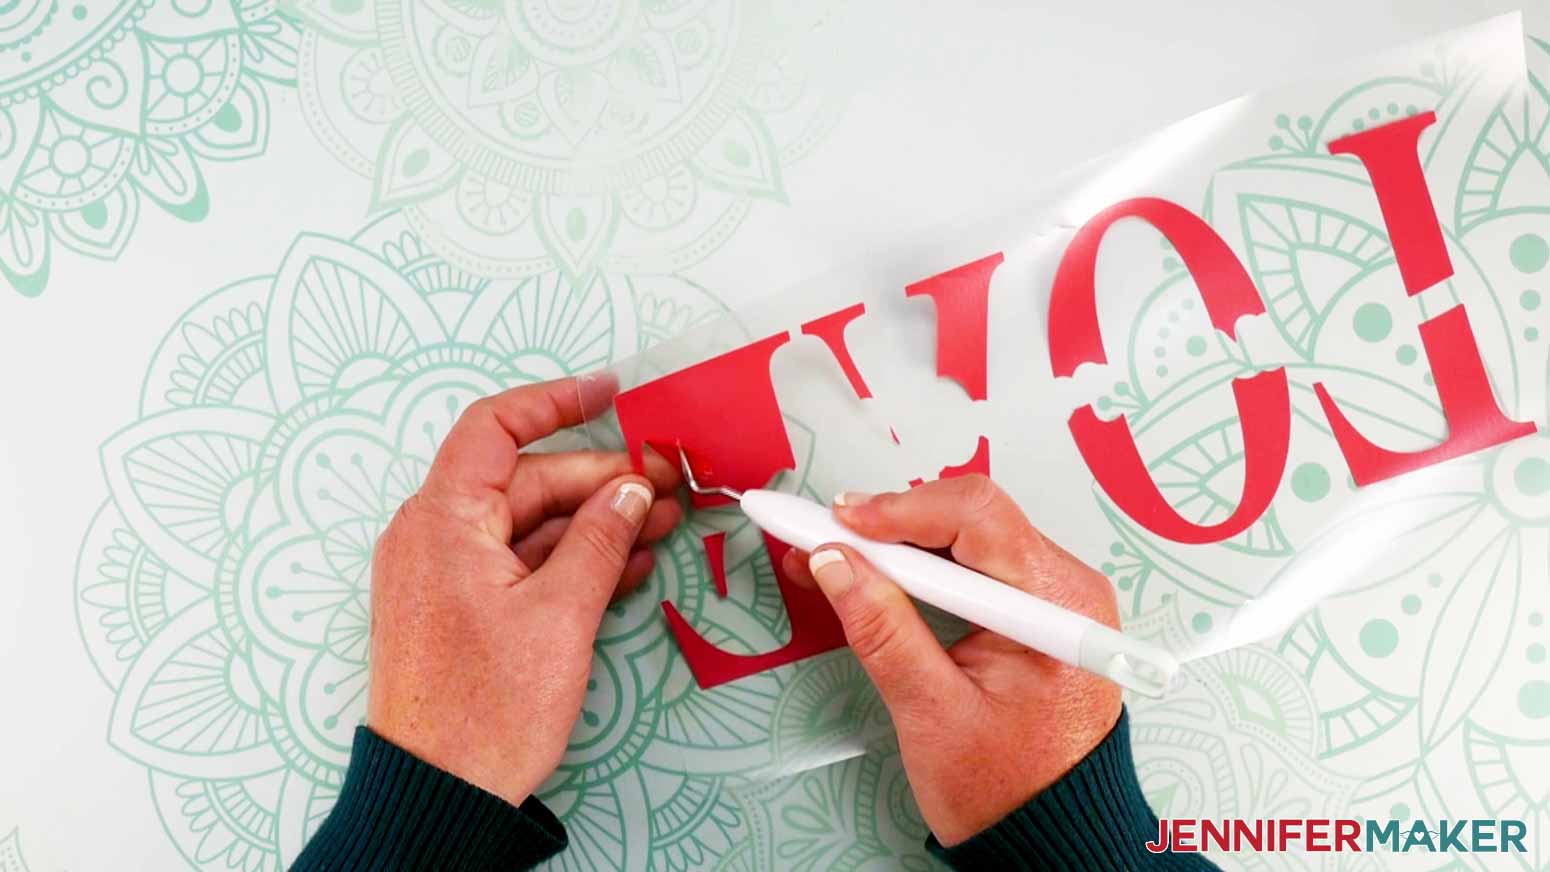
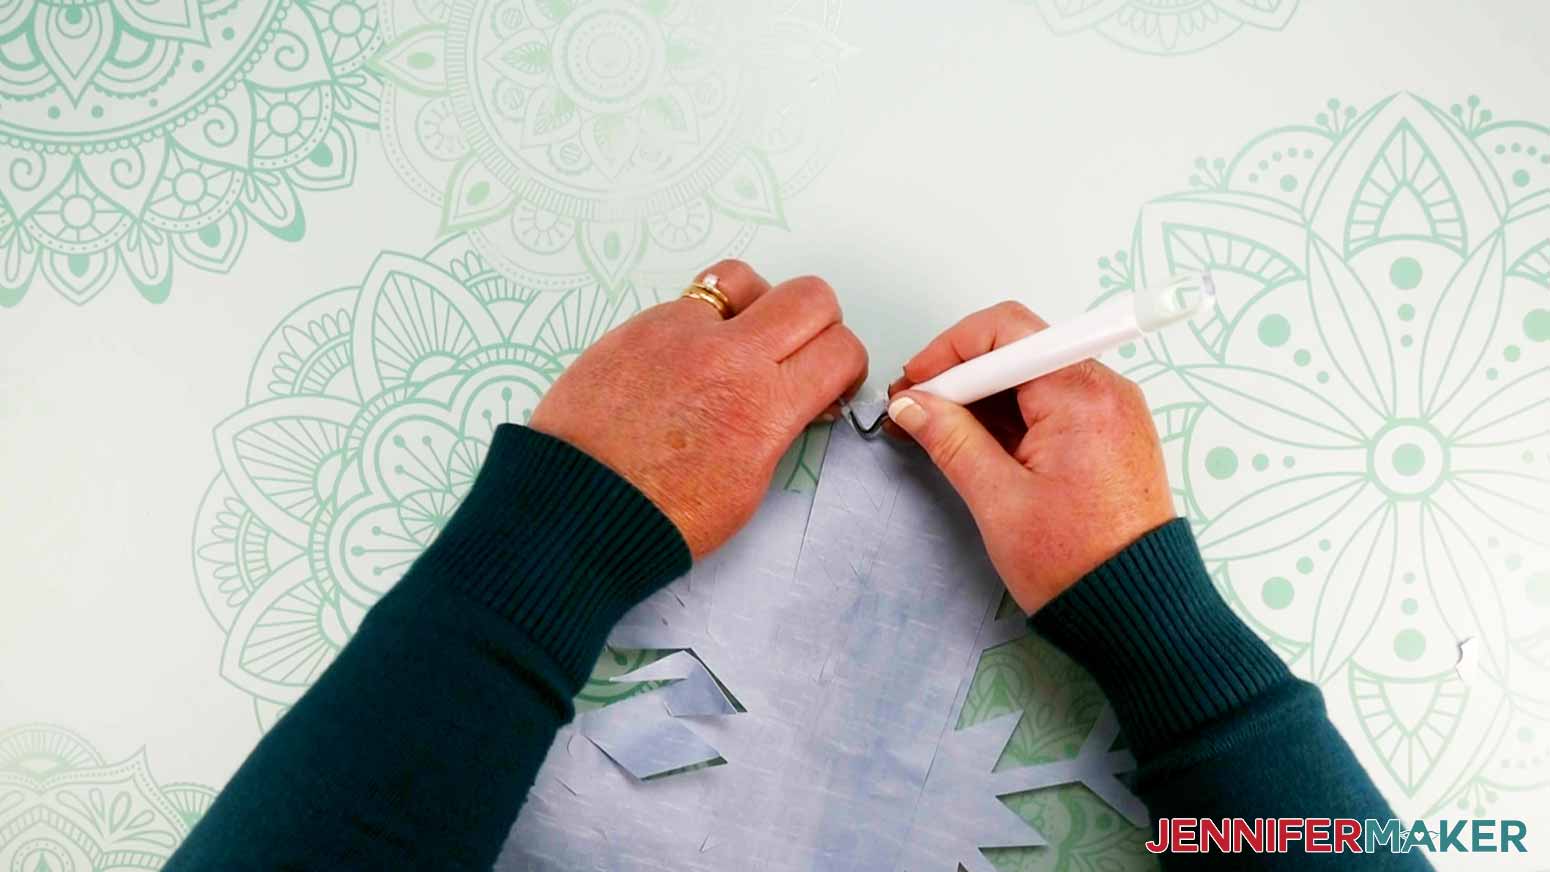
Once your design is cut, it's time to weed out all of the excess iron-on vinyl or infusible ink. Don't forget to get inside all of your letters.
Next, you need to prepare your shirt. Many people wonder if they should wash their shirt before applying their design and this is what I recommend: If you are making your shirt to sell or display, do not prewash it. The color of the shirt will remain more vibrant and professional. If you are making the shirt for personal use or as a gift, the choice is yours.
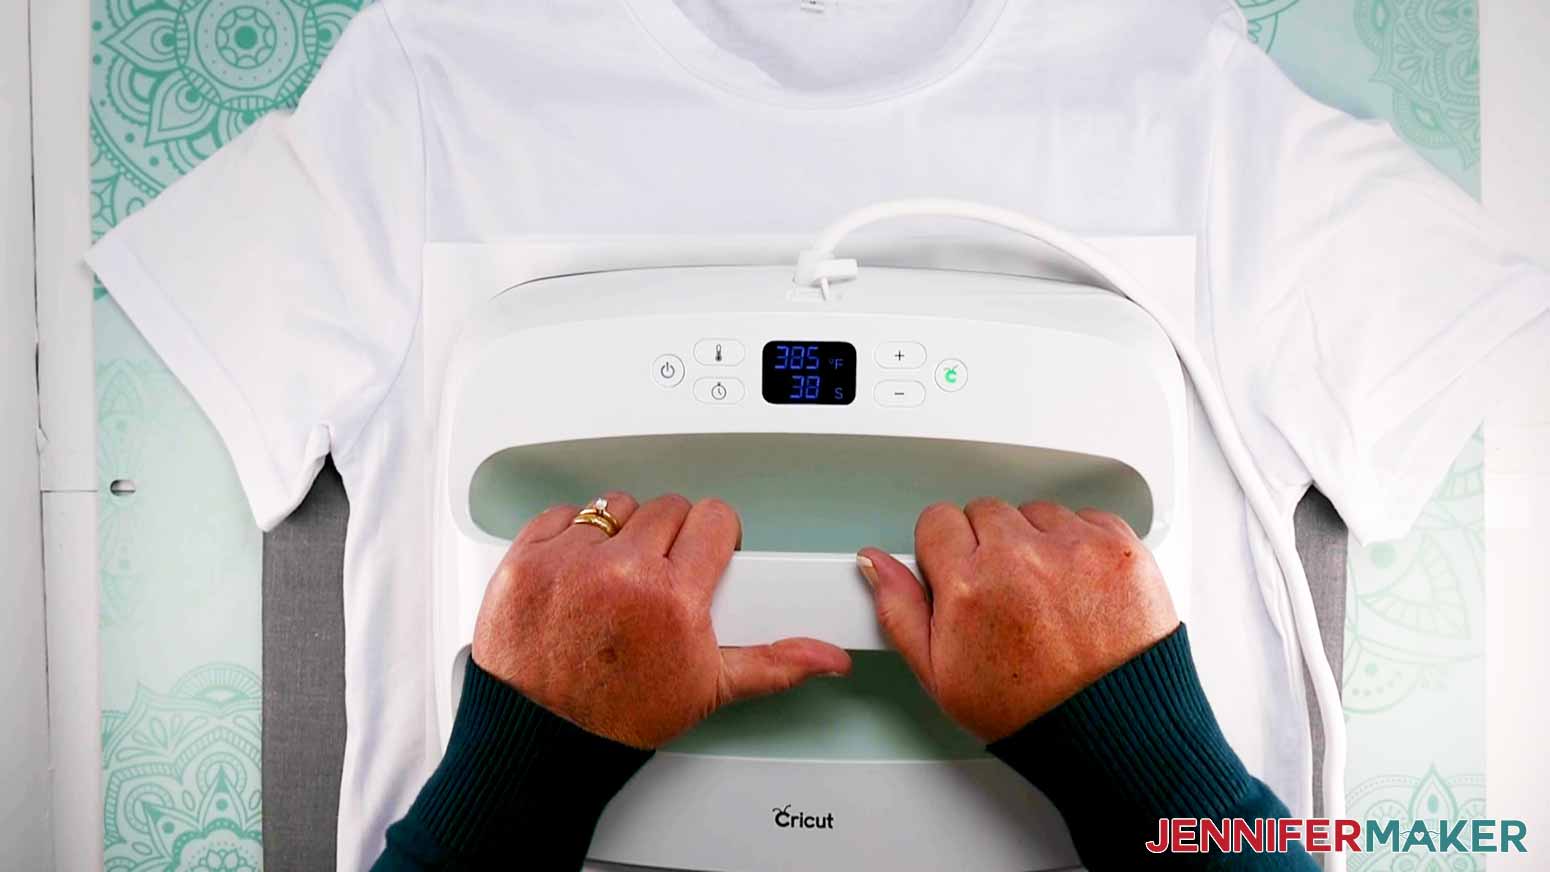
Place your t-shirt on a firm surface such as a Cricut EasyMat (not an ironing board). For iron-on vinyl: Using your EasyPress set to 330º for iron-on, preheat the shirt for 5 seconds. For Infusible Ink: Using your EasyPress set to 385º for iron-on, preheat the shirt for 15 seconds
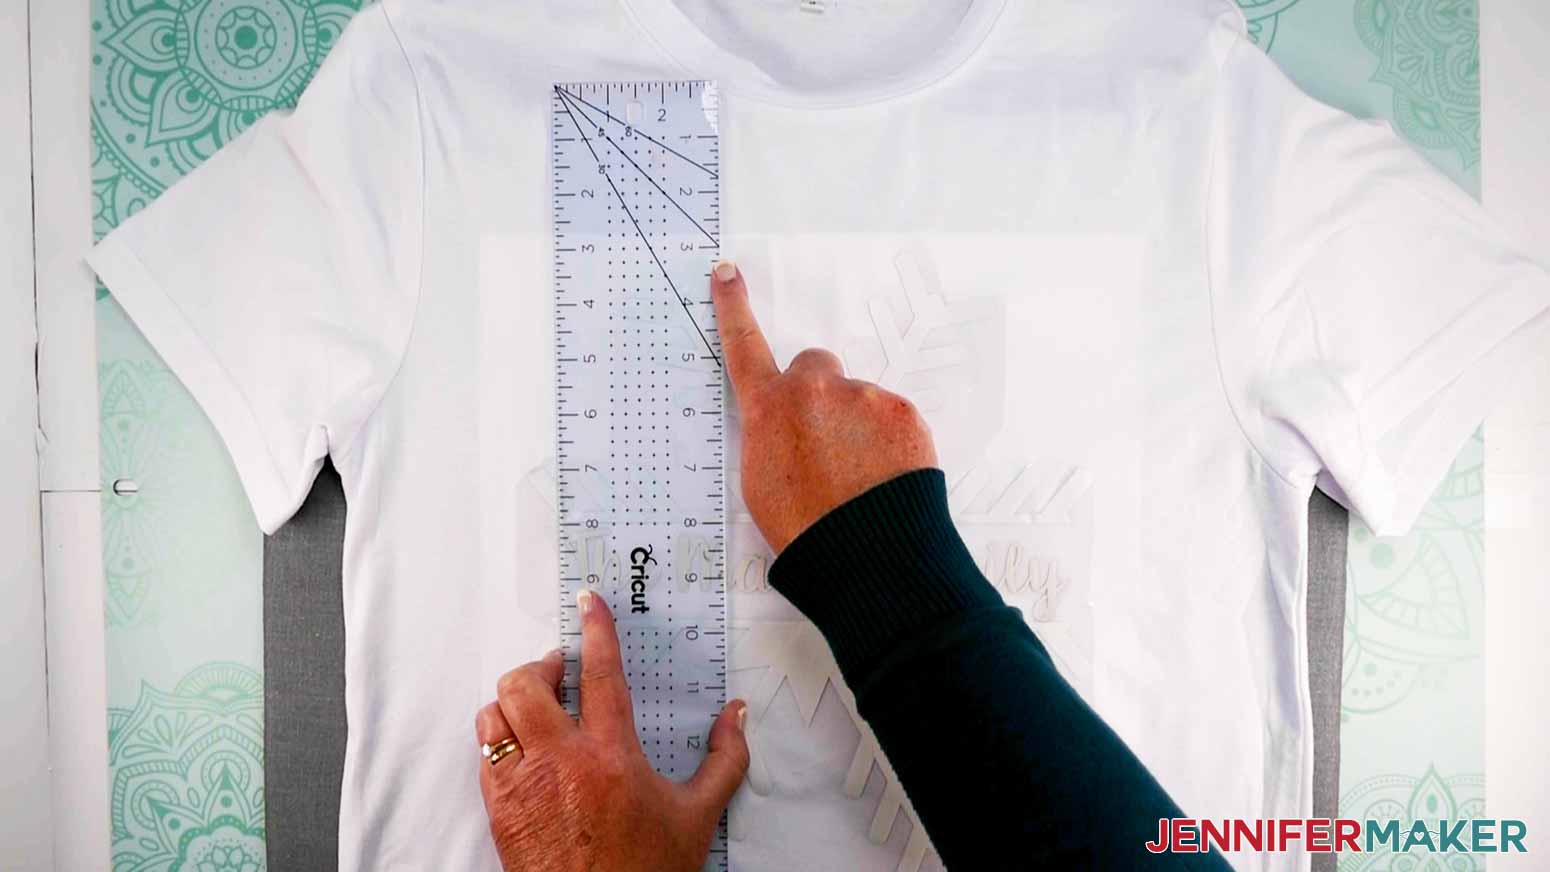
Place the iron-on decal on the shirt with the shiny side facing up so the adhesive layer or Infusible Ink is directly against the shirt. For an adult shirt, I recommend that you position the design about 3 inches below the collar seam on a classic crew neck shirt.
FOR IRON-ON VINYL: If you are using an iron, cover the decal with a piece of parchment paper or a Teflon sheet to protect a polyester shirt (this is not necessary with a cotton shirt). If you have multiple colors/layers. You will press one at a time. Start with the largest piece (like the snowflake or main knockout word) and then add the smaller pieces/colors one at a time.
NOTE: When layering iron-on vinyl, you NEED to cover your design with parchment paper or a Teflon sheet to protect applied layers from sticking to your EasyPress or heat source.
For INFUSIBLE INK: Place a piece of white cardstock inside your shirt to protect from any ink bleeding through. Use a lint roller on your shirt to make sure any dust particles are removed. Once your design is aligned on the front, cover it with a piece of butcher paper (provided in Infusible Ink boxes).
NOTE: If you are using multiple colors and layering your Infusible Ink, you need to press all colors at the same time. For my Snowflake design, I cut the family name on black Infusible Ink. After weeding the black Infusible Ink, I used my Cricut scissors and trim closely around the words. I then aligned the black Infusible Ink in the split part of the snowflake design and placed the two pieces together on my shirt.
For this project using Cricut Smart Iron-On Vinyl, I pressed the decal on for 30 seconds with an EasyPress at 315º.
For this project using Cricut Infusible Ink, I pressed the decal on for 40 seconds with an EasyPress at 385º.
NOTE: These designs look great with Glitter Iron-On Vinyl too! I recommend checking Cricut's Heat Guide to make sure you have the right settings for your vinyl and shirt material.
For IRON-ON VINYL: Flip over your t-shirt and add more heat (15 seconds with an EasyPress).
When the carrier sheet and vinyl feel cool to touch, peel the shiny carrier sheet off. If areas of the design lift up after applying, replace the carrier sheet and repress for 10 seconds.
NOTE: If you are using a different type of iron-on vinyl, be sure to check the directions. Some vinyl needs to completely cool before peeling.
For INFUSIBLE INK: Slowly lift the EasyPress and let your liner cool completely before removing it from your shirt.
Notes
Fonts Used
Bear Family: Timberly and Caferus
Believe Personalization: Cricut Sans and Christmas Jellyshake
Snowflake Personalization: Breethy
Love Knockout Design: Times and I Love Glitter
I absolutely love how these turned out! Wouldn’t these be SO fun around the holidays?! No more needing to spend a ton of money. And, when you know how to do this, you no longer need someone else to create your custom shirts for you!
Whether you’d like to make some matching holiday PJs, or gift your friend’s newborn an adorable onesie, this project has got you covered. And best of all, it’s pretty simple to complete!

Answers to Your Questions About How to Make DIY Custom T-Shirts
Q: Where is your tutorial for this project?
This is a special project we made for our free Maker Academy Weekend 2021 event! A complete and detailed step-by-step video premiered during the event November 4-7, 2021. Get access to the workshop video and printable workbook with a VIP Pass to Maker Academy Weekend 2021, which comes with other perks and bonuses, too!
Q: What kind of T-shirts do I need?
I recommend cotton, or mostly cotton, if you’re using iron-on vinyl. For Infusible Ink, use polyester or mostly polyester T-shirts.
Get the free designs for my custom shirts!
I’m excited to see what you come up with using my designs! Please share a photo of your custom t-shirts in our Facebook group or tag me on social media with #jennifermaker.
Love,

Want to remember this? Save this DIY Custom T-Shirts Tutorial to your favorite Pinterest Board!