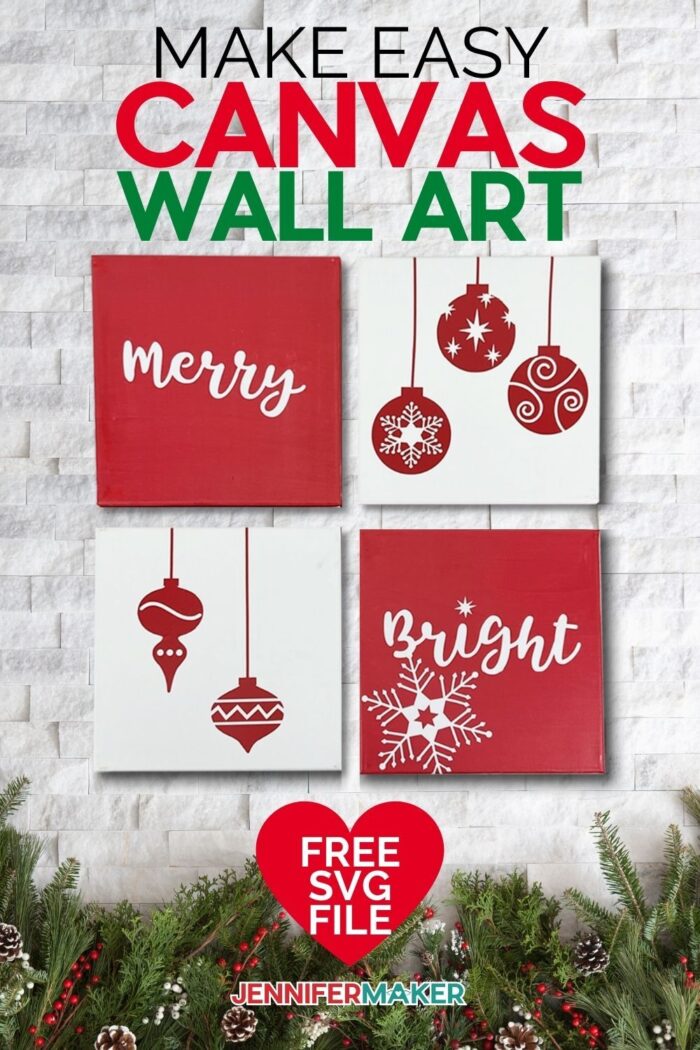
An easy and fun way to create easy DIY canvas wall art using paint, vinyl, and stencils.
Decorating your home can definitely be expensive, but if you are like me, and you like DIY projects, it doesn’t have to be. In this tutorial, I’m going to show you how to make beautiful and easy canvas wall art with your Cricut. I have created three free DIY canvas wall art designs that you can mix and match and even customize to match your style!


I’ve said it before and I’ll say it again: I’m a big fan of projects that don’t break the bank and that you can customize any way you like. This canvas wall art project is so fun to create and all you need to get started is a blank canvas and a few other materials!
The canvas that I used measures 10 inches by 10 inches, but this project can be resized to fit other size canvases and I’ll be showing you just how to do it. I will use mod podge to prep my canvas, but you can also use spray adhesive. They both help the vinyl stick.
I will also be using both Smart and regular permanent vinyl, stencil vinyl and some acrylic paint.
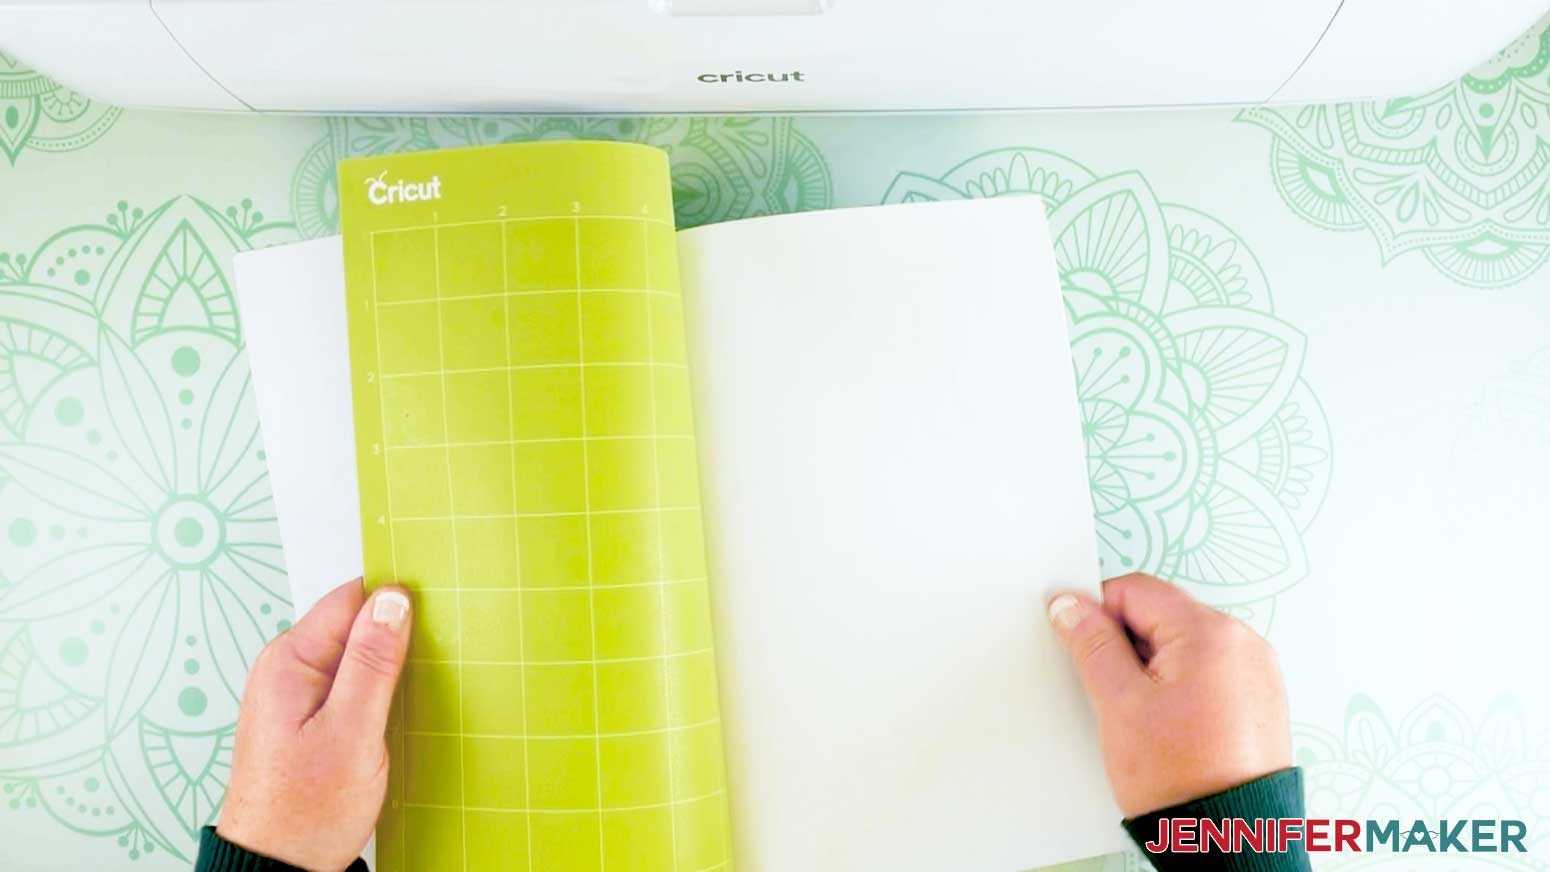
Last, but not least, we will also use the amazing Cricut Cutting machine, a mat, weeding tool and scraper, as well as scissors and either butcher paper or a drop cloth to protect our work surface.
If you’re looking for a great way to add a new look or some modern art to your home, what better way than to use a white canvas with your favorite colors and create your very own wall art! The best part is that not only is this a budget-friendly option, but you will have an art piece that was uniquely created by you!
Once you’re all done with this fun project, you can hang them up in your living room, dining room, or any room really. This is such an easy way to add a modern look or focal point to any blank walls.
You don’t have to be a professional artist or spend a lot of money to create your very own unique wall art. If you have an empty wall you’ve been thinking of sprucing up, this is your perfect chance!
I’ve included some fun ways to hang up your piece of art for the holidays.
Here’s a supply list of what you need to make your canvas wall art! This post contains some affiliate links for your convenience (which means if you make a purchase after clicking a link I will earn a small commission but it won’t cost you a penny more)! Read my full disclosure policy.
Materials to Make DIY Canvas Wall Art
View my Amazon shopping list with the exact items we used to make this project
- Four (4) 10″ x 10″ Stretched Canvases
- Stencil Vinyl (2 rolls)
- Premium Vinyl (Any Color) or Smart Vinyl (I used Red (3ft)and Aqua (3ft)
- Transfer Tape (Standard Grip)
- Acrylic Paint Set
- Mod Podge (Matte)
- (Optional) Spray Adhesive, Paper towel
- (Optional) Fonts (I used Tingler Script)
- Design #339 – My free SVG/PDF/DXF design files are available in my free resource library(get the password by filling out the form at the bottom of this page)


How to Make Your Own DIY Canvas Wall Art

Easy Wall Art
An easy and fun way to create Easy DIY Wall Art using paint, vinyl and stencils.
Materials
- Here is a shopping list of the actual items I used to create this project! This list contains affiliate links. As an Amazon Associate I earn from qualifying purchases.
- 10" x 10" Arteza Stretched Canvas
- Cricut Stencil Vinyl (2 rolls)
- Cricut Smart Vinyl - Red (3ft)
- Cricut Smart Vinyl - Aqua (3ft)
- Cricut Premium Vinyl (Any Color)
- Cricut Transfer Tape (Regular)
- Acrylic Paint Set
- Mod Podge (Matte)
- Spray Adhesive (optional)
- Paper towel (optional)
- Tingler Script by FontBundles.net
Tools
- A method to cut your vinyl, I used the amazing Cricut Maker 3 but you could also use any Cricut Maker, or Explore.
- Cricut Green StandardGrip Machine Mat 12" x 12"
- Bristle Paint Brushes
- Foam Paint Brushes (optional)
- Sponges (3)
- Cricut Weeding Tool
- Cricut XL Scraper
- Scissors
- Cricut TrueControl Knife Tool (optional)
- Cricut Roll Holder (optional)
- Butcher Paper for paint spills
- Drop Cloth for paint spills
Instructions
Decorating your home can definitely be expensive, but if you are like me, and you like DIY projects, it doesn't have to be. In this tutorial, I'm going to show you how to make beautiful and easy wall art with your Cricut.
Here are three free designs I have created that you can mix and match and even customize so everything matches your style.
The techniques I used for these are: stencil with paint on canvas, vinyl on canvas, and a mix of both techniques. I will go over all three in this tutorial.
Here is a list of techniques used in each project:
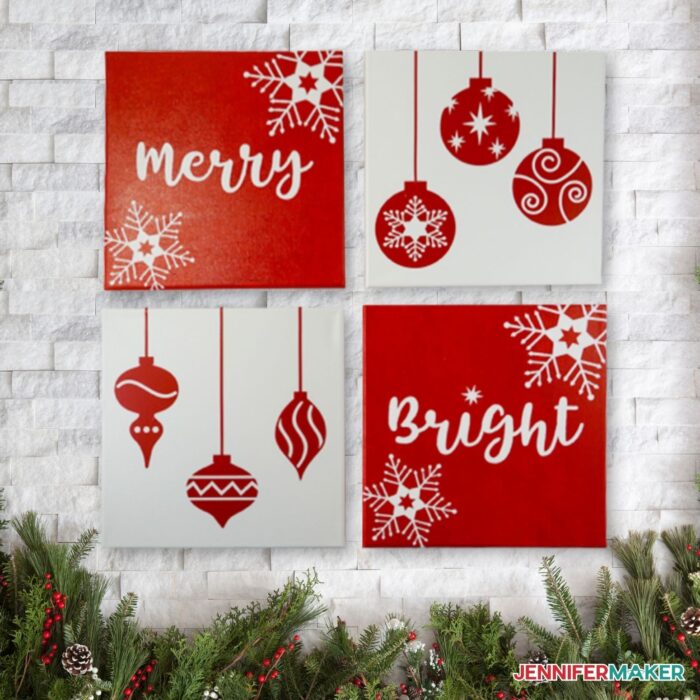
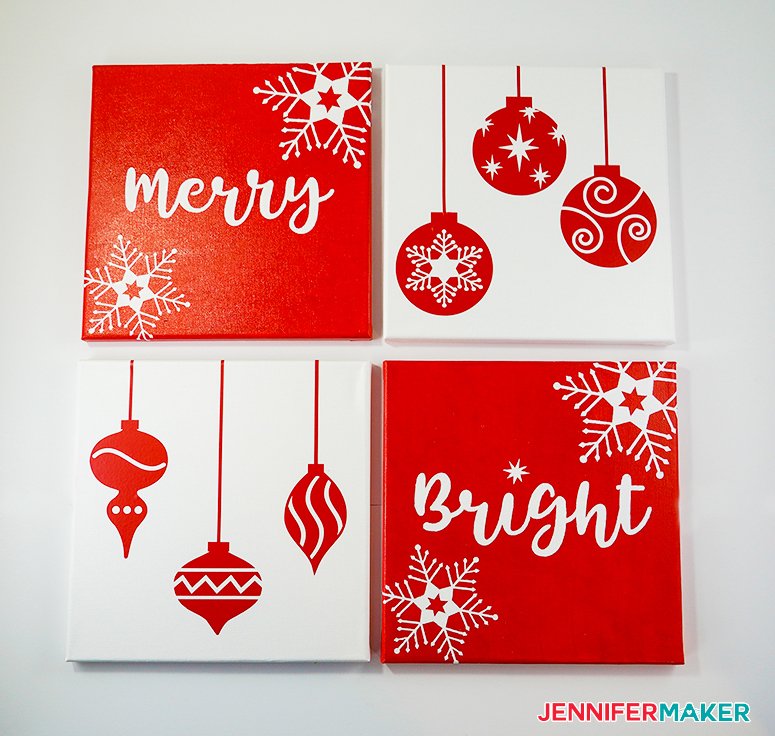
Merry/Bright Design: I used a combination of Stencil Vinyl and Smart Vinyl for this one. The words "Merry/Bright” and the snowflakes are done with a Stencil Vinyl and the ornaments are cut out of Smart Vinyl in Red.
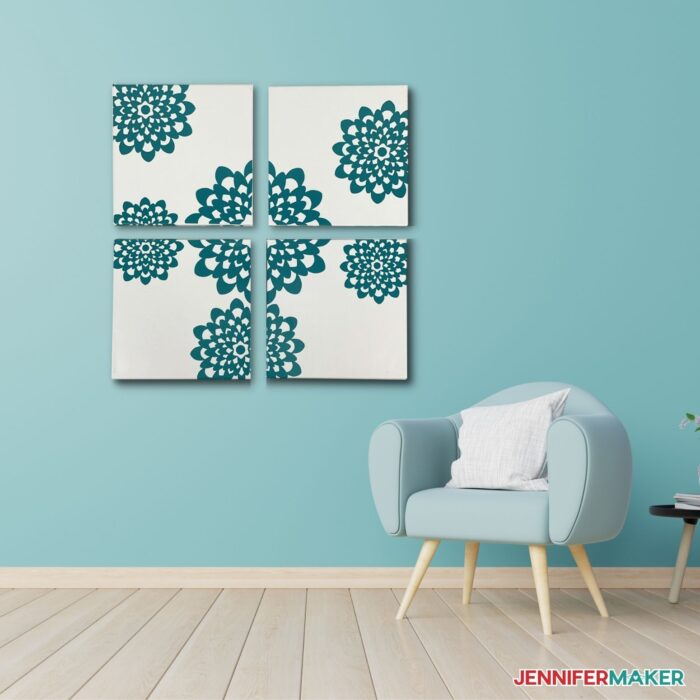
Blue Flower Design: The whole project is made from vinyl and I used Smart Vinyl in Aqua for this design.
Ombre Flower Design: I used stencils made from Permanent Vinyl for this whole project. I will show you how to use paint to create an Ombre effect.
This is what my Easy Wall Art SVG files look like in Cricut Design Space.
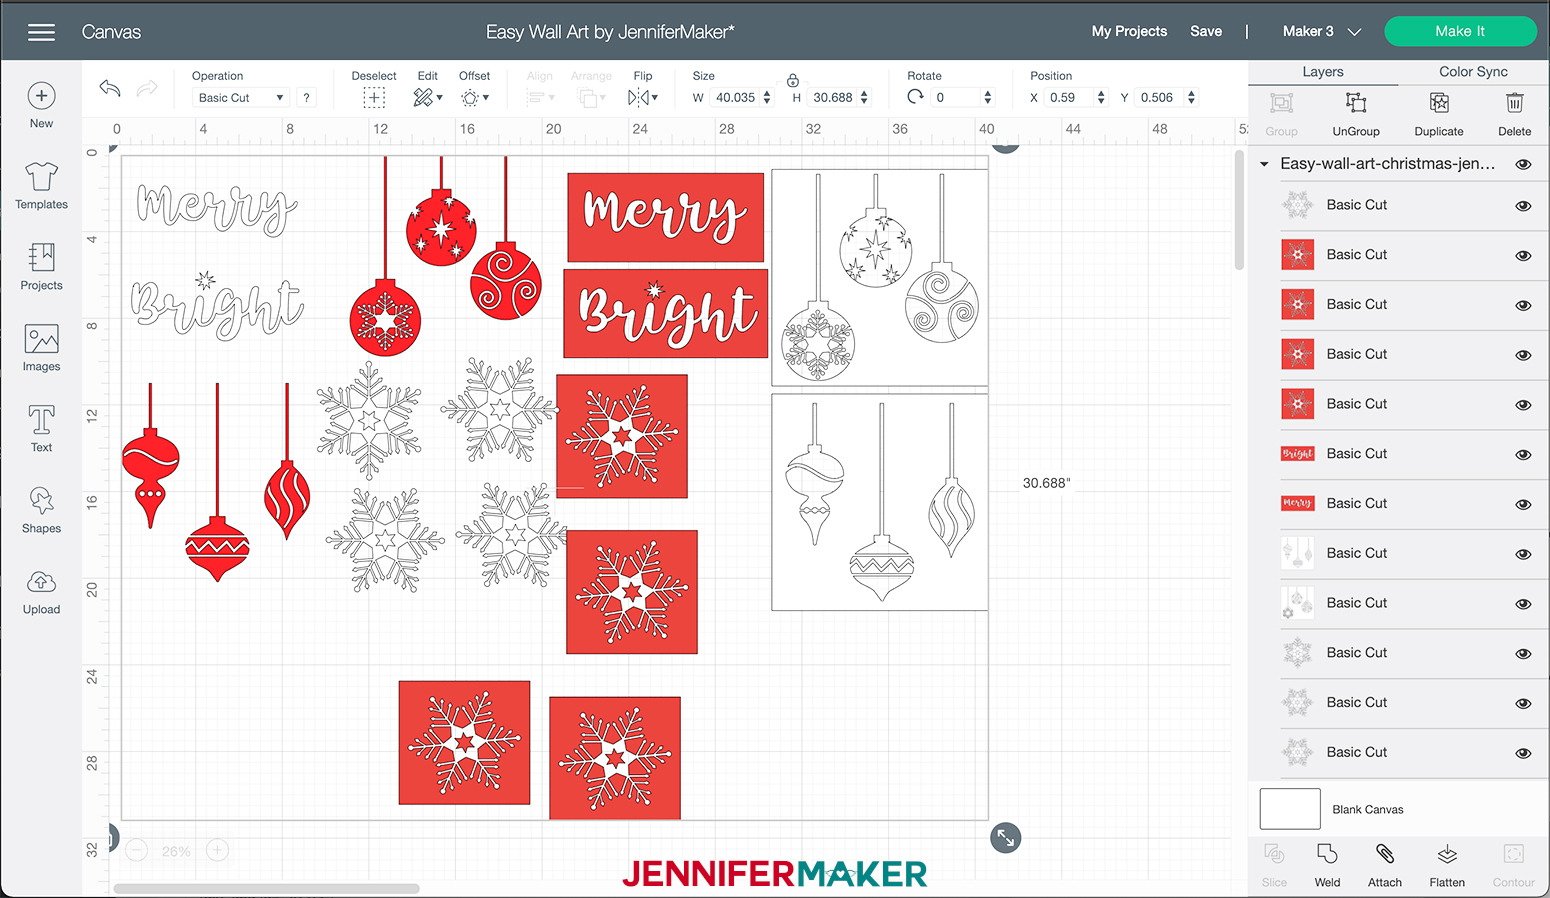

NOTE: There are two versions of each design. The one on the left is for the vinyl design, the one on the right is for the stencil design. Choose the technique you would like to make, ungroup the designs and delete the rest.
"MERRY/BRIGHT" DESIGN
STEP 1: PREPARE YOUR CANVASES
First, download my Canvas Wall Art designs from my library – look for Design #339.
We will start with the "Merry/Bright" Design.
First, we are going to prep the canvases.
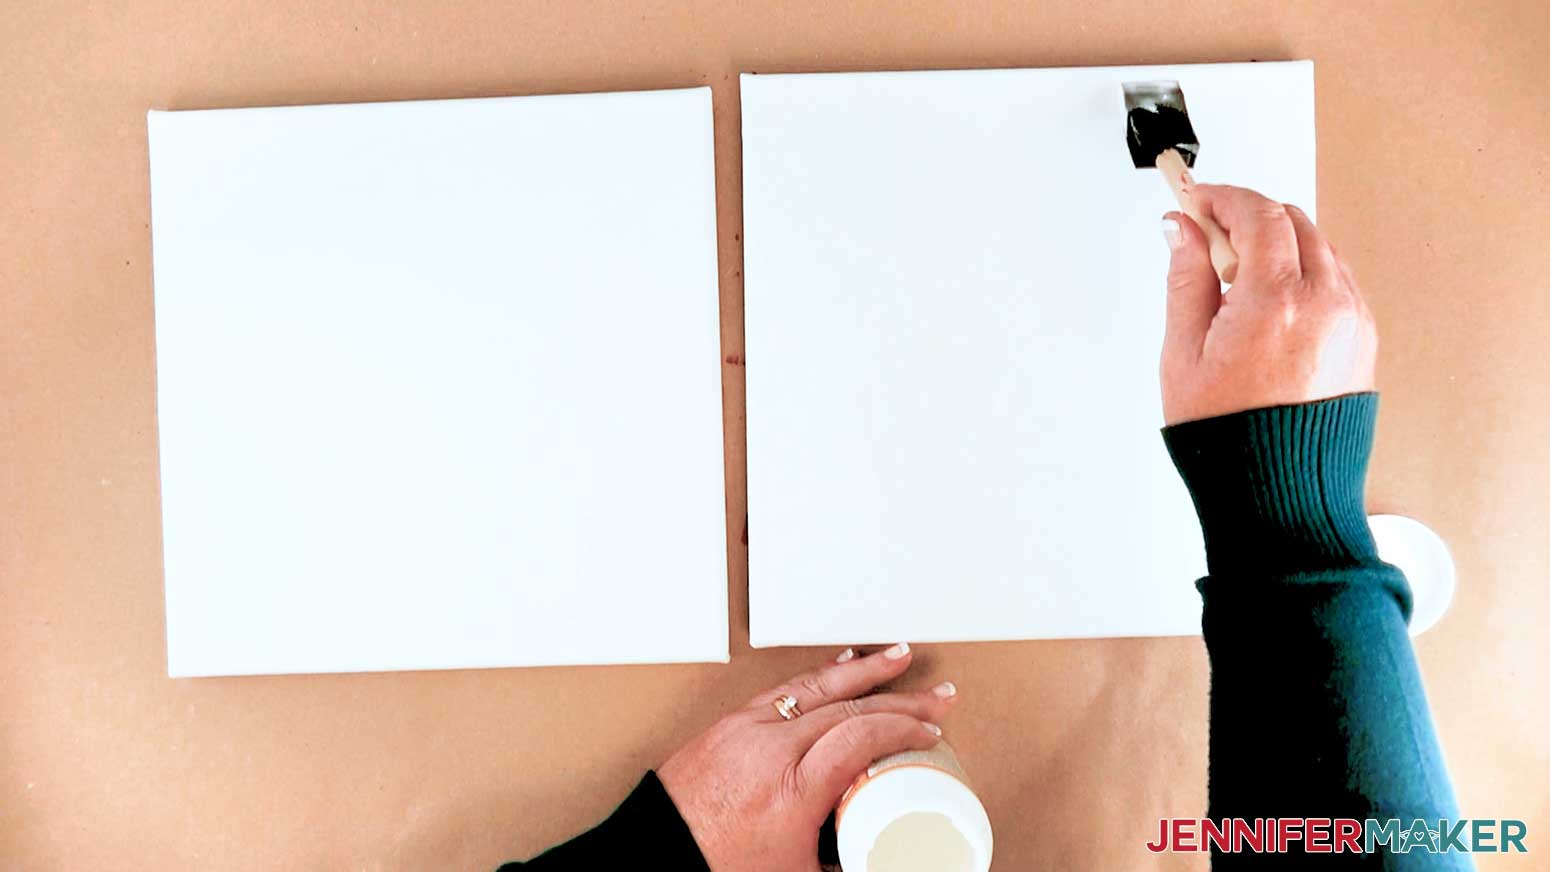
Lay down Butcher Paper or a Drop Cloth to protect your work area from any paint spills.
Take two canvases and using your foam brush and paint them red. Set them aside to dry for at least 1 hour.

You’ll also want to seal the other two white canvases with paint, Mod Podge, or spray adhesive before you attach your vinyl. This will make it much easier to transfer your vinyl to your canvas and will help it adhere. Just be sure to let your sealed canvases dry before you apply your vinyl.
STEP 2: GET MY FREE EASY WALL ART DESIGN FILE
Now it's time to download my free Easy Wall Art Files, design #339, from my free resource library.
TIP: If you are not sure how to upload an SVG cut file to Cricut Design Space, watch this helpful video training series I made. If you are on an iPad or iPhone, here is how to download and upload SVG files to the Cricut Design Space app.
Once uploaded to Cricut Design Space, zoom out to see the whole design.
My designs are sized for 10" square canvases. If you are using a different size, make sure to adjust the size of the design in Cricut Design Space.
For example: If using 12" x 12" canvases click "Select All" at the top of your screen then adjust the size larger by 2 inches. Either with the resize handle on the lower right corner of the design or by adding to the measurements at the top of your screen.
For an 8" x 8" canvas, click "Select All" at the top of your screen then adjust the size smaller by 2 inches. Either with the resize handle on the lower right corner of the design or by adding to the measurements at the top of your screen.
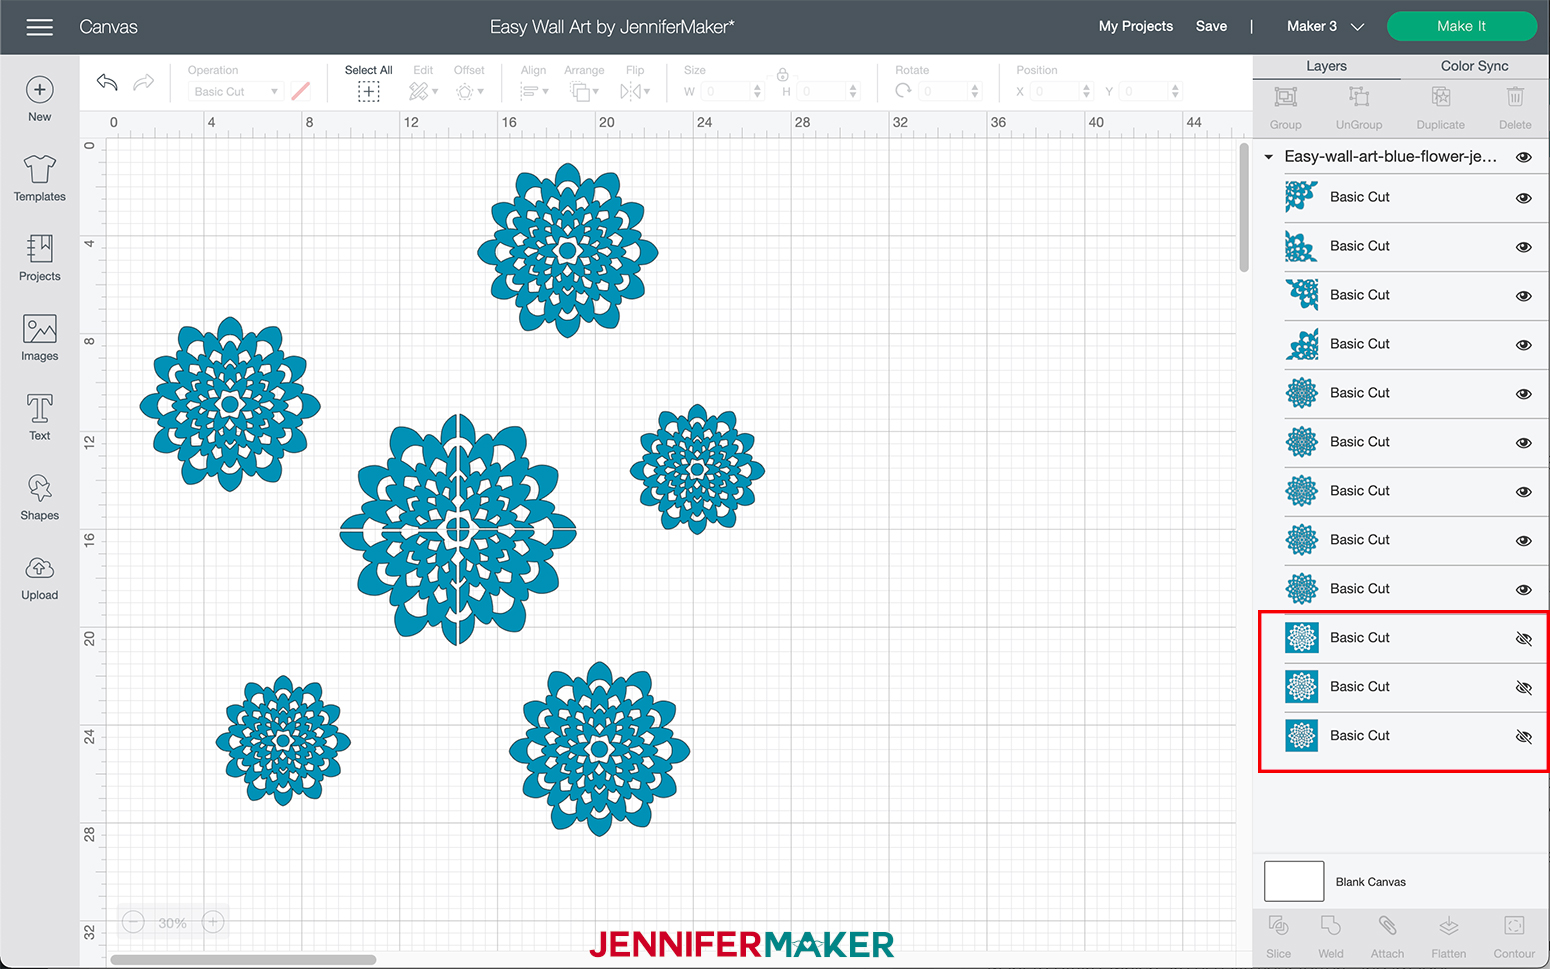
Ungroup the design.
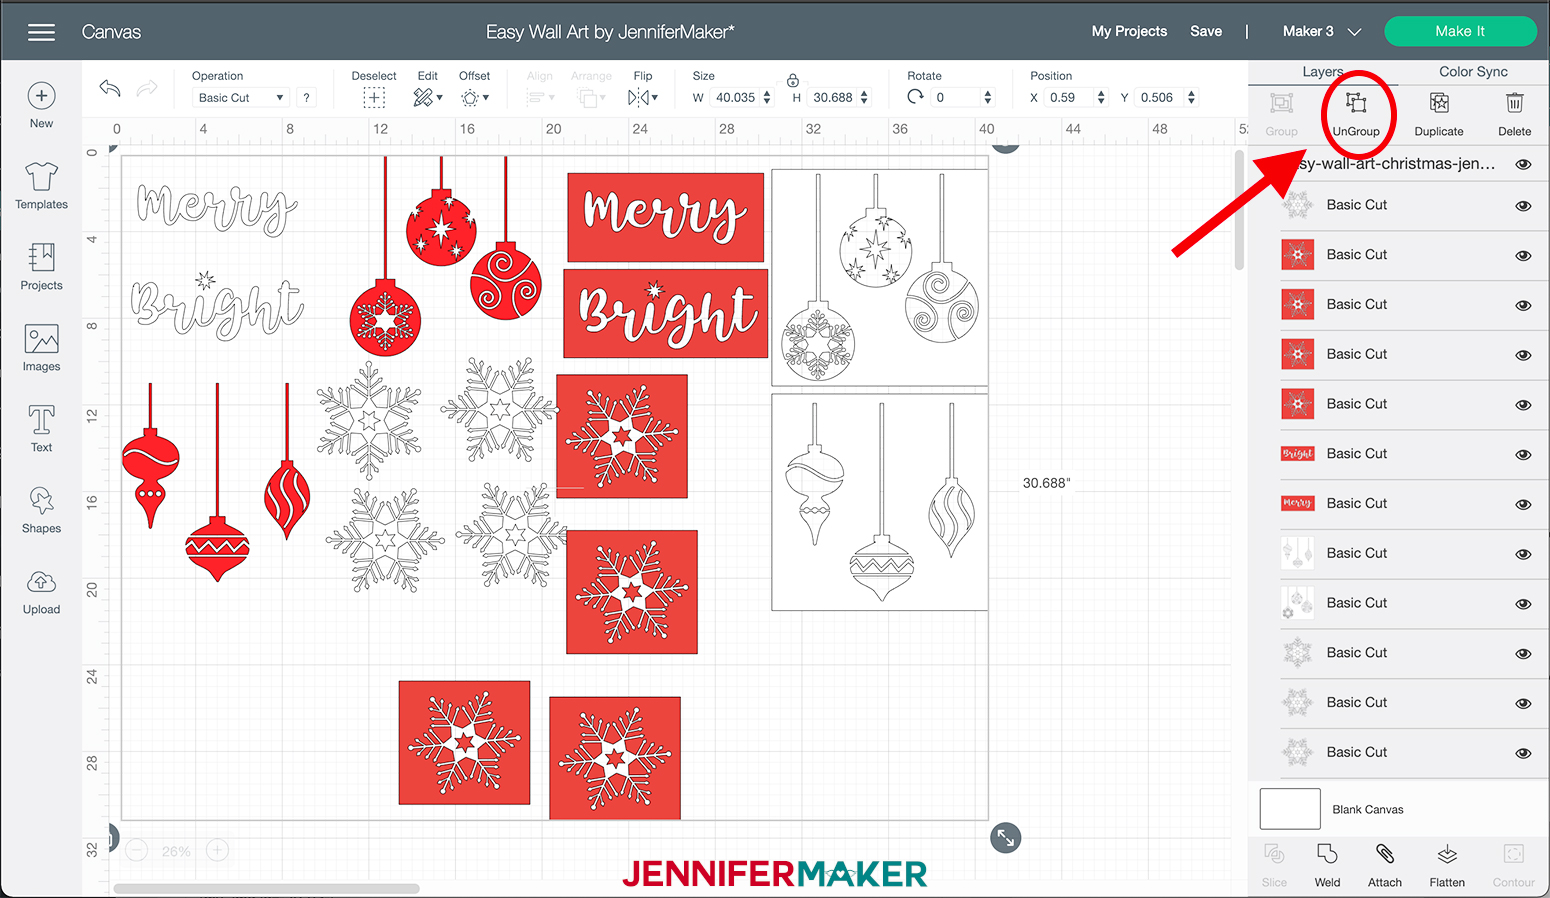
Next, hide the white layers by locating the layer in the layers panel and clicking the eye icon on the right side. We are hiding these layers so I can show you both techniques. We will use red vinyl ornaments and paint the stencils with white paint to create our design.
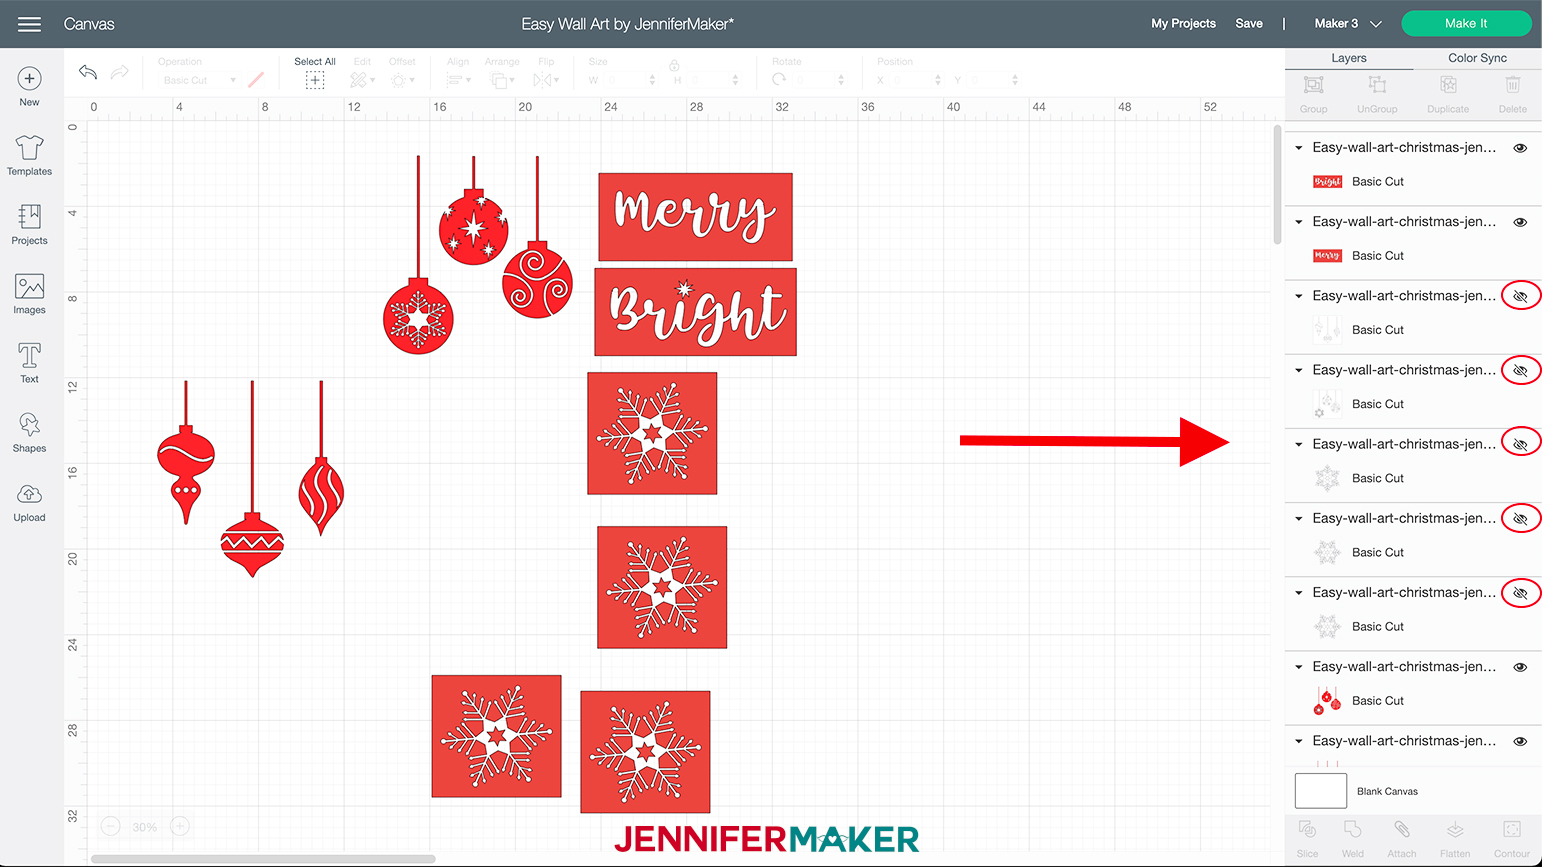
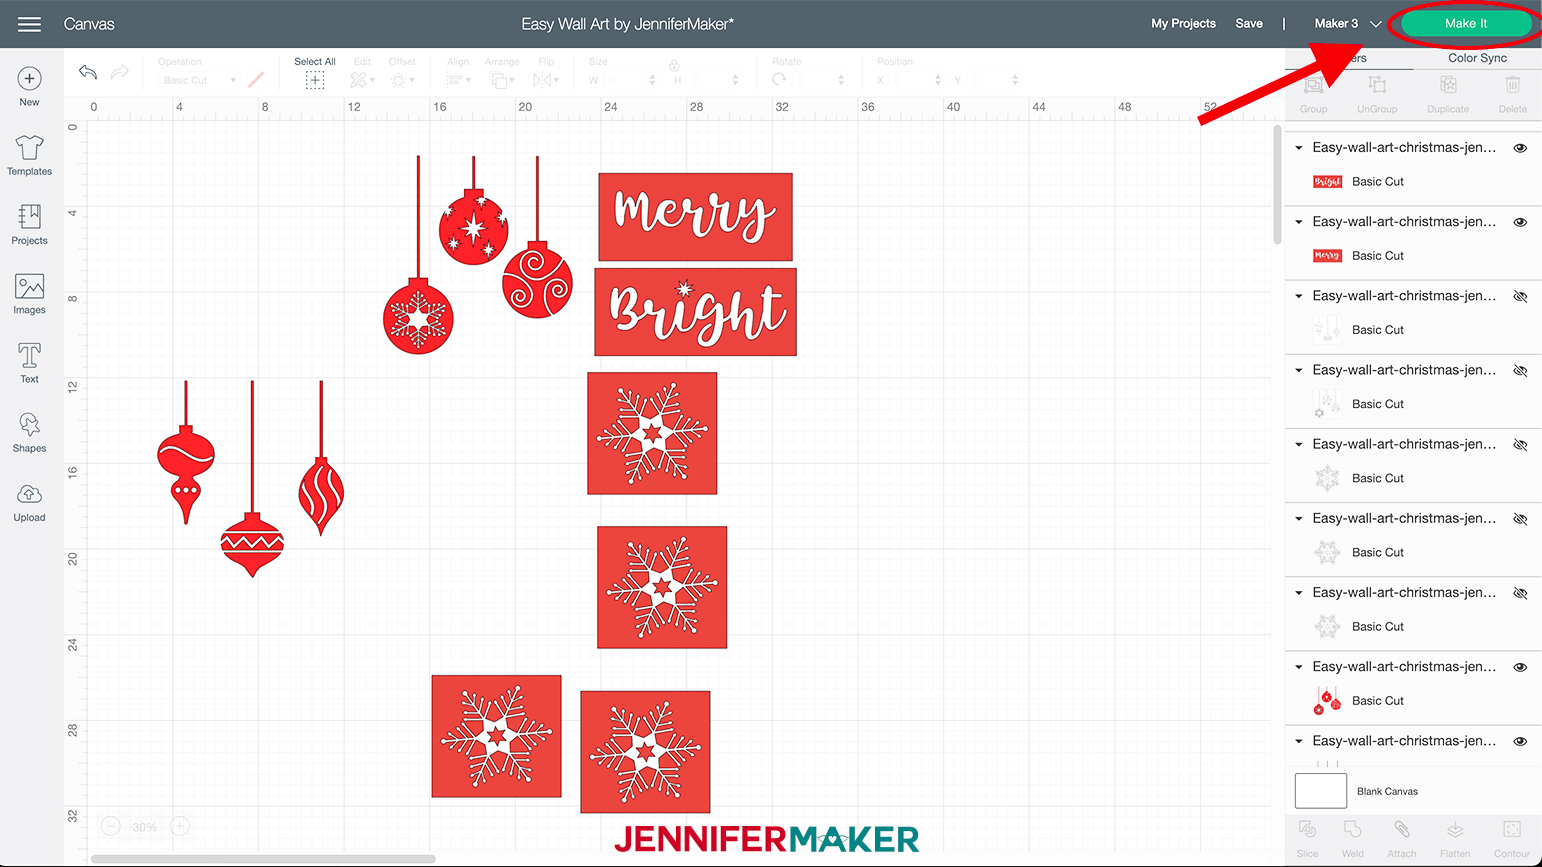
Then click "Make It" in the top left corner.
On the next screen select “Multiple Ways”, we are using both Stencil Vinyl ("On Mat") and Smart Vinyl ("Without Mat"). Then click "Done."
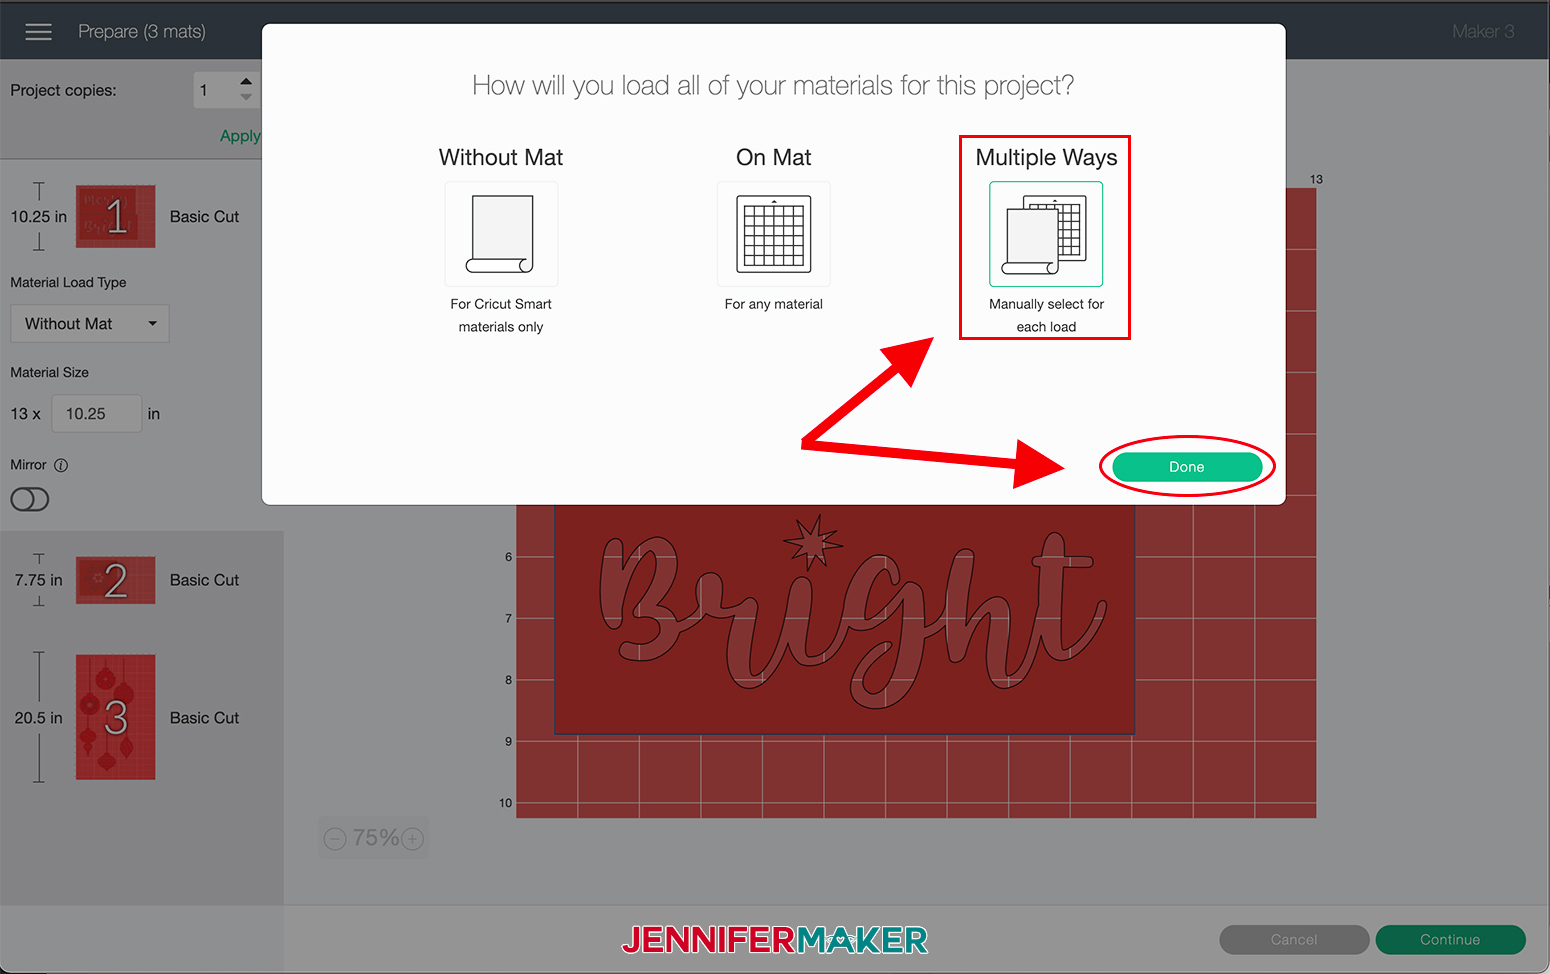
By default, it is set to cut "Without Mat". If you are making this on a Maker 3 like me or an Explore 3, change to "On Mat" for the Merry and Bright and snowflake stencils.
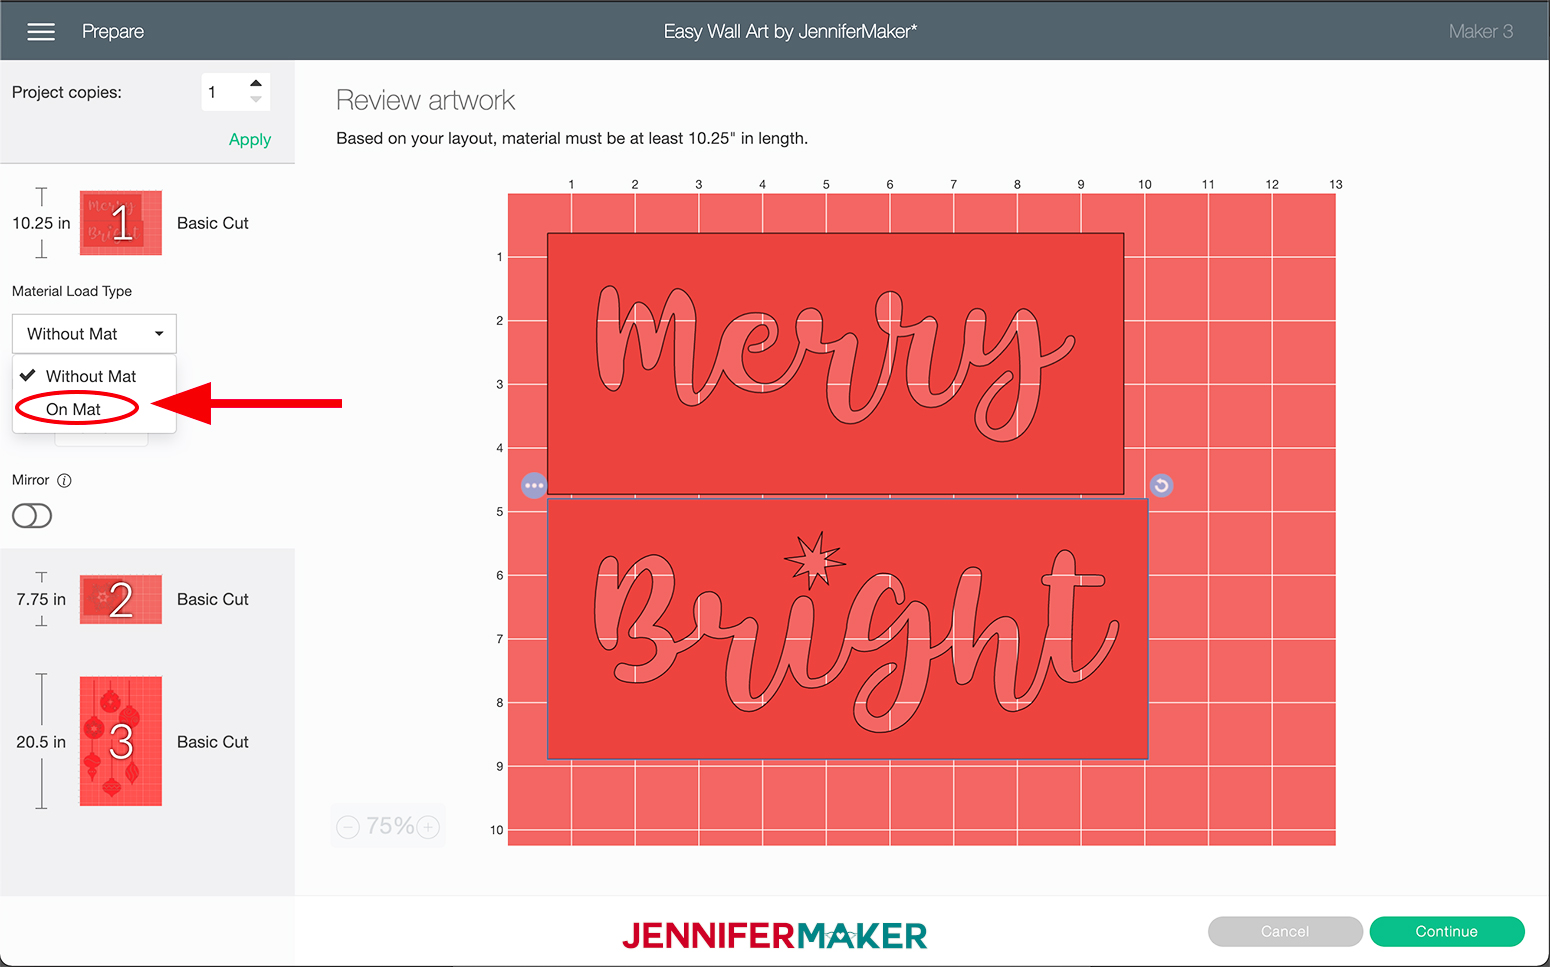
For the Ornament pieces leave it on "Without Mat".
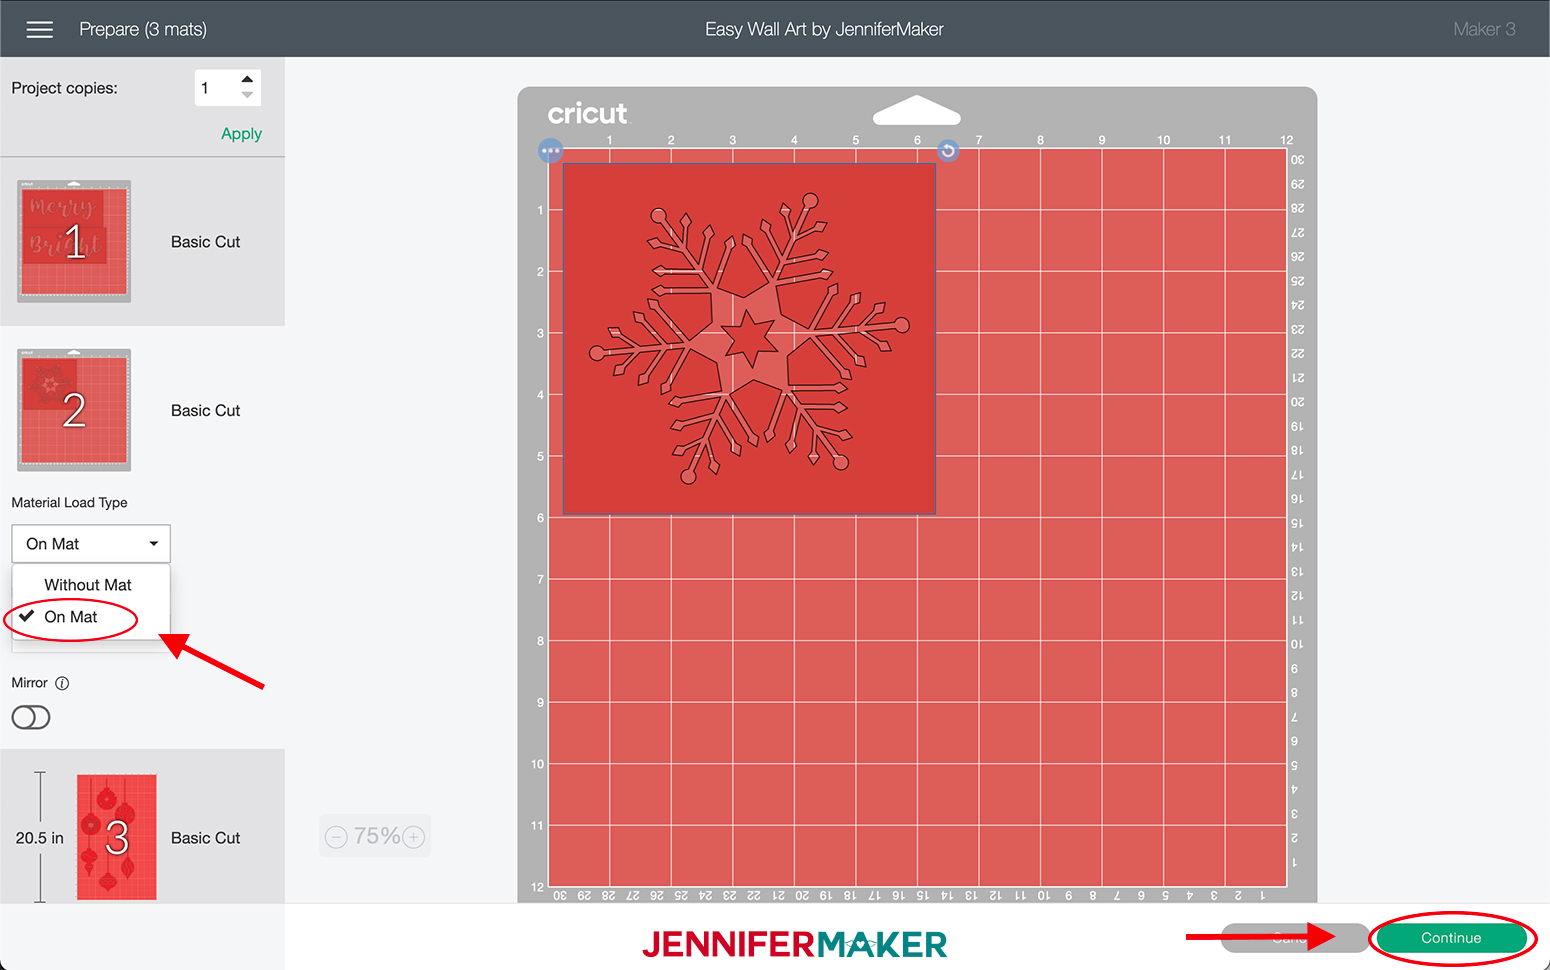
Click “Continue” on the lower right corner of your screen.
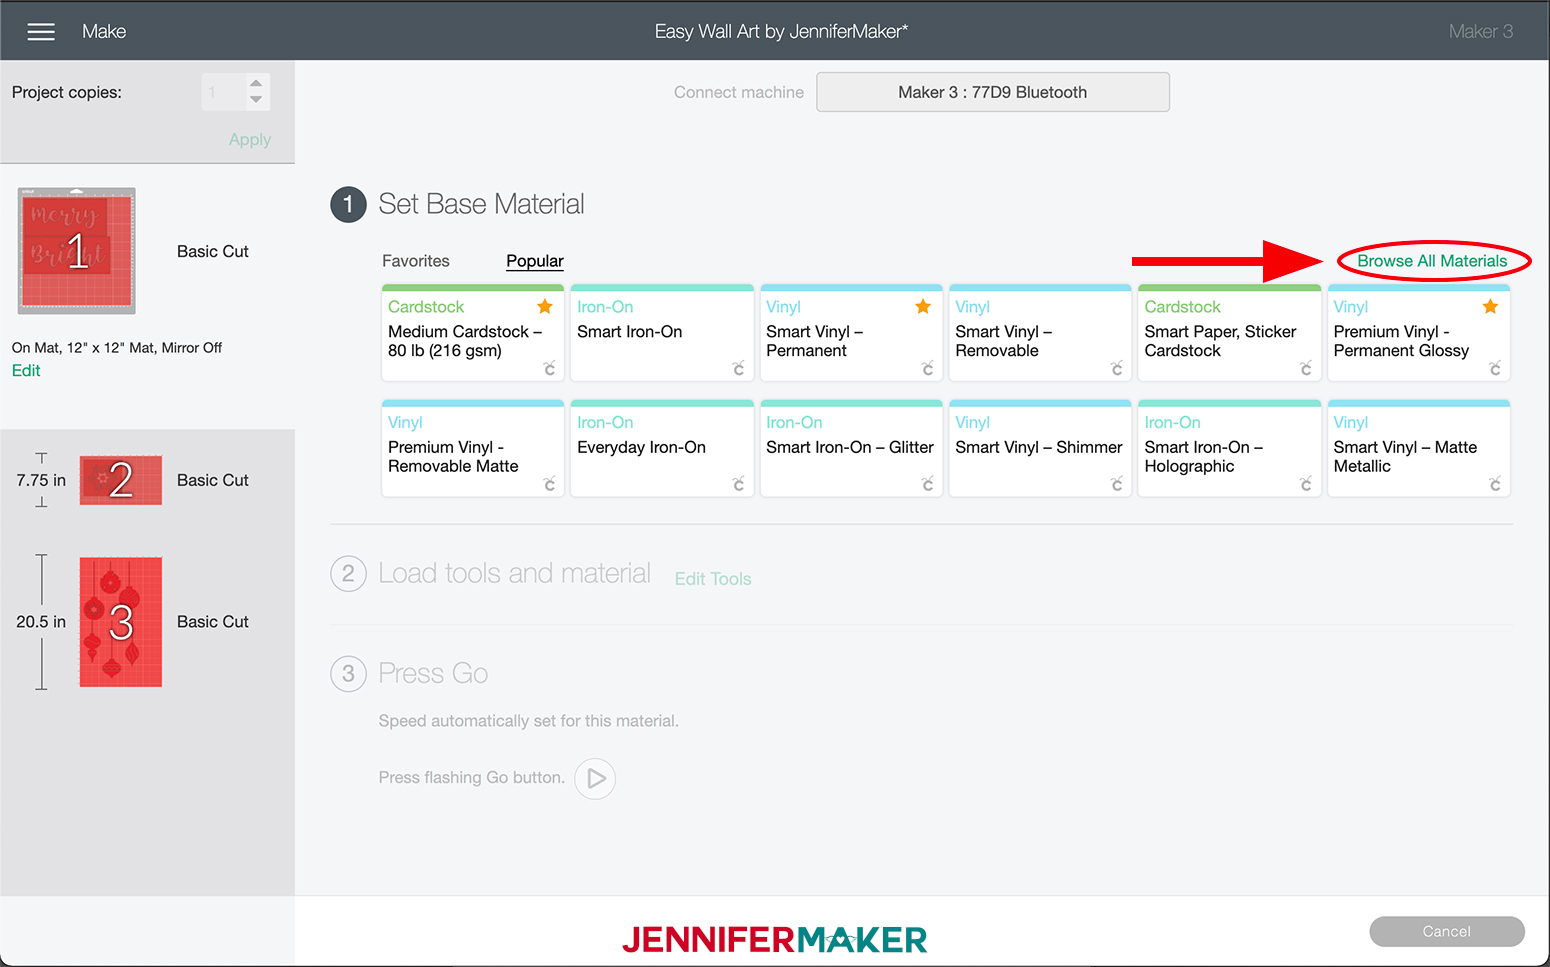
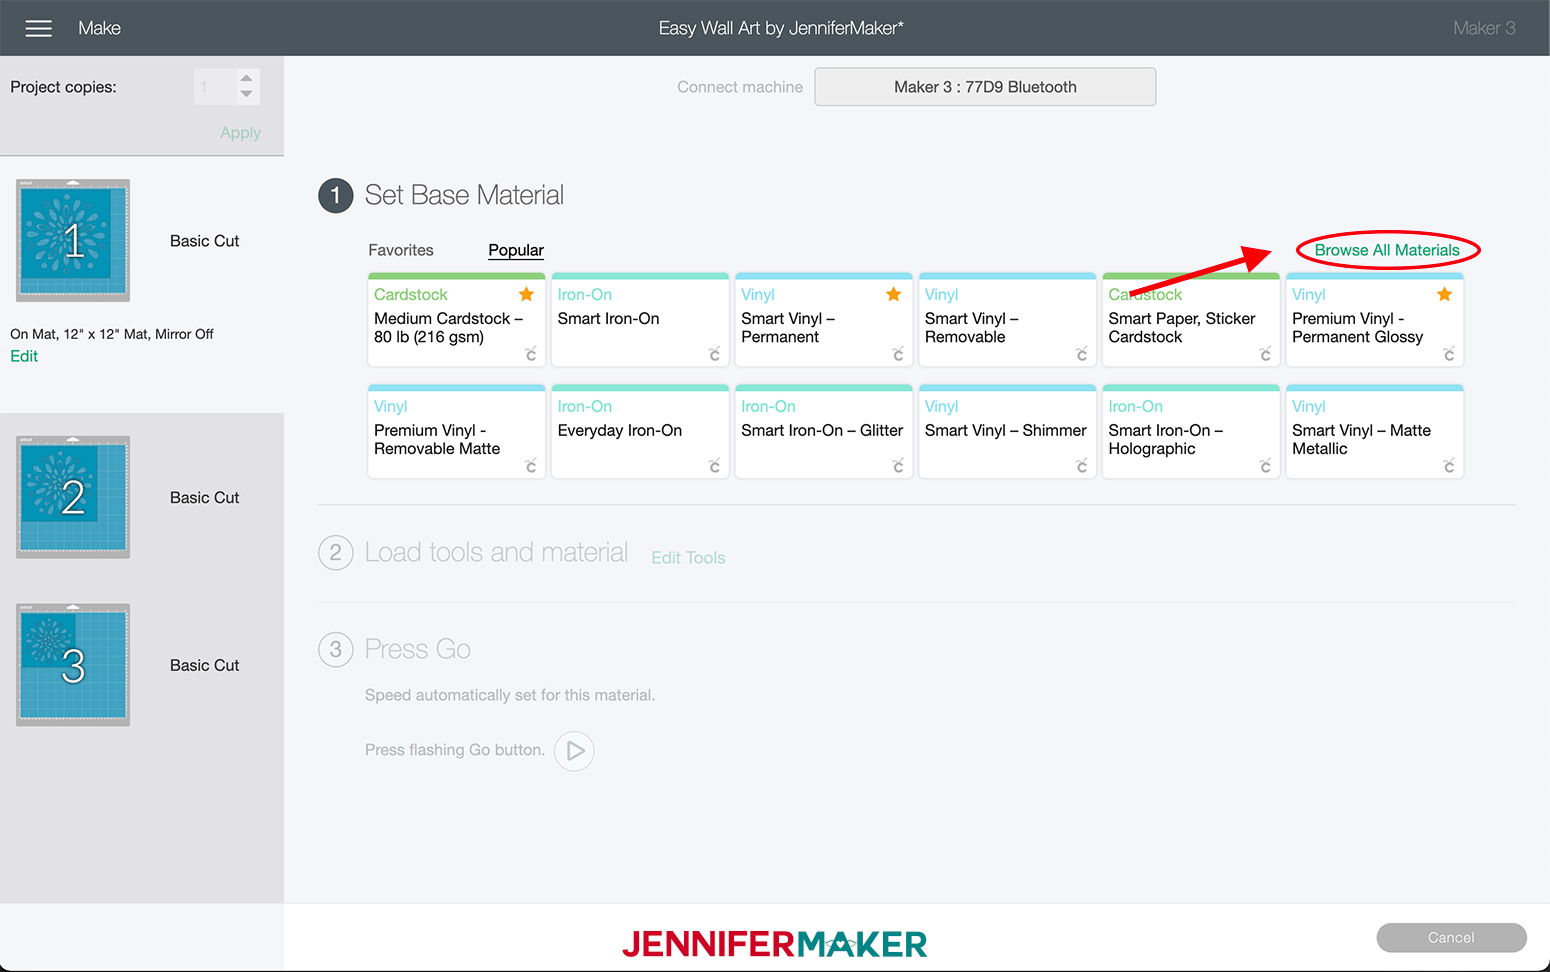
Now we are going to select our materials. For the stencils, click the "Browse All Materials" button on the right side of the screen.
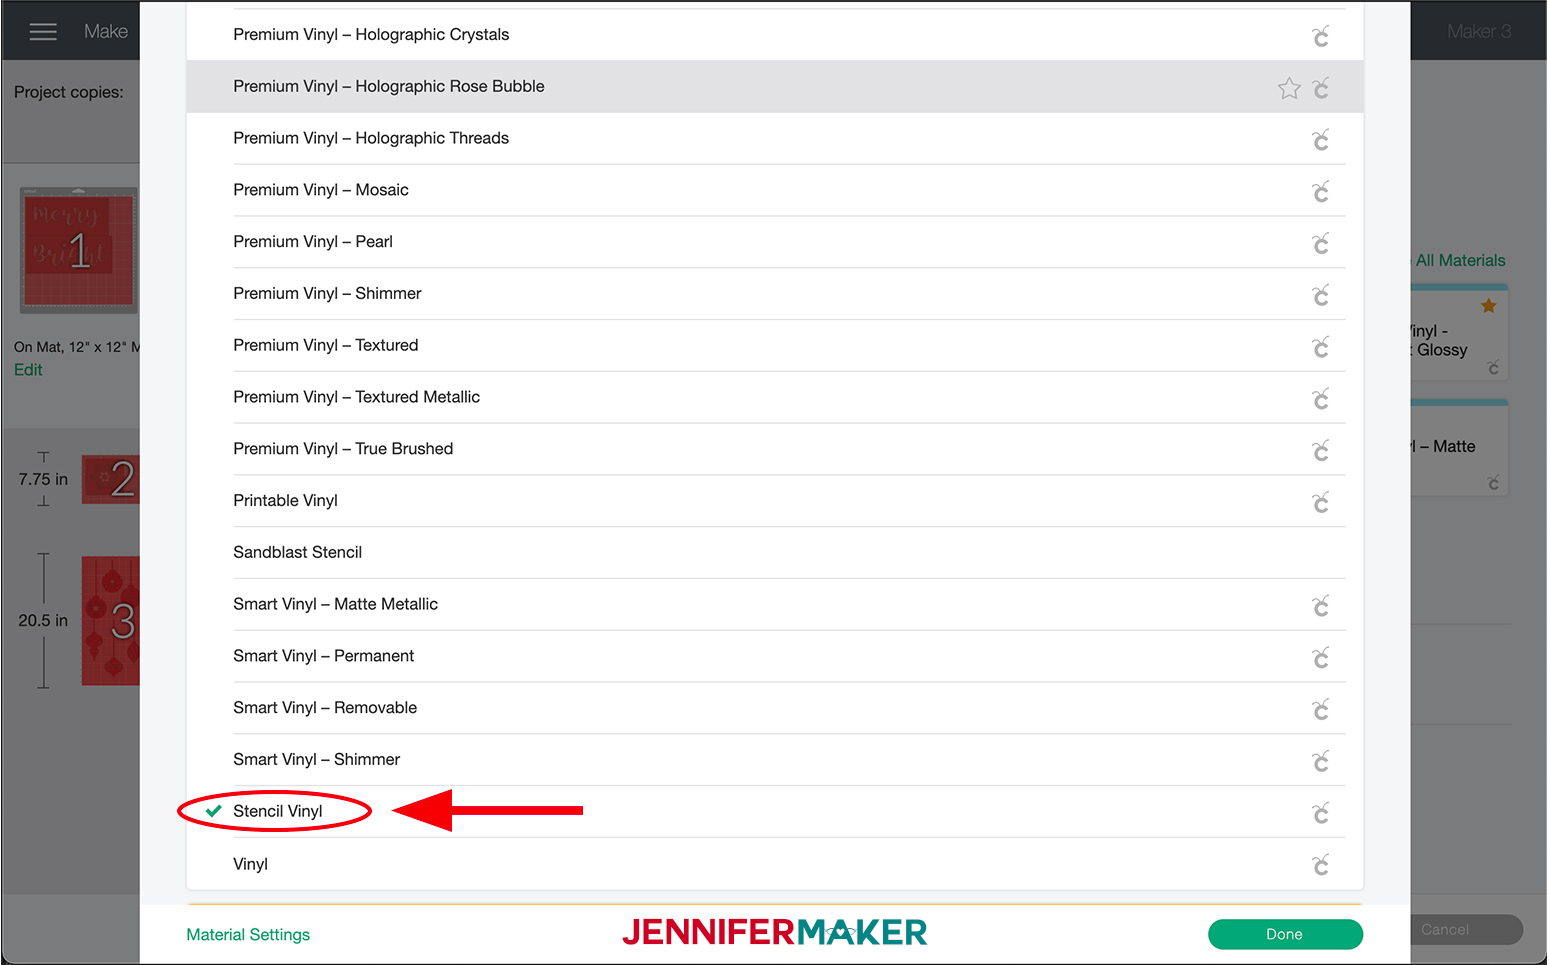
Then select "Stencil Vinyl" from the menu under the vinyl section. Then click "Done."
Load the mat into your machine with your Stencil Vinyl and tap the blinking "Arrow/Go" button to begin the cut.
Next, unload your mat.
To remove the vinyl from the mat, flip the mat over and peel the mat away from the vinyl. This prevents the material from curling.
Repeat this for the snowflake stencil as well. You may also use Cricut Premium Vinyl as they both work great for creating stencils I will show both ways in this tutorial. If you are using Cricut Premium Vinyl click "Premium Vinyl - Permanent Glossy" for the material setting.
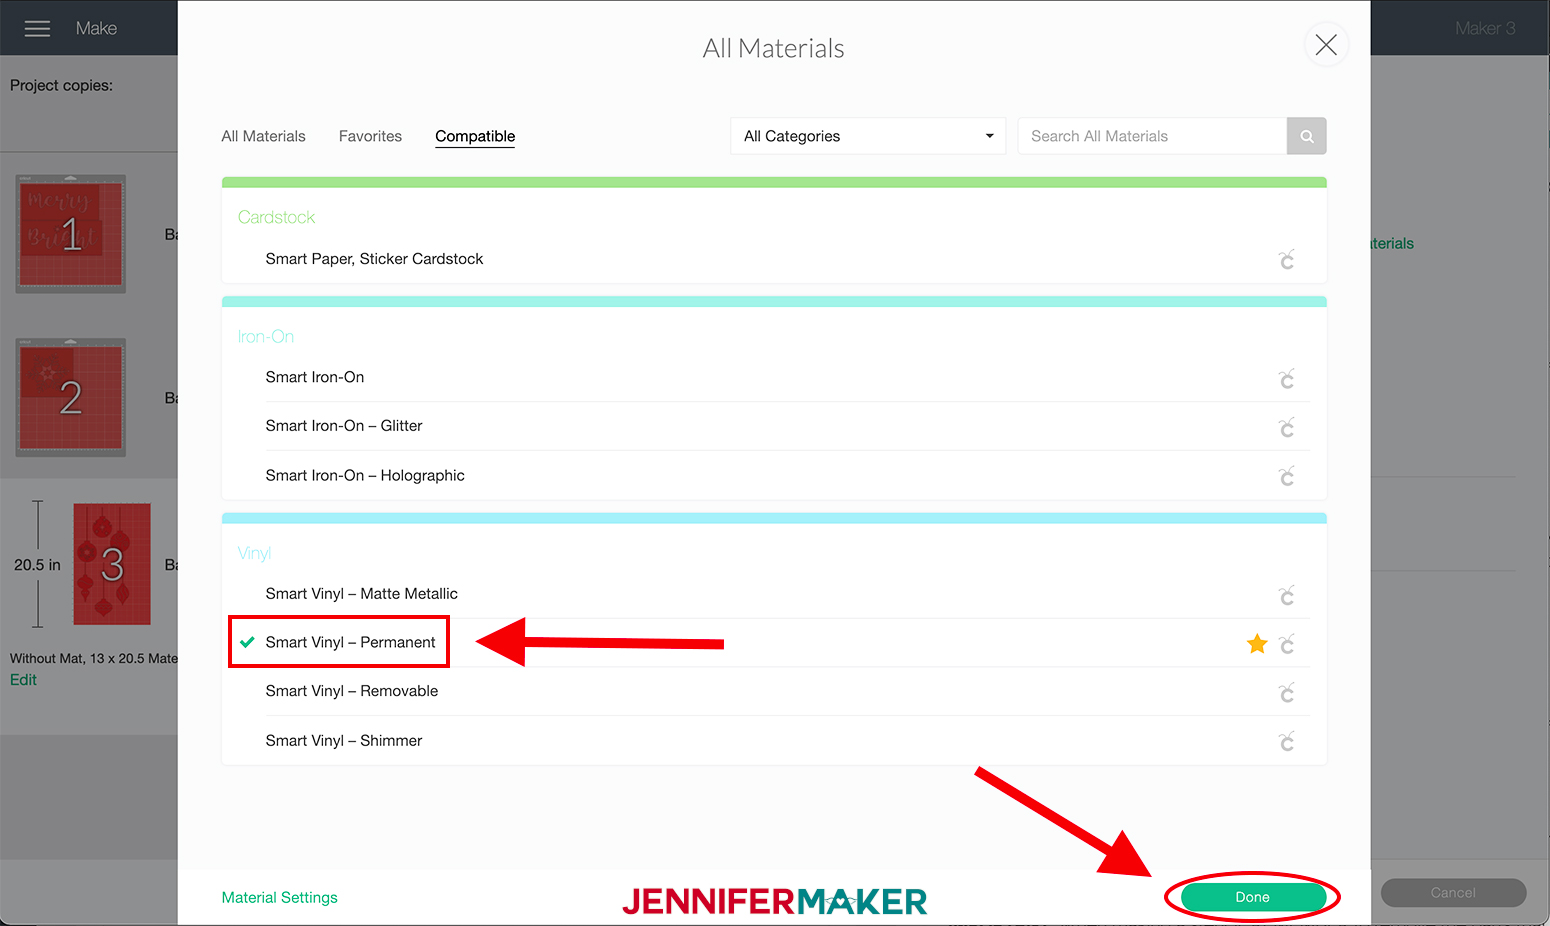
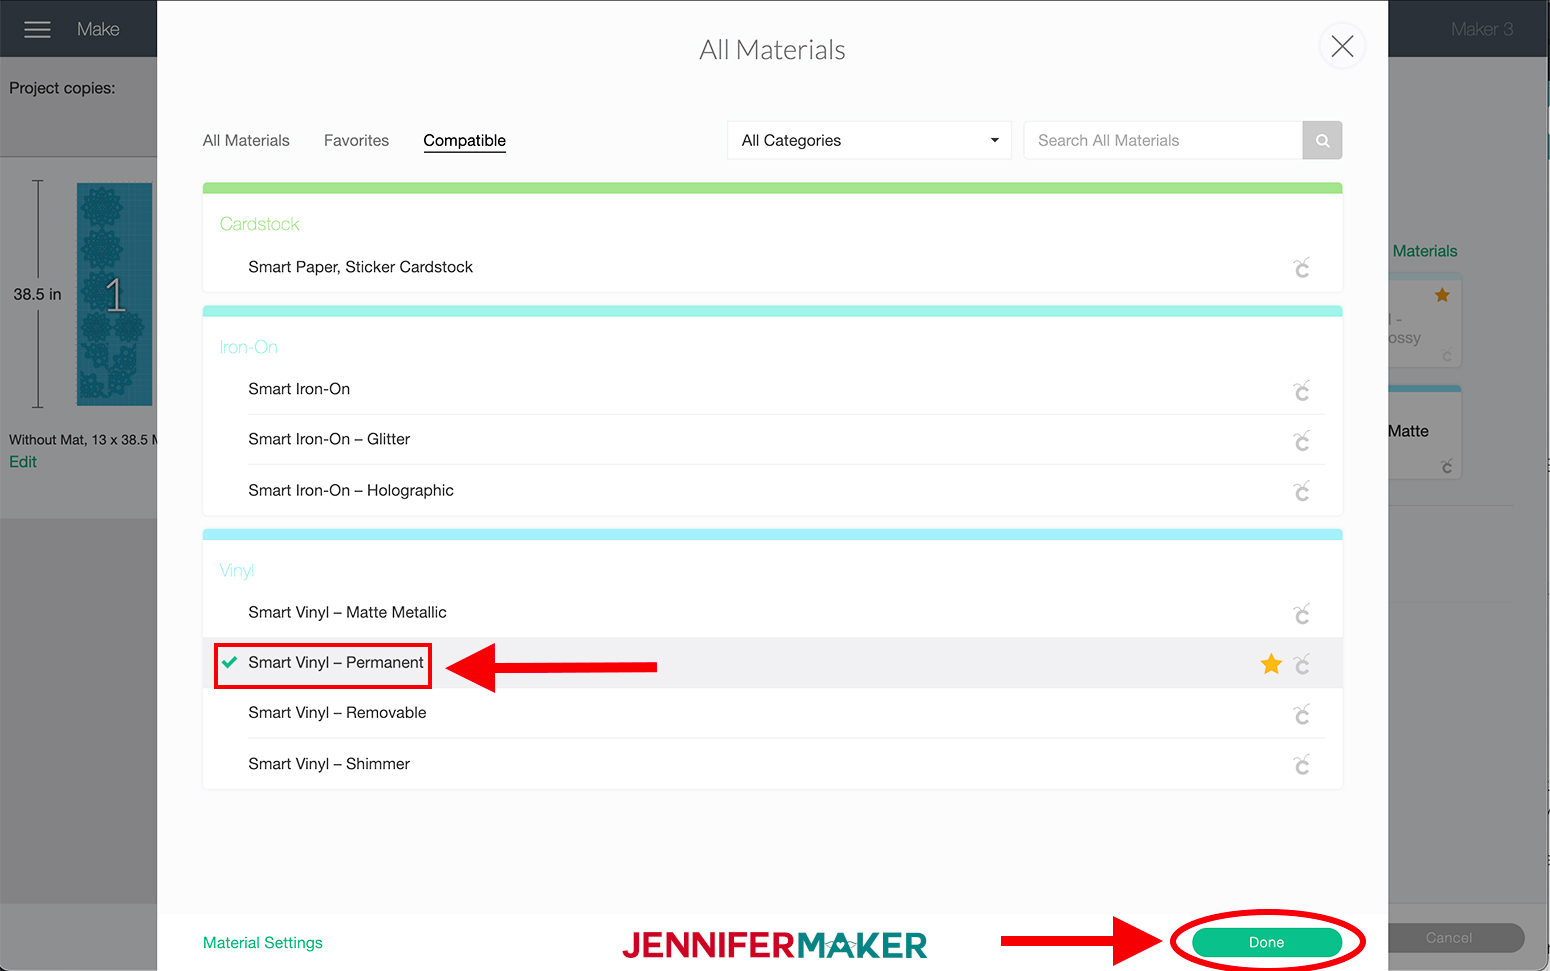
Next, we are going to select the material for the ornaments. Remember, as noted above you will choose "Without Mat" for this cut since you are using Smart Vinyl. For the "Smart Vinyl" click the "Browse All Materials" button on the right side of the screen. Select "Smart Vinyl-Permanent" from the menu under "Vinyl" and click "Done."
Feed your Smart Vinyl into your Cricut Maker 3 or Explore 3. You can either use the Cricut Roll Holder which is optional or just cut the amount of Smart Vinyl indicated on your screen.
Press the “Load/Unload” Button. Your machine will pull the vinyl all the way through to confirm there is enough material before starting the cut. Once your machine is ready, press the flashing "Arrow/Go" button. Now sit back and watch your Cricut whiz through and cut the design quickly and effortlessly!
When your design is done cutting, use the Cutter on the Roll Holder to trim off the Smart Vinyl. If you didn't use a roll holder you can, of course, skip this step.
STEP 3: WEED AND TRANSFER YOUR DESIGN
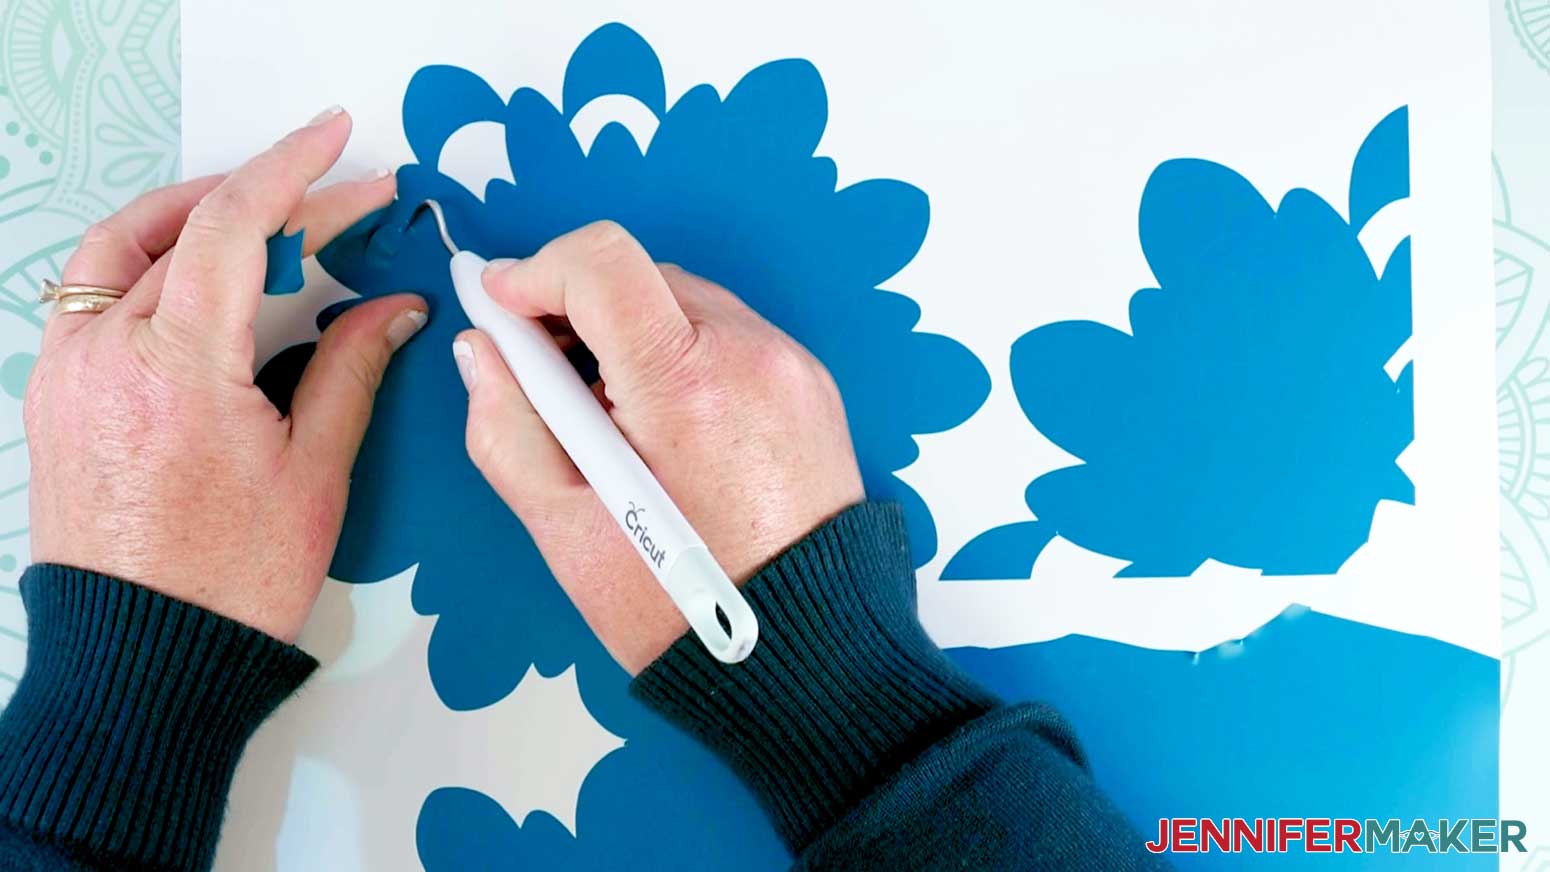
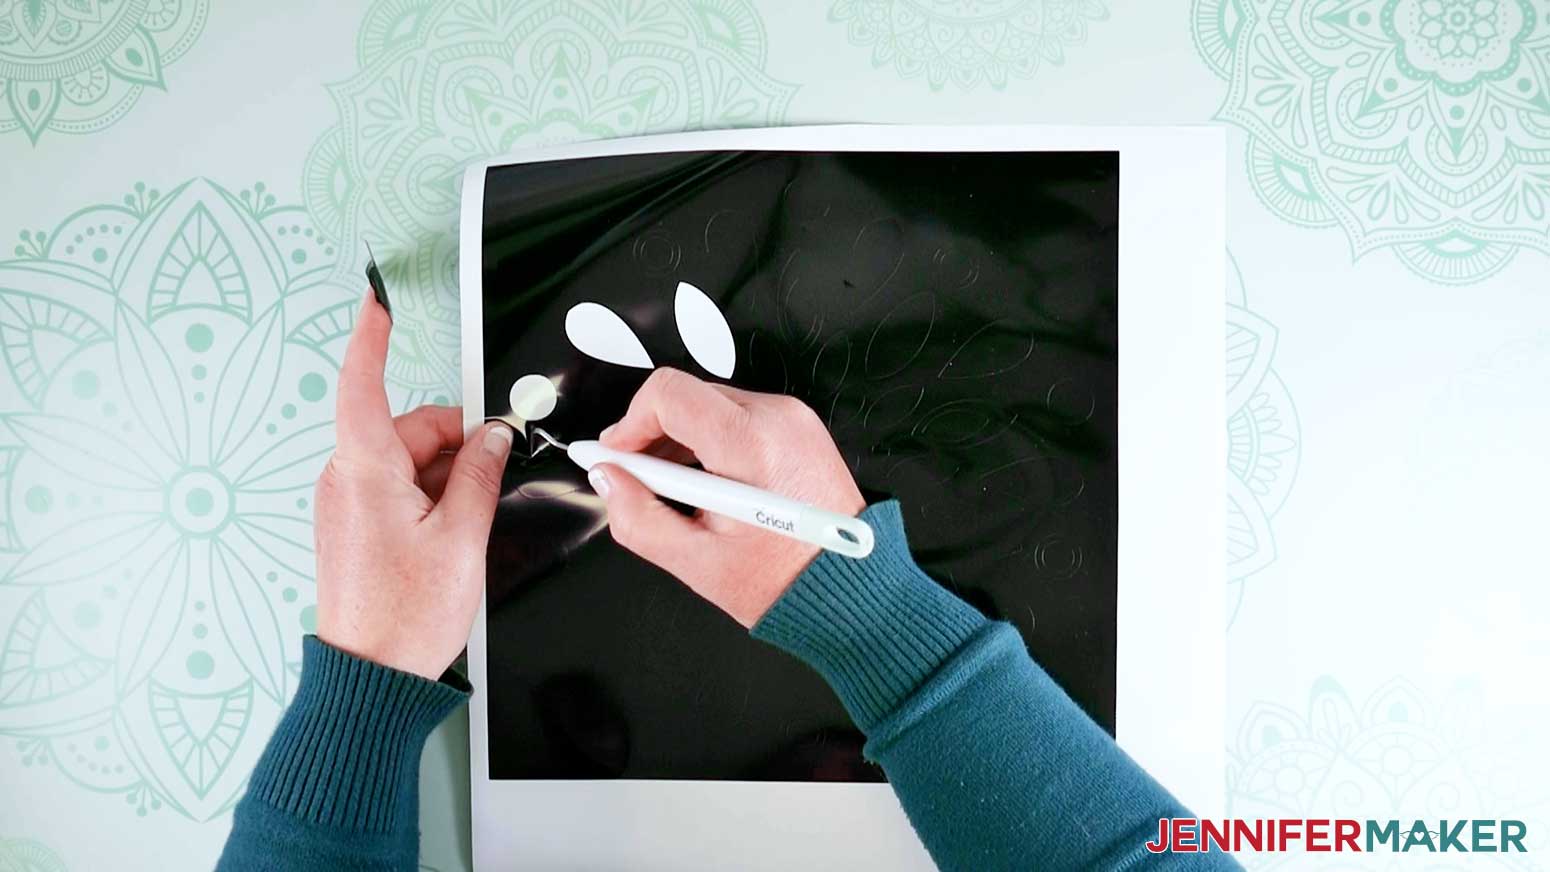
Once you have your design cut, weed all of the excess vinyl from the design.
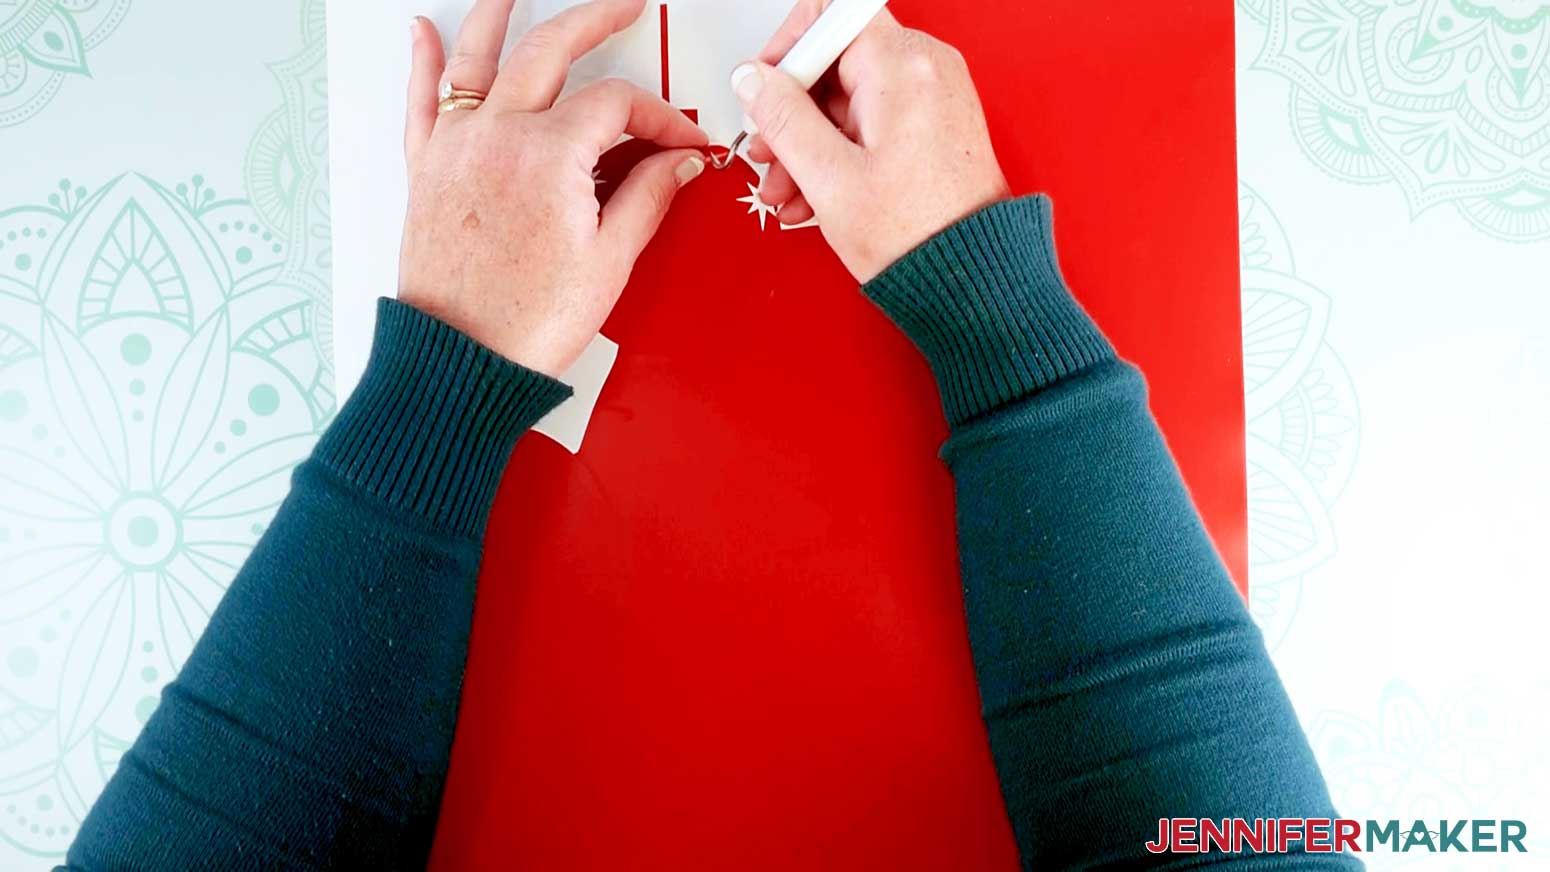
IMPORTANT: When weeding vinyl for a stencil, make sure to remove the parts that you want to PAINT, which is usually your letters and images.
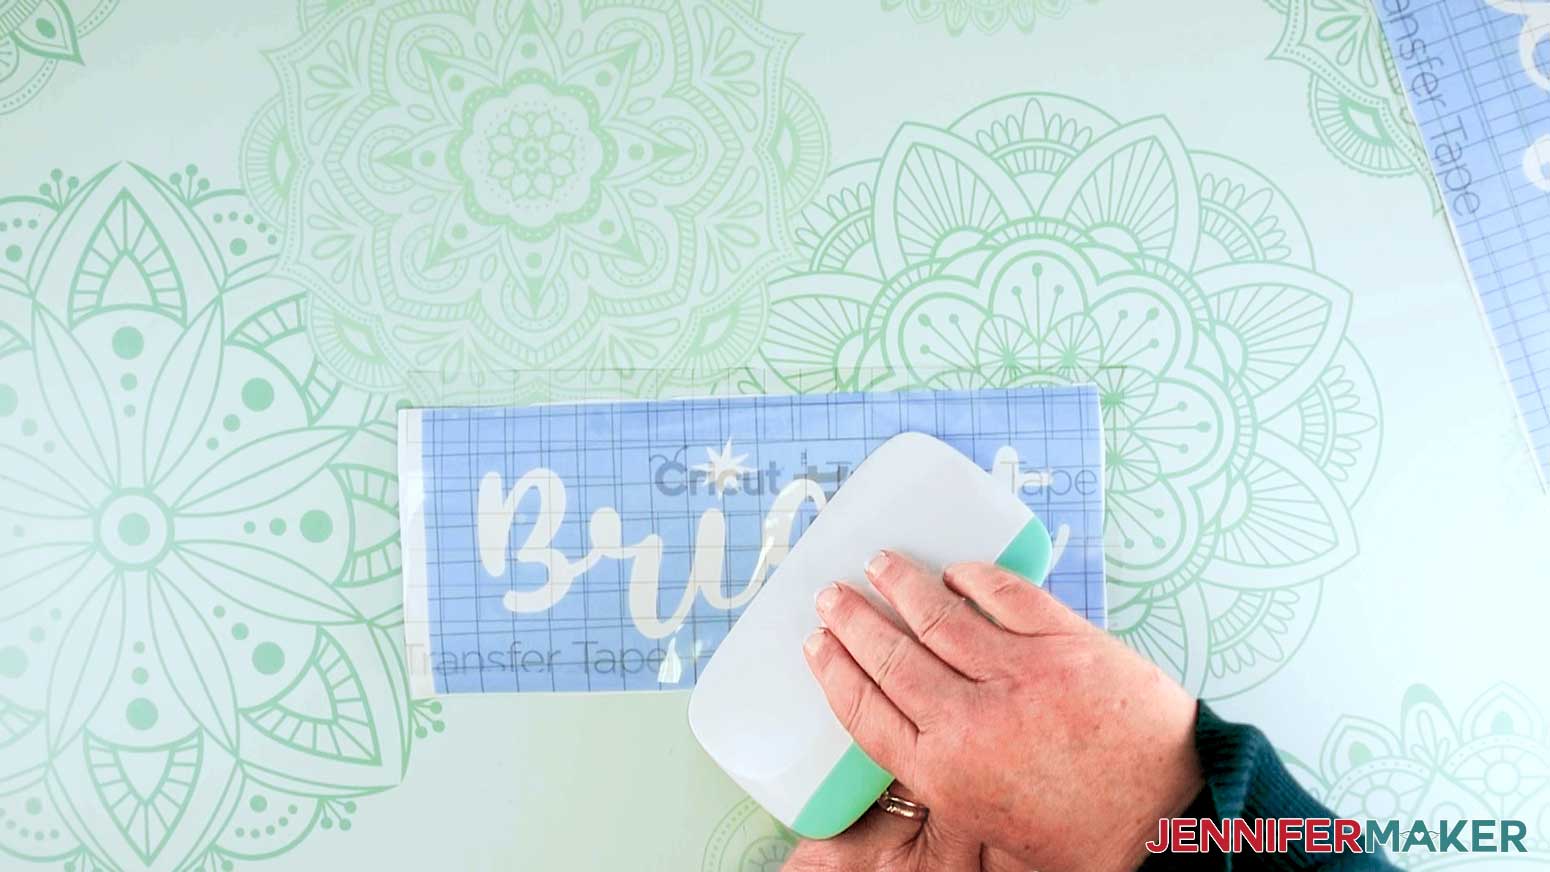
Once your design is weeded, cut a piece of transfer tape the same size as your design. Remove the backing from the transfer tape.
TIP: I recommend you reduce the tack on your transfer tape first by sticking it to your shirt or a paper towel -- this will make it less sticky and easier to remove when you put it on your canvas.
Next, apply the transfer tape to your vinyl decal by holding the transfer tape in the shape of a taco, then putting the bottom of your “taco” onto the middle of your design. Smooth the tape over the decal from the center outward using the XL Scraper Tool.
Gently lift the transfer tape bringing the design with it. If the vinyl does not stick to the transfer tape, place the transfer tape back down and burnish it with the XL Scraper Tool again.
STEP 4: PLACE YOUR DESIGN ON THE CANVAS
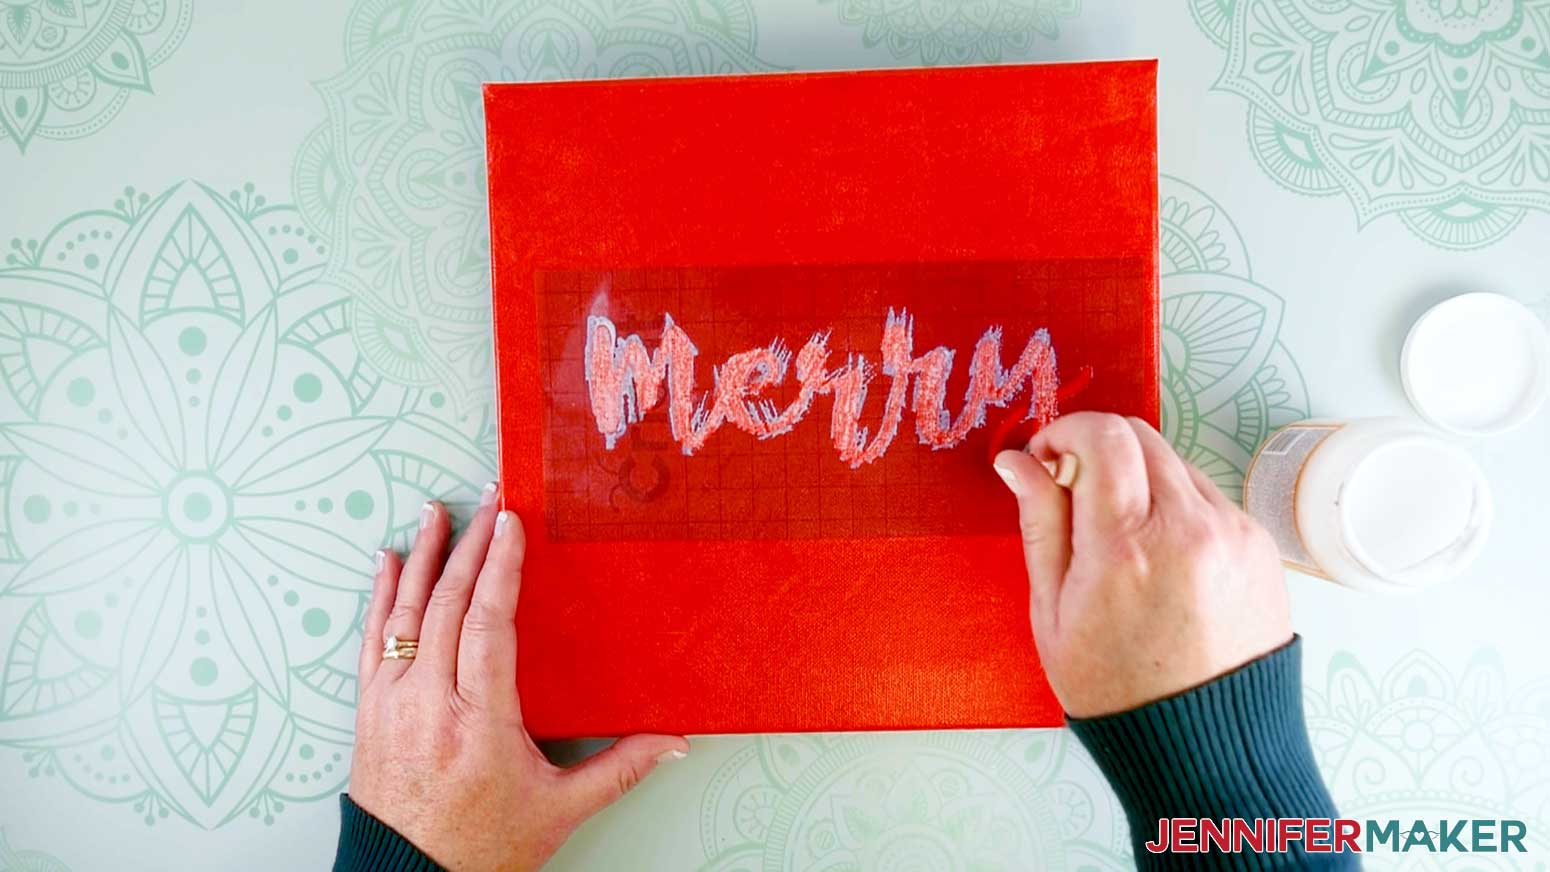
Once you have one of your designs on the transfer tape, take one red painted canvas square. Place the stencil “Merry” in the center (make sure the paint is dry). Next, put hardcover books that are the same size as your canvas underneath your canvas, this really helps with burnishing the vinyl to ensure it sticks to the canvas.
Burnish the "Merry" stencil onto the canvas. Gently remove the transfer tape. If your stencil comes up with your transfer tape place it back down and burnish it again.
IMPORTANT: This design is a little different you can’t put the stencils on the canvas all at once because they will stick and overlap. Instead, you will first add the center stencil "Merry/Bright", paint it, let that dry (1 hour) and remove the stencil. Then we will move onto the next stencil (snowflakes).
For more details on how to paint the stencils move on to STEP 5.
Now, we are going to create the second red canvas.
Take the second red painted canvas and put hardcover books that are the same size as your canvas underneath your canvas. Then place the “Bright” stencil in the center and burnish it.
Repeat painting steps for this stencil.
Now we are going to paint our snowflake stencils.
Place one of the snowflake stencils on the top right corner with 3/4 of the design on the front of the canvas. In the bottom left corner place another whole snowflake stencil on the canvas. Use the same placement for the "Bright" canvas. These do not need to be perfect be creative and place them wherever you like!
Burnish the snowflake stencils onto the canvas.
Paint these stencils using the technique below.
STEP 5: MOD PODGE AND PAINT THE STENCILS
Now that you have your stencils in place, take Mod Podge and coat the inside of the stencil. I like to use the "Pounce" method instead of traditional painting where you apply the paint in strokes from side to side, this way you move your stencil brush straight up and down in a bouncing motion. To see this method in action check out my tutorial on "How to Perfectly Paint Wood Signs with Vinyl Stencils Made on Your Cricut."
Be careful not to get too much Mod Podge on the edges of the stencil, otherwise, it will stick to the stencil, not the canvas.
Wait for the Mod Podge to completely dry before painting the stencil with acrylic paint (white). I usually leave it set for an hour.
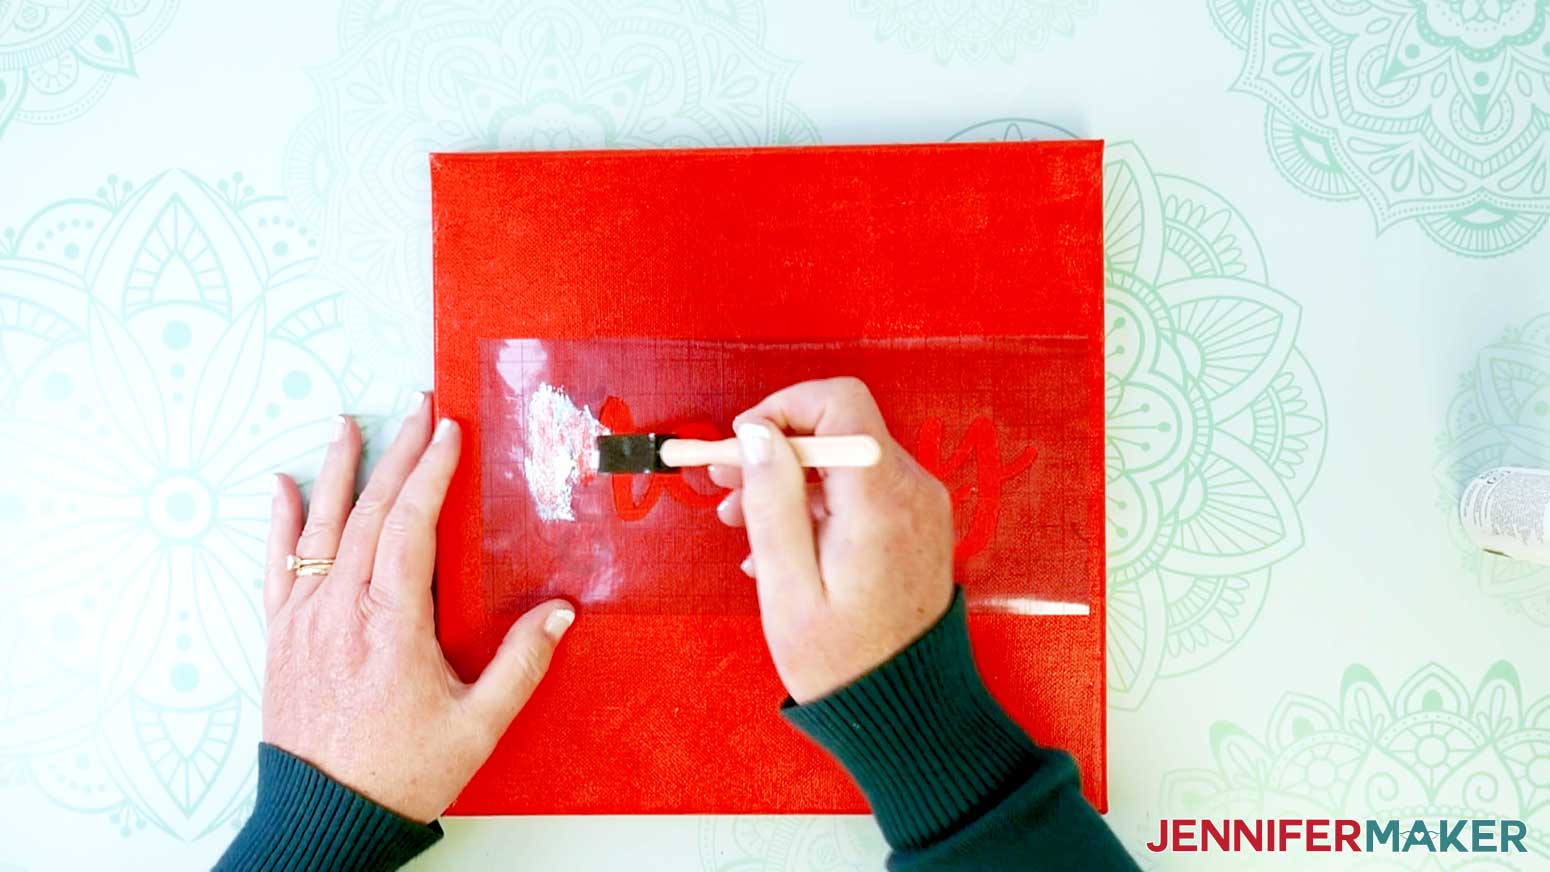
Remove the stencil and repeat these steps with the remaining stencils.
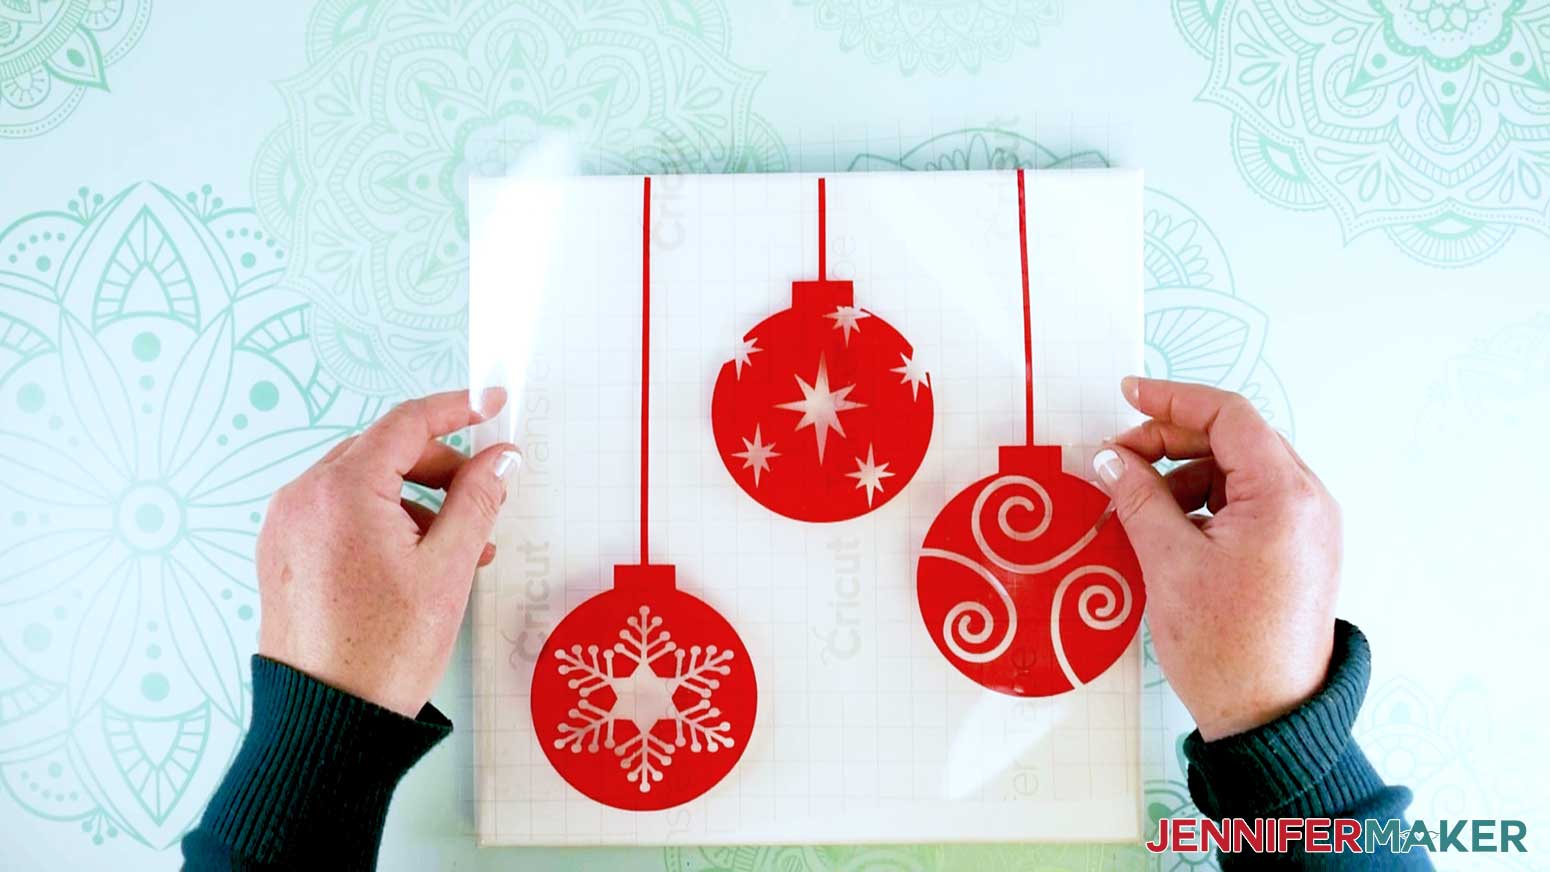
STEP 6: PLACE VINYL ON THE CANVAS
Take the two remaining white canvases. Using the transfer tape, place the red ornaments in the center leaving a small piece of the ornament strings at the top to go over the edge.
Put hardcover books that are the same size as your canvas underneath your canvas and burnish the design onto the canvas. Again gently remove the transfer tape.
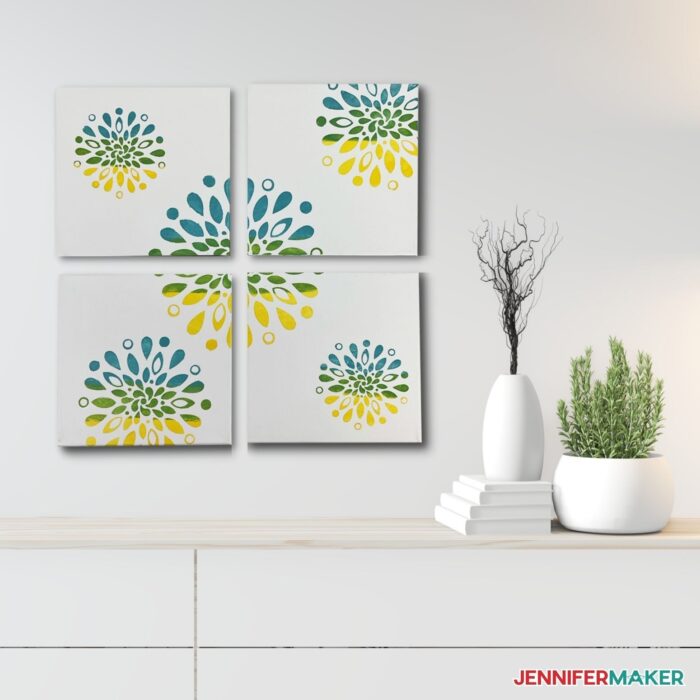
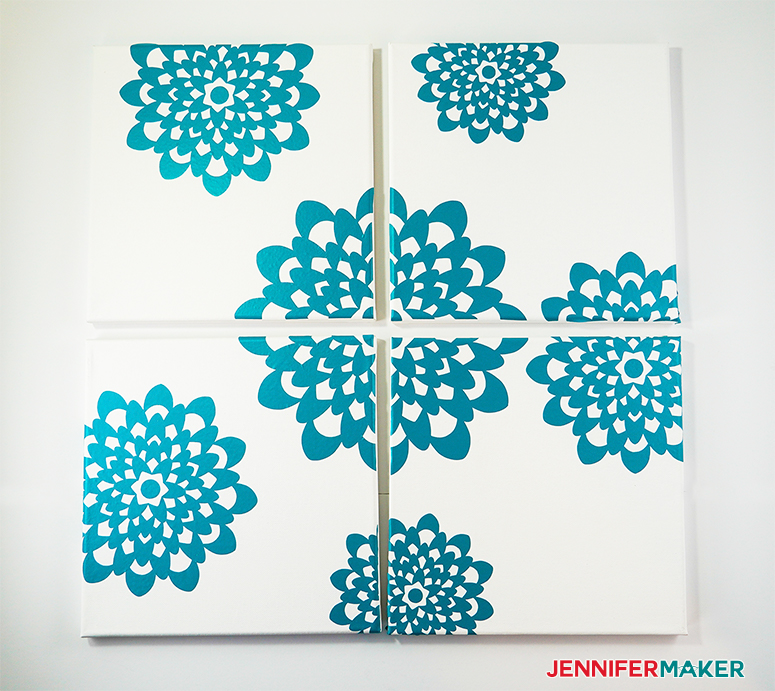
BLUE FLOWER DESIGN
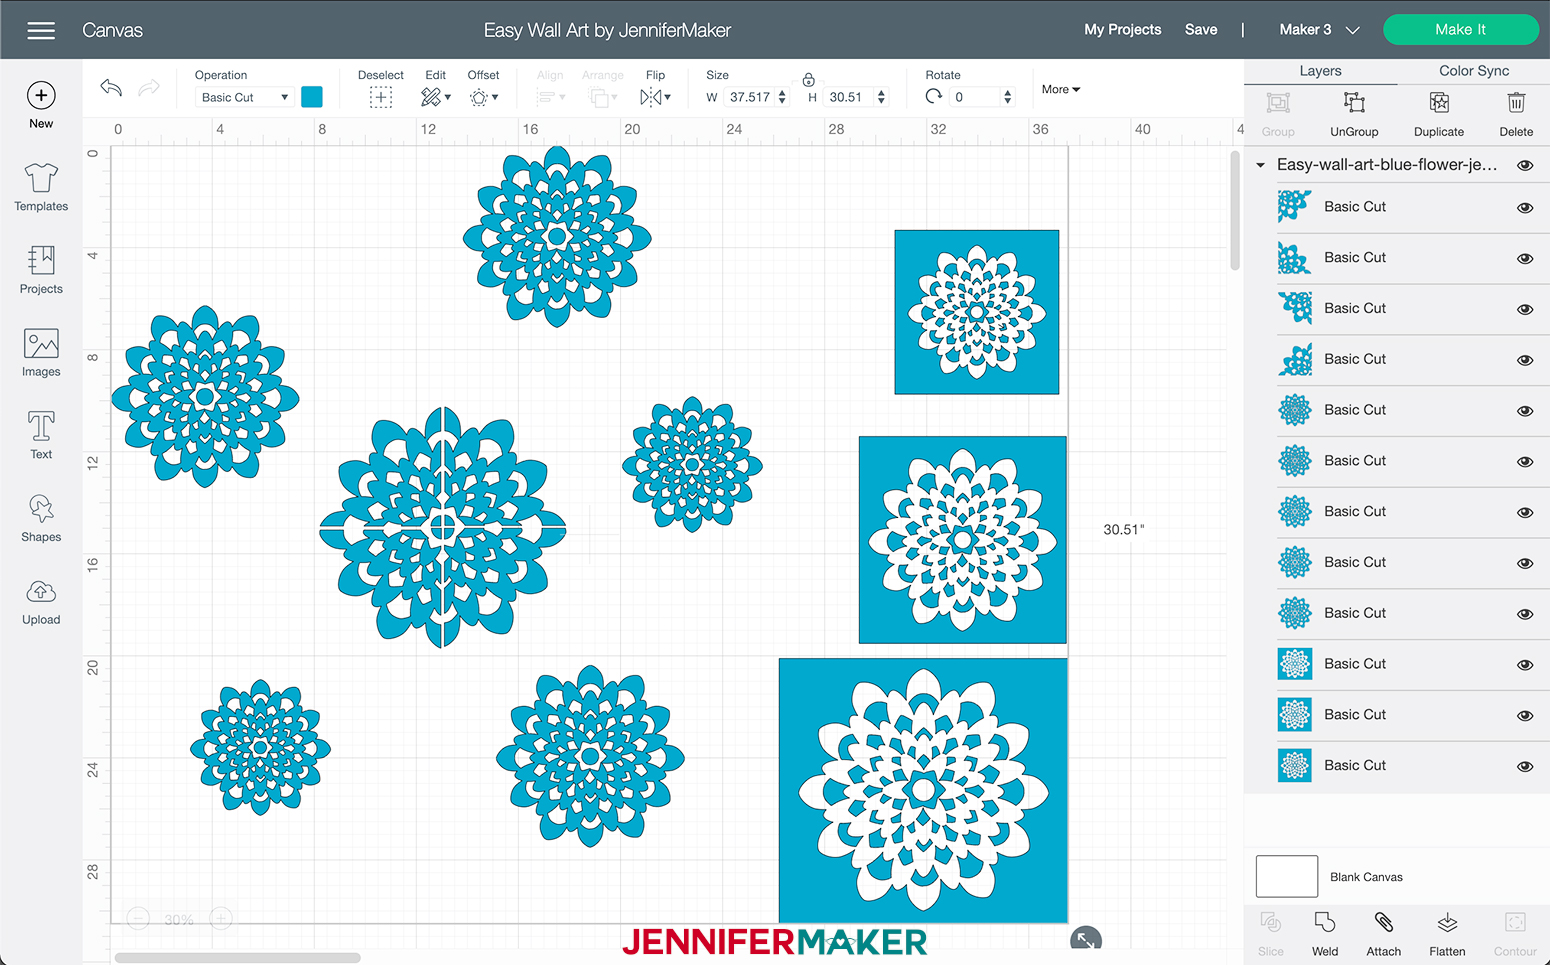
Next, I am going to show you how to create my Blue Flower Design using vinyl.
STEP 1: PREPARE YOUR CANVASES
First, put hardcover books that are the same size as your canvas underneath your canvas.
You’ll also want to seal all four canvases with paint, Mod Podge, or spray adhesive before you attach your vinyl. This will make it much easier to transfer your vinyl to your canvas and will help it adhere. Just be sure to let your sealed canvases dry before you apply your vinyl (1 hour).
STEP 2: GET MY FREE EASY WALL ART DESIGN FILE
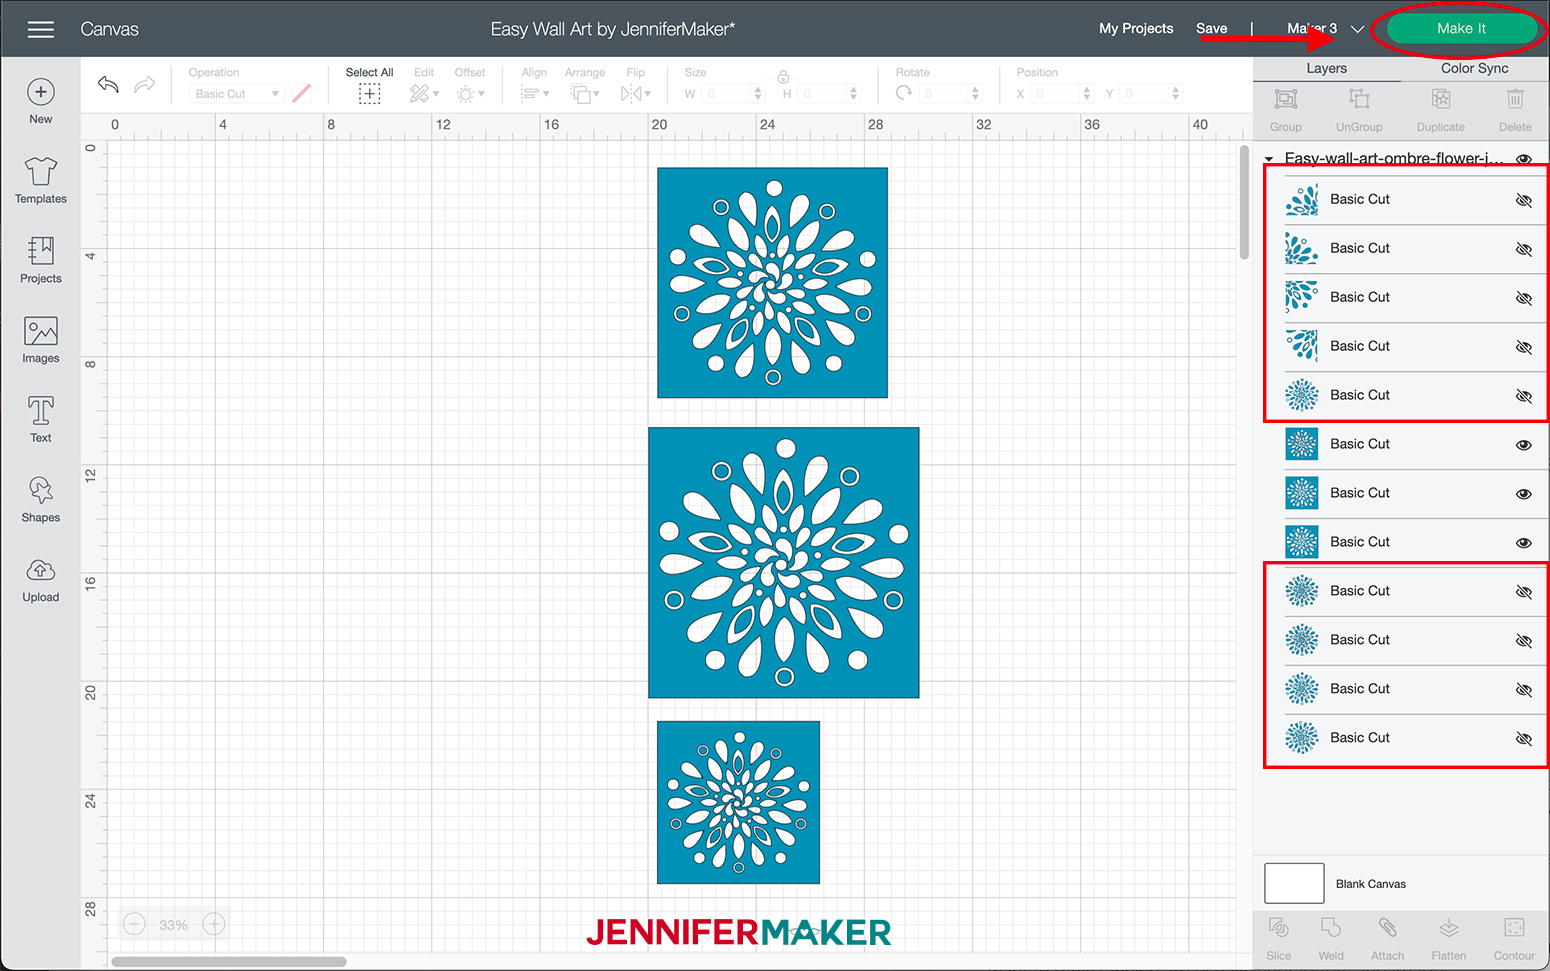
Upload the SVG file to Cricut Design Space. If you are not sure how to do this, reference STEP 2 above.
Next, we are going to hide the stencil pieces in the layer tab. Go to the first stencil layer in the layers panel and click the eyeball icon on the right. Next, go to the other two stencil layers and click the eyeball icon on the right for these as well.
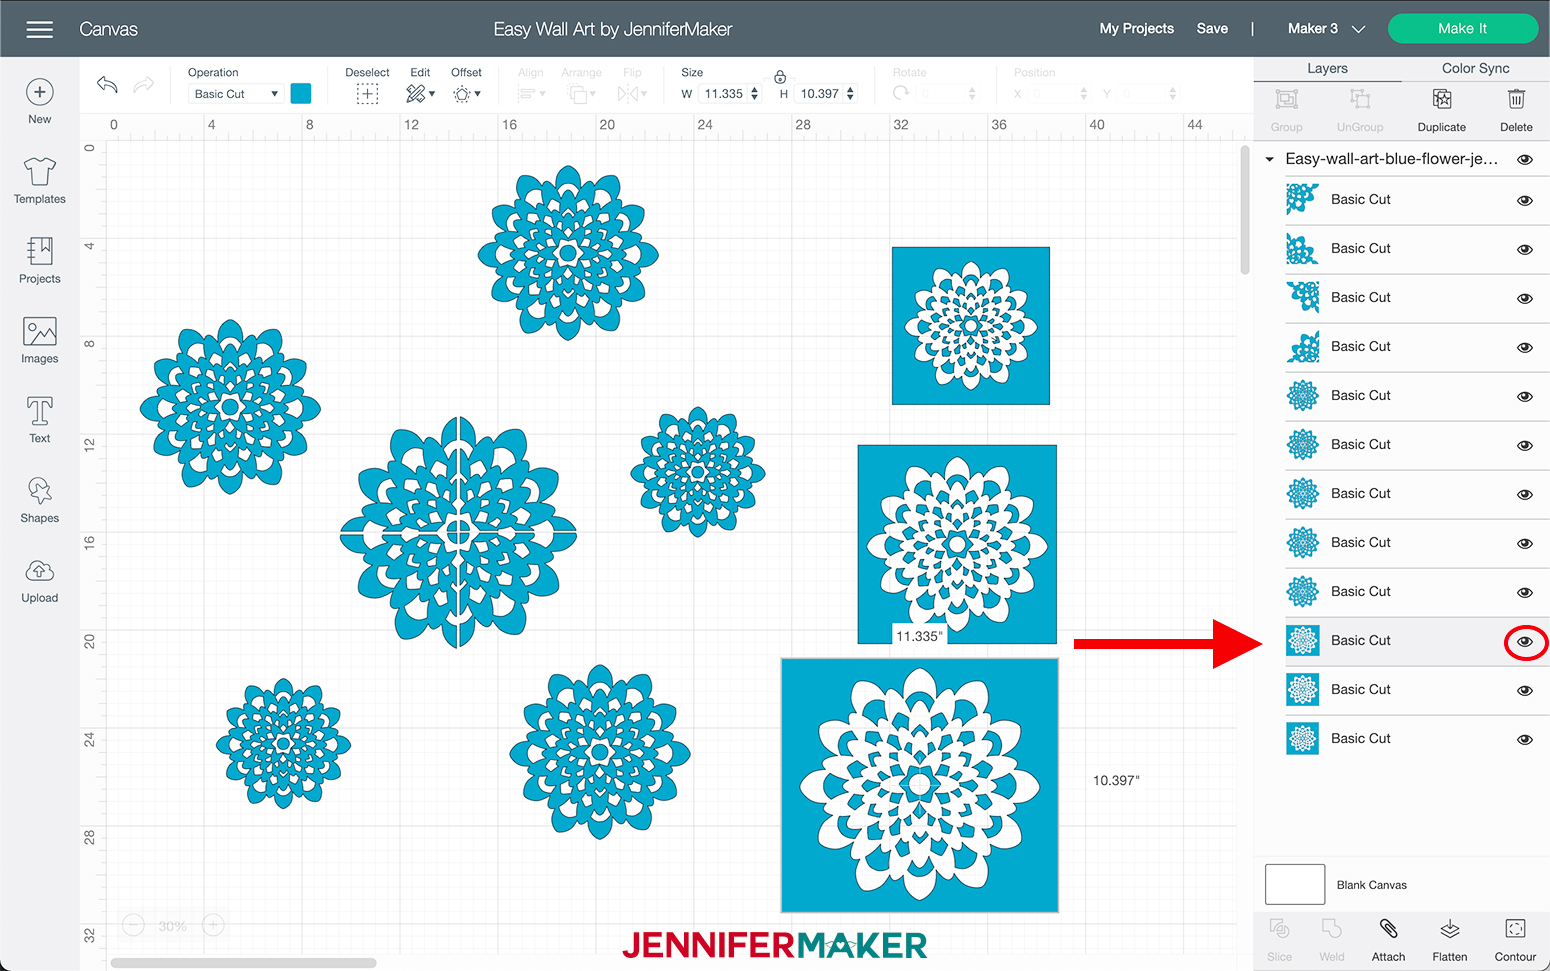
Your layers panel and design should look like this.
Once you have finished hiding the layers, click "Make It" at the top right corner.
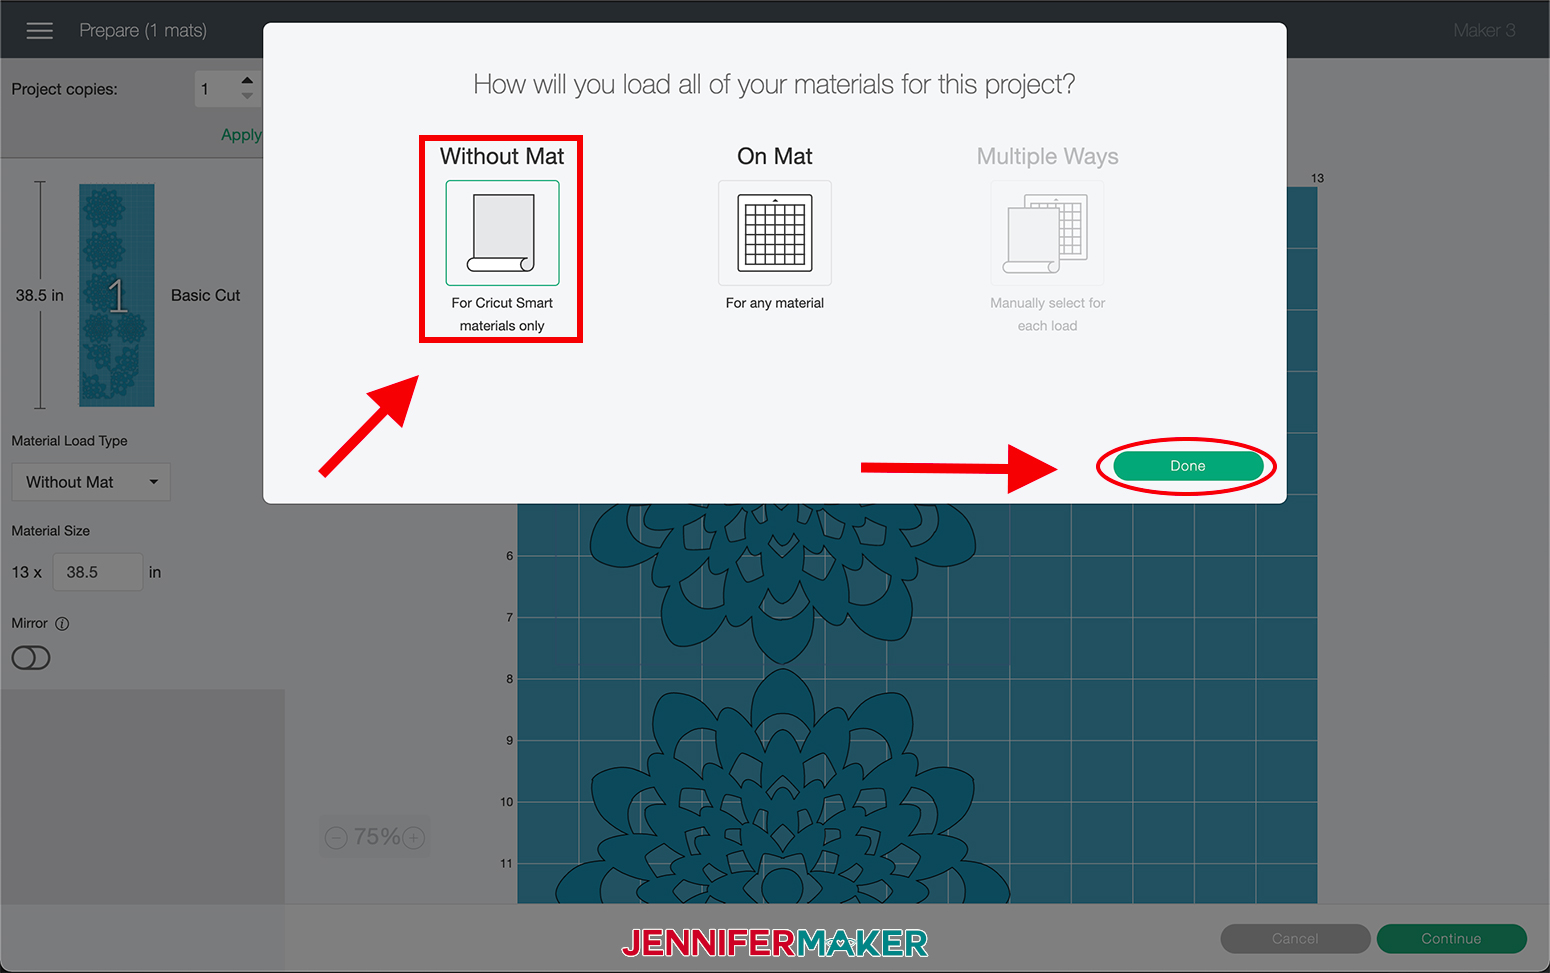
On the next page select "Without Mat" and click "Done."
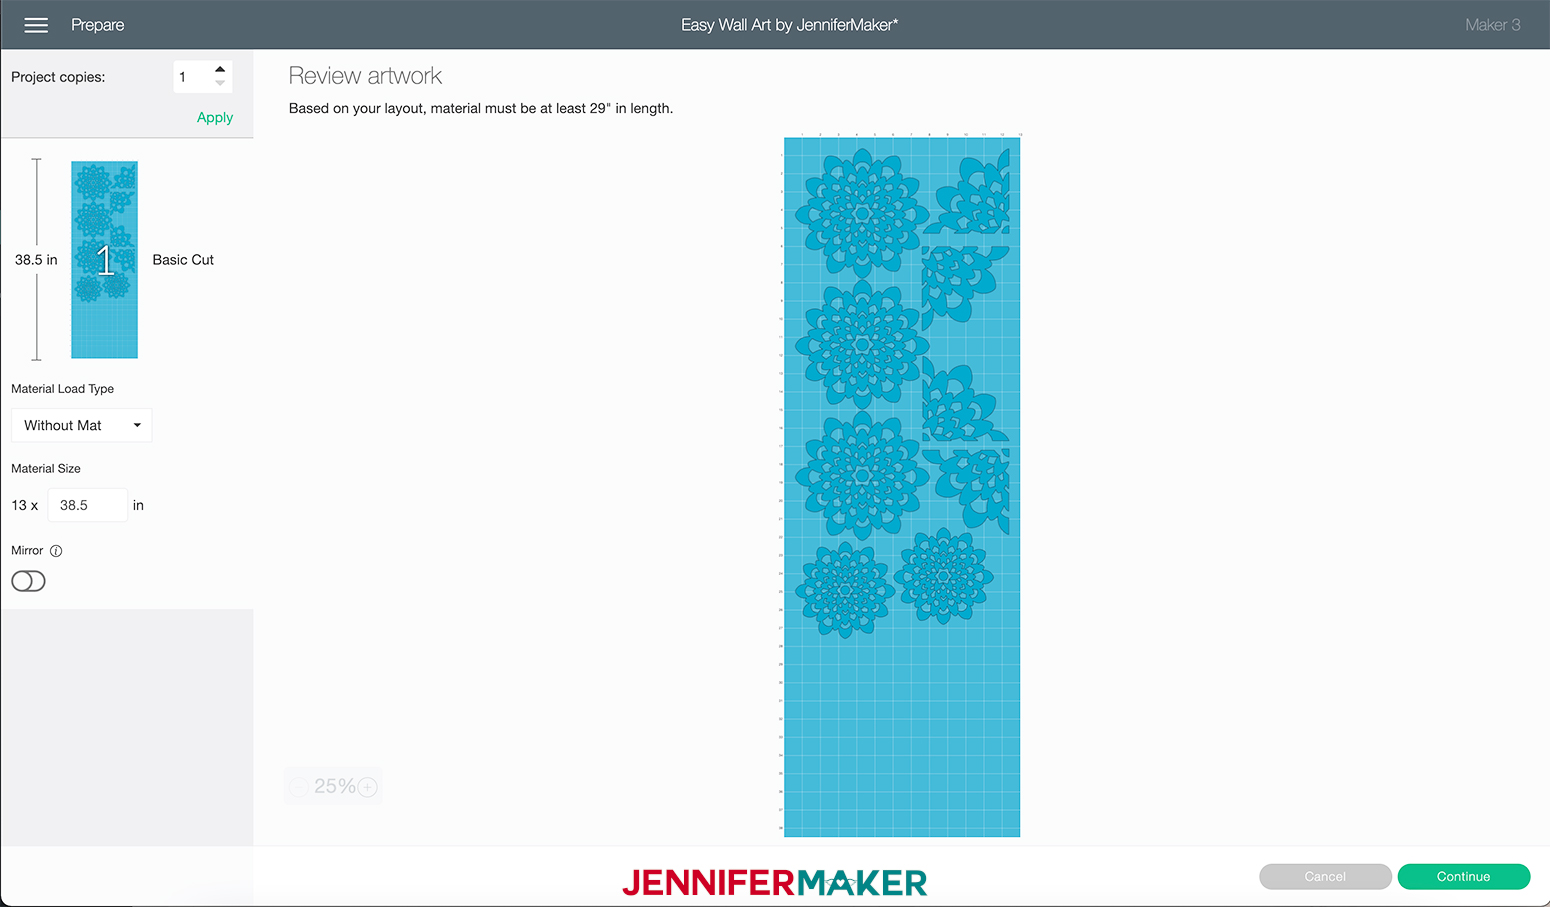
Move your design pieces around so that the design is not longer then the 36". To do this click and drag the piece you would like to move and place it where you would like it to be. Be sure not to overlap the pieces.
On the next page, click "Continue" in the lower right corner.
Next, we are going to select our materials. To do this select "Browse All Materials."
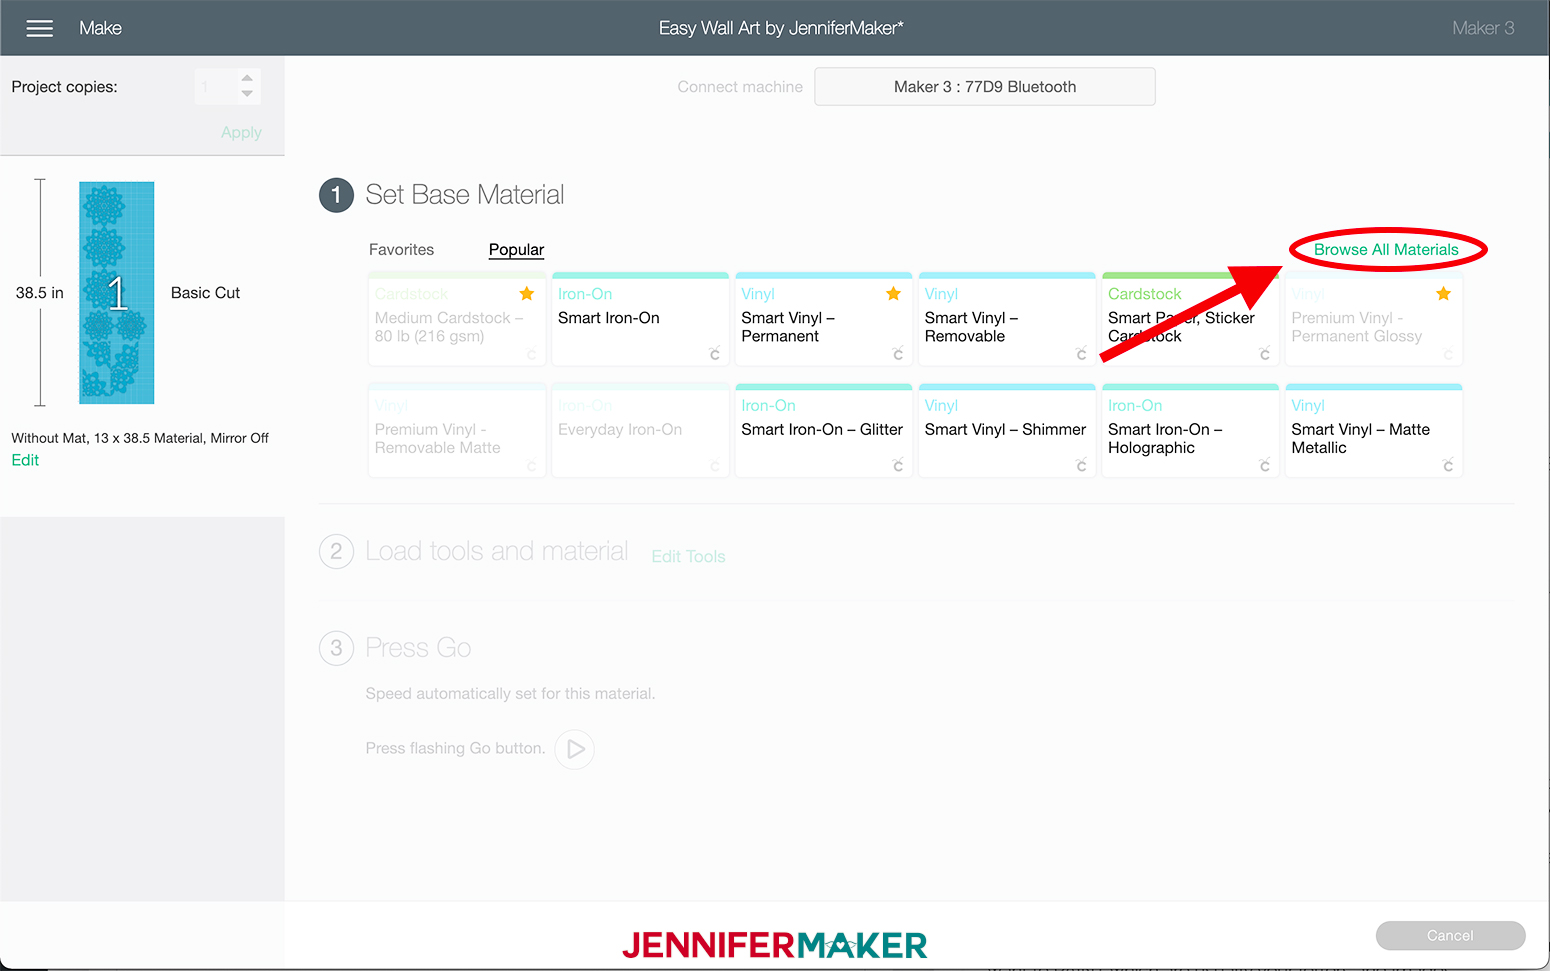
Then select "Smart Vinyl - Permanent" and click "Done".
On the next page, select "Continue".
Feed your Smart Vinyl (Aqua) into your Cricut Maker 3 or Explore 3.
Press the “Load/Unload” Button. Your machine will pull the vinyl all the way through to confirm there is enough material before starting the cut. Once your machine is ready, press the flashing "Arrow/Go" button. Now sit back and watch your Cricut cut the design. When your design is done cutting, use the Cutter on the Roll Holder to trim off the Smart Vinyl. If you didn't use a roll holder you can, of course, skip this step.
STEP 3: WEED AND TRANSFER YOUR DESIGN
Then weed the excess vinyl from the design.
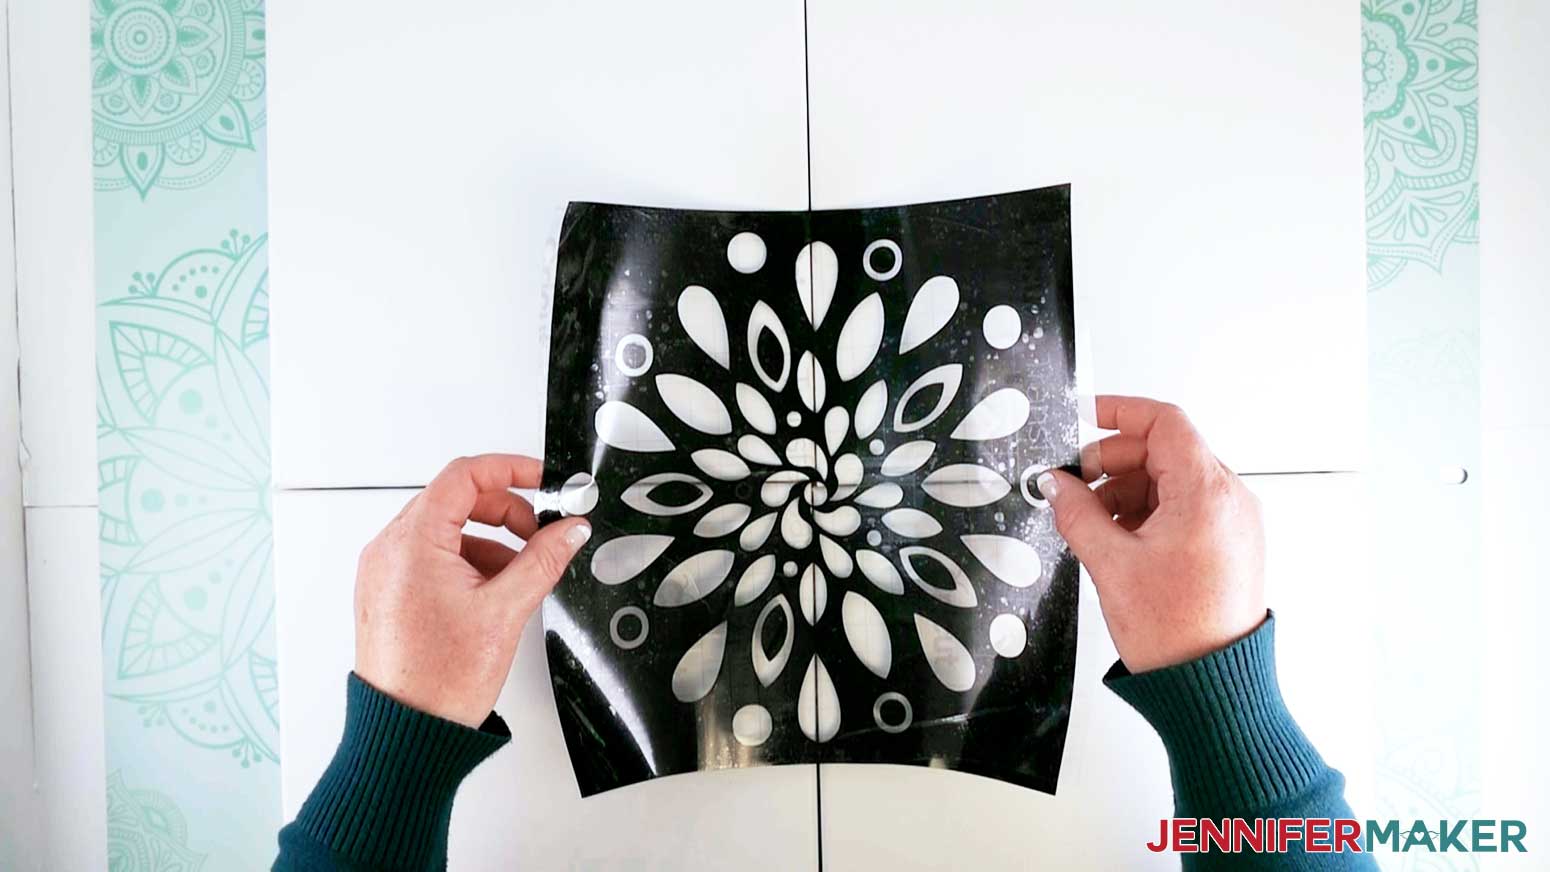
Once your design is weeded, take one piece of the large, blue-quartered flower and cut a piece of transfer tape the same size as your design. Remove the backing from the transfer tape. Apply the transfer tape to your vinyl decal by holding the transfer tape in the shape of a taco, then putting the bottom of your “taco” onto the middle of your design. Smooth the tape over the decal from the center outward using the XL Scraper Tool.
Place your four canvases in a square position with the edges touching for now.
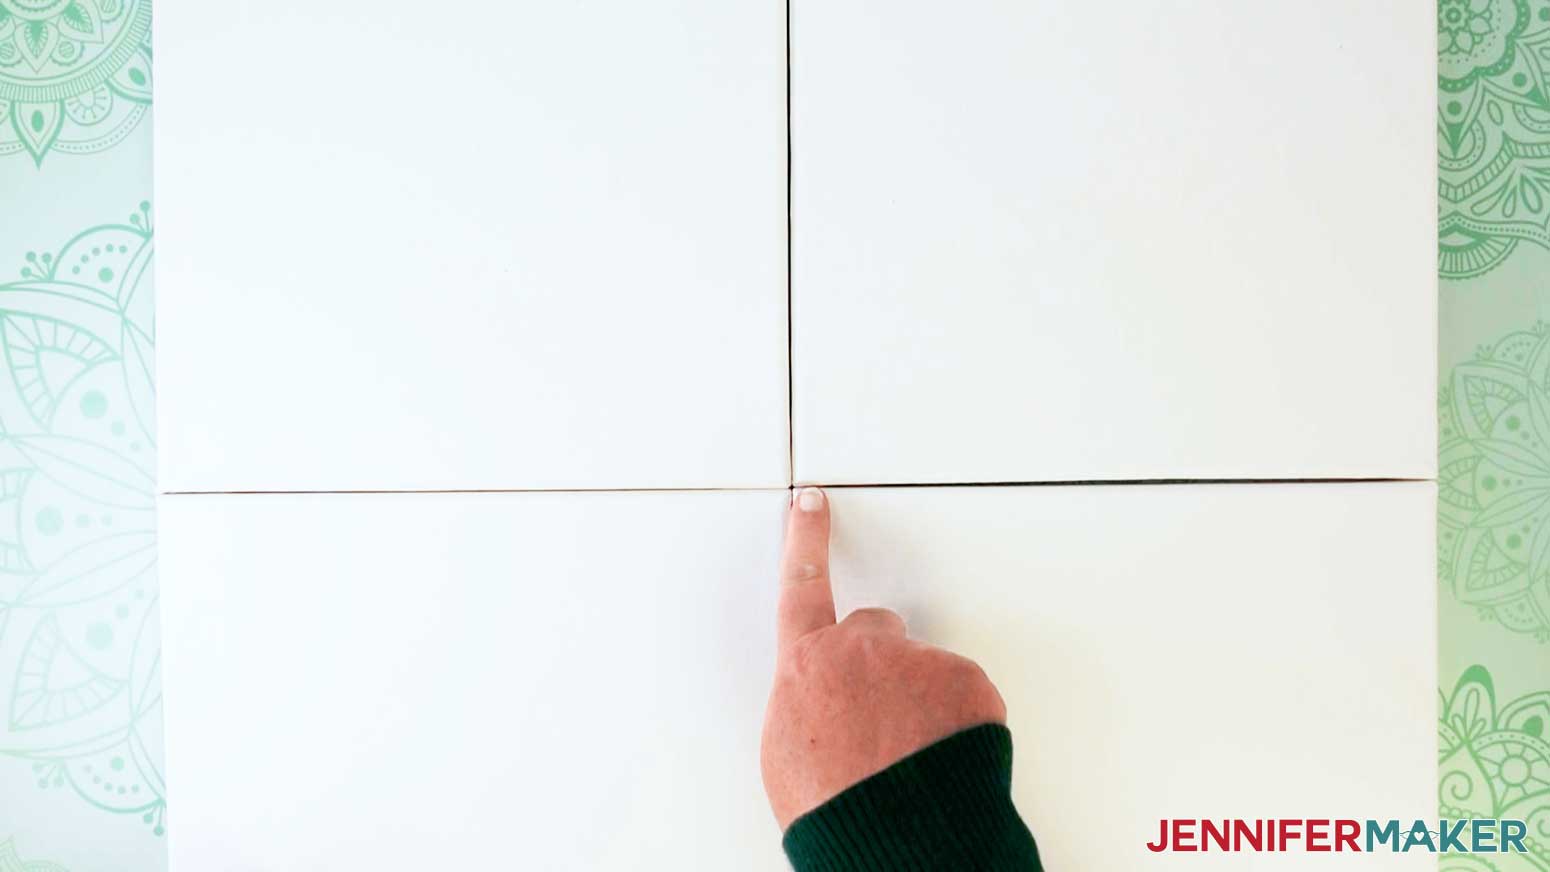
Take one piece of the large blue-quartered flower and place it on the bottom right corner of the top left canvas. Be sure the edges of the design are slightly over the edge. Burnish the design onto the canvas. Flip the canvas over and rub the back of the canvas where the flower is with the XL Scraper Tool, this will help the vinyl adhere to the canvas. Continue to complete the center flower by using the remaining quartered flower pieces.
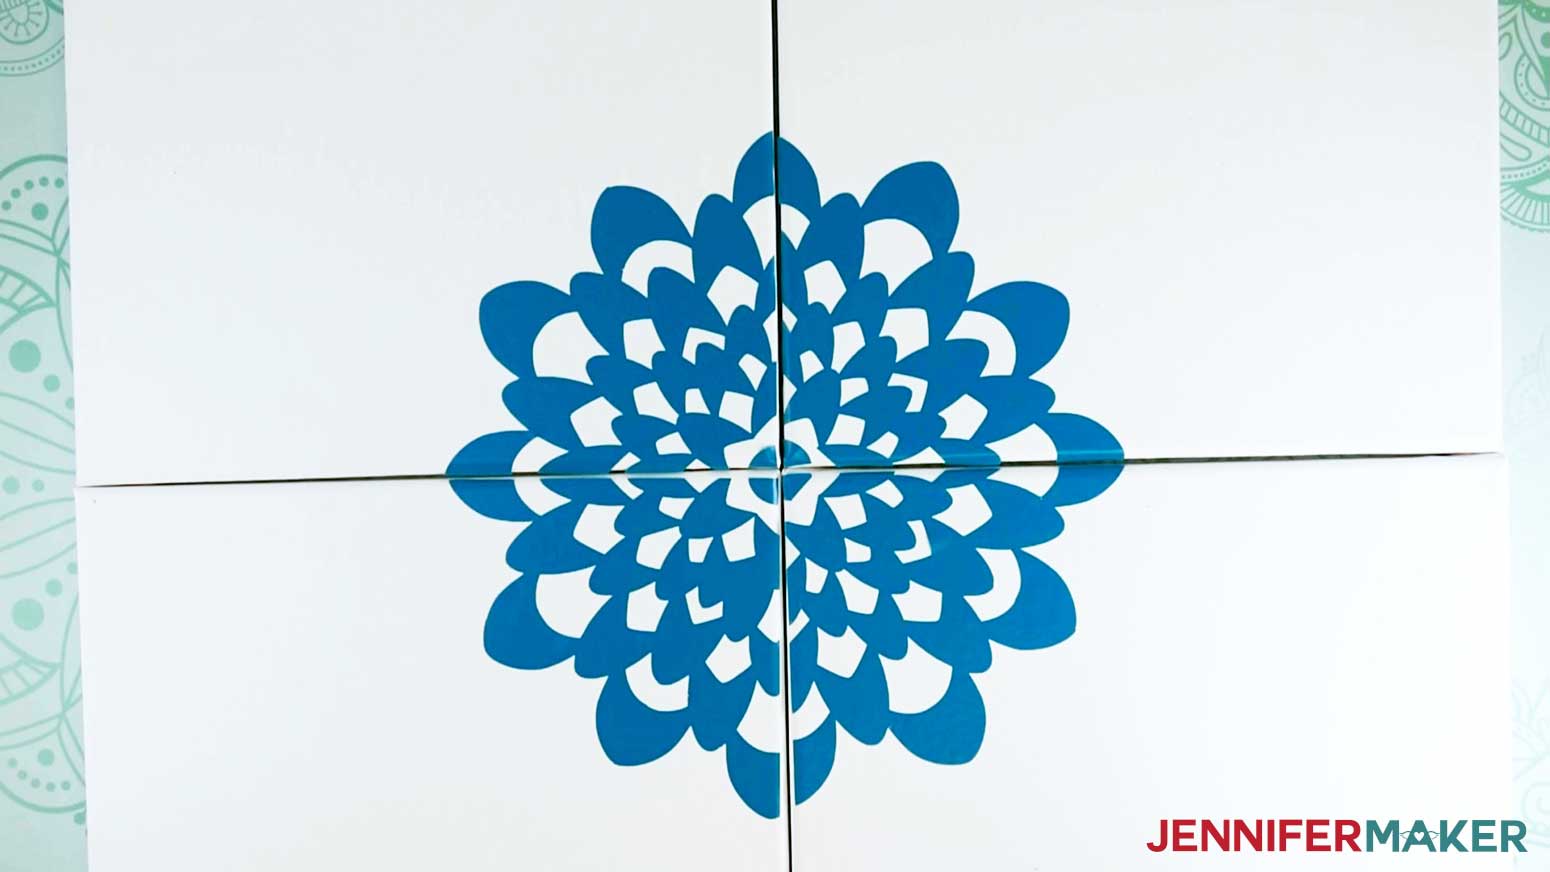
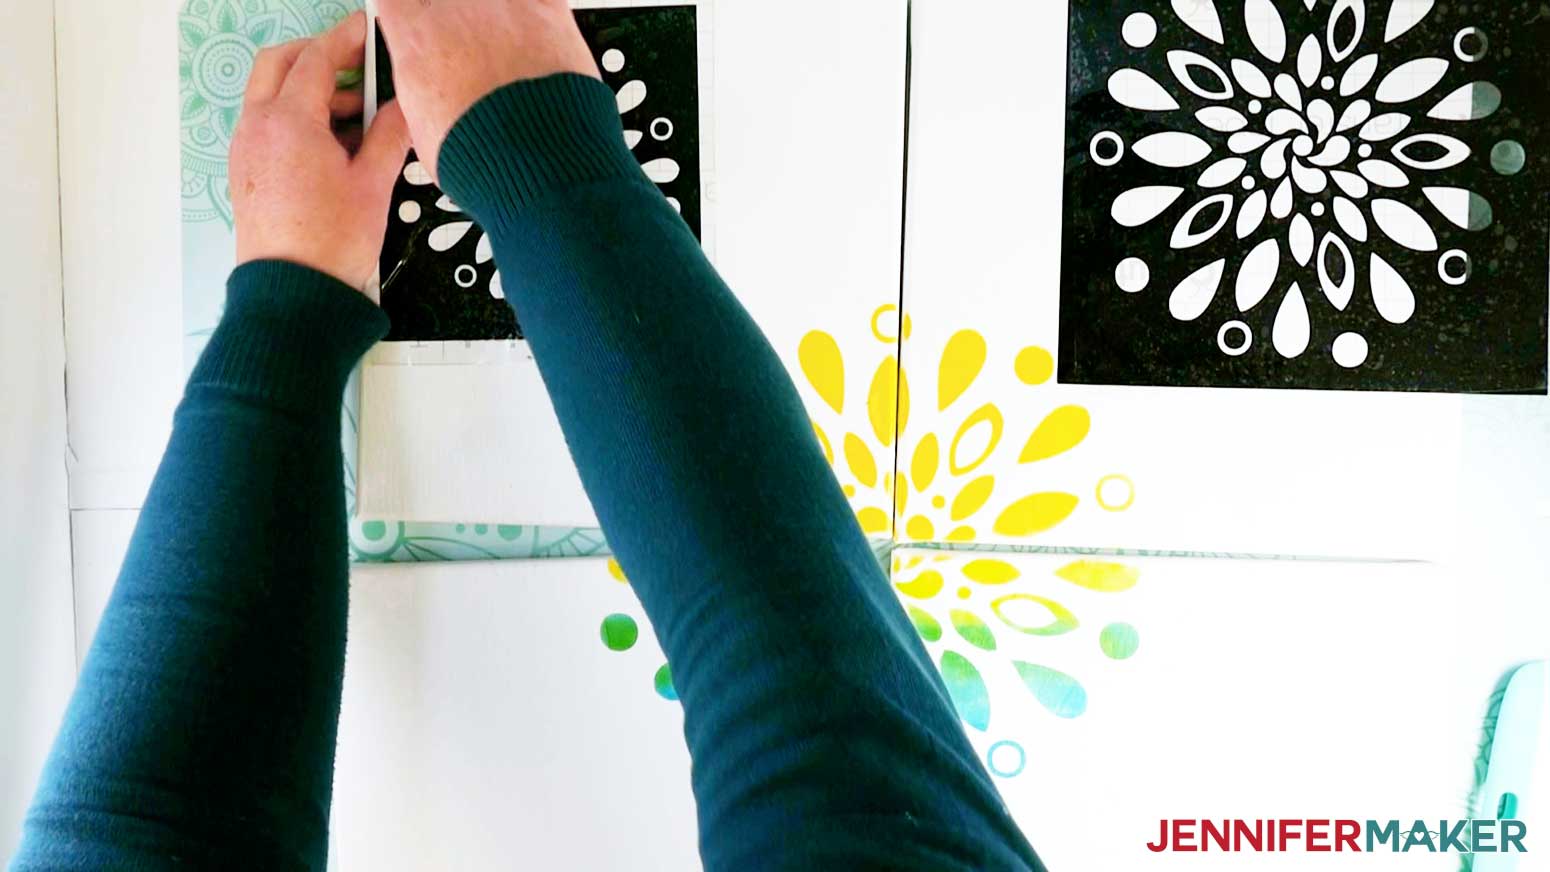
On the top left canvas, use transfer tape to place a medium-size flower at the top in the center leaving ¼ of the flower to wrap around the edge. Flip the canvas over and rub the back of the canvas where the flower is with the XL Scraper Tool.
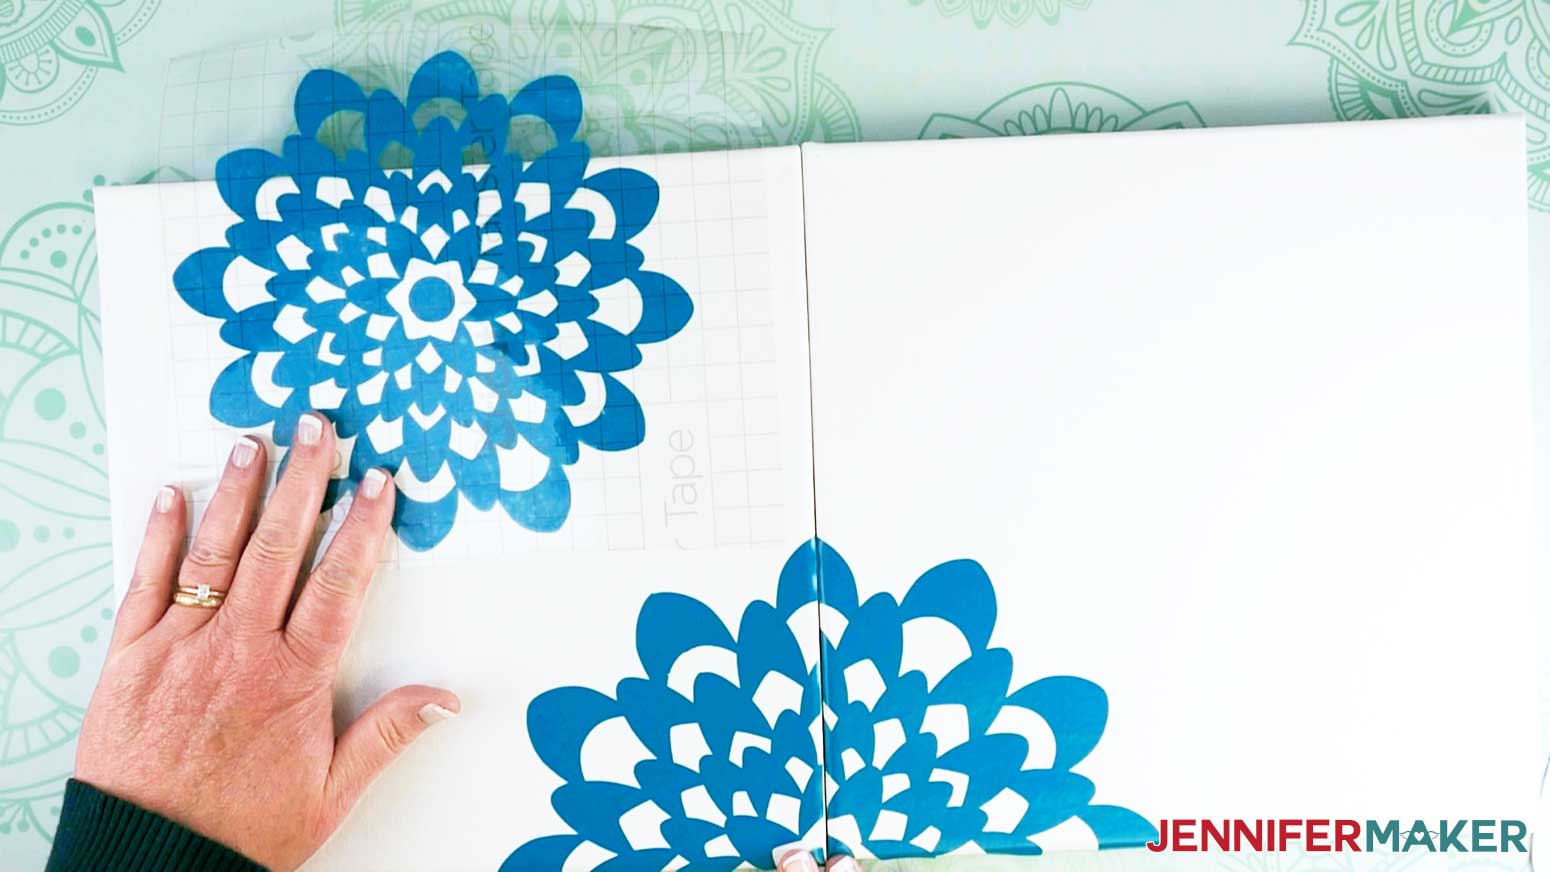
On the top right canvas, use transfer tape to place a small flower near the left side of the canvas, leaving a little of the flower to wrap around the top edge. Flip the canvas over and rub the back of the canvas where the flower is, this will help the vinyl adhere to the canvas.
Take one medium size flower and place it between the two right canvases with more of the flower on the bottom canvas. Gently rub the flower with the XL Scraper Tool. Carefully cut the flower at the split between the two canvases using scissors or the TrueControl Knife Tool. Once cut, flip the canvas over and rub the back of the canvas with the XL Scraper Tool.
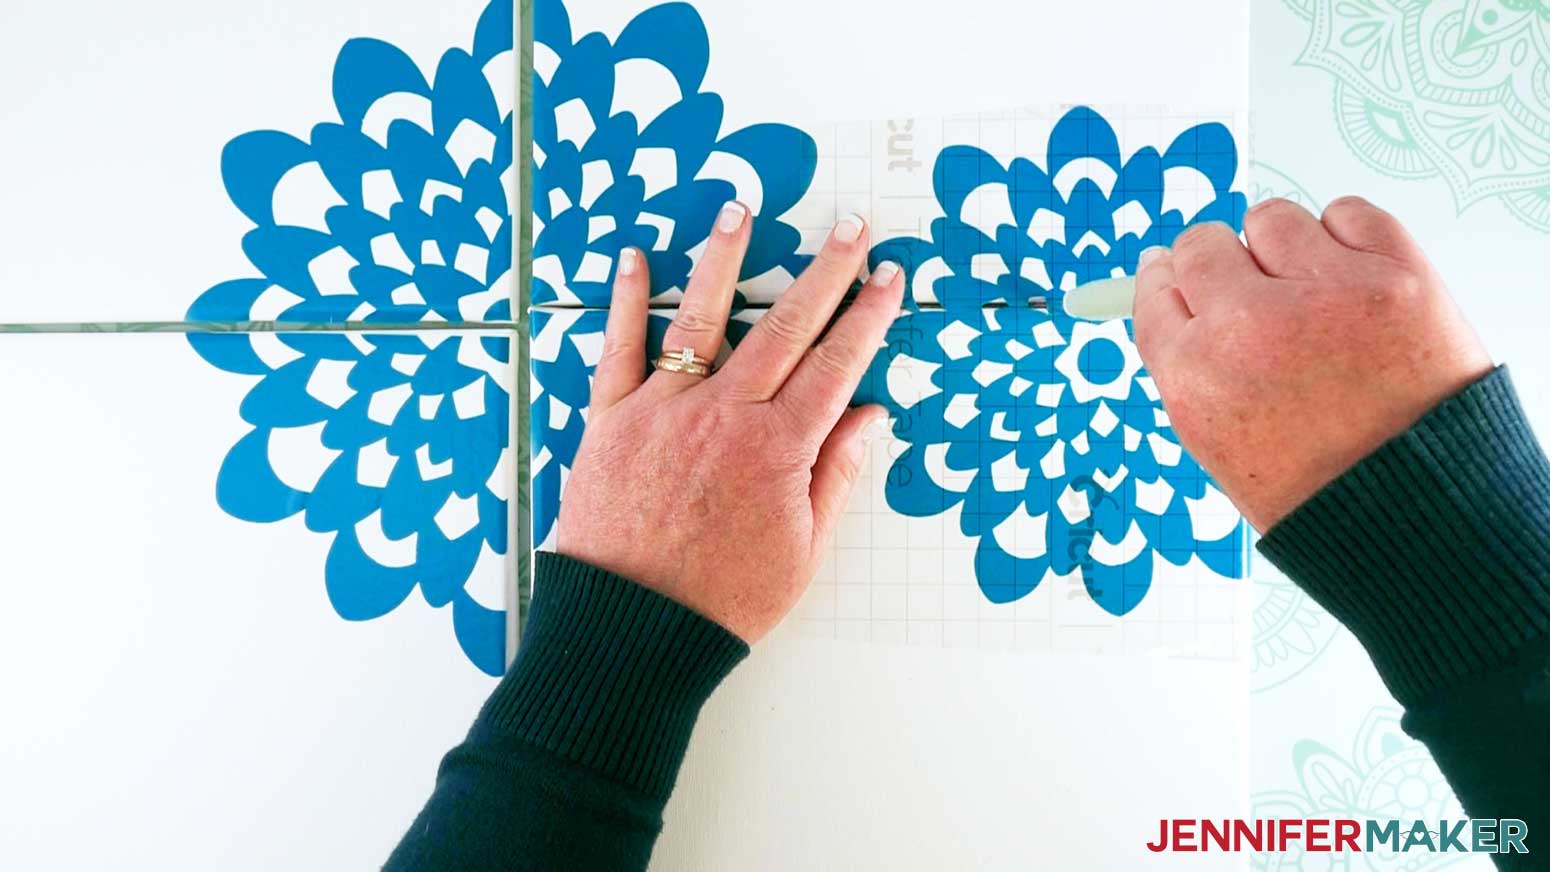
Take the last small flower, using transfer tape, and place it between the bottom two canvases with slightly more of the flower on the right-hand canvas. Again, gently rub the flower with the XL Scraper Tool. Carefully cut the flower at the split between the two canvases using scissors or the TrueControl Knife Tool. Once cut, flip the canvas over and rub the back of the canvas.
Finally, using transfer tape, place the last medium flowers on the lower left side of the bottom left canvas leaving ¼ of the flower to wrap around the edge. Flip the canvas over and rub the back of the canvas.
EASY WALL ART OMBRE FLOWER
For this project, I used stencils made from Cricut Premium Vinyl.
STEP 1: PREPARE YOUR CANVASES
First, take out four canvases and place them in a square shape on your table. For now, keep them so that the edges are touching in the center. We do not need to add Mod Podge or spray adhesive to these canvases right away. We will add Mod Podge to the stencil later in the process.
STEP 2: GET MY FREE EASY WALL ART DESIGN FILE
Upload the SVG file to Cricut Design Space.
Next, hide vinyl pieces in the layer tab. Go to the first design layer in the layers panel and click the eyeball icon on the right. Do this for the rest of the vinyl design pieces.
This is what Cricut Design Space should look like when you have finished hiding the layers.
Click on the small stencil and then select duplicate. Repeat for the medium stencil.
NOTE: If you want to save vinyl you can reuse your stencils.
Click "Make It" in the top left corner.
On the next page select "On Mat" and then click "Done".
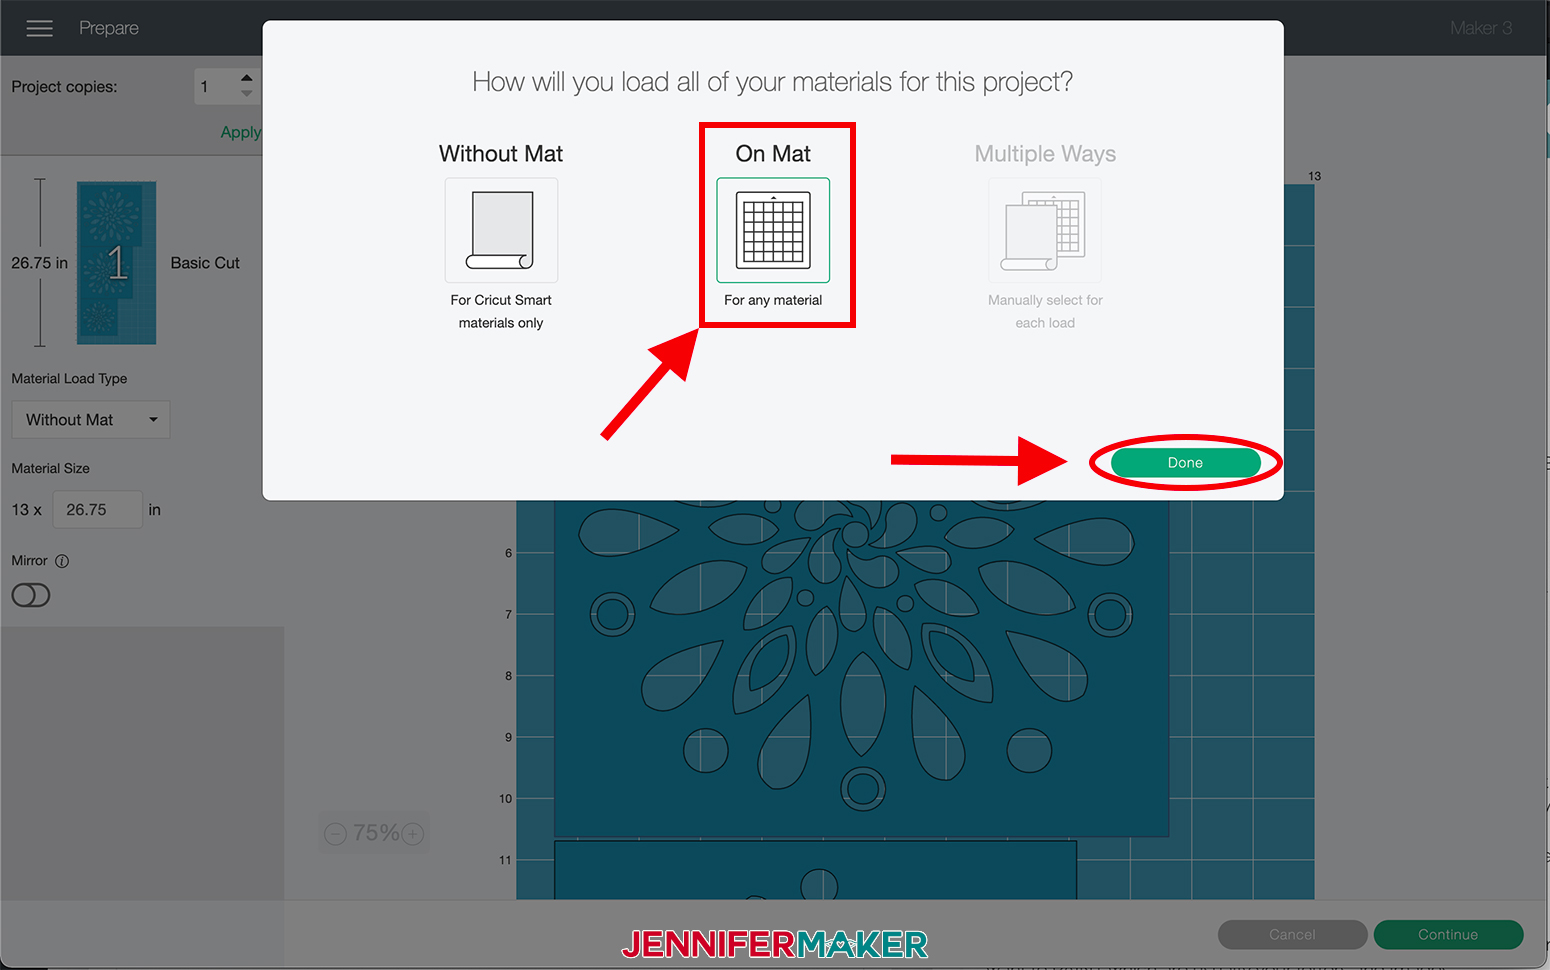
Now, we are going to select our materials. For the stencils, click the "Browse All Materials" button on the right side of the screen.
Select "Premium Vinyl - Permanent Glossy" from the menu under the Vinyl section and click "Done."
Load the mat with your Premium Vinyl and tap the blinking "Arrow/Go" button.
Next, unload your mat and remove the vinyl from the mat.
To remove the vinyl from the mat, flip the mat over and peel the mat away from the vinyl.
STEP 3: WEED AND TRANSFER YOUR DESIGN
Now weed all of the excess vinyl from the design.
IMPORTANT: When weeding vinyl for a stencil, make sure to remove the parts that you want to PAINT, which is usually your letters and images.
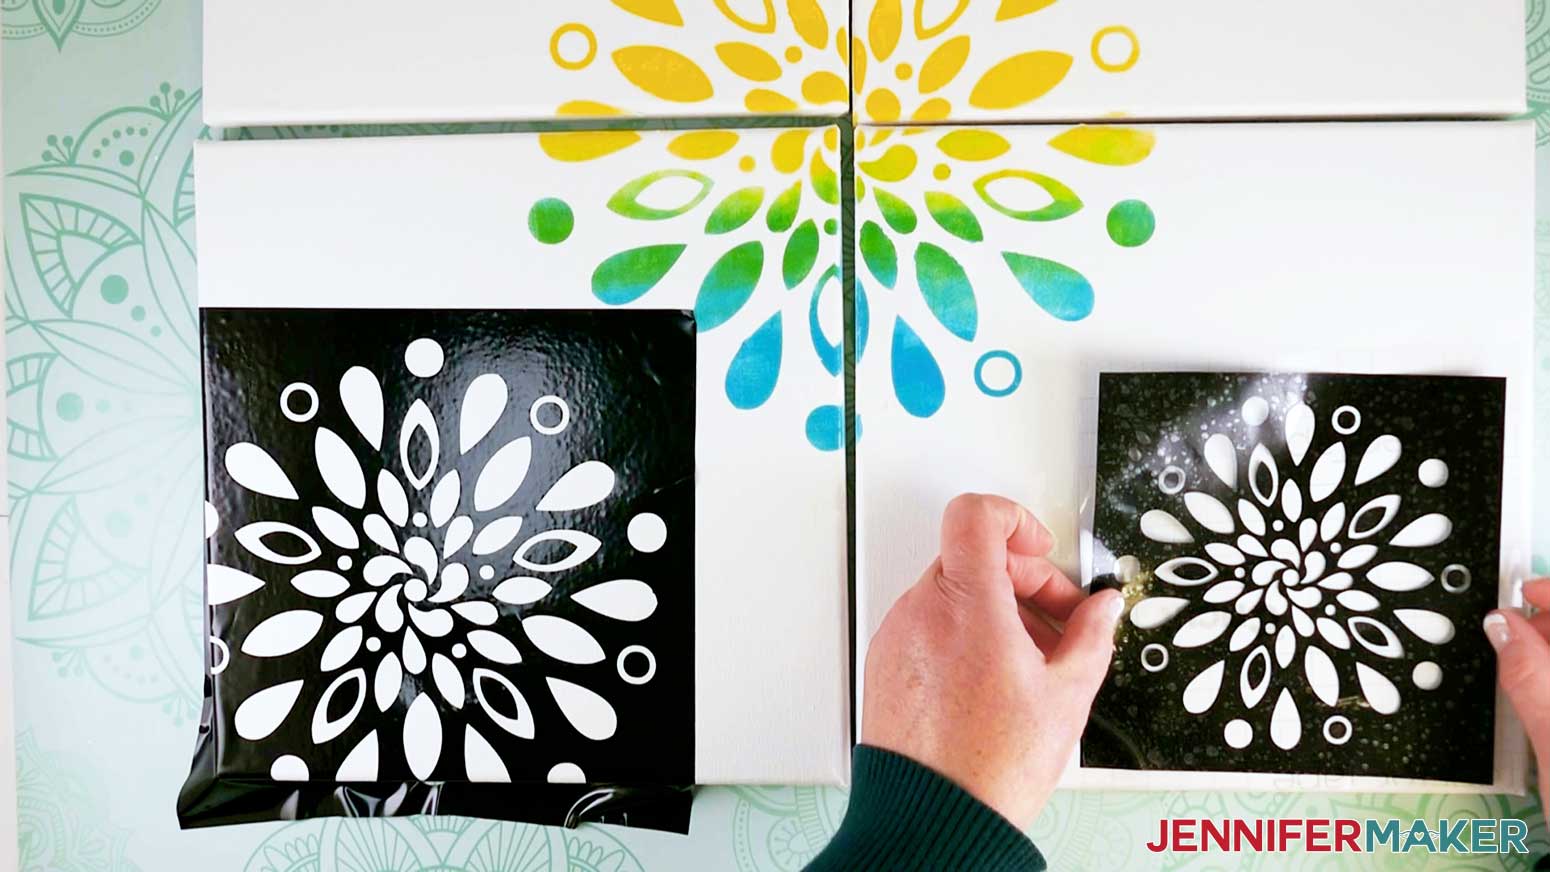
IMPORTANT: This design is a little different from the rest because there are 5 stencils and you can’t put them on the canvas all at once because they will stick and overlap. Instead, you will first add the center stencil, paint it, let that dry (1 hour) and remove the stencil. Then we will move onto the next stencil.
Now take the biggest stencil and cut a piece of transfer tape the same size as the design. Remove the backing from the transfer tape. Apply the transfer tape to your vinyl stencil by holding the transfer tape in the shape of a taco, then putting the bottom of your “taco” onto the middle of your stencil. Smooth the tape over the stencil from the center outward and rub gently with the XL Scraper Tool.
Gently lift the transfer tape bringing the design with it. If the vinyl does not stick to the transfer tape, place the transfer tape back down and burnish it with the XL Scraper Tool again.
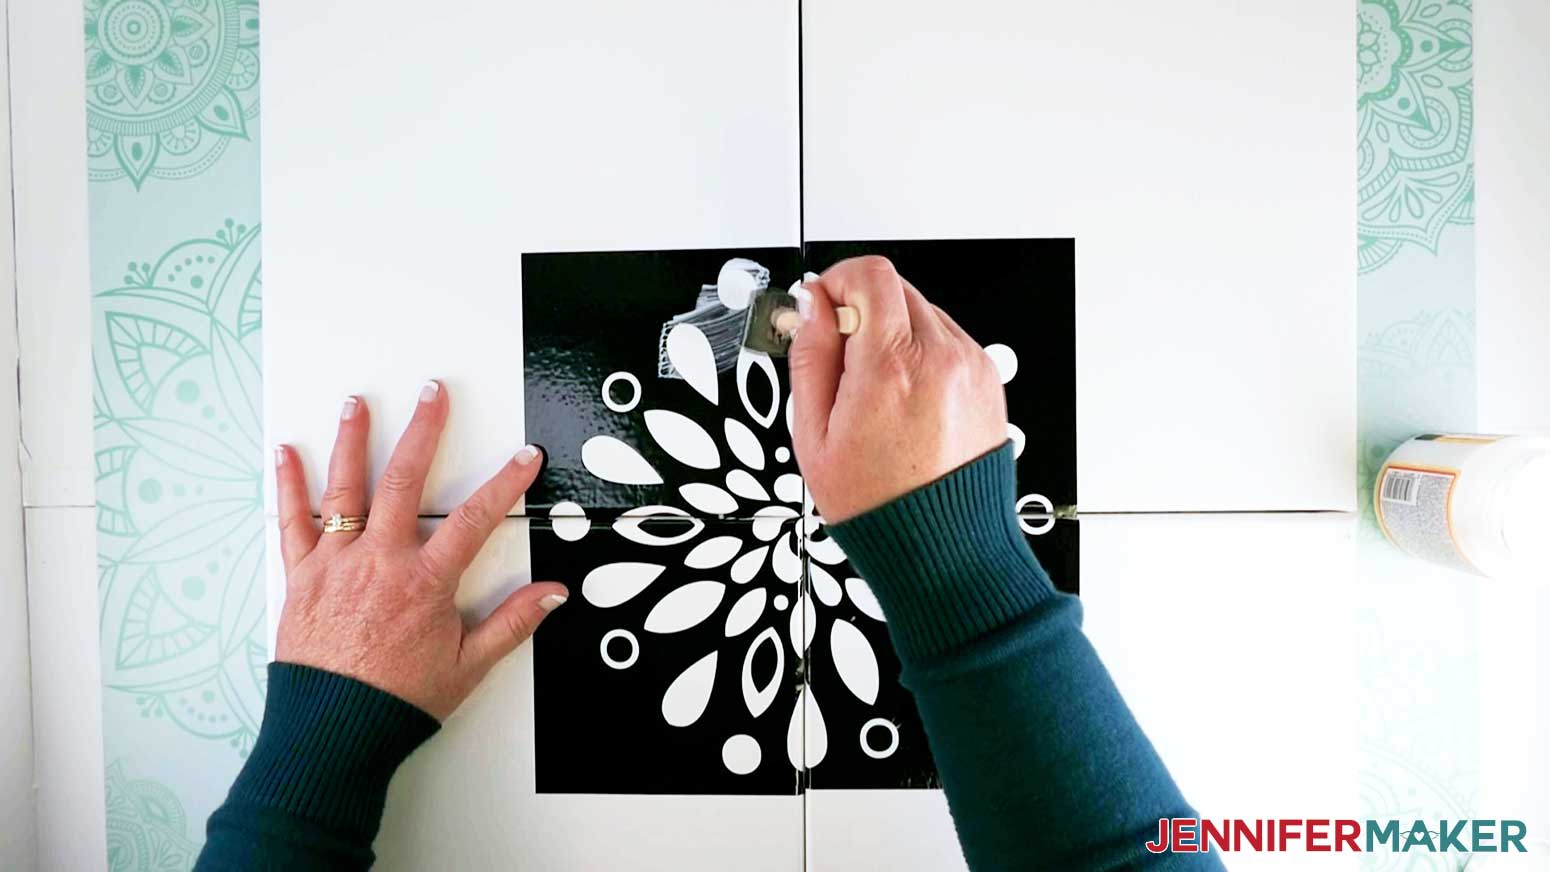
Next, place the biggest stencil at the center of the canvases using transfer tape and rub gently so that the stencil adheres to the canvases. Now slowly pick up a corner of the transfer tape and remove it from your stencil.
Now you can move to STEP 4 to paint this stencil.
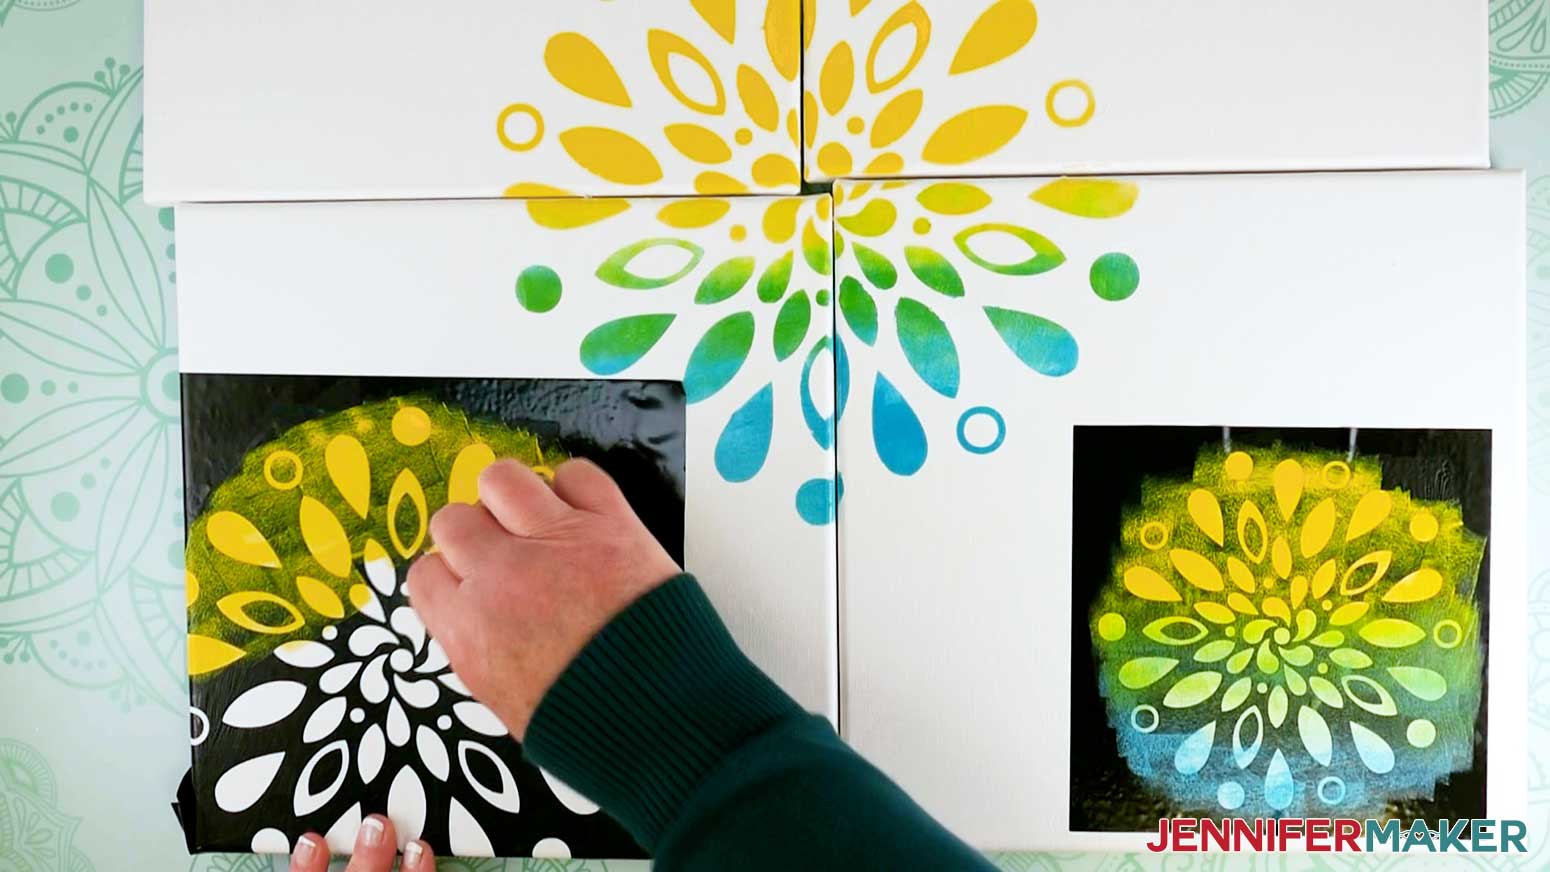
Once the big stencil is complete, place the small stencil in the corner of the top left canvas. Place the medium stencil on the top right-hand canvas towards the center of the top edge leaving a small amount of the flower hanging off the edge.

Optional: Gently rub the hanging piece of the stencil down so that you can paint the sides of the canvas too.
For the bottom canvases, place the medium size stencil in the bottom corner of the left-hand canvas with a small portion of the flower hanging over the edge.
On the right-hand canvas place the small stencil on the bottom corner without letting any of the design hang off the edge.
STEP 4: PAINT STENCIL
IMPORTANT: You will paint in this design one section at a time. Apply the largest stencil to the center first, paint it, let it dry, and then move onto the next stencil and repeat. Make sure to let each part dry before moving on.
Now that you have your stencil in place, take Mod Podge and paint the inside of the stencil. I like using the "Pounce" method mentioned above in the "Merry/Bright" design. Be careful not to get too much Mod Podge on the edges of the stencil, otherwise, the Mod Podge will pull off when you remove the stencil as it will stick to the stencil, not the canvas. Wait for the Mod Podge to completely dry, I usually let mine dry for an hour.
Next, take three sponges, one for yellow, one for blue, and one that will be used for mixing the two colors.
NOTE: Feel free to use whatever color combination you would like! I always enjoy experimenting with different colors to see how many cool combinations I can come up with!
First, use your yellow paint sponge to dab yellow on ¾ of the stencil from the top to just below the center.
Use the blue paint sponge to dab the blue on the lower portion of the stencil. Be careful not to get any yellow paint on the sponge.
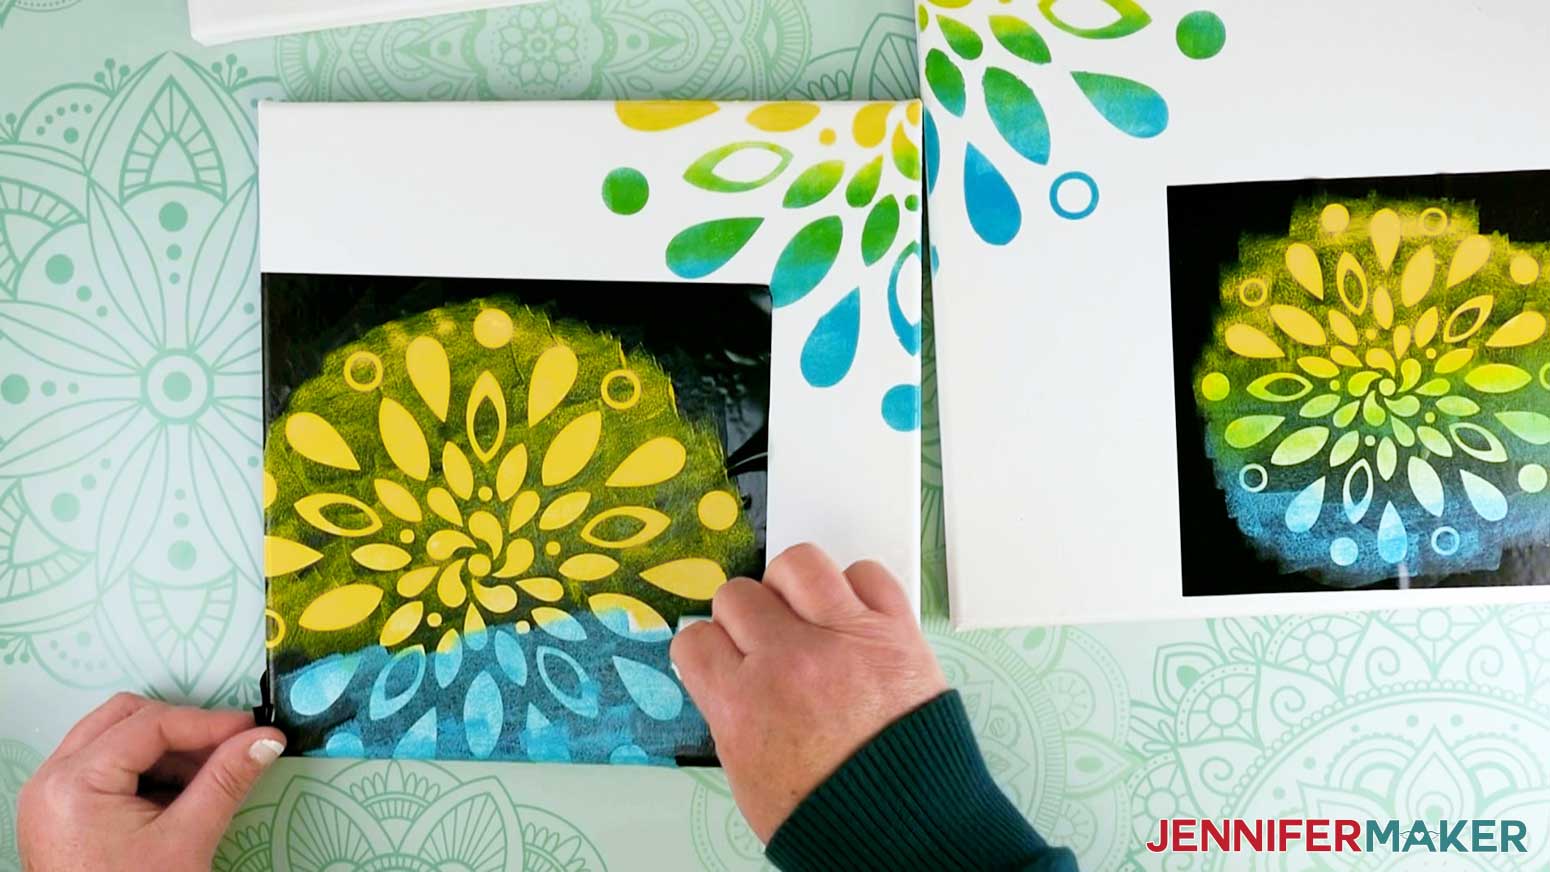
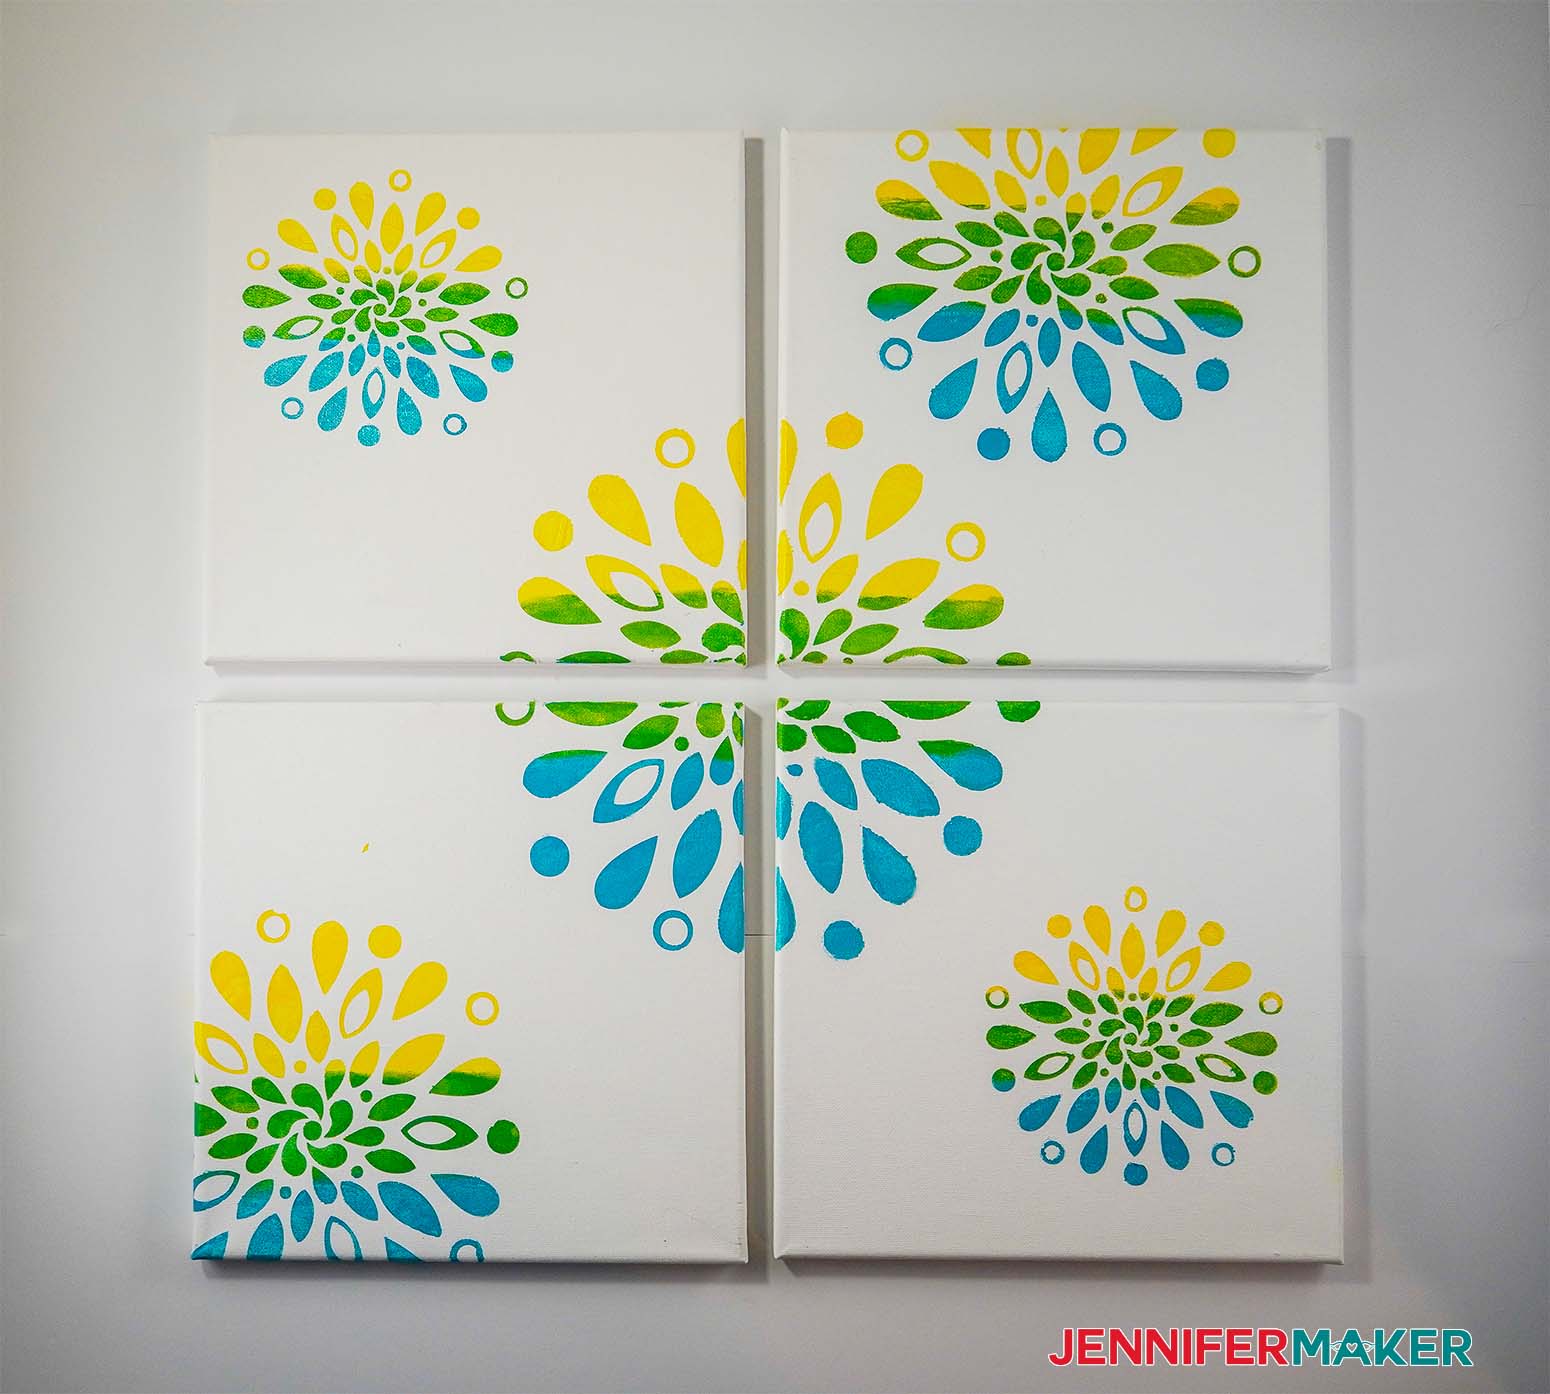
Lastly, with your yellow paint still wet, use another sponge and add blue paint to the middle section changing this section of paint from yellow to green. Continue to blend until you are satisfied with the transition from yellow to green to blue.
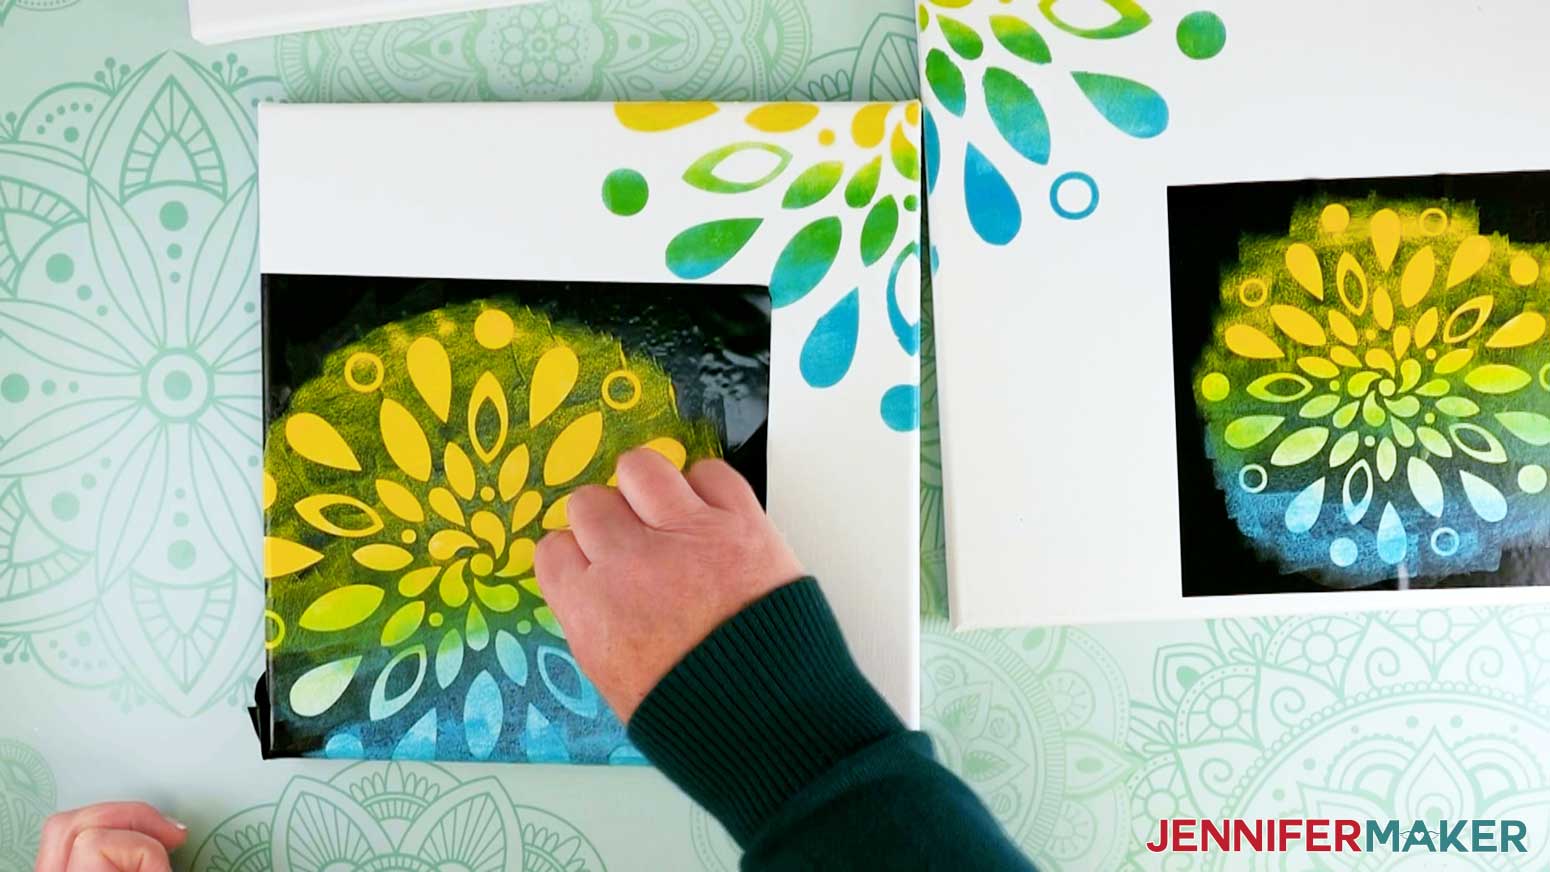 Once the paint has completely dried, which takes about 30 minutes, carefully remove your stencil. Use the weeding tool to remove the small centerpieces.
Now you have your finished Wall Art!
Notes
FONTS USED: Tingler Script font by FontBundles.net
My finished Easy Wall Art pieces are 10" x 10".
Recommended Products
As an Amazon Associate and member of other affiliate programs, I earn from qualifying purchases.

The detailed step-by-step assembly video on how to create the easy wall art is part of Maker Academy Weekend. Get a pass to watch all 20+ workshops, each with a printable handbook, transcript, audio files, design files, and support with a VIP pass below:

I’m loving how they turned out! It’s amazing how you can take an easy wall art idea and turn it into something you can be inspired by every day.
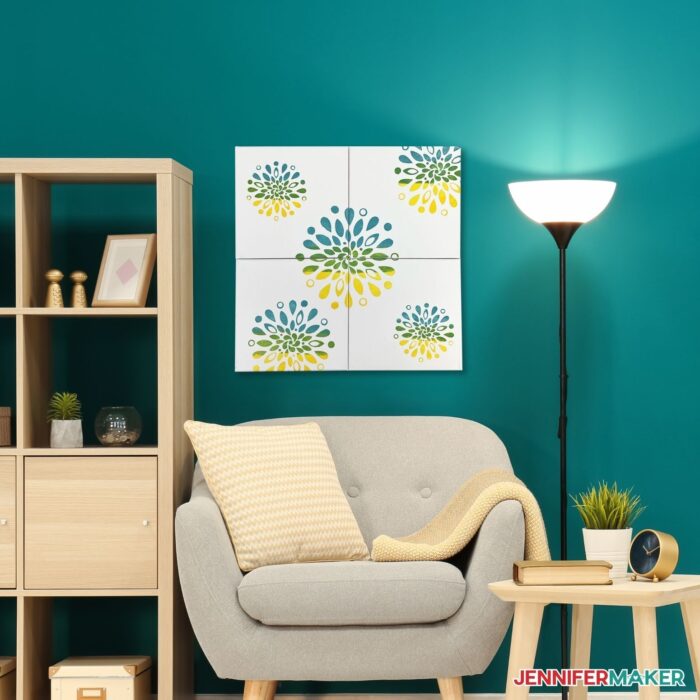
Add a pop of color to any room or give them away to a friend. Both will make a great impact and are the perfect way to make someone’s day just a little bit brighter!
Answers to Your Questions About How to Make Your DIY Canvas Wall Art
Q: Where is your tutorial for this DIY canvas wall art project?
This is a special project we made for our free Maker Academy Weekend event! A complete and detailed step-by-step video premiered during the event November 4-7, 2021 — specifically, this tutorial video was available to watch for free for 24 hours beginning November 5 at 2:00 pm ET! Get the workshop video replay and a 15-page printable handbook that details how to make this beautiful project with a VIP Pass to Maker Academy Weekend, which comes with other perks and bonuses, too!
Q: My store doesn’t have any canvases! Where do I find them?
If you can’t find canvases at your local craft stores, try ordering them from Amazon. These come in a pack of 8 so you can create even more personalized wall art! If that’s not an option, be sure to check out your local dollar store!
Get the free designs for my DIY Canvas Wall Art!
I’m looking forward to seeing what you make with my designs and how you use them! Please share a photo of your DIY canvas wall art in our Facebook group or tag me on social media with #jennifermaker.
Love,

Want to remember this? Save this DIY Canvas Wall Art Tutorial to your favorite Pinterest Board!