
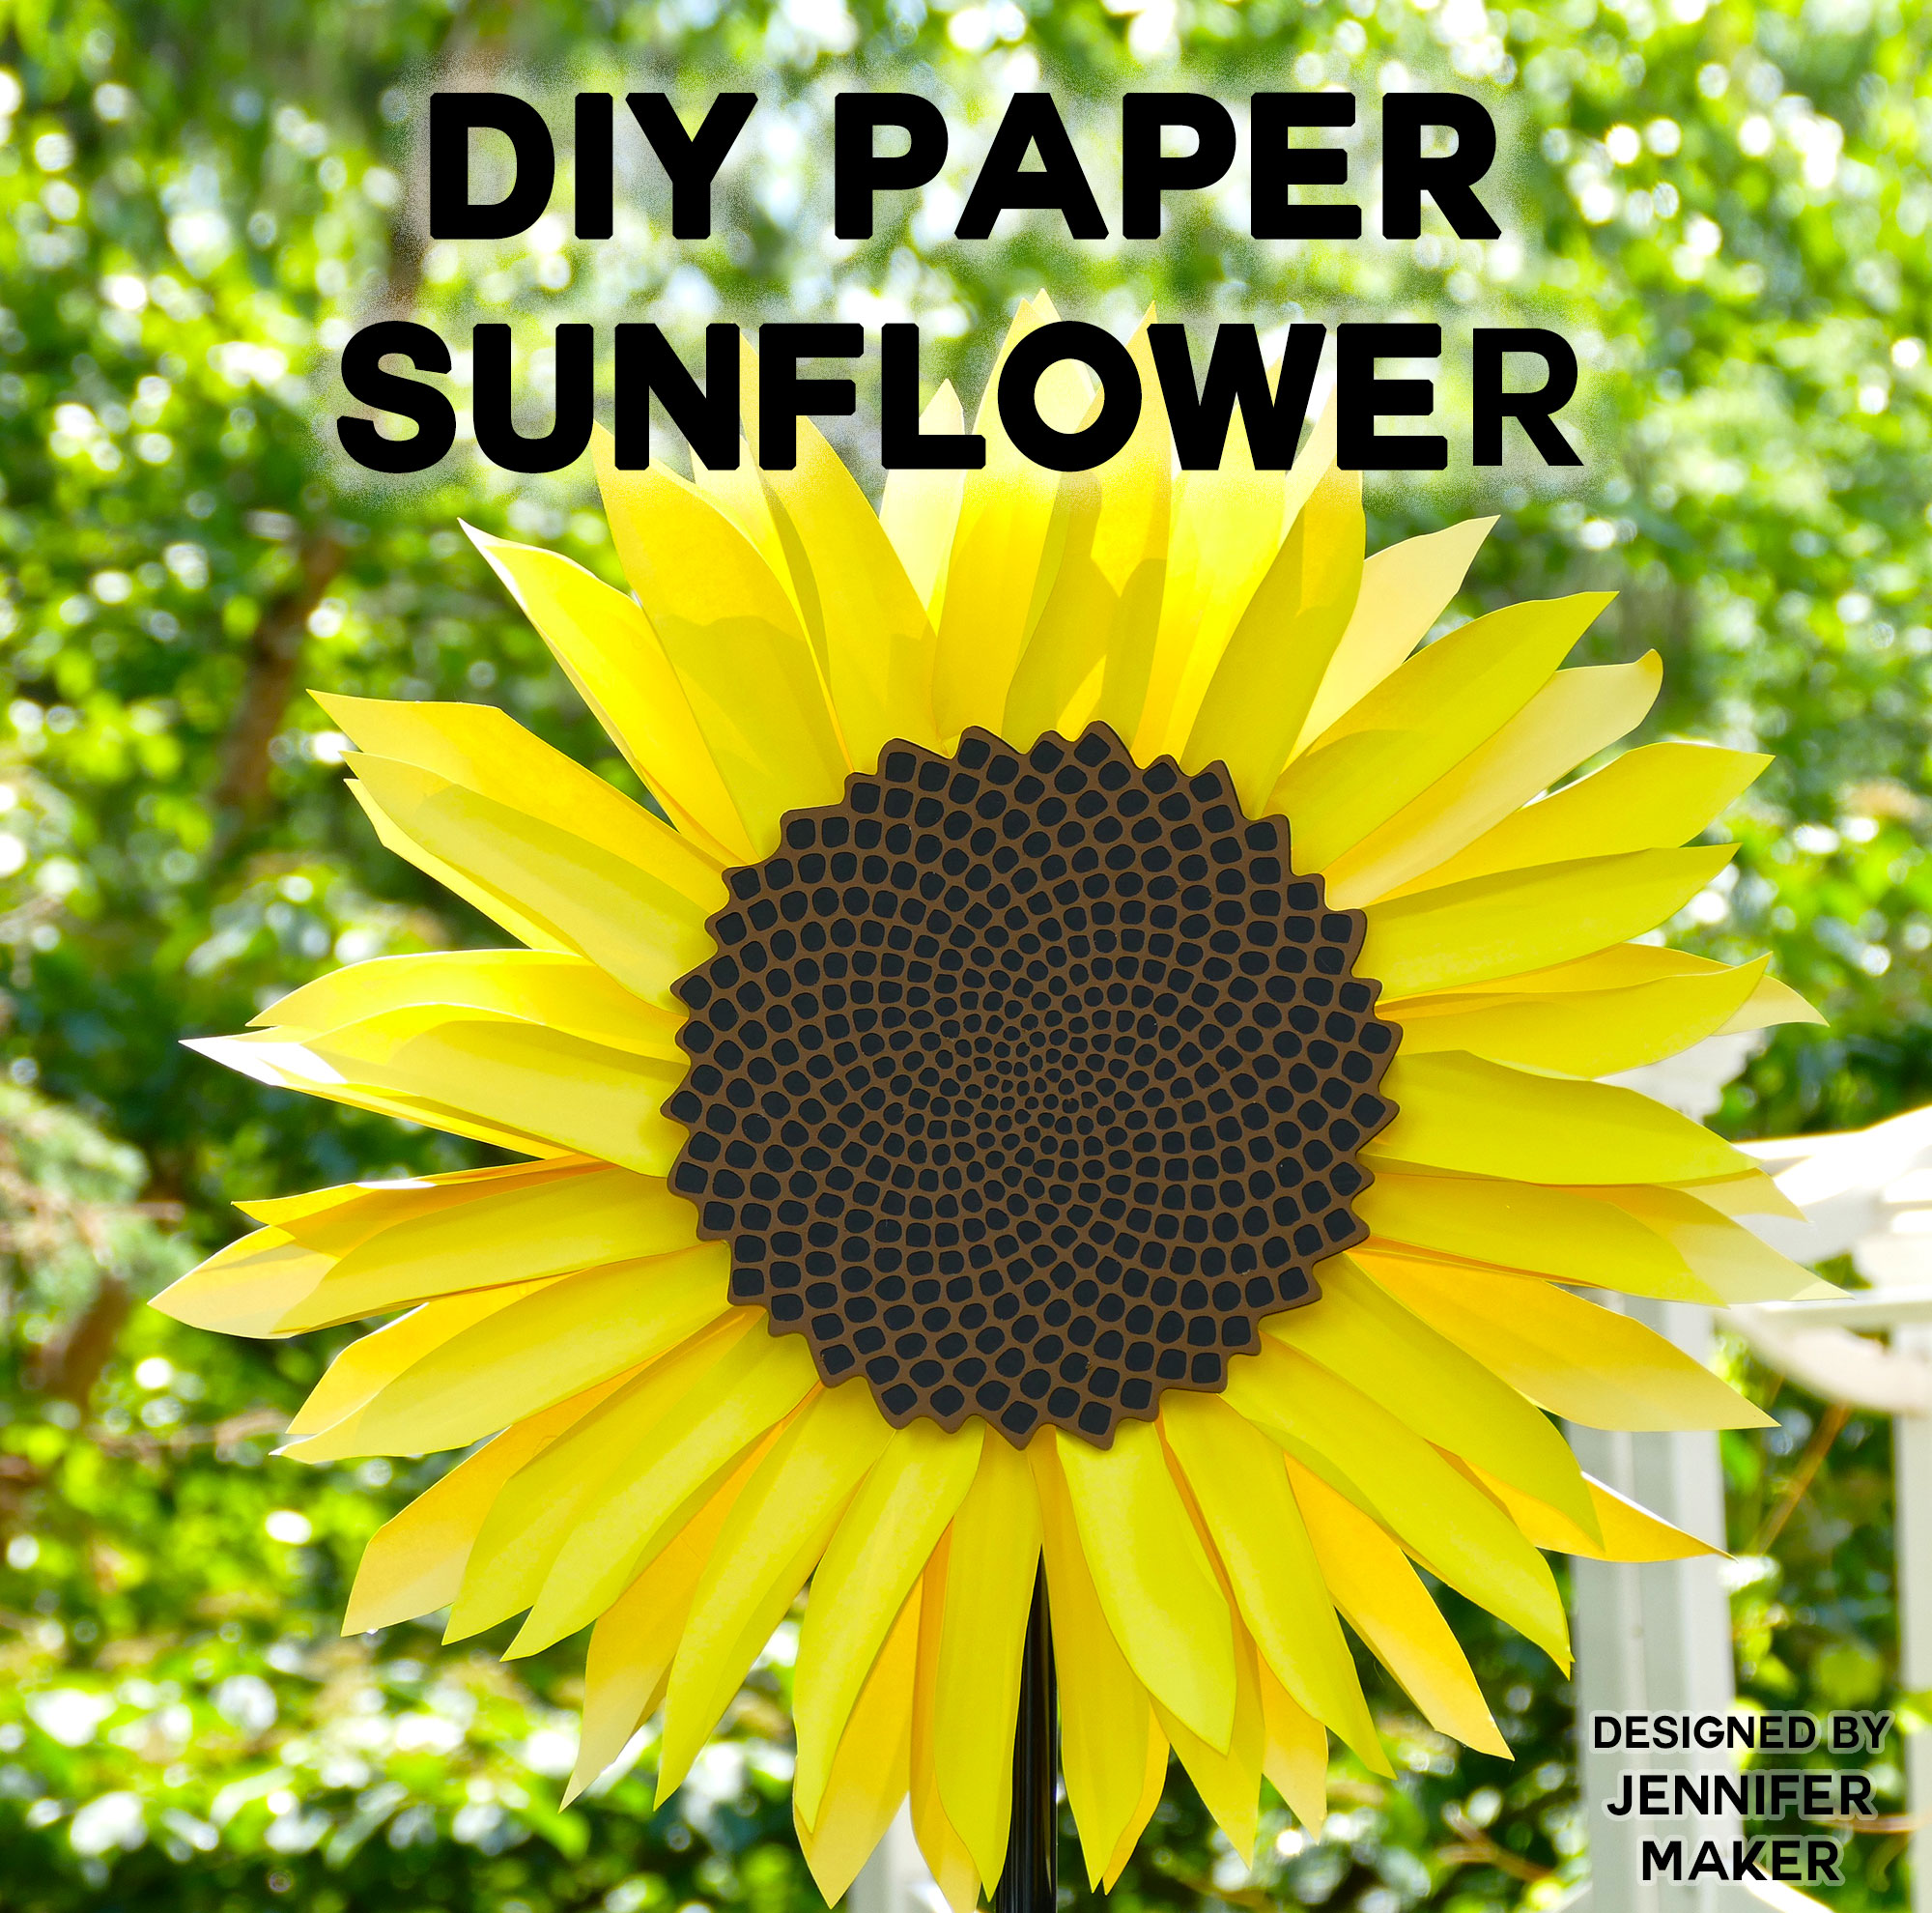
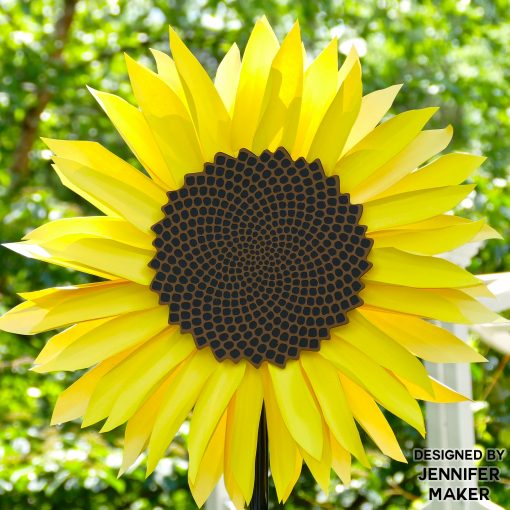
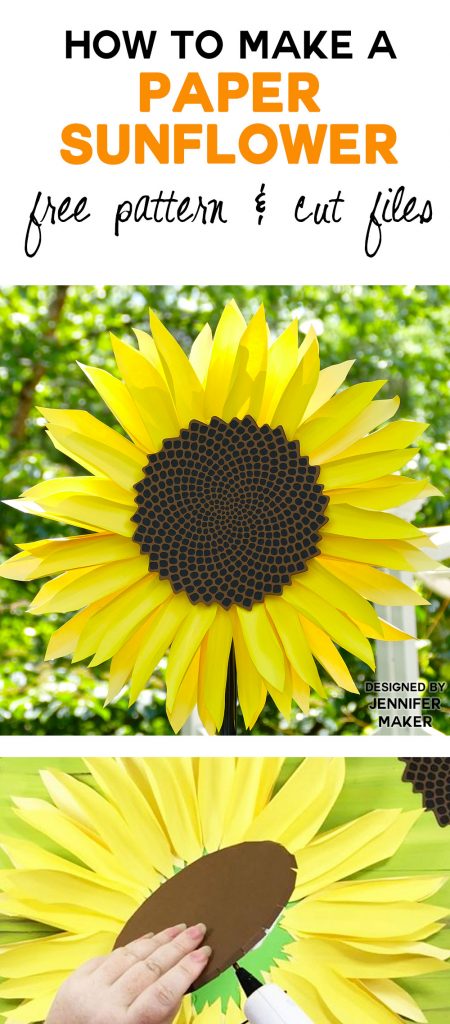
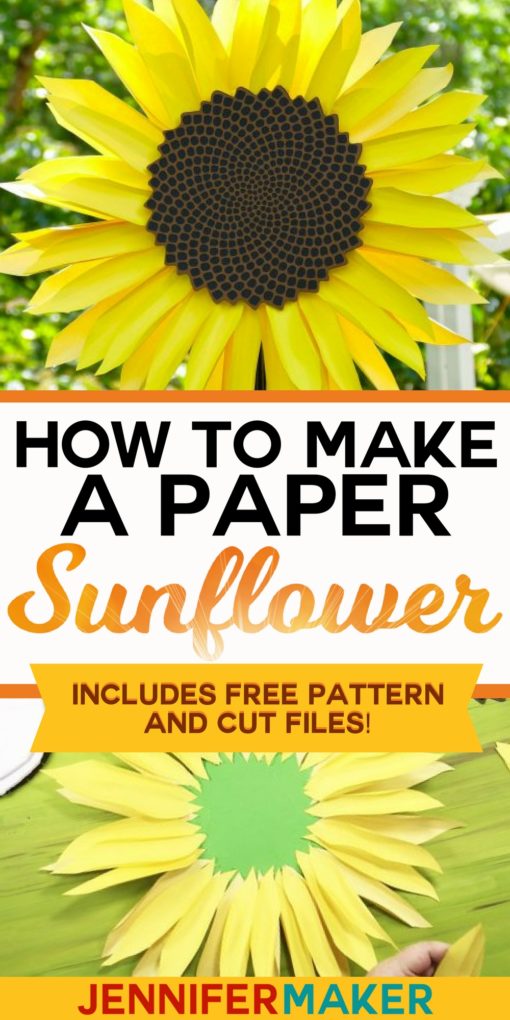
Make a stunning paper sunflower with this step-by-step tutorial and free template. This mesmerizing sunflower makes beautiful home decor!
After I made my giant paper rose a couple of weeks ago, a number of you asked me to make a large paper sunflower. I happily dove into that project, only to discover the seed head of the sunflower was somewhat of a challenge. My first couple of tries of the giant paper sunflower were uninspired and a little weird. So I dug deeper.
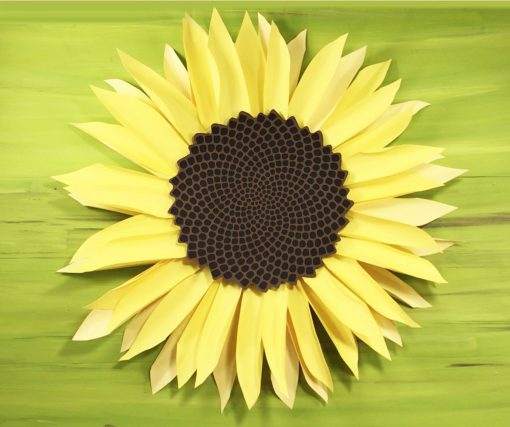
One of the keys to success with a paper flower is studying real flowers and shapes. So I learned more about the sunflower. I traced its petals and spent a long time studying the seed head. I was intrigued to learn that the sunflower’s seeds grow in a Fibonacci pattern. That was when inspiration struck! I designed a seed head based on a mesmerizing Fibonacci spiral and it all fell into place. 
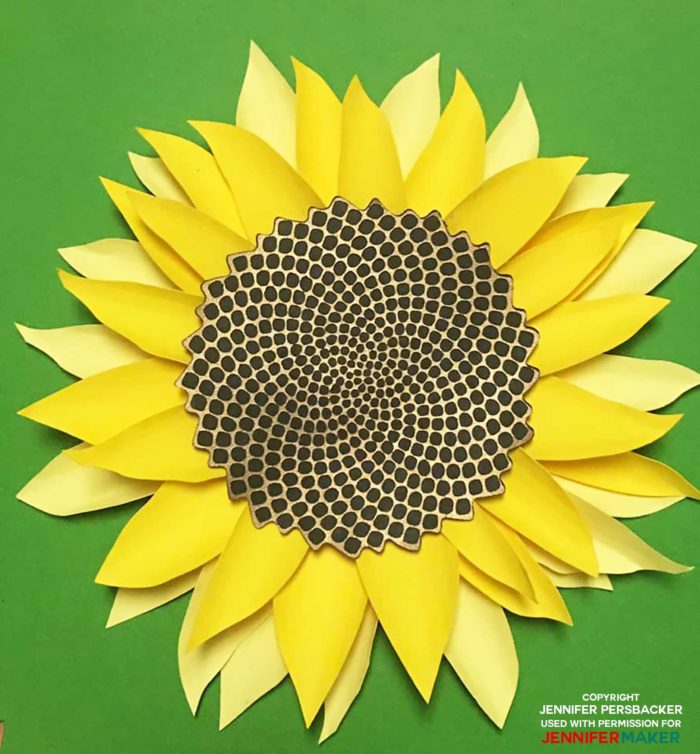
Many of my readers have made this paper sunflower with great success! Look at this gorgeous sunflower made by Jennifer Persbacker. She made the sunflower with a shiny paper over the seed head — it’s just stunning!
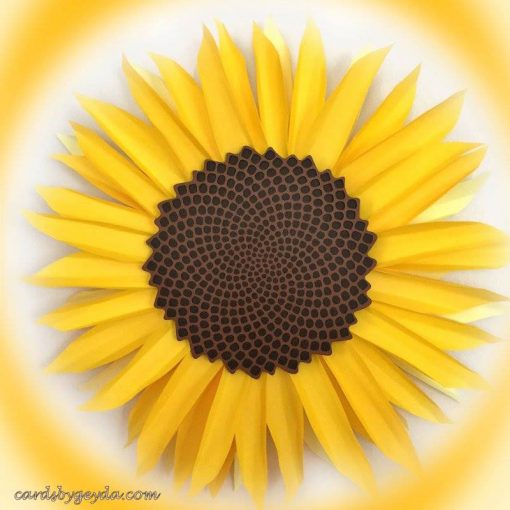
Here is a cheerful sunflower made by reader Misty Morgan — it makes me happy just looking at it!
The end result is a lovely and huge paper sunflower with a gorgeous center. Take a quick look at this DIY giant paper sunflower outside in the sunshine in the video below:
And you can make one, too! It’s not that difficult — I’ve got a full tutorial and assembly video to show you how.
Watch the full assembly video for the giant paper sunflower tutorial so you can see me put the sunflower together — pictures speak louder than words!
I’m excited to show you how to make a paper sunflower! This post contains some affiliate links for your convenience (which means if you make a purchase after clicking a link I will earn a small commission but it won’t cost you a penny more)! Read my full disclosure policy.
Giant Paper Sunflower Craft Materials
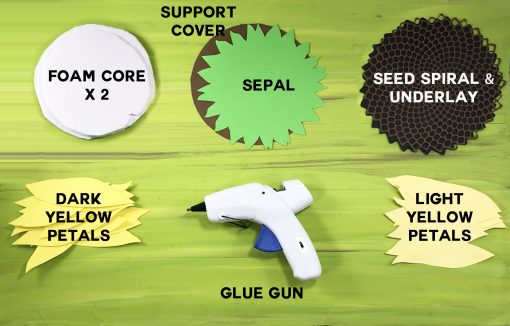
- 13 sheets of 65 lb. 8.5″ x 11″ cardstock — 9 yellow*, 2 brown, 1 black, and 1 green. I used Core’dinations Cardstock.
- Spray adhesive
- Hot glue gun and glue
- A 12″ x 12″ sheet of foam core
- A 20″ piece of 22 gauge floral wire (optional, for creating a hanger)
- A way to cut out your pieces (I used a Cricut, but you could also use a Silhouette Cameo or scissors)
- Design #36 – The SVG/DXF/PDF files (in my free resource library — get the password by filling out the form at the bottom of this post)
* Note on yellow cardstock: I used two different colors of yellow to give my sunflower more depth. Five sheets in bright yellow and four sheets in muted yellow.
How to Make a Big Paper Sunflower
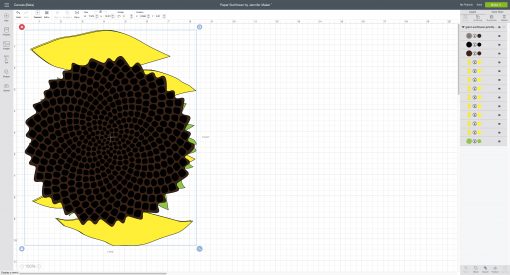
First, cut out your petals, seed head, sepal (base), and foam core cover. You can cut everything with scissors or a cutting machine. If you cut things out with scissors, you’ll want to print the seed head rather than try to cut it. If you’re using a Cricut, simply upload the SVG file to Cricut Design Space and click Make It — everything is sized and in the correct number for you to just load up your mats with paper and feed them into your Cricut. There is no scoring or attaching to worry about.
Here is what the paper sunflower file looks like uploaded to Cricut Design Space.
IMPORTANT NOTE: If you’re not sure how to upload an SVG file to Cricut Design Space, or you’re having issues (such as getting a message that says “unsupported file”), please watch my free training series, SVGs Made Simple. It will help you SO much!
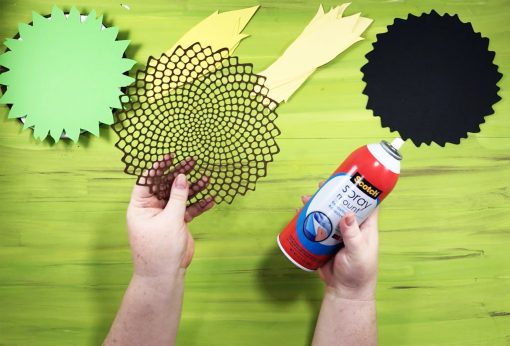
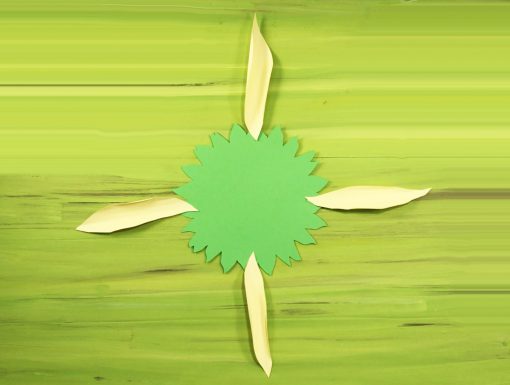
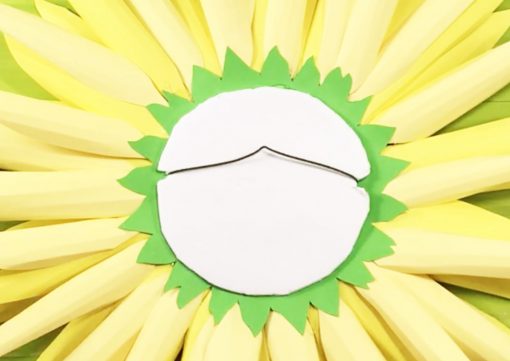
Begin by attaching the spiral seed pattern to the black seed underlay. To do this, spray the backside of the spiral seed pattern with spray adhesive, wait 30 seconds, then attach it to the underlay. Pay attention to how it lines up so you get it in the right place. If you see spots where the spiral bumps out over the underlay, just keep rotating it until the bump-outs disappear. I show how to do this in the assembly video. Once attached, set the seed head aside.
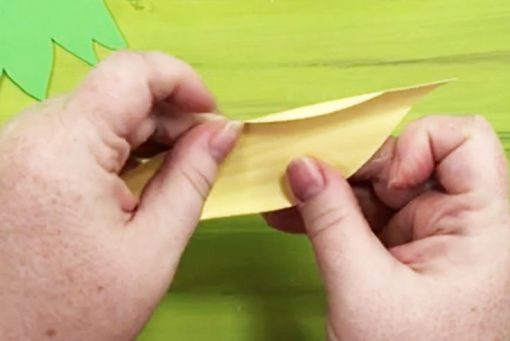
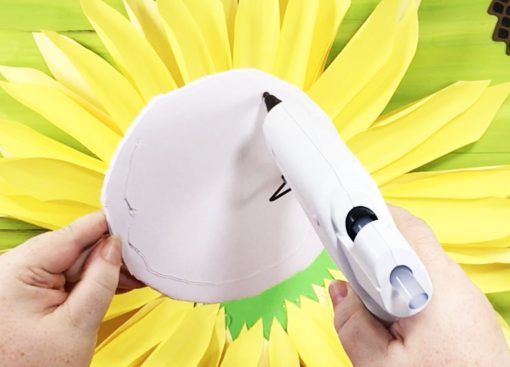
Now it’s time to work on those petals. If you cut out petals on different intensities of yellow, start with the lighter colored petals. Start by creasing your petals lengthwise several times so you have about 7-8 creases parallel to each other on your petal, then smooth it out. This simulates the texture and shape of a real sunflower petal.
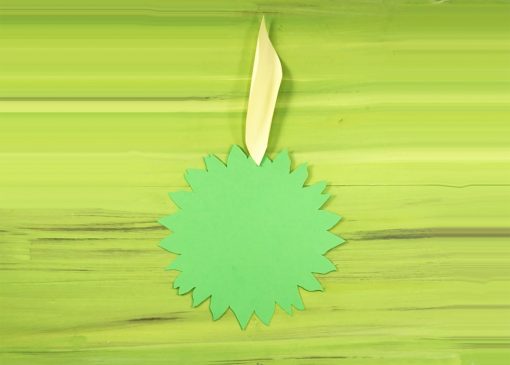
Once the petal is shaped, put a small dab of hot glue at one tip of your petal (whichever tip you want), then attach the petal tip to the edge of your sepal.
The next petal goes on directly across from the first. The third and fourth go at 90 degree angles to the first and second, so you have one petal at each of the cardinal points around your sepal. Doing it like this helps you keep your petals balanced, like a real sunflower.
Continue shaping and attaching your petals around your sepal, filling in the spaces between petals as you go. Keep going until you have about 16 petals attached.
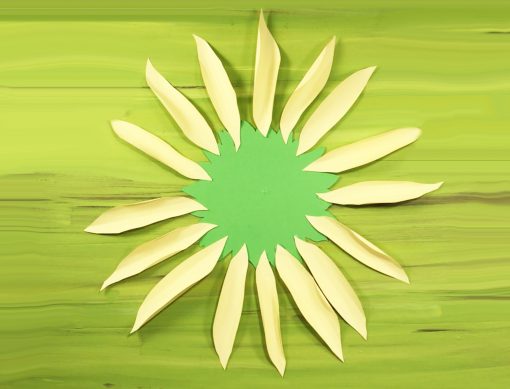
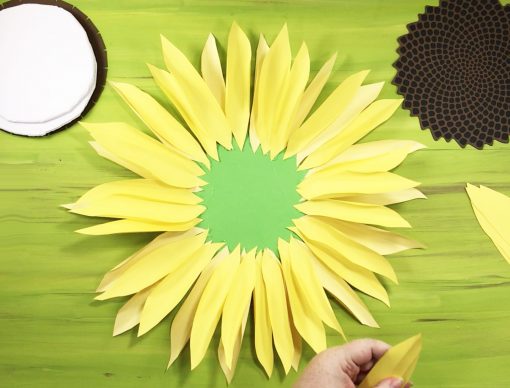
If you cut darker yellow petals, switch to using those now. Shape and attach petals and place these around your sepal, in between the petals you already attached. You should notice your sunflower start to fill in.
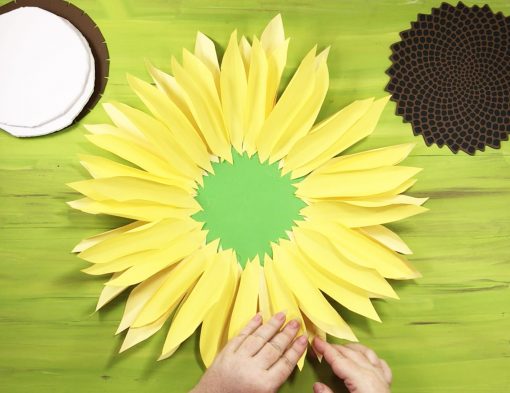
Once you’ve put another 16 petals on, take a good look at your sunflower. Do you see any gaps in petals? Use your remaining darker yellow petals to fill in those gaps.
Then go back and fill in any additional gaps with the lighter yellow petals, being sure to sandwich them between layers.
Once you have all 55 of your petals on your sunflower, it’s time to build up the center. Cut out two circles from your foam core (I used regular scissors to cut them out). Your circles should be just under 6.5″ in diameter. Glue them to each other with hot glue.
Now fold down the tabs on your foam cover piece, then attach to your glued circles. Glue down the tabs to the edge of your foam circles as well.
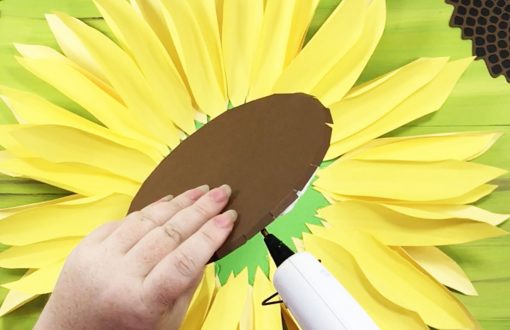
Now glue this center support to the very center of your paper sunflower, cardstock side up. It’ll look like a big Thin Mint!
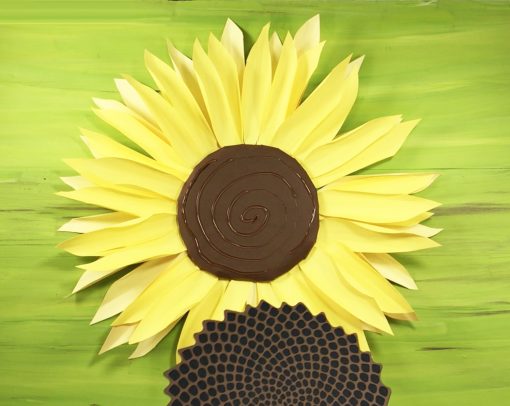
And now you can glue the seed head to the center support in your sunflower. Make sure you put hot glue in a spiral starting at the edge of the support and going all the way into the middle, then attach the seed head.
If you want to hang your paper sunflower on a wall or backdrop, cut out another circle about 5″ wide, cut two small notches in either side and then wrap stem wire around it. Glue the wire down on the back to keep it in place, then attach the hanger to the back of your flower with hot glue.
Want to attach a stem to your paper sunflower DIY? The easiest way is simply to put a dowel (wrapped in floral tape) through the hanger on the back of your sunflower, which is what I’ve done in my photos. If your sunflower will be seen from the backside as well as the front, cut out another green sepal piece, fold it in half, cut a slit in it along HALF of the fold’s edge (sepal edge to sepal center), then put this around the top of your dowel at the back of your paper sunflower. Glue the sides of the slit so it makes a cone shape, then glue the cone itself to the back of your sunflower.
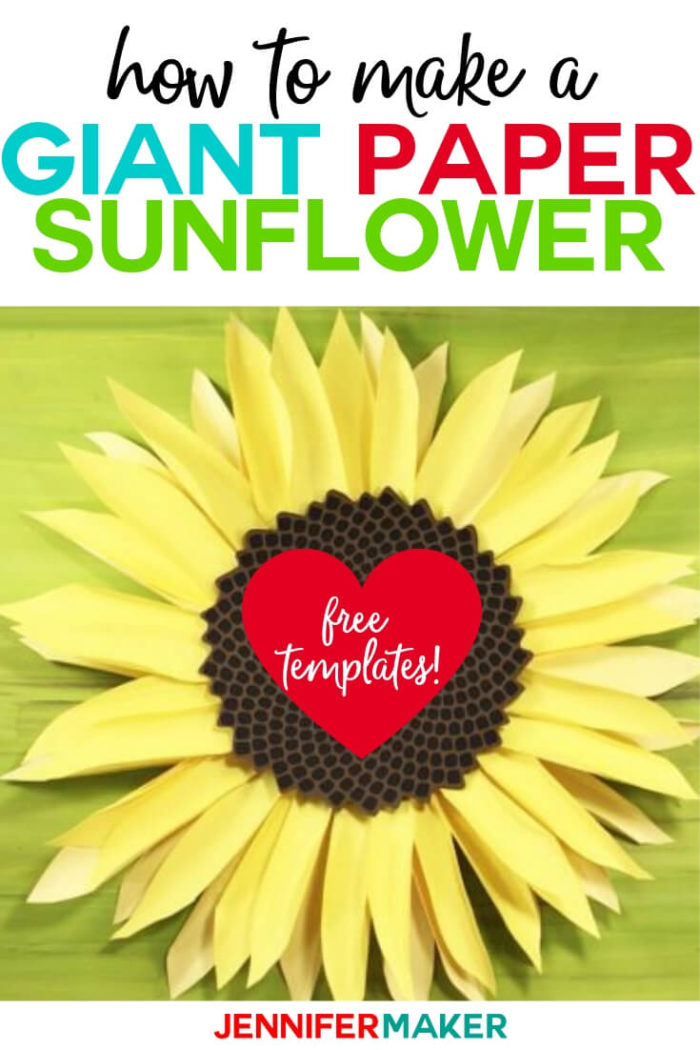
I think this giant sunflower paper flower is so cheerful! I’ve now made several of them and I’ll be decorating my renovated craft room with them. You can also use them for decorating around the house, wedding receptions, photo backdrops, you name it. These paper sunflower decorations are really attention-getting and gorgeous. I’d love to hear what you make with this design. Please send me photos at [email protected], and I will include them here with your permission.
Free Cut Files for the Giant Paper Sunflower
Get the password for the library with the free giant sunflower pattern and giant sunflower SVG/DXF/PDF files here by filling out this form:
Love,

More Paper Flower Tutorials & SVG Cut Files
View all my paper flowers here.
Want to remember this? Save How to Make a Giant Paper Sunflower to Your Favorite DIY Pinterest Board!
More Fun and Easy Craft Posts
DIY Dry Erase Board — So Simple & Cute
Make a Craft Supply Organizer in 5 Minutes!
DIY Paper Winged Heart with Hidden Messages
DIY Sharpie Mugs — Four Different Techniques
Do you like to make 3D paper crafting projects, too? Share and leave a comment below!

Awesome, thank you for sharing such a wonderful design and creating an easy to follow tutorial.
My pleasure, Terry!
Hi Jennifer!
Your flowers are amazing! Where do I get a spiral seed pattern to make the sunflower center? Thank you!
Thank you, Elizabeth! The spiral seed pattern is included in the files you can download. 🙂
WOW your flowers look real. I had to take a double take! 🙂 Great projects!
Thank you, Kathleen!
This is amazing! Great job on the design; kinda makes me wish I had a Cricut!
Thank you, Lora!
love it! thanks for sharing on craft schooling sunday!
Wow! This is so cool!
Jennifer, this is amazing and I love that you incorporated the Fibonacci spiral into your post! Fascinating math component!
Hi Jennifer, I love this project! Basically because I love flowers = so anyway to bring them into my home – without them dying is a plus!! Thanks for linking up at trekkingthru.com Have a great week!!
I love this! So cute and summery. Thank you for sharing in the GRAND Social link party!
You’re welcome! Thank you for hosting the party. 🙂
This is adorable! I need to find a spot for one in my house!!! I love anything I can make with my Cricut.
Thank you, Cassie!
Your sunflower is beautiful and intriguing. You did an amazing job of researching the center and creating a flower that is so realistic. Smiles, Linda at Paper Seedlings
Thank you so much, Linda!
I love paper crafts & this sunflower is adorable! Thanks for the video & the cut files.
That is adorable! What a fun way to decorate a summer party! Pinning to try. 🙂
Wow! When I was scrolling and saw your picture, I thought it was a real sunflower!
Thanks, Angela!
This is amazing how you made this sunflower. I would love to try and make one.
You will be one of my features this week at http://www.fabifabu.com/2017/07/16/inspiration-galore-project-party Thanks for sharing see you there!!
Awesome! So excited! Thank you, Fabiola!
Hi Jennifer! I love sunflowers as they always make me feel happy. I love your idea of a paper one as you would have happiness every day. Thanks for sharing with us at #BloggersPitStop and have a lovely week.
Congrats Jennifer! Your post is Featured at the #WednesdayAIMLinkParty. See here: http://grammysgrid.com/wednesday-aim-link-party-23/
Actually, I’m looking some resource about paper sunflower and intelligentdomestications blog recommend you. Thanks for write a helpful info.
Just a big WOW! You did it like a pro. I will try it too. Thanks for sharing with us, such an useful tutorial.
Great, Great and Great,
The sunflower tutorial is awesome. You have made is fantastic. I am a DIY beginner, I have two kids.They love sunflower. I think they will be happy. Your tips very helpful.Now, I need glue gun It’s essential tools for homemade. Really, Thanks for sharing the post!
Keep up such a good post.
I just made this and it turned out FANTASTIC. I am using it in place of a wreath on my front door…but need to make another for inside my house so I can see it and SMILE (how often do you look at your own front door). Thanks for the wonderful tutorial and the free cut files, all of which made this super simple.
Me and my 10 years old girl Emily used this post for Emily’s Homework.
Many thanks For this awesome article
Hooray! Happy I could help. 🙂
It’s the most beautiful paper sunflower I have seen. Thanks Jennifer for all the time and effort that you put on your work for us (your followers). It’s certainly the most realistic sunflower.
So happy you like my sunflower, Danae!
Just joined. I have to say that I am very impressed with the intricacy of the sunflower. My sister, who passed away a few years ago loved sunflowers and to keep her legacy we have adopted the sunflower to remember her by. Of course living in Kansas the sunflower state helps too. I can’t wait to make some of the sunflowers and other things you have designed.
Hi, Wanda! So happy to hear you like my sunflower — this is one of my favorite projects, too! After you make the sunflower, come share it with us in our Cricut group. We’d all love to see it! 🙂
I’ve just recenty discovered giant flowers and your tutorials. I am loving making my own giant flowers. I have made the Spellbound Rose twice – one pink, one red, and now the sunflower. So much fun! Thanks, Jennifer, for the tutorials and SVGs.
Hi Jennifer. Love your videos!!! I’m planning on making this giant sunflower but was wondering if you used hot glue for a reason or if could this be done using Art Glitter Glue?
Hot glue is what I had and I know it works really well. You can definitely try to use Art Glitter Glue. I know it does well for paper crafts and cards.
Hi Jennifer, Love the sunflower tutorial. Actually I like all you videos. How can I adjust the template to make a smaller sunflower on my Cricut Joy. Thanks
Hi Diane, here is a blog post to walk you through the process to resize a design in Cricut Design Space https://jennifermaker.com/resize-svg-files-cricut-design-space/. I hope that helps!
I just saw this video. Absolutely amazingl. Any suggestions if you wanted to put them in a yard for a party. Meaning coming out of the ground temporarily. . Would a dowel work?
Thank you
I don’t see why not, I think that’s a great idea! I’d love to see how it turns out if you’d love to share in my Cricut Crafter & Makers group.
Absolutely love the sunflower! Doing a baby shower with sunflowers in the theme. Can this be resized to make a little smaller. Would love to do big and small ones. Thanks so much for all your creativity!
That is a wonderful idea, Leeann! You are welcome to resize them in Design Space to fit your needs!