
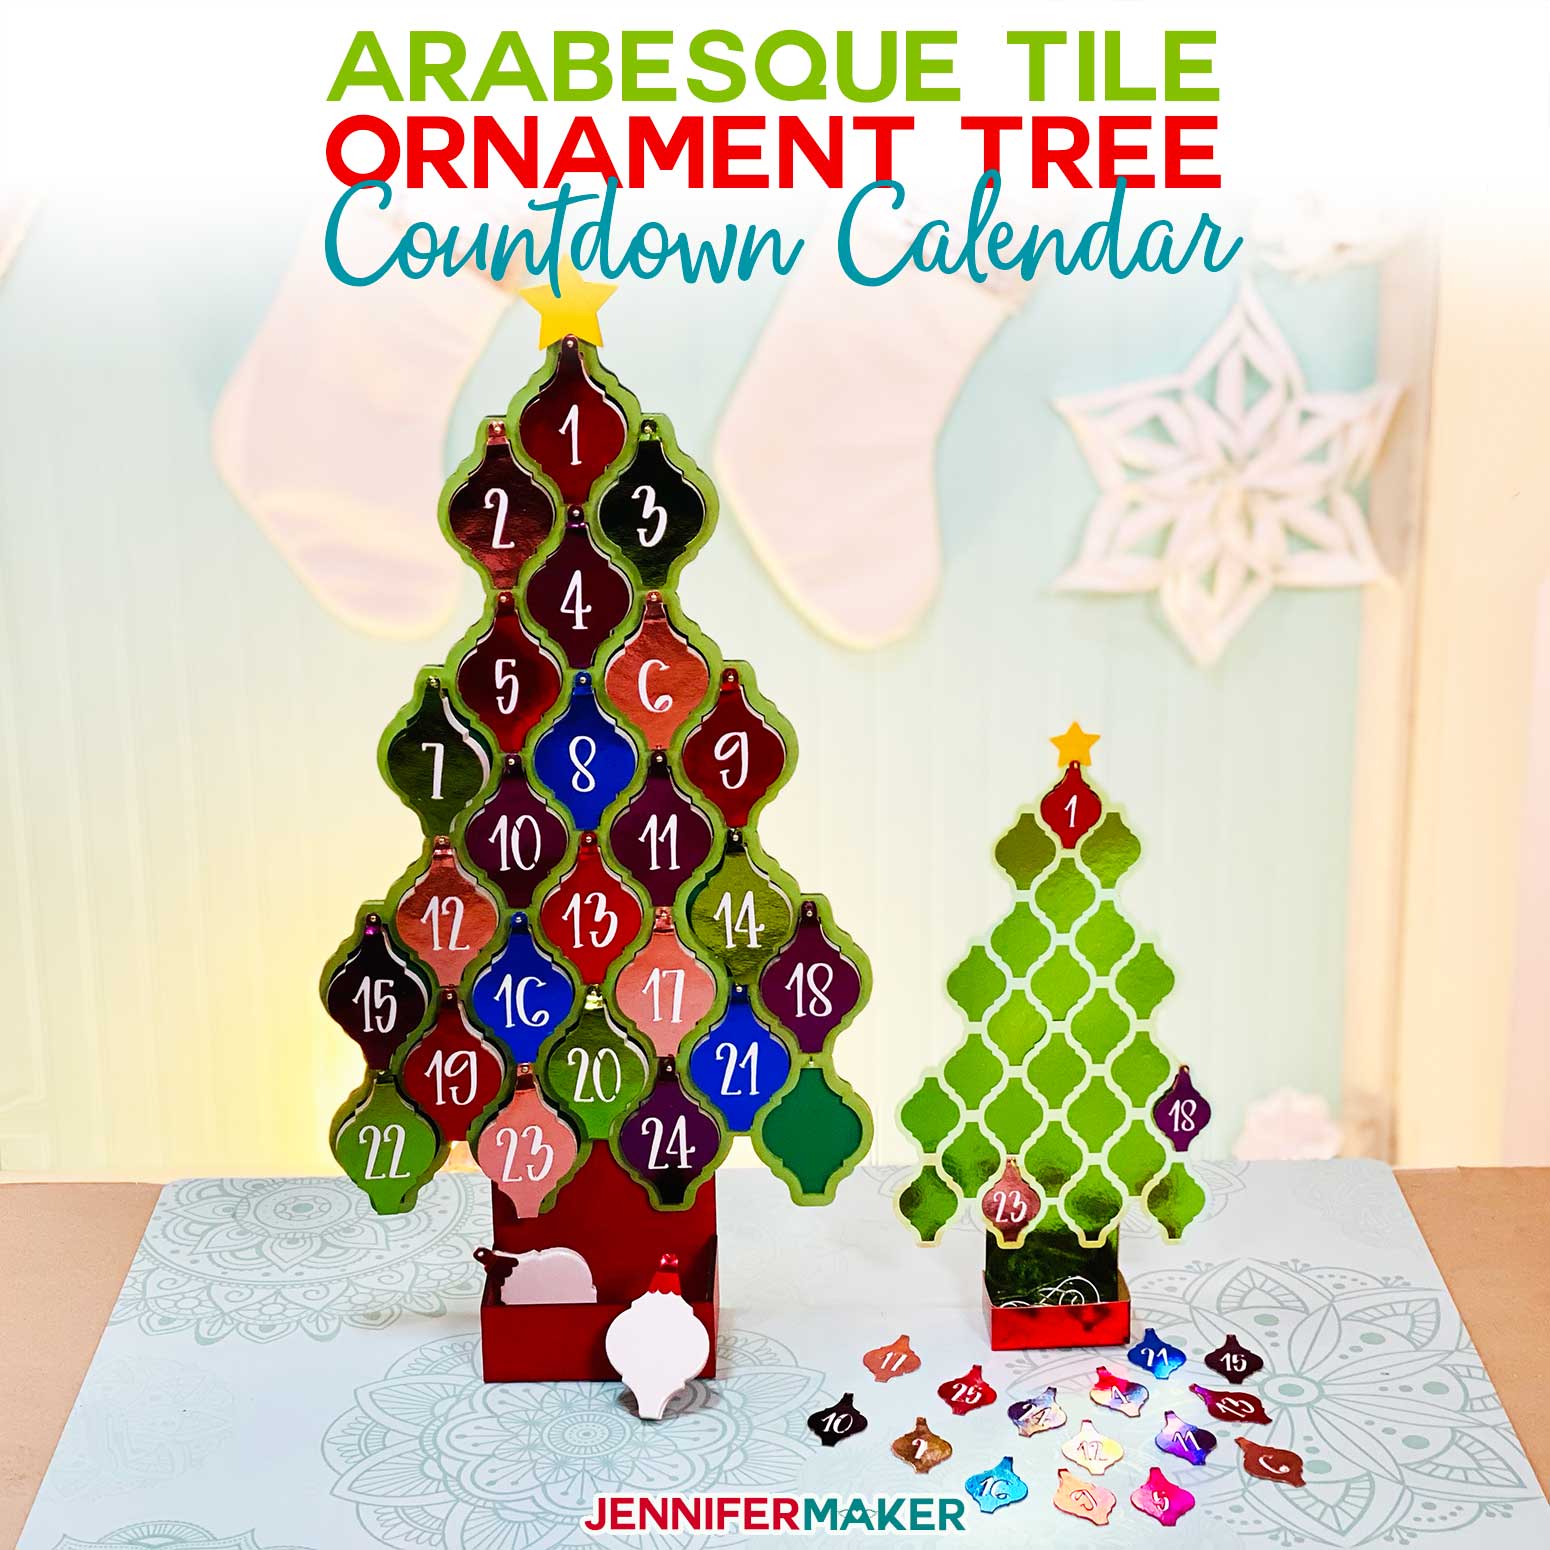
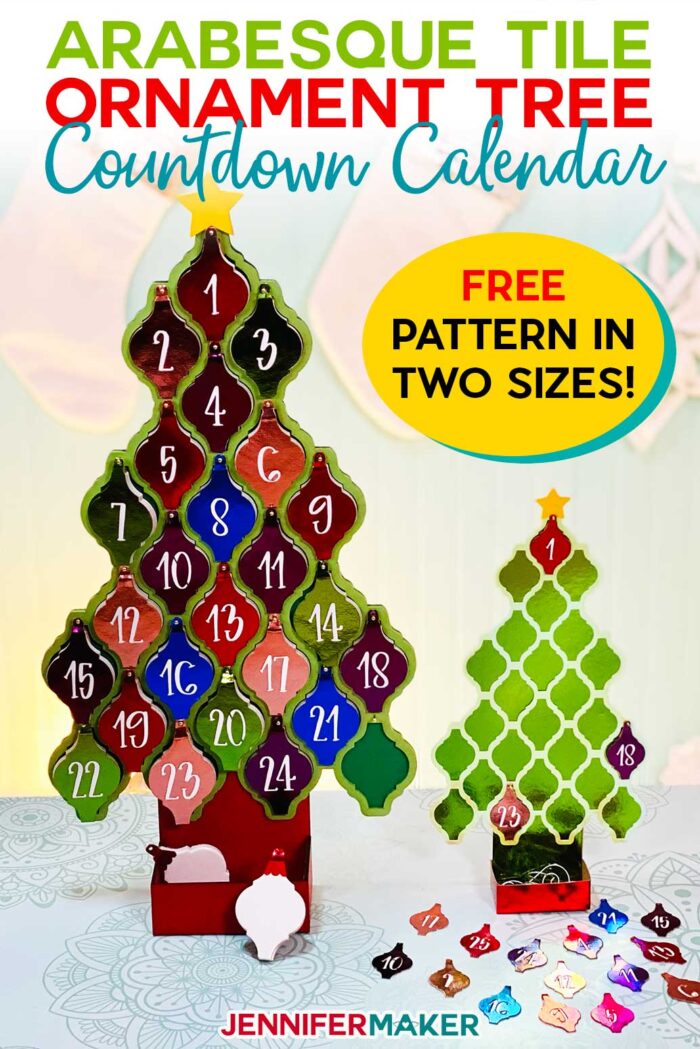
Learn how to create this arabesque tile ornament tree countdown calendar for Christmas! You can make this in two sizes from a variety of materials — ceramic tiles are optional!
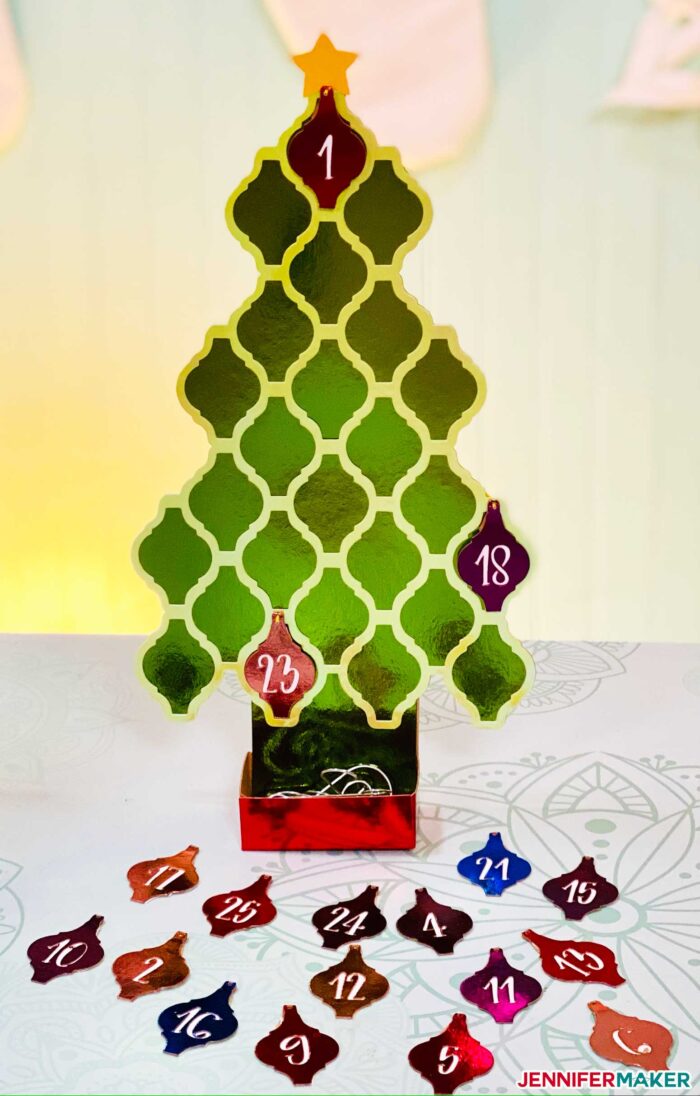
I’m gearing up to do my annual project-a-day extravaganza in December and I wanted a fun way to countdown the days. This is my fourth year doing this and each year I try to create a new countdown, such as the Christmas Tree Advent Calendar with Boxes and then the Christmas Town Countdown. This year ceramic arabesque tile ornaments are all the rage, and I thought it would be fun to make some ornaments for each day of the countdown and hang them from a wood tree. So I designed a big version I can actually hang the smaller of the ceramic tiles on, as well as a smaller one that can be cut with simple Kraft board so everyone can join in on the fun. Ceramic tiles are completely optional—you can use Kraft board or chipboard to make them from my included templates in the free project pattern!

This tile ornament Christmas tree can be used in SO many ways to countdown. You can put all of the ornaments up with the backs with numbers facing out, then turn each ornament over to reveal the front each day. Or you can remove the ornaments and hang them on your actual Christmas tree. Or, you can keep the ornaments in the box at the bottom and put them on your little tree to count each day. There are many options!
For this project, I used the small “Mohawk Glasen” glazed tiles available at Menards home improvement store. These were the smallest arabesque tiles I’ve found, and I wanted 25 tiles for each day leading up to Christmas. Now I realize not everyone has access to a Menards, but note that you can purchase them online here and have them shipped to you. But the good news is you can also just cut the exact same shape out of card stock or Kraft board and skip the whole ceramic tile thing altogether. It’s your choice! (Note that the ceramic ornaments will only fit on the large version of the ornament tree, and it must be made from chipboard (Cricut) or draft board/MDF (Glowforge) to support the weight of the ceramic ornaments.)
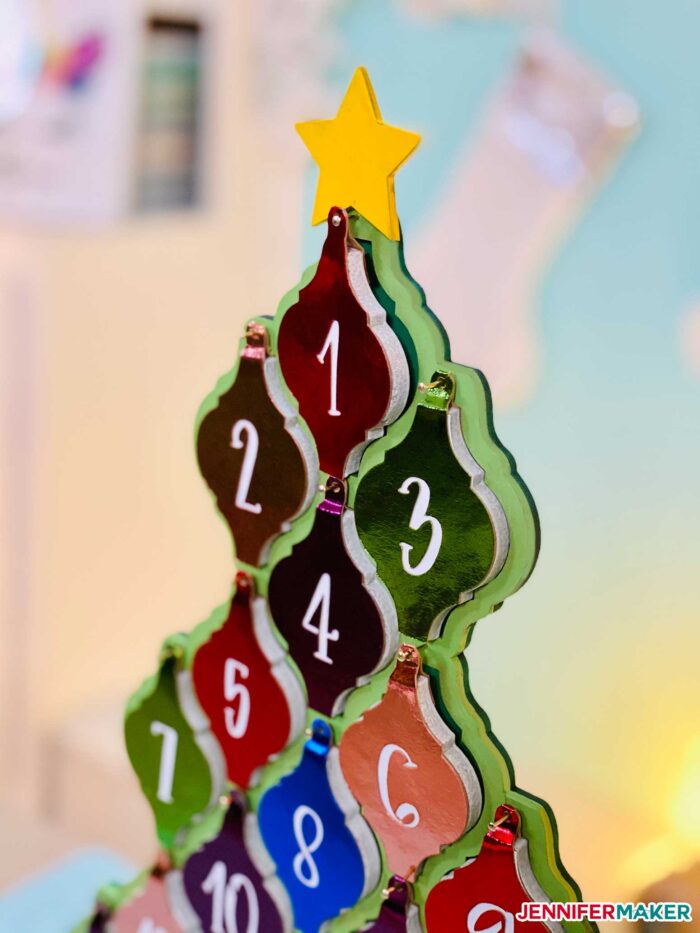
Here is the large ornament tree without all the ornaments on it yet:
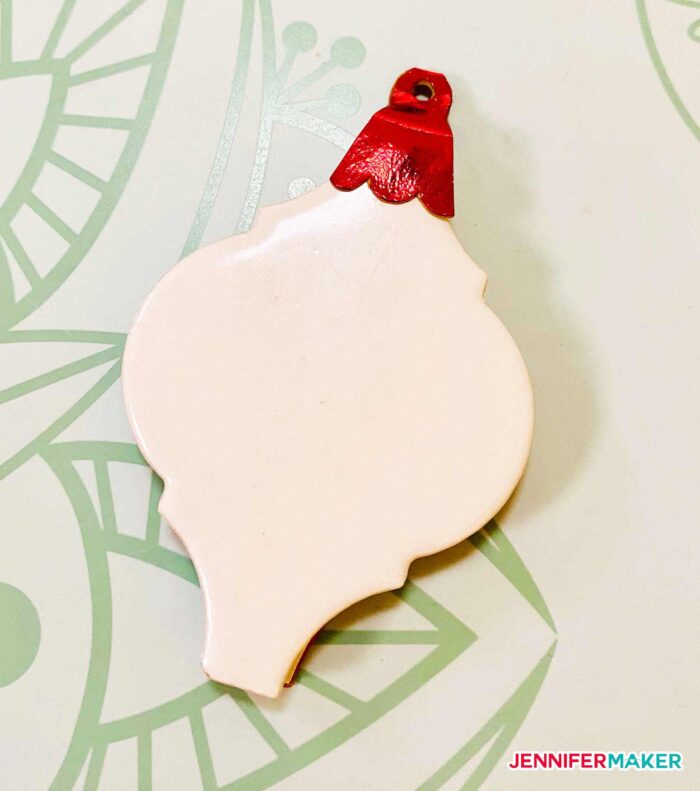
To get the ceramic tile ornaments to hang on the tree compactly, we designed and cut “cap hangers” that you can glue to the tops of the tiles. This is a simple way to add a “hole” to your ceramic ornaments, as well as cover the entire back side which is typically rough and uneven. You’ll find these ornament backs and cap hangers included in the free project files as well.
Yes, I am working on designs to go on the front of these tile ornaments, and I’ll share them when they are ready! In the meantime, I’ve included links to some ornament design bundles you may like.
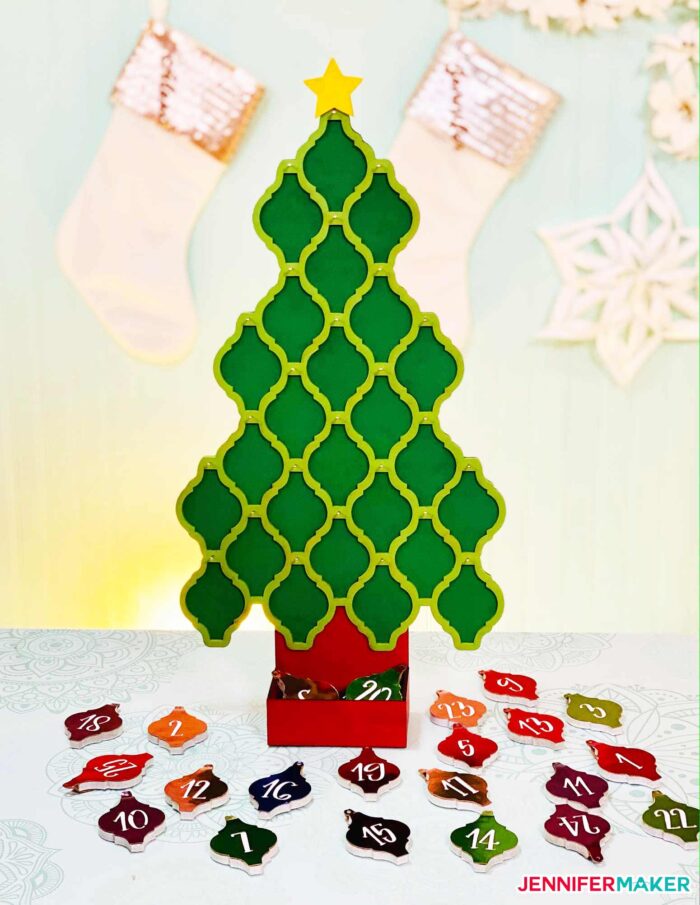
Here is what the smaller ornament tree looks like — this one was cut on a Cricut Explore using foil Kraft board. Naturally, this small one is not study enough to support ceramic tiles, but it does a fine job with the Kraft board or cardstock versions (included in free pattern). The numbered backs and hangers are all included as well (I used a font called Christmas Wishes for the numbers). I’ve hung each ornament on the tree with a paper clip I bent up and pushed in from the back — works great!
Let me show you how easy it is to make this arabesque tile ornament tree countdown calendar! This post contains some affiliate links for your convenience (which means if you make a purchase after clicking a link I will earn a small commission but it won’t cost you a penny more)! Read my full disclosure policy.
Materials to Make an Arabesque Tile Ornament Tree Countdown Calendar
See my Amazon shopping list for this project here!
- Five sheets of heavy chip board 1.5-2mm (to cut a large tree on a Cricut Maker) or two 11″ x 19″ boards of 1/4″ Draft Board or MDF (to cut a large tree on a Glowforge)
- Seven sheets of 12″ x 12″ Kraft board (to cut a small tree on a Cricut Explore, and to cut all of the ornament backs and hangers for either size) — I used colors from both the Cricut Foil Jewel Sampler and the Cricut Holographic Foil Kraft Board Pack
- One sheet of white 12″ x 12″ 65-80 lb. card stock or Kraft board (to cut cardstock ornaments)
- 25 Mohawk Glasen” glazed tiles from Menards home improvement store (if you want a tile ornament that fits on the large tree)
- 25 5/8″ brass escutcheon pins (for the large tree) or 25 paper clips (for the small tree)
- Acrylic paint and/or spray paint
- Tacky glue
- Painter’s tape
- Designs to go on the front of your ornaments, such as these ornament designs, or these quarantine ornament designs.
- A way to cut your tree (I used the Cricut Maker cutting machine for large tree, and the Cricut Explore for the small tree, and the large tree can also be cut on a Glowforge laser cutting machine).
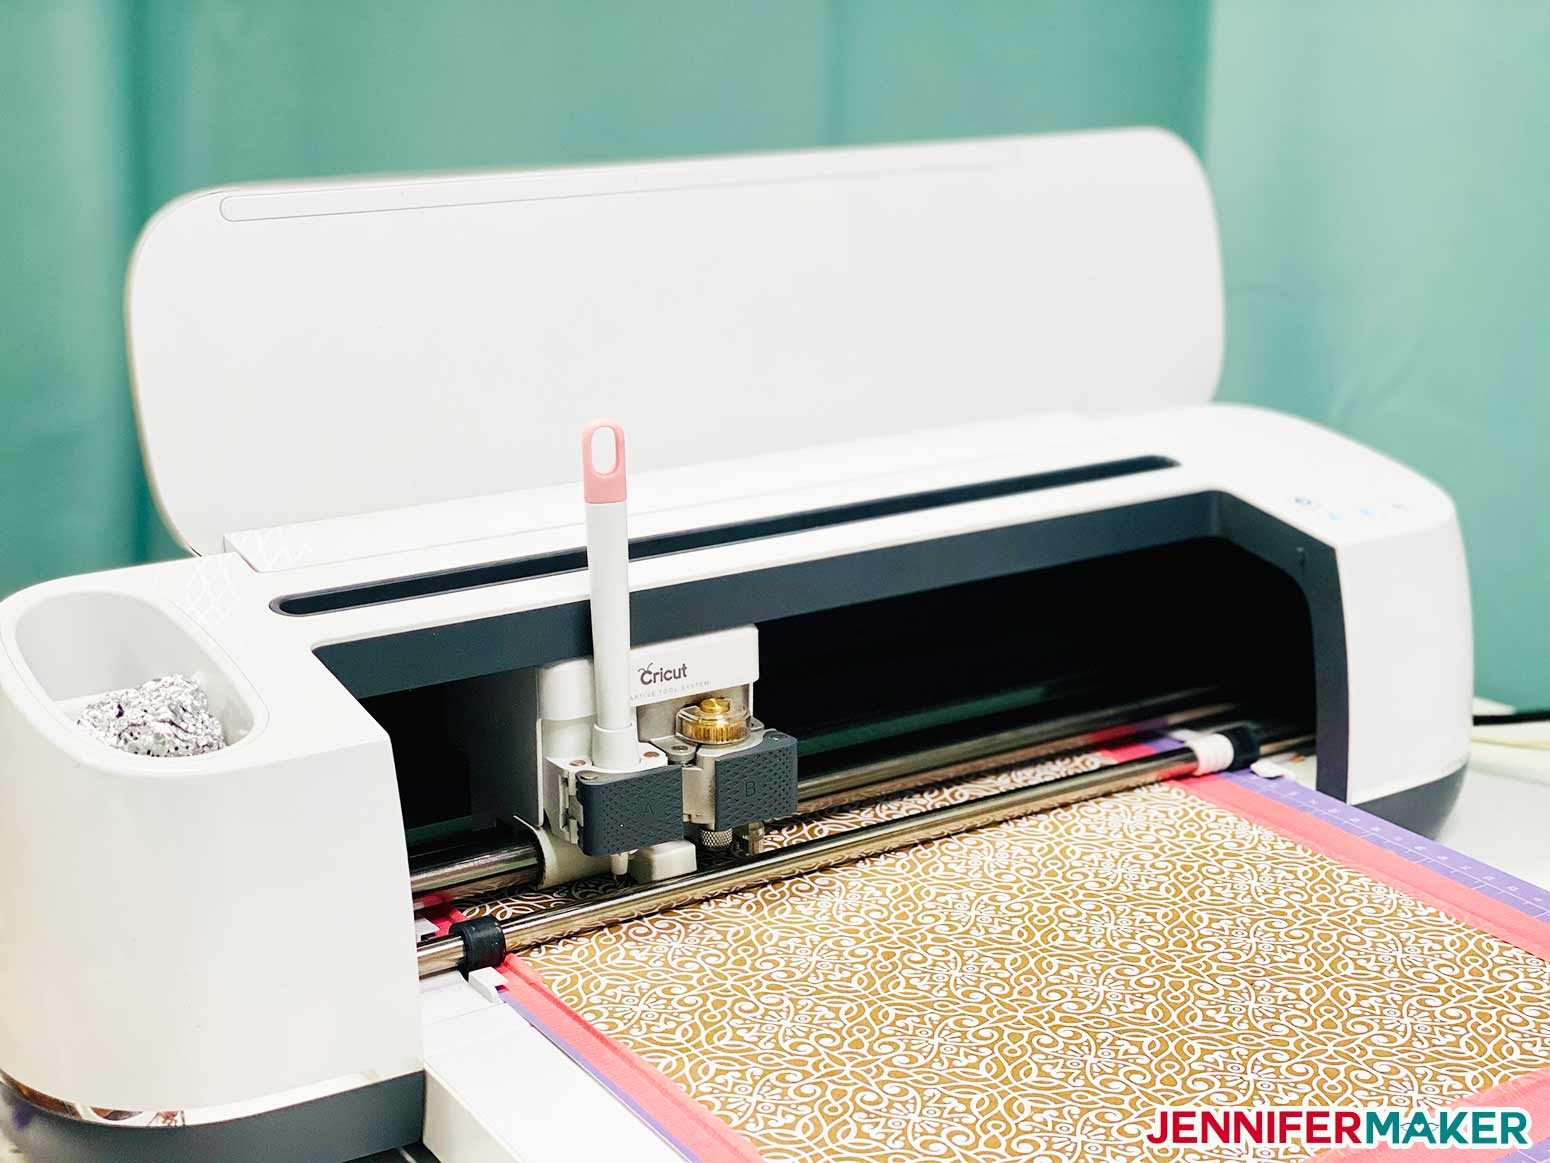
- Knife blade (for a Cricut Maker to cut chipboard) or a Fine Point Blade (for a Cricut Explore or Maker to cut Kraft board)
- A cutting mat for your Cricut (purple for cutting chipboard, or green for Kraft board and cardstock — just make sure it’s sticky!)
- (Optional) Christmas Wishes font (that’s what I used for the numbers on the backs of my advent tree)
- Design #250 (My free SVG/PDF/DXF design files are available in my free resource library – get the password by filling out the form at the bottom of this page)
How to Make an Arabesque Tile Ornament Tree Countdown Calendar
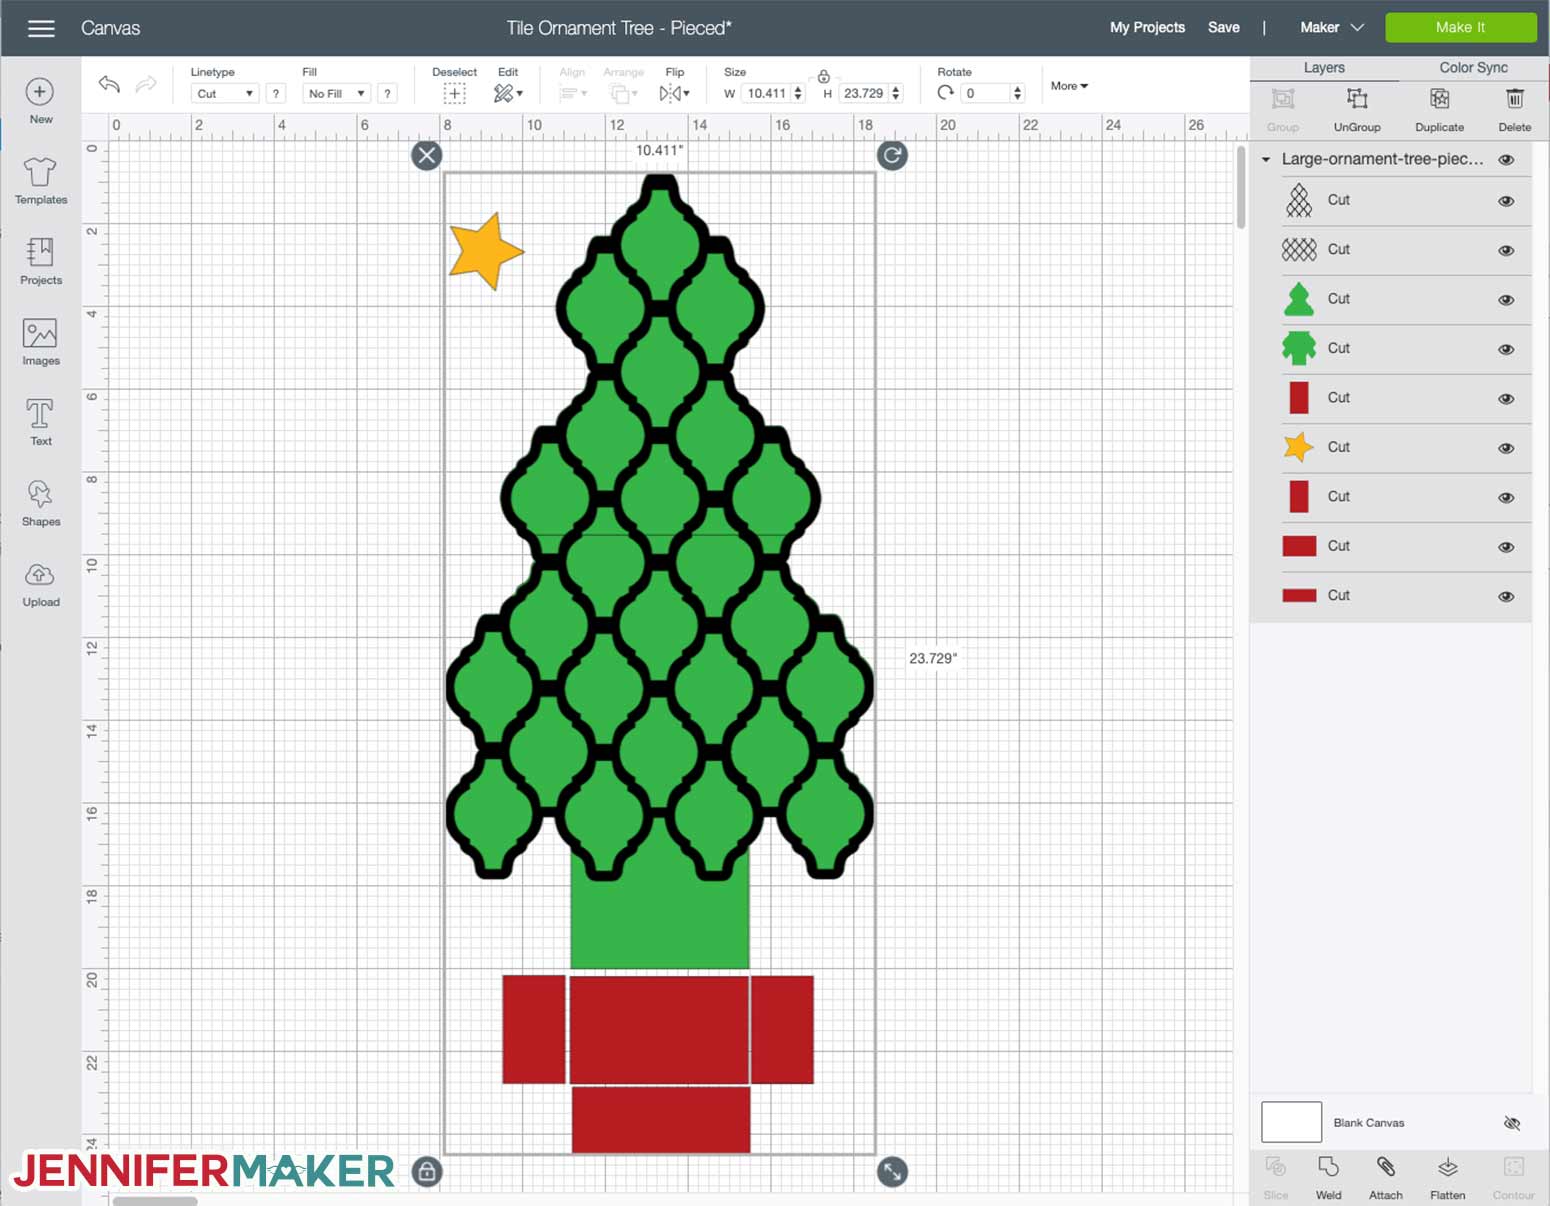
Learn how to make the large version of my tile ornament tree countdown calendar using the Cricut Maker. This tile ornament tree project is made with design #250, which you can get from my free resource library (get the password to the library in the form at the bottom of this page). There are three versions of this tree-- a small version intended for cutting from Kraft board on the Cricut Explore or Maker, a large "pieced" version intended for cutting from heavy chipboard on the Cricut Maker with the knife place, and a large "whole" version intended for cutting on the Glowforge laser cutting machine. This tutorial will cover the Cricut versions primarily. Here is what the large pieced version of my arabesque tile ornament tree countdown calendar design file will look like when you upload it to the Cricut Design Space: Tip: If you are not sure how to upload an SVG cut file to the Cricut Design Space, watch this helpful video training series I made. Once the ornament tree file is uploaded into Cricut Design Space, you may wish to ungroup the design or change colors, but it is not necessary. Do not resize it larger as it will not cut any larger on Cricut chipboard (which is 11" x 11"). Also, it is currently sized perfectly to fit the small arabesque tiles noted in my supply list — it will not fit the tiles from Lowes or Home Depot, which are larger and heavier. Cutting on the Cricut Maker: Place the material you are cutting on a purple Cricut StrongGrip mat. Press down well to create a firm bond between the material and your mat. Tape all four edges of chipboard to the mat (masking tape or painter’s tape recommended). Do not let your tape wrap around the edges of your mat to avoid jams. On the Cricut Maker cutting machine, move white star wheels all the way to the right to avoid making an indentation in your material. Load the mat into the machine and begin to cut. The Cricut Maker's default setting is to make 24 passes when cutting heavy chipboard. The machine will make multiple passes while increasing the pressure with each pass. I recommend you keep an eye on your Maker as it cuts, as it may be done in as little as 18 passes. To check, just pause your machine, lift up a corner, and see if it’s cut all the way through yet or not. Cutting on the Cricut Explore: I used the Fine Point Blade and housing to cut Kraft board on my Cricut Explore. Place the material you are cutting on a green Cricut StandardGrip mat. Press down well to create a firm bond between the material and your mat. Turn the dial on the Cricut Explore to Custom and select Kraft Board from the list of custom materials. (I also cut mine on More pressure.) Load the mat into the machine and begin to cut. Once you have cut the ornament tree pieces, select the ornament(s) you want to use and cut them from Kraft board or cardstock of your choice. Glue the Tree Together: If you made the large version from heavy chipboard on a Cricut Maker, you need to glue the pieces together with tacky glue. Be sure you glue the join in the pieces, as well as glue together the bottom tree layer and top tree layer. If you made the small version from Kraft board, just glue the top tree layer to the bottom tree layer. Glue the Box Together: Now glue the box together and attach it to the tree. The large version just gets glued along the edges; the small version has tabs, and then the tree is inserted into the box and glued down. Glue the Backs/Caps on the Ornaments If you intend to use your ornament tree as a countdown like I am, glue the numbered backs onto either your ceramic tiles or paper versions of the tiles, folding the top around to the front of the tile and lining up the holes. If you want to just use unnumbered ornaments on the tree, use the caps provided in the pattern and glue them to the top of your ornaments (they work for both ceramic and paper ornaments). Hang the Ornaments from the Tree If you made the large ornament tree, hammer in the brass escutcheon pins above each ornament spot so the pins go in far enough to be stable but do not poke out the back. Here are what the brass pins look like when inserted into the tree to hold the ornaments. If you made the small ornament tree, take a paper clip and pull up the SHORT end so it is sticking straight up from the paper clip, then poke that in the hole above each ornament spot from the back to create a little place to hold an ornament. Tape the paperclip to the backside of your tree for more stability. Repeat for the other 24 ornaments. Here are what the paper clips look like when inserted from the back of the tree to hold the paper ornaments. And here is what the paper clips look like from the front — just a little place to hold the ornaments. Enjoy your tile ornament tree painted or unpainted, it's your choice! My large ornament tree is painted with dark green spray paint on the base layer, "foliage green" acrylic craft paint on the top layer, fire engine red acrylic paint on the box, and gold acrylic paint on the star. My small ornament tree has no paint — it's all colored Kraft board. If your tile ornament tree is tippy, put something heavy in the box at the bottom to stabilize it. Alternately, you can hang it on the wall or attach it to a board or easel to stabilize it. As an Amazon Associate and member of other affiliate programs, I earn from qualifying purchases.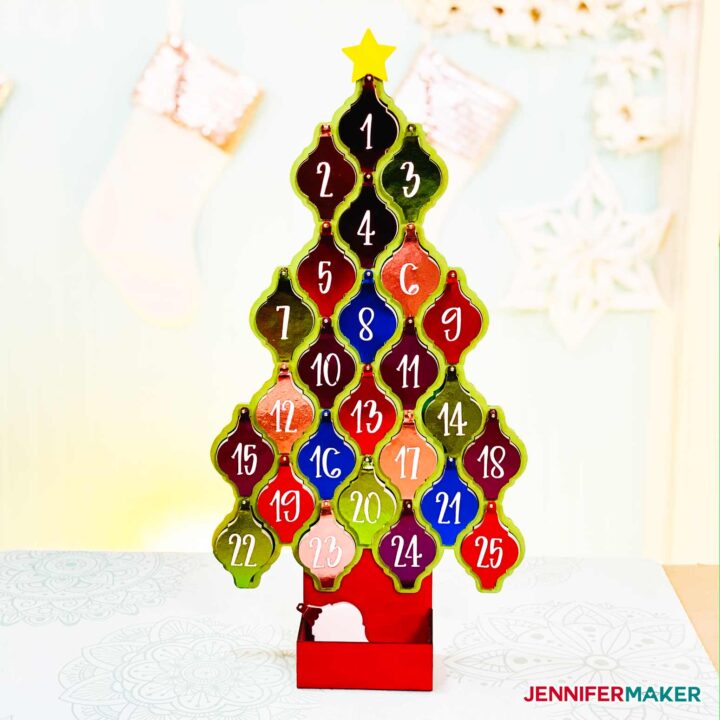
DIY Tile Ornament Tree Countdown Calendar
Materials
Tools
Instructions
STEP 1: GET THE TILE ORNAMENT TREE DESIGN
STEP 2: CUT THE ORNAMENT TREE DESIGN
I cut the ornament tree on the Cricut Maker using the Knife Blade. I used Cricut Heavy Chipboard as my material for the tree. This project takes several hours to cut the tree pieces from heavy chipboard on the Cricut Maker. Be aware and plan accordingly. This is a good project to set to cut while you're doing something else.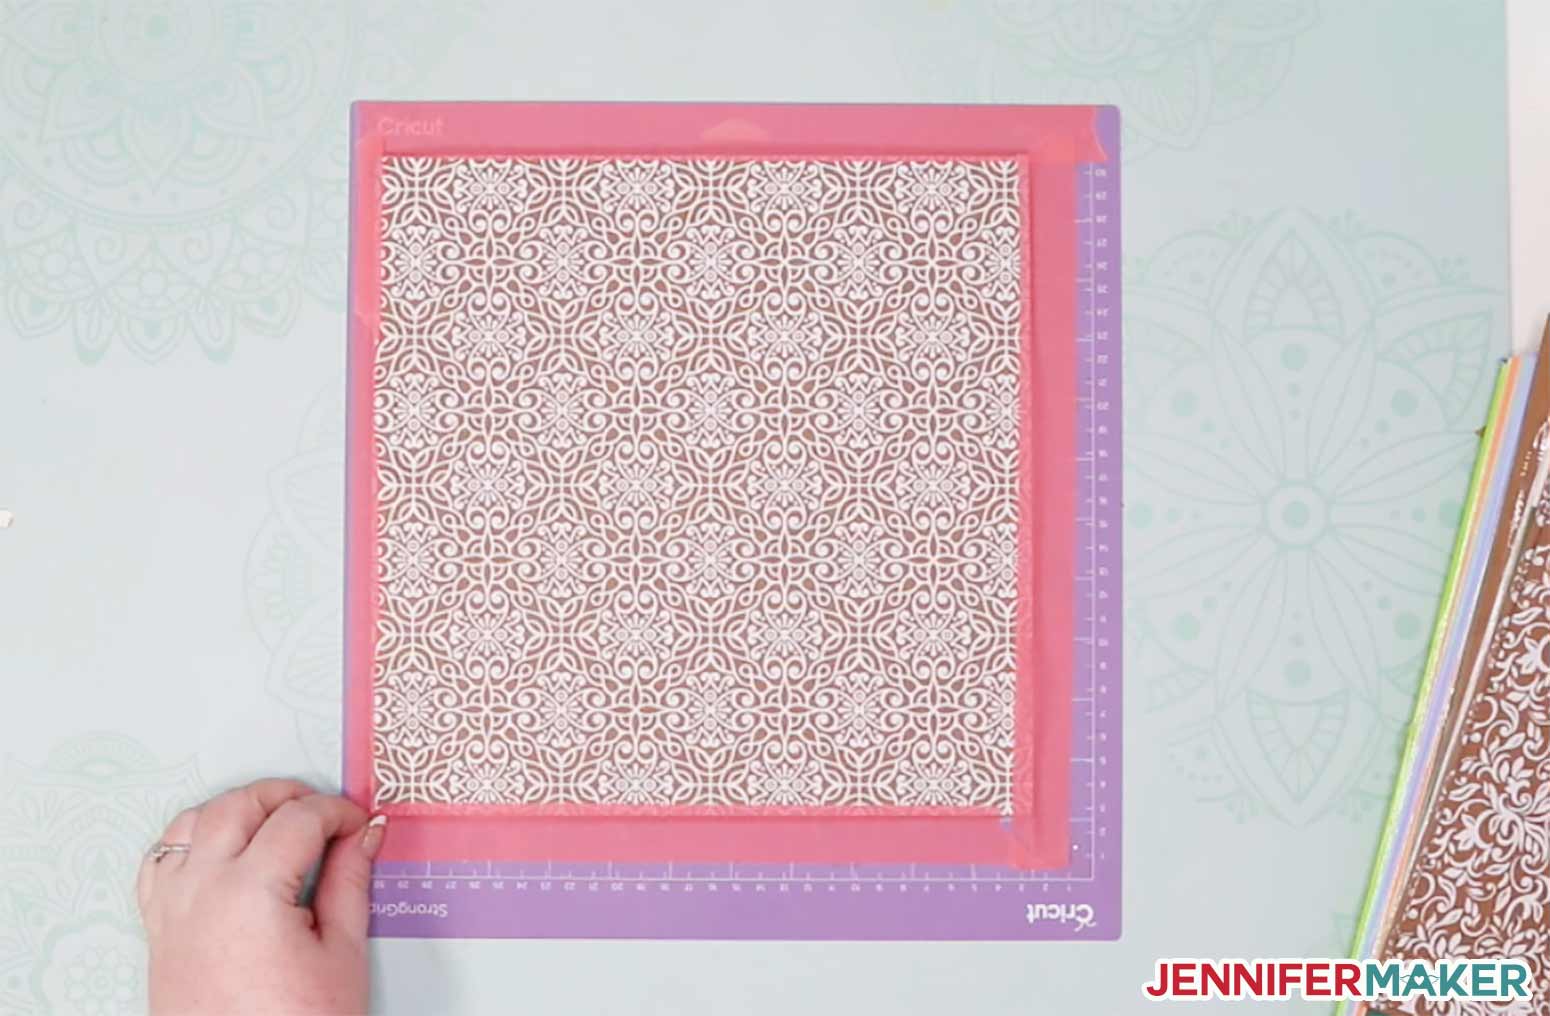
The small version of the tile ornament tree may be cut from Kraft board on the Cricut Explore. I used Cricut Foil Kraft Board as my material, however, you can experiment with other types of cardboard you may have on hand. STEP 3: ASSEMBLE YOUR TILE ORNAMENT TREE


STEP 4: SHOW IT OFF!
Notes
Recommended Products


Get my free SVG files to Make a Tile Ornament Christmas Tree
I’d love to see your Christmas trees with all of your pretty decorated ornaments! Please do share a photo of your trees and ornaments in our Facebook group or tag me on social media with #jennifermaker.
Love,

Want to remember this? Save this tile ornament Christmas tree tutorial to your favorite Pinterest Board!


I’ve been seeing these tile ornaments everywhere, but I didn’t know how they made them. Thanks for the pattern and the information. Looking forward to the 25 days of Christmas. Thanks
Hi Lillie! So glad you found my tutorial!
Hi Jennifer. I could not get the same tiles as you as I am in Canada so I bought smaller ones. Is there a way to customize the pattern to fit my tiles?
Hi Jessica! I would just measure the tiles and adjust accordingly.
When Im making the small version of the tree, the top of the ornament or number that u fold over, is cutting the holes to close together and it jus causes the back piece of the fold to fall off. am i doing something wrong.
Hi Amy! If you are resizing the design at all, this could be causing the issue. The design worked perfectly for me. If you still have trouble, reach out to my team at [email protected] with any photos and details that might help them.