
Your photos can make or break your blog. Back when I began online publishing in the ’90s, we used photos sparingly because of bandwidth and dialup modems. These days, however, you NEED good photos. Your readers expect them. Your blog posts need them. And you will reach more people through them. But they need to be as good as possible. So you need to learn how to take great blog photos!
To say I take a lot of photos and video for my blog is an understatement. I fill up my camera’s 64 GB disc almost daily! My blog is VERY visual, and nearly every post has a step-by-step photo tutorial with it. I’ve learned a great deal about how to take great blog photos and videos over the past year, and I’m still learning! But I’m happy to share with you what I know, what I use, and the tips and tricks I’ve gathered along the way.
First, a caveat. I have been a photographer since I was a teenager. And as I’ve taken all of the photos for my published books for the past 20 years, that technically makes me a professional photographer. So I had a little head start.
Still, blog photography is very specific and quite different from travel photography (which is what I was more experienced with). Case in point: When I first began my blog in 2016, I submitted multiple projects to Craftgawker. They repeatedly told me my photos were too dark or at a weird angle. Another story, from my fourth month: I applied to an influencer network and I was turned down. When I asked why, I was told this:
We would suggest working on showing consistency of bright, well styled photos. We noticed some photos were not in the best lighting, different sizing in posts and not centered.
Ouch! But you know, having this sort of feedback was helpful, and I worked hard on my photography after that.
I think I still have room to improve, but most of the feedback I get now is positive. And my readers seem happy. So I’m counting that as a win!
So let me tell you how I do what I do… (and, yes, there are affiliate links in this post. I try to be a good little blogger!)
The Cameras I Use for Great Blog Photos
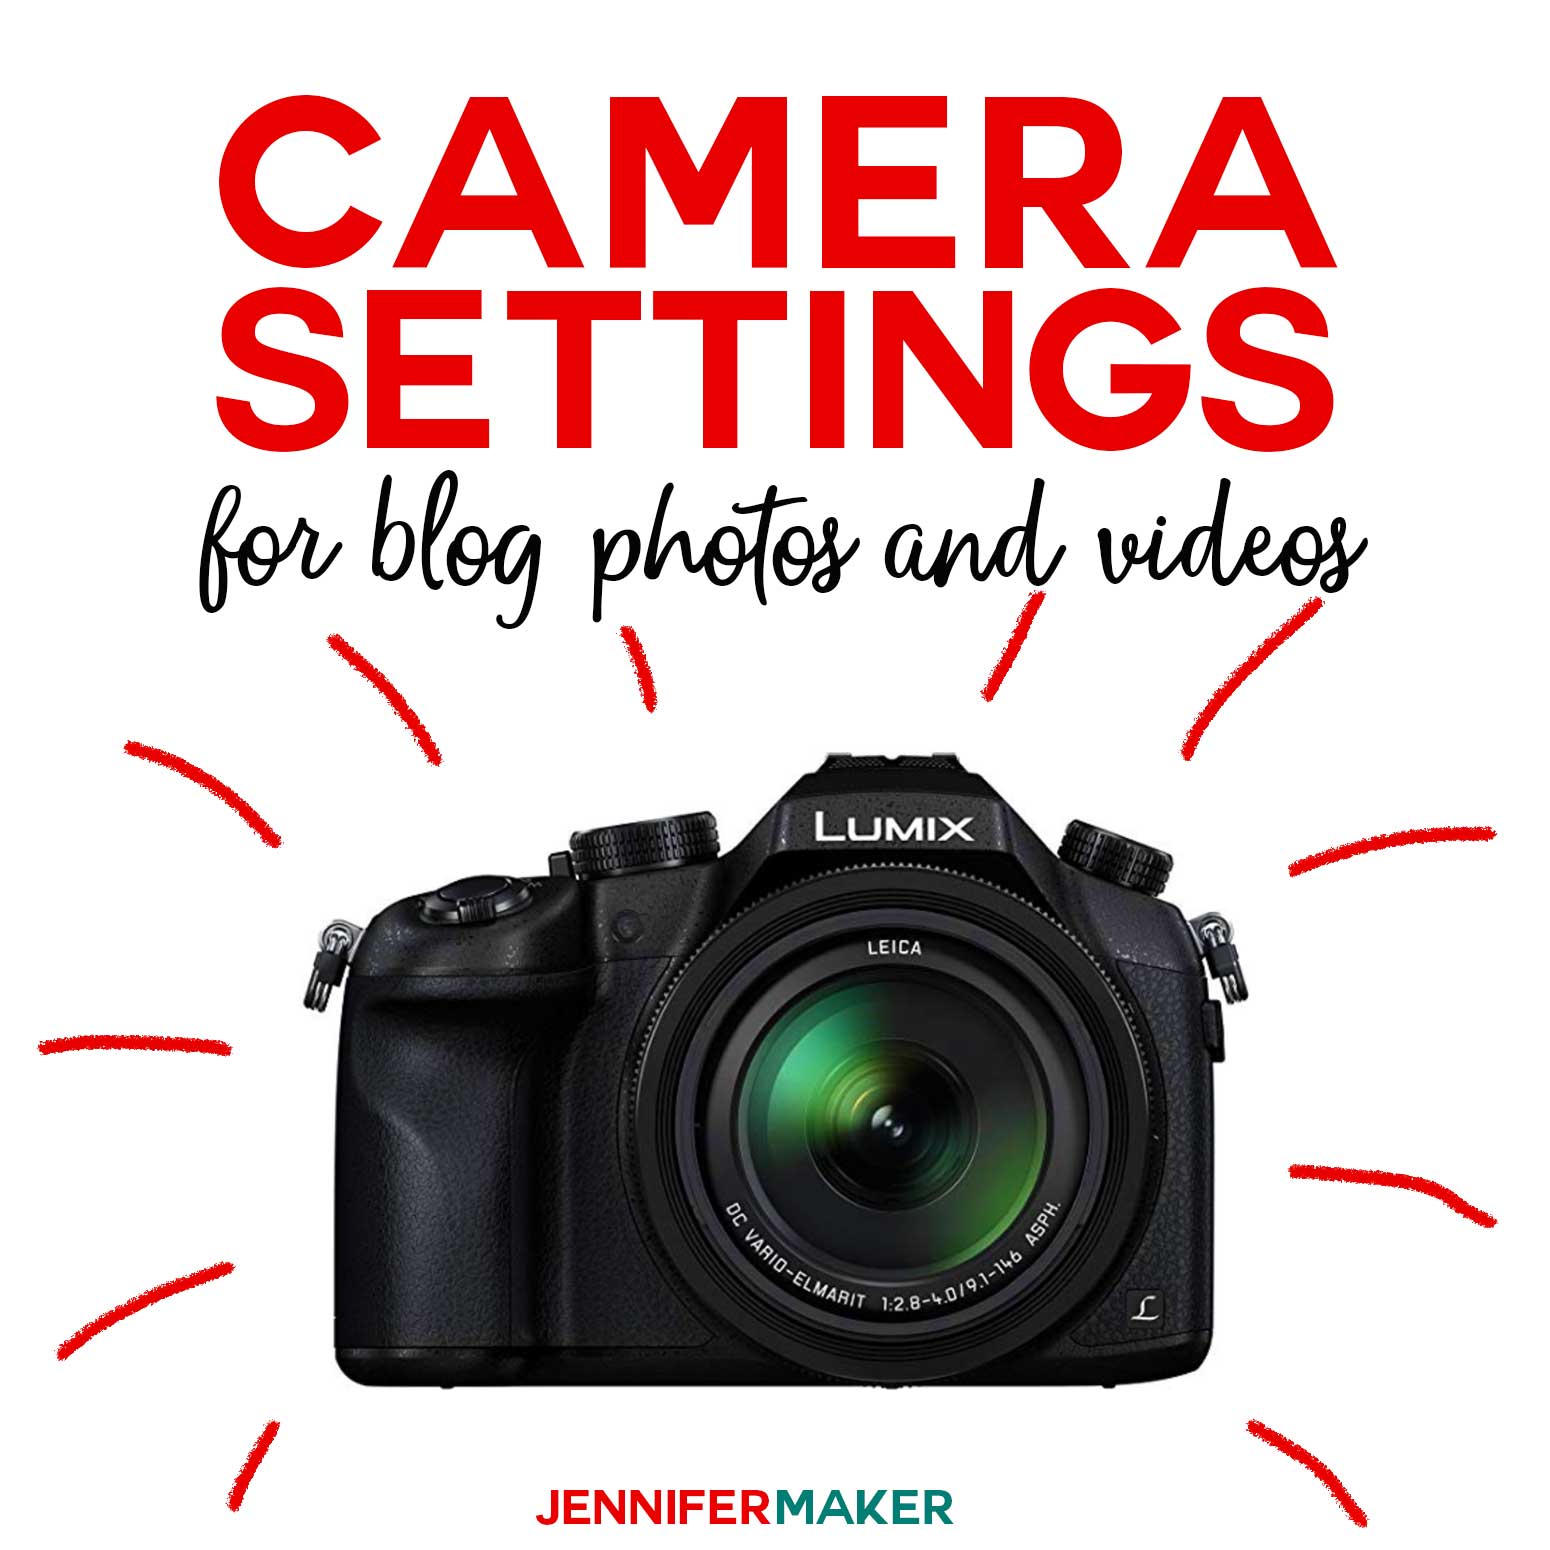
Let me start with my cameras. I use two cameras. My main one is a Panasonic Lumix FZ1000 that I got before my blog began (thankfully, since I was dead broke when I started). I LOVE this camera and I count myself fortunate I had it. It does REALLY high quality photography and 4K video. Tons of presets mean you really don’t need photography skills to use it. It’s still considered a point-and-shoot—it is NOT a DSLR. But it’s amazing. Truly. And I’ve used a lot of cameras in my career. My favorite feature has to be the “portrait” mode in the video setting—it makes me look good, even at close up. I don’t know how it does it. It must be softening the skin textures or something. Whatever. Love it.
I’ve had the Lumix for two years now. It’s very durable and stands up to all sorts of conditions and less-than-awesome handling by both me and my child. I’ve dropped it more times than I care to mention. I’m thinking about getting a second one, it’s that good. I love this camera so much bought a second one! You can see exactly which settings I use for my Lumix here.
My third camera is an iPhone 7 Plus (before that, I had an iPhone 5, which was not as good). It has a 12 MP wide-angle camera and a 12 MP telephoto camera, plus a depth-of-field effect.
I use all cameras about equally, but for different things.
I use my Lumix for most of my videos and my tutorial photos, and anything that needs a really high resolution shot. I use my iPhone for quick photos (Facebook photos mostly), quick videos, and anything that needs a strong bokeh effect (bokeh is the depth-of-field effect when your background blurs but whatever is in the foreground is nice and sharp).
If I had to, I could get away with using just the iPhone 7. The iPhone wouldn’t be quite as a good nor as rich, but it is doable. Because there’s more to it than just the camera.
I recently used video from both the Lumix and the iPhone at the same time, switching between them in my edited video. The Lumix gave the big picture and the iPhone was the closeup. You can see the results of that “multi-cam” video here:
The Lighting I Use for Great Blog Photos
Lighting was a huge issue for me when I started out. Being used to travel photography and natural light, I didn’t even think about adding lighting for a couple of months. Here’s a photo I took on my blog BEFORE I got better lighting:

See how dim it is? And the shadow is pretty strong. It doesn’t pop! It’s not appealing.
But after struggling with dim and out of focus photos, I did some research and decided I needed a lightbox. Only problem was I was super broke (you can read my blog success story if you subscribe to my blogger mailing list at the bottom of this post). So I had to make my own lightbox from dollar store foam sheets and wax paper. Which I DID! And despite now making a full-time income on my blog, I am still using that lightbox to this day and it’s still working for me.
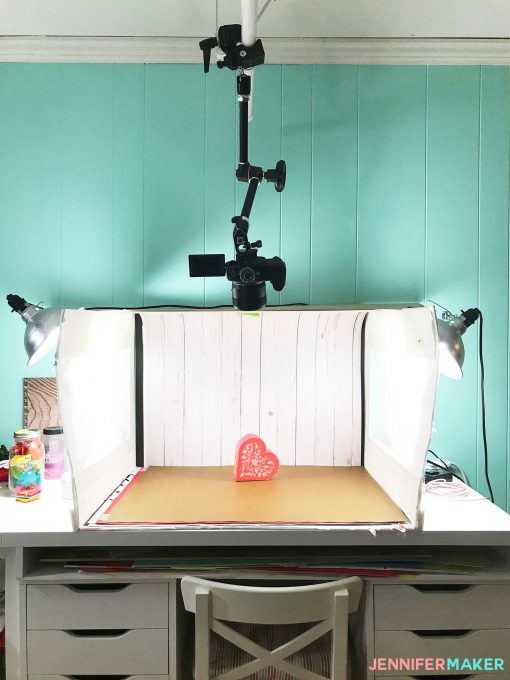
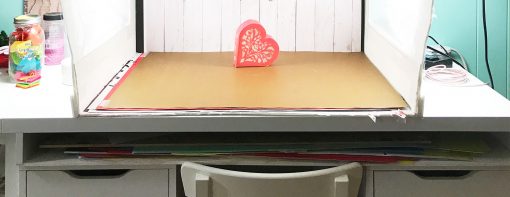
Here’s my lightbox today:
Here is that heart-shaped box as I photographed it in the lightbox the day I made it:
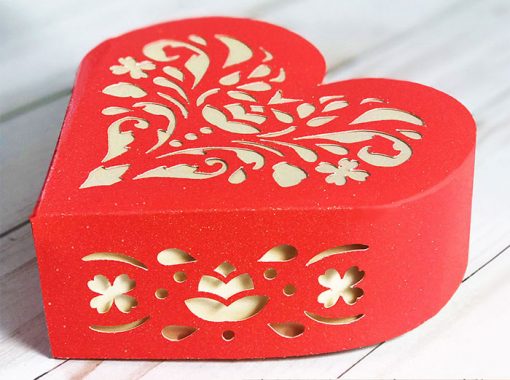
You can see how much clearer and crisper it looks than the donut bath bomb above. You can see the cuts in the paper, and the depth of field. The details pop out much better.
Here’s my tutorial for the DIY lightbox so you can make one, too! That tutorial explains which lights I use and recommend in the lightbox. My lightbox is quite large, and it would work well for food bloggers, too.
I also have two additional lights with super high lumens bulbs that are on tripods that I move around my workspace as needed.
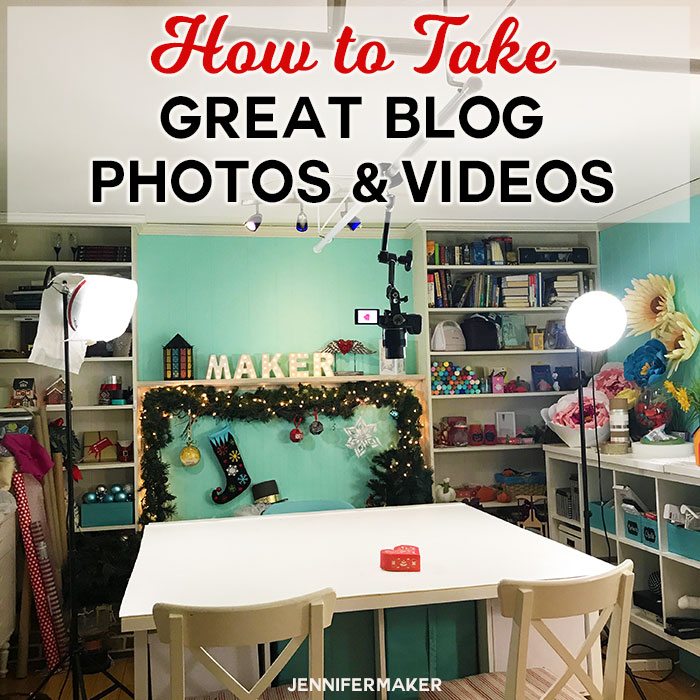
My favorite way to light things is to use two lights at 45-90° angles to the thing I’m photographing. This is just based on my trial and error. Here are my two tripod lights in my craft room.
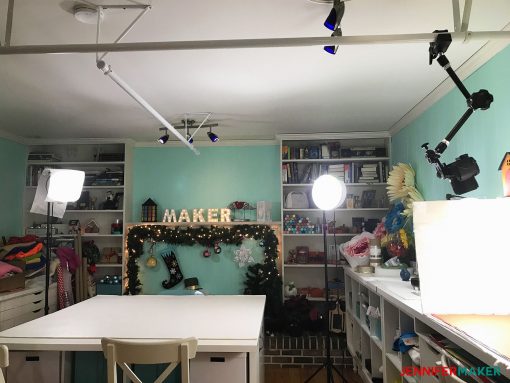
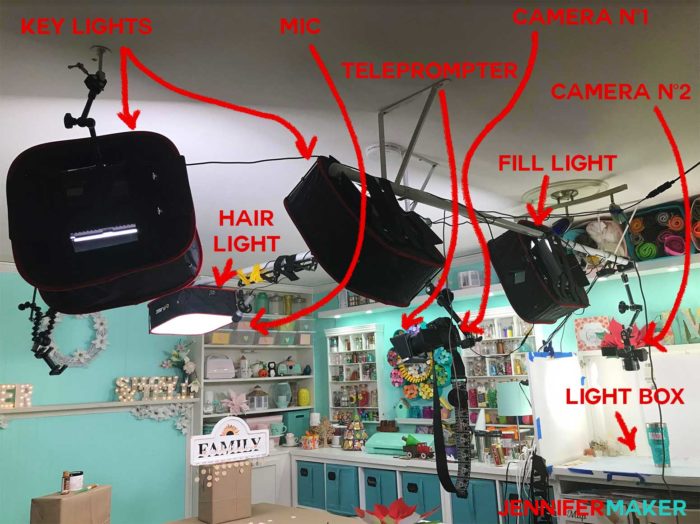
I ALSO have four more LED light panels that I suspend from my ceiling for my video work. Each LED panel has 600 lights and they’re super bright. I’m using Samtian lights (two kits).
Here’s what it all looks like:
Be Sure to Diffuse Your Light
Diffusing your lights is important because it minimizes shadows and gives your photos a more professional look. All of my lights are diffused, sometimes with super-cheap methods like wax paper and paper towels but also with softboxes.
In the photo above, each of these LED lights are covered with “softboxes” — they cover the light and diffuse to cut down on harsh shadows. I use four Karmerar D-Fuse Softboxes. I suspend these four boxes from the rods above my room using the velcro on the softboxes themselves (in three cases) and with a “magic arm” on a ceiling hook in the fourth case.
In the photo above that one, my two lights on tripods have homemade wax paper diffusers over them, and one has some extra paper towel to diffuse the light further. I like the paper towel because I can just layer it to diffuse the light even more. Very low tech and inexpensive.
What About Natural Light?
I rarely use natural light at all because I live in the frozen tundra of Michigan it’s tough to come by (or there’s snow outside, which makes it tough to work in). The only times I really need natural light are when I’m taking a slow-motion video (because the fluorescent lights will show up as flickers on the video) and when I just need the brilliance of the sun in a regular video.
Mostly I take all of my photos and videos in the evening. When I take them in the day, I often have to close my blinds so I have better control over the light.
The Backdrops and Mats
I have a collection of homemade backdrops and store-bought poster board that I use interchangeably depending on the project and the season. Right now I’m using a gold metallic poster board and a wood plank simulation poster board because it’s festive. I recommend lighter colors as it will help you reflect more light and get your things to pop more.
To make your own backdrops that look like real boards, take a foam core board, score it in plank-size lines with a knife, then push in those lines with something square and angled (I used a plastic box) to give the “planks” some dimension. Now just paint the foam board as you wish. I had the best results from using several shades of colors and blending them to get that trendy “farmhouse” plank look. Here’s my pink mat (note that you can see more shadows in the lightbox than usual because the room’s lights are on—I usually turns these off for the best lightbox photos).

You can also buy some mats already made, which I am planning to do. Here are the ones on my list to get:
You can see that I’ve made a large storage slot under my lightbox for all of my backdrops and poster boards in this photo:
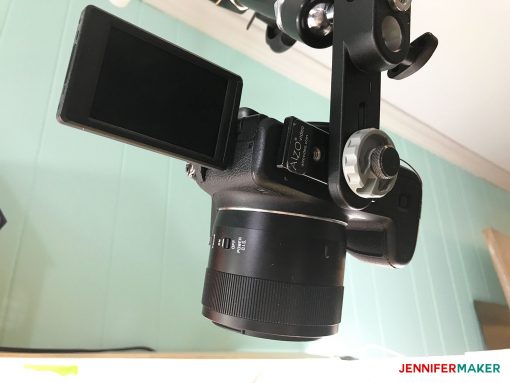
The Mounting System
I’ve come up with a great way to mount my camera in my workspace that does NOT involve a tripod yet still allows me to move and point the camera nearly anywhere. I installed two white closet rods from my ceiling. Then I attached a special “magic arm” that I mount my camera to. This magic arm clamps onto the closet rods anywhere along their length, so to move my camera, I just move the arm. And the arm itself can be positioned in virtually limitless ways and directions, so I can point my camera face down at a surface or at anything (ANYTHING!) in the room. It’s really freaking amazing.
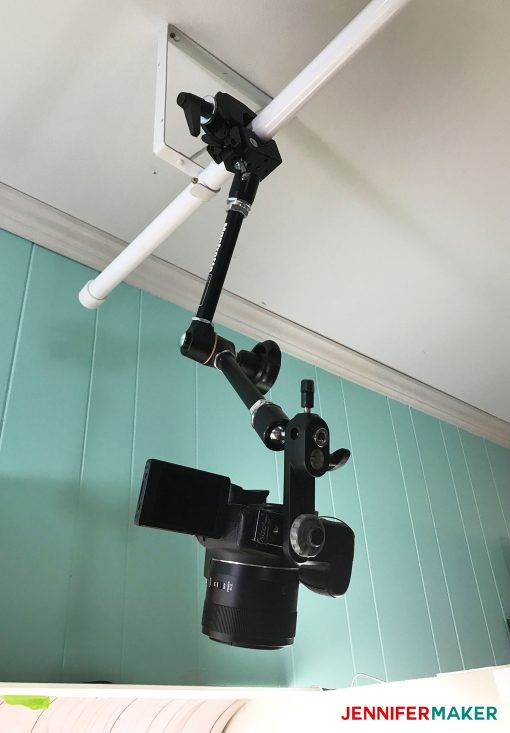
If you want to do this, just mount white metal closet rods from your ceiling. Be sure to mount the hanging brackets in studs in your ceiling so it can bear some weight.

You’ll then need these two camera mounts (one is the arm, and one is the clamp):
Manfrotto 244 Variable Friction Magic Arm with Camera Bracket
Manfrotto 035RL Super Clamp with 2908 Standard Stud
They are amazing!! I can take pictures anywhere. I love this. I am planning on buying another set so I can keep one above my lightbox all the time, and the other will float around the room.
The Editing Software I Use
I use two pieces of software to edit all of my photos and videos, both from Adobe. All photos get edited in Adobe Photoshop. All videos get edited in Adobe Premiere Pro. They are both very much worth their costs (and both have free trials if you want to try them first). Premiere Pro had a learning curve, but I was able to find pretty much everything I needed to know either on YouTube or from my then 13-year-old. I use Photoshop the most, and it’s what I make all images in, including images for Pinterest.
I color correct and brighten every photo I take, by the way. I will also edit out specks of dust, weird glares, or whatever just seems distracting from what I want my reader to see. To make this easier, I created a “Action” in Photoshop that brightens the exposure, increases the vibrancy, resizes my photos to the desired size, and adds my watermark in the corner. Then I edit manually as needed after that.
My Personal System for Taking Blog Photos Fast
Because every posts needs multiple photos, I’ve come up with a system for taking photos that works really well for me. Here’s what I do:
- Virtually every photo session starts in my lightbox. So I get my camera into place, put in a fresh battery (I have two batteries and one is always charging), make sure there’s room on my card, and turn on my diffused lights.
- I place my backdrop (horizontal working surface and vertical back surface) based on the project. If my project is white, I pick a color that will allow it to stand out. Otherwise I go with light or off-white.
- Because I am a craft blogger and do tons of tutorials, my next step is to get all my materials for the project laid out on my board.
- Now I turn on my camera (which, remember, is mounted directly overhead on the “magic arm”) and turn it to the video setting. Yes, video, even if I all I want are still photos. I made sure that only the project materials and the backdrop are showing, not the lightbox sides.
- I press the shutter on the camera and start taking video.
- I do the entire project in my lightbox while my camera is shooting video. I rather like this because I am free from visual distraction and I have good lighting! It was a little weird at first, knowing that every thing I do was being recorded, but I got used to it.
- I end the video when the project is done.
- I leave my camera mounted — I rarely move it anymore because I now have it in the perfect position. If I wanted more head-on photos of my finished product, I use my iPhone’s camera. I may change the lighting or the backdrop, or put in some styled props at this point.
- I insert my photo card into my computer and import all the videos and photos I took.
- While the videos are importing, I find the best “glam shot” of my project and create my feature photo from it in Adobe Photoshop. I add a text overlay in a super easy-to-read font and my watermark. I upload it to my post’s Featured Image spot with a good alt tag that includes my keyword(s).
- Once the video is imported, I open it up and take stills (screen shots) of various important steps. Those stills become the photos in my step-by-step tutorial. All of them are brought into Photoshop, colors are corrected, everything is brightened up, and I resize it to 1020 px wide so it’s good for Retina screens. I name all of these photos with my focus keywords and upload them to my blog with appropriate alt tags.
- If I am creating a video (I try to do this for most of my projects these days), I take intro and outro video using my video setup on my second camera. I record the video on a separate mic that feeds directly into my computer. When finished, I import that video and save my audio. I then open Adobe Premiere Pro and add in my various videos and audio. After putting it all together and editing it down, I then record a separate voiceover for the assembly portion of my video using my good mic, then overlay it on the video. I export it at a high resolution and upload it to both YouTube and Facebook. You can see the sorts of videos I make at my YouTube channel.
Whew! If it seems like a lot, it is. But the more I do it, the more like second nature it becomes. Really!
Notes on “Talking Head” Videos
Whenever it’s just me talking to the camera, I call that a “talking head” video. These can be tricky to do when it’s just you without a video crew. I am not particularly good at talking off the cuff and I need a script to sound good. Before I bought a teleprompter, I set up a tripod about 8 feet from me and then rubber banded my phone right below my camera. At this distance and angle, my eyes appeared to be looking in the camera (mostly) when I was actually looking at my phone. The font was huge and I used a free app called Teleprompter.
Here is an example of a video where I am looking at my phone mounted just underneath my camera:
I do a lot of my “talking head” videos (especially my course videos) at my desk. I created a panel backdrop that I painted to look like my craft room and I put it behind me. That allows me to sit at my desk and read my script from my computer.
Sound is either done with a lapel mic or separately with my good mic. If I am sitting at my desk, I record the sound separately in my mic (while I’m talking on the video) and import that to get the best sound.
You can see an example of one of my course “talking head” videos here: https://jennifermaker.teachable.com/courses/219585/lectures/3413666 — in this video, I am using my high quality mic (not my camera’s mic nor a lapel mic), but I’m not using a teleprompter (instead I’ve positioned my camera so it is just above my monitor).
UPDATE: In December 2017, I bought the Parrot Teleprompter that works with my mobile device to display my script on a mirror in front of my lens. I LOVE IT!
I hope this has been helpful! If you have ANY questions, just let me know — you’re welcome to email me at [email protected]
If you are interested in learning more about my blogging method and techniques, and my personal story of how I created a full-income blog within one year, please subscribe to my little blogger mailing list below.
Love,


Thanks for this post and all of the information Jennifer! I am hoping to mount something like this on my ceiling also.
This is brilliant, yet again! Thanks Jennifer – ordered a few things!! <3
Thank you so much, Kathy!
Thank you for such a thorough post! I have a lightbox I purchased years ago for my eBay listings…I don’t know why I haven’t thought to use it for my blog pictures! Now I just need the camera:)
Aaaah, this post is so packed with helpful information! You are awesome Jennifer!!
Great post! So informative for us newbies! I’m impressed to see that you use an iPhone! Most of the info I’ve come across says NOT to us a cell phone. But when you’re broke and that’s all you have…
I love the idea of having the tripod mount attached to the roof! Thanks for some great ideas!