
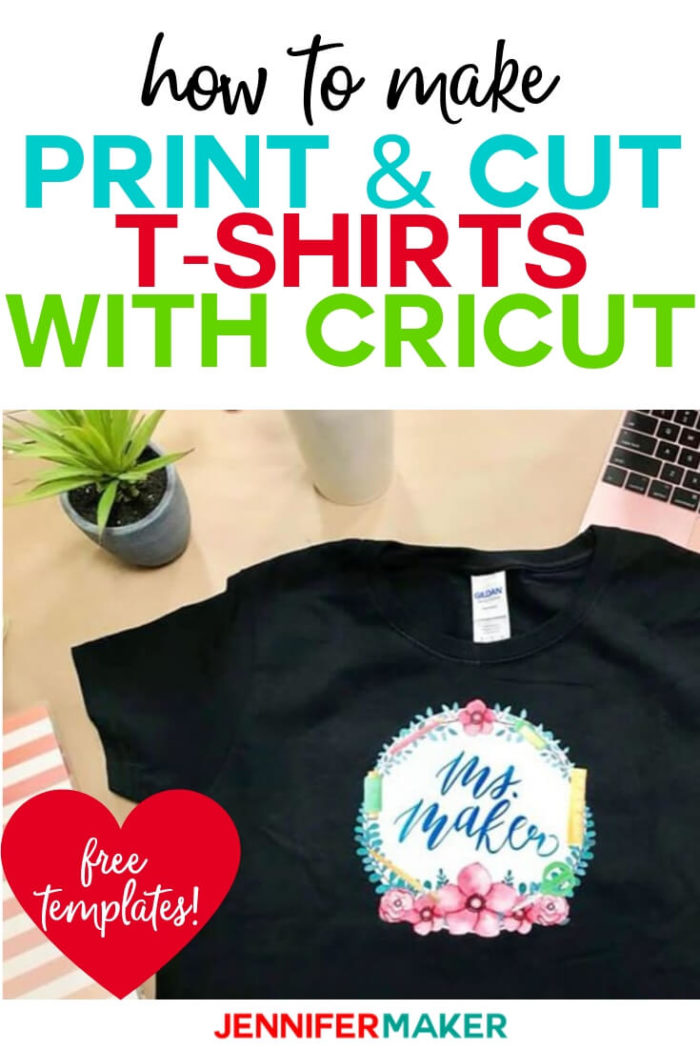
Learn how to use Print Then Cut in Cricut Design Space to make fun projects like this iron-on transfer T-shirt!
Print Then Cut seems to be one of the hardest to understand features of Cricut Design Space. So today I want to show you how easy Print Then Cut really is and demystify the whole process for you! There’s a lot of things we can make with the Print Then Cut feature, like stickers, wall decals, laptop and keyboard overlays, ornaments, and even temporary tattoos. But when I asked you all what you most wanted me to show you how to make with Print Then Cut on a Cricut, the overwhelming answer was T-SHIRTS!
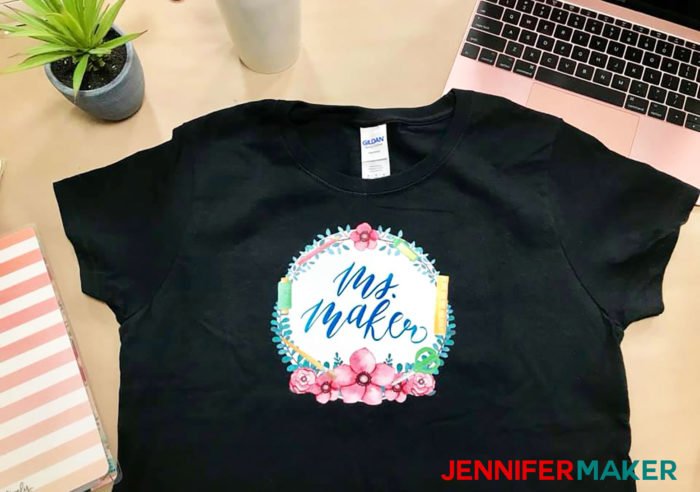
So what we’re going to do today is use the Print Then Cut feature to make these printable iron on decals for T-shirts. The awesome thing about these is you can make decals for your shirts in full color — you’re not limited by vinyl color or anything like that. The sky’s the limit!
All you need for this project is a T-shirt, printable iron-on transfer medium, an inkjet printer, a way to press your decal, like an EasyPress or iron, and a decal you make with the Print Then Cut feature in Cricut Design Space!
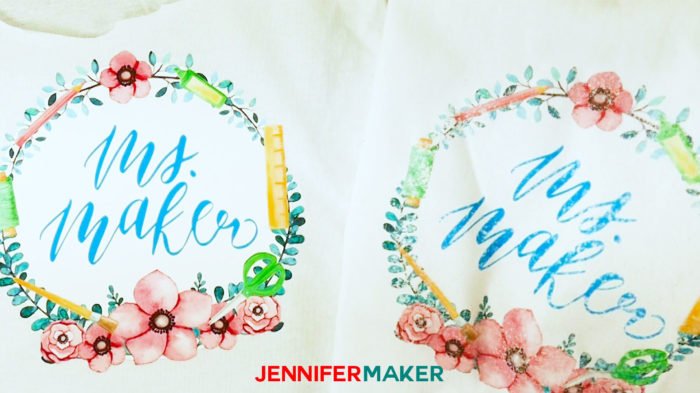
I just made these cute shirts — one black and one white, so we could compare and see which one worked best with this technique. I also tried two different brands of iron-on transfers. AND I also experimented with using the transfers for light fabric as well as those for dark fabric — did you know there were two different kinds? Yep! And it matters! While I was at it, I also tried switching up the transfers onto the light and dark shirts. And the results might surprise you!
So let’s head on over to Cricut Design Space so I can teach you all about Print Then Cut, show you how to prepare different designs, AND tell you which kinds of designs work best for this particular technique.
So let me show you how to use the Print Then Cut Cricut feature to make fun and full-color decal T-shirts! This post contains some affiliate links for your convenience (which means if you make a purchase after clicking a link I will earn a small commission but it won’t cost you a penny more)! Read my full disclosure policy.
Materials for Print Then Cut Cricut Transfer T-Shirts
- Printable iron-on transfer medium — I experimented with several brands, but the one I recommend is any of the iron-on transfer mediums FOR DARK FABRICS, such as this one or this one.
- Inkjet printer (I use an HP Envy 7155)
- EasyPress, heat press, or iron
- Parchment paper or teflon sheet (there should be one in your package of transfers)
- A way to cut your decal (I used the amazing Cricut)
- Design #142 – My “Ms. Maker” brush lettering design (available in my free resource library—get the password at the bottom of this post)
- The pink flower wreath PNG from the Watercolor Flowers and Birds Set at DesignBundles.net
- The craft supply PNG files from the Watercolor Craft Collection at Design Bundles.net
How to Make the Print Then Cut Cricut Transfer T-Shirts
Step 1: Find or Make a Print Then Cut Design in Cricut Design Space
Cricut Design Space has many powerful features, one of which is Print Then Cut. I think many of you are scared of it, but I can help you understand and use it better!
Basically, all Print Then Cut is a way to cut out a printed image on your Cricut. When set up properly, your Cricut will cut around the image, leaving you with a super precisely cut image you can use for your projects.
So to get started, go to Cricut Design Space, start a new project, and click on Templates. Choose the shirt type you want to make, the size, and the color — this will help you visualize your shirt as you design it.
Now you need an image. I think most people want to use images they find online, so let me show you how to do that. Let’s say I want to make a unicorn shirt. The simplest way is to use one in Cricut Design Space — to find images, click on Images on the left side, then type in a word to describe what you want, like unicorn. And if you click Filter then check the Printables box, you can see just the images that are ideal for Print Then Cut, like these unicorns here. Once you find one, just click the image and click Insert Images.
Once it’s on your canvas, you’ll want to resize it to fit your shirt. It’s important to note that you need to keep your Print Then Cut image smaller than 6.75” high and 9.25” long. You can change the size of an image by clicking on it and typing a new number in the W and H boxes at the top of the screen, just like this.
So this looks great! Now there are a few things to double-check before we can make it. First, is it flattened into just one layer. To find out, look at the layers panel on the right. We can see that this unicorn is actually made of up several layers. So to fix that, select all the layers and click Flatten at the bottom of the Layers panel.
One last thing is to make sure the layer is labeled as Cut and Print, which this one is. So this design is ready to go!
But what if you can’t find the image you want in Design Space? Here’s what you do. Go find an image you do want to use — there are many images online. You should assume EVERY image you find anywhere is copyrighted and request permission to use or purchase a license. If you are looking for a large collection of images that may provide a license so you can use them, Wikimedia Commons has a very large image library (see https://commons.wikimedia.org/wiki/Category:Images) and each image tells you whether if and how you can use that image. And remember that my own blog at https://jennifermaker.com has many free images in the resource library which you are welcome to use as well. If you intend to sell your shirts, you MUST have a commercial license.
Once you find an image you have permission to use, you can download the image, then go over to Cricut Design Space, click Upload, then Upload Image, then Browse, and find the unicorn image and click Open. Now Cricut Design Space will ask you to select the option that best matches your image — choose Complex. You’ll then get a screen that looks like this — this is your chance to clean up the image. This unicorn is pretty clean, but it has a big white background. We can get rid of the background by making sure the magic wand cursor is selected and then click on the areas we want to remove. And don’t forget to look for inside bits that should be deleted, like right here. You can click the Preview button to see how your image will cut out. Once your image looks good, click Continue, make sure Save as Print Then Cut Image is selected, then press Save. Once it’s uploaded, select the image and click Insert Images. Now resize it so it fits on the shirt and is under 6.75” x 9.25”. Now make sure your image is set to Cut and Print over in the Layers panel. If not, you can change it in the Linetype menu at the top of window — make sure it’s set to Cut and Print. If so, you’re good to go!
If a ready-made image isn’t going to work for you, you can design your own! And there are so many ways to do that right within Cricut Design Space. For example, you can click Shapes, choose a shape like a heart, then go up to the Fill menu and select Print. Now click on the box to the right of that menu and select Pattern. There’s a TON of patterns in here to choose from. Pick one you like — you can even edit the pattern a bit by clicking Edit Pattern to change the scale, rotation, and flip the pattern up or down. Resize the image to fit and you’re good to go!
You can do more, too! Let’s say you’d like to personalize this heart. Click Text on the left side, type in a name, choose the font you’d like, resize it to fit inside the heart, then select both the heart and the text and click Slice. Delete the two layers with the words and you’re left with this!
Here’s another fun way to make a personalized design for a shirt with Print Then Cut. Find an image you like and import it. I already uploaded this photo of the tools, so I’m going to add it to my canvas now. Resize it to fit. Now type a name and choose a big bold font, like Impact. Resize the word so it fits within the image — you may also want to decrease the letter space so it’s compact. Now select both the image and the name and click Slice. This time, remove the outer image and the black letters, and you’re left with just the name with letters from the image! Isn’t that cool?
And you can get fancier, like I did with the decal I put on my OWN shirts. To make it, I found some artwork I liked over at DesignBundles.net. The artwork was free at the time I made this video — I used the Watercolor Flowers and Birds Set and the Watercolor Craft Collection. I downloaded both and unzipped them. So let me show you how I added them. Click Upload, then Upload Image, then Browse, and find the image you want to upload — like this wreath here, and click Open. Now Cricut Design Space will ask you to select the option that best matches your image — choose Complex. You’ll then get a screen that looks like this — this is your chance to clean up the image. You can make it smaller with the magnifying glass icon with a subtract symbol in it. I want to remove the leaves at the bottom of this wreath, so to do that I click the Eraser tool. You can change the size of your Eraser with this slider. I recommend you zoom in so you can really see the detail and make smooth eraser lines. Click the Preview button to see how it will cut out and fix any little mistakes you see now.
Once your image looks good, click Continue, make sure Save as Print Then Cut Image is selected, then press Save. Once it’s uploaded, select the image and click Insert Images. Now resize it so it fits on the shirt and is under 6.75” x 9.25”. Now make sure your image is set to Cut and Print over in the Layers panel. If not, you can change it in the Linetype menu at the top of window — make sure it’s set to Cut and Print.
Now if I want to add more to this image, so I created brush lettering image — you’re welcome to use this image, too — it’s over on my blog for free at jennifermaker.com. I’ve already uploaded it, so now I’m going to place it inside my wreath.
I decided I also wanted some crafty things on my wreath, so I added things like a brush, scissors, ruler, glue, pencil, and thread. I got all of these images from the Watercolor Craft Collection image set from DesignBundles.net.
Now this image is okay, but there’s an issue. If I make this design now, it’s going to have a LOT of little leaves and those stems look really thin. Not only that, but I have a lot of floating parts — like my letters, and I’ll have to position all of those things manually on my shirt. You don’t use transfer tape with transfer paper. So I’m going to add a big circle behind this design. It’s going to make it SO much easier to both weed and apply to my shirt. So this is a big tip — when you’re making a Print Then Cut design for iron-on transfers like we are, keep your floating parts to a minimum.
So this design is almost ready to cut, but there’s one issue — it’s all in layers right now. If we made it now, it wouldn’t cut out right. So to fix this, select all the layers in your design and click Flatten at the bottom of the layers panel on the right. NOW we see the Print and Cut label show up on the layer and it’s good to go!
Let’s go ahead and cut this now. Click Make It. If you get this image that your design is too large, go back to your canvas and make sure your design is under 6.75” by 9.25”.
When you have the sizing right, you’ll see your mat preview screen. Go ahead and click Continue.
Now, what you do next depends on whether you’re using the transfer medium for LIGHT colored fabrics or DARK colored fabrics. If you’re cutting on the light-colored transfer medium, you need to MIRROR your image. To do that, click on the Edit link next to your design and toggle the Mirror option on and click Done. If you’re cutting on the dark-colored transfer medium, you do NOT mirror your design. Let’s do our white colored transfer medium first and leave it mirrored.
First, we need to print our design on the transfer medium. So click Send to Printer and make sure the Bleed is on — the bleed function will add a little border around your image so you don’t have a white outline. I also recommend you click Advanced Options and make sure your paper type is set appropriately (I set mine to specialty paper, matte) and make sure your quality is set to best for the most vibrant image. This should also help with banding, which are the horizontal lines that can show up when you print something.
Step 2. Print Your Design FROM WITHIN Cricut Design Space
So let’s go print this now! It’s important to note you must use an inkjet printer for this iron-on transfer technique.
Watch my video to see this process!
Note: If you have issues getting Print Then Cut to work, please check out Cricut’s Print Then Cut Troubleshooting Page.
Step 3: Cut Your Design on your Cricut
Once the transfer tape is printed, you’ll need to come back to Cricut Design Space and set it up for cutting. So click Browse All Materials and search on printable iron-on. Choose Printable Iron-On Light and click Done. I like to change my pressure to More. Now let’s cut it out.
Now, if you’re cutting on the fabric medium for dark colored fabrics, which is what I recommend, make sure your design is NOT mirrored but otherwise print it the same way. And when you go to cut it, select the Printable Iron-On Dark setting.
Step 4: Prepare Your Iron-On Print Decal for Your Shirt
Watch my video to see this process!
Step 5: Iron On Your Print Decal
Watch my video to see this process!
Get my Ms. Maker SVG cut file totally FREE!
Download my free Ms. Maker brush lettering image by subscribing (free) below to get the password to my resource library.
Love,

Want to remember this? Save the Print Then Cut Cricut Transfer Shirt Tutorial to Your Favorite DIY Pinterest Board!

I’m using an iPad and I don’t see where you find “templates.”
Templates are not available in Cricut Design Space on the iPad — they are only available in the desktop version.
I did find some when I searched in images
This is an amazing tutorial Jennifer! I swear I learn something new EVERY TIME I watch one of your videos. I had no idea you could double click in the left corner to get different grids (or hide grids) on the Design Space screen, and I’ve been using Cricut Design Space for years! See, I ALWAYS learn something cool from you!
I use Print Then Cut often and love it, but I never used it for iron-on products. I even have a pack of the transfer paper for dark clothing! Now I’m going to try it!
Thanks for all you share. You’re a wealth of knowledge, information and creativity. Thanks also for the information on the free download from DesignBundles.net. I love the digital set, and their website has so many cool designs. I am glad to find them through you!
Happy Crafting!
Thank you SO much for this tutorial! I am a new Cricut user, and all of your tutorials are so informative and explained extremely well. I can’t wait to give this one a try!
Thank you so much Mrs. Maker for sharing all those video tutorials. I’m new to all this and your posts are very helpful. I look forward to using my new cricut maker. Thanks again 🙂
Is it possible to make something that is not all connected? Like if you hadn’t added the white circle behind the wreath. Is there a type of transfer medium for HTV similar to the transfer tape used with vinyl?
You can certainly cut it out, but you’ll have to place everything on the shirt manually. The transfer doesn’t have any sort of sticky back, so you can’t use a transfer sheet (as it wouldn’t come off the transfer sheet once you place it on the shirt). There may be a way to do it with something very lightly sticky, but I’m not sure what that would be.
Wow, the dark colored transfer is worth it over the light transfer for sure! That is such an amazing difference- and so creative that you thought to try both on a white tee. I’ve actually experimented with TeeSpring with loading images I’ve handdrawn to their platform to make print on demand. These are super cute, for sure, but for bulk orders if you wanted to start selling them in mass, TeeSpring may be worth looking into. I’ve also heard good things about Zazzle although I’ve yet to try them. With TeeSpring, every part of the process is free. You pick the price and you can upload your design to multiple products like tees, bags, socks, pillows, and mugs. They do shipping, printing, and everything.
I do know about the shirt printing places, and I have used them in the past, but I love making things on my Cricut because I can do it without needing to plan in advance more than a few hours. 🙂
I found YOU by accident. I was like you mentioned hunting through the internet for some advice, and there you were. I have learned alot and I am much more comfortable using Cricut Design Space. Thanks for that. I keep watching for more cool stuff!
It looks like there are some images missing in the step by step instructions that show how to create the print then cut design.
You are Awesome Jennifer! God Bless You! for sharing all this acknowledge with us. I think the same; every time I learn something new, I didn’t know about the double click on the left corner to hide the grids =)
And all the tutorial is amazing, Thank you very much!
Oh my Gosh! I just made my first Print Then Cut design on a T-Shirt. Thanks to your wonderful tutorial it came out perfect! I have been looking into so many tutorials and yours are by far the easiest to understand and follow. And, I love the way you stick to the subject! So many other ramble on about other things and It’s easy to get lost. Thank You Jennifer!
in the print and cut for iron on vinyl, does your printer have to be connected to the cricut?
I’m going to purchase a colour printer to do cut and prints. Is there a particular printer I should purchase
I always keep my favorite things blog post updated! But the printer I use is the HP Envy 7155!
I have a laser printer. If I use the laser transfer paper that goes with a laser printer…..why can’t I use the cricut to cut it and the heat press to iron it on? I’m confused.
You can try it, but keep in mind that laser printers use heat to fuse the image to the paper and when it is too hot the paper will jam and could ruin your fusing unit.
Can you make this with a photo.
Hi Lore! Yes, you can! Just upload a photo and follow the remainder of the steps.