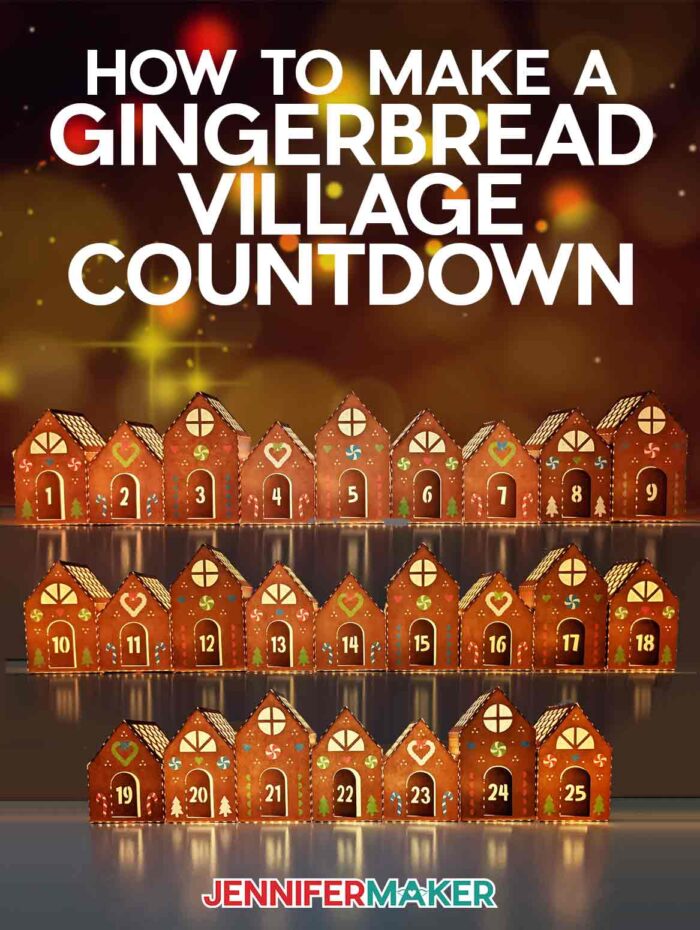
Learn how to make a gingerbread village countdown from cardstock!
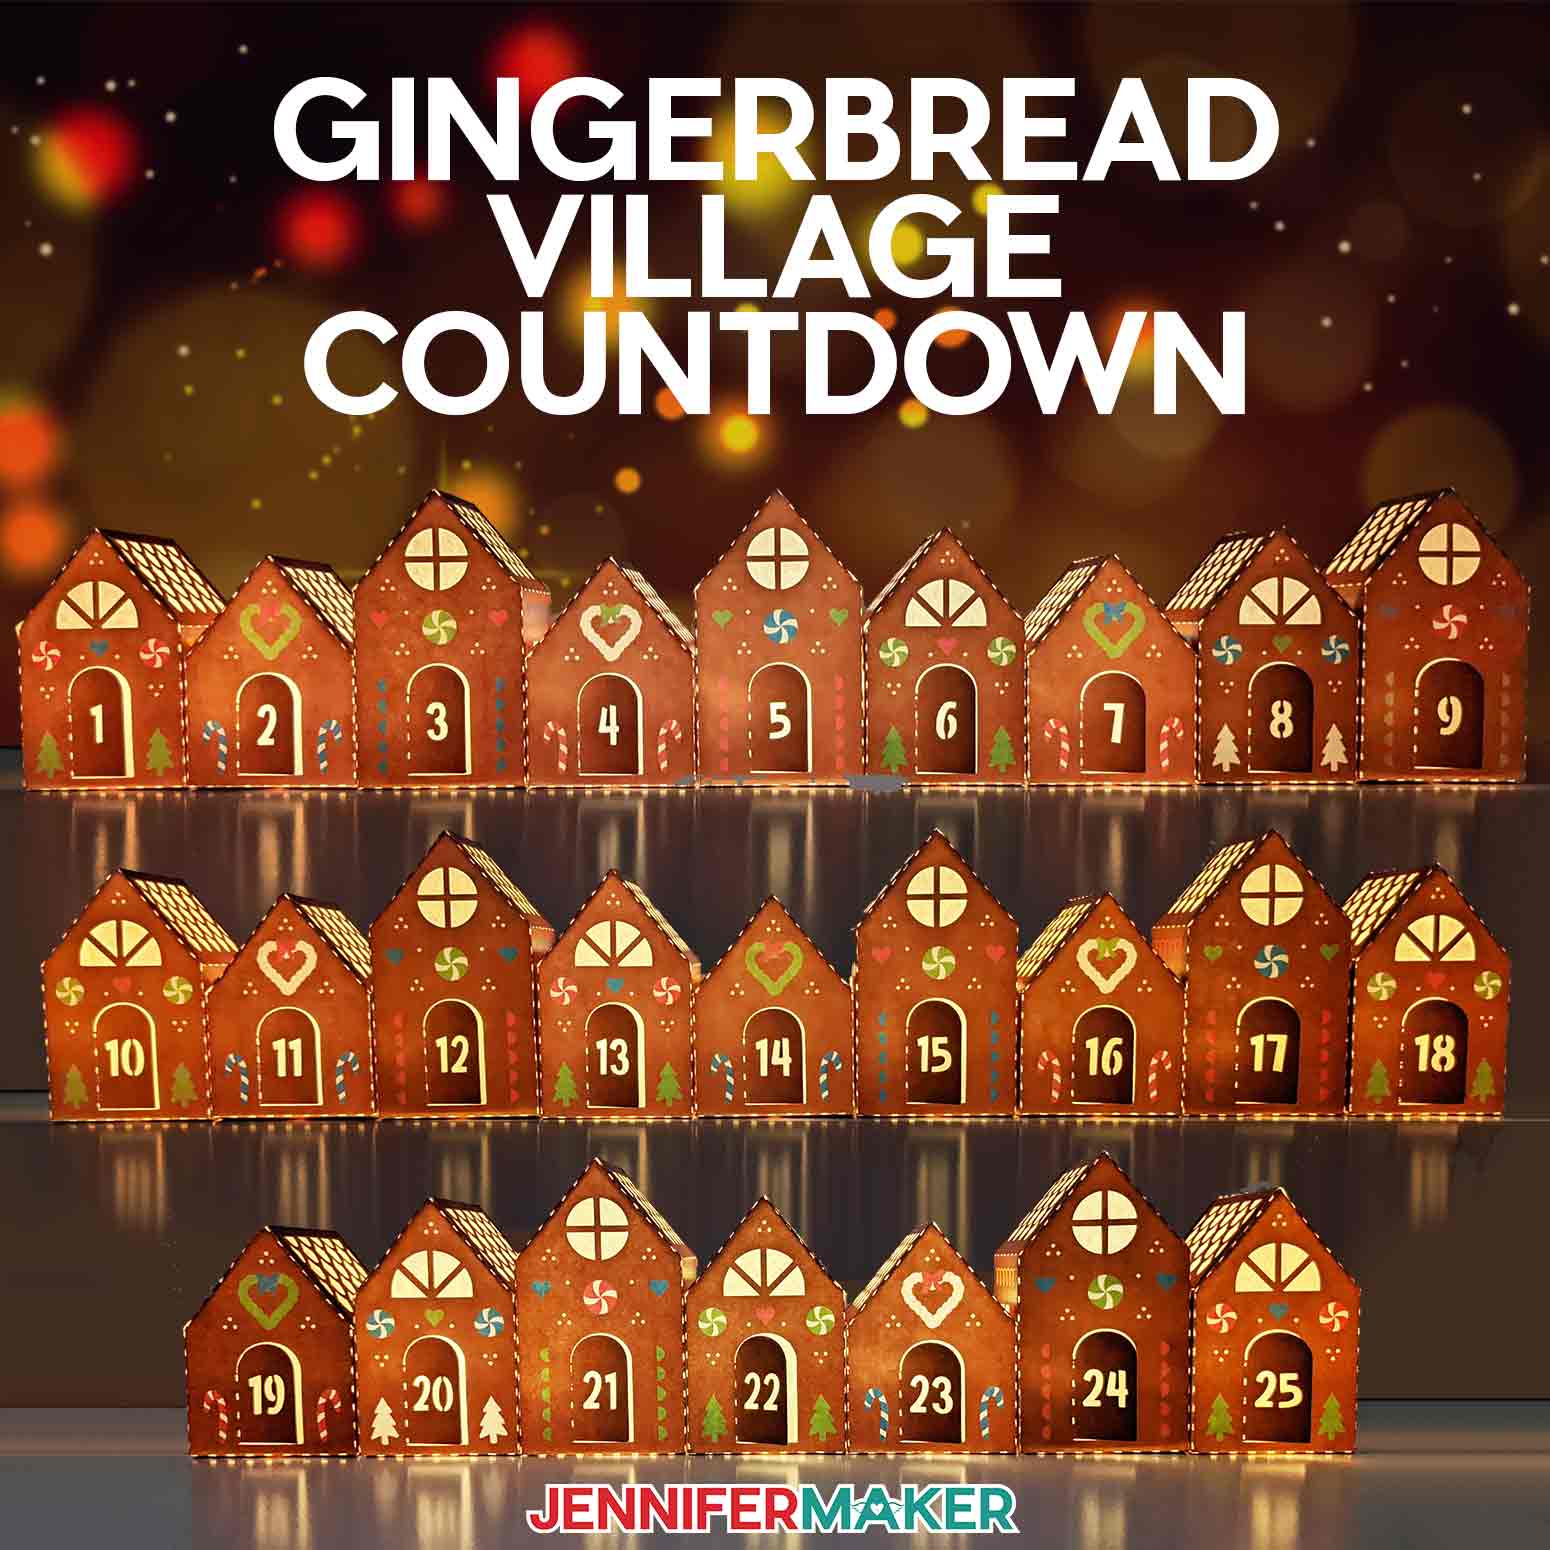
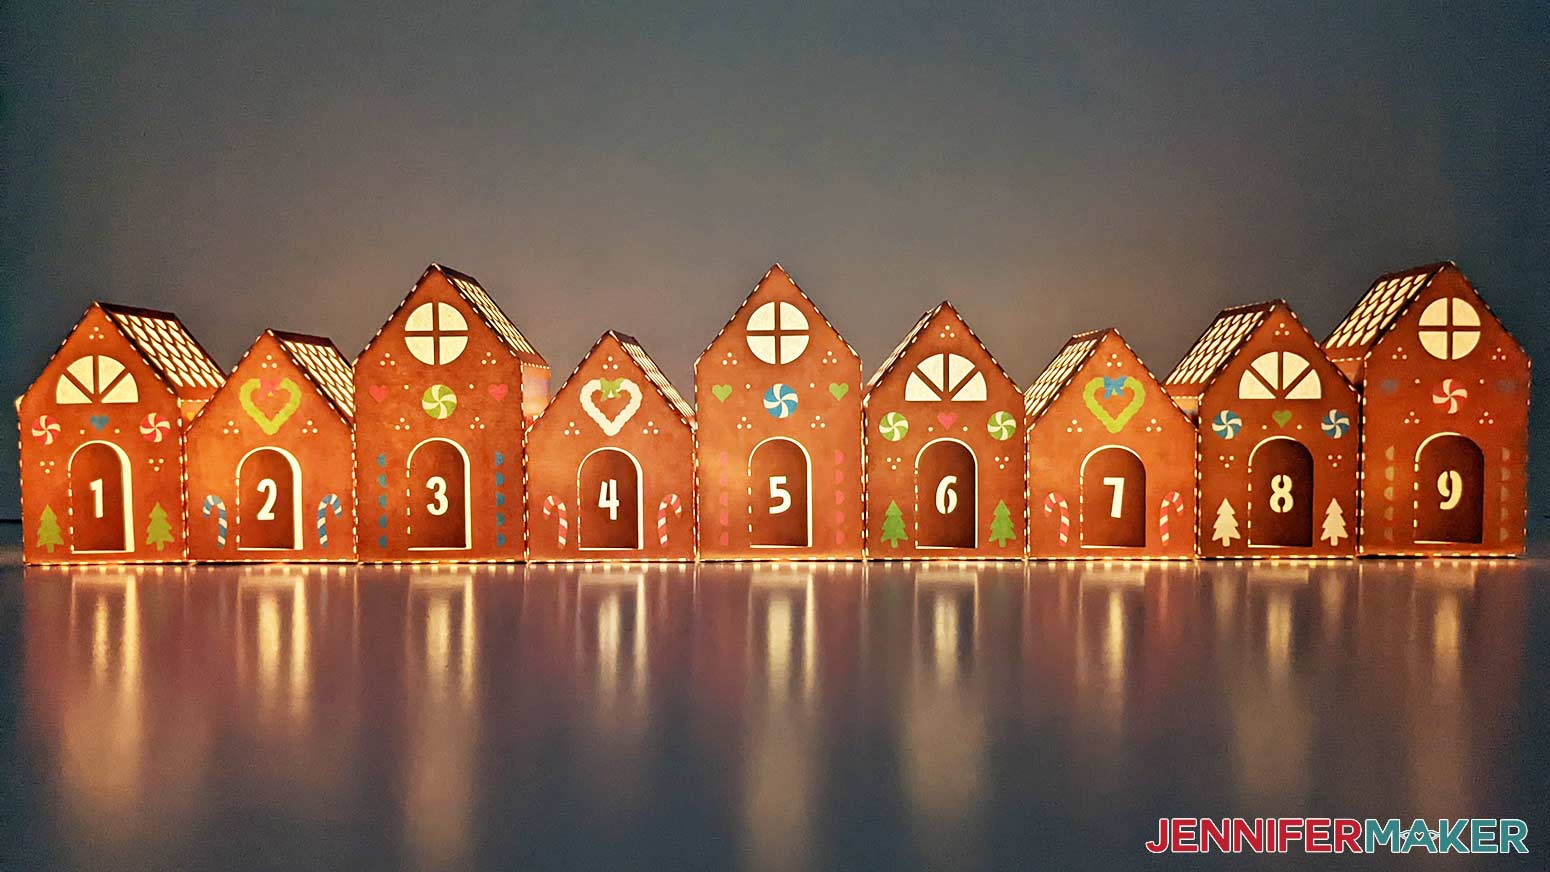
Christmas is coming, so it’s time for a new advent calendar! I love this new gingerbread village countdown because it looks like a sweet mountain town! I’ll show you different ways to make and assemble the houses from simple to simply stunning! And once they’re done, you can open one each day leading up to your holiday event!
Watch the full step-by-step gingerbread village countdown tutorial:

 What is the Merry Maker Mingle? This is an annual tradition here at JenniferMaker! Every day for the first 25 days of December, we gift you with a brand new project, design, tutorial, and video for something YOU asked us to make. On top of that, we host a giveaway with 25 days of prizes. Some of the amazing prizes are Cricut cutting machines, sewing machines, gift cards, and beautiful print editions of our popular Cricut Coach Playbook. You can even earn bonus entries for sharing photos of the daily projects! Click here to learn more about the Merry Maker Mingle!
The holiday season is so busy, sometimes it’s nice to have a daily ritual to keep you grounded. For me, that’s an advent calendar! I look forward to opening a new tab or box every day, even if I’m the one who put the notes or gifts inside!
This year’s advent calendar is a mix of gingerbread houses, Lemax Village collectibles, and vintage Christmas village decorations. There are lots of options to fit your Christmas cheer style!
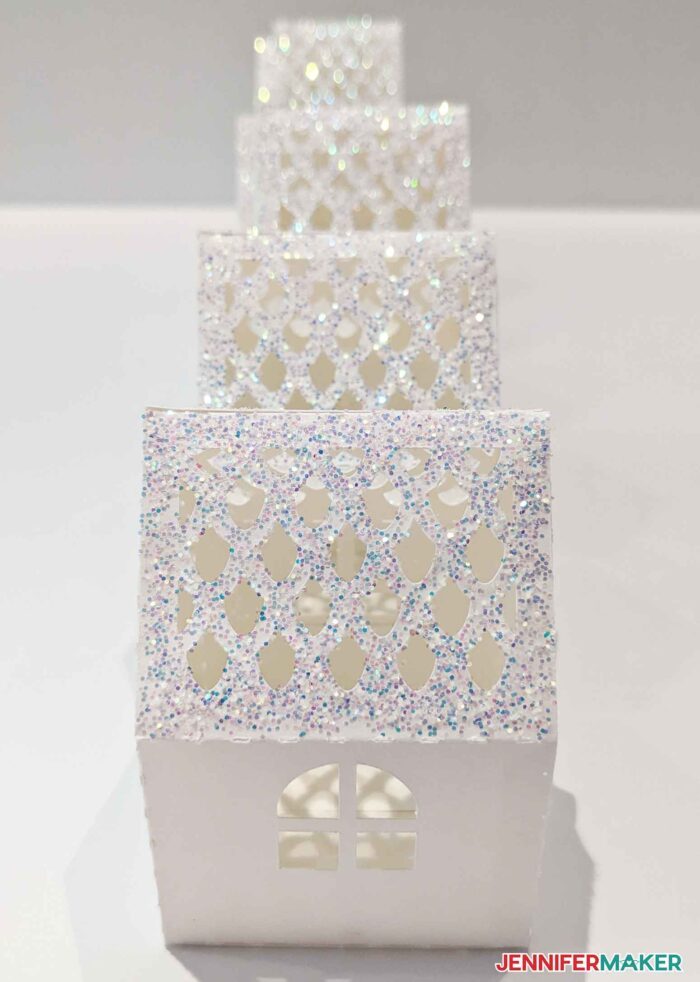
The Print then Cut gingerbread village countdown takes some extra steps, but the bright colors are so worth it! When they’re all set up, it looks like a hand-painted scene!
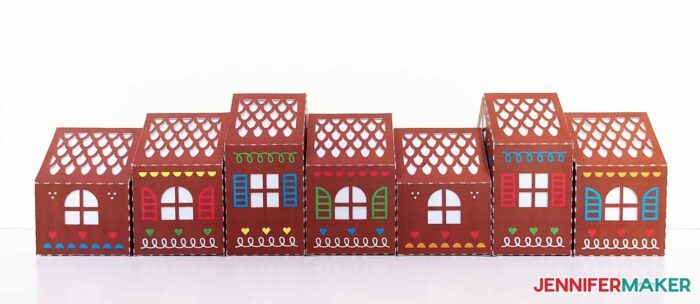
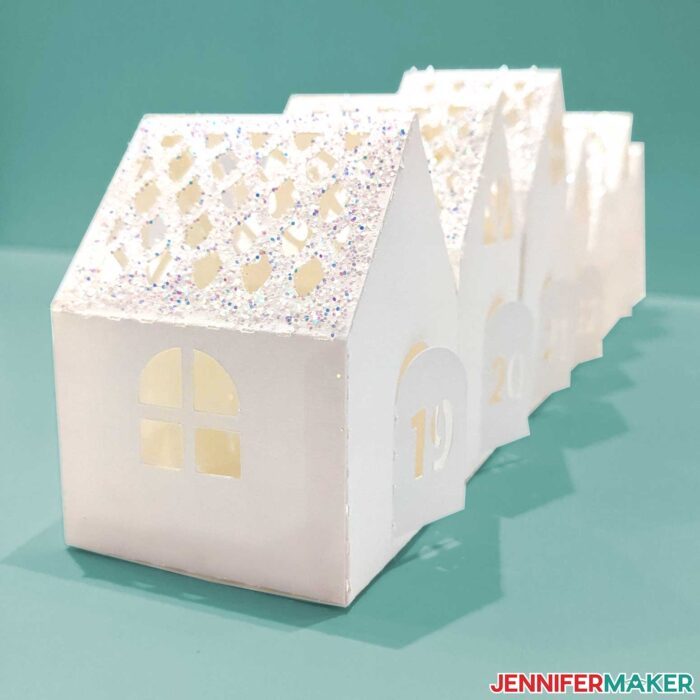
I also made simple cut versions in brown or white cardstock that I love just as much!
Depending on the style you choose, you’ll just need cardstock and glue to put the gingerbread village countdown together. I cut mine on a Cricut Maker 3, but you can use any Maker or Explore. See the details for each combination of exterior, liner, and assembly technique below!
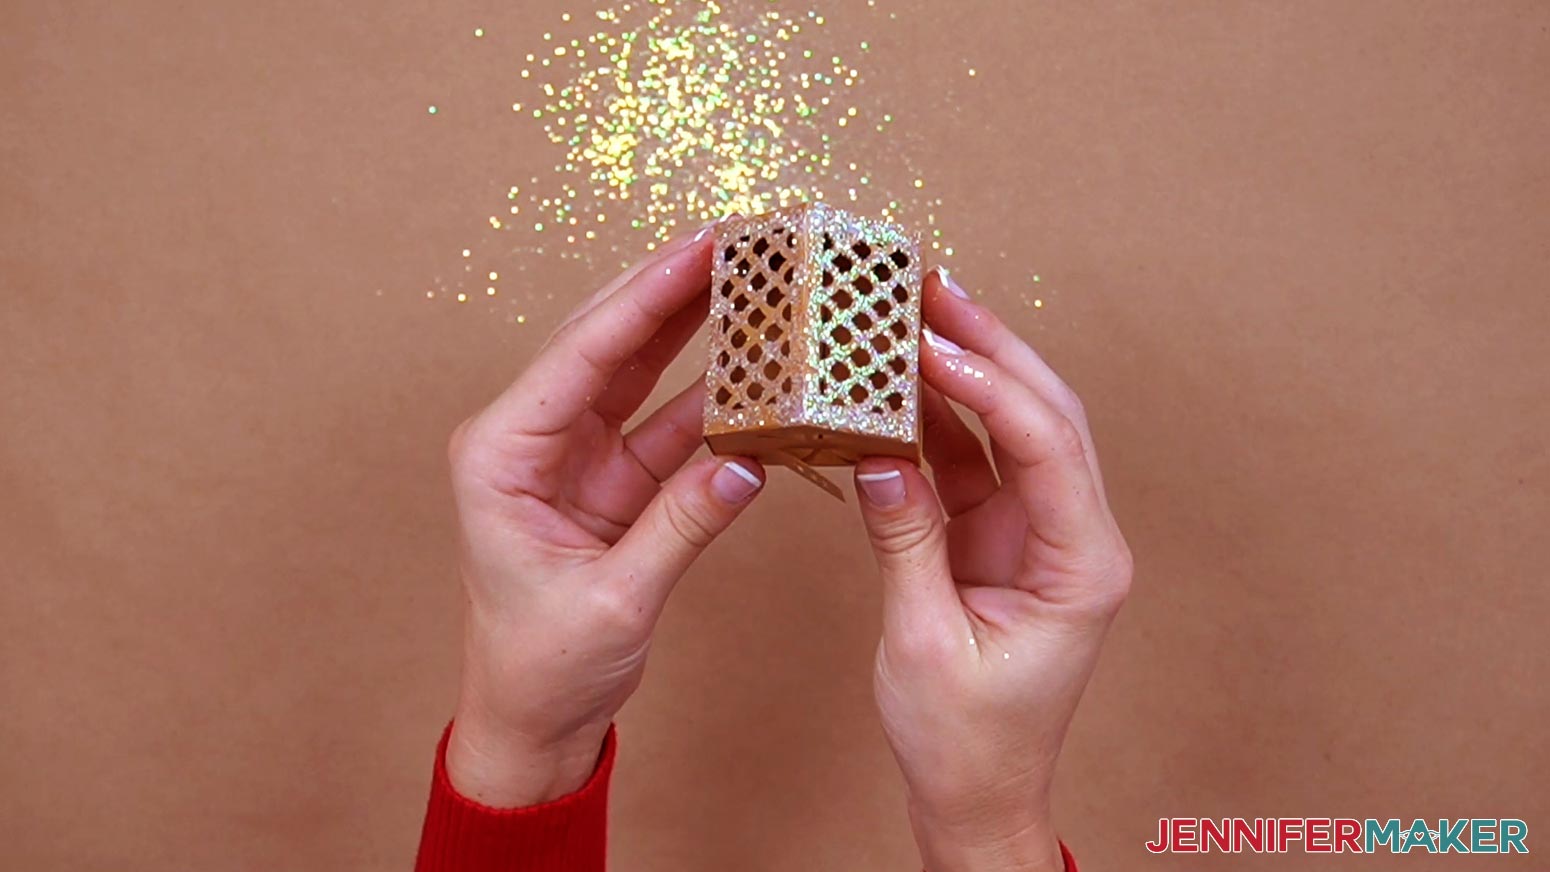
Adding some glitter on top is optional, of course, but the snowy effect is beautiful. Especially if you add some fairy lights behind the scene or tea lights inside the houses. I did try adhesive spray for the glitter but it got everywhere! I liked Bearly Art Precision Craft Glue with a paintbrush instead and got much better results! I’ll also show you a way to assemble your gingerbread village countdown so you can store the houses flat until next year! I tried several adhesives and finally found the perfect tool.
And you don’t need to use them as a gingerbread village countdown to the Christmas season. The houses would look adorable as table accents on the big day, too!
Let me show you how easy it is to make this gingerbread village countdown! This post contains some affiliate links for your convenience (which means if you make a purchase after clicking a link I will earn a small commission but it won’t cost you a penny more)! Read my full disclosure policy.
Materials to Make a Gingerbread Village Countdown
View my Amazon shopping list with the exact items we used to make this project
- Twenty-five (25) Sheets of 8.5″ x 11″ 65 lb. White Cardstock and an Inkjet Printer — I used the [HP ENVY Photo 7155 (for Print Then Cut houses) -OR-
- Twenty-five (25) Sheets of 8.5″ x 11″ or 12″ x 12″ 65 lb. White Cardstock (for plain white houses) -OR-
- Twenty-five (25) Sheets of 8.5″ x 11″ or 12″ x 12″ 65 lb. Brown Kraft Cardstock (for gingerbread-colored houses)
- Seventeen+ (17) Sheets of 8.5″ x 11″ 20-24 lb. Copy Paper (optional, for calibration and/or inside liners, which you can also use Wax Paper
- Twenty-five (25) [LED Tea Lights -OR- One to Twenty-five (1-25) Sets of Fairy Lights (optional)
- Craft Glue – use code JENNIFERMAKER for a discount at checkout!
- Glitter (optional) – I loved mine from the Glitter Guy – use code JENNIFERMAKER for a discount at checkout!
- Paint Brush (optional) — for evenly applying craft glue to the house roofs to adhere glitter
- Adhesive Spray (optional) — another method for adhering glitter to the house roofs
- Butcher Paper (optional) — to keep your work surface clean when applying glitter
- A method to cut your cardstock — I used the amazing Cricut Maker 3, but you can also use the Cricut Maker or the Cricut Explore Series machines with your Fine-Point Blade
- Cricut Green StandardGrip Machine Mat 12″ x 12″
- Cricut Blue LightGrip Machine Mat 12″ x 12″ (optional) — for calibration and/or cutting copy paper or wax paper
- Scoring Stylus or Single Scoring Wheel (optional) — for files with score lines
- 1/2″ x 1/2″ Restickable Mounting Squares (optional) — for assembling your houses so they can be stored flat
- Brayer
- Scraper
- Spatula
- Fabric Storage Container with Dividers -OR- Plastic Storage Containers (optional, for storing your assembled houses)
- Optional: Cute Holiday Shoes — I’m wearing Chocolatica’s Ginger Bread Mary Janes by Hot Chocolate Design
- Design #440 (My free SVG/PDF/DXF design files are available in my free resource library – get the password by filling out the form at the bottom of this page)
How to Make Your Own Gingerbread Village Countdown
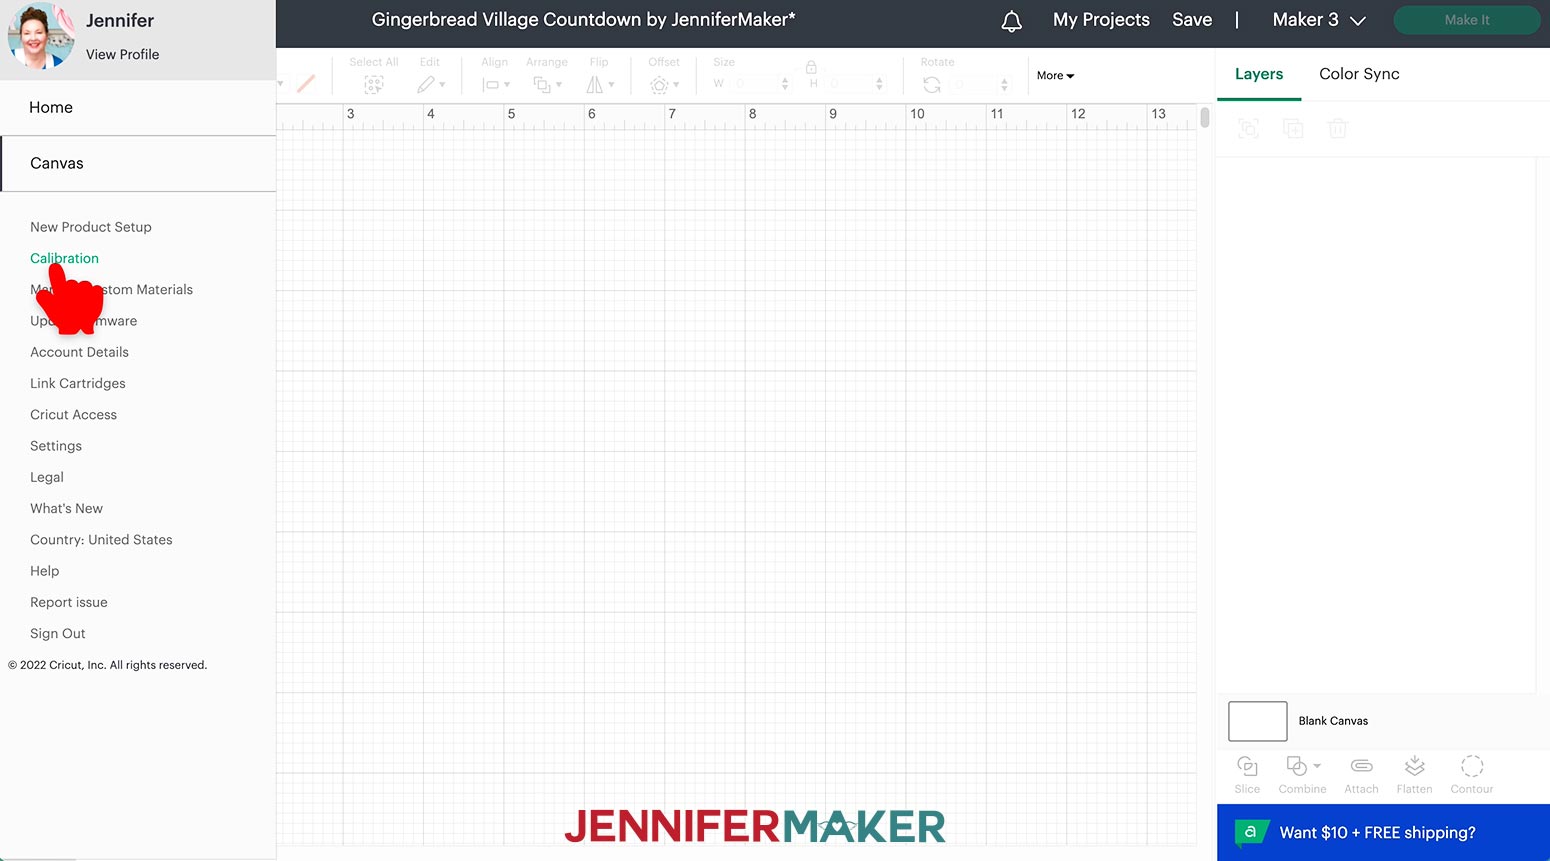
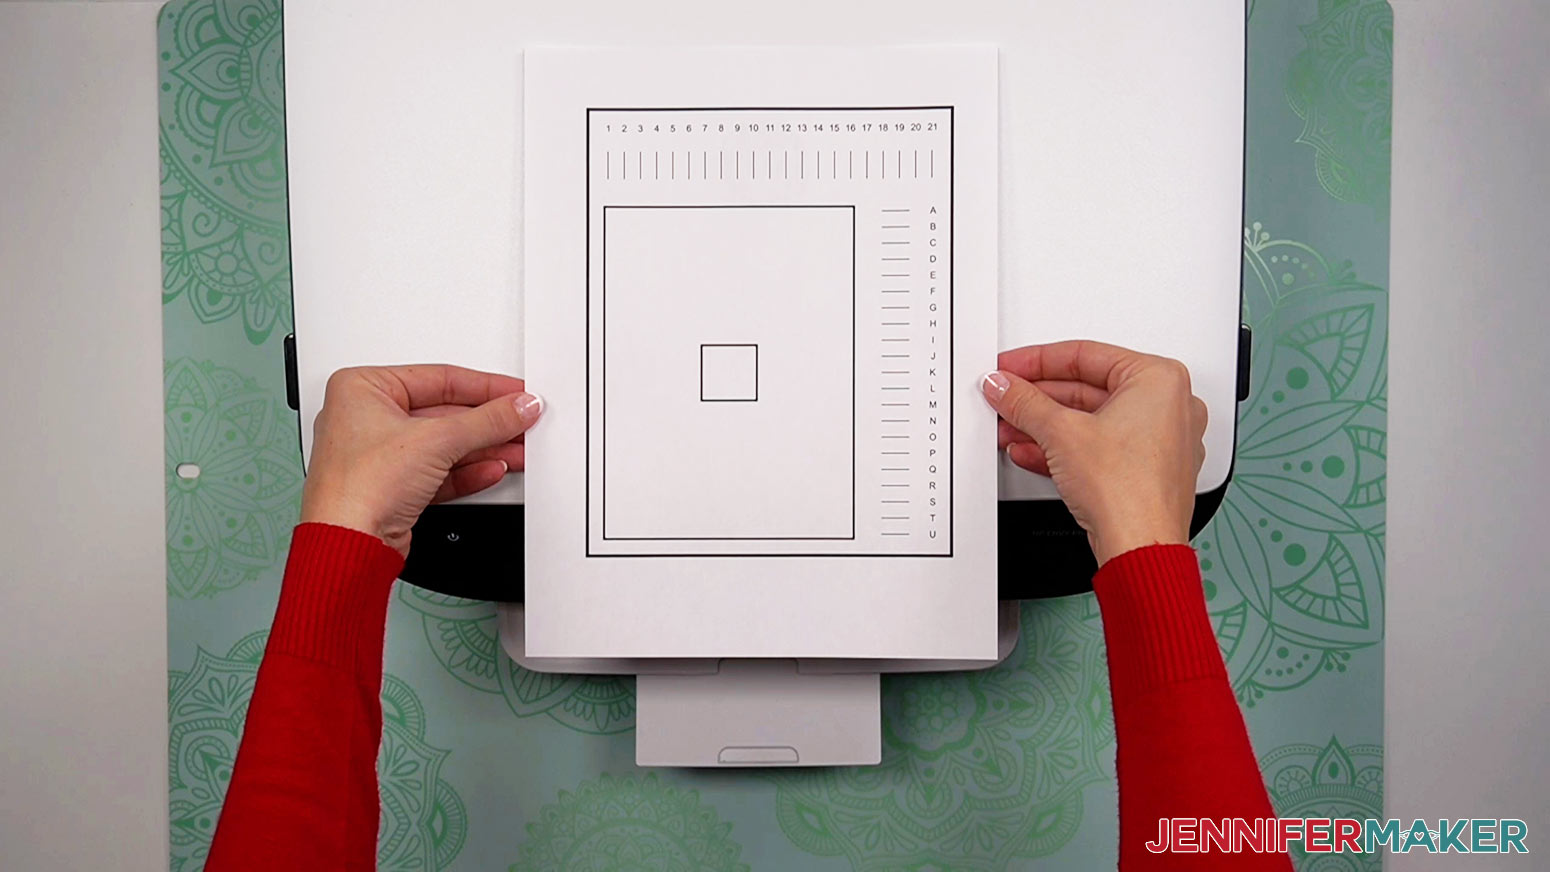
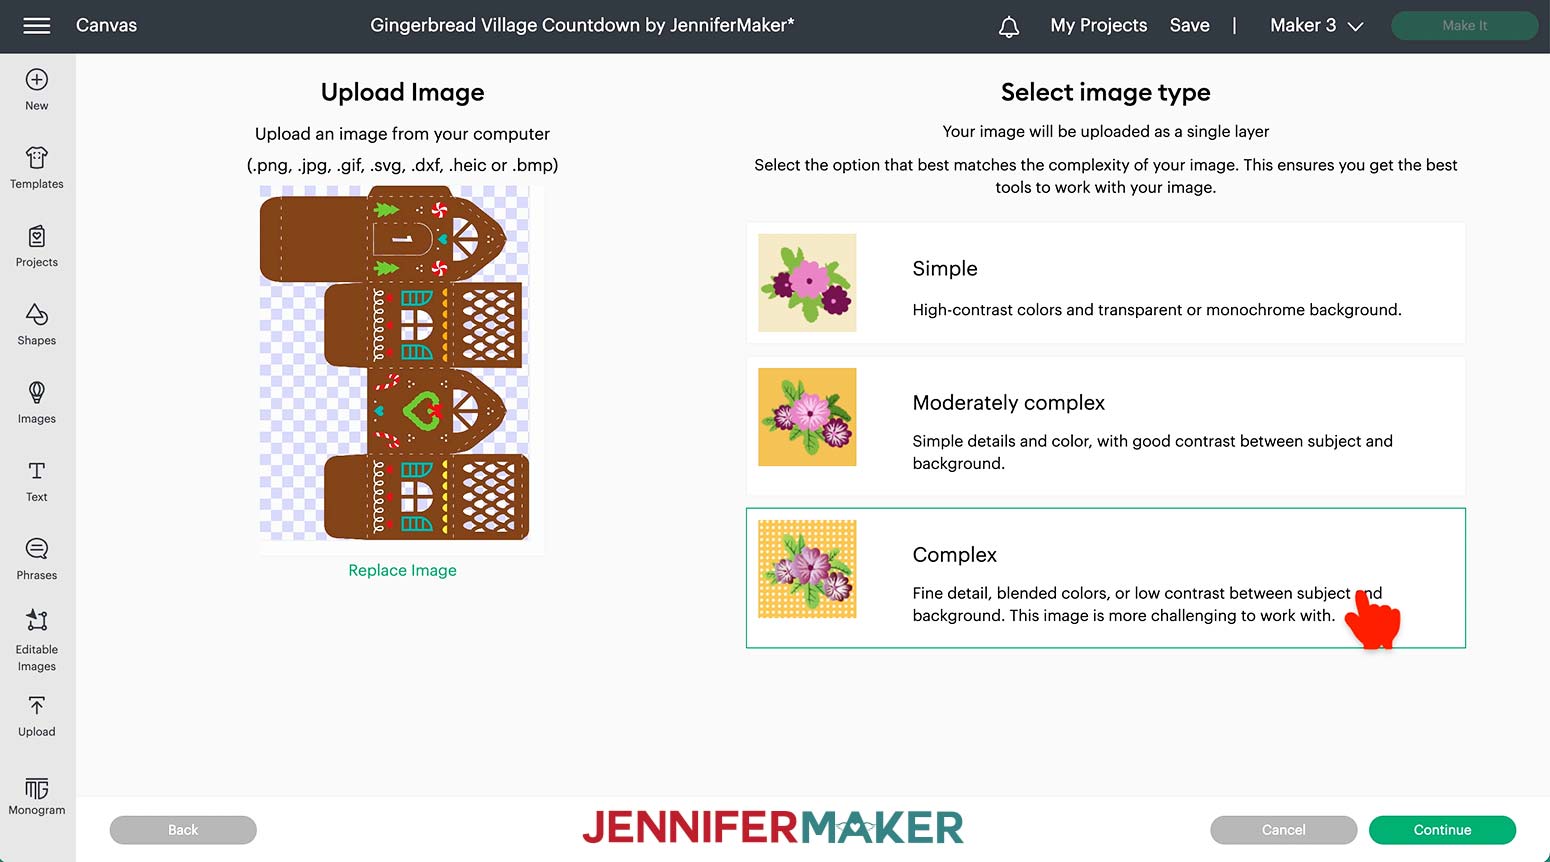
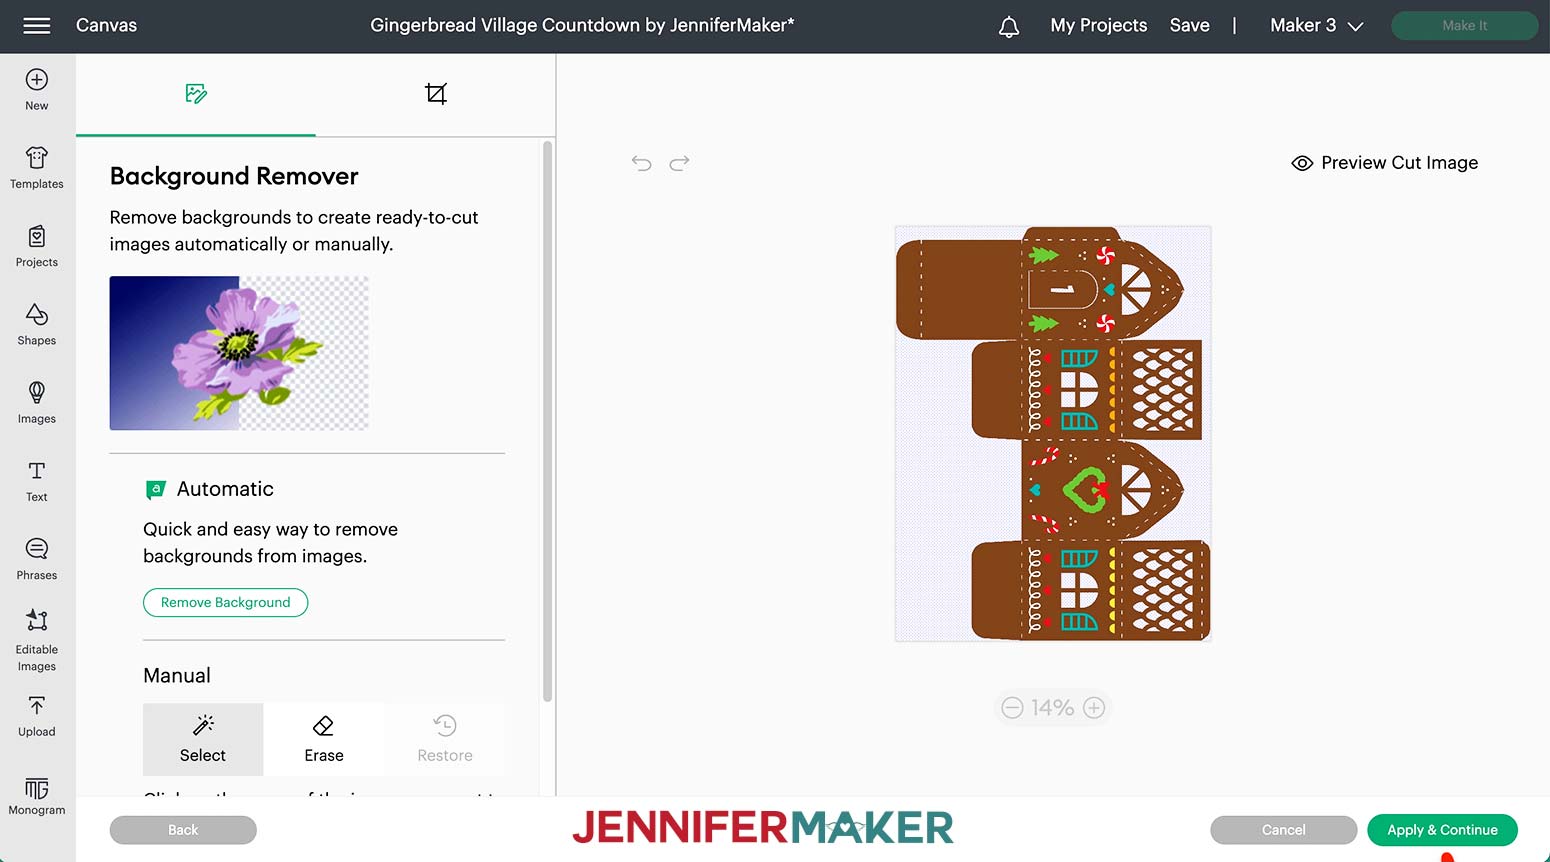
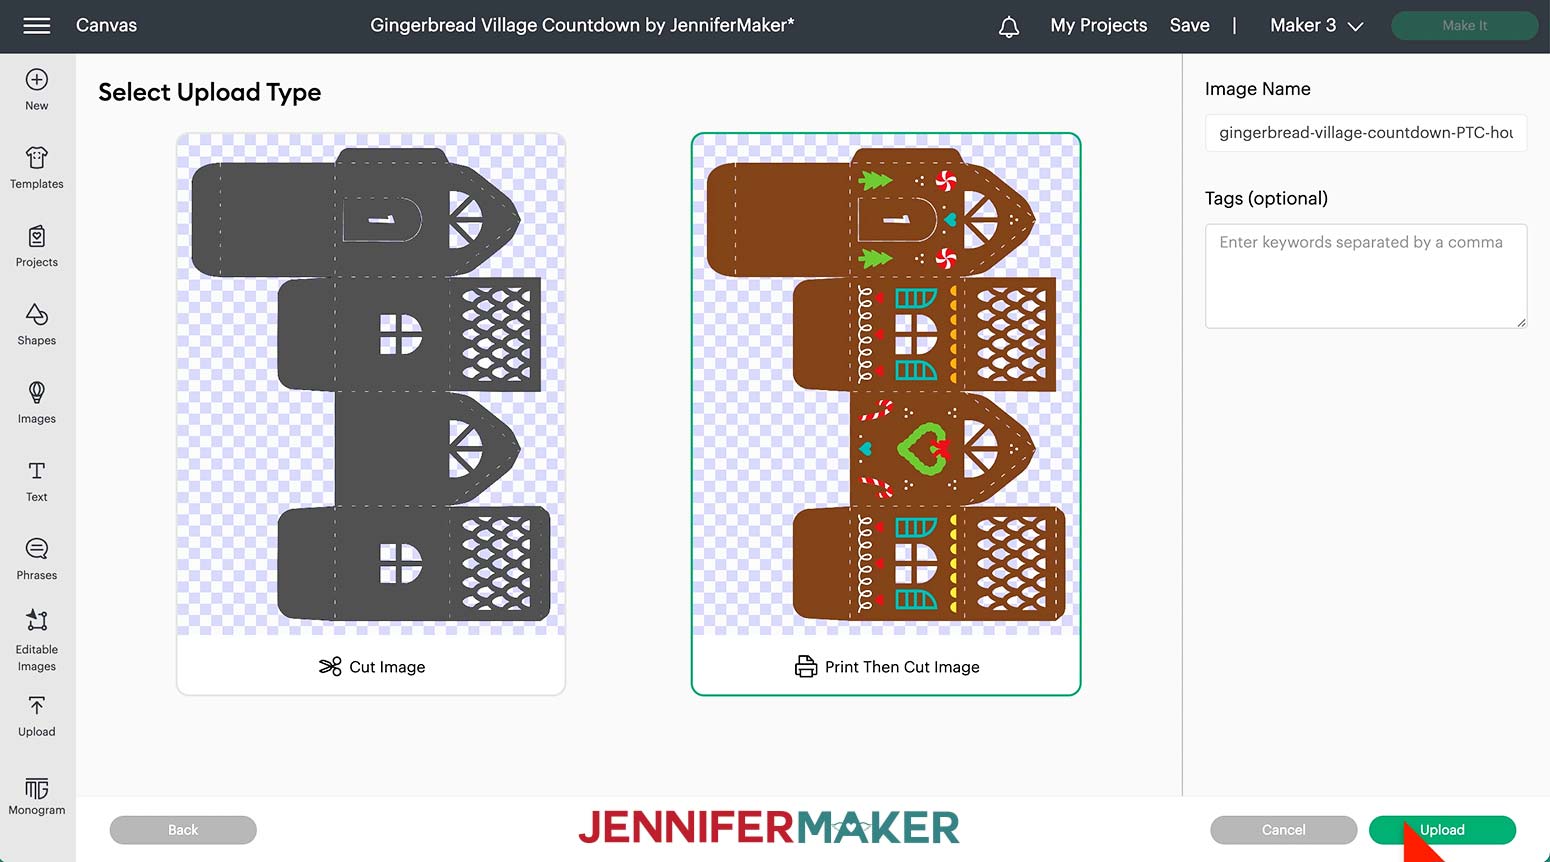
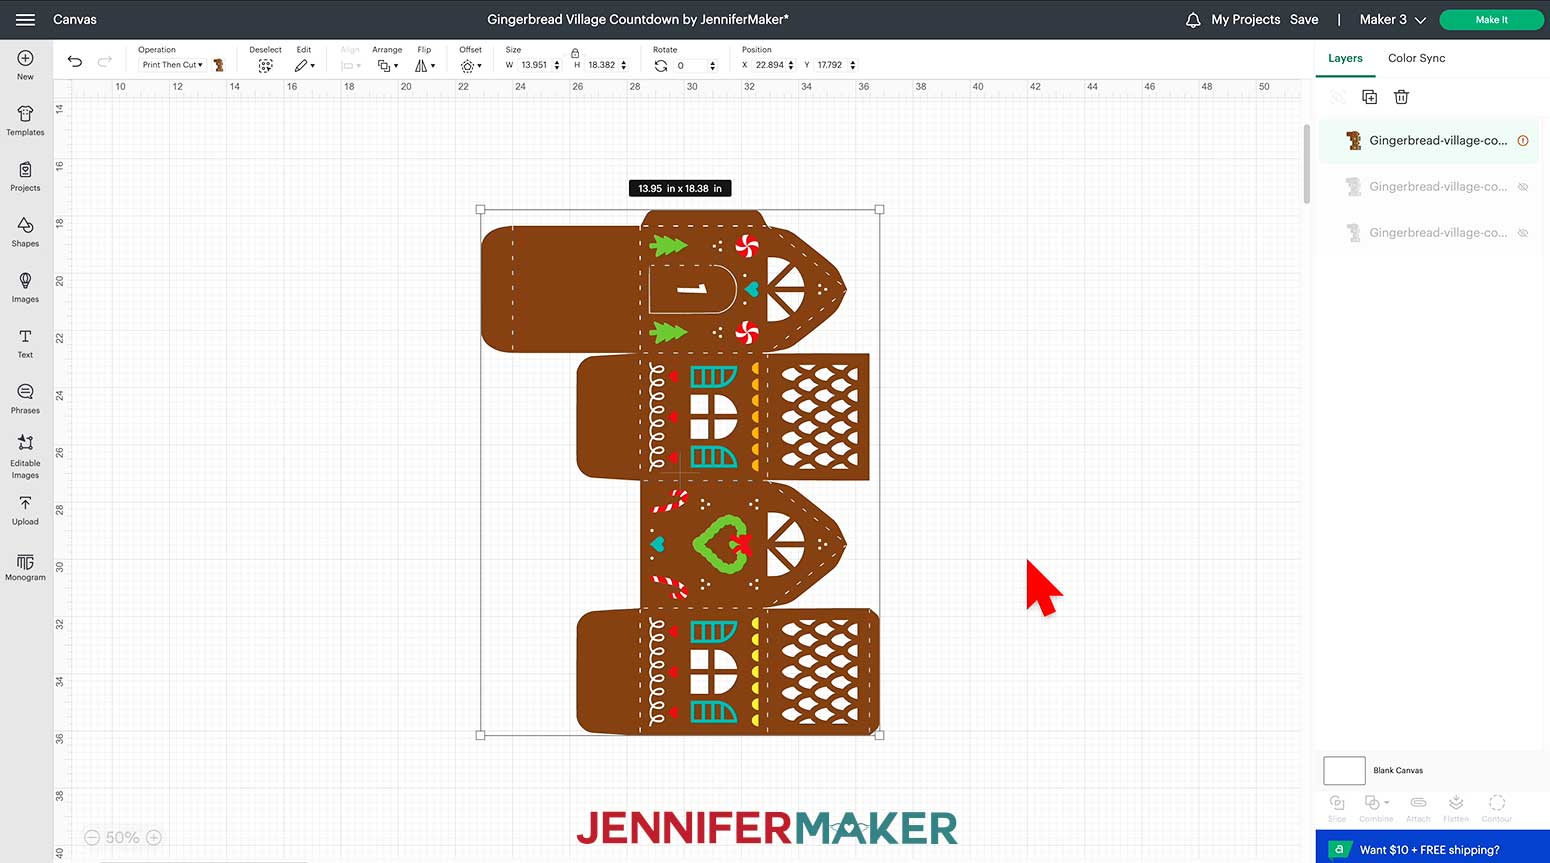
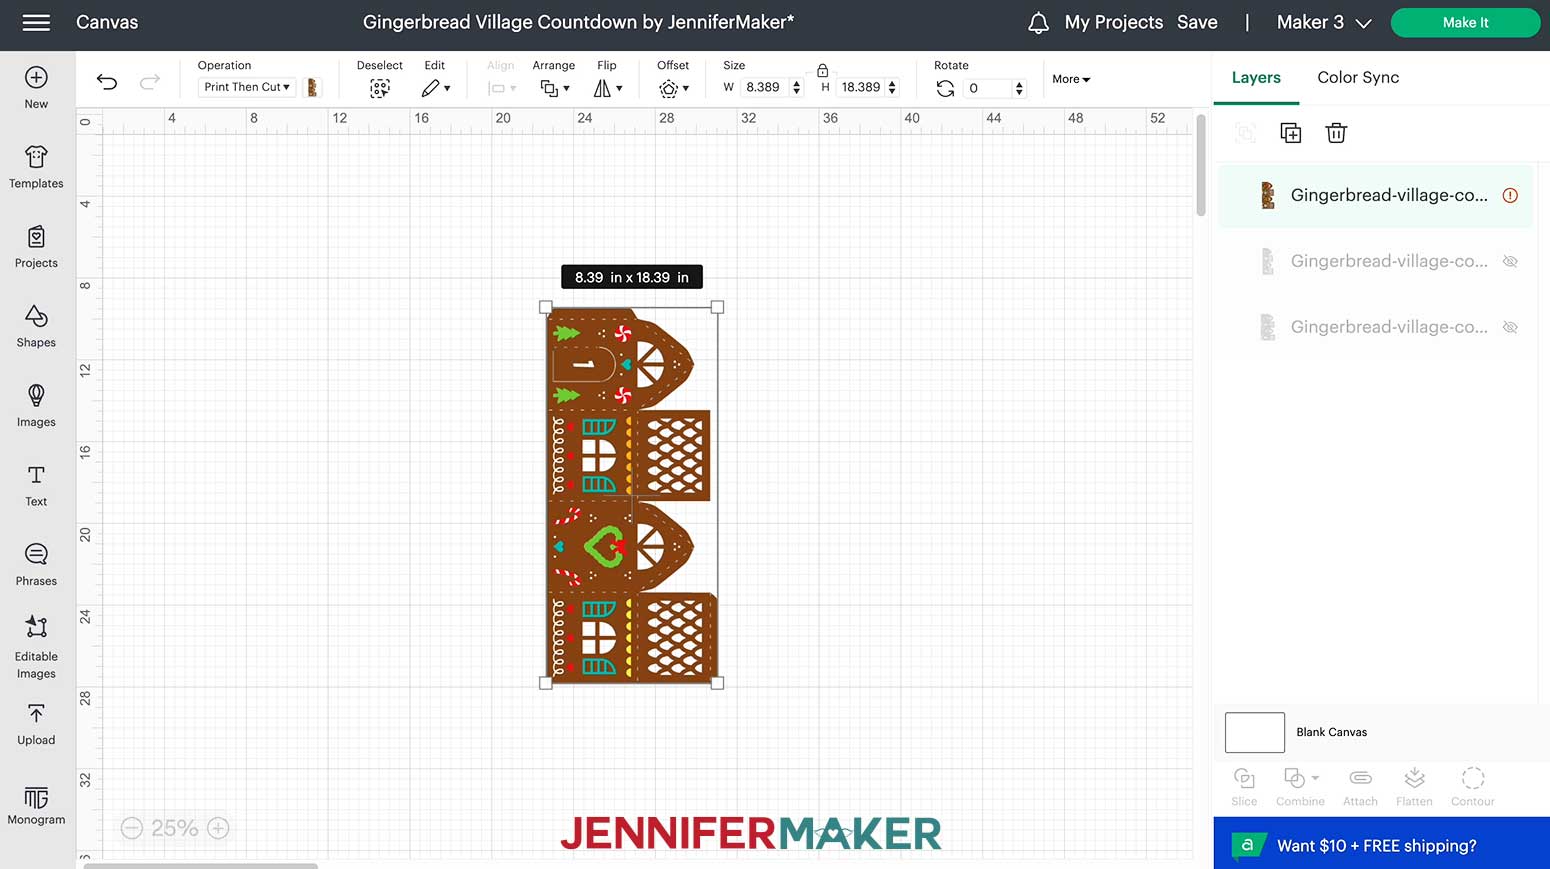
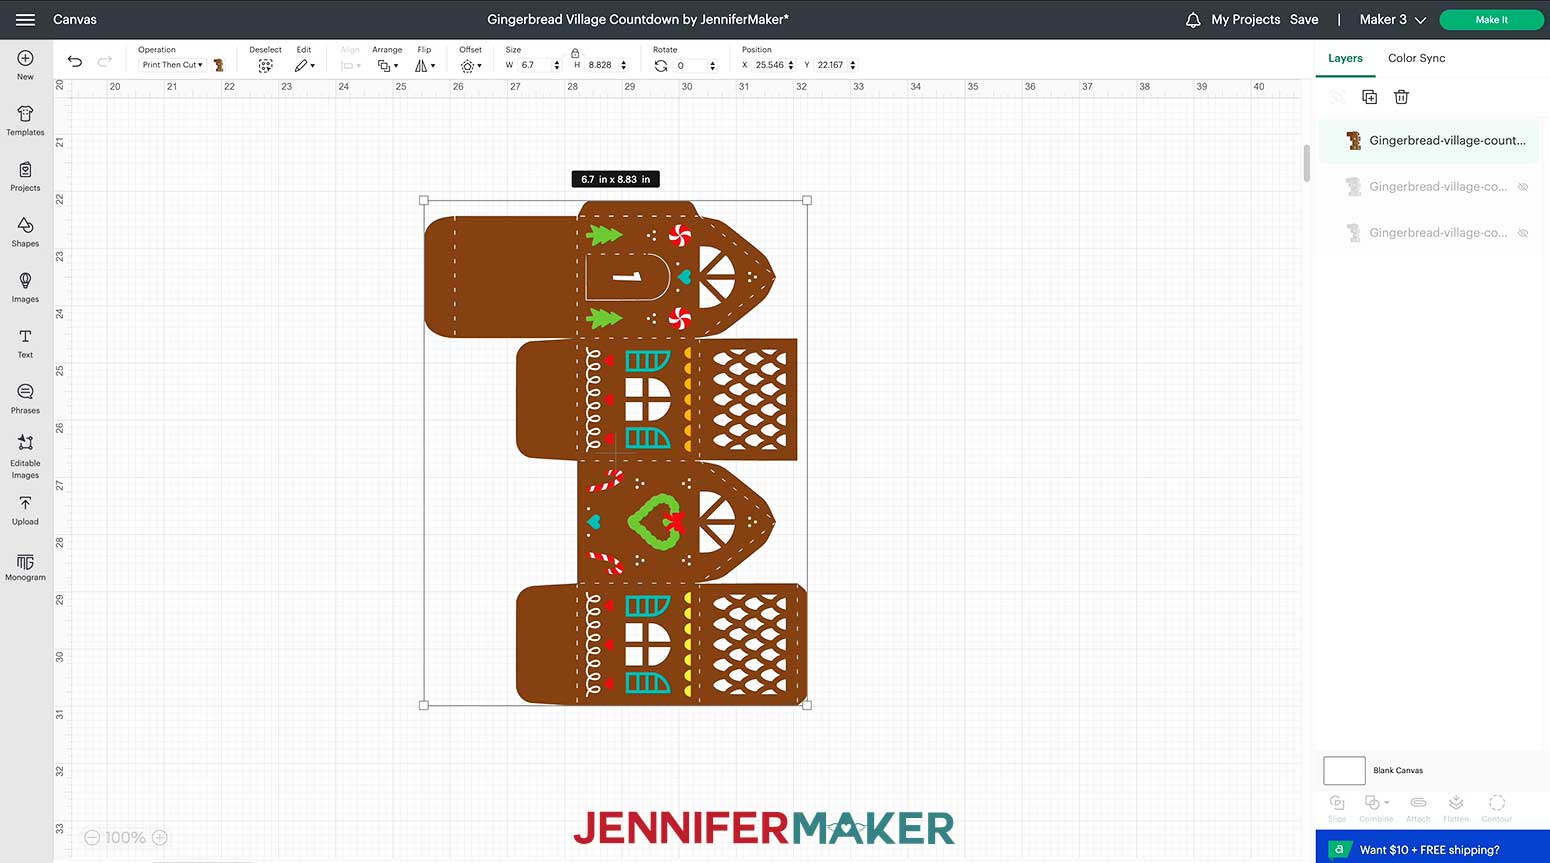
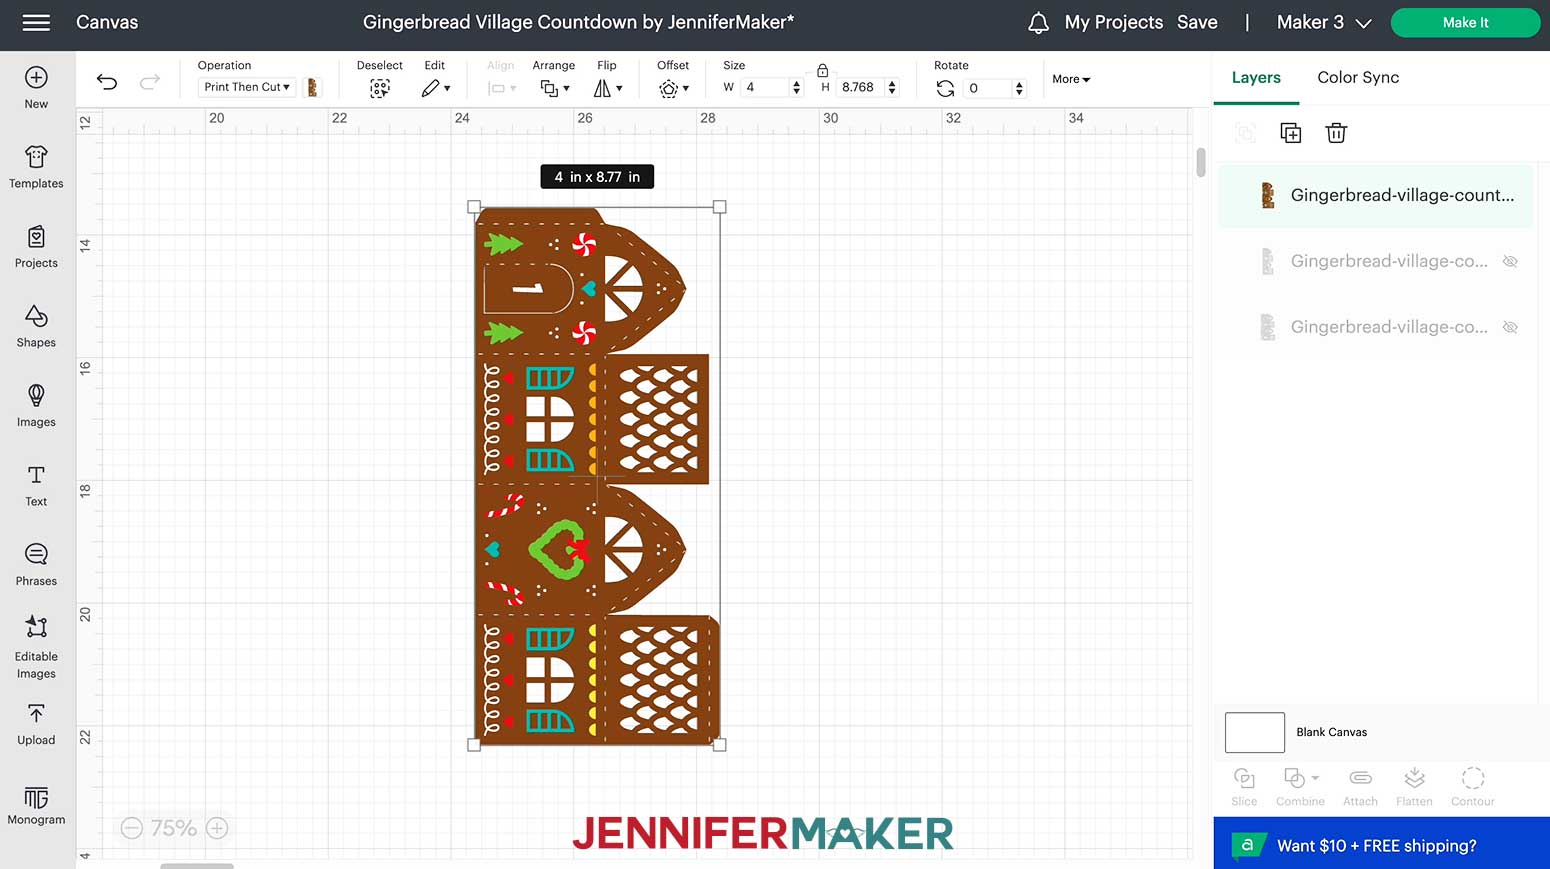
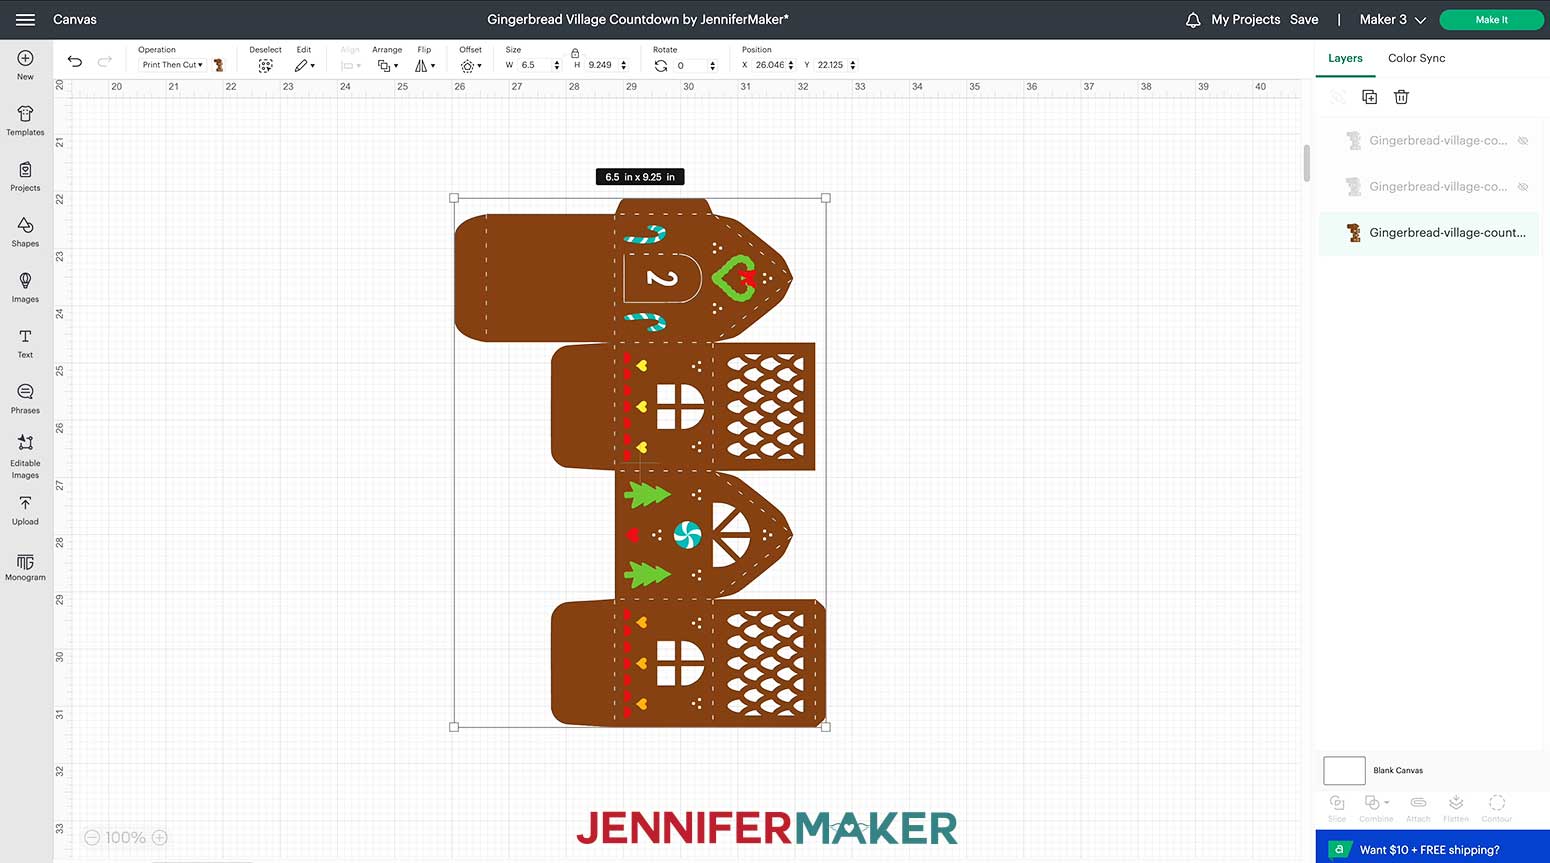
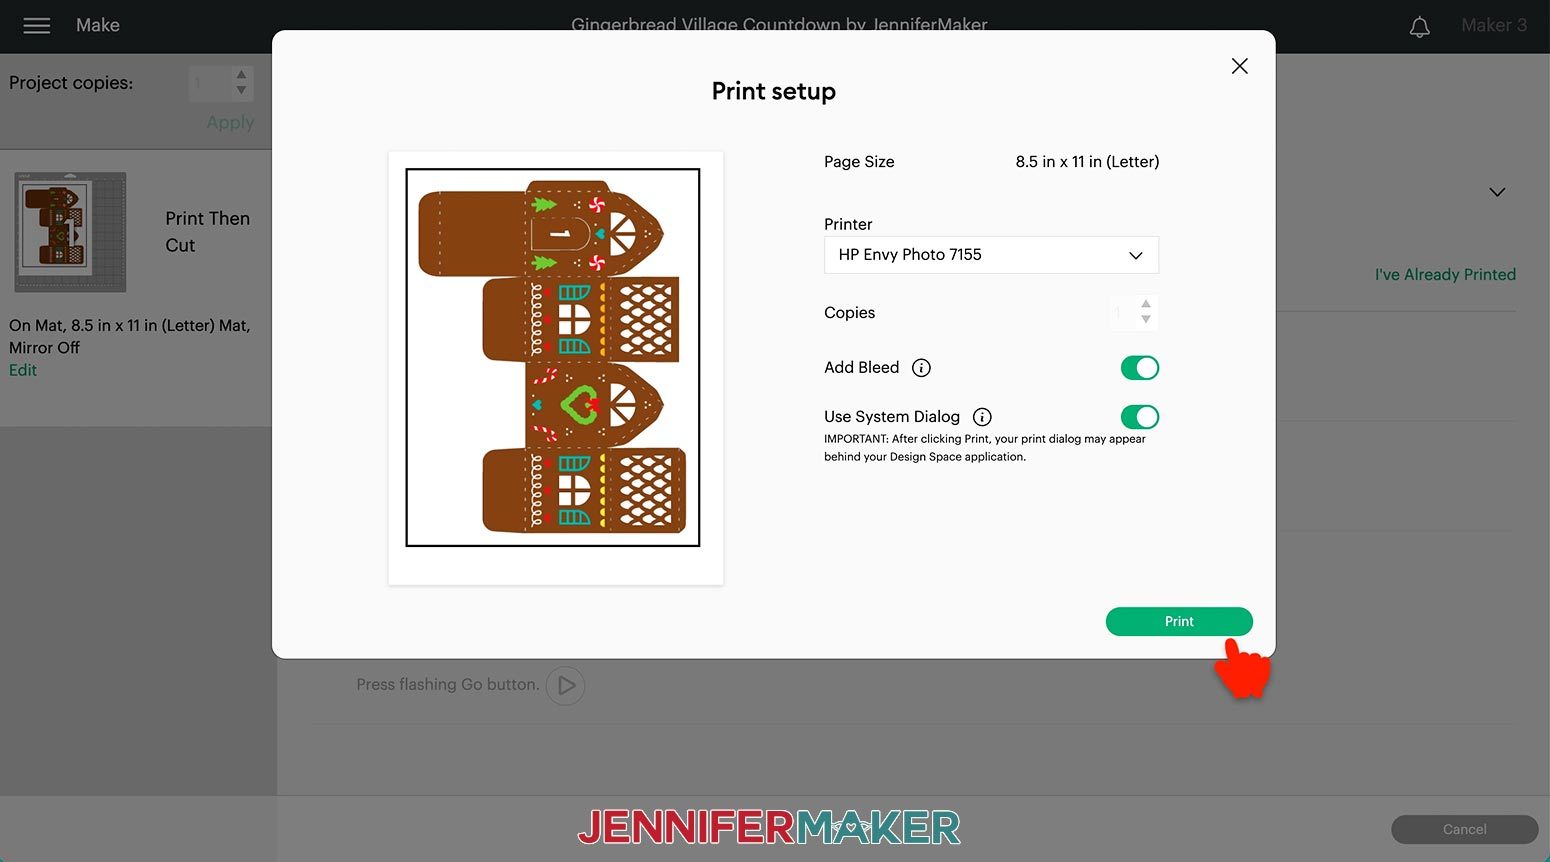
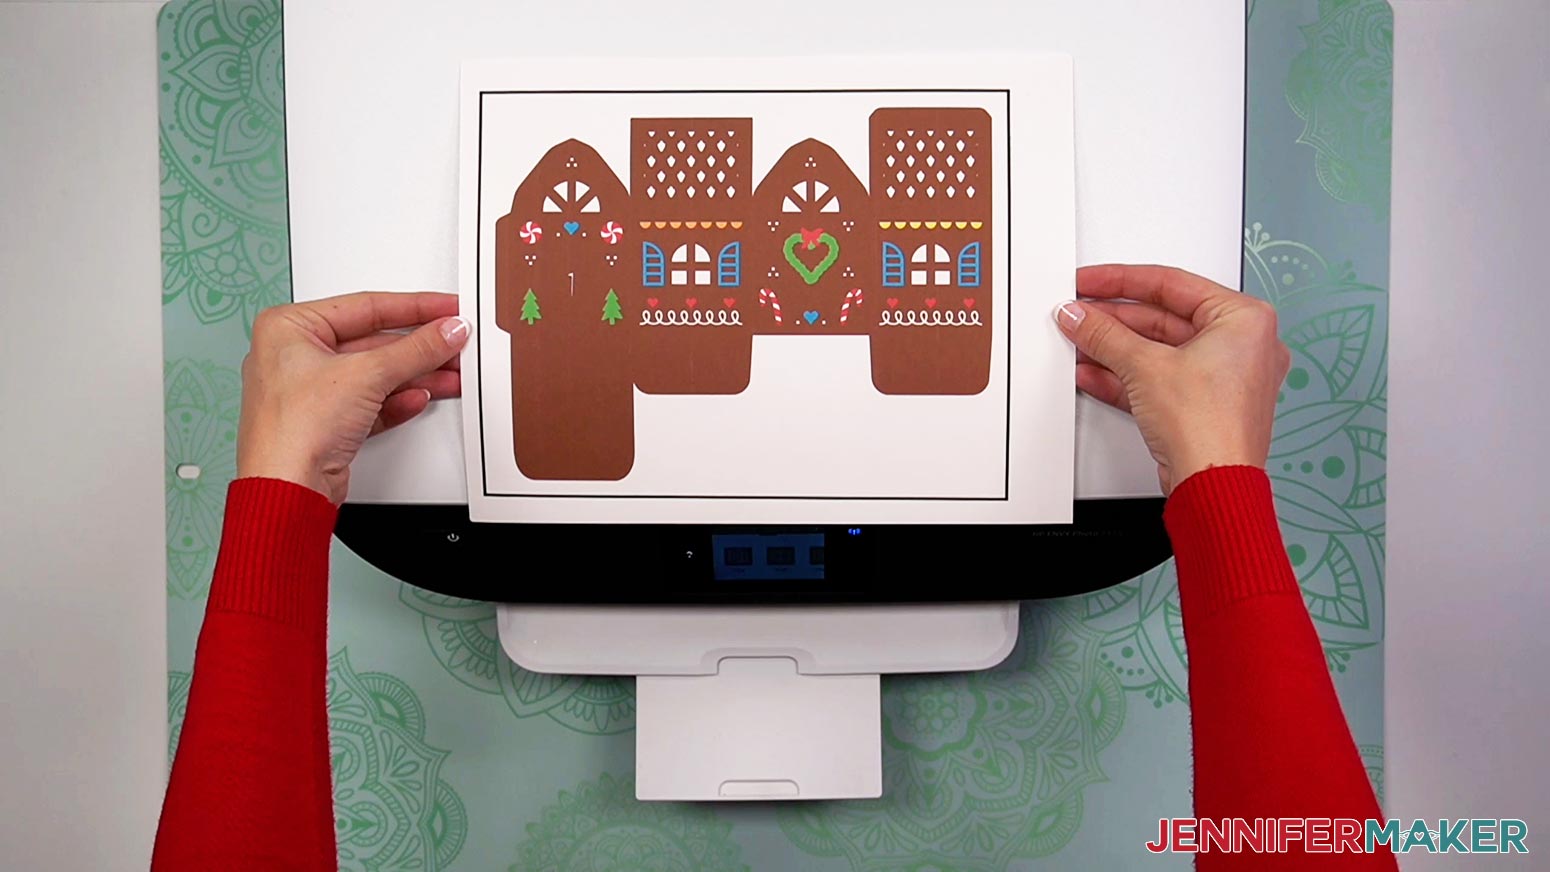
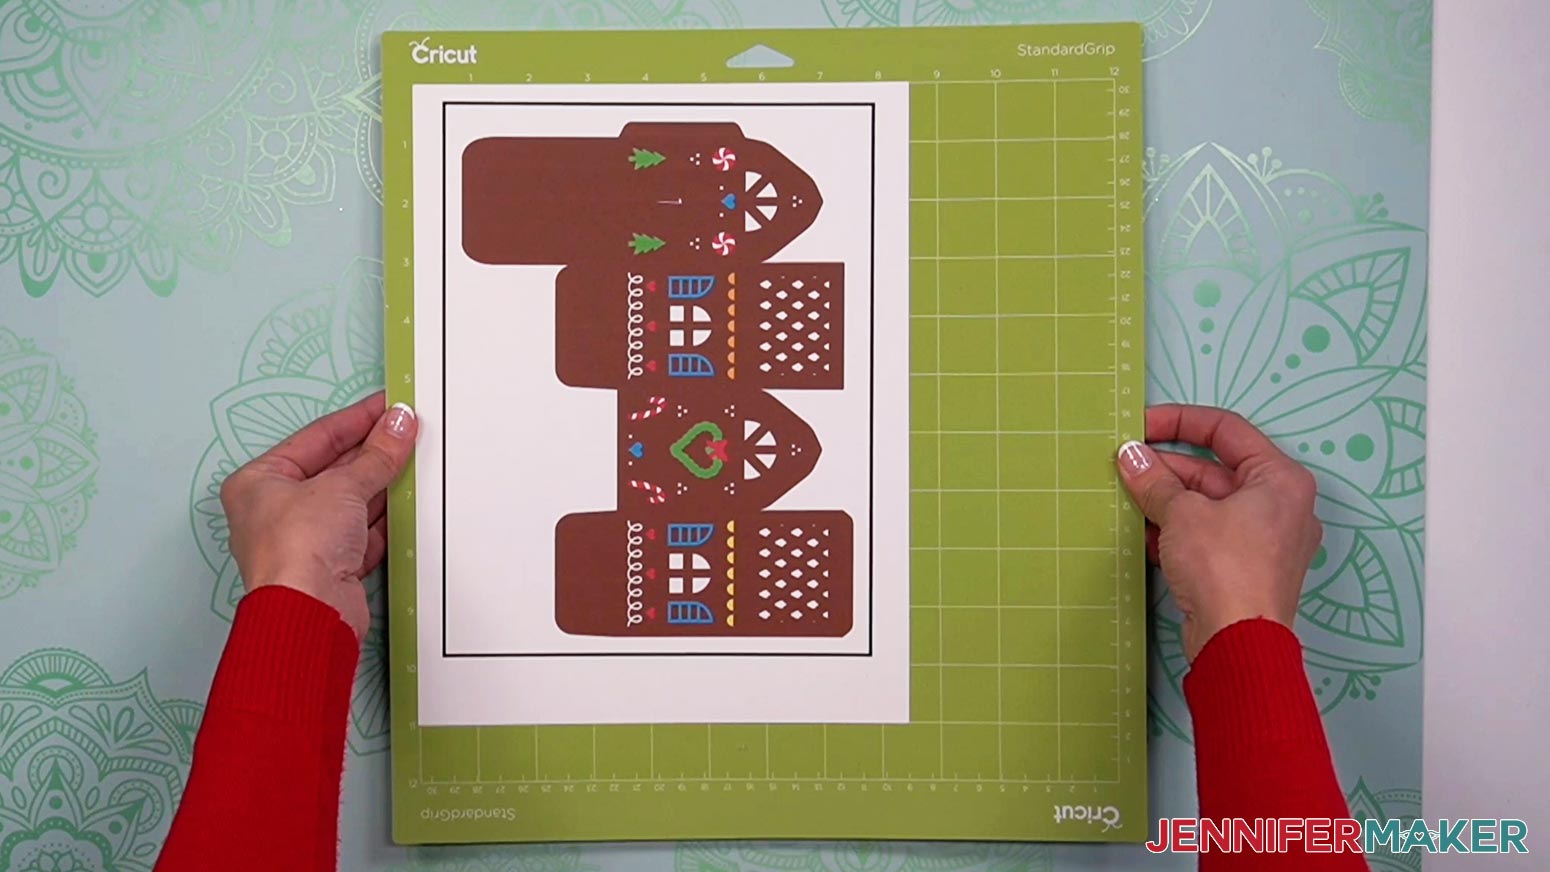
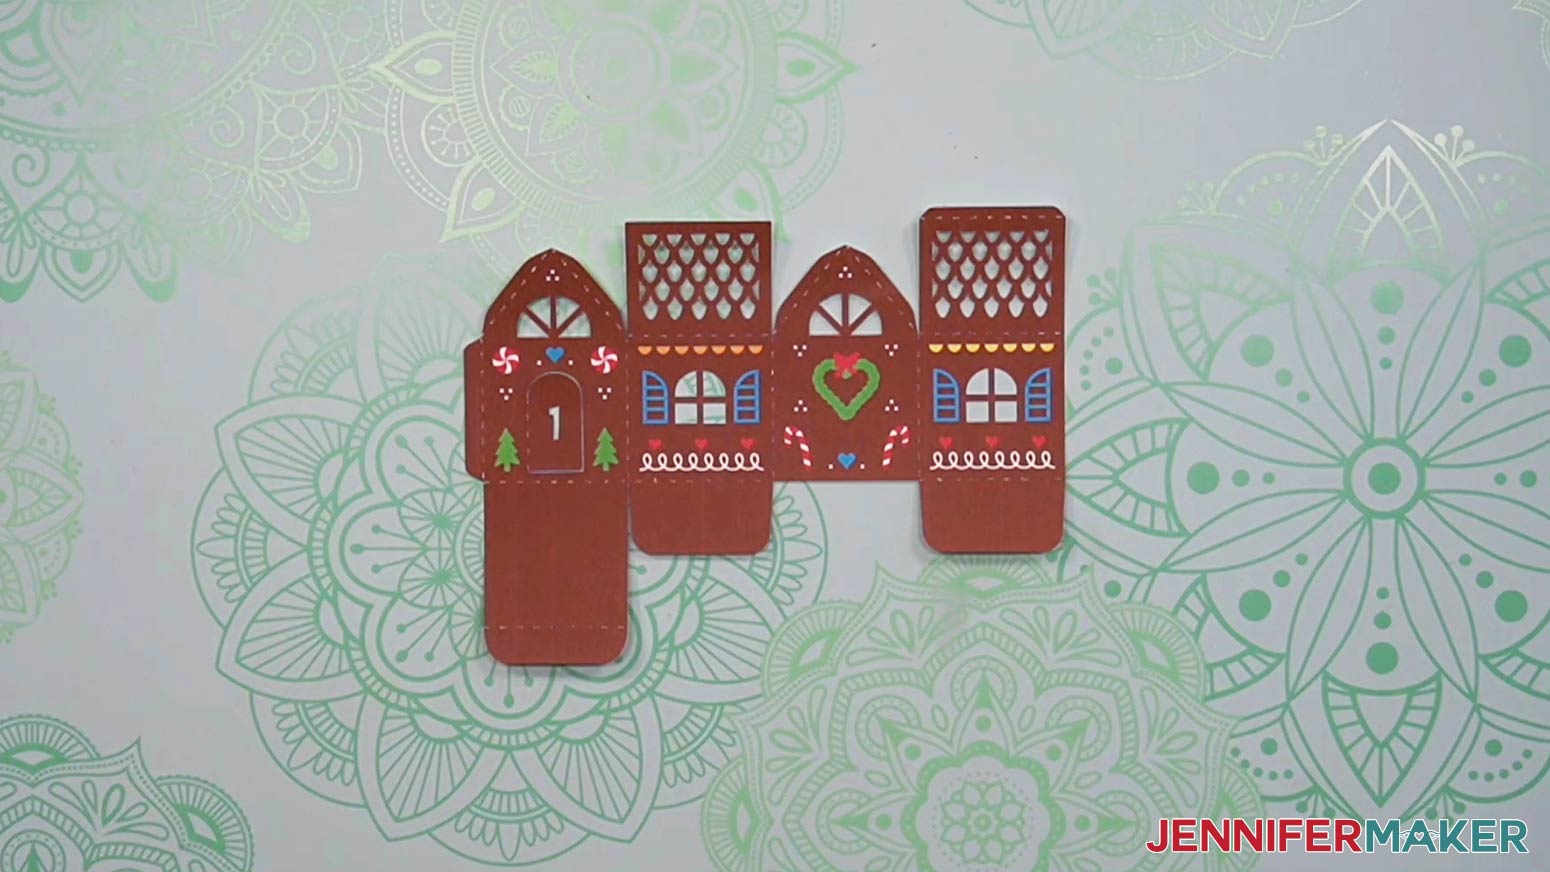
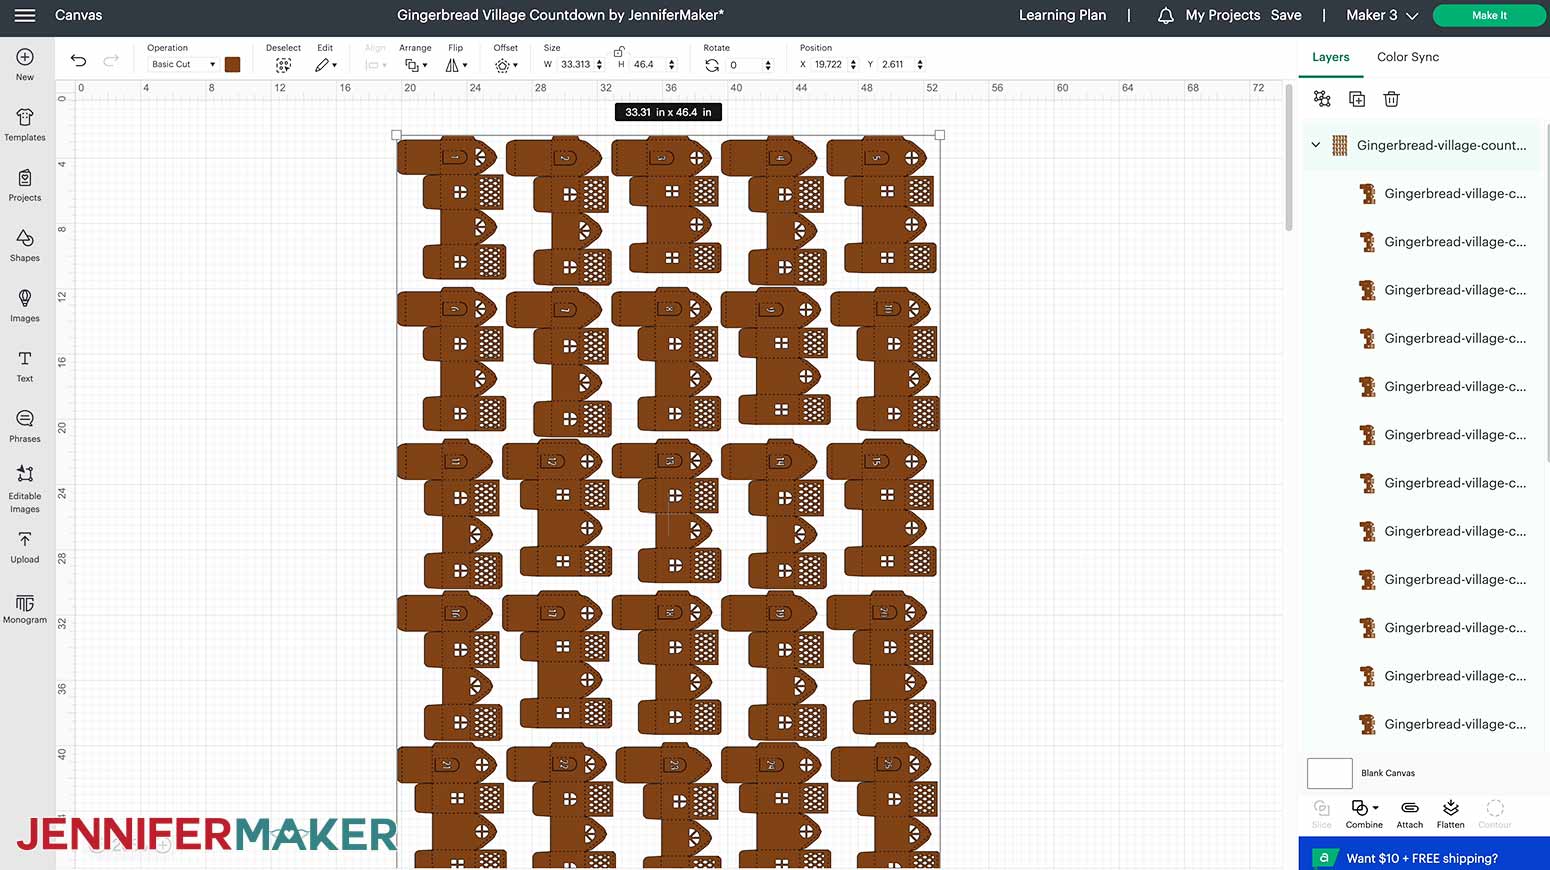
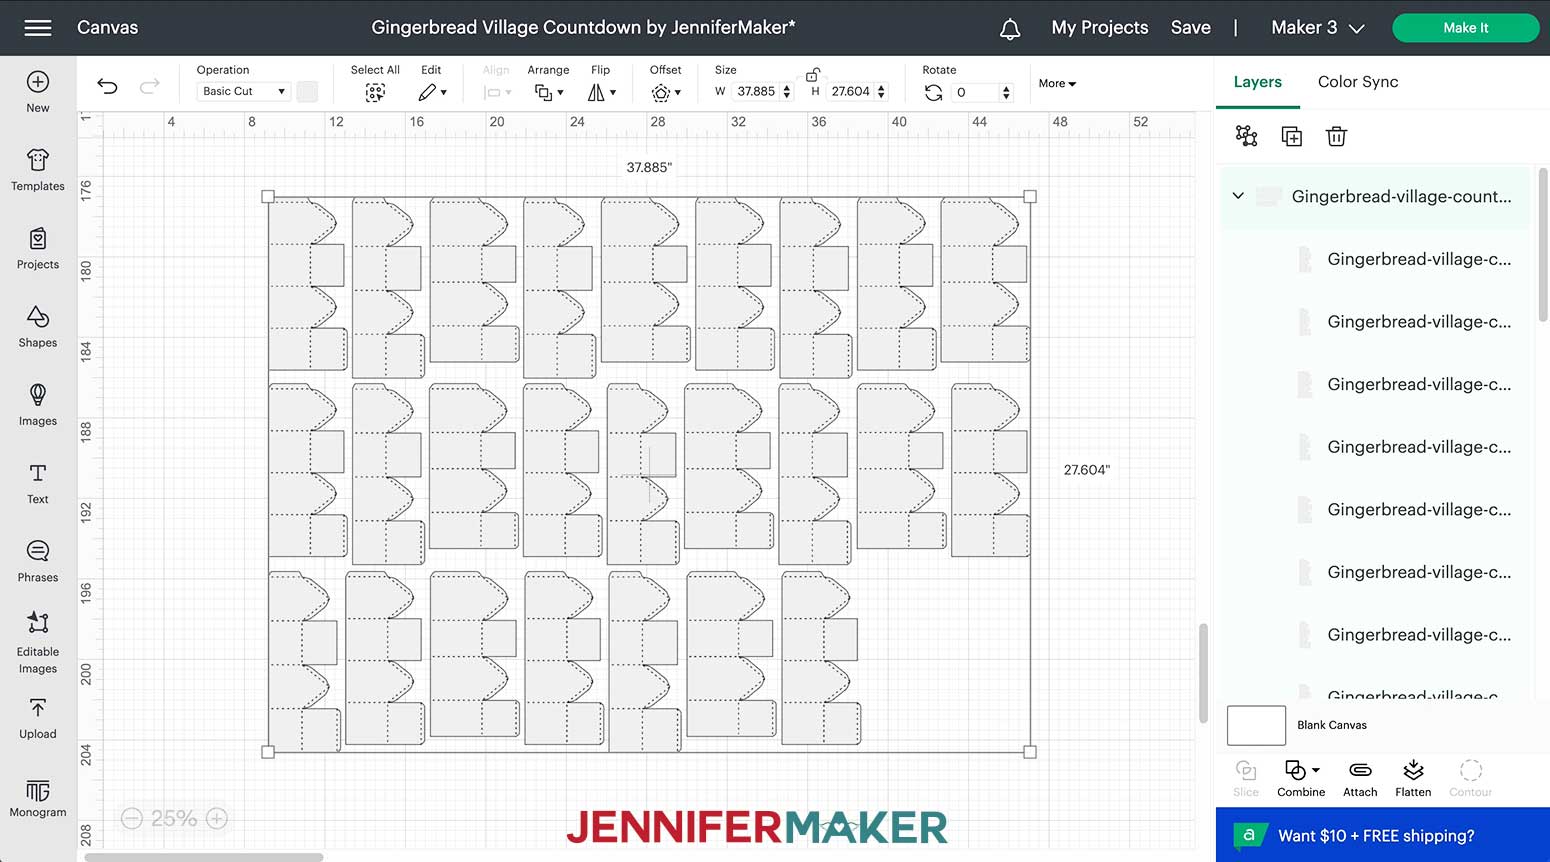
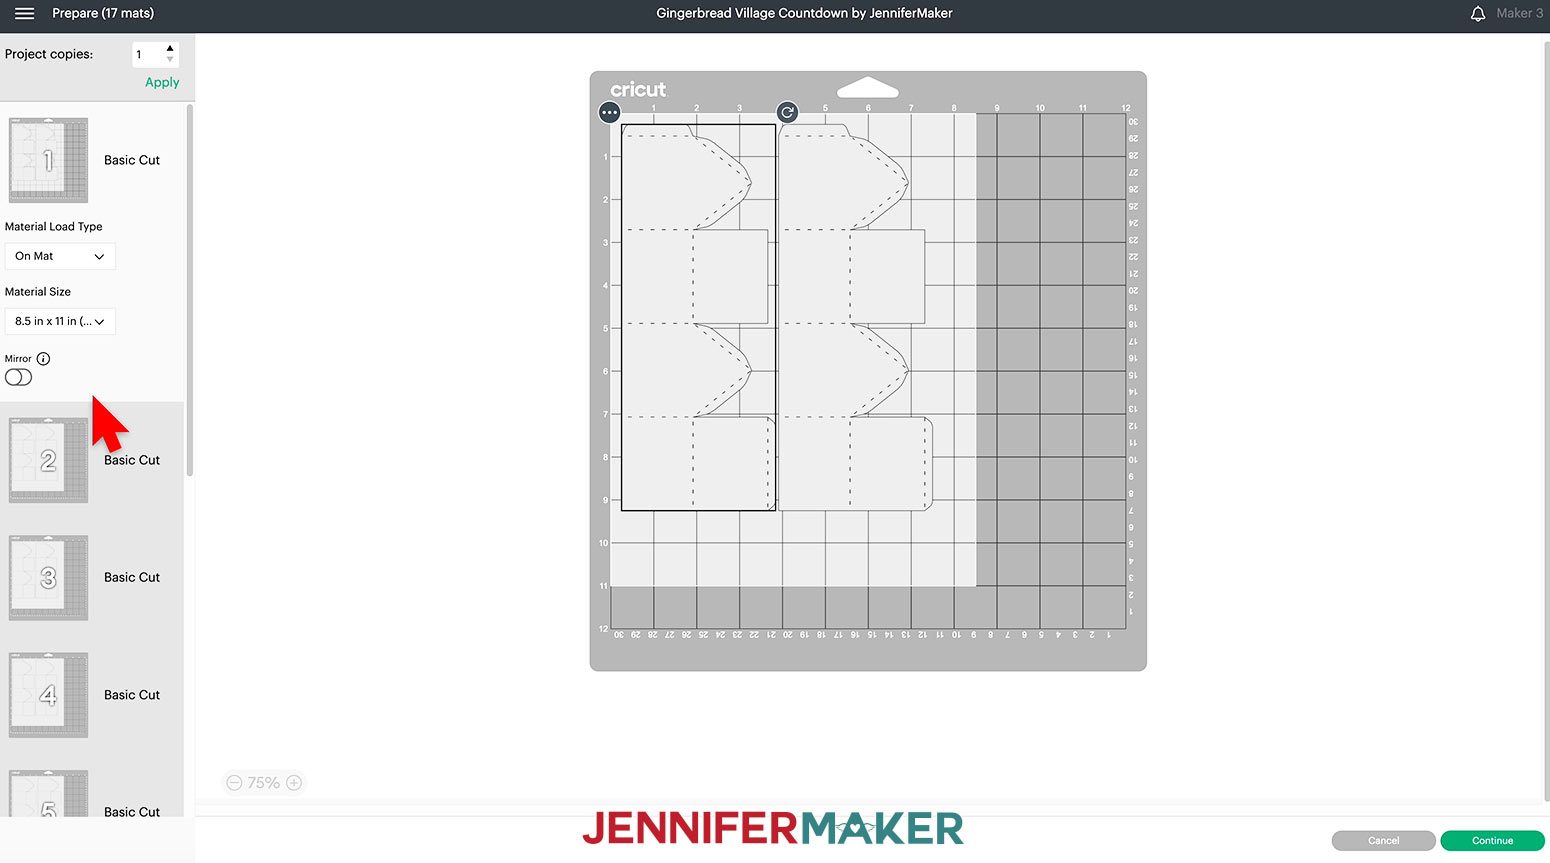
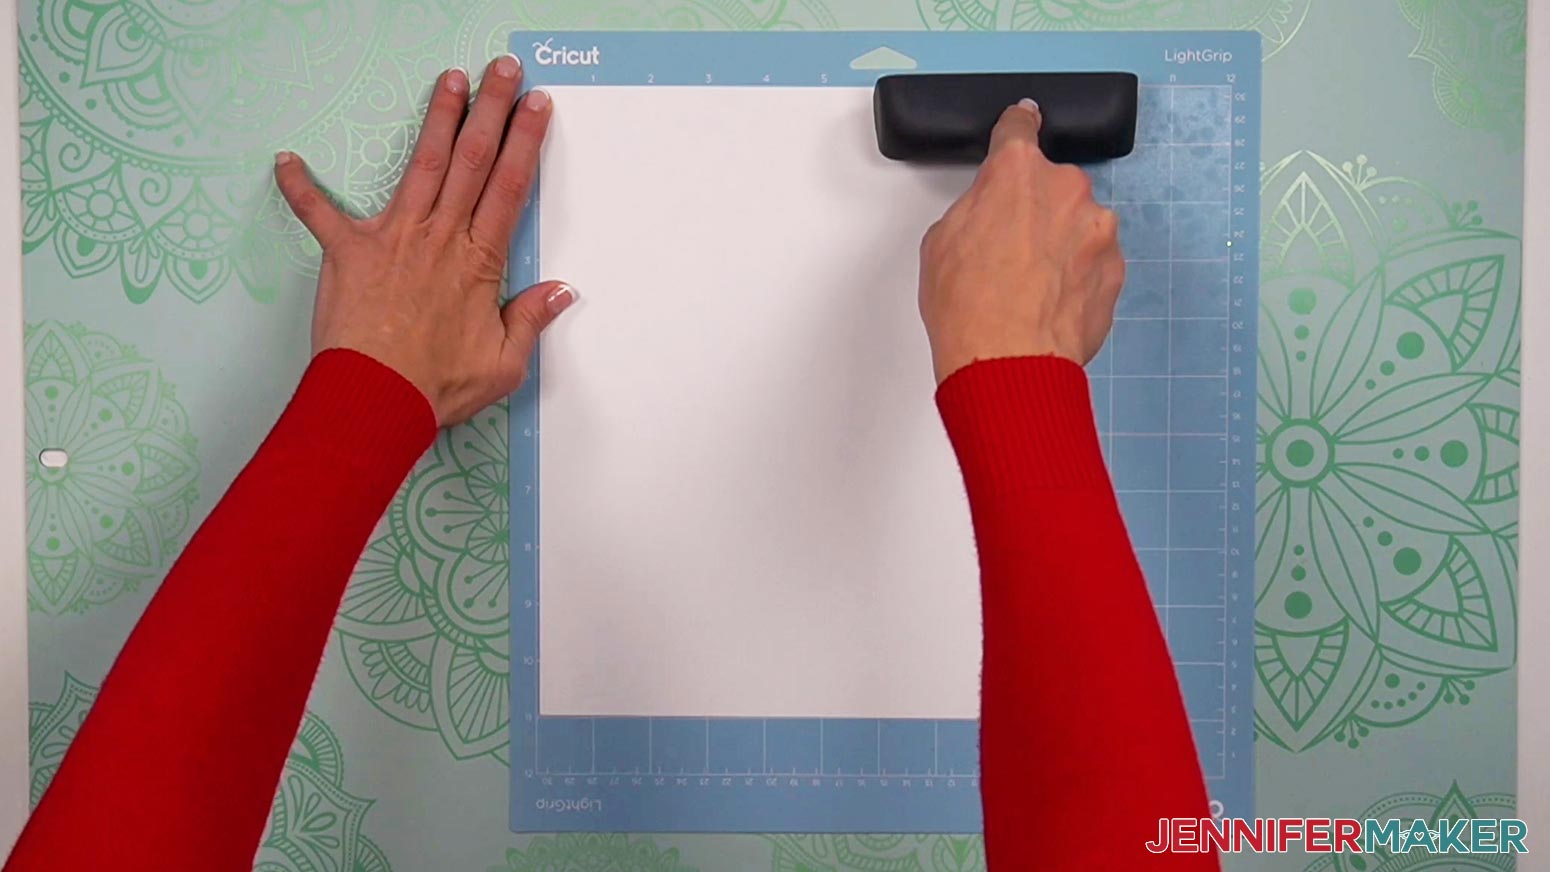
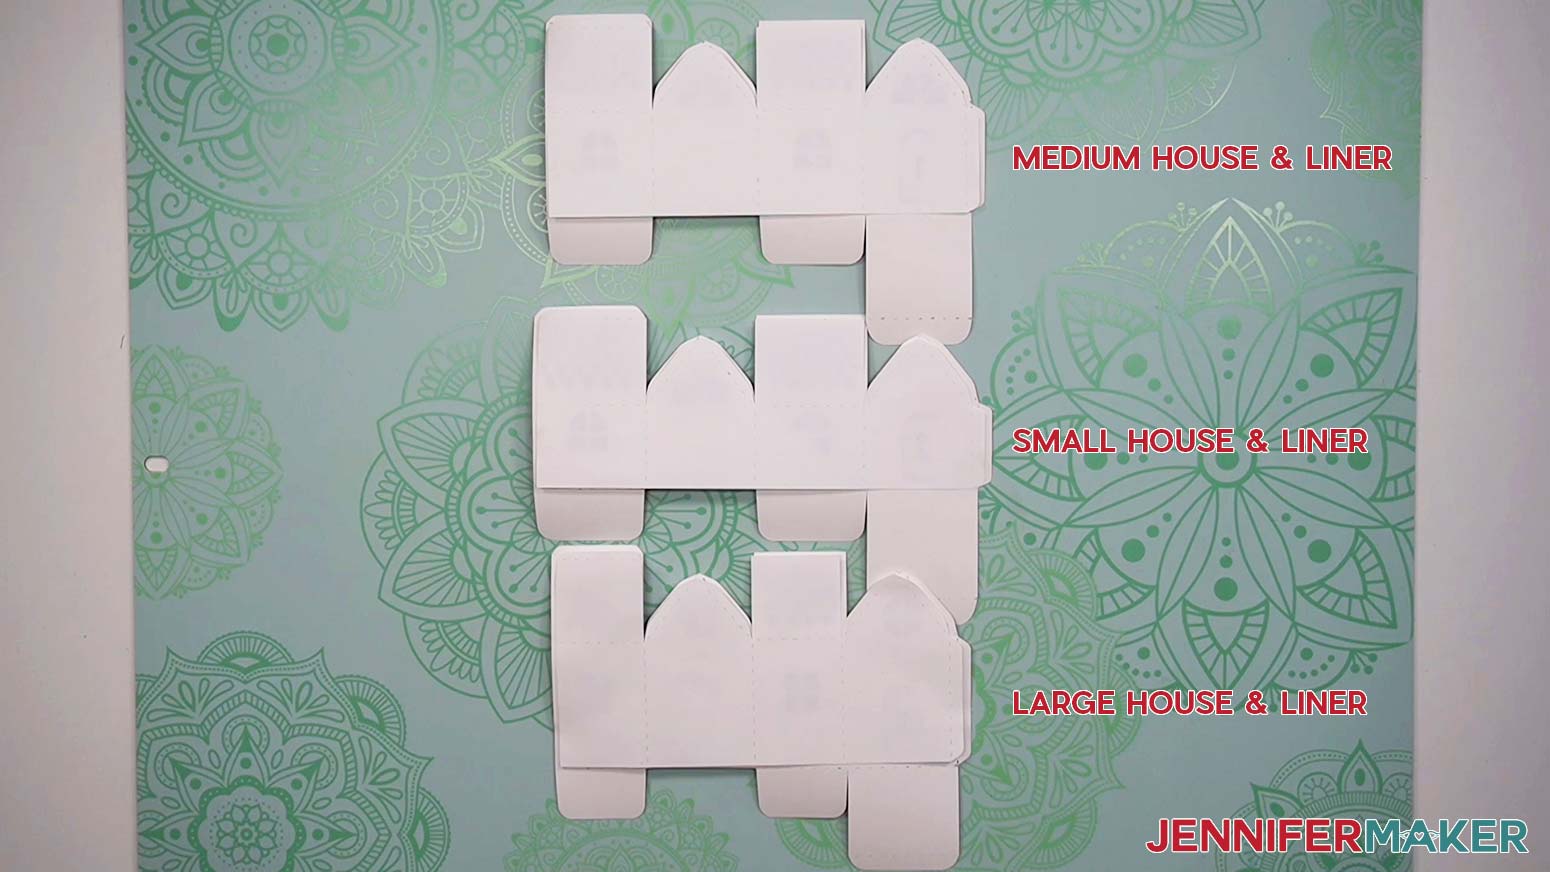
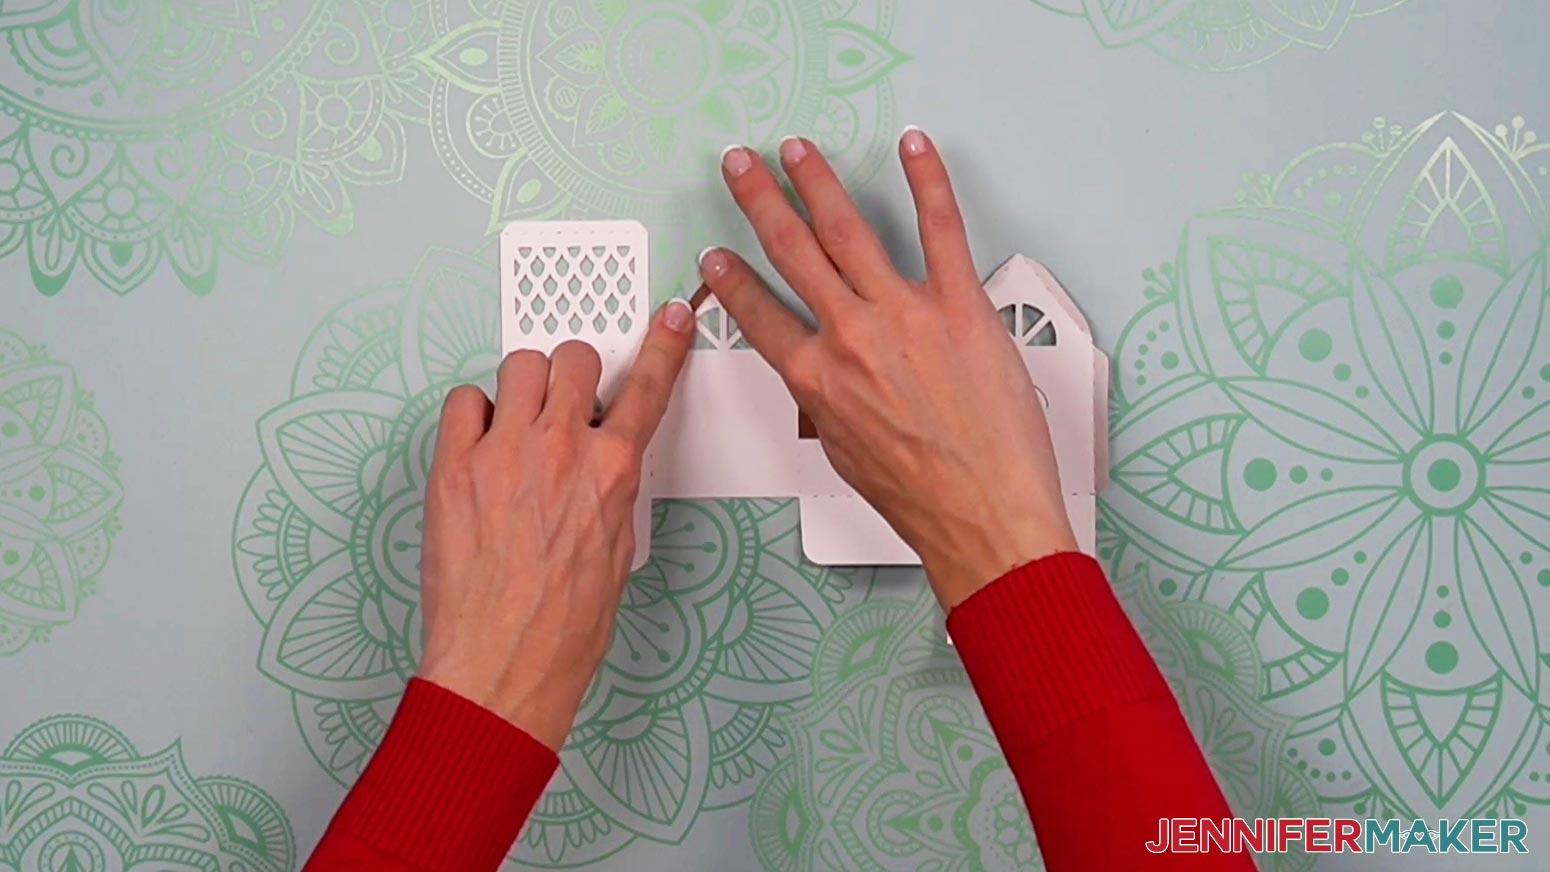
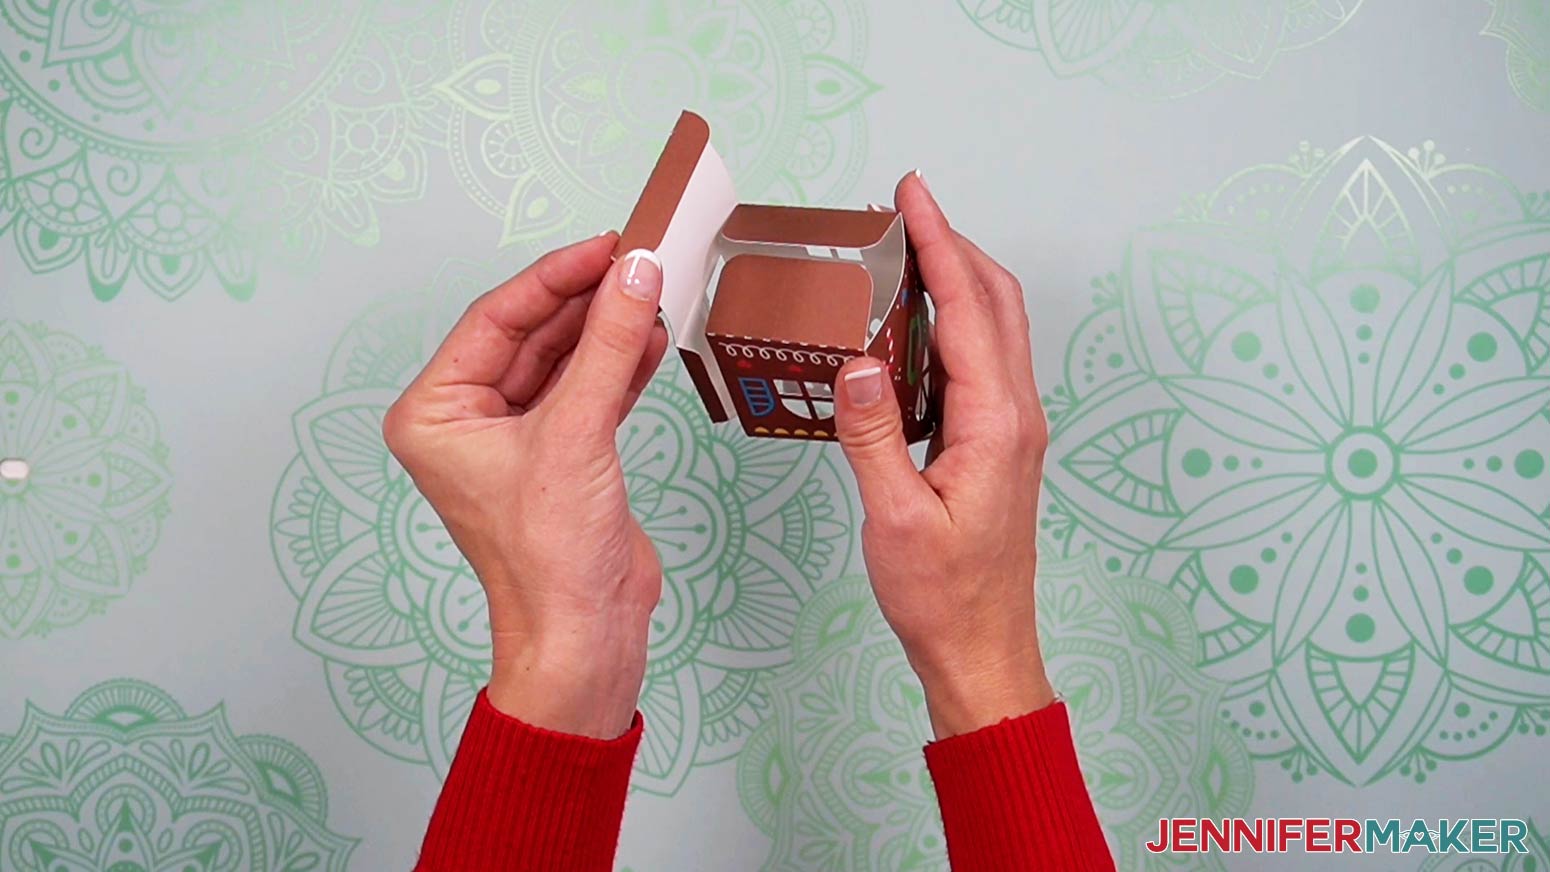
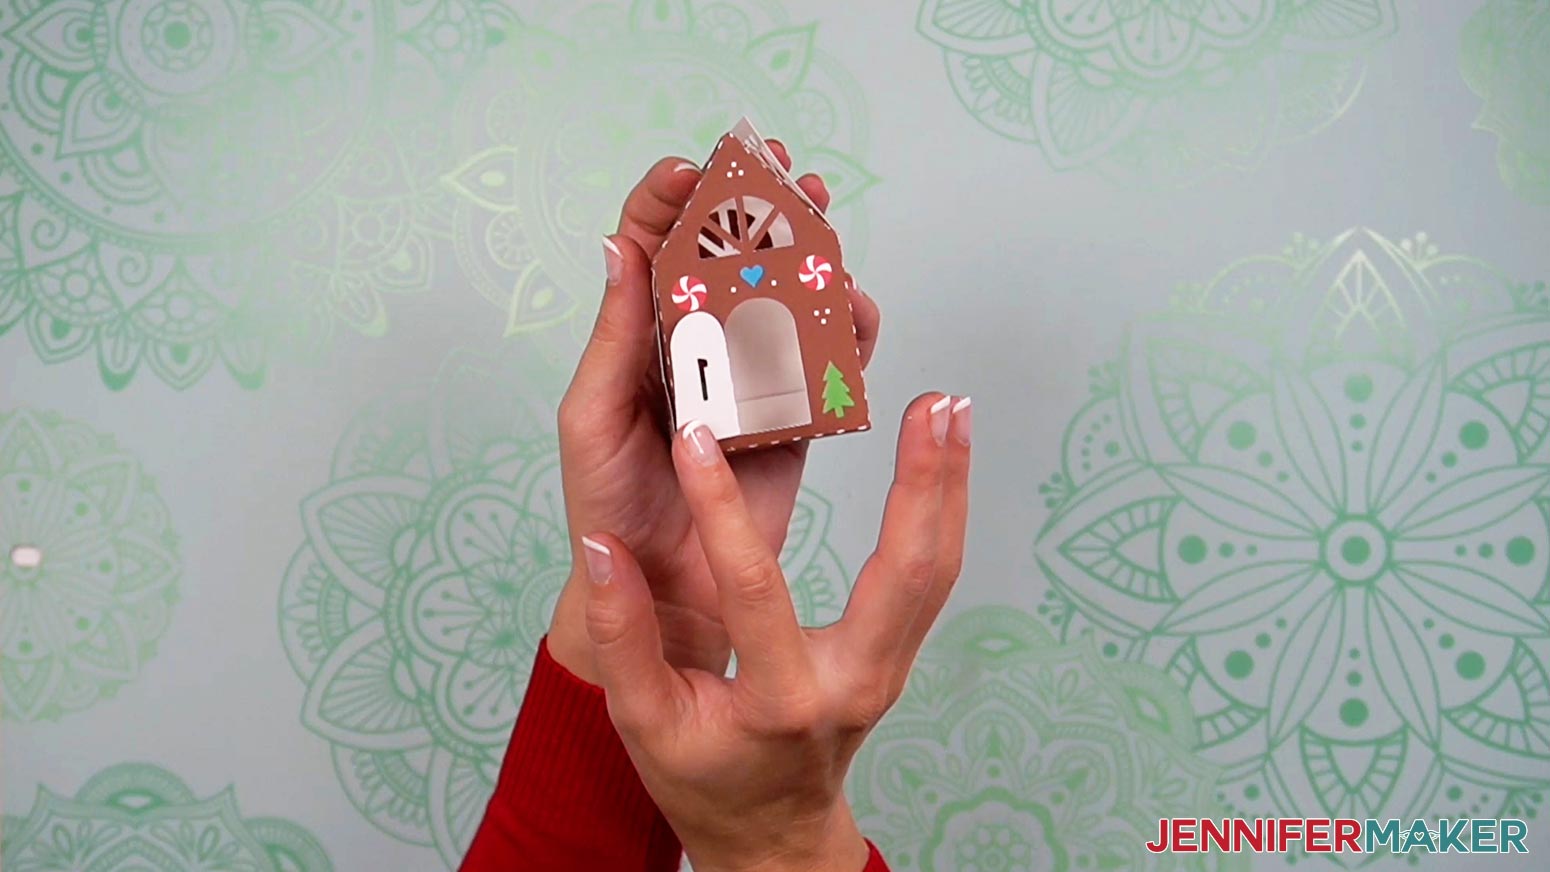
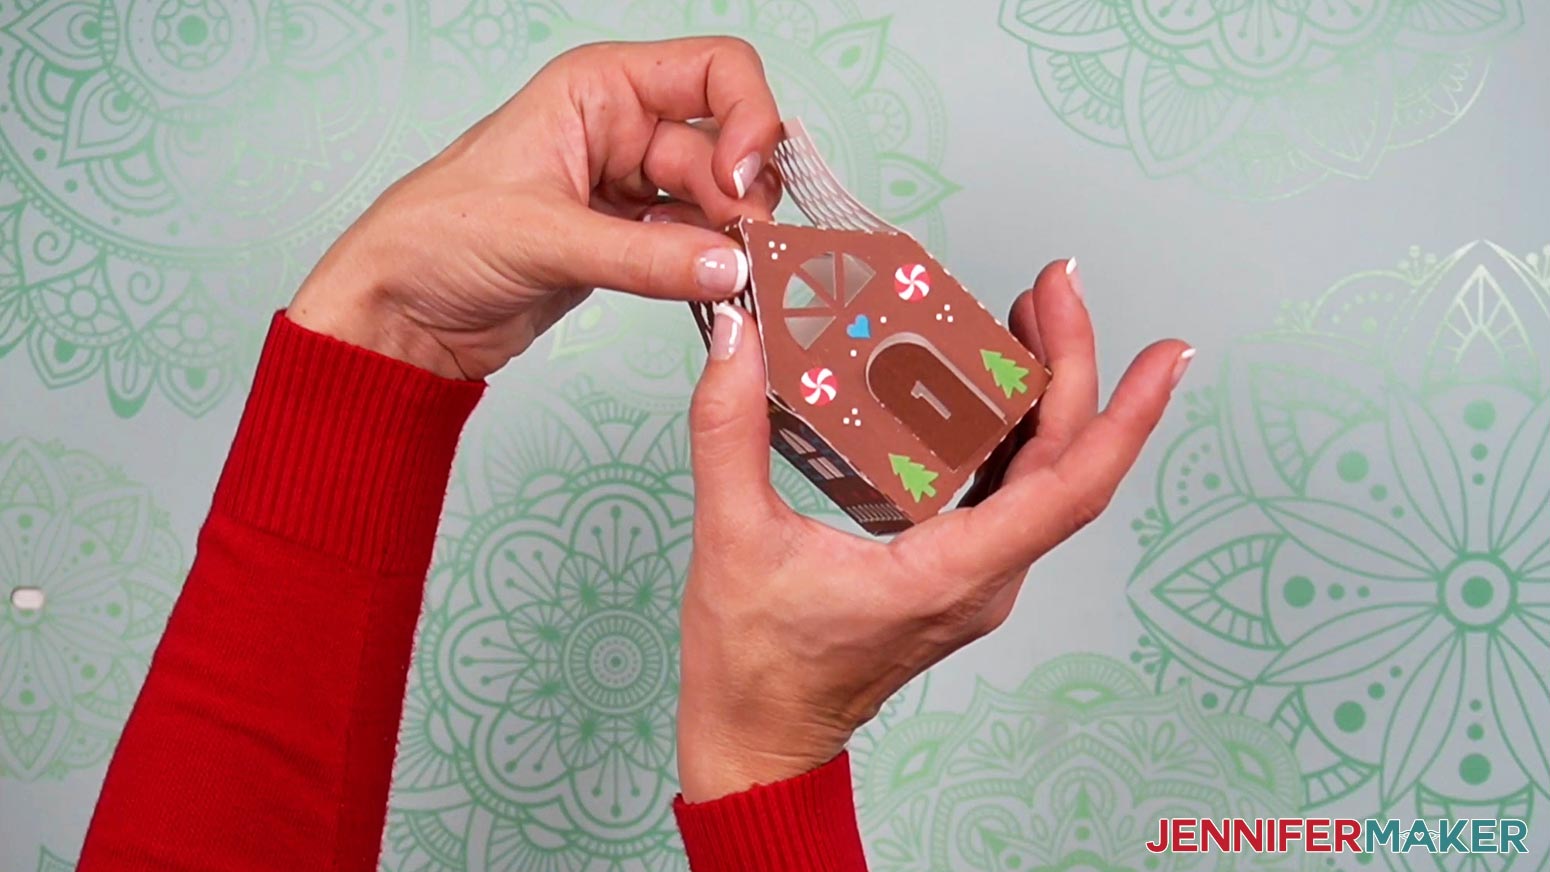
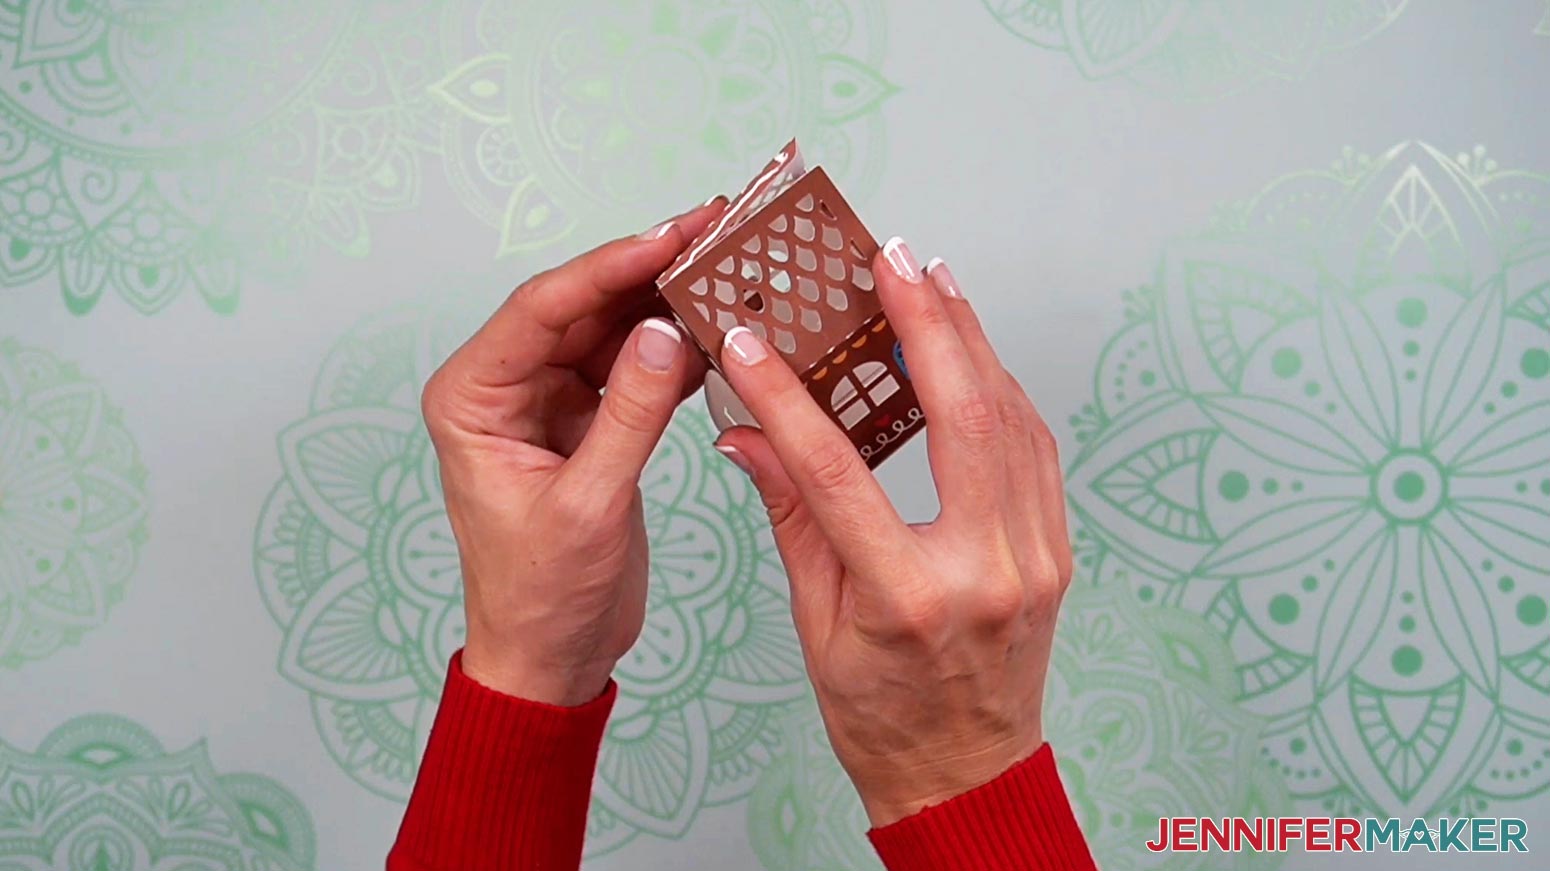
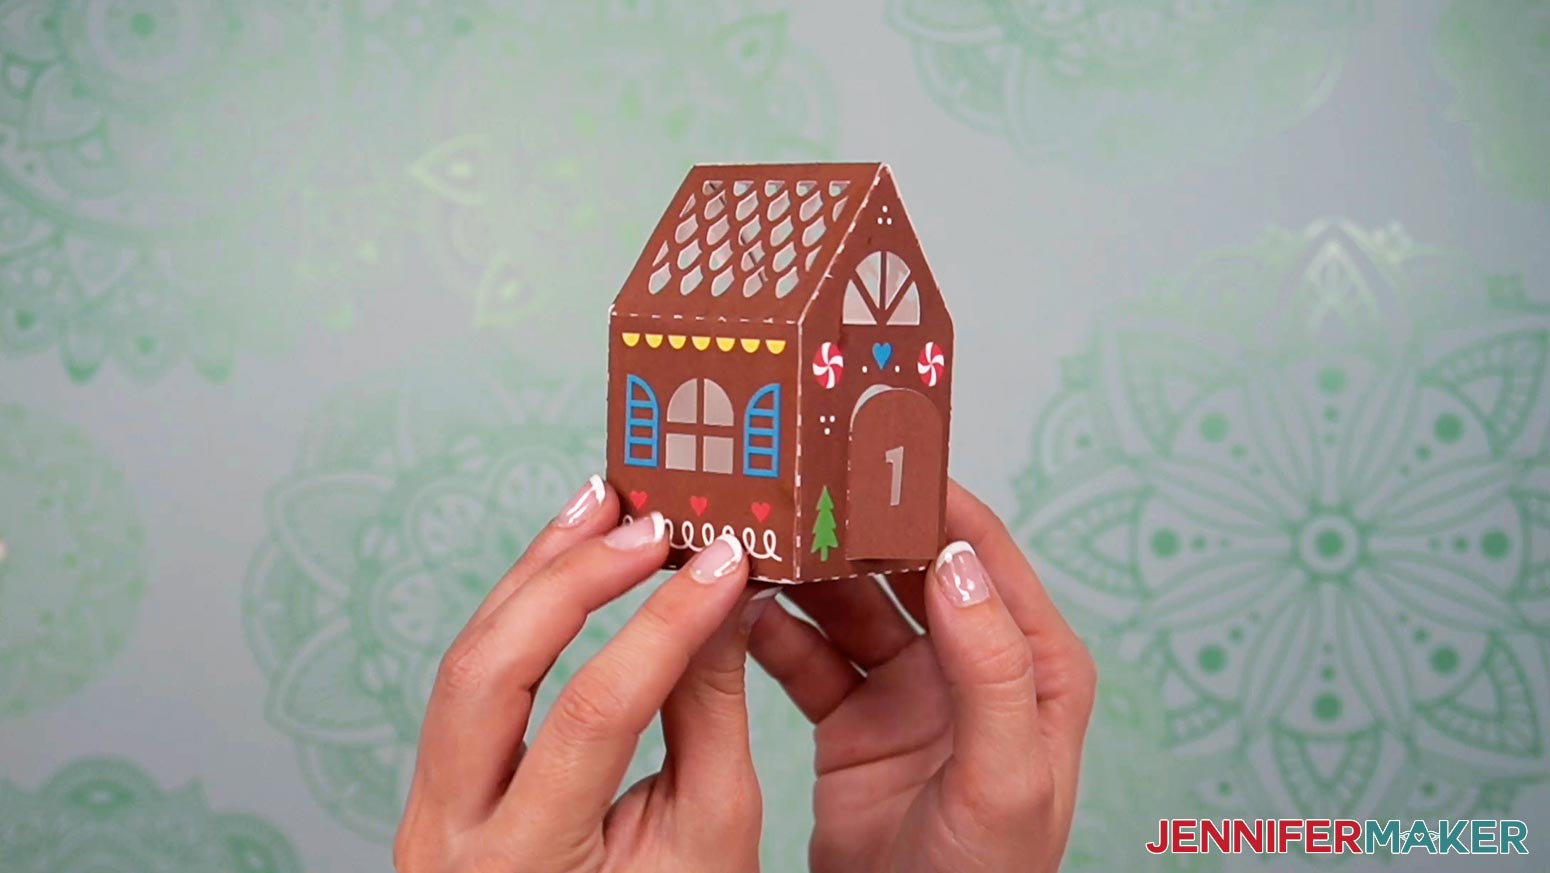
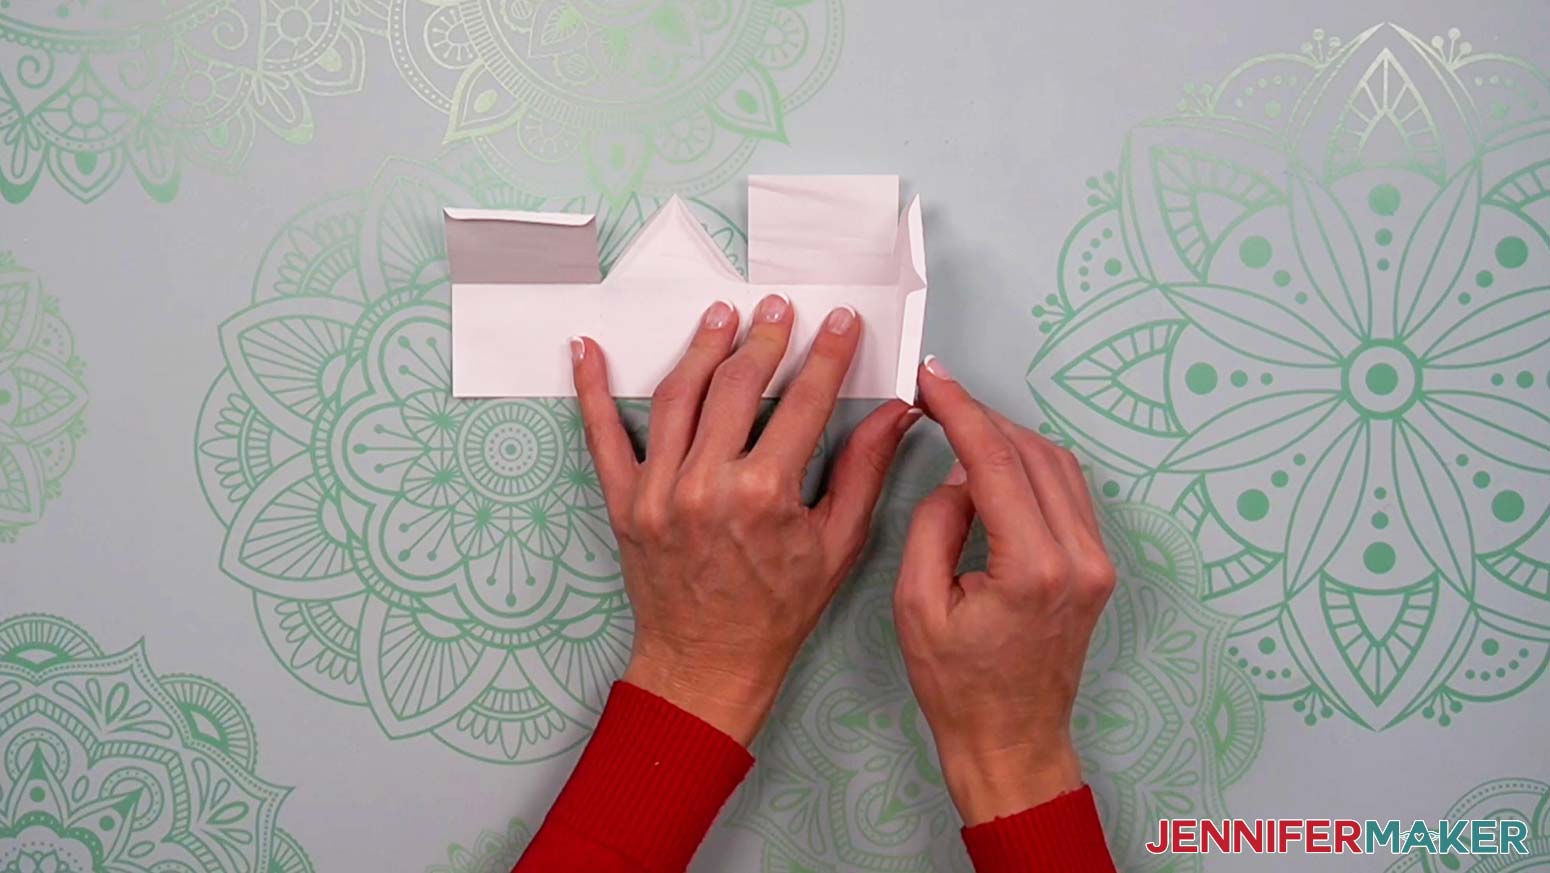
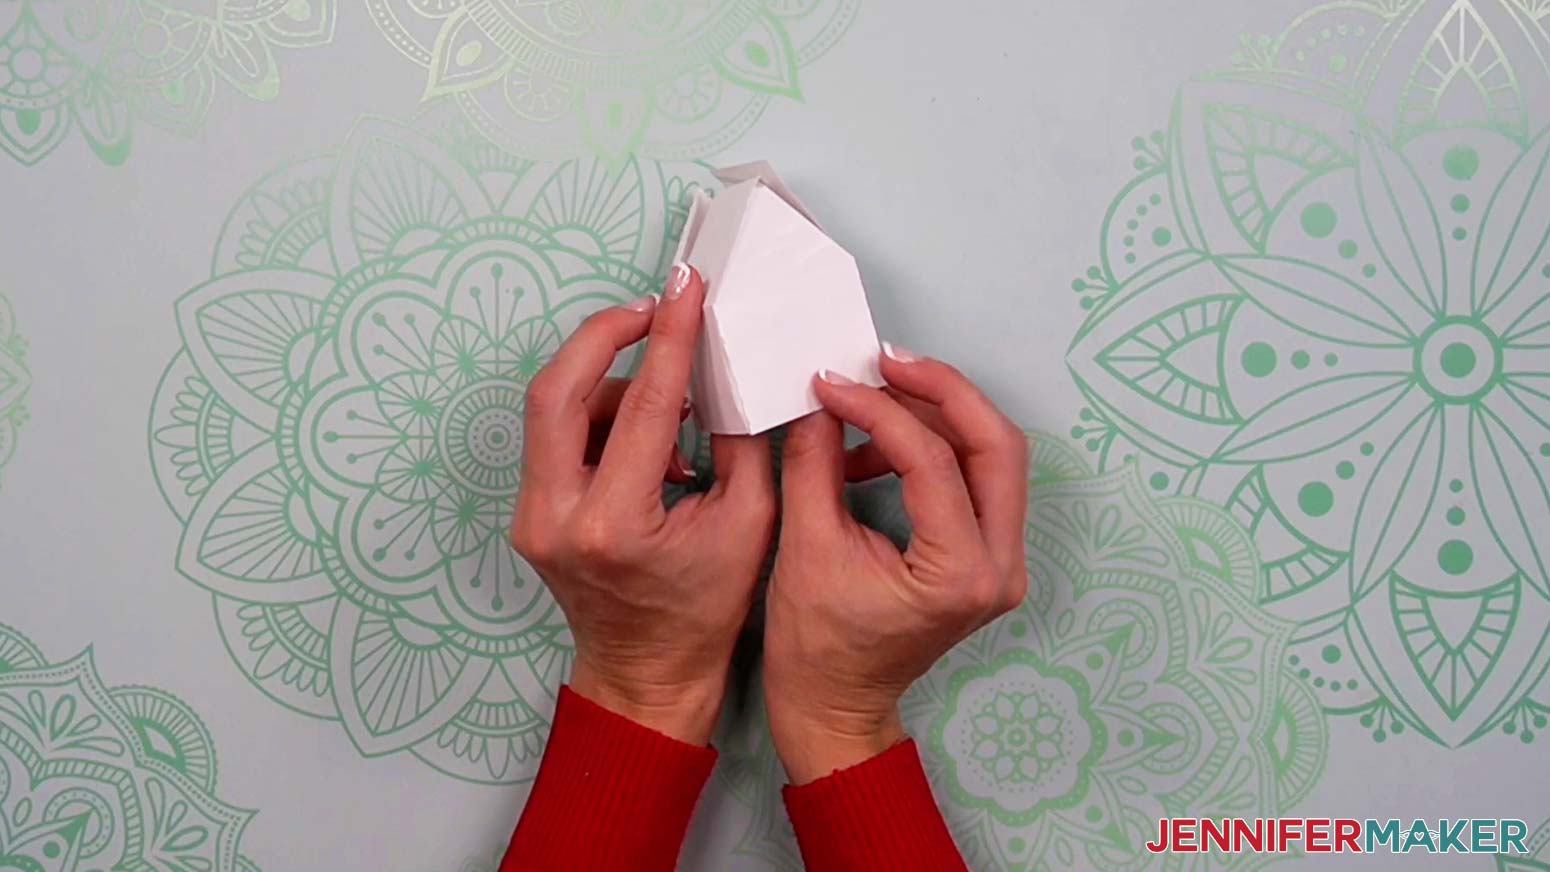
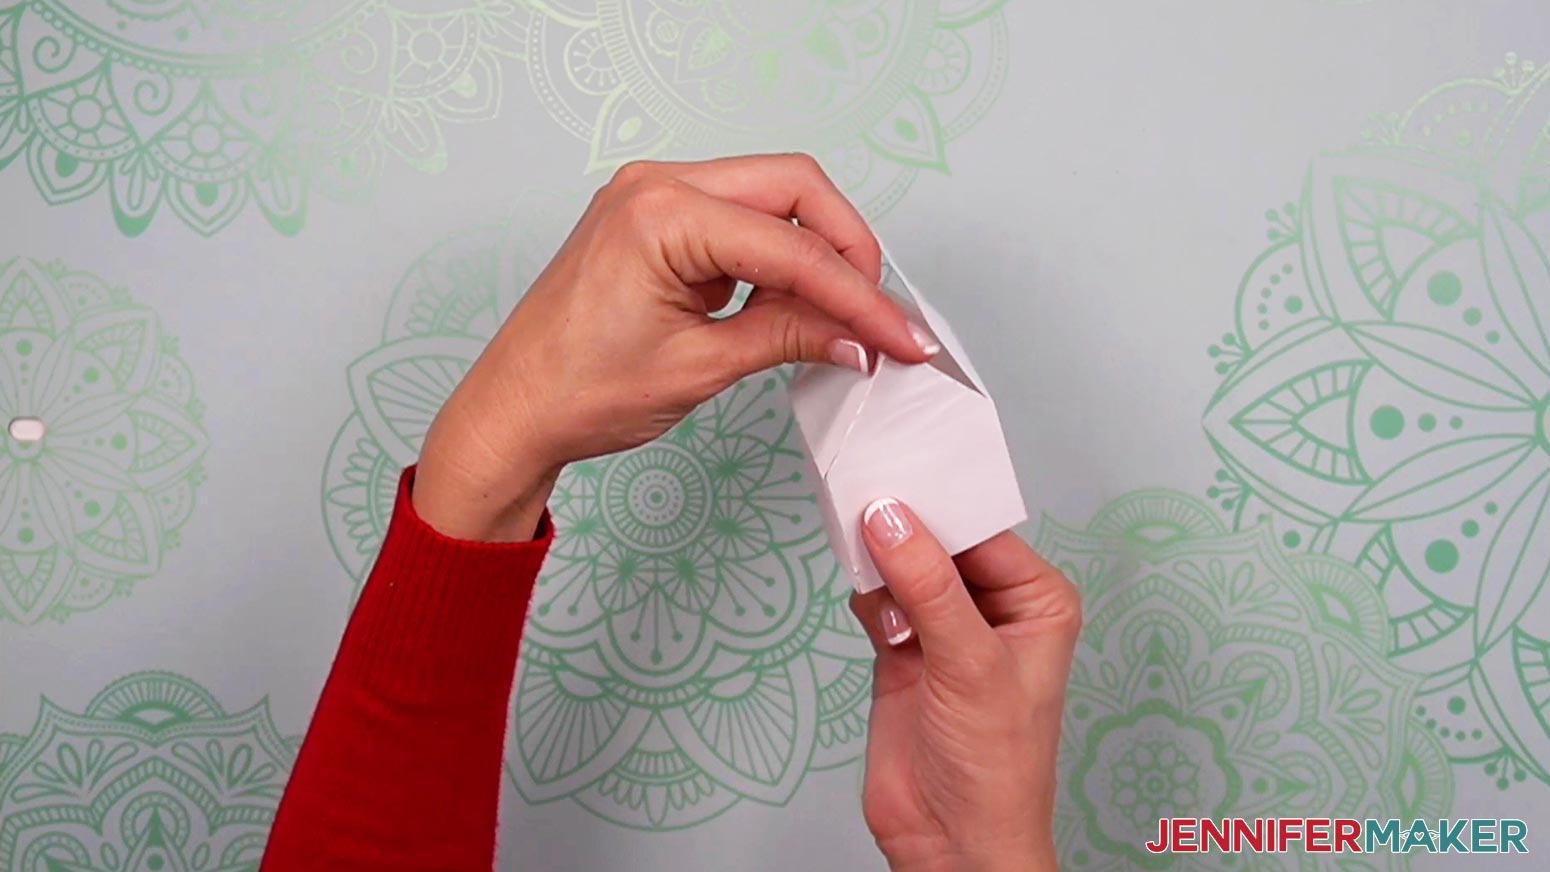
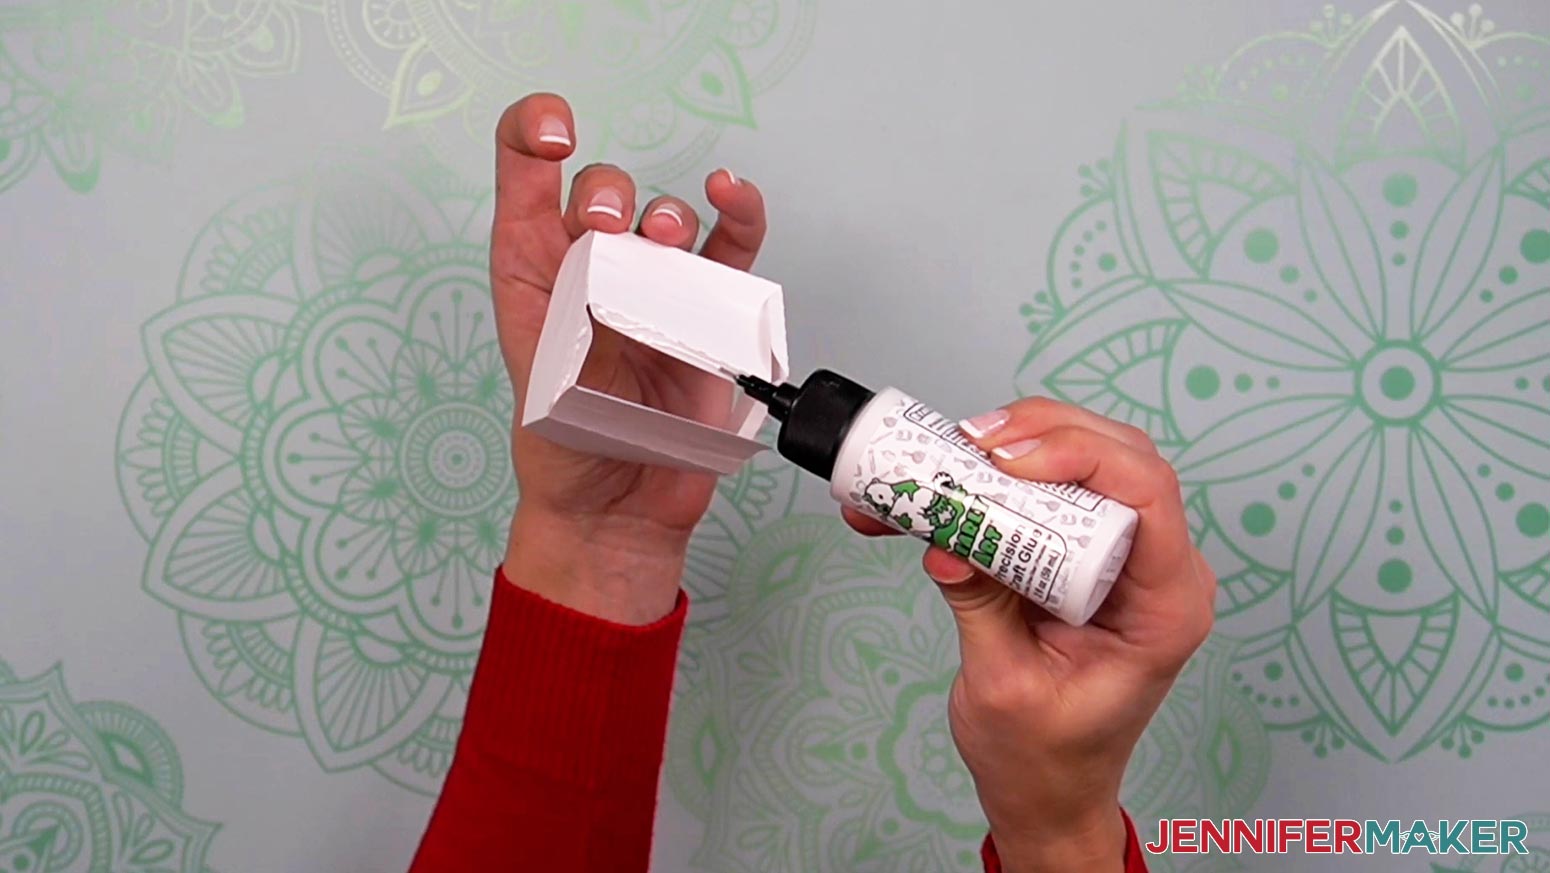
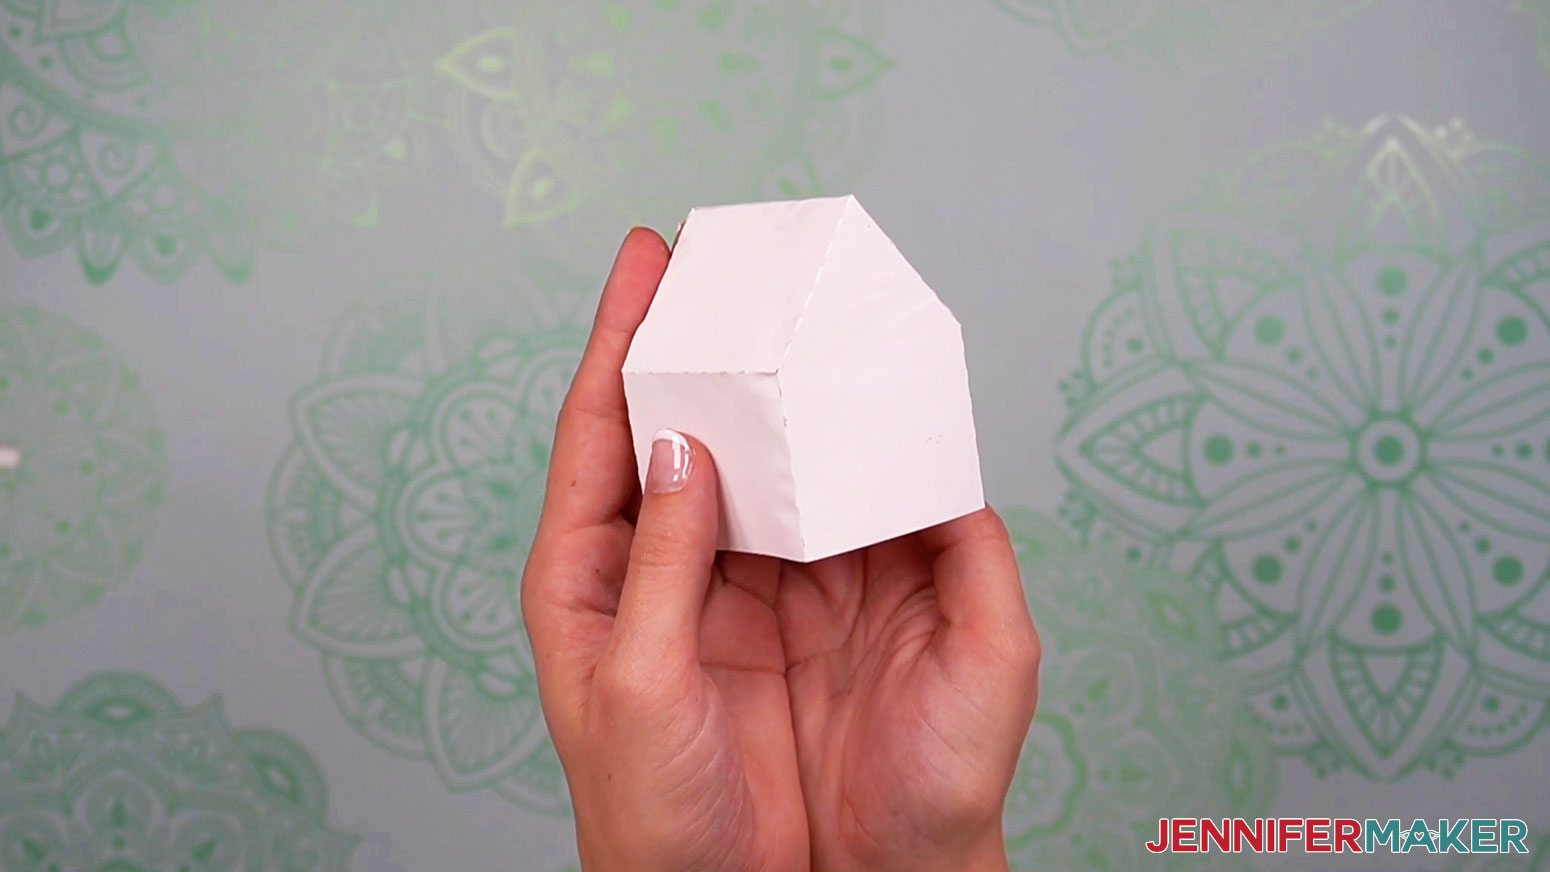
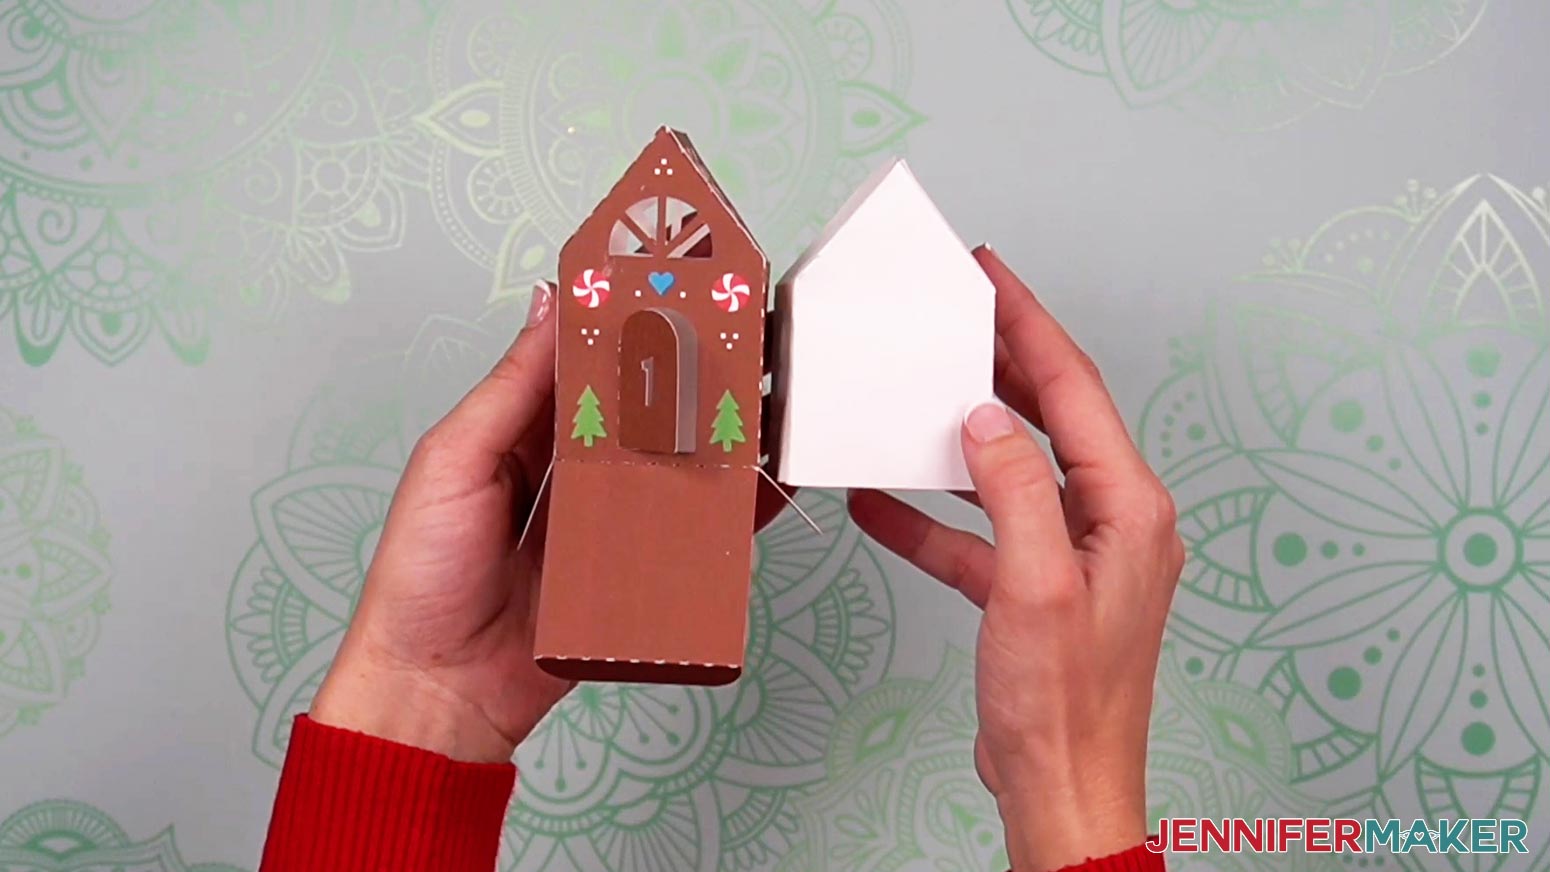
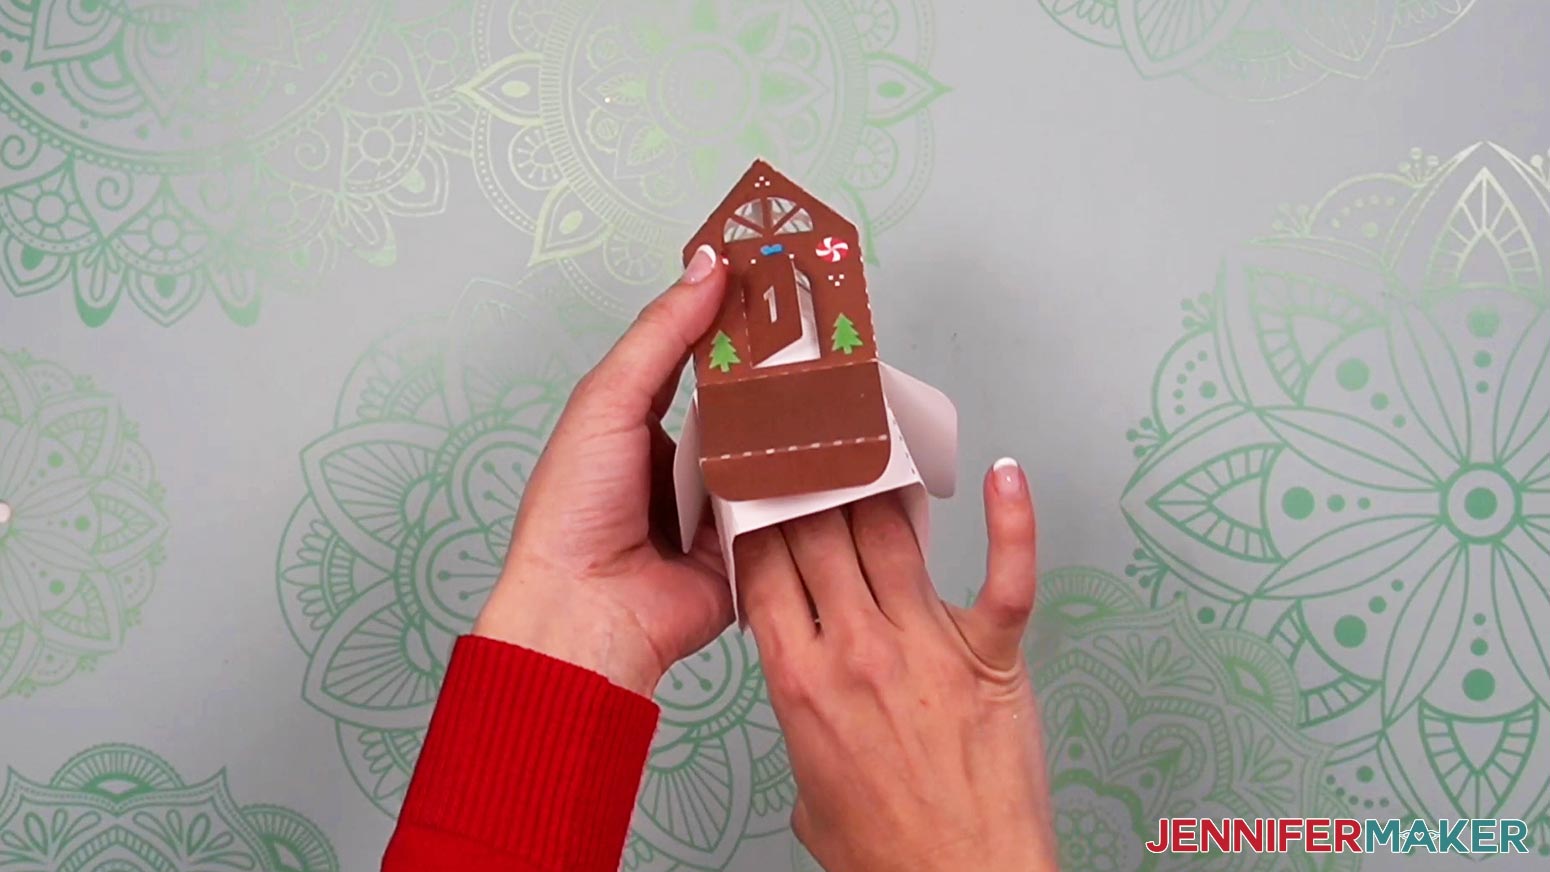
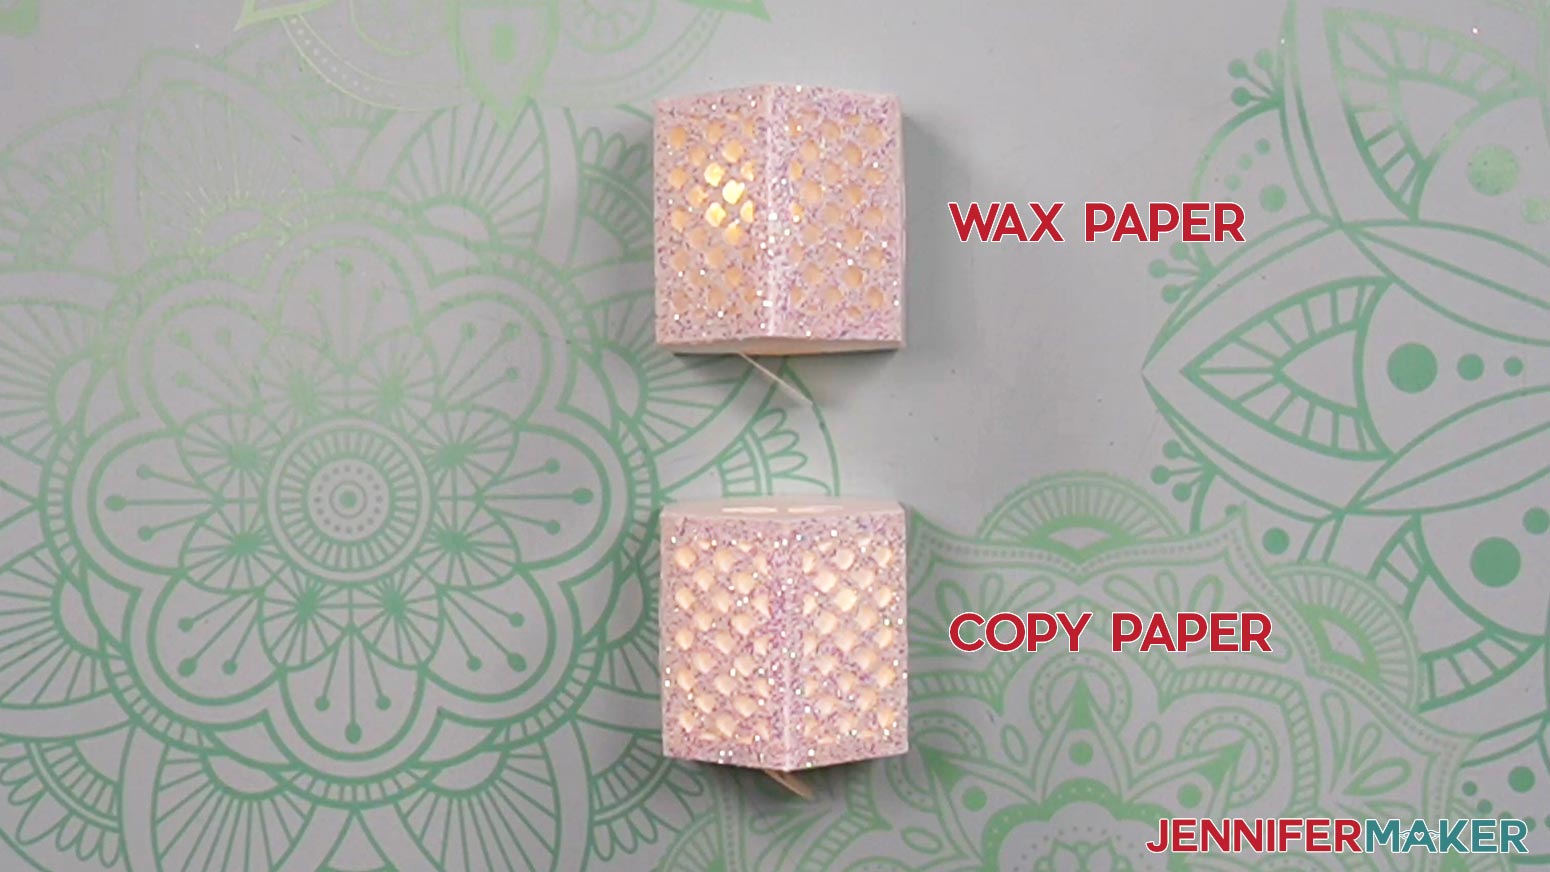
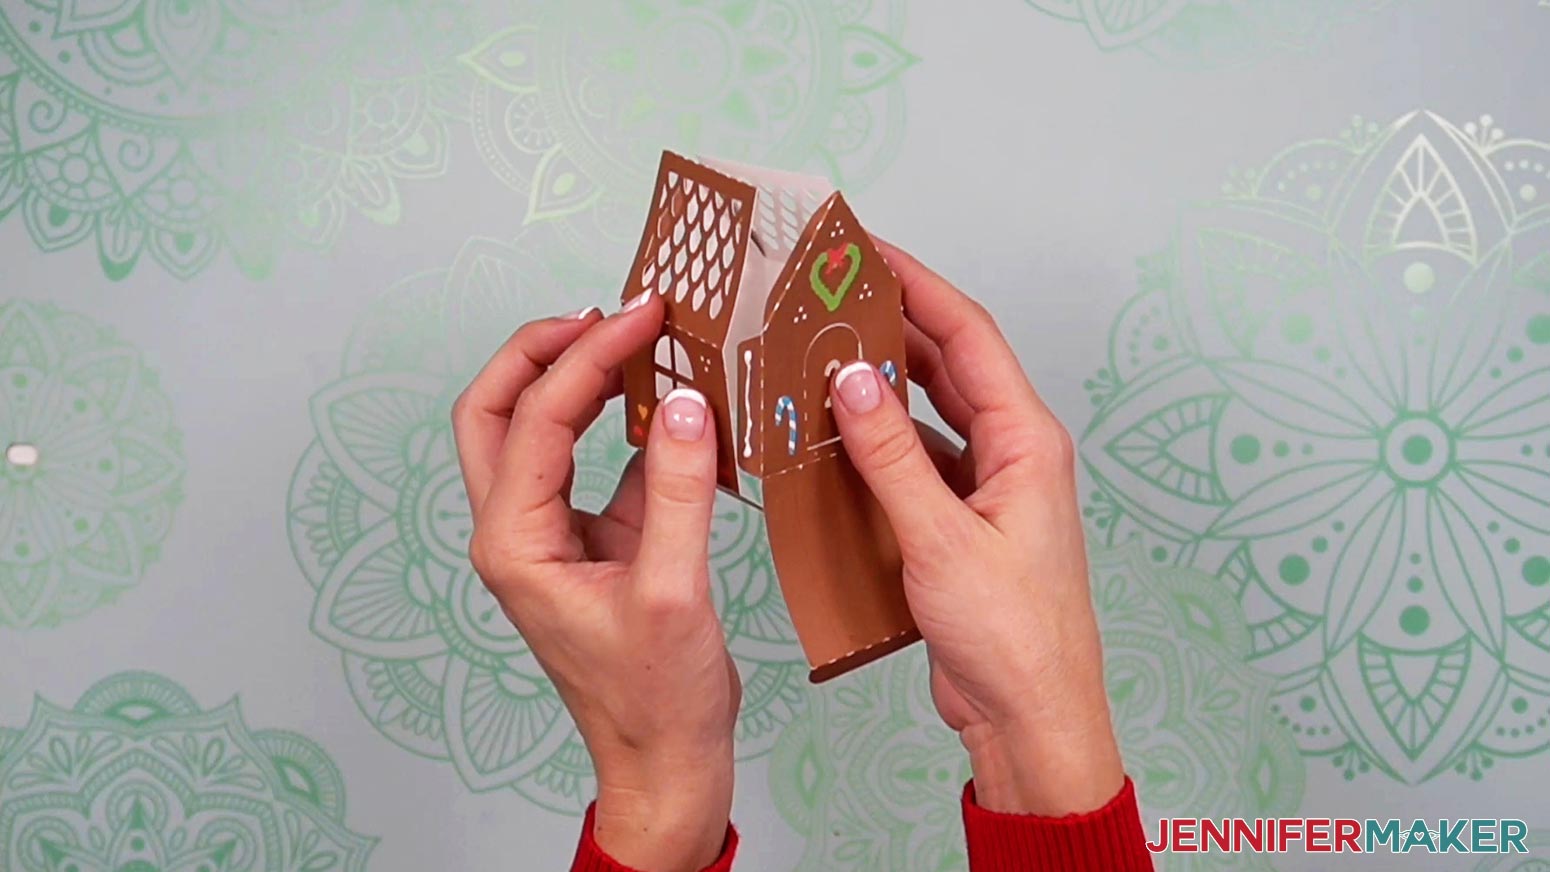
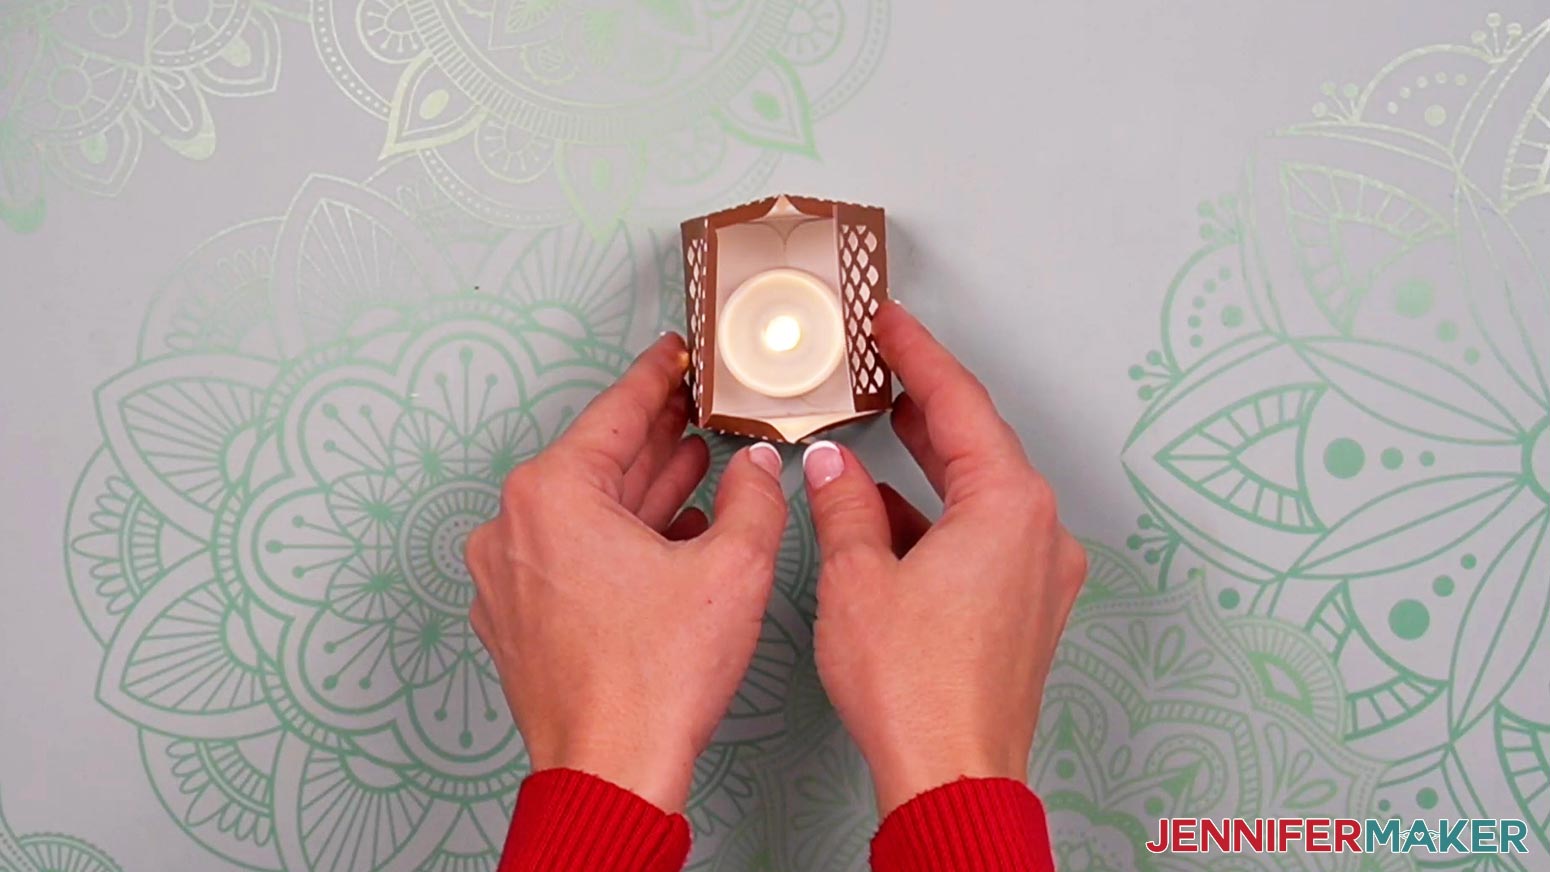
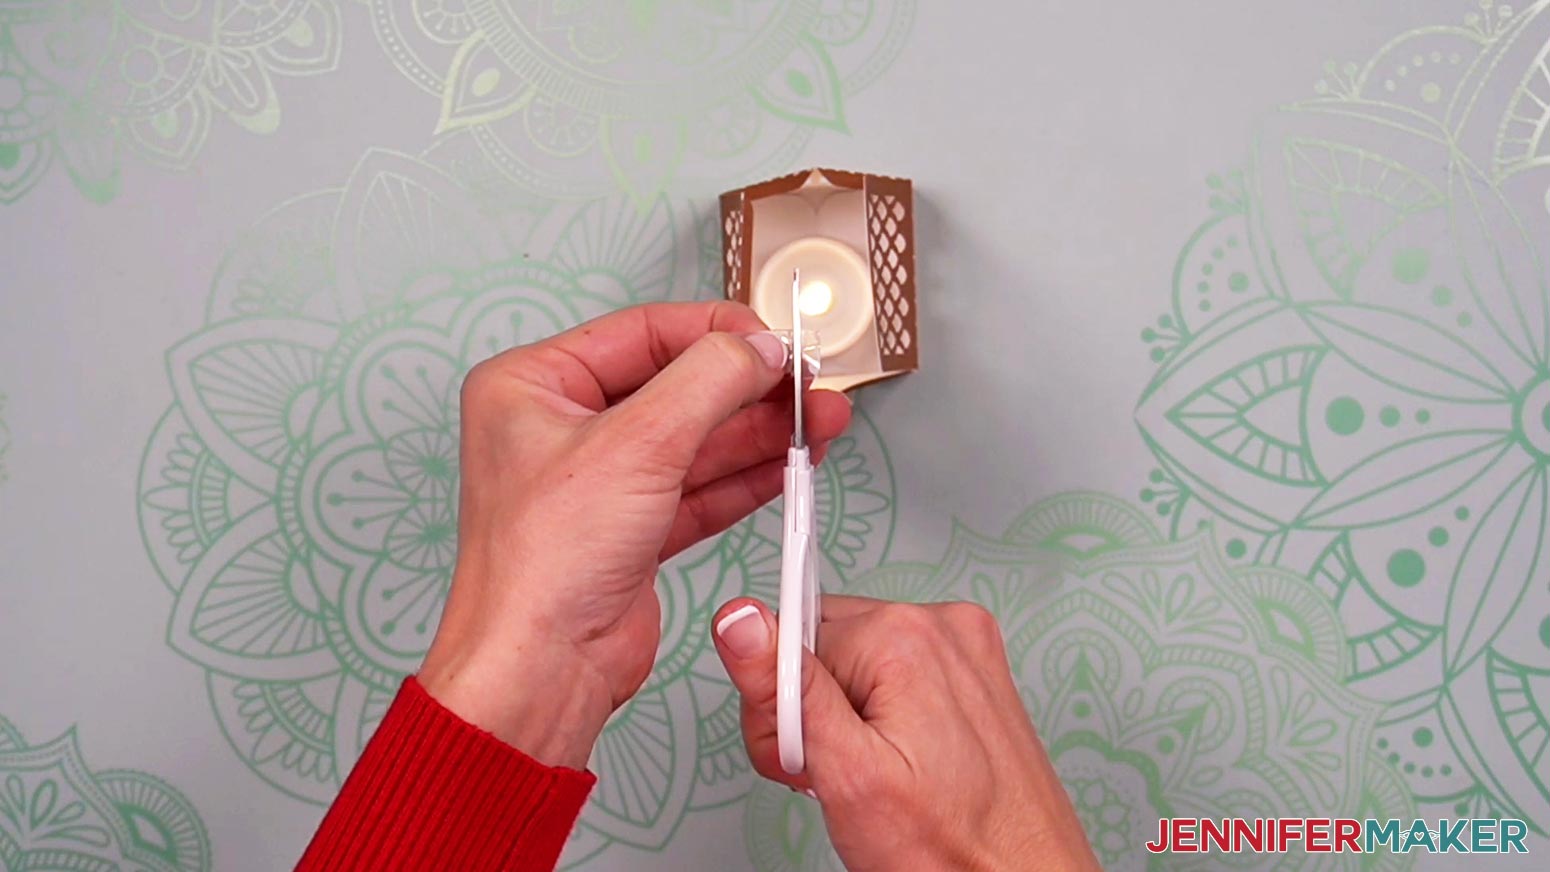
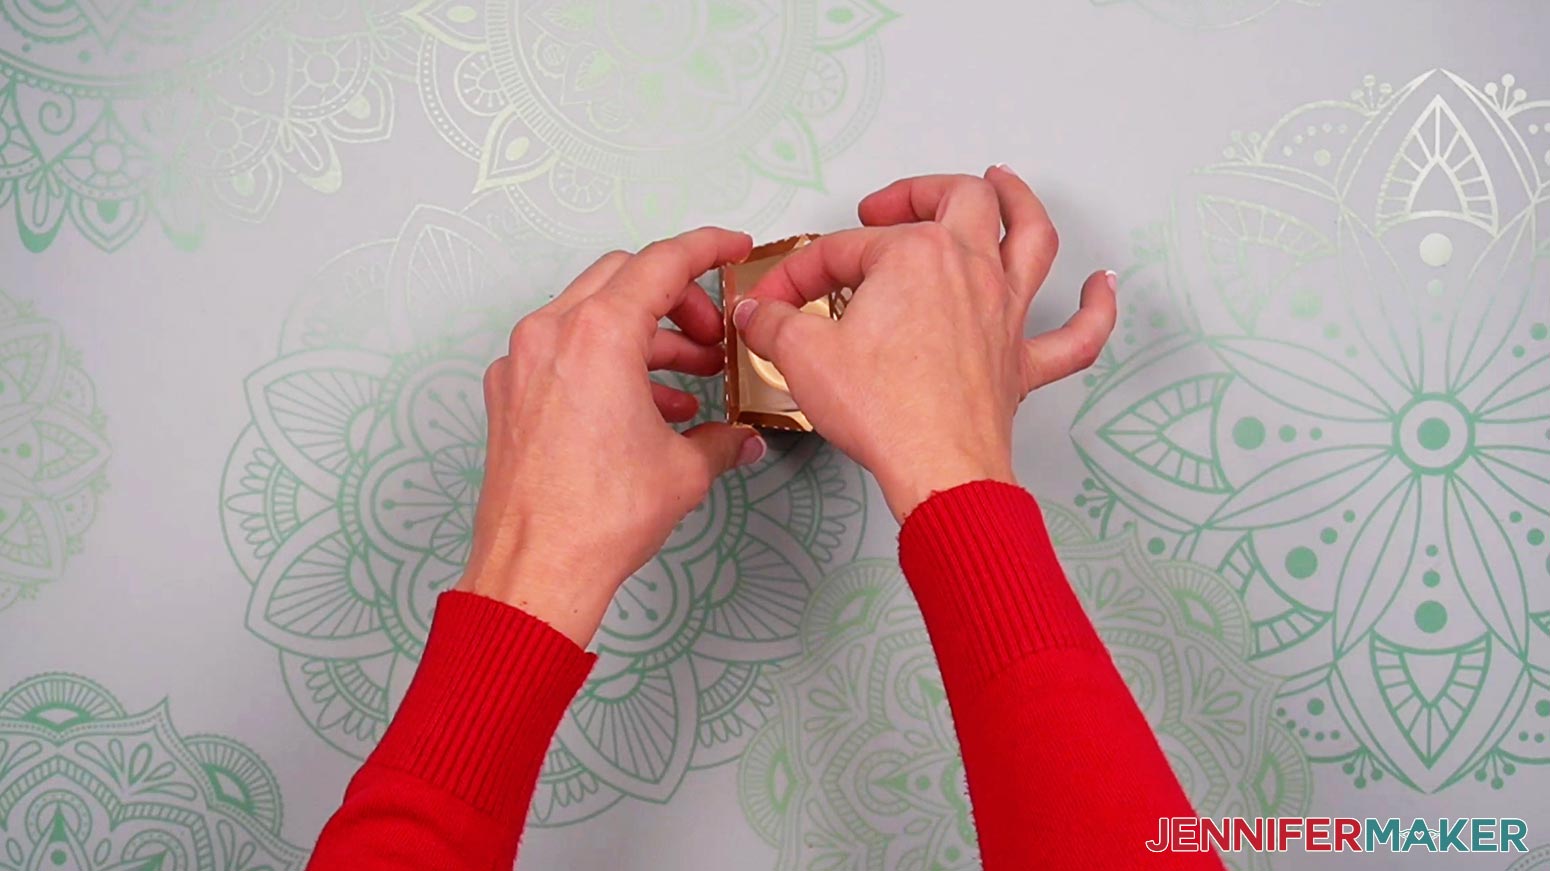
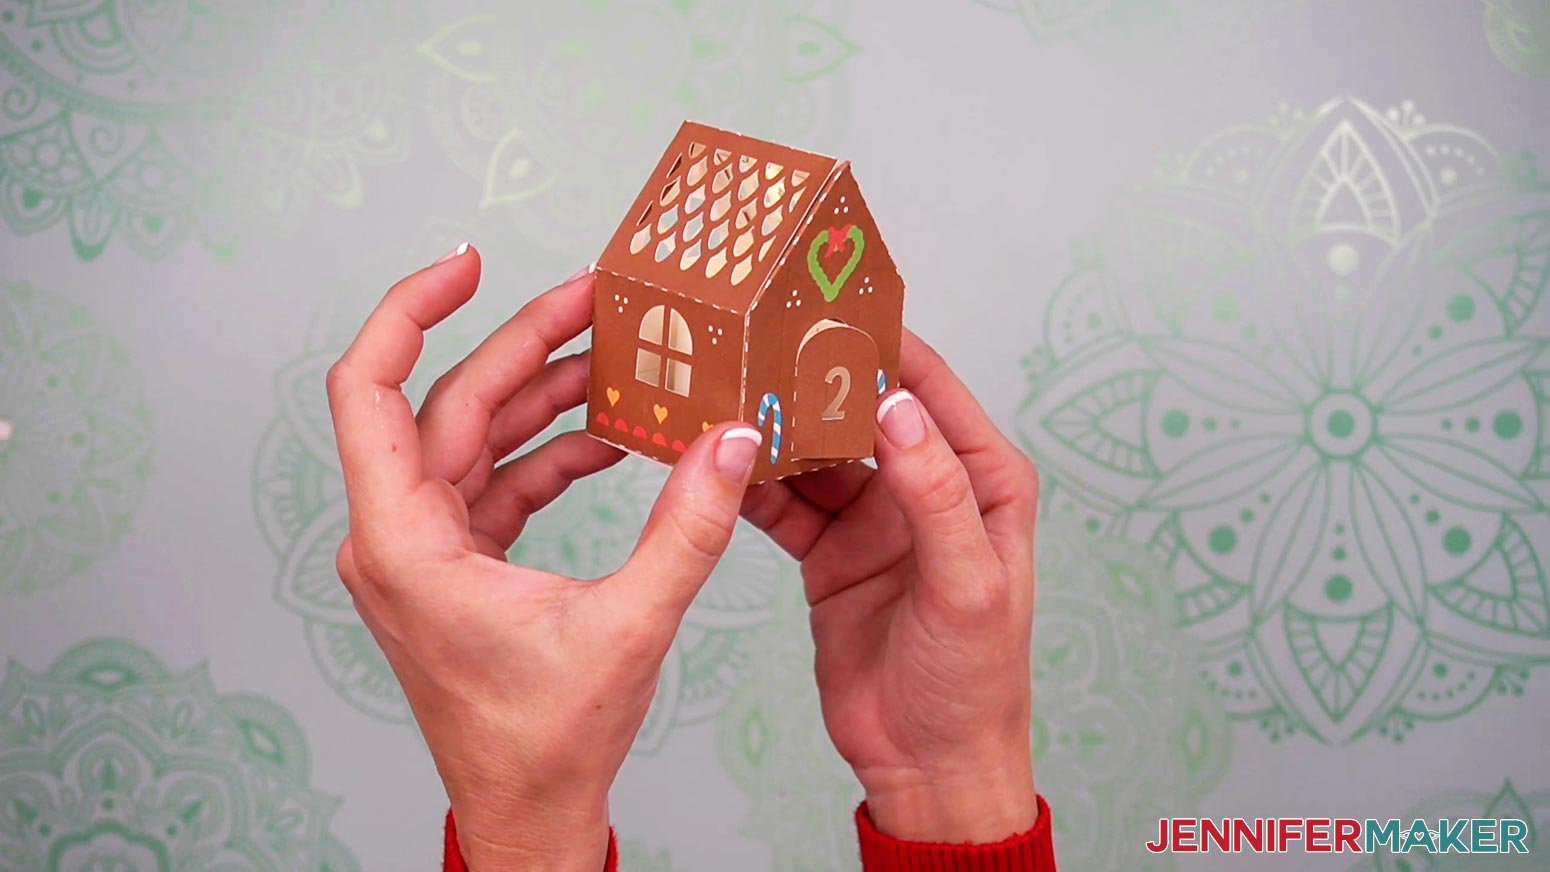
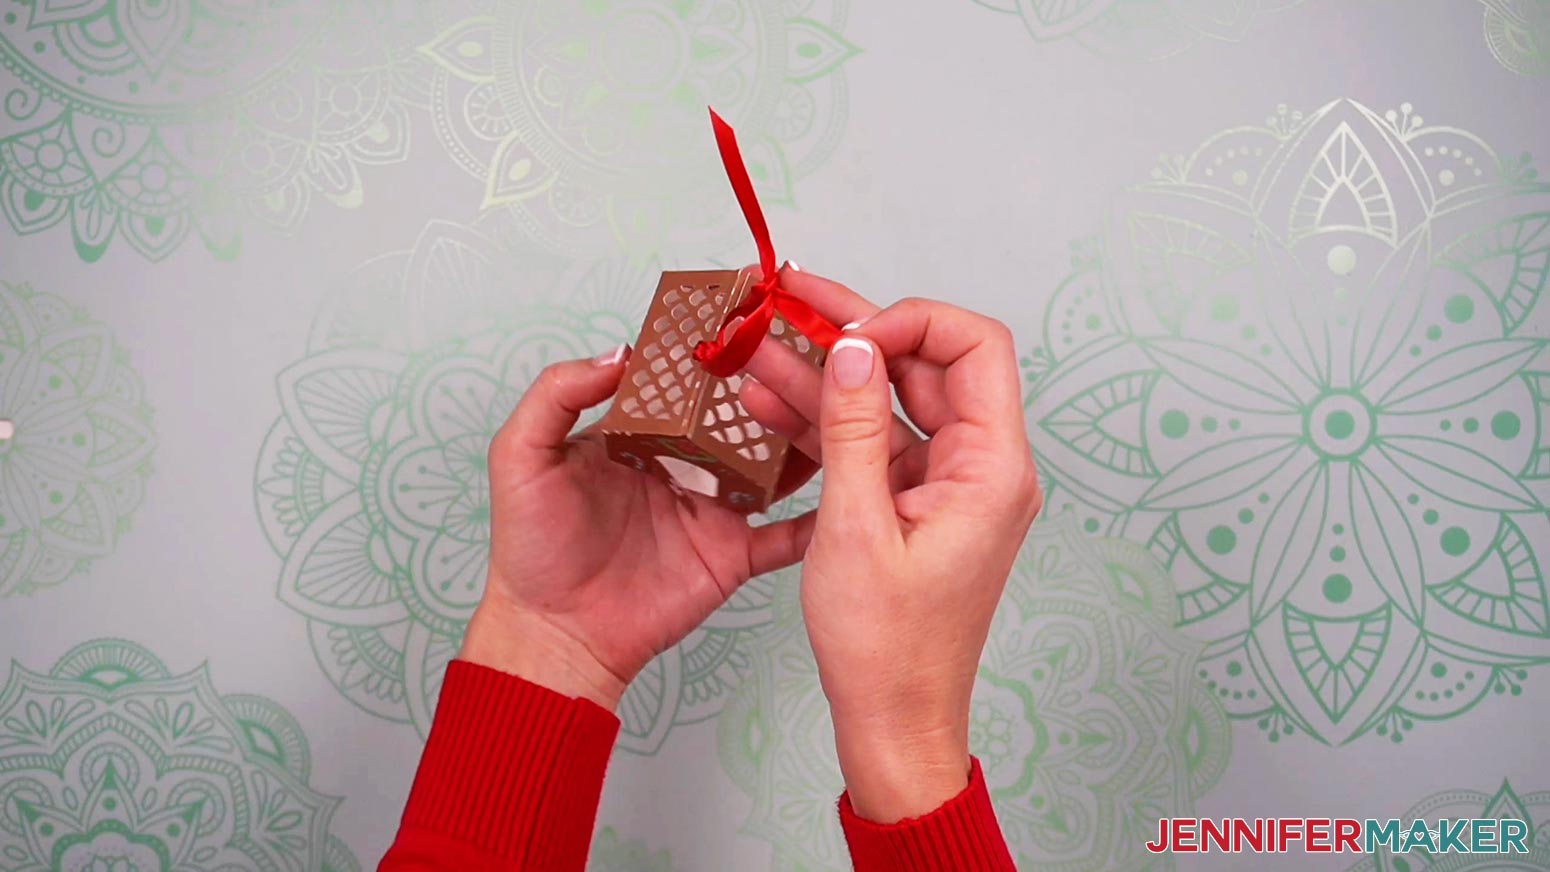
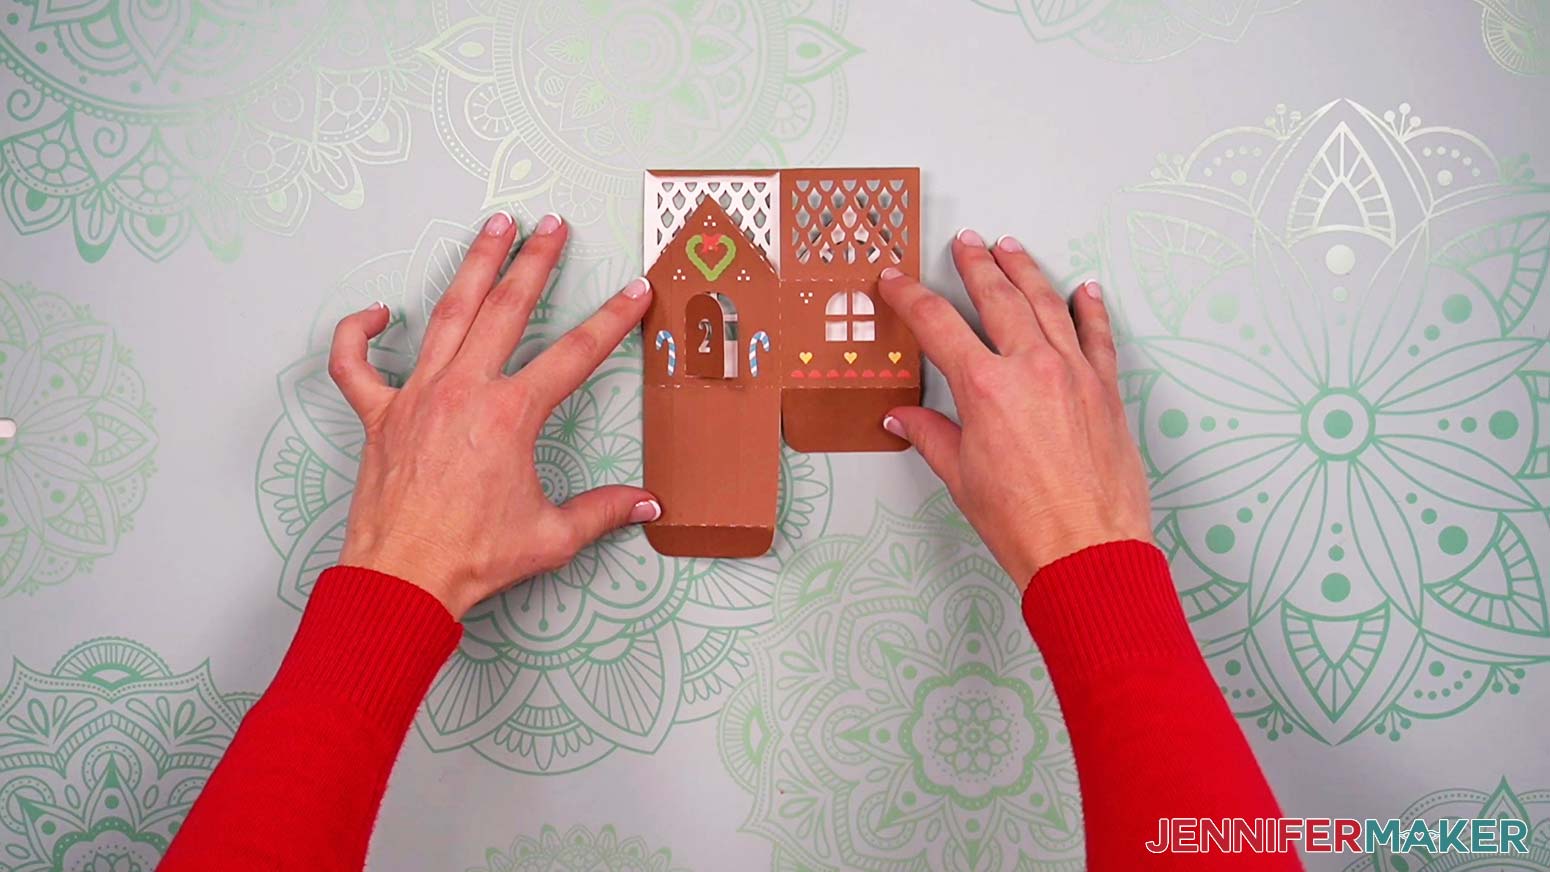
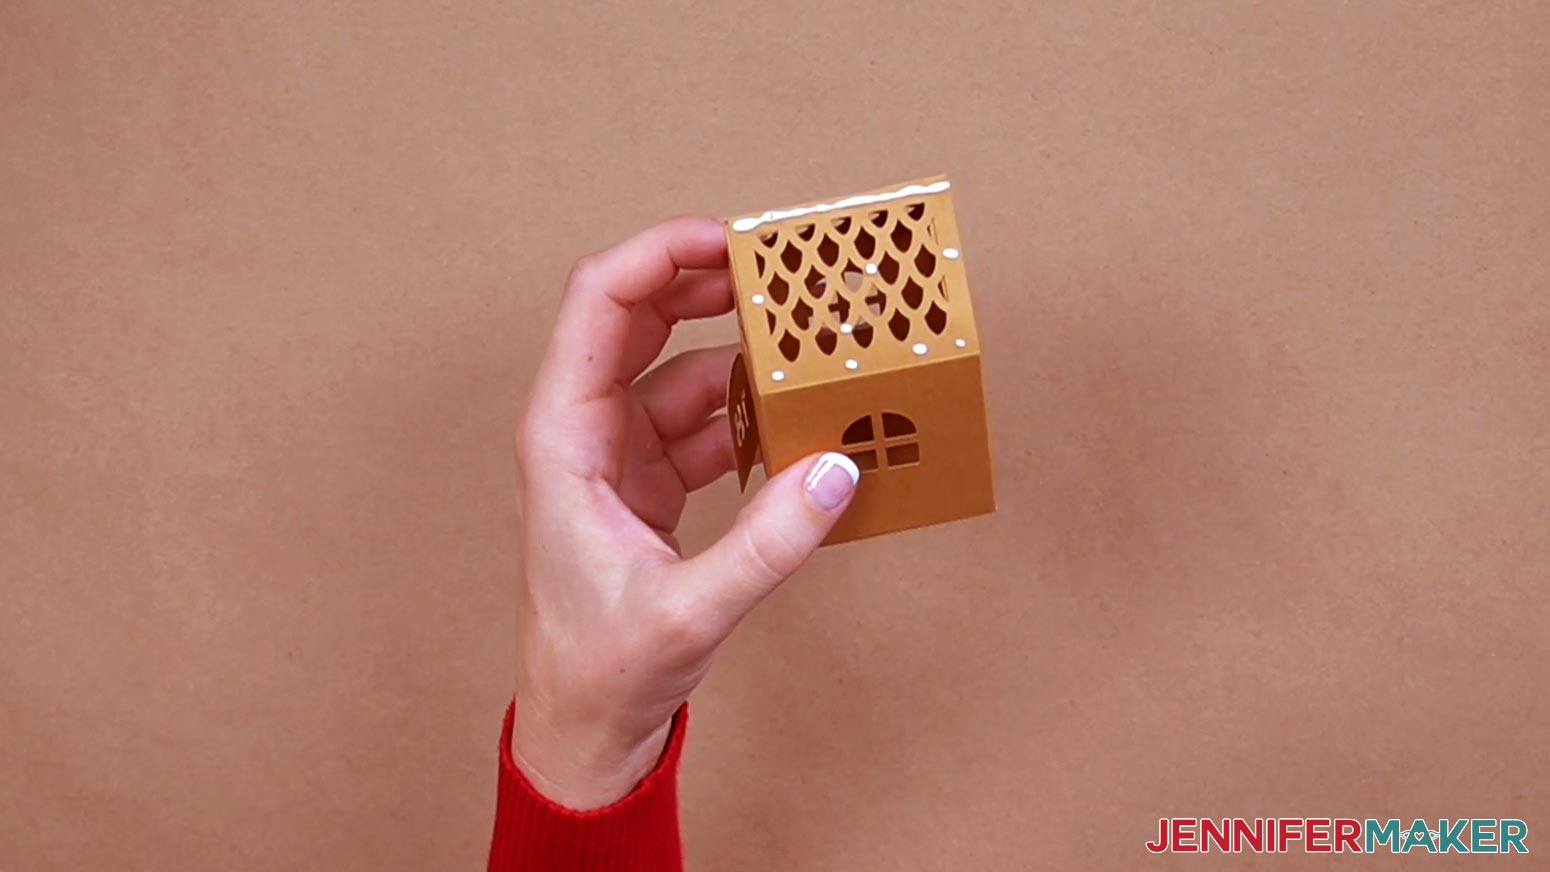
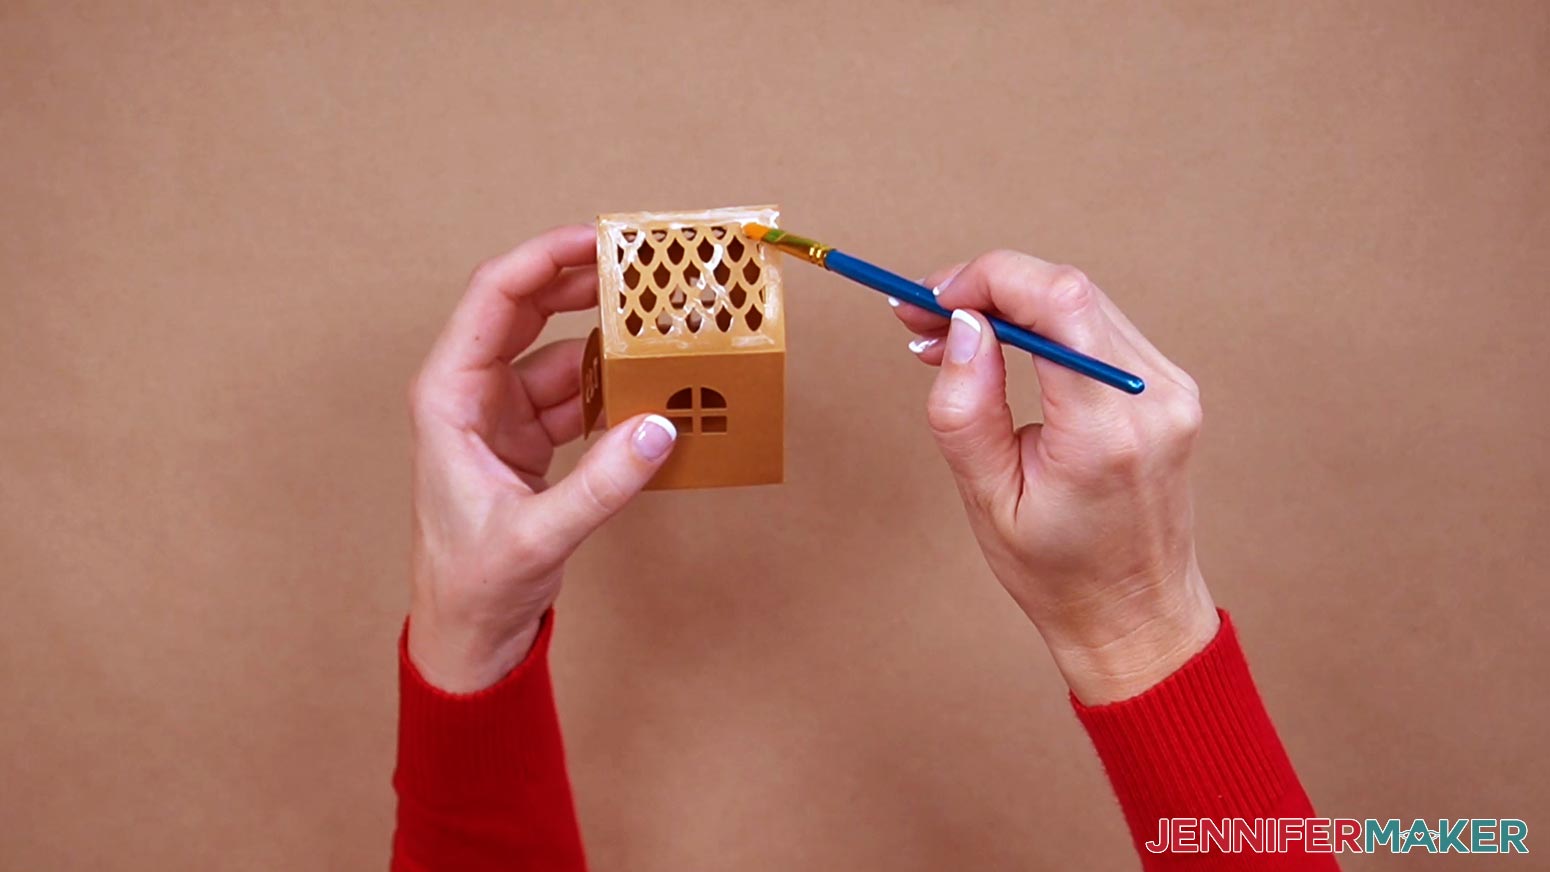
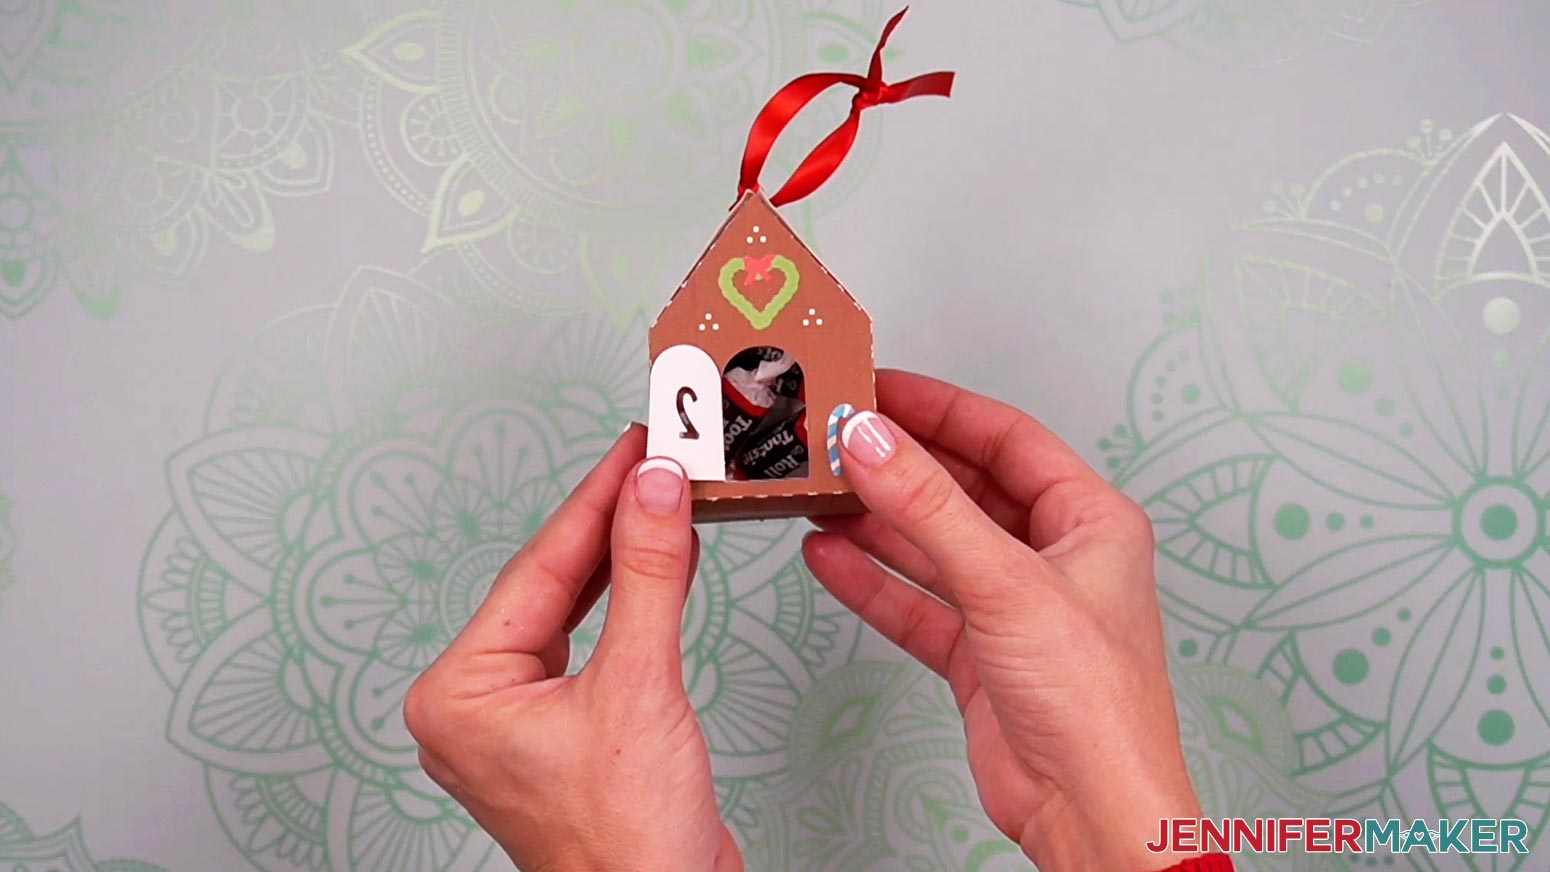
Learn how to make 25 cute Print Then Cut gingerbread houses for your very own Gingerbread Village Countdown for the holidays! If you're making the Print Then Cut houses and you've never used the Print Then Cut feature with your specific printer - or if it's been a while - calibrate your machine's settings before starting. You can watch this video to learn how to do it. In a new Cricut Design Space window, click the three lines in the upper left corner, then select "Calibration." Select "Print Then Cut." Then, follow the prompts to select your printer and print a test sheet. Place the test sheet on your LightGrip machine mat following the instructions and load it into your Cricut. Your Cricut will perform many cuts that may or may not line up with the coded lines. IMPORTANT: Do NOT unload your mat until the Calibration test is complete. Answer the questions in Design Space about the cut results. If the calibration was off, you may need to print another test sheet and check the settings once more. Keep working on the calibration process until your cuts look good. Once your calibration is successful, your Cricut is ready! Also, clean the print heads on your inkjet printer for the best print quality. Consult your printer's manual for the specific steps, as they vary between printers. Next, download my free Gingerbread Village Countdown SVG/DXF/PNG/PDF files from my free resource library. It's Design #440. The SVG folder contains folders for Inside Liner files, Cut Only House files, and Print Then Cut House files. Each of those folders also includes a version with score lines (with "score" in the name) that requires a scoring wheel or stylus and a version with dashed cut lines (with "no-score" in the name) that only needs the Fine-Point Blade. NOTE: If you'd like to put tea lights or fairy lights inside your finished houses, you can use either version. However, you will get some light leaking out of the dashed cut lines if you use that version. The PNG folder contains separate Print Then Cut files for each of the 25 houses. There are two versions -- ones with a bottom flap that you can close up to make into a gift box, and ones without the bottom flap that work great with tea lights or fairy lights. You won't need a scoring wheel or stylus for these because they contain dashed cut lines for the folds. There is also a folder containing PDF files that you can print and cut by hand if you don't have a cutting machine. I will show you how to prepare the Print Then Cut Houses using the PNG files and the Inside Liners with dashed cut lines using the SVG file. NOTE ABOUT SCORE FILES: If you want to make the Score versions, refer to my tutorial on How to Make Envelopes to learn how to adjust the files. All score layers in the files have a red color swatch, no fill color in the Layers Panel, and are grouped with their corresponding cut layers. NOTE ABOUT PNG FILES: When placing the PNG files on your Canvas, they will come in very large. That's due to the way Design Space uploads PNGs, but it's easy to fix. All you need to do is resize them according to the directions below. Print Then Cut House Outsides First, upload the PNG file for your first house following the same upload steps you would for an SVG file until you reach a screen with the PNG on the left. Select "Complex" for the image type and then click "Continue" in the lower right corner. You do not need to do anything on the next screen, so click "Apply & Continue." For Upload Type, select "Print Then Cut" and click "Upload." You should now see your Print Then Cut house file in your Recent Uploads. Select it and click "Add to Canvas." This is what my Gingerbread Village Countdown Print Then Cut House 1 design looks like on my Canvas. You can zoom out to see all of the design by clicking on the minus (-) sign on the lower left. If you're making the houses without bottoms, here's what the House 1 design looks like on the Canvas. As you can see, the designs are very large. That's because of the way Design Space uploads PNGs, but it's easy to fix! Select the house and make sure the lock icon is closed at the top. If you're making the "gift box" version, type "6.7" in the Width (W) field at the top of your screen and press Enter on your keyboard. This will make the height very close to 8.8". If you're making the "no bottom" version, type "4" in the Width (W) field at the top, which will make the height very close to 8.8". Now our first house is the perfect size for printing! I'm going to demonstrate the complete process with House 1, but you can use the same steps for the others. There are 25 total houses, each with a different number (1 to 25) on the front door, so you'll need to upload the other 24 PNG files to Design Space to make the whole set. There are three different house sizes (small, medium, and large), but they all have complementary styles so they look like a village when placed side by side. When you upload the PNG files for the Gift Box Houses With Bottoms to Design Space, they will need to be resized according to the list below. Here's what Houses 2 and 3 look like after resizing. When you upload the PNG files for the Houses Without Bottoms to Design Space, they will need to be resized according to the list below. Here's what Houses 2 and 3 without bottoms look like after resizing. After assembly, these are what the finished sizes of each of your houses will be. These are the perfect size for the current Print Then Cut dimensions as of November 2022, and they also allow a standard-sized tea light to fit inside each of the finished houses. You're now ready to print and cut! Make sure the correct machine is selected, then click "Make It" in the upper right corner. If prompted, click "On Mat" and "12 x 12" on the pop up. On the Prepare screen, check that your mat says Print Then Cut with a Material Size of 8.5" x 11." Then, click Continue in the lower right. Click the green "Send to Printer" button to open the Print Setup window. Make sure your printer is listed and the sliders next to "Add Bleed" (a small border around each image that allows for more precise cutting) and "Use System Dialog" are green. Then click "Print." The print screen for your printer will appear, but it might be hidden behind Design Space. Minimize your Cricut window if needed to see the print settings. Your window will look different depending on your computer and printer. Make sure your printer is listed in the window. Set the paper type to plain and the print quality to the highest available. If you're printing more than one house at a time, make sure you print them one-sided. Uncheck the "Two-Sided" option if needed. Put your 8.5" x 11" white cardstock in the printer. Press "Print." After your design has printed, let it dry to avoid any smears during the cutting process. See the black box around your design? This is called a registration box and is used by your Cricut machine to tell it exactly where to cut your project. On your Make Screen, select the "Medium Cardstock - 80 lb" setting and change the Pressure to "More" for a cleaner cut. Place the printed sheet on your green StandardGrip machine mat facing the same way it is on the screen and use a clean brayer to make sure it's fully adhered. Check that your Fine-Point Blade is clean and in Clamp B. Then, load the mat into the machine and press the flashing button to cut your design. When the cut is finished, unload the mat, flip it over, and roll it back to release the cardstock. This helps prevent the material from curling and ripping. You can also use your spatula to remove some of the more intricate areas and prevent them from ripping. Use your scraper to remove any small pieces of cardstock that are left on the mat. TIP: If you're struggling to get clean cuts, try using a new clean and sticky mat. You can also try changing your material setting to "Cardstock (for intricate cuts)" with Default Pressure. Follow the same steps as above to Print and Cut your other 24 houses. Here's what my Print Then Cut Gingerbread House 1 looks like after cutting. TIP: If your machine's cuts seem to be off when cutting your printed designs, and you've already calibrated, try increasing the light directly above your machine, or moving your machine to a brighter area. Print Then Cut works best when your machine can easily detect the black registration box around your design, and it needs good overhead lighting to do this. Cut-Only House Outsides If you're not using the Print Then Cut feature and you're cutting your houses on plain 8.5" x 11" or 12" x 12" paper, the houses are ready to cut! Here's what the cut-only SVG file for the house outsides looks like on my canvas. On the Prepare screen, you can move some objects to other mats in order to save paper. You may need to rotate the objects on the mat so they don't overlap each other. Follow the tips on combining mats in my DIY Lollipop Holders tutorial. Inside Liners You can cut your inside liners on any type of paper that light can easily shine through. I chose 24 lb. copy paper, but 20 lb. copy paper and wax paper also work. I don't recommend using vellum because it can be difficult to cut. First, upload the SVG file titled "gingerbread-village-countdown-insides-no-score-tool-needed-jennifermaker-SVG" to Cricut Design Space and add it to your Canvas. If you are not sure how to upload an SVG cut file to Cricut Design Space, watch this helpful video training series I made. If you are on an iPad or iPhone, here is how to download and upload SVG files to the Cricut Design Space app. This is what my Gingerbread Village Countdown inside house liners look like on my canvas. You can zoom out to see all of the design by clicking on the minus (-) sign on the lower left. The design contains all 25 house liners. Each one is sized to perfectly fit within the house outsides once assembled. There are three different designs, and the size of each one in the file is below. This file is ready to cut! Make sure the correct machine is selected, then click "Make It" in the upper right corner. If prompted, click "On Mat" and "12 x 12" on the pop up. On the Prepare screen, if you're using standard copy paper like me, change the Material Size to 8.5" x 11" . This should give you 17 total mats. If you're using the wax paper sheets from my materials list, leave the size at 12" x 12," which will take 11 mats. Then, click Continue in the lower right. On the Make Screen, I selected the "Copy Paper - 24 lb" setting and left the pressure at Default. Check the "Remember material settings" box. If you're using wax paper, select the "Wax Paper" setting. Select the "Copy Paper - 20 lb" setting if you're using thinner copy paper. Leave the pressure at Default for these settings, also. Place your liner material on a blue LightGrip machine mat and use a brayer to make sure it's fully adhered. Check that your Fine-Point Blade is clean and in Clamp B. Then, load the mat into the machine and press the flashing button to cut your design. When the cut is finished, unload the mat, flip it over, and roll it back to release the paper. This helps prevent the material from curling and ripping. Go slowly and use your spatula to remove the pieces if needed. Follow the same steps as above to cut the rest of your designs. NOTE: The inside designs will not cut in the same order as the outside designs. There are three different sizes of inside pieces, so I recommend stacking them into three separate piles as they cut. Two of your stacks will have eight pieces and one will have nine once you're finished. The Houses and Inside Liners are assembled separately and then combined, so you can work on them in the order you prefer. House Outsides Place one of your cut houses face down and fold along all the dashed or scored lines. Since the "gift box" houses will need to be able to hold something inside, there's a flap at the bottom with a tab that can be tucked inside to close up the hole. Don't forget to fold the door outward just a bit so you can see inside the house! Now you can add glue to all the tabs to hold everything in place. Start with the tab on the side. TIP: When making the "gift box" version, I found it easier to get the tab positioned just right when I closed up the bottom first by tucking in the flap to form the box shape. Gently press down along the side against the glued tab to make sure it adheres. Wait a few seconds for the glue to dry before moving on. Next, add glue to the two tabs on the top beneath the roof piece with the tab attached to its end. Press down and gently run your fingers along the roof edges until the glue dries and the roof piece stays in place. Add glue to the remaining tabs at the top to attach the other side of the roof. Again, press down and run your fingers along the edges to make sure everything adheres well. Once the glue is dry, you're done with your first house! Follow these same steps to assemble the other 24 houses. Inside Liners NOTE: I don't recommend including the inside liners on your houses if you want to store them flat. Place one of your cut liners face down and fold along all the dashed or scored lines. The insides don't have flaps at the bottom like the outsides, so there are fewer lines to fold. Now add glue to the tabs, starting with the side tab, just like you did with the outside pieces. Hold the tab in place until the glue dries. Next, add glue to the two tabs on the top beneath the roof piece with the tab attached to its end. Press down and gently run your fingers along the roof edges until the glue dries and the roof piece stays in place. Now you can add glue to the remaining tabs at the top to attach the other side of the roof. Again, press down and run your fingers along the edges to make sure everything adheres well. Once the glue is dry, you're done with your first inside liner! Follow these same steps to assemble the other 24 inside pieces. Then, match up your houses and liners according to size. You can tell them apart by their height. Take an outside piece and open up the bottom. Grab a matching liner and make sure the roof angles face the same direction. Carefully slide the liner piece inside. Close the flap on the bottom back up and you're done! Repeat for your remaining 24 sets of houses and liners. TIP: If you're having trouble inserting the bottom flap once the liner is inside the house, you can add a small line of glue between the two layers on the inside to adhere them. This will eliminate the gap that could get in the way when pushing the flap's tab into the house. Here's what an assembled house with a copy paper liner looks like next to a house with a wax paper liner. As you can see, the wax paper is a bit more transparent, which lets more light shine through. I like them both, but you can choose whichever one you prefer! If you'd like to be able to take your houses apart and store them flat at the end of the season, I can show you how! You'll just need to use some restickable mounting squares and leave off the inside liners. Let me walk you through the steps. Place one of your cut houses face down and fold along all the dashed or scored lines. Don't forget to fold the door outward just a bit so you can see inside the house! Now, add craft glue to the tab on the side of the house. This is the only spot where you'll use craft glue -- if you use it on any of the other tabs, you won't be able to flatten your houses for storage later! Gently press down along the side against the glued tab to make sure it adheres. Wait a few seconds for the glue to dry before moving on. Now you can place your tea light, fairy lights, or other surprise inside the house. I found it easier to place the item inside before finishing assembly. Next, cut a removable square in two and remove the backing for one half. Place it on one side of the top tab on the roof's peak, then add the other half to cover the nearby section. Remove the protective material. Tuck the remaining tabs in a bit and pinch the two roof pieces together to secure them at the sticky spots. Again, press down and run your fingers along the edge to make sure it adheres well. You don't need to add any removable squares to the tabs on the sides of the roof -- the house will stay together just fine without them. You can also thread a few inches of thin ribbon through a roof tile on either side and tie a bow at the top to add more support. When you’re ready to put them away, gently remove the sticky squares, remove anything inside, unfold the bottom, and allow the house to collapse flat on its side. You're done with your first house! Follow these same steps to assemble the other 24 houses for flat storage. I tried two different methods for adding glitter to the tops of my assembled houses. Adhesive Spray I found this method to be quicker but also messier. I ended up getting glitter on the sides of my houses in addition to the roofs because it was hard to keep the spray in one concentrated area. If you use this method, make sure to do it outside or in a spray box to protect your work area from overspray. Craft Glue: My Preferred Choice Bearly Art craft glue and a paint brush worked much better! It took a little bit longer, but I think the results were well worth the extra time. First, cover your work surface with a piece of butcher paper because glitter can be messy. Then, apply a thin line of glue around the outside edge of one side of the assembled house's roof, and a few dots in the center. Then, use your brush to evenly spread out the glue so there are no clumps or uncoated areas on that side of the roof. Quickly shake or sprinkle glitter onto the wet glue before it dries too much. Tap off the excess onto your butcher paper. Repeat this process for the other half of the roof. You're done! You can follow these same steps to add glitter to all 25 assembled house roofs. You're done! Here's what each of my finished Gingerbread Village Countdown houses look like. Aren't they just so cute? Now you can place tea lights or fairy lights inside or behind each one and display them on your mantle, a shelf, or a table to enjoy them. You can even add some string and hang them from your tree! And since each one is a box you can open, you can put all kinds of fun surprises inside! Finished Sizes: Small Houses: 3.1" high x 2.2" wide x 2.2" deep Medium Houses: 3.5" high x 2.1" wide x 2.1" deep Large Houses: 4" high x 2.2" wide x 1.9" deep Font Used: Wonderful Display Font (for the house numbers) As an Amazon Associate and member of other affiliate programs, I earn from qualifying purchases.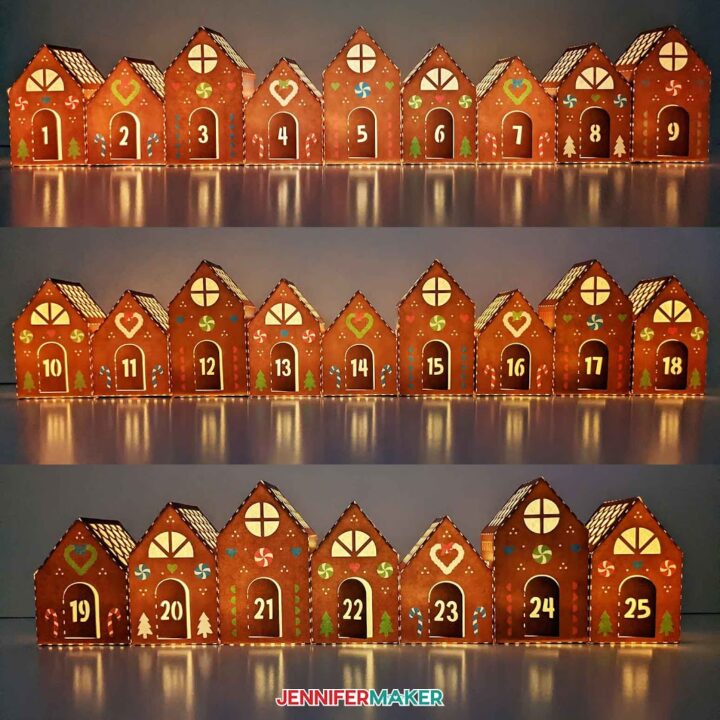
Gingerbread Village Countdown
Materials
Tools
Instructions
STEP 1: PREPARE TO PRINT THEN CUT
STEP 2: GET MY FREE GINGERBREAD VILLAGE COUNTDOWN DESIGNS
STEP 3: PREPARE AND CUT YOUR DESIGNS
STEP 4: ASSEMBLE YOUR GINGERBREAD VILLAGE COUNTDOWN HOUSES


Variation: Assembly for Flat Storage
Variation: Add Glitter

STEP 5: SHOW IT OFF

Notes
Recommended Products

Answers to Your Questions About Making a Gingerbread Village Countdown
Q: What is Merry Maker Mingle?
Starting December 1st and leading to Christmas, I present you with a brand new “gift” — a project to craft, make, or do. You can make these projects on a Cricut cutting machine or by hand if you don’t have one. Most of our Merry Maker Mingle projects will come with a fun video with yours truly, a step-by-step printable photo tutorial, and a free pattern/SVG cut file. Sign up with your email address to get daily updates, special offers, and prizes!
Q: What kind of paper do I use to make the gingerbread houses?
You can really use any 65 lb-105 lb. cardstock — it’s your choice what color and texture you want to use. You could even use Cricut Foil Kraft Board. The most important thing is that it be a good quality cardstock. If you plan to print then cut these gingerbread houses, I recommend sticking with white 65 lb. cardstock.
Q: How do I get clean cuts on my gingerbread houses?
Use good quality cardstock, make sure your blade is clean, and use a stick mat. Learn more about solutions to cutting problems in my Cricut Cutting Problems guide.
Q: What can I use instead of copy paper or wax paper?
Try vellum. You can also use a patterned acetate. Or nothing at all — it’s your choice!
Q: How do I calibrate my Cricut for Print Then Cut?
Check out this helpful video on calibration.
Q: Can you help me with Print Then Cut?
Print Then Cut is a really really cool feature of the Cricut Explore and Maker cutting machines, but so many of you tell me you are intimidated by it. Sometimes this may be because you haven’t tried it yet and it seems complicated, but other times it could be because you did try it and it didn’t quite work the way you expected. So I’d like to share my best tricks and tips for excellent Print Then Cut projects. Because the ability to make fun projects like these Gingerbread Houses is totally worth it!
First, the printer — it’s important you know that you need a printer to do Print Then Cut, as you Cricut doesn’t print on it’s own. This may seem obvious to some, but perhaps not to others, so I wanted to mention it. Cricut recommends we use an inkjet printer, but I’ve found that a laser printer is also okay so long as the material you’re putting in it is appropriate — so don’t put printable vinyl in a laser printer unless it says you can, as the high heat of the printer will hurt the vinyl. Paper is fine though. I prefer to use an inkjet most of the time. I use the HP Envy, but Epson EcoTanks are also a good brand of inkjet printer to use with Cricut Print Then Cut.
Next, printing issues — sometimes the printer has issues feeding the paper you want to cut on a Cricut. If this happens, use the rear feed if you have one. If you don’t have one, try putting just one sheet of paper into your printer at a time, as most feed issues that affect print then cut are the result of the printer’s inability to pick up just one sheet of paper. I also recommend you avoid Cricut’s Sticker Paper (sorry, Cricut) — it’s just too thick for most people’s printers.
Speaking of paper type, you’ll get the best results when it comes to cutting your design if you use matte paper, not glossy paper. The little sensor on your Cricut can have problems reading the registration lines on glossy paper because there can be glare. So if you’re having problems, use matte, non shiny paper. OR, if you absolutely must use that glossy paper, print out two sheets of your designs — one on glossy, one on matte — and then cut out the middle of the matte paper and place it over your glossy paper like a frame, then tape down and cut.
My next tip is to Calibrate your Cricut. This is important for getting good cuts that align with your design — you can learn how to do calibrate over at jennifermaker.com/calibration. Just follow the steps in my video!
I ALSO recommend you check your printer. If you’re having issues with printing and are seeing streaks or inconsistent colors, clean your printheads. You can learn how to clean printheads by checking your printer’s manual or support site.
Now let’s talk about Printer Settings — this is a big one! When you go to print from Cricut Design Space, you’ll have the option to Use System Dialog. Be sure to toggle that option to ON, and then move or minimize the Cricut Design Space window so you can see the system dialog box, as it’s usually BEHIND the Design Space window. Everyone’s dialog box will look a little different, but be sure to change the quality to best or high or maximum, or whatever it says. This makes a HUGE difference in how good your final print looks. Don’t forget to do this. If you do this and your still think your print doesn’t look great, clean those printheads on your printer.
My next tip is lighting. Be sure to pay attention to the lighting in your room. If you have a desk lamp shining on your Cricut, it can cause issues with the sensor’s ability to pick up the registration lines properly. Move the light to improve the lighting. Direct sunlight coming through a window can have the same effect. You may want to experiment with lowering or raising the overall light in your room, too.
If you continue to have issues getting your Cricut to cut your design properly, I have more tips!
First, check your machine mat. Make sure there are no marks or smudges on it that might confuse the sensor.
Then check your sensor light and make sure it is clean. You can sweep it gently with a small, clean dry brush. It’s possible there was something stuck on it, perhaps some glitter or paper, that was interfering with the sensor.
You’ll also want to be sure the sensor light is actually coming on when you try to cut a printed design. If it does not, be sure to contact Cricut Member Care for help.
If your cut is off no matter what you do, check that you’re printing your page properly and are not accidentally shrinking it. Some computers and printers will default to “Fit to Page” or “Shrink to Fit” in the System Dialog box. You want to be sure that is not selected and you’re printing at 100%.
Something else to pay attention to are our registration marks. Be sure they are black, not gray, and not filled with lines. They should be solid black and present at all four points of your design.
If you continue to have with Print Then Cut issues, I invite you to come ask about your specific situation in my Cricut Crafters Group — share a photo of what you’re trying to do, your material choices, your Cricut model, and anything else so our community can help point you to a possible solution. We’ve collectively done millions of Print Then Cut projects and we can help you!!
Get my free SVG files to create a beautiful Gingerbread Village Countdown
I love seeing what you make with my designs and how you use them! Please share a photo of your gingerbread village countdown in our Facebook group or tag me on social media with #jennifermaker.
Love,

Want to remember this? Save this Gingerbread Village Countdown Tutorial to your favorite Pinterest Board!