Let’s make DIY phone cases that are as unique as you are!
These days we carry our phones everywhere we go! It’s almost hard to remember what life was like without them. And now that our phones are one of our most important accessories, it makes sense that we keep them on trend, right? You know I love adding a special touch to everything and my phone is no exception! And thanks to the amazing Cricut cutting machine I can switch up my phone case whenever I want! And it’s SO EASY! In this tutorial I’m going to share some fun designs that you can use to customize and make your own DIY phone cases!

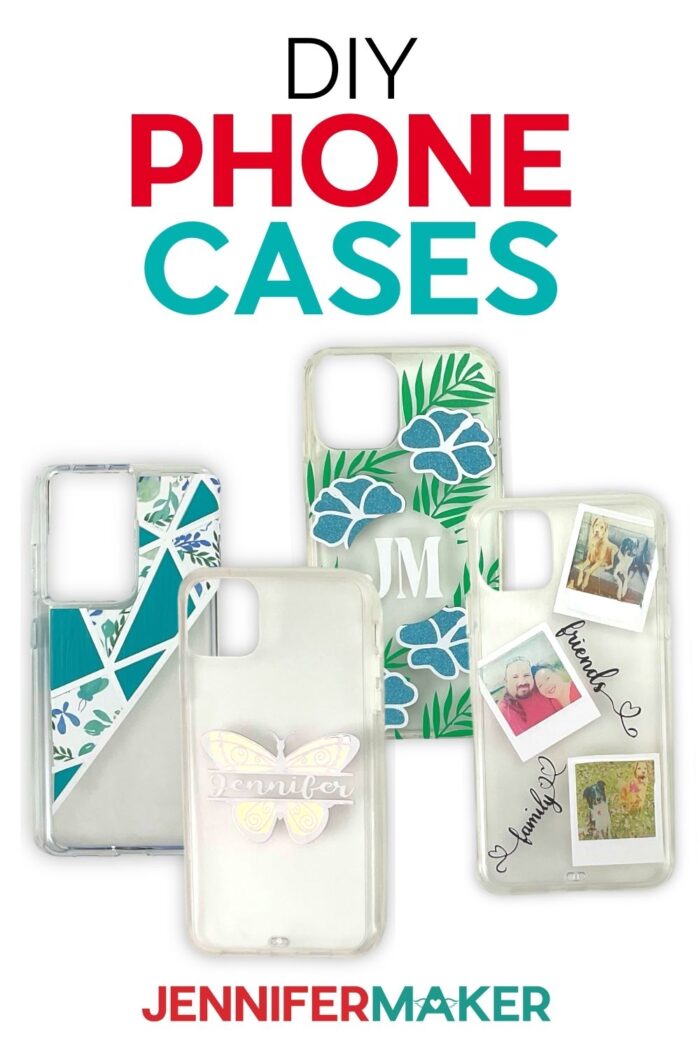
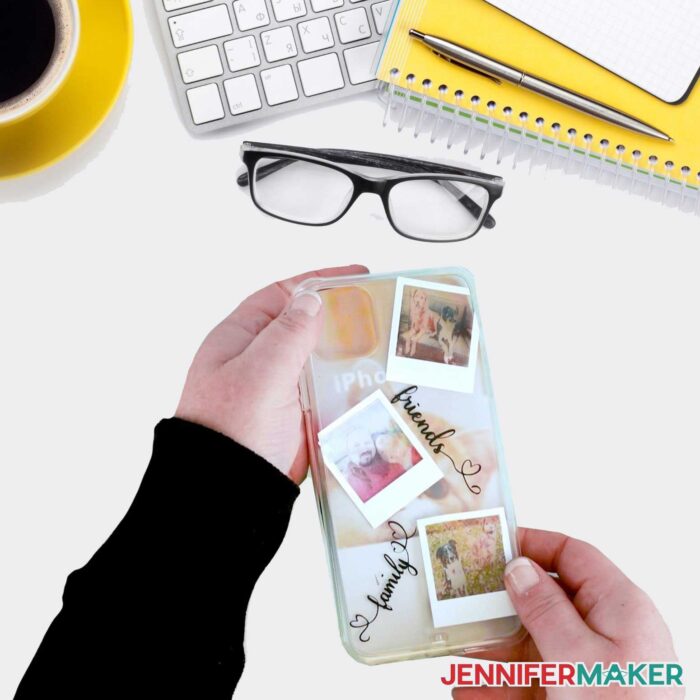
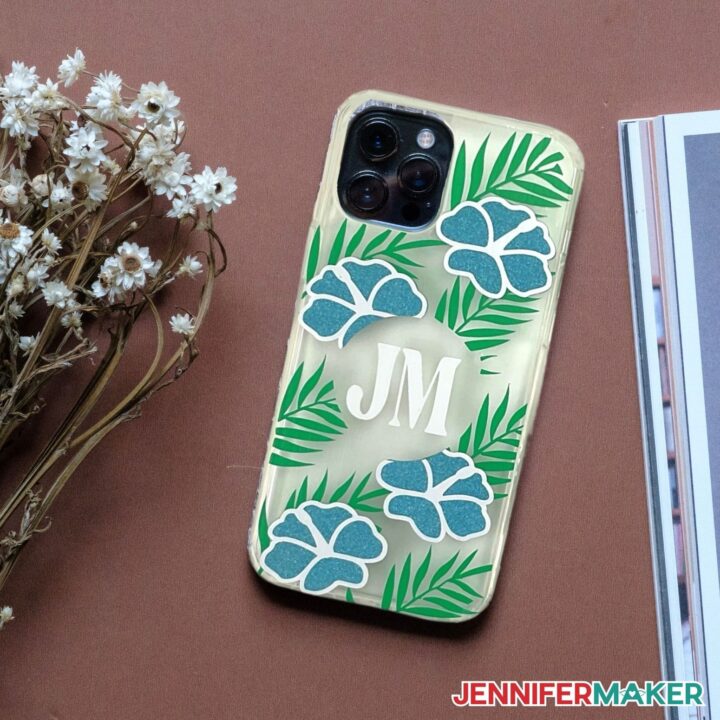
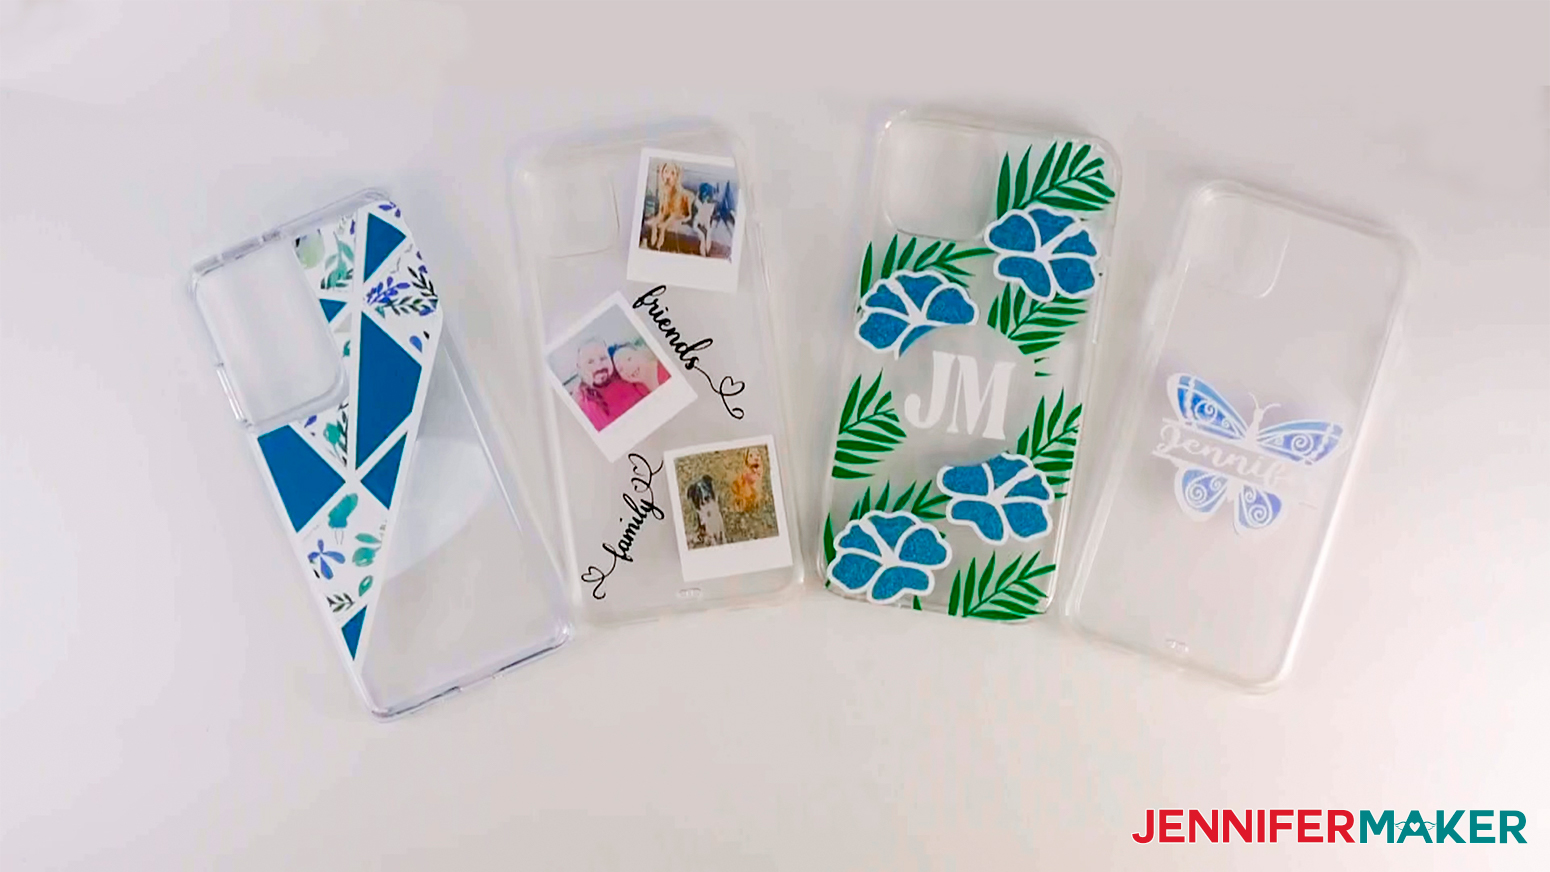
How awesome is this personalized clear phone case? This is such a fun way to turn a plain phone case into a super cute case. I made this using an iPhone case but you can really make this for any cell phones. You can use my free patterns to create your own custom phone case with this simple DIY project following my easy steps!
To create this easy DIY phone case, we will need a clear case for your phone. You can even use an old phone case you may have lying around. I got these from Amazon, but you can find blanks at lots of places, like Five Below and sometimes even the Dollar store will have them in stock. We’ll also need some vinyl. I’m using a few different types: regular, smart, glitter and patterned vinyl, along with transfer tape.
And I’m going to use Mod Podge to seal my designs, but that’s optional. Of course we will need our amazing Cricut Cutting machine. You can use the Maker Series, Explore Series or even the Joy for this project! We’ll need a green cutting mat, weeding tool and scraper. If you want to add photos to your phone case you will need some Cricut Printable Sticker paper for that!

You no longer need to spend a lot of money to have your very own custom DIY phone case. I’ve seen some crazy prices for these and thought, wouldn’t it be a great idea if I could create the perfect phone case using my own design and my own case? You can create them using a little bit of creativity, your favorite color combinations, and an inexpensive case.
The best part is that you’ll have a cute phone case that all started with a fun idea! This would also be a great way to get your friends or family together so that you can all create a unique case that’s perfect for you.
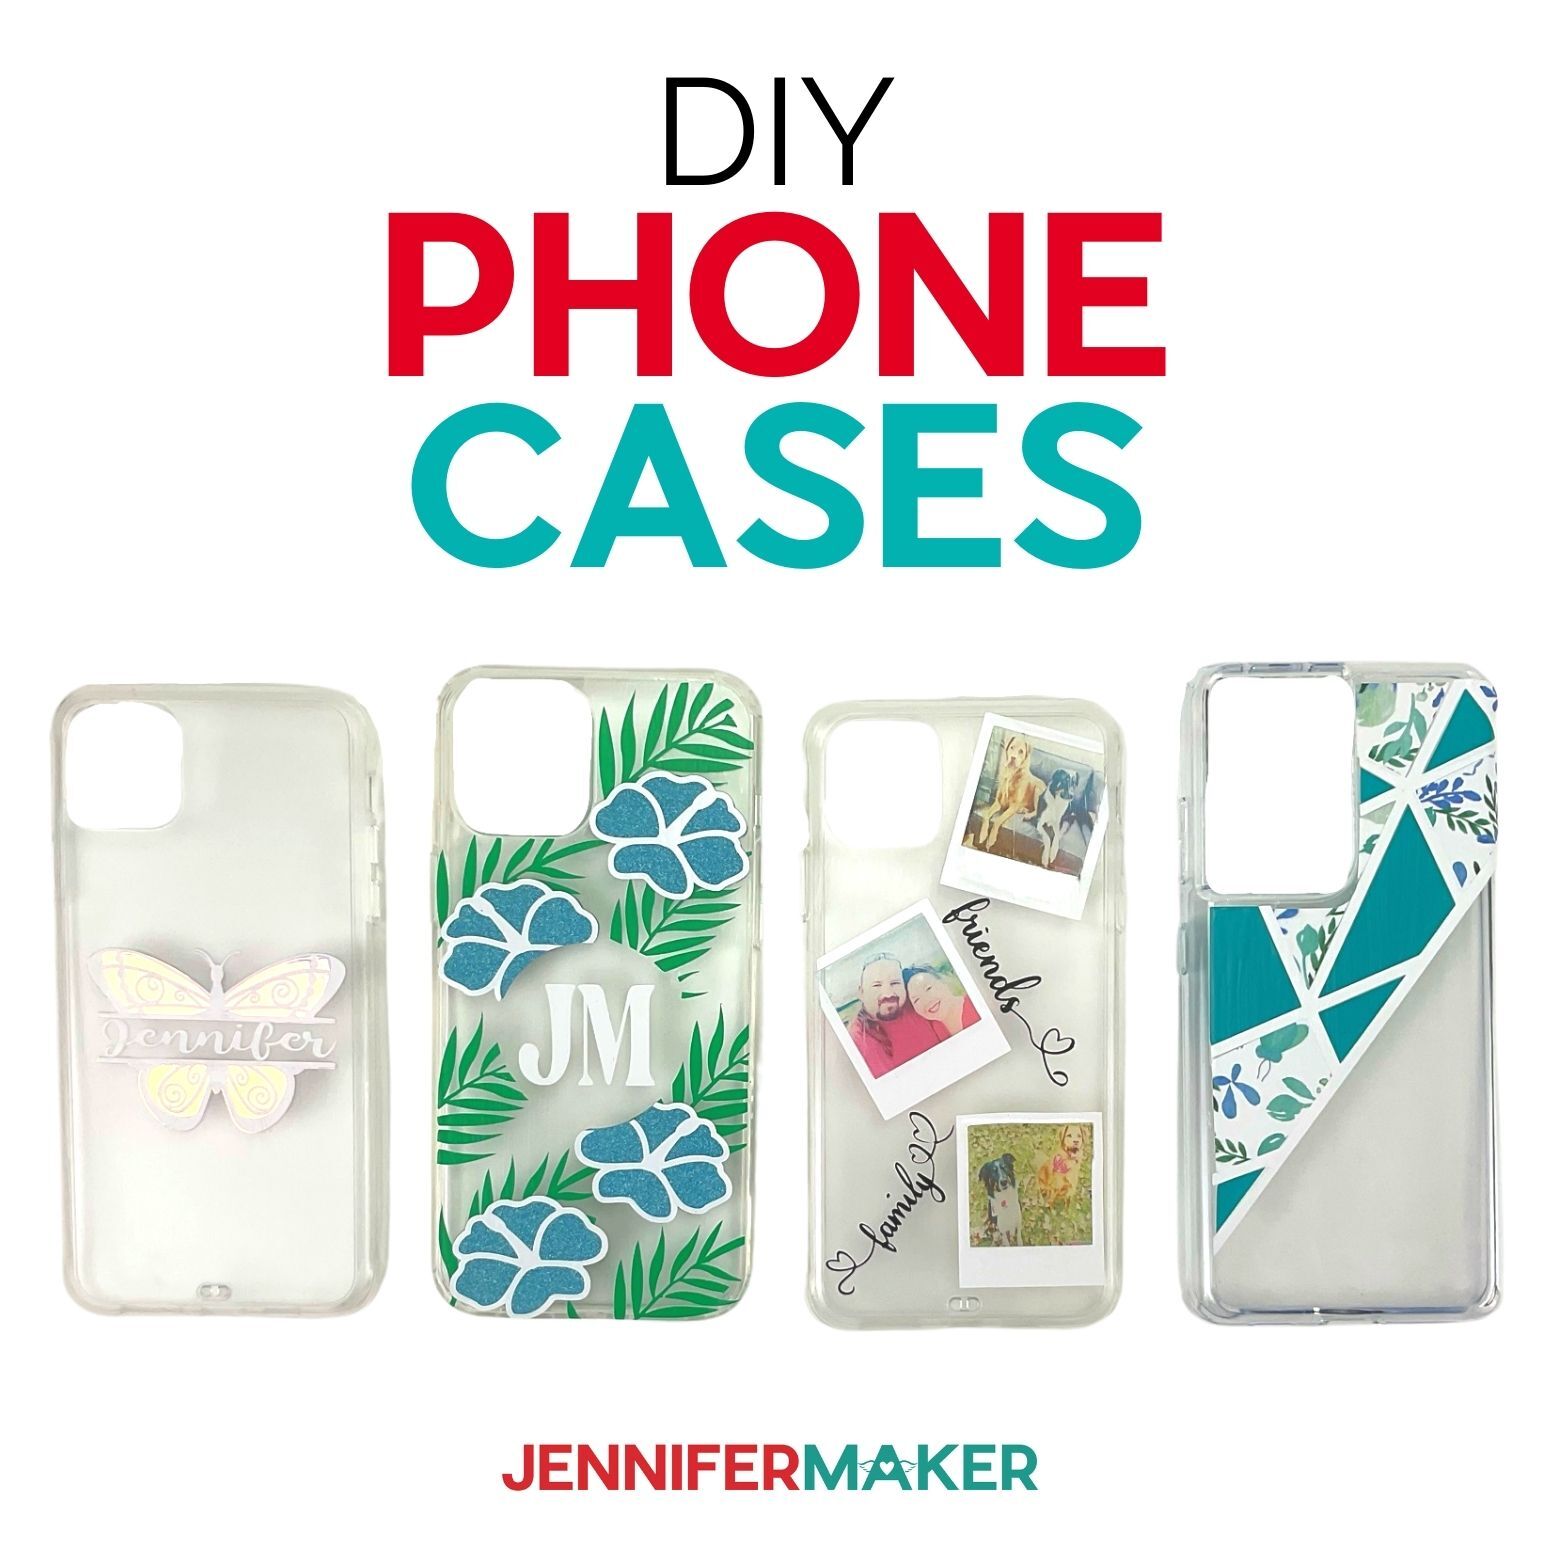
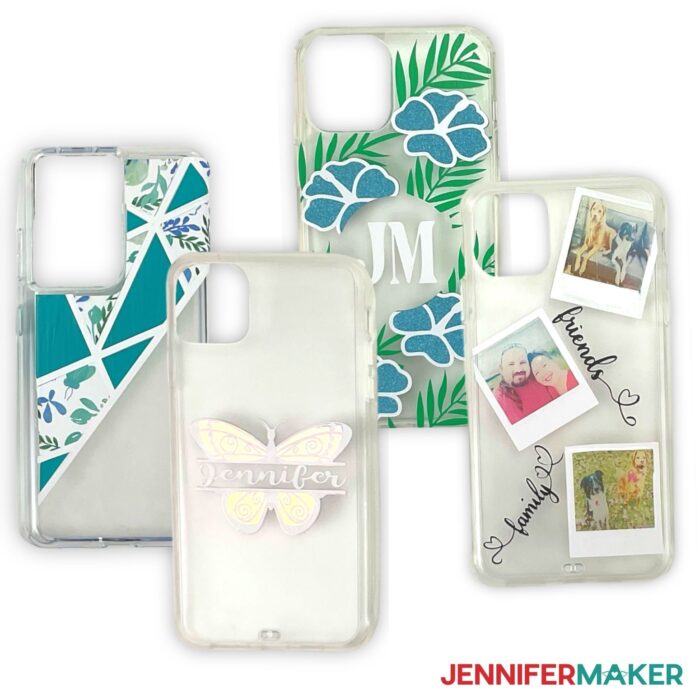
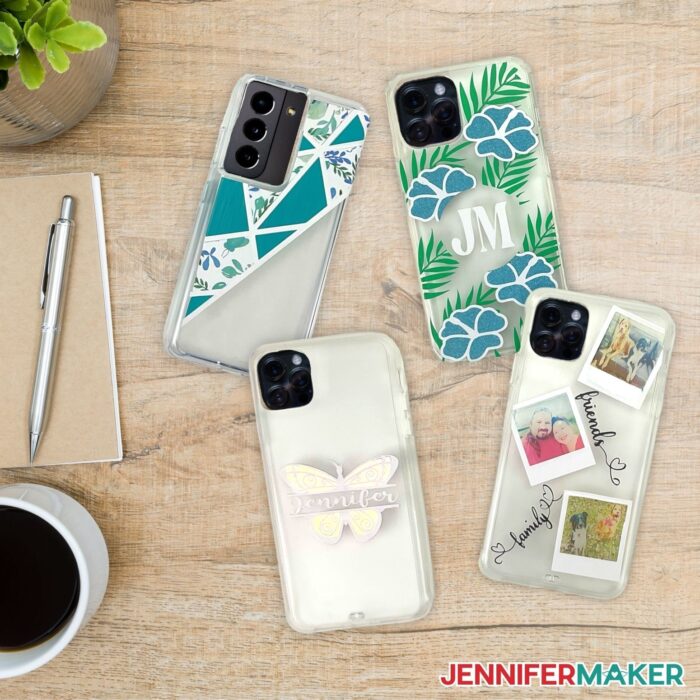
I created four designs for you to pick out your favorite, or, even better, make all of them!
Here’s a supply list of what you need to make phone cases! This post contains some affiliate links for your convenience (which means if you make a purchase after clicking a link I will earn a small commission but it won’t cost you a penny more)! Read my full disclosure policy.
Materials to Make Phone Cases
View my Amazon shopping list with the exact items we used to make this project
- Phone Case (Such as iPhone 12 Pro Max Case or iPhone 11 Pro Max Case or Galaxy s21 Case)
- Smart Vinyl – Aqua (Abstract Design)
- Premium Patterned Vinyl (Abstract Design)
- Premium Vinyl – White (Abstract, Butterfly & Photo Designs), Black (Photo Design)
- Holographic Sparkle Vinyl – Opal (Butterfly Design)
- Avery Printable Sticker Paper – Clear (Photo Design)
- Glitter Vinyl – Teal (Tropical Design)
- Smart Vinyl – Grass (Tropical Design)
- Transfer Tape (Standard Grip)
- Krylon UV-Resistant Clear Gloss (Photo)
- Mod Podge – Matte
- (Optional) Fonts (I used Hey Lover, Bright, Tingler Script)
- Weeding Tool
- Scraper tool
- Green StandardGrip Machine Mat
- Foam Paint Brush
- Measuring Tape
- Cricut Roll Holder (optional)
- A method to cut your vinyl – I used the amazing Cricut Maker but you can also use the Cricut Explore
- Design #325 – My free SVG/PDF/DXF design files are available in my free resource library (get the password by filling out the form at the bottom of this page)
How to Make Your Own DIY Phone Cases
The detailed step-by-step assembly video on how to create these personalized vinyl letter decals was broadcast during Maker Academy Weekend 2021. Get a pass to watch all 20+ workshops, each with a printable handbook, transcript, audio files, design files, and support with a VIP pass below:

DIY Phone Cases
We are making DIY phone cases! Phone cases that are as unique as you are!
Materials
- iPhone 12 Pro Max Phone Case
- iPhone 11 Pro Max Phone Case
- Galaxy s21 Phone Case
- Cricut Smart Vinyl - Aqua (Abstract Design)
- Cricut Premium Patterned Vinyl (Abstract Design)
- Cricut Premium Vinyl - White (Abstract, Butterfly & Photo Designs)
- Cricut Holographic Sparkle Vinyl - Opal (Butterfly Design)
- Avery Printable Sticker Paper - Clear (Photo Design)
- Cricut Premium Vinyl -Black (Photo Design)
- Cricut Glitter Vinyl - Teal (Tropical Design)
- Cricut Smart Vinyl - Grass (Tropical Design)
- Cricut Transfer Tape (Standard Grip)
- Krylon UV-Resistant Clear Gloss (Photo)
- Mod Podge - Matte
- Hey Lover by FontBundles.net
- Bright by FontBundles.net
- Tingler Script by FontBundles.net
- Design #325 (My free SVG/PDF/DXF design files are available in my free resource library - get the password by filling out the form at the bottom of this page)
Tools
Instructions
STEP 1: GET MY FREE DIY PHONE CASE DESIGN FILES
Have you ever wondered if you could design your own phone case? Well, wonder no more. In this tutorial, I'm going to show you step by step how to design your very own personalized phone case with your Cricut.
First, download my free DIY Phone Case Files, design #325, from my free resource library.
TIP: If you are not sure how to upload an SVG cut file to Cricut Design Space, watch this helpful video training series I made. If you are on an iPad or iPhone, here is how to download and upload SVG files to the Cricut Design Space app.
I will be using the Cricut Maker 3 for this tutorial, but you can use any model to make these fun phone cases.
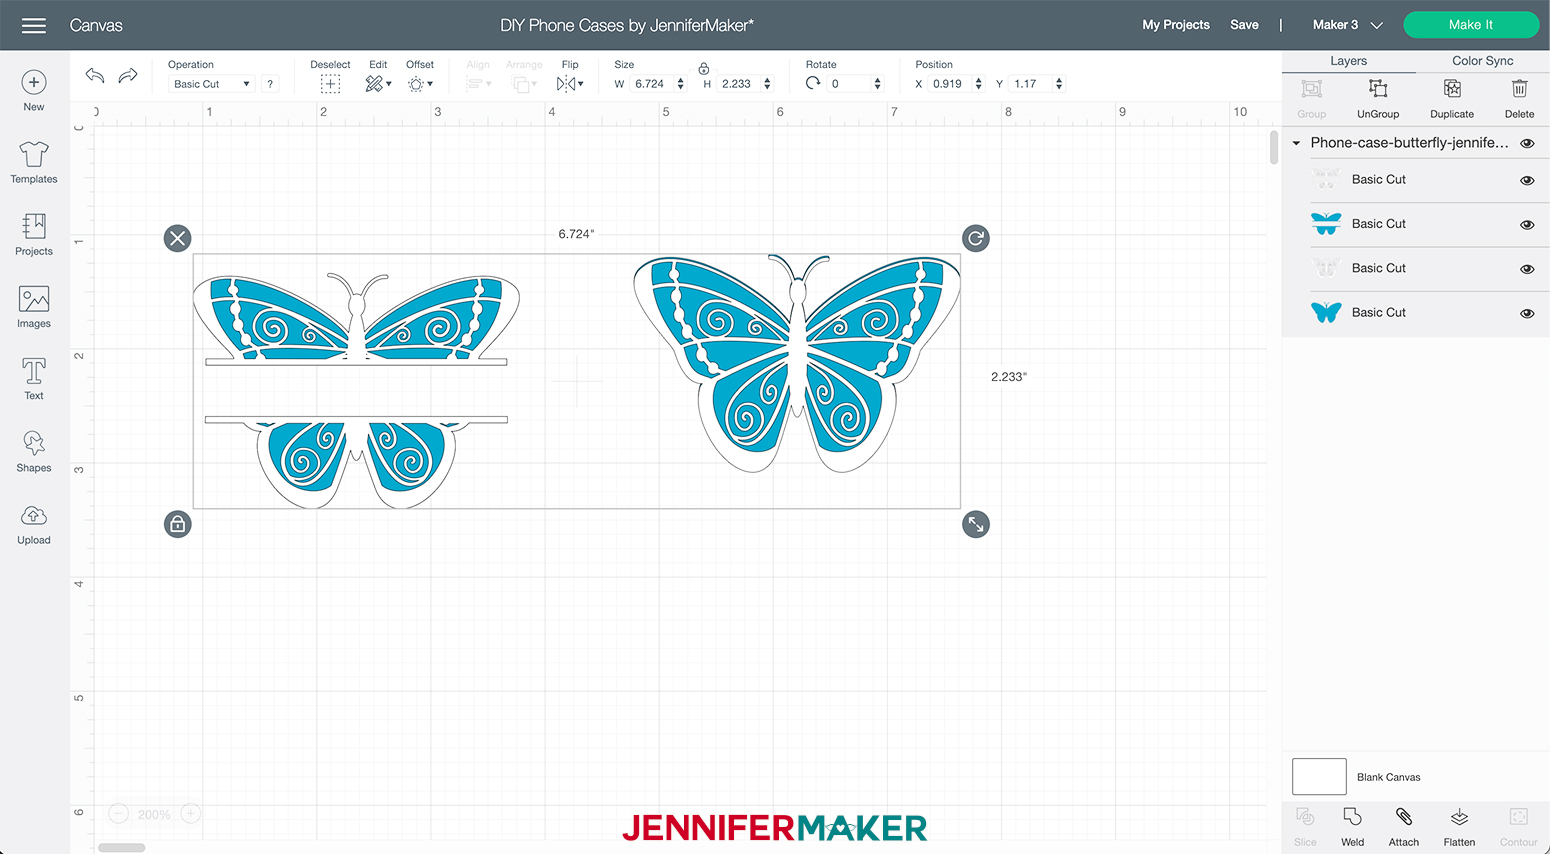
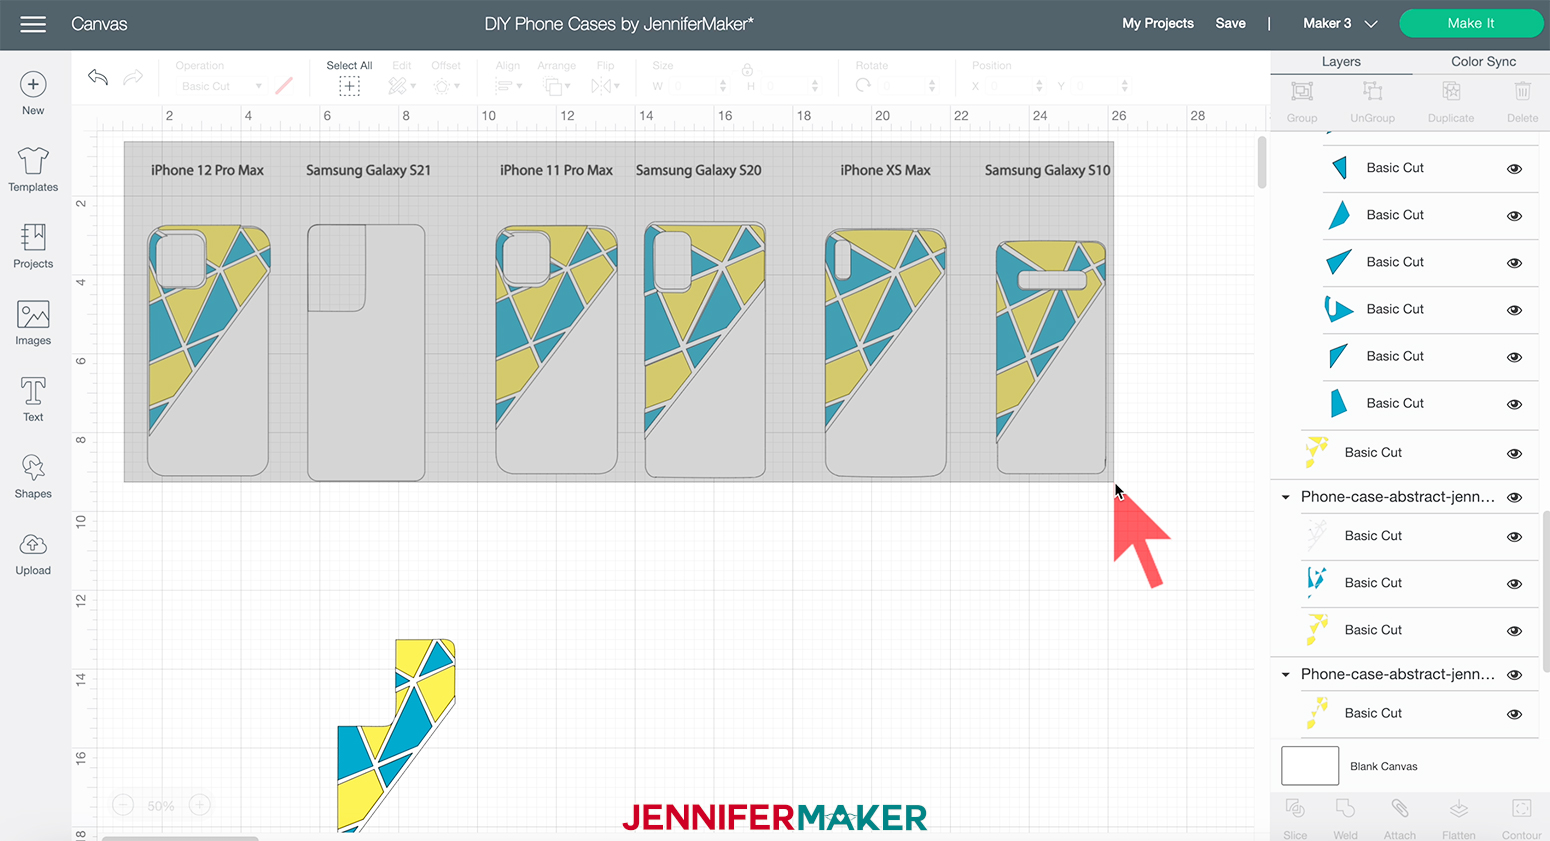
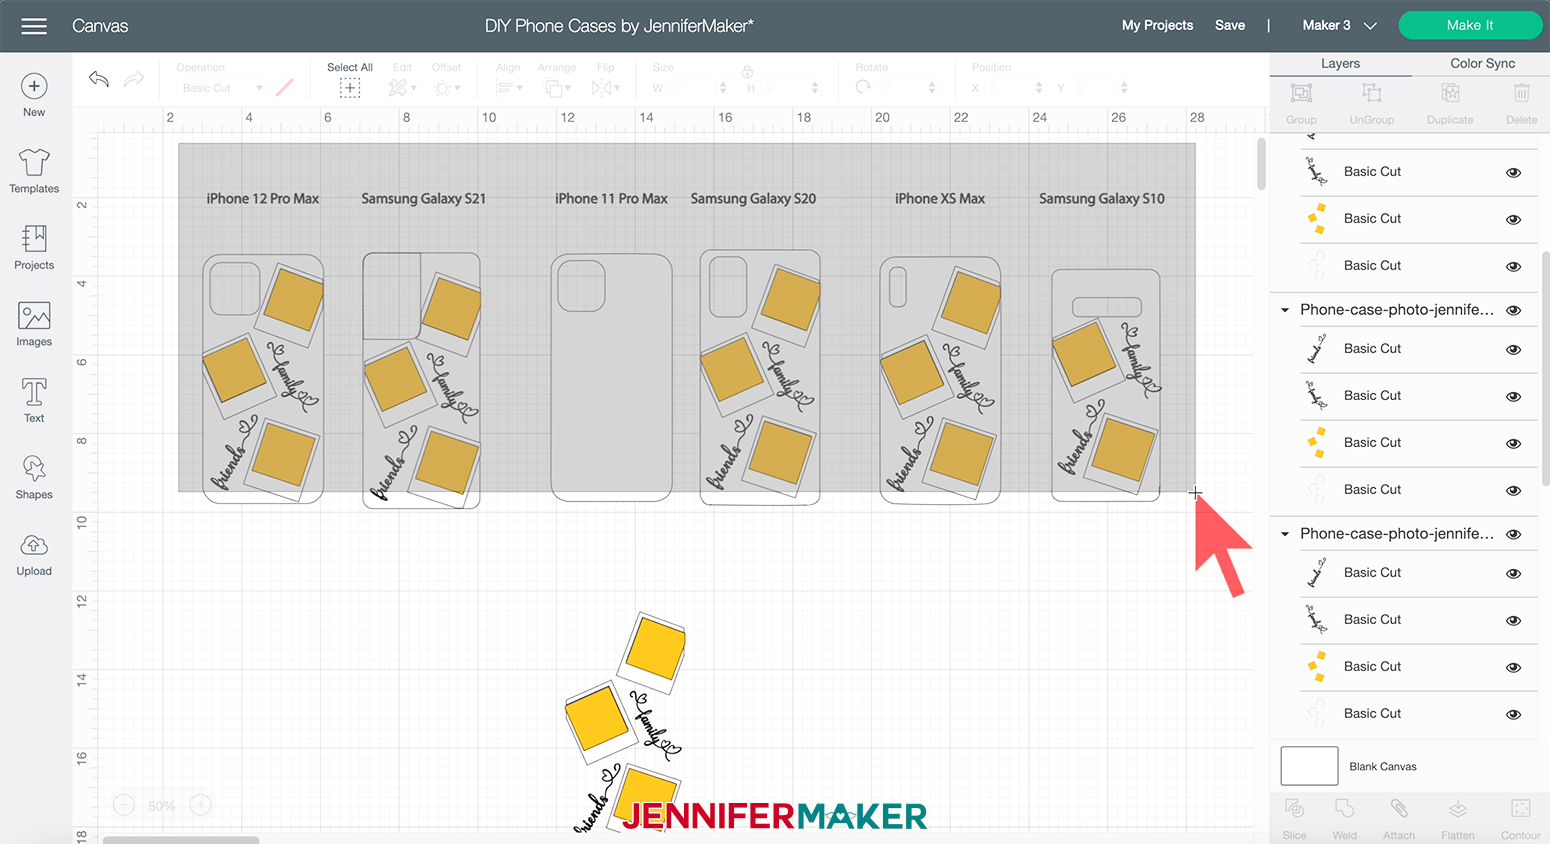
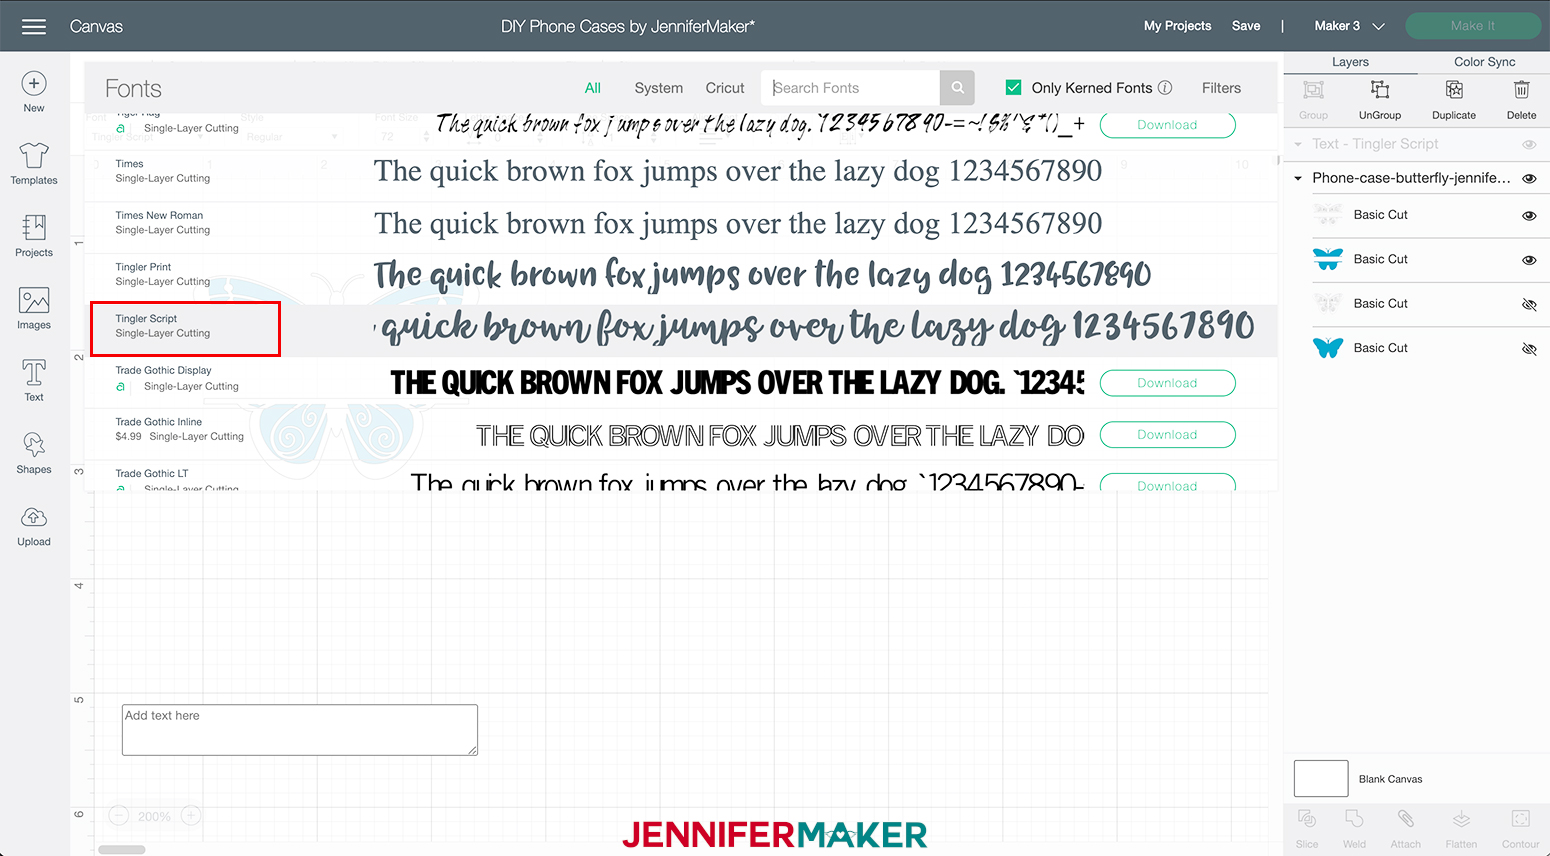
This is what my DIY Phone Case SVG files look like in Cricut Design Space.
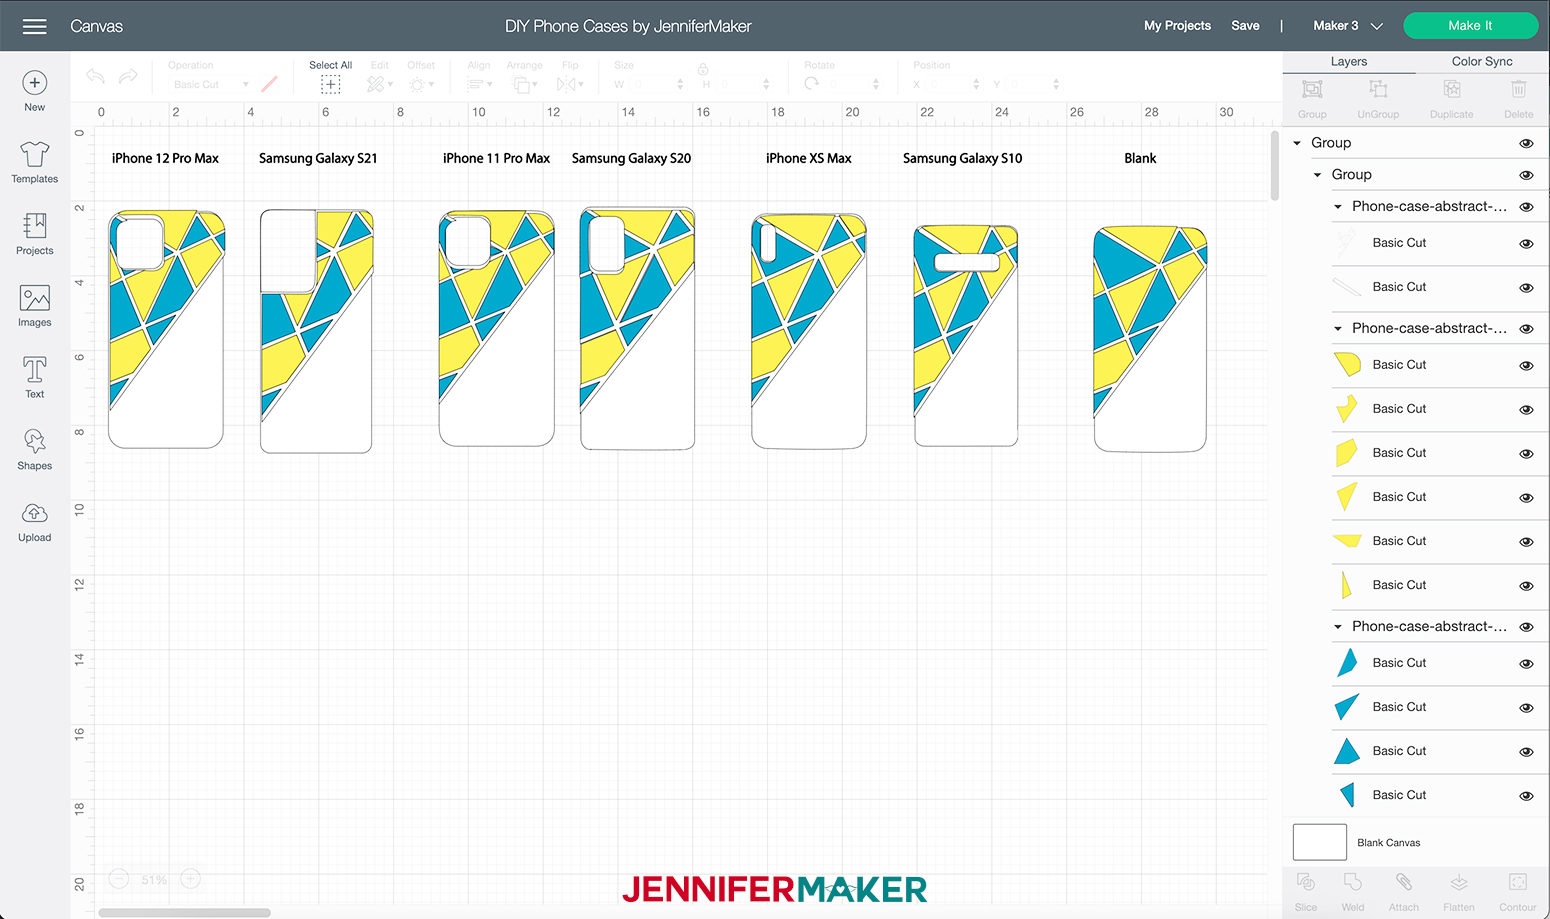
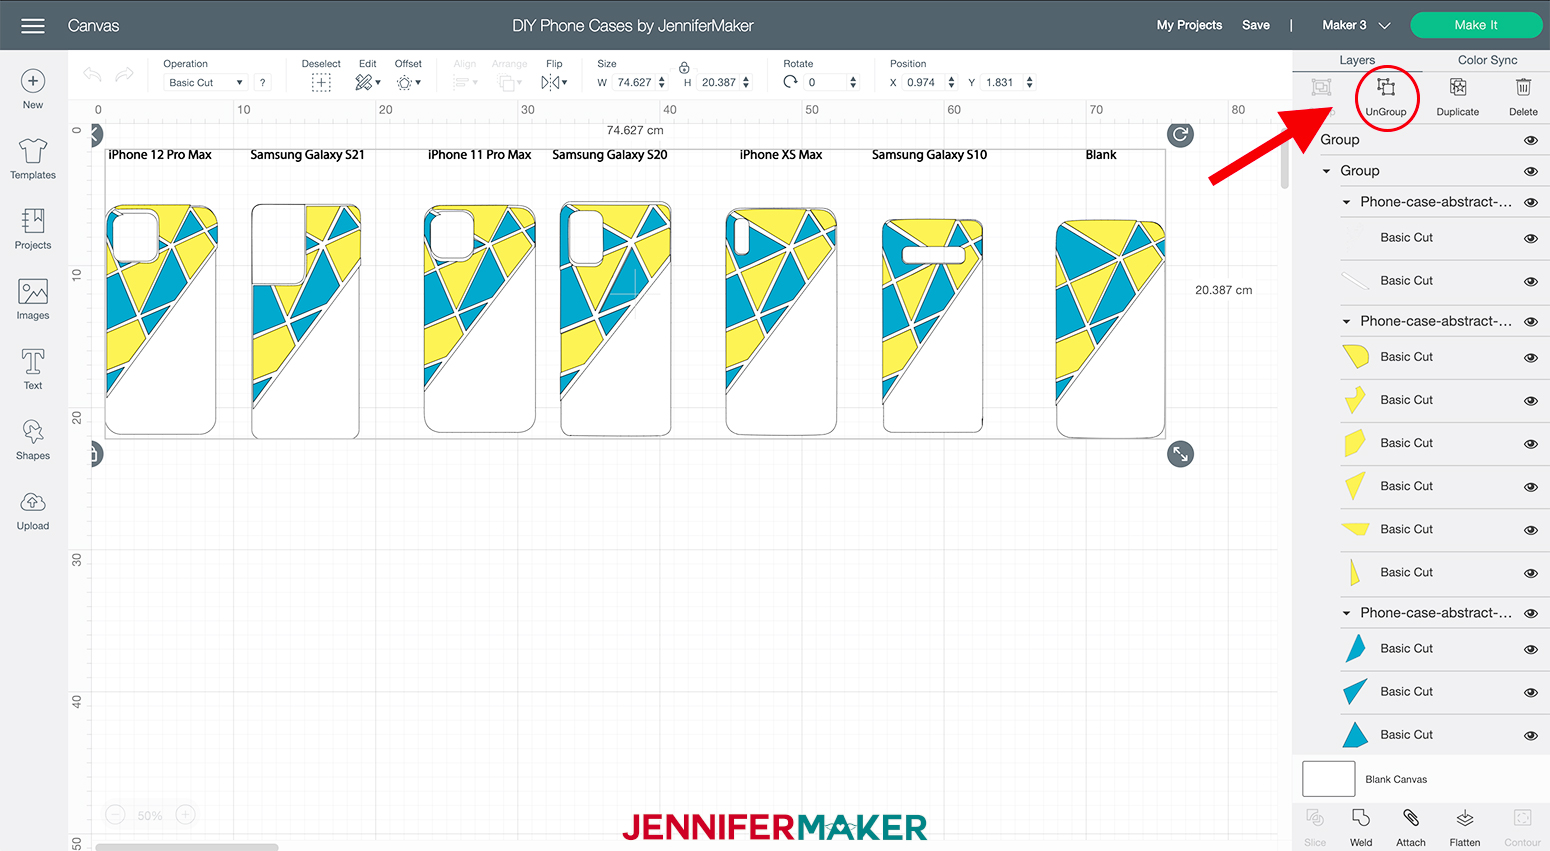
I created four designs, all of which are compatible with the most recent models of the iPhone and Samsung phones. Obviously, there are A LOT of different phone models on the market and it would be impossible to cover every make and model, but this tutorial will lay the groundwork for you to design your own case, no matter what type of phone you have.
Here are the phone models these specific designs were created for:
- iPhone 12 Pro Max
- iPhone 11 Pro Max
- iPhone XS Max
- Samsung Galaxy S21
- Samsung Galaxy S20
- Samsung Galaxy S10
NOTE: If you do not have any of these style phones I show you how to resize the designs in the butterfly design.
STEP 2: SELECT AND CUT YOUR DESIGN
So let's get started.
First, select the design and phone case you would like to make. I will explain the setup for each below.
ABSTRACT DESIGN
We will start with the Abstract design.
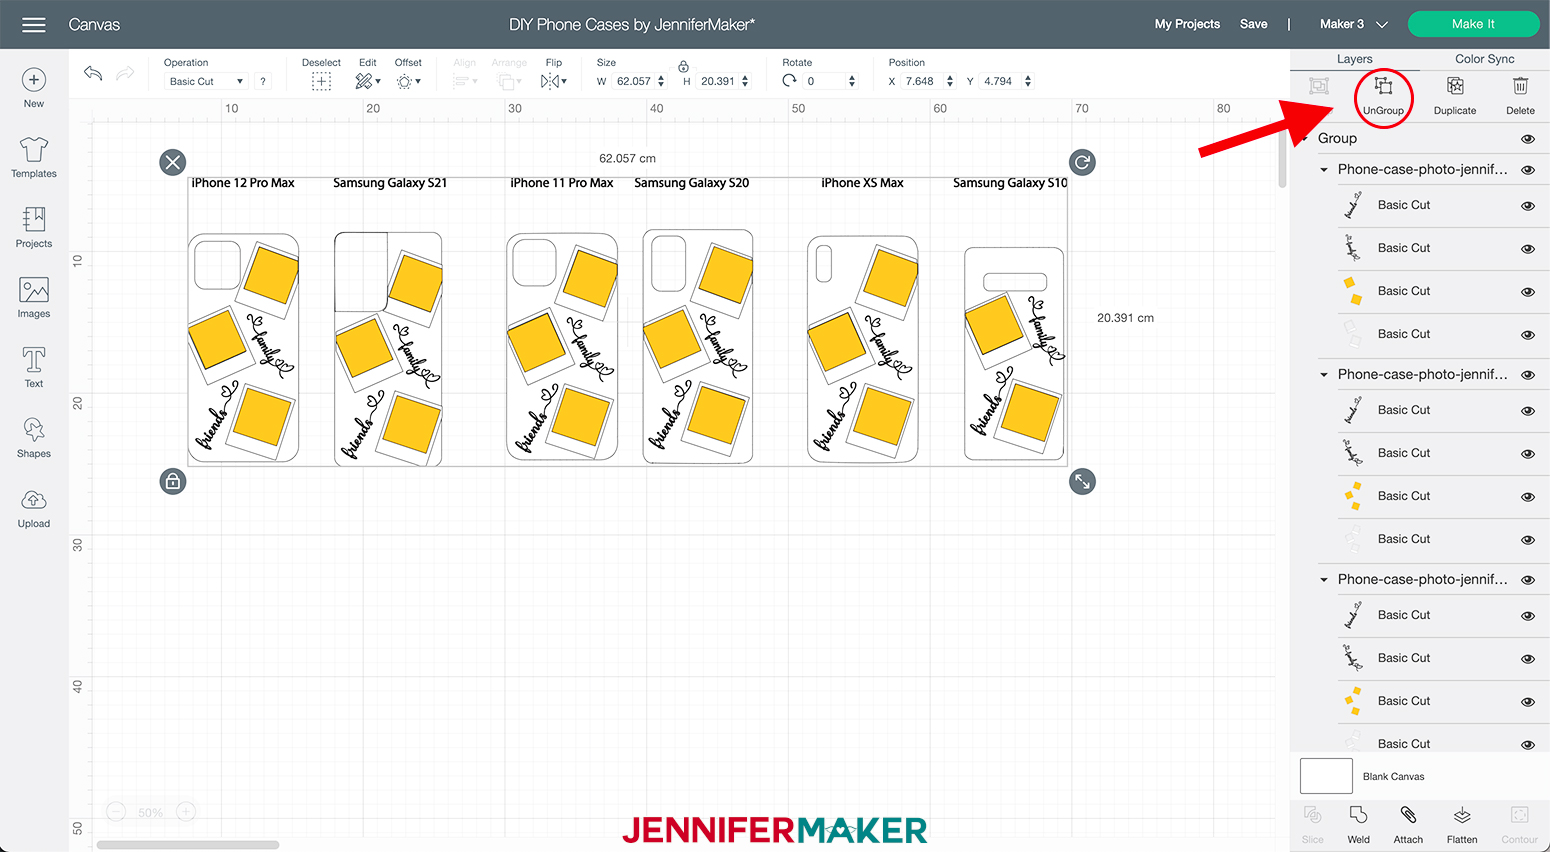
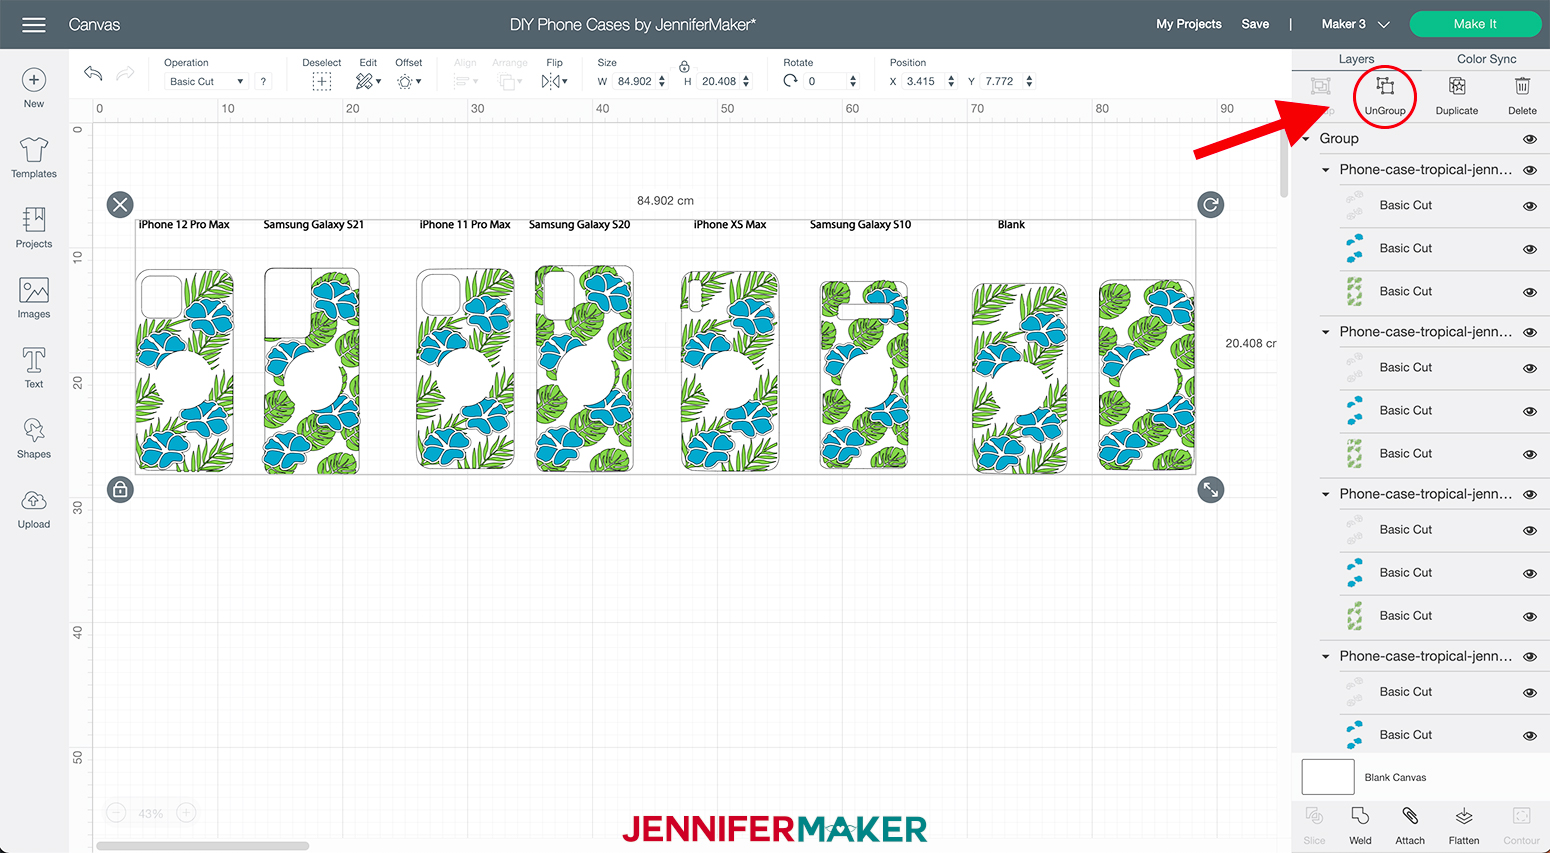
First, ungroup the design and delete all phone styles and designs that you do not want from the layer panel. To do this I am going to select "Ungroup" at the top right of my screen.
Click and drag the phone style you would like to use away from the rest of the designs.
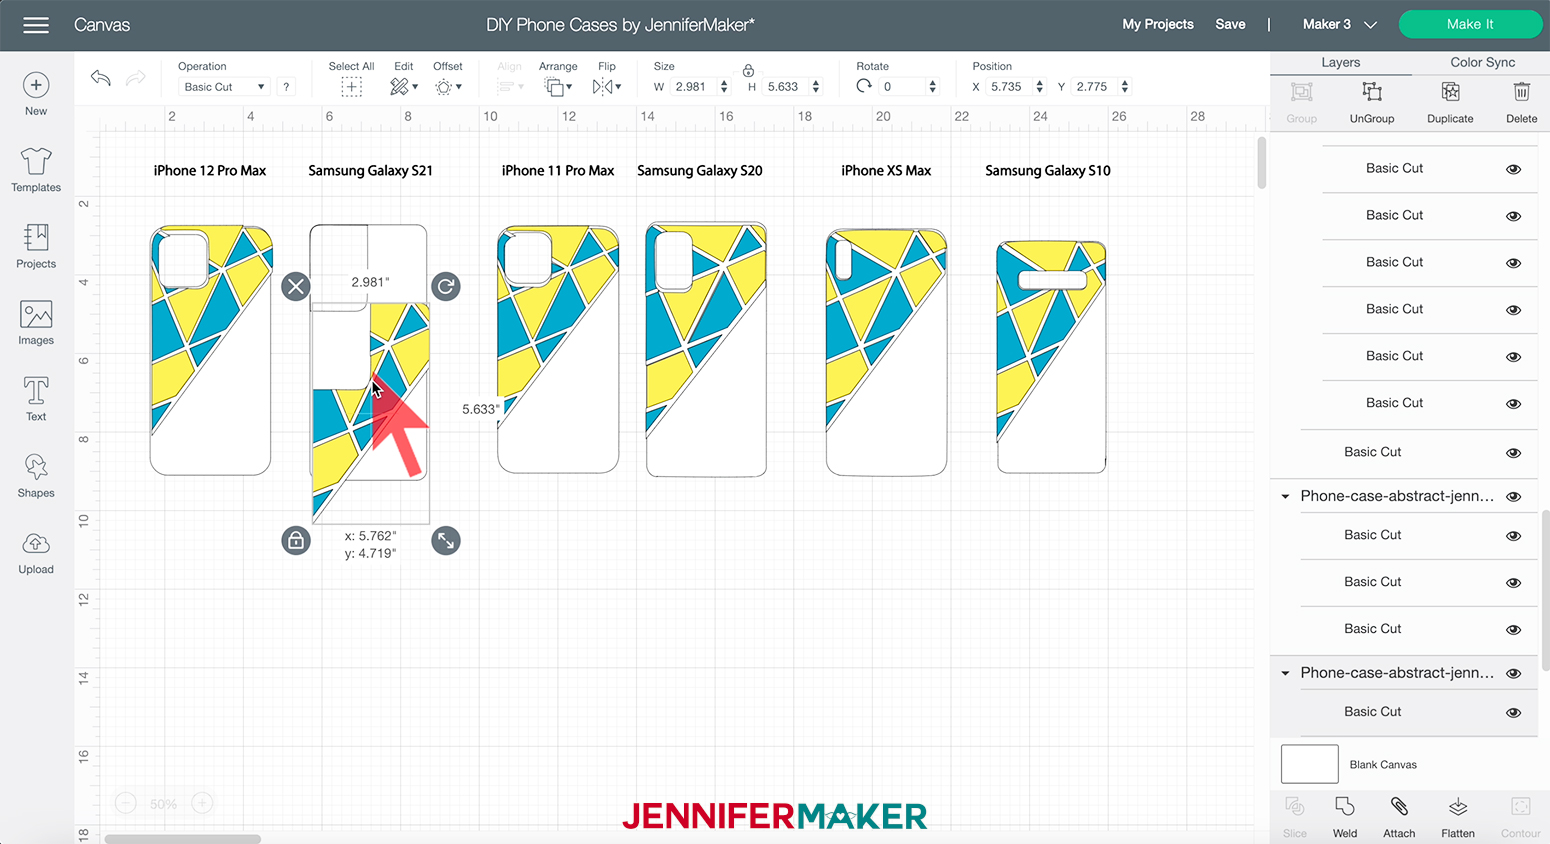
Then I am going to left-click and drag my bounding box over the designs I don't want. Then click "Delete" at the top right corner or on your keyboard.
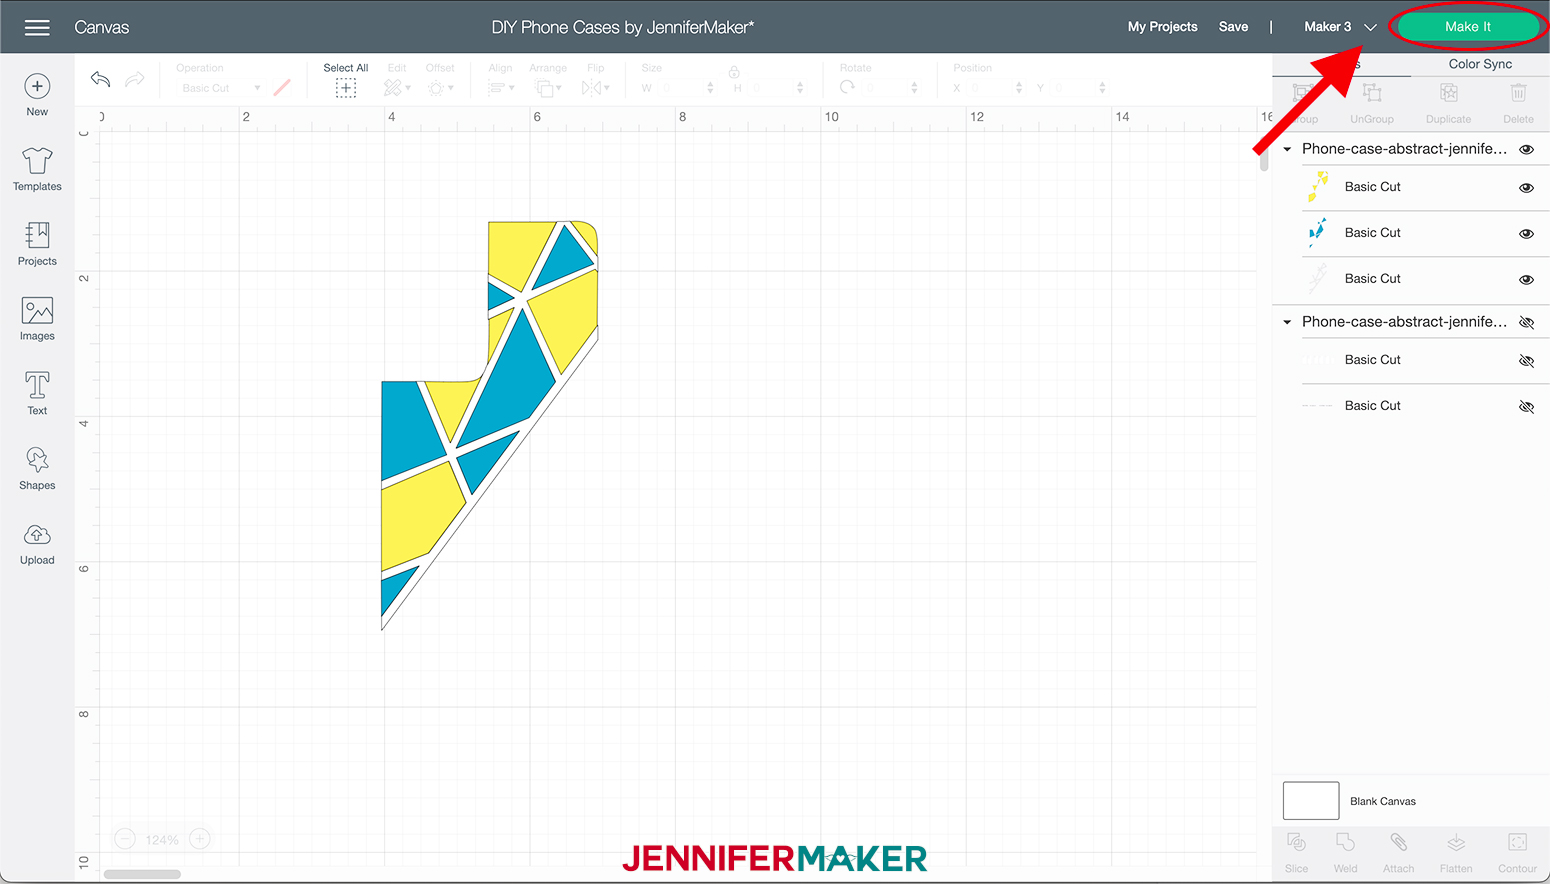
For this tutorial, I’m going to use the second design to show you how to make a custom case for the Samsung Galaxy s21, but you can follow these basic steps for all six models.
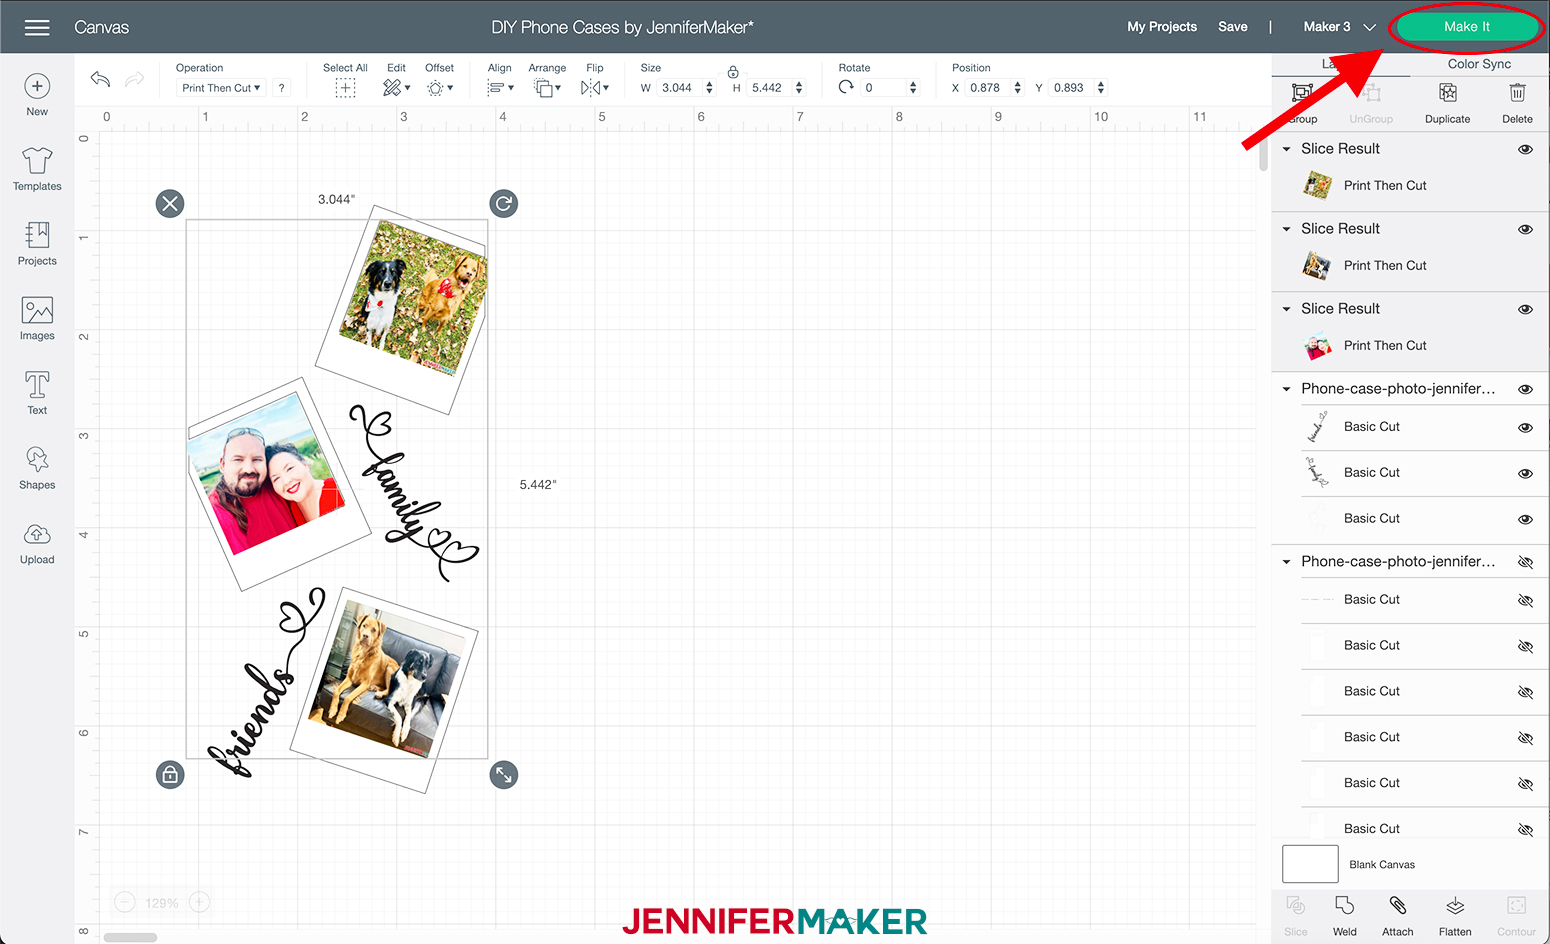
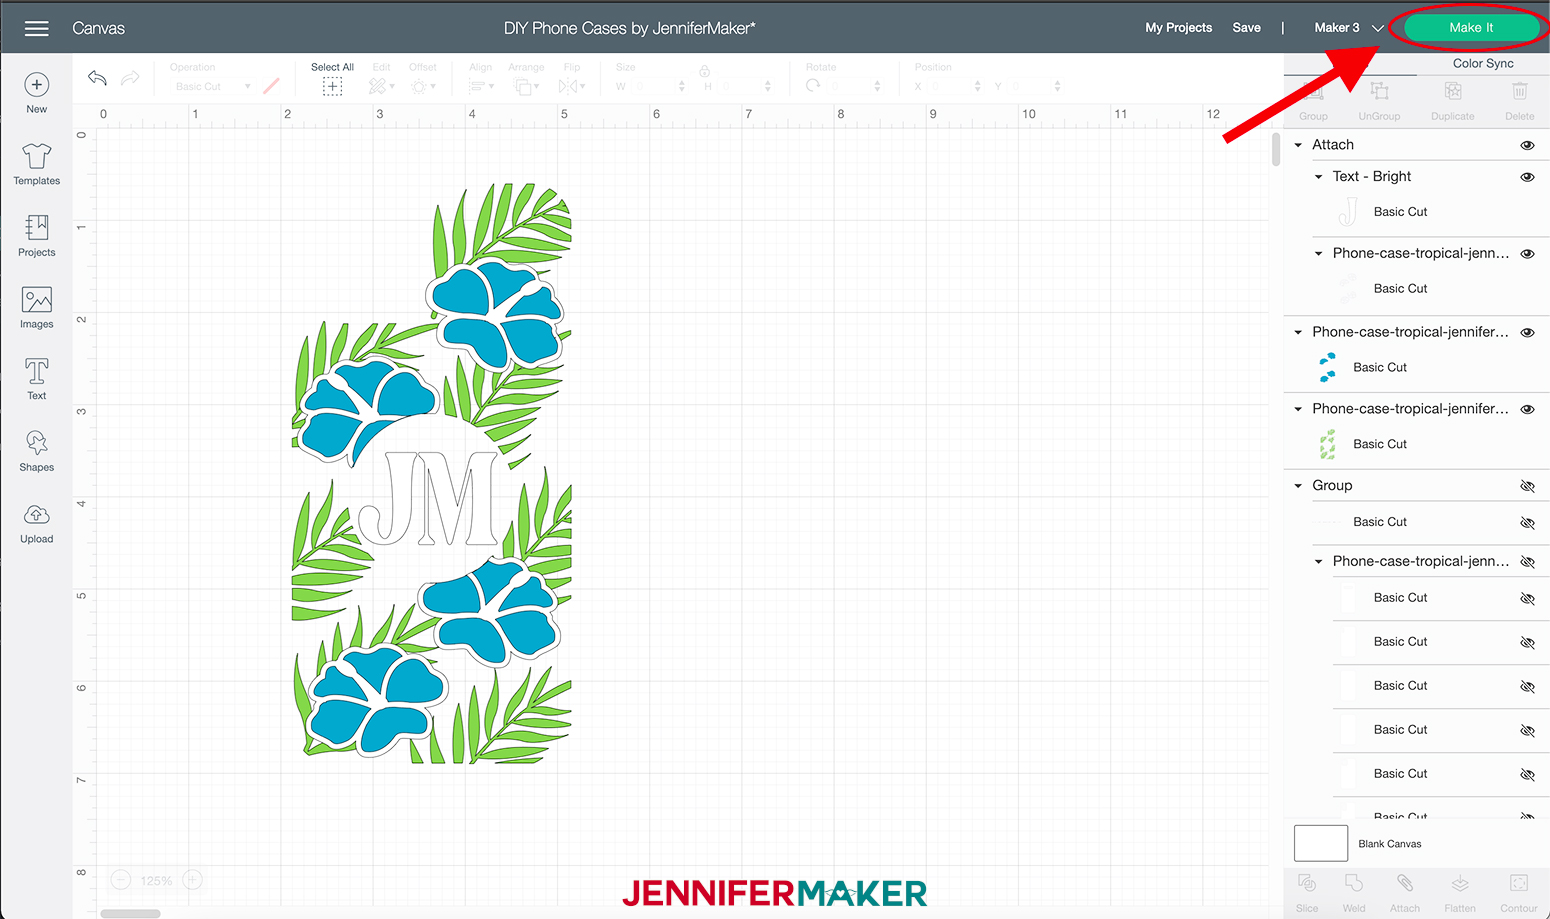
Now that I have chosen the right design for my phone case I am going to go ahead and click "Make It."
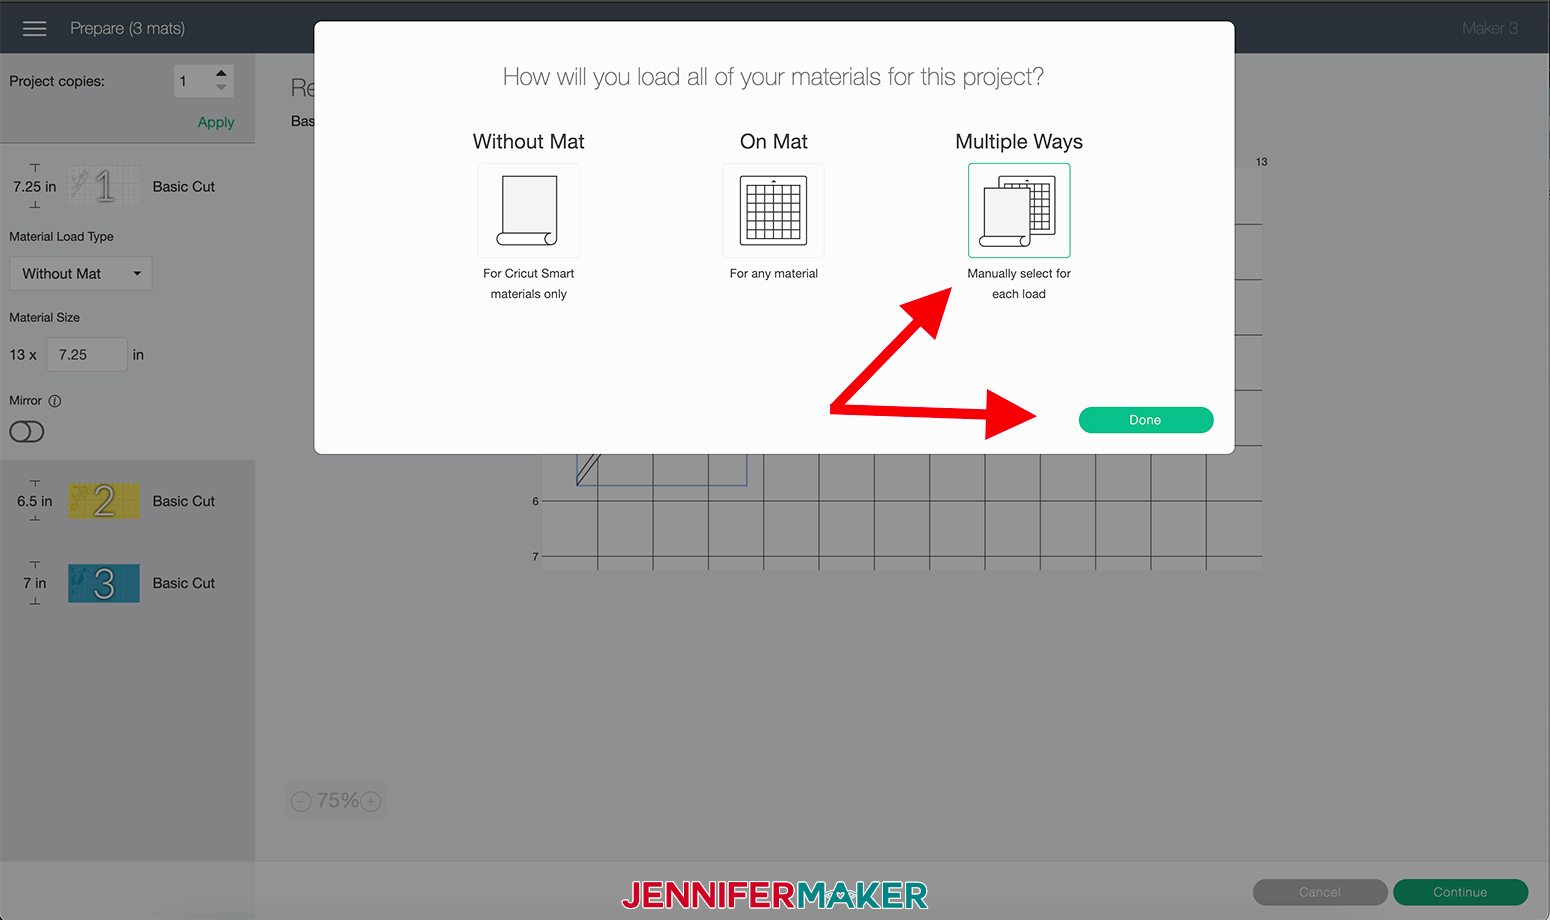
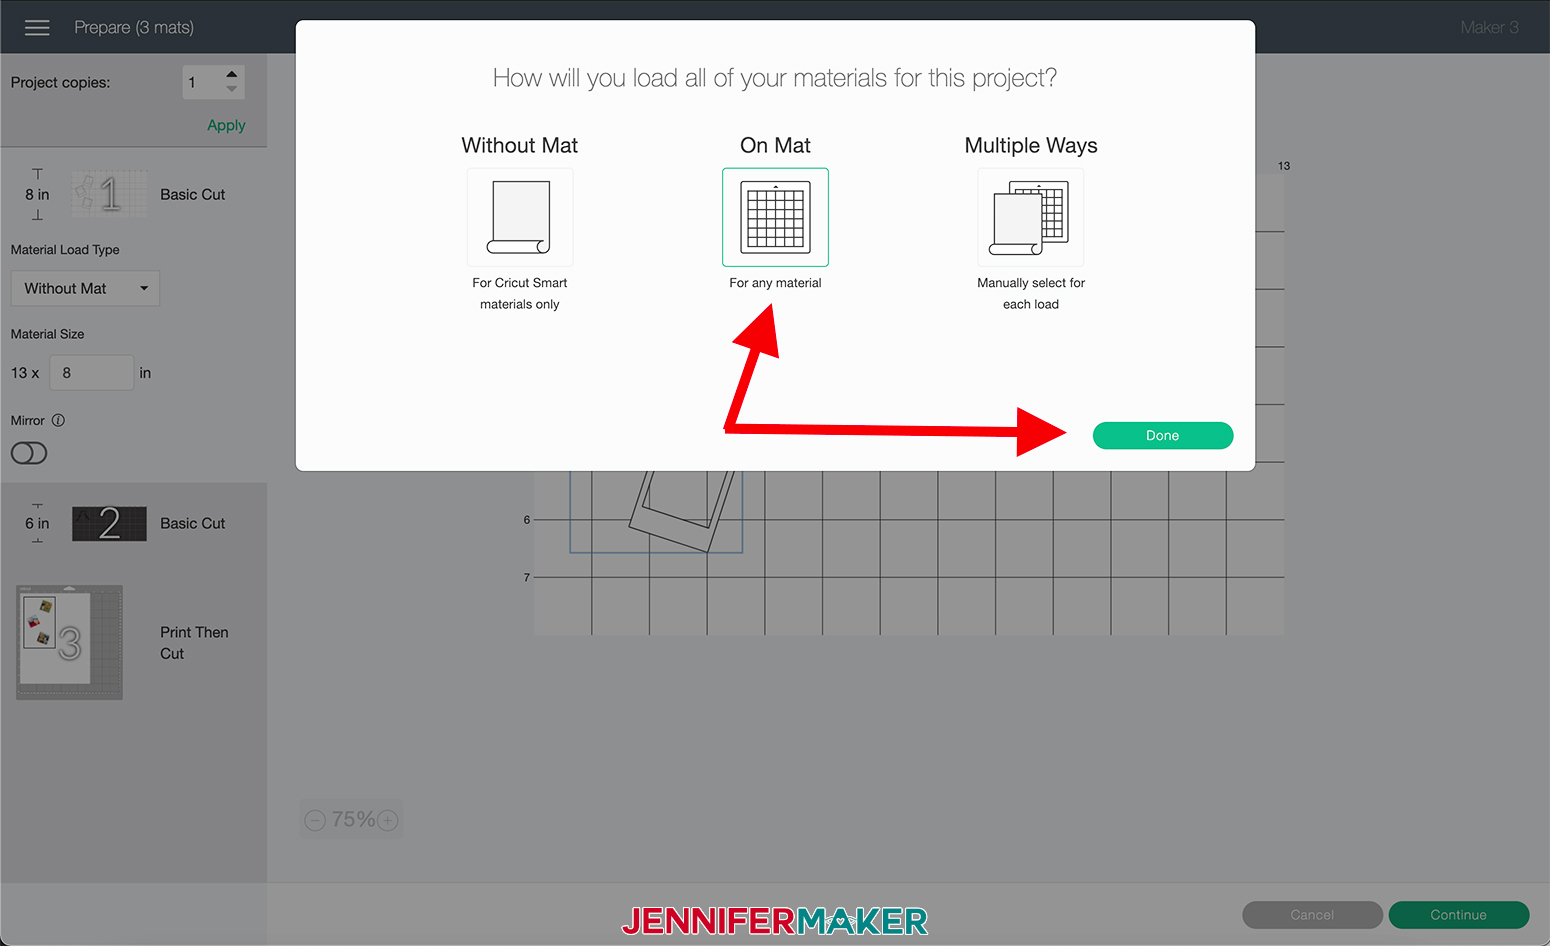
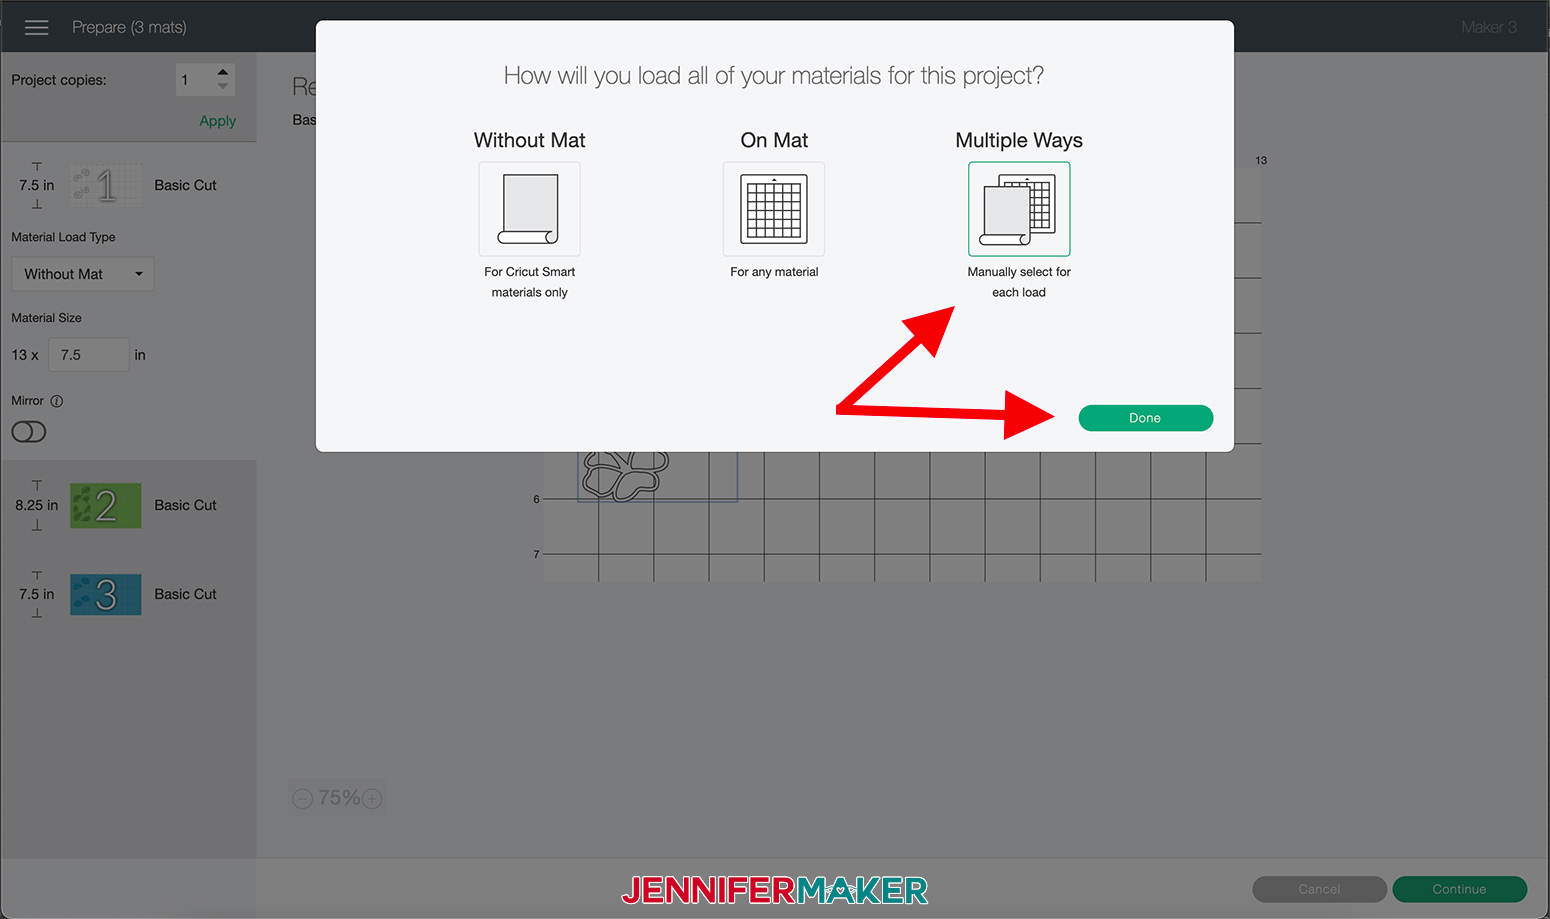
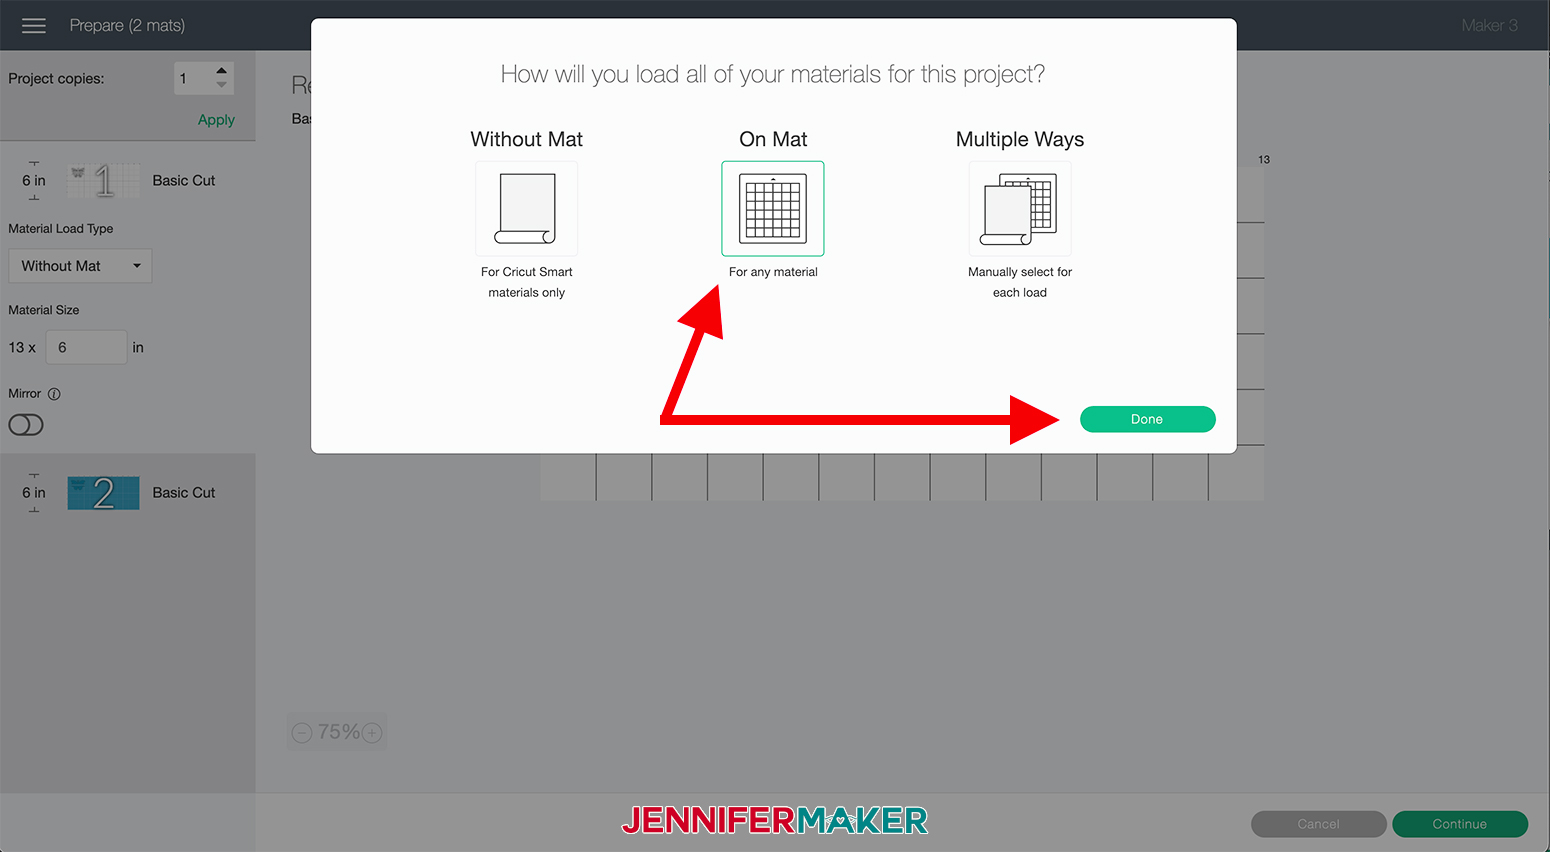
On the next page select "Multiple Ways," we are using both Premium Vinyl ("On Mat") and Smart Vinyl ("Without Mat"). Then click "Done."
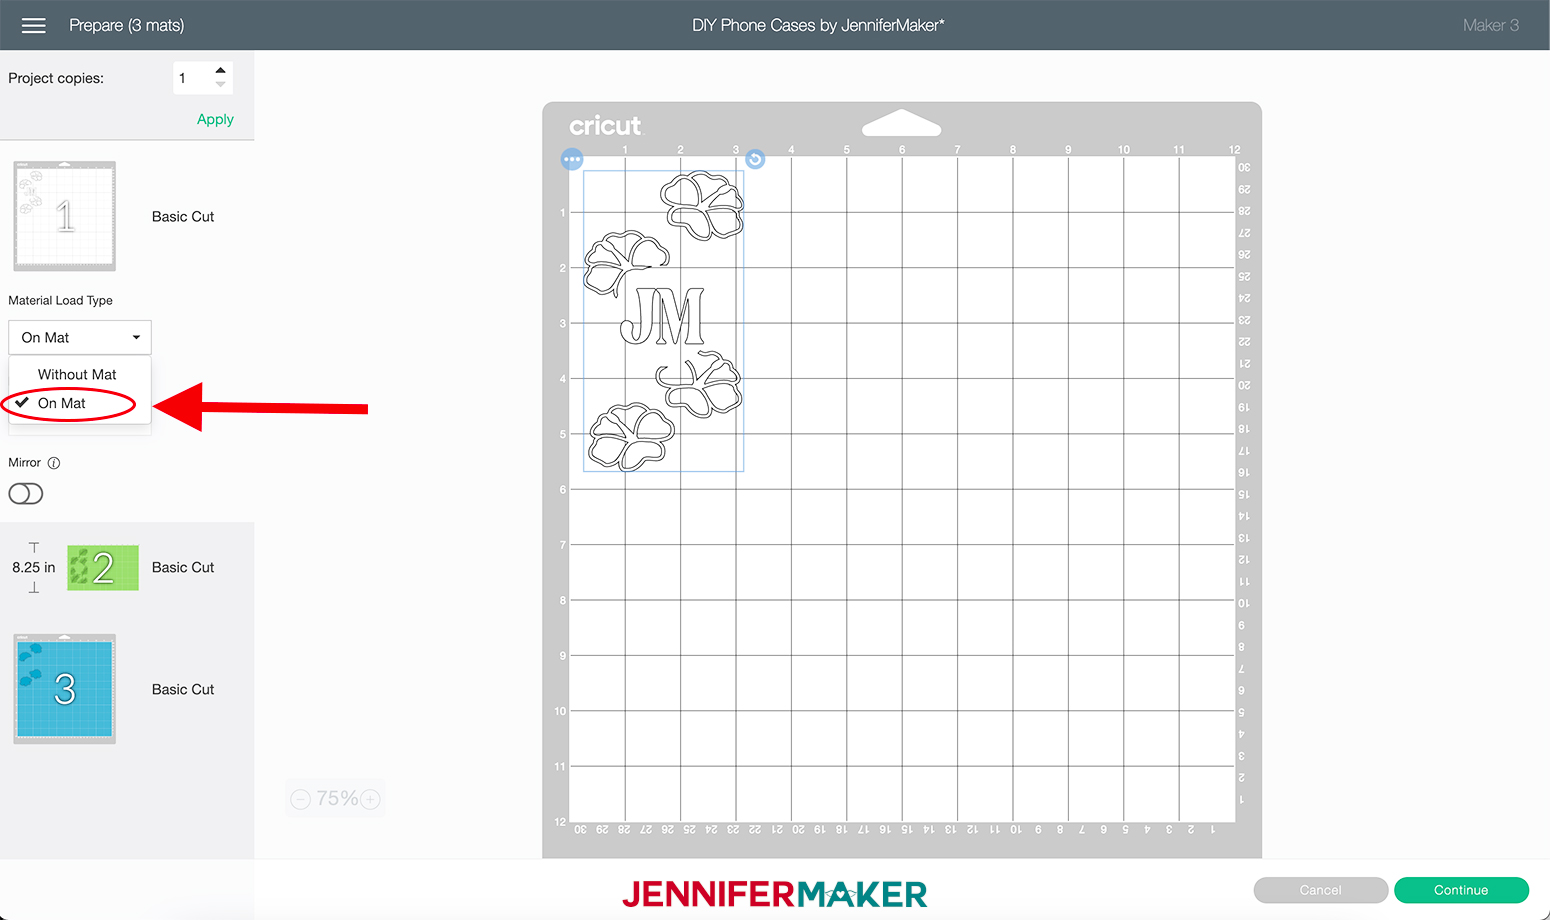
For the first mat (white) select "On Mat" from the drop-down menu on the left-hand side of the screen.
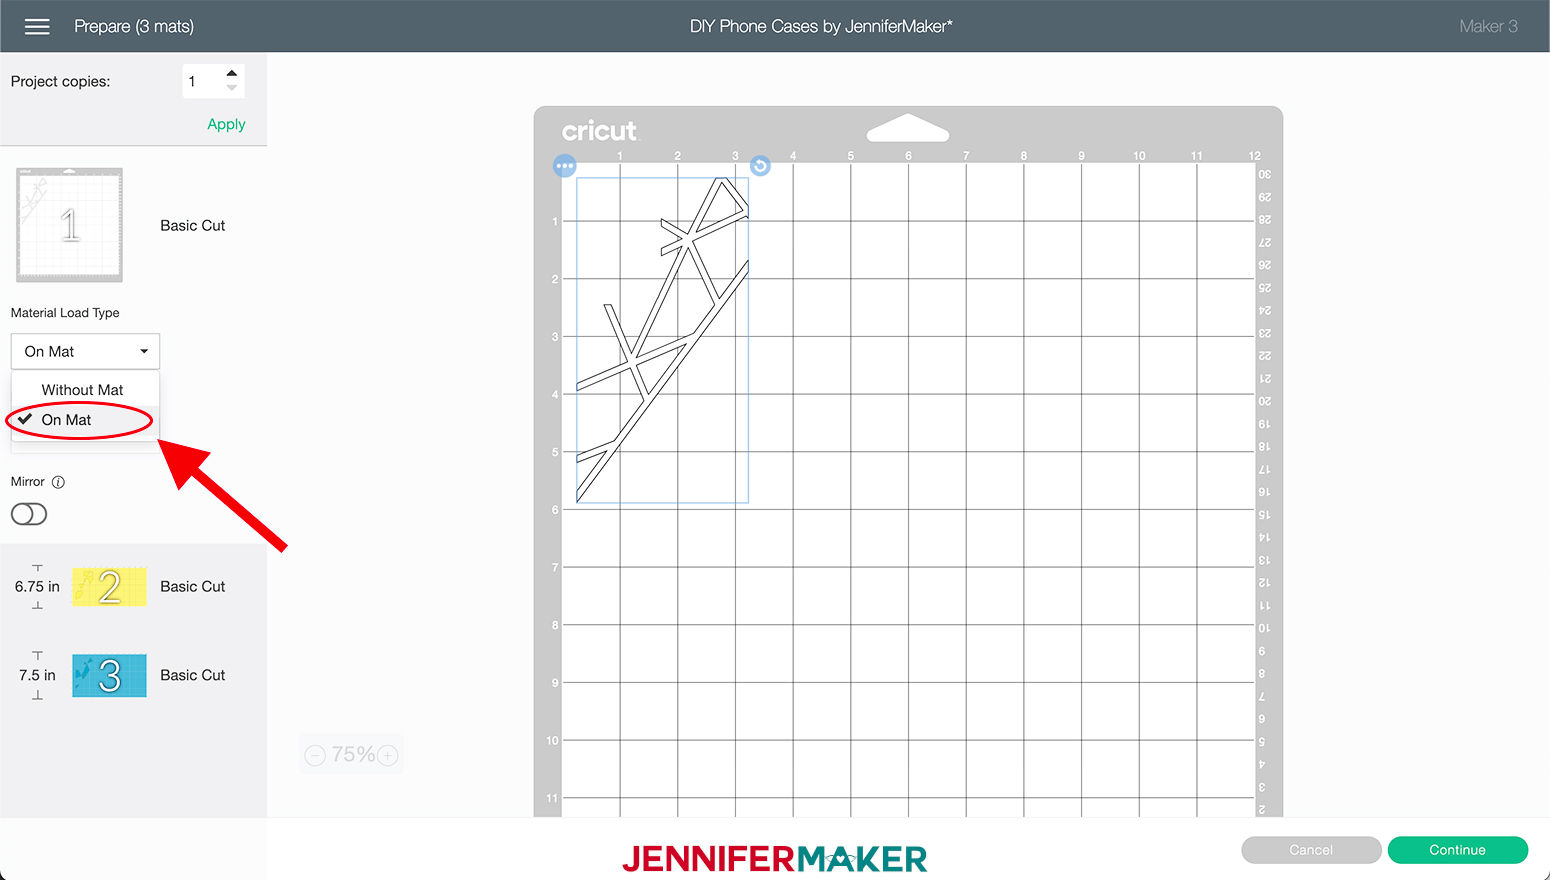
Next, select the yellow mat and again select "On Mat" from the drop-down menu on the left as we did above. This will be your Cricut Premium Patterned Vinyl.
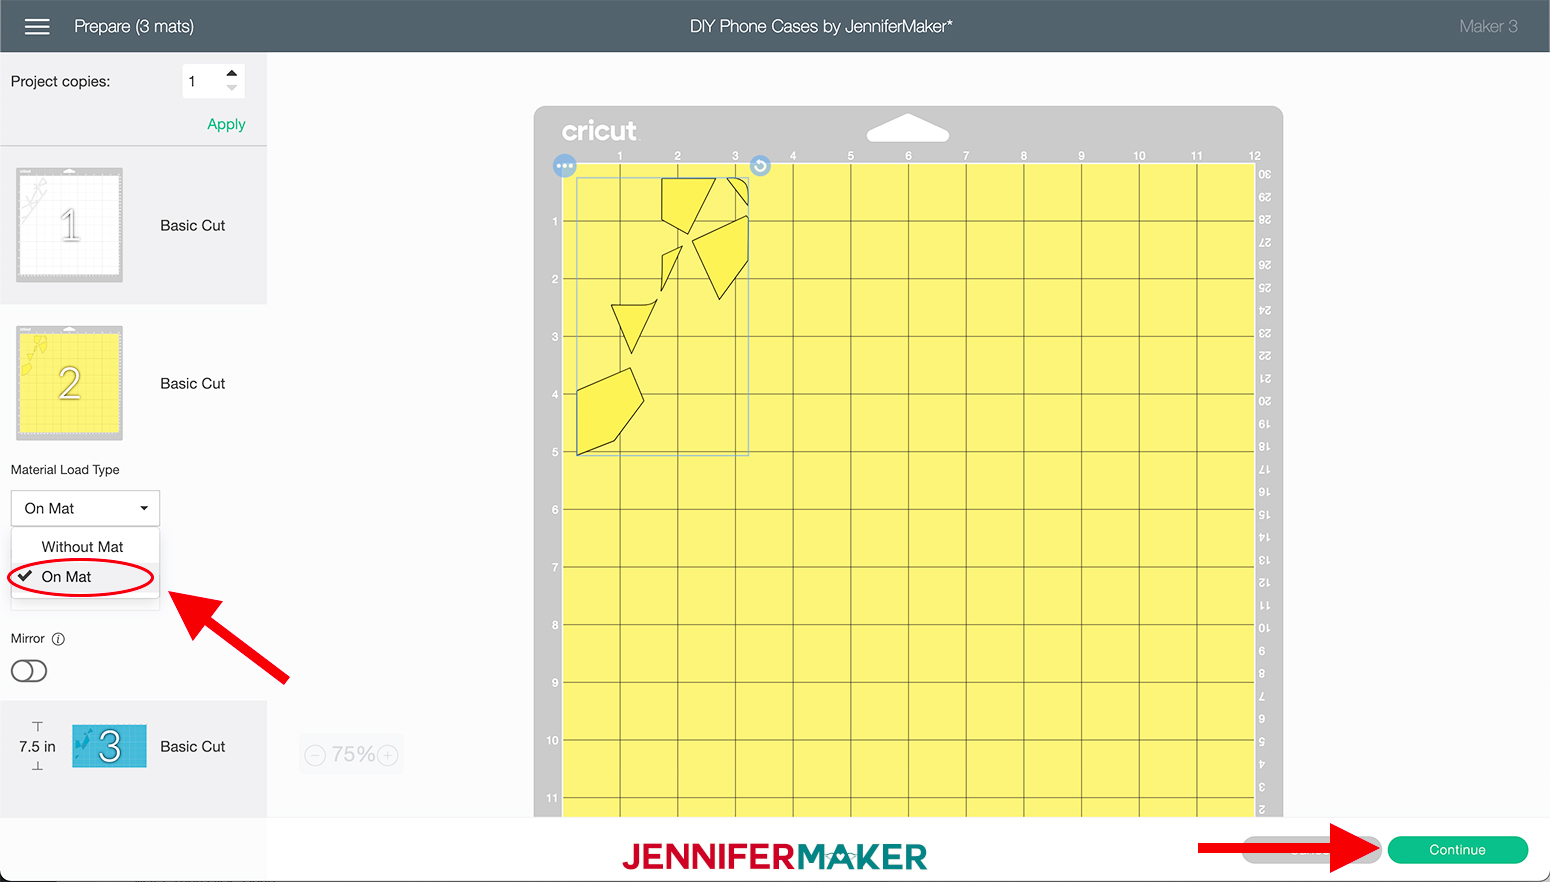
The blue mat we will cut without a mat using Cricut Smart Vinyl (Aqua). Which is the default so we do not have to select anything for this mat.
NOTE: If you use regular vinyl for the whole design, you can skip this step.
Click "Continue" on the lower right corner of your screen.
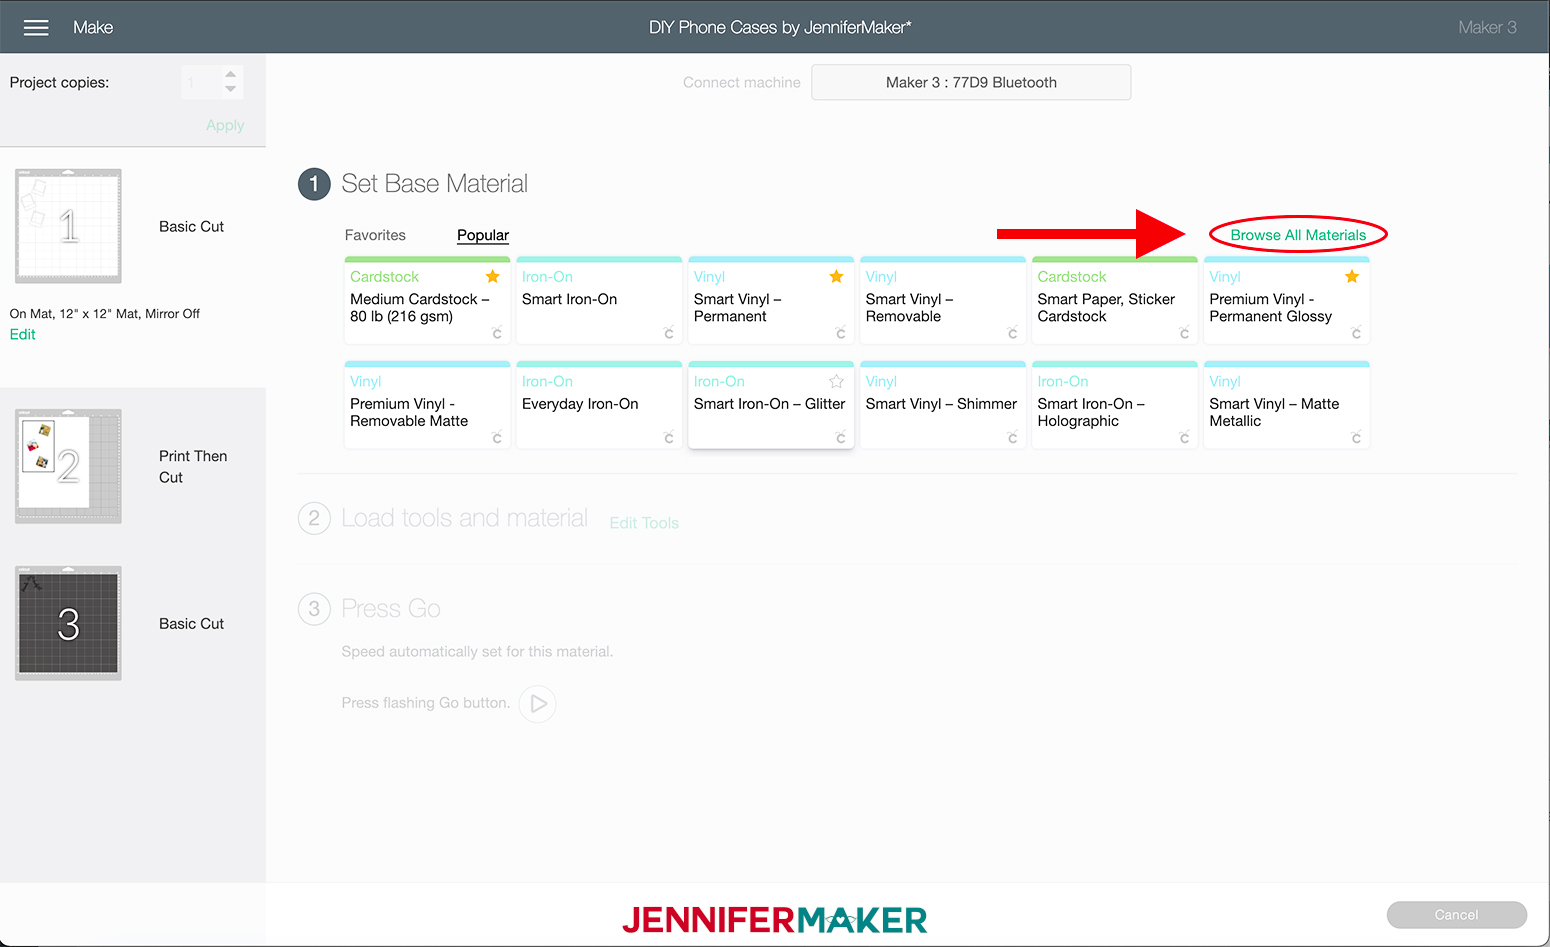
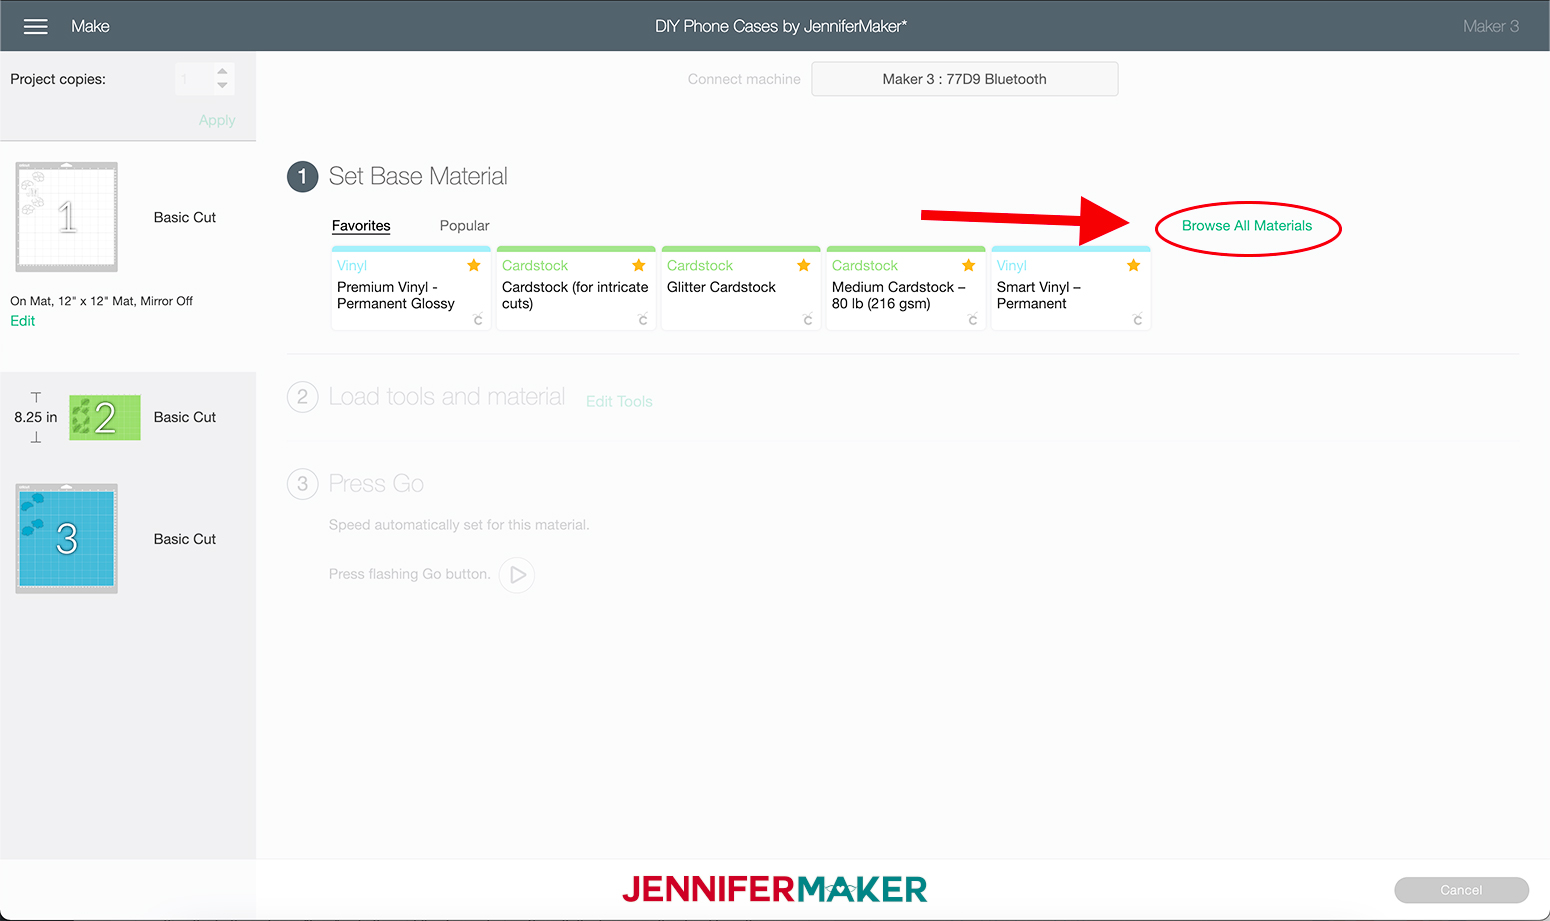
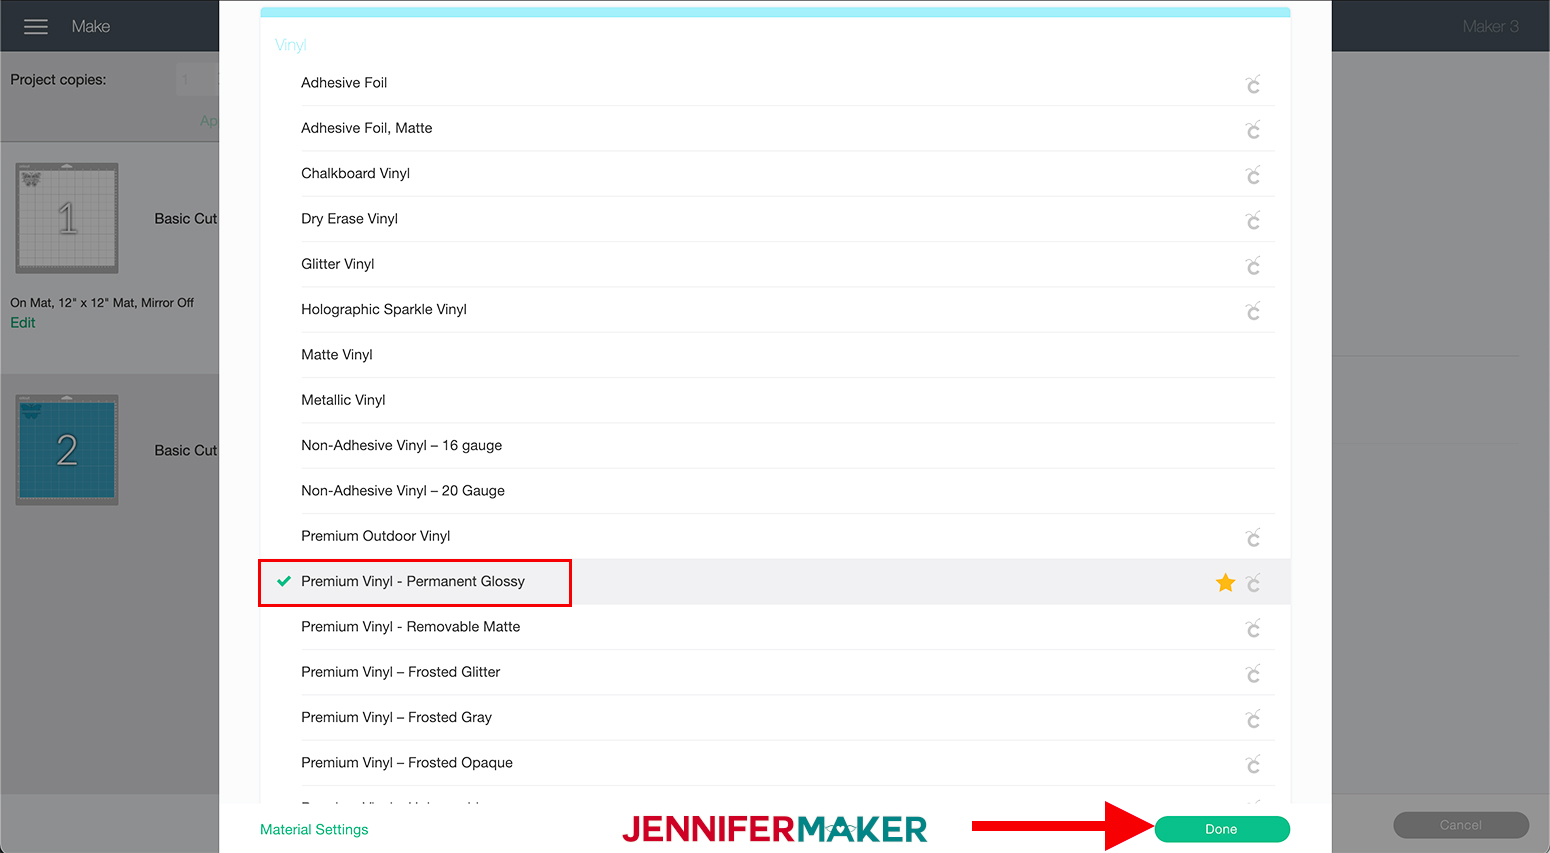
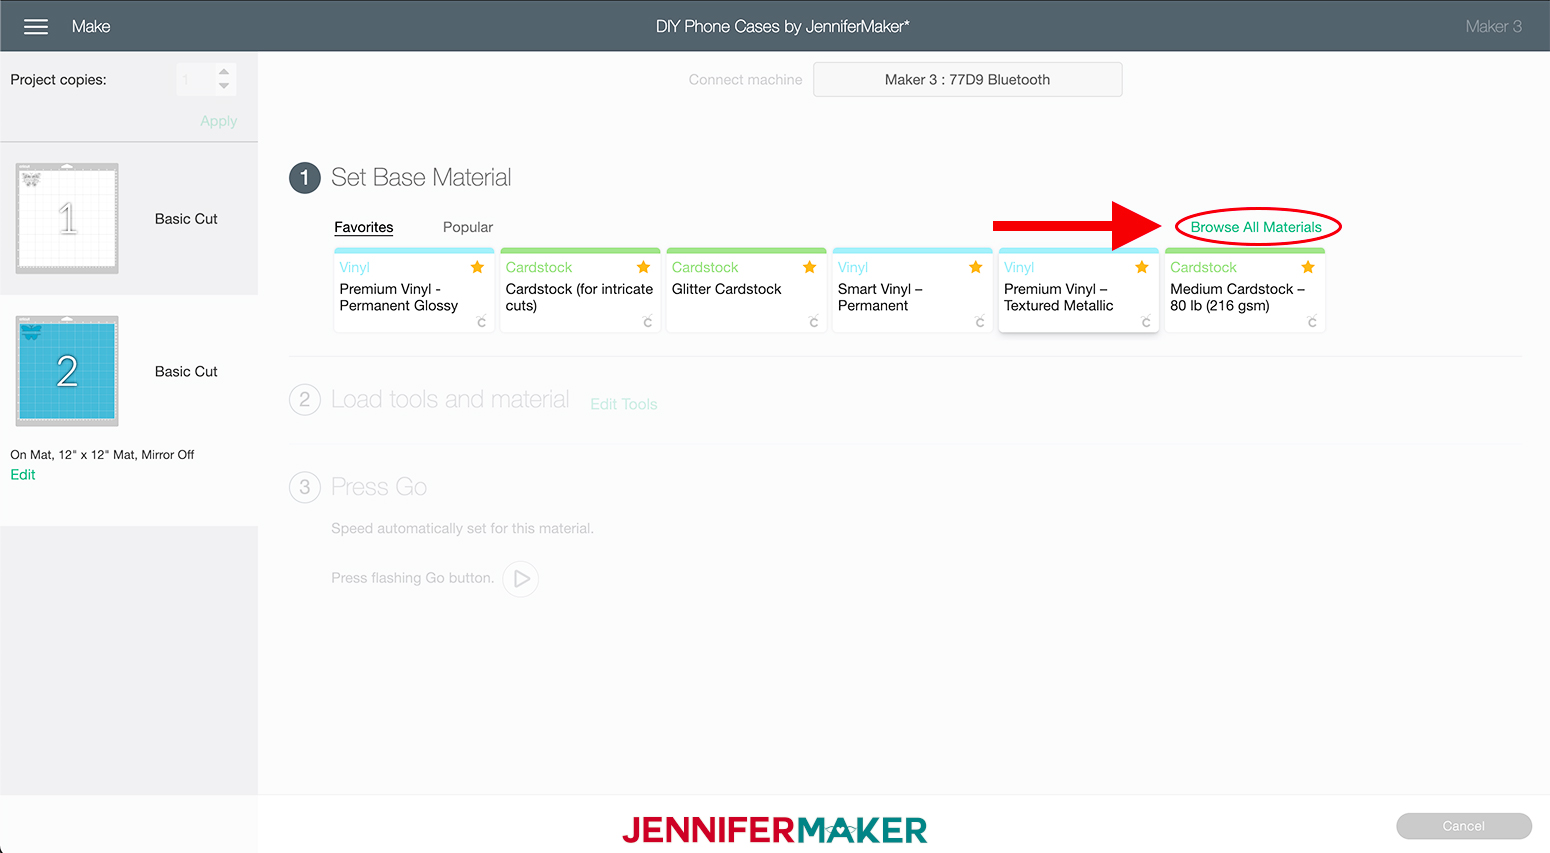
Now we are going to select our materials. Click the "Browse All Materials" button on the right side of the screen.
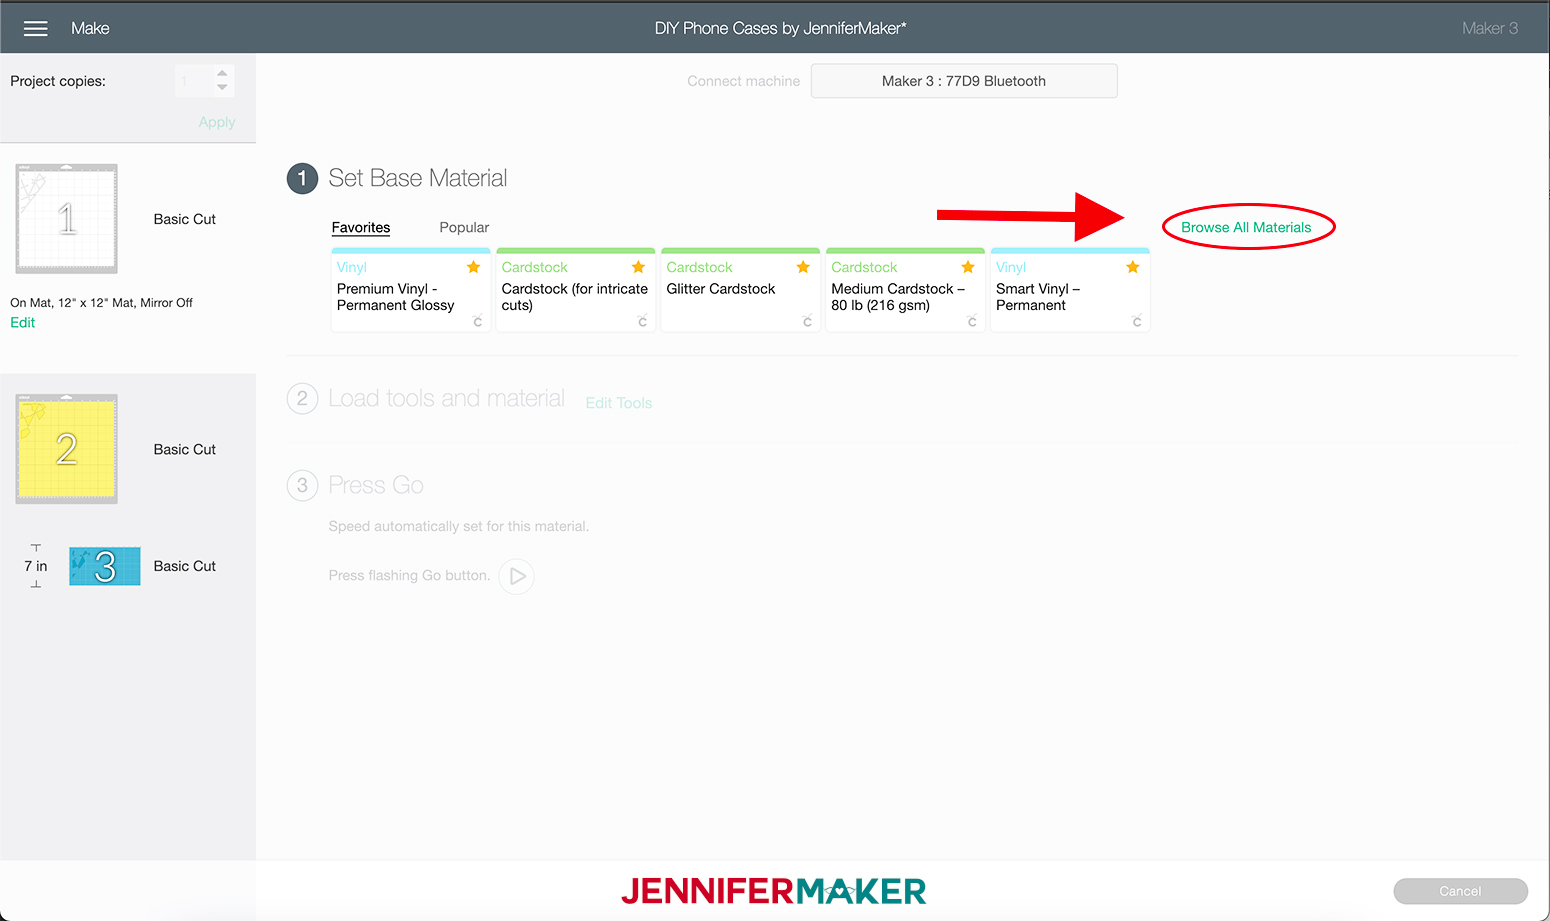
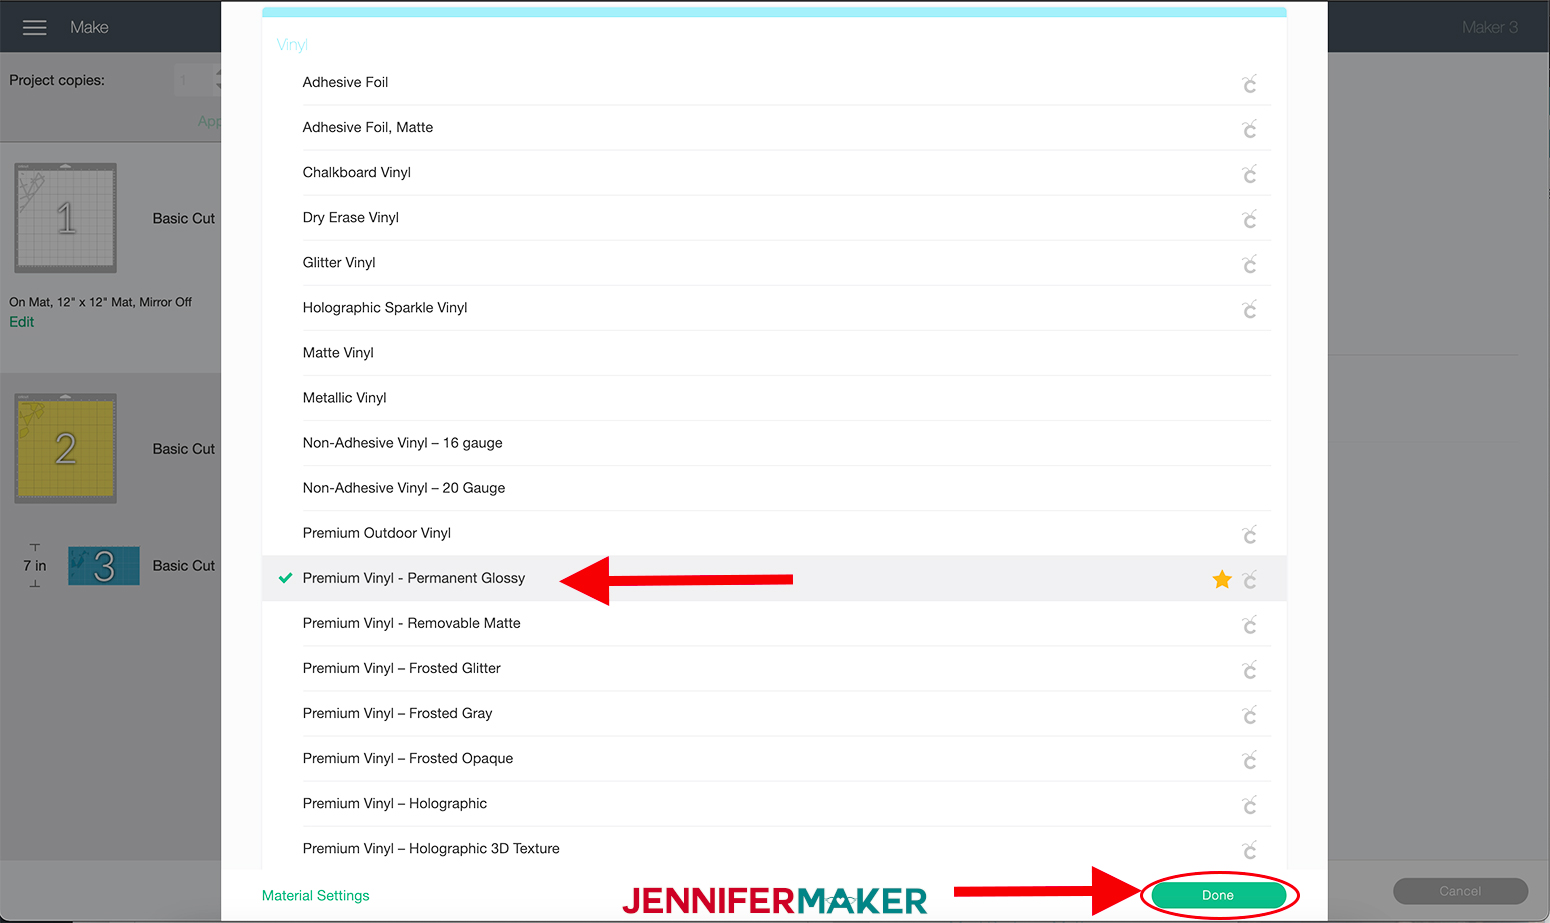
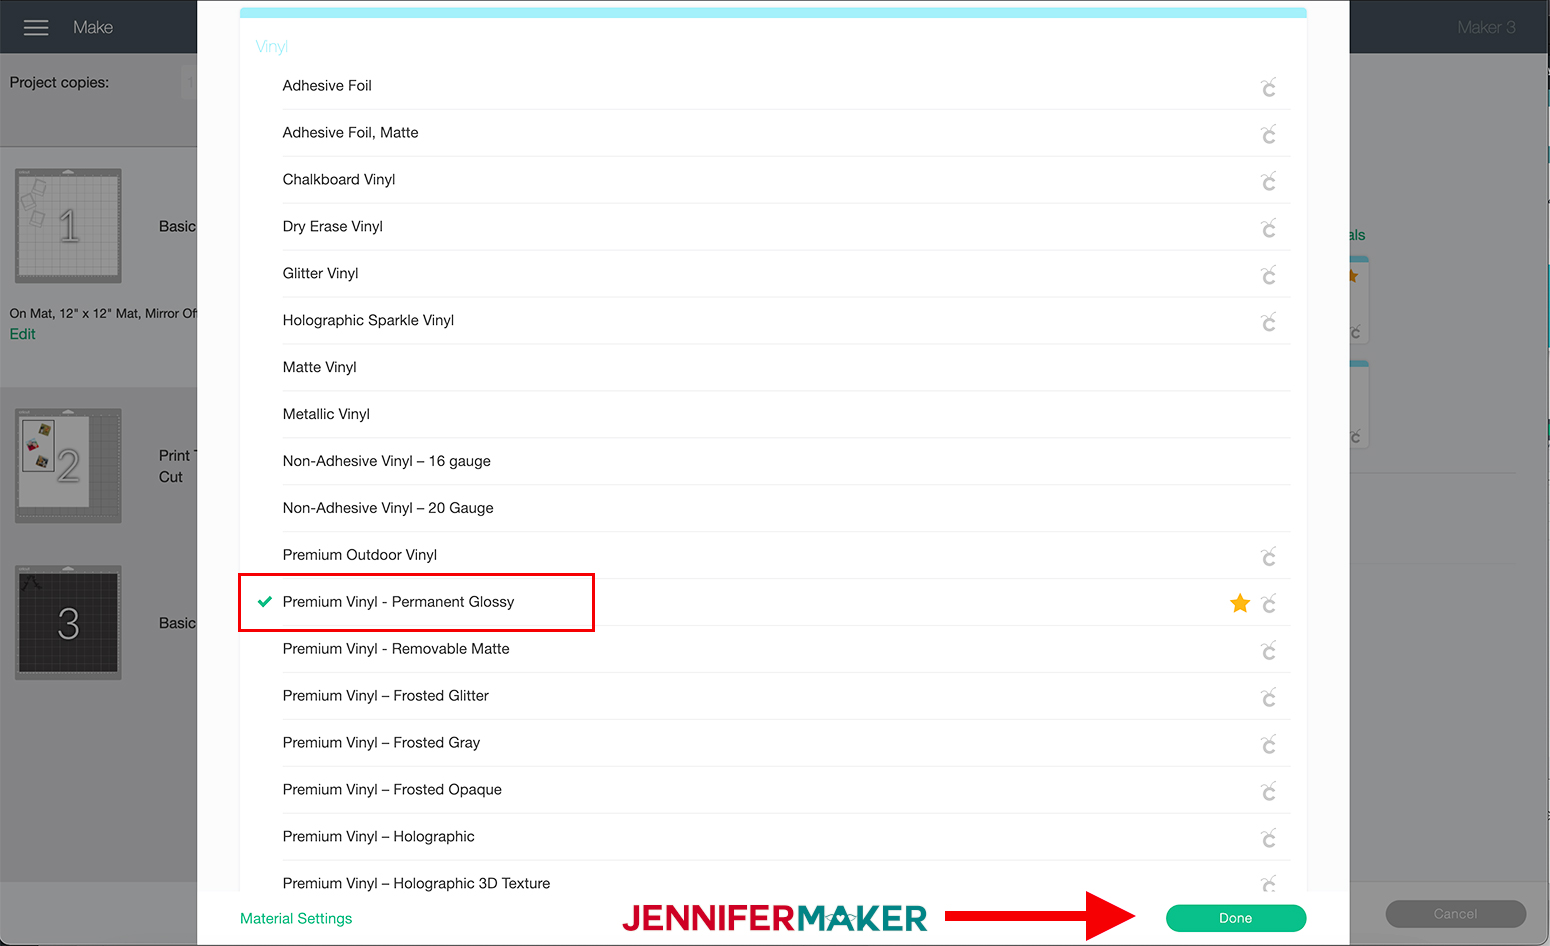
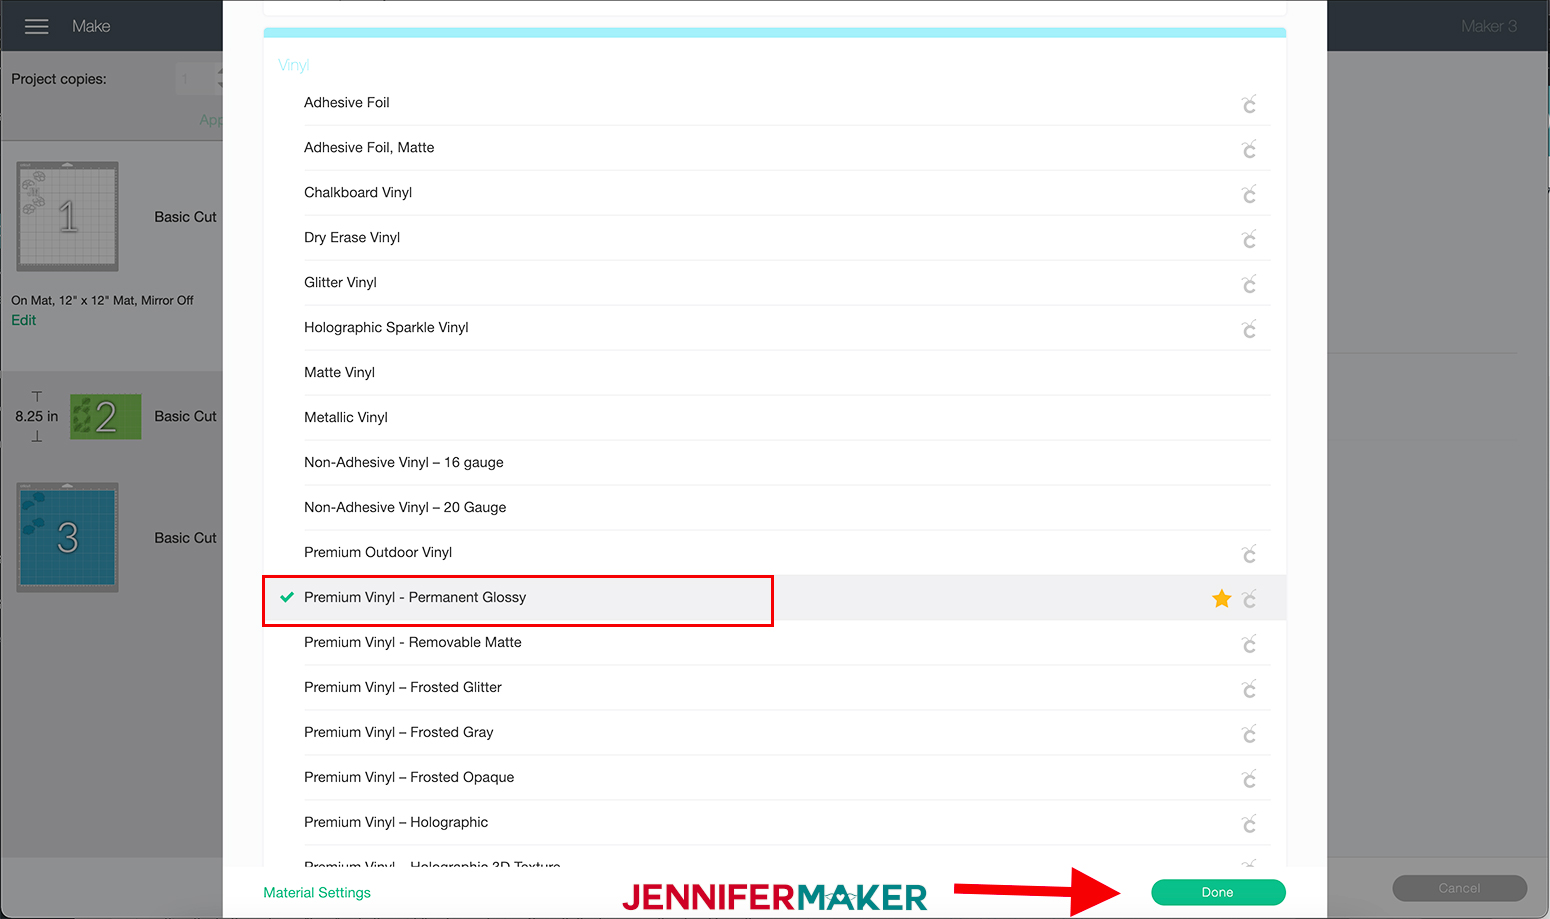
Then select "Premium Vinyl - Permanent Glossy" from the menu under the Vinyl section. Then click "Done."
NOTE: You do not need to use "More” Pressure with the Maker 3. However, each machine is different and I usually do select “More” pressure with most of my materials.
Now, using the Cricut Green StandardGrip 12" x 12" mat cut the first two mats using the above setting.
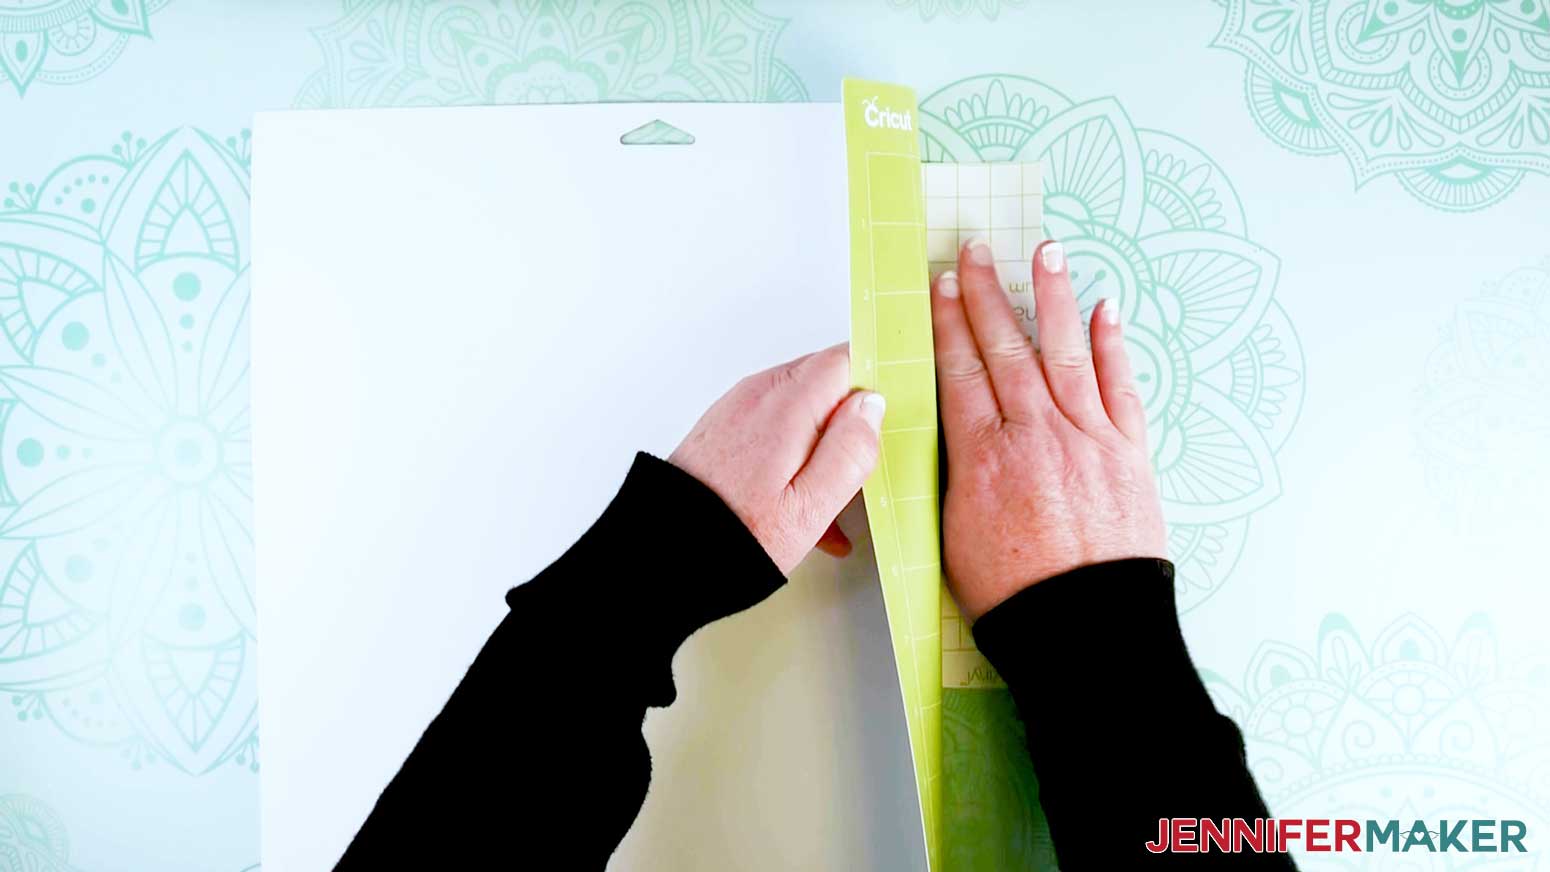
To remove the vinyl from the mat, flip the mat over and peel the mat away from the vinyl. This prevents the material from curling.
Repeat this for the yellow mat.
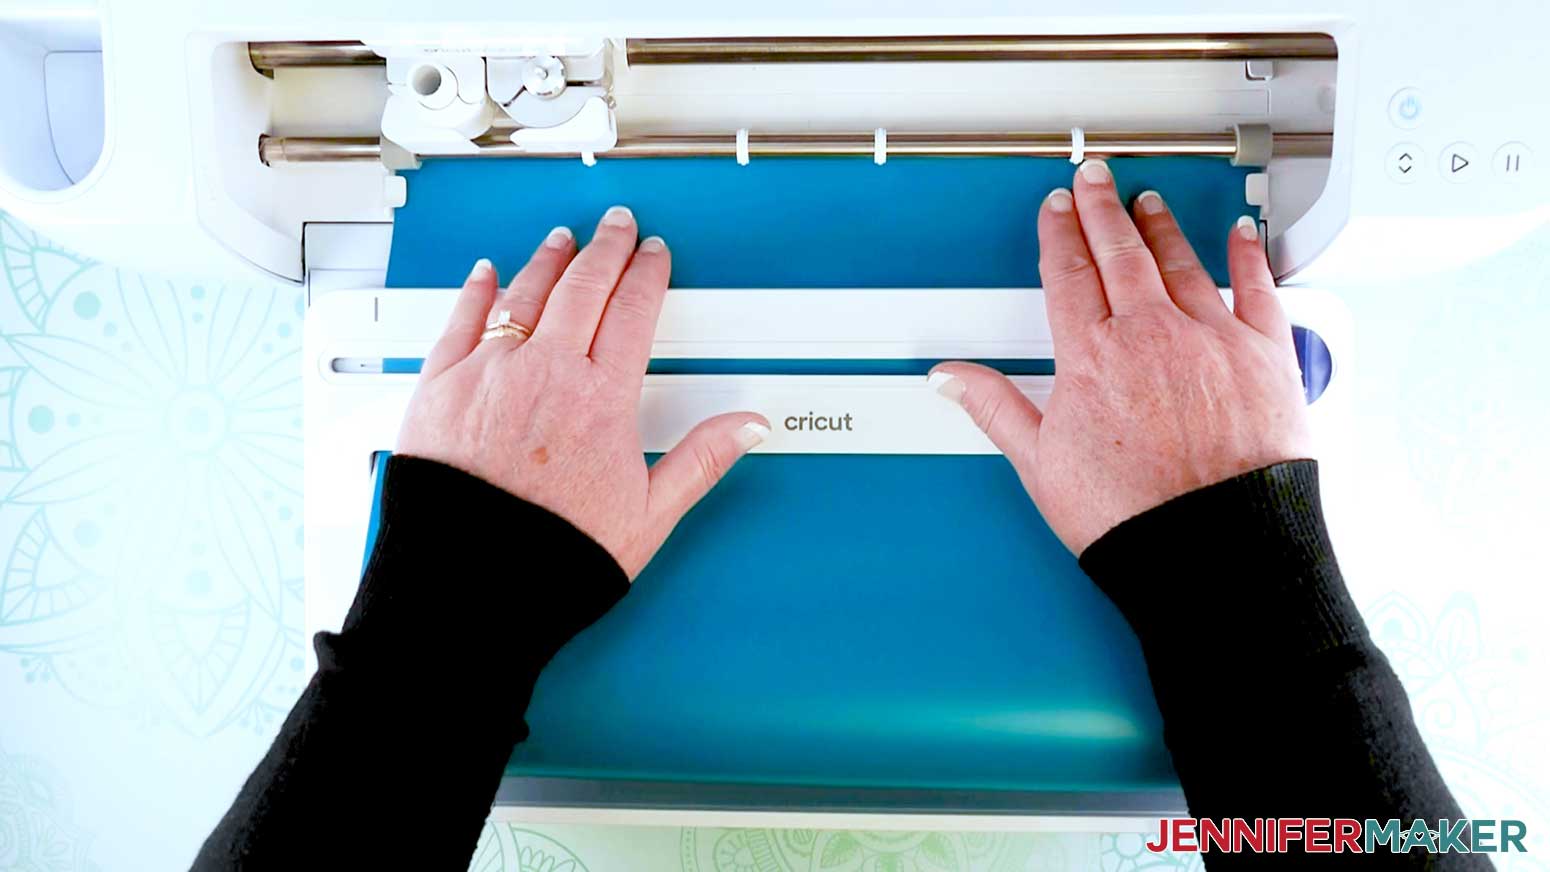
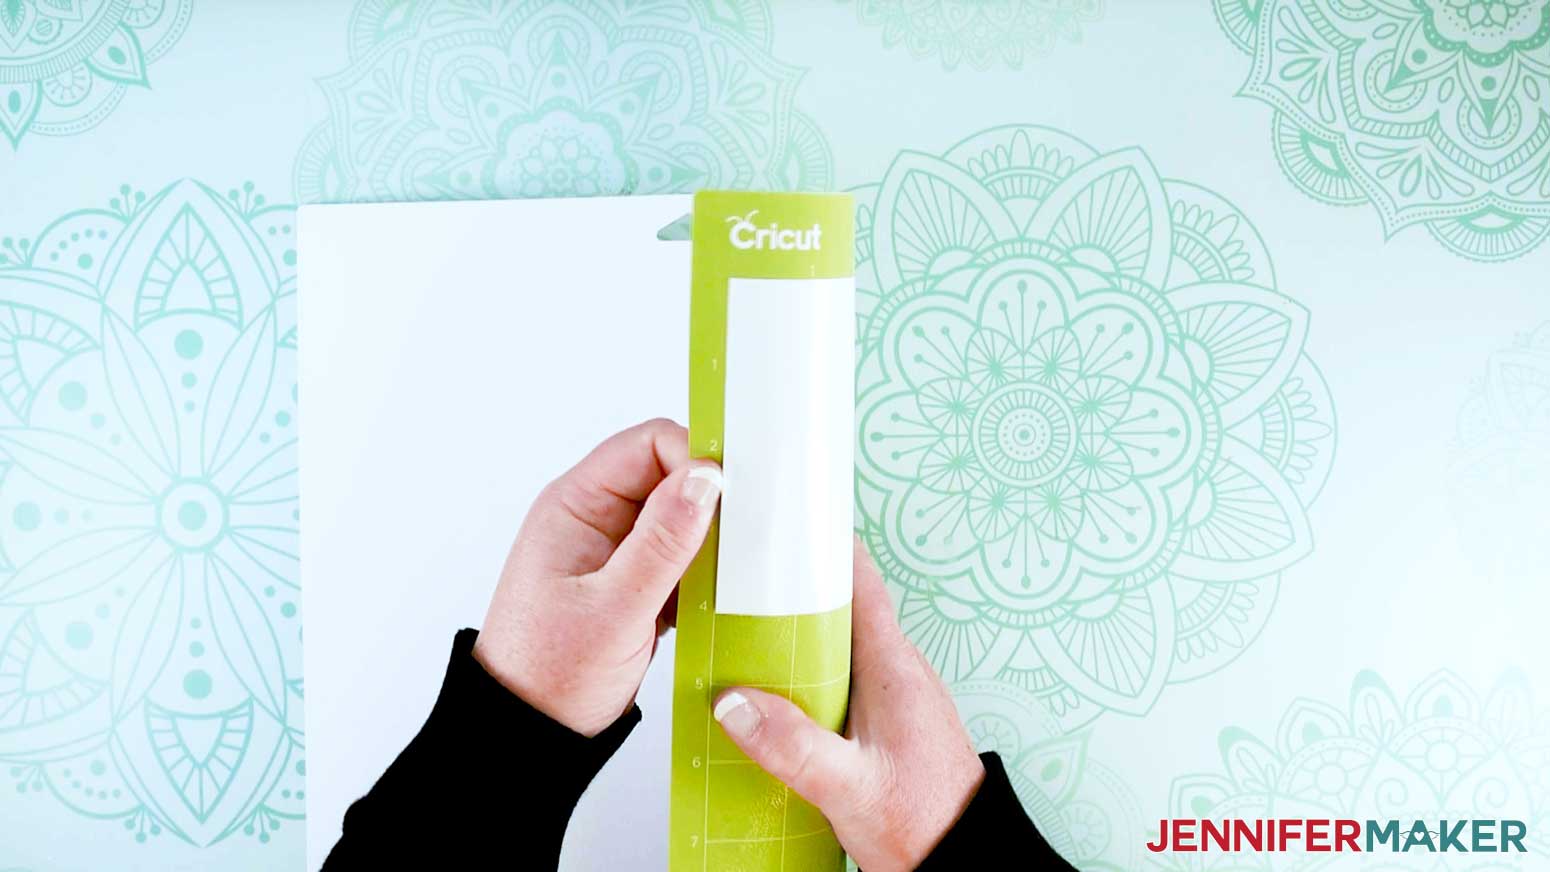
For the blue mat, feed your Smart Vinyl into your Cricut Maker 3 or Explore 3. I am using the Cricut Roll Holder which is optional.
Press the “Load/Unload” Button. Your machine will pull the vinyl all the way through to confirm there is enough material before starting the cut. Once your machine is ready, press the flashing "Arrow/Go" button.
When your design is done cutting, press the “Load/Unload” Button to remove your vinyl from the machine.
NOTE: Your material settings might be different than mine, it all depends on what type of material you are using for your phone cases. Be sure to select the correct settings for your material.
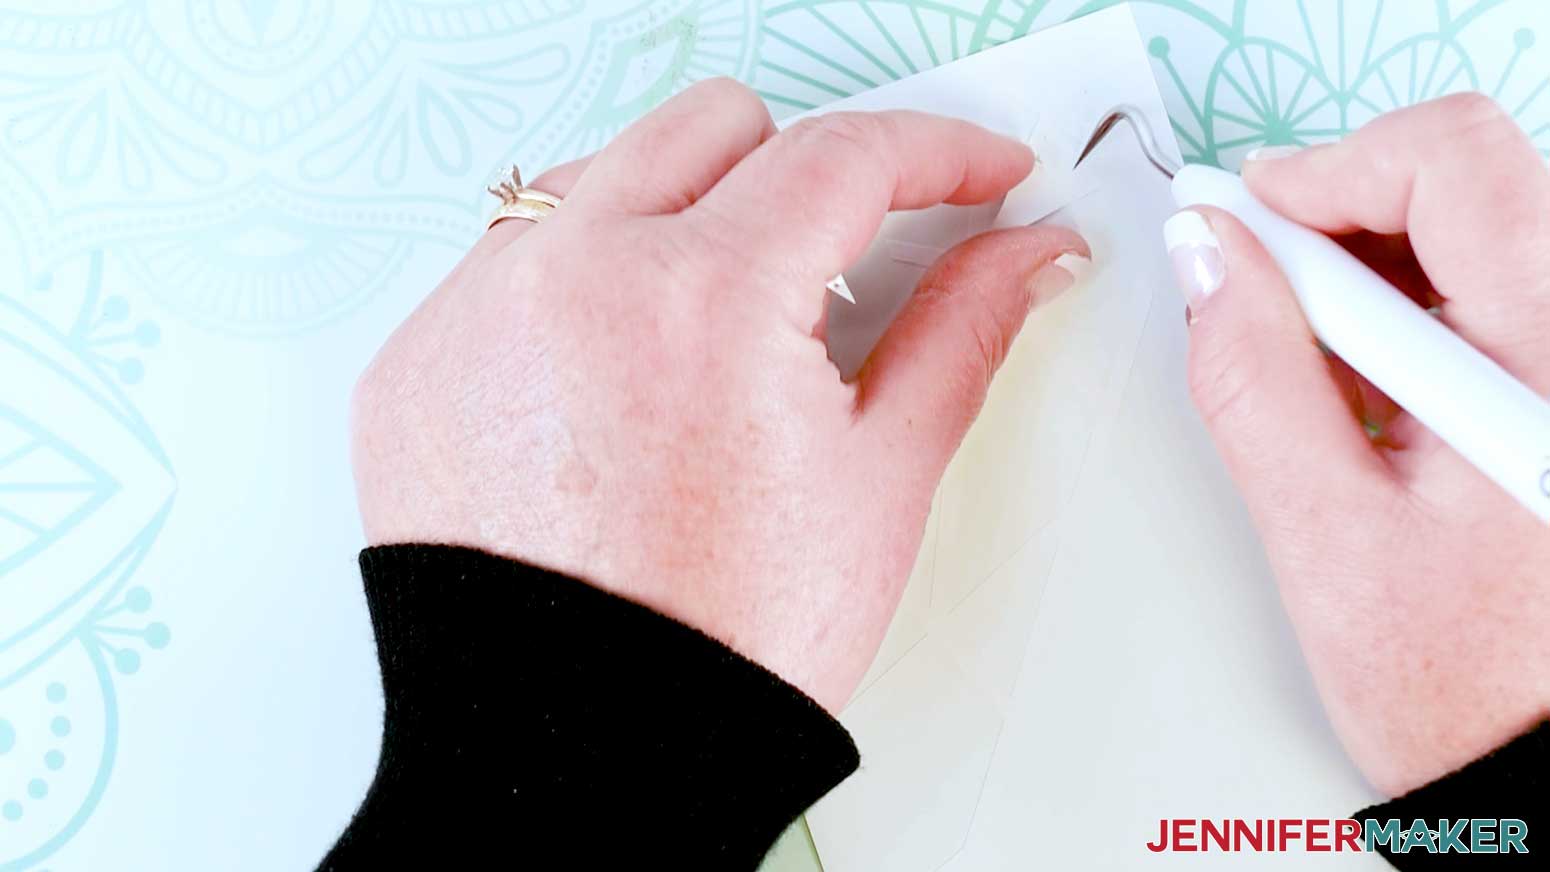
Finally, weed the excess vinyl.
STEP 3: TRANSFER THE DESIGN TO YOUR PHONE CASE
Time to put it all together!
Take your phone case out and lay it down on the table. I am using the design for my Samsung Galaxy 21 as that is the style phone I have.
IMPORTANT: Make sure to check if it has a protective cover on it. If so remove it before continuing. As we want the design to adhere directly to the phone case.
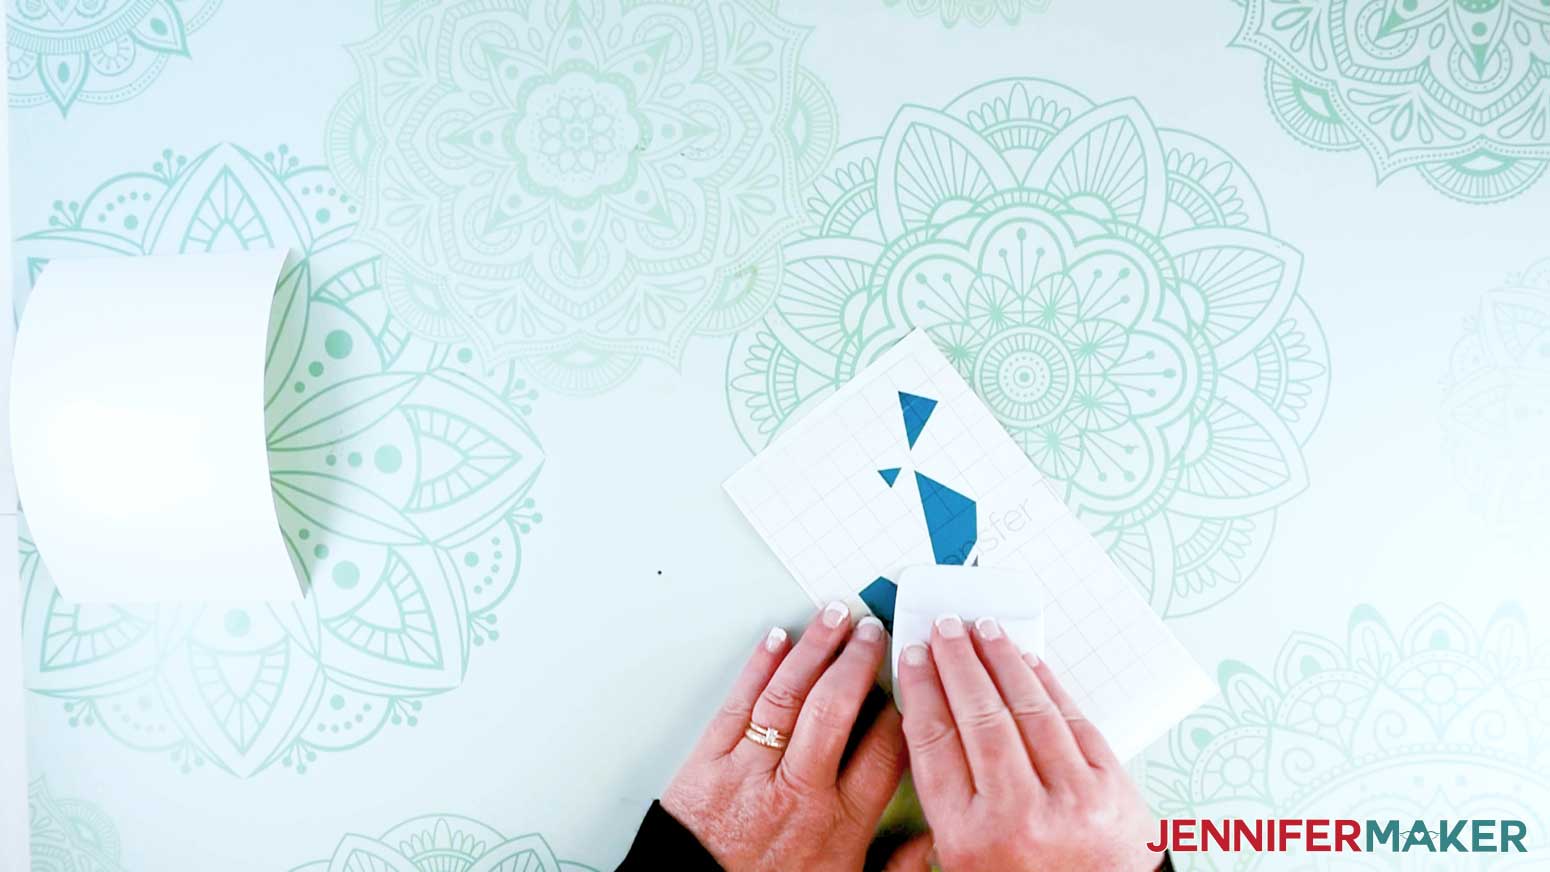
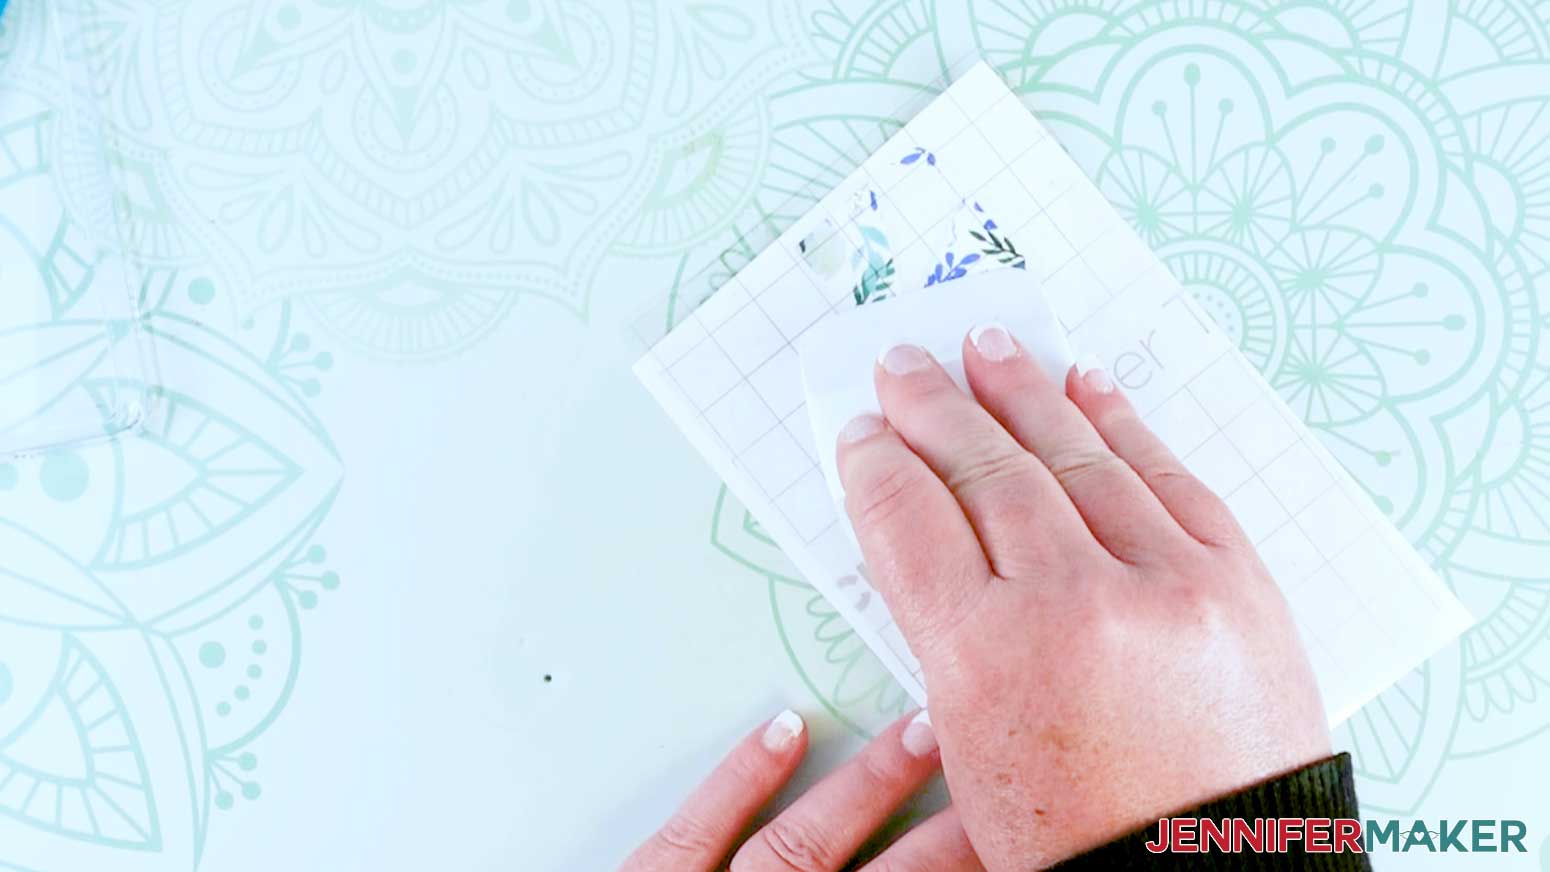
We will start with the Smart Vinyl Aqua layer. Cut a piece of transfer tape slightly bigger than your design.
Place the transfer tape on top of the vinyl using the taco method. To do this hold the transfer tape in the shape of a taco, then place the bottom of your “taco” onto the middle of your design. Smooth the transfer tape over the vinyl decal from the center outward using the scraper tool.
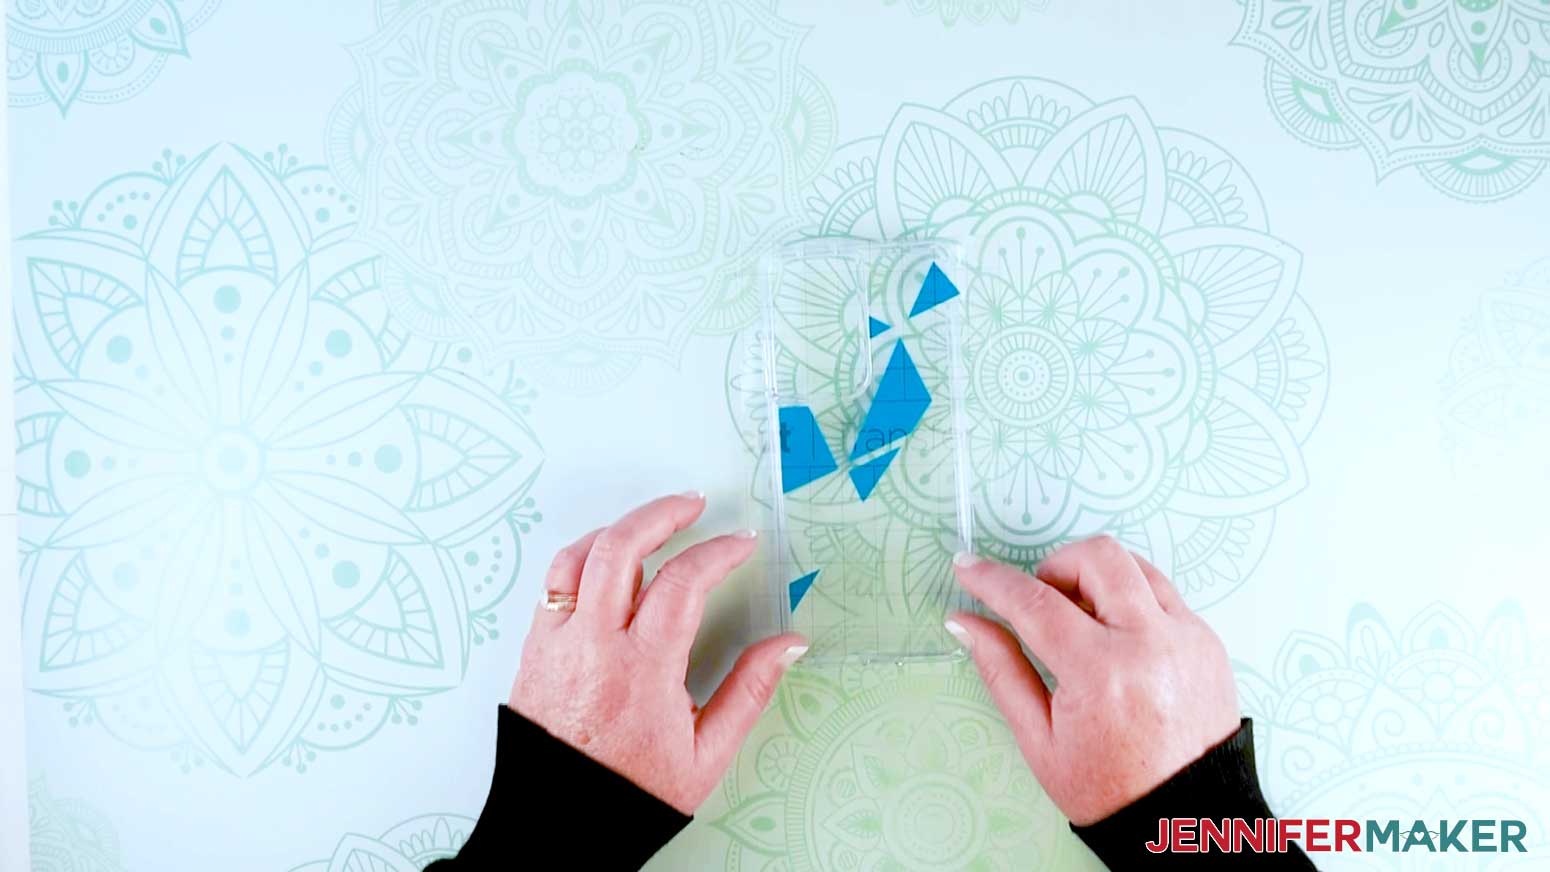
Once it's burnished, gently pull the transfer tape back, the vinyl should come up with it. If the vinyl does not stick to the transfer tape, place the transfer tape back down and burnish it with the scraper tool again.
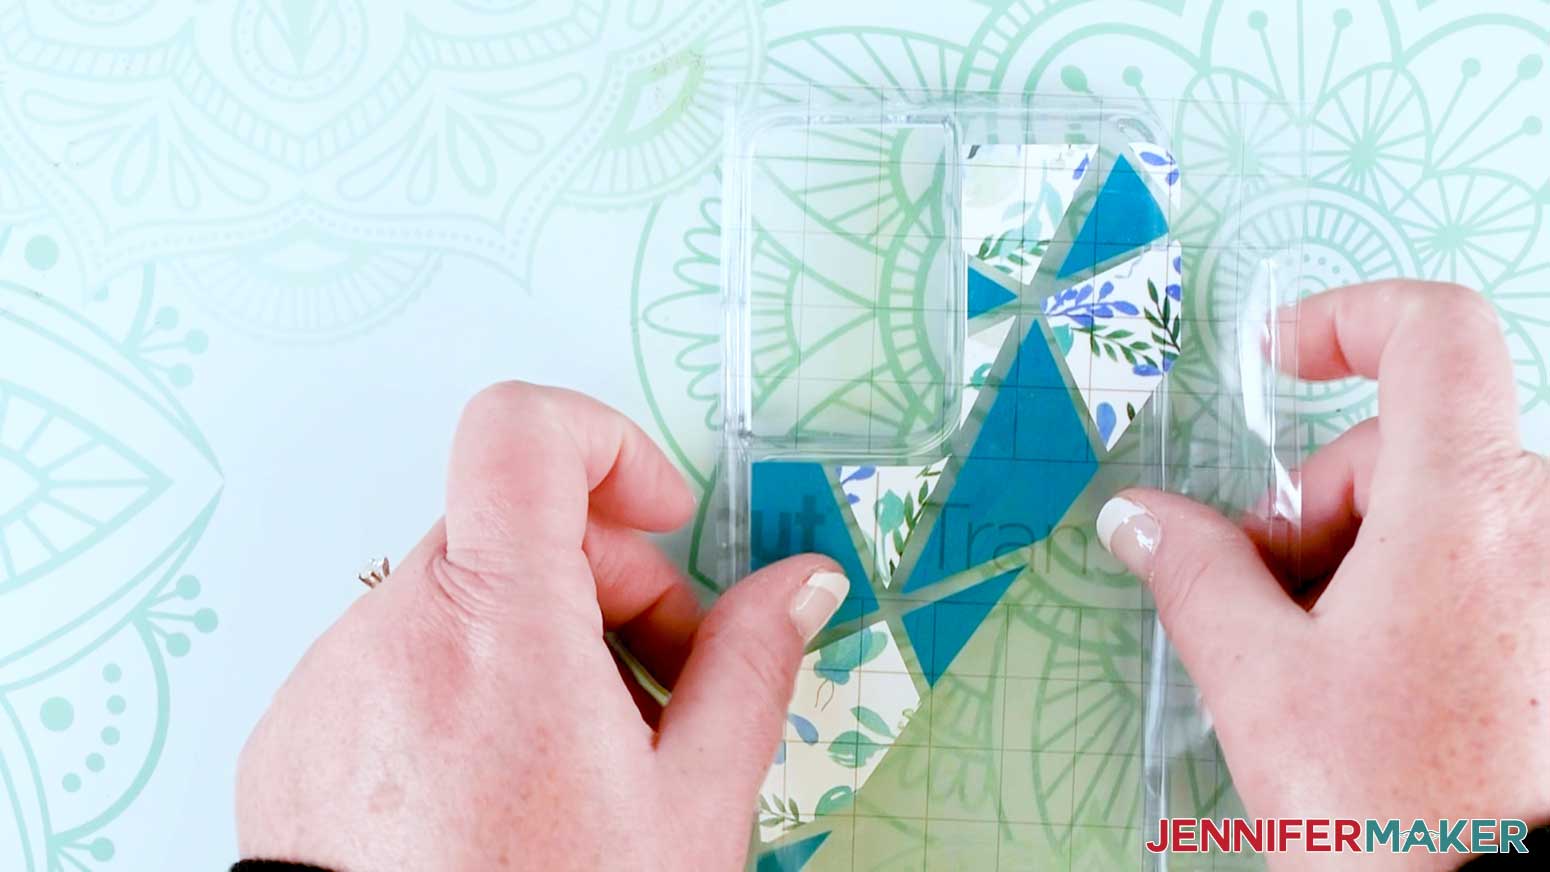
Now we'll put this part on the phone case. Line up the edges of the shapes to the phone case. Use the taco method to place the vinyl from the center out to the edges.
Tack down the vinyl by burnishing it on the phone case and gently remove the transfer tape.
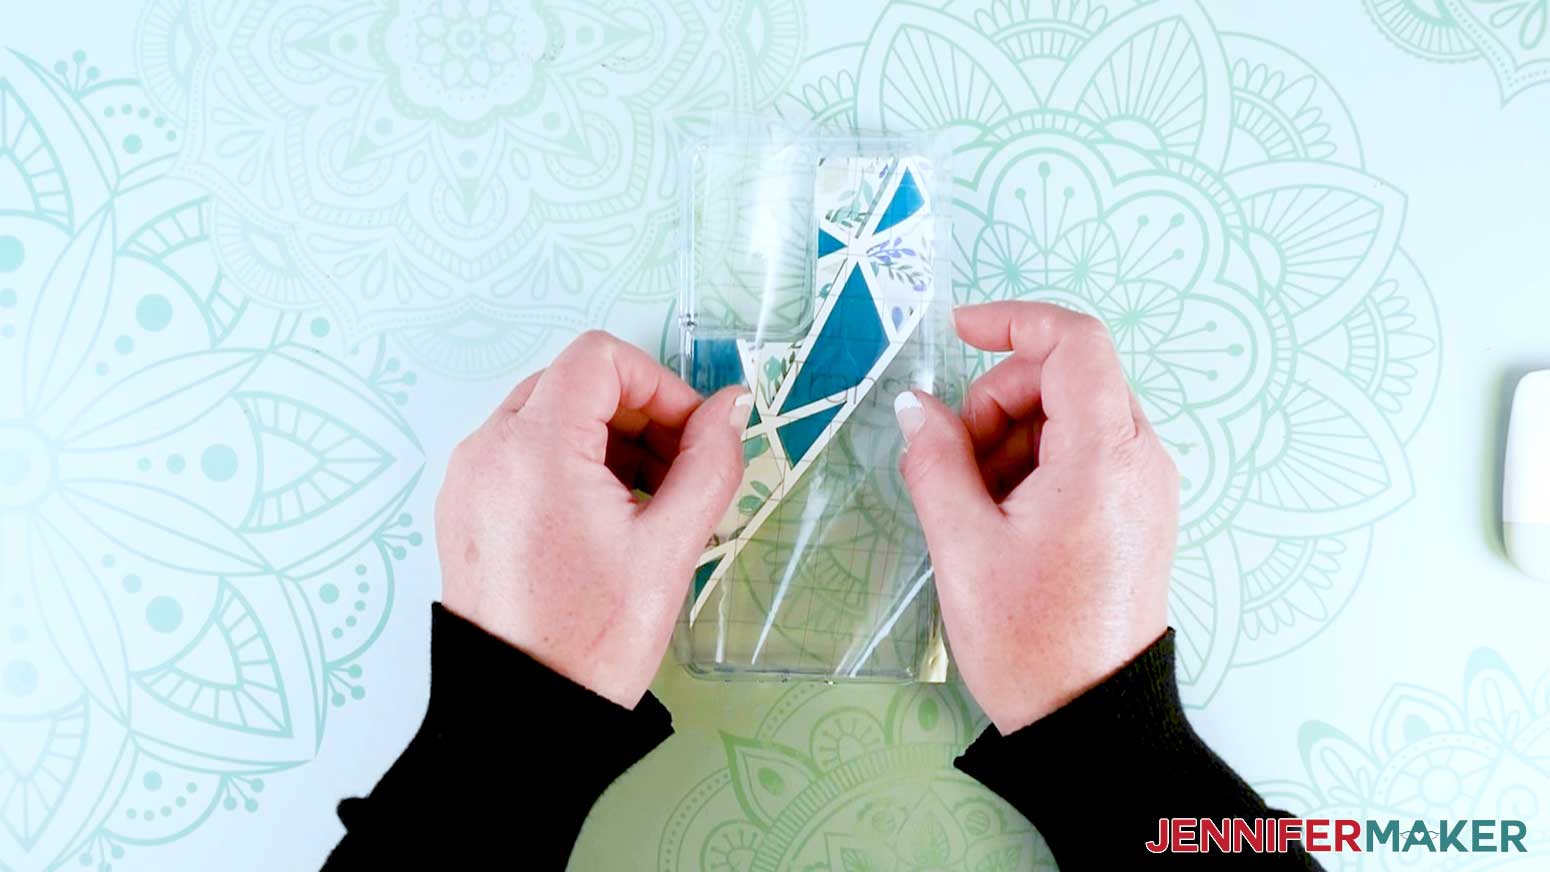
Next, take the Patterned Vinyl layer and place transfer tape on top of the vinyl and burnish it using the scraper tool to make the vinyl adhere to the tape.
Gently lift the transfer tape bringing the design with it. If the vinyl does not stick to the transfer tape, place the transfer tape back down and burnish it with the scraper tool again.
Line up the edges of the shapes to the phone case.
Tack down the vinyl by burnishing it on the phone case.
Lastly, take the Abstract lines that are made out of White Cricut Premium Vinyl. Again place transfer tape on top of the vinyl and burnish it using the scraper tool to make the vinyl adhere to the tape.
Line everything up and tack it to the phone case.
TIP: You may have to move the shapes slightly to make them line up correctly. To do this take the weeding tool and gently pull up the vinyl, move it into position and tack it back down.
STEP 4: APPLY MOD PODGE
Once all the vinyl is in place, it's time to add a layer of Mod Podge to the entire phone case. With your bristle paintbrush use a small amount of Mod Podge and apply it to the entire case. Make sure to paint in one direction, otherwise, it may look messy. The Mod Podge helps protect the vinyl.
Once your Mod Podge is completely dry, it takes about 20 mins. You now have your completed Phone Case!
NOTE: You can use any type of Mod Podge to seal your phone cases! A few examples are matte, satin, glossy, glitter, and even glow in the dark!
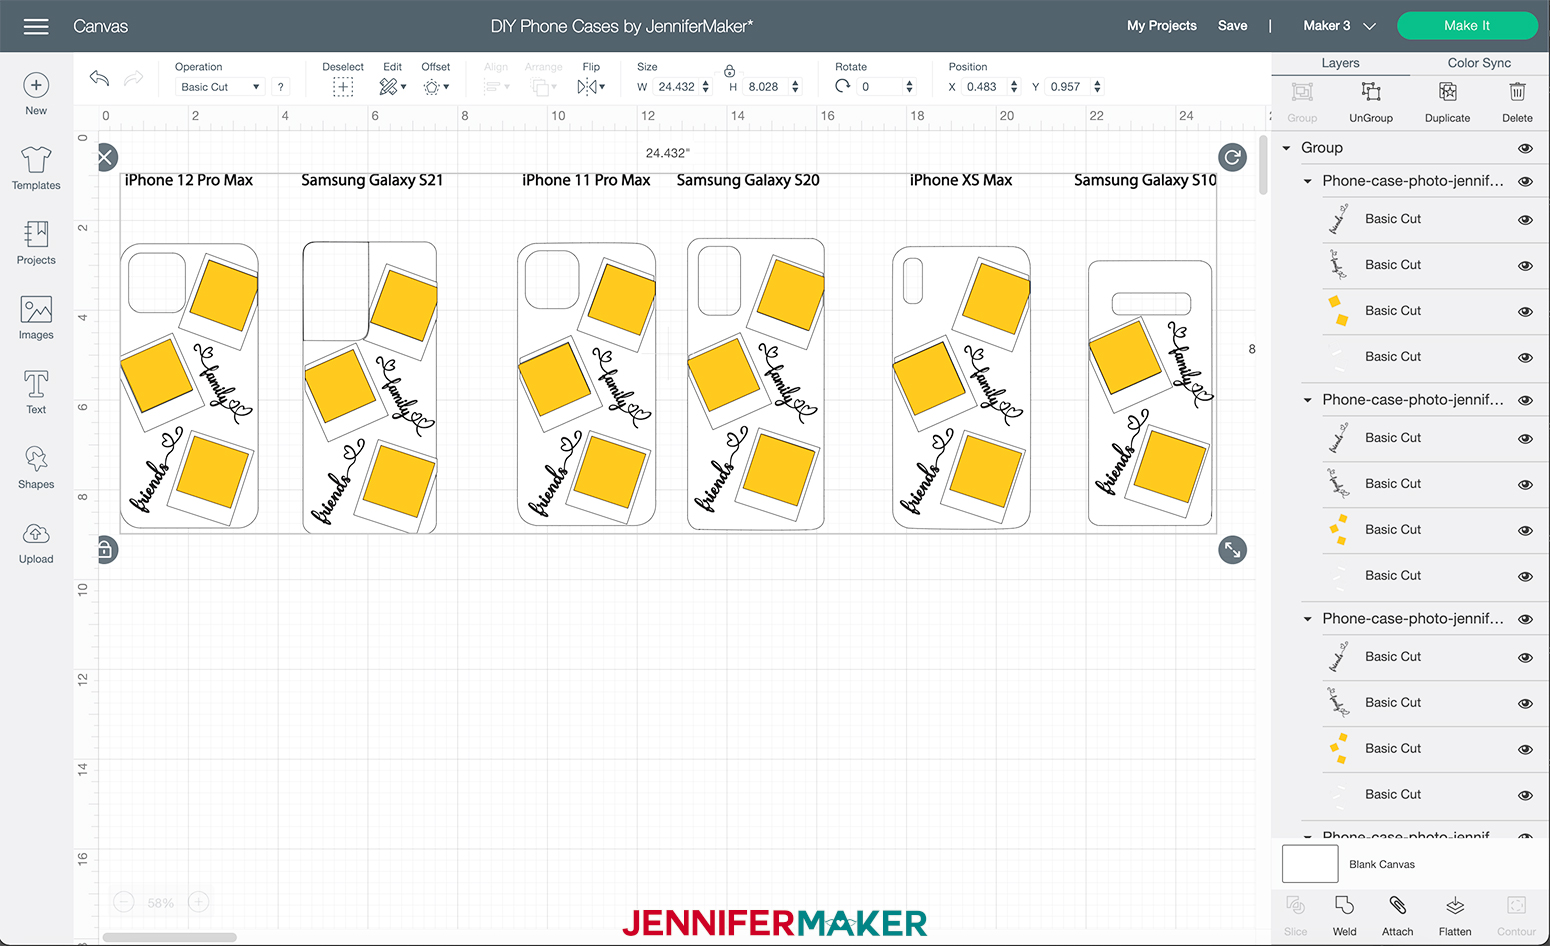
PHOTO DESIGN
NOTE: This design is not compatible with the Cricut Joy as it uses Print Then Cut.
First, ungroup the design and delete all phone styles and designs that you do not want from the layer panel. To do this I am going to select "Ungroup" at the top right of my screen.
Click and drag the phone style you would like to use away from the rest of the designs.

Then I am going to left-click and drag my bounding box over the designs I don't want. Then click delete at the top right corner.
For this design, we are going to use three photos. You’ll want to have these uploaded to your device in order to get them into Cricut Design Space.
To upload your photos to Design Space click the “Upload” in the lower-left corner.
Then click the "Upload Image" button.
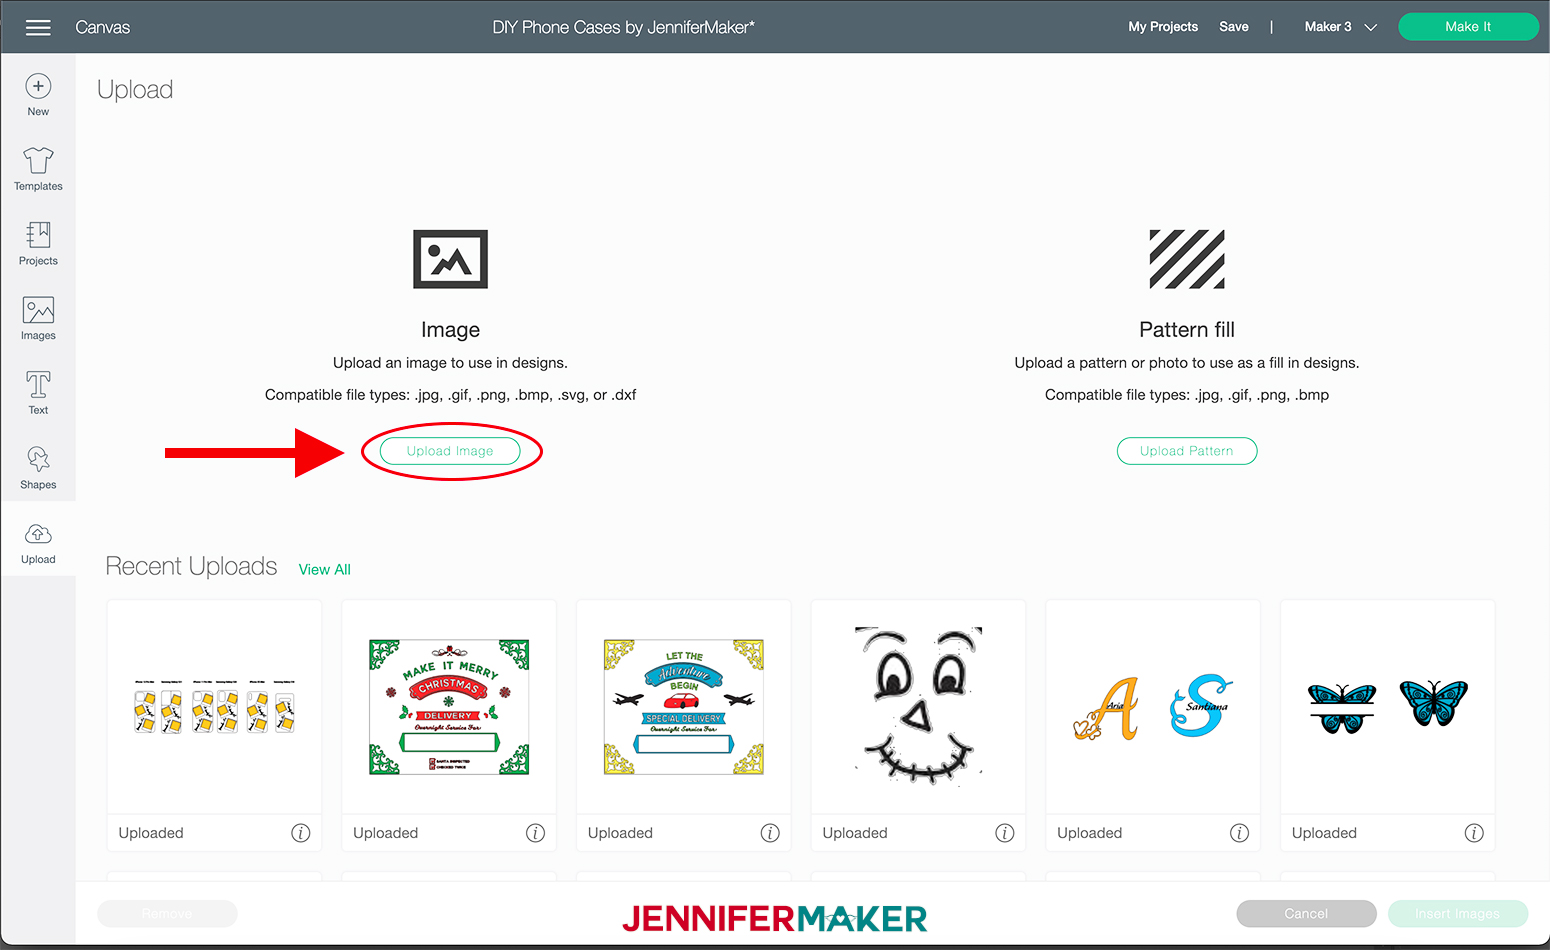
Click "Browse" and select the photo you want to use and click "open." I used a photo of Greg and I on the beach.
On the next page choose "Complex" and click "Continue."
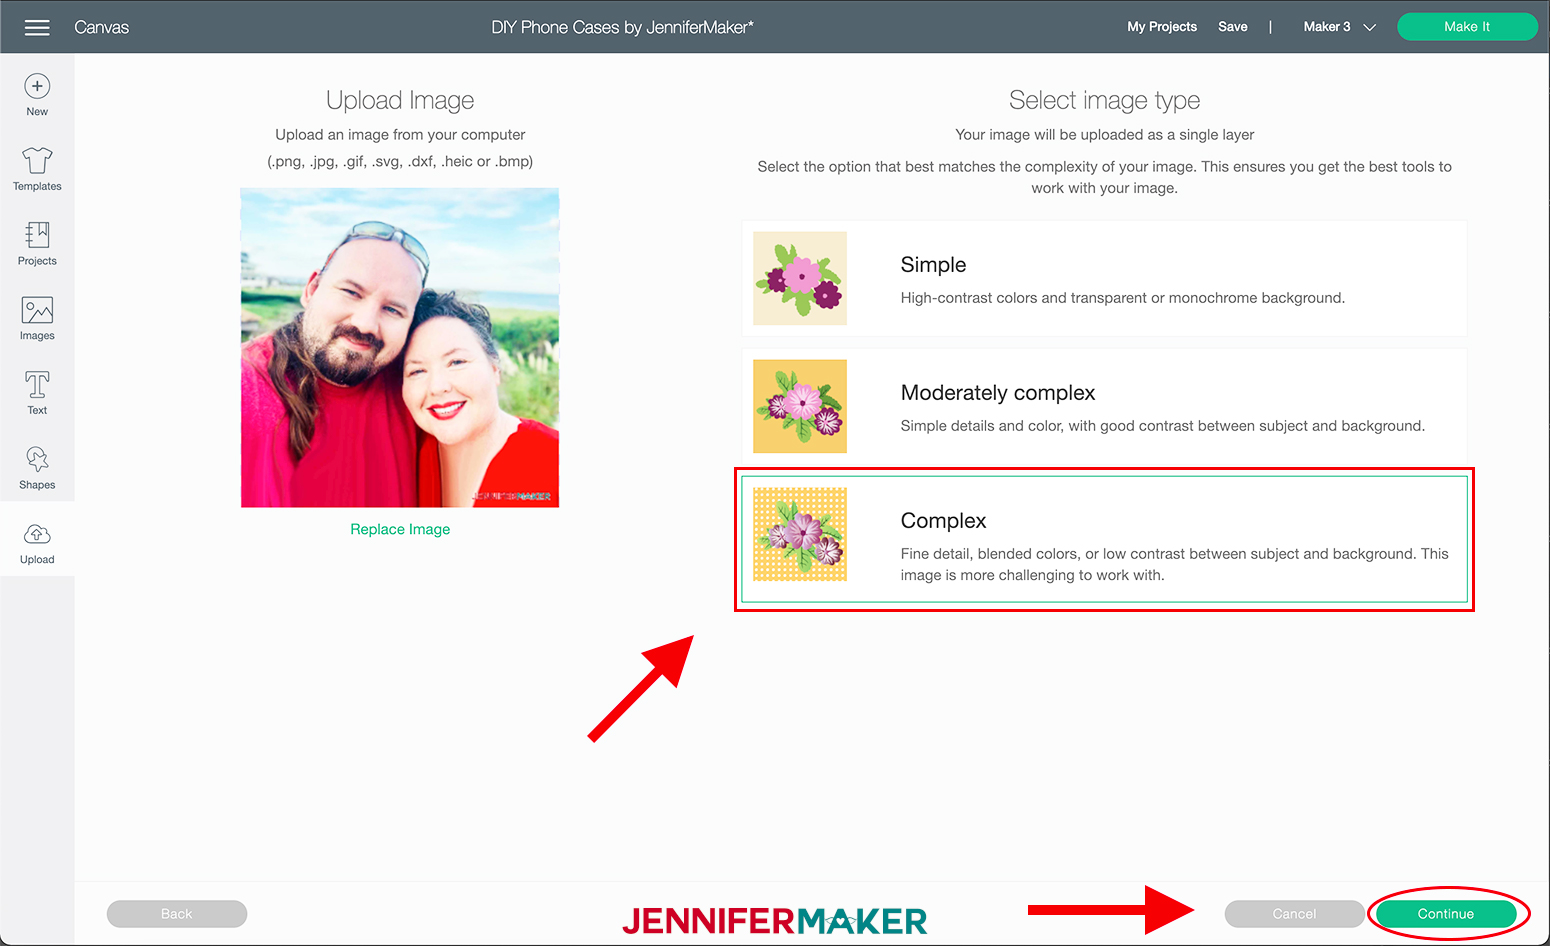
Then click "Continue" again on the next page.
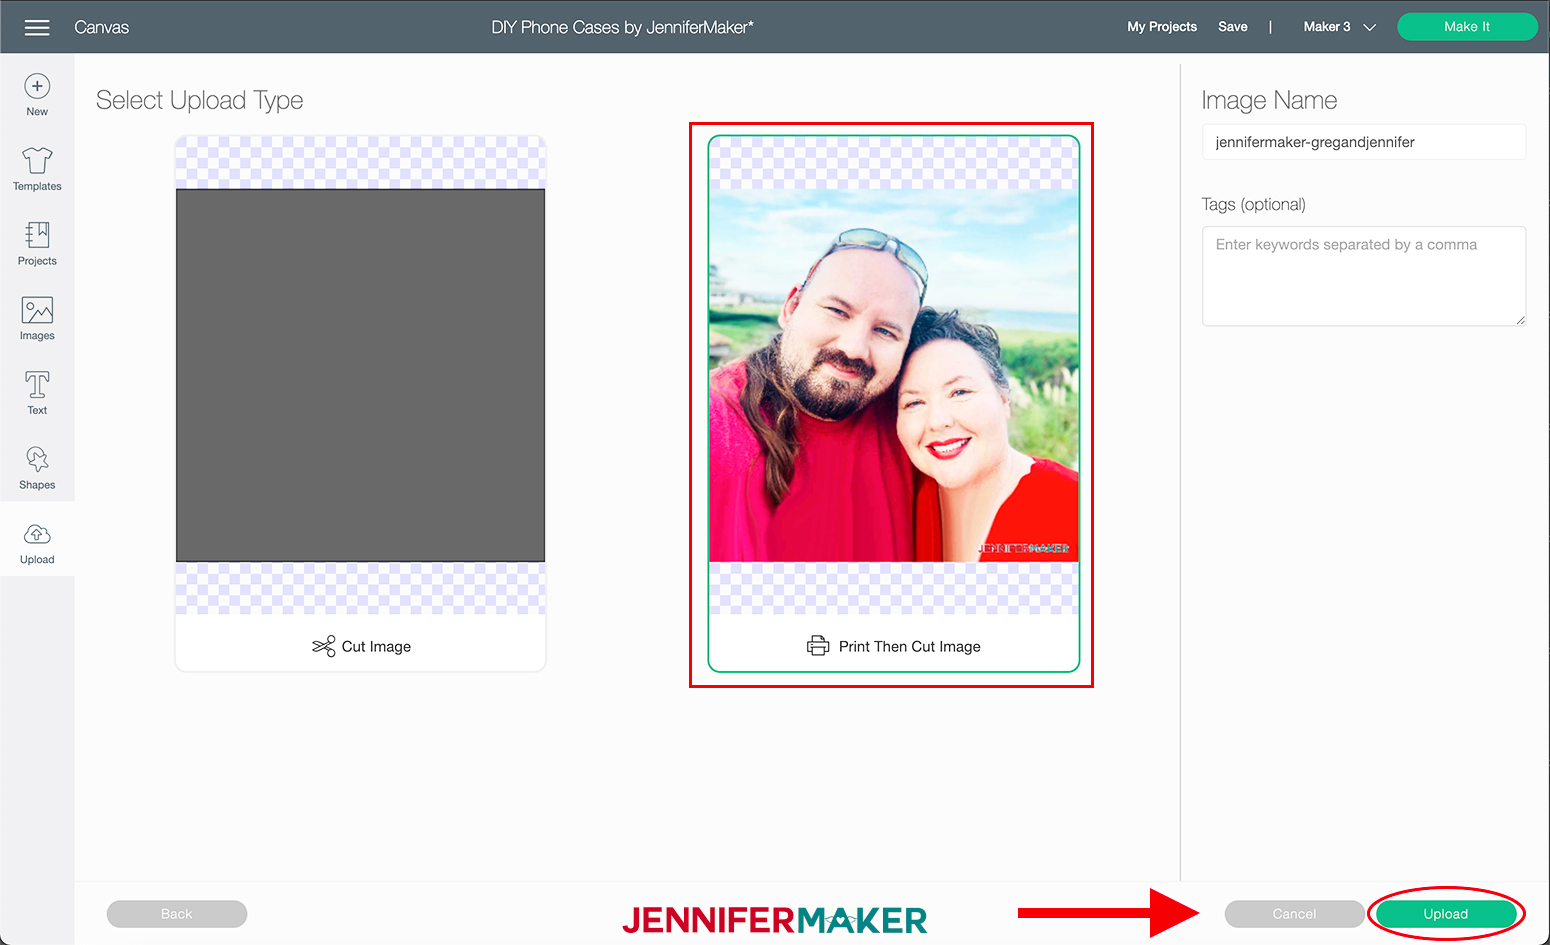
Next, select "Print then Cut" on the right-hand side. Select "Upload." Click on the image and select "Add to Canvas." Repeat this step for all your photos.
TIP: To learn more about uploading pictures to Cricut Design Space check out my How To Upload Images To Cricut Design Space on my blog.
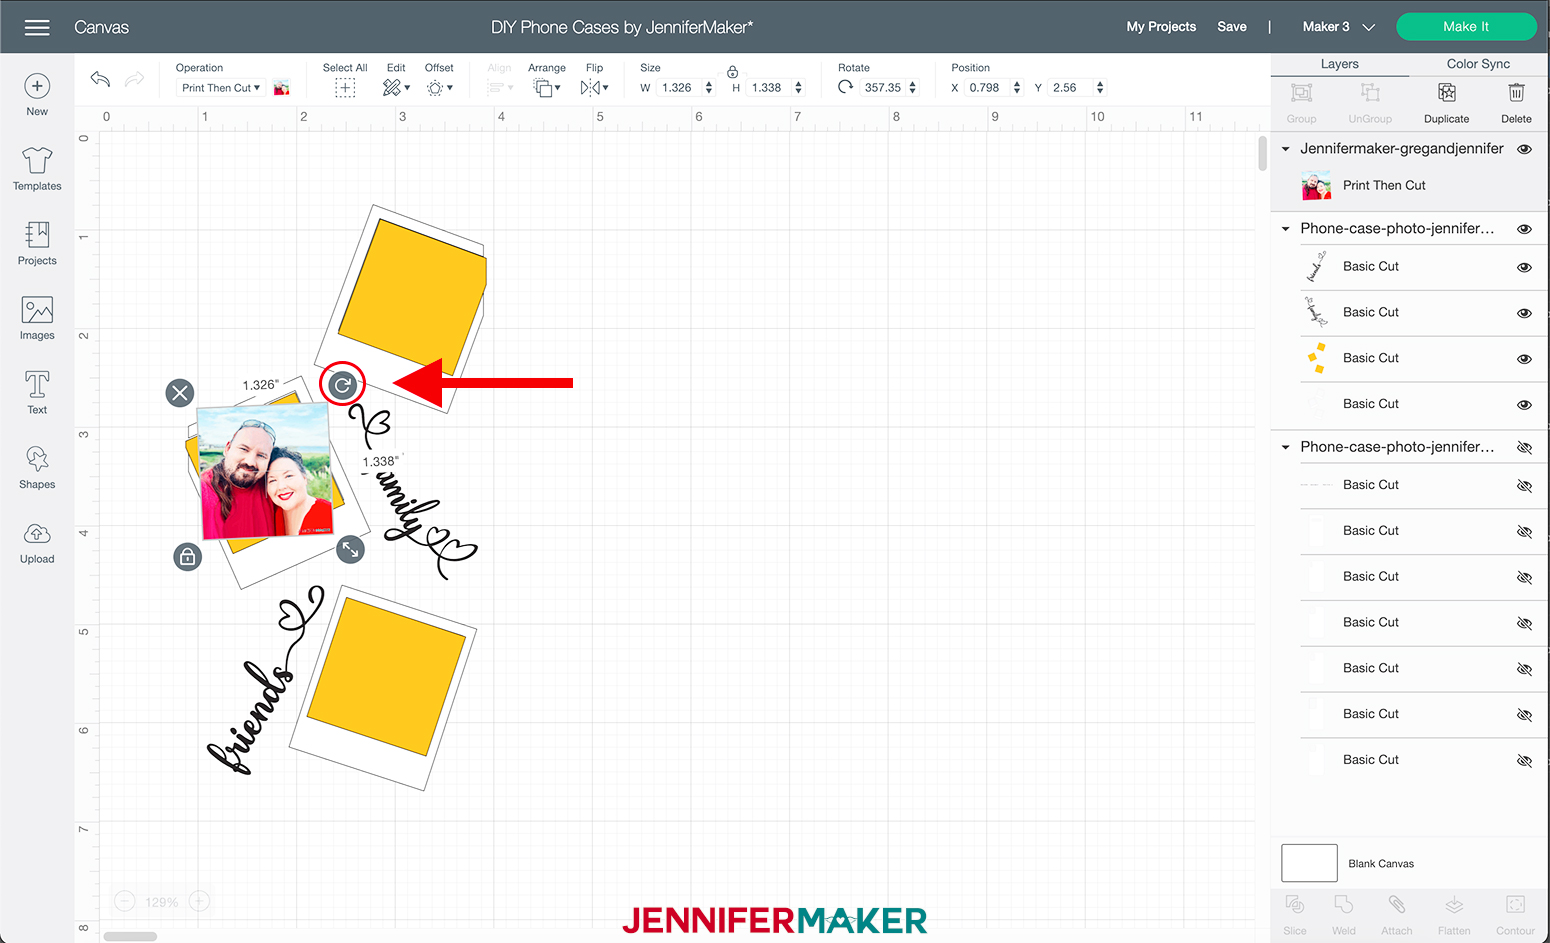
Now that you have your photos, resize them so they fit just outside of the orange boxes.
To do this click and hold the resizing handle and move your mouse so that the image gets smaller (around 1.3 depending on the image).
NOTE: The boxes are 1.3 inches for both height and width.

Now click and hold the rotation button and move your mouse slightly to the left. This rotates the image to the left so that it lines up with the orange boxes.
Select both your photo and the orange square by selecting your photo holding down the shift key and clicking the orange square in the layers panel.
Once you have both selected click "Slice" in the lower right corner of your screen.
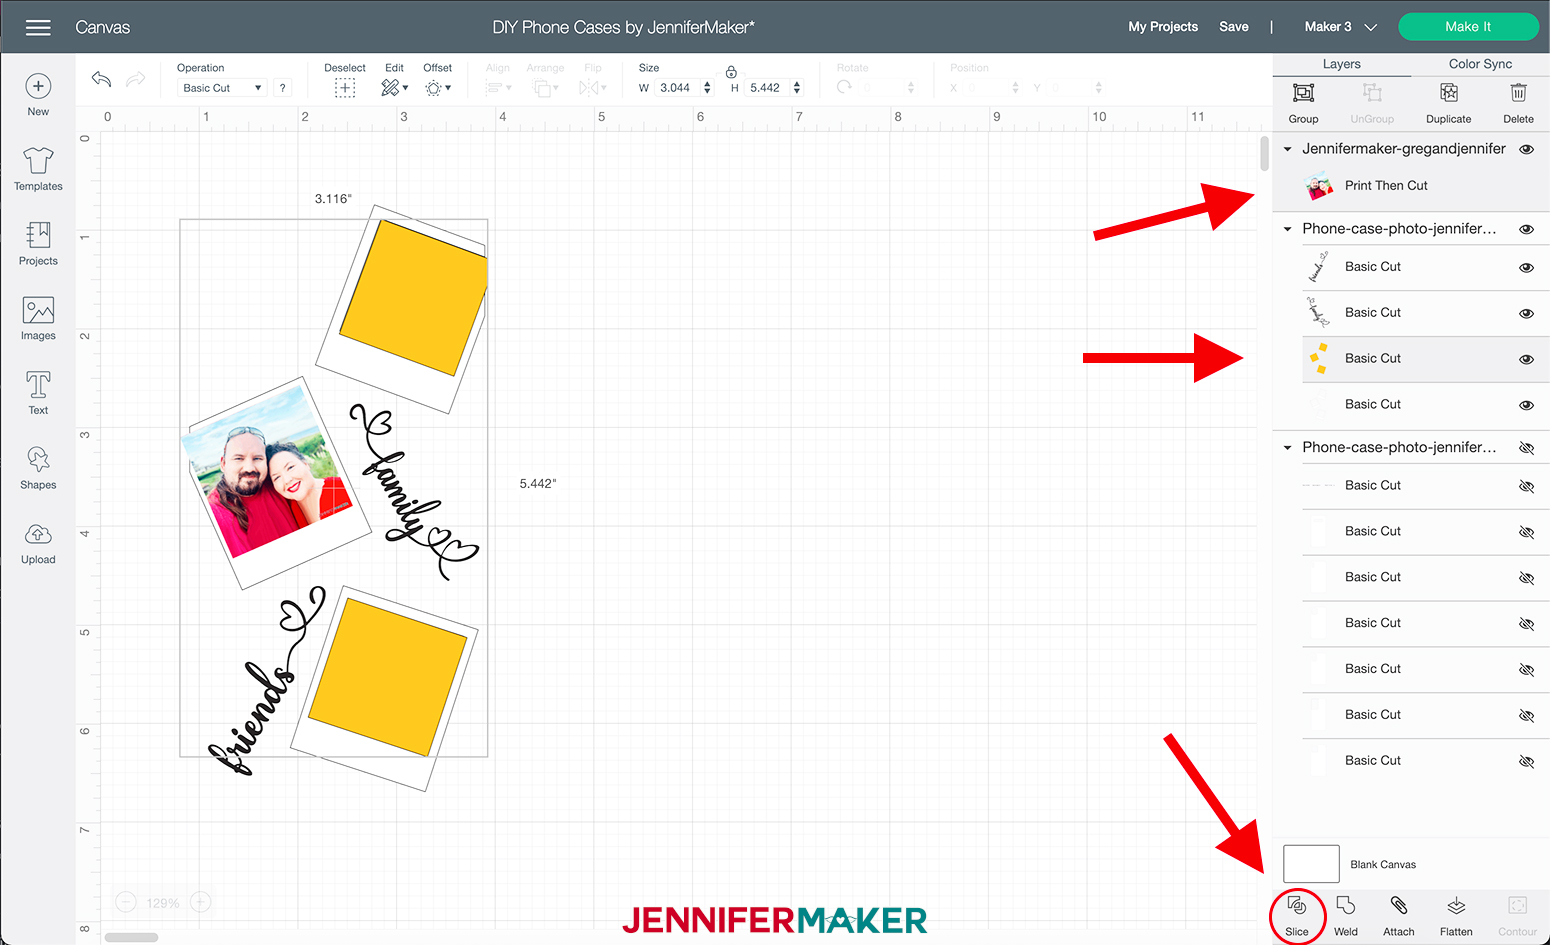
Delete all extra pieces from the slice and repeat for the other two photos.
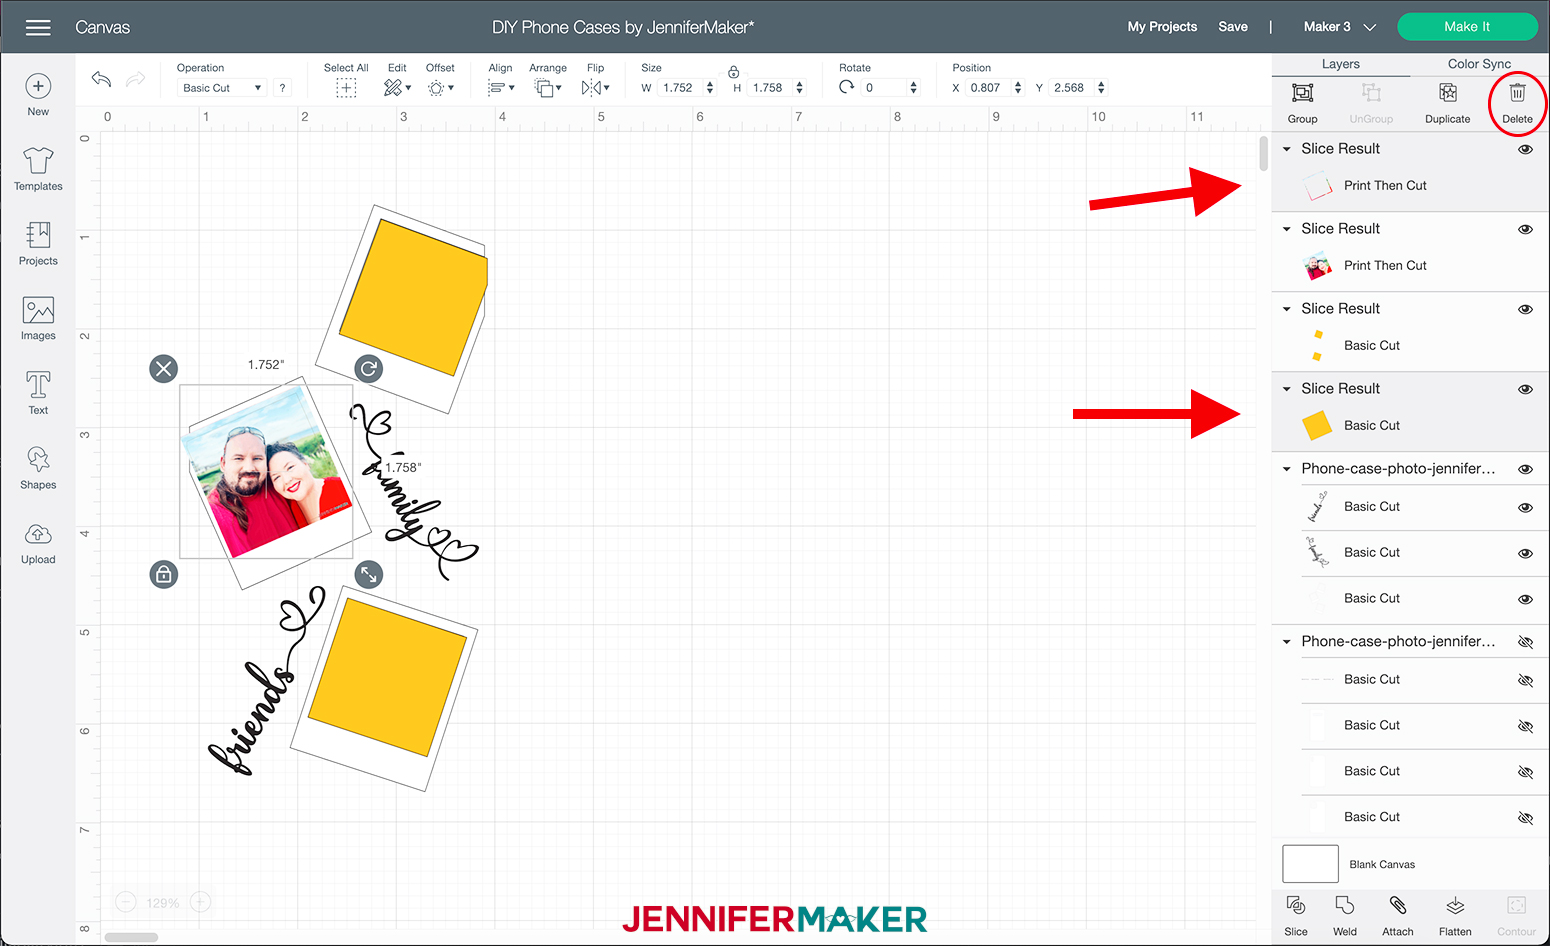
Once all your photos are sliced select them all by again holding down the shift key and clicking the layers in the layers panel.
Then click "Attach" in the lower right.
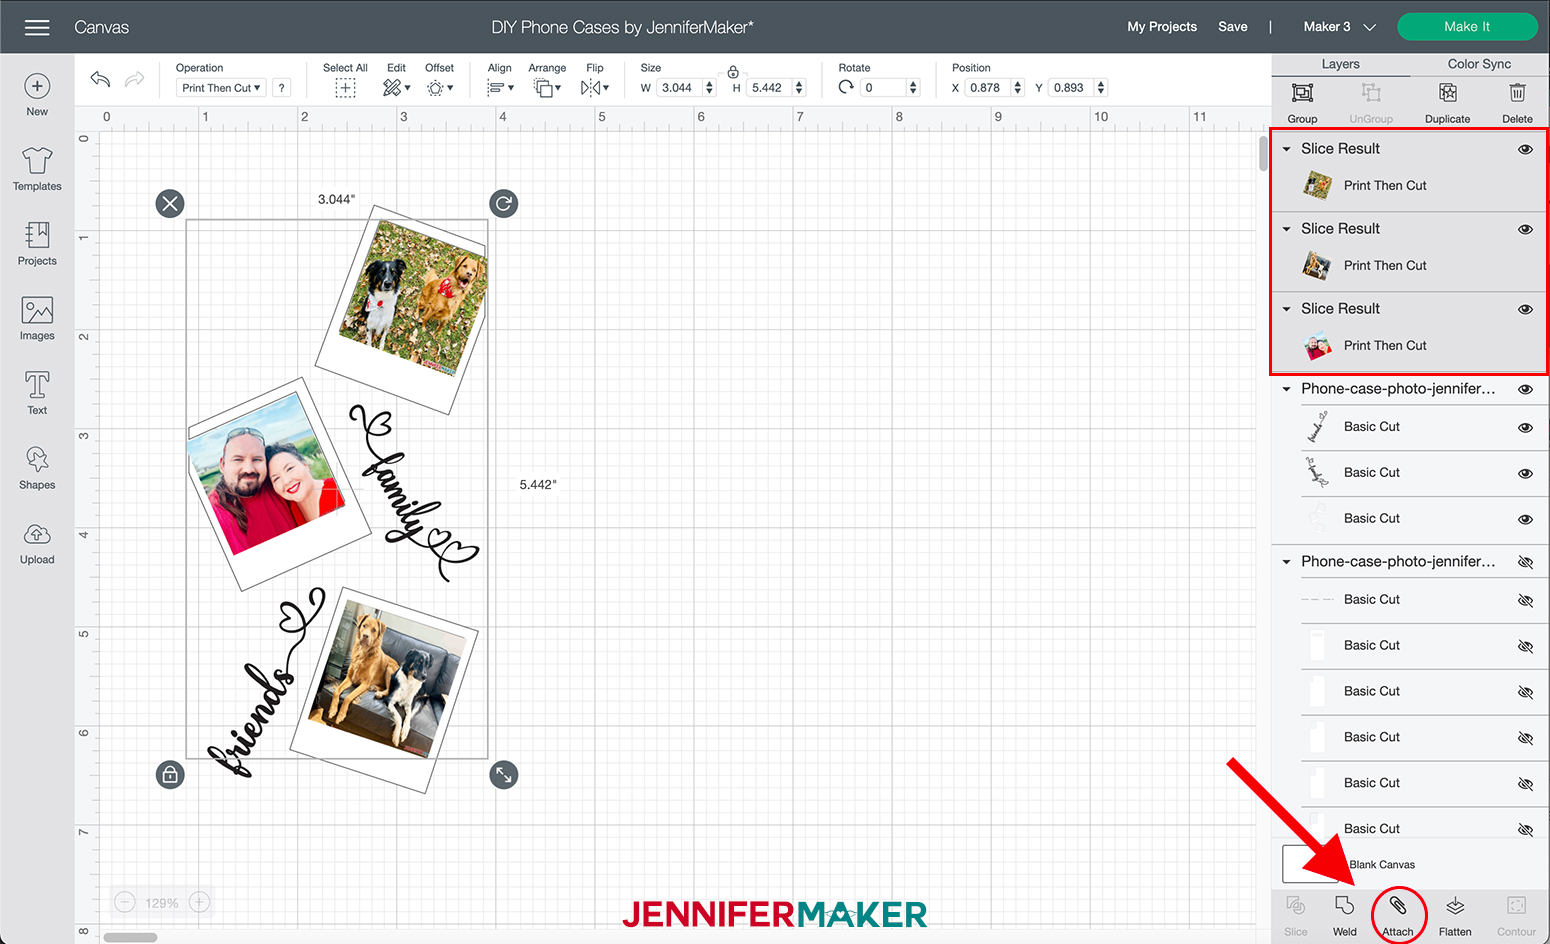
Now, I am going to go ahead and click "Make It."
On the next page select "On Mat" and click "Done."
Then click "Continue" at the bottom right corner.
Now we are going to select our materials. Click "Browse All Materials."
Then select "Premium Vinyl - Permanent Glossy and click "Done."
NOTE: You do not need to use "More Pressure" with the Maker 3, however, all machines are different. I usually select “More” pressure for most of my materials, but again it’s all dependent on your particular cutting machine.
Now, using the Cricut Green StandardGrip 12" x 12" mat cut the first mat.
To remove the vinyl from the mat, flip the mat over and peel the mat away from the vinyl. This prevents the material from curling.
Repeat these steps for the black mat as well.
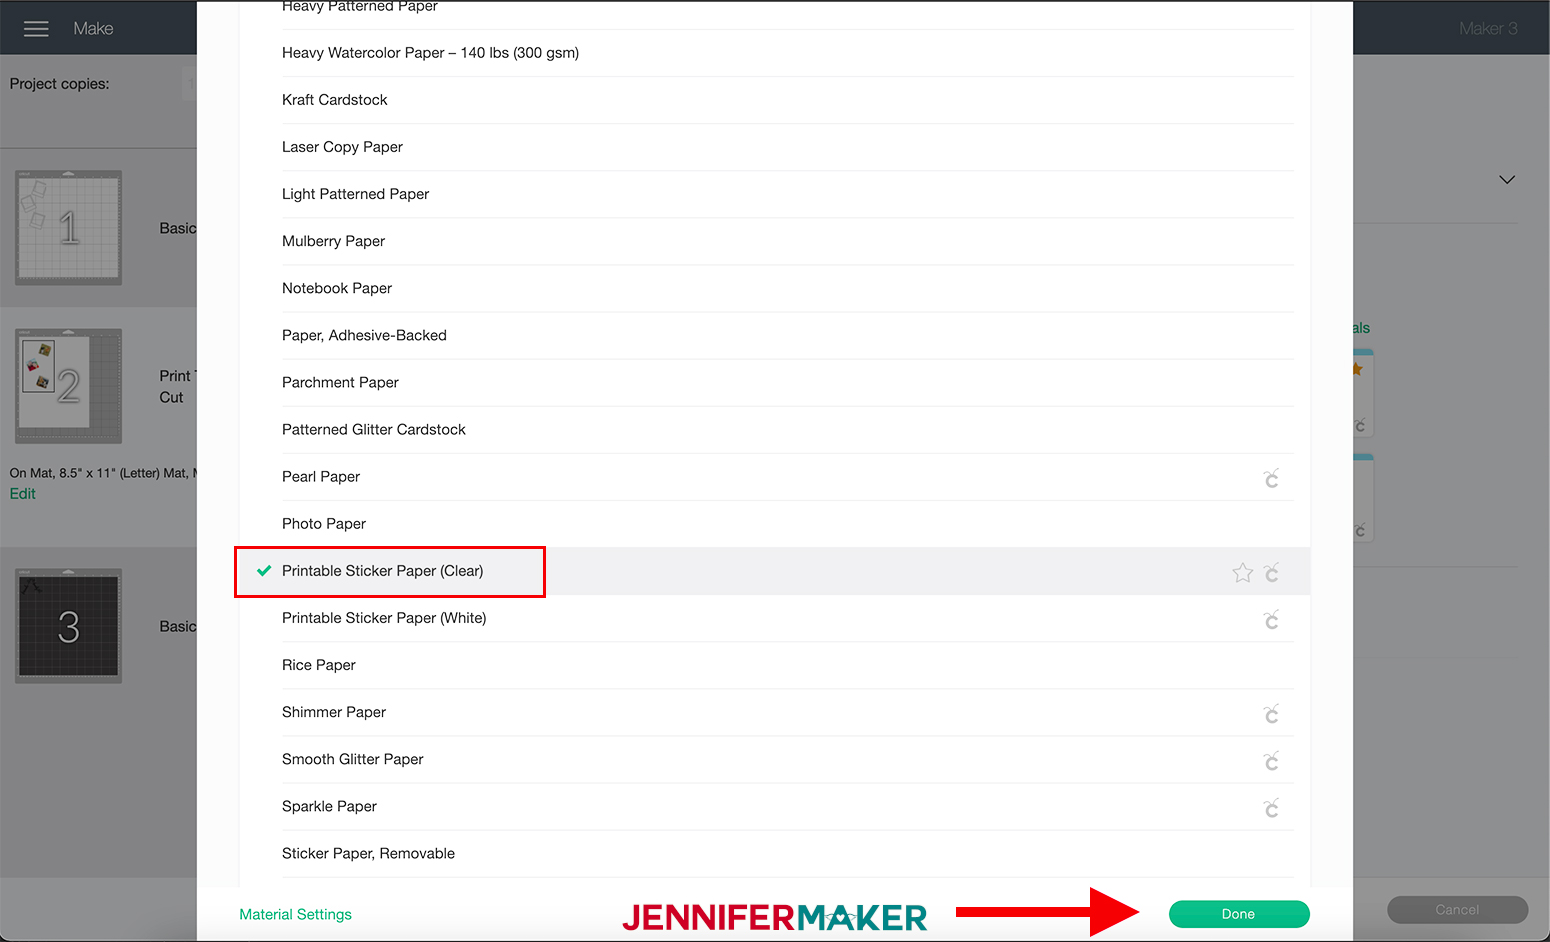
The photo layer uses Print then Cut. For this layer, insert the Printable Sticker Paper (Clear) into your printer so that it prints on the shiny side. Click "Send to printer" in Cricut Design Space. On the pop-up page select "Print" this will send your image to your printer and it will start printing it. How cool is that!
Once printed let it dry for 5-10 mins to ensure the ink does not smudge. Then place onto your mat.
Select "Browse All Materials" again and select "Printable Sticker Paper (clear)" under paper in the materials menu.
Load your mat and select the blinking "Arrow/Go" button.
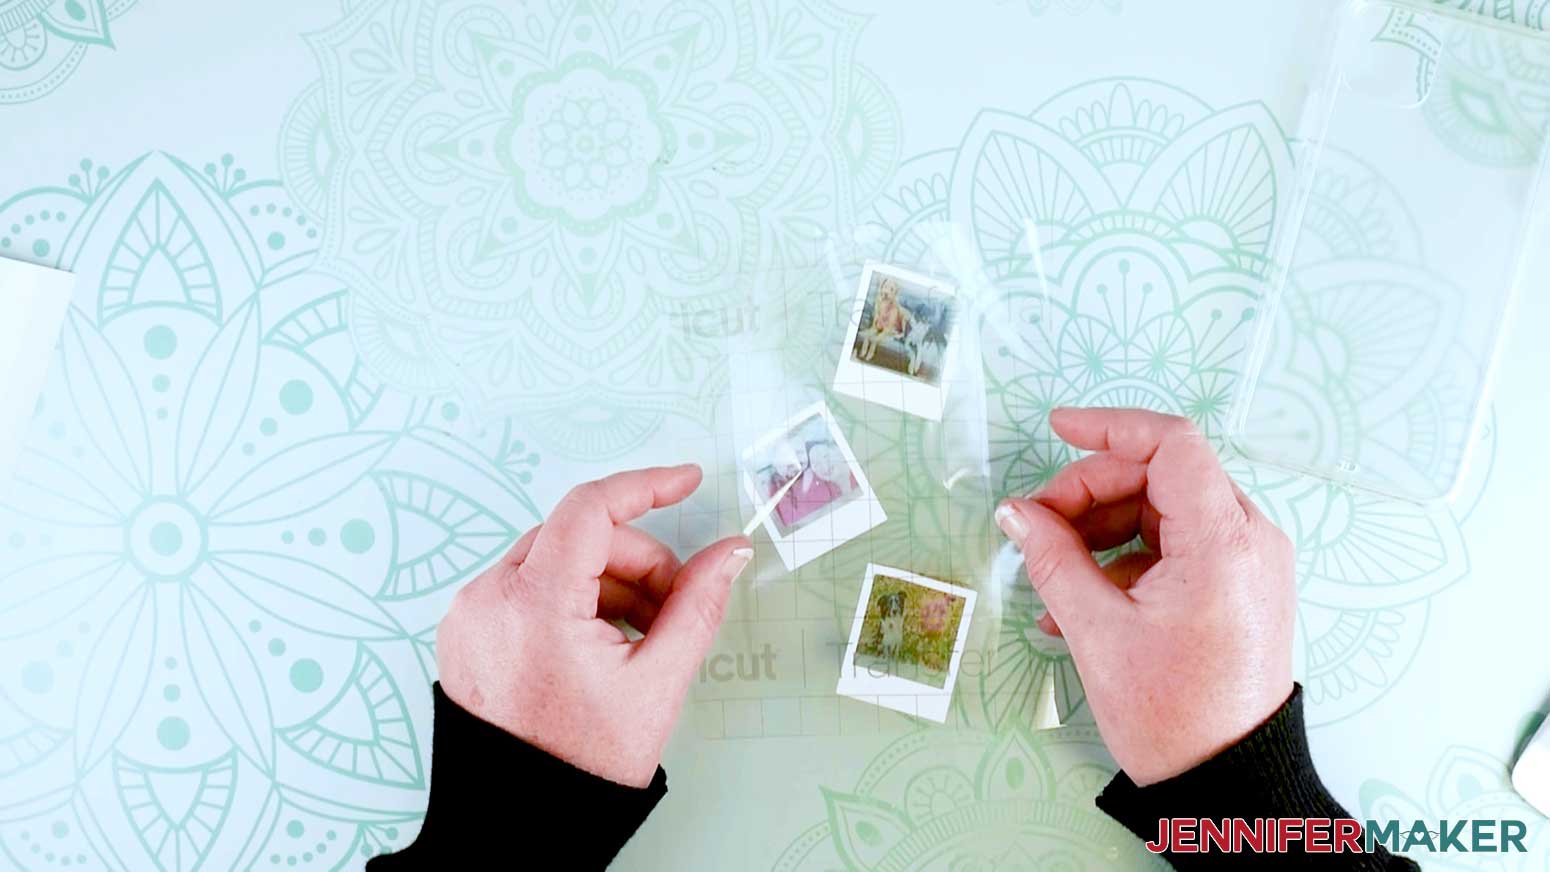
Once it is cut carefully remove it from the mat and weed the vinyl and remove the photos.
STEP 3: TRANSFER THE DESIGN TO YOUR PHONE CASE
Take your phone case out and lay it down on the table. Make sure to check if it has a protective cover on it. If so remove it before continuing. As we want the design to adhere directly to the phone case.
Next, cut a piece of transfer tape slightly bigger than your design.
Take your pictures, and the photo frames and place the photo frames on top of the pictures using transfer tape and burnish them together.
Next, take your completed photos and place transfer tape on top of them and burnish it using the scraper tool to make the vinyl adhere to the tape.
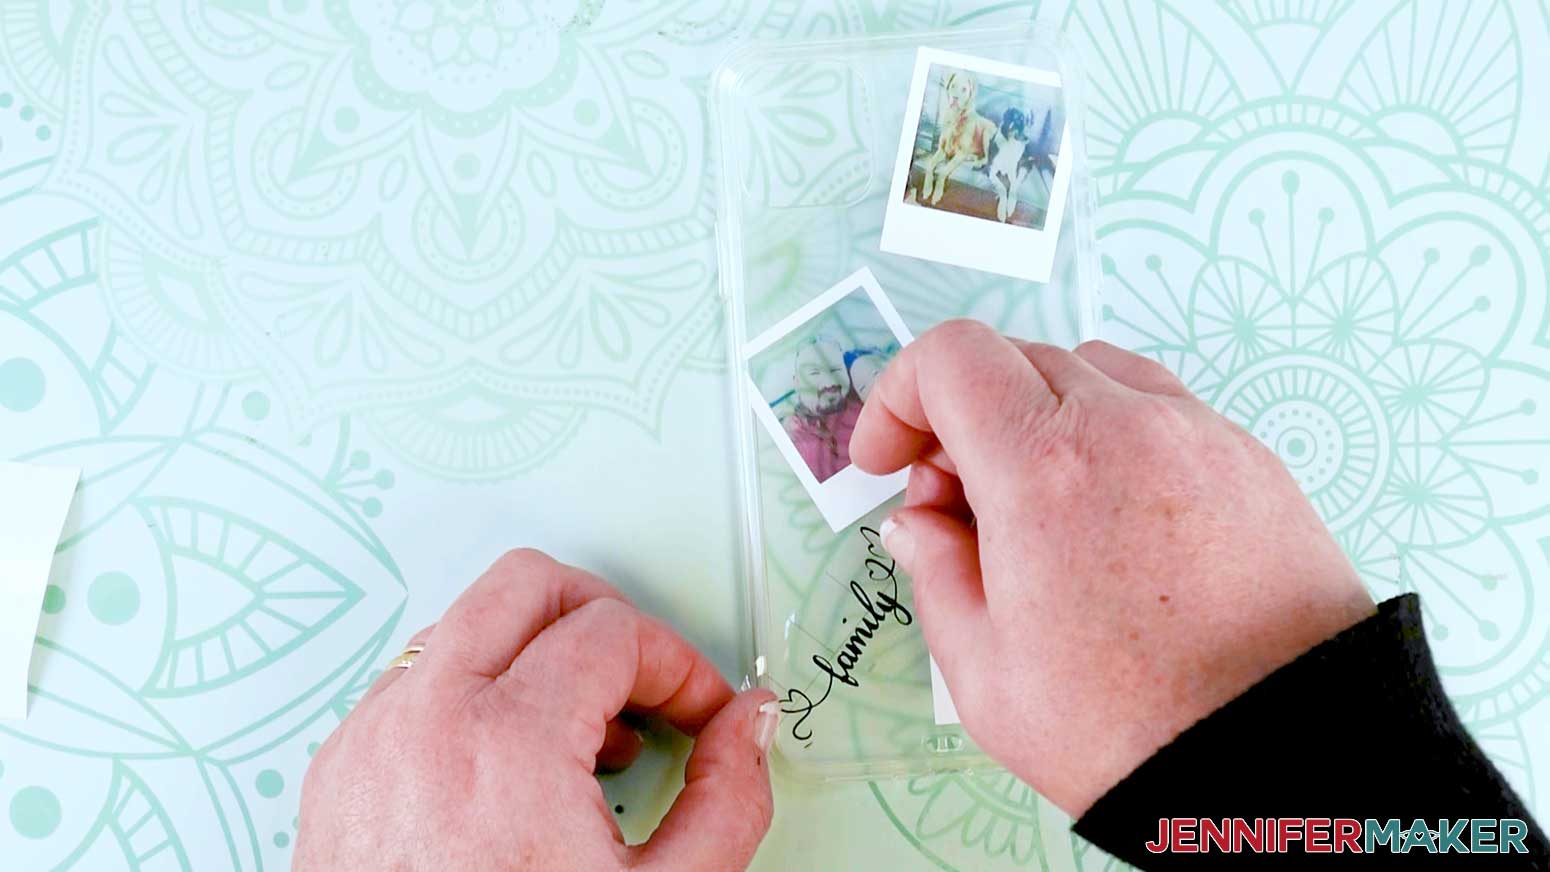
Line up the edges of the photos to the edges of your phone case. Some of the photo frames may hang over the edge.
Tack the photos down to the phone case using the burnishing technique and remove your transfer tape.
Next, take the word family and place transfer tape on top of the vinyl, and burnish it using the scraper tool to make the vinyl adhere to the tape.
Place the word "family" between the two bottom photos on the left-hand side. Angling it at 70 degrees and burnishing it down.
Next, carefully remove your transfer tape.
Lastly, take the word “friends” place transfer tape on top of the vinyl, and burnish it using the scraper tool to make the vinyl adhere to the tape.
Place the word "friends" between the three photos on the right-hand side. Angling it down and tack it in place. Gently remove your transfer tape.

STEP 4: APPLY MOD PODGE
Now you’re not quite done — you need to seal your phone case. This is important because the inkjet-printed photos will smear and run without sealer. But rather than use Mod Podge, which may smear your photo, I recommend a clear sealer spray. So follow the manufacturer’s safety instructions to spray the phone case in a well-ventilated area and allow it to dry. You may need several coats.
And there you go...what a fun design and personal design!
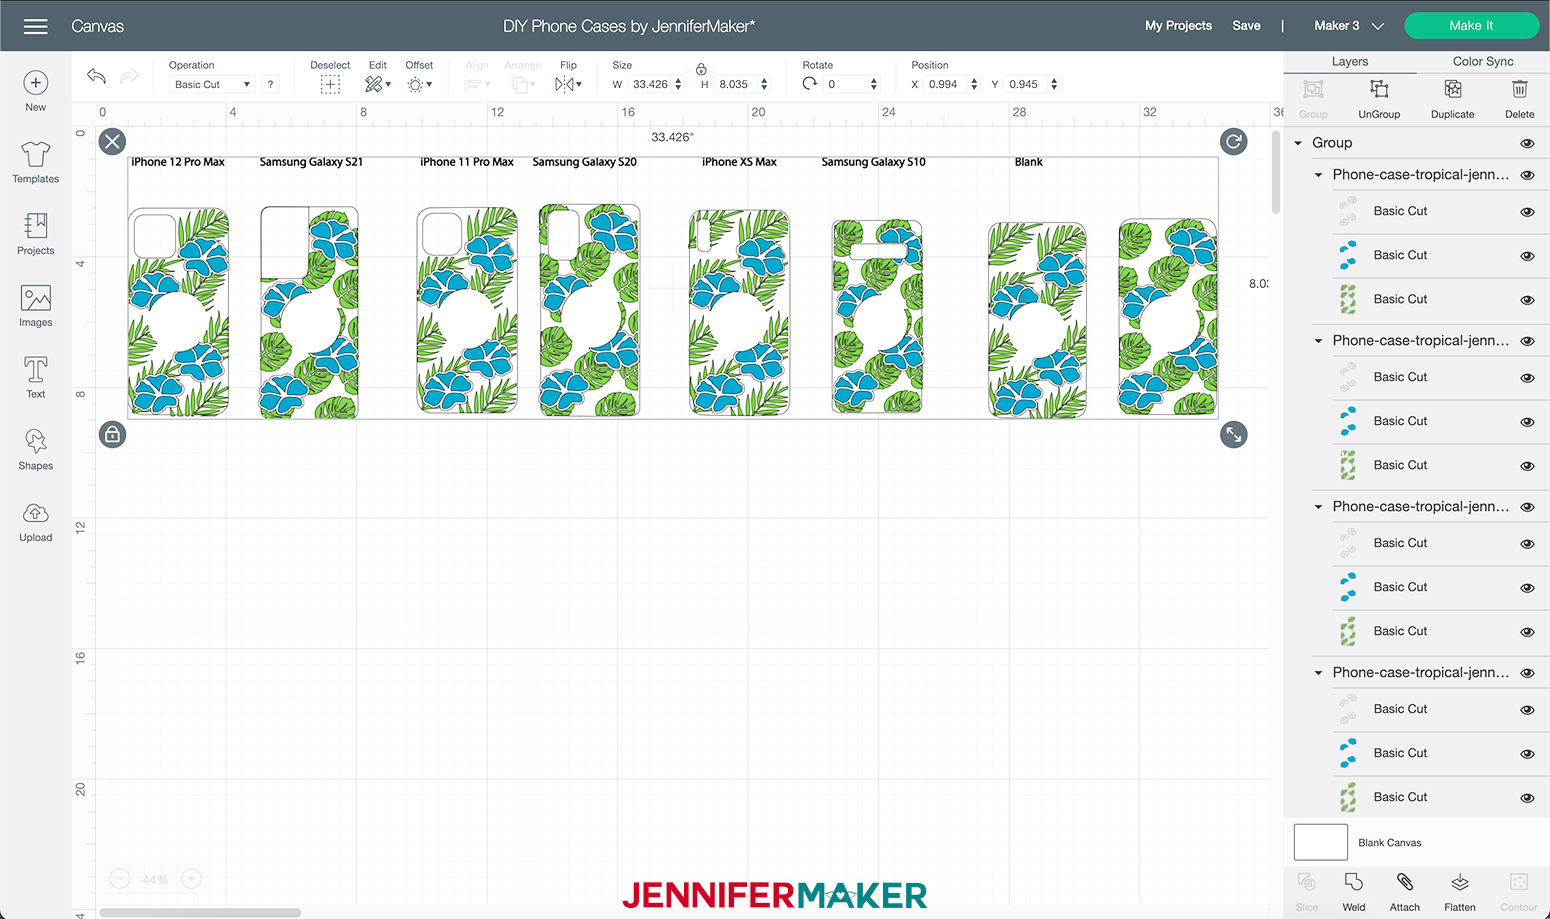
TROPICAL DESIGN
First, ungroup the design and delete all phone styles and designs that you do not want from the layer panel. To do this I am going to select "Ungroup" at the top right of my screen.
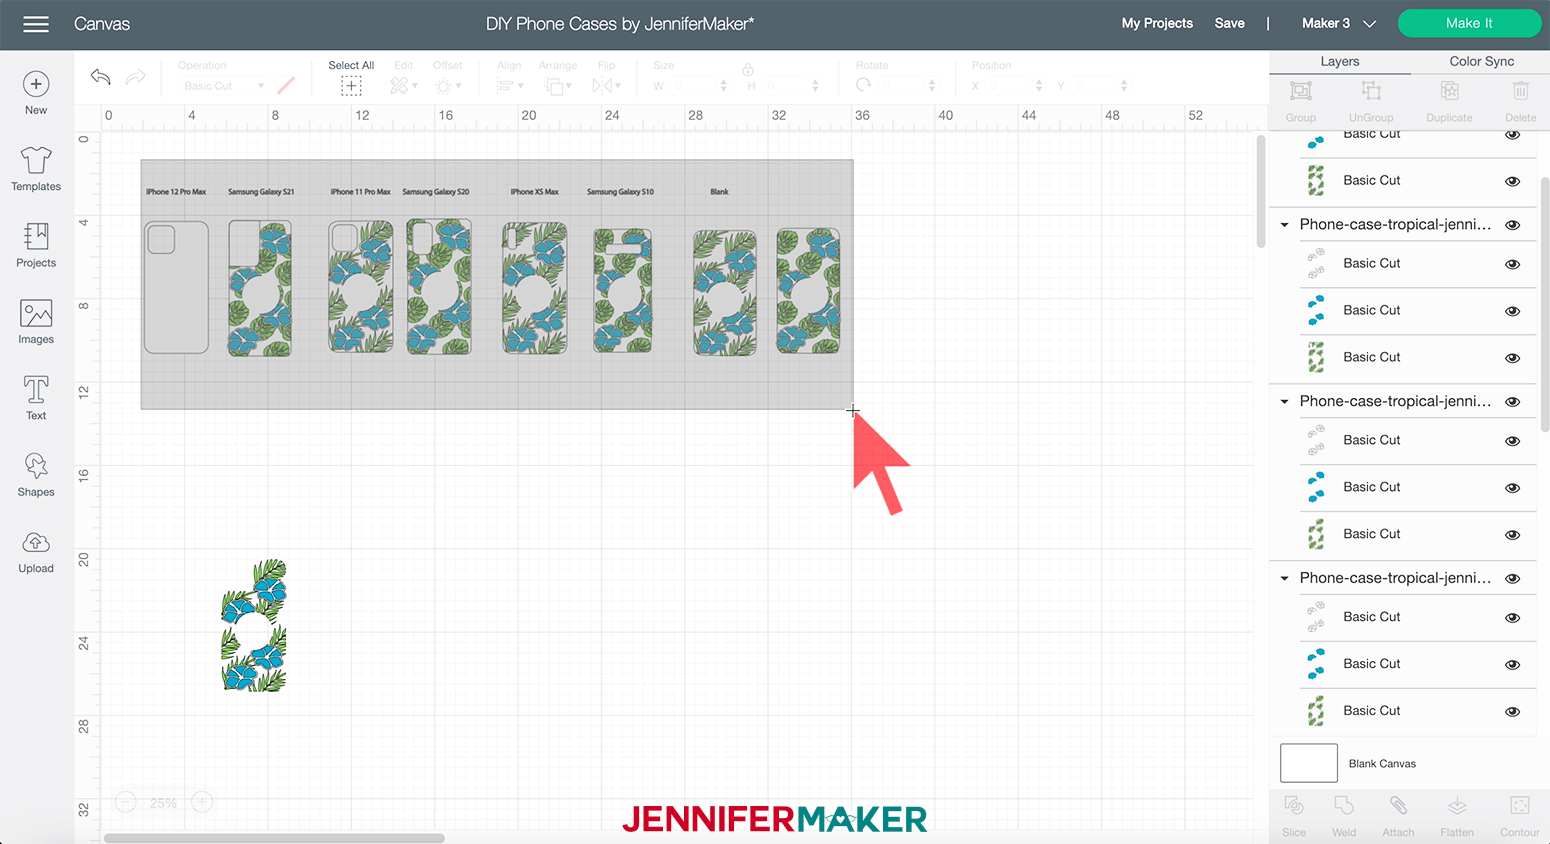
Click and drag the phone style you would like to use away from the rest of the designs.
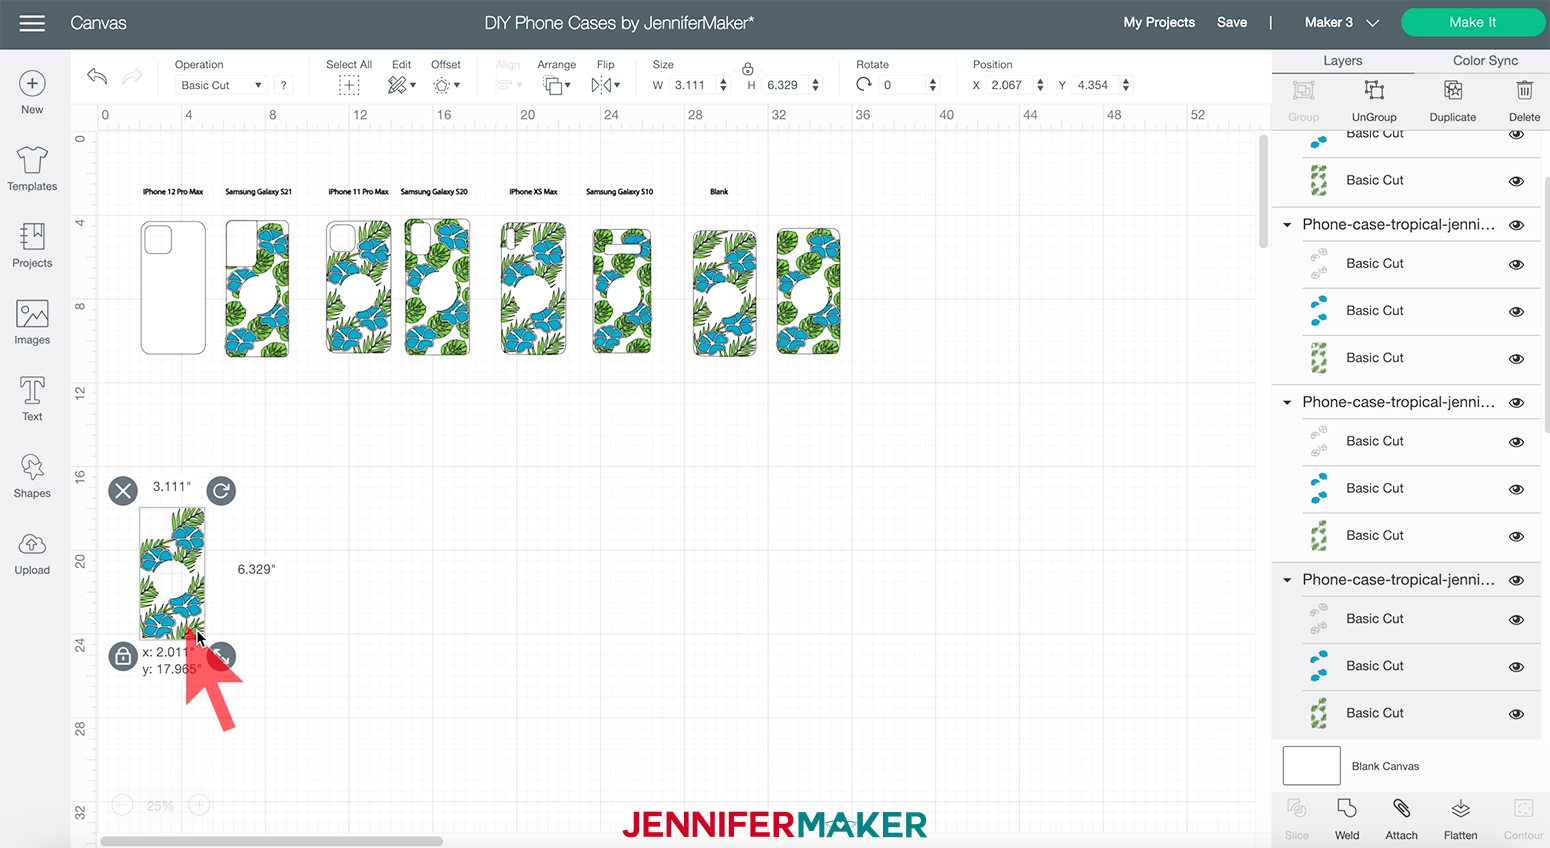
Then I am going to left-click and drag my bounding box over the designs I don't want. Then click delete at the top right corner. I am going to use the iPhone 12 Pro Max for this design.
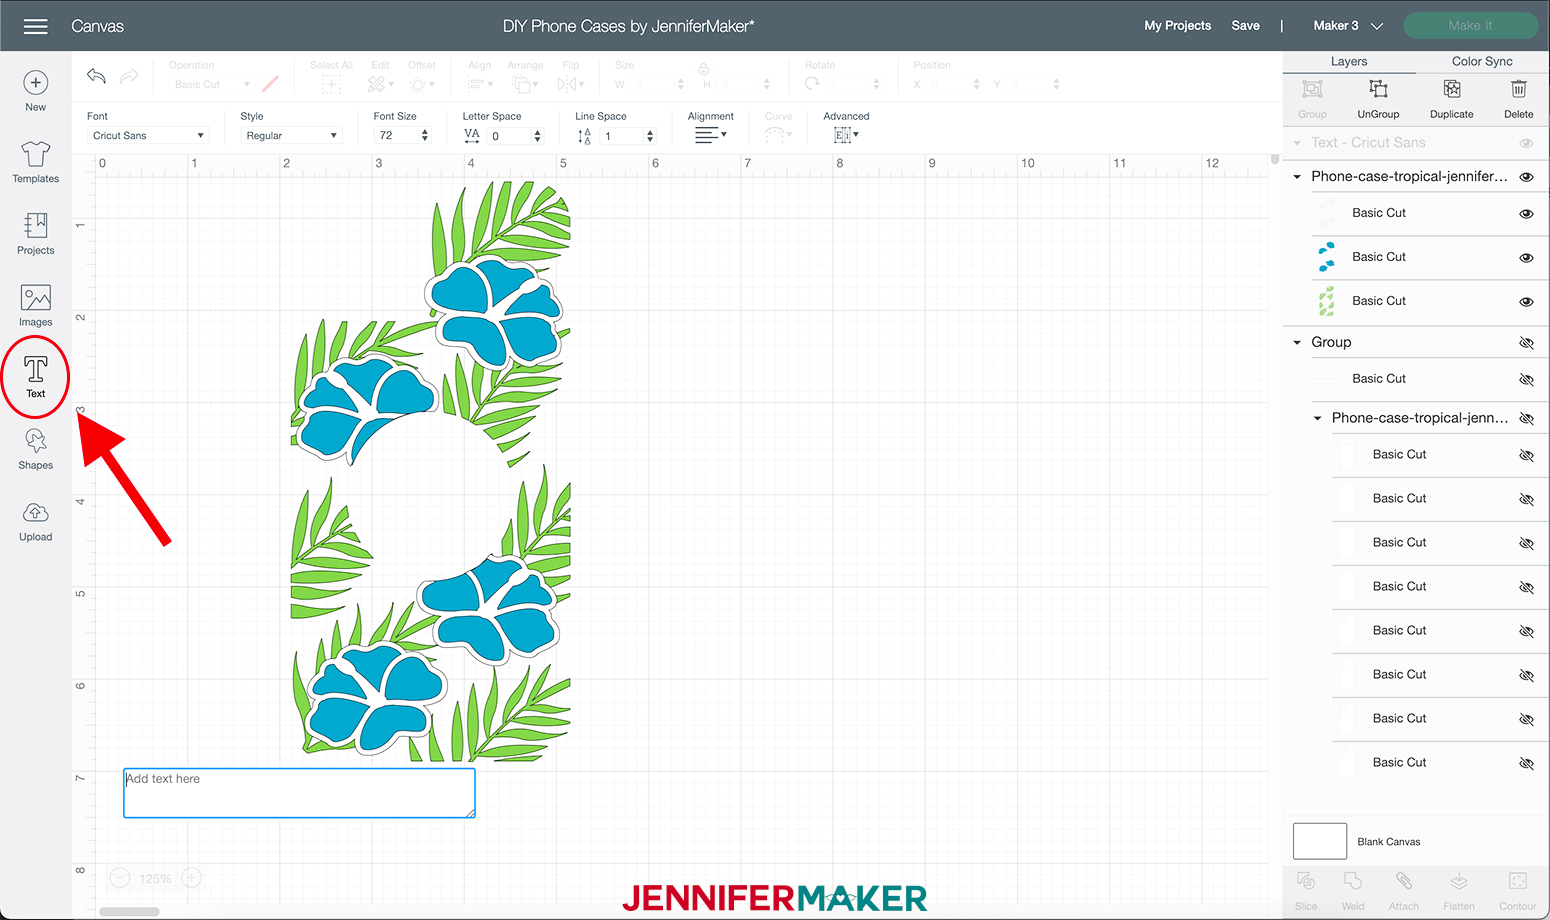
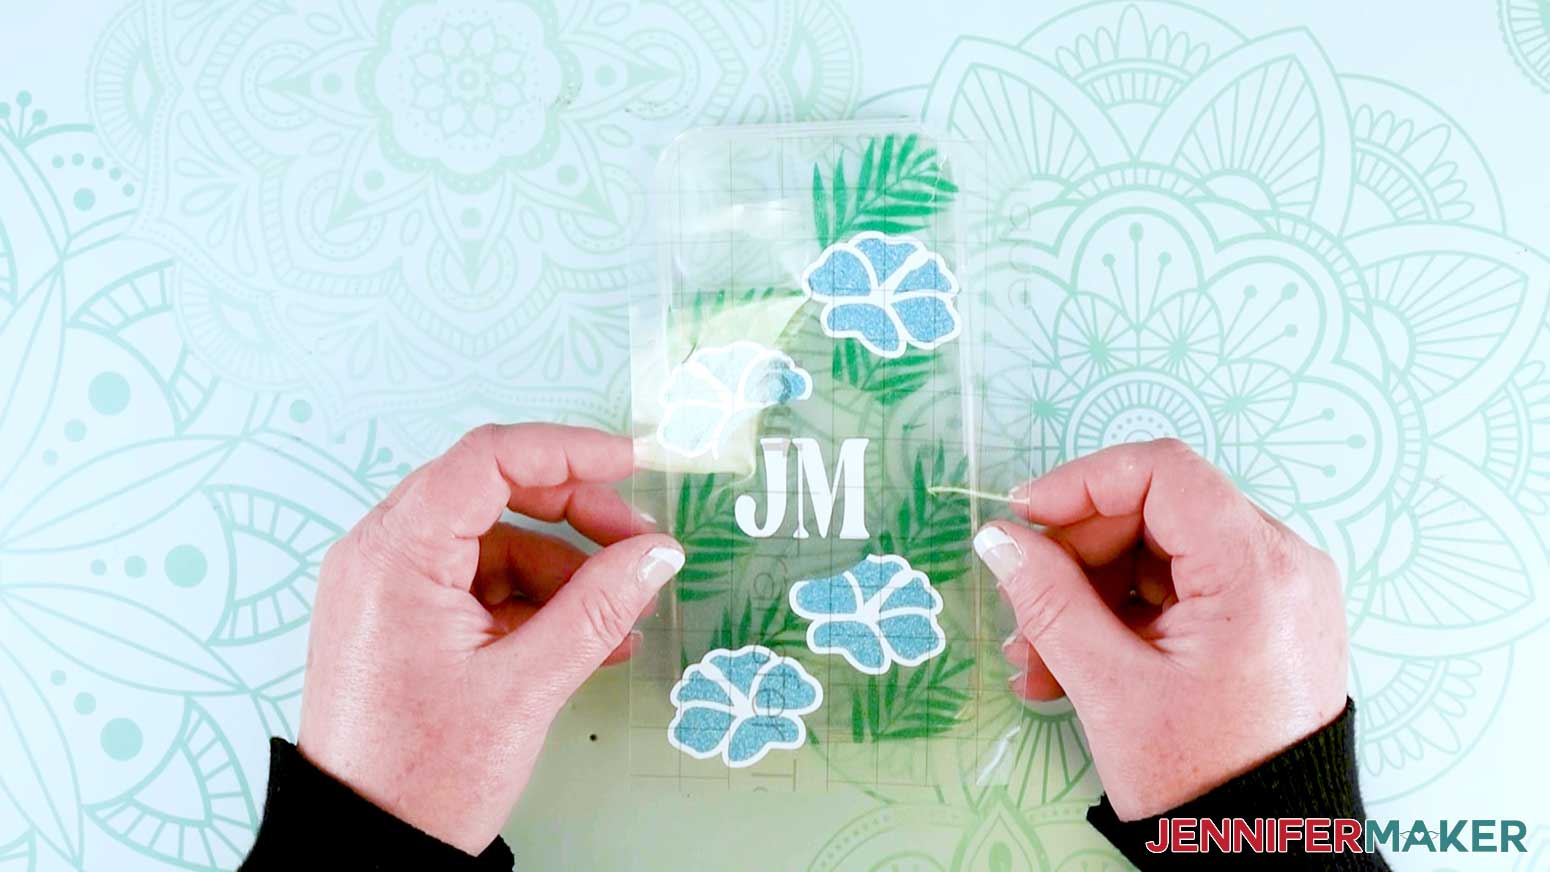
There is a hole in the center where you can put your initials or your name. Customize it any way you would like!
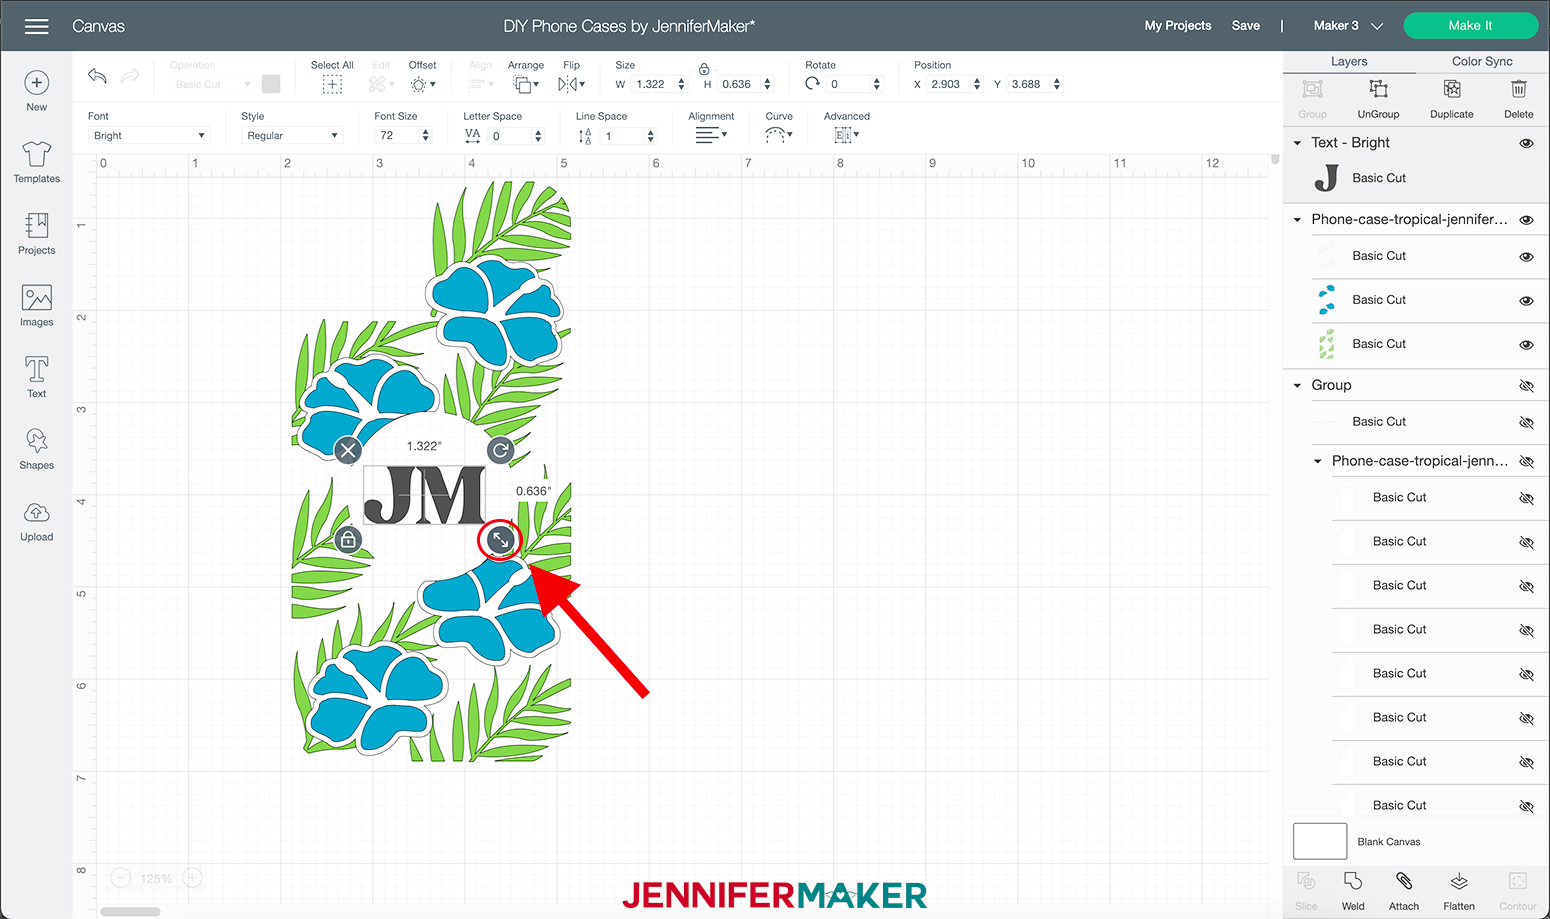
I am going to put my initials "JM" in the center.
To do this I am going to select the "Text" tool and type my initials.
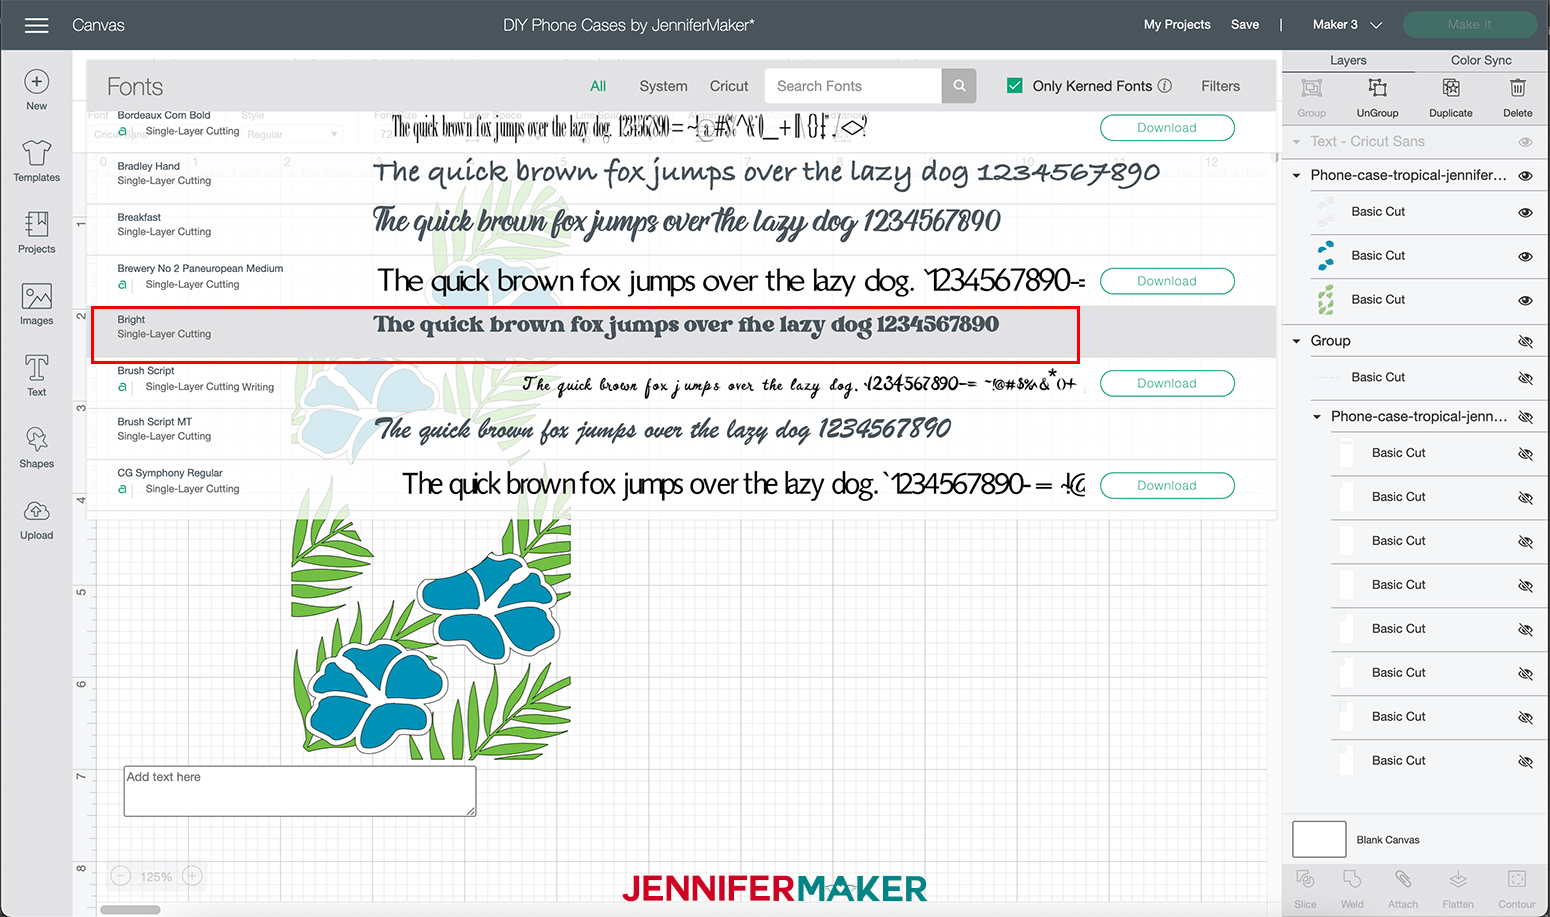
Next, I am going to select the font I am going to use by going to the font drop-down menu at the top left of the screen. I am going to select "Bright" From FontBundles.net but feel free to select whatever font you like!
TIP: If you are not sure how to upload fonts to Cricut Design Space, check out my tutorial "How to Upload Fonts to Cricut & Create a Subway Art Sign" on YouTube.
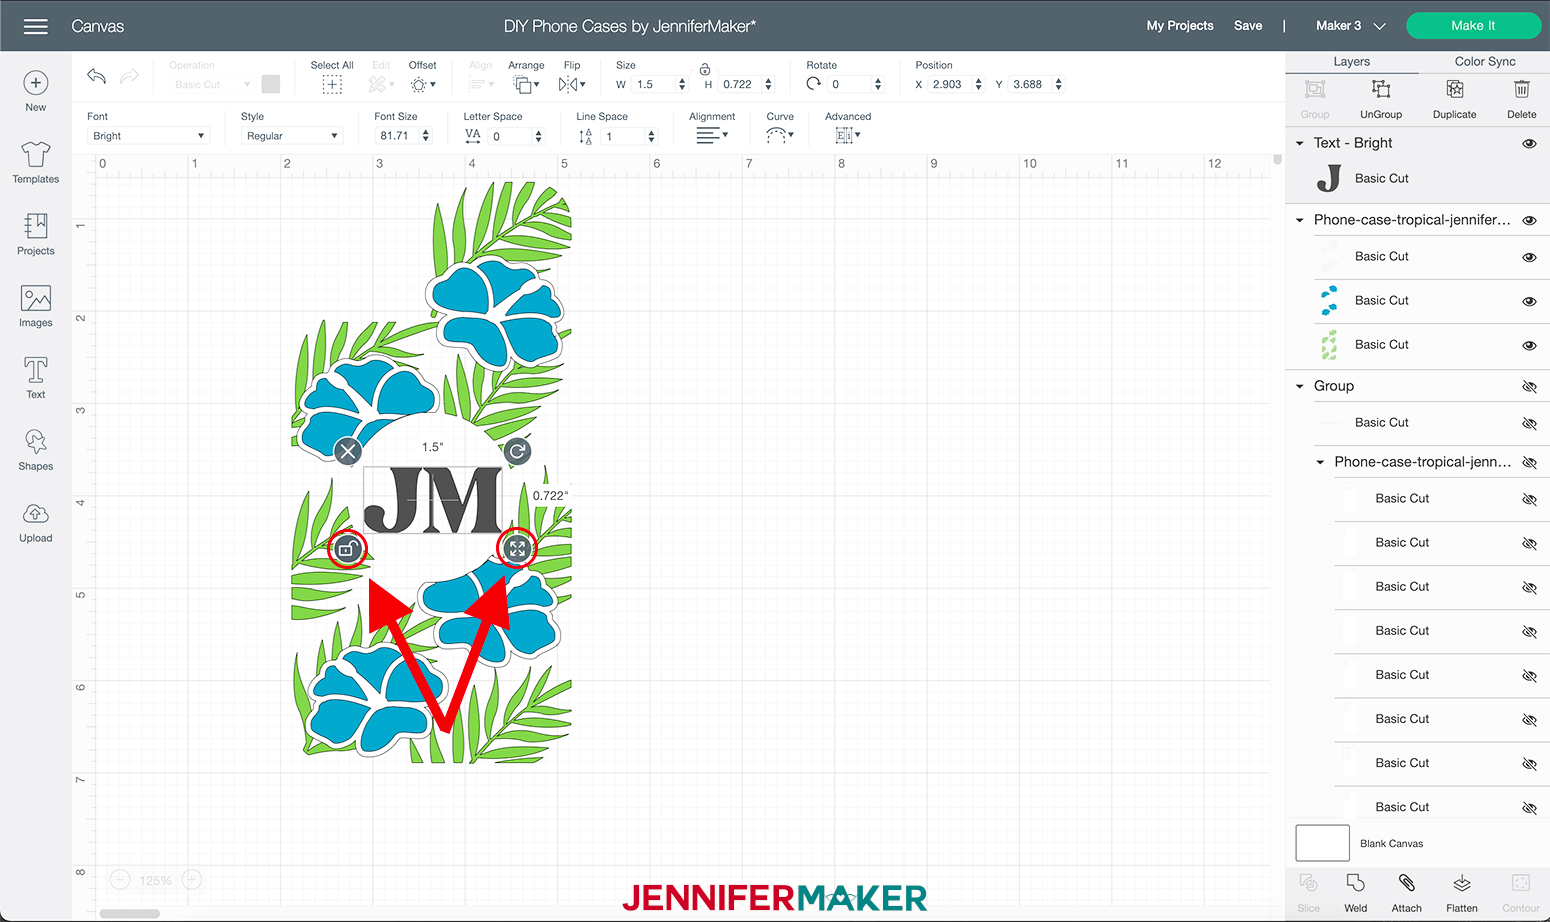
Now I am going to resize it using the resizing handle. Then I am going to click the lock button to unlock sizing and I am going to make my letters a little bit bigger. My final size for my initials is 1” x 1.5.” Every phone and initials are different so size to your liking!
Now we are going to select our design in the layers panel and click "Ungroup."
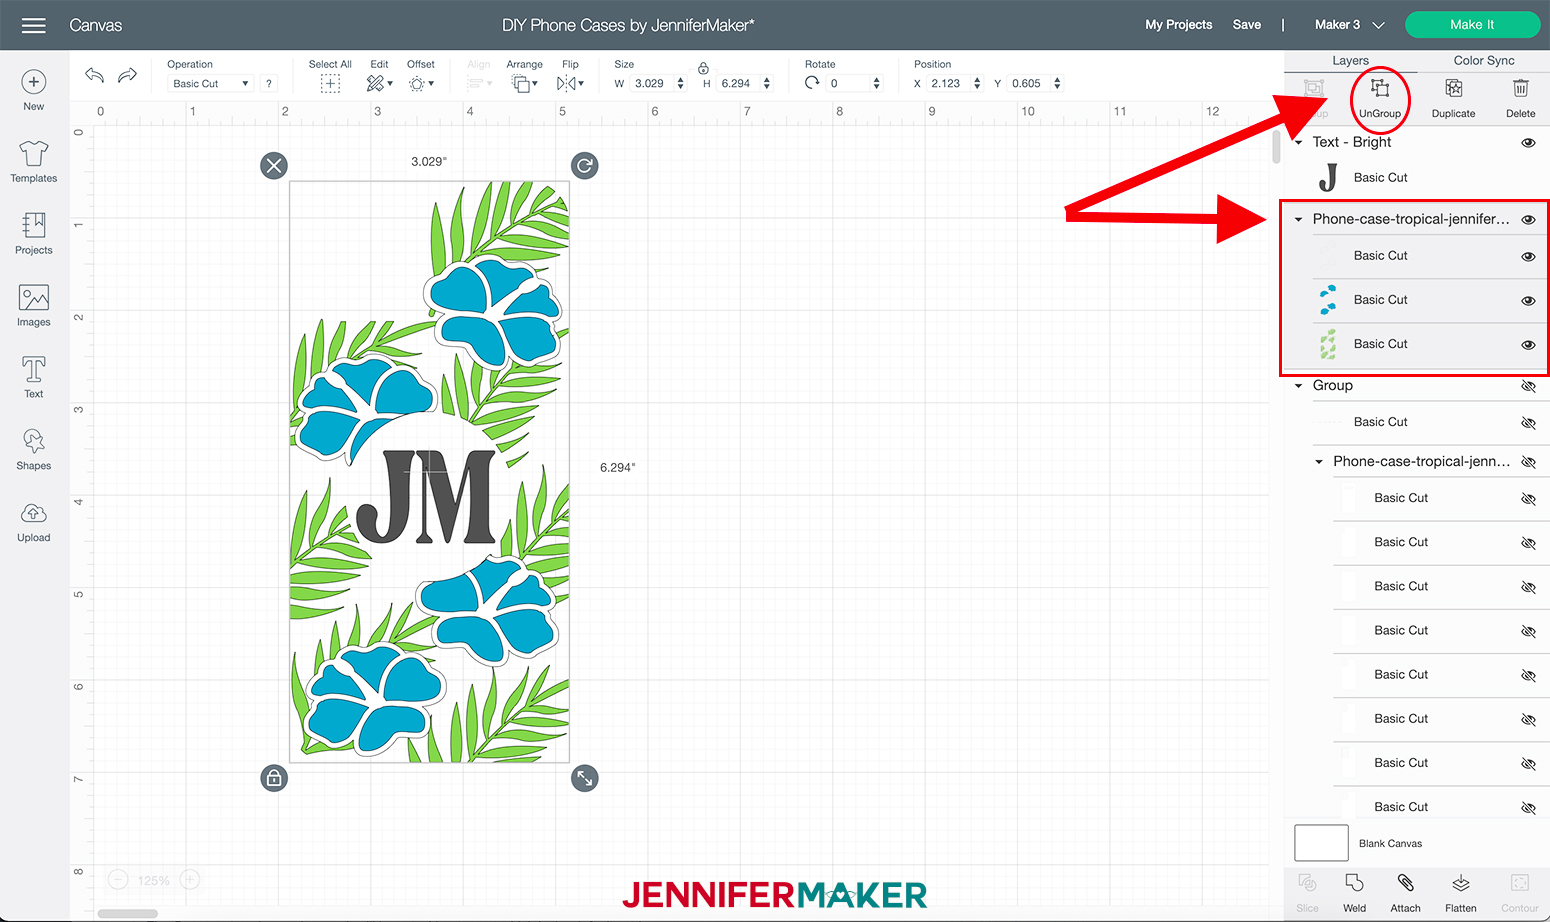
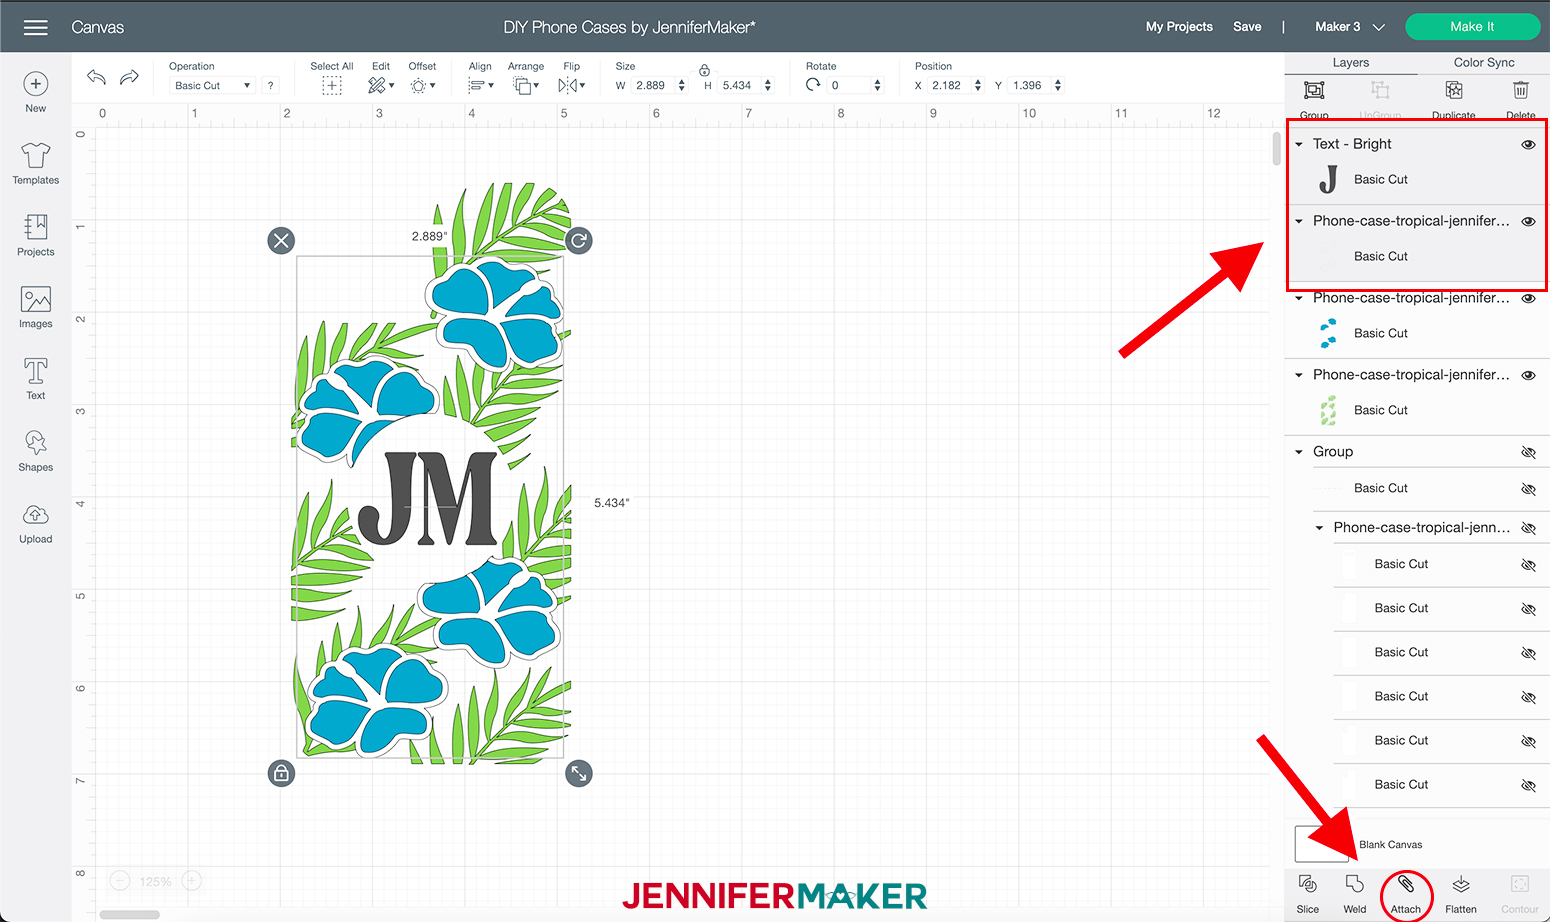
Next, I am going to select my initials and hold down the shift key and select the White flower outline. Then click "Attach" at the lower right corner of your screen. This changes the color of the initials to white and the Cricut will cut these two on the same mat.
Now that I have my design prepped I am going to go ahead and click "Make It."
On the next page select "Multiple Ways" and click "Done."
For the white mat select "On Mat" from the drop-down menu on the left-hand side of the screen.
The Green mat we leave alone as it will be cut without a mat which is the default setting.
For the blue mat select "On Mat" from the drop-down menu on the left as we did above.
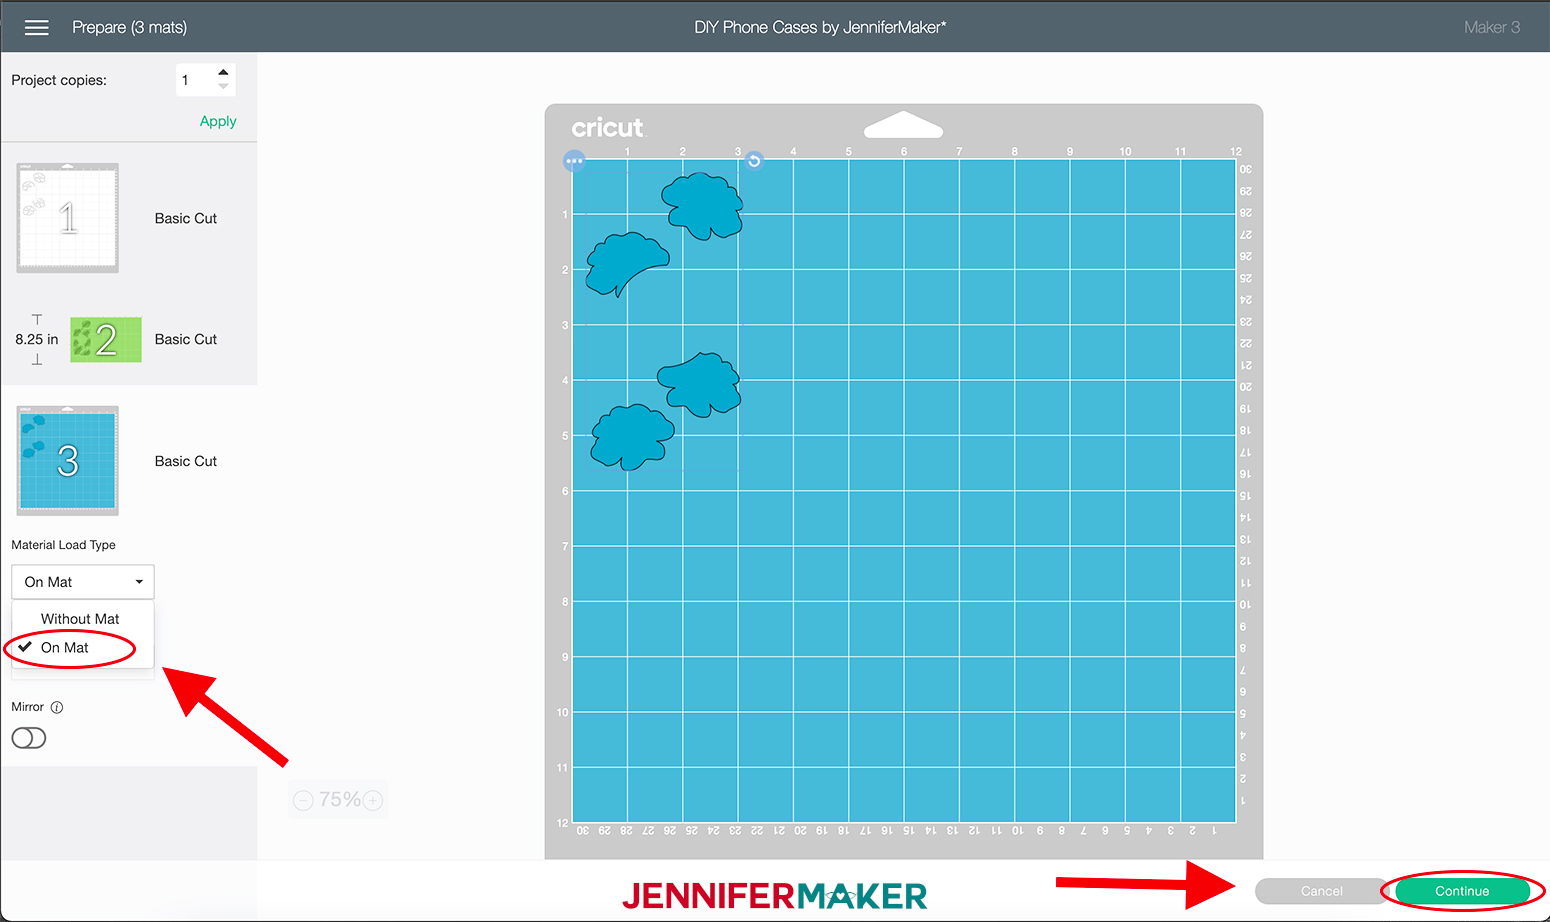
Then click "Continue" in the lower right corner.
Now we are going to select our materials, for the white mat, click the "Browse All Materials" button on the right side of the screen.
Then select "Premium Vinyl - Permanent Glossy" from the menu under the Vinyl section. Then click "Done."
Now, using the Cricut Green StandardGrip 12" x 12" mat cut the first mat with Cricut Premium Vinyl (white).
Then remove the vinyl from the mat. Flip the mat over and peel the mat away from the vinyl. This prevents the material from curling.
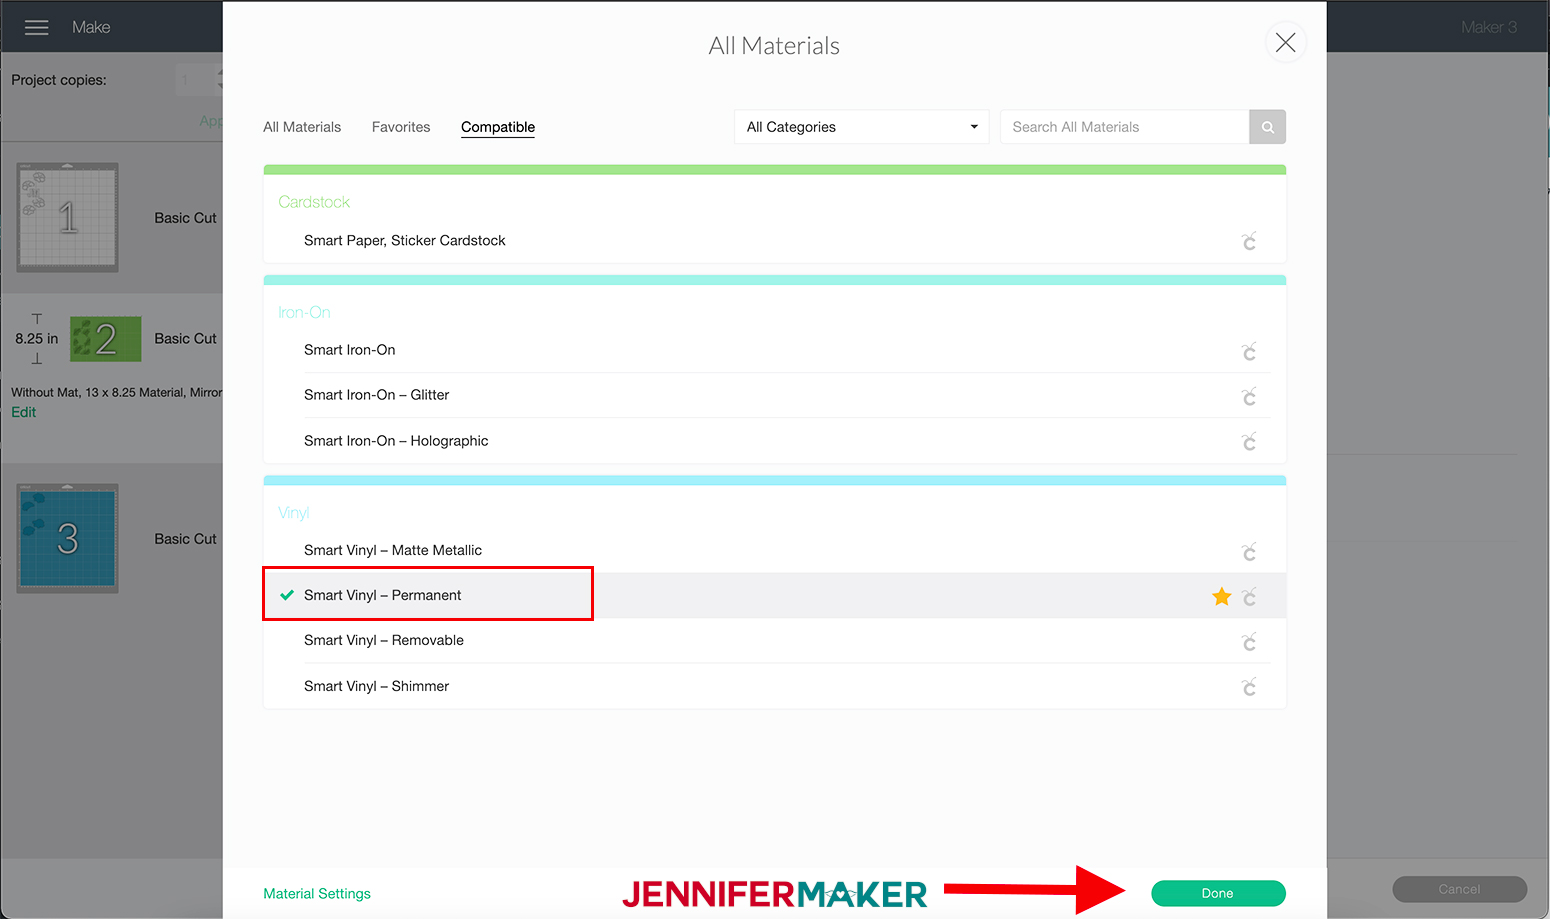
For the green mat, use the "Smart Vinyl - Permanent" setting from the materials menu and feed your Smart Vinyl into your Cricut Maker 3 or Explore 3.
Press the “Load/Unload” Button. Your machine will pull the vinyl all the way through to confirm there is enough material before starting the cut. Once your machine is ready, press the flashing "Arrow/Go" button.
When your design is done cutting, press the “Load/Unload” Button to remove your vinyl from the machine.
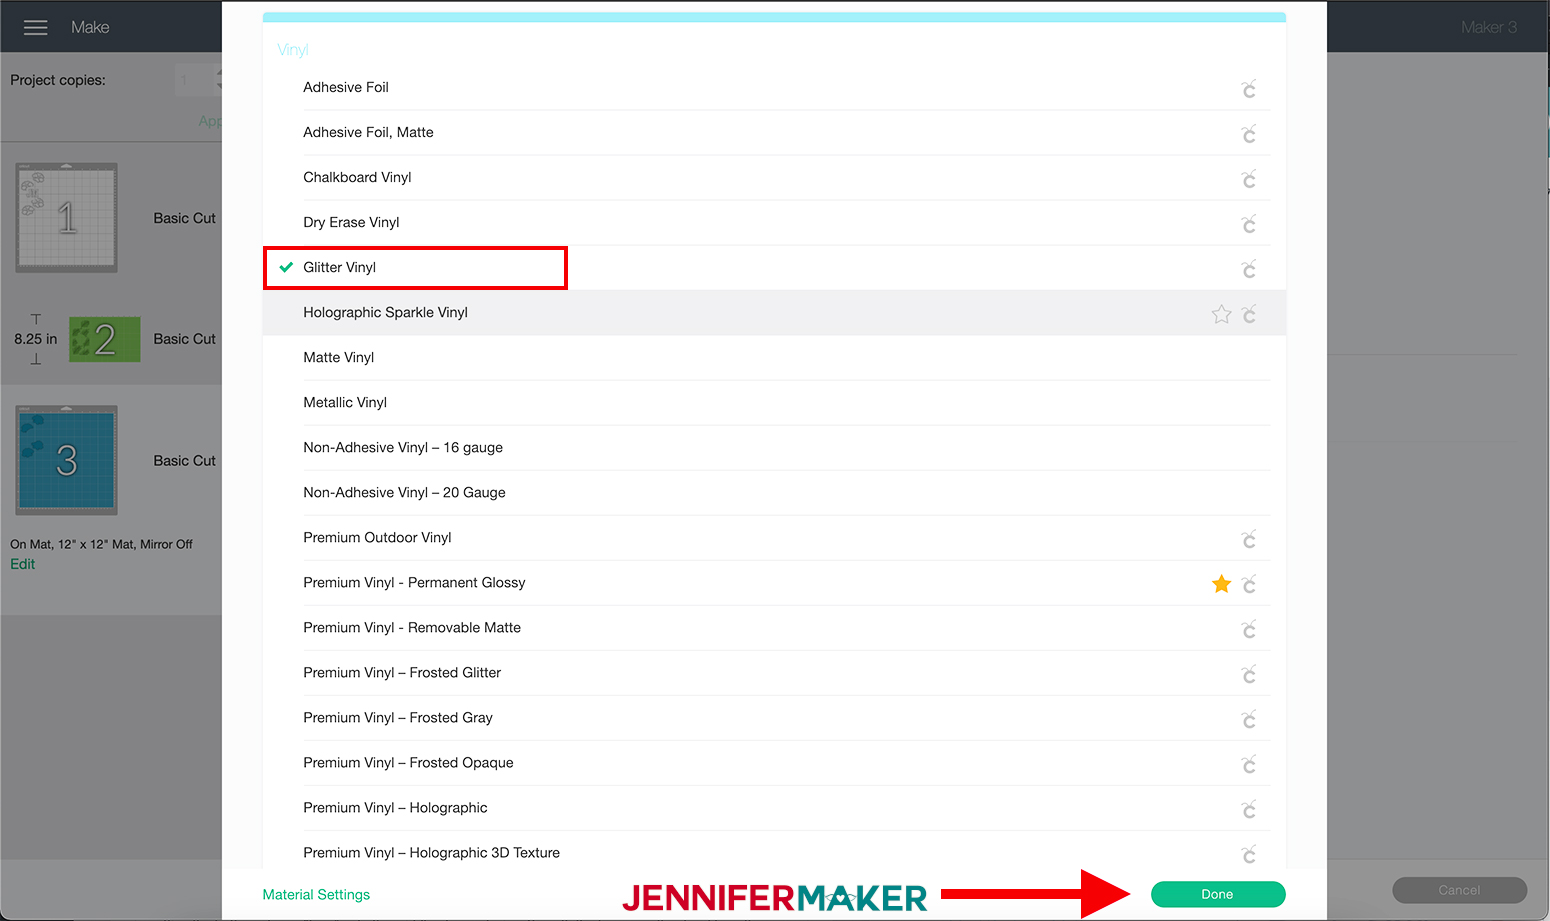
Next is the blue mat, for this mat, we are going to again select the "Browse All Materials" button on the right side of the screen. Click “Glitter Vinyl” From the Vinyl Section and click “Done.”
Again load your mat this time with the glitter vinyl (Teal) and cut the design. Remove the Vinyl from the mat as we did above.
Next weed the excess vinyl from your designs.
STEP 3: TRANSFER THE DESIGN TO YOUR PHONE CASE
Take your phone case out and lay it down on the table. Make sure to check if it has a protective cover on it. If so remove it before continuing on. As we want the design to adhere directly to the phone case.
Next, cut a piece of transfer tape slightly bigger than your design.
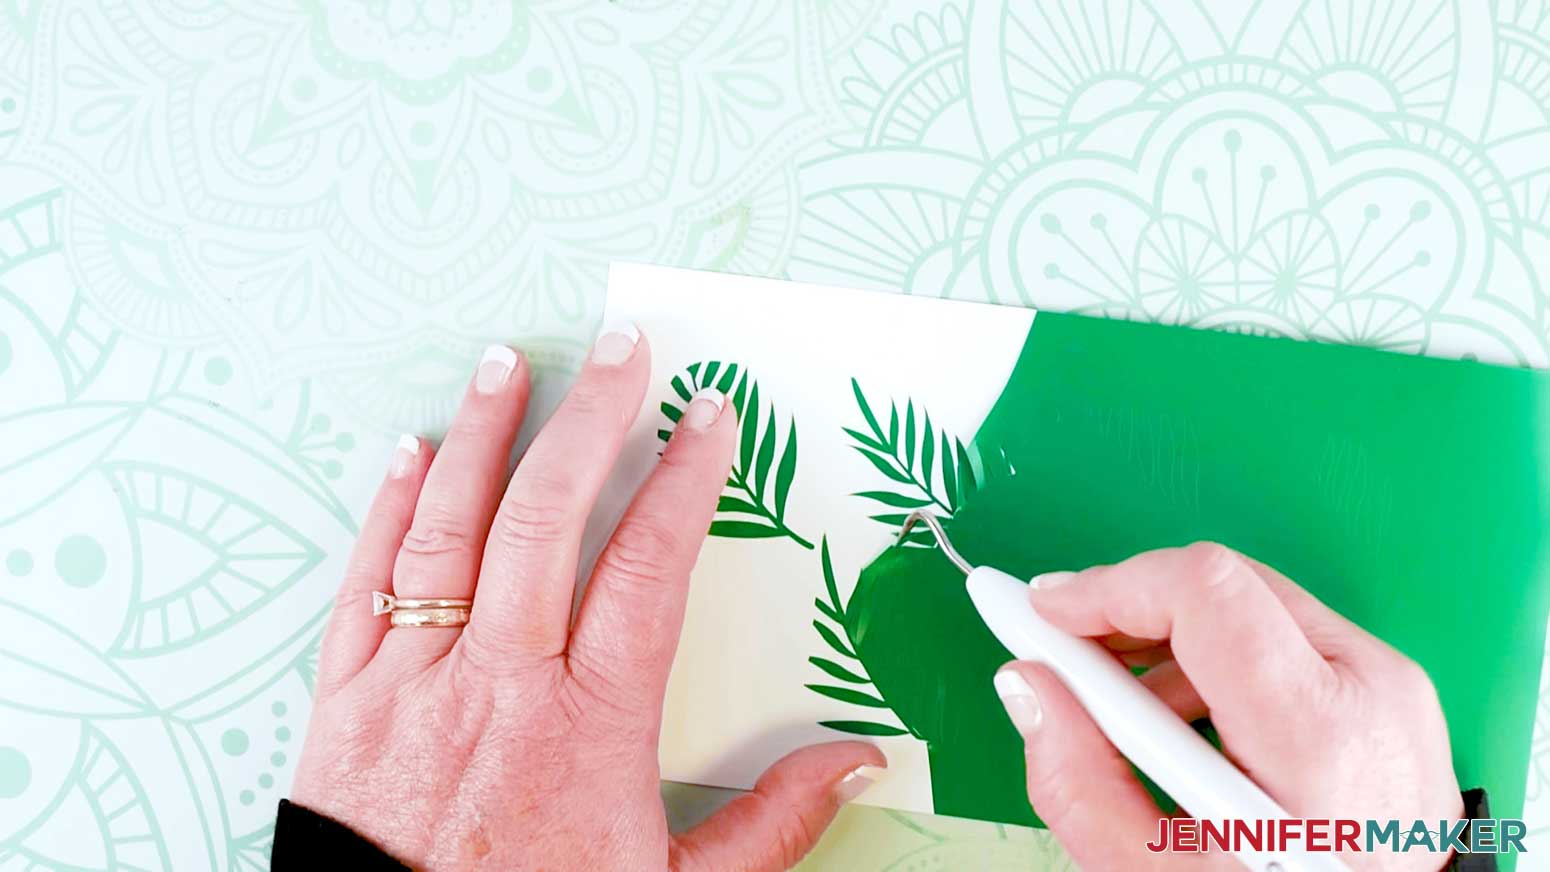
Take the leaf layer and place transfer tape on top of the vinyl and burnish it using the scraper tool to make the vinyl adhere to the tape. I like to use the taco method by holding the transfer tape in the shape of a taco, then putting the bottom of your “taco” onto the middle of your design. Smooth the tape over the decal from the center outward using the scraper tool.
Gently lift the transfer tape bringing the design with it. If the vinyl does not stick to the transfer tape, place the transfer tape back down and burnish it with the scraper tool again.
Line up the edges of the shapes to the phone case. Use the taco method to place the vinyl from the center out to the edges and burnish it onto the phone case and remove the transfer tape.
TIP: Burnish around the edges of the phone case with your finger to help the vinyl adhere.
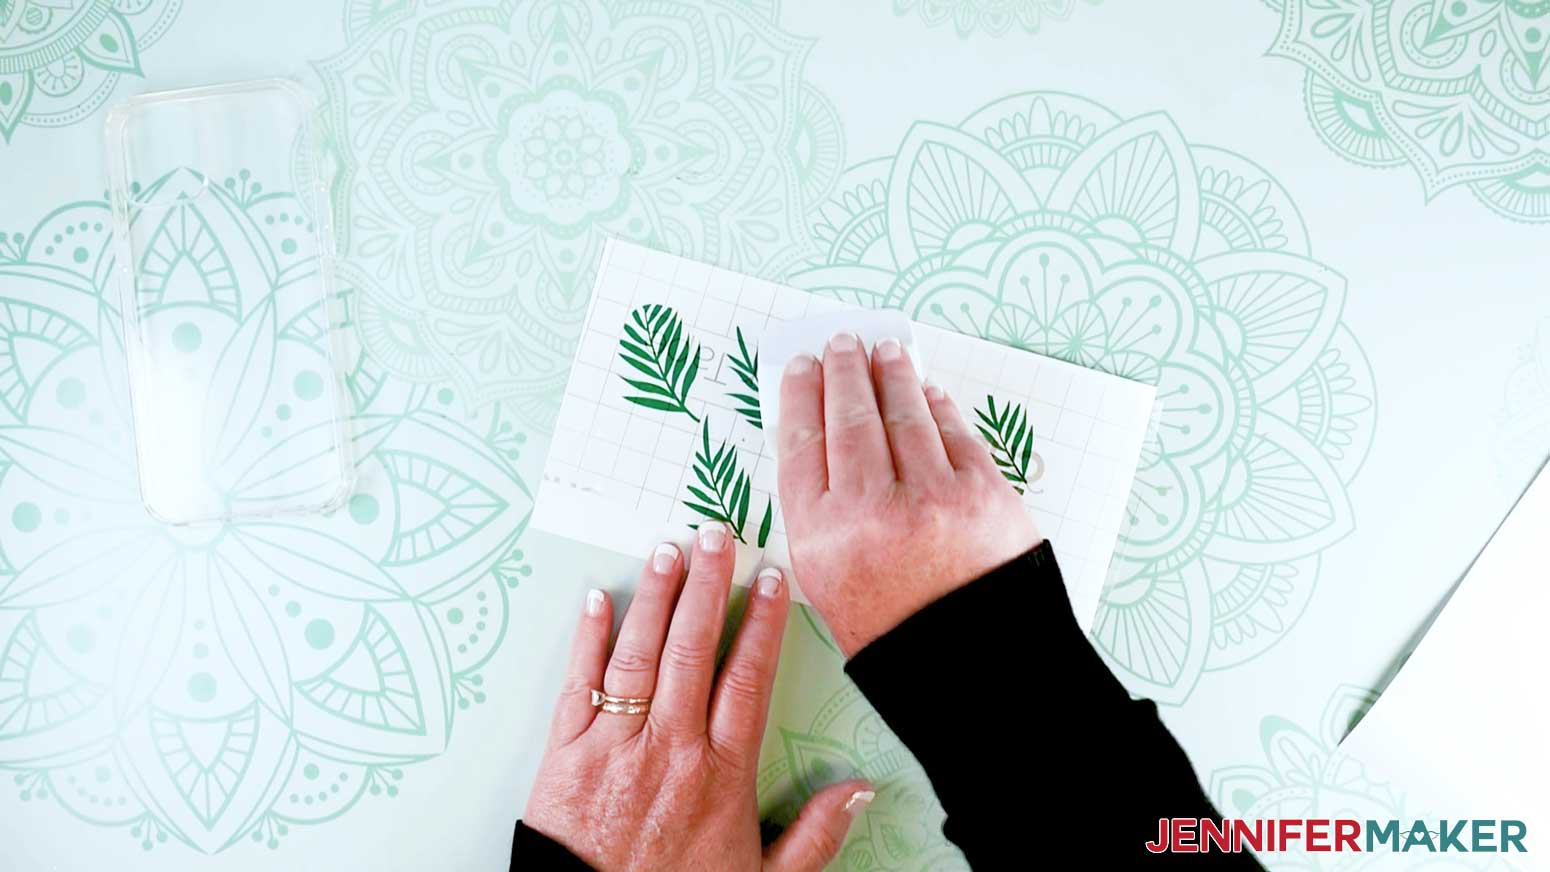
Now take the flower outline (white) layer and using transfer tape place the design on the blue glitter vinyl flowers.
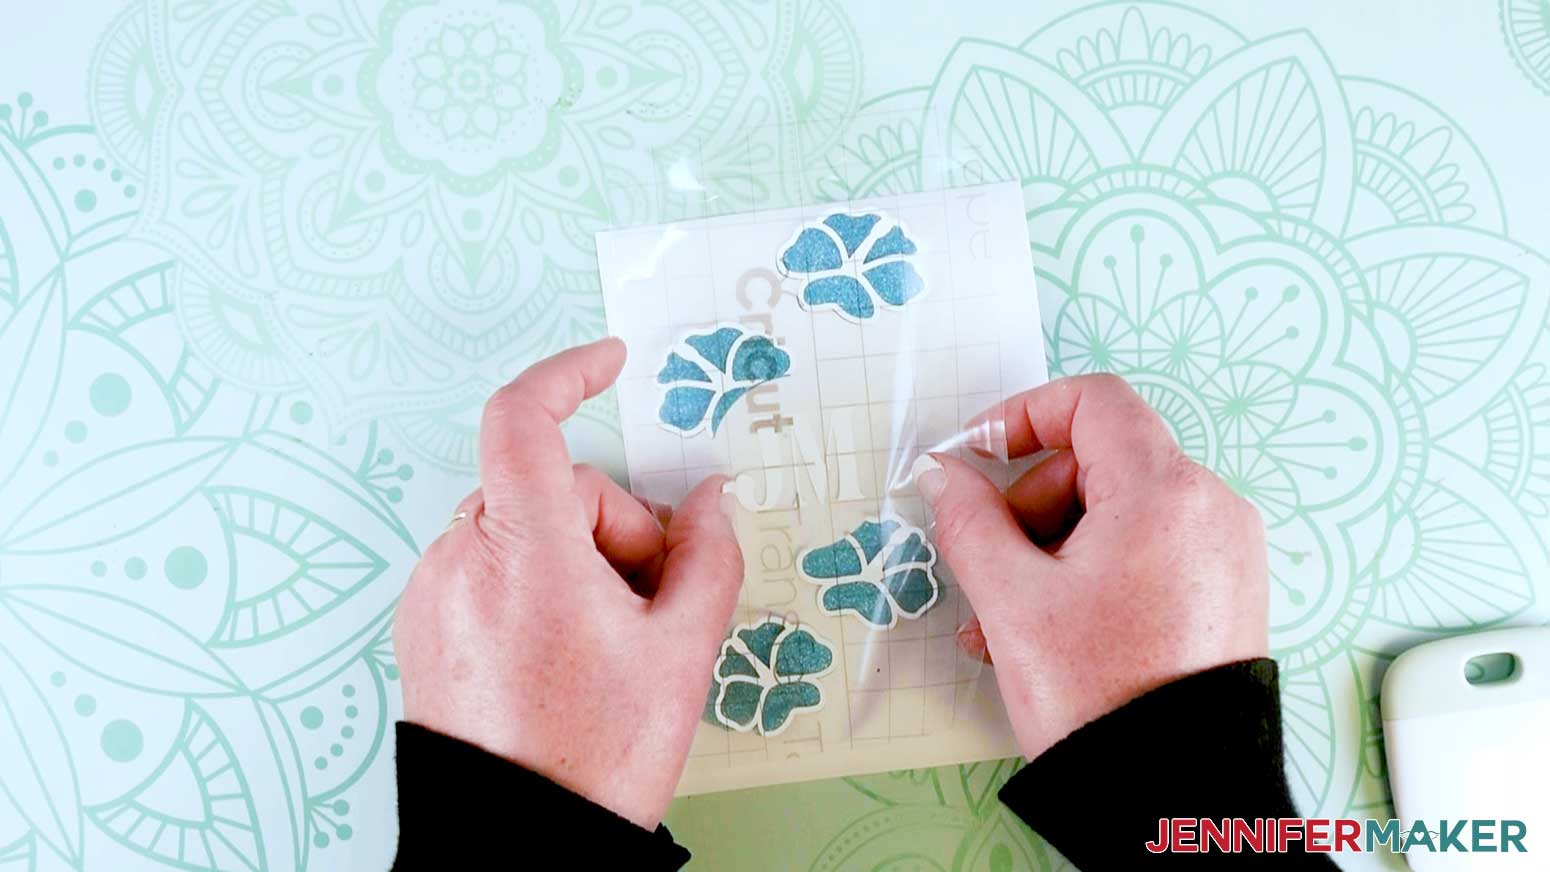
Once they are lined up burnish the design so that you get both the glitter vinyl layer and the white outline layer at the same time.
NOTE: This may take a bit more burnishing as the white layer doesn't always like to adhere to the glitter vinyl.
Transfer this design over to your phone case and place it down on top of the leaf layer. Make sure to line up your edges.
STEP 4: APPLY MOD PODGE
Apply a layer of Mod Podge to the entire phone case. Be sure to paint in one direction otherwise, it looks slightly messy.
Once your Mod Podge is completely dry, it takes about 20 mins. You now have your completed Phone Case!
NOTE: You can use any type of Mod Podge to seal your phone cases!
BUTTERFLY DESIGN
This design can be customized for any phone case and I will show you how you can add your personal touch. Awesome! right? Okay, let's get started!
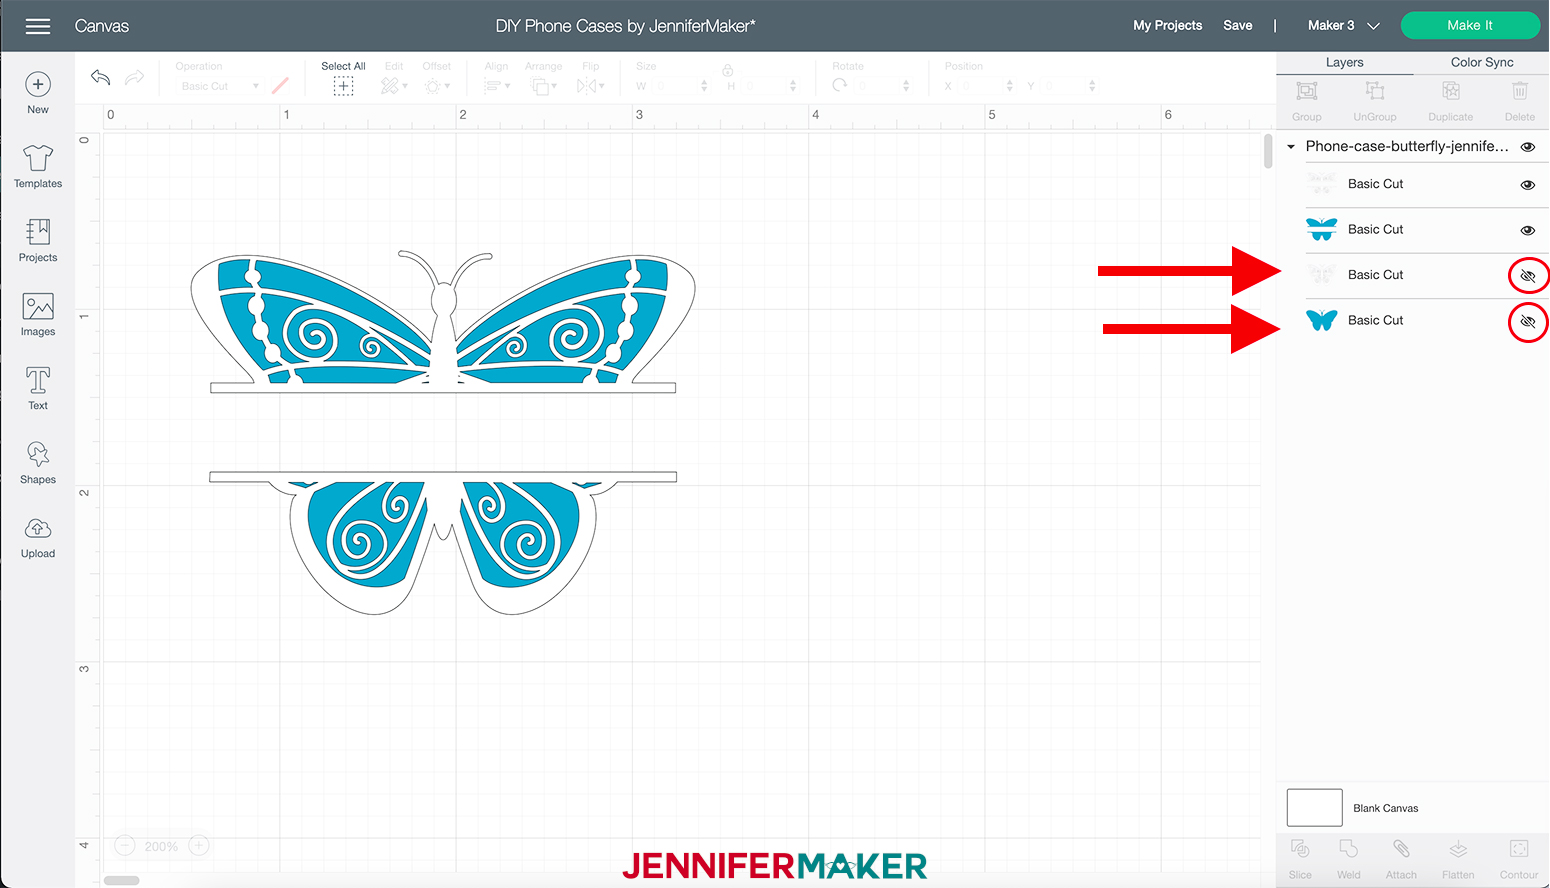
For this design, we want to first "Ungroup" the design
Next, hide the two full butterfly pieces because I'm going to show you how to customize the other design. I have added this so you can have a complete version of this beautiful butterfly design.
Now, select the hide icon for both the butterfly outline and the overlay.
Next, click the "Select All" button at the top center of your screen.
For this tutorial, I’m going to use this design to show you how to customize the design to fit the iPhone 11 Pro case. You can use the same technique to customize it for your phone case.
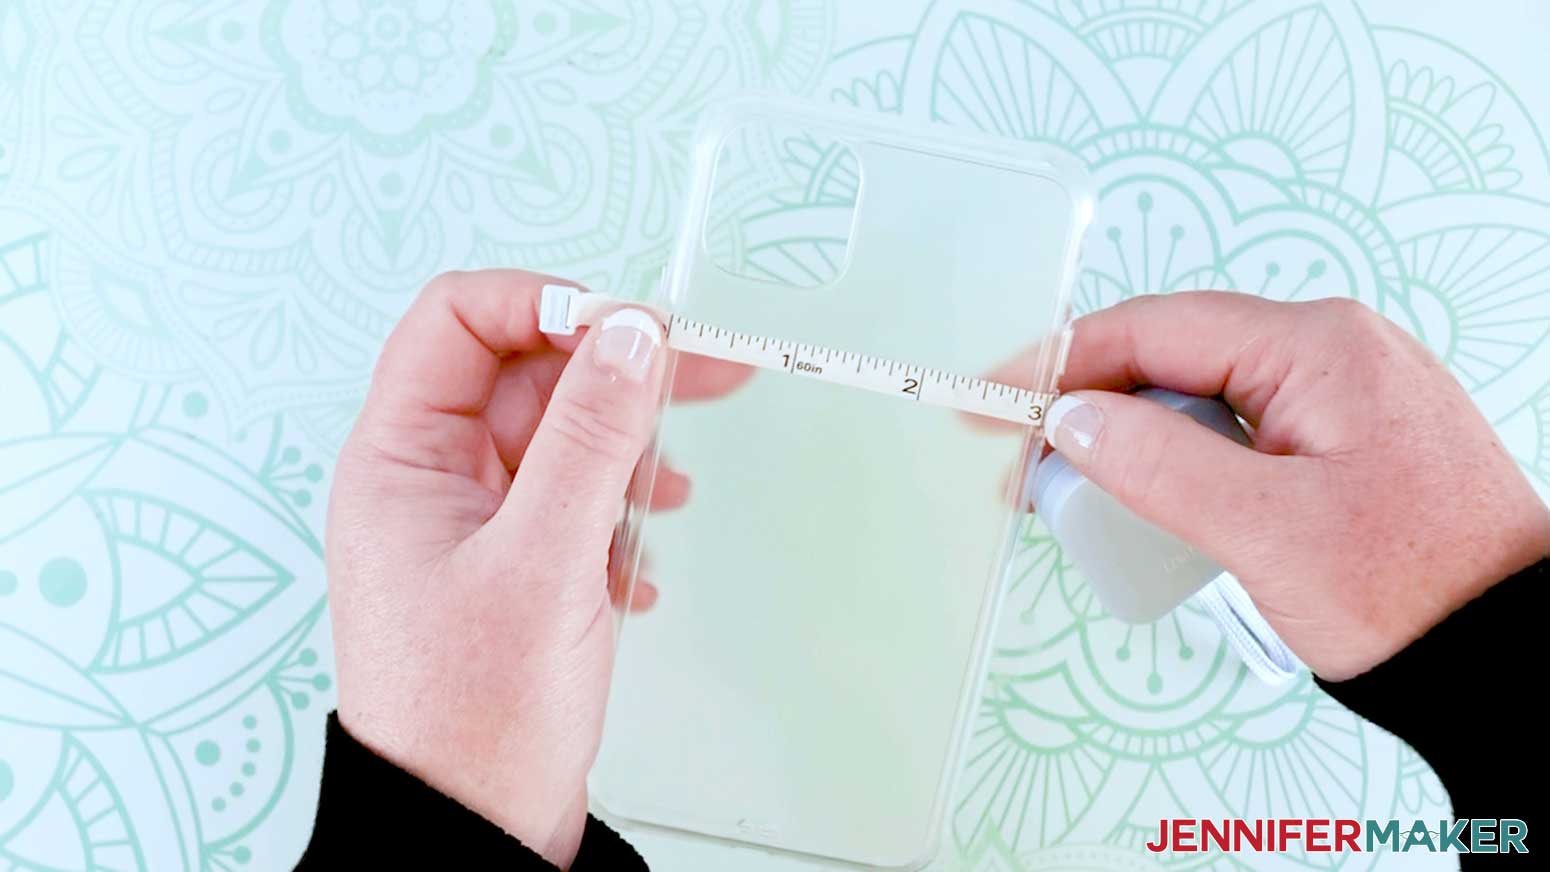
Next, we are going to measure the width of our phone case. Mine is 3 inches but yours may be different.
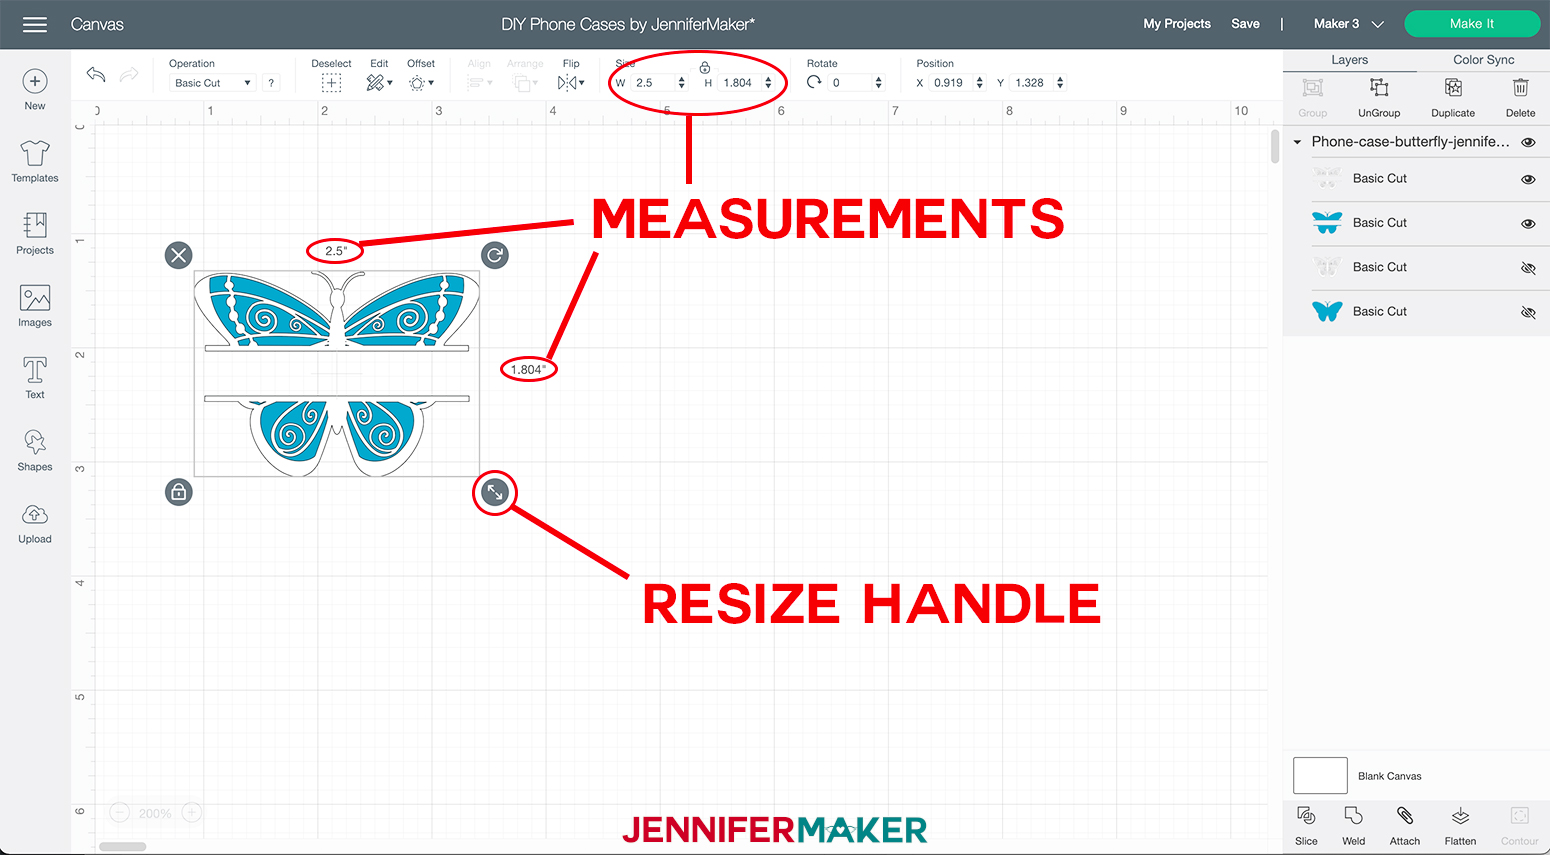
Now in Cricut Design Space use the resizing handle or the measurement box at the top of the screen, resize the butterfly design to be 1/2” smaller than the width of your phone case. This is so the design fits on the back of the phone case and doesn't hang over the edges.
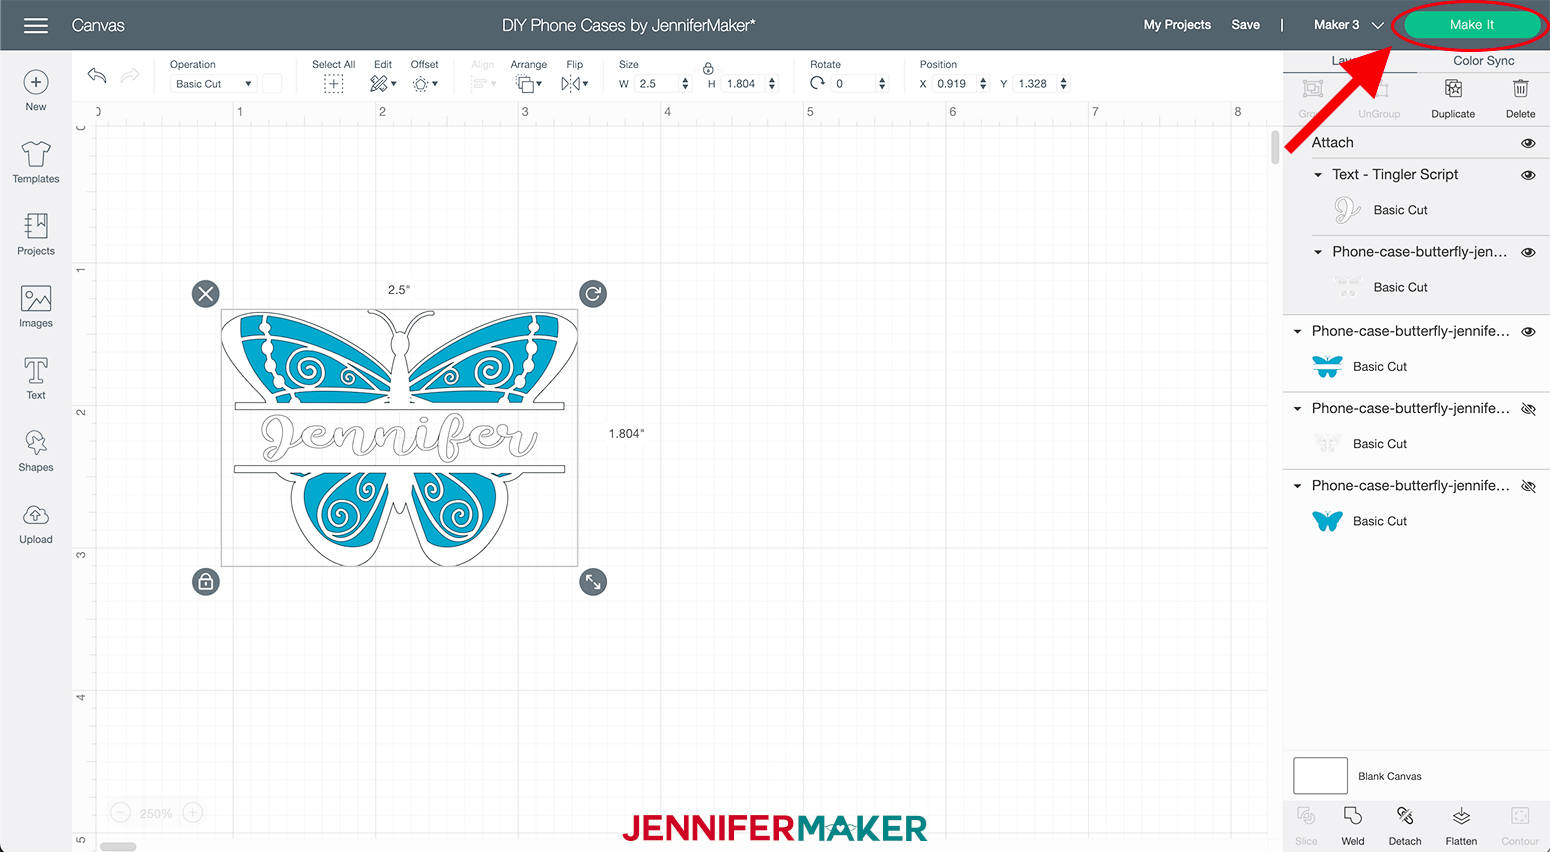
My resized butterfly is 2.5 inches.
Now that I have my butterfly the correct size I am going to add my name to fit between the two butterfly pieces.
Using the "Text" tool I am going to type my name.
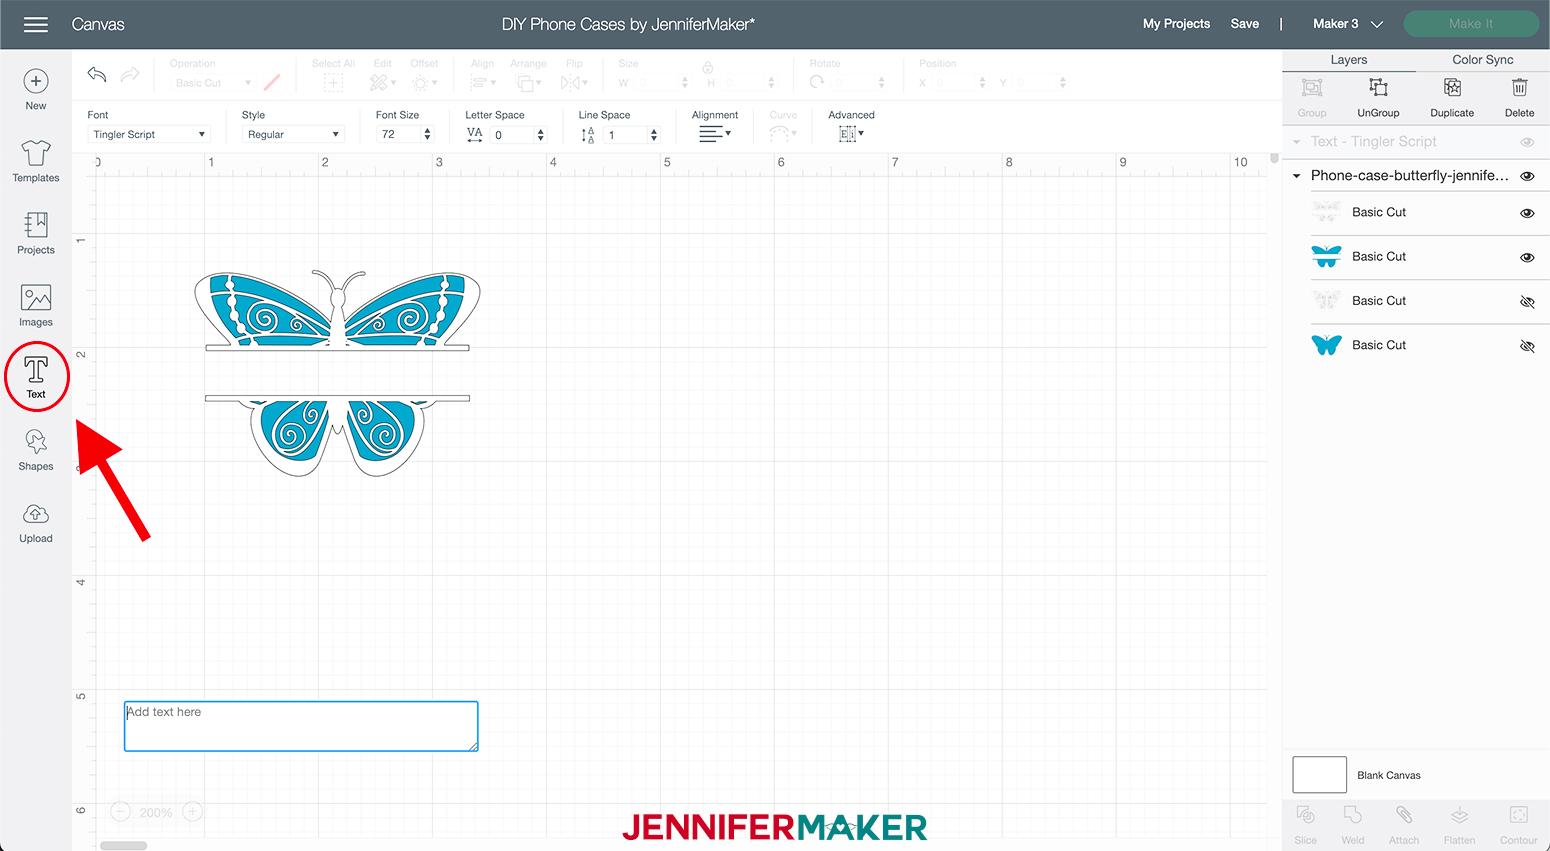
Now I am going to select the font I am going to use by going to the font drop-down menu at the top left of the screen.
I am going to select "Tingler Script" from FontBundles.net but feel free to select whatever font you like!
Now I am going to resize it using the resizing handle as we did above.
With the text resized, we are going to select "Ungroup" at the top right side of the screen.

Next, we are going to select our name, hold down the shift key and click the butterfly overlay (White).
Then click "Attach."

Now that I have my design prepped I am going to go ahead and click "Make It."
On the next page select "On Mat" and click "Done."
Then click "Continue" at the bottom right corner.
Now we are going to select our materials, for the design, click the "Browse All Materials" button on the right side of the screen.
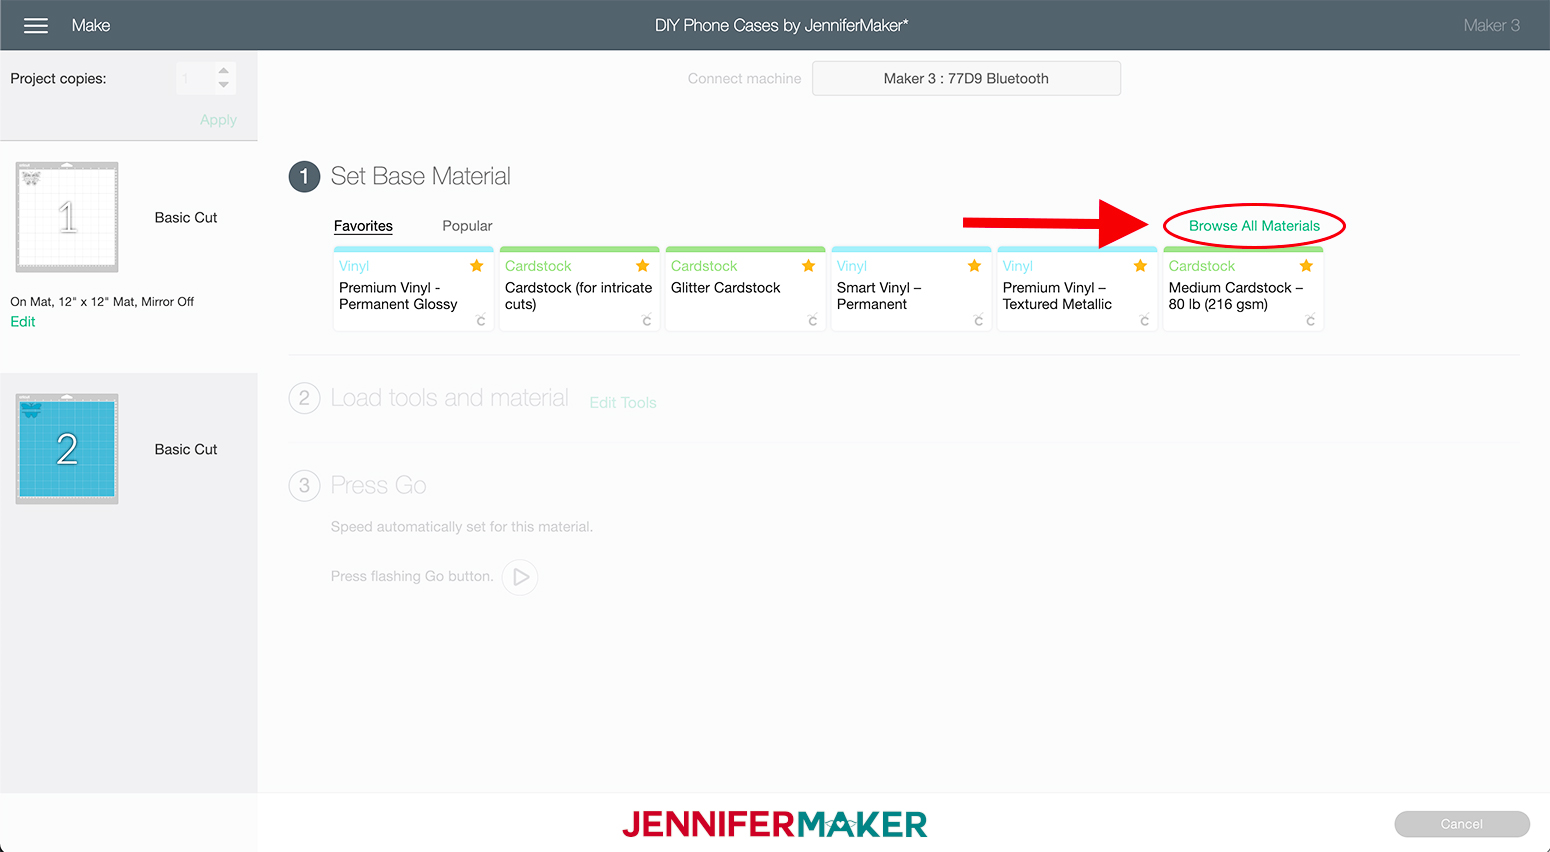
Then select "Premium Vinyl - Permanent Glossy" from the menu under the Vinyl section. Then click "Done."
Now, using the Cricut Green StandardGrip 12" x 12" mat cut the first mat.
To remove the vinyl from the mat, flip the mat over and peel the mat away from the vinyl. This prevents the material from curling.
Next, cut the holographic vinyl.
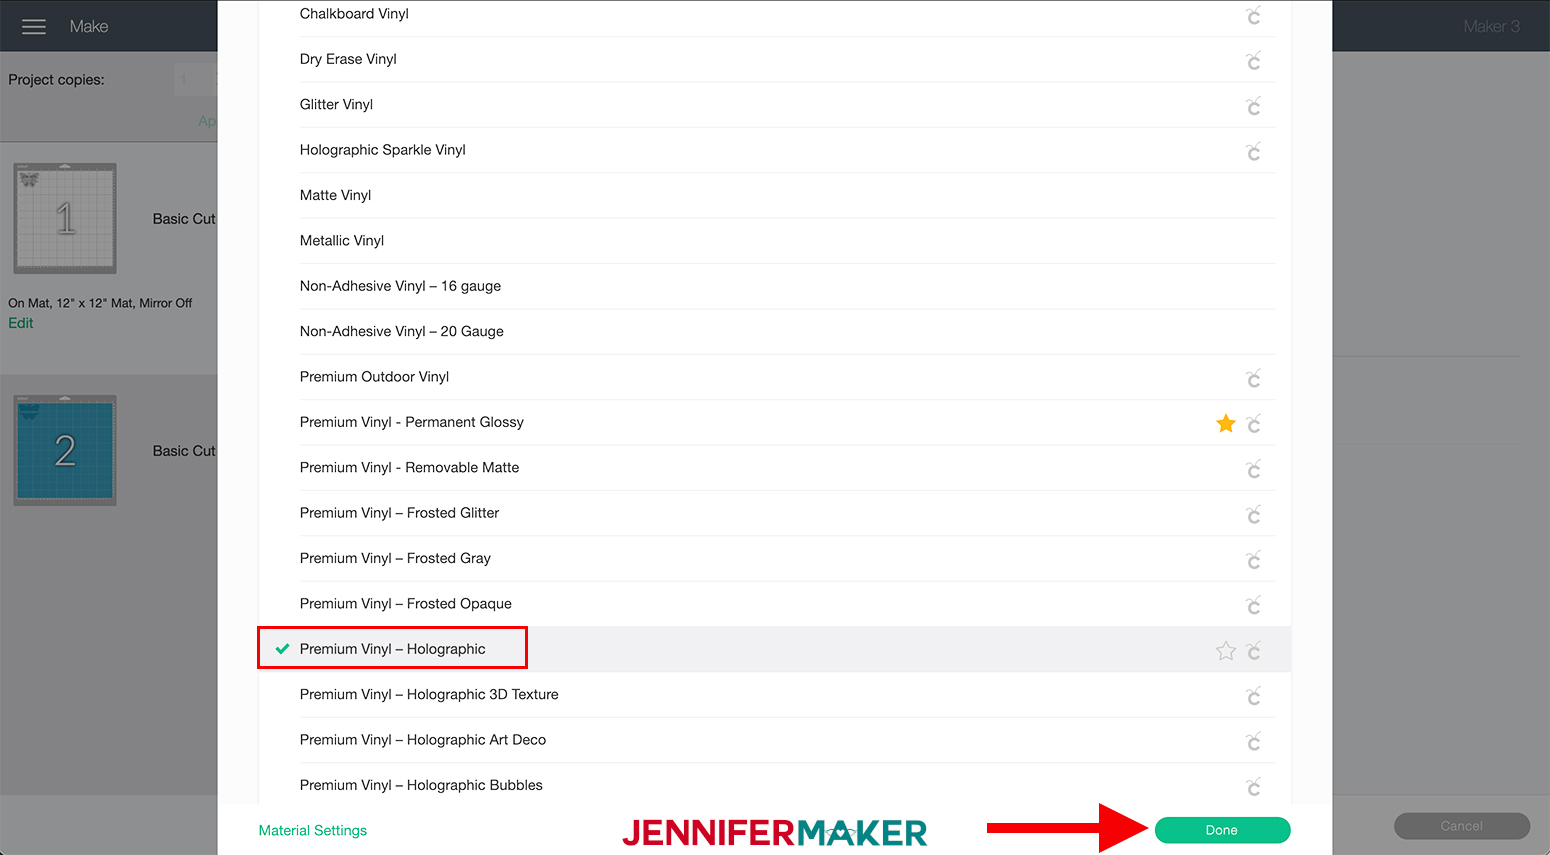
To select the materials, click "Browse All Material" on the right side of the screen and select "Premium Vinyl - Holographic" from the menu under the Vinyl section. Then click "Done."
Now cut the vinyl on your machine the same as we did before. Again, remove the vinyl from the mat.
Next weed the design of all excess vinyl that is not a part of the design.
STEP 3: TRANSFER THE DESIGN TO YOUR PHONE CASE
Using the "taco" method, as mentioned earlier, take the holographic pieces and place transfer tape on top of the vinyl and burnish it using the scraper tool to make the vinyl adhere to the tape.
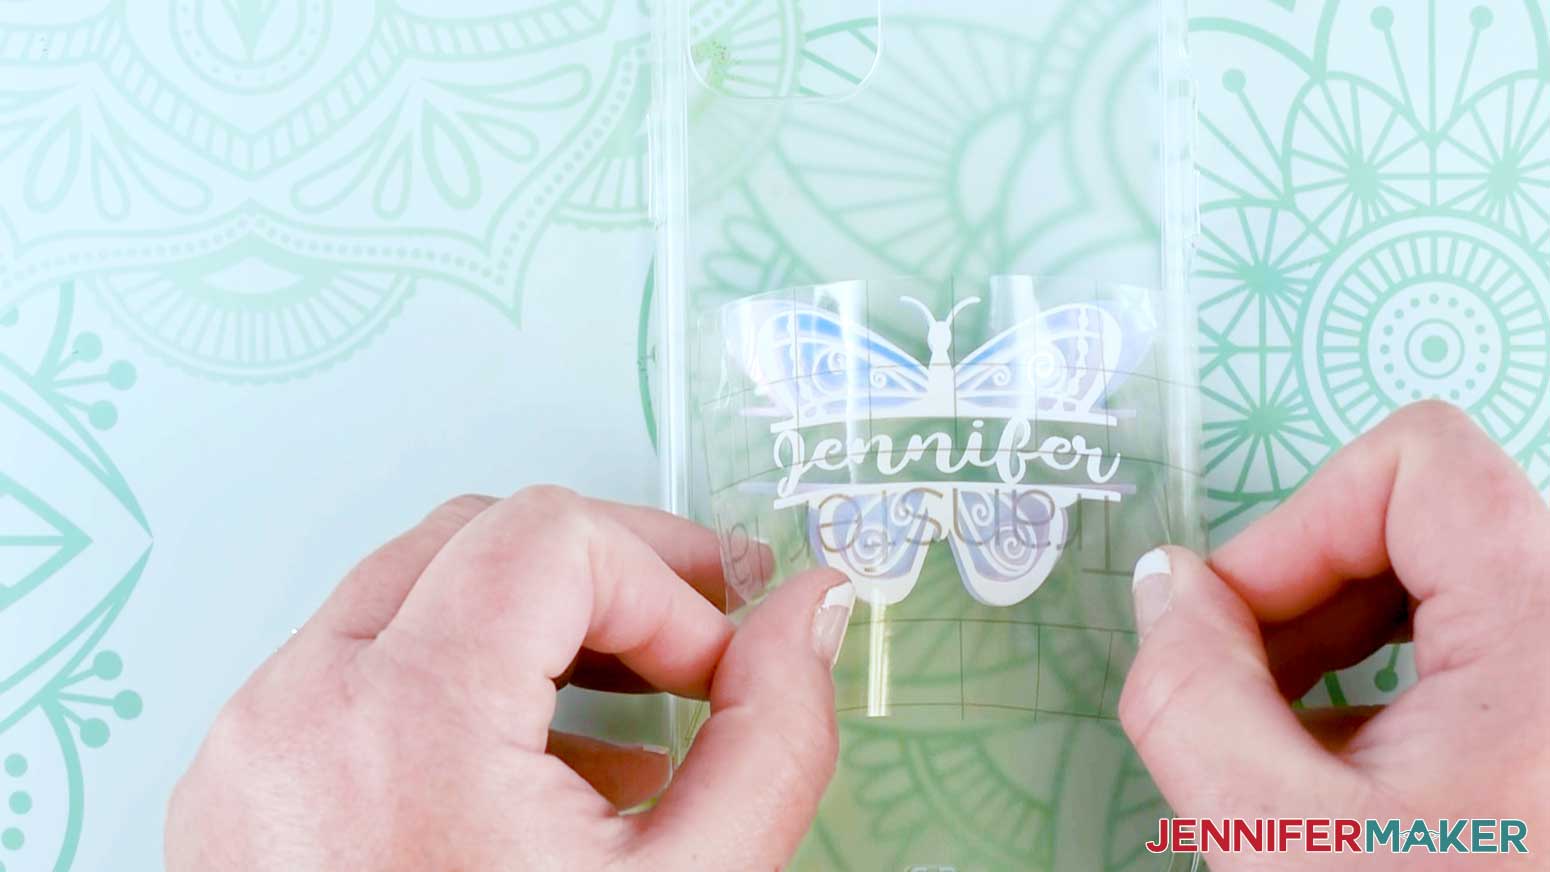
Place the design in the middle of the phone case and burnish it down. Gently remove the transfer tape from the design.
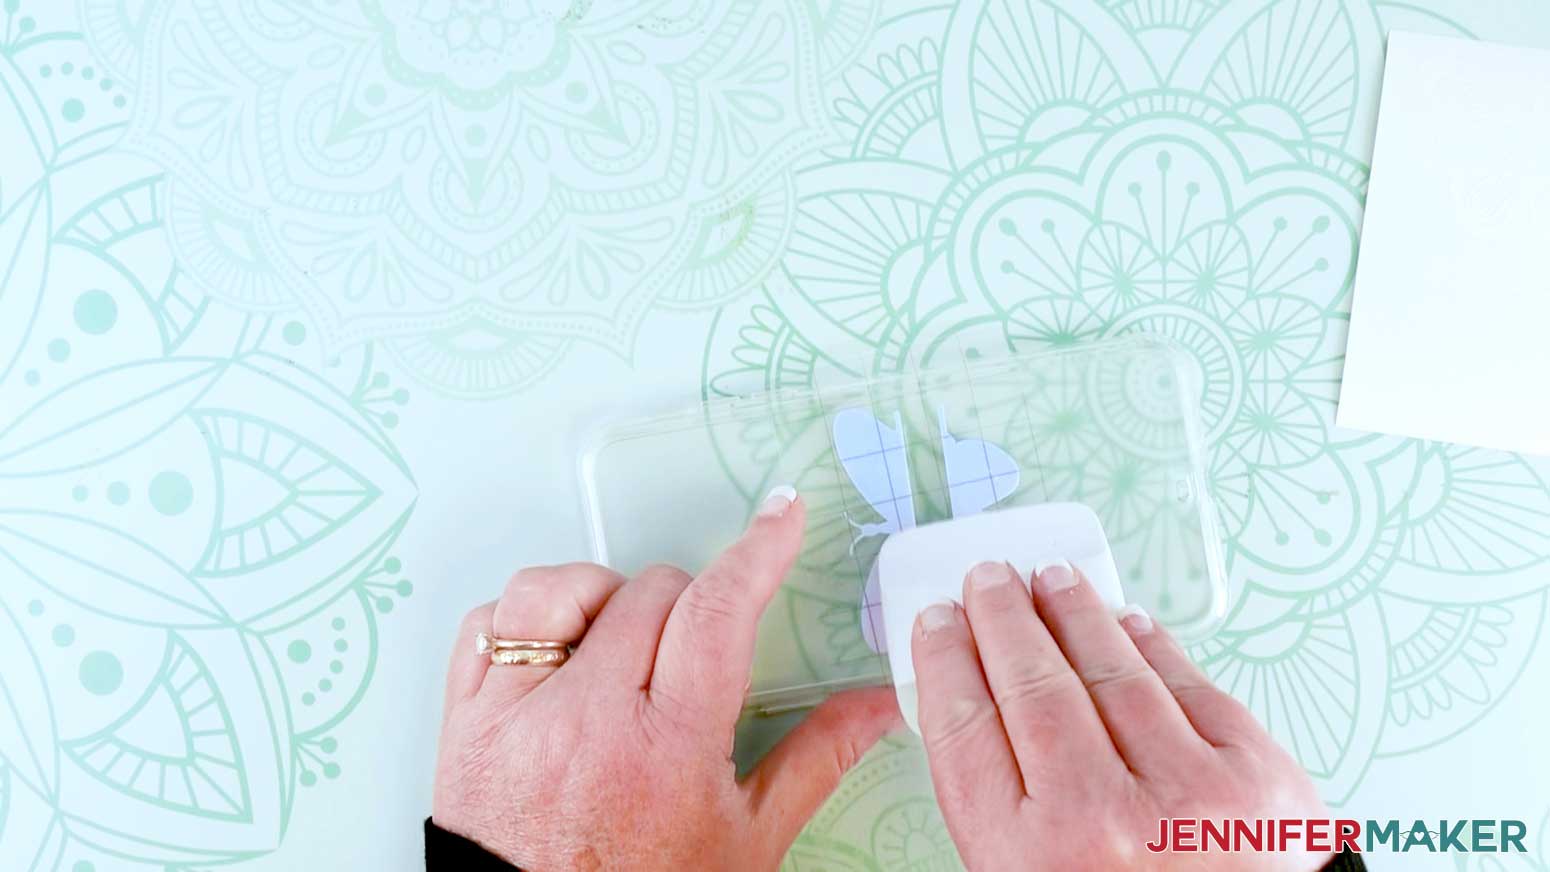
Then place the white butterfly overlay piece on top of the holographic outline using transfer tape and burnish it down. Gently remove the transfer tape from the design.
STEP 4: APPLY MOD PODGE (OPTIONAL)
Apply a layer of Mod Podge to the entire phone case. Be sure to paint in one direction otherwise, it looks slightly messy. This is an optional step, if you do not put mod podge on the case the vinyl may come off faster.
IMPORTANT: DO NOT cover the holographic vinyl parts with Mod Podge. This dulls the vinyl and it doesn't look as nice. For this cover the outside edges of the butterfly so it stays in place.
Once your Mod Podge is completely dry, it takes about 20 mins. You now have your completed Phone Case!
Notes
Add a geometric print with this abstract design or even a tropical design by adding some leaves and flowers to the back of your phone. You can also add your name and your favorite photos! Whatever design you decide to go with, the end result will make it look like you just purchased a brand new case.
These really don’t take a lot of time and you can find all these items easily at your local craft store. Gift your loved ones handmade phone cases for birthdays or holidays, I can assure you they will be thrilled to receive them!
Answers to Your Questions About How to Make DIY Phone Cases
Q: Where is your tutorial for this phone case project?
This is a special project we made for our free Maker Academy Weekend event! A complete and detailed step-by-step video premiered during the event November 4-7, 2021. Get access to the workshop video and printable workbook with a VIP Pass to Maker Academy Weekend 2021, which comes with other perks and bonuses, too!
Q: Can I make one for my phone?
I have templates for an iPhone 12 Pro Max, iPhone 11 Pro Max, iPhone XS Max, Samsung Galaxy S21, Samsung Galaxy S20, Samsung Galaxy S10, and a generic one that can be used for most any phone.
Get a free ticket to Maker Academy Weekend to see how this works!
I love seeing what you make with my designs and how you use them! Please share a photo of your phone cases in our Facebook group or tag me on social media with #jennifermaker.
Love,

Want to remember this? Save this DIY Phone Cases Tutorial to your favorite Pinterest Board!