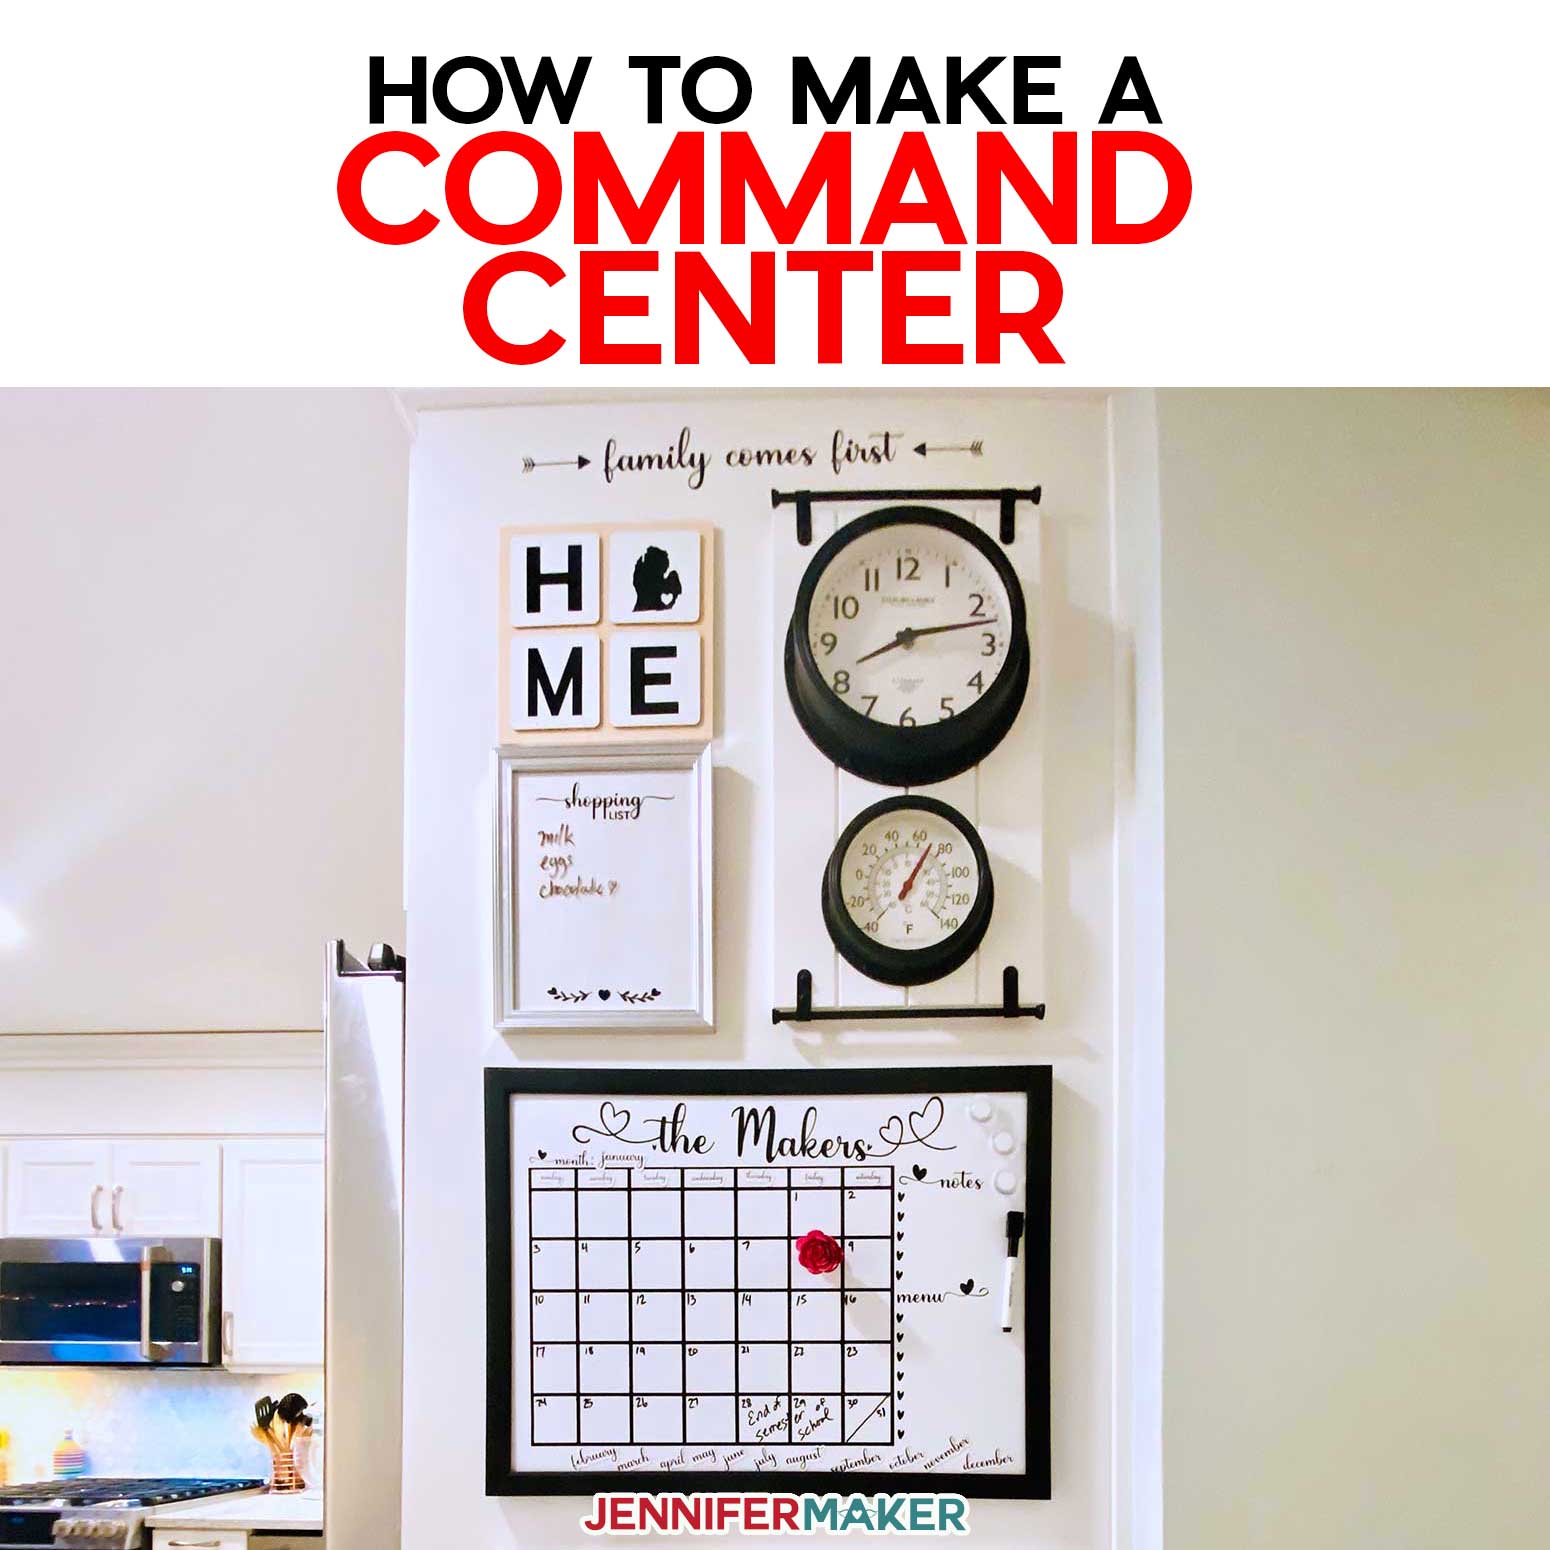
Learn how to make your own DIY family command center to keep your family and things organized!
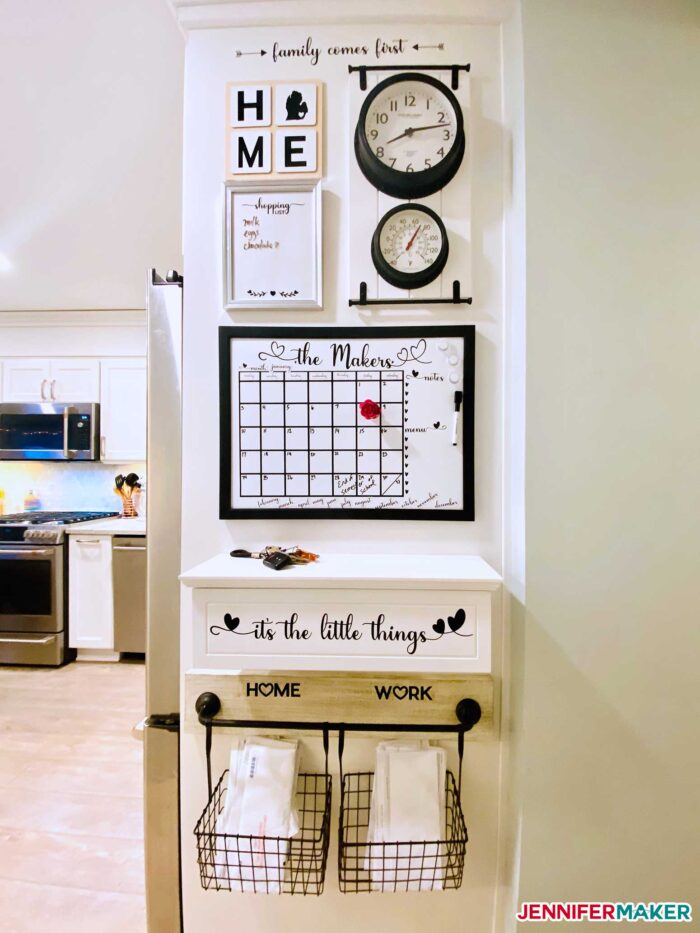
I love my home, and I believe that starting and ending our busy days in a home that makes us feel good is everything. I also know that life can be crazy, and it’s easy to lose sight of what’s important. That’s why I think it’s so critical to designate one central place in your home where you can keep your life and plans and little stuff organized. Some people call this the drop zone, others may call it the family wall, but I call it the family command center. In my house, this is where our family calendar lives, where we collect our mail and notes, where we drop our keys and phones, and where we keep pens and charging cords and all of those little things that are so important. Now your needs may be different than mine, so let’s talk about how you decide what goes into a family command center, then how to plan and personalize one that fits your family!
But first, whenever I begin an organization project, I use my P.A.C.T. system. PACT stands for Purge, Assess, Contain, and Tag. The PACT system works perfectly for creating the ultimate DIY family command center, too!
SO the first step in PACT is to Purge. If you already have a centralized spot in your house, a drop zone for your things, you will need to purge it of anything you no longer use or need. I didn’t have to purge my area because I did that when I had my kitchen renovated. So I had the privilege of starting with a blank wall. I did have a few boxes in front of it leftover from the holidays, however, so I got rid of those and that gave me my blank slate to work with. Your area will be different, no doubt, but don’t forget to begin with the purge. Remove and recycle or donate what you don’t need, or relocate things where they belong.
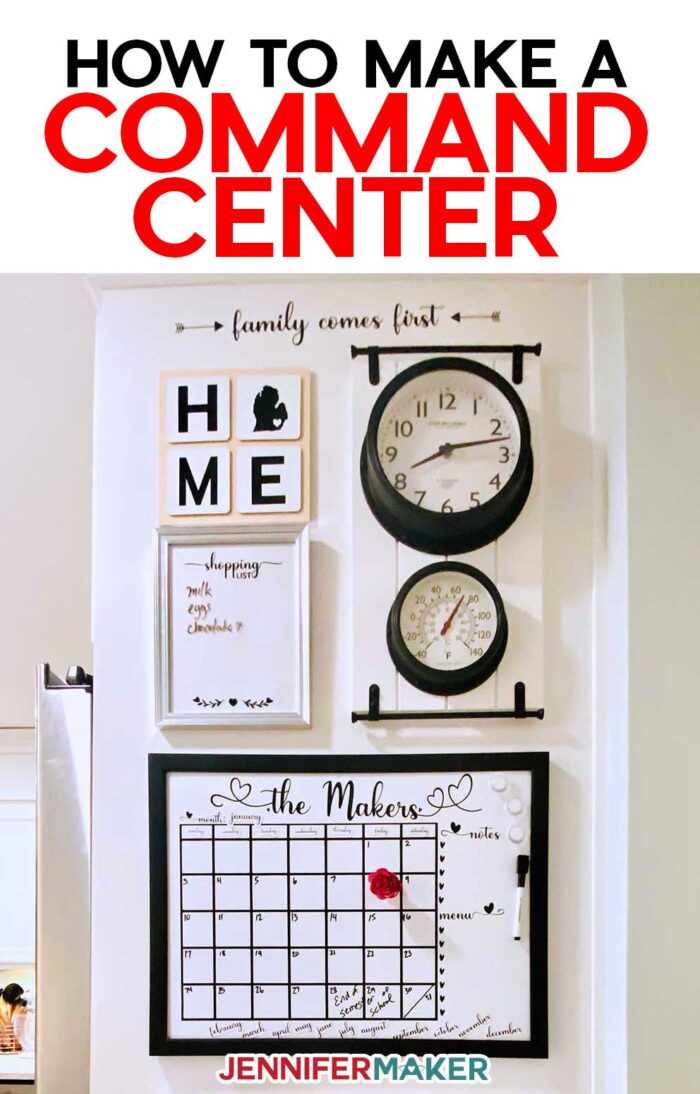
The next step in the PACT system is A – Assess Your Needs. This is when you take a good look at the items you didn’t purge, the ones you want to keep in your central command center. What you need to organize in a central location will vary from person to person. It could be anything from shoes, backpacks, homework, bills, cards, paperwork, keys, coats, hats, checklists, shopping lists, coupons, and notes to things like your time, schedules, appointments, and important reminders. Only you will know what you need. In my home, we keep our shoes and coats and bags by the front door, so our command center only needed to focus on important family information like our schedules, notes, and mail, plus be a drop zone for little things like keys and phones that were always collecting on our kitchen counters. So when I assessed our needs, I decided I needed a clock, a calendar, a shopping list, a ledge to hold the keys and phones, a storage area for pens and cords and other little things, and bins for our mail.
The next step in the PACT system is C – Contain Your Stuff. Now that you know what you need to organize, we need to find containers … whether that’s a container like bins for shoes, or baskets for mail, or a corkboard for notes. Again, what sort of containers work best will depend on what you’re putting into your command center.
So for my command center, the central and most important thing was our family calendar. So I began there and figured out everything around it. I bought a magnetized whiteboard like this to be my focal point. I want the whiteboard to have space for a perpetual calendar, as well as notes and a weekly menu.
I also decided we needed a shopping list, so I will use a simple frame and create an erasable board with it, much like the dry erase board.
Another important container for our command center is a place for our keys, phones, pens, cords, and other small stuff we were leaving on our kitchen counters. So I found a ledge with extra storage below it that I can put small bins to keep the little things on and in.
And finally, we needed containers for mail. We’d been storing them in baskets on our kitchen counter, which was taking up valuable real estate in our small kitchen. So I really wanted to get them into this command center where they would be with all of the other important things. So I bought a set of hanging baskets that I could put below the ledge.
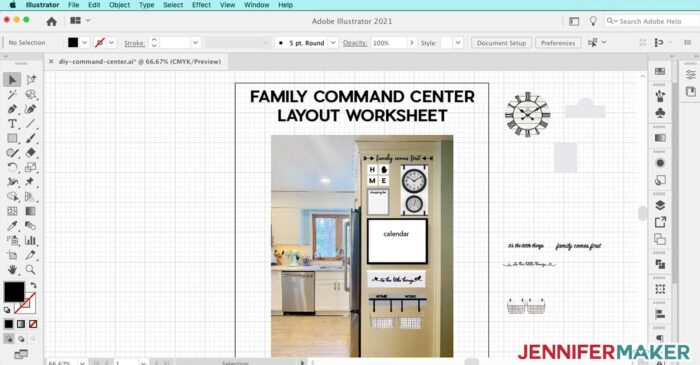
Once you have containers, you need to figure out where they would go on the wall. You can do this in a few ways. The low tech way is to cut out paper in the size and shape of each item and find the best way to arrange your containers in your command center — I recommend this way over painter’s tape outlines because it lets you rearrange things until they look and fit the way you want.
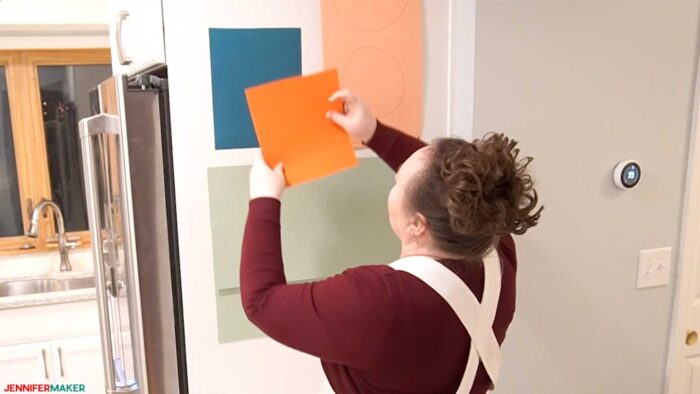
The high tech way to do this is to take a photo of your space, import it into an image editor program, and then place photos of representations of your containers on the photo until you are pleased. I did a combination — I planned out my command center in an image editor first (I used Adobe Illustrator) and then once I’d found the containers, I put the actual shapes up on my wall so I could see how they physically looked in the space.
The last step in the PACT system is T — tagging things. I’m a BIG believer in labelling and personalizing, so I’m going to do that with all of my containers before I ever put them up on the wall. Tags, labels, and personalization help you identify and use your containers better because you know where everything goes, and so does everyone else.
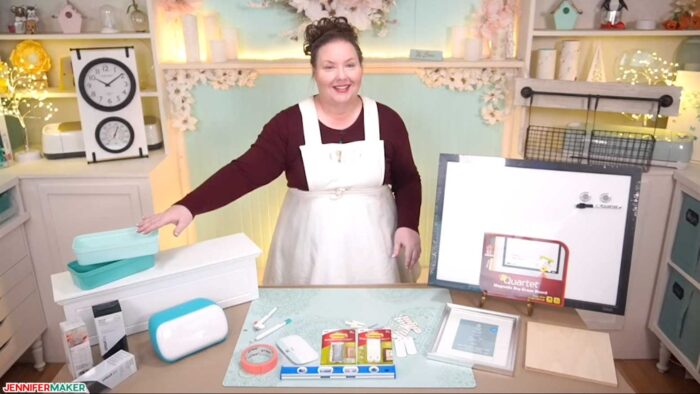
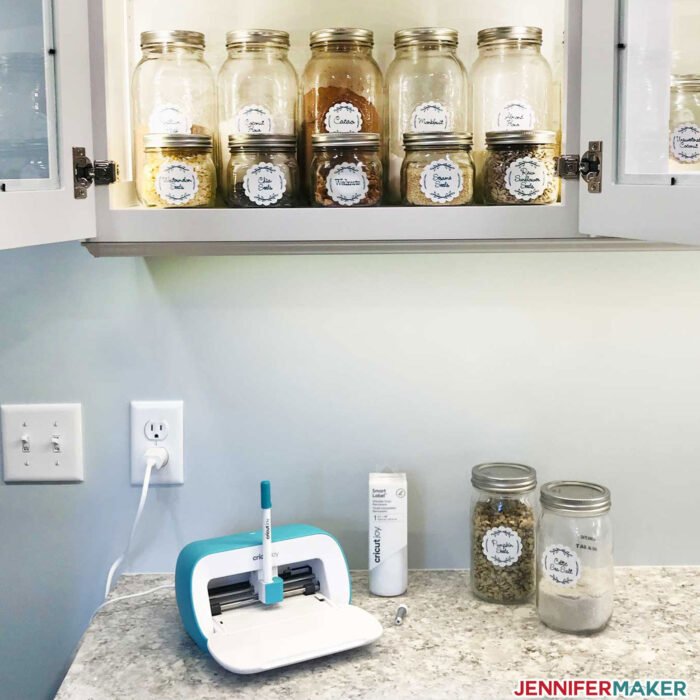
To label these containers, I could go low-tech and use a permanent Sharpie or a label maker, but we have a better solution: I’m going to use black vinyl and a cutting machine. Cutting machines make it SO easy to create labels and personalize things. So for these containers, I going to label and tag them using the Cricut Joy, which is a compact cutting machine that can cut 50 different materials, including paper, labels, and vinyl up to 20 feet long. The Cricut Joy is ideal for home decor and organization, and the perfect tool to use to personalize and organize my command center. I’ve used it to make pantry labels already!
So I’m going to use the Cricut Joy to cut permanent black vinyl so I can personalize the whiteboard, containers, and baskets to my family’s needs … plus hopefully tie everything together and make it look great in the process!
Let me show you how easy it is to make a DIY family command center in a small space! This post contains some affiliate links for your convenience (which means if you make a purchase after clicking a link I will earn a small commission but it won’t cost you a penny more)! Read my full disclosure policy.
Materials to Make a Family Command Center
View my Amazon shopping list with the exact items we used to make this project!
- Craft vinyl (I used both black removable vinyl and black permanent vinyl)
- Transfer tape (regular grip, not strong grip)
- Weeding tool
- Scraper tool
- Frames (I used this silver frames from Michaels)
- Containers (I used these small containers from Michaels)
- Ledge shelf
- Wire baskets
- Wall clock
- Whiteboard (see the full Whiteboard Calendar tutorial here)
- Command Universal Frame Hangers
- A way to cut your vinyl (I used the Cricut Joy cutting machine but they can also be cut on a Cricut Explore or Cricut Maker)
- Cricut Fine Point Blade (for parchment, acetate, or mylar) or a Cricut Deep Point Blade (for chopping mats)
- Green StandardGrip Cutting Mat
- Decals and labels for your command center — I put the ones I used in Design #286 in my free resource library (get the password by filling out the form at the bottom of this page)
How to Make a Family Command Center
How to put together a simple family command center in a small space My cut files for this project are free for you to use. You can get them either as a printable PDF or as an SVG cut file to use in a cutting machine like a Cricut. I used my whiteboard tutorial to create my whiteboard. You'll want to follow that tutorial to obtain your free SVG cut files and build a whiteboard to best suit your family's needs. Starting with the whiteboard, I want to personalize just for my family, as well as add a grid for a perpetual calendar and notes on the side. So I cut permanent black vinyl on my Cricut, weeded the excess vinyl I didn't need, and applied it to my whiteboard with transfer tape. The months are made with printable magnet sheets so we can just move them around to update the calendar throughout the year. The Cricut Joy can't print and cut the magnets, but you can just print the magnet sheets on your printer and cut the magnets out with scissors easily enough. You could use printable magnet sheets to create more things for your calendar too, like ways to mark birthdays or special events. You could get really personalized and have fun with this! I used my tutorial for DIY Dry Erase Board in order to create my shopping list. You'll want to follow this tutorial, but I will tell you how I made this particular shopping list. I took a simple photo frame, opened it up, and removed the glass. Then I cut black vinyl with the letters "shopping List" on my Cricut -- but I cut them mirrored, which means I cut them in reverse, so I could apply them to the INSIDE of the glass. Now I can put the glass back in the frame and it reads properly. Now I can write on the glass with a dry erase marker -- and then just wipe it right off when we need to start a new list. You could use this idea to create whatever checklists and chore charts you may need for your command center. Learn how to make this simple dry erase project at jennifer maker dot com slash diy dry erase board If you want to create these labels, I have a simple tutorial on DIY Pantry Labels that will guide you step by step to make these for your own command center! I chose to make my labels from the same black vinyl, but you could also cut out cute shapes from writable label vinyl and have your Cricut write the names on for you. I just type out the words I want in the font I prefer, cut, weed, transfer, and apply. The fun thing about using a cutting machine like this over a label maker is how pretty you can make it. Labeling the baskets is a little trickier. You can buy label frames, or you could simply cut some cardstock labels and hang them from the baskets with twisty ties. But as my baskets came mounted on this wood panel, I decided to add more black vinyl to the panel itself and that helps me tie it in to the overall command center, too. So I cut the words "Home" and "Work" out of black vinyl, weeded it, and transferred it to my panel. This time, however, I used removable vinyl because that will allow me to change up my labels later without ruining the finish on the panel. Removable vinyl can be removed up to two years later without leaving any residue or damaging a surface. And while I'm at it, I'll use the Cricut to cut more removable black vinyl that I'll use to decorate the top of my command center wall as well as my ledge for little things. I thought the words "Family Comes First" would be perfect for the top of my command center, so I cut that from black removable vinyl in one long 20 inch strip. I then weeded all the excess vinyl off and put it onto transfer tape. And since I have this white ledge, I thought it would be fun to decorate it with vinyl as well, so I cut out the words "it's the little things" from removable black vinyl and applied it to the front of the drop-down drawer. And finally, as I had a little extra space on my wall, I made a decorative piece with black vinyl. This was easy and fun -- it's just the letters H O M and E, expect the O is the shape of my home state Michigan. You can easily design this yourself in Cricut Design Space using the Cricut Sans font in bold. Then, you will find state shapes by searching for your state name in the Images area. This is a super easy and fun wall decor that you can size perfectly to fit your space. Now that I've got everything labelled and personalized, it's time to get it up onto the wall. I've already determined where I want everything to go with the paper cut outs, so now it's just a matter of getting it up nice and straight. To put everything on your wall, you'll want some rubbing alcohol, a lint-free cloth like a coffee filter or blue shop towel, a measuring tape or ruler, a pencil, a level, and some painter's tape. I'm going to work from the top down because I have extra space at the bottom of my command center in case I decide along the way to adjust things. To get the vinyl decal transferred to the wall, first begin by cleaning the wall with your rubbing alcohol and lint-free cloth. You want to be sure you have any dust and debris off your wall. Now to get the decal straight and centered, put the decal with the paper backing still on it up on your wall and adjust it until it looks right, then tape the top edge in place. If you can't tell if it is straight, use your level. But I usually just step back from the wall and look at it to gauge how it looks. Once it is in place where you want it, flip your decal up while keeping it still taped to the wall, peel off the backing, and burnish it to your wall from the top down. Be sure to burnish it really well, as removable vinyl doesn't isn't as sticky as regular vinyl. Then just peel off the transfer tape and your decal is on your wall! To get the clock and frames onto the wall easier, I am using Command Strip hangers. These are so easy to use and I can remove them later if I want to switch my decor around. I just put the Command Strip hangers on the back of my items, hold them up to the wall where I want them to go, put the level on top to make sure they're straight, then press into place. The ledge is more substantial, so I want to attach it directly to the wall with hardware. To determine exactly where to drill, I put painter's tape on the back of the ledge and mark the holes. Now I just remove the painter's tape, put it into place on the wall, make sure it's level, then drill right through the painter's tape. Super easy! I can then easily hang up the ledge. This technique works well for the wood panel with the hanging baskets, since those also need to support weight. My wall here is just a panel board, if your wall is drywall, you should use drywall anchors which are often included with anything that is load bearing. And that's all there is to it. My command center is set up and ready to go!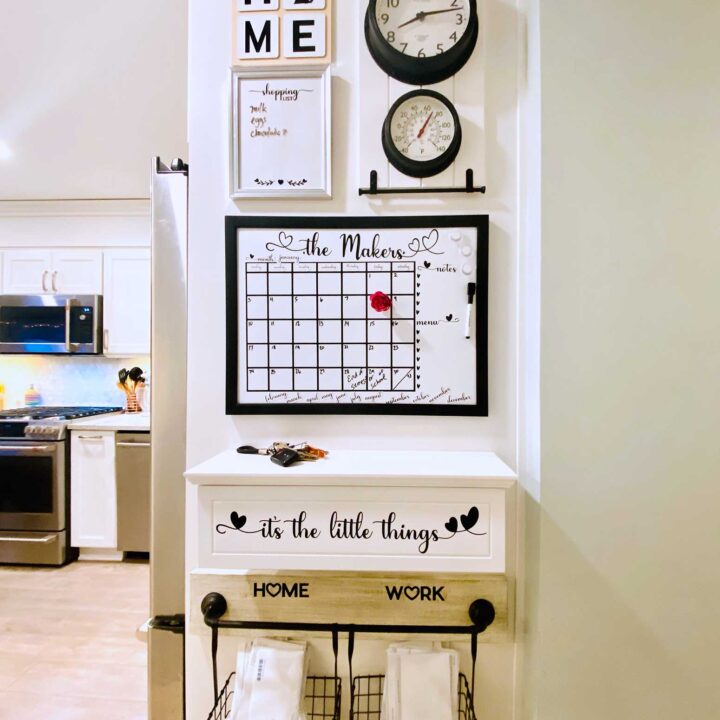
Family Command Center
Instructions
Step 1: Get my free SVG Cut Files
Step 2: Building my Whiteboard
Step 3: Creating my Shopping List
Step 4: Little Containers
Step 5: Labeling Baskets
Step 6: Adding Details to my Command Center
Step 7: Hanging Everything on the Wall
Answers to Your Questions About How to Make a Family Command Center
Q: Can I use permanent vinyl on my wall?
A: Sure, but just understand that it may not come off without also taking some of the paint or even drywall with it.
Q: Can I use the Cricut Explore or Maker?
A: Yes! While everything in this tutorial was cut on the Cricut Joy, you can also use the Explore or Maker instead.
Q: Can I add pictures to the vinyl?
Absolutely! You use print then cut to make designs up to 9.25” x 6.75” ! We have a tutorial for just that in our Easy Print and Cut Stickers blog post.
Q: How do you choose the best spot for a command center?
Try to find a high traffic spot, somewhere near an entry or mud room is often a good place to set one up. I picked my spot, near the kitchen, because everyone passes here multiple times a day and it had an unused wall.
Q: I have a very small space and can’t include everything you have. What is most important to have?
That will vary on your needs. I have found that having a calendar to look at any time I pass by helps me remember any upcoming appointments. Then, a place for keys so they don’t get lost, and a spot for the daily mail since I don’t always have time to sort it all every day. Determining your most pressing needs will help you figure out what needs to go on your command center.
Get my free SVG files to Make a Family Command Center
What I love about my family command center is that it’s personalized just to my family’s needs, and I’m really happy with out it turned out. I also love that because I used Command hooks and removable vinyl on several things, I can easily change things later if I want to.
If you have or get a Cricut cutting machine and need a little help getting it set up and going, I have a fun series called the Cricut Kickoff — these are free online classes that walk you through the unboxing, setting up, and first initial projects for your Cricut,. Sign up for that free course at jennifermaker.com/cricut-kickoff
I am also the host of a group called Cricut Crafters & Makers where all we talk about are ways to use our Cricuts to make and decorate beautiful things. It’s a very friendly group with a lot of really amazing ideas! You can join that group at jennifermaker.com/cricutcrafters. Come on over — we’d love to have you!
I’d love to see YOUR family command center! Please share a photo in our Facebook group or tag me on social media with #jennifermaker.
Love,

Want to remember this? Save this Family Command Center Tutorial to your favorite Pinterest Board!