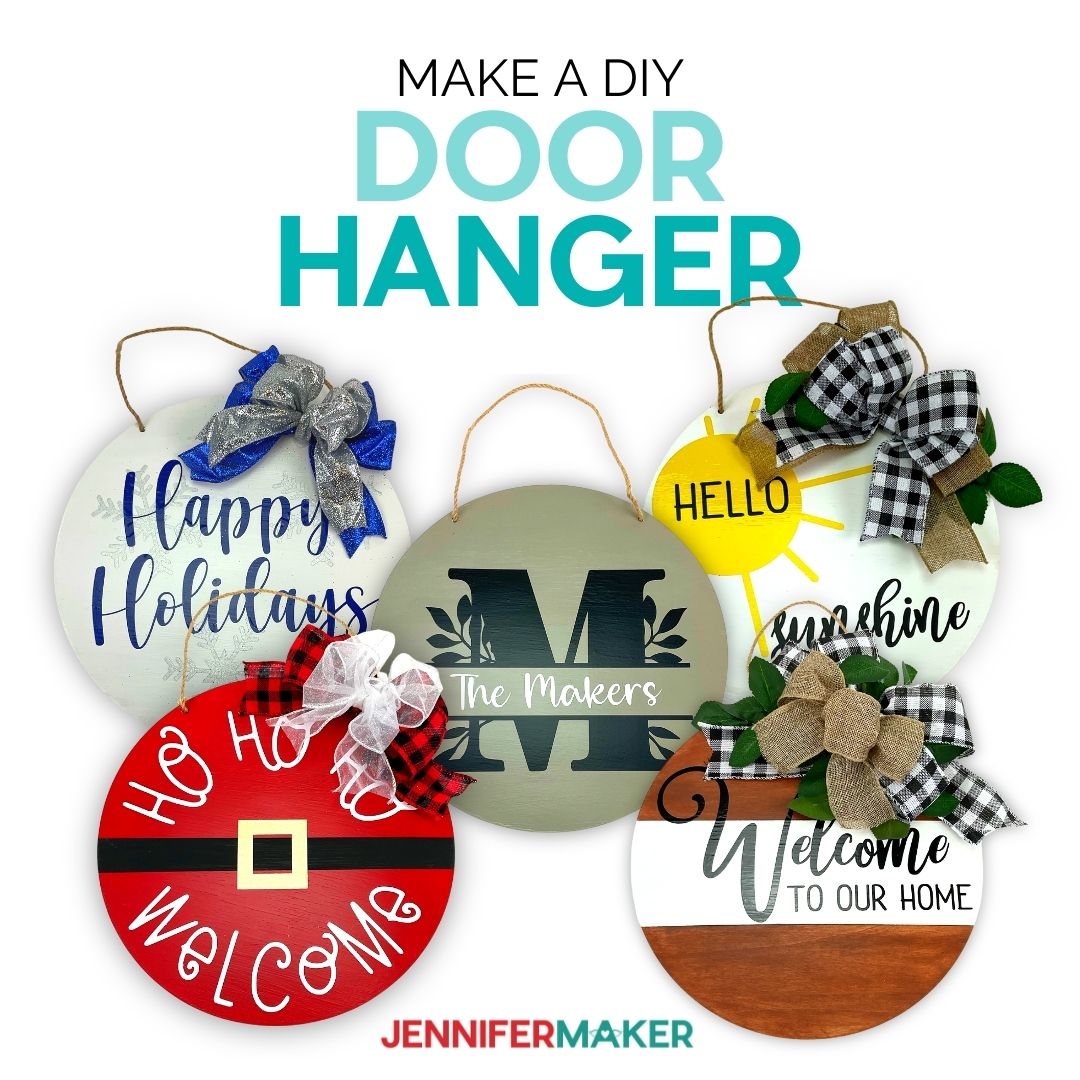
Make your own personalized DIY door hangers in a variety of styles!
One of my favorite things about being able to make anything I want is how I can stay up on the trends so much easier! And right now, round wood door hangers are all the rage. This trendy home decor sign is nothing more than a thin wood round, painted and/or decorated with vinyl, that you can personalize and hang on your front door. Super cute and super easy! And a fun way to personalize your home decor and offer a change from the more typical seasonal wreaths. To make it even easier for you to make and personalize your own DIY door hanger, I’ve designed several free SVG cut files and printable patterns for you to use.

My DIY Door Hanger designs start with an unfinished wood circle — you can get these in a variety of sizes, but I think a 12 inch wood round works best for most front doors. If you can find your wood circles with pre-drilled holes and twine, even better. And that’s how the ones I used come (see materials below for source). Having the wood rounds pre-drilled and hung in advance makes this project so much easier. Feel free to drill and hang your own, of course!
To really make your DIY door hanger stand out, I recommend painting it before decorating it. And before you ever do that, I recommend sanding your wooden circle to smooth it and get off the rough edges for your paint and vinyl. This makes a huge difference in how professional it looks and how well your vinyl will stick to it.
My favorite paint for DIY door hangers is chalk paint, but you can use acrylic paint, of course. Use a foam brush for the smoothest results on your background color. Or try a faux wood stain with some brown acrylic paint and a baby wipe — I show how to do this in my step-by-step video.
If you want to add a second paint color to your wood piece, you’ll also want some painter’s tape to get nice straight lines!
Once your paint is dry, I highly recommend applying water-based polycrylic to protect your paint and wood. The smooth sealer also helps you when applying the vinyl later on, as it’s much easier to stick to the smooth polycrylic than rough wood or paint.
To decorate your circle door hanger, I recommend permanent vinyl as it will stick to your round wood sign the best. And you’ll also need transfer tape to apply it to your DIY door hanger. I’m using my free designs along with a Cricut cutting machine to cut the vinyl!
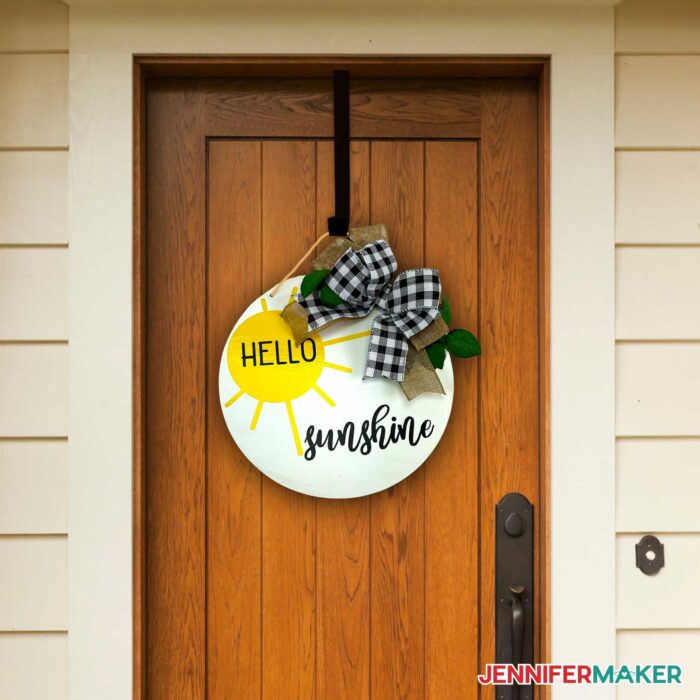
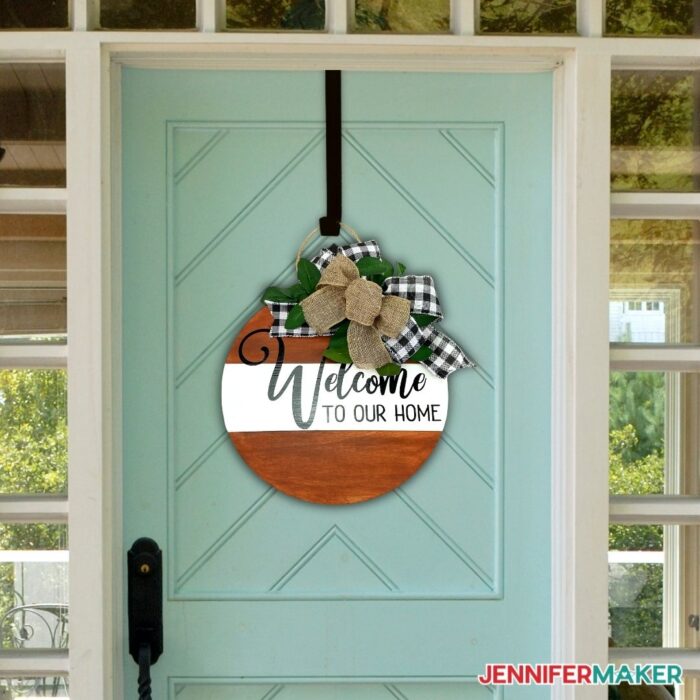
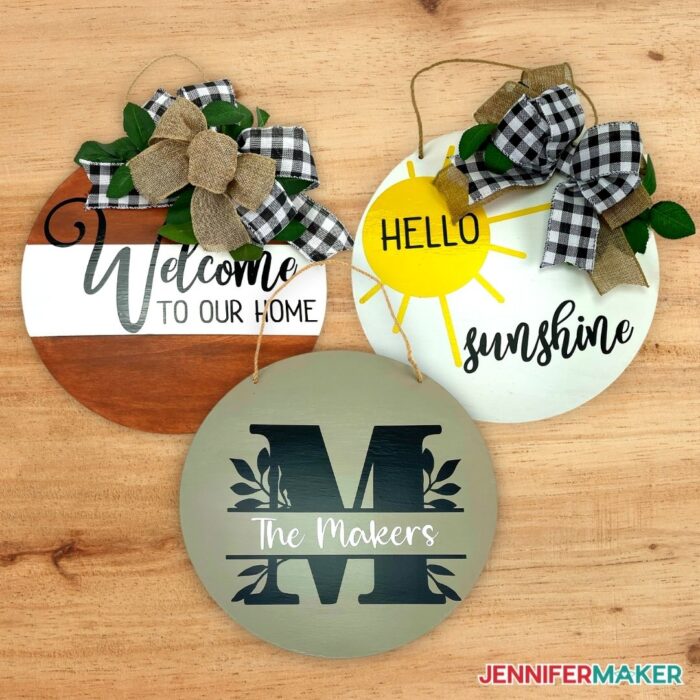
And to top your wood round off, add a bow and/or some artificial leaves to the top of the circle — it’s totally your choice! Get creative!
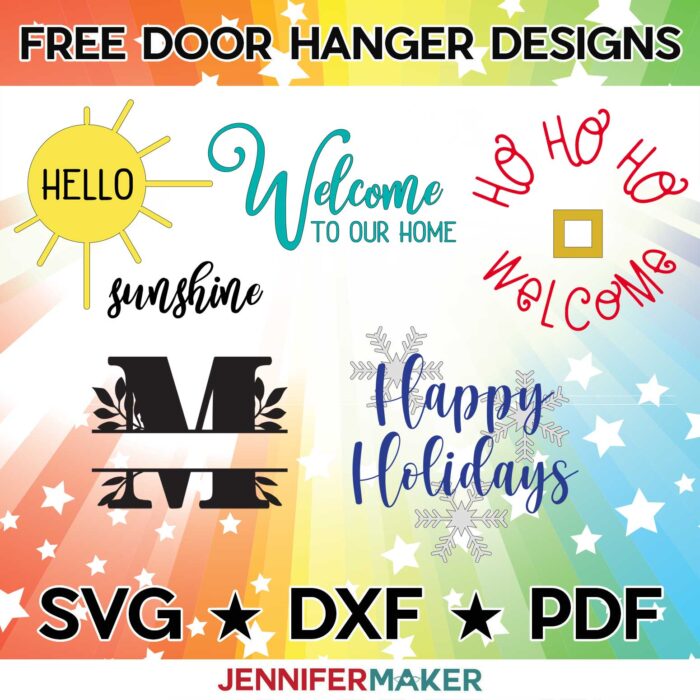
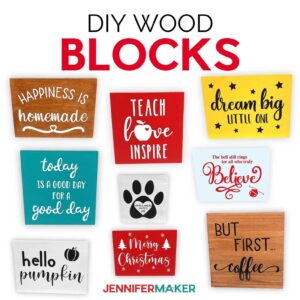
I’ve made five different designs for you to use, including these fun holiday versions:

Here’s a supply list of what you need to make round door hangers! This post contains some affiliate links for your convenience (which means if you make a purchase after clicking a link I will earn a small commission but it won’t cost you a penny more)! Read my full disclosure policy.
Materials to Make a Round Wood Door Hanger
View my Amazon shopping list with the exact items we used to make this project
- 1 Unfinished Wood Round — you can get these from Amazon, Home Depot, Lowes, Michaels, Joann, and Hobby Lobby
- 220 Grit Sand Paper
- Chalk Paint – White paint (For Welcome, Hello Sunshine, or Happy Holidays sign), Red paint (For Santa Sign), Grey paint (For Monogram Sign), Black paint (Santa’s Belt)
- Brown Acrylic Paint (for Faux Wood Stain)
- Foam Paint Brush
- Water-based Polycrylic sealer in Clear Matte
- Bristle Paint Brush for Polycrylic
- Permanent Vinyl – Black (For Welcome, Monogram, or Hello Sunshine sign), White (For Monogram and Santa Sign), Stone Yellow (For Hello Sunshine sign), Blue (For Happy Holidays Sign), Gold (For Santa Sign), Silver (For Happy Holidays Sign)
- Transfer Tape (Regular) or Strong Grip Transfer Tape (If Using Glitter Vinyl)
- Hot Glue Sticks and Hot Glue Gun (to attach bow and/or greenery)
- Wired 2″ Ribbon (Optional)
- Floral Wire (Optional for Ribbon Bows)
- Artificial Leaves (Optional)
- Weeding Tool
- XL Scraper
- Green StandardGrip Machine Mat 12″ x 12″
- Painter’s Tape (For Welcome Sign or Santa Sign)
- Baby Wipes (For Faux Wood Effect)
- Butcher Paper (Optional to Protect Surface while Painting)
- Paper towel or Rag to Clean Dust
- Ruler (or other measurement tool for creating stripes on Welcome and Santa sign)
- Pencil for Marking Measurement Lines
- Disposable Gloves (Optional)
- A method to cut your vinyl – I used the amazing Cricut Maker but you can also use the Cricut Explore
- Design #334 – My free SVG/PDF/DXF design files are available in my free resource library (get the password by filling out the form at the bottom of this page)
How to Make Your Own DIY Door Hangers

Round Wood Door Hangers
Learn how to make round wood door hangers in different styles!
See the list of recommended items to get in our Amazon shopping list at https://www.amazon.com/shop/jennifer.maker?listId=2ZY0978550P6V
Materials
- One (1) - 12" Unfinished Wood Round
- 220 Grit Sand Paper
- Water-based Polycrylic in Clear Matte
- Bristle Paint Brush for Polycrylic
- Chalk Paint - White (For Welcome, Hello Sunshine, or Happy Holidays sign)
- Chalk Paint - Red (For Santa Sign)
- Chalk Paint - Grey (For Monogram Sign)
- Chalk Paint - Black (Santa's Belt)
- Brown Acrylic Paint (for Faux Wood Stain)
- Foam Paint Brush for Chalk Paint
- Cricut Premium Vinyl Permanent - Black (For Welcome, Monogram, or Hello Sunshine sign)
- Cricut Smart Vinyl Permanent Black (Optional for Welcome, Monogram, or Hello Sunshine Sign)
- Cricut Premium Vinyl Permanent - White (For Monogram and Santa Sign)
- Cricut Smart Vinyl Permanent White (Optional for Monogram and Santa Sign)
- Cricut Premium Vinyl Permanent - Stone Yellow (For Hello Sunshine sign)
- Cricut Premium Vinyl Permanent - Blue (For Happy Holidays Sign)
- Cricut Premium Vinyl Permanent Glitter - Gold (For Santa Sign)
- Cricut Premium Vinyl Permanent Glitter - Silver (For Happy Holidays Sign)
- Cricut Transfer Tape (Regular)
- Cricut Strong Grip Transfer Tape (If Using Glitter Vinyl)
- Hot Glue Stick (to Attach Bow)
- Wired 2" Ribbon (Optional)
- Floral Wire (Optional for Ribbon Bows)
- Artificial Leaves (Optional)
- Berson Dream Font Trio
- Bogi Split Monogram Font
- Timberly Font
- Christmas Kisses Font
- Homework Font
- Design #334 - Get my free designs for your round wood door hangers, including the ones you see in this tutorial, along with several more, from my free resource library (get a password for it at the bottom of this page)
Tools
- A method to cut your vinyl, I used the amazing Cricut Maker 3 but you could also use any Cricut Maker, Explore, or Joy.
- Weeding Tool
- XL Scraper
- Green StandardGrip Machine Mat 12" x 12"
- Painter's Tape (For Welcome Sign or Santa Sign)
- Baby Wipes (For Faux Wood Effect)
- Butcher Paper (Optional to Protect Surface while Painting)
- Paper towel or Rag to Clean Dust
- Ruler (or Other Measurement Tool for Creating Stripes on Welcome and Santa sign)
- Pencil for Marking Measurement Lines
- Hot Glue Gun (to Attach Bow and Greenery)
- Disposable Gloves (Optional)
Instructions
STEP 1: PREP YOUR WOODEN DOOR HANGER
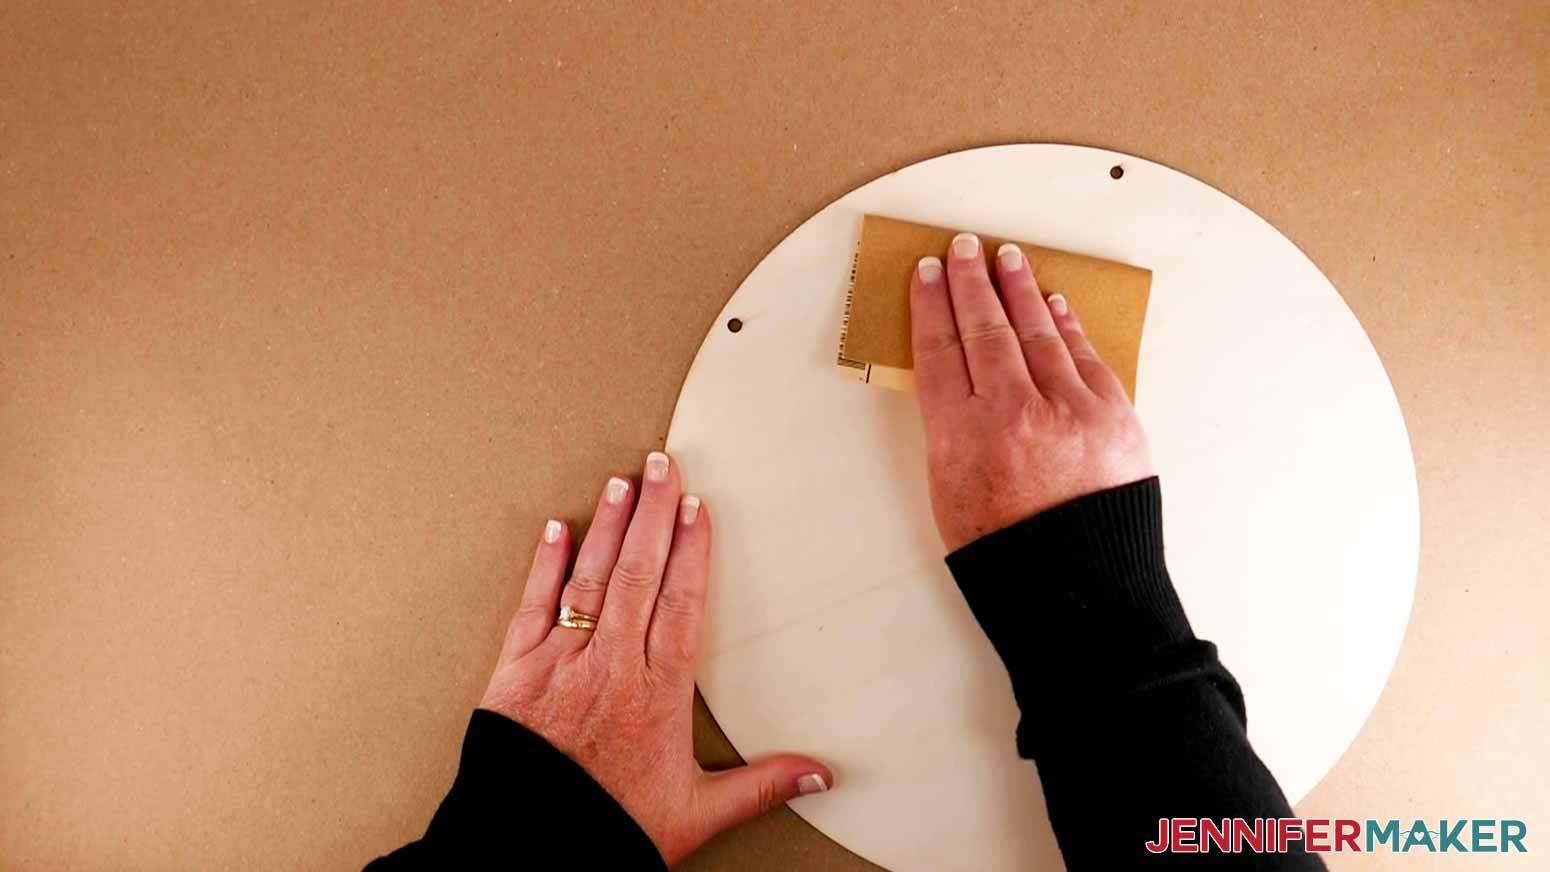
GET YOUR BOARD SMOOTH AND CLEAN
The prep work for your door hanger takes a little time so plan to get started at least one day before you want to complete your sign. If you're using the same wood rounds as me, the wood is pretty smooth. If you feel any bumps or rough edges, you'll want to use your 220-grit sandpaper to smooth those out. Use a paper towel or rag to remove any dust on your board.
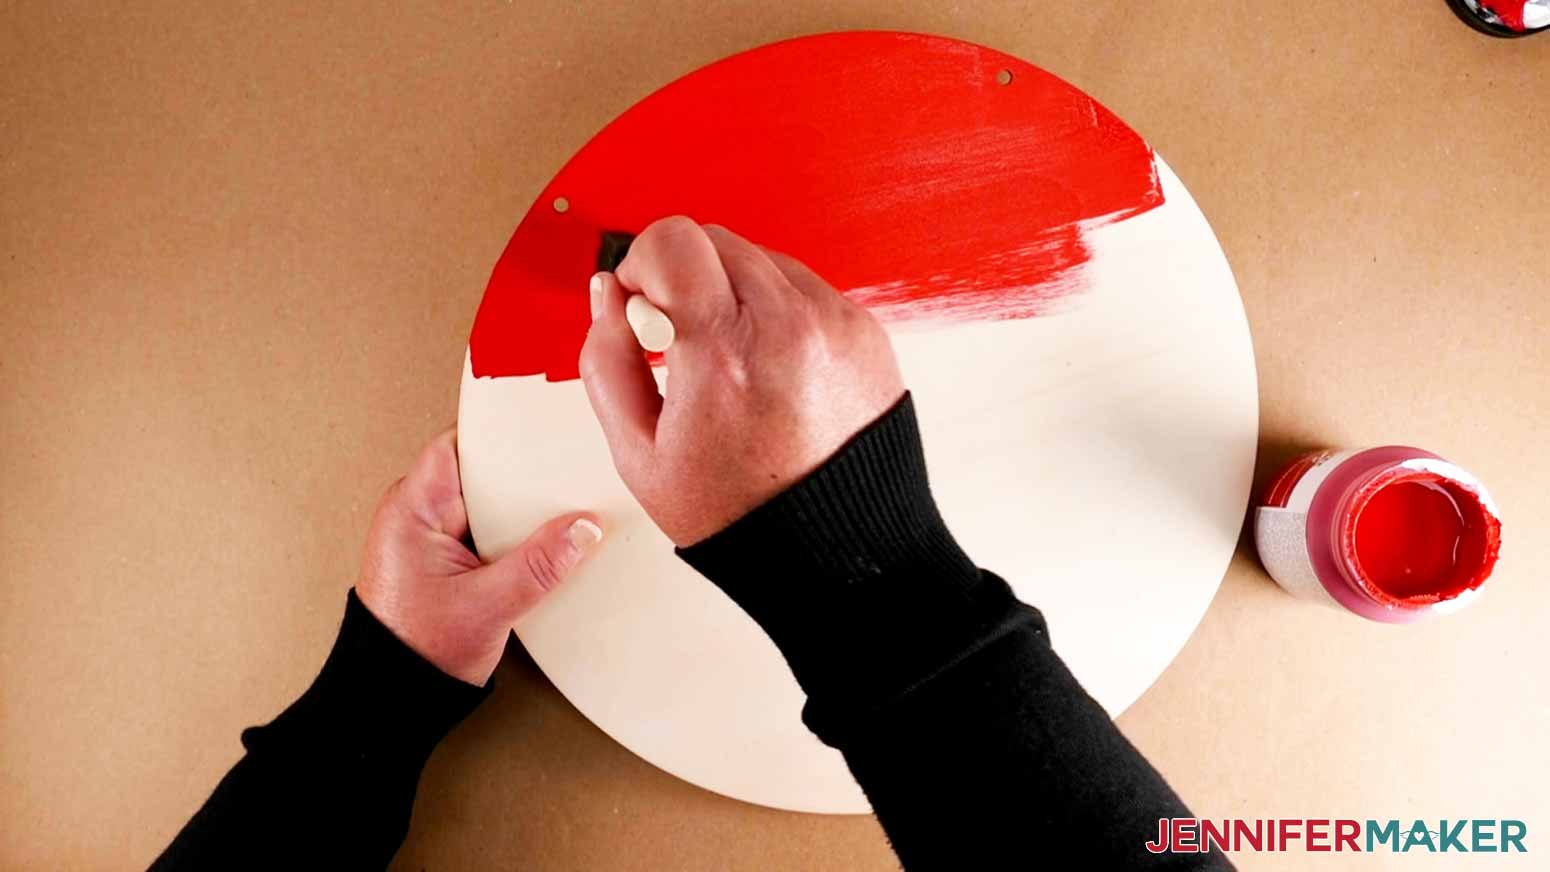
PAINT YOUR BOARD WITH A SOLID COLOR
If you are going to have a solid color for the background of your sign, choose your chalk paint color and apply the paint with a foam brush. I recommend painting with the grain of your wood. Allow a couple hours for the paint to dry and apply a second coat. Again, I recommend painting with the grain. If you are adding a second color for a stripe on your board, you should wait at least 2-3 hours to make sure your first two coats are dry. This is important so that when you apply the painter's tape for the stripe, it doesn't pull up any of the paint when you remove it.
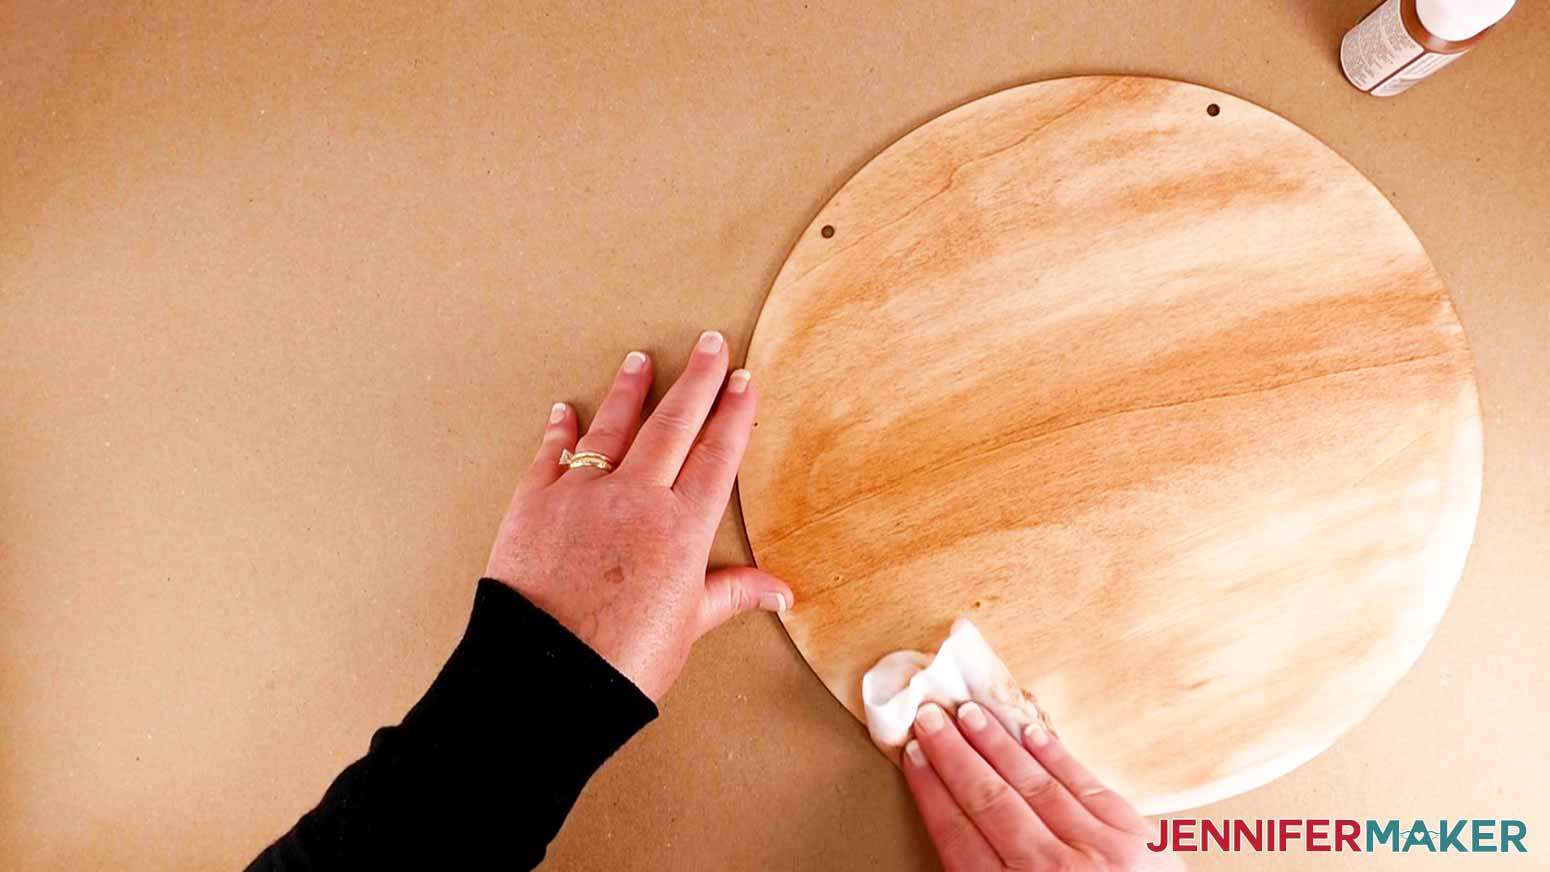
PAINT YOUR BOARD WITH A FAUX WOOD STAIN
Take a baby wipe and fold it in fourths. Dab a small amount of brown acrylic paint onto the wipe. Rub the paint into the wood sign until you reach your desired shade. Once the paint has dried (about 10 minutes), you can repeat the process if you decide you'd like a darker brown.
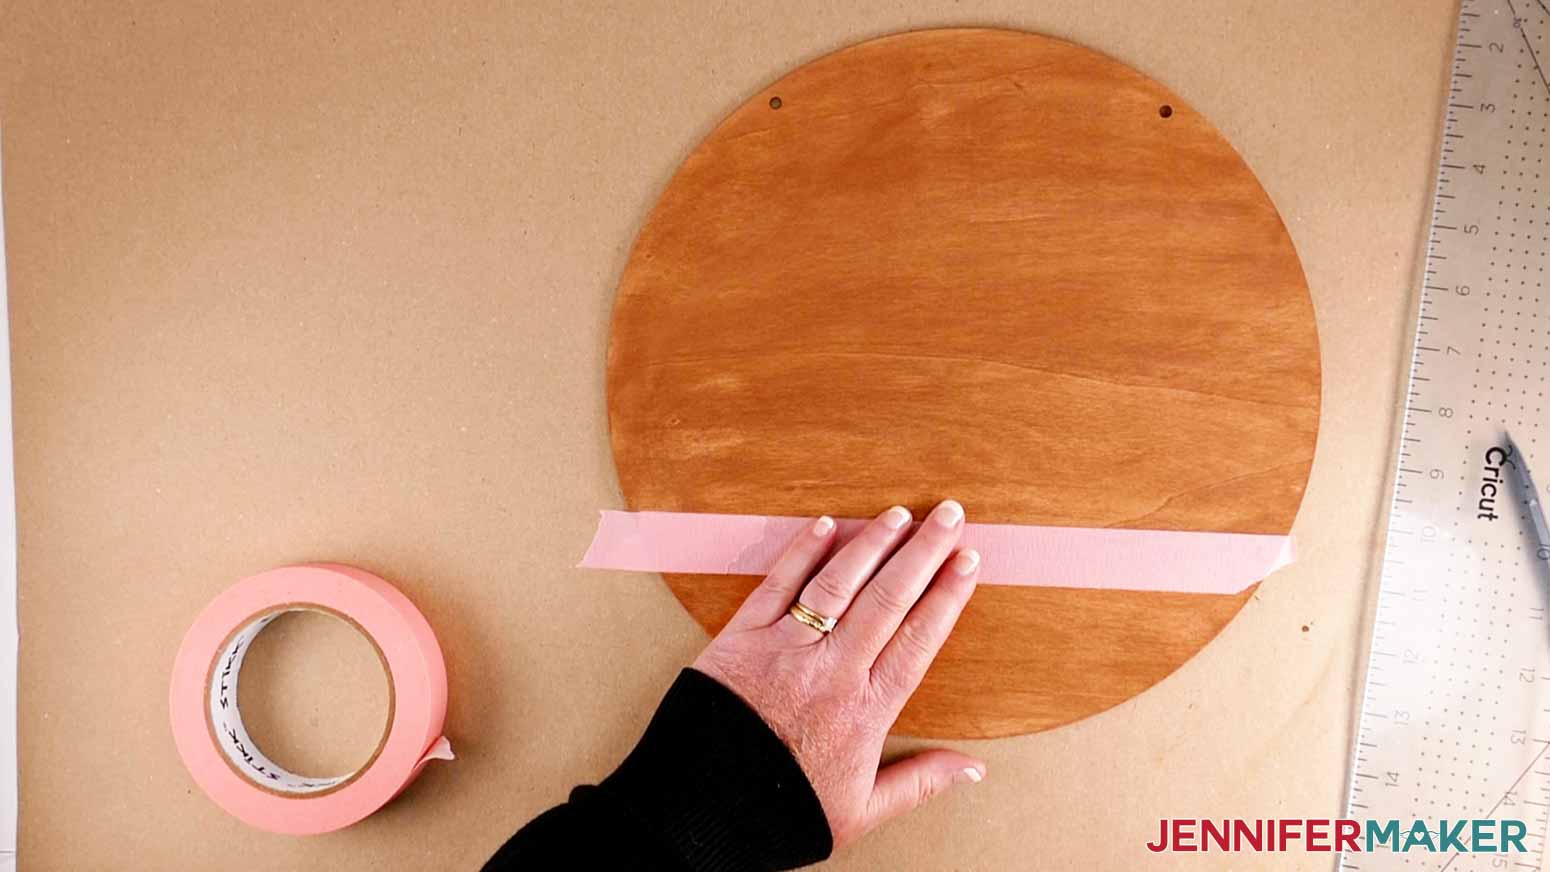
ADDING A SECOND COLOR TO THE HOME SIGN
If you are making the Welcome to our Home or Ho Ho Ho Welcome sign, you need to paint your stripe next.
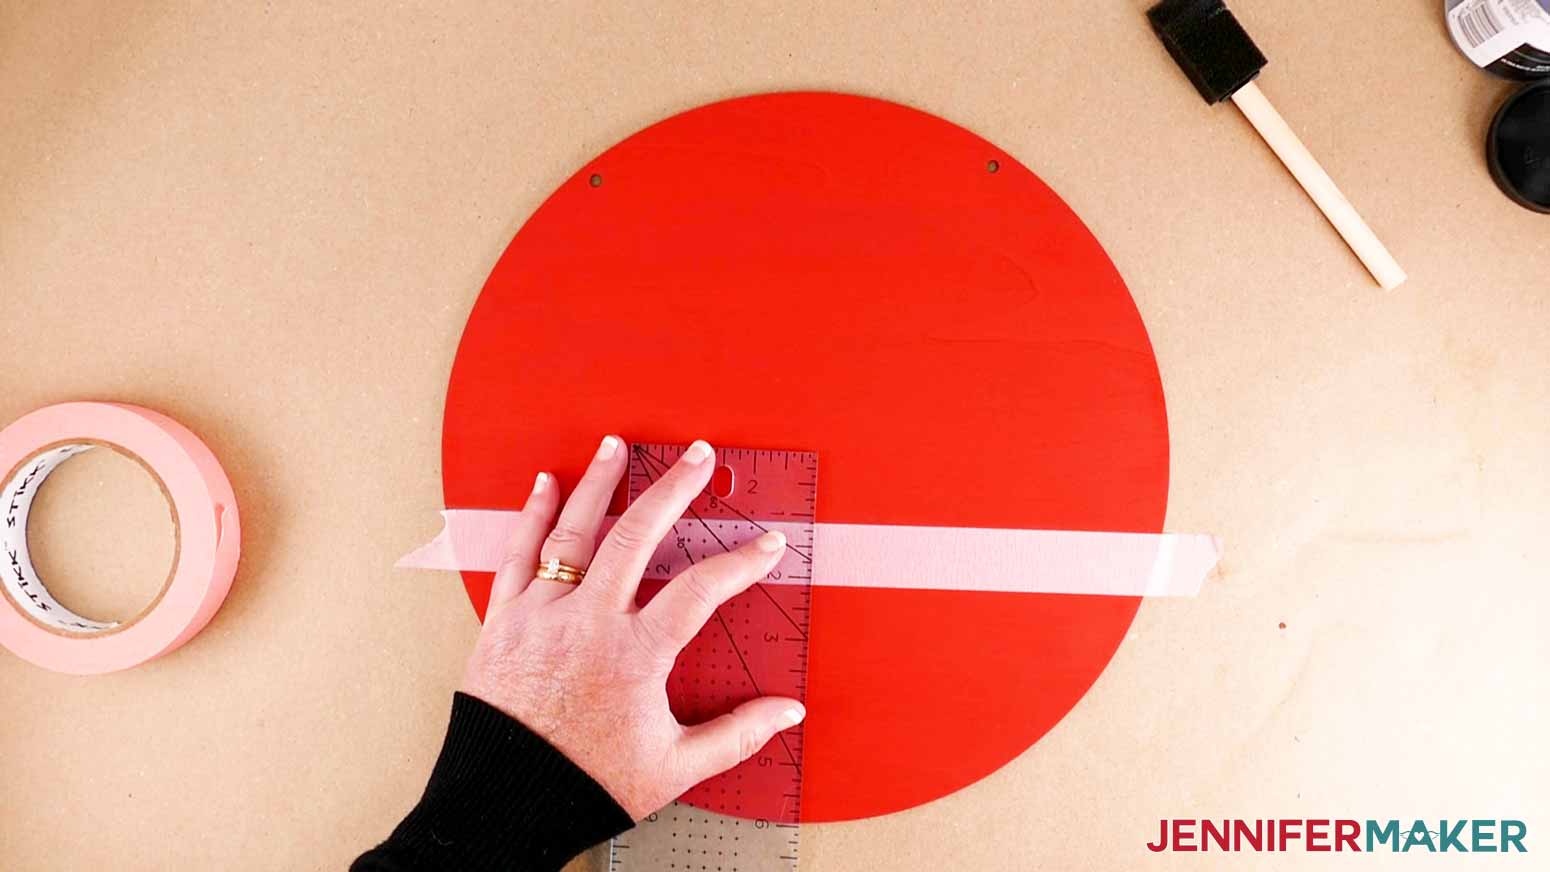
NOTE: Make sure the holes for the hanger are at the top of your wood round when measuring for the stripes and adding vinyl.
For the Welcome to our Home: I used white chalk paint for the stripe on this sign. The bottom of the stripe measures 3 1/2" from the bottom of the sign. The stripe is also 3 1/2" thick. Use your ruler and pencil to make small guides at 3 1/2" from the bottom and then place your painter's tape along the line. Once your first piece of tape is in place and you are happy with the angle, use your ruler and pencil again to mark 3 1/2" above the bottom tape line for your top tape line. Remember, before you paint, the open area between the two pieces of tape should measure at 3 1/2".
Once you're happy with your tape lines, make sure they are pressed firmly along your sign. Going with the grain, apply your white chalk paint. Once dry (after about an hour), I recommend a second coat for a more solid appearance.
TIP: The first coat may appear dry but if you apply your second coat of chalk paint too quickly, you could pull up part of the first coat. Allow as much time as you can, I recommend at least one hour.
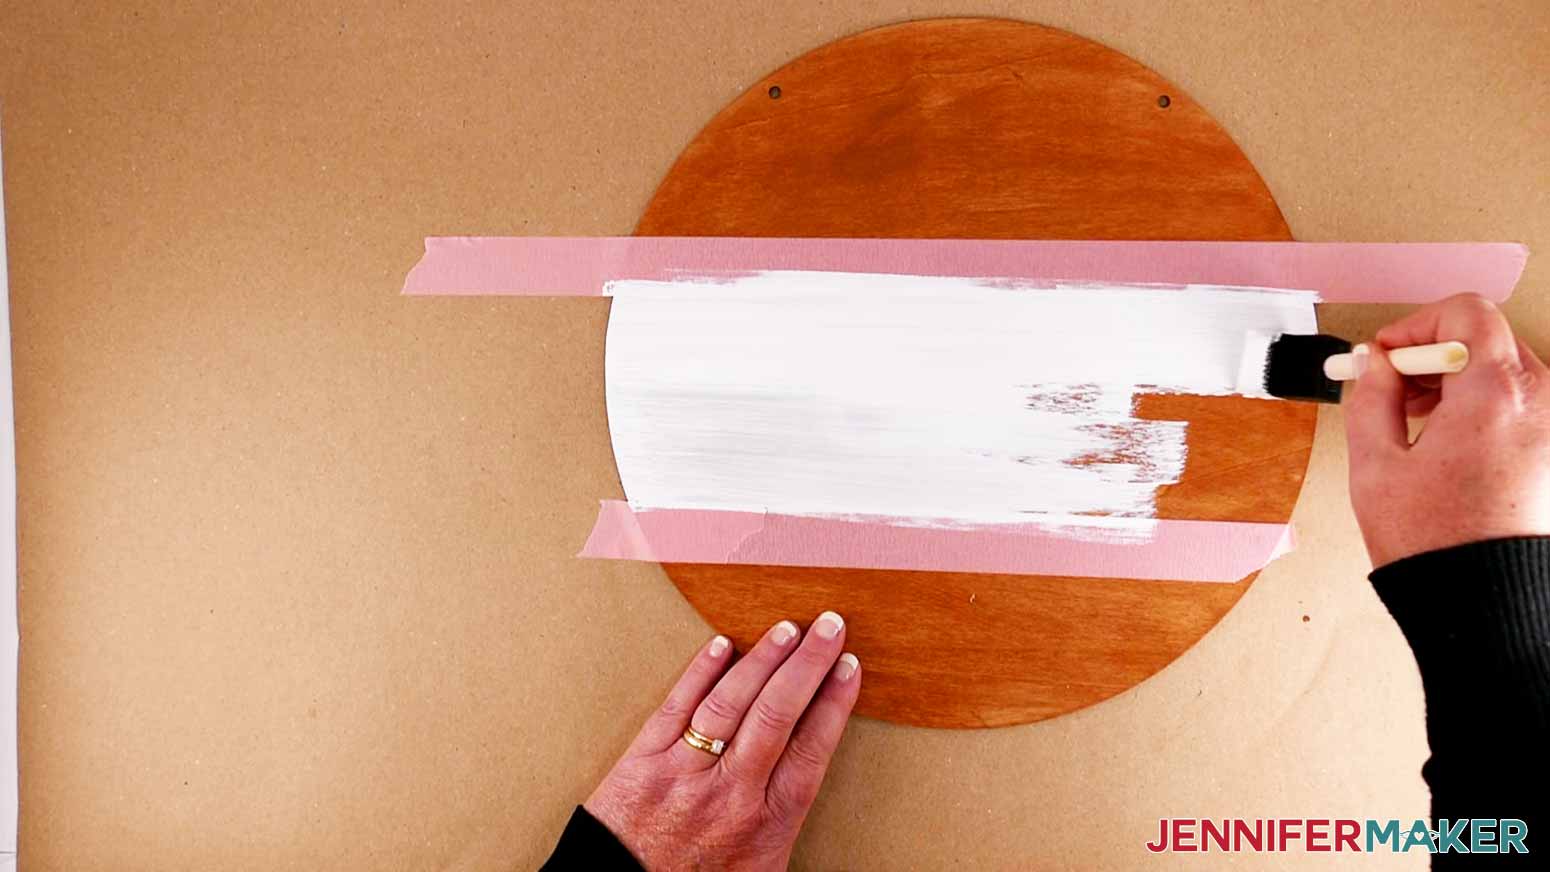
When your paint is dry, gently peel off your painter's tape and admire your beautiful work! If you see any small pencil marks on the wood, be sure to gently erase them.
![]()
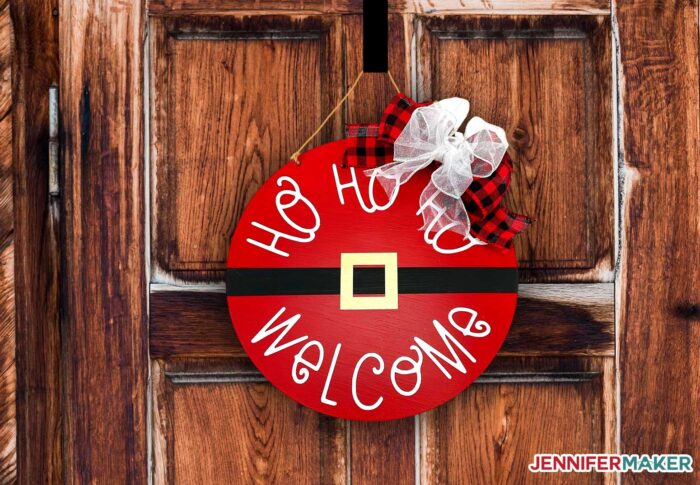
ADDING A SECOND COLOR TO THE SANTA SIGN
I used black chalk paint for the stripe on this sign. The bottom of the stripe measures 4 3/4"" from the bottom of the sign. The stripe is just a little over 1" thick (1 1/8" to be exact). Use your ruler and pencil to make small guide marks at 4 3/4" from the bottom and then place your painter's tape along the line. Once your first piece of tape is in place and you are happy with the angle, use your ruler and pencil again to mark 1 1/8" above the bottom tape line for your top tape line. Remember, before you paint, the open area between the two pieces of tape should measure about 1 1/8".
TIP: If you are using a different size wood round sign, you may want to first size your design in design space and check the measurement of the inside of Santa's belt buckle. You may want to adjust your belt size.
Once you're happy with your tape lines, make sure they are pressed firmly along your sign. Going with the grain, apply your black chalk paint. Once dry (about an hour), I recommend a second coat for a more solid appearance.
TIP: The first coat may appear dry but if you apply your second coat of chalk paint too quickly, you could pull up part of the first coat. Allow as much time as you can, I recommend at least one hour.
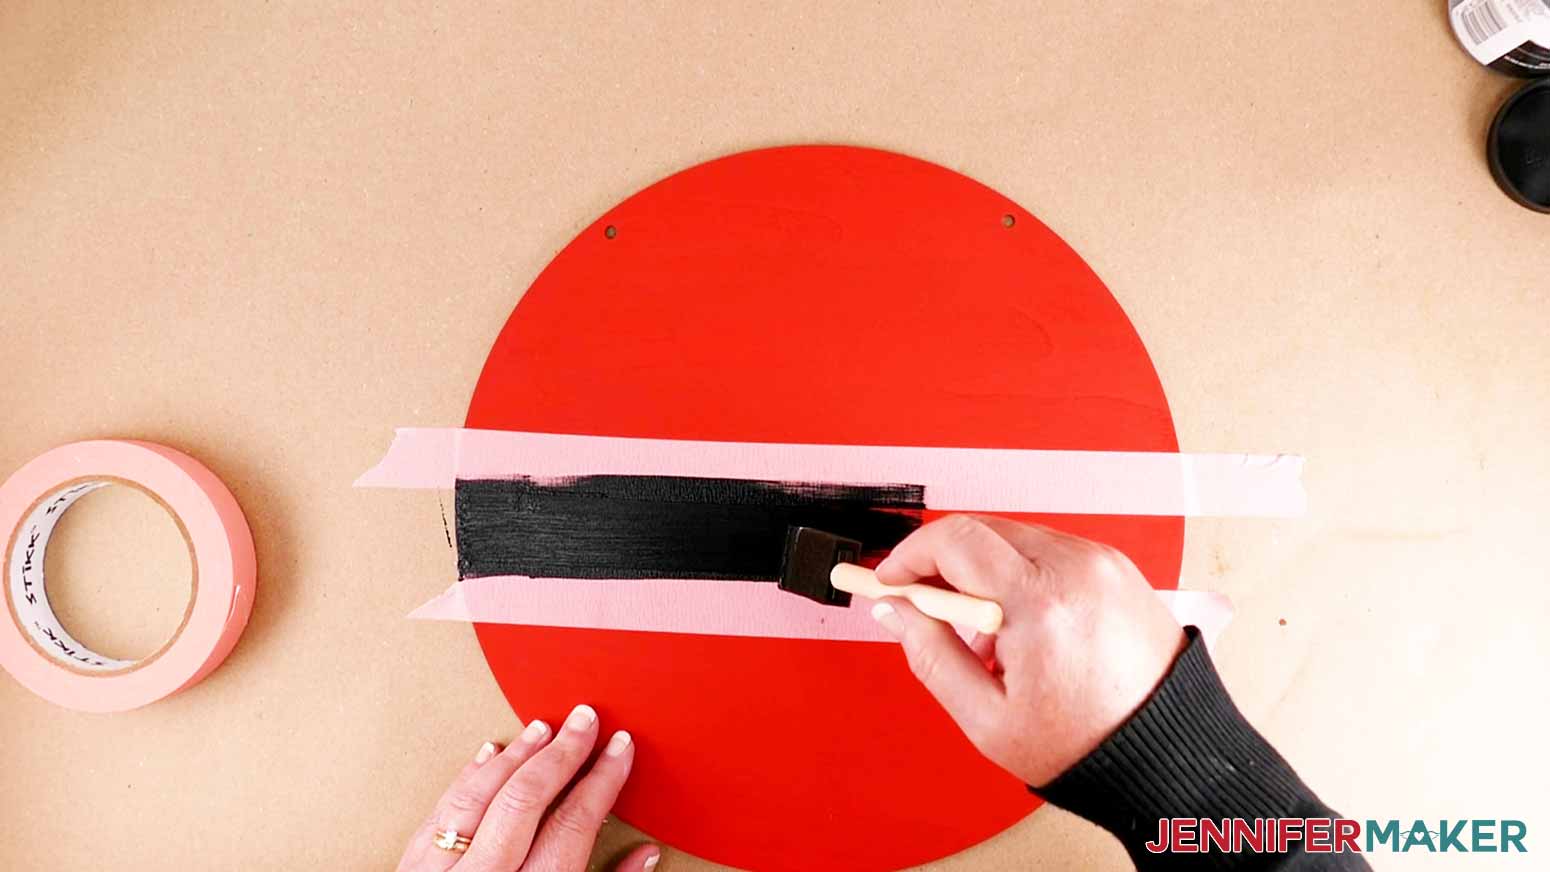
When your paint is dry, gently peel off your painter's tape and admire your beautiful work! If you see any small pencil marks on the wood, be sure to erase them.
![]()
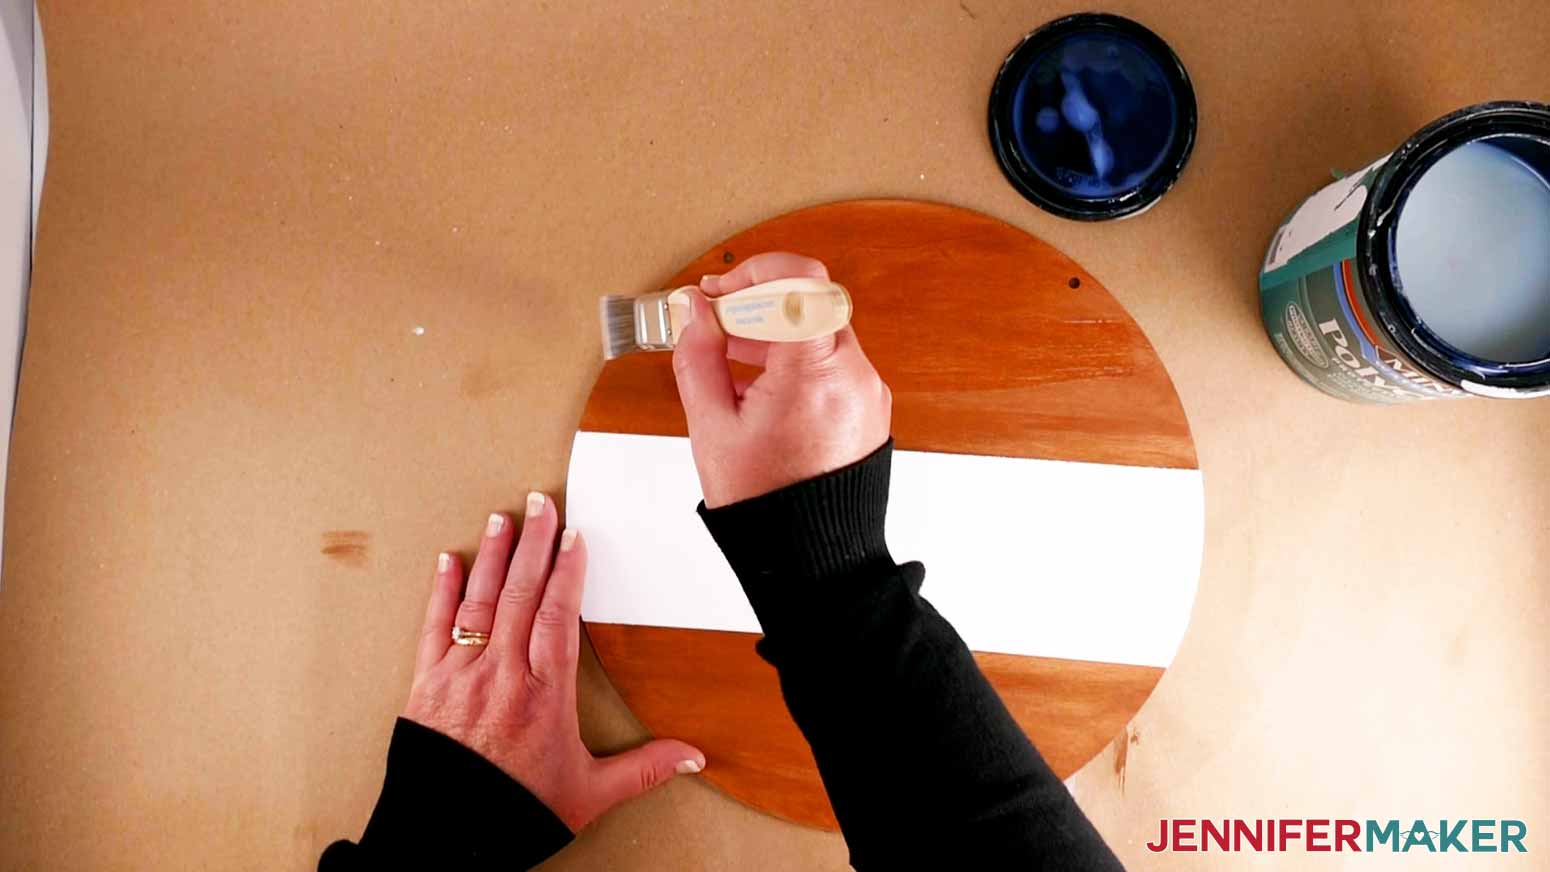
APPLY POLYCRYLIC: I recommend allowing your sign to dry overnight before applying the Polycrylic. Once your paint is completely dry, use your bristle paint brush to apply water-based Polycrylic to your sign. Apply generously to prevent streaking in the finish. Always make sure to apply Polycrylic in a well ventilated area and either use gloves or wash your hands thoroughly when finished. Allow a minimum of 12 hours, but preferably 24 hours to let the Polycrylic dry.
TIP: If you notice streaking in your finish, you can apply a second coat to smooth out the finish.
STEP 2: DOWNLOAD AND PREPARE YOUR DESIGN
Download our door hangers SVG with five design options! Start off by getting your free Door Hangers file from my free resource library.
TIP: If you are not sure how to upload an SVG cut file to Cricut Design Space, watch this helpful video training series I made. If you are on an iPad or iPhone, here is how to download and upload SVG files to the Cricut Design Space app.
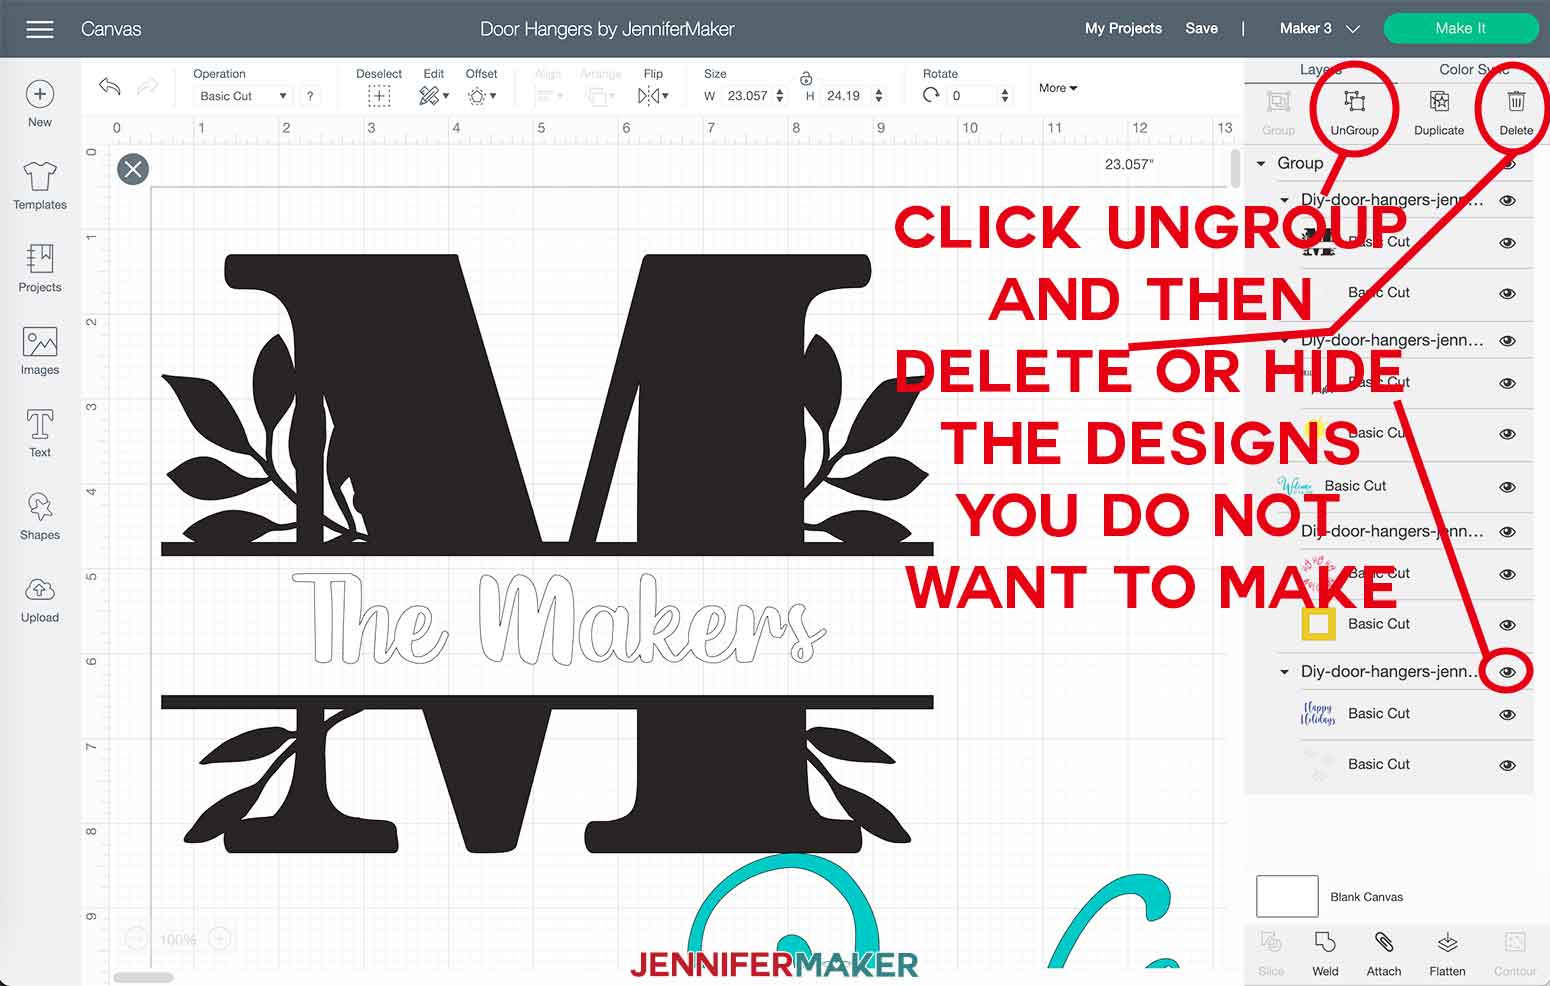
All door hanger designs in my collection are formatted to fit the size of the wood round in this tutorial (11.8"). Click "Ungroup" to individually select the design you'd like. You can hide or delete the other designs.
If you are using a different size wood round, I recommend making a circle (as a template) and size it to the dimensions of your sign. In Design Space, click on Shapes and then Circle. Keep your circle locked and change the dimensions by either dragging the two arrows in the lower right or changing the dimensions at the top of the screen to match the size of your wood round.
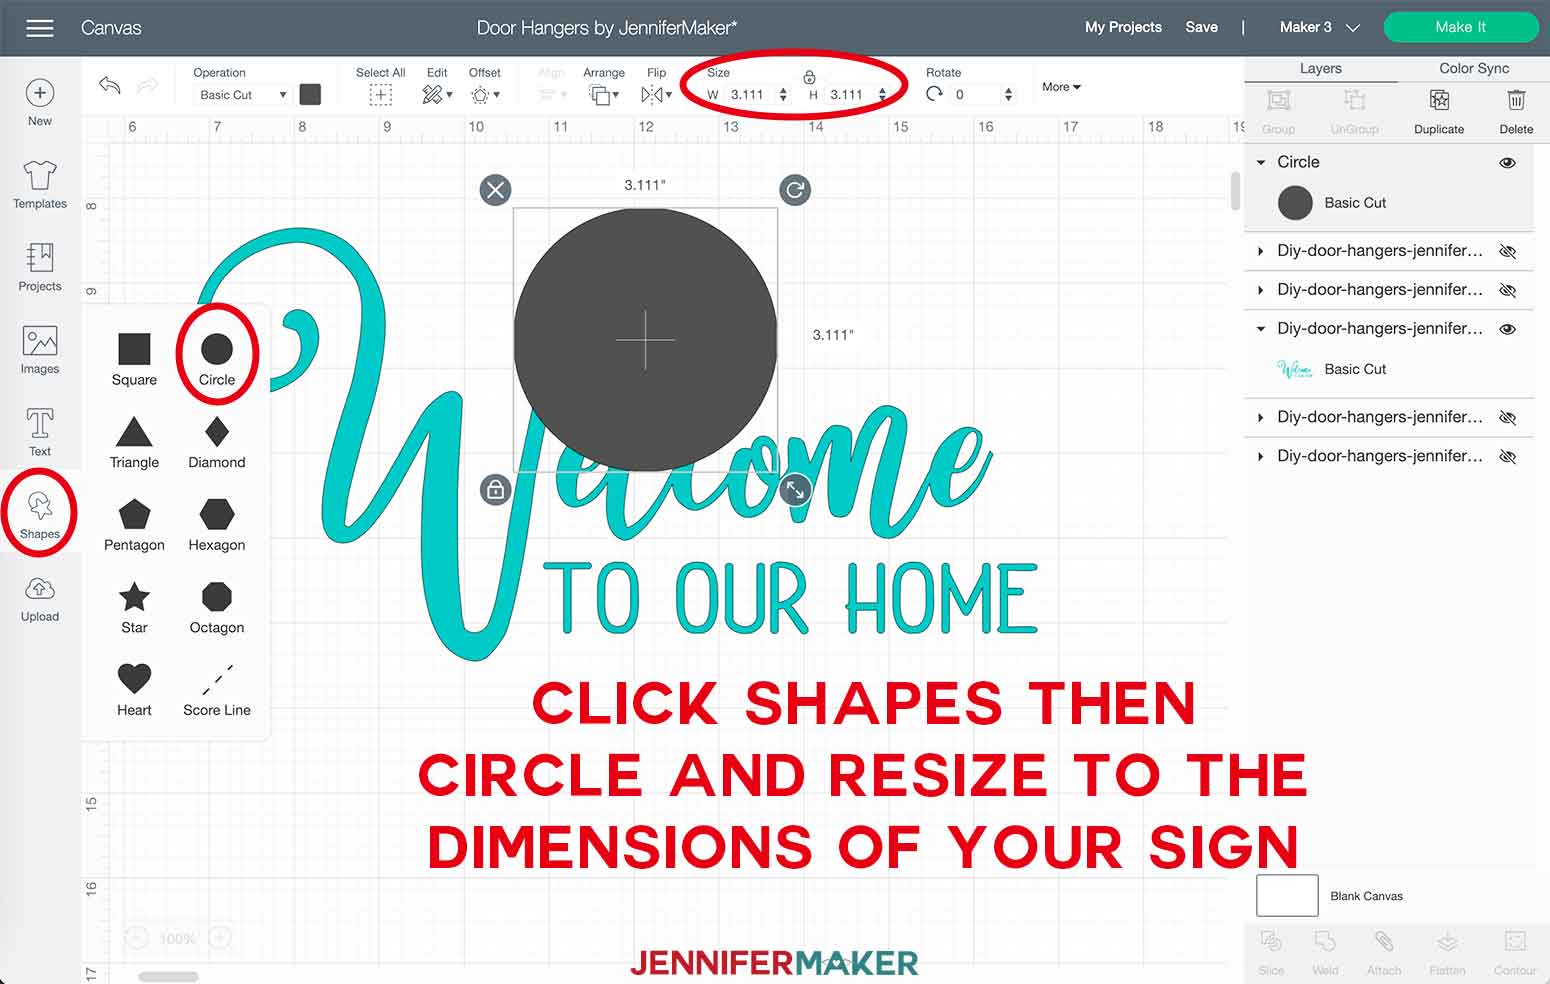
You can then place the design you want over the circle to see how much you need to resize. I recommend keeping your images locked so the ratios remain the same as you use the resize handle to resize the designs.
TIP: If your circle is covering your design, select the circle, click "Arrange" and then select "Send to Back."
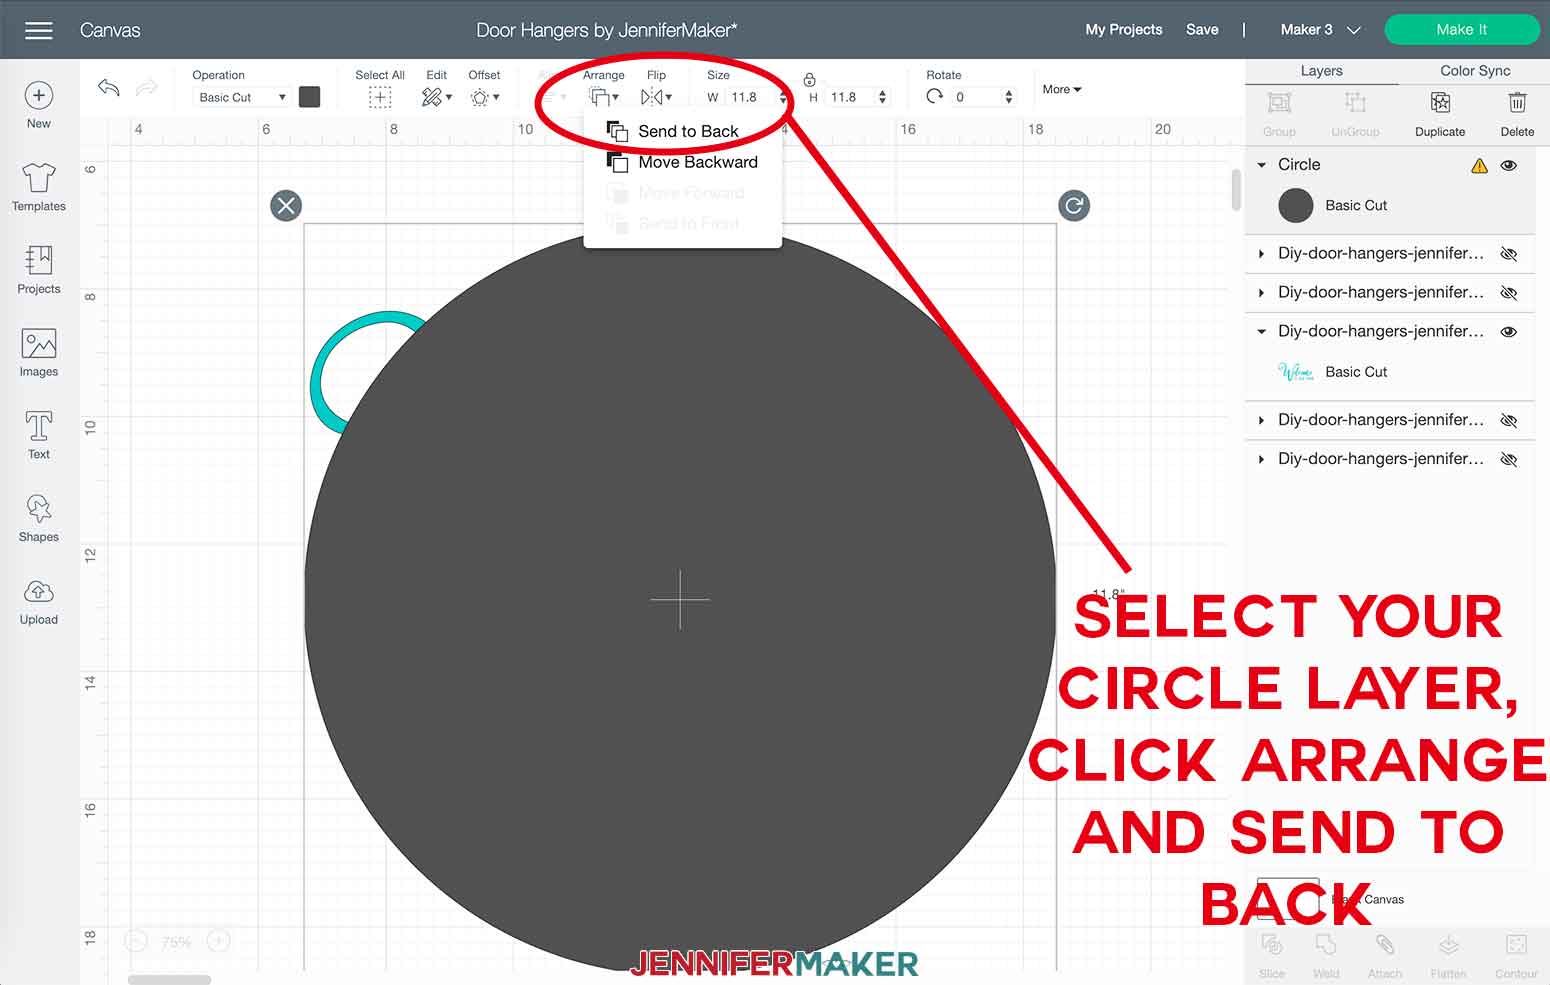
MAKE IT: Once you have you design sized correctly for your sign, you can hide or delete your circle and click "Make It."
If you are using Smart Vinyl on a Cricut Maker 3 or Explore 3, select "Without Mat" and then measure and cut your Smart Vinyl according to the measurements on the screen.
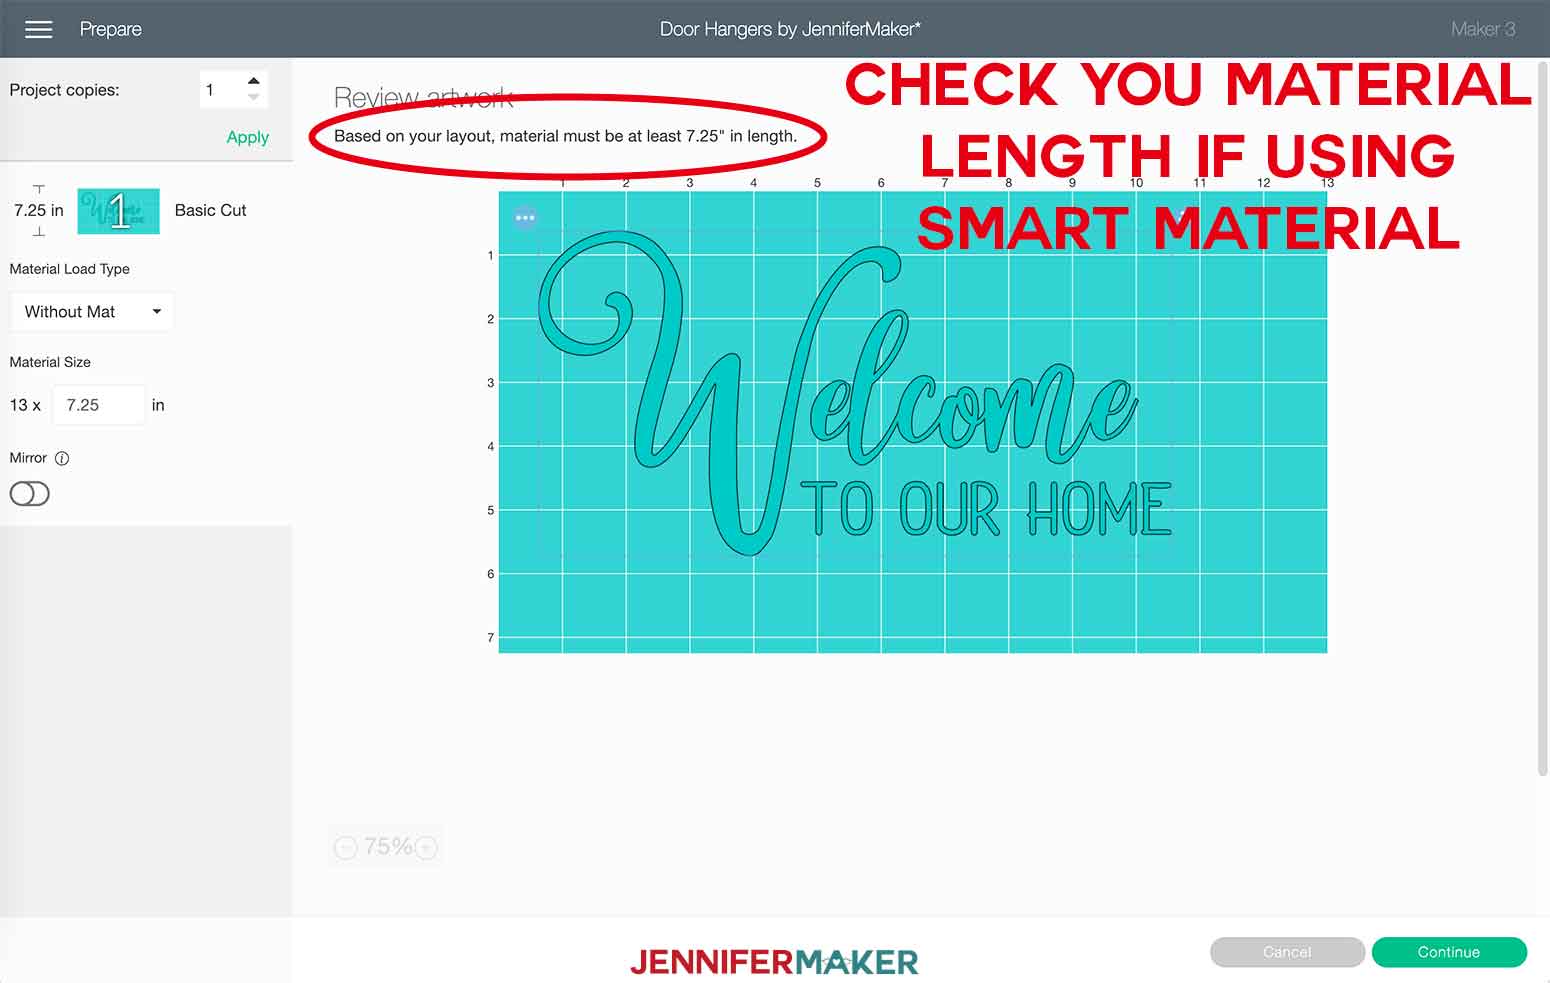
If using Cricut Premium Permanent Vinyl, select “On Mat” and place your permanent vinyl on a Green StandardGrip 12" x 12" cutting mat.
Click "Continue" and select your material, either Smart Vinyl-Permanent or Premium Vinyl. I recommend changing the pressure setting to "More."
Load your material and click "Go!"
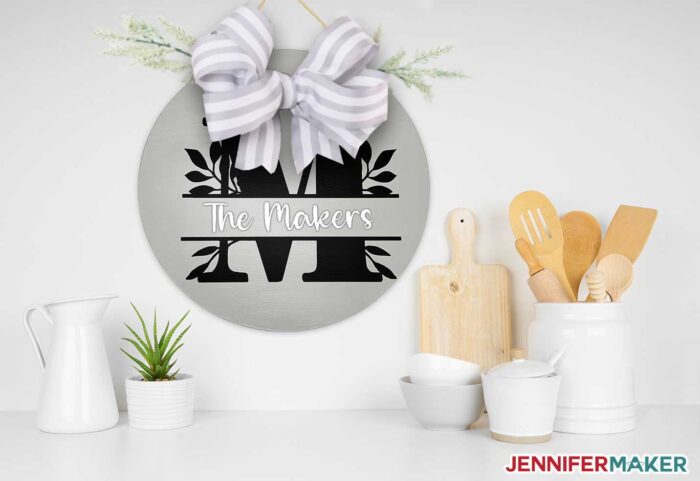
NOTE FOR A PERSONALIZED MONOGRAM DESIGN: I used the font Bogi Split Monogram to create my monogram sign. I used the font Timberly in the middle of the monogram. You can make your sign with any font you'd like, such as Maestic B or Albanian Olive Monogram. Did you find a font that you like but it isn't a split mongogram design? I can help you with that too! Check out my tutorial on making your own split monogram in Design Space!
STEP 3: APPLY YOUR DESIGN
Once your design is finished cutting, unload your mat.
I like to keep my vinyl on the mat when I weed to keep it from moving around. Now use your weeding tool to peel away all of the excess vinyl. Make sure to remove all the centers in the letters…these are also referred to as “counters.”
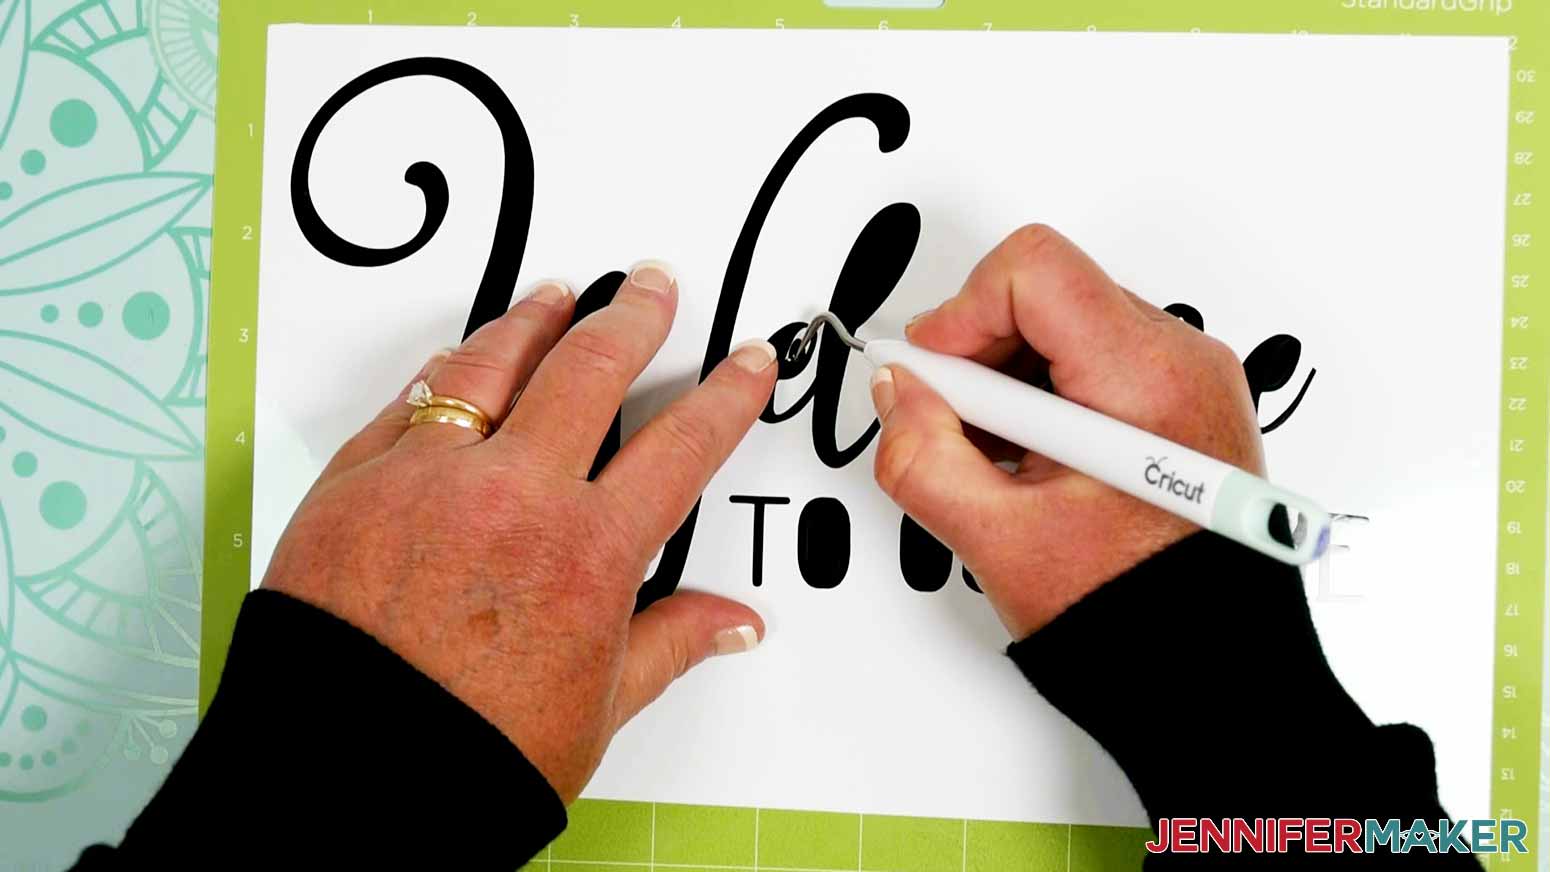
Cut a piece of transfer tape to the size of your design. Peel away the transfer tape backing, hold it over your vinyl and fold it like a taco. Line up the center of the transfer tape with the center of your design and apply from the middle outward.
TIP: If you are applying Glitter Permanent Vinyl, remember to use Strong Grip Transfer Tape.
![]()
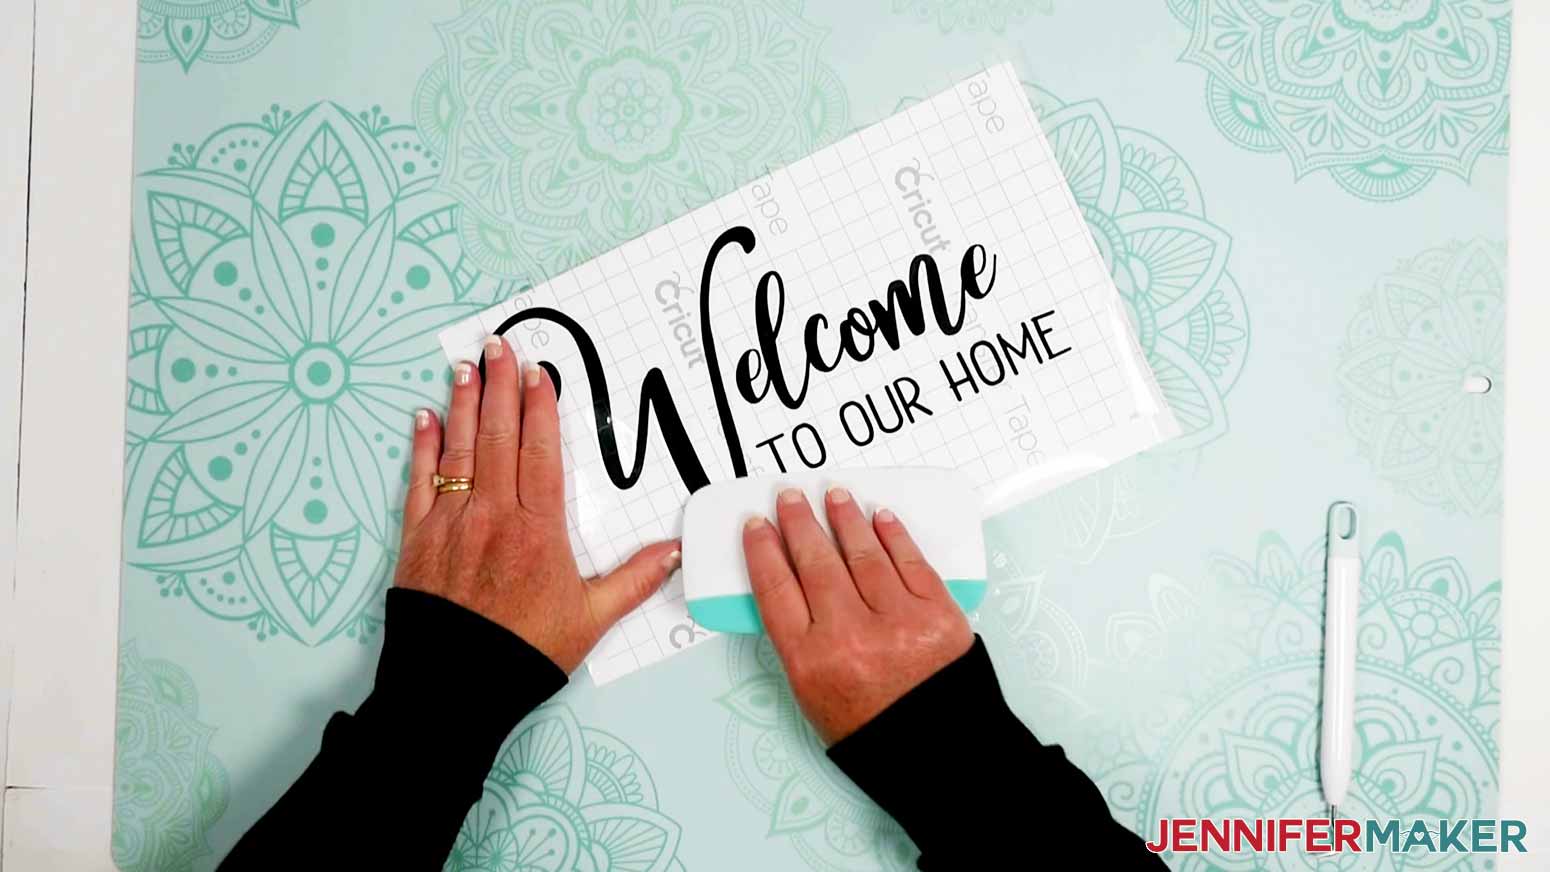
Use your scraper tool to burnish the front of your design. Then flip over your mat and remove everything by gently pulling the mat away from the design. Now use your scraper tool again to burnish your design from the back to make sure it adheres to the transfer tape.
Gently peel away the backing of your permanent vinyl. If any pieces of vinyl do not stick to the transfer tape, you can use your scraper to burnish that area again. Once your backing is removed, gently fold your transfer tape into the taco shape again and align your vinyl with your wood round. Press the center of the "taco" onto the sign and gently spread the design from the center moving to the outer edge.
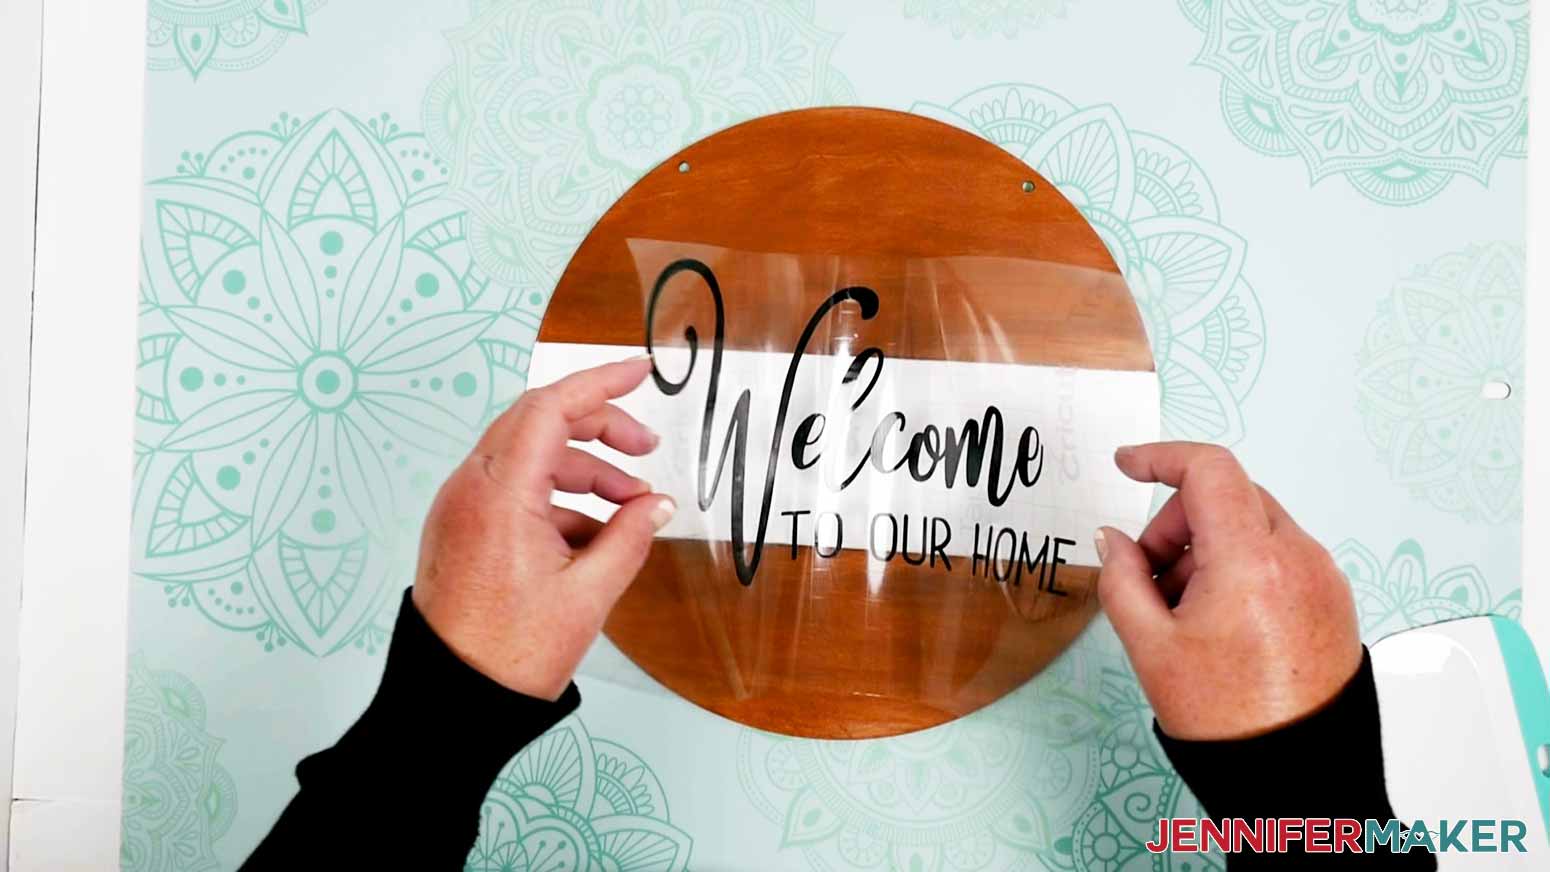
Use your scraper tool to burnish your vinyl to the sign. Gently peel away your transfer tape. Have your scraper handy to reburnish any areas that may lift as you remove the transfer tape.
![]()
Once you've removed your transfer tape, you may notice small air bubbles in your vinyl. No one will likely notice these but I understand if you want to get them out. I have three tips for you to try!
First, you can use your scraper and try to reburnish the area to smooth out the bubbles.
Second, you can use a straight pin to pop the bubble and then burnish the vinyl towards the hole you made to smooth it out.
Lastly, you can use a hairdryer to heat the vinyl and then burnish the bubble area. Be careful not to melt your vinyl!
Are you wondering if you need to apply a sealer over your vinyl? If you've prepped your sign like I did and used permanent vinyl, you do not need to seal your sign. I've had wooden signs last outdoors for years with this method!
STEP 4: APPLY YOUR HANGER AND RIBBON
If you are using the same signs as me, your wood rounds come with twine to hang the sign. Insert the twine through the holes at the top and tie a knot on each end.
The signs also come with ribbon that you can make into a bow, but I chose to use a thicker, wired ribbon. You can use whatever you'd like or nothing at all!
Bows can be tricky but using wired ribbon helps create great bows. Start by pulling a piece of the ribbon out for the length of the tail (that's the part that hangs down).
Leave the tail hanging and roll the attached end of the ribbon into a circular shape.
From there, loop out the attached side to make one side of your bow. Pull the attached side of the ribbon to the other side and twist it behind the center circle.
Make your second loop (on the opposite side of your first loop). Pull the attached end back across to the other side.
Again, twist it in the middle. Make your third loop on the same side at your first.
Pull the attached end back across, twist in the middle, and make the fourth loop.
Pull the attached end to the center and then down to make your second tail.
Measure the second tail to be the same length as your first tail and cut your ribbon. Now grab a piece of floral wire, about 8 inches or so, and feed it through the center circle and twist tightly behind the bow to hold all of the parts together.
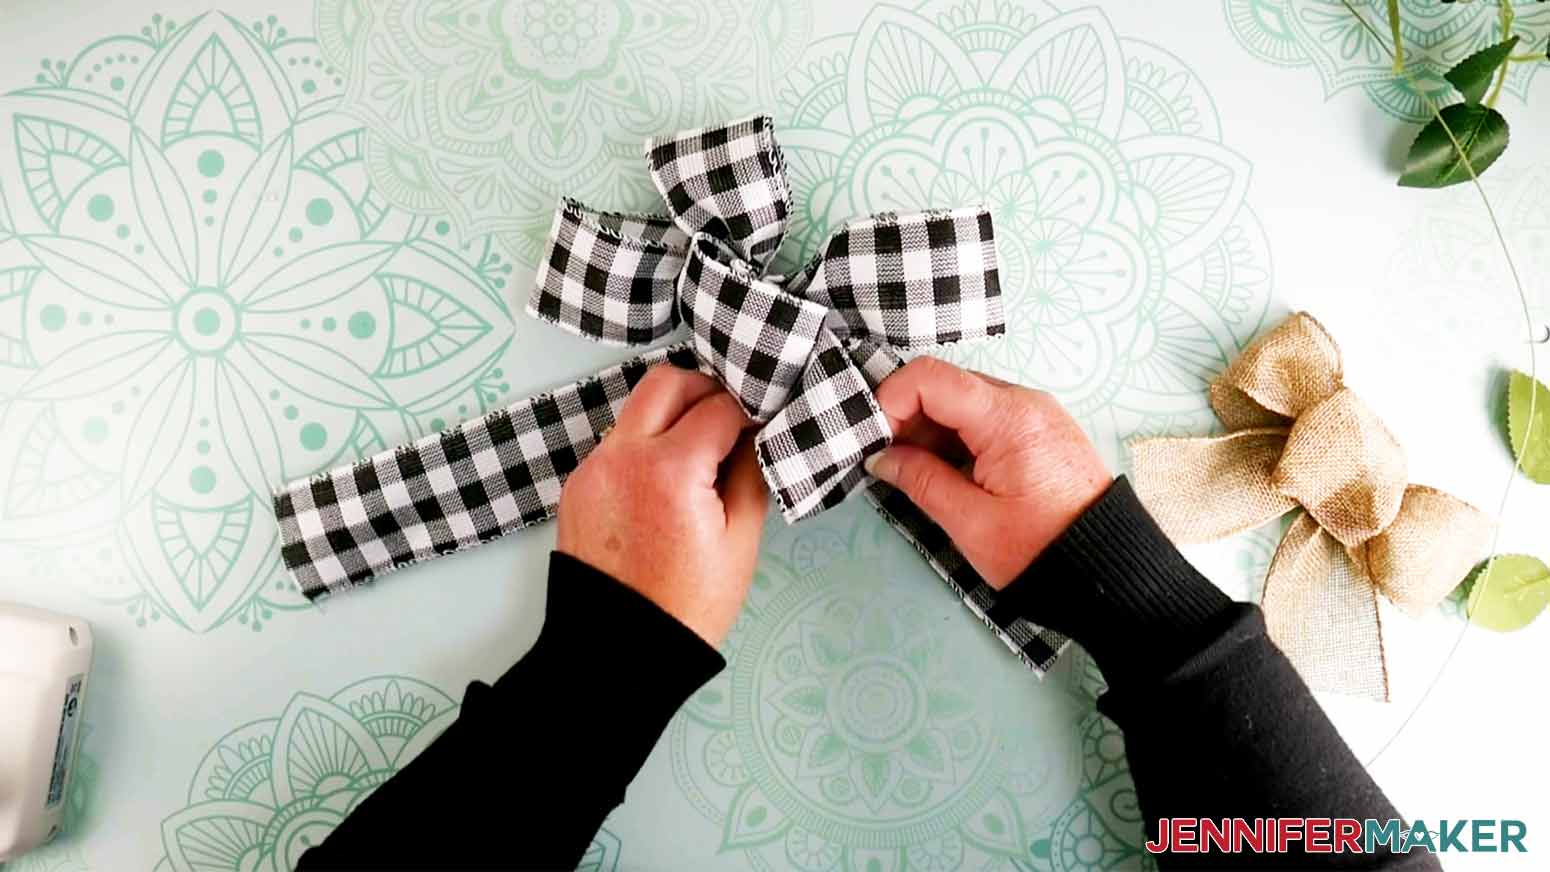
NOTE: If you choose to add a second bow, you will want to reference your first bow and make it either slightly larger or slightly smaller so they compliment each other.
You're almost done! Use a hot glue gun to attach your bow and any greenery to your sign.

Notes
Fonts
Welcome to our Home - Berson Dream Font Trio (Both Sans and Script are in the font package)
Hello Sunshine - Berson Dream Font Trio (Both Sans and Script are in the font package)
The Makers - Bogi Split Monogram and Timberly
Ho Ho Ho Welcome - Christmas Kisses
Happy Holidays - Homework
Recommended Products
As an Amazon Associate and member of other affiliate programs, I earn from qualifying purchases.

The detailed step-by-step assembly video on how to create personalized round wood door hangers is part of Maker Academy Weekend. Get a pass to watch all 20+ workshops, each with a printable handbook, transcript, audio files, design files, and support with a VIP pass below:

I just love how my DIY door hangers turned out — not only do they look great on a front door, but you can use them to decorate bedroom doors or kitchen walls, too!
Round wooden door hangers look particularly festive at Christmas time, too!
Answers to Your Questions About How to Make Round Wood Door Hangers
Q: Where is your tutorial for this project?
This is a special project we made for our free Maker Academy Weekend event! A complete and detailed step-by-step video premiered during the event November 4-7, 2021 — specifically, this tutorial video was available to watch for free for 24 hours beginning November 5 at 10:00 am ET! To watch the replay of the video and get the 15-page printable handbook that details how to make this beautiful project, get a VIP Pass to Maker Academy Weekend, which comes with other perks and bonuses, too!
Q: How can I make a monogram like your big “M”?
This monogram comes from the Bogi Split Monogram Font! That font contains every letter of the alphabet as a split monogram.
Q: My store doesn’t have any wood rounds! Where do I find them?
If you can’t find DIY wood sign kits locally, try ordering them from Amazon. And, bonus, they come pre-drilled and pre-hung! If that’s not an option, be sure to check your dollar store!
Q: My wood rounds aren’t pre-drilled and pre-hung. What can I do to hang them?
Get some jute rope and hot glue it to the back to create a hanger!
Q: When I put my transfer tape on my wood round to apply the vinyl, some of the paint lifts off. What do I do?
You need to wait until the paint and/or sealer is completely dry. I recommend allowing your sign to dry overnight before applying polycrylic sealer. Once your paint is completely dry, use your bristle paint brush to apply water-based polycrylic sealer to your sign. Apply generously to prevent streaking in the finish. Always make sure to apply polycrylic in a well ventilated area and either use gloves or wash your hands thoroughly when finished. Allow a minimum of 12 hours, but preferably 24 hours to let the polycrylic dry before applying vinyl.
And check out the other fun projects we made together during Maker Academy Weekend 2021:


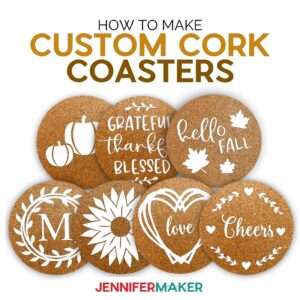


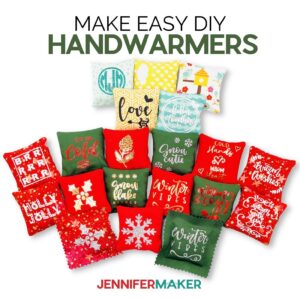
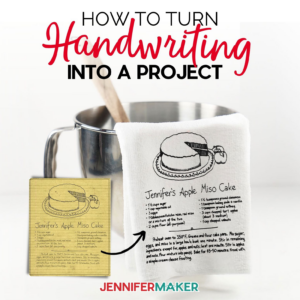
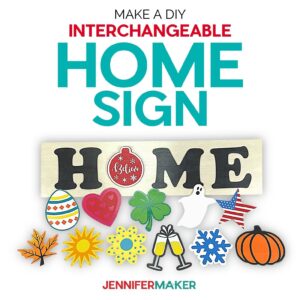


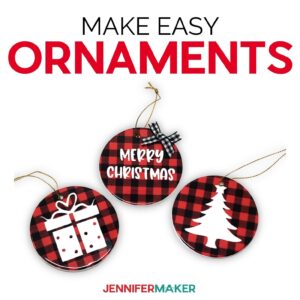


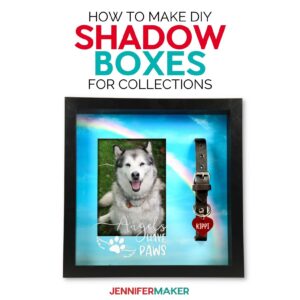

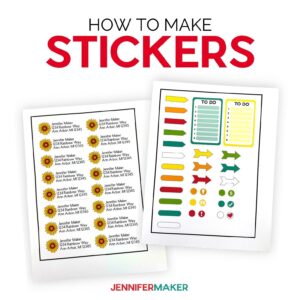


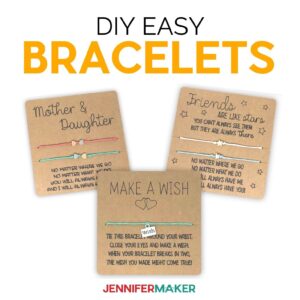
Get the free designs for my DIY door hangers and all these other projects!
I love seeing what you make with my designs and how you use them! Please share a photo of your round wood door hangers in our Facebook group or tag me on social media with #jennifermaker.
Love,

Want to remember this? Save this DIY Door Hanger Tutorial to your favorite Pinterest Board!