Learn how to make a Dollar Tree Christmas tree and Dollar Tree Christmas wreath with custom options!
With a few dollars and some creativity, you can make holiday decor to last several seasons with Dollar Tree DIY projects. I have lots of ideas in my full Dollar Tree DIY Christmas Decorations collection. And detailed instructions to make a Reverse Canvas using mostly Dollar Tree supplies. But when I saw the mini Christmas trees and garland options, I knew we had to make a tree and wreath to match the rest! I’ll show you how to take them from uninspiring to irresistable with a few supplies and tricks!
Watch the full step-by-step DIY Christmas wreath from Dollar Tree and matching tree video tutorial:


Dollar Tree has a growing selection of wire wreath forms just waiting to be made into beautiful wreaths. Making them really full and lush can be tough, so I’ll show you how I got the look using a long length of garland! Add some of your favorite florals and the Dollar Tree Christmas wreath is ready for your front door!

The Dollar Tree Christmas Tree looked a little sad right out of the box, but garland ties helped fill in the bare spots. Then, decorations and some spray snow took it from Charlie Brown to Rockefeller Center! Just on a smaller scale you can create at home, complete with a custom tree skirt using my free SVG files and tutorial.

If you want more ideas for the Dollar Tree Christmas tree, I made another version on my TikTok channel!
In addition to filling in thin spots and spray snow, how can you take these Dollar Tree DIY projects to another level?
My best advice is to pick different colors to match your home decor. That way, your cute Christmas decor will look cohesive and blend with your normal surroundings. The seasonal items might be sparkly and have more green than the rest, but sticking to a complementary pallette is a great way to get high-end results without spending a lot of money.
This will influence the decorations, florals, paints, and vinyls for your project, but you can get an idea of what you’ll need in my material list below. You can find a great deal of options in many colors in the dollar store crafts aisles!

Let me show you how to make a Dollar Tree Wreath DIY project and mini tree! This post contains some affiliate links for your convenience (which means if you make a purchase after clicking a link I will earn a small commission but it won’t cost you a penny more)! Read my full disclosure policy.
Materials to Dollar Tree Wreath DIY
View my Amazon shopping list with the exact items we used to make this project
Mini Tree
- Green Table-Top Artificial Christmas Tree 18″
- Wired Garland Ties
- Vase Filler – I used Red and Gold
- Round Christmas Bells – I used Red and Gold
- Metal Jingle Bells (Larger) – I used Red and Gold
- Glittery Mini Bows
- Wooden Star Ornament
- Gold Paint (for Star)
- Mini Tree Skirt or from Dollar Tree
- Cricut Iron-On Vinyl – Gold
- Cricut Iron-On Vinyl – Cherry Red
- Cricut Smart Glitter Iron-On – Silver
- Red Ribbon (Optional)
- Wooden Block for Tree Base or from Dollar Tree (Optional)
Wreath
Both
- Artificial Holly Bushes
- Berry Garland
- Variety of Poinsettia Bushes
- Holly Bushes with Pine Cones
- Textured Snow Spray
- A method to cut your iron-on vinyl, I used the amazing Cricut Maker 3 but you can also use the Cricut Maker, Cricut Explore 3, the Cricut Explore, or the Cricut Joy.]
- Cricut Green StandardGrip Machine Mat 12” x 12
- Cricut EasyPress 3 (9″x9″)
- Weeding Tool
- Hot Glue Gun & Glue Sticks
- Foam Paint Brush
- Disposable Gloves
- Butcher Paper
- Scissors
- Hot Glue Gun Finger Caps
- Wire Cutters
- Cricut EasyPress Heat Resistant Mat (12″x12″)
- Ruler
- Design #444 (My free SVG/PDF/DXF design files available in my free resource library – get the password by filling out the form at the bottom of this page)
How to Make a Dollar Tree Wreath DIY and Mini Tree

DIY Christmas Wreath Dollar Tree
Learn how to make a breautiful DIY Dollar Tree Christmas Tree and Christmas Wreath!
Materials
- Green Table-Top Artificial Christmas Tree 18"
- Wired Garland Ties
- Vase Filler - I used Red and Gold
- Round Christmas Bells - I used Red and Gold
- Metal Jingle Bells (Larger) - I used Red and Gold
- Glittery Mini Bows
- Wooden Star Ornament
- Gold Paint (for Star)
- Mini Tree Skirt
- Cricut Iron-On Vinyl - Gold
- Cricut Iron-On Vinyl - Cherry Red
- Cricut Smart Glitter Iron-On - Silver
- Red Ribbon (Optional)
- Wooden Block for Tree Base (Optional)
- Floral Garden Wreath Form 14"
- Artificial Garland 15'
- Artificial Holly Bushes
- Berry Garland
- Variety of Poinsettia Bushes
- Holly Bushes with Pine Cones
- Textured Snow Spray
- Design #444 (My free SVG/PDF/DXF design files available in my free resource library - get the password by filling out the form at the bottom of this page)
Tools
- A method to cut your iron-on vinyl, I used the amazing Cricut Maker 3 but you can also use the Cricut Maker, Cricut Explore 3, the Cricut Explore, or the Cricut Joy.
- Cricut Green StandardGrip Machine Mat 12” x 12
- Cricut EasyPress 3 (9"x9")
- Weeding Tool
- Hot Glue Gun & Glue Sticks
- Foam Paint Brush
- Disposable Gloves
- Butcher Paper
- Scissors
- Hot Glue Gun Finger Caps
- Wire Cutters
- Cricut EasyPress Heat Resistant Mat (12"x12")
- Ruler
Instructions
STEP 1: DECORATE YOUR DIY CHRISTMAS TREE AND WREATH
Before we start decorating, I recommend placing butcher paper over your work surface to protect it.
MINI TREE
Let's tap in to that creativity and start with the mini tree. The Mini Christmas Tree from Dollar Tree comes with inserts to make a stand. I chose to use a 4" wood square for a sturdier base and discard the stand pieces.
Apply hot glue around the bottom of your mini Christmas tree and place it in the center of the wooden block. While pressing it firmly in place, apply more glue around the base of the tree where it meets the wood for an extra strong adhesion. Allow the tree a few minutes to set and dry so you don't accidentally bump it out of place.
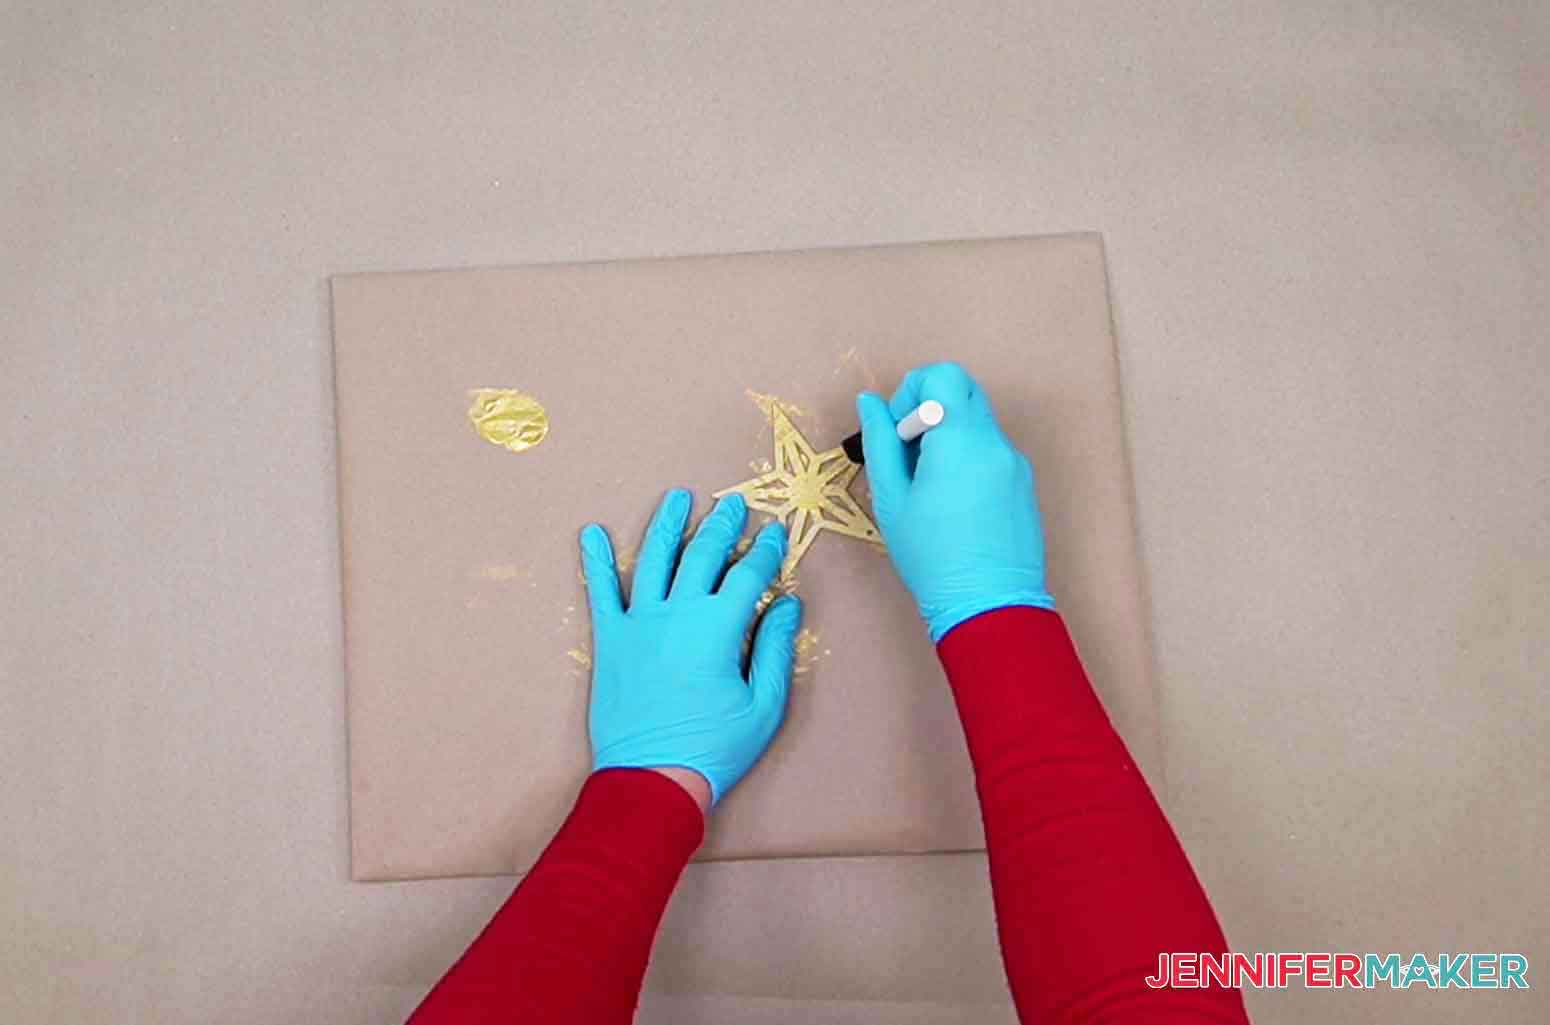
While the base is drying, let's paint the wooden star for the tree. Use a small foam brush to apply the gold paint to the front. Set it aside to dry. You will only see one side but if you'd like, you can paint the back once the front is dry.
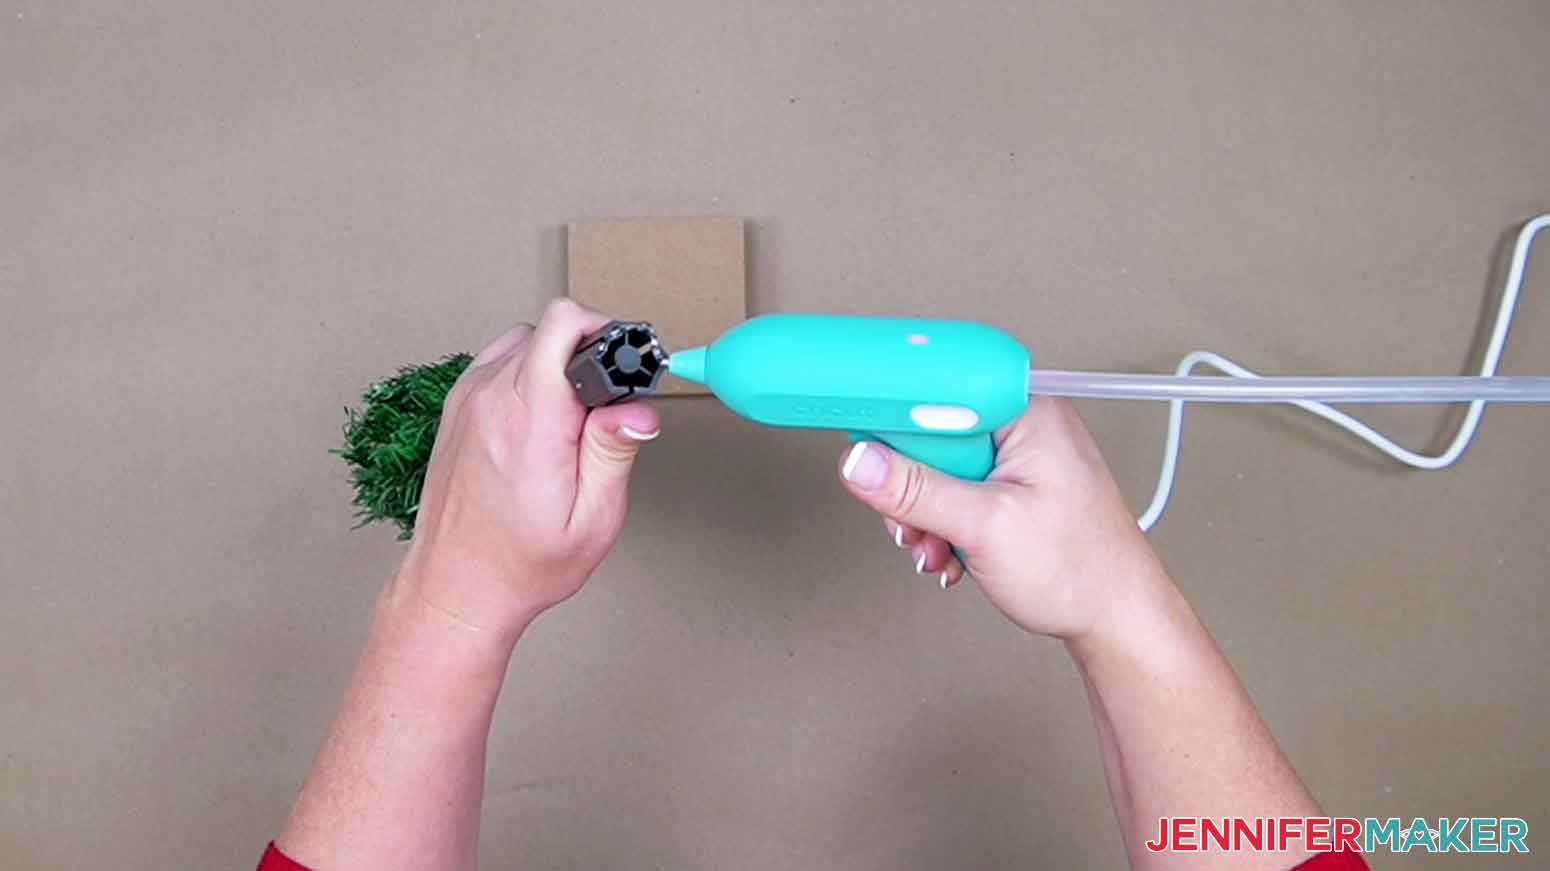
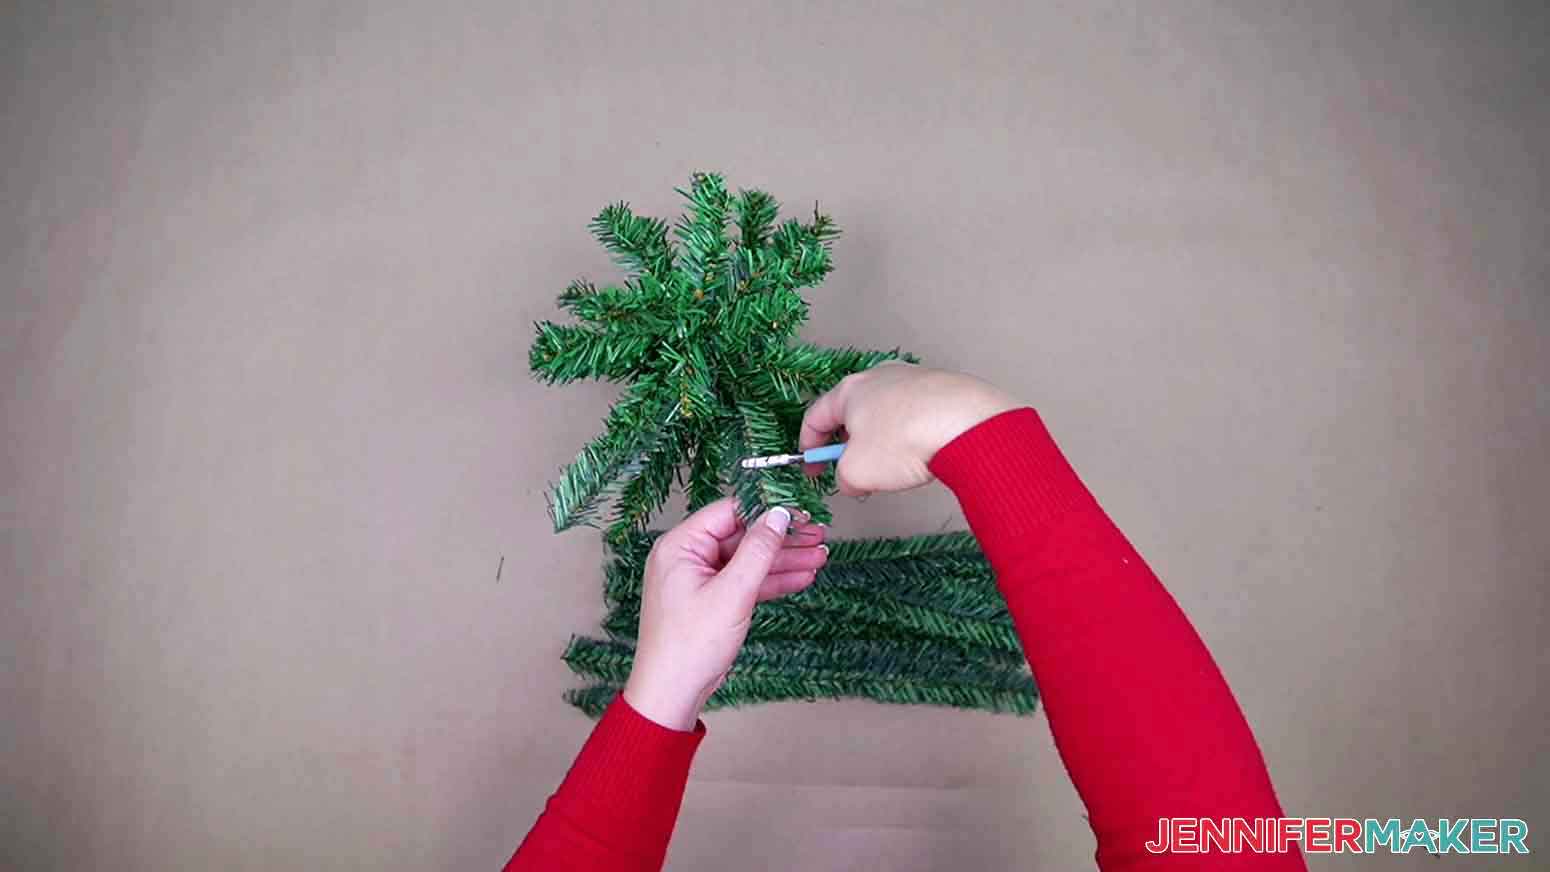
Wrap garland ties around the tree trunk throughout the tree to add in extra branches. I bent and wrapped the center of the garland ties around the truck to hold them in place. I added in about six, but feel free to add as many or as little as you'd like for some extra fullness in your tree. If you have a branch that is too long, you can use your wire cutters to trim it down.
OPTIONAL: Some crafters may want a flocked tree but not on their decorations. If so, spray your tree with spray snow and allow some time to dry before adding any of the decorations. You may wish to add several coats depending on the amount of "snow" you want on your tree.
Now it is time to add the decorations! Use the hot glue gun to apply decorations on the branches like ornaments. I used mini glittery bows, large and small bells, and some red and gold vase filler. Don't forget to glue your star on top while adding the tree decorations!
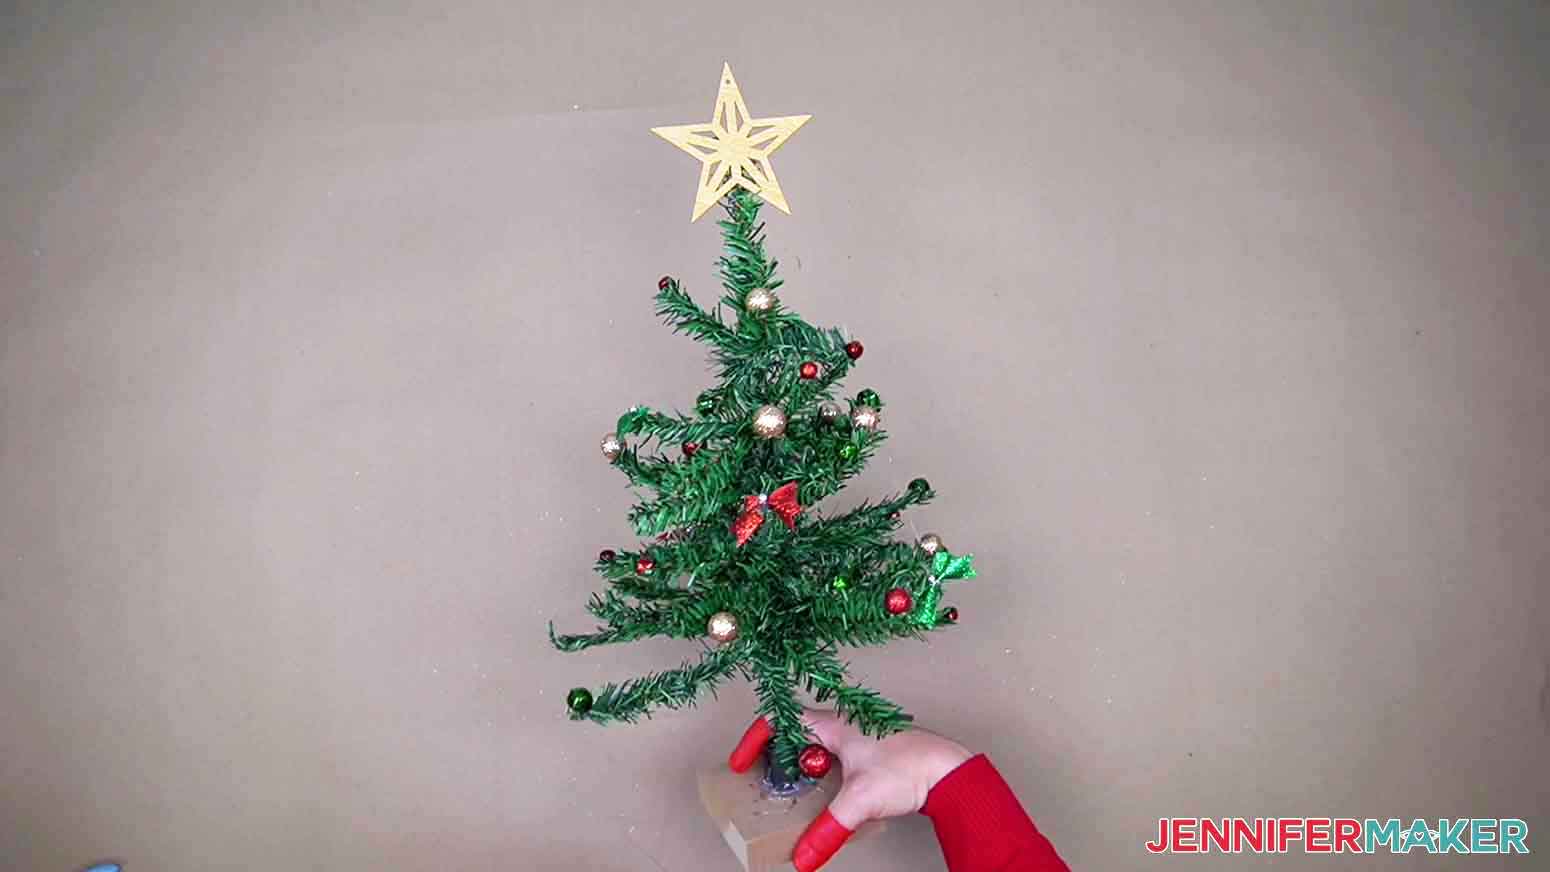
Lastly, I wrapped a small piece of red ribbon around the base of the tree and dabbed a little hot glue to hold it in place. This is also an optional addition.
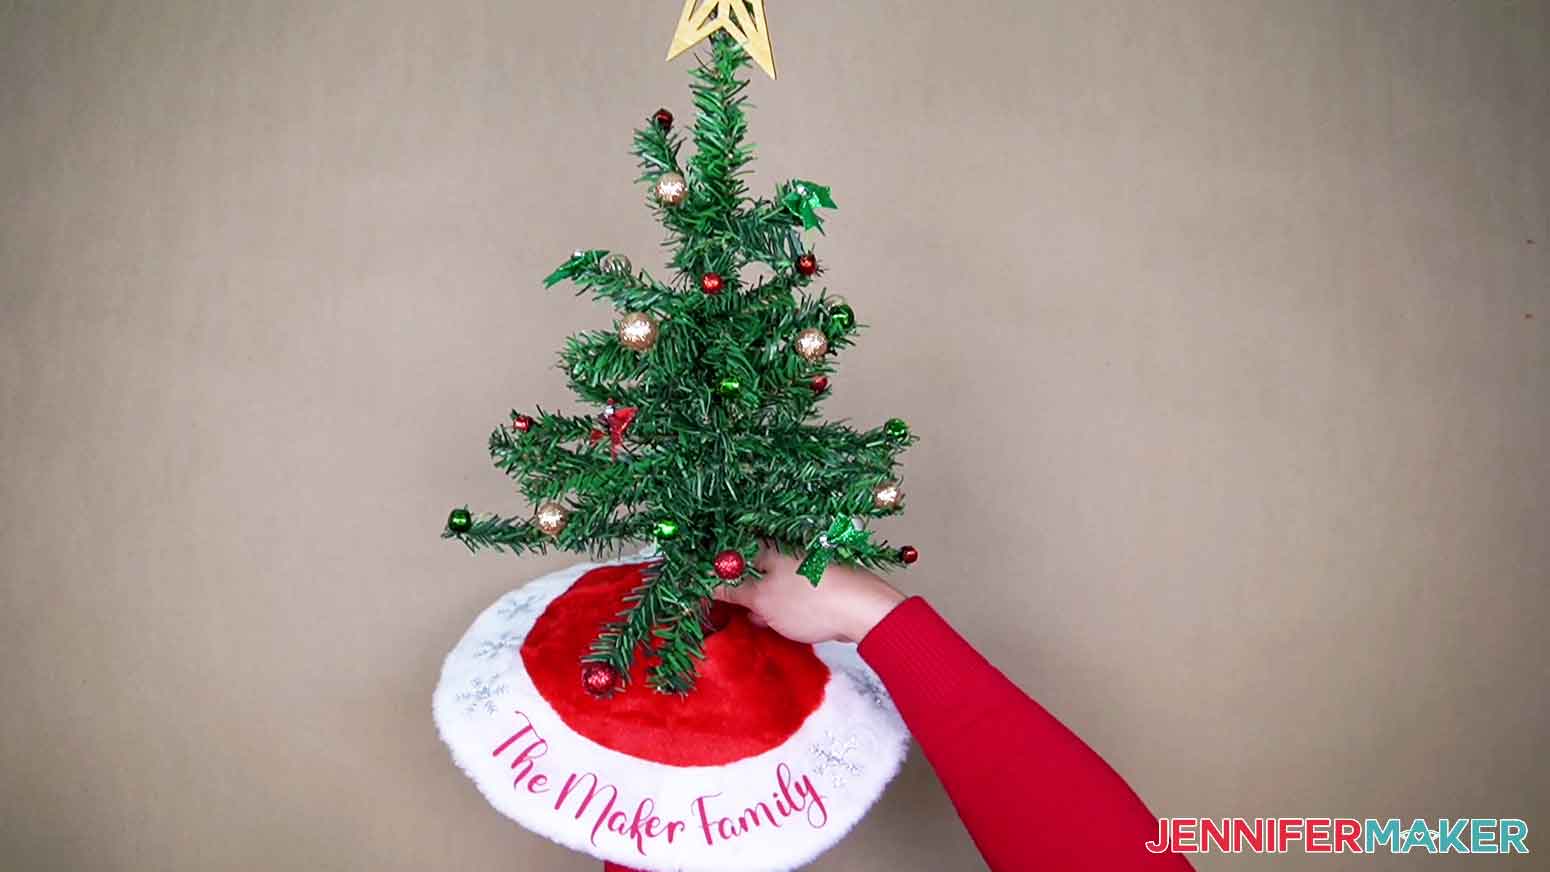
Wrap your mini skirt around the base and put it on display!
WREATH
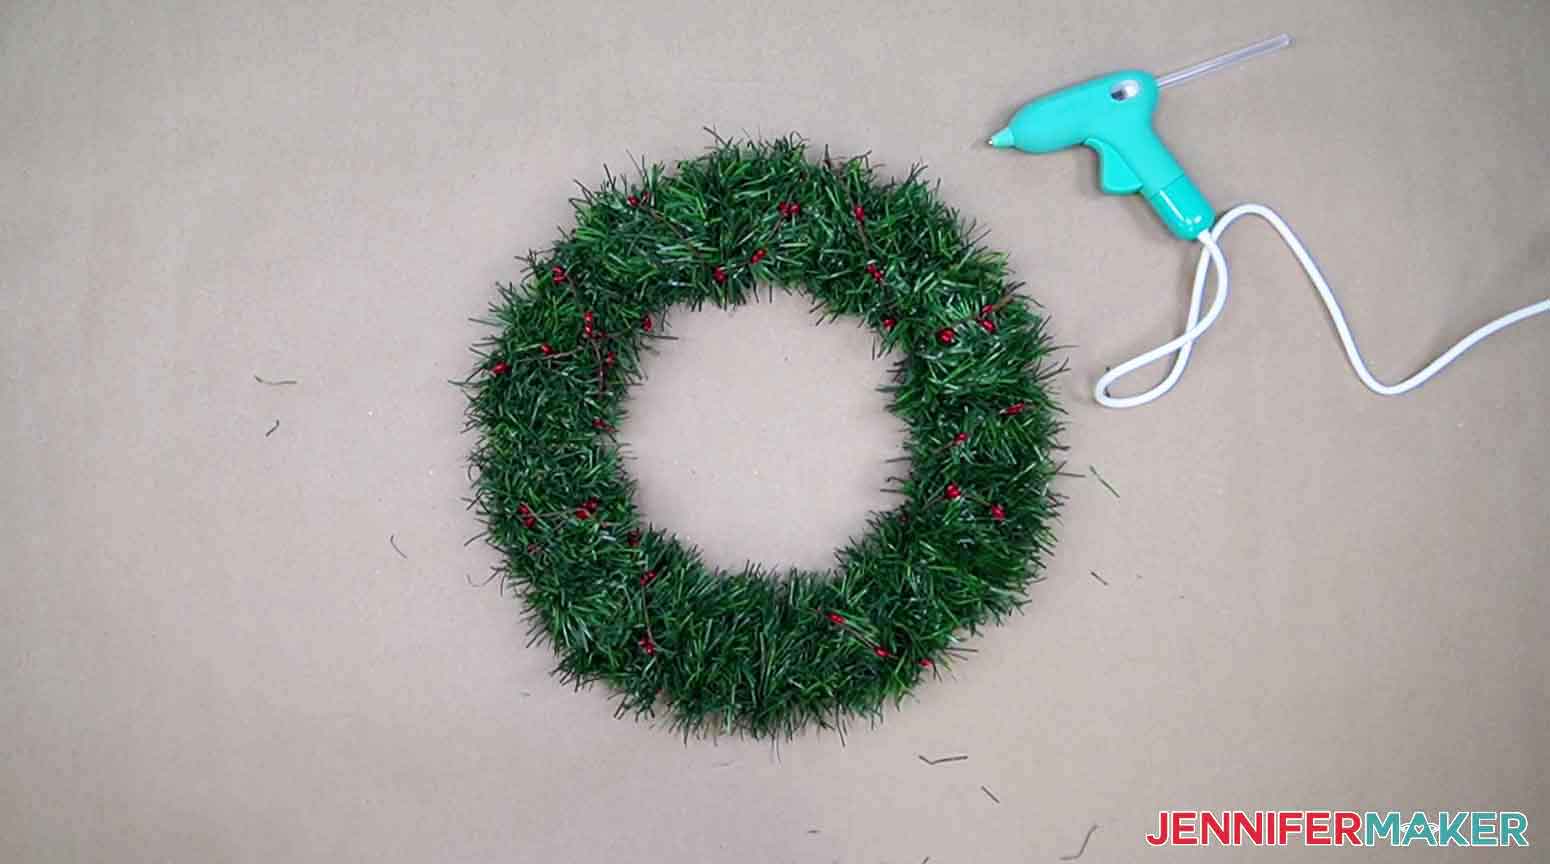
Let's make the wreath next! I used a 15' strand of green garland and wrapped it around a 14" floral wire form. Twist an end of the garland around the form to hold the starting point in place. I started on the inside and wrapped the garland around the wreath form, rotating it as I wrapped. I worked my way clockwise around the wreath form from the inside moving outward. I wrapped it around the wire form about every quarter way around the form helped to hold the garland to the wire form.

Don't worry if you see any of the exposed wire form because we can cover that with an added decoration.
When the garland is wrapped, twist the end of the garland to the wire form to attach it.
OPTIONAL: Some crafters may want a flocked wreath but not on their decorations. If so, spray your wreath with spray snow and allow some time to dry before adding any of the decorations. You may wish to add several coats depending on the amount of "snow" you want on your wreath.
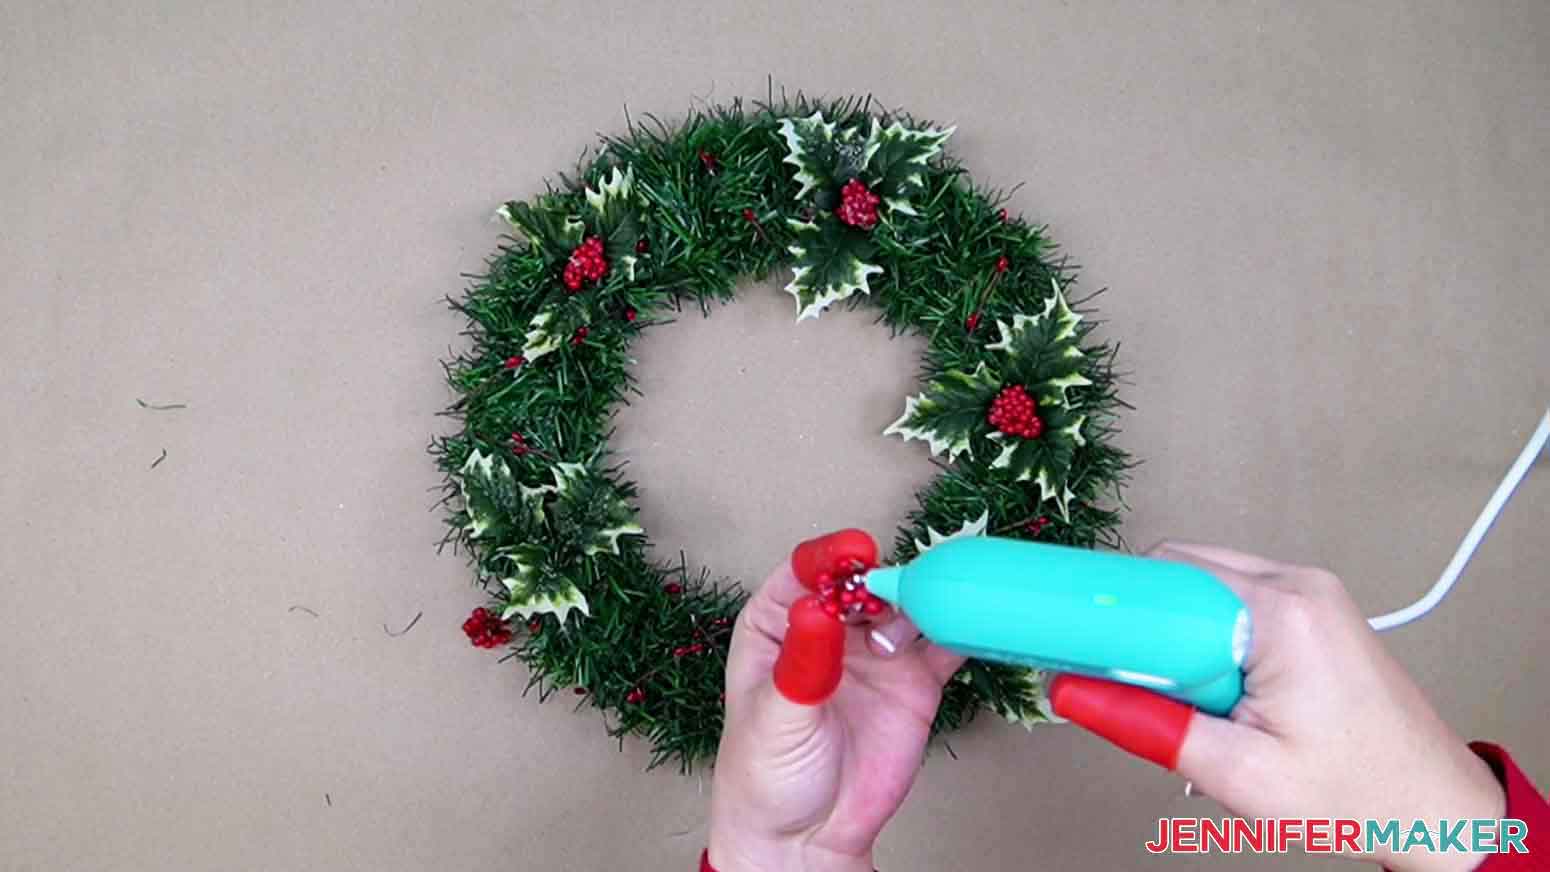
Time to start placing decorations! I first used a strand of the beautiful berry garland and wrapped that around the wreath. Like the garland, you can go under the wire form or garland to help hold it in place. If you need, you can add a dab of hot glue to help.
Next, use your wire cutters to remove poinsettia flowers, pinecones, holly, berries, etc. from their branches. I first placed my pieces on the wreath without gluing them in so that I could move things around to my liking.

Once you're happy with all of the wreath decor, use hot glue to attach each piece.
Lastly, if you haven't already, you can add Spray Snow for a flocked look or leave it as is!
The wire wreath form also makes for a "built-on" hanger. No hanging hardward is necessary, The wreath is ready to hang on a wall or door hook.
STEP 2: GET MY FREE DIY CHRISTMAS TREE SKIRT FILE
Download my DIY Christmas Tree Skirt designs from my free resource library -- it's Design #444.
The SVG has a "Merry Christmas" design and a snowflake.
TIP: If you are not sure how to upload an SVG cut file to Cricut Design Space, watch this helpful video training series I made. If you are on an iPad or iPhone, here is how to download and upload SVG files to the Cricut Design Space app.
STEP 3: PREPARE YOUR DIY CHRISTMAS TREE SKIRT SVG FILE
This is what my DIY Christmas Tree Skirt SVG file looks like when it is added to the Cricut Design Space Canvas.
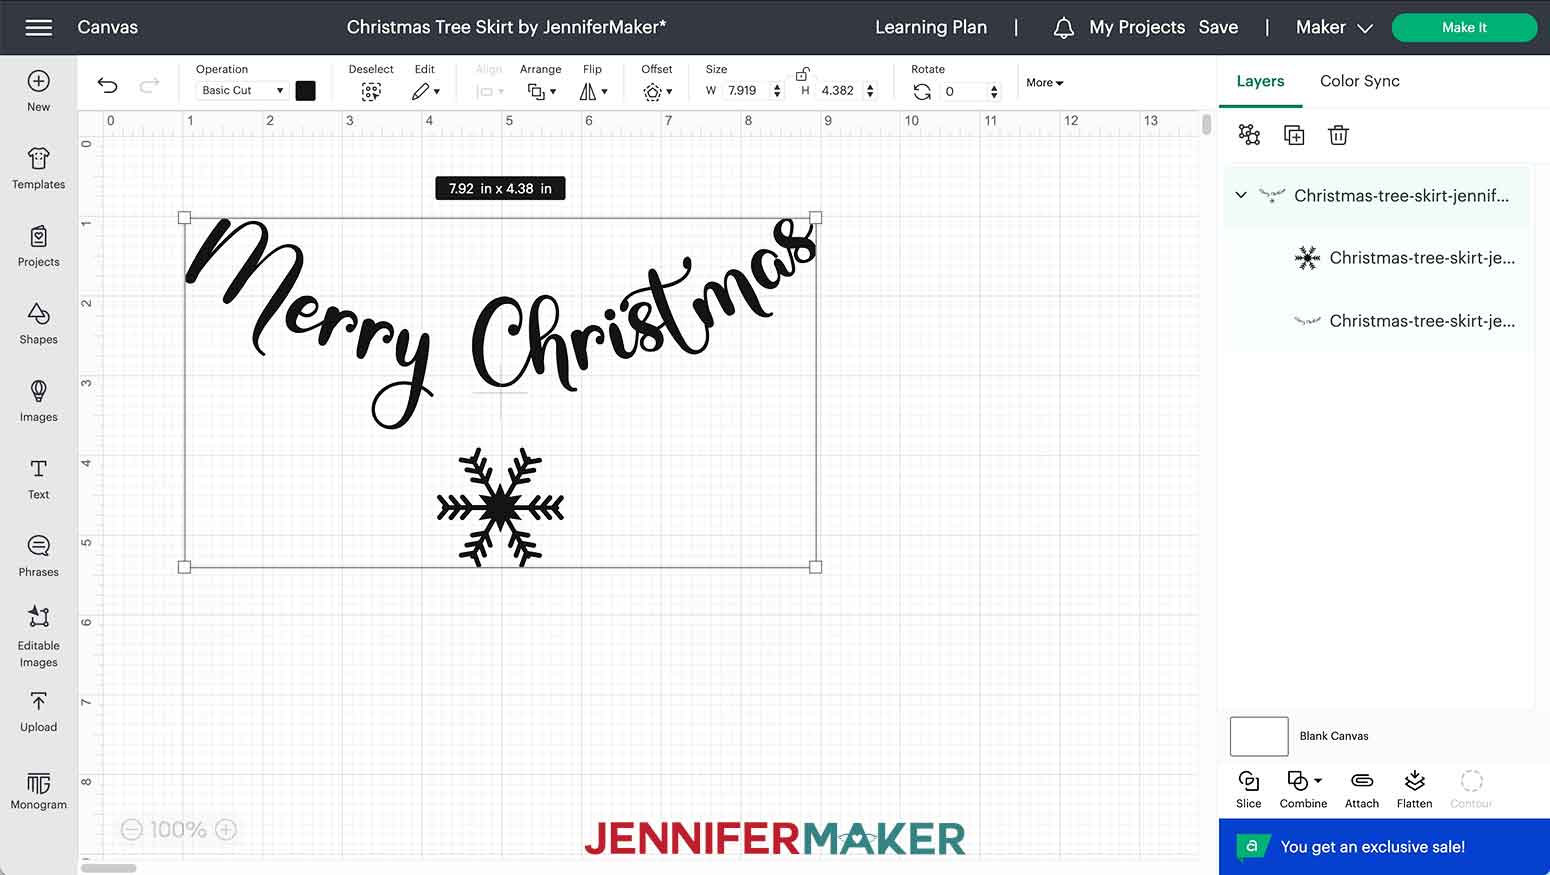
I'm going to show you how to make a tree skirt template on the Canvas so you can properly size your design. Then we'll personalize it!
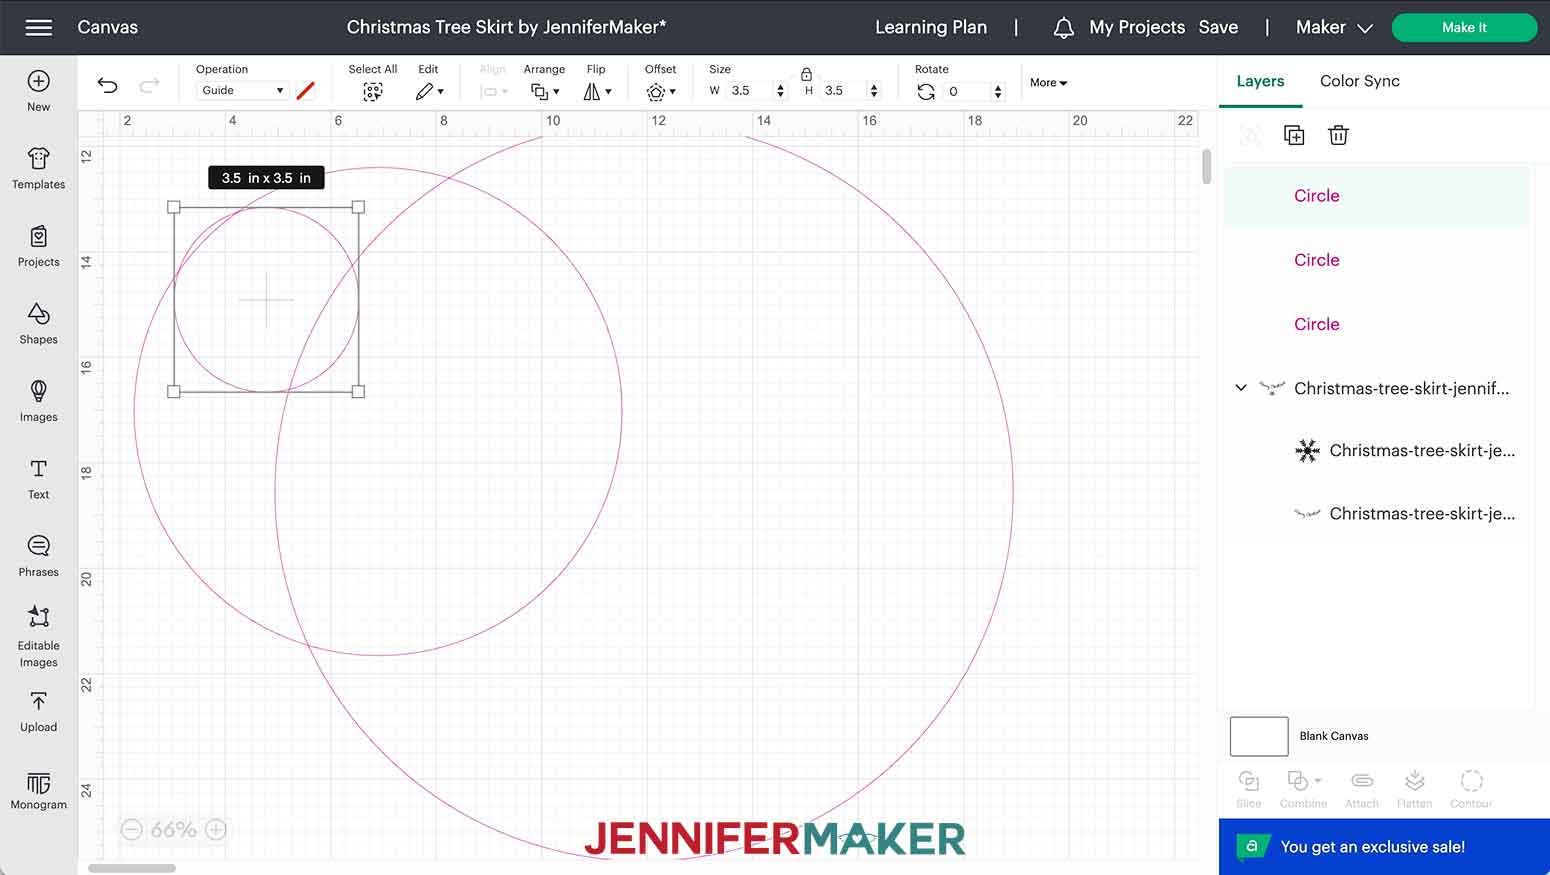
Let's first measure the tree skirt so that we'll be able to make a template. Use a ruler to measure the diameter of the outer edge of the tree skirt. Mine measures at about 14".
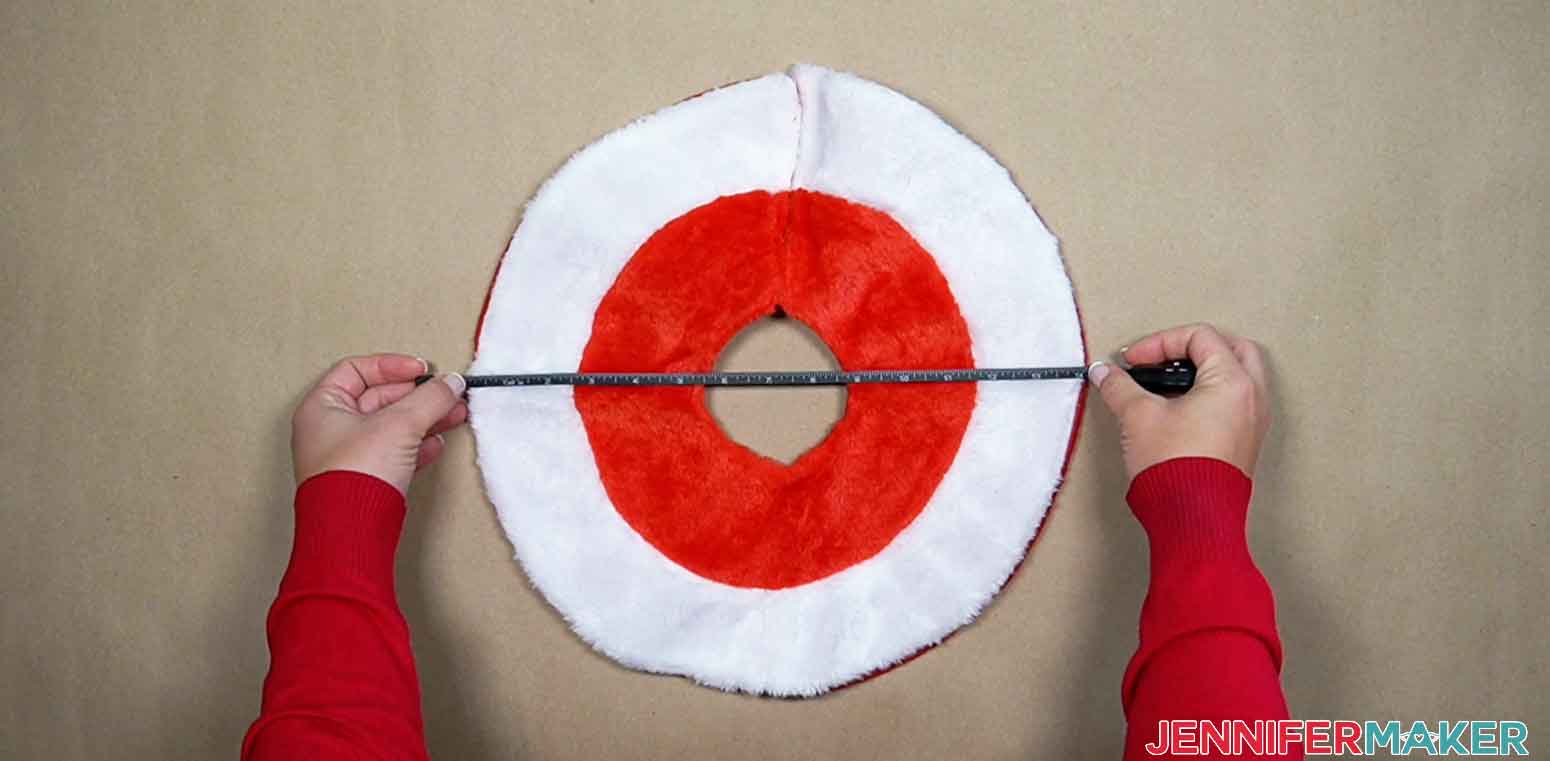
Next, measure the diameter from the inner side of each white edge. The middle measurement for the tree skirt I'm using is about 9.25".
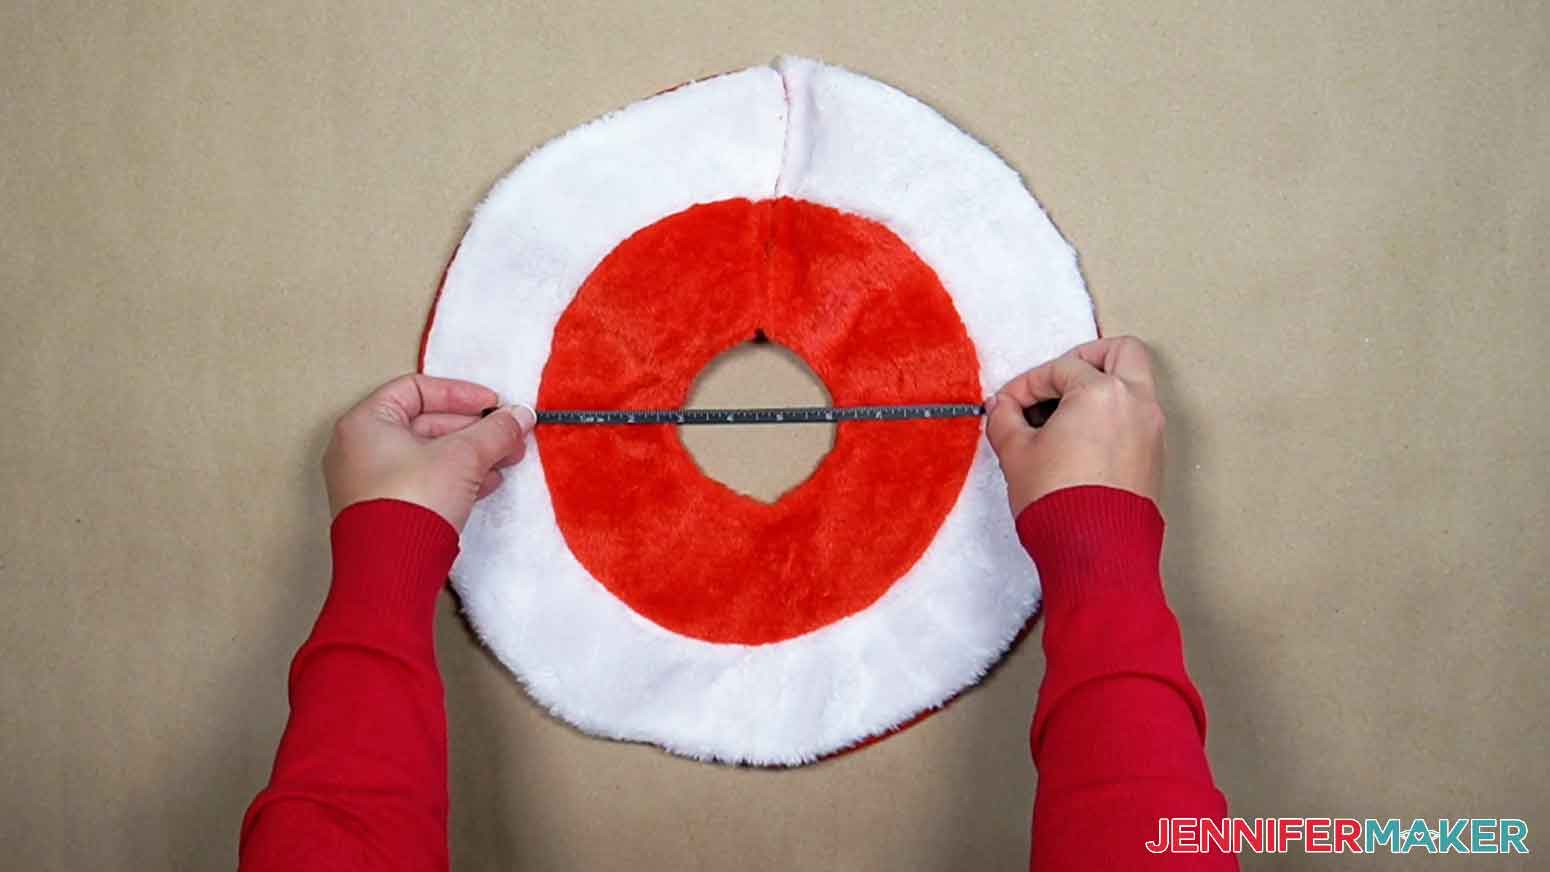
The last measurement will be the inner circle, which is the opening that wraps around the tree. Mine measures about 3.5"

In Cricut Design Space, let's use circles to make a template for the tree skirt design. Click "Shapes" on the left side of the Canvas and select the circle in the "Free" section.
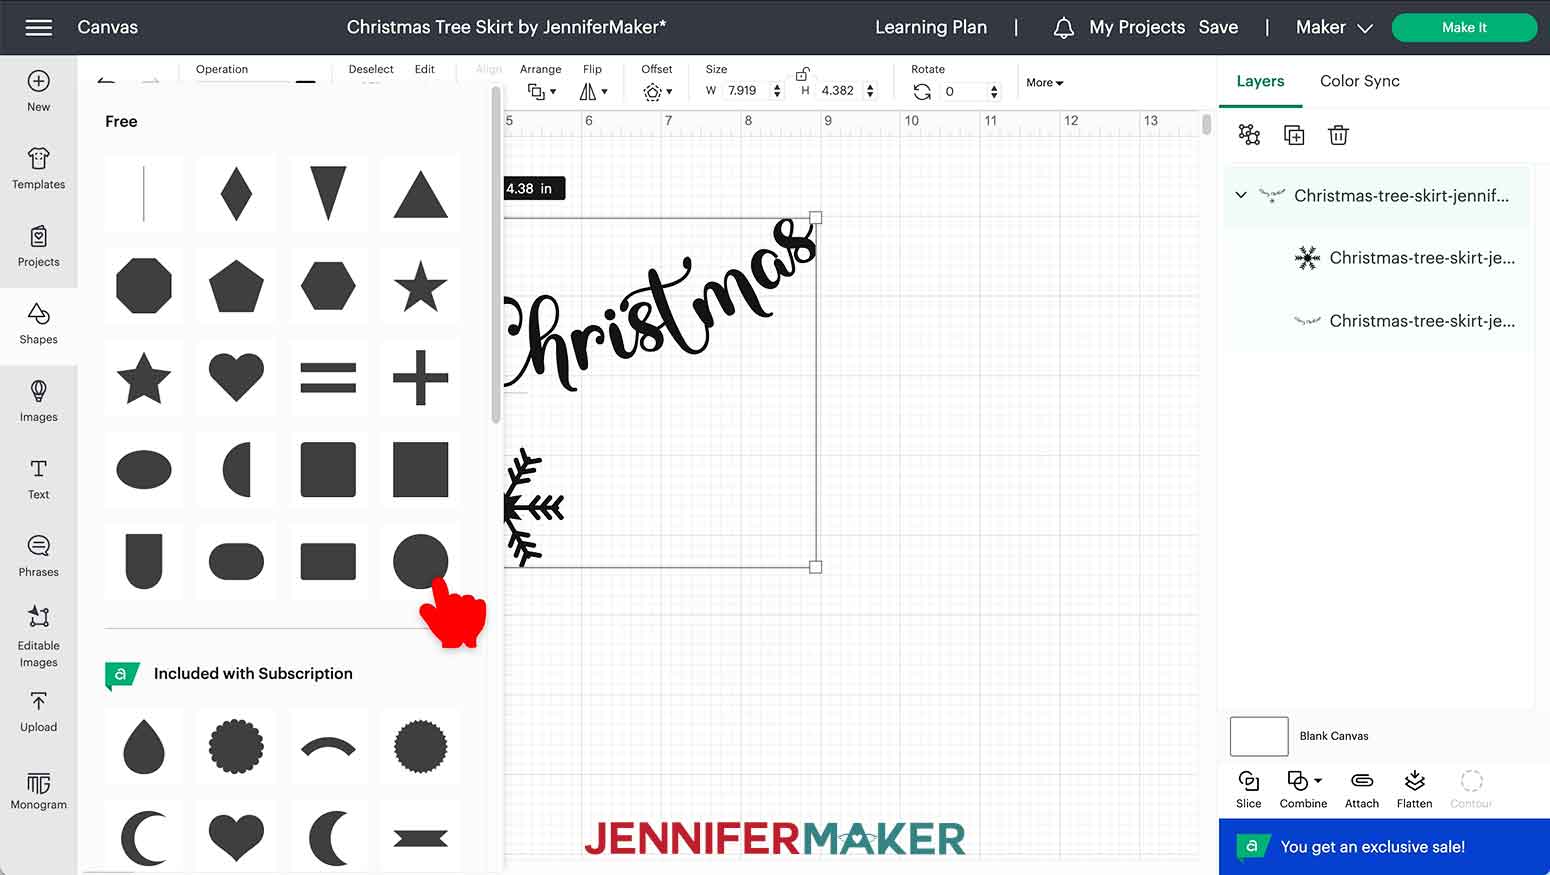
Click and drag the circle to a blank area on the Canvas. Let's change the measurement to the outer measurement that we took. Make sure the lock icon is closed, then type "14" in the "W" (width) box and press the "Enter" key.
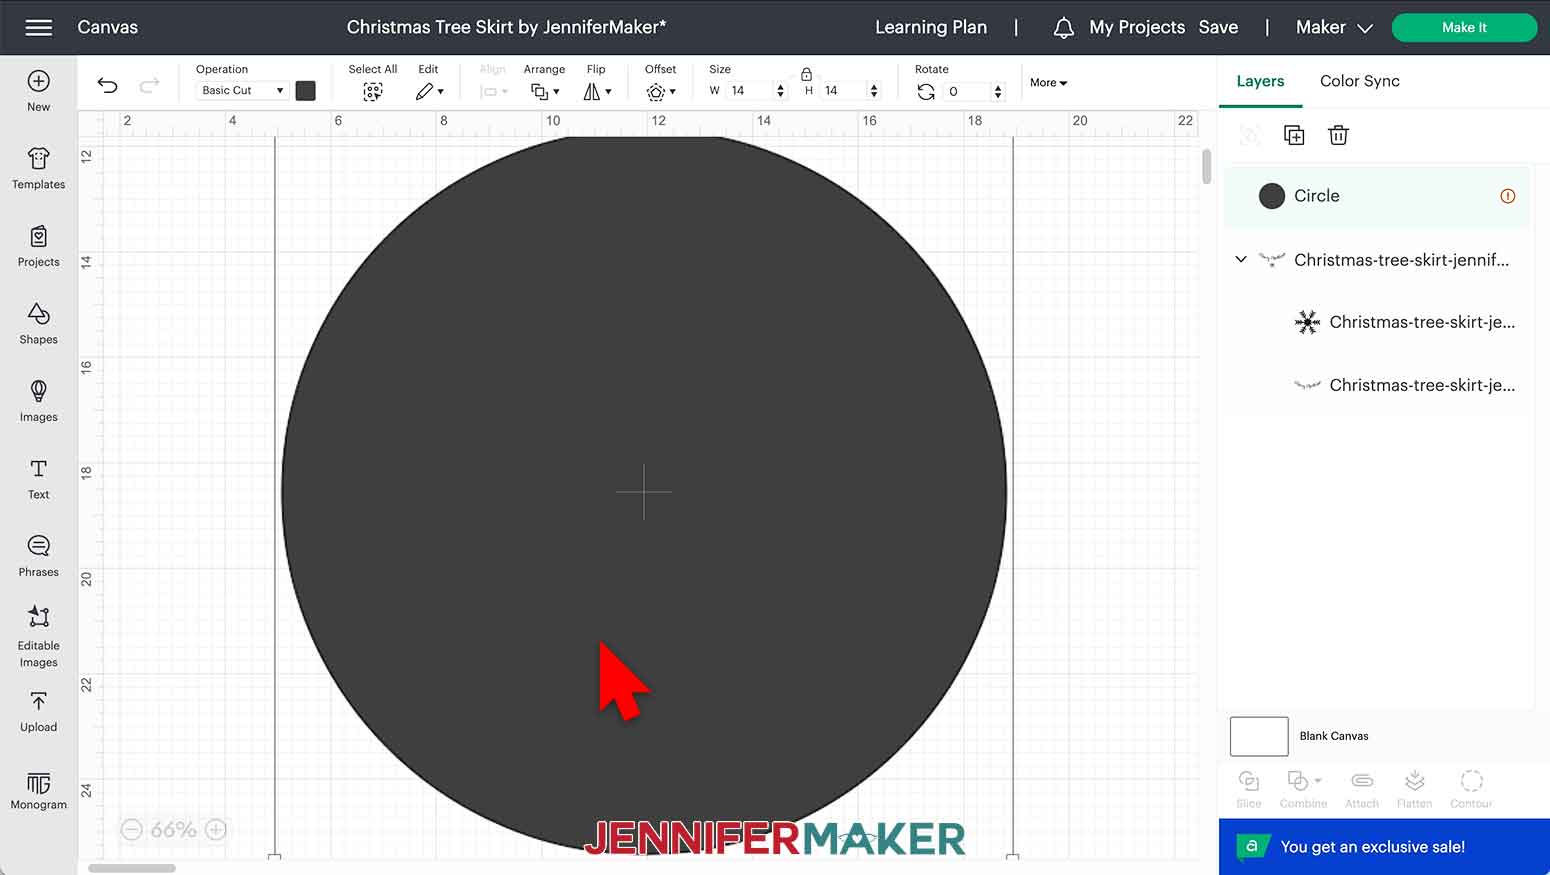
You may need to click the minus in the lower left corner of the Canvas to zoom out and see the whole circle on your screen.
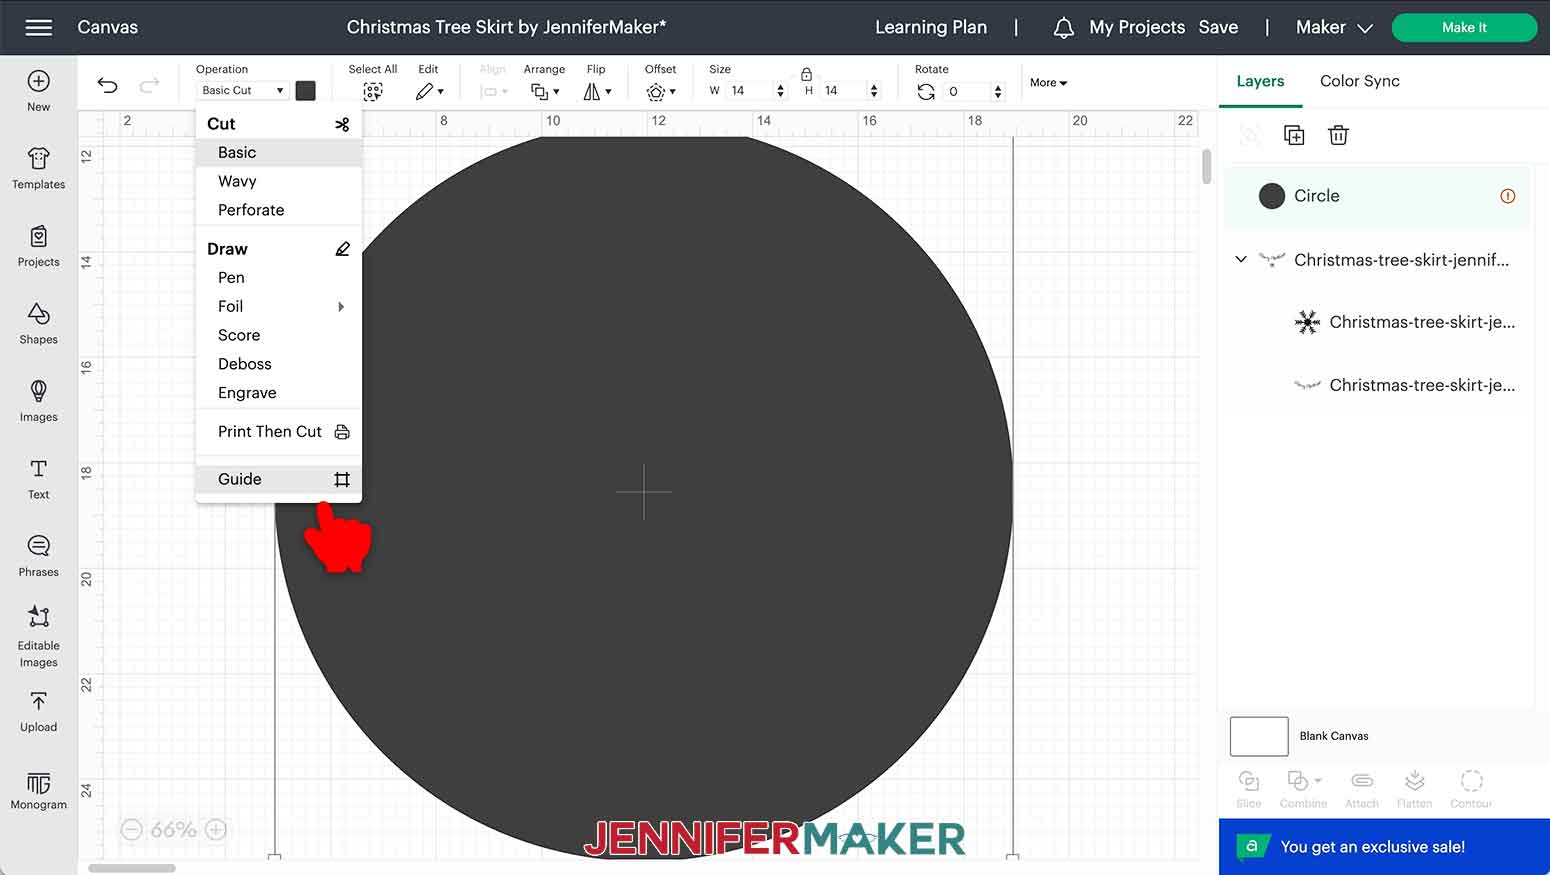
While the circle is still selected, click on the Operation menu and select "Guide."
Keep the circle selected and click the "Duplicate" icon at the top of the Layers Panel.
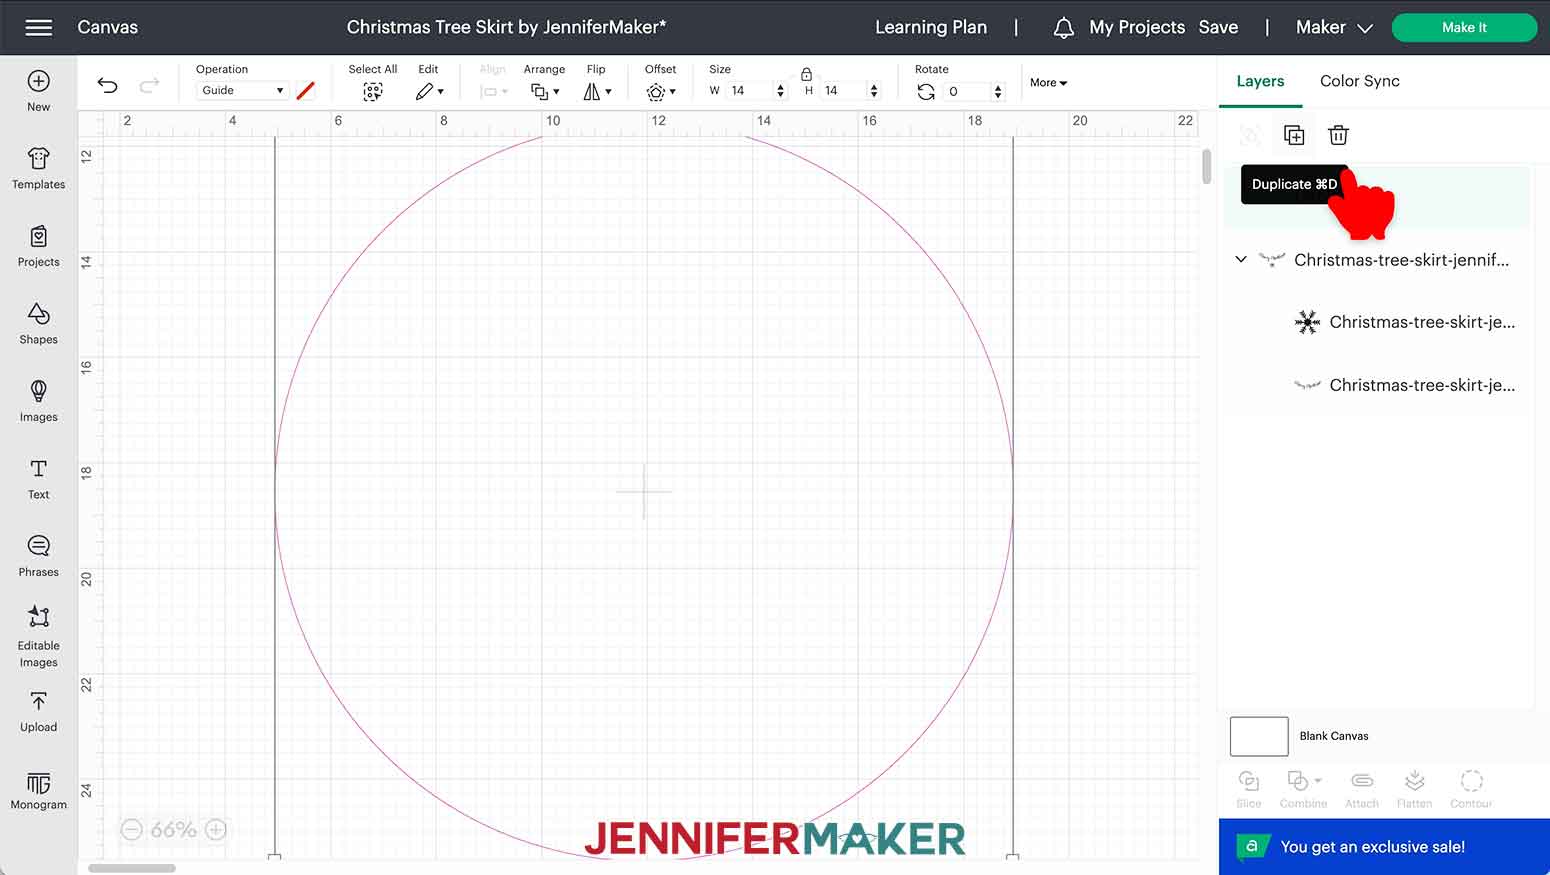
Now the new circle will be the selected layer. Change the measurement to the middle measurement that you took. I will enter "9.25" in the width field and press Enter.
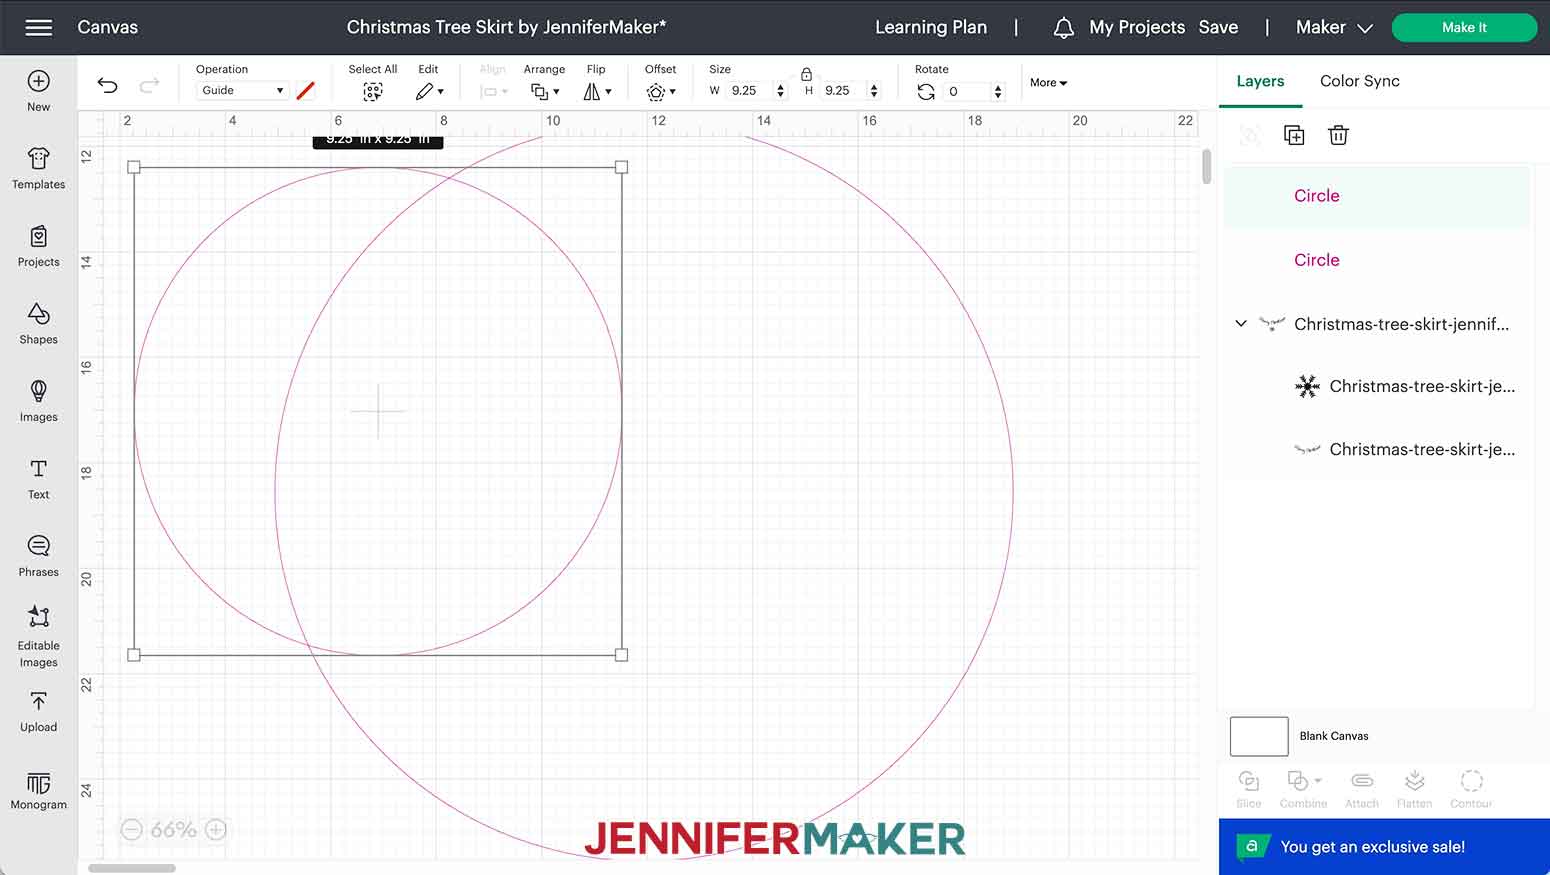
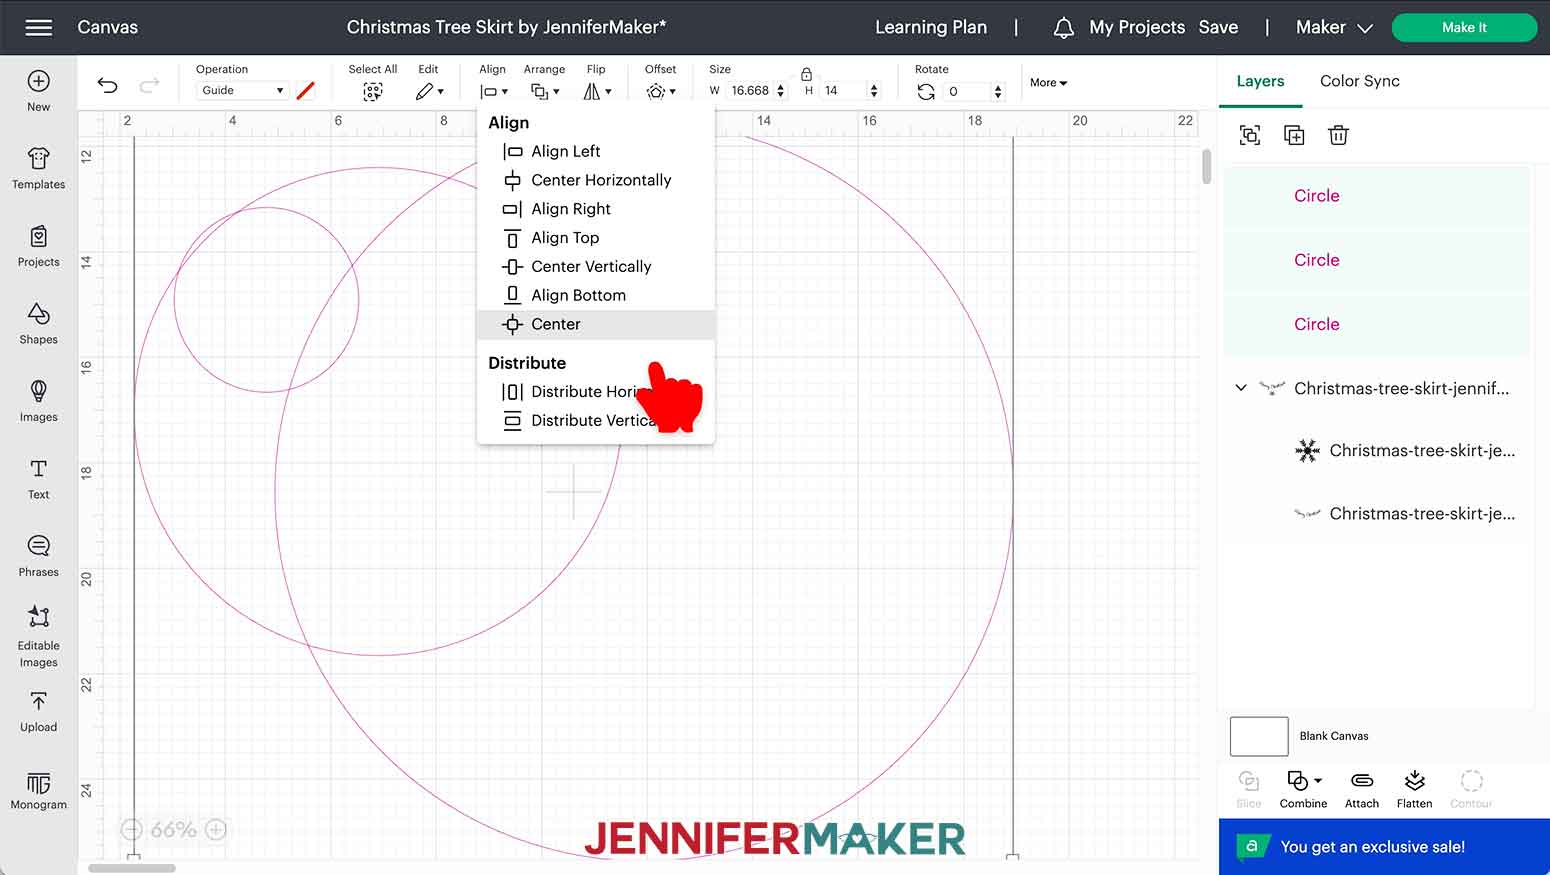
Now, click on "Duplicate" once more to create one more circle. This will represent the inner opening. I will enter "3.5" in the width field and press Enter.
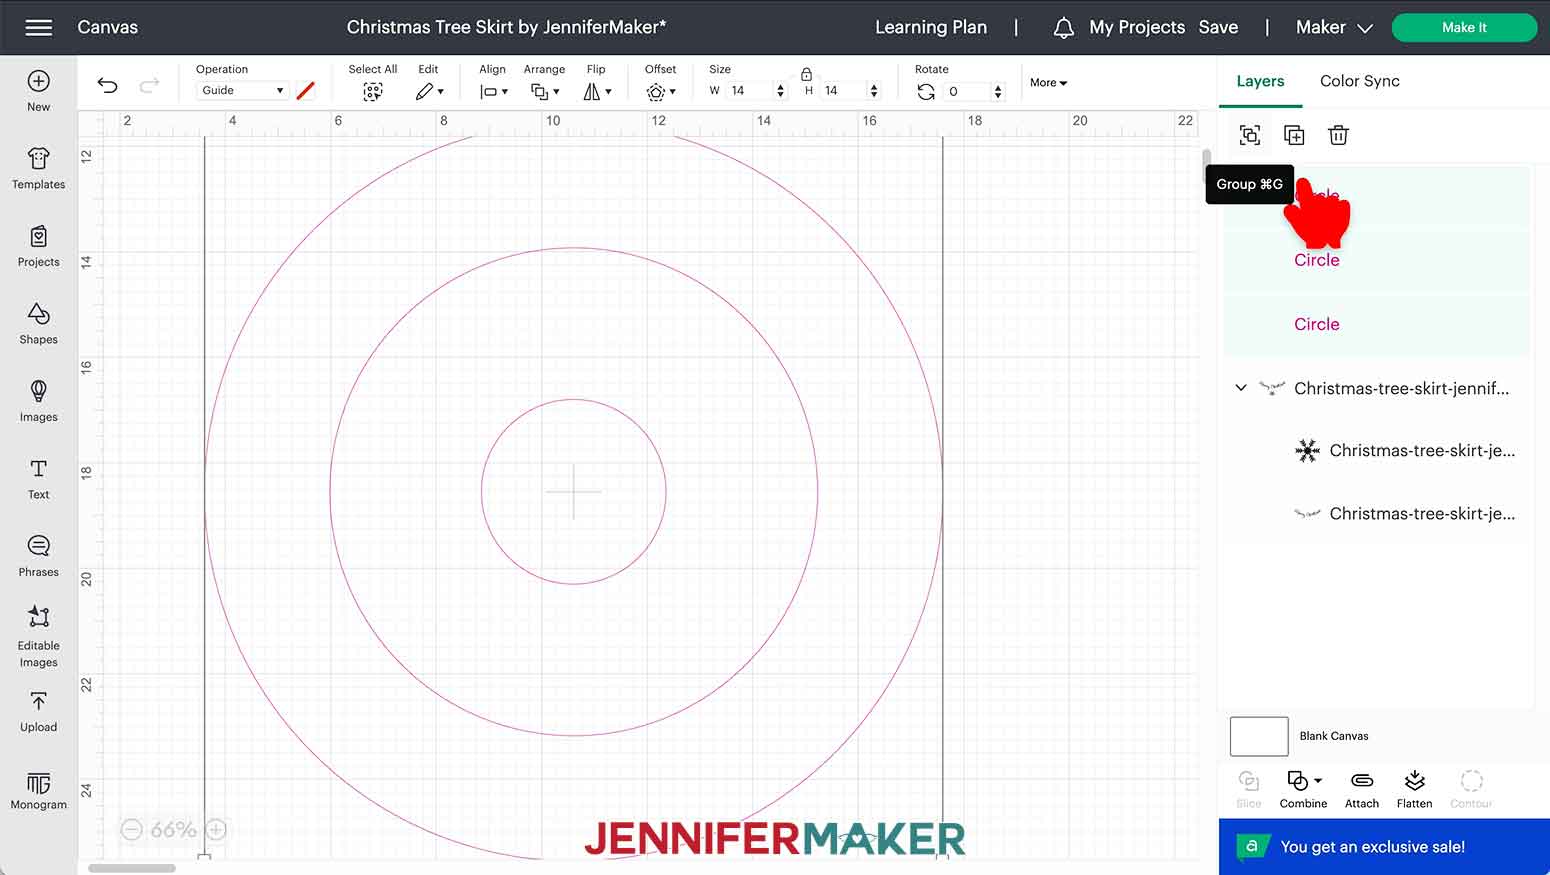
Click and drag your mouse over all three circles or press Shift to select the circle layers in the Layers Panel. Click "Align" and "Center."
I plan to keep these circles together for the design sizing so click the "Group" icon above the Layers Panel. This will keep them aligned together.
Now that the template is prepared, click on the SVG and then click the "Ungroup" icon above the Layers panel.
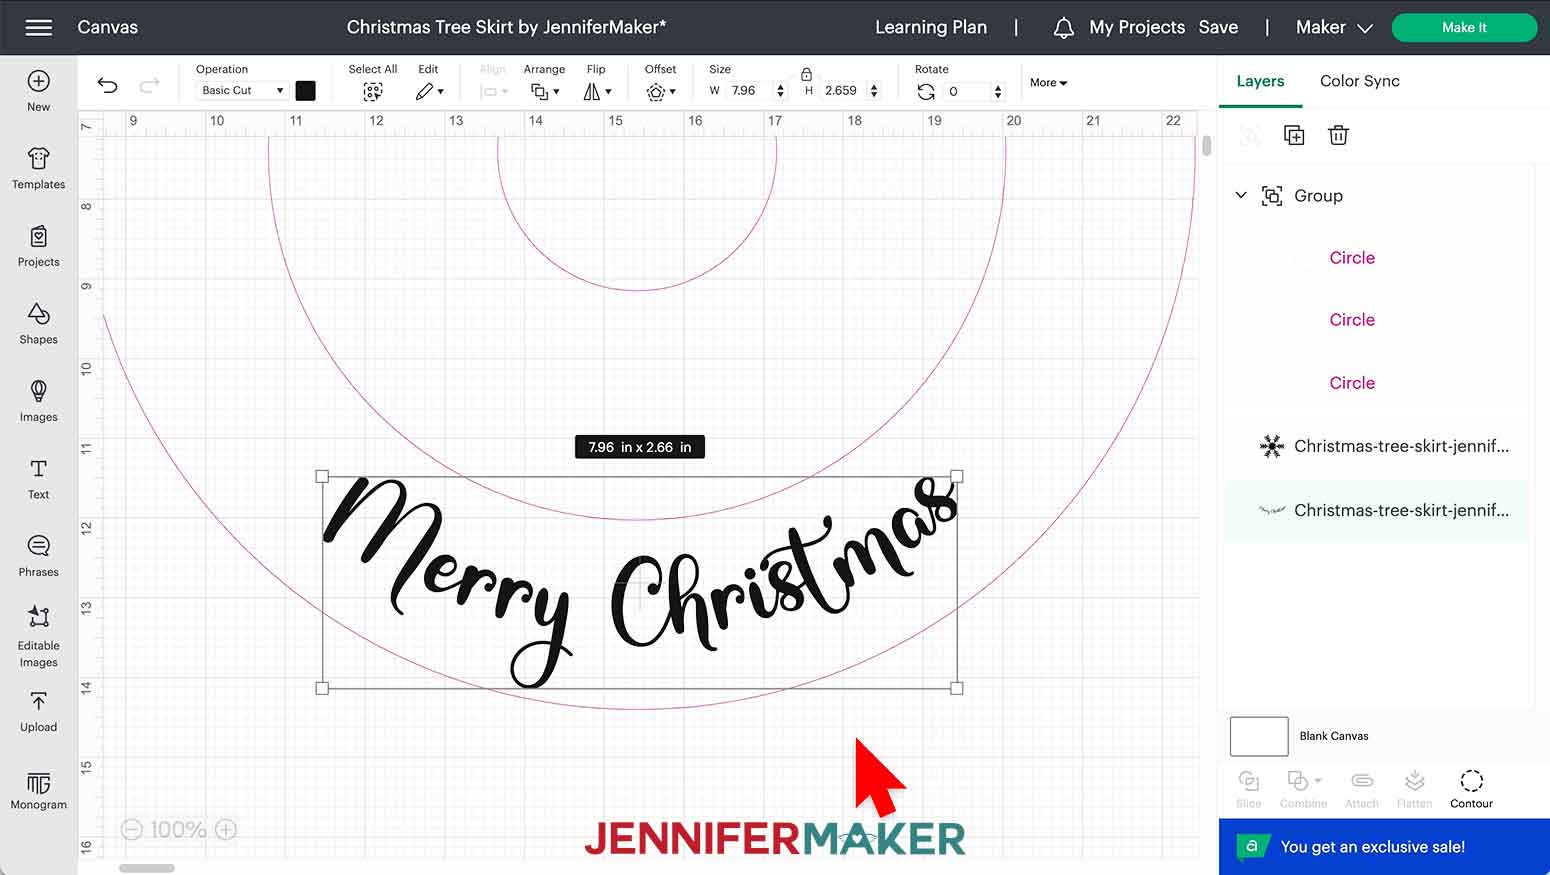
For the "Merry Christmas" design, click and drag it over to the template. If you're making a tree skirt the same size as me, the text should perfectly fit in the white space of the template. If you are making a different size tree skirt, you may need to click and drag the bounding box's corner to resize the text.
You can leave the "Merry Christmas" on the tree skirt template or move it out of the way. If you aren't even going to make the "Merry Christmas" then you can hide or delete it from the Layers Panel.
For the snowflake design, drag it over to the white area on your tree skirt template. Click and drag the corner of the snowflake to resize it to fit in the white area of the tree skirt. Allow some open area around the snowflake for an easier application.
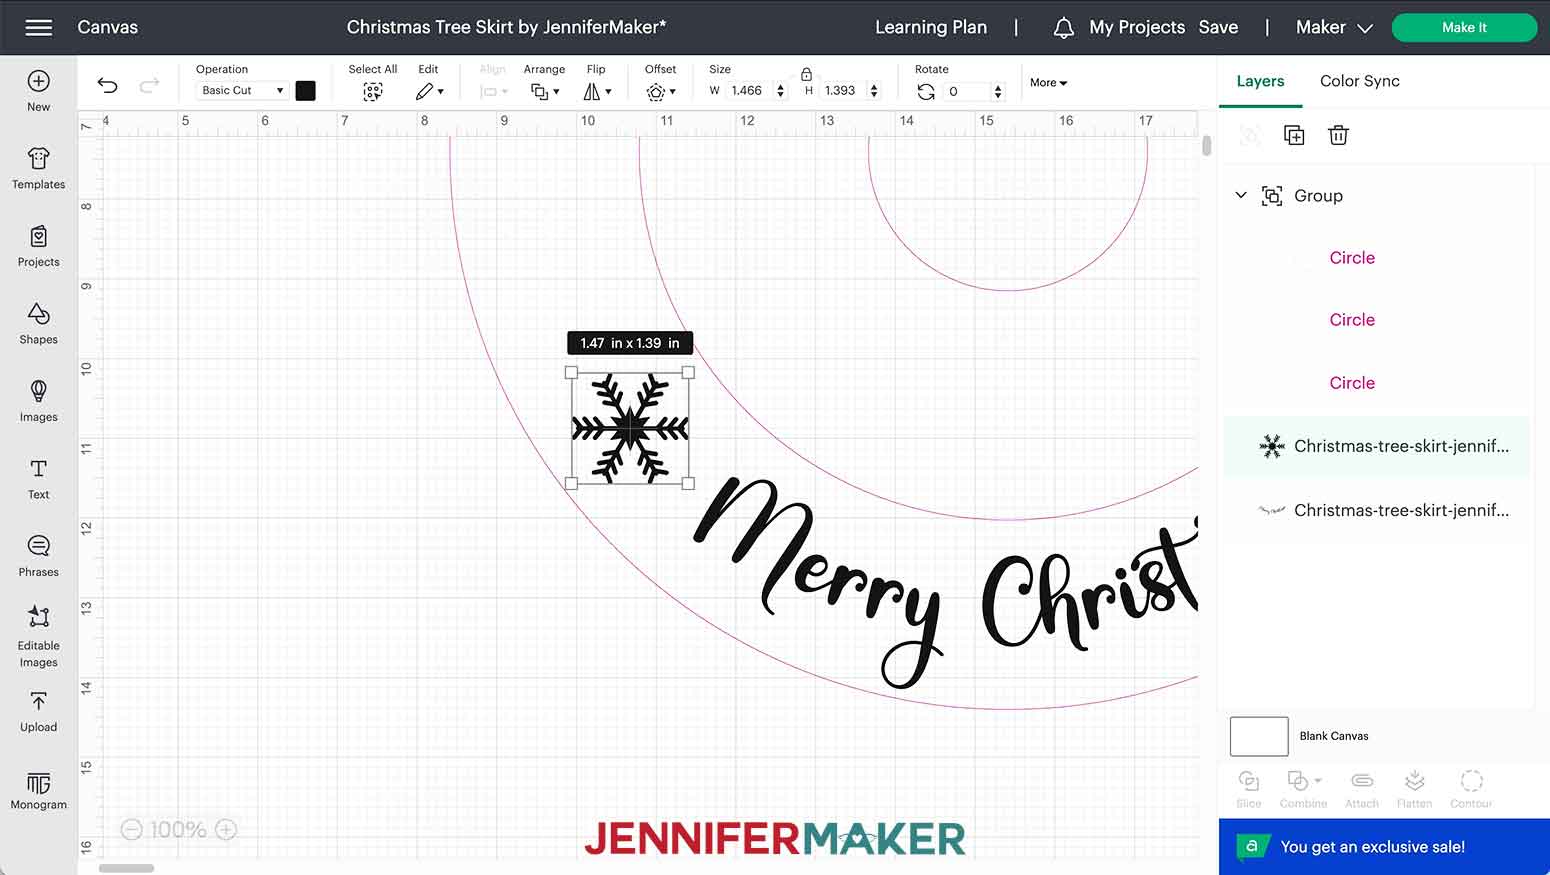
You can now click "Duplicate" to create as many snowflakes as you'd like for your tree skirt. I'm going to use 12 snowflakes for mine and position them around the skirt to make sure they'll fit.
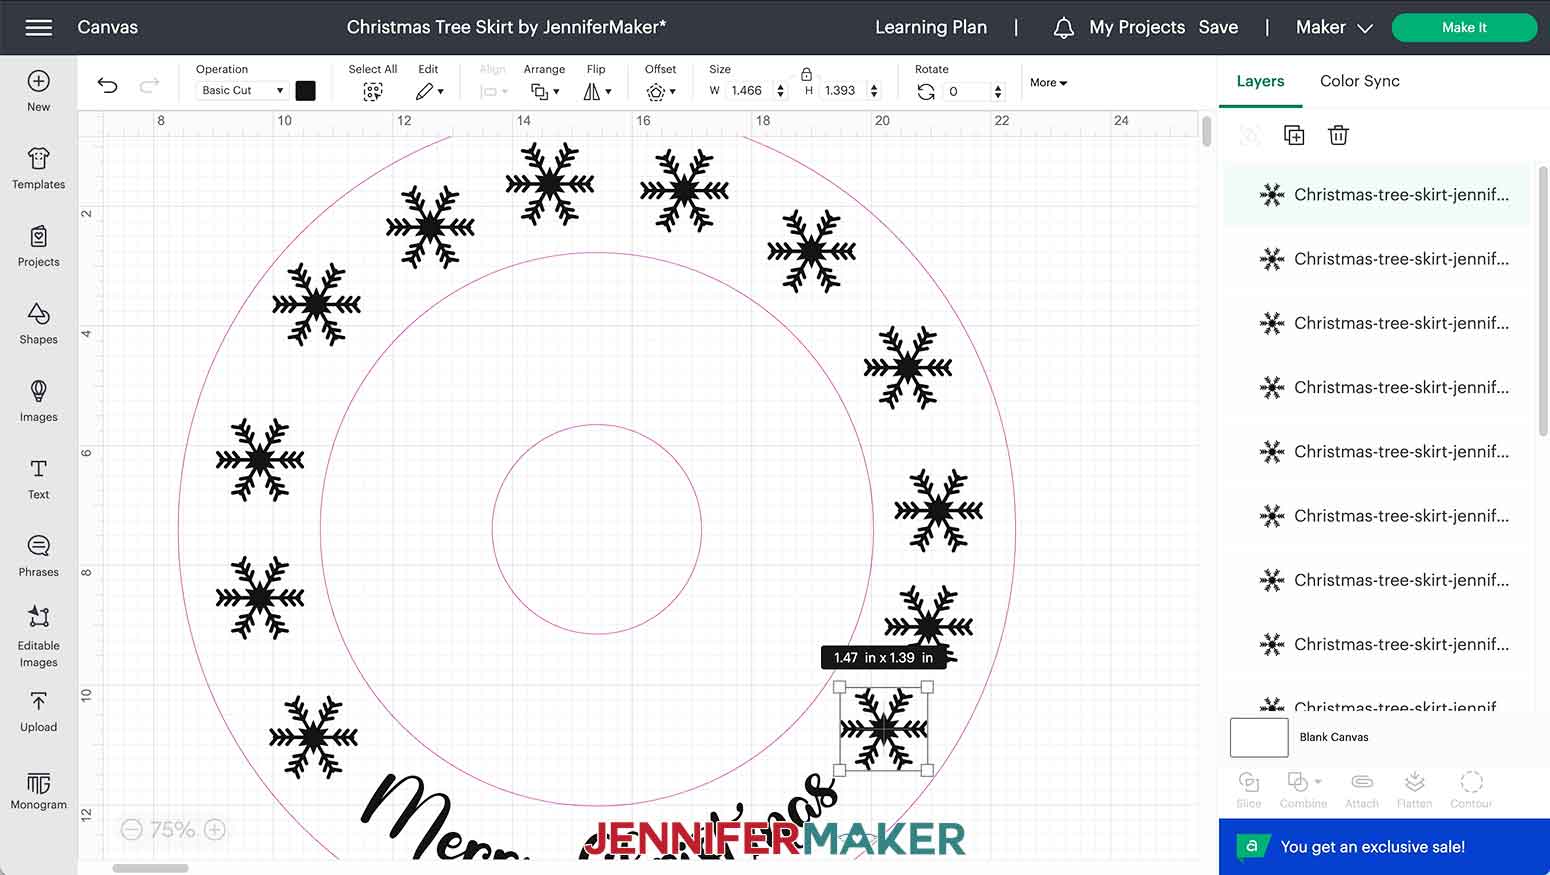
I'm going to press and hold the Shift key on my keyboard to select all of the snowflake layers and click "Group" at the top of the Layers Panel to keep them together. You can move them aside to work on a personalization, if you'd like.
PERSONALIZED TREE SKIRT
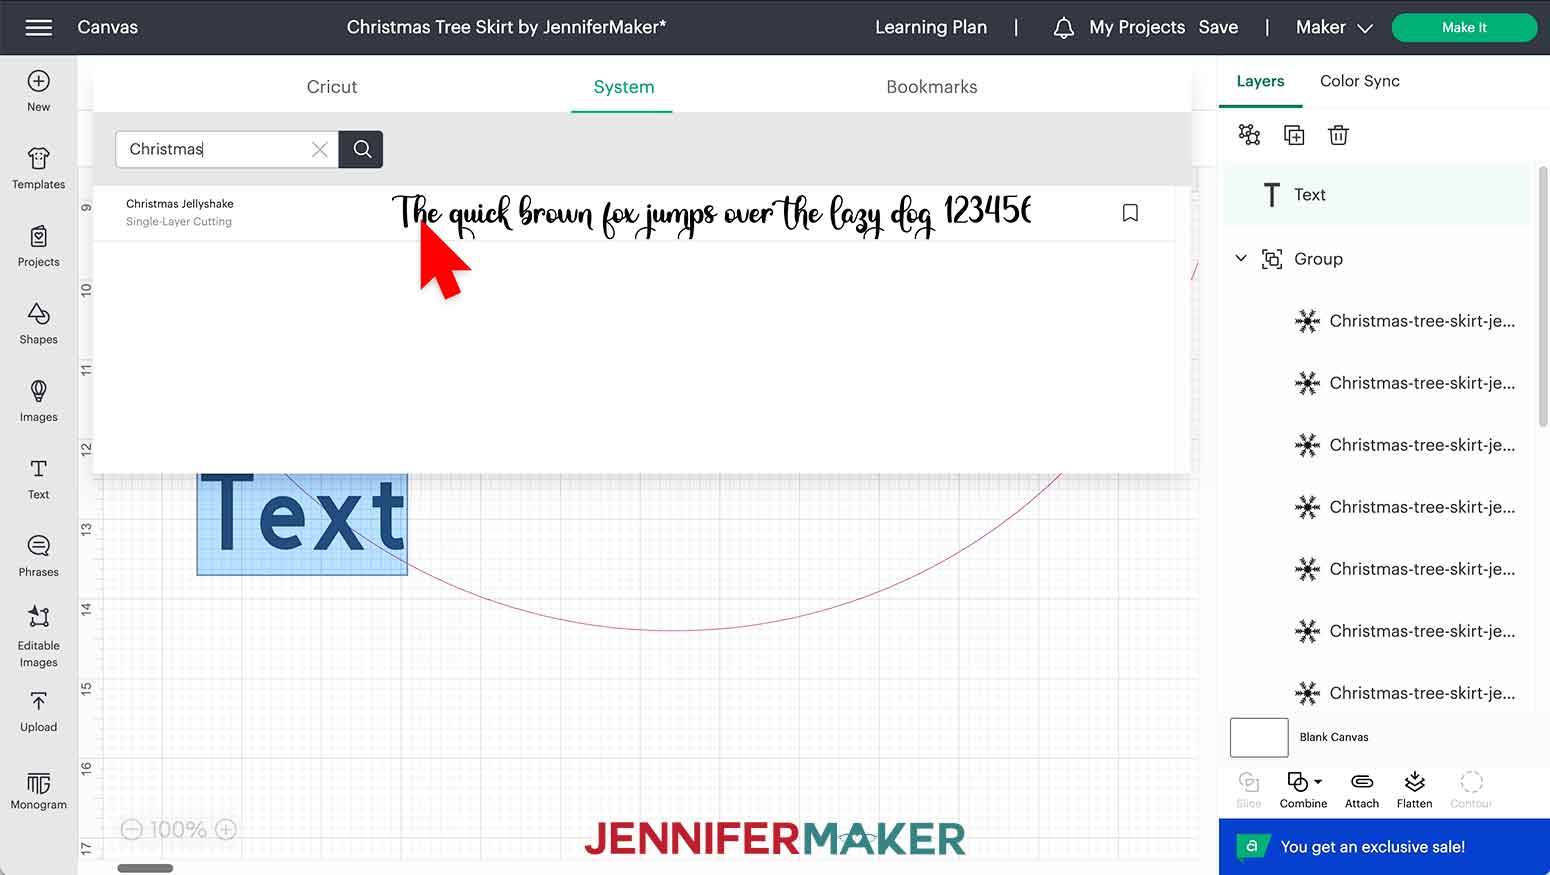
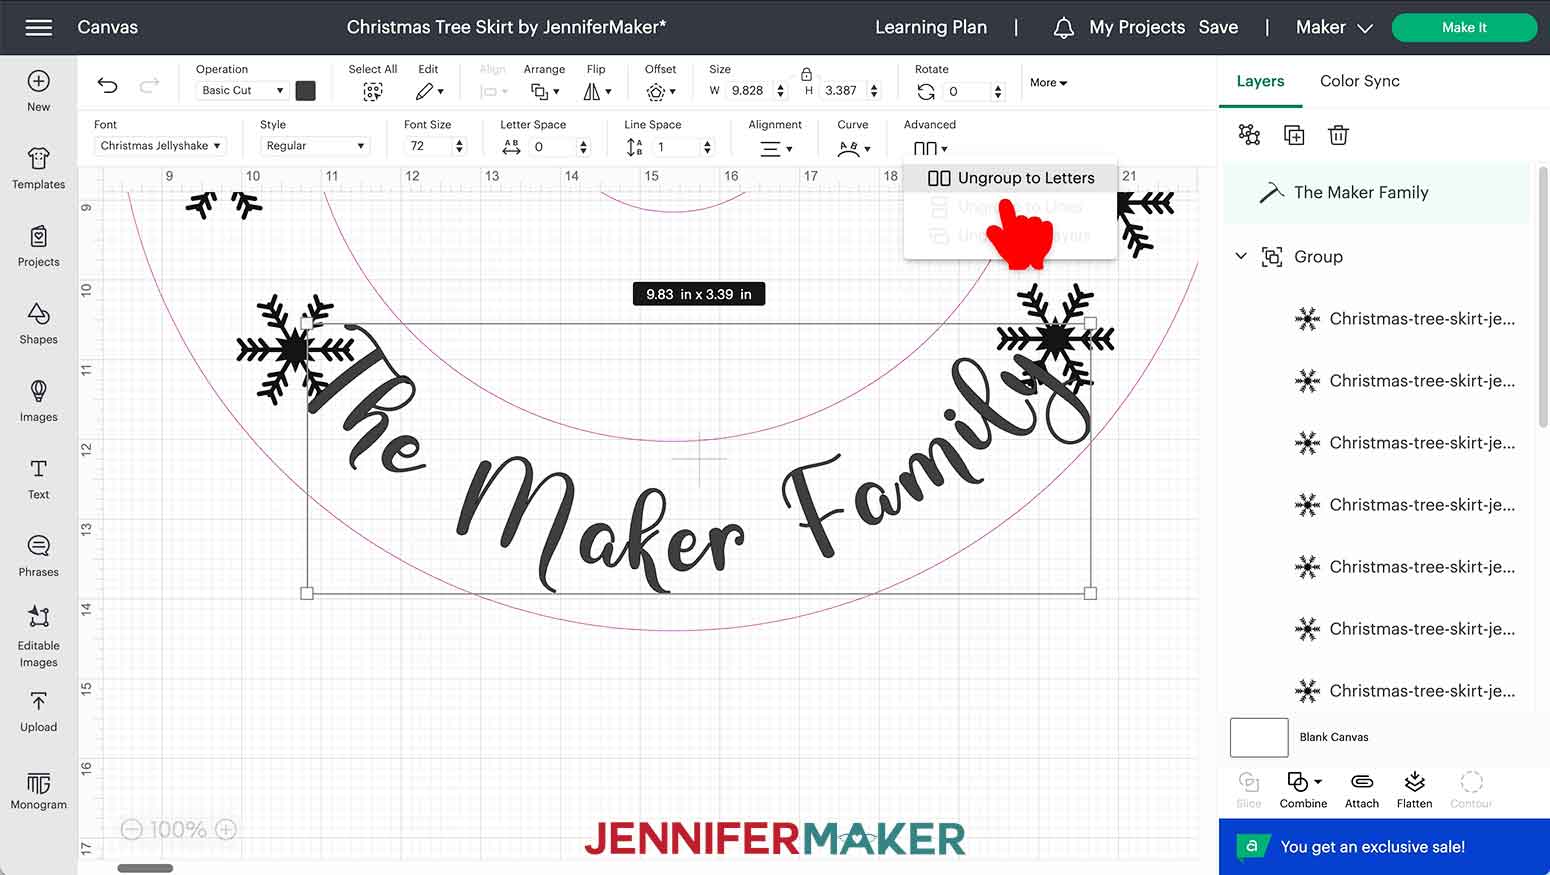
Click the Text icon on the left of the Canvas. Then, click the drop-down Font menu to select your font. I'm going to click on "System" and search for "Christmas Jellyshake" which you can purchase from FontBundles.net, but you can use any font you'd like. Click to select the font.
Type your personalization in the text box. I'm going to make mine say "The Maker Family." I left the font size at the default 72 but you may need to adjust yours depending on the font you choose. Click and drag it to the lower white area of the tree skirt template. Click the "Curve" icon and then drag the slider to the left to create an upward curve with your text.
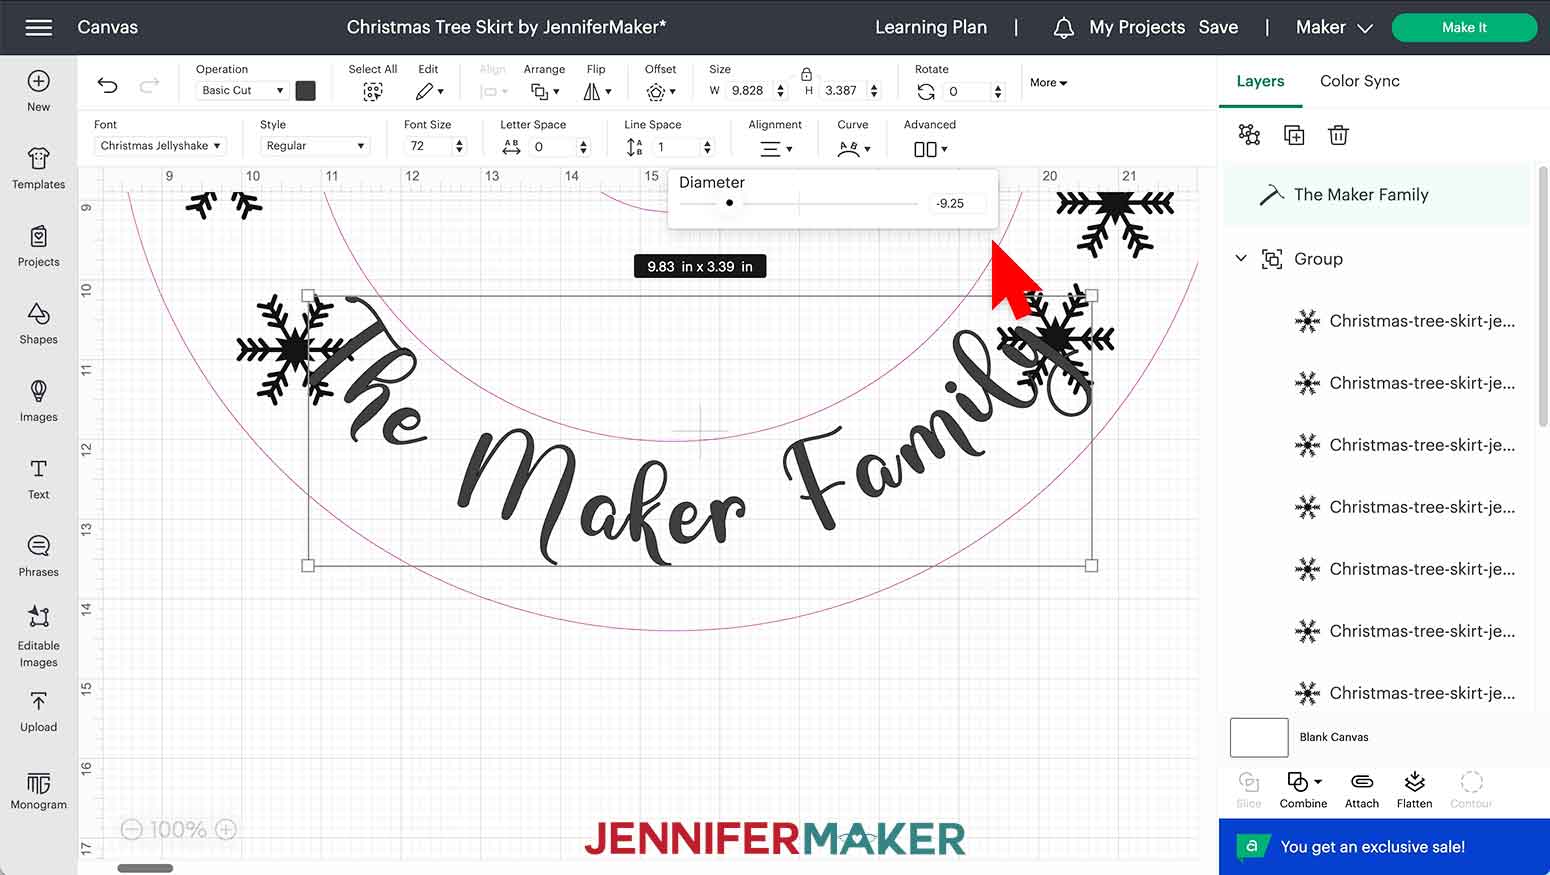
For the length of my personalization, I am happy with the curve set to about -9.25 but yours may be different.
TIP: If you have a tough time getting the right look, it might help to click "Advanced" and "Ungroup to Letters" to manually place the letters around your tree skirt. Once you're happy with the letter placement. press and hold the Shift key to select all of the letters in the Layers Panel and click "Attach."
We now have all our designs ready to make. Feel free to combine designs. The personalization would look great with the snowflakes! If you are using more than one color of vinyl, be sure to click each layer and select the appropriate color from the Color box.
I'm going to change "The Maker Family" to red, the snowflakes to gray (to cut on silver), and leave "Merry Christmas" in black.
NOTE: Your guides can stay on the canvas. Design Space knows they are a template and will not appear on the next screen.
STEP 4: CUT AND APPLY IRON-ON VINYL TO YOUR DIY CHRISTMAS TREE SKIRT
In the upper right corner, make sure your correct machine is selected and click "Make It."
I'm going to use a mixture of Smart Iron-On vinyl and Everyday Vinyl so in the pop up I'll select "Multiple Ways" and click "Confirm" in the lower right corner.
I am going to leave the gray layer as "Without Mat" but will change the red and black layers to "On Mat."
Since these are all iron-on designs, we need to click the toggle under "Mirror" to the green "on" position for each mat.
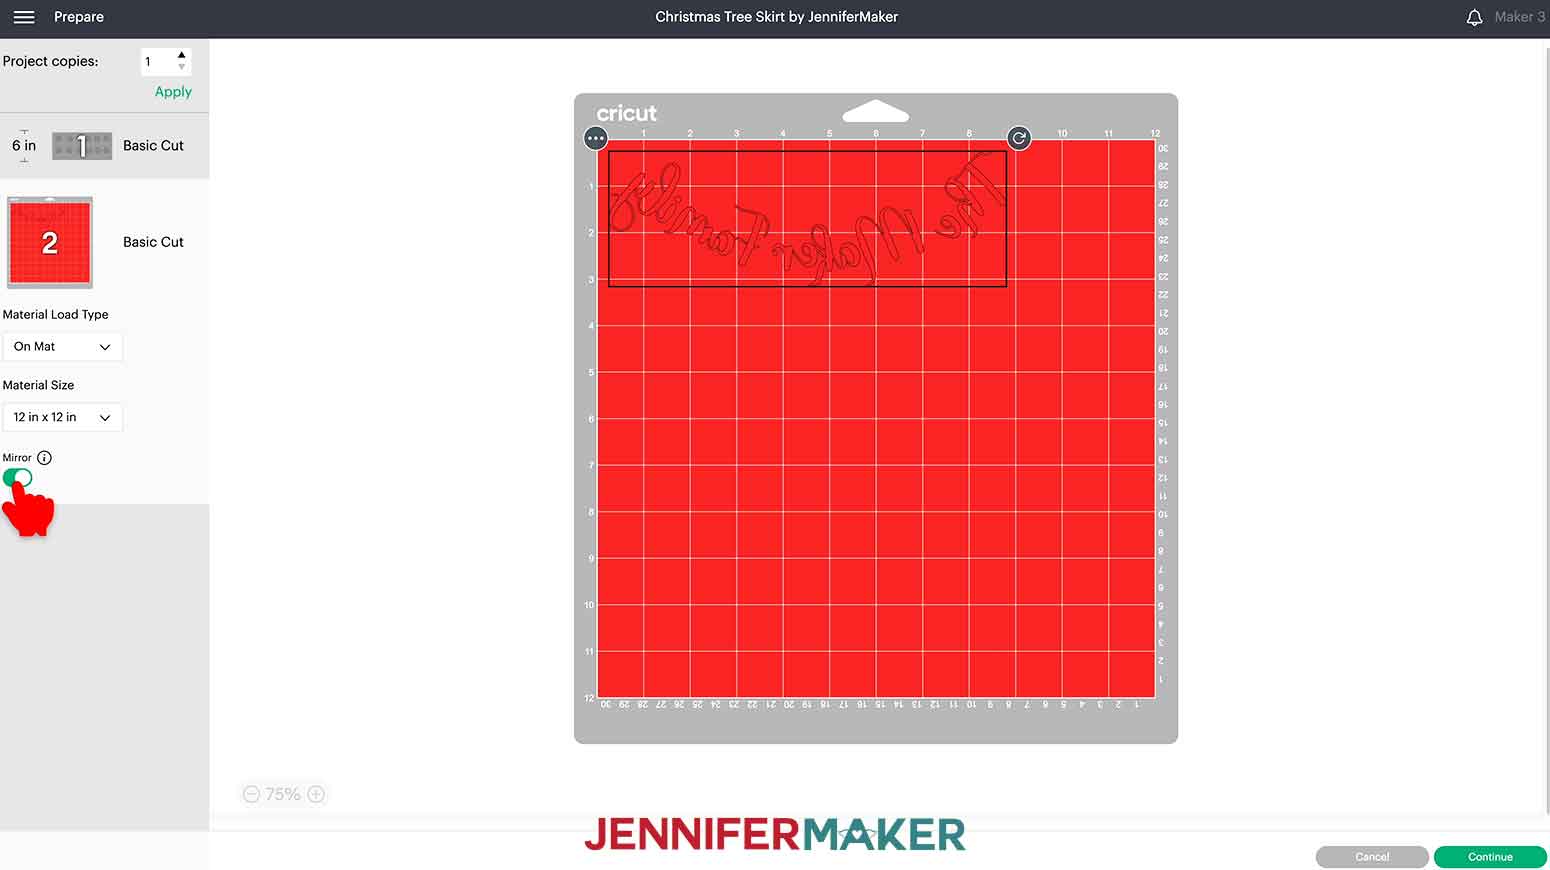
After changing all the mats, click back on the first mat and click the green Continue button.
NOTE: If you are cutting snowflakes, you may be wondering if it matters to mirror them. Technically, symmetrical images do not need to be mirrored but it is good practice to always turn Mirror on when using iron-on vinyl.
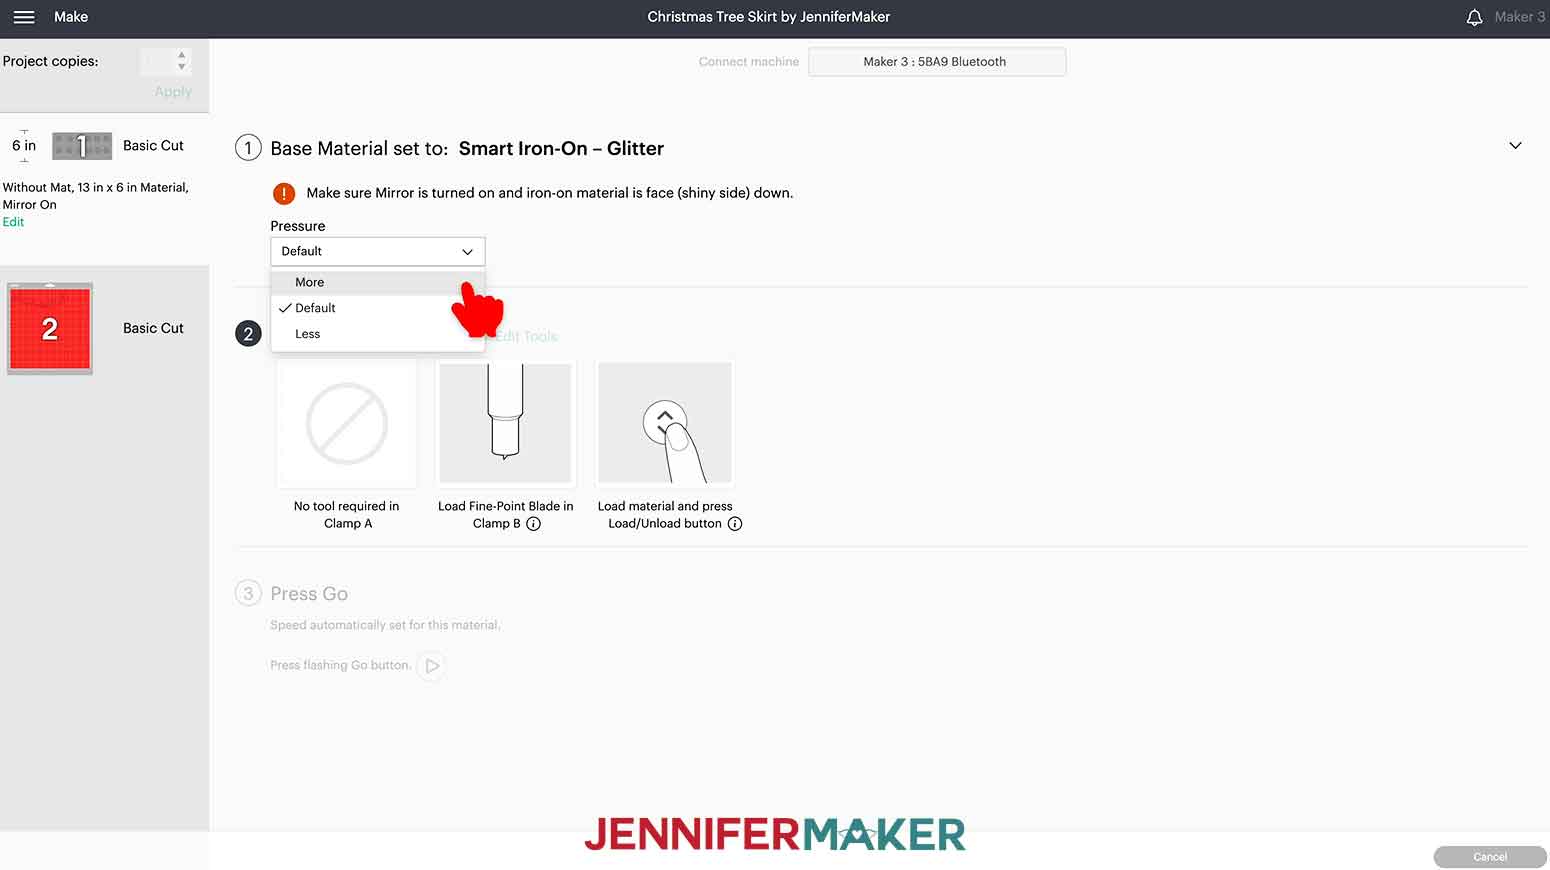
On the Make screen, select the type of iron-on material you are going to use. I am going to use "Smart Iron-On - Glitter" for the gray mat and "Everyday Iron-On" for the red and black mats. If you don't see the material you are using displayed on your screen, click "Browse All Materials" to search for it and select it.
Make sure your Fine-Point Blade is clean and in the correct clamp.
Like with most of my cuts, I recommend changing the Pressure to "More."
Cut your glitter iron-on Smart Vinyl to the appropriate size and either place it shiny side down on a green StandardGrip mat or load it directly in to the machine, if you are also using Smart materials. Press the flashing arrows to load it into the Cricut.
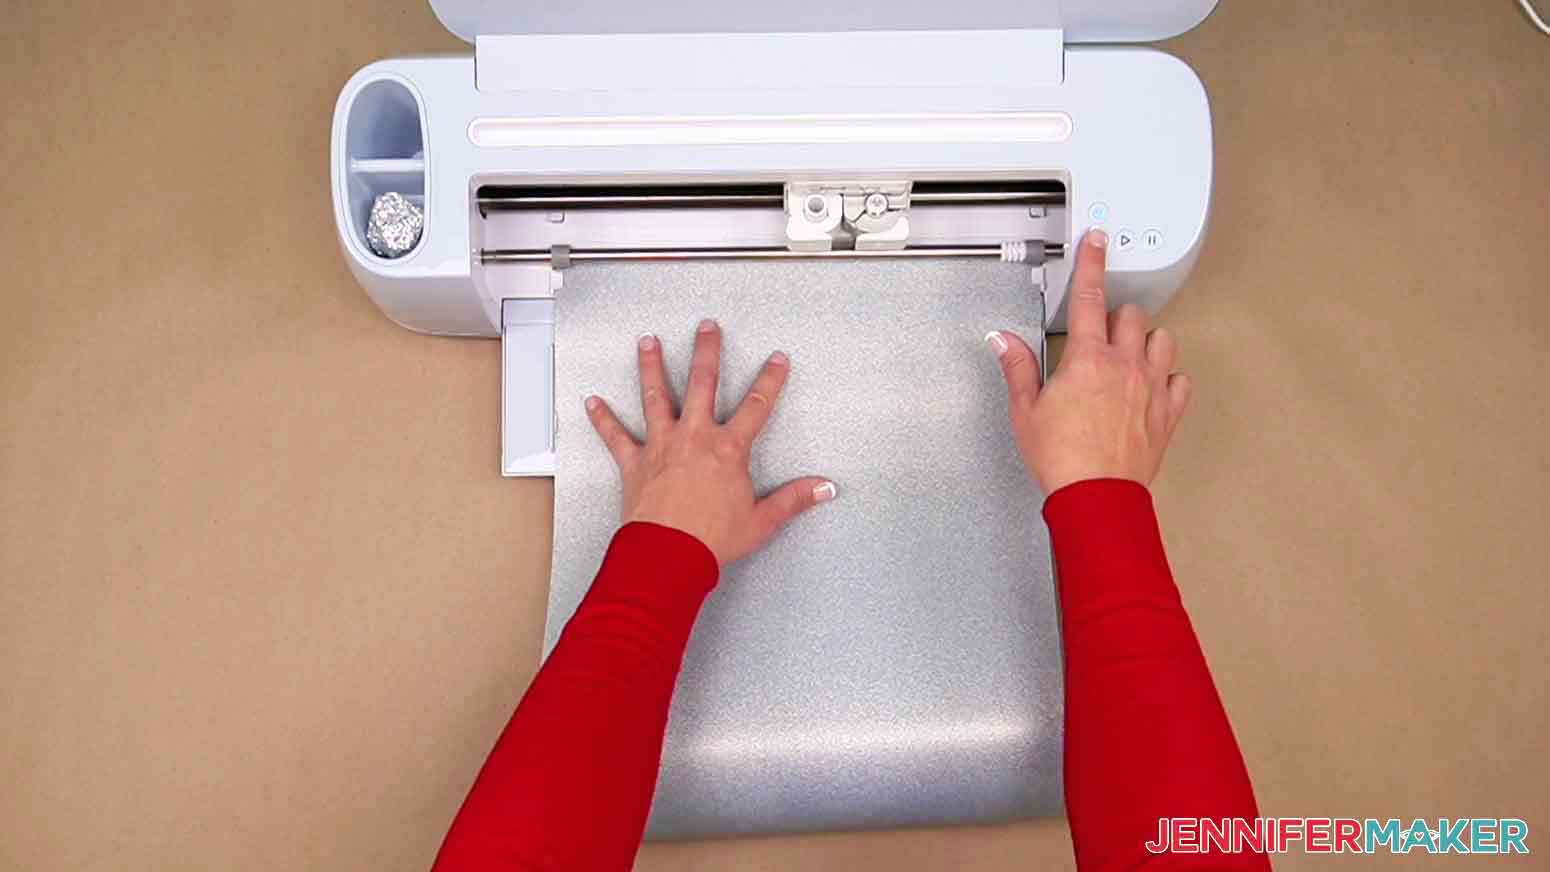
The Cricut will measure the material to make sure there is enough and when the middle button begins flashing, press it to begin the cut.
When the cut is done, press the arrows again to unload the vinyl.
If you used a mat, flip it over and peel it back to release the vinyl.
Place the next piece of vinyl on the mat and load it into the machine by pressing the flashing arrows. Again, press the flashing middle button to cut the vinyl and then unload it when it is done. Repeat the same steps for the last mat as well.
Use a weeding tool to remove all of the extra vinyl around your designs. Cut the snowflakes apart so you can place them independently.

My tree skirt is a cotton/poly blend so the Cricut Heat Guide says I should set the EasyPress to 330° and 30 seconds to work with Smart Glitter Iron-On, which I'll add first.
If you're using a different press, check the Cricut Heat Press Guide for the correct settings.
Because the texture of the tree skirt material isn't typical for iron-on vinyl, I placed a piece of white butcher paper over it to protect it from any potential mishaps. Preheat the tree skirt for five seconds.
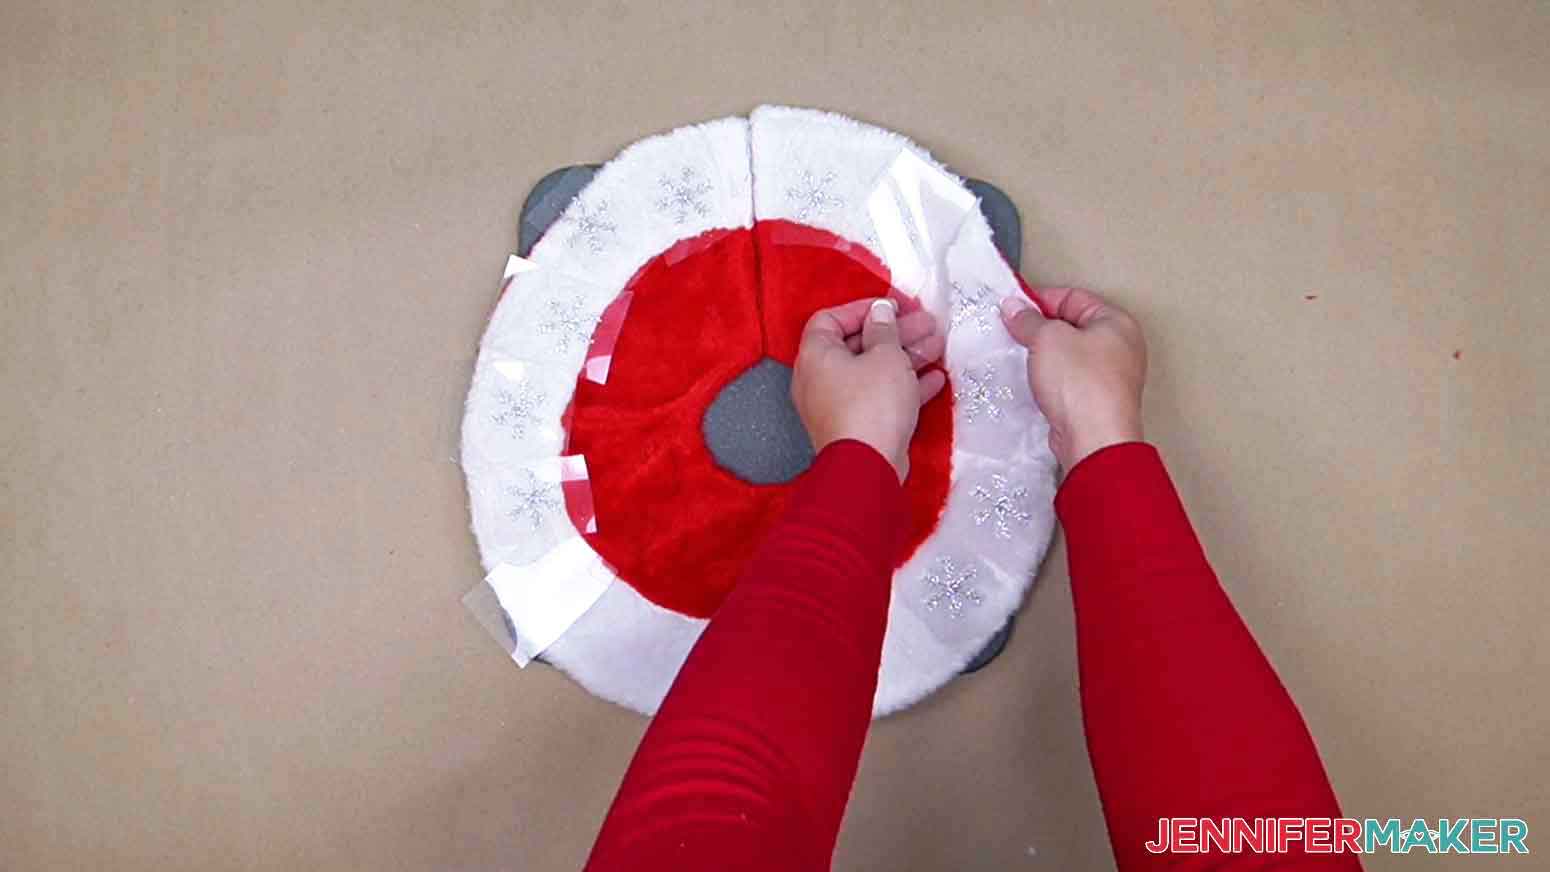
Place the snowflake designs around the tree skirt. The glittery vinyl side faces down, against the skirt and the shiny plastic layer faces up. Leave space for the words if you’re adding them! Cover everything with white butcher paper.
NOTE: When pressing Cricut iron-on vinyl on standard materials, you do not need to cover the liner with butcher paper. We chose to use this method as a precaution to protect the furry white part of the tree skirt and our EasyPress.
Press the designs for 30 seconds with firm pressure. Remove the EasyPress, flip the tree skirt over, cover with butcher paper, and press for 15 more seconds.

Flip the skirt back over and gently peel away the vinyl liners when they're cool to the touch. Go slow and steady to not pull the vinyl up with any of the white fur of the tree.
Lower the EasyPress temperature to 315° and repeat the same steps for the Merry Christmas and custom designs. Cover the tree skirt with butcher paper and preheat the tree skirt for five seconds. The liner of Everyday Iron-On faces up so the text reads correctly. Cover the tree skirt with butcher paper and press for 30 seconds with firm pressure. Flip the skirt and press for 15 seconds from the back. Remove the liner when it is cool to touch.
Your beautiful DIY Mini Christmas tree skirt is complete!
STEP 5: SHOW IT OFF
I can't wait to see your DIY Christmas Wreath and Mini Tree decorations! This is how mine turned out and I am so excited to put them on display!

Notes
FONT
Merry Christmas - Christmas Jellyshake / Free Alternative: Marchila
Recommended Products
As an Amazon Associate and member of other affiliate programs, I earn from qualifying purchases.

Answers to Your Questions About Dollar Tree Wreath DIY Projects
Q: How do you make a Dollar Tree wreath?
A: I have so many Dollar Tree wreath ideas! My Winter Wreath uses a foam base, so you can adjust it to fit the foam wreaths available at Dollar Tree for a DIY Fall wreath. Or, get inspiration from by Paper Butterfly Wreath to use a grapevine wreath form from your local Dollar Tree. It makes a gorgeous DIY summer wreath.
Q: How do you make a mesh ribbon wreath for Dollar Tree?
A: You can make a deco mesh wreath like my cute Snowman! He uses a wire frame, pipe cleaners, cardstock and some simple Dollar Tree supplies.

Q: Is it cheaper to make your own wreath?
A: It can be, as long as you use inexpensive like the dollar store supplies I found for a DIY wreath. Faux flowers can get expensive, so set a budget and stick to it at your local dollar store!
Q: Can I cut this project on a Cricut Joy?
Yes, just resize the tree skirt decal so that the largest piece fits on the Cricut Joy machine mat. See our Resizing Guide for more details.
Q: What is Merry Maker Mingle?
Each day in December leading to Christmas, I present you with a brand new “gift” — a project to craft, make, or do. You can make these projects on a Cricut cutting machine or by hand if you don’t have one. Most of our Merry Maker Mingle projects will come with a fun video with yours truly, a step-by-step printable photo tutorial, and a free pattern/SVG cut file. Sign up to get daily updates and prizes!
Get my free SVG files to create DIY Christmas Wreath Dollar Tree Projects
I love seeing what you make with my designs and how you use them! Please share a photo of your Dollar Tree Wreath DIY in our Facebook group or tag me on social media with #jennifermaker.
Love,

Want to remember this? Save this DIY Dollar Tree Christmas Wreath & Tree Tutorial to your favorite Pinterest Board!