
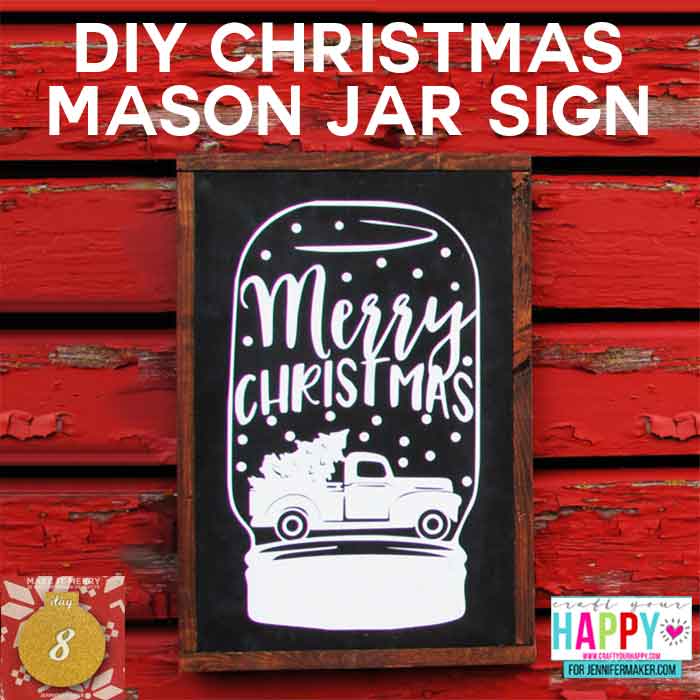
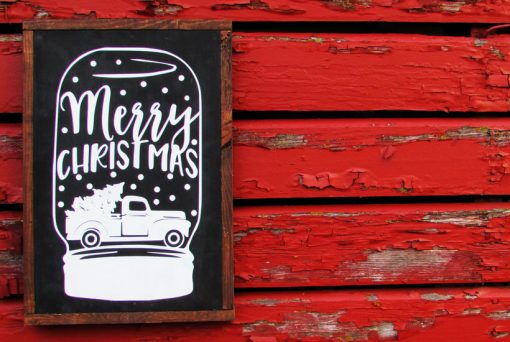
 For Day 8 of our MAKE IT MERRY: 25 Days of Maker Projects Christmas, I have a special gift from a special guest! Today’s project comes from an awesome fellow DIY blogger who is here to show us how to paint a custom chalkboard-style sign with a stencil: a DIY Christmas Mason Jar sign!
Hello fellow makers! I’m Lori and I have my own blog over at Craft Your Happy. I believe that you can find joy no matter your circumstances by getting in touch with your creative side.
Craft Your Happy is a new blog and I blog about DIY and crafting, with a heavy focus on making things with my cutting machine. I’m a lifelong crafter so I have collected a lot of tools over the years. I can definitely say that next to my computer, my cutting machine has been my Best. Purchase. Ever.
My computer is important to me because I design cutting files for craft cutters over at my Etsy shop, Crafts You Cut. I’ve been designing graphics for about 10 years now and I’m almost completely self-taught. It’s something I really enjoy doing.
My designs aren’t beautiful and elaborate paper-cutting designs like Jennifer’s, but rather word art. For the most part, I design in the “modern farmhouse” style. (Thank you, Joanna Gaines!) My designs are primarily used to cut out vinyl. My designs are popular for signs, mugs, and apparel. Like Jennifer, I have a Resource Library and in that library, you’ll find a growing collection of free cutting files for your own use.
I am absolutely thrilled that Jennifer asked me to guest post here on her wonderful blog! I am so grateful to her for her generosity!
So today, I want to share with you a Christmas design that I created exclusively for Jennifer Maker. I’m also going to show you how to take that cutting file and make a simple wooden chalkboard style sign. It’ll be a great addition to your holiday home!
Sign-making can be a pretty quick project with the help of your vinyl cutter. I find the process to be almost instant gratification. Once you start making signs, you’ll have trouble stopping! If you’re like me, you’ll have so many signs you’ll run out of walls on which to put them!
Plus, I love mason jars and I love snow globes and this design combines both! I hope you’ll love it as much as I do. This post contains some affiliate links for your convenience (which means if you make a purchase after clicking a link I will earn a small commission but it won’t cost you a penny more)! Read my full disclosure policy.
Materials for the DIY Christmas Mason Jar Sign
- 1 – 12×18 inch plywood (I prefer to use 1/2-inch plywood) You can pick this up at any big box home improvement store or lumber yard. Tip: Home Depot and Lowes will cut a sheet of plywood for you for free or a nominal charge. Small town lumber yards are always great with customer service and while the plywood might cost a little more, it’s usually better quality and they’ll almost always cut it for free. If you buy a 4×8 foot sheet of plywood, it costs under $25 a sheet and you can make LOTS of signs from that one sheet. I always have them cut sizes that are 12 inches wide since that’s the maximum width the Silhouette Cameo will cut. You can do varying sizes of 12×12, 12×18, 12×24, etc.
- Craft Paint – I prefer chalk paint because it dries quickly. (I’m a bit of an impatient crafter.) It also sands beautifully! I use the Waverly chalk paint from Wal-Mart mostly because it’s local to me, but you can use any chalk paint or craft paint that you’d like.
- 400 grit sandpaper – This is a fine grit sandpaper that you probably wonít find in the hardware section. It’s mainly used to sand auto body paint so it can be found at the local auto parts store or here.† I have used 300 grit sandpaper in a pinch and found that to work just fine.
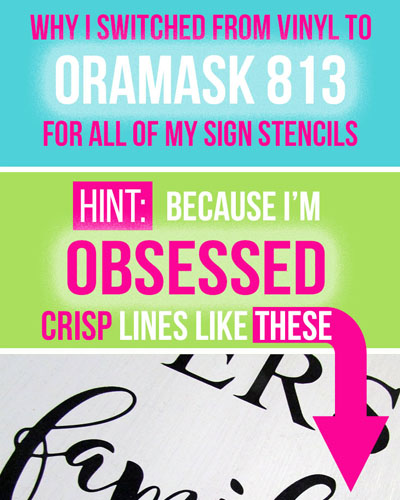
- Oramask 813 vinyl stencil mask – This is the secret sauce to successful stenciling with your Silhouette or Cricut!
- Transfer Tape
- An old credit card or squeegee
- Paintbrush – I use cheap chip brushes because Iím terrible at cleaning out my brushes, but you can use any paint brush you’d like.
- Makeup sponge
- Poly Sealer or Wax (this is optional – you don’t have to seal your sign if it’s not going outside)
- 1×2 inch boards to frame out your sign (optional)
- Wood stain if you’re going to stain your frame: Varathane is my favorite but any dark walnut stain will work.
- A way to cut out your stencil (I used a Silhouette Cameo, but you can also use a Cricut)
- Merry Christmas Mason Jar Snow Globe Cutting File – Found in Lori’s resource library (get the password by filling out her free signup form)
How to Paint Your Custom Chalkboard Sign Board
I think what draws me to the modern farmhouse look is the rustic quality of the workmanship. I’m a bit of a perfectionist, so I appreciate anything that doesn’t require me to be perfect (even if it’s just in my own mind.) So what I’m saying is slap that paint on the board! It doesn’t have to be perfect! You will probably see brush marks. I’ve had to get over that and I’m sure you will, too!
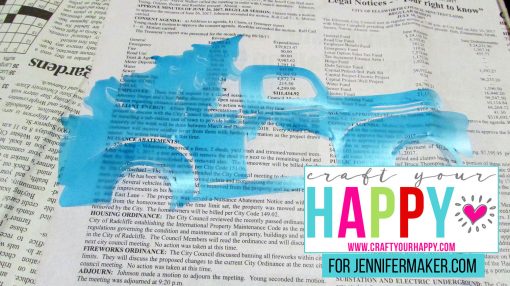
I put two coats of paint on my board and I sanded with the 400 grit sandpaper in between coats. Paint will cause the grain to lift on the wood, so you’ll want to sand that grain down so your stencil sticks well to the board and doesn’t lift off or leave gaps. Our goal is crisp lines with no bleeding and sanding (along with the Oramask 813) is the secret to that. Since this sign is meant to look like a chalkboard, the distressed look fits right in!
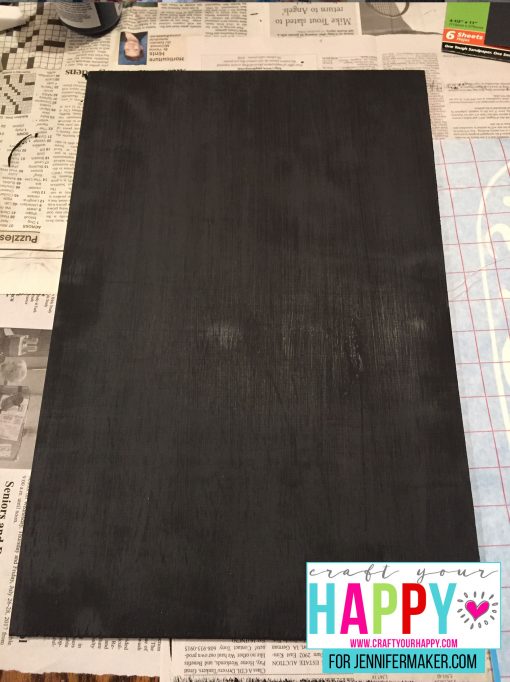
I typically don’t paint the backs of my signs since no one sees the back. And because I’m framing this sign, I won’t paint the edges of the boards. You can do a floating type sign and not frame out the board if you wanted. If you were to do a frameless design, then you’ll want to paint around the edges of your board.
While you’re waiting for your board to dry, it’s time to cut out your stencil. But first, let’s discuss the material you’re going to use.
Thoughts On Stencil Material
Now, you can certainly use any old vinyl you have in your stash to do this project, BUT—and that’s a mighty big BUT—I highly recommend using the Oramask 813 paint mask vinyl. Before Oramask 318, I would use whatever vinyl I could find. Sometimes it was the cheapest oddball color from Amazon or the Hobby Lobby stuff I used out of desperation. I would suffer through the unknowns of whether I would have problems with paint bleeding. No one wants that after going to the work (and expense) of cutting out a stencil.
Once I found the Oramask 813, my problems were over! It’s made for use as a stencil! It is paint mask vinyl. Notice how it’s translucent. Oramask allows me to see where I’m placing it on my board. It’s also easy to see where it might be lifting up on the board so you can rub it back down again. Gaps cause bleeds and bleeds are heartbreaking. Not that I’m being overly dramatic or anything.
The Oramask has just the right amount of “stick” to it. Vinyl would sometimes stick too well to my project and I would pull up the vinyl and the paint from the design. This has a texture of a heavy shiny paper. Once you’ve finished painting your stencil, you can rip it off in sections from your project.
The key is sanding your board before you place the stencil mask on it. That makes for a better adhesion to the surface.
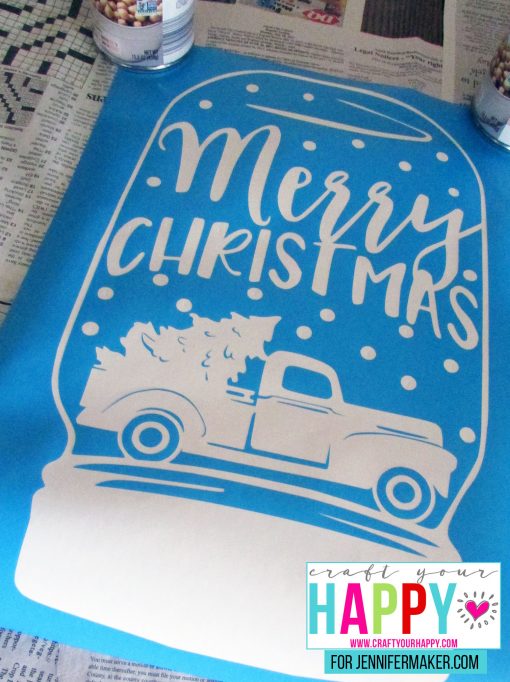
Cutting And Weeding Your DIY Christmas Mason Jar Stencil
First, cut out your stencil on your favorite vinyl cutter.
Once you have cut out your stencil, you’ll want to weed the stencil. Weeding means you’re going to remove the parts of the Oramask you don’t want to use. Some people really love to weed vinyl and some people hate it. I’m in the camp that loves to weed and I often find myself fighting my daughter off who also likes to weed. I find it therapeutic. I hope you do, too. You’ll see above that after weeding, it looks like a regular stencil. You’re going to be painting in the sections where the Oramask has been removed.
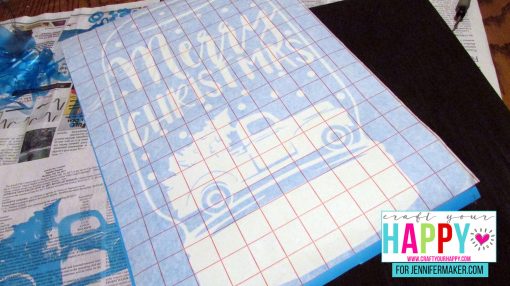
You’ll need some transfer paper to place the design on the board. This is sometimes a bit tricky. You’ll want to make sure your transfer tape is square with your design. Cut off an amount of transfer paper to match your design dimensions and peel off the back. The transfer paper feels a little like masking tape. You’ll want to place that carefully onto your design and use a credit card or squeegee to smooth any bubbles. When I have been out of transfer paper, I have used contact paper in a pinch. I do prefer the transfer paper because it has those nice, one inch squares marked out for you.
It should look like the photo below when you’re done. At this point, you still have the backing paper on the Oramask.
After you’ve put the transfer paper on sticky side down, you’ll peel the backing off the Oramask.
Once you’ve separated the two layers, carefully place your stencil on your board. I think this is the hardest part of the process! Line up your corners of the stencil with that of the board and start from the top and work your way to the bottom. Again, take out your credit card or squeegee and apply light pressure to get the stencil to stick to your board.

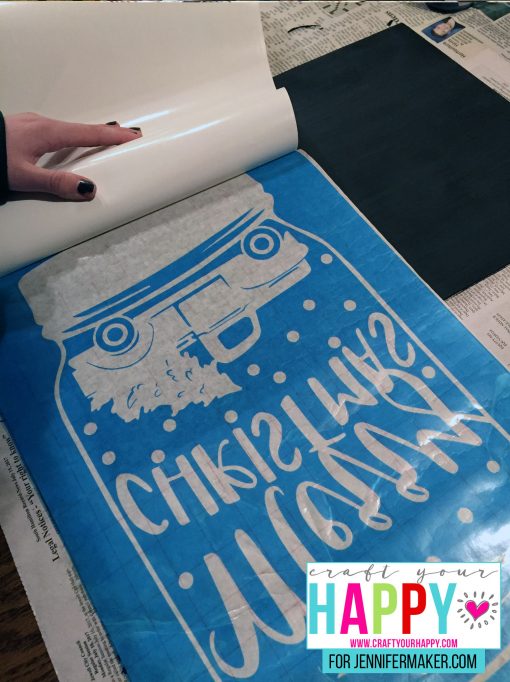
When you feel as if you’ve completely pressed the stencil down onto the board, it’s time to peel the transfer paper off.
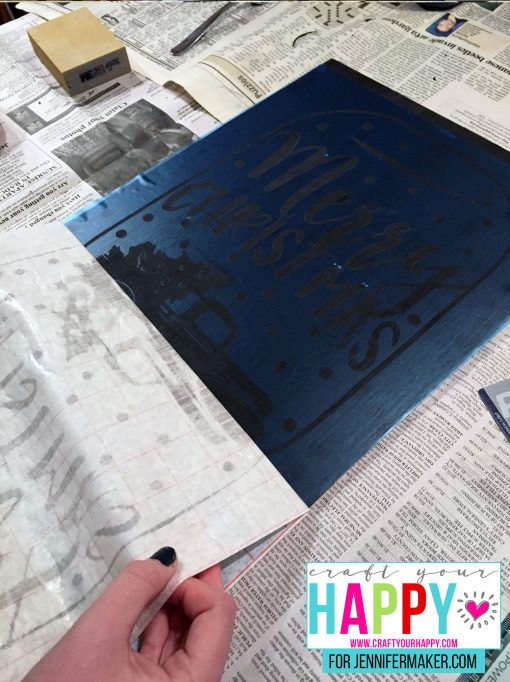
DO NOT be alarmed if some of your pieces of “floating” vinyl (like the insides of letters and objects) want to come up with the transfer paper. Just push them back down and apply harder pressure on the transfer paper. After it has been applied, it should look like this. At this point, you may see some gaps around your letters and other areas you’ve cut out and weeded. Just push them back down gently with your finger or credit card/squeegee. This will probably be the most time-consuming part of this process. At least is always is for me!

Painting The DIY Christmas Mason Jar Stencil
Now that your stencil is in place, it’s time to start painting.
My favorite way of putting the paint on is to use a simple makeup sponge. They’re just the right size, they’re disposable and best of all, they’re cheap! You can buy a big bag of them much cheaper than you can buy those foam pouncers you see at the hobby stores.
I carefully dip the tip of my sponge into the paint and then I offload the paint onto a paper plate or newspaper. You don’t want too much paint on the sponge. I’d rather have a couple of light coats than one heavy one. Lightly sponge the paint on the cut lines of your stencil.
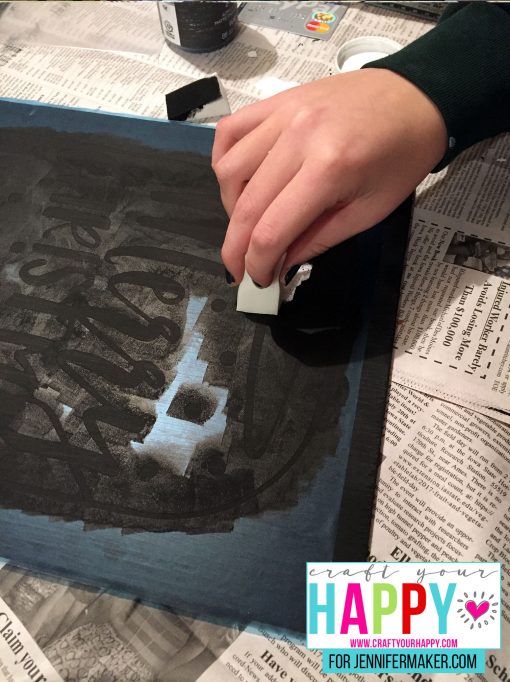
I’ll bet you’re asking yourself why I’m painting with black paint at this point? To make the sharpest, crispest lines possible, I like to take the same color as my board (in this case, black) and go around the edges of my stencil. That way, I have a nice “seal” that will prevent bleeding. Some people will use Mod Podge to seal the edges. I prefer paint just because I already have it out. Those who are huge fans of Oramask 813 will tell you they don’t do this step. What can I say? I’m paranoid. Your mileage may vary, so it’s up to you which direction you want to go. Personally, I’d rather take the time to seal the edges than have to deal with correcting the bleeds later.
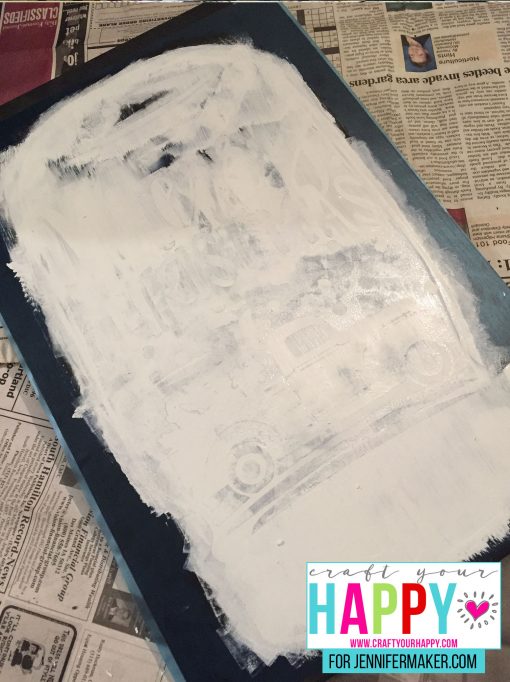
Once your base color is dry, then you can go over the stencil with your actual line color. Because this is a chalkboard sign, I’m using white. And because you’re using white over black, you’re going to want to make sure your black paint is completely dry or you’ll end up with gray. Again, lightly sponge the paint onto the stencil.
Removing The DIY Christmas Mason Jar Stencil
We are in the homestretch now! You don’t have to even have to wait for this round of paint to completely dry before removing the stencil. In fact, it’s highly recommended that you don’t let the Oramask dry on your board. If it dries on the board, it has a tendency to pull the base paint of the sign off with the stencil. Never leave it set for a couple of days and then come back to finish it off. Ask me how I know.
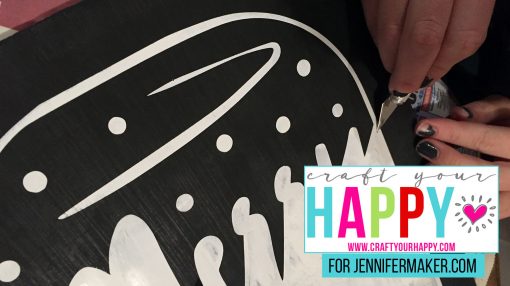
I start with the area that I have painted first and go from there. You’ll see how to comes up in sections and that it comes up easily! It will almost feel like paper tearing when it comes off. Be mindful of the direction you’re pulling the Oramask. Since it’s likely the paint isn’t dry, you don’t want to smear it on your painted board.
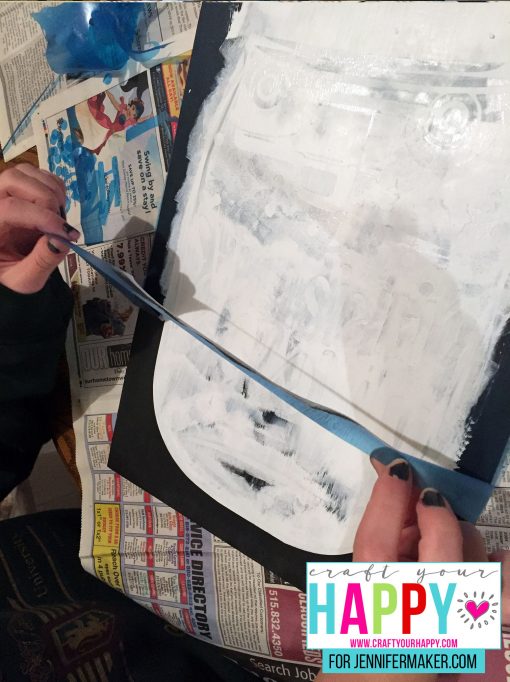
Because this design has several small pieces that need to come off, I use an Exacto knife to help lift up those areas that might be held down by the paint. Be careful not to gouge your board, but if you do, just fill it in later with a bit of paint on the tip of a brush.
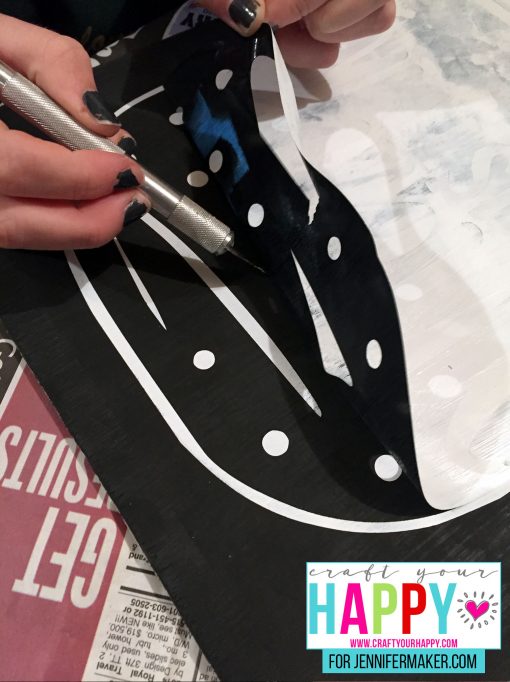
I’m not sure I can accurately put into words how excited I am to see these beautiful, crisp lines!
At this point, the decision is completely up to you if you wish to frame your board or not. I personally like framed signs, but I also like the floating look as well. The nice thing about farmhouse style decorating is that there really seem to be no rules. Do whatever makes YOU happy!
What will you do to Craft Your Happy, today?
Lori
Get the free cut files for the DIY Christmas Mason Jar
To get the cut files for this awesome project, you need to go to Lori’s site and sign up there for free—she’ll send you the password in an email so you can get the file from her free resource library.
I hope you have fun making the DIY Christmas Mason Jar Chalkboard Sign! If you make one, Lori and I would both love to see it! Share a photo with us at [email protected] or tag me on social media with #jennifermaker.
Also, be sure to visit tomorrow to open the Day 9 gift of my MAKE IT MERRY: 25 Days of Maker Projects Christmas! If you want to be notified of when there is a new gift ready to open on my blog, just fill out this form!
Love,

Want to remember this? Save the DIY Christmas Mason Jar Sign to your favorite Pinterest board!
If you like this project, you may also like these free designs and tutorials from Craft Your Happy:


Thank you for this beautiful project!
You’re welcome, Gail!