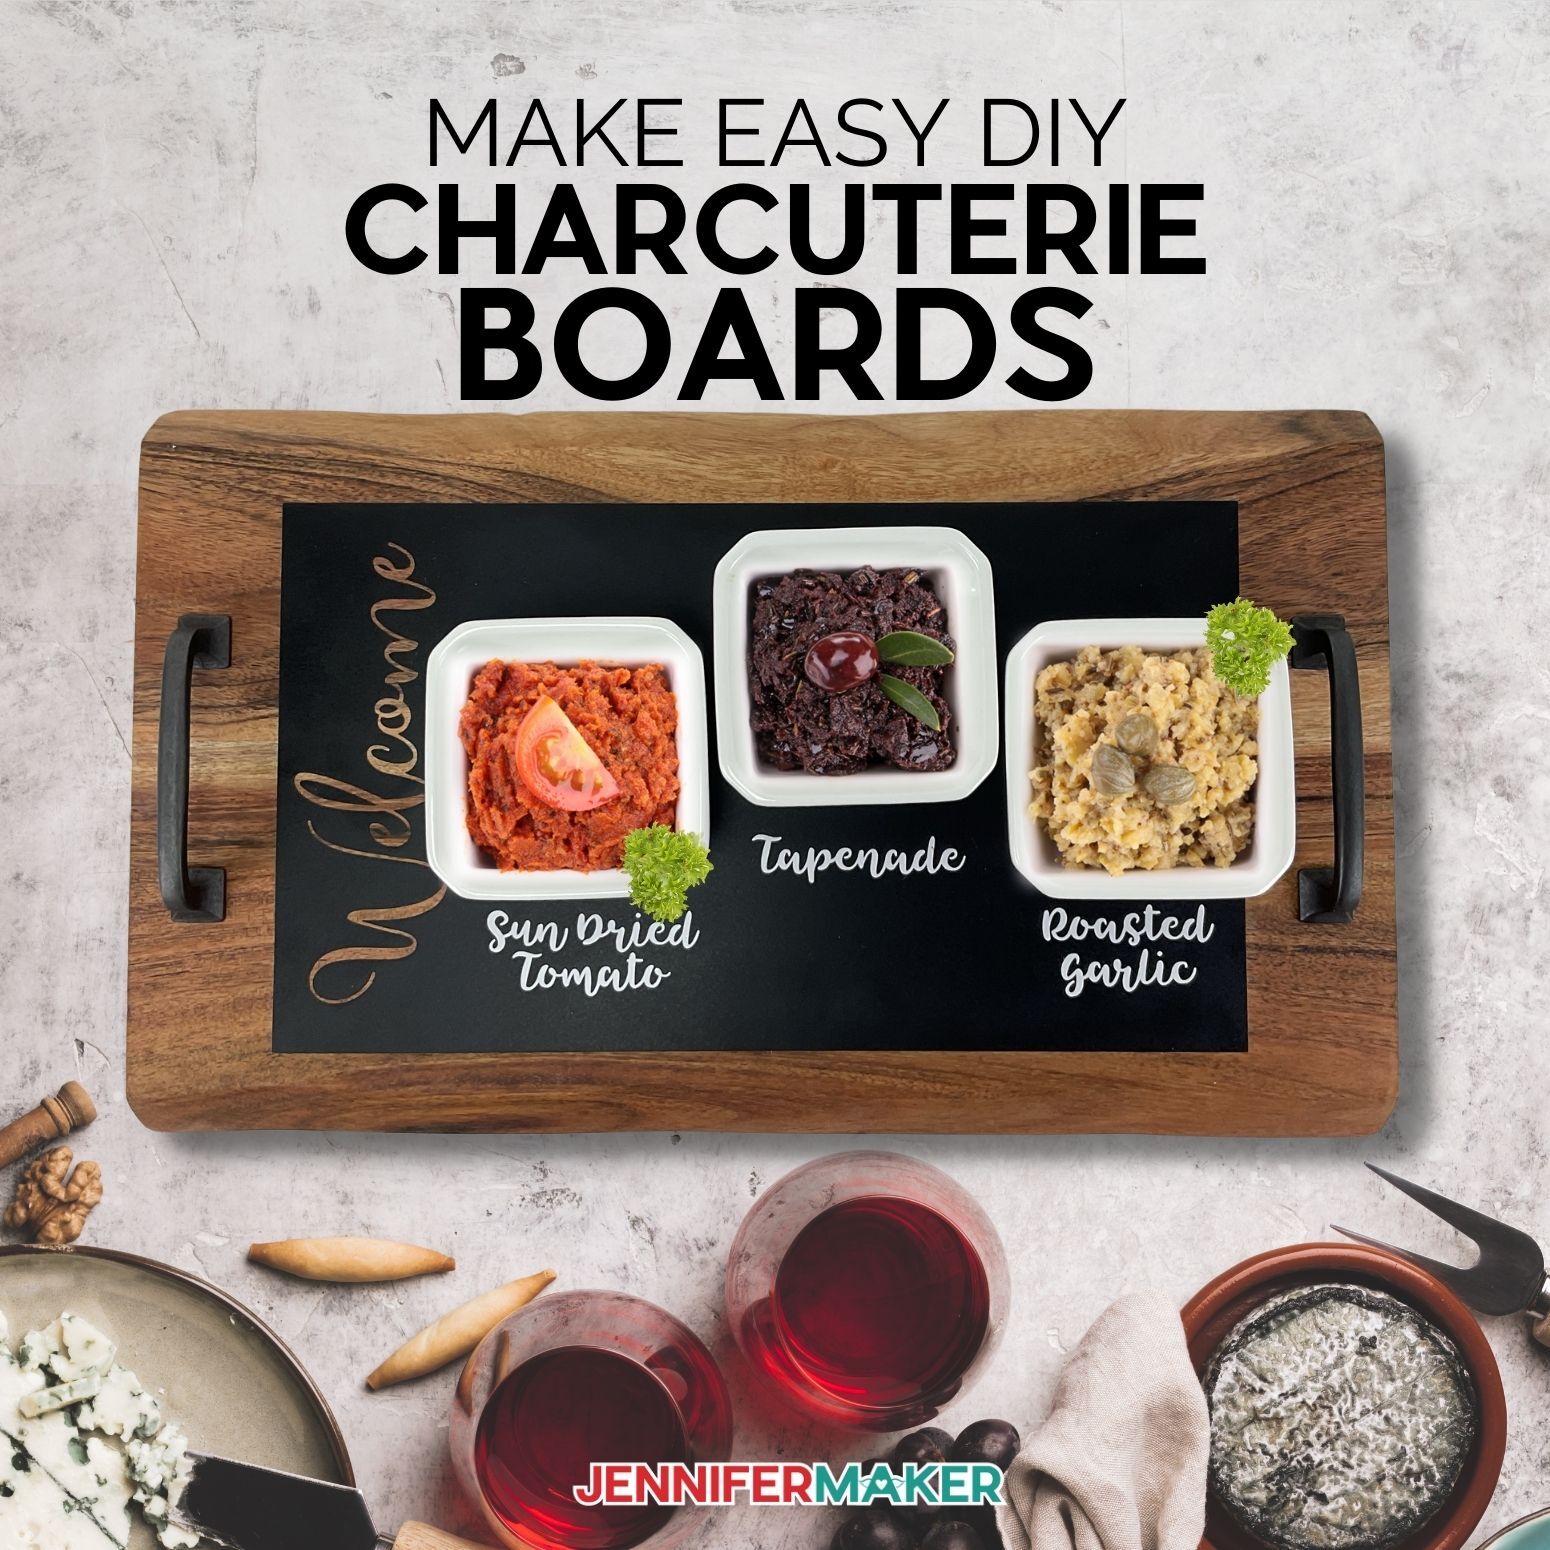
Entertaining is fun with these gorgeous DIY charcuterie boards, creating what is essentially an infinitely customizable serving tray!
Personalized serving trays are perfect for entertaining. And right now the trend is charcuterie boards — they are crazy popular! So I thought, how can I make one with my Cricut? I came up with a fun DIY charcuterie board project I just have to share! This is a fun and easy way to customize your very own charcuterie tray. I made four different designs that are ready to be cut and added to your tray. I’m also going to show you how to make a custom design from a blank template.

Let’s take a look at the materials we will need for this DIY charcuterie board project.
We will start with a tray, mine is made from hand crafted acacia wood and measures approximately 15 by 9 inches. Isn’t this wood so beautiful? Originating from one of the largest wood plantations in Asia, Mountain Woods products are farmed using responsible and environmentally friendly forestry practices. It’s a win-win!
We’ll also need some handles, I got these three inch brass handles that we will add with the help of our drill. Then we will need some vinyl, I’m using chalkboard vinyl and some white removable vinyl, along with some transfer tape. Next, we’ll write on our board with chalk or chalk markers, whichever you prefer. And of course we will use our Cricut cutting machine and a mat, along with a weeding tool and extra large scraper.
And with the chalkboard vinyl, you can use chalk or chalk markers to label your board. But, that’s not all, I’m also showing you how to make faux chalk labels!

Add small bowls or plates of food and you’re ready to host your next party! You’re sure to wow your guests and have them asking where they can purchase one as well!
I’ve seen lots of charcuterie boards over the past years and they’ve become increasingly popular. I’ve seen some create-a-cheese platters with a variety of cheeses. Others have fresh fruit, cured meats, fresh herbs, hard cheeses.
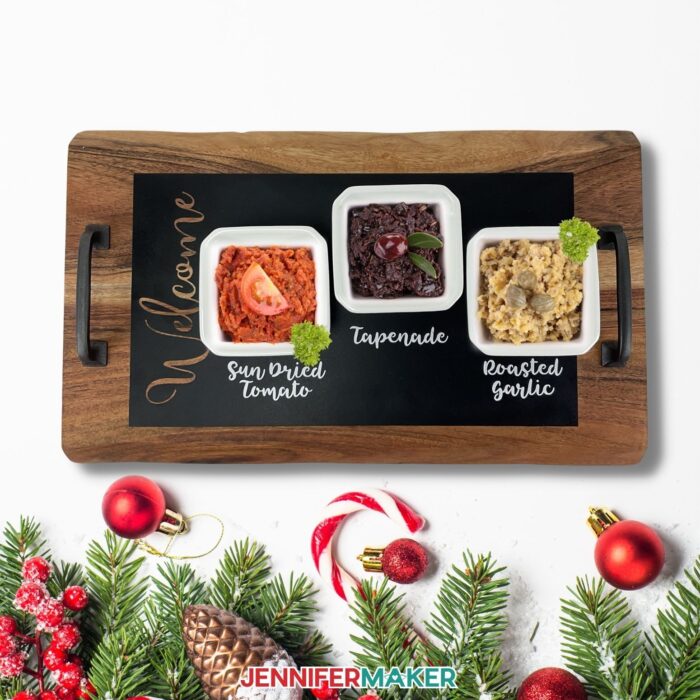
If you are hosting a special occasion, such as a birthday or holiday, add your favorite things to your charcuterie board and it’s sure to be a big hit!
Here’s a supply list of what you need to make your charcuterie boards! This post contains some affiliate links for your convenience (which means if you make a purchase after clicking a link I will earn a small commission but it won’t cost you a penny more)! Read my full disclosure policy.
Materials to Make DIY Charcuterie Boards
View my Amazon shopping list with the exact items we used to make this project
- One (1) Wood Cutting Board 15″ x 9″
- Two (2) Brass 3” Handles
- Chalkboard Vinyl (6.5″ per decal)
- Transfer Tape (7″ per decal)
- (Optional) Chalk Pen, Cricut Removable White Vinyl, Ceramic Bowls, Chalk
- (Optional) Fonts (I used Adinda Font and Tingler Script Font)
- A method to cut your vinyl decals, (I used the amazing Cricut Maker 3 but you can also use the Cricut Maker, the Cricut Explore 3 or the Cricut Explore — you can use the standard fine point blade for this project)
- StandardGrip Cutting Mat 12″ x 12″
- Weeding Tools
- XL Scraper
- Drill
- Dewalt Drill Bit Set
- Design #338 – My free SVG/PDF/DXF design files are available in my free resource library get the password by filling out the form at the bottom of this page)
How to Make Your Own DIY Charcuterie Boards
The detailed step-by-step assembly video on how to create these personalized vinyl letter decals was broadcast during Maker Academy Weekend 2021. Get a pass to watch all 20+ workshops, each with a printable handbook, transcript, audio files, design files, and support with a VIP pass below:

Charcuterie Trays
Entertaining is fun with this gorgeous customizable serving tray!
Materials
- One (1) Acacia Cutting Board 15" x 9"
- Two (2) Franklin Brass 3” Handles
- Cricut Chalkboard Vinyl (6.5" per decal)
- Cricut Transfer Tape (7" per decal)
- Chalk Pen (Optional)
- Cricut Removable White Vinyl (Optional)
- Ceramic Bowls (Optional)
- Chalk (Optional)
- Adinda Font
- Tingler Script Font
- Design #338 (My free SVG/PDF/DXF design files are available in my free resource library - get the password by filling out the form at the bottom of this page)
Tools
- A method to cut your vinyl decals, I used the amazing Cricut Maker 3 but you can also use the Cricut Maker, the Cricut Explore 3 or the Cricut Explore — you can use the standard fine point blade for this project
- StandardGrip Cutting Mat 12" x 12"
- Cricut Weeding Tools
- Cricut XL Scraper
- Drill
- Dewalt Drill Bit Set (3/8", 5/32" and 5/64")
Instructions
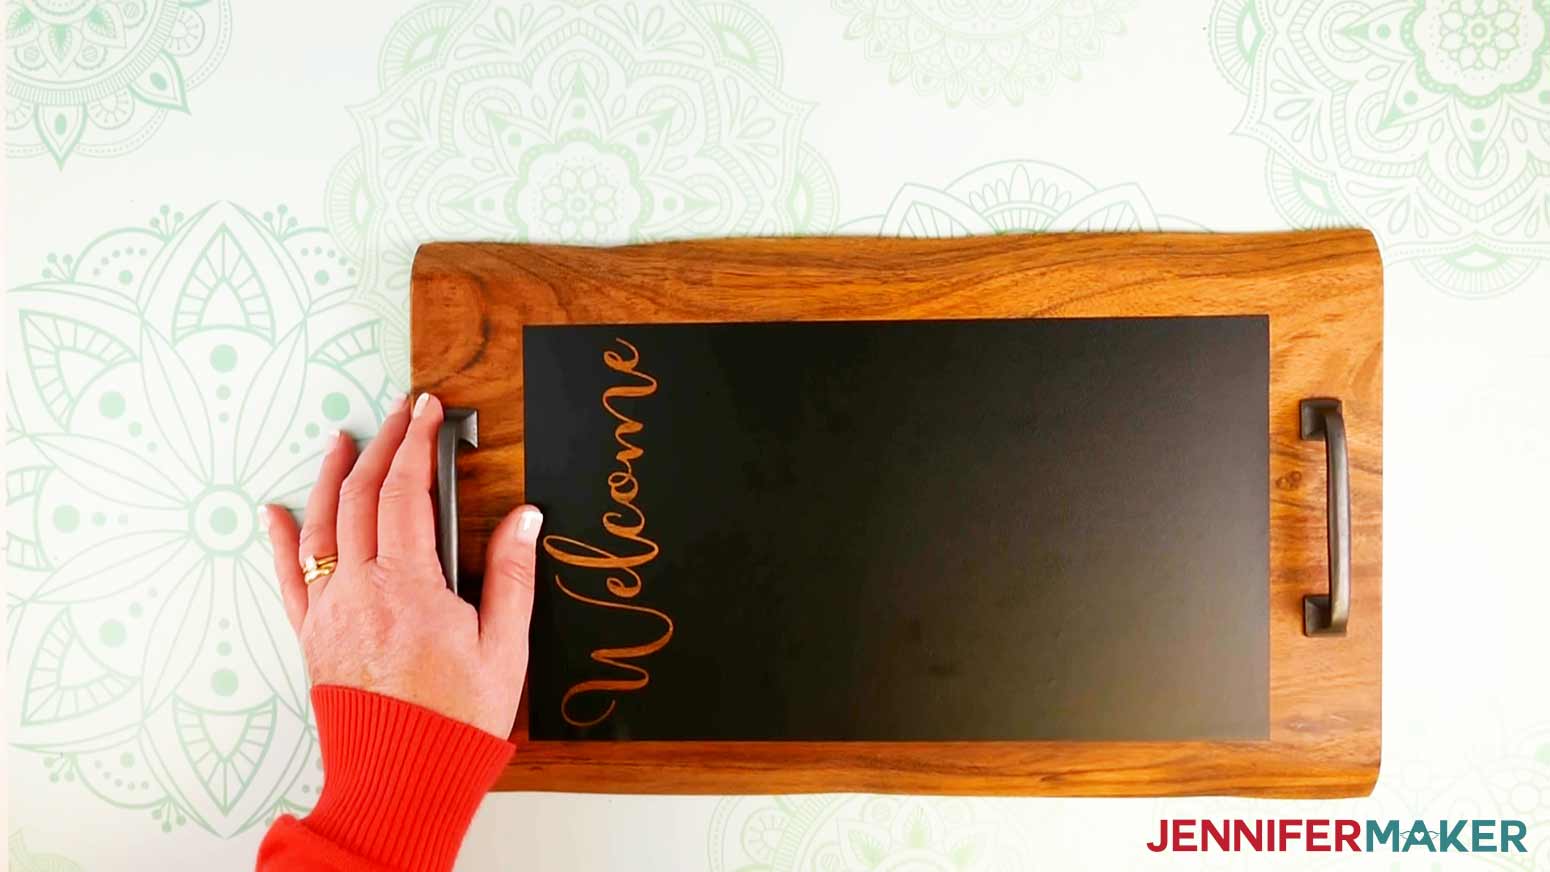
These chalkboard and Acacia wood Charcuterie Trays are perfect for entertaining. I made several chalkboard decal designs — a grapevine, an olive branch, snowflakes and some holly sprigs — that are ready to cut. I also included a blank template, and I’ll show you how to personalize it, I’m going to add “Welcome” to my sign, but you can add any word you want, like “Congrats” or something else in case you’re celebrating a new home, anniversary or other special event. You can handwrite labels to describe your charcuterie food items directly on the chalkboard vinyl with chalk or chalk markers, but I’ll also show you how to make faux chalk labels in case you don’t have the best handwriting! These Charcuterie Trays measure approximately 15" x 9" and are decorated with chalkboard decals measuring 11.5" x 6.5".
STEP 1: GET MY FREE CHARCUTERIE TRAYS FILES
The first step is to download my Charcuterie Trays designs and template from my free resource library -- it's design #338.
TIP: If you are not sure how to upload an SVG cut file to Cricut Design Space, watch this helpful video training series I made. If you are on an iPad or iPhone, here is how to download and upload SVG files to the Cricut Design Space app.
This is what my Charcuterie Tray SVG file looks like when it is uploaded to Cricut Design Space.

STEP 2: PREPARE AND CUT YOUR DESIGN
In Design Space, click on "Ungroup" to ungroup everything.
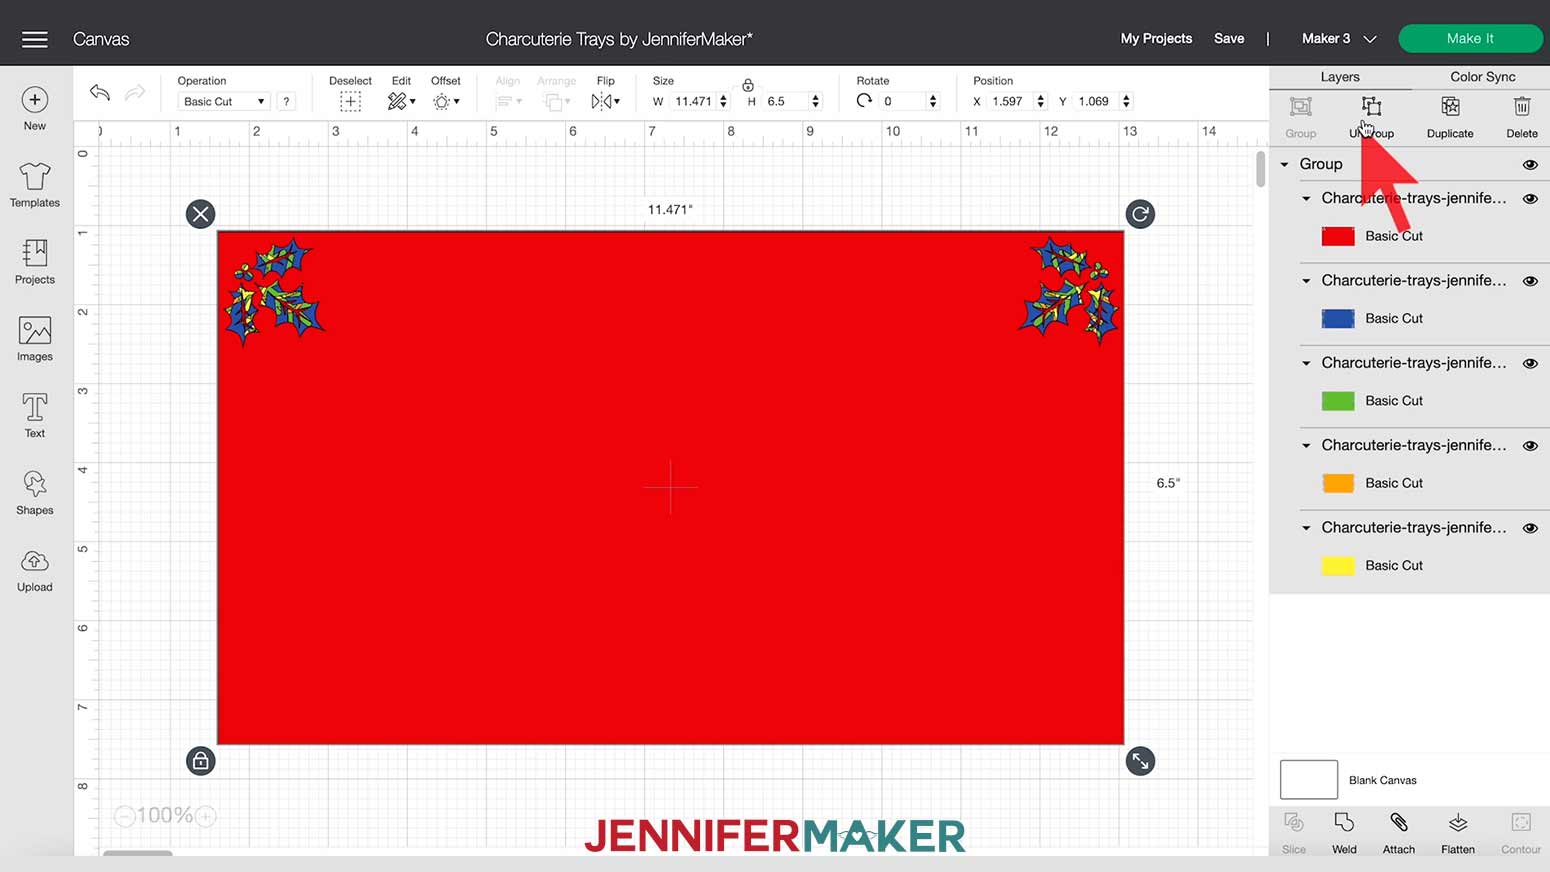
The holly, snowflake, grapevine, and olive branch designs are ready to cut. The last YELLOW layer is a template so you can make your own decal with a custom design or word. I will show you how I made a “Welcome” chalkboard decal.
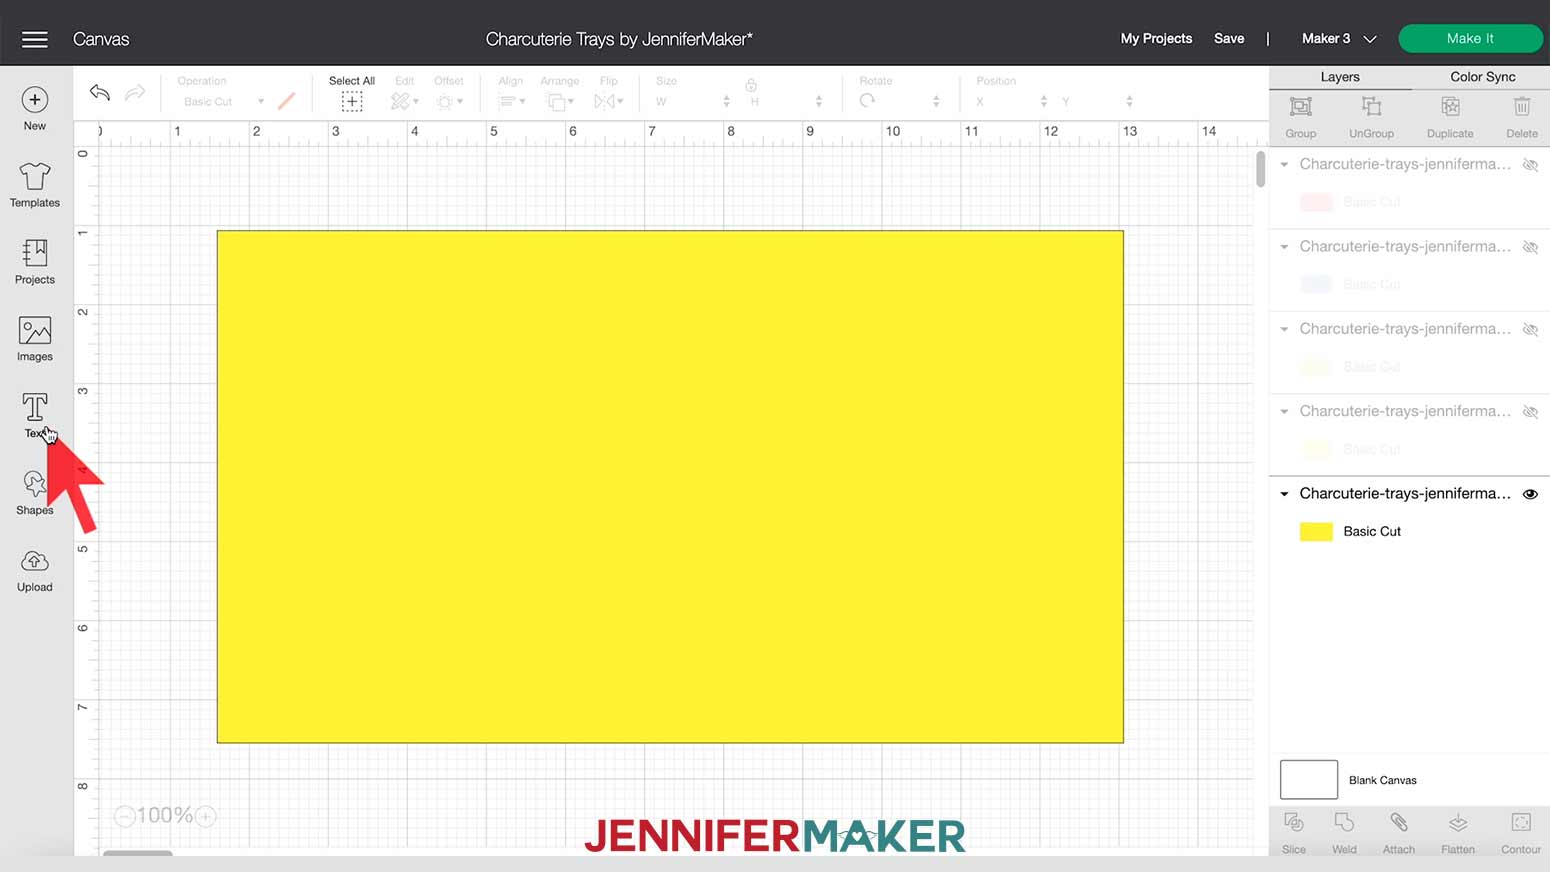
First, hide or delete the designs you don't want. You can do this by selecting the design layer and deleting it or clicking on the eye icon to the right of layer to hide it. Keep the YELLOW layer for this tutorial.

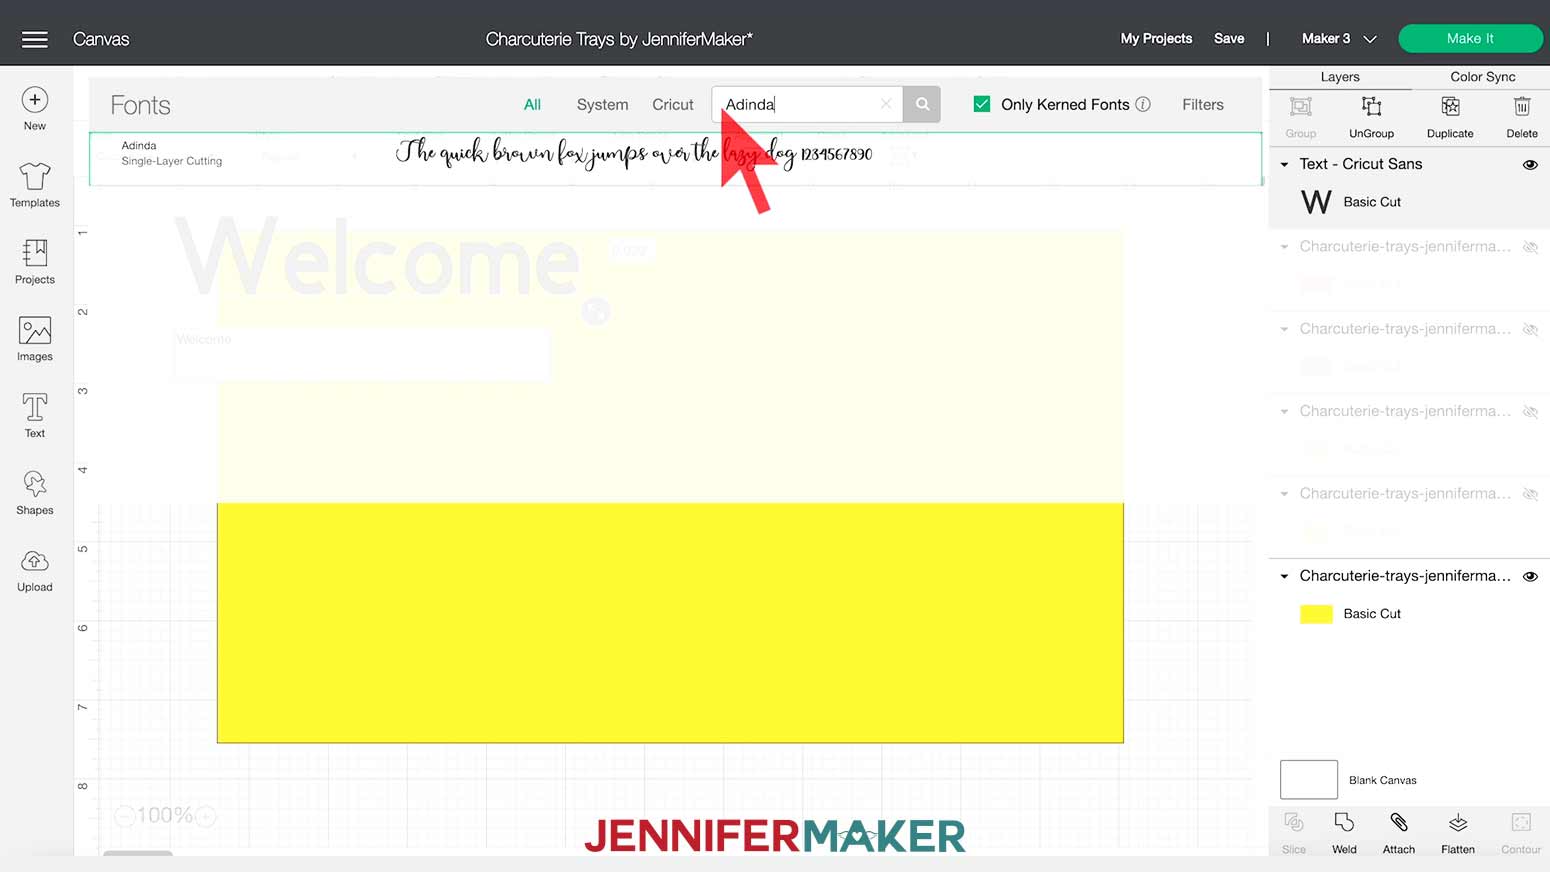
Next, select the "Text" tool in the tools panel on the left side of the canvas.
I typed “Welcome” in the box and selected Adinda for the font. But you can write anything and use whatever font you'd like.
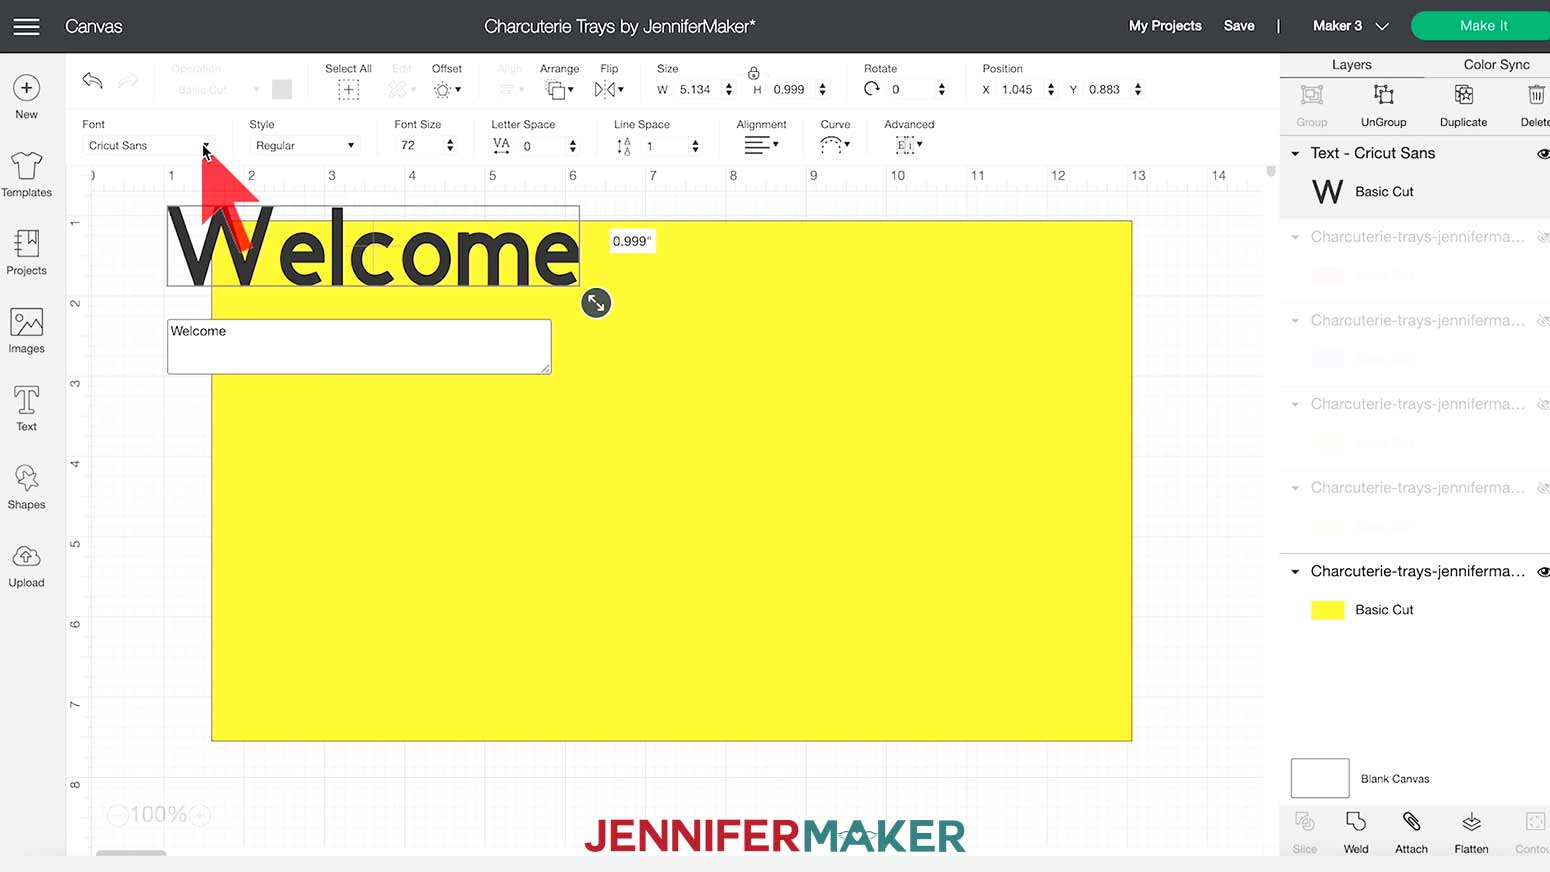
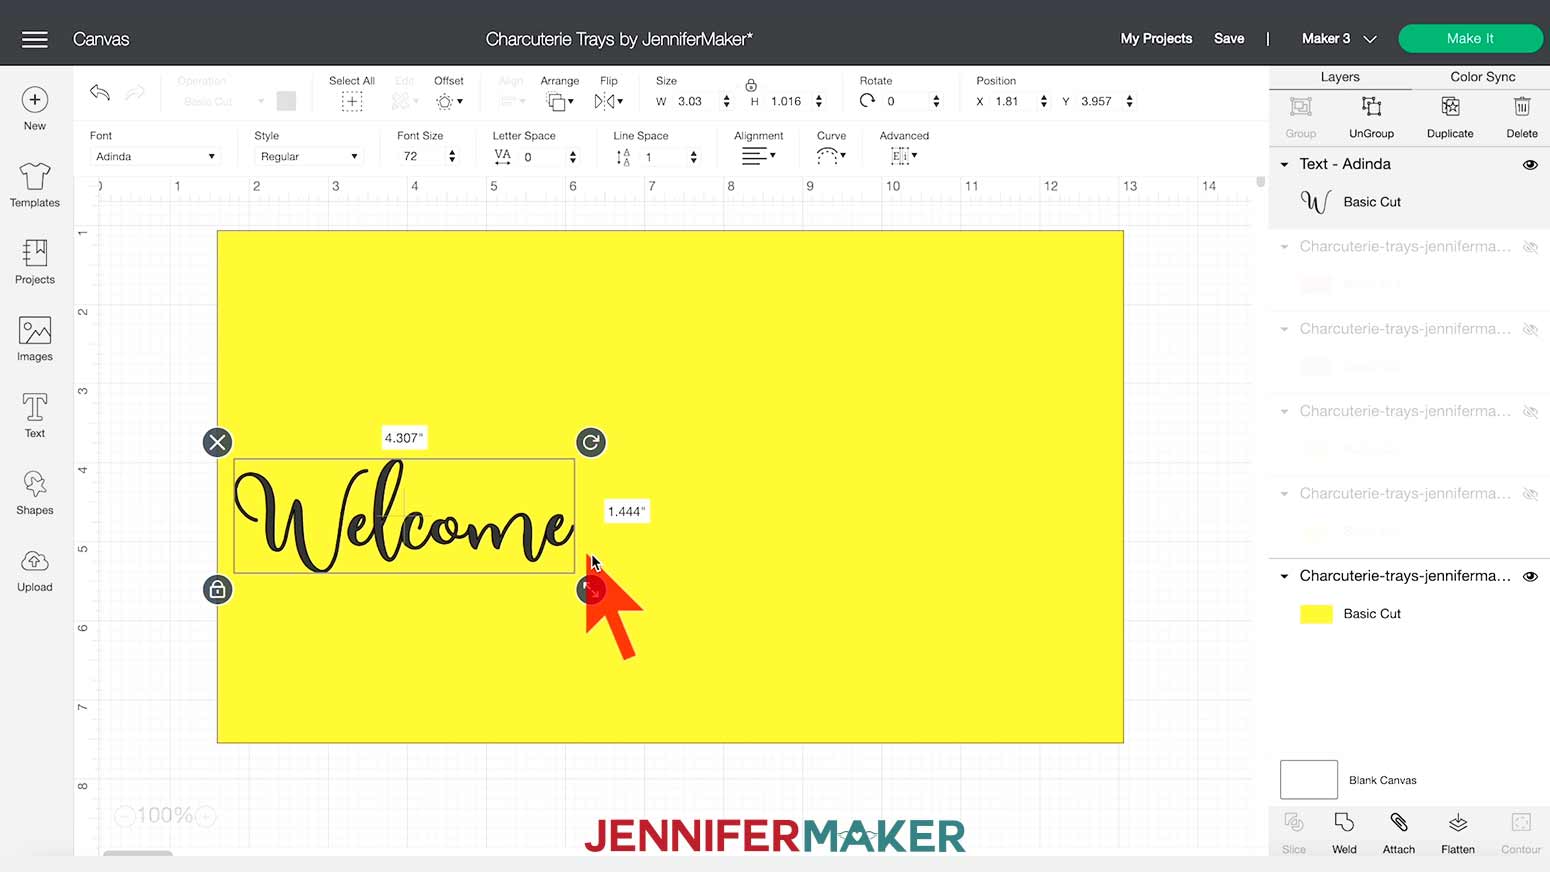
Change the size of the text by clicking and dragging the resize handle on the bottom right corner of the text box on the canvas.
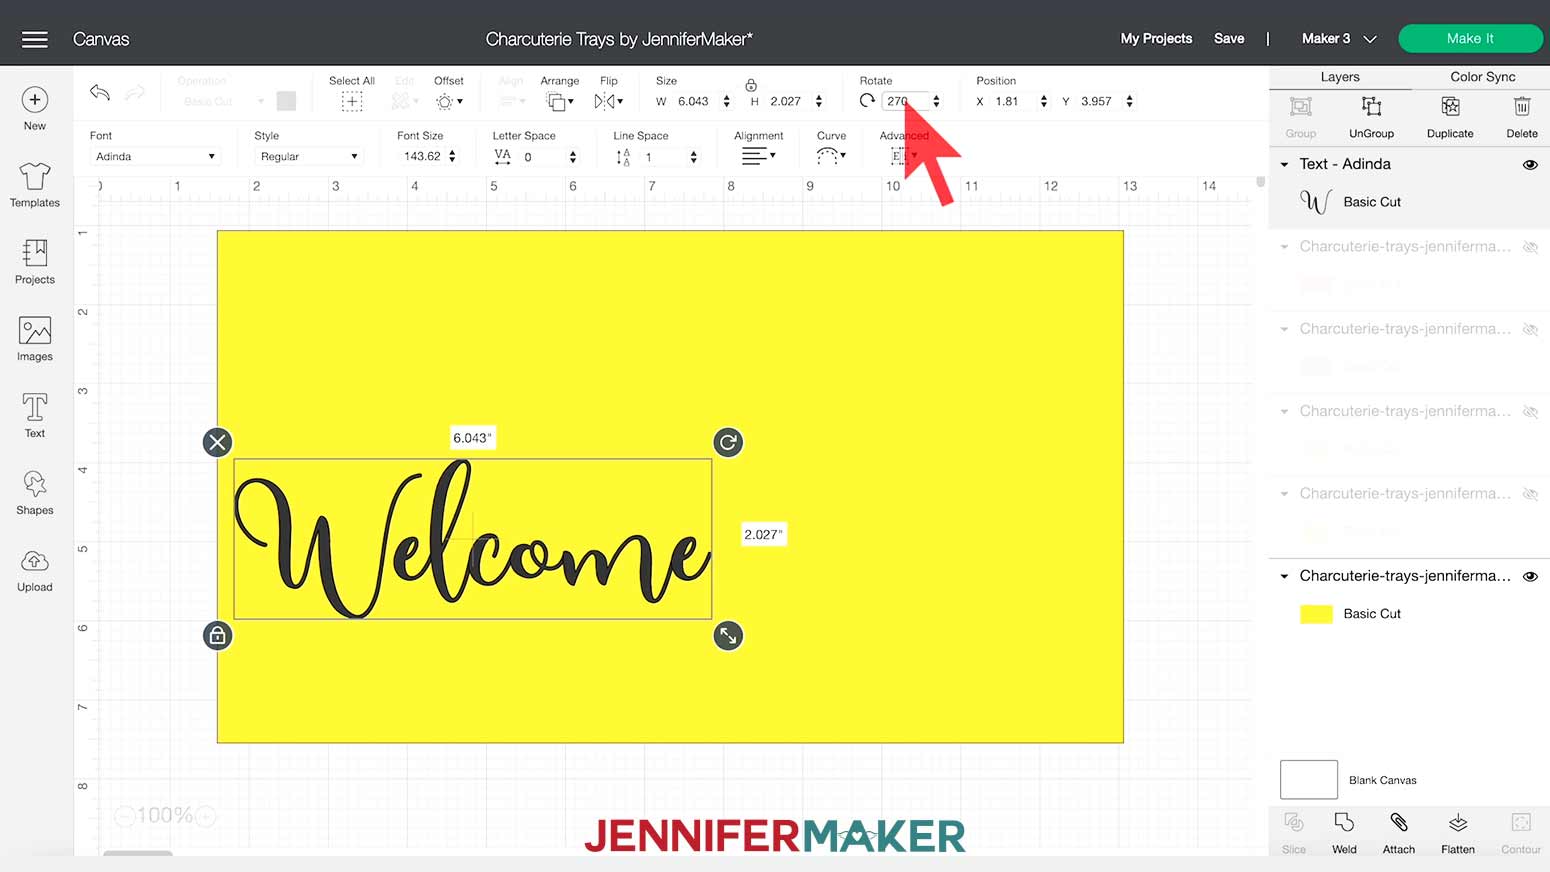
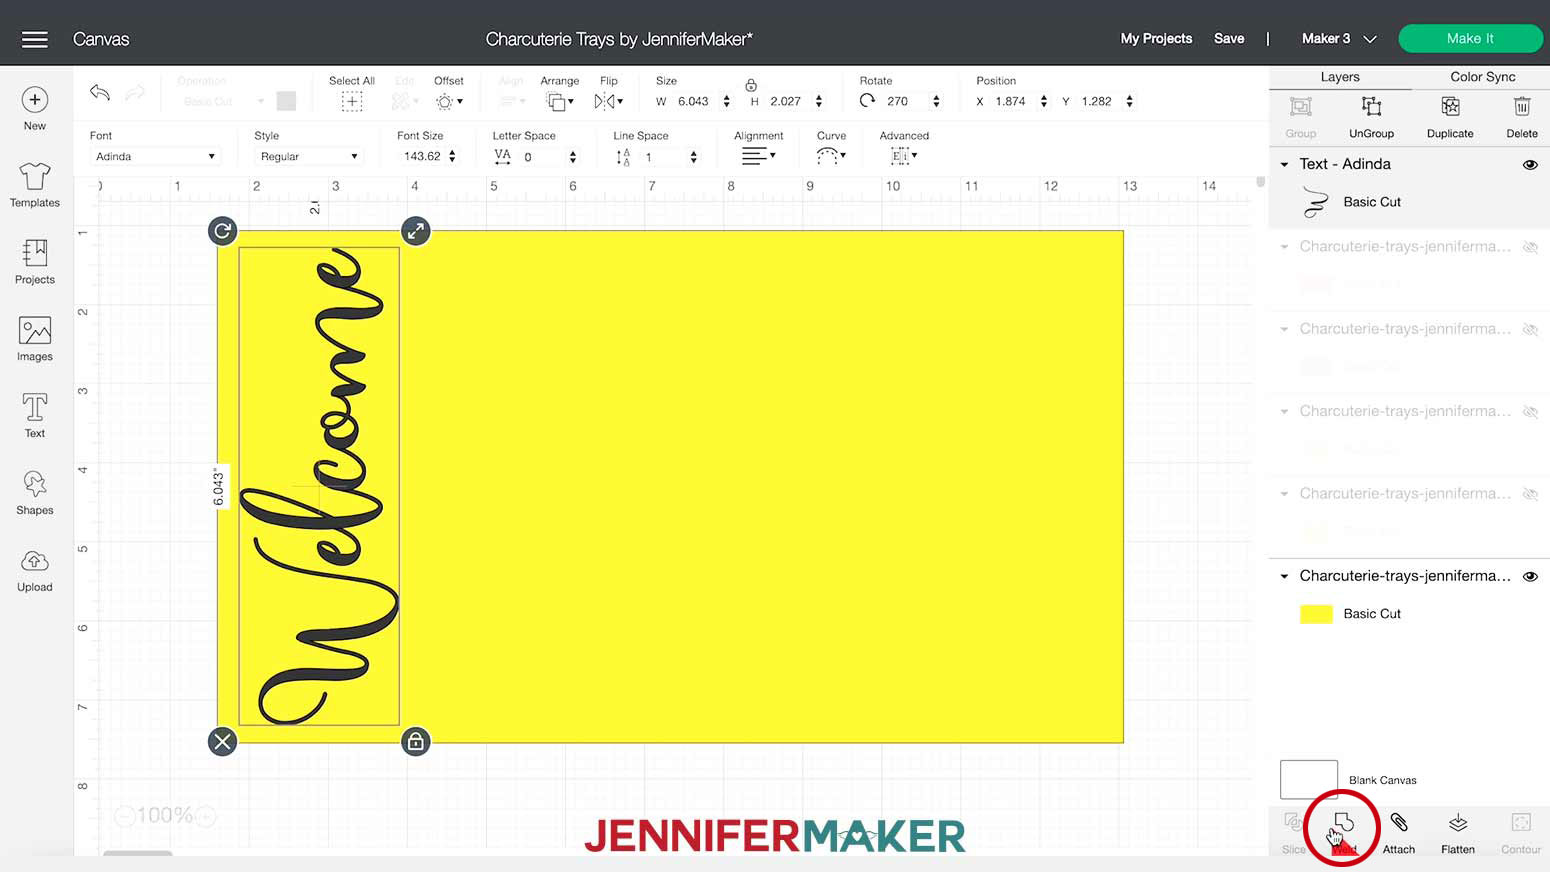
I rotated my text by clicking in the "Rotate" box in the upper menu while my text box layer is selected. I typed 270 to turn the text box so the text runs the length of the short side of the decal template. You can also use the rotate tool on the upper right hand corner of the boundary box around the text to rotate the text, but this way is more precise.
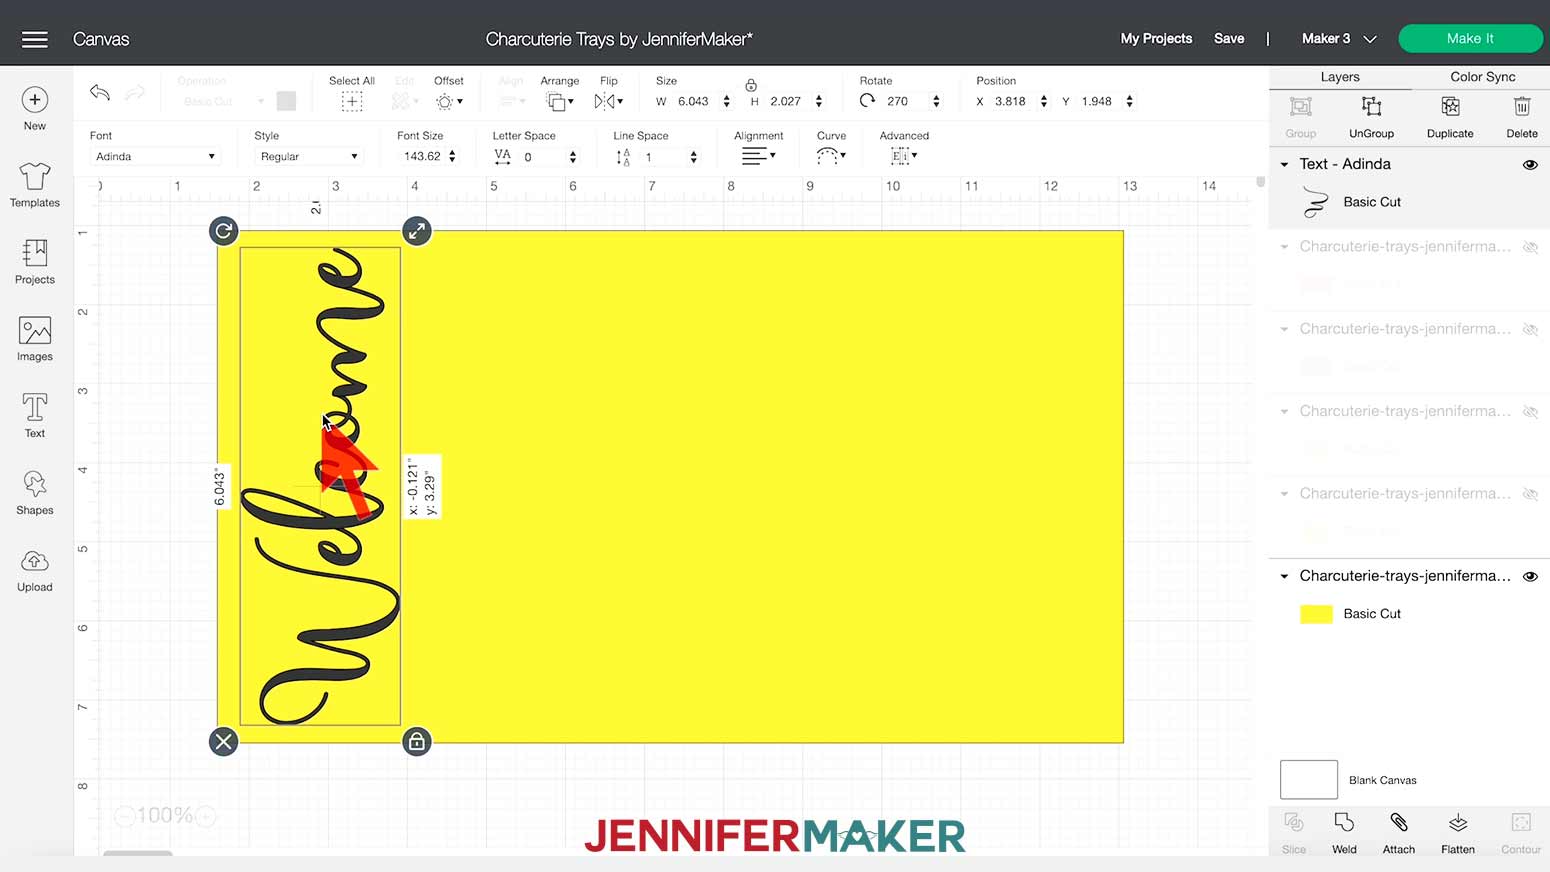
Now, click and drag the text until you have it aligned along the side of the decal template. Keep adjusting the size and location until you’re happy with the placement.
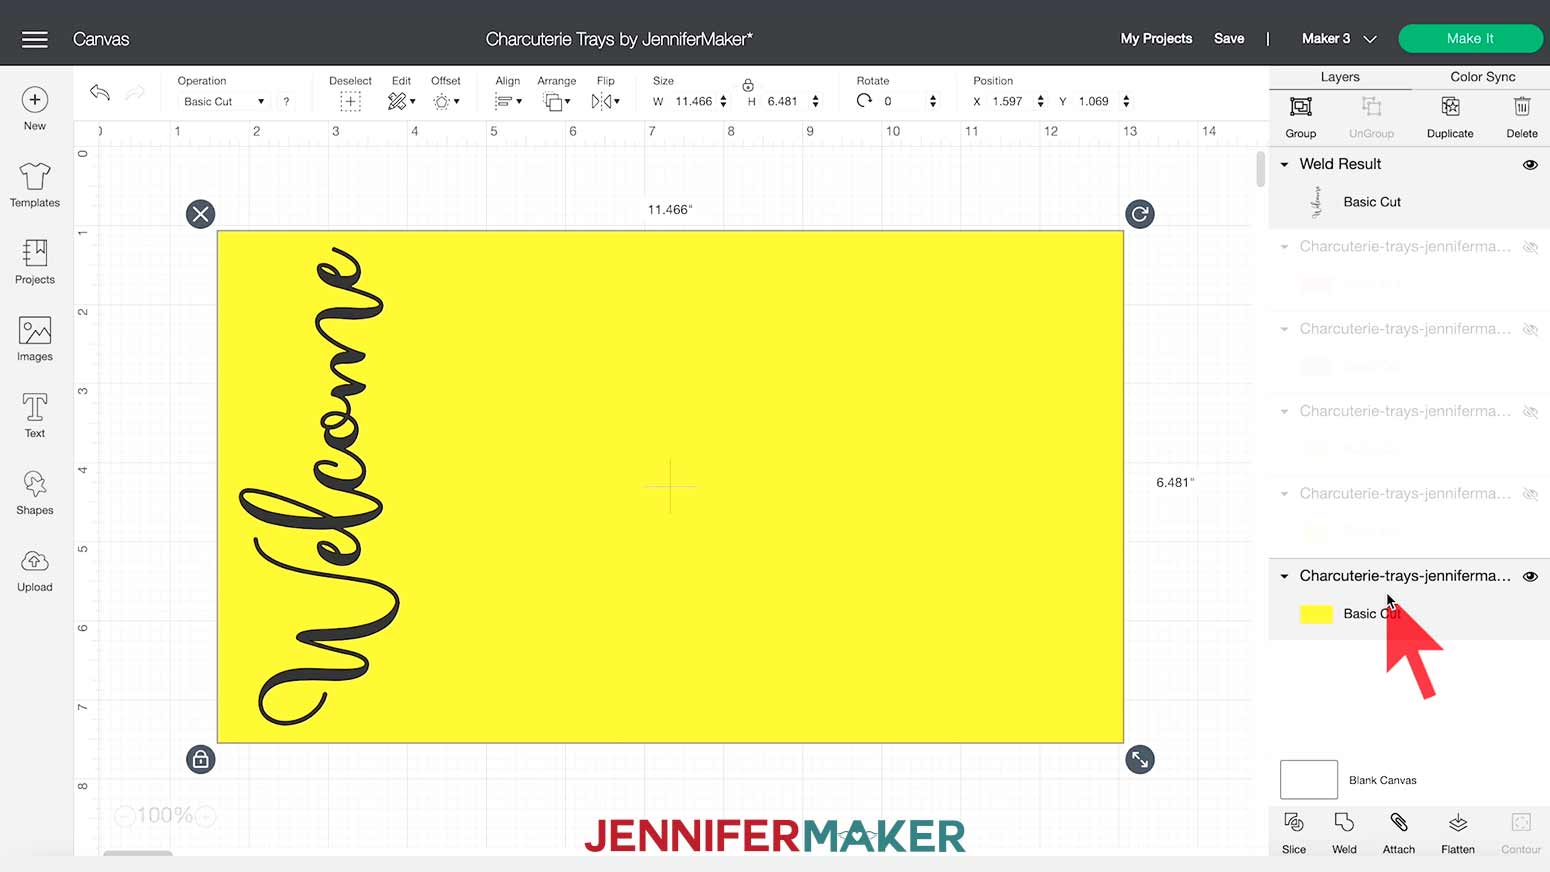
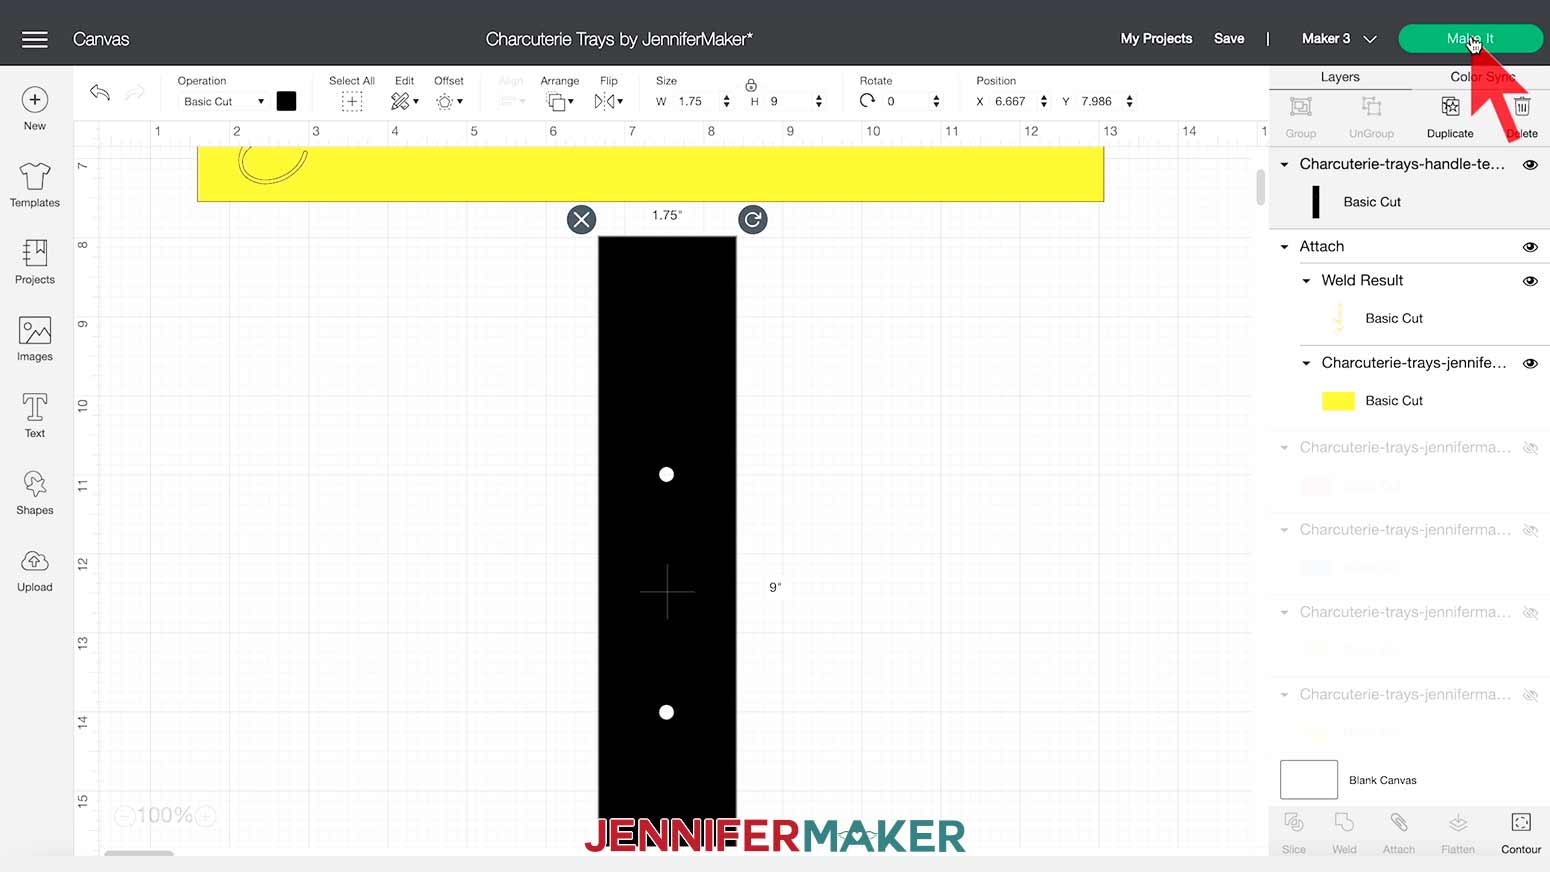
With your text layer still selected, click on "Weld" at the bottom of the Layers Panel on the right side of the canvas. This ensures the word will cut out as a single piece of vinyl and not as individual layers.
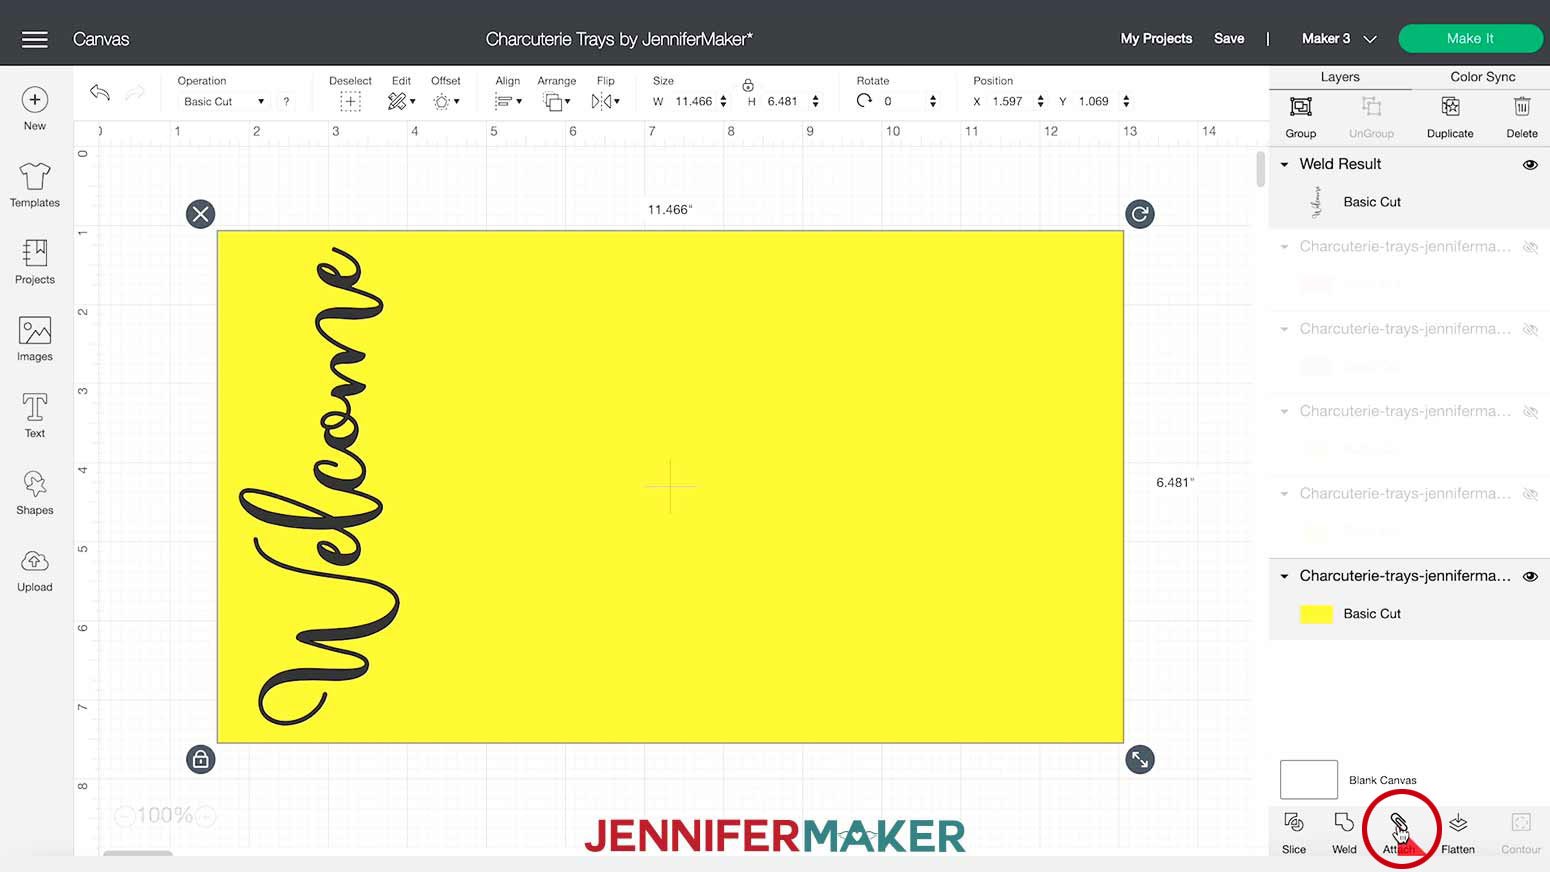
Hold down the Shift key while clicking on both the text layer and the yellow template layer in the Layers Panel on the right side of the canvas.
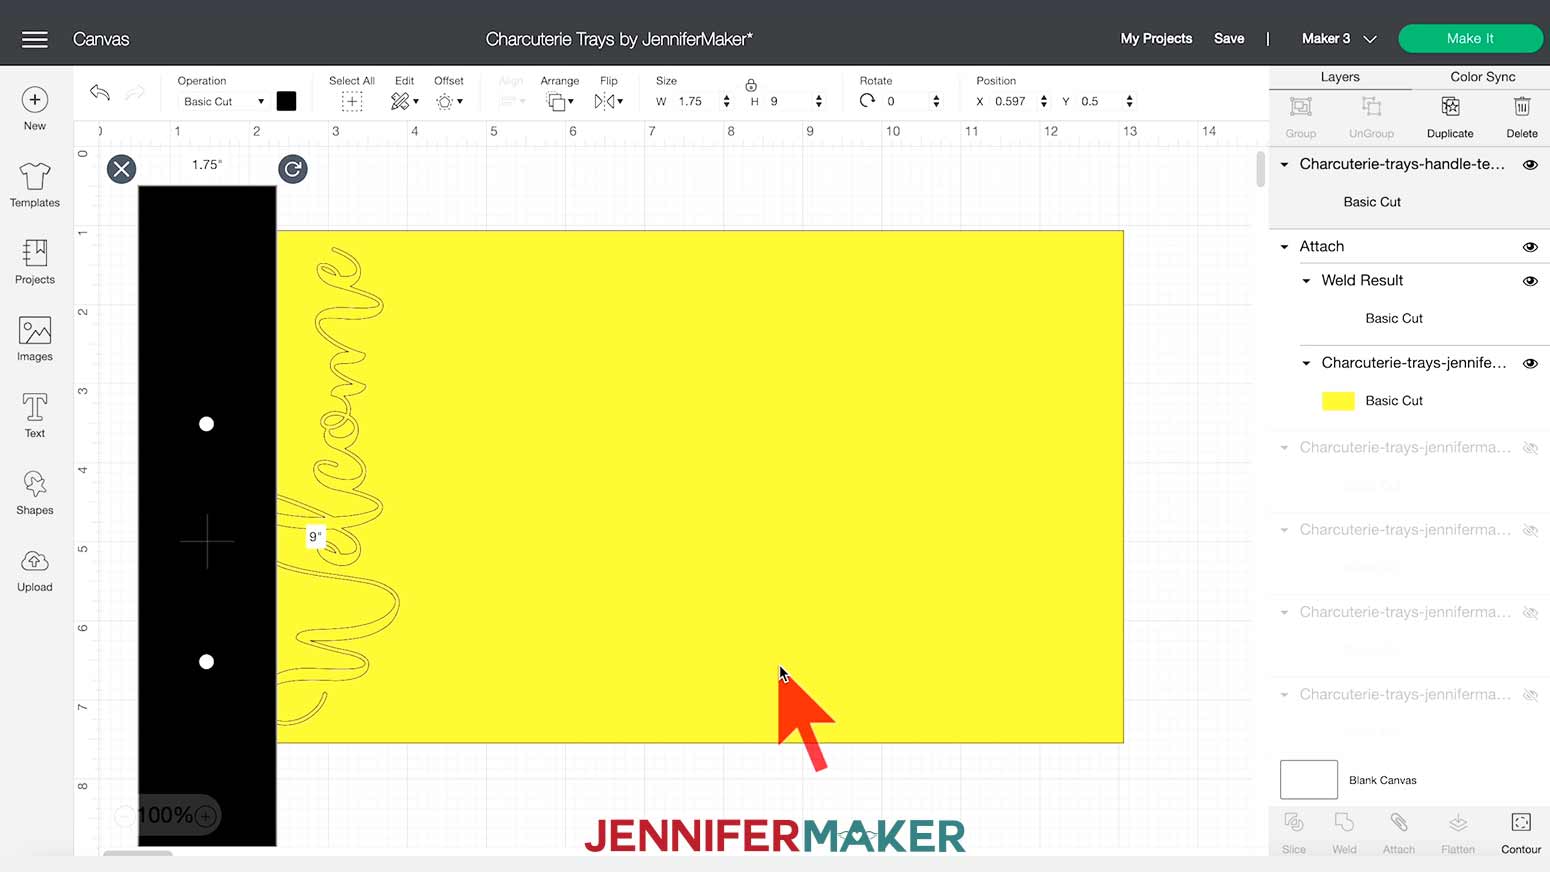
Click "Attach" at the bottom of the Layers Panel. By attaching these two layers, the text will be cut out of the decal vinyl the way I cut my “Welcome” custom chalkboard decal.
Now you have a custom design ready to cut!
TIP: Decide which other designs you’d like to cut, and show any you want by clicking on the eye icon on those layers in the Layers Panel. Also, if you need to resize the decals to fit your particular tray, now is a good time to do that. Select the layer you want to resize and drag the arrow on the lower right corner of the design box on the canvas until it’s the size you want. You can also type the exact dimensions up to where it says "Size." Make sure to click on the lock to unlock it so you can enter exact measurements.
If you are using the same cutting board and handles I am, I also included an SVG file as a template to help determine where to drill the holes for the handle screws. Just import this file in DS the same way you did above. IMPORTANT: You do NOT want to change the size or alter this template in any way.
Once you’re ready to cut, select your machine on the top menu bar and then click "Make It."
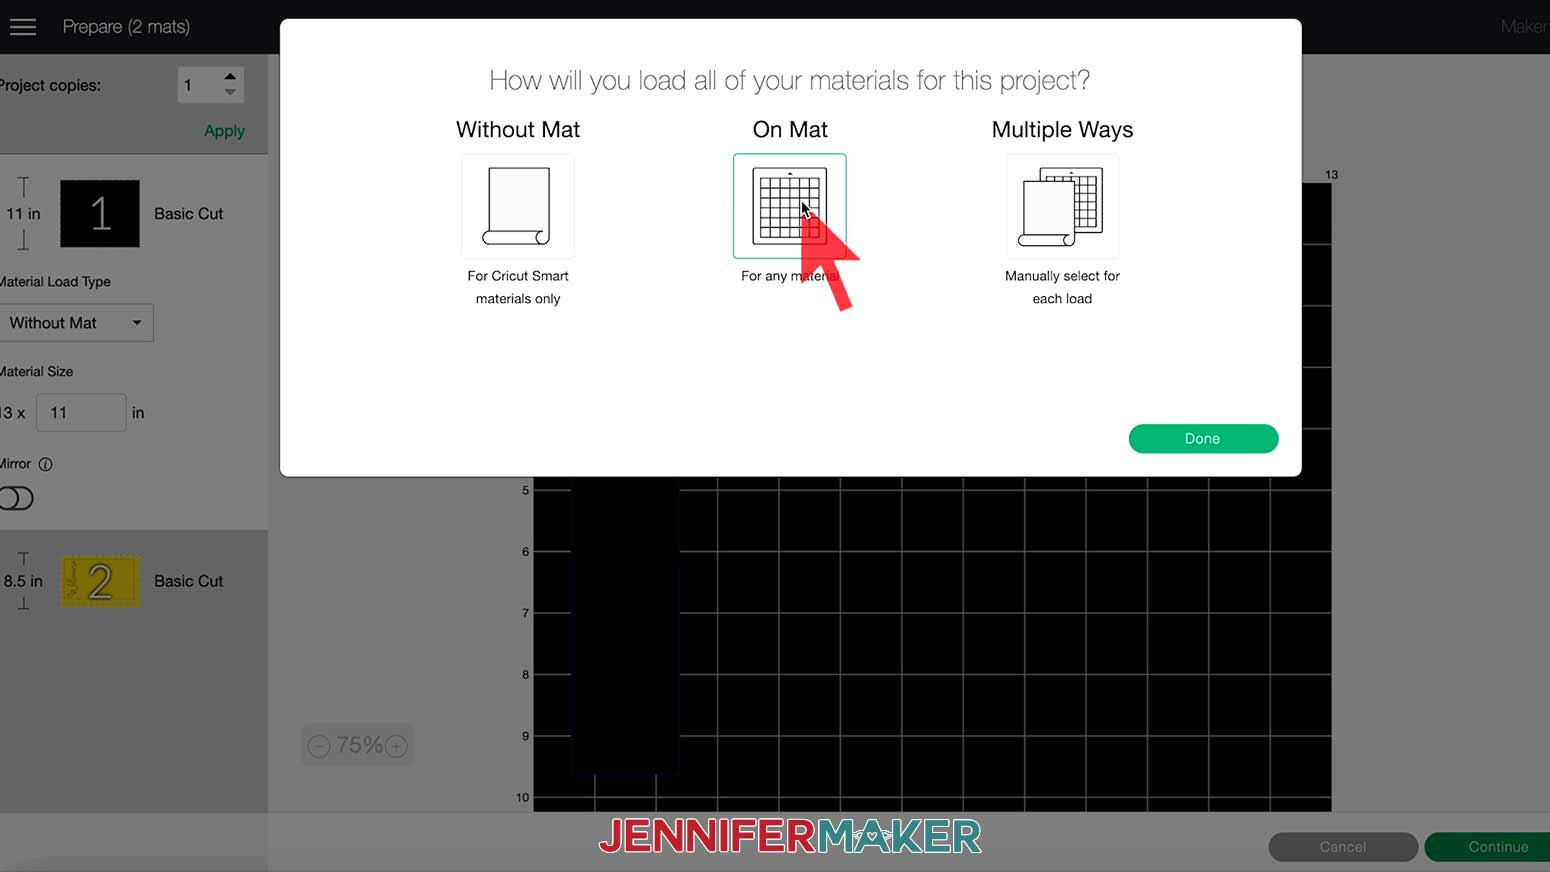
If you’re prompted to select how you want to load your materials, select "On Mat" and click "Done."
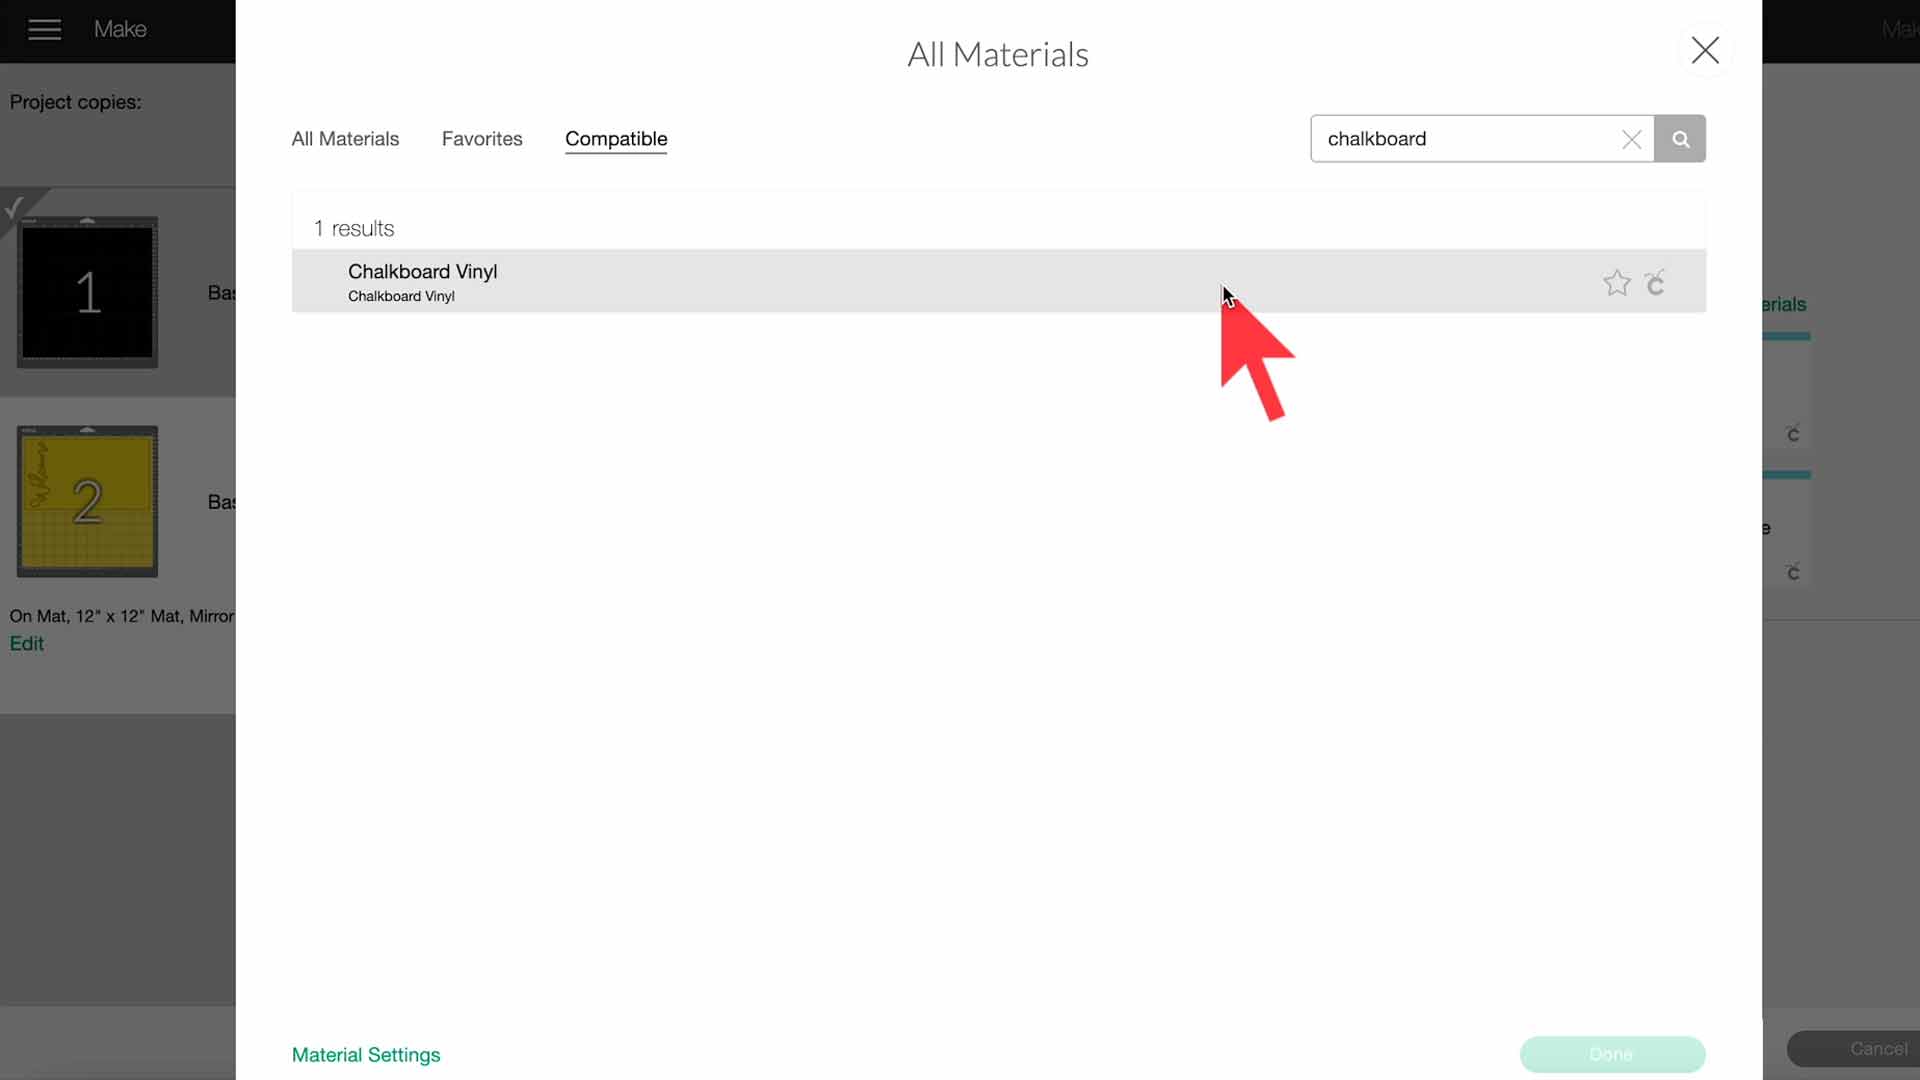
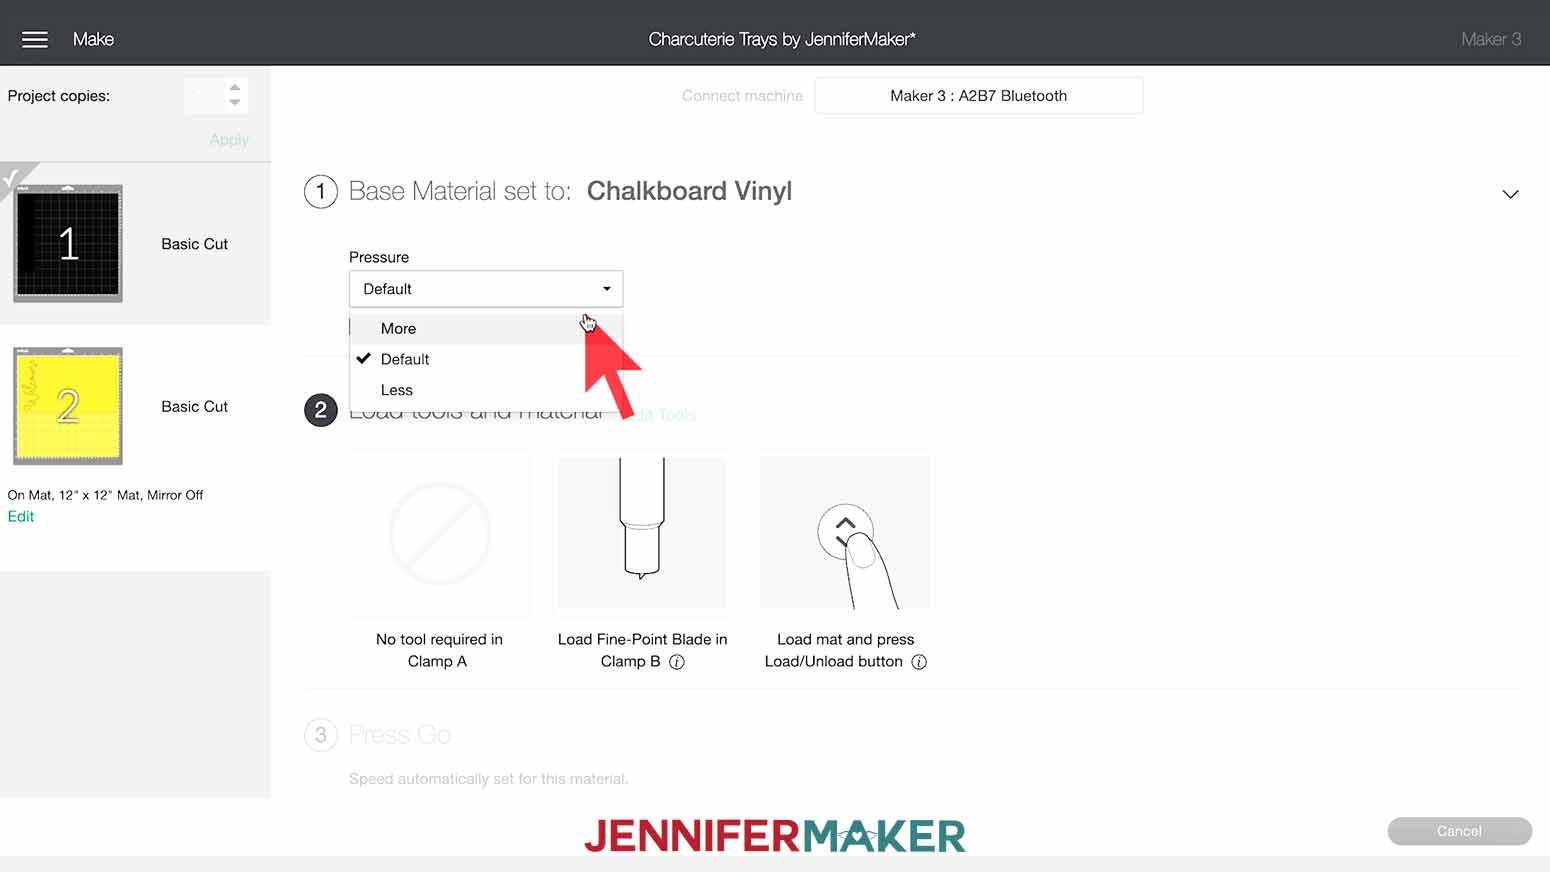
Select your Base Material when prompted. If you are cutting the optional handle template, make sure to select Laser Paper or Copy Paper as your material for that mat. You’ll want to choose Chalkboard Vinyl for the decals. I selected "More Pressure" to ensure a nice clean cut.
Place black Chalkboard Vinyl on a Green StandardGrip Mat. Each design will require a 12 x 7 inch piece of vinyl. If you are cutting the handle template, also place a sheet of Letter sized laser paper on a Blue LightGrip Mat.
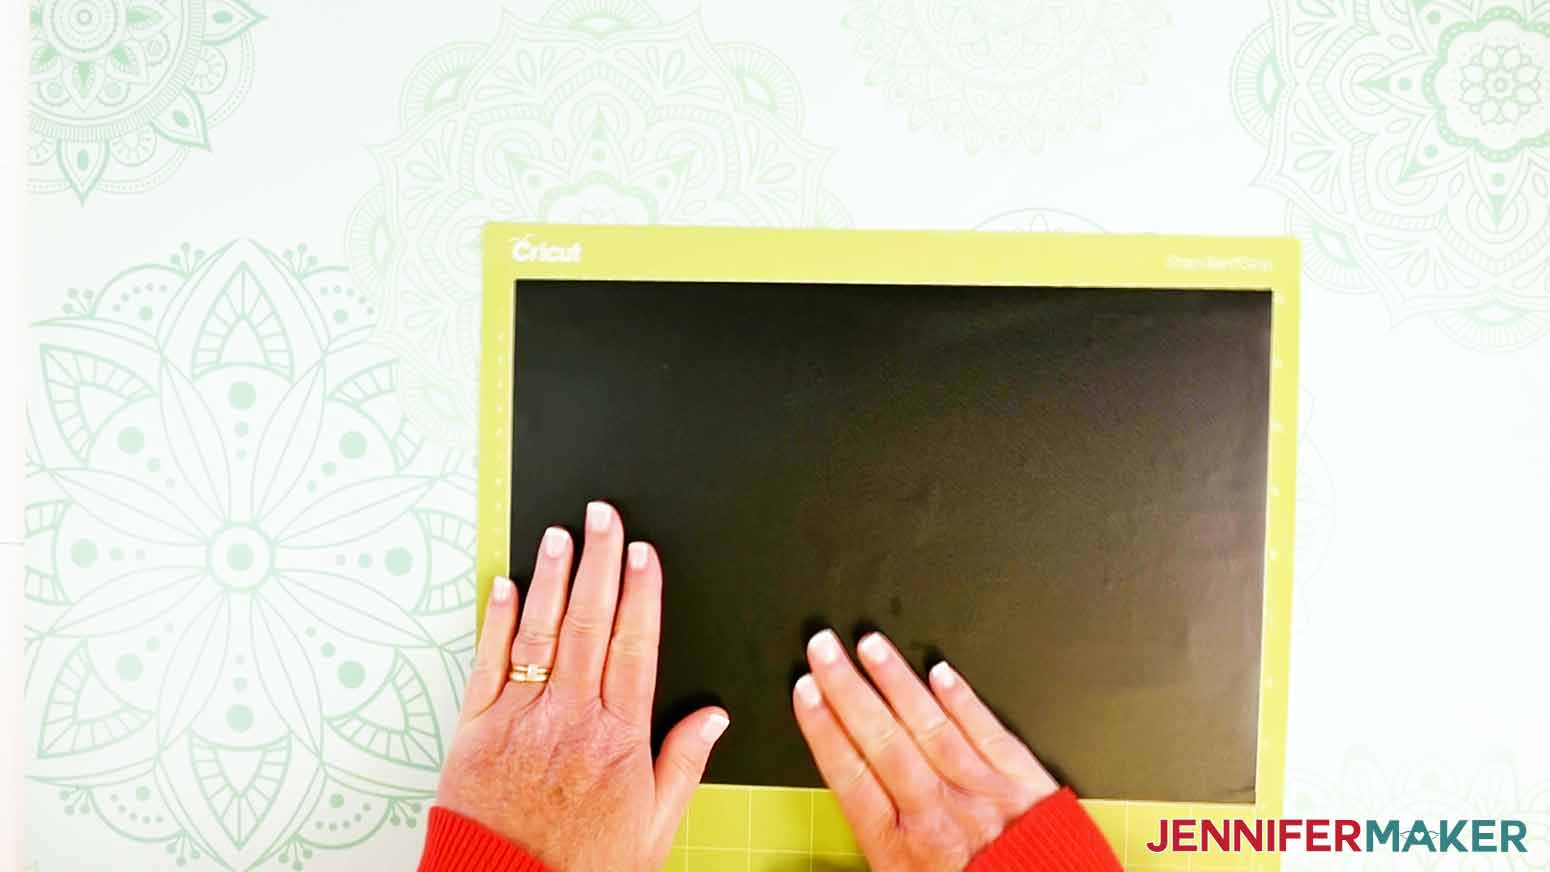
You will be prompted to load your Fine-Point Blade and mats. When you’re all set up, click the flashing Start button.
STEP 3: ASSEMBLE THE CHARCUTERIE TRAYS
Now let's assemble the Charcuterie Tray. First, you’ll want to decide where you’d like to attach the handles on the cutting board or wood slab. If you are using the same handles and cutting board I used, make sure you cut out the template SVG I provided, and use that to help determine where to drill the holes for the screws. Place the paper template FLUSH against the short side of the wood on the UNDERSIDE side of the cutting board. Tape it in place using painters tape. NOTE: The template does not need to be flush against the top and bottom edges. Vertically it can just be centered so your handles will be centered. Here's a helpful guide.
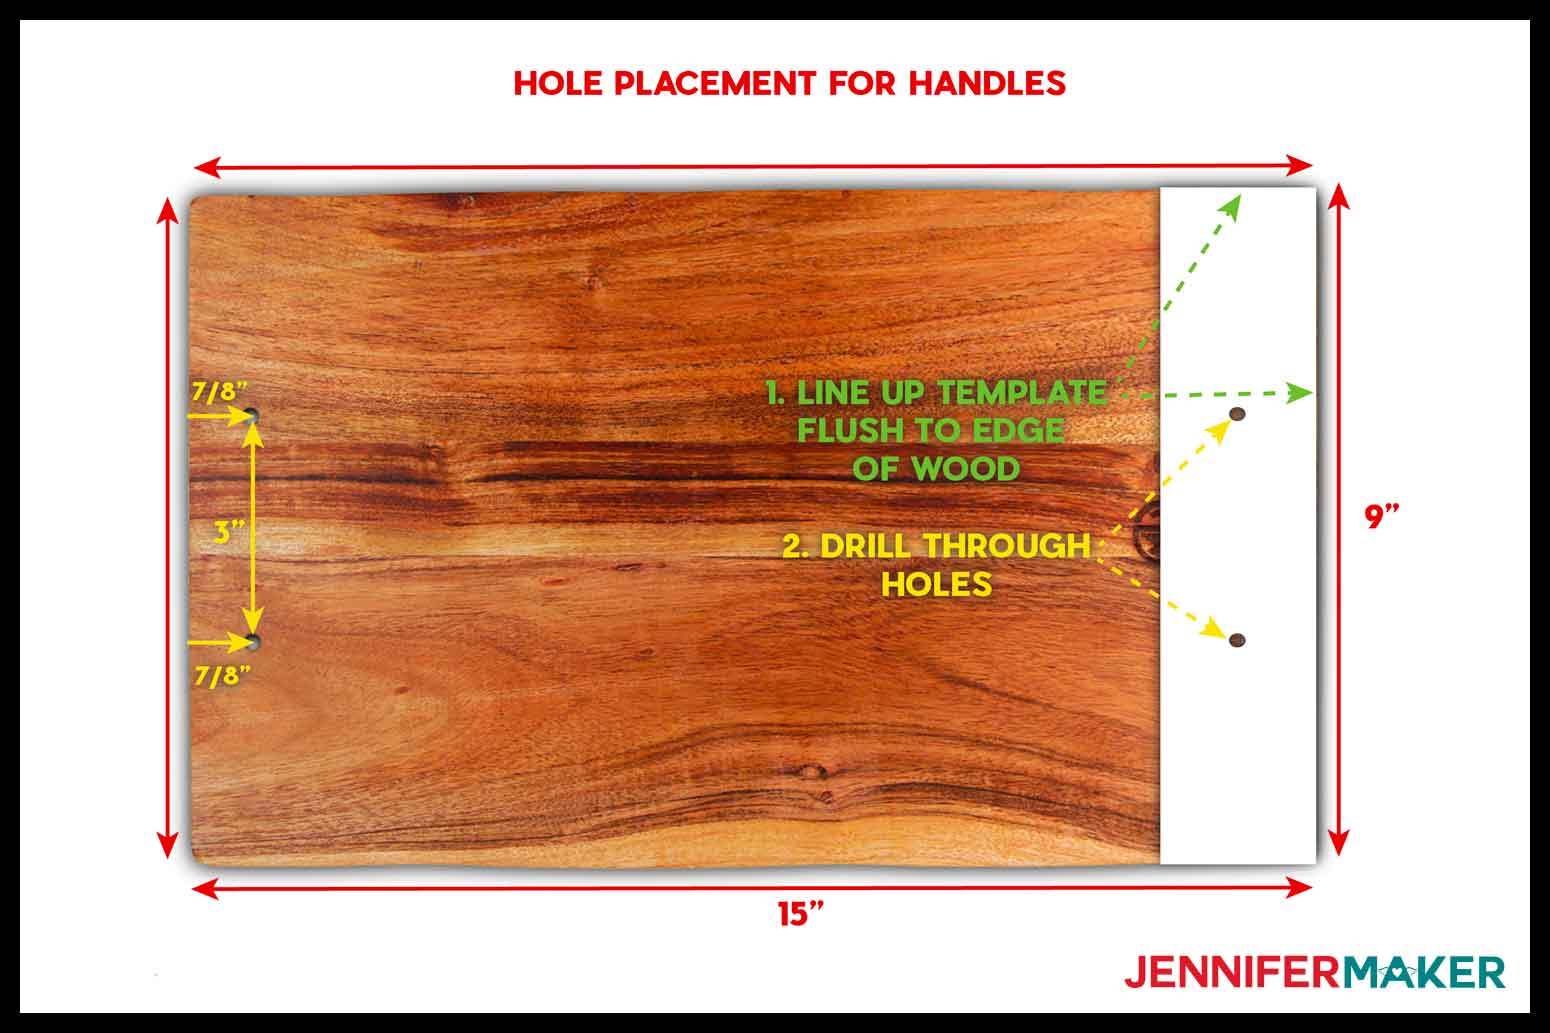
And this is what my tray looks like with the template aligned and taped on the underside of my cutting board.
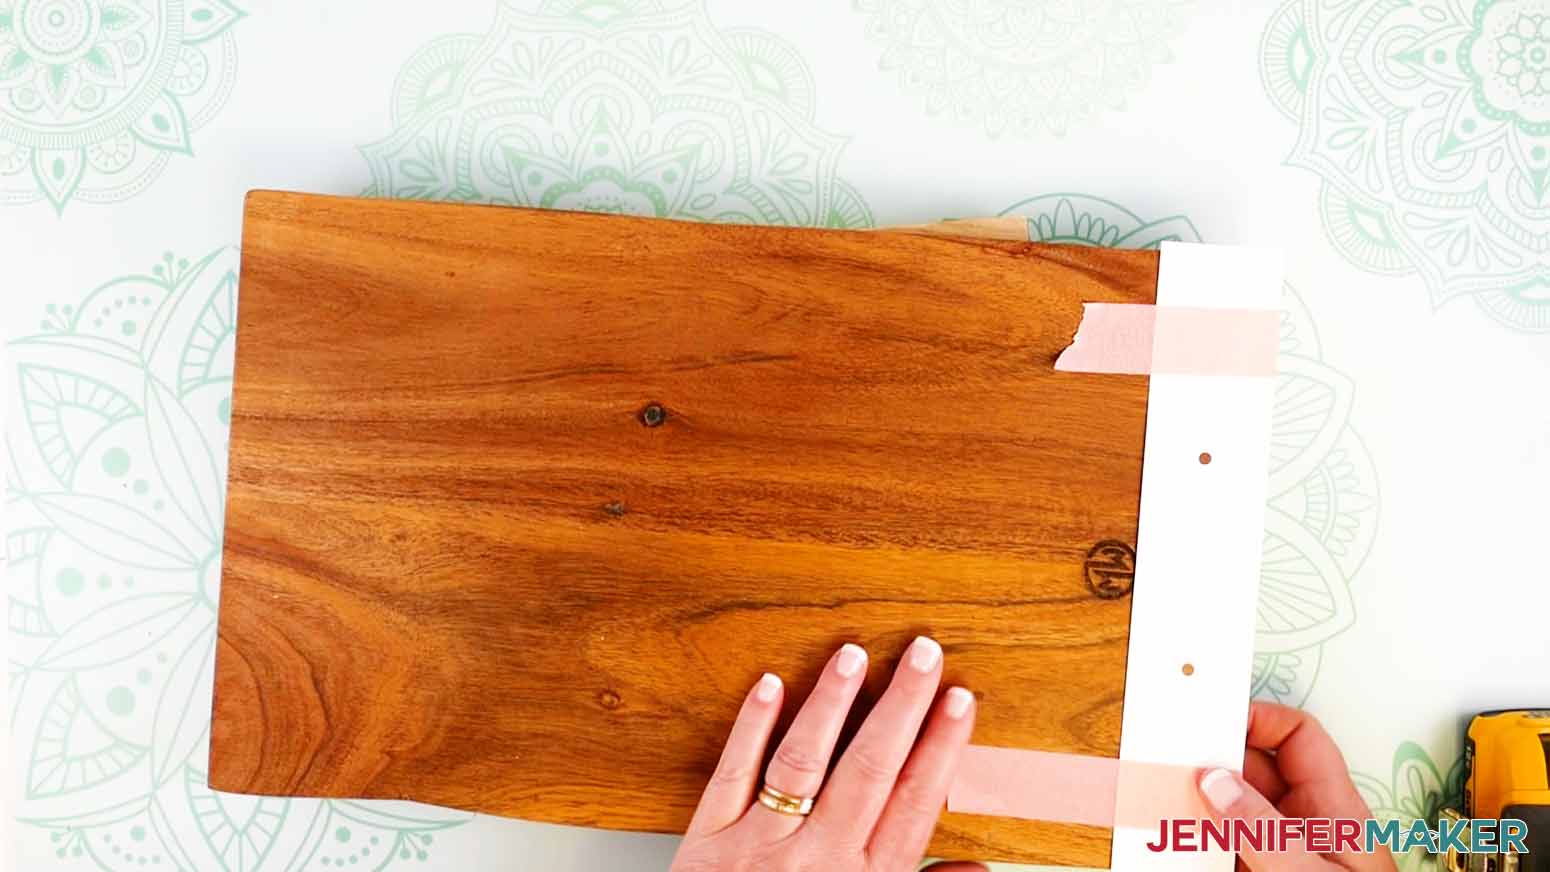
TIP: If you are using a different cutting board or handles, you may want to make a rudimentary template by placing a handle on a piece of printer paper and using a weeding tool to poke a hole from the underside of the paper in the center of each screw hole. Cut out the template and place it on your board to help visually figure out where your holes should be.
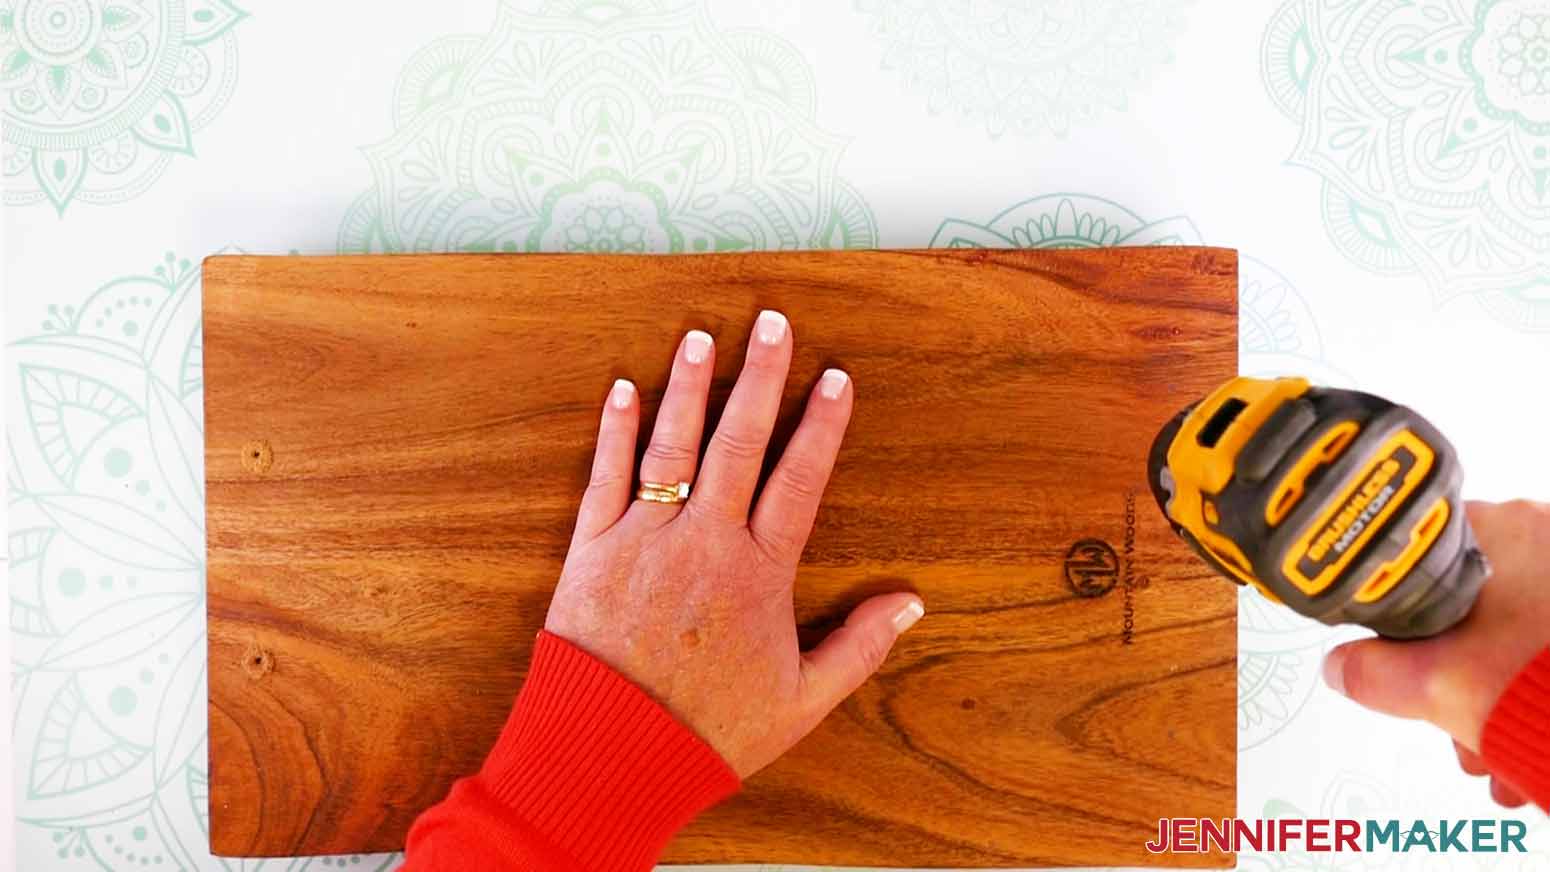
Now, use the pointy end of a small drill bit to indent and mark the wood in the center of each hole in the template. This helps your drill bit go in the right spot.
Once you have indentations marking each hole, move the template to the other side of the board and line it up the same way to mark the holes for the other handle. So again, the template should be flush against the SHORT side. Mark your holes by indenting in the center with a drill bit. Then remove the template.
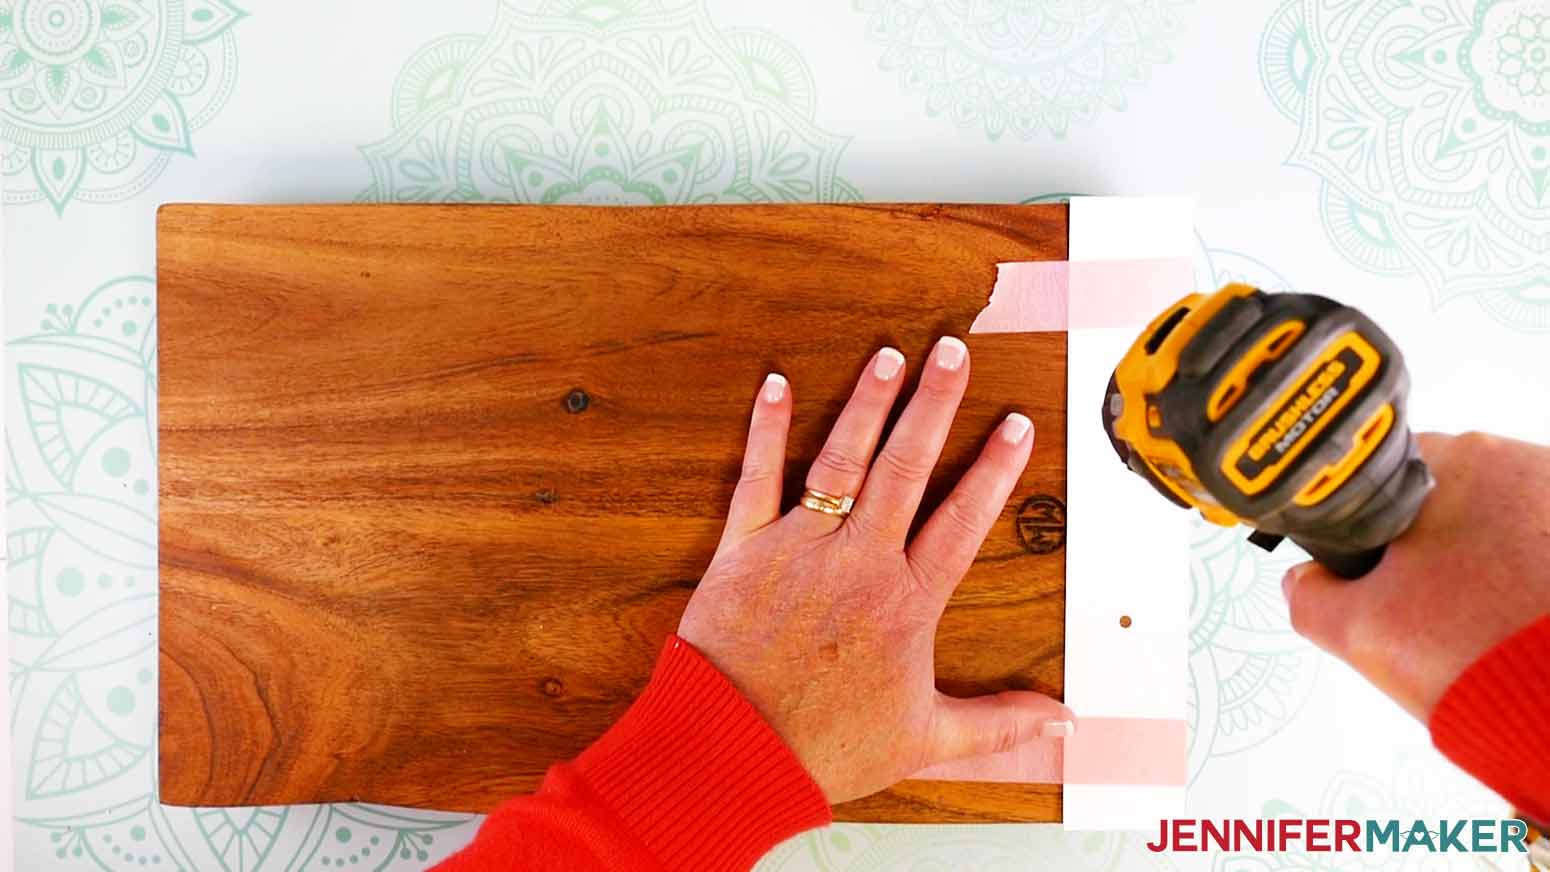
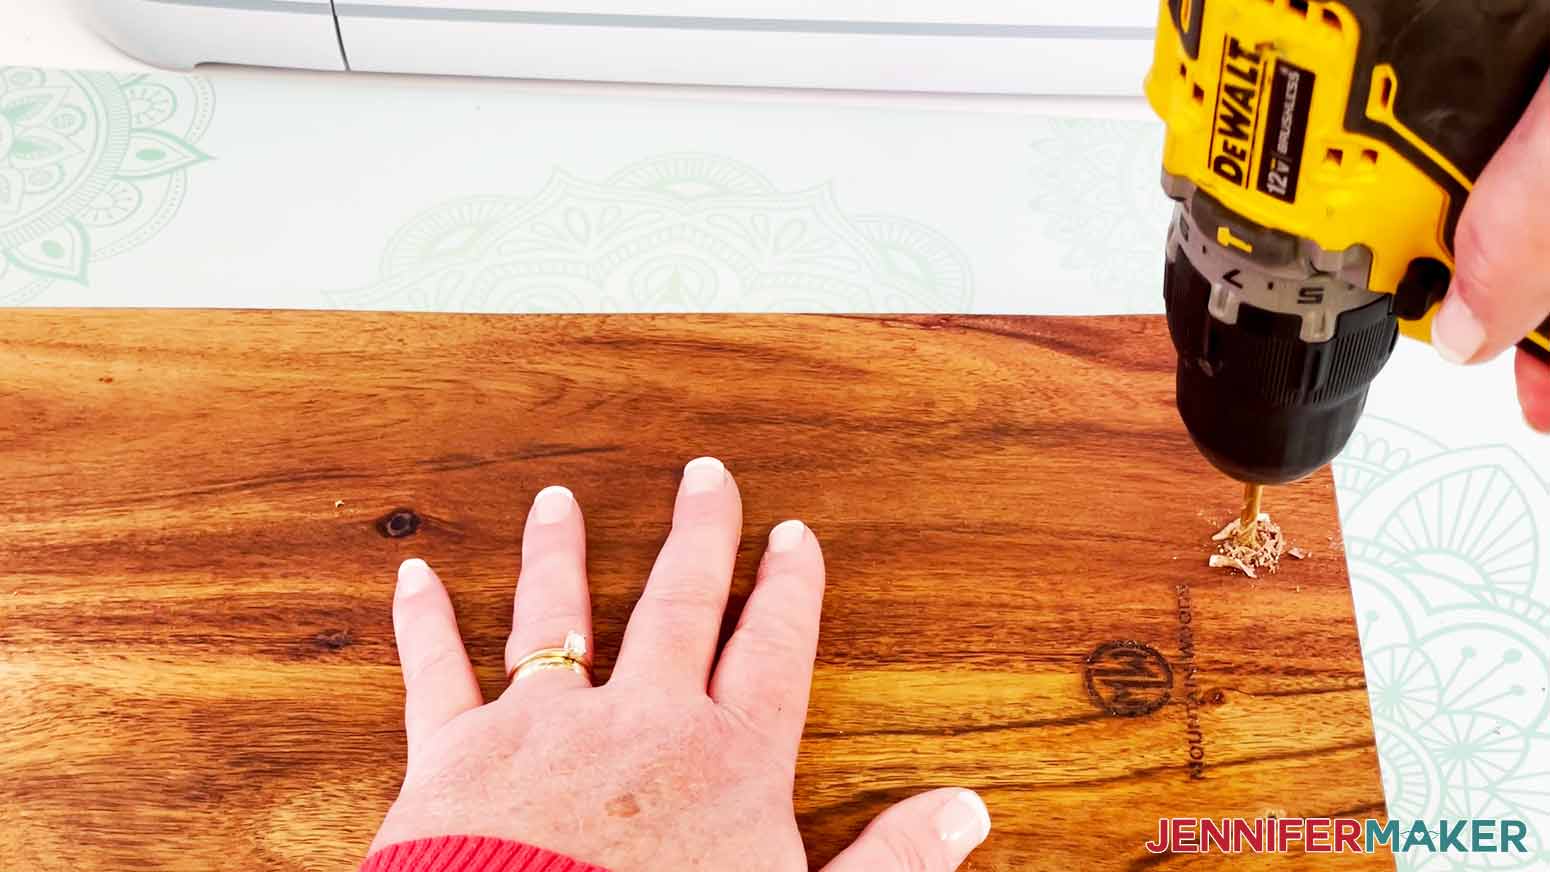
Now that all your holes are marked on the bottom side of the cutting board, remove the template. Load a drill with a bit SMALLER than 5/32” to drill a pilot hole (such as 5/64" or 1/16"). Carefully line up your bit in your indentations and drill all the way through your tray, making sure the bit is aligned in your hole indentations and is straight up and down (not angled).
TIP: If you’re drilling atop a craft table or other surface, be sure to hang the board off the edge so you don’t accidentally drill into your table! Acacia wood is a hard wood, which means it will take some effort and pressure to drill all the way through.
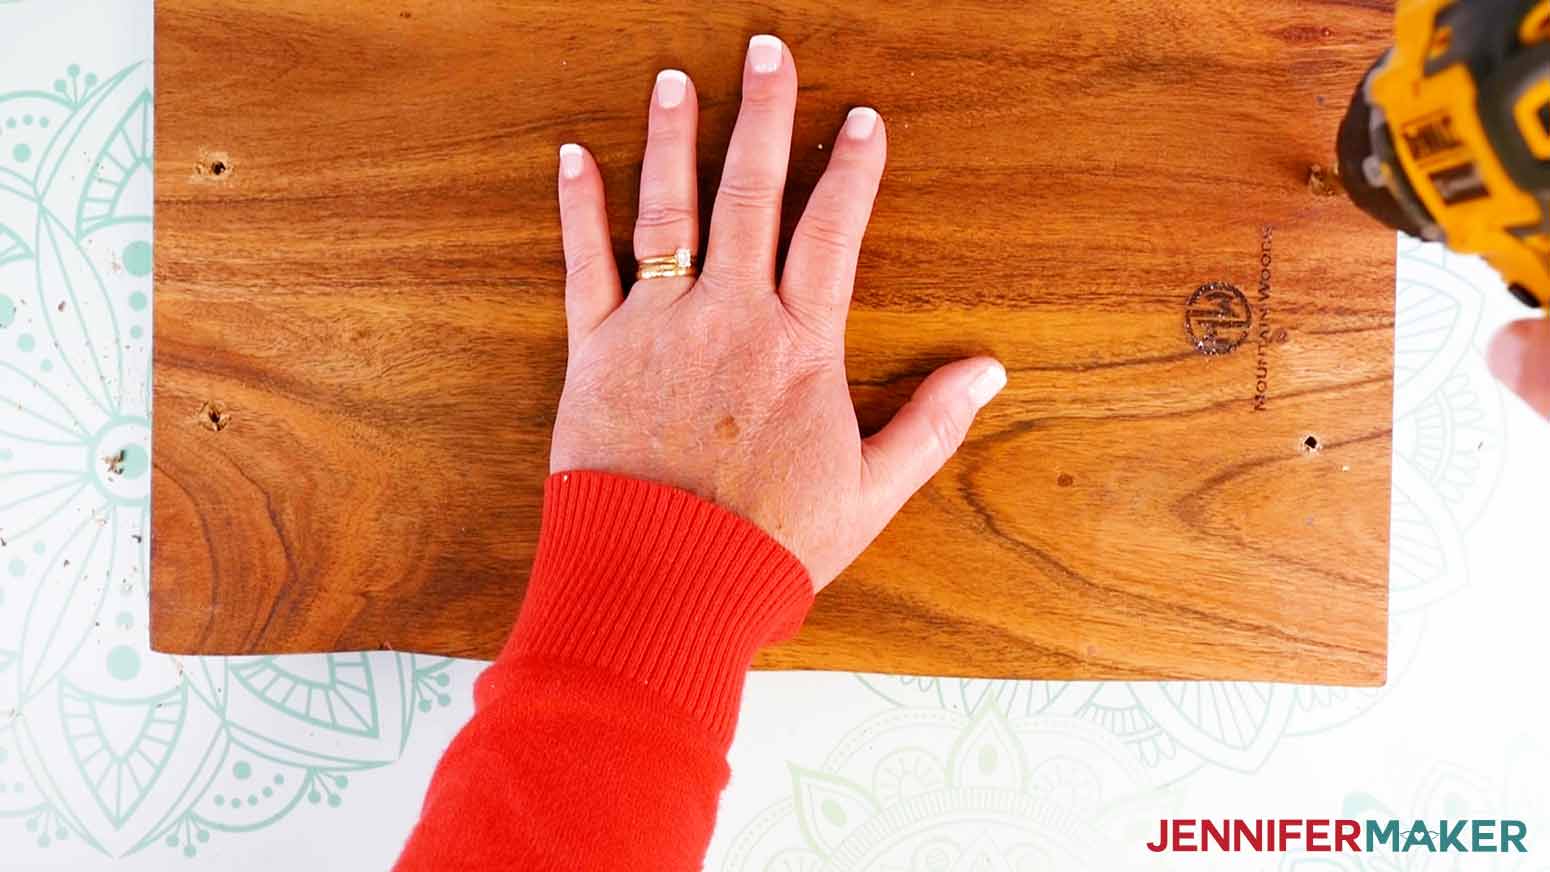
Once your pilot holes are drilled, change your bit to a 5/32” bit (or one that fits your screw size that came with your handles). Redrill each of the holes to make them bigger and the correct size to fit the diameter of the handle screws.
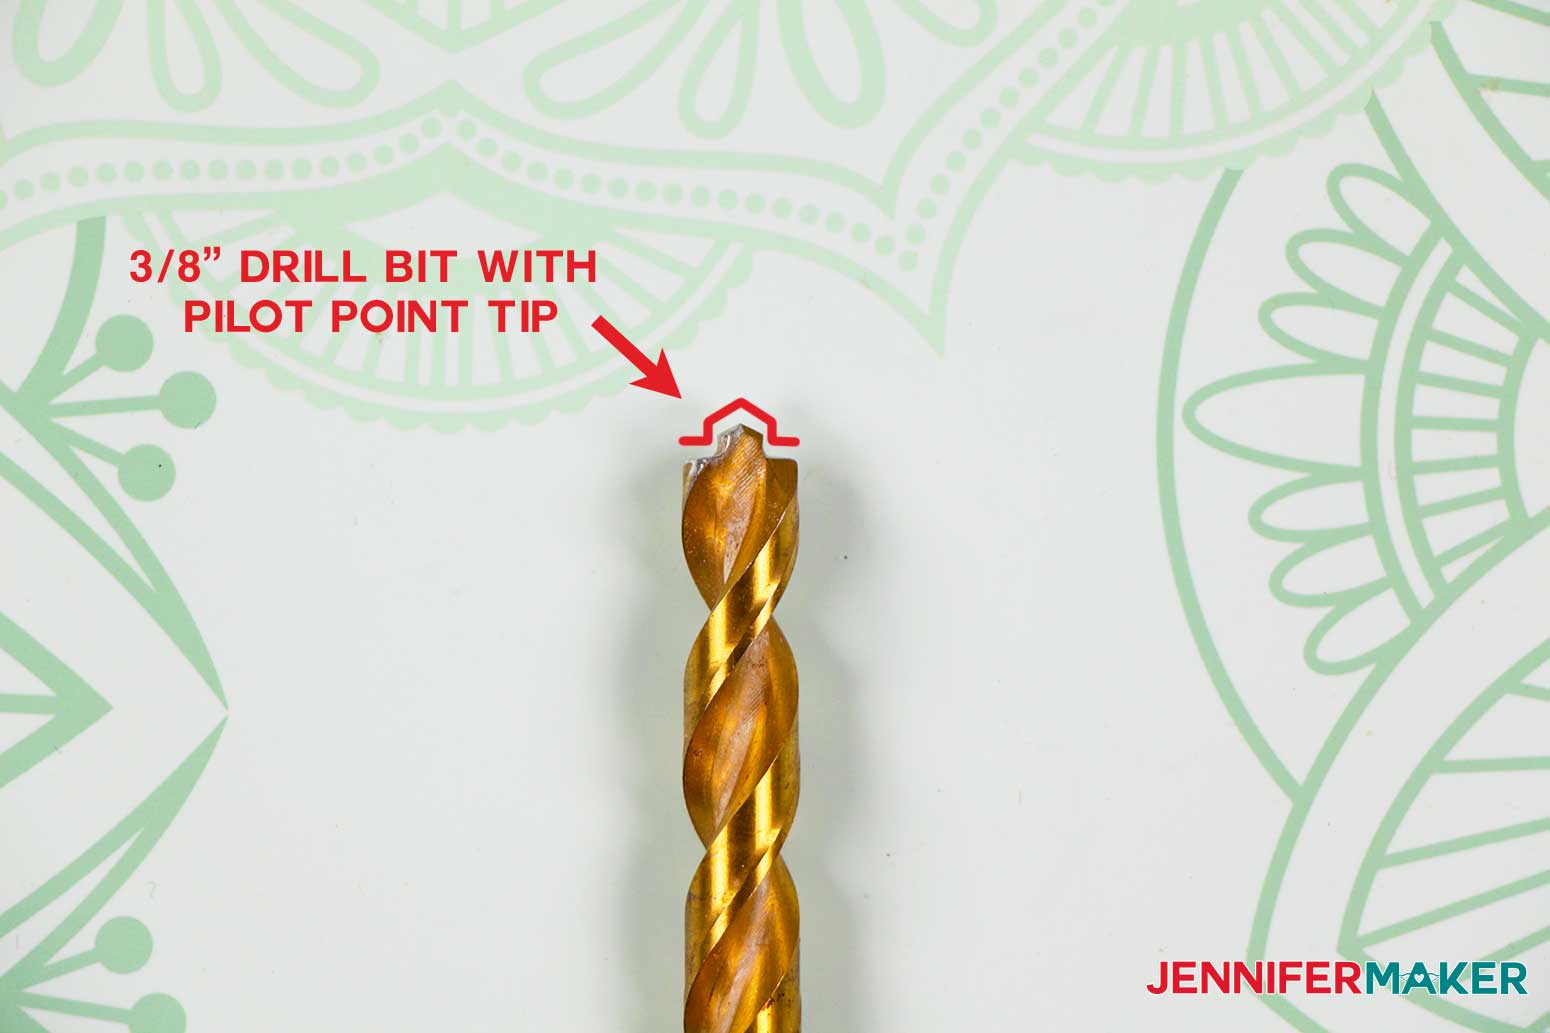
Now you want to countersink your holes so when you attach the screws they are are flush with the wood and not poking out (so the screw heads don’t scratch your table). To do this, load a 3/8” drill bit shaped like this Dewalt bit with a pilot point. The shape is important so you create a "shelf" for the screw head to rest on.
Still working on the underside of your cutting board, drill approximately 1/16” deep, or just deep enough to sink the screw head in the wood.
TIP: Don’t drill too deep or the screw will not fit snuggly!
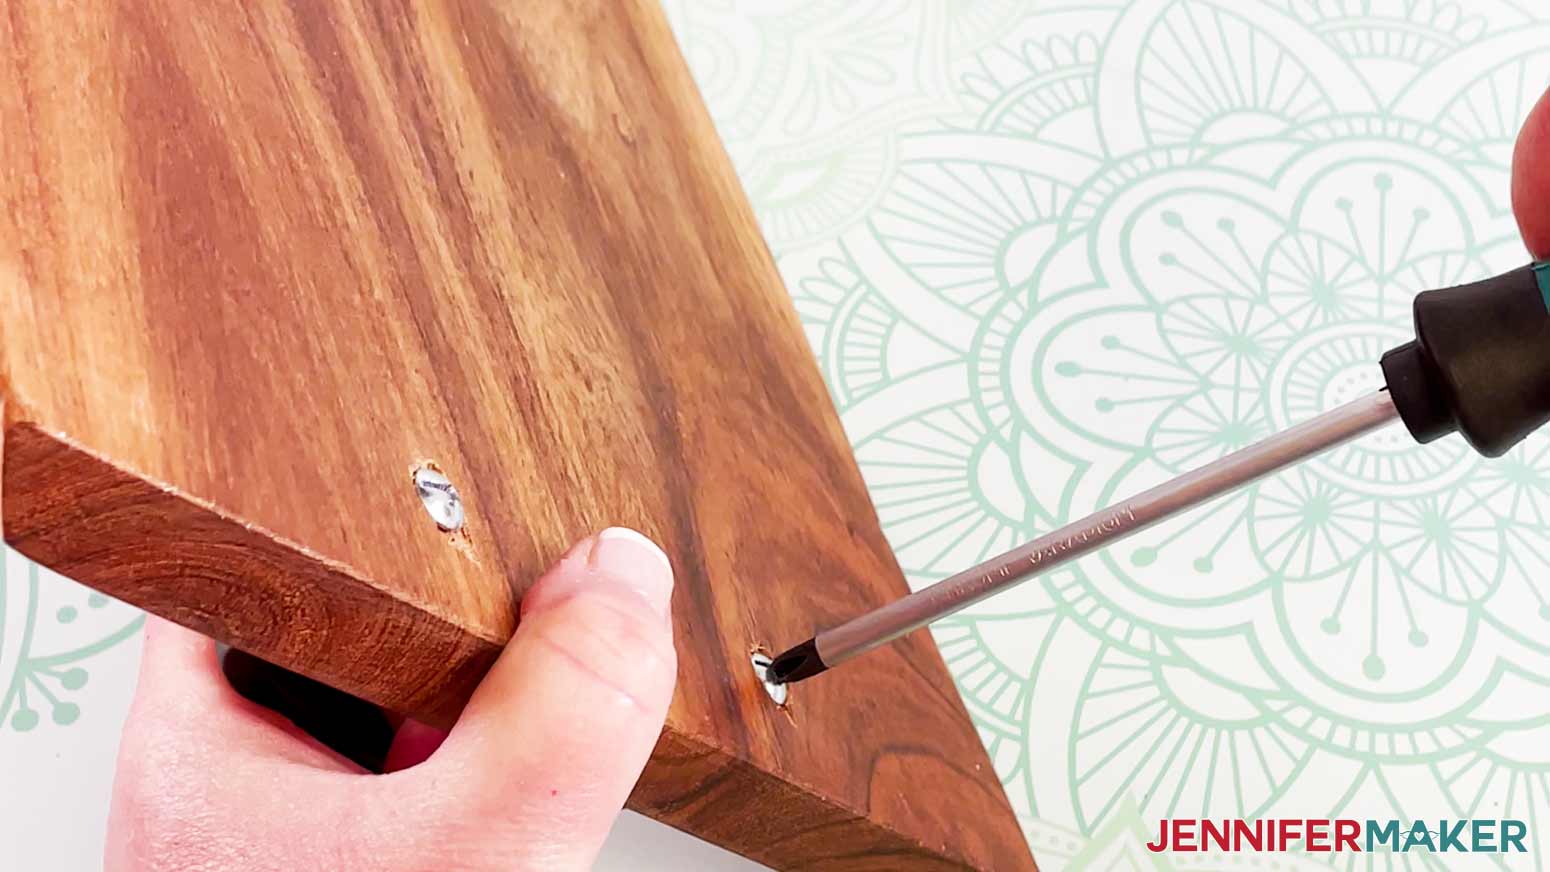
Now, attach the handles by feeding 1" screws up from the underside of the wood board and screwing them into the handles (if you are using the same handles as me, use the SMALLER of the two screw sizes). Use the drill or a Phillips head screwdriver to tighten them, making sure not to overtighten them.
STEP 4: WEED AND TRANSFER THE VINYL
Now that our Charcuterie Tray is assembled let's get our vinyl ready to transfer.
Weed your vinyl designs carefully, removing all of the excess vinyl you do not need. Be sure that all the small pieces and any centers to the letters stay adhered to the carrier sheet.
TIP: I have lots of weeding tips on my Cricut Best Tips and Tricks post.
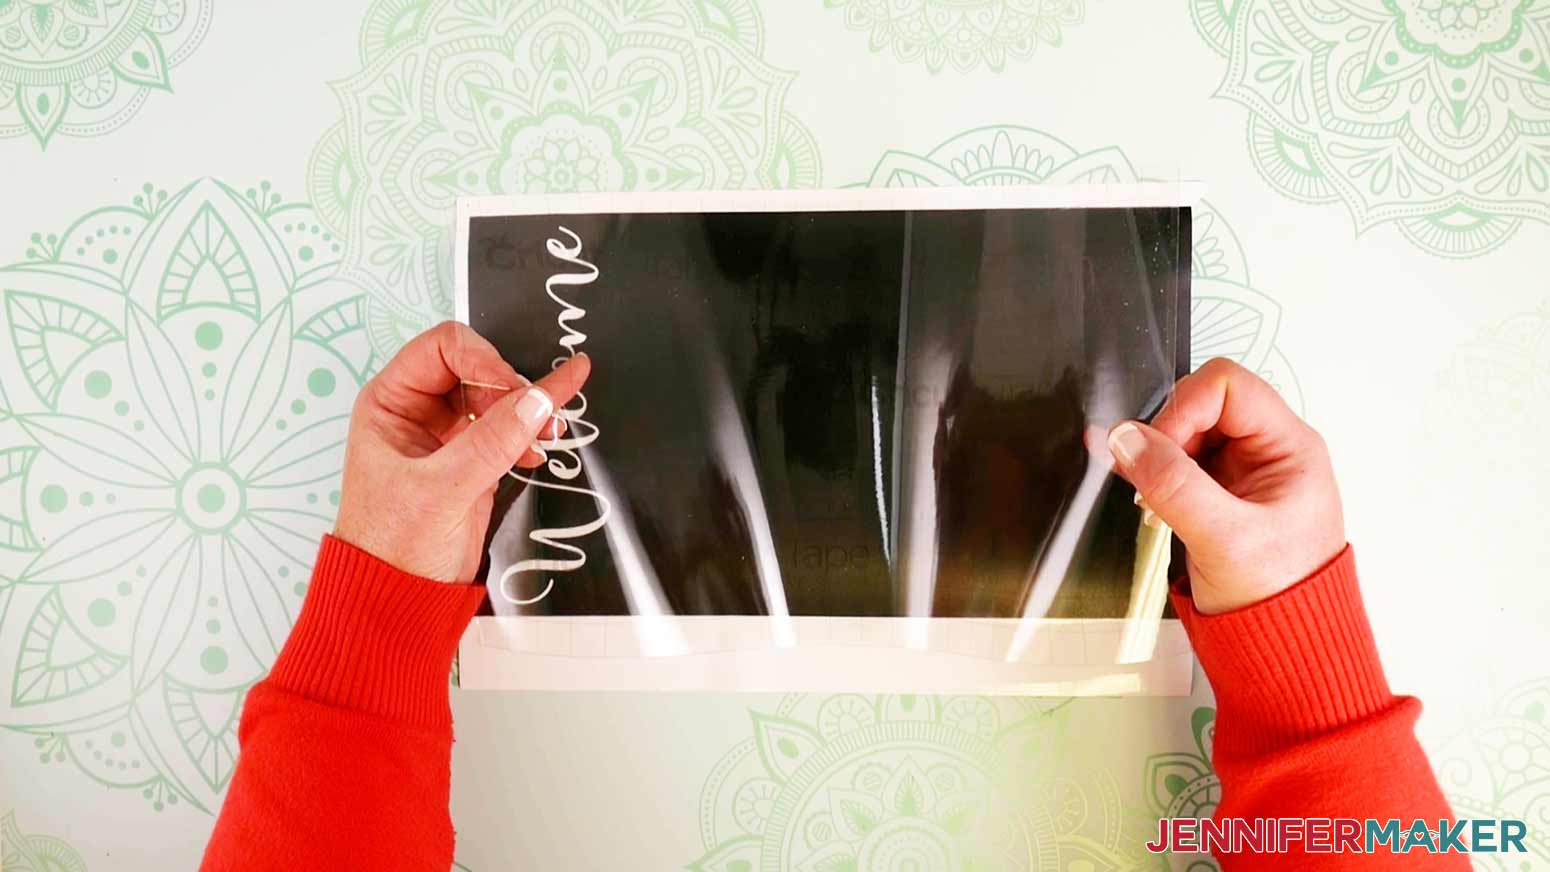
Cut a piece of Cricut Transfer Tape a size just larger than your weeded vinyl design. Remove the backing from the transfer tape. Apply the transfer tape to your vinyl decal by holding the transfer tape in the shape of a taco or “U” shape then putting the bottom of your “taco” onto the middle of your design.
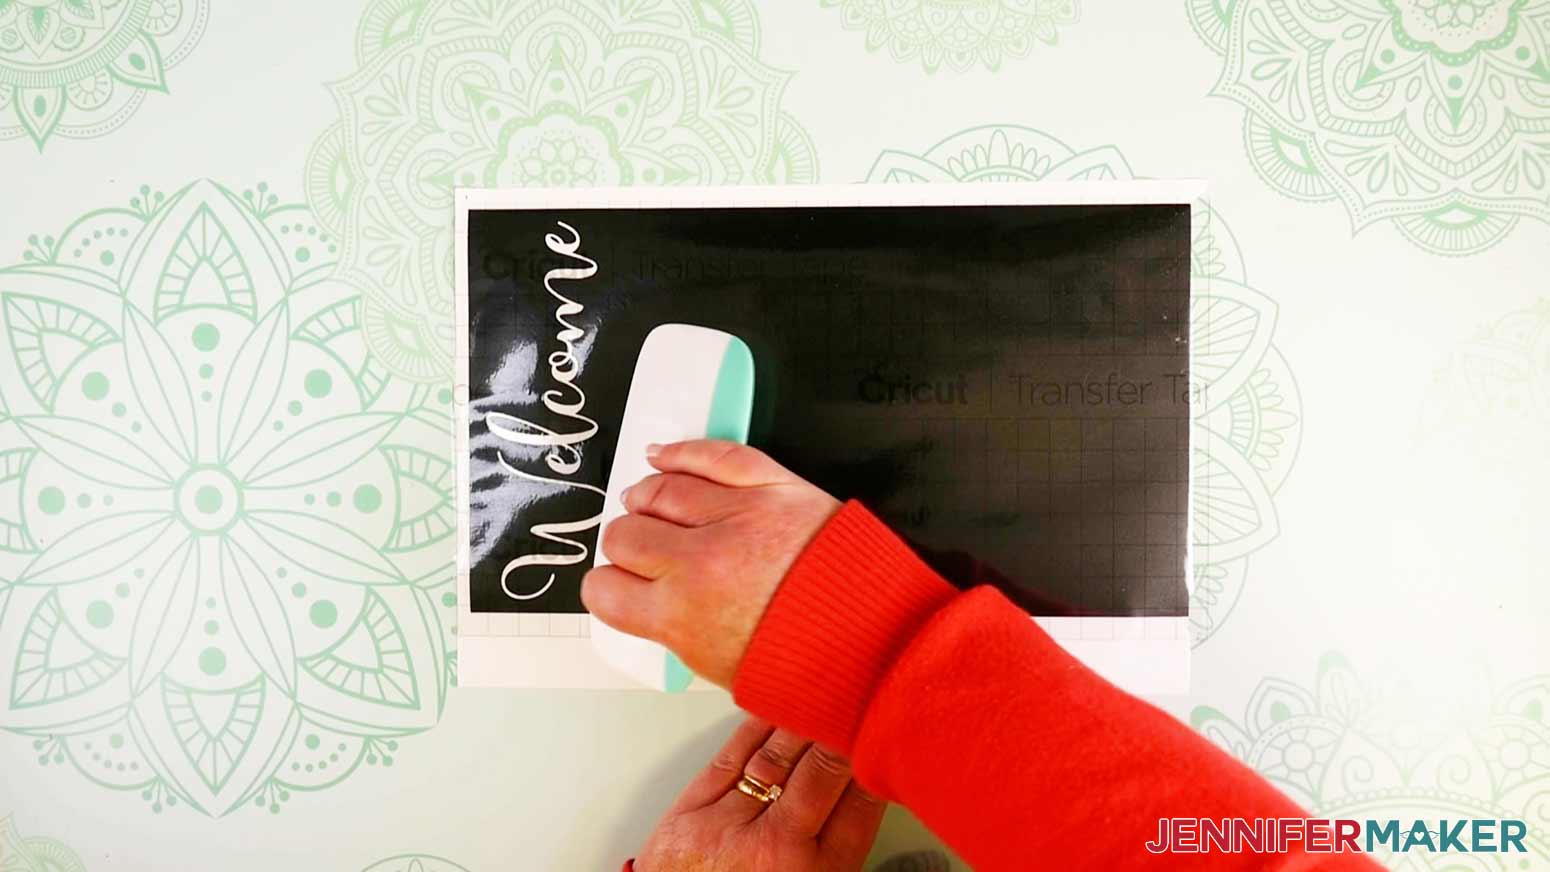
Smooth the transfer tape over the decal from the center outward making sure to press out and remove any bubbles. When the transfer tape is in place, use a scraper tool or other hard and flat-edged item (like a store loyalty card) to transfer the vinyl decal design to the transfer tape. It’s important to scrape it well to transfer the vinyl decal. It helps to scrape it from both the transfer tape side AND the carrier sheet side.
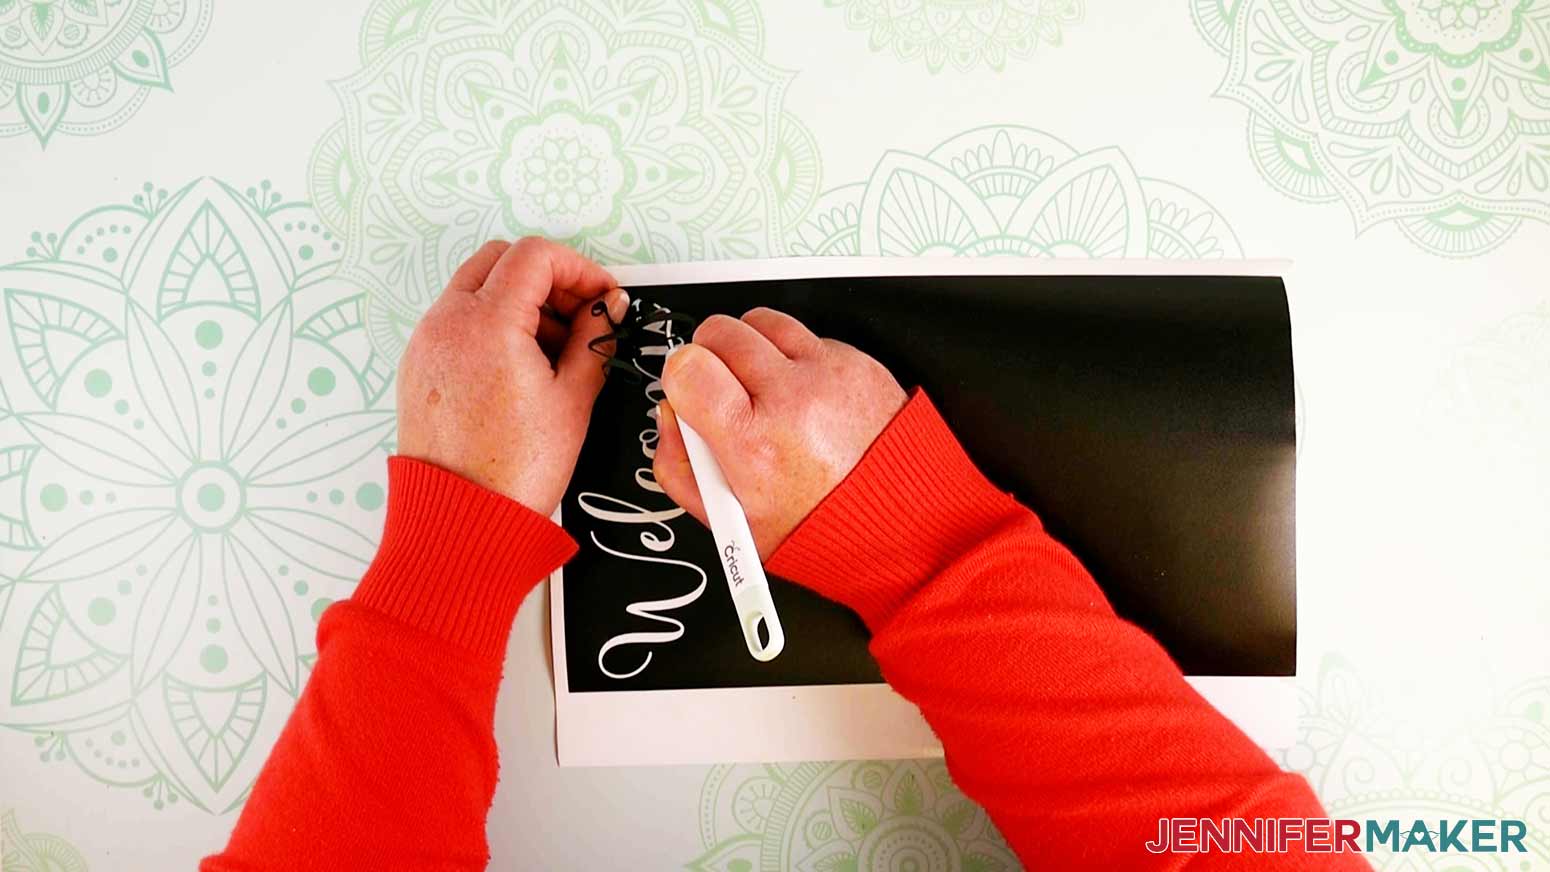
Carefully peel the carrier sheet off the vinyl.
TIP: If little bits don’t want to transfer to your tape, scrape it again and pay careful attention to those problem areas.
STEP 5: APPLY THE CHALKBOARD VINYL
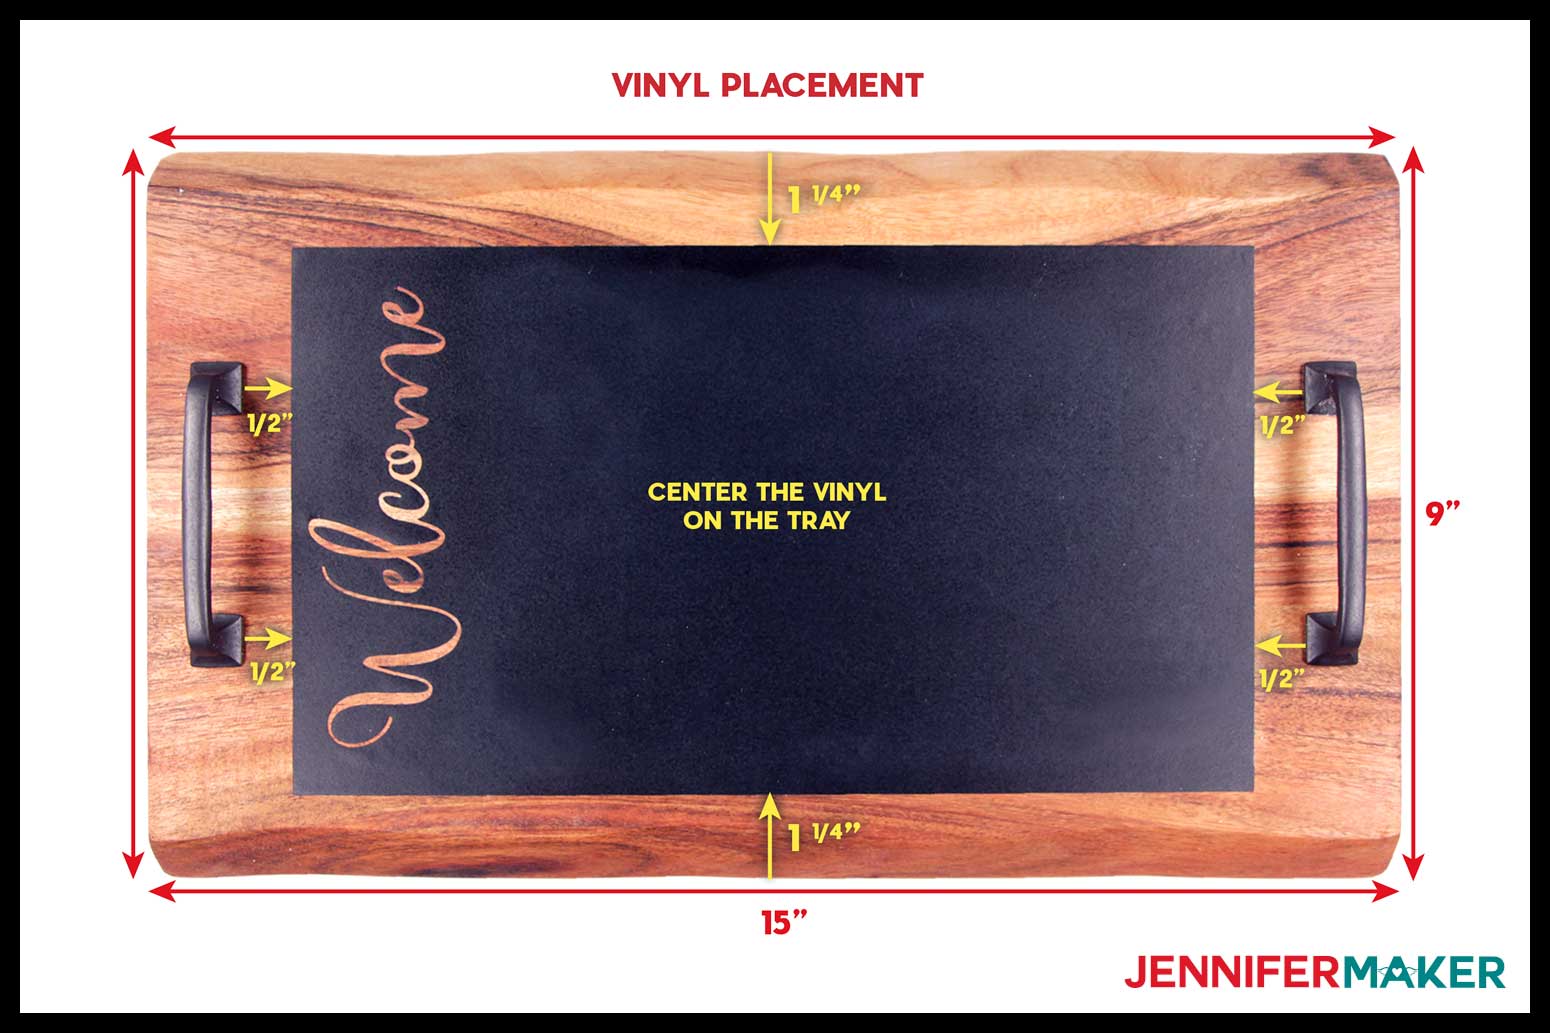
Now, center your chalkboard vinyl on the tray. You can eyeball it, but if you want to make sure it's perfectly centered you can measure and follow this placement guideline, which allows for approximately 1/2" from the top, bottom and inside edges of the handles. Yours may be a little different due to variability in the wood boards.
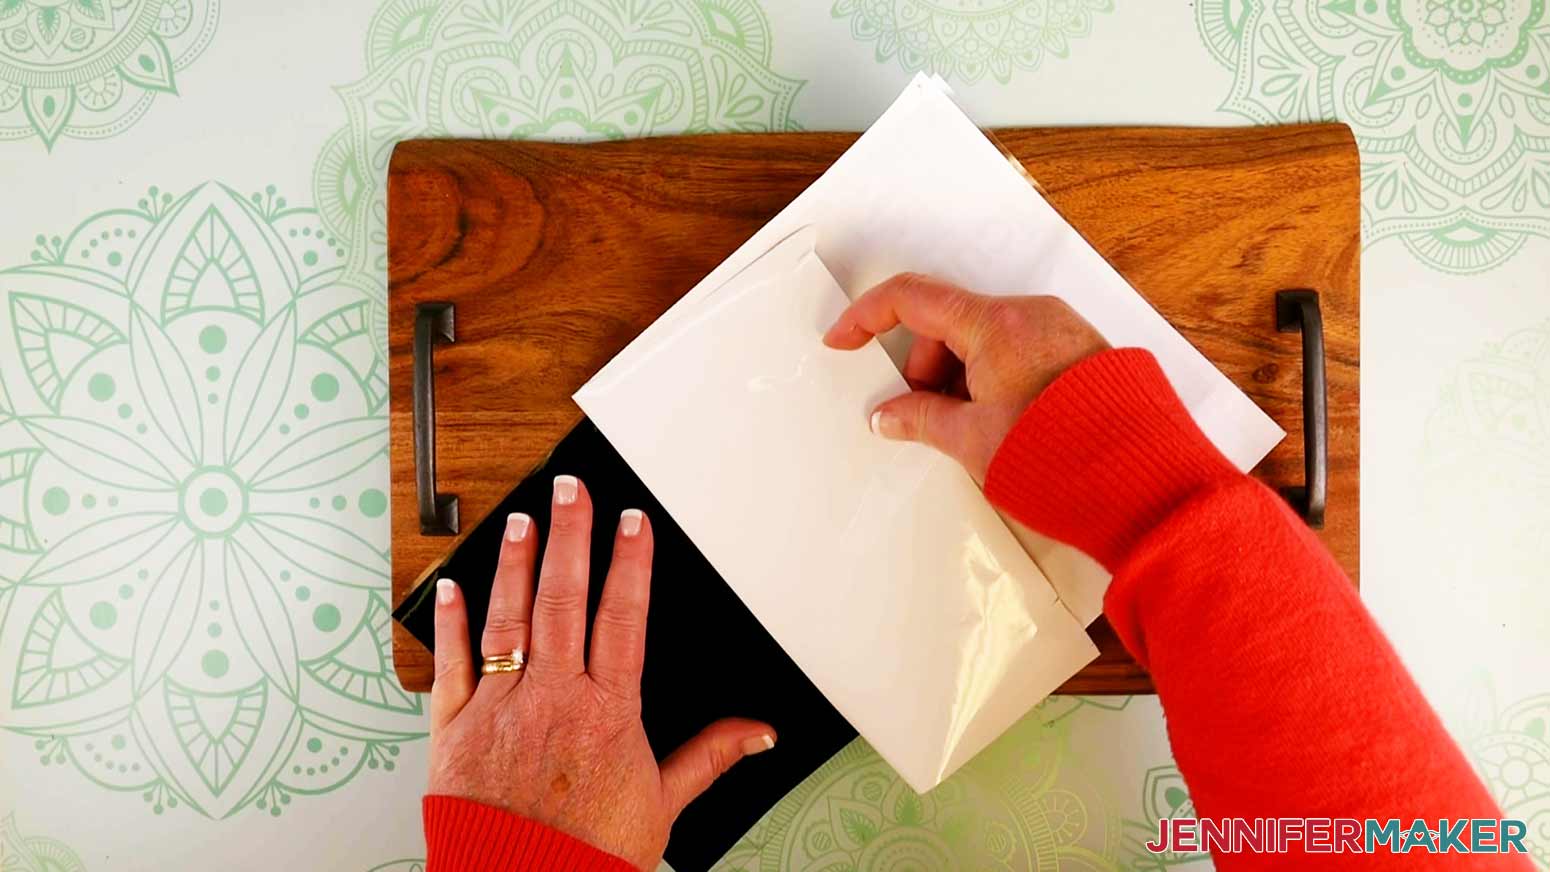
Adhere the top edge of the vinyl first, and then carefully lay it downward over the wood using your scraper to push out any bubbles or creases in the vinyl as you go. Make sure both the vinyl and transfer tape are well-adhered to the wood tray.
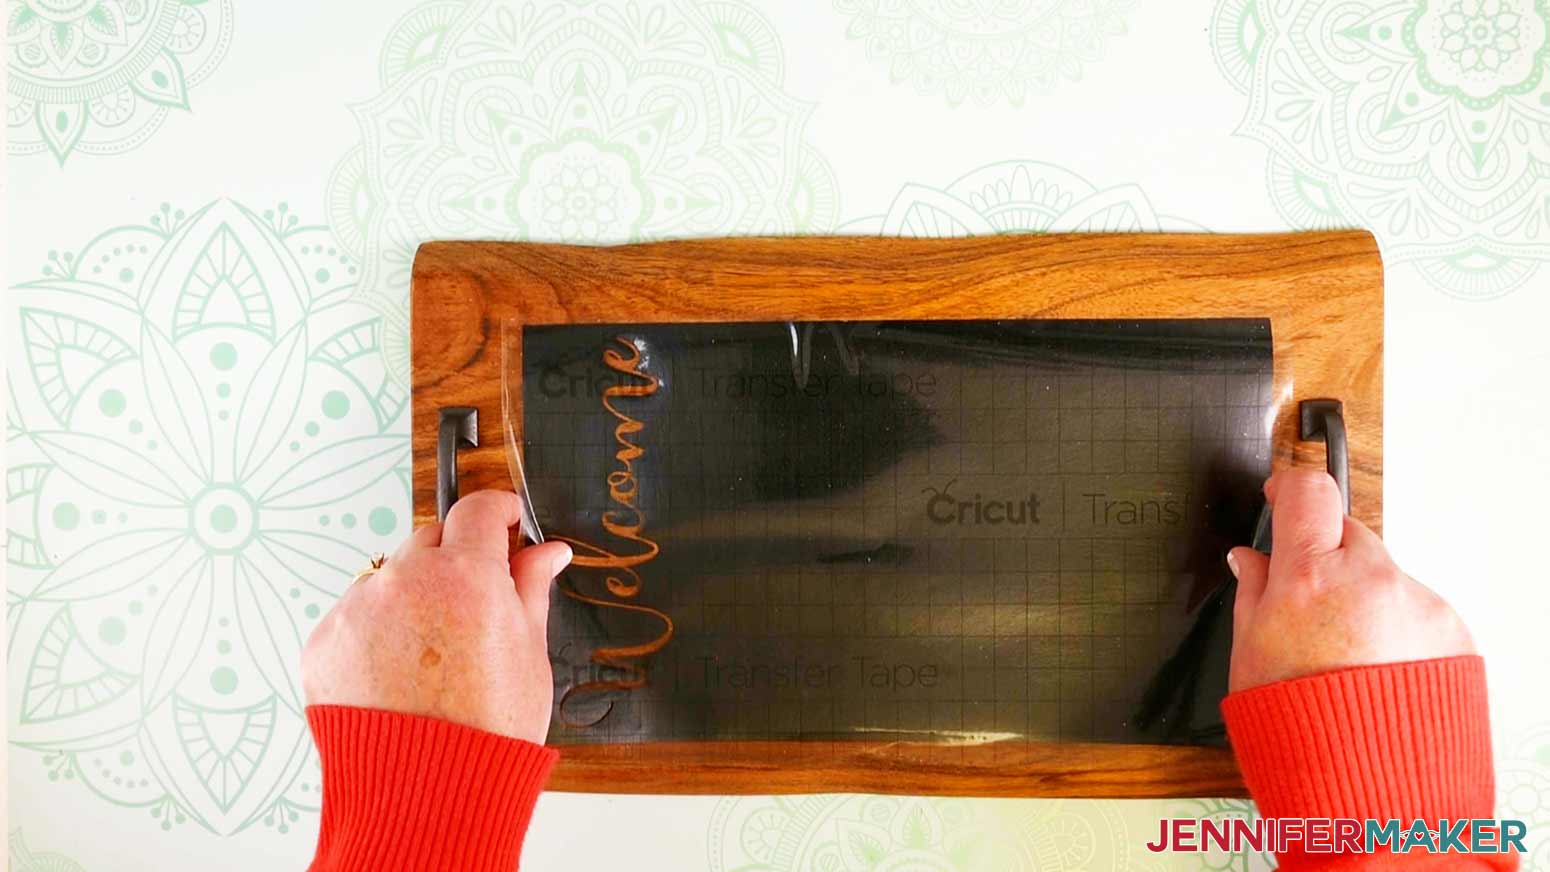

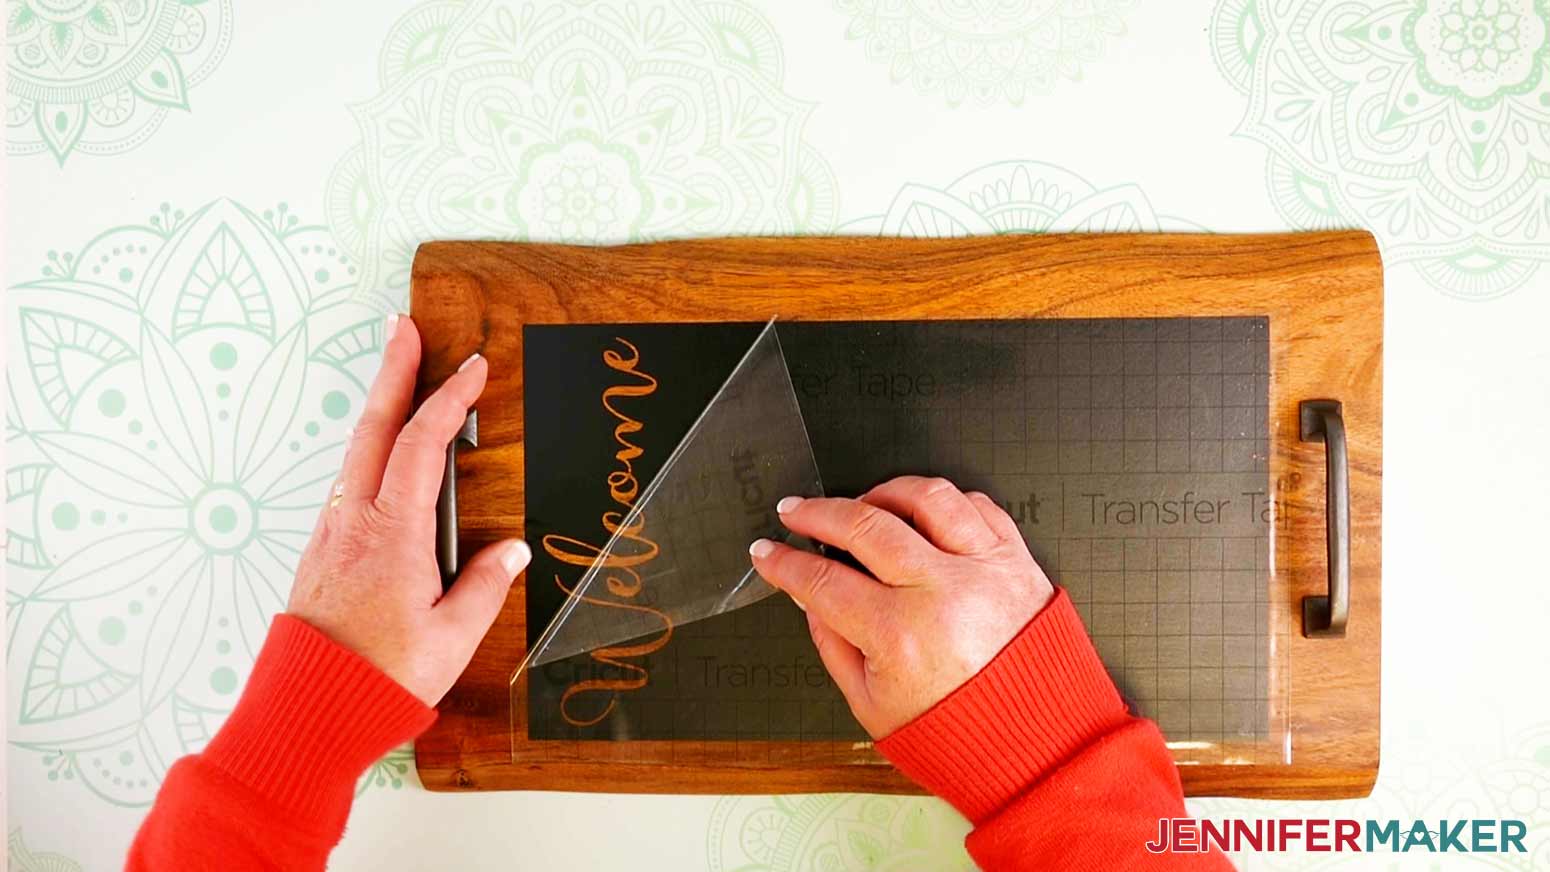
Pick up a corner of the transfer tape and slowly remove it from your vinyl.
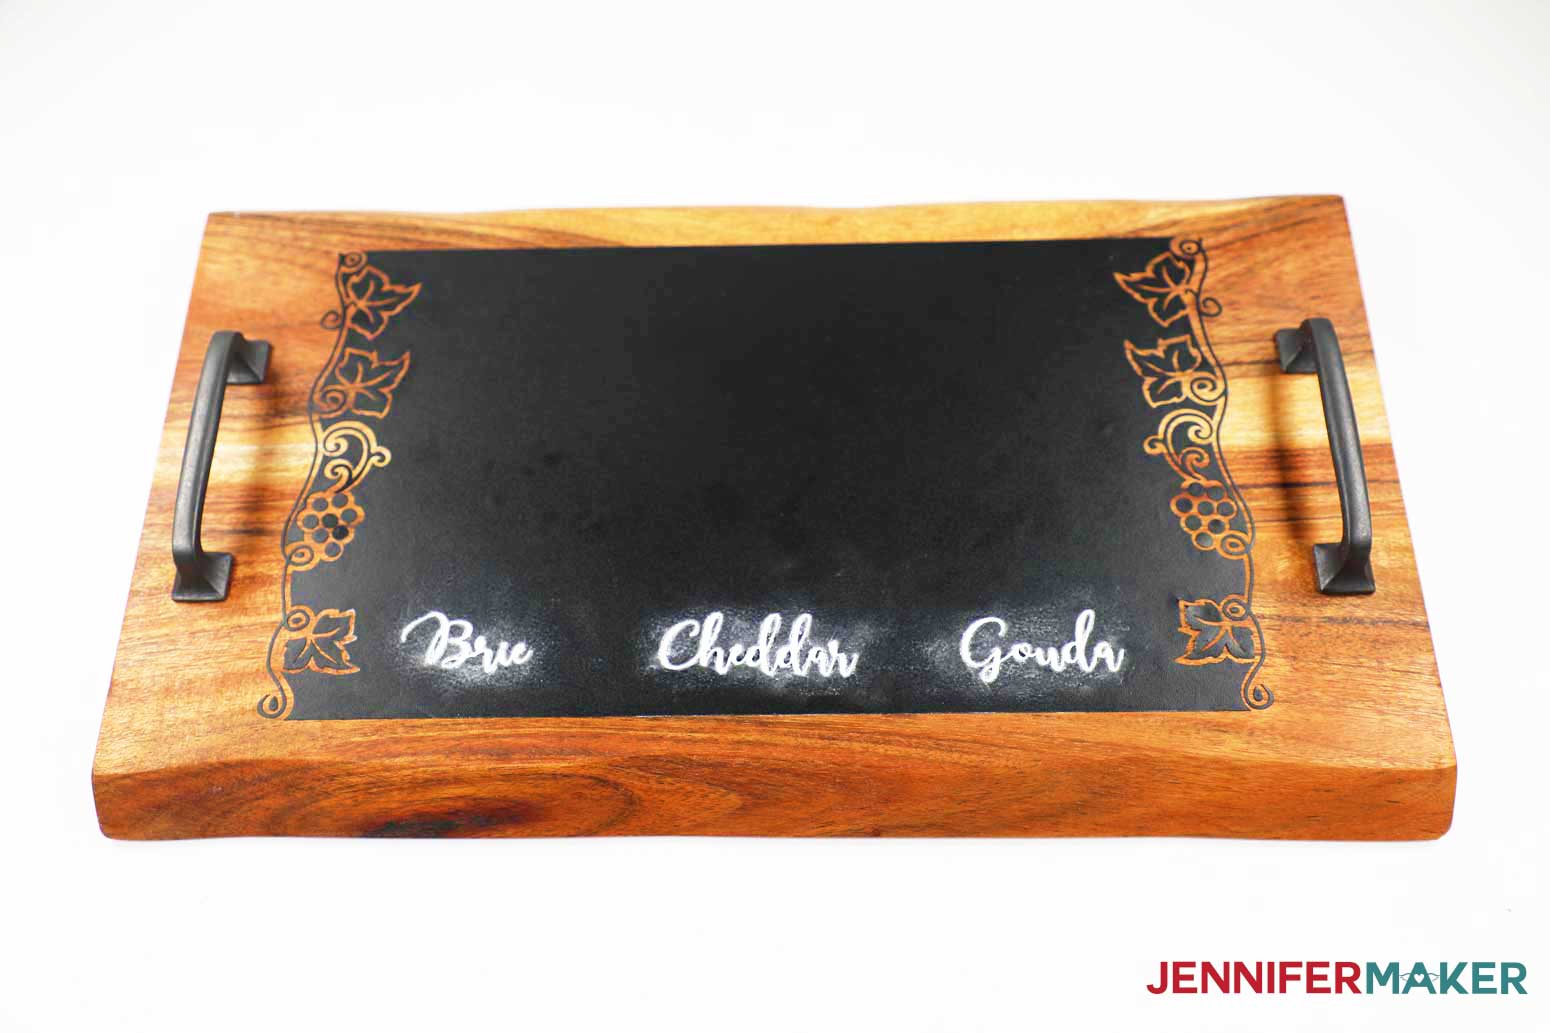
Use your scraper again to make sure the vinyl is securely adhered to the tray without any noticeable bubbles. This is what the finished tray looks like!
STEP 6: ADD LABELS
Now, let’s add some descriptive food labels! If you have beautiful handwriting, you can write directly on the vinyl with chalk or a chalk marker. But if you are challenged in the handwriting department, here’s a fun trick for getting perfect writing every time.
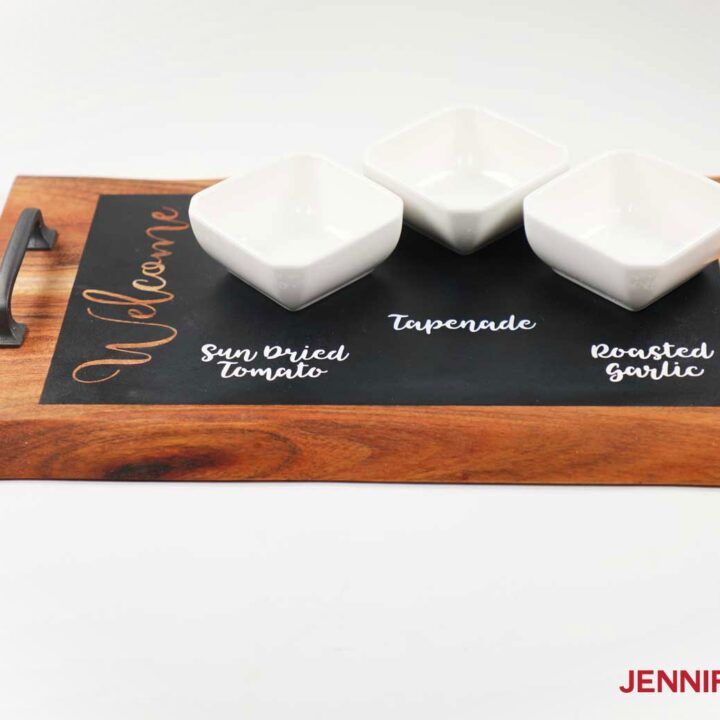
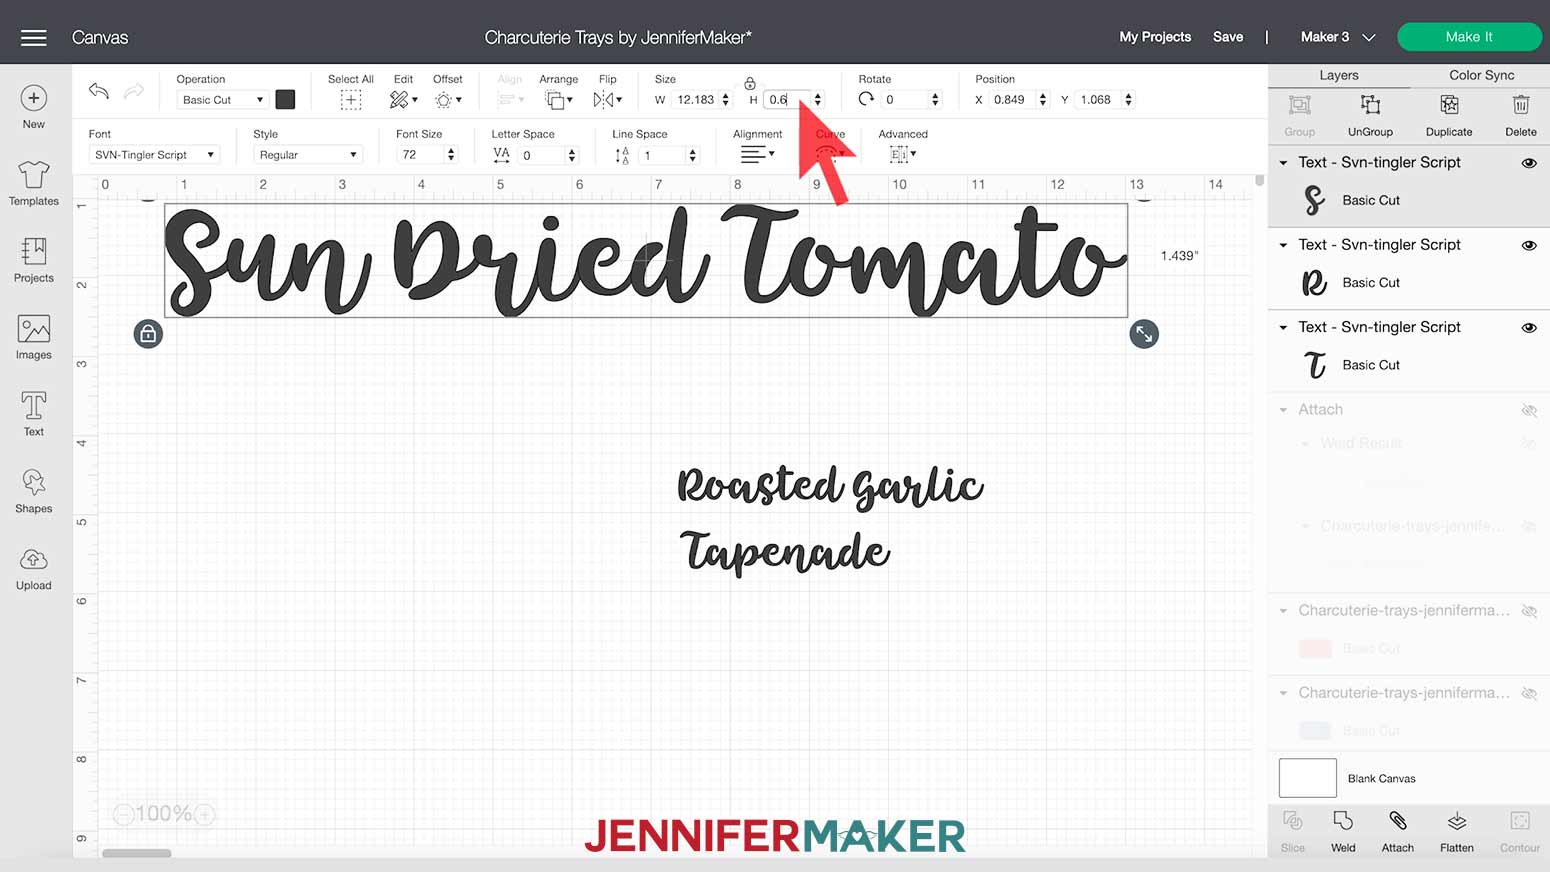
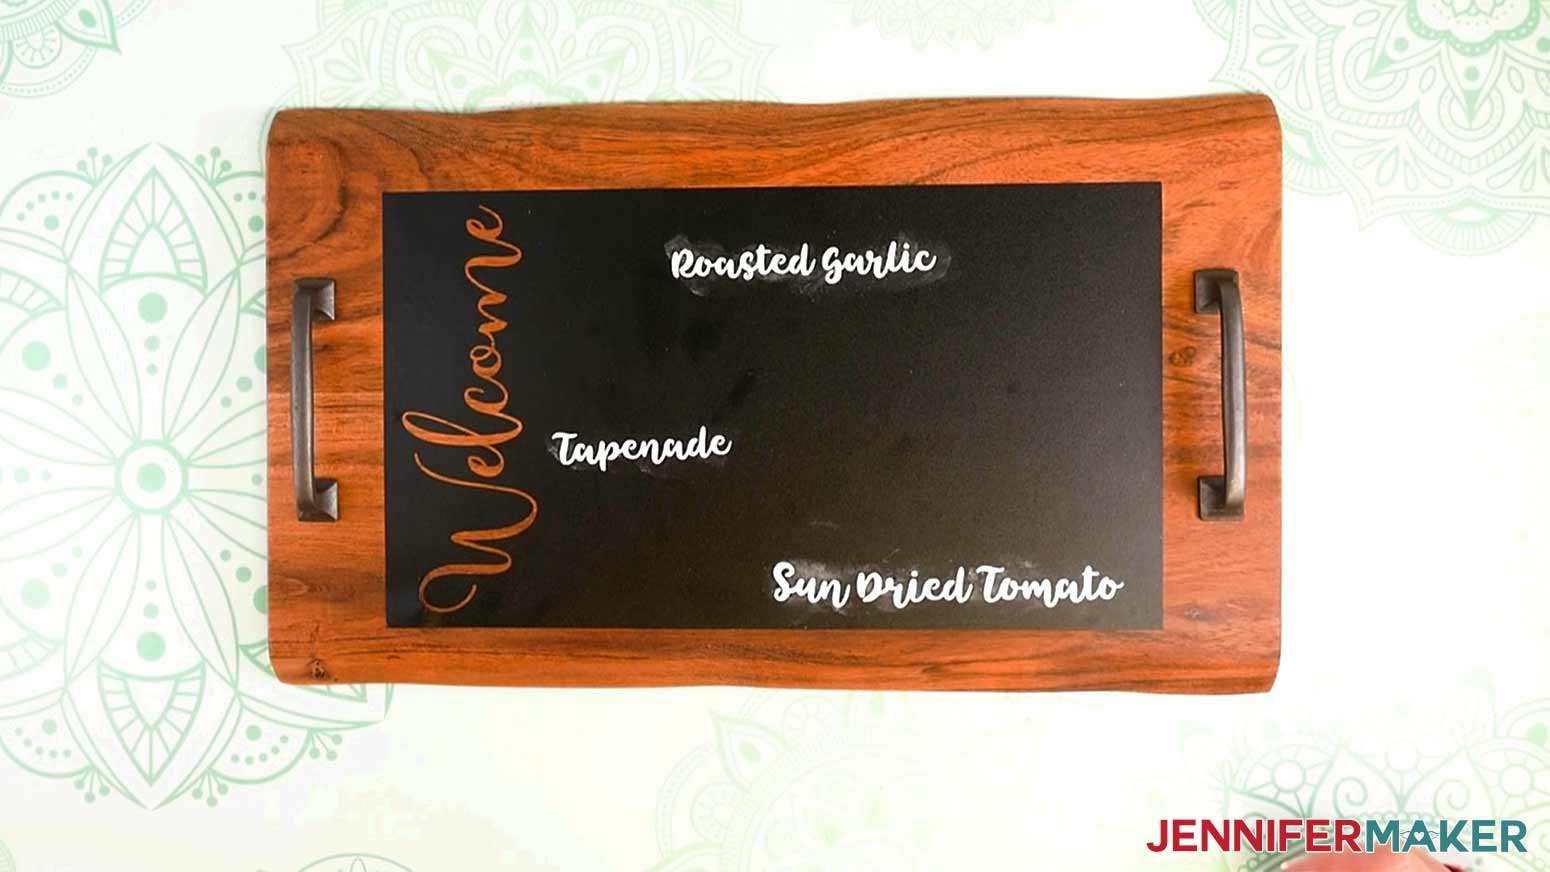
In Design Space, create a Text box like we did in Step 1 above and type your descriptive words. For my tray, I typed “Tapenade,” “Roasted Garlic” and “Sun Dried Tomato.” I used Tingler Script font and sized each to approximately 0.6” tall, which was 28pts.
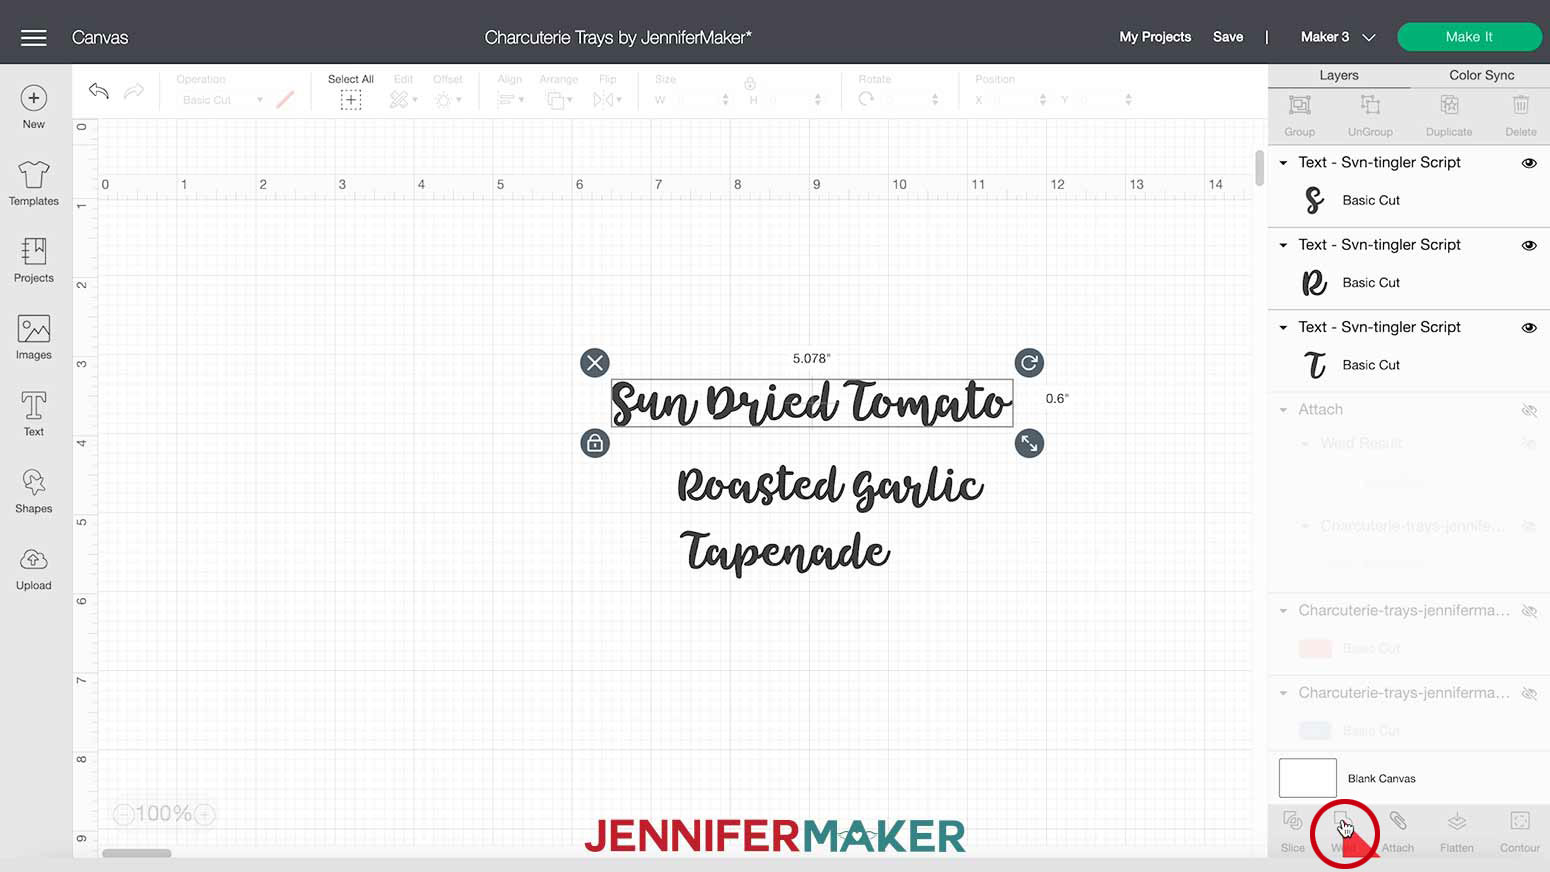
Select each Text layer in the Layers Panel on the right side of the canvas and click on "Weld." This ensures the word will cut out as a single piece of vinyl and not as individual layers.
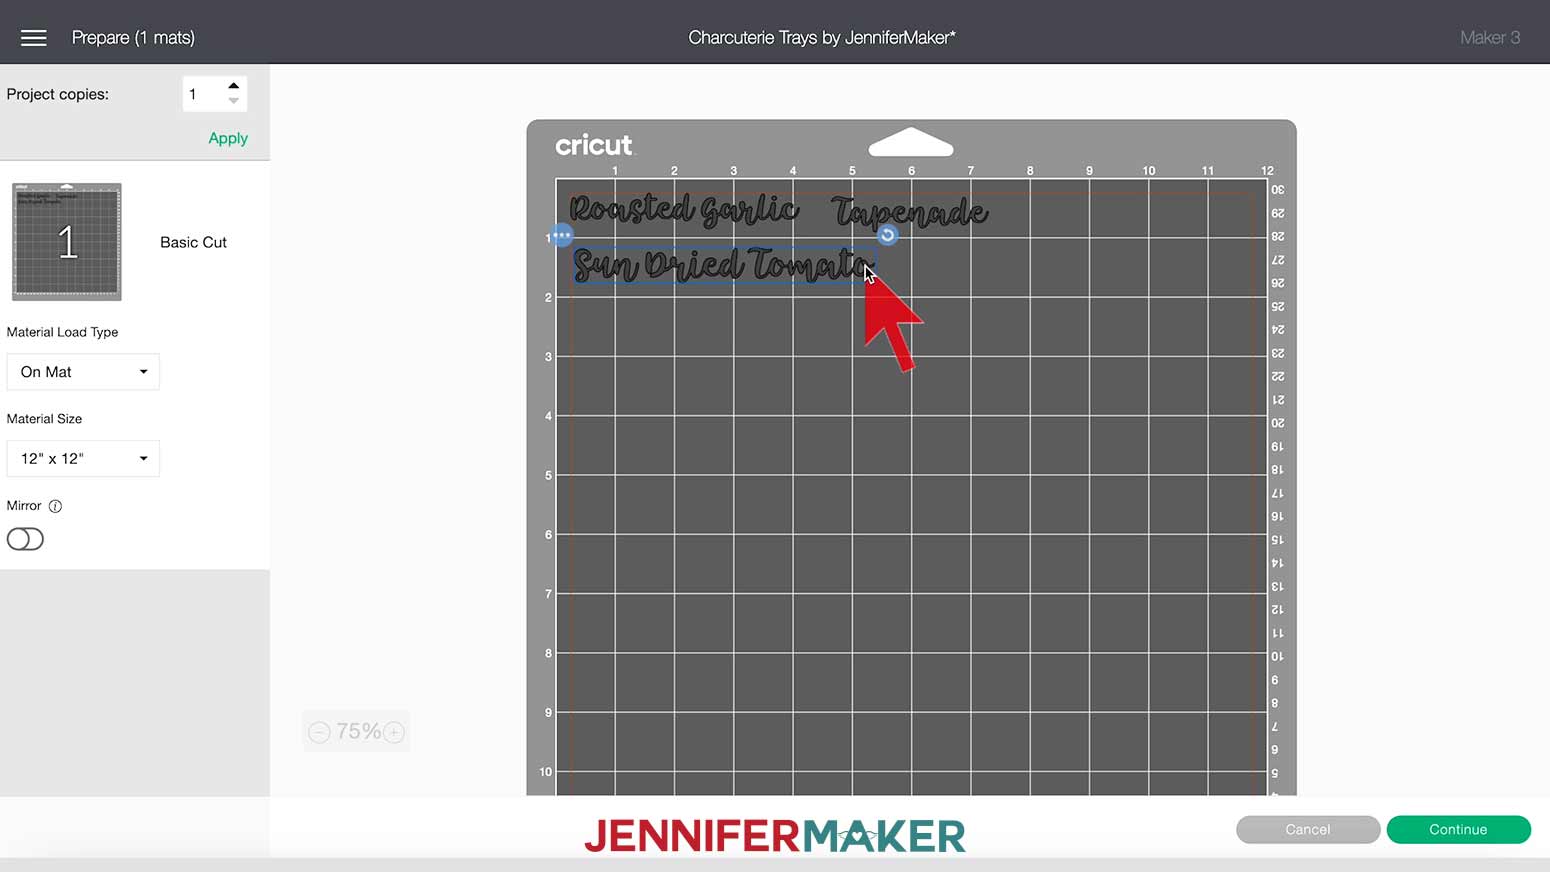
Follow the same steps we took in Step 1 to cut your labels. Select your Cricut machine and then click "Make It." Select your Base Material when prompted. You’ll want to choose Premium Vinyl—Removable as your material. I selected "More Pressure."
Place white removable vinyl on a Green StandardGrip Mat. Look at the mat layout to determine the amount of vinyl you’ll need.
You will be prompted to load your Fine Point Blade and mat. When you’re all set up, click the flashing Start button.
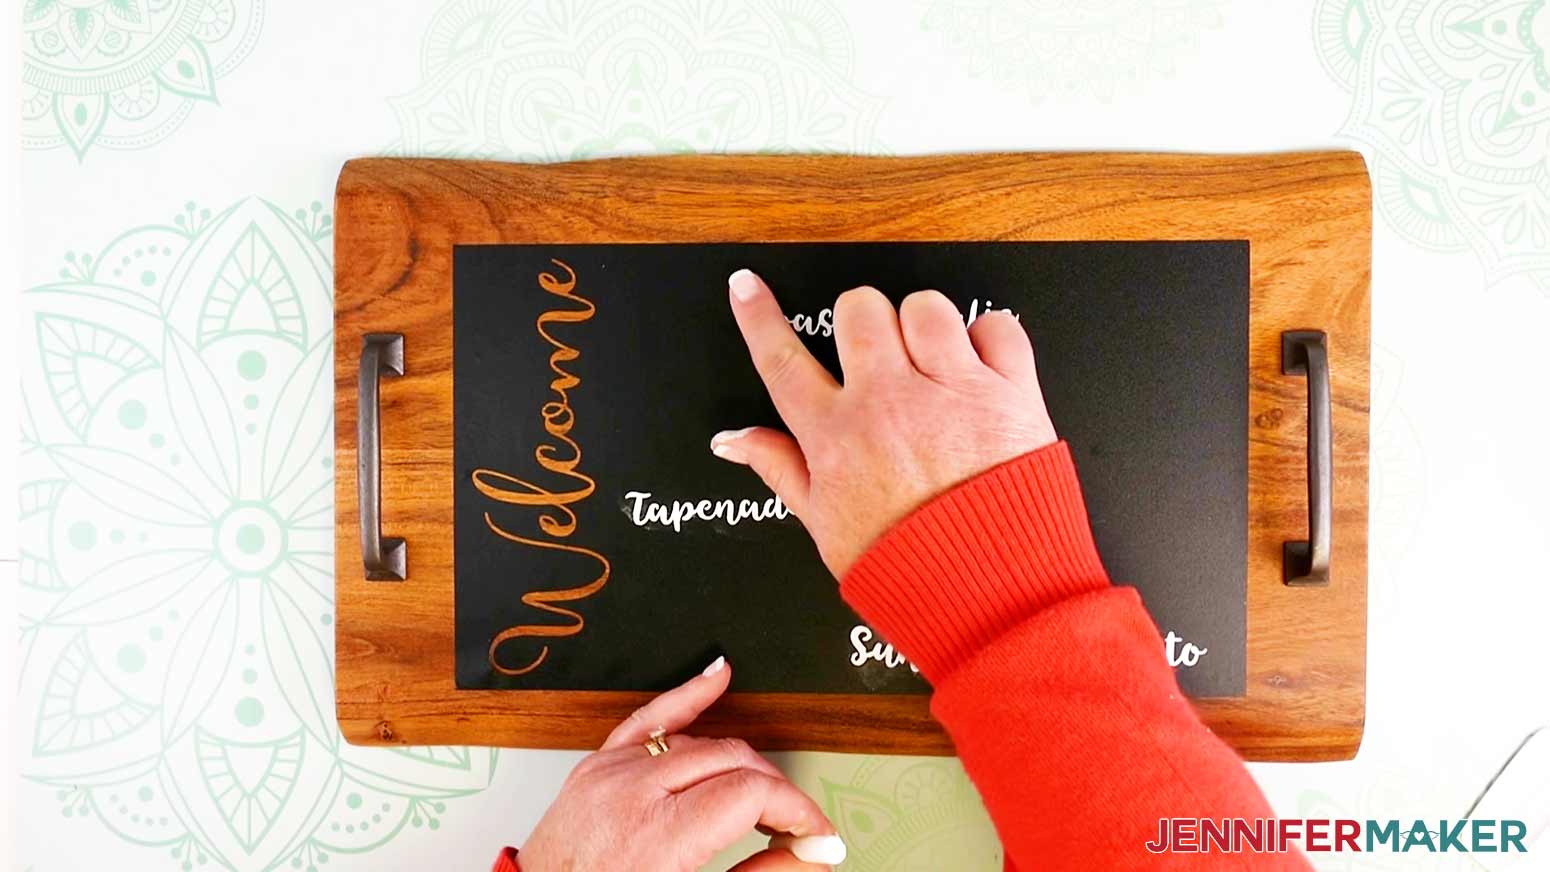
Now, weed and transfer your removable labels to the chalkboard vinyl just like you did in Step 3 above.
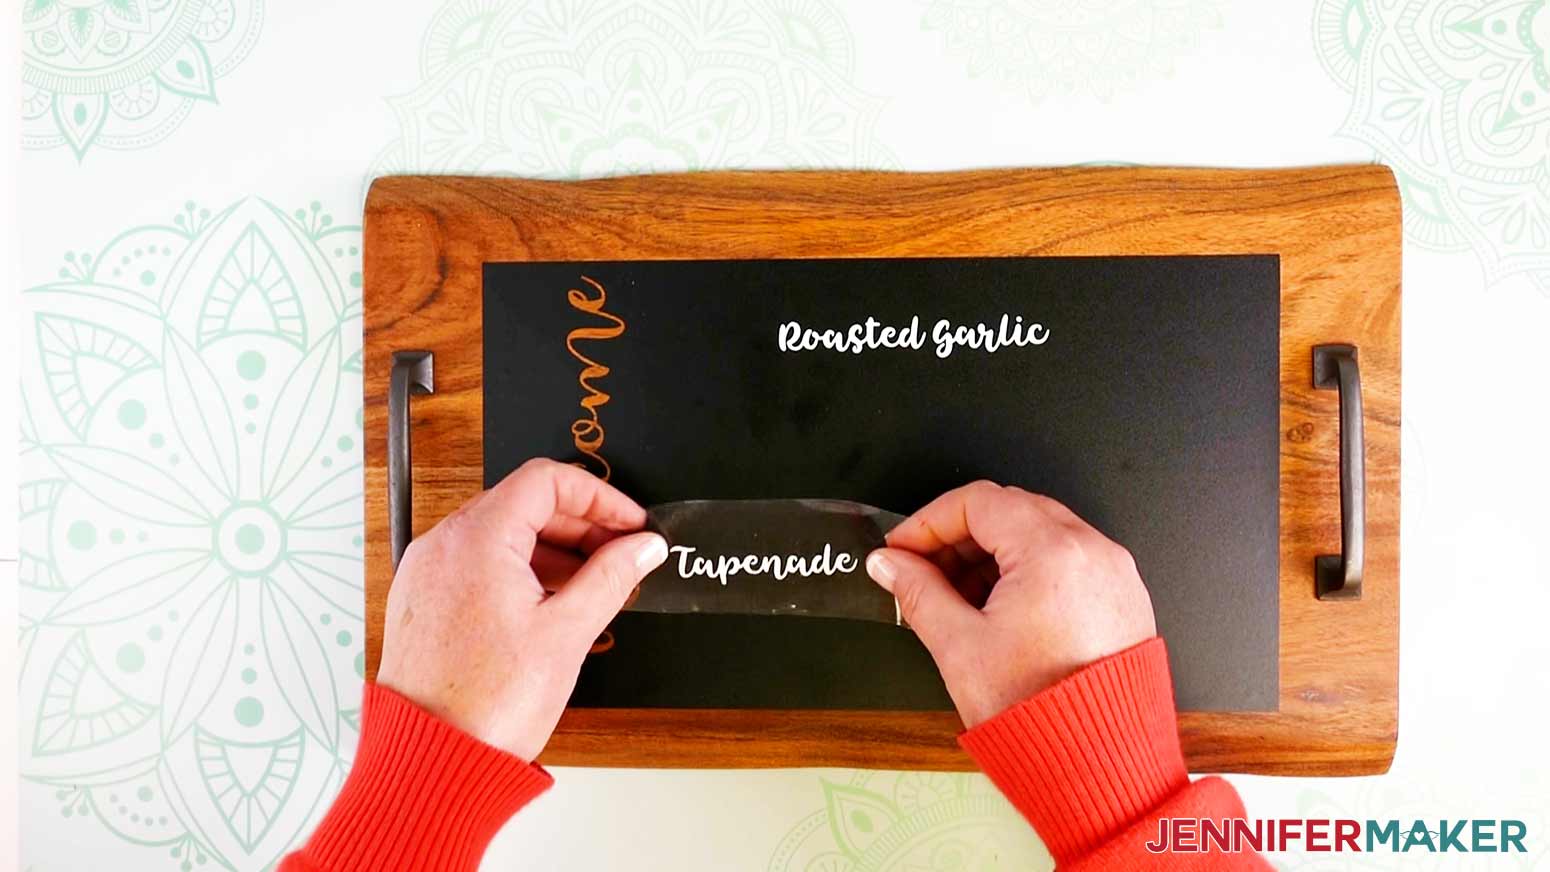
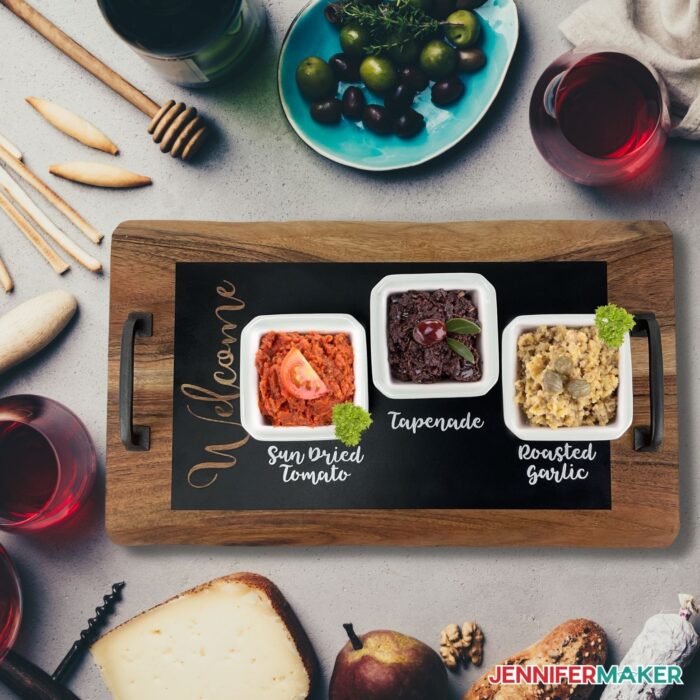
To make the words look more like realistic chalk writing, take a piece of chalk and smudge it around the outlines of the white vinyl.
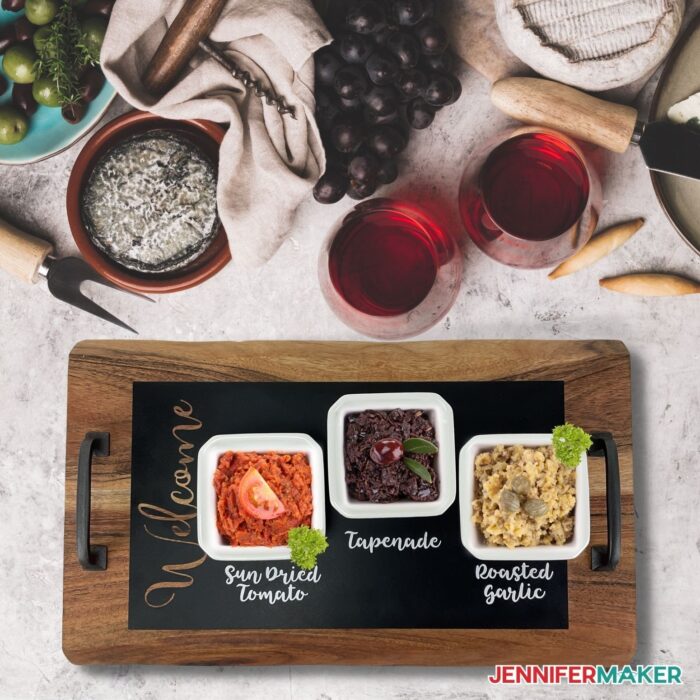
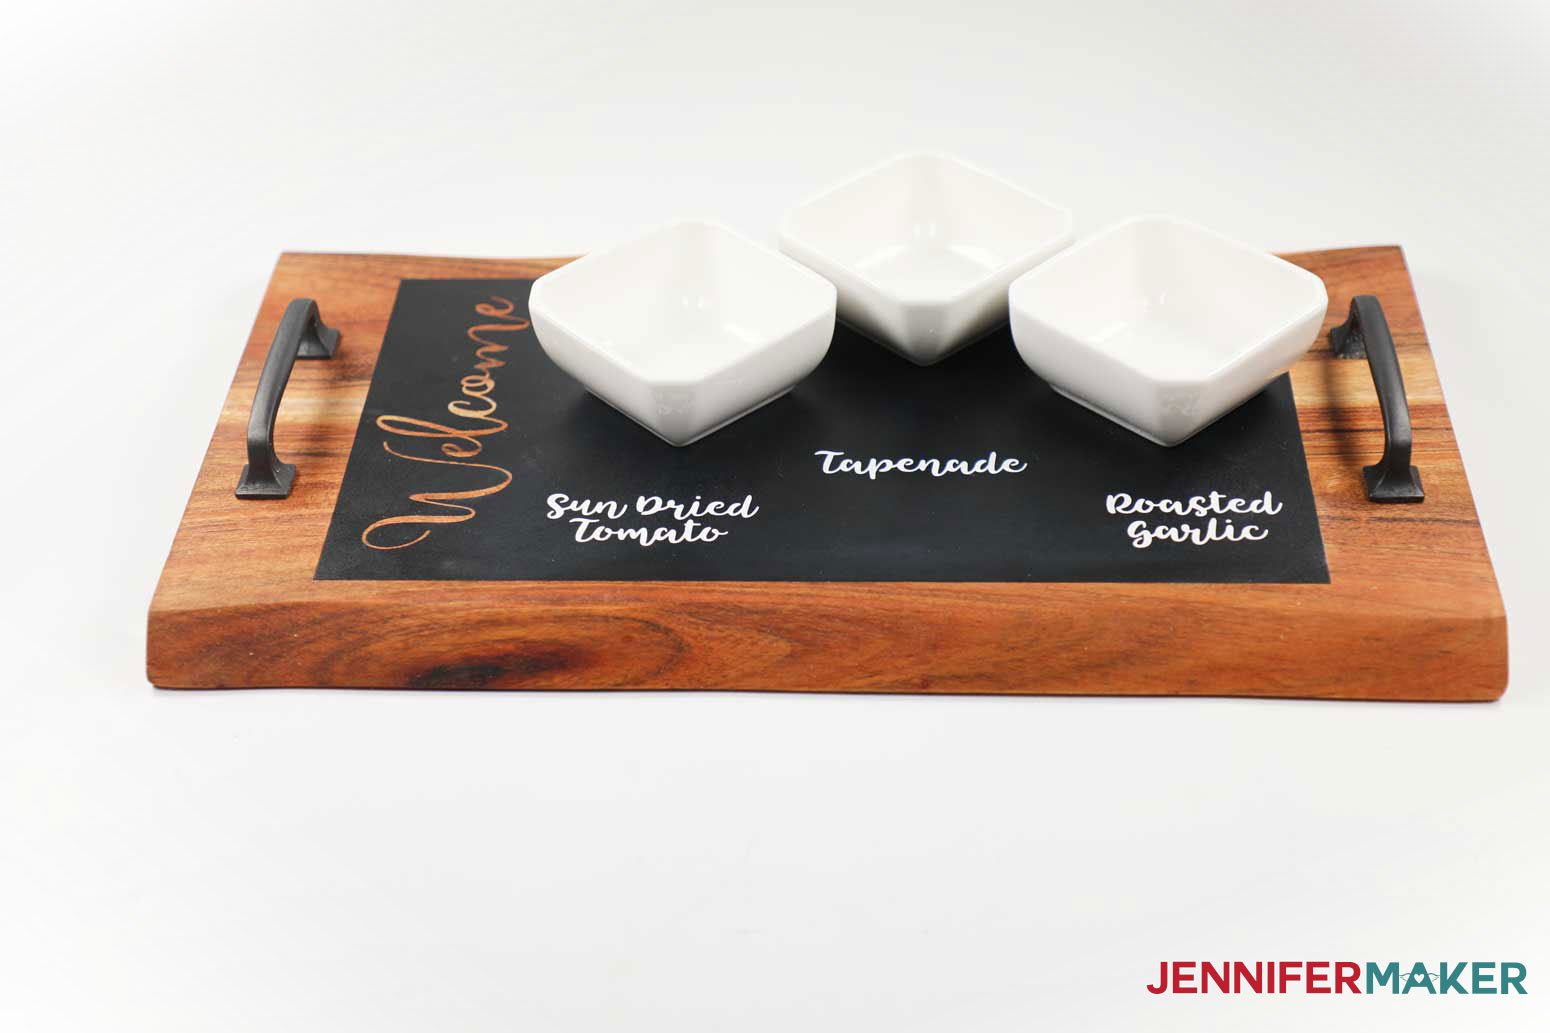
Voila! Add small bowls or plates of food and you’re ready to host a party!
Here are a couple versions I made.
Notes
The fonts I used for the Charcuterie Trays are Adinda (for the custom decal) and Tingler Script (for the removable labels).
The approximate final size of the Charcuterie Trays is 15 x 9 inches.
NOTE: Chalkboard vinyl is not FDA approved as a food safe product so placing food directly on the vinyl is not recommended. I suggest using napkins or small bowls and plates to hold food.
TIP: No drill? No problem! The tray handles are completely optional. Or, there are lots of tray alternatives that don't require assembly or tools. Check your local craft store for a premade tray, or simply use a butcher block or other wooden cutting board.
I absolutely love how these turned out! It’s pretty easy to turn a simple charcuterie board into a beautiful charcuterie board. Now just imagine your favorite assortment of meats, a few slices of cheese, dried fruit, and you’ve just created the perfect charcuterie board and are bound to have a great day!
Answers to Your Questions About How to Make Your DIY Charcuterie Boards
Q: Where is your tutorial for this charcuterie tray project?
This is a special project we made for our free Maker Academy Weekend event! A complete and detailed step-by-step video premiered during the event November 4-7, 2021. Get access to the workshop video and printable workbook with a VIP Pass to Maker Academy Weekend 2021, which comes with other perks and bonuses, too!
Q: My store doesn’t have any charcuterie boards! Where do I find them?
If you can’t find charcuterie boards at your local craft stores, try ordering them from Amazon. I really love the one I picked as they are environmentally friendly! If that’s not an option, be sure to check out your local dollar store!
Q: What do I put on a charcuterie platter?
Some ideas I’ve seen have pretty simple ingredients such as blackberry jam, fresh rosemary sprigs, cherry tomatoes, red grapes, you can even add a glass of wine too. How much food you add will depend on the number of your guests. Of course, you can always make one for yourself as well! Whatever you decide to fill yours with, this homemade charcuterie board is a great way to add a nice touch and set up a fun way for you or your guests to have a nice meal.
Get the free designs for my charcuterie boards!
I’m looking forward to seeing what you make with my designs and how you use them! Please share a photo of your DIY charcuterie board art in our Facebook group or tag me on social media with #jennifermaker.
Love,

Want to remember this? Save this DIY Charcuterie Boards Tutorial to your favorite Pinterest Board!