
Learn the top 25 best Cricut tips and tricks that every crafter should know! I demonstrate each of these shortcuts for you so you know exactly how they work.
The Cricut cutting machine is hands down my favorite crafting tool. I use it so much that over the years that I’ve come across or come up with a lot of nifty Cricut Shortcuts that help me craft better and faster with it. It took time to learn these tips, which meant in the beginning I was making a lot of mistakes, wasting a lot of material, and working slower than I wanted to. So I want to pass along what I think the BEST Cricut tips and tricks are to you now in the hopes of saving YOU time and money!
These Cricut tips and tricks are from my personal collection, as well as contributed by the members of my amazing team. Between us all, we have decades of Cricut experience with a variety of different materials and techniques. These shortcuts are the best of the best. If you only had time to learn so many tips, these are the ones I want you to know!
By the way, if you prefer to read or just want to print out these tips to keep next to your Cricut, I’ve put all 25 of these tips — and a whole lot more — into my Cricut ShortCUTS collection. You can get all the details on this printable e-book at https://jennifermaker.com/shortcuts
See exactly how these 25 Best Cricut Tips & Tricks work in my video, where I demonstrate each one, or keep scrolling to read the tips:
But the video is just part of this, there’s something even better. I pretty much always have a thing you can download and keep, and today is no exception. Scroll down to the bottom of the post to see what it is!
I’ve organized the tips in this video as a countdown to my most favorite Cricut tip, and I’m excited to share and demonstrate them to you! Let’s get started!
This post contains some affiliate links for your convenience (which means if you make a purchase after clicking a link I will earn a small commission but it won’t cost you a penny more)! Read my full disclosure policy.
Things You Can Get That Make Your Cricut Crafting Easier & Faster
View my Amazon shopping list with the exact items I recommend in this tutorial!
- Aluminum foil
- Cricut Scraper, XL
- Silicone ring for weeding
- Baby wipes or wet wipes (alcohol free)
- Pink painter’s tape
- Baby powder and makeup brush
- Air Release Weeding Tool
- LightGrip Mat
- Fabric Weights
- Compressed Air
- Command Wire Hooks
- Lint roller
- Contact paper
- Slap bracelets
- Lint free paper towels
- Alcohol pump dispenser
- Spray bottle
The 25 Best Cricut Tips & Tricks
#1 Best Cricut Tip: Improve Your Cuts with Aluminum Foil
To keep your fine-point and deep-point blades clean and cutting well, repeatedly poke the blade tip into a piece of aluminum rolled into a tight ball. Just tear off a 12” sheet of aluminum foil, ball it up tightly, push the blade’s plunger down to expose the blade, and poke the ball about 40-50 times. Poking the pointy part of the blade into that foil ball will remove debris or oxidation that can build up on the blade and help it cut better.
While this is not sharpening the blade, as is commonly believed, it is using friction to remove little bits of stuff that collect on your blade and can cause issues when cutting. I regularly poke my blade into an aluminum foil ball and rarely, if ever, have issues getting clean cuts anymore.
Alternatively, if you don’t want to risk poking yourself with your blade or leaving your blade behind in your foil ball, you can put a piece of aluminum foil on your mat and cut several simple designs out of it—this will also clean your blade and improve your cuts!
Watch this ShortCUT in action:
Where to Get Aluminum Foil: Dollar store, any grocery store, Amazon
Time to Implement This ShortCut: Less than a minute
Flip the Mat to Remove Materials Without Damaging Them
Are you tired of having material rip or curl when you take it off your cutting mat? You don’t have to put up with it, and I’m going to share my secret to removing materials from mats, even fragile cardstock from the green StandardGrip cutting mat, without damaging them or curling them.
The key is to remove the mat from your material rather than remove your material from your mat. To do this, just flip your cutting mat over so it’s face down on your work surface, then gently bend your mat up and away from your material—this puts the force of the bend into the mat, which will bend right back, not your material. Often, your material will spring right off the mat for you!
See this ShortCUT in action:
Time to Implement: Less than a minute
Get Little Bits Off Your Mat Quickly with a Scraper or Card
Often when we cut cardstock or other materials, little bits will be left behind on the cutting mat and it can take a while to remove them one by one. The fastest way to remove them is to scrape them off.
You can use a regular size scraper or even an extra large scraper which will do the job faster.
If you don’t have a scraper or forgot yours somewhere, you can also scrape the little bits off your mat with a plastic card, like a store loyalty card, hotel card, or an expired credit card.
See this ShortCUT in action:
Where to Get: Any store that gives out loyalty cards, Amazon, craft stores
Time to Implement: 1-2 minutes, depending on how many bits were left behind.
Clean Mats with Baby Wipes
Do you have a cutting mat that is so well-loved that it just won’t keep anything stuck on it? Never fear … you can give it new life!
Just use a non-alcohol based baby wipe to wipe down your cutting mat. If it’s particularly dirty with fibers or whatnot, wipe in small circles all around the mat until it’s clean.
Then allow it to dry, which usually takes about 10 minutes for me.
Not only will this clean your mat, but it’ll help retain some of its stickiness, too.
I have a mat that I’d used well over a year ago and when it lost its stick, I just put it into a drawer, then forgot about it. When I pulled it out and wiped it down with the wet wipe, it became sticky and usable again!
See this ShortCUT in action: https://youtu.be/Dfr2RSMJUKY
Where to Get: Baby wipes are at dollar stores, grocery stores, and Amazon
Time to Implement: About 5 minutes to wipe down a really dirty mat
Keep Your Cricut Tools Handy
I recommend you keep all of your Cricut tools together in one place so it’s easier to use them when you need them.
The simplest way to do this is to put your tools in the accessory cups in your Cricut itself—you can also use the flip up compartment on your Cricut drawer.
Did you know there’s even a little section for blades on the left and it has a magnet to keep them in place? Another idea is to put your tools on a pegboard near your Cricut. Get the details for a framed pegboard at https://jennifermaker.com/diy-framed-pegboard-craft-organizer-tools/
Or you can make my Cricut tool bench—get the files and tutorial for it at https://jennifermaker.com/toolbench
You can also use a 3D printed tool holder, like this one we designed and made ourselves. Get details on this tool holder at https://jennifermaker.com/3dtoolholder
The key is to keep everything together so you’re not wasting time hunting for your tools.
See this ShortCUT in action: https://youtu.be/PWu2W96zaoo
Where to Get: Tool Bench, 3D Tool Holder
Time to Implement: Just a few minutes to collect everything together.
Store Your Cricut Pens Tip Down
Store your pens with the tip down in your accessory cup, tool holder, or pen storage. Storing pens upside down means the ink is always near the tip and is ready to go when you are ready to use them. This avoids or reduces issues where your Cricut pens just don’t want to write after putting them in the machine. And if you just bought a pack of pens and are having issues with them, keep in mind that they’re packaged with the point up and need some time for the ink to settle to the tip. The only exception to this rule is the Cricut gel pens—gel pens should be stored horizontally to keep the ink from leaking out. This may also go without saying, but also keep the caps on your pens. In fact, when you go to use your pen in your Cricut, put the cap on the other end of your pen while it’s in your Cricut so you don’t lose it!
See this ShortCUT in action: https://youtu.be/MyyIAJ0RjdY
Where to Get: Tool Bench, 3D Tool Holder
Time to Implement: Store as you go!
Weed Faster with a Container or Painter’s Tape
When you’re weeding a design and there are small bits to remove, it’s crucial you keep these tiny pieces away from your work surface or they can migrate back into your design. This usually means having to stop and move your weeded bits out of the way every once in a while. But you can speed up weeding if you keep a small container close at hand as you work. You can use something fancy like this silicone ring that lets you put bits in as you go, or something as low tech as a baby wipe container, wet wipe dispenser, or even just an empty tissue box. Another idea is to wrap some painter’s tape around your hand several times, sticky side up, and then just put the bits on the tape as you work. You should use whatever works best for you!
See this ShortCUT in action: https://youtu.be/zPoNxkTCEKs
Where to Get: Amazon
See Cut Lines Better with Baby Powder or Corn Starch
It can be difficult to see the cut lines in vinyl in order to weed them, especially if you have less than stellar eyesight like me.
To make the lines more visible, sprinkle a little baby powder or corn starch on your vinyl, then brush it in with a makeup brush (both of which you can get at the dollar store inexpensively).
The powder goes right into the cut lines making them appear for you so you can weed better and faster! The powder wipes right off when you’re finished.
See this ShortCUT in action: https://youtu.be/mZuMJfswZaM
Where to Get: Amazon
Time to Implement: Less than 30 seconds to shake and brush!
Use the Right Tools for Faster Weeding
Weeding vinyl is challenging when you’re not using the right tools. Most people just use the Cricut weeder, not realizing that while it is a fine tool, it may not always be the right tool for the job. Other great weeding tools include dental tools, tweezers, and craft knives. You can also use an empty 5mm pencil and a size 70 needle in place of the lead and make your own weeding tool. Or get fancy and buy a special weeding tool that also serves as an air release pen for bubbles — the other end can hold down small pieces that lift up when you’re removing vinyl.
See this ShortCUT in action: https://youtu.be/Scr2AJ15s1E
Where to Get: Amazon
Keep Your Vinyl in Place As You Weed
A lot of vinyl comes on rolls, specifically Cricut vinyl, and that means when you’re done cutting it can still be really curly and not want to lay flat on your surface. And frankly trying to keep the curl down while you weed can be a nightmare. You can try to keep your vinyl in place while you weed, as that will make it so much easier. There are a few ways to do this. One way is to weed on a slightly sticky (not super sticky) mat to keep it in place. You can use a blue LightGrip machine mat or an older green StandardGrip machine mat. You can also just tape your vinyl down to your surface with some painter’s tape and that will keep it in place. And finally, if you prefer to weed on a BrightPad or some other sort of lightbox so you can see your cut lines, you can use fabric weights and that will keep it in place, or also painter’s tape works just fine on your BrightPad. If you can keep your vinyl in place while you weed, it’s almost like having a third hand. And it is a huge help!
See this ShortCUT in action: https://youtu.be/rHMy2R0QLb8
Where to Get: Amazon or Cricut
Time to Implement: Just a few extra seconds
Keep Your Cricut Clean with Compressed Air
Over time, little bits of paper and debris will collect in your Cricut and it can be really difficult to get to them to clean them out. But keeping your machine clean matters, as it makes it easier for the mat to pass through unimpeded. I like to use a can of compressed air, the type used for electronics, and squirt puffs of air along the bed to remove all the gunk. It works really well and you don’t have to worry about getting into those hard to reach places. So long as you aim the can of compressed air directly at the bed of the machine, the air can go right out the back slot, along with all of your dust!
See this ShortCUT in action: https://youtu.be/zUmmDebXqjU
Where to Get: Amazon
Time to Implement: 1 minute or less
Keep Mats Within Easy Reach
You’re more likely to craft if your mats are within reach and ready to go. When you’re new and have just one or two, you can simply slide them right under your Cricut. But what about later when you’ve collected several mats of various grip strengths? Or you have the longer mats? Use a picture hook or Command strip hook (the metal type) near your Cricut to hang your mats. I have a hook for regular size mats and long size mats, and it’s SO convenient.
See this ShortCUT in action: https://youtu.be/WTdwc_6i6qQ
Where to Get: Amazon
Time to Implement: Just a few minutes to hang up on your wall or on the side of your desk
Transfer With Less Sticky Tape and Save Your Sanity
Let’s face it, sometimes transfer tape is just TOO sticky. So if you are having issues getting your vinyl to come off your tape, or you’re just out of tape, there are some alternatives. You can put strips of painter’s tape or masking tape on a vinyl design and transfer with that. You can use lint roller sheets in a pinch, too. Another idea is to use clear contact paper, which is less sticky and generally quite inexpensive. If you have none of these things and are struggling with the sticky tape, try sticking your tape to a clean shirt or piece of fabric before you use it — this will reduce its tack and make it a little less sticky.
See this ShortCUT in action: https://youtu.be/CyybvYDlQw0
Where to Get: Amazon
Time to Implement: No extra time needed
Waste Less Material with Test Cuts
One of the most frustrating things you can do is waste expensive material, especially when it was your last piece of cardstock or vinyl in just that one color. But you don’t have to do this! Whenever you have a piece of material that is either new to you, or is in scarce supply, always do a test cut first. Simply open Cricut Design Space, click on Shapes then click Circle and resize the circle down to a half inch. Now just cut out the circle. If you can remove the circle freely from your material, you’ll know your settings are good and you can cut out your entire design. But if you cannot, change your settings and try to cut out that circle again. Repeat until you can cut out the circle, THEN cut out your design. You will waste a LOT less material this way.
See this ShortCUT in action: https://youtu.be/Bn_0ibF6ho4
Time to Implement: Just a minute or two!
Get Better Results with Double Passes
Have you ever cut something and you can already tell it didn’t cut all the way through before you even unload it? I can often tell just by lifting up a corner on my mat. If this happens to you, there’s something you can do. Before unloading your mat, press your “C” button again. This will pull your mat back in and re-cut it exactly as it just did, and this time it will cut a little further. You can do the same thing with scoring if you think the score isn’t quite deep enough. The key is to do it before you press the Unload button. If you do it after you’ve unloaded the mat, the mat is likely to be in a slightly different position and will cut or score in a different position, too.
See this ShortCUT in action: https://youtu.be/K0QBXjTrAQo
Time to Implement: As much time as your first cut.
Keep Your FabricGrip Mats Cleaner
The pink FabricGrip machine mats can get messy, especially when you cut something like felt or fleece. While the mats will keep working for a while even with fibers and threads on them, it can be a mess. And you can’t wipe down or wash the FabricGrip mats the same way you can the other mats. If you also struggle with this, consider putting a sheet of contact paper or transfer tape sticky side up on your FabricGrip mat before you position your fabric on it. This means the fabric bits get stuck on that paper or tape rather than your mat, and it extends the life of your mats. Keep in mind that you can only get about 7 cuts before you’ll need to change your contact paper or transfer tape on your mat, and it may take a while to remove because the cuts will cut into the paper or tape, too. But it will keep your mat cleaner!
See this ShortCUT in action: https://youtu.be/UNpwfqTwFt8
Where to Get: Amazon
Time to Implement: 10-15 minutes
Keep Vinyl Rolls From Unrolling
Are vinyl rolls unrolling on you and making a mess?
You can tape it closed with painter’s tape and it won’t leave any residue like Scotch tape might.
Another idea is to take a paper cardboard roll, cut it into a two inch length, then cut a slit in it — you can wrap these right around your rolls to keep them tidy. And, bonus, you can even write the type of vinyl it is on the cardboard!
And if you have some of those slap bracelets, you can quickly wrap those right around your rolls of vinyl to keep them in place, too!
See this ShortCUT in action: https://youtu.be/YTa8PlIRxqs
Where to Get: Amazon
Time to Implement: Store as you go!
Extend the Life of your Cutting Mats
If you cut a lot of projects like me, your mats can lose their stick pretty quickly. But there is something you can do to get more out a mat that’s losing its stick! If you pay attention, your Cricut always puts items to cut in the upper left corner of your mat by default. This means if you move things to be cut to other parts of mat, it’s likely to be more sticky in those areas. For example, try moving things to the center or other corner in the mat preview to use your mat more evenly. And also be sure to turn your mat around 180° and use the other end, too! Often an old mat will be stickiest on the bottom edge.
See this ShortCUT in action: https://youtu.be/qJLJl-3zygQ
Time to Implement: Do it as you go along!
Tape Down Materials To Prevent Moving On Your Mat
If your mat has lost its stick entirely, you may still be able to use it with a little painter’s tape. Just place your material down on the mat, then tape it down at the very edges with some painter’s tape. You may need to move your design to the center of the mat to accommodate the tape lines. Just avoid using this on any design with really intricate cuts, as that sticky mat really makes a difference then. And don’t let the tape overlap the mat or get under the rollers, as it will likely jam your Cricut. This tip is also great for cutting any material that is really stiff, as they don’t like to stay in place even with a brand new and sticky mat.
See this ShortCUT in action: https://youtu.be/PxWutZb-4SY
Where to Get: Painter’s Tape on Amazon
Charge Your Phone or iPad While You Craft on a Cricut Maker
If you have a Cricut Maker, you also have another charging station. On the right lower side of the Maker, look and you’ll see a USB port. You can use this to charge your phone or iPad, or even plug in your BrightPad. And you can rest your device or BrightPad in the built-in slot at the top of your Cricut Maker, too! I can’t tell you how many times I’ve charged my phone from this port. Most people have no idea this port is even here, but now YOU do!
See this ShortCUT in action: https://youtu.be/bkpzVQKvWWI
Where to Get: Amazon
Access All Material Settings for Better Cutting
You’re not limited by the material you see on your dial on the Explore series machines, or the materials you see under Popular on your Make screen in Design Space. You can access a whole bunch settings for very specific materials. First, if you’re using an Explore series machine, make sure you turn your dial to Custom Settings and keep it there. (Makers don’t even have a dial and are always on Custom Settings.) Second, when you’re on the Make screen, be sure to click the Browse All Materials link in the upper right corner to search through ALL the settings and select the best one. Having the right setting makes a HUGE difference in the success of your cut!
See this ShortCUT in action: https://youtu.be/epFq9EIjdI4
Cut More Than One Color of Material at Once
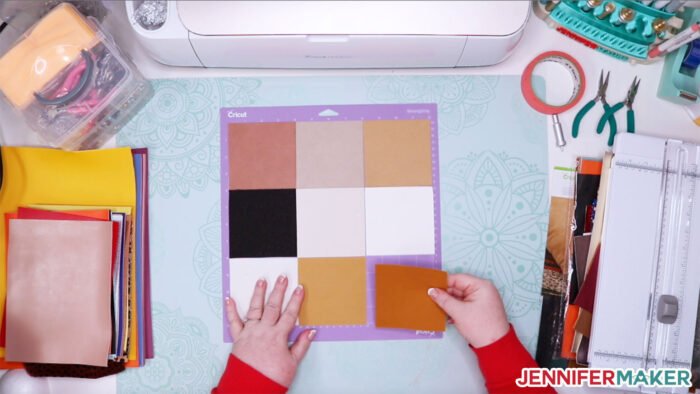
Frustrated by loading and unloading lots of mats when you have a design with many layers or colors? You can save time and headaches by cutting more than one color of a material at once! Just move all cut elements to the same mat in Design Space, either by making them the same color or by moving them individually on the Mat Preview screen (click the three dots in the upper left corner of each cut element and then click Move to Mat). Then you need to position each element in a different corner or section of your cutting mat in the mat preview screen. Once the Cricut knows where to cut everything, put appropriately-sized pieces of material in the corresponding sections on your mat. It helps to refer to your Mat Preview as you place your material. This allows you to cut a TON of different colors at once!
See this ShortCUT in action: https://youtu.be/Y3jTem1xcAs
Time to Implement: A couple extra minutes saves a lot of extra loading and unloading!
Reduce Tack on New Mats
Brand new mats can be super tacky, and this can cause issues with getting materials off mats. But you can reduce the tack on new cutting mats simply by patting them down with your hands—the oil from your hands will make the mats a touch less sticky. Alternately, press a clean paper towel on your mat to transfer a thin layer of fibers to the mat and reduce its stick. Neither of these actions actually harms the adhesive on the mat, and you can later wipe them down to reveal more of the adhesive later.
See this ShortCUT in action: https://youtu.be/1JdrOrYN-Ag
Where to Get: Amazon
Use a Lint Roller to Remove Debris and Fibers
Cutting mats collect a lot of bits of paper, dust, and fibers, all of which can reduce the effectiveness of your mats. One really quick way to remove this layer of stuff and get a sticker mat is to run a lint roller over the surface of the mat. This will pick up a lot of the loose little bits that like to cling to your mat. Of course, it’s a great idea to keep your plastic mat protectors on your cutting mats while they’re not in use to avoid collecting any extra dust or pet hair!
See this ShortCUT in action: https://youtu.be/LhtirR7TiNw
Where to Get: Get Lint Rollers on Amazon or at your local dollar store
Time to Implement: A couple of minutes
Wipe Down Surfaces with Alcohol Before Applying Vinyl
Whenever you are applying vinyl to smooth surfaces, you’ll get a much better adhesion if you wipe it down first with rubbing alcohol. And the higher the alcohol count, like 91% or 95%, the faster it will dry. You can just use a giant jug like this, but a spray bottle with a fine mist works really well. If you find you need to apply small amounts of alcohol frequently, a push-down pump dispenser is a lifesaver—you can get the big ones on Amazon, or the small ones at the dollar store (they are marketed as nail polish remover pumps). It’s also really important that when you wipe down your surface that you use a lint-free towel, or you’re just introducing more dust to your surface. I use Scott shop towels, but if you don’t have those, you can just use a coffee filter, which is lint free!
See this ShortCUT in action: https://youtu.be/pB1WpRR8ME8
Where to Get: Amazon
Time to Implement: Less than a minute
Get my Cricut ShortCUTS E-Book!
I’ve turned my favorite tips & tricks (and many more tips that I don’t mention in the video) into a brand new ebook called Cricut ShortCUTS: Tips, Tricks, Hacks, and Hidden Features to Craft Faster and Better. I’ll be continuously updating it, like I do the Playbook, so get it now and watch it grow and expand!

Get my Cricut ShortCUTS e-book for just $14
I’d love to hear YOUR tips and tricks! Please share them in our Facebook group, email them to me at [email protected], or tag me on social media with #jennifermaker.
Love,

Want to remember this? Save the 25 Best Cricut Shortcuts to your favorite Pinterest Board

I use a lot of your tips and tricks and they work great. I was wanting to know if you have anymore diy’s like the one for making the homemade quills.
Great tips
Love the 25 tips especially the one about charging your phone while working on Cricut never knew that. And placing phone on top of the Cricut. Pretty cool!
I am going to be starting a scrapbook project so I am interested in paper crafting ideas. Loved the tips and tricks video. In fact, I have enjoyed and learned alot from all the videos I have watched.
Thanks, Karen
Thank you so much!