
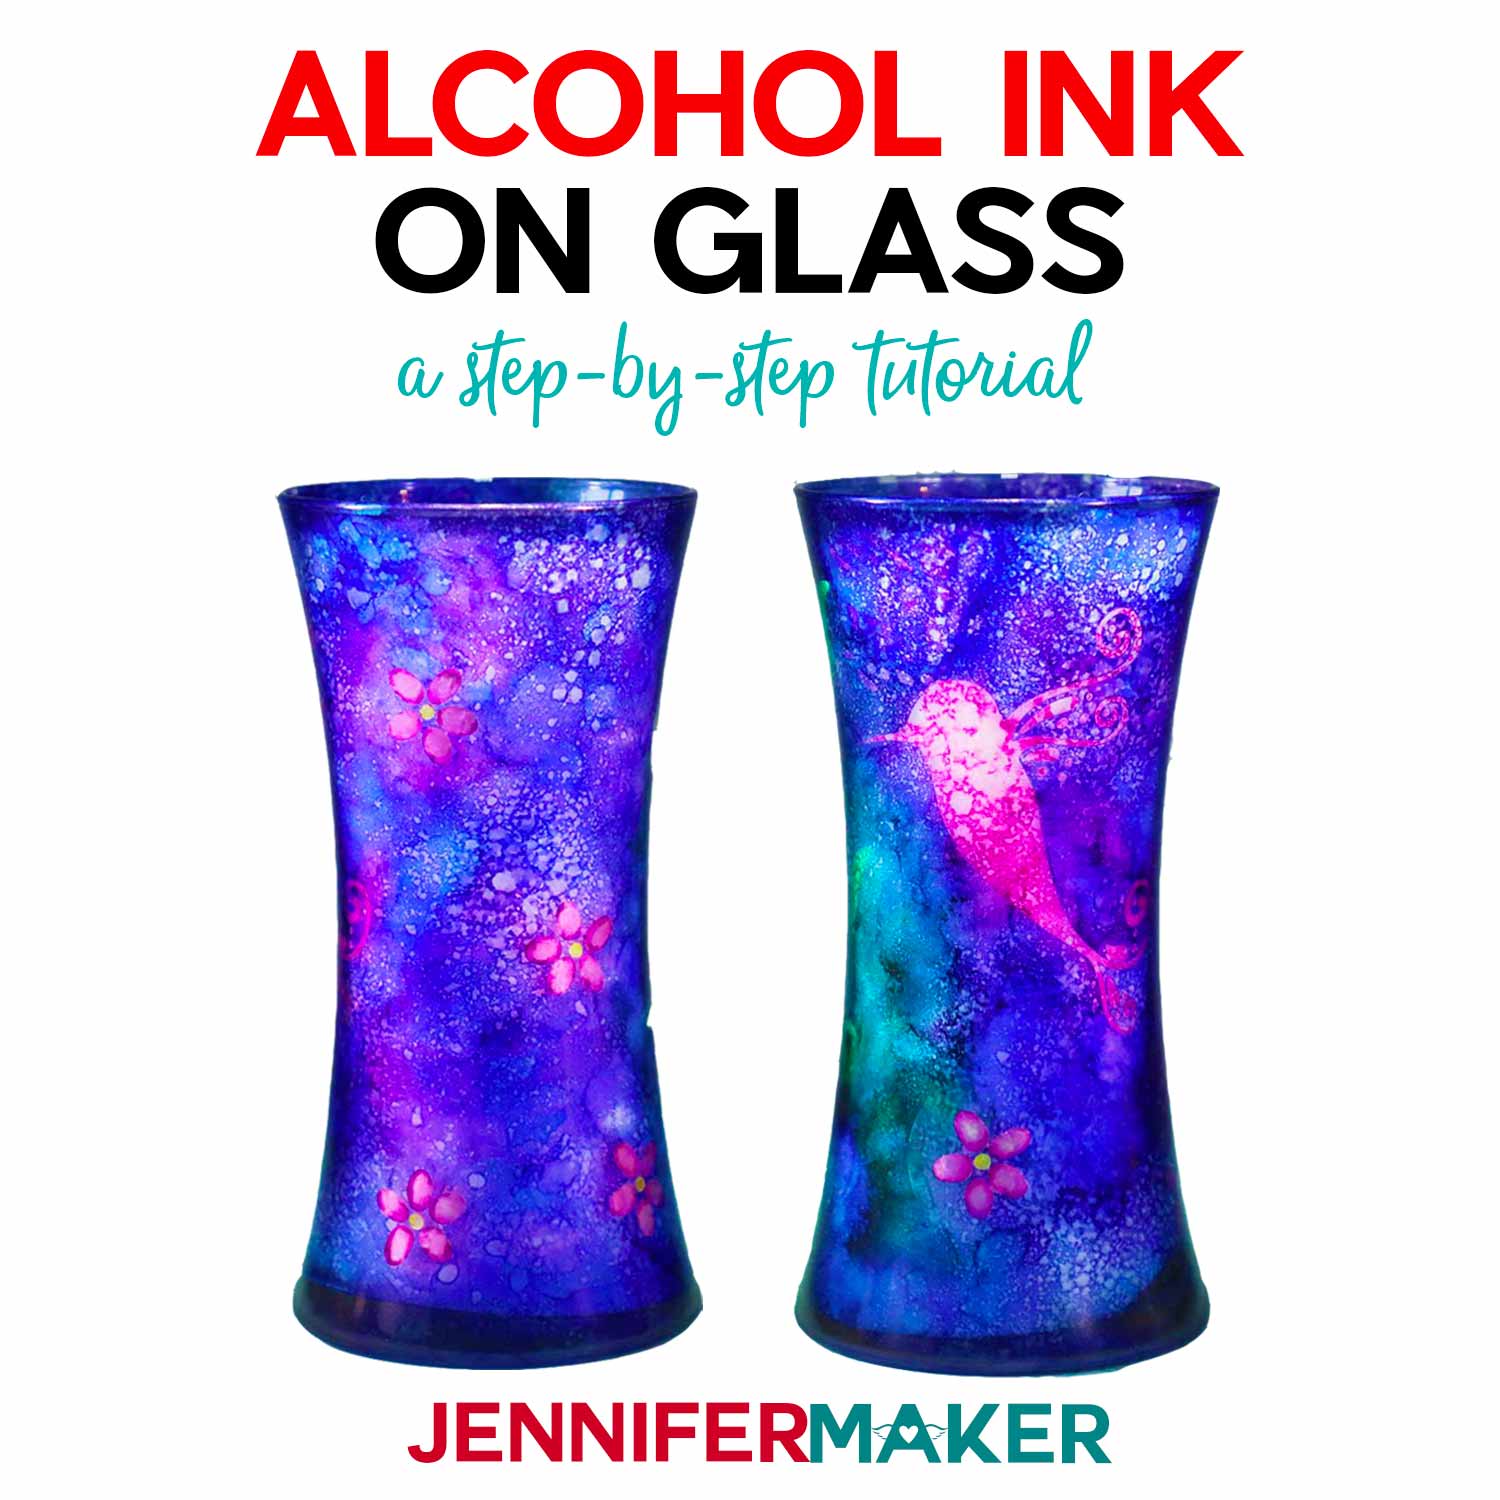
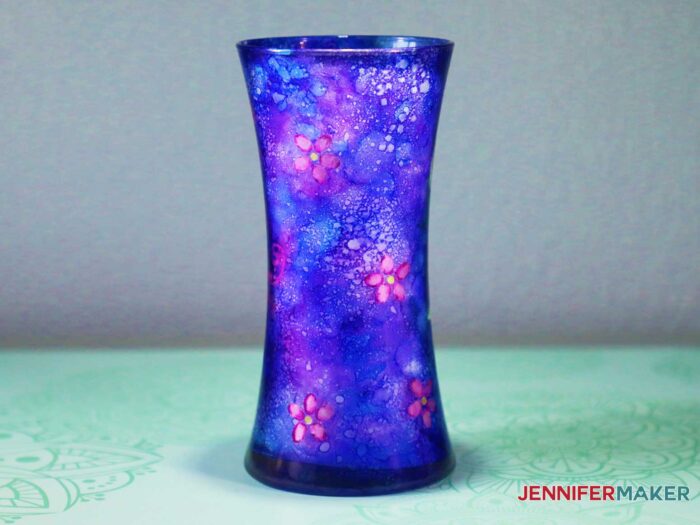
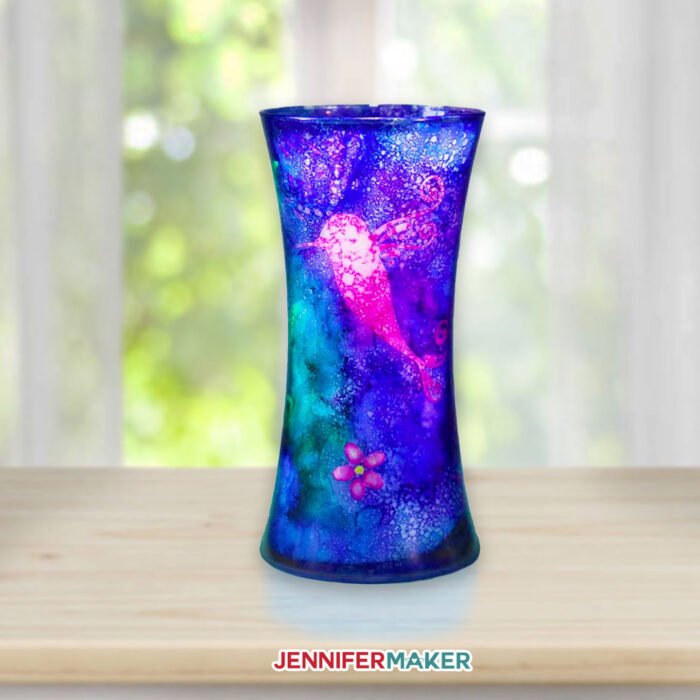
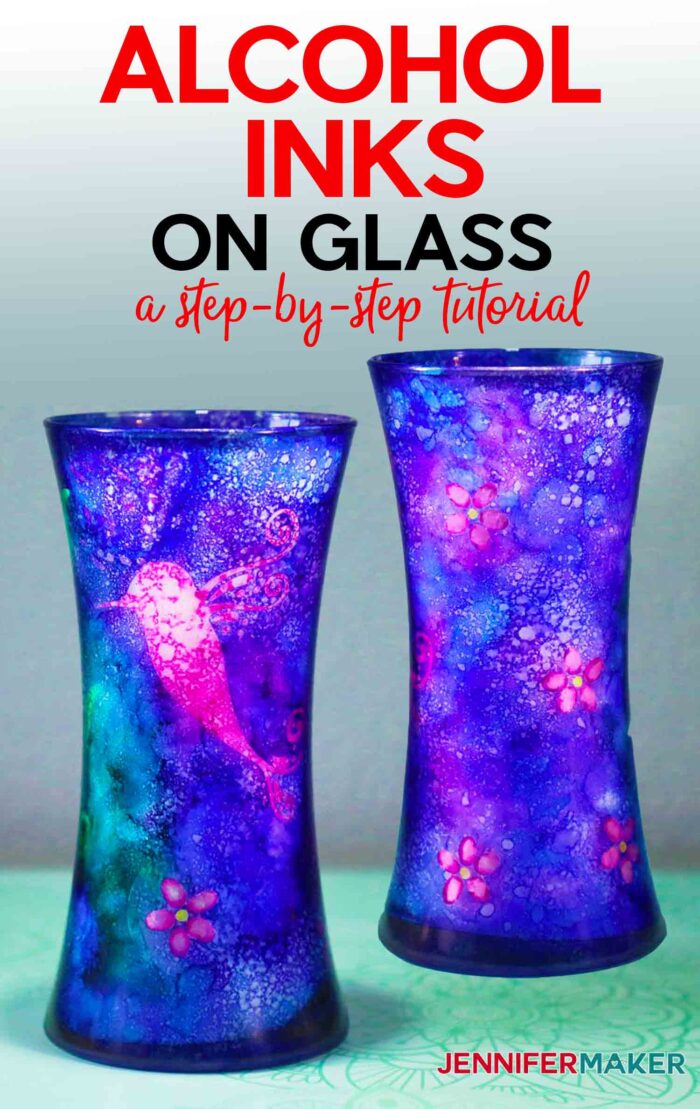
Learn how to make a beautiful vase Alcohol Ink Glass Vase with my simple step-by-step tutorial that shows you how to use stencils for peek-a-book designs!
Do you love creating beautiful DIY home decor? It always makes me happy to see my handmade projects around my home. In this tutorial, I teach you how to design a beautiful vase using alcohol ink on glass and stencils. Imagine creating a wonderful glass vase design that will amaze and delight everyone, especially yourself! This is an easy project, but it does require drying time between the different layers and stencils. The great thing is that if you want to make changes to your vase design during the process, you can always clean the alcohol ink off the glass and start over. So for Day 18 of The Great Maker 25-Day Gift-Away Challenge, we are painting a beautiful vase with my alcohol ink glass vase tutorial!
See exactly how to paint this alcohol ink glass vase with stencils in my tutorial video (or keep scrolling if you prefer a printable step-by-step photo tutorial):

 What is The Great Maker 25-Day Gift-Away? This is an annual tradition here at JenniferMaker! Every day for the first 25 days of December we gift you with a brand new project, design, tutorial, and video. On top of that, we host a giveaway with 25 prizes. Some of the amazing prizes are Cricut cutting machines, sewing machines, gift cards, and beautiful print editions of our popular Cricut Coach Playbook. You can even earn bonus entries for sharing photos of the daily projects! Click here to learn more about The Great Maker 25-Day Gift-Away!
Do you have a plain vase hanging about your house that needs a makeover? Or just want to create a beautiful vase for your home or to give as a gift? You can turn a simple and unpretentious vase into a magnificent work of art with a stencil and some alcohol inks! Yes, you can put alcohol inks on glass and the result is breathtaking.
If alcohol inks are new to you, you’re not alone — I only heard about these a few years ago from my mother, who brought them over to my house once so my daughter and I could play with them. Alcohol inks are highly pigmented, alcohol-based inks that are great to use on any hard, non-porous surface like glass, but they also work well on metal, plastic, ceramic, stone, leather and polymer clay. Once the ink is on the surface, the alcohol evaporates, leaving the dye behind. And you can mix them in interesting ways, too!
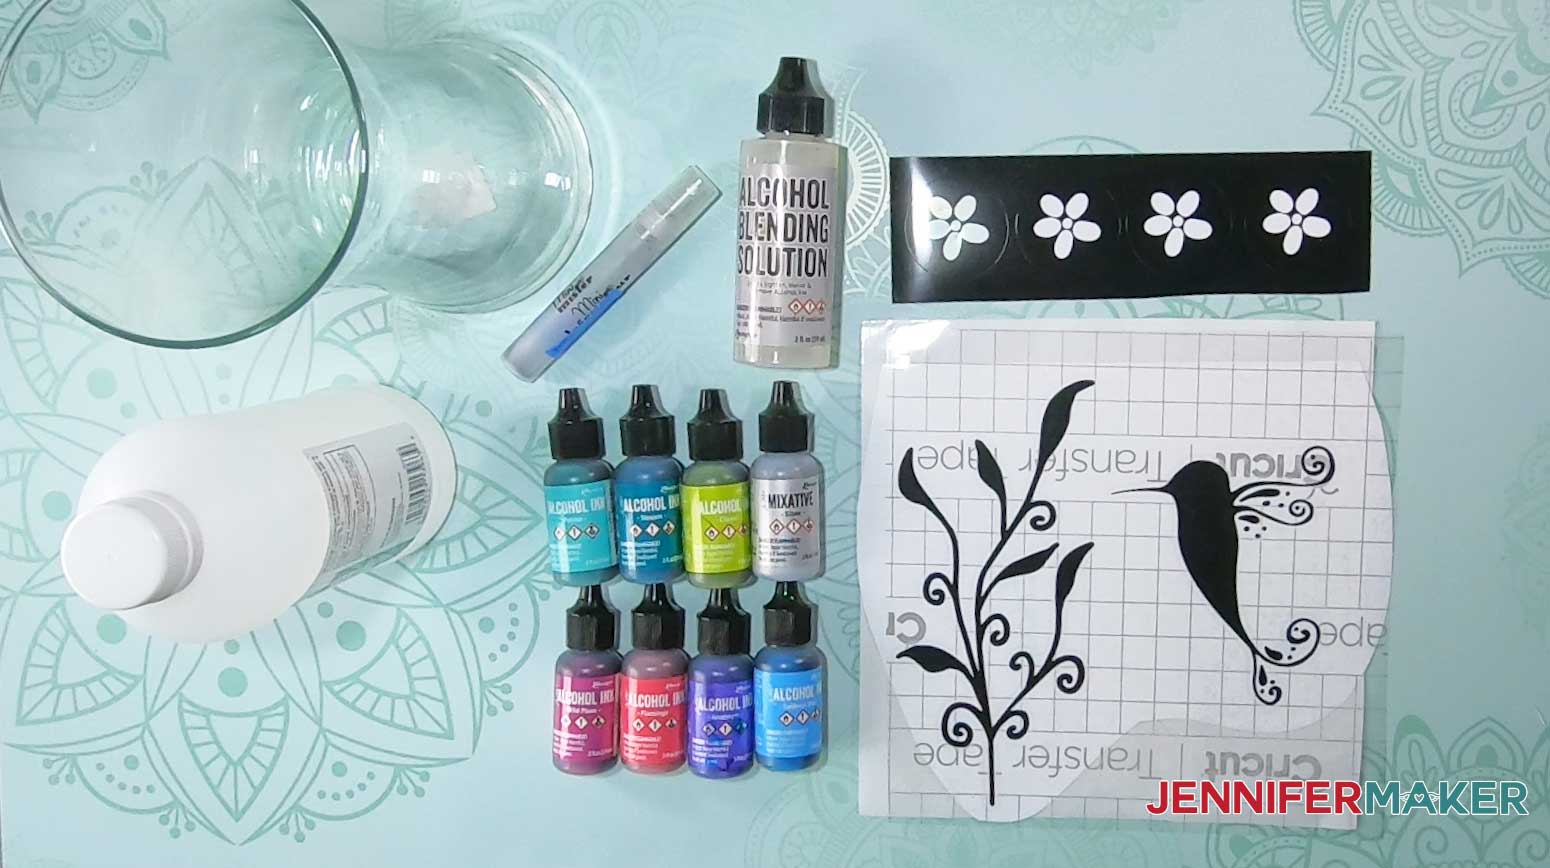
So for this project, we’ll use alcohol inks in a variety of colors — I’ve used wild plum, stream, patina, citrus, amethyst, and flamingo. (I love those names!) I also recommend some alcohol ink metallic mixatives — I am using the silver metallic mixative. You won’t need much of these — a little alcohol ink goes a long way.
And in order to get this gorgeous blended effect, you need an alcohol blending solution and some cosmetic wedges. I will show you how to use them all!
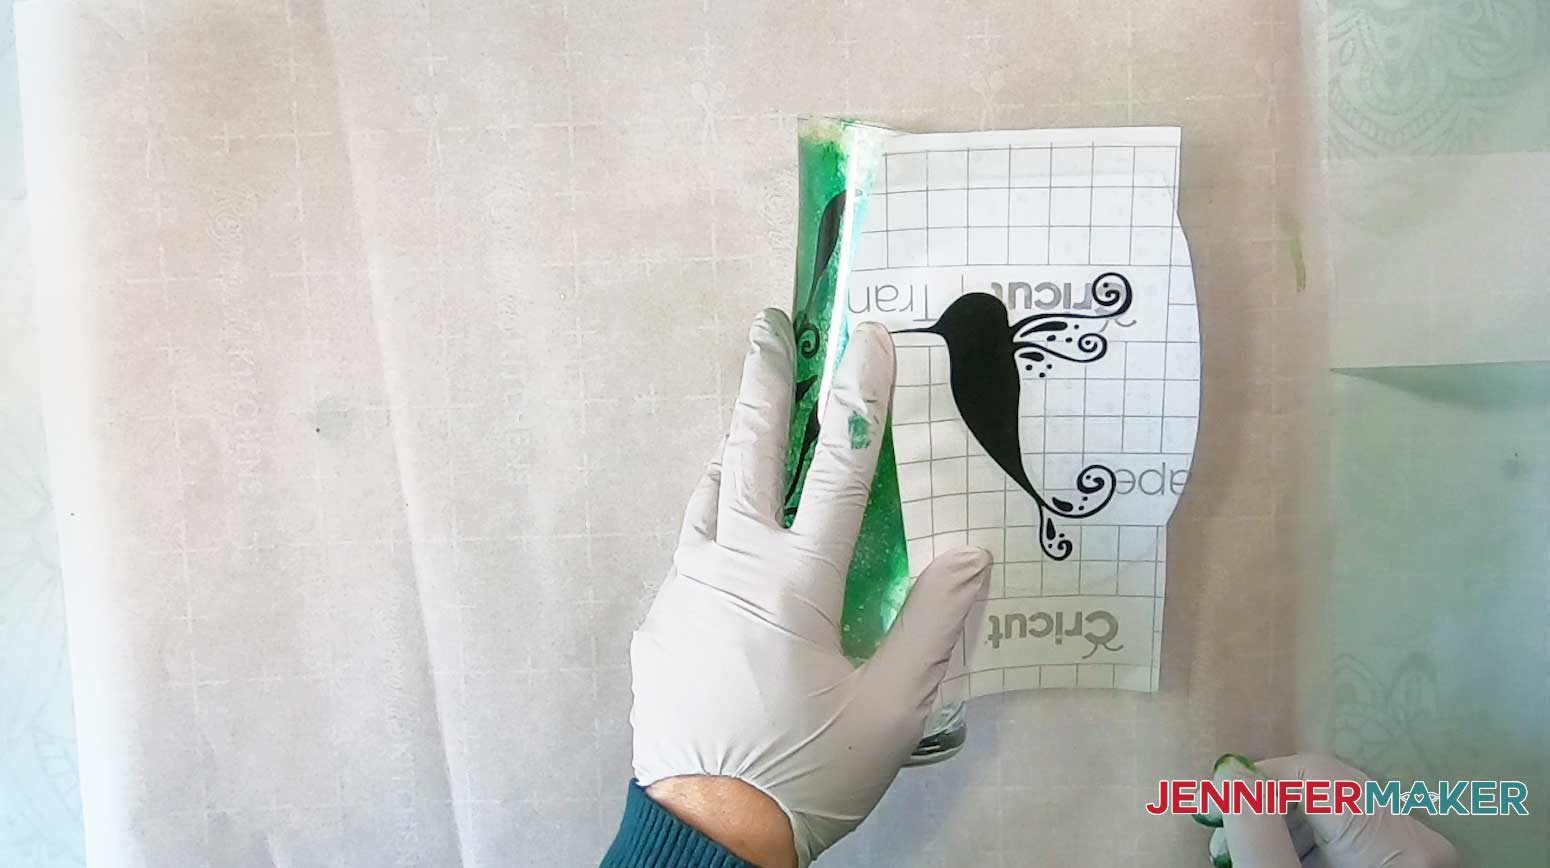
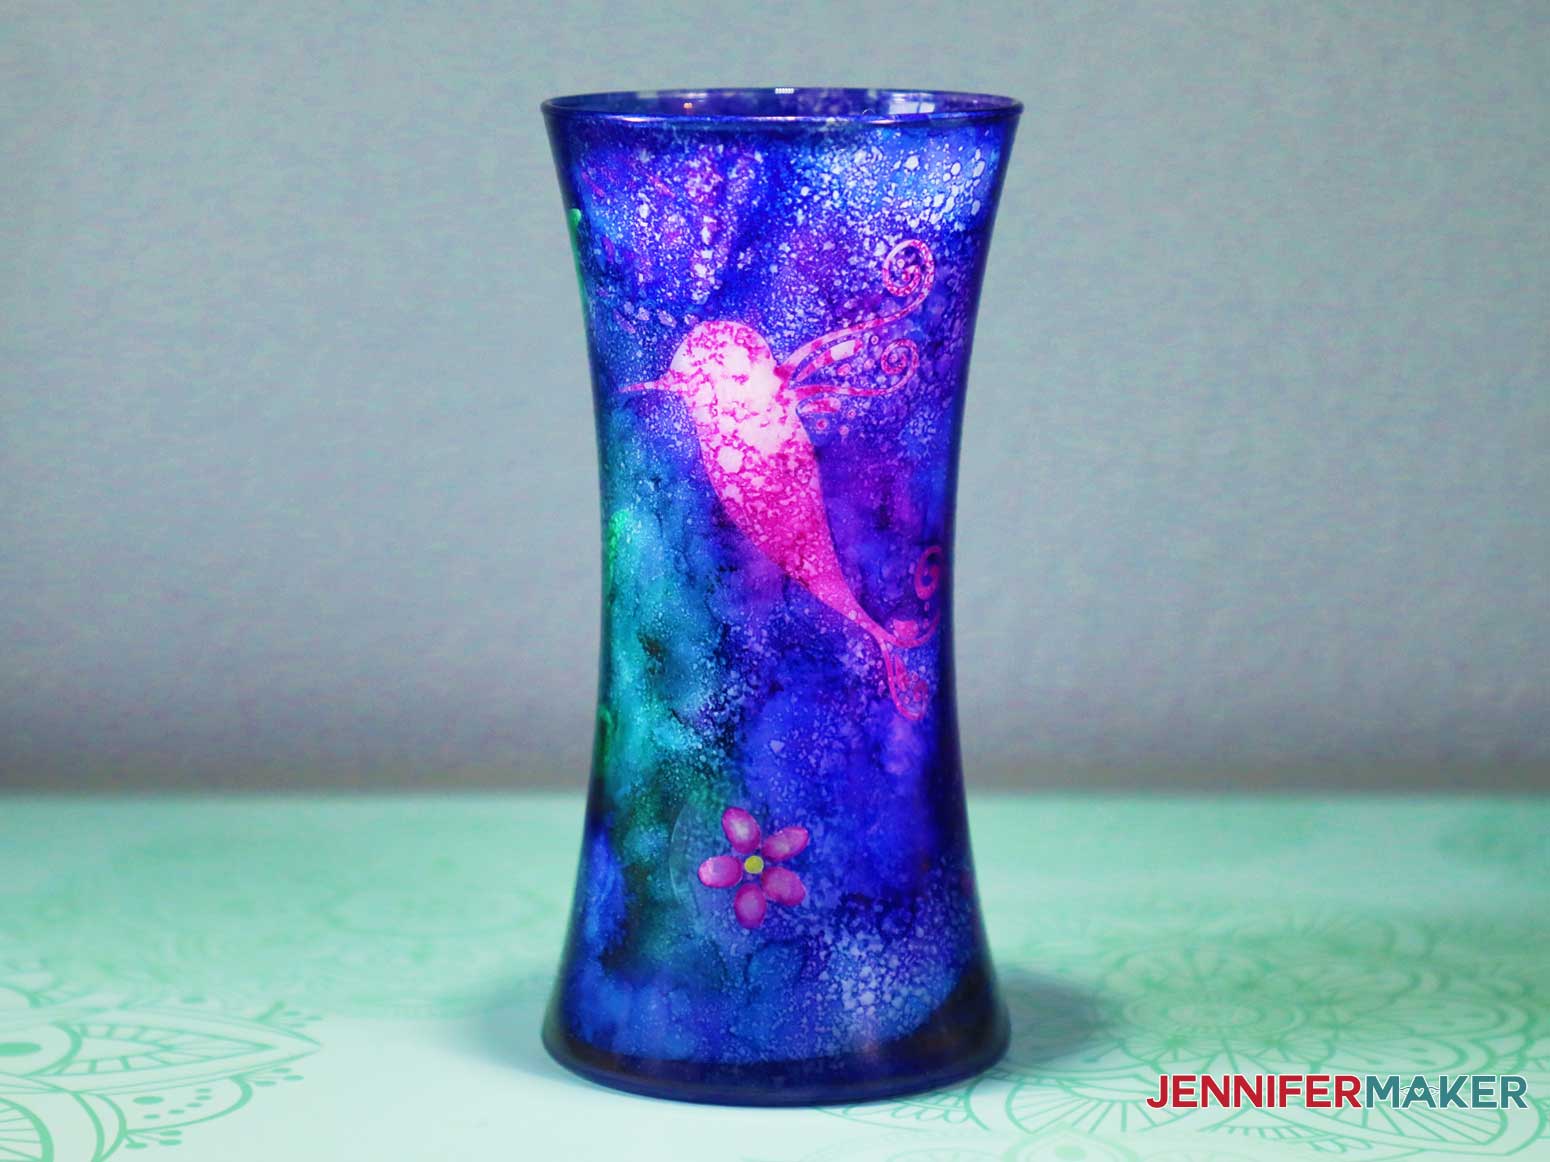
The hummingbird design you see here is achieved with a stencil. You can also put flowers or butterflies on. So for the stencil, you’ll need some permanant vinyl and some transfer tape. You also need a way to cut it — you can cut it on a Cricut cutting machine, or by hand with a craft knife.
And, of course, you need a clear glass vase. Any size will do — I’m using an 8″ vase. The wider the vase, the more you’ll be able to see your stenciled design.
Other useful things include a weeding tool, gloves, isopropyl alcohol, towels, scissors, and parchment paper.
Finally, you need some UV resistant spray and varnish spray to keep the beautiful alcohol inks from fading.
And, as with most crafts, work in a well ventilated area and avoid skin contact. Breathing alcohol fumes can be dangerous. Here is the safety data sheet for alcohol ink. I recommend you always wear gloves and a ventilator for safety. The manufacturer of the alcohol inks I used (Ranger) does not recommend filling any sprayer with Adirondack Alcohol Inks, Metallic Mixatives, Snow Cap Mixative, or Alcohol Ink Blending Solution as these contents contain alcohol and should not be airborne.
So let me show you where to get my free stencil designs — the hummingbird and the butterfly — and then how to use them to create this stunning alcohol ink glass vase. This post contains some affiliate links for your convenience (which means if you make a purchase after clicking a link I will earn a small commission but it won’t cost you a penny more)! Read my full disclosure policy.
Materials to Create with a Gorgeous Alcohol Ink Glass Vase
View my Amazon shopping list with the exact items we used to make this project!
- Glass Vase – (I used this 8-Inch vase)
- Alcohol Ink (Wild Plum, Stream, Patina, Citrus, Amethyst, and Flamingo)
- Alcohol Ink Metallic Mixatives (Silver)
- Alcohol Blending Solution
- Cricut Premium Vinyl(any color)
- Transfer Tape
- Krylon Kamar Varnish Spray
- Krylon UV Resistant Spray
- Cricut Cutting Mat (LightGrip or StandardGrip works)
- Weeding Tool
- Cosmetic Wedges
- Teflon Sheet or Parchment Paper
- Scissors
- Isopropyl Alcohol 90% or higher
- Lint-Free Paper Towels
- Nitrile Gloves and a respirator with organic vapor cartridges
- A way to cut your design (I used the Cricut Maker cutting machine but they can also be cut on a Cricut Explore or Cricut Joy)
- Design #269 (My free SVG design files available in my free resource library—get the password by filling out the form at the bottom of this page)
Alcohol Ink on Glass Tutorial
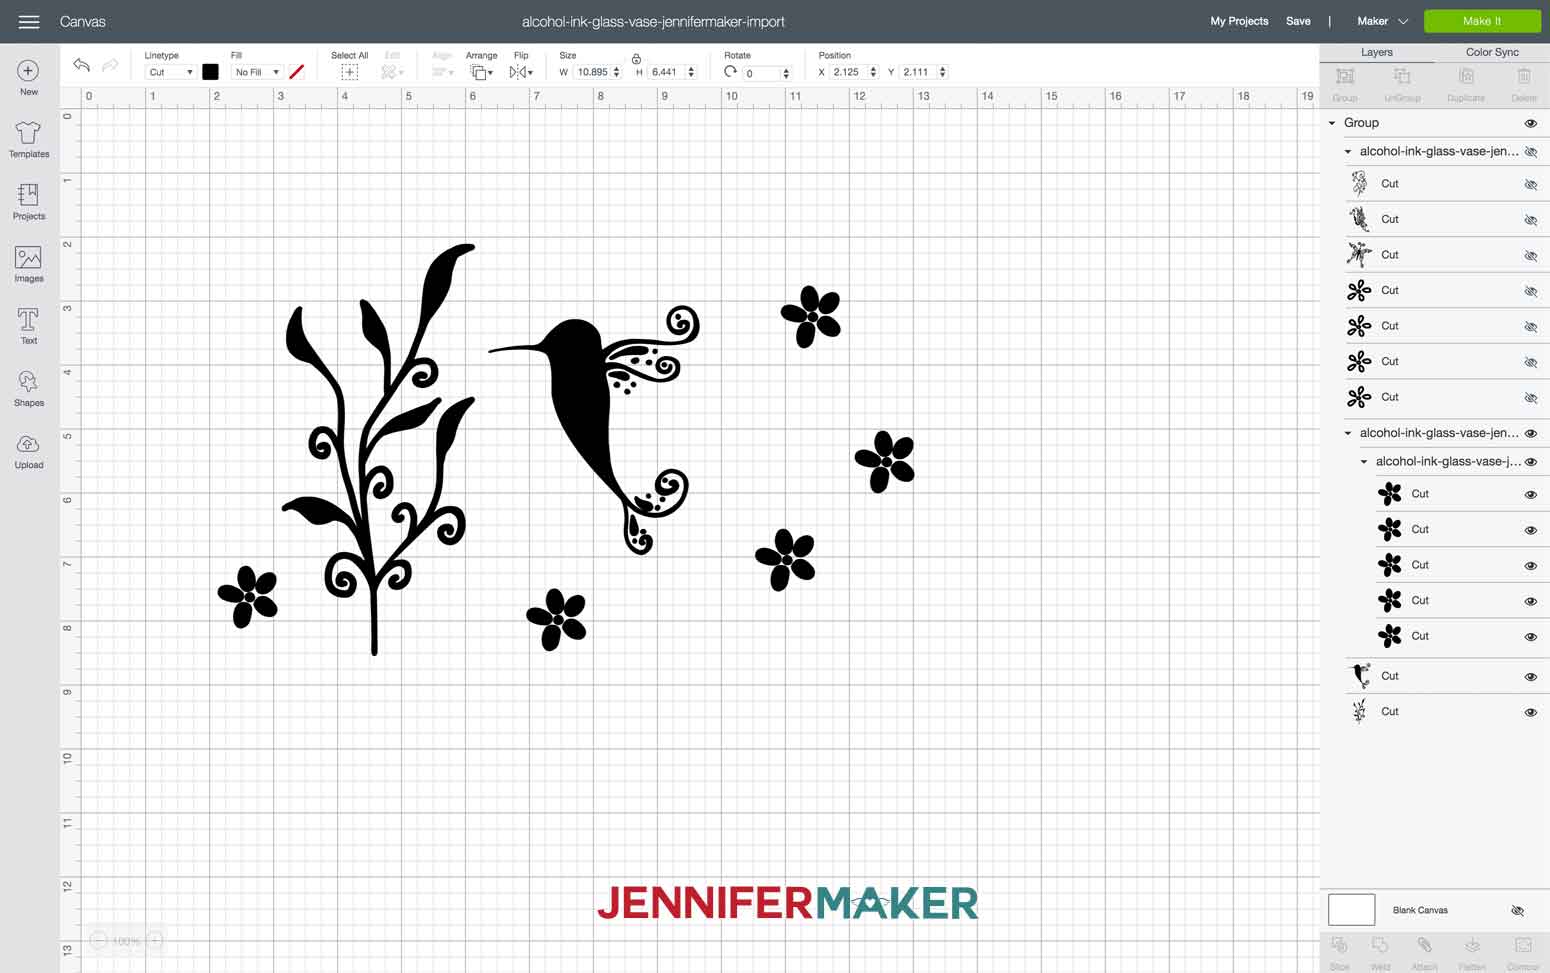
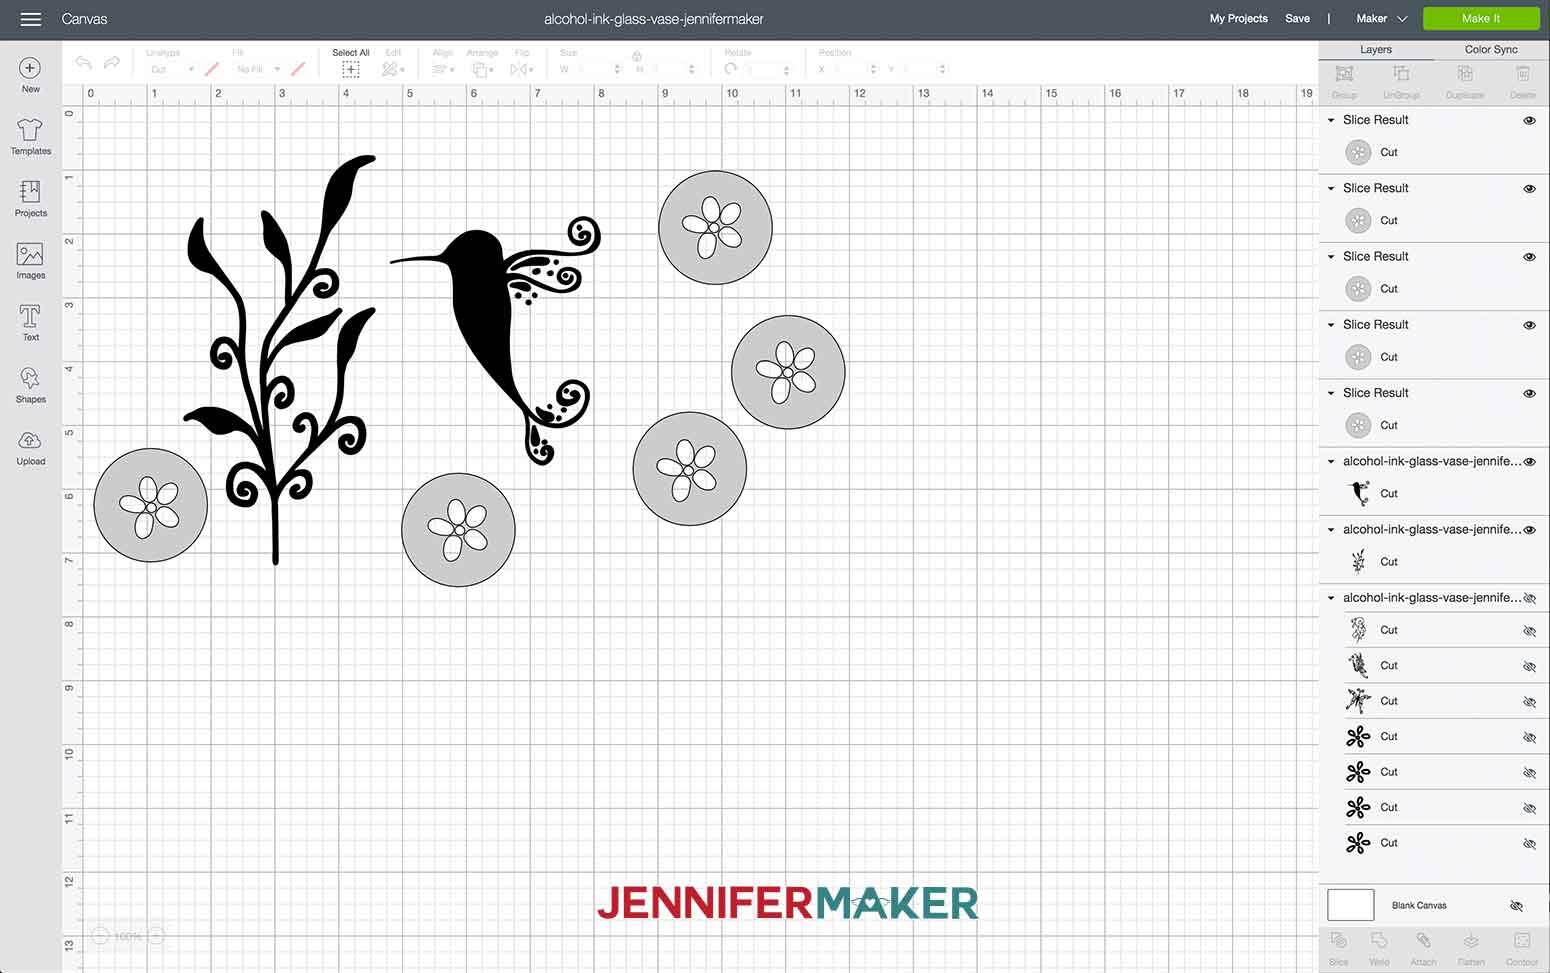
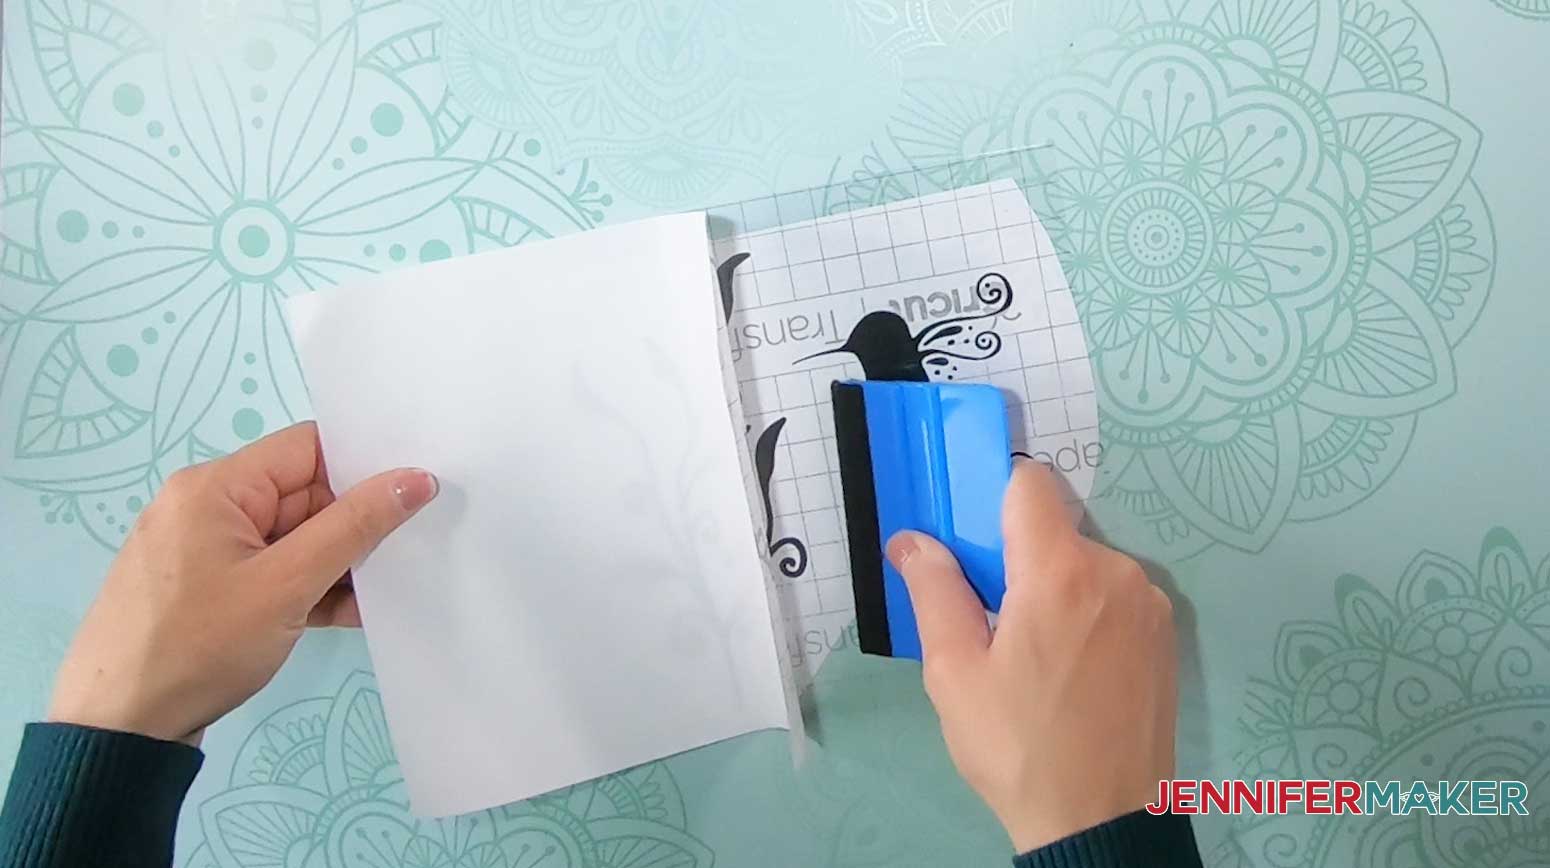
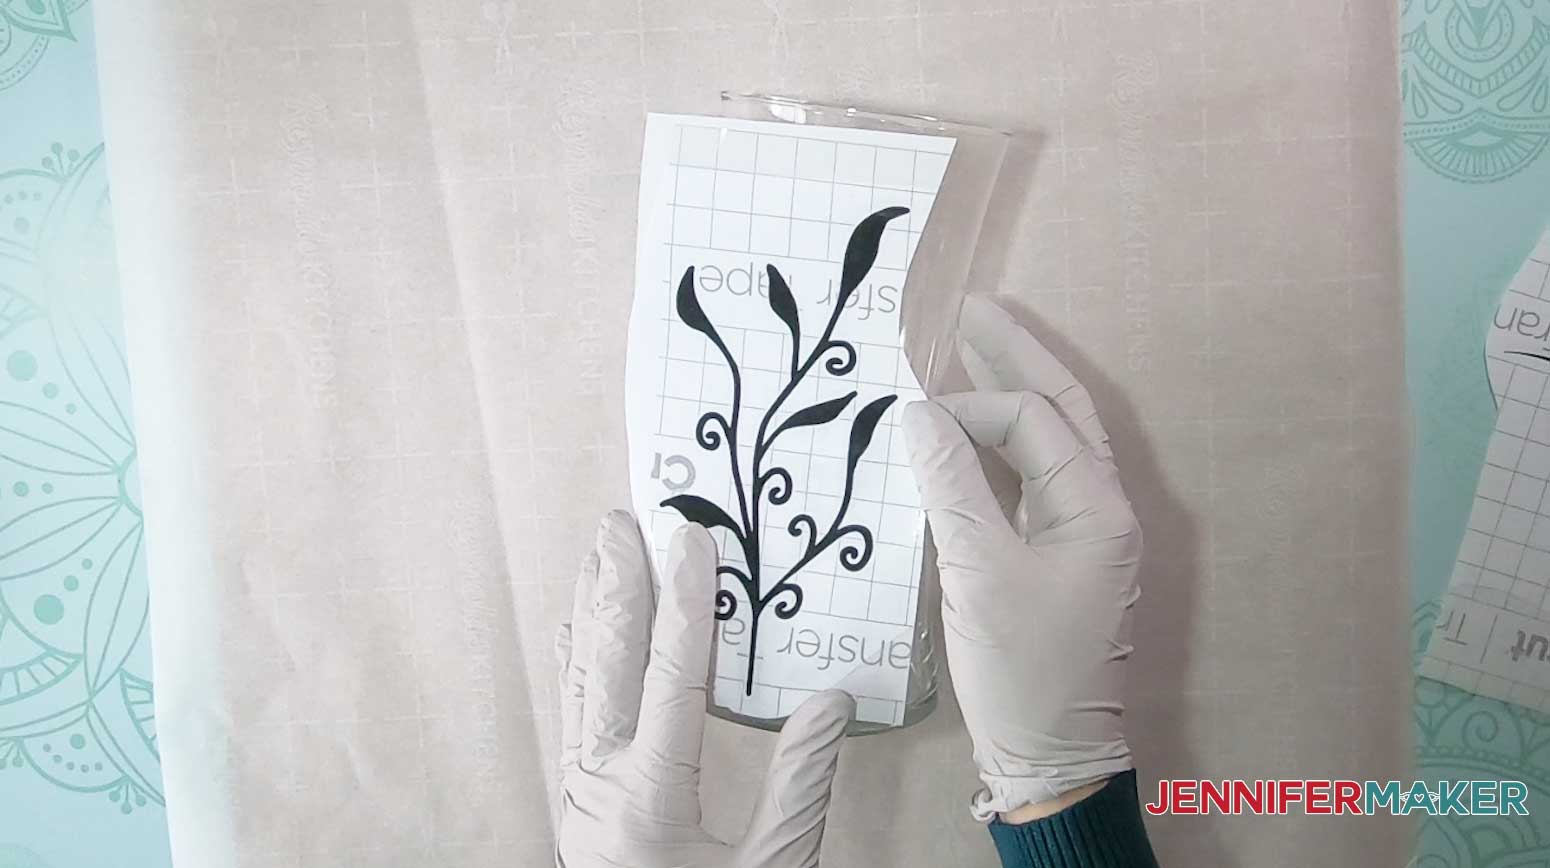
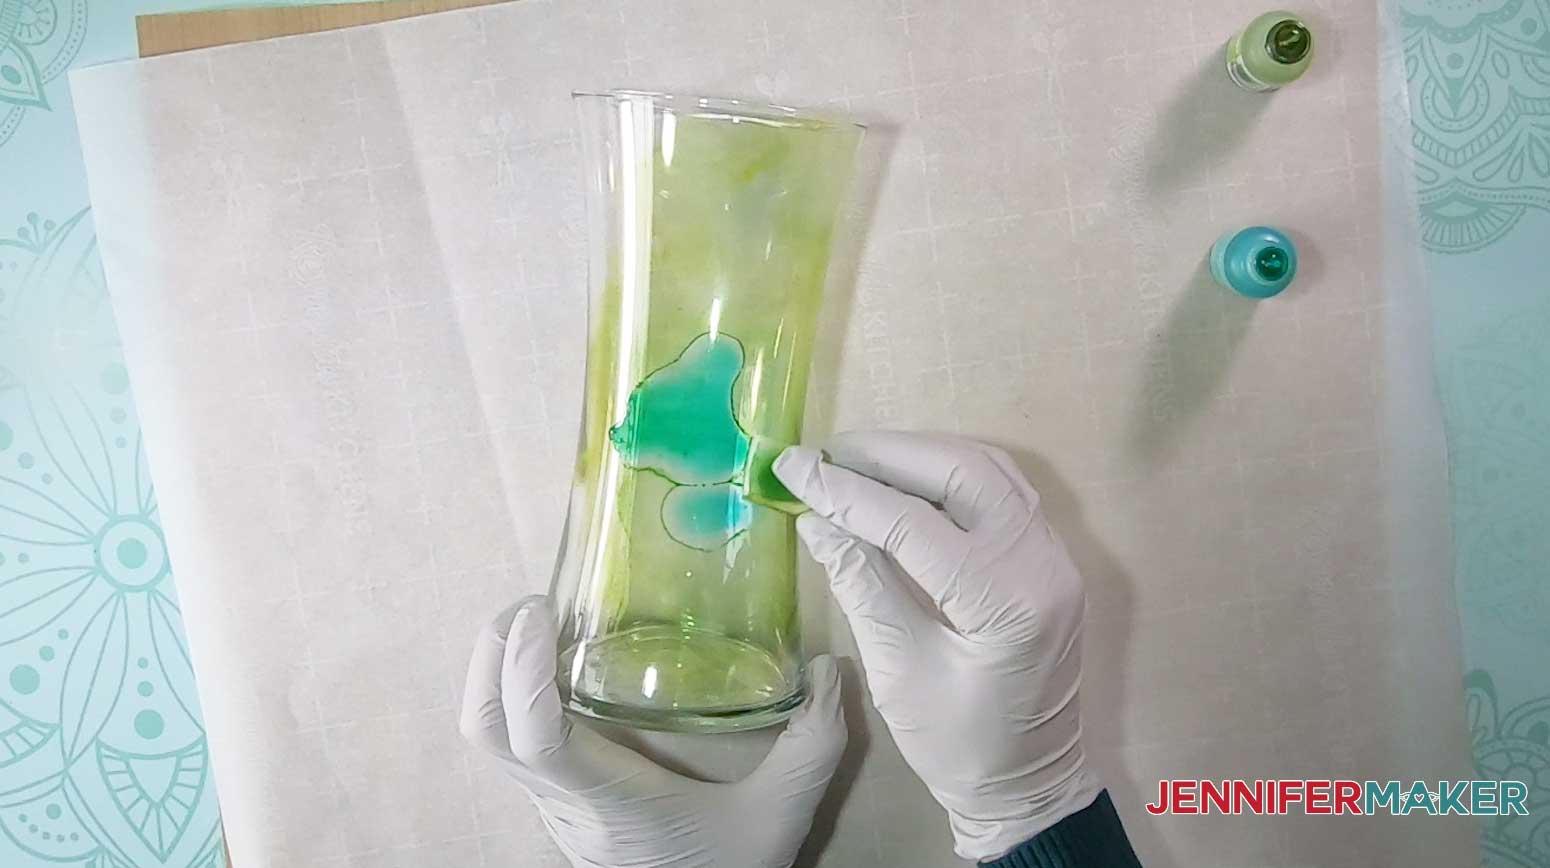
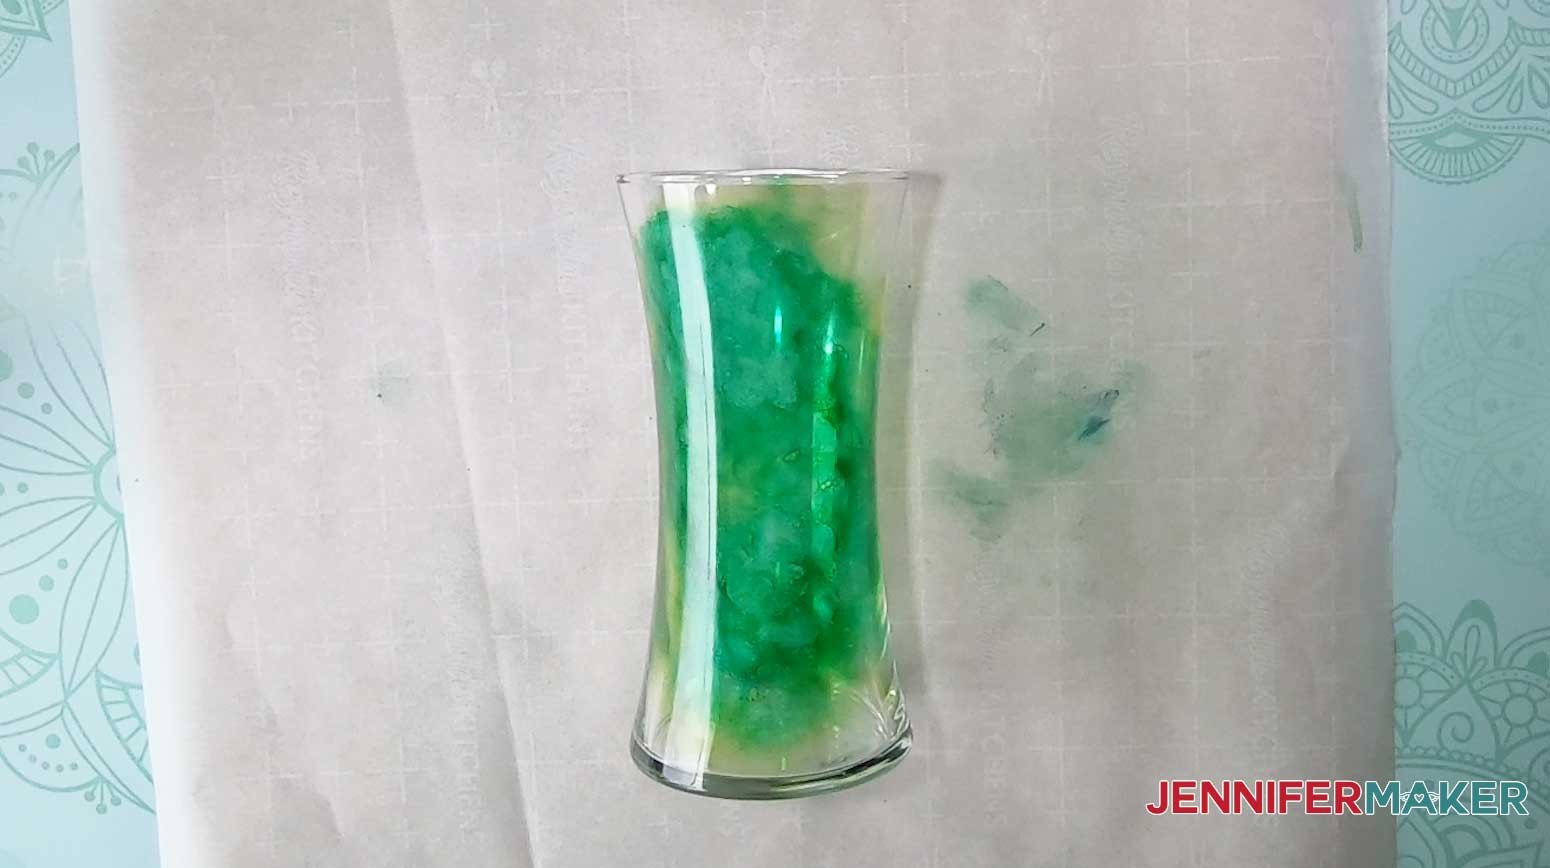
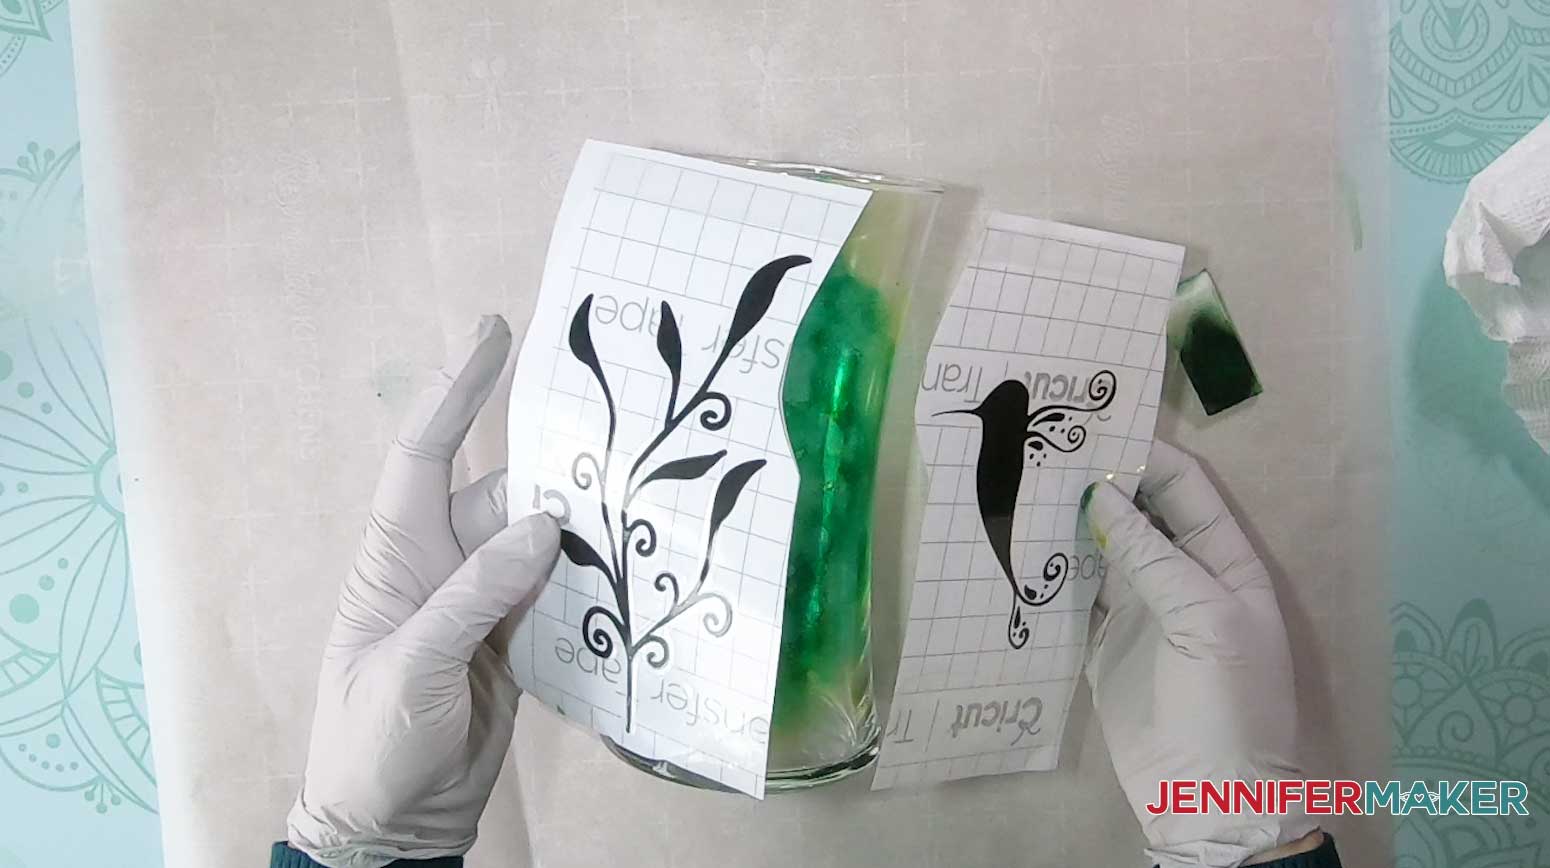
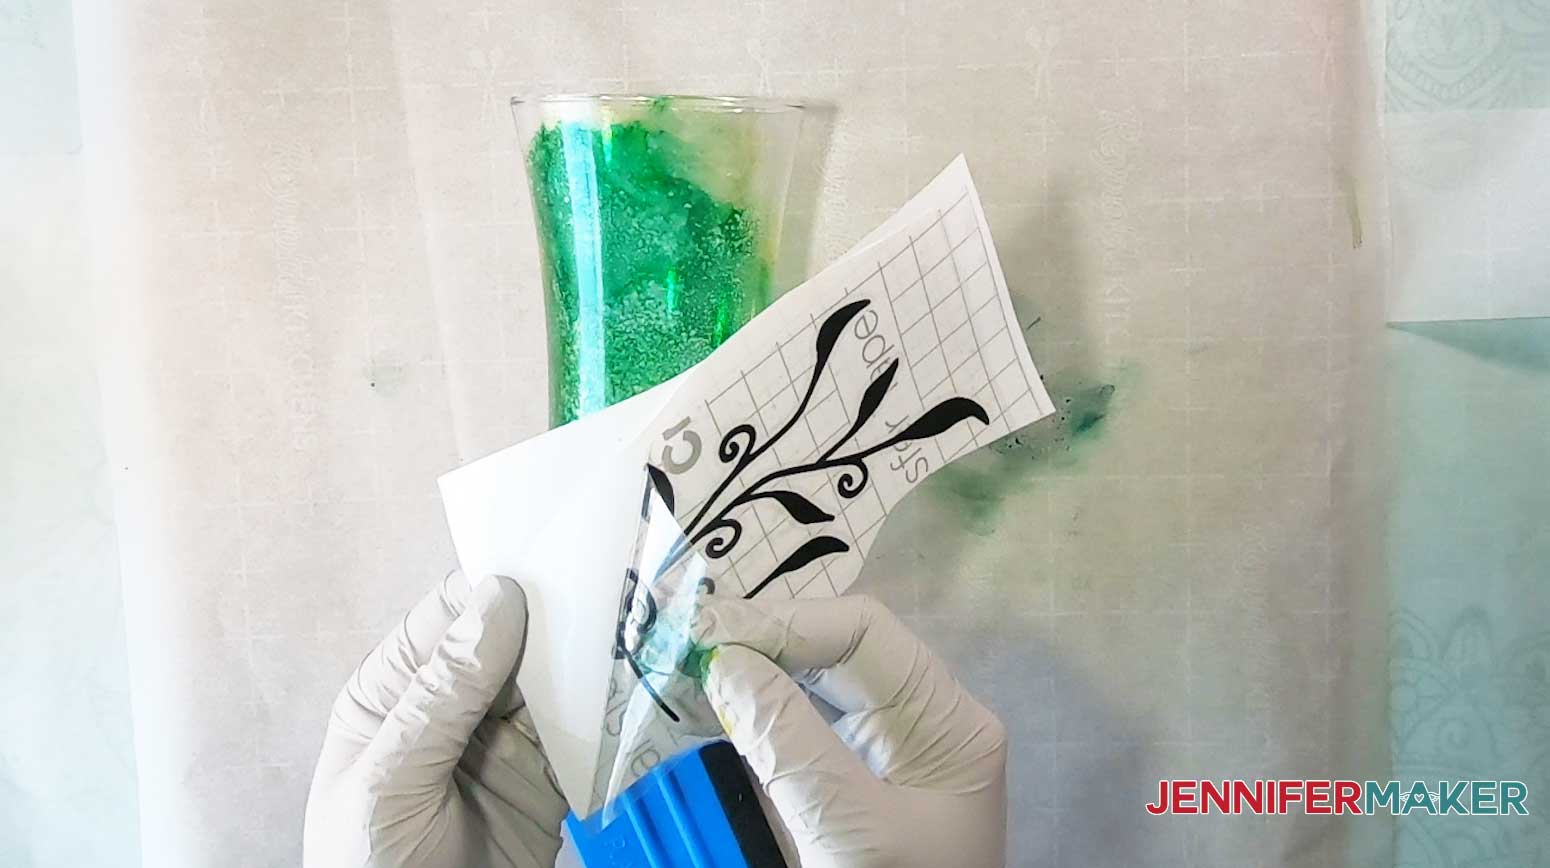
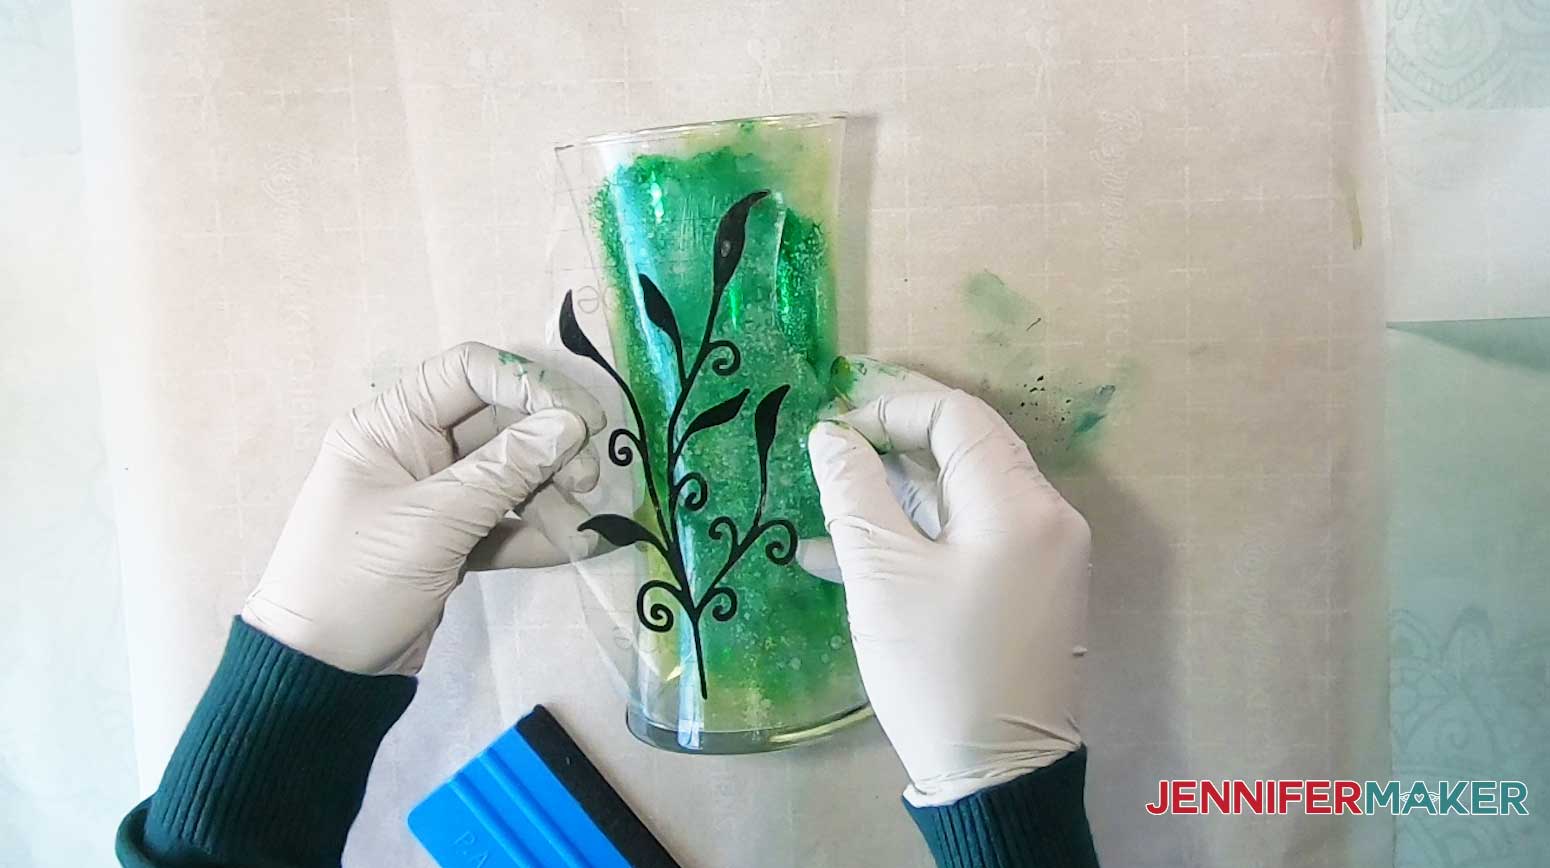
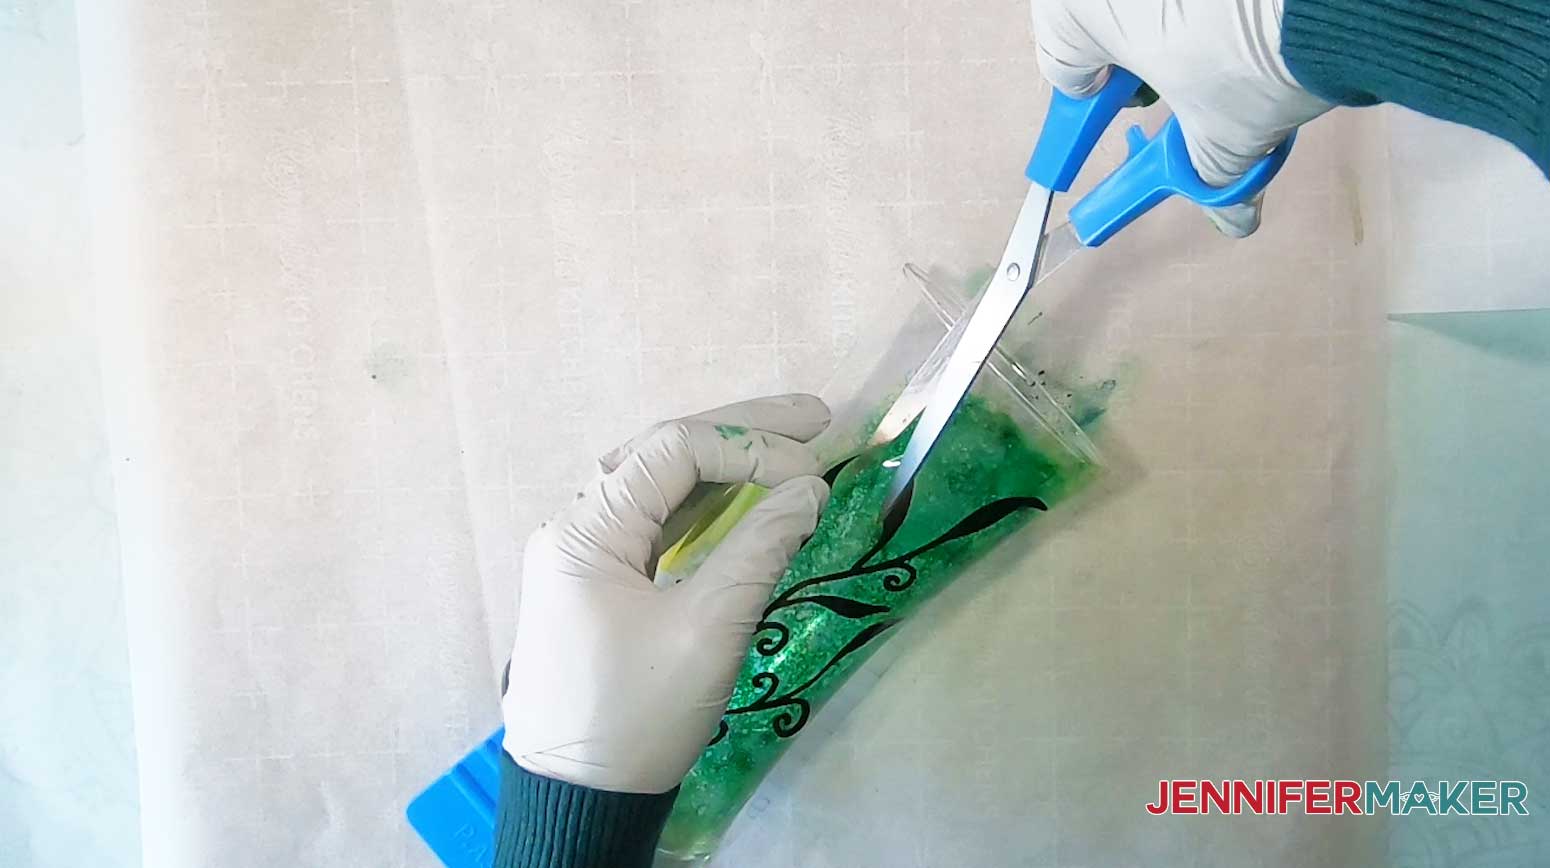
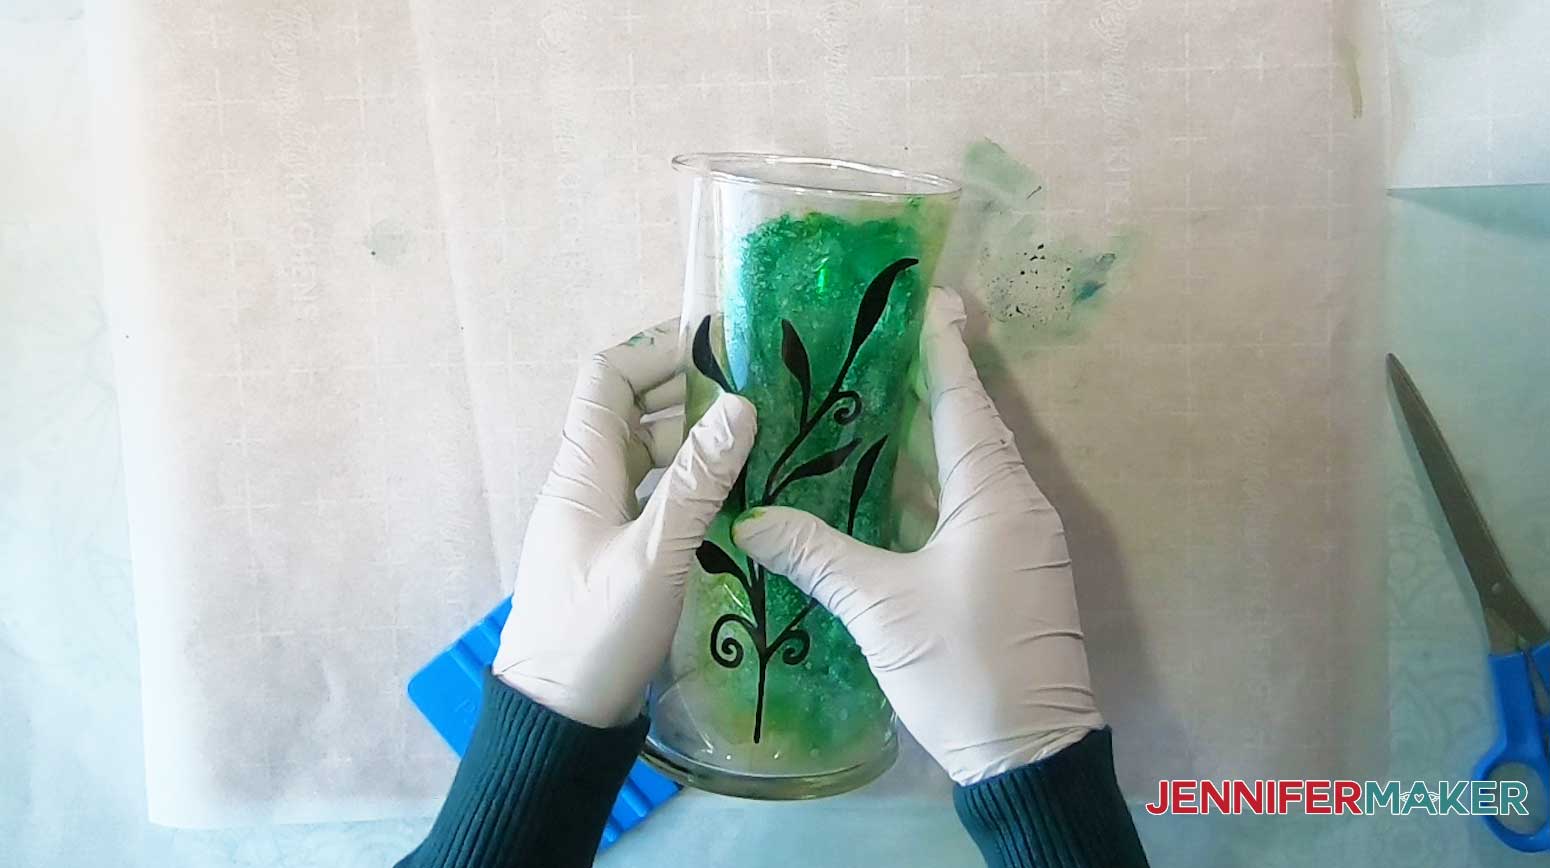
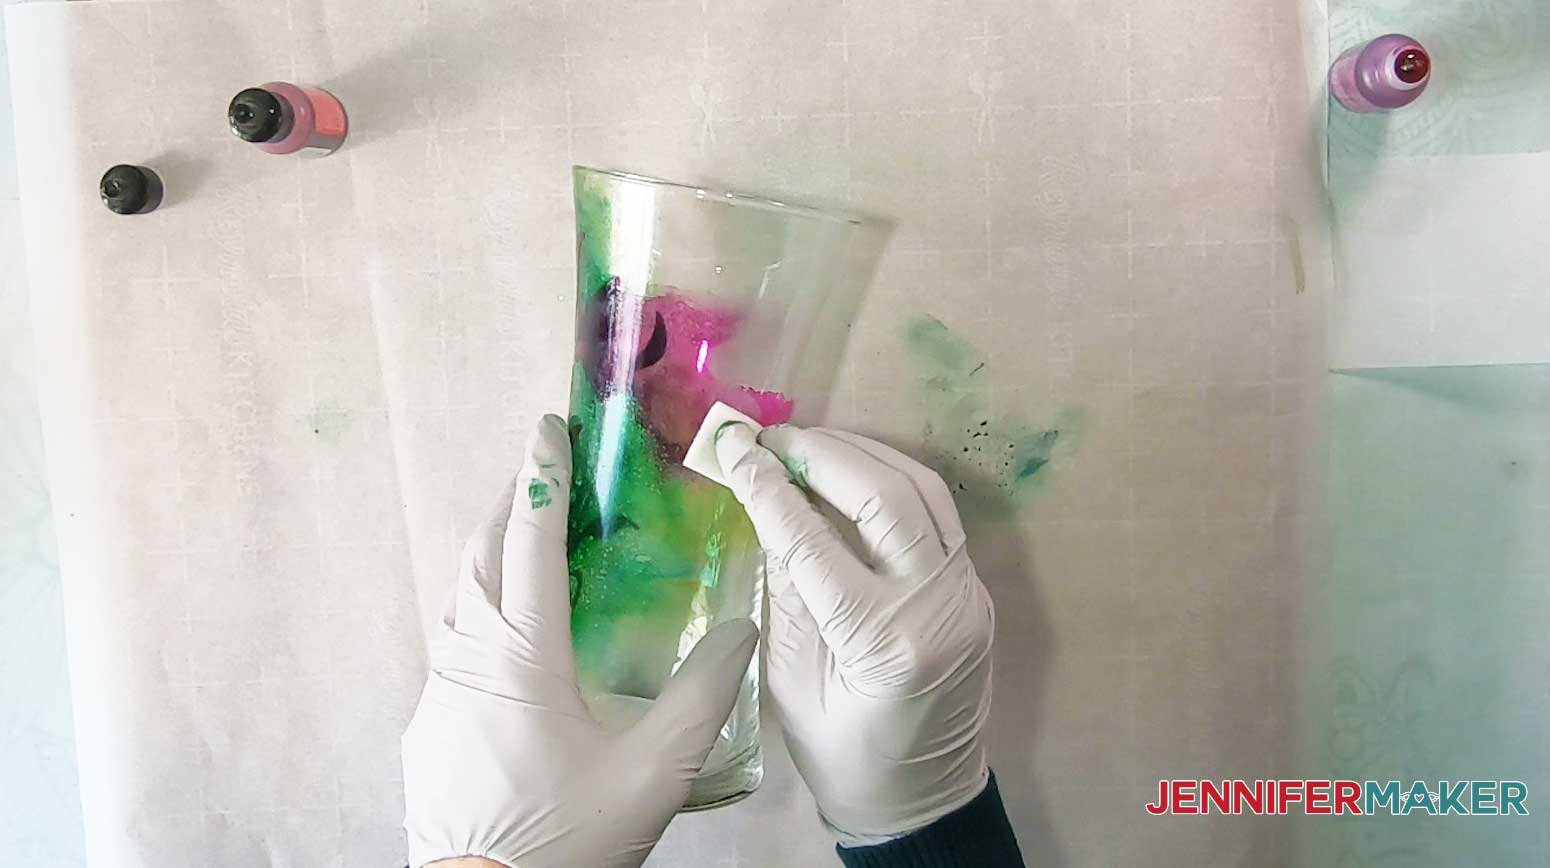
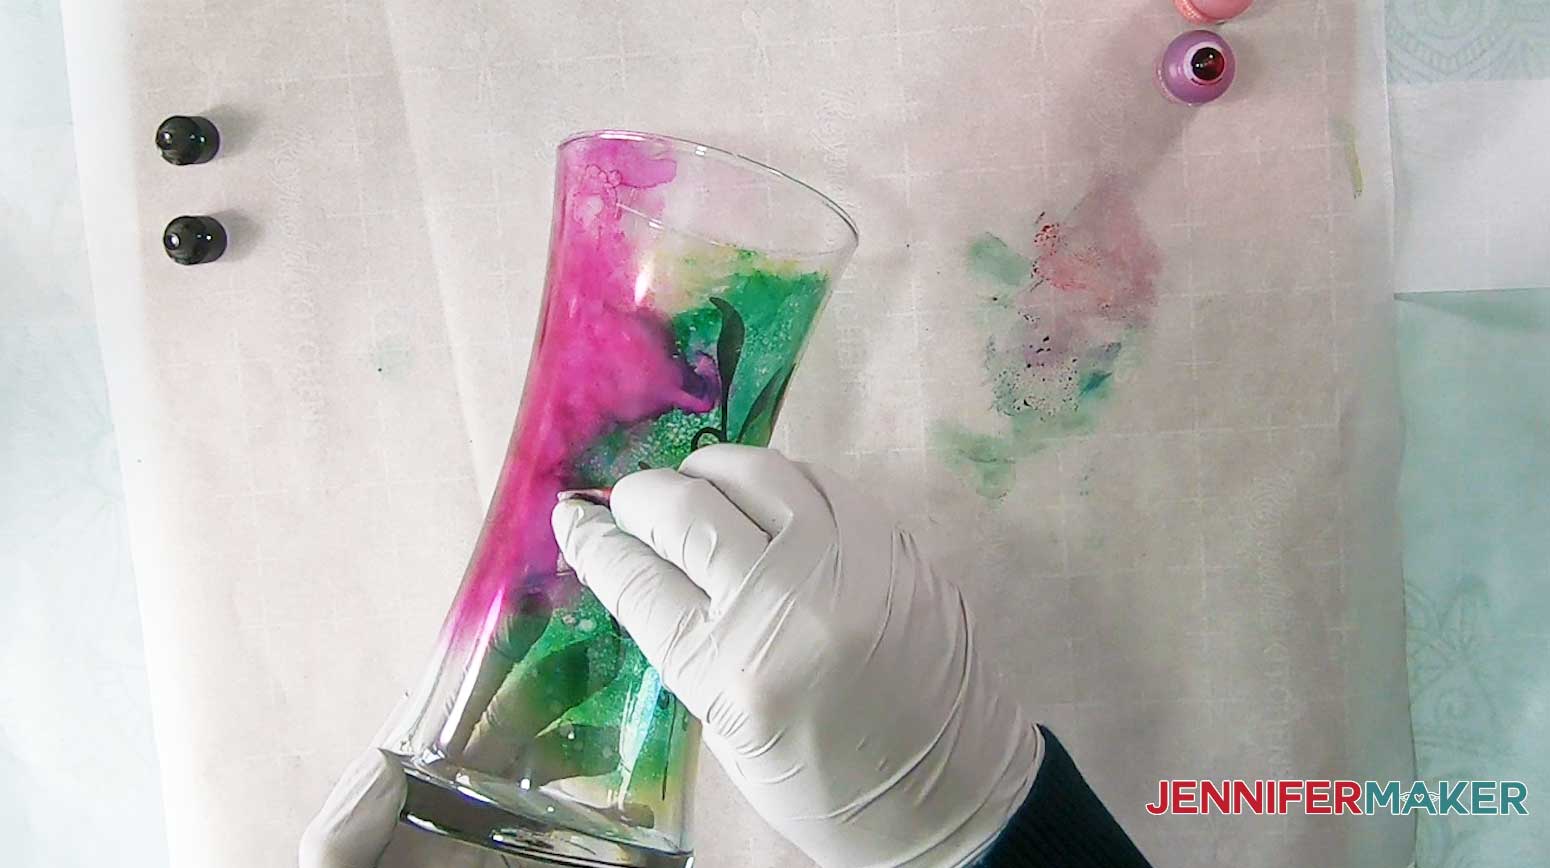
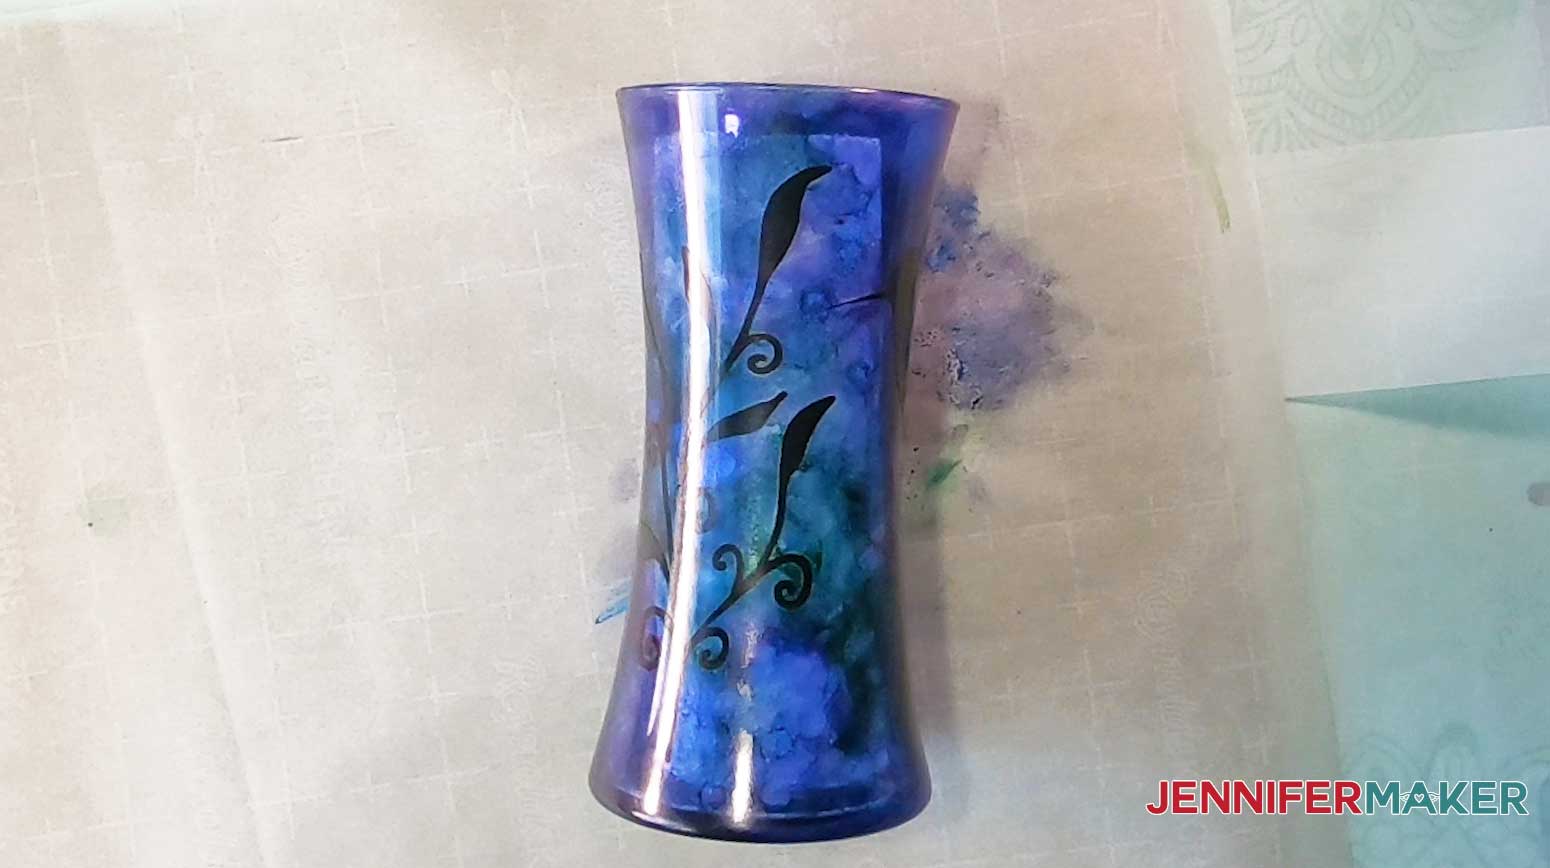
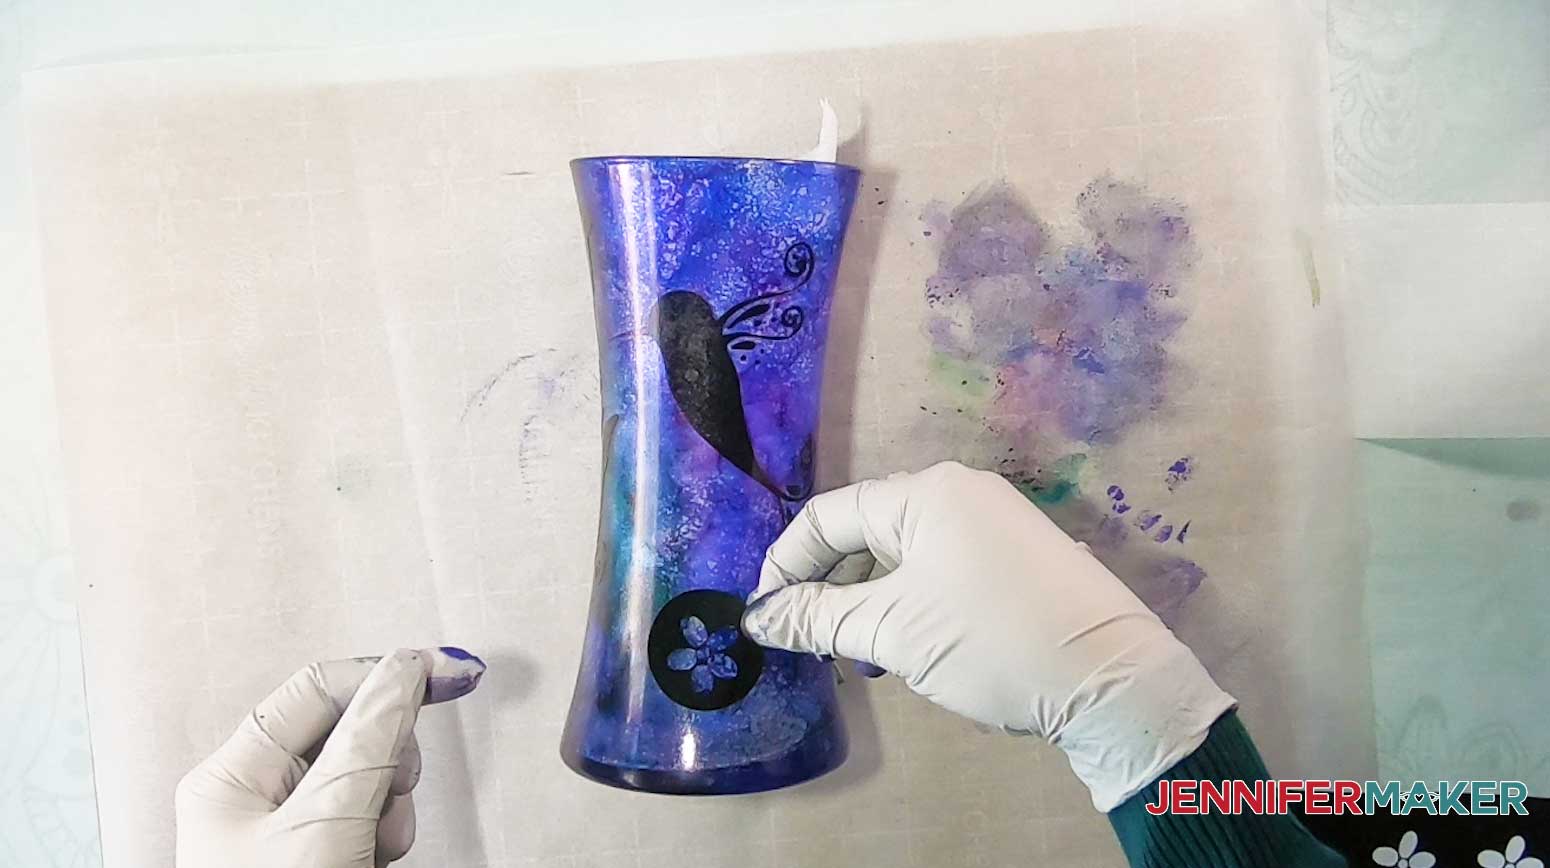
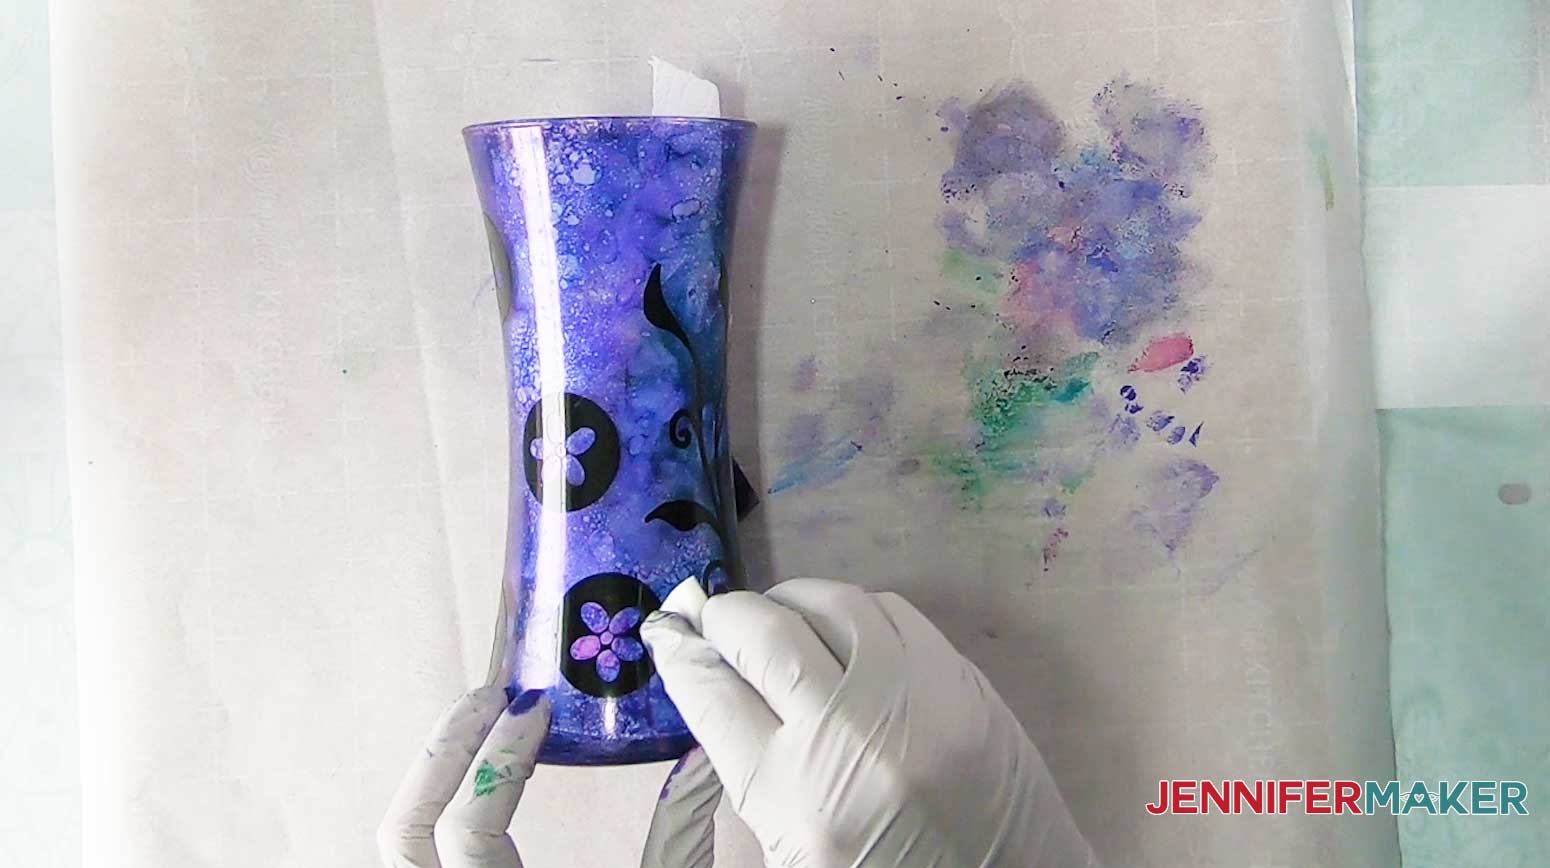
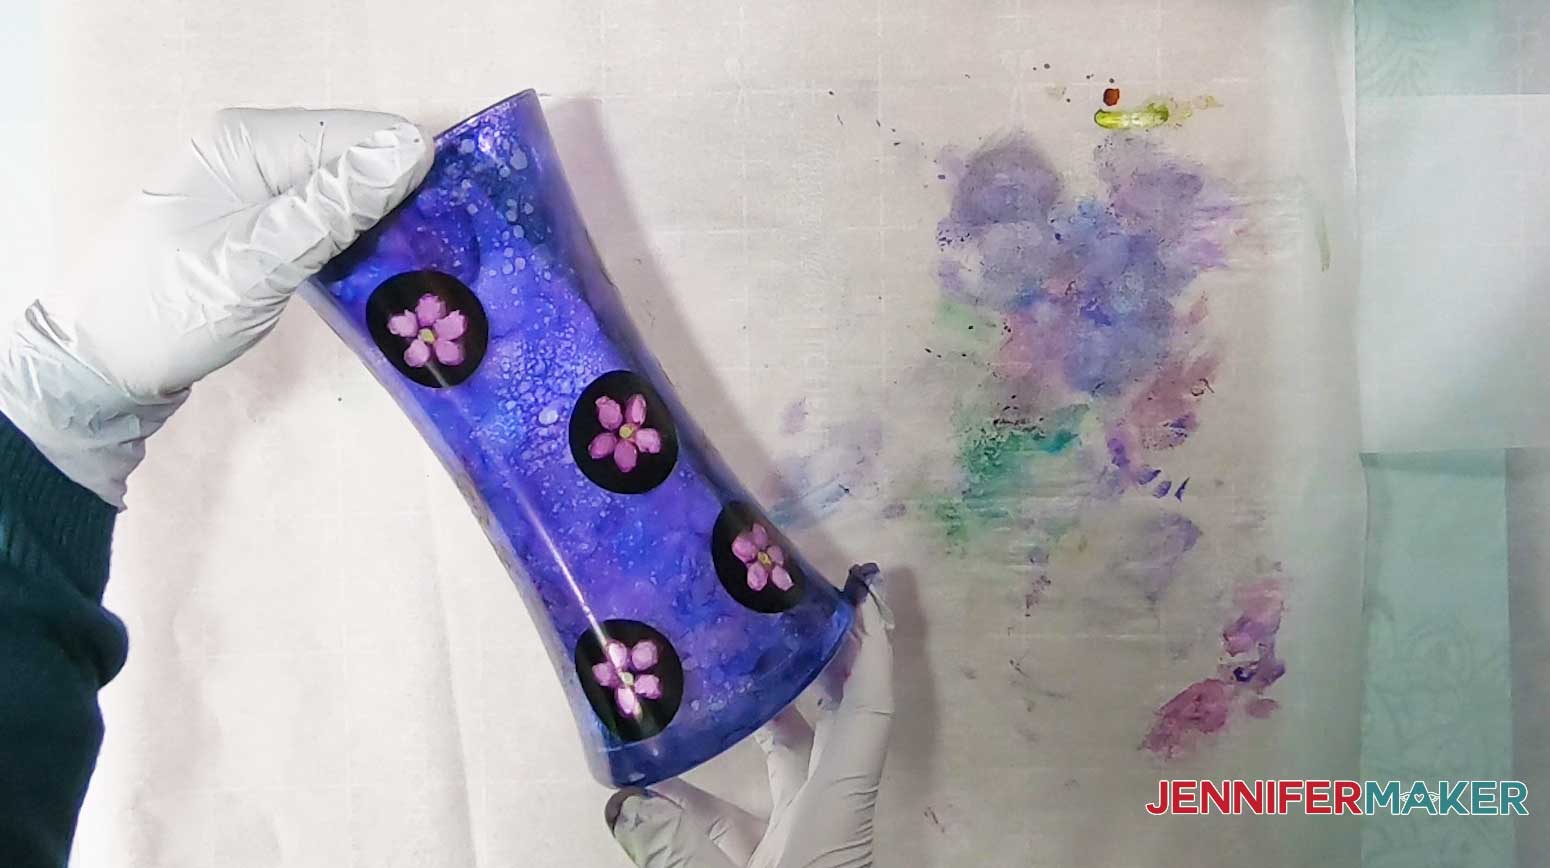
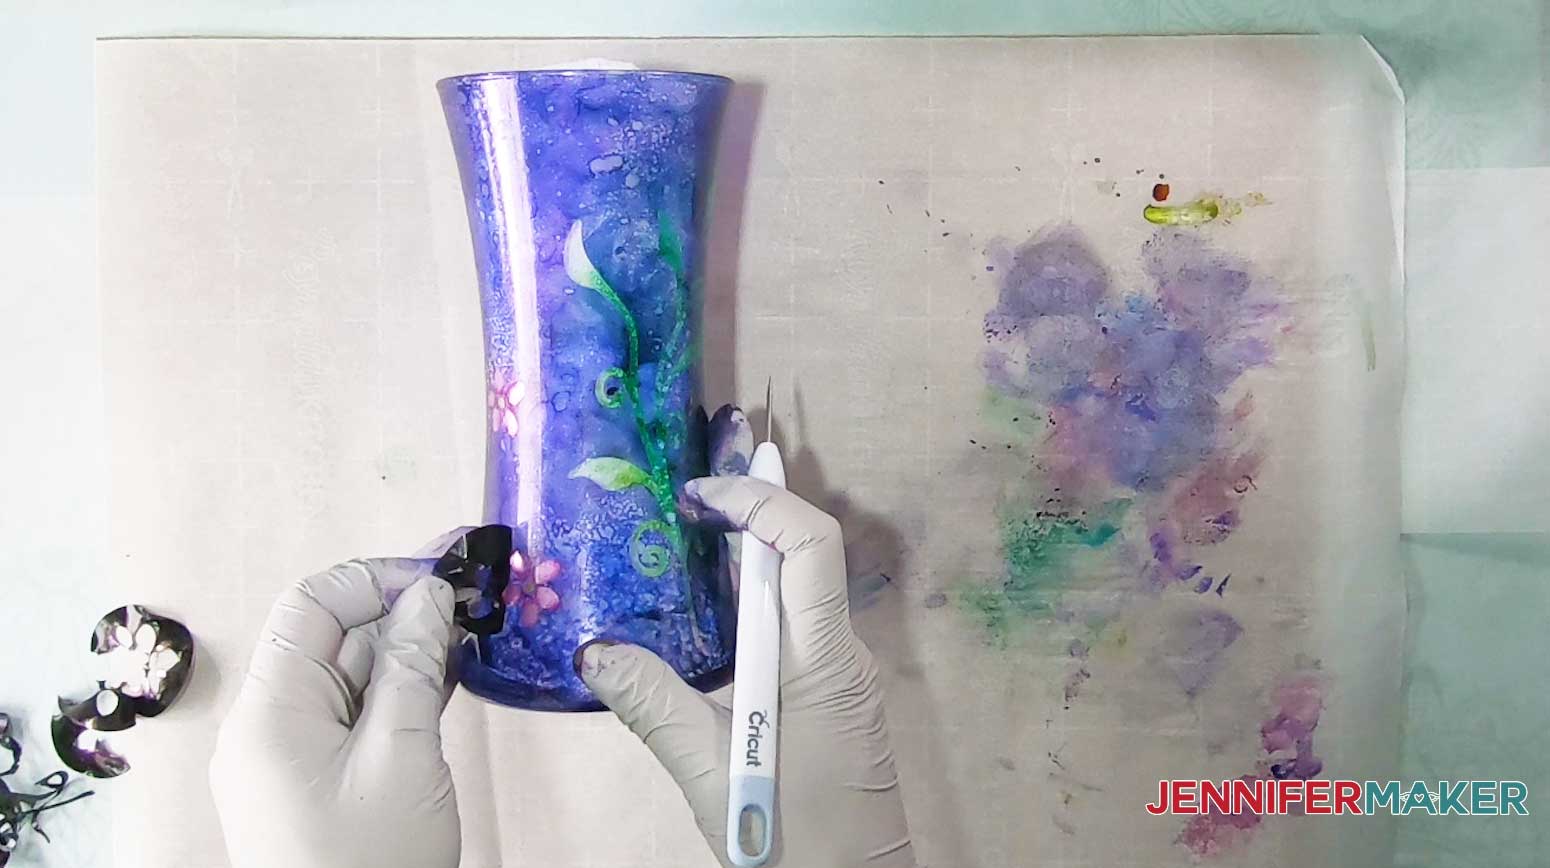
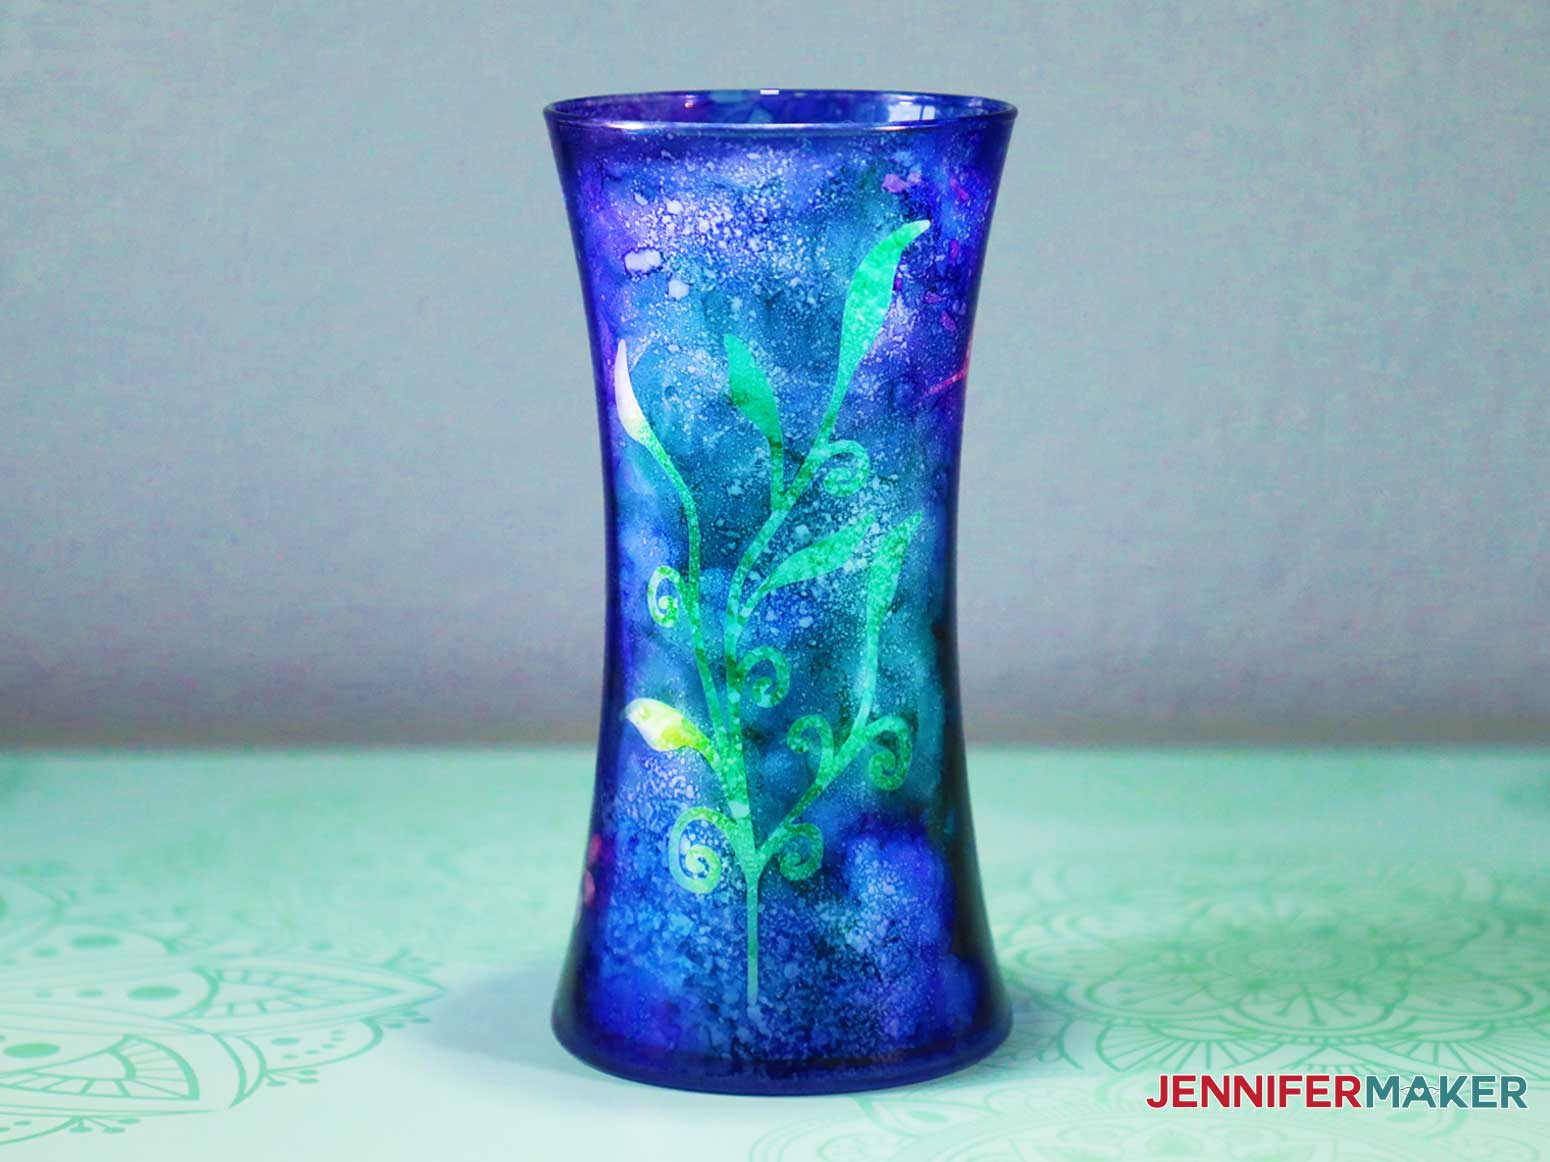
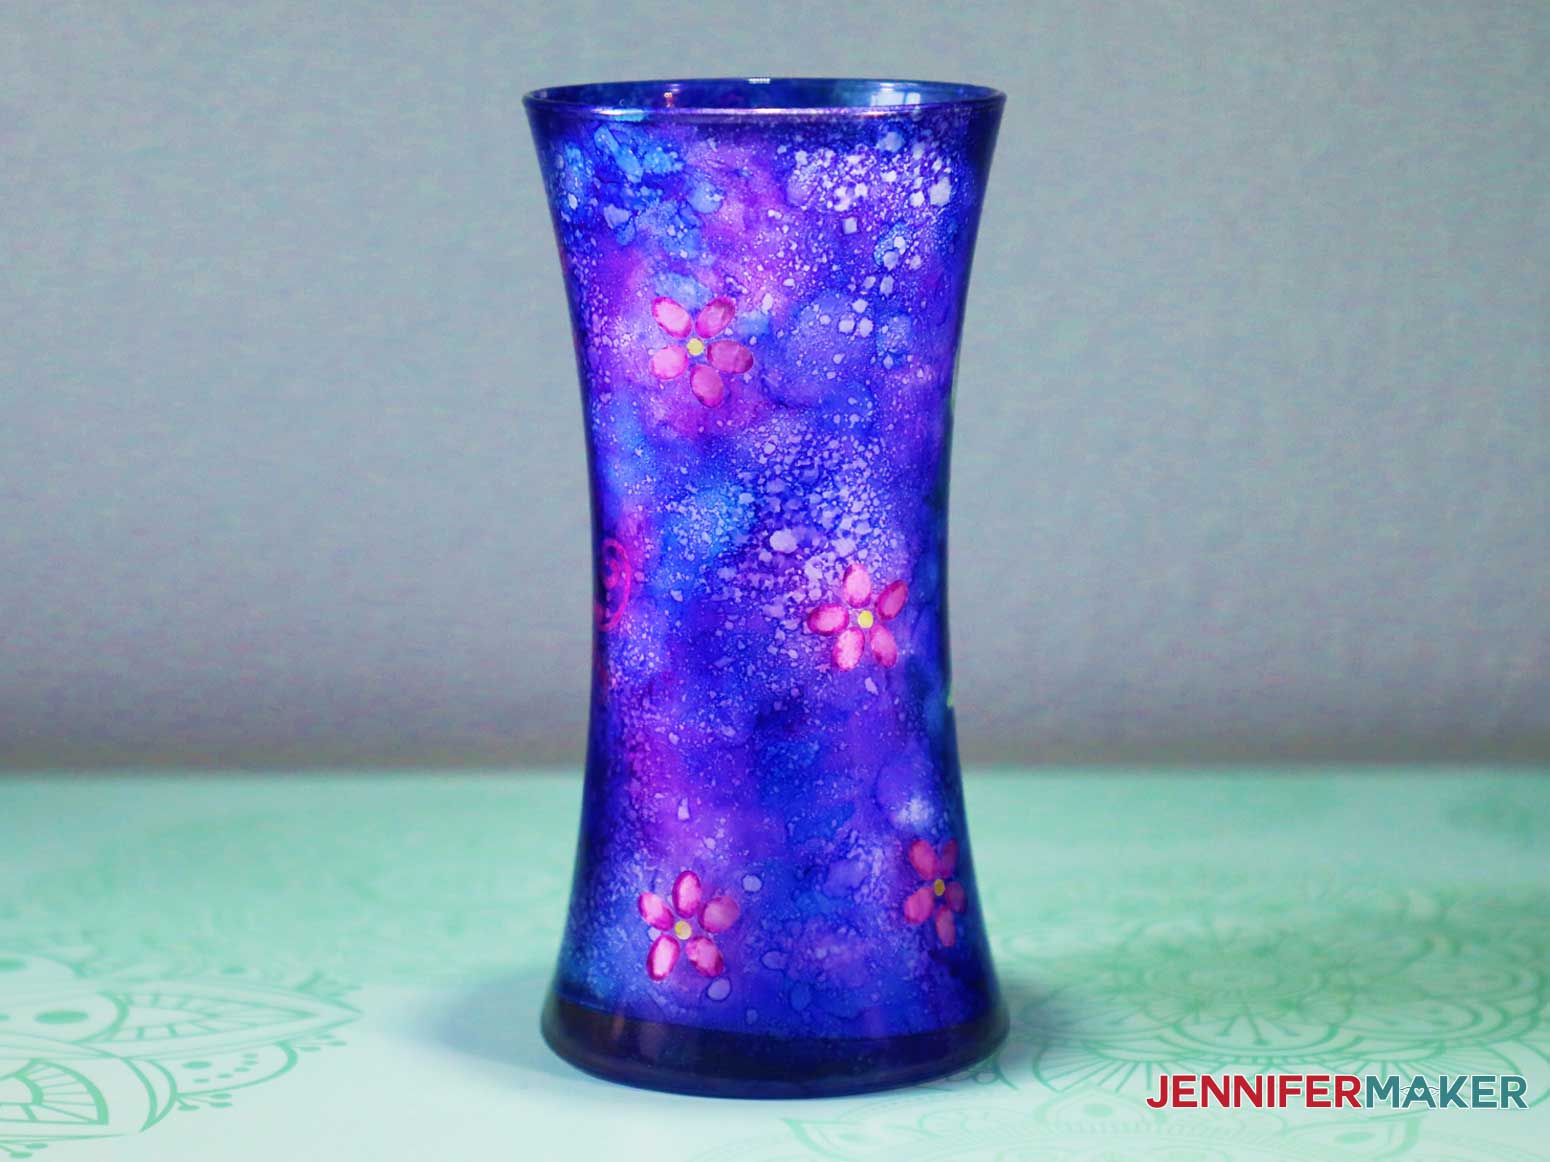
This gorgeous vase is a delight to make using my alcohol ink on glass step-by-step tutorial! Get Design #269 which is the free stencil SVG files for this tutorial. You can download it from my free resource library (get the password to the library in the form at the bottom of this post). Upload my stencil SVG files into Cricut Design Space. If you're not sure how to upload an SVG cut file to Cricut Design Space, watch this helpful video training series I made. If you're on an iPhone or iPad, here's how to download and upload SVG files to the Cricut Design Space app. There are two designs in this file, a butterfly and a hummingbird. This is what the hummingbird design looks like in Design Space: First, hide the design you will NOT be using (to hide a group, click on the eyeball icon in the Layers panel next to the project name). Now, adjust the size and design if needed to fit your vase. To do this, ungroup everything. You will need to ungroup twice—once for the overall project and again to ungroup all the elements of either the butterfly or hummingbird design you chose to keep visible. After ungrouping, each element will be independent so you can move them around and customize your own design. Get creative! Note: Remember to weld any overlapping pieces and then attach everything together before you cut it so it stays exactly in the same spot as you designed it. This project is set up so these “reverse” stencils mask the areas we’ve already painted on the vase and want to preserve. So we will layer our colors from the bottom coat to the top coat. For example, we will first paint the green layer for the leaves, and then add the leaf stencil on top to preserve the color before adding the next layer of color. But you can also turn any part of the image into a traditional stencil (a piece of vinyl with the design cut out of it). For my hummingbird vase, I wanted to make the flowers into cutout stencils so I can add more detail to the petals after I’ve painted all the other layers. To do this, I created a circle larger than the flower design and placed it under one of the flower layers. I then selected both the flower layer and the circle layer and then clicked on Slice at the bottom of the Layer panel. We now have three new layers called Slice Result. We only want to keep the third one, which is the flower cut out of the circle, so we delete the first two. I repeated this process for all the flowers. TIP: If you have any issues doing this, make sure all the layers are ungrouped first). This is what my new file looked like before I cut it: Click "Make It" and you will be prompted to select your material settings and place your vinyl on your cutting mat. The vinyl color doesn’t matter because we are only using it as a stencil. Just be sure it contrasts in color to the inks you are using so you can see it well. Follow the prompts to load the mat and tools into your Cricut. When the vinyl is done cutting, gently weed the design and burnish transfer tape or paper on top of the vinyl decal. TIP: I did not use transfer tape on the cutout flowers. They were easy enough to place like stickers. But I used transfer tape to stick the more detailed and intricate pieces on the vase. I started with a single vinyl decal, but I cut out the designs into different parts as I needed them. I placed each element on the vase individually as I layered my colors. These are all the materials I used to make the alcohol ink glass vase: Alcohol ink can be messy so cover your workspace with resistant Teflon or parchment paper. Use gloves to protect your hands! It's also important to work in a well-ventilated space and/or wear a respirator with organic vapor cartridges. Make sure you have paper towels and Isopropyl Alcohol (90% or higher) available. Alcohol inks are easily cleaned up by diluting and dabbing with Isopropyl Alcohol. Stenciling and painting the vase is a several-part process. First, make the leaf section. You can just eyeball where the grass stencil will go on the vase (but don’t stick it down yet!). Paint this area thoroughly with green inks (Stream and Patina). Don’t worry about any drips or covering too much of the vase. You can easily clean up the excess ink later. You can add the colors individually and mix them together directly on the glass. It might be easier to place the ink droplets on your parchment paper, mix the colors on the paper, and then dab the ink onto the glass. NOTE: Alcohol reacts to wet alcohol ink by diluting it, and it also reactivates dried ink. Be careful when blending layers because if it’s too wet it will be hard to get the colors to stay in place. For best results, let each layer dry a bit before you blend in the next layer. TIP: If you don’t like something, you can wipe it off while the ink is still wet or add some Isopropyl Alcohol to a paper towel or wedge and clean it off. You can fix areas to your liking, or even start over completely by cleaning all the ink off the vase. Alcohol inks are translucent. You can see that the grass, hummingbird, and background layers are translucent. If you want any of these elements to be opaque and stand out more, you can mix a metallic mixative into the colored alcohol inks (See Step 6). To prevent drips, let the translucent green layer dry on its side for about an hour. Use clean cosmetic wedges to keep the vase from rolling if necessary. After the first layer has dried, mix a small amount of Alcohol Blending Solution with a few drops of Silver Metallic Mixative so that you can dab the metallic ink with a cosmetic wedge. NOTE: You may be tempted to use a spray bottle or mini mister, as we were, but the manufacturer does not recommend filling any sprayer or mini mister with alcohol Inks, Metallic Mixatives, or Alcohol Ink Blending Solution as these contents contain alcohol and should not be airborne. You may want to practice first on a piece of parchment paper until you get the hang of it and achieve a look you like. This is what the glass vase looks like after adding the metallic mixative. See how the ink changes? Now, let your vase dry again for an hour or more until it’s completely dry. Once your glass vase is completely dry, determine where the grass stencil will go on top of the green ink. Be sure the grass stencil is burnished really well and sticks to the transfer tape. Remove the backing from the transfer tape. Gently place the stencil over the green inked area, taking care to make sure there are no bubbles or creases in the vinyl. You can cut slits in the negative space of the transfer tape to help fit the vinyl into the curves. Make sure the stencil adheres really well to the vase and then remove the transfer tape. Once you remove the tape, carefully run your fingers over the vinyl again to make sure it's well adhered to the glass vase. Any gaps or creases will allow ink to run under the stencil and will ruin your perfectly green section! Now you're ready to paint the second layer. Dab pink inks (Flamingo and Watermelon) on the area of the vase where you want the hummingbird. In the areas where the green and pink meet, you can either blend the colors or use Isopropyl Alcohol or Alcohol Blending Solution to clean the excess green off the glass first. Once your second layer is completely dry, determine where over the pink ink layer you want to place the hummingbird on the glass vase. Remove the backing from the transfer tape on the hummingbird design and gently adhere the stencil over the pink inked area, taking care to make sure there are no bubbles or creases in the vinyl just like you did for the grass stencil. At this stage, it may help to add a piece of white paper or paper towel inside the vase so you can see the stencils and colors better. Now you can paint the background layer. Blend the colors (Amethyst and Sailboat Blue) by applying them in layers until the entire vase is covered. You can either blend the background inks into the existing green and pink sections or if you don’t want a blended color effect you can use Isopropyl Alcohol or Alcohol Blending Solution to clean the excess green and pink off the glass first. Let the vase dry. TIP: If the colors run because you put too much mixative on, you can re-dab that section with the main colors you want until you fix the section. Then re-dab it with the mixative. Just make sure to allow each new layer to dry before adding the next. This is what the vase looks like after drying another few hours: Once your vase is completely dry, place your flower stencils on the vase. You can place these by hand, just make sure the stencil adheres really well and that there are no creases. Dab pink ink (Flamingo) over the flower petal sections of the stencil. Put Alcohol Blending Solution on a cosmetic wedge and dab the flower centers to remove any of the purple(background) color so the clear glass is showing. Dab a mixture of two drops of green (Citrus) ink and one drop of silver metallic mixative into the center of each flower. Dab silver mixative over the pink petals until they are opaque. Let the vase dry for another few hours. Once the vase is completely dry, carefully remove all the stencils. Use a weeding tool to help lift the edges of the stencils. This is the big reveal! You may want to add more silver mixative at this stage, but be really careful not to accidentally blend your edges between colors, unless you’re going for that effect. It is very important to add UV protectant to alcohol inks so they don’t fade. But you need to seal the vase BEFORE adding the UV spray. If you don't seal your vase, the beautiful design will smear and run. After the sealer has dried, spray the UV protectant over the entire vase. Let it dry completely and now you’re done! You may now use the vase to hold flowers or add a candle to show off the beautiful colors and design at night. Special thanks to the JenniferMaker Design Fairy Team, specifically Design Fairy Kelly, for helping me design and assemble this gorgeous vase. As an Amazon Associate and member of other affiliate programs, I earn from qualifying purchases.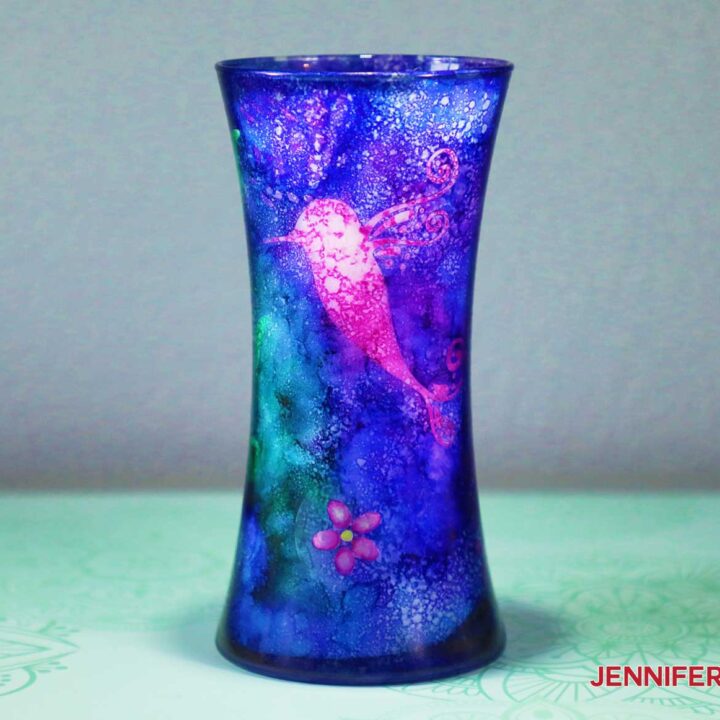
Alcohol Ink on Glass Tutorial
Materials
Tools
Instructions
STEP 1: GET MY FREE DESIGN FILES
STEP 2: PREPARE THE VASE
The first thing you want to do is make sure your vase is clean and free of debris and oils. Moisten a paper towel with Isopropyl Alcohol and rub the vase down thoroughly and let it dry.
STEP 3: PAINT THE FIRST LAYER
To get the blotted effect, you can place droplets directly on the vase and then dab them with a cosmetic wedge. 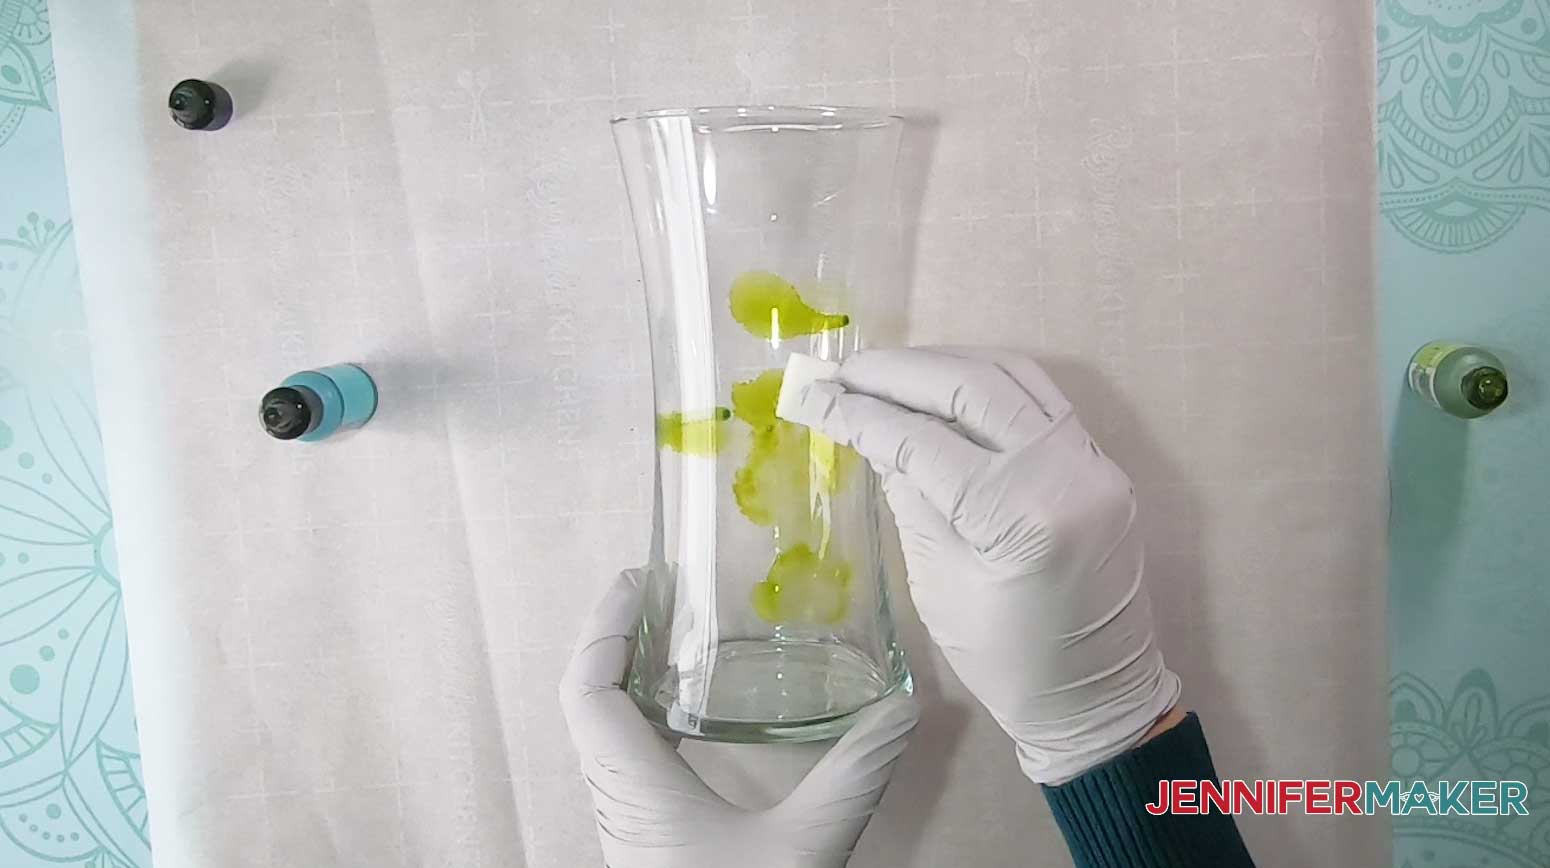
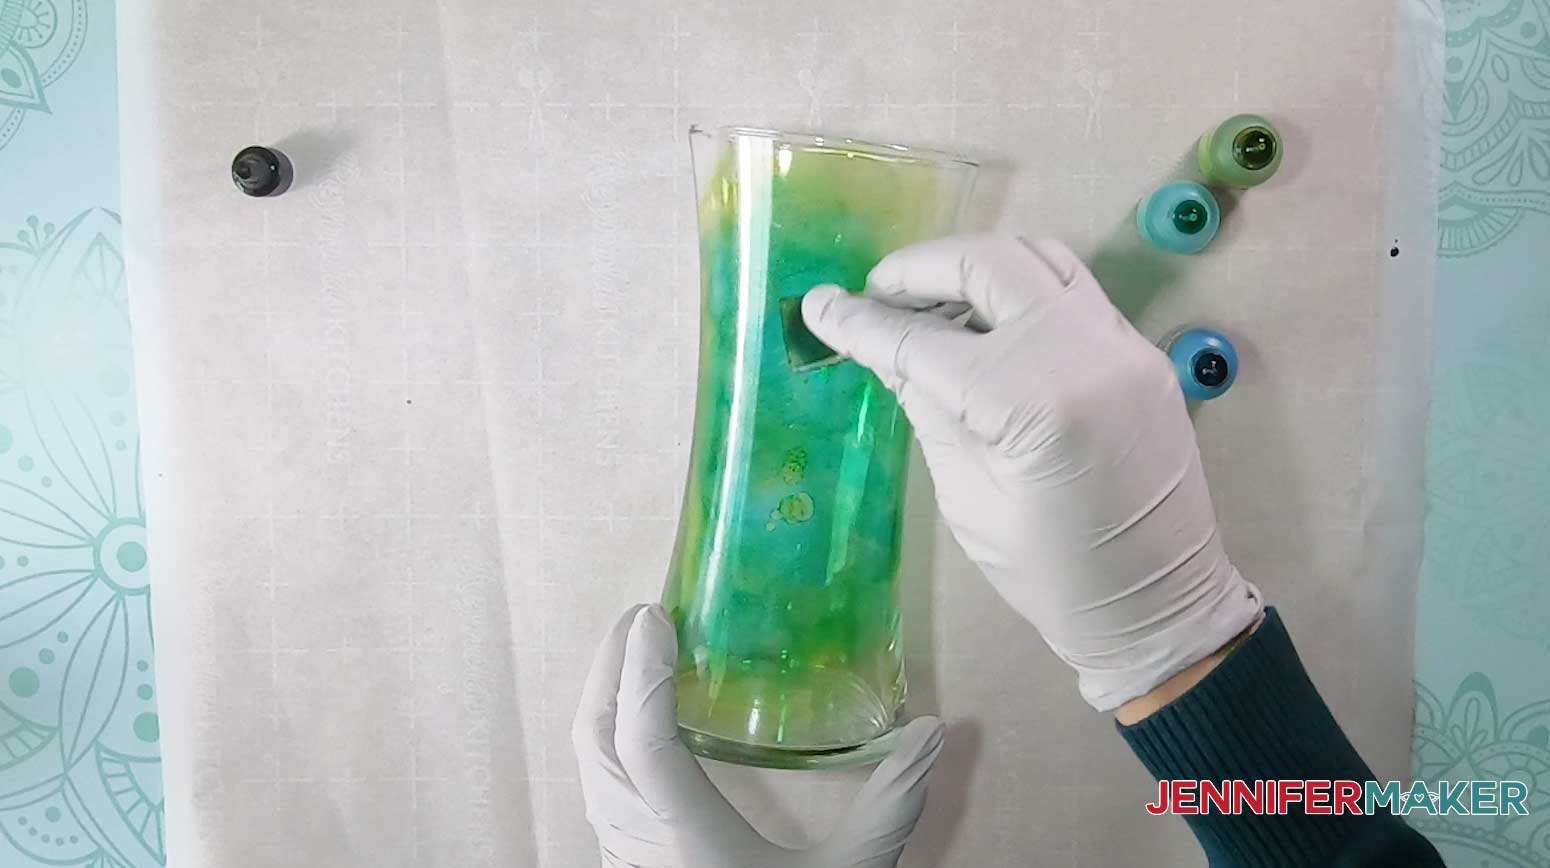
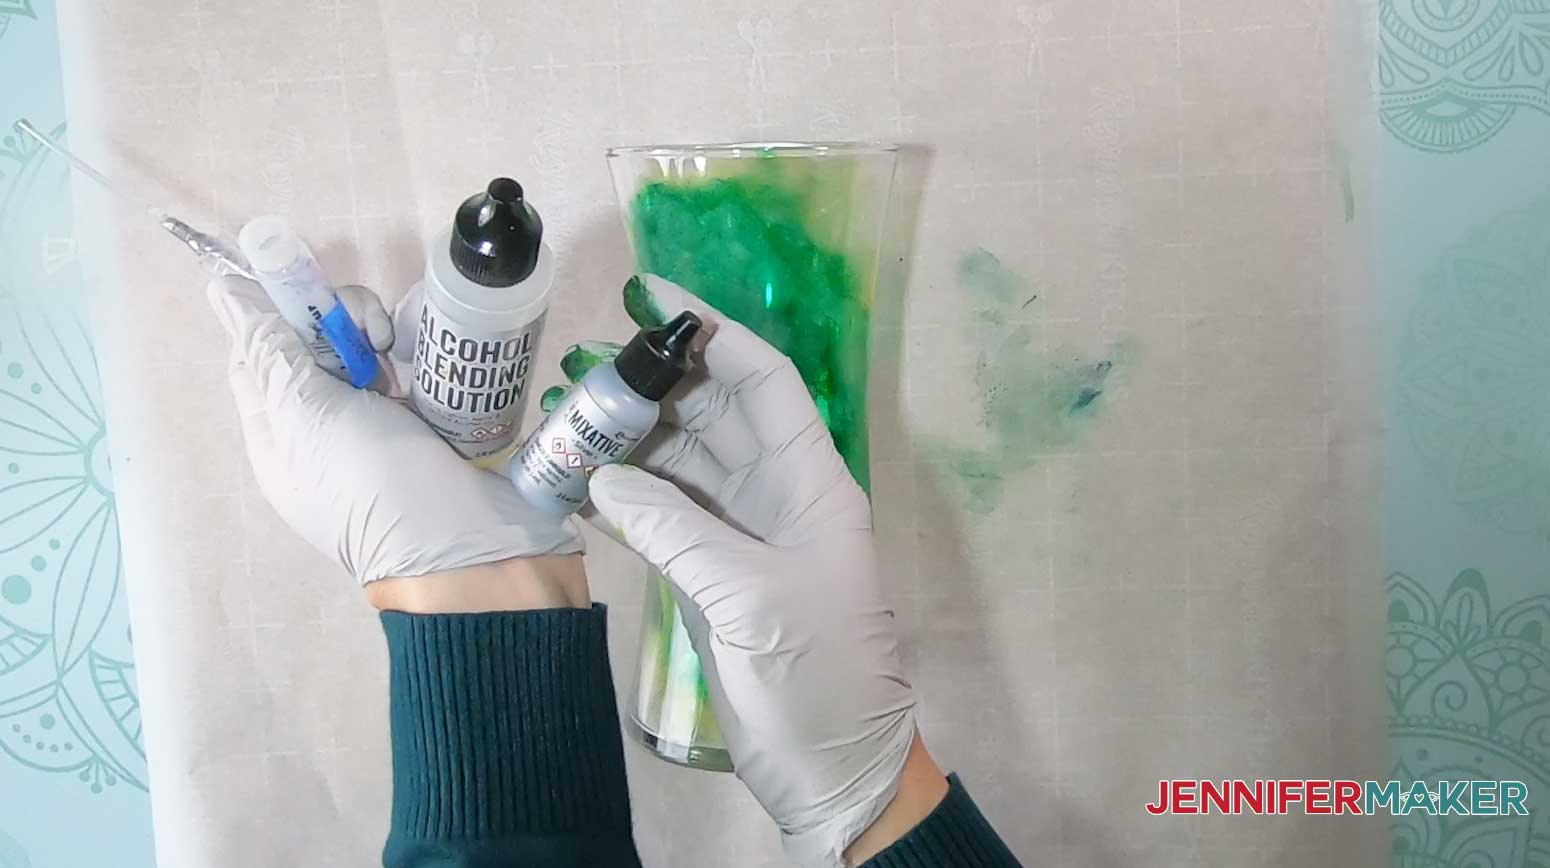
Carefully dab your solution on the green ink section. The metallic mixative adds a bit of shimmer to the ink. Be sure to use sparingly. If you’re too liberal, you can run your green ink. 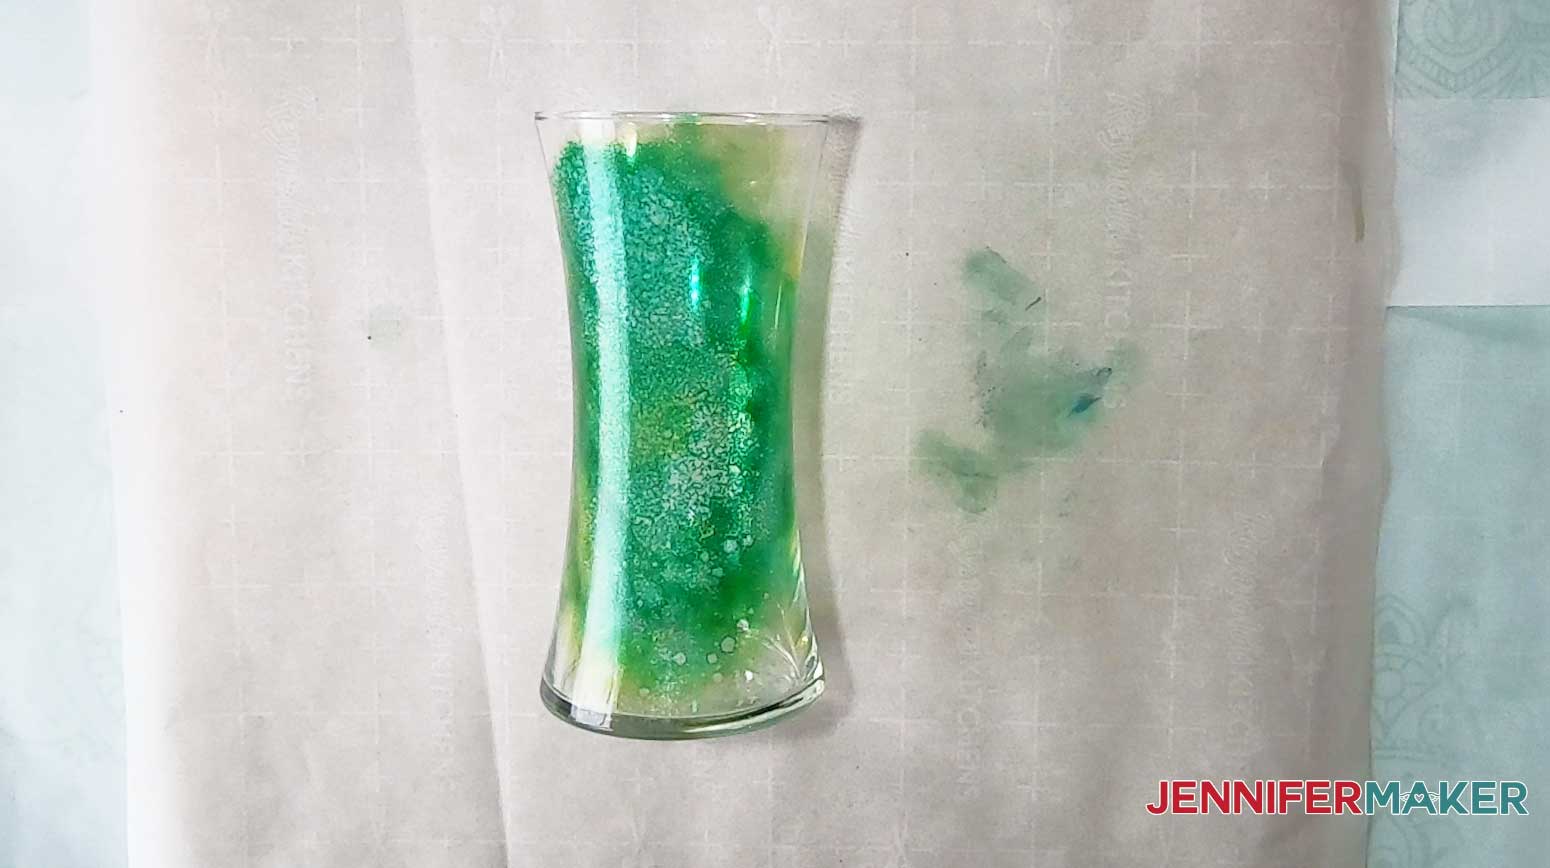
STEP 4: APPLY STENCILS AND PAINT THE ADDITIONAL LAYERS

With the pink inks applied, let the vase dry again.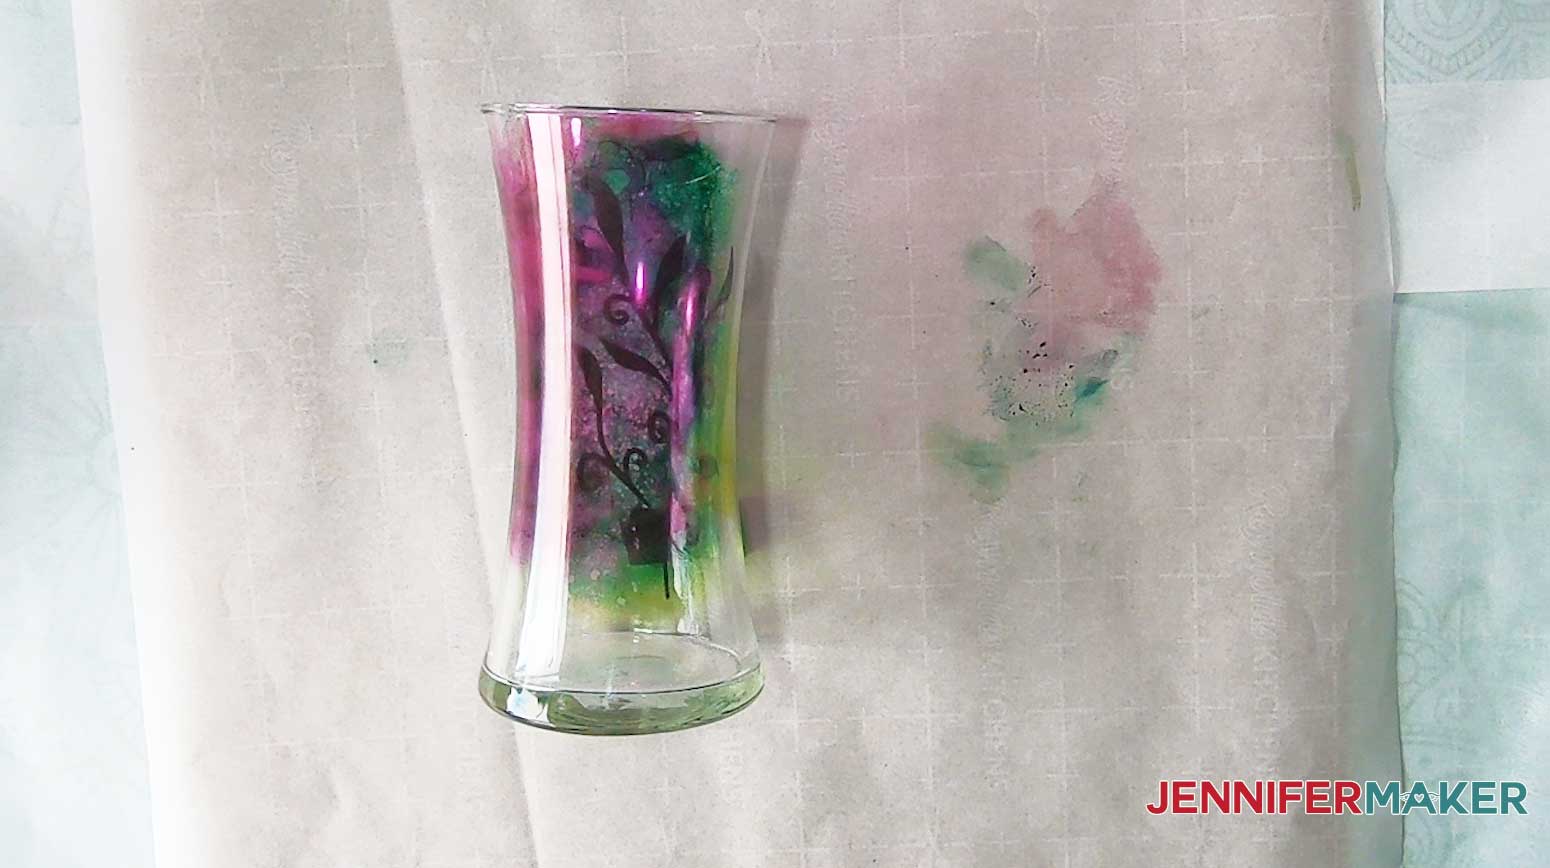
After 1 hour, you can dab the silver mixative over the pink section to get the effect you like. Let your alcohol inks on glass dry.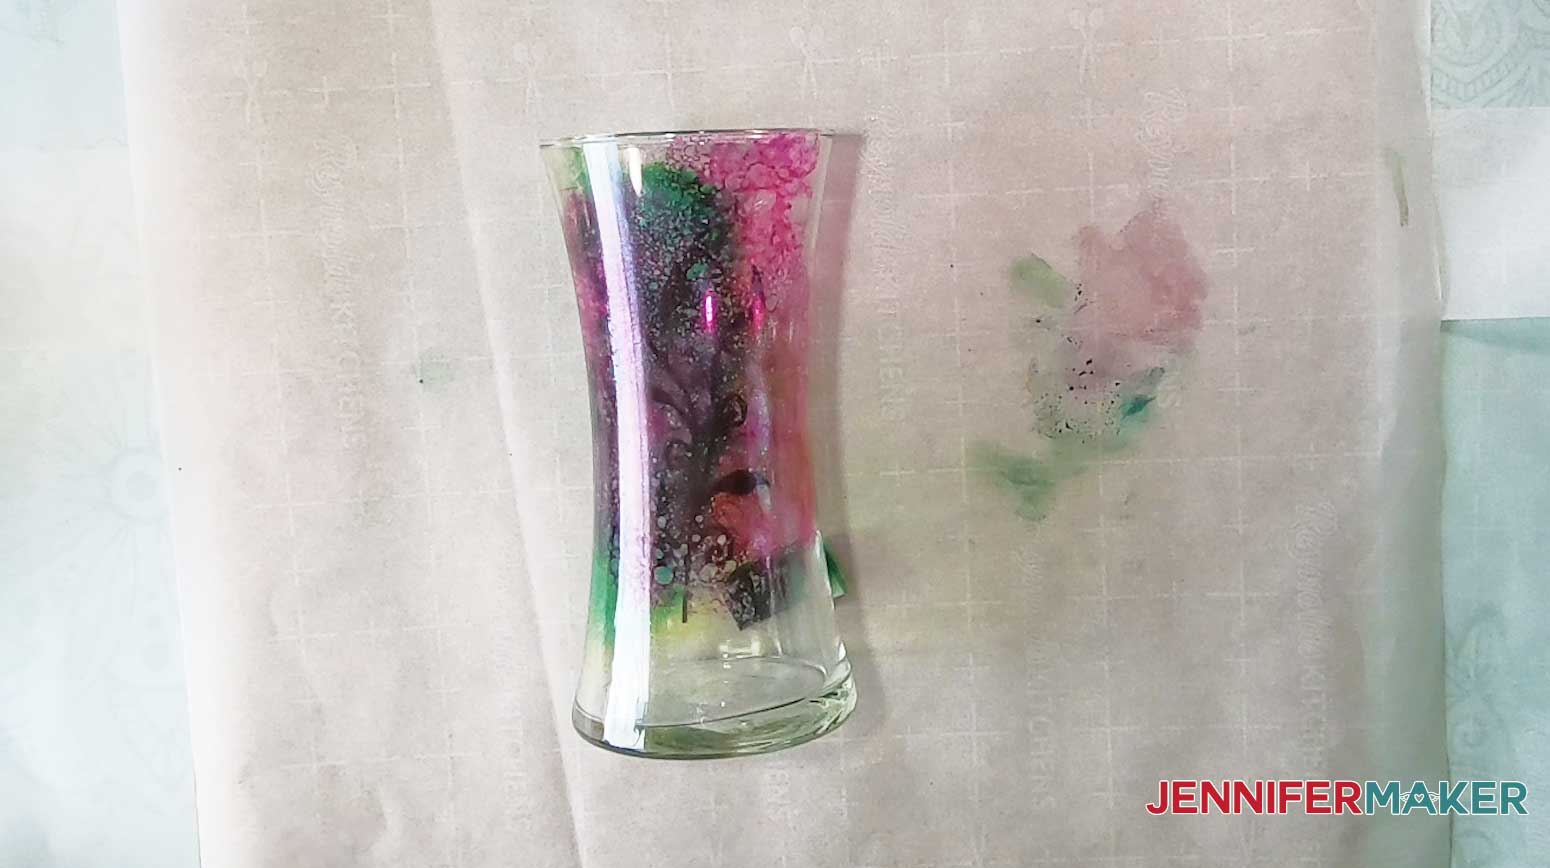

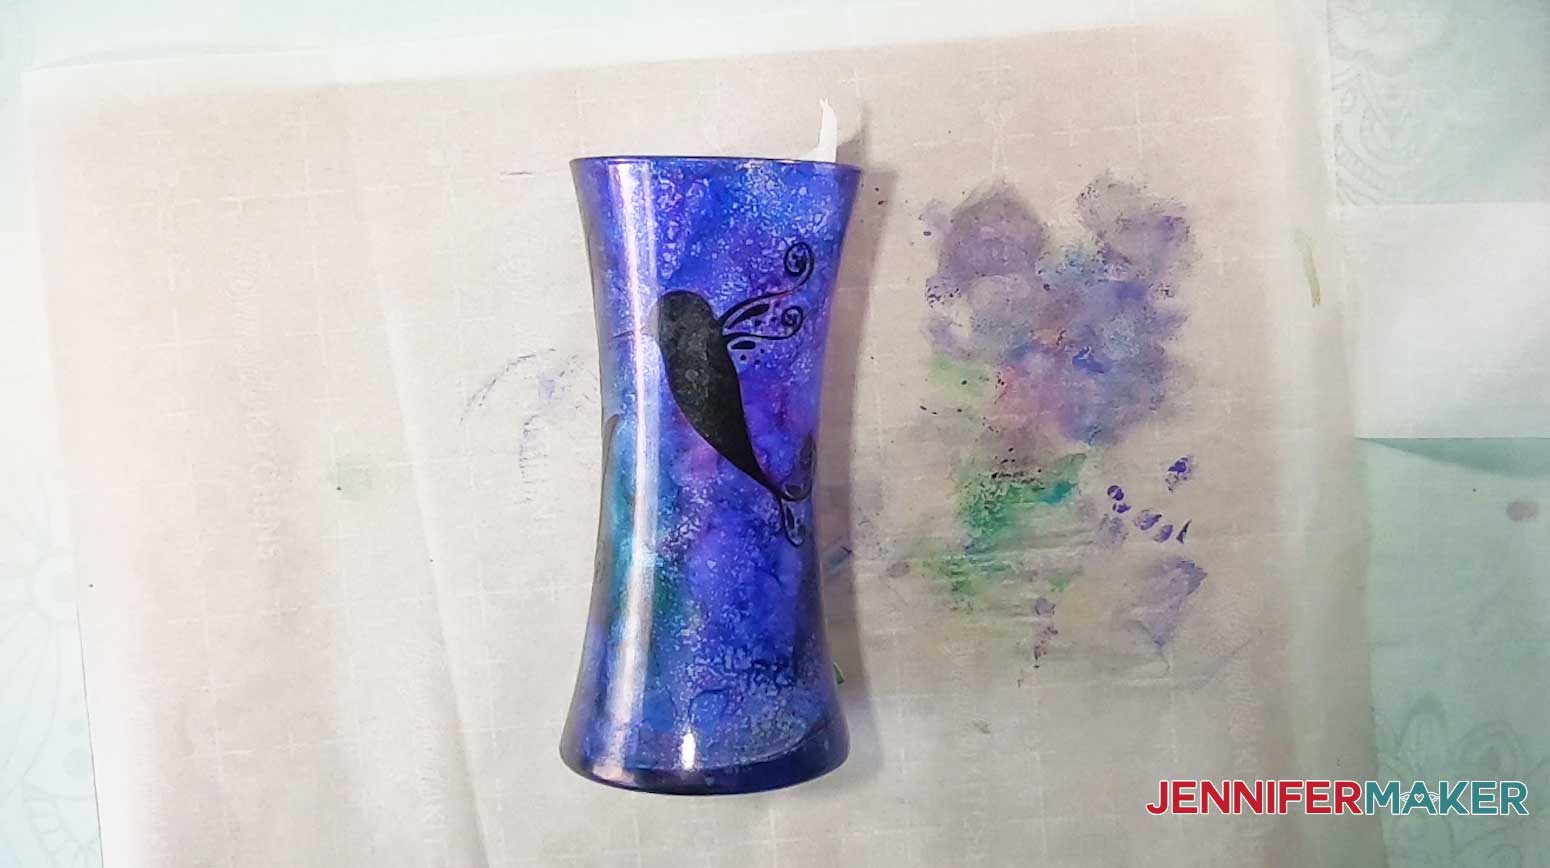
STEP 5: APPLY AND PAINT THE FLOWER STENCILS

STEP 6: REMOVE THE STENCILS AND SEAL THE VASE
Working in a well-ventilated area and wearing a respirator and gloves, apply two coats of sealer (allowing about an hour in between coats) and then let it dry overnight.STEP 7: Show it Off
Notes
ACKNOWLEDGMENTS
Recommended Products

Answers to Your Questions About Alcohol Ink on Glass
Q: Why should you use alcohol ink?
Alcohol ink is very thin and it blends easily making for beautiful designs!
Q: Can you use a blow dryer to speed up the drying process?
We do not recommend using a blow dryer to speed the process as it can cause some of the materials to be spread airborne.
Q: Does the alcohol ink give off fumes?
The inks can give off fumes and it is suggested you use these in well ventilated areas only.
Q: Is this project good for beginners?
Yes, this is a great project for beginners as it is very forgiving! The project does take time for each layer to dry, though, so patience is needed!
Get my free stencil files to follow my Alcohol Ink on Glass Tutorial
I’d love to see what you create using my alcohol ink on glass tutorial. Please share a photo in our Facebook group or tag me on social media with #jennifermaker.
See all of the projects, tutorials, and free designs in The Great Maker 25-Day Gift-Away Challenge!
Love,

Want to remember this? Save this Alcohol Ink Glass Vase tutorial to your favorite Pinterest Board!

Jennifer, thank you. That is completely beautiful!
So glad you love it, Lisa!
Gorgeous! Have to try this, haven´t used my alcohol inks yet so time for it now. Thank´s Jennifer for all this inspiration you share.
Hope you will give it a try, Marie!
Perfect time to break out those alcohol inks, Marie!
So beautiful, would something like this be suitable to make for a drinking glass at all? Perhaps same concept different finishing materials?
I agree, they are so beautiful, but this project is definitely for decoration only!
Beautiful. My question is can you use alcohol inks on colored glass when putting lights inside?
I have not tried, Lorraine. You could give it a try and if it doesn’t work the way you like it to you can gently remove the ink with rubbing alcohol.