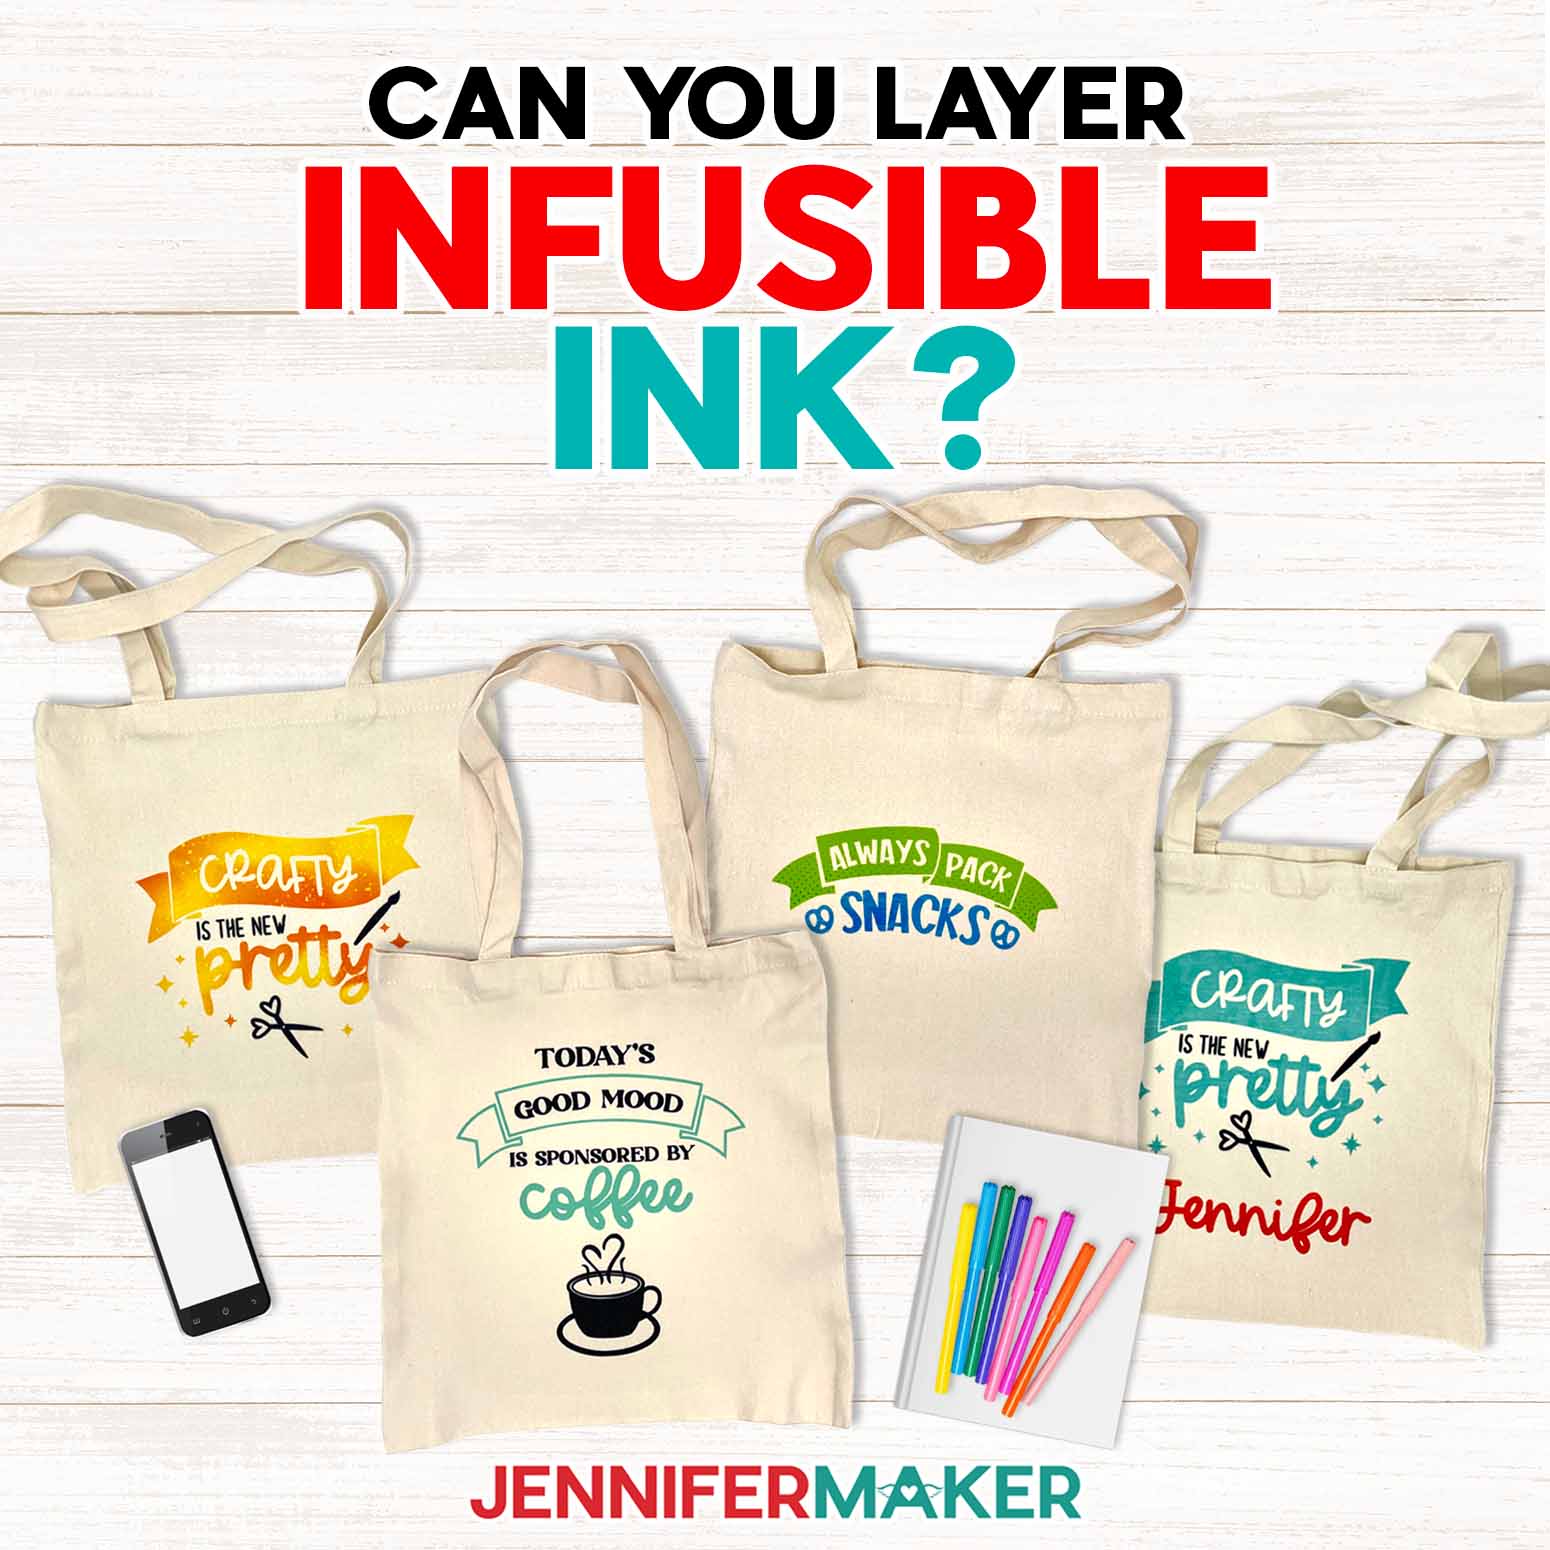
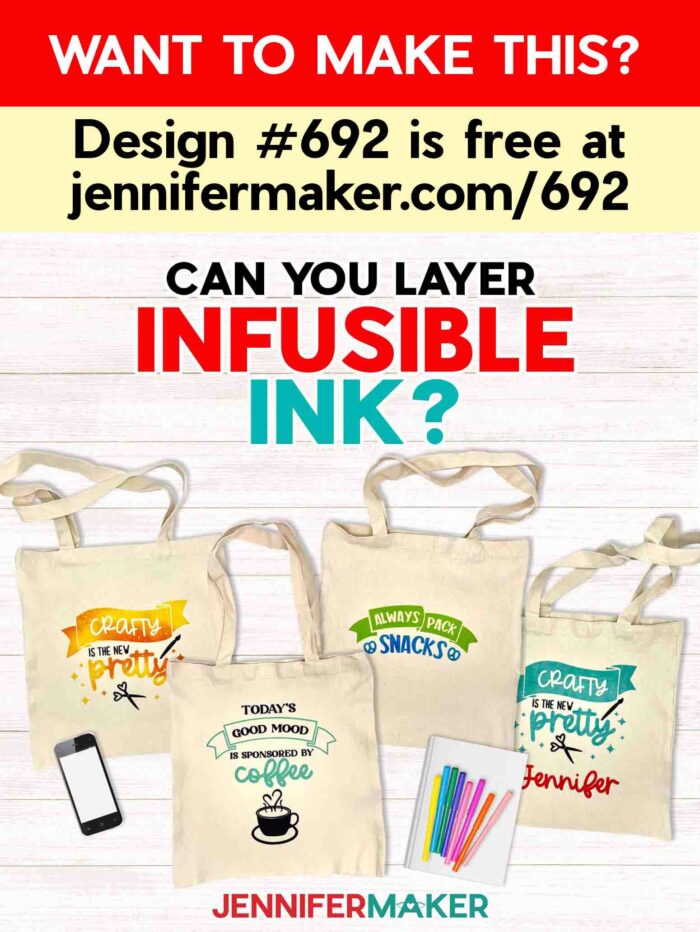
Learn how to layer infusible ink on tote bags and other projects!
Creating brilliant, colorful projects is easy with Infusible Ink transfer sheets! This material comes in a bunch of different colors and patterns– SO many, in fact, that I often want to use more than one in a design. But, can you layer Infusible Ink? For the most vibrant results, Infusible Ink should ONLY be pressed once — so how do you layer designs? I’ll show you how, AND how to fix an Infusible Ink faux pas!
Watch the full step-by-step video tutorial on making a layered infusible ink tote bag:

Infusible Ink is one of my favorite materials to work with when I want vibrant, durable, and permanent designs. It’s also a great alternative to sublimation printing for those who don’t have a sublimation printer! Infusible Ink transfer sheets come in a wide variety of colors and patterns – so what if you want to use multiples in a design?
Here’s the problem: For the most vibrant results, Infusible Ink should only be pressed once. If you press a second time, you can dull the colors or ruin the design. This is why it’s key to get the layering right when using multiple sheets — it ensures everything transfers perfectly in a single press. Today, I’ll show you a hack for layering Infusible Ink so you can create customized color and pattern combos to make a fun, colorful tote bag – and avoid mistakes like one I’ll show you in the video!

I’ll show you how to cut the SVG versions of the designs using a Cricut cutting machine. If your cutting machine uses DXF files instead of SVGs, no worries — I’ve included those, too! You can also use the included PDF files so you can cut them by hand, but it’s much easier (and more fun) to sit back and watch your cutting machine do the work for you!
I’ll use my Cricut Maker 3, but you can also use an original Cricut Maker, a Cricut Explore series machine, the Cricut Venture, or the Cricut Joy Xtra. You’ll need some basic Cricut machine crafting supplies like a green StandardGrip machine mat, too – plus some tools to remove it from the mat. I have a full list of tools and craft supplies you’ll need to make it below, along with links where to find them!
After cutting, I’ll walk you through how to weed your sheets of Infusible Ink (hint: it’s not like vinyl!) and how to perfectly trim and prepare each carrier sheet with heat-resistant tape for a successful single press.
Next we’ll prepare and lint roll the tote bag, attach our Infusible Ink design, and then the magic happens!
Unlike adhesive or heat transfer vinyl, which sits on top of the surface of a material, Infusible Ink fuses directly into the fibers – creating a design that’s vibrant, permanent, and smooth to the touch. It works best on surfaces made from polyester or coated with a polymer, also known as sublimation blanks, and can be used with Infusible Ink, too! Infusible Ink comes in sheets that can be cut into shapes, then pressed onto sublimation blanks using a heat press. An iron won’t work for this process — it doesn’t get hot enough.
I used a Cricut EasyPress to apply the heat to my tote bags, but you can use any heat press that’s larger than your design. Don’t use a household iron, they do not get hot enough to sublimate.
Once you see how easy it is to layer Infusible Ink to make tote bags, you’ll want to make all kinds of Infusible Ink projects!
Can you layer Infusible Ink? Let me show you how! This post contains some affiliate links for your convenience (which means if you make a purchase after clicking a link I will earn a small commission but it won’t cost you a penny more, there is no additional cost)! Read my full disclosure policy.
Materials to Make a Layered Infusible Ink Tote Bag
View my Amazon shopping list for the exact items I used!
- One (1) 15″ x 16″ Sublimation Tote
- Infusible Ink Transfer Sheets (in a variety of colors and patterns)
- One (1) 12″ 12″ Sheet of White Cardstock
- White Uncoated Butcher Paper
- A way to cut your Infusible Ink – I’m using the Cricut Maker 3, but you can also use the Cricut Maker, a Cricut Explore Series machine, the Cricut Venture, or the Cricut Joy Xtra.
- Cricut Green StandardGrip Machine Mat 12″ x 12″
- Brayer
- Spatula
- Weeding Tool
- Tweezers
- Scissors
- Paper Trimmer (Optional)
- Cricut TrueControl Knife (optional, to cut carrier sheet on Coffee design)
- Self-Healing Cutting Mat (optional, if using Cricut TrueControl Knife)
- Heat Press – I used the 12″ x 12″ Cricut EasyPress
- Cricut EasyPress Mat
- Lint Roller
- Fan (for ventilation)
Can You Layer Infusible Ink? Learn How!
Layered Infusible Ink Totes
Can you layer Infusible Ink? Let’s learn how with an Infusible Ink Tote Bag!
Materials
- One (1) 15” x 16” Sublimation Tote
- Infusible Ink Transfer Sheet - Bright Teal (“Coffee” design)
- Infusible Ink Transfer Sheet - Black (“Coffee” & “Crafty” designs)
- Infusible Ink Transfer Sheet - Splashpad Patterns (Orange for “Crafty” design)
- Infusible Ink Transfer Sheet - Comic Dots Rainbow Patterns (Lighter Green for “Snacks” design)
- Infusible Ink Transfer Sheet - Distressed Cool Water Patterns (Lighter Blue for “Snacks” design)
- One (1) 12" x 12" Sheet of White Cardstock
- White Uncoated Butcher Paper
- Design #692 (My free SVG/DXF/PDF design files are available in my free resource library - get the password by filling out the form at the bottom of this page)
Tools
- A way to cut your materials - I’m using the Cricut Maker 3, but you can also use the Cricut Maker, a Cricut Explore Series machine, the Cricut Venture, the Cricut Joy, or Cricut Joy Xtra
- Cricut Green StandardGrip Machine Mat 12" x 12”
- Brayer
- Weeding Tool
- Tweezers
- Scissors
- Portable Trimmer (optional)
- Cricut TrueControl Knife (optional, to cut carrier sheet on "Coffee" design) -AND-
- Self-Healing Cutting Mat (optional, if using Cricut TrueControl Knife)
- Heat Press - I used the 12” x 10” Cricut EasyPress
- Cricut EasyPress Mat
- Lint Roller
- Fan (for ventilation)
Instructions
STEP 1: GET MY FREE HOBBY TOTE BAG INFUSIBLE INK DESIGNS
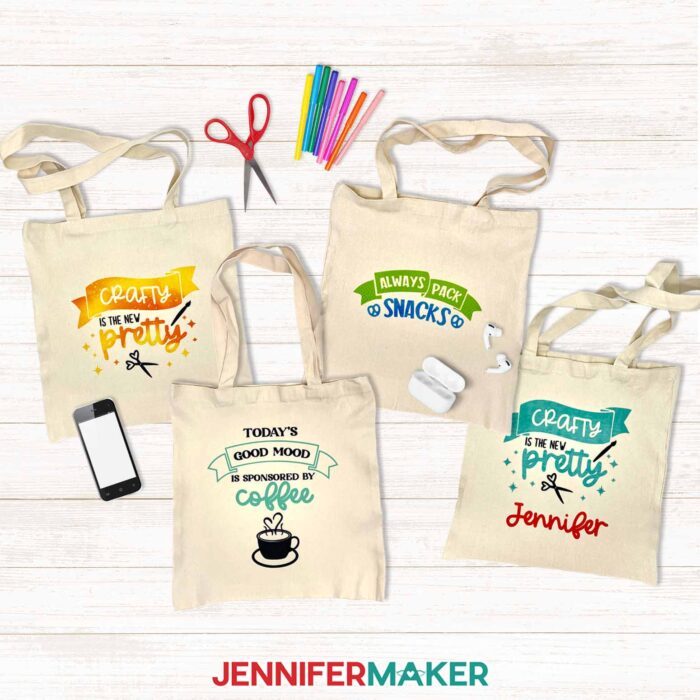
First, download my Hobby Tote Bag designs from my free library – look for Design #692. Alternatively, you can use the Save This Project form near the top of this post and the design link will be emailed to you.
The designs are sized to fit the tote bags in my materials list.
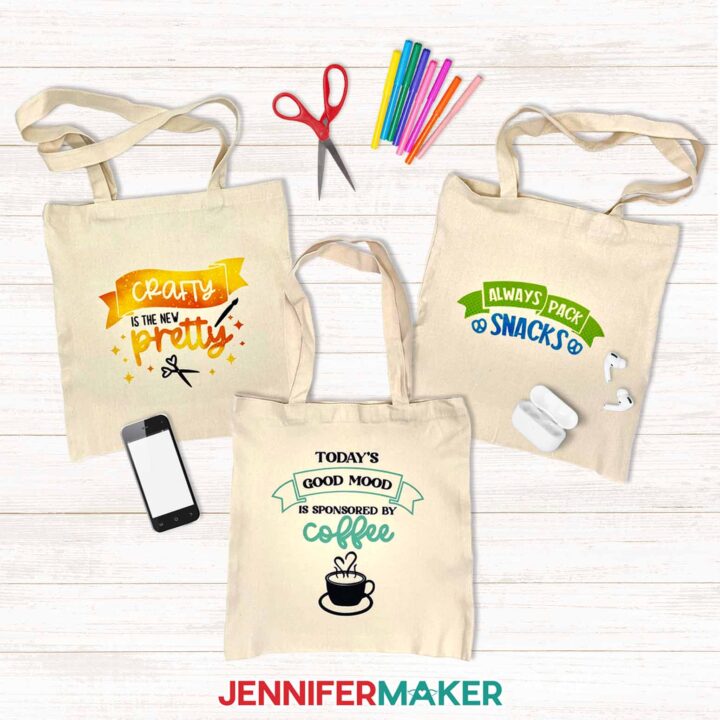
The SVG and DXF folders contain three designs. There’s a “Coffee” design, a “Crafty” design, and a “Snacks” design. Each design is two colors. I will show you how to cut the designs from two different sheets of Cricut infusible ink, then show you how to layer them and press them onto a tote bag.
TIP: If you’re not sure how to download zip files and upload designs, go to jennifermaker.com/svgs.
STEP 2: PREPARE AND CUT YOUR INFUSIBLE INK DESIGN
First, measure the Width and Height of the main part of your tote bag, the area where you’ll sublimate your design.
CRICUT DESIGN SPACE
- In Cricut Design Space on a blank Canvas, click “Upload.”
- Click “Upload Image.”
- Click “Browse.”
- Find and select the SVG you need.
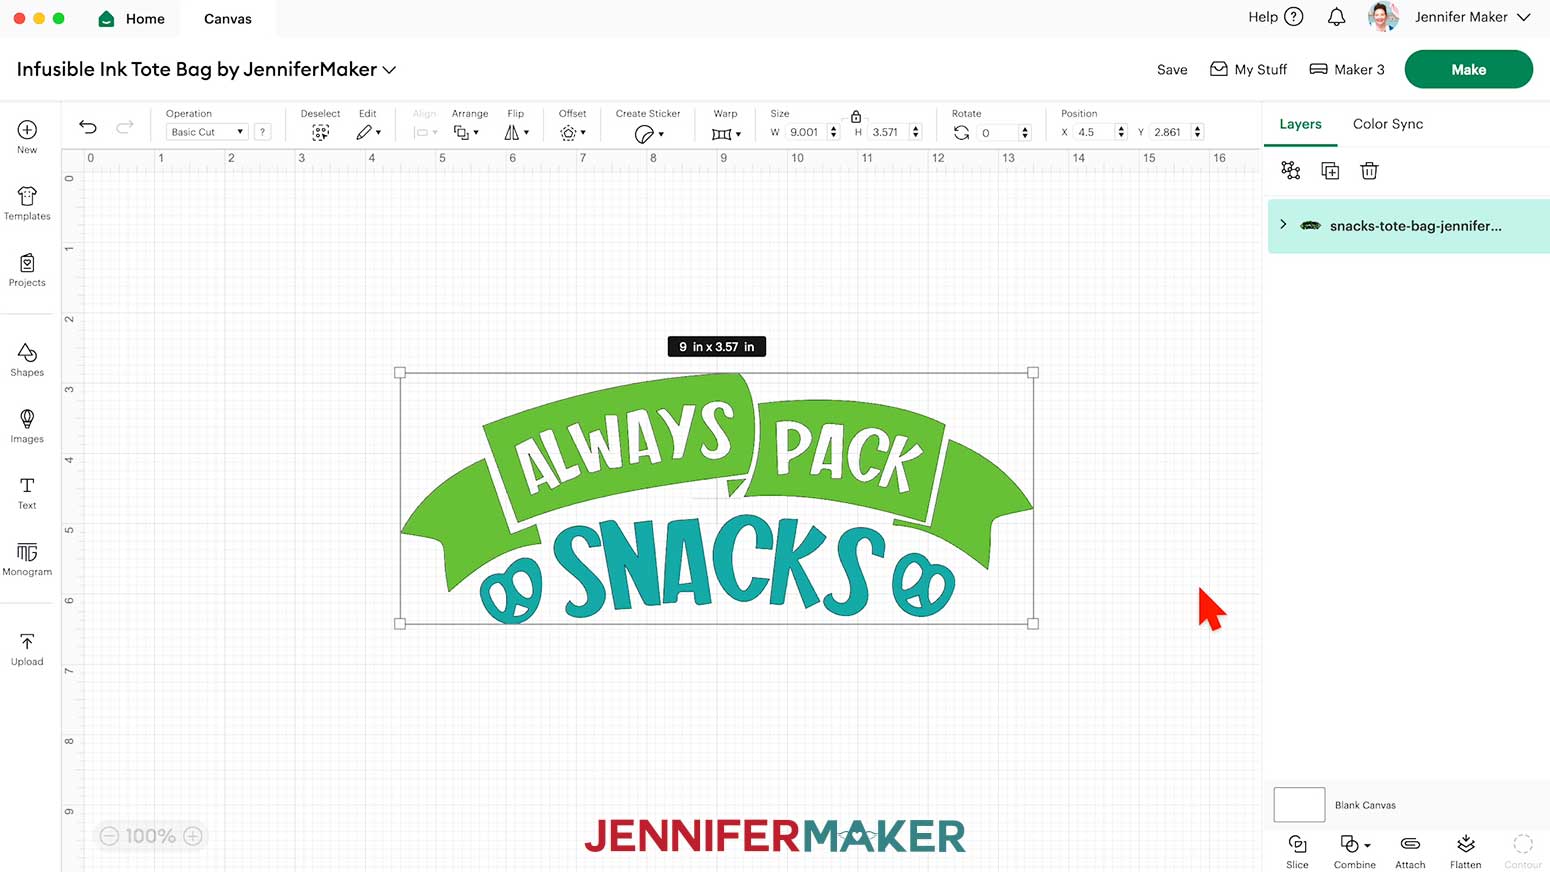
NOTE: I’ll demonstrate with the “Snacks” design, but the “Coffee” and “Crafty” designs follow the same steps. - Click “Open” and then “Continue.”
- Click “Upload” to add the SVG to your Canvas.
- Here is how the designs look on my Canvas.

- Click “Save,” then choose a name you’ll remember. Then click “Save” again.
- To help size the design to fit your tote bag, let’s make a template. Click “Shapes” on the left side of the screen.
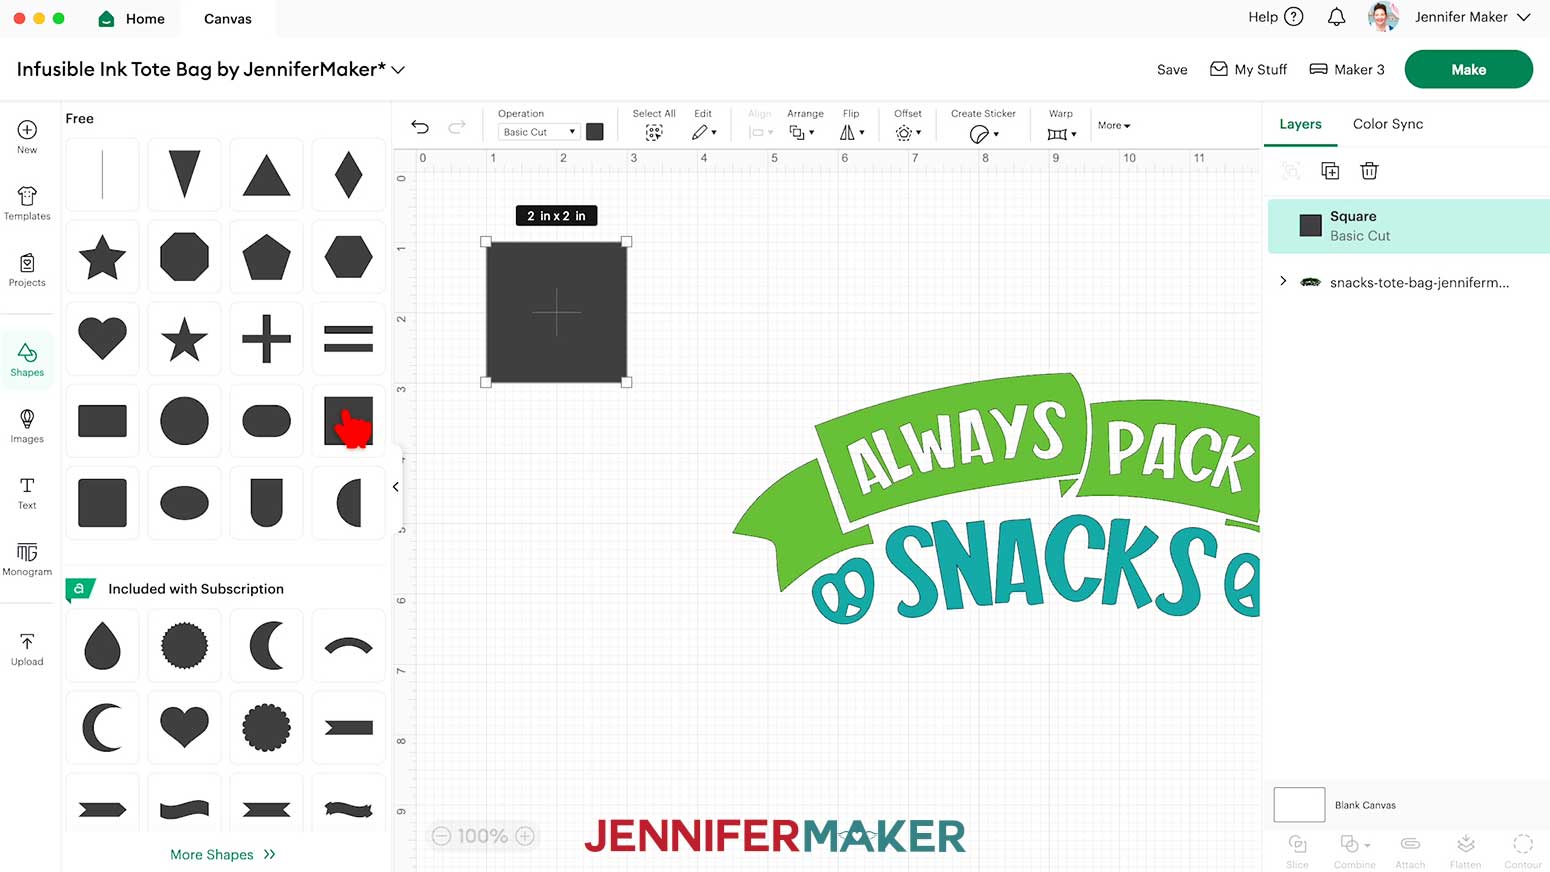
NOTE: There is a tote bag template in Cricut Design Space, but the measurement includes the handle, making it a confusing and inaccurate way to size your Infusible Ink design. I strongly recommend using a Square shape instead. - Select the free Square to add it to your Canvas, then click the little arrow to close the Shapes window.
- Let’s resize the Square to represent the sublimatable area of your tote bag. Click the lock icon to unlock the Square’s proportions.
- Change the Width (W) and Height (H) to match the width and height you recorded earlier -- the dimensions of the sublimatable area of your tote bag. Mine were 15” wide by 16” tall.
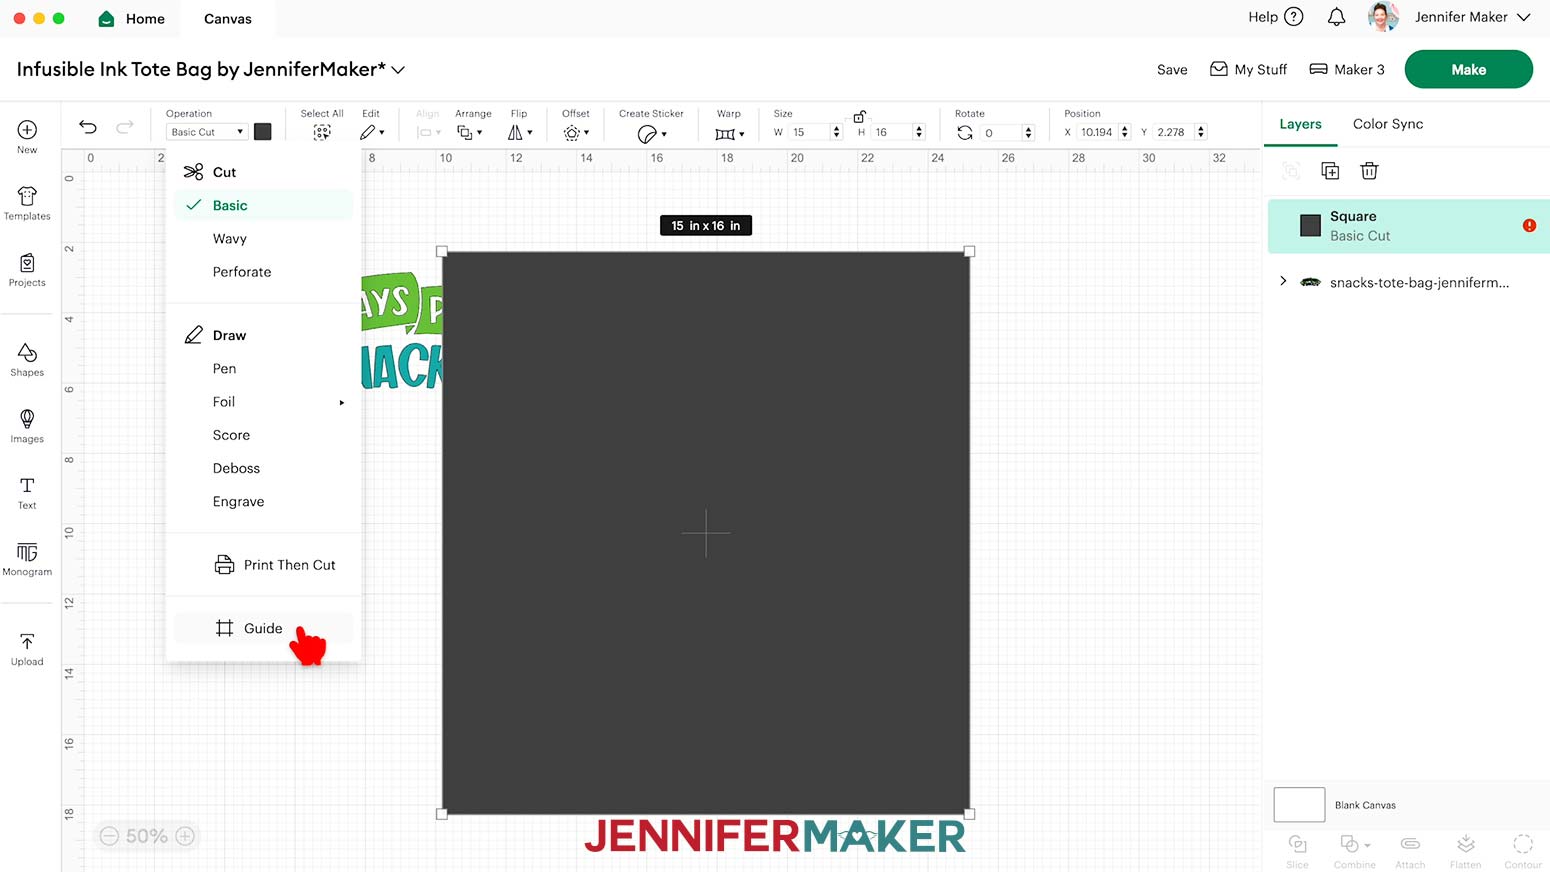
- With the Square selected, click the drop-down menu under “Operation” and select “Guide.” The Square will become a pink outline.
- Drag your design inside the Guide Square.
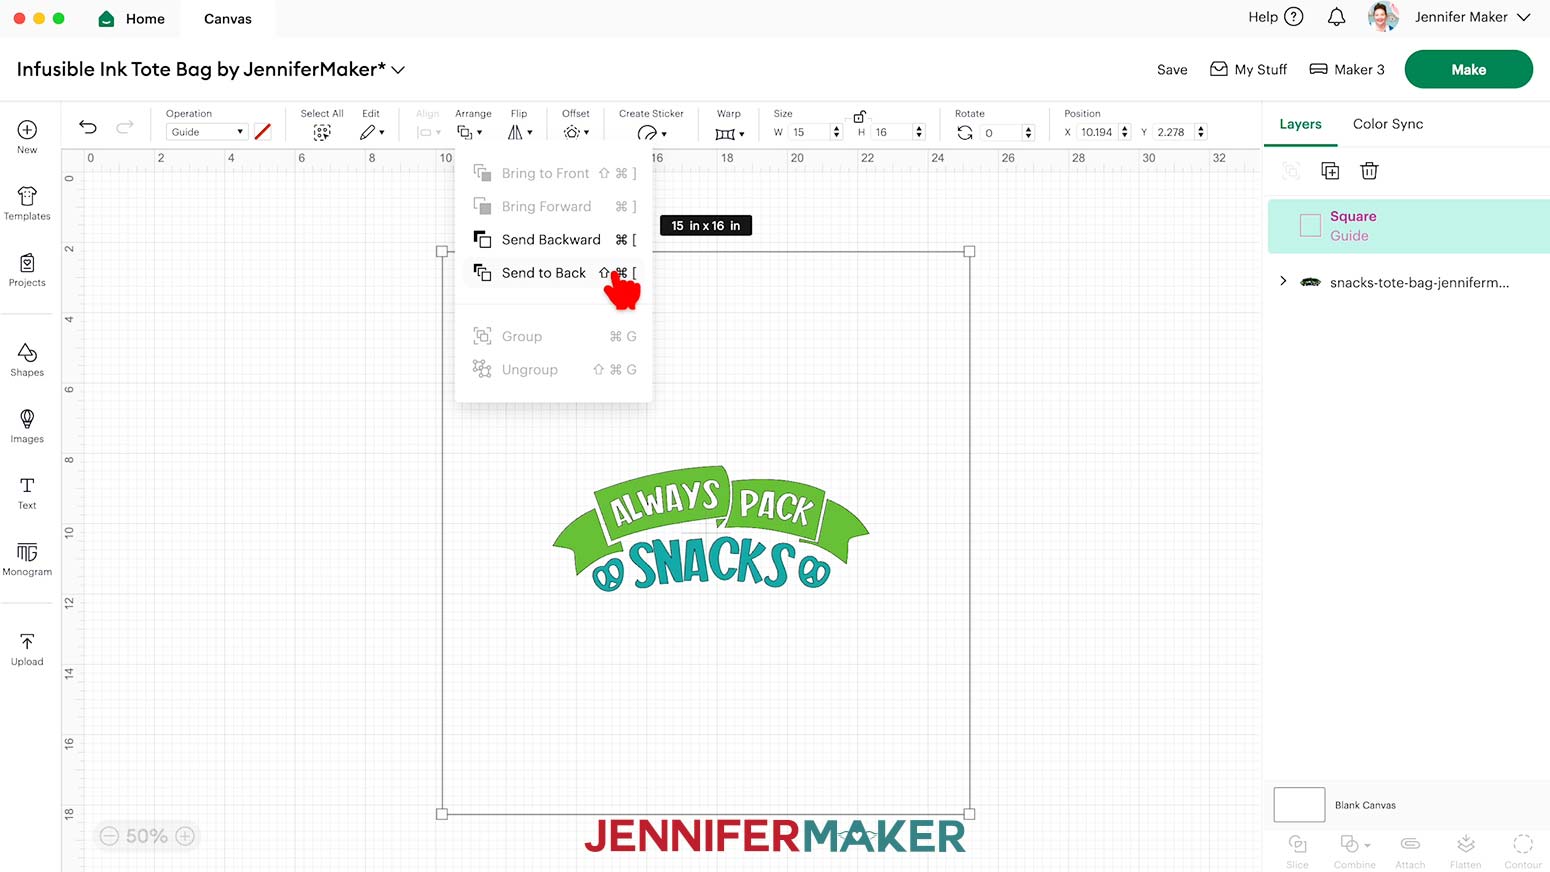
- With the Guide Square selected, click “Arrange” and “Send to Back.”
- Select the design, then click and drag the corner handles to resize it to your desired size. Leave some space on either side of the design, and be sure the size of the design does not exceed the size of your Infusible Ink sheets.
- If desired, ungroup the design, then select each layer and change its color in the Color Box at the top to match your Infusible Ink transfer sheets.


CUTTING
- Make sure the correct machine is selected.
- Click “Make” in the upper right corner of the screen.
- On the Prepare screen, make sure that “On Mat” and “12 in x 12 in” are selected.
- Toggle “Mirror” ON so the design will transfer correctly.
NOTE: If you’re using different sizes of Infusible Ink transfer sheets, adjust your “Material Size” settings to match. - Click “Continue.”
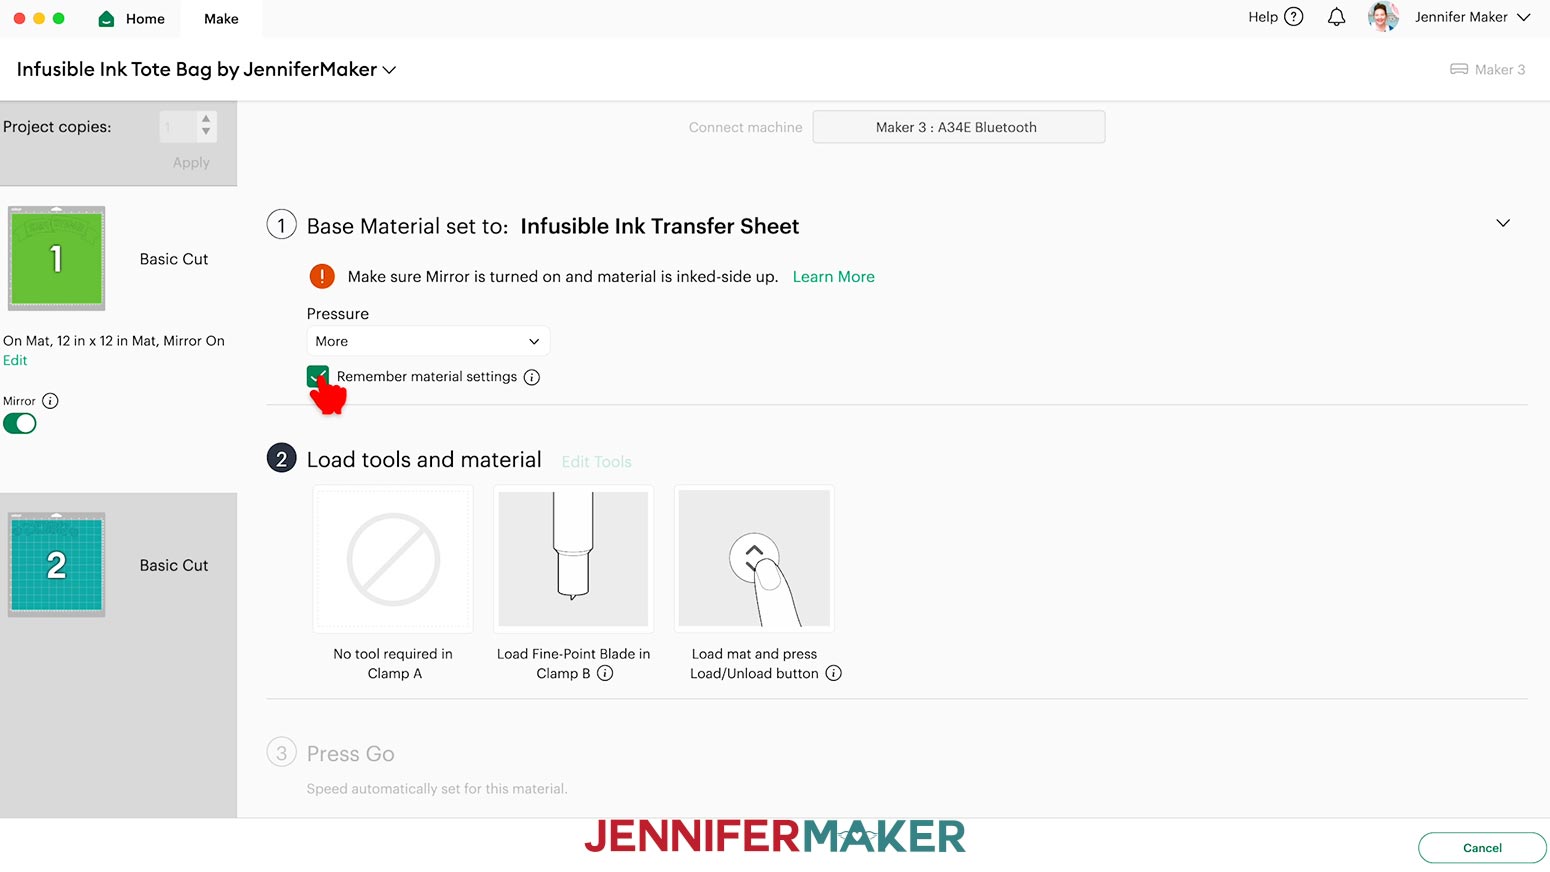
- On the Make screen, choose “Infusible Ink Transfer Sheet” as the material and choose “More” Pressure for a cleaner cut.
- Check the box next to “Remember material settings” to apply the settings to the second mat, too.
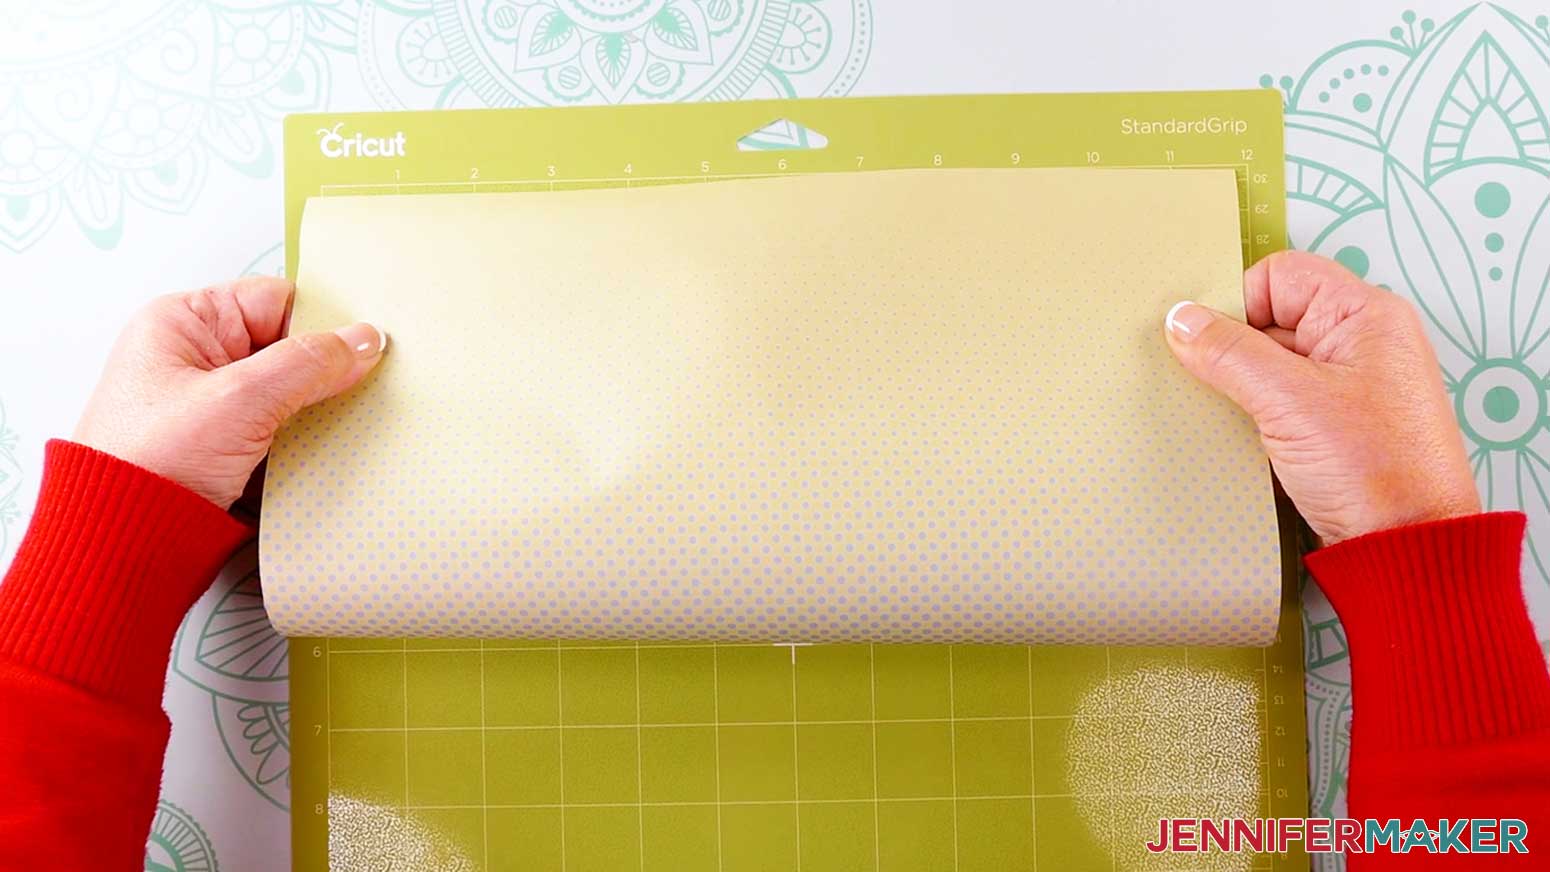
- Place your first mat’s Infusible Ink sheet colored-side up on a green StandardGrip machine mat so it covers the design area on the screen.
TIP: If you touch the Infusible Ink, your skin oils can interfere with the transfer, so wash and dry your hands well before handling the transfer sheet. - Use your brayer to smooth the sheet down and make sure it’s adhered well.
- Make sure your Premium Fine Point Blade is clean and in the correct clamp.
- Insert your prepared mat into your cutting machine so it matches the screen’s orientation, and press the flashing button to load it.
- Press the flashing middle button to begin the cuts.
- When it has finished cutting, don’t unload the mat just yet. Instead, use your weeding tool to gently lift a corner of the design to see if the cut went all the way through the sheet in the correct spots.
- If it’s not cut through, smooth the material back down and press the middle “Go” button again so your Cricut can go back over the cuts one more time.
- When the cut is finished, press the flashing button to unload the mat.
- Flip your mat over and peel it away from the Infusible Ink sheet.
- If there is a lot of extra Infusible Ink transfer sheet uncut next to your design, use scissors or a paper trimmer to cut it off and save it for smaller projects. Leave about ½” of space between the design and each of the cut edges.
- Repeat steps 8-17 for the second mat.
- To weed an Infusible Ink transfer sheet, gently roll and bend the cut areas until the edges of the design start to lift up from the carrier sheet.
TIP: You might hear some cracking noises, but don’t worry, this is normal.
NOTE: If making the “Crafty” design, use scissors to cut the paintbrush, scissors, and “is the new” text apart first, then weed each separately. Do not cut the other sheet with the banner apart before weeding. - Use your fingers to gently bend the carrier sheet and pull the extra ink pieces off of it.
TIP: You can use a weeding tool or tweezers to help lift sections you don’t want, or hold design elements in place on the carrier sheet while removing extra sections. Just be careful not to scratch the ink on the areas you’re keeping. - Be sure to remove all of the extra pieces that aren’t part of your design. Be careful to leave the counters within the letters that are represented by negative space (such as the counters in the A’s and P of the “Snacks” design). Try to keep your fingers off of the carrier sheet to keep it as clean as possible.
TIP: If the sections you’re removing don’t come off in one piece, it’s fine to cut or tear them – just be careful not to cut or tear the parts of the design you’re keeping. - Once your Infusible Ink sheet is completely weeded, flip it over and look at it from the back. This is how your design will appear on your tote bag.
NOTE: Make sure that you didn’t miss any extra bits when you weeded, or they’ll be pressed onto the tote.
TIP: If any small pieces of Infusible Ink pop off of the carrier sheet, gently use tweezers to reposition them and pat them in place, ink-side up. Use the Design Space Canvas or slight cut indents on the carrier sheet to help with correct placement. - Place the weeded sheet on your work surface, sticky-side up.
- Repeat steps 19-23 with the second sheet of Infusible Ink.


STEP 3: ASSEMBLE YOUR INFUSIBLE INK LAYERS
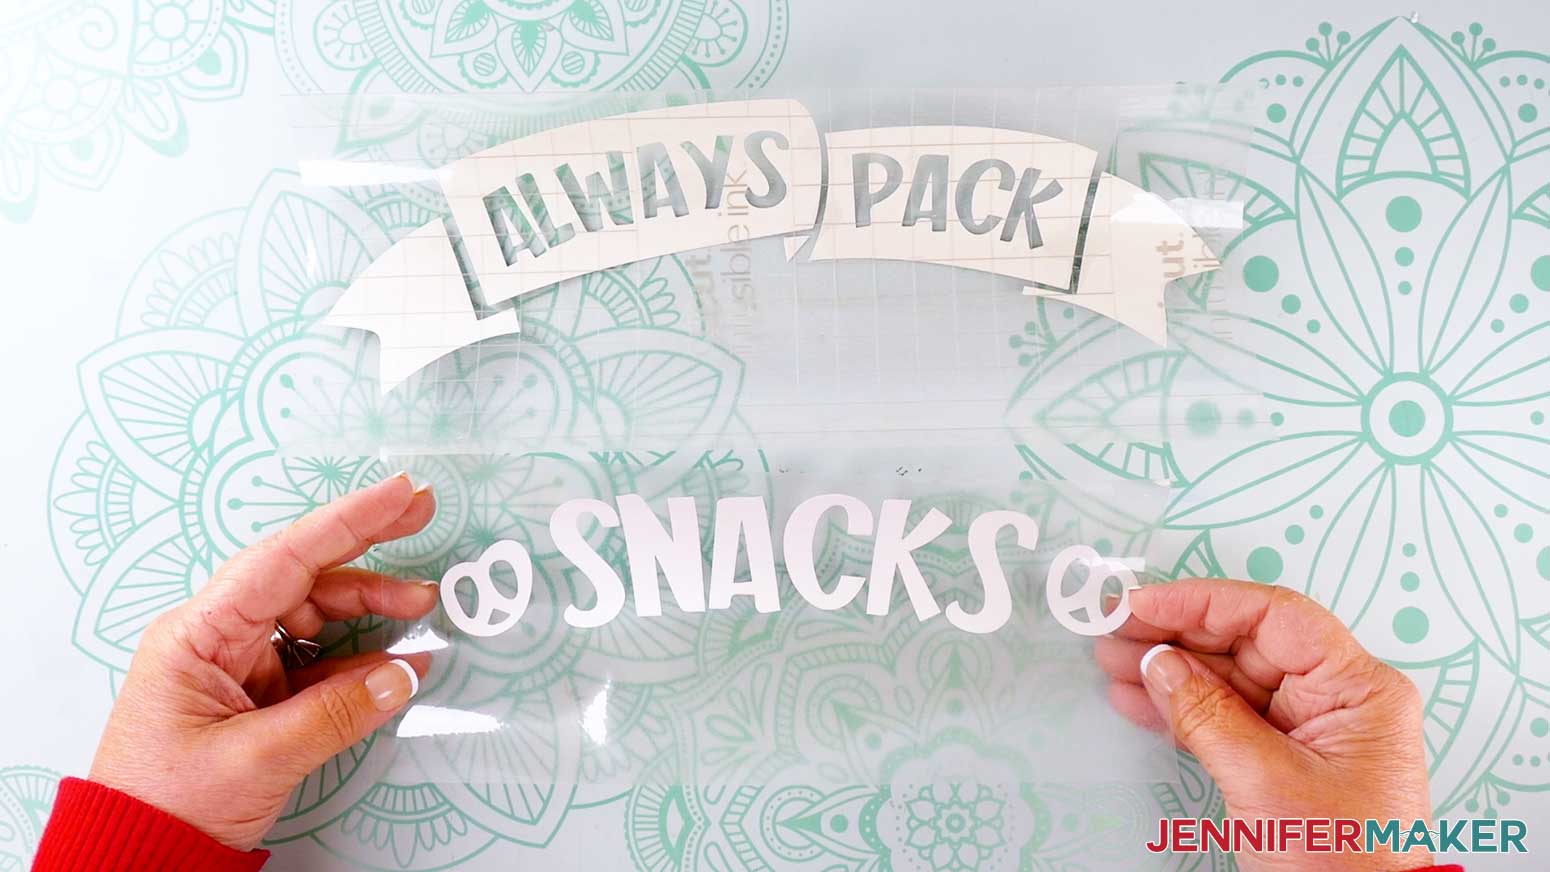
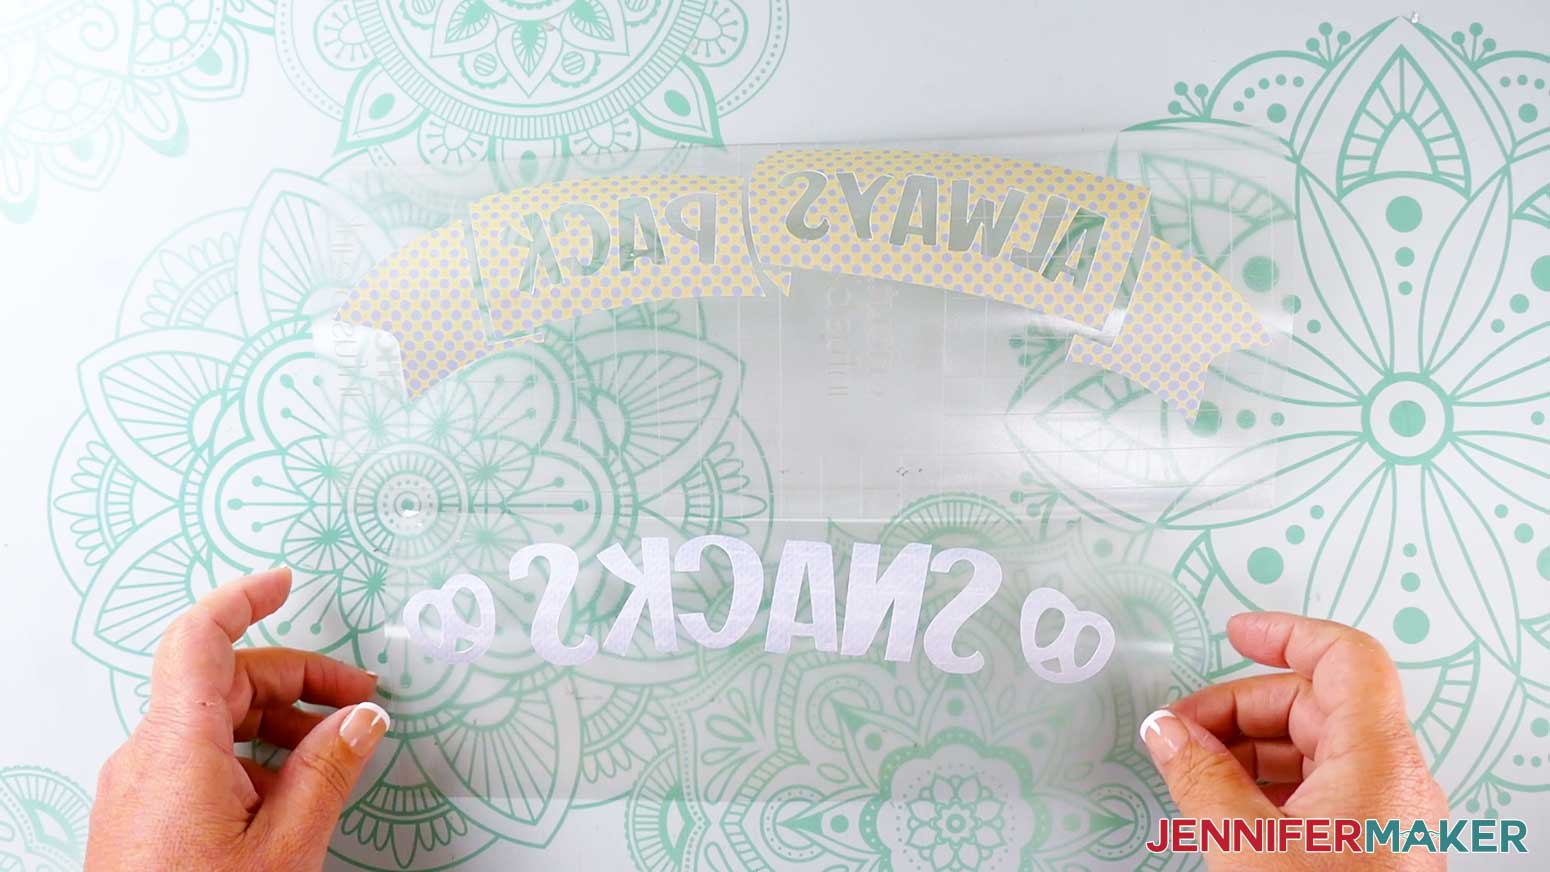
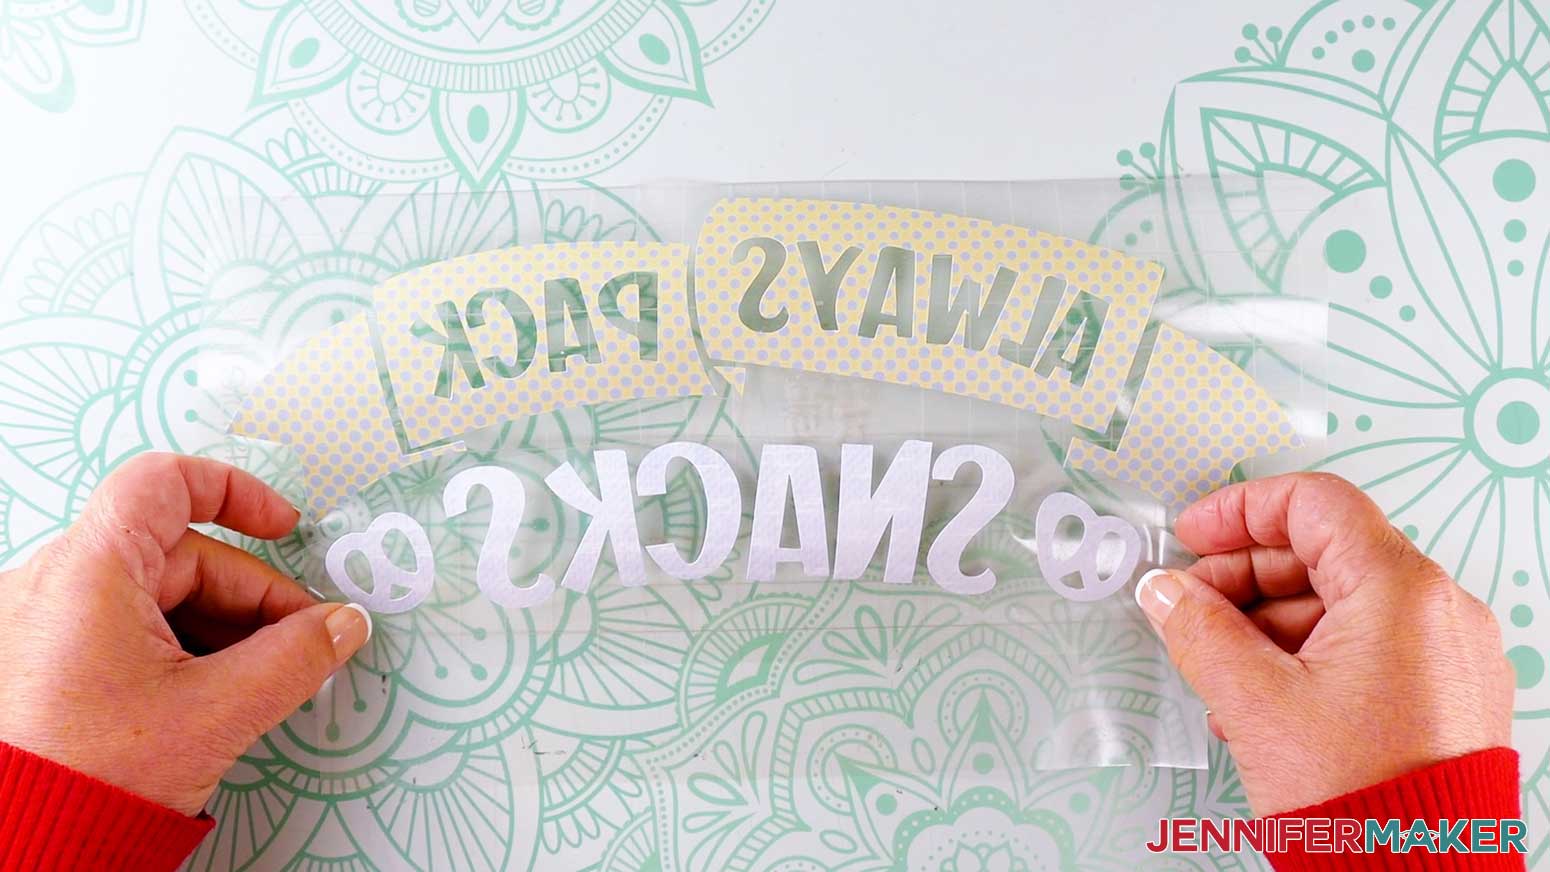
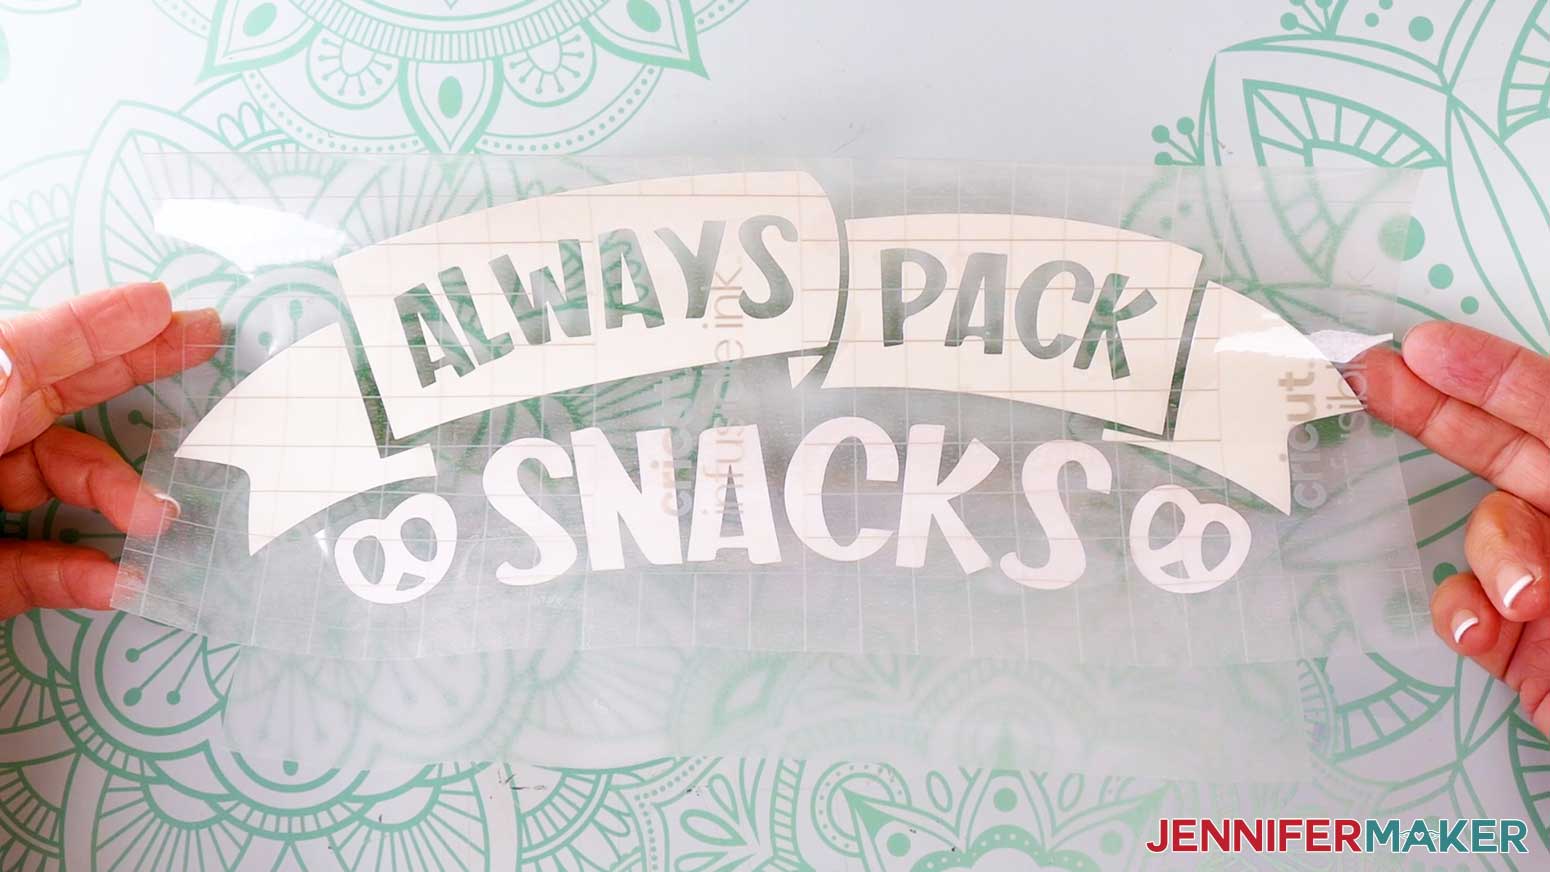
“SNACKS” DESIGN
- Trim the carrier sheet closely around the top edge of the design, leaving about 1/16” of space between the design and the edge of the carrier sheet.
- Using your Design Space screen as reference, place the “Snacks” sheet sticky-side up within the space on the carrier sheet under the “Always Pack” sheet to complete the design.
TIP: If the bottom layer moves as you’re trying to apply the top layer, you can put your bottom layer onto a LightGrip or StandardGrip machine mat to stabilize it. - Press to adhere the layers together.
- Check that there is no carrier sheet covering any of the Infusible Ink on the sticky sides of the sheets.
- Flip the adhered layers over to check the placement of the design elements.
- If necessary, peel the added layers off and make adjustments. Once you’re happy with how it looks, place it onto your work surface sticky-side up.
TIP: If you used a machine mat to stabilize the bottom layer, gently peel both layers off the mat, keeping the design assembled. Place it onto your work surface sticky-side up.

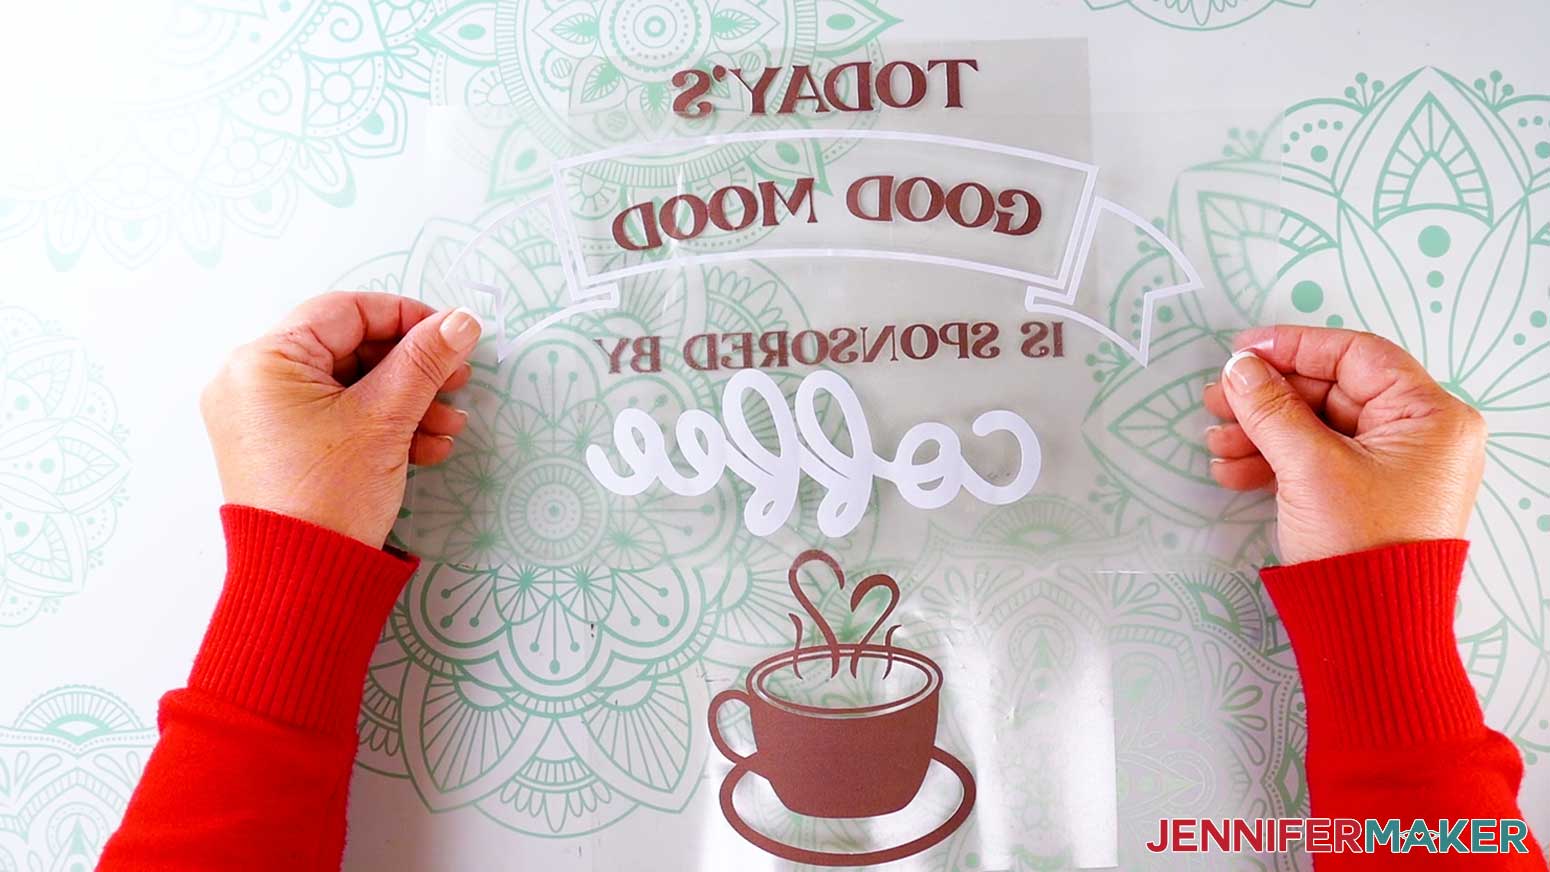
“COFFEE” DESIGN
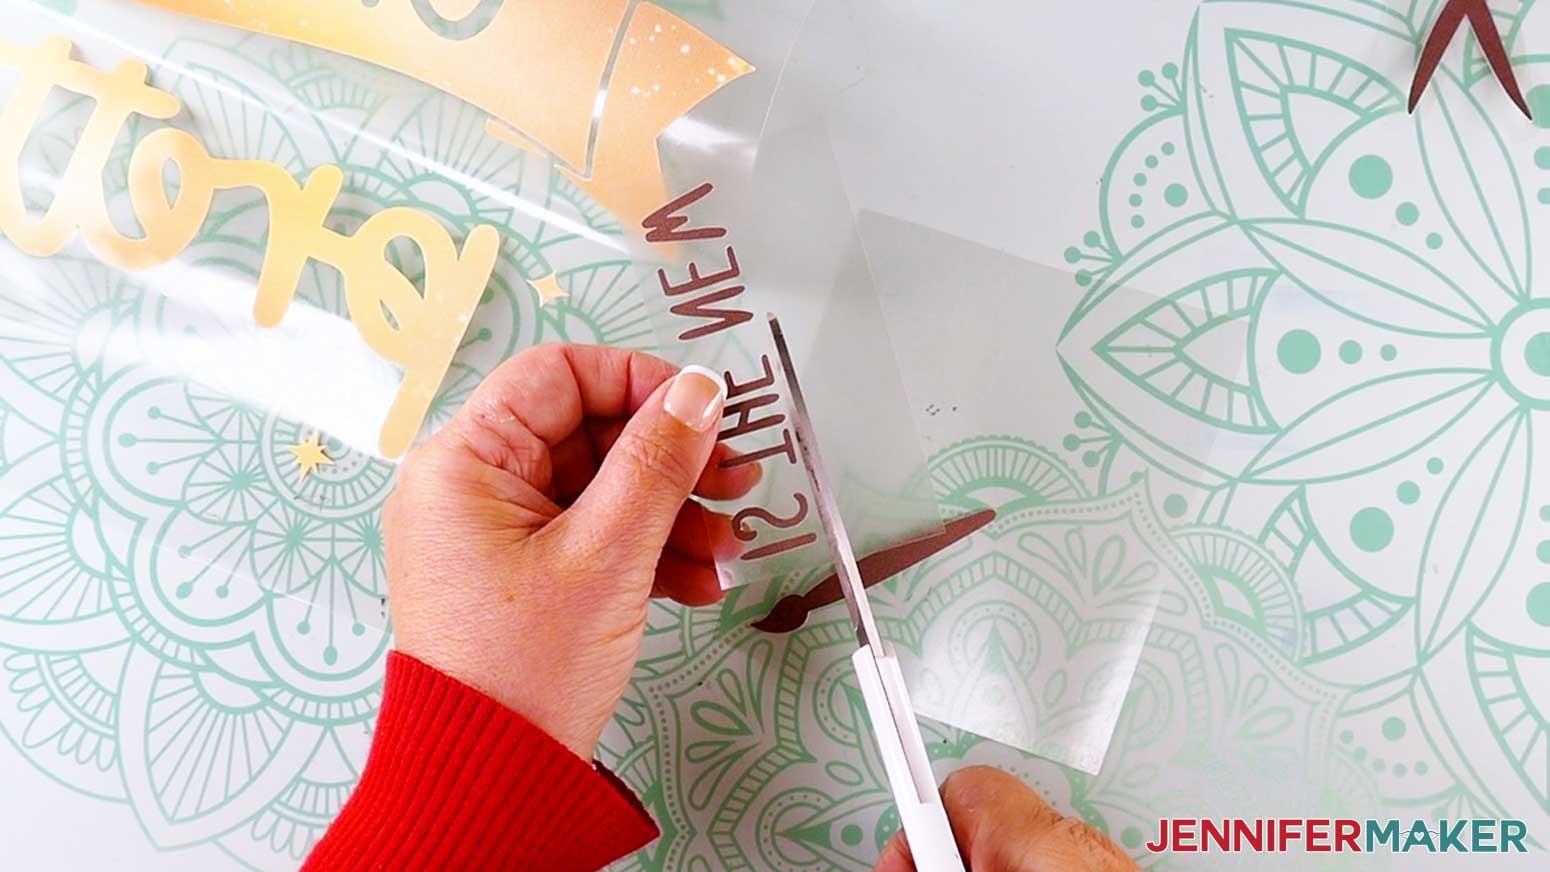
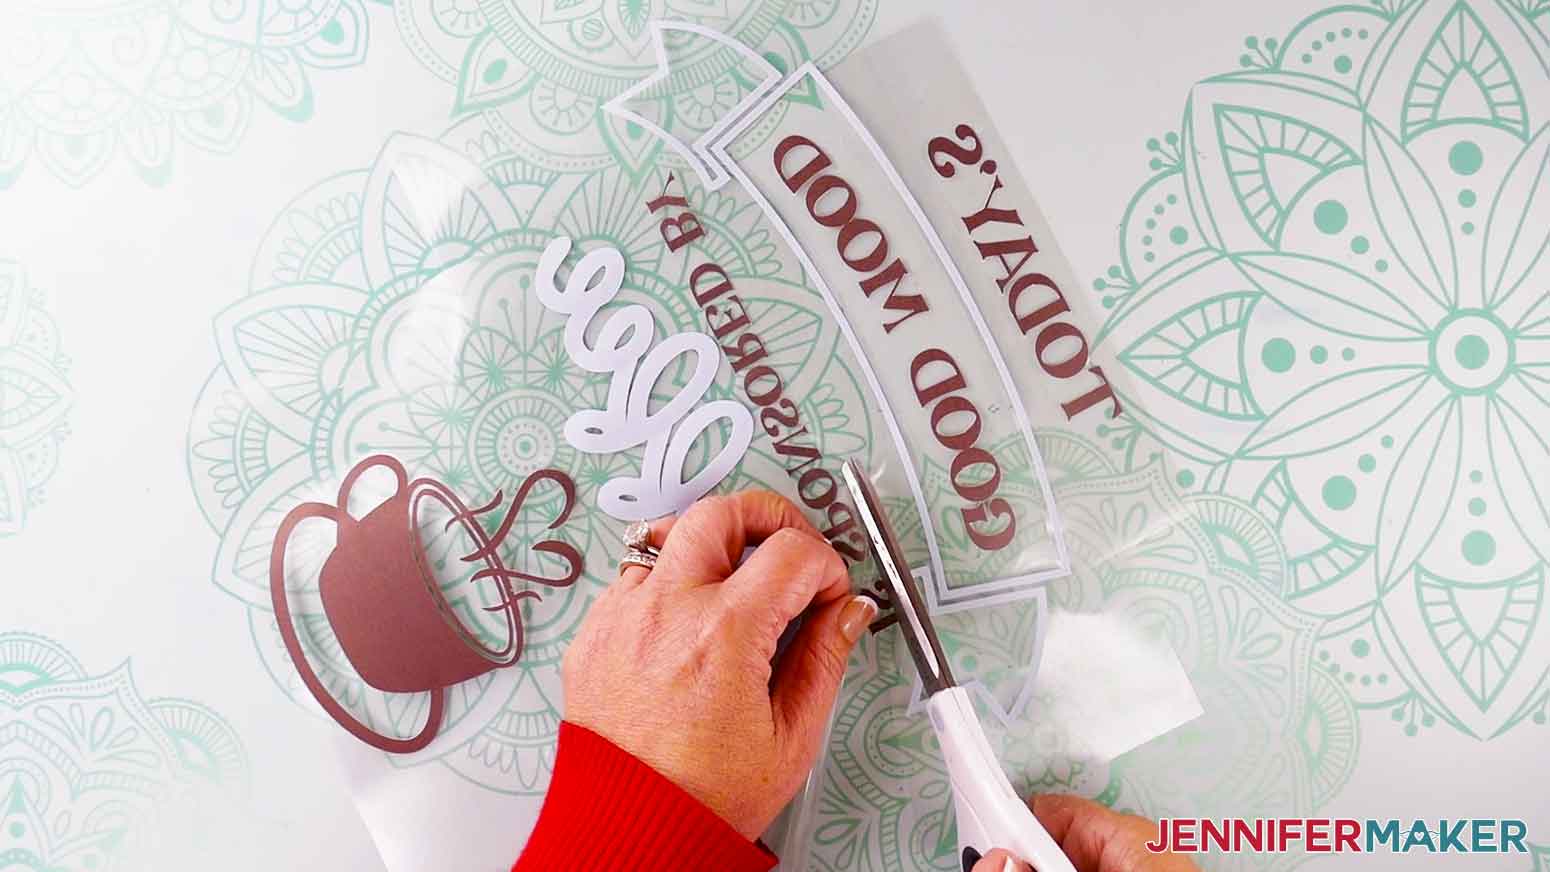
- Grab the piece with the word “coffee” and the banner, and trim the carrier sheet closely around the bottom edge of the design (around the bottom of the word “coffee,” leaving about 1/16” of space between the design and the edge of the carrier sheet.
- Place the piece sticky-side up on a self-healing cutting mat.
- Use scissors to carefully cut away the carrier sheet inside of the large banner shape, leaving about ⅛” of space between the cut edges and the edges of the Infusible Ink.
NOTE: I found it easier to use a Cricut TrueControl Knife (or a similar craft knife) to cut away the carrier sheet inside of the large banner shape. Just be careful, because the knife is very sharp. Use a self-healing cutting mat underneath so you do not damage your work surface. - Using your Design Space screen as reference, hold the “coffee” and banner sheet sticky-side up over the “good mood” design sheet, but don’t press it down yet.
TIP: If the bottom layer moves as you’re trying to apply the top layer, you can put your bottom layer onto a LightGrip or StandardGrip machine mat to stabilize it. - Make sure the “is sponsored by” text is not touching the banner or the “coffee” letters. If it is, peel off the top layer and try aligning the sheets again.
- Once the layers are well-aligned, use your fingers to tack the banner and “coffee” portions of the design into place so they don’t shift. Don’t press down the other areas.
- Poke the tip of your scissors under the edge of the top carrier sheet, just below the banner.
- Use scissors to trim the carrier sheet along the contour of the bottom of the banner, from edge to edge.
- Then use scissors to carefully trim the carrier sheet along the top of the word “coffee,” from edge to edge.
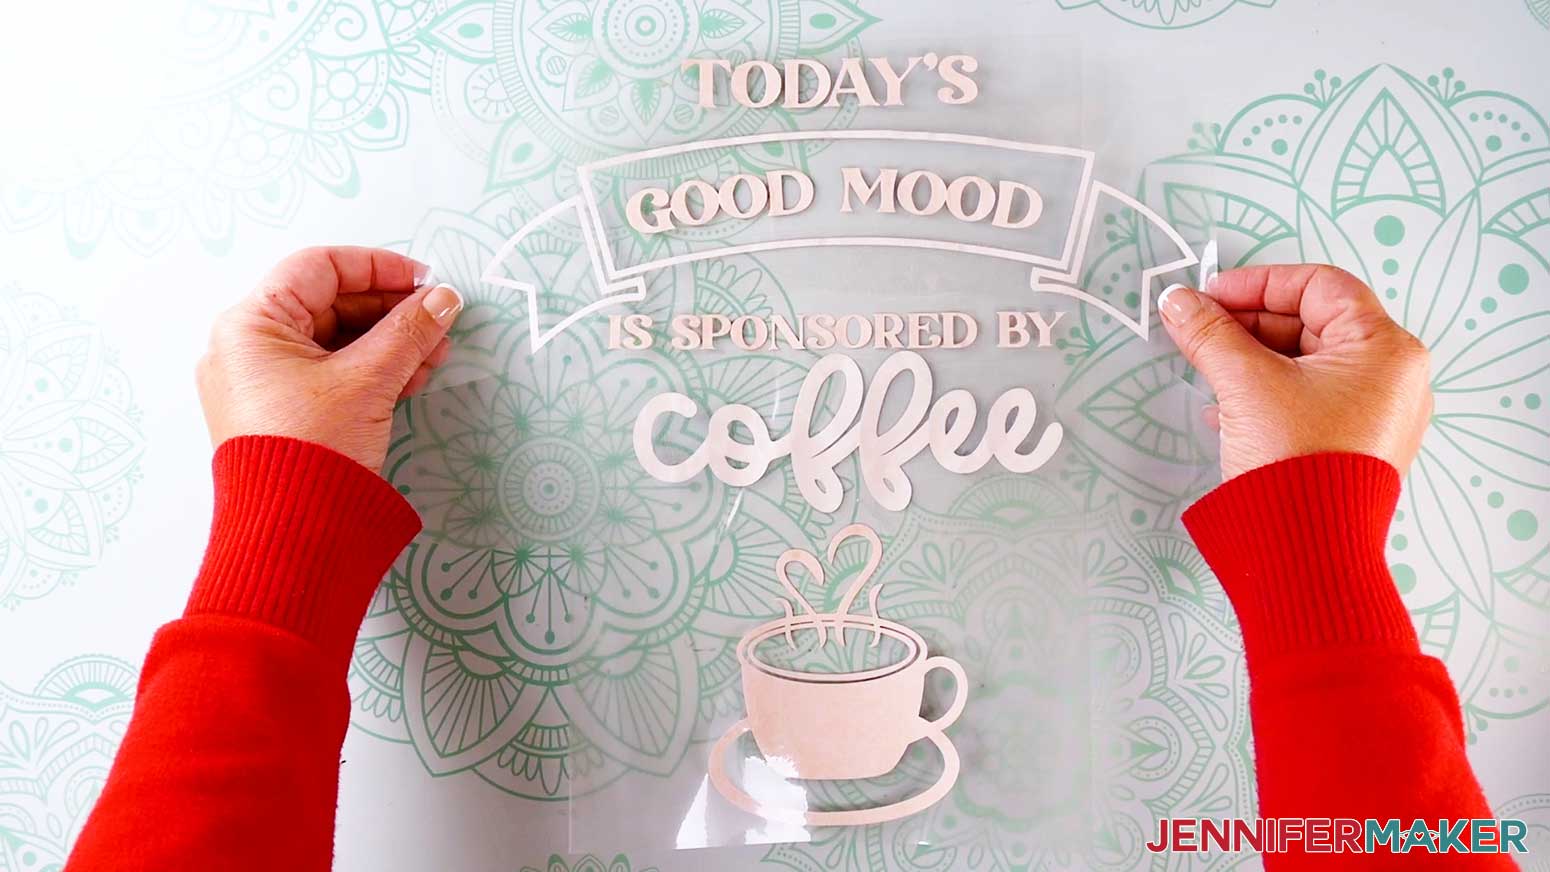
- Look at the design and make sure that none of the carrier sheet from the top “coffee” and banner layers are covering any of the Infusible Ink on the bottom “good mood” layer.
- Press with your fingers to adhere the layers together.
- Check that there is no carrier sheet covering any of the Infusible Ink on the sticky sides of the sheets.
- Flip the adhered layers over to check the placement of the design elements.
- If necessary, peel the added layers off and make adjustments. Once you’re happy with how it looks, place it onto your work surface sticky-side up.
TIP: If you used a machine mat to stabilize the bottom layer, gently peel both layers off the mat, keeping the design assembled. Place it onto your work surface sticky-side up.


“CRAFTY” DESIGN
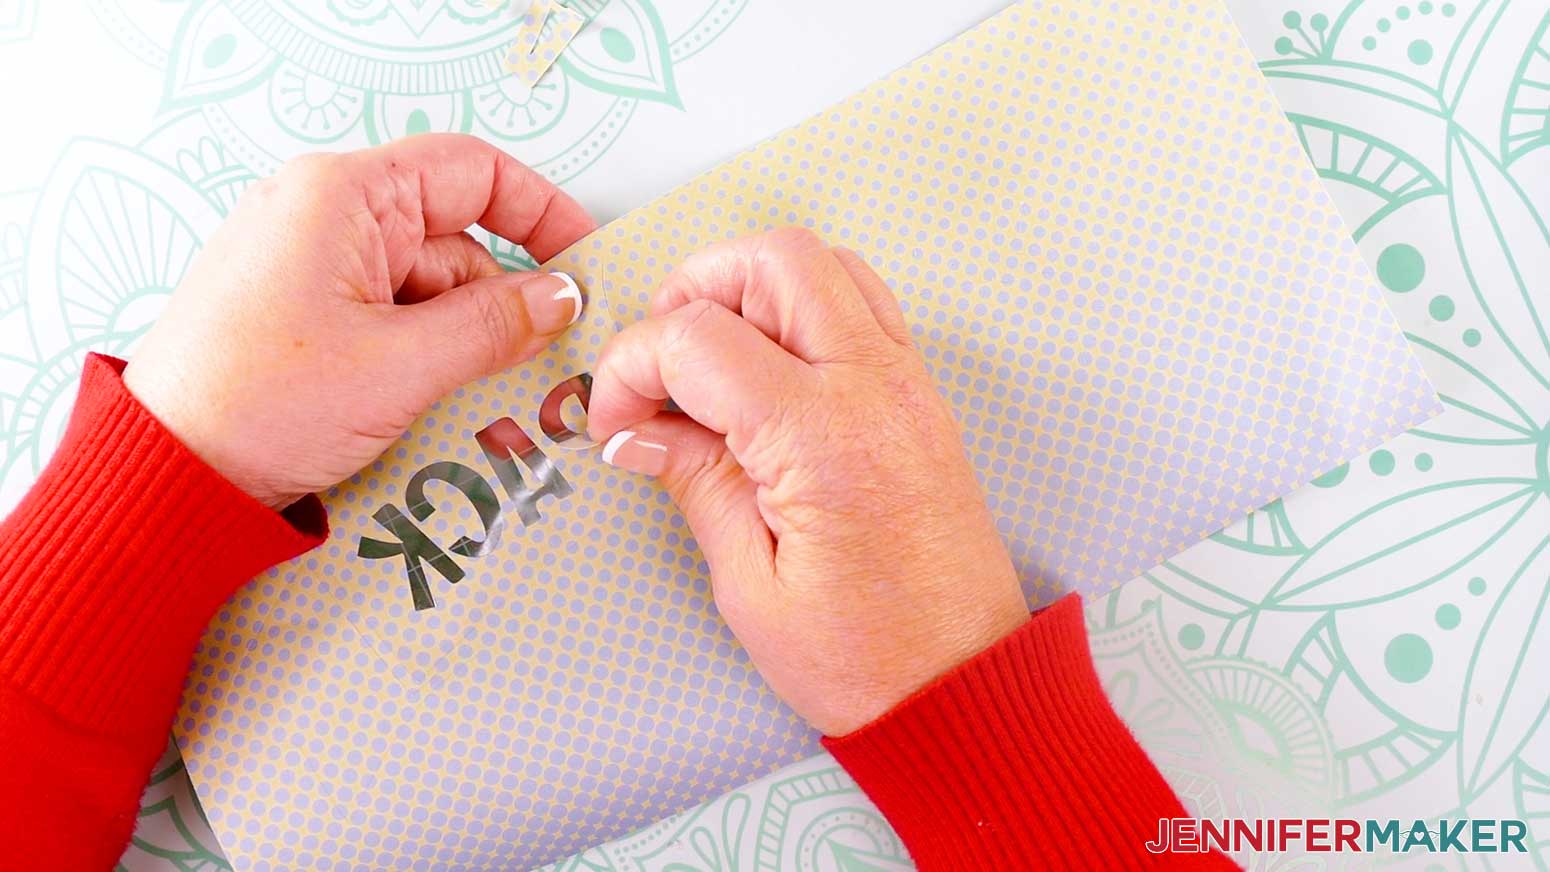
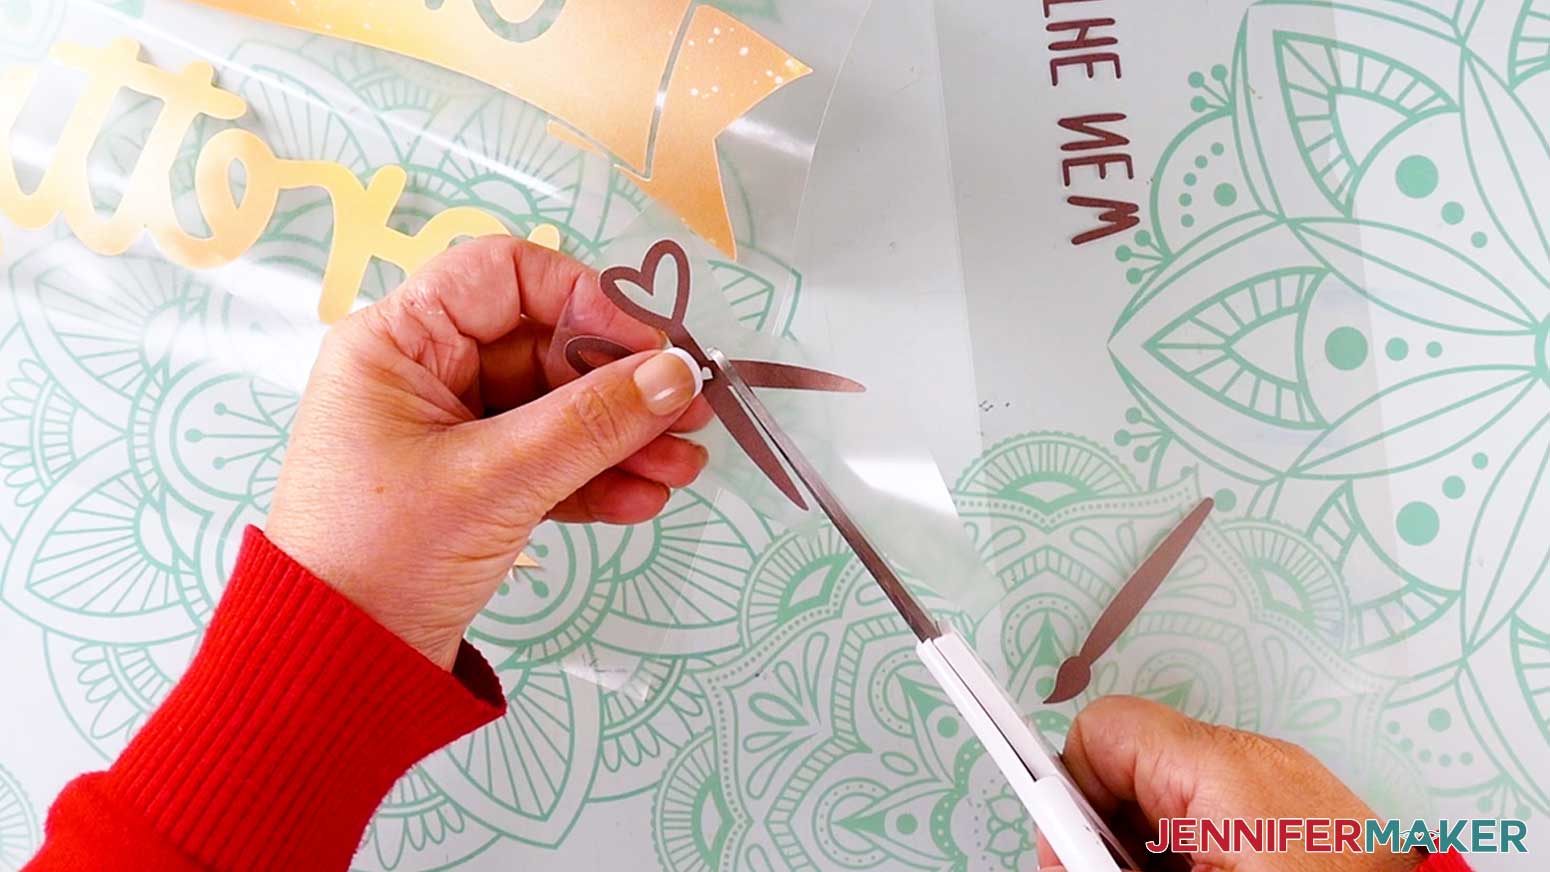
- Place the larger sheet with the banner sticky-side up on your work surface.
- Trim closely around each of the three smaller pieces, leaving about 1/16” of space between the edges of the Infusible Ink and the edges of the carrier sheets.
- Using your Canvas in Cricut Design Space as reference, place each of the three smaller pieces sticky-side up onto the larger piece with the banner. The placement doesn’t need to be exact, but avoid overlapping the Infusible Ink or the carrier sheets on top of the Infusible Ink on the banner piece.
TIP: If the bottom layer moves as you’re trying to apply the top layers, you can put your bottom layer onto a LightGrip or StandardGrip machine mat to stabilize it. - Press to adhere the layers together.
- Check that there is no carrier sheet covering any of the Infusible Ink on the sticky sides of the sheets.
- Flip the adhered layers over to check the placement of the design elements.
- If necessary, peel the added layers off and make adjustments. Once you’re happy with how it looks, place it onto your work surface sticky-side up.
TIP: If you used a machine mat to stabilize the bottom layer, gently peel both layers off the mat, keeping the design assembled. Place it onto your work surface sticky-side up.


STEP 4: SUBLIMATE YOUR TOTE BAG
Follow these steps for all three designs.
NOTE: Before you begin, open a window and/or turn on a fan for ventilation.
- Place your pressing mat on your work surface. I used a Cricut EasyPress mat.
- Check the material content of your tote bag. It should be listed on the tote bag’s tag, or in the product listing or packaging.
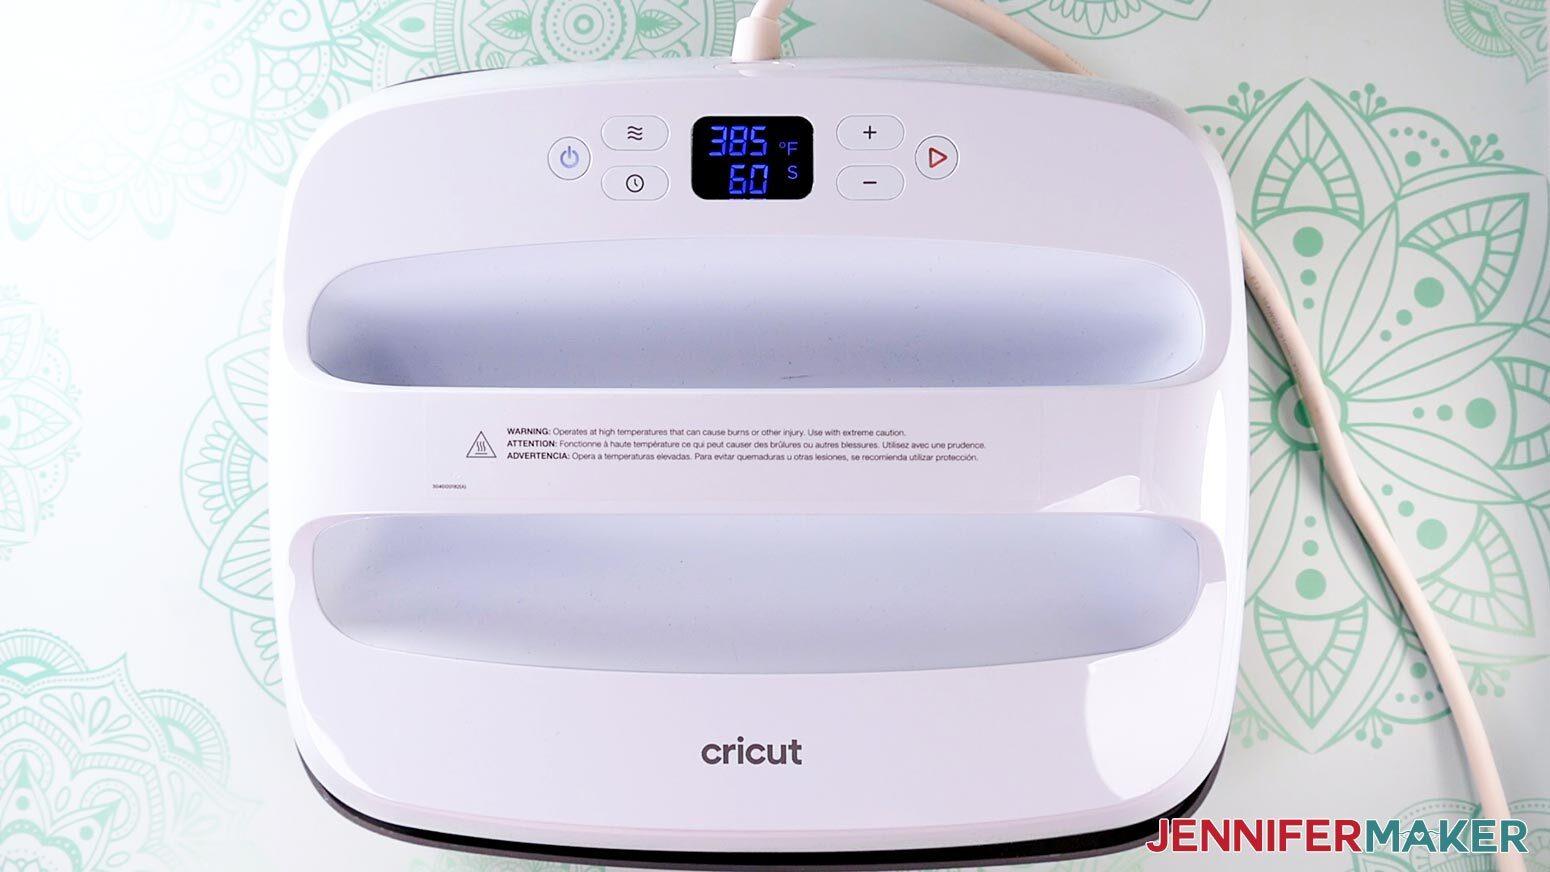
- Follow the settings in my Sublimation Cookbook and preheat your heat press to 385°F (195°C) and set the timer for 60 seconds. These settings are for the Canvas Pillows, which have the same material content as my tote bag.
TIP: My tote is 100% poly canvas, so I followed the settings for a 100% poly canvas pillow cover in my Sublimation Cookbook. Always check the material on your blank before beginning a sublimation project, and choose your settings based on that, not the project type. - Place the tote bag on top of the pressing mat, with the side you’d like to sublimate face up.
- Press the tote bag for 10-15 seconds to remove any moisture and press out any wrinkles. If wrinkles persist, slide the heat press around the surface of the tote bag to iron them out.
- Lift the heat press straight up and place it back onto its cradle.
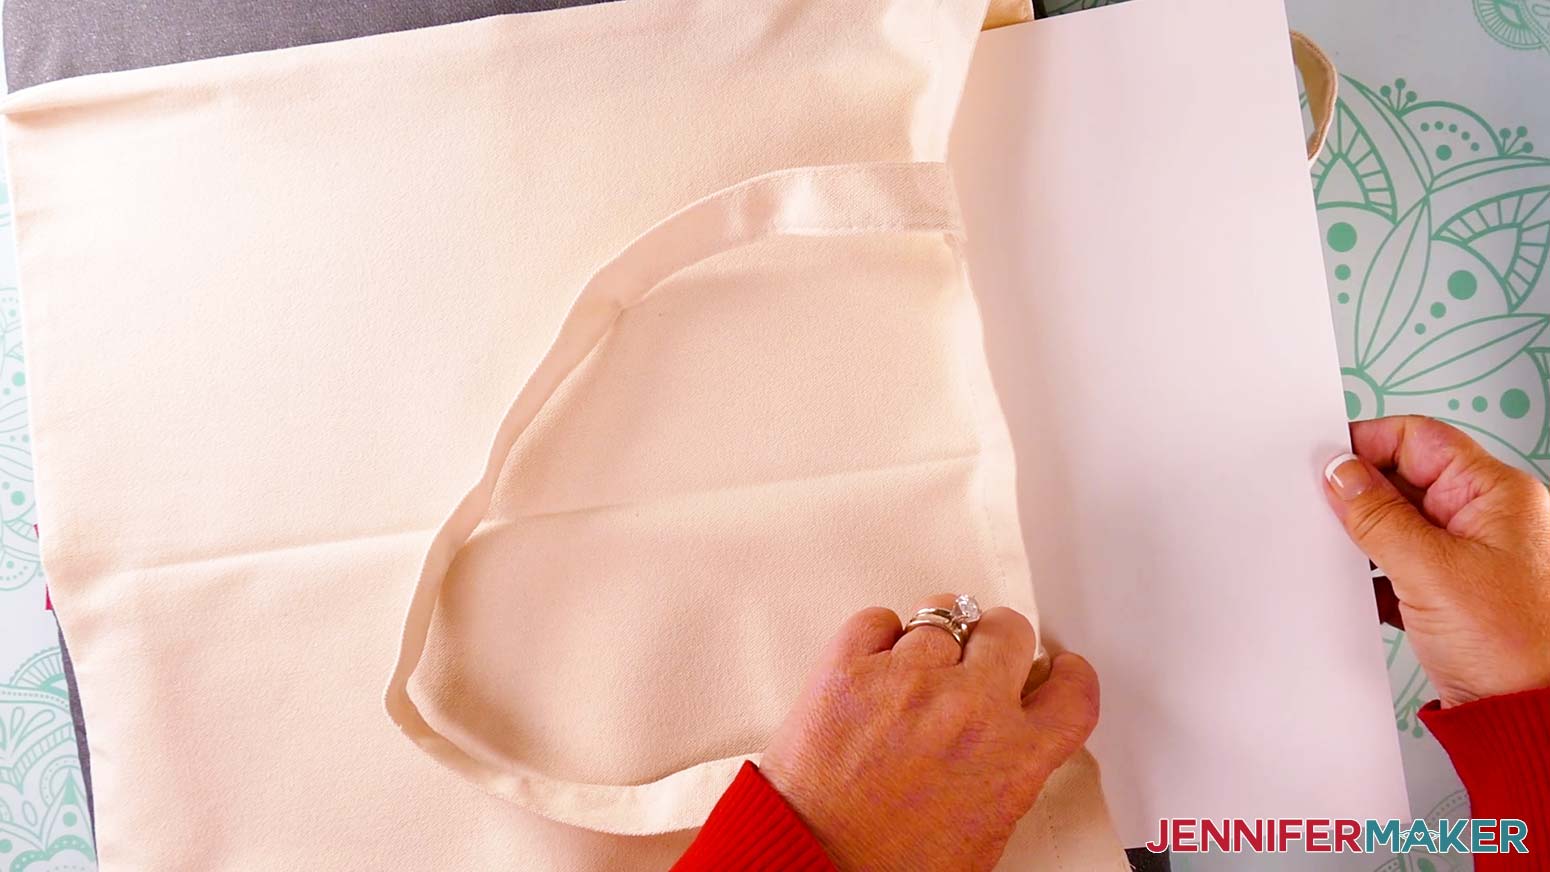
- Insert a 12” by 12” piece of clean white cardstock into the bag to protect the back of the bag from Infusible Ink during the pressing process.
- Place the tote bag back on top of the pressing mat, with the side you’d like to sublimate face up and the handles facing away from you.
- Use a lint roller to remove debris, dust, and excess fibers from the side of the tote bag you’ll sublimate.
- Turn the assembled Infusible Ink design sticky-side down, and position it over the tote bag. Use the handles as a guide, and center the design top to bottom and side to side on the bag.
- Use your hands to press the design down onto the tote bag. You do not need to use heat-resistant tape because the carrier sheet should be sticky enough to keep it in place.
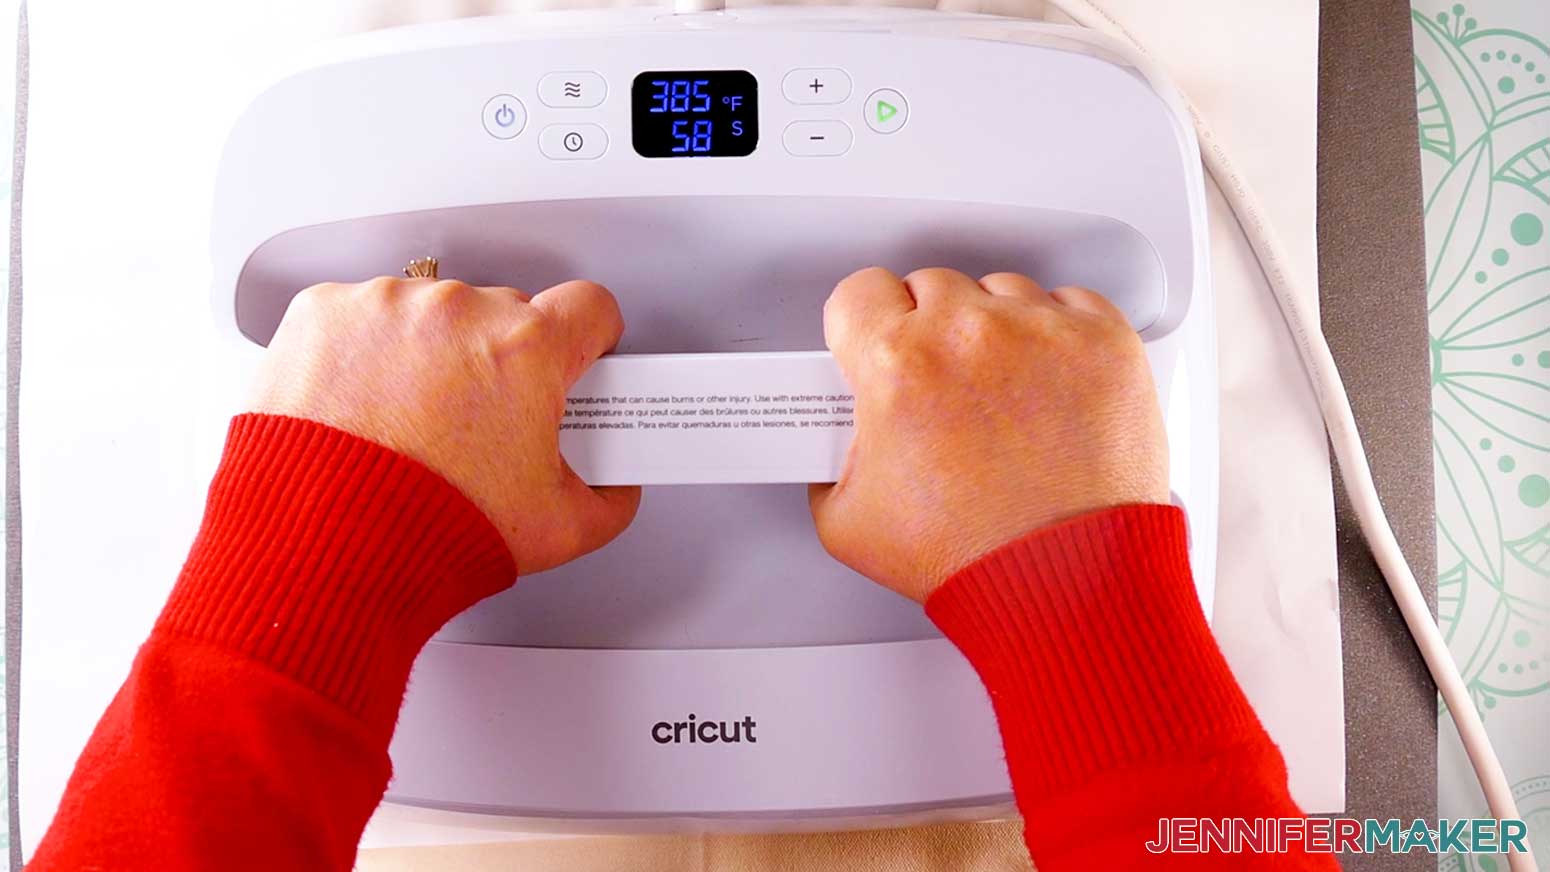
- Place a piece of clean, white, uncoated butcher paper over the tote bag and design.
- Pick up your heat press and orient it so the plate will cover the entire design.
- Press the tote bag with firm pressure at 385° F for 60 seconds. Remember, these settings are in my Sublimation Cookbook under “Canvas Pillows,” which are 100% poly canvas like my tote bag. Always check the material on your blank before beginning a sublimation project, and choose your settings based on that, not the project type.
- When the time is up, lift the heat press straight up and place it back onto its cradle.
- Wait at least 10 seconds for the materials to cool, then remove the butcher paper and peel off the carrier sheet.
NOTE: The tote bag shrank 1” to 1.5” on each side while pressing. Keep this in mind if you need the bag to be a particular size when finished.


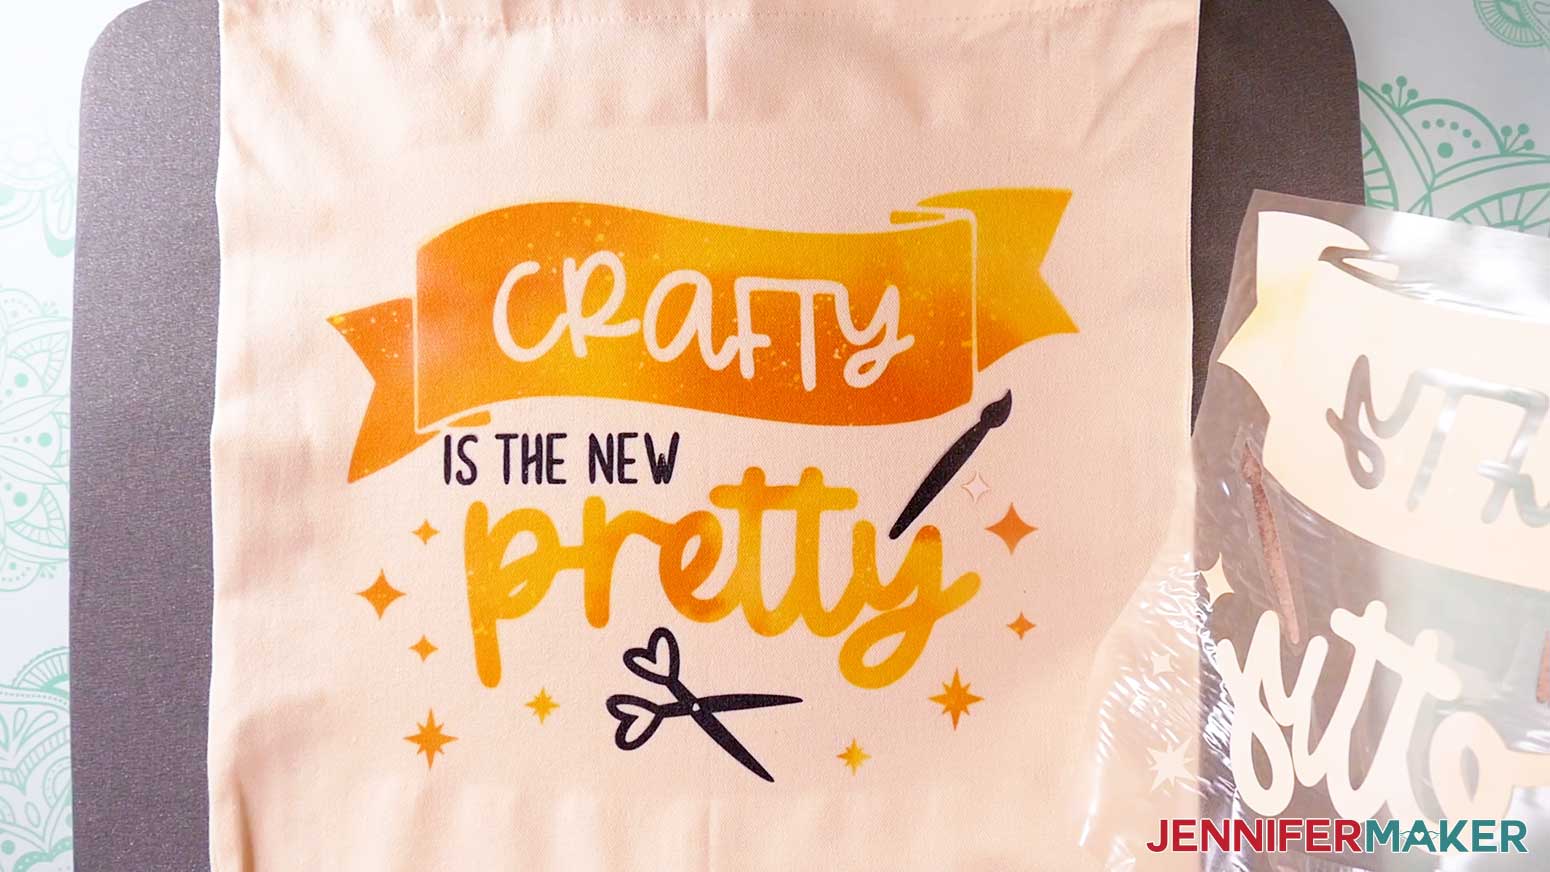
STEP 5: SHOW IT OFF
Here are my finished tote bags with layered Infusible Ink designs!
Notes
Fonts Used: Wonderful (“Snacks” design), Transcity (“Coffee” design), Cakepop (“Coffee” and “Crafty” designs), Farm Dream (“Crafty” Design)
Free Alternatives: Thanks, Transcity, Loverine, Roundo
Finished Tote Bag Size: 14” x 14.5” plus handles (tote bag shrank slightly when pressed)
Print Size:
“Snacks” design: 9” x 3.57”
“Coffee” design: 9” x 9.59”
“Crafty” design: 9” x 6.98”
Care instructions: Use a household iron to remove wrinkles around the seams of the bag -- be careful not to iron over the design. Machine wash on delicate setting with cold water. Air dry or tumble dry low heat.
Answers to Your Questions About How to Make Layered Infusible Ink Projects
Q: I want a different design. How do I personalize a layered Infusible Ink tote bag?
A: You can learn how to customize your own layered Infusible Ink tote bag in my ADVANCE program. Learn more about ADVANCE here!
Q: How do I know if my design is the right size?
A: Not sure if your design is uploading at the correct size? If you are using Cricut Design Space Beta for Desktop, try switching to the Live version as this has worked in our testing. Here are the dimensions you should see for each design on your Canvas:
coffee-tote-bag-jennifermaker-SVG: 9″ x 9.59″
crafty-tote-bag-jennifermaker-SVG: 9″ x 6.98″
snacks-tote-bag-jennifermaker-SVG: 9″ x 3.57″
If you need help resizing your design, see my Resizing Guide.
Q: Can I cut the Infusible Ink designs on a Cricut Joy Xtra or original Cricut Joy?
A: The designs are sized to fit the Cricut Joy Xtra, but they’re too large to be cut on a Cricut Joy without resizing them smaller.
Q: Do I have to use a Cricut to cut my Infusible Ink pieces?
A: You can cut your Infusible Ink sheets with scissors, but it’s much easier to cut them precisely with a cutting machine. We always include several versions of each free file in the free download ZIP file. If you have a Silhouette Cameo, which uses Silhouette Studio, you can use the DXF file in Silhouette Basic Edition. If you have upgraded to Silhouette Designer Edition, Designer Edition Plus, or Business, you can use the SVG format with your Silhouette machine to cut each intricate design. If you don’t have a cutting machine, you can print and then cut out my digital download PDF files, too! The ZIP archive in my resource library includes these file types and more!
Q: Do you have any other Infusible Ink projects I can make?
A: I love making Infusible Ink crafts! Here are some of my favorite Infusible Ink projects:
- Layered Infusible Ink Mugs
- Infusible Ink Tie Dye Shirts
- Infusible Ink Hats
- Shaped Edge Mugs
- Infusible Ink Wind Spinner
- Infusible Ink Pens Mandala Tote Bag
Q: Can I make and sell these Infusible Ink designs?
A: I love supporting creative entrepreneurs! If you want to use my designs and projects for commercial use, please familiarize yourself with my important licensing information before selling your crafts.
I do not permit sale of my digital items, but you can sell the creative goods you make with them — as long as you follow my licensing requirements. That means you cannot sell these SVG files, but you can sell items that you made with the files.
Get my free SVG/DXF/PDF files to make a layered Infusible Ink tote bags!
(If you do not see the signup form above, click here.)
I love seeing what you make with my designs and how you use them! Please share a photo of your Infusible Ink tote bags in our Facebook group or tag me on social media with #jennifermaker.
Love,

Want to remember this? Save this “Can You Layer Infusible Ink?” tutorial to your favorite Pinterest Board!